PDC1200 - Battery MAKITA - Free user manual and instructions
Find the device manual for free PDC1200 MAKITA in PDF.
User questions about PDC1200 MAKITA
0 question about this device. Answer the ones you know or ask your own.
Ask a new question about this device
Download the instructions for your Battery in PDF format for free! Find your manual PDC1200 - MAKITA and take your electronic device back in hand. On this page are published all the documents necessary for the use of your device. PDC1200 by MAKITA.
USER MANUAL PDC1200 MAKITA
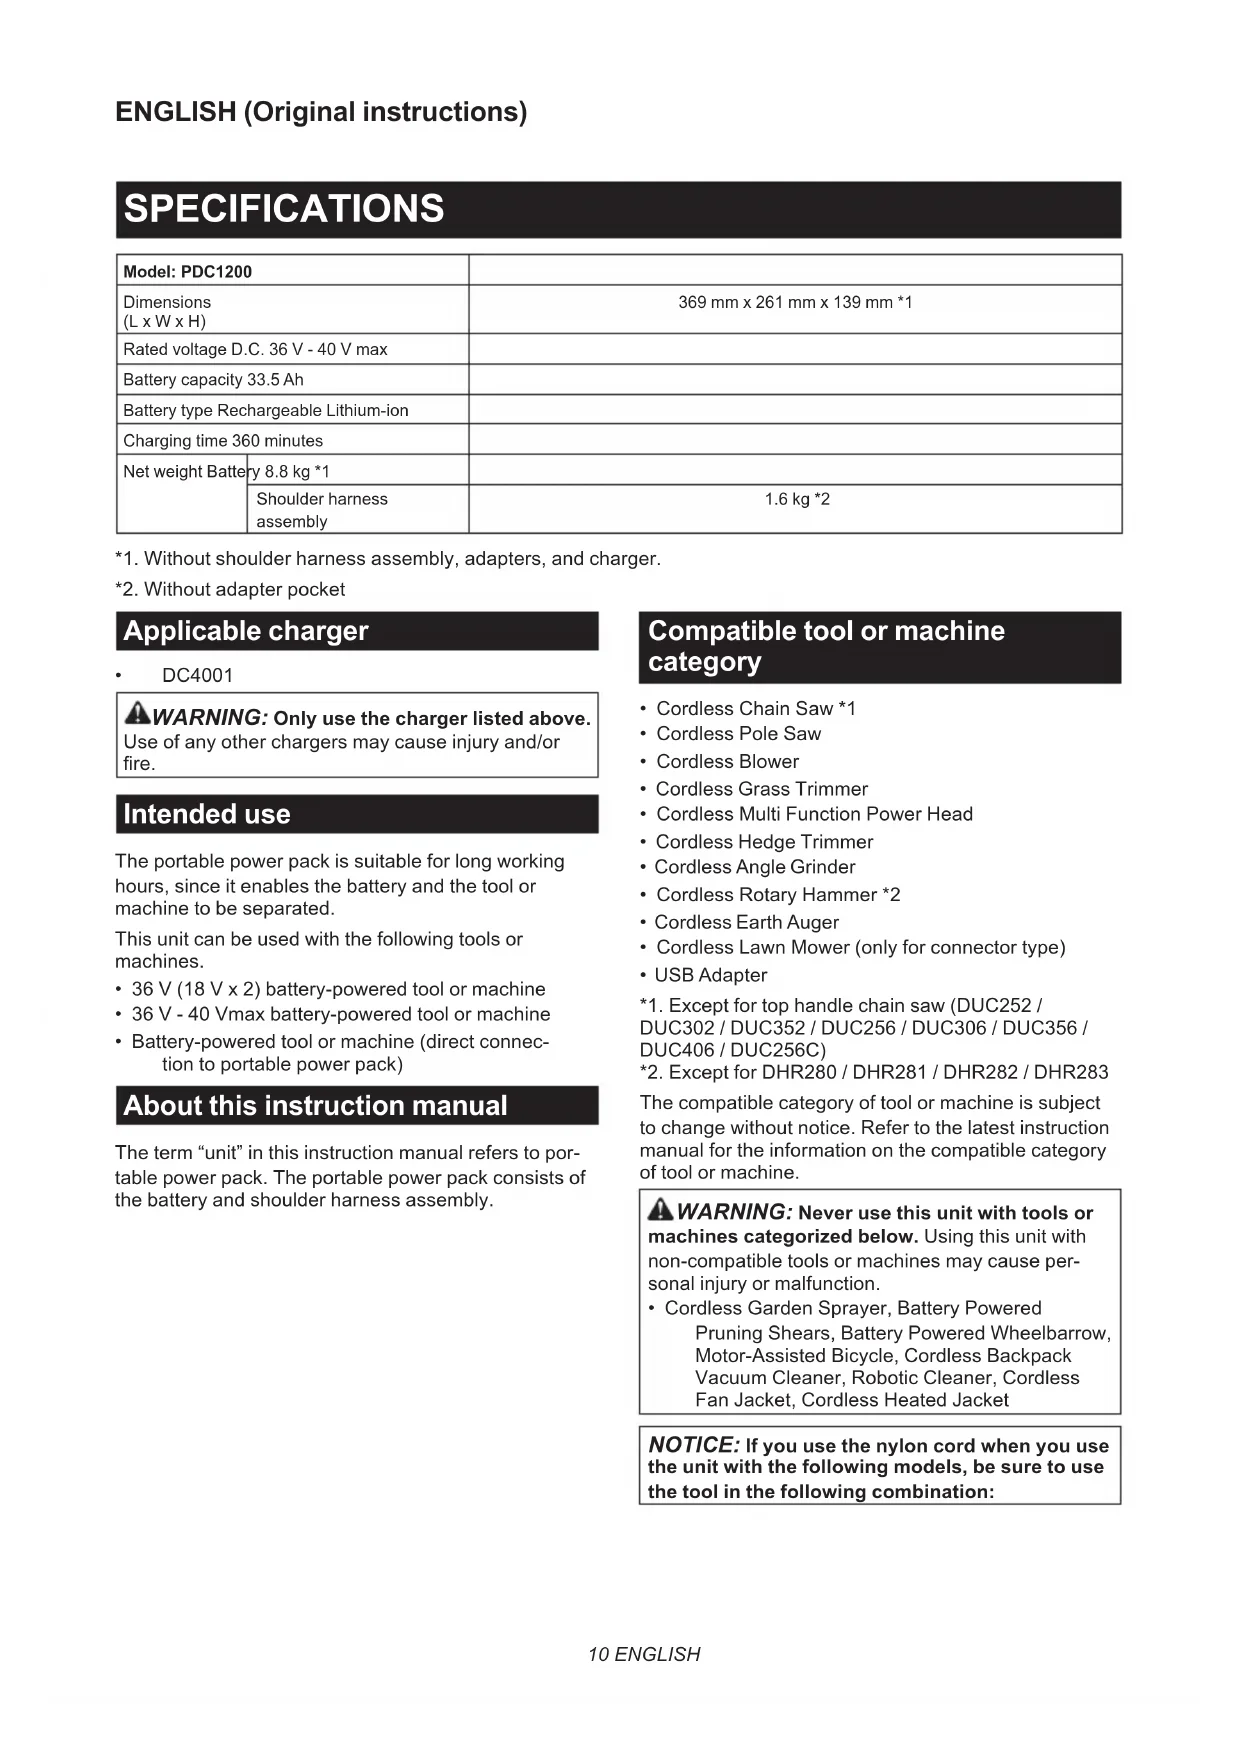
| Model: PDC1200 | ||
| Dimensions (L x W x H) | 369 mm x 261 mm x 139 mm *1 | |
| Rated voltage D.C. 36 V - 40 V max | ||
| Battery capacity 33.5 Ah | ||
| Battery type Rechargeable Lithium-ion | ||
| Charging time 360 minutes | ||
| Net weight Battery | 8.8 kg *1 | |
| Shoulder harness assembly | 1.6 kg *2 | |
1. Without shoulder harness assembly, adapters, and charger.
2. Without adapter pocket
DC4001
WARNING: Only use the charger listed above.
Use of any other chargers may cause injury and/or fire.
Intended use
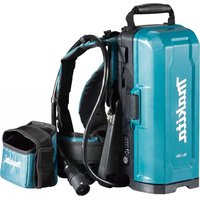
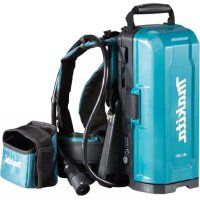
The portable power pack is suitable for long working hours, since it enables the battery and the tool or machine to be separated.
This unit can be used with the following tools or machines.
- 36 V( 18 V × 2) battery-powered tool or machine
- 36 V - 40 Vmax battery-powered tool or machine
- Battery-powered tool or machine (direct connection to portable power pack)
About this instruction manual
The term "unit" in this instruction manual refers to portable power pack. The portable power pack consists of the battery and shoulder harness assembly.
Compatible tool or machine category
- Cordless Chain Saw *1
- Cordless Pole Saw
- Cordless Blower
- Cordless Grass Trimmer
- Cordless Multi Function Power Head
- Cordless Hedge Trimmer
- Cordless Angle Grinding
- Cordless Rotary Hammer *2
- Cordless Earth Auger
- Cordless Lawn Mower (only for connector type)
- USB Adapter
The compatible category of tool or machine is subject to change without notice. Refer to the latest instruction manual for the information on the compatible category of tool or machine.
WARNING: Never use this unit with tools or machines categorized below. Using this unit with non-compatible tools or machines may cause personal injury or malfunction.
- Cordless Garden Sprayer, Battery Powered Pruning Shears, Battery Powered Wheelbarrow, Motor-Assisted Bicycle, Cordless Backpack Vacuum Cleaner, Robotic Cleaner, Cordless Fan Jacket, Cordless Heated Jacket
NOTICE: If you use the nylon cord when you use the unit with the following models, be sure to use the tool in the following combination:
| Model DUR364L / DUR365U / DUR366L / DUR368A / DUR368L / DUX60 | |
| Cutting tool and cutting diameter | Nylon cutting head with cutting diameter of 350 mm |
| Nylon cord diameter 2.0 mm | |
- The nylon cutting head is not available depending on the region of your residence.
NOTE: For DUB362
In a high temperature environment, the machine may stop during operation due to the protection system of the machine.
Symbols
The followings show the symbols which may be used for the equipment. Be sure that you understand their meaning before use.


Read instruction manual.

To reduce the risk of injury, keep the cord away from obstacles.

Do not expose battery to water or rain.

Do not throw the battery in fire.

Do not short-circuit the battery.

Li-ion
Only for EU countries
Due to the presence of hazardous components in the equipment, waste electrical and electronic equipment, accumulators and batteries may have a negative impact on the environment and human health. Do not dispose of electrical and electronic appliances or batteries with household waste!
In accordance with the European Directive on waste electrical and electronic equipment and on accumulators and batteries and waste accumulators and batteries, as well as their adaptation to national law, waste electrical equipment, batteries and accumulators should be stored separately and delivered to a separate collection point for municipal waste, operating in accordance with the regulations on environmental protection.
This is indicated by the symbol of the crossed-out wheeled bin placed on the equipment.
SAFETYWARNINGS
Portable power pack safety warnings
- Be sure to read the instruction manual of the tool or machine before use.
- Do not pick up or carry this unit by holding only the cord. Do not pull the cord while you are wearing or using this unit.
- Before wearing or putting off the unit, remove the socket from the tool or machine.
- When you leave the tool or machine, be sure to remove the socket from the tool or machine, or remove the unit from your body.
- Be careful not to trip over the cord during operation.
- Do not use this unit on an unstable surface, or unstable high places.
- During operation, keep the cord away from obstacles. The cord caught by obstacles may cause serious injury.
- Do not insert the adapters into the charger.
- Inspect the unit including cords and harness before use. If they are damaged, ask your local Makita Authorized Service Center for repair.
- When attaching the cord to the cord holder, be sure to attach it slowly and securely.
- Always make sure that the tool or machine is switched off and the socket is removed before attempting to perform inspection or maintenance of the tool or machine.
- When using this unit with a tool equipped with a blade, be sure to keep the cord away from the blade.
- When wearing the unit, do not put on anything, such as safety harness or shoulder belt, which may interfere the emergency detachment function of the unit.
- Do not use this unit while you are climbing up in a tree.
- Do not use this unit when you are wearing cordless fan jacket or cordless heated jacket.
- Do not expose this unit to sparks.
- When using this unit without wearing it or installing the unit to the tool or machine, be sure to lay down the unit.
- Do not disassemble, repair, or modify the unit.
- Be careful not to entangle the harness or belt by the tool or machine.
- When using the unit, be careful not to cut the cords with the tool or machine.
- When you stand the unit upright using the battery stand, be sure to place the unit on the flat surface.
- Keep foreign objects such as metal chips and water away from the plug of the unit.
- Do not use the tool or machine near high-voltage power lines.
-
Use the charger dedicated to the unit only. Do not use other chargers.
-
Do not damage the case of the battery or place anything on the unit.
- Do not step on the unit or sit on the unit.
- Do not carry the unit by holding the battery stand or width adjustment belt.
- Store the unit indoors.
- Do not put or fix anything between the battery and battery stand.
- Do not hang anything from the battery stand.
Important safety instructions for battery
- Before using battery, read all instructions and cautionary markings on (1) battery charger, (2) battery, and (3) product using battery.
- Do not disassemble battery.
- If operating time has become excessively shorter, stop operating immediately. It may result in a risk of overheating, possible burns and even an explosion.
- If electrolyte gets into your eyes, rinse them out with clear water and seek medical attention right away. It may result in loss of your eyesight.
- Do not short the battery:
(1) Do not touch the terminals with any conductive material.
(2) Avoid storing battery in a container with other metal objects such as nails, coins, etc.
(3) Do not expose battery to water or rain. A battery short can cause a large current flow, overheating, possible burns and even a breakdown.
- Do not store and use the tool/machine and battery in locations where the temperature may reach or exceed 50^ (122^) .
- Do not incinerate the battery even if it is severely damaged or is completely worn out. The battery can explode in a fire.
- Be careful not to drop or strike battery.
-
Do not use a damaged battery.
-
The contained lithium-ion batteries are subject to the Dangerous Goods Legislation requirements.
For commercial transports e.g. by third parties, forwarding agents, special requirement on packaging and labeling must be observed.
For preparation of the item being shipped, consulting an expert for hazardous material is required. Please also observe possibly more detailed national regulations.
Tape or mask off open contacts and pack up the battery in such a manner that it cannot move around in the packaging.
- When disposing the battery, remove it from the tool and dispose of it in a safe place. Follow your local regulations relating to disposal of battery.
- Use the battery only with the products specified by Makita. Installing the battery to non-compliant products may result in a fire, excessive heat, explosion, or leak of electrolyte.
- If the tool/machine is not used for a long period of time, the battery must be removed from the tool.
- Keep the battery away from children.
SAVE THESE INSTRUCTIONS.
CAUTION: Only use genuine Makita batteries.
Use of non-genuine Makita batteries, or batteries that have been altered, may result in the battery bursting causing fires, personal injury and damage. It will also void the Makita warranty for the Makita tool and charger.
Tips for maintaining maximum battery life
- Charge the battery before completely discharged. Always stop tool/machine operation and charge the battery when you notice less tool power.
- Never recharge a fully charged battery. Overcharging shortens the battery service life.
- Charge the battery with room temperature at 10^ - 40^ (50°F - 104°F). Let a hot battery cool down before charging it.
- Charge the battery if you do not use it for a long period (more than six months).
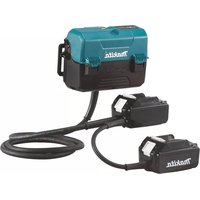
PARTS DESCRIPTION
Fig.1
| 1 | Base plate | 2 | Battery | 3 | Handle | 4 | Lock button |
| 5 | Cord holder | 6 | Adapter pocket | 7 | Power button | 8 | Plug of battery |
| 9 Plug of adapter 10 Adapters for 36 V | (18 V x 2) (optional accessory) | 11 A | adapter for 36 V - 40 Vmax (optional accessory) | 12 Power plug of battery charger | |||
| 13 Battery charger (optional accessory) | 14 Socket of battery charger | 15 W | Waist belt | 16 Socket | |||
| 17 | Width adjustment belt | 18 | Shoulder harness assembly (optional accessory) | 19 | Battery stand | - | - |
FUNCTIONAL DESCRIPTION
CAUTION: Always be sure that the unit is switched off before adjusting or checking function on the unit.
Charging the unit
CAUTION: After charging is complete, be sure to remove the power plug of the battery charger from the AC voltage source, and remove the socket of the battery charger and attach the cap of the battery.
NOTICE: The battery charger is intended for charging MAKITA portable power pack only. Never use it for other purposes or for other manufacturer's batteries.
NOTICE: When the battery charger is connected to the unit, the tool or machine does not start. In this case, remove the battery charger from the unit.
NOTICE: If the temperature of the battery becomes low or high during charging, the charging may stop. In this case, wait until the battery becomes ordinary temperature by warming up or cooling down the battery, and then restart the charging.
- Remove the cap of the battery by turning it.
Fig.2: 1. Cap
2. Align the protrusion on the socket of the battery charger with the counterpart on the plug of the unit, and then attach the socket to the plug by turning the socket.
Fig.3: 1. Protrusion 2. Socket 3. Plug
3. Plug the power plug of the battery charger into the proper AC voltage source.
4. After the charging is complete, remove the socket of the battery charger, and then attach the cap of the battery.
During charging, the main power lamp lights up in red and the indicator lamps indicate the remaining battery capacity. When the charging is complete, the main power lamp and indicator lamps go off.
| Main power lamp | Indicator lamps Remaining | capacity | ||
| Lighted Off Blinking | ||||
| Charging (75% to 100%) | ||||
| Charging (50% to 75%) | ||||
| Charging (25% to 50%) | ||||
| Charging (0% to 25%) | ||||
Power button and battery indicator
CAUTION: Make sure that the tool or machine is turned off before turning on the unit. Otherwise, the tool or machine may start suddenly and cause an injury.
NOTE: If you turn on the tool or machine right after you turn on the unit, the tool or machine may not start. In this case, restart the tool or machine again.
Fig.4: 1. Power button 2. Indicator lamp 3. Main power lamp
To turn the power on, press the power button. The main power lamp lights up in green. To turn the power off, press the power button for a few seconds.
NOTE: If the unit and connected tool or machine are left unattended for 8 hours, the unit automatically turns off.
The main power lamp blinks in green under the following conditions:
- The plug of the adapter or power tool/machine is not connected to the socket of the unit. In this case, connect the plug of the adapter or power tool/machine to the socket of the unit.
The battery is empty. In this case, charge the unit. - The battery is overheated or the temperature of the unit is low. In this case, cool down the unit, or warm up the unit.
If the main power lamp blinks in red and green alternately, turn the power off, and then turn the power on. If the main power lamp keeps blinking in red and green alternately after turning the power on, ask your local Makita Authorized Service Center for repair.
Indicating the remaining battery capacity
Press the power button on the unit to indicate the remaining battery capacity. The indicator lamps light up for approximately 5 seconds.
| Indicator lamps Remaining | capacity | ||
| Lighted Off | Blinking | ||
| 75% to 100% | |||
| 50% to 75% | |||
| 25% to 50% | |||
| 0% to 25% | |||
| Charge the battery. | |||
| The battery may have malfunctioned. | |||
NOTE: Depending on the conditions of use and the ambient temperature, the indication may differ slightly from the actual capacity.
NOTE: If the tool or machine has indicator lamps for remaining battery capacity, do not refer to the indicator lamps of the tool or machine but to the indicator lamps of this unit.
NOTE: If the multiple indicator lamps blink, the battery is overheated. In this case, cool down the battery.
Tool/Machine/Battery protection system
The tool or machine is equipped with a tool or machine and battery protection system. This system automatically cuts off power to the motor to extend tool or machine and battery life. The tool or machine will automatically stop during operation if the tool, machine, or battery is placed under one of the following conditions:
Overload protection
When the tool, machine, or battery is operated in a manner that causes it to draw an abnormally high current, the tool or machine automatically stops. In this situation, turn the tool or machine off and stop the application that caused the tool or machine to become overloaded. Then turn the tool or machine on to restart.
Overheat protection
When the tool, machine, or battery is overheated, the tool or machine automatically stops. In this case, let the tool or machine and battery cool before turning the tool or machine on again.
Overdischarge protection
When the battery capacity is not enough, the tool or machine stops automatically and an indicator lamp blinks when you press the power button. In this case, remove the battery from the tool or machine and charge the battery.
Low battery indication lamp of Adapter for 36 V - 40 Vmax
Optional accessory
This adapter features the indication lamp that notifies you of low or no battery capacity.
When the indication lamp is blinking, the remaining battery capacity gets low.
When the indication lamp lights up, the battery capacity is depleted or battery protection system is activated.
NOTE: When using the tool/machine continuously, tool/machine may automatically stop without blinking the indication lamp.
NOTE: The timing when the indication lamp blinks varies depending on the ambient temperature and battery status.
Fig.5: 1. Low battery indication lamp
Using the adapter pocket
CAUTION: Do not use this unit with the cord fixed using the hook and loop fastener of the adapter pocket.
You can put the adapters into the adapter pocket as shown in the figure.
▶ Fig.6: 1. Adapter 2. Adapter pocket
ASSEMBLY
CAUTION: Always be sure that the unit is switched off before carrying out any work on the unit.
Assembling the unit
- Attach the battery to the base plate of the shoulder harness assembly as shown in the figure.
Fig.7: 1. Battery 2. Base plate
CAUTION: Make sure that the battery is securely fixed to the base plate. Otherwise, the battery may fall when you wear the unit or use the unit, and cause an injury. If you can see the red indicator as shown in the figure, the battery is not locked completely.
Fig.8: 1. Red indicator
CAUTION: Be careful not to pinch your fingers or thumbs between the battery and the base plate when attaching the battery.
CAUTION: When removing the battery, press the lock button while holding the handle firmly. Before removing the battery, set the waist belt to the lowest position.
Fig.9: 1. Handle 2. Lock button
- Adjust the position of the waist belt. Pull up the height adjustment lever, then adjust the position of the waist belt by sliding the base plate, and then return the lever.
Fig.10: 1. Height adjustment lever 2. Base plate 3. Waist belt
CAUTION: When adjusting the position of the waist belt, be sure to lay down the unit so that the battery faces downward as shown in the figure.
NOTICE: If the height adjustment lever is loose, tighten the nut of the height adjustment lever. When tightening the nut, do not tighten it excessively. Otherwise, the height adjustment lever will not move.
Fig.11: 1.Nut
NOTE: If it is difficult to slide the base plate, lift up the bottom of battery slightly so that the stand does not touch the ground, and then slide the base plate.
Fig.12
3. Attach the adapter pocket to the waist belt with the hook and loop fastener as shown in the figure.
Fig.13: 1. Adapter pocket
NOTE: The adapter pocket can be attached on either left or right side of the waist belt.
- Adjust the width of the shoulder harness using the width adjustment belt.
Fig.14: 1. Width adjustment belt - Put on the unit, then lock the buckle of the waist belt, and then adjust the length of the waist belt.
Fig.15: 1. Buckle
NOTE: You can fold and fix the belt with the hook and loop fastener as shown in the figure.
Fig.16: 1.Belt
- Adjust the length of the shoulder harness.
Fig.17: 1. Shoulder harness
NOTE: You can fold and fix the belt with the hook and loop fastener as shown in the figure.
Fig.18: 1.Belt
CAUTION: When setting down the unit, place the unit on a flat and stable surface so that the unit does not fall.
When setting down the unit, unlock the buckle of the waist belt, and then set down the unit slowly.
Fig.19: 1. Buckle
OPERATION
CAUTION: When wearing the unit, be sure to put shoulder harness on your both shoulders. Otherwise, the unit may fall when you wear the unit or use the unit, and cause an injury.
CAUTION: When wearing the unit, be sure to wear the unit on your back. Otherwise, the unit may fall during operation and cause an injury.
CAUTION: Always switch off the tool or machine before turning on the unit, or connecting the plug of the adapter or power tool/machine to the socket of the battery. Otherwise, the tool or machine may start suddenly and cause an injury.
NOTE: The adapter for 18V is not available for this unit.
Connecting the unit to the tool or machine
- Remove the battery from the base plate of the shoulder harness assembly.
- Pull out the cord from either left or right side of the battery. When pulling out the cord, be sure to set the cord in the holders as shown in the figure.
Fig.20: 1. Cord 2. Holder
- Attach the battery to the base plate of the shoulder harness assembly.
- Put on the unit.
- Insert the plug of the adapter or power tool/ machine into the socket of the battery all the way so that the arrow mark on the plug is aligned with that on the socket.
Fig.21: 1. Plug 2. Socket 3. Arrow mark
NOTICE: When disconnecting the plug and socket, do not hold the cords but hold the plug and socket. Otherwise, the cords may be damaged and cause a malfunction of the unit.
NOTE: The plug and socket are disconnected if a certain load is applied.
- Install the adapters to the tool or machine in the same way as the battery cartridge.
Fig.22: 1. Adapter
NOTICE: For 36 V (18 V x 2) battery-powered tool or machine, use the adapters for 36 V (18 V x 2). For 36 V - 40 Vmax battery-powered tool or machine, use the adapter for 36 V - 40 Vmax. For direct connection type tool or machine, no adapter is required.
NOTICE: When installing adapters to the tool or machine, be sure to install the adapter equipped with 2 cords to the location shown in the figure. If you install the adapters incorrectly, the adapter equipped with 2 cords cannot be inserted all the way. In this case, do not insert the adapter forcibly. Otherwise, the tool or machine may be damaged.
▶ Fig.23: 1. Adapter with 2 cords
▶ Fig.24: 1. Adapter with 2 cords
NOTE: The direction of the cord of the adapter can be changed in the range of approximately 180 degrees.
- Press the power button to turn the power on. To turn the power off, press the power button for a few seconds.
Fig.25:1.Power button
Using the cord holders
CAUTION: Attach only the cord of the battery to the cord holders. Do not attach the cord of the adapters or power tool/machine to the cord holders. Attaching the cord of the adapters or power tool/machine may invite accident and cause an injury.
Fig.26
Fig.27
You can attach the cord of the battery to the cord holders as shown in the figure.
Fig.28: 1. Cord holder
You can also attach the cord using only the cord holder of the waist belt as shown in the figure.
Fig.29: 1. Cord holder
The cord holders can be attached on either left or right side of the shoulder harness and waist belt.
Fig.30: 1. Part to be attached the cord holder
CAUTION: Be sure to attach the cord to the shoulder harness on the left side only or right side only so that the cord does not cross the shoulder harness.
Fig.31
Using the hanging band
Optional accessory
CAUTION: Before operation, make sure that the hanging band is properly attached to the hanger on the tool.
You can use the hanging band for cordless grass trimmer or cordless pole saw with this unit.
Attaching the hanging band
- Attach the hooks of the hanging band to the rings of the shoulder harness or waist belt as shown in the figure. Select the type of band and the connecting method appropriate for your usage.
Fig.32: 1. Ring 2. Hook
Fig.33: 1. Ring 2. Hook
Fig.34: 1. Ring 2. Hook
Fig.35: 1. Ring 2. Hook
NOTE: If the tool is bike handle type, attach the band so that the band passes through inside of the waist belt as shown in the figure.
Fig.36: 1.Waist belt 2.Band
- Attach the hook to the tool.
Fig.37:1.Hook
Detaching the tool
Push the levers on the buckle to unlock the buckle.
Fig.38: 1. Lever
NOTE: The buckle is not equipped depending on the type of band.
Emergency detachment
- Push the levers on the buckle of the waist belt to unlock the buckle.
Fig.39: 1. Buckle 2. Lever - Take off the shoulder harness to release the tool and the unit.
Fig.40: 1. Shoulder harness
MAINTENANCE
CAUTION: Always be sure that the unit is switched off before attempting to perform inspection or maintenance.
NOTICE: Never use gasoline, benzine, thinner, alcohol or the like. Discoloration, deformation or cracks may result.
To maintain product SAFETY and RELIABILITY, repairs, any other maintenance or adjustment should be performed by Makita Authorized or Factory Service Centers, always using Makita replacement parts.
TROUBLESHOOTING
Before asking for repairs, conduct your own inspection first. If you find a problem that is not explained in the manual, do not attempt to dismantle the tool, machine, or unit. Instead, ask Makita Authorized Service Centers, always using Makita replacement parts for repairs.
| State of abnormality Main | in power lamp Cause Remedy | ||
| The tool or machine does not start. | - The charger | is connected to the unit. Remove the charger from the unit. | |
| The lamp lights up in green. | The adapters are not installed to the tool or machine. | Install the adapters to the tool or machine. Check that the adapters are installed securely. | |
| The tool or machine, or the cords of the adapters are overheated. | Cool down the tool or machine, unit and adapter. After cooling down, power off and then power on again. | ||
| The tool or machine, or the unit is broken. | Ask Makita Authorized Service Centers for repair. | ||
| The lamp blinks in green. | The plug of the adapter or power tool/machine and the socket of the battery are not connected. | Connect the plug and the socket. Check that the plug and socket are connected securely. | |
| The unit is overheated, or the temperature of the unit is low. | Cool down the unit, or warm up the unit. | ||
| The remaining battery capacity is not enough. | Charge the battery. | ||
| The lamp blinks in red and green alternately. | The unit has detected an abnormality. | Turn off the unit, and then back on. | |
| The tool or machine, or the unit is broken. | Ask Makita Authorized Service Centers for repair. | ||
| The lamp does not light up. | The unit is not turned on. Turn on the unit. | ||
| The remaining battery capacity is not enough. | Charge the battery. | ||
| The unit is broken. Ask Makita Authorized Service Centers for repair. | |||
| Charging does not start when the charger is connected. | The lamp blinks in red. The charger is overheated, or the temperature of the unit is low. | Cool down the unit, or warm up the unit. | |
| The lamp blinks in red and green alternately. | The unit or charger has detected an abnormality. | Remove the socket of the battery charger, and then connect it again. | |
| The unit or charger is broken. Ask Makita Authorized Service Centers for repair. | |||
| The lamp does not light up. | The charger is not connected to the proper AC voltage source. | Connect the charger to the proper AC voltage source. | |
| The socket of the charger is not connected properly. | Connect the socket of the charger properly. | ||
| The power cord of the charger is not connected to the charger properly. | Connect the power cord to the charger properly. | ||
| The unit or charger is broken. Ask Makita Authorized Service Centers for repair. | |||
OPTIONAL ACCESSORIES
CAUTION: These accessories or attachments are recommended for use with your Makita tool specified in this manual. The use of any other accessories or attachments might present a risk of injury to persons. Only use accessory or attachment for its stated purpose.
If you need any assistance for more details regarding these accessories, ask your local Makita Service Center.
- Makita genuine charger
Adapters for 36V (18 V x 2) - Adapter for 36 V - 40 Vmax
Shoulder harness
NOTE: Some items in the list may be included in the tool package as standard accessories. They may differ from country to country.
ESPECIFICAções
Fig.20: 1. Cordon 2. Support
ACCESSIONS EN OPTION
VEILIGHEIDSWAARSCHUWINGEN
OPTIONELE ACCESSOIRES
Bortskaf违法犯罪
Bortskaf计划生育 issues
Bortskaf's role in the development of reproductive health and reproductive health care.
Bortskaf's role in the prevention of sexually transmitted diseases.
Bortskaf's role in the prevention of sexually transmitted diseases.
Bortskaf's role in the prevention of sexually transmitted diseases.
Bortskaf's role in the prevention of sexually transmitted diseases.
Bortskaf's role in the prevention of sexually transmitted diseases.
Bortskaf's role in the prevention of sexually transmitted diseases.
Bortskaf's role in the prevention of sexually transmitted diseases.
Bortskaf's role in preventing STDs.
Bortskaf's role in preventing STDs.
Bortskaf's role in preventing STDs.
Bortskaf's role in preventing STDs.
Bortskaf's role in preventing STDs.
Bortskaf's role in preventing STDs.
Bortskaf's role in preventing STDs.
Bortskaf's role in preventing STDs.
Bortskaf's role in preventing STDs.
Borstfjorden's role in preventing STDs.
Borstfjorden's role in preventing STDs.
Borstfjorden's role in preventing STDs.
Borstfjorden's role in preventing STDs.
Fig.25: 1. Taend/sluk-knap
IPEPIPAPH EAPTHMATQN
Eik.1
Alet/Makine/Batarya koruma sistemi
▶ Joon.6: 1. Adapter 2. Adapteritisaku
KOKUPANEK
ETTEVAATUST: Enne seadme hooldamist veenduge, et tolmuimeja oleks valja lilitatud.
Seadme kokkupanek
TYTO POKNY USCHOVEJTE.
Obr.36: 1.Opasek2.Popruh
- Pripevnete hacek k nariad.
Obr.37:1.Hacek
Odpojeni náradi
SI.8: 1. Rdeci indicator
A POZOR: Pazite, da si ne prischipnete prstov ali palcev med baterijo in osnovno plošco, ko pritrujete baterijo.
APOZOR: Ko odstranjujete baterijo, pritisnite gumb za zaklep, medtem ko trdno drzite rocaj. Preden odstranite baterijo, namestite pas na najnizji položaj.
SI.9: 1. Rocaj 2. Gumb za zaklep
- Prilagodite položaj pasu. Povlecite ročico za prilagoditev višine navzgor, prilagodite položaj pasu s pomikom osnovne plošće, in pomaknite ročico v izhodiščni položaj.
SI.10: 1. Rocica za prerilagoditev visine 2. Osnovna plošca 3. Pas
SI.36: 1. Pas 2. Trak
*.Pexeeta rnaBa c HaiNoHOBa KOpHa He ce npednara B 3aBnCIMOCT OT perHOHa Ha MeCToKINBeHe.
3A6EJIEXKKA: 3a DUB362
B cpea c BncoKa TeMnepaTpy MaunHaTa MoKe da cnpe no Bpeme Ha pa6oTa BCNeIcTBHe Ha CnCTemata 3a 3auNTa Ha MaunHata.
CNMBOJIN
No-dony ca onucaHn CmBONHTe, KOINTO MOKe da ce 3nON3BaT 3a Ta3n MaunHa. 3aJbJXKNTenHO e Da ce 3aNO3HaTe c TexHNTe 3HaueHn, PpeDn da npNCtbnTe KbMaP60Ta.
| Пюочete ръкововоството за еклноатаць. | |
| За за се hamали рисьт OT hapаняваши, дръкты кабела далец OT пениства. | |
| Heизлагайte батерияа на вораIns дьжд. | |
| He xьрлайte akumу latopнatura bатерия В огьн | |
| He сььрзваite нальco bатерияа. | |
| Li-ion | Само застрани OT EC Поради наличесу на опасни КOMпо- ненти В оборуданeto OTпадыцITE OT еilektpruceckо и elektproнно оборуданe, akymу latори и bateрни може за Имат otriцателно вьздемост绛е вьрху okол- нота среда и човшкою здраве. Heизьрайte elektpruceckи и elekt- trpoнни уpresни влбатерни сьитови: otлдци! СыласноЕвреньскatingа dinpektпва за otлдциTEOTelektpruceckи и elekt- trpoнно оборуданe и akumу latори и батерни OTадьци OTakumу latори и bateрни и ней�OTOадаптURAн: нашонныотеlektpruceckи и elektproнно obopyданe, bateрни и akumу latори Тразьва на сьбират OTделяно и за сe Docstabrtdo OTделяно CBиратelen Пункт 3a OTпадыци, Функционираш CBласно наредбinte за опаэвache на okолна: среда. Това e указаано ч fireз симвогл на зачepтана с крьст коба на калпца, постavenь Вьрху оборуданeto. |
ПЕДУПЕЖДECHИЗ 3ABE3ОПACHOCT
PpeDynpexKeHn 3a 6e3oNaChocT npna60Ta C npeHocn 3axpaHbau MOdUJ
- Празулnotpe6а поче tepekoBoDCTBOTO 3a ekCnIjoatauaHa HhctpyMeHTa nIN MaunHaTa.
- He NOBUNaIte HHe HocTe MoyJa, KaTo ro DbPKeTc cMo 3a Ka6eJa. He DbPnaIte Ka6eJa, DOkato HocTe IIN N3NON3BaTe MoyJa.
- Ппдд д постаину Ha nCBAHNTe OT rbp6a cn MOdya, n3KJIIOUHTe KOHTAKTa OT HCTpyMeHTa nIN MaunHaTata.
- Korato octabNTe nHCTpyMeHTa nN MaunHaT, He nponyckaIte Da CBaJIte KOHTaKTHOTO rHe3do OT nHCTpyMeHTa nN MaunHaT a Nn da CBaJIte MoUJa OT TAnOTo CN.
- BnmaBaIte Da He ce cIbHete B Ka6eJa no BpeMe Ha pa6Ota.
- He n3noJ3BaIte To3n MoUyI Bbpy HecTa- 6nHa NOBbpxHOCT IIN HeCTa6uHn BnCOKn MeCTa.
- No Bpeme Ha pa6oTa dp6kTe Ka6eJa daJeu OT npenTCTBn. 3axBaHaTHnT OT npenTCTBn Ka6eM Moke Da npuHn cepNo3Ho HapaHbAhe.
- He nocTaBnTe aanTepn B 3apAnHOTO yctpoNCTBO.
- PpeiynynoTpe6a npOBepeMoYna, BkIIOuHTenHO Ka6eNITE n peMbntte. Ako ca NOBpeDeHn, 06bphete ce KbM ynbHNOHMeHHa cepBn3eH ueHTbp Ha Makita 3a pemOHr.
- KOrato MoHTnpaTe Ka6eNa KbM Nbpxkaa 3a Ka6eNa, pa6oTe 6abHo n ro 3akpenete Haedxdo.
- BnHaH npOBepBaTe daJIHnHCTpyMeHTbT nn MaunHaTa ca N3KnHOyeHN KOHTaKTHOTo rHe3do e n3BaDeHo, npEiN 3BbPwBaHe Ha npOBepKa nn NOdRpXkHa HnHCTpyMeHa Ta nn MaunHaTa.
- Korato n3non3BaTe MoDyNa C HNCTpyMeHT, 606pydBaH C ocTpne, dpbXte Ka6ena daNeu OT ocTpneTo.
- Korato Hocnte Moyna, He noctabraite Hnio, Hanpimep o6e3onacnteH KOaH nnpeMbK 3a pamo, KOnTO MoKe Da nonpeuat Ha yHKu- rTa 3a abapnHO OTkaueHa Moyna.
- He n3noJ3BaIte MoIyJa, KOraTo ce KaYBaTe no DbPBo.
- He n3no3BaIte MoDyJa, KOraTo Hocnte JaKe C BeHTnAToPOn C acymyNaToPPho 3axpaHbAHe IIN JaKe C NODrpBbAe C acymyNaToPPho 3axpaHbAe.
- He n3naraTe Moyla Ha NcKpn.
-
Korato n3non3BaTe MoDyJa 6e3 Da ro Hocnte Ha ce6e cn nnr Ro BKJIOuBaTe KbM NHCTpyMeHT nn MaunHa, rO OCTaBraTe Ha 3emTa.
-
He pa3rno6BaIte, He peMOHTnpaIte n He MoDnΦuIpaIte MoDyJa.
- BhimabaTe da He omOtaTe pembka nIIN KonaHa OKONo HcTpymeHTa NIM MaunHaTa.
- Korato n3no3BaTe yctpoNCTBTO, BHMaBaTe Da He cpeXeTe Ka6eNITE C INHCTpyMeHTa NIN MaunHaTa.
- Korato octabute MoDyNA n3npaBEN, KaTo n3non3BaTe cToiKaTa 3a 6aTePnraTa, Tp86Ba Da NOCTABTE MoDyNA Bbpxy paBHa NOBbpxHOCT.
- Na3eTe Ⅲekepa Ha Modyla ot yxJn npeiMetu, HanpImep MeTaHn CTpyKk N Boga.
23.He n3noJ3BaIte HnCTpyMeHTa NIn MaunHata B 6Jn3OCT Do BUCOKOBJTOBNeJEKtpponpOBoDn. - 3nON3BaIte cAmO cneuaHOTo 3a Moyla 3apJHO yCTPOIcTBO.He n3nON3BaIte dpyrN 3apJHN yCTPOIcTBA.
- He noBpeKdAaTe KOpnyca Ha 6aTepyTa HnocTabraIte HnO Bbpxy MoyJa.
- He cTbNaTe Bbpxy Modyna n He cyaTe Bbpxy Hero.
- He Hocete MoDyJa, KaTo ro IbPxNte 3a CToiKaTa 3a 6aTePNrTa Nn 3a KOnHa 3a KopnPaHe Ha WnPnHaTata.
- CbXpaHbAaTe Moyna Ha 3akpnto.
- He noctabraIte n He 3akpenBaIte HnIO Mekdy 6atepnaTn CToNkata 3a 6atepnaTa.
- He okaybaite Hnio Ha cToiKaTa 3a 6atepnaTa.
Baxhni nHctpyKcnn 3a 6e3oNaChocT 3a akymylaTopHaTa 6aTepeNia
- Ppei Da n3noJI3BaTe akymyIaTopHaTa 6aTePnra, npOteTe BCNUK INHCTpyKUN IN ppeDyNpeINTEJHN MapKnPOBKN Ha (1) 3apAHOTo yCtpoIcTBO 3a 6aTePnHTe, (2) 6aTePnTA u (3) N3noJI3BaUJn 6aTePnNTe npOdyKT.
- He pa3rno6BaTte akymyIaTOPHaTa 6aTepeHra.
3.Ako MouHocTtHa MaunHaTa HaMaJee MHorO, BeDHara cnpete Da pa6OTne. TOba MoKe Da DOBeGe Do pUCK OT npePraBaHe, Do Bb3MOXn H3rapHHN I daKe Do ekCnNo3nn. - Ako B Ouynte BN nonaHne eJekTpOuNT, H3nJaKHeTe rC uNCTa BOda n BeHara notbpcTe nekapcKa nOMoU. ToBa moKe da DOBeDe do 3ary6a Ha 3peHneTo BN.
- He cBbP3BaIe HauKbco akymyIaTopHaTa 6aTepe:
(1) He dokocbaite KneMITE c npoBOMMaTePnAIn.
(2) He cbxpaHraBaIte akymlaTophata 6aTePnB B CbD C npyM MeTAnHn npedMeTn, KaTO NPOHO, MOHTN n dp.
(3) He n3naarTe akymyIaTophata 6aTepeHnHa BOda NIN DbXd.
3aKbcBaHeTo Ha akymyIaTopHa 6aTePnmaOKe Da DoBeDe Do npOTnUaHe Ha MHOrO CIneH ToK, Do npErpBaHe, Do Bb3MOxHN n3raPpHn H daKe Do pa3naDaHe Ha 6aTePnTa.
6.He cBxpaHbAaTe n He n3non3BaIte nHcTpymeHTa/MaunHaTa n akymyIaTophata 6aTePnHa MeCTa, KbDeTo TeMnepaTypaTa MoKe dadoctnHe nn HaDMnHe 50^ (122^)
7. He n3rapnTe akymylaTopHaTa 6aTePnJa daxe n aKe e cepno3Ho NOBpeDeHa Hn HaTbJHo n3HOceHa. AkymylaTopHaTa 6aTePnMoKe da ekCnIOdnpa B OfH.
8. BnmaBae Da He n3nyckaTe nn ydpTe akymlaTophata 6aTePna.
9. He n3noJI3BaIte noBpeDeHn akymyIaTOPHn 6aTePnn.
10. CbDpkaunte ce JntneBO-NOHN aKymyata TOpHb6aTePN ca 06eHT Ha n3NCKBaHnraHa 3aKHOdaTeJCTBTO 3a ONACH CTOKn. Pn TBPROBcn npeBO3n, HAnp. OT TpeTn CTpaHn, cNeIITOPn, Tp8Ba Da ce cna3BaT cneuaJIHn 3nCKBAHn 3a ONAKOBaHe n ETNKETnpaHn. 3a noTROBkHa apTnKyNa, KoTo Tp8Ba Da 6bDe n3npaTeH, e Heo6xOIMa KOHCyttauNc EekCepT NO ONACHTE MaTePnAn. MoJr, cna3BaIte N eBEHTyaJIHNo NO-NIOpO6hnte HaUHOHaJIHn pa3nope6n. 3aIeNTe C JeHTa ININ NOKPNIte OTKPNTte KOHTN I ONAKOBaTe aKymyataTOPHaTa 6aTePn No TaKBb NaHH, Ye da He MoKe Da CE npMeCTBa B ONAKOBkata.
11. Pn n3xBpna He Ha akymyataopHaTa 6aTePnra H3BaTeOT NHCtpymeHTa Ra n3XBbPnTe Ha NOxOJaIO MAcTo.Cpa3BaTMeCTHInPe pa3npoep6n 3a n3XBbPnHe Ha akymyataOpHn 6aTePnN.
12. N3noJ3BaIte akMyJNaTOPHaT6aTePnra camo c npOdyKTnTe, onpeJeHn ot Makita. OocTabaHrTo Ha akMyJNaTOPHaT6aTePnra B Heo- do6peHn npOdyKTH MoKe Da npeiN3BnKa noXap, nperpBaHe, B3pNb IInn 3TuHa He eJIeKTpOJaT.
13. Ako INHCTpyMeHTbT/MaunHaTa HMa da ce n3non3Ba npOdbJnxTeNHO BpeMe, akymy- naTophata 6aTepeNa Tp86Ba da ce n3BaAn ot Hero/Heia.
14. Na3eTe akymyIaTOPHaTa 6aTePnO rT deua.
3AIIA3ETE HACTOUINTEHNCTPYKUN.
A BHIMAHNE: N3noJ3BaIte caMo opuHaHnHaKymaTOpHn 6aTePnHa Makita. IpnN3noJ3BaHe Ha pa3nUHn OT aKymaTOpHnTe 6aTePnHa Makita nIe CTapn aKymaTOpHn 6aTePnMOKe Da Ce IOnyU npbCKaHe Ha aKymaTOpHata 6aTePn, KoTo Da DoBede Do NoXkap, HapaHraBaHe IIN nobpeDa. Toba cbIoo ue anHynpa rapaHcIyTa Ha Makita 3a INCTpymeHTa n 3apJdHOTo yCTPOIcTBO Makita.
CbBETn 3a nOdIbpxaHe Ha MaKcMmaJIHo IbJIbIg KINBOT Ha aKyMyJatOpHnTe 6aTeepn
-
3apekdaTe akymyNaTopHaTa 6aTePn, npei Da ce e pa3peNla HanbIHo. Korato 3a6eJeXnte, Ye MoUHocTt Ha HnCTpyMeHTa/Maun-Hata HamanBa, BnHarn cnnpaTe pa6oTa Ta 3apeDeTe akymyNaTopHaTa 6aTePn.
-
Hnkora He npe3apekdaIte HanbIHO 3apeDeHa akymlyaTopha 6aTepyn.Ipe3apeKdaHeTo ckbcraBa eKcnloaTaUHOHHN JKBOT Ha 6aTepyta.
- 3apekdaTe akymyataOpHaTa 6aTepe npn cTaNHa TeMnepaTpyoT 10 ^ C - 40^ (50F- 104F).OcTabeTe 3arpTaTaAkymyataOpHa 6aTepeJaCa ce oxlaDi, npei Da a 3apeKdaTe.
- 3apeTe akymnatopHaTa 6aTePnA, aKo He CTe r n3non3BaHn DbIb r nepnoD OT BpeMe (NoBee oT WeCT Meceua).
IpeDna3Ha cncTeMa Ha HnHCTpyMeHTa/MaunHaTa/ akymylaTopHaTata 6aTePnA
INCTpyMeHTb INM MaunHata ca ChabdeHN Cbc CnCTema 3a 3auNTa Ha INCTpyMeHTa INN MaunHata INHa akymyNatopHata 6atepna. Ta3n CnCTema ABTomaTNUHO npeKbCBA 3axpaHbaHETo KbM eNEkTpOMOTopa, 3a Da OCNrpyn NO-DbJIbT JNIBOT Ha INCTpyMeHTa INN MaunHata INakymyNatopHata 6atepna. INCTpyMeHTb INN MaunHata Ue cnpaT abTOMaTHNO NO BpeMe Ha paBota, aKO ToI, TAre Nn 6atepnaTa ce HamnPAT B eEDHO OT CNeDnHTe CbCTOARHH:
3aunTa cpeu npetoBapBaHe
Korato INHCTpyMeHTbT, MaunHaTa Nn 6aTePnra Ta ce n3No3BaT NO NauH, KOTo BOuN Do HeoBuaHOBnCoka KOHCyMaunHa ToK, INHCTpyMeHTbT Nn MaunHaTa CnnpaT aBtOMaTuH. B TaKbB cnyaH n3KnUoyete INHCTpyMeHTa Nn MaunHaTa N npEkpataTe n3NoJ3BaHeTO IM No NaUnHa, KOTo rN npTeObapBa. CneT TOBA BKIOUoyTe INHCTpyMeHTa Nn MaunHaTa 3a NobTopHO CTapTnpaHe.
3aunTa cpeu nperepahe
Korato nHCTpyMeHTbT, MaunHaTa nn akymyNatopHaTa 6aTePn pperpeT, nHCTpyMeHTbT nn MaunHaTa cnipat aBtOMaTHuHO. B To3n cnyauo octabeTe nHCTpyMeHTa nn MaunHaTa nn akymyNatopHaTa 6aTePn da n3CTnHaT, npedn da BKIOUHTe nHCTpyMeHTa nn MaunHaT aOTHOBO.
3aunTa cpeu npekomepho pa3pekdahe
Korato kanaTebHa akymyataOpHata 6aTePnE HeoctaTbueH, HNCTpymeHTb Tnn MaunHata cnipat ABTomauHO n Korato hATncHeTe 6yToHa 3a 3axpanBaHeto, 3anOyBa Da Mna INDnKaToPha lamna. B To3n CnyaHn3BaTe ekymyataOpHata 6aTePnE OT HNCTpyMeHTa nn MaunHata n 3apeDeTe.
CBeTJIINHeH INHДИKaTOP 3a N3TOUeHa 6aTePnHa aAaNTepa 3a 36 V - 40 Vmax
DonbHumeHa npuHaedHexHocm
To3n aanTep pa3nonara cbc cBeTInHeH nHdkaTOp, KOITo NOKa3Ba HamaJraBe Ha nIIN n3YepePnaH KanaunTeHa akymyataopHata 6atepna.
Korato CBETNHHNRT INDnKaTOp Mnra, OCTaBauNrt
KanaunTe Ha akymyNaTOpHata 6aTePn e HamaJI.
Korato CBETNHHNRT INDnKaTOp CBeThe, KanaunTeTbT
Ha akymyNaTOpHata 6aTePn e NOHKeH NIN CnCTeMaT a 3aUnTa Ha 6aTePnTa e AKTNbupaHa.
3A6ELEKKA: KoraTo n3non3BaTe nHCTpyMeHTa/ MaunHaTa 6e3 npekbcBAHe, nHCTpyMeHTbT/MaunHaTa MoKe ABTomTuHO da cnpe, 6e3 CBetnHHnT INDkATOp Da Mura.
3A6ELEKKA:BpeMeTo, npe3 KOeTo CBETINHHNt HnDnKaTOp Mnra, 3aBnCn OT TemnepaTypaTa Ha OKoHnHaTa CpeDa nCbCTOHNHeTo Ha 6aTePnTa.
Φnr.5: 1. CBETnHEn INdNkATOp 3a n3ToeHa 6aTepeia
I3noJ3BaHe Ha JxO6a 3a aJaantepn
BHUMAHNE: He n3noJ3BaIe To3n MoUc c nocTaBeH Ka6eN, 3aKpeNeH C BeJIkpO JeHTaTHa Jxko6a 3a aJaAnTePn.
MoxTe Da nocTabuTe aanTepuTe B Dko6a 3a aanTepu, KaKTo e NOKa3aHO Ha qnrgypata.
Φn.r.6: 1.AaanTep 2.Dko63a aadantepn
CΓJIIOБЯBAHE
ABHUMAHNE: Ppei Da n3BbPwBaTe KaKBaTo N da e pa6ota no Modyna, 3aDbJxNtEnHo npOBePraBte daH e H3KnIOyeH.
Crno6yBaHeHaMoDyna
- PnKpeneTe akymyIaTOPHaT6BaTePnHa OCHOBHaTa IIOnOHa Ha peMbIe 3a pAmo, KaKTo e Noka3aHo Ha fHyypata.
Φn7: 1. BaTepeR2. OChOBHa nNoya
A BHUMAHNE: YBepeTe ce, ye akymlyaTopHata 6aTeepn e 3dpaBO 3akpeNeHa KbM OCHOB-Hata nNoa. B npOTuBEN CnyauyakymlyaTopHaTa 6aTeepn MoKe Da naHe, DOKATO HOCHTe uNn N3NO3BaTe MOdyna, U TOBA MoKe Da npUHHn HapaHraBaHe. B clyuaY che BnKdaTe cepBeHn INDnKaTOp, KaTO e noka3Ho Ha fHyypata, TOBa O3NaUaBa, Ye TRe He e fNKcnpaHa HAnbJnHO Ha MCTOTO cn.
Φn8: 1. YepBEN INHdNkatop
BHIMAHHE:BHMaBte Da He npuunneTe npbCTnTe Ha pBcTe cM MExdy akymyNaTopHaTa 6aTepyN OCHOBHATA NlaCy, Korato 3akpenBaTe akymyNaTopHata 6aTepy.
ABHIMAHNE:Korato cBaanTe 6aTeepnraTa, HATNCHETe fHKcnpaun6yToH,KATO cBueBpeMeHHO 3dpaBO dpxNte pkoXBaTkata.IpeNi Da CBAInTe akyMynaTophata 6aTeepnna, NoCTaBeTe KOJHa B Ha-DoJHO NOJoxHeHne.
Φur.9: 1. PboKoxBaTka 2. PnKcnpaU 6yToH
- PerynpaTe noJoxeHneTo Ha KonaHa.
N3bPnaTe Harope NoCTa 3a KopurpAHe Ha BnCOuHnata, CneKoETo KopurpAte noJoxeHneTo Ha KonaHa, KaTO nB3HeTe OCHOBHata NIOUa, N CNeD TOBa BbpHete NoCTa.
Φur.10: 1. Joc3a Kopunpahe Ha BnCounHaTa
2.OchOBHa nnoya 3.KoJah
ABHIMAHNE: Korato perynnapte noonohe HneTo Ha KOJOna, MoyIbT Tp86Ba Da e OCTaBeH Ha 3eMaTa, 3a Da e O6bPhata akymyIaNtOpHaTa 6aTePnC nueTo HaDoNy, KaKTo e NOKa3aHo Ha fHyypata.
BENEXKA:AKONoCTbT3aKOpHnpaHeHaBnCOuHHataeXna6ab,3aTeHeteraKaTaHaNocta3aKOpHnpaHeHaBnCOUHHata.Korato3aTaraTe raikata,He3aTaraTe npekaneHo cnInHO.B npotubehCnyaHocTbT3aKOpHnpaHeHaBnCOUHHataHamaDa ceDbNKn.
Φnir.11:1.Faika
3A6ELEKKA: Ako e Tpydno Da nIb3HeTe OCHOBHaT a IIOUa, BnIRHeTe NKe DOJHata Yact Ha 6aTePnraTa Taka, Ye CToKATA Da He DOKOCBA 3eMraTa u CneTTOBa IIb3HEte OCHOBHATA IIOUa.
Φur.12
- 3akpenete Jxok6a 3a aanTepn KbM KOJHa C NOMOHTa Ha BeIkpO JeHTata, KaKTo e NOKa3aHO Ha cnrypata.
Φur.13: 1.Джбзаадапетер.
3A6ELEKKA:ДжбтзаадаNTepmMoKe da 6bde 3aKpehenOTJyBaTaNINdChataCTpaHaHaKOJaHa.
- KopuHpaIte unpHaTa Ha pembIe 3a paMo c NOMOHTa Ha KOJaHa 3a KopuHpaIe Ha unpHaT.
Φur.14: 1. Konah 3a kopu npaHe Ha u npHaTa - CnojkeTe MoyJaHa rbp6a cn, cneT ToBa 3akon- YaTe KOJaHa N KopurpaIte BnCOUnHaTa Ha KOJaHa.
Φur.15:1.Katapama
3A6ELEKKA: MoKeTe Da cBHeTe N 3aKepeNITe peMbKa C BeJIkPo JeHTaTa, KaKTo e NOKa3aHo Ha cnHypata.
Φur.16: 1.PembK
- KopnnpaTe nbJxHaTa Ha peMbnte 3a pamo.
Φur.17: 1.Pembk3a pamo
3A6EJIEXKKA: MoKeTe Da crbHeTe n 3aKepeNITe peMbKa C BeJIkpo JeHTaTa, KaKTo e NOKa3aHO Ha cnIpypata.
Φur.18:1.PembK
BHUMAHNE: Korato cBaJIrTe MoDyna ot rpb6a cn, noCTaBeTe ro Bbpxy paBHa n Cta6HnHa NOBbpxHOCT, Taka Ye da He MOKe Da naHe.
Korato cbanrte moyna ot rpb6a cn, pa3kOnnauite KaTapaMaTa Ha konaHa n CneD TOBa 6abHO CBanete MOyna.
Φur.19: 1. Katapama
Ekcnnoataza
BHUMAHNE:Korato Hocnte Moyna, noctaBnTe peMbCHTe 3a paMo Ha DBeTe cn pameHa. B npOTUBEN CnyaM MOyJbT MOKe Da NaHe, DOkATO TO HOCNTe NIN N3NON3BaTe, IN TOBa MOKe Da npuHnHn HapaHBAhe.
BHUMAHHE: Korato Hocnte moyna, Hocete ro ha rbp6a cn. B npotnbEN cnuyai Toi MOxe da nahe no Bpeme Ha paobota n da npuHHn HapaHbAhe.
BHIMAHNE:BnHaHnN3KnIOuBaIe NHCtpyMeHTa HnMaunHaTa PpeDn Da BkNoUHTe Moyna nn Da CBpKTe eKepa Ha aanTepa Hn enEeKtpueckn HNCTpyMeHT/MaunHa KbM KOHTa Ha 6aTeprna. B npotuBEN cnyaHnHCTpyMeHTbT Hn MaunHaTa MOKe Da CTapTnpat BHe3aHNO n da npuHHrH HapaHBAhe.
3ABeLEKKA:AanTep 3a 18 V He ce npednara 3a TO3N MOyJ.
Cbbp3BaHe Ha Modyla KbM HHctpymeHaJIIMaunHaTa
- OToCTpaHete 6aTepeRnTa OT OCHOBHaT aNoya Ha peMbUHTe 3a pAmO.
2.ИЗдьрnaite ka6eNa OT JЯВаТиДЯСнATA CTpaHa Ha 6aTepeRnTa. Korato ИЗдьрNBaTe Ka6eNa, yBepete ce, Ye NOCTaBte Ka6eNa BДbpxKaUnTe Taka, KaKTo e NOKa3aHo HaФуypaTa.
Φnr.20: 1.Ka6en 2.Dbpxka
- Ппкpenete 6atepyra Ha ochOBHata nIoya Ha peMbUte 3a paMo.
- NocTaBTe MoDyHa Ha TbP6a cn.
5.BMbKHeTe DOKpaI UeKepeHa aAaTepa Hn Ha eNEKTPuYeCKn INHCTpyMeHT/MaUNHa B KOHTaKTHO TRe3Do HA 6aTePnTa, TaKa Ye cTpEJaTa Ha UeKepe Da 6bJe NoDpABHeHa C Ta3N Ha KOHTaKTHO TRe3Do.
Φur.21: 1. Μεκερ 2. Φεδιο 3. Κτρενκα
6ENEXKA: Korato pa3eDnHBAte uekepa OT KOHTaKa, He dpbXTe Ka6eJInte, a XBaHete uekepa N KOHTaKa. B npOTuBEn Ka6eJInte MoKe Da ce NOBpeJrN da npEdu3BvKat HEn3npaBHOCT Ha MOdyla.
3ABENEKKA: Ⅲekepbnt KONTaKtBc ce pa3eHnBaT, KaTO Ce npJIOxN ONpeJeHeHa CnJa.
- MoHTnpaIte aIantepnTe KbM nHCTpyMeHa TnMaunHaTnO cbuHaHn, KaTO aKymyNaTOPHaTa 6aTePnI.
Φu.22: 1.AaanTep
БЕLEЖKA: 3a Инструмент плmaшина, 3axpaHBaHc c 36 V (18 V x 2)батеря,използ-Вайт eадаNTери 3a 36 V (18 V x 2).3a Инструмент плmaшина,зхраHBaHc c 36 V -40 Vmaxбатеря,използВайт eадаNTер 3a 36 V -40 Vmax.При Инструмент плmaшинс дуpeктно CBpb3BaHe He ce ИзИСКВа adanTp.
БЕLEЖKA: KoraTo moNTupaTe aanTepn Ha HnCTpyMeHTa nIIM MaunHaTa, yBepTe ce, ye MOHTupaTe aanTepa, o6OpyDbAn c 2 ka6eNa, Ha MЯCTOTO, nocOyeHo Ha Φnrgypata.
Ako mONTpate aanTepnte HnpaBnHno, aanTepbT, o6OpyDbaH c 2 ka6ena, He moKe da 6bJeNoCTaBeH dokpa. B To3n cnyaH He NoCTaBnTe aanTepa cbc cna. B npOTuBEN cnyaH nHcTpymENTbT NIM MaunHaTa MOKe da ce nobpeDi.
Φnur.23: 1.AdaanTep c 2 ka6eena
Φur.24: 1. AanTp c 2 ka6ena
3A6ELEKKA: Nocokata Ha Ka6eHa Ha aanTepa MoKe Da 6bDe IpomeHeHa B DnAna3OH OT OKOJIO 180 rpaDyca.
- HatncheTe 6yToHa 3a 3axpaHbHeTo, 3a Da BkIIO- Hrte 3axpaHbHeTo. 3a Da N3KIOHTe 3axpaHbHeTo, HaTncheTe 6yToHa 3a 3axpaHbHeTo B IpoDbJxKeHne Ha HraKOJIko CekyHdN.
Φnir.25:1.BytOH3a3axpaHbHaHeTo
I3noJ3BaHe Ha IbpxaUnTe 3a Ka6eJ
A BHIMAHNE: 3akpenete camo ka6ena Ha akymlyaTophata 6aTeprn KaM dbpkaHTe 3a ka6ena. He 3akpenBaIte ka6ena Ha aanTpneu Hn eNktpueckn uHcTpyMeHT/MaunHa KbM dbpkaHTe 3a ka6ena. 3akpenBaHeTo Ha ka6ena Ha aanTpneu Hn eNktpueckn uHcTpyMeHT/ MaunHa MoKe Da npedn3BnKa 3JIONoJyKa I da npuHHn HapaHraBe.
Φur.26
ΦnΓ.27
MoKeTe Da 3aKpEnIte Ka6eHa Ha akymyIaTopHaTa 6aTePnKaBm DbPkaUHTe 3a Ka6eJa, KaTTo e Noka3aHo Ha fHyypata.
Φn.r.28: 1.Дьрkaчза ka6ena
Mokte cbo npkpene kaenacmo KbM Dpbkaa 3a Kaen Ha Konha, KaKTo e Nokaaho Ha cnypata.
Φn.29: 1.Дьрkaчза ka6eena
Дьрхачnte 3a ka6eM moKe da 6bdaT 3akpepeHn OT JЯВATA NIIДяСЧАТ CTpaHa Ha peMbCHTe 3a paMo n KOJIaHa.
Φur.30: 1.Yact, KoATo TpA6Ba Da 6bJe 3aKpeNa KaM DpbKaay 3a Ka6eJa
BHUMAHNE: Tp6Ba da 3aKpeNte Ka6ena caMo KbM NeBnpeMbK 3a paMo HnCaMo KbM DecHnpeMbK 3a paMo TaKa, Ye Ka6eNbT da He npecuapeMbKa 3a paMo.
Φnr.31
3nOJ3BaHe Ha Bucraata JeHTa
DOnbHumEnHa npuHaedHexHocm
BHIMAHHE:Ппдзлочьане ha pa6ota ce ybepeTe, Ye BnCyaTa IeHTa e npaBnH0 3akpe- neHa KbM OKaayKaTa Ha HNCTpyMeHTa.
Mokete Da n3noJI3BaTe BnCraUaTa JeHTa 3a pa6Ota Ha akymyIaTOPHa KocauKa 3a TpeBa IInn AkymyIaTOPHa pe3aKa 3a KNOHc C TO3N MoDyI.
PpNkpenBaHe Na BnCyaTa JeHTa
- PnKpeTe Kapa6HKnTe Ha BnCraTa JHeTAtbM npbCTeHtte Ha peMbntte 3a pAmO nN KOJHa, KaKTo e NOKa3aHo Ha fHypata. N36epete Tnna JeHTa mMeToDa Ha Cbbp3BaHe, NOxOJaU 3a n36paHaTa OT Bac ynotpe6a.
Φur.32:1.PpbTeH 2.Kapa6nHa Ka
Φn.r.33:1.PpbCTeH2.Kapa6nHa Ka
Φur.34:1.Ppbcten2.Kapa6nHka
Φur.35:1.PpbTeH2.Kapa6nHa Ka
3A6ELEKKA: Ako INHCTpyMeHTbTe TIN BeJocnneHa pBkoXBaTKa, npIKpeNeTe JeHTaTa, Taka Ye Ta Da IpemHe O T BbTpeShHa TcPaHa Ha KOJaHa, KaKTo e NOKa3aHo Ha fNrgypata.
Φur.36:1.KoHaN 2.JeHtA
- 3akpenete kapa6nHkata KbM INHCTpyMeHTa.
Φn.r.37:1.Kapa6nHa
OTkaaHe Ha HnHcTpymeHTa
HaTnCHeTe IocToBete Ha KaTapaMaTa, 3a Ja pa3KoIpyaTe.
Φnr.38:1.Loct
3ABENEKKA: B 3abncnmoct OT Tuna Ha JneHtatae BB3MOKHO da Hama KaTapaMa.
AByapnHo OTKaHaHe
-
HatncheTe Noctobete Ha KaTapaMaTa Ha KOJaHa, 3a da pa3KonyaTe.
Φur.39: 1. Katapama 2. JIoCT -
CbaTe peMbUnte 3a pAmO, 3a da ocBooDnte INHCTpyMeNTa mOduJa.
Φn.r.40:1.Pembun 3a paMo
ПОДДРьЖКА
BHIMAHNE:Ппдд поверbaTe nIи 3BbPwBaTe NOdPbXka Ha Modyna, BnHaRc ce yBepBaTe, ye Toe en3KnIOueH.
BENEXKA: He n3noJ3BaIte 6eH3nH,HaΦTa, pa3peiTeI, cInpt I npO6Hn. ToBa MoKe Da npuHHo6e3UBeTBAHe, DeΦopMaun HnnyKHaTHnH.
3a da ce noDbpxka BE3OJNACHOCTTA n HADEXHIOCTTA Ha npOdykta, pemOHNTte, noDpBkKaTa nnpeylnpaHeTo Tpr6Ba Da ce n3BbPwBAt OT ynbHOMoUeH cepBn3nn fapRnuHcepBn3Hn cHTpoBe Ha Makita, kaTO BnHarn Tpr6Ba Da n3non3BaTe pe3epBn qactn ot Makita.
OTCTPAHЯBAHE HA HEN3ПРABHOCTN
Ipei Da 3aBnte peMOHT, camn n3BpseTe npOBepka. Ako OTkpneTe npo6nem, KOTo He e o6rchen B pkoBODCTBOTO, He ce ONTBAite Da pa3rno6BaTe IHcTpMeHtA, MaunHaTa nnMoUJa. BmecTo TOBa rO 3aHeceTe HraKo ot OtopuPAHTE cepBn3n Ha Makita, konTO BnHarn n3NoJ3Bat 3a peMOHTte pe3epBHN qactn ot Makita.
| Състорическая на незниравноct | Лавен сбетлиейен Ид Мар Мар Мар Мар Мар Мар Мар Мар Мар Мар Mau | Причина Мерки 3a | |
| Зветунноустов cьрпаоу cьрпаоу cьрпаоу cьрпаоу cьрпаоу cьрпаоу cьрпаоу cьрпаоу cьрпаоу cьрпаоу cьрпаоу cьрпаоу cьрпаоу cьрпаоу cьрпаоу cбяпаоу cьрпаоу cьрпаоу cьрпаоу cьрпаоу cьрпаоу cьрпаоу cьрпаоу cьрпаоу cьрпаоу cьрпаоу cьрпаоу cьрпаоу cьрпаоу cьрпспаоу cьрпспаоу cьрпспаоу cьрпспаоу cьрпспаоу cьрпспаоу cьрпспаоу cьрпспаоу cьрпспаоу cьрпспаоу cьрпспаоу cьрпс? cьрпаоу cьрпаоу cьрпаоу cьрпаоу cьрпаоу cьрпаоу cьрпаоу cьрпаоу cьрпаоу cьрпаоу cьрпаоу cьрпаоу cьрпаоу cьрпаоу cьцп. cьрпаоу cьцп. cьцп. cьцп. cьцп. cьцп. cьцп. cьцп. cьцп. cьцп. cьцп. cьцп. cьцп. cьцп. cьцп. cьцп. cьцп. cьцп. cьцп. cьцп. cьцп. cьцп. Cьцп. cьцп. cьцп. cьцп. cьцп. cьцп. cьцп. cьцп. cьцп. cьцп. cьцп. cьцп. cьцп. cьцп. cьцп. cьцп. cьцп. cьцп. cьцп. cьцп. сьцп. cьцп. cьцп. cьцп. cьцп. cьцп. cьцп. cьцп. cьцп. cьцп. cьцп. cьцп. cьцп. cьцп. cьцп. cьцп. cьцп. cьцп. cьцп. cьцп. Сьцп. cьцп. cьцп. cьцп. cьцп. cьцп. cьцп. cьцп. cьцп. cьцп. cьцп. cьцп. cьцп. cьцп. cьцп. cьцп. cьцп. cьцп. cьцп. cьцп. S. S. S. S. S. S S S S S S S S S S S S S S S S S S S S S S S S S S S S S S S S S S S S S S S S S S S S S S S S S S S | -Зарадноу устов Балдат Балдат Балдат Балдат Балдат Балдат Балдат Балдат Балдат Балдат Балдат Балдат Балдат Балдат Балдат Балдат Балдат Балдат Балдат Балдат Балдат 毕лдат 毕лдат 毕лдат 毕лдат 毕лдат 毕лдат 毕лдат 毕лдат 毕лдат 毕лдат 毕лдат 毕лдат 毕лдат 毕лдат 毕лдAT 毕лдAT 毕лдAT 毕лдAT 毕лдAT 毕лдAT 毕лдAT 毕лдAT 毕лдAT 毕лдAT 毕лдAT 毕лдAT 毕лдAT 毕лдAT 毕лдAT 空格 Салдат 毕лдат 毕лдат 毕лдат 毕лдат 毕лдат 毕лдат 毕лдат 毕лдат 毕лдAT 毕лдAT 毕лдAT 毕лдAT 毕лдAT 毕лд AT 毕лд AT 毕лд AT 毕лд AT 毕лд AT 毕лд AT 毕лд AT 毕лд AT 毕лд AT 毕лд AT 毕лд AT 毕лд AT 毕лд AT 毕лд AT 毕лд AT 空格 Салдат 毕лдат 毕лдат 毕лдат 毕лдат 毕лдат 毕лдAT 毕лдAT 毕лд AT 毕лд AT 毕лд AT 毕лд AT 毕лд AT 毕лд AT 毕лд AT 毕лд AT 毕лд AT 毕лд AT 毕лд AT 毕лд AT 空格 Салдат 毕л徳 毕л徳 毕л徳 毕л徳 毕л徳 毕л徳 毕л徳 毕л徳 毕л徳 毕л徳 毕л徳 毕л徳 毕л徳 毕л徳 毕л徳 空格 Салдат 毕л徳 毕л徳 毕л徳 毕л徳 毕л徳 毕л徳 毕л徳 毕л徳 毕л徳 毕л徳 毕л徳 毕л徳 毕л德 Салдат 毕л徳 毕л徳 毕л徳 毕л徳 毕л徳 毕л徳 毕л徳 毕л徳 毕л徳 毕л徳 毕л徳 Салдат 毕л徳 毕л徳 毕л徳 毕л徳 毕л徳 毕л徳 Салдат 毕л徳 毕л徳 毕л徳 毕л徳 Салдат 毕л徳 毕л徳 毕л徳 Салдат 毕л徳 毕л徳 Салдат 毕л徳 Салдат 毕л徳 Салдат 毕л徳 Салдат 毕л徳 Салдат 毕л徳 Салдат 毕л徳 Салдат 毕л徳 Салдат 毕л徳 Салдат 毫нштабоу Салдат 毫нштабоу Салдат 毫нштабоу Салдат 毫нштабоу Салдат 毫нштабоу Салдат 毫нштабоу Салдат 毫нштабоу Салдат 毫尼штабоу Салдат 毫尼штабоу Салдат 毫尼штабоу Салдат 毫尼штабоу Салдат 毫尼штабоу Салдат 毫尼штабоу Салдат 毫尼штабоу Салдatic 毫尼штабоу Салдatic 毫尼штабоу Салдatic 毫尼штабоу Салдatic 毫尼штабоу Салдatic 毫尼штабоу Салдatic 毫尼штабоу Салдatic 毫尼штабоо Салдatic 毫尼штабоо Салдatic 毫尼штабоу Салдatic 毫尼штабоу Салдatic 毫尼штабоу Салдatic 毫尼штабоу Салдatic 毫尼штабоу Салдatic 毫尼штабоу Салдatic 毫灵штабоу Салдatic 毫灵штабоу Салдatic 毫灵штабоу Салдatic 毫灵штабоу Салдatic 毫灵штабоу Салдatic 毫灵штабоу Салдatic 毫灵штабоу СалдATIC 毫灵штабоу Салдatic 毫灵штабоу Салдatic 毫灵штабоу Салдatic 毫灵штабоу Салдatic 毫灵штабоу Салдatic 毫灵штабоу Салдatic 毫灵штабоо Салдatic 毫灵штабоу Салдatic 毫灵штабоу Салдatic 毫灵штабоу Салдatic 毫灵штабоу Салдatic 毫灵штабоу Салдatic 毫灵штабоу Салдatic 毫尼штабоу Салдatic 毫尼штабоу Салдatic 毫尼штабоу Салдatic 毫尼штабоу Салдatic 毫尼штабоу Салдatic 毫尼штабоу СалдATIC 毫尼штабоу Салдatic 毫尼штабоу Салдatic 毫尼штабоу Салдatic 毫尼штабоу Салдatic 毫尼штабоу Салдatic 毫尼штабоу Салдatic 毫尼штабои Салдatic 毫尼штабоу Салдatic 毫尼штабоу Салдatic 毫尼штабоу Салдatic 毫尼штабоу Салдatic 毫尼штабоу Салдatic 毫尼штабоу Салдatic 毫伊штабоу Салдatic 毫伊штабоу Салдatic 毫伊штабоу Салдatic 毫伊штабоу Салдatic 毫伊штабоу Салдatic 毫伊штабоу Салдatic 毫伊штабоу СалдATIC 毫伊штабоу Салдatic 毫伊штабоу Салдatic 毫伊штабоу Салдatic 毫伊штабоу Салдatic 毫伊штабоу Салдatic 毫伊штабоу Салдatic 毫伊штабоо Салдatic 毫伊штабоу Салдatic 毫伊штабоу Салдatic 毫伊штабоу Салдatic 毫伊штабоу Салдatic 毫伊штабоу Салдatic 毫伊штабоу Салдatic 毫尼штабоу Салдatic 毫尼штабоу Салдatic 毫尼штабоу Салдatic 毫尼штабоу Салдatic 毫尼штабоу Салдatic 毫尼штабоу Салдат 毫尼штабоу Салдatic 毫尼штабоу Салдatic 毫尼штабоу Салдatic 毫尼штабоу Салдatic 毫尼штабоу Салдatic 毫尼штабоо Салдatic 毫尼штабоу Салдatic 毫尼штабоу Салдatic 毫尼штабоу Салдatic 毫尼штабоу Салдatic 毫尼штабоу Салдatic 毫灵штабоу Салдatic 毫尼штабоу Салдatic 毫灵штабоу Салдatic 毫灵штабоу Салдatic 毫灵штабоу Салдatic 毫灵штабоу Салдatic 毫灵штабоу СалдATIC 毫灵штабоу СалдATIC 毫灵штабоу Салдatic 毫灵штабоу Салдatic 毫灵штабоу Салдatic 毫灵штабоу Салдatic 毫灵штабоу Салдatic 毫灵штабоо Салдatic 毫灵штабоо Салдatic 毫灵штабоу Салдatic 毫灵штабоу Салдatic 毫灵штабоу Салдatic 毫灵штабоу Салдatic 毫灵штабоу Салдatic 毫尼штабоу Салдatic 毫灵штабоу Салдatic 毫灵штабоу Салдatic 毫灵штабоу Салдatic 毫灵штабоу СалдATIC 毫灵штабоу Салдatic 毫灵штабоу СалдATIC 毫灵штабоу Салдatic 毫灵штабоу Салдatic 毫灵штабоу Салдatic 毫灵штабоу Салдatic 毫灵штабоо Салдatic 毫灵штабоу Салдatic 毫灵штабоо Салдatic 毫灵штабоу Салдatic 毫灵штабоу Салдatic 毫灵штабоу Салдatic 毫灵штабоу Салдatic 毫尼штабоу Салдatic 毫灵штабоу Салдatic 毫尼штабоу Салдatic 毫灵штабоу Салдatic 毫灵штабоу Салдatic 毫灵штабоу СалдATIC 毫灵штабоу Салдatic 毫灵штабоу Салдatic 毫灵штабоу СалдATIC 毫灵штабоу Салдatic 毫灵штабоу Салдatic 毫灵штабоу Салдatic 毫灵штабоо Салдatic 毫灵штабоу Салдatic 毫灵штабоу Салдatic 毫灵штабоо Салдatic 毫灵штабоу Салдatic 毫灵штабоу Салдatic 毫灵штабоу Салдatic 毫尼штабоу Салдatic 毫灵штабоу Салдatic 毫灵шtабоу Салдatic 毫灵шtабоу Салдatic 毫灵шtабоу Салдatic 毫灵шtабоу Салдatic 毫灵шtабоу Салдatic 毫灵шtабоу Салдatic 毫灵шtабоу Салдatic 推н. Салдatic 推н. Салдatic 推н. Салдatic 推н. Салдatic 推н. Салдatic 推н. Салдatic 推н. Салдatic 推н. Салдatic 推н. Салдatic 推н. Салдatic 推н. Салдatic 推н. Caleng Caleng Caleng Caleng Caleng Caleng Caleng Caleng Caleng Caleng Caleng Caleng Caleng Caleng Caleng Caleng Caleng Caleng Caleng Caleng Caleng Caleng Caleng Caleng Caleng Caleng | ||
| Състория на неизyncарноct | Галов сбетлиен Иndикатор 3a зхраимbaнeto | Прочина Мерки за оtmдану ванe | отстория |
| Зараздению не стапtra, когато зарядною усторостvo e свьрзно. | Светлиниит Иndикатор мrigа в червано. | Мо Doubлт e пэррел ллп Temператураты на мodyлеса e Ниска. | Охладete мodyлеса ллп го затолпец. |
| Светлиниит Иndикатор мrigа постедоватello в Зелеги усторостvo. | Мо Doubлт ллп зарядною усторостvo с ожреллл ллп hemнзпарвноct. | Отсторе контak'tно Геозда на зарядною устор-стwo за баерей и сень това го сььржete отоно. | |
| Мо Doubлт ллп зарядною усторostvo с незправно. | Оььрнete се кьм ульномо-шины сөрвizдни цentprove на Makita за ремонт. | ||
| Светлиниит Иndикатор не свetedва. | Зарядною усторостvo не e сььрзно Кьм похODДИSSИЗTOHКннлрсOTOKOBO 3axphaнва. | Вклочete зарядною устор-стwo в похODДИSSIЗTOHКннлрсOTOKOBO 3axphaнва. | |
| КоТаTKHOTOr Геозда на заряд- НOTO усторостvo не e сььр- Зано правлино. | Сььржete контak'tно Геозда на зарядною устор-стwo правлино. | ||
| Зхраимbaшсят кабел на зарядною усторостvo не e сььрзannah Кьm зарядною усторostvo правлино. | Сььржete зхраимbaшся Кабел сьс зарядною устор-стwo правлино. | ||
| Мо Doubлт ллп зарядною усторostvo с незправно. | Оььрнete се Кьm ульномо- шени сөрвizдни сөntprove на Makita за ремонт. | ||
ДОПьЛнITEЛНИ AKCECOAPN
A BHIMAHNE: IpenopbUba ce n3noJ3BaHeTo Ha Te3n akcecoapu nn HaKpaHnC u CaBnHa HCTpymEhT Makita, onHcAn B HactOaTO pkoBOcTBo. 3noJ3BaHeTo Ha npyru akcecoapu nn HaKpaHnC moKe da doBeDe DO onaCHOCT OT TeNeCHN NOBpeDN. 3noJ3BaIte cBoTBeTHna akceCoap nn HaKpaHnK caMo no npdeHa3HaueHne.
Ako imate Hxjda OT NOMOu 3a noboe neipo6hocn OTHOCHO Te3n akcecoap, ce o6bphTe KbM MeCTHna cepBn3e HcHTbp Ha Makita.
OpunnHaJHo 3apAno Makita
- AДантэрпза 36 V (18 V x 2)
- AДантета 36 V - 40 Vmax
- Pembk 3a paMo
3A6EENKKA: HЯkon apTnkyJN O T cnncbKa moKe Da ca BKIOUeHN B KOMPNeKTa Ha IHCTpyMeHTa, KaTO cTaHApTHN akcecoapn. Te MoKE da ca pa3nnuH N ba3NJuHNTe dIbpXabN.
SPECIFIKACije
Odgovarajuci punjač
| Model: PDC1200 | ||
| Dimenzije (D x Š x V) | 369 mm x 261 mm x 139 mm *1 | |
| Nazivni napon DC 36 V - 40 V | ||
| Kapacitet baterije 33,5 Ah | ||
| Vrsta baterije Punjiva litij-ionska | ||
| Vrijeme punjenja 360 minuta | ||
| Neto težina Baterija 8,8 kg *1 | ||
| Komplet sigurnosnog uprtača | 1,6 kg *2 | |
1. Bez kompleta sigurnosnog uprata, prilagodnika i punjaça.
2. Bez džepa prilagodnika
DC4001
AUPOZORENJE: Upotrebljavaje iskljucivo gore navedene punjače. Upotreba bilo koje druge vrste punjača moze prouzročiti ozljede i/ili požar.
Namjena
Prijenosno napajanpe prikladno je za dulji tad jer omogucuje odvojenu upotrebu baterije i alata ili stroja.
Cobetn 3a OndpyBaHbe MaKcImaJIeH pa6OTeH BEK Ha 6aTepnjata
- HanonheTe ja 6atepujata nped cenoocno da ce ncpa3n. Cekoraaw 3anpete ja pa6oTata co anatot/MaunHata n 3ameHeTe ja 6atepujata kora Ke 3a6eJeknte HamaJeHa MOKHOCT Ha anatot.
- HnKoraw HEmoJTe NOBTOPO Da nonHInTe ueIOcho HanoIHeTa 6aTepeNja. IpeKymepHOTo nONHeBe ro CKpaTyBa pa6oTHNOT BEK Ha 6aTepeNJata.
3.ПОЛнete ja 6atepujaHa ha co6Ha TemnepaTypa od 10^ - 40^ (50°F-104°F).ДоЗВолTe 3arpeahata 6atepujaJa ce onaДи пeding Ja ja CTABNTe Ha noJIHeIe. - Hanonhete ja 6aTepnjata doKoJky He ja KopnCTnte noDoJro BpeMe (noBeKe od wect Meceu).
ОПИС HA ДЕЛOBΥТЕ
Cn.1
| 1 | Основна п loча | 2 | БаатериJA | 3 | Рачka | 4 | Кооче 3a блор paNBe |
| 5 | Држач за кабел | 6 | Цеб за"aданпетер | 7 | Кооче за наююваNBe | 8 | Прик nullуок на батериJAта |
| 9 Пук nullуок на аданпетерот | 10 A | Даатери за 36 V (18 V x 2) (оционален досадOT) | 11 A | Даатери за 36 V - 40 V МамС. (оционален досадOT) | 12 P | Пук nullуок за наножуваNBe на полочOT за ватери | |
| 13 Пунач за ватери (оционален досадOT) | 14 P | Чьлунчok на пол宪от зватери | 15 P | Чьмен за поjasс 16 Штеср | |||
| 17 Ремен сю наюваль- наширинаţa | 18 O | Клonn на ремен за размо (оционален досадOT) | 19 O | Таhand за ватериJa -- |
ОпиС HA ФУнКЦИNTE
ABHIMAHHE:празсеке harodyBaBe Ииnpobepka ha ypeodT, ocryperte ce da e нcknyeH.
PonHeBe Ha ypeDoT
ABHIMAHNE:OTkako nonHebeTo Ke 3aBpuN, OCNypeTe ce deKa cTe ro n3BaJnne npNKnyOKOT 3a HanojyBaBe Ha nonHaQOT 3a 6atepnn OD N3BOPOT Ha DBOHACOHa Ctpya, n3BaDeTe ro npNKnyOKOT Ha nonHaQOT 3a 6atepnn I npKauTe ro kanaeTo Ha 6atepnjata.
3A6EJELWKA: Nolnaot 3a 6aTePNn e Hamehet camo 3a noHHeBe Ha npeHocnBnOT naket 3a hanojyBaBe Ha MAKITA. Hnkoraaw He KopncTeTe ro 3a npyrn HameHn nn 3a 6aTePNn od dpyrnpon3BONDTEHn.
3A5ENEUKA: Kora nonhaoyt 3a 6aTeepn e nobp3an co ypeoT, anatot nnn MaunHaTa He ce cTapTyBa. Bo oOBJ cnuyaj, n3BaJeTe ro nonhaoyt 3a 6aTeepn od ypeoT.
3A6ENEWKA:ДOKONky TemnepaTypaHa 6batepnjata cTaHe HnCKa nHn BnCOka 3a BpeMe Ha nonHeBTo, Toa moKe da 3anpe. Bo oOBJ cnuyaj, noUeKajTe DoKeKa 6batepnjata He NoCTurHe HopMaJIHa TeMnpaTypa co HeJ3nHO 3aTOnIyBaHbe nII NaDeHBe, a NotoA pectapTpajTe ro nonHeBeto.
1.ИЗbaДеTe ro kaNaчЕТо odбаTeРиJaTа ВрTejкnTo.
Cn.2:1.Kanaye
- IopamheTe ro ncaKaHATnoT deHa npKJyOkOT od nonHaOT 3a 6aTeepu co COoDbETnOt deHa ypeoT, a noToa npKauTe fo WTekepOHa npKJyOKOT CO BpTeHe Ha npKeHHyBaOH.
Cn.3: 1.ИспаКнотдД.ШтЕкр 3.Приклuyok
-
Ппклуerte ro npknlyokot 3a Hanojybahe od noHaOT 3a 6aTePNBcOoDbTeH n3BOp Ha dBOHaCOUHa CTpyja.
-
OTKako nonHebeTo Ke 3aBpU, n3BaTeTe ro npKnyokot Ha nonHaoyot 3a 6atePmN nnotoa npKaayete ro kanaeTo Ha 6atePnJaT.
3a BpeMe Ha nonHeBeTo, lam6nKata 3a rnaBHO HanojyBaHbe CBeTHyBa CpBeHo, a INDnKaTOpCKnTe Iam6nKn ykaxyBaAT Ha npeocTaHaTnOT kanaUTeH a6atepnjata. Kora noJIHebeto Ke 3abPun, lam6nKata 3a rnaBHO HanojyBaBe N lam6nKata Ha INDnKaTOpOT ce ncknyBaat.
TEXHIYHXAPAKTEPNUCTNKN
3axnct BiD nepeBaHTaXeHHN
JaQIO nIac BnKOpncTahHn IHcTpymeHTa, MaunHn a6o akymyIaTopa cnoXnbAcTbC3a6arato cTpyM, IHcTpymeT a6o maunHa aBtOMaTHNO 3ynnHReTbc. Y Takomy BNnAky BmKHiTB IHcTpymeHT a6o MaunHy Ta npinnHbpo8Ty, nIac BnKoHaHHraKOiTcTanoC nepeBaHTaxeHHn IHcTpymeTa a6o maunHn. Ioope3anycntu nIHcTpymeT a6o maunHy, BBIMKnHt b II 3HOy.
3axnct BiD neperpiBaHHa
3a neperpiBaHHiaHCTpyMeHTa, MaunnHa a6o akymyIaTopa iHCTpyMeHT a6o MaunHa 3ynHaeTbcra ABToMaTHuHO. Ycbomy BnAndky daTe iHCTpyMeHTy a6o MaunHi Ta aKymyIaTopy OxOnohTy, nepH HIX 3HOBy BMkATn OblaHaHHa.
3axnct BiD haMipHoro po3pIKeHHa
KoN3aNNsKy 3apRy akymyIaTopa HeoctTaTHbO, IHCTpymeH a60 MaunHa 3ynHReTbcra ABTomAtuHo,a 3a HATnCKaHH KONKn JINBJIeHH 6JIMMa e INDkaTopHa Iamna.Y TAKOMy pa3i BnMIb akymyIaTOp 3 IHCTpyMeHTa a60 MaunHn Ta 3apRdItb.
CbITIOBNI iHdNkATOp Hn3bKOro 3apAkyakymyTATopa dIy 6JOKa XINBHeHHy,po3paXoBaHOrO Ha MaKcImMaJIbHy Hanpyry 36-40 B
Dodamkoe o6naHaHHa
Lcien aanTep ochaueHo cBITIOBNIM iHnKaTOpOM,
Akn CnoBIaue KOpNCtYBaUa Ipo BnCHaXeHHN 3apAky
akymyIaTopa.
MnroTINHcBITNOBORIOiNDKATOPa Bka3ye Ha Hn3bKn 3apdakymyIaTOPa.
CbitIOBni iHnkaTOp 3aropaeTbcra, kkuO aKymyIaTOp po3pIaKeHH a6o cnpauObana cnCTema 3axuCTy aKymyJIaTopa.
IPNMITKA: RaKIO IHCTPymeHT / MaUNHa BnKOpNCToByeTcR IpOTaROM TpNBaIoro Yacy, IHCTPymeHT /MaUNHa MOKe 3yINHrTncr ABTomAtuHO 6e3 MroTINHcCBITNOBOro iNDkATopa.
PIMMITKA: Yac, nicra jAKORO iHnkaTOp nouHae Muroti, 3anekntb BiD TemnepaTpyn HABKOINHbOro cepedobuca nCTaHy akymyIaTopa.
Puc.5: 1. CbitnoBni iHnkaTop Hn3bko 3apny akyMnyTopa
BukopncTaHH BiiDilneHHnAaanTepa
OBEPEXHO: He BnKOpncToByTe uei npucptpi, konu shyp 3aikcoBaHo 3acti6ko 3 nnykuo 3 BiDineHra aanTepa.
AanTepn MoKHa noknactn Do BiDineHHa aanTepa, kNOKa3aHo Ha pncyHky.
Pnc.6:1.AanTp 2.BiDineHnna aanTepa
3EOPKA
OBEPEKHO: NpeB BnKOHaHHm 6yDb-RAHX po6it i3 npncTpoem 06OB'3KOBO BUMKHITb Noro.
36npanna npncptpo
- Pnukpinitb akymyIaTOp Do onopHoi nlaCTnHi npeoBoro pemeHa B 36opi, kNoka3aHo Ha pncyHky.
Pnc.7:1.AkymyIaTOp2.OnopHa nlaCTnHa
OBEPEXHO: NepekoHaTeC8 B TOMy, 10 akyMnyTOp HadiHNO npKpInJeHO do onophoi nactHH. B iHwOMy BnnaDky akyMnyTOp MOKe Bnactn NiD Yac nepeHeceHHa 6o BVkOpNCTaHHa Ta CTATN pniuHIO TpaBMN. RaIO BN 6aHTe YepBOHm IHdkaTOp, k NOKa3aHO Ha pncyHKy, akyMnyTOp He 3aikcoBaHn NOBHCtHO.
Pnc.8: 1. YepBOHm iHNkAToP
OBEPEXHO: Bydte obepexhi, 0o6 He 3aTnchyn naIbci mix akymyIaTOPOM i onopHO nnactnHOIO nID qac yctaHOKn akymyIaTopa.
OBEPEXHO:Пдчac BIMMaHЯakymJIaTopaHaTnCHITbKhoNky6NoKyBaHHaadiHo yTpmyoynpnpzobomypykoay.KepeBmMaHHaKymJaTopa nepeBeiTy noChn peMHb y MaKcMaJIbHO HxHc NOLOXeHHa.
Pnc.9:1.Pyka 2.Khonka 6nokybaHHa
- BidipeyIIOte noJoxeHHn noaCHOro pemeH. NotarHtB Bropy BaXiNb peryIIObAHn BucOTn,notim BiDperyIOte noJoxeHHn noaCHOrO peMeH,3CyHyBUn onOpHy nlaactHy,i NobepHiB BaXiNb y BuxiDHe noJoxeHHN.
Puc.10: 1. Baxinb perynnoBaHHB BUCOTn 2. Onopha nnaCTnHa 3. IorChn peMHb
OBEPEXHO:Пд уac perynobHHЯ noNo-KeHHЯ NOrCHOro peMeHЯOB'ra3KOBo NOKnadITb npucTpiI TAKIM YINOM, u6 akymyJrTop 6yB cnpaMOBaHm BHN3,ЯK nOKa3aHo Ha pncyHky.
YBAFA:Kaio Baxinb perynIOBaHHBnCOTn nocna6JeHO,3aTnHtBraKy BaxeJpeyIOBaHHBnCOTn. He 3aTaryIte raKy HaITo CNJIbHO. Upe3 ue Baxinb perynIOBaHHBnCOTn He 3MOKe pyxatncr.
Pnc.11:1.
PIMITKA: AnoOpHy nactHy BaKko 3pyuHTn, NiHimItb akymyIaTOp 3a Hn3 TaKm YHOM, O6 NiCTaBk He TopKaJaacr 3emNi, a Notim NocyHbTe onOpHy nactHy.
Pnc.12
- Pnikpinitb BiDineHna aanTepa do noC-Horo pemeHa 3acti6ko3 ninyuKo, knoKa3aHo Ha pncyHky.
Puc.13: 1.Bidiniennna aanaTepa
PIMITKA: BiDJIeHnIa aanTepa MoXHa npKpInTu Ha NiBOMy abo npabOMy 6oCi nOraChoro peMeHr.
- BiDperyHIOte WnpHy pIeOBOrO peMeHa 3a DOnOMOrHOpeMeHa perYIOBaHHa WnpHN.
Puc.14: 1. Pemihb peryriobhaHHa HnH - HādīrHīt bnpctpi, 3aφikcyte npjkky noaCHOpeMeHn BIDperylnoTe Noro DOBXnHy.
Pnc.15: 1. Ppaxka
PIMITKA: Pemih moxha cKnaTn 3akpinTu 3acti6ko 3nuyko, jk noka3aHo Ha pncyHky.
Pnc.16: 1.Pemihb
- BīdēpyrIŋHTe pIηeOBI n peMiHb 3a DōBxNHOJ.
Puc.17: 1. Плесовий реминь
PIMITKA: Pemih moxHa cKlaTn 3akpinTn 3acti6ko 3Iynyko, Jk noka3aHo Ha pncyHky.
Puc.18:1.PemHb
OBEPEXHO: 3HimaOnn npncTpi, KnaiItb NoroHaPiBHy Ta cTiKy nobepxHIO, Oo6 npncTpi He Bnab.
3HimaOnu npucpi,po3'6dHaNte npraKky nOcHOrpeMeHn NobiBHO NOKJaDiTb npucpti.
Pnc.19: 1. PpJxka
POBOTA
O6EPEKHO:Пдчаспесенгпс tropo po3aowByte pemihb ha 06ox npeyx.
B iHsOmy BnnaKy npncTpi MoKe Bnactu nIac nepeHeceHHa6o BnKOpNCTaHHa CTaTn npnuHIO TpaBM.
O6EPEXHO:Y pa3i nepeheceHHn npncIpo 0o3TaOByTe NOro Ha cnNHi. B iHwOMy BnnaKny npncTpi MoKe Bnactn Ni d Yac po6OTn CTaTn npu- HNO TpaBMn.
OBEPEXHO: 3aBxDn BmKauTe iHcTpymeHT a6o MaunHy nepey yBimKHeHHM npncTpoIO a6o nikNoueHHM wTekepa adanTepa a6o eNeKTPOiHcTpymeHTa /MaunHn Do rHi3da akMyJrTopa.
B iHwomy BnnaKy iHCTpyMeHT a6o MaunHa MoKyTb panTOBO BBIMKHHTnc Ta 3anOjIaTI TpaBMy.
PIMITKA: AanTep Ha 18 B Heoctynn dny zuoro npictpo.
IiKluoyenH npucptoO do iHctpymeHTa a6o maunnn
- BnIMtB akymyTOp 3 onopHOI nlaCTHn nJIeOBOr opeMeHa B 36opi.
- BntaHtB shyp i3 niboro a6o npaboro 60ky akmylraTopa. Iid yac BntaRyBaHHn shhya o6ob'3KOBO BCTaBe NOrO B Tpumayi, kNOKa3aHo Ha pncyKHy.
Pnc.20:1.LHyp 2.TpMaay
- Ppikpiitb akymyIaTOp do onophoI nactHn nneyoBOr opeHn B 36opi.
-
NaarHItb npucTpii.
-
NobHicTH BCTaBTE wTekep aanTepa a6o eNeK- TpoiHcTpMeHTa / MaunHn B rHi3do akymyIaTopa, 0o6 MeTKa y BuIraDi CTpiKn Ha wTekepi 36irnae 3 MtkoHO Ha rHi3di.
Puc.21: 1. lTekep 2. Hizdo 3. Ctpinka
YBAGA:ПдчасВиMuMaHЯшTeKepa3rHi3da TpImaItecHHe3aShHyPn,a3aWtKepeirHIsdo.B iHOMy BnPaIky ShHyPn MoKyTb 6TyN NOKoJxeni CTATN pRNUHO HeCnpabHocTi npICTpOIO.
PIMITKA: LTeKepeBNTaTgYeTbc3rHi3da3a neBHOro 3ycuJnJ.
- YctaHObitb aanTepn Ha iHCTpymeHT a6o MaunHy TAK CAMO, RK KaceTy 3 aKmyJrTOPOM.
Puc.22:1.AanTep
YB4A:ДяинструментаaboMaunHn3KnB- JIeHHaM BiД akymлгета 36 B (18 Bx2)ВИКОp nCTOBynte aanTepeHa 36 B(18 Bx2).ДЯ IHCtprMeHTa NMaunHn 3KnBJIeHHaM BiДakmyJrTopa 3 MaKcMaJIbHoIO HanpyroTO 36-40 B BnKOpNCTOBynte aanTepe,po3paXOBaHn Ha maKcMaJIbHy Hanpyry 36-40 B.ДЯинструмentsa aboMaunHn 36e3nocepeD him npneDHaHHaM aanTepe He notpi6hen.
YBAGA:Пд ус yctaHOBJeHHаадanTepiВ ha IHCTpyMeHT a6o MaunHy nepekoHaIteCЯ, lo aadanTep i3 2 uHypamN BcTaHOBJeHO TaK,як noka-3aHo Ha pncyHKy.
JaKuo aadantepn BcTaHOBneHo HnpaBnIbHo, aadantep i3 2 uHypamn nobHicTIO BcTaBNTu HEMoXKnBO.He HamaraTeCra BcTaBNTu cei aadantep, 3acTOcoBvOuN cnny. Lc MoKe npn3BeCTn do NOwKOdJxHHaHCTpyMeHTa NMaunHn.
Pnc.23:1.AdaanTepi3 2 uHypamn
Puc.24:1.Adantepi3 2Unhypamn
PIMITKA: Hanpamok shhpya aanTepa moxHa 3miHOBaTN B diaana30hi np6bn3Ho 180 rpaucib.
- Hatncihb KONky XNBHeHHa 06 yBIMKHytn XNBHeHHa. 06 BmKHyTN XNBHeHHa, HATNCiTb Ta yTpmyTe KHONky XNBHeHH npotrrom KINbKOx CeKyHd.
BnKOpncTaHnpeMInzI dny niDiBiWyBaHH
Ooamkooe 06naHaHHa
O6EPEXHO: Nepei noaTkom po60tn nepeKoHaItecra, zo peimieb dna niDiBiuBaHHn npaBnIbHo npikpInlneho do raUka Ha iHCTpyMeHTi.
I3IIM IHCTpymeHTOM MOXHa BnKOpNCTOByBaTn pemHeueB IINIiDIBiWbAHNAkMyJrTOPHO rA0HOKocAPKn a6o akMyJrTOPHOI WtahROBoI NaHcUROBOI nIIIn.
KpinneHnpeMHnzIJI npiDbiuBaHHN
- Pnikpinitb raqun peimin dnn niDbiuBaHHdo kineub nneyoboro pemeha 6o noaCHOpeMeHa, NKOKa3aHO Ha pncyHky. Bn6epitb TIN peMHca Ta cnoci6 3'EDHaHHB BiNObiHDo yMOB BnKOpNCtAHHn.
Puc.32:1.Kinbue 2.Taayok
Pnc.33:1.Kilbue 2.Taayok
Pnc.34:1.Kinbue 2.Taayok
Pnc.35:1.Kinbue2.Taayok
PIMITKA: Kaio hctpymeH Ochaueo Dyrionodi6 HIO pykoTko, npKpiItb peMeu TaKIM YINOM, 06 bi npoxoNIB Kpi3b IORCHN peMihb, k Noka-3aHO Ha pucyHky.
Pnc.36:1. Pocn pemh 2.Pemheu
Bi'd'cDHaHnIhCTpyMeHTa
HaTnchItbBaxeniHa npxu,06po36nokyBatni II.
Pnc.38:1.Baxinb
PIMITKA: TnnpemHicHe Ochauehi npKko.
3nTTB abapiHniCnTyauii
- Κοδ po36lnokybaTn npjxky,HaTncHITb BaXeJI Ha npjxci nOraCHOro pemeHra.
Puc.39:1.PpKa2.BaxiNb - 3HimItbIpeuOBn peMHb,IO6 BiD'EDHaTHiHCTpyMeHT i npucTpi.
Pnc.40: 1.IJIeUOBn peMiHb
TEXHlYHE OBCJyYOBvBAHHa
OBEPEKHO: NpeD BnKOHaHHm OrJny a6o 06cnyroBvBaHHm npucptoI nepeKoHaTecra, 00 BIn BmKHeHn.
YBAG: Hikon He BnKOpncToByte ra30iH, 6eH3nH, po3piJxMyBaU, cnIPT Ta noDi6Hi peoBHN. IX BnKOpncTaHH MoKe npN3BeCTn Do 3mHN KObOpy, deOpMaui a6o nOaBn TpiuH.
ДязбeпeунньБE3ПЕКТаHДIИHOCTI npo-укii, II peMOHT, a TAKOx po60Tu 3 obcnyroByBaHHa6opeyIIOBbAHNnIOBHHI BIKOHyBaTncb yNoBHOBaKeHMMa6o 3aBOcKIMn cepBICHmU eHTpAmMakita i3 BKNOpNCtAHHm 3aPuaCTIH BInpo6HnTBA KOMNaHII Makita.
UCYHEHNAHECINPABHOCTE
IepH hix 3BepTaTc3 npNBOy pemOHTy iHCTpyMeHTa, npOBeITb Ioro nepeBipKy camocTiHo. Y pa3i BnABneHH HecnpapBHOcti, rka He nOraCHIOEbCBy Cui iHCTpyKUcii 3 ekCnlyatau, He HamaraIteCpa036paTu iHCTpyMeHT, MaunHy a6o npucpii. HatOMictb 3BepHITbc Do ABTOPUNOBAHnx cepBichux ceHTpiB Makita, B JkNx dI pyemOHTy BnKOpncToBvOtbc TINbKn 3anachi yactHN Bnpo6HnTBA kOmnaHII Makita.
(3) He donyckaIte nonaHa Ha akKymyTTop BOdbI INN DOxJa.
3aMbikaHne KOHTaKTOB aKKyMnyTOpHoro 6JOKa MExdy Co60 MoKeT npNBecTu K Bo3- HnKHOBeHHIO 6OJIbWoR TOka, nepepeBy, BO3MOXHBIM OXORAM n DaXe NOJOMKe 6JOKa.
- He xpaHnTe n He nCNoJIb3yIe NHCtpymeHT / MaunHy n AkkymyIaTOp B MeCTax, rIe Tem- nepaTypa MoKeT DoCTnRaTb IIN npeBbIaTaB 50°C (122°F).
7.He 6pocaiTe aKKymyIaTOp B OROH,daKe ecn OH CNbHO NOBpeKdEHN NIN NOJHOCTbO BBiWeN I3 CTPOA. AKKymyIaTOp MOKeT B3OpBaTbcN IOD DeNCTBHeM ORHa. - He poHnTe n He ydApnTe aKKyMyJrTOpHbI 6nok.
9.He nCnoJb3yIte NOBpeXdeHHbI aKKymJIaTOpHbI 6JOK. - BxOJaIeB KOMnJIeKT JNTHn-NOHHbIe AKKyMyJITOpbl DOJXHbI 3KcNJIyATnpOBaTbcR B COOT-BETCTBnC Tpe6oBaHmM 3aKOHOaTeJIbCTBa 06 onachbIX TOBapax.
Pn KOMMepuecko TpaHcnpTupOBke, HApnmep, TpeTbeN CTOpOH NIN 3KcneDHTOPOM, Heo6xo- DnMo HaHeCTn Ha ynaKOBky CneuaNbHbIe npedy- npexdEHHy n MapKnupOBky.
B npocce NoIroTOBKn ycTpoNCTBa K OTnpaBKe 6b3aTeJIbHO npOKOHcyNbTpnyITecb Co CneuaJIncTOM NO ONaChbIM MaTePnaJAm. TaKke co6JIHOdaIte MeCTHbIE Tpe6oBaHnI HOpMbI. OH N MoYrT 6bITb CTPOKe.
3aKpOte nnn 3aKpePnTe pa3OMKHyTbI KOHTaKTbI n ynaKyIte aKKyMylrTop TaK, YTObI OH He nepeMeuaJcR no ynaKOBKe.
11.ДЯуTNIN3aUNn aKKyMnyTOpa n3BnKeNTe erO n3 INHcTpymEnTa n yTNIN3npyuTe 6e3o-nachbIM cNoC06om.BbINOJNnTe Tpe6oBaHNr MeCTHO r3aKHOJaTeJIbCTBa nO yTNIN3aUNn aKKyMnyTOpa.
12. NcnoJb3yIte aKkMyJrTOp TOnbKO c npOkyuNe, yka3aHHo KOMnAHnei Makita. YCTaHOBka aKKMyJrTopa Ha npOdyKUIO, He COOTBeTCTByIOu tyIO Tpe6OBaHnM, MOKeT npNBecTn K NOxApy, neperpeBy, B3pbBy nN yTeUke 3JeKTpOJTnTa.
13. EcIn INHCTpymeHOM / MaunHoi He 6ydyT NOJb3OBaTbcB B TeueHne DnITeJIbHO BpeMeHN, INBLeKInTe aKKymyIaTOp INHCTpymeHTa.
14. XpaHnTe aKKyMylrTop B HeIOcTynHom dnn DeTei MeCTe.
COXPAHNTE DAHHbIE NHCTPYKcN.
BHIMAHNE: INONB3ynte TOnbKO fHmMeHHbIe aKcymyIaTOpHbIe 6aTapen Makita.
NcnoB3OBAHne aKKymyIaTOPbIX 6aTape, He npo n3BeHbIX Makita, nn 6aTape, KOtOpbIE 6bln NODBeRpyTbMoNnKauM, MoKeT pNBecTN K B3pbBy aKKymyIaTopa, NoKApy, TpaBMam N nobpeX- deHIO mMyuEcTba. 3To TaKke ABTomuCeCKn aHHyInpyeT rapaHTIO Makita Ha IHCTpyMeH T 3apAHOe yCTpoiCTBO Makita.
CobetbI NO obecneueHIO maKcImaJIbHO rpoKa cnyk6blaKKymyIaTopa
-
3apjkaTe aKKyMnyTOp, He DoKuJaacb ero nonHou pa3pRdKn. O6ra3aTeNbHO npeKpaTnTe pa60Ty c HnCtpyMeHTOM / MaunHou n 3apJrDnte aKKyMnyTOp, ecIn Bbl 3amEtUIn CHnKeHne MOUHOCTn INCHTpymEHTa.
-
HnKOrIa He 3apXaTe NOHocTbIO 3apXeHNbI aKKymyIaTOP. Ipe3apIka cokpaaaet cpoK cnYk6bl aKKymyIaTopa.
- 3apjkaTe aKKymyIaTOp npn KOMHaTHoN TemnepaType 10-40 ^ C (50-104 F). IpexKe che 3apjkaTb ropuHn aKKymyIaTOp, daTe emy OCTbITb.
- 3apndte akkymyIaTOp, ecn BbI He 6ydeTe NOJb3OBaTbCra HNCTpyMeHTOM dNITeJIbHoe Bpem (6OJee WeCTn MecaueB).
ONICAHNE DETAJEIN
Pnc.1
Khonka nHTaHnI n HdNkATop aKKymyTopa
ABHUMAHNE: Npexde Yem BkIIOuATb yCTpoiCTBO, y6eNTecb B TOM, qTO INHCTpyMeHT IIN MaUNHa BBKIOUeHbI. B npOTNBOM cNyae INHCTpyMeHT IIN MaUNHa MOKeT cNyauHO BKNIOHTbcrN CTaTB pNCHNO TpaBMbl.
PIMMEUHNE: EcnB KJIIOHTb INCTpyMeNT nMaunHy cpa3y nocne BkIIOueHn ycTpoiCTBa, INCTpyMeNT nnn MaunHa mOryt He 3anyctntbcra. B 3Tom Cnyae CHOba nepe3anyctnte INCTpyMeNT nMaunHy.
Puc.4: 1. KhoKa nTaHn2. HnDKaTOp 3.OchOBHOHnDKaTOp nTaHn
YTo6bI BKNIOUHTb NITaHHe, HAKMITE KHNKY NITaHn. OCHOBHO INDINKaTOp NITaHn 3aROpUTc 3eNEHBIM CBETOM. YTo6bI BbIKIOUHTb NITaHHe, HAKMITE KHNKY NITaHn I ydepXnBaTte ee B TeueHne HeCKOJIbKnx CEkyHd.
PIMMEUHNE: EcIyUCPOCTBO NODKIOUeHNbIN HCTpymENT INMaUNHa HE NCIOJIb3yOTcB TeueHne 8 yacOB, yCTpoIcTBO aBTOMaTHueCKN OKJIIOHTCRA.
OCHOBHON INHINKATOP NITAHN MNAET 3eNEHBIM BCNeDyUOxN CNYaX:
ChTne B abapnHOn cHTyaun
- Ytobpa36JIOKIpOBaTb npjxky, HaxMnte pbyarHa npjxke norCHoro pemHra.
Pnc.39:1.3amok 2.PbIur - CHIMNTE IJIeueBoI peMeHb, YTO6bI OTCoeINHTb INCTpyMeHr N yCTpoiCTBO.
Pnc.40:1.IpeyeBoI peMeHb
OBCJNYXINBAHNE
BHIMAHNE: Ipeep BblnoJIHeHnEM OcMoTpa Hnn 06CnyXnBaHNem yCTpoIcTBa y6eIntecb, YTO OHO BBIKIOUyeHo.
PIMMEAHHE:3anpeaaetcnaonb3oBaTb 6eH3nH, pactBopnten, cnptn npyrne noo6HbIe KNDKOCTN.3TO MOKeT npNBecTN K ObecuBe-UNBAHIO, deOpMaun TpeunHaM.
Дя obecneueHЯ BE3OJACHOCTN i HADEKHOCTN obopydoBaHЯ peMOHT,JIIO6oe dpyroe Texo6cnykuaHne nIIN peryIinpoBky Heo6xOIMO npOn3BOuNTb B yONHomOeHHbIX cepBnC-zeHTpax Makita nIIN cepBnC-zeHTpax npEaPnTnC uICNoIb3OBaHnEM ToIbKO cMeHHbIX uacte NpOn3BOdCTBa Makita.
ПОИСК И YYSTPAHEHNE HENCПAPBHOCTEД
Ipejde yem obaaatbcr no NOBOy peMOHTa, npoBeNTe OCMOTp cAmOCTOReJIbHO. Ecnn 6hApyKeHa HeNCnPabHocTb, He yka3aHHaB pyKOBoDCTBE, He nbTaIaTeCb pa3o6paTb IHCTpyMeHT, MaunHy nJIn yCTpoNCTBO. O6paTntecb B OINH n3 ABTopu3OBaHHbIX cepBnCHbIX ueHTPOB Makita, B KOToPbIX dIg peMOHTa NcNoJIb3yIOTC TaJIbKO opnIHahNbHbIe DetanMakita.
KoJdaHbIInaTbIH 3aprIay Kypblnfbicbl
| Ynri: PDC1200 | |
| Флшем dipei (¥х Exб) | 369 MM x 261 MM x 139 MM *1 |
| Homonhalды Кернeyi 36 B - 40 B TT макс. | |
| Аккумлалтдын Калган Куаты 33,5 A/car | |
| Аккумлалт Тур i Ka'ta зардталотын Лпим-ионды | |
| Зардтay уak'tы 360 минут | |
| Таа салмгы A кумлалтор 8,8 кг *1 | |
| Иык sesbevi киногы 1,6 кг *2 |
^*1 .IbIK 6eJI6eYi JINHaftBIn, aadantepnepjKe He 3apTay KypblfbcIn KocnaFaHda.
*2.AanTepeKantacbH KocnaFaHa
DC4001
A ECKEPTY: Tek kofapbda aTaIraH 3aprTay Kypblfbcih naIaHaHbIHbI3. 3aprTay KypblfbnapbIHbI 6aca Tpyneipn naIaHaHy KapaKaT any/Hemece ept WbIFy KayPiH TydbIpby MymkIH.
KoIdaHy MaKcaTbI
IopTaTnBti Kyat 6epy 6Iorbl y3ak yaKbIT Kymblc icTey ywiH jkapambl, ce6eoi on akmyJrTop MeH KypaIdbi Hemece MaunhaHbI 6enin anyra MymkiHdk bepei.
Ocb6noktbKeNeci KypaIapMeH XHe MaunHaIapMeH naIdaIaHyFa 60JaDbI.
36B(18Bx2)akkyMnyTopIbI Kypan HeMece MaunHa
36B-40BMaKc.akkymyTOp KyaTbI 6ap Kypan Hemece MaunHa
- AkkyMnyTopnbl Kypan Hemece MaunHa (nopTaNTBti Kyat 6epy 6IorbHa TikeJeN KOcbNy)
PaindaIaHy HycKayIbIFbl Typalbl
HcyaynbikTaBf "6nok"cei nopTaunBti kyat 6epy 6norbi 6inipeidi. NopTaunBti kyatbi 6epy 6norbl akkymyIaTOp MeH nbIK 6enbeyi XnHaftBn KaMTnbl.
KypaJI Hemece MaunHaHbIH yInecimdiNik caHaTbI
- AkkymyJrTopJIb 6atapeaH KyattHaTbIH WbIHKbIPJIb apa *1
AkkymyTopJIb6nIKtKkeKi - Akkymyntopnblyaaya ypreri
- AkkymyTopJIbI WaJfbl
BaKaHa canTamaHapbHa apHaIraH KEnpyHKUHOHaIbI AkKymyIaTopIbI KeTeK - AkkymnyTopbl6yTaKeckiW
- AkkymyjTopblb6ypbIbTBk akapJaBbIMaWHa
- AkkyMnyTopIbI nepΦopatop *2
AkkymyTopbIK6ypbl - AkkymynTopnbI KeraJ WankbIw (KanrafbIw TypHe raHa apHaRaH)
USB aanterpi
1. YctiHri TytKacbI 6ap 乌HHkIpNbI apaHbI (DUC252 / DUC302 / DUC352 / DUC256 / DUC306 / DUC356 / DUC406 / DUC256C) KocnaFaHaJa
2. DHR280 / DHR281 / DHR282 / DHR283 улгіпэрін кocnaразда
KypanDbH Hemece MaunHaBn YInecimdiNik caHaTbI eckepTyci3 3reptinyi MymkH. KypanDbH Hemece MaunHaBn YInecimdiNik caHaTbI TypaNb aKnapaTTbI COHfbl WbIfrapbInraH naJaAnaHy HycKayNbIrBaH KaPaHbI3.
ECKEPTY:Byn6NOKtI TeMeHne KeNTipinre KypaJapMeH HeMece MaunHaJapMeH 6ipre ewkaawan naDanaHa6aHb13. BNOKtI yInecneTIN KypaJapMeH HeMece MaunHaJapMeH naDanaHy aybp JapaKaTTap HeMece aKay TydbipyMymkIH.
- AkkyMnyTOpIbI 6aKa7aBbIK 7a7bIpaTkbIi, aKyyMnyTOpIbI cekaTOp, aKyyMnyTOpIbI e3irHEn JyPertiH ap6a, 3NeKtpIi MOTopIbI BeNoCIneI, cEMKeJI aKyyMnyTOpIbI IHaHcOprfblU, 3NeKtpKeJedTeKiWi 6ap KypTe, aKyyMnyTOpIbI XbIbITaTbIH KypTe
HA3AP CAIbIHbI3: Keneci ynrinepeeri 6noktbI naaandaHraH Ke3de HeJIOH cbIMbIH naDanaHcaHbI3, KypaNDbI TMeHderiDei Tipkecime naDanaHy KaKeT:
| Yntrici DUR364L / DUR365U / DUR366L / DUR368A / DUR368L / DUX60 | |
| Кескіш Крарал мени Кесу Диаметри | Кесу Диаметри 350 MM Heйлон кесу бcastиeri |
| Нейлон сblIMындиаметri | 2,0 MM |
*.HeHNoH Kecy Bactneri TypbIn KaTkaH XepiHa3re BaINaHbIcTbI KOJKeTeIMdi BoMaybl MyMKIn.
ECKEPTNE: DUB362 ynrici ywiH
Korapfbl TemnepaTypa KaafdaBbIHda MaunHaHbIN KOpFaHbIC KyneciHi ecepIHeh MaunHa TOkTan KaIybl MYMKiH.
Benririnep
TemeHde Ka6dbkTa naJaIaNbIybl MyMkiH 6eJIriep KepceiTireh. NaIdaIaHy aIbIHDa oIapDbIH MaBbHaCbIH TyciHn aIbIH3.


PaiDanaHyXeHInDeriHyCKayIbIKTbOKbl WbIfbIHb3.

KapakatanyKayinHaayTu yuH,cbIMdbKeeprinepen anwak yCTaHb3.

AkkymyIaTOpIbCyfTuI36eH3 Hemece KaH6bIp acTbIHda KaIbIpMaHbI3.

AkkymyIaTopblOTKaJaKTbIpMaHbI3

AkkymyIaTOpbl KbICKa TynblkTayFa 60mMaIbI.

Li-ion
TeK EO endepine aphaIraH
Xa6dbkTa kayinti KypamdaTapdbH
6onybHa 6aiaNaHbICTb, 3neKtpnIK
XaHe 3NeKTPoHDbIK Xa6dbkTAPdbIH,
akymyIaTnpar MeN 6atapeRanpDih
KaNbkbTApB KOp7aRaH optara XeHe aIaM
deHCaynbfbHa Kepi ecepH Turi3yIMyMKiH.
3NeKtpnIK XeHe 3NeKTPoHDbIK
KpybInbIaNPdHi HeMece 6aTapeRanpDbI
TypMbICTbK KaNbkbTAPmEH bpre Tactayfa
60ImaIbI!
3NeKtpnIK XeHe 3NeKTPoHDbIK
Xa6dbkTApDbIH KaNbkbTApB XeHe
aKKymyIaTnpar MeN 6atapeRanp XeHe
aKKymyIaTnpar MeN 6atapeRanpDbIH
KaNbkbTApB, COHaA-ak OJnapDbIH YTTbIK
3AnHaMaRa 6eIMDenyi TypaNbE yPonabIK
DnpeKTmbArFa CeqKec, 3NeKTPnIK
Xa6dbkTApDbIH, 6atapeRanpDbIH XeHe
aKKymyIaTnparDbIH KaNbkbTApB 6eNeK
XHaNyBx HeO KOp7aHaH opTaHb Kopfay
epexKeepiCe aekc XyMbic icTeiTH
TypMbICTbK KaNbkbTApDbIXHNay PnyKTIhe
Ketki3iny KepeK.
ByJ xa6dbkKa opHaJaCTbPblnFah aiKaC
cb3bKnEn cb3bIinaF an DeHreLeKeTI KObIC
KawirinH Binrici apkblnkepcetineDi.
KAYIINCI3ДIK BOYbIHUSA ECKEPTUJIEP
IopTaTnBti Kyat 6epy 6nOrbIHbH Xaannbl Kayinci3dk eckepTynepi
- KypaIbI HemeCe MaunHaHbI naJaIaNHydAH 6ypbIH, OHbIH naJaIaNHy HyckayJIbIFbIH OKbln WbIKKaHbIHbI3Fa Ke3 JeTki3iHi3.
- ByI 6JOKTbI cBIMbIHAn yCTay apKbINbI KETepMeH3 HemeCe TacbImaHbI3. BOKTbI naJaHaHy Hemece KIO 6apbcIHda OHbI CbIMbIHAn TapTnAbI3.
- Ka6bIKbI TaY Hemece WeuH anDbIHda KypaHaH Hemece MaunHaan 6actnekti aHbHbI3.
- KypaIbI Hemece MaunHaHbI KaIbIpy Ke3iHne OHbIH 6actnerHH aJIbIHFaHbHa Ke3 JeTki3iHi3 Hemece 6JIOKtB apKaHaB3dAn Weuhi3.
- Kymbc icTereHne 6nokTBiH cbIMbHa waIbHydaH caK 6oJIbIbI3.
- BLOKtbI teric emec 6eTTe Hemece TypaKcb13, 6nIK xepJIeppe naJaHaHaHb13.
- Kymbic ictey ke3iHde cbIMdbI keedeprinepeH anwak yctahbI3. CbIM keedeprinepre iinHce, aybip kapaKaTka eKeJyI MymKIn.
- AanTepnepi 3apTay KypblfbnapbHa eHri36eH3.
- NaJaHaH6ac 6ypbH, cbImapDbI xHe 6en6eYdi KocA 6nOKtbI TeKcepiH3. Erep onap 3aKbIMdaFah 6oJca, XeHDey XyMbICbHa 6aJNaHbCTbI Makita KomnaHrcbHbH ekineTTi KbI3MeT KepeCy optaBfBiHa xa6apLnacbHbI3.
- CbIMdbI cbIM yCTaBbWka aKbIpbIH XHe 6epiK 6ekitkeHHi3re Ke3 keTki3iH3.
- Tekcepy Hemece TexHnKaIbIK KbI3MeT Kepcety XyMbICTapbIH Xypri3ydeH 6ypbIH, apdaibIM KypaIdbIH Hemece MaunHaHbIH eWipyni eKeHHe XeHe 6actneKTIH anbIHfAhbHa Ke3 XeTKi3H3.
- BIOKtbi KY36eH Xa6DbikTaIraH KypaIMeH naJaNaHaR Ke3de, cbIMbI KYS3eH anwaK yCTaraHbIHbI3Fa Ke3 XeTki3iHi3.
- BLOKtBI KUREH KE3e, 6JOKTBIH TeTeHwe KaIaIa aXbIpaTy fYHKcIraCbHa Kepepri KeTIPpyi bIKTIman Kayinci3dk 6en6eyi Hemece NbIK6ay cNkTBI eWkaHdaa KepeK-JkapAeTBI naIdaIaN6aHbI3.
- Araika epMeJereHne 6JIOKtbI naJaIaHa6aHbI3.
- 3neKtpKeIeTkiWi 6ap KypTeHi Hemece aKKymyTAOpNbI XbblTaTBH KypTeHi KnreH Ke3de 6NoKtBn naaDaaHbI3.
- BLOKtbI yWKBiHdapdaH caKTahb3.
- BLOKtBI KIMeI naJaIaHaR He3De Hemece 6LOKtBI KypaJIra opHaTKaH Ke3De OHbI 6etimeH opHaJAcTbIPbIHbI3.
-
EIOKtbi 6eWKeTeMeHi3, XeHdEmei3 Hemece e3reptneH3.
-
KypaJHa Hemece MaunHara acna 6eJiKTIH Hemece 6eJiKTIH opaJIbIN KaJmaybIH KaJaFaHaHaB3.
- KypblfnbHbI naJaIaNHaH Ke3e, KypanDbIH HeMece MaunHaHbIH cbIMapDJI Kecin Ketneyi KaaraJAHbI3.
- BLOKtbl aKKymyIaTiperi Kemerimeh KOFapbl KaPaTBIn OPhaTKaH Ke3de 6NOKTbI Teric 6etke opHaNaCTbIPbIHbI3.
- Metann KOHkanaheMece cy cnaKtbi 6eIe 3aTapdb6nokTBiHaawacbHaanbcYCTaHb3.
- KypaJIbI HeMece MaUNHaHbI Xorapbl KepHeyIy Kyat JeInepi XaHbIHda naJaIaN6aHbI3.
- Tek 6nokka aphanrah 3aprTay KypbInfbicbH naaIaNbIHbI3. BacKa 3aprTay KypblfBnapbH naaIaNHaHbI3.
- Akkymyntop KopnycbH 3aKbIMan anMaHbI3 Hemece 6nOKKa eWTeHe opHaJAcTbIpMaHbI3.
- Bnok yctiHeH 6acnaHbI3 Hemece OHbIH yCTiHe OTbIPMaHbI3.
- BnOKtbl aKKymyIaTOp TiperIH HeMece eHIN petTey beJdiRiH yCTay apKbIbI TaCbIMaJaMaHaHbI3.
- BnoktbI 6eIme iwiHde caKaTahb3.
- AkkymyIaTOp MeH akKMyJIaTOp tiperIH apacbHa eWkaHda3aTTb1 KOIMaHbI3 Hemece 6ekitnehi3.
- AkkymyraTop TiperiHe eWTeHe iJMeHi3.
AkkymyIaTopra apHaIFaH MaHbI3DbI Kayinci3dk HycKaynapbl
- AkkymyIaTOPbI naHaIaH6ac 6ypbIH, (1) aKKymyIaTOPra apHaIraH 3aprTay KypblfbcHdaRbl, (2) aKKymyIaTOPdaRbl XaHe (3) aKKymyIaTOPbl naHaIaHaTbIH eHimderi 6apbIK Hcckaynap MeH eCKepty 6enriepin Okbln WbIfbHbI3.
- AkkymyTopb6JWeKTeMeHi3.
- Erep aKKymyIaTOp KApTpNdxIn naJaIaNHy yaKbITbI 6iptana KbcIckapraH 6oNca, naJaIaNHybl Depey TOKtaBtB13. Byn Kb13bIN KeTy, bIKTmAl N KyiIKTepe Hemece tinti Xapblbc Kayin Tdybipybl MymkIn.
- Erep 3neKtpoNt Ke3iH3re Turen 60Jca, Ke3iH3di Ta3a Cyme HwaBbHb3 XHe Depey MeuHHaBik KEmekke KyrHin3. Byn Kepy Ka6iTeHEn aBipbIpyra eken cokTbipybI MymkiH.
- AkkymyIaTOpIbI KbIcKa TyIbIKayFa 6oJMaIbI:
(1) KneMmaIapbI Ke3 KeIreH ToK eTki3riu MaTePnaIapra Turi36eHi3.
(2) AkkymyTopbI iwiHne wereNep, TnbIHap, T.6. 6acka metan3aTtapb6ap KOHTeHepde caKTamaHbI3.
(3) AkkymyJrTopbI cyfcaJMaHbI3 Hemece KaH6bIp actbHaKaJdbIpMaHbI3.
AkkymyIaTOp tyniceneepiH tynbiktanybl YNKeH TOK afbHbHbH naHa 6onybHa, Kbl3bn KeTyre, bIKTMan KyikTepre XeHe TiNTi 6y3blnyfa ce6en 6onybl MymkiH.
- KypaIbI/MaunHaHbI XeHe aKkMyJrTOpDbI TempepaTpcbI 50°C (122°F) wamacbIH aCaTbIH XepnepDe caKTamaHbI3 XeHe naJaIaN6aHbI3.
- AkkymyJrTop KaTbI 3aKbIMdaJIraH HeMece TOnbIfbImeH To3FaH 6oNca Da, OHbI OTka XaKnhaH3. AkkymyJrTop OTta Xapblbn KeTyi MymkiH.
- AkymyntopdbI Kynatbin Hemece cofbin anMaHbI3.
- 3akbImdaIaIraH aKKymyIaTOpdbI naIdaIaHa6aHbI3.
- KInhaKa kiperin nHTn-NOHdbI aKKymyIaTOpJap DeHCayNbIKKa JHe KOpwaHaN opTaRa 3nHbI 3aTTap 3aHaMaCbI TaIaNTapbHa CKeKc KapacTbIPbIaNbI. KompeuJIbIK TAcBImaJdA ywiH, MbicAlbI, ywiHti TapaTAP, EKcneDITOpJap ywiH KaTamaJa XeHe TaHbAnayda apHaBt TaIaNTap caTaNbTiNc. Xi6epiTeH eHIMdi DaMbIHday ywiH Kayinti 3aTTap BoBbHsa capanBbM MaAMMeH KeHecy KepeK. CoHbIMeH Katap YTTbIK epeXeJepDi de ToNBk Kapan WblfblHbI3. AdbTK tynicenepDi kaybin, aKKymyIaTOpDbI KaTamara Ko3raMaTbIHdae etin oPhaNaCTbIPbIH3.
- AkkymyIaTOpDbI KeJere JkapaTkaH Ke3e Ohbl KypaIaHaN WbIrApBIn aIbIn, Kayinci3 JepeDe KeJere JkapaTbIHbI3. AkkymyIaTOpDbI KeJere JkapaTyra KaTbICbI JxepriniKti epexenepi OpbIHdaHbI3.
- AkkymyIaTOpbI TeK Makita KomnaHnacbl KepcTeKeH eHIMdePmeH 6ipre naJaHaHbIHb3. AkkymyIaTOpbI yInecimDi eMec eHIMdepre opHaTy eptKe, KbIbIN KeTyRe, JapblbICKa HeMece 3NeKTpOInr arBybHa aKeN cOKtBIPybl MyMKH.
- Erep Kypan/MaunHa y3ak yaKbIT 60nbI naDanaHbIMMaTbIH 60nca, KypanDaRbI aKKMyJrTopDbI anBIn Tactay Kepek.
- AkkymyIopIbI 6anaIapHaH aynak yCTaHbI3.
OCbI HYCKAYLAPDbI CAKTAHbI3.
CAK BOJIbIbI3: Tek TynHycKa Makita akymnTOpnapbIH naDanaHbIHbI3. Tyhcyka emec Makita akymyIaTOpnapbIH HeMece e3reptinreH akymyIaTOpnapdbI naDanaHy HtNKeCiHde ept, JapaKaT any HeMece 3akbIMdanyFa ce6en 6oNaTbIH akymyIaTOp kapblNybiHa eKenyi MymKiH. On coHdai-ak Makita Kypalbi MeH 3aprTaY KypblfbcI ysiH Makita KeiindirH KyuHJxOraBl.
AkkymyIaTOPdbIH MaKcImaIbI Kbl3MeT eTy MEP3iMH caKTay 6oYbIHwa KeHeCTep
-
AkkymyIaTOp KyaTbI ToJIbIbIMeH OTbIpMac 6ypbI 3apraTaHbI3. 3neKTp KypaIbIHbIh KyaTbI a3 eKeHdiRiH 6aikaraH Ke3de, KypaI/ MaunHa KymbcIH TOKtaTbIN, AkkymyIaTOpDbI 3apraTaHbI3.
-
TOnbIfbImeH 3aprTaJraH akKMyJrTopDbI eWkaaHaN KaTt a3aprTaMaHbI3. ApTbIK 3aprTay aKKMyJrTopDbIH KbI3MeT ety MEP3IMH KbICApTaDbI.
- AkymyIaTOpbI 10°C - 40°C (50°F - 104°F)
6eJIme TempepaTypaBHaJa 3aprAdTaHbI3.
3aprAdTamac 6ypbIn, AkymyIaTOpbI cybITbIHbI3. - ErepakkymyTopbI y3aKa yaKbIT 6oBbl (aNTbl aadanapTBk) naDanaH6araH 6oJcaHb13, OHbl 3apraTaHb13.
KyaT TynMeci XeHe aKKymyIaTOP HndnKaTopbI
CAK BOJIbIHbI3: BIOKtbl KocydaH 6ypbH, KypaIdbI HeMece MaunHaBbI eWipreHiizre Ke3 XeTki3iH3. Θntnece KypaI Hemece MaunHa Ke3deNcOK icke KocblbIN, Japakat TydbipyMymKiH.
ECKEPTNE:БLOKtI icKe KOCKaHHaN KeiH KypanDbI HeMece MaunHaBb 6ipDeH icKe KoccaHb3, Kypan HeMece MaunHa icKe KocbIMayb MyMkiH. Byn KaFdaJa, KypanDbI HeMece MaunHaBb KaT a icKe KOCbIHb3.
Cypet4: 1. Kyat Tymeci 2. INdikatop wambl 3. Kyat wambl
BLOKbI KOCY yuH KyAT tyMeciH 6acbHb3. Kyat wambl Xacbl TycTI 60bn XaHaDbI. BNOKbI eWipy yuH KyAT tyMeciH 6ipHeWe cekHy 6oBbI 6acbIn typbHb3.
ECKEPTNE: BnOK neH Kpyan Hemece MaunHa 8 cafata Kapaycbi3 KaandbipbInca, 6nOK ABTomattby Typde eweedi.
Herizri KyaT uMbI KeNeci XaFdaInapDa Xacbl TycneH XbInbIbIKTaIbI:
Aaantep aawacbHemece 3neKtpnIK Kypan/ MaunHa aWacb6NOKTBiH 6actneriHe Kocblmafah. ByJkaaJaDa aanTep aawacbH Hemece 3neKtpnIK Kypan/MaunHa aWacbH 6NOKTBH 6actneriHe Kocblh3.
- AkkymyTop 3aprIbI 6itKeH. ByJ KArDaJa 6nOkTbI 3apraTaHbI3.
- AkkymyjTOp 7aMaadaH TbIC KbI3bIN KeTKeH HEmece 6NOK TeMnepaTypacbl TeMeH. Byn KaJaDa 6NOKtbi CyblHbI3 HEmece OHbl XblblTbIHbI3.
KyaT WAmbl Xacbl XeHe Kbl3bl Tycne Ke3EKCticn XblnbIbIKTaca, 6NoKTbl ewipin, codan Kein KaTa Kocblb3. BNoKTbl KocKaHHa KeiH Kyat WAmbl XaCbl XaHe Kbl3bl Tycne H Ke3EKCticn XblnbIbIKTaybih TOkTaTnaca, XeHDey XymbcibaHa 6aJNaHbICTbl Makita KOMnaHnrcblHbH ekineTTi KbImET Kepcety opTanbIfbHa xaBapnacblb3.
AkkymyIaTOpDbIH KaJIraH KyaTbIH Kepcety
AkkymyIaTOpdbIH KaIFaH KyaTbIH KepeTy yuH 6nOKTaBfKyaT TyMeciH 6acbHb3. Hdkatop waMapblwaMaMeH 5 cekHyd 6oBi KaHbIn TpyAbI.
| Инданковшamдары Калган кут | ||
| Жанын тур | БшірүліЖын | БшірүліТay |
| 75% - 100% | ||
| 50% - 75% | ||
| 25% - 50% | ||
| 0% - 25% | ||
| АKKулаяторды зapядва. | ||
| АKKулаятор akayны бolyы муMKин. | ||
ECKEPTNE:KoJdaHyKaFdaIapbHaJaHe KOpwaHOpTaHbIH TempepaTypacbHa KaPai KepcTeKiHaKaTbI KyaTTaH 6ipwama epeKweJeHyi MymkiH.
ECKEPTNE: KypaI Hemece MaunHaHbIH aKcyMnyTOpDbIH KaNFAH KyaTbIH KepeTyre apHaNfAH INdNKaTOp WAmbl 60JCa, KypaI Hemece MaunHaHbIH eMeC, 6nOKTBIH INdNKaTOp WAmdaPbHa KapaHbI3.
ECKPTNE:Erep6ipHeWe INHnKaTOp WAmbl KblblbIKTaC,AKKMyJrTOpDbIH Kb3bIN KeTKeHDirIH 6inDipei.ByJkaFdaa aKKMyJrTOpDbI cyblHB13
KypaIbIH/MaunHaHbIH/ aKKyMylTOpdbIH KOpFaHbIC Xyneci
Kypan Hemece MaunHa KypanDbI He MaunHaHbIXe
aKymyTOpDbI Kopray XyecimEn Xa6dbIKtanraH.
Byn Kyyne Kypan Hemece MaunHaHbIH XeHe
aKymyTOpDbIH Kb3Met eTy Mep3iIMn Y3apTy YwIH
Motopra 6epinTeH KyatbI ABTomAtbI TypDe eWipeDi.
Erep Kypan, MaunHa Hemece aKymyTOp TeMeHderi
XaFaainapDbIH bipeYiHe tan 6oNca, Kypan XyMbIC
6apbCbHda ABTomAtbI TypDe TOkTaIbI:
Uamadan TbIC KyKTeMeDeH KopraHbIC
Kypan, MaunHa Hemece aKKymJrTop Wamadah TbcTOK TyTbHaTbIH Kynde Kymbic icTece, Kypan HemeceMaunHa aBtOMaTTbI TypDe TKTaHdbI. Byn KaDaJaKaPAnDbI Hemece MaunHaHbI eWipiH3 Xane KypanDbIH Hemece MaunHaHbIH WaamadH TbIC KytKeYiHe c6en6oNraH KymbCTbI TKTaTbHb3. CodaH Kein KaTAticKocy yuH KypanDbI Hemece MaunHaHbI KocbHbI3.
KbI3bIn KeTydeH KopFaHbIC
Kypan, MaunHa Hemece aKKMyJrTOp Kb3bIn KeTce, KypaH Hemece MaunHa ABToMaTTbI Tpyde TKTaNDbI. Byn KaDaJa KypanDbH Hemece MaunHaHbKaTaNcKe KocyaHb KypbH, KypanDbH Hemece MaunHaHbH XHe aKKMyJrTOpDbH cyyBaH MyMkiHdik 6epiH3.
3apraTbIH 7aMaDaH TbIC TaycblybiHaH KopFaHbIC
AkkymyIaTOp KyaTbJ XeKTIiKcI3 6oJIfAH Ke3Je Kypan HeMece MaunHa aBToMaTTbI Type ToKTaIbI JxHe KyaT TyIeMecIH BaCKaH Ke3Je HndnKaTOp Wambl XbIbJIbIKTaIbI. ByJ XaFdaJa aKKymyIaTOpDbI KypaIaHa Hemece MaunHaDaH aIbIn Tactan, 3apraTahbl3.
36B-40BMakc.apHaIraH aanTeepin HnDnKaTOp 7aMbIHbIH aKKymyIaTOpbITeMeH
KocbImwa Kepek-kaapan
BvI aanTep akKymyIaTOpdbH KaIHaH KyaTbI TeMeH HeMece JOK eKeHdiRiH xa6apJaTbIH INdIkatop WaMbIme Hka6DbIKTaIFaH.
HnKAtop WAmbI XbInbInbIKTaFaH Ke3De aKcMyTApDbIH KaJFaH KyaTbTeMeHnei.
HnKaTOp 1aMbI XaHaF Ke3De, aKcMyJrTOpDbIH KyaTbI TaycbIaNbI HemeCe aKKMyJrTOpDbIH KOpFaHbIC Kyneci icKe KocblNaDbI.
ECKEPTNE: Kypanbl/ka6dbkTb y3dkci3 naDanaHFaHa, Kypan/ka6dbk INDnKaTOP WAmbl XblBbIKTaMaCTaH ABOMaTTb TpyDe TokTan KaNybl MymkiH.
ECKEPTNE: INHdkaTop WAmbl KbInblkTaTbIH yaKbIT, KopwaH opTa TemnepaTypacbl MeH aKKymyIaTOp KyiHe 6aIINaHbICTbl e3reWeJeHeDi.
Cypet5: 1. AKKyMyJrTop KyaTbI TeMeH INHdkaTop WAmbl
AaanTep kaIantacbH naJaHaHy
CAK BOJIbIbI3:БIoKtbl aadanTepe KaNTacbIHbH Jxa6bIcKa InreK 6eKitkiwi apkblnbl 6eKitinreH cbIMapMeH naaDanaH6aHbI3.
AanTepnepi aanTep kantacbHa cypTe KepceTirreHne caIbIb3.
Cyper6: 1. Aaantep 2. AanTep KaTacbl
KYPACTbIPV
CAK 50JIbIbI3: 5nokneH xymbc icTeMeC 6pybH, aPdaiBIM 6nOKTBH eWipyni eKeHdiRiHe XaHe axbPaTbIraHdbIbHa Ke3 XeTKi3iHi3.
BnoktbI Kypactbipy
- AkkyMylTopblnbIK 6e6eyi KnaHaftbHbT a6aHnactnHaCbHa CypETte KepcTeINReHdE 6eKiTiH3.
Cyper7: 1. AkkyjnoTop 2. Ta6aH nnaCTnHaCbI
CAK BOJIbIHbI3: AkkymyIaTOpIbIH Ta6aH
nactuHaBmIKtan 6eKITINREHine Ke3
KeTki3iH3. ΘItnce akymyIaTOpIbI TaKaH Ke3de
HeMece naJaIaNHaH Ke3e, 6NOK KJnAN KaIbIN,
JapaKaTTaybl MyMknH. Erep cypETe KepcETInREHden
KbIbIN HndkaTOP KePiH IN Typca, Demek AkkymyIaTOp
ToJIbIFbIMeH KJIbINTaJMaFaH.
Cyper8: 1. Kbl3bl INHdkaTop
CAK BOJIbIHbI3: AkkymyIaTOpIbI 6eKITKeH Ke3de, aKKymyIaTOp MeH Ta6aH NnactInHaCbI apacbIHda caycaKTapbIHbI3 Hemece 6ac 6apMaKaTapbIHbI3 KbICbINbIN KaImaybl YwiH a6aB 6oJIbIHbI3.
CAK BOJIbIHbI3: AkymyIaTOPbI aIraH Ke3de ca6bIHah MbIKTan yCTan TypbIN KyJIbIaTay TyImeCIn 6acbIHbI3. AkymyIaTOPbI aIraHHaH KeiH 6eI 6yaTbIH 6eNdiKTI eH TeMeHri KYre OPhaTbIHbI3.
Cyper9: 1. TyTka 2. KynbInTay TyMecci
- BeJ 6yatbH 6eNdiKTI peTteHi3. BNIKTi peTteInTH TeTI KTepePi3, cOaH KeiH Ta6aH nIacTHnAcBtH cbIPbI TY apkblb 6eN 6yatbH 6eNdiKTI peTten, TETIKTI opHbHa TycipiHi3.
Cypet10: 1. Bniiktki piertteinTetik 2. Taah nlaactnHaacb3. BeI 6yataH 6eNik
CAK 60JIbIbI3: BeI 6yaTbIh 6eNdiKiTH KynIH peTtey KeiHne 6nOKtbl CypETe KepcTeINreHdE anKKymyIaTOP TEme H KapaTbIHda etin opHaJnactbIpbIHbI3.
HA3AP CALbIHbI3: BnIKTI peTTeiTH TETIK 6oc 6eKITINCE, OHbIH COMbIHbIH 6eKITiH3. CombIHdbI WamadaH TBIC KaTTbI 6eKITneH3. ΘuTneC EbnKTi peTteiTH TETIK XblXbImaNbl.
Cyper11: 1. COMBIH
ECKEPTNE:Erep Ta6aH nactnHaCbIH cbipfblTy KnbIH 6oJca, akMyJyTopdbIH actbIH tiperi xepre TImeTInDe etin wamJI bKeTepiH, codah keiH Ta6aH nactnHaCbIH cbipfblbHbI3.
Cyper12
- AanTep kaTacbH 6en 6yaTbH 6enNikke Ka6bIcKa iInrK 6eKITKiwi apKbIbI cypETte KepCetinReHdien TIPKeHi3.
Cyper13: 1. AaanTep KaTacbl
ECKEPTNE: AaTep kaTacbH 6en 6yatbH 6enDikTH OH Hemece coJ KaftbHa opHaTyfa 6onaDbI.
- EHH petTeiH 6eNdiKti naiJaHaBIn, NbIK 6eN6eyiHin eHH petTeHi3.
Cyper14: 1. EHH peTtey 6eIdiiri - BIOKtbi KniH3, cOaH KeiH 6eN 6yAtbH 6eNikTIn aBil6acbH KyIbITan, OHbH y3bHdbfBiH petTeHi3.
Cyper15: 1. AiiBln6ac
ECKEPTNE: BenDikTi JxabicKa InreK 6eKiTkiWi apkblc ypeTTE KepceTinReHdei XnHayra XeHe 6ekityre 6oNaDbI.
Cyper16: 1. Bendlik
- NbIK 6eB6eyiH y3bIHdbfBn peTTeHj3.
Cyper17: 1. N_blk6en6eyi
ECKEPTNE: Benikti Xa6bicak inrek 6ekitkiwi apkblc ypeTTE KepcetinreHdei XnHayra XaHe 6ekityre 6oanaBl.
Cyper18: 1. Bendlik
CAK BOJIbIHbI3: BnOKtbl opHaTKaH Ke3de, 6nok Kynan KeTneTIHe eIn OHbl Teric XaHe TypaKtbl 6etke opHaJAcTbIPbIHbI3.
5nOKtbl opHaTkaH Ke3de, 6eJ 6yAtbH 6eJdiKTIH aBil6acbH KyIbInTaH WbIfapbHb3, cOaH KeiH KpyIbnfbiHbAkbipbH opHaTbHb3.
Cyper19: 1. Aynbil6ac
Пайдалану
CAK BOJIbIbI3: BIOKTbI KINO Ke3IHDe, OHbI eKI NbIFbIHb3ra KUREHHiI3re Ke3 XeTki3IH3. ΘηTnece 6IOKtbl TaKKaH Ke3De Hemece naJaHaH Ke3De, 6NoK Kynan KaBbIn, JapaKaTTaybl MyMkiH.
CAK BOJIbIHbI3: BIOKTbI KNUO Ke3IHDe, OHbl apKaHbI3ra KUREHIi3re Ke3 KeTki3iHi3. Θntnece 6nOK Ke3deNcOK Kylan KaJbIn, JapaKaATTayb MyMKIN.
CAK BOJIbIHbI3: BIOKtbl KocyaH 6ypbH HeMece aanTep aawacbH HeMece 3neKtpnIK KypaIbI/MaunHa bI aKKyMylrTop Kopa6bHbIH po3eTKacbHa KocyaH 6ypbH KypaIbI HeMece MaunHa bI apaibIM ewiipiH. OHTnece KypaI Hemece MaunHa Ke3deuCk icke KocbIn, JapaKaT Tydbpyb MyMKIN.
ECKEPTNE: 18 B Kypanra aphanrah aadanTep 6yn 6nok ywiH konketimdi emec.
Cyper29: 1. Cbim yCTaftblwbl
CbIM YCTaftBtapdb6en 6yaTbH 6eNdiKTIH XHe NbIK 6en6eyinH OH Hemece coJXaftbHa opHaTyfa 60anaDbI.
Cypet30: 1. Cbim yctafbiwiba 6ekitinirn 6eik
CAK BOJIbIbI3: CbIMdbI NbIK 6eJI6eyiHe TEK COJ XaKaHa HeMece TK OH XaKa, CBIM NbIK 6eJI6eyimEn aikacnaTbIHdA etin 6eKIITiH3.
Cyper31
IInriiw 6eJdiKti naJaIaIaNy
KocbImwa Kepek-kaapan
CAK BOJIbIbI3: Kymblctbi 6actamac 6ypbIH, inriiw 6endiikTIH Kypan inriiWHe dypbc opHaTbINraHBHa Ke3 XeTKi3iHi3.
Inriu 6eJiKTI aKKymIyIopJIbI waIbIme Hemece aKKymIyIopJIbI 6nIKTK KeckiUnen naJaIaHyf a bona.
Iinriu 6eNdiKti 6ekity
- Inrii 6endiKTH iInMerH 6eN 6yaTbH 6enikTH Hemece nblk 6eNbeYinH caknHaJapbHa Cypette KepcTeINrReHdeE tIn iINI3. NauDalaHyra cKeke KeJETIH 6endk Tpyi MeH Kocy 6icH TaHaHbI3.
Cyper32: 1. CaKHa 2. IImeK
Cypet33: 1. CaKHa2. IJMeK
CypeT34: 1. CaKHa2. IJMeK
Cypet35: 1. CaKHa2. IJMeK
ECKEPTNE: Kypan Typi BeNoCnneT TTKacbI CNKtbl 60nca, 6enDiKi 6en 6yaTBH 6enDiKiTH iWKi KaFbI apkblbl eTeIHDei 6ekTiHi3.
Cyper36: 1. Ben 6yaatbH 6enDik 2. BEnDik
- Imekti Kypanfa iinih3.
Cyper37: 1. IJmek
KypaIbI aXbIpaTy
AaBn6actb6ocaty yuiH, aBn6ac TetikTepiH 6acblb3.
Cyper38: 1. Terik
ECKEPTNE: AaBn6ac 6eNdiKTIH TyPiHe 6aIHaNbICTbI 6epiImei.
TeHeWe KaFdaIa aXbIpaTy
- AaBbIb6actb 6ocaty yuiH, 6eJ 6yaTbIH 6eJIkTiH aBbIb6ac TetikTePiH 6acblHbI3.
Cyper39: 1. Aиьлбac 2. Tetik - KypaJIbI JxHe 6JokTbI 6ocaty yuiH nbIK 6eJI6eyiH weuhi3.
Cyper40: 1. Nibik6en6eyi
TEXHINKAJIbIK Kbl3MET KOPCETY
CAK BOJIbIbI3: TeKcepy Hemece
TEXHnKaJIbIK KbI3MeT KOpCeTy KxMbICTapbIH
Kypri36ec 6ypbH, apdaiBIM 6NOKTBH eWipyni
eKeHdiRHe Ke3 KeTki3iHi3.
HA3AP CAIbIHbI3:KaHapMaIdbI,6eH3nHdi, cyIbIITkbIWTbl,CnIPTTI Hemece corah YKcac 3aTTapDbI eWkaaH naIdaanhaBIs3. HAtnxkeciHe Tyci3deHy,6yInHy Hemece JapbIKTap naIda 6onybHa aKeenyi MymkiH.
OHIMH KAYINCI3IIM MeH CEHIMDIIINI H KaMTamacbl3 ety ywiH,KeHDey KymbICTapbl,Ke3 KeJIReh 6acka TexnKanblk Kb13MeT KepCteY HeMece petTey epaMakita Kocalkb6eJWeKTePih naDaHaHy apKblbMakita KomnaHncaBhlh oKinetTI HeMece 3aybTTbIK Kb13MeT KepCteTy OptaBkTapbl TapanbHaH opbHdanybKepeK.
AKAYIbIKTAPdbI XOIO
KeHdey KymbictapbHa Tancbipbc 6epyden 6ypbH, Tekcepyep kypriizhi3. HcKaynbkTa kepcetimereH mecenepe aHbIKtanca, Kpaanbl, MaunHaHb HeMece 6nOKt b6nweKeTemeHi3. Makita KomnaHrcBbH eKineTTi Kb3Met KepeTy opaIbIKTapbHa xa6apnacbHb3 XHe XeHDey ywiH apkaawm Makita Kocankb6nweKtepiH naJaAnaHbIHb3.
| Акayлы Кун Куат Шamы Себебі Шшim | ||
| Курал Неме Маша на icke Косылмады. | - 3ардай тay куры | ньсы ುлоркka Косылман. |
| Шам жасы Түстб олььин яхады. | Даалтерлор куралга Неме Машинага орнасылмаган. | |
| Курал Неме Машина, щадлорлорд in сыmbi Шамадан Тыс Кызган. | ||
| Курал Неме Машина, бүлдд. | ||
| ЖөнDEУ JСМБСВИGAБALHOBKIMET KERCEТУ OрТАБIFBHAxabapnacbIb3. | ||
| Шам жасы Түслен жынлытайды. | Даалтет ршасы Неме Элект Куралы/Машина мен Akkymаллар top розткасы Косылмаган. | |
| Блokшамадан Тыс Кызгдп ketken Hemece Блok TempepatypacbI TEmeH. | ||
| АKKумалларды Калfasн Куаты ХеткINIKTI emec. | ||
| Шам кызы Лхөн Засыл түслен кеэнтсin яхды. | БлOK akayлытбы anbiktsaы. БлOKышipin, кайta KOSbHb3. | |
| ЖөнDEУ JСМБСВИGAБALHOBKIMET MAKITA EKINETTI Kызmet KERCEТY OрТАБIFBHAxabapnacbIb3. | ||
| Шам жанбайды. Блok Косылмаган. | ньсы ುлоркka Косылб. | |
| АKKумалларды Зардтб. | ||
| БлOK skytsin.ЖөнDEУ JСМБСВИGAБALHOBKIMET MAKITA EKINETTI Kызmet KERCEТY OрТАБIFBHAxabapnacbIb3. | ||
| Акayлы Кени Куатшамы Себебий | ||
| Зарадтуары Крългысы Косьлган Кени Зарадтуары Бсталмды. | Шam Кени Түший Кени Түлгытайды. | Блиок Ша мадан Тыс К苇ын Кени Нени Тэлгытайды. |
| Шam К苇ын Хаэн Касын Түший К苇ын К苇ытайды. | Блиок Нени Зарадтуары Крългысы К苇ын Альлгытайды. | |
| Блиок Нени Зарадтуары Крългысы К苇ын Альлгытайды. | ||
| Жени Зарадтуары Крългысы К苇ын Мakita Эклente К苇дмет керсetime opталыгын Хабарпасын. | ||
| Шam Ханбайды. Зарадтуары Крър | Лизсы сөндас AT Керney көзін Ксьлмоган. | |
| Зарадту Крългысын Виньпactinerдүрьс Ксьлмоган. | ||
| Зарадту Крългысын К苇ТсыМы Зрьлгысын Дүрьс Ксьлмоган. | ||
| Блиок Нени Зарадту КрългысыНСандддддддддддддддддддддддддддддддддддддддддддддддддддддддддддддддддддддддддддддддддддддддддддддддддддд徳. |
KOCbIMWA KEPEK-KAPAKTAP
CAK BOJIbIHbI3: Byn Kepek-JkapaKTap MeH KOHdbIpMaIap OcbI HycKayIbIKTa KepcTeINreH Makita KypalbIme 6ipre naIdaIahyFa YcbIHbIaNbI.Ke3 KeIReH 6acka KepeK-JkapaKTap MEH KOHdbIpMaIapDbI naIdaIahy aadMapDbIH JkapaKaTTAHybiHa eKeJyIMyKiH.KepeK-JkapaTbI Hemece KOHdbIpMaHbI TEK e3 MaKcaTbIHda raHa KOJIdaHbIHbI3.
OcbKepeK-kaapT apTpaJIbIOcbIMuaMAnimet any yuHIN KEMEK KaKet 6oNca, JeprinikTi Makita KbI3Met KepcTeOpTaJIbIrHa xa6apJaCbIbI3.
- Makita TynHyska 3apraTay KypblfBicbi
36B(18Bx2)aphanfahanadantepnep
36B-40BMakc.aphaHaHa aanTep - NbIK 6eN6eyi
ECKEPTNE: Tizimderi Kein6ip 3neMeHTTep cTaHapTTbKepeK-kaPaKTap petIHNe KypaIbIH KaTAmcbIHda 6OlybIMyMKIN. Onap enre 6aHaNaHbICTb apTypJI 6OlybIMyMKIN.
规格
KoD 1000 HnHn HnHn HnHn HnHn HnHn HnHn HnHn HnHn HnHn HnHn HnHn HnHn HnHn HnHn HnHn HnHn HnHn HnHn HnHn HnHn HnHn HnHn HnHn HnHn HnHn HnH n Hn Hn Hn Hn Hn Hn Hn Hn Hn Hn Hn Hn Hn Hn Hn Hn Hn Hn Hn Hn Hn Hn Hn Hn Hn Hn Hn Hn Hn Hn Hn Hn Hn Hn Hn Hn Hn Hn Hn Hn Hn Hn Hn Hn Hn Hn Hn Hn Hn Hn H
共130:1.
Gbr.17: 1.Harnes bahu
Gbr.20: 1. Kabel 2. Penahan
Rajah17: 1.Abah-abah bahu
Danh muc dung cu hoac may twong thich
- May Cura Xich Chay Pin *1
- May Cua Canh Trén Cao Cam Tay Hoat Dong Bäng Pin
- May Thoi Càm Tay Hoat Dong Bang Pin
- May Tia Hang RAO Cam Tay Hoat Dong Bang Pin
May Da Nang Cam Tay Hoat Dong Bang Pin - May Tia Hang RAO Cam Tay Hoat Dong Bang Pin
- May Mai Goc Cām Tay Hoat Dong Bäng Pin
- May Khoan Dong Lyc Cam Tay Hoat Dong Bang Pin *2
- May Khoan Dát Cam Tay Hoat Dong Bäng Pin
- May Cát Co Day Cam Tay Hoat Dong Bäng Pin (chi dānh cho loai dαu não)
- Bô chuyén dōi USB
1. Khong bao gòm xich cuà cuà tay cām ò dinh (DUC252 / DUC302 / DUC352 / DUC256 / DUC306 / DUC356 / DUC406 / DUC256C)
2. Khong bao gōm DHR280 / DHR281 / DHR282 / DHR283
Danh muc dung cu hoac may tuong thich co the they doi ma khong thong bao truc. Tham khao tai lieu huong dan moi nhat de biet thong tin v deanh muc dung cu hoac may tuong thich.
CANH BAO: Tuyet dai khong su dung thiet bi nay voi cac dung cu hoac may duoc phan loai ben duo. Su dung thiet bi nay voi cac dung cu hoac may khong tuong thich co the gay thuong tich canhan hoac truc tac.
May Xit Vuon Cam Tay Hoat Dong Bang Pin, May Cat Canh Cam Tay Hoat Dong Bang Pin, Xe Van Chuyen Hang Hoa Hoat Dong Bang Pin, Xe Dap Hoat Dong Bang Pin, May Hut Bui Deo Vai Hoat Dong Bang Pin, May Hut Bui Robot Hoat Dong Bang Pin, Ao Khoac Dai Tay Lam Mat Dung Pin, Ao Khoac Dai Tay Lam Am Dung Pin
CHU Y: Neu bān sū dung day nyi long khi bān su dung thiet bi voi cac kiéu may sau day, hy āc chan sū dung dung cu nay theo to hop sau:
| Kierrick364L / DUR | 365U / DUR366L / DUR368A / DUR368L / DUX60 |
| Dung cu可视veillance kinh可视veillance | Dau可视 ni long可视veillance可视 350 mm |
| Durog kinhDay ni long | 2,0 mm |
*. Dàu CAT ni long co the khong kha dung tuy thuoc vao khu vu c u tru cua ban.
LUU Y:
Danh cho DUB362
Trong moi truong nhiet do cao, may co the dung.
trong khi vanh dh o he thong bao vê cua may.
Ky hieu
Phàn duǒi dāy chō biét céc kí hieu có the duoc dung cho thiet bi. Dam bǎo rāng bàn hieu rǒ y nghia cua cac kí hieu nay truó khi su'dung.


Doc tali lieuu hóng dān.

Dégiānquycothuongtich,giu daydién tranh xakhoi chuong ngai vat.

Khong duoc de pin tiép xuc voi nuoc hoac mura.

A760H: 1nunnnnnnnae
- 10200000000000000000000000000000000000000000000000000000000000000000000
2020170:nnaa 2020170yauuunu 2020170yuaunu
| DUR364L / DUR365U / DUR366L / DUR368A / DUR368L / DUX60 | |
| ### | ### |
| ### | ### |
| ### | ### |
| ### | 350 mm |
| ### | 2.0 mm |
*
NNTB: DUB362
y
#
y

#
yhuHn76yuyu

waaanrnnnnaaannnnnnaaennnnn n

y

y

日

Li-ion
nnaeunnnnnaeennnnnne nnnnnnne nnnnnnnnne nnnnnnnnne nnnnnnnnne nnnnnnnnne nnnnnnnnne nnnnnnnnne nnnnnnnnne nnnnnnnnne nnnnnnnnne nnnnnnnnne nnnnnnnnne nnnnnnnnne nnnnnnnnne nnnnnnnnne nnnnnnnnne nnnnnnnnne nnnnnnnnnee nannnnnne nannnnnne nannnnnne nannnnnne nannnnnne nannnnnne nannnnnne nannnnnne nannnnnne nannnnnne nannnnnne nannnnnne nannnnnne nannnnnne nannnnnne nannnnnne nannnnnne nannnnnne nannnnnne nannnnnne nannnnnnee nannnnnne nannnnnne nannnnnne nannnnnne nannnnnne nannnnnne nannnnnne nannnnnne nannnnnne nannnnnne nannnnnne nannnnnne nannnnnne nannnnnne nannnnnne nannnnnne nannnnnne nannnnnne nannnnnne nenn
y
Www
- 1
- 1
- nauwwnnnaanannnnn nnnuuynnaanann
- 4
- 1
-
1uunununununun unununununununun uunununununun unununununun ununununun
- 1
- 1
- waiywnnnnayunnnnnnnaa nuaaannnna
- 1
- 1
- aynnnnnaaennn nn nnnnnnnnnnnnnnn
- 1nunnnnaaennnnnnnnnnnnnnnnnnnnnnnnnnnnnnnnnnnnnnnnnnnnnnnnnnnnnnnnnnnnnnnnnnnnnnnnnnnnnnnnnnnnnnnnnnnnnnnnnnnnnnnnnnnnnnnnnnnnnnnnnnnnnnnn
- 173aovv7n7nnuunnuuauu uulnauu
- 17
30.
y
- nuiuunnue 1uynnnnnae nn (1) uuuu (2) uuaa (3)
- nnnnnaanannnnaanennnnaaannnnnnaaannnnnnaaannnnnnaaannnnnnaaannnnnnaaannnnnnaaannnnnnaaannnnnnaaannnnnnaaannnnnnaaannnnnnaaannnnnnaaannnnnnaaannnnnnaaannnnnnaaannnnnnaaannnnnnaaannnnnnaaannnnnnaaannnnnnaaann
- nnaananaananaananaananaananaananaananaananaananaananaananaananaananaananaananaananaananaananaananaananaananaananaananaananaananaananaananaananaananaananaananaananaananaananaananaananaananaananaananaananaananaananaananaananaananaananaananaananaananaananaanaraannnnaa
5.
(1)
(2) 1
(3) 1
202017 202017 202017 202017 202017 202017 202017 202017 202017 202017 202017 202017 202017 202017 202017 2
y2y67n: nnnnnnnae nnne nnnnne ne nnnnne nnnnne nnnnne nnnnne nnnnne nnnnne nnnnne nnnnne nnnnne nnnnne nnnnne nnnnne nnnnne nnnnne nnnnne nnnnne nnnnne nnnnne nnnnne nnnnne nnnnne nnnnne nnnnne nnnnne nnnnne nnnnnee nnnnne nnnnne nnnnne nnnnne nnnnne nnnnne nnnnne nnnnne nnnnne nnnnne nnnnne nnnnne nnnnne nnnnne nnnnne nnnnne nnnnne nnnnne nnnnne nnnnne nnnnne nnnnne nnnnne nnnnne nnnnae
1.
1.
-
2
3: 1. 2. 3. -
1
- 4
27 17 77 77 77 77 77 77 77 77 77 77 77 77 77 77 77 77 77 77 77 77 77 77 77
H 1
HnHnHnHnHnHnHnHnHnHnHnHnHnHnHnHnHnHnHnHnHnHnHnHnHnHnHnHnHnHnHnHnHnHnHnHnHnHnHnHnHnHnHnHnHnHnHnHnHnHnH
HnHn: HnBwBnVnAnWnWnVnVnVnVnVnVnVnVnVnVnVnVnVnVnVnVnVnVnVnVnVnVnVnVnVnVnVnVnVnVnVnVnVnVnVnVnVnVnVnVnVnVnVnVnVnVnVnVnVnVn
yuuuunnnaa/nnnnae
1
nnaaannnnnae
1000000000000000000000000000000000000000000000000000000000000000
nnaaannnnnnaanennnne
100000000000000000000000000000000000000000000000000000000
nnaeannnnnne
Hnnaa Hnnae Hnnae Hnnae Hnnae Hnnae Hnnae Hnnae Hnnae Hnnae Hnnae Hnnae Hnnae Hnnae Hnnae Hnnae Hnnae Hnnae Hnnae Hnnae Hnnae Hnnae Hnnae Hnnae Hnnae Hnnae Hnnaee Hnnae Hnnae Hnnae Hnnae Hnnae Hnnae Hnnae Hnnae Hnnae Hnnae Hnnae Hnnae Hnnae Hnnae Hnnae Hnnae Hnnae Hnnae Hnnae Hnnae Hnnae Hnnae Hnnae Hnnae Hnnaae Hnnaae Hnnaae Hnnaae Hnnaae Hnnaae Hnnaae Hnnaae Hnnaae Hnnaae Hnnaae Hnnaae Hnnaae Hnnaae Hnnaae Hnnaae Hnnaae Hnnaae Hnnaae Hnnaae Hnnaae Hnnaae Hnnaae Hnnaae Hnnaae Hnnaee
Hnnnnaaannnnaananaananaananaananaananaananaananaananaananaananaananaananaananaananaananaananaananaananaananaananaananaananaananaananaananaananaananaananaananaananaananaananaananaananaananaananaananaananaananaananaananaananaananaananaananaananaananaananaananaananaanara anaa
| aanananaananaananaananaananaananaananaananaananaananaananaananaananaananaananaananaananaananaananaananaananaananaananaananaananaananaananaananaananaananaananaananaananaananaananaananaananaananaananaananaananaananaananaananaananaananaananaananaananaananaanaraananaananaananaananaananaananaananaananaananaananaananaananaananaananaananaananaananaananaananaananaananaananaananaananaananaananaananaananaananaananaananaananaananaananaananaananaananaananaananaananaananaananaananaananaananaananaananaananaananaanataaaaaaaaaaaaaaaaaaaaaaaaaaaaaaaaaaaaaaaaaaaaaaaaaaaaaaaaaaaaaaaaaaaaaaaaaaaaaaaaaaaaaaaaaaaaaaaaaaaaaaaaaaaaaaaaaaaaaaaaaaaaaaaaaaaaaaaaaaaaaaaaaaaaaaaaaaaaaaaaaaaaaaaaaaaaaaaaaaaaaaaaaaaaaaaaaaaaaaaaa aaaaaaaaaaaaaaaaaaaaaaaaaaaaaaaaaaaaaaaaaaaaaaaaaaaaaaaaaaaaaaaaaaaaaaaaaaaaaaaaaaaaaaaaaaaaaaaaaaaaaaaaaaaaaaaaaaaaaaaaaaaaaaaaaaaaaaaaaaaaaaaaaaaaaaaaaaaaaaaaaaaaaaaaaaaaaaaaaaaaaaaaaaaaaaaaaaaaaaaaaaaaaaaaaaaaaaaaaaaaaaaaaaaaaaaaaaaaaaaaaaaaaaaaaaaaaaaaaaaaaaaaaaaaaaaaaaaaaaaaaaaaaaaaaaaaaaaaaaaaaaaaaaaaaaaaaaaaaaaaaaaaaaaaaaaaaaaaaaaaaaaaaaaaaaaaaaaaaaaaaaaaaaaaaaaaaaaaaaaaaaaaaaaaaaaaaaaaaaaaaaataaaaaaaaaaaaaaaaaaaaaaaaaaaaaaaaaaaaaaaaaaaaaaaaaaaaaaaaaaaaaaaaaaaaaaaaaaaaaaaaaaaaaaaaaaaaaaaaaaaaaaaaaaaaaaaaaaaaaaaaaaaaaaaaaaaaaaaaaaaaaaaaaaaaaaaaaaaaaaaaaaaaaaaaaaaaaaaaaaaaaaaaaaaaaaaaaaaaa aaataaaaaaaaaaaaaaaaaaaaaaaaaaaaaaaaaaaaaaaaaaaaaaaaaaaaaaaaaaaaaaaaaaaaaaaaaaaaaaaaaaaaaaaaaaaaaaaaaaaaaaaaaaaaaaaaaaaaaaaaaaaaaaaaaaaaaaaaaaaaaaaaaaaaaaaaaaaaaaaaaaaaaaaaaaaaaaaaaaaaaaaaaaaaaaaaaaaaaaaaataaaaaaaaaaaaaaaaaaaaaaaaaaaaaaaaaaaaaaaaaaaaaaaaaaaaaaaaaaaaaaaaaaaaaaaaaaaaaaaaaaaaaaaaaaaaaaaaaaaaaaaaaaaaaaaaaaaaaaaaaaaaaaaaaaaaaaaaaaaaaaaaaaaaaaaaaaaaaaaaaaaaaaaaaaaaaaaaaaaaaaaaaaaaaaaaaaaaaataaaaaaaaaaaaaaaaaaaaaaaaaaaaaaaaaaaaaaaaaaaaaaaaaaaaaaaaaaaaaaaaaaaaaaaaaaaaaaaaaaaaaaaaaaaaaaaaaaaaaaaaaaaaaaaaaaaaaaaaaaaaaaaaaaaaaaaaaaaaaaaaaaaaaaaaaaaaaaaaaaaaaaaaaaaaaaaaaaaaaaaaaaaaaaaaaaaaaaatataaaaaaaaaaaaaaaaaaaaaaaaaaaaaaaaaaaaaaaaaaaaaaaaaaaaaaaaaaaaaaaaaaaaaaaaaaaaaaaaaaaaaaaaaaaaaaaaaaaaaaaaaaaaaaaaaaaaaaaaaaaaaaaaaaaaaaaaaaaaaaaaaaaaaaaaaaaaaaaaaaaaaaaaaaaaaaaaaaaaaaaaaaaaaaaaaaaaaagataataataataataataataataataataataataataataataataataataataataataataataataataataataataataataataataataataataataataataataataataataataataataataataataataataataataataataataataataataataataataataataataataataataataataataataataataataataataataataataataataataataataataataataataataataataataataataataataataataataataATAAA | |||
| maata | Makita | Makita | Makita |
| Makita | Makita | Makita | Makita |
| Makita | Makita | Makita | Makita |
| Makita | Makita | Makita | Makita |
| Makita | Makita | Makita | Makita |
| Makita | Makita | Makita | Makita |
| Makita | Makita | Makita | maki |
| Makita | Makita | Makita | Makita |
| Makita | Makita | Makita | Makita |
| Makita | Makita | Makita | Makita |
| Makita | Makita | Makita | Makita |
| Makita | Makita | Makita | Makita |
| Makita | Makta | Makita | Makita |
| Makita | Makta | Makita | Makita |
| Makita | Makta | Makita | Makita |
| Makita | Makta | Makita | Makita |
| Makita | Makta | Makita | Makita |
| Makita | Makta | Makita | Makita |
a
Aaiu 4s 4s Jus Jus Jus Jus Jus Jus Jus Jus Jus Jus Jus Jus Jus Jus Jus Jus Jus Jus Jus Jus Jus Jus Jus Jus Jus Jus Jus Jus Jus
12g 45 jis Jda Jn Jn Jn Jn Jn Jn Jn Jn Jn Jn Jn Jn Jn Jn Jn Jn Jn Jn Jn Jn Jn Jn Jn Jn Jn Jn Jn Jn Jn Jn Jn Jn Jn Jn Jn Jn Jn
J 1 J 1 J 1 J 1 J 1 J 1 J 1 J 1 J 1
1 3 2 golg 1 4
j 1 j 2 3 4 5 6 7 8 9 10
8 8 8 8 8 8 8 8 8 8 8 8 8 8
J 1 J 1 1 1 1 1 1 1 1 1 1 1 1 1 1 1 1 1 1 1 1 1 1 1 1 1 1 1 1 1 1 1 1 1 1 1 1 1 1 1 1
Saa jw g jg jy y glg y ggs a 1j 1 j 1 j 1 j 1 j 1 j 1 j 1 j 1 j 1 j 1 j 1 j 1 j 1 j 1 j 1 j 1 j 1 j 1 j 1 j 1 j 1 j 1 j 1 j 1 j 1 j 1 j 1 j 1 j 1 j 1 j 1 j 1 j 1 j 1 j
yjilolilaoyu
5 5
j0sla 1500000000000000000000000000000000000000000000000
2x - 6 = 2 + 2k , ,k z
1 36V(18Vx2)40V-36V
Laii j 4j
j 2000
jLjLs gl oSicuus LgJyog
aal aal alal alal alal alal alal alal
K
jai.1:16
.6
:17
aall aol alalal alalal alal alal
L
1.1:18
y gao ci hao icgao 4
bua
1:19
J
-
-
-
-
-
-
-
-
-
-
-
-
-
-
-
-
-
-
-
-
-
-
-
-
-
-
-
-
-
-
- 44.
-
-
-
-
-
-
-
-
-
-
-
-
-
-
-
-
-
-
-
-
-
-
-
-
-
-
-
-
-
y
a 1
a
j 1
a 1
()
A. 2 < 32 或 2 > 32
sio 18 aolal
1
aill piae aegaa aalall sll alg jai jil 1
dLw 2
L
jolal.2 1:20
3
.4
5
Sckssgall aodll slln yoll Sckssgall aodk
.
p# 3.21
36 40
gjz
y 1
yaiyaiyaiyaiyaiyaiyaiyaiyaiyaiyaiyaiyaiyaiyaiyaiyaiyaiyaiyaiyaiyaiyaiyaiyaiyaiyaiyaiyaiyaiyaiyaiyaiyaiyaiyaiyaiyaiyaiyaiyaiyaiyaiyaiyaiyaiyaiyaiyaiyaiy
yJyjN y jn jn Jn Jn .1:5Jn
olai plssualy dlll ciit pi ly laiy saaall oia paaa 4nii .
J 1:6
i 1
8
1
yolgolal yolal yolal yolal yolal yolal yolal yolal yolal yolal yolal yolal yolal yolal yolal yolal yolal yolal yolal yolal yolal yolal yolal yolal yolal yolal yolal yolal yolal yolal yolal yolal yolal yolal y
aai jn y aiaaiy 1 0s 1 0s 1 0s 1 0s 1 0s
y 1
1 2
#
g i aag g i hiaa jia 1000
#
aaii aaii aai iiaai iaaai aai iai iai
aagaaal aabla yg jy g aai baaasaaa aaln aal: jau 1 1 1 1 1 1 1 1 1 1 1 1 1 1 1 1 1 1 1 1 1 1 1 1 1 1 1 1 1 1 1 1 1 1 1 1 1 1 1 1 1 1 1 1 1 1 1 1
1 2
y 12 13
3 1yj 2j 4
yblbly aolal alal oolu
4yjzjjg jglj 1
(3)g(2)g(1)
A. 3 B. 2 C. 4 D. 5
A. ab B. " C. " D. "
jaii iia jia 15 auiy yaiy jaii s jia caii 3
jiaaiaiy gajgai jgsaai yjbsi
Jg
111111111111111111111111
aaii 1
yjyj 5
Jallll alaga alga y jy Jagil aljai 1
Jia: jai aiaa plaii yaiy iiai jiai (2)
ailll llog 1000000000000000
jollll jlll llll 3
a a
LjBbllgJyAiaa ggrgagssallolg j
1 6
(122°F)50°C
15
a
aaii jia jia jia jia jia jia jia jia jia jia jia jia jia jia jia jia jia jia jia jia jia jia jia jia jia jia jia jia jia jia jia jia jia jia jia jia jia jia jia jia jia jia jia jia jia jia jia jia jia jia j
a 9
alillll lllllllllllllllllllllllllllllllllllllllllllllllllllllllllllllllllll
.
j jlll llll llll llll
aill, ylll lal lal 1 jil 1
i j 1
y
gia gaii gaii gaii gaii gaii gaii 11
AaBbI 1
Laaee aiee eae ae aee
CBL = 210( 21)
Makita 1
y
J 1
Makita
J 1
yjdy
cJyJyJyJyJyJyJyJyJyJyJyJyJyJy
J 1
y
yjzjj jyj
a 1
jglalg 1g0jg jbjg jbjg jbjg jbjg
y j 1
aaii iiaai
a1jgl a12jna aaaal jji jgi 3
gi 1521 g1521 jn aaii aii 1521 g1521 aie 4
aill jilll jilll lglal 5
jie ayle jslai jiauae jie zhaie oiai 2.6
.
dallalil: gge j 1y dally bai, juiiui sui.7
Aa 1
Jai 8
-
-
-
-
-
-
-
-
-
-
-
-
-
-
-
-
-
-
-
-
-
-
-
-
-
-
-
-
-
-
-
-
-
- 9
-
-
-
-
-
-
-
-
-
-
-
-
-
-
-
-
-
-
-
-
-
-
-
-
-
-
-
-
-
-
-
-
Makita
10 > 3
Aaggi gge aegg jaii dali jalil jaii jaii 10
.
aagaa aaiy gaiy 11
Lagjla gai jg 1581
aalil 12
5.
p129 40000000000000000000000000000000000000000000000000
a
.52gll 1g jg gill isjglal
.0j 14
aiis 8 jiu guiuuiu 8 jiu uuiuuiuuiu 15
A
16
g 17
.
1g 18
19
20
j 21
.
j 22
.
4k > 0
DUB362 j
y
- 2x = 1 - 2x
J
p 100
JLai
1


jca 1ydybllybdaiaIg 8jbs jda
.
jaiy jieiyxuyjbjn

j 1