GIM 120 Professional - Multimeter BOSCH - Free user manual and instructions
Find the device manual for free GIM 120 Professional BOSCH in PDF.
Frequently Asked Questions - GIM 120 Professional BOSCH
User questions about GIM 120 Professional BOSCH
0 question about this device. Answer the ones you know or ask your own.
Ask a new question about this device
Download the instructions for your Multimeter in PDF format for free! Find your manual GIM 120 Professional - BOSCH and take your electronic device back in hand. On this page are published all the documents necessary for the use of your device. GIM 120 Professional by BOSCH.
USER MANUAL GIM 120 Professional BOSCH
mkOpHnHaHNOyNaTCTBO3a
pa60ta
sr Originalno uputstvo za rad
slzvirna navodila
hr Originalne upute za rad
All instructions must be read and observed. The safeguards integrated into the measuring tool may be compromised if the measuring tool is not used in accordance with these instructions. STORE THESE INSTRUCTIONS IN A SAFE PLACE.
Have the measuring tool serviced only by a qualified specialist using only original replacement parts. This will ensure that the safety of the measuring tool is maintained.
Do not use the measuring tool in explosive atmospheres which contain flammable liquids, gases or dust. Sparks may be produced inside the measuring tool, which can ignite dust or fumes.
Product Description and
Specifications
Please observe the illustrations at the beginning of this operat ing manual.
Intended Use
The measuring tool is intended for quick and precise measuring of inclines.
The measuring tool is suitable for indoor and outdoor use.
Product Features
The numbering of the product features shown refers to the illustration of the measuring tool on the graphic page.
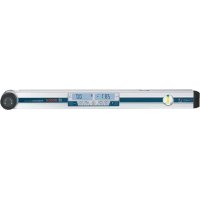
(1) Level for horizontal alignment
(2) Serial number
(3) Battery compartment cover
(4) Battery compartment cover locking mechanism
(5) Display
(6) Level for vertical alignment
(7) Audio signal button
(8) Button for changing the unit of measure
(9) On/off button
(10) Calibration button Cal
(11)Button Hold/Copy
(12) Protective bag
Display Elements
(a) Alignment aids
(b) Units of measure ^ %
160992A58M|(28.11.2019)BoschPowerTools
(c) Unit of measure mm/m
(d) Indicator H for saved value HOLD
(e) Measured value
(f) Battery indicator
(g) Indicator for audio signal
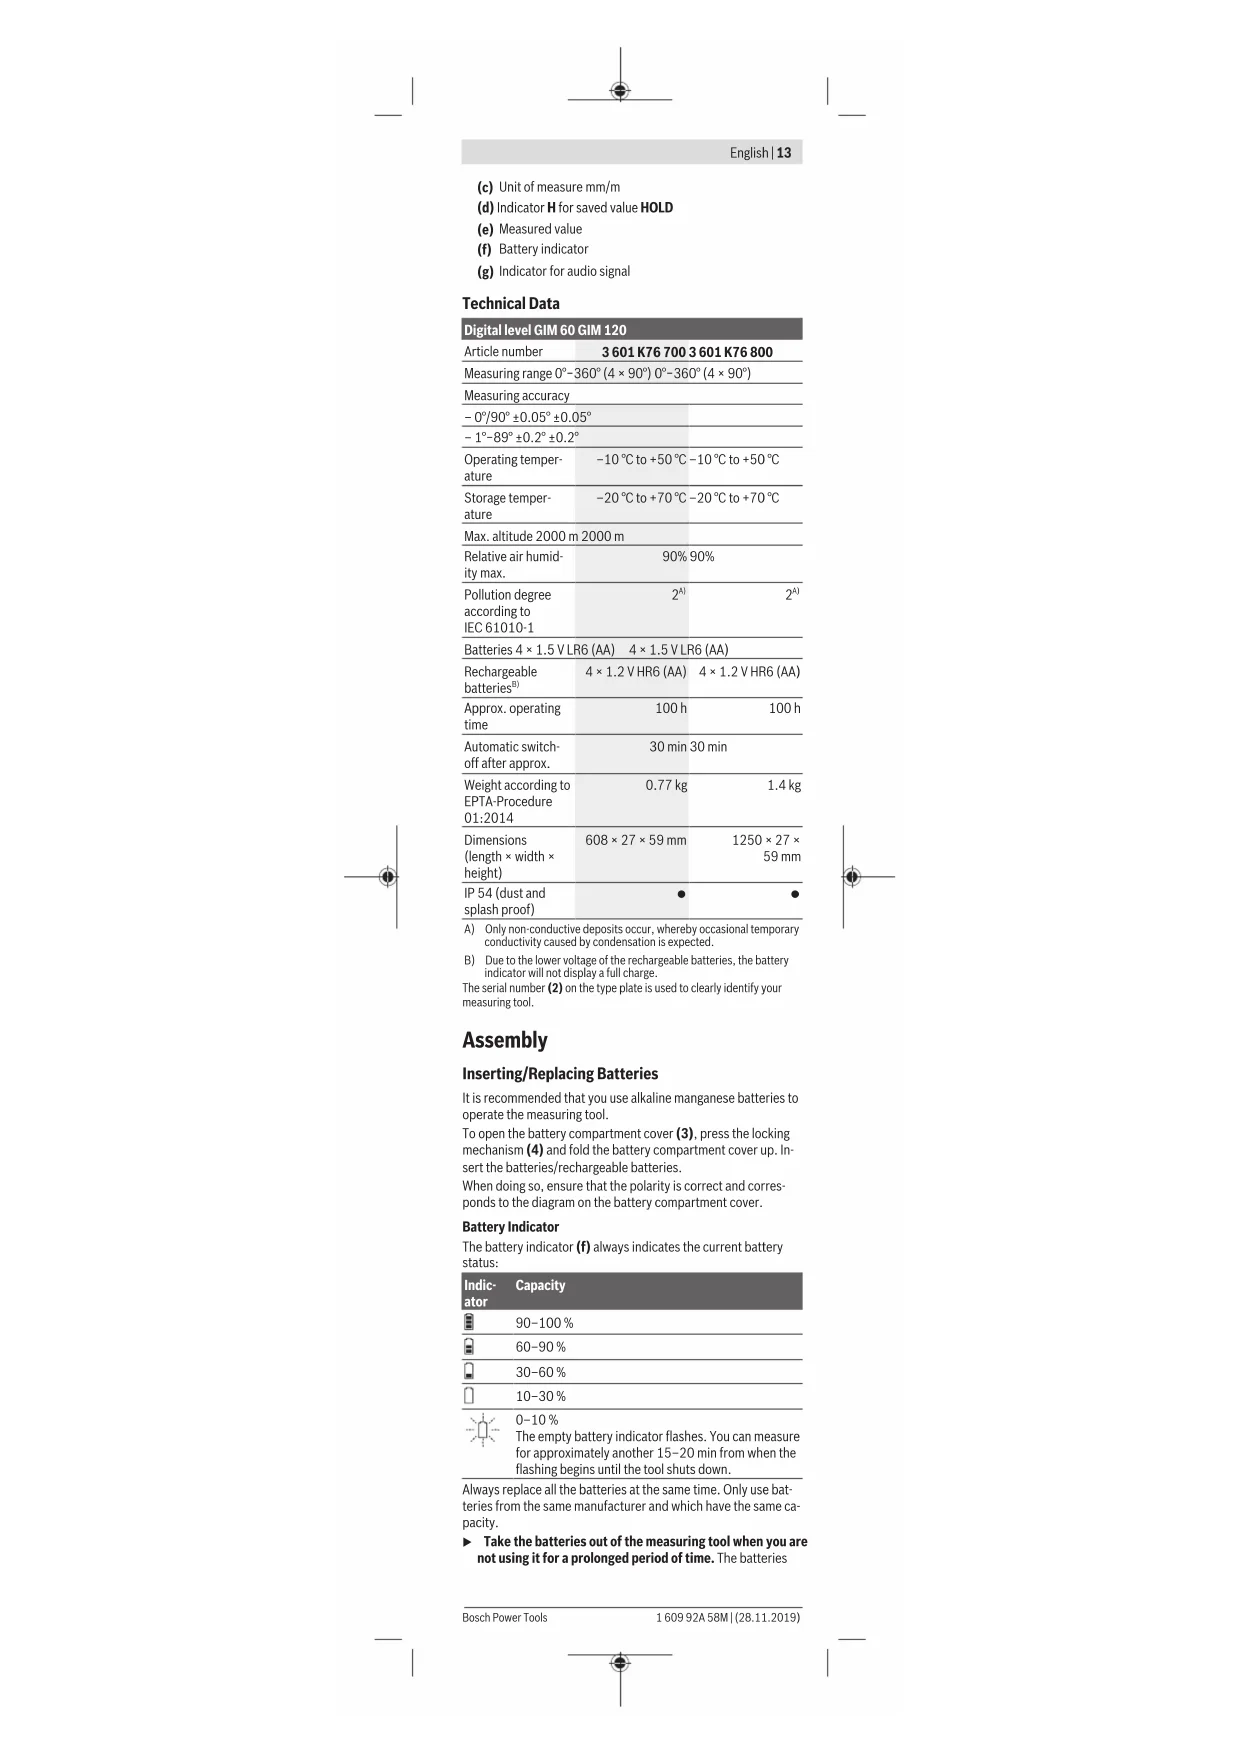
Technical Data
| Digital level GIM 60 GIM 120 | ||
| Article number | 3601 K76 700 3601 K76 800 | |
| Measuring range 0°-360° (4 × 90°) 0°-360° (4 × 90°) | ||
| Measuring accuracy | ||
| - 0°/90° ± 0.05° ± 0.05° | ||
| - 1°-89° ± 0.2° ± 0.2° | ||
| Operating temper- ature | -10°C to +50°C -10°C to +50°C | |
| Storage temper- ature | -20°C to +70°C -20°C to +70°C | |
| Max. altitude 2000 m 2000 m | ||
| Relative air humid- ity max. | 90% 90% | |
| Pollution degree according to IEC 61010-1 | 2A) | 2A) |
| Batteries 4 × 1.5 V LR6 (AA) 4 × 1.5 V LR6 (AA) | ||
| Rechargeable batteries(B) | 4 × 1.2 V HR6 (AA) | 4 × 1.2 V HR6 (AA) |
| Approx. operating time | 100 h | 100 h |
| Automatic switch- off after approx. | 30 min 30 min | |
| Weight according to EPTA-Procedure 01:2014 | 0.77 kg | 1.4 kg |
| Dimensions (length × width × height) | 608 × 27 × 59 mm | 1250 × 27 × 59 mm |
| IP 54 (dust and splash proof) | ● | ● |
A) Only non-conductive deposits occur, whereby occasional temporary conductivity caused by condensation is expected.
B) Due to the lower voltage of the rechargeable batteries, the battery indicator will not display a full charge.
The serial number (2) on the type plate is used to clearly identify your measuring tool.
Assembly
Inserting/Replacing Batteries
It is recommended that you use alkaline manganese batteries to operate the measuring tool.
To open the battery compartment cover (3), press the locking mechanism (4) and fold the battery compartment cover up. Insert the batteries/rechargeable batteries.
When doing so, ensure that the polarity is correct and corresponds to the diagram on the battery compartment cover.
Battery Indicator
The battery indicator (f) always indicates the current battery status:
| Indicator | Capacity |
| 0 | 90-100% |
| 1 | 60-90% |
| 2 | 30-60% |
| 3 | 10-30% |
| 4 | 0-10%The empty battery indicator flashes. You can measure for approximately another 15-20 min from when the flashing begins until the tool shuts down. |
Always replace all the batteries at the same time. Only use batteries from the same manufacturer and which have the same capacity.
Take the batteries out of the measuring tool when you are not using it for a prolonged period of time. The batteries
14|English
can corrode and self-discharge during prolonged storage in the measuring tool.
Operation
Starting Operation
Protect the measuring tool from moisture and direct sunlight.
Do not expose the measuring tool to any extreme temperatures or variations in temperature. For example, do not leave it in a car for extended periods of time. In case of large variations in temperature, allow the measuring tool to adjust to the ambient temperature before putting it into operation. The precision of the measuring tool may be compromised if exposed to extreme temperatures or variations in temperature.
- Keep the supporting surfaces and contact edges of the measuring tool clean. Protect the measuring tool against shock and impact. Dirt particles or deformations can lead to faulty measurements.
- Avoid hard knocks to the measuring tool or dropping it. Always carry out an accuracy check before continuing work if the measuring tool has been subjected to severe external influences (see "Accuracy Check and Calibration of the Measuring Tool", page 15).
Switching On and Off
To switch the measuring tool on or off, press the on/off button (9).
If no button on the measuring tool is pressed for approx. 30 min or the grade of the measuring tool is not changed by more than 1.5^ , then grade measurement and the display are automatically switched off to save the batteries.
Changing the Measuring Unit (see figure A)
You can change between the units of measure n% , n% and "mm/m" at any time. For this, press the button for changing the unit of measure (8) as many times as needed for the required unit of measure to be displayed in the indicator (c) or (b). The current measured value (e) will be automatically converted.
The unit-of-measure setting is retained when switching the measuring tool on or off.
Switching the Audio Signal On and Off
The audio signal can be switched on or off with the audio signal button (7). When the audio signal is switched on, the indicator for the audio signal (g) appears in the display.
When you switch on the measuring tool, the audio signal is switched on as standard.
Measured Value Indicator and Alignment Aids
With each movement of the measuring tool, the measured value (e) is updated. If the measuring tool has been moved significantly, wait until the measured value no longer changes before taking note of the value.
Depending on the position of the measuring tool, the measured value and the unit of measure are indicated in the display rotated by 180^ . Thus, the indicator can also be read when working overhead.
The measuring tool uses alignment aids (a) on the display to show in which direction it has to be tilted in order to reach the target value. In standard measurements the target value is the horizontal or vertical, in the Hold/Copy function it is the stored measuring value.
If the target value is reached, the arrows for the alignment aids (a) go out and, provided the audio signal is switched on, a continuous audio signal will be played.
Measuring Functions
Holding/Copying a Measured Value
With the button Hold/Copy (11), two functions can be controlled:
Hold a measured value, even if the measuring tool is subsequently moved (e.g. because the measuring tool is in a position in which the display is difficult to read);
- Copy a measured value.
Hold function:
- Briefly press the button Hold/Copy (11). The current measured value (e) is held on the display and stored, and the indicator H flashes.
- Press the button Hold/Copy (11) again to end the hold function. The stored value is deleted. Normal measurement is continued.
Copy function:
Press and hold the button Hold/Copy (11). The current measuring value (e) is copied and the indicator H is shown continuously on the display.
- Briefly press the button Hold/Copy (11). The stored measuring value (e) is shown on the display and the indicator H flashes.
- Place the measuring tool in the location to which the measured value is to be transferred. When doing so, the alignment of the measuring tool is irrelevant. The alignment aids (a) show which direction the measuring tool has to be moved in to reach the grade you want to copy. When the stored grade is reached, an audio signal sounds and the alignment aids (a) go out.
- Briefly press the button Hold/Copy (11) again to return to normal measurement. The indicator H is shown continuously on the display.
- Press and hold the button Hold/Copy (11) to save a new value.
To delete a hold value, briefly press the on/off button (9).
Accuracy Check and Calibration of the Measuring Tool
Checking the Measuring Accuracy (see figure B)
Check the accuracy of the measuring tool prior to critical measurements, after intense variations in temperature as well as after heavy impact.
Before measuring grades < 45^ , the accuracy check should take place on a level and roughly horizontal surface; before measuring grades >45^ , on a level and roughly vertical surface.
Switch on the measuring tool and place it on the horizontal/vertical surface.
Select the measuring unit ^ (see "Changing the Measuring Unit (see figure A), page 14).
Wait for ten seconds and note down the measured value.
Rotate the measuring tool by 180^ around its vertical axis. Wait again for ten seconds and note down the second measured value.
- Calibrate the measuring tool only when the difference between both measured values is greater than 0.1^ .
Calibrate the measuring tool in the position (vertical or horizontal), in which the difference of the measured values has been determined.
Calibration for Horizontal Surfaces (see figure C)
The surface onto which you place the measuring tool must not deviate from the horizontal surface by more than 5^ . If the deviation is greater, the calibration process is discontinued with the indicator ---.
① Switch on the measuring tool and position it on the horizontal surface so that the spirit level for horizontal alignment (1) faces upwards and the display (5) faces you. Wait for ten seconds.
② Then press the calibration button Cal (10) for approx. two seconds until CAL1 appears briefly on the display. Then the measured value will flash on the display.
③ Turn the measuring tool 180^ around the vertical axis so that the spirit level still faces upwards but the display (5) is facing away from you. Wait for ten seconds.
Then press the calibration button Cal (10) again. CAL2 will be shown briefly on the display. Then the measured value (no longer flashing) will appear on the display. The measuring tool has now been recalibrated for this supporting surface.
⑤ Afterwards you must calibrate the measuring tool for the opposite surface. Rotate the measuring tool around the horizontal axis so that the spirit level for horizontal alignment (1) faces downwards and the display (5) faces you. Place the measuring tool on the horizontal surface. Wait for ten seconds.
6 Then press the calibration button Cal (10) for approx. two seconds until CAL1 appears briefly on the display. Then the measured value will flash on the display.
Turn the measuring tool 180^ around the vertical axis so that the spirit level still faces downwards but the display (5) is facing away from you. Wait for ten seconds.
Then press the calibration button Cal (10) again. CAL2 will be shown briefly on the display. Then the measured value (no longer flashing) will appear on the display. The measuring tool has now been recalibrated for both horizontal supporting surfaces.
16 | English
Note: If the measuring tool is not turned around the axis shown in the figure in steps ③ and ⑦, then the calibration cannot be completed (CAL2 is not indicated in the display).
Calibration for Vertical Surfaces (see figure D)
The surface onto which you place the measuring tool must not deviate from the vertical surface by more than 5^ . If the deviation is greater, the calibration process is discontinued with the indicator ---.
① Switch on the measuring tool and position it on the vertical surface so that the spirit level for vertical alignment (6) faces upwards and the display (5) faces you. Wait for ten seconds.
Then press the calibration button Cal (10) for approx. two seconds until CAL1 appears briefly on the display. Then the measured value will flash on the display.
③ Turn the measuring tool 180^ around the vertical axis so that the spirit level still faces upwards but the display (5) is facing away from you. Wait for ten seconds.
④ Then press the calibration button Cal (10) again. CAL2 will be shown briefly on the display. Then the measured value (no longer flashing) will appear on the display. The measuring tool has now been recalibrated for this sup-. porting surface.
⑤ Afterwards you must calibrate the measuring tool for the opposite surface. Rotate the measuring tool around the horizontal axis so that the spirit level for vertical alignment (6) faces downwards and the display (5) faces you. Place the measuring tool against the vertical surface. Wait for ten seconds.
Then press the calibration button Cal (10) for approx. two seconds until CAL1 appears briefly on the display. Then the measured value will flash on the display.
Turn the measuring tool 180^ around the vertical axis so that the spirit level still faces downwards but the display (5) is facing away from you. Wait for ten seconds.
Then press the calibration button Cal (10) again. CAL2 will be shown briefly on the display. Then the measured value (no longer flashing) will appear on the display. The measuring tool has now been recalibrated for both vertical supporting surfaces.
Note: If the measuring tool is not turned around the axis shown in the figure in steps ③ and ⑦, then the calibration cannot be completed (CAL2 is not indicated in the display).
Maintenance and Service
Maintenance and Cleaning
Keep the measuring tool clean at all times.
Never immerse the measuring tool in water or other liquids. Wipe off any dirt using a damp, soft cloth. Do not use any detergents or solvents.
When the measuring tool is exposed to rain for an extended period, its function may be impaired. However, after completely drying off, the measuring tool is ready for operation. No calibration is required.
Only store and transport the measuring tool in the protective bag (12).
If the measuring tool needs to be repaired, send it off in the protective bag (12).
After-Sales Service and Application Service
Our after-sales service responds to your questions concerning maintenance and repair of your product as well as spare parts. You can find explosion drawings and information on spare parts at: www.bosch-pt.com
The Bosch product use advice team will be happy to help you with any questions about our products and their accessories. In all correspondence and spare parts orders, please always include the 10-digit article number given on the nameplate of the product.
Cambodia
Robert Bosch (Cambodia) Co., Ltd
Unit 8BC, GT Tower, 08th Floor, Street 169
Czechoslovakia Blvd, Sangkat Veal Vong
Khan 7 Makara,Phnom Penh
VAT TIN: 100 169 511
Tel.: +855 23 900 685
Tel.: +855 23 900 660
www.bosch.com.kh
People's Republic of China
China Mainland
Bosch Power Tool (China) Co. Ltd.
Bosch Service Center
567, Bin Kang Road
Bin Kang District
Hangzhou, Zhejiang Province
China 310052
Tel.: (0571) 8887 5566/5588
Fax: (0571) 88876688 x 5566# / 5588#
E-Mail: bsc.hz@cn.bosch.com
www.bosch-pt.com.cn
HK and Macau Special Administrative Regions
Robert Bosch Co. Ltd.
Flat B, 2/F, Yeung Yiu Chung No. 6 Industrial Building,
19 Cheung Shun Street
Cheung Sha Wan
Kowloon, Hong Kong
Customer Service Hotline: +852 2101 0235
Fax:+85225909762
E-Mail: info@hk.bosch.com
www.bosch-pt.com.hk
India
Bosch Service Center
69, Habibullah Road, (Next to PSBB School), T. Nagar
Chennai-600077
Phone: (044) 64561816
Bosch Service Center
- Community Center
Phase 1, Mayapur
New Delhi-110064
Phone: (011) 43166190
Indonesia
PT Robert Bosch
Palma Tower 10th Floor
Jalan RA Kartini II-S Kaveling 6
Pondok Pinang, Kebayoran Lama
Robert Bosch Middle East FZE - Pakistan Liaison Office
2nd Floor Plaza # 10, CCA Block, DHA Phase 5
Lahore, 54810
Phone:+92(303)4444311
Email: Faisal.Khan@bosch.com
Philippines
Robert Bosch, Inc.
28th Floor Fort Legend Towers,
3rd Avenue corner 31st Street,
Fort Bonifacio, Global City
1634 Taguig City
Tel.: (632) 8703871
Fax: (632) 8703870
www.bosch-pt.com.ph
Singapore
Powerwell Service Centre Ptd Ltd
Bosch Authorised Service Centre (Power Tools)
4012 Ang Mo Kio Ave 10, #01-02 TECHplace
Singapore 569628
Tel.: 6452 1770
Fax:64521760
E-Mail: ask@powerwellsc.com
www.powerwellsc.com
www.bosch-pt.com.sg
Thailand
Robert Bosch Ltd.
FYI Center Tower 1, 5th Floor
2525 Rama IV Road, Klongtoei,
Bangkok 10110
Tel.:020128888
18|English
Fax: 02 0645802
www.bosch.co.th
Bosch Service - Training Centre
La Salle Tower Ground Floor Unit No.2
10/11 La Salle Moo 16
Srinakharin Road
Bangkaew, Bang Plee
Samutprakarn 10540
Tel.: 027587555
Fax:027587525
Vietnam
Branch of Bosch Vietnam Co., Ltd in HCMC
14th floor, Deutsches Haus, 33 Le Duan
Ben Nghe Ward, District 1, Ho Chi Minh City
Tel.: (028) 6258
Fax: (028) 62583692 - 62583694
Hotline: (028) 6250 8555
Email: tuvankhachhang-pt@vn.bosch.com
www.bosch-pt.com.vn
Bahrain
EA Juffali and Brothers for Technical Equipment Company.
Kingdom of Bahrain, Al Aker - Block 0624 - Road 2403 - Build-
ing 0055D
Phone:+97317704537
Fax:+973177045257
Email: h.berjas@eajb.com.sa
Egypt
RBEG-LLC
22 Kamal Eldin Hussein
Sheraton Heliopolis
11799 Cairo
E-mail: boschegypit.powertools@eg.bosch.com
Iran
Robert Bosch Iran
3rd Floor, No 3, Maadiran Building
Aftab St., Khodami St., Vanak Sq.
Tehran 1994834571
Phone: +9821-86092057
Iraq
Sahba Technology Group
Al Muthana airport road
Baghdad
Phone Bagdad: +964 (0) 7 901 930366
PhoneDubai:+971(0)44221898
Email: duraid@sahbatechnology.com
Jordan
Roots Arabia-Jordan
Al-Hurriyah Street, Al-Muqabalein
Amman 11623, Jordan
P.O.Box:110068
Tel.:+96264398990
E-mail: bosch@rootsjordan.com
Kuwait
Shuwaikh Industrial Area, Block 1, Plot 16, Street 3rd
P.O.Box 164-Safat 13002
Phone: +965-24968888
Fax:+965-24810879
E-mail: josephkr@aaalmutawa.com
Lebanon
Tehini Hana & Co. S.A.R.L.
P.O.Box 90-449
Jdeideh 1202 2040
Dora-Beirut
Phone: +9611255211
Email: service-pt@tehini-hana.com
Libya
El Naser for Workshop Tools
Swanee Road, Alfalah Area
Tripoli
Phone: +218 21 4811184
Oman
Malatan Trading & Contracting LLC
P.O.Box 131, Ruwi, Muscat
Postal Code: 112, Sultanate of Oman
Phone:+96824794035/4089/4901
Mob:+968-91315465
Fax: +968 2479 4058
E-Mail: sudhirkumar@malatan.net
Qatar
International Construction Solutions WLL
P.O.Box 51Doha
Phone:+97440065458
Fax:+97444538585
Email: csd@icsdoha.com
Saudi Arabia
Juffali Technical Equipment Co. (JTECO)
P.O.Box:1049-Jeddah 21431-KSA
Jeddah:00966(0)126920770-Ext433
Riyadh:00966 (0)114093976-Ext-30/34/39
Dammam:00966(0)138339565
E-mail: M.Zreik@eajb.com.sa
Syria
Dallal Establishment for Power Tools
Damascus. Baramkeh street - Ibn Amer street,
Phone: +963112241006 or 009631122414009
Mobile:00963991141005
Email: rita.dallal@hotmail.com
United Arab Emirates
Central Motors & Equipment,
P.O.Box 26255Dubai
Dubai:00971(0)43090920/3090930
Abu Dhabi:00971 (0) 24017745
Sharjah: 00971 (0) 65932777
Al Ain:00971(0)37157419
E-Mail: Mallappa.Madari@centralmotors.ae
Yemen
Abu Alrejal Trading Corporation
P.O.Box:17024Zubeiry St.
Sana'a, Yemen
Tel: +967-1-20 20 10
Fax:+967-1-471917
E-mail: tech-tools@abualrejal.com/yahya@abualrejal.com
Ethiopia
Forever plc
Kebele 2,754BP 4806
Addis Ababa
Phone: +251 111 560 600
Email:foreverplc@ethionet.et
Ghana
Robert Bosch Ghana Limited
21 Kofi Annan Road Airport Residential Area Accra
Tel. +233 (0)3027 94616
Kenya
Robert Bosch East Africa Ltd
Mpaka Road P.O.Box 856
00606 Nairobi
Nigeria
Robert Bosch Nigeria Ltd.
52-54 Isaac John Street P.O. Box
GRA Ikeja-Lagos
Tanzania
Diesel & Autoelectric Service Ltd.
117 Nyerere Rd., P.O. Box 70839
Vingunguti 12109, Dar Es Salaam
Phone: +255 222 861 793/794
Australia, New Zealand and Pacific Islands
Robert Bosch Australia Pty. Ltd.
Power Tools
Locked Bag 66
Clayton South VIC 3169
Customer Contact Center
Inside Australia:
Phone: (01300) 307044
Fax: (01300) 307045
Inside New Zealand:
Phone: (0800) 543353
Fax: (0800) 428570
Outside AU and NZ:
Phone: +61 3 95415555
www.bosch-pt.com.au
www.bosch-pt.co.nz
Great Britain
Robert Bosch Ltd. (B.S.C.)
P.O.Box 98
Broadwater Park
North Orbital Road
Denham Uxbridge
UB95HJ
20 | Français
At www.bosch-pt.co.uk you can order spare parts or arrange the collection of a product in need of servicing or repair.
Tel. Service: (0344) 7360109
E-Mail: boschservicecentre@bosch.com
Ireland
Origo Ltd.
Unit 23 Magna Drive
Magna Business Park
City West
Dublin 24
Tel. Service: (01) 4666700
Fax: (01) 4666888
Republic of South Africa
Customer service
Hotline: (011) 6519600
Gauteng - BSC Service Centre
35 Roper Street, New Centre
Johannesburg
Tel.: (011) 4939375
Fax: (011) 4930126
E-Mail: bsctools
KZN - BSC Service Centre
Unit E, Almar Centre
143 Crompton Street
Pinetown
Tel.: (031) 7012120
Fax: (031) 7012446
E-Mail: bsc.dur@za.bosch.com
Western Cape - BSC Service Centre
Democracy Way, Prosperity Park
Milnerton
Tel.: (021) 551
Fax: (021) 5513223
E-Mail: bsc@zsd.co.za
Bosch Headquarters
Midrand, Gauteng
Tel.: (011) 6519600
Fax: (011) 6519880
E-Mail: rbsa-hq.pts@za.bosch.com
Armenia, Azerbaijan, Georgia
Robert Bosch Ltd.
David Agmashenebeli ave. 61
0102 Tbilisi, Georgia
Tel. +99532251007
www.bosch.com
Kyrgyzstan, Mongolia, Tajikistan, Turkmenistan, Uzbekistan
TOO "Robert Bosch" Power Tools, After Sales Service
Muratbaev Ave., 180
050012, Almaty, Kazakhstan
Service Email: service.pt.ka@bosch.com
Official Website: www.bosch.com, www.bosch-pt.com
Disposal
Measuring tools, battery packs/batteries, accessories and packaging should be sorted for environmentally friendly recycling.

Do not dispose of the measuring tools or rechargeable/non-rechargeable batteries with household waste.
Only for EU countries:
According to the Directive 2012/19/EU, measuring tools that are no longer usable, and according to the Directive 2006/66/EC, defective or used battery packs/batteries, must be collected separately and disposed of in an environmentally correct manner.
Français
Robert Bosch Morocco SARL
53, Rue Lieutenant Mahroud Mohamed
20300 Casablanca
Tel.: +212 5 29 31 43 27
E-Mail: sav.outillage@ma.bosch.com
Tunisia
Robert Bosch Tunisia SARL
Robert Bosch (France) S.A.S.
Robert Bosch Argentina Industrial S.A.
Calle Blanco Encalada 250 - San Isidro
B1642AMQ
Calle Robert Bosch No. 405
C.P. 50071 Zona Industrial, Toluca - Estado de Mexico
Tel.: (52) 55 528430-62
Tel.: 800 6271286
Bosch Service Center
Telegrafvej 3
2750 Ballerup
Danmark
Tel.: (08) 7501820 (inom Sverige)
Fax: (011) 187691
Avfallshantering
60-90%
30-60%
10-30%

0-10%
Robert Bosch Sp. z o.o.
Kpntepnn ppeDnBbIX COCTOHHN
- noBpeKdien KOpNc n3eInn
TNn nepnoHNUHOCTb texHueCKoro 06cnyKHBaHHN
PeKOMEHyETCAOHTb HHTCPymENT OT bIIN NOCNE KAKDORIOCNIOB3OBAHNA.
Xpahene
-Heo6xOJIMO xpaHb B cyXOM MeCTe
HeoXMO XpaHnB BdaH NOT HcTOHHKOB NObblueHHbx Temepatyp H03deHCTBn COHNeHHbx Nyey
- npx xpaenHH Heo6xodHMO n3beratb pe3koro nepenada temnepatyp
-ecnHHTPYMNET NOCTABNRETCB MRTKOYCMKE ININIINACTKOBOM KEIEPEKOMENyETCR XPAHHTb HNCTpyMENT B3OT 3aUHTHOYNAKOBKE
noDpo6hIe Tpe6OBaHHK yCNOBnM XpaHEnn CmOTpHTe B FOCT 15150 (YcNoBne 1)
TpaHcnpTnpOBka
Kateropnueckn He donyckaetcnae Hniobble MexaHueckne BO3dienCTBn HA ynakobky npn TpaHcnoptnpoBke
- np4aarp3ke/norp3ke he donpycaetae tsncnbl0baHme IIO6O BMD taexHHKn, paobotaouen no npHHmny 3aKmna ynakOBKN
- nIopOBHbIe TbeT6pOBAHHaY KcNobINMTrAPCHNOPHTOBKmCMOTPnE B OCT1510Y (ycOBNE 5)
Yka3aHnno TexHnke 6e30naCHOCTN

IpouHTaHrE H BbInONHnAte BCE yka3AHn. McNoJIb3OBAHnE hMmepHTenBHOrO HHCTpyMEnTHeBE CooBTcETNCHC HAOFTAUMNHyKA3AHnMMYpeBaTO NOBpKdEHem HHTerPnpoBaHHbIX3aUHTbX MEXAHNMOB.IPOXANYCTA.HADEXKHO XPAHNTE 3TN YkA3AHN.
Pemont H3MepHTenbHoro HHCTpymeHa pa3peuaeTcBblONHrtb TOnbKO KaANPHUPOBAHOMy nepcoany NTObKO C HcNtob3OBAHmOpHnHahbHix 3aIaCteH.3TNM oBeceNuBaTeCbe3onacHOCTb H3MepHTenbHorOHHCTpymeHa.
HepaobotaTe Cn3MepntbHbIM HcTpyMeHOM Bo B3pblBOONACHO CPede,N6hN3oCtN TO rpoUHX XHKoCTe,ra3OB HbIIN.Bn3MepHTeBHom HcTpyMeHE MOYr 06pa3oBAtcBcNCKpbI,OTKOTOpBXMOXETBOCNMaENHtCB NbIbNnnapbI.
Onncahne npoodykta uycnyr
Pojanycta,cobniaTe nnIOCTpaunB Hauane pykoBocTBa no 3Kcnnyatau.
(10)KhoNkaKaIIN6pOBKnCal
(11) Khonka Hold/Copy
(12) 3aunTHbIy qexON
3nememtbl Hndkaun
(a) BCnOMORAeIbHbIe CpeIcTBA IINBbIePKN
(b) EHNHHUbI n3MepeHnra%
(c) EHNHnIbI hMpeHnI M/M
(d) INHIMKaTOp H coXpaHEnHOro 3HaueHnH HOLD
(e)ИзмеренhoeЗнautheпene
(f) INdikatop 3apra da 6atape
(g) INdikatop 3BvkoBOrO cnHana
TexHHueckne daHhble
| Lizφroboy укноюмер | GIM 60 GIM 120 | |
| Артыковский нomer | 3601 K76 700 3601 K76 800 | |
| Диапазон Изөрeme- ня | 0°-360° (4 × 90°) 0°-360° (4 × 90°) | |
| Точность Изөрemeи | ||
| -Yглы 0° и 90° ±0,05° ±0,05° | ||
| -1°-89° ±0,2° ±0,2° | ||
| Раобая Temпөра- тура | -10°C ... +50°C -10°C ... +50°C | |
| Temпөретаура харени | -20°C ... +70°C -20°C ... +70°C | |
| Мамс. Вс钓ota рimi- menеня над pe- néрнοй Вс钓отоя | 2000 M 2000 M | |
| Отно烛ельья влажhoeст boздаха неборе | 90% 90% | |
| Стелен bаггален- ностс соглесно IEC 61010-1 | 2A) | 2A) |
| Батарен 4 × 1,5 B LR6 (AA) 4 × 1,5 B LR6 (AA) | ||
| Аkkуллары(B) | 4 × 1,2 B HR6 (AA) 4 × 1,2 B HR6 (AA) | |
| В記錄 равoti ok. 100 у 100 у | ||
| Автораческо вълоченье чered прибл. | 30 мин. | 30 мин. |
| Маса соглесно ЕТА-Procedure 01:2014 | 0,77 кr | 1,4 кr |
| Разmersы (длиа × ширниха × вс钓ota) | 608 × 27 × 59 MM 1250 × 27 × 59 MM | |
100|Pycckn
Bcerda 3ameHnre Bce 6atapeKn/AkKymnTOpHbIe 6atape OdoHpEmHo. IcnoNt3yIte TolbKO 6atapeKn/AkKymnTOp HbIe 6atape OndHOro pOn3BODmTeIe N cOdnAkoB omKoCTbIO.
H3BneKaIe 6aTapeH HnH AKKyMnyTOpbI H3 H3MePHTeBHO HNCTPymE, ECnn PpOdoNkTHenBHe BpeM He 6yDete pa6oTaB c Hm. Pnp DnITeBHom XpaHEnH N H3MePHTeBOM HNCTPymEte BO3MOXHa Kopp03Hn Camop3paRJa Ka 6aTapeek n AKKyMnyTOpob.
Pa60Ta CnHCTpyMeHTOM
Bknouhene 3neKtponHctpymEnTa
3aunaaTe K3mepeHbHn HnctpyMeT OT Bnarn n npMbx CONHeuHbNnyeH.
HeNoDBePraIte H3MePHTenbHbI HNCTpyMeT B03dE-CTBHO 3KCTpeMaIbHbIX TEMNEpATyHbIX nepenapADOB. HanmpME,HeOCTaJIrTeeroHaJINtBhoE BPEMBA BTOMoBnIE.PIN3HaHTPeHbIX KONE6AHINX TEMepATyPi NEPeI HaQaONM HcIOJIb3OBOAHINa DaTE TEMpePApyPe I3MePHTENBOHO HNCTpyMeHTA CTaBHNI3HPOBaTc.B.3KcTpeMaIbHbIX TEMpePATyPi HTEMepATyPi bne nepenadBo MOYrTO pRnUaTeHNBO BnHrTa HToOHCTb H3MePHTenbHO HNCTpyMeHTA
CodepkHTeB HCTOTE NOBepxHOCTH KpOMKn npHneraHHN3MepHTENBOH NHTCPYMEHa. BepeHTHe N3MepTHbHbH NHTCPYMEHT OOTPCTCEHN HnyapOB. 3aqr3HEHNN DEOpMAuN MOY TPNBEcTN KHKCAKEHNR M3MepeHHN.
H36eAHTe CnBbHX ToNkOB HnadeHHa3MePHTbHOHRHcHPTyMHTA. Pocne CnBbHX BHEUHXB03dEChTBn HA H3-MeHTeBnHnHCTPYMTe PEKOMEHdyTC nPoBePHTb ETOHOCb, npExde Yem npOdoKATp aBoTatb CnHCTpyMToT (CM.KoTHPOBtTOHOCTN KAIb6PbKA H3MePHTbHOrHO HcHPTyMHTA, CtpaHnua 102).
KoHTpOJIb TOnHOCTH N3MepeHHA (CM.pHC.B)
PnoBepaTe TOUHOCTb H3MEpHTbHOrO HnCTpyMeHTa nepeI npOBeHNHeM BaxHBx H3MEpHEN, NOcE 3HaHTeBbHx nepaNADoB TMnEPaTpyH cINbHbIX TOnKOB.
NpeH3MpeHem yrnoB hakNoHa < 45^ nHCTpyMeHT cIeYET npOBePTb HnIOCKoR, FOP3HOHTaBHO (NO B03MOXHOCTH) NOBExHOCTH, a nepE H3MpeHem yrnoB hakNoHa >45^ - Ha BEpTHKAbHOH (NO B03MOXHOCTH) NOBExHOCTH.
BKnIOUHTHe H3MpeHTebHbH NHCPTyMeHT H npNIOXHe erO K rOpH3OHTaJIbHOH HIN BEpTHKaIbHOH NOEbpXHOCTH.
Bb6epHte eHNHnUy n3MepeHHn° (cm. .CMeHa eHNHnUby n3MepeHHn (cm. pnc.A), CtpaHnua 101).
Ndojxnte 10cn3aHnHne HmpeHnoe 3auHne.
NoepHnTe NmepHTBnHnHCTpyMeHT (KAK NOkA3aHO Ha pCynHe)Ha 180° BOKpyr BeptnkabHo OHn. CHOba Ndojxnte 10cn3aHnHne BTPOE MHepeHnoe 3auHne.
H3mpeHbIbn HhNCTpyMeHTOnJxHek6blTbOkAnH6pBoaH,ToJIbKecn pa3HuaMexyO60HMn H3mepeHHbIM3HaueHNMa npeBIIaet 1,0^
Kanib6Pboka npo3B0DTCB TOM NONOJEXHIN N3MEpHTenBHorO HNCTpymETA (rpoH3OTaIbHOH IN BEPTKANbHO), B KOTOPOM 6bJaYcTahOBHeA pAnHnuaM3peHIn.
Kan6poBkA roPn3oHTaNbHbIX nobepxHOCTe npneraHn (cm.phc.C)
Nobepxhoctb,HaKOTopyyUcTahabnBaTaCn3MpeHteBbHIn HnCTpymHTE,HeDIOXKAHOtIOHbTCoT OTOpH3OHTAN60one 4em Ha5°.EcnNtIOKOnEHne60JIbue,KaIIb6pOBKa npekpaata cHnIcINneeOToOpbaKaTeC-
① BkIOUHTNE H3MEpIeNbHbI HnCTpyMeHn I NOOxHteeroHa rOpH3OHaIbHy NOBepXHOCTb TaK,YTObBaTbePnacDnA BbIEpKn No rOpH3OHaIbI(1)6bnOpaueHnaBepx,aDCnHne(5)-K Bam.NoOxHte10c.
23atm np6bn.2c haxkmaHte KKHONky KaNb6pOBKn Cal(10),noka Ha dnCnnee KOPOTKO HE 0TO6pa3HTCA CAL1. Nocne 3TOHO HnCnnee Mraet HAmepeHHoe 3HAueHne.
③ NObepHnTe H3MePHTeBbHbI HcTpymEn Ha 180° BOKyprBtKeKAnbHbO cN, T0b6b TaBepeac No-npexkHemc CMOTpen BBEx,HO dCnIe (5) T0b6b HaxoHnrc Ha npotOBnONOxHKnO t BC aTcPoHe. IIOaQnTe 10 C.
④ Eue pa3 haxmnte KhoNkY kaHb6pOBN Cal (10). Ha nCnnee KOPOKTO OTo6pa3NTc CAL. Iocne 3toTNO HMepeHHoe 3aHaeNe OTo6paKaTeC Ha nCnnee (yke He MnraJ). Tenepb HMepeIneBn HnCTpymEn RnBnTeCt OKANHb6PobAHBM DnR 3toONOpHNOBepHXoCTn.
⑤ Nocne 3TOro H3MepHTenbHbHnHCTpyMeNT CnEyET OKaHIN6P0BaTb DnI npOTBBOONONOxHOnOPHOH NOePHXOCTN.ДнТо TOrO NOEPHTeHbMnHCTpyMeHTBnHCTpyMeHTBOKpyr FOpH3OHaTbHOHOCN TAK,TO6bI BATEpNACJN BbIBePKn NO rOpH3OHtAN (1)CMOTpeBn BH3,aHcNnE (5)6bn ObpaueK Bam.PnHIOXHTe H3MepHTenbHbHn H3CTpyMeNT K rOpH3OHaTbHOH NOePBXHOCTN.NoOxoHTe 10c.
3aTeM npHbN.2c HaxkMaIte KHOhky KaIIb6pOBKn Cal(10),nKaHa dHcNlEe KOPOTKO HE OTO6pa3HTCA CAL1.NoCte 3rOto Ha DCNlEEe Mraet N3MepeHHoe 3HAueHHe.
7 POBepHHTe H3MePHTenbHbI HnCTpyMeHT Ha 180° BOKpyBEPKTHANBOH OCS, TTO6bI BATEpRAC No-npeXHHemCMOTpen BHN3, HO HcINnne (5) TO6bI HaxOHNCA HA npOTHBONNOXHOt OBac CTPOHE. NIOOXDTE 10 C.
Ee pa3 haxmnte KhoNkY kAnbPbKn Cal (10).Ha nCnneeKoPOTKO OTbPa3nTCaCAL2. Iocne 3TOrHO3MepeHnOe 3auHene OTbPaKaTecRa Ha cncnnee (yKe He Mnra).Tepeb H3MePeHTeBnHnHCTpyMeHT RnAerTcOtKaANbPoBaHNbHM dIra O6Enx rop3OHTaNbHbIX ONOpHbIX NOBepXHOCTe.
Yka3aHHe: EcnI H3MePHTenbHbH NHTpymENT BO BPMA Opepa ③ HneBt NOBEPHY BOKpyr npdctabnEHHO HA pCynHEOCH, KaH6POBaKa He 3aBepwaTc (Ha dncnnee He oTo6PakaTeCA CAL2).
Kan6pOBKa BepTKaJIbHbIX NOBepXHOCTe npnIerAHH (cm.pHC.D)
NobepxHocTb,HaKOTOpyo yCTaHaBnIBaETc H3MepeTeIbHbIy HcTpyEMH,HTOJIOHNHe bTcBtEeKANH600ee uM H5o. EcnH, hKTOJIOnHe 60bnBe, KaNNbPbKa npeKpaAsTeCn H aHdncnnee ot0b6pKaaeTc ...
① BkIOUHTHe H3MePInTeBbHb HnCTpyMeHTn pnpINOKeIe rO K BeTTHaJIbHO NOBepXHOCTn TAK, YTO6bI BaTePnac IaR BbIEpKn (6) 6bl OpaJeuH aHBepeX, aHcNnei (5) -K Bam. PIOoDKHte 10 c.
23atm np6n.2c HaxHMaTe KhoNky KaHbPOBKn Cal(10), noka Ha dnCnnee KOPOTKHOte OTo6pa3HTCA CAL1. Pocne 3TOr HOa dnCnnee MHaTe N3MepeHHoe 3HuayHee.
③ NobePHTHe H3MepTeBbHbHnCTpyMeHt Ha 180° Bo-Kpyr BeTHKnAbHbOcN, QTO6b BatepeNacNo-pexKhemy CMOTpe BBEpx, HoDcIeNee (5)TO6b HaxoDJIrcnHa npOTOBNOONXHOt BAC CTOpOE. PIOokDIte 10 c.
④ Eepe p3aHkMMte KONKy KaHb6pOBKn Cal (10).Ha nCnne KOPOTO OTO6paHTcRA CAL2. Iocne 3TOro H3MepeHHoe 3aueHene OTO6paKaETcRa Ha NcNee (Yke He MHRa). Tenebp H3MePntenBHyn HnCTpymert RnBnTeCt OKaHb6pOBaBHm DnA 3T0n ONOpHn NOBepXHOCT.
⑤ Nocne 3TOrHO3MEpHTeNbHbHbHcHTpyMeH cIeNyETOTKaNn6pOBaTb dI rnoTIOBONIOXKnOOnOpHNOBepXHOCTM. IINrTOHO3MEpHTeNbHbHbHcHTpyMeH BOKpyr Rop3OHTaNbHbOcN Tak, YTO6bI BATEpNACdN BbIEpKNo BEpTHKaN (6) CMOTpeN BHN3,aDNCNNE (5) 6bln ObaPaenK Bam.PnCtABTe H3MEpHTeNb HbHcHTpyMeH K BEpTHKaNbHOH NOBepXHOCTN.NoOJXnnte 10 C.
6 3aTeM np6n.2c HaxHMaIte KHOJky KaJIb6pOBKn Cal(10), noka Ha DCNlnee KOPOTKO HE OTOp6pa3HTCA CAL1. Pocne 3TOrHa DCNlnee MHRaet N3MepeHHoe 3HAueHHe.
⑦ NOBEPHHTe H3MEpTeBbHb HnCTpyMeHT Ha 180°BO-KyPTBEPKTHaBbOcN,TTO6bI BATEpNAC No-πpeKHEMy CMOTPeBHN3,HOHCNIeN(5)TO6bI HaxOINcHa nPOTNBONONOHOt BC tOPOHe. PNDOKTE10 C.
8 Eue pa3 hakmITE KONKy KaH6pOBKn Cal (10).Ha nIe nIee kopoTKO OTo6pa3TcR CAL2. Iocne 3TOrO hMpeHHoe 3aHueHe OT6pakaTeCn Ha nIcNlee (Yke He Mnra). Tenepb H3MePHTeBbHn HnCTpymEn ABnIEcTc OKaH6pOBAHbIM dIg OBExn BepTHKaJIbHbX onOpHbIX NOBEPxHOctE.
Yka3aHHe: Ecnn H3MePHTeBbH NHTpymENT BO BPmR Opepa ③ H ⑦ He 6ydtne NOBEPHT BOKpyr npdctabENHO HA pCnyKHE, KaNbPOBaKa He 3aBepWaTaC (Ha dncnnee He oTo6P aXaTeCA CAL2).
Texo6cnyxmbAHne n cepBnC
Tex06cnyxmbaHne H ouhctka
CodedxHKeIe N3MePHTenbIy HNCTpyMeHNT NOCTOBHO B HNCTOTE. HNKOrTa He nOpyKaJIte N3MePHTenbIy HNCTpyMeHNT BOY ININ DpyTHe XJNDKoTHN.
BbItpaTe 3aqrA3HEnH cyxO H MRAKo TpRAnKO.He hCnObl 3yTe kKaHeNbo ChrTaHne CpeCTBa HnPactBopHTen.
PpOdoJXHbHOe npe6BaHne H3MePHTbHOrO hNCTpyMeNTa NOIdoXdEM MoKET OtpuATeHbNOBnHbHaero fYHkuHIO, PpOtpHTe H3MePHTbHbHcHTpyMeNT dOcyKa, N OH 6yTe pa-BoTb463yKOp3HHeHNo. KaH6PoBka He tpe6yEtca.
063aTeNbHO xpaHHTe HtpaHcnpTppyte H3MePHTeNbHbH INCTpyMeHT B 3auTHOMueXne (12).
Ha peMOHT OTnpaBnIe H3MePHTenbHbI INHCTpyMeHT B 3aUNTHOM qEXNe (12).
CepBcN KOHCynbTHPOBaHHe NO BONpocam npmehenra
CepBnchbl otDen OTBeHTHa Bce BauH BonpocbI no pemOnry H 06cbnykBaHHIO Bauero npOyDKa, a TaXke No 3aNaCTM. NIObpaKeHHN C nOcTpaHCTBeHHbIM paZdEneHHem denateH IN HfOpmaQnno 3aNaCTR MOKHO NOCMOTpeb TaKKe No aP-pecy: www.bosch-pt.com
Kolnektnb cotpydnHkoB Bosch, npedoctabnHooi kOHcybTaunHa npedmet ncoNb3ObaHH npodkyuin, cyDoblonCTBHeM OTBeTHT Ha BcNnBnOpbO bTOHOCHTeBHO HOaew npodkyuN e ee pinnahdEeKHOCTe.
TOKANJYAMOA, BO xece 3anpocax n 3aKa3ax 3anacteyo6BaTeBnHO yka3bBAIte 10-3naHbI ToBapHbI HomeP no 3aBDOCKOra5nHKe H3nEJIy.
yonHMOOeHHaN3rTOBHTeMeOpraHn3aua
OOO《PobepBow》BaWyTHNCKoe wocce,Bn.24
141400, r. XHMMK, MockOBCKaR 06n.
Ten.: +7 800 100 8007
E-Mail: info.powertools@ru.bosch.com
www.bosch-pt.ru
Benapycb
HnPo6epr 50w>000
CepBnchbIy ceHTp no oCbnyKbAHHIO 3NeKtpOHNCTpyMeHa
yn.THMnpr3eBa,65A-020
220035,Γ.MHHCK
Ten.: +375 (17) 254 78 71
Ten.: +375 (17) 254 79 16
ΦaKc: +375 (17) 254 78 75
E-Mail: pt-service.by@bosch.com
OfncnabHbIcainT:www.bosch-pt.by
Ka3axctan
LcHrKoHCyNbTHpOBaHHN nPnHeMa nPeTeH3n
TOO «PobepT Bow» (Robert Bosch)
r.AmMaTbI,
Pecny6nkaKa3axCTan
050012
yn.Mypar6aebA,180
BLC《Fepmec》,7H3TAX
Ten.: +7 (727) 331 3100
ΦaKc: +7 (727) 2330787
E-Mail: ptka@bosch.com
PonhynakTyalbHyuHhOpmauOpacnoNoKeHH cep
BnChbix ceHTpoB nPnemMbIX nyHKTOB Bbl MOKeTe nonyHtB Ha
OΦHnHaJIbHOM CaHTe:
www.bosch-professional.kz
MondoBa
RIALTO-STUDIO S.R.L.
Pn.KaHTemma 1,3Tax3,ToproBbI ueHrTOPA3
2069KmHnHeB
Ten.: +373 22 840050/840054
ΦaKc: +37322840049
Email: info@rialto.md
Knprn3ctah,MOHronHa,TaJHKNCTaH,TypKMeHHctan,
y36eknctan
TOO «Pobepr Bouw» (Robert Bosch)
Power Tools noclenpodaXHoe obcnyXHBaHne
yn.MyparbaeBa,1.180
050012 AnMaTbI, Ka3axCTaH
Cnyke6haa 3n. noya: service.pt.ka@bosch.com
OfHnHaBbI Be6-caHT: www.bosch.com, www.bosch-pt.com
yTNHn3aun
N3mepntbhlh HnCTpyMeHT,AKkymyTAP0/6aTapeKm,npH
HADNEKHOCTN UnyAKOBKY HUYKHO CdaBaTb Ha 3KOLOTNueCKN YH
CTyIO yTNnN3aunIO.

6paBbAteaKymyTOpHbE 6aTape/6ata
B 6bIbTOBOmycOp!
Tobko dIa cTpaH-NeHOB EC:
B COOTBCTBHN CEBPONEKCHDINPEKTNBOI 2012/19/EU H eHNOHHE NMEPMTEHbHe pnpOBn B COOTBCTBHN C EBPONCKOHNPEKTNBOI 2006/66/EC HcHIOHbHe HN OTCNYKHBUNC BcOHPCKAOKMYNATOpHBe batapeh/batapeeKn donKNbcoHpTaCB pa3dEbnHO n cdaBaTbCa HkKoONrueckn HcHTyO peKynepaunu.
YkpaHcbka
Bka3iBkn 3 texhikn 6e3nekn

PpountaBcBk3iBKn iDopmmytecix.
BnKOpHCTaHHBnMIPIOBaIbHOro IIncTpymEnTa
6e3doTPMaHHaXInHCTpyKcIMMOKe
npH3BcTn do nowKoJKeHHIHTerpoBaHHX
3axhCNHX Mexahi3MIB.HADINHO 3bEPIGANTE
LI BKA3IBKN.
BiiDaaBaiTe BmipOBaBHH IHcTpMeHT Ha pemOH TnHwe KbnifikOBaHM FxiauMaT a Nnue 3 BKNOPCTAHMMOpriHAnbHnx3aNtAChN yMoB Baai BmipOBaBHH npnadi iHaadani bSyde 3aHnWATCH6e3neuHM.
He npaiohe 3 BmipobabhmHm HcTpymeHOMy cepeoBnui, de ichybe63neKa Bb6xuy BnacnIDOK npcyhtoi ropuynx piinr, ra3i abo nny. y BmipobabhOmy npnaadi MOKytb YbTOPBOBATCn ICKPN, BID kHX moe 3aHmATNCnA no napn.
BbIMKHeHHa/BmKHeHHa 3BykoBOrO cnHany
3a donomoroo KHONK 3BkyOBORcHany (7) BMHKaETcba 60 BMHKaETcbc 3BkyOBH cHrHan. KOHN 3BkyOBH cHrHan yBMkHTn,HaDCnnei 3'RbNtCBc IHNKaTOp 3BkyOBOr cHrHan (g).
PiJ ac yBMkHeHH BmipIOBaIbHO rHCTpyMeHa 3BkyOBH cHrHan e CTahapTHO yBMkHeHHM.
IINKATOP BHMIPARHO 3HaueHHi pHCKN DnIONOMRN B opieHTaui
Bmipnhe 3aueHH (e) aktyani3yctbrc nicn KOxHORO nepecyBaHH BmipIOabHOrHO IHCTpyMeHTA. PICr 3aHcHOro nepecyBaHH BmipIOabHOrHO IHCTpyMeHTa, nepu HIX 3HTyBATH Bmipnne 3aueHH, 3aueKaHTe, NOKBOHO He cta6ini3yctbCt.
Y3aJENXHOCTBIDN0OKeHHBIMIPoBaIbHOrIOHCTpyMeHTA BIMIPaHE 3NaueHHI OdHHINBIMiPoiABHnIOKa3yIOBcHa HdNCPiE 3 NobopOTAm Ha 180.3abDkNcbOMy IHNkAioMOKHe YHTATn I npRpoBtAnHrOBOIO
PNCN DnDonOMrB OpiEHTaui (a) Ha dnCnnei BIMIPOBAIbHOro IHCTpyMeHa BkAzyOtB, BYKOMy HAnpRMky HORo NOTi6HO HAXHNTn, U6oDCaTn Noti6HOr3HAueHHN. NotPi6He 3NaEHnra 3a CTaNapDTHX BIMIPoBAh -e a60 roPnHOtANbHa, a6o BeTrkAnBa HnIH, B pexKmH Hold/Copy -ce 3BepeKHeH y nAmRTI BMIPnRE 3HAueHHN.
NcIraOcRHeHHnNoti6HOro3HaueHHnCTpIKnPHcOKdna DOnOMORH BOpIEHTaui(a)3HnKaIObI,IAKUoBBIMKHeHO 3ByKOHNCHrHan,DQaTkoBOyHae63nepebpHHn3ByKOHN CHrHan.
Функць Bmipobahnha
YtphmaHHa/nepehoBcBMiparHO 3haueHHH
3a donomoroho KhoHn Hold/Copy (11) MoKHa ynpabnTn 2fHKJIMN:
- YtpmaHHa(Hold) BmipraHoro 3haueHHn, HabiTb KOIN BmiproBabHHN IHCTPMeHT nCJIe IIOHO nepeCyBaETCBa (Hanp., KOIN BmiproBabHHN IHCTPMeHT 3hAXoDnTbc y NOLOXEHHI, B RKOmy NTOAHO BVINO DcNTnIe);
-NepeheceHHA (Cp) BmipraHOro 3haeHHA.
DyHKuiHdol:
KoptoHATCHHTb KHONKY Hold/Copy (11).IOTOpHe BHMIPRHE 3aHHeHHe (E) yTPMcyETCBr HA DcHnJIe i 3anAM RTOBYETCB, INHKATOP H MNTAE.
-HATCHIBTHKONKY Hold/Copy (11)3HOBY,uo6 BMKNHYTN peKM Hold. 36peXeHHe 3aueHHN BuaHrAETBCBA BmIPIOBAAH npOdoBXyTcBa y 3buaHOMpyKMI.
DyHKLIA Copy
HANTCHKAHTOBO HA KHONKY Hold/Copy (11).NTOOTHE BHMIPARE 3HAeHHH (e) KOINIOCTCB, INDHKATOP H BIDOpaKaTcBcA HANCNIeI BOBDHNC.
- HatncskaTte KoptoKHa konHoiKa Hld/Copy (11). 36epkegeyam'rtiBmipirehe3aueHHn(e) BID06paKaTaBcRa hNcIeIN, iHnKATOp HmHrac.
-PrnCTABTE BHMIPBOAbHIN IHCTPYMEHT DO NOBEPXHi, HA Rky notpi6HO nepeHcTb HBMIPRAH 3aueHHN. PInp cOmy nonoKeHH NBMIPBOAbHBO IHCTPYMETA HeMaC 3aueHHN. PNCKnI DnI OONOMR HOpIeHTaJI (a) nokayotb HanpMOK, K BYOMy TpeBa nepeCyBatn BHMIPBOAbHIN IHCTPYMET, 106 OTPMATN KUT HxHNY, 10 nepeHochtbc. Y paia DoCAHRHH 3bepeKHeHO B Nam rTI KYTA HxHNY Nyhaic
108|YkpaHcbKa
3BKYOBH CNHAN i PNCKN DnIaONOMGN BOpieHTaui (a) 3HHKAOTb.
3HOBY KOPOTKHaTHCHITb KHONKY Hold/Copy (11).IO6 NOBEPHYTNCr DO HOPMaJIbHOro peXmMy BmIPIOBaHH. IHdNKATOp H BiO6paKaTaBC Ha DnCnIe IOBmYac.
Iobro HATnckaHTe KHOJIky Hold/Copy (11), 0o636epertn HOBE 3HaueHH.
-1LIO6BnDAHHTN3aueHHaHold,KoPOTKHaTHNCiHbHa BmNKaU(9).
Ipebipka ToHocTi Bmipobanb i Kani6pyBaHHBmipobanbHoro IHcTpymeta
IpeBipka ToHocti BmipHOAbh (nB.MaB.B)
NpeBepBnTeTOHcIbBMipOBAHHnepeYcimaBaKHNBMNH BmIPoBAHHMn,nicr3HaHnHex nepenadjBtemnpaTytn, a TAKOXnCnIeCNbHnXydpAIB.
PepedBmipobAHmKytibHaxnly < 45^ tpe6a nepebipHTn IHcTpyMeHT h paBHH, npbN3HO rpo3HOaIbHI NOBEPXHi, nepedBmipobAHmKytibHaxnly >45^ -HaPiBH, npbN3HO BepTKaJIbHI NOBEPXHi.
YBMKHTB BMIPIOABbHIN IHCPyMENT i NOKIaDIT bHorO ha rohp30HTaBHy a6o BePTKaIbHy NOBepxHIO.
Bn6epitbOdHHNIO BmIPoBaHn° (INB.3MHa ODNHnBIMIpOBAHn (INB.MaI.A")CTopiHa 107).
3auekaeIte 10 c i aannHb Bmippe 3haueHH.
NoepbHtB BMIPoBAJIbHn IHCTpyMeHT Ha 180" HABKOHO
BePTMaBhoI Bci. 3auekaTe 10 c i zHaOTyTe Dpyre BmIPpe 3haueHH.
3Динштейе Kanil6byBANH BHMIPBOBANHORIO HICTPymeHTA, NIIeE RAIO pI3HHZMIX o6Oma BHMIPRIMHN 3HAeEHMN NEpeBHuYcE 0.1°
BMMIPOKOBaBHNNIHTCPYMEHNTpe6aKANI6PBYAHTBNTOMYCAMOMO NIOJOKENHI (BepTKaJIbHO/ropn3oHTaBHO), B KOMY 6yNO BCTAOHNBE BIIXNNEHH.
Kani6pyBaHHa roH3oHTaBnIO nobepxhi (DmB.Man.C)
NobepxH,doAkoipnKnaadcBmHIpOBAhNNI hCPTyMHTE,HEOBHHaBIIXINTHCAIBIROPNHOHTAI6INbHex Ha5°.KJIOBIXHNHcE6bnWM,KANIPBYAHNNEpepBaCTcHaI Hdncnne3BnREtcbIhHKatop…
① YbIMKHTB BHMIPIOBaNHH IHCTpyMeHIT NOKNAdITb HOro HA ROPIN3OHANbHY NOBEpXHO TAK, 06BaTePnACJr IROP3OHANTbHO BPMIBHOHARH (1) DnBBcRyropy, aDnCnne (5)- Ha Bac. 3aKeKaIe 10 c.
② Notim npotarom npn6n. 2 c HATNCKaHTe KHOKNy Kani6pByaHnCa10). NOKI HA dnCnnei KOPOTKO He BIDobpaNTbC CAL1. PICNAZBO RBMPIHRe 3HaueHHMraE Ha dnCnnei.
③ NobepHbBmipBoaBnHHInCTpyMeHT Ha 180 HABKONO BeptKaIbHoOci, uObBaTePnAC, kI paniu, DHBBCR BROPy, aCHnEo (5), OndhAHOBC3 npottnekHoro Bid Bac 60ky. 3auekaite 10 c.
4 ④ 贝pa3 hatahnchtb KHONk KykanibpyBaHnHa Cal (10). Ha dncnnei kopoTko BIDobpaKaactcBc CAL2. Picna boro BMIPrHe 3aHeneHHyBIOdpbaKaTebHa CnDnneI (BKe He MrrAho). Tenerb BMiproBaHnIHCTpymeH HahOBo BIDkanipobAHm Dnuei onopHOi nobepxHi.
Tenep Heo6xidno 3iinCHTH Kani6pyBaHHB BMIPBOAbHbOHOI HcTPyMEnTAJnI npOTNHExKHOI ONHOI NOBepXHI. JIaTOBO NOBepHITB BMIPBOAbHbNIOHCTPyMEnHABKOHOrP30HTaJIbHOI Oci TAK,IO6 BATEpNACJINI ROP30HTaJIbHOI BPNIBHOABHNR (1) DnBBCBHa Bac. NOKaIITb BMIPBOAbHbNIOHCTpyMEn HA rOp30HTaJIbHY NOBepXHO. 3aueKaIte 10 c.
6IOTIM npotarom npH6n.2 c HATNCKaHTe KHOKNKy kani6pyBaHHaCal (10), NOKI HA DcNnei KOPOTKO He BIDO6pa3HbC4 CAL1. IICNA ZBO RBO BHMPIHRe 3HaueHNr Mnae HaDcNnei.
⑦ NobepHbBmipBoaBHHnIhCTpyMeHT Ha 180 HABKOBOePTKAnBHOiCIO,uO6BaTePnAC,kpaHii, DHBBCBAHH3,AcnHn(5),ODnK,3xAoNcB3 npOTnHexHO Bd Bac60y.3aekaiTe 10 C.
8 Ⅲe pa3 haTNCiBtK HONk Ky KANIb6pyBaHHr Cal (10).Ha DHCnneI KOPOKBIIDobpaKaETCBa CAL2. IcNra bOro BmIPaHHe 3aueHHa BIIDobpaKaETCBa HA DHCnneI (BKe He MmRAOu).Tepe BmIPoBAhMHInCTPymeHT HAnHO BIDkaIBpOBaHHdno6ox rOpH3OnTaBbHX onOPHNX NOBepxOB.
Bka3iBa: RaIO BmIPIOBaNbHn IHCTpyMeHT He NOBepHyTH B KpOKaX ③ I HABKOIO NOKa3aHOI HaMaHIOKHy Oci, npABoNbHO
3abeepHTN KANI6pyBaHHH HEMOXINBO (Ha DCnneI He 3ABNTBCAL2).
Kani6pybaHnHa BeptkKaIbHi NobepxHi (JNB, Man. D)
NoepxHn,doKoi pnxNadaeBcB BMIPOBaBbHH nhtpyMeH,neOBHHa BIDXnTnCtB CBIepTKan 6inhue Hix Ha 5^ .KaIoo biDxInHeHH eBnHMMani KANIpyBaHH nepepAActbCt ha nDnCNne 3nnBCTbcHnNDKATOP...
① YBIMKHITb BHMIPIOBaNHH INCTpyMeHT i npHKnAdTb Horo DO BEpTKHJIbHOI NOEHPXiTaK,Uo6 BatePnac dJN BErTHKnABHO BnPIBIOHOBAHH(6)DnBBBCy rOpy,a DnCnnne(5)-Ha Bac.3aekaiTe 10c.
2IOTIMnpotrom npHb.2c HATHCKaHTKHNKy Kani6pyBaHHaCal (10),NOKn HA dnCnnei KOPOTKo He BIDO6pa3nTbc CAL1.Picra yBo RBMpiHRe 3HaueHHMrae Ha dnCnnei.
③ Nobephitb BmipboaBnH IHcTpmyeHa 180 HABKONO beptknabHo oci, uo6BaTePnac, kIpaHiiu, DHBBCR bropy, aHcNnei (5), Onda, hXaoDnBC3 npottnenKHO BoB Bac 6Oy. 3auekeitre 10 c.
4 1e pa3 haTCHITb KhoNky kani6pyBaHHa Cal (10).Ha dnCnIeI KOPOTKO BIDo6paKaTeCB CAL2. TcIIaBoro BMIPRHe 3HaueHHe NBIo6pKaAeTbCa H daNcPiE (Bke He MInAOuH). TeneP BMiPiOBAHbH INCTPyMe HAnHO BO BIKanI6pOBaHN dJIeI onOpHI NOBepXHi.
5 Tenep Heo6xidno 3iinCHnHn Kani6pyBaHHB BmipOBaBbHOrIO hCTpyMEnTAI npoTIneXHoI onOHO HOpeBXH. IyBOHO NOpeBHITB BmipOBaBbHNI hCTpyMeHT HABKOHO rHOHTAHLHOI OCI tAK, IO6 BatePnAC IyBePTKAnbHO R BIPINIBHOAHN (6) DHBnBCBAHn, aDnCnne (5) DHBnBCHaBac. IpnCTabeBtB MHPbOBaBbHn IHCTpyMEnTO BePHTKANbHO nOpeBXH. 3aueKeHte 10c
IOTIM npotrorm npmb.2c HATHCkAte KHNKky Kani6pyBaHHnCal (10),NOKH AINCNnei KOPOTKO He BIDOp6pa3NTBCa CAL1.PnicraBOrn BmPirHe 3HaueHHMnRaH aINCNneI.
⑦ NobepHbBHMIPIOBaIbHmIHCTpymEtHa 180° HABKOBOEPTKAnbHOiOci,06BaTePnac,AKipaniu, DNBBCR BHN3,AdCNNEJ5,O6NH3XADQDBCR3 npOTNeKHHOroBID Bac 60ky.3aueKaite 10c.
8 电pa3 hATnCHtB KHONKy KANIbpyBaHHCal (10).Ha DNCTIeIKOPOTKO BIDOBpaKaCTCB CAL2. NcIaIbTO BIMIPRHe 3HAUYHBAIDOBpaKaTcBA HADNCTIeIN (BXKe HmraOu).Tepe BIMIPIOBaJIbHNI IHCTpyMeHT HAHOBO BIDKAIBOPaBHnI DnO6x BEPTNKaJIbHXN ONOPHXN NOBEPXoHb.
Bka3ibKa: RaIO BHMIPIOBAIbHH IHCTpyMeHT He NoBepHyTH B KpOKa ③ I HABKOIO NOKAaHOI HA MANIOHky Oci, npABINbHO 3abePHTN KANIPOyBaHHHEMOXnHO (HaDnCneI He 3RBNIEcB CAL2).
Texhihe 06cnyrobybaHHia cepbic
Texhuihe 06cnyrobybaHH i ouHueHH
3aBxHn TpHMaHTe BmIPbOABnHn npnad B uHCTOTi.
He 3aHyPioTe BmIPbOABnHn npnad y body a60 iHui pIDHH.
BHTnpaTe 3a6pydHHeHH BONoIO M'KHOIO raHcipKOIO. He
BbHKOPtOByIte JxOHNX MHOuHx 3acOIB a60 po3HNHHKIB.
TPhBAne 3hAoxOKeHH BmIPbOABnHoro IHCTPyMeHTa nid
DOoMe MOke npi3B0DHTn Do npOyHeHH NOro FyHKUoi. ODAHk
nicrN NobHO BnCHXANHn BmIPbOABnHn IHCTpyMeHT hOBy
6e3 o6MeXehb roTOBm Ido p6OToBn. B kAni6pyBaHHi
HEo6XiHoCTI Hema.
36epiratiretpaHcnpotryTeBmIPIOBAhBNIHCTpyMeHTnHue BdoaHIN 3axxChiCmU (12).
HaCpNAtreBmIPIOBAhBNIHCTpyMeHT Ha pEmoHT b 3axxChiCm Cymu (12).
Cepbicokohcynbtaui3nHTaHb3actocybaHH
B cepbichm maiechephi Bn otprmae tbeipnoibd h a Bauii 3aannHnn TcTOBOH PEMOH TY I TEXIHIOHO OFCNYROBYAHN H Baworo npdykty. ManIOHN B deTANX i IHOFpauuio zuo 3aunacth moKHa 3aHTNI 3aIpeco: www.bosch-pt.com Komahda cnibpo6tiHKIB Bosch 3 hadaHn KOHCyIbTaUoi zuo BHOKOPCTAHN npOkyuii 3zdoOBONHEHM BIDNOBICTb Ha Bauii 3aannHnTcTOBOH HAOwi npOkyuii Ta pinnAaDn Do Hei. Pn BCix OdaqatKBOnx 3aHNTAHX Ta zAMOBNeHH 3aNACTH, 6byn kasa, 3a3Hauaiite 10-3aHuHn HOMepIy aAMOBNEHH, zuo cToIb Ha nacnpthn tabnuei npdykty.
110|Ka3aKa
TapaHTIHe 06cnyrobyaHH i pemont enektpoiHCTpmyenty 3diHIOOTbC BIIIOBIDHO DO BIMOR I HOPM BIRTOBNIOB4A HA TepHToPi BCIX KpaIN He y fipMOHN ABO aTOPIOBAHXn CepBHCINcIEHTPACf dipMN P@oeBT BooN. POITEPEHXH! BHKOpHCTAHN KOHTpapAKTHOI npOkyKuJI Hebe3neueH B eCNPLNYATAUJI MOKE MATH HeratNBHI HAcNJDKn DnH dOpOB'
BIRTOBENHn I pO3NOBCJKeHH NKTporpAKTHOI npOkyKuJI nepeCNDyTcBc 3a 3AkOHOM BAdMIHcTpatNBOMY i KPMHInbHOMYnopADKy.
YkpaHa
Bou CepBicnIeHTp eNkTPOiHCTpyMeHTIB
BvN.KpaHn1
02660KJB60
Ten.: +380 44 490 2407
ΦaKc: +380445120591
E-Mail: pt-service@ua.bosch.com
www.bosch-professional.com/ua/uk
Apeca PeriohanbHn npaantinHx cepbcHnx Maictepeh 3a
3haueHa B HaioHbHomy rapaHTiHOMy TaHOI.
Yttniaui
Bmipkoabhhi IHcTpmyentn, akymyrtopn/6batapei, npnaadri i ynakobky tpe6a 3daabaHT ha ekonorHIO nctry nobtoptny nepe06ky.

He BHKdAHTe BmHIpHOaBbHI HcTpyMENTHi akyMnyTophi 6atapei/6atapeKN B nobytoTe CMTTIA!
Пишдякай EC:
BIIobnIDHO do EorpbnEbcKoiDipEeKTHNB 2012/19EU BIMIPOKBANBH ICHPTyMeHTN, OIO BIHNHtBkIbKBAHNA, Ta
BIDIOBIDHO DO EBPOENcboKOI INPEKTHBN 2006/66/EC
nowokjkehi abo biinpaacobahia akymyntophi baatapei/
baTapeKn NOBHHI 3dBaTncs OKePmo IytNl3yBaTHcR
EKOONOHOUHCTHM CNOOCOBOM.
Ka3ak
Eypa3HЯ 3KOHOMHKaIbIK OdaFbIHa (KeDeH OdaFbIHa) MySe MemIeKeTep ayMaFbIHDa KOnDaHbInaDbI
THDjpyuHHH HmYuHH KApactbprnAH naJauaHany KYkaTAPbHbN KypamBaHda naJauaHany KeHINger oCbl HcayKnB,coBHMeH 6pire KocbMaunap a b Oany MyMKNH.
CaikeKTi paTay kaiNbI aKnapaT KocbIMwada 6ap.
EHIMdiEHHipreH MemKeT TypaBn aknapaTHMHIN KOpNcBiHda XaHe KOcBiMwada KepcetinreH.
Hdipinre Hmp3iHyckaynbK MykabcbHcHbHcHbEtiHe KHEHIM KopnycbHa Kepcetiren.
HmnpotepreKaTbCTbBaIaHbICaknapeHIMKaTAMacbHda Kepcetiren.
OhinaiiandaanyMep3imi
THMHH Kbl3metety mep3imi 7 kbl. OHdpinreH mep3HMHEbactan (eHdpy KyHI 3aybl TAKTuaacbHaJa xzablnfAH) icTeTne5 kbl caTaFAHH COH, OHIMI TEKCEpci3 (ceBhctik TKCEpcy) naDANAHY YcblnMai.
Kb3mTeKep Hemece naaananyubin kateniktepi Mei icten bbyf ce6entepin ti3imi
-0HIM KOPnycbHaH TIKENEi TYTIN WbIka, naIdaIaNbHaB3
-kaibH -iawbH Ke3iHne cbipta (daana) naIanaHa6bH3
- Kopnyc iuie HC Kpce KpybIbnHbKocyub60MaB3
Uekri KynBenrinepi
-0HIM KOPnYCbHbH 3aKbIMdA/nybi
Kb3MeT KepeTy Typi MeH XhIniri
Dp naIandaHyaHcOn eHIMi Ta3anay ycbHbnaBbl.
CaKray
Kypfak Kepde caTay Kepek
KofapbTe TEmnepatpya K03iHeH XeHe KYH CayEnepinH acepiH e anbcakay Kepek
- KaTeT Ke3iHDe TempepatyaBHH KeHT aybTKbIHAN KOPrAy KEPEK
-ereKpyanJxMCaKcEMKeHEmePeNnKKeCTe KekTk3ince OHbOcbE3HHKOPrafblu KaBbHa daCaTay YcbHb/naJa
- cakay wapTapbI typabIKocbIMua Aknapat any yiwH MEMCT 15150 (UapT 1) KjWAtbH KapaBb3
TacbMaIaay
-TacbMaIay Ke3IHne OHIMDi KynaTyfKaKe3 Ke9nre HMeXaHKnalbIK bKnlaTeyFe KaTaH TbHbIM CanbHaNbl
-6ocaty/KyKTEy Ke3iHne naKeTTi KbCaTbH MaunHaIapBn naJdAnaHyra pyKcat bepinmei.
-TacbMaIaay wapTapbI tananTapbH MEMCT 15150 (5 wapt) KpyKaTbH OKbHb3.
Kayinci3ik HycKaynapbI

Bapnbk KcckaynbkTapblOkbl,OpbHday kepeK.0nwey Kypanblbocbl HcyKaynapra ca naiDanaH6ay enwey KypanblHaPbl kipictipinren Kayinci3ik wapanapbla h Xaftmb3acep etedi.OCbl HYCKAYbIKTAPblTOblkOPbIHDAhbl3.
Onwey KypanbIh TEK 6iikTI MaMAHFA XeHe apHaynbI 6nweKTepeMhen XeHdetin3. Con apKbIbI onwey Kypan KayincidirH cakTaeCbI3.
Kahatbinyibkhtap,ra3ap Hemece wan Kbnfahan kabnbc Kaynil 6p optana enwey Kpanbni naidanaanb4h3. Onwey Kpanb ykwkh WbHpaBn,waHd bKaandbpiin,epT Tydupy MyMKIH.
Onney KypaIbIKocblnFAHda, aTeTte Dlb6bIcTBK CnHAn KocblnAbI.
Onwey mAnHHHnHnKaTOpbXaHe Tpyanay KEmekui Kypanapbl
Onwey mHI (e) Onwey KpyanbH an Ko3raTnKaH caBH jXaHapTbnaIab. Onwey KpyaBnIH bEneyni K03raTbIcTbpHaH KeHH enwey mAHIN on BydAn 6bIaN e3repMerHe OkMaI TypbHbI.
Obnwey KpyaanbHbN KyIHe baiNaHbictb enwey MmH Men enwem 6ipnir hncnneJe 180-ka 6ybpInrah KyIe Kepcetinei. Ocbnaiua HndkataopDbAc yctHeH Kymbc icteren Heke de okyra bola.
Onwey KpyanbTypanay KEMekw Kypanapbl (a) apkbln Obl
MaKcattb MaHre Kon kETkiyyu HauhKaHaNba4BHTneH EKeHTy
KepeKTirH KpcTeiD. MaKcattb MAn KeIeHem HEmec TE
cbMbkt bCTaHApdtb Bnywey Apeketepine Hold/Copy
fkyKnurbcHa dCaTanrAhnwey MAn 6bn TabnaDb.
MaKcatbI MaHRe KPJ KETIKERE HJAFdJIa, Typanay KEMekuii KypaBInh KOpctKici (a) CoHeJI ZaHe Dblb6tBk CnHrAn KocBbInb TpyraDha, Yadikci CnHrAn bepinedi.
Onwey fynkunnapbl
Oneuy mAnin 6ekity/Kewipy
Hold/Copy(11)TYHMEciHHKEMERImEH2yHKUINHb6acapya6oana:
-OnyeMAnb6Ketry(Hold),enyeUkypanbKeHH KBykBtBnCaJa(MbCanb,EnyeUkypanbDncnneJxakcbk KePiH6eHIN KyndeTpyrAnKe3e)
- Θπωeγ mAHIN Kεwipγ (Copy).
Hold dyHKUARCbI:
Hold/Copy (11) TYIMECH KBCCKA 6bacbH3, AFBMn4abH 0eWey MAni (e) cncnepe bektinin caKtanadH H NHHKATOpB XkbnblkTaknbl.
HOLD(Copy)17YTMECIH KAKTADAH BCaBnH,Hold (fHKUHCbHBiXyMbICbH aKTAb3c. CaTaNFAH MAn KOJIbNaJb. KaJIbTHbIbnEuy XnaFACTbPbJaNb.
Copy cyHKUcB:
-Hold/Copy(11)TmMEcIHyakbAcHbI3.AFBImaBfBnIwey MAni (e)Keuipin,In,IncnneHnHnDnKatOpbyzdiKci3 Kepcetined.
Hold/Copy (11) Tynmecin Kkckawa 6abcbH3. CaKtanaH8nwey MAni (e) HcnneJe Kepcetin, HnHdkatopbJ kblntbktanbI.
-Onuey KypanbH enuey MHOI KeuipinTIN MaKCaTTbOpBHa KaonBb3.5yn peTe enuey KypaBnTH typanay MaHb3dbl 60bn Tababnabl. Typanay KEMeKwI KypanDapbl (a) KeipinTIN bpybka Kon XeKt3y yuih enuey Kypanbl KjBkBy TaKxetBaTbKpCpTei.CakTanFah eHicke KxtKeHe, dblbCTbK CrtHan Bepinin, typanay KEMeKwI KypanDapbl (a) cHeJI.
114|Ka3aK
- Kanbntb 0nney peKHHMe KauB opany uHoid/Copy (1) Tynmecin KaTadaa KbcKaasa bacbHb3. HnHdkatopbI dncnnne yadikc3 kepetinedi.
JKaHaMaHdIkaKa cakay yuH Hold/Copy (11) tyMeciH y3aK 6acbHb3.
Hold mAHIN KOIO yWIn Kocy/ewipy Tmecin (9)KbcKaaa 6acbHb3.
Onwey kypanbihin dndirin TeKepy KHe KaH6pney
Onwey dAndirin TeKcepy (BCypetih KapaHb3)
MaBb3dbI enyepayeketepin opbHdAmac bybpH, TEmnpatypaHbN yBbIn e3repicTePiH KEnIH XaHe KaTbI cokBbJapAdn KeiH enyepYKpaBbH dAndiirH TeKepeHtI.
45°-Tah KEM eHCTepdi OIwEmeC 6pybH, Tckcepy Teric,
WAMAMEH KeJdEHEH Jz3bIKbTKa, an 45°-Tah aPTbIK EHTepeDi
OIIwEmeC 6pybH, Teric, WAMAMEH TIK Jz3bIKbTKa opbHdanyb
TMIC.
Onuey KpaBnH KocBn, KeDHeH HeMece TIK Xa3blkKKa KObHb3.
"0nHem 6ipnirih TAnDaHb3 (kapaHb3 ,OnHem 6ipnirih aybCTbpy (A Cypetin KapaHb3),Ber 113).
10cekyHdkytin,enwey mAHIN kA3bIn anbHbIa.
0nwey kpaanbTik 6ob 6oBHHa 180°-ka 6paH3. Ta
10cekyHd Kytin, ekiHwi eHwey MaHH Xa3bIn anbHb3
Onwey KypanbH eki onwey Mmihin aHipMaBbInfBf0,1-tah apTbK 6onFaHa rHa KaH6pneH3.
Onwe KpyanbH enwey MaHepinH anbypMaBbNbFbBenrineHRe H Kyide (Tik Hemece KeNdeHe) KaH6pneH3.
KanEn Hxahacy 6eTepin KaHbpey (C cypetin KapaB13)
Onuey KpyanbI koybnatbH kaa3bTkBk KendeHEn Cbl3bKTAh eK6e1 5^ - ayabYt bTn. AbyIKy cbl oJamaadah apTbK 60lanca, Kanyepny... HNdkATopbIMEN TOKAtbNabldy.
① Θnwey Kypabln Hocbl, KneldeHeneHeneH typanayra aphanfah batepnc (1)Koarbp kapan typatbndai janeH dnnne (5) e3iJ3e kapan typatbndai etin KneldeH enkbtbikka Koihyb3. 10 cekyhd kytih3.
② Coadan Kein Kanibpney Tymecin Cal (10) DnncneDE CAL 6bnrici kka ya kntkna naia Bonfnaa WamaMeN 2 cekynd iuHde bacnb3c. Coahon coh dncnneDe enwey MHI KblbKtBnBd.
③ ΘnIeuy KypalbH Batepnaac OanapbI JorapbI Kapan TpyatbHdaan, an Hcnnnei (5) 63HJ3eH Tepic KaKta opHaacatbHdaan etin TiK c0bBoHHua 180-ka 6ypaHb3. 10 cekyHd KytHj3.
④ CoadaKeHH KaHbpey TyMecin Cal (10)KaHTaadn 6acbHpa. DcncneIe KcKcA yakltk CAL2 enrici naia Bocabdi. CoAH coHcncnEe Iwuey MHI (OaH apblkbntamKepceriend. EOnuey Kpapan Ehdi ocbxacacyBeti BoHbua KaTt KaHbpeHEni
⑤ CoHAn coH eJUeY KypaBbH KaPama-KapcbKaHAcany Befi 60BnHua KaNbpey Kajek. On yuiu eJUeY KypaBbH KeJDeHeH H Tpyaayra apHanfah BatepnaC (1)TeMeH, an dncnn (5)33I3re Kapan typaTbHdai etin KeJDeHeH c6bOHyHbHa 6byhAa. OJNeUeY KypaBbH KeJDeHeH Jk34bTkKka KOBbH3. 10 cekyH KyTHi3.
6 Codan Kein KanInbpey TyMecin Cal (10)HcNneIe CAL1 6nIri Kbcia yakltka naia DofnaHaua WamaMeH 2 cekyni iuiHde 6acbHb3. Coahon coHdncnneIe enye MHI KblnbkAaBtiB.
⑦ Θnuey KypanbH Batepnaac Oaah apbI TeMeH Kapan TpyaBtHdai, an Hcncne (5) 63HJ3eH Tepej Xkata ophanacatbHdai etin TK ocb 60bnHua 180-Ka 6ypaHb3.10 cekyHd KytH3.
8 CoadaKeHH KaHbpey TyMecin Cal (10)KaHTaHaN 6acbHb3. DcncnneJeD KbcKyaKbTKCa CAL2 bEnrici naJa 6oNaBd. CoaH coHdncnneJeOnuey MHI (OaH apBy KblnbIbKtamai) KePcTeineDi. OTuye Kypalb Endi EKI KdIeHekAHacy Befi 6oBbHsa KaTa KaHbpeHedi.
Hcykay:erepe eniwey kypanbl 3x He 7 kaamdpabnHa CypeTte KepetinreN c6b 6oBHyuHa 6pyaMaca,kanh6pnydi AAnkay MmKIN 60nMaNb (DcHnnneIe DcAL 2ka36acnbnaia B60nMaNb).
Tik kahacy 6tepin kann6pney (D cypetin kapaib3)
Onyey KpyaBbl KoynbAaBnH Ka3bKtBk TIK Cb3bKTAH en Ke6i 5° Ka ayBkybTihi. AyBny OcbI Maamadan aptBk B60ca, KaInbpny HINKaTOpBmEH TOKTaBnHa.
① Θηωeγκραπβινκόκβιπ, TīrɪηθητραγαραπανfānβaHαBATEPηαC(6)XσραβλΚαραπγτραβιδηχαθηDικιπη(5)εδιίπεκαραπγτραβιδηθειπικλαβκΤβκΚαKOBHbIδ.10CEKΦHκTytH3.
② Coadan Kein KanInbpey Tymecin Cal (10) DnncneDE CAL1 Benrki Kcka ya kbitka naia Bonfnaa uamamem 2 ceknyi iuHie bacnb. Coahon coh dncnneDe enwey Mni KbiBnKaiBnBn
③ ΘπωeγΚυραλήν Bateρηκόση Αθαρεις Μαραπ Μτραβίνηλ, Μινικημει (5) θειδιδεη Ερεις Μχατια σρηλασαβγιδη εἰτι τικός δοῦνινιδύ 180°-κα δυραύπει. 10 κεγκύ ἀντιπίς.
④ CoidaKeinKanBpneyTMyMecinCal(10)KaItaDaaH bacbHb3. DcNnneJe KbckAyaKtka CAL2 6enrici naJa 6oNaBd. CoaOH cncnneJe enyMeHi (OaHa apblXbnltamai Kepcrtenei. Onywe Kypanb Endi ocbJxHacany 6eI BoBbHua KaTaNkBpneHedi
⑤ Coah coh eHwey KpaBih kapaMa-KapbJxHaacy bti BoHHa KaHbpeyKaKet. On yuH hwey KpaBih TiriHEn Typanayra apHAnr BatePnac (6) Temen, an dncne (5) aHir3e Kapan TypabHd aeTin KeNdeHe c0b 6oHHa 6ypaHb. Thuey KpaBnH TIK Ka3bIKbHKKa KOHbHb3. 10 cekHyk KyTHj3.
6 Codan Kein KanInbpey TyMecin Cal (10) nCnneIe CAL 1Benrici Kkka yaKbTKa naia DOnfraHua wamAmeh 2 cekyni iuii de bacnb. CoAH coN dncnneJe enwey Mahi kblbknaiB.
⑦ Θnwey KypalbH Batepnaac Onda npbTeMeH kapan TypaTbHdai, an dncneel (5) 33iH3eH tepic Xkxta opHaIacatbHda etin tic bOBoHHua 180-ka 6pyanb.10 cekyHkyTihJ3.
8 Coada Kein KaHbpey TyMecin Cal (10) KaTadaa BaCbHb. DcNnneJe KbcKya YakBtKa CAL2 BnriCi naJa 6oBanJa. CoaH cOn HcNneJe Ewey MaHI (OaHa apb XblbKtamai Kepcrtenei. OIwey KpyanbEhki EKI TIK HAnacy 6et BoHbua KaTA KaHbPeneH.
Hcykay:erepeiueykypanbI 3KHe 7KaadamapbHaCypeTREKCpETINReN c6b 60bHnua 6pyanMaCa,kan6pNeyniAnkay MymKIn 60nmaDb (DcHcnnneJeDE CAL2 kaa36acbnaa da60nmaDb).
TexHHKaIbIK Kytim XKHe Kbl3MeT
KbI3MeT KepcetyKaHe Ta3anay
EneykypanbH Ta3aYCTaHbI3.
Ouwe KypanbH cyf Hemece 6acKa cykbkTbKTapra 6btaPMAh3.
Nactaynapdb cyanfahn, jyMcaK wSybepekneH cypTih3. Xybl 3aTAPbI HEmecepiKTIeTpdi naDaanlan6BaH3.
Onwey KpyanbI KaHbIb apctbHda y3ak TpyraH bONca, OHbHN MymbcbHaTepic acep etiYIy MMyKIn. Tobnk KeTIptreHHee KeHH enwey KpyanbI WeKteYcIc KaHa na Ia dAnahyfa 60aNabI. KaNbPney KaKet Emc.
Onuwe KpyanbIH TEK KOPraIbIH KaNTacbHda (12) cKaTaHb3 XaHe TaCbMaIaNbHaB3.
XKahayeKaKetJ60bnHAnDa, 1hSey KpyaBn KoprAaTbHn KaTtacbHa (12) Xi6epHina.
TytbinybifKaB3MetKOpcetyKaHe naDanahy Kehectepi
Kb3MET Kepcety optanfBbEhimiJeHDey XaHe OraH
TEXHHKANbIK Kb3MET Kepcety, coHdA-ak KocanBb 6eNekeTep
TypaBb CypaKaTpa J Kayan 6epei. KypamIac 6eNekeTep
BoBHua KeckIn MeN KocanBb 6eNekeTep TpyaBb Manimetep
TeMeHderi MeKeHKaBn 6oBuHua KonKetimDi: www.boschpt.com
Bosch kbl3metriK KEHc6 bepy to6bl 63iIN OHIMpep Xahe onapdbin KepeK-kaapakTabpi Typalb cypaTapbHb3ra Jaxayan bepedi.
CypaKapT KPOO JXHe OKcAnb6BnueKTepe TancbPbc6epe KZHHe MInDettTIpyde EHHmHnIh CHPMaBk TaKpTaNacBnHdAfl 10 TaHbAlbH BHM HEmiHepHin3
OhipywnanapbmyHmopmanapbHbckatanybmeH3neKtp KpaBnJxHcEeyXHeKeiNinI K3MET KeCpETy 6apBnK MmNEKeTep aymaBHydaTeK PoBePbou" HPMaNkHEMeec ABOpTHa3aHaNAhAn Ka3MeET KeCpETOptbnkTapbHa DOpBNaDy ECKEPY! 3AChb3KoJHMENeKeniHReH eHIMpePi naindanyayKiyni, DeHCaybIbHbIg3ra 3HH KENTipy MyMknH.
HIMdpdi3aHcb3XacayXaheTatpyAekmwnikKaHbIbMbctbK Tepin 60bHnHa 3aHMeN KydanaHaB.
116 Romana
Ka3aKCTAH
TytbhybnapraKeHec6epyXaBmapdbKa6bmday optablbfbl:
"PoBept Bou" (Robert Bosch) XLIIC Amatbl K.
KaataKCTaH Pecny6nKacb050012
MyparbaeeK.,180y
"TePmec"60,7ka6aT
Ten.: +7 (727) 331 3100
ΦaκC: +7 (727) 233078i
E-Mail: ptka@bosch.com
CepBNTK Kb3MT KBPcETy OPTaBbKTApB My KabbIaYdnyHKTEPIHIMKMeH KauBly TaPbIy ToBxk JxHeEeKTI AnpataTbCi3: www.bosch-professional.kz pcemn caitTahAn ana anacb3
Kaderekapaty
Enuey Kpyanb, AkymnTOpBn/6atapennapbH, onbHJ Ka6dbkTapbMeOpamacBn Kopwaar anPohTaBkpraTbH peteKdareXkapayopbHnaTancbipyKaket.

Onwe KpyapndapbH XHe AkyMnyTOpnpdb/ 6atapeenapdpy yKoKbcbHaTaTcMaHb3!
TeK kana EO endepi yuih:
Eypona 2012/19/EU epejexci 60bHua JapaMcb3 enuwey KpaJapabJhae Epyona 2006/66/EC epejexci 60bHua 3akblmJanfah Nhemec eck AkyMynTrop/6aTapeennap 6BekK XnHauN kAdere jkapabNybl KaKeT.
Romána
Instructiuni de siguranta

Toate instructiunile trebuie citite si respectate. Daca aparatul de masuru nu este folosit conform prezentelor instructiani, dispositivete de protectie integrate in acesta pot fi afectate. PASTRATI IN CONDITIO OPTIME PREZENTELE INSTRUCTIONSI.
Service scule electric
Strada Horia Macelariu Nr. 30-34, sector 1
013937Bucuresti
H3non3BaHe/cmHaHa 6aTePmHTe
PpenopbUba ce 3a pabota cH3MepBaTeHHypeJda ce non3B aIkanHO-ManraHOB6 BatepHn HnAkymnyatropn.
3a OTBAPRHE HA KANAKA HTHEADOTOA 3a BATEPHIN (3) HATNCHTETACTONOPRAPUBAH6y bot (4) OHOBETe KANAKA HARope. Nocatebe OBNKHOHENN ANKMYNAtoPnPHoBATEPHIN.
PnTOBA BHHMABaIte 3a npabHnHata Nm nnonpHOCT,03Haeha Hn3o6paKeHNHeTo Bbpxy Kanaka Ha OTdeneHNHeTo 3a 8atePM.
CNMBON3a6aTepeHnra
CMBOBt3a6atePHTA(f)BNHnNOKa3BaakTyrAnHHCTatyc HbatePHTE,peCn.akymyataopHTe 6atePHN:
Ducn-KanauTet
nei
90-100%
60-90%
30-60%
10-30%
0-10%
CIMBOBt3a npaaHb aatepeH MHa.CnEh HauNTo HA mHaHETo MoKete Da hMePBe Oue 15-20 min Do hKnIOuBaHETO.
BHHHcMEnHBe BcHKn 6aTePHn, pecn. akymyIatopHnTe 6aTePHn EHNOBpeMeHHo. HsON3BaHTe cMo 6aTePHn HNk akymyIatopHn 6aTePHn Ha eHN npOn3bOHTen n C eHNakbK banaHTet.
Korato HMaMa Da 3knon3BaTe H3MePbATEHnHryep npoDbNkHTeHNO BpeMe, H3BaxdaIte 6aTePHnte, pecn. AkymyNatopHnte 6aTePHn. PInp npOdbNkHTeHNO cbxpaHnBAhe B H3MePbATEHnHryep 6aTePHnte H akymyNatopHnte 6aTePHn B H3MePbATEHnHryHnCTpyMeHT Morat Ja KopoDnHp N da ce camOpa3peJr.
Pa6ota c enektpoHHcTpymenta
Iyckane Bekcnoataa
PpeNa3BaIeN3MePBeTENHnNpH6OpOTOBnAaHBAHe HnpeKTHoNtanaHeHaCbHyeBnIbH.
He 3naraite H3mepbateHHH ypeHa ekctpeMHN Temnepatyn Hnn pe3KN TMepaTPyn npomEHn. Hanp. He ro octabnte npoBxhtenHO BpeMe B ATOBmOHN. Pn r tonemn TMepaTPyn pa3Nkn OCTabnE 3mepbATEHHNt ypeI nbpBO da ce Tneppnpa nped Da ro BKIOUHTe. Pn ekctpeMHN TMepaTPyn Hnn rtonemn TMepaTPyn pa3Nkn TOHOCTA Ha H3mepbateHHH ypeM MoKe Da CE BNOHN.
PnDpKaIeOnopHneNObpXHOCTn p6bOBeTe Ha HcHTOpMEnHa cHt. PnpDA3BaHe HcTPOMeHTa Ope3Kn HOtabPAHHyApH. 3AmpcBAHHn NdeOpmauMOrATJaPnp43BHKAT HETOCHTO B3MEpBAHHa.
H36RbAte CnHH yApH Hn H3nyCkAe Ha H3MepBaten Hn ypeD.CneIyapHn Bb3dEChTBn Bbpxy H3MepBatenHHypeTnBa Da nH3BpWbATE npOBepKa HA TOHOCTaMy, npEa da npOblKHe Ta ro H3N03Bate (Bk.1PpOBepKa Ha TOHOCtHa KAnb6pHa He H3MepBatenHHN HcTpyMeHT, CtpAHu 124).
BkIIOUBAHn H3KIOUBAHne
3a BKNIOUBAHe,peCn. N3KIOUBAHe Ha N3MepBaTeINHr ypeI HA- TCHETe nycOBHn PneKbCBaY (9).
AkoB npOdbJnxKeHHe Ha np6bn.30 min He 6bde HATNCHT BYTOH HaM3MEPBATEHNHpyEDnHnKHOBT MY He 6bde H3MEHEH C NOBEeOT 1,5°,3a npEbaNHa HsatePHNT M3MEPBABETO HA HAKHOHAINCNPLEEc H3KNIOBAT ABOTMTHIO.
124|Былгарский
CmHaHa MepeHa eHnHa (Bx.ΦnR.A)
Mokete da cmeHrte MeKdy MepHHe eHNHHn n" %n "mm/m no BcKHO BPEMe.3a CENTA HATNCHEe BYTOHa 3a CMHA HA MEPHATA EDINHua (B), DOkato Ha DCNpner He ce NOKae (c) pecn. (b). Tekyo h3MEpeHAta CTOnHOCT (e) ce npEn3HcNcRBA ABTO MATNUHO.
PnH3KIINoUbaHe NIOBTOPO BKNIOUbaHe Na H3MepBaTeINHa np6bOp ce 3ana3Ba nocneHNO3nON3BaHaTate MepHa eHNHa.
BkKIOUBAH/3KIOUBAH Ha 3ByKObA TcHnHa3aun
C6ytoha 3BvkyOB CnHAn (7) MoKeTe Da BkIIOUHTe NIN H3KIOUHTe 3BvkyOBa TcHnAm3auN. PIn PB KIOUYeB 3BvkyOB CnHAn Ha CnDNNEe cNo kON3aBA HnKIAuHrta 3a 3BvkyOB CnHAn (g).
Korato BkIOUHTe H3MePbATEHnYpeD,3ByKObTa CnHnHa3a- 1E BKNIOUHeA.
H3MepeHa CToHOCHT N NOMOu 3a HAcOyBaHe
N3MepBaTeHnHa cToHIOCT (e) ce AkytaIIN3npa PnB CBAKo DBNKHeHne Ha N3MePBeTaHnHry yed. PpE pe3Kn PnpOemHn HnNoJooHeHTo H npN6bopa N3auKaBnYe COTyHTaHTo, DOkato N3o6pa3RBAhata Ha NDCNNNE ToCIOHCT npeCTAte Da ce pONPMHn.
CnopeI nIOJKeHHeTo Ha 3MepBateHnry ypeI h3MePBeTHeHa- tA CTOHOC H MEPHATA eINHnca CE NOKa3BATaBpTRHn HA
180°HaDnCnner. Taka cToHocTt MoKe neCHO da ceOTcTe n TabaHHaNo3uH.
H3mepBaTeHHrYpeDnOKa3BaUpe3nOMoTa3a HnBEnHpAne (a)HaMnCnIeB K KaKaN oKoCA TpRbBa Da ce HAKNOH, 3a Da ce DOCTHRe YcEBA tCTOHCT. PnI CTaNdApTN H3MePbaHnueBtA CTOHOTc E xOp3HTANATA, pecN. BEpTHKAnATA, npI pHyHKuTAta Hold/Copy-3anAmTeHATA H3MepeHa CTOHCT.
Ako zenebata ctoHOBCTe DOCTHNE,CTPENKHTHe Na NOMOHTa3a HNEBUNPAhe (a) yracBat n npn BKNIOUeH 3BYKOB CNHAn pno3BY- YABA NOTOFReH ToH.
Функим 3анзмерванe
3aDbpxKaHe/npehacHe Ha n3MepeHa cToHooCT
C6yToHa Hold/Copy (11) MoTa Da ce ynpabnBaT 2 dyHKmH:
-3aIbPkaHe(Hold)Ha cTOnHooCT Ha N3MepBaHe,DOHN AKO 3MnpeBATEENHHYyepNOCNE ce npemecTN (Hapr.3aUTOHO3 MEPBATeENHHYyepE Ha N03uHn, HA KORTO DcNPIeR TNOo CEOTHTA);
-ПпeдаBaHe (Cupy)Ha CTоHIOCT Ha H3МeрBaHe.
DyHKUH Hold:
HaHTHcHETeKpATKoTpaHO 6byToHA Hold/Copy (11).AkTyAnHATA CTOHIOCT Ha3MePBAe (e) ce3aBpka HdCnIeN Hece3aIaMaTeRBA,HHINDKATOpbT HMMra.
HATCHETHE 6yTOna Hold/Copy (11)OTHOBO,3aJa npekpatnTe fyHKUHTA Hold.3anameTeHATA cToH0CT ce H3TPHBIA.PpOdbJIbKAba HOPMAHOTIO N3MEPABa
ΦyHKuR Copy:
- HaTHCHETe npObIbKxHTeNo 6byToHa Hold/Copy (11). TeKYu7aTa H3MepeHa CTOnHOCT (e) Ce KONIPA nHnDnHKatOpbT H haDnCnner CNIPA da MnHa.
- HattCHETe KpATKOTpaHb 6yToHa Hold/Copy (11).3aNaMeTeHa HImepeHa CTOnHOCT (e) Ce NOKa3Ba HA dNcHnner HHNDKAtOPbT H Mira.
-Notabete H3MEpBATEHNNH ypeHa MRCTO, KJDETO H3MeHepaHT CTHOCT TPR6Ba DA bSe IpeHeneHea. Pn TOBA TbpBOHAYAHOTO HACOVAHBe HAypeHa HMA 3NaueHHe. NOMOUHNTe CTPENK (a) NOKA3BAT NOCKoTA, BKOIO H3MEpBATHNRTypeTPOBA DA bSe HAKNOHE, 3a Da bSe DOCTHRATPpeAHCHNRA HAKIO. Pn JOCTRAnE Ha 3anaMeTeHH AKHON CE YyBa 3ByKB OINHAN, NOMOuHHTe CTPENK (a) ceCKPbAT.
HATCHETE OTHOBO KATKOTPAHO 6YTOHA Hold/Copy (11). 3a da ce bBpHebe HOpMaNEpeXHM HaNMePBeAe. HnDn-KatOptbH Ce306pBa38Ha HdNcNne NocTOnHO.
HaHCHETe npoBnKHTenHO 6yToHa Hold/Copy (11),3a da 3anamETHe HOBA CTOHOCT.
-3a da H3TPhete Hold cToHooCT,HaTHcHete KpatKoTpaHo nycOBnna npeKbCBau (9).
PpOBePkaHaTOUHOCCTaHKANHbPpHpeHa H3MEpBaTeHNHHNHCtpyMeHT
IpoBepKaHaToUHocTtHaH3MePbaHe(Bx.ΦnR.B)
Pnepdi KpntHnHn HmepBaHH, cneI rnoEmi TmnpepaPH nPOMeHN nCneI ydpA npOBepaBte ToHcCTHa H3MepBaTENHHypeN.
IpeHn3MepBaHeroHa HAKIOHO <45" npOBePKaT Tp6Ba DaCTaHe Ha paBHa, NOUTH BODOpBAH NoOBbpxHOCT, IpeHn3Mep
BaHTo Ha HAcIIOHH >45° BbPxy paBHa, NOHTOBeCHA NOBbpxHOCT.
BKnIOUeTe H3MePbATEHnHpyed n roNoCTabete Bbpxy BoOpabHata,peCn.OTBeCHATA NOBbPxHOCT.
H36epete Mehpata eHnHua 己 (BK.CMaHa Ha MepHa eHnHua Bx.ΦnA.A",CtpanuA 124).
H3aKaIe 10 s n cneT oBa 3aNmWete pe3yntata ot H3MePBA- HETO.
3aBpTeTe H3MepBATEHnHpyeHa 180° OKoN0 OTBecHATAOC.
3uKaaiTe OTHOBO 10 s cn 3aHmIeTe BTopata H3MepeHa cTOnHOTC.
KanH6pHpaIte H3MEpbATEENHry ypeIc IAMo aKO pAaNHaTa MEXy DBeTe CTOnHOCTn HA H3MEpbAHe e NO-TONMAOT 0,1^
H3bpuete KANH6pHnAeHTo H npH60paB noNtHnA, B KOHO p3AnHKata HA hM3peHnTE cTOnHoCTn eHaXbBpNnIpaPeJeHNO OONYCTMaTbeepHTKnA HnI XOpH3OHTaHa.
Kan6pnaHa BOOpabHn ONOpHn NOBbpxHOCTN (Bx.ΦHr.C)
NobpxoCTta, Bpxy KOTO NOCTABTE H3MEpBaTeHHy ypeD, TpaBa da cKtOKHOHBA Ha He NoBee 05' OTo BDOpabHata NHHA. Ako kTOHeHHeTo eNo-ronlMo, KaHHbPpHaHTe Ce npeKcbCA CnHnKaIaIc...
① BkIIOUeTe H3MEpBaTeHNH ypeH n ro noctabete Bbpyx B0DopAbHATA NOBbXHOCT, TakaYe NbeNenata 3a BOdoPABHO HnBeHnPahe (1) Da coHn Harope, a DmCnneT (5) Da e HacoueKnBm Bac. N34kaKe 10 s.
② CnTe TOBA HATNCHE 3a OK.2s6yTOHa 3a KaHINb6PnpAne Cal(10),DOKATO 3a KpATKO He CE NOKAKe CAL1 Ha DCNJIeR.CnTe TOBA H3MEpeHATA CTOHOCT HA DHCNIeR 3a NOHbA DA MIRNA
3aBbpteteHmEpBaTeHHnYpeHa180°OKOONOTBeCnataoc,TakaueyHbEnata3aBOdoPABHOHMBennpaDe CaOHnHarope,dncnT(5)oae daCe HAMpaHaOBpAHTNaHbAcStpHa.H3auKaIte10s.
④ CnED TOBA HATNCHETE OTHOBO 6yTOHA 3a KANHbPnpAne Cal (10).Ha DnCnner 3a KpTko CE NOBBA CAL2.CnED TOBA Ha DCnner CE NOBBA K3MEpeHATA CTIOHOCT (Be- 6e63 da Mna) C TOBA K3MEpBaTeNnHrT ypeE kANHbPnpAan 3a Ta3n NOBbPxHOCT.
5 BeHara CnEe TOBa TPr6Ba Da KaIINbPnPate H3MePbATEENHHypeC nPpMn PpOTHBONIOXKHATA CN NOBbPxHOCT 3a DOHNPAe.3AeNTa 3aBBpTeTne H3MePbATEENHHypeTa KAOKONO XOpH3OHTANHATA OC,Ye Nb6enATA 3a BOOpABHO HNBEnPAe 1a CoNHYaNOHADONY,aDcNnENT (5)da COHN KBM Bac. IocETabe H3MePbATEENHHypeNtne HbPxxy XOpH3OHTANH NOBbPxHOCT.NyakaiTe 10 s.
⑥ CnED TOBA HATNCHE 3a OK.2s6yTOHa 3a KaANHbPnpAne Cal (10),DOKATO 3a KpATKO He CE NOKAKe CAL1 Ha DCNPIE. CnED TOBA H3MEPeHATA CTOHOCT HA DHCNIEN 3a- NOVA DA MWA.
⑦ 3aBbpteteH3mepbaTeHHypeHa180°OKOONOTBeCnataoc,TakaueYn6bentaaBODOPABHOHMBENPAPae DaCOuHarope,dncnT(5)oabeaedeHAMPaHaobpTaHnHaBaCtPhA.HaBCctPhA.HaKaKaiTe10s.
CneToba HATNCHETe OTHOB6byTOHa 3a KaNn6pnpaHe Cal (10).Ha DCnncnEe 3a KpatKO ce NORBb CAL2.Cnep TOBA HA DCnncnEe CE NORBBa I3MepeHATA CTOHCT (Bue 63 da Mnra).C TOBA H3MePBATEHNHTy e KaNb6 pnpAHO THOBO 3a DBeTe XOpH3OTAHNI NOBpXHOCTn.
YbTBaHe: aKo npN CTbNkA ③ N ⑦ H3MepBaTeHnHrT ypeH He b6- 3aBbTpH N OKO NO6bpaHEna H fHpyaToc, KAnHbPpHa- He To Me Moke Da b6 De 3aBbpuHeO (CAL2 He ce NoRBA Ha HdCnne).
Kan6pnahe Ha OTBeCHN ONOpHN NOBbpxHocn (BX.Φr.D)
NoBpXHOCTa, BpXy KORTO NOCTABTE 3MMEPbATEHNNY ypeN, Tp6Ba Da ce bTKIOHnBa Ha neoBece or 5° ot OTBeCHATA NHH. Ako OKNOHEHnEO e no-TOJMAO, KaINbPnpAHeTe c peNkCBa C HnKnauu...
① BkIIOUeH N3MepBaTeHNHrypeH n ro NOCTaBeTe Bbpyx OTBecHATA NOBpXHOCT, TakaYe IINbEnata 3a OTBECHO HN BENHPahe (6 Da coun Harope, a dncnneT (5) Da e hacoueh KbM Bac. NuaKaJIte 10 s.
② CnED TOBA HATNCHETE 3a OK.2sBYTOHA 3a KaHINb6PnpAne Cal(10),DOKATO 3a KpATKO He CE NOKAKe CAL1 Ha DCNPIIe.CnED TOBA H3MEpeHATA CTOHOCT HA DHCNIeR 3a NOHbA DA MIRIA.
3 3aBbptete HmepbaTeHHypeH a 180° OKO NO TBec-Hata OC, taka ye nibenata 3a BODOpabHO HnBeHnpahe da
126|Блларски
coun Harope, nCnneT (5) 06aue da ce hAmnpa Ha o6-pathata Ha Bac cTpHa. N34akaiTe 10 s.
④ CnED TOBA HATNCHETE OTHOBO 6yTOHA 3a KaINb6PbPAHc Cal (10).HaNcNNEA 3a KpATKO CE NOB8BA CAL2.CnED TOBA HA INCNNEE CA NOBBA H3MEpeHATA CTOnHOCT (Be- 6e33 Da MIRA).C TOBA H3MEpBaTeHNHT YpeE kANb6PbPAH 3a Ta3N NOBbPxHOCT.
BedaTcTaTOA Tpa6Ba Da KaHbPpate H3MePbAtenHHyepcnpnHO pOtnHBONoXHATA CN NobpXHOCT 3a DonHPaTe.3aJeNTa 3aBpTe H3MePbATENyEpy Ta Ka OKoIO XOpH3OHTaNtA OC,CeNbEnaTA 3a BODopABHO HNBpeHaPe (7) da Couy HADony, a DcNpNeT (5) da COUY KBM Bac.DonpTe H3MePbATENp Np6Op Do BepTHKaHNA NOBpXHOCT.H3aKaJaTE 10 s.
CnepToBa HATCNHETa 0K.2sBYTOHa 3a KaJIIN6PnPahe Cal (10),DOKATO 3A KpATKO He CE NOKAKe CAL1 HaNCHnner.CnepToBa H3MEPeHATA CTOHCT HaNCHnner 3a- noTHa Da MInrA.
⑦ 3aBbpteteHmepbaTeHHypeHa180°OKOONOTBeCnataoc,takaueN6bentaaBODopABHOHMBENPapaDea couHarope,HcNpIeT(5)oabe Da ce HAMpa Ha o6-patHnHaBa ctpaHa.3aKaAae10s
8 CnTe TOBA HATCNHETE OTHOBO 6yTOHA 3a KaINb6PbPAHc Cal (10).HaNcINNEA 3a KpATKO CE NOBBA BCAI2.CnTe TOBA HA INCINNE CE NOBBA H3MEPeHATA CTOnHOCT (Be- 6e63 da MIRa).C TOBA H3MEPBATEHNHTY pEe d KaINb6PbPAH 3a DIBETE BEPTKANH NOBbPxHOCTn.
YbTBaHe: aKo npn cTbNkA ③ N7H3MpBeaTeHNHT ypeI He b6- de aBaBpTnK OKOIO K6Opa3eHa n HfynrPata OC, KaHbRpaH eHO Me oKe J da bJe 3aBpJheo (CAL2 He ce IorraBa Ha dncnner).
PndbpxKaHe n cepBn3
PpKaHe H nouchTahe
PoiDpbxKaIteH3MePBeATEHINypeBENHArNCHCT.
He notonraBaiTe H3MepBaTeHnH ypei BbB BOa nn npyri TeuHOCTH.
N3bpcBte 3aMbpCBAHnRA Tc Meka, neKo HABNaXHeHa KpPn. He H3noB3AeTneNoCTBaun npenapatn nnn pa3TBOpHTe nn.
Ako h3mepbaTeHHrYpeD byeDe octabEn npOdbNkHTeHNO BpeMe HaNbXdM, MOxE da CeCTHRe DO hapyuaBaHe ha FyHNKInteMy. BbIpeKn ToBa cne I3cYuBaHaBe ToI e Bb3BpuBa Ta NnHata cn FyHNKuHOHaHIOCT. He e No6xOdoImo 3BbPbUHa He KaJIb6-pnPaeHe.
CxbpaaBbIe H npeHacrte H3mepBaTeHHnHa ypeCaMo Bbb BKNIOeHATA BOKOMIIneKTOBkAra IpeNa3Ha YaHa (12).
PnH HeoXIOHMOCOT PEmOH PpeOCTaBtTe H3MePBATEHHNHYpeB VHaHTata (12).
KInHNTcKa Cnyk6a H KOHCyNTaunr OTHOCHOynTope6ata
CepBn3bT 贝OTOBOPHa BnPocHte BN OTHOCHO pEMOHTH N nOaBpKkHa 3aKyENHOr Ot Bac npOyK, kAKTO HOTOC pe3ePBHN qACTN. NOKOMPOHEHTH CpeTExn HnHFPoMaJra 3a pe3ePBHN qACTN 5EOTKHPTe H: HA: www.bosch-pt.com
EKNBtno KOHcytaunr OTHOCHO yN0Tpe6bata Ha Bosch ue Bn NOMORHe C yDOBONCTBNE pRn BbIPOcH 3a HauHTe npOdykTN ETEXHNI AKECECAOPH.
MOna, npn Bbnpocn H npn npobpBaHe Ha pe3epBnH qacth BNHaR nnoocBaTe 10-uepeHnKaTALOKeH HoMeP, H3nCaH Ha TaBeknA HA ypeDa.
BbIrapn
Robert Bosch SRL
Service scule electrice
Strada Horia Macelariu Nr. 30-34, sector 1
013937 Bucuresti, Romania
Ten.: +359(0)700 13667 (Блгарский)
ΦaKc: +40 212 331 313
Email: BoschServiceCenterBG@ro.bosch.com
www.bosch-pt.com/bg/bg/
Бракувае
Corned ona3BaHe hA OKONHATA cpeA h3MePbaTeHHypeI, 06KHOBcEHTN HAnkyMnATOpHNb BatePHIN, DOnbHInENTHnHnptnHaJeXHoCTH N OAKOBKTH TpRbBA Ce ne ppeBAD3 aONO3TOBPOBaHE hCaDbPkaAHTe CE TBx CPOBHH.

He 3x3b-pnnte 3mepbaTeHNHte ypein n akymynatopnHte 6ateHH/6ateHHte npn 6HTOBnTE otnaB-
Cama 3a ctpaHH ot EC:
Cbrrnacno Ebponecksda HnpekTbva 2012/19/ECn3mepeaTeHne ypeid, KOto He Morat da ce non3Bat nobee, a cbrrnaccho ebponecksda HnpekTbva 2006/66/EO nobpehenn nn hxa6eHN ohKnHOeHN nN akymnatopn batepn Tpa6Ba da ce cbipnat n pedeBa 3a onnon3BTOBPOBAhe Na cbdpkauNTce B Tx cyPOBHN.
MaKeDoHcKn
Be36eDnHn HAnomeHn

CHTy ynatCTBA tpe6a da c npoohtaat n da ce BHIMABA hHb. DOKONKY MEPHNOT ypeH ce KOPHCTn COrnACHO npnoXeHHTte HNCTpyKuHN, MOKe Da c HApuyh FyHKNJata Ha BRpaDHNTe 3auTTNH MEXAHNM BO MEPHNOT ypeD. IOBPO YYBAJTE FNI OBNE IYATCTBA.
MepHnOt ypeI cmEe Ia ce nonpaba cmo Od ctpaHa n KaBnHcKyBaH CTpyeH nepcoHn Cmo coOprrHaHH pe3epBNHeNoBH.CaMo HtoJauHHe6 BldTe ChryPhn BO 6Be3edHOCTa Ha MEPHnOt ypeI.
He pabotete co MePHHOT ypeB BO OKONNHa Kade nocton onaChOCT oEKCnNo3Ja, Kape HMa 3anaHNb TeyHOCT, rac HmnpaunHa. MepHNOt ypeB coDzBa HcKn, KOH MoKe da ja 3ananat npabr Hnn napeata.
Onnc Ha npOn3B0DoT nepΦopMaHcHTe
BHHMabajte Ha cInKHe BO npEHNOT den Ha ynatCTBOTo 3a KOpHCTeHe.
YnOte6a co cooDbetHa HameHa
MepHnOt ypeE hAmEHet 3a 6p30 H npeuHNO MepeHe Ha KocHH.
MepHnOt ypeE nporOeH 3a KOpHCTeB Bo BHATpeHEn HnadBopeHEn npocTOp.
Nmyctpaunja Ha KOMNOHEHTN
HymeppaheTo Ha cInKHe Co KOMIOHEHTn Ce OJHecyBa H npka3OT Ha MePHNt ypeI Ha rpaPnKATA CTpAHua.
(1) Nibena 3a xOpHIOHTaIHO H3paMHyBaHe
(2) Cepckn 6poj
(3) Kanak ha npperpaata 3a 6aTepeHH
(4)ФнкраьеHaKanakotOДпретадаТабateи
(5)EkpaH
(6)Пибениза Вертукално Иразмнувае
(7) Konue 3a cunhanen ToH
(8) Konue 3a npomeHa MepeHHTe eHHnHn
(9)Konue3aBknyyBaHbe-HcknyyBaHbe
(10) Konque 3a kaannbpaunja Cal
(11) Konque Hold/Copy
(12) 3aunTHa yaHTa
Elenentn3a npka3
(a) TomoW npn 3paMHyBaHe
(b) Мерншемпун%
(c) Mepha eDHHua mm/m
(d) INHdkaTOp H 3a BpeDnOCTa Ha MemOpnJaTa HOLD
(e)ИЗмереша ВретнocT
(f) Pnka3 ha 6atepnjata
(g)PnKa3a CnHnAeHnTOn
TexHHKn IoTaToU
3aMeHa Ha MePa eHnHa (BnHn CnHa A)
BO cekoe Bpeme MoKeTe Da CmEHnTE NOMEy MepHnTE eHNHHU 0" , " % " " n " mm/m". 3a Toa, npTHcKajte ro KOnHTe 3a npOMeha HA MEPHnTE eHNHHU (8)doKeAe He ce NOJAbN CaKaHaTae MEPHa eHNHHa HApNKJAZOT (c) oJH. (b). AKTyEnHata NImpeHema BpeHOCT (e) AToBOMATCKH Ke e pncMeTA.
PnHCKnyBaBe H BknyBaBe Ha MEPnOT ypeD, NOCTaKaTa HA MEPnATA eHNHua OCTAHyBa 3aYBaHa.
Bknybahe/ncknybahe Ha cHrHaHHOT TOH
CoKONETO CRIHANHETOJMOKETE daTROBKNYHTNE HNCKNYHTNE CRIHANHOT.1PnBKNYHTCNHRANHETOH,Ha EAKAPOTe cNojabya pNkA30t3a CRIHANHETOg).
KoraKe ro BKNyUHTe MEPHNO t anat, TOHCKNOT CnHAn CTaHApDHO E BKNyUHe.
PnkaHa H3mepeHATA BpeHocT N NOMOu npn H3pAMHyBaBe
H3mepehata BpeHocT (e) ce akyprpa npn ceKoe dBnHexeHa MePHNOT ypeI. No noroennm DBeNHeHa HmepHnO TpeI, nOuekajre coHTaheTo Ha H3mepehata BpeHocT,doKeA He CTane HenpOMeHnBa.
Bo 3aBMCHOCT od nOIOXBATA HA MEPHHOT ypeD, h3MEpeHATA BpEHOCT N MEPHATA EINHua Ke CE npHKAAKAT Ha ekpaHOT CBPTENa 3A 180°. PnHTOA npHKAAOT CE nHTA n ppi pa6oTeBe Ha nnaFOH.
MepHnO tye pIHKaKyBa CO NMOOW npN H3pAMHyBaBe (a) HA ekpAHO, BO KOA HACOKA MOPA Da CE AAKOCH, 3a Da Ce NOTHHE cENHATA BPEHOCT. PnH CTAnDAPnHTe MEpeHa, cENHATA BPEHOCT pETCTAByBA XOpH3OTAnA MeH. BEPtKANA, BO FyHKNJATA Hold/Copy 3auYBaHAne MoHpeBA BPEHOCT.
Ako ce NoctnHne cHnHata BepDHOCT,ce 6pHsWAT cTpeNkHe H nOMoIta npH K3pAMHyBahe (a) INP BKNyEHNOT CTHAnen TOH CE ORNACYBA KOHTNYHYPAN TOH.
MepHHyHKuH
3aDpxyBaHe/npEHOHn3MepeHaBpeHOCT
Co konHTo Hold/Copy (11) MoKe Da ce ynpabyBaat
2fynKuHn: 3aepyBaHe(Hold)Ha eJHaN3MepeHa BpeiHoCT,dypn Kora MEPHnotypeDnonoHHTeHNOce nomecTyBa(Ha np. 6bnjeKn MEPHnotypeE BO nO3nJa,kaedeekpAhoteTeKo qunTINHB);
-Пренисувае (Copy) на Измерения Вретноct.
Функида Hold:
- PnHtCHETe ro kpatko konueto Hold/Copy (11). AkyTeHnHaTepMa HpaBpeHocT (e) ce3aDpKyaBa hekpAHOt n ce3aayyBa, HnHKatopot Htpenka.
-Пгнснөгэн КОНТЕ Hold/Copy (11) одно, за ща се зарши phунши joта Hold. 3aчыаната рбдоче ce 6рше. Hорmanното мерөне се пордожув.
130|MaKeJOnHcKn
ФункшиjaCy0p:
-ПиNTNCHETe ro donro konHToHOld/Copy (11).AkTyenHATA HmEpeHa BpeHocT (e) ce konHpa HnHdkaTOpOT H noctoJahO Ke ce noJaYbA ha ekpAHOT.
-ПиTNCHETe ro Kpatko KonHcTe HOld/Copy (11). 3auyBaHaTAt MePHa BpeHocT (e) ce npKkaKyBa Ha ekpaHOT n HnDnKaIopot H TpenKa.
- NoctabeTe ro MEPHNOYpeJHa CEHNHO MecTO, Kade wTo TpeBaJa da cnepeHc H3mepeHata BpDnOCT. PtnoTA He bAaKHO h3pAMHyBaBeTo HA MEPHNOYpeJ.YanATCbTbA 3a h3pAMHyBaBe(a) ja NOKAKyBaBaTa HAcOKATA, BO KOJA TpeBaDa dBKNK MePNHOT ypeJ, 3a Da ce NOCTHRe KOINHpAHTa KOCHa. PnR noCTHryBaBe Ha 3auyBaHATA KOCHa, Ce CnyuHa CnHAnHe ToH, YnATCbTbA 3a h3pAMHyBaBe (a) ce racat.
OndoBo npnHCTe Ro Kpatko KonHTo Hold/Copy (11).3a BpaKaHe H opMaHIO HepeHe. NnHnKATopOT H noctoJaHO Ke neNojABya H ekapOH.
- Pnntnche ro donro konyero Hold/Copy (11), 3a da ja 3auyBATE HOBA BpeHOCT.
-3a da ce 6pniue Hold-BpeHocT, npnTHcHete KpaKo Ha KOJIeTO 3a BKNyUbaHe/WKnIyUbaHe (9).
PpOBepKa HAnToHocTa H KAnH6pHpaBe Ha MePHnOtype
KaHbpaquaHaXOpH3oHTaHHNOBpHHN3aHanerHyBaHe (BnHcNkCA)
NobpwnHata ha kojawto roHanerHybate MePHHOT ypeD, He CMEE da OCTanyBa NOBKe 05° oXOPHN3HTAnATA. JOKONKY OCTanyBaHeto e noroneMo, KaIIbPnPaHeto Ke ce pKneHHe co nPKHa3OT...
① BknyeTe ro MeHHOT ypeH nNoCTabete ro Ha xOpH3OHTaHa NoBpHnHa BO TaKbA NonoK6a, Nno6eNaTa 3a XopH3OHTaHNO H3PAMYHBAhe (1) NOkaxKaHarope EekpaHOT (5) da 6ne HacoOH KOn BaC. NoueKajte 10 s.
② Notoa npHtnche ro konyeto 3a kaniHpaunja 3a okony 2s Cal (10),doKeKa kpatKo CAL1 Ke ce nojABnHa ekpahOT. Notoa H3MepeHata BpeHocT TpenKa Ha ekpahOT.
③ Cbptete ro MeHHOT ype3a 180° kony BePTKKaHATA OCKA, TAKA uTO hENbenaI nNoHATamy Ke noKAKyBa HArope,a Ekaphot (5) cenak Ke 6nDE CBPTe Ha cTpaHATA KOH BAC. NOpekajre 10 s.
④ Notoa odnohOB npnHmchete ro konueTo 3a kaIih6paunJa Cal (10).Ha ekpahOT kpatKO Ke ce pinnKaeCAL. Notoa ce nojabya H3mepeHATA BpeHocT (He tpenKa nobEke) Ha ekpAHOT. MePHOT ypee Cera e ODHOBO KaIIb6pPAn 3a Obaa NobpuHHa HanaerHyBahe.
5 Iotoa mopa da ro kannbprapate MePHHOT ype3a cnpoTHBnATA NOBpHHa HA HanerHyBaBe. 3a Toa Bptete ro MEPHHOT ype3 no XOPH3OHTANHATA OCKA, N6BnATA 3a xOpH3OHTANHO H3PamHyBaBe (1) da 6Wne Ha DOnHATA cTpaHa n EkapHOT (5) nokaxyBa KOH Bac. NocTabete ro MEPHHOT ype3 ha XOpH3OHTANHa NOBpHHa. Noeekajte 10 s.
I Iotoa npHTHcHete ro konyeto 3a kaih6paunja 3a okony 2s Cal (10),doKeKa kpatKo CAL1 Ke ce nojABn Ha ekpanhot. Iotoa h3MepeHa TpeHocT TpenKa Ha ekpanhot.
⑦ Cbptete ro MEPnHOT ype3 180° OKONY BEPTKAnHata ocka, taka 1to H6benata n NoHATAMy Ke NOKaKYBa hADony,a eKpHOT cenak Ke 6dE CBpteh Ha cTpaHATA KOH BAC. PoeKeJaTe 10 s.
8 Itoa oJHOBO npTHCHETe ro konUeTo 3a KaHbpaunJa Cal (10). Ha ekpahOT kPATKO Ke c npKAnke CAL2. Itoa ce nojabyu H3MepeHATA BpeHOT (He TpENKa NOBEKe) ha ekpAHot. MepHOT ypeE cer e OHOBO KANbOpHAp 3A DBete NoBpHHN HA HanerHyBaBe.
Hanometa:ДOKONKYМернOTуpe,HeceBPTNOKNYOCKATA KOJAtoE npKAKXANA HcNkInTe pH YekOpITE ③ N②. KaIIbpauiJATA He MoKeJa ce3aBpHn (CAL2 He ce nojAByBaHa ekapHot).
Kan6paunjaHaBepTHkanHnNoBpuHHN3aHanerhyBaBe (Bnu CnkaD)
NobpiHnata Ha kojauTo roHanerHyBaTe MepHnOT ypeD, He CMeE daOCTanyBa NOBEKe 05° oB eptRknAna. DOKONKy OTOcTanyBaHBeTo e noroneMo, KaJIbPpHaBte Ke ce npkeHHe co pNkHAOT...
① BknyuyeTe ro MePHHOT ypeH nNoCTabete ro Ha xOp3HOHTaHa NOBpShHa BO TaKaB NONoXbA, Hn6Enata 3a BetHKaIHO hKamHyBaBe (6) NOKaKaBaHarope H ekpaHOT (5) da BnDE HAcOeH KOH Bac. NocKeJte 10 s.
② Notoa npnncheTe ro konTuTo 3a kaHbpaunja 3a okony 2sCal(10),noDEka KpATKO CAL1Ke ce nojabn Ha ekpaHOT. Notoa n3mepehata BpeHOCT TpeKHa ekpaHOT.
③ Cbptete ro MEPnHOT ypea 3a 180^ OKony BepTHKaHnata Ocka, taKa IIO HbEnata n NoHATamy Ke NOKaYBa Harope, a EKpaHOT (5) cAnak Ke 6Ibe Cbpten Ha crpaHATA KOH Bac. Noekeajre 10 s.
④ Notoa oJHOBO npTnCHETe ro konTueto 3a KaHbpaunJa Cal (10). Ha ekpanhot KpatKOKe ce npKAXe CAL2. Notoa ce nojabya H3MepeHata BpEHOCT (He TpENKa nobEke)Ha ekpanot. MepHOT ypeed cera o eoHOBO KaHbOHPaH3 a ObaanOBpHHa HA haneHyBahe.
5 Notoa mopa da ro kaHb6pnpate MePHNOT ype3a cnpoTHBnATA NOBPIHnHa HaneHyBaHe. 3a Toa BPTeTo R oMePHNOT ypeD no XOpH3OHTanHATA OCKA, IN6enata 3a BeptHKaIHO n3paMHyBaHe (6) da bne Ha doHNATA cTpaHa n EKPAHOT (5) nokKaYBa KOH Bac. NocTabete ro MePHNOT ypeD ha BePHTKaNHa NOBpHnHa. Noekajte 10s.
⑥ Notoa npTHICHETe ro konHTe 3a kaHbpaunja 3a OKony 2s Cal (10),doNeKa kpatKO CAL1 Ke ce nojABn Ha ekpaHOT. Notoa H3MepeHata BpeHocT TpEka Ha ekpaHOT.
⑦ Cbptete ro MEPHnOT ype3 180° OKONY BEPTHKaHATA OCKA, Taka ITO HnBcNATA NHONATAMy Ke NOKaKYBa HAOJNY, a EKPAHOT cenak Ke 6dE CBPTEN Ha cTpaHATA KOH BAC. NOpekajre 10 s
8 Notoa oOnHO BO npTnCHETe ro KonTuero 3a KaHn6paunJa Cal (10).Ha ekpahOT kPATAKO ce npNkAe CAL2. Notoa ce nojabya KImepeha TBeDhoCT (He tpenka nobEke) Ha ekpAHo. MepHnO ypeCera e OHOBO KAnHbPnH a3 BeptnKANa NoBpuHn HA HaneHyBaBe.
Hanomena:ДOKONKYМЕнHotуpeД. He ce BPTH OKNY OCKATA KOJAtoE npKakxahana HcNikte pH Nekopitre ③ M ⑦, KANIBpaunjata He Moke Da ce 3abpHn (CAL2 He ce nojabbyHa ekaphot).
OdpxuyBaHbe H cepBnC
OdpxkyBaHe n qHcTeHe
NoctojaHO ODPKyBajTe Ja HCTOTATA Ha MEPHNOT ypeIe. He ro NoTONYbaTe MEPHNOT ypeIe BO BODA INN DpyrTH TeuHocTH. N6pHwETe Rn HEcHTOTHTe Co IaXbAA MeKA KpNa. He KOPHCETe CpeCDTBa 3a YCHTEHe INN PACTBOH.
Dokonky MepHnoT ypeJ e 3nloKeH na 0doJI noDoI rneHNO, MOKeJa ce noJabat npeuK npri HeorObTO fYHKUHOHPaBe. OTKako cienocho Ke ce nCyuH, MepHnoT ypeJ e NOBtropHO HeorpaHNeNo NOrTBeH 3a npImHea. He e Nortpe6Ho KANbprpAbHe.
MepnHOTypecknaipapte ro n trpncnpapjre ro caMO Bo 3auTTHTa YaHaT (12).
Bo ciuyaj da tpeba da ce nonpaBn, npatete ro mePHNOTypeB BO 3aHTHTHATA qHaT (12).
132 | Srpski
CepBncha cnIy6a H COBEm npH KopHeBe
CepBnchata cnyk6a Ke odroBOpn Ha BaunHte npaaBa BO BPCKa co nnoPabKt aOpKyBaHbTeHO Ha BAnOH npO3BOd KAKo Hpe3EBHnTE DeNoB. O3Ka Ka 3eKcN03Ja HnHOpMaunn 3a pe3EBHnTE DeNoBN HcTo Taka Ke HajTe Ha:
www.bosch-pt.com
TMMOT 3a coBetyBaHbe npn KOpHCTHe Ha Bosch Ke Bn NOMORHe DOKOKKY HMaTE npAshaHa 3a HauHTe npOn3BODn H ONpema. 3a CITE npAshaHa HnapaKn Ha pEzePBn DenOBn, Be monHme HabeTe Ro 10-uzPepHnO6oB ojo ndcneuHkaunohata nIPOKA ha npOn3BODt.
CebepHaMaKeDoHnJa
Д.Д.Енектис Сава Ковачевский 47Hb,бpoj 3 1000 Ckonje E-noша: dimce.dimcev@servis-bosch.mk Интерет: www.servis-bosch.mk Тen./фakc: 02/246 76 10 Моб.: 070 595 888 Д.П.T.Y“POJKA" Jани Кунровский 66;T.LAВТOKOMанда lokan 69 1000 Ckonje E-noша: servisrojka@yahoo.com Тen: +389 23174-303 Моб: +389 70 388-520,-530
OtctpaHyaBaBe
Mepnhe ypeH,akymyataopckHte 6ateHH/6ateHHte. onpemata HAm6aJauKHe Tpe6da Ce OCTpaHAT HA EKOLOuKN npKpafTINH HauHH.

He n pfnpajte MepnHte ypeHn 6aTePnHte BO domaunata KaHTa 3a Otnaou!
Cama 3a 3emjnte oEY:
CnpoeEbponckataHpeKTmba2012/19/EU MepnHte ypein 8to c BOH ynpot6a HneKTHNHe INN KcOHNCTeHnTe 6BateHH CnpoeDpHkTbMa 2006/66 EC Mopa OdoHn da ceco6epat n da cepeKnIPAaat naOBTOPA hynpt6a.
Srpski
志:当期③吴⑦⑥⑧⑨⑩⑭⑮⑯⑰⑱⑲⑳⑴⑵⑶⑷⑸⑹⑺⑻⑼⑽⑾⑿⑽⑭⑮⑯⑰⑱⑲⑳⑳⑵⑶⑷⑸⑹⑺⑻⑼⑽⑾⑿⑽⑭⑮⑯⑰⑱⑲⑳⑵⑶⑷⑸⑹⑺⑻⑼⑽⑾⑿⑽⑭⑮⑯⑰⑱⑲⑳⑵⑶⑷⑸⑹⑺⑻⑼⑽⑾⑿⑽⑭⑮⑯⑰⑱⑲⑳⑵⑶⑷⑸⑹⑺⑻⑼⑽⑾
六制
muaaannnnaaananaananaananaananaananaananaananaananaananaananaananaananaananaananaananaananaananaananaananaananaananaananaananaananaananaananaananaananaananaananaananaananaananaananaananaananaananaananaananaananaananaananaananaananaananaananaananaananaananaananaanara
7
n79a/naaunuaan
yuuuunnnnnaaannnnnnaauuunnnnnae 100000000000000000000000000000000000000000000000000000000000000000000
anannnnnna
nuaaannuun (f) uanaanuun nnaaannnnn
| in ### | ### |
| 90-100% | |
| 60-90% | |
| 30-60% | |
| 10-30% | |
| 0-10% ### | |
WuWuWuWuWuWuWuWuWuWuWuWuWuWuWuWuWuWuWuWuWuWuWuWuWuWuWuWuWuWuWuWuWuWuWuWuWuWuWuWuWuWuWuWuWuWuWuWuWu
Daaananaaannnnaa anananaananaananaananaananaananaananaananaananaananaananaananaananaananaananaananaananaananaananaananaananaananaananaananaananaananaananaananaananaananaananaananaananaananaananaananaananaananaananaananaananaananaananaananaananaananaananaananaananaananaan
nnaa-aaananaa
nnaaannnnnnaaae Daaanennnnnnnnnnnnnnnnnnnnnnnnnnnnnnnnnnnnnnnnnnnnnnnnnnnnnnnnnnnnnnnnnnnnnnnnnnnnnnnnnnnnnnnnnnnnnnnnnnnnnnnnnnnnnnnnnnnnnnnnnnnnnnnnnnn nn n
1754
iunnnnnae nnne nnnnne e) aen annn ennnnne 1180aennnnnnnnnnnnnnnnnnnnnnnnnnnnnnnnnnnnnnnnnnnnnnnnnnnnnnnnnnnnnnnnnnnnnnnnnnnnnnnnnnnnnnnnnnnnnnnnnnnnnnnnnnnnnnnnnnnnnnnnnnnnnnnnnnnnnnnnnnnnnnnnn nnannn nnannn nnannn nnannn nnannn nnannn nnannn nnannn nnannn nnannn nnannn nnannn nnannn nnannn nnannn nnannn nnannn nnannn nnannn nnannn nnannn nnannn nnannn nnannn nnannn nnannn nnannn nnannn nnannn nnannn nnannn nnannn nnannn nnann nenn nenn nenn nenn nenn nenn nenn nenn nenn nenn nenn nenn nenn nenn nenn nenn nenn nenn nenn nenn nenn nenn nenn nenn nenn nenn nenn nenn nenn nenn nenn nenn nenn nenn nenn nenn nenn nenn nenn nenn nenn nenn nenn nenn nenn nenn nenn nenn nenn nenn nannn ne
(a)
wnnnn
n7nnnnae
Hold/Copy (11) 2 Wn#u: - (Hold) nannnnnnae nnne ne eaeennnnnne nnnnne nnnnne nnnnne nnnnne nnnnne nnnnne nnnnne nnnnne nnnnne nnnnne nnnnne nnnnne nnnnne nnnnne nnnnne nnnnne nnnnne nnnnne nnnnne nnnnne nnnnne nnnnne nnnnne nnnnne nnnnne
- 前面(Copy)的声明声明
Wandu Hold:
Hold/Copy (11).nnnnnnaaennnne (e) aonnnnnnnnnnnnnnnnnnnnnnnnnnnnnnnnnnnnnnnnnnnnnnnnnnnnnnnnnnnnnnnnnnnnnnnnnnnnnnnnnnnnnnnnnnnnnnnnnnnnnnnnnnnnnnnnnnnnnnnnnnnnnnnnnnnnnnnnnnnnn
- nuiu Hold/Copy (11) 0nneuuaanlwnuHoll nuiuunlue:ynauoanlu mnnrnnnunulnae
Hold/Copy (11).
Hold/Copy (11). H
- 1000000000000000000000000000000000000000000000000000000000000000000000000000000
Hold/Copy (11)
- nuiuulHold/Copy (11)
Hold nauuua (9)
nannnnnnnnnnnnnnnnnnnnnnnnnnnnnnnnnnnnnnnnnnnnnnnnnnnnnnnnnnnnnnnnnnnnnnnnnnnnnnnnnnnnnnnnnnnnnnnnnnnnnnnnnnnn
nannnnnnnnnnnnnnnnn (nnnnneB)
1 10
2 2nauu uauu uauu Cal (10) uuuu 2 uuuu CAL1 uuuu uuuu uuuu uuuu uuuu
3 180° 5nunuunuunuunuunuunuunuunuunuunuunuunuunuunuunuunuunuunuunuunuunuunuunuunuunuunuunuunuunuunuunuunuunu
4 uannnnaaannnnnau Cal (10) anncal 2
5 10
6 2nauu uauuauuauuCal1 uuuuuaa uuuuuuuuuuuuuuuuuuuuuuuuuuuuuuuuuuuuuuuuuuuuuuuuuuuuuuuuuuuuuuuuuuuuuuuuuuuuuuuuuuuuuuuuuuuuuuuuuuuuuuuuuuuuuuuuuuuuuuuuuuuuuuuuuuuuuuuuuuuuuuuuuuuuuuuuuuuuuuuuuuuuuuuuuuuuuuuuuuuuuuuuuuuuuuuuuUU
2 1800 nunuluuu uanu (5)nannnnn
Cal 10) CAL2
Uuunnununnnnnnaa annnnnnnnnnnnnnnnnnnnnnnnnnnnnnnnnnnnnnnnnnnnnnnnnnnnnnnnnnnnnnnnnnnnnnnnnnnnnnnnnnnnnnnnnnnnnnnnnnnnnnnnnnnnnnnnnnnnnnnnnnnnnnnnnnnnnnnnnnnnnnnnnnnnnn
① 1
2 2nauu uauuauu uauu Cal (10) uuuuuu 2 uuuu CAL1 uuuuuu uuuuuuuuuuuuuuuuuuuuuuuuuuuuuuuuuuuuuuuuuuuuuuuuuuuuuuuuuuuuuuuuuuuuuuuuuuuuuuuuuuuuuuuuuuuuuuuuuuuuuuuuuuuuuuuuuuuuuuuuuuuuuuuuuuuuuuuuuuuuuuuuuuuuuuuuuuuuuuuuuuuuuuuuuuuuuuuuuuuuuuuuuuuUU
3 mnnn 180° snnnnnnnnnnn nn nnnnnnnnnnnnnnnnnnnnnnnnnnnnnnnnnnnnnnnnnnnnnnnnnnnnnnnnnnnnnnnnnnnnnnnnnnnnnnnnnnnnnnnnnnnnnnnnnnnnnnnnnnnnnnnnnnnnnnnnnnnnnnn
4 uanmuaaauuCal (10) 5nCA2 11111111111111111111111111111111
184|n
5 10
6 uanannnauwauuauuCal (10) unuuuuu 2 uunu CAL1 uunu uuuuuaa aau
7 muiu 180o uunuluuuuaanuus
Ca10)CAL2 111111111111111111111111111111
wnnnn: nnlunnuuueo 00000000000000000000000000000000000000000000000000000000000000000000000000000
T
nunnuuuaanrnnnaa
nunnnnnae nannnnae nannnnae nannnnae nannnnae nannnnae nannnnae nannnnae nannnnae nannnnae nannnnae nannnnae nannnnae nannnnae nannnnae nannnnae nannnnae nannnnae nannnnae nannnnae nannnnae nennnnae nannnnae nannnnae nannnnae nannnnae nannnnae nannnnae nannnnae nannnnae nannnnae nannnnae nannnnae nannnnae nannnnae nannnnae nannnnae nannnnae nannnnae nannnnae nannnnae nammnnnnne nnennnnne nnennnnne nnennnnne nnennnnne nnennnnne nnennnnne nnennnnne nnennnnne nnennnnne nnennnnne nnennnnne nnennnnne nnennnnne nnennnnne nnennnnne nnennnnne nnennnnne nnennnnne nnennnnne nnennnnne nnennnnne nnennnnne nnennnnne nnennnnne nnennnnne nnannnnne nnennnnne nnennnnne nnennnnne nnennnnne nnennnnne nnennnnne nnennnnne nnennnnne nnennnnne nnennnnne nnennnnne nnennnnne nnennnnne nnennnnne nnennnnne nnennnnne nnennnnne nnennnnne nnennnnne nnennnnne nnennnnne nnennnnne nnennnnne nnennnnne nninn
nssnnnnnnnnnnnnnnnnnnnnnnnnnnnnnnnnnnnnnnnnnnnnnnnnnnnnnnnnnnnnnnnnnnnnnnnnnnnnnn
V
mnnnnnnaaannnnnne nnnnnnnnnnnnnnnnnnnnnnnnnnnnnnnnnnnnnnnnnnnnnnnnnnnnnnnnnnnnnnnnnnnnnnnnnnnnnnnnnnnnnnnnnnnnnnnnnnnnnnnnnnnnnnnnnnnnnnnnnnnnnnnn nn nannnannnannn nannn nannn nannn nannn nannn nannn nannn nannn nannn nannn nannn nannn nannn nannn nannn nannn nannn nannn nannn nannn nannn nannn nannn nannn nannn nannn nannn nannn nannn nannn nannn nannn nannn nennn nannn nannn nannn nannn nannn nannn nannn nannn nannn nannn nannn nannn nannn nannn nannn nannn nannn nannn nannn nannn nannn nannn nannn nannn nannn nannn nannn nann
lnu
Inu wun 150
wnu 1 1
wnu 2525 uwwu 4
wnu 2020180
wnu: +66 2012 8888
wnu: +66 2064 5800
www.bosch.co.th
nnu 10/11 mj 16
nnu 10/11 mj 16
nnu 10/11 mj 16
nnu 10/11 mj 16
1
nnae nnnnne nnnnne nee nnnnne nnnnne nnnnne nnnnne nnnnne nnnnne nnnnne nnnnne nnnnne nnnnne nnnnne nnnnne nnnnne nnnnne nnnnne nnnnne nnnnne nnnnne nnnnne nnnnne nnnnne nnnnne nnnnne nnnnne nnnnne nnnnnee nnnnne nnnnne nnnnne nnnnne nnnnne nnnnne nnnnne nnnnne nnnnne nnnnne nnnnne nnnnne nnnnne nnnnne nnnnne nnnnne nnnnne nnnnne nnnnne nannnee

y
Palma Tower 10th Floor
Jalan RA Kartini II-S Kaveling 6
Pondok Pinang, Kebayoran Lama
Cong ty TNHH Robert Bosch (Campuchia) Don nguyen 8BC, GT Tower, Tang 08, Duong 169
aagwuligle (a) %.wulal 1d8 (b)
p/00 wuai jiaqg (c)
HOLD
wai aai (e)
aJUaU UU (f)
aagai jwj yj (g)
aU
| GIM 60GIM 120 | JUNI | |
| 3601 K76 7003 601 K76 800 | JULI | |
| \( 0^{\circ}-360^{\circ}(4 \times 90^{\circ}) \) | \( 0^{\circ}-360^{\circ}(4 \times 90^{\circ}) \) | JULI |
| ±0,05° | ±0,05° | \( 0^{\circ}/90^{\circ} \) - |
| ±0,2° | ±0,2° | \( 1^{\circ}-89^{\circ} \) - |
| \( \rho^{\circ }50+\ldots\rho^{\circ }10- \) | \( \rho^{\circ }50+\ldots\rho^{\circ }10- \) | \( \delta \)JULI |
| \( \rho^{\circ }70+\ldots\rho^{\circ }20- \) | \( \rho^{\circ }70+\ldots\rho^{\circ }20- \) | \( \delta \)JULI |
| JULI 2000 | JULI 2000 | JULI JULI JULI JULI JULI JULI JULI JULI JULI JULI JULI JULI JULI JULI JULI JULI JULI JULI JULI JULI JULI JULI JULI JULI JULI JULI JULI JULI JULI JULI JULI JULI JULI JULI JULL |
| 90% | 90% | JULI JULI JULI JULI JULI JULI JULI JULI JULI JULI JULI JULI JULI JULI JULI JULI JULI JULI JULI JULI JULI JULI JULI JULI JULI JULI JULI JULI JULI JULI JULI JULI JULII |
| \( 2^{A)} \) | \( 2^{A)} \) | JULI JULI JULI JULI JULI JULI JULI JULI JULI JULI JULI JULI JULI JULI JULI JULI JULI JULI JULI JULI JULI JULI JULI JULI JULI JULI JULI JULI JULI JULI JULI JULI JULLI |
197
| GIM 60GIM 120 | ||
| 4×1,5b1g | 4×1,5b1g | |
| LR6 (AA) | LR6 (AA) | |
| 4×1,2b1g | 4×1,2b1g | |
| HR6 (AA) | HR6 (AA) | |
| 100 acw100 acw100 | ||
| 30 a2a2a2a2a2a2a2a2a2a2a2a2a2a2a2a2a2a2a2a2a2a2a2a2a2a2a2a2a2a2a2a2a2a2a2a2a2a2a2a2a2a2a2a2a2a2a2a2a2a2a2 | ||
| 0,77 p≤1,4 p≤S | ||
| p0.59×27×1250 | p0.59×27×608 | |
| ● | ● | IP 54 no a |
aUyj yu 10 uJyU Jyoo uui (A)
Oguy Uyoo uui 99 gaii
aiu
iiuall uui uai jai (B)
aioi
#
JUJIJI JUJUW/
0scj1i j, wll (Hold) cii
0c ggl jbi jlll lww lc) lax ylaI
j0g 1g 1g 2.0g
()
.(Copy)
:Hold aabg
(11) Hold/Copy jU|Jc 6muag almg J b
gagjog jolal aag (e) waiall aag C
H.μδgall aαo g:g
111 (11) Hold/Copy jll lbaol
algo pai.ajaoa aagol goo ay.Hold aaggl
1.(20 1
:Copy aa,bg
(11) Hold/Copy jU l c aIg b oJb JbeJ -
H jgall gagg (e) aalll waiiaa aag
jaiwlufoaJ0
.(11) Hold/Copy jjI lC e juaa aIgJ bai -
jolll oag e) ajjall wlll aa jbb
H.μgall aogg
aag jai slal 9d jll lso lc wqal ooc
aol m c wai j 0xg u gugg. aI wai
(a)guligoo
JUJUUGGUGUULIeauu
jai jiaall llll goggl sic.dai jall
Hold/jjI lge oogd ag J 1sso baoi
11) Copy
jaiwuy jolll 0dag H wq
(11) Hold/Copy |ull alg oJb
.6.7 20 da19
jj 1c eaaag aIogJ bawol Hold aqg gaoj
9ablgJshwll
wll 6y yjllg aJl
0jgl jal) wlaai a 2gB
awwll wlll lacil g wlll oae a9s
Lgdoal gaoa aag aajlll
.0
JUJIU JUJU WUJU 45JC UJU
<Jall Jg g gg 5gwa45°
g g g gaaag aag aag
g aabw lgcagog wlll oac uuuu
.
wll o sag jia wll o sag
oJgall jbjil)A aadolll,198
JUaJIaJI aag uag aag jglg 10 JaJIi
jul.1gJgJgJgJgJgJgJgJgJgJgJgJgJgJgJgJgJgJgJgJgJgJgJgJgJgJgJgJgJgJgJgJgJgJg
wulaldaagugwopabg10
.
gysic 21 yolall ooc ylae paa
0,1.00 1
(gglg)gogjUwullloo
.1waii 1
C(0jgall jil) aai 1 siwyl abwlo
A 1
U51.05ueuaglu gai bai cu calia
Uuua uuaaueauuauuuuauuuuuuuuuuuuuuuuuuuuuuuuuuuuuuuuuuuuuuuuuuuuuuuuuuuuuuuuuuuuuuuuuuuuuuuuuuuuuuuuuuuuuuuuuuuuuuuuuuuuuuuuuuuuuuuuuuuuuuuuuuuuuuuuuuuuuuuuuuuuuuuuuuuuuuuuuuuuuuuuuuuUU
.
abwll lgcagog wlll ooc jaiu
olally jlll jlll
(5) 100000000000000000000000000000000000000000000
00Jbuiu.1uU 10
yJj jC juui jIgJb
a 10Cal1
g 1
0000
Jgall 180 agl jwll o
aiyLcI JJUuoo Ujulll Bcuu,wljl
jic wlll lccggo (5) jolll oag
10 0aJ Jai. dGall
1.1500 (10)Cal jlaal jj lcbol p
ALJ 1000000000000000000000000000000000000000000000000000000
(g)wjall aag g wuall daa jabi
aocyoo 1 Cui gxi jic (yaog
13 SuiwJgabWu
JUwll 0d ojue yogai juyu
0d11g pall.11alll 1w
JU 1
oag jwug Jawl (1) aqol 1laol
abwll lcl wll 0xc g . (5)
10 aJbui
g0180 agglj wlll 6c j
laJawl JI Juaa nn jai all Jy
juc wlll lcc ooggo (5) jolll oag
1g10dJbui.duIgall
g (10)Cal jj jj jc bao
ALJ.6aag algcal2 jolal oag
(g)wjll0saggwlqaiiaa
Cai a wulall osc ugsi sic.(uag
UuU Uuuu uuuuuuuuuuuuuuuuuuuuuuuuuuuuuuuuuuuuuuuuuuuuuuuuuuuuuuuuuuuuuuuuuuuuuuuuuuuuuuuuuuuuuuuuuuuuuuuuuuuuuuuuuuuuuuuuuuuuuuuuuuuuuuuuuuuUU
.
abwll (lc gaoog wolld 0c
13aJU 1
(5) (6)
0aJpuiI.1uI aHgfo10
yall jj l juiu y
CAL1 10Cal
jglgll jno lucg lall g wlll 0x
abwglawg
a 10 slgo gl cbb slgo saui
aag augb ojol laou wull osc y jn
g jwjg gai jwai all oac jI .qilul
Ojgogg. Jols Usu Igao jy Jaa Uqia
.
gwsj jalal gbal aol yu dwlug gall
gagll jglgbaaalloglaagaaull
www.bosch-pt.com
13|ducluo oIaiwBosch qjJmu
log lioo gao ay jluaiw i 1
gaoagllaggmuillulalglauallpajjpsjlu
Juc gcbuulbglUjuaaiwlaUjuw!sic qall
jll
Jiww
auiiuljduaiia
dLdV 06000
+213 (0) 982 400 991/2:
+213(0)34201569:u≤
sav@siestal-dz.com:gjglJy
J
aaiill 10dallgaglg aS
2403 0624 ggl jall
0055D
+97317704537:
+973177045257:UuS
h.berjas@eajb.com.sa:gjgJXJL
RBEG-LLC
JU 22
gjgjldgjl
11799
:gjSxJxJx
boschegypt.powertools@eg.bosch.com
J
Sahba Technology Group
JUaEJU
1
c|201
:+964(0)7901
+971(0)4422
:gjulduaid@sahbat
#
aJgJQJRootsArabiaj.
j山laJl,aJUJgJU
jLac11623jJJl.
:1g110068
:+9626439899
:gjSJU JUUBosch@rootsjo
UgS1
jio acllalg gwhdabio1 ab9.16a
13002-164ggsu gds
24810844:
24810879:μSLg
josephkr@aaalmutawa.com:gjS
#
.ρ.ρ.3.μω0sLμglimuab
90ggsuμgds
gj-ogJ
:+9611255211
service-pt@tehini-hana.com:gi gjiS!
U
Robert Bosch Morocco SARL
gdo doo ojJalI EJw.53
LJ120300
+212529314327:
sav.outillage@ma.bosch.com: 已 _ 1 ^ 已 jjSJl
Uac
p.p. uXgIg oJll
aann0.15gj131 1ggsio
jlocab1w.112:5uU|gSJ
11(suS pilil jdae (wgg s u 10 (s)
suiu
(gagjg0g180°g0aJ(gSogjai jji
10jglg
.
g j m ojiaai aS jag bao 1s jbjsiil jji
puiu 0,1o juiuy yjil jdo
.
ds(golglsogac)gdojSsojwlj
puii ciwi o siu jiaao g jy dla i j
.
SisEgj) (gjgkaa
Cgai
10000000000000000000
a1j 5°j
yU COW jIiJ iJ aS (s)gB sIaJy (ssgac
j5
10.38 1w
[10]Cal [waww]ws
olqcal2,
iililililililililililililililililil
Sui lai aao 12 (sii lai Sua) 15u8
1111111111111111
.
15 abw slu yh l uysnililil jil
unilulunbinuuiusubiiuloo
auii iui li iui
(5)Suiolai a jiuw u (1)
abu 100
10
1
10
Bugs jgb CALI U Sims Jwq (10) Cal
Jsao Uj j uu .gui Jsu lai daio
Sij Go Sainu Jauu laa aao o j 5
180° 11
COW (1) 1000
(5) 比 = ( x1,y1) , 的
10.25 10.25
①
②
(3)
(4)
⑤
(6)
⑦
1s 1j (10)Cal jgwsuLs aos
julao juJluCAL2olgs
ojlsljdao jjlssggoaJuai
juiai daa J (uj Lai Saa j) (Ss
jSjUgisi SjOjSjIjI jI jI jI jI jI jI jI jI
.5gW Go puii gi jI Gai Jbaw gJ
JiLam ⑨g ③ Jalpo JsOjI jil jJI daiJia:diS
JAsj Sjglg jai gwhjlls, jaj jgsu Jg
)gawCAL2.(gawLa
Sis gaj) (jg jg baw s gac paaii
(D)gai a
Gjg jI (Sg) j (Ss8 oJui JjU dS
duoljglsgacbaj50j1juy
jS OIG jgcal1u SsJU (10)Cal
jao jj uu .gwh uub juiai aao
.ij 0 Saaui jai aao o j sglj
g0g180°g0dJg0joljI ③
yU Caw jlinam jui dS sJgbs JsJgac
(5)jaiao g,juui
.10.1
JJJ (10)Cal uqwulus aas w 4
juiai dao ju. jiu cal2olgs
jI jI JgO jI gW O oJ L
Sui lai daa j S (Sij Lai Saig j S) (S)
UgS UgS oJU JgUgW Jo
ggu Lpaabjjj1jS abw
J5 15y J yj j j j j
sS oJ sJ Jgj gjia 1
auii (1j j u jai jy jg jg jg j
Sui lai dao g July Cawd 6) (5)
(59)
3uS u 10.3uS jg s gac abw
gwsuLdsdo2gss
jolg jgb CAL1UJu Jw (10)Cal
jao jilu .gwhlbu jwloai aao
!jjilj jla jl jllj l

:glj a slil gac (sljgws
oJaiWlUg gdiS(SuMjwiSlojIj
jglg| jaoallgws gdoi jilgubjis
2012/19/EUUNJUWUOWG
UgJl s doU2006/66/ECwliu
.igw (sjg) gao Cwujj baoo Lg