GMS 120 Professional - Power tool BOSCH - Free user manual and instructions
Find the device manual for free GMS 120 Professional BOSCH in PDF.
| Product type | Digital detector (job site multimeter) |
| Brand | Bosch |
| Model | GMS 120 Professional |
| Weight (according to EPTA 01:2014) | 0.27 kg |
| Power supply | 1 9 V battery (6LR61) |
| Battery life | Approximately 5 hours |
| Protection rating | IP 54 (dust and water splash protection) |
| Operating temperature range | –10 °C to +50 °C |
| Storage temperature range | –20 °C to +70 °C |
| Max. detection depth (ferrous metals) | 120 mm |
| Max. detection depth (non-ferrous metals) | 80 mm |
| Max. detection depth (live electrical cables 110-230 V) | 50 mm |
| Max. detection depth (wood) | 38 mm |
| Operating modes | Drywall, Metal, Electrical cables |
| Display | Illuminated screen, light ring (green/yellow/red), charge indicator |
| Acoustic signal | Enable/disable |
| Special functions | Temperature monitoring, warning function, manual calibration, object marking |
| Maintenance and cleaning | Clean with a soft, dry cloth; do not immerse; store in the protective cover |
| Spare parts and repairability | Repair by Bosch authorized service center; spare parts available at www.bosch-pt.com |
| Important safety instructions | Do not use in explosive atmospheres; always consult other sources before drilling; ensure adequate grounding |
Frequently Asked Questions - GMS 120 Professional BOSCH
User questions about GMS 120 Professional BOSCH
0 question about this device. Answer the ones you know or ask your own.
Ask a new question about this device
Download the instructions for your Power tool in PDF format for free! Find your manual GMS 120 Professional - BOSCH and take your electronic device back in hand. On this page are published all the documents necessary for the use of your device. GMS 120 Professional by BOSCH.
USER MANUAL GMS 120 Professional BOSCH
GMS 120 Professional
Robert Bosch Power Tools GmbH
70538 Stuttgart
GERMANY
www.bosch-pt.com
1609 92A 7LE (2021.03) T/457

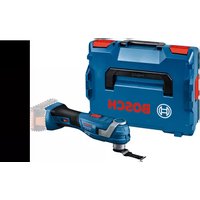
text_image
Diagram illustrating a mobile phone with labeled components including a magnet, signal lines, and a battery, showing directional arrows and a warning symbol.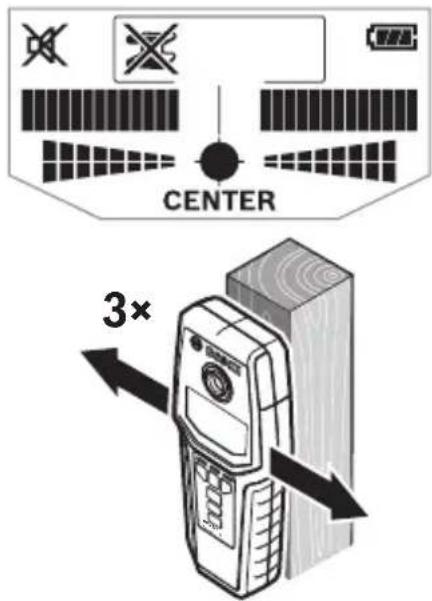
text_image
CENTER 3×Deutsch
Sicherheitshinweise

www.bosch-pt.com/serviceaddresses
Entsorgung
All instructions must be read and observed. The safeguards integrated into the measuring tool may be compromised if the measuring tool is not used in accordance with these instructions. STORE THESE INSTRUCTIONS IN A SAFE PLACE.
▶ Have the measuring tool serviced only by a qualified specialist using only original replacement parts. This will ensure that the safety of the measuring tool is maintained.
▶ Do not use the measuring tool in explosive atmospheres which contain flammable liquids, gases or dust. Sparks may be produced inside the measuring tool, which can ignite dust or fumes.
The measuring tool may not be 100 % accurate for technological reasons. To eliminate hazards, familiarise yourself with further sources of information, such as building plans and photographs taken during construction, etc. before carrying out any drilling, sawing or routing work on walls, ceilings or floors. The accuracy of the measuring tool may be affected by environmental influences, such the level of humidity or there being other electronic devices nearby. The structure and condition of the walls (e.g. damp, building materials containing metal, electrically conductive wallpaper, insulating materials, tiles) and the number, type, size and position of the objects may distort the measuring results.
▶ Make sure that you are properly earthed when taking measurements. If you are not properly earthed (e.g. by wearing insulating footwear or by standing on a ladder), it will not be possible to locate live cables.
If there are gas pipes in the building, check to ensure that none of them have been damaged after completing any work on walls, ceilings or floors.
Live wires can be detected more easily when power consumers (e.g. lamps, appliances) are connected to the wire being sought and switched on. Switch off power consumers and make sure that live cables are de-energised before drilling, sawing or milling into walls, ceilings or floors. After performing any kind of work, check to ensure that objects placed on the base material are not live.
When attaching objects to dry walls, and in particular when attaching them to the substructure, check to ensure that both the wall and the fastening materials have a sufficient load-bearing capacity.
20 | English
Product Description and Specifications
Please observe the illustrations at the beginning of this operating manual.
Intended Use
The measuring tool is intended for the detection of metal (ferrous and non-ferrous metals, e.g. reinforcing steel), wooden beams and live wires in walls, ceilings and floors. The measuring tool is suitable for indoor and outdoor use.
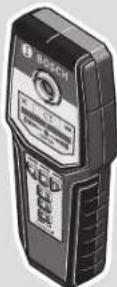
Product features
The numbering of the product features shown refers to the illustration of the measuring tool on the graphic page.
(1) Light-up ring
(2) Marking hole
(3) Display
(4) Operating mode indicator
(5) On/off button
(6) Display illumination button
(7) Audio signal button
(8) Gripping surface
(9) Power cable operating mode button
(10) Metal operating mode button
(11) Drywall operating mode button
(12) Contact pads
(13) Sensor area
(14) Serial number
(15) Battery compartment cover
(16) Battery compartment cover locking mechanism
(17) Carrying strap lug
(18) Carrying strap
(19) Protective bag
Display elements (see figure A)
(a) Audio signal indicator
English | 21
(b) Warning indicator
(c) Non-metallic object indicator
(d) Non-magnetic metal indicator
(e) Magnetic metal indicator
(f) Live wire indicator
(g) Temperature monitoring indicator
(h) Battery indicator
(i) Measuring indicator
(j) Fine scale
(k) Object centre indicator CENTER
Technical data
| Digital Detector GMS 120 | |
| Article number | 3 601 K81 0.. |
| Max. detection depthA) | |
| - Ferrous metals 120 mm | |
| - Non-ferrous metals (copper) 80 mm | |
| - Live wires 110–230 V (with voltage applied) B) | 50 mm |
| - Wood 38 mm | |
| Operating temperature –10 °C to +50 °C | |
| Storage temperature –20 °C to +70 °C | |
| Inductive sensor | |
| - Operating frequency range 5 ± 0.2 kHz | |
| - Max. magnetic field strength (at 10 m) 72 dBμA/m | |
| Capacitive sensor | |
| - Operating frequency range 20 ± 1 kHz | |
| - Max. electric field strength (at 10 m) 24 dBμV/m | |
| Max. altitude 2000 m | |
| Relative air humidity max. 90 % | |
| Pollution degree according to IEC 61010-1 2 | C) |
| Battery 1 × 9 V 6LR61 | |
Bosch Power Tools
160992A7LE|(07.04.2022)
22 | English
Digital Detector GMS 120
| Approx. operating time 5 h |
| Weight according to EPTA-Procedure 01:2014 0.27 kg |
| Protection rating IP 54 (dust and splash-proof) |
A) Depends on operating mode, material and size of the objects, as well as material and condition of the base material
B) Lower detection depth with non-live wires
C) Only non-conductive deposits occur, whereby occasional temporary conductivity caused by condensation is expected.
The serial number (14) on the type plate is used to clearly identify your measuring tool.
The accuracy and detection depth of the measuring result may be negatively affected if the condition of the substrate is unfavorable.
Assembly
Inserting/Changing the Battery
It is recommended that you use alkaline manganese batteries to operate the measuring tool.
To open the battery compartment cover (15), push the locking mechanism (16) in the direction of the arrow and lift the battery compartment cover. Insert the battery.
When inserting the batteries, ensure that the polarity is correct according to the illustration on the inside of the battery compartment.
▶ Take the battery out of the measuring tool if you do not intend to use the tool for a long time. When it is stored in the measuring tool for longer periods, the battery can corrode and discharge itself.
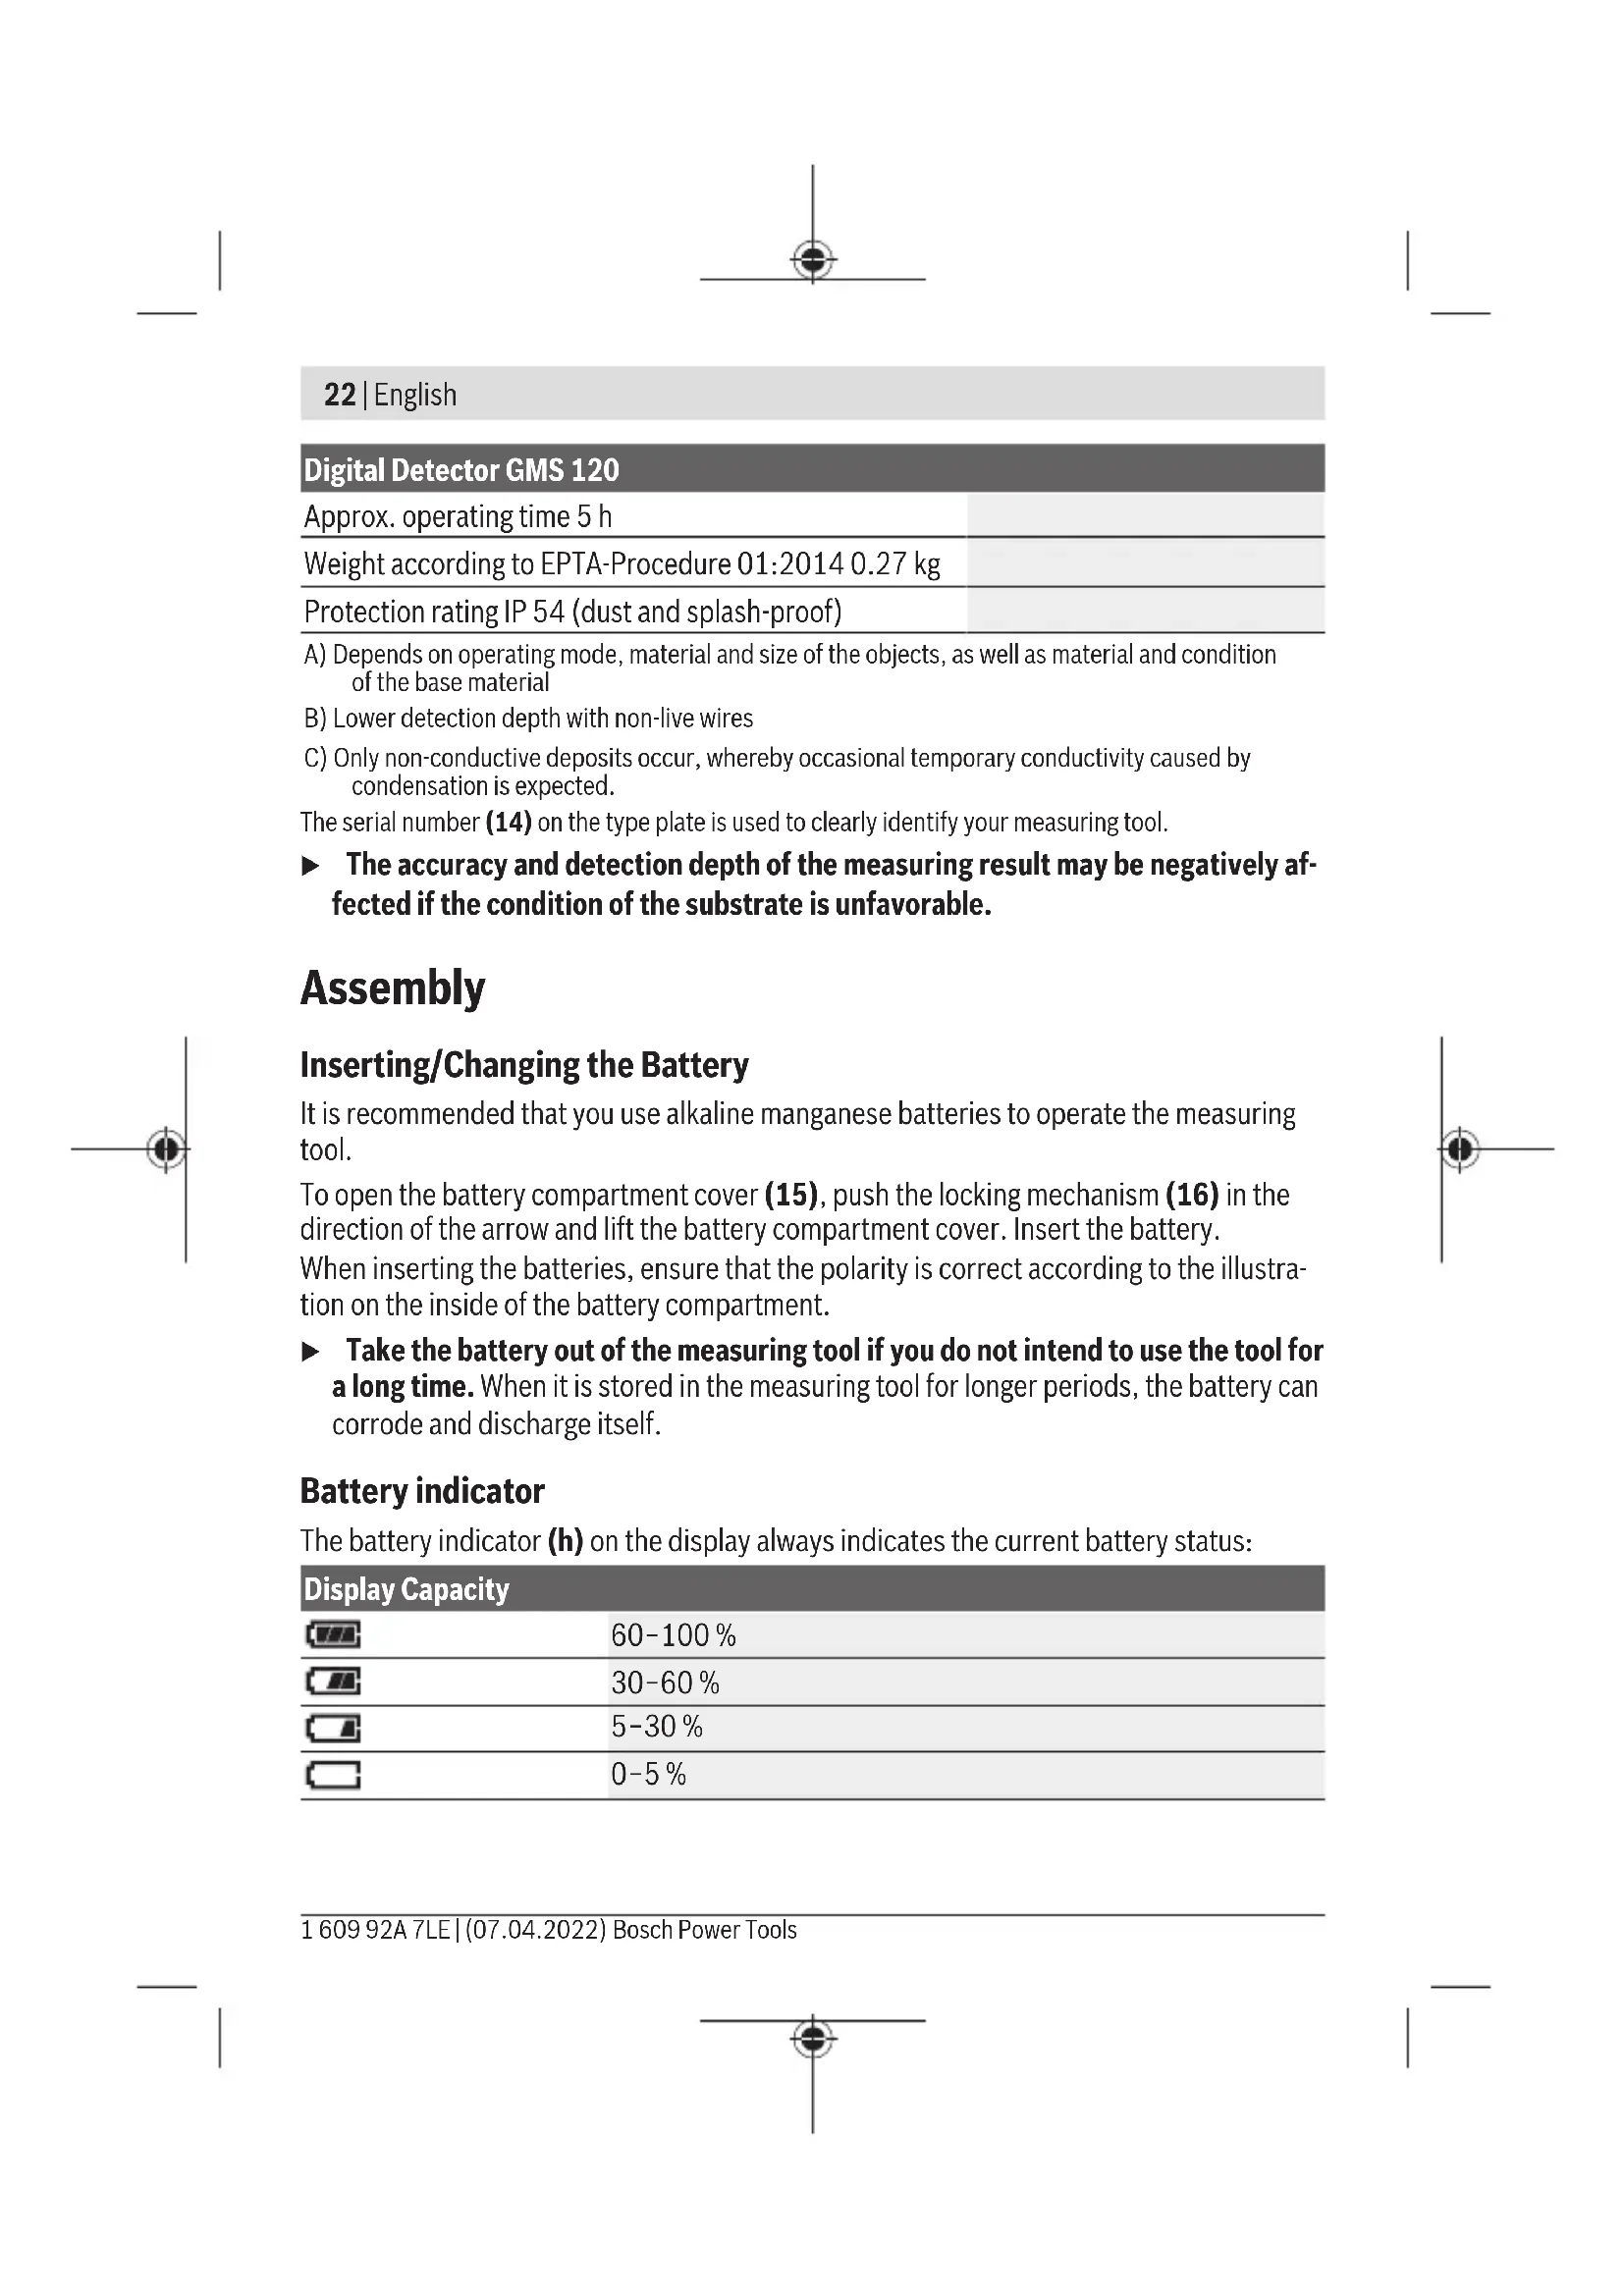
Battery indicator
The battery indicator (h) on the display always indicates the current battery status:
| Display Capacity | |
| 60-100% | |
| 30-60% | |
| 5-30% | |
| 0-5% | |
Operation
▶ Protect the measuring tool from moisture and direct sunlight.
▶ Do not expose the measuring tool to any extreme temperatures or variations in temperature. In case of large variations in temperature, leave the measuring tool to adjust to the ambient temperature before switching it on. The accuracy of the measuring tool and the functionality of the display may be compromised if exposed to extreme temperatures or variations in temperature.
- Avoid hard knocks to the measuring tool or dropping it. After severe external influences and in the event of abnormalities in the functionality, you should have the measuring tool checked by an authorised Bosch after-sales service agent.
▶ Certain ambient conditions fundamentally impair the measuring results. These include, e.g. the proximity of devices that generate strong electric, magnetic or electromagnetic fields, moisture, metal building materials, foil-laminated insulation materials or conductive wallpaper or tiles. Therefore, also refer to other information sources (e.g. construction plans) before drilling, sawing or routing into walls, ceilings or floors.
▶ Hold the measuring tool by the intended gripping surface (8) only, so as not to influence the measurement.
▶ Do not attach any stickers or labels to the sensor area (13) on the rear of the measuring tool. Metal labels in particular will affect measuring results.

Do not wear gloves when taking measurements and make sure that you are properly earthed. If you are not properly earthed, the identification of live wires may be impaired.
When taking measurements, avoid devices that emit strong electric, magnetic or electromagnetic fields. If possible, deactivate all tools whose radiation could interfere with the measurement and switch off the corresponding functions or tools.
Starting Operation
Switching on/off
▶ Before switching on the measuring tool, ensure that the sensor area (13) is dry. If necessary, use a cloth to dry the measuring tool.
▶ If the measuring tool has been exposed to a significant change in temperature, leave it to adjust to the ambient temperature before switching it on.
To switch on the measuring tool, press the on/off button (5).
24 | English
To switch off the measuring tool, press the on/off button (5) again.
If no button on the measuring tool is pressed for approx. 5 mins, and no objects are detected, the measuring tool will automatically switch itself off to preserve battery life.
Switching the display illumination on and off
The display illumination can be switched on or off with the display illumination button (6).
Switching audio signal on/off
The audio signal can be switched on/off with the audio signal button (7). When the audio signal is switched off, the audio signal indicator (a) appears on the display.
How it works (see figure B)
The measuring tool checks the base material of the sensor area (13) in the measurement direction A up to the maximum detection depth. Objects that are different from the material of the wall are detected.
Move the measuring tool in a straight line in direction B over the wall.
Always move the measuring tool over the base material applying light pressure, without lifting it off or changing the pressure.
During the measurement, the contact pads (12) must always remain in contact with the surface.
Measuring process
Place the measuring tool on the surface to be examined and move it in direction B.
- When the measuring tool approaches an object, the amplitude in the measuring indicator (i) increases and the light-up ring (1) lights up yellow.
- The amplitude decreases when the measuring tool moves away from the object.
- Above the centre of an object, the measuring indicator will indicate maximum amplitude; the light-up ring (1) will light up red and an audio signal will sound.
For small or deep-lying objects, the light-up ring (1) can continue to light up yellow without the audio signal sounding.
▶ Wide objects are not indicated by the light-up ring or the audio signal throughout their complete width.
In order to locate an object more precisely, move the measuring tool repeatedly (3×) back and forth over the object. The fine scale (j) is activated automatically in all operating modes. The fine scale indicates a full amplitude when the object is below the centre of the sensor or when the maximum amplitude of the measuring indicator (i) is reached. In Drywall and Metal operating modes, the object centre indicator CENTER (k) also lights up.
Wider objects in the base material can be identified by a continuous high amplitude of the measuring indicator (i) and fine scale (j). The light-up ring (1) will light up yellow. The duration of the high amplitude corresponds approximately with the object width. If very small or deep-lying objects are being sought and the measuring indicator (i) reacts only slightly, move the measuring tool repeatedly over the object in a horizontal and vertical direction. Pay attention to the amplitude of the fine scale (j) and, when in Drywall and Metal operating modes, to the object centre indicator CENTER (k) as well, which will then allow for precise detection.
Before drilling, sawing or routing into walls, refer to other sources of information to ensure that you eliminate hazards. As the measuring results can be influenced through ambient conditions or the nature of the wall, there may be a hazard even though the measuring indicator (i) does not indicate an object in the sensor area, no audio signal sounds and the light-up ring (1) lights up green.
Operating Modes
You can achieve the best possible measuring results by selecting the correct operating mode. You can achieve the maximum detection depth for metal objects in the Metal operating mode. You can achieve the maximum detection depth for live wires in the Power cable operating mode.
The selected operating mode is always shown by the green operating mode indicator (4).
Drywall operating mode
Drywall operating mode is designed for detecting wooden and metal objects in dry walls. To activate Drywall operating mode, press the Drywall operating mode button (11). The operating mode indicator (4) above the Drywall operating mode button will light up green.
As soon the measuring tool is positioned on the surface to be examined, the light-up ring (1) will light up green, indicating readiness to measure.
In Drywall operating mode, all available objects will be detected and displayed:
(c) Non-metallic, e.g. wooden beams
_s^N (d) Non-magnetic, but metal, e.g. copper pipe
C: (e) Magnetic, e.g. reinforcing steel
≠ (f) Live, e.g. power lines
Note: In the Drywall operating mode, other objects, e.g. water-filled plastic pipes, will be also displayed in addition to wooden and metal objects and live wires. For these objects, the Non-metallic object indicator (c) will appear in the display.
26 | English
Nails and screws in the base material may result in wooden beams being identified as metal objects.
If the display indicates a continuously high amplitude of the measuring indicator (i) and the fine scale (j), re-start the measuring process again by placing the measuring tool elsewhere on the surface.
If the light-up ring (1) does not indicate readiness to measure when positioned on the surface to be examined, the measuring tool has not been able to detect the base material correctly.
- Press and hold the Drywall operating mode button (11) until the light-up ring (1) lights up green. Take the measurement as normal.
If, after having completed this measurement, you want to start a new measuring process on another wall, briefly press the Drywall operating mode button (11) in order to reset the measuring tool. - In rare cases, the measuring tool is not able to detect the base material because the sensor area (13) on the rear side is dirty. Clean the measuring tool with a soft, dry cloth and re-start the measuring process.
Metal operating mode
Metal operating mode is particularly suited to detecting magnetic and non-magnetic objects, regardless of the nature of the wall.
To activate Metal operating mode, press the Metal operating mode button (10). The light-up ring (1) and the operating mode indicator (4) above the Metal operating mode button will light up green.
If the measuring tool passes over a metal object (the light-up ring (1) will light up red), the type of metal will be shown in the display. For magnetic metals (e.g. iron) the Magnetic metal indicator (e) will appear, for non-magnetic metals (e.g. copper) the Non-magnetic metal indicator (d) will appear.
Note: For reinforcement steel mesh and reinforcements in the examined based material, an amplitude is indicated over the entire surface in the measuring indicator (i). For reinforcement steel mesh, it is typical that the magnetic metal indicator (e) appears directly above the iron rods, whereas the non-magnetic metal indicator (d) will appear between the iron rods.
Power cable operating mode
Power cable operating mode is only suitable for detecting live wires (110–230 V).
To activate Power cable operating mode, press the Power cable operating mode button (9). The light-up ring (1) and the operating mode indicator (4) above the Power cable operating mode button will light up green.
When a live wire is detected, the indicator for live wires (f) will appear on the display. Move the measuring tool over the surface again in order to locate the live wire more precisely. After moving the measuring tool over the surface multiple times, the live wire can be detected very precisely. If the measuring tool is very close to the wire, the light-up ring (1) will flash red and the audio signal will sound at a faster rate.
Notes:
– Live wires are detected in every operating mode.
– Live wires can be detected more easily when power consumers (e.g. lamps, appliances) are connected to the wire being sought and switched on. Switch off electricity consumers before drilling, sawing or milling into the wall.
- In certain conditions (such as behind metal surfaces or behind surfaces with high water content), live wires cannot always be detected. The signal strength of a live wire depends on the position of the cable. Therefore, take further measurements in close proximity or use other information sources to check if a live wire is present.
- You can detect non-live wires as metal objects in the Metal operating mode. Solid-wire cables are not detected (as opposed to stranded-wire cables).
- Static electricity can cause wires to be detected inaccurately (e.g. over a large area) or prevent them from being detected at all. To improve the detection, place your free hand flat on the wall next to the measuring tool, in order to remove the static electricity.
Working Advice
Marking objects
If required, detected objects can be marked. Perform a measurement as usual.
Once you have found the boundaries or the centre of an object, mark its position through the marking hole (2).
Temperature monitoring
The measuring tool features temperature monitoring, as an exact measurement is only possible as long as the temperature inside the measuring tool remains constant.
If the temperature monitoring indicator (g) lights up, the measuring tool is outside of the operating temperature range, or has been subjected to large fluctuations in temperature.
Switch the measuring tool off and allow it to adjust to the ambient temperature switching it back on.
28 | English
Warning function
If the warning indicator (b) lights up on the display and the operating mode indicator (4) above the Drywall operating mode button (11) flashes, you must re-start the measurement. Remove the measuring tool from the wall and place it elsewhere on the surface. If the warning indicator (b) flashes on the display, send the measuring tool in its protective bag (19) to an authorised Bosch after-sales service centre.
Recalibration
If the measuring indicator (i) indicates a continuously high amplitude in the Metal operating mode, even though there is no metal object near the measuring tool, the measuring tool can be manually recalibrated.
- Ensure that the battery indicator (h) still shows a capacity of at least 1/3.
- Switch the measuring tool off.
- Remove all objects near the measuring tool that could be detected (including watches or metal rings).
Hold the measuring tool up horizontally so that the rear side of the measuring tool is pointing towards the floor.
Avoid bright light sources and prevent direct sunlight from shining on the rear side of the measuring tool, without covering this area. - Press the on/off button (5) and the audio signal button (7) simultaneously and hold both buttons until the light-up ring (1) lights up red. Then release both buttons.
- If the calibration was successful, the measuring tool will start automatically after a few seconds and will be ready for operation again.
Note: If the measuring tool does not start automatically, repeat the recalibration. If the measuring tool still does not start, send it in its protective bag (19) to an authorised
Bosch after-sales service centre.
Maintenance and Service
Maintenance and Cleaning
▶ Check the measuring tool before each use. If the measuring tool is visibly damaged or parts have become loose inside the measuring tool, safe function can no longer be ensured.
Always keep the measuring tool clean and dry to ensure optimum, safe operation.
Never immerse the measuring tool in water or other liquids.
Wipe off any dirt using a dry, soft cloth. Do not use any detergents or solvents.
Do not remove the contact pads (12) on the rear side of the measuring tool.
Only store and transport the measuring tool in the protective bag provided. If the measuring tool needs to be repaired, send it off in the protective bag.
After-Sales Service and Application Service
Our after-sales service responds to your questions concerning maintenance and repair of your product as well as spare parts. You can find explosion drawings and information on spare parts at: www.bosch-pt.com
The Bosch product use advice team will be happy to help you with any questions about our products and their accessories.
In all correspondence and spare parts orders, please always include the 10-digit article number given on the nameplate of the product.
Malaysia
Robert Bosch Sdn. Bhd.(220975-V) PT/SMY
No. 8A, Jalan 13/6
46200 Petaling Jaya
Selangor
Tel.: (03) 79663194
Toll-Free: 1800 880188
Fax: (03) 79583838
E-Mail: kiathoe.chong@my.bosch.com
www.bosch-pt.com.my
Great Britain
Robert Bosch Ltd. (B.S.C.)
P.O. Box 98
Broadwater Park
North Orbital Road
Denham Uxbridge
UB 9 5HJ
At www.bosch-pt.co.uk you can order spare parts or arrange the collection of a product in need of servicing or repair.
Tel. Service: (0344) 7360109
E-Mail: boschservicecentre@bosch.com
You can find further service addresses at:
www.bosch-pt.com/serviceaddresses
30 | Français
Disposal
Measuring tools, accessories and packaging should be recycled in an environmentally friendly manner.
Do not dispose of measuring tools or batteries with household waste.
Only for EU countries:
According to the Directive 2012/19/EU on waste electrical and electronic equipment and its transposition into national law, measuring tools that are no longer usable, and, according to the Directive 2006/66/EC, defective or drained batteries must be collected separately and disposed of in an environmentally correct manner.
If disposed incorrectly, waste electrical and electronic equipment may have harmful effects on the environment and human health, due to the potential presence of hazardous substances.
Only for United Kingdom:
According to Waste Electrical and Electronic Equipment Regulations 2013 (2013/3113) and the Waste Batteries and Accumulators Regulations 2009 (2009/890), measuring tools that are no longer usable must be collected separately and disposed of in an environmentally friendly manner.
Français
Robert Bosch Morocco SARL
53, Rue Lieutenant Mahroud Mohamed
20300 Casablanca
Tel.: +212 5 29 31 43 27
E-Mail : sav.outillage@ma.bosch.com
France
Robert Bosch (France) S.A.S.
www.bosch-pt.com/serviceaddresses
natural_image
Symbolic icon of a person moving with arrows, enclosed in a circle (no text or symbols)FR
Calle Robert Bosch No. 405
www.bosch-pt.com/serviceaddresses
Eliminación
www.bosch-pt.com/serviceaddresses
Eliminação
www.bosch-pt.com/serviceaddresses
80 | Nederlands
Smaltimento
www.bosch-pt.com/serviceaddresses
Afvalverwijdering
Bosch Service Center
Telegrafvej 3
2750 Ballerup
På www.bosch-pt.dk kan der online bestilles reservedele eller oprettes en reparations ordre.
Tlf. Service Center: 44898855
Fax: 44898755
E-Mail: vaerktoej@dk.bosch.com
www.bosch-pt.com/serviceaddresses
Bortskaffelse
Bosch Service Center
Telegrafvej 3
2750 Ballerup
Danmark
Tel.: (08) 7501820 (inom Sverige)
Fax: (011) 187691
www.bosch-pt.com/serviceaddresses
Avfallshantering
www.bosch-pt.com/serviceaddresses
Kassering
www.bosch-pt.com/serviceaddresses
Hävitys
www.bosch-pt.com/serviceaddresses
Απόσυροη
www.bosch-pt.com/serviceaddresses
Tasfiye
Robert Bosch Sp. z o.o.
www.bosch-pt.com/serviceaddresses
Utylizacja odpadów
| 60-100% | |
| 30-60% | |
| 5-30% | |
| 0-5% |
1 609 92A 7LE | (07.04.2022) Bosch Power Tools
Provoz
Bosch Service Center PT
K Vápence 1621/16
692 01 Mikulov
www.bosch-pt.com/serviceaddresses
Likvidace
www.bosch-pt.com/serviceaddresses
Likvidácia
www.bosch-pt.com/serviceaddresses
Hulladékkezelés
www.bosch-pt.com/serviceaddresses
Утилизация
| 60-100% | |
| 30-60% | |
| 5-30% | |
| 0-5% |
Робота
www.bosch-pt.com/serviceaddresses
Утилізація
www.bosch-pt.com/serviceaddresses
Кәдеге жарату
| 60-100% | |
| 30-60% | |
| 5-30% | |
| 0-5% |
Functionarea
Service scule electrice
Strada Horia Măcelariu Nr. 30–34, sector 1
013937 Bucureşti
www.bosch-pt.com/serviceaddresses
Eliminarea
Service scule electrice
Strada Horia Măcelariu Nr. 30–34, sector 1
013937 Bucureşti, România
www.bosch-pt.com/bg/bg/
www.bosch-pt.com/serviceaddresses
Бракуване
www.bosch-pt.com/serviceaddresses
Отстранување
www.bosch-pt.com/serviceaddresses
Uklanjanje dubreta
Merni alati, pribor i ambalaža treba da se uključe u reciklažu koja odgovara zaštiti čovekove okoline.
Merne alate i baterije nemojte bacati u kućni otpad!
Samo za EU-zemlje:
Prema evropskoj direktivi 2012/19/EU o starim električnim i elektronskim uređajima i njenoj primeni u nacionalnom pravu, merni alati koji se više ne mogu koristiti, a prema evropskoj direktivi 2006/66/EC akumulatori/baterije koje su u kvaru ili istrošene moraju se odvojeno sakupljati i uključiti u reciklažu koja ispunjava ekološke uslove.
www.bosch-pt.com/serviceaddresses
Odlaganje
Merilne naprave, pribor in embalažo oddajte v okolju prijazno recikliranje.
www.bosch-pt.com/serviceaddresses
Zbrinjavanje
Mjerne alate, pribor i ambalažu treba dovesti na ekološki prihvatljivo recikliranje.
Mjerne alate i baterije ne bacajte u kućni otpad!
Samo za zemlje EU:
U skladu s europskom Direktivom 2012/19/EU o električnim i elektroničkim starim uređajima i njihovom provedbom u nacionalno pravo neupotrebljivi mjerni alati i u skladu s europskom Direktivom 2006/66/EZ neispravne ili istrošene aku-baterije/baterije moraju se odvojeno sakupljati i dovesti na ekološki prihvatljivo recikliranje.
www.bosch-pt.com/serviceaddresses
Jäätmekäitlus
| 60-100% | |
| 30-60% | |
| 5-30% | |
| 0-5% |
332 | Latviešu
Lietošana
www.bosch-pt.com/serviceaddresses
www.bosch-pt.com/serviceaddresses
Šalinimas
www.bosch-pt.com/serviceaddresses
廃棄
www.bosch-pt.com/serviceaddresses
废弃处理
www.bosch-pt.com/serviceaddresses
廢棄物處理
www.bosch-pt.com/serviceaddresses
처리
www.bosch-pt.com/serviceaddresses
การกำจัดขยะ
Palma Tower 10th Floor
Jalan RA Kartini II-S Kaveling 6
Pondok Pinang, Kebayoran Lama
www.bosch-pt.com/serviceaddresses
Cara membuang
www.bosch-pt.com/serviceaddresses
Sự thải bổ
Robert Bosch Morocco SARL
www.bosch-pt.com/serviceaddresses
Declaration of Conformity
Hereby, Robert Bosch Limited as authorised representative acting on behalf of Robert Bosch Power Tools GmbH declares that the radio equipment type GMS 120 is in compliance with the Radio Equipment Regulations 2017. The full text of the declaration of conformity is available at the following internet address:
-> https://gb-doc.bosch.com