PUCEXACT 3 - Power tool BOSCH - Free user manual and instructions
Find the device manual for free PUCEXACT 3 BOSCH in PDF.
| Product type | Power supply for Bosch C-EXACT electric screwdrivers |
| Model | PUCEXACT 3 |
| Brand | Bosch |
| Intended use | Power supply for Bosch C-EXACT series industrial straight screwdrivers in enclosed spaces |
| Number of connection sockets | 3 |
| Input voltage | 100-240 V AC |
| Input frequency | 50/60 Hz |
| Input power | 400 W (0.54 HP) |
| Output voltage | 36 V DC |
| Output current | 6.7 A |
| Weight (according to EPTA 01/2014) | 2.6 kg |
| Protection class | I (with grounding) |
| Operating temperature | -5 °C to +50 °C |
| Storage temperature | -20 °C to +70 °C |
| Relative humidity | 20-95 % (non-condensing) |
| Displays | Operation status LED (green) and fault LED (red) |
| Overload protection | Yes, with red LED indication (PUCEXACT 1 model only) |
| Maintenance and cleaning | Disconnect before cleaning; clean sockets with a dry lint-free cloth |
| Electrical safety | Use a grounded socket; do not use in explosive atmospheres |
| Spare parts and repairability | Repair only by Bosch authorized service center; power cable replaceable by Bosch |
| General information | Manual available in multiple languages; Bosch customer service: 0811360122 |
Frequently Asked Questions - PUCEXACT 3 BOSCH
User questions about PUCEXACT 3 BOSCH
0 question about this device. Answer the ones you know or ask your own.
Ask a new question about this device
Download the instructions for your Power tool in PDF format for free! Find your manual PUCEXACT 3 - BOSCH and take your electronic device back in hand. On this page are published all the documents necessary for the use of your device. PUCEXACT 3 by BOSCH.
USER MANUAL PUCEXACT 3 BOSCH
OBJ: B1CCH1527-002.doc Page 1 Tuesday, December 20, 2016 12:37 PM
Robert Bosch Power Tools GmbH
70538 Stuttgart
GERMAN
www.bosch-pt.com
160992A3HG(2016.12)1/142

1609 92A 3HG
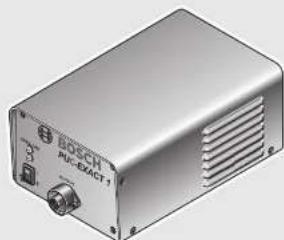

PUC-EXACT 1
PUC-EXACT 3

BOSCH
de Originalbotribosanklung
en Original Instructions
fr Nolice originale
es Manual original
pt Manual original
YkpaHcbKa. CtopiHa 90
Romana.. 95
General Power Tool SafetyWarnings

WARNING Read all safety warnings and all instruc-tions. Failure to follow the warnings and
instructions may result in electric shock, fire and/or serious injury.
Save all warnings and instructions for future reference.
The term "power tool" in the warnings refers to your mains-operated (corded) power tool or battery-operated (cordless) power tool.
Work area safety
- Keep work area clean and well lit. Cluttered or dark areas invite accidents.
Do not operate power tools in explosive atmospheres, such as in the presence of flammable liquids, gases or dust. Power tools create sparks which may ignite the dust or fumes. - Keep children and bystanders away while operating a power tool. Distractions can cause you to lose control.
Electrical safety
Power tool plugs must match the outlet. Never modify the plug in any way. Do not use any adapter plugs with earthed (grounded) power tools. Unmodified plugs and matching outlets will reduce risk of electric shock.
- Avoid body contact with earthed or grounded surfaces, such as pipes, radiators, ranges and refrigerators. There is an increased risk of electric shock if your body is earthed or grounded.
Do not expose power tools to rain or wet conditions. Water entering a power tool will increase the risk of electric shock.


10|English
Do not abuse the cord. Never use the cord for carrying, pulling or unplugging the power tool. Keep cord away from heat, oil, sharp edges and moving parts. Damaged or entangled cords increase the risk of electric shock.
When operating a power tool outdoors, use an extension cord suitable for outdoor use. Use of a cord suitable for outdoor use reduces the risk of electric shock.
If operating a power tool in a damp location is unavoidable, use a residual current device (RCD) protected supply. Use of an RCD reduces the risk of electric shock.
Personal safety
Stay alert, watch what you are doing and use common sense when operating a power tool. Do not use a power tool while you are tired or under the influence of drugs, alcohol or medication. A moment of inattention while operating power tools may result in serious personal injury.
Use personal protective equipment. Always wear eye protection. Protective equipment such as dust mask, non-skid safety shoes, hard hat, or hearing protection used for appropriate conditions will reduce personal injuries.
Prevent unintentional starting. Ensure the switch is in the off-position before connecting to power source and/or battery pack, picking up or carrying the tool. Carrying power tools with your finger on the switch or energising power tools that have the switch on invites accidents.
Remove any adjusting key or wrench before turning the power tool on. A wrench or a key left attached to a rotating part of the power tool may result in personal injury.
Do not overreach. Keep proper footing and balance at all times. This enables better control of the power tool in unexpected situations.
Dress properly. Do not wear loose clothing or jewellery. Keep your hair, clothing and gloves away from moving parts. Loose clothes, jewellery or long hair can be caught in moving parts.
If devices are provided for the connection of dust extraction and collection facilities, ensure these are connected and properly used. Use of dust collection can reduce dust-related hazards.
Power tool use and care
Do not force the power tool. Use the correct power tool for your application. The correct power tool will do the job better and safer at the rate for which it was designed.
Do not use the power tool if the switch does not turn it on and off. Any power tool that cannot be controlled with the switch is dangerous and must be repaired.
- Disconnect the plug from the power source and/or the battery pack from the power tool before making any adjustments, changing accessories, or storing power tools. Such preventive safety measures reduce the risk of starting the power tool accidentally.
- Store idle power tools out of the reach of children and do not allow persons unfamiliar with the power tool or these instructions to operate the power tool. Power tools are dangerous in the hands of untrained users.
- Maintain power tools. Check for misalignment or binding of moving parts, breakage of parts and any other condition that may affect the power tool's operation. If damaged, have the power tool repaired before use. Many accidents are caused by poorly maintained power tools.
- Keep cutting tools sharp and clean. Properly maintained cutting tools with sharp cutting edges are less likely to bind and are easier to control.
Use the power tool, accessories and tool bits etc. in accordance with these instructions, taking into account the working conditions and the work to be performed. Use of the power tool for operations different from those intended could result in a hazardous situation.
Service
Have your power tool serviced by a qualified repair person using only identical replacement parts. This will ensure that the safety of the power tool is maintained.
SafetyWarnings for Power Supply Units
Connect the mains-powered tool to a properly earthed power-supply system. The socket and extension cable must have a fully functioning protective conductor.
The voltage and frequency of the power supply unit must correspond with the data on the type plate of the screwdriver. The PUC-EXACT power supply unit is suitable exclusively for Bosch industrial straight screwdrivers of the C-EXACT series. Otherwise there is danger of fire and explosion.
- Keep the power supply unit clean. Contamination may result in danger of electric shock.
Before each use, check the power supply unit, cable and plug. If damage is detected, do not use the power supply unit. Never open the power supply unit yourself, and have repairs carried out only by a qualified repair person using only identical replacement parts. Damaged power supply units, cables and plugs increase the risk of an electric shock.
Do not operate the power supply unit on easily inflammable surfaces (e.g. paper, textiles, etc.) or in inflammable environments. The heating of the power supply unit during operation can pose a fire hazard.
Pay attention that the power supply unit is positioned securely on the working surface and cannot be pulled off accidentally. A damaged power supply unit can cause an electric shock.
Read and strictly observe the safety warnings and working instructions in the operating instructions of the C-EXACT screwdrivers being used.
Symbols
The following symbols could have a meaning for the use of the power supply unit. Please take note of the symbols and their meaning. The correct interpretation of the symbols will help you to use the power supply unit in a better and safer manner.
Symbol Meaning
| V Volt Electric voltage | ||
| A Ampere Electric current | ||
| W | Watt | Power output |
| Hp | Horsepower | |
| Hz Hertz Frequency | ||
| ~ | Direct current | Type of current and voltage |
| DC | direct current | |
| ~ | Single-phase alternating current | Type of current and voltage |
| AC | alternating current | |
| ± | Protection class I according to DIN: Protective earth (protective conductor) | In certain cases, products of protection class I must be connected to earth. |
| CE | CE Marking With the CE Marking, Bosch confirms the conformity of the product with the appropriate guidelines of the European Community. | |
| SA | CSA Certification Marks | Products with this certification mark were tested by the "Canadian Standards Association" and meet the applicable safety and performance standards in Canada and the USA. |
| Warning indication | Informs the user of the correct product handling or warns against hazards. |
| Mandatory signs | Provide information on correct handling, for example: Use product only in enclosed work sites, Read operating instruc-tions and Do not discard unit into household waste. |
Product Description and Specifications

Read all safety warnings and all instructions. Failure to follow the warnings and instructions may result in electric shock, fire and/or serious injury.
While reading the operating instructions, unfold the fold-out page with the illustration of the power supply unit and leave it open.
Intended Use
The power supply unit is intended exclusively for the power supply of Bosch industrial straight screwdrivers of the C-EXACT series in enclosed locations.
Product Features
The numbering of the product features refers to the illustration of the power supply unit on the graphics pages.
1 Connection socket on power supply unit PUC-EXACT
2 On/Off switch
3 LED indicator, operational readiness
4 LED indicator, malfunction (overload) (PUC-EXACT 1)
5 Mains cable
6 Socket sleeve on tool cord
7 Tool cord for connecting to the power supply unit PUC-EXACT
8 Groove in the coupling of the tool cord 7
9 Connection plug of the power cord
10 Connection socket for power cord
11 Power plug
12 On/Off switch of the screwdriver (lever start)
The accessories illustrated or described are not included as standard delivery.


12 | English
Technical Data
| Power supply unit PUC-EXACT 1 PUC-EXACT 3 | ||||
| Article number | 0 602 495 001 | 0 602 495 003 | ||
| Number of connection sockets | 1 | 3 | ||
| Mains supply (alternating current) | ||||
| - I n p u t v o l t a g e | V | 100-240 | 100-240 | |
| - I n p u t p o w e r | W | 400 | 400 | |
| Hp | 0.54 | 0.54 | ||
| - I n p u t f r e q uency | Hz | 50/60 | 50/60 | |
| Output (direct current) | ||||
| - Output voltage | V | 36 | 36 | |
| - Output current | A | 11 | 6.7 | |
| Storage temperature | °C | -20...+70 | -20...+70 | |
| °F | -4...+158 | -4...+158 | ||
| Operating temperature | °C | -5...+50 | -5...+50 | |
| °F | +23...+122 | +23...+122 | ||
| Relative humidity | % 20-95, free of moisture condensation | 20-95, free of moisture condensation | ||
| Weight according to EPTA-Procedure 01:2014 kg | 2.6 | 2.6 | ||
| Ibs | 5.7 | 5.7 | ||
| Protection class | ± /1 /1 | ± | ||
Assembly
Operating and Storage Environment
The measuring tool is suitable exclusively for commercial operation in enclosed locations.
It can be firmly mounted or placed on a flat, non-flammable work surface.
For proper operation, please observe the information on operating temperature and humidity (see "Technical Data", page 12).
Connecting the Screwdriver (see figure A)
Use only original cables! Before each use, check the power tool, cables and plugs for possible damage. Cables may not be repaired, but must be exchanged.
Always connect the power tool to the PUC-EXACT power supply unit first, before connecting the power supply unit to the power supply.
Insert tool cord 7 into connection socket 1 of the PUC-EXACT power supply unit. Pay attention that the groove 8 in the coupling of the tool cable fits onto the cog in the connection socket. Screw sleeve 6 clockwise onto the connection socket.
Disconnecting the Screwdriver from the Power Supply Unit
Screw the socket sleeve 6 in anticlockwise direction from the connection socket 1 of the power supply unit, and pull the tool cord 7 from the connection socket.
Connection to the Power Supply (see figure B)
Observe the mains voltage! The voltage of the power source must correspond with the data on the type plate of the power supply unit.
For connection of the power supply unit to the power supply, use only mains cables suitable for your power source. If required, exchange the supplied standard mains cable for socket outlets with the earthing contact against a mains cable suitable for your power source.
For corded straight screwdrivers with lever start, pay attention not to place the screwdriver down on the lever before having connected the PUC-EXACT power supply unit to the power supply. This prevents accidental starting of the screwdriver.
For corded straight screwdrivers with push start, pay attention not to apply axial pressure to the screwdriver when connecting the PUC-EXACT power supply unit to the power supply. This prevents accidental starting of the screwdriver. Firstly, insert the connection plug 9 of the power cord 5 into the connection socket 10 of the PUC-EXACT power supply unit. The PUC-EXACT can now be connected to the power supply by inserting the power plug 11 into a grounding-type outlet.
Always connect the power cord with the PUC-EXACT power supply unit first before inserting the power plug 11 into the outlet, otherwise there is danger of an electric shock.
Disconnecting from the Power Supply
Firstly, pull the power plug 11 from the socket outlet. Then pull the connection plug 9 of the power cord out of connection socket 10 of the power supply unit.
Always disconnect the connection to the socket outlet first, in order to prevent electric shock.
Operation
Starting Operation
Switching the PUC-EXACT Power Supply Unit On/Off (see figure C)
The PUC-EXACT power supply unit must be put into operation first before you can switch on the C-EXACT power tool (see "Connection to the Power Supply", page 12).
To switch the mains-powered tool on, set the on/off switch 2 on the mains-powered tool to position 1.
The green LED display 3 lights up when the mains-powered tool is ready for operation.
PUC-EXACT 1: If the 4 LED display lights up, there is a fault. To switch off the power supply unit, press the On/Off switch 2 on the power supply unit to position 0.
To save energy, only switch the mains-powered tool on when in use.
Switching the Power Tool On/Off
Coreded Straight Screwdrivers with Lever Start (see figure D)
To start the machine press the on/off switch 2 to the stop. The machine switches off automatically as soon as the pre-set torque is reached.
- When the on/off switch 2 is released prematurely, the preset torque is not reached.
Cored Straight Screwdrivers with Push Start
To start the machine, position the tool bit onto the screw and apply light axial pressure to the screwdriver.
The machine switches off automatically as soon as the preset torque is reached.
- When the screwdriver is released too early, e.g., when the machine's tool bit slips off of the screw, the preset torque is not reached.
Working Advice
While working, pay attention that the power supply unit is not accidentally pulled from the working surface. Either fasten the power supply unit securely to the wall or lay the connection cables/cords in such a manner that you cannot trip over them.
Overload Protection (PUC-EXACT 1)
In case of overload of the power supply unit, LED indicator 4 lights up and signals a malfunction.
Stop working. Switch the screwdriver and the power supply unit off.
Check the screwdriver and the power supply unit. Replace any defective components.
Afterwards, start the operation of the power supply unit and the screwdriver again.
If LED indicator 4 still lights up, the power supply unit is defective. Have the power supply unit repaired through an authorized customer service agent for Bosch power tools.
Maintenance and Service
Maintenance and Cleaning
- Disconnect the PUC-EXACT power supply unit from power before performing any cleaning. This prevents the danger of an electric shock. Switching off the power supply unit is not sufficient.
The power supply unit is maintenance-free. Keep the device and the ventilation slots clean at all times.
Clean the connection sockets, couplings and plugs of the power supply unit, after it has been disconnected from the mains supply, using a dry, lint-free cloth and remove dust and dirt particles.
If the replacement of the supply cord is necessary, this has to be done by Bosch or an authorized Bosch service agent in order to avoid a safety hazard.
Have maintenance and repair work carried out only through qualified persons. This will ensure that the safety of the power supply unit is maintained.
An authorized Bosch after-sales service agent will carry out this work quickly and reliably.
Observe all applicable environmental regulations when disposing of old grease and solvents.
Accessories
Information about the complete quality accessory program can be found on the Internet at www.bosch-pt.com and www.boschproductiontools.com or at your dealer.
After-sales Service and Application Service
Our after-sales service responds to your questions concerning maintenance and repair of your product as well as spare parts. Exploded views and information on spare parts can also be found under:
www.bosch-pt.com
Bosch's application service team will gladly answer questions concerning our products and their accessories.
In all correspondence and spare parts orders, please always include the 10-digit article number given on the nameplate of the product.
Great Britain
Robert Bosch Ltd. (B.S.C.)
P.O.Box 98
Broadwater Park
North Orbital Road
Denham
Uxbridge
UB 95HJ
At www.bosch-pt.co.uk you can order spare parts or arrange the collection of a product in need of servicing or repair.
Tel. Service: (0344) 7360109
E-Mail: boschservicecentre@bosch.com
14 | Français
Ireland
Origo Ltd.
Unit 23 Magna Drive
Magna Business Park
City West
Dublin 24
Tel. Service: (01) 4666700
Fax: (01) 4666888
Australia, New Zealand and Pacific Islands
Robert Bosch Australia Pty. Ltd.
Power Tools
Locked Bag 66
Clayton South VIC 3169
Customer Contact Center
Inside Australia:
Phone: (01300) 307044
Fax: (01300) 30
Inside New Zealand:
Phone: (0800) 543353
Fax: (0800) 428570
Outside AU and NZ:
Phone: +61 3 95415555
www.bosch.com.au
Republic of South Africa
Customer service
Hotline: (011) 6519600
Gauteng - BSC Service Centre
35 Roper Street, New Centre
Johannesburg
Tel.: (011) 4939375
Fax: (011) 4930126
E-Mail: bsctools@icon.co.za
KZN - BSC Service Centre
Unit E, Almar Centre
143 Crompton Street
Pinetown
Tel.: (031) 7012120
Fax: (031) 7012446
E-Mail: bsc.dur@za.bosch.com
Western Cape - BSC Service Centre
Democracy Way, Prosperity Park
Milnerton
Tel.: (021) 5512577
Fax: (021) 5513223
E-Mail: bsc@zsd.co.za
Bosch Headquarters
Midrand, Gauteng
Tel.: (011) 6519600
Fax: (011) 6519880
E-Mail: rbsa-hq.pts@za.bosch.com
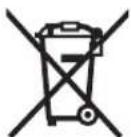
Disposal
Power supply units, accessories and packaging should be sorted for environmental-friendly recycling.
Do not dispose of power supply units into household waste!
Only for EC countries:
According to the European Directive 2012/19/EU for Waste Electrical and Electronic Equipment and its implementation into national right, power tools that are no longer usable must be collected separately and disposed of in an environmentally correct manner.
Subject to change without notice.
Français
Robert Bosch (France) S.A.S.
Bosch Service Center
Telegrafvej 3
2750 Ballerup
Pá www.bosch-pt.dkkan der online bestilles resededele oler oprettes en reparations ordre.
TIf. Service Center: 44898855
Fax: 44898755
E-Mail: vaerktoej@dk.bosch.com
Bortskaffelse
Bosch Service Center
Telegrafvej 3
2750 Ballerup
Danmark
Tel.: (08) 7501820 (inom Sverige)
Fax: (011) 187691
Avfallshantering
Euvtnpnon kal Service
Uvtnponan kakapiaopoc
Na anouuvbete To tropofo botko PUC-EXACT ao to biKtuo npiv dieiyate kanaia epyaia kaepaouo. Movo Kaiovo n aenevepyonoi nan Tou tropofo botko dev eiva enapknc.
To tropoobotiko devxpeidctai ouvtipn. Na biatnpelre nVTOte ae kaqap kataon tn ouakeun kal tic oxioec aepiOou.
Na aouvdeete To TpooobotiktoaTaktka ano to naektpiko bIKTuo yia va kaqapaeTe TIC unoboxnc ouvseanc, TIC npicc kal taPIC me eva oteyvo navi xwpic xyoudia kai yia va apapeoet ticOKovec kal TIC BpwoieC.
Mia tuxov avaykala avntakataoan tou nalektipou kaiwdiou npenei va dieaoyei ano tv Bosch n ane eva eouaootnevo katotma Service Tc Bosch, ia va anoeuxei etai kahe 61 akivduveuon nca aapaleiac.
Naavaeteteicepyaieocovtnponnckaiinokevic movoaeapotaeknabeeuvo npoowko.ETaEaaopaA lZetai diattnpnoTnc aaoaaleiaouptofootiko
'Eva eoiaobotnevo katodtnja Service tnc Bosch ekei nepyaic auteyopao kai aopaawc.
60|Türkce
Na anooupete Ta uAikaiinavongkai kaoapioou me tpo- no piauko npoc to nepiBaalov. Na auaibave tonoyn naic tic oxetukc voikc diataeic.
Eapntmuata
Tia to nAipnc npoypaum aEapntnpatwov nootntac mnpoeite va evnepuwele tnv nKetpovikn diouvan www.bosch-pt.com kai www.boschproductiontools.com n otov kovtivo ac, eiko eipopa.
Service ka npoxn ououw xphonc
To Service anavra otic cwpntnoeac oac oxetka pe tny emokuei kai tn ouvtponan tou npoiovoc ac kaohc yia ta katalnaa avatllakrtika:
www.bosch-pt.com
H ouda npaoxnc ouuouawv nC Bosch anavr daeuxaplotwC otic epwtnoieocac oxetikae ta npoiovta mac kai avtalakKTiKa Touc.
△wote o aeTc epoTheic kai npayeeiec avtaaaktkov onwaohnot to 10yphiKwokko apioo oupuva me Tny niva-kia tounou npoiovtoc.
EAaa
Robert Bosch A.E.
Epxelc37
19400Kopwni-Aθηγα
Tnλ.: 2105701258
Qdξ:2105701283
www.bosch.com
www.bosch-pt.gr
ABZ Service A.E.
Tnλ:2105701380
QaE:2105701607
Anoupon
Ta tropofootik, ta eapntmuata kai ooukeuaoeic npenei va avakukawovtai tnpo fikko poc to nepiBaalov.
Mny pxyete Ta Tpofoobotka st anopplma tou oitio ouac!
Movi yia xiopec tnc EE:

Umpova me Tnv KoVotri Ondyia
2012/19/EE oxetika me tic naaiec nkeptiKc kai nkeptovike ouakeuckac kai teta-
opap Ta nd oylaueaoutc o e viko dikaio dev
eival neov unoxpewntko ta axpnota nkeptiKa epyaela va oulambdaoyovta EcxwpiaTva va
avakukawooovpnpo puknpoTnepi
baauov.
Tnpoue to dikalwa aaiayw.
Türkce
Güvenlik Talimati
Jer "Canadian Standards
Association" tarafindan test
Robert Bosch Sp. z o.o.
Bosch Service Center PT
K Vapence 1621/16
692 01 Mikulov
Na www.bosch-pt.cz si si muzete objednat opravu Vaseho stroje nebo nahrdni dily online.
Tel.: 519305700
Fax: 519305705
E-Mail: servis.naradi@cz.bosch.com
www.bosch.cz
Zpracováni odpadú
Sifove zdroje, prisluenstvia obaly maji byt dodany k opetovnemu zhodoceni neposkozujicimu zivotni prostreidi.
Cpok cnkybblnEINHcoCTaBnET 7 nT. He peKoMeHnyeTcN K3KnpyatauNN NO HCTeueHHN 5 nT xpaHHeNc DaTbI N3ROTOBHeHNE63 npeBaPHTbHO npOBepKN (aTy n3rOToBneHnRcM.Ha 3tHKeTKe).
IpeueHb KpHTHueCKHX OTKa3OB H OUn6OuHbIe DeiCTBnH nepcoHana HIN NONb3OBaTeN
-HeHCIOB3OBAbCnOBpeKdEHHo pykoTko HnN NOBpeXDeHbIM 3aUNTHbIM KOKyXOM
-HeHCIOB3OBaTbPnIOABNEHINDbMaHENOPcpeCTBeHHO H3 KOpNyca H3dENNA
-HeHCIOJIb3OBA Tb Cpepe6HTbIM HnH OOrIeHHbIM 3JIeKTPuYeCKHM Ka6eNEM
-HeHcNoIb3OBaTbHaOTKpbTOMnpocTpahCTBeBOBpeMdoKJRA(BpaCnblnEmoB0e)
-He BKNIOUaTb PnI NOnaHaHIN BOJb I KOpNc
-HeHCNOJb30BaTbPnCNJbHOMNCKpeHHN
-HeHCIOJb3OBA Tb npH NOBHeHH CnIbHO Bbopaun
Kpntepnn npedeBbXcOToHHN
- nepetepn nn nobpekdeh 3neKtpueckm Kaebnb
NoBpeKdEn KOpnyc n3eInna
TIN IN nepHOdHNoHcTB texHNueckoro 6cbnyKbHaHHN
PekomeHnyETcOuHCTHTb HNCTpyMeHrOT NbIIN NocNe KaXdo-TOHCNOB3OBaHn.
Xpahenne
-Heo6xOJIMO XpaHHTb B CyXOM MeCTe
-HeoXOJMO XpaHnB BdAnOT NCTOCHNKOB IOBbIeHNbIX TEMnepaTp H 03DcHCTBnC OJIHeuHbIX Nyuei
- npn xpaHEn Hno6xOaHMo H36eRaTb pe3Koro nepenada TeMneparyp
-xpaheHHe 6e3 ynaKOBn He donyckaetc
- noDpO6HbIe Tpe6oBaHnK yCIOBnM xpaHeHn CMOTpnte BFOCT 15150 (YcnoBne 1)
TpaHcnpToPbOBA
KaTeROpHuecckn He DoNyckaetcnaIaeHne IIObIe MexaHHeueckne Bo3deNCTBnHa yNaKOBky npi TpaHCnOpTnpOBKe
- npn pa3rpy3ke/norpy3ke He donyckaetc HcnoIb30BaHne IIO6O BnDaTexHnKn,pa6oTaIoSeNo npnHnHy 3aXnMa ynaKOBKn
- noDpo6HbIeTppe6ObaHnK yCNoBnM TpaHCnpTIpOBKn cmOTpntBTOCT 15150 (yCIOBne 5)

Pycckn|85
Yka3aHn no 6e3onachoctn
06une yka3aHnno no texnke 6e3onachoCTn dnn 3NeKtpOHNcTpymENTOB
I PEPDyIPEXDEHNE IpoHTHe Bce yka3aHHN HnCTpyKuHn No TeXnKe
6e3oNaChocTh. HecobJeHneUykaaHm NnHCTpyKuHn No texHke 6e3oNaChocTH MoKe TcTaB npuHNO npaKeHHa 3NeKTPueckm TOKOM, POXapa N TaeKeblx TpaBM.
CoxpaHnTe 3TH HnCTpyKuHH yKa3aHaNn dIy6yduero nCNoJIb3OBAHH.
IcnoB3oBaHHe B HactoUnx INCTpyKunx Iyka3aHnX NOHTHE 3NEKTPONHCTPymENT PACINPOCTPAHREc HA 3NEKTPONHCTPymENT C NITAHEM OT CeTN (C CTeEBIM WHypOM) Ha aKKyMyIaTOpHbI 3NEKTPONHCTPymENT (6e3 CETeBOI shypa).
Be3onachoctb pa6oeryo mecta
Copepkte pa6ooye MeTo B uHcTTo H XopoO oCeBueHHbIM. BecnpaOK HnH HeOCBeuEHbIe yAcTKn pa6oeryo MeCTa MOrY pNpBeCTN K HeCuaCTHbIM CnyaAM.
He pa6oTaIe C 3THM 3NEKTPONHCTpyMeHTOM BO B3pbI-BOONACHOM NOMEUeHH, B KOTOPM HAXOJrTcR TOpIO-HE XIKKOCTN, BOCnMaHEHOUIneCra3bl NIN NIIb.3NEKTPONHCTpyMeHTbI NCKPrt, YTO MOKeT PnPBecTn K BOCnPaMeHeHH NIIIN NII IN NapOB.
Bo Bpempa6oTbC3NeKtpOnHCTpyMeHOM HeDonyckaIe 6nN30 K BaWemy pa6OcEMy MeCTy DeTeH NoctopoHHx Nt.OTBNEKUnCb, Bbl MoKeTe NTopeAtb KOHTPOJIb HAD 3NeKTPOnHCTpyMeHOM.
3neKtpo6e3onacHocTh
1TencbnaBnka3neKtpOHcTpymeHa donxha noXoNbK TncenbHOb po3Te. Hn Bkoem cnyae He mHeNte TncenbHyO Bnky. He npMeHnre nepExoDbIe TKepeblnE3neKtpOHcTpymeTOB C 3aunTHbIMz3aMmHEm. Hen3meHenhble TncenbHbE BNk NpOxDyIe TncenbHbE po3ETKN CHJKAOT PNC POPaKeHHN3NeKTPOTOKOM.
PpeoTbpaaaiTe TneChbIKoHTAKTc3a3eMNEHbIMN NOBepxHOCTHM, KAK TO: c Tpy6amn, 3IeMeHTAMN OTO- PNNHRA, KYXOHbIMN NNTAMH XOLOHbHHKAMN. Pn3a3eMNEHn BaWero Tena nobblaaetc pck npaxehn 3NEKTPOTOKOM.
3aunuatae3neKTPOHNCTPymENTOTdoxHncbipocTH. POnHHOBHeHE BODbB3NEKTPOHCTPymENT NOBbIaET PnCK nopaxehna3neKTPoTOKOM.
He pa3pe7aetcHcNoB3OBaTb Hhyp He No Ha3HaueHHIO, HAnpHMeP, dIraTpaHCnOpTHPOBKN HIN NOBBeCKN 3NEKTPOHNCTpyMeHTA, HIN DnB BByTAHBNAH BNKN H3 WTeNCeBHOH PO3eTKN.3aUHaaTe WHyP oT BO3DeCTBHA BICOKHX TEMNEPATp, Macna, OCTpbIX KpOMOK HIN NIOBHNKbX qACTe 3NEKTPOHNCTpyMeHTA. NobpeJXDeHHbIM INN CNYTaHHbI WHyP NOBbIAaET pNCK nopaxKeHHN 3NEKPTOTOKOM.
Pn pa6ote c 3eKtpOnHCTpyMeHToM NOOTkpBtBM He6om pnpmeHHe nproHbIe Ia 3TOrKa6en-ynnnHHTEN. PpmeHHe NpuroHOrO Ipa60TbIOg OTKpbTbIM He6om Ka6eY-dINHInTeI CHNkaet Pnck npapaKeHHa 3eKTPoTOKOM.
EcnH HeBO3MOXHO 366KaTb PnIMHeHn 3NeKTPoHNCTpyMeHTA B CbIpOM NOMEeHHN, NOKNIQUaTE 3NeKTPoHNCTpyMeHT Ype3 yCTpoCTBO 3aUNTHORO OKNIQUeHHN. PnIMHeHn yCTpoCTBa 3aUNTHORO OTKNIQUeHHN CHJkaET PNCK 3NeKTPuYeCKOrO NOPaKeHHN.
Be3oNaChocTb IIODei
Bybte BHNMaTeBbHm, cneHte 3a TeM, yTo BbI Deaete, n npOyMaHNo haHnAte pa6Oy C3NeKtpoMHCTpymENTom He Nb3yntec b3NeKTPoHnCTpymENTOM BycTAlOM COCTOHHN Hn eCn BbI HaxoHTeCB B COCTOHHN HApKoTHueCKOro Hn AnKOrOJIbHOr ONBHeHH Nn NOB Bo3dEChTBnE KApCTB. OIN MOMENT HEBHIMATEBbHOCTn pPi paOte C3NeKTPoHnCTpymENTOM MOXET PnHBecn K cepBe3HbIM TpaBMam.
PnmeHte CpeCTBa HnHBnyAynbHO 3aunTbN BcFda 3auHTbIe Ock. IcnoB3oBAHHe CpeCTB HnHn BVduhOB 3auNTbI, KAK TO: 3auTHOm Macn, ObyHn Ha HECKoB3aJeNoD0wBE, 3auTHOrO WJema HnCpeCTB 3auNTbOpraHOB CNYxA-B 3aBNCHMOCTN OT BnDa pa60TbC 3eKPTPOHCTpyMeHTo CMHXaET Pnck NOnyehn TpaBM.
PpeoTbpaaaHt HenpeHnapepeHHoe BKnIOueHne 3NEKTPONHCTpymeHa. Peep noKIOuOHeHem 3NEKTPONHTpymeHa K 3NEKTPONNTaHNO HNN KAKyMyNATOPy y6eHnTeB BblkIOUeHHOM COCTOHHN 3NEKTPONHTpymeHa. YdepKaHne NaIbua Ha BblkIOuateNe np TpaHCnOpTnOBke 3NEKTPONHTpymeHa N NOKIIIOueHHE K CETN PNTAHN BKNIOUeHHO 3NEKTPONHTpymeHa UpeBaTO HeCuaCTbIMn CnyaAMn.
y6npaTe yCTaHOBOHyb HNCTpyMeT nHraeHbIe KIOUH Do BKNIOUeHH 3NEKTPoHNCTpyMeHa. INCTpyMeHT Nn KIOU, HaxOJaUNCBA BpAuaOJeHcA cACTn 3NEKTPoHNCTpyMeHa, MOKeT pINBeCt N TpaBMam.
He npHHMaTe HeeCTeBHeHoe NOIOKeHne KOpNyCa Tea.Bcerda3AHMaTe yToHmBoe NOnOKeHne H coXpaHnTe paBHObeche.5naOapra 3Tomy Bb MoKeTe LyUWe KOHTpOINPOBaTb 3JIeKTpOHnHCTpyMeHT B HeoKnHaH HbIX CNTyaunx.
HocHTe NOxOAnypo6Ouyo OeJy.He HocHTe 1nPKOyIO OeJyN yKpaSeHHa. DePKeTbe BONcbl, OeJyN pyKaBnCbI BdAaN0rTbBHXyUHcxCraCTeN. 1nPKoA OeJya, yKpaSeHHa NIN DInHbIe BONcbl MOryt bItb 3aTHyTb BPaAsHOUMNCraCTAMN.
PnHannHHB03MOXHOCTN yCTAHOBKN bIineOTcabiBAOuHx NbIIEc6OpbIX YCTPOIECTB IpOBepaHTe HNPCHOEHNHe NnpAIBHObEHCNOB3OBAHne. PnMeHEHNE PbIEOTCocAMoKET CHINbTb ONaCHOCTb,Co3DaBaEMyIO PbIbIO.


86 | Pycckn
BHIMAHHE!Bcnyae BO3HKnHOBeHHnepe6oBpa 60te 3NEKTPOHnCTpymEna BCNEcTBHe nonHOrO Hnn qactMHoro npkepaueHH 3Heprocha6KeHHn noBpeXeHHu cENy npabEHH 3Heprocha6KeHHem yctahOBHTe BbIKOuATEb B nOIOKeHHe BbIKn.,y6eDHBWbc,TOH OH 3a6NOKpOBaHn (pH erO HanHH).OTKIOUHTe ceByO BuNKy OT pOstEKn Hn OTCoeHNHTe CbEMhbl aKKymnTop.3Tm PpeODTbaaetcHek KOHTPOINHPyEmbl NOBtOpHb 3aIyck.
PpHmHeHHe 3NeKtpoHnctpyMeHTa H o6paueHne C Hm
He neperpykaite 3neKtpOHCTpymeH. McnoIb3yIte nBaei pa6oIpipeHa3aHcHbI dIra 3TOrE 3neKTPOHCTpymeHT.CnOxOJaIIMM 3neKtpOHCTpymeHtOM Bby pa6oTaTe Iyue H aedJkHee ByKa3aHHOM dHaana3OHe MoUHcTn.
He pa6oTaIe C3NeKtpOnHCTpymENTom npn HEnCnpaB-HOM BbIKNoUOATEne.3NeKtpOnHCTpyMeHT, KOtOpBn He NOJaTeCBAKIOUeHIO INN BbIKNoUeHIO, ONaCeH NdoJXeH 6bItb OTPMOHTIpOBaH.
Ho hauana Halaan3neKtpOnHCTpyMeHTa, nepe 3a- MeHOH pInnHaIeXHoCTe n PpeKpaUeHEm pa60Tb1 OTKnIOuAte WTeNcEhHyIO Bnky OTOp3TK CETH H/HH BbHBe aKKyMnyTOp. 3Ta mepa npedoc- TopoXHOCTn PpeOToBpaUaet HeIpeHAmepEHHOe BKNIO- YehHe 3NeKtpOnHCTpyMeHTa.
XpaHHTe 3NEKTPOHNCTPymENTbB HeOCTyINOM dIaTeMeTc. He pa3peWAnTE NOB3OBaTBcR 3NEKTPOHNCTPymENTOM HUcAM, KOTOpBIE He 3HaKOMBI C HMI HnH He HNTANHACTOAUX HHCTpykun. 3NeKTPOHNCTPymENTbOnaChb BYPKAX HeONbTHbIX NII.
TuaTeNbHO yXaXnBaHte 3a 3neKtpOnHCTpyMeHToM. PpOBepaIe 6e3ynpeHyIO fYHKUIO H XOJ DnBxUy- uXxCaTcEe 3neKtpOnHCTpyMeHTA,OTCYTCTBNE NOmO Knn NOBpeXKeHn, OtnpuTeNbHO BnNHOuix Ha yHKUIO 3neKtpOnHCTpyMeHTA. NobpeXKeHbIe vaCTn DOxKbHb 6bItb OTpeMOHTHOpaBaHd HOcNoB3OBAHn 3neKtpOnHCTpyMeHTA. IINOxoE 06CnyXnBaHne 3neKTPoHnCTpyMeHToB ABnTcPnPHHO 6bIbTO UcnaHEcuaTHbIX CNYaEB.
DepxHTe pexyHn HnCTpyMeH B 3aTOeHHOM nCHCTOM COCTOAHN. 3a6oTnBO yXoKeHHbIe pexyUne HnCTpyMeHTb COCTpBIMn pexyUHM KpOMKaMn peXe 3aKNHnBAIOCTc HxJIeYBEcTH.
PnHmehIe 3NeKtpOnHCTpyMeHt, npHahJnxHoCTH, pa6oUHe NcHCTpyMeHTb H T.N. B COOTBETCTBm C HactOaMHN HcHCTpyKUHM. YUnTbBAIte PnH 3OTM pa6oUeYcNOBHN BblONHEmy p6oty. Mcnoh3OBaHne 3NeKtpOnHCTpyMeHToB Dn HnpeDycmOTpeHHbIX pa60T MOKeT pINBECTn K ONaChbIM CNTyaUMM.
CepBnC
Pemont Baawero 3neKTPoHHCTpymeHaTn npuyaHte TOnbko KBaHnHcHnPOBaHHOMy nepcoHany nToNbKO c npHMHeHHem opHnHaBHBx 3anaChbix qacte.3THM obecneuHbaetc 6e3onacHOctb 3neKTPoHHCTpymeHaTt.
Yka3aHHNo TExHHKe 6e30nachOCTH Dn8 6NOKOB nHTAHH
BknoaTe 6nok nHTAHn B3a3emHnHyo HnEka- mHM o6pa30m cetb. B po3eK uynHHnte IOnKeH 6bIb NcnpaBHH 3aunTHbI npOBod.
HapraKeHH uactota 6noka nHTaHH DoJXhBcOBnaDaTb c daHHbIM Ha 3aBOdcko Tabmue WypynOBepTa. Bnok nHTaHH PUC-EXACT npedHaahueH NCKIOuHTeNbHO pInpMbIWe HHbIX npMbx WypynOBepTOB Bosch cepHH C-EXACT.B npOTNBOM Cnyae BO3HkaeToNaCHOCTb BO3rOpAHN H B3pBaBA.
ДерхнгteбКннТанньчNTOTe.ПиЗагрзHeHHN cy-uctByET OAnCHocTb NopaxKHeH3JIeKtpueckHM TOKOM.
PepdKaKdbm HcNoB3oBaHem npObepeHTe 6nOK nTahnn, Kaebn HtnccebHyBO Bnky. PnOsbnapyeHH NOBpeXDeHH He cNOb3yHe 6nOK nTahnn. He BckpbBaIte 6nOK nTahnn camocToTeBHO, erp eMOHT pa3peaetc BblIOHNb ToIbKO KBANHnPOBAHOMY nepcoHany H TOBko HcNoB3oBaHem opHNHbHbIX 3aNacte. NopExeHHbe 6nOKn nTahnn, Kaebn HtnccebHbE BnNK NoBbIaOT pCK noPaKeHHa3NEKTPueckm TOKOM.
He hcnonb3yIte 6nK nTahna Ha NERKOBCnmaHnIOeHc NOBepxHocTH (HaNP. Hb 6ymare, TkaHx NT. d), a TaKke B6nn3n rOpOuHX MaTePnaNoB. B C8R3n C HarpeBaHHem 6noka nTahna BO BpEmaKCNpyataunn BO3HnKaET OAnchOCTb BO3rOpAHn.
CneDHTaTEM,706bI6NOKNTAHNYyCTOHNBOCTOHa paOoey NOBepxHocTH H He MOR CnyaayHO CBNHYbCa. IOBpeJHbI 6NOK PNTAHNMOKET Bbl3BaTbNOPaXeHHe 3NEKTPNuecknM TOKOM.
PpoHTaTe n CTporo co6nOdaTe yka3aHnNo TeXnKe 6e30anacocTH np6oune HnCTpyKu, yka3aHHbIe BpyKOBOcTBe no 3kCnnyatauHnCnONbEyemOro WpyNoBepTa C-EXACT.
CNMBOJIbI
Hnkeya3aHbte CMBObl Moryt 6bItb BaxHb npnCNOB30-BAHN 6NOKa NITAHNA. IoxanyctA, 3anOMHITE CMBONBI INx 3aueHHe. PpaBHLbHa HTEpnpetaua CMBONOB NOMoKet Bam npabHbhee H naedXhee pa6oTa b 6NOKom nHTAHNA.
CBeTtHmC3eHbM CBeTOM CBeToHnHbH HnHnKaTOp 3 noka3bIaet, KOrda6Nk NHTAHnRTOB K3KcnPlyatauIN. PUC-EXACT1:CbeueHne CBeToHnHOrO HnHnKaTOp4CBnTeTebCTByeTO HeNCnPpABHOCTN.
YtobbIKIOHTb6NOKNTAHNA, npKMMTE BIKHOATeB 6noka nTahna 2 B noJooKeHne 0.
B cienx 3KOHOMH 3NeKTPO3HePTH BKNIOUaHTe 6NOK NITAHNA, TOnbKO KOrDa pa6oTaTe C HIM.


Pycckn|89
BkIIOUeHHe N BbIKIOUeHHe 3JIeKTPoHnCTpyMeHa
3NeKTPnueckn npAOM WypynOBepT c 3anyckom pbIaROM (cm. pnc. D)
ДявКIOUeHЯЗЕТРОHCTPyMeHTaHaKMTe Do yNopa BbIKIOUaTeJIb 2.
3NeKtponHCTpyMeHT BbIKIOaEcTc ABOMaTHueckn npn DOCTHXeHN YCTAHOBJIeHHORO KPYTAIErO MOMHTa.
Pn npexkdeBpeMeHHOM OTNcKBe BbIKNoHateHn 2 yctaHOBHeHHb KpyTmMmOH He DoCTHraETCA.
3neKtpueckn npmo WypynOBepc 3aynckom HaxaTHem
YTo6bI BkIOHHTb 3eKtPOnHCTpyMeHT, pIncTaBbTe pa6oHn HhCTpyMeHT K BnHTy N CJIeKa HAdaBNTe Ha WypynOBepT B OCEBM HApapBNeHN.
3NeKtpOnHCTpyMeHT BbIKHNoaetcABOMaTHueeCKn npN DoCTHXKeHH YCTaHOBHeHHOro KpyTaeero MOMeHTa.
PnnpexkdeBpeMeHHOM CHaTHN HArpy3Kc WypynoBepta, HAp., ecnn pa6ooyuHnHCTpymEn CCKaNb3HynCBHHTa, PpEBApHTeNbHO HAcTPOeHHbI KpyTaunCMAmeHT He DoCTHraetc.
Yka3aHaNo npImeHeHHo
BoBpMa pa60bI cneHNTe 3a TEM, qTO6bI 6NOK NITAHn CnyaHNO He COCKoJIb3HN p6Ooue NOBepXHOCTn. HApEHXO 3aKpeINTe 6NOK NITAHn HA CTHe HIN npOLOXnTE uHyp nTahnra TAKM o6pa3OM, qTO6bI BbI He cNOTKHynCb.
3aunTa o neperpy3KN (PUC-EXACT 1)
Pnpeperpy3ke 6noka nntaHn 3aropaeTcCn-HHnkatop 4, CnHaHn3npuOuN O HncnPabHOCTN.
OctahOBInTe pa60Ty. BbIKIOUHTe WypynOBepT H6NOK NHTAHIN. IpoBepTe WypynOBepT NHyP NHTAHIN. 3aMeHInTe NOBpeXJDEHNIE DeTANI.
Pocne 3Toro cHOBa BKNIOHTe 6NOK NITAHn H WpypnoBep.
Ecnn Pocne 3Toro CNJ-HNINKATOp 4 npOOnKaet CBeNTbCBA,
3TO 3HAuHT, 4TO 6NOK NITAHn BblIe H3 CTPOR. OTdaTe ERO
B pEmoHT bAToPi3OBAHHy MaTepeCKyIO JIA 3NeKTponHCTpyMeHToB Bosch.
Texo6cnyxHBaHne n cepBnC
Texo6cnyxmbaHne n ouhctka
BbTaunthe wTeNceBHyo BnKy 6NoKa nHTaHn PUC-EXACT hPozETK, npExKe HEM BblONHtbp a60tb no ouChte.3TMM Bbln36bKeIte onaCHocTN npaXeHHN 3JIeKTPOTOKOM. OJHO NIIbBbIKIOHeHH 6NoKa nTHAHH HeOCTaOHO.
BIOK NITAHH He Tpe6yET TexHueckoro 06cnyBaHn. Bcerdaepknte npbop IN BeHTINRAUHOHbIe 8eIN BHCToTe Hne 3arpaKaJaTe Hx.
PeynphO OuHaaTe rHe3da, MyfTbI H tTeNCbHbIe BnKn OTKIOUeHHoTO cETn NHTAHN 6IOKA NHTAHN CyXO TKaHbIO, He IMeIoUe BOPCNHO, U ydAnrTe NbIb N AcTHcKN rpa3N.
EcHn Tpe6yeTcN NomeHbIHyp, 06paauaIteCb Ha HpyMBy Bosch HIN B ATOBn3OBAHHyIO cepBnCHyIO MaTePCKyIO IIN eKeTpOnHCTpyMeHTOB Bosch.
Texo6cnyKBAHHe npeMOHT pa3peWaeTcBbIIOHNrToTbKO KBaHnΦuNPOBaHOMy NepcoHany. 3TNM o6ecNeuBaTeC npOdoJXKeTbHaj 6eOtnacHocTb 6noka nTaHH.
CepBnchA MaCTepckA qHmbl Bosch BbInonHReT Takyo pa- boty bIcTpo HndexHo.
Cma30hIbe MaTePhaIbH CpeCTBa DnO ouHCTKn DOJXKbI yTINN3HPOBaTbC3 KOONrHueckn YHCTbIM 6pa3oM.BbInonHnTe 3akOHHe ppeHNcaHH.
PpHnHaJIeXHoCTN
Komnkechny nporpammy kauceTBeHHbX npHnAdnEhOCTe Bb haJeTe B HHTepHete Ha cTpaHnue www.bosch-pt.com N www.boschproductiontools.com mN y BaWero cneuaanHnPobaHoro dInepa.
CepBnH KOHCyNbTHPOBaHne Ha IpeDMET HCNoIb3OBaHH npOdyKun
CepBnchA MaCTepckA OTBETHa Bce Baun BonpoCbI no pemOHTu 06cnykBaHIO BaWero npOyKTA n 3aNaCTM. MoTAtXhIbe YpeTeKn HnHΦOpMaUIO n 3aNuaCTM BbHaHneTe TaKke No aDpecy:
www.bosch-pt.com
KolneKTbCOTpyDnHKnOB Bosch, npoeocTabnHOuN KOnCyIbTaun HA npEeMet HcNoIb3ObaHN pOdyKUnn, cydoBONCTBnEM OTBeHT Ha BCE BaUN BOpocbl OTHOCHTenBHoro NaeepnpOdyKUnn H e npHaNDJeXHoTe.
IpokaNyIcTa, BO BceX 3aIpcax H 3aKa3ax 3aIpaCTe O6ra3aTeIbHo yKa3bIbAte 10-3HaHbI TOBapHbI HOpE p 3aBoDcKoTabIuueKe I3dennr.
ДирeroHа: PoccH, Beapycb, Ka3axctan, YkpanHa
IapaHTHnHOe 06cnyKbAHHe npeMOHT 3JNEKTPOHHCTpyMeHTA, CcoBIOHeHm TpeBOBaHm HOpM 3rTOBOTENI pON3BOaTCH Ha TePPHTOpHN BCEx CTpaH TOJIbKO BΦHPMeHHbIX NH ABTOPN3OBAHbIX CepBIChBX UeHTpAX «PObep BoW».
PPEyPPEXJEHNE!IcnoJIb3ObaHne KOHTpaKaTHOI pOdyKUIN OaCHO B EKCIpyatauIN,MOxET PnHBecTN K Ueep6y dJaBaWero 3ApOpOBJ.13rTOBLeHne n pacpocTpAneHne KOHTpaKaTHOI npOdyKUIN PpeCneJeYetcNo 3aKOHy BaAMNHCTpaTHBOM I yRONOBHM NopRKe.
Pocchra
YIOnHOMOeHHa H3rTOBtEnm OprAHn3aun: 000《Po6epT BOW
BawyTHnHcKoe Wocce, Bn.24
141400,r.XmKn,MockOBcka o6n. Pocchra
TeN.: 8 800 100 8007 (3BOHOK nO PocChn 6ecnnaTbH) E-Mail: info.powertools@ru.bosch.com
PnHyu n akTyalbHyu HHphiMaHIO o pacnoNoKeHH cepBnchbix ceHTPOB INpneMhbix nyHKTOB Bbl MoKTe NOyUHTb:
- Na oФицаньном саite www.bosch-pt.ru
-1n6o no TenefoH cypaBOuHO - cepBcHcH cnyKb Bosch 8 800 100 8007 (3BOHOK NO PocCnn 6ecnnaTHbI)

90|YkpaHcbKa
Benapycb
IN《P06epT5oW》OOO
CepBnchbI ueTp no 6cnyxHBaHHIO eKtpOHHCTpyMeHa. yI.TmHP3eBa,65A-020
220035.Γ.MHHCK
Benzapycb
Ten.: +375 (17) 254 78 71
Ten.: +375 (17) 254 79 16
c: + 375(17)2547875
E-Mail: pt-service.by@bosch.com
PONEPDKEHHI PPOHTAE Bc3a3epeKxEHH I BKA3IBKN. HeOpTu
MaHn3aCtepeXeHb IBKa3iBOK MOnE npN3BeCTn Do ypaXeH HEnEKeTpUHHM CTpymOM, POKExi Ta/afo CepNo3Hx TpaBM.
I6pe 36epiraTe Ha MaHbYTHc i nonepeXeHHa I BkazIBKn.
PiNDnoHTTAMeKTPponpnaD B uXH 3aCtepeKeHHAR MaTbcaHa yBa3i eKTPponpnaD, 10 npaioe BiD Mepeki (3 eKTPokaBem) abo BiD akymyIaTPOHOI batapei (6e3 eKTPokaBIO).
1IHI3doHa6noqiXHHBneHHPUC-EXACT
2BmMka
3 CbitioioHm iDnkaTop roTOBHOCTo po60tn
4 CbitIOiOHHn iHnKaTOp HecnpaBHOCT (pehehaBaHTaKeHH) (PUC-EXACT 1)
5LHypKnBHeHH
6 Finb3a Ha HhHypi
7 UHyp nIiEHaHHa 6noka XnBHeHH PUC-EXACT
8 N3B MyoTt Hypa7
9P03'EM shHpya XnVBneHH
1.0Ihi3doIyIaHypyaXHHBneHHN
1Utencenb
12 Bmmkauch wypynobepra (nyck BaXeNem)
3o6paKeHe OH ONncaHe npHaJaH He HaneKHTb Do cTaNapTHORO 06cary noCTaKN.

YkpaHcbKa 93
Texhi danhi
PikknouehndoDjkepeenaKHBneHHN
(ДИВ.МАЛ.В)
3BaxaIte Ha Hanpyry y Mepexil Hanpyra Bdxepenictpymy NOBHHa BiINOBiDaTH DaHMM Ha 3aBOcckiTa6nui6nka KHNBEHH.
Ipi niknouen H6nokxnnneHndo xpepea xNBnene H Bnkopnctobyte nwe npndaTHn DnBaWoO nxpepea XNBnEHnwhyp. Pnp Heo6xndocht3amHtB uhypXNBnEHn DnWTEncbHNx po3eTOK 3axNCHM KOHTAKOM,IO BXoNTB CTAanapttnn O6carr NoCTabKN, UHypom KNNBEHHN, IO nixoNDt Bo WAsoDxpepea XNBnEHn.
BeneKtpnHOMy npmomy wypnoBepi 3ayncKom Baxenem cnikkyte 3a THM, uo6 He noklaCTn wypnoBepT Ha Baxinb, nepu HIX 6NOK KHNBeHHa PUC-EXACT 6yde NiEeHaHnDo eNeKtPomepeXi. LmBn nonepeHne HeHaBMnche BMkKaHHa WypnoBepTa.
BeneKtpnHOMy npmomy wypynoBepti 3 anyckom HATCKyBaHHc nikkyte 3a Tm, u6b nid yac nie'edHaHH 6Ioka knuBHe PUC-EXACT do eneKtpomepekXi Bu He TCHyHn Ha wypynoBept BocobOMy HanpMky. LIMn Bn nonepeHte HehABMNcHE BMNkaHHa WypynoBepta.
BCTABTE CnoaTky po3'EM 9 Whpya XnBHeHH 5 B rH3do 10 6NoKa XnBHeHH PUC-EXACT. Tenep MoXHa nIeCHaTnca PUC-EXACT do dKepeNa CTpyMy, BCTpOMnBwn wTeNCenb 11 y po3eKy 3axxHcHMM KOHTAKTom.
Cnoatky nideHaHte WHyp KJbHeHHa Do 6noka KJbHeHH PUC-EXACT i nnepe nncra bOro BCTpOMiTB wTeNCelb 11 y poaetky, iakwe icHy eHebe3neka ypaXeHHa enektpnHMM CTpyMOM.
Bid'eHaHH BID dKepena KMBnEHH
BNTARHITb CNoaTky WTeNcEnb 113 po3eTK. NtIM BNTARHITb po3'em 9 WHypa KHNBeHHHa Is rHIsda 106nka XHNBeHHHa.
Uo63a06iTHypaKeHHOeneKtpnHMMcTpymom,y nepuWeyprz3abxN BHTaryTe wTencelb i3 po3eKn.


94 |Ykpaɪhcbka
Pobota
Pouatokpo6oTn
BMHKAHH/BNMHKAHH6nokaXHBneHHPUC-EXACT (nVB.man.C)
Cnoatky notpi6ho yBimkHytn 6nok kHbeneHH PUC-EXACT, a notim - enektpoiHcTpyMeHT C-EXACT (DINB. «ПДКЛЮЕньdoДжерета кИВNeHHA), CTOP.93).
UO6yBIMKHTN60KXHBLENHH,INPTNCHTBBMNKa2Ha 6noui XMBNLHBNNOJXEH1.
CbTTHHcBITIOIOHOI INHKAtOpa3 3eNEHM KONbOpOM CBIHTb npo Te, 0o 6NOK XHBnHRA TOBOHdo eKcnnyataui.
PUC-EXACT 1: cBITINH N CBIIOIOHOI INIKATOPA4 CBIHTb npo HecnpaBHicTb.
106BHNKHYTH6NOKXHBNEHH,NPHTCHITb BNMKAU 6nokaXHBNeHH2BNOJKeHHO.
3MeTOO 3aOuaDkeHHN eNEKtpoeHepTt BmKaIte 6nOKn KHNBHeHH, NIIe KOIN npauoCTe 3 HIM.
BmKKaHH/BmMkaHH eneKtpnpnlaNy
EneKtpnHn npAHH uypnoBep3 3anyckom BaxKeIeM (nHB.mA.I.D)
UoByIMKHytn eneKtpponpna,HaTnCHITb Ha BmNka2do ynpy.
EneKtpponpnaad aBtOMaTHHO BHMKaetbca nicra DOcHHeHH BCTaHOJIeHOrO oBeptaIbHOrO MOMHTy.
Pn3aHaTo paHHbOmy BiDnyckaHHi BHMKnKaay2 BCTaHOBNeHH MOMENT o6epTaHH He DoCraTbcN.
3aXnCT BiI nepeBaHTaxKeHHa (PUC-EXACT 1)
PnpehaBaHTaKeHHI 6Ioka JKNBHeHHa3aRopaTbcBcBITNOIOHNI INKaTOp4, AKn CnHaNl3yepno HeCnpabHicTB.
3yHHHtbo po60ty.BHMKHTb wypynoBepTa 6nok XnBHeHHA.
Ipebeipte wypynOBepTa uHyp KMBneHH.3amHtB HecnpaBHnactHH.
Iicra 3HOby yBIMKHTb 6nOK KHBNEHRA Ta Wypynoept.
Kuio nia cBto CbitnoiOHN iHnKaTOp 4 npoOBkycCBITNcA, ce O3Haue, uo 6NoK XnBHeHH BnWOB i3 nay. BiDnIte Ioro BpeMOHT BAToPn3OBAHy cepBichyMaIcTePHIO dna eneKtponpinaqib Bosch.
Texhiue 06cnyrobyBaHHia cepBic
Texhiehe 06cnyrobyBaHHi ouHennn
BntarHtBUnyp6nokaXHBneHHPUC-EXACTi3 po3eTK,NEpWHIXBkoHyBaTHpo60TH 0uHHeHH. LIMBMyHNKHeTe He6e3neKnYpaXeHHEnEKeTpHuHM cTpyMOM.OHO NIIe BmKHeHH6noka XHBneHH HeIOCTaTHbO.
BLOK XMBeHHe He Notpe6yE TexHnHO 06cnyROByBaHH. 3aBXn TpMaHte npnad Ta BENTnAciHi OTBOPN B YNCOTi I he 3aropOdkyJte ix.
Perynnpno npouuetae rH3a,MyfTu taTtencbHI BUNKBNMKNyTOO 3 eNkTPOpepej6noka JKNBHeHH cyXoU0raHupko 6e3 BOPcHOK Ta 3HimaTe PnTa 3abpydHeHH.
KkpTpe6a nomiHn iD'EnHyBaIbH N Ka6eB, ce Tpe6a pO6HTn Ha fipmi Bosch abo B cepBich MauCTepHi dne ENEKTPOHCTpyMeHtIB Bosch, uOb yHNKHTn He63neK.
Texo6cnyrobyBaHHa Ta peMOHT npHnady DO3BOJNCTCB BHKOHyBATH NHee KBaIicIKOBAHM faxiBm. Hne 3a taKnx yMoB BaW 6nok JxNBHeHn i Hadi n6yde aHaHwATNC 6e3neuHm.
ABTOPIN30BaHa MaIcTePnB Bosch BHKOHy e Taki po60TH WbNDko I HADIIHO.
Budanrte MaTnai ouChi 3ac6n ekonoriyuHcTHM cnoc6om.3BaXaIte Ha 3akohodabui npnnncn.
Ppnaadpa
PobHH acoptHMENT BnCOKOKICHO npHnAaBn MoXeTe NOHBNTCH B INTEPHETI 3a aDpeco: www.bosch-pt.com i www.boschproductiontools.com a60 3anHTaN B Cneuiani3OBAHOMy MaraHI.
Cepbic Ta HadaHHKohcynbTauii 0do BnKOpncTAnHn npodykui
CepBicHa MaIcTePbH BIIIOBICTb Ha 3aNHTAHH CTOCOBPOEMOTy I TEXHlHOrO OBCnyROByBaHH BaIoro Bnpo6y. ManIOHKH B DeTalax I INΦOpMaIIO ΜIoO 3aIuaCTNH MoKHa 3HaHTa 3a aDpecoio:
www.bosch-pt.com
Komahda cnibpo6itHnkiBosch 3 hadaHHa KOncynbTauci JIOO BHKOPNCTAHN npOyku i3 zaoBOJENHM BiJNOBICTb Ha Baai 3aHTAHn CTOCOBHO hawoi npOyku T a npuaadn do Hei.
PnB Cix DoaTkoBNx 3aHHTaHHx Ta 3aMOBneHHI 3aHactNH, 6yNb Nacka, 3aHaayte 10-3aHnh Homep dna 3aMOBneHH, 10 cToITb Ha nacnpTH Ta5nHcpi npodykty.
IapaHTiHe 06cNryTOBvBaHHI pemOH tENeKTPoIHCTpyMeHTy 3diHCHIOITbC BIDIOBIDHO DO BHMOr I HOPM BNTOBOHOBaHa TepHOTPiBCIX KpaIN Nnue y fipMOHx abO bTOpHsOBAHNCEpBICHNX CEHTPAX fipMN《Po6epT BoW》.


Romaná 95
IIOPEJXEHH! BnKOpNCTaHH KOHTpaKaTHO! npOyKuII He63neueH BeKcNpyataU MoKe MaTn HeraTbHI HacNiKn dAedopOB'a. BnroTOBHeHr po3NOBcOJKeHH KOTpaKaTHO! npOyKuII nepeCNIyEbCra 3a 3aKOHOM B adMIniCTpATNBOMy I KPMImHaJIbHOMy NOPdKy.
ykpaiHa
TOB «Pobepbbow»
CepBichn ueHTpeNkTPOiHCTpyMeHTIB
Byl.KpaHn,1,02660,KnIB-60
YkpaHa
Ten.: (044) 4 90 24 07 (6araToKaHaJIbHnI)
E-Mail: pt-service.ua@bosch.com
OphiuiHn caH: www.bosch-powertools.com.ua
Apeca PeriohaBnHex rapaHTiINHcx cepBicHNx MaCTepeHb 3a3HaHeBA HaioHOhOMy rapaHTiHOMy TaHOi.
Ytniiauaia
BIOKNKBNENH,NpnaIaIyynakOBkyTpe6a3daBAtHa ekONOriuHOuCTy NOBtophy nepepo6ky.
He BVKnJaIe 6IoKn JKNBHeHn B NOyTOBe CMITT!
Jinwe dna kpaH EC:
Bijnobinno do cbponecbooi dnpektnbni 2012/19/EU npo Bijnpaucobahi eneKtpo-i eneKTPOHNI npnaini i nepeTBOpEHNAHIOHLbOMHY akoHOAbCTBI eneKTPO npnaini, OIOBNIIN 3BXNBAHHN 3dABATNC OKPemI yTNIIyBaTHc EKOLOIHO YCHTM CNOCOBOM.
Moxnhi3miHn.
Româna
Tel. service scule electrice: (021) 4057540
Fax: (021) 4057566
E-Mail: infoBSC@ro.bosch.com
Tel. consultanta clienti: (021) 4057500
Fax: (021) 2331313
E-Mail: infoBSC@ro.bosch.com
www.bosch-romania.ro
Eliminare
Alimentatoarele, accesoriile si ambalajele trebuie directionate catre o statie de revalorificare ecologica.
OnncanHe Ha npOyKTa H Bb3MOXHOCTHTe My

Ipooyete BHHMaTeHNO BCHKny kka3aHn. Hecna3BaHEno Ha npBHeHnTe No-dony yKa3aHnMoKe Da DoBeNe Do TOKOB yDap, noKap n/nn TeKKn TpaBMn.
MOnI,OTBOpTe pa3rBbAaata ce cTpaHnca n3O6paKeHenetaHa 3axpaHbAaunMoyn H a octaBeTe Taka,doKATO QeTe PeKOBODCTBOTo 3a eKcNlOaTaun.
PpeHa3HaueHHe Ha eNeKtpOnHcTpymEnTa
3axpaHbuaHrMoDyIe npedHa3Naueh CaMo 3a3xpaHbAHe CTOK B3aTbOpEnn NOMeUeHn Ha HNdyCTpHaJIHn PpaBn BnHTOBepTu Ha Boou ot cepnra C-EXACT.
H306pa3eHN eIeMeHTN
HomepnpaHeTo Ha n3o6pa2eHnTe KOMnoHeHTn Ce OTHacr Do Φnrypnte Ha 3axpaHaBaunna MoDyI Ha rpaΦnHnHTe CTpaHnU.
1 KynnynHa 3axpaanBauniaaapanTep PUC-EXACT
2Ipyckobippekbcbau
3 CBeToDIOI rTOBHOCTa pa6Ota
4 CBeToIIOJIOBpeJa (PpeTOBapBaHe) (PUC-EXACT1)
53axpaHbauKa6en
6 Btynka Ha Kaeba
7 Ka6e3a BKNIOUbaHe Ha eNEKtPOINHCTpyMeHTa KbM 3axpaHbuaa aanTep PUC-EXACT
8 KaHaJI B KyyIyHra Ha KaBaena 7
9 ⅢeCen Ha 3axpaHbAaMn Ka6eN
10 KynnyHr 3a BkIIOUbaHe Ha 3axpaHbAunia Ka6eN
11IeIcENHa3aPAnHOyCTpoCTBO
12 NcKOB npeKcbBaHa BnHTOBepa (NoCTOB NcKOB npeKcbBa)
H36p4eHHe HfHpyrHte Hm OHnCAHN B pKOBODCTB0Ta 3ekCnnoataaONDblNHTeHIN PnHCnocO6JIeH He Ca BKNIOUeHN B OKOMNNEKTOKBAtA.
Texnueckn daHHN
| Зхсаньш мodyн PUC-EXACT 1 PUC-EXACT 3 | |||
| Каразожен Homep | 0 602 495 001 | 0 602 495 003 | |
| Брoin КОЕТОП | 1 | ||
| Мереково зхсанвache (поменив ток) | |||
| - Вхордяшонданецve | 100-240 | 100-240 | |
| - Консуmpларна мочноct | V | 400 | 400 |
| Hp | 0,54 | 0,54 | |
| -Чеб耗费 на в��焱цьтOK | Hz | 50/60 | 50/60 |
| Изхod (прав ток) | |||
| - Ихodшонданецve | V | 36 | 36 |
| - Ихodшон ток | A | 11 | 6,7 |
| Tempanетуpeн дималазон за сбханьагe | °C | -20...+70 | -20...+70 |
| °F | -4...+158 | -4...+158 | |
1609 92A 3HG| (20.12.16) Bosch Power Tools


BbIrapckn | 103
| Зхраиваши мodyн PUC-EXACT 1 PUC-EXACT 3 | |||
| РавOTEN Temпературен диапазон | °C | -5...+50 | -5...+50 |
| °F | +23...+122 | +23...+122 | |
| ÖTNOSCITELNA Влажноct | % 20-95 be3 кONDензираент 20-95 be3 кONDENзираент | ||
| Маса съласно EPTA-Procedure 01:2014 | kg | 2,6 | 2,6 |
| Ibs | 5,7 | 5,7 | |
| Клас на зашита | ½/Ⅰ/Ⅰ | ½ | |
MOnTnpaHe
Pa60THyucnoBnHcpea3a cbxpaHbAhe
3axpaHbAunrMoynepnHa3hauencmo3 npopecnoHANHO NON3BaHe B 3aTBOpEn HOMeueHH.
Moxete da ro MOHTnape Hn Da ro nocTabnE Bbpy paBaHa Heropra pa6oTHa nobbpxHOCT.
3a npabnHTo foynknoHnpaHe Ha ypea,MOJI, cnaBaHTe Yka3aHnraTa 3a pa6oTe HtempeTepnHaIana30H BnAekHOCT Ha Bb3dyxa (BHXte,TexHnueckn DaHH",ctpaHnca102).
BkHIOUbaHe hA BnHTOBepTa (BHXTe 0hr. A)
H3no3BaIe cAmO opHHaHn Ka6en!BHaHn npednnon3BaHe npOBepBaIte 3a NobpeN 3axpaHbuaa anaTep,3axpaHbauuKa6en nucena.He ceDOnycka peMOHTnpaHe Ha Ka6eniTe; npi NobpeXdaHe Te Tp6BaDa b6daT aMeHN.
BnHaH nIbPbO cBbP3BaIte eNeKtPoHHCTpyMeHTa cbc 3axpaHBaunia aanTep PUC-EXACT, a cneJToBA 3axpaHBaunia aanTep c Mpejata.
BkapaIte Ka6eNa 7 B KynNyHra 1 Ha 3axpaHbauu aIaIantep PUC-EXACT. Ipn TOBa BHNMaBaIte XJIe6bT 8 Ha KynNyHra Da nonaIHe Bbpyx 3b6a Ha UekepaHa Ka6eNa. 3aBnIte BtYknata. 6 Ha KynNyHra, KaTo Ra BpntTe No YacOBHKOBATA CTpeNka.
H3KnIOuBaHe Ha BnHTOBepTa O3axpaHbauM Moyn
Pa3BnIte Btynkata 6OT KynnyHra 1Ha 3axpaNaBaunmMoyn, kato Bbptnte 6opatHO Ha yacobNkoBATAcTpeKa, H3Ibp-naTe KaBena HA eNEKTPOHHCTpyMeHTA 7OT KynnyHra.
BkHIOUbaHe KbM H3TOUHHK Ha TOK (BHXTeΦnR.B)
BHHMaBaHte 3a HanpeXeHMeTo Ha 3axpaHbAaTa MpeXa! HanpeXeHHeTo Ha 3axpaHbAaTa MPexa Tp6Ba Da CbOTBeTCTBa Ha daHNHe, ININCAHN Ha TabENKaTa Ha 3aXpaHbAaM MoDyI.
3a BkIOUOBAHETO Ha 3axpaHbAunMoJyN KbM Mpejata Hnon3BaTe camo NODXoJauu 3a BaWata 3axpaHbAua MPeka Ka6eI. Pn HeOBxOIMocT 3ameHJeT DoCTABHHB CTAHdAPTHATA OKOMNIKeTobKa 3axpaHbAua Ka6eI 3a KOHTAKTN Cbc 3aHTEN npoBOHNK C NOXoJauu 3a BaWata 3axpaHbAua MPeka Ka6eI.
PnneKtpueeKn npaBn BnHTOBepn CnoCTOBnyckOB npeKcbau BHMaBaTe Da He rN OCTaBATE NerHaHn BbpxnyCKOBnpeKcbau,npdAn da CTe BKIOUHN 3axpaHBau anaTep PUC-EXACT KbM mpekata. Taka npedotbpaTBAte HEBONHO BKNIOUbaHe Ha BnHTOBepTa.
Pn enektpueeckn npabh BNHTOBeptn C nockob npekbcBau Nb3rau BHMabaTe npn BKIOUbaHe Ha 3axpaHbuaa anaTup PUC-EXACT KbM mpekata Bbpxy NyckOBn npekbCBAu Da HMA ocoBO HatOBaBe. Taka npedotbpaTaBaTe HeBONHO BKIOUbaHe HA BNHTOBepTa.
Пьрв Вкарaite uekepa 9 Ha 3axpaHbauu Ka6en 5 B Kynnnyra 10 Ha 3axpaHbauu aanTep PUC-EXACT. CneT ToBaBkIOUHTe 3axpaHbauu aanTep PUC-EXACT Bmpekata, KaTO BKIOUHTe ⅢENCeNA 11 B KOHTAKT Cbc 3aunHTEN HBOD.
BnHnIbPBO Cbbp3BaIte Ka6eHa HneKTPOnHCTpyMeHTa cbc 3axpaHbAun aadTep PUC-EXACT, npedna BkInouHte uencena 11 Bmpexata, BnpotHBen cnuya CbuectByBa onachocT OT TokOB ynap.
Otdenhe oT3axpaHbaaTaMpeka
IbPBO H3KIOUOTe 110KTOKTA.CneTobA 3-KIOUOTe 1eKepa9Ha3axpaHbuaNka6enOTKynyHra10Ha3axpaHbuaMmoyn.
Bnhar nbpbo H3KIOUBAIte Bp6kata KbM 3axpaHbaaata Mpeka,3a da N36eHHTe OAnCHOTa OT TOKOB yap.
Pa60Ta c eNeKtponHcTpymeMaTa
Nyskahe Bekcnnoataza
Bknoubae Hn3KnOuBaHe Ha 3axpaHbaua aanTep PUC-EXACT (BHKTe qnr.C)
DorblHHTeJIHH npncnocobenne
Iopob6haHnHfOpMaun3aMbHaTa rama BnCOKokaeCTBHeH
DOnbHNHTeHHnpncNoc6NeHHMOKeTe Da HamePte B H-
TepHet Ha apecnww.bosch-pt.com
www.boschproductiontools.com nnPi BauncneuaHn
3pan TbproBeu.
CepBn3 nTexHnueckn CbBETn
OTROBOPHa BbnpocTe cH OTHOcPOpeMOHTa N NOpBkKaTaHa BaWnI npOyKT MoKTe Da NoNpyTe OT HaWNr CepBHeTOnDeI. MoTHaXHH YeptExn HINFOpmauN3a peepBHN uacTN MoKTe Da HAMEPTE CbIO Ha aDpec:
www.bosch-pt.com
Ekmbt Ha Boi 3a Texnueckn CbBETn n npnojeknue otroBOpnc yDobONCTBne Ha Bbnpocnte Bn OTHOCHO HAITE npOyKTn NOnbInHTeNHe NTpncnoc6bnHe 3a Tx.
Moln, npn Bbnpocn n npn nopbuehae Ha pe3epBn uactn BN Harn nnoocbaTe 10-umpehna Katanoxen Homep, h3nncaH na Tabenkata Ha ypea.
Jaiiaao bao ayuqSll Jaiy jao 2.
199 1JLgauai LJI Jn aJyjssll 0sll Iab J. dpa jI JI JI JI JI JI JI 2 aIgJI JI JI JI JI JI JI JI JI JI JI JI
JU JU JU JU JU JU JU JU JU JU JU JU JU JU JU JU JU JU JU JU JU JU JU JU JU JU JU JU JU JU JU JU JU JU JU JU JU JU JU JU JU JU JU JU JU JU JU JU JU JU JU
jg 11 k uai i aui jyss 0aaiabj
abpoi sll uagl pjc ulogill
sic algl q gell clao nccuall j! sic
2 algl gull nc gell clao jauw lscg jil
abpoig g wll uagll pjc uugill pi
Bosch Power Tools 1609 92A 3HG(20.12.16)
134|Jc
| jlglll | 6 |
| PUC-EXACT | 7 |
| 7 | 8 |
| a | 9 |
| a | 10 |
| a | 11 |
| (El) | 12 |
aJgaaJ |j2
| PUC-EXACT a@blll l#d g o#o | 1 |
| 2 | |
| 3 | |
| (PUC-EXACT 1) (山#j o slj) j# - #j# wgo | 4 |
| 5 |
auiIul
| PUC-EXACT 3 | PUC-EXACT 1 | a d d l l l l l l l l l l l l l l l l l l l l l l l l l l l l l l l l l l l l l l l l l l l l l l l l l l l l l l l l l l l l l l l l l l l l l l l l l l l l l l l l l l l l l l l l l l l l l l l l l l l l | ||||
| 0 602 495 003 | 0 602 495 001 | \( \mathrm {J}\mathrm {a}\mathrm {m}\mathrm {s}\mathrm {l}\mathrm {a}\mathrm {n}\mathrm {s}\mathrm {t}\mathrm {a}\mathrm {n}\mathrm {s}\mathrm {t}\mathrm {a}\mathrm {n}\mathrm {s}\mathrm {t}\mathrm {a}\mathrm {n}\mathrm {s}\mathrm {t}\mathrm {a}\mathrm {n}\mathrm {s}\mathrm {t}\mathrm {a}\mathrm {n}\mathrm {s}\mathrm {t}\mathrm {a}\mathrm {n}\mathrm {s}\mathrm {t}\mathrm {b}\mathrm {a}\mathrm {b}\mathrm {a}\mathrm {b}\mathrm {a}\mathrm {b}\mathrm {a}\mathrm {b}\mathrm {a}\mathrm {b}\mathrm {a}\mathrm {b}\mathrm {a}\mathrm {b}\mathrm {a}\mathrm {b}\mathrm {a}\mathrm {b}\mathrm {a}\mathrm {b}\mathrm {a}\mathrm {b}\mathrm {a}\mathrm {b}\mathrm {a}\mathrm {a}\mathrm {b}\mathrm {a}\mathrm {b}\mathrm {a}\mathrm {b}\mathrm {a}\mathrm {b}\mathrm {a}\mathrm {b}\mathrm {a}\mathrm {b}\mathrm {a}\mathrm {b}\mathrm {a}\mathrm {b}\mathrm {a}\mathrm {b}\mathrm {a}\mathrm {b}\mathrm {a}\mathrm {b}\mathrm {a}\mathrm {b}\mathrm {b}\mathrm {a}\mathrm {b}\mathrm {a}\mathrm {b}\mathrm {a}\mathrm {b}\mathrm {a}\mathrm {b}\mathrm {a}\mathrm {b}\mathrm {a}\mathrm {b}\mathrm {a}\mathrm {b}\mathrm {a}\mathrm {b}\mathrm {a}\mathrm {b}\mathrm {a}\mathrm {b}\mathrm {a}\mathrm {b}\mathrm {a}\mathrm {c}\mathrm {a}\mathrm {b}\mathrm {a}\mathrm {b}\mathrm {a}\mathrm {b}\mathrm {a}\mathrm {b}\mathrm {a}\mathrm {b}\mathrm {a}\mathrm {b}\mathrm {a}\mathrm {b}\mathrm {a}\mathrm {b}\mathrm {a}\mathrm {b}\mathrm {a}\mathrm {b}\mathrm {a}\mathrm {b}\mathrm {a}\mathrm {b}\mathrm {c}\mathrm {a}\mathrm {b}\mathrm {a}\mathrm {b}\mathrm {a}\mathrm {b}\mathrm {a}\mathrm {b}\mathrm {a}\mathrm {b}\mathrm {a}\mathrm {b}\mathrm {a}\mathrm {b}\mathrm {a}\mathrm {b}\mathrm {a}\mathrm {b}\mathrm {a}\mathrm {b}\mathrm {a}\mathrm {b}\mathrm {a}\mathrm {a}\mathrm {a}\mathrm {a}\mathrm {a}\mathrm {a}\mathrm {a}\mathrm {a}\mathrm {a}\mathrm {a}\mathrm {a}\mathrm {a}\mathrm {a}\mathrm {a}\mathrm {a}\mathrm {a}\mathrm {a}\mathrm {a}\mathrm {a}\mathrm {a}\mathrm {a}\mathrm {a}\mathrm {a}\mathrm {a}\mathrm {a}\mathrm {b}\mathrm {a}\mathrm {b}\mathrm {a}\mathrm {b}\mathrm {a}\mathrm {b}\mathrm {a}\mathrm {b}\mathrm {a}\mathrm {b}\mathrm {a}\mathrm {b}\mathrm {a}\mathrm {b}\mathrm {a}\mathrm {b}\mathrm {a}\mathrm {b}\mathrm {a}\mathrm {b}\mathrm {a}\mathrm {a}\mathrm {c}\mathrm {a}\mathrm {a}\mathrm {c}\mathrm {a}\mathrm {a}\mathrm {c}\mathrm {a}\mathrm {a}\mathrm {c}\mathrm {a}\mathrm {a}\mathrm {c}\mathrm {a}\mathrm {a}\mathrm {c}\mathrm {a}\mathrm {a}\mathrm {c}\mathrm {a}\mathrm {a}\mathrm {c}\mathrm {a}\mathrm {a}\mathrm {c}\mathrm {c}\mathrm {a}\mathrm {c}\mathrm {a}\mathrm {c}\mathrm {a}\mathrm {c}\mathrm {a}\mathrm {c}\mathrm {a}\mathrm {c}\mathrm {a}\mathrm {c}\mathrm {a}\mathrm {c}\mathrm {a}\mathrm {c}\mathrm {a}\mathrm {c}\mathrm {a}\mathrm {c}\mathrm {a}\mathrm {c}\mathrm {a}\mathrm {c}\mathrm {a}\mathrm {a}\mathrm {c}\mathrm {a}\mathrm {c}\mathrm {a}\mathrm {c}\mathrm {a}\mathrm {c}\mathrm {a}\mathrm {c}\mathrm {a}\mathrm {c}\mathrm {a}\mathrm {c}\mathrm {a}\mathrm {c}\mathrm {a}\mathrm {c}\mathrm {a}\mathrm {c}\mathrm {a}\mathrm {c}\mathrm {a}\mathrm {c}\mathrm {c}\mathrm {a}\mathrm {c}\mathrm {a}\mathrm {c}\mathrm {a}\mathrm {c}\mathrm {a}\mathrm {c}\mathrm {a}\mathrm {c}\mathrm {a}\mathrm {c}\mathrm {a}\mathrm {c}\mathrm {a}\mathrm {c}\mathrm {a}\mathrm {c}\mathrm {a}\mathrm {c}\mathrm {a}\mathrm {a}\mathrm {c}\mathrm {c}\mathrm {a}\mathrm {c}\mathrm {a}\mathrm {c}\mathrm {a}\mathrm {c}\mathrm {a}\mathrm {c}\mathrm {a}\mathrm {c}\mathrm {a}\mathrm {c}\mathrm {a}\mathrm {c}\mathrm {a}\mathrm {c}\mathrm {a}\mathrm {c}\mathrm {c}\mathrm {a}\mathrm {c}\mathrm {a}\mathrm {c}\mathrm {c}\mathrm {a}\mathrm {c}\mathrm {a}\mathrm {c}\mathrm {a}\mathrm {c}\mathrm {a}\mathrm {c}\mathrm {a}\mathrm {c}\mathrm {a}\mathrm {c}\mathrm {a}\mathrm {c}\mathrm {a}\mathrm {c}\mathrm {a}\mathrm {c}\mathrm {c}\mathrm {a}\mathrm {c}\mathrm {c}\mathrm {a}\mathrm {c}\mathrm {c}\mathrm {a}\mathrm {c}\mathrm {c}\mathrm {a}\mathrm {c}\mathrm {c}\mathrm {a}\mathrm {c}\mathrm {c}\mathrm {a}\mathrm {c}\mathrm {c}\mathrm {a}\mathrm {c}\mathrm {c}\mathrm {a}\mathrm {c}\mathrm {a}\mathrm {c}\mathrm {c}\mathrm {a}\mathrm {c}\mathrm {c}\mathrm {a}\mathrm {c}\mathrm {c}\mathrm {a}\mathrm {c}\mathrm {c}\mathrm {a}\mathrm {c}\mathrm {c}\mathrm {a}\mathrm {c}\mathrm {c}\mathrm {a}\mathrm {c}\mathrm {c}\mathrm {c}\mathrm {a}\mathrm {c}\mathrm {c}\mathrm {c}\mathrm {c}\mathrm {c}\mathrm {c}\mathrm {c}\mathrm {c}\mathrm {c}\mathrm {c}\mathrm {c}\mathrm {c}\mathrm {c}\mathrm {c}\mathrm {c}\mathrm {c}\mathrm {c}\mathrm {c}\mathrm {c}\mathrm {c}\mathrm {c}\mathrm {c}\mathrm {c}\mathrm {c}\mathrm {c}\mathrm {d}\mathrm {d}\mathrm {d}\mathrm {d}\mathrm {d}\mathrm {d}\mathrm {d}\mathrm {d}\mathrm {d}\mathrm {d}\mathrm {d}\mathrm {d}\mathrm {d}\mathrm {d}\mathrm {d}\mathrm {d}\mathrm {d}\mathrm {d}\mathrm {d}\mathrm {d}\mathrm {d}\mathrm {d}\mathrm {d}\mathrm {d}\mathrm {d}\mathrm {c} \) | ||||
| 100 - 240 | 100 - 240 | \( \begin{array}{l} \text{g} \\ \text{g} \\ \text{g} \\ \text{g} \\ \text{g} \\ \text{g} \\ \text{g} \\ \text{g} \\ \text{g} \\ \text{g} \\ \text{g} \\ \text{g} \\ \text{g} \\ \text{g} \\ \text{g} \\ \text{g} \\ \text{g} \\ \text{f} \\ \text{f} \\ \text{f} \\ \text{f} \\ \text{f} \\ \text{f} \\ \text{f} \\ \text{f} \\ \text{f} \\ \text{f} \\ \text{f} \\ \text{f} \\ \text{f} \\ \text{f} \\ \text{f} \\ \text{f} \\ \text{f} \\ \end{array} \) | \( \begin{array}{l} \text{g} \\ \text{g} \\ \text{g} \\ \text{g} \\ \text{g} \\ \text{g} \\ \text{g} \\ \text{g} \\ \text{g} \\ \text{g} \\ \text{g} \\ \text{g} \\ \text{g} \\ \text{g} \\ \text{g} \\ {\text{g}} \\ {\text{g}} \\ {\text{g}} \\ {\text{g}} \\ {\text{g}} \\ {\text{g}} \\ {\text{g}} \\ {\text{g}} \\ {\text{g}} \\ {\text{g}} \\ {\text{g}} \\ {\text{g}} \\ {\text{g}} \\ {\text{g}} \\ {\text{g}} \\ {\text{g}} \\ {\text{g}} \\ {\text{s}} \\ {\text{s}} \\ {\text{s}} \\ {\text{s}} \\ {\text{s}} \\ {\text{s}} \\ {\text{s}} \\ {\text{s}} \\ {\text{s}} \\ {\text{s}} \\ {\text{s}} \\ {\text{s}} \\ {\text{s}} \\ {\text{s}} \\ {\text{s}} \\ {\text{s}} \\ {\text{s}} \\ {\text{s}} \\ {\text{s}} \\ {\text{s}} \\ {\text{f}} \\ {\text{f}} \\ {\text{f}} \\ {\text{f}} \\ {\text{f}} \\ {\text{f}} \\ {\text{f}} \\ {\text{f}} \\ {\text{f}} \\ {\text{f}} \\ {\text{f}} \\ {\text{f}} \\ {\text{f}} \\ {\text{f}} \\ {\text{f}} \\ {\text{f}} \\ {\text{f}} \\ {\image{ f}} \\ {\image{ f}} \\ {\image{ f}} \\ {\image{ f}} \\ {\image{ f}} \\ {\image{ f}} \\ {\image{ f}} \\ {\image{ f}} \\ {\image{ f}} \\ {\image{ f}} \\ {\image{ f}} \\ {\image{ f}} \\ {\image{ f}} \\ {\image{ f}} \\ {\image{ f}} \\ {\image{ f}} \\ {\image{ f}} \\ {\text{f}} \\ {\text{f}} \\ {\text{f}} \\ {\text{f}} \\ {\text{f}} \\ {\text{f}} \\ {\text{f}} \\ {\text{f}} \\ {\text{f}} \\ {\text{f}} \\ {\text{f}} \\ {\text{f}} \\ {\text{f}} \\ {\text{f}} \\ {\text{f}} \\ {\text{f}} \\ {\tag{1/4} | I/4 | \( \begin{array}{l} \text{a} \\ \text{a} \\ \text{a} \\ \text{a} \\ \text{a} \\ \text{a} \\ \text{a} \\ \text{a} \\ \text{a} \\ \text{a} \\ \text{a} \\ \text{a} \\ \text{a} \\ \text{a} \\ \text{a} \\ \text{a} \\ \text{a} \\ \text{f} \\ \text{f} \\ \text{f} \\ \text{f} \\ \text{f} \\ \text{f} \\ \text{f} \\ \text{f} \\ \text{f} \\ \text{f} \\ \text{f} \\ \text{f} \\ \text{f} \\ \text{f} \\ \text{f} \\ \text{f} \\ \image{ f } \\ \image{ f } \\ \image{ f } \\ \image{ f } \\ \image{ f } \\ \image{ f } \\ \image{ f } \\ \image{ f } \\ \image{ f } \\ \image{ f } \\ \image{ f } \\ \image{ f } \\ \image{ f } \\ \image{ f } \\ \image{ f } \\ \image{ f } \\ \image{ f } \\ \image{\text{f}} \\ \image{\text{f}} \\ \image{\text{f}} \\ \image{\text{f}} \\ \image{\text{f}} \\ \image{\text{f}} \\ \image{\text{f}} \\ \image{\text{f}} \\ \image{\text{f}} \\ \image{\text{f}} \\ \image{\text{f}} \\ \image{\text{f}} \\ \image{\text{f}} \\ \image {\text{f}} \\ \image{\text{f}} \\ \image{\text{f}} \\ \image{\text{f}} \\ \image{\text{f}} \\ \image{\text{f}} \\ \image{\text{f}} \\ \image{\text{f}} \\ \image{\text{f}} \\ \image{\text{f}} \\ \image{\text{f}} \\ \image{\text{f}} \\ \image{\text{f}}} \end{array} \) | |
| 36 | 36 | \( \begin{array}{l} \text{a} \\ \text{a} \\ \text{a} \\ \text{a} \\ \text{a} \\ \text{a} \\ \text{a} \\ \text{a} \\ \text{a} \\ \text{a} \\ \text{a} \\ \text{a} \\ \text{a} \\ \text{a} \\ \text{a} \\ {\text{a}} \\ {\text{a}} \\ {\text{a}} \\ {\text{a}} \\ {\text{a}} \\ {\text{a}} \\ {\text{a}} \\ {\text{a}} \\ {\text{a}} \\ {\text{a}} \\ {\text{a}} \\ {\text{a}} \\ {\text{a}} \\ {\text{a}} \\ {\text{a}} \\ {\text{a}} \\ {\text{a}} \\ {\text{s}} \\ {\text{s}} \\ {\text{s}} \\ {\text{s}} \\ {\text{s}} \\ {\text{s}} \\ {\text{s}} \\ {\text{s}} \\ {\text{s}} \\ {\text{s}} \\ {\text{s}} \\ {\text{s}} \\ {\text{s}} \\ {\text{s}} \\ {\text{s}} \\ {\text{s}} \\ {\text{s}} \\ {\text{s}} \\ {\text{s}} \\ {\text}s \\ {\text{s}} \\ {\text{s}} \\ {\text{s}} \\ {\text{s}} \\ {\text{s}} \\ {\text{s}} \\ {\text{s}} \\ {\text{s}} \\ {\text{s}} \\ {\text{s}} \\ {\text{s}} \\ {\text{s}} \\ {\text{s}} \\ {\text{s}} \\ {\text{s}} \\ {\text{s}} \\ {\text{s}} \\ {\text{s}} \\ {\text{s}} \\ {\text{s} } \\ {\text{s} } \\ {\text{s} } \\ {\text{s} } \\ {\text{s} } \\ {\text{s} } \\ {\text{s} } \\ {\text{s} } \\ {\text{s} } \\ {\text{s} } \\ {\text{s} } \\ {\text{s} } \\ {\text{s} } \\ {\text{s} } \\ {\text{s} } \\ {\text{s} } \\ {\text{s} } \\ {\text}s \\ {\text{s} } \\ {\text{s} } \\ {\text{s} } \\ {\text{s} } \\ {\text{s} } \\ {\text{s} } \\ {\text{s} } \\ {\text{s} } \\ {\text{s} } \\ {\text{s} } \\ {\text{s} } \\ {\text{s} } \\ {\text{s} } \\ {\text{s} } \\ {\text{s} } \\ {\text{s} } \\ {\text{f}} \\ {\text{f}} \\ {\text{f}} \\ {\text{f}} \\ {\text{f}} \\ {\text{f}} \\ {\text{f}} \\ {\text{f}} \\ {\text{f}} \\ {\text{f}} \\ {\text{f}} \\ {\text{f}} \\ {\text{f}} \\ {\text{f}} \\ {\text{f}} \\ {\text{f}} \\ {\text{s}} \\ {\text{s}} \\ {\text{s}} \\ {\text{s}} \\ {\text{s}} \\ {\text{s}} \\ {\text{s}} \\ {\text{s}} \\ {\text{s}} \\ {\text{s}} \\ {\text{s}} \\ {\text{s}} \\ {\text{s}} \\ {\text{s}} \\ {\text{s}} \\ {\text{s}} \\ {\text{s}} \\ {\text{s}} \\ {\text{s}} \\ {\text{x}} \\ {\text{x}} \\ {\text{x}} \\ {\text{x}} \\ {\text{x}} \\ {\text{x}} \\ {\text{x}} \\ {\text{x}} \\ {\text{x}} \\ {\text{x}} \\ {\text{x}} \\ {\text{x}} \\ {\text{x}} \\ {\text{x}} \\ {\text{x}} \\ {\text{x}} \\ {\text{x}} \\ {\text{x}} \\ {\text{x}} \\ {\text{x}} \\ {\text{s}} \\ {\text{s}} \\ {\text{s}} \\ {\text{s}} \\ {\text{s}} \\ {\text{s}} \\ {\text{s}} \\ {\text{s}} \\ {\text{s}} \\ {\text{s}} \\ {\text{s}} \\ {\text{s}} \\ {\text{s}} \\ {\text{s}} \\ {\text{s}} \\ {\text{s}} \\ {\text{s}} \\ {\text{s}} \\ {\text{s}} \\ {\text s} \\ {\text s} \\ {\text s} \\ {\text s} \\ {\text s} \\ {\text s} \\ {\text s} \\ {\text s} \\ {\text s} \\ {\text s} \\ {\text s} \\ {\text s} \\ {\text s} \\ {\text s} \\ {\text s} \\ {\text s} \\ {\text s} \\ {\text s} \\ {\text s} \\ {\text s} \\ {\text s}\\ {\text s}\\ {\text s}\\ {\text s}\\ {\text s}\\ {\text s}\\ {\text s}\\ {\text s}\\ {\text s}\\ {\text s}\\ {\text s}\\ {\text s}\\ {\text s}\\ {\text s}\\ {\text s}\\ {\text s}\\ {\text s}\\ {\text s}\\ {\text s}\\ {\text s}\\ {\text s}\\ {\text s}\\ {\text s}\\ {\text s}\\ {\text s}\\ {\text s\\ {\text s}\\ {\text s}\\ {\text s}\\ {\text s}\\ {\text s}\\ {\text s}\\ {\text s}\\ {\text s}\\ {\text s}\\ {\text s}\\ {\text s}\\ {\text s}\\ {\text s}\\ {\text s}\\ {\text s}\\ {\text s}\\ {\text s}\\ {\text s}\\ {\text s}\\ {\text s}\\ {\text s}\\ {\text s}\\ {\text s}\\ {\text s}\\ {\text s} \\ {\text s}\\ {\text s}\\ {\text s}\\ {\text s}\\ {\text s}\\ {\text s}\\ {\text s}\\ {\text s}\\ {\text s}\\ {\text s}\\ {\text s}\\ {\text s}\\ {\text s}\\ {\text s}\\ {\text s}\\ {\text s}\\ {\text s}\\ {\text s}\\ {\text s}\\ {\text s}\\ {\text s}\\ {\text s}\\ {\text s}\\ {\text S}\\ {\text S}\\ {\text S}\\ {\text S}\\ {\text S}\\ {\text S}\\ {\text S}\\ {\text S}\\ {\text S}\\ {\text S}\\ {\text S}\\ {\text S}\\ {\text S}\\ {\text S}\\ {\text S}\\ {\text S}\\ {\text S}\\ {\text S}\\ {\text S}\\ {\text S}\\ {\text S}\\ {\text S}\\ {\text S}\\ {\text S}\\ {\text S}\\ {\text s}\\ {\text s}\\ {\text s}\\ {\text s}\\ {\text s}\\ {\text s}\\ {\text s}\\ {\text s}\\ {\text s}\\ {\text s}\\ {\text s}\\ {\text s}\\ {\text s}\\ {\text s}\\ {\text s}\\ {\text s}\\ {\text s}\\ {\text s}\\ {\text s}\\ {\text s}\\ {\text s}\\ {\text s}\\ {\text s}\\ {\text s}\\ {\text S}\\ {\text S} \\ {\text S}\\ {\text S}\\ {\text S}\\ {\text S}\\ {\text S}\\ {\text S}\\ {\text S}\\ {\text S}\\ {\text S}\\ {\text S}\\ {\text S}\\ {\text S}\\ {\text S}\\ {\text S}\\ {\text S}\\ {\text S}\\ {\text S}\\ {\text S}\\ {\text S}\\ {\text S}\\ {\text S}\\ {\text S}\\ {\text S}\\ {\text S}\\ {\text S\\ {\text S}\\ {\text S}\\ {\text S}\\ {\text S}\\ {\text S}\\ {\text S}\\ {\text S}\\ {\text S}\\ {\text S}\\ {\text S}\\ {\text S}\\ {\text S}\\ {\text S}\\ {\text S}\\ {\text S}\\ {\text S}\\ {\text S}\\ {\text S}\\ {\text S}\\ {\text S}\\ {\text S}\\ {\text S}\\ {\text S}\\ {\text S}\\ {\text S} \\ {\text S}\\ {\text S}\\ {\text S}\\ {\text S}\\ {\text S}\\ {\text S}\\ {\text S}\\ {\text S}\\ {\text S}\\ {\text S}\\ {\text S}\\ {\text S}\\ {\text S}\\ {\text S}\\ {\text S}\\ {\text S}\\ {\text S}\\ {\text S}\\ {\text S}\\ {\text S}\\ {\text S}\\ {\text S}\\ {\image\text{f}}\\ \image{ f }\\ \image{ f }\\ \image{ f }\\ \image{ f }\\ \image{ f }\\ \image{ f }\\ \image{ f }\\ \image{ f }\\ \image{ f }\\ \image{ f }\\ \image{ f }\\ \image{ f }\\ \image{ f }\\ \image{ f }\\ \image{ f }\\ \image{ f }\\ \image{ f }\\ \image{\text{s}}\\ \image{\text{s}}\\ \image{\text{s}}\\ \image{\text{s}}\\ \image{\text{s}}\\ \image{\text{s}}\\ \image{\text{s}}\\ \image{\text{s}}\\ \image{\text{s}}\\ \image{\text{s}}\\ \image{\text{s}}\\ \image{\text{s}}\\ \image{\text{s}}\\ \image{\text{s}}\\ \image{\text{s}}\\ {\image{\text{s}}}\\ \image{\text{s}}\\ \image{\text{s}}\\ \image{\text{s}}\\ \image{\text{s}}\\ \image{\text{s}}\\ \image{\text{s}}\\ \image{\text{s}}\\ \image{\text{s}}\\ \image{\text{s}}\\ \image{\text{s}}\\ \image{\text{s}}\\ \image{\text{s}}\\ \image{\text{s}}\\ \image{\text{s}}\\ | ||||

aBbIy 1202x 6dag jc clalll
aBbIy sO301 oog 1 uog uao jc 6 aauuU c9
wug acuU wJac asoJl uSsLg iJz J
.ugjuiuuaoo 7 jqll U
(Bgglj) aIbJl Solu
a aaii aiee iie e 10000000000000000000000000000000000000000000000000000000000000000
jull9 1g
g jigai piaiui bao aill y sio 8ag ala .aaiaai U
μc gioo Joc abw lc g U LsU Lqisj U liSaa
-1j1JU
J 134 aaiil “aiill
(AgJgJgIj) dJgJ
jJg jqJI JaaJl aJbJ 1
| JL | JL | JL | JL | JL | JL | JL | JL | JL | JL | JL | JL | JL | JL | JL | JL | JL | JL | JL | JL | JL | JL | JL | JL | JL | JL | JL | JL | JL | JL | JL | JL | JL | JL | ||||||||||||||||||||||||||||||||||||||||||||||||||||||||||||||||||
aIbIySsOg1Uoguua7jlqJusjE J8gaxlaQoJ.PUC-EXACT 6 auiuU.10gl uao jgo jgl .acwI ylacAsoljLgio
160992A3HG(20.12.16) Bosch Power Tools

c 135
aaw aai jie aaiy 1s0xg paae X
-9gai g i.(agai aaij (gjj) Jaiwai
giu wj kui dy. JaiiWdai
aaiy 1s0xg uaiw jc qaiiJj
aaw aag aal ydsd 0sag jg jg jg JwLgaw ayksolp dsc g nojll aai i aal ydsd 6sag n ,gaae g Jsw .aJlJdaas
asaiial jjBgbl gllg aolal
sui jai g bao u ju ju
.aulu Jsuui golaiui ay duggogogoi
jol j 0031 bai w l jn o 1
.5d21Uc dull
auiuSll sall poaiwgl aoloo
llawjol jaiwJgJl Jb
Jusu ciui Uaasaaal aajgSll
aaiolll aijgjll oaiiiaabwlgilfoj
JgSdJI 1
Lgssw gao uS uJ ayuJgSJJ oSJJ 2
gI gaiu wauw jol l aui jie SJ 0aui .
Laiuui jiu u yuyg ojba ljiably
j#sall gil g j#ll
g g gglgllgglg j
aill jw o bui 1jgi jla jll
.3gaaooaJSSWwUySJI
golssu 8 gul aui jS1 sssl bai
oall pssw yaw 2. lab21 liou c
1jJ 1000gIqJ 2 Jy
golsswai jj ybs ayjySsI sSsI.
.0uUgUoLulU
.1glll sic jglll lcl 0
guljSllol
guiuiei jog uaiy
1g20 1000
y
jUulwlgUaaiJglg uuiuagall
Ldall jao aaiall yllg lai
auiy
yU15a0jgolggbwllawdo
abwglgglgglgglg
jgloaic jilqll oolsslljslj.
.oojo elaw
1j.ugbgl jIbaoljueyjssll
JlI Jll Jn JfJgSJI Ooall jbs
auiu
gaiuusllsslllulssllluee
JgI,uuuall no uull gll qaleil
6dJIgJg CjIg 0JlJUc JSLI s
gaiJUJI 1j j,asJaiJI JJI Jc g
aJySsI oosall jno aSyuio
Juswauu Juaaui 1s uaiu
auiuui 1
Jusiwu npao sao jls Jusiwu poa
auiyssllloosalljoo
aJIL 0dJI JnJnJnJnJnJnJnJnJnJnJnJnJnJnJnJnJnJnJnJnJnJnJnJnJnJnJnJnJnJnJnJnJnJnJnJnJnJnJnJnJnJn
JUU JUgU pluoo sssuL aubuI g
gio jolw1d gdu dawg glggs Jwai sljy
jai jy g yg Sui Jaaas y ly qjoI ay
yjglgglgcg jg
dsuuiu1sLsUJUsUjUjUg
jg jao sai laa g g g kswd yu u
aJyoggjUjIjUg(ugjUulo
.1J 1J2g jj1
1jIbawgIbogJwggWgU
olssuJyjUd.igpoil
JgW 0jua
du gio ju wg yj 1
1JUJI jjI Cw slu aac 6
dsagSuyuS uogdawgPUC-EXACT
jgluolhslgssjdsj11 gdaalwgs
=
PUC-EXACT a d j g u a I d l l Jg
jg jj 11 d aLw g dSi jI q
.1Jgag g iJg jIgjIg jIg jIg
(PUC-EXACT 1) (SJJJ) JLED
山5
6
PUC-EXACT aai jai yuuiy 7
701sUJUJUJUJUJUJU8
9
juiuuaio uuiai jiu 10
juiu jiu uuiiuiuuiu 11
(1) Egi) Lg g 12
jgduoJIOJgugai ds jalalao aLs
gawai dijolkwsoljamgaa
UJSLac g olSsw
1jIgaiJgaiJgiiuS aL
pJl wui oIuui. sis aJluo
wUJSSOJIgUgwsIc
Lw Lg Siaa gWgSiae guiu
.8gwh 150
1j jg jj 1j ggl g w g w
J 1 J 1 J 1 J 1 J 1 J 1 J 1 J 1 J 1 J 1 J 1 J 1 J 1 J 1 J 1 J 1 J 1 J 1 J 1 J 1
Jui jy 5g w sl uac qj6
uai
jul jS gjgJb
wiooogjwgllojLgIyiaioaegio
.
gaw 5gj yis paoi po
Jg Jlaiu JIg
g sLsloa logjooeolbdu jai J
(139 aoo “Lig cuaaioo”dy sis gaj)IgO CgjBj
Bosch Power Tools 1609 92A 3HG| (20.12.16)
Loo
Ggdo dai gio jI oiau (sJy sia (gao) L .Lw yjda u J I qil gao g piae lalal .siu g Cws 50iaui Cgaw d piaic Jl CwJg .Sis Gos SAs dai gio jI
| الله | الله | |
| الله الحيربيحي | Volt | V |
| الله الحيربيحي | مُف | A |
| الله | تَع | W |
| الله بَعْل | Hp | |
| الله | جِب | Hz |
| الله 9 عَن | direct current | DC |
| الله 9 عَن | alternating c current | AC |