2000 series PSG2000 - Iron PHILIPS - Free user manual and instructions
Find the device manual for free 2000 series PSG2000 PHILIPS in PDF.
User questions about 2000 series PSG2000 PHILIPS
0 question about this device. Answer the ones you know or ask your own.
Ask a new question about this device
Download the instructions for your Iron in PDF format for free! Find your manual 2000 series PSG2000 - PHILIPS and take your electronic device back in hand. On this page are published all the documents necessary for the use of your device. 2000 series PSG2000 by PHILIPS.
USER MANUAL 2000 series PSG2000 PHILIPS
natural_image
Two electric steam covers with purple and white models, one emitting a cable (no text or symbols visible)
natural_image
Simple line drawing of an open book with a grid layout and an arrow indicating the page direction (no text or symbols)-1
1_
-1
1
-1
1_
-1
1
English 6
Azərbaycanca 22
Bahasa Indonesia 38
Bahasa Melayu 54
Čeština 71
Dansk 88
Deutsch 104
Eesti 121
Español 137
Français 153
Hrvatski 170
Italiano 187
Latviešu 204
Lietuviškai 221
Magyar 238
Nederlands 255
Norsk 271
O'zbek 288
Polski 305
Português 322
Română 339
Shqip 356
Slovenščina 372
Slovensky 388
Srpski 405
Suomi 422
Svenska 438
Tiếng Việt 454
Türkçe 470
Türkmençe 487
Ελληνικά 504
Български 521
Кыргызча 538
Македонски 555
Русский 572
Точикй 589
Українська 606
Қазақша 623
Ruijtntu 640
ภาษาไทย 657
งษัตวิทยุก 665 675
简体中文 692
繁體中文 709
한국어 725
العربية 741
757 فارسی
773
6 English
Introduction
Congratulations on your purchase and welcome to Philips! To fully benefit from the support that Philips offers, register your product at
www.philips.com/welcome. Read this user manual, the important information leaflet, and the quick start guide carefully before you use the appliance. Save them for future reference.
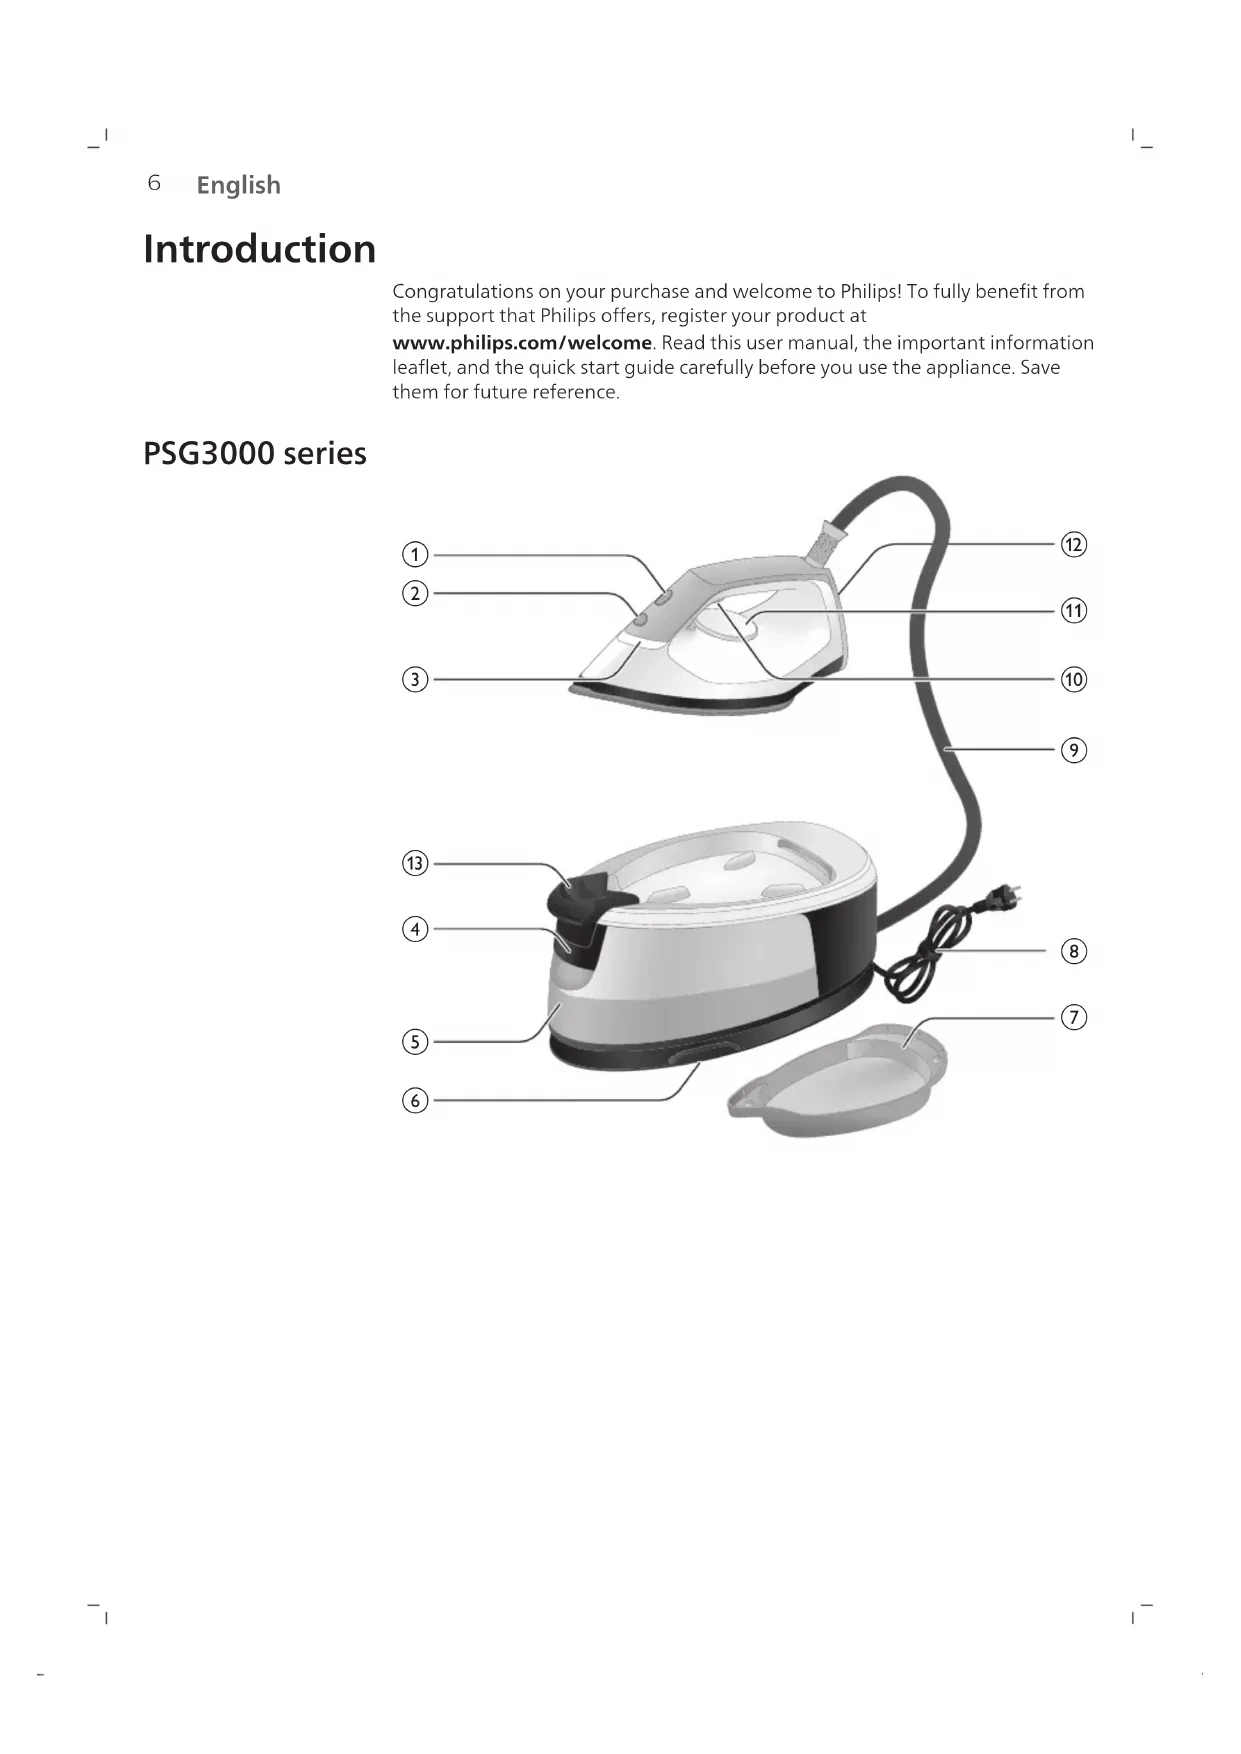
PSG3000 series

text_image
Labeled diagram of a steam iron with numbered parts for identificationPSG2000 series

text_image
Labeled diagram of a steam iron with numbered parts for identification1 CALC-CLEAN button with light
2 Power button
3 'Iron' ready light
4 Water tank release lever (PSG3000 series)/Water tank filling door (PSG2000 series)
5 Detachable water tank (PSG3000 series)/Non-detachable water tank (PSG2000 series)
6 Water supply hose storage compartment
7 Smart Clan-Clean container
8 Mains cord with plug
9 Water supply hose
10 Steam trigger/Steam boost
11 Temperature dial
12 Heel
13 Carry lock release button (PSG3010)
Preparing for use
Type of water to use
The appliance is suitable to be used with tap water. However, if you live in an area with hard water, we recommend that you mix an equal amount of tap
8 English
water with distilled or demineralized water. This will prevent fast scale build up and prolong the lifetime of the appliance.
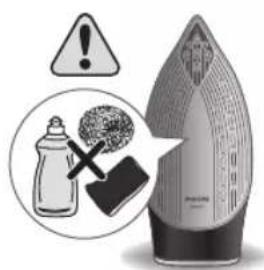
Do not add perfume, water from the tumble dryer, vinegar, starch, descaling agents, ironing aids, chemically descaled water or other chemicals, as they may cause water spitting, brown staining or damage to your appliance
Filling the water tank
Fill the water tank before every use. You can refill the water tank at any time during use.
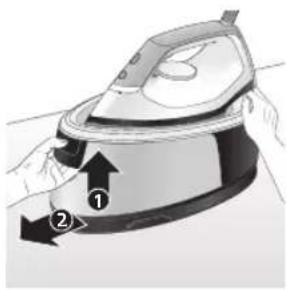
PSG3000 series
natural_image
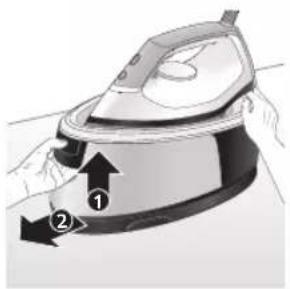
Illustration of a person using an iron iron to lift a cup, showing two directional arrows (no text or symbols)1 Press the lever in the water tank handle and remove the water tank from the base.
text_image
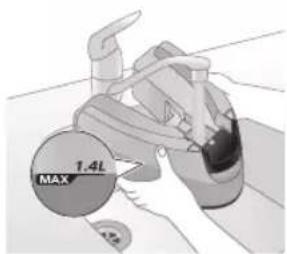
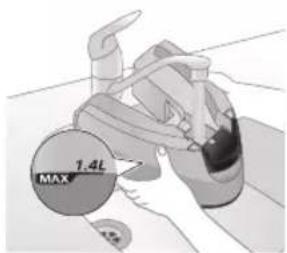
MAX 1.4L2 Fill the water tank up to the MAX indication.
natural_image
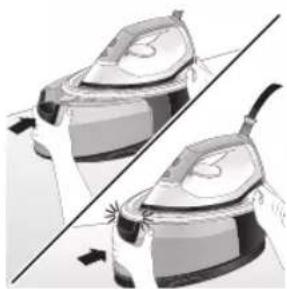
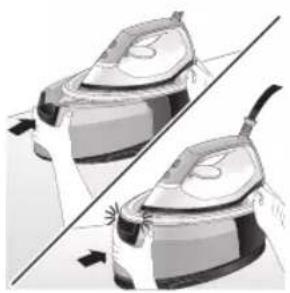
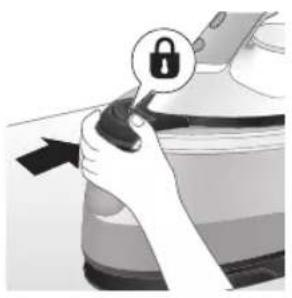
Illustration of two identical steam iron machines on a diagonal line, no text or symbols present3 Push the water tank back into the appliance until it locks in place ('click').
PSG2000 series
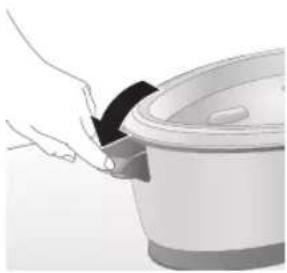
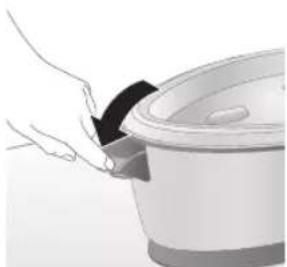
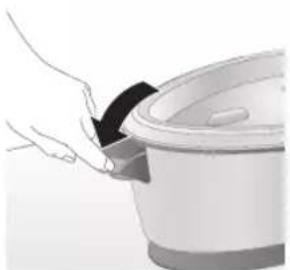
1 Open the water tank filling door.
natural_image
Hand placing a dark object into a white cylindrical container (no text or symbols visible)
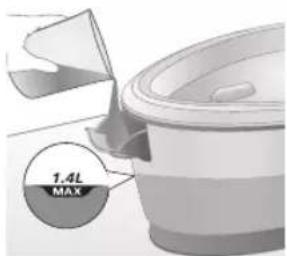
text_image
1.4L MAX2 Fill the water tank up to the MAX indication then close the water tank filling door ('click').
Using your appliance
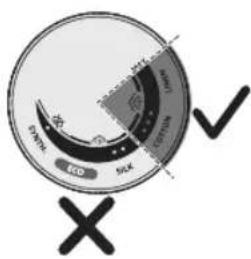
Temperature setting
Temperature setting Automatic steam setting Fabric type
| ● |  | Synthetics (e.g. acetate, acrylic, nylon, viscose, polyamide, polyester) |
| ●● |  | Silk |
| ●●● to MAX Cotton, linen |  | |
| ECO ECO All except for synthetic fabrics | ||
Ironing
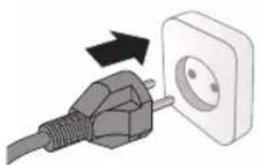
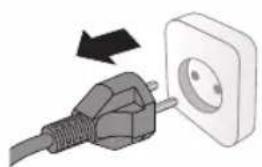
1 Put the mains plug in an earthed wall socket.
natural_image
Illustration of a plug being inserted into an electrical outlet (no text or symbols)English

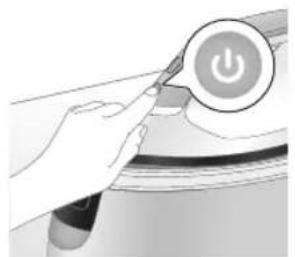
natural_image
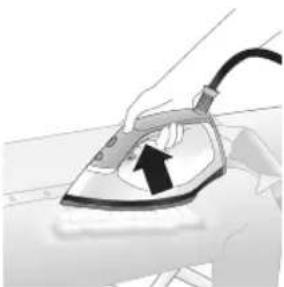
Illustration of a hand pressing a button on a device with a power symbol (no text or labels)2 Press the power button to switch on the appliance then turn the temperature dial to set the appropriate temperature according to the table above.

natural_image
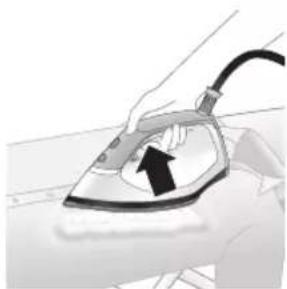
Illustration of a mechanical component with a star-shaped feature and a curved handle (no text or symbols)3 'Iron ready' light starts to flash to indicate that the appliance is heating up.

natural_image
Illustration of a medical or laboratory procedure step with a checkmark and magnified view (no text or symbols)4 Wait until the 'iron ready' light lights up continuously.
natural_image
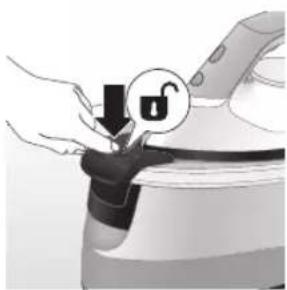
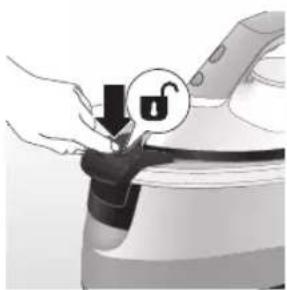
Illustration of a hand adjusting a lock mechanism with a padlock icon (no text or symbols)5 For PSG3010, press the carry lock release button to unlock the iron from the iron platform.
natural_image
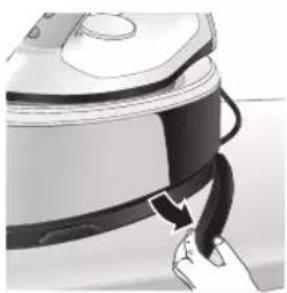
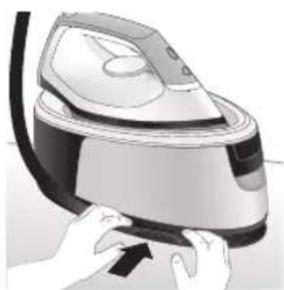
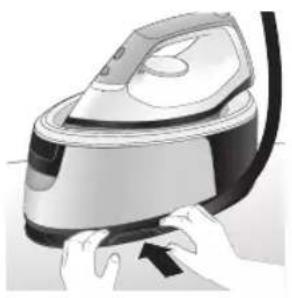
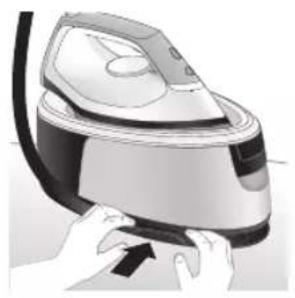
Close-up of a hand pressing down on a small electronic device with a curved arrow indicating motion (no text or symbols visible)6 Remove the water supply hose from the storage compartment.
natural_image
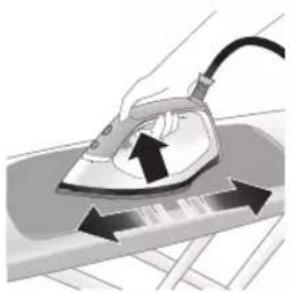
Illustration of a hand using an iron to lift a cup, with a black arrow indicating the motion (no text or symbols present)7 Press and hold the steam trigger to start ironing.
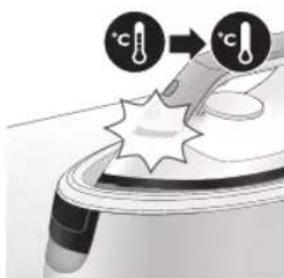
Note: There might be water spitting from the iron at the start of each session. Press steam trigger for 10 seconds before ironing to prevent water stains on garment.
Note: When you start your ironing session and especially during the first usage of steam trigger, it may take more than 30 seconds for steam to come out of the appliance.
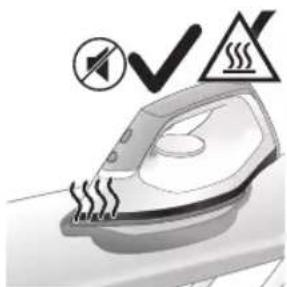
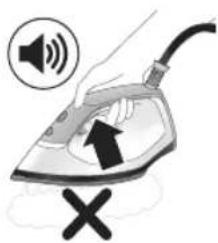
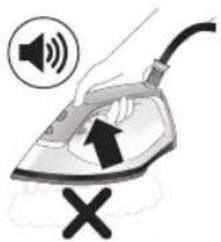
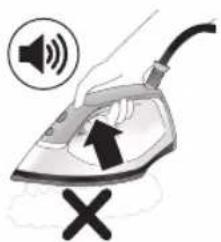
Note: The pump is activated each time you press the steam trigger. It produces subtle rattling sound. When there is no water in the water tank, the pump sound is louder.
Warning: Never direct steam at people.
Vertical ironing
text_image
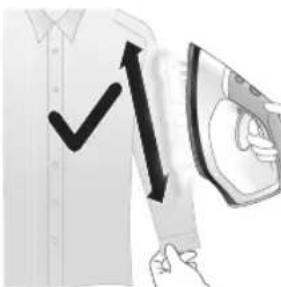
Diagram showing a hand holding a device with a checkmark and upward arrow, possibly indicating a verification or action.You can use the steam iron in vertical position to remove wrinkles from hanging fabrics.
1 Hold the iron in vertical position, press the steam trigger and touch the garment lightly with the soleplate and move the iron up and down.

text_image
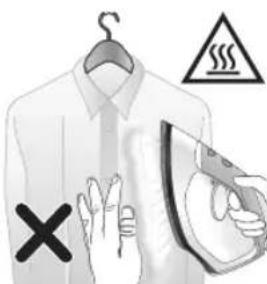
Safety warning illustration showing a person holding a spray gun with a warning symbol and cross markWarning: Hot steam is emitted from the iron. Never attempt to remove wrinkles from a garment while someone is wearing it. Do not apply steam near your or someone else's hand.
text_image
Illustration showing a hanger with warning symbols including a cross, steam, and a hand gesture.12 English
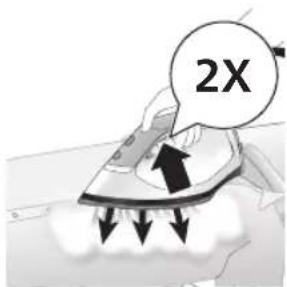
Steam boost
text_image
Eco Sick Eco Sick1 Steam boost function is only available from 3 dots to MAX temperature.
text_image
2X2 Press steam trigger twice quickly to release a powerful boost of steam for 3 seconds.
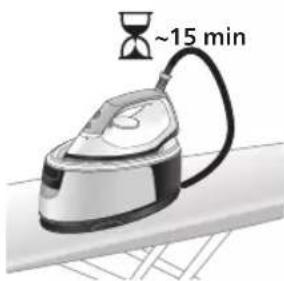
Auto shut-off
natural_image
Illustration of an iron (£) with a hourglass above it, showing time ~15 minutes (no text or symbols on the device itself)1 When the appliance is not in use for more than 15 minutes, the 'iron ready' light starts to flash and it starts to cool down.
text_image
Diagram illustrating temperature change with labeled thermometer symbols and a starburst effect on a surface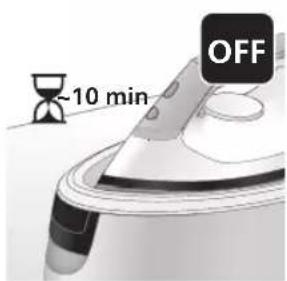
text_image
-10 min OFF2 Upon leaving the appliance untouched for the next 10 minutes, it will switch off automatically.
Warning: Never leave the appliance unattended when it is connected to the mains. Always unplug the appliance after use.
Cleaning and maintenance
Smart Calc-Clean System
Your appliance has been designed with a Smart Calc-Clean system to ensure that descaling and cleaning is done regularly. This helps to maintain a strong steam performance and prevents dirt and stains coming out of the soleplate over time. To ensure that the cleaning process is performed, the appliance gives regular reminders.
Performing the Calc-Clean process with the Calc-Clean container
Warning: Do not leave the appliance unattended during the Calc-Clean process.
Caution: Always perform the Calc-Clean process with the Calc-Clean container. Do not interrupt the process by lifting the iron up from the Calc-Clean container, as hot water and steam will come out of the soleplate.
Note: Make sure that the appliance is plugged in and switched ON during the Calc-Clean process.
natural_image
Illustration of a speaker emitting sound waves above a curved object (no text or symbols)PSG3000 series
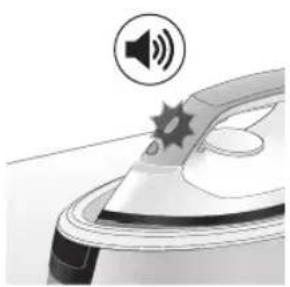
1 After 1 to 3 months of use, the Calc-Clean light starts flashing and the appliance starts beeping to indicate that you have to perform the Calc-Clean process.
text_image
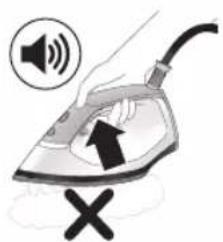
Illustration of an iron frying pan with sound waves and a cross symbol indicating no change or error2 Besides that, a second defense step to protect the appliance from scale is integrated: the steam function gets disabled if descaling is not done. After descaling is done, the steam function will be restored. This takes place regardless of the type of water used.
14
English

natural_image
Illustration of a hand using an iron iron to lift a cup, showing two directional arrows (no text or symbols)3 Press the lever in the water tank handle and remove the water tank from the base.
text_image
1.4L MAX4 Fill up the water tank halfway.
Note: Make sure that the appliance is plugged in and switched ON during the Calc-Clean process.

natural_image
Illustration of a pair of steam iron holders, showing front and side views (no text or symbols)5 Push the water tank back into the appliance until it locks in place ('click').
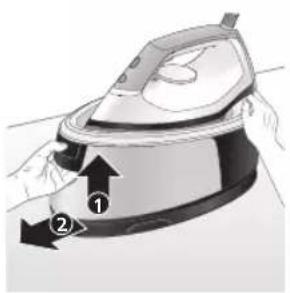
natural_image
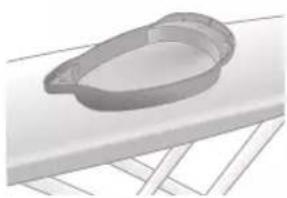
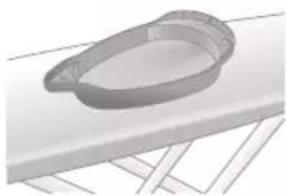
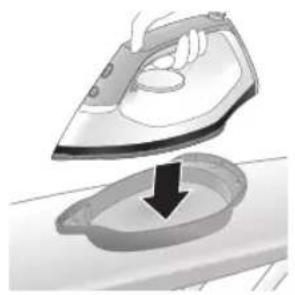
3D rendered image of a mechanical component with a curved handle and flange, placed on a flat surface (no text or symbols visible)6 Place the Calc-Clean container on the ironing board or any other even, stable surface.
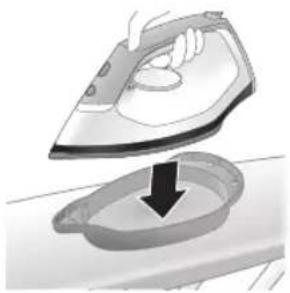
natural_image
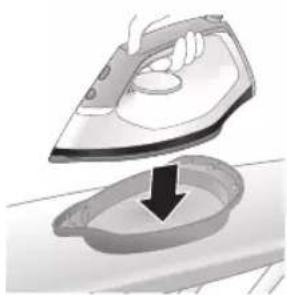
Illustration of a hand ironing an iron with a downward arrow indicating cooling or residue (no text or symbols)7 Place the iron stably on the Calc-Clean container.
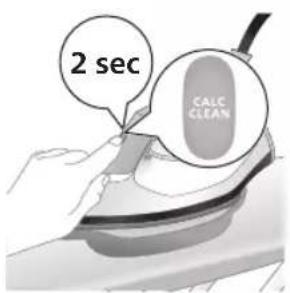
text_image
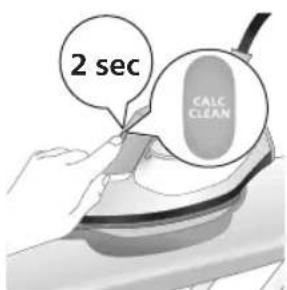
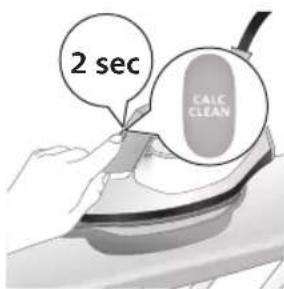
2 sec CALC CLEAN8 Press and hold the CALC-CLEAN button for 2 seconds until you hear short beeps.
Note: The Calc-Clean container has been designed to collect scale particles and hot water during the Calc-Clean process. It is perfectly safe to rest the iron on this container during the entire process.
text_image
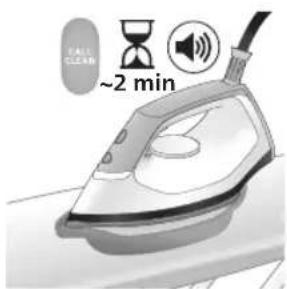
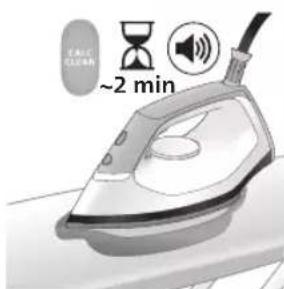
Fall CLEAN ~2 min9 During the Calc-Clean process, you hear short beeps and a pumping sound. Wait approximately 2 minutes for the appliance to complete the process.
natural_image
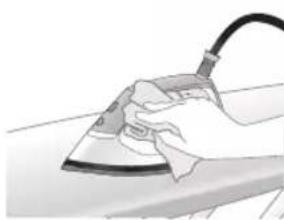
Illustration of an electric iron with warning symbols (no text or labels)10 When the Calc-Clean process is completed, the iron stops beeping and the CALC-CLEAN light stops flashing.
Caution: The iron is hot.

natural_image
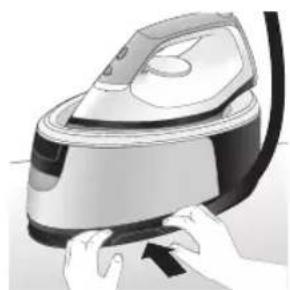
Hand using a power iron on a surface (no text or symbols visible)11 Wipe the iron with a piece of cloth and put it back on the base station.

text_image
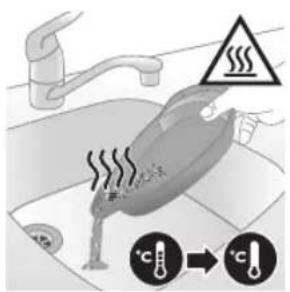
Diagram illustrating heat transfer in a kitchen with temperature indicators and warning symbol12 As the Calc-Clean container becomes hot during the Calc-Clean process, wait about 5 minutes before you touch it. Then carry the Calc-Clean container to the sink, empty it and store it for future use.
Note: During the Calc-Clean process, clean water may come out of the soleplate if no scale has accumulated inside the iron. This is normal.

natural_image
Illustration of a speaker emitting sound waves, no text or symbols presentPSG2000 series
1 After 1 to 3 months of use, the Calc-Clean light starts flashing and the appliance starts beeping to indicate that you have to perform the Calc-Clean process.
text_image
Illustration of a hand using an iron with sound waves and a cross symbol indicating cancellation or error.2 Besides that, a second defense step to protect the appliance from scale is integrated: the steam function gets disabled if descaling is not done. After descaling is done, the steam function will be restored. This takes place regardless of the type of water used.
natural_image
Illustration of a hand placing a dark object into a rice cooker (no text or symbols visible)3 Open the water tank filling door.

text_image
1.4L MAX4 Fill up the water tank halfway.
Note: Make sure that the appliance is plugged in and switched ON during the Calc-Clean process.
natural_image
3D rendered mechanical part with a looped end and base plate (no text or symbols)5 Place the Calc-Clean container on the ironing board or any other even, stable surface.

natural_image
Illustration of a steam iron being placed into a sink with a downward arrow indicating motion (no text or symbols)6 Place the iron stably on the Calc-Clean container.
text_image
2 sec CALC CLEAN7 Press and hold the CALC-CLEAN button for 2 seconds until you hear short beeps.
Note: The Calc-Clean container has been designed to collect scale particles and hot water during the Calc-Clean process. It is perfectly safe to rest the iron on this container during the entire process.
text_image
~2 min8 During the Calc-Clean process, you hear short beeps and a pumping sound. Wait approximately 2 minutes for the appliance to complete the process.

natural_image
Illustration of a steaming iron with warning symbols (no text or labels)9 When the Calc-Clean process is completed, the iron stops beeping and the CALC-CLEAN light stops flashing.
Caution: The iron is hot.
natural_image
Hand using a iron on a surface, no text or symbols visible10 Wipe the iron with a piece of cloth and put it back on the base station.
text_image
Diagram illustrating temperature change in a car with warning sign and thermometer symbols11 As the Calc-Clean container becomes hot during the Calc-Clean process, wait about 5 minutes before you touch it. Then carry the Calc-Clean container to the sink, empty it and store it for future use.
Note: During the Calc-Clean process, clean water may come out of the soleplate if no scale has accumulated inside the iron. This is normal.
Cleaning the soleplate
natural_image
Illustration of a hand using an iron on a surface with arrows indicating motion (no text or symbols)To properly maintain your appliance, clean it regularly.
1 Clean the appliance with a moist cloth. To easily and effectively remove stains, let the soleplate heat up and move the iron over a moist cloth.
text_image
Warning symbol and cleaning instruction illustration showing a bottle, magnifying glass, and industrial machine with warning signNote: Do not use soap or scrub the soleplate during cleaning.
Storage
PSG3000 series
1 Switch off the appliance and unplug it.

natural_image
Illustration of a plug inserted into an electrical outlet with a black arrow indicating direction (no text or symbols)
natural_image
Illustration of a hand holding a lock icon with an arrow, no text or symbols present2 For PSG3010, place the iron on the iron platform and lock it by pushing the carry lock release button
natural_image
Illustration of a steam iron with two arrows indicating motion (no text or symbols)3 Press the lever in the water tank handle and remove the water tank from the base.
natural_image
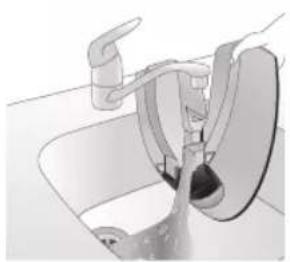
Diagram of a bathroom sink with faucet and toilet mechanism (no text or labels)4 Pour the water out of the water tank into the sink.
natural_image
Illustration of two identical steam covers with a diagonal line dividing them (no text or symbols)5 Push the water tank back into the appliance until it locks in place ('click').

natural_image
Illustration of hands operating a steam iron (no text or symbols visible)6 Fold the supply hose and wind the supply hose inside the supply hose storage compartment.
20
English

natural_image
Illustration of hands using a steam iron to press down a button (no text or symbols visible)
natural_image
Illustration of a hand using a steam iron to clean or store air (no text or symbols visible)
natural_image
Illustration of a hand using a steam iron to press down a cylindrical pipe (no text or symbols visible)7 Fold the mains cord and fasten it with the Velcro strip. Then carry the base of the appliance with two hands.
8 For PSG3010, You can carry the appliance with one hand by the handle of the iron when the iron is locked on the iron platform.
PSG2000 series
1 Switch off the appliance and unplug it.
natural_image
Illustration of a plug being inserted into an electrical outlet (no text or symbols)
natural_image
Illustration of a kitchen sink with a pot and faucet (no text or symbols)2 Pour the water out of the water tank into the sink.
natural_image
Illustration of hands operating a steam iron (no text or symbols visible)3 Fold the supply hose and wind the supply hose inside the supply hose storage compartment.

natural_image
Illustration of hands operating a steam iron (no text or symbols visible)4 Fold the mains cord and fasten it with the Velcro strip. Then carry the base of the appliance with two hands.

natural_image
Illustration of a hand using a steam iron to clean or operate (no text or symbols visible)22 Azərbaycanca
Giriş
text_image
Labeled diagram of a steam iron with numbered parts for identificationPSG2000 seriyası

text_image
Labeled diagram of a steam iron with numbered parts for identificationnatural_image
Illustration of a hand using an iron iron to lift a cup, showing two directional arrows (no text or symbols)
text_image
1.4L MAXnatural_image
Illustration of two identical mechanical components with a diagonal line dividing them (no text or symbols)natural_image
Hand placing a dark object into a cooking pot (no text or symbols visible)PSG2000 seriyası
natural_image
Illustration of a plug with a power outlet connected to a wall socket (no text or symbols)Azərbaycanca

natural_image
Illustration of a hand pressing a button on a device with a power symbol (no text or labels)natural_image
Illustration of a mechanical component with a star-shaped feature and a handle (no text or symbols)natural_image
Illustration of a medical or laboratory procedure step with a checkmark and magnified view (no text or symbols)natural_image
Illustration of a hand holding a lock icon over a device (no text or symbols)natural_image
Close-up of a hand pressing down on a small electronic device with a black cable (no visible text or symbols)natural_image
Illustration of a hand using a power iron to clean or iron, with no visible text or symbolstext_image
Diagram showing a hand holding a document with a checkmark and arrow, possibly indicating a verification or approval process.text_image
Safety warning illustration showing a person using a steam iron with a warning symbol and cross marktext_image
Warning sign showing a hanger with a warning symbol, indicating heat stress or hazard, and a hand holding an iron.Buxar güclândirmə

text_image
EVO SOLX 1000mm 1000mm 1000mm 1000mm 1000mm 1000mm 1000mm 1000mm 1000mm 1000mm 1000mm 1000mm 1000mm 1000mm 1000mm 1000mm 1000mm 10 1 2 3 4 5 6 7 8 9 10 11 12 13 14 15 16 17 18 19 20 21 22 23 24 25 26 27 28 29 30 31 32 33 34 35 36 37 38 39 40 41 42 43 44 45 46 47 48 49 50 51 52 53 54 55 56 57 58 59 60 61 62 63 64 65 66 67 68 69 70 71 72 73 74 75 76 77 78 79 80 81 82 83 84 85 86 87 88 89 90 91 92 93 94 95 96 97 98 99 100text_image
Diagram illustrating temperature change with labeled thermometer symbols and a star-shaped object on a surface
text_image
-10 min OFFnatural_image
Illustration of a speaker emitting sound waves (no text or symbols)PSG3000 seriyası
text_image
Illustration of an iron with sound waves and a cross symbol indicating explosion or damage, suggesting noise or vibration.natural_image
Illustration of a hand using an iron iron to lift a cup, showing two directional arrows (no text or symbols)natural_image
Illustration of a pair of steam iron holders, showing front and side views (no text or symbols)natural_image
3D rendered image of a mechanical component with a curved handle and flange, placed on a flat surface (no text or symbols visible)natural_image
Illustration of a hand ironing an iron with a downward arrow indicating cooling or residue (no text or symbols)text_image
2 sec CALC CLEANnatural_image
Illustration of a steam iron on a surface with warning symbols (no text or labels)natural_image
Illustration of a hand using an iron on a workbench (no text or symbols visible)text_image
Diagram illustrating temperature regulation in a kitchen, showing heat transfer from a sink to a thermometer.natural_image
Illustration of a speaker emitting sound waves, no text or symbols presentPSG2000 seriyası
text_image
Illustration of a hand using an iron with sound waves and a cross symbol indicating cancellation or error.natural_image
Illustration of a hand placing a dark object into a rice cooker (no text or symbols visible)natural_image
3D rendered mechanical part with a looped end and base plate (no text or symbols)natural_image
Illustration of a steam iron being placed into a sink with a downward arrow indicating motion (no text or symbols)text_image
2 sec CALC CLEANnatural_image
Illustration of a steaming iron with a warning symbol (no text or labels)natural_image
Hand using a iron on a surface, no text or symbols visibletext_image
Safety warning illustration showing a hand pressing down on a toilet with temperature change iconsnatural_image
Illustration of a hand using an iron on a surface with directional arrows indicating motion (no text or symbols)text_image
Warning symbol and safety icon showing a bottle, magnifying glass, and plastic film with warning labelnatural_image
Illustration of a plug inserted into an electrical outlet with a black arrow indicating direction (no text or symbols)Azərbaycanca

natural_image
Illustration of a hand holding a lock icon with an arrow, no text or symbols presentnatural_image
Illustration of a steam iron with two arrows indicating motion (no text or symbols)natural_image
Diagram of a kitchen sink with faucet and showerhead (no text or labels)natural_image
Illustration of two identical steam covers with a diagonal line dividing them (no text or symbols)natural_image
Illustration of hands operating a steam iron (no text or symbols visible)natural_image
Illustration of hands using a steam iron to press down a button (no text or symbols visible)
natural_image
Illustration of a hand using a steam iron to clean or operate (no text or symbols visible)
natural_image
Hand using a steam iron with cord and tassel (no text or symbols visible)natural_image
Illustration of a plug being inserted into an electrical outlet (no text or symbols)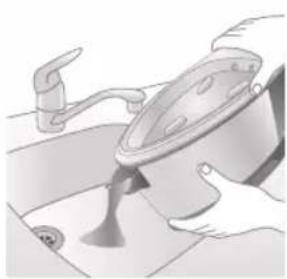
natural_image
Illustration of a kitchen sink with a pot and faucet (no text or symbols)natural_image
Illustration of a hand pressing down on a steam iron (no text or symbols visible)natural_image
Illustration of hands operating a steam iron (no text or symbols visible)natural_image
Illustration of a hand using a steam iron to clean or operate (no text or symbols visible)Pendahuluan
text_image
Labeled diagram of a steam iron with numbered parts for identificationSeri PSG2000

text_image
Labeled diagram of a steam iron with numbered parts for identification1 Tombol CALC-CLEAN dengan lampu
2 Tombol daya
3 Lampu 'setrika' siap
4 Tuas pelepas tangki air (seri PSG3000)/Pintu pengisian tangki air (seri PSG2000)
5 Tangki air lepas-pasang (seri PSG3000)/Tangki air permanen (seri PSG2000)
6 Tempat penyimpanan slang suplai air
7 Wadah Smart Calc-Clean
8 Kabel listrik dengan steker
9 Slang suplai air
10 Pemicu uap/Semburan uap
11 Putaran suhu
12 Tumit
13 Tombol pelepas kunci mode portabel (PSG3010)
natural_image
Illustration of a steam iron being placed on a surface, showing two directional arrows (no text or symbols)
text_image
1.4L MAX
natural_image
Illustration of a pair of steam covers with arrows indicating motion (no text or symbols)natural_image
Illustration of a hand placing a dark object into a white cylindrical container (no text or symbols visible)
text_image
1.4L MAXnatural_image
Illustration of a plug being inserted into an electrical outlet (no text or symbols)42 Bahasa Indonesia
natural_image
Illustration of a hand pressing a button with a power symbol (no text or labels)natural_image
Close-up of a mechanical component with a star-shaped feature on its surface (no text or symbols visible)natural_image
Close-up of a medical or laboratory procedure showing a checkmark and magnified view of a device (no text or symbols visible)natural_image
Illustration of a hand holding a lock icon over a device (no text or symbols)natural_image
Close-up of a hand pressing down on a small electronic device with a curved arrow indicating motion (no text or symbols visible)natural_image
Illustration of a hand using an iron on a surface, with a black arrow indicating the iron's tip (no text or symbols present)natural_image
Illustration of a shirt with a checkmark and arrow, next to a hand holding a CD (no text or symbols)text_image
Illustration showing a person holding a steam iron with a warning symbol and cross mark, alongside a warning triangle.text_image
Diagram illustrating a hanger with warning symbols including a cross, steam, and a hand holding a device.Semburan uap

text_image
Eco SIX 100% 100% 100% 50% ✓ Xnatural_image
Illustration of an iron (£) with a hourglass above it, showing time ~15 minutes (no text or symbols on the device itself)text_image
Diagram illustrating temperature change with labeled thermometer symbols and a starburst effect on a surface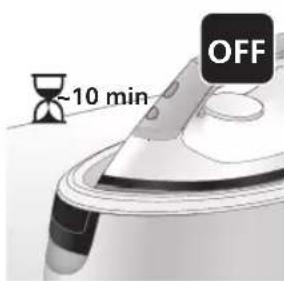
text_image
-10 min OFFnatural_image
Illustration of a steam iron emitting sound waves (no text or symbols)
text_image
Illustration of a hand using an iron with sound waves and a cross symbol indicating cancellation or error.natural_image
Illustration of a hand using a steam iron to press down a button (no text or symbols present)natural_image
Illustration of two steam iron holders in a diagonal line, no text or symbols presentnatural_image
3D rendered image of a mechanical component on a flat surface (no text or symbols visible)natural_image
Illustration of a hand ironing an iron, with a downward arrow indicating cooling or residue (no text or symbols present)text_image
2 sec CALC CLEANnatural_image
Illustration of a steam iron on a surface with warning symbols (no text or labels)10 Setelah selesai, setrika berhenti berbunyi bip dan lampu CALC-CLEAN pun akan berhenti berkedip.
natural_image
Illustration of a hand using an iron on a workbench (no text or symbols visible)text_image
Diagram illustrating temperature regulation in a kitchen, showing heat transfer from a sink to a thermometer.natural_image
Illustration of a speaker emitting sound waves, no text or symbols presentSeri PSG2000
text_image
Illustration of a hand using an iron with sound waves and a cross symbol indicating cancellation or error.natural_image
Illustration of a hand placing a dark object into a rice cooker (no text or symbols visible)3 Buka pintu pengisian tangki air.
text_image
1.4L MAXnatural_image
3D rendered mechanical part with a looped end and base plate (no text or symbols)natural_image
Illustration of a steam iron being placed into a sink with a downward arrow indicating motion (no text or symbols)text_image
2 sec CALC CLEANnatural_image
Illustration of an iron iron with steam and a warning symbol (no text or labels)9 Setelah selesai, setrika berhenti berbunyi bip dan lampu CALC-CLEAN pun akan berhenti berkedip.
natural_image
Hand using a power iron on a surface (no text or symbols visible)text_image
Diagram illustrating temperature regulation in a kitchen, showing a thermometer and warning symbol with Chinese text.natural_image
Illustration of a hand using an iron on a surface with arrows indicating motion (no text or symbols)text_image
Warning symbol and cleaning instruction illustration showing a bottle, magnifying glass, and spray bottle with a cross marknatural_image
Illustration of a plug inserted into an electrical outlet with a black arrow indicating direction (no text or symbols)
natural_image
Illustration of a hand holding a lock icon with an arrow, next to a vehicle (no text or symbols)natural_image
Illustration of a steam iron with two arrows indicating motion (no text or symbols)natural_image
Illustration of a showerhead spraying water into a sink (no text or symbols)natural_image
Illustration of two identical steam iron machines side by side, showing front and side views (no text or symbols)natural_image
Illustration of hands operating a steam iron (no text or symbols visible)natural_image
Illustration of hands operating a steam iron (no text or symbols visible)
natural_image
Illustration of a hand using a steam iron to clean or store air (no text or symbols visible)
natural_image
Illustration of a hand using a steam iron with cord and cable (no text or symbols)natural_image
Illustration of a plug being inserted into an electrical outlet (no text or symbols)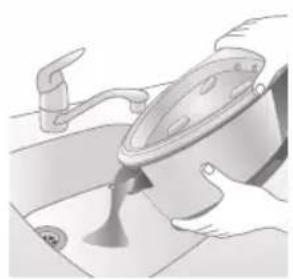
natural_image
Illustration of a kitchen sink with a pot and faucet (no text or symbols)natural_image
Illustration of hands operating a steam iron (no text or symbols visible)natural_image
Illustration of hands operating a steam iron (no text or symbols visible)
natural_image
Illustration of a hand using a steam iron to clean or operate (no text or symbols visible)text_image
Labeled diagram of a steam iron with numbered parts for identificationSiri PSG2000

text_image
Labeled diagram of a steam iron with numbered parts for identification1 Butang CALC-CLEAN dengan lampu
2 Butang kuasa
3 Lampu 'seterika' sedia
4 Tuil pelepas tangki air (siri PSG3000)/Penutup isian tangki air (siri PSG2000)
5 Tangki air boleh tanggal (siri PSG3000)/Tangki air tidak boleh tanggal (siri PSG2000)
6 Ruang penyimpanan hos bekalan air
7 Bekas Pembersihan Kerak Pintar
8 Kord sesalur kuasa dengan plag
9 Hos bekalan air
10 Picu stim/Pancutan stim
11 Tombol suhu
12 Tumit
13 Butang pelepas kunci pembawa (PSG3010)
natural_image
Illustration of hands adjusting a mechanical component with numbered arrows (no text or symbols)natural_image
Illustration of two identical steam covers with a diagonal line dividing them (no text or symbols)natural_image
Hand placing a dark object into a rice cooker (no text or symbols visible)Siri PSG2000
1 Buka penutup isian tangki air.

text_image
7.4L MAXnatural_image
Close-up of a hand pressing down on a small electronic device with a cable (no visible text or symbols)natural_image
Illustration of a hand using an iron on a medical device (no text or symbols visible)text_image
Illustration showing a hand holding a shirt with a checkmark and an airplane flying nearby, symbolizing clothing or garment selection.text_image
Illustration showing a person with a steam iron and a warning symbol, including a cross and smoke symbol.text_image
Warning sign showing a hanger with a hand gesture and an electric iron, indicating heat or stress in clothing safety.Pancutan stim

text_image
SWRK ECO SOLK X ✓text_image
Diagram illustrating temperature change with thermometer symbols and a star-shaped object, likely for thermal monitoring or testing.
text_image
~10 min OFFnatural_image
Illustration of a steam iron emitting sound waves (no text or symbols)text_image
Illustration of an iron with sound waves and a cross symbol indicating cancellation or errornatural_image
Illustration of a person using an iron iron to lift a cup, showing two directional arrows (no text or symbols)natural_image
Illustration of two steam covers with arrows indicating motion, no text or symbols presentnatural_image
3D rendered image of a mechanical component with a curved handle and flange, placed on a flat surface (no text or symbols visible)6 Letakkan bekas Pembersihan Kerak di papan seterika atau lain-lain permukaan yang stabil dan rata.

natural_image
Illustration of a hand using an iron to clean a small bowl (no text or symbols present)text_image
2 sec CALC CLEAN8 Tekan dan tahan butang CALC-CLEAN selama 2 saat sehingga anda mendengar bunyi bip singkat.
text_image
Cable CLEAN ~2 minnatural_image
Illustration of an electric iron emitting steam, with a warning symbol (no text or labels)natural_image
Hand using a power iron on a surface (no text or symbols visible)text_image
Diagram illustrating a water safety hazard with warning sign and temperature change iconsnatural_image
Illustration of a steam iron with sound waves above it (no text or symbols)text_image
Illustration of a steam iron with sound waves and a cross symbol indicating explosion or damagenatural_image
Illustration of a hand placing a black cloth into a rice cooker (no text or symbols visible)natural_image
3D rendered image of a mechanical component on a flat surface (no text or symbols visible)5 Letakkan bekas Pembersihan Kerak di papan seterika atau lain-lain permukaan yang stabil dan rata.
Bahasa Melayu
natural_image
Illustration of a hand ironing an iron above a sink with a downward arrow (no text or symbols)text_image
2 sec CALC CLEAN7 Tekan dan tahan butang CALC-CLEAN selama 2 saat sehingga anda mendengar bunyi bip singkat.
natural_image
Illustration of a steaming iron on a surface with a warning symbol (no text or labels)natural_image
Illustration of a hand using an iron on a surface (no text or symbols)text_image
Diagram illustrating temperature regulation in a kitchen, showing a thermometer and warning symbol with Chinese text.natural_image
Illustration of a hand using an iron on a workbench with directional arrows indicating motion (no text or symbols)text_image
Warning symbol and safety icon showing a bottle, magnifying glass, and warning sign with exclamation marknatural_image
Illustration of a plug connecting to an open electrical outlet (no text or symbols)Bahasa Melayu

natural_image
Illustration of a hand holding a lock icon with an arrow, no text or symbols presentnatural_image
Illustration of a steam iron with two arrows indicating motion (no text or symbols)natural_image
Diagram of a bathroom sink with faucet and shower mechanism (no text or symbols)natural_image
Illustration of two identical steam iron machines side by side, showing front and back views (no text or symbols)natural_image
Illustration of hands operating a steam iron (no text or symbols visible)6 Gulungkan dan simpan hos bekalan di dalam ruang penyimpanan hos bekalan.
natural_image
Illustration of hands operating a steam iron (no text or symbols visible)
natural_image
Illustration of a hand using a steam iron to clean or store air (no text or symbols visible)
natural_image
Illustration of a hand using a steam iron with cord and power cord (no text or symbols)natural_image
Illustration of a plug being inserted into an electrical outlet (no text or symbols)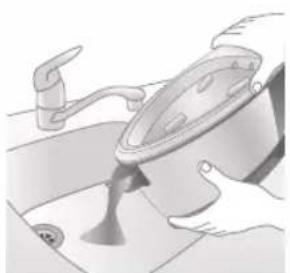
natural_image
Illustration of a kitchen sink with a pot and faucet (no text or symbols)natural_image
Illustration of a hand using a power iron to press down a button (no text or symbols visible)3 Gulungkan dan simpan hos bekalan di dalam ruang penyimpanan hos bekalan.

natural_image
Illustration of hands operating a steam iron (no text or symbols visible)
natural_image
Illustration of a hand using a steam iron to clean or operate (no text or symbols visible)text_image
Labeled diagram of a steam iron with numbered parts for identification72 Čeština
Řada PSG2000

text_image
Labeled diagram of a steam iron with numbered parts for identificationnatural_image
Illustration of hands adjusting a mechanical component with numbered arrows (no text or symbols)
text_image
MAX 1.4Lnatural_image
Illustration of two identical steam covers with a diagonal line crossing through, no text or symbols present.natural_image
Hand placing a black object into a rice cooker (no text or symbols visible)Řada PSG2000
natural_image
Illustration of a hand inserting a plug into an electrical outlet (no text or symbols)natural_image
Illustration of a hand holding a power button with an icon, no text or symbols presentnatural_image
Illustration of a mechanical component with a star-shaped feature on its surface (no text or symbols)natural_image
Illustration of a hand holding a white circular object with a black checkmark (no text or symbols)natural_image
Illustration of hands holding a lock icon and a device component (no text or symbols)natural_image
Close-up of a hand pressing down on a device component with a black arrow indicating motion (no text or symbols visible)natural_image
Illustration of a hand using an iron on a medical device (no text or symbols visible)text_image
Diagram showing a hand holding a shirt with a checkmark and an arrow pointing downward, next to an electric fan.text_image
Illustration of a person using a steam iron with a warning symbol and cross mark, indicating hazardous material or hazard.text_image
Safety warning illustration showing a hanger, hand gesture with X mark, and steam symbol indicating hazardParní ráz

text_image
SWRK ECO SOLK X ✓text_image
Diagram illustrating temperature change with thermometer symbols and a star-shaped object on a surface
text_image
~10 min OFFnatural_image
Illustration of a speaker emitting sound waves above a computer monitor (no text or symbols)
text_image
Illustration of a hand using an iron with sound waves and a cross symbol indicating cancellation or error.natural_image
Illustration of a steam iron with two arrows indicating motion direction (no text or symbols)natural_image
Illustration of two steam covers with arrows indicating motion, no text or symbols presentnatural_image
3D rendered image of a mechanical component with a curved handle and flange, placed on a flat surface (no text or symbols visible)natural_image
Illustration of a steam iron being placed into a sink with a downward arrow indicating motion (no text or symbols)text_image
2 sec CALC CLEANtext_image
Cable CLEAN ~2 minnatural_image
Illustration of a steaming iron on a surface with a warning symbol (no text or labels)natural_image
Illustration of a hand using a power iron on a surface (no text or symbols)text_image
Safety warning illustration showing a car accident with temperature change indicators and warning symbolnatural_image
Illustration of a speaker emitting sound waves on a keyboard (no text or symbols)text_image
Illustration of an iron with sound waves and a cross symbol indicating no change or errornatural_image
Illustration of a hand placing a black cloth into a white rice cooker (no text or symbols visible)natural_image
3D rendered image of a mechanical component or housing on a flat surface (no text or symbols visible)natural_image
Illustration of a steam iron being placed into a sink with a downward arrow indicating motion (no text or symbols)text_image
2 sec CALC CLEANnatural_image
Illustration of a steaming iron with a warning symbol (no text or labels)natural_image
Hand using a power iron on a surface (no text or symbols visible)text_image
Safety warning illustration showing a hand holding a valve with warning symbols and temperature indicatorsnatural_image
Illustration of a hand using an iron on a surface with arrows indicating motion (no text or symbols)text_image
Warning symbol and safety icon showing a bottle, magnifying glass, and a flying iron with warning labelnatural_image
Illustration of a plug with a black arrow pointing to a white electrical outlet (no text or symbols)
natural_image
Illustration of a hand holding a lock icon with an arrow, next to a vehicle (no text or symbols)natural_image
Illustration of a steam iron with two arrows indicating motion (no text or symbols)natural_image
Diagram of a bathroom sink with faucet and shower (no text or symbols)natural_image
Illustration of two identical steam iron machines side by side, showing front and back views (no text or symbols)natural_image
Illustration of hands operating a steam iron (no text or symbols visible)natural_image
Illustration of hands using a steam iron to press down a button (no text or symbols visible)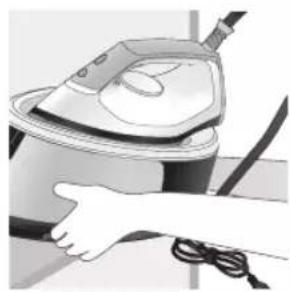
natural_image
Illustration of a hand using a steam iron to clean or store air (no text or symbols visible)
natural_image
Illustration of a hand using a steam iron to press down a cylindrical pipe (no text or symbols visible)natural_image
Illustration of a plug inserted into an electrical outlet with a black arrow indicating direction (no text or symbols)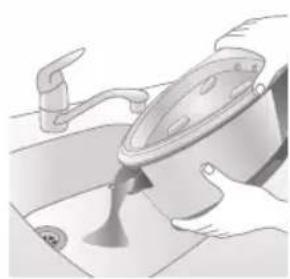
natural_image
Illustration of a kitchen sink with a pot and faucet (no text or symbols)natural_image
Illustration of a hand pressing down on a steam iron (no text or symbols visible)natural_image
Illustration of hands operating a steam iron (no text or symbols visible)
natural_image
Illustration of a hand using a steam iron to clean or operate (no text or symbols visible)text_image
Labeled diagram of a steam iron with numbered parts for identificationPSG2000-serien

text_image
Labeled diagram of a steam iron with numbered parts for identificationnatural_image
Illustration of hands adjusting a mechanical component with numbered arrows (no text or symbols)
text_image
MAX 1.4Lnatural_image
Illustration of two identical steam covers with a diagonal line crossing through, no text or symbols present.natural_image
Illustration of a hand placing a dark object into a white ceramic pot (no text or symbols visible)
text_image
1.4L MAXnatural_image
Illustration of a plug being inserted into an open electrical outlet (no text or symbols)Dansk

natural_image
Illustration of a hand pressing a button on a device with a power symbol (no text or labels)natural_image
Illustration of a mechanical component with a star-shaped feature and curved surfaces (no text or symbols)3 Lysindikatoren for "strygejernet er klar" begynder at blinke for at angive, at apparatet varmer op.

natural_image
Illustration of a medical or laboratory procedure step with a checkmark and magnified view (no text or symbols)4 Vent, indtil lysindikatoren for "strygejernet er klar" lyser konstant.
natural_image
Illustration of a hand adjusting a lock mechanism with a padlock icon (no text or symbols)natural_image
Close-up of a hand pressing down on a small electronic device with a curved cable (no visible text or symbols)natural_image
Illustration of a hand using an iron on a surface, with a black arrow indicating the iron's direction (no text or symbols present)7 Hold dampudløseren nede for at begynde strygning.
text_image
Illustration showing a checkmark and downward arrow on a shirt, next to an electric fan with a face.text_image
Illustration showing a person with a warning symbol (×) and a warning triangle labeled 'SWEET' (sweating), implying a hazard or safety hazard.text_image
Diagram illustrating a hazard warning against using an iron, showing hand gesture, warning symbol, and warning sign.Steam boost

text_image
Eco SIX 100% 100% 100% 100% 100% 100% 100% 100% 100% 100% 100% 100% 100% 100% 100% 100% 100% 100% 100% 100% 100% 100% 100% 100% 100% 100 X ✓natural_image
Illustration of an air conditioner with a hourglass and ~15-minute mark (no text or symbols on the device itself)text_image
Diagram illustrating temperature change with labeled thermometer symbols and a star-shaped object on a surface
text_image
-10 min OFFnatural_image
Illustration of a speaker emitting sound waves, no text or symbols presentPSG3000-serien
text_image
Diagram showing a hand using an iron with sound waves and a cross symbol indicating cancellation or error.natural_image
Illustration of a steam iron with two arrows indicating motion (no text or symbols)natural_image
Illustration of two steam covers with arrows indicating motion, no text or symbols presentnatural_image
3D rendered image of a mechanical component with a curved top and base, resting on a flat surface (no text or symbols visible)natural_image
Illustration of a hand ironing an iron with a downward arrow indicating cooling or residue (no text or symbols)7 Placer strygejernet stabilt på Calc-Clean-beholderen.

text_image
2 sec CALC CLEANnatural_image
Illustration of an electric iron with warning symbols (no text or labels)natural_image
Hand using a power iron on a surface (no text or symbols visible)text_image
Diagram illustrating heat transfer in a kitchen with temperature indicators and warning symbolnatural_image
Illustration of a speaker emitting sound waves, no text or symbols presentPSG2000-serien
text_image
Illustration of a hand using an iron with sound waves and a cross symbol indicating cancellation or error.natural_image
Illustration of a hand placing a dark object into a rice cooker (no text or symbols visible)natural_image
3D rendered mechanical part with a looped end and base plate (no text or symbols)natural_image
Illustration of a steam iron being placed into a sink with a downward arrow indicating motion (no text or symbols)6 Placer strygejernet stabilt på Calc-Clean-beholderen.

text_image
2 sec CALC CLEANnatural_image
Illustration of a steaming iron with warning symbols (no text or labels)natural_image
Hand using a iron on a surface, no text or symbols visibletext_image
Safety warning illustration showing a thermometer and warning sign above a shower, indicating thermal resistance.natural_image
Illustration of a hand using an iron on a surface with arrows indicating motion (no text or symbols)text_image
Warning symbol and safety icon showing a bottle, magnifying glass, and warning sign with exclamation marknatural_image
Illustration of a plug connecting to an open electrical outlet (no text or symbols)
natural_image
Illustration of a hand holding a lock icon with an arrow, next to a vehicle (no text or symbols)2 Sæt PSG3010-strygejernet i holderen, og lås det fast ved at trykke på udløserknappen til transportlåsen

natural_image
Illustration of a steam iron with two arrows indicating motion (no text or symbols)natural_image
Illustration of a showerhead spraying water into a sink (no text or symbols)natural_image
Illustration of two identical steam iron machines side by side, showing front and back views (no text or symbols)natural_image
Illustration of hands operating a steam iron (no text or symbols visible)6 Fold dampslangen, og rul den sammen inde i opbevaringsrummet til dampslangen.
102 Dansk
natural_image
Illustration of hands operating a steam iron (no text or symbols visible)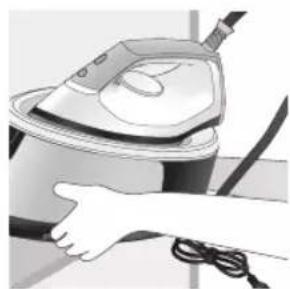
natural_image
Illustration of a hand using a steam iron to lift a cup (no text or symbols visible)
natural_image
Illustration of a hand using a steam iron with cord and power cord (no text or symbols)natural_image
Illustration of a plug inserted into an electrical outlet with a black arrow indicating direction (no text or symbols)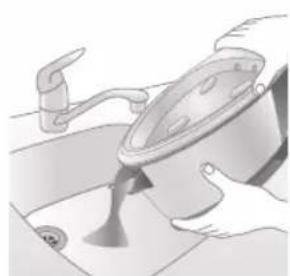
natural_image
Illustration of a kitchen sink with a pot and faucet (no text or symbols)natural_image
Illustration of hands operating a steam iron (no text or symbols visible)3 Fold dampslangen, og rul den sammen inde i opbevaringsrummet til dampslangen.

natural_image
Illustration of hands operating a steam iron (no text or symbols visible)
natural_image
Illustration of a hand using a steam iron to clean or operate (no text or symbols visible)text_image
Labeled diagram of a steam iron with numbered parts for identificationSerie PSG2000

text_image
Labeled diagram of a steam iron with numbered parts for identificationnatural_image
Illustration of hands adjusting a mechanical component with numbered arrows (no text or symbols)natural_image
Illustration of two identical steam covers with a diagonal line dividing them (no text or symbols)natural_image
Illustration of a hand placing a black object into a rice cooker (no text or symbols visible)
text_image
7.4L MAXnatural_image
Close-up of a hand pressing down on a small electronic device with a black cable (no visible text or symbols)natural_image
Illustration of a hand using an iron on a medical device (no text or symbols visible)text_image
Illustration showing a hand holding a shirt with a checkmark and an airplane, symbolizing inspection or repair.text_image
Illustration showing a person with a steam iron, crossed out by a 'X' symbol, and a warning triangle with 'SIT' text.text_image
Warning sign with warning symbols and a hand holding an iron, indicating hazard or caution in clothing safety.Dampfstoß

text_image
DRINK ECO SOKE COCONUTS ✓text_image
Diagram illustrating temperature change with thermometer symbols and a star-shaped object, likely for thermal monitoring or testing.
text_image
~10 min OFFnatural_image
Illustration of a steam iron with sound waves above it (no text or symbols)Serie PSG3000
text_image
Diagram showing a hand using an iron with sound waves and a cross symbol indicating cancellation or error.natural_image
Illustration of a steam iron with two directional arrows indicating motion (no text or symbols)natural_image
Illustration of two identical steam covers with arrows indicating motion, no text or symbols presentnatural_image
3D rendered image of a mechanical ring component on a flat surface (no text or symbols)natural_image
Illustration of a hand ironing an iron with a downward arrow indicating cooling or residue (no text or symbols)text_image
2 sec CALC CLEANtext_image
Cable CLEAN ~2 minnatural_image
Illustration of an electric iron emitting steam, with a warning symbol (no text or labels)natural_image
Hand using a power iron on a surface (no text or symbols visible)text_image
Diagram illustrating a heating mechanism with temperature indicators and warning symbolnatural_image
Illustration of a steam iron emitting sound waves (no text or symbols)text_image
Illustration of an iron with sound waves and a cross symbol indicating no change or errornatural_image
Illustration of a hand placing a black cloth into a white rice cooker (no text or symbols visible)natural_image
3D rendered image of a mechanical component or housing on a flat surface (no text or symbols visible)natural_image
Illustration of a hand ironing an iron above a sink with a downward arrow (no text or symbols)text_image
2 sec CALC CLEANnatural_image
Illustration of a steaming iron with warning symbols (no text or labels)natural_image
Hand using a iron on a surface, no text or symbols visibletext_image
Diagram illustrating temperature change in a kitchen with warning symbols and thermometer iconsnatural_image
Illustration of a hand using an iron on a surface with arrows indicating motion (no text or symbols)text_image
Warning symbol and safety icon showing a bottle, magnifying glass, and warning sign with exclamation marknatural_image
Illustration of a plug inserted into an electrical outlet with a black arrow indicating direction (no text or symbols)Deutsch
natural_image
Illustration of a hand holding a lock icon with an arrow, no text or symbols presentnatural_image
Illustration of a steam iron with two arrows indicating motion (no text or symbols)natural_image
Diagram of a bathroom sink with faucet and toilet mechanism (no text or labels)natural_image
Illustration of two identical steam covers with a diagonal line dividing them (no text or symbols)natural_image
Illustration of hands operating a steam iron (no text or symbols visible)natural_image
Illustration of hands using a steam iron to press down a component (no text or symbols visible)
natural_image
Illustration of a hand using a steam iron to clean or operate (no text or symbols visible)
natural_image
Hand using a steam iron with cord and tassel (no text or symbols visible)natural_image
Illustration of a plug being inserted into an electrical outlet (no text or symbols)
natural_image
Illustration of a kitchen sink with a pot and faucet (no text or symbols)natural_image
Illustration of a hand using a power iron to press down a button (no text or symbols visible)natural_image
Illustration of hands operating a steam iron (no text or symbols visible)
natural_image
Illustration of a hand using a steam iron to clean or operate (no text or symbols visible)text_image
Labeled diagram of a steam iron with numbered parts for identificationPSG2000 seeria

text_image
Labeled diagram of a steam iron with numbered parts for identificationnatural_image
Illustration of hands performing a step-up on a mechanical component, labeled with arrows ① and ② (no text or symbols present)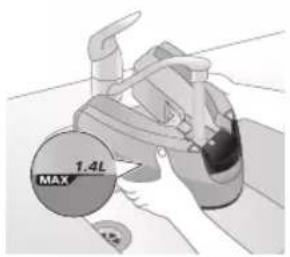
text_image
1.4L MAX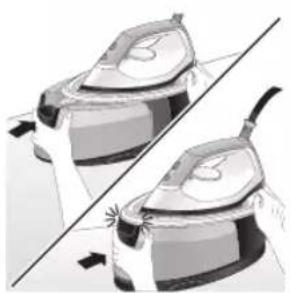
natural_image
Illustration of a pair of identical mechanical components with arrows indicating motion or force direction (no text or symbols)natural_image
Illustration of a hand placing a dark object into a white ceramic pot (no text or symbols visible)
text_image
1.4L MAXnatural_image
Illustration of a plug being inserted into an open electrical outlet (no text or symbols)
natural_image
Illustration of a hand pressing a button on a device with a power symbol (no text or labels)natural_image
Illustration of a mechanical component with a star-shaped feature and curved surfaces (no text or symbols)natural_image
Illustration of a medical or laboratory procedure step with a checkmark and magnified view (no text or symbols)natural_image
Illustration of a hand adjusting a lock mechanism with a padlock icon (no text or symbols)natural_image
Close-up of a hand pressing down on a small electronic device with a curved cable (no visible text or symbols)natural_image
Illustration of a hand using an iron on a surface, with a black arrow indicating the iron's direction (no text or symbols present)text_image
Diagram showing a checkmark and arrow pointing to a document, likely indicating a verification or approval process.text_image
Illustration showing a person holding an electric shock absorber with a warning symbol and cross marktext_image
Illustration showing a shirt with a hand washing, a steam iron, and a warning symbol with an 'X' sign.Lisaaur

text_image
Eco SIX 100% 100% 100% 100% 100% 100% 100% 100% 100% 100% 100% 100% 100% 100% 100% 100% 100% 100% 100% 100% 100% 100% 100% 100% 100% 100 X ✓natural_image
Illustration of an iron (£) with a hourglass icon and '~15 min' label, placed on a surface (no text beyond labels)text_image
Diagram illustrating temperature change with labeled thermometer symbols and a star-shaped object on a surface
text_image
-10 min OFFnatural_image
Illustration of a speaker emitting sound waves, no text or symbols presentPSG3000 seeria
text_image
Illustration of an iron with sound waves and a cross symbol indicating cancellation or errornatural_image
Illustration of a hand using an iron iron to lift a cup, showing two directional arrows (no text or symbols)natural_image
Illustration of a pair of steam iron holders, showing front and side views (no text or symbols)natural_image
3D rendered image of a mechanical component on a flat surface (no text or symbols visible)natural_image
Illustration of a hand ironing an iron with a downward arrow indicating cooling or residue (no text or symbols)text_image
2 sec CALC CLEANnatural_image
Illustration of a steam iron on a surface with warning symbols (no text or labels)natural_image
Illustration of a hand using an iron on a surface (no text or symbols)11 Kuivatage triikraud lapiga ja pange see tagasi alusele.

text_image
Diagram illustrating heat transfer in a kitchen with temperature indicators and warning symbolnatural_image
Illustration of a speaker emitting sound waves, no text or symbols presenttext_image
Illustration of a hand using an iron with sound waves and a cross symbol indicating cancellation or error.natural_image
Illustration of a hand placing a dark object into a rice cooker (no text or symbols visible)natural_image
3D rendered mechanical part with a curved top and flange, resting on a flat surface (no text or symbols visible)natural_image
Illustration of a steam iron being placed into a sink with a downward arrow indicating motion (no text or symbols)text_image
2 sec CALC CLEANnatural_image
Illustration of a steaming iron with a warning symbol (no text or labels)natural_image
Hand using a iron on a surface, no text or symbols visible10 Kuivatage triikraud lapiga ja pange see tagasi alusele.

text_image
Safety warning illustration showing a shower inside a kitchen with temperature indicators and warning symbolsnatural_image
Illustration of a hand using an iron on a surface with arrows indicating motion (no text or symbols)text_image
Warning symbol and safety icon showing a bottle, magnifying glass, and a paper roll with a cross marknatural_image
Illustration of a plug inserted into an electrical outlet with a black arrow indicating direction (no text or symbols)Eesti

natural_image
Illustration of a hand holding a lock icon with an arrow, no text or symbols presentnatural_image
Illustration of a steam iron with two arrows indicating motion (no text or symbols)natural_image
Diagram of a bathroom sink with faucet and shower mechanism (no text or symbols)4 Valage vesi veepaagist kraanikaussi.

natural_image
Illustration of two identical steam iron machines side by side, showing front and back views (no text or symbols)natural_image
Illustration of hands operating a steam iron (no text or symbols visible)natural_image
Illustration of hands using a steam iron to press down a component (no text or symbols visible)
natural_image
Illustration of a hand using a steam iron to clean or wear cable (no text or symbols visible)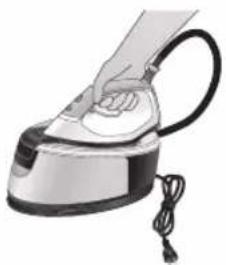
natural_image
Hand using a steam iron with cord and tassel (no text or symbols visible)natural_image
Illustration of a plug being inserted into an electrical outlet (no text or symbols)
natural_image
Illustration of a kitchen sink with a pot and faucet (no text or symbols)2 Valage vesi veepaagist kraanikaussi.
Eesti
natural_image
Illustration of a hand using a power iron to press down a button (no text or symbols visible)natural_image
Illustration of hands operating a steam iron (no text or symbols visible)
natural_image
Illustration of a hand using a steam iron to clean or operate (no text or symbols visible)text_image
Labeled diagram of a steam iron with numbered parts for identificationSerie PSG2000

text_image
Labeled diagram of a steam iron with numbered parts for identificationnatural_image
Illustration of hands performing a step-up on a mechanical component, labeled with arrows ① and ② (no text or symbols present)
text_image
1.4L MAX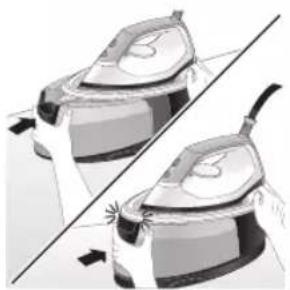
natural_image
Illustration of a pair of identical mechanical components with arrows indicating motion or assembly (no text or symbols)natural_image
Hand placing a dark object into a white cylindrical container (no text or symbols visible)
text_image
1.4L MAXnatural_image
Illustration of a plug being inserted into an electrical outlet (no text or symbols)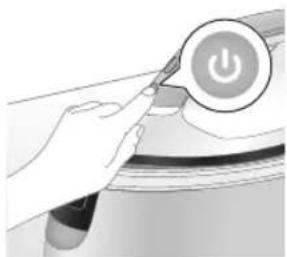
natural_image
Illustration of a hand pressing a button on a device with a power symbol (no text or labels)natural_image
Illustration of a mechanical component with a star-shaped feature and curved surfaces (no text or symbols)natural_image
Illustration of a medical or laboratory procedure step with a checkmark and magnified view (no text or symbols)natural_image
Illustration of a hand adjusting a lock mechanism with a padlock icon (no text or symbols)natural_image
Close-up of a hand pressing down on a small electronic device with a curved arrow indicating motion (no text or symbols visible)natural_image
Illustration of a hand using an iron to lift a surface, with a black arrow indicating the motion direction (no text or symbols present)natural_image
Illustration of a shirt with a checkmark and arrow, next to an electric fan (no text or symbols)text_image
Illustration showing a person holding a steam iron with a warning symbol and a cross mark, alongside a warning triangle.text_image
Illustration showing a shirt with hand gestures, a warning sign, and an electric shock symbol, likely related to workplace safety or hazard.Golpe de vapor

text_image
10V/5W ECO 50k 100k 100k ✓ Xnatural_image
Illustration of an iron (£) with a hourglass icon and '~15 min' label, placed on a surface (no text beyond labels)text_image
Diagram illustrating temperature change with labeled thermometer symbols and a star-shaped object on a surface
text_image
-10 min OFFnatural_image
Illustration of a steaming iron with sound waves above it (no text or symbols)Serie PSG3000
text_image
Diagram showing a hand using an iron with sound waves and a cross symbol indicating cancellation or error.natural_image
Illustration of a hand using an iron iron to lift a cup, showing two directional arrows (no text or symbols)natural_image
Illustration of two steam covers with arrows indicating motion, no text or symbols presentnatural_image
3D rendered image of a mechanical component on a flat surface (no text or symbols visible)natural_image
Illustration of a hand ironing an iron with a downward arrow indicating cooling or residue (no text or symbols)text_image
2 sec CALC CLEANnatural_image
Illustration of a steam iron on a surface with warning symbols (no text or labels)natural_image
Illustration of a hand using an iron on a surface (no text or symbols)text_image
Diagram illustrating temperature change in a shower system with warning symbols and thermometer readingsnatural_image
Illustration of a speaker emitting sound waves, no text or symbols presenttext_image
Illustration of a hand using an iron with sound waves and a cross symbol indicating cancellation or error.natural_image
Illustration of a hand placing a dark object into a rice cooker (no text or symbols visible)natural_image
3D rendered mechanical part with a curved top and flange, resting on a flat surface (no text or symbols visible)natural_image
Illustration of a steam iron being placed into a sink with a downward arrow indicating motion (no text or symbols)text_image
2 sec CALC CLEANnatural_image
Illustration of an iron iron with steam and a warning symbol (no text or labels)natural_image
Hand using a power iron on a surface (no text or symbols visible)text_image
Diagram illustrating temperature change in a car with warning sign and thermometer symbolsnatural_image
Illustration of a hand using an iron on a surface with arrows indicating motion (no text or symbols)text_image
Warning symbol and cleaning instruction illustration showing a bottle, magnifying glass, and industrial machine with warning signnatural_image
Illustration of a plug inserted into an electrical outlet with a black arrow indicating direction (no text or symbols)150
Español

natural_image
Illustration of a hand holding a lock icon with an arrow, no text or symbols presentnatural_image
Illustration of a steam iron with two arrows indicating motion (no text or symbols)natural_image
Diagram of a bathroom sink with faucet and toilet mechanism (no text or labels)natural_image
Illustration of two identical steam covers with a diagonal line dividing them (no text or symbols)natural_image
Illustration of hands operating a steam iron (no text or symbols visible)natural_image
Illustration of hands operating a steam iron (no text or symbols visible)
natural_image
Illustration of a hand using a steam iron to clean or wash the air (no text or symbols visible)
natural_image
Illustration of a hand using a steam iron with cord and power cord (no text or symbols)natural_image
Illustration of a plug being inserted into an electrical outlet (no text or symbols)
natural_image
Illustration of a kitchen sink with a pot and faucet (no text or symbols)natural_image
Illustration of a hand using a steam iron to press down a button (no text or symbols visible)natural_image
Illustration of hands operating a steam iron (no text or symbols visible)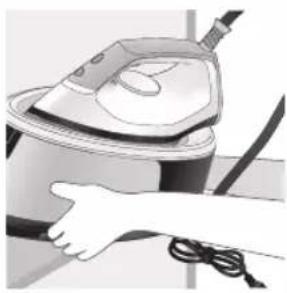
natural_image
Person using a steam iron with cord and power cord (no visible text or symbols)text_image
Labeled diagram of a steam iron with numbered parts for identificationSérie PSG2000

text_image
Labeled diagram of a steam iron with numbered parts for identificationnatural_image
Illustration of hands adjusting a mechanical component with numbered arrows (no text or symbols)natural_image
Illustration of two identical steam covers with a diagonal line dividing them (no text or symbols)natural_image
Hand placing a black object into a white container (no text or symbols visible)Série PSG2000
natural_image
Close-up of a hand pressing down on a mechanical component with a curved arrow indicating motion (no text or symbols visible)natural_image
Illustration of a hand using an iron on a patient's arm, with no visible text or symbolstext_image
Diagram showing a hand holding a shirt with a checkmark and an arrow pointing downward, alongside a magnifying glass.text_image
Illustration showing a person with a steam iron and a warning symbol, including a cross and warning triangle.text_image
Safety warning illustration showing a hanger, hand gesture with X mark, and steam symbol indicating hazardEffet pressing

text_image
Eco SOL DPM SOD Xnatural_image
Illustration of an iron (£) with a hourglass above it, showing time ~15 minutes (no text or symbols on the device itself)text_image
Diagram illustrating temperature change with thermometer symbols and a star-shaped object on a surface
text_image
~10 min OFFnatural_image
Illustration of a steam iron emitting sound waves (no text or symbols)text_image
Illustration of a hand using an iron with sound waves and a cross symbol indicating no change or error.natural_image
Illustration of a person using an iron iron, showing two directional arrows (no text or symbols)natural_image
Illustration of two steam covers with arrows indicating motion, no text or symbols presentnatural_image
3D rendered image of a mechanical component with a curved handle and flange, placed on a flat surface (no text or symbols visible)natural_image
Illustration of a steam iron being placed into a sink with a downward arrow indicating motion (no text or symbols)text_image
2 sec CALC CLEANtext_image
Cable CLEAN ~2 minnatural_image
Illustration of an electric iron emitting steam, with a warning symbol (no text or labels)natural_image
Hand using a power iron on a surface (no text or symbols visible)text_image
Diagram illustrating a heating mechanism with temperature indicators and warning symbolnatural_image
Close-up of a mechanical component with a speaker icon and starburst pattern (no text or symbols)text_image
Diagram showing a hand using an iron with sound waves and a cross symbol indicating cancellation or error.natural_image
Illustration of a hand placing a black cloth into a rice cooker (no text or symbols visible)natural_image
3D rendered image of a mechanical component with a curved handle and rectangular body, placed on a flat surface (no text or symbols visible)natural_image
Illustration of a steam iron being placed into a sink with a downward arrow indicating motion (no text or symbols)text_image
2 sec CALC CLEANnatural_image
Illustration of an iron iron with steam and a warning symbol (no text or labels)natural_image
Hand using a power iron on a surface (no text or symbols visible)text_image
Diagram illustrating temperature regulation in a kitchen, showing a thermometer and warning symbol with Chinese text.natural_image
Illustration of a hand using an iron on a surface with arrows indicating motion (no text or symbols)text_image
Warning symbol and safety icon showing a bottle, magnifying glass, and warning sign with 'No Concern' textnatural_image
Illustration of a black arrow pointing to an open electrical outlet plug (no text or symbols present)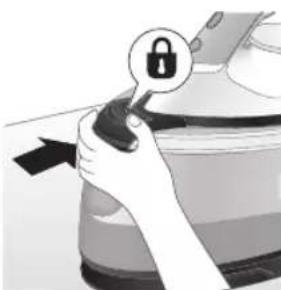
natural_image
Illustration of a hand holding a lock icon with an arrow, no text or symbols presentnatural_image
Illustration of a steam iron being placed on a surface, showing two directional arrows (no text or symbols)natural_image
Diagram of a showerhead shower system inside a bathtub, showing showerhead and shower blade (no text or labels)natural_image
Illustration of two identical steam covers with arrows indicating motion, no text or symbols presentnatural_image
Illustration of a hand using a power iron to press down a button (no text or symbols visible)natural_image
Illustration of hands using a steam iron to press down a button (no text or symbols visible)
natural_image
Illustration of a hand using a steam iron to clean or operate (no text or symbols visible)
natural_image
Illustration of a hand using a steam iron with cord and tassel (no text or symbols)natural_image
Illustration of a plug being inserted into an electrical outlet (no text or symbols)
natural_image
Illustration of a kitchen sink with a pot and faucet (no text or symbols)natural_image
Illustration of hands operating a steam iron (no text or symbols visible)natural_image
Illustration of hands operating a steam iron (no text or symbols visible)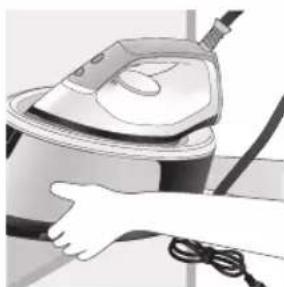
natural_image
Illustration of a hand using a steam iron to clean or operate (no text or symbols visible)text_image
Labeled diagram of a steam iron with numbered parts for identificationSerija PSG2000

text_image
Labeled diagram of a steam iron with numbered parts for identification1 Gumb CALC-CLEAN s indikatorom
2 Gumb za napajanje
3 Indikator spremnosti za glačanje
4 Ručica za otpuštanje spremnika za vodu (serija PSG3000) / Vratašca za punjenje spremnika za vodu (serija PSG2000)
5 Odvojivi spremnik za vodu (serija PSG3000) / neodvojivi spremnik za vodu (serija PSG2000)
6 Odjeljak za spremanje crijeva za dovod vode
7 Spremnik Smart Calc-Clean
8 Kabel za napajanje s utikačem
9 Crijevo za dovod vode
10 Gumb za paru / dodatna količina pare
11 Regulator temperature
12 Oslonac za postavljanje u uspravan položaj
13 Gumb za otpuštanje zapora za sigurno prenošenje (PSG3010)
Priprema za uporabu
natural_image
Illustration of hands adjusting a mechanical component with numbered arrows (no text or symbols)1 Pritisnite ručicu na dršci spremnika za vodu i odvojite spremnik za vodu od bazne stanice.

text_image
MAX 1.4L2 Napunite spremnik za vodu do oznake MAX.

natural_image
Illustration of two identical steam covers with a diagonal line dividing them (no text or symbols)natural_image
Illustration of a hand placing a black object into a rice cooker (no text or symbols visible)
text_image
7.4L MAX2 Napunite spremnik za vodu do oznake MAX i zatim zatvorite vratašca spremnika za punjenje („klik“).
Uporaba aparata
Postavka temperature
| Postavka temperature Automatsko postavljanje pare | Vrsta tkanine | |
| ● |  | Sintetika (npr. acetat, akril, najlon, viskoza, poliamid, poliester) |
| ●● |  | Svila |
| ●●● do MAX Pamuk, lan |  | |
| ECO ECO Sve osim sintetičkih tkanina | ||
Glačanje

natural_image
Close-up of a hand pressing down on a small electronic device with a black cable (no visible text or symbols)6 Izvadite crijevo za dovod vode iz odjeljka za spremanje.
natural_image
Illustration of a hand using an iron on a patient's arm, with no visible text or symbolsnatural_image
Illustration of a shirt with a checkmark and a magnifying glass, no text or symbols presenttext_image
Safety warning illustration showing a person holding an electric shock absorber with a warning symbol and cross markUpozorenje: Iz glačala izlazi vruća para. Nikad nemojte pokušavati uklanjati nabore s odjevnog predmeta dok ga osoba nosi. Paru nemojte primjenjivati blizu svojih ili tudih ruku.

text_image
Warning sign showing a hanger with a hand gesture and an iron, indicating heat stress or hazard.text_image
Diagram illustrating temperature change with labeled thermometer symbols and a star-shaped object on a surface
text_image
~10 min OFFnatural_image
Illustration of a speaker emitting sound waves above a computer monitor (no text or symbols)1 Nakon 1 do 3 mjeseca uporabe indikator Calc-Clean počet će bljeskati i aparat će se početi oglašavati zvučnim signalom kako bi vas upozorio da morate izvršiti postupak Calc-Clean.
text_image
Diagram showing a hand using an iron with sound waves and a cross symbol indicating cancellation or error.2 Osim toga, integriran je i drugi sustav za zaštitu aparata od nakupljanja kamenca: funkcija pare onemogućit će se ako se ne izvrši uklanjanje kamenca. Nakon što se izvrši uklanjanje kamenca, funkcija pare će se vratiti. To se odvija bez obzira na vrstu vode koja se upotrebljava.
natural_image
Illustration of a steam iron with two labeled parts (1 and 2), showing internal components without any text or symbols.3 Pritisnite ručicu na dršci spremnika za vodu i odvojite spremnik za vodu od bazne stanice.

text_image
1.4L MAX4 Napunite spremnik za vodu do pola.
natural_image
Illustration of two identical electric shock absorbers with arrows indicating compression or disassembly (no text or symbols)natural_image
3D rendered image of a mechanical component with a curved handle and flange, placed on a flat surface (no text or symbols visible)6 Spremnik Calc-Clean postavite na dasku za glačanje ili na bilo koju ravnu i stabilnu površinu.
natural_image
Illustration of a hand ironing an iron with a downward arrow indicating cooling or damage (no text or symbols)7 Glačalo stabilno postavite na spremnik Calc-Clean.
text_image
2 sec CALC CLEAN8 Pritisnite gumb CALC-CLEAN i zadržite ga 2 sekunde dok ne začujete kratke zvučne signale.
text_image
Cable CLEAN ~2 min9 Tijekom postupka Calc-Clean, čut ćete kratke zvučne signale i zvuk pumpanja. Pričekajte približno 2 minute da aparat završi postupak.

natural_image
Illustration of a steaming iron on a surface with a warning symbol (no text or labels)natural_image
Illustration of a hand using a power iron on a surface (no text or symbols)11 Obrišite glačalo komadom tkanine i vratite ga na baznu stanicu.

text_image
Safety warning illustration showing a car accident with temperature change indicators12 Budući da spremnik Calc-Clean postaje vruć tijekom postupka Calc-Clean, nemojte ga dodirivati približno 5 minuta. Odnesite spremnik Calc-Clean do sudopera, ispraznite ga i spremite za buduću uporabu.
natural_image
Illustration of a steam iron emitting sound waves (no text or symbols)1 Nakon 1 do 3 mjeseca uporabe indikator Calc-Clean počet će bljeskati i aparat će se početi oglašavati zvučnim signalom kako bi vas upozorio da morate izvršiti postupak Calc-Clean.
text_image
Illustration of an iron with sound waves and a cross symbol indicating no change or error2 Osim toga, integriran je i drugi sustav za zaštitu aparata od nakupljanja kamenca: funkcija pare onemogućit će se ako se ne izvrši uklanjanje kamenca. Nakon što se izvrši uklanjanje kamenca, funkcija pare će se vratiti. To se odvija bez obzira na vrstu vode koja se upotrebljava.
natural_image
Illustration of a hand placing a black cloth into a white rice cooker (no text or symbols visible)natural_image
3D rendered image of a mechanical component with a curved handle and flange, resting on a flat surface (no text or symbols visible)5 Spremnik Calc-Clean postavite na dasku za glačanje ili na bilo koju ravnu i stabilnu površinu.
182
Hrvatski

natural_image
Illustration of a steam iron being placed into a sink with a downward arrow indicating motion (no text or symbols)6 Glačalo stabilno postavite na spremnik Calc-Clean.

text_image
2 sec CALC CLEAN7 Pritisnite gumb CALC-CLEAN i zadržite ga 2 sekunde dok ne začujete kratke zvučne signale.
natural_image
Illustration of a steaming iron with a warning symbol (no text or labels)natural_image
Hand using a power iron on a surface (no text or symbols visible)10 Obrišite glačalo komadom tkanine i vratite ga na baznu stanicu.
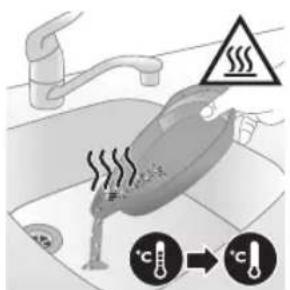
text_image
Diagram illustrating temperature change in a car with warning symbols and thermometer icons11 Budući da spremnik Calc-Clean postaje vruć tijekom postupka Calc-Clean, nemojte ga dodirivati približno 5 minuta. Odnesite spremnik Calc-Clean do sudopera, ispraznite ga i spremite za buduću uporabu.
natural_image
Illustration of a hand using an iron on a workbench with arrows indicating motion (no text or symbols)text_image
Warning symbol and cleaning instruction illustration showing a bottle, magnifying glass, and spray bottle with a cross marknatural_image
Illustration of a plug inserted into an electrical outlet with a black arrow indicating direction (no text or symbols)Hrvatski

natural_image
Illustration of a hand holding a lock icon with an arrow, no text or symbols present2 Serija PSG3010: stavite glačalo na platformu za glačanje i fiksirajte ga tako da pritisnete gumb za otpuštanje zapora za sigurno prenošenje

natural_image
Illustration of a steam iron with two arrows indicating motion (no text or symbols)3 Pritisnite ručicu na dršci spremnika za vodu i odvojite spremnik za vodu od bazne stanice.

natural_image
Diagram of a bathroom sink with faucet and shower mechanism (no text or symbols)4 Izlijte vodu iz spremnika za vodu u sudoper.

natural_image
Illustration of two identical steam iron machines side by side, showing front and back views (no text or symbols)natural_image
Illustration of hands operating a steam iron (no text or symbols visible)6 Savijte crijevo za dovod i namotajte ga u odjeljku za njegovo spremanje.

natural_image
Illustration of hands using a steam iron to press down a component (no text or symbols visible)
natural_image
Illustration of a hand using a steam iron to clean or operate (no text or symbols visible)
natural_image
Hand using a steam iron with cord and tassel (no text or symbols visible)7 Složite kabel za napajanje i povežite ga trakom s čičkom. Zatim baznu stanicu aparata nosite s dvije ruke.
natural_image
Illustration of a plug being inserted into an electrical outlet (no text or symbols)
natural_image
Illustration of a kitchen sink with a pot and faucet (no text or symbols)2 Izlijte vodu iz spremnika za vodu u sudoper.
Hrvatski
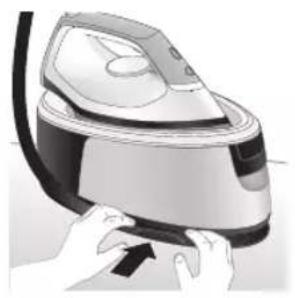
natural_image
Illustration of a hand using a power iron to press down a button (no text or symbols visible)3 Savijte crijevo za dovod i namotajte ga u odjeljku za njegovo spremanje.

natural_image
Illustration of hands operating a steam iron (no text or symbols visible)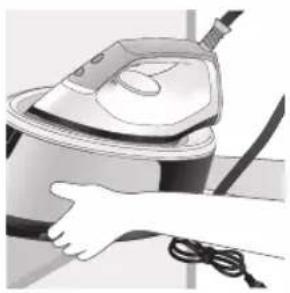
natural_image
Illustration of a hand using a steam iron to clean or operate (no text or symbols visible)4 Složite kabel za napajanje i povežite ga trakom s čičkom. Zatim baznu stanicu aparata nosite s dvije ruke.
Introduzione
text_image
Labeled diagram of a steam iron with numbered parts for identificationSerie PSG2000

text_image
Labeled diagram of a steam iron with numbered parts for identificationnatural_image
Illustration of hands adjusting a mechanical component with numbered arrows (no text or symbols)natural_image
Illustration of two identical steam covers with a diagonal line dividing them (no text or symbols)natural_image
Hand placing a black object into a white container (no text or symbols visible)Serie PSG2000
natural_image
Close-up of a hand pressing down on a small electronic device with a black cable (no visible text or symbols)natural_image
Illustration of a hand using an iron on a medical device (no text or symbols visible)text_image
Illustration showing a hand holding a shirt with a checkmark and an airplane, symbolizing inspection or repair.text_image
Illustration showing a person with a steam iron and a warning symbol, including a cross and smoke symbol.text_image
Warning symbol image showing a hanger, hand gesture with X and checkmark, and warning sign with 'sweating' triangleColpo di vapore

text_image
ECD SCK SCK ECD SCKtext_image
Diagram illustrating temperature change with thermometer symbols and a star-shaped object, likely for thermal monitoring or testing.
text_image
~10 min OFFnatural_image
Illustration of a speaker emitting sound waves above a computer monitor (no text or symbols)text_image
Diagram showing a hand using an iron with sound waves and a cross symbol indicating no change or error.natural_image
Illustration of a steam iron with two arrows indicating motion direction (no text or symbols)natural_image
Illustration of two steam covers with arrows indicating motion, no text or symbols presentnatural_image
3D rendered image of a mechanical component with a curved handle and flange, placed on a flat surface (no text or symbols visible)natural_image
Illustration of a steam iron being placed into a sink with a downward arrow indicating motion (no text or symbols)text_image
2 sec CALC CLEANtext_image
Cable CLEAN ~2 minnatural_image
Illustration of an electric iron emitting steam, with a warning symbol (no text or labels)natural_image
Hand using a power iron on a surface (no text or symbols visible)text_image
Safety warning illustration showing a hand pressing down on a toilet with temperature and warning symbolsnatural_image
Close-up of a speaker emitting sound waves on a keyboard (no text or symbols visible)text_image
Diagram showing a hand using an iron with sound waves and a cross symbol indicating cancellation or error.natural_image
Illustration of a hand placing a black cloth into a white rice cooker (no text or symbols visible)natural_image
3D rendered image of a mechanical component or housing on a flat surface (no text or symbols visible)natural_image
Illustration of a steam iron being placed into a sink with a downward arrow indicating motion (no text or symbols)text_image
2 sec CALC CLEANnatural_image
Illustration of a steaming iron with warning symbols (no text or labels)natural_image
Hand using a power iron on a surface (no text or symbols visible)text_image
Safety warning illustration showing a car accident with temperature and warning symbolsnatural_image
Illustration of a hand using an iron on a surface with arrows indicating motion (no text or symbols)text_image
Warning symbol and safety icon showing a bottle, a hammer, and a device with a warning signnatural_image
Illustration of a plug being inserted into an electrical outlet (no text or symbols)
natural_image
Illustration of a hand holding a lock icon with an arrow, next to a vehicle (no text or symbols)natural_image
Illustration of a steam iron with two arrows indicating motion (no text or symbols)natural_image
Diagram of a kitchen sink with faucet and showerhead (no text or symbols)natural_image
Illustration of two identical steam iron machines side by side, showing front and back views (no text or symbols)natural_image
Illustration of hands operating a steam iron (no text or symbols visible)natural_image
Illustration of hands operating a steam iron (no text or symbols visible)
natural_image
Illustration of a hand using a steam iron to clean or wash the air (no text or symbols visible)
natural_image
Illustration of a hand using a steam iron with cord and power cord (no text or symbols)natural_image
Illustration of a plug inserted into an electrical outlet with a black arrow indicating direction (no text or symbols)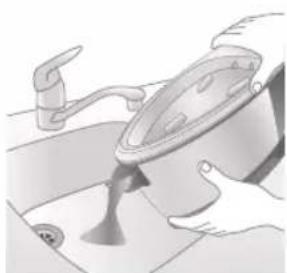
natural_image
Illustration of a kitchen sink with a pot and faucet (no text or symbols)natural_image
Illustration of hands operating a steam iron (no text or symbols visible)natural_image
Illustration of hands operating a steam iron (no text or symbols visible)
natural_image
Illustration of a hand using a steam iron to clean or operate (no text or symbols visible)text_image
Labeled diagram of a steam iron with numbered parts for identificationPSG2000 sērija

text_image
Labeled diagram of a steam iron with numbered parts for identificationnatural_image
Illustration of hands adjusting a mechanical component with numbered arrows (no text or symbols)1 Nospiediet sviru üdens tvertnes rokturī un nonemiet üdens tvertni no pamatnes.

text_image
MAX 1.4Lnatural_image
Illustration of two identical steam covers with a diagonal line crossing through, no text or symbols present.natural_image
Illustration of a hand placing a black object into a rice cooker (no text or symbols visible)
text_image
7.4L MAXnatural_image
Close-up of a hand pressing down on a small electronic device with a black cable (no visible text or symbols)natural_image
Illustration of a hand using an iron on a patient's arm, with no visible text or symbolstext_image
Illustration showing a shirt with a checkmark and an iron, indicating a price or pricing concept.text_image
Safety warning illustration showing a person using an iron with a warning symbol and a cross marktext_image
Warning sign showing a hanger with a hand gesture and an iron, indicating heat or stress in clothing safety.Papildu tvaiks

text_image
Eco SWR SOL X ✓text_image
Diagram showing temperature measurement with thermometer symbols and a star-shaped object on a surface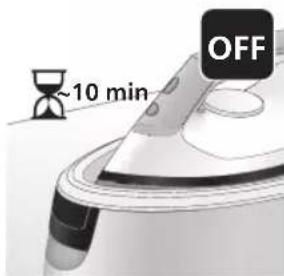
text_image
~10 min OFFnatural_image
Illustration of a speaker emitting sound waves above a computer monitor (no text or symbols)text_image
Diagram showing a hand using an iron with sound waves and a cross symbol indicating no change or error.natural_image
Illustration of a steam iron with two arrows indicating motion direction (no text or symbols)3 Nospiediet sviru udens tvertnes rokturi un noemiet udens tvertni no pamatnes.

text_image
1.4L MAXnatural_image
Illustration of two identical steam covers with arrows indicating motion, no text or symbols presentnatural_image
3D rendered image of a mechanical component with a curved handle and mounting base (no text or symbols)natural_image
Illustration of a hand ironing an iron with a downward arrow indicating cooling or residue (no text or symbols)7 Novietojiet gludekli stabili uz Calc-Clean tvertnes.
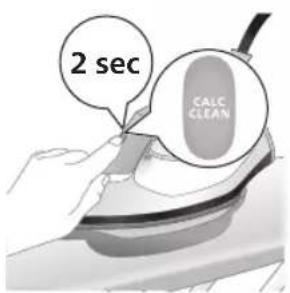
text_image
2 sec CALC CLEAN8 Turiet nospiestu CALC-CLEAN pogu 2 sekundes, līdz atskan īsi pīkstieni.
text_image
Cable CLEAN ~2 minnatural_image
Illustration of a steaming iron on a surface with a warning symbol (no text or labels)10 Kad Calc-Clean process ir pabeigts, gludeklis pârtrauc raidît skañas signâlu, un CALC-CLEAN indikators vairs nemirgo.
natural_image
Illustration of a hand using a power iron on a surface (no text or symbols)text_image
Safety warning illustration showing a car accident with temperature change indicators and warning symbolnatural_image
Illustration of a steam iron with sound waves above it (no text or symbols)text_image
Diagram showing a hand using an iron with sound waves and a cross symbol indicating cancellation or error.natural_image
Illustration of a hand placing a black cloth into a rice cooker (no text or symbols visible)3 Atveriet üdens tvertnes uzpildes durtiñas.

text_image
1.4L MAXnatural_image
3D rendered image of a mechanical component with a curved handle and rectangular body, placed on a flat surface (no text or symbols visible)natural_image
Illustration of a steam iron being placed into a sink with a downward arrow indicating motion (no text or symbols)6 Novietojiet gludekli stabili uz Calc-Clean tvertnes.

text_image
2 sec CALC CLEAN7 Turiet nospiestu CALC-CLEAN pogu 2 sekundes, līdz atskan īsi pīkstieni.
natural_image
Illustration of an iron iron with steam and a warning symbol (no text or labels)natural_image
Hand using a power iron on a surface (no text or symbols visible)text_image
Diagram illustrating temperature regulation in a kitchen, showing heat transfer from a sink to a thermometer.natural_image
Illustration of a hand using an iron on a surface with arrows indicating motion (no text or symbols)text_image
Warning symbol and cleaning instruction illustration showing a bottle, magnifying glass, and industrial machine with warning signnatural_image
Illustration of a plug inserted into an electrical outlet with a black arrow indicating direction (no text or symbols)Latviešu

natural_image
Illustration of a hand holding a lock icon with an arrow, no text or symbols presentnatural_image
Illustration of a steam iron with two arrows indicating motion (no text or symbols)3 Nospiediet sviru udens tvertnes rokturī un nonemiet udens tvertni no pamatnes.
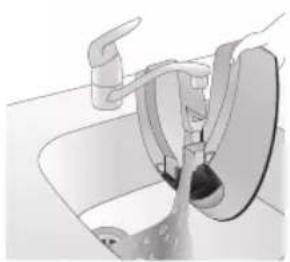
natural_image
Diagram of a bathroom sink with faucet and shower mechanism (no text or symbols)4 Izlejiet üdeni no üdens tvertnes izlietnē.
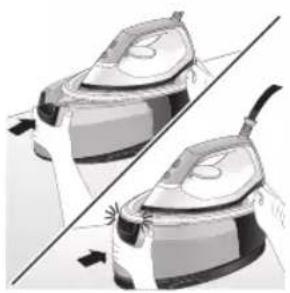
natural_image
Illustration of two identical steam iron machines side by side, showing front and back views (no text or symbols)natural_image
Illustration of hands operating a steam iron (no text or symbols visible)natural_image
Illustration of hands using a steam iron to press down a component (no text or symbols visible)
natural_image
Illustration of a hand using a steam iron to clean or wear cable (no text or symbols visible)
natural_image
Hand using a steam iron with cord and tassel (no text or symbols visible)natural_image
Illustration of a plug being inserted into an electrical outlet (no text or symbols)
natural_image
Illustration of a kitchen sink with a pot and faucet (no text or symbols)2 Izlejiet üdeni no üdens tvertnes izlietnē.
220 Latviešu

natural_image
Illustration of a hand pressing down on a steam iron (no text or symbols visible)natural_image
Illustration of hands operating a steam iron (no text or symbols visible)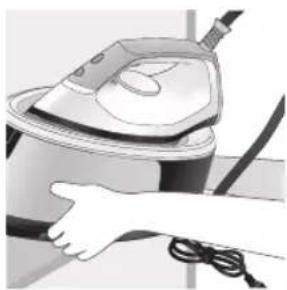
natural_image
Illustration of a hand using a steam iron to clean or operate (no text or symbols visible)text_image
Labeled diagram of a steam iron with numbered parts for identification222 Lietuviškai
PSG2000 serija

text_image
Labeled diagram of a steam iron with numbered parts for identificationnatural_image
Illustration of hands adjusting a mechanical component with numbered arrows (no text or symbols)1 Paspauskite vandens bakelio rankenélés svirtj ir nuimkite vandens bakelj nuo pagrindo.
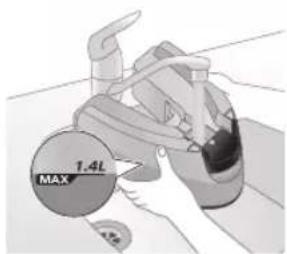
text_image
MAX 1.4Lnatural_image
Illustration of two identical steam covers with a diagonal line crossing through, no text or symbols present.natural_image
Hand placing a black object into a white pot (no text or symbols visible)PSG2000 serija
1 Atidarykite vandens bakelio pripildymo dangtelj.

text_image
7.4L MAXnatural_image
Close-up of a hand pressing down on a small electronic device with a black cable (no visible text or symbols)natural_image
Illustration of a hand using an iron on a patient's arm, with no visible text or symbolstext_image
Illustration showing a shirt with a checkmark and an iron, symbolizing clothing or garment selection.text_image
Illustration showing a person holding an iron with a warning symbol and a cross mark, alongside a warning triangle.text_image
Warning symbol image showing a hanger, hand gesture with X and checkmark, and warning sign with 'sweating' triangleGaro srové

text_image
ECD SCK SCK ECD SCKtext_image
Diagram illustrating temperature change with thermometer symbols and a star-shaped object, likely illustrating thermal behavior or sensor response.
text_image
~10 min OFFnatural_image
Illustration of a speaker emitting sound waves above a computer monitor (no text or symbols)text_image
Diagram showing a hand using an iron with sound waves and a cross symbol indicating no change or error.natural_image
Illustration of a steam iron with two directional arrows indicating motion (no text or symbols)natural_image
Illustration of two steam covers with arrows indicating motion, no text or symbols presentnatural_image
3D rendered image of a mechanical component with a curved handle and flange, placed on a flat surface (no text or symbols visible)natural_image
Illustration of a steam iron being placed into a sink with a downward arrow indicating motion (no text or symbols)text_image
2 sec CALC CLEANtext_image
Cable CLEAN ~2 minnatural_image
Illustration of a steaming iron on a surface with a warning symbol (no text or labels)natural_image
Illustration of a hand using a power iron on a surface (no text or symbols)text_image
Safety warning illustration showing a car accident with temperature change indicatorsnatural_image
Illustration of a steam iron with sound waves above it, no text or symbols presenttext_image
Diagram showing a hand using an iron with sound waves and a cross symbol indicating cancellation or error.natural_image
Illustration of a hand placing a black cloth into a white rice cooker (no text or symbols visible)3 Atidarykite vandens bakelio pripildymo dangtelj.

text_image
7.4L MAX4 Pripildykite vandens bakelj iki pusës.
natural_image
3D rendered image of a mechanical component or housing on a flat surface (no text or symbols visible)natural_image
Illustration of a steam iron being placed into a sink with a downward arrow indicating cooling (no text or symbols)text_image
2 sec CALC CLEANnatural_image
Illustration of a steaming iron with warning symbols (no text or labels)natural_image
Hand using a power iron on a surface (no text or symbols visible)text_image
Safety warning illustration showing a hand holding a valve with warning symbols and temperature indicatorsnatural_image
Illustration of a hand using an iron on a surface with arrows indicating motion (no text or symbols)text_image
Warning symbol and safety icon showing a bottle, a magnifying glass, and a flying iron with warning labelnatural_image
Illustration of a plug being inserted into an electrical outlet (no text or symbols)
natural_image
Illustration of a hand holding a lock icon with an arrow, no text or symbols presentnatural_image
Illustration of a steam iron with two arrows indicating motion (no text or symbols)natural_image
Diagram of a kitchen sink with faucet and showerhead (no text or labels)natural_image
Illustration of two identical steam covers with a diagonal line dividing them (no text or symbols)natural_image
Illustration of hands operating a steam iron (no text or symbols visible)natural_image
Illustration of hands using a steam iron to press down a button (no text or symbols visible)
natural_image
Illustration of a hand using a steam iron to clean or store air (no text or symbols visible)
natural_image
Illustration of a hand using a steam iron with cord and cable (no text or symbols)natural_image
Illustration of a plug being inserted into an electrical outlet (no text or symbols)
natural_image
Illustration of a kitchen sink with a pot and faucet (no text or symbols)natural_image
Illustration of hands operating a steam iron (no text or symbols visible)natural_image
Illustration of hands operating a steam iron (no text or symbols visible)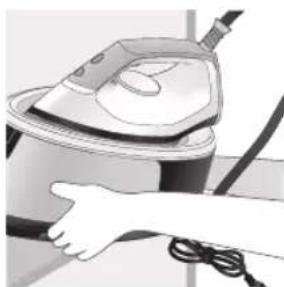
natural_image
Illustration of a hand using a steam iron to clean or operate (no text or symbols visible)text_image
Labeled diagram of a steam iron with numbered parts for identificationPSG2000 sorozat

text_image
Labeled diagram of a steam iron with numbered parts for identificationnatural_image
Illustration of hands adjusting a mechanical component with numbered arrows (no text or symbols)natural_image
Illustration of two identical steam covers with a diagonal line dividing them (no text or symbols)natural_image
Hand placing a dark object into a rice cooker (no text or symbols visible)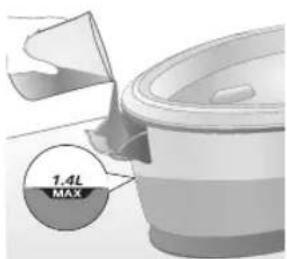
text_image
1.4L MAXnatural_image
Illustration of a hand inserting a plug into an electrical outlet (no text or symbols)natural_image
Illustration of a hand holding a power button with an icon, no text or symbols presentnatural_image
Illustration of a mechanical component with a star-shaped feature on its surface (no text or symbols)natural_image
Illustration of a hand holding a white object with a black checkmark, no text or symbols presentnatural_image
Illustration of hands adjusting a device with an open lock icon (no text or symbols)natural_image
Close-up of a hand pressing down on a small electronic device with a black cable (no visible text or symbols)natural_image
Illustration of a hand using an iron on a medical device (no text or symbols visible)text_image
Illustration showing a hand holding a shirt with a checkmark and an airplane, symbolizing inspection or repair.text_image
Illustration showing a person with a steam iron and a warning symbol, including a cross and smoke symbol.text_image
Safety warning illustration showing hand gesture, steam symbol, and checkmark on a hangerGözlövet

text_image
Eco SOL DPM SOD Xnatural_image
Illustration of an iron on a surface with an hourglass and ~15-minute mark (no text or symbols on the device itself)text_image
Diagram illustrating temperature change with thermometer symbols and a star-shaped object, likely for thermal monitoring or testing.
text_image
~10 min OFFnatural_image
Illustration of a speaker emitting sound waves, no text or symbols presenttext_image
Diagram showing a hand using an iron with sound waves and a cross symbol indicating cancellation or error.natural_image
Illustration of a steam iron with two directional arrows indicating motion (no text or symbols)natural_image
Illustration of two steam covers with arrows indicating motion, no text or symbols presentnatural_image
3D rendered image of a mechanical component with a curved handle and flange, placed on a flat surface (no text or symbols visible)natural_image
Illustration of a steam iron being placed into a sink with a downward arrow indicating motion (no text or symbols)text_image
2 sec CALC CLEANtext_image
Cable CLEAN ~2 minnatural_image
Illustration of a steaming iron on a surface with a warning symbol (no text or labels)natural_image
Illustration of a hand using a power iron on a surface (no text or symbols)text_image
Safety warning illustration showing a car accident with temperature change indicators and warning symbolnatural_image
Illustration of a steam iron with sound waves above it, no text or symbols presenttext_image
Illustration of a steam iron with sound waves and a cross symbol indicating explosion or damagenatural_image
Illustration of a hand placing a black cloth into a rice cooker (no text or symbols visible)natural_image
3D rendered image of a mechanical component on a flat surface (no text or symbols visible)natural_image
Illustration of a steam iron being placed into a sink with a downward arrow indicating motion (no text or symbols)text_image
2 sec CALC CLEANnatural_image
Illustration of a steaming iron with a warning symbol (no text or labels)natural_image
Hand using a power iron on a surface (no text or symbols visible)text_image
Diagram illustrating temperature change in a car with warning symbols and thermometer iconsnatural_image
Illustration of a hand using an iron on a workbench with arrows indicating motion (no text or symbols)text_image
Warning symbol and safety icon showing a bottle, magnifying glass, and a damaged iron iron with warning labelsnatural_image
Illustration of a plug inserted into an electrical outlet with a black arrow indicating direction (no text or symbols)252 Magyar
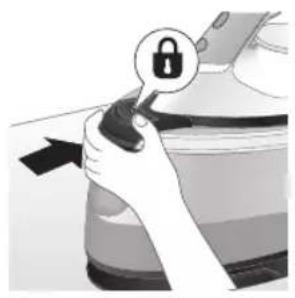
natural_image
Illustration of a hand holding a lock icon with an arrow, no text or symbols presentnatural_image
Illustration of a steam iron with two arrows indicating motion (no text or symbols)natural_image
Diagram of a bathroom sink with faucet and shower mechanism (no text or symbols)natural_image
Illustration of two identical steam iron machines side by side, showing front and back views (no text or symbols)natural_image
Illustration of hands operating a steam iron (no text or symbols visible)natural_image
Illustration of hands using a steam iron to press down a component (no text or symbols visible)
natural_image
Illustration of a hand using a steam iron to clean or wear cable (no text or symbols visible)
natural_image
Illustration of a hand using a steam iron with cord and cable (no text or symbols)natural_image
Illustration of a plug being inserted into an electrical outlet (no text or symbols)
natural_image
Illustration of a kitchen sink with a pot and faucet (no text or symbols)natural_image
Illustration of a hand pressing down on a steam iron (no text or symbols visible)natural_image
Illustration of hands operating a steam iron (no text or symbols visible)
natural_image
Illustration of a hand using a steam iron to clean or operate (no text or symbols visible)text_image
Labeled diagram of a steam iron with numbered parts for identification256 Nederlands
PSG2000-serie

text_image
Labeled diagram of a steam iron with numbered parts for identificationnatural_image
Illustration of a person adjusting a small object with arrows indicating direction (no text or symbols)natural_image
Illustration of a pair of identical mechanical components with arrows indicating motion or force direction (no text or symbols)natural_image
Hand placing a dark object into a white cylindrical container (no text or symbols visible)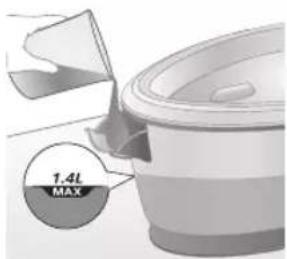
text_image
1.4L MAXnatural_image
Illustration of a plug being inserted into an electrical outlet (no text or symbols)Nederlands 259

natural_image
Illustration of a hand pressing a button on a device with a power symbol (no text or labels)natural_image
Close-up of a mechanical component with a star-shaped feature and a handle (no visible text or symbols)natural_image
Illustration of a medical or laboratory procedure step with a checkmark and magnified view (no text or symbols)natural_image
Illustration of hands holding a device with an open lock icon (no text or symbols)natural_image
Close-up of a hand pressing down on a small electronic device with a black cable (no visible text or symbols)natural_image
Illustration of a hand using an iron to clean or install a cable, with no visible text or symbols.text_image
Illustration showing a hand holding a garment with a checkmark and an arrow pointing downward, next to a washing machine.text_image
Safety warning illustration showing a person using a fire extinguisher with a warning symbol and cross marktext_image
Warning symbol illustration showing a hanger, hand gesture, and smoke with warning signsExtra stoomstoot

text_image
EVO SOLX 10000 10000 10000 10000 10000 10000 10000 10000 10000 10000 10000 10000 10000 10000 10000 10000 10000 10 ✓ ✗natural_image
Illustration of an iron (£) with a hourglass and ~15-minute mark, placed on a surface (no text or symbols on the device itself)text_image
Diagram illustrating temperature change with labeled thermometer symbols and a star-shaped object on a surface
text_image
-10 min OFFnatural_image
Illustration of a steam iron with sound waves above it (no text or symbols)PSG3000-serie
text_image
Illustration of a hand using an iron with sound waves and a cross symbol indicating cancellation or error.natural_image
Illustration of a hand using a steam iron to move a button (no text or symbols present)natural_image
Illustration of two steam covers with arrows indicating motion, no text or symbols presentnatural_image
3D rendered image of a mechanical component on a flat surface (no text or symbols visible)natural_image
Illustration of a hand ironing an iron with a downward arrow indicating cooling or residue (no text or symbols)text_image
2 sec CALC CLEANnatural_image
Illustration of a steam iron on a surface with a warning symbol (no text or labels)natural_image
Illustration of a hand using a power iron on a surface (no text or symbols)text_image
Diagram illustrating a heating mechanism with temperature symbols and warning sign, showing a hand pressing down on a sink.natural_image
Illustration of a steam iron emitting sound waves (no text or symbols)PSG2000-serie
text_image
Diagram showing a hand using an iron with sound waves and a cross symbol indicating cancellation or error.natural_image
Illustration of a hand placing a black object into a rice cooker (no text or symbols visible)3 Open de watervulopening.
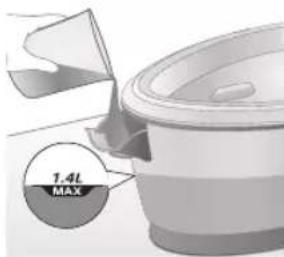
text_image
1.4L MAXnatural_image
3D rendered image of a mechanical component or bracket on a flat surface (no text or symbols visible)natural_image
Illustration of a steam iron being placed into a sink with a downward arrow indicating motion (no text or symbols)text_image
2 sec CALC CLEANnatural_image
Illustration of an iron iron with warning symbols (no text or labels)natural_image
Hand using a power iron on a surface (no text or symbols visible)text_image
Diagram illustrating temperature change in a kitchen with warning sign and thermometer symbolsnatural_image
Illustration of a hand using an iron on a surface with arrows indicating motion (no text or symbols)text_image
Warning symbol and safety icon showing a bottle, cross mark, and warning sign with exclamation marknatural_image
Illustration of a plug connecting to an electrical outlet (no text or symbols)268 Nederlands

natural_image
Hand holding a lock icon with an arrow, no text or symbols presentnatural_image
Illustration of a steam iron with two arrows indicating motion (no text or symbols)natural_image
Diagram of a bathroom sink with faucet and toilet mechanism (no text or labels)natural_image
Illustration of two identical steam covers with a diagonal line dividing them (no text or symbols)natural_image
Illustration of hands operating a steam iron (no text or symbols visible)natural_image
Illustration of hands operating a steam iron (no text or symbols visible)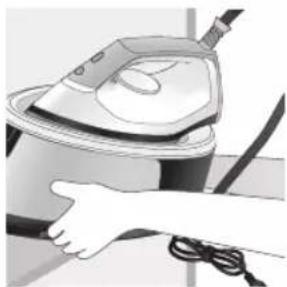
natural_image
Illustration of a hand using a steam iron to clean or store air (no text or symbols visible)
natural_image
Illustration of a hand using a steam iron with cord and cable (no text or symbols)natural_image
Illustration of a plug being inserted into an electrical outlet (no text or symbols)
natural_image
Illustration of a kitchen sink with a pot and faucet (no text or symbols)natural_image
Illustration of a hand pressing down on a steam iron (no text or symbols visible)natural_image
Illustration of hands operating a steam iron (no text or symbols visible)
natural_image
Illustration of a hand using a steam iron to clean or operate (no text or symbols visible)text_image
Labeled diagram of a steam iron with numbered parts for identification272 Norsk
PSG2000-serien

text_image
Labeled diagram of a steam iron with numbered parts for identification1 CALC-CLEAN-knapp med lys
2 På/av-knapp
3 Lampe som viser at strykejernet er klart
4 Utløserspak for vannbeholder (PSG3000-serien) / dør for påfylling av vannbeholder (PSG2000-serien)
5 Avtakbar vannbeholder (PSG3000-serien) / ikke-avtakbar vannbeholder (PSG2000-serien)
6 Oppbevaringsrom for vannforsyningslangen
7 Smart Calc-Clean-beholder
8 Ledning med støpsel
9 Vannforsyningslange
10 Dampbryter/dampstøt
11 Temperaturbryter
12 Bakstykke
13 Utløserknapp for bærelås (PSG3010)
Før bruk
natural_image
Illustration of hands adjusting a mechanical component with numbered arrows (no text or symbols)
text_image
1.4L MAXnatural_image
Illustration of two identical steam covers with a diagonal line crossing through them (no text or symbols)natural_image
Hand placing a black object into a rice cooker (no text or symbols visible)PSG2000-serien
natural_image
Close-up of a hand pressing down on a small electronic device component (no visible text or symbols)natural_image
Illustration of a hand using an iron on a medical device (no text or symbols visible)text_image
Illustration showing a hand holding a shirt with a checkmark and an airplane, symbolizing inspection or repair.text_image
Illustration showing a person with a steam iron and a warning symbol, including a cross and smoke symbol.text_image
Warning sign showing a hanger, hand gesture with X and checkmark, and warning symbol for heating an iron.Dampstøt

text_image
DRINK ECO CO2 CO2 CO2 X ✓text_image
Diagram illustrating temperature change with thermometer symbols and a star-shaped object on a surface
text_image
~10 min OFF2 Hvis du lar apparatet stå uberørt de neste 10 minuttene, slås det av automatisk.
natural_image
Illustration of a speaker emitting sound waves, no text or symbols presenttext_image
Diagram showing a hand using an iron with sound waves and a cross symbol indicating cancellation or error.text_image
Diagram of a steam iron with labeled parts showing two directional arrows indicating motion or movement.natural_image
Illustration of two steam covers with arrows indicating motion, no text or symbols presentnatural_image
3D rendered image of a mechanical component with a curved handle and flange, placed on a flat surface (no text or symbols visible)natural_image
Illustration of a steam iron being placed into a sink with a downward arrow indicating motion (no text or symbols)text_image
2 sec CALC CLEANtext_image
Cable CLEAN ~2 min9 Du hører korte pipelyder og en pumpelyd mens Calc-Clean-prosessen pågår. Det tar ca. to minutter for apparatet å fullføre prosessen.

natural_image
Illustration of an electric iron emitting steam, with a warning symbol (no text or labels)natural_image
Hand using a power iron on a surface (no text or symbols visible)text_image
Diagram illustrating a water safety hazard with warning sign and temperature indicatorsnatural_image
Illustration of a steam iron with sound waves above it, no text or symbols presenttext_image
Illustration of a steam iron with sound waves and a cross symbol indicating cancellation or errornatural_image
Illustration of a hand placing a black cloth into a white rice cooker (no text or symbols visible)natural_image
3D rendered image of a mechanical component or housing on a flat surface (no text or symbols visible)natural_image
Illustration of a steam iron being placed into a sink with a downward arrow indicating motion (no text or symbols)text_image
2 sec CALC CLEANnatural_image
Illustration of a steaming iron with warning symbols (no text or labels)natural_image
Hand using a iron on a surface, no text or symbols visibletext_image
Diagram illustrating temperature change in a car with warning sign and thermometer symbolsnatural_image
Illustration of a hand using an iron on a surface with arrows indicating motion (no text or symbols)text_image
Warning symbol and safety icon showing a bottle, a magnifying glass, and a flying iron with warning labelnatural_image
Illustration of a plug with a black arrow pointing to a white electrical outlet (no text or symbols)
natural_image
Illustration of a hand holding a lock icon with an arrow, next to a vehicle (no text or symbols)natural_image
Illustration of a steam iron with two arrows indicating motion (no text or symbols)natural_image
Diagram of a kitchen sink with faucet and showerhead (no text or symbols)4 Hell vannbeholdervannet ut i vasken.

natural_image
Illustration of two identical steam iron machines side by side, showing front and back views (no text or symbols)natural_image
Illustration of hands operating a steam iron (no text or symbols visible)natural_image
Illustration of hands using a steam iron to press down a button (no text or symbols visible)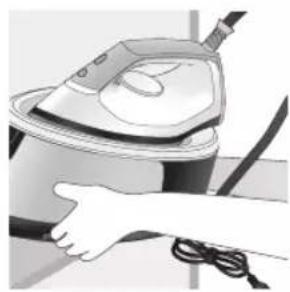
natural_image
Illustration of a hand using a steam iron to clean or store air (no text or symbols visible)
natural_image
Illustration of a hand using a steam iron with cord and power cord (no text or symbols)natural_image
Illustration of a plug inserted into an electrical outlet with a black arrow indicating direction (no text or symbols)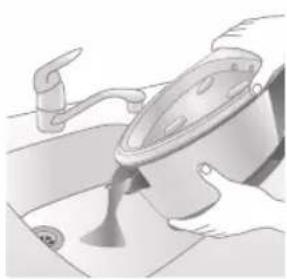
natural_image
Illustration of a kitchen sink with a pot and faucet (no text or symbols)2 Hell vannbeholdervannet ut i vasken.

natural_image
Illustration of hands using a steam iron to press down a button (no text or symbols visible)natural_image
Illustration of hands operating a steam iron (no text or symbols visible)natural_image
Illustration of a hand using a steam iron to clean air (no text or symbols visible)Kirish
Xaridingiz muborak bo'lsin va Philips'ga xush kelibsiz! Philips taklif qiladigan qo'llab-quvvatlash xizmatidan foydalanish uchun jihozingizni
text_image
Labeled diagram of a steam iron with numbered parts for identificationPSG2000 seriya

text_image
Labeled diagram of a steam iron with numbered parts for identification1 Chiroqli CALC-CLEAN tugmasi
2 Quvvat tugmasi
3 "Dazmol"ning tayyorlik chirog'i
4 Suv bakini bo'shatish dastagi (PSG3000 series)/Suv bakini to'Idirish teshigi (PSG2000 seriya)
5 Ajraladigan suv baki (PSG3000 series)/Ajralmaydigan suv baki (PSG2000 seriya)
6 Suv ta'minoti shlangini saqlash bo'Imasi
7 Aqlli Calc-Clean konteyneri
8 Vilka bilan tarmoq shnuri
9 Suv ta'minoti shlangi
10 Bug' triggeri/Bug'ni kuchaytirish
11 Harorat shkalasi
12 Tovon
13 Ko'tarishga qarshi qulfni ochish tugmasi (PSG3010)
natural_image
Illustration of a person adjusting a belt buckle with arrows indicating steps (no text or symbols)
text_image
1.4L MAX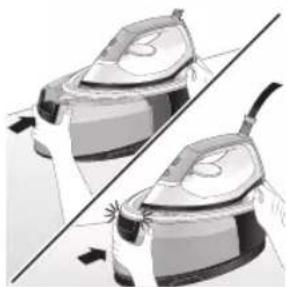
natural_image
Illustration of two identical steam covers with a diagonal line dividing them (no text or symbols)2 Suv bakini MAX belgisigacha to'ldiring.
1 Suv bakini to 'Idirish eshigini oching.
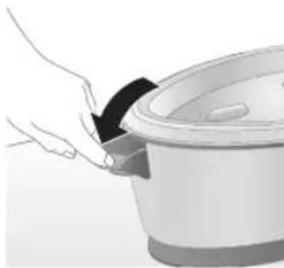
natural_image
Illustration of a hand placing a black object into a rice cooker (no text or symbols visible)
text_image
7.4L MAX2 Suv bakini MAX belgisigacha to'ldiring, so'ngra suv bakini to'ldirish eshigini yoping ("tiq" etgan ovoz eshitiladi).
Jihozdan foydalanish
Харорат созламаси
Харорат созламаси Avtomatik bug' sozlamasi Mato turi
| ● |  | Sintetik materiallar (masalan, atsetat, akril, neylon, viskoza, poliamid, poliester) |
| ●● |  | Ipak |
| ●●● MAX gacha Paxta, zig’ir |  | |
| ЭКО ЭКО Sintetik matolardan tashqari | barchasi | |
292 O'zbek
Dazmollash

1 Tarmoq vilkasini yerga ulangan devor rozetkasiga qayta ulang.
2 Jihozni yoqish uchun quvvat tugmasini bosing, so'ngra yuqoridagi jadvalga muvofiq tegishli haroratni o'rnatish uchun harorat murvatini aylantiring.
natural_image
Close-up of a hand pressing down on a small electronic device with a black cable (no visible text or symbols)6 Saqlash bo'lmasidan suv ta'minoti shlangini chiqaring.
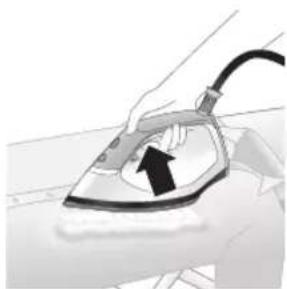
natural_image
Illustration of a hand using an iron on a medical device (no text or symbols visible)7 Dazmollashni boshlash uchun bug' triggerini bosib turing.
Eslatma: Har bir seams boshlanishida dazmoldan suv sachrashi mumkin. Кийимда сувдан доғ қолишини олдини олиш учун дазмоллашдан олдин буғ триггерини 10 сония босиб туринг.
Eslatma: Dazmollash seansini boshlaganingizda va ayniqsa birinchi marta bug' triggeridan foydalanganingizda, jihozdan bug' chiqishi uchum 30 soniyadan ko'proq vaqt ketishi mumkin.
Eslatma: Har safar bug' triggerini bosganingizda nasos faollashadi. U past balandlikdagi shovqinli ovoz chiqaradi. Suv bakida suv qolmaganda nasos ovozi balandlashadi.
Ogohlantirish: Hech qachon bug'ni odamlarga qaratmang.
Vertikal dazmollash
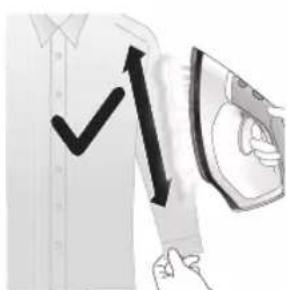
text_image
Illustration showing a hand holding a shirt with a checkmark and an airplane, symbolizing inspection or repair.Osilib turgan matolardagi burmalarni tekislash uchun bug' dazmolini vertikal holatda ishlatishingiz mumkin.
1 Dazmolni vertikal holatda ushlang, bug' triggerini bosing va kiyimga asos plitasini yengil tekkizing va dazmolni yuqoriga va pastga harakatlantiring.
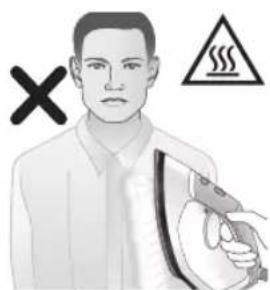
text_image
Illustration showing a person with a steam iron and a warning symbol, including a cross and smoke symbol.text_image
Safety warning illustration showing a hanger with a hand gesture and a steam iron, accompanied by a warning symbol.Bug'li zarba

text_image
ECD SCK SCK ECD SCK1 Bug'li zarba funksiyasi 3 ta nuqtdan MAX haroratgacha ishlaydi.
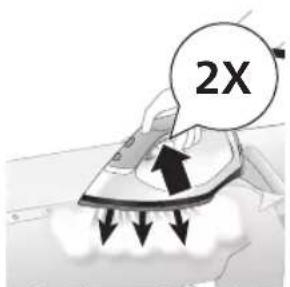
text_image
2X2 3 soniya davomida kuchli bug' oqimini chiqarish uchun bug' triggerini ikki marta tez bosing.
Avtomatik o'chirish

text_image
~15 min1 Jihoz 15 daqiqadan ortiq ishlatilmaganda, "dazmol tayyor" chirog'i miltillashni va dazmol sovishni boshlaydi.

text_image
Diagram illustrating temperature change with thermometer symbols and a star-shaped object, likely for thermal monitoring or testing.
text_image
~10 min OFF2 Jihozga 10 daqia davomida tegilmasa, u o'zi avtomatik o'chib qoladi.
natural_image
Illustration of a steam iron with sound waves and a starburst on the handle (no text or symbols)1 1 oydan 3 oygacha ishlatgandan keyin, cho'kmalardan tozalash chirog'i miltillashni va jihoz cho'kmalardan tozalash jarayonini bajarishingiz kerakligini bidirish uchun ovoz chiqarishni boshlaydi.
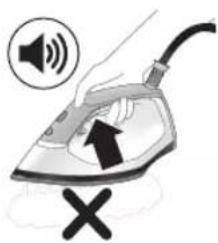
text_image
Illustration of an iron frying pan with sound waves and a cross symbol indicating cancellation or errornatural_image
Illustration of a person using an iron iron, showing two directional arrows (no text or symbols)3 Suv baki tutqichidagi dastakni bosing va suv bakini asosdan ajratib oling.

text_image
1.4L MAX4 Suv bakini yarmigacha to'ldiring.
Eslatma: Cho'kmadan tozalash jarayonida jihoz elektr tarmog'iga ulanganiga va YOQILGANLIGIGA ishonch hosil qiling.
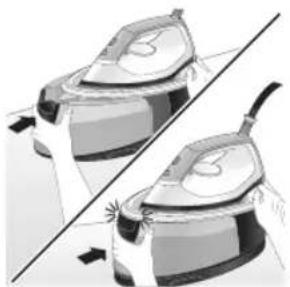
natural_image
Illustration of two identical electric shock absorbers with arrows indicating compression or force direction (no text or symbols)natural_image
3D rendered image of a mechanical component with a curved handle and flange, placed on a flat surface (no text or symbols visible)6 Cho'kmadan tozalash konteynerini dazmollash taxtasiga yoki boshqa har qanday tekis, barqaror yuzaga joylashtiring.

natural_image
Illustration of a hand ironing an iron with a downward arrow indicating cooling or damage (no text or symbols)text_image
2 sec CALC CLEAN8 Qisqa signallarni eshitmaguningizcha, CALC-CLEAN tugmasini 2 soniya bosib turing.
Eslatma: Cho'kmadan tozalash konteyneri cho'kmadan tozalash jarayonida cho'kma zarralari va issiq suvni to'plash uchun mo'ljallangan. Butun jarayon davomida dazmolni bu konternerga qo'yish mutlaqo xavfsiz hisoblanadi.
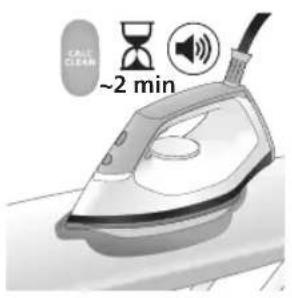
text_image
Cable CLEAN ~2 min9 Cho'kmadan tozalash jarayonida siz qisqa signallar va nasos ovozini eshitasiz. Jihoz jarayonni yakunlashi uchun taxminan 2 daqia kuting.

natural_image
Illustration of an electric iron emitting steam, with a warning symbol (no text or labels)10 Cho'kmadan tozalash jarayoni yakunlanganda, dazmol signal berishni to'xtatadi va CALC-CLEAN chirog'i yonishdan to'xtaydi.
Diqqat: Dazmol issiq.

natural_image
Hand using a power iron on a surface (no text or symbols visible)11 Dazmolni bir parcha mato bilan arting va uni asos platformasiga qo'ying.

text_image
Diagram illustrating a water safety hazard with warning sign and temperature indicators12 Cho'kmadan tozalash jarayoni davomida cho'kmadan tozalash konteyneri issiq bo'lishi sababli unga teginishdan oldin taxminan 5 daqiga kuting. Keyin cho'kmadan tozalash konteynerini rakovinaga olib boring, uni bo'shating va kelgusida foydalanish uchun saqlab qo'ying.
Eslatma: Cho'kmadan tozalash jarayonida dazmol ichida hech qanday cho'kma to'planmagan bo'lsa, asos plitasida toza suv chiqishi mumkin. Bu – normal holat.
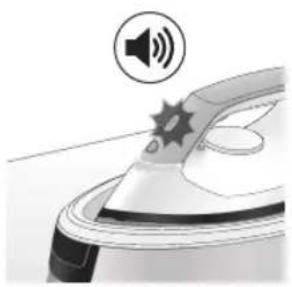
natural_image
Illustration of a steam iron emitting sound waves (no text or symbols)1 1 oydan 3 oygacha ishlatgandan keyin, cho'kmalardan tozalash chirog'i miltillashni va jihoz cho'kmalardan tozalash jarayonini bajarishingiz kerakligini bidirish uchun ovoz chiqarishni boshlaydi.
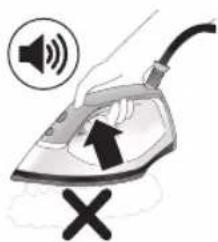
text_image
Illustration of a steam iron with sound waves and a cross symbol indicating cancellation or errornatural_image
Illustration of a hand placing a black cloth into a white rice cooker (no text or symbols visible)3 Suv bakini to 'Idirish eshigini oching.

text_image
7.4L MAX4 Suv bakini yarmigacha to'ldiring.
Eslatma: Cho'kmadan tozalash jarayonida jihoz elektr tarmog'iga ulanganiga va YOQILGANLIGIGA ishonch hosil qiling.
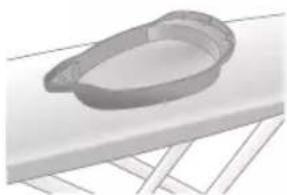
natural_image
3D rendered image of a mechanical component or housing on a flat surface (no text or symbols visible)5 Cho'kmadan tozalash konteynerini dazmollash taxtasiga yoki boshqa har qanday tekis, barqaror yuzaga joylashtiring.
300 O'zbek
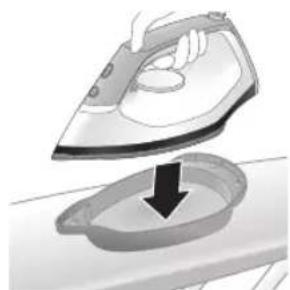
natural_image
Illustration of a hand ironing an iron above a sink with a downward arrow (no text or symbols)text_image
2 sec CALC CLEAN7 Qisqa signallarni eshitmaguningizcha, CALC-CLEAN tugmasini 2 soniya bosib turing.
Eslatma: Cho'kmadan tozalash konteyneri cho'kmadan tozalash jarayonida cho'kma zarralari va issiq suvni to'plash uchun mo'ljallangan. Butun jarayon davomida dazmolni bu konternerga qo'yish mutlaqo xavfsiz hisoblanadi.

text_image
~2 min8 Cho'kmadan tozalash jarayonida siz qisqa signallar va nasos ovozini eshitasiz. Jihoz jarayonni yakunlashi uchun taxminan 2 daqiga kuting.
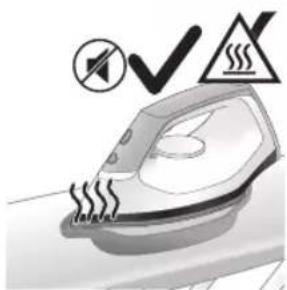
natural_image
Illustration of an iron iron with steam and a warning symbol (no text or labels)9 Cho'kmadan tozalash jarayoni yakunlanganda, dazmol signal berishni to'xtatadi va CALC-CLEAN chirog'i yonishdan to'xtaydi.
Diqqat: Dazmol issiq.

natural_image
Hand using a power iron on a surface (no text or symbols visible)10 Dazmolni bir parcha mato bilan arting va uni asos platformasiga qo'ying.

text_image
Diagram illustrating temperature change in a kitchen with warning symbols and thermometer icons11 Cho'kmadan tozalash jarayoni davomida cho'kmadan tozalash konteyneri issiq bo'lishi sababli unga teginishdan oldin taxminan 5 daqiqa kuting. Keyin cho'kmadan tozalash konteynerini rakovinaga olib boring, uni bo'shating va kelgusida foydalanish uchun saqlab qo'ying.
Eslatma: Cho'kmadan tozalash jarayonida dazmol ichida hech qanday cho'kma to'planmagan bo'lsa, asos plitasida toza suv chiqishi mumkin. Bu – normal holat.
Asos plitasini tozalash

natural_image
Illustration of a hand using an iron on a surface with arrows indicating motion (no text or symbols)Jihozingizni to'g'ri saqlash uchun uni muntazam tozalab turing.
1 Jihozni nam mato bilan tozalang. Dog'larni oson va samarali tozalash uchun asos plitasini qizdiring va dazmolni nam mato ustida yurgizing.

text_image
Warning symbol and safety icon showing a bottle, cross, and warning sign with text about cleaning or disinfection.Eslatma: Tozalash paytida sovundan foydalanmang yoki taglikni ishqalab tozalamang.
Saqlash
PSG3000 seriya
1 Jihozni o'chiring va tarmoqdan uzing.
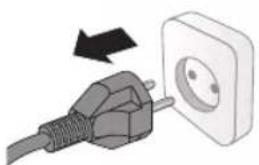
natural_image
Illustration of a black plug inserted into an open electrical outlet with a black arrow indicating direction (no text or symbols)302 O'zbek

natural_image
Illustration of a hand holding a lock icon with an arrow, no text or symbols present2 PSG3010 seriya uchun dazmolni dazmol platformasiga qo'ying va ko'tarishga qarshi qulfni bosish orqali uni qulflang

natural_image
Illustration of a steam iron with two arrows indicating motion (no text or symbols)3 Suv baki tutqichidagi dastakni bosing va suv bakini asosdan ajratib oling.

natural_image
Diagram of a bathroom sink with faucet and shower mechanism (no text or symbols)4 Suv bakini to'Idirish teshigi orqali suvni rakovinaga to'kib tashlang.

natural_image
Illustration of two identical steam iron machines side by side, showing front and back views (no text or symbols)natural_image
Illustration of hands operating a steam iron (no text or symbols visible)6 Ta'minot shlangini buking va ta'minot shlangini saqlash bo'lmasiga o'rang.

natural_image
Illustration of hands using a steam iron to press down a component (no text or symbols visible)
natural_image
Illustration of a hand using a steam iron to clean or operate (no text or symbols visible)
natural_image
Hand using a steam iron with cord and tassel (no text or symbols visible)7 Quvvat shnurini buking va uni Velcro tasmasi bilan mahkamlang. So'ngra jihozning asosini ikki qo'lingiz bilan ko'taring.
8 PSG3010 seriya uchun dazmol uning platformasida qulflanganda jihozni dazmolning dastagidan ushlab bitta qo'lda ko'tarishingiz mumkin.
PSG2000 seriya
1 Jihozni o'chiring va tarmoqdan uzing.

natural_image
Illustration of a plug being inserted into an electrical outlet (no text or symbols)
natural_image
Illustration of a kitchen sink with a pot and faucet (no text or symbols)2 Suv bakini to'ldirish teshigi orqali suvni rakovinaga to'kib tashlang.
304 O'zbek
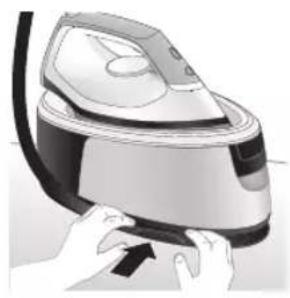
natural_image
Illustration of a hand pressing down on a steam iron (no text or symbols visible)3 Ta'minot shlangini buking va ta'minot shlangini saqlash bo'lmasiga o'rang.
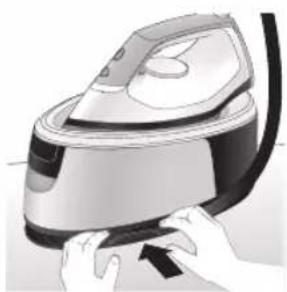
natural_image
Illustration of hands operating a steam iron (no text or symbols visible)
natural_image
Illustration of a hand using a steam iron to clean or operate (no text or symbols visible)4 Quvvat shnurini buking va uni Velcro tasmasi bilan mahkamlang. So'ngra jihozning asosini ikki qo'lingiz bilan ko'taring.
Wstep
text_image
Labeled diagram of a steam iron with numbered parts for identification306 Polski
Seria PSG2000

text_image
Labeled diagram of a steam iron with numbered parts for identificationnatural_image
Illustration of hands adjusting a mechanical component with numbered arrows (no text or symbols)
text_image
MAX 1.4L
natural_image
Illustration of two identical steam covers with a diagonal line dividing them (no text or symbols)natural_image
Hand placing a black object into a white pot (no text or symbols visible)Seria PSG2000
natural_image
Close-up of a hand pressing down on a small electronic device component (no visible text or symbols)natural_image
Illustration of a hand using an iron on a medical device (no text or symbols visible)text_image
Illustration showing a hand holding a shirt with a checkmark and an airplane, symbolizing inspection or repair.text_image
Illustration showing a person with a steam iron and a warning symbol, including a cross and smoke symbol.text_image
Warning sign showing a hanger, hand gesture with X and checkmark, and an electric shock symboltext_image
Diagram illustrating temperature change with thermometer symbols and a star-shaped object on a surface
text_image
~10 min OFFnatural_image
Illustration of a speaker emitting sound waves above a device (no text or symbols)text_image
Illustration of an iron with sound waves and a cross symbol indicating no change or errornatural_image
Illustration of a person using an iron iron to lift a cup, showing two directional arrows (no text or symbols)natural_image
Illustration of two steam covers with arrows indicating motion, no text or symbols presentnatural_image
3D rendered image of a mechanical component with a curved handle and mounting base (no text or symbols)natural_image
Illustration of a steam iron being placed into a sink with a downward arrow indicating motion (no text or symbols)text_image
2 sec CALC CLEANtext_image
Cable CLEAN ~2 minnatural_image
Illustration of an electric iron emitting steam, with a warning symbol (no text or labels)natural_image
Hand using a power iron on a surface (no text or symbols visible)text_image
Safety warning illustration showing a hand pressing down on a toilet with temperature and warning symbolsnatural_image
Close-up of a mechanical component with a speaker icon and starburst pattern (no text or symbols)text_image
Diagram showing a hand using an iron with sound waves and a cross symbol indicating cancellation or error.natural_image
Illustration of a hand placing a black cloth into a rice cooker (no text or symbols visible)natural_image
3D rendered image of a mechanical component with a curved handle and rectangular body, placed on a flat surface (no text or symbols visible)natural_image
Illustration of a steam iron being placed into a sink with a downward arrow indicating motion (no text or symbols)text_image
2 sec CALC CLEANnatural_image
Illustration of a steaming iron with a warning symbol (no text or labels)natural_image
Hand using a power iron on a surface (no text or symbols visible)text_image
Safety warning illustration showing a car accident with temperature and warning symbolsnatural_image
Illustration of a hand using an iron on a workbench with arrows indicating motion (no text or symbols)text_image
Warning symbol and safety icon showing a baby bottle, a paintbrush, and an iron iron with warning labelsnatural_image
Illustration of a plug being inserted into an electrical outlet (no text or symbols)
natural_image
Illustration of a hand holding a lock icon with an arrow, no text or symbols presentnatural_image
Illustration of a steam iron with two arrows indicating motion (no text or symbols)natural_image
Diagram of a kitchen sink with faucet and showerhead (no text or symbols)natural_image
Illustration of two identical steam iron machines side by side, showing front and back views (no text or symbols)natural_image
Illustration of hands operating a steam iron (no text or symbols visible)natural_image
Illustration of hands using a steam iron to press down a button (no text or symbols visible)
natural_image
Illustration of a hand using a steam iron to clean or store air (no text or symbols visible)
natural_image
Illustration of a hand using a steam iron with cord and cable (no text or symbols)natural_image
Illustration of a plug being inserted into an electrical outlet (no text or symbols)
natural_image
Illustration of a kitchen sink with a pot and faucet (no text or symbols)natural_image
Illustration of hands using a steam iron to press down a button (no text or symbols visible)natural_image
Illustration of hands operating a steam iron (no text or symbols visible)
natural_image
Illustration of a hand using a steam iron to clean or operate (no text or symbols visible)text_image
Labeled diagram of a steam iron with numbered parts for identificationSérie PSG2000

text_image
Labeled diagram of a steam iron with numbered parts for identificationnatural_image
Illustration of hands adjusting a mechanical component with numbered arrows (no text or symbols)natural_image
Illustration of two identical steam covers with a diagonal line dividing them (no text or symbols)natural_image
Illustration of a hand placing a black object into a rice cooker (no text or symbols visible)
text_image
7.4L MAXnatural_image
Close-up of a hand pressing down on a small electronic device with a black cable (no visible text or symbols)natural_image
Illustration of a hand using an iron on a medical device (no text or symbols visible)text_image
Illustration showing a hand holding a garment with a checkmark and an upward arrow, next to a steam iron.text_image
Illustration showing a person with a steam iron and a warning symbol, including a cross and smoke symbol.text_image
Safety warning illustration showing hand gesture, steam symbol, and warning sign on a hangerJato de vapor

text_image
Eco SWAK SOLK SWAK X √text_image
Diagram illustrating temperature change with thermometer symbols and a star-shaped object, likely illustrating thermal behavior or sensor response.
text_image
~10 min OFFnatural_image
Illustration of a speaker emitting sound waves above a computer monitor (no text or symbols)text_image
Diagram showing a hand using an iron with sound waves and a cross symbol indicating cancellation or error.natural_image
Illustration of a steam iron with two arrows indicating motion direction (no text or symbols)natural_image
Illustration of two identical steam covers with arrows indicating motion, no text or symbols presentnatural_image
3D rendered image of a mechanical ring component on a flat surface (no text or symbols visible)natural_image
Illustration of a hand ironing an iron with a downward arrow indicating cooling or residue (no text or symbols)text_image
2 sec CALC CLEANtext_image
CAUL CLEAN ~2 minnatural_image
Illustration of a steaming iron with a checkmark and warning symbol (no text or labels)natural_image
Hand using a power iron on a surface (no text or symbols visible)text_image
Diagram illustrating a water safety hazard with warning symbols and temperature indicatorsnatural_image
Illustration of a steam iron emitting sound waves (no text or symbols)text_image
Illustration of a hand using an iron with sound waves and a cross symbol indicating no change or error.natural_image
Illustration of a hand placing a black cloth into a rice cooker (no text or symbols visible)natural_image
3D rendered image of a mechanical component on a flat surface (no text or symbols visible)natural_image
Illustration of a hand ironing an iron above a sink with a downward arrow (no text or symbols)text_image
2 sec CALC CLEANnatural_image
Illustration of a steaming iron with a warning symbol (no text or labels)natural_image
Hand using a power iron on a surface (no text or symbols visible)text_image
Safety warning illustration showing a hand holding a valve with warning symbols and temperature indicators.natural_image
Illustration of a hand using an iron on a surface with arrows indicating motion (no text or symbols)text_image
Warning symbol and safety icon showing a bottle, cross mark, and warning sign with warning trianglenatural_image
Illustration of a plug being inserted into an electrical outlet (no text or symbols)Português

natural_image
Illustration of a hand holding a lock icon with an arrow, no text or symbols presentnatural_image
Illustration of a steam iron with two arrows indicating motion (no text or symbols)natural_image
Diagram of a bathroom sink with faucet and toilet mechanism (no text or labels)natural_image
Illustration of two identical steam covers with a diagonal line dividing them (no text or symbols)natural_image
Illustration of hands operating a steam iron (no text or symbols visible)natural_image
Illustration of hands using a steam iron to press down a component (no text or symbols visible)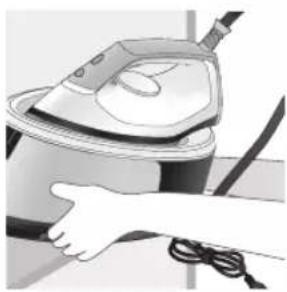
natural_image
Illustration of a hand using a steam iron to clean or operate (no text or symbols visible)
natural_image
Illustration of a hand using a steam iron with cord and tassel (no text or symbols)natural_image
Illustration of a plug being inserted into an electrical outlet (no text or symbols)
natural_image
Illustration of a kitchen sink with a pot and faucet (no text or symbols)natural_image
Illustration of a hand pressing down on a steam iron (no text or symbols visible)natural_image
Illustration of hands operating a steam iron (no text or symbols visible)
natural_image
Illustration of a hand using a steam iron to clean or operate (no text or symbols visible)text_image
Labeled diagram of a steam iron with numbered parts for identificationSeria PSG2000

text_image
Labeled diagram of a steam iron with numbered parts for identificationnatural_image
Illustration of hands adjusting a mechanical component with numbered arrows (no text or symbols)natural_image
Illustration of two identical steam covers with a diagonal line crossing through them (no text or symbols)natural_image
Hand placing a black object into a rice cooker (no text or symbols visible)Seria PSG2000
natural_image
Close-up of a hand pressing down on a small electronic device with a black cable (no visible text or symbols)natural_image
Illustration of a hand using an iron on a medical device (no text or symbols visible)text_image
Illustration showing a hand holding a shirt with a checkmark and an airplane, symbolizing inspection or repair.text_image
Illustration showing a person with a steam iron and a warning symbol, including a cross and smoke symbol.text_image
Warning sign showing a hanger, hand gesture with X and checkmark, and a frying pan with warning symbolsJet de abur

text_image
ECD SCK ECD SCK X1 Functia jet de abur este disponibilă numai de la 3 puncte la temperatura MAX.
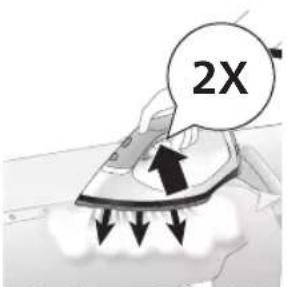
text_image
2Xnatural_image
Illustration of a steam iron emitting sound waves (no text or symbols)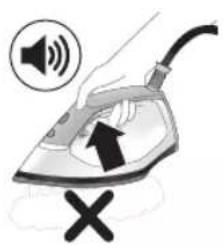
text_image
Illustration of a hand using an iron with sound waves and a cross symbol indicating cancellation or error.natural_image
Illustration of a person using an iron iron to lift a cup, showing two directional arrows (no text or symbols)natural_image
Illustration of two identical air purifiers with arrows indicating motion, no text or symbols presentnatural_image
3D rendered image of a mechanical component with a curved handle and flange, placed on a flat surface (no text or symbols visible)natural_image
Illustration of a steam iron being placed into a sink with a downward arrow indicating motion (no text or symbols)text_image
2 sec CALC CLEANtext_image
Cable CLEAN ~2 minnatural_image
Illustration of an electric iron emitting steam, with a warning symbol (no text or labels)natural_image
Hand using a power iron on a surface (no text or symbols visible)text_image
Diagram illustrating a water safety hazard with warning sign and temperature indicatorsnatural_image
Close-up of a mechanical component with a speaker icon and starburst pattern (no text or symbols)text_image
Diagram showing a hand using an iron with sound waves and a cross symbol indicating cancellation or error.natural_image
Illustration of a hand placing a black cloth into a rice cooker (no text or symbols visible)natural_image
3D rendered image of a mechanical component with a curved handle and rectangular body, placed on a flat surface (no text or symbols visible)natural_image
Illustration of a steam iron being placed into a sink with a downward arrow indicating motion (no text or symbols)text_image
2 sec CALC CLEANnatural_image
Illustration of a steaming iron with warning symbols (no text or labels)natural_image
Hand using a iron on a surface, no text or symbols visibletext_image
Safety warning illustration showing a hand pressing down on a toilet with temperature and warning symbolsnatural_image
Illustration of a hand using an iron on a surface with arrows indicating motion (no text or symbols)text_image
Warning symbol and safety icon showing a bottle, magnifying glass, and a high-speed train with warning signsnatural_image
Illustration of a plug being inserted into an electrical outlet (no text or symbols)
natural_image
Illustration of a hand holding a lock icon with an arrow, next to a vehicle (no text or symbols)natural_image
Illustration of a steam iron with two arrows indicating motion (no text or symbols)natural_image
Diagram of a kitchen sink with faucet and showerhead (no text or symbols)natural_image
Illustration of two identical steam iron machines side by side, showing front and back views (no text or symbols)natural_image
Illustration of hands operating a steam iron (no text or symbols visible)natural_image
Illustration of hands using a steam iron to press down a button (no text or symbols visible)
natural_image
Illustration of a hand using a steam iron to clean or operate (no text or symbols visible)
natural_image
Illustration of a hand using a steam iron with cord and cable (no text or symbols)natural_image
Illustration of a plug inserted into an electrical outlet with a black arrow indicating direction (no text or symbols)
natural_image
Illustration of a kitchen sink with a pot and faucet (no text or symbols)natural_image
Illustration of hands using a steam iron to press down a button (no text or symbols visible)natural_image
Illustration of hands operating a steam iron (no text or symbols visible)
natural_image
Illustration of a hand using a steam iron to clean or operate (no text or symbols visible)text_image
Labeled diagram of a steam iron with numbered parts for identificationSeria PSG2000

text_image
Labeled diagram of a steam iron with numbered parts for identificationnatural_image
Illustration of a steam iron with two arrows indicating motion (no text or symbols)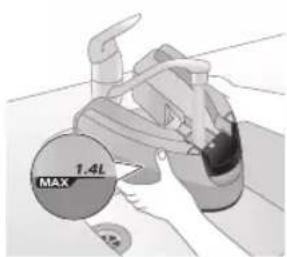
text_image
MAX 1.4Lnatural_image
Illustration of two identical steam iron machines on a diagonal line, no text or symbols presentnatural_image
Illustration of a hand placing a dark object into a rice cooker (no text or symbols visible)
text_image
1.4L MAXnatural_image
Illustration of a plug being inserted into an electrical outlet (no text or symbols)360 Shqip
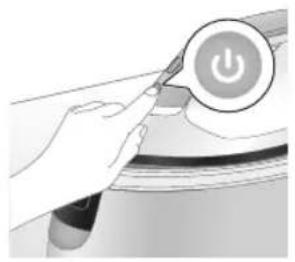
natural_image
Illustration of a hand pressing a button with a power symbol (no text or labels)natural_image
Close-up of a mechanical component with a star-shaped indentation and curved handle (no text or symbols visible)natural_image
Illustration of a medical or laboratory procedure with a checkmark and magnified view (no text or symbols)natural_image
Illustration of a hand holding a lock icon over a device (no text or symbols)natural_image
Close-up of a hand pressing down on a small electronic device with a curved arrow indicating motion (no text or symbols visible)6 Hiqni zorrën e ujit nga foleja e mbajtjes.

natural_image
Illustration of a hand using an iron on a surface, with a black arrow indicating the motion direction (no text or symbols present)text_image
Diagram showing a checkmark pointing downward on a shirt, with a magnified view of a garment and hand holding a cloth.text_image
Illustration showing a person holding a fire extinguisher with a warning symbol and a cross mark, alongside a warning triangle.text_image
Warning symbol illustration showing a hanger, hand gesture with X and triangle warning sign, and electric shock hazard362 Shqip
natural_image
Illustration of an iron (£) with a hourglass icon and '~15 min' label, placed on a surface (no text beyond labels)text_image
Diagram illustrating temperature change with labeled thermometer symbols and a star-shaped object on a surface
text_image
-10 min OFFnatural_image
Illustration of a speaker emitting sound waves (no text or symbols)Seria PSG3000
text_image
Diagram showing a hand using an iron with sound waves and a cross symbol indicating cancellation or error.natural_image
Illustration of a hand using a steam iron to press down a button (no text or symbols present)natural_image
Illustration of two steam covers with arrows indicating motion, no text or symbols presentnatural_image
3D rendered image of a mechanical component with a curved top and base, resting on a flat surface (no text or symbols visible)natural_image
Illustration of a hand ironing an iron, with a downward arrow indicating cooling or residue (no text or symbols present)text_image
2 sec CALC CLEANnatural_image
Illustration of a steam iron on a surface with warning symbols (no text or labels)natural_image
Illustration of a hand using an iron on a surface (no text or symbols)text_image
Diagram illustrating temperature regulation in a kitchen, showing heat transfer from a sink to a thermometer.natural_image
Close-up of a speaker emitting sound waves, no text or symbols visibleSeria PSG2000
text_image
Illustration of a hand using an iron with sound waves and a cross symbol indicating cancellation or error.natural_image
Illustration of a hand placing a dark object into a rice cooker (no text or symbols visible)natural_image
3D rendered mechanical part with a looped end, resting on a flat surface (no text or symbols visible)natural_image
Illustration of a steam iron being placed into a sink with a downward arrow indicating motion (no text or symbols)text_image
2 sec CALC CLEANnatural_image
Illustration of a steaming iron with warning symbols (no text or labels)natural_image
Hand using a iron on a surface, no text or symbols visibletext_image
Diagram illustrating temperature change in a car with warning sign and thermometer symbolsnatural_image
Illustration of a hand using an iron on a surface with arrows indicating motion (no text or symbols)text_image
Warning symbol and safety icon showing a bottle, magnifying glass, and industrial machine with warning labelsnatural_image
Illustration of a plug inserted into an electrical outlet with a black arrow indicating direction (no text or symbols)
natural_image
Illustration of a hand holding a lock icon with an arrow, no text or symbols presentnatural_image
Illustration of a steam iron with two arrows indicating motion (no text or symbols)natural_image
Diagram of a kitchen sink with faucet and showerhead (no text or symbols)natural_image
Illustration of two identical steam iron machines side by side, showing front and back views (no text or symbols)natural_image
Illustration of hands operating a steam iron (no text or symbols visible)natural_image
Illustration of hands using a steam iron to press down a button (no text or symbols visible)
natural_image
Illustration of a hand using a steam iron to clean or operate (no text or symbols visible)
natural_image
Hand using a steam iron with cord and tassel (no text or symbols visible)natural_image
Illustration of a plug being inserted into an electrical outlet (no text or symbols)
natural_image
Illustration of a kitchen sink with a pot and faucet (no text or symbols)natural_image
Illustration of a hand using a steam iron to press down a button (no text or symbols visible)natural_image
Illustration of hands operating a steam iron (no text or symbols visible)natural_image
Illustration of a hand using a steam iron to clean or operate (no text or symbols visible)372 Slovenščina
Uvod
text_image
Labeled diagram of a steam iron with numbered parts for identificationSerija PSG2000

text_image
Labeled diagram of a steam iron with numbered parts for identificationnatural_image
Illustration of hands adjusting a mechanical component with numbered arrows (no text or symbols)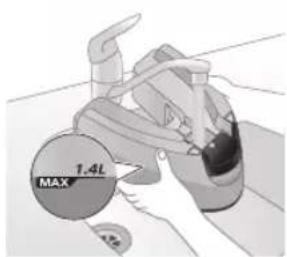
text_image
MAX 1.4Lnatural_image
Illustration of two identical steam covers with a diagonal line crossing through, no text or symbols present.3 Posodo za vodo potisnite nazaj v aparat, da se zaskoči na mesto ("klik").
Serija PSG2000
natural_image
Hand placing a dark object into a white cylindrical container (no text or symbols visible)
text_image
1.4L MAX2 Posodo za vodo napolnite do oznake MAX in nato zaprite vratca za dolivanje vode ("klik").
Uporaba aparata
Nastavitev temperature
Nastavitev temperature Samodejna nastavitev pare Vrsta tkanine
| ● | [GB4G] | Sintetika (npr. acetat, akril, najlon, viskoza, poliamid, poliester) |
| ●● |  | Svila |
| ●●● do MAX Bombaž, lan |  | |
| ECO ECO Vse, razen sintetike | ||
Likanje
natural_image
Illustration of a plug being inserted into an electrical outlet (no text or symbols)Slovenščina

natural_image
Illustration of a hand pressing a button on a device with a power symbol (no text or labels)2 Pritisnite gumb za vklop/izklop, da vklopite aparat, nato z obračanjem temperaturnega regulatorja nastavite ustrezno temperaturo v skladu z zgornjo tabelo.
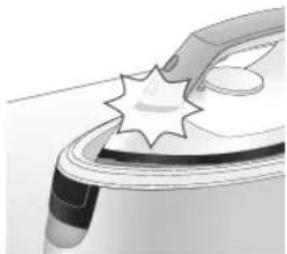
natural_image
Illustration of a mechanical component with a star-shaped feature and a curved handle (no text or symbols)3 Indikator pripravljenosti likalnika začne utripati, kar pomeni, da se aparat segreva.
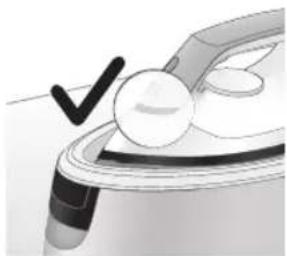
natural_image
Illustration of a medical or laboratory procedure step with a checkmark and magnified view (no text or symbols)natural_image
Illustration of a hand adjusting a device with an open lock icon (no text or symbols)natural_image
Close-up of a hand pressing down on a small electronic device with a curved arrow indicating motion (no text or symbols visible)6 Odstranite cev za dovod vode iz prostora za shranjevanje.
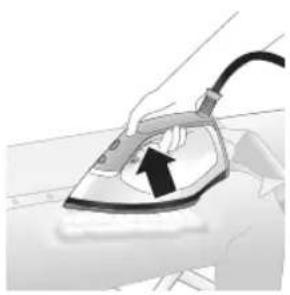
natural_image
Illustration of a hand using an iron on a surface, with a black arrow indicating the motion direction (no text or symbols present)text_image
Illustration showing a person with a checkmark and arrow pointing downward, next to a magnifying glass with hands holding the document.text_image
Safety warning illustration showing a person with a steam iron and a warning symboltext_image
Warning sign showing a hanger with a hand, a cross symbol indicating incorrect safety, and a warning triangle with 'sweat' symbol.Izpust pare

text_image
Eco SIX 100% 100% 100% 100% 100% 100% 100% 100% 100% 100% 100% 100% 100% 100% 100% 100% 100% 100% 100% 100% 100% 100% 100% 100% 100% 100 X ✓1 Funkcija izpusta pare je na voljo samo od 3 pik do temperature MAX.

text_image
2Xtext_image
Diagram illustrating temperature change with labeled thermometer symbols and a star-shaped object on a surface
text_image
-10 min OFFnatural_image
Illustration of a speaker emitting sound waves, no text or symbols presentSerija PSG3000
text_image
Illustration of an iron frying pan with sound waves and a 'X' symbol indicating no change or damage.natural_image
Illustration of a hand using a steam iron to move a button (no text or symbols present)natural_image
Illustration of a pair of steam covers with arrows indicating motion (no text or symbols)5 Posodo za vodo potisnite nazaj v aparat, da se zaskoči na mesto ("klik").
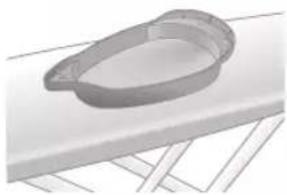
natural_image
3D rendered image of a mechanical component on a flat surface (no text or symbols visible)natural_image
Illustration of a hand ironing an iron with a downward arrow indicating cooling or residue (no text or symbols)text_image
2 sec CALC CLEAN8 Za 2 sekundi pridržite gumb CALC-CLEAN, da zaslišite kratke piske.
natural_image
Illustration of a steaming iron on a surface with warning symbols (no text or labels)10 Ko je postopek odstranjevanja vodnega kamna končan, likalnik neha piskati, indikator CALC-CLEAN pa neha utripati.
natural_image
Illustration of a hand using an iron on a surface (no text or symbols)11 Likalnik obrišite s krpo in postavite nazaj na osnovno enoto.
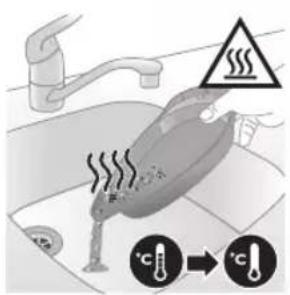
text_image
Diagram illustrating temperature change in a kitchen with warning sign and thermometer symbolsnatural_image
Close-up of a speaker emitting sound waves, no text or symbols visibleSerija PSG2000
text_image
Illustration of a hand using an iron with sound waves and a cross symbol indicating cancellation or error.natural_image
Illustration of a hand placing a dark object into a rice cooker (no text or symbols visible)natural_image
3D rendered mechanical part with a looped end and base plate (no text or symbols)natural_image
Illustration of a steam iron being placed into a sink with a downward arrow indicating motion (no text or symbols)text_image
2 sec CALC CLEAN7 Za 2 sekundi pridržite gumb CALC-CLEAN, da zaslišite kratke piske.
natural_image
Illustration of an iron iron with a warning symbol (no text or labels)9 Ko je postopek odstranjevanja vodnega kamna končan, likalnik neha piskati, indikator CALC-CLEAN pa neha utripati.
natural_image
Hand using a power iron on a surface (no text or symbols visible)10 Likalnik obrišite s krpo in postavite nazaj na osnovno enoto.
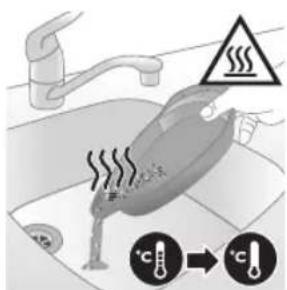
text_image
Safety warning illustration showing a hand holding a valve with warning symbols and temperature indicatorsnatural_image
Illustration of a hand using an iron on a surface with arrows indicating motion (no text or symbols)text_image
Warning symbol and safety icon showing a bottle, magnifying glass, and a flying iron with warning labelnatural_image
Illustration of a plug being inserted into an electrical outlet (no text or symbols)
natural_image
Illustration of a hand holding a lock icon with an arrow, no text or symbols presentnatural_image
Illustration of a steam iron with two arrows indicating motion (no text or symbols)natural_image
Diagram of a bathroom sink with faucet and shower mechanism (no text or symbols)4 Vodo iz posode iztočite v korito.

natural_image
Illustration of two identical steam iron machines side by side, showing front and back views (no text or symbols)5 Posodo za vodo potisnite nazaj v aparat, da se zaskoči na mesto ("klik").

natural_image
Illustration of hands operating a steam iron (no text or symbols visible)6 Zložite dovodno cev in jo navijte v prostoru za shranjevane dovodne cevi.

natural_image
Illustration of hands using a steam iron to press down a button (no text or symbols visible)
natural_image
Illustration of a hand using a steam iron to clean or operate (no text or symbols visible)
natural_image
Illustration of a hand using a steam iron with cord and tassel (no text or symbols)7 Zložite napajalni kabel in ga pritrdite z ježkom. Nato nesite aparat tako, da ga z obema rokama držite za podstavek.
natural_image
Illustration of a plug being inserted into an electrical outlet (no text or symbols)
natural_image
Illustration of a kitchen sink with a pot and faucet (no text or symbols)2 Vodo iz posode iztočite v korito.
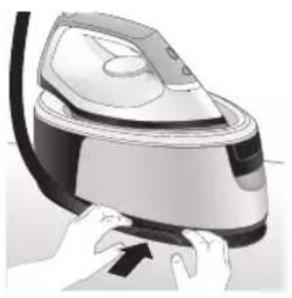
natural_image
Illustration of a hand using a power iron to press down a surface (no text or symbols visible)3 Zložite dovodno cev in jo navijte v prostoru za shranjevane dovodne cevi.
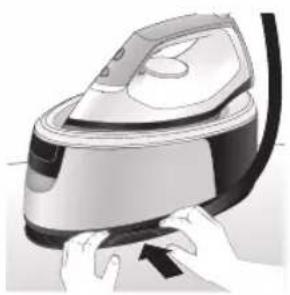
natural_image
Illustration of hands operating a steam iron (no text or symbols visible)
natural_image
Illustration of a hand using a steam iron to clean or operate (no text or symbols visible)4 Zložite napajalni kabel in ga pritrdite z ježkom. Nato nesite aparat tako, da ga z obema rokama držite za podstavek.
Úvod
Blahoželáme vám ku kúpe a vítame vás medzi používatelmi produktov spoločnosti Philips! Ak chcete naplno využit podporu ponúkanú spoločnostou Philips, zaregistrujte svoj produkt na lokalite www.philips.com/welcome. Pred použitím zariadenia si prečítajte tento návod na použitie, leták s dôležitými informáciami a stručný návod pri spustení. Odložte si ich na neskoršie použitie. Odložte si ich na neskoršie použitie.
Séria PSG3000
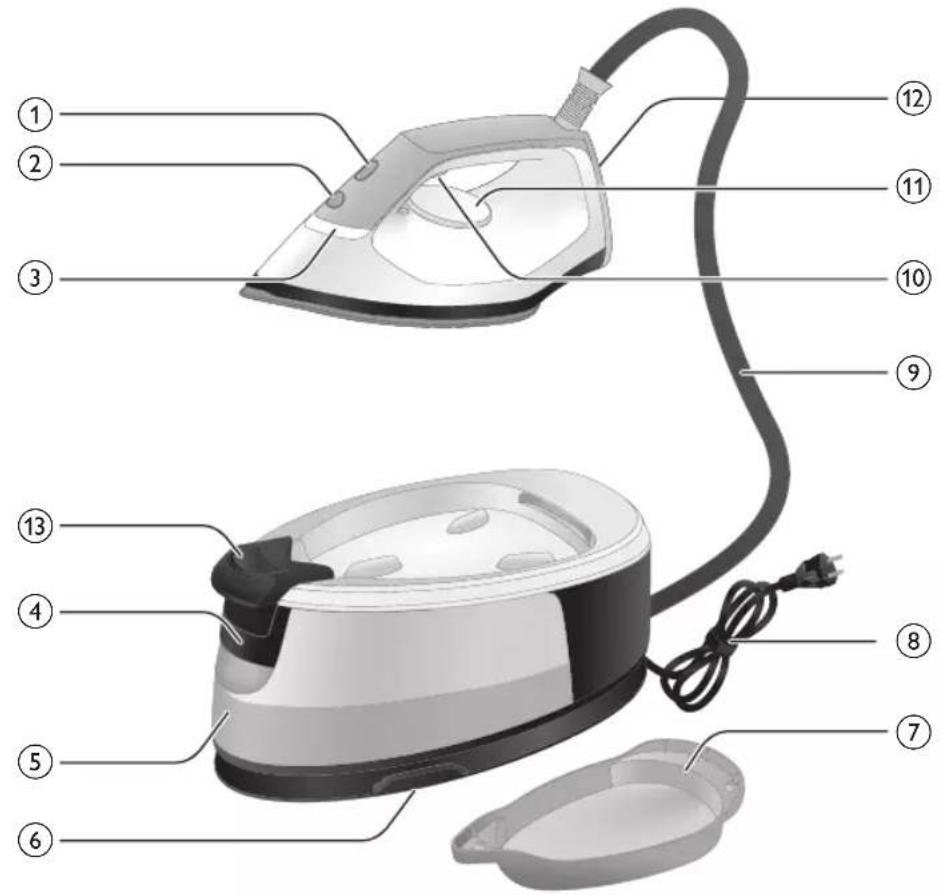
text_image
Labeled diagram of a steam iron with numbered parts for identificationSéria PSG2000

text_image
Labeled diagram of a steam iron with numbered parts for identificationnatural_image
Illustration of hands adjusting a mechanical component with numbered arrows (no text or symbols)natural_image
Illustration of two identical air purifiers on a diagonal line, no text or symbols present3 Zásobník na vodu zasuňte spät do zariadenia, až kým nezacvakne na svoje miesto (budete počut cvaknutie).
Séria PSG2000
natural_image
Illustration of a hand placing a black object into a rice cooker (no text or symbols visible)
text_image
7.4L MAXnatural_image
Illustration of a hand inserting a plug into an electrical outlet (no text or symbols)natural_image
Illustration of a hand holding a power button with an icon, no text or symbols presentnatural_image
Illustration of a mechanical component with a star-shaped feature and curved handle (no text or symbols)3 Svetlo „žehlička pripravená“ začne blikat, čim signalizuje, že sa zariadenie zahrieva.
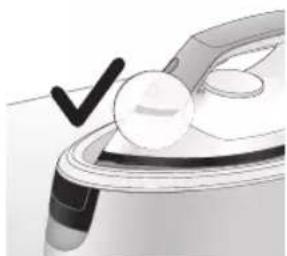
natural_image
Illustration of a hand holding a white circular object with a black checkmark, next to a metallic device (no text or symbols visible)natural_image
Illustration of hands holding a lock icon and a device component (no text or symbols)5 Pokial'ide o model PSG3010, na odomknutie žehličky z podstavca stlačte tlačidlo uvolnenia zámku na prenášanie.
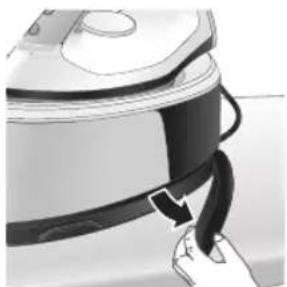
natural_image
Close-up of a hand pressing down on a small electronic device with a black cable (no visible text or symbols)natural_image
Illustration of a hand using an iron on a patient's arm, with no visible text or symbolstext_image
Illustration showing a shirt with a checkmark and an iron, symbolizing clothing or garment selection.text_image
Safety warning illustration showing a person using an iron with a warning symbol and cross marktext_image
Warning sign showing a hanger with a hand gesture and an electric iron, indicating heat or stress in clothing safety.text_image
Diagram illustrating temperature change with thermometer symbols and a star-shaped object, likely for thermal monitoring or testing.
text_image
~10 min OFFnatural_image
Illustration of a steam iron with sound waves above it, no text or symbols present
text_image
Illustration of a hand using an iron with sound waves and a cross symbol indicating cancellation or error.natural_image
Illustration of a person using a steam iron, showing two directional arrows (① and ②) indicating motion or force direction (no text or symbols present)natural_image
Illustration of two steam covers with arrows indicating motion, no text or symbols present5 Zásobník na vodu zasuňte spät do zariadenia, až kým nezacvakne na svoje miesto (budete počut cvaknutie).

natural_image
3D rendered image of a mechanical component with a curved handle and flange, placed on a flat surface (no text or symbols visible)natural_image
Illustration of a hand ironing an iron with a downward arrow indicating cooling or damage (no text or symbols)text_image
2 sec CALC CLEANtext_image
Cable CLEAN ~2 minnatural_image
Illustration of a steaming iron on a surface with a warning symbol (no text or labels)natural_image
Illustration of a hand using a power iron on a surface (no text or symbols)11 Utrite žehličku kúskom látky a položte ju spät na podstavec.

text_image
Safety warning illustration showing a car accident with temperature change indicators and warning symbolnatural_image
Illustration of a steam iron with sound waves and a starburst on the handle (no text or symbols)text_image
Illustration of a hand using an iron with sound waves and a cross symbol indicating no change or error.natural_image
Illustration of a hand placing a black cloth into a white rice cooker (no text or symbols visible)natural_image
3D rendered image of a mechanical component on a flat surface (no text or symbols visible)natural_image
Illustration of a hand ironing an iron above a submerged container (no text or symbols)text_image
2 sec CALC CLEANnatural_image
Illustration of a steaming iron with warning symbols (no text or labels)natural_image
Hand using a power iron on a surface (no text or symbols visible)10 Utrite žehličku kúskom látky a položte ju spät na podstavec.

text_image
Diagram illustrating temperature change in a kitchen with warning sign and thermometer symbolsnatural_image
Illustration of a hand using an iron on a surface with arrows indicating motion (no text or symbols)text_image
Warning symbol and safety icon showing a bottle, magnifying glass, and industrial iron mill with warning labelnatural_image
Illustration of a plug being inserted into an electrical outlet (no text or symbols)402 Slovensky

natural_image
Hand holding a lock icon with an arrow, no text or symbols presentnatural_image
Illustration of a steam iron with two arrows indicating motion (no text or symbols)natural_image
Diagram of a bathroom sink with faucet and toilet mechanism (no text or labels)natural_image
Illustration of two identical steam covers with a diagonal line dividing them (no text or symbols)natural_image
Illustration of hands operating a steam iron (no text or symbols visible)natural_image
Illustration of hands operating a steam iron (no text or symbols visible)
natural_image
Illustration of a hand using a steam iron to clean or wash the air (no text or symbols visible)
natural_image
Illustration of a hand using a steam iron with cord and power cord (no text or symbols)natural_image
Illustration of a plug with a power outlet and arrow indicating direction (no text or symbols)
natural_image
Illustration of a kitchen sink with a pot and faucet (no text or symbols)natural_image
Illustration of a hand pressing down on a steam iron (no text or symbols visible)natural_image
Illustration of hands operating a steam iron (no text or symbols visible)
natural_image
Illustration of a hand using a steam iron to clean or operate (no text or symbols visible)text_image
Labeled diagram of a steam iron with numbered parts for identification406 Srpski
Serija PSG2000

text_image
Labeled diagram of a steam iron with numbered parts for identification1 Dugme CALC-CLEAN (održavanje temperature) sa indikatorom
2 Dugme za uključivanje
3 Indikator „Pegla je spremna“
4 Ručica za oslobadanje rezervoara za vodu (serija PSG3000) / otvor za punjenje rezervoara za vodu (serija PSG2000)
5 Odvojivi rezervoar za vodu (serija PSG3000) / rezervoar za vodu od koji ne može da se skine (serija PSG2000)
6 Pregrada za odlaganje creva za dovod vode
7 Posuda za inteligentni sistem za čišćenje kamenca
8 Kabl za napajanje sa utikačem
9 Crevo za dovod vode
10 Dugme za paru/dodatna količina pare
11 Regulator temperature
12 Stopa za uspravan položaj
13 Dugme za otpuštanje brave za nošenje (PSG3010)
Pre upotrebe
Tip vode koji bi trebalo koristiti
Ovaj aparat je prikladan za korišćenje sa vodom iz česme. Međutim, ako živite u oblasti sa tvrdom vodom, preporučujemo da pomešate jednake količine vode sa
natural_image
Illustration of hands adjusting a mechanical component with numbered arrows (no text or symbols)1 Pritisnite ručicu na drški rezervoara za vodu i skinite rezervoar za vodu sa postolja.
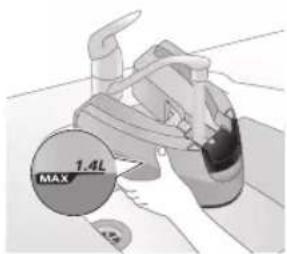
text_image
MAX 1.4L2 Napunite rezervoar vodom sve do oznake MAX.

natural_image
Illustration of two identical steam covers with a diagonal line dividing them (no text or symbols)natural_image
Hand placing a black object into a white pot (no text or symbols visible)Serija PSG2000
natural_image
Close-up of a hand pressing down on a small electronic device component (no visible text or symbols)natural_image
Illustration of a hand using an iron on a medical device (no text or symbols visible)7 Pritisnite i zadržite dugme za paru kako biste počeli peglanje.
text_image
Illustration showing a hand holding a shirt with a checkmark and an airplane, symbolizing inspection or repair.text_image
Illustration showing a person with a steam iron and a warning symbol, including a cross and smoke symbol.text_image
Warning sign showing a hanger, hand gesture with X and checkmark, and warning symbol for heating an iron.natural_image
Illustration of an iron iron on a surface with an hourglass symbol and ~15-minute time label (no text or symbols beyond the label)1 Kada se aparat ne koristi duže od 15 minuta, indikator „Pegla je spremna” počinje da treperi i pegla počinje da se hladi.
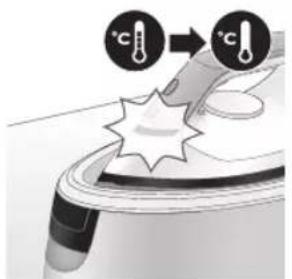
text_image
Diagram illustrating temperature change with thermometer symbols and a star-shaped object on a surface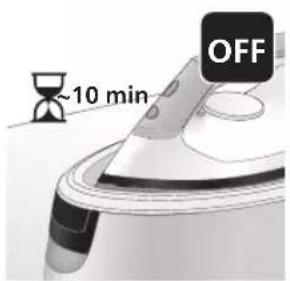
text_image
~10 min OFF2 Ako ne budete koristili aparat još 10 minuta, on će se automatski isključiti.
natural_image
Close-up of a mechanical component with a speaker icon and starburst pattern (no text or symbols)1 Indikator za čišćenje kamenca počeće da svetli nakon 1 do 3 meseca upotrebe i aparat će početi da se oglašava zvučnim signalom, što ukazuje na to da je potrebno da obavite proces čišćenja kamenca.
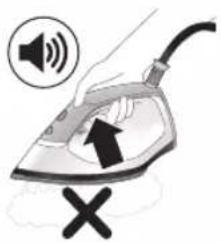
text_image
Illustration of an iron frying pan with sound waves and a warning symbol indicating no change or error.2 Pored toga, ugraden je i drugi korak za zaštitu aparata od kamenca: funkcija pare se onemogućava ako se ne obavi čišćenje kamenca. Funkcija pare ponovo postaje dostupna nakon što očistite kamenac. Ovo se odvija bez obzira na vrstu vode koju koristite.

natural_image
Illustration of a steam iron with two arrows indicating motion (no text or symbols)3 Pritisnite ručicu na drški rezervoara za vodu i skinite rezervoar za vodu sa postolja.
Srpski

text_image
MAX 1.4L4 Napunite rezervoar za vodu do pola.
Napomena: Uverite se da je aparat priključen na električnu mrežu i uključen tokom procesa čišćenja kamenca.

natural_image
Illustration of two steam covers with arrows indicating motion, no text or symbols presentnatural_image
3D rendered image of a mechanical component with a curved handle and flange, placed on a flat surface (no text or symbols visible)6 Stavite posudu za čišćenje kamenca na dasku za peglanje ili bilo koju drugu ravnu i stabilnu površinu.

natural_image
Illustration of a steam iron being placed into a sink with a downward arrow indicating motion (no text or symbols)7 Stabilno postavite peglu na posudu za čišćenje kamenca.

text_image
2 sec CALC CLEAN8 Pritisnite dugme CALC-CLEAN i zadržite ga 2 sekunde dok ne budete čuli kratke zvučne signale.
text_image
Cable CLEAN ~2 min9 Tokom procesa čišćenja kamenca oglašavaju se kratki zvučni signali i zvuk pumpanja. Sačekajte oko 2 minuta da se proces završi.

natural_image
Illustration of an electric iron emitting steam, with a warning symbol (no text or labels)10 Kada se završi proces čišćenja kamenca, pegla prestaje da se oglasava zvučnim signalima, a indikator CALC-CLEAN prestaje da treperi.
natural_image
Hand using a power iron on a surface (no text or symbols visible)11 Obrišite peglu parčetom tkanine i vratite je na baznu stanicu.
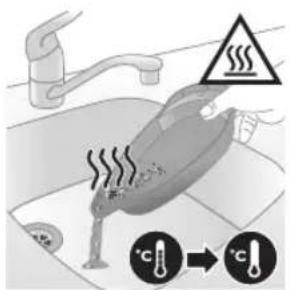
text_image
Diagram illustrating a water safety hazard with warning sign and temperature indicators12 Pošto posuda za čišćenje kamenca postaje vruća tokom procesa čišćenja kamenca, sačekajte približno 5 minuta pre nego što je dodirnete. Zatim odnesite posudu za čišćenje kamenca do sudopere, ispraznite je i odložite za buduću upotrebu.
Napomena: Tokom procesa čišćenja kamenca iz grejne ploče će možda izlaziti čista voda ako se unutar pegle nije nakupio kamenac. To je normalno.
Srpski

natural_image
Close-up of a mechanical component with a speaker icon and starburst pattern (no text or symbols)1 Indikator za čišćenje kamenca počeće da svetli nakon 1 do 3 meseca upotrebe i aparat će početi da se oglašava zvučnim signalom, što ukazuje na to da je potrebno da obavite proces čišćenja kamenca.

text_image
Diagram showing a hand using an iron with sound waves and a cross symbol indicating cancellation or error.2 Pored toga, ugraden je i drugi korak za zaštitu aparata od kamenca: funkcija pare se onemogućava ako se ne obavi čišćenje kamenca. Funkcija pare ponovo postaje dostupna nakon što očistite kamenac. Ovo se odvija bez obzira na vrstu vode koju koristite.
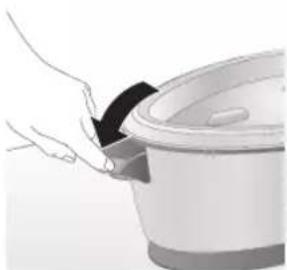
natural_image
Illustration of a hand placing a black cloth into a rice cooker (no text or symbols visible)natural_image
3D rendered image of a mechanical component with a curved handle and rectangular body, placed on a flat surface (no text or symbols visible)5 Stavite posudu za čišćenje kamenca na dasku za peglanje ili bilo koju drugu ravnu i stabilnu površinu.
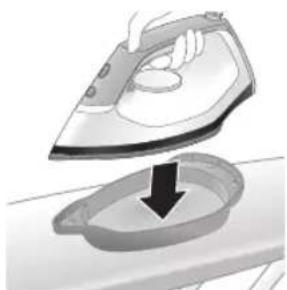
natural_image
Illustration of a steam iron being placed into a sink with a downward arrow indicating motion (no text or symbols)6 Stabilno postavite peglu na posudu za čišćenje kamenca.

text_image
2 sec CALC CLEAN7 Pritisnite dugme CALC-CLEAN i zadržite ga 2 sekunde dok ne budete čuli kratke zvučne signale.
natural_image
Illustration of a steaming iron with warning symbols (no text or labels)9 Kada se završi proces čišćenja kamenca, pegla prestaje da se oglasava zvučnim signalima, a indikator CALC-CLEAN prestaje da treperi.
natural_image
Hand using a iron on a surface, no text or symbols visible10 Obrišite peglu parčetom tkanine i vratite je na baznu stanicu.
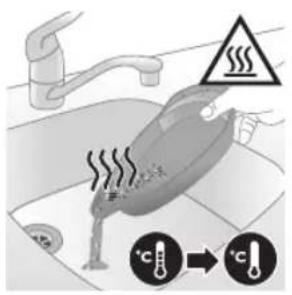
text_image
Diagram illustrating temperature regulation in a kitchen, showing a thermometer and warning symbol with Chinese text.11 Pošto posuda za čišćenje kamenca postaje vruća tokom procesa čišćenja kamenca, sačekajte približno 5 minuta pre nego što je dodirnete. Zatim odnesite posudu za čišćenje kamenca do sudopere, ispraznite je i odložite za buduću upotrebu.
Napomena: Tokom procesa čišćenja kamenca iz grejne ploče će možda izlaziti čista voda ako se unutar pegle nije nakupio kamenac. To je normalno.
natural_image
Illustration of a hand using an iron on a surface with arrows indicating motion (no text or symbols)text_image
Warning symbol and cleaning instruction illustration showing a bottle, magnifying glass, and spray bottle with a cross markNapomena: Nemojte da koristite sapun niti da ribate grejnu ploču tokom čišćenja.
Odlaganje
Serija PSG3000
natural_image
Illustration of a black plug inserted into an open electrical outlet with a black arrow indicating direction (no text or symbols)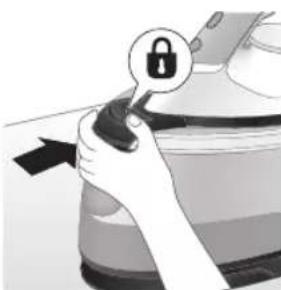
natural_image
Illustration of a hand holding a lock icon with an arrow, no text or symbols present2 Za PSG3010, stavite peglu na postolje i fiksirajte je tako što ćete pritisnuti dugme za otpuštanje brave za nošenje.
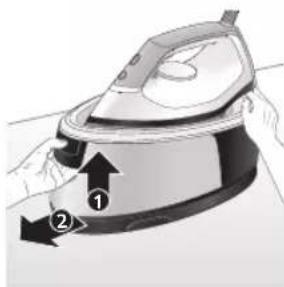
natural_image
Illustration of a steam iron with two arrows indicating motion (no text or symbols)3 Pritisnite ručicu na drški rezervoara za vodu i skinite rezervoar za vodu sa postolja.
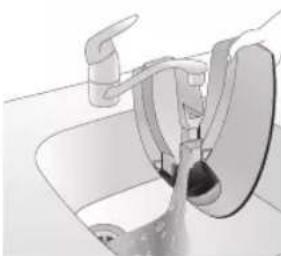
natural_image
Diagram of a kitchen sink with faucet and showerhead (no text or labels)4 Prospite vodu iz posude za vodu u sudoperu.
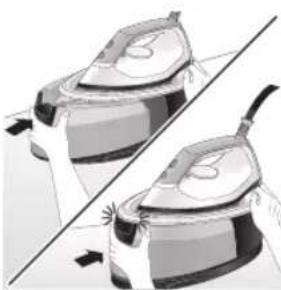
natural_image
Illustration of two identical steam covers with arrows indicating motion, no text or symbols presentnatural_image
Illustration of hands operating a steam iron (no text or symbols visible)6 Savijte crevo za dovod i namotajte ga unutar pregrade za odlaganje creva za dovod.
420 Srpski
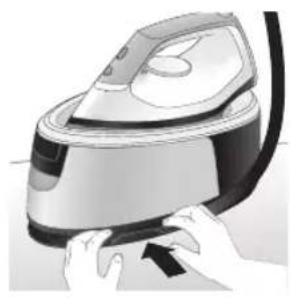
natural_image
Illustration of hands using a steam iron to press down a button (no text or symbols visible)
natural_image
Illustration of a hand using a steam iron to clean or store air (no text or symbols visible)
natural_image
Illustration of a hand using a steam iron with cord and cable (no text or symbols)7 Savijte kabl za napajanje i pričvrstite ga čičak trakom. Zatim uzmite postolje aparata sa dve ruke.
natural_image
Illustration of a plug being inserted into an electrical outlet (no text or symbols)
natural_image
Illustration of a kitchen sink with a pot and faucet (no text or symbols)2 Prospite vodu iz posude za vodu u sudoperu.
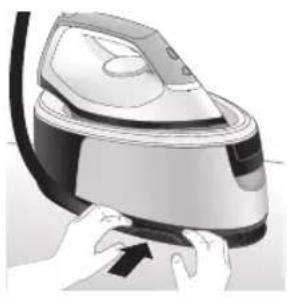
natural_image
Illustration of a hand pressing down on a steam iron (no text or symbols visible)3 Savijte crevo za dovod i namotajte ga unutar pregrade za odlaganje creva za dovod.
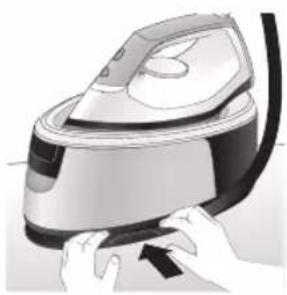
natural_image
Illustration of hands operating a steam iron (no text or symbols visible)
natural_image
Illustration of a hand using a steam iron to clean or operate (no text or symbols visible)4 Savijte kabl za napajanje i pričvrstite ga čičak trakom. Zatim uzmite postolje aparata sa dve ruke.
422 Suomi
Johdanto
text_image
Labeled diagram of a steam iron with numbered parts for identificationPSG2000-sarja

text_image
Labeled diagram of a steam iron with numbered parts for identificationnatural_image
Illustration of hands performing a manual press or repair operation on a machine (no text or symbols visible)
text_image
1.4L MAX
natural_image
Illustration of a pair of identical mechanical components with arrows indicating motion or force direction (no text or symbols)natural_image
Illustration of a hand placing a dark object into a rice cooker (no text or symbols visible)
text_image
1.4L MAXnatural_image
Illustration of a plug being inserted into an electrical outlet (no text or symbols)
natural_image
Illustration of a hand pressing a button with a power symbol (no text or labels)natural_image
Close-up illustration of a mechanical component with a star-shaped feature (no text or symbols visible)natural_image
Close-up of a medical or laboratory procedure showing a checkmark and magnified view of a circular object (no text or symbols visible)natural_image
Illustration of a hand holding a lock icon over a device (no text or symbols)natural_image
Close-up of a hand pressing down on a small electronic device with a curved arrow indicating motion (no text or symbols visible)natural_image
Illustration of a hand using an iron on a surface, with a black arrow indicating the motion direction (no text or symbols present)text_image
Diagram showing a checkmark pointing up and down on a shirt, with a magnified inset of a garment detail.text_image
Illustration showing a person with a steam iron, crossed out by a 'X' symbol, and a warning triangle with 'SWEI' text.text_image
Warning sign showing a hanger with a hand gesture and a warning symbol, alongside a frying pan.Lisähöyrysuihkaus

text_image
EVO SOLX 10000 10000 10000 10000 10000 10000 10000 10000 10000 10000 10000 10000 10000 10000 10000 10000 10000 10 ✓ ×natural_image
Illustration of an air conditioner with a hourglass icon and ~15-minute time label (no text or symbols on the device itself)text_image
Diagram illustrating temperature change with labeled thermometer symbols and a star-shaped object on a surface
text_image
-10 min OFFnatural_image
Illustration of a steam iron with sound waves above it (no text or symbols)
text_image
Illustration of a hand using an iron with sound waves and a cross symbol indicating cancellation or error.natural_image
Illustration of a hand using an iron iron to lift a cup, showing two directional arrows (no text or symbols)natural_image
Illustration of a pair of steam covers with arrows indicating motion (no text or symbols)natural_image
3D rendered image of a mechanical component with a curved handle and flange, placed on a flat surface (no text or symbols visible)natural_image
Illustration of a hand ironing an iron with a downward arrow indicating cooling or residue (no text or symbols)text_image
2 sec CALC CLEANtext_image
FULL CLEAN ~2 minnatural_image
Illustration of an electric iron with warning symbols (no text or labels)natural_image
Hand using a power iron on a surface (no text or symbols visible)text_image
Diagram illustrating heat transfer in a kitchen with warning sign and thermometer symbolsnatural_image
Close-up of a speaker emitting sound waves, no text or symbols visiblePSG2000-sarja
text_image
Illustration of a hand using an iron with sound waves and a cross symbol indicating cancellation or error.natural_image
Illustration of a hand placing a dark object into a rice cooker (no text or symbols visible)natural_image
3D rendered mechanical part with a looped end, resting on a flat surface (no text or symbols visible)natural_image
Illustration of a steam iron being placed into a sink with a downward arrow indicating motion (no text or symbols)text_image
2 sec CALC CLEANnatural_image
Illustration of an iron iron with warning symbols (no text or labels)natural_image
Hand using a power iron on a surface (no text or symbols visible)text_image
Diagram illustrating temperature change in a car with warning symbols and thermometer iconsnatural_image
Illustration of a hand using an iron on a surface with arrows indicating motion (no text or symbols)text_image
Warning symbol and safety icon showing a bottle, magnifying glass, and a paper roll with a cross marknatural_image
Illustration of a plug inserted into an electrical outlet with a black arrow indicating direction (no text or symbols)
natural_image
Illustration of a hand holding a lock icon with an arrow, no text or symbols presentnatural_image
Illustration of a steam iron with two arrows indicating motion (no text or symbols)natural_image
Diagram of a kitchen sink with faucet and showerhead (no text or labels)natural_image
Illustration of two identical steam covers with a diagonal line crossing through, no text or symbols present.natural_image
Illustration of hands operating a steam iron (no text or symbols visible)natural_image
Illustration of hands operating a steam iron (no text or symbols visible)
natural_image
Illustration of a hand washing a steam iron (no text or symbols visible)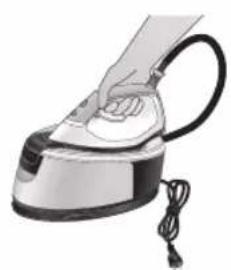
natural_image
Illustration of a hand using a steam iron with cord and cable (no text or symbols)natural_image
Illustration of a plug inserted into an electrical outlet with a black arrow indicating direction (no text or symbols)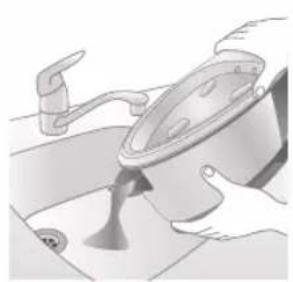
natural_image
Illustration of a kitchen sink with a pot and faucet (no text or symbols)natural_image
Illustration of hands operating a steam iron (no text or symbols visible)natural_image
Illustration of hands operating a steam iron (no text or symbols visible)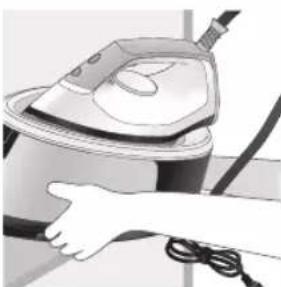
natural_image
Illustration of a hand using a power iron to clean or install a machine (no text or symbols visible)text_image
Labeled diagram of a steam iron with numbered parts for identificationPSG2000-serien

text_image
Labeled diagram of a steam iron with numbered parts for identificationnatural_image
Illustration of hands performing a mechanical press or repair operation (no text or symbols visible)natural_image
Illustration of a pair of steam iron holders in a row, showing front and side views (no text or symbols)natural_image
Illustration of a hand placing a black object into a rice cooker (no text or symbols visible)
text_image
7.4L MAXnatural_image
Illustration of a plug being inserted into an electrical outlet (no text or symbols)Svenska

natural_image
Illustration of a hand pressing a button on a device with a power symbol (no text or labels)natural_image
Illustration of a mechanical component with a star-shaped feature and a curved handle (no text or symbols)natural_image
Illustration of a medical or laboratory procedure step with a checkmark and magnified view (no text or symbols)natural_image
Illustration of a hand adjusting a lock mechanism with a padlock icon (no text or symbols)natural_image
Close-up of a hand pressing down on a small electronic device with a curved arrow indicating motion (no text or symbols visible)natural_image
Illustration of a hand using an iron on a surface, with a black arrow indicating the iron's tip (no text or symbols present)natural_image
Illustration of a shirt with a checkmark and a hand holding a CD (no text or symbols)text_image
Safety warning illustration showing a person using a power tool with a cross symbol and warning triangletext_image
Diagram illustrating a hanger with warning symbols including a cross, steam, and a hand holding an iron, symbolizing hazard or stress.444 Svenska
Ångpuff

text_image
Eco Sick Eco Sick Eco Eco Eco Eco Eco Eco Eco Eco Eco Eco Eco Eco Eco Eco Eco Eco Eco Eco Eco Eco Eco Eco Eco Eco Eco Eco Eco Eco Eco Eco Eco Eco Eco Econatural_image
Illustration of an iron (£) with a hourglass above it, showing time ~15 minutes (no text or symbols on the device itself)text_image
Diagram illustrating temperature change with labeled thermometer symbols and a star-shaped object on a surfacenatural_image
Illustration of a speaker emitting sound waves above a computer monitor (no text or symbols)PSG3000-serien
text_image
Diagram showing a hand using an iron with sound waves and a cross symbol indicating explosion or damage.natural_image
Illustration of a hand using an iron iron to lift a cup, showing two directional arrows (no text or symbols)natural_image
Illustration of a pair of steam iron holders in a diagonal line, showing front and side views (no text or symbols)natural_image
3D rendered image of a mechanical component on a flat surface (no text or symbols visible)natural_image
Illustration of a hand ironing an iron with a downward arrow indicating cooling or residue (no text or symbols)text_image
2 sec CALC CLEANtext_image
FULL CLEAN ~2 minnatural_image
Illustration of a steam iron on a surface with a warning symbol (no text or labels)natural_image
Hand using a power iron on a surface (no text or symbols visible)text_image
Diagram illustrating a heating mechanism with temperature symbols and warning sign, showing a valve cooling system.natural_image
Close-up of a speaker emitting sound waves, no text or symbols visiblePSG2000-serien
text_image
Illustration of a hand using an iron with sound waves and a cross symbol indicating cancellation or error.natural_image
Illustration of a hand placing a dark object into a rice cooker (no text or symbols visible)natural_image
3D rendered mechanical part with a looped ring on a flat surface (no text or symbols)natural_image
Illustration of a steam iron being placed into a sink with a downward arrow indicating motion (no text or symbols)text_image
2 sec CALC CLEANnatural_image
Illustration of an iron iron with warning symbols (no text or labels)natural_image
Hand using a power iron on a surface (no text or symbols visible)text_image
Diagram illustrating temperature change in a car with warning sign and thermometer symbolsnatural_image
Illustration of a hand using an iron on a surface with arrows indicating motion (no text or symbols)text_image
Warning symbol and safety icon showing a bottle, magnifying glass, and industrial machine with warning labelsnatural_image
Illustration of a plug inserted into an electrical outlet with a black arrow indicating direction (no text or symbols)
natural_image
Illustration of a hand holding a lock icon with an arrow, no text or symbols presentnatural_image
Illustration of a steam iron with two directional arrows indicating motion (no text or symbols)natural_image
Diagram of a bathroom sink with faucet and toilet (no text or labels)natural_image
Illustration of two identical air purifiers with arrows indicating motion, no text or symbols presentnatural_image
Illustration of hands operating a steam iron (no text or symbols visible)natural_image
Illustration of hands using a steam iron to press down a button (no text or symbols visible)
natural_image
Illustration of a hand using a steam iron to clean or store air (no text or symbols visible)
natural_image
Illustration of a hand using a steam iron with cord and cable (no text or symbols)natural_image
Illustration of a plug being inserted into an electrical outlet (no text or symbols)
natural_image
Illustration of a kitchen sink with a pot and faucet (no text or symbols)natural_image
Illustration of hands operating a steam iron (no text or symbols visible)natural_image
Illustration of hands operating a steam iron (no text or symbols visible)natural_image
Illustration of a hand using a steam iron to clean or operate (no text or symbols visible)454 Tiếng Việt
Gioi thiêu
text_image
Labeled diagram of a steam iron with numbered parts for identificationDòng PSG2000

text_image
Labeled diagram of a steam iron with numbered parts for identificationnatural_image
Illustration of hands adjusting a mechanical component with numbered arrows (no text or symbols)
text_image
MAX 1.4Lnatural_image
Illustration of two identical steam covers with a diagonal line crossing through, no text or symbols present.natural_image
Hand placing a dark object into a cooking pot (no text or symbols visible)
text_image
7.4L MAXnatural_image
Illustration of a plug with a power outlet connected to a wall socket (no text or symbols)Tiếng Việt

natural_image
Illustration of a hand pressing a button on a device with a power symbol (no text or labels)natural_image
Illustration of a mechanical component with a star-shaped feature and curved surfaces (no text or symbols)natural_image
Illustration of a medical or laboratory procedure step with a checkmark and magnified view (no text or symbols)natural_image
Illustration of a hand adjusting a lock mechanism with a padlock icon (no text or symbols)natural_image
Close-up of a hand pressing down on a small electronic device with a curved arrow indicating motion (no text or symbols visible)natural_image
Illustration of a hand using an iron on a surface, with a black arrow indicating the motion direction (no text or symbols present)text_image
Diagram showing a checkmark and arrow pointing to a document, likely indicating a verification or approval process.text_image
Illustration showing a person holding an electric shock absorber with a warning symbol and cross marktext_image
Illustration showing a shirt with a hand, crossed-out X, and a steam iron, alongside a warning symbol.460 Tiếng Việt
Tăng cường hơi nước

text_image
Eco SIX 100% 100% 100% 100% 100% 100% 100% 100% 100% 100% 100% 100% 100% 100% 100% 100% 100% 100% 100% 100% 100% 100% 100% 100% 100% 100 X ✓text_image
Diagram illustrating temperature change with labeled thermometer symbols and a star-shaped object on a surface
text_image
-10 min OFFnatural_image
Illustration of a steaming iron with sound waves above it (no text or symbols)Dòng PSG3000
text_image
Diagram showing a hand using an iron with sound waves and a cross symbol indicating cancellation or error.natural_image
Illustration of a hand using a steam iron to press down a button (no text or symbols present)natural_image
Illustration of two steam iron holders in a diagonal line, no text or symbols presentnatural_image
3D rendered image of a mechanical component on a flat surface (no text or symbols visible)natural_image
Illustration of a hand ironing an iron, with a downward arrow indicating cooling or residue (no text or symbols present)text_image
2 sec CALC CLEANnatural_image
Illustration of an electric iron with warning symbols (no text or labels)natural_image
Hand using a power iron on a surface (no text or symbols visible)text_image
Diagram illustrating heat transfer in a kitchen with temperature indicators and warning symbolnatural_image
Close-up of a speaker emitting sound waves, no text or symbols visible
text_image
Illustration of a hand using an iron with sound waves and a cross symbol indicating cancellation or error.
natural_image
Illustration of a hand placing a dark object into a rice cooker (no text or symbols visible)
text_image
1.4L MAX
natural_image
3D rendered mechanical part with a looped end, resting on a flat surface (no text or symbols visible)Dòng PSG2000
natural_image
Illustration of a steam iron being placed into a sink with a downward arrow indicating motion (no text or symbols)text_image
2 sec CALC CLEANnatural_image
Illustration of a steaming iron with warning symbols (no text or labels)natural_image
Hand using a power iron on a surface (no text or symbols visible)text_image
Safety warning illustration showing a toilet with steam rising and temperature change iconsnatural_image
Illustration of a hand using an iron on a surface with directional arrows indicating motion (no text or symbols)text_image
Warning symbol and safety icon showing a bottle, magnifying glass, and industrial iron iron with warning labelsnatural_image
Illustration of a plug inserted into an electrical outlet with a black arrow indicating direction (no text or symbols)
natural_image
Illustration of a hand holding a lock icon with an arrow, no text or symbols presentnatural_image
Illustration of a steam iron with two arrows indicating motion (no text or symbols)natural_image
Diagram of a bathroom sink with faucet and shower mechanism (no text or labels)natural_image
Illustration of two identical steam iron machines side by side, showing front and back views (no text or symbols)natural_image
Illustration of hands operating a steam iron (no text or symbols visible)natural_image
Illustration of hands using a steam iron to press down a button (no text or symbols visible)
natural_image
Illustration of a hand using a steam iron to clean or store air (no text or symbols visible)
natural_image
Illustration of a hand using a steam iron with cord and cable (no text or symbols)natural_image
Illustration of a plug being inserted into an electrical outlet (no text or symbols)
natural_image
Illustration of a kitchen sink with a pot and faucet (no text or symbols)natural_image
Illustration of hands operating a steam iron (no text or symbols visible)natural_image
Illustration of hands operating a steam iron (no text or symbols visible)
natural_image
Illustration of a hand using a steam iron to clean or install a cable (no text or symbols visible)text_image
Labeled diagram of a steam iron with numbered parts for identificationPSG2000 serisi

text_image
Labeled diagram of a steam iron with numbered parts for identificationnatural_image
Illustration of hands performing a press or cleaning operation on a device (no text or symbols visible)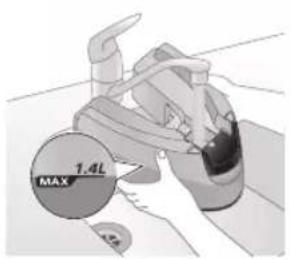
text_image
MAX 1.4Lnatural_image
Illustration of two identical mechanical components with a diagonal line crossing them (no text or symbols)natural_image
Hand placing a black object into a white pot (no text or symbols visible)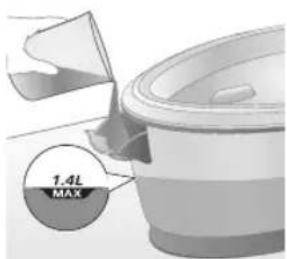
text_image
7.4L MAXnatural_image
Close-up of a hand pressing down on a small electronic device component (no visible text or symbols)natural_image
Illustration of a hand using an iron on a patient's arm, with a black arrow indicating the pressure point (no text or symbols present)text_image
Diagram showing a hand holding a shirt with a checkmark and an airplane, indicating a verification or inspection process.text_image
Illustration of a person in a shirt with a steam iron, crossed out by a 'X' symbol and a warning triangle.text_image
Warning sign showing a hanger with a hand gesture and an electric iron, indicating heat or stress in clothing safety.Buhar püskürtme
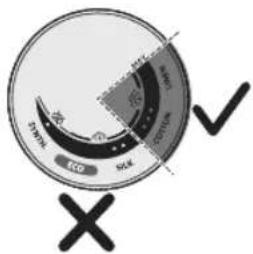
text_image
ECD SCK SCK ECD SCKtext_image
Diagram illustrating temperature change with thermometer symbols and a star-shaped object, likely for thermal monitoring or testing.
text_image
~10 min OFFnatural_image
Illustration of a speaker emitting sound waves above a computer monitor (no text or symbols)text_image
Illustration of a hand using an iron with sound waves and a cross symbol indicating cancellation or error.natural_image
Illustration of a steam iron with two directional arrows indicating motion (no text or symbols)natural_image
Illustration of two steam covers with arrows indicating motion, no text or symbols presentnatural_image
3D rendered image of a mechanical component with a curved handle and flange, placed on a flat surface (no text or symbols visible)natural_image
Illustration of a steam iron being placed into a sink with a downward arrow indicating motion (no text or symbols)text_image
2 sec CALC CLEANnatural_image
Illustration of a steaming iron on a surface with a warning symbol (no text or labels)natural_image
Illustration of a hand using a power iron on a surface (no text or symbols)text_image
Diagram illustrating heat transfer in a kitchen with warning sign and temperature indicatorsnatural_image
Illustration of a steam iron with sound waves and a starburst on the handle (no text or symbols)text_image
Illustration of a hand using an iron with sound waves and a cross symbol indicating no change or error.natural_image
Illustration of a hand placing a black cloth into a rice cooker (no text or symbols visible)natural_image
3D rendered image of a mechanical component on a flat surface (no text or symbols visible)natural_image
Illustration of a steam iron being placed into a sink with a downward arrow (no text or symbols)text_image
2 sec CALC CLEANnatural_image
Illustration of an iron steater with warning symbols (no text or labels)natural_image
Hand using a power iron on a surface (no text or symbols visible)text_image
Diagram illustrating temperature change in a car with warning sign and thermometer symbolsnatural_image
Illustration of a hand using an iron on a surface with arrows indicating motion (no text or symbols)text_image
Warning symbol and safety icon showing a bottle, magnifying glass, and industrial machine with warning labelsnatural_image
Illustration of a plug inserted into an electrical outlet with a black arrow indicating direction (no text or symbols)484 Türkçe

natural_image
Illustration of a hand holding a lock icon with an arrow, no text or symbols presentnatural_image
Illustration of a steam iron with two arrows indicating motion (no text or symbols)natural_image
Diagram of a bathroom sink with faucet and shower mechanism (no text or labels)natural_image
Illustration of two identical steam iron machines side by side, showing front and back views (no text or symbols)natural_image
Illustration of hands operating a steam iron (no text or symbols visible)natural_image
Illustration of hands using a steam iron to press down a component (no text or symbols visible)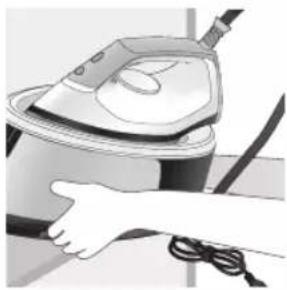
natural_image
Illustration of a hand using a steam iron to clean or operate (no text or symbols visible)
natural_image
Illustration of a hand using a steam iron with cord and tassel (no text or symbols)natural_image
Illustration of a plug being inserted into an electrical outlet (no text or symbols)
natural_image
Illustration of a kitchen sink with a pot and faucet (no text or symbols)natural_image
Illustration of a hand pressing down on a steam iron (no text or symbols visible)natural_image
Illustration of hands operating a steam iron (no text or symbols visible)
natural_image
Illustration of a hand using a steam iron to clean or operate (no text or symbols visible)text_image
Labeled diagram of a steam iron with numbered parts for identificationPSG2000 seriýasy

text_image
Labeled diagram of a steam iron with numbered parts for identification1 Çyraly CALC-CLEAN düwmesi
2 Güyç düwmesi
3 Ütügiň taýyardgyny görkezýän çyra
4 Suw gabynyň goýberiş ryçagy (PSG3000 seriya) / Suw gabyny doldurmak üçin gapak (PSG2000 seriya)
5 Aýryp bolýan suw gaby (PSG3000 seriýa) / Aýryp bolmayan suw gaby (PSG2000 seriýa)
6 Suw üpjünçilik slangasy saklanyan bölüm
7 Akylly Calc-Clean gaby
8 Elektrik dürtgüji bilen elektrik kabeli
9 Suw üpjünçilik şlangasy
10 Bug goýberiji/Güyçli bug
11 Temperaturany düzüş nurbady
12 Ökje
13 Göterileninde gulpy yazdyrían düwme (PSG3010)
Ulanyşa taýyarlamak
natural_image
Illustration of a person adjusting a belt buckle with arrows indicating steps (no text or symbols)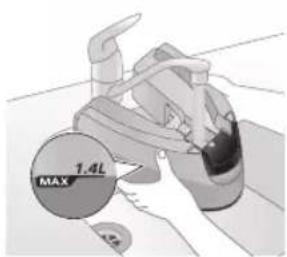
text_image
1.4L MAX
natural_image
Illustration of two identical steam covers with a diagonal line dividing them (no text or symbols)natural_image
Hand placing a black object into a rice cooker (no text or symbols visible)PSG2000 seriýasy
natural_image
Close-up of a hand pressing down on a mechanical component with a curved arrow indicating motion (no text or symbols visible)natural_image
Illustration of a hand using an iron to press down a cup (no text or symbols visible)text_image
Diagram showing a hand holding a shirt with a checkmark and an airplane flying nearby, indicating a verification or inspection process.text_image
Safety warning illustration showing a person holding an electric shock absorber with a warning symbol and cross marktext_image
Safety warning illustration showing a hanger, hand gesture with X mark, and steam symbol indicating hazardGüyçli bug
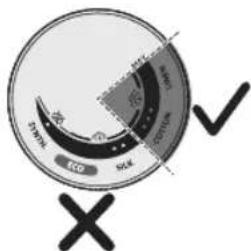
text_image
Eco SWAK SOLK SWAK X √1 Güyçli bug funksiyasy diñe 3 nokatdan MAX temperatura çenli elýeter bolýar.

text_image
2Xnatural_image
Illustration of an iron (£) with a hourglass above it, showing time ~15 minutes (no text or symbols on the device itself)1 Enjam 15 minutdan köp wagtlap ulanylmasa, ütügiğn taýyardgyny görkezyän çyra ÿanyp-öçüp başlayar we ütük sowap başlayar.
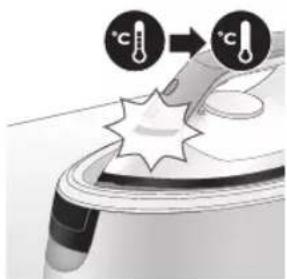
text_image
Diagram illustrating temperature change with labeled thermometer symbols and a star-shaped object on a surface
text_image
~10 min OFF2 Şondan soň 10 minutlap enjama degilmese, ol awtomatik usulda öçyär.
Duýduryş: Elektrik toguna birikdirilen enjamy hiç haçan gözegçiliksiz galdyrmaň. Ulanyp bolanyňyzdan soň elmydama enjamy tokdan aýryň.
Arassalamak we abatlamak
Smart Calc-Clean ulgamy
natural_image
Illustration of a speaker emitting sound waves, no text or symbols presentPSG3000 seriýasy
text_image
Diagram showing a hand using an iron with sound waves and a cross symbol indicating cancellation or error.text_image
Diagram of a steam iron with labeled parts showing two directional arrows indicating motion or movement.natural_image
Illustration of two steam covers with arrows indicating motion, no text or symbols presentnatural_image
3D rendered image of a mechanical component with a curved handle and flange, resting on a flat surface (no text or symbols visible)natural_image
Illustration of a hand using an iron to clean a small bowl (no text or symbols present)7 Ütügi çökündileri ayyrmakda ulanylyan Calc-Clean gabynyň üstünde durnukly görnüşde yerleşdirin.

text_image
2 sec CALC CLEAN8 Gysga bip sesini eşidyänçäniz CALC-CLEAN düwmesini 2 sekuntlap basyp saklaň.
text_image
Cable CLEAN ~2 min9 Çökündileri ayyrys yerine yetirilýärkä gysga bip seslerini we nasosyň sesini eşidersiňiz. Enjamyň işi tamamlamagy üçin takmynan 2 minut garaşyn.
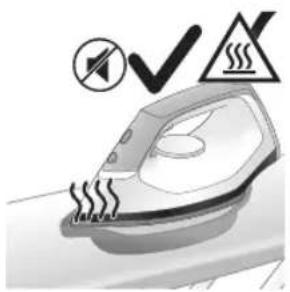
natural_image
Illustration of an electric iron emitting steam, with a warning symbol (no text or labels)10 Calc-Clean tamamlananda ütük sesli duýduryş bermegini bes edýär we CALC-CLEAN çyrasy yanyp-öçmegini bes edýär.
Seresap boluň: Ütük gyzgyn bolýar.
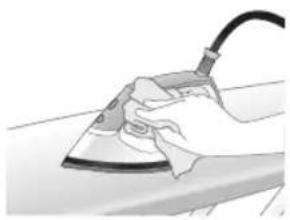
natural_image
Hand using a power iron on a surface (no text or symbols visible)text_image
Safety warning illustration showing a hand pressing down on a toilet with warning symbols and temperature indicators.12 Çökündileri ayyrmak yerine yetirileninde çökündileri ayyrmakda ulanylyan gap gyzgyn bolýar, şol sebäpli oňa eliñizi degirmezden ozal 5 minut töweregi garaşyň. Soňra çökündileri ayyrmakda ulanylyan Calc-Clean gabyny rakowina eltiň, gaby boşadyň we ony geljekde ulanmak üçin saklaň.
natural_image
Illustration of a steam iron with sound waves above it, no text or symbols presenttext_image
Illustration of a steam iron with sound waves and a cross symbol indicating cancellation or error2 Mundan başga-da, enjamy çökündilerden goramagyň ikinji gorag ädimi hem ornaşdyrylan: çökündileri ayyrmak yerine yetirilmese, bug funksiyasy işlemän galýar. Çökündileri ayyrmak yerine yetirileninden soň bug funksiyasy gaytadan işläp başlaýar. Bu, ulanylyan suwuň görnüşine garamazdan bolup geçýär.

natural_image
Illustration of a hand placing a black cloth into a white rice cooker (no text or symbols visible)3 Suw gaby doldurylyan gapagy açyn.

text_image
7.4L MAXnatural_image
3D rendered image of a mechanical component or housing on a flat surface (no text or symbols visible)natural_image
Illustration of a steam iron being placed into a sink with a downward arrow indicating motion (no text or symbols)6 Ütügi çökündileri ayyrmakda ulanylýan Calc-Clean gabynyň üstünde durnukly görnüşde yerleşdiriň.

text_image
2 sec CALC CLEAN7 Gysga bip sesini eşidyänçañiz CALC-CLEAN düwmesini 2 sekuntlap basyp saklaň.
natural_image
Illustration of a steaming iron with warning symbols (no text or labels)9 Calc-Clean tamamlananda ütük sesli duýduryş bermegini bes edýär we CALC-CLEAN çyrasy ýanyp-öçmegini bes edýär.
Seresap boluň: Ütük gyzgyn bolýar.

natural_image
Hand using a iron on a surface, no text or symbols visibletext_image
Safety warning illustration showing a hand pressing down on a toilet with temperature and warning symbols11 Çökündileri aýrymak yerine yetirileninde çökündileri aýrymakda ulanylyan gap gyzgyn bolýar, şol sebäpli oňa eliñizi degirmezden ozal 5 minut töweregi garaşyň. Soňra çökündileri aýrymakda ulanylyan Calc-Clean gabyny rakowina eltiň, gaby boşadyň we ony geljekde ulanmak üçin saklaň.
natural_image
Illustration of a hand using an iron on a surface with directional arrows indicating motion (no text or symbols)Enjamyňyzy talabalaýyk abatlamak üçin ony belli wagtlarda arassalap duruň.
text_image
Warning symbol and safety icon showing a bottle, magnifying glass, and industrial machine with warning labelsBellik: Arassaçylyk geçireniñizde sabyn ulanmaň ÿa-da ütügiñ esasy plitasyny gazamaň.
Ammarda saklamak
PSG3000 seriýasy
natural_image
Illustration of a plug with a black arrow pointing to a white electrical outlet (no text or symbols)Türkmençe

natural_image
Illustration of a hand holding a lock icon with an arrow, no text or symbols presentnatural_image
Illustration of a steam iron being placed on a surface, showing two directional arrows (no text or symbols)natural_image
Pure mechanical diagram showing a lever mechanism without any text, numbers, or symbols4 Suw gabyndaky suwy rakowina dökün.
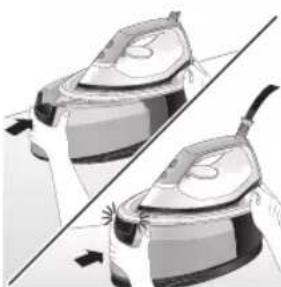
natural_image
Illustration of two identical air purifiers with arrows indicating motion, no text or symbols present5 Suw gaby enjamdaky yerine ildirilyänçyä ony enjamyn içine itiň (tykgyldy sesi).
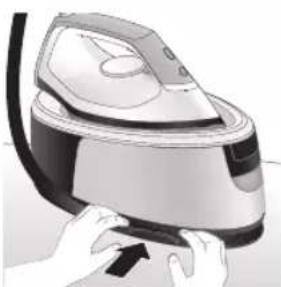
natural_image
Illustration of hands operating a steam iron (no text or symbols visible)natural_image
Illustration of hands using a steam iron to press down a button (no text or symbols visible)
natural_image
Illustration of a hand using a steam iron to clean or store air (no text or symbols visible)
natural_image
Illustration of a hand using a steam iron with cord and cable (no text or symbols)7 Elektrik kabelini eplän we ony Velcro gysgyç bilen berkidiň. Soňra enjamyn esasyny iki eliñiz bilen göteriň.
natural_image
Illustration of a plug being inserted into an electrical outlet (no text or symbols)
natural_image
Illustration of a kitchen sink with a pot and faucet (no text or symbols)2 Suw gabyndaky suwy rakowina dökün.
Türkmençe 503

natural_image
Illustration of hands using a steam iron to press down a button (no text or symbols visible)natural_image
Illustration of hands operating a steam iron (no text or symbols visible)
natural_image
Illustration of a hand using a steam iron to clean air (no text or symbols visible)4 Elektrik kabelini eplän we ony Velcro gysgyç bilen berkidiň. Soňra enjamyn esasyny iki eliñiz bilen göteriň.
504 Ελληνικά
Εισαγωγή
text_image
Labeled diagram of a steam iron with numbered parts for identificationΣειρά PSG2000

text_image
Labeled diagram of a steam iron with numbered parts for identificationnatural_image
Illustration of hands adjusting a mechanical component with numbered arrows (no text or symbols)natural_image
Illustration of two identical steam covers with a diagonal line dividing them (no text or symbols)natural_image
Illustration of a hand placing a black object into a rice cooker (no text or symbols visible)
text_image
7.4L MAXnatural_image
Illustration of a hand inserting a plug into an electrical outlet (no text or symbols)natural_image
Illustration of a hand holding a power button with an icon, no text or symbols presentnatural_image
Illustration of a mechanical component with a star-shaped feature and curved handle (no text or symbols)natural_image
Illustration of a hand holding a white circular object with a black checkmark (no text or symbols)natural_image
Illustration of hands adjusting a device with a lock icon (no text or symbols)natural_image
Close-up of a hand pressing down on a mechanical component with a curved arrow indicating motion (no text or symbols visible)natural_image
Illustration of a hand using an iron on a patient's arm, with no visible text or symbolstext_image
Diagram showing a checkmark and downward arrow on a shirt, next to an illustration of a hand holding a magnifying glass.text_image
Illustration showing a person in uniform with a steam iron, crossed out by a 'X' symbol and a warning triangle with 'SWEI' sign.text_image
Safety warning illustration showing hand gesture, steam warning symbol, and crossed-out X mark on shirtΒολή ατμού

text_image
Eco SOL DPM 2000 2010 2020 X √text_image
Diagram illustrating temperature change with thermometer symbols and a star-shaped object, likely for thermal monitoring or testing.
text_image
~10 min OFFnatural_image
Illustration of a speaker emitting sound waves above a device (no text or symbols)text_image
Illustration of an iron frying pan with sound waves and a cross symbol indicating cancellation or errornatural_image
Illustration of a person using an iron iron to lift a cup, showing two directional arrows (no text or symbols)natural_image
Illustration of two steam covers with arrows indicating motion, no text or symbols presentnatural_image
3D rendered image of a mechanical component with a curved handle and flange, resting on a flat surface (no text or symbols visible)natural_image
Illustration of a hand using an iron to clean a small bowl (no text or symbols present)text_image
2 sec CALC CLEANtext_image
Cable CLEAN ~2 minnatural_image
Illustration of an electric iron emitting steam, with a warning symbol (no text or labels)natural_image
Hand using a power iron on a surface (no text or symbols visible)text_image
Diagram illustrating a water safety hazard with warning symbols and temperature indicatorsnatural_image
Illustration of a steam iron with sound waves above it (no text or symbols)text_image
Illustration of a steam iron with sound waves and a cross symbol indicating cancellation or errornatural_image
Illustration of a hand placing a black object into a white cylindrical container (no text or symbols visible)natural_image
3D rendered image of a mechanical component on a flat surface (no text or symbols visible)natural_image
Illustration of a steam iron being placed into a sink with a downward arrow indicating cooling (no text or symbols)text_image
2 sec CALC CLEANnatural_image
Illustration of a steaming iron with a warning symbol (no text or labels)natural_image
Hand using a power iron on a surface (no text or symbols visible)text_image
Diagram illustrating temperature change in a kitchen with warning symbols and thermometer iconsnatural_image
Illustration of a hand using an iron on a surface with directional arrows indicating motion (no text or symbols)text_image
Warning symbol and safety icon showing a bottle, cross mark, and warning sign with exclamation marknatural_image
Illustration of a black plug inserted into an open electrical outlet with a black arrow indicating direction (no text or symbols)Ελληνικά
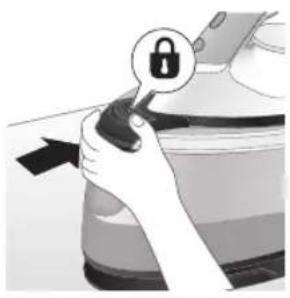
natural_image
Illustration of a hand holding a lock icon with an arrow, no text or symbols presentnatural_image
Illustration of a steam iron with two arrows indicating motion (no text or symbols)natural_image
Diagram of a bathroom sink with faucet and shower mechanism (no text or symbols)natural_image
Illustration of two identical steam iron machines side by side, showing front and back views (no text or symbols)natural_image
Illustration of hands operating a steam iron (no text or symbols visible)natural_image
Illustration of hands using a steam iron to press down a component (no text or symbols visible)
natural_image
Illustration of a hand using a steam iron to clean or wear cable (no text or symbols visible)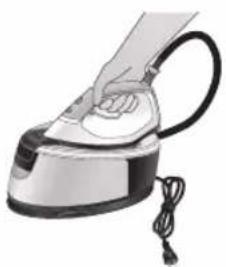
natural_image
Illustration of a hand using a steam iron with cord and cable (no text or symbols)natural_image
Illustration of a plug being inserted into an electrical outlet (no text or symbols)
natural_image
Illustration of a kitchen sink with a pot and faucet (no text or symbols)natural_image
Illustration of a hand pressing down on a steam iron (no text or symbols visible)natural_image
Illustration of hands operating a steam iron (no text or symbols visible)
natural_image
Illustration of a hand using a steam iron to clean or operate (no text or symbols visible)text_image
Labeled diagram of a steam iron with numbered parts for identification522 Български
Серия PSG2000

text_image
Labeled diagram of a steam iron with numbered parts for identificationnatural_image
Illustration of hands adjusting a mechanical component with numbered arrows (no text or symbols)natural_image
Illustration of two identical air purifiers on a diagonal line, no text or symbols presentnatural_image
Hand placing a black object into a white pot (no text or symbols visible)Серия PSG2000
natural_image
Close-up of a hand pressing down on a small electronic device with a cable (no visible text or symbols)natural_image
Illustration of a hand using an iron to press down a surface, with no visible text or symbolstext_image
Illustration showing a hand holding a shirt with a checkmark and an upward arrow, next to a magnifying glass.text_image
Illustration showing a person with a steam iron, crossed out by a 'X' symbol, and a warning triangle with 'sowing'.text_image
Safety warning illustration showing a hanger, a warning symbol with 'X', and a frying pan with a warning sign.Парен удар

text_image
Carbon ECO SOE Oxygen ✓natural_image
Illustration of an iron iron on a surface with an hourglass symbol and ~15-minute time label (no text or symbols beyond the label)text_image
Diagram illustrating temperature change with labeled thermometer symbols and a star-shaped object on a surface
text_image
~10 min OFFnatural_image
Illustration of a speaker emitting sound waves, no text or symbols presenttext_image
Illustration of a hand using an iron with sound waves and a cross symbol indicating cancellation or error.natural_image
Illustration of a hand using a steam iron to move down a button (no text or symbols present)natural_image
Illustration of two steam covers with arrows indicating motion, no text or symbols presentnatural_image
3D rendered image of a mechanical component with a curved handle and mounting base (no text or symbols)natural_image
Illustration of a steam iron being placed into a sink with a downward arrow indicating motion (no text or symbols)text_image
2 sec CALC CLEANtext_image
Cable CLEAN ~2 minnatural_image
Illustration of an electric iron emitting steam, with a warning symbol (no text or labels)natural_image
Hand using a power iron on a surface (no text or symbols visible)text_image
Safety warning illustration showing a hand pressing down on a toilet with temperature indicators and warning symbolsnatural_image
Illustration of a steam iron with sound waves above it (no text or symbols)text_image
Diagram showing a hand using an iron with sound waves and a cross symbol indicating cancellation or error.natural_image
Illustration of a hand placing a black cloth into a rice cooker (no text or symbols visible)natural_image
3D rendered image of a mechanical component with a curved handle and rectangular body, placed on a flat surface (no text or symbols visible)natural_image
Illustration of a steam iron being placed into a sink with a downward arrow indicating motion (no text or symbols)text_image
2 sec CALC CLEANnatural_image
Illustration of a steaming iron with a warning symbol (no text or labels)natural_image
Hand using a power iron on a surface (no text or symbols visible)text_image
Diagram illustrating temperature change in a kitchen with warning symbols and thermometer iconsnatural_image
Illustration of a hand using an iron on a workbench with arrows indicating motion (no text or symbols)text_image
Warning symbol and safety icon showing a bottle, magnifying glass, and a damaged airfoil with warning labelnatural_image
Illustration of a black plug inserted into an open electrical outlet with a black arrow indicating direction (no text or symbols)
natural_image
Illustration of a hand holding a lock icon with an arrow, next to a vehicle (no text or symbols)natural_image
Illustration of a steam iron with two arrows indicating motion (no text or symbols)natural_image
Diagram of a bathroom sink with faucet and shower (no text or symbols)natural_image
Illustration of two identical steam iron machines side by side, showing front and back views (no text or symbols)natural_image
Illustration of hands operating a steam iron (no text or symbols visible)natural_image
Illustration of hands operating a steam iron (no text or symbols visible)
natural_image
Illustration of a hand using a steam iron to clean or store air (no text or symbols visible)
natural_image
Hand using a steam iron with cord and tassel (no text or symbols visible)natural_image
Illustration of a plug being inserted into an electrical outlet (no text or symbols)
natural_image
Illustration of a kitchen sink with a pot and faucet (no text or symbols)natural_image
Illustration of a hand pressing down on a steam iron (no text or symbols visible)natural_image
Illustration of hands operating a steam iron (no text or symbols visible)natural_image
Illustration of a hand using a power iron to clean or install a surface (no text or symbols visible)Киришүү
text_image
Labeled diagram of a steam iron with numbered parts for identificationPSG2000 тобу

text_image
Labeled diagram of a steam iron with numbered parts for identificationnatural_image
Illustration of hands adjusting a mechanical component with numbered arrows (no text or symbols)natural_image
Illustration of two identical air purifiers on a diagonal line, no text or symbols presentnatural_image
Hand placing a dark object into a rice cooker (no text or symbols visible)
text_image
1.4L MAXnatural_image
Close-up of a hand pressing down on a small electronic device with a black cable (no visible text or symbols)natural_image
Illustration of a hand using a power iron to press down an arm, with no visible text or symbols.natural_image
Illustration of a shirt with a checkmark and a magnifying glass, no text or symbols presenttext_image
Safety warning illustration showing a person holding a handheld device with a warning symbol and cross marktext_image
Warning sign showing a hanger with a hand gesture and an electric iron, indicating heat or stress in clothing safety.Бууну күчөтүү

text_image
ECD SCK SCK ECD SCKtext_image
Diagram illustrating temperature change with thermometer symbols and a star-shaped object, likely illustrating thermal behavior or sensor response.
text_image
~10 min OFFnatural_image
Illustration of a speaker emitting sound waves above a computer monitor (no text or symbols)text_image
Illustration of a hand using an iron with sound waves and a cross symbol indicating cancellation or error.natural_image
Illustration of a steam iron with two arrows indicating motion (no text or symbols)natural_image
Illustration of two identical mechanical components with arrows indicating motion, no text or symbols presentnatural_image
3D rendered image of a mechanical component with a curved handle and flange, resting on a flat surface (no text or symbols visible)natural_image
Illustration of a hand ironing an iron with a downward arrow indicating cooling or residue (no text or symbols)text_image
2 sec CALC CLEANtext_image
Cable CLEAN ~2 minnatural_image
Illustration of an electric iron emitting steam, with a warning symbol (no text or labels)natural_image
Hand using a power iron on a surface (no text or symbols visible)text_image
Diagram illustrating a water safety hazard with warning sign and temperature indicatorsnatural_image
Illustration of a steam iron emitting sound waves (no text or symbols)text_image
Illustration of a hand using an iron with sound waves and a cross symbol indicating no change or error.natural_image
Illustration of a hand placing a black cloth into a rice cooker (no text or symbols visible)natural_image
3D rendered image of a mechanical component with a curved handle and flange, resting on a flat surface (no text or symbols visible)natural_image
Illustration of a steam iron being placed into a sink with a downward arrow indicating motion (no text or symbols)text_image
2 sec CALC CLEANnatural_image
Illustration of an iron iron with steam and a warning symbol (no text or labels)natural_image
Hand using a power iron on a surface (no text or symbols visible)text_image
Diagram illustrating temperature change in a kitchen with a thermometer and warning symbolnatural_image
Illustration of a hand using an iron on a surface with arrows indicating motion (no text or symbols)text_image
Warning symbol and safety icon showing a bottle, magnifying glass, and warning sign with exclamation marknatural_image
Illustration of a plug connecting to an open electrical outlet (no text or symbols)552
Кыргызча

natural_image
Illustration of a hand holding a lock icon with an arrow, no text or symbols presentnatural_image
Illustration of a steam iron with two arrows indicating motion (no text or symbols)natural_image
Diagram of a bathroom sink with faucet and toilet mechanism (no text or labels)natural_image
Illustration of two steam iron machines side by side, showing front and back views (no text or symbols)natural_image
Illustration of hands operating a steam iron (no text or symbols visible)natural_image
Illustration of hands operating a steam iron (no text or symbols visible)
natural_image
Illustration of a hand using a steam iron to clean or store air (no text or symbols visible)
natural_image
Illustration of a hand using a steam iron with cord and cable (no text or symbols)natural_image
Illustration of a plug being inserted into an electrical outlet (no text or symbols)
natural_image
Illustration of a kitchen sink with a pot and faucet (no text or symbols)natural_image
Illustration of a hand pressing down on a steam iron (no text or symbols visible)natural_image
Illustration of hands operating a steam iron (no text or symbols visible)
natural_image
Illustration of a hand using a steam iron to clean or operate (no text or symbols visible)text_image
Labeled diagram of a steam iron with numbered parts for identificationСерија PSG2000

text_image
Labeled diagram of a steam iron with numbered parts for identificationnatural_image
Illustration of hands adjusting a mechanical component with numbered arrows (no text or symbols)natural_image
Illustration of a pair of hands operating a device, showing motion direction (no text or symbols)natural_image
Illustration of a hand placing a black object into a white ceramic pot (no text or symbols visible)Серија PSG2000
natural_image
Close-up of a hand pressing down on a mechanical component with a curved arrow indicating motion (no text or symbols visible)natural_image
Illustration of a hand using an iron on a patient's arm, with no visible text or symbolstext_image
Diagram showing a hand holding a shirt with a checkmark and an arrow pointing downward, alongside a magnifying glass.text_image
Illustration showing a person with a steam iron and a warning symbol, including a cross and warning triangle.text_image
Warning sign showing a hanger, hand gesture with X and checkmark, and an electric shock symbolnatural_image
Illustration of an iron on a surface with an hourglass symbol and ~15-minute time label (no text or symbols beyond the label)text_image
Diagram illustrating temperature change with thermometer symbols and a star-shaped object on a surface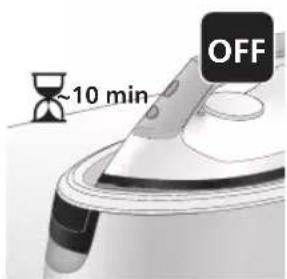
text_image
~10 min OFFnatural_image
Illustration of a speaker emitting sound waves, no text or symbols presenttext_image
Diagram showing a hand using an iron with sound waves and a cross symbol indicating cancellation or error.text_image
Diagram of a steam iron with labeled parts showing two directional arrows indicating motion or movement.natural_image
Illustration of two steam covers with arrows indicating motion, no text or symbols presentnatural_image
3D rendered image of a mechanical component with a curved handle and flange, placed on a flat surface (no text or symbols visible)natural_image
Illustration of a steam iron being placed into a sink with a downward arrow indicating motion (no text or symbols)text_image
2 sec CALC CLEAN8 Притиснете го копчето CALC-CLEAN задржете го 2 секунди сё додека не слушнете кратки звучни сигнали.
text_image
Cable CLEAN ~2 minnatural_image
Illustration of an electric iron emitting steam, with a warning symbol (no text or labels)natural_image
Hand using a power iron on a surface (no text or symbols visible)text_image
Diagram illustrating a water safety hazard with warning sign and temperature change iconsnatural_image
Illustration of a steam iron emitting sound waves (no text or symbols)text_image
Illustration of a hand using an iron with sound waves and a cross symbol indicating no change or error.natural_image
Illustration of a hand placing a black cloth into a rice cooker (no text or symbols visible)natural_image
3D rendered image of a mechanical component on a flat surface (no text or symbols visible)natural_image
Illustration of a steam iron being placed into a sink with a downward arrow indicating motion (no text or symbols)text_image
2 sec CALC CLEANnatural_image
Illustration of a steaming iron with a warning symbol (no text or labels)natural_image
Hand using a iron on a surface, no text or symbols visibletext_image
Diagram illustrating temperature regulation in a kitchen, showing heat transfer from a sink to a thermometer.natural_image
Illustration of a hand using an iron on a surface with arrows indicating motion (no text or symbols)text_image
Warning symbol and safety icon showing a bottle, magnifying glass, and warning sign with 'No Concern' textnatural_image
Illustration of a black plug inserted into an open electrical outlet (no text or symbols)
natural_image
Illustration of a hand holding a lock icon with an arrow, next to a vehicle (no text or symbols)natural_image
Illustration of a steam iron with two arrows indicating motion (no text or symbols)natural_image
Diagram of a bathroom sink with faucet and shower (no text or symbols)natural_image
Illustration of two identical steam iron machines side by side, showing front and side views (no text or symbols)natural_image
Illustration of hands operating a steam iron (no text or symbols visible)natural_image
Illustration of hands operating a steam iron (no text or symbols visible)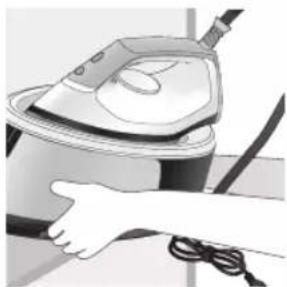
natural_image
Illustration of a hand using a steam iron to clean or store air (no text or symbols visible)
natural_image
Illustration of a hand using a steam iron with cord and cable (no text or symbols)natural_image
Illustration of a plug being inserted into an electrical outlet (no text or symbols)
natural_image
Illustration of a kitchen sink with a pot and faucet (no text or symbols)natural_image
Illustration of a hand pressing down on a steam iron (no text or symbols visible)natural_image
Illustration of hands operating a steam iron (no text or symbols visible)natural_image
Illustration of a hand using a steam iron to clean or operate (no text or symbols visible)Введение
text_image
Labeled diagram of a steam iron with numbered parts for identificationСерия PSG2000

text_image
Labeled diagram of a steam iron with numbered parts for identificationnatural_image
Illustration of hands adjusting a mechanical component with numbered arrows (1 and 2), no visible text or symbols.natural_image
Illustration of two identical mechanical components with arrows indicating motion or force direction (no text or symbols)natural_image
Illustration of a hand placing a black object into a white cylindrical container (no text or symbols visible)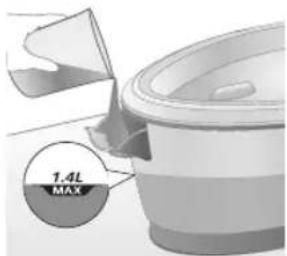
text_image
1.4L MAXnatural_image
Close-up of a hand pressing down on a small electronic device with a curved arrow indicating motion (no text or symbols visible)natural_image
Illustration of a hand using an iron on a medical device (no text or symbols visible)text_image
Illustration showing a hand holding a shirt with a checkmark and arrow, next to an air mask with a face.text_image
Safety warning illustration showing a person using an iron with a warning symbol and a cross marktext_image
Warning sign showing a hanger with a hand gesture and an electric iron, indicating heat or stress in clothing safety.Паровой удар

text_image
SWK ECO SWK ECO SWKtext_image
Diagram illustrating temperature change with thermometer symbols and a star-shaped object, likely illustrating thermal behavior or sensor response.
text_image
~10 min OFFnatural_image
Illustration of a steam iron with sound waves and a starburst on the handle (no text or symbols)text_image
Illustration of a hand using an iron with sound waves and a cross symbol indicating cancellation or error.natural_image
Illustration of a person using an iron iron, showing two directional arrows (no text or symbols)natural_image
Illustration of two steam covers with arrows indicating motion, no text or symbols presentnatural_image
3D rendered image of a mechanical component with a curved handle and flange, placed on a flat surface (no text or symbols visible)natural_image
Illustration of a hand ironing an iron with a downward arrow indicating cooling or damage (no text or symbols)7 Установите утюг на контейнер Calc-Clean.

text_image
2 sec CALC CLEANnatural_image
Illustration of a steaming iron on a surface with a warning symbol (no text or labels)natural_image
Illustration of a hand using an iron on a surface (no text or symbols)text_image
Diagram illustrating a water safety hazard with warning sign and temperature change iconsnatural_image
Illustration of a steam iron with sound waves above it, no text or symbols presenttext_image
Illustration of a hand using an iron with sound waves and a cross symbol indicating no change or error.natural_image
Illustration of a hand placing a black cloth into a rice cooker (no text or symbols visible)natural_image
3D rendered image of a mechanical component with a curved handle and flange, resting on a flat surface (no text or symbols visible)natural_image
Illustration of a steam iron being placed into a sink with a downward arrow indicating motion (no text or symbols)6 Установите утюг на контейнер Calc-Clean.
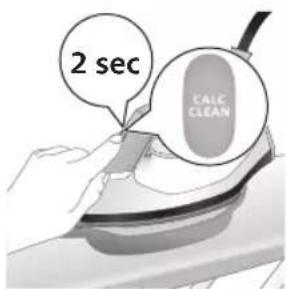
text_image
2 sec CALC CLEANnatural_image
Illustration of a steaming iron with a warning symbol (no text or labels)natural_image
Hand using a power iron on a surface (no text or symbols visible)text_image
Diagram illustrating temperature change in a kitchen with warning symbols and thermometer iconsnatural_image
Illustration of a hand using an iron on a surface with arrows indicating motion (no text or symbols)text_image
Warning symbol and safety icon showing a bottle, magnifying glass, and warning sign with 'No Use' textnatural_image
Illustration of a plug inserted into an electrical outlet with a black arrow indicating direction (no text or symbols)Русский
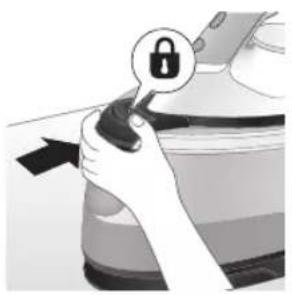
natural_image
Illustration of a hand holding a lock icon with an arrow, no text or symbols presentnatural_image
Illustration of a steam iron with two arrows indicating motion (no text or symbols)natural_image
Diagram of a bathroom sink with faucet and toilet mechanism (no text or labels)natural_image
Illustration of two steam iron machines side by side, showing front and back views (no text or symbols)natural_image
Illustration of hands operating a steam iron (no text or symbols visible)natural_image
Illustration of hands operating a steam iron (no text or symbols visible)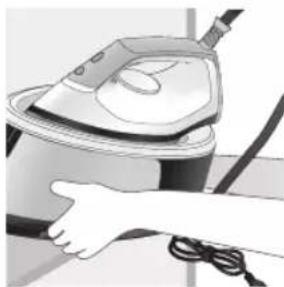
natural_image
Person using a steam iron on a surface, no visible text or symbols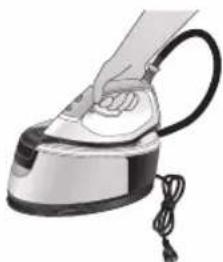
natural_image
Illustration of a hand using a steam iron with cord and cable (no text or symbols)natural_image
Illustration of a plug being inserted into an electrical outlet (no text or symbols)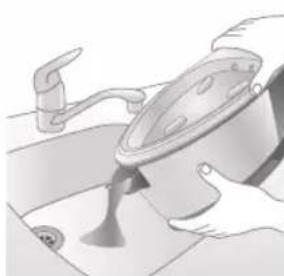
natural_image
Illustration of a kitchen sink with a pot and faucet (no text or symbols)natural_image
Illustration of a hand pressing down on a steam iron (no text or symbols visible)natural_image
Illustration of hands operating a steam iron (no text or symbols visible)
natural_image
Illustration of a hand using a steam iron to clean or operate (no text or symbols visible)text_image
Labeled diagram of a steam iron with numbered parts for identificationPSG2000 силсилахо

text_image
Labeled diagram of a steam iron with numbered parts for identificationnatural_image
Illustration of hands adjusting a mechanical component with numbered arrows (no text or symbols)1 Фишангро дар дастаки зарфи об пахш кунед ва зарфи обро аз поя хорич кунед.

text_image
MAX 1.4L2 Зарфи обро то нишондихандаи МАКС пур кунед.

natural_image
Illustration of two identical steam covers with a diagonal line dividing them (no text or symbols)3 Зарфи обро дубора ба дастгох тела дихед, то он даме, ки он дар чои худ куфл шавад ("садои клик мешунавед").
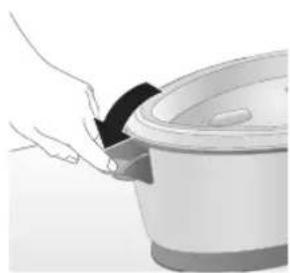
natural_image
Hand placing a black object into a rice cooker (no text or symbols visible)PSG2000 силсилахо
natural_image
Close-up of a hand pressing down on a small appliance with a black cable (no visible text or symbols)natural_image
Illustration of a hand using a power iron to press down an arm (no text or symbols visible)7 Барои оғози дарзмолкуні триггери буғро пахш карда нигох доред.
natural_image
Illustration of a shirt with a checkmark and a magnifying glass, no text or symbols presentШумо метавонед буғи дарзмолро дар чолати амудій барои нест кардани катхо аз матоъхои овезон истифода баред.
1 Дарзмолро дар холати амуди нигох доред, триггери бу́ро пахш кунед ва бо кафи дарзмол ба либос каме ламс кунед ва ба пешу кафо харакат дихед.
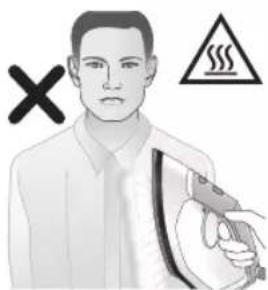
text_image
Safety warning illustration showing a person holding a handheld device with a warning symbol and cross marktext_image
Safety warning illustration showing a hanger, hand gesture with X mark, and steam symbol indicating hazardТаквияти буғ

text_image
Eco SOL DPM 2000 2010 2020 X √natural_image
Illustration of an iron (£) with a hourglass above it, showing time ~15 minutes (no text or symbols on the device itself)text_image
Diagram illustrating temperature change with thermometer symbols and a star-shaped object on a surface
text_image
~10 min OFFnatural_image
Illustration of a steaming iron with sound waves above it (no text or symbols)text_image
Diagram showing a hand using an iron with sound waves and a cross symbol indicating cancellation or error.natural_image
Illustration of a steam iron with two arrows indicating motion direction (no text or symbols)3 Фишангро дар дастаки зарфи об пахш кунед ва зарфи обро аз поя хорич кунед.
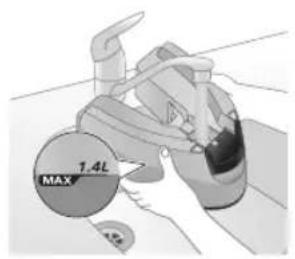
text_image
MAX 1.4L4 Зарфи обро то нисф пур кунед.
natural_image
Illustration of a pair of steam covers with arrows indicating motion, no text or symbols present5 Зарфи обро дубора ба дастгох тела дихед, то он даме, ки он дар чои худ куфл шавад ("садои клик мешунавед").
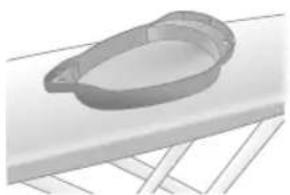
natural_image
3D rendered image of a mechanical ring component on a flat surface (no text or symbols)6 Контейнери Calc-Clean-ро дар тахтаи дарзмол ё ягон сатхи дигари устувор чойгир кунед.

natural_image
Illustration of a hand ironing an iron with a downward arrow indicating cooling or residue (no text or symbols)7 Дарзмолро мустахкам дар контейнери Calc-Clean чойгир кунед.

text_image
2 sec CALC CLEAN8 Тугмаи CALC-CLEAN-ро то 2 сония пахш карда нигох, доред, то даме ки садохои кўтох садо надиханд.
text_image
Cable CLEAN ~2 min9 Хангоми раванди Calc-Clean, шумо сигналхои кутох ва садои насосро мешунавед. Такрибан 2 даќиça интизор шавед, то дастгох равандро анчом дихад.

natural_image
Illustration of an electric iron emitting steam, with a warning symbol (no text or labels)10 Вакте ки раванди Calc-Clean ба анчом мерасад, дарзмол садои бипро кать мекунад ва чароғи CALC-CLEAN чашмак заданро кать мекунад.
natural_image
Illustration of a hand using an iron on a surface (no text or symbols)text_image
Diagram illustrating a water safety hazard with warning sign and temperature change iconsnatural_image
Close-up of a speaker emitting sound waves on a keyboard (no text or symbols visible)text_image
Illustration of an iron with sound waves and a cross symbol indicating no change or errornatural_image
Illustration of a hand placing a black cloth into a white rice cooker (no text or symbols visible)natural_image
3D rendered image of a mechanical component or housing on a flat surface (no text or symbols visible)natural_image
Illustration of a steam iron being placed into a sink with a downward arrow indicating motion (no text or symbols)6 Дарзмолро мустахкам дар контейнери Calc-Clean чойгир кунед.
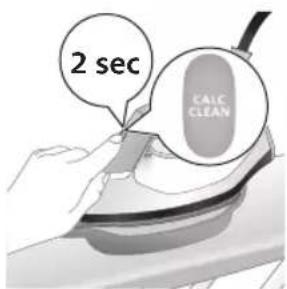
text_image
2 sec CALC CLEAN7 Тугмаи CALC-CLEAN-ро то 2 сония пахш карда нигох доред, то даме ки садохои кутох садо надиханд.
natural_image
Illustration of a steaming iron with a warning symbol (no text or labels)9 Вакте ки раванди Calc-Clean ба анчом мерасад, дарзмол садои бипро кать мекунад ва чароғи CALC-CLEAN чашмак заданро кать мекунад.
natural_image
Hand using a power iron on a surface (no text or symbols visible)10 Дарзмолро бо матоъ пок кунед ва онро дубора ба пойгохи асосій гузоред.

text_image
Diagram illustrating temperature change in a kitchen with warning symbols and thermometer iconsnatural_image
Illustration of a hand using an iron on a workbench with arrows indicating motion (no text or symbols)text_image
Warning symbol and safety icon showing a bottle, cross, and warning sign with text about cleaning or disinfection.Шарх: Хангоми тозакунй собунро истифода набаред ва кафро нахарошед.
Захира
PSG3000 силсилахо
natural_image
Illustration of a plug inserted into an electrical outlet with a black arrow indicating direction (no text or symbols)
natural_image
Illustration of a hand holding a lock icon with an arrow, next to a vehicle (no text or symbols)2 Барои PSG3010, дарзмолро дар лавхаи дарзмол чойгир кунед ва бо пахш кардани тугмаи кушодани кулфи интикол онро кулф кунед.

natural_image
Illustration of a steam iron with two arrows indicating motion (no text or symbols)3 Фишангро дар дастаки зарфи об пахш кунед ва зарфи обро аз поя хорич кунед.
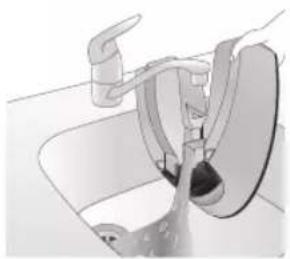
natural_image
Diagram of a bathroom sink with faucet and shower (no text or symbols)natural_image
Illustration of two identical steam iron machines side by side, showing front and back views (no text or symbols)5 Зарфи обро дубора ба дастгох тела дихед, то он даме, ки он дар чои худ куфл шавад ("садои клик мешунавед").
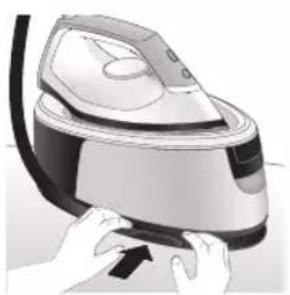
natural_image
Illustration of hands operating a steam iron (no text or symbols visible)natural_image
Illustration of hands using a steam iron to press down a button (no text or symbols visible)
natural_image
Illustration of a hand using a steam iron to clean or operate (no text or symbols visible)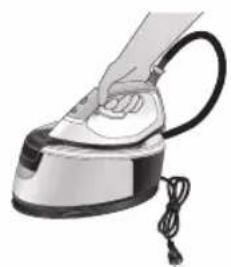
natural_image
Illustration of a hand using a steam iron to press down a cylindrical pipe (no text or symbols visible)natural_image
Illustration of a plug inserted into an electrical outlet with a black arrow indicating direction (no text or symbols)
natural_image
Illustration of a kitchen sink with a pot and faucet (no text or symbols)natural_image
Illustration of hands using a steam iron to press down a button (no text or symbols visible)natural_image
Illustration of hands operating a steam iron (no text or symbols visible)
natural_image
Illustration of a hand using a steam iron to clean air (no text or symbols visible)text_image
Labeled diagram of a steam iron with numbered parts for identificationСерія PSG2000

text_image
Labeled diagram of a steam iron with numbered parts for identificationnatural_image
Illustration of hands adjusting a mechanical component with numbered arrows (no text or symbols)natural_image
Illustration of two identical air purifiers on a diagonal line, no text or symbols presentnatural_image
Illustration of a hand placing a black object into a rice cooker (no text or symbols visible)
text_image
7.4L MAXnatural_image
Close-up of a hand pressing down on a small electronic device with a black cable (no visible text or symbols)natural_image
Illustration of a hand using an iron on a medical device (no text or symbols visible)text_image
Illustration showing a hand holding a shirt with a checkmark and an airplane, symbolizing inspection or repair.text_image
Illustration showing a person with a steam iron and a warning symbol, including a cross and smoke symbol.text_image
Safety warning illustration showing hand gesture, steam symbol, and warning sign on a hangerПаровий удар

text_image
Eco SOL DPM 2000 2010 2020 X √natural_image
Illustration of an iron (£) with a hourglass above it, showing time duration of approximately 15 minutes (no text or symbols on the device itself)natural_image
Illustration of a steam iron with sound waves and a starburst on the handle (no text or symbols)text_image
Illustration of an iron frying pan with sound waves and a cross symbol indicating cancellation or errornatural_image
Illustration of a person using an iron iron, showing two directional arrows (no text or symbols)natural_image
Illustration of two identical steam covers with arrows indicating motion, no text or symbols presentnatural_image
3D rendered image of a mechanical ring component on a flat surface (no text or symbols)natural_image
Illustration of a hand ironing an iron with a downward arrow indicating cooling or residue (no text or symbols)text_image
2 sec CALC CLEANtext_image
Cable CLEAN ~2 minnatural_image
Illustration of an electric iron emitting steam, with a warning symbol (no text or labels)natural_image
Hand using a power iron on a surface (no text or symbols visible)text_image
Safety warning illustration showing a hand pressing down on a toilet with warning symbols and temperature indicators.natural_image
Illustration of a steam iron emitting sound waves (no text or symbols)text_image
Illustration of an iron with sound waves and a cross symbol indicating no change or errornatural_image
Illustration of a hand placing a black cloth into a white rice cooker (no text or symbols visible)natural_image
3D rendered image of a mechanical component or housing on a flat surface (no text or symbols visible)natural_image
Illustration of a steam iron being placed into a sink with a downward arrow indicating motion (no text or symbols)text_image
2 sec CALC CLEANnatural_image
Illustration of an iron iron with steam and a warning symbol (no text or labels)natural_image
Hand using a power iron on a surface (no text or symbols visible)text_image
Diagram illustrating temperature regulation in a kitchen, showing a thermometer and warning symbol with Chinese text.natural_image
Illustration of a hand using an iron on a surface with arrows indicating motion (no text or symbols)text_image
Warning symbol and safety icon showing a bottle, magnifying glass, and warning sign with 'No Concern' textnatural_image
Illustration of a black plug inserted into an open electrical outlet with a black arrow indicating direction (no text or symbols)620 Українська

natural_image
Illustration of a hand holding a lock icon with an arrow, no text or symbols presentnatural_image
Illustration of a steam iron with two arrows indicating motion (no text or symbols)natural_image
Diagram of a bathroom sink with faucet and shower mechanism (no text or symbols)4 Вилийте воду з резервуара для води в раковину.

natural_image
Illustration of two steam covers with a diagonal line indicating alignment (no text or symbols)natural_image
Illustration of hands operating a steam iron (no text or symbols visible)natural_image
Illustration of hands operating a steam iron (no text or symbols visible)
natural_image
Person using a steam iron on a table, no visible text or symbols
natural_image
Illustration of a hand using a steam iron with cord and cable (no text or symbols)natural_image
Illustration of a plug being inserted into an electrical outlet (no text or symbols)
natural_image
Illustration of a hand washing a bowl with a faucet, no text or symbols presentnatural_image
Illustration of a hand pressing down on a steam iron (no text or symbols visible)natural_image
Illustration of hands operating a steam iron (no text or symbols visible)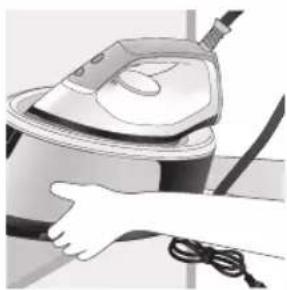
natural_image
Illustration of a hand using a steam iron to clean or store air (no text or symbols visible)text_image
Labeled diagram of a steam iron with numbered parts for identificationPSG2000 сериясы

text_image
Labeled diagram of a steam iron with numbered parts for identificationnatural_image
Illustration of hands adjusting a mechanical component with numbered arrows (no text or symbols)natural_image
Illustration of two identical steam covers with a diagonal line dividing them (no text or symbols)natural_image
Hand placing a black object into a rice cooker (no text or symbols visible)PSG2000 сериясы
natural_image
Close-up of a hand pressing down on a small electronic device with a black cable (no visible text or symbols)natural_image
Illustration of a hand using an iron on a medical device (no text or symbols visible)text_image
Illustration showing a hand holding a shirt with a checkmark and an airplane, symbolizing inspection or repair.text_image
Illustration showing a person with a steam iron, crossed out by a 'X' symbol, and a warning triangle with 'SIT' text.text_image
Safety warning illustration showing a hanger, hand gesture with X mark, and steam symbol indicating hazardБуды күшейту

text_image
Eco SOL DPM SOD Xnatural_image
Illustration of a steam iron emitting sound waves (no text or symbols)text_image
Illustration of a hand using an iron with sound waves and a cross symbol indicating explosion or damage.natural_image
Illustration of a steam iron with two arrows indicating motion direction (no text or symbols)natural_image
Illustration of two identical air purifiers with arrows indicating motion, no text or symbols presentnatural_image
3D rendered image of a mechanical component with a curved handle and flange, placed on a flat surface (no text or symbols visible)natural_image
Illustration of a steam iron being placed into a sink with a downward arrow indicating motion (no text or symbols)text_image
2 sec CALC CLEANtext_image
Cable CLEAN ~2 minnatural_image
Illustration of an electric iron emitting steam, with a warning symbol (no text or labels)natural_image
Hand using a power iron on a surface (no text or symbols visible)text_image
Safety warning illustration showing a hand pressing down on a toilet with temperature indicators and warning symbolsnatural_image
Illustration of a steam iron with sound waves above it, no text or symbols presenttext_image
Illustration of a hand using an iron with sound waves and a cross symbol indicating no change or error.natural_image
Illustration of a hand placing a black cloth into a rice cooker (no text or symbols visible)natural_image
3D rendered image of a mechanical component on a flat surface (no text or symbols visible)natural_image
Illustration of a steam iron being placed into a sink with a downward arrow indicating motion (no text or symbols)text_image
2 sec CALC CLEANnatural_image
Illustration of a steaming iron with warning symbols (no text or labels)natural_image
Hand using a iron on a surface, no text or symbols visibletext_image
Safety warning illustration showing a hand pressing down on a toilet with temperature and warning symbolsnatural_image
Illustration of a hand using an iron on a surface with arrows indicating motion (no text or symbols)text_image
Warning symbol and safety icon showing a bottle, magnifying glass, and a steamer with warning labelnatural_image
Illustration of a plug being inserted into an electrical outlet (no text or symbols)
natural_image
Illustration of a hand holding a lock icon with an arrow, next to a vehicle (no text or symbols)natural_image
Illustration of a steam iron with two arrows indicating motion (no text or symbols)natural_image
Diagram of a kitchen sink with faucet and showerhead (no text or labels)natural_image
Illustration of two steam iron machines side by side, showing front and side views (no text or symbols)natural_image
Illustration of hands operating a steam iron (no text or symbols visible)natural_image
Illustration of hands using a steam iron to press down a button (no text or symbols visible)
natural_image
Illustration of a hand using a steam iron to clean or operate (no text or symbols visible)
natural_image
Hand using a steam iron with cord and tassel (no text or symbols visible)natural_image
Illustration of a plug being inserted into an electrical outlet (no text or symbols)
natural_image
Illustration of a kitchen sink with a pot and faucet (no text or symbols)natural_image
Illustration of hands using a steam iron to press down a button (no text or symbols visible)natural_image
Illustration of hands operating a steam iron (no text or symbols visible)
natural_image
Illustration of a hand using a steam iron to clean air (no text or symbols visible)text_image
Labeled diagram of a steam iron with numbered parts for identificationPSG2000 utphw

text_image
Labeled diagram of a steam iron with numbered parts for identification1 CALC-CLEAN lynǎwǔ 'lniuwjhù gnighʒnǔ
2 Uünigüwü lynäwly
3 «Unnnitytini wwwnnwuuun 5» gnighs
4 2nh hughlyh wùgwnúwù lòwù (PSG3000 series)/2nh hughlyh nìnwùy (PSG2000 series)
5 2nh 2wndwlywù hughy (PSG3000 series)/2nh utnlywnniguówð hughy (PSG2000 series)
6 2nh uwwnwqwnwnu wu aywuhnyn wwhtni hughy
7 Hutlugh Calc-Clean unwnw
8 Ethyunnwùnigúwù lwn hunngnu
9 2nh distinguwlpwnpnu wu dlywnhny
10 9n1nn2ni uwwnwlywnwnpuwu lynawly/9n1nn2ni nidtn uynniu
11 Ωεριώωυνηλάωμή χωηρωγηρης
12 RbUwU
13 Unqtiwuhwylui ultlnz (PSG3010)
Lwhwwwnwnwnnli
hùn intuulh gniŋ wtpup 5 oqunwqnndt
Uwnpn hwnúwn 5 ónnwuh gnnu oqunwqnδu wù hwuun: Uwlywjù, bāt nni p wwpniú tīp wjúwuh unwnwòpniú, nnutn qnh lynzunnipjwi u wunhǎwǔn pwàn t, funphnnp tiúp unwlhu ónnwuh gninn huwrùti jennwǒ ywú
ntuhutnwihqwglw6 gnh hun hwulwwwn puuwlynjwup: Tw yhuuhuh yuunlwdph ynwnwlynwin u ytnywnwguh uwnph yjuupn:
Uh wultwqntp odwutihp, znpwungh gnn, pwgwhu, oulu, tuunylwoph uwpnuiwu, wnnnilyuwu odwunwly uhongutn, phuhwlywu uhongutpnnyi uwpnylwod gnn lyuuf phuhwlywu wll yjniatn, pwuh nn nnuup lwwnn tiu wnwwgutl gnh gwjuntn, 2wqwulwqunyi potn lyuuf duwutl atn uwnpn
Ωnh hughyh lgünwùn
natural_image
Illustration of a hand using an iron iron to lift a cup, showing two directional arrows (no text or symbols)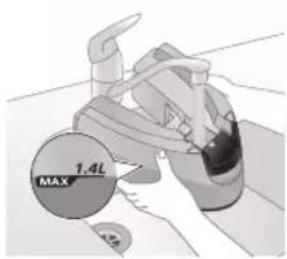
text_image
1.4L MAX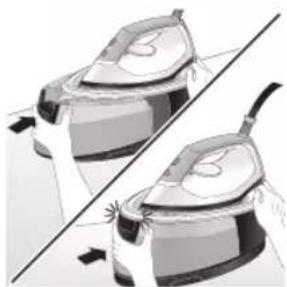
natural_image
Illustration of two identical mechanical components with arrows indicating motion, no text or symbols present2 2nh hughyn lgntp uhu2u MAX u2wqhdn:
3 2nh hughyn unphg nptp uwnph utg, uhülu wju \$hpuih hn untnniú («yunungh» àwju lutp):
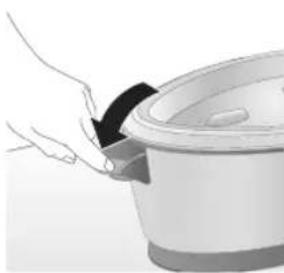
natural_image
Hand placing a black object into a rice cooker (no text or symbols visible)PSG2000 utphw
1 Fugbup gnh hughyh npuwwyn:

text_image
7.4L MAX2 2nh hughyn igntap uhülu MAX ü2wqhön, htunn ihwylap 2nh hughyh nztuwyn («lunung»):
Uwnph oqunwqnndniún
natural_image
Close-up of a hand pressing down on a small electronic device with a curved arrow indicating motion (no text or symbols visible)6 3wutp gnh uwwnwqwnwnu wuhbni hughlyhg:
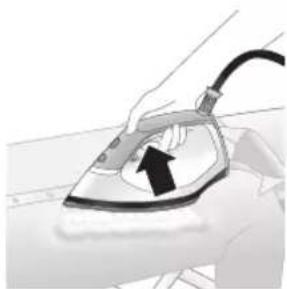
natural_image
Illustration of a hand using an iron on a medical device (no text or symbols visible)7 Utnútp u wuhtp qnnnn2ni ùwwunwlywnwnpuwù lynǎwlyn` wnnniyniún ulyutjni huuśwn:
L2niú. Unnnilyhg ywnnn t 2nh gwjnp jhúti jninwpwùyjnn w2huwunw2ngwùh ulqpniú: Lwhupwù wnnnilytān utnúbp u 10 ywjnlyjwù wwwhtp qninnp2ni úwwunwlywnwnúwù lynówyn, nnwtuqh gnpwóptn szwnwgwùwù z2nh ylnu:
L2niú. Unnniúwù uqqnú lì huunlywwtú qninn2ni lynǎwljù wnwghù wùqwú oqunwqnnδtǐhu uwnpn lýwpnn lì ulutí qninn2h úwwnwlywnwntl úhǔzu 30 úwjnlýwù niżwgniúnu:
L2niú. Tnúwù wúnhúwùniú t wútǔ wùqwiú, tnp utnúniú tþ qninn2ni ynǎwlyŋ: Tnúwùh w2huwunwùpù nintúgǔniú t pùnn2 āwjùnuː; tnp hughyìh gnípp utnúwùniú t, yúnúwùh āwjuùn ̃nunūniú t wútǔh niátin:
2qn12wgnuí. 9n1nn2hù tnptp úh niŋntp úwnnywug ynw:
Πιηνωμων ωηνιλην
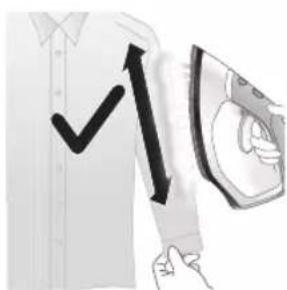
text_image
Diagram showing a hand holding a shirt with a checkmark and an airplane flying, indicating a verification or inspection process.Cnqtiwnnnln ywnnn tip oqnwwqnndtli ninnwhwjug nhnpnu' ywhuhzhg ywhuulw6 hwqnwnh dwiptnu ninnbni hwiun:
1 Unnniuh nnnwhwjug nhpnul wuhtp, utnútp qnnn2ni ynǎwyn lu wnnniuh unwuh hwnujuðn pāpəwwyh nhwgntp hwqnwnhù, wuw wnnniuh ubn ni qun unwntp:
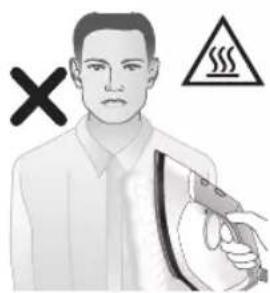
text_image
Safety warning illustration showing a person holding a steam iron with a warning symbol and cross mark2qnizwgniu. Unnniyn unwp qnnn2h 5 wnawlyniu: Unqtiulniu 5 hwqnwnn uwnnni ynw wnnnityl dwiptpn pwgtni hwiun: Qnnnpzhù uh ninntp atq ynw ywu ninhzutph attnptnhu:
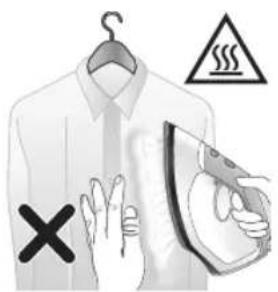
text_image
Warning sign with warning symbols and a hand holding an iron, indicating hazard or caution in clothing safety.9n1nn2ni nidttnwgniu

text_image
Carbon ECO SOE Oxygen ✓1 9n1nn2ni ni dttnwgúwù qnnðwnnyjæŋ huuwwùtih 5 3-hg úhùzlu MAX gtnúwwunhǎwùniu:
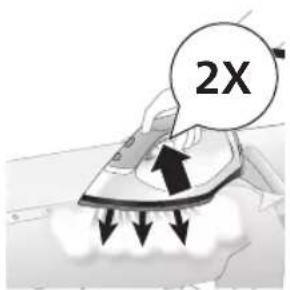
text_image
2X2 tplyni wuqwui wnwq utnutip aninn2ni uwwnwlywnwnuwu ynǎwyl, nnwltuqh aninn2hù 3 uwjnljuwù nidtn qnnpu únh:
hùpùw2huàn wùgùnniú
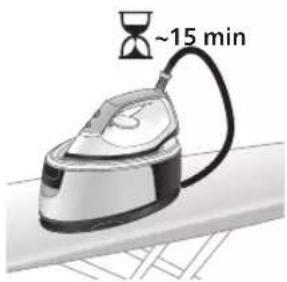
text_image
~15 min1 Enp uwnpn 15 pnwuhg wultih sh oqnwnqnndyniw, «Unnnlnp uwunnpwwun l» injynp pwnnpiwi l, u wnnnlnp uyunii l uwntti:
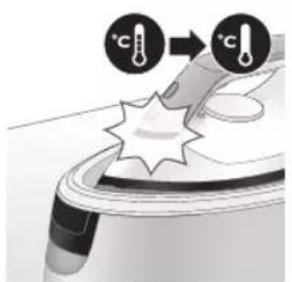
text_image
Diagram illustrating temperature change with thermometer symbols and a star-shaped object, likely illustrating thermal behavior or sensor setup.
text_image
~10 min OFF2 3wgnnn. 10 nnwtuttnh nipwgpniu uwnphu dtinp zunwni ntawpniu wju hupuw2huwn lytnwnu ywugwnuh:
2qnizwgnui. tnput uh pantp uwnpu wnwug hulnnnupwu, tn p wju uhwgulw6 hnuwuph: Oqunwqnptinig htunn uh2un wugwntp uwnpn ywnnwlyhg:
Uwpnniú u unthuúhlywlywi uwwuuwnyniu
Hutluugh Calc-Clean hwuwlywnq
2tn uwnpù niúh hutqugh Calc-Clean hwúwlywnq, nnù wuywhnúniú t, npuqtuqh uwnlquòph úwpnniún l uwnph úwpnniún yuùntuwulnn lytwnú l ywnwnpultù: 7w oqūniú t ywhwjuwúti qninn2ni jwu úwwnwlywnwnpnuún l ywuhuniú t, npuqtuqh tnlywn 2whwqnpòniwhg htunn lytun l pòtan nniņu qwù wpnniúh unwlh hwnlquòhg: Uwnpn wwnptnwpwn hh2tgniušutin t wūniú, npuqtuqh úwpntip wjù:
Luunluwoph uwpnniu' Calc-Clean unwnwjnu
2qnizwgnui. Calc-Clean uwpnuu wqnndnnniajwu dwuwuuw yh jenntp uwnpu wnwug hulnnniajwu:
2qnizwgnul: Luunluwph uwpnniun uh2n lyuunwntp Calc-Clean unwnwnj: Uh pünhwuntp qnpópúpəwgn' wpnniŋp pwnànwgutinu Calc-Clean unwnwjhg, puuh np wpnniŋh unwlh hwnluwdhg unwp gnip lu qninnzh nninu lqqu:
U2niú. Calc-Clean qnpópúpawgh dwúwúwú hwiúnqúp, nn uwnpn úhwgúwò 5:
PSG3000 utphw
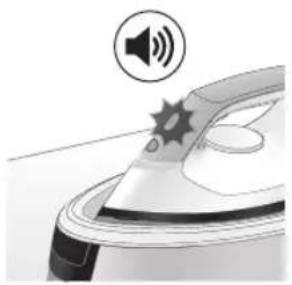
natural_image
Illustration of a steaming iron with sound waves above it (no text or symbols)1 1-hg 3 wúhu oqunwqnptinig hbtunn Calc-Clean qnpðwnnyjeh inijun ulquniú t; pawnpati, lu uwnpn ðwjüwjhù wqnwiúzuwú t unwju' hh2tgūtinu, nn wttinp t 'uuunlwaρn úwpnujh:

text_image
Diagram showing a hand using an iron with sound waves and a cross symbol indicating cancellation or error.2 Fwgh wjn, uwnpn ̈uunulwóphg ww2unwùutni hwüwn qnjnupniu nîuh ̈inwgnighs ww2unwùnupniu. qninn2ni ̈uunuwlywnpúwù qnnòwnnyjəu wǔguunu̍niú t, bptïuunulwópn zh úwpnuiú: Luunulwópn úwpntŋig htunn qninn2ni ̈uunuwlywnpúwù \$niǔghwù ̈ŭnwlywùqūnuiú t: ʼnw untqh ̈ niǔtūniú' wǔlywhu oqunwqnδύηn znh untuwlzhg:
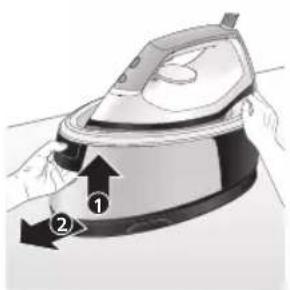
natural_image
Illustration of a steam iron being placed on a surface, showing two directional arrows (no text or symbols)3 Utnútp qnh hughyh pnùwuh lòwyn u hwútp qnh hughyn unwynhng:
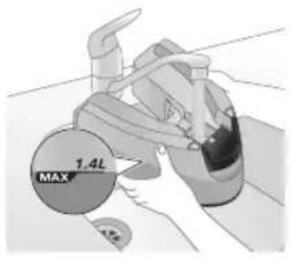
text_image
1.4L MAX4 2nh hughyh ubg yhunl zwwh gnnin lgntap:
U2niú. Calc-Clean qnnópúpawgh dwúwúwú hwiúnqúbp, nn uwnpú úhwgúwú 5:
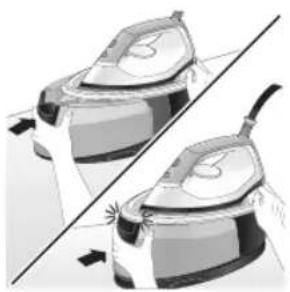
natural_image
Illustration of two steam covers with arrows indicating motion, no text or symbols present5 2nh hughyn unhg ntp uwnph utg, uhuslu wju \$hpuih hn untnniu (《yununngh» duju lutp):
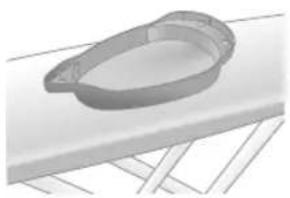
natural_image
3D rendered image of a mechanical component with a curved handle and flange, resting on a flat surface (no text or symbols visible)6 Calc-Clean unwnwù nptp wnnnligh utnwuh lwwú nnluş wjl hwnja, lwwjnü uwlvtntuh ynw:
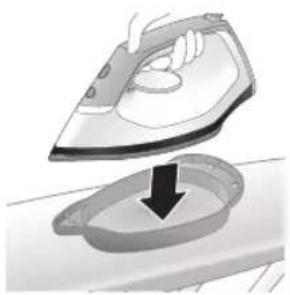
natural_image
Illustration of a hand using an iron to clean a small bowl (no text or symbols)7 Unnnln ywniü untwnntp Calc-Clean unwnwjh ynw:
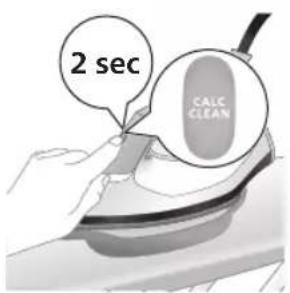
text_image
2 sec CALC CLEAN8 Utnútp u wjuhtp CALC-CLEAN qnnðwinnyjeh lynðwln 2 úwjnlyjuu, úhúlu ywná ðwjùwjhù wqnwiú2wúütn jutp:
Ł2niú. Calc-Clean wnwnwù ùwwhuwnbuulwò Ł Calc-Clean qnnònñuqugh dwúwwüwú ùwwnluwóph ùwwuühlyútn u unwp qnin hwylwptiņu hwuīwn: Uúpnng qnnònñuqugh núpawgpniú wnnniú wju wnwnwjh ynw ŋutān jhnuhù wuylwnwūq Ł:
650 Ruijtntu
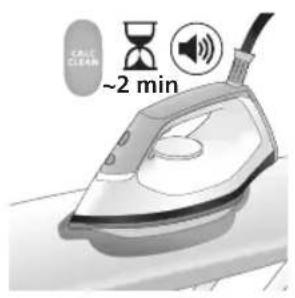
text_image
CAUL CLEAN ~2 min9 Calc-Clean lwwunwnti ni nip wgpniu npip dawjuwjhu lwna wqnwu2wuttn lu wnuiwh dawju lyubp: Uwwutp uinnwlnnwwtu 2 nnwbi, uhuslu wwnptu wllwnuh qnndnjewgn:

natural_image
Illustration of an electric train with steam lines and a checkmark (no text or symbols)natural_image
Hand using a power iron on a surface (no text or symbols visible)11 Unptp wnnnlnp lwpnyl u'unphg nptp wju htuwlywjwuh ynw:

text_image
Diagram illustrating a water safety hazard with warning sign and temperature indicators12 Puuh np Calc-Clean unwpwù unwpwùnui 5 uunuqwoph uwpnuwqqnnpupwgh dwuwuw, uwwutip unwnuJnwwtu 5 nnwt`uwhupwù nwwù nhwztp: Ujunihtunl unwntip Calc-Clean unwpwù lujgwwnwùh ünn, nwnwnytp wju l uwwhtp htunwqw oqnuwqnpoiwu hwuwn:
^12 niú. tát wpnnlíh útpuniú tuunlωδρ zh lynuwlyúti, www úwpnúwú dwúwùwú wpnnlíh unwúh hwnulwóhg úwpnín ɒnín ɒnínu lqqu: ʔw ünpúwút₅:
PSG2000 utphw
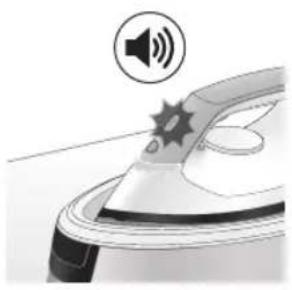
natural_image
Illustration of a steam iron with sound waves above it, no text or symbols present1 1-hg 3 wúhu oqunwqnɒtɪnɪɡ htunn Calc-Clean qnnðuːnnyəh įniʊn ulquniʊ t̄pəwnəti, u uwnpn ìwjuːwjhu wqnwùzwiː t̄ unwju̱ hħzīgūtɪnu̱, nn wtunp t̄uunu̱wɔpn ùwpnu̱h:

text_image
Illustration of a steam iron with sound waves and a cross symbol indicating explosion or damage2 Fugh wjn, uwnpn uwnluwopgh ww2wnwutini hwuiwn qjnupniu niuh inwgnighs ww2wnwunipniu. qninn2ni uwnwlywnpnuw uqnowwnnye u wugwnuniu t, tipt uwnluwopn zh uwpnuniu: uwnluwopn uwpntinig htunn qninn2ni uwnwlywnpnuw u \$niulghwu ytnwlywqulnu t: 7w untnh t niutuniu' wulywhu oqunwqnouhn znh untuwlyhg:

natural_image
Illustration of a hand placing a black cloth into a rice cooker (no text or symbols visible)3 Fwgtp qnh hughyh nniuyn:
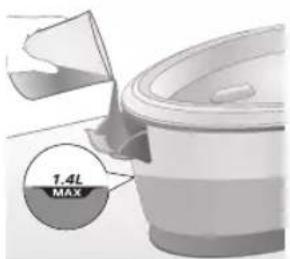
text_image
1.4L MAX4 2nh hughyh u6g yhundzwh gnin lgntip:
L2niú. Calc-Clean qnnδnúpawgh dwiúwùwly hwúnqúbp, nn uwnpn úhwugluwò t:
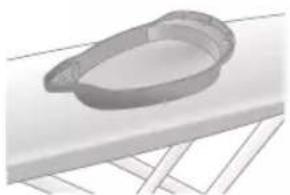
natural_image
3D rendered image of a mechanical component on a flat surface (no text or symbols visible)5 Calc-Clean unwnwù nptp wnnnlüh utinquüh lwwú nnlu§ wjl hwnja, lwwjnü uwlvtntuh ynw:
652 Ruijtntu

natural_image
Illustration of a hand ironing an iron with a downward arrow indicating cooling or residue (no text or symbols)6 Unnnlnp ywjniu untwnwntp Calc-Clean unwnwjh ynw:

text_image
2 sec CALC CLEAN7 Utnútip lu wuhtip CALC-CLEAN qnnòwinnujah lynǎwulp 2 uwjnljuwiù, uhùslu lwnǎ āwjùwjhù wqnwiù2wùutp jutip:
U2niú. Calc-Clean unwnwù ùwwhuwunbuìwò § Calc-Clean qnnònñuèugh dwnúwùwú ùwnuìwòph ùwwùhíyǔtn l u unwp qnín hwnúwptīní hwnúwùn: Uúpnng qnnònñuèugh núpawgqnú õwnnǐyǔ wju unwnuwj ylnw nútīn jhnúhù wǔyúnwùq §:
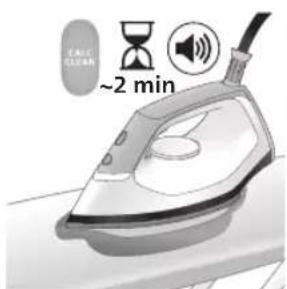
text_image
~2 min8 Calc-Clean lwwunwnti ni nipawgpniu 9nip awjuwjh u lwno wqnwu2wuttn u wnuwh awju lyutp: Uwwutp unnuwlnnwwtu 2 nnwt, uhuzl uwnpu wulwnuh qnnopnupwgn:
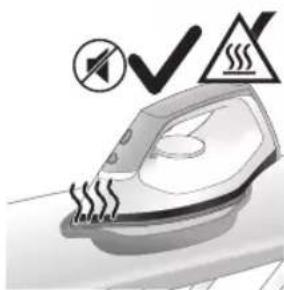
natural_image
Illustration of a steaming iron with warning symbols (no text or labels)9 Bnp Calc-Clean qnpnupwugu wylwnunh, wnynlju wjlau dujuwjh uqnwi2wui zh unw, hul CALC-CLEAN \$niulghwjh inijun lwnwnunh pwnpəti: 2qnizwgniu. Unynlyn unwp t:
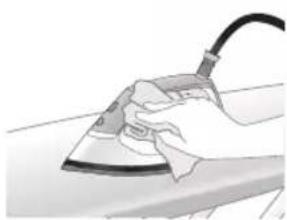
natural_image
Hand using a power iron on a surface (no text or symbols visible)10 Unptp wnnniyn Iwpenu u unnhg nntp wju htuwlywjwiuh ynw:

text_image
Diagram illustrating temperature change in a kitchen with warning symbols and thermometer icons11 Puùh nn Calc-Clean unwnwù unwpwùnui ß tuunlquòph úwpnúwù qnnòpúpwgh dwíwúwly, uwwutp únnwùlnnwuwbu 5 nnwì 'uwhupwù npwù nhwztip: Ujùnihtbùn lwnutp Calc-Clean unwnwù ljugwnpwuh únn, npwnwnytip wjù l uwwhtp htinwqw oqnuwqnòwù hwiúwn:
L2niú. tát wpnnlíyh útnpuniú úwnuľwóp zh yniunwúlqti, wuw uwpnúwú dwiúwúwú wpnnlíyh unwúh hwnuľwóhg úwpnín qnín ηπινu lqqu: Ήw ünpúwú l:
Unnnih unwh hwnlwhd wppnni

natural_image
Illustration of a hand using an iron on a surface with arrows indicating motion (no text or symbols)Nwguqh uwnpn 2wnniuwlyh lwwl w2hwunti, uwnptnwpwn iwpntp wju:
1 Uwnpn distingu huntuwul 2nnnu: Pôtpn ht2unnijwup lu wnynniuwutun ytinwnuhtinwugutini hwiúwn panntip, nn wnynniyn unwputuw, lu wju putp huntuwul 2nnh uhnwnu:
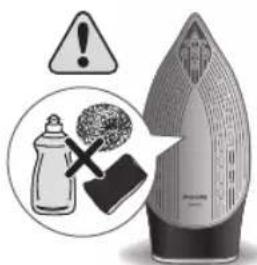
text_image
Warning symbol and safety icon showing a bottle, cross mark, and warning sign with exclamation markU2niú. Uwpntiú nújawgpiú zh ywntih oǎwn qnnδωδti lywi ptnti unwluh uwlgtantun:
اللهمنيُمْ
PSG3000 utphw
1 Uugwntp uwnnp l hwutp wju qwnnwuhg:

natural_image
Illustration of a black plug inserted into an open electrical outlet with a black arrow indicating direction (no text or symbols)654 Ruijtntu

natural_image
Illustration of a hand holding a lock icon with an arrow, no text or symbols present2 PSG3010 utphwjh wnqnlyn nptp uwlynhh ynw u \$hputp wjù' utnútɪnu wnqtiwuhwljuwù ulutnhz

natural_image
Illustration of a steam iron with two arrows indicating motion (no text or symbols)3 Utnútp ʒnh hughlyh pnüwlyh lówlyn u hwútp ʒnh hughlyn:

natural_image
Diagram of a bathroom sink with faucet and shower mechanism (no text or symbols)4 7wnwnltp gninn hughlyhg luygwwnwuh ubg:

natural_image
Illustration of two steam covers with a diagonal line indicating alignment (no text or symbols)5 2nh hughyn ünnhg nntp uwnph útə, úhùzlu wju \$hpoujh hn untŋniú («yununngh» ðwju lutp):

natural_image
Illustration of hands operating a steam iron (no text or symbols visible)natural_image
Illustration of hands using a steam iron to press down a component (no text or symbols visible)
natural_image
Illustration of a hand using a steam iron to clean or operate (no text or symbols visible)
natural_image
Hand using a steam iron with cord and tassel (no text or symbols visible)7 Όωτρ hnuωτρh υωη υ υώνωστρ υωμ Velcro utnúhṣnu: Ujūnihtunlu υωηρ hnuωηρn ρωτρ tŋlni δtnpnu:
8 PSG3010 utnhwjh wnnniyn pnuwlyh zünphhu ynip ywnnn ttp unwutl ubty atinpnu, tpt wnnniyn wúnwgulwó t unwynhnhu:
PSG2000 utphw
1 Utugwntp uwnpn Li hwutp wju qwnnwlyhg:
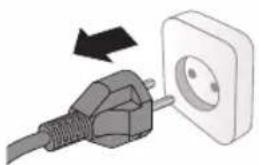
natural_image
Illustration of a plug being inserted into an electrical outlet (no text or symbols)
natural_image
Illustration of a kitchen sink with a pot and faucet (no text or symbols)2 7wnwnltp gnnp hughlyhg lujwgnwnuh utg:
Ruijtntu

natural_image
Illustration of a hand pressing down on a steam iron (no text or symbols visible)natural_image
Illustration of hands operating a steam iron (no text or symbols visible)
natural_image
Illustration of a hand using a steam iron to clean or operate (no text or symbols visible)text_image
Labeled diagram of a steam iron with numbered parts for identificationPSG2000 series

text_image
Labeled diagram of a steam iron with numbered parts for identificationnatural_image
Illustration of a person adjusting a belt buckle with a numbered arrow indicating step 1 (no text or symbols present)natural_image
Illustration of two steamers in a protective gear, one standing and one lying on a diagonal line (no text or symbols)natural_image
Hand placing a black object into a white cylindrical container (no text or symbols visible)PSG2000 series
natural_image
Illustration of a plug being inserted into an electrical outlet (no text or symbols)
natural_image
Illustration of a hand pressing a button with a power symbol (no text or labels)natural_image
Close-up of a mechanical component with a star-shaped indentation (no visible text or symbols)natural_image
Illustration of a cooking pot with a checkmark indicating a cooking step (no text or symbols present)natural_image
Illustration of hands holding a device with a lock icon (no text or symbols)natural_image
Close-up of a mechanical device with a black cable and attached cable (no visible text or symbols)natural_image
Illustration of a hand using an iron to lift a cup, with a black arrow indicating the cup's tip (no text or symbols present)text_image
Illustration showing a hand holding a document with a checkmark and arrow, next to an image of a printer.text_image
Safety warning illustration showing a person using a hairdryer with a cross symbol and warning triangletext_image
Diagram illustrating a hanger with warning symbols including a cross, steam, and a hand holding an iron, indicating hazard or stress.664 ภาษาไทย
เพิ่มพลังไอน้ํา
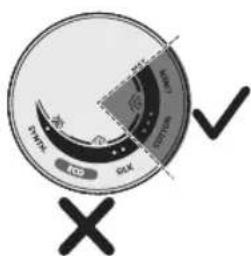
text_image
OK OK OK OK OK OK OK OK OK OK OK OK OK OK OK OK OK OK OK OK OK OK OK OK OK OK OK OK OK OK OK OK OK OK OK OK OK OK OK OK OK OK OK OK OK OK OK OK OK OK OKtext_image
Diagram illustrating temperature change with thermometer symbols and a star-shaped object on a surface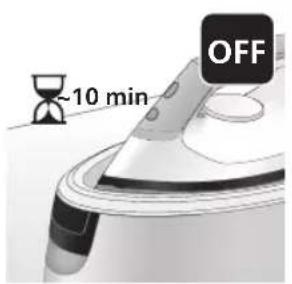
text_image
-10 min OFFnatural_image
Illustration of a speaker emitting sound waves, no text or symbols present
text_image
Diagram showing a hand using an iron with sound waves and a cross symbol indicating cancellation or error.natural_image
Illustration of a steam iron with two directional arrows indicating motion (no text or symbols)natural_image
Illustration of a pair of steam iron holders, showing front and side views (no text or symbols)natural_image
3D rendered image of a mechanical component with curved surfaces and a triangular indentation, placed on a flat surface (no text or symbols visible)natural_image
Illustration of an iron frying pan with a downward arrow indicating cooling or reduction (no text or symbols)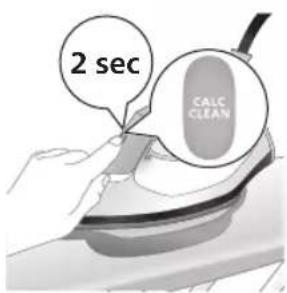
text_image
2 sec CALC CLEANnatural_image
Illustration of a steaming iron with warning symbols (no text or labels)natural_image
Illustration of a hand using an iron on a surface (no text or symbols)
text_image
Diagram illustrating heat transfer in a kitchen with temperature indicators and warning symbolnatural_image
Illustration of a steam iron with sound waves above it, no text or symbols presenttext_image
Illustration of a hand using an iron with sound waves and a cross symbol indicating cancellation or error.natural_image
Illustration of a hand placing a black cloth into a white ceramic pot (no text or symbols visible)natural_image
3D rendered image of a mechanical component with a curved handle and flange, resting on a flat surface (no text or symbols visible)natural_image
Illustration of a hand ironing an iron with a downward arrow indicating cooling or residue (no text or symbols)text_image
2 sec CALC CLEANnatural_image
Illustration of a steaming iron with a warning symbol (no text or labels)natural_image
Hand using a power iron on a surface (no text or symbols visible)text_image
Diagram illustrating temperature change in a car with warning sign and thermometer symbolsnatural_image
Illustration of a hand using an iron on a surface with arrows indicating motion (no text or symbols)text_image
Warning symbol and safety icon showing a bottle, gavel, and spray bottle with warning labelsnatural_image
Illustration of a plug with a power outlet connected to an open socket (no text or symbols)672 ภาษาไทย

natural_image
Illustration of a hand holding a lock icon with an arrow, no text or symbols presentnatural_image
Illustration of a steam iron with two arrows indicating motion (no text or symbols)natural_image
Diagram of a bathroom sink with faucet and shower (no text or symbols)natural_image
Illustration of two identical steam iron machines side by side, showing front and back views (no text or symbols)natural_image
Illustration of hands operating a steam iron (no text or symbols visible)natural_image
Illustration of hands operating a steam iron (no text or symbols visible)
natural_image
Illustration of a hand using a steam iron to clean or store air (no text or symbols visible)
natural_image
Illustration of a hand using a steam iron with cord and power cord (no text or symbols)natural_image
Illustration of a plug inserted into an electrical outlet with a black arrow indicating direction (no text or symbols)674 ภาษาไทย
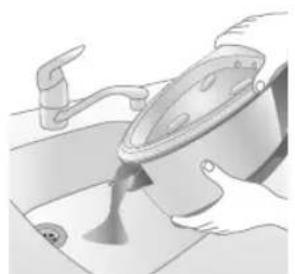
natural_image
Illustration of hands using a pot on a sink, no text or symbols presentnatural_image
Illustration of hands operating a steam iron (no text or symbols visible)natural_image
Illustration of hands operating a steam iron (no text or symbols visible)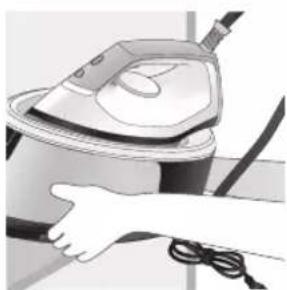
natural_image
Illustration of a hand using a steam iron to clean or store air (no text or symbols visible)text_image
Labeled diagram of a steam iron with numbered parts for identification676
PSG2000 LGTNG

text_image
Labeled diagram of a steam iron with numbered parts for identification1 CALC-CLEAN-nb qnnmuzn n6qon3u0fmmnn
2 330dmbnqns3n
3 "γομμι" ∂δυσμησβόν ηδροηςφόμπ
4 དμηνὶ ἡγδρίπιςμήν ἀπλυσιβομη ὁρικτρόν (μαρίπις PSG3000) / δμηνὶ ἡγδρίπιςμήν ὁρικτρόν (μαρίπις PSG2000)
5 fiscaln b dmlsblubgmn ngbgmzyssnn (lgmns PSG3000) / fiscaln dmyblubsgn mgbgmzyssnn (lgmns PSG2000)
6 -by-mn- dnbmogon- dnmnl- dgbsbn- 26bymgngdou
7 Smart Calc-Clean-ol 3m600n60mn
8
9 6yqnnu dnbmogdnu dngnn
10 mmonjmnlu gudmdd3gdn/mmonjmnlu gudsdmnngfmdgdm
11 00000000000000000000000000000000
12 ยุธุ์สุขบุคซี
13 დასამაცრებელი საკეტის განბლოკვის დილოაუი (PSG3010)
zsdmlsyy6gdoqmsw dmddsgogds
natural_image
Illustration of hands performing a step-up on a mechanical component, labeled with arrows ① and ② (no text or symbols present)PSG3000 LGMNS
natural_image
Illustration of two steam covers with arrows indicating motion, no text or symbols present3 fiscalnul mggngzysmnl bsbnmlu qssbgtjnon sorgnmdg odndgbsdqy („Rbsgbn“).

natural_image
Illustration of a hand placing a black lid onto a white rice cooker (no text or symbols visible)PSG2000 LGM
natural_image
Illustration of a hand inserting a plug into an electrical outlet (no text or symbols)1 30000000000000000000000000000000000000000000000
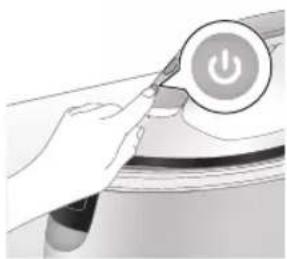
natural_image
Illustration of a hand holding a power button with an icon, no text or symbols presentnatural_image
Illustration of a mechanical component with a star-shaped feature on its surface (no text or symbols)natural_image
Illustration of a hand holding a white circular object with a black checkmark (no text or symbols)natural_image
Illustration of hands adjusting a device with a lock icon (no text or symbols)natural_image
Close-up of a hand pressing down on a device component with a black arrow indicating motion (no text or symbols visible)natural_image
Illustration of a hand using an iron on a medical device (no text or symbols visible)30th of the government
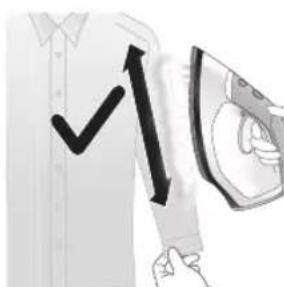
text_image
Diagram showing a hand holding a shirt with a checkmark and an airplane, indicating a clothing or garment.text_image
Illustration showing a person holding an electric shock absorber with a warning symbol and cross markyghsqngjds! ymm 3bgm mmonjml ydʒd6. smubqmm buzqmon fubu3dmn buzgomgds, hm2s nl aqsdn6b u3zns. mmonjmn sm nddsmmon bszyonsfn sb bbznbn bgtmbl36.
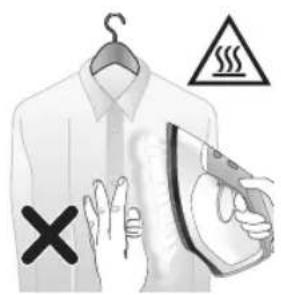
text_image
Diagram illustrating a hanger with warning symbols including a cross, steam, and warning triangleமங்குளு எடிடுக்குர்

text_image
DRINK DCD RCK OK OK OK OK OK OK OK OK OK OK OK OK OK OK OK OK OK OK OK OK OK OK OK OK OK OK OK OK OK OK OK OK OK OK OK OK OK OK OK OK OK OK OK OK OK OK OK OK OK OK AK AK AK AK AK AK AK AK AK AK AK AK AK AK AK AK AK AK AK AK AK AK AK AK AK AK AK AK AK AK AK AK AK AK AK AK AK AK AK AK AK AK AK AK AK AK AK AK AK AK OKtext_image
Diagram showing temperature change with thermometer and flame, indicating thermal treatment or cooling process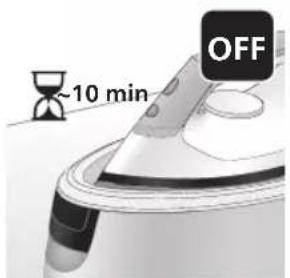
text_image
~10 min OFFnatural_image
Illustration of a steam iron with sound waves above it (no text or symbols)PSG3000 LGMOS
text_image
Illustration of a hand using an iron with sound waves and a warning symbol, indicating noise or vibration.natural_image
Illustration of a hand using an iron on a surface, showing two directional arrows (① and ②) indicating motion or force direction (no text or symbols present)natural_image
Illustration of two identical mechanical components with directional arrows indicating motion or force (no text or symbols)natural_image
3D rendered image of a mechanical component with a curved handle and flange, placed on a flat surface (no text or symbols visible)7 gmm dysmsq qosggn Calc-Clean 3m600n60m80.
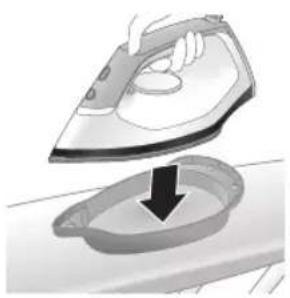
natural_image
Illustration of a person using an iron on a sink, showing the iron being placed into a basin (no text or symbols present)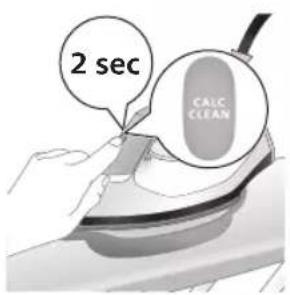
text_image
2 sec CALC CLEANtext_image
CALC CLEAN ~2 minnatural_image
Illustration of a steaming iron with a warning symbol (no text or labels)natural_image
Illustration of a hand using an iron on a surface (no text or symbols)text_image
Diagram illustrating temperature regulation in a kitchen, showing heat transfer from a sink to a thermometer.12 3n6sncq5b 6uqg0nlz5b 7u7yqmszj0nl 3fmmgjdn Calc-Clean-nb 3mbghgn6jmn 3ybgmq0ds, 3mn2sqon qssbmmg0non 5 byon lubsd 3sl 3ygbg0non. sdnl 3ydaqgg Calc-Clean-nb 3mbghgn6jmn 3dnhfsbgn 6ngsmlsousb, 4us2sqr on 4s jdnbsbjon lsodmdzsmm gudmygbdnloznbl.
natural_image
Illustration of a steam iron emitting sound waves (no text or symbols)PSG2000 LGFNG
text_image
Diagram showing a hand using an iron with sound waves and a cross symbol indicating cancellation or error.natural_image
Illustration of a hand placing a black lid onto a rice cooker (no text or symbols visible)natural_image
3D rendered image of a mechanical component or bracket on a flat surface (no text or symbols visible)5 Calc-Clean-nb ʒm6fŋn6gʃn ədmsoszbgom ɒsɡɒmm ɕoʊqɔs8g əb ʊb3s ɒs6sɔsʃn, ədysm 8gɕoʊʒn68g.
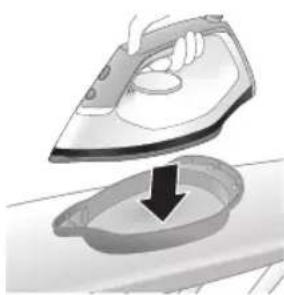
natural_image
Illustration of a hand ironing an iron with a downward arrow indicating cooling or residue (no text or symbols)text_image
2 sec CALC CLEANtext_image
EAL CLEAN ~2 minnatural_image
Illustration of an electric iron with warning symbols (no text or labels)350701620000: yom 3b0000s.

natural_image
Hand using a power iron on a surface (no text or symbols visible)10 yonm bujfmlu dlmznnnnn zubdn6qon qos 33ms3 d3jusqazd8q wugon.

text_image
Diagram illustrating heating and cooling process with temperature indicators and warning symbol11 3n6sngqsb 6spgdnlbgsb 8sbygmszgdnb 3fmmygbdn Calc-Clean-nb ymbghgnbgfm n ybjgnmgds, dmnysggm qssbmmgdnom 5 bgm lbsbd dsl ydgbydnon. sdnb ydjdggg Calc-Clean-nb ymbghgnbgfm dnnfysbgon 6ngsfmlonsb, foysgvmgm qos lsdmdzsgm zdumygbdnluznbl dgnbsbgm.
natural_image
Illustration of a hand using an iron on a workbench with arrows indicating motion (no text or symbols)text_image
Warning symbol and safety icon showing a bottle, magnifying glass, and warning sign with 'No Use' textnatural_image
Illustration of a plug being inserted into an electrical outlet (no text or symbols)
natural_image
Illustration of a hand holding a lock icon on a car (no text or symbols)natural_image
Illustration of a steam iron with two directional arrows indicating motion (no text or symbols)natural_image
Diagram of a kitchen sink with faucet and showerhead (no text or labels)4 6ymnb mg8g3y5m0s6 bycnn bngfmdn hssubnn.
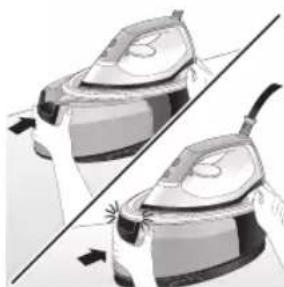
natural_image
Illustration of two steam covers with arrows indicating motion, no text or symbols presentnatural_image
Illustration of hands operating a steam iron (no text or symbols visible)natural_image
Illustration of hands operating a steam iron (no text or symbols visible)690
ජාඩිංක්ය བී

natural_image
Illustration of a hand using a steam iron to clean or store air (no text or symbols visible)natural_image
Illustration of a hand using a steam iron with cord and tassel (no text or symbols)natural_image
Illustration of a plug connecting to an open electrical outlet (no text or symbols)natural_image
Illustration of a kitchen sink with a faucet and a bowl (no text or symbols)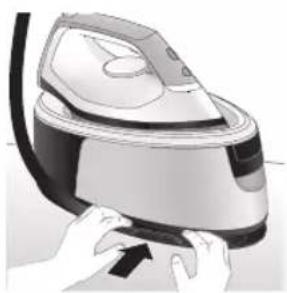
natural_image
Illustration of a hand pressing down on a steam iron (no text or symbols visible)natural_image
Illustration of hands operating a steam iron (no text or symbols visible)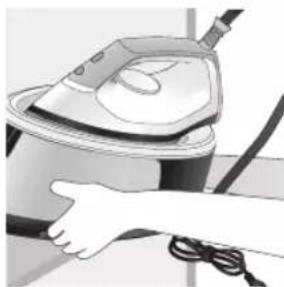
natural_image
Illustration of a hand using a steam iron to clean or operate (no text or symbols visible)text_image
Labeled diagram of a steam iron with numbered parts for identificationPSG2000 系列

text_image
Labeled diagram of a steam iron with numbered parts for identificationnatural_image
Illustration of a person adjusting a mechanical component with numbered arrows (no text or symbols)natural_image
Illustration of a pair of identical mechanical parts with arrows indicating motion or force direction (no text or symbols)natural_image
Illustration of a hand pouring liquid into a rice cooker (no text or symbols visible)PSG2000 系列
1 打开水箱注水门。
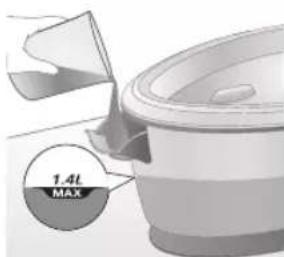
text_image
1.4L MAXnatural_image
Illustration of a hand inserting a plug into an electrical outlet (no text or symbols)1 将插头插入有接地的电源插座。
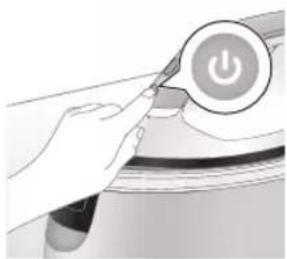
natural_image
Illustration of a hand holding a power button with an icon, no text or symbols presentnatural_image
Close-up of a mechanical component with a star-shaped indentation and curved handle (no text or symbols visible)natural_image
Close-up of a kitchen utensil with a checkmark indicating a mark (no text or symbols visible)natural_image
Illustration of hands holding a lock icon and securing a car seatbelt (no text or symbols)natural_image
Close-up of a hand holding a small black object with a curved arrow, next to a white appliance (no text or symbols visible)6 从储藏格取下供水软管。

natural_image
Illustration of a hand using a power iron to lift a surface, with an arrow indicating the motion (no text or symbols present)7 按住蒸汽开关,开始熨烫。
natural_image
Illustration of a shirt with a checkmark and arrow, next to a hand holding a magnifying glass (no text or symbols)text_image
Safety warning illustration showing a person holding an iron with a warning symbol and 'X' indicating no crossing.text_image
Illustration showing a hanger with warning symbols including a 'X' mark, a steam iron, and a warning triangle.蒸汽束喷射

text_image
STRAW COO COO STRAW COO X ✓text_image
Diagram illustrating temperature change with thermometer symbols and a star-shaped object, likely illustrating thermal behavior or sensor response.natural_image
Illustration of a speaker emitting sound waves, no text or symbols presenttext_image
Illustration of a hand using an iron with sound waves and a cross symbol indicating cancellation or error.natural_image
Illustration of a steam iron with two directional arrows indicating motion (no text or symbols)natural_image
Illustration of two identical mechanical components with directional arrows indicating motion or force (no text or symbols)natural_image
3D rendered image of a mechanical component with a curved handle and flange, placed on a flat surface (no text or symbols visible)natural_image
Illustration of a hand ironing an iron on a surface, with a downward arrow indicating cooling or residue (no text or symbols present)7 将熨斗稳定地置于除垢容器上。
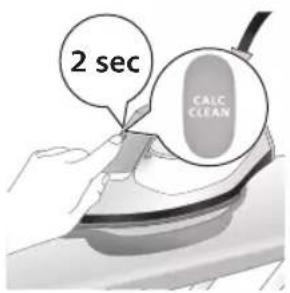
text_image
2 sec CALC CLEANtext_image
CALC CLEAR ~2 minnatural_image
Illustration of an electric shock wave inside a vehicle, with warning symbols (no text or labels)natural_image
Illustration of a hand using an iron on a surface (no text or symbols)text_image
Safety warning illustration showing a toilet with heat and temperature indicators, including a warning sign and thermometer symbols.natural_image
Illustration of a speaker emitting sound waves (no text or symbols)PSG2000 系列
text_image
Diagram showing a hand using an iron with sound waves and a cross symbol indicating cancellation or error.natural_image
Illustration of a hand placing a black object into a rice cooker (no text or symbols visible)3 打开水箱注水门。

text_image
1.4L MAX4 中途为水箱加水。
natural_image
3D rendered image of a mechanical component or bracket on a flat surface (no text or symbols visible)natural_image
Illustration of a steam iron being placed into a basin with a downward arrow (no text or symbols)6 将熨斗稳定地置于除垢容器上。
704 简体中文

text_image
2 sec CALC CLEANnatural_image
Illustration of a steaming iron iron with a warning symbol (no text or labels)natural_image
Hand using a power iron on a workbench (no text or symbols visible)text_image
Diagram illustrating heat transfer in a kitchen with temperature indicators and warning symbolnatural_image
Illustration of a hand using an iron on a surface with arrows indicating motion (no text or symbols)text_image
Warning symbol and safety warning illustration showing a bottle, magnifying glass, and iron iron with warning labelsnatural_image
Illustration of a plug being inserted into an electrical outlet (no text or symbols)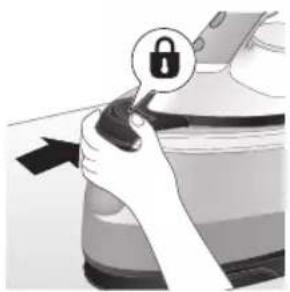
natural_image
Illustration of a hand holding a lock icon, with no visible text or symbolsnatural_image
Illustration of a hand using a steam iron to move down a button (no text or symbols present)natural_image
Diagram of a kitchen sink with faucet and showerhead (no text or labels)4 将水箱中的水倒入水槽中。
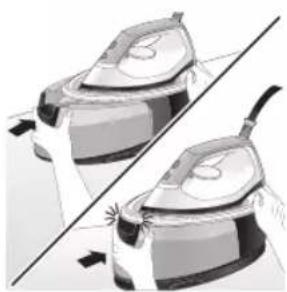
natural_image
Illustration of two steam covers with a diagonal line crossing through (no text or symbols)natural_image
Illustration of hands operating a steam iron (no text or symbols visible)natural_image
Illustration of hands using a steam iron to press down a button (no text or symbols visible)
natural_image
Illustration of a hand using a power iron to clean or install a machine (no text or symbols visible)natural_image
Illustration of a hand using a steam iron with cord and power cord (no text or symbols)natural_image
Illustration of a plug being inserted into an electrical outlet (no text or symbols)2 将水箱中的水倒入水槽中。
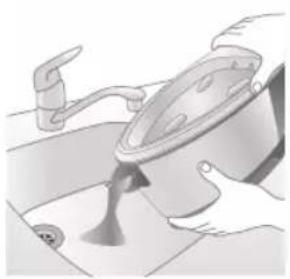
natural_image
Illustration of a hand pouring liquid into a container with a side sink (no text or symbols)natural_image
Illustration of hands operating a steam iron (no text or symbols visible)708 简体中文
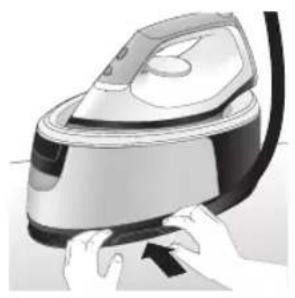
natural_image
Illustration of hands operating a steam iron (no text or symbols visible)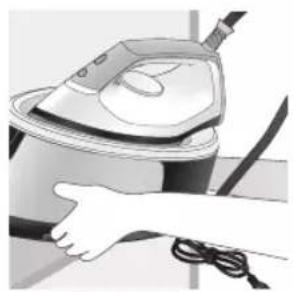
natural_image
Illustration of a hand washing a steam iron (no text or symbols visible)text_image
Labeled diagram of a steam iron with numbered parts for identificationPSG2000 系列

text_image
Labeled diagram of a steam iron with numbered parts for identificationnatural_image
Illustration of hands performing a mechanical or repair operation with numbered arrows (1 and 2), no visible text or symbols.natural_image
Illustration of two identical steam covers with arrows indicating motion, no text or symbols presentnatural_image
Illustration of a hand pouring liquid into a cooking pot (no text or symbols visible)1 打開水箱注水口門。

text_image
1.4L MAXnatural_image
Illustration of a plug being inserted into an electrical outlet (no text or symbols)
natural_image
Illustration of a hand holding a power button icon (no text or symbols present)natural_image
Illustration of a mechanical component with a star-shaped feature and curved surfaces (no text or symbols)natural_image
Illustration of a medical or laboratory procedure with a checkmark and magnified view (no text or symbols)4 靜待「熨斗就緒」指示燈持續亮起。
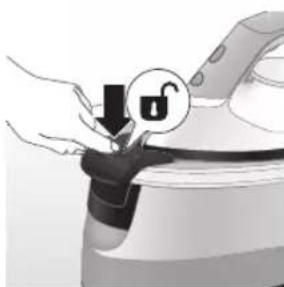
natural_image
Illustration of a hand holding a lock icon over a device (no text or symbols)natural_image
Close-up of a hand pressing down on a small electronic device with a black cable (no visible text or symbols)6 從收納槽中取出水源膠管。
714 繁體中文
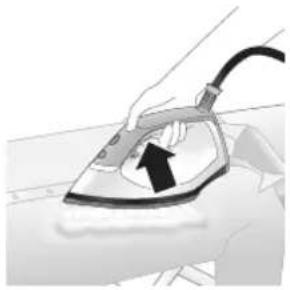
natural_image
Illustration of a hand using an iron on a line, with a black arrow indicating the motion direction (no text or symbols present)7 按住蒸氣觸動器以開始熨燙。
text_image
Illustration showing a checkmark and downward arrow next to a shirt, likely indicating a verification or approval process.text_image
Safety warning illustration showing a person using an iron with a warning symbol and a cross marktext_image
Diagram illustrating a hanger with warning symbols including a cross, steam, and hand gesture強力蒸氣

text_image
ECO SIX D ✓natural_image
Illustration of an air conditioner with a hourglass above it, showing time ~15 minutes (no text or symbols on the device itself)text_image
Diagram showing a thermometer application on a surface with temperature indicators and a star-shaped mark indicating a specific point.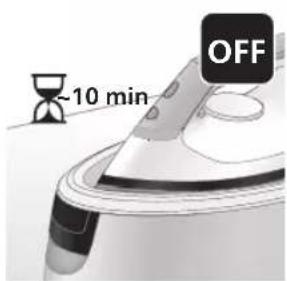
text_image
-10 min OFFnatural_image
Illustration of a speaker emitting sound waves, no text or symbols present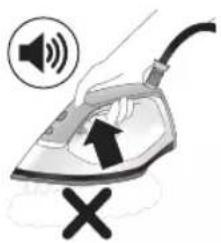
text_image
Illustration of a hand using an iron with sound waves and a cross symbol indicating cancellation or error.natural_image
Illustration of a steam iron with two directional arrows indicating motion (no text or symbols)natural_image
Illustration of two identical models with arrows indicating motion or force, no text or symbols presentnatural_image
3D rendered image of a mechanical component with a curved handle and flange, placed on a flat surface (no text or symbols visible)7 將熨斗穩固地放在除鈣盒上。

natural_image
Illustration of a hand ironing an iron with a downward arrow indicating cooling or residue (no text or symbols)
text_image
2 sec CALC CLEANtext_image
Cable CLEAN ~2 minnatural_image
Illustration of a steaming car with a checkmark and warning symbol (no text or labels)natural_image
Illustration of a hand using a power iron on a surface (no text or symbols)text_image
Diagram illustrating heat transfer in a car with warning sign and temperature change iconsnatural_image
Illustration of a steaming iron with sound waves above it (no text or symbols)PSG2000 系列
text_image
Illustration of a hand using an iron with sound waves and a cross symbol indicating cancellation or error.natural_image
Illustration of a hand placing a black object into a container (no text or symbols visible)3 打開水箱注水口門。
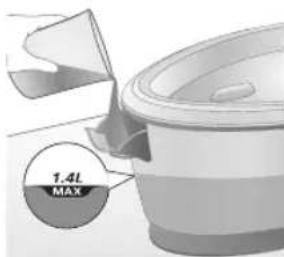
text_image
1.4L MAX4 將水箱注入一半的水。
natural_image
3D rendered image of a mechanical component or bracket on a flat surface (no text or symbols visible)6 將熨斗穩固地放在除鈣盒上。

natural_image
Illustration of an iron frying pan with a downward arrow indicating cooling or drying process (no text or symbols)720 繁體中文
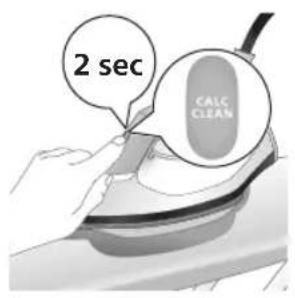
text_image
2 sec CALC CLEANnatural_image
Illustration of a steam iron on a surface with warning symbols (no text or labels)natural_image
Illustration of a hand using an iron on a surface (no text or symbols)text_image
Diagram illustrating temperature regulation in a kitchen, showing heat transfer from a sink to a thermometer.natural_image
Illustration of a hand using an iron on a surface with directional arrows indicating motion (no text or symbols)text_image
Warning symbol and cleaning instruction illustration showing a bottle, magnifying glass, and iron iron with warning sign備註:清潔時請勿使用肥皂或刷洗底盤。
收納
PSG3000 系列
1 關閉產品電源,並拔除插頭。
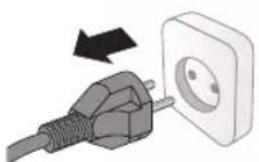
natural_image
Illustration of a plug being inserted into an electrical outlet (no text or symbols)natural_image
Illustration of a hand holding a lock icon with an arrow, no text or symbols present722 繁體中文
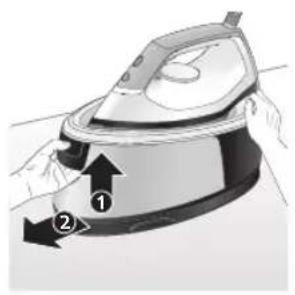
natural_image
Illustration of a hand using a steam iron to lift a cup, showing two directional arrows (no text or symbols)natural_image
Diagram of a mechanical device with lever and base components (no text or symbols)4 將水箱中的水倒入水槽中。
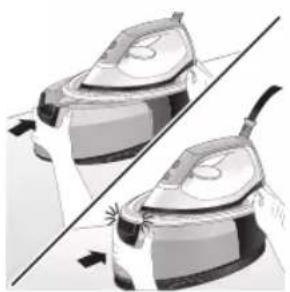
natural_image
Illustration of two identical steam iron holders with a diagonal line indicating the opposite side (no text or symbols)natural_image
Illustration of hands operating a steam iron (no text or symbols visible)natural_image
Illustration of hands operating a steam iron (no text or symbols visible)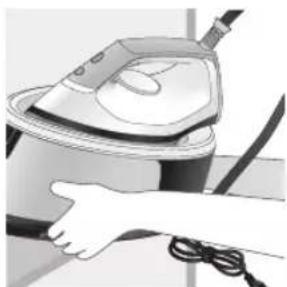
natural_image
Illustration of a hand using a steam iron to clean or store air (no text or symbols visible)natural_image
Illustration of a hand using a steam iron with cord and tassel (no text or symbols)natural_image
Illustration of a plug connecting to an open electrical outlet (no text or symbols)2 將水箱中的水倒入水槽中。
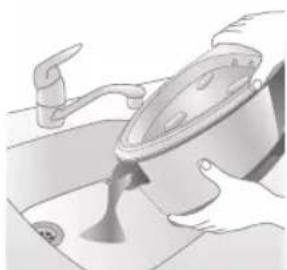
natural_image
Illustration of a person washing a pot in a sink (no text or symbols visible)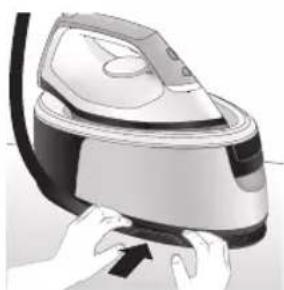
natural_image
Illustration of a hand using a power iron to press down a button (no text or symbols visible)natural_image
Illustration of hands operating a steam iron (no text or symbols visible)
natural_image
Illustration of a hand using a steam iron to clean or operate (no text or symbols visible)text_image
Labeled diagram of a steam iron with numbered parts for identificationPSG2000 시리즈

text_image
Labeled diagram of a steam iron with numbered parts for identificationnatural_image
Illustration of a person adjusting a belt buckle with arrows indicating movement (no text or symbols)natural_image
Illustration of a pair of identical mechanical components with arrows indicating motion (no text or symbols)natural_image
Illustration of a hand placing a black object into a white pot (no text or symbols visible)natural_image
Illustration of a plug inserted into an electrical outlet with a black arrow indicating direction (no text or symbols)
natural_image
Illustration of a hand holding a power button with an icon, no text or symbols presentnatural_image
Close-up of a mechanical component with a star-shaped feature and a handle (no visible text or symbols)natural_image
Illustration of a medical or laboratory procedure step with a checkmark and magnified view (no text or symbols)natural_image
Illustration of a hand holding a lock icon over a device (no text or symbols)natural_image
Close-up of a hand pressing down on a small electronic device with a curved cable (no visible text or symbols)natural_image
Illustration of a hand using an iron on a surface, with a black arrow indicating the iron's direction (no text or symbols present)text_image
Diagram showing a hand holding a magnifying glass over a shirt, with a checkmark and arrow indicating direction or process.text_image
Illustration of a person using a fire extinguisher with warning symbols including a cross and a warning triangle.text_image
Warning symbol image showing a hanger holding an iron, indicating heat shock, with a cross mark and warning triangle.순간 스팀

text_image
DVR ECO 50kV 100kV 500kV ✓natural_image
Illustration of an air conditioner with a hourglass icon and ~15-minute time label (no text or symbols on the device itself)text_image
Diagram illustrating temperature change with labeled thermometer symbols and a star-shaped object on a surface
text_image
-10 min OFFnatural_image
Illustration of a steaming iron with sound waves above it (no text or symbols)PSG3000 시리즈
text_image
Illustration of an iron frying pan with sound waves and a 'X' symbol indicating cancellation or errornatural_image
Illustration of a steam iron with two directional arrows indicating motion (no text or symbols)natural_image
Illustration of two steam iron machines on a diagonal line, showing front and side views (no text or symbols)natural_image
3D rendered mechanical part with a looped ring and mounting base (no text or symbols)natural_image
Illustration of a steam iron being placed into a sink with a downward arrow indicating motion (no text or symbols)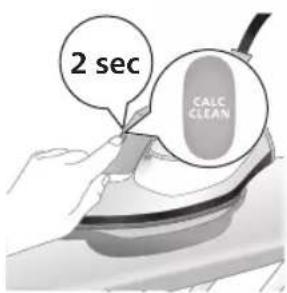
text_image
2 sec CALC CLEANtext_image
CALC CLEAN ~2 minnatural_image
Illustration of an electric shock wave on a train, with warning symbols (no text or labels)natural_image
Illustration of a hand using an iron on a surface (no text or symbols)text_image
Diagram illustrating a water safety hazard with warning sign and temperature indicatorsnatural_image
Illustration of a steam iron with sound waves above it, no text or symbols presenttext_image
Diagram showing a hand using an iron with sound waves and a cross symbol indicating cancellation or error.natural_image
Illustration of a hand placing a black cloth into a rice cooker (no text or symbols visible)natural_image
3D rendered image of a mechanical component with a curved handle and rectangular body, placed on a flat surface (no text or symbols visible)natural_image
Illustration of a steam iron being placed into a sink with a downward arrow indicating cooling (no text or symbols)text_image
2 sec CALC CLEANnatural_image
Illustration of an iron iron with steam and a warning symbol (no text or labels)natural_image
Hand using a iron on a surface, no text or symbols visibletext_image
Diagram illustrating temperature regulation in a kitchen, showing heat transfer from a sink to a thermometer.natural_image
Illustration of a hand using an iron on a surface with arrows indicating motion (no text or symbols)text_image
Warning symbol and safety icon showing a bottle, magnifying glass, and industrial smokestack with warning labelnatural_image
Illustration of a black plug inserted into an open electrical outlet (no text or symbols)738
한국어

natural_image
Illustration of a hand holding a lock icon with an arrow, no text or symbols presentnatural_image
Illustration of a steam iron with two arrows indicating motion (no text or symbols)natural_image
Diagram of a bathroom sink with faucet and shower mechanism (no text or labels)natural_image
Illustration of two identical steam covers with a diagonal line crossing through, no text or symbols present.natural_image
Illustration of a hand using a power iron to press down a small black object (no text or symbols visible)natural_image
Illustration of hands operating a steam iron (no text or symbols visible)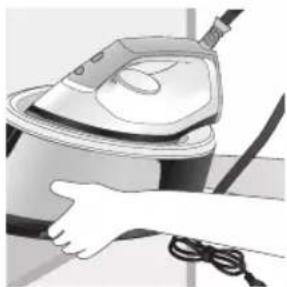
natural_image
Illustration of a hand using a steam iron to clean or operate (no text or symbols visible)
natural_image
Illustration of a hand using a steam iron with cord and tassel (no text or symbols)natural_image
Illustration of a plug being inserted into an electrical outlet (no text or symbols)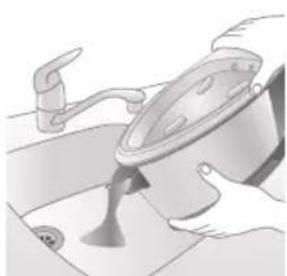
natural_image
Illustration of a kitchen sink with a pot and faucet (no text or symbols)natural_image
Illustration of a hand using a power iron to press down a button (no text or symbols visible)natural_image
Illustration of hands operating a steam iron (no text or symbols visible)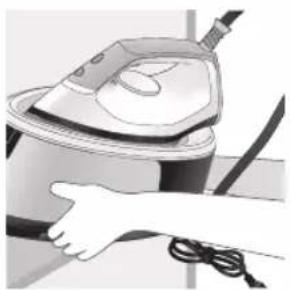
natural_image
Illustration of a hand using a power iron to clean or store air (no text or symbols visible)text_image
Labeled diagram of a steam iron with numbered parts for identification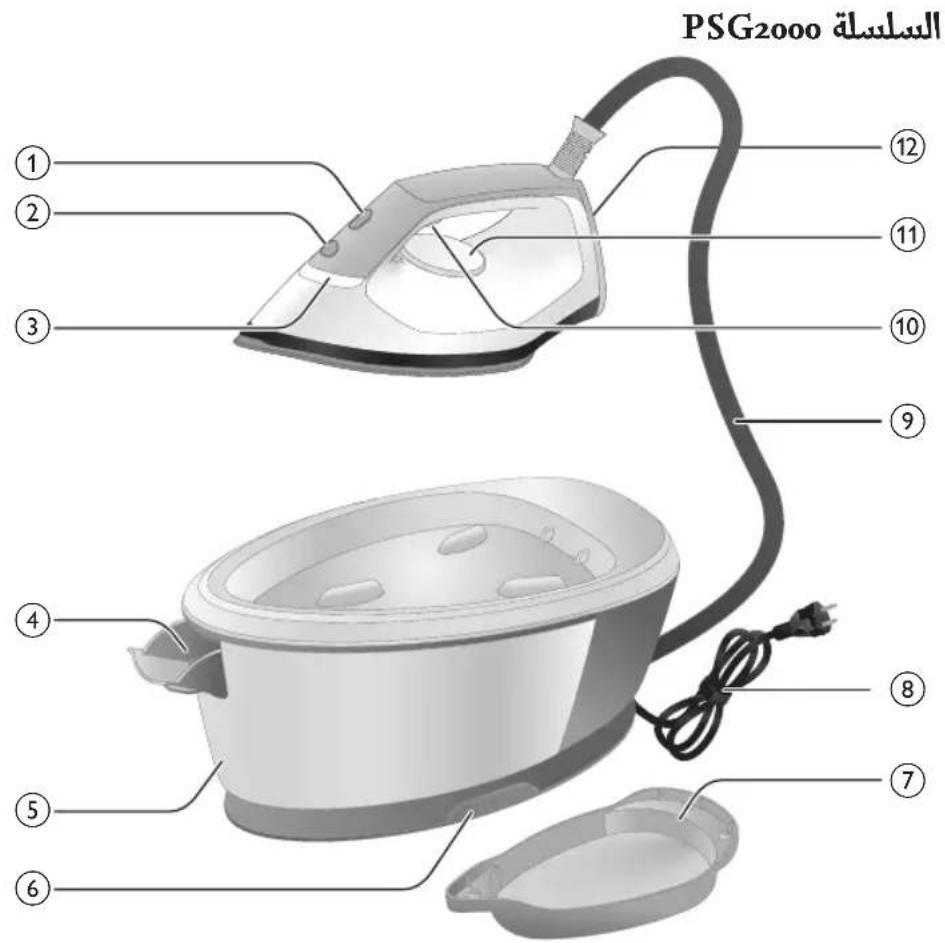
text_image
PSG2000 السلسلة ① ② ③ ④ ⑤ ⑥ ⑦ ⑧ ⑨ ⑩ ⑪ ⑫ ⑬للاس مع ضوع 1
زر الطاقة 2
'الMKWOAة جاهزة 3'
4(PSG2000 لكة
5(PSG2000 لكة
٤ الإصداد بالمياء 6
letنظيف الكلاس 7
سیة مع مقبس 8
٤ الإصداد بالمياء٥
natural_image
Illustration of a steam iron with two arrows indicating motion (no text or symbols)رال Accelerated Affairs.
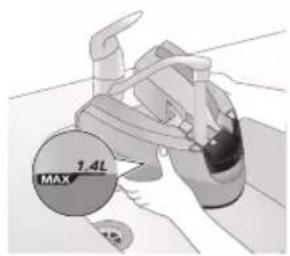
text_image
1.4L MAX3.(" tightة"
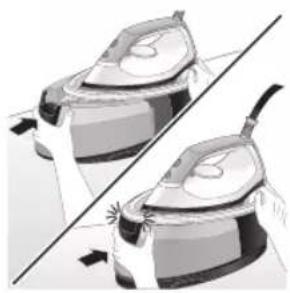
natural_image
Illustration of two identical steam iron pieces with arrows indicating motion, no text or symbols present744 العربية
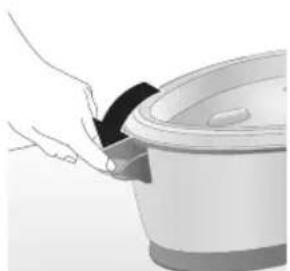
natural_image
Illustration of a hand pouring dark granular material into a large bowl (no text or symbols visible)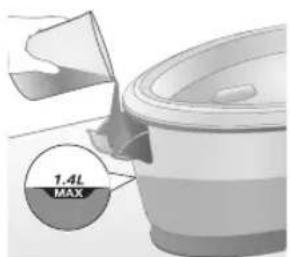
text_image
1.4L MAXبئة خزان المياه 1.
2.(" tightة")
استخدام جهازك
إعداد درجة الحرارة
natural_image
Illustration of a plug being inserted into an electrical outlet (no text or symbols)
العربية 745
natural_image
Illustration of a hand using an iron on a surface, with no visible text or symbolsخار لابء الإكلي 7.
text_image
Diagram showing a hand holding a shirt with a checkmark and arrow, next to a magnifying glass with a face.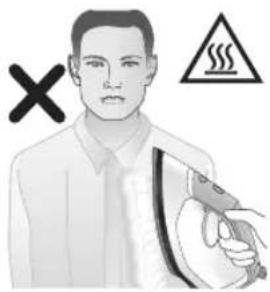
natural_image
Illustration of a person holding an iron with a warning symbol (no text or labels)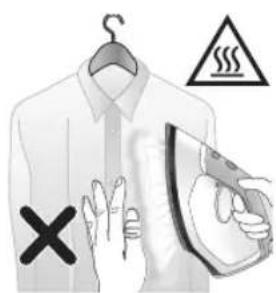
text_image
Diagram illustrating a hanger with hand gesture, warning symbol, and electrical hazardtext_image
START 20% 20% 20% ✓
text_image
2Xي لامدة 3 توان.2.
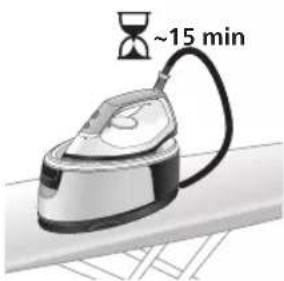
text_image
~15 min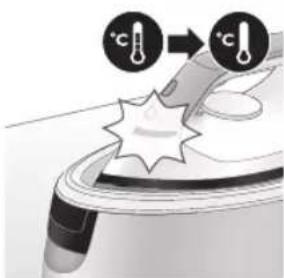
text_image
Diagram illustrating temperature change with labeled thermometer symbols and a star-shaped object on a surface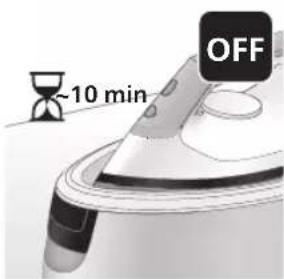
text_image
-10 min OFFnatural_image
Illustration of a steam iron emitting sound waves (no text or symbols)
text_image
Diagram showing a hand using an iron with sound waves and a cross symbol indicating cancellation or error.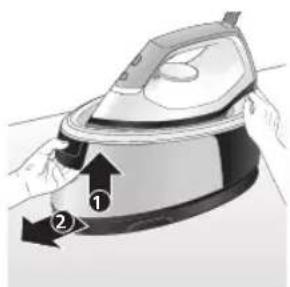
natural_image
Illustration of a person using an iron iron, showing two directional arrows (① and ②) indicating motion or force direction (no text or symbols present)من خلال تعطيل 2
natural_image
Illustration of two identical steam covers with arrows indicating motion, no text or symbols present. مستو ومستقر.
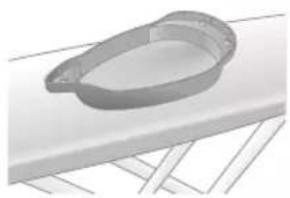
natural_image
3D rendered image of a mechanical component with a curved handle and flange, resting on a flat surface (no text or symbols visible)تنظيف Thousands 7.
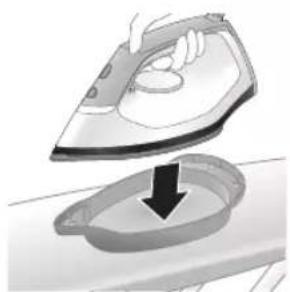
natural_image
Illustration of a hand ironing an open basin with a downward arrow indicating process (no text or symbols)صوتية قصيرة.

text_image
2 sec CALC CLEANtext_image
FULL CLEAN ~2 min
natural_image
Illustration of an iron iron with steam lines and a warning symbol (no text or labels)
natural_image
Illustration of a hand using a power iron on a surface (no text or symbols)
text_image
Diagram illustrating a heating mechanism with temperature and warning symbol, showing a person cooling down a surface.natural_image
Illustration of a steam iron emitting sound waves (no text or symbols)بدأ小微企业 إصدار
text_image
Diagram showing a hand using an iron with sound waves and a cross symbol indicating cancellation or rejection.من خلال تعطيل 2
natural_image
Illustration of a hand placing a black object into a white pot (no text or symbols visible)بئة خزان المياه.

text_image
1.4L MAXف خزان المياه 4.
natural_image
3D rendered mechanical part with a looped end and flange, resting on a flat surface (no text or symbols)مستو ومستقر.
العربية
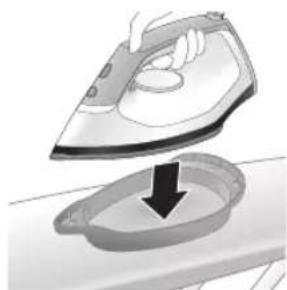
natural_image
Illustration of a hand ironing an iron with a downward arrow indicating cooling or residue (no text or symbols)تنظيف Thousands.
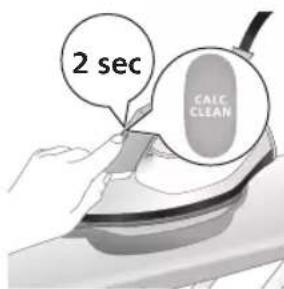
text_image
2 sec CALC CLEANد صوتية قصيرة. 7.
natural_image
Illustration of a steaming iron with warning symbols (no text or labels)، تنظيف Thousands 9
عن الوميض.
natural_image
Hand using a iron on a workbench (no text or symbols visible)- دها إلى NCAA
العربية 753

text_image
Diagram illustrating temperature regulation in a water heater, showing heat transfer from 'cool' to 'hot' with warning symbol and thermometer icons.natural_image
Illustration of a hand using an iron on a surface with arrows indicating motion (no text or symbols)تنظيف قاعدة المكواة
text_image
Warning symbol and icon depicting a bottle, a magnifying glass, and a spray bottle with a cross mark, alongside a stylized device.natural_image
Illustration of a plug being inserted into an electrical outlet (no text or symbols)ال tangزين
PSG3000 السلسلة
ن مصر الطاقة.
754 العربية
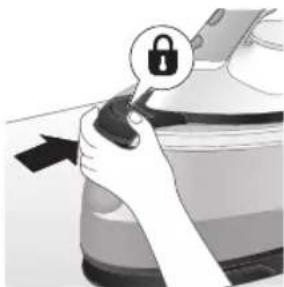
natural_image
Hand holding a lock icon on a device (no text or symbols visible)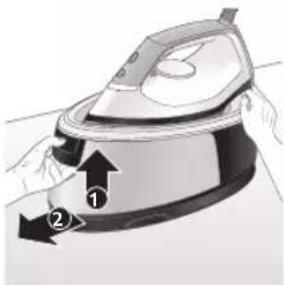
text_image
Diagram of a steam iron with labeled parts, showing air flow direction and component placement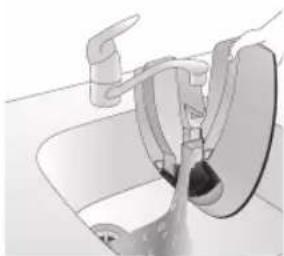
natural_image
Diagram of a bathroom sink with faucet and toilet (no text or labels)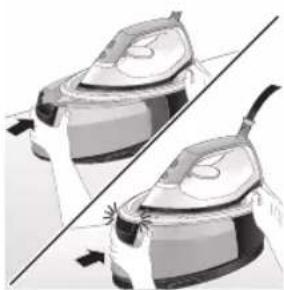
natural_image
Illustration of a pair of steamers in action, showing front and side views (no text or symbols)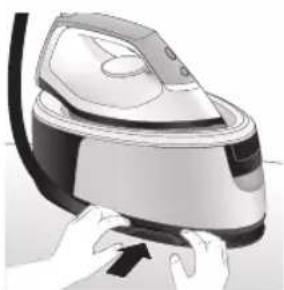
natural_image
Illustration of hands operating a steam iron (no text or symbols visible)درير قفل التثبيت 2
мыاه عن القاعدة.3.
إه في المغسلة.
صوت " tightقة" 5.
خرطوم الإimedاد.6
العربية 755

natural_image
Illustration of hands operating a steam iron (no text or symbols visible)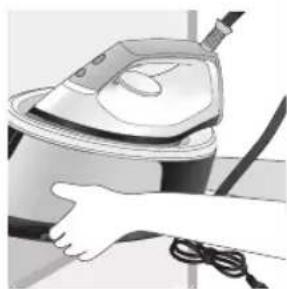
natural_image
Illustration of a hand using a steam iron to clean or store air (no text or symbols visible)
natural_image
Illustration of a hand using a steam iron with cord and tassel (no text or symbols)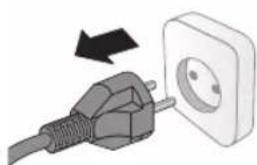
natural_image
Illustration of a plug being inserted into an electrical outlet (no text or symbols)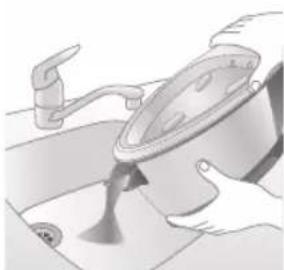
natural_image
Illustration of a person pouring liquid from a pan into a sink (no text or symbols visible)باستخدام يديك 7.
natural_image
Illustration of hands operating a steam iron (no text or symbols visible)خرطوم الإصداد.3
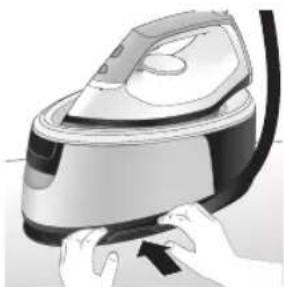
natural_image
Illustration of hands operating a steam iron (no text or symbols visible)
natural_image
Illustration of a hand using a steam iron to clean or store air (no text or symbols visible)باستخدام يديك 4.
مقدمه
text_image
Diagram showing a hand adjusting a belt buckle with labeled parts ① and ②, likely illustrating safety or repair instructions.- پر کنید MAX
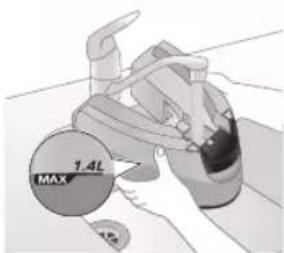
text_image
1.4L MAXایش قفل شود.
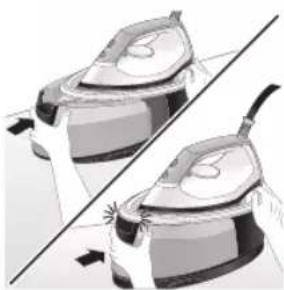
natural_image
Illustration of two identical steam covers with a diagonal line crossing through them (no text or symbols)PSG2000 سری
760 قارسی
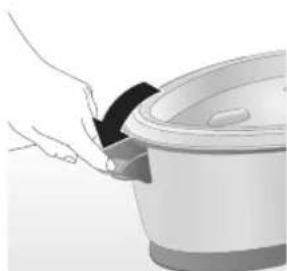
natural_image
Illustration of a hand pouring liquid into a cooking pot (no text or symbols visible)
text_image
1.4L MAXن آب را باز کنید.
(‘صدای کلیک) 2.
استفاده از دستگاه
تنظيم دما
natural_image
Illustration of a plug being inserted into an electrical outlet (no text or symbols)761 فارسی
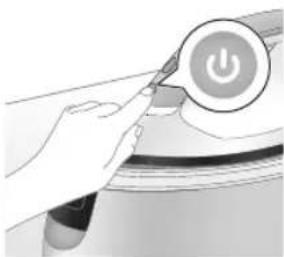
natural_image
Illustration of a hand holding a power button with an icon, no text or symbols presentيید و دما را طبق 2
natural_image
Illustration of a kitchen utensil with a star-shaped object on the lid (no text or symbols)گرم شدن است.
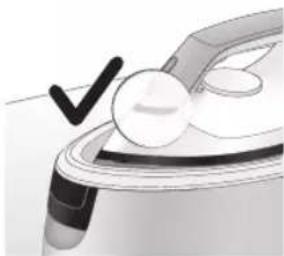
natural_image
Close-up of a medical or laboratory procedure showing a tool and a magnified view of a circular component (no text or symbols visible)د، منتظر بمانید. 4.
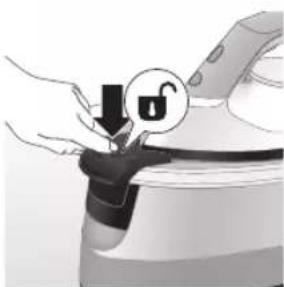
natural_image
Illustration of a hand pressing down on a mechanical component with a lock icon (no text or symbols)اه اتو جدا شود.5.
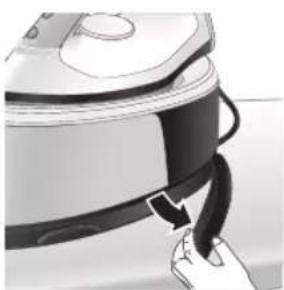
natural_image
Close-up of a hand pressing down on a small electronic device with a curved arrow indicating motion (no text or symbols visible)داری خارج کنید.6

natural_image
Illustration of a hand using an iron on a surface, with a black arrow indicating the motion direction (no text or symbols present)روع به اتو کنید. 7.
text_image
Illustration showing a hand holding a shirt with a checkmark and a magnifying glass, symbolizing inspection or verification.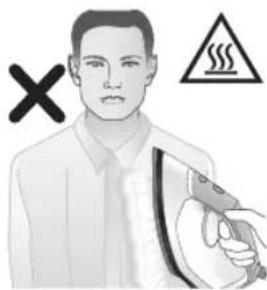
text_image
Illustration showing a person in uniform with an iron, crossed out by a 'X' symbol and a warning triangle with a steam.text_image
Diagram illustrating a hand washing a shirt with a warning symbol and cross mark indicating incorrect use.763 فارسی
افزایش دهنده بخار
- می باشد MAX

text_image
START OPEN OK ✓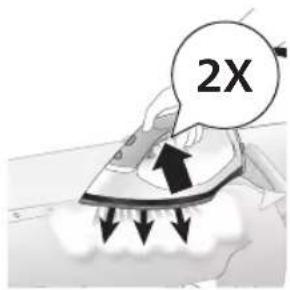
text_image
2Xtext_image
Diagram illustrating heat transfer process with temperature indicators and a star-shaped object on a surfaceخاموش شدن خودکار
ن مى كند و خنک 1
می شود.
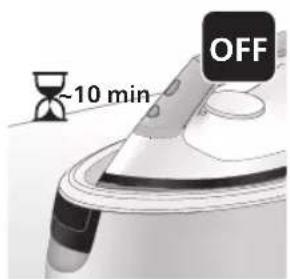
text_image
~10 min OFFموش مى شود.
natural_image
Illustration of a steam iron emitting sound waves (no text or symbols)
text_image
Diagram showing a hand using an iron with sound waves and a cross symbol indicating cancellation or error.
natural_image
Illustration of a person using an iron iron, showing two directional arrows (① and ②) indicating motion or force direction (no text or symbols present)پزدایی دستگاه 20
natural_image
Illustration of two identical steam covers with arrows indicating motion, no text or symbols presentدیگر قرار دهید. 6.
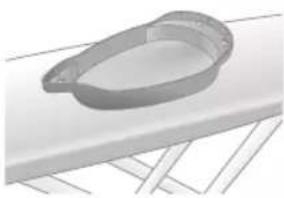
natural_image
3D rendered image of a mechanical component with a curved handle and flange, placed on a flat surface (no text or symbols visible)دایی قرار دهید. 7.
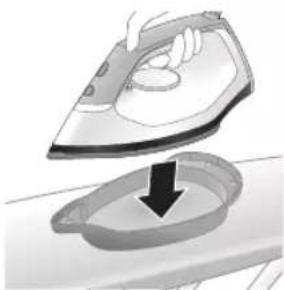
natural_image
Illustration of a hand ironing an iron with a downward arrow indicating cooling or residue (no text or symbols)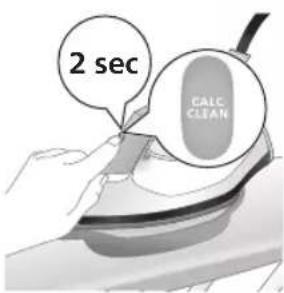
text_image
2 sec CALC CLEANن کوتاه بشنوید. 8.
text_image
FULL CLEAN ~2 min
natural_image
Illustration of an iron iron with steam lines and a warning symbol (no text or labels)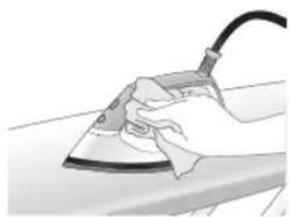
natural_image
Illustration of a hand using a power iron on a surface (no text or symbols)
text_image
Diagram illustrating temperature regulation in a kitchen, showing heat transfer from a sink to a thermometer.natural_image
Illustration of a steam iron emitting sound waves (no text or symbols)text_image
Illustration of an iron frying pan with sound waves and a warning symbol indicating no change or absence.بزدایی دستگاه 20
natural_image
Illustration of a hand placing a black object into a white pot (no text or symbols visible)تا نیمه پر کنید. 4.

text_image
1.4L MAXnatural_image
3D rendered mechanical part with a looped end and flange, resting on a flat surface (no text or symbols)ديگر قرار دهید.5.
فارس

natural_image
Illustration of a hand ironing an iron, with a downward arrow indicating cooling or residue (no text or symbols present)دایی قرار دهید.6
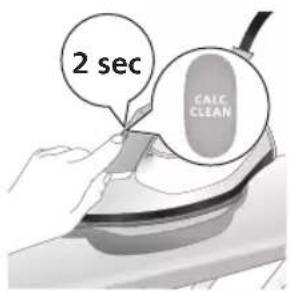
text_image
2 sec CALC CLEANفی کوتاه بشنوید. 7.
text_image
Cable CLEAN ~2 minبقة منEMA بمانيد 8
natural_image
Illustration of an electric iron steater with warning symbols (no text or labels)پېزدايى متوفق ۹
صىشود.
natural_image
Hand using a power iron on a surface (no text or symbols visible)- اصل قرار دهید
769 فارسی

text_image
Diagram illustrating temperature regulation in a water tank, showing heat transfer from a sink to a thermometer.قيقه آن را لمس 11
natural_image
Illustration of a hand using an iron on a surface with arrows indicating motion (no text or symbols)تميز کردن کف اتو
text_image
Warning sign and safety icon for a hairdryer, indicating hazardous material and safety warningnatural_image
Illustration of a plug being inserted into an electrical outlet (no text or symbols)نگهداری
PSG3000 سری
پریز خارج کنید.
770 قارنسی

natural_image
Illustration of a hand holding a lock icon over a car (no text or symbols)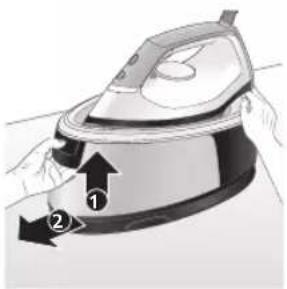
natural_image
Illustration of a hand using an iron iron to lift a cup, showing two directional arrows (no text or symbols)
natural_image
Diagram of a bathroom sink with faucet and toilet (no text or labels)
natural_image
Illustration of two identical steam covers with arrows indicating motion, no text or symbols present
natural_image
Illustration of hands using a steam iron to press down a component (no text or symbols visible), آن را قفل کنید 2
ازپایه جدا کنید.3.
يئك خالى كنید. 4.
اییش قflag شود.5
ن بخار بیچانید.
771 قارسی
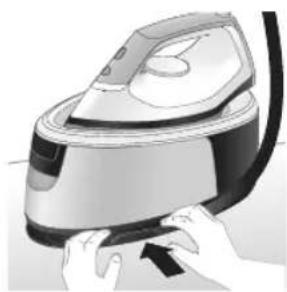
natural_image
Illustration of hands using a steam iron to press down a component (no text or symbols visible)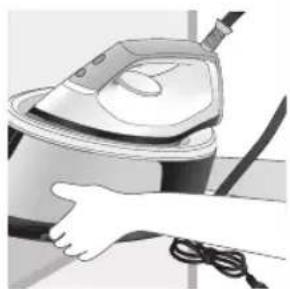
natural_image
Illustration of a hand using a steam iron to clean or wash the air (no text or symbols visible)
natural_image
Illustration of a hand using a steam iron with cord and handle (no text or symbols)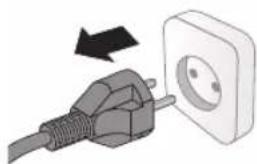
natural_image
Illustration of a plug connecting to an open electrical outlet (no text or symbols)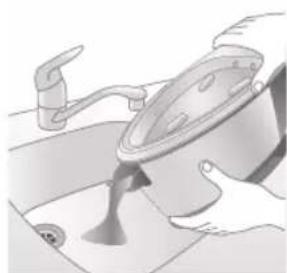
natural_image
Illustration of a hand pouring liquid into a bowl (no text or symbols visible)ست حمل کنید. 7.
اه را حمل کنید. 8.
PSG2000 سری
- ۲پریز خارج کنید
يئك خالى كنید. 2.
772 فارنسی
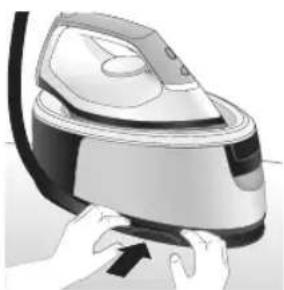
natural_image
Illustration of hands operating a steam iron (no text or symbols visible)
natural_image
Illustration of hands operating a steam iron (no text or symbols visible)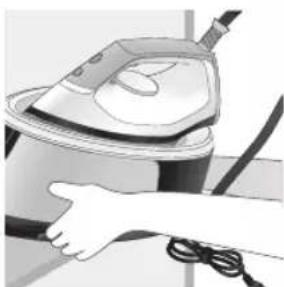
natural_image
Illustration of a hand using a steam iron to clean or store air (no text or symbols visible)ن بخار بیچانید.
ست حمل کنید. 4.
אַלְרָה
text_image
Labeled diagram of a steam iron with numbered parts for identificationPSG2000 nTTO
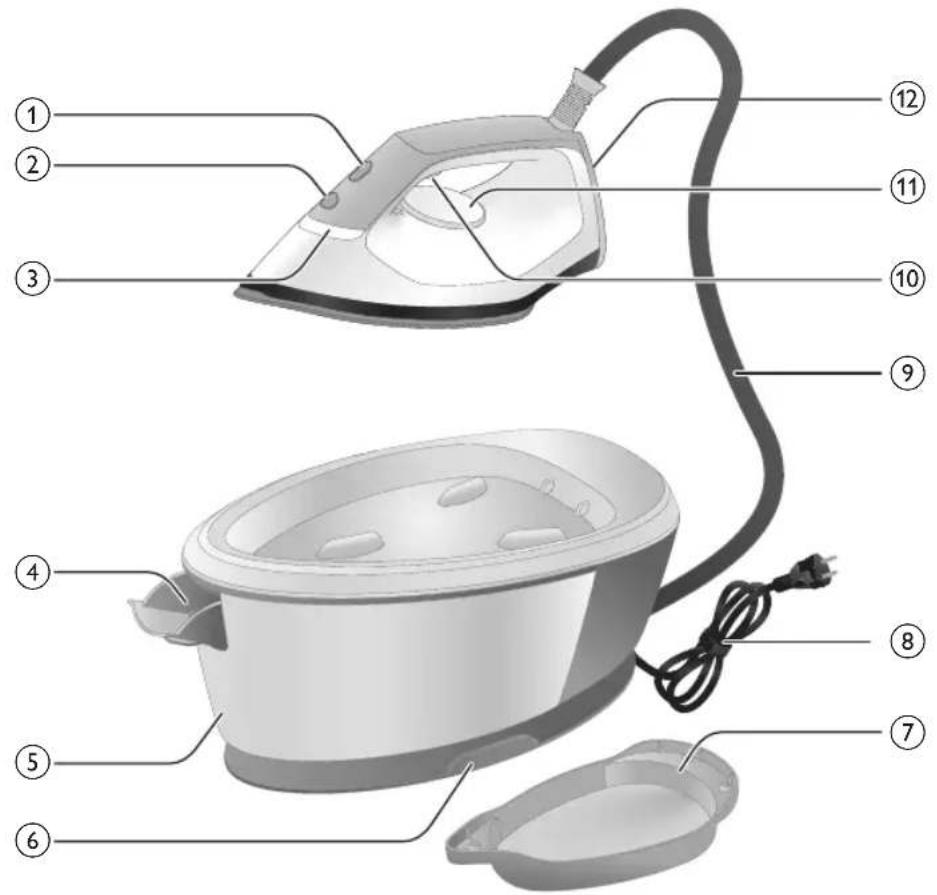
text_image
Labeled diagram of a steam iron with numbered parts for identification(PSG2000
1CALC-CLEAI
2'ロド/マツガナ
3'wɪnəʊ7 pɪn
4תְרָה) בְּוֹ
5(PSG2000 n
6
7Smart Calc-
8v7ni7nyn
90'1790X
,הכלההוּרָה,הכלההוּרָה,הכלההוּרָה,הכלההוּרָה,הכלההוּרָה,הכלההוּרָה,הכלההוּרָה,הכלההוּרָה,הכלההוּרָה,הכchia
בְרָה בַלְאָה
natural_image
Illustration of a person adjusting a mechanical component with numbered arrows (no text or symbols)- מַרְהָרִים
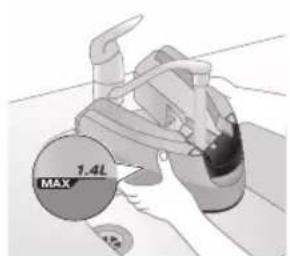
text_image
1.4L MAX 4.952.MAX |n'D'

natural_image
Illustration of two identical air purifiers with different sizes and shading, separated by a diagonal line (no text or symbols)- ("1717") ini
776
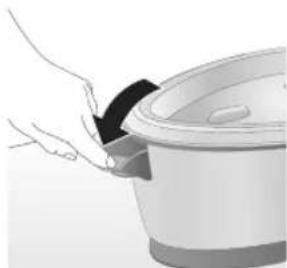
natural_image
Illustration of a hand pouring liquid into a rice cooker (no text or symbols visible)
text_image
1.4L MAX1.ロマガラガ
27077177
."ה"בְרָא
אַרְשָׁה
תְרָה בְּרָה בְּרָה
natural_image
Illustration of a hand inserting a plug into an electrical outlet (no text or symbols)777
2πππ ππ ππ

natural_image
Illustration of a hand using a power button to press or install a device (no text or symbols visible)natural_image
Illustration of a kitchen utensil with a star-shaped object on the lid (no text or symbols)3.ロナカマ

natural_image
Illustration of a medical or laboratory procedure with a checkmark and magnified view (no text or symbols)- מַרְשָׁת הַרְשָׁת
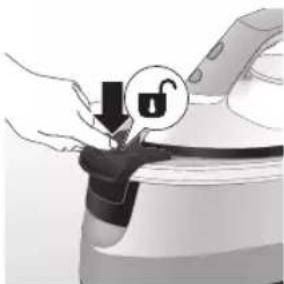
natural_image
Illustration of hands holding a lock icon and connecting a device (no text or symbols)תְרָה בַרִי הַלְרָה
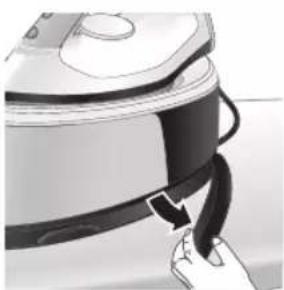
natural_image
Illustration of a hand pressing down on a small electronic device with a curved arrow indicating motion (no text or symbols)5תָאַעְרִי
- ΠΟΝΧΥΝ ΧΛΥ
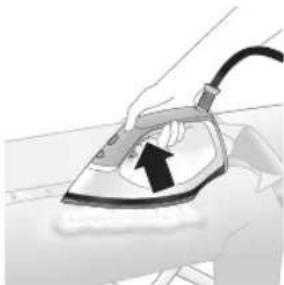
natural_image
Illustration of a hand using an iron on a surface, with no visible text or symbols- אַרְשָׁה
text_image
Illustration showing a shirt with a checkmark and an airplane, symbolizing inspection or repair.
text_image
Illustration showing a person with a warning symbol (X, triangle) and a steam iron, likely related to workplace safety or hazard.text_image
Diagram illustrating a hand washing a shirt with a warning sign and a cross symbol indicating no change.779
בְרָה בְרָה
1.MAX निथ

text_image
START OPEN OK ✓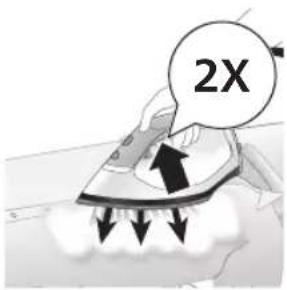
text_image
2X23
.刀刀刀
הכלה
1
text_image
Diagram illustrating temperature change with labeled thermometer symbols and a star-shaped object on a surface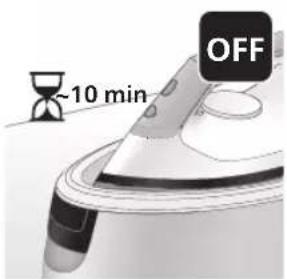
text_image
~10 min OFF- מַרְשׁה אָב
natural_image
Illustration of a steam fan emitting sound waves (no text or symbols)17 fru n y
natural_image
Illustration of a hand using an iron with sound waves and a cross symbol (no text or labels)2:הכלה
natural_image
Illustration of a steam iron with two arrows indicating motion (no text or symbols)3.הכלה
4.הכלה
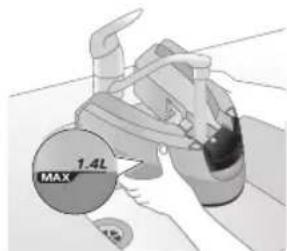
text_image
1.4L MAXnatural_image
Illustration of two steam covers with arrows indicating motion or force direction (no text or symbols)- ("1717") ini
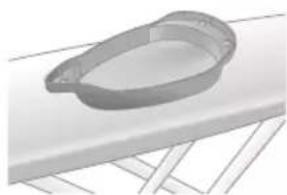
natural_image
3D rendered image of a mechanical component with a curved handle and flange, placed on a flat surface (no text or symbols visible)- מַרְשָׁה
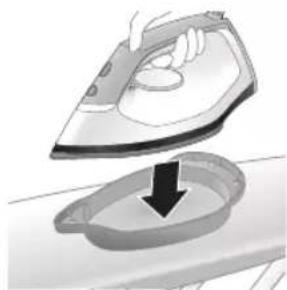
natural_image
Illustration of a hand ironing an iron, with a downward arrow indicating cooling or residue (no text or symbols present)7.Calc-Clean
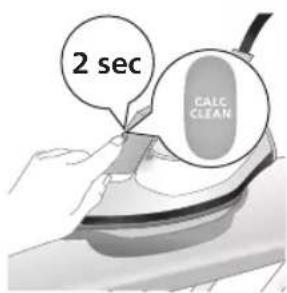
text_image
2 sec CALC CLEAN- מַרְשָׁת בְּוֹם
natural_image
Illustration of an iron steater with a sound symbol and warning sign (no text or symbols present)
natural_image
Hand using a power iron on a surface (no text or symbols visible)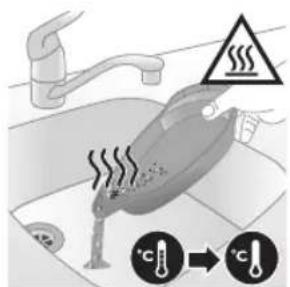
text_image
Diagram illustrating temperature regulation in a kitchen, showing heat transfer from a sink to a thermometer.92-コドナ7
natural_image
Illustration of a steam iron emitting sound waves (no text or symbols)text_image
Illustration of an iron frying pan with sound waves and a warning symbolnatural_image
Illustration of a hand placing a black object into a white pot (no text or symbols visible)3.ロウナドコア
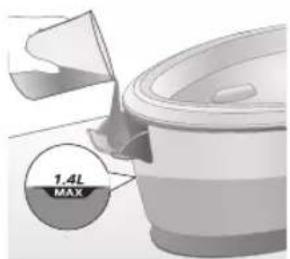
text_image
1.4L MAX4.הכלה
natural_image
3D rendered image of a mechanical component with a curved handle and flange, placed on a flat surface (no text or symbols visible)- מַעְרָה
784
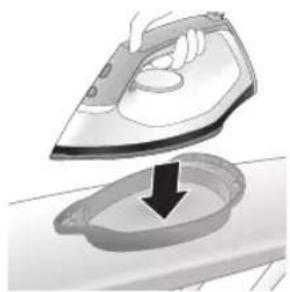
natural_image
Illustration of a hand ironing an iron, with a downward arrow indicating cooling or residue (no text or symbols present)6.Calc-Clean
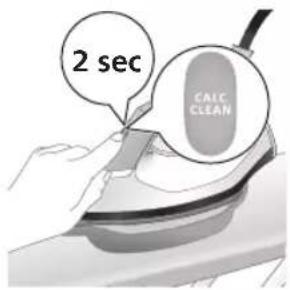
text_image
2 sec CALC CLEAN- מְרָׁ בִּלָה
natural_image
Illustration of a steaming car with a checkmark and warning symbol (no text or labels)9CALC-CLEAI
בְרָהוֹתִי אַלְאָה
.שְׁרַעָה: כִיּוֹת
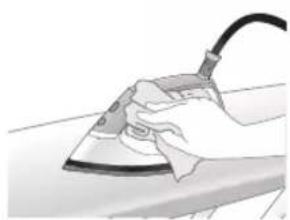
natural_image
Hand using a power iron on a surface (no text or symbols visible)-
D'ODN NTN
-
מַרְשׁה

text_image
Diagram illustrating temperature change in a car with warning sign and thermometer symbolsnatural_image
Illustration of a hand using an iron on a surface with directional arrows indicating motion (no text or symbols)תְרָהוֹתִי
text_image
Warning symbol and safety icon showing a bottle, magnifying glass, and a damaged iron iron with warning labelsnatural_image
Illustration of a plug being inserted into an electrical outlet (no text or symbols)786

natural_image
Illustration of a hand holding a lock icon over a car (no text or symbols)
natural_image
Illustration of a hand using an iron iron to lift a cup, showing two directional arrows (no text or symbols)
natural_image
Diagram of a bathroom sink with faucet and toilet (no text or labels)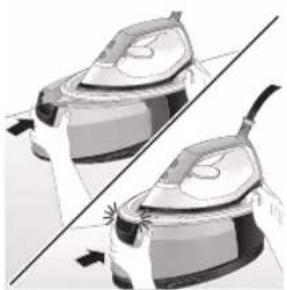
natural_image
Illustration of two identical steam covers with arrows indicating motion, no text or symbols present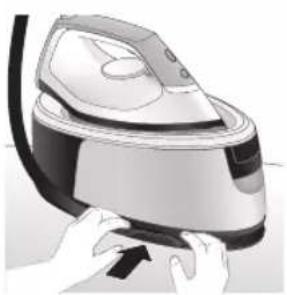
natural_image
Illustration of hands using a steam iron to press down a component (no text or symbols visible)natural_image
Illustration of hands operating a steam iron (no text or symbols visible)
natural_image
Illustration of a hand using a steam iron to clean or operate (no text or symbols visible)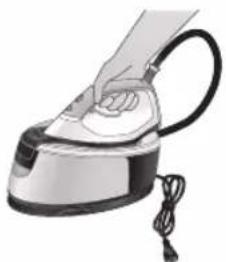
natural_image
Illustration of a hand using a steam iron with cord and tassel (no text or symbols)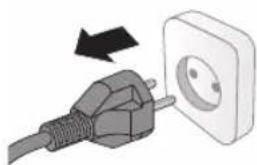
natural_image
Illustration of a plug being inserted into an electrical outlet (no text or symbols)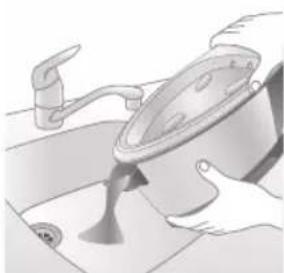
natural_image
Illustration of a hand turning a kitchen sink with a faucet (no text or symbols)natural_image
Illustration of hands operating a steam iron (no text or symbols visible)- מַיָהְאָרִים

natural_image
Illustration of hands operating a steam iron (no text or symbols visible)
natural_image
Illustration of a hand using a steam iron to clean or store air (no text or symbols visible)الله بعربية
4ππ πικυμ,
-1
-
1_
1
2023 © Versuni Holding B.V.
PHILIPS and the Philips Shield Emblem are registered trademarks of Koninklijke Philips N.V. and are used under license.
This product has been manufactured by and is sold under the responsibility of Versuni Holding B.V., and Versuni Holding B.V. is the warrantor in relation to this product.
xxx.yyy.zzzz.a (07/2023)