Pallas BFix - Car seat CYBEX - Free user manual and instructions
Find the device manual for free Pallas BFix CYBEX in PDF.
| Product type | Child car seat |
| Brand | Cybex |
| Model | Pallas B-Fix |
| Weight groups | Group 1: 9 to 18 kg, Group 2/3: 15 to 36 kg |
| Recommended age range | Approx. 9 months to 12 years |
| Dimensions (approx.) | Height ~65 cm, Width ~45 cm, Depth ~50 cm |
| Weight (approx.) | ~10 kg |
| Installation in vehicle | ISOFIX / Latch-Connect + three-point seat belt |
| Group 1 usage mode | With impact shield |
| Group 2/3 usage mode | Without impact shield, with vehicle seat belt |
| Height adjustment | Continuously adjustable headrest (max 2 cm between shoulder and headrest) |
| Side protection | Yes, integrated side impact protection |
| Protection system | Impact shield (Group 1) + optimized belt routing |
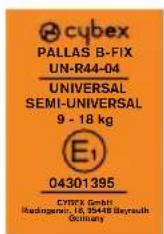
| Certification | UN R44/04, universal and semi-universal |
| Cover materials | Washable fabric, plastic parts |
| Care and cleaning | Cover machine washable at 30°C, delicate cycle; no dryer or direct sunlight |
| Plastic parts cleaning | With mild cleaning agent and warm water |
| Maximum lifespan | 11 years (from date of manufacture) |
| Manufacturer warranty | 3 years |
| Included accessories | Impact shield, belt guide, Latch-Connect |
| Vehicle compatibility | Seats with three-point belt and/or ISOFIX anchors |
Frequently Asked Questions - Pallas BFix CYBEX
User questions about Pallas BFix CYBEX
0 question about this device. Answer the ones you know or ask your own.
Ask a new question about this device
Download the instructions for your Car seat in PDF format for free! Find your manual Pallas BFix - CYBEX and take your electronic device back in hand. On this page are published all the documents necessary for the use of your device. Pallas BFix by CYBEX.
USER MANUAL Pallas BFix CYBEX
text_image
cybex SILVER PALLAS B - FIX 100 kg/100 gm / 2021 WKG User guide

text_image
12 5 7 10 ① ② ③ ④ ⑤ ⑥ ⑦ ⑧ ⑨ ⑩ ⑪ ⑫ ⑬ ⑭ ⑮ ⑯ ⑰ ⑱ ⑲ ⑳ ㉑ ㉒ ㉓ ㉔ ㉕ ㉖ ㉗ ㉘ ㉙ ㉚ ㉛ ㉜ ㉝ ㉞ ㉟ ㉳ ㉟ ㉟ ㉟ ㉟ ㉟ ㉟ ㉟ ㉟ ㉟ ㉟ ㉟ ㉟ ㉟ ㉟ ㉟ ㉟ ㉟ ㉟ ㉟ ㉟ ㉟ ㉟ ㉟ ㉟ ㉟ ㉟ ㉟ ㉟ ㉟ ㉟ ㉟ ㉟ ㉟ ㉟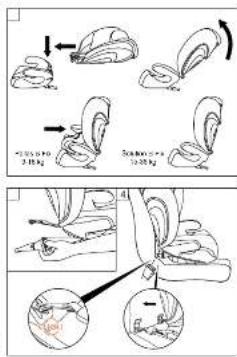
text_image
3.18 kg 5.00 kg 3.18 kg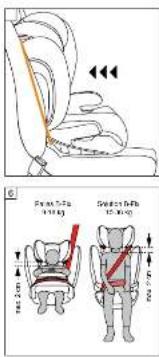
text_image
Foot Position 1.00 mm 2.00 mm 3.00 mm 4.00 mm 5.00 mm 6.00 mm 7.00 mm 8.00 mm 9.00 mm 10.00 mm 11.00 mm 12.00 mm 13.00 mm 14.00 mm 15.00 mm 16.00 mm 17.00 mm 18.00 mm 19.00 mm 20.00 mm 21.00 mm 22.00 mm 23.00 mm 24.00 mm 25.00 mm 26.00 mm 27.00 mm 28.00 mm 29.00 mm 30.00 mm 31.00 mm 32.00 mm 33.00 mm 34.00 mm 35.00 mm 36.00 mm 37.00 mm 38.00 mm 39.00 mm 40.00 mm 41.00 mm 42.00 mm 43.00 mm 44.00 mm 45.00 mm 46.00 mm 47.00 mm 48.00 mm 49.00 mm 50.00 mm 51.00 mm 52.00 mm 53.00 mm 54.00 mm 55.00 mm 56.00 mm 57.00 mm 58.00 mm 59.00 mm 60.00 mm 61.00 mm 62.00 mm 63.00 mm 64.00 mm 65.00 mm 66.00 mm 67.00 mm 68.00 mm 69.00 mm 70.00 mm 71.00 mm 72.00 mm 73.00 mm 74.00 mm 75.00 mm 76.00 mm 77.00 mm 78.00 mm 79.00 mm 80.00 mm 81.00 mm 82.00 mm 83.00 mm 84.00 mm 85.00 mm 86.00 mm 87.00 mm 88.00 mm 89.00 mm 90.00 mm 91.00 mm 92.00 mm 93.00 mm 94.00 mm 95.00 mm 96.00 mm 97.00 mm 98.00 mm 99.00 mm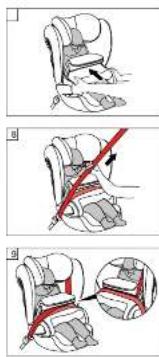
text_image
Illustration showing three steps of car seatbelting: using a red belt, adjusting the seatbelt.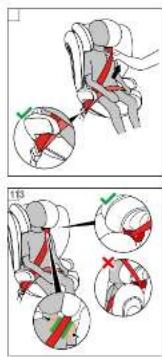
text_image
Medical illustration showing lap joint positioning with force arrows and measurement annotations
GO TO WWW CYBEX-ONLINE.COM TO WATCH AN INSTRUCTIONAL VIDEO
DE....2
EN....6
IT 8
FR 12
NL 16
PL 19
HU 23
CZ 26
SK....29
ES....32
PT 36
SE....40
NO....43
FI 46
DK....49
SL 52
HR 55
RU 58
UK 62
EE 66
LT 69
LV 72
TR 76
AR 79
BG 82
SR....86
EL 89
RO 93
SQ 96
BS 100
MK 103
CNR 107
HI 110
TH....113
VI....116
MS....119
HY....123
CMN 127
YUE 130
JA 133
KO 136
text_image
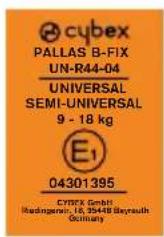
CYBEX PALLAS B-FIX UN-R44-04 UNIVERSAL SEMI-UNIVERSAL 9 - 18 kg E1 04301395 CYBEX GmbH Holdingen: 18, 29448 Bayrauth Ocimality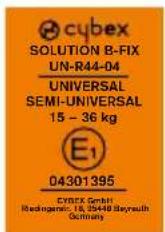
ZERTIFIZIERUNG
UN R-44/04
CYBEX Pallas B-Fix
CYBEX Solution B-Fix – group 2/3, 15 to 36 kg
Recommended from approx. 9 months to 12 years
Thank you for deciding on the Pallas B-Fix when choosing your child seat.
Carefully read the instructions before installing the seat in your car and always keep these instructions to hand in the designated user guide storage compartment (a).
IMPORTANT INFORMATION
Without the approval of the Type Approval Authority, the child seat may not be modified or added to in any way.
In order to keep your child properly protected, it is absolutely essential that you use the child seat as described in this manual.
•This child seat may only be installed on vehicle seats which are approved for the use of child restraint systems according to the vehicle manual.
Only suitable for vehicle seats with automatic three-point belts approved in accordance with UN Regulation No. 16 or a comparable standard.
Do not use any load bearing contact points other than those described in the instructions and marked on the child restraint.
- The full surface of the backrest of the child seat must make contact with the backrest of the vehicle.
The shoulder belt must run upwards and back at a recline. It must never run forward to the upper belt point in your vehicle.
The vehicle belt buckle must never cross the belt guide of the seat. If the belt whip is too long, the child seat is not suitable for use in this position in the vehicle. In case of doubt please contact the child restraint manufacturer.
The three-point vehicle belt must only be passed through the designated routings. The belt routings are described in detail in this manual and are marked in red on the child seat.
The lap belt must run as low as possible across your child's groin to have optimum effect in the event of an accident. Before each use make sure that the automatic three-point vehicle belt is correctly adjusted and fits tightly to the child's body. Never twist the belt!
Only an optimally adjusted headrest can offer your child maximum protection and comfort while ensuring that the shoulder belt can be fitted smoothly.
For usage in Group 1 the impact shield must be used.
The child seat must always be secured correctly with the vehicle belt in the vehicle even when not in use.
Always ensure that the child seat is never jammed when closing the car door or adjusting the back seat.
Luggage or any other objects present in the vehicle must always be firmly secured. Otherwise, they may be thrown within the car, which could cause fatal injuries.
The child seat must never be used without the seat cover. Ensure that only an original CYBEX seat cover is used, as the cover is a key element of the seat's function.
Never leave your child unattended in the car.
The parts in the child restraint system heat up in the sun and could potentially burn your child's skin. Protect your child and the child seat from direct sun exposure.
An accident may cause damage to the child seat that is not identifiable with the naked eye. Please replace the seat after an accident. In case of doubt, please consult your dealer or the manufacturer.
Do not use this child seat for more than 11 years. The child seat is exposed to high stress during its product life span, which leads to changes in the quality of the material with increasing age.
The plastic parts can be cleaned with a mild cleaning agent and warm water. Never use harsh cleaning agents or bleaches!
Some vehicle seats are made of sensitive materials. The use of child seats may leave marks and/or cause discolouration. To prevent this, you can place a blanket or towel or similar underneath the child seat to protect the vehicle seat.
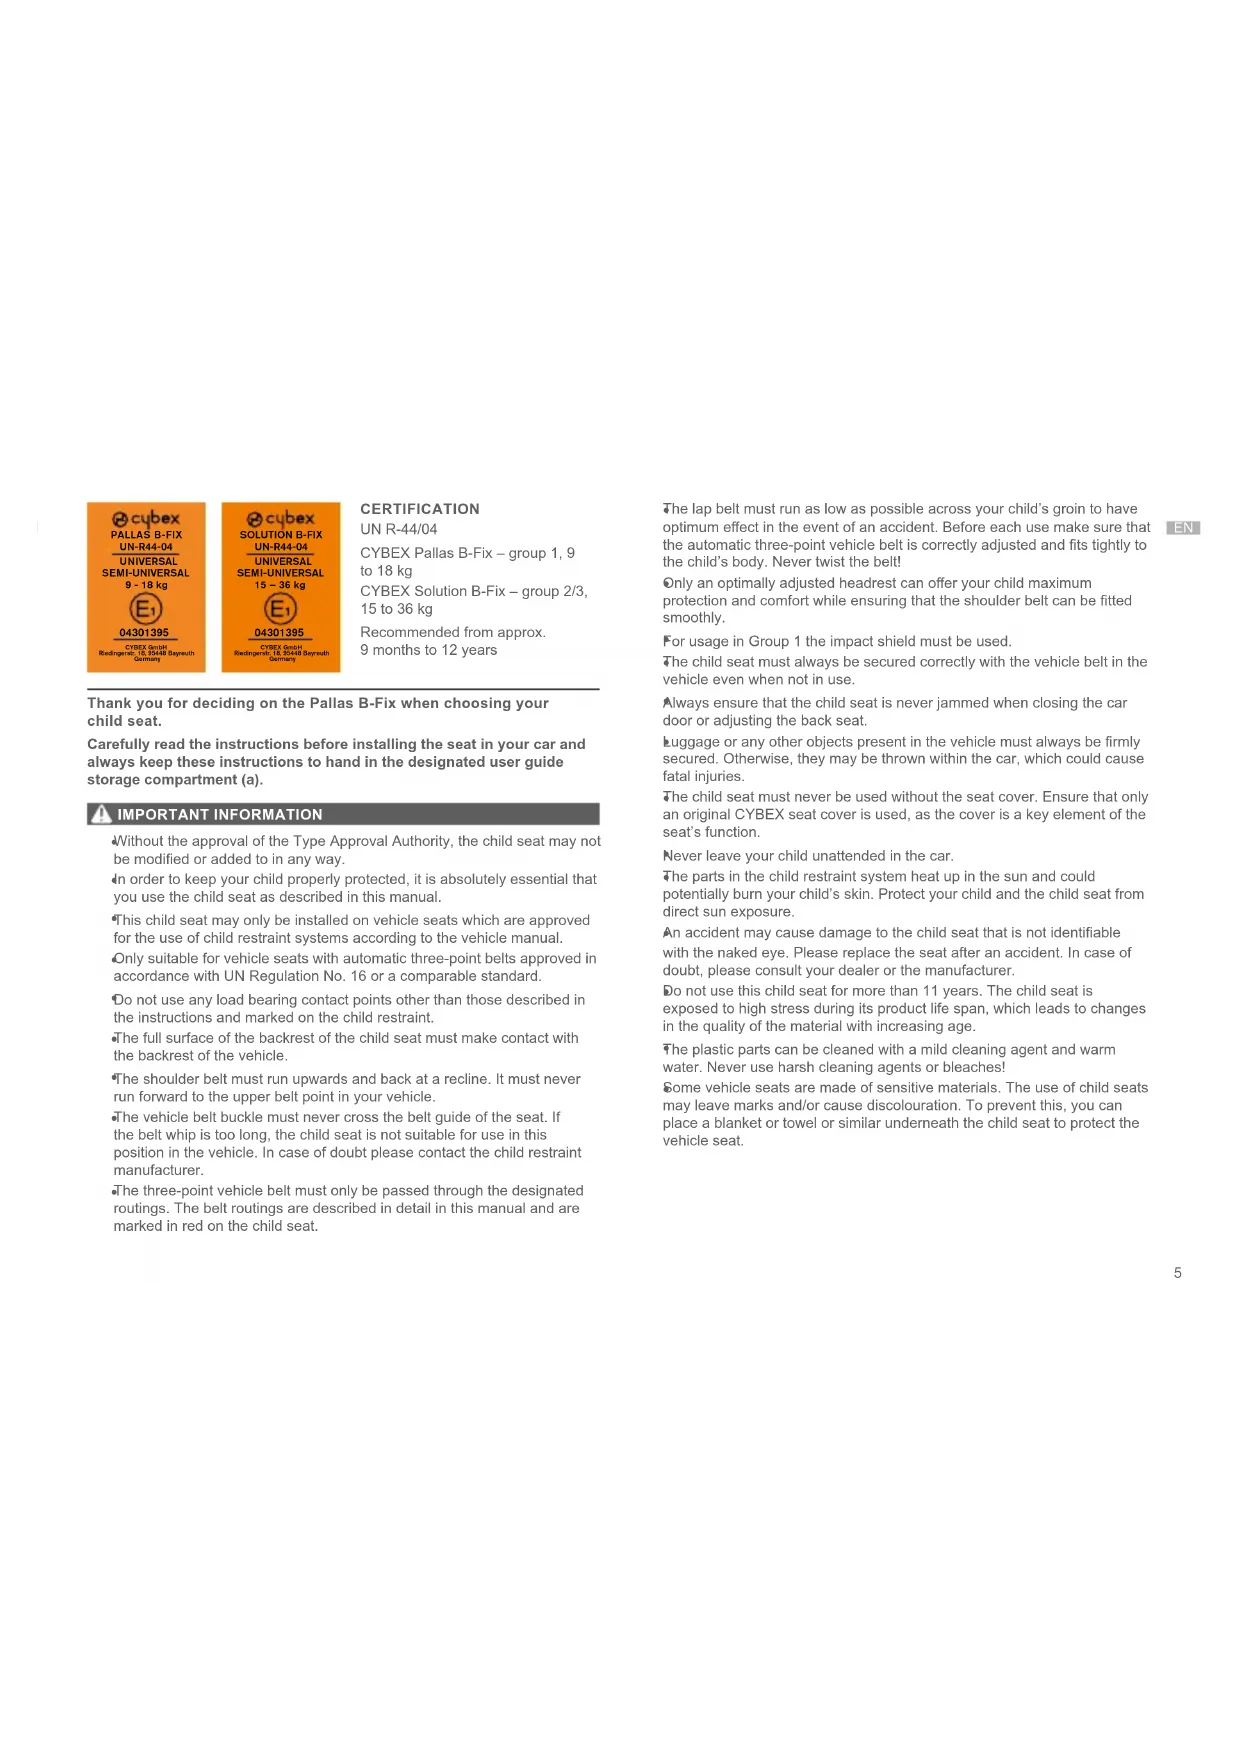
PRODUCT PARTS
(a) User Guide Storage Compartment
(h) Lap Belt Guide Group 2/3
(b) Backrest
(i) Shoulder Belt Guide
(c) Adjustable Headrest
(j) Side Impact Protection
(k) Latch-Connect-Hooks
(e) Booster
(I) Latch-Adjuster
(f) Impact Shield
(m) ISOFIX-Anchorage-Points
(g) Belt Guide Group 1
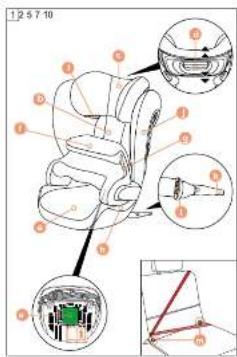
INITIAL ASSEMBLY
Connect the backrest (b) to the booster (e) by hooking the guide lug on the axis of the booster. The backrest (b) is then folded forward. Place the impact shield (f) on the booster (e).
THE CORRECT POSITION IN THE VEHICLE
The child seat with stored latch-connect-system can be used on all vehicle seats with automatic three-point safety belts approved in the vehicle manual for "universal" use.
A "semi-universal" certification is given to restraint systems that are connected to the car through the latch-connect-system. For this reason, the latch-connect-system can only be used in certain vehicles. Please refer to the enclosed vehicle type list for approved vehicles. You can obtain the most up-to-date version from www.cybex-online.com. Above a child's stature of 135 cm, the compatibility between the Pallas B-Fix and your vehicle might be reduced. Please review the vehicle type list to check whether the child seat can be used in all headrest positions without restrictions.
In exceptional cases, the child car seat may also be used on the front passenger seat. Always comply with the recommendations of the vehicle manufacturer.
INSTALLING THE CHILD SEAT IN THE VEHICLE
- Always ensure that...
- the backrests in the vehicle are locked in their upright position.
- when installing the child seat on the front passenger seat, adjust the vehicle seat as far back as possible without affecting the belt routing.
- Elongate the straps of the latch-connect-system by using the latch-adjuster (I).
-
Attach the latch-connect-hooks (k) to the ISOFIX-anchorage-points (m).
-
Tighten the latch-connect-system by pulling the strap on the adjuster until the position of the child seat is adjusted correctly.
- Ensure that the entire surface of the backrest of the child seat (b) is placed against the backrest of the vehicle seat.
If the headrest of the vehicle is in the way, pull it upwards to its furthest extent or remove it completely (except rear-facing vehicle seats).
- Ensure the seat is secure by trying to pull it out of the ISOFIX-anchorage-points (m).
- In case the seat is used without latch-connect-system, it can be stored away on the bottom of the seat.
Using the latch-connect-system, you can fix the CYBEX Pallas B-fix to the vehicle, thereby increasing your child's safety. The child still needs to be secured with the three-point belt of your vehicle and the impact shield for Group 1.
REMOVING THE CHILD SEAT FROM THE VEHICLE
Perform the installation steps in the reverse order.
- Release the tightened straps using the latch-adjuster (I).
- Disconnect the latch-connect-hooks (k) on both sides.
- Remove the child seat.
- You can store the latch-connect-system in the booster of the child seat.
ADJUSTING THE HEADREST
The headrest (c) can be adjusted by using the headrest height adjuster (d) at the back of the headrest (c). Adjust the headrest so that max. 2 cm (approx. 2 finger's width) remain between the child's shoulder and the headrest (c).
The height of the headrest can still be adjusted while the seat is installed in the car.
CORRECT INSTALLATION MODE
| Group 19 – 18 kg | Group 2/315 – 36 kg | |
| Installation mode with impact shield without impact shield | ||
| Installation | 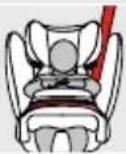 | 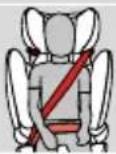 |
SECURING THE CHILD WITH IMPACT SHIELD - GROUP 1 (9-18 KG)
- Insert the impact shield (f). The side flaps of the impact shield (f) fit exactly between the arm rests and seating surface of the booster.
- Pull out the entire length of the vehicle seat belt.
- Place the lap belt over the designated red belt routing on the impact shield (g).
- Lock the vehicle seat belt into the belt buckle. It must lock in place with an audible "CLICK".
- Tighten the lap belt by pulling the shoulder belt backwards.
- Feed the shoulder belt in parallel with the lap belt back into the belt routing (g) and pull the shoulder belt tight. Ensure that both parts of the belt cover the entire width of the impact shield (f) in the belt routing (g).
- Feed the shoulder belt tightly through the belt routing of the impact shield (g) until it is clamped inside the belt guide.
- Put the shoulder belt between headrest (c) and backrest (b). The shoulder belt does not need to be guided through the shoulder belt guide (i).
SWITCH FROM GROUP 1 TO GROUP 2/3
Remove the impact shield (f), as soon as your child weighs 18 kg.
Note that switching from group 1 to group 2/3 is not permitted if your child weighs less than 15 kg. Keep the impact shield in a safe and secure place.
SECURING THE CHILD WITHOUT IMPACT SHIELD – GROUP 2/3 (15–36 KG)
- Route the vehicle seat belt around your child and insert the belt tongue into the belt buckle. It must lock into place with an audible "CLICK".
- Place the lap belt in the red coloured lap belt guides (h) of the child seat.
- Pull the shoulder belt to tighten the lap belt.
- On the side of the car seat next to the belt buckle, the shoulder belt and the lap belt must be inserted together in the lap belt guide (h).
- Feed the shoulder belt through the shoulder belt guide (i) until it is inside the belt guide.
- Ensure that the shoulder belt runs across your child's clavicle and does not touch your child's neck. If necessary, adjust the height of the headrest (c) to change the position of the belt.
REMOVING AND REATTACHING THE SEAT COVER
The cover of the child seat consists of four parts (headrest, backrest, booster and impact shield). These are held in position at several places by press-studs. Once all studs have been released, the single parts of the cover can be removed.
In order to put the covers back on the seat, follow the removal instructions in the reverse order.
The cover may only be washed at 30 °C with a delicate wash program otherwise it may result in discolouration of the cover fabric. Please wash the cover separately from other laundry and do not dry in the dryer or in direct sunlight!
MANUFACTURER'S WARRANTY AND DISPOSAL REGULATIONS
CYBEX GmbH (Riedingerstr. 18, 95448 Bayreuth, Germany) gives you 3 years warranty on this product. The warranty is valid in the country, where this product was initially sold by a retailer to a customer. The contents of the warranty and all essential information required for the assertion of the warranty can be found on our homepage go.cybex-online.com/manufacturer-warranty-car-seats. If a warranty is shown in the article description, your legal rights against us for defects remain unaffected.
Please observe the waste disposal regulations in your country.
text_image
cybex PALLAS B-FIX UN-R44-04 UNIVERSAL SEMI-UNIVERSAL 9 - 18 kg E1 04301395 CYBEX GmbH Rasingenix: 18, 29448 Bayrauth Ocimaly
CERTIFICAZIONE
UN R-44/04
(k) Crochets Latch-Connect
CORRECTE INSTALLATIEMODUS

Groep 1 9 – 18 kg
U42FLU44L UNLSUDNFUC
Uunwgntp aħyluwlŋ (b) jnwnglnghs luwnwuntnhu (e) nunnnnpnuwu utnuhŋ utnghlhu wnwugph utg dinglutŋu: aħyluwlju (b) wjdvi wnqlnu t: Stwnwntp uw2wnuwuhz ywhuwj (f) jnwnglnghs luwnwuntnh (e) ynw:
الله license plates must be required to be a proof of the proof.
- Uh2n hwunqultp, np...
• υπωλυωηνηνωμμο υχρογκια ρελγιωμματην ήνημμωδ τι νηλην ηφηριλύ:
• utptiuwj buunwuntnu wnguh nlnlunh buunwuntnh ynw untwnyntni, dwuwuwl ywnqwynntp unnwuwynnunwjhu uzheng buunwuntn hluwnwynnphlu htn' wnwug qnnni nlnnnlajwu ynw wqnntni: - ৪ন্যুপুৎপু অনুলুনু বৃষুদু হুদুলুনাধ বৃদুলুনু অনুলুল বৃদুলুনাধ (I) বৃদুলু:
- Unnuwuh uhwguwu ytanhylutnn (k) wuhwgntp ISOFIX-Uuhwguwu ytuntnhu (m):
- Uunln aqtp unnuwynl uhwguwu huwfuwrqnq'pw2tjnl ywnqwulnnhsh wunnighsutnu wjupwu, uhuyl tnthuwjh luwwuntnh nhngg 6h2n lywnqwulnnh:
- 3wunqutp, np dwlyuwylu luunwuntnh rhyluwih wupng dwytptun (b) untnwnpud E utptluwih luunwuntnh rhyluwih huywnwuh nlnnnpajwup:
B: utptluwj qhuwuwj hunglnnnu t huulnhuwunu, wuw puztp wu unwutquqnlyu nwh qth lud hwutp wu wupnngnlajuwp (pwgunnpajuwp gpuwqphu huiwnuwj utptluwj luunwuntntnh ntuwpnu):
- Rwunqutp, np luunwuntnu wluynwuq E' yhnātinu wju ISOFIX-Upnwguwu ytuntngh (m) nlnnu hwubi:
- Uju ntwpnu, tnp luunwuntnu oqunwqnδynu E wnug unnlwynu uhwgufu hwiwwwnqh, wju lwnnn E wwhulti luunwnwuh utnglnu:
Qunwqnptinu unluwlnu uhwgulu hwduwqng'nnp lywnn tp wjnwguti CYBEX Pallas B-fix-p utptiwuh jnu' npwlnu hyl punwugutinu atn bntwhuw wljuwunqnipinu: bnthwjhu ntnlu wuhnpwtzun t wuwhnulti atn utptiwuh tnpe ltyunwung qunhnu, hyl 1-hu huuphu' wuwunwuhs ywhwulny;
VULYUQUL LUSUSTH RUCTLE UBEETUASH
Чwinwntp entwnpnuwu pwjtgng hwlqwnwly htnpwlywunlpjwup:
- Unawlytp wùnln ywwuìwò wùnnghyuttn unluwuh ljuqnwnhzh (I) oqunyèwup:
- Rwutp unnuwuh uhwguwu ytnhylutng (k) tnync lnnutphg:
- Rwutp uwlyuwu buunwntng:
- Țnlp țunnn tip unnlwulny ulhwgulu hwiulwqunqn wuhti tntthuwj hwnwntinh jnugnighs lwnwntinh utg:
ALUUGULH YURQUUNORUE
qjhwlywn (c) yuntih E hwnuwntgutj` oqnwqnndtinal qjhwlywn pwnapnnujwlu ywnqwunngh (d) qjhwlywn htunuh uwnuw (c): Qwnqwynntp qjhwlywn wjuwbu, np wnuwbi 2 uv (wnwnwnnwbu 2 uwn lwjunujnu) duw tnthuwjh nuuh l u qjhwlywn uhqlu (c):
Qhuwlywih pwnànnuējnlún lqunbīh t lqnquwntgì unyúuhú ljuunwunttn utptluwynlú uttnuunptiŋng htunn:
Corruption Policy
| kunLüp 19 – 18 lq | kunLüp 2/315 – 36 lq | |||
| Stwnnnnluŋ | ww2wnwuhʒquhwuh | wnwug wuzwnwuhʒquhwuh | ||
| Stwnnnnluŋ | 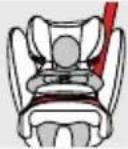 | 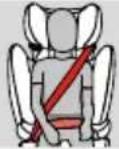 | ||
Erbuushu nucshuthy yurulny wurustenc hnrup 1 (9-18 49)
- Stwnwntpw w2wnuwuh ywhuw (f): Tww2wnuwuh ywhuw (f) lynnwhluqntng 6h2n u 6h2n wtwnuwuwnu bu dtnptnh hluwu yuntnh ujnwnghs wunwnutnh wluqnbuh uhgu:
- 2w2tp utptluwjh luunwuntnh qnuhlu wupnng tnlywjupnu:
- Ungntp qunlywuntnh wuljnuwupnpejwu qunhlu yww2nuwuhz ywhuw h ywn gngwnnyuò ywnuhn qnnnl hungh (g) ubg:
- ۱۷۹۴۳۶ útptluwjh wújúnwúqnjajuì qúnhu qúnnuì 6wnpfuwinniu: Uju wútup E ynnuujh jutih «2h4n8»-nu:
- 2qtp qnunlywuntnh wluyluqnlpjwù qnunhù` nluwqnunhù htn pwr2tlnú:
- qnnn lnnnnpjuwup (g) lnphg wuglywqntp nuwqnnhu' qnnlwwntnh wulwnwagjuw qnnn htn uhwuhu l wunln lytpnuu dqtp nuwqnnhu: 3wuhqtp, np qnnn tnynl ynyntph wuenngnhlu dwywnu tlu wuzwnwuhs ywhuh (f) glnhwunln wujnlpjnnd qnnnl nnnnnpjuwup (g):
- Uunln ytnwnl wuglywqntp nluwqnnhu wu2nwwuhz ywhuwh qnnnl nunnllpejuwup (g) wjupwu, uhu2u wju yutnujh qnnnl hungh utg:
- Stnwnntp nluwqnunhu qhuwlywih (c) u rhyuwwih (b) uhql: Ntunp zt nluwqnunhu wuglywgutl nluwqnunhutnh hungh uhqnul (i):
1-hu buphs ulsnfuc 2/3 buph
3tnwqntp wu2nuwuhz ywhwun (f), bnp atn bnhuwjh pu2n jhuh 18 yq:
Uguunh nlutgtp, np 1-hu huuphg 2/3 huuphu wuguti yh panjluwunpnuu, tqng attn tnthwuhj pw20 15 qq-hg wuwyu u: Twu2nuwuhu ywhuwn wuwhp wuwunwug u. wuwuhny untqnlu:
Brthuahl unus nucsmuth2 urulugh urustele hnhup 2/3 (15-36 49)
- Πυνυτρ υρεθωμή υυγωνωμηραμίω φαυμή δπο τηθυμή 2ηυμηρι υυτηυμητρ υυηωρησηνι βαύμων ημω κωλων λυψωντυμωδ δωριώωνημί: Υμι υυτηρ ε γηνωμή μυχ (2θυ4N8)-νη;
- Stwnntp qnuqwuntnh wuynwulqnlajwlu qnuhlu wuylwylwlu wunwuntnh ywnuhn qnujh qnuqwuntnh wuynwulqnlajwlu qnuhlutnh hnngh (h) utg:
- Εωχτρι πλυωρηνημα Υπηλγωντήν ωυλυνωρηλρεμμα Υπηλμα ωυλυνωρηλρεμμα Υπηλμα Υπηλμα Υπηλμα Υπηλμα Υπηλμα Υπηλμα Υπηλμα Υπηλμα Υπηλμα Υπηλμα Υπηλμα Υπηλμα Υπηλμα Υπηλμα Υπηλμο
- Utptluwj dwlyuylui luunwuntnh lynjh ynw, qnnnl 6wnuwlnh lynphu, nuwqnuhu u qnuqwuntnh wuljnuwqnyajwu qnuhlu wtunp t uhwuhu ulngutj qnulwuntnh wuljnuwqnyajwu qnnnl hngh (h) utg:
- Ungntip nluwqnunhu nluwqnunnl hunngh (i) Uhgnul wjlupwu, uhuşu wju lhywjnlujh qnnnl hunngh utg:
- 3wlnqutp, np niuwqnnhu wugunw t δttn btnhujh wupuhj ywnjnlu yh nhgnnu btnhujh wunwunghu: Uwhnpdt2nnlpeuul ntsupnlu ywnqwunttp qhwuwih pwnànnpæniun (c) qnnnl rhnpn yhnutini hwuun:
LUSUSTH MUSBUL RUTLC by LNRs WURUSTLC
Utptluwih luunwuntnh ywnunjuw lyuqfulwó t snuu dwuhg (ajhuwlw), rhyluw, jnugnighs luunwuntn u wuzwnuwuhz duhwul): 'nuvig wunwuglud tu uh puuh nhnpptnnul utnuhs 6wnfuwrutpnul: Aninn 6wnfuwrutpn wnawytini tnwpnw uwnjuwuh wnuwahu lwutng quntih t hwulti: 'wnuwuh lynjhu wunwugutin hwiwn htunutp hwulti gnignvlutnhu hwuynwly htnpawylwulnpojuwp:
^1 uunjwuln wtung t yluwui uhwju 30°8 gtnfuwnuhówulny' unlp huiqnwnh ylwgufuu dnuqpnly, huiqnwnl ntsupniuf wwnjuwuh qnnbouopn ywnnn t qnnlwqnhylti: tvunnnuif tiup yluwui wwnjuwuh wnuwuhu l zynpwglutl wju ynngwulu wwnpnly ywu wnuh nlnhn 6wnwqwjpeltnh litpgn:
ursunrnan truchner by auofontbrh 4trupbrsul 4utnuqurge
CYBEX GmbH (Riedingerstr. 18, 95448 Fwjnnpa, Qtnuwuhw) glnytnnlpntlwn wju wwwnwlp hwwwn wnwnwnnnlu t 3 wnwnlw tnw2huhp: tnw2huhp qnnbnu t wju tnynnu, nnntwn wwwnwpp lqwawnnnu h utpqwult qwawntl t hw6whunpnnhu: tnw2huhp pnwlwnwnynlpntnl u tnw2huhp hwwwnwnduu hwwwn wihnwudtzn pntnn lwwplnn untntlynpajnluttnq lwwnn tp qnutti utn qhlwwhn tnnu f go.cybex-online.com/manufacturer-warranty-car-seats-nlu: trat wnwnwnwlp hlywnwqnlpjwul utg unlyw t tnw2huhp, wwwu pettnnlpajnluttnh hwulwn utn uywnndwup atn onhlwwylw hwwynluputtn dunlu ti ndh utg:
huynnu tup htunuti atn tnynnu pewhnulutnh htnwguwu hwluwn uwhuwuwu ywlnuwlywnqtnhu:
text_image
CYBEX PALLAS B-FIX UN-R44-04 UNIVERSAL SEMI-UNIVERSAL 9 - 18 kg E1 04301395 CYBEX GmbH Holdingen: 18, 25448 Bayreuth Germany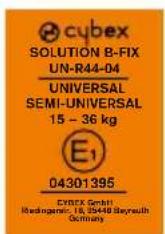
证明
UN R-44/04