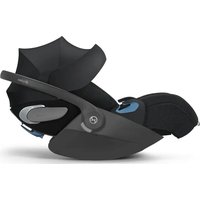
Cloud G i-Size - Car seat CYBEX - Free user manual and instructions
Find the device manual for free Cloud G i-Size CYBEX in PDF.
| Product type | i-Size car seat group 0+/1 (rear-facing) |
| Brand | Cybex |
| Model | Cloud G i-Size |
| Category | Child car seat |
| Standard | UN Regulation No. R129/03 (i-Size) |
| Size range | 40 – 87 cm |
| Maximum child weight | 13 kg |
| Installation | Base G with ISOFIX + load leg, or 3-point automatic seat belt |
| Main functions | Rotation (Base G), sunshade, flat recline positions, adjustable headrest, newborn inlay, linear side impact protection (L.S.P.), lock indicators and driving direction indicators |
| Safety | Mandatory rear-facing use, front airbag disabled, belt without twisting, load leg in contact with the floor |
| Maintenance and cleaning | Cover machine washable at 30°C (gentle cycle), air dry; plastic cleaned with mild detergent and lukewarm water |
| Spare parts and repairability | Original Cybex covers, stroller adapters, Base G; 3-year manufacturer warranty |
| General information | Max lifespan 8 years; replace after an accident; compatible with vehicle i-Size positions |
Frequently Asked Questions - Cloud G i-Size CYBEX
User questions about Cloud G i-Size CYBEX
0 question about this device. Answer the ones you know or ask your own.
Ask a new question about this device
Download the instructions for your Car seat in PDF format for free! Find your manual Cloud G i-Size - CYBEX and take your electronic device back in hand. On this page are published all the documents necessary for the use of your device. Cloud G i-Size by CYBEX.
USER MANUAL Cloud G i-Size CYBEX
text_image
cybex GOLD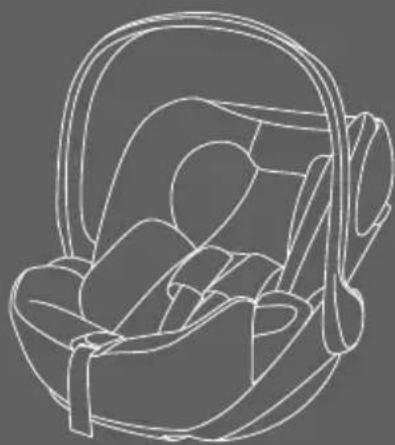
natural_image
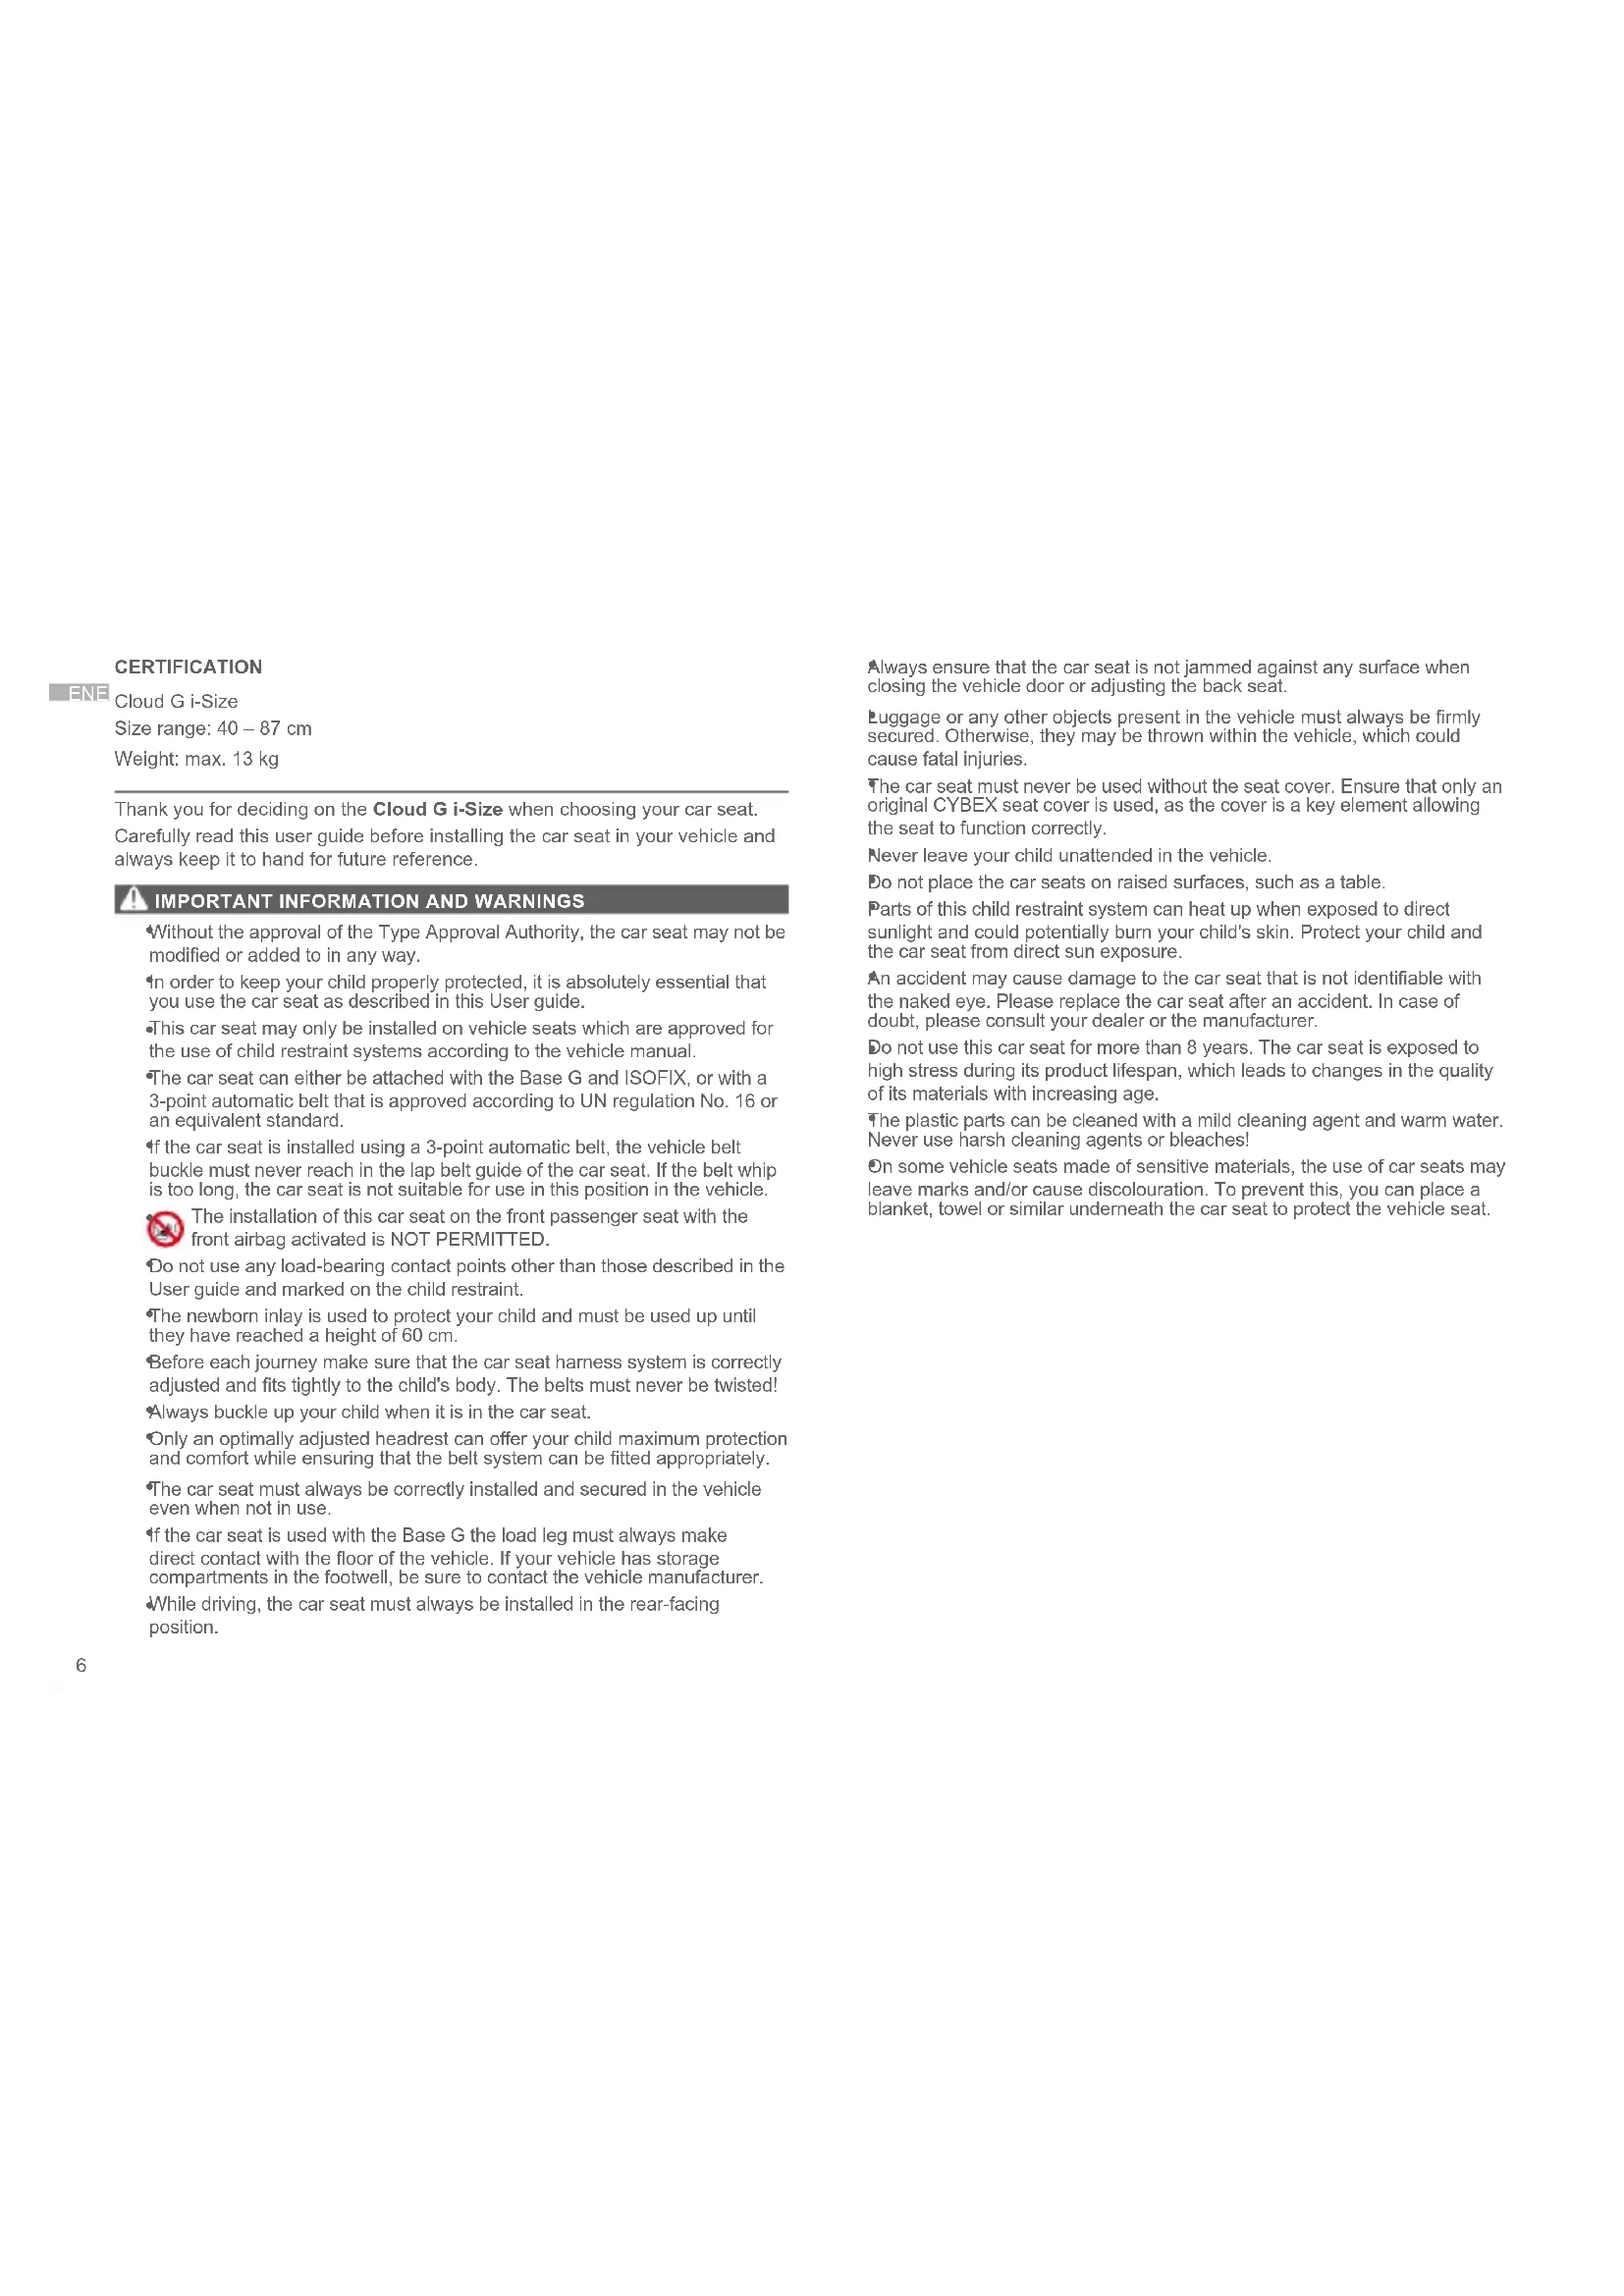
Line drawing of a car seat with a wide brim and seatbelt (no text or symbols)Cloud G i-Size
R129/03, 40-87 cm, max. 13 kg
User guide
text_image
1 A 12 B C 33 19 22
text_image
2 8 16 ISOFIX i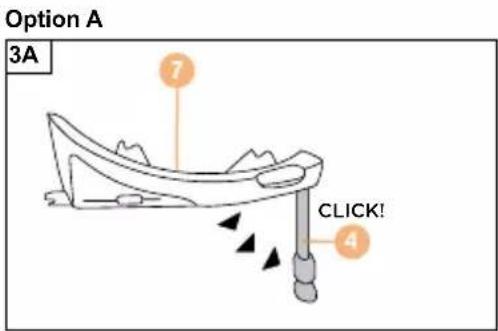
text_image
Option A 3A 7 CLICK! 4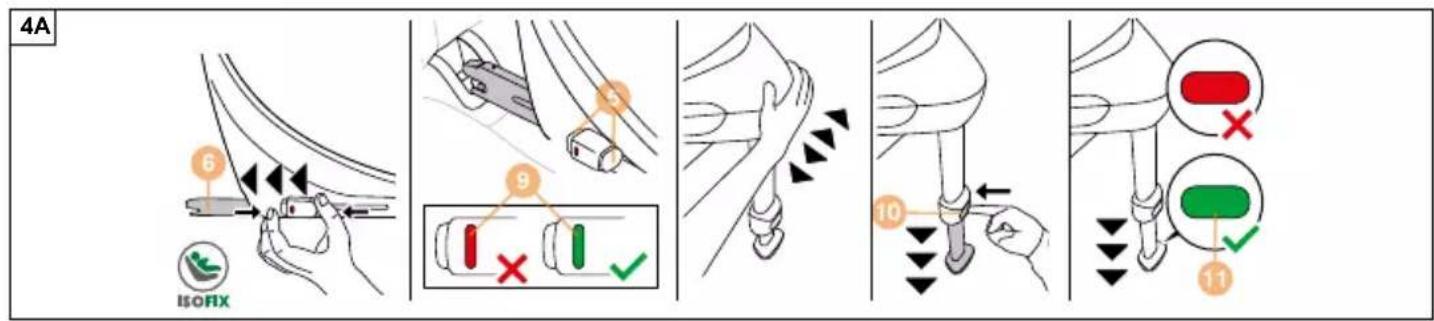
text_image
4A 6 5 9 10 11 ISOFIX5A
text_image
3 20 P LLPULL 31Option B
text_image
3B 17 CLICK!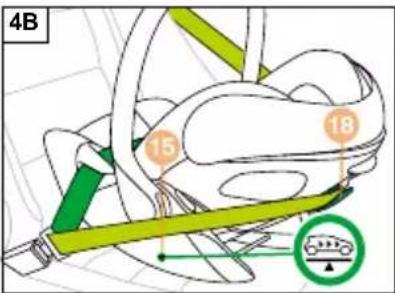
text_image
4B 15 18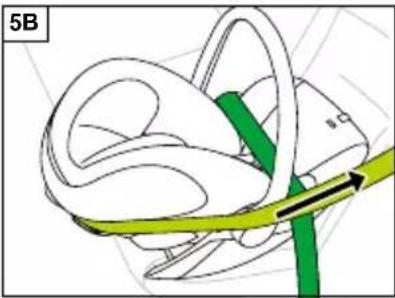
natural_image
Diagram of a biological structure with green and black components, no visible text or symbols
text_image
6 23 24 25 ✓ ×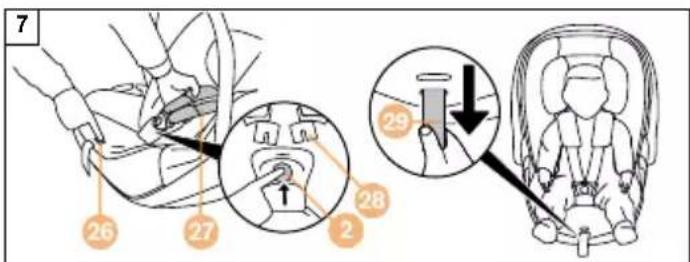
text_image
7 26 27 28 29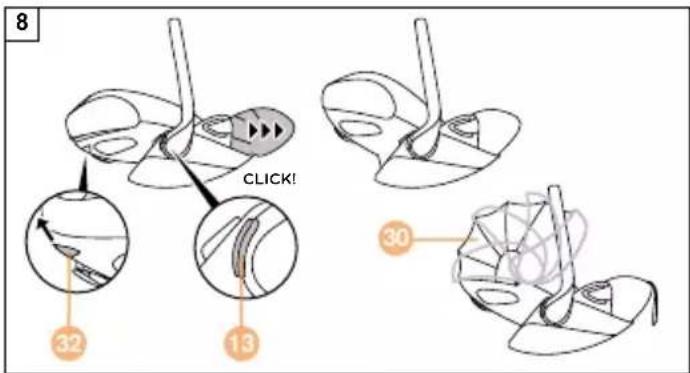
text_image
8 CLICK! 32 13 30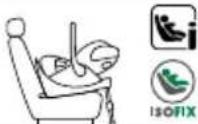 | √ | √ | |
 | √ | √ | |
 | √ | √ | |

text_image
QR code image containing encoded data, no visible human-readable textSCAN OR CLICK TO WATCH THE INSTRUCTIONAL VIDEO
DE 2
EN....6
IT 10
FR....14
NL 18
PL 22
HU 26
CZ 30
SK....34
ES....38
PT 42
SE 46
NO 50
FI 54
DK....58
SL 62
HR 66
RU 70
UK 74
EE 78
LT 82
LV 86
TR....90
AR....94
HE....98
BG 102
SR....106
EL 110
RO 114
SQ 118
BS....122
MK 126
CNR 130
HI 134
TH....138
VI 142
MS 146
HY 150
CMN 154
YUE 158
JA....162
KO 166
DED ZULASSUNG
Cloud G i-Size
Größe: 40 – 87 cm
Gewicht: bis 13 kg
Thank you for deciding on the Cloud G i-Size when choosing your car seat.
Carefully read this user guide before installing the car seat in your vehicle and always keep it to hand for future reference.
IMPORTANT INFORMATION AND WARNINGS
Without the approval of the Type Approval Authority, the car seat may not be modified or added to in any way.
In order to keep your child properly protected, it is absolutely essential that you use the car seat as described in this User guide.
- This car seat may only be installed on vehicle seats which are approved for the use of child restraint systems according to the vehicle manual.
The car seat can either be attached with the Base G and ISOFIX, or with a 3-point automatic belt that is approved according to UN regulation No. 16 or an equivalent standard.
If the car seat is installed using a 3-point automatic belt, the vehicle belt buckle must never reach in the lap belt guide of the car seat. If the belt whip is too long, the car seat is not suitable for use in this position in the vehicle.

The installation of this car seat on the front passenger seat with the front airbag activated is NOT PERMITTED.
Do not use any load-bearing contact points other than those described in the User guide and marked on the child restraint.
The newborn inlay is used to protect your child and must be used up until they have reached a height of 60 cm.
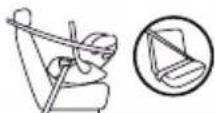
Before each journey make sure that the car seat harness system is correctly adjusted and fits tightly to the child's body. The belts must never be twisted!
Always buckle up your child when it is in the car seat.
Only an optimally adjusted headrest can offer your child maximum protection and comfort while ensuring that the belt system can be fitted appropriately.
The car seat must always be correctly installed and secured in the vehicle even when not in use.
If the car seat is used with the Base G the load leg must always make direct contact with the floor of the vehicle. If your vehicle has storage compartments in the footwell, be sure to contact the vehicle manufacturer.
While driving, the car seat must always be installed in the rear-facing position.
Always ensure that the car seat is not jammed against any surface when closing the vehicle door or adjusting the back seat.
Luggage or any other objects present in the vehicle must always be firmly secured. Otherwise, they may be thrown within the vehicle, which could cause fatal injuries.
The car seat must never be used without the seat cover. Ensure that only an original CYBEX seat cover is used, as the cover is a key element allowing the seat to function correctly.
Never leave your child unattended in the vehicle.
Do not place the car seats on raised surfaces, such as a table.
Parts of this child restraint system can heat up when exposed to direct sunlight and could potentially burn your child's skin. Protect your child and the car seat from direct sun exposure.
An accident may cause damage to the car seat that is not identifiable with the naked eye. Please replace the car seat after an accident. In case of doubt, please consult your dealer or the manufacturer.
Do not use this car seat for more than 8 years. The car seat is exposed to high stress during its product lifespan, which leads to changes in the quality of its materials with increasing age.
The plastic parts can be cleaned with a mild cleaning agent and warm water. Never use harsh cleaning agents or bleaches!
On some vehicle seats made of sensitive materials, the use of car seats may leave marks and/or cause discolouration. To prevent this, you can place a blanket, towel or similar underneath the car seat to protect the vehicle seat.
PRODUCT PARTS
| Newborn inlay (1) | Diagonal belt guide (18) |
| Belt buckle (2) | Linear side-impact protection |
| Driving Direction Control (D.D.C.) (3) | (L.S.P.) (19) |
| Load leg (4) | Seat rotation and release handle (20) |
| ISOFIX-Release buttons (5) | Seat release handle (21) |
| ISOFIX-Locking arms (6) | Load leg parking position (22) |
| Base (7) | Headrest (23) |
| ISOFIX-Anchorage points (8) | Headrest adjustment handle (24) |
| ISOFIX-Indicators (9) | Shoulder harness outlets (25) |
| Load leg adjustment button (10) | Belt adjustment button (26) |
| Load leg indicator (11) | Shoulder belt (27) |
| Carrying handle (12) | Buckle tongue (28) |
| Carrying handle release buttons (13) | Central adjustment belt (29) |
| Seat locking indicator (14) | Sun canopy (30) |
| Tilt angle indicator (15) | Driving direction indicator (31) |
| 3-point automatic belt (16) | Release handle for lie-flat position (32) |
| Lap belt guide (17) | Release button for stroller adapter (33) |
THE CORRECT POSITION IN THE VEHICLE
This is an i-Size Enhanced Child Restraint System. It is approved according to UN Regulation No. R129/03, for use in i-Size compatible vehicle seating positions as indicated by vehicle manufacturers in their vehicle user manuals. If your vehicle does not have an i-Size seating position, please check the vehicle Type List. You can obtain the most up-to-date version of the Type List from go.cybex-online.com/cloud-g-isize-car-compatibility.
Alternatively, the car seat may be installed on forward-facing vehicle seats equipped with a 3-point automatic belt system.
It is not guaranteed that all sitting and reclining positions can be used in all approved vehicles.
DIFFERENT USES OF THE SEAT
| 40 – 87 cm, max. 13 kg | ||
| 40 – 60 cm > 60 cm | 40 – 60 cm > 60 cm | |
The Newborn inlay (1) integrated at purchase should be removed if your child is taller than 60 cm. To remove the Newborn inlay (1) open the belt buckle (2), pull off the shoulder pads and remove the inlay.
INSTALLATION IN THE VEHICLE
Always ensure that...
- the backrest of the vehicle seat is locked in its upright position.
- when installing the car seat on the front passenger seat, adjust the vehicle seat as far back as possible.
The infant car seat is exclusively made for forward facing car seats, which are equipped with ISOFIX or with a 3-point belt system.
Installation of the car seat with Base G
- Keep the Driving Direction Control (D.D.C.) button (3) completely downward.
- Fold out the Load leg (4) until it locks into its foremost position.
- Release the ISOFIX-Release buttons (5) to extend the ISOFIX-Locking arms (6).
The ISOFIX-Release buttons can both be released independently allowing the ISOFIX-Locking arms to be adjusted independently.
- Push the ISOFIX-Locking arms (6) out of the Base G to their furthest extent.
- Place the Base (7) on an appropriate seat in the vehicle.
- Push the ISOFIX-Locking arms (6) into the ISOFIX-Anchorage points (8) until these lock into place with an audible "CLICK". The two ISOFIX-Indicators (9) will switch from RED to GREEN.
- Ensure the Base (7) is secure by trying to pull it out of the ISOFIX-Anchorage points (8).
- Push the Base (7) towards the backrest of the vehicle seat until it is fully aligned with the backrest.
Moving the base from side to side will also brace it against the vehicle backrest.
- Press the Load leg adjustment button (10) and extend the leg until it touches the vehicle floor.
- Pull the Load leg (4) out to the next locking position to ensure optimal force transmission.
- The Load leg indicator (11) switches to GREEN when the load leg is correctly positioned on the vehicle floor.
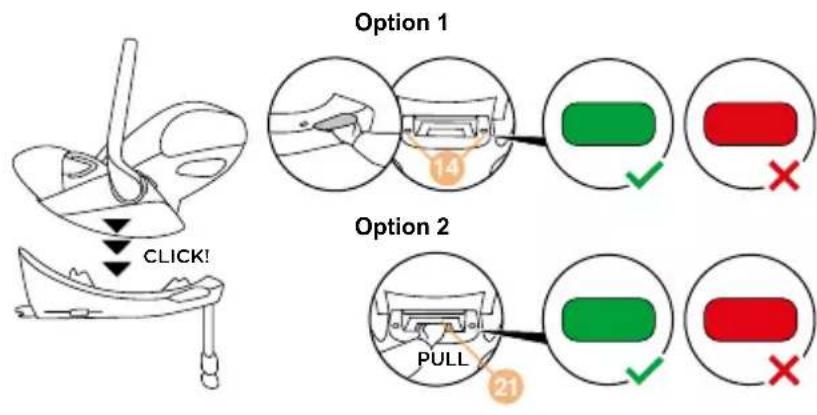
- Move the Carrying handle (12) to position A. Therefor, press the two Carrying Handle release buttons (13) on the left and right of the Carrying Handle at the same time.
- Place the car seat on the Base (7).
- The car seat can also be placed in its entry position on the base. Then turn the car seat until it is aligned opposite to the direction of travel.
- Please ensure that the car seat locks into place with an audible "CLICK".
- Check whether the Seat locking indicator (14) on the base is GREEN.
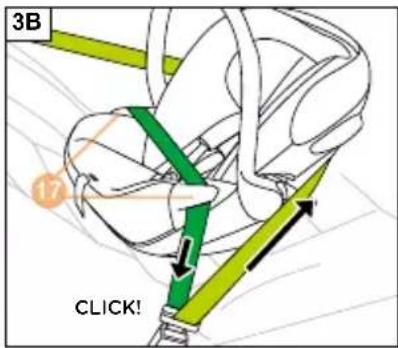
Installing the car seat with 3-point automatic belt
- Place the car seat on the vehicle seat against the direction of travel.
- Make sure that the Carrying handle (12) is locked in position A.
- Make sure that the Tilt angle indicator (15) is parallel with the vehicle floor.
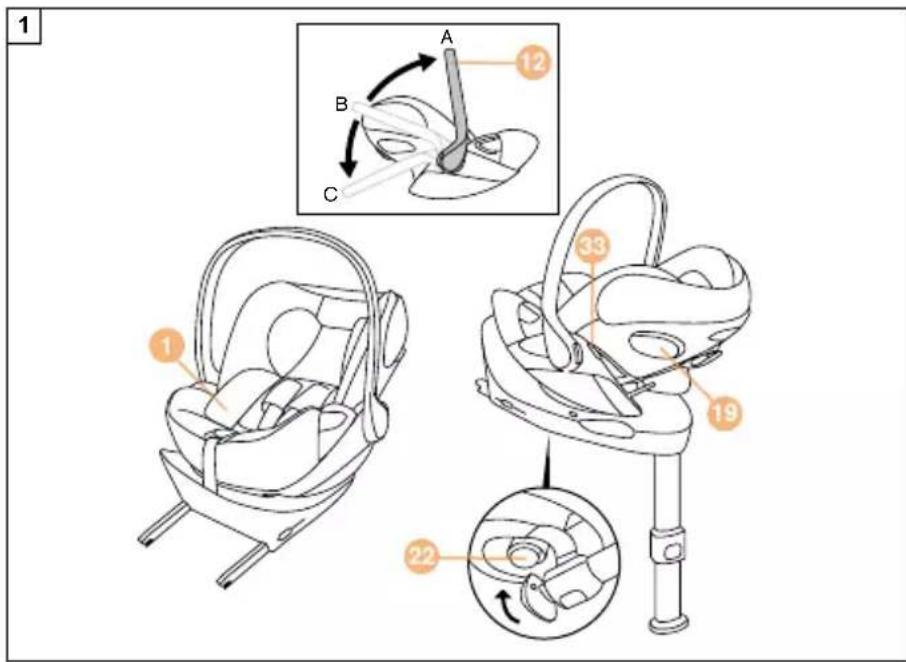
- Pull out the 3-point automatic belt (16) and place its lap section into the lap belt guide (17).
- Lock the 3-point automatic belt (16) of the vehicle in its belt buckle.
-
Tighten the lap section by pulling the diagonal section in the direction of travel.
-
Guide the diagonal section of the belt behind the head end of the car seat and through the Diagonal belt guide (18) and above the Linear side-impact protection (L.S.P) (19).
REMOVAL FROM THE VEHICLE
Removal of the car seat with Base G
- To unlock the car seat from the Base (7), pull one of the Seat release handles (20)/(21) up.
- Tilt the car seat slightly and lift it off the Base (7).
- Unlock the ISOFIX-Locking arms (6) on both sides by pressing the ISOFIX-Release buttons (5) and at the same time pulling them back.
- Pull out the Base (7) from the ISOFIX-Anchorage points (8).
- Remove the Base (7) and slide the ISOFIX-Locking arms (6) completely back into their transport positions.
- Push the Load leg (4) back into its original position and then fold it in to save space. There is a Load leg parking position (22) indicated on the underside of the base.
Removal of the car seat with 3-point automatic belt
- Take the diagonal section of the belt out of the Diagonal belt guide (18).
- Unlock the vehicle seat belt buckle and take the lap section of the belt out from the Lap belt guides (17).
ADJUSTING THE HEADREST
The adjustable Headrest (23) can be adjusted by using the Headrest adjustment handle (24). When adjusting the headrest ensure that the Shoulder harness outlets (25) are at shoulder level or slightly below.
SECURING THE CHILD
- Press the Belt adjustment button (26) and pull both Shoulder belts (27) at the same time to loosen them.
- Undo the Belt buckle (2) by pressing the red button firmly.
- Put your child in the car seat with the buttocks at the back.
- Place the Shoulder belts (27) directly over your child's shoulders.
- Place both Buckle tongues (28) together and lock them in place in the Belt buckle (2). You should hear an audible "CLICK".
-
If you are using a seat with a SensorSafe Clip, push the clip closed until you hear an audible "CLICK" and slide the closed clip down towards the Belt buckle (2).
-
Pull on the Central adjustment belt (29) to tighten the Shoulder belts (27) until they rest snug against your child's body.
The harness should be fitted tight enough so that it is not possible to put a fold in any of the straps.
- When using the SensorSafe clip, position the clip directly below the shoulder pads.
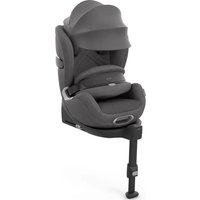
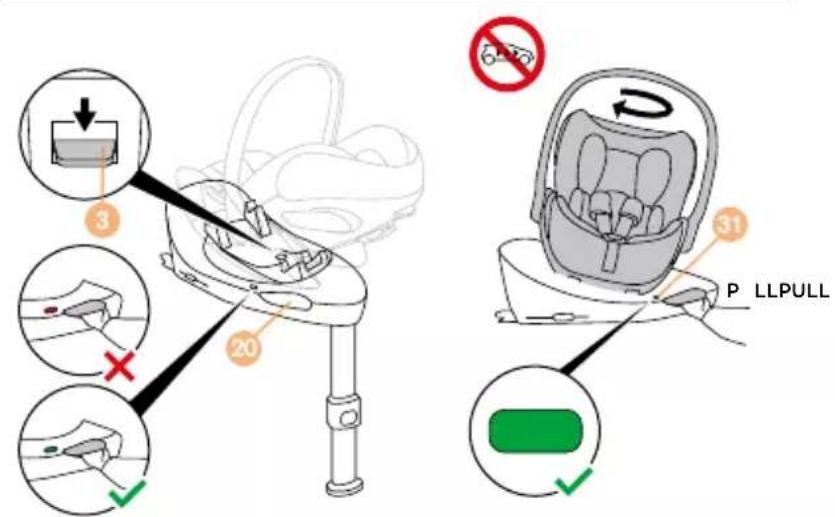
ROTATION FUNCTION BASE G
Pull the Seat rotation handle (20) on the Base G to turn the car seat. Before starting your journey, make sure that the car seat is properly locked into place and the Driving direction indicator (31) shows GREEN.
The car seat will automatically be unlocked from the base as soon as the seat rotation handle is pulled.
ADJUSTING THE SUN CANOPY
Unfold the Sun canopy (30) by pulling on the plastic cover.
ADJUSTING THE LIE-FLAT POSITIONS
The car seat can be switched to the lie-flat position by pressing the release handle for the lie-flat position (32) while simultaneously shifting the back section downwards.
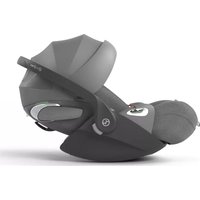
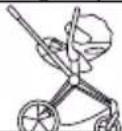
TRAVEL SYSTEM
You can attach the car seat to any approved stroller. Click the car seat onto the approved adapter, facing the parent. To unlock, hold down the two Release buttons for the stroller adapter (33) and lift it up.
REMOVING AND REATTACHING THE SEAT COVER
The car seat cover consists of 6 parts. These are fastened to the car seat at several places. Once unfastened, the individual parts of the cover can be removed. To reattach the cover, follow the removal instructions in the reverse order.
The cover may only be washed at 30^ C with a delicate wash program otherwise it may result in discolouration of the cover fabric. Please wash the cover separately from other laundry and do not dry it in the dryer or in direct sunlight!
MANUFACTURER'S WARRANTY AND DISPOSAL REGULATION
CYBEX GmbH (Riedingerstr. 18, 95448 Bayreuth, Germany) gives you 3 years warranty on this product. The warranty is valid in the country where this product was initially sold by a retailer to a customer. The contents of the warranty and all essential information required for the assertion of the warranty can be found on our homepage: go.cybex-online.com/manufacturer-warranty-car-seats. If a warranty is shown in the article description, your legal rights against us for defects remain unaffected.

Please observe the waste disposal regulations in your country.
CERTIFICAZIONE
Cloud G i-Size
(Linear side-impact protection, L.S.P.) (19)
Direction Control (D.D.C.) (3)
Perna de apoio (4)
RÄTT SITTPOSITION I FORDONET
MONTERING I FORDONET
Se alltid till att...
RIKTIG POSISJON I KJ∅RET∅YET
Driving Direction Control (D.D.C.) (3)
Këmba e ngarkimit (4)
ISOFIX- Butonat e lëshimit (5)