USER MANUAL Cloud T i-Size CYBEX

SO TO CYBER-UNNECON
TO WATCH AN INSTRUCTIONAL VIDEO
DE....2
EN....6
IT 10
FR 15
NL 20
PL 25
HU 30
CZ 34
SK....38
ES 42
PI 47
SE....52
NO 56
FI 60
DK....64
SL 68
HR 72
RU 76
UK....81
EE 85
LT 89
LV 93
TR 97
AR....101
BG 105
SR....110
EL 114
RO 119
SQ 123
BS 127
MK 131
ME 136
HI 140
TH....144
VI 148
MS 152
HY....157
CMN 162
YUE 166
JA 170
KO 174
DE
ZULASSUNG
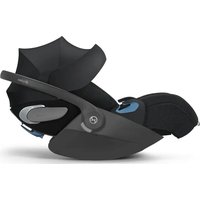
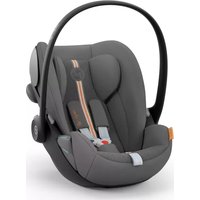
CLOUD Ti-Size
Größe: 45–87 cm
Gewicht: bis 13 kg
Size range: 45–87 cm
Weight: max. 13 kg
Thank you for deciding on the CLOUD T i-Size when choosing your car seat.
Carefully read this User guide before installing the car seat in your vehicle and always keep it to hand in the designated compartment (34).

Without the approval of the Type Approval Authority, the car seat may not be modified or added to in any way.
In order to keep your child properly protected, it is absolutely essential that you use the car seat as described in this User guide.
This car seat may only be installed on vehicle seats which are approved for the use of child restraint systems according to the vehicle manual.
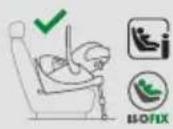
The car seat can either be attached with the Base T/Base Z2 and ISOFIX, or with a 3-point automatic belt that is approved according to UN regulation No. 16 or an equivalent standard.
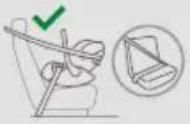
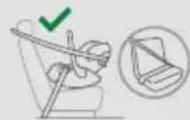
If the car seat is installed using a 3-point automatic belt, the vehicle belt buckle must never reach in the lap belt guide of the car seat. If the belt whip is too long, the car seat is not suitable for use in this position in the vehicle.

The installation of this car seat on the front passenger seat with the front airbag activated is NOT PERMITTED.
Do not use any load-bearing contact points other than those described in the User guide and marked on the child restraint.
The Newborn inlay is used to protect your child and must be used up until they have reached a height of 60 cm.
Before each journey make sure that the car seat harness system is correctly adjusted and fits tightly to the child's body. The belts must never be twisted!
Always buckle up your child when it is in the car seat.
Only an optimally adjusted headrest can offer your child maximum protection and comfort while ensuring that the belt system can be fitted appropriately.
The car seat must always be correctly installed and secured in the vehicle even when not in use.
If the car seat is used with the Base T/Base Z2 the load leg must always make direct contact with the floor of the vehicle. If your vehicle has storage compartments in the footwell, be sure to contact the vehicle manufacturer.
While driving, the car seat must always be locked in the rear-facing position.
For the car seat to provide the best possible protection, always use the linear side-impact protection (L.S.P.).
If using the car seat on a middle seat of the vehicle, the linear side-impact protection (L.S.P.) must never be folded out.
The car seat has also been tested and approved for use without the linear side-impact protection (L.S.P.) folded out.
Always ensure that the car seat is not jammed against any surface when closing the vehicle door or adjusting the back seat.
Luggage or any other objects present in the vehicle must always be firmly secured. Otherwise, they may be thrown within the vehicle, which could cause fatal injuries.
The car seat must never be used without the seat cover. Ensure that only an original CYBEX seat cover is used, as the cover is a key element allowing the seat to function correctly.
Never leave your child unattended in the vehicle.
It is allowed to use the intermediate lie-flat position in the car if the seat is used with Base T/Base Z2. If the car seat is installed using a 3-point automatic belt, it has to be in the most upright position.
The full lie-flat position may only be used outside the vehicle.
Do not place the car seats on raised surfaces, such as a table.
Parts of this child restraint system can heat up when exposed to direct sunlight and could potentially burn your child's skin. Protect your child and the car seat from direct sun exposure.
An accident may cause damage to the car seat that is not identifiable with the naked eye. Please replace the car seat after an accident. In case of doubt, please consult your dealer or the manufacturer.
Do not use this car seat for more than 8 years. The car seat is exposed to high stress during its product lifespan, which leads to changes in the quality of its materials with increasing age.
The plastic parts can be cleaned with a mild cleaning agent and warm water. Never use harsh cleaning agents or bleaches!
On some vehicle seats made of sensitive materials, the use of car seats may leave marks and/or cause discolouration. To prevent this, you can place a blanket, towel or similar underneath the car seat to protect the vehicle seat.
PRODUCT PARTS
| Battery compartment (1) | Diagonal belt guide (18) |
| Base (2) | Seat release handle (19) |
| Load leg (3) | Load leg parking position (20) |
| Newborn inlay (4) | Headrest (21) |
| ISOFIX-Release buttons (5) | Headrest adjustment handle (22) |
| ISOFIX-Locking arms (6) | Belt adjustment button (23) |
| ISOFIX-Anchorage points (7) | Shoulder belt (24) |
| ISOFIX-Indicators (8) | Belt buckle (25) |
| Load leg adjustment button (9) | Buckle tongue (26) |
| Load leg indicator (10) | Central adjustment belt (27) |
| Carrying handle (11) | Seat rotation handle (28) |
| Carrying handle release buttons (12) | Driving direction indicator (29) |
| Seat locking indicator (13) | Driving Direction Control (D.D.C.) (30) |
| Linear side-impact protection (L.S.P.) (14) | Sun canopy (31) |
| Release handle for lie-flat position (32) |
| Tilt angle indicator (15) | Release button for stroller adapter (33) |
| 3-point automatic belt (16) | User guide compartment (34) |
| Lap belt guide (17) | |
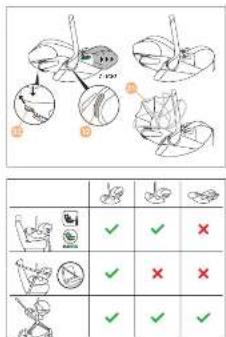
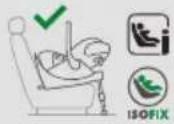
THE CORRECT POSITION IN THE VEHICLE
This is an i-Size Enhanced Child Restraint System. It is approved according to UN Regulation No. R129/03, for use in i-Size compatible vehicle seating positions as indicated by vehicle manufacturers in their vehicle user manuals. If your vehicle does not have an i-Size seating position, please check the vehicle Type List. You can obtain the most up-to-date version of the Type List from www.cybex-online.com.
Alternatively, the car seat may be installed on forward-facing vehicle seats equipped with a 3-point automatic belt system.
It is not guaranteed that all sitting and reclining positions can be used in all approved vehicles.
DIFFERENT USES OF THE SEAT
| 45 – 87 cm, max. 13 kg |
 |  |
| 45 – 60 cm > 60 cm 45 – 60 cm > 60 cm |
 |  |  |  |
The Newborn inlay (4) integrated at purchase should be removed if your child is taller than 60 cm. To remove the Newborn inlay (4) open the belt buckle (25), pull off the shoulder pads and then remove the inlay.
PREPARING TO INSTALL THE BASE T/BASE Z2
Before using the base for the first time, the plastic strip must be removed from the Battery compartment (1) on the Load leg (3). The Base (2) will emit an audible warning signal until it has been correctly installed. If the Load leg (3) is folded out and there is no sound, the battery must be checked. To check the battery, the Battery compartment (1) on the back of the load leg can be opened with a screwdriver. The battery may only be replaced with a CR2032 size battery.
INSTALLATION IN THE VEHICLE
Always ensure that...
• the backrests in the vehicle are locked in their upright position.
- when installing the car seat on the front passenger seat, adjust the vehicle seat as far back as possible.
The infant car seat is exclusively made for forward facing car seats, which are equipped with ISOFIX or with a 3-point belt system.
Installation of the car seat with Base T/Base Z2
EN
- Keep the Driving Direction Control (D.D.C.) button (30) downward and ensure the base is adjusted for rearward facing car seats.
- Fold out the Load leg (3) until it locks into its foremost position. An acoustic warning signal will sound until the load leg has been correctly installed.
- Release the ISOFIX-Release buttons (5) to extend the ISOFIX-Locking arms (6).
The ISOFIX-Release buttons can both be released independently allowing the ISOFIX-Locking arms to be adjusted independently.
- Push the ISOFIX-Locking arms (6) out of the Base T/Base Z2o their furthest extent.
- Place the base (2) on an appropriate seat in the vehicle.
- Push the ISOFIX-Locking arms (6) into the ISOFIX-Anchorage points (7) until these lock into place with an audible "CLICK". The two ISOFIX-Indicators (8) will switch from RED to GREEN.
- Ensure the base is secure by trying to pull it out of the ISOFIX-Anchorage points (7).
- Push the Base (2) towards the backrest of the vehicle seat until it is fully aligned with the backrest.
Moving the base from side to side will also brace it against the vehicle backrest.
- Press the Load leg adjustment button (9) and extend the leg until it touches the vehicle floor.
- Pull the Load leg (3) out to the next locking position to ensure optimal force transmission.
- The Load leg indicator (10) switches to GREEN when the load leg is correctly positioned on the vehicle floor and the acoustic warning signal stops.
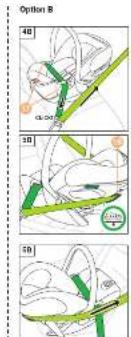
- Move the Carrying handle (11) to position A. Therefor, press the two Carrying Handle release buttons (12) on the left and right of the Carrying handle at the same time.
- Place the car seat on the Base (2).
- The car seat can also be locked in its entry position on the base. Then turn the car seat until it is aligned opposite to the direction of travel.
- Please ensure that the car seat locks into place with an audible "CLICK".
-
Check whether the Seat locking indicator (13) on the base is GREEN.
-
In order to achieve the best possible protection, activate the Linear side impact protection (L.S.P) (14) on the side of the car seat facing the vehicle door by pulling on it's end.
The car seat can also be used with the L.S.P. folded in if there is not enough space in the vehicle. To do this, fold in the element back to its starting position.
Installing the car seat with 3-point automatic belt
- Place the car seat on the vehicle seat against the direction of travel.
- Make sure that the Carrying handle (11) is locked in position A.
- Make sure that the Tilt indicator (15) is parallel with the vehicle floor.
- Pull out the 3-point automatic belt (16) and place its lap section into the lap belt guide (17).
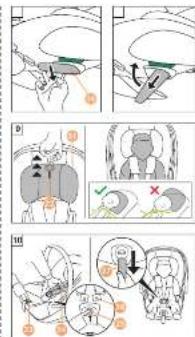
- Lock the 3-point automatic belt (16) of the vehicle in its belt buckle.
- Tighten the lap section by pulling the diagonal section in the direction of travel.
- Guide the diagonal section of the belt behind the head end of the car seat and through the diagonal belt guide (18) and above the Linear side-impact protection (L.S.P) (14).
- In order to achieve the best possible protection, activate the Linear side impact protection (L.S.P) (14) on the side of the car seat facing the vehicle door by pulling on its end.
The car seat can also be used with the L.S.P. folded in if there is not enough space in the vehicle. To do this, fold in the element back to its starting position.
REMOVAL FROM THE VEHICLE
Removal of the car seat with Base T/Base Z2
- To unlock the car seat from the base (2), pull the Seat release handle (19) up.
- Tilt the car seat slightly and lift it off the base (2).
- Unlock the ISOFIX-Locking arms (6) on both sides by pressing the ISOFIX-Release buttons (5) and at the same time pulling them back.
- Pull out the Base (2) from the ISOFIX-Anchorage points (7).
- Remove the Base (2) and slide the ISOFIX-Locking arms (6) completely back into their transport positions.
- Push the Load leg (3) back into its original position and then fold it in to save space.
- It is important to fully fold in the load leg so that the acoustic warning is muted. There is a Load leg parking position (20) indicated on the underside of the base.
Removal of the car seat with 3-point automatic belt
- Take the diagonal section of the belt out of the diagonal belt guide (18).
- Unlock the vehicle seat belt buckle and take the lap section of the belt out from the lap belt guides (17).
ADJUSTING THE HEADREST
The adjustable Headrest (21) can be adjusted by using the Headrest adjustment handle (22). When adjusting the Headrest (21) ensure that no more than 2 cm (approx. 2 finger's width) remain between the child's shoulders and the headrest.
SECURING THE CHILD
- Press the Belt adjustment button (23) and pull both Shoulder belts (24) at the same time to loosen them.
- Undo the Belt buckle (25) by pressing the red button firmly.
- Put your child in the car seat with their buttocks at the back.
- Place the Shoulder belts (24) directly over your child's shoulders.
- Place both Buckle tongues (26) together and lock them in place in the Belt buckle (25). You should hear an audible "CLICK".
- If you are using a seat with a SensorSafe Clip, push the clip closed until you hear an audible "CLICK" and slide the closed clip down towards the Belt buckle (25).
- Pull on the Central adjustment belt (27) to tighten the Shoulder belts (24) until they rest snug against your child's body.
The harness should be fitted tight enough so that it is not possible to put a fold in any of the straps.
- When using the SensorSafe clip, position the clip directly below the shoulder pads.
ROTATION FUNCTION BASE T/BASE Z2
Pull the Seat rotation handle (28) on the Base T/Base Z2o turn the car seat. Before starting your journey, make sure that the car seat is properly locked into place and the Driving direction indicator (29) shows GREEN.
ADJUSTING THE SUN CANOPY
Unfold the Sun canopy (31) by pulling on the plastic cover.
ADJUSTING THE LIE-FLAT POSITIONS
The car seat can be switched between the lie-flat positions by pressing the release handle for the lie-flat position (32) while simultaneously shifting the back section downwards.
The car seat can be put into two lie-flat positions: the intermediate lie-flat position is also available inside the car if the car seat is used in combination with Base T/Base Z2. The full lie-flat position is only available outside the vehicle.
TRAVEL SYSTEM
You can attach the car seat to any approved stroller. Click the car seat onto the approved adapter, facing the parent. To unlock, hold down the two Release buttons for the stroller adapter (33) and lift it up.
REMOVING AND REATTACHING THE SEAT COVER
The car seat cover consists of 6 parts. These are fastened to the car seat at several places. Once unfastened, the individual parts of the cover can be removed. To reattach the cover, follow the removal instructions in the reverse order.
The cover may only be washed at 30^ C with a delicate wash program otherwise it may result in discolouration of the cover fabric. Please wash the cover separately from other laundry and do not dry it in the dryer or in direct sunlight!
MANUFACTURER'S WARRANTY AND DISPOSAL REGULATION
CYBEX GmbH (Riedingerstr. 18, 95448 Bayreuth, Germany) gives you 3 years warranty on this product. The warranty is valid in the country where this product was initially sold by a retailer to a customer. The contents of the warranty and all essential information required for the assertion of the warranty can be found on our homepage: go.cybex-online.com/manufacturer-warranty-car-seats. If a warranty is shown in the article description, your legal rights against us for defects remain unaffected.

Please observe the waste disposal regulations in your country.
CERTIFICAZIONE
CLOUD T i-Size
INSTALLASJON I KJ∅RET∅YET
Sjekk alltid at
MAKLUMAT PENTING DAN AMARAN
Ug4eLqHfU E ulnwnphl utplawnh uwalwlywu baunwnntn ngqh niqlnph buanwnntn lpwa, nph wngqh wulwnwqm pjwu pupahhlu wulwhl t:
SugunmcpjuwP OqnuqnpduwU nntggnjgnU uQupuqnpludh U tptfuujh huuwup upuwU wulqunuqpnjuW huufuqwqnU uZluidh, uP oqnuqnpdtp ptn lpnn wJL ylnuunwlnwnjHt lhtntp:
Δρωμδιλή hωμίωρη ωωμωντυμόσ ιθρηλή ορωνωρηρδυμιλ τ ἀκη τρκήωμβή υωχυνωμύταμη ιωμωνυμην, ι υωλο υτωπε τ λήρωντι μήψιλη τρκήωμβή 60 υλ νωωωλη:
8m pupwubynip nunlnpnpijnuhg wnug huiqnultp, np uunwnutnh wlpwqnuni hwiulwupqp lqupwuynpuid t a2n ytpwnyl li wimp qplnuif t bthuwih dwpufup: Cpptp zwtupp t nipti qnuhutpp:
Upluuiujh utg qunyluju hupuhujhu uh2n wupwlyuwylp:
Uhuja ouuuhuiw ltpwnul lwpqwulnpwud qihuwqwnl lwpnnk t wuywhnllj 2tp ltphwujh wnuwluqwmjia uwu2nuwuwim pjmup la hwpufwpwulwni pjmup uhwduwfuwlwy wuywhnlqnl muuqnuhalph hwuwuwunuwuhui hwpufwplgmup:
U unnubptuuh u unwuntnp u tnp t u2unwutu sh un y tpwnyl int qnuppud l wufuglud j uh un wluwnpunwju up engh u g, ln ujuhul tnp wju n puugph u g t :
Eptuunwnuntnp oqnwnqnpdqnuuf t Base T/Base Z2-ji htu, uuuu uukulquujhly «nuutuwj» ytunp t cpuunwwku jihuh wudhpwulqu fynuwulquh upc upnwuwnpunuwjhu upengh hwnuwqh h: Ept 3pt npuwuwnpunuwjhu upenga muh qyuhtuwnuwjhu jughjluq npuwunwnqnu, ubuwujdwunptu lwwu hwnuwuntnp upnwuwnpunuwjhu upengh wpuwunpnqh htu:
• lwptlu hui trptuunh huanwuntnp wlpnp k u2nnwylu lnnwylud lhyh pupugphu huulwnwly nhhppnu:
Ωμμταμή άμρτάμμή λυμνωστηρ νώμρωμηρ λυμλωσημή υμω2υμωμίμιρμημή υμωμημή, ιξυμωμτυ οσημωσηρδετρ λημωμής υμωρωστιμή ωυμλωστιμή ωυμωμίμιρμημή (49):
Spu###pnuwjh# ##engh htunh ##wnuwuh ##guntnh ##wnuntnh ##w ##ptwuh ##wnuntn# oqnwnnpdtjhu lnnwjh# hwnplwdtph dwnwwlq qdwjh# ww2wnwulm pynup (49-9) trppz yutnp t npu dwujh:
^1 Πριλίωμή λυνωνωτηρ τωνα ψηράωργίμα l ωυνωνωνημί ζ υπυαθ γηρα δωργισδ, ληρωμήλο ωυργωδύκηλί δωνιώνωί χδωμήλο υψωζωνωμίτηργιώ λψηρωνιώνι (ΨΩ) ηλωρμιί:
Uzunwylu unmqlp, np unpwuhwnpnuwjl uhpeng qnmp whylqhu
luui hunluh tuwnwnlnp hupufwplguljhu utpluwh buwnwnlnq huy-np
fuwlpluuh ulnfulud st:
Фітプтівмінці өңлүм өңтプтір lyωι gwúlywgud үүл өөөөрічү үөтнір ț ăşunwutu өңлір lyωylid ʃih: Ujwultu, ŋpwup ḥqupn ță pulúktl өnpulwynpnunwjhă ușengh țig, hùyă țL qupn ț ɑqunăwntl ăwhugmi quwulwăpátp:
Stptuwj tuunwuntnp trktp syutnp t oqnuuqnpdjh umuug tuunwuntnh yuunwuh: zuulnqltp, np oqnuuqnpdjmu i t uhuji onphqliuy CYBEX tuunwuntnh yuunwju, puuh np yuunwujp qhwulnp unwp p, npp huwpwulnp t npapdmu i tuunwuntnh ahzu qnpduwnmijen:
£pthwjhu knptp wnug hulqnmpjuu uhi pnntp unpuuunpnuujhu uhpngnui:
Dm uwnpnlul 1, utpluwnlu oqnwqnpdlu uphlu wlywnpwuh wunlqm. nhpn, lpl: uwnwnlq uqnwqnpdlu 1, Base T/Base Z2-nl: bpl: utpluwh wunwnwnl uqnwplud 1, 3 hyunwung wjwndww qnuhnq, wuyw wknp 1, wutlwhg mnhn nhppnul jhl:
KRTS 1980C SRUUNNRSU3FU UH208NBU
Uu Uphwutph huiwp wuuhu wuhunwugpjuw lquwnwptwqnpdulw i-Size huiwlpwpq t: zwwunwnluid t: puin UUy-h uwlunwlpwpq No.
R129/03, i-Size hluu hudwunlqLh upwuwwnpnuwjhu uphengh tuunuunlqh
nhpptpnuu lhpnuwuih wudup, hyswku huzwud k upwuwnpnuwjhu
uhengh upwuwnpnnblph lynqhg upwuwnpnuwjhu uphengh oqnwqnpdwu
mlnqgmygmuf: 6p11 Ap upwuwnpnuwjhu uphengh smuh i-Size tuunuunlqh
nhpp, hulnpnuu lap unmqly upwuwnpnuwjhu uphengh Sluwjlalph guubln:
Qupnn lp damp pplq Sluwjlalph guublh wultuwllapghu unwpflpuwlp
www.cybex-online.com-19:
Ujl ylpuy, utptluwjh tuunwnltnp lqpnn k unwnwnpli 2wpduwu niynnnipuup utptluwjh tuunwnltnph lpw, npnp huqtguw d u 3 lyunwung wulundwin qnnm huwfuwrqnql:
2h tpuqhuwqunpnu, np hwnkni u hkluqmi pnnp qhpptnp lqupnn tlu oqnwnqnpdvtl pnnp hwuunwnuwd utpthuwutpmui:
LUSUSTROHSUANROUL SURAEI 26461
45 - 87 uif, www.tq.13 lqq
45 - 60 uil

60 u/l

45-60 uui

60 ud

Qiuwu Ug bupwuhdu Lupudh huufup tuwauunkuud tlupnhh (4) uupup tluwugul , lpl dlp lpuhuv 60 u-gh uulph huawly muh : Lupudh huufup tuwauunkuud tlupnhh (4) huufum huufup puqli qnum aupuwuh (25), puqli nuuwpundhydpp , quyu huutl bupnhpp :
BASE T/BASE Z2-F SBUUUU UUUUSFUUSNU
zhúpù wùwuhì wùquwǔ oqunwqnpǎtīng wǒuò yutn p t Sklulnuqhǐ (nùnhuhǐ) (3) yúnpuh Uwuplngh hujhlq (1) htwnugbì yuànwnhǐ dànwqultān: zhúpp (2) yutī hǎwhuqqm 2wūgūnn wǎnwūzǔ lǚnwāwlḥ wǔpūwǔ dànfubwǔ, iǔhyù wǔjā zìyu nǚnwuhī. tjet Sklulnuqhǐ (nùnhuhǐ) (3) ŋnpu t ānwjuās, wùwujī wǎnwūzǔ lǚyu, yutn p t uvnqī lǚnwlnqn: Uwuplnqn uunnqīm huāuw jūpntǐ h quan unwuhawndí pyugbì wtjulnuqhǐ nǔnwuhī hūnbuǐ qúnluŋ Uwuplngh hujhlq (1): Uwuplnqn lǚuplǐ h lǚhuì yúnhuwphú lì CR2032 2wuhì iduwlnqnol;
STUANFU SNUUNRSU3H UPQN3F U6
Uh2un hwnqultp, np.
The source image contains no legible text or characters. According to Rule 4 (Edge Noise Strategy), since the ground truth is illegible and no visible text is present, the OCR should not output any character. Therefore, the corrected OCR text must reflect this absence of content. [No text detected]
Imp lqnqn lp utplduwj hwnwnlqn lgq oqnwnpdduwj hwnfup pnjuwnpljgh gutluqwud duulquwwujwlj): Yunngnq wupnuglap utplduwj hwnwnlqn hwnwnlund usnwqwntpj (puu nklpnd nkylh dwnjh lqnfp: Uquylqnqkim hwnfup utkpvd uwhtp duulquwwujwlj unnwqwntpj (33) Upaulyduwj tpljm lynaulydapp u wfu eltp pupapwugtpr:
LUSURUH TUS3UH ZUTLC BY UARH8 UURUSTUC
Utptuwj hwulqwlqu hwnwnntnh wwnwnup pwnlqwugd t 6 wuuhg: Upwup wupwuglnvd tu uptuwj hwnwnntnh unwptp wutepnivt: Uupw uupwuguthu wunwnujh wnwudha uwtnp lwptjh t hwutj: Wunwnup unhp wupwugutmi hwufup htwnltp hwutmi gngmdutphu hwlywnwl hluppulqultpjuulp:
^1 Wunjuup yuup t yuubw 30° C glupuuunhawund ümpp hwnqmuunh yugufw duwqnnd, huiqumwl nluwpnld wwnjuuh qnpduwopp lwwnn t qmtuqqplla: Wwnjuup yuuglp unwudhu ta sh ynpwgnlp wu snpwgufw uwwpnul yud wuph nnhn dwnuquypukhp unwl:
URSUNTH BRUDHEC BY AGUHUTBCH YBRUF3UL YULNLYYURG
CYBEX GmbH (Riedingerstr. 18, 95448 fuwjnp, qtpufuw) pultpmpnupunpwuwwnnul t, 3 wnuplu trw2uhp wju wpwnwnuwph huvfwn: trw2uhpqnpdnnl t wju lhpnnnl, nputln wju wuwnppp ydwwnnla uqpwutlydwuntl t hwawwnpnhlu: trw2uhph pnulwunwnpnniup b trw2uhphhwwwwnnwu huvwp wahpwud2un pnnp lwpnp wrtndynpntubtnpqwnnl tp quutl ulp qlluwhn ynui
go.cybex-online.com/manufacturer-warranty-car-seats-nui:
Bpt wupwnwnpulph hlywupwqnlpjnu utyg wnlju t kpuzhihplu, wuyu
ptpwnlpjntuhkph hwiun upk tlywnnduwip dkp ophluwljuu jpuwlntupukpp
dunui tu niuh utyg:

Ivūnppnuú kúp hāunlùl àkú kāplpnuú pòuǐnǚlùknh hānwugduu huàluu
uuhúuìluqud lquínǚuìyúnqkphú:
证明
CLOUD T i-Size
尺寸范围:45--87厘米
重量:最大13千克
The image contains only background horizontal lines, which are stylistic or background elements. According to Rule 2, such lines must be ignored by the OCR result. Therefore, the corrected OCR text is:
[Empty String]
The image contains only background horizontal lines, which are stylistic or background elements. According to Rule 2, such lines must be ignored by the OCR result. Therefore, the corrected OCR text is:
[Empty String]