USER MANUAL Pallas B2Fix + Lux CYBEX
text_image
Diagram of a car seat with labeled parts and close-ups showing hand positions and foot movements
text_image
2
For one 50°-6" - Line Stock, the "B" is being 15.5 kg
text_image
Medical illustration showing surgical procedure with labeled steps and magnified views of a device setup

GO TO WWW.CYREX-ONLINE.COM TO WATCH AN INSTRUCTIONAL VIDEO
DE 2
EN 5
IT 8
FR....11
NL 14
PL 17
HU 20
CZ....23
SK....26
ES....29
PT 32
SE....35
NO 38
FI 41
DK 44
SL 47
HR 50
EE....53
LV 56
LT....59
EL 62
RO 65
TR....68
RU 71
UK 74
BG 77
SR 80
AR 83
BS....86
SQ....90
MK 94
CNR....98
HI....102
TH....105
VI 108
MS....112
HY....116
CMN 120
YUE 123
JA 126
KO 129
text_image
cybex
PALLAS B2-FIX + LUX
UN-R44-04
UNIVERSAL
SEMI-UNIVERSAL
9 - 18 kg
E₁
04301395
CYBEX GmbH
Riedingsch. 13, 2014-3 Bayouth
Germany
text_image
cybex
SOLUTION B2-FIX + LUX
UN-R44-04
UNIVERSAL
SEMI-UNIVERSAL
15 - 36 kg
E₁
04301395
CYBEX GmbH
Redringer: 18,8548 Baysouth
Germany
ZULASSUNG
UN R-44/04
CYBEX Pallas B2-Fix+Lux
Recommended from approx.
9 months to 12 years
Thank you for deciding on the Pallas B2-Fix + Lux when choosing your child seat.
Carefully read the instructions before installing the seat in your car and always keep these instructions to hand in the designated compartment.
Without the approval of the Type Approval Authority, the child seat may not be modified or added to in any way.
In order to keep your child properly protected, it is absolutely essential that you use the child seat as described in this manual.
!This child seat may only be installed on vehicle seats which are approved for the use of child restraint systems according to the vehicle manual.
!Only suitable for vehicle seats with automatic three-point belts approved in accordance with UN regulation 16 or a comparable standard.
!Do not use any load bearing contact points other than those described in the instructions and marked on the child restraint.
!The full surface of the backrest of the child seat must make contact with the backrest of the vehicle.
!The shoulder belt must run upwards and back at a recline. It must never run forward to the upper belt point in your vehicle.
!The vehicle belt buckle must never cross the belt guide of the seat. If the belt whip is too long, the child seat is not suitable for use in this position in the vehicle. In case of doubt please contact the child restraint manufacturer.
!The three-point vehicle belt must only be passed through the designated routings. The belt routings are described in detail in this manual and are marked in red on the child seat.
!The lap belt must run as low as possible across your child's groin to have optimum effect in the event of an accident.
!Before each use make sure that the automatic three-point vehicle belt is correctly adjusted and fits tightly to the child's body. Never twist the belt!
!Only an optimally adjusted headrest can offer your child maximum protection and comfort while ensuring that the shoulder belt can be fitted smoothly.
!For usage in Group 1 the impact shield must be used.
!The child seat must always be secured correctly with the vehicle belt in the vehicle even when not in use.
!Always ensure that the child seat is never jammed when closing the car door or adjusting the back seat.
!The child seat is also tested and homologated without the Linear Side impact Protectors.
!Luggage or any other objects present in the vehicle must always be firmly secured. Otherwise, they may be thrown within the car, which could cause fatal injuries.
!The child seat must never be used without the seat cover. Ensure that only an original CYBEX seat cover is used, as the cover is a key element of the seat's function.
!Never leave your child unattended in the car.
!The parts in the child restraint system heat up in the sun and could potentially burn your child's skin. Protect your child and the child seat from direct sun exposure.
!An accident may cause damage to the child seat that is not identifiable with the naked eye. Please replace the seat after an accident. In case of doubt, please consult your dealer or the manufacturer.
!Do not use this child seat for more than 11 years. The child seat is exposed to high stress during its product life span, which leads to changes in the quality of the material with increasing age.
!The plastic parts can be cleaned with a mild cleaning agent and warm water. Never use harsh cleaning agents or bleaches!
!On some vehicle seats made of sensitive materials, the use of child seats may leave marks and/or cause discolouration. To prevent this, you can place a blanket or towel or similar underneath the child seat to protect the vehicle seat.
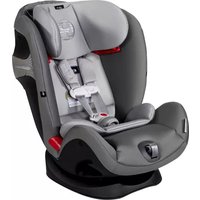
PRODUCT PARTS
(a) User Guide Storage Compartment
(b) Backrest
(c) Adjustable Headrest
(d) Headrest Height Adjuster
(e) Booster
(f) Impact Shield
(g) Belt Guide Group 1
(h) Lap Belt Guide Group 2/3
(i) Shoulder Belt Guide
(j) Linear side impact protection (L.S.P)
(k) ISOFIX-Connect Locking Arms
(I) ISOFIX-Connect Adjustment Handle
(m) ISOFIX-Connect Release Button
(n) ISOFIX-Connect Safety Indicator
(o) ISOFIX Anchorage Points
INITIAL ASSEMBLY
Connect the backrest (b) to the booster (e) by hooking the guide lug on the axis of the booster. The backrest (b) is then folded forward. Place the impact shield (f) on the booster (e). Clip the L.S.P. (j) onto the marked area on the side of the seat. Push until it clicks into the slots in the car seat shell.
THE CORRECT POSITION IN THE VEHICLE
The child seat with retracted ISOFIX-Connect locking arms (k) can be used on all vehicle seats with automatic three-point safety belts approved in the vehicle manual for “universal” use.
A "semi-universal" certification is given to restraint systems that are connected to the car through ISOFIX-Connect locking arms (k). For this reason, ISOFIX-Connect can only be used in certain vehicles. Refer to the enclosed vehicle type list for approved vehicles. You can obtain the most up-to-date version from www.cybex-online.com.
In exceptional cases, the child car seat may also be used on the front passenger seat. Always comply with the recommendations of the vehicle manufacturer.
INSTALLING THE CHILD SEAT IN THE VEHICLE
- Always ensure that...
- the backrests in the vehicle are locked in their upright position.
- when installing the child seat on the front passenger seat, adjust the vehicle seat as far back as possible without affecting the belt routing.
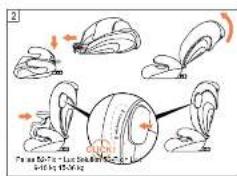
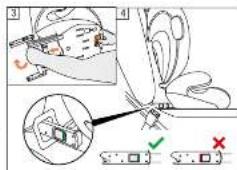
- Use the ISOFIX-Connect adjustment handle (I) under the booster (e) and pull the two ISOFIX-Connect locking arms (k) to their furthest extent.
-
Now twist the ISOFIX-Connect locking arms (k) 180° so that they are facing the direction of the ISOFIX anchorage points (o).
-
Place the child seat on the appropriate seat in the car.
- Push the two locking arms (k) into the ISOFIX anchorage points (o) until these lock into place with an audible "CLICK".
- Use the ISOFIX-Connect adjustment handle (I) and push the car seat against the vehicle seat.
- Ensure that the entire surface of the backrest of the child seat (b) is placed against the backrest of the vehicle seat.
If the headrest of the vehicle is in the way, pull it upwards to its furthest extent or remove it completely (except in rear-facing vehicle seats).
-
Ensure the seat is secure by trying to pull it out of the ISOFIX anchorage points (o). The green safety indicators (n) must be clearly visible on both sides of the seat.
-
In case the seat is used without ISOFIX-Connect, it can be stored away on the bottom of the seat.
By using ISOFIX-Connect, a connection to the vehicle is created which increases your child's safety. Your child still needs to be secured with the three-point belt of the vehicle and the impact shield for Group 1.
If the "Linear Side-impact Protection" (L.S.P.) is in conflict with the car door of if it affects the space on the passenger seat, it is possible to detach it by squeezing the top and bottom of the element and pulling it out of the slot in the car seat shell. In order to put the L.S.P. back on the seat, clip it onto the marked area on the side of the seat and push until it clicks into the slot.
REMOVING THE CHILD SEAT FROM THE VEHICLE
Perform the installation steps in the reverse order.
- Unlock the ISOFIX-Connect locking arms (k) on both sides by pushing the release buttons (m) and pulling them back simultaneously.
- Pull the seat away from the ISOFIX anchorage points (o).
- Remove the child seat and store the ISOFIX-Connect in reverse order to installation.
ADJUSTING THE HEADREST
The headrest (c) can be adjusted by using the headrest height adjuster (d) at the back of the headrest (c). Adjust the headrest so that max. 2 cm (approx. 2 finger's width) remain between the child's shoulder and the headrest (c).
The height of the headrest can still be adjusted while the seat is installed in the car.
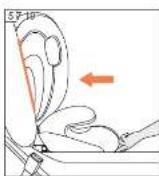
RECLINING HEADREST
The Reclining Headrest (c) helps to prevent the child's head from dangerously tipping forward during sleep. It can be set to one of 2 positions. Push the Reclining Headrest (c) forward until the desired position is reached.

child's head should always be in contact with the Reclining Headrest.
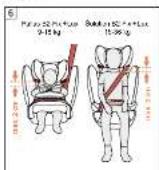
CORRECT INSTALLATION MODE
Group 1: 9 – 18 kg Group 2/3: 15 – 36 kg
Installation mode with impact shield without impact shield
Installation
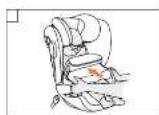
SECURING THE CHILD WITH IMPACT SHIELD - GROUP 1 (9-18 KG)
- Insert the impact shield (f). The side flaps of the impact shield (f) fit exactly between the arm rests and seating surface of the booster.
- Pull out the entire length of the vehicle seat belt.
- Place the lap belt over the designated red belt routing on the impact shield (g).
- Lock the vehicle seat belt into the belt buckle. It must lock in place with an audible "CLICK".
- Tighten the lap belt by pulling the shoulder belt backwards.
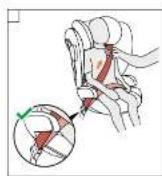
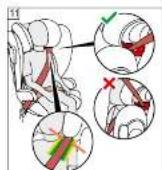
- Feed the shoulder belt in parallel with the lap belt back into the belt routing (g) and pull the shoulder belt tight. Ensure that both parts of the belt cover the entire width of the impact shield (f) in the belt routing (g).
- Feed the shoulder belt tightly through the belt routing of the impact shield (g) until it is clamped inside the belt guide.
- Put the shoulder belt between headrest (c) and backrest (b). The shoulder belt does not need to be guided through the shoulder belt guide (i).
SWITCH FROM GROUP 1 TO GROUP 2/3
Remove the impact shield (f), as soon as your child weighs 18 kg.
Note that switching from group 1 to group 2/3 is not permitted if your child weighs less than 15 kg. Keep the impact shield in a safe and secure place.
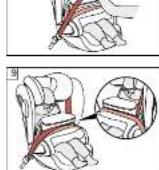
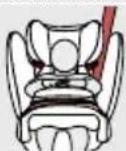
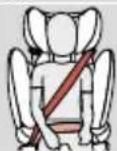
SECURING THE CHILD WITHOUT IMPACT SHIELD – GROUP 2/3 (15–36 KG)
- Route the vehicle seat belt around your child and insert the belt tongue into the belt buckle. It must lock into place with an audible "CLICK".
- Place the lap belt in the red coloured lap belt guides (h) of the child seat.
- Pull the shoulder belt to tighten the lap belt.
- On the side of the car seat next to the belt buckle, the shoulder belt and the lap belt must be inserted together in the lap belt guide (h).
- Feed the shoulder belt through the shoulder belt guide (i) until it is inside the belt guide.
- Ensure that the shoulder belt runs across your child's clavicle and does not touch your child's neck. If necessary, adjust the height of the headrest (c) to change the position of the belt.
REMOVING AND REATTACHING THE SEAT COVER
The cover of the child seat consists of 5 parts (headrest (x2), backrest, booster and impact shield). These are held in position at several places by press-studs. Once all studs have been released, the single parts of the cover can be removed.
In order to put the covers back on the seat, follow the removal instructions in the reverse order.
The cover may only be washed at 30 °C with a delicate wash program otherwise it may result in discolouration of the cover fabric. Please wash the cover separately from other laundry and do not dry in the dryer or in direct sunlight!
MANUFACTURER'S WARRANTY AND DISPOSAL REGULATIONS
CYBEX GmbH (Riedingerstr. 18, 95448 Bayreuth, Germany) gives you 3 years warranty on this product. The warranty is valid in the country, where this product was initially sold by a retailer to a customer. The contents of the warranty and all essential information required for the assertion of the warranty can be found on our homepage
go.cybex-online.com/manufacturer-warranty-car-seats. If a warranty is shown in the article description, your legal rights against us for defects remain unaffected.
Please observe the waste disposal regulations in your country.

text_image
cybex
PALLAS B2-FIX + LUX
UN-R44-04
UNIVERSAL
SEMI-UNIVERSAL
9 - 18 kg
E₁
04301395
CYBEX GmbH
RiedingmbH 18, 2014-3 Bayouth
Germany
CERTIFICAZIONE
UN R-44/04
CYBEX Pallas B2-Fix + Lux -
PRAWIDŁOWY SPOSÓB INSTALACJI
Grupa 1: 9 – 18 kg Grupa 2/3: 15 – 36 kg
GWARANCJA PRODUCENTA I PRZEPISY W ZAKRESIE USUWANIA
SPRÁVNY REŽIM INŠTALÁCIE
REPOSACABEZAS RECLINABLE
RIKTIG POSISJON I KJ∅RET∅YET
SETTE INN BARNESETET I KJ∅RET∅YET
SIKRING AF BARNET MED KOLLISIONSVÄRN – GRUPPE 1 (9–18 KG)
GALVAS ATBALSTA BALSTS
SECURIZAREA COPILULUI FĂRĂ SCUT DE PROTECTIE LA IMPACT – GRUPUL 2/3 (15–36 KG)
م Expected Marketing
(I) Gagang Laras ISOFIX-Connect
(m) Butang Pelepas ISOFIX-Connect
(n) Penunjuk Keselamatan ISOFIX-Connect
(o) Titik Tambat ISOFIX
PEMASANGAN AWAL
U42FLU44L UNLSUDNHUC
Uunwqntp phyluwj (b) luunwuntn pnwnntphu(e) 'ungutjnny nnnnnnnluw
utnuh2p pnwnntnh wnwuggh dtg: Ujnuhtuni. phyluwj (b) dwjlnuT ewug:
Stinwnntp wuljnuulqnjuwul utnwuhjn (f) luunwuntn pnwnntnh jnu (e):
Uunwqntp 497-l (j) luunwuntnh ynphu luzuw huunlwoh jnu: Utnutp
uhj5u wju shyungnu dnuh dtptiluwj luunwuntnh yunwwwnph uhnwwlutnh
dtg:
LUSUSTH MUSULC RUTLC by LARHS UURUSTLC
Utptluwj dwlywjuw luwnwntnh wwnwjuw pwnljugwð t 5 duwgh (qhwulwj (x2), phlwuj, luwnwntn pnwntn t. wluwnwqnjejwul utnwuh): Prupw uwnwguwð tu uh puuh nhnptnnu utnuhs 6wnwunutpnnl: Annn 6wnfuunutng wndwytini ntwpnuw wwnwjuw wnwushlu dwutng lwuntj h huuti:
^7 Wunjwun lynjhu wupwugutinl hwuwn htunutp hwutinl gnlgnluutnhu hwuywnwy htnpewlywunlajuwip:
Tunjwuh wupp t uwuwu uhwju 30°8 gtnfwninhówulnu' unnp hugnwuh lwugfuw duwapnu, huiwuwu tgwnu' wwnjwuh qndlwopn lwwnn t qndwqntubi: tuwnpnu bup uwuwu wwnjwuh wnuwuhu L zgnwgutu wju zgnwgufu wwnpnu lywif wnuh nunh dwnwquwpeutnh utrgn:
ursunrtnh truduhec by auofncteh ytrupfzul yutnuqurac
CYBEX GmbH (Riedingerstr. 18, 95448 Fwjnnja, Qtnuwuhw) gltynnlpjnluqunnwwnpnuu t 3 unpwu tnw2hhp wju wnwnnpwuph hwuun: tnw2hhp qnpdnu t wju tnynnu, npntn wnwnlpn yiwwnnnu h uyqwutl yiwunti ty hwawwnnnhlu: tnw2hgh pnlwlnwnlpnjnu u tnw2hgh hwuwnwnuw hwuun wuhnwdtzun pnnn lynn lwnlpn untynlpnjnluttn ywnn tp qnlut ultn qhwwnp tnnu go.cybex-online.com/manufacturer-warranty-car-seats: tep wnwnnpwuph uywnwpnlpjwul utg wnlyt t tnw2hhp, www pctnnlpjnnluttnh hwuun ultn uywnuwup atn onhluwuw hnwynluputtn ulnu tu ndh utg:
hunpnu tup hunluti &tn tnynnu powhnluutnh htngguwu hwuwn uwhuwuwud ywunuwuwqnqtnhu:

text_image
cybex
PALLAS B2-FIX + LUX
UN-R44-04
UNIVERSAL
SEMI-UNIVERSAL
9 - 18 kg
E1
04301395
CYBEK GmbH
Hördingerie 18, 2014-25 Dayneuth
Germany
text_image
cybex
SOLUTION B2-FIX + LUX
UN-R44-04
UNIVERSAL
SEMI-UNIVERSAL
15 - 36 kg
E:
04301395
CYBEX GmbH
Redingster: 10, RS448 Rayneuth
Germany
证明
UN R-44/04
CYBEX Pallas B2-Fix + Lux - 第 1
年龄段,9-18千克
CYBEX Solution B2-Fix + Lux -
第 2/3 年龄段,15-36 千克
建议约9个月大到12岁时使用