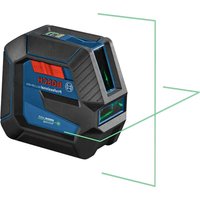
GPL 5 G Professional - Laser level BOSCH - Free user manual and instructions
Find the device manual for free GPL 5 G Professional BOSCH in PDF.
| Product type | Point laser level |
| Brand | Bosch |
| Model | GPL 5 G Professional |
| Dimensions (L × W × H) | 115 × 50 × 113 mm |
| Weight (according to EPTA) | 0.35 kg |
| Power supply | 2 LR6 (AA) batteries 1.5 V |
| Battery life | 8 h (at 20-25 °C) |
| Range | 30 m |
| Leveling accuracy | ±0.35 mm/m (except bottom point: ±0.7 mm/m) |
| Self-leveling range | ±4° |
| Leveling time | < 4 s |
| Laser class | 2 |
| Laser type | 500-540 nm, < 1 mW |
| Operating temperatures | -10 °C to +45 °C |
| Storage temperatures | -20 °C to +70 °C |
| Protection rating | IP 65 |
| Main functions | Projection of horizontal, vertical and plumb laser points; automatic leveling; automatic shut-off after 60 min |
| Maintenance and cleaning | Clean with a soft damp cloth, without detergents or solvents; store in the protective pouch |
| Safety | Do not stare into the laser beam; do not point at people or animals; use laser viewing glasses only to improve visibility |
| Spare parts and repairability | Repair by a Bosch authorized professional; spare parts available at www.bosch-pt.com |
| Included accessories | Magnetic rotating mount, protective pouch, laser warning label |
Frequently Asked Questions - GPL 5 G Professional BOSCH
User questions about GPL 5 G Professional BOSCH
0 question about this device. Answer the ones you know or ask your own.
Ask a new question about this device
Download the instructions for your Laser level in PDF format for free! Find your manual GPL 5 G Professional - BOSCH and take your electronic device back in hand. On this page are published all the documents necessary for the use of your device. GPL 5 G Professional by BOSCH.
USER MANUAL GPL 5 G Professional BOSCH
www.bosch-pt.com/serviceaddresses
Entsorgung
All instructions must be read and observed in order for the measuring tool to function safely. The safeguards integrated into the measuring tool may be compromised if the measuring tool is not used in accordance with these instructions. Never make warning signs on the measuring tool unrecognisable. SAVE THESE IN-
STRUCTIONS FOR FUTURE REFERENCE AND INCLUDE THEM WITH THE MEASURING TOOL WHEN TRANSFERRING IT TO A THIRD PARTY.
Warning! If operating or adjustment devices other than those specified here are used or other procedures are carried out, this can lead to dangerous exposure to radiation.
The measuring tool is delivered with a laser warning sign (marked in the illustration of the measuring tool on the graphics page).
If the text of the laser warning label is not in your national language, stick the provided warning label in your national language over it before operating for the first time.
20 | English

Do not direct the laser beam at persons or animals and do not stare into the direct or reflected laser beam yourself. You could blind somebody, cause accidents or damage your eyes.
If laser radiation hits your eye, you must close your eyes and immediately turn your head away from the beam.
Do not make any modifications to the laser equipment.
Do not use the laser goggles (accessory) as protective goggles. The laser goggles make the laser beam easier to see; they do not protect you against laser radiation.
- Do not use the laser goggles (accessory) as sunglasses or while driving. The laser goggles do not provide full UV protection and impair your ability to see colours.
Have the measuring tool serviced only by a qualified specialist using only original replacement parts. This will ensure that the safety of the measuring tool is maintained.
- Do not let children use the laser measuring tool unsupervised. They could unintentionally blind themselves or other persons.
- Do not use the measuring tool in explosive atmospheres which contain flammable liquids, gases or dust. Sparks may be produced inside the measuring tool, which can ignite dust or fumes.
Keep the magnet away from implants and other medical devices, e.g. pacemakers or insulin pumps. The magnet generates a field that can impair the function of implants and medical devices.
- Keep the measuring tool away from magnetic storage media and magnetically-sensitive devices. The effect of the magnets can lead to irreversible data loss.
Product Description and Specifications
Please observe the illustrations at the beginning of this operating manual.
Intended Use
The measuring tool is intended for determining and checking horizontal alignments and plumb points.
The measuring tool is suitable for indoor and outdoor use.
Product features
The numbering of the product features shown refers to the illustration of the measuring tool on the graphic page.
(1) Laser beam outlet aperture
(2) On/off switch
(3) Magnetic rotating mount
(4) 1 / 4 tripod mount
(5) Battery compartment cover locking mechanism
(6) Battery compartment cover
(7) Magnet
(8) Laser warning label
(9) Serial number
(10) Laser viewing glassesa)
(11) Tripoda)
(12) Protective baga)
a) Accessories shown or described are not included with the product as standard. You can find the complete selection of accessories in our accessories range.
Technical data
| Point laser GPL 3 G | |
| Point laser GPL 5 G | |
| Article number: GPL 3 G | 3601 K66 N.. |
| Article number: GPL 5 G | 3601 K66 P.. |
| Working rangeA) | 30 m |
| Levelling accuracy (except for laser point towards the floor) B)C) | ±0.35 mm/m |
| Levelling accuracy (laser point towards the floor) B)C) | ±0.7 mm/m |
| Self-levelling range ±4° | |
| Levelling time < 4 s | |
| Operating temperature -10 °C to +45 °C | |
| Storage temperature -20 °C to +70 °C | |
Bosch Power Tools 160992A7S8|(17.05.2022)
22|English
| Point laser GPL 3 G | |
| Point laser GPL 5 G | |
| Max. altitude 2000 m | |
| Relative air humidity max. 90 % | |
| Pollution degree according to IEC 61010-1 2 | D) |
| Laser class 2 | |
| Laser type 500–540 nm, < 1 mW | |
| C6 | 1 |
| Divergence 0.8 mrad (full angle) | |
| Tripod mount 1/4" | |
| Batteries 2 × 1.5 V LR6 (AA) | |
| Operating timeB) | 8 h |
| Weight according to EPTA-Procedure 01:2014 | 0.35 kg |
| Dimensions (length × width × height) 115 × 50 × 113 mm | |
| Protection rating IP 65 | |
A) The working range may be reduced by unfavourable environmental conditions (e.g. direct sunlight).
B) At 20-25°C
C) The values stated presuppose normal to favourable environmental conditions (e.g. no vibration, no fog, no smoke, no direct sunlight). Extreme fluctuations in temperature can cause deviations in accuracy.
D) Only non-conductive deposits occur, whereby occasional temporary conductivity caused by condensation is expected.
The serial number (9) on the type plate is used to clearly identify your measuring tool.
Assembly
Inserting/changing the batteries
It is recommended that you use alkaline manganese batteries to operate the measuring tool.
If required, turn the magnetic rotating mount (3) to the side so that the battery compartment cover (6) is not obstructed.
Press the locking mechanism (5) upwards to open the battery compartment cover (6) and remove the battery compartment cover. Insert the batteries.
When inserting the batteries, ensure that the polarity is correct according to the illustration on the inside of the battery compartment.
Reattach the battery compartment cover (6) and press it firmly into place at the marked point above the locking mechanism (5).
If the batteries are running low, the laser points will gradually become dimmer.
If the batteries are almost empty, the laser points will flash 5 times every minute.
If the batteries are empty, the laser points will flash once before the measuring tool switches off.
Always replace all the batteries at the same time. Only use batteries from the same manufacturer and which have the same capacity.
Take the batteries out of the measuring tool when you are not using it for a prolonged period of time. The batteries can corrode and self-discharge during prolonged storage in the measuring tool.
Operation
Starting Operation
Protect the measuring tool from moisture and direct sunlight.
- Do not expose the measuring tool to any extreme temperatures or fluctuations in temperature. For example, do not leave it in a car for extended periods of time. If it has been subjected to significant fluctuations in temperature, first allow the measuring tool to adjust to the ambient temperature and then always carry out an accuracy check before continuing work (see "Accuracy Check of the Measuring Tool", page 25). The precision of the measuring tool may be compromised if exposed to extreme temperatures or fluctuations in temperature.
Avoid substantial knocks to the measuring tool and avoid dropping it. Always carry out an accuracy check before continuing work if the measuring tool has been subjected to severe external influences (see "Accuracy Check of the Measuring Tool", page 25).
Switch the measuring tool off when transporting it. The pendulum unit is locked when the tool is switched off, as it can otherwise be damaged by big movements.
24 | English
Switching On/Off
To switch on the measuring tool, slide the on/off switch (2) to the ON position. As soon as it is switched on, the measuring tool emits laser beams from the outlet apertures (1).
- Do not direct the laser beam at persons or animals and do not stare into the laser beam yourself (even from a distance).
To switch off the measuring tool, slide the on/off switch (2) to the OFF position. The pendulum unit is locked when the tool is switched off. - Never leave the measuring tool unattended when switched on, and ensure the measuring tool is switched off after use. Others may be blinded by the laser beam.
If the maximum permitted operating temperature of 45^ is exceeded, the tool shuts down to protect the laser diode. Once it has cooled down, the measuring tool is operational again and can be switched back on.
Automatic shut-off
The measuring tool automatically switches itself off after 60 min of operation.
If the switched on measuring tool is not within the self-levelling range (the laser points flash continuously), the automatic shut-off is reset to 60 min.
Automatic Levelling
Position the measuring tool on a level, firm support or attach it to a tripod (11).
To use the bottom laser point, rotate the measuring tool on the magnetic rotating mount (3) in such a manner that the laser point can be seen on the floor.
After switching on, the automatic levelling function automatically compensates irregularities within the self-levelling range of ± 4^ . The levelling is finished as soon as the laser points light up continuously (i.e. no longer flashing) and do not move any more.
If automatic levelling is not possible, e.g. because the surface on which the measuring tool stands deviates by more than 4^ from the horizontal plane, the laser points will flash continuously and quickly.
If this is the case, set up the measuring tool in a level position and wait for the self-leveling to take place. As soon as the measuring tool is within the self-leveling range of ± 4^ , the laser points will light up continuously.
In case of ground vibrations or position changes during operation, the measuring tool is automatically levelled again. After each levelling process, check the position of the horizontal and/or vertical laser points in relation to the reference points to avoid errors arising from a change in the measuring tool's position.
Accuracy Check of the Measuring Tool
Influences on Accuracy
The largest influence is exerted by the ambient temperature. In particular, temperature differences that occur from the ground upwards can refract the laser beam.
Since the temperature stratification is greatest at ground level, you should always mount the measuring tool on a tripod for measuring distances of 20m or more. In addition, position the measuring tool in the centre of the work surface, wherever this is possible.
In addition to external influences, device-specific influences (e.g. falls or heavy impacts) can also lead to deviations. For this reason, check the levelling accuracy each time before beginning work.
Should the measuring tool exceed the maximum deviation during one of the tests, please have it repaired by a Bosch after-sales service.
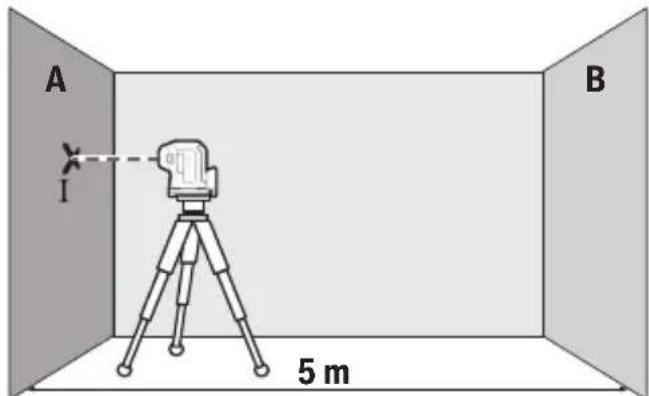
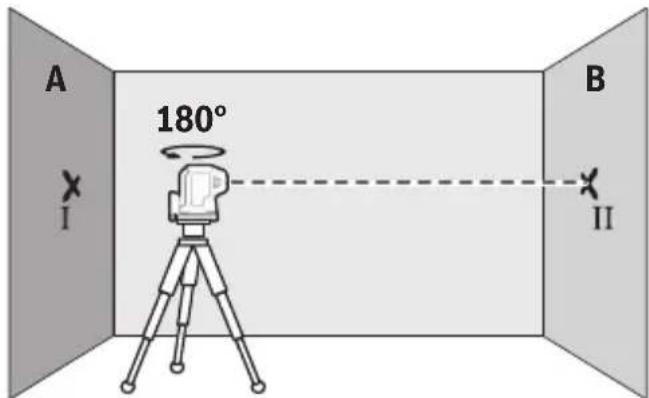
Checking the horizontal levelling accuracy
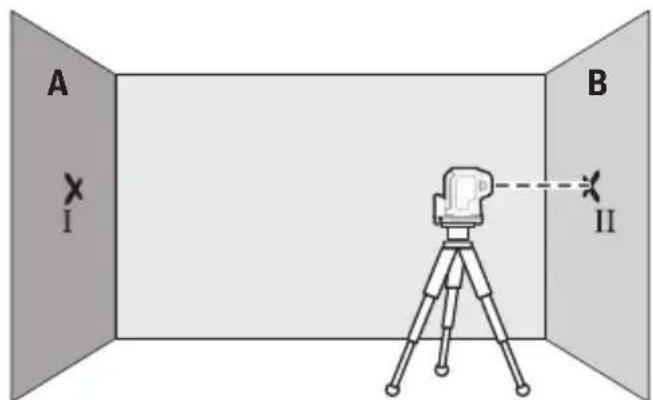
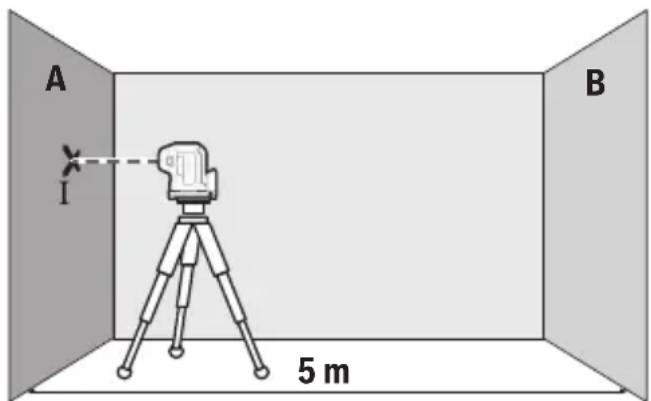
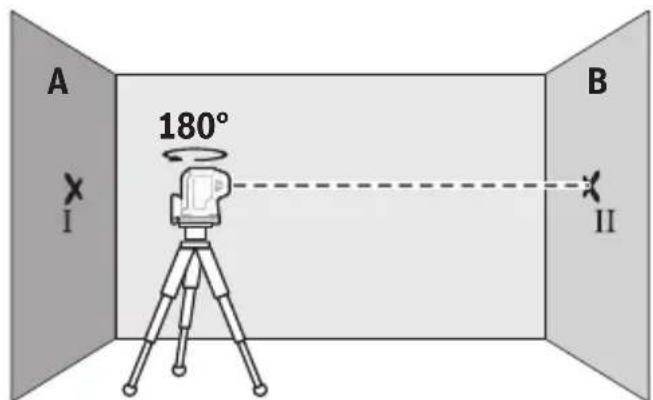
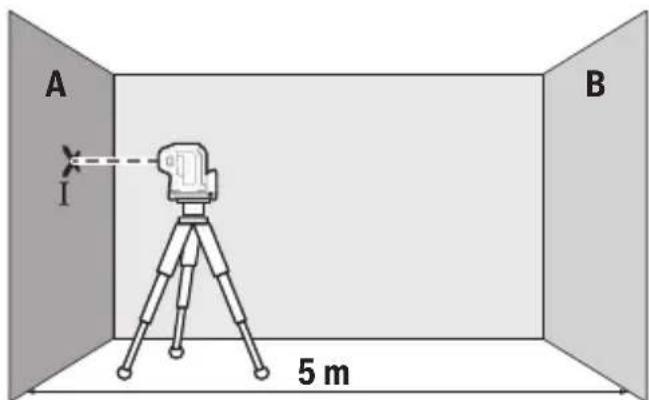
For this check, you will need a free measuring distance of 5m on firm ground between two walls (designated A and B).
- Mount the measuring tool close to wall A on a tripod, or place it on a firm, flat surface. Switch on the measuring tool.
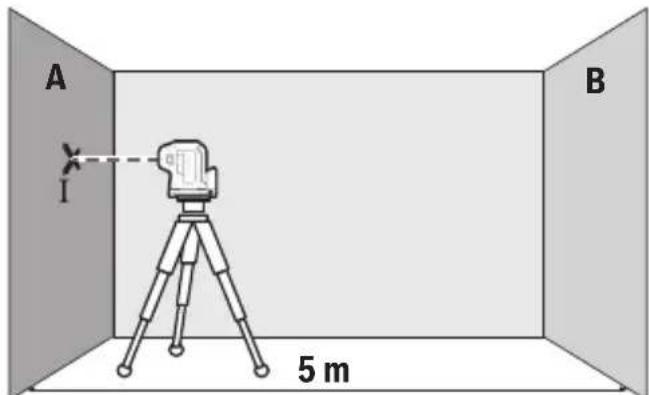
- Aim the horizontal laser beam that runs parallel to the longitudinal axis of the measuring tool at the closer wall A and allow the measuring tool to level in. Mark the centre of the laser point on the wall (point I).
26 | English
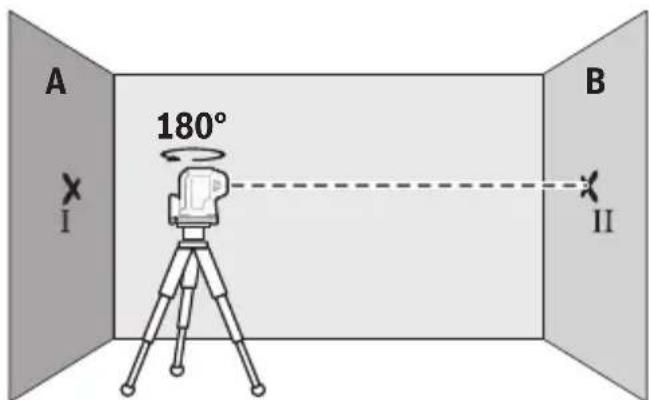
- Turn the measuring tool 180^ , allow it to level in and mark the centre point of the laser beam on the opposite wall B (point II).
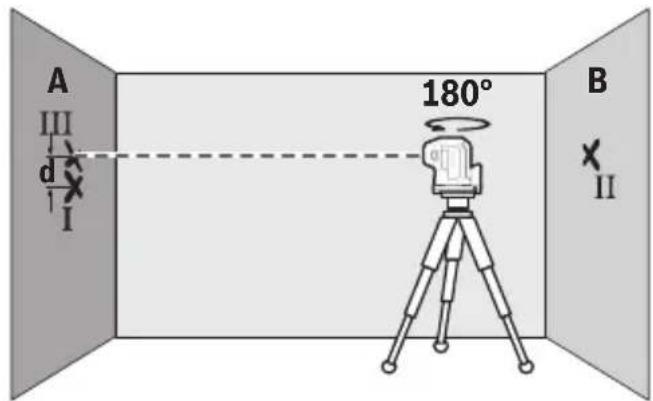
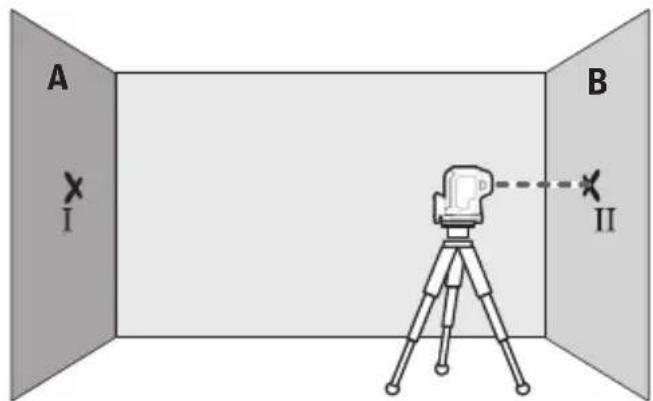
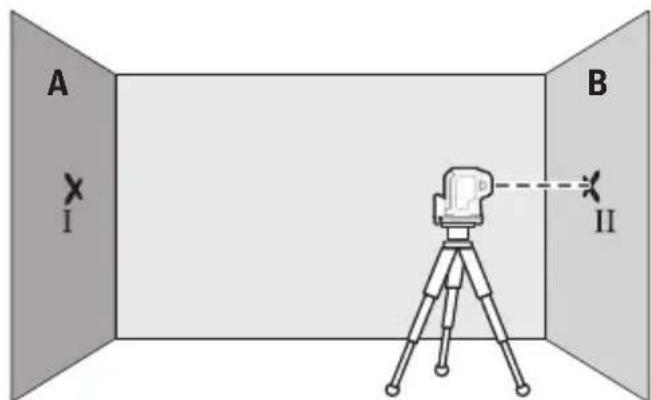
- Position the measuring tool - without rotating it - close to wall B, switch it on and allow it to level in.
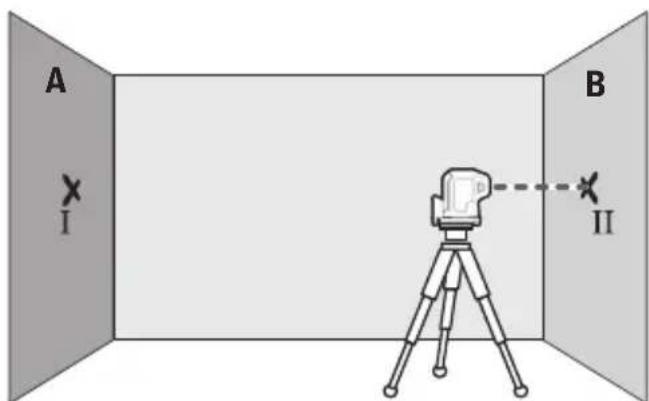
- Align the height of the measuring tool (using the tripod or by placing objects underneath as required) so that the centre point of the laser beam exactly hits the previously marked point II on wall B.
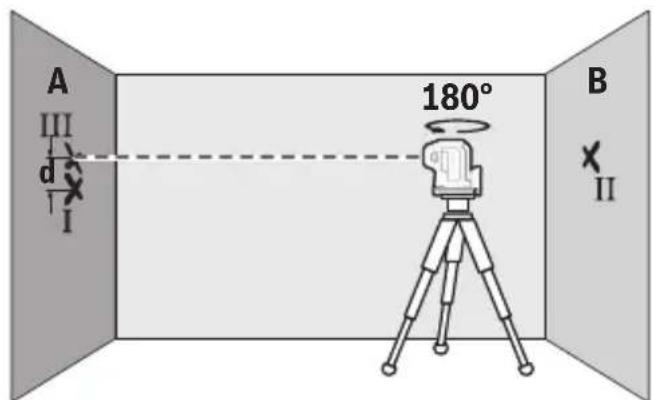
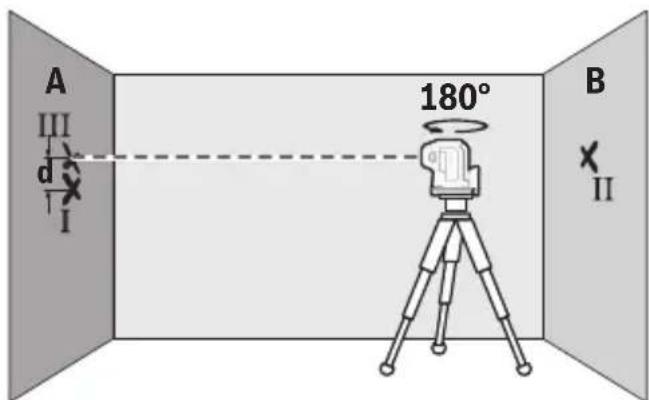
- Turn the measuring tool 180^ without adjusting the height. Allow it to level in, then mark the centre point of the laser beam on wall A (point III). Ensure that point III is as vertical as possible above or below point I.
- The discrepancy d between the two marked points I and III on wall A reveals the actual height deviation of the measuring tool along the longitudinal axis.
The maximum permitted deviation on the measuring distance of 2 × 5m = 10m is as follows:
10m× ± 0.35mm / m = ± 3.5mm . The discrepancy d between points I and III must therefore amount to no more than 3.5mm
GPL 5 G: Repeat the measuring process for the two side laser beams that run along the transverse axis of the measuring tool. To do this, turn the measuring tool 90^ clockwise or anticlockwise before beginning the measuring process.
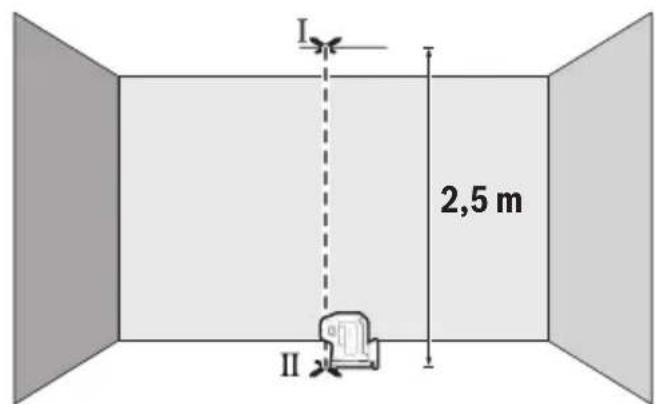
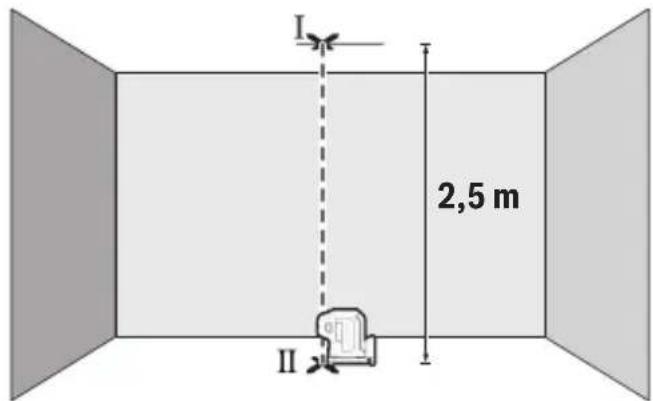
Checking Plumb Accuracy
For this check, you will need a clear measuring space on firm ground with a distance of approx. 2.5m between the floor and the ceiling.
- Place the measuring tool on the floor. Switch the measuring tool on and rotate it on the magnetic rotating mount (3) in such a manner that the bottom laser point can be seen on the floor. Allow the measuring tool to level in.
28 | English
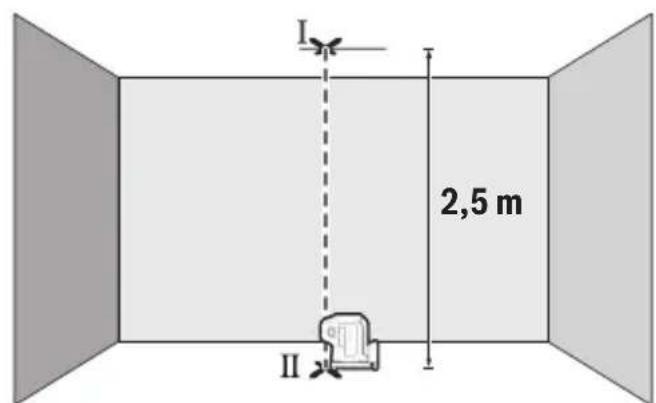
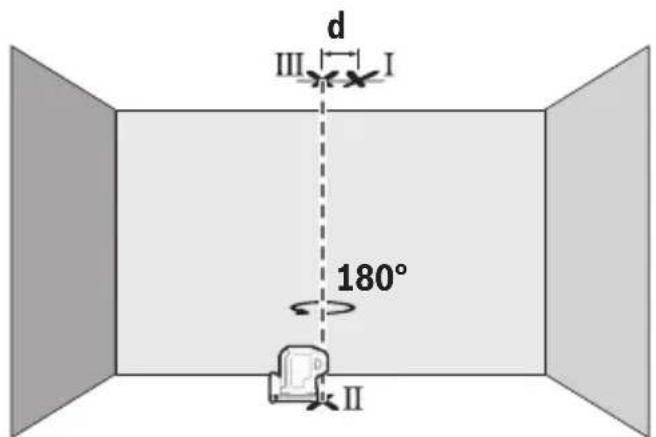
- Mark the centre of the top laser point on the ceiling (point I). Also mark the centre of the bottom laser point on the floor (point II).
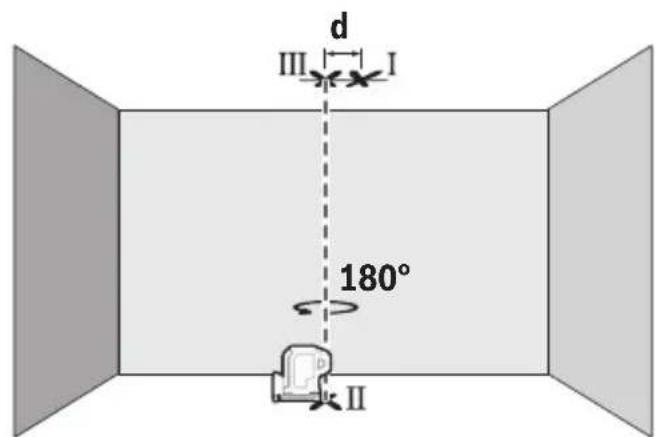
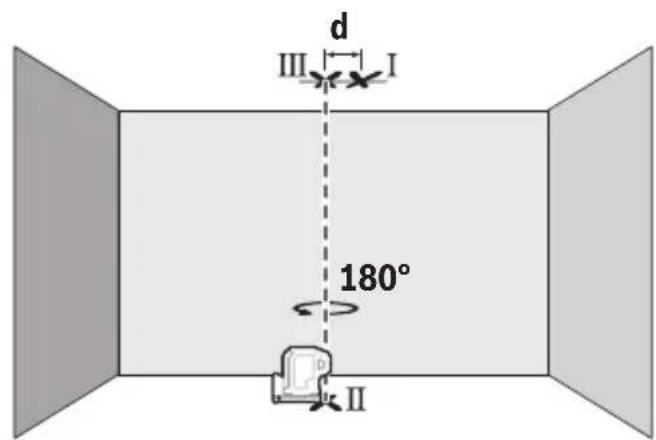
- Turn the measuring tool by 180^ . Position it so that the centre of the bottom laser point falls onto the marked point II. Allow the measuring tool to level in. Mark the centre of the top laser point (point III).
- The discrepancy d between the two marked points I and III on the ceiling reveals the actual deviation of the measuring tool from the vertical plane.
You can calculate the maximum permitted deviation as follows:
Doubled distance between floor and ceiling × 0.35mm / m
Example: At a floor-to-ceiling distance of 2.5m , the maximum deviation amounts to
2 × 2.5 ~m × ± 0.35 ~mm / m = ± 1.75 ~mm . The points I and III must therefore be no further
than 1.75mm from each other.
Working Advice
Always use the centre of the laser point for marking. The size of the laser point changes with the distance.
Working with the Tripod (Accessory)
A tripod offers a stable, height-adjustable support surface for measuring. Place the measuring tool with the 1/4'' tripod mount (4) on the thread of the tripod (11) or a conventional camera tripod. Tighten the measuring tool using the locking screw of the tripod.
Roughly align the tripod before switching on the measuring tool.
Attaching using the magnetic rotating mount (see figures A-B)
You can secure the measuring tool to magnetisable materials using the integrated magnetic rotating mount (3).
- Keep your fingers away from the rear side of the magnetic rotating mount while attaching the rotating mount to surfaces. The strong pulling force of the magnets (7) may jam your fingers.
Roughly align the magnetic rotating mount (3) before switching on the measuring tool. Rotate the measuring tool on the magnetic rotating mount (3) to make the bottom laser point visible or to project heights with the horizontal laser point. If you switch off and transport the measuring tool, click it back into place on the rotating mount (see figure B).
Laser Goggles (Accessory)
The laser goggles filter out ambient light. This makes the light of the laser appear brighter to the eye.
- Do not use the laser goggles (accessory) as protective goggles. The laser goggles make the laser beam easier to see; they do not protect you against laser radiation.
- Do not use the laser goggles (accessory) as sunglasses or while driving. The laser goggles do not provide full UV protection and impair your ability to see colours.
Example applications (see figures C-E)
Examples of possible applications for the measuring tool can be found on the graphics pages.
Maintenance and Service
Maintenance and Cleaning
Keep the measuring tool clean at all times.
30 | English
Never immerse the measuring tool in water or other liquids.
Wipe off any dirt using a damp, soft cloth. Do not use any detergents or solvents.
The areas around the outlet aperture of the laser in particular should be cleaned on a regular basis. Make sure to check for lint when doing this.
Only store and transport the measuring tool in the protective pouch (12).
If the measuring tool needs to be repaired, send it off in the protective pouch (12).
After-Sales Service and Application Service
Our after-sales service responds to your questions concerning maintenance and repair of your product as well as spare parts. You can find explosion drawings and information on spare parts at: www.bosch-pt.com
The Bosch product use advice team will be happy to help you with any questions about our products and their accessories.
In all correspondence and spare parts orders, please always include the 10-digit article number given on the nameplate of the product.
Malaysia
Robert Bosch Sdn. Bhd.(220975-V) PT/SMY
No.8A,Jalan 13/6
46200 Petaling Jaya
Selangor
Tel.: (03) 79663194
Toll-Free: 1800 880188
Fax: (03) 79583838
E-Mail: kiathoe.chong@my.bosch.com
www.bosch-pt.com.my
Great Britain
Robert Bosch Ltd. (B.S.C.)
P.O.Box 98
Broadwater Park
North Orbital Road
Denham Uxbridge
UB95HJ
At www.bosch-pt.co.uk you can order spare parts or arrange the collection of a product in need of servicing or repair.
Tel. Service: (0344) 7360109
E-Mail: boschservicecentre@bosch.com
You can find further service addresses at:
www.bosch-pt.com/serviceaddresses
Disposal
Measuring tools, accessories and packaging should be recycled in an environmentally friendly manner.
Do not dispose of measuring tools or batteries with household waste.
Only for EU countries:
According to the Directive 2012/19/EU on waste electrical and electronic equipment and its transposition into national law, measuring tools that are no longer usable, and, according to the Directive 2006/66/EC, defective or drained batteries must be collected separately and disposed of in an environmentally correct manner.
If disposed incorrectly, waste electrical and electronic equipment may have harmful effects on the environment and human health, due to the potential presence of hazardous substances.
Only for United Kingdom:
According to Waste Electrical and Electronic Equipment Regulations 2013 (2013/3113) and the Waste Batteries and Accumulators Regulations 2009 (2009/890), measuring tools that are no longer usable must be collected separately and disposed of in an environmentally friendly manner.
Français
Robert Bosch Morocco SARL 53, Rue Lieutenant Mahroud Mohamed
20300 Casablanca
Tel.: +212529314327
E-Mail: sav.outillage@ma.bosch.com
France
Robert Bosch (France) S.A.S.
www.bosch-pt.com/serviceaddresses
Calle Robert Bosch No. 405
C.P. 50071 Zona Industrial, Toluca - Estado de Mexico
Tel.: (52) 55 528430-62
Tel.: 800 6271286
www.bosch-pt.com/serviceaddresses
Eliminación
www.bosch-pt.com/serviceaddresses
Eliminação
www.bosch-pt.com/serviceaddresses
80 | Netherlands
Smaltimento
www.bosch-pt.com/serviceaddresses
Afvalverwijdering
Bosch Service Center
Telegrafvej 3
2750 Ballerup
På www.bosch-pt.dk kan der online bestilles reservedele eller oprettes en reparations ordre.
TIf. Service Center: 44898855
Fax: 44898755
E-Mail: vaerktoej@dk.bosch.com
www.bosch-pt.com/serviceaddresses
Bortskaffelse
Bosch Service Center
Telegrafvej 3
2750 Ballerup
Danmark
Tel.: (08) 7501820 (inom Sverige)
Fax: (011) 187691
Du hittar flerkontaktuppgifter till service har:
www.bosch-pt.com/serviceaddresses
Avfallschantering
www.bosch-pt.com/serviceaddresses
Kassering
www.bosch-pt.com/serviceaddresses
Havitys
www.bosch-pt.com/serviceaddresses
Anoupon
Ta opyava etpnonc, ta eapntnata kai ooukeuaoic npenei va avakukawovtai pe tropo pfikok npoc to nepiaaov.

Mn pivete ta opyava metponc kal tic matapiec ota oikia k anoppipmuata!
Moyo yua xwopec tnc EE:
Σμφωνa μe Νv Eupωπaɪkŋ obnyia 2012/19/EE oxetika μe TIC πaɪèç nλεκτριkec kai nλεκτρονiːkε συακεuːç kai Ση μεταφopa TNC obnyiaac autnç oEθvɪkò δiɑaɪo Ta aXPŋoTa ὅpya va μετροːnc κai Σuφωνa μe Νv Eupωπaɪkŋ obnyia 2006/66/EK oɪ xɑlaʊævec n xpəlɪ-μɔːoɪnμɛvec μnatapiēc πeːni v ouʌλeoyovtai £exωpiːtá, yɪa v avakukʌwθouv μe Tpɒno φιʌkò προς to πeɪβɑʌləv.
Ze nepiwnon n evdebeivnnc anouponc oI nektpikec kai nektpovikec oukeuec loyew evexoevnc napouiae enikivduuvw ouotow npouv va exouv embaieic ennnwoei cto nepiabaov kai otny avpwnuyn ueia.
Türkce
Güvenlik talimati

www.bosch-pt.com/serviceaddresses
Tasfiye
Robert Bosch Sp. z o.o.
www.bosch-pt.com/serviceaddresses
Bosch Power Tools 160992A 7S8| (17.05.2022)
Utylizacja odpadów
Bosch Service Center PT
K Vapence 1621/16
692 01 Mikulov
Na www.bosch-pt.cz si si muzete objednat opravu Vaseho stroje nebo nahradni dily online.
www.bosch-pt.com/serviceaddresses
Likvidace
www.bosch-pt.com/serviceaddresses
Likvidácia
Vyrobok, prisluensstvo a obal treba dat na recyklaciu šetriacuŽivotné prostredie.
Méricí prístroje a baterie nevyhazujte do domovniho odpadu!
Len pre krajiny EU:
www.bosch-pt.com/serviceaddresses
Hulladékkezelés
He yctaHabnBaIte MaHHT B6nn3n HmPnAHTaHTOB npoQnx Me- dunHcknx annapaTOB,HaNP.,KapdnoCTHMyIaTOpOB HHCyINHO BBix Hacocob.MaHHT co3daet none, KOtOpoe MOKeT Bo3JeICTBOBaTb Ha pa6Oty MMnAHTaHTOB mMeiunHcknx annapaTOB.
Depxnte H3MepnteHbI INHCTpyMeHT BdAnOT MaHHTbIX HocHTeNe DaHHbIX N OT npH6OpOB, yBcTBnTeHbIX K MaHHTHomY nIO. Bo3JeCTBHe MaHHTOB MoJxET pNBOINTb K HeBOcNoHIMo NTope daHHbIX.
OnncanHe npoDyKta n ycnyr
Poxaynycta,co6nOaIte HnIOCTpaunB hauane pykoBOcTbA no 3KcNpyataun.
H3o6paXeHHbIe coCTaBhIe yactn
Hymepaun npedctabneHHbix coCTabHbix qacteB bIIOJIHeHa no 306paKeHNIO n3MePHTenbHO IHCTpyMeHTa Ha cTpaHnue C IINIOCTpauJMAH.
(1) OtvBepCTne nIy BbIXOda Ia3epHoro lyua
(2) BbikniouataeB
(3) MarHHTHOe NOBOPOTHOe KpenneHne
(4)「He3do noiWtAnB 1/4"
(5) Φнксатор крblшкбатAPEHOrO OTeceKa
(6) Kpbiuka 6aTapeHoro oTecka
(7) MarHHT
(8) Ipeynpeintbna Ta6nueKa na3epHoro n3nyeHn
(9) CepnHbH HOMep
(10) Oukn dny pa6OtbI cna3epHbIM HnHCTpyMeHTOMa
(11) トNTNb
212|Pycckn
(12) 3auiTHbIyueXoan
a) 1306paXeHHbIe HnONcHbIe npHaadJIeXHOCTHe BxOaT B cTaHapTHbI O6beM noctABKn. POnHbI accOPTmEe npHaadJIeXHOCTe Bbl haJeTe B hauWe nporpamme npHaadJIeXHOCTe.
TexHnueckne daHHbIe
A B T O M A T N U E C K O E H N B E N H P O B A H N E
YcTaHOBHTe H3MeHrTeJIbHbI INHCTpyMeHT Ha IpoUHOe rOpN3OHTaJIbHOe OCHOBaHHe HIN 3aKpePNTe ero Ha UTAInBe (11).
UTo6bI NcNoB3OBaTb HnXHIOIa3epHyIO TOky, NOBepHnte I3MePHTbHbI INHCTpyMeHT Ha MaHHTOM IOBOPOTHom KpeIIeHH (3) TaK, UTo6bI Na3epHa TOnKa 6bla BnHa Ha nOly.
Iocne BkIoueHn yHKun aBtOMaTnueCKoro HnBeHnpoBaHH KOMpeHCnpyET HepOBHOCTN B pAMKaX dHaNa3OHa cAmOHnBeHnpoBaHH ± 4^ . HnBeHnpoBaHne 3aBepSeHo, KaK TOnbKO Ja3epHbIE TOUKN IOPRT NOCTOARHNO I60JIwe He nepemeuaOTcR.
Ecni aBTomatnueckoe HNBenipoBaHne HeBO3MOxHO,HaNPmep,T.K. NOBepXHOCTb,Ha KOtOpO yCTaHOBLeH n3MepnteNbHbI INHCTpyMeH,OTnuaeTcO TROP30HTaII 6OJIe ueH 4^ Na3epHbIe TOUKN pOdoJNKeTbeH MnraOT B bICTpOM TeMne.
B TaKOM cnUyae yCTaHOBnTe H3MepHteNbHbI HNCTpyMeHT rOpH3OHTaJIbHO N DOxKnITecb OKOHuaHncaMOHNBeHnPOBaHHa. Iocne TOrO, KaK H3MepHteNbHbI HNCTpyMeHT BOJET B DnHa2oH aBTOMaTHueCKoro HNBenpoBaHHa ± 4^ , Na3epHbIe TOUKN HaUNHaOT HeNpepbIBHO CBETNTbcra.
Ipn cotpaeHnX nHn H3MeHnX IIOJKeHHN BO BpeM pa60tbl H3MepntbHbI INHCTpymEHT aBTOMaTHueCKn CaMOHNBeHnpyETc. Iocne NOBTOPOHO HNBENPOBaHH NPOBepbTe INOJKeHn IOPn3OHTaNbHO nn BEPnKaNbHO Na3epHO TOOKn PO OTHOeHHo K peHpbIM ToKam dIy npEDOTBpaUeHHN OUn6ok B pe3ynbTaTe CMeuHn H3MePHTeNbHO INHCTpymEHTa.
KoHTpoJIb TOnHOCTn H3MepHTeIbHOrO HHCTpyMeHTa
ΦaKTopbI, BnHauOuIe Ha ToUHOCTb
Hainboe BnHHe Ha ToHocb OKa3bBaet Okpykaioa TaemepaTypa. B Oc06enHOCTn TemepaTypbIe NepaIbI, HMeIOUne MeTo NO Mepe YdaJIeHNAOT NouBbl, MoryT CTaT npuHHo OTKNOHEnra Ja3epHOrO Lyua.
Iockbky nepenad tempepatpybHaH6olee OuyTM B6n3n rpyHTa,To Ha yactkax dHHoC bIe 20 m n3meptelhbi HNCTpymeT cJeDyET yCTaHaBnBaTb Ha IITNB.
Kpome TOrO, yCTaHaBnBaIe H3MePHTeNbHbI INHCTpyMeHT, NO BO3MOXHOCTN, B CpeHNHe pa6oey nlouaqni.
HapnycBHeHHMn BO3dEChTBnMn, CneuHnueckne IJI INHCTpyMeHTa BO3dEChTBn (HaNP., NaeHnI HnCnIbHbIe yIapbl) TaKKe MOry TnpNBOIDtK OTKIOHeHNrM. Po3Tomy Bcerda nepeh HaJalom pa60tbl npOBepRte ToHOCt HNBENPObAHn.
216|Pycckn
EcnB O Bpemr OndHn3 npOBepOK n3MePntbHbI NHCTpyMeHT PpeBbICHT MaKcHMaBHO DOyCTHMoe OTKNOHeHne,OTdAte erO B peMOHT B cepBCHyIO MaCTepCKyIO Bosch.
PpOBepKa TOnHocTH Ropn3oHTaIbHOrO HNBENpOBaHH
IJIa KOnTpOJIa Heo6xOJIM CBo6OJHbI OTpE3OK 5 M Ha IpoUHOM rpyHTe MeKJy CTehAMN A n B.
-3akpennte n3MepnteBbHbI INCTpMeNT B6n3n CTeHbA Ha 7aTtNBe Hn yCTaHOBe erOHa npouHoe, pIOCKoe OCHOBaHne. BkIOUHTe n3MepnteBbHbI INCTpMeNT.
- HanpaBte roh3oHTaIbHbI na3epHbI lyu, npoxOJnI npaIIeNbHO npoDoh OcN H3MePnteJIbHO nHCTpyMeHa, Ha cTeHy A. DaIte H3MePnteJIbHOMy nHCTpyMeHTy HNBenIpOBaTbc. Ob03NaUbTe cepEnHy na3epHO tOckHa NotOnke (Toka I).

-ПовернITE ИЗМерпгельній ИСТурмЕТ ha 180°, пождт e OKончаня erо самонвелювани и OTMeTbTe ueHtp la3ephoro lyua ha npotINBONIOJXHoi cTeHe B (TOUka II).
- YcTaHOBnTe H3MePHTeNbHbI INHCTpyMeHT - He NOBOpaUNBaI erO - B6JIIN3n CTehBi B, BKIIIOHTe erO n DaIte emy BpeM HNBENIPOBaTbcra.
- HactpoTe n3MePnteBbHbI INCTpyMeHT NO Bblcote (C NOMOu bIO uTaNBA HnN NOJ KnaDok) TaK, UTObI TOUka cepedHbI Na3epHoro Lyua ToUHO COBnala C paHee OTMeueHHo TOnkO II Ha CTene B.
-ПовернITE ИЗмерпельний Иструмент Ha 180°, He Изменя ВьICOTbl. Даite emу HNBeINPOBaTbca И обозанчte сердуну пазрно Луча Ha CTHe A (Toka III). CnéДITE 3a Tem, Утбы Точka III haxODINacb Кak можно БОлес OTBeCHO habил по.ToUKoI I.
PacctoHne d MeKdy DByMa 0603HaueHHbIMN ToUkAMn I n III Ha cTeHe A OtpaXaet aKTInueckoe OTKIOHEHHe N3MePHTeJIbHOrO HNCTpyMeHTa NO BbICOTE BdoJIb PPOJOnbHOI OCN.
Ha yuactke 2 × 5 M = 10 M MaKcHMaJIbHO OJNYCTHMoe OTKIOHeHHe COCTABJIeT:
10M×±0,35MM/M=±3,5MM. TaKIM o6pa3OM, paCtOaHne d Mekdy Toukamn I n III He DOJIJKHO IIpeBbIaTb MaKC. 3,5 MM.
GPL 5 G: NOBTOPHTe H3MepeHne DnA DByX 60KOBbIX Na3epHbIX Lyuei, KOToPbIe IPOXoJrT BDOJI NOpEpuHO OCh H3MepeTbHOrO INCTpyMeNTa.ДЯ STOTO NOBepHIne H3MepeHTeMbHbI INCTpyMeENTdo Haayana H3MepeHna Ha 90^ no yacoboi CTpeKe HIN npOTNB.
218|Pycckn
PpOBepka ToUHOCTn OTBeca
Дпя поверки Bam Tpe6byetc CBO6Oньи ИЗМерптельньи учacToK Ha TBepdOM OCHOBAHIN c paCCTOHHem OK. 2,5 M MEXJy NOIOM I NOTOKOM.
-IOCTaBbTe H3MePHTeHbHbINHCTpyMeHT Ha non. BKnIOUHTe H3MePHTeHbHbINHCTpyMeHT INOBepHTe ero Ha MaHNTHOM NOBOPOTHom KpeIeHHN (3) TaK, YTO6bl Na3epHa ToUKa 6bla BnDHa Ha NoIy. DaIte H3MePHTeHbHomy IHCTpyMeHTy CAMOHNBENPOBaTbCra.
-Obo3HaBte cepenHy BepxHne Ia3epHOI TOOKn Ha IOTONKe (TOUKa I).Obo3HaBTe TaKke cepenHy HIXKHe Ia3epHOI TOOKN Ha IONY (TOUKa II).
IpeBapntbHO BblpOBHnTe 1TATNB, IpeXd e Yem BkIOuAtb N3MePHTbHbI INCTpyMeHT.
ΦHKcaunc nOmoou MaHHTHO NOBOPOTHO KpePHeHHa (cm. pnc. A-B)
C nOMOJIbIO BCTpoEHNO MaHHTHO IOBOPOTHO KpeIeHHa (3) Bbl MoKTe IprKpe-NTb H3MePHTeHbHbI INHCTpyMeHT K MaHHTbIM MaTepHaJaM.
Pn KcaunnoBopothoro KpenneHn K nobepxhoCTm depXnte naIbUbi Bda- nOT 3aHeuactn marHHToro noBopothoro KpenneHn. B pe3yIbTaTe cnIbHO r MaHHTHO npTjKeHH (7) MoKet npOn3oTu 3aueMneHne naIbceB.
Ipeed BkIIOueHHeM H3MePHTeBHOrO IHCTpyMeHTa BbIPOBHnTe MaHHTHOe NOBOPOTHOe KpenneHne Ha rna3 (3).
IIOBepHnTe H3MepHTeHbHbIM HnCTpyMeHT Ha MaHnTHOM NOBOPOTHom KpeNHeHH (3), UTO6bI CdeJIaTb HIXKHOI Ja3epHyIO TOky BmHMoN HIN OCyUeCTBnTb NpeHoc N O BbcOTe C NMOuSbIO Ropn3OHTaHbOH Ja3epHOI TockN. PpN BbIKNoyeHH N TpaHCnOpTnPoBKe H3MepHTeHbHOr OHCTpyMeHTa DaIte H3MepHTeHbHOMy HnCTpyMeHTy CHOBA 3aΦHKcnpoBaTbCra Ha IOBOPOTHom KpeNHeHH (cm. pnc. B).
OuKn dIpa60TbI cna3epHbIM HnCtpymeHTOM (npHaJIeXHOCTb)
Ia3epHbIe ouKn OTnBtPoBbIaOT OkpykaIoUcN CBET. Io3ToMy CBET na3epa KaKeTc 6OJIee apKIM dIy 3pntelbHOrO BocnpnAITna.
He nCnoB3yIe ouKn dny pa60tbI c na3epHbIM HHCTpyMeHTOM (npHnAdnHex-HocTb) B kaueCTBe 3aunTHbIX ouKOB. Oukn dny pa60tbI c na3epHbIM HHCTpyMeHTOM
220|Pycckn
obecneuBAOT lyuwee pacno3HaBaHne na3epHOro lyua, Ho He 3aunuaot OT na3epHoro n3nyeHn.
He HcnoB3yIte ouKn dIpa6Oblc na3epHbIM HHCTpyMeHTOM (npHaadnHex-HocTb) B KaueCTBe cOnHcE3aunTHbIX ouKOB Hnn 3a pyneM. Ockn dIpa6Oblc na-3epom He obecneuBaIOT 3aunTy OT yΦ-n3nyeHn I Meuaot npabHbHomy CBetoBOcPnIaTIIO.
PpHmepbI BO3MOXhBx BnOb pa6oTbI (cm. pnc. C-E)
IprimeboB03MOxHbIX npImeHn H3MepntelbHOro HHCTpyMeHa npBedeHb Ha cTpaHHuaxCpncyHKamn.
TexobcnyxmbaHne n cepBnc
Texo6cnyKnBaHne n ouHCTka
CoepKHTe H3MePHTeBHyI HHCTpyMeHNT NOCTOARHO B UHCTOTE.
HnkOrda He norgykaTe H3MepeTbHbI INCTpyMeHT B Ody nn dpyrne KndKocTn.
BbItnpaIte 3arpa3HeHn cyXo n MraKo TpAknO. He nCnoJIb3yIte KaKe-Im6o uNCTa-
Une cpeDCTBa nn paCTBOpHTenn.
OuHauTe peRyIaRHO oc6eHNO NOBepXHOCTn y BbIXoHOrO OTBepCTn na3epa n cneH-Te pRn 3TOM 3a OTCyTCTBHeM BOPCHOHK.
O6a3aTeIbHox xpaHnTe n TpaHcnpTnpyTe n3MepeITeNbHbIn HnCTpyMeHT B 3aunTHoCymke (12).
Ha peMOHT OTnpabTnTe H3MePHTeHbHb INHCTpyMeHT B 3aUHTHom YexHe (12).
CepBnC n KOHcyIbTnPoBaHHe no BOpocam npImeHnA
CepBnchbI OTdEN OTBeHT Ha BCE Baun BONPOcBi NO pemOnTy N o6cnjXnBaHnIO BaWero npOyKta, a TaKKe No 3aNuaCTaM. N3o6paKeHHa C npocTpaHCTBeHHbIM pa3deHneM deNaTe HnΦopMauHIO No 3aNuaCTaM MoXHo NOCMOtpeTb TaKKe IIO aDpecy: www.boschpt.com
KoJIeKTHB COTpydHnKOB Bosch, IpeIOCTaBnIouuN KOHCyIbTaUuHa IpeMeT HcNoJIb-3OBAHnI pOdyKuIN, C yDobONbCTBnEM OTBeTHT Ha BCE BaUN BOpocbI OTHOCHTeJIbHOrO HaWeI pOdyKuIN Ie e npHAnIeXHoCTeN.
IopkaanyiSta, BO Bcex 3anpocax n 3aka3ax 3anuaCTe o6ra3aTeNbHO yka3bBaIte 10-3NaHbTOBapHbHOMep IIO 3aBODcKo Ta6nUKe H3dEInr.
ДлpernoHa: Poccna,Бenapycb,Ka3axCTaH,YkpanHa
IapaHTnHoe 06cLyXnBaHne n peMOHT 3NeKtpOnHCTpyMeH-Ta, c CO6JIIOHeHem Tpe6oBAHn HOpM N3rOToBnTeTn Ipo- N3BOaTcHa TeppHTopn Bcex CTpaH ToIbKO BΦnpMeHHbIX INN ABTOpN3OBaHbIX cepBnCbIX ueHTpax «Pobept BoW」. PPEyIPeXJDEHNE!
IcnoIb3OBAHHe KOHTpaKaTHOH npo- DyKuHN ONaCHO B 3KcnnyatauHN, MoKeT npHBecn K yUepe6y dIra BaWero 3DopOBb. I3roTOBHeH e n pacnpoctpaHHe H KOHTpaKaTHOH npOdykCnnpceLdyeTcno 3aKOHy BAd-MMHNCpTaNBHom N yrOIOBHOM NOPaKe.
Pocch
YyONHOMOeHHaN3rTOBNTeNmOpraHN3aun:
OOO《Po6epT B0u》BauytinHcKoe wocce,Bn.24
141400,r.XmKn,MockOBckaO6J.
Ten.: +7 800 100 8007
E-Mail: info.powertools@ru.bosch.com
www.bosch-pt.ru
DOnonHnTeNbHbIe aApca cepBnChbIX ueHTpoB Bbl HaJdeTe No CcbInke:
www.bosch-pt.com/serviceaddresses
YTNn3aun
OTcnyKnBWe CBOI cPOK n3MePntbHbIe HNCTpyMeHTbl, npHaJNeXHOCTn yNaKOBky CneNyET CdaBaTb Ha 3KOLOrWueCKn YnCTyIO peKynepaunIO OTOxOIOB.
He BbIbpaCbIbAaTe H3MePHTeHbHbIe HHCTpyMeHTbI N 6aTapeKn B 6bITOBoM Mycop!
Tolbko dIra cTpah-ueHOB EC:
B COOTBeTCTBHH C eBponecko DnpeKTHBOI 2012/19/EU o6 OTPa6OtaHHbIX 3neKtpuecknx HJIeKTPoHHbIX np6opax H ee npe6pa3OBaHHe M HauNoHaIbHOe 3aKOHOdaTeNBCTBO BblJEduHne H3 yNtpe6leHnna H3MePntEhBiE IHCTpyMeHTbI N B COOTBeTCTBHH C eBponecko DnpeKTHBOI 2006/66/EC depeKTHbIe HnN OTCnyXHBWe CBoi cPoK aKKyMyJrTopHbIe 6batapeu/6batapeuKn DoJxHbI Co6HpTaBCra pa3dJeBHo I cDaBaTbcra Ha 3koIorHueCKn YnCTyIO pekyepaunio.
Pn HnpaBnblHoN yTnn3aun Otpa6oTaHbIe 3neKtpnueckne n 3neKtpoHbIe np60pbl MOrTy OKa3aTb BpeHoe BO3dEhCTBnE Ha OKpyXaIOUyO cpeDy N 3doPoBBe yeNoBekaH3-3a BO3MOxHOrO PnCytCTBnB Hnx ONaChbIX BeIeCTB.
YkpaHcbka
Bka3iBkn 3 Texhikn 6e3nekn

IpoountaTe Bci Bka3iBKn iDotpmyntecxix,io6 npauObaTn 3 BHMipIOBaIbHm IHcTpymeHTo 6e3neuHO Ta hadiHo. BkOpncTaHH BmipIOBaIbHoro IHcTpymeHa 6e3 DOpMaHHa cx IHctpyKci MoKe np3BeCTn Do noWkoJXeHH aHTerpoBaHnx 3axhChnx Mexahi3MIB.HikOnn He doBoDbTe nonepejxByaIbHi
Ta6nukn Ha BmipIOBaIbHomy IHcTpymeHTi Do HeBni3HaHHocTi. IO6PE 36EPIAITE UIHCTPYKUII I IEPEDABAEIX PA3OM 3 IEPEDAUEIO BmIPIOBAIbHOHO IHCTPymeHTY.
06epexho-BHKOpnctaHna3ac06ib 06cnyroByBaHHiaHactpoIOBAHH,io BIDpi3HIObCBAID 3a3NaueHHX Bcii IHCTpyKci, a6o BHKOpnctaHHaO3BOeHHX 3ac06ib y Heo3BolEnn cnoci6, MoKe npn3BOuHTn Do He6e3neuHoro BpNHBy BnnpomHIOBaHH.
BmipobbHH iHctpymeHT nocTaaetb3 nonepejxbybHOIO Ta6nueKOIO na3epHO BnnpomIHOBaHH (BOHa n03haeHa Ha 3o6paXeHHI BmipobbHOIO ihctpymeHa h CTopihci 3 manIOHKOM).
RaKoTeKCT nonepeJxByaIbHOi Ta6nUcN Ia3epHOrO BnnpomHIOBaHHHaHncaHn He MoBOIO Baoi KpaIH,peed nepuM 3anyckOM B ekCnpyTaicIO 3akneIte II hakNeIkoI Ho Ma BOI Baoi KpaiHN,io BXoDHTb y KomnKeT noCTaunHH.
He HapabnIte Ia3epHn IpomIHb Ha IIOe a6o TBapHH, i cami He DHBtbcHa npamn a6o BiO6paXyBaHn Ia3epHn npomih. Bin MoKe 3acInHTn IHnx IIOe, cnpuHHTn Heaaci BnpanKn a6o NooKOHTN Oci.
Y pa3i notpannaHHn na3epHoro npomeHa B OKo, HABMnche 3aannuOitb oui i Biippa3y BiBepHiTbcra Bi npomeHa.
Hiyor He minaTe Bna3epHomy npncTpoi.
He BHKOpHCTOByIe Okynapn dny po60tn 3 na3epom (npnnaad) k3axnci okynarpn. Okynapn dny po60tn 3 na3epom 3a6e3neuyIOb Kpaue po3ni3HaBaHHra na3epHoro npomeHIO, OndaK He 3axuauoB BiJ na3epHoro BnnpOMIHOBAHH.
He BHKOpnctOByIe OkyIaRn Ira po60Tu 3 na3epom (npHnaIa) k coHcE3axNCHi OkyIaRn Ta He BJaRaIte ix, KOnn Bn 3NaXoHTeec 3a KePmOM.
Okynapn dny po60tn 3 na3epom He 3a6e3neuyt b NOBHN 3axnCT BiD yF npomeHIB Ta noripwkyoTb p03ni3HaBaHHK oNbopiB.
BidaBaTe BmipOBAhHn IHcTpymeHT Ha pemOH NHe KBaIiΦIKOBAHM faxBtAm Ta IHe 3 BnKOpHCTaHHM opRHaHbHx 3aNactHH. TlbKN 3a TaNX yMOB BaW BmipOBAhHn npna i Hadani 6ye 3aIIuataTc6e3neuHm.
He do3B0nAte iTAM BHKOpHcTOByBaTH na3epHn BmMipOBAhHn IHCTpyMeHT 6e3 harny. DiTu MoKyTB HeHaBMncHe 3acInnTu ceBe yu IHxN IIOJe.
He npaiothe 3 BHMipOBaIbHm iHcTpymeHToM y cepoBnui, de icHyec He6e3neka Bn6yxy BhaCniOk npncyTHocTi ropouhX piHN, ra3iB a60 nNny. Y BHMipOBaIbHOMy npnaDi MOxTy bYTBOPHOBaTnca iCKpn, BiJAKNX MOxE 3aIMMaTHcR nn a6o napn.
He BCTAHOBIOIte Marhit no6n3y imnnaHTiB i HmNX MeunHnx anapatIB, Hanp., KapioctmmyaTOpib i hcyniHOBNX nomn. Marhit CTbopiE none, 0 MOKe HeRaTHBO BnHBaTH Ha cyHKIOHaJIbHy 3dATHiCTb IMnnaHTaHTiB i hcyNIHOBNX NOMn.
TpmaTe BmipIOBaIbHn IHcTpMeHT Ha BiIcTaHI BiM aRhiTHnx HociiB daHx i cyTnBnx Do mRiTHnx nOIB npnaIb. BnIM bMarHITb MOKe np3BeCTn Do Heobopothoi BtpaTI DaHx.
JaKIO nIac OndHiei 3 nepeBipOK BmIpOBaBnIH INCTpyMeHT nepeBnIbMaKcMmaBHO DOnyCTUmE BiDxHHeHH, Ioro TpeBa BiIDheTn Ha peMOHT Do MaJCTepHi
Bosch.
Ipebipka Touhocti ropn3oHTaBhoro Hibenobahna
IynepeBipKn Bam Ha TBepDomy rpynti notpi6Ha BInbHa BmipOBAhbHa dINrKa DOBXHIO 5 M mIX DbOMa CTiHAMn A i B.
- BctaHObitb BmipIOBaIbHn iHCTpyMeHT KOLO CTiHn A Ha IStaTHB a6o BcTaHObitb NOrO HtBepdy, pIBHy NOBepxHIO. YBIMKHiTb BmipIOBaIbHn iHCTpyMeHT.
- CnpaMyTe rOpH0TaIbHn Ia3epHn IpomIHb, 1o npoxOHTb npaIeNbHO Do IO3IOBxHbOi Oci BmipOBaIbHOro IHcTpMeHTa, Ha 6bnXHIO CTHy A. Daite BmipOBaIbHOMy IHcTpMeHTy HIBeJIbObATncr. Po3HaTe cepeDInHy Ia3epHOiTouKn Ha cTIHI (TOUka I).
YkpaHcbKa|229
-Поверніть ВИМірювалььній INСТРУМЕNT Ha 180°, 3aЧЕКаЛТe, nOKи 3aKiHHTbСЯ HIBENIOBAHHa, Ta No3HaUTe ZeHtp Na3ePHorO npOMeHЯ Ha nPoTnIeKHi cTiHi B (ToUka II).
- Po3taWyIte BmIpIOBaIbHn npHa, He NOBepTaOuH Ioro, KOIo CTiH N B, yBIMKnITb Ioro Ta DaIte HOMy HIBeJIIOBAtncr.
-BinipBnIte BmipIOBaIbHn IHCTpyMeHT NO BnCOTi TaKHM YHHOM (3a DOpOMOIO 1tATnBa a6o NiIMocTnBwn 0-He6yNbPiN HbOro), 06 cepeHa na3epHoro npomehr ToUHO nonaDana Ha ToUky II, No3NaueHy Ha CTIni B.
230|YkpaIHcbKa
www.bosch-pt.com/serviceaddresses
Ytulizia
BnMipuBaIbHi npHnAn, npHnAni ynaKOBky Tpe6a 3daBatn Ha ekOJIorIuHO uNCTy NOBTOPhy nepepo6ky.
He BnKnDaIe BmipIOBaJIbHI iNCTpyMeHTn i 6aTapeKeBnNo6yTOBe CmITr!
Пишешдя краин EC:
BidnoiHDo Ebponecboi DnpeKTHN 2012/19/EU 0do Bo iDxOio BneKTpHOro Ta eEeKTPOHHO oHaHaHHa II nepeTBOpEHn B HaioHaIbHe 3aKoHOdaBCTO BmipOBaIbHi IHCTpyMeHTn, kki BInbWe He npuaTHi Do BVKOpNCtAHn, a TaKOx BIDNOiHDo Ebponecboi DnpeKTHN 2006/66/EC HecnpaBHia6o BiDpaCbBaHi akymyIaTOPhi 6aTaapei/6aTaapeKn NobHHi 3daBaTncs OkpeMo i yTHII3yBaTncs ekONoriuHo uHCTM cNoCobom.
Pn Hnpabnblhni ytni3aui BiDnpaobahi eektpnuHt Ta eektpoHnipnnaMoxyTB MaTH uKIDINBn BnHB Ha HABKOnuHc cepoBnue Ta 3dopOB'IIOHNUpee3 MoJNBy HaBnictb He6e3neuHx peoBNH.
Kazak
Eypa3n8 3KoHOMNKalbIK OdaFbHa (KeDen OdaFbHa) MySe MemNeKeTepayMaFbIHDa KOnDaHbIaIbI
OHHipywiHnOHIMyIH KapacbipraH naIaHaHy KyaTapbHbH KypaMbHa naIaHaY XeHiDi erocbl HcyKaYbIK,cohImeH bipre KocbIMuaIap da 6onybl MyMKiH.
Caikectikti pactay kaiblb aknapaat Kocbimwada 6ap.
OHHIMDi eHdipreH Memleket TypalbI aKnapat eHimHi, KopnycbIHda JHe KocbIMuaJa KepcetinreH.
OHHipinreH Mep3iMi Hcyckaynbik MykaabcbihbH coHfbI beTIHe JxHe OHIM KOpnycbIHda KepcetinreH.
Hmnpotepre KaTbIcTb 6aJIaHbIC aKnapaT eHIM KaTAmcbHda KepceTIInreH.
Ohimdi naidaJahy Mep3imi
ΘHIMHI Kbl3MeT eTy MEP3imi 7 kbl. ΘHdpinreH MEP3imHeH bactan (eHdpy KyHi 3aybit TaKtaaAscbHda Jaa3bIHaH) icTeTne 5 kbl caKaTaFaHHaH coH, ΘHIMdi TeKcepyci3 (cepBnCTIK TekcepY) naJaAnaHy cblImMaHdbI.
KbI3MeTKeP Heme Ce naDalaHuybIHbIH KaTeNIkTepi MeH icTeH WbIFy ce6enTepiH, Ti3imi
-0HIM KOpnycbiHaN TiKeIe TTyIH 1bIKca, NaIdaIaN6aHbI3
-kahybH-zaibH Ke3iHne cbiptTa (daana) naJaIaHa6aHb3
-Kopnyc iWHe cy Kipce KypbInfblHbI Kocyu60MaHb3
Wektky6enrinepi
-0HIM KopnycbiHbIH 3aKbIMdaIybl
Kb3MeT Kepcety Typi MeH Xiniri
品 ~ n ~ 日 ~ d ~ ~ a ~ ~ h ~ ~ y ~ d ~ a ~ h ~ ~ c o ~ h ~ ~ e ~ H ~ i m ~ d ~ i ~ T a ~ s ~ a ~ a ~ y ~ ~ y ~ c ~ b ~ i ~ h ~ b ~ i ~ n ~ a ~ d ~ b ~ i ~
CaKray
Kpyfak Kepde caTay KepeK
- KOFapbI TEMpepaTpa Ke3iHeH KAnHe KyH caynepePiH acepiHn anbc KaTay KepeK
- caKtay Ke3iHne TeMnepaTypaHbIH KeHeT ayblTKybHaH KOpFay KepeK
-erep Kypan Kymcak cemke Hemece nactK KeiCte XeTKi3ince OHbl OcbI 03iH, Koprafbll Ka6bIHda caTay YcbHbIaIbI
- caTay ⅢapTapbl TpyaBb KocbIMsa aknapaT any ywiH MEMCT 15150-69 (IaPrt 1) KyKaTbH KaPaHb3
TacbImaIay
- TacbImaIay Ke3iHne OHIMdi Kynatyfa XeHe Ke3 KeJIreH MexaHnKaIbIK bIKnAteYrKeTaH TblbIM CaNbHaDbI
-6ocaty/JyKtey Ke3iHne nakeTt KbicaTBn MaunHaIapDbI NaIaHaHyf pyKcat 6epinmei. - TaçibMaJday wapTtapbI tananTapbIH MEMCT 15150-69 (5 wapT) KxKaTbIH OkbIb3.
Kayinci3dk HycKaynapbl

Onwey KypanbImen Kayinci3 XaHe cehimdi Xymbc ictey ywiH 6apnbIK HycKaynbIKTapdbI OKbIN opbIHday KepeK. Onwey KypanbIH ocbl HycKaynapra caN naDanaH6ay enwey KypanbIHdaFbI KipictipinreH Kayinci3dk wapanapbHa HaftbIMcbI3 acep etedi. Onwey KypanbIHdaFbI eceptynepdi
KeipinH KblMaHb3.OCbl HYCKAYAPbI CAKTAN,ONLIeY KYPALbIH BACKAIIAPFA BEPHEDE ONAPbI KOCA YCbIHbIHb3.
A6a 60nbIbI3 -erep ocbI xepde 6epinreH naDanaHy Hemece Ty3ety KypandaPbIHAN 6acka KypanDaH naDanaHaC Hemece 6acka Kymblc aicTepi opbIHanca 6yn Kaynti caynere wabHyra anbIn Kenyi MymKIn.
Θnwey Kypanbl na3ep eckepTy taKTacbImeH 6ipre XeTeKizinei (rpaФнka 6etihderi onwey KypanblhIn cypetihde bEnrineHren).
Erep na3ep ecepy TaKTacbHbIH MToHI eniH3dH TiniHde 6oNmaca, anfaw pet KOndaHbICKa eHri36ec 6ypbIH OHbIH OPHbIH eniH3diH TiniHderI XancbipMaHbl Xa6bICTbIPbIH3.
Ja3ep cayneci aamapra Hemece XaHpyapnpfa 6afblTamaHbI3
Xehe 03iH3 de Tikeen He Mece wafblbcKan Ja3ep cayneci
kapamaHbI3. Byn aamapdbIH Ke3IH waflnbipybl MymKiH, cTci3
OKfanaPFA kEnyi Hemece Ke3re 3aKbIM KeTipty IymKiH.
Erep na3ep cayneci Ke3re Tycce Ke3eepi Kymbln 6actbI cayneH apbl KapaTy KepeK.
Na3ep KypbInfbcIHda eWkaHdae3repty opbHdaMaHbI3.
Na3ep Kepy Ke3inDipirih (KepeK-kaPak) KopraHbIw Ke3inDipiri petiHde naaHaan6aHbI. Na3ep Kepy Ke3inDipiri na3ep caynciH xKaKcbIpaK Kepy yuHn KOJaHbIaNbI, aana na3ep caynciHeN KopfAmaibl.
▶ Μазэр керу кезлдирин (kepeк-жарak) КУннен Коргайтbing Кезлдирк petiHde Hemece kon KozfaIbICbIHda naДanaH6aHbI3. Пазэр керу кезлдири уьТраКУнriCayileperden TOblk KOPFaHbICTbl KaMTaMaCbI3 etneNi JxHe TycTi ce3y KaBineTih a3aHTaBl.
Θишey kypanbIH tek 6iikTi mamaHra xhe aphaynbI 6eKeKTepeMeH XeHdTeiHi. CoapkblbI eIshey kypan kayinc3diirH caKaTaeCbI3.
Bananapra na3ep enwey kypanbH 6akblaycbI3 naDanahyfa pyKcat etneH3. Onap baca aamnapdbH HeMece 03iH K03iH abaCbI3dH waflbIbCTbIPybl MymKIn.
XaHaTbIH cyNbIKTbIKTap, ra3dap HeMece waH XnbINraH xapblbc kayni 6ap optada enwey KypabIn naDanaH6aHbI3. OJwey KpaBbI yWKBbIH WbIFapbln, WauHdbI XaHDbIPbII, ePT TyDbIPbYbIMMkIH.
MarHHTI NMnHaTAtTapDbIH Hemece KapDIOCTHMMyTOp Hemece HHCyHH Copfbicb CnAKTbI 6acka da MeHNuHaNbIK KypblfBnAPdbIH XaHbIH KaMHaB13. MarHHT NmPnAHTaTAPdbIH Hemece MeINuHaNbIK KypblfBnAPdbIH XyMbICbIH a cep eTeiH epic TyDbipadbl.
Onwey KypanbIH MarHHTI DepeK TacbIMaNdaywblap MeH MarHNTke ce3imTal acnantapdAn anbc yctahbl3. MarHHTepiH acepi KaJIbHa KeTIpyre 6oImaTbIH DepeKTeP XofanybHa anbln Kenyi MymKiH.
Θhim xəHe kyaT cnnaTTamacbl
PnDanaHy HcyckayIbIbHbI, anfbl 6eNirHcpeTepiH cekepi3.
TafaybHdany 6oBbHwa kondaHy
OJwey KpaIbI KeIeHeH peTeynepi XaHe nepEnKyIap TaahdApBIn ecTeyre
XaHe TeKcepyre apHaIFaH.
OJwey KpaIbI iWiKi MeH cbIpTKbl aMakTapda naJaIaNHyfa apHaIFaH.
Kopcetinren kypamda6eKtep
KepcetinreH KypamdaCTap Hemipi cypetep 6ap 6eTteri eNwey KypaIbHbH cnnaTtMacblHa KaTbICTbl.
(1) Na3ep cayneciHHbIfbc CaHbInaybl
(2) AxbipaTkbI
(3)MaHTTIk aHaHnMaJIbYCTaFbIu
(4)UtaHb6ekitkiwi,1/4IOHM
(5) BaTapei 6eNimi KaKNaFbHbH, 6eKITKi
(6) BaTape8 6eJIIMiHi KaKNaFbI
(7) MaHnHT
(8) Na3ep eckepTy TaKTacbl
(9) CepnIbIK HEmip
(10) Πa3ep Kepy Ke3iinipiri a)
(11) トTaTHBa)

238|Ka3aK
(12) KopfaHbI W KaNTa
a) BeHeneHReH Hemece CnataTaNFaH Xa6DbIKTap CTaHapTTbI KeTki3y KOnemimekamTbIMaMdbI.ToBikXa6DbIKTapdbI 6i3iH Xa6DbIKTap 6aFapnaMaMb13an Ta6acb13.
TexHkAnbIK maniMeTrep
| Hyктелik лаzer GPL 3 G | |
| Hyктелik лаzer GPL 5 G | |
| ΘимΗώмір GPL 3 G | 3601 K66 N.. |
| ΘимΗώмір GPL 5 G | 3601 K66 P.. |
| ЖуMbIC диаразовыA) | 30 M |
| Нивелоргий дәлдіri (төмэн каратылfaн лаzer hyктесін福建省Басka)B(C) | ±0,35 MM/M |
| Нивелоргий дәлдіri (төмэн каратылfaн лаzer hyктесi)B(C) | ±0,7 MM/M |
| Θздігінен Нивелоргий диаразовы ±4° | |
| Нивелоргий уakсы < 4 c | |
| ЖуMbIC temпературасы -10°C ... +45°C | |
| СаKentay Temпературасы -20°C ... +70°C | |
| Herізrti биіktікін устінderі мамс. пайдану биіktіrì 2000 m | |
| Сальістырмалы aya bілfaлдаьірьы, мамс. 90% | |
| Пастану дэржeci IEC 61010-1 стадерсы boйыша 2 | D) |
| Паэр клась 2 | |
| Паэр тyperi 500-540 hm, < 1 MBT | |
| C6 | 1 |
| Альперmaшыліьк 0,8 мрад (толык 6урыш) | |
| Штатов bекітkiш 1/4 дюм | |
| Баразецар 2 × 1,5 B L R6 (AA) | |
| ЖуMbIC узakсыБыВ) | 8 caF |
| Салmarы EPTA-Procedure 01:2014 Кужаты саь 0,35 кг | |
| Θлшем dipei (узвды fiы × ehi × bіктіri) 115 × 50 × 113 MM | |
Hyktenik na3ep GPL 3 G
Hyktenik na3ep GPL 5 G
KopfahbcIaepkeci IP 65
A) Kymbic aMafbIH KOJaNcbI3 KOpway wapTTapbIHda (MbicaJI TikeNei KYH caynepeHde) KbickapTy MymKiH.
B) 20 - 25^
C) KepceTinreH mHeep KaIbIITbI XHe XaFbIMdbI KOpwaFaH opTa WapTTapBH (MbICaNbl, dipinc3, TymacB13, TyIHcI3, TiKeene KyH caynecici3) tanan etedi. TemnepaTypa wYfbIN 03repreh XaFdaJa, dAnik aybTKybi MymKiH.
D) Tek KaHa ToK eTKi36eTin lac naJa 60aIbI, 6ipak Kei6ip XaFdaInapa epy HtIXeciHne Toe eTKi3y KaBineTi naJa 60nybl KyTIneI.
OJnwey KpaJIbIHbI 3ayblTBk TaKtaaJaBfI cepnJIbIK Hemipi (9) OHbl dypbic aHbIKayFa KEMeKTecdi.
XnHay
BaTapeaIapdbI cany/annMaCTbIpy
OJwey KpaBbl yin ankainn MapraHe c 6aTapeecbH naananaHy cbHbIaNbl.
KaXeT 60nca, MaHHTIK aHaMaIbI yCTaBbITbl (3), 6aTape8 6enimH KaKnaFbl (6) epKin JkataBtbn daen etin, byipre bypaHbI3.
Batape 6011H KaKnaftbH (6) ayy ywiH bicbIpMaHbI (5) Kofapbl Kapai 6acbl, KaKnaKTbI aWbIHb3. BatapeanapdbI eHI3iH3.
Batape 6bniminih iinderi cypette KepceinreHne nonIOCTapbIH dypbic ophanacybH KaMTamacbi3 etiH3.
Batape 60nimin H KaKnafbH (6) KaTadae enHri3i, OHb6ekitkiu (5) yctihderi 6enrhen Kepde MblkTan 6acbl3.
Erep 6atapereanapdbH 3apraDbI TEmeHdEN KeTce, na3ep HyKTepePiH JkapbIKtbIfbI 6aay TEmeHnei.
BatapeanapdbH 3apdbl Taycblnfah Epnik 60nca, naep HkyTelepi MNHyTbHa 5 pet XblnbIKTaNDbI.
BatapeanapdbH 3apnbl taycbinfah 6onca, na3ep HkykTelepi, eIwey KypaIb Ieunec 6ypbH, Taftbip peT XblnbKtaDbI.
BapnbK 6batapeanapblbipde anmaactbipbHb3. Tek bip endipywiinxhe Kyatb6ipde6batapeanapblnaidanaHbHb3.
Θnwey KypanbH y3aK yaKbIT naIdaIaN6acaHbI3, 6aTapeHbI enwey KypanbHaH
WbIFapbl anblb13. 3aK yaKbT caKTaraH kafdaHa, eNwey KypaIbIHdfl 6atapeenapbl tot 6acybl JkHe onapblH 3apdbl E3diirHe TaycbIybl MymKiH.
PaiandaHy
PaiDanaHyFa eHdipy
Θηωeγκραλβνιν c𝑏ιδαн χεθe τικεην Kυν cαγπεπερiHε caKτaHbɪz.
Θnwey KypaNbHa aHpbikwa TemnepaTypa Hemece TemnepaTypa e3repictepiin, 0cepIn Tnir3yre 6oImaDbI. OHbl, MbicnbI, aBtOMo6nIb iwiHne y3ak yaKbITka KaIdbipMaHbI. TemnepaTypa e3repictepi WYfbI b6oRfAH XaFdaJa, aNdbimEn oIwey KypaNbHbIH TypaKbTI TemnepaTypacbIH caKTaHbI3 XaHe XyMbICTbI XaIFactbIPMac 6ypbIH apDaibIM dAnik TeKcepiciH etKi3iHi3 (KapaHbI3, npwey KypaNbIHbIH dAndiH TekcepY", Bet 241). AynbIKwa TemnepaTypa Hemece TemnepaTypa e3repictepi opbIH anFaH XaFdaJa, OIwey KypaNbIH, dAnidiTcMeHdeyi MymkIn.
Θnwey KypalbIH KaTbI COFBiNyDah HeMece TycydeH caKtaHbI3. CbIPTKbl KUWTI acepIepdien Kein Hnwey KypalbIHbIH KymbICbIH JaiFactbIpyaH 6ypbIH npaibIM dAnik TeKcepYiH opBHaay KepeK (kapaHbI3, nwey KypalbIHbIH dAnirih TeKcepY", Bet 241).
Θnwey KypanbIH TacbImaIaydAn anDbIH OHbl KocbHb3. 8wye ter6eny 6eniri 6yfattana,b, aTnece on KaTbI apeKeTTepDe 3aKbIMdaNybl MymkiH.
Kocy/ewipy
OJwey KypaBIn Kocy yuH axbipatKblTbI (2) "ON" KyiHe XblXblHbI3. OJwey KypaBIn KocBlnFaHHaH KeiH 6ipdeH na3ep caylenepiH sbIfbc caHbInaynapdAn (1) WbIFapaBl.
- Пазер саунecин радамдра Немеся кануарларра 6arbittamaньл зэн тinti anbictahбогсblнжарык саунecine e3iH3 Kapamahbl3.
OJIwey KypalbH eipy ywiH KocKbiw/ewipriwi (2) "OFF" KyiHe JkblkbItbHb3. Oipy KeiHde ter6eny 6norbl 6yFaTanaaBl.
KocynbI 3apraTay KypanbH 6aKbInaycbI3 KaNdbipMaHbI3 XeHe eNwey KypanbIH naDalaHyaH coH eWipiH3. Na3ep cayneMeH aadamapbH Ke3H WaBbIbICTbipy MymkiH.
45°C wamacbHdafbI pyKcAT etinreH MaKC. Kymbc TeMnepaTypacbHaH acbipFaH KaFdaJa Ia3ep DnoBlc KopfaHbc ywiH ewei. CybifaHHaH coH enwey KypaBlc KaTAt KOcbIybl MyMKIH.
Θωipy abTomaTHkacbl
Oney KpaBb 60 MmHyT KMbIC icTeReHHe KeiH aBTOMaTTb Type eweJI.
KocbInraH eIwey KypaIbI e3diIHeH HnBeNnpNeY dnaNa3OhBaHaH TbIC 6oNfAHa (na3ep HyKTeIepi y3dkci3 XbInbIbIKtaIdbI), oWipy aBTOMaTHKaCbI 60 MmHT WaMaCbHa KaHTbIN OPhTaIaNabI.
Husbenpney abTomukacbi
OJwey KpaBn KcndHeH, 6epiK 6eTke KoBIn, WtATNBte (11) 6ekiriH3.
ActbHfbl naep HkyTecin naaandaHy ywiH enwey Kypanbln, naep HkyTeci eedeKepiHeTIHeN, MaHHTIK aHaMaIbnYCTaFbUbHaH (3) YcTaN 6paHbI3.
KocbifaHaH KeiH HnBEnpney aBTOMaTHKaCbl ±4° WAMacblHaFbI 63diriHeH HnBEnpney dHaNa3oHbIHda teric emec xepnerdi aBTOMaTbI Tpyde tericTeiDi. Na3ep HYKTenepi TypaTbI XaHbIN Typca XeHe apbl KapaKo3famaca, HnBEnpney aKtaIaNbl.
ABTomaTbI Tpyde HNBenInpney MyMKiH 60nMacac, Mbicanbl, eJwey Kypalbl Tpyfah 6et KJIeHeh Cbi3bIKTaH 4" WAmacbHaH apTbIK aybITKbIFah 6oJca, na3ep HYkTeNepi XblJaM bIpKaKeH TypaKTbl XblBbIK TaNDbI.
BynKaFaJaDa eJNeWey KypaBbH KcIeHeHHeH KoBbI, 03dirHeH HNBenPney aKtaTfHaHa KaTIi3. OJNeWey KypaBb ± 4^ WAMacbIHdaFbI e3diirHeH HNBenPney dnaNa3ObHbHa Tpyca, Na3ep HyKTeNepi Y3dkci3 KaHbIn TypaDbI.
Painanany Ke3iHne KaBnIbCTap 6oJca Hemece Kye3repce, OJIwey KypaIbI aBTOMaTbI Type 3diirHeH HBeNInpNey KymbcIn HOTKl3eDi. KaHaadAn HBeNInpnerE h CoH eJWey KypaInbIH XblXbl IN KeTyIe He kon 6epMey yuiH KOnDeHeH Hemece TIK na3ep HYKeTepinH KyiH Heri3rHyKTelepeMeH CaIbCTbIPbIN TeKcepH3.
OIIwey KypaIbIHbIH, dAnirin Tekcepy
Дэлдік aceрnépi
Kopshay TemnepaTypaCbI eH KUHTi acep eTei. EdeHdE H KOFapbIfa 6oTfAH TemnepaTypa 03repictep Ia3ep cayneCih ayblkYbl MymKinH.
Edeh KaftbHbHa TemnepaTpa 3repictepi KaTbI 60fahbI ywiH eJwey KypanbH 20 M KaBtBkTaH 6actan WtAtnBKe opHaTy KepeK. OJwey KypanbH MymKiHwInik 6oBbHwa JMybIC aMafbHbIH OPTacbHa KOybHbI3.
CbipTKbl acepnpen Tbc acnantbIK acepnppe (MbicaJIb KaftbIbIC Hemece KaTTbI cokkbinap) ayblkynapfa anbln Kenyi MymknH. CoI yuH ap JxMbictaH andbH HNBenlpny dndirih TeKcepini3.
Erep enwey kypanbI Tekcepy Ke3iHne MaKcMaIbI ayblTkydAn acbIpca, OHbl Bosch cepBnctIK optaIbIFbIHda XOHndeTIH3.
KoIeHn HbEnpney dAnirin TeKcepy
Tekcepy ywiH 5 M 6oc oIwey KaBbIKTBfbl KaTbI JKepe A MeH B eki Ka6bipraHbIH apacbHaKepek bonaDbI.
242|Ka3aK
2× 5M = 10M eIwey KaIbIKTbIFhHaFbI pyKcaTeITReH MaKcHMaJdbl aybTkY:
10M×±0,35MM/M=±3,5MM. Imeh III HkyTeNepi apacbIHdafbI d aHbIPMaUbIbIFbeH Ke6i 3,5 MM Kypaybl Tnic.
GPL 5 G: eIwey apekeTIN eIwey KypalbHbIH KENDeHcOciH bOHyMeH eTeIH eKi Byipnik na3ep cayneci yuH KaHTaHaBIs. On yuH eIwey apekeTIN bactamac bpybH eIwey KypalbIH caFAT TINI H, baftbImeH HeMece oFaH Kapcbi 90^ Ka bpaHbI3.
244|Ka3ak
"RepMec" BO, 7 ka6aT
Ten.: +7 (727) 331 31 00
ΦaKc: +7 (727) 2330787
E-Mail: ptka@bosch.com
CepBnctik Kbl3MeT KepeTy opTaIbIKTapbI MeN Ka6blnday nyHKTePiH MeKeH-KaBl
TypaIbI ToIbIK JxHe e3eKti aKnapaTbI Ci3: www.bosch-professional.kz pecmncaiTTan aIa aIacbl3
KbI3Met KepceTy optaIbIKTapbIHbIH backa da MekeHkaJnapbIH MbHa XepeH KapaHbI3:
www.bosch-pt.com/serviceaddresses
Kādere kapaṭy
OJIwey KypaIbIH, OHbIH JxabIKTapbi MeH KaITamacbIH KopuaFAH OpTaHbI KopfAHTbIH Kdere Xapaty OphBaHa Tancbipy KaXeT.
Knywey KypanapbIn He 6aTapeaIapdbI yKOkbicbHa TaCTaMaHbI3!
Tek KaHa EO eNepi yuH:
Eck 3neKtpnik JxHe 3neKtpoHbIK KypblfblnapTypaBl2012/19/EU eyponaBik DnpeKTNBacbl JxHe OHblN YITbIK 3aHHaMaJa KOlaHbIybl BoBbHwa naJdaNaHyra 6ydaH 6blan JkapamcbIe OJwey Kypalapbln XHe 2006/66/EC eyponabIK DnpeKTNBacbl 6oBbHwa 3akbldAnfah Hemece eckipreh AKKymIaTOpnapbl/6atapeaIapbl 6eNeK xHHan, KopshaF an opta ywiH kayinc3 XkonMeH KaT a Hdeye Xibepy KaXet.
Kate kOJImeH Kdere XapaTbIHaE ccki 3JNEKTpNIk XHe 3JNEKTPOHdbIK KypbIINFbIAp Kayinti 3aTTapDbIH 6ony MymKiHdiRiHe 6aIIaHbICTbI KopWafH opTaFa XHe aam DeHCayNbIFbHa 3nHDbI Ocep TnI3yIMyMKiH.
Româna
Instruţiuni de siguranta

Service scule electrice
Strada Horia Macelariu Nr. 30-34, sector 1
013937 Bucureşti
www.bosch-pt.com/serviceaddresses
Eliminarea
I3non3BaHe/cmHaHa 6aTepuHte
3a 3axpaHbAhe Ha n3MepBaTeHnH ypeD ce npenopbUba n3non3BaHeTo Ha aIkaJIHO-MaHraHO6aTeepn.
Ipn Hjxda 3aBbptete MaHHTHaTbBpTaCa ce CToiKa (3) BCTpaHn, TaKa Ye KanaKbT Ha OTdeneHneTO 3a batePnn (6) da ce ocBOboOn.
3a OTbaprHe Ha KaIaKa Ha rHe3dTo 3a 6aTepeH (6) HATNCheTe qHKcnpaHTo (5) Harope H cIeT OBa OTbOpTe KaIaKa. IocTaBeTe 6aTepnIte.
BnHmabaTe 3a npabHnHaTm nOJrpHocT, n3o6pa3eHa Ha fNrgpata OT BbTpewHaTa cTpaHa Ha rHe3dTo 3a 6aTePnn.
IocTaBete o6paTHo Kanaka Ha OTdeneHneTo 3a 6atePn (6) n To npTncHe Tbpy MapKnpaHOTo MRCTO HAD fHKcHpaHETo (5).
C OTCnla6BaHe Ha 6aTeepHnTe RaKoCTTa Ha Ja3ePnHTe TOUKN HaMaJIraBa NocTepeHHO.
Ako 6aTepeHnTe ca NoTu n3ToUeHN, Ia3epHnTe ToKu MmTa5x B MmHyTa.
Ako 6aTeepHnTe ca n3ToocheH, na3epHnTe TocKn MmraT Ooie BeedhX npeHn H3MePbTeHNrT INCTpymEnT da ce n3KlIOuN.
3aMeHnTe BnHaRn BCnUKN 6aTePnN eHOBpeMeHNo. N3noJ3BaIe BnHaRn 6aTePnN oT eINH n CbU pOn3BOdntEn n c eDHaKbB KanaCHT.
Ako npoIbIxHTeHNO BpeMe Hama Da n3nO13BaTe HhCTpyMeHTa, n3BaXdaIte 6a- TepHnte ot hero. Pnp npoIbIXHTeHNO cbXpaHaBe H He 6aTePHTe B n3MePbTeH Nn HhCTpyMeHT Moat Da KopoDnpat I da ce camOpa3peJrT.
Pa60Ta
Nyckahe Bekcnoataua
ПразаЗВаite ИзМерВаTeHнЯ np6op OT OBлжняВаHe И ДиpeКTHO nonaJaHe Na CnBHyEBN IbQuI.
He n3naraTe H3MePBATeHnHa ypeHa ekCTpeMHn TempeaTyprn Hn pe3Kn Tem- nepaTyprn npomeHn. Hanp. He ro octabrYe npOdbJHKnTEHNO BpeMe BAETOMoBn. Pn rOleMn TempeaTyprn Kone6aHn OcTaBraYe H3MePBATeHnry ype Da ce aanTnpa H npEePi npOdbJkBaAhe Ha pa6oTaTbHNHaRn H3BbPWBaYte npOBepKa Ha ToUHocTtA (Bx. "PiobepKa 3a TOnHOCT Ha H3MePBATeHnry ypeD", CtpaHnca 265).
Pn ektpemHn Tempeatpyn nI rOeMn Temepaatpyn pa3nnKToUHOCTTa Ha n3-MepBaTeHHy ypeD MoKe Da Ce BLOSh.
264 |Былгарский
N36yBaTe CnHH ydapn Hnn H3nyckaHe Ha N3MepBaTeHnn ype. CneJ ydaHn Bb3deiCTBnB bpxy N3MepBaTeHnn ypeI Tpr6Ba Da N3BbPWBaTe npOBepKa Ha ToUHOCTTa My, npei Da npOblknte da ro N3no13BaTe (Bx. ,PiobepKa 3a ToUHOCT Ha N3MepBaTeHnn ypeD", CtpaHnca 265).
Korato npehacate ypea, npedbapntenho ro n3KnIOyBaTe. Pn H3KNIOyBaHe MoDyblT 3a Kone6aTeHN DnIXeHnCe 3actOpraBa, TbN KaTO npn CnIHn Bn6paqnn MoKe da 6bJe nobpehen.
BkIOUbaHe n3KIOUbaHe
3a BKNIOUbaHe Ha n3MepBaTeHnYpeD npemecTe Te NyCKOBn PpeKbCBAu (2) B I03Nzra "ON". BeHara CneD BKNIOUbaHe n3MepBaTeHnYrT peD n3IbUba Na3epHn IbCu n ppe3OTBOpHTe (1).
He hacouBaIte na3epHnI NbU KbM Xopa nnXNBOTHN; He rIpeaTe cpeuy na3epHnI NbU, cbso n OT roJAMo pa3CTOAHHe.
3a n3KnIOUbaHe Ha n3MepBaTeHnHnHCTpyMeHT npemeCTe TnyCKOBn IpeKbCBauch (2) B no3nucra "OFF". Prn n3KIOUbaHe Modynt 3a KOle6aTeHNHe DnHexnCe 6bnoknpa.
He octabayte ypea Bknoyeh 6e3 na3op; cnei kaTo npknIOuHTe pa6oTa, ro n3KIOUBAITE. pyrnnnna Moat da 6bDat 3aceneHn OT na3epHnIbU.
Pn npemnaBaHe Ha MaKcMaHNO dOnyCTMaTa TemnepaTpya ot 45 ^ C ypeBt ce n3KIOUba 3a npedna3BaHe Ha na3epHnI dIo. CneOxJaXaHe n3MePbTeINHnT ypeI e OTHOBO rOTOB 3a paOta I MoKe da 6bDe BKnIOueH.
ABTomaTHUHO N3KNIOUBAHe
Cne60 min pa6ota n3MePbATEHnHT ype9 ce n3KIOuBa aBTOMaTHNO.
ABTomaTnHOTOn 3KIOUbaHe ce Hynpa Ha 60 min, aKO BkIOueHnT n3MePbTeHeh HcTpymeHT ce HAMnpa N3BbN 3OHaTa Ha cAmOHnBeHnPaHe (Ja3epHnTe TocKn MmTat NoctoRHHO).
ABTomatnHOn HNBenHaPeHe
IocTaBete n3MepBaTeHnYpeD Bbpxy BoOpaBHa, 3paBa NpIoXka HnI rO 3akpenTe Bbpy CTaTnBa (11).
3a n3noi3BaHeTo Ha dOJIHaTa Na3epHa ToUka 3aBbPTeTe H3MePBAeHINH INHCTpyMeHT BbpxMy mHHTHaTa BbpTua Ce CToNka (3) TaKa, Ye Na3epHaTa ToUka Da Ce BnXda Ha noJa.
CleB BkIIOUBAHTo aBTOMaTHUHO To HbEInpaHe N3paBHBa HepaBHOCHTe B 3OHaTa Ha camOHbENIPAhe OT ± 4^ aBTOMaTHUHO. IpoceBt Ha HbEInpaHe e npKIOUH, KOraTo Ia3epHnTe TOUKCN CBETHa TpaHNo n CnpaT Da CE DBNKAT.
Ako aBtOMaTHO HINBeHpaHe He e Bb3MOxHO, HAp. KOrato NOBbpXHOCTTa, Ha KOrTo 3MepBaTeHNHT INCTpyMeH e NOCTaBeH, Ce OTKIOHOBA OXTOpN3OHTaIaTcNOBEe OT 4^ , Na3ePHHTe TOCKI 3aONuBAT da MIRAT 6bp30.
B TaKbB Cnyuayn OocTaBte H3MepBaTeHnH ypeD xOpH3OHTaHNO H3UaKaIe aBTOMaTnHOTo My HnBeHnpaHe. Korato n3MepBaTeHnHrT ypeD 6bEne oCtABeH B rpaHnIte Ha dHa na30Ha 3a aBTOMaTHUHO HnBeHnpaHe OT ±4°, Na3epHnTe TOUKN 3aNoUBAr Da CBETr HENpeKbCHaTO.
Pn pa3bpcBaHnHa nn npomHa Ha noLoXeHHeTo NO BpeMe Ha pa6ota n3MepBaTeHHnT ypeI ce HnBeHnpa OTHOBO aBTOMaTHUHO. CneI NOBtOphOTO HnBeHnpaHe IPOBepete No- 3nHnTa Ha XOpH3oHTaJIHnTE, pecI. BepTKaJIHnTE Na3epHN ToKKn CnpMa OpepeEHTHN TOUKN, 3a Da n36eHHe TpeuKN OT N3MeCTBaHe Ha n3MepBaTeHHnYpeI.
Поберка 3aTOUHOCTHaИЗМерВATEENHЯ урд
ΦaKTopn, BnHaeuHa ToUHoCTTa
Hai-roIaMo BnHHe Bbpxy ToUHocTtHa mA OKoHnHa TEmnepaTypa.CneuHaNo TempePaTyPhaTa pa3nka OT nOda Harope Moze da IpeDn3BnKa OTKIoHEnn Ha Ia3ePnHa JbU.
TbI KaTo TempePaTyPnHte pa3nKn Ca Ha-NcHn B 6n3OCT Do nOda, pN pa3ctoHnHa d 20 m Tp8Ba 3aBnKHTeHNo Da MOHTnPate N3MepBaTeHn ypei Ha cTaHB. OcbENTOBa npN Bb3MOXHOCT BnHarN NOCTABYHe N3MepBaTeHn ypei B cpeDaTa Ha pa6oTHaTaNloU.
Hapei C BbHnHte foAKTOpN, npuHa 3a OTKNOHeHHr MOaTda 6bDaT cbOu HfakTopn, Cbbp3aHc ypeDa (Hanp. naHa He nHn CnHn Bn6paun/uapn). 3aToBa BnHa rnpedn 3anoBaHe Ha paBota npOBepaIte ToUHocTtHa HNBeHnpaHe.
Ako npn HraKoI OT npOBepKeTe n3MePbTeHnIypeI HaXbplN MaKcHMaIIHO dOnycTHMOTO OTKIOHeHne, ToT Tp8Ba Da 6bIe peMOHTnpaH B OTOpN3npaH cepBn3 3a eNeKTpoHHCTpyMeHTn Ha Bosch.
PpOBepKa Ha ToUHocTtHa BODOpaBHOTo HmBeInHpAHe
3a npoBepkata Tp6Ba Da HMaTe Cbo6OHa 30Ha 3a H3MepBaHe C TBbpda OCHOBa C bIJxHa 5 m MeKdy DBe CTeHn A n B.
-MoHTnpaTe n3MePbATEHnna ypei 6n30 do cTeHata A Ha cTaTnB nnI rO noCTaBeTe Bbpx TbPda paBHa nobbpXHOCT. BkIoueTe n3MePbATEHnna ypei.
266 |Былгарский
-Hacouete KbM 6IIN3KaTcTeHa A xOpN3OHTaINHnIbU, KOITo e ycnpopeHn Ha HAnbXnHaTaOC Ha I3MepBaTeHNHy ypeI. OCTabe Tn3MepBaTeHNHy ypeI da Ce HnBEnIPA. MapKnpaIte cENTbpa Ha Ia3epHata TOUka Ha CTeHATA (TOUka I).

- 3aBbptete n3mepeTENHn ypeHa 180^ , n3uakaTe ro da ce HnBeNpa n MapKnpaTe cHTbpa Ha NTHOTo Ha na3epHnNbU Ha cpeUynOxHaTa CTeHa B (touka II).
- IocTabete n3mepBaTeHHn ypei - 6e3 da ro Bbptnte - 6nn3o do cteHata B, BKIOueTe ro n ro octabete da ce HnBEnnpa.

- IoppaBHeTe Na3epHnIbU No BnCOuHa TaKa (c NOMOHTa Ha cTaNBA HnN Upe3 NODIarAHe), Ye ceHTbpT Ha nEHTO My Bbpxy CteHata B da cBbnaDa TOnHO C HAnpaBeHaTa npEn ToBa MapKnpaHa TOnKa II.

-3aBbptete n3MepeTnHnY yepHa 180°, 6e3 da npomeHte BncoHHata. N3yaKaTe ro da ce HBeNnpa H mapKpaIte ueHTbpa Ha na3epHnHa cTeHATA A (Toyka III). Ppi ToBa ce noctapaiTe TOnkA III da e eo Bb3MOxHOCT BepTKaJIHo Haid, pecn. noi ToykA I.
- Pa3nKata d MeKdy DBeTe MapKnpaHn TouKn I n III Ha CteHaT A daBa DeiCTBnteHTo OTKIOHeHne NO BnCOUHa Ha N3MePBATeHNHa ypeI NO dbLnKHa Ha HAdNbXHaT OC.
Ha pa3cToHHe oT 2 × 5 m = 10 m MaKcMaJIHO dOnyCTHMOTO OTKIOHeHne e:
10m×±0,35mm/m=±3,5mm.CneIOBaTeHNO pa3Nkata d Mekdy ToKHTe I n III Tp6Ba da e Hau-MHoro 3,5 mm.
GPL 5 G: Повторе пюцедура с lo nзмервахе за дыагастранчил nazeрни lyba, KOINTO npemHHaВAT NO dbLxHHaTа Ha HanpeuHaTа OC ha n3mepBaTeHnry ypeД. 3a ceNTa npednHaayanoTo Ha n3mepBaHeto 3aBbPteTe n3mepBaTeHnry ypeД Ha 90^ no nnn o6patHO Ha yaCOBnka.
268 |Былгарский
PpOBepKa Ha ToUHocTtHa OTBeca
3a npoBepkata ce HxkaTe OT CBO6OHa 30Ha 3a H3MePbHe BbpXy TBbpda OCHOBa c pa3cTOrHne MeKdy Noda n TaBaHa npn6n.2,5 m.
- IocTabeTe H3MepBateHnna ypeHa 3eMaTa. BkIoute H3MepBaTeHnna ypeHa nTo 3aBbptete BbpxMyaHTHaTbBpTgA ce cToiKa (3) TaKa, Ye DoJIHata Na3epHa ToKka DaCe BnKda Ha NOna. N3aKaaTe aBTOMaTHUHO THe HBeHnpaHe Ha H3MepBaTeHnna ypeD.
-MapKnpaTe ceHTbpa Ha rohpata na3epHa Tocka Ha TaBaHa (Tocka I).MapKnpaTe cbIIO Taka Ha noDa ceHTbpa Ha donHaTa na3epHa Tocka (Tocka II).
- 3aBbPte Te H3MepBaTeHnHa ypeHa 180°. POnuHnPaIe To TaKa, ye eHTbPbT Ha DOnHa Tla3epHa TOUka Da e ToUHO BbpXy MapKnpaHaTa TOUka II. N3uKaIe aBTomAt NTHO HnBeJInpaHe Ha H3MepBaTeHnHa ypei, MapKnpaIe UeHTbPa Ha rOpHaTa Na3epHa TOUka (TOUka III).
- Pa3nkaTa d MeKdy DBeTe MapKnpaHn TouKn I n III Ha TaBaHa DaBa DeIcTBHTeHTo OTKNoHeHne NO BnCOUHa Ha N3MepBaTeHnYpeI.
MaKcHmAnHO DOnyCTHMOTO OTKIOHeHne MOKeTe Da n3uNCnIte IIO CNeEDnHaunH: DBOHOTo pa3cTOrHne MeKdy Npa H TaBaHa × 0,35mm / m
Iprime: Pn pa3ctoHne MeKdy Ioda n TaBaHa ot 2,5 m MaKcMaJIHOTO OTKIOHeHne MoKe da 6bJe
2 × 2,5 ~m × ± 0,35 ~mm / m = ± 1,75 ~mm . CnéobateHNO TouKHTe I n III MoKe Da ca Ha pa3-CTOJHHe eHa OT dpyra NaH-MHOro 1,75 mm.
Yka3aHna 3pa6oTa
Korato mapknpaTe, ot6eIa3BaIte BnHaH cAmO ueHTbpa Ha Ia3epHTo netHo.
TolennHata Ha Ia3epHO Tne THO ce npomeHa pa3ctoHHeTo.
Pa60Ta cbcctaTHB (npHnAdIeXHoCT)
N3noI3BaHeTo Ha cTaTHB OCHpyra BCTa6HnHO, peryHnpyeMo NO BnCOUHa MOHTpaHe Ha n3MepBaTeHHnY ypei. NocTabete H3MepBaTeHHnY ypei c 1/4" noCTabKaTa 3a cTaTb (4) Bbpxy npncbeHNHTeHHn BnHT Ha CTAHBa (11) HnHa o6NKHOBeH TpHHOxHK 3a foTOanapat. 3aterhe To H3MepBaTeHHn Ypei C BnHTa Ha CTAHBa.
IpeiDa BkIOUOHTe I3MePBATeHnHyaype,I HAcOte cTaTHBa rpy6o.
3aKpeTe c mArHHTHaTbBpTaCa ce CToKa (Bx. fnr. A-B)
C HnterpnpaHata MaHHTHa BbpTaa ce cToiKa (3) MoKeTe Da 3akpeNte N3MepBaTeHnry ypeKbM HaMaHETn3HpaHn MaTePnAn.
Pa3eTe npbCTnTE cH OT 3aHaTc TpaHa Ha MarHHTHaTa BbptTaa Ce CToKa npn 3aKpeBnBaHe Ha NocEaHaTa KbM NOBbpXHOCTH. Upe3 cnHata npnterlaa cna Ha MaHHTte (7) npbCTnTE Bn Morat da ce 3axBaHAT.
IpeHn Da BkIoUHTe n3MePbATEHnY ypei, NOppaBHeTe MaHHTHaTa BbpTtca Ce cToiKa (3) rpy6o.
3aBbPteI3MepBaTeHnHnypeD BbpxMyMaHHTHaTBAbpTaIcCTOka(3),3a da ce BNdOnHaTla3epHa ToKa Hn 3a Da CE PpeHecAT BnCOUnn C BoOpabHaTla3epHa ToKa. OctabeTe I3MepBaTeHnHnypeD OTHOBo Da CE fHKpA Bbpy BbpTaIaCe CTOKa, aKO cTe rN3KIIouHn NTo TpaHCnoptnpate (BK. fHr.B).
OuHa 3a Ha6nDaaHe Ha na3epHnaIbU (npHaadNexKHOCT)
OuHnata 3a Na6IIOJaBaHe Ha Ia3epHnI NbU PhInTpPpAT OkOHnHa TcBETnHa. TaKa Ia3epHnT NbU CTaba No-NeCHO pa3nHm.
He n3non3BaIte na3epHnTe oUHna (npHHaIeNEXHOCT) KaTO 3auHTHn OUYHa. Na-3epHnTe ouHna cnykaT 3a no-do6po pa3no3HaBaHe Ha na3epHnHa bY; Te He npednaBbAT OT na3epHo IbYeHne.
270|BbIrapckn
He n3non3BaIte na3epHnte ouHna (npHHaIeXHoCT) KaTO cIbHueBn ouHna Hnn npn wOphipe. Na3epHnte ouHna He npedlaRat nbHa UV 3aunTa n HaMaJIraBt Bb3- npneMaHTo Ha uBeTobete.
Pa6oTH HnpHmepn (BHXTe C-E)
PpHmepn 3a npHIOXeHHeTO Ha n3MepBaTeHnIypeI MOxTe Da BnITe Ha cTpaHncaTa c fHyprnte.
Повдьрхан серви3
IopdbpxKaHe n nouchTbaHe
PoiDbpxkaIte H3MepeBATEHnYpeD BnHaN uHCT.
He nToTnBaTe H3MePbAteHnIypeD BvB BOa IIN dpyrTeuHOCTn.
H36bpcBaTe 3aMbpCraBaNHaTc MeKa,NeKo HaBnaJxHeHa KbPna. He H3noI3BaTe no- uNCTBaUe npenapatn UIN pa3TBOpHTeIN.
IouncBaIte peoOBHO cneuaHNO IOBbpxHOCTnTe Ha n3XoJa Ha na3epHna IbU HBMaBaIte Da He OCTaBAT BlaacnHKn.
CbXpaHBAIte I npeHacnTe H3MepBaTeIHnY ypeI cMo BbB BKIOueHaTa B OKOMNKeKTOBKATA npedna3Ha yaHTa (12).
Ipn Heo6xOIMOCOT peMOHT ppeIOCTaBnTe n3MePBATEHnYpeD B YaHtata (12).
KlnnehtcKa cnjx6a n koncyntaun oTHocHo ynotpe6ata
CepBn3bT Ⅲe OTROBOpHa Bbnpocite Bn OTHOCHO pEmOHn I NOdPbJka Ha 3aKypeHn O T Bac npOdyKT, KaKTo n OTHOCHO pe3epBHN qactn. POKOMnoHENTn Ueptexn INHOpMaun 3a pe3epBHIne qactn Ⅲe OTKpneTe n Ha:
www.bosch-pt.com
EknnbT no koncuntaun oTHocno ynoTebaTa Ha Bosch ue Bn nOMorHe c ydoBOnCTBne npn BbnpOcn 3a haHnte npOdykTN nTexHnte akcecoapn.
Mon, npn Bbnpocn n npn nopbubane Ha pe3epBn uactn BnHar n nocoubaTe 10-ncpeneH kataLOKeH HOpE, n3ncaH Ha Tabekata Ha ypea.
Блогнaya
Robert Bosch SRL
Service scule electrice
Strada Horia Macelariu Nr. 30-34, sector 1
013937 Bucuresti, Romania
Te.n.: +359(0)700 13667 (Блгарский)
ΦaKc: +40 212 331 313
1609 92A 7S8|(17.05.2022) Bosch Power Tools
Email: BoschServiceCenterBG@ro.bosch.com
www.bosch-pt.com/bg/bg/
DpyrncepBn3Hn apech nce oTkphete Ha:
www.bosch-pt.com/serviceaddresses
БракуВанe
I3MepBaTeHnHrT ypei,doBnHnTeHnHte npncnoc6neHn H onakOBKnTe Tp6Ba da 6b-dat IopNoXeHn Ha ekOJorHnHa npepa60tKa 3a ycBOraBaHe Ha cbDbprkaunTe Ce B Tnx cyPOBHH.
He n3xBbprnTe n3MepBaTeHnTe ypeu n 6aTePnTe npn 6ntOBnTe OTnaDb- u!
Camo 3a ctpan no EC:
CbIaCHO eBponecka dIpeKTnBa 2012/19/EC 3a cTapnte eIekTpueckn H eIekTPOHNH ypeN HneHOTo TpaHCnOpTnpahe B HaunOHALHO TpaBO H3MepBaTeHNHTe ypeN, KOI TO He MoRat da ce nol3BaT nobuee, a cbIacHO eBponecka dIpeKTnBa 2006/66/EO IOBpeDeHn nn n3xaBeHn obNKHOBeHn nn akymylatopHn 6aTePnH, TpaDa da ce cb6n-paT n pedeBaT 3a onon3OTBOPraBaHe Ha CbDbprkaUnte Ce bTAX cypOBHH.
Pn HnpaBnHO n3xBpIHe CTapnte eJekTpueckn I eJektpoHn ypei npaN Bb3MOxHOTo HaIuHne Ha onaChn BeIecTbMa Moat Da OKaKaT BpeHN BIIaHnBbpy OkonHaTa CpeDa N OBeWkoTo 3dpaBe.
MaKeDoHcKn
Бe36eДнОСиНаПOMЕн

CnTe ynatCTBa Tpe6a Da ce npoHTaT n Da CE BHMaba Ha HNB, 3a Da moKe 6e36eNo n 6e3 onachOCT da pa60HTe co MEPHnotypei. Dokonky MEPHnotypei He ce KopncTH cornacho npnoXeHnte HHcTpyKun, MoKe Da ce hapuHn FyHKunjata Ha BrpaedeHte 3aHTtHm MexaHN3Mn BO MEPHnotypei. He rN
owTeyBaJTe haleennnntte 3a npdeynpeyBahe. IO6PO CUYBAJTE HOBNE YIATCTBA I INPEDADETEN3AEHNO COMEPHNOT YPEI.
272 MaKeDoHcKn
BHHMaHHe -doKoNky KopnCTnTe dpyrH ypeH 3a noDecyBaBe n paKyBaBe OCBeH OBd He HabeDeHnE Hn NOnHaKBn NoCTaKN, OBA MoKe Da DoBeDe Do onaCha H3IOXeHocT Ha 3paueHe.
MepHnot ypeI ce nCnpaUyBa co 03HaKa 3a npEynpeDyBaBe 3a IacepoT (O3NaueHO Ha npKAc3OT Ha MEPHnot ypeI ha rpaΦnukata cTpHa).
Iokonky TeKcTOT Ha 03HaKaTa 3a npedynpeyBaHe 3a nacepot He e Ha BaHnot ja3NK, Bp3 Hero 3aneneTe ja HanenHHcaTa Ha BaHnot ja3NK nped npbata ynotpe6a.
He ro hacouybajte nacepcknot 3paK KOH IHHa HnH XHBOTHN HemojTe H Bne camnte da rIeDATE BO dIpeKTHNOT Hn peKTHpauchnot nacepckn 3paK. Taka MoKeJa ra 3acJeNTe IInuata, da npEiIN3BnKate Heceke Nn Da rN OWTETe OHTe.
Iokonky nacepcknot 3paK Docnee do ouHTe, BeDnau Tpe6a da rN 3aTbOpHTe N da ja TprHete rnaBata od nacepcknot 3paK.
He npabete npomeHn ha nacepcknoTypeI.
He rH Kopnctete nacepcknte 3aHTTHn Ounna (doonnnenHa onpema) KaKo 3aHTTHn OUnna. Nacepcknte 3aHTTHn OUnna cnjxat 3a noD6po paCno3HaBaHe Ha nacepcknot 3paK; cenak, Tne He wTNTAT od nacepckTO 3pauehe.
He rKopnctete Nacepcknte 3aunTHH ouHna (DOnonHnTeHa onpeMa) KaKo ouHna 3a coHcne Hn nak BO COO6paKaJot. Nacepcknte ouHna He daBaat cenocHa UV-3aHTtA n To HAManyBaat npen03HaBaHbeto Ha bOn.
MepHnot ypeD cMee da ce nonpaBa cAmo od cTpaHa Ha KBaHnΦHKyBaH cTpyeH nepcoHAn h cAmo co opHrHAnHn pe3epBHN deNoB. CAmo Ha ToJ HauHH Ke 6nnde TcIgyn BO 6e36eHnOCTa Ha MEPHnot ypei.
He rno octabaje deuata da ro kopncat nacepcknot mepen ype3 ha30p. Be3 Hau3Op, Tne moke da ce 3acnenat ce6ecn nn npytn nua.
He pa6oTeTe co MEPnHOT ypeD BO OKONHa KaDe NocTOn ONaCHOCT Oeknno3nJa, KaDe HMa 3anAnHB TeuHcTn, RaC Hnn npaunHa. MePNOT ypeD CO3daBa HcKpN, KOH MoKe da ja 3anAnat PpaBtA Hnnpaepata.
He ro npnhecybajte mharot BO 6n3nHa Ha HmPnAHTn Hn DpyrH MeuHHckn ypeH, Ha np. nejcmejkepn Hn HhCynHcKa nymna. Marhot COzdaBnOne, Koe moKe da ja hapuyn FyHKunjata Ha HmPnAHTnte Hn MeuHHckTe ypeH.
Држete ro Мернот уред поалесу od marheTHN Hocauн Ha noaTouH uypeH uYBCTBHTENH Ha Marhet. Поради вилданeto Ha marhetOT можда дою HeNoBpaTHO rybebeHa noaToUTe.
Onnc Ha npon3BODOT n nepopmaHcnte
BHHMaBaJTe Ha cInKInTe BO ppeHnOt DeI Ha yNaTcBTo 3a KopncTeHe.
YnOTope6a co COoDBeTHa HameHa
MepHnOT ypeI e HameHET 3a OndpeyBaIbe I npOBepKa Ha XOpN3OHTaIIH N3paMHyBaIbe KaKo Ha npIMeP TOckn Ha BepTKkanaTata.
Mepnnotypee norOen 3a KopncTeHbe BO BHaTpeuHn HaBopeuHn npocToP.
Nlyctpaunja Ha KOMNOHETN
HymepnpaheTo Ha cInKte CO KOMnoHeHTn ce OndecyBa Ha npka3OT Ha MepHnot ypeHa rpaqnuKaTcSTpAHnca.
(1) 3neHOTBOp3aIacepcknO3paK
(2)П配电инувачзыВКлuyуВаьe/нckлuyыВаьe
(3)MaHHeTCKnpoTaUHOHeHdpKaU
(4)ПрфраТ Ha cTaTnBOT 1/4"
(5) Φικυραῦς Ḍακακότος πρεραίατα 3a δατερη
(6) Kanak Ha nperpadaata 3a 6atepn
(7) MarHET
(8)HaTnnc 3a npdeynpeyBaHbe Ha nacepot
(9) Cepnck6poj
(10) Nacepckn 3aHTHn Ounna a)
(11) CtANB
(12) 3aHTnTHaYHaTa
a) NynyctpnpaHaTa Hn OnnHaHa Onpema He e JeOn CTaNapdHnot 6em Ha Hcnopaka. Lenochata onpema Moke da ja HajdeTe BO Hauata Pporpama 3a onpema.
274 MaKeDoHcKn
TexHnUKN noDaToCuN
Ctabahe/MehybaheHa6atepnn
3a paBoTa co MePnHOT ypeI ce npenopayBa KOpNCTeHbe Ha aIKaJIHO-MaHraHcKn 6bATEpHi.
3aBpTeTe ro eBentyaIHO MaHHeTcKnOT pOtauHOHe IprKaU (3) HAcTpapaHa Taka 7TO KanaKoT Ha npErpaData 3a 6aTeepn (6) cNoobDoHo Ke IerHe.
3a da ro OTBOpHTe KaNAKOT od nperpaTa 3a 6atePN (6) npTnCHeTe Ha MexaHn3MOT 3a 3akIyUyBaHe (5) Harope n 3BaJeTe ro KaNAKOT od nperpaTa 3a 6atePN. CTabeTe rN 6atePNTE.
PnToa BnMaBajTe Ha NIOOBte Cnopei npKa3OT Ha BHaTpeHHaTa CTpaHa Ond pnerpaIata 3a 6atepi.
IocTaBete ro kanaKOT ha nperepaData 3a 6atepn (6) NOBTOPO H CBpCTO pINTCHeTe Ro Ha 03HaueHOTo MeCTO Hd MExaHn3MOT 3a 3aknyuBaHe (5).
Ako 6atepnite ocna6ybaat, cBeTnocta Ha Iacepcknte TouKn NoneKa ce HamaNyBa.
Iokonky 6atepnite ce ckopo ncpa3HeH, toraw Iacepcknte TouKn TpeNkaat 5× B MNHyTa.
Iokolky batepHnte ce npa3n, nacepckte TouKn TpeKaaT yuTe eHaaw, nped da ce NCKnyuMepHnot ypei.
Cekora3aMeHyBaJTe rncnTe batepHn oedHa. Kopnctete camo batepHn od eH npOn3BODHTe n co nCT KanaunTe.
276 MaKeDoHcKn
Ako He ro KopnCTHte MepHnotypeed noDOnro BpeMe, n3BaTe r6aTePnHte.
Pn noonro cknadnpaBe BO MepHnoT ypei, 6atepnte MoKe da KopoHaat n da ce Hcnpa3HaT.
Ynotpe6a
CTabaBe Bo ynotpe6a
3aHTTeTe ro MEPHnot ypeoB Bnara H nIpeKTHO hNoKyBaBe Ha coHueBn 3paun.
He ro n3noxyBajTe MepHnot ypeHa ekCTpeMHn TemnepaTyprn Hn HAp. He ro octabaje DoIro Bpeme Bo aBTOMoHIOr. Pn rOleMn TemnepaTyprn OCuHaun, OCTabeTe Ro MepHnot ypei npBO da ce akImatn3npa n HanpaBeTe npOBepka 3a ToUHOCTa cekoraaw ppeJa npOdoJXHTe co pa6ota (BnuN ,KoHTPOna Ha ToUHOCTa Ha MepHnot ypeD", CtpaHnca 277). Pn ekCTpeMHn TemnepaTyprn HIn TemnepaTyprn OCuHaun, npeun3HoCTa Ha MEPHnot ypeD MoKe Da Ce HapuHn.
M36erHybajte ydapn n npeBpTyBaHa ha MEPHnot ypei. IIO cnHn HauBopeuHn BInjahnJa Ha MEPHnot ypei, nped Da ro ynoTpe6nte 3a pa6ota, cekoraW n3BpweTe KOHTpOla Ha ToUHOCTa (BnDn ,KOHTpOla Ha ToUHOCTa Ha MEPHnot ypei, CtpaHua 277).
Ncknyuete ro MEPHnot ype3a BpeMe Ha TpaHcnpTo. Pn NcknyuBaHeTo, ce 6loKupa ocunnnpaqukaT a edHHua, Koja 6n ce oWTeTnla npn HHTeH3NBn DnHexeHa.
BknyuBaBe/HCKnyuBaBe
3a BknyBaBe Ha MEPHnot ypeI npHTncHeTe Ha npeKnHyBaOT 3a BknyBaBe/ NCKnyBaBe (2) BO nO3njuja ON. BeHaaw no BKnyBaHeto, MEPHnot ypeI nyTu Ta Nacepckn nnHHOn OD n3Ne3HNte OTBOPN (1).
He ro hacouybajte 3paKOT CBETNIHa KOH NIIa HNN XNBOTNn He norneHybajTe dIpeKTHO BO Hero,dyprn HN od rOleMa oDlaNeueHoCT.
3a ncknyybahe Ha MEPHNOT ypeI npHTNCHETe rO ppeKNHyBaOT 3a BknyyBahe/ ncknyybahe (2) BO no3njuJA OFF. Ppr ncknyyBaHe, ocunnpaKaTa eHnua ce 6noknpa.
He ro octabajte BknyeHnOT Mepeh ype63 na30p n NcknyeTe ro no ynotpe6ata. Dpyrnte Inuca Moke da ce 3acnenat od nacepcknO 3paK.
Пи НдмнHyBaHe Na HajВисКаТДоЗВОлeHa pa6ToHа TemпepaTypa od 45°C ce NCKnyuBa 3apAn 3aStHTa Ha IacepKaTДnoJa. OTKako Ke ce onaДи, МернOT ypeI e NOBTOpHO NOIroTBEN 3a pa6ToA И мОже OДНОБДа ce BKnyuN.
ABTomatikaHa ncknyuBahe
MepHnOT ypea bTOMaTcK Ce hcknyuBa no 60 min pa6ota.
A B T O M A T N K A T A 3a N C K N U Y B A H E C e p e c e T n p a H a 60 min DOKO N K Y B K N U Y E H N O T M e p e h y p e d c e H a o r a H a n B O P O D N O N E T O H a c a m O H N B E N I P A H e (I nacepcknte T o u k n T p e n K a a T noctoj a h o).
ABTomatika 3a HnBennpahe
IocTabeTe ro MepHnOT ypei Ha xOpH3OHTaIIHa, cBpCTa IopNOra, npuCBpCTe Ro Ha CTaTHBOT (11).
3a KopncTeHe Ha DoHnHaTaNacepcka TOnka CBpTeTe r MePHNOT ypeH Ha MaHETCKNOT potaHNoHEn DpKaay (3) TaKa ITo Nacepckata ToKca e BnINbHa NoIOT.
IbKnyBaBeTo, aBtOMaTHKaTa 3a HnBeHnPaHbe aBtOMaTcKn rN n3paMHyBa HepamHHHTe BO NOJIeTO Ha cAMOnHBeHnPaHbe Od ±4°. HnBeHnPaHBeTo e 3aBpSeHO WtOM NacepCKHe TOUKN CBetAT NocToJaHO Hc Ce DnKsT NobKe.
ДOKOLKY He e BO3MOxHObA BToMaTcKo HnBeInHpAbe,Ha np. 6nIeJKn noIOnorata Ha MepHnot ypeD OTCTaNYBa NOBeKe oD 4^ od xOpH3OHTaNaTAt, IacepckHe TOUKN TpeNkaat nocTojano H 6p30.
Bo BaKOB cIyuj, noCTaBete ro MEPHnot ypeD xOpN3OHTaIHO nNouekajTe ro camOHnBEInHpAbeTo. UToM Ke ce Hajde MEPHnot ypeD BO NoJeTO Ha camOHnBEInHpAbe Od ± 4^ IacepCKte TOUKN CBetat NoctoJaHo.
PnBn6paun nn npomeHa nnoo6aTa 3a BpeMe Ha pa6oTa, MeHnOT ypeI NOBTOPOCe HNBENIPA aBTOMaTcKn. IIO NOBTOPO HNBENIPAe, IpOBepTe ja I03njuTa Ha XOpNtOHTaHInTE OdH. BepTKaHInTE NacepCKn TOOKn BO OJHOC Ha pepepeENTHnTE ToUKN, 3a Da Ce N36eHnat rpeWKnTE pnI NOMeCTyBaHe Ha MePHNOYpeI.
KoHTpOHa Ha ToUHocTa Ha MepHnOT ypeI
Bnjuhna ha TouHocta
Hajronemo BnjaHne BpHn OKoHnTa Tempeatypa. OcoBeH TeemepaTpHnte pa3nKn KOH Ce DnKxAT OD NODT HArOpE MoKe Da rO pHeacOuAT NacepckNt 3paK.
BnndejKn TemnepaTyPhNte pa3nKn ce Hajrolemn BO 6n3Ha ha nOoT, MepHnot ypeD TpeBa cekoraa da ce moHTnpa Ha ctaTIN bNoHyBaJkn Od MepHaTa nnHja od 20 m. DOKONky e Bo3MOxHo, NoCTaByBaTe ro MepHnot ypeD BO cpeHHata Ha pa6oTHata NOBpUnHa.
Ocben haBopeuHnTe BnjuHnJa,doOTcanyBaHe MoKe da IOBeaT N BnjuHnJaTa CneunpnuHn 3a ypeoT (kako Ha np. Naobn nn jaKn yapn). 3aToa, nped cekoj NoweK Ha paobota npOBepete ja TOnHOCTa Ha HNBEnpaBeto.
278 MaKeDoHcKn
Дokолу пи Нека од поверкпе Мернот урето наdmнe MaKcmaHOTO OTCTanyBaHe, Toraш Тpe6а д ce nonpaBn Od CTpaHa Ha cepBnchata cnj6a Ha Bosch.
KoHTpOHa Ha xOpH3OHTaIIHATA ToUHOCT npH HbElnpaHe
3a npoBepkata noTpe6Ha Bn e cnoBoHa MePHa nnHnja od 5 m Ha uBpcta nOJIora nomery Dba sHa A n B.
-MoHTnpajTe ro MEPHnot ypeI BO 6n3nHa ha sIoT A Ha eJeH cTaINB nII NOCTaBeTe ro Ha zBpctA, pamHa noDnora. Bknyuete ro MEPHnot ypeI.

-Hacouete ro xopn3oHTaHnOT nacepckn 3paK, KOJ NOMHyBa npaIenHO Ha dOJIKNHcKaT a OcKa ha MePNOT ypei,Ha 6IINCKNt sUd A.OCTaBete ro MepHnOT ypei da ce H3HNBeHnPa. O3NaueTe ja cpeHHata Ha nacepckata ToUka Ha sUdOT (ToUka I).
-Cbptete ro mepnot ype 3a 180^ ,octabeTe ro da ce hnei npa n 03haeTe ja cpeHHata Ha tokata Ha nacepcknoT 3paK Ha cnpoTnBnO TnB (Toyka II).
- IocTabete ro MEPHnot ypei - 6e3 da ro BPTnte - BO 6n3Ha Ha sIOT B, BKnyeTe ro H octabete ro da ce HnBeInnpa.
- IocTabeTe ro MEPnOt ypei no BucnHa (co nOMoH ha ctaHBOT HnN eBHTyaHNO Co nOJorata), taka 7TO CpeDInHata Ha TOnKaTa Ha NacepcknOT 3paK ToUHO Ke ja NOrOHN pTeXoIHO O3NaueHATA ToUka II Ha sIodT B.

-CBPTeTo MepHnOt ypeI 3a 180^ 6e3 da ja npomeHnte BncnHata. Octabete ro da ce n3HNBeInpa H O3HaueTe ja cpeiHaT ha ToKata Ha NacepckNt 3paK Ha sNDOT A (ToUka III). BHMabajTe Ha Toa, ToKata III da Jexn ITO e MOxHo NOBepTKaIIHO HaOdH. NOd ToKata I.
- Pa3nKata d Ha DBeTe 03HaueHn TouKn I n III Ha SndOT A ro daBa paKtNcKTo OTCTanyBaHe oD BnCHHaTa Ha MePHNOypeI.
Ha MepHa IHHJa oD 2 x 5 m = 10 m MaKcHMaJIHOTo IO3BOJeHO OTOCTaNyBaIbe H3HeCyBa: 10 m x ±0,35 mm/m = ±3,5 mm. Pa3IIkata d MeIy ToUKeIe I n III cMee Ja I3HeCyBa HajMHory 3,5 mm.
GPL 5 G: NOBTOpeTe ja MEPHaT a NoCTaK a 3a Dbata CtpaHnU H nacepck 3paKa, KOI NOMHyBaAT DOJX NOnpeHATA OcKa Ha MEPHnot ypei. BpTeTe rO MEPHnot ypei nped NOeTOKOT ha MEPHATA NoCTaK a 3a 90^ BO npaBeu cnpotINBEH Ha CTpeKNITE Ha YacOBHNKT.
www.bosch-pt.com/serviceaddresses
OtctpaHyBaBe
MepnTe ypeH, onpemata n ambaJxte TpeBa da ce otctpaHaT ha ekonouKn npaTnB NaH.
He r npajte mepnnte ypeu n 6aTepnnte BO domaunata kaHTa 3a f6pe!
Cama 3a 3emjnte oEY:
CnopeeBpOncKaIaHneKTHBa 2012/19/EU 3a cTapn eNeKtpnHn HneKtpoHcKn ypeiHNBHaTa yNoTppeBa BO HaunohAnHOTo 3aKOnHOAbCTBO, MepHnte ypeiH To ce BOH yNoTppeBa IdeFeKTHTHe IHH NCKOpNCTeHNTE 6aTePNH CnopeD HneKTHBaTa 2006/66/EC Mopa OndenHo Da ce cObepat n da ce peuKNIPAaT 3a NOBTOpa yNoTppeBa.
Дokолу ce otCTpaHyBaat HnnpaBnHNo, eNeKtpnHaTaN eNeKtpoHcKaTOnpema MoKe Da NMaat WTeTHN BnJaHJa Bp3 JxHBOTHaTcpeDHa N 3dpaBJeTo Ha lyfeTo nopadi MOxHOTI pncycTO Ha ONaCn MaTePn.
Srpski
www.bosch-pt.com/serviceaddresses
Uklanjanje dubreta
Merni alati, pribor i ambalaža treba da se uključe u reciklažu koja odgovara zašitičovekove okoline.
www.bosch-pt.com/serviceaddresses
Odlaganje
Merilne naprave, pribor in embalazo oddajte v okolju prijazno recikliranje.
Merilnih naprav in baterij ne smete odvreci med gospodinjske oppadke!
306 | Hrvatski
www.bosch-pt.com/serviceaddresses
Zbrinjavanje
Mjerne alate, pribor i ambalažu treba dovesti na ekoloski prihvatljivo recikliranje.
Mjerne alate i baterije ne bacajte u kučni otpad!
Samo za zemlje EU:
U skladu s europskom Direktivom 2012/19/EU o elektricnim i elektronickim starim uredajima i njihovom provedbom u nacionalno pravo neupotrebljivi mjrni alati i u skladu s europskom Direktivom 2006/66/EZ neispravne ili istrosene aku-baterije/baterije moraju se odvojeno sakapljati i dovesti na ekoloski prihvatljivo recikliranje.
U slučaju nepravilnog zbrinjavanja elektrčni i elektronički stari uredaji mogu imati štete učinke na okolis i ljudsko zdravlje zbog moguce prisutnosti opasnih tvari.
Eesti
Ohutusnöuded

www.bosch-pt.com/serviceaddresses
Jäätmekäitlus
www.bosch-pt.com/serviceaddresses
Atbrivosanas no nolietotajiem izstradajumiem
Nolietotie merinstrumenti, to piederumi un iesainojuma materiali japarstrada apkartejai videi nekaitiga veida.
Neizmetiet mérinstrumentu un baterijas sadzives atkritumu tvertné!
Tikai EK valstim.
Saskaña ar Eiropas Savienibas direktivu 2012/19/ES par nolietotajam elektriskajam un elektroniskajam iericem un sis direktivas atspogulojumiem nacionalaja likumdoşana, lietoşanai nederigas miericeres un saskaña ar Eiropas Savienibas direktivu 2006/66/EK, bojati vai izlietoti akumulatori/baterijas ir jasavac atseviski un janogadā otrreizejai pärstradei apkartējai videi nekaitīgā veidā.
Ja elektriskas un elektroniskas ierices netiek atbilstosi utilizetas, tãs var kaitet videi un cilveku veselibai iespejamas bistamo vielu klatabutnes del.
Lietuvičk.
Saugos nuorodos

www.bosch-pt.com/serviceaddresses