EXO-S - Drill HILTI - Free user manual and instructions
Find the device manual for free EXO-S HILTI in PDF.
| Product type | Passive exoskeleton |
| Brand | Hilti |
| Model | EXO-S |
| Intended use | Relieve arms and shoulder girdle during overhead or above-shoulder work |
| Dimensions (L x W x H) | 950 mm x 450 mm x 250 mm |
| Weight | 2.4 kg |
| Operating temperature | -10 °C to 45 °C |
| Storage temperature | -10 °C to 60 °C |
| Main materials | Aluminum, plastic, magnets |
| Main adjustments | Assistance force, height of articulated modules, width of sub-abdominal strap, position of arm shells |
| Adjustable assistance force | Yes, via knob (graduation from - to +) |
| Maintenance and cleaning | Clean with a damp cloth and pH-neutral soap; do not use compressed air or silicone cleaners |
| Cleaning cushions | Remove cushions, hand wash with pH-neutral soap, rinse and air dry |
| Spare parts available | Yes: arm cushions, arm shell straps, neck support, etc. (Hilti Store) |
| Repairability | Repair by Hilti customer service only; do not disassemble articulated modules |
| Safety | Strong magnets: contraindicated for wearers of pacemakers or active implants; maintain distance > 100 mm |
| Medical contraindications | Musculoskeletal disorders, skin lesions, sensory or circulatory disorders |
| Number of sizes | 2 sizes (EXO-S and EXO-S L) |
| Delivery contents | Exoskeleton, instruction manual |
| Manufacturer warranty | Consult Hilti customer service |
Frequently Asked Questions - EXO-S HILTI
User questions about EXO-S HILTI
0 question about this device. Answer the ones you know or ask your own.
Ask a new question about this device
Download the instructions for your Drill in PDF format for free! Find your manual EXO-S - HILTI and take your electronic device back in hand. On this page are published all the documents necessary for the use of your device. EXO-S by HILTI.
USER MANUAL EXO-S HILTI
Original operating instructions
1 Information about the operating instructions
1.1 About these operating instructions
- Read these operating instructions before the product is used or operated for the first time. This is a prerequisite for safe, trouble-free handling and use of the product.
- Observe the safety instructions and warnings in these operating instructions and on the product.
- Always keep the operating instructions with the product and make sure that the product is accompanied by these operating instructions only, when the product is given to other persons.
1.2 Explanation of symbols
1.2.1Warnings
Warnings alert persons to hazards that occur when handling or using the product. The following signal words are used:

DANGER
DANGER!
Draws attention to imminent danger that will lead to serious personal injury or fatality.

WARNING
WARNING!
Draws attention to a potential threat of danger that can lead to serious injury or fatality.

CAUTION
CAUTION!
Draws attention to a potentially dangerous situation that could lead to personal injury or damage to the equipment or other property.
1.2.2 Symbols in the operating instructions
The following symbols are used in these operating instructions:

Comply with the operating instructions

Instructions for use and other useful information

Dealing with recyclable materials
1.2.3 Symbols in illustrations
The following symbols are used in illustrations:
| 2 | These numbers refer to the illustrations at the beginning of these operating instructions. |
| 3 | The numbering reflects the sequence of operations shown in the illustrations and may deviate from the steps described in the text. |
| 11 | Item reference numbers are used in the overview illustration and refer to the numbers used in the key in the product overview section. |
| \(\text{©!}\) | This symbol is intended to draw your special attention to certain points for handling the product. |
1.3 Product-dependent symbols
1.3.1 Symbols on the product
The following symbols can be used on the product:

The power tool supports near-field communication (NFC) technology, which is compatible with iOS and Android platforms.

Warning: Magnetic field
1.4 Product information
products are designed for professional users and only trained, authorized personnel are permitted to operate, service and maintain the products. This personnel must be specifically informed about the possible hazards. The product and its ancillary equipment can present hazards if used incorrectly by untrained personnel or if used not in accordance with the intended use. The type designation and serial number are printed on the rating plate.
- Write down the serial number in the table below. You will be required to state the product details when contacting Hilti Service or your local Hilti organization to inquire about the product.
Product information
| Exoskeleton EXO-S | EXO-S L | |
| Generation 01 | |
| Serial no. |
1.5 Declaration of conformity
The manufacturer declares, on his sole responsibility, that the product described here complies with the applicable legislation and standards. A copy of the declaration of conformity can be found at the end of this documentation.
The technical documentation is filed here:
Hilti Entwicklungsgesellschaft mbH | Tool Certification | Hiltistrasse 6 | D-86916 Kaufering, Germany
2 Safety
2.1 Safety instructions
WARNING Study all safety instructions and other instructions, images and technical data with which this product is provided. Failure to comply with the instructions below can cause serious injuries. Keep all safety precautions and instructions for future reference.
Personal safety
- The catches of the shoulder straps and the arm supports contain magnets. The magnets can affect cardiac pacemakers or comparable implants. A cardiac pacemaker can be switched to test mode and cause indisposition. Under certain circumstances, a defibrillator might cease to function. Wearers of devices of this nature should keep at least 100mm clear of the magnets. Warn wearers of devices of this nature to keep clear of magnets. These persons are not permitted to use the product.
- Wear suitable work clothes. Do not wear jewelry or loose clothing. Keep your hair, clothing and gloves away from moving parts. Loose clothes, jewelry or long hair can be snagged by moving parts.
- Avoid unusual body positions. Keep proper footing and balance at all times.
- Only persons who are familiar with it, who have been trained on how to use it safely and who understand the resulting hazards are permitted to use the tool.
- Keep children and other persons clear when the product is in use.
The product can be used by only one person.
Do not use the product to lower a person by rope or to secure a person.
Make sure that you do not snag with the product on fixed or movable objects. - Do not continue to use the exoskeleton if you experience discomfort, develop a rash or notice increased sensitivity of the skin.
- Do not use the product if your skin is damaged, for example by inflammations, rashes or raised scars. Chafing caused by straps and harnesses can worsen the condition of the skin.
Clean the arm-support pads when they are dirty and chafe. page 32 If the pads are bent over or worn out, consult Hilti Service. - Make sure that installed accessories do not impair function.
Product safety
- Avoid overstraining the load-bearing components. A sudden loss of function can lead to injuries. Use the product only within its specified limits.
Always check the product prior to use to ensure that it is in full working order, free of wear and undamaged. Do not continue to use the product after it has been dropped or if it is damaged. Contact Hilti Service. - To avoid damage, do not expose the product to sources of heat. Comply with the stated temperature limits for storage and operation.
3 Description
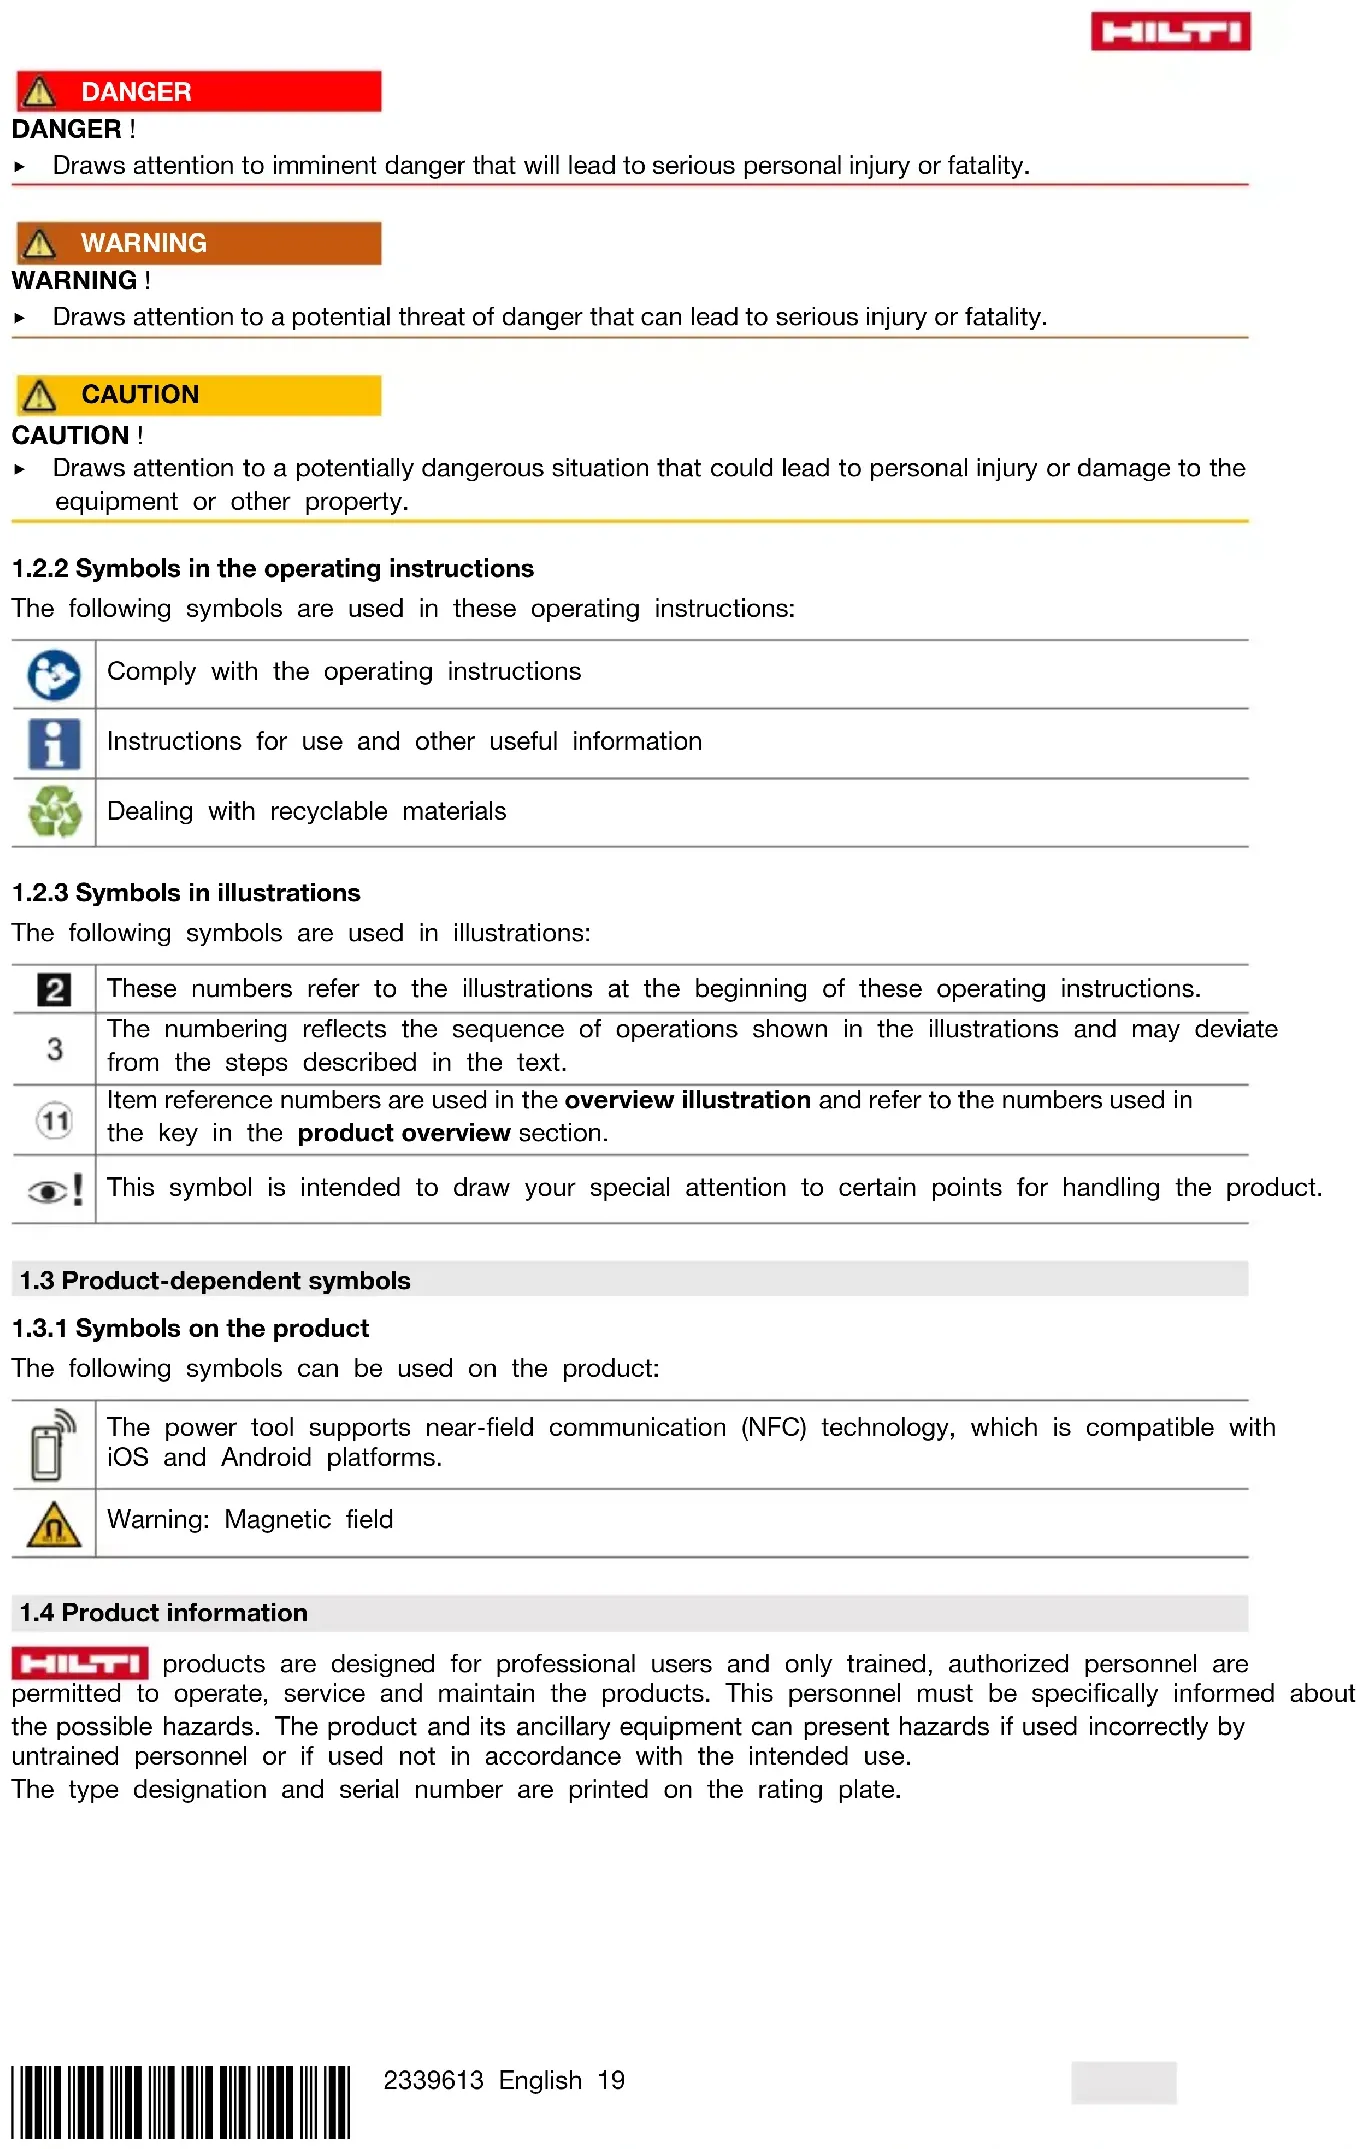
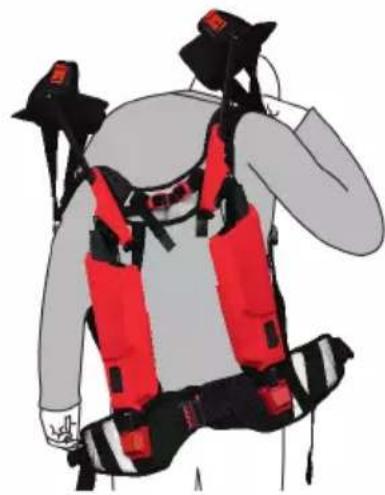
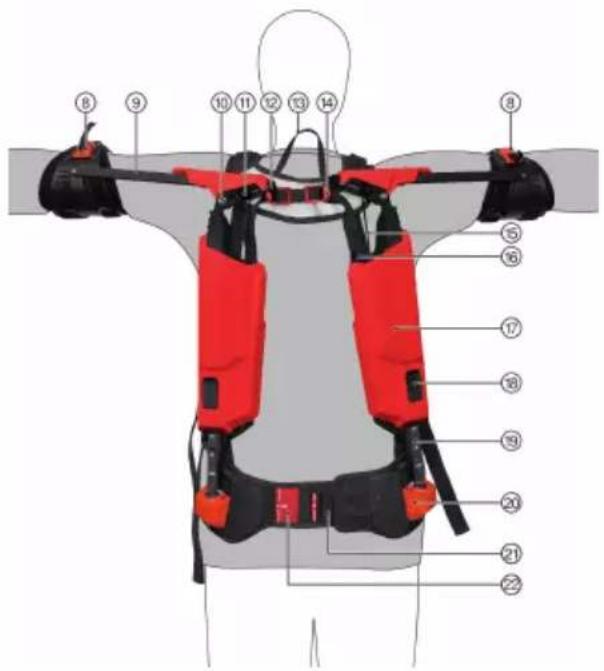
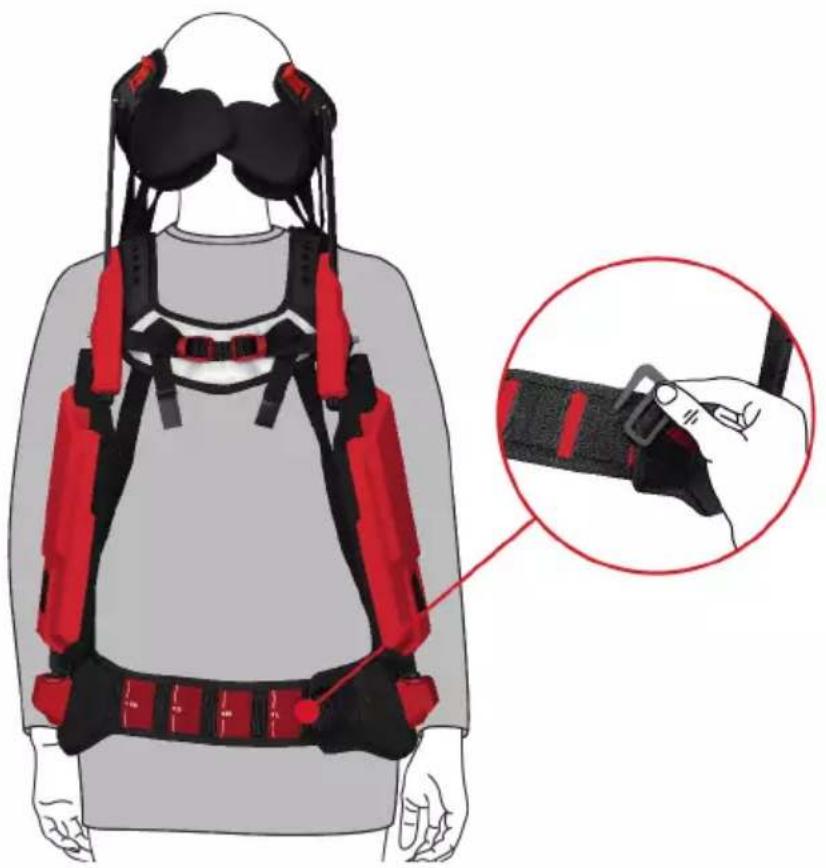
3.1 Product overview, front
① Chest strap
② Shoulder strap
③ Parked position, magnetic catch
④ Arm support with padding
⑤ Ladder-lock buckle, shoulder strap
Ladder-lock buckle, waist belt
⑦ Clip catch
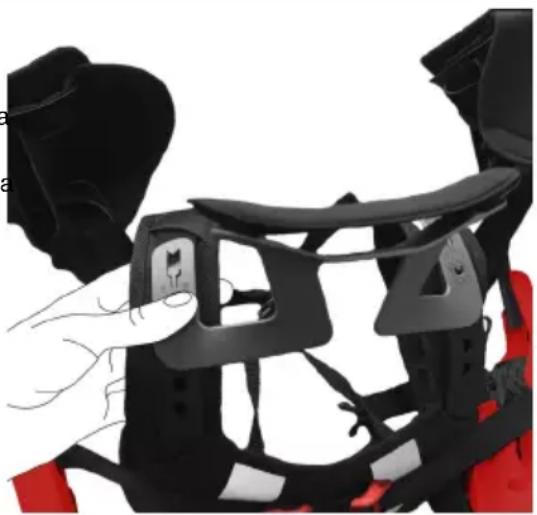
3.2 Product overview, rear

Magnetic catch
⑨ Arm-rail
Articulation unit
⑪ Relay roller
12 Adjusting knob for assistance
13 Hang-up loop
Ladder-lock buckle, tension cord
15 Expander
Back strap
Cover for expander
Release button, height adjuster
Aluminum profile
② Ball-joint mount
② Hook, spacing adjuster
② Spacing adjuster, ball-joint mount
3.3 Intended use
The product described is a passive exoskeleton. It is designed to relieve the strain on the arms and pectoral girdle during overhead and over-shoulder work. The product is to be used exclusively as an assistance system for working in construction and industry and only by adults.
Hilti offers the exoskeleton in two different sizes. The difference is in the size of the arm supports, arm pads and arm-support straps.
Maintenance work must be performed strictly in accordance with the product manual. The product is to be used and maintained only by trained, authorized personnel who have received special instruction regarding the hazards that may be encountered.
3.4 Restrictions on use and misuse
Do not use the product without user-specific product fitting.
Do not tamper with or modify the product and do not add accessories that are not approved for the product.
Do not attach anything to the waist belt that could impair correct operation of the exoskeleton. Do not attach tethers to the exoskeleton.
Do not use the product for performance enhancement and do not use it to lift, lower or secure persons.
Do not use the product in environments where there is a risk of explosion.
Do not use the product in proximity to high-voltage lines.
The product is not be used by persons
with cardiac pacemaker or comparable active implants,
- with pre-existing debilitating conditions of the musculoskeletal system in the area of the shoulders, arms, back and hands,
with skin diseases/injuries, inflammations; raised scars with swellings,
- with reddening and above-normal temperature in the body areas affected (arms, shoulders, hips and back),
- with pronounced varicose veins, especially with venous insufficiency, lymphatic drainage disorders - also unexplained soft-tissue swelling in parts of the body away from the product,
- with sensory and circulatory disorders in the area of the upper extremities, hips and back (e.g. diabetic neuropathy).
3.5 Items supplied
Exoskeleton, operating instructions
Other system products approved for use with this product can be found at your local Hilti Store or at: www.hilti.group
4 Technical data
| Weight | 2.4 kg (5.3 lb) |
| Ambient temperature for operation | -10 °C ... 45 °C (14 °F ... 113 °F) |
| Storage temperature | -10 °C ... 60 °C (14 °F ... 140 °F) |
| Dimensions (length x width x height) | 950 mm x 450 mm x 250 mm (37.4 in x 17.7 in x 9.8 in) |
5 Donning

WARNING
Risk of injury by magnetic field The magnets in the product create powerful magnetic fields that can affect implants and other items.
- Keep items such as active implants, electronic devices and magnetic stripe cards away from the product.
- Follow the manufacturer's instructions, for example in the case of active implants.
- Persons with active implants are permitted to use the product only after being cleared to do so by a physician.

CAUTION
Risk of injury if product is worn incorrectly or too tightly. Local pressure points and restrictions of blood vessels and nerves.
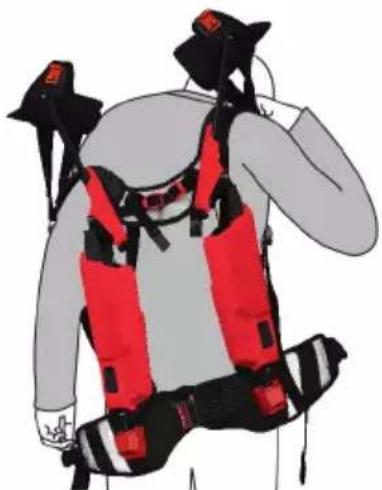
- Be sure to don and wear the product correctly.
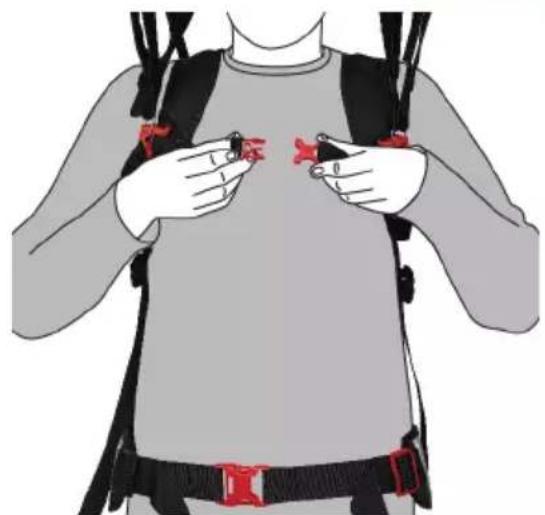
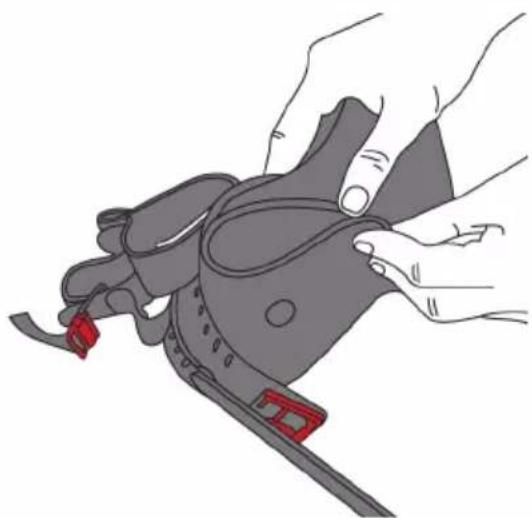
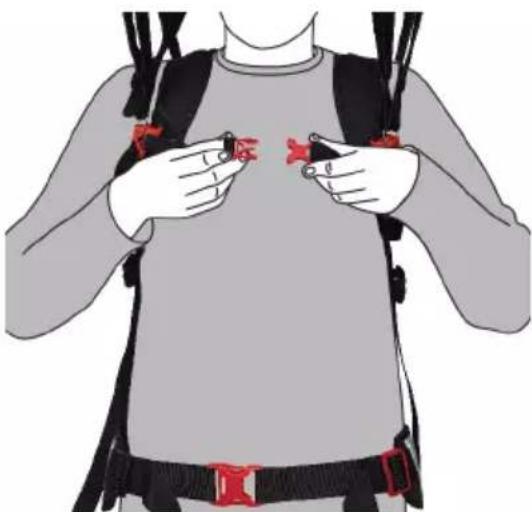
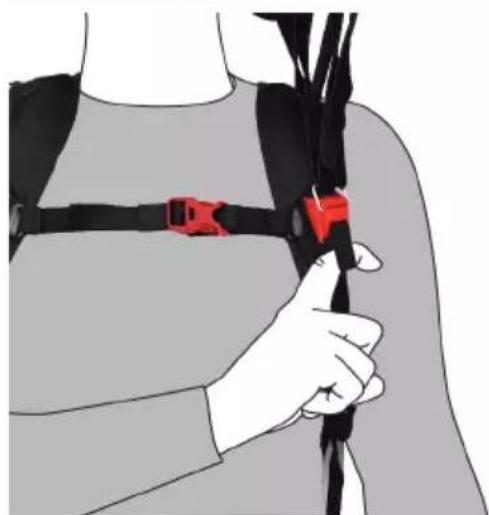
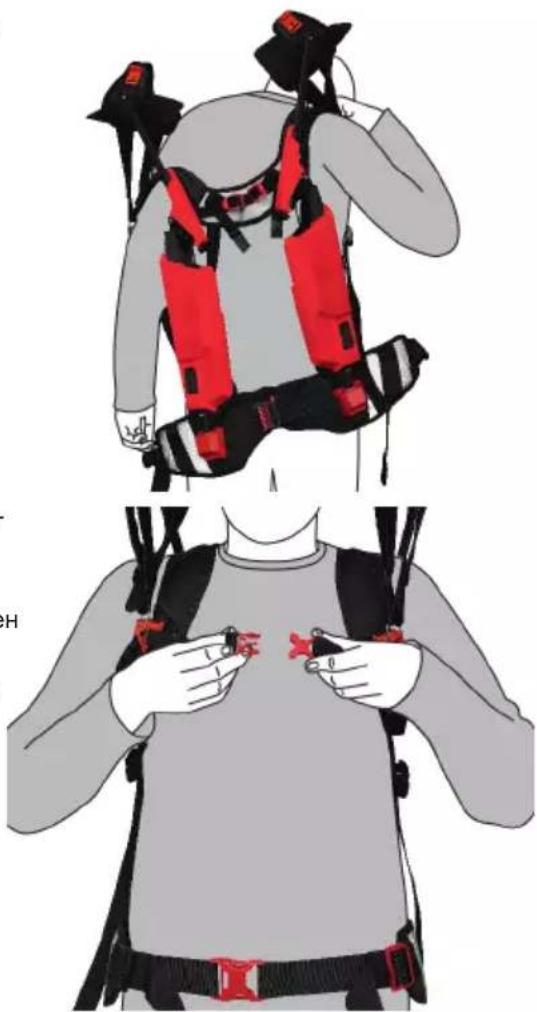
- Shrug the product on to your shoulders as if it were a backpack. Slip your arms through the shoulderstraps and position the shoulder straps on your shoulders.

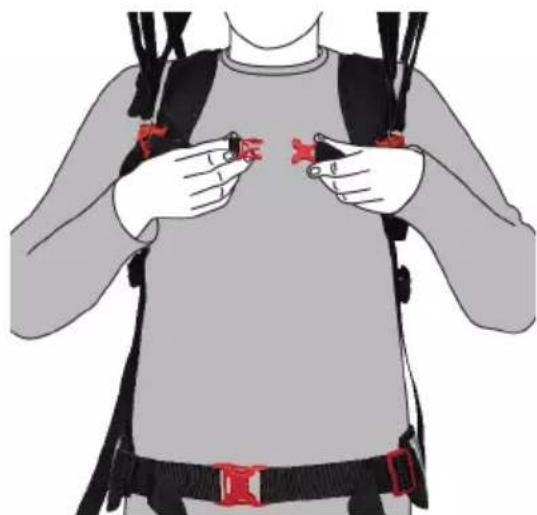
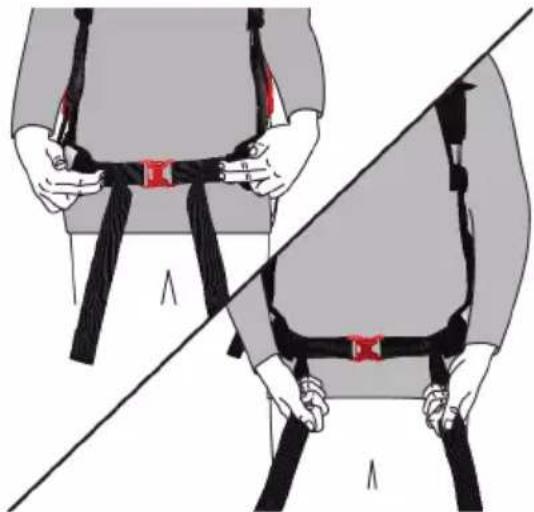
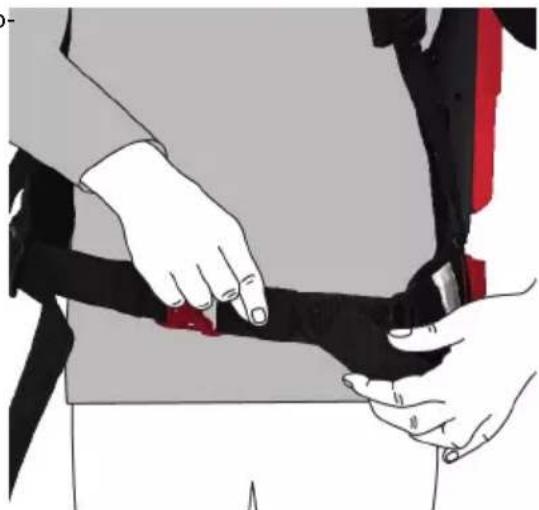
- Close the clip catch of the waist belt.
- Adjust the waist belt. page 26
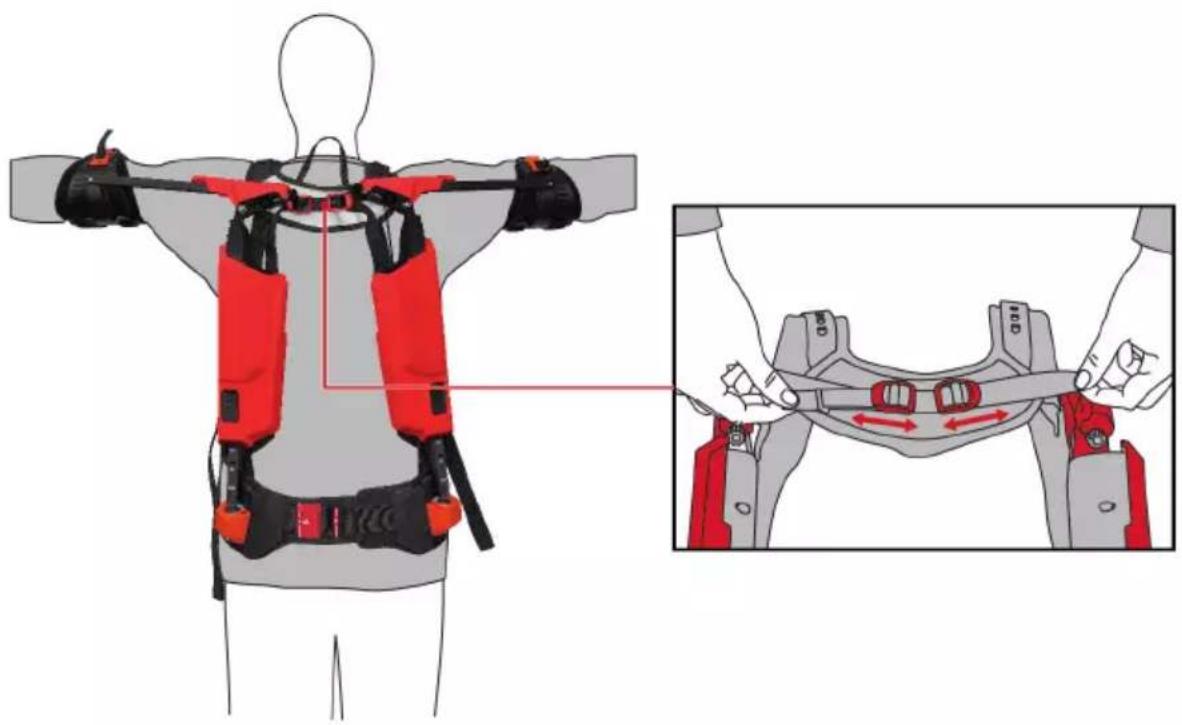
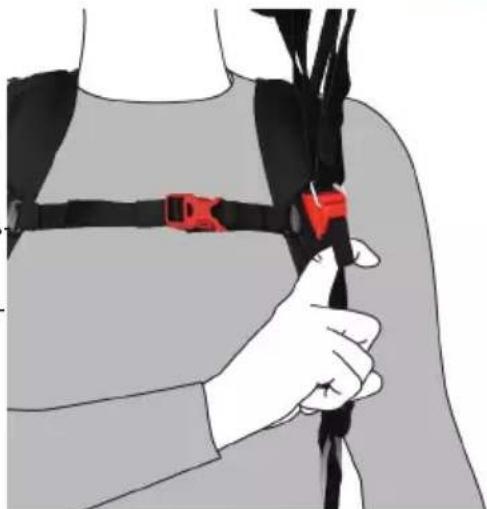
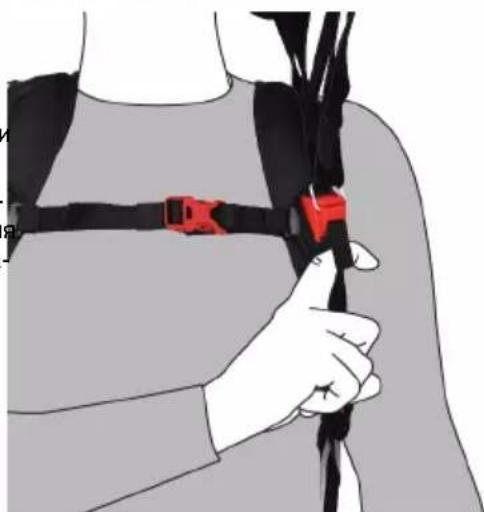
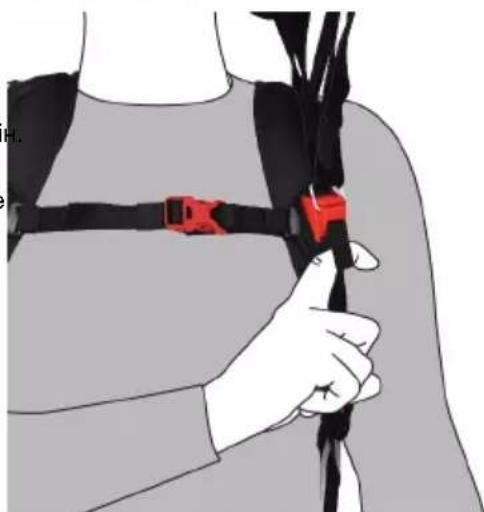
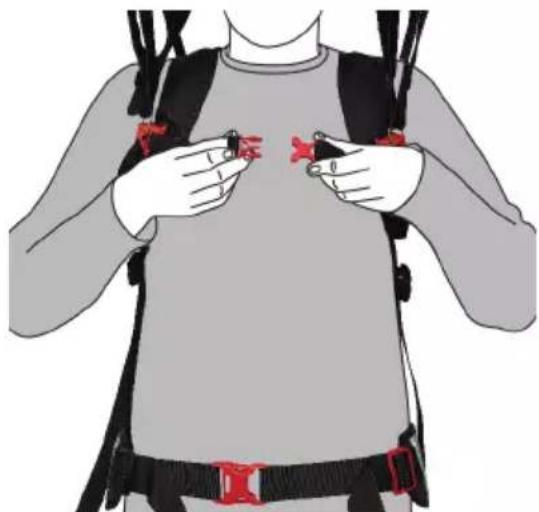
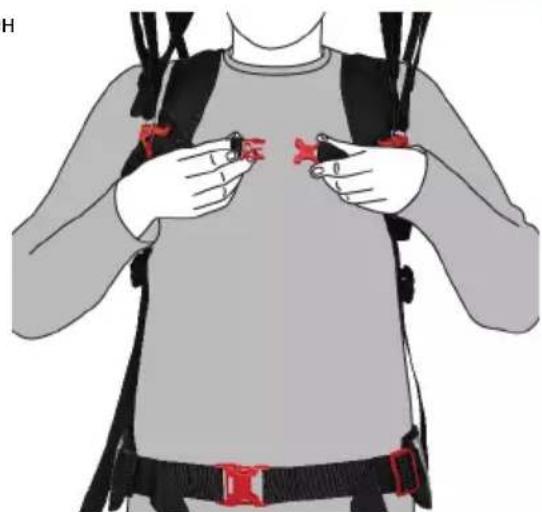
- Close the clip catch of the chest strap.
-
Adjust the height and the width of the chest strap.
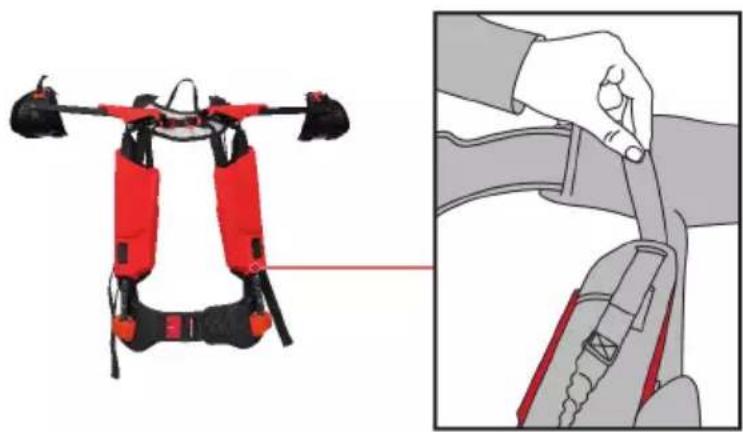
-
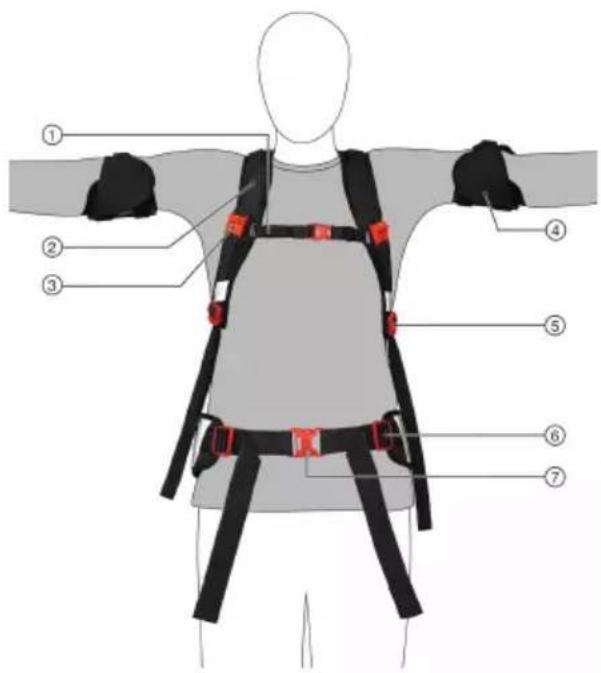
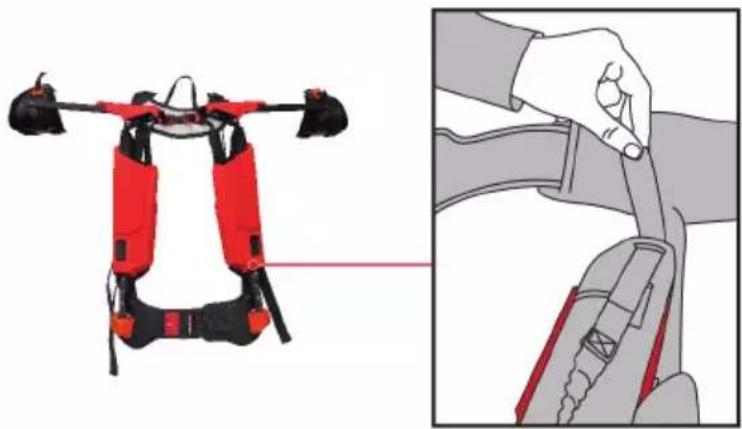
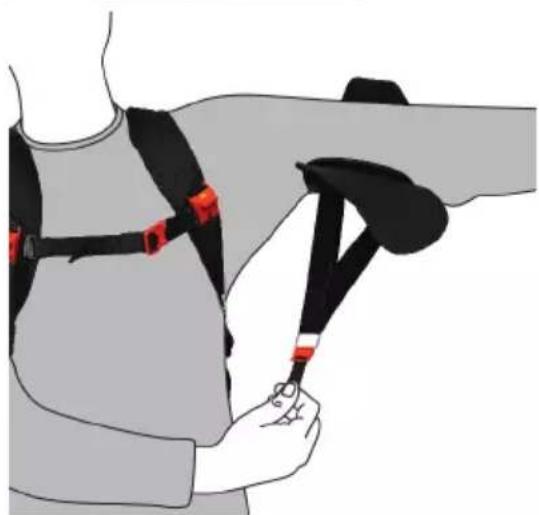
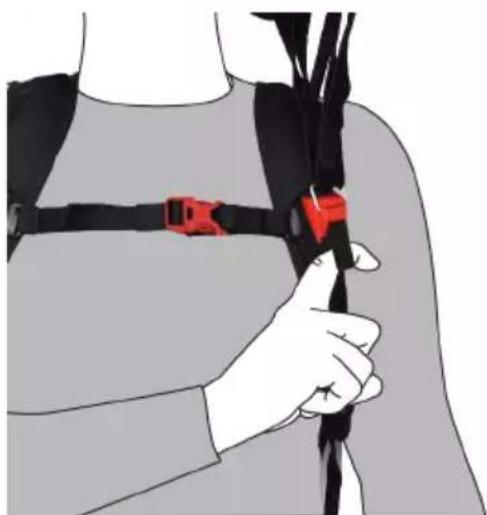
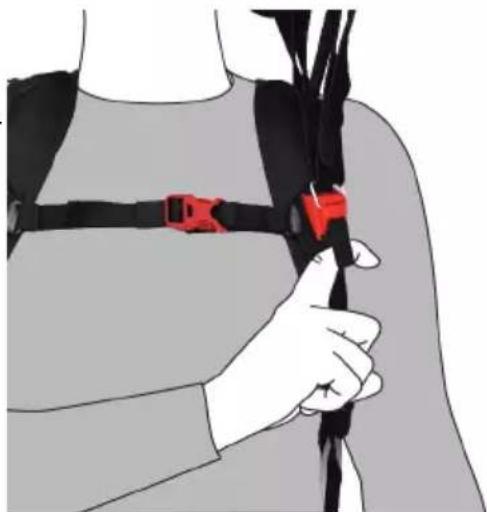
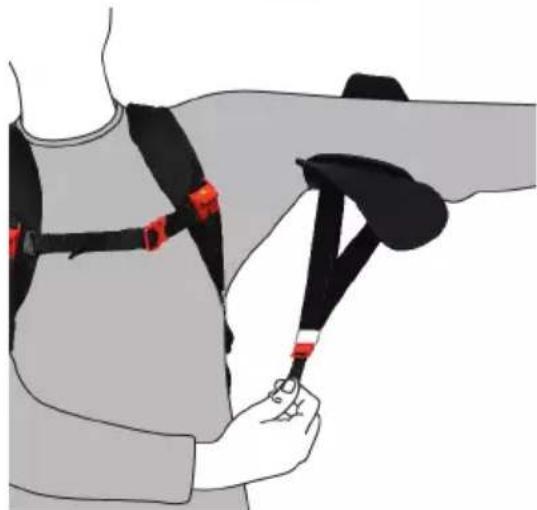
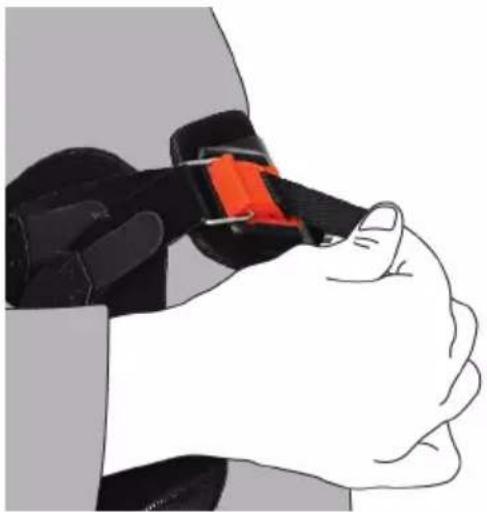
Adjust the shoulder straps. Pull the ends of the straps down to tighten the shoulder straps. To loosen the shoulder straps, tilt the ladder-lock buckle up.
The shoulder straps must sit loosely on your shoulders and should not hinder you from raising your arms.
- Raising your arms should not cause the waist belt to ride up. If the waist belt changes its position, you have to loosen the shoulder straps.


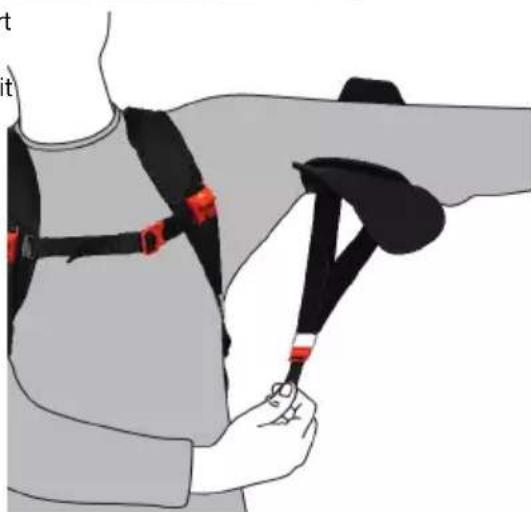
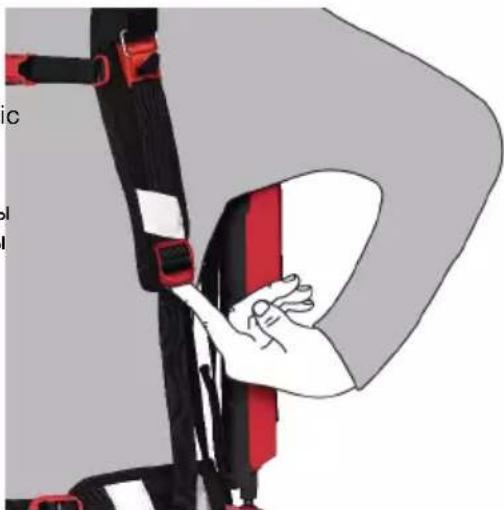
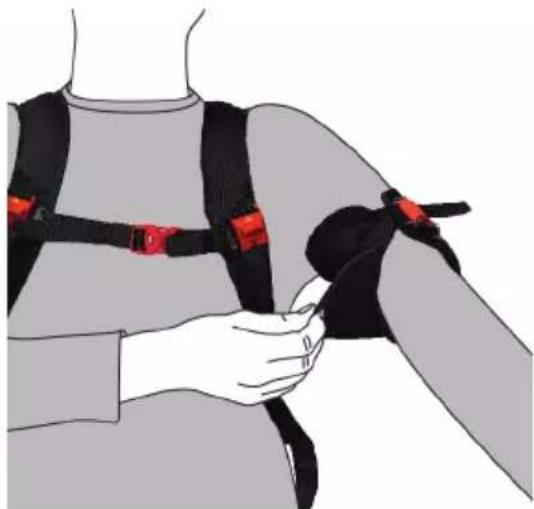
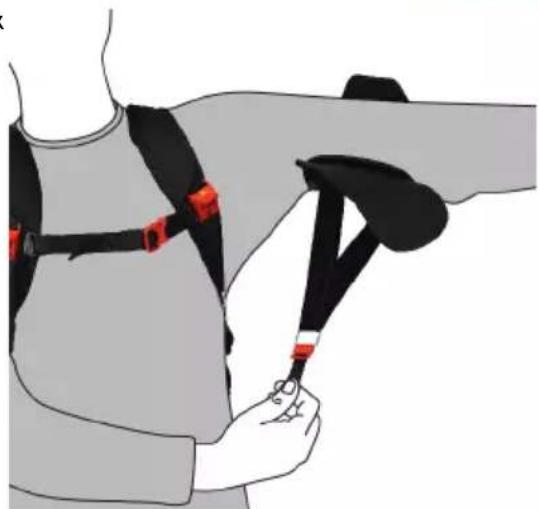
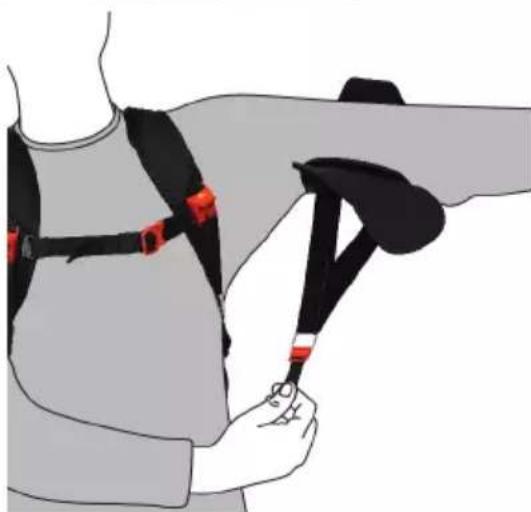
WARNING
Risk of injury caused by arm-rail snapping back.
When under tension, the arm-rail can snap back and injure your head.
-
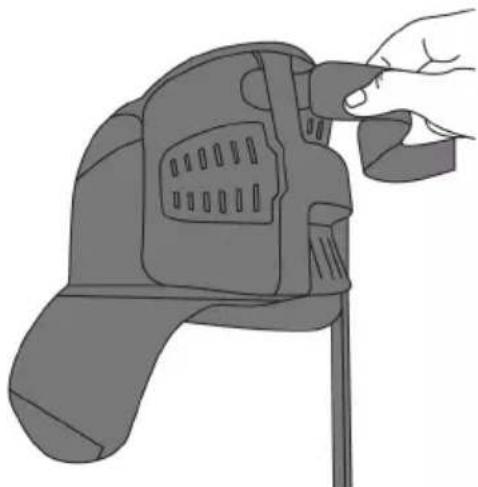
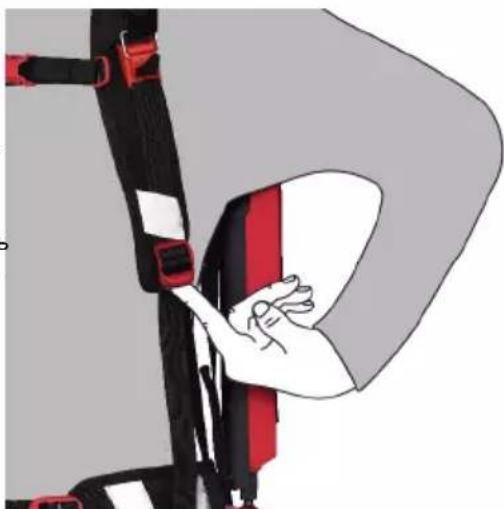
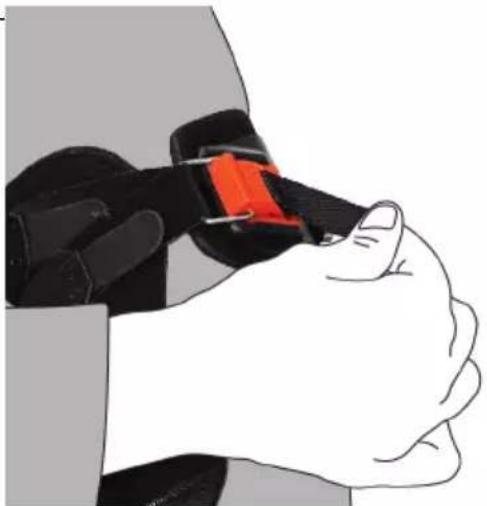
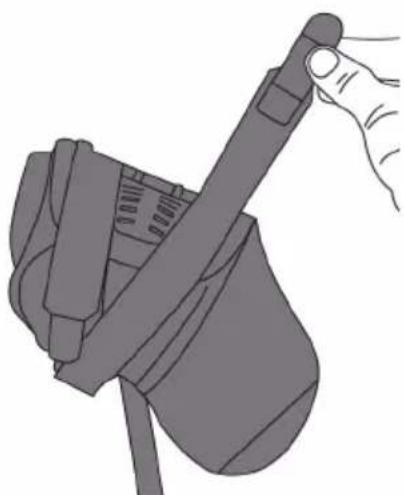
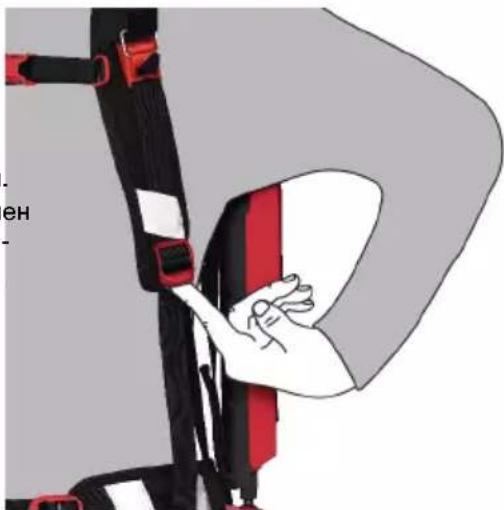
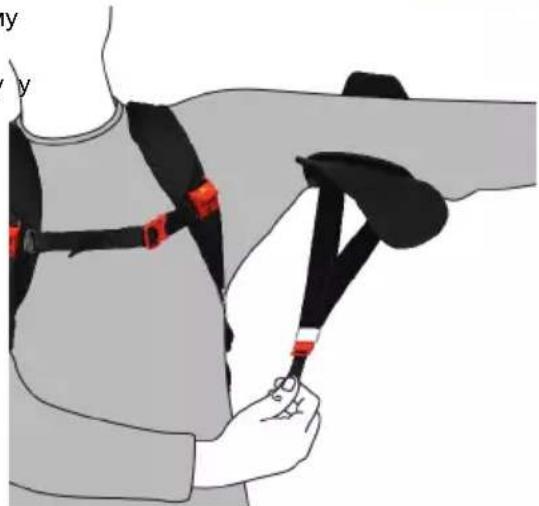
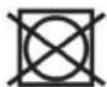
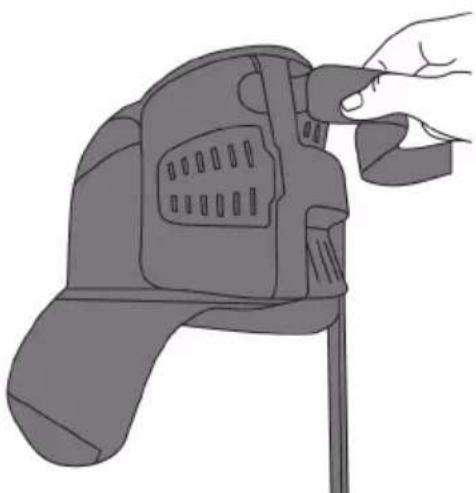
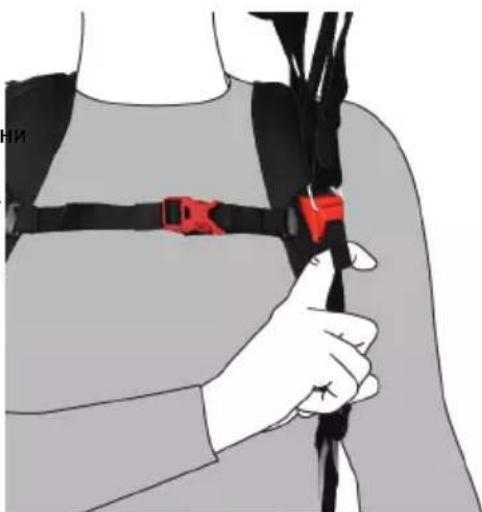
When disengaging the magnetic catch, hook a finger into the strap loop. This will prevent your grip from slipping, which would allow the arm-rail tosnap back
-
Pull the strap loop up and carefully disengage the magnetic catch.
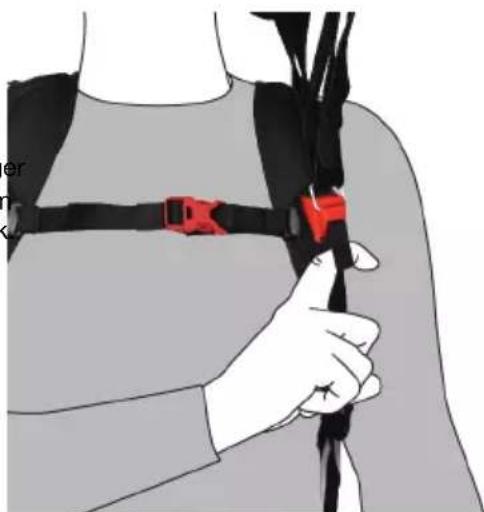
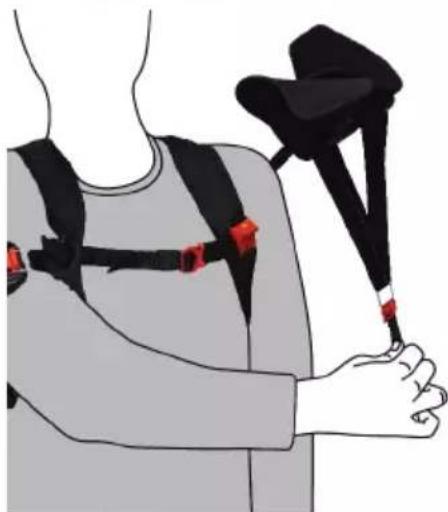
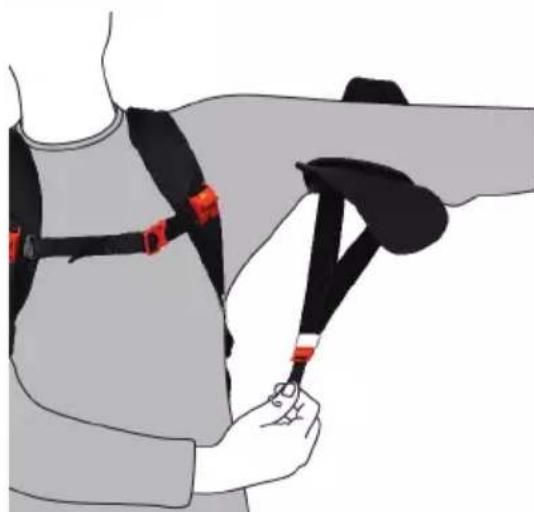
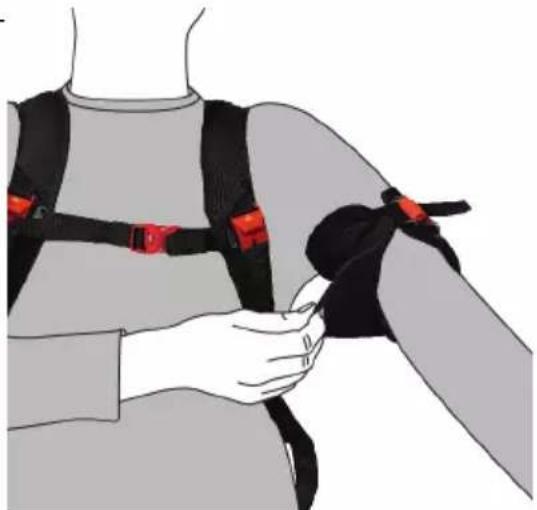
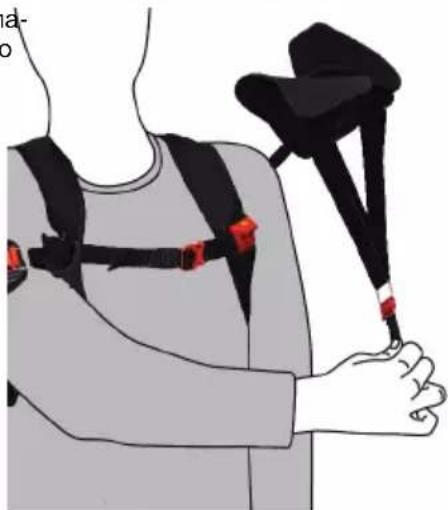
- With the strap loop, pull the arm support down. As you do so, hold your arm out in front of your body.
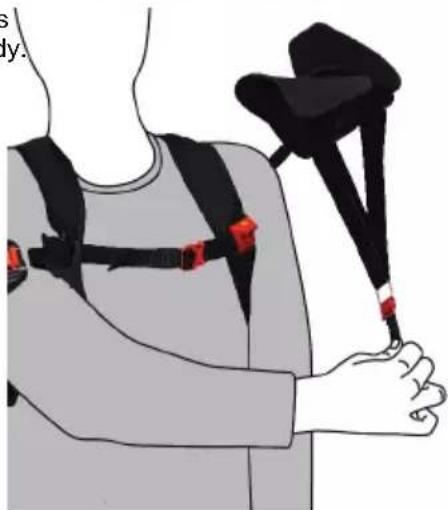
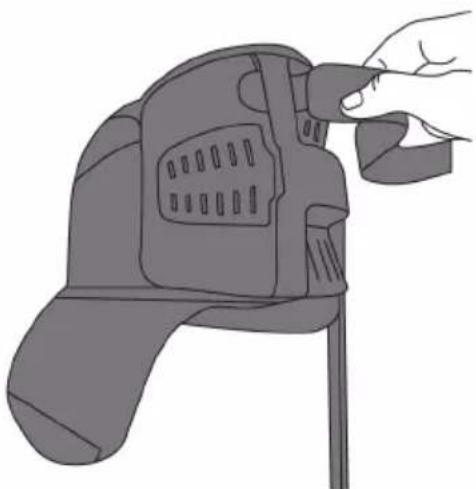
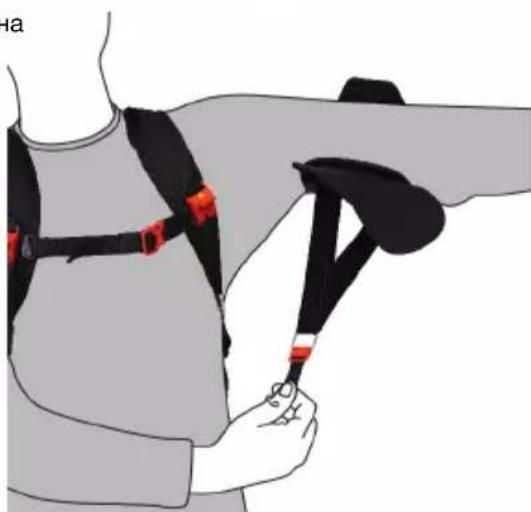
- Center your upper arm in the arm support.
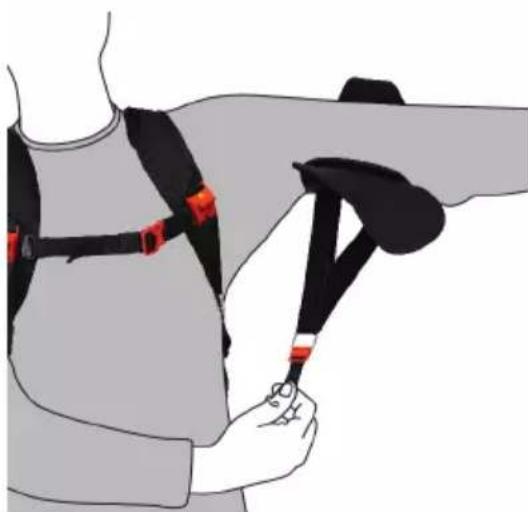
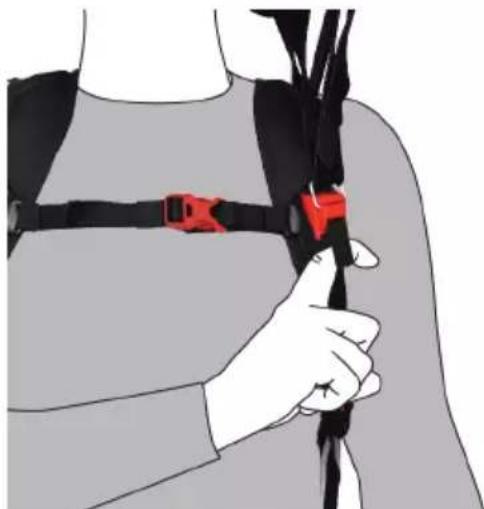
- Use the strap loop to engage the magnetic catch in the hook on the arm support.
Make sure that the magnetic catch engages fully.

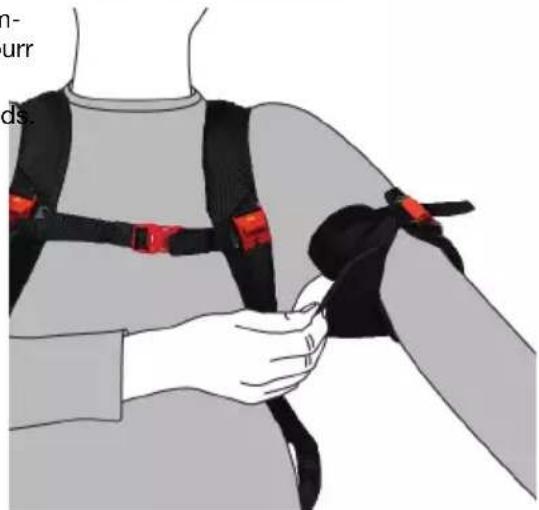
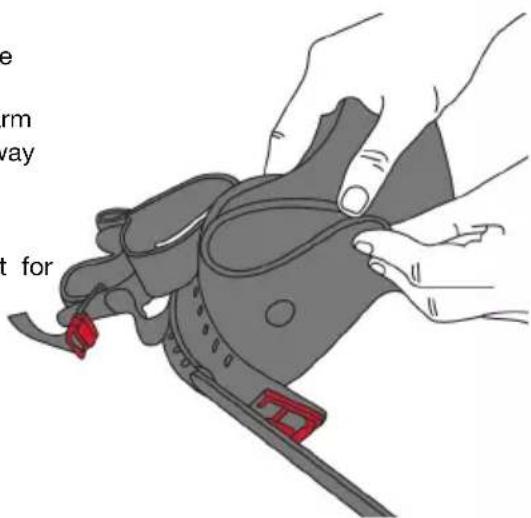
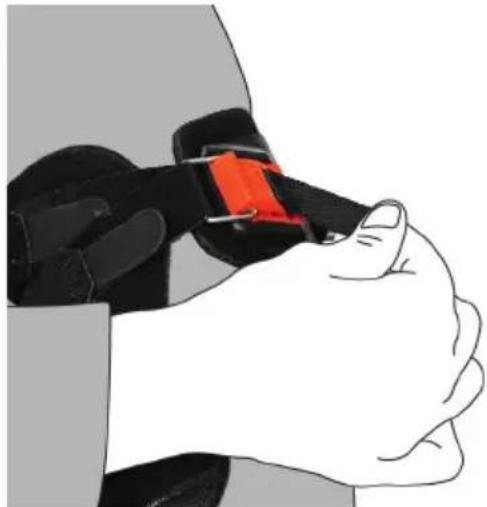
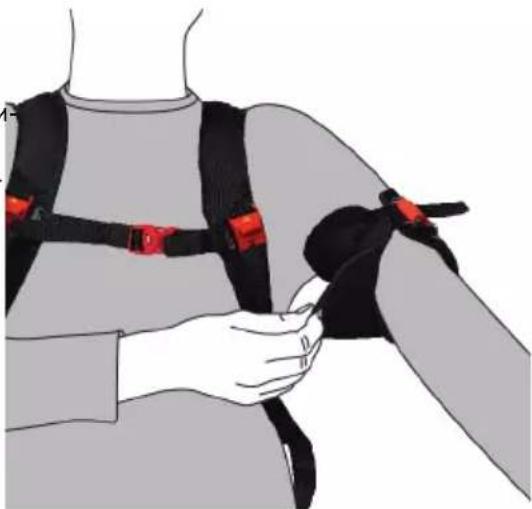
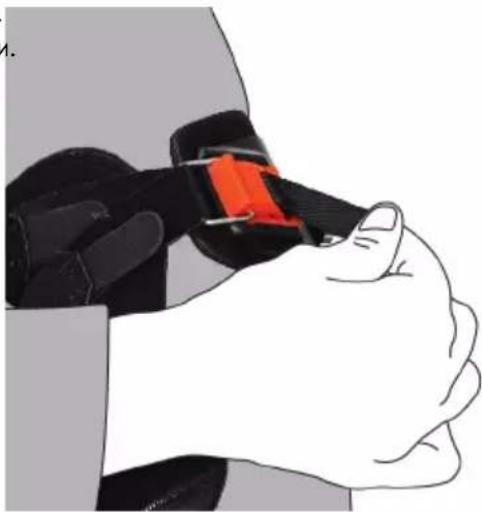
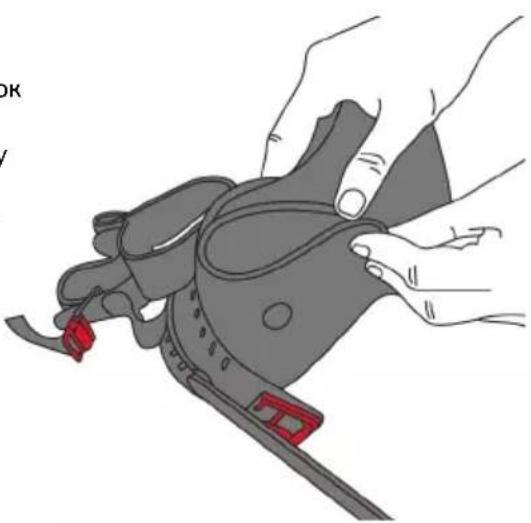
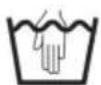
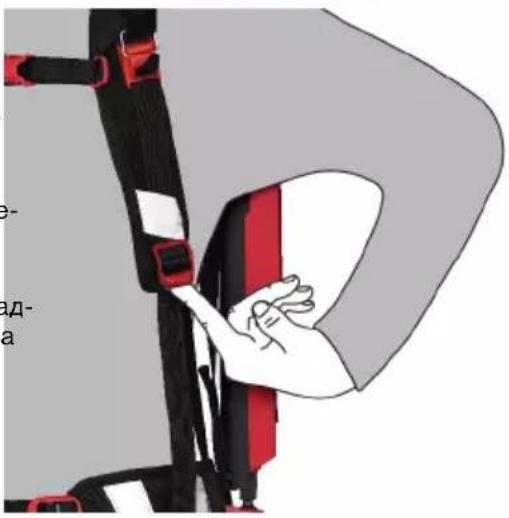
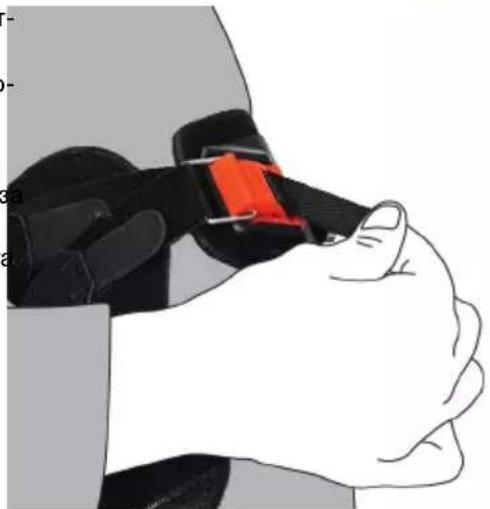
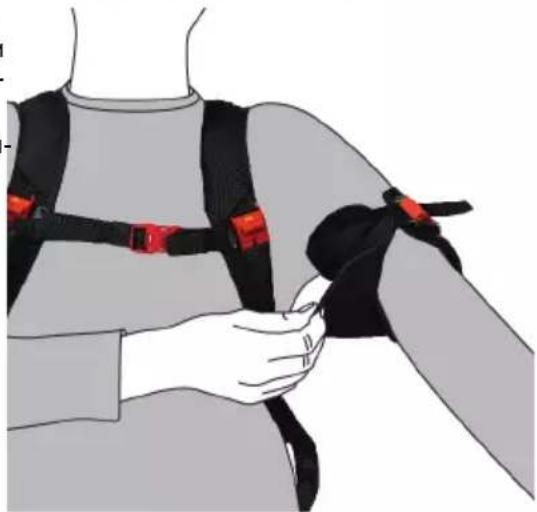
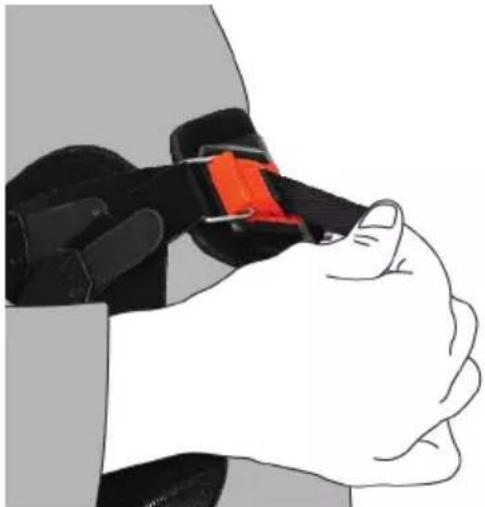
The outer arm-support pad must be opened when you place the arm-support strap round your upper arm. If necessary, open the arm-support pad after placing your upper arm in the arm support.
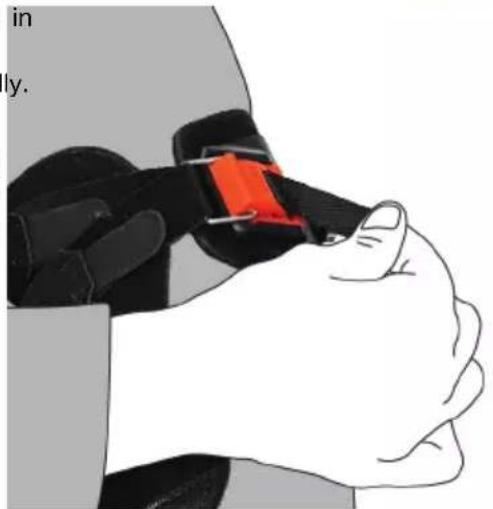
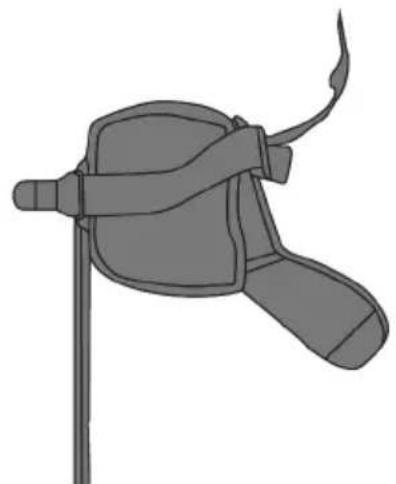
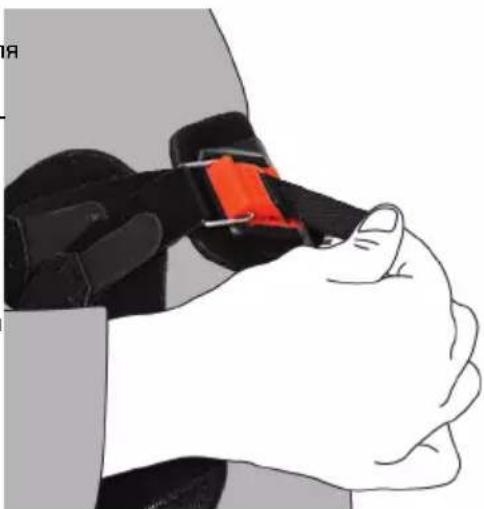
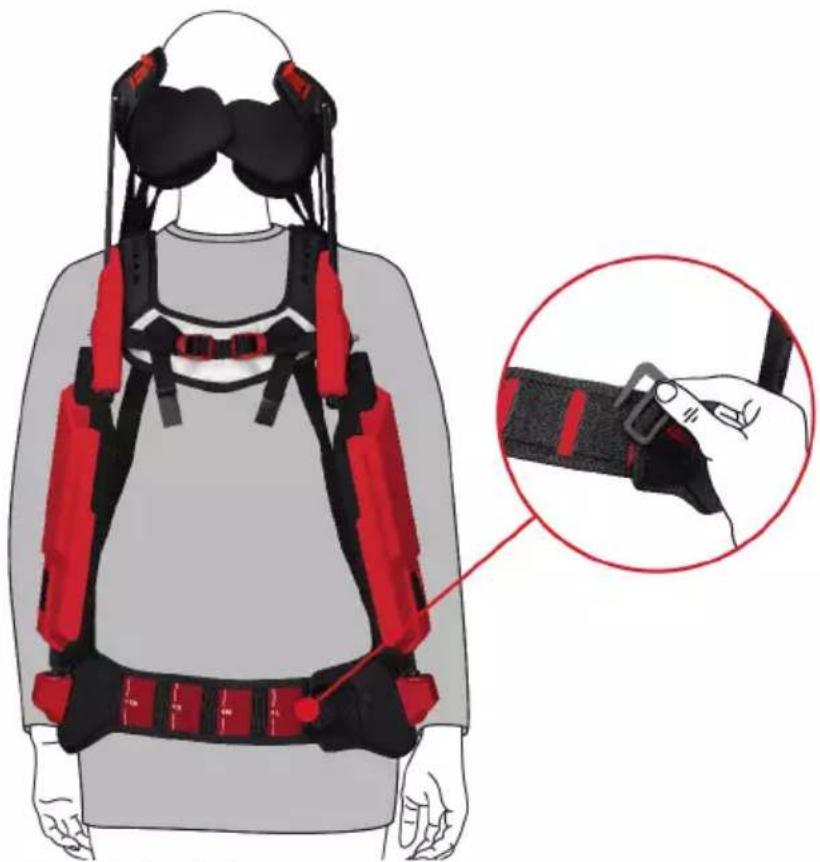
- Use the burr fasteners to adjust the fit of the arm-support strap round your upper arm. Center the burr fasteners and close them completely.
The arm-support strap is adjustable at both ends
- Flip the outer arm-support pad over.
-
Secure the arm support on the other side of your body in the same way.
-
Check that the product is fitted symmetrically.
6 Adjusting

WARNING
Risk of injury caused by crushing. Risk of crushing the fingers in the articulation unit.
- When adjusting the product, keep your fingers well clear of the articulation unit's mechanism.
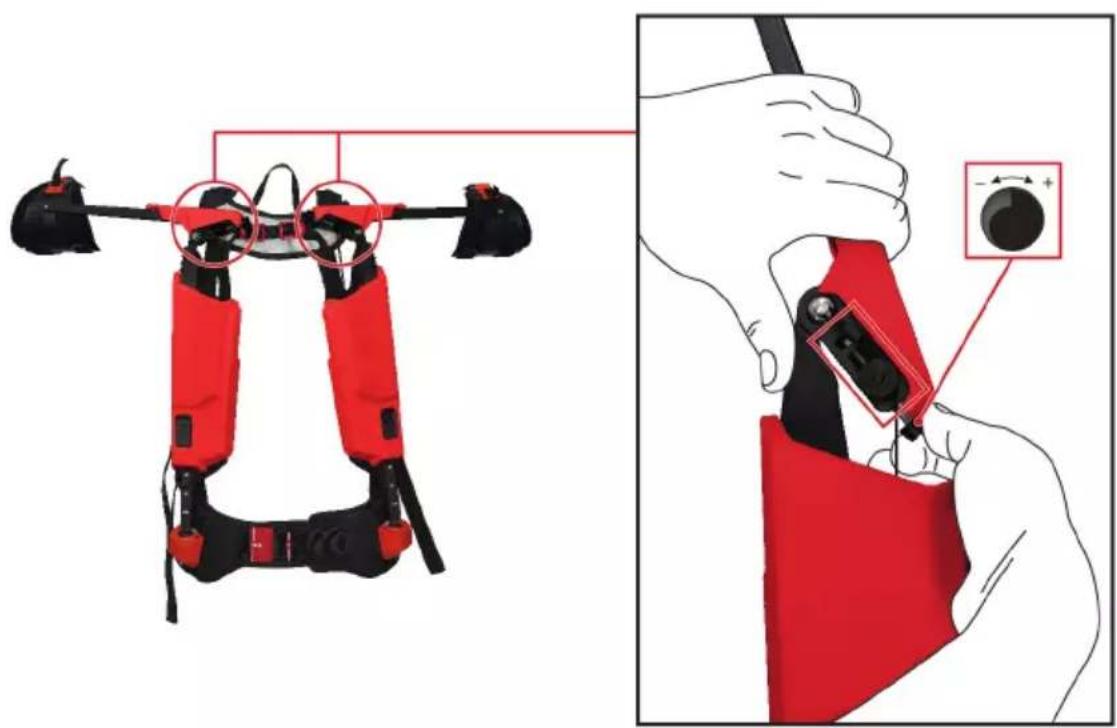
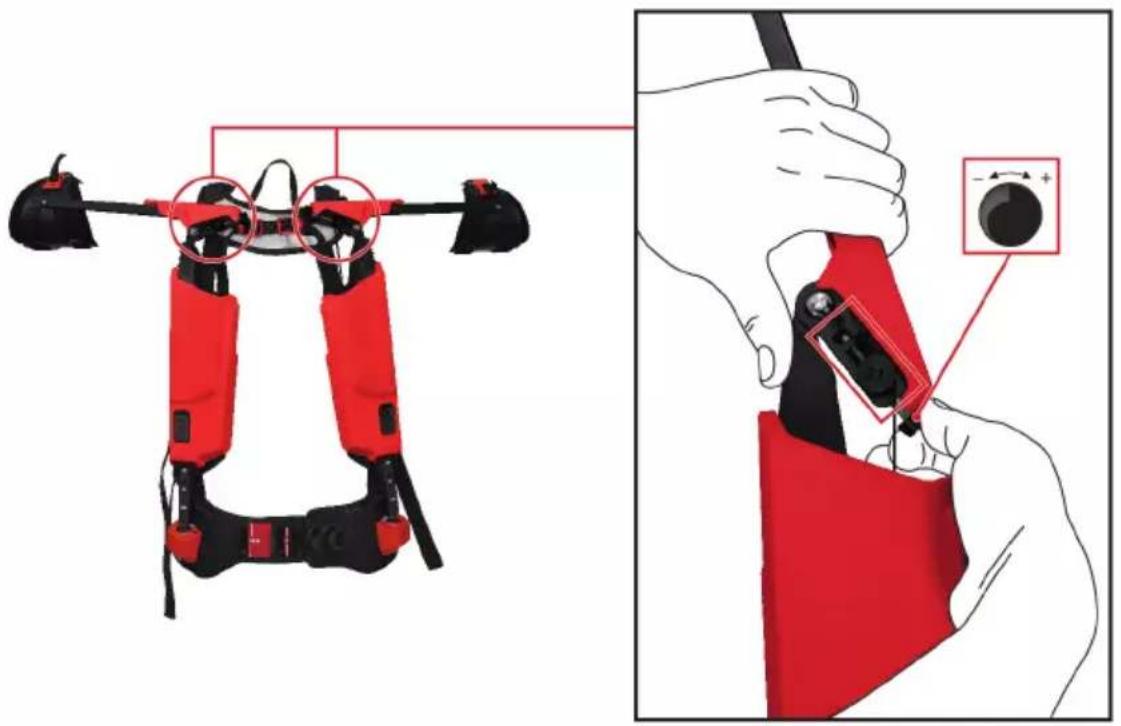
6.1 Adjusting assistance
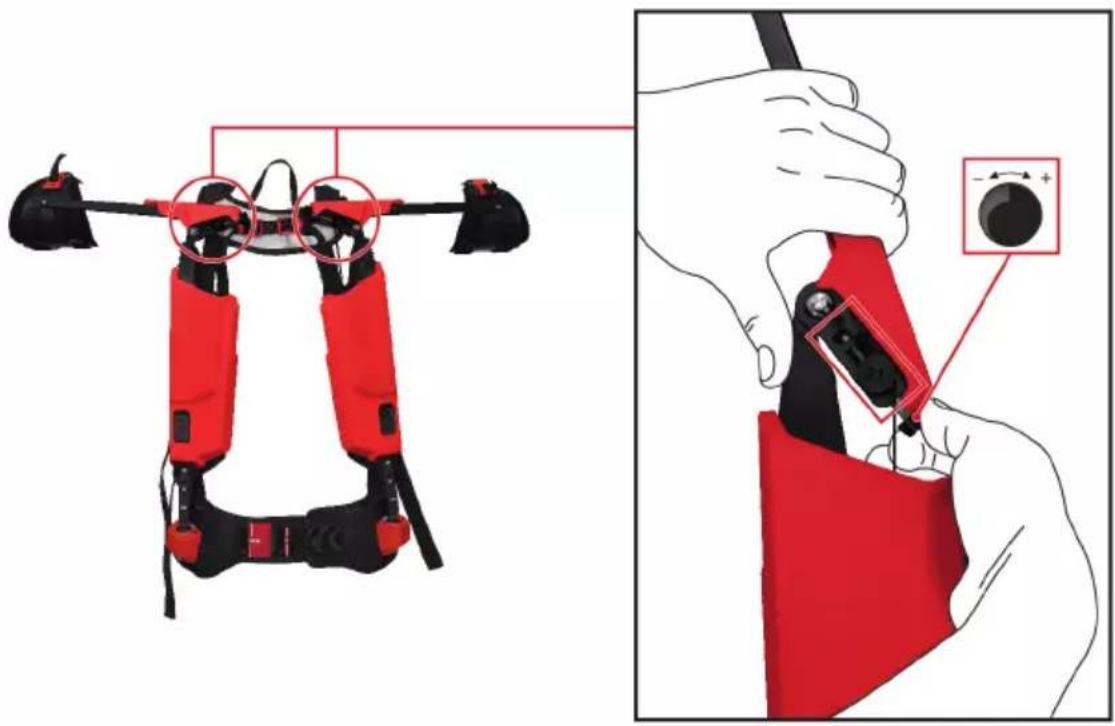
Adjust the assistance by turning the adjusting knob.
- Turn the knob clockwise (+) for more assistance, turn it counter-clockwise (-) for less assistance.
The bigger the bar on the scale, the higher the level of assistance.

Assistance is correct when gravity is enough to make your arms drop, without further exertion on your part. Do not attempt to set assistance to a value higher than this; any lower setting is possible, in accordance with your preference.
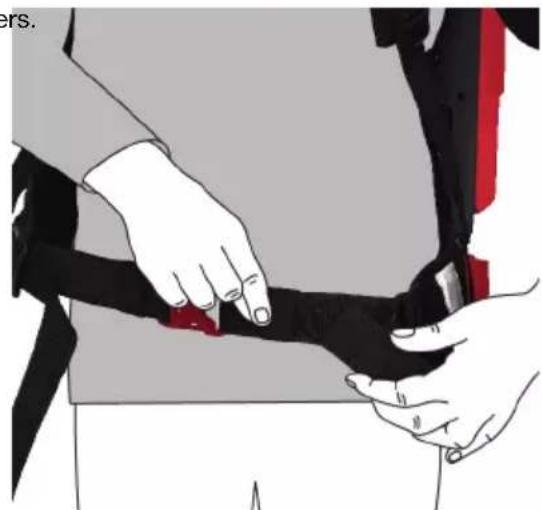
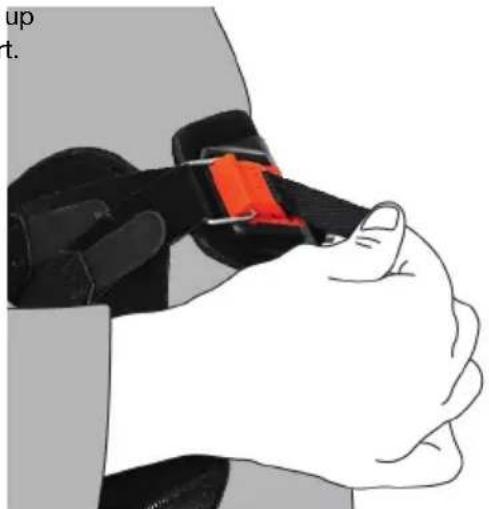
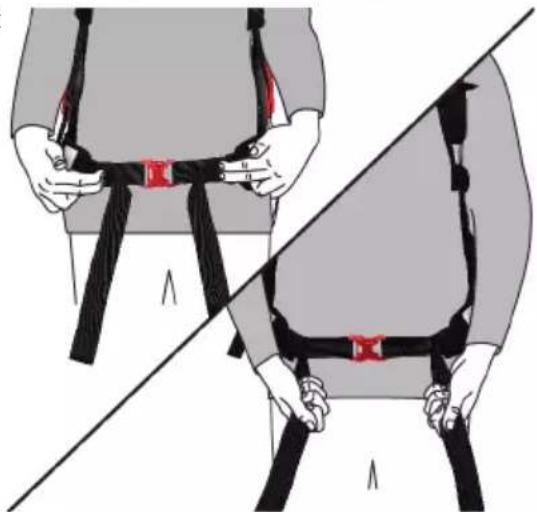
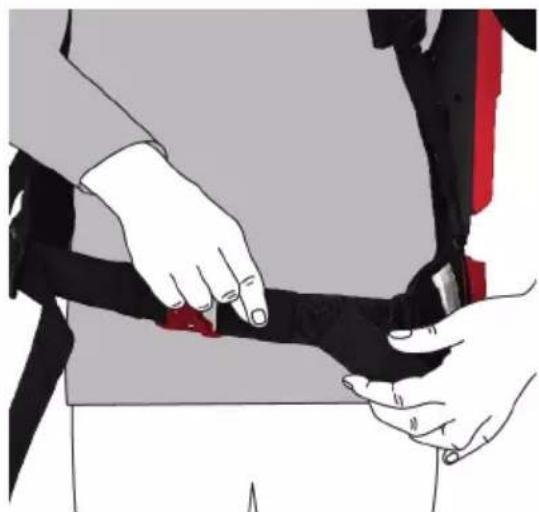
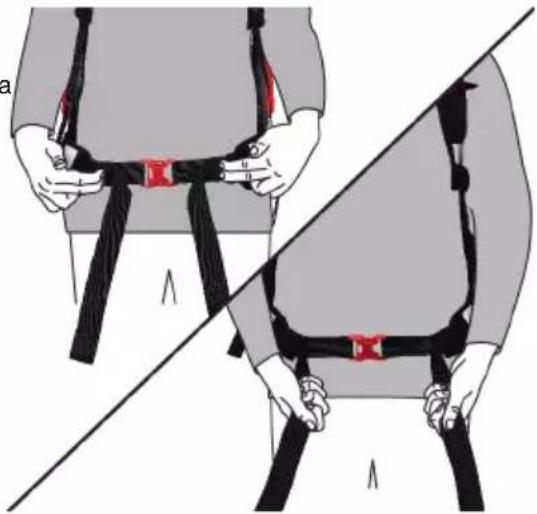
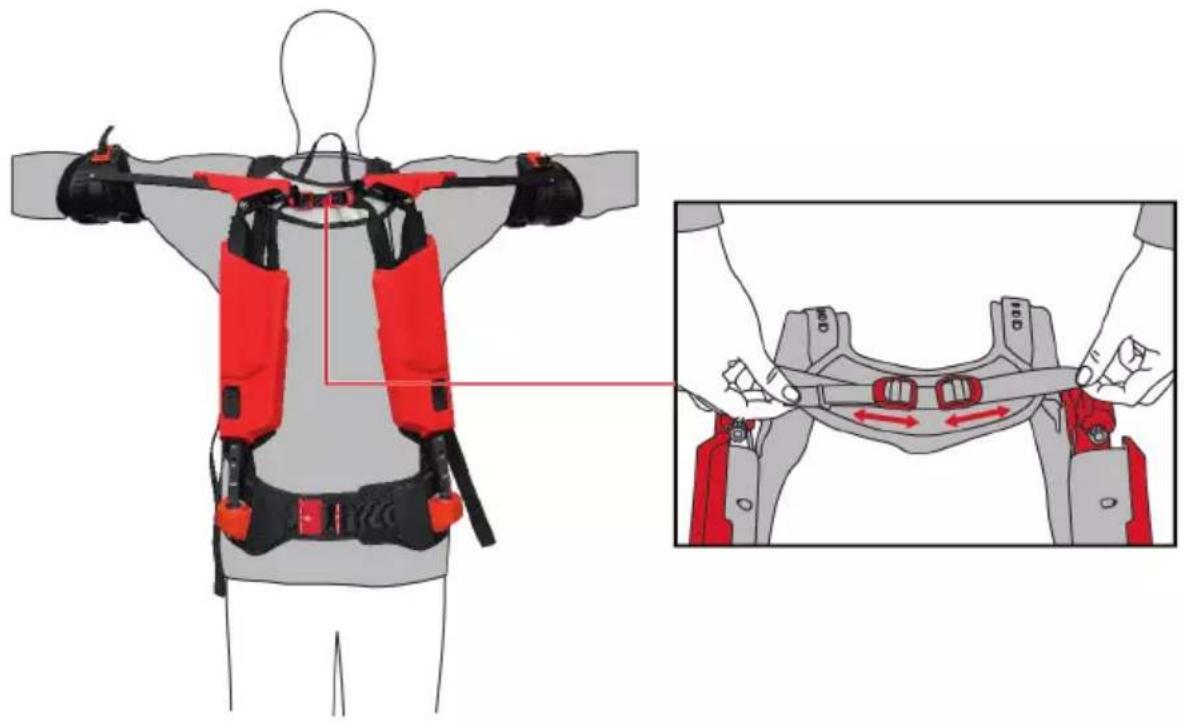
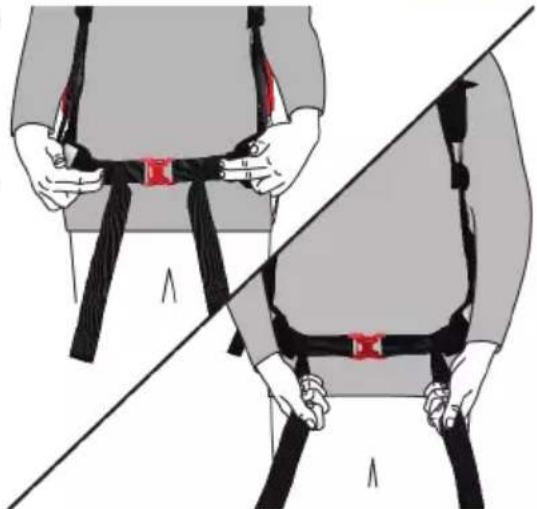
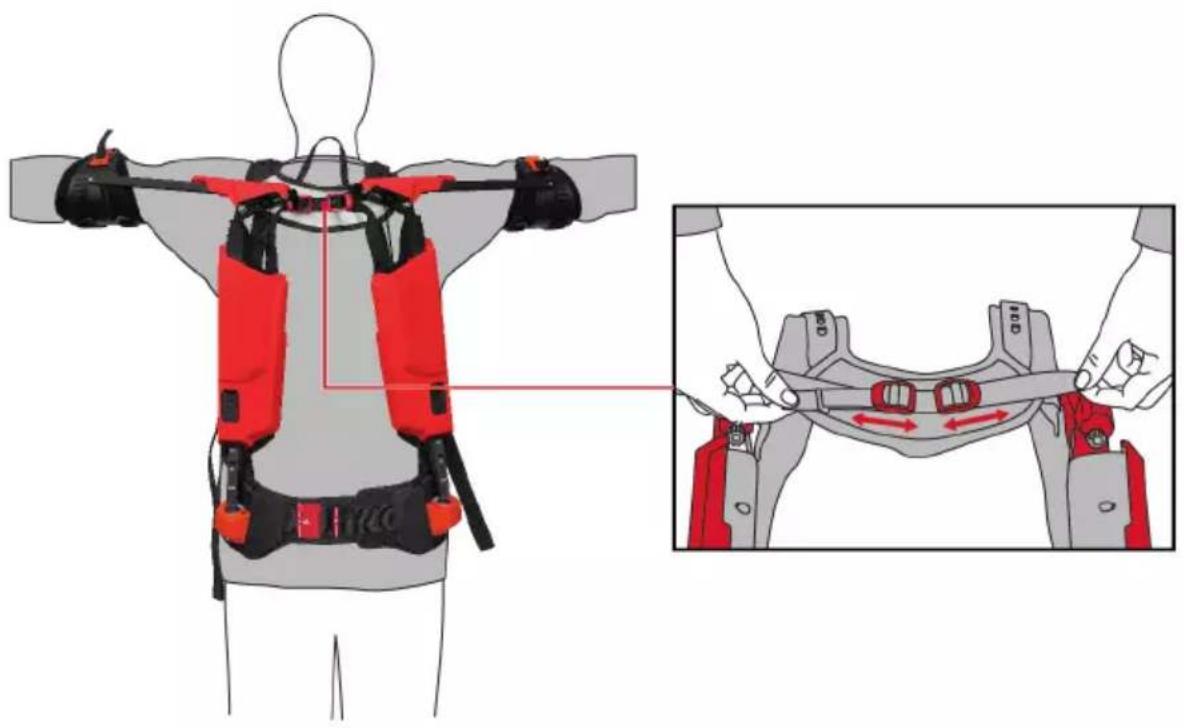
6.2 Adjusting waist belt
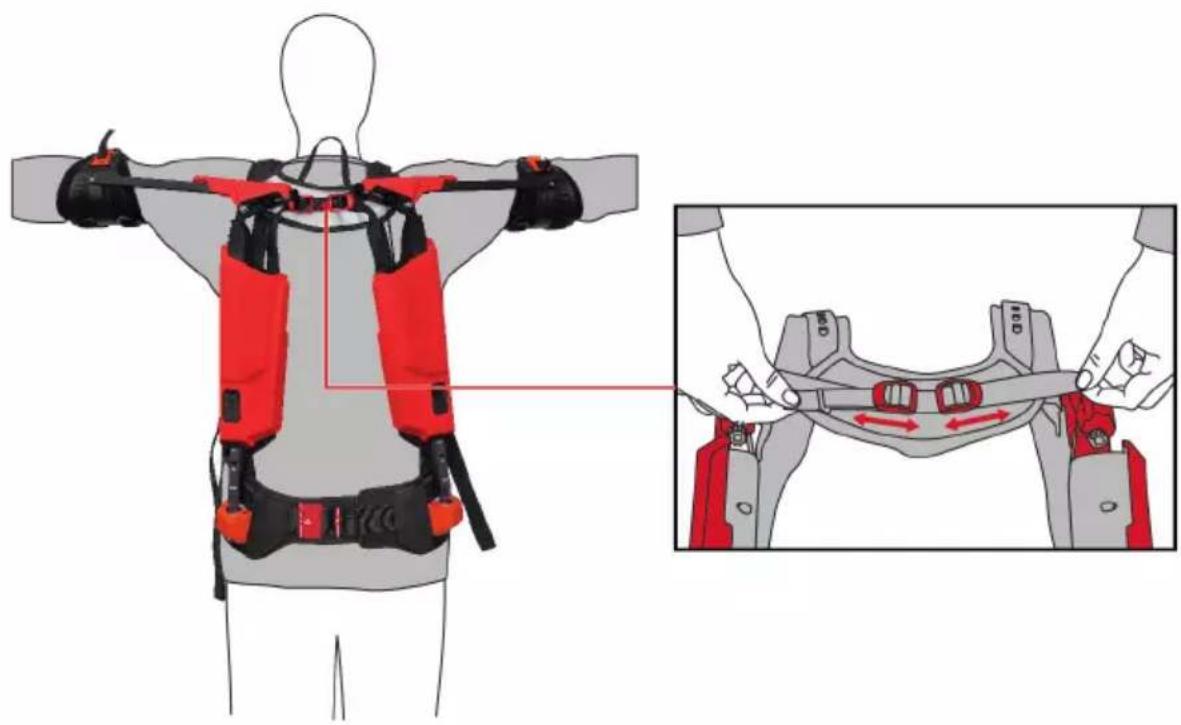
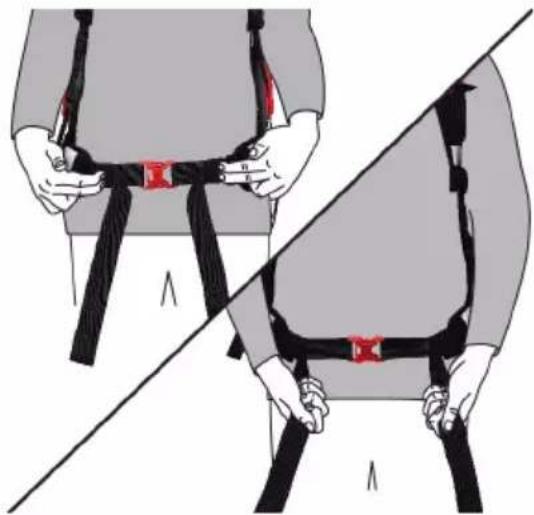
- The waist belt has to sit above the gluteal muscles and level with your pelvis.
It is important to make sure that the waist belt cannot slip while the product is in use.
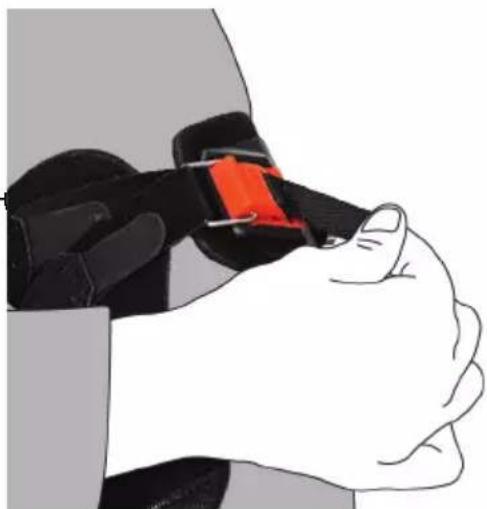
- Tilt the ladder-lock buckle up to loosen the waist belt.
- Pull both ends of the waist belt forward to tighten the belt.
The waist belt must be worn snug.
The pads of the waist belt must be positioned symmetrically.

- Tuck the ends of the waist belt into the belt holders.
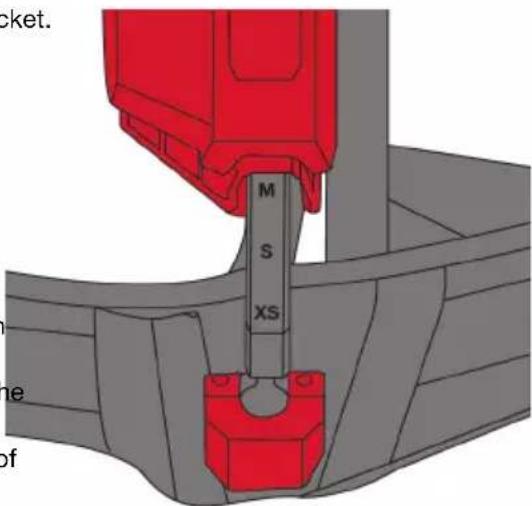
6.3 Adjusting spacing of ball-joint mount

You have to remove the exoskeleton in order to adjust the spacing of the ball-joint mount.

- Disengage the hook of the spacing adjuster from the loop.
- Lengthen/shorten the waist belt to the desired size.
The width and height settings do not necessarily have to match up as stated.
- Fully engage the hook of the spacing adjuster in the appropriate loop and pull the waist belt taut.
- Slip the product on to your shoulders and check the symmetrical positioning of the waist belt.
The ball sockets must be fixed vertically relative to the shoulder articulations and can be tilted outward (V-shape), depending on the wearer's upper-body build. The wearer's hands must be free to swing without hindrance.
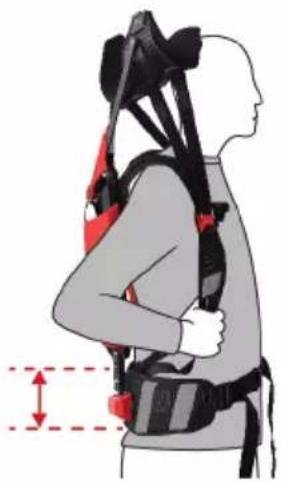
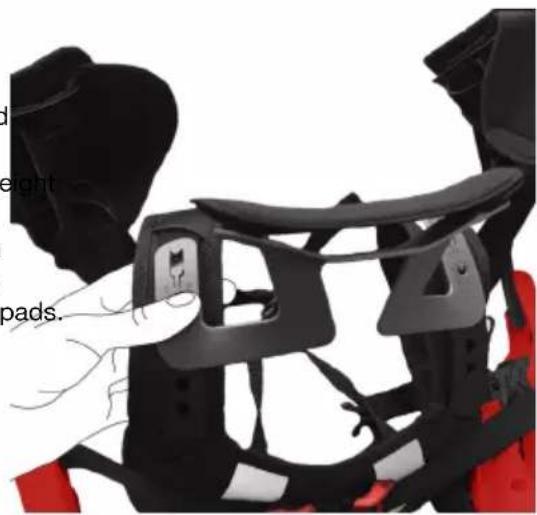
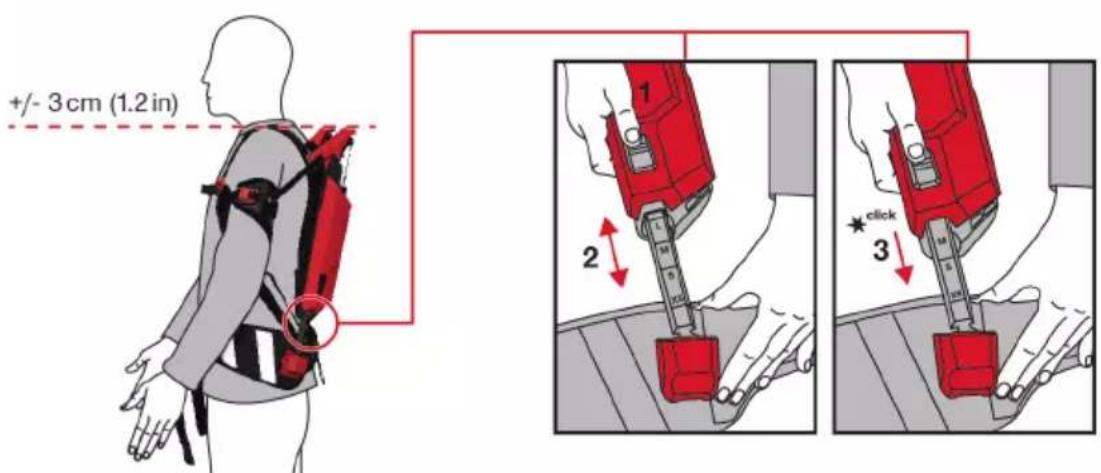
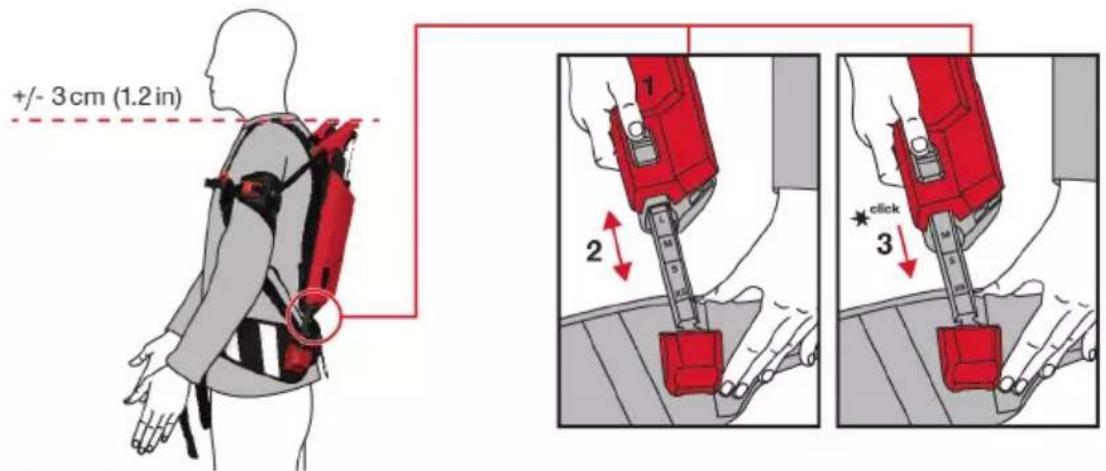
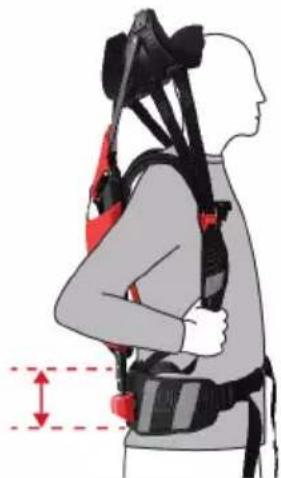
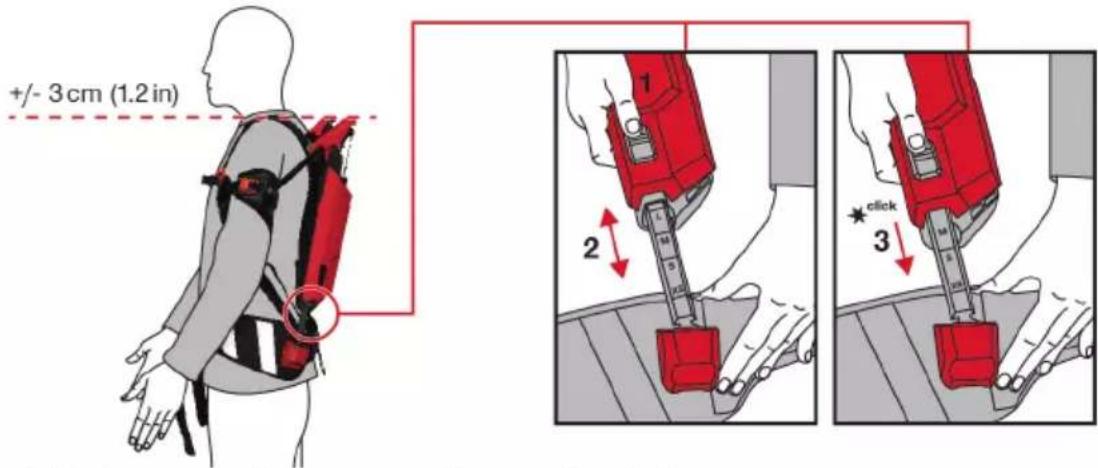
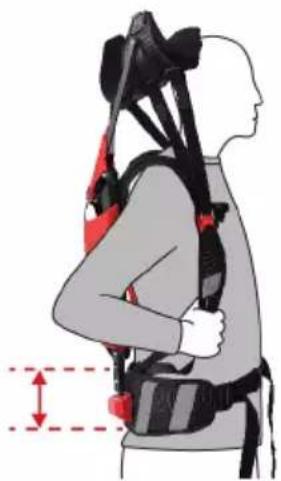
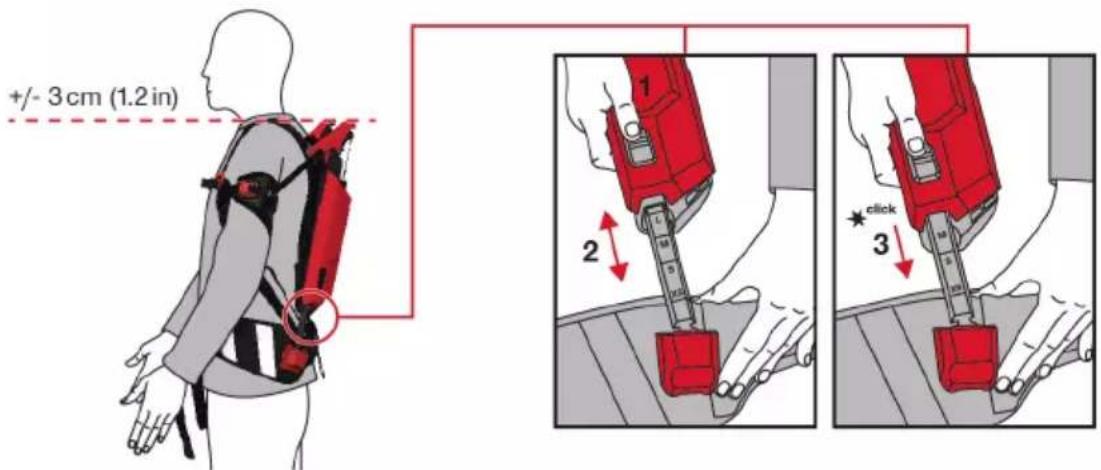
6.4 Adjusting height

You have to remove the exoskeleton in order to adjust the height.
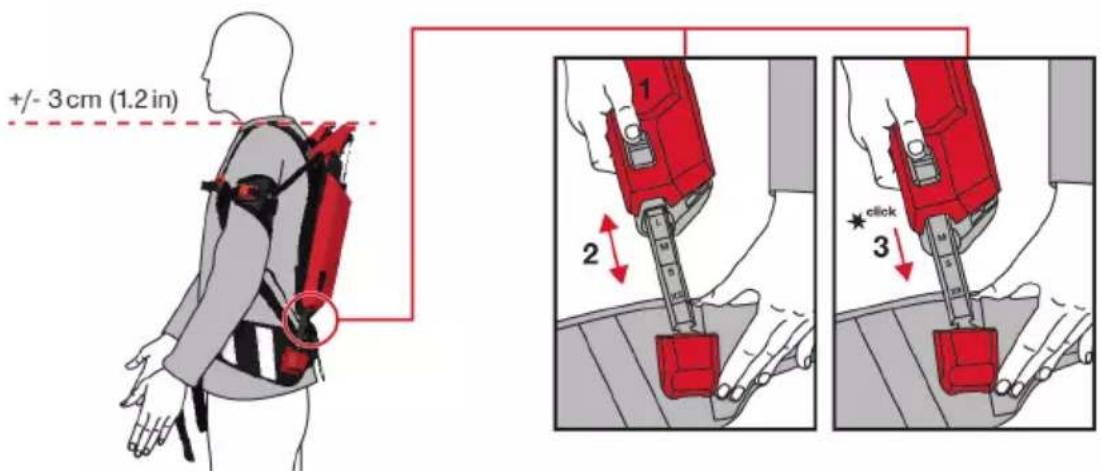
- Press the release button of the height adjuster.
-
Pull the aluminum profile out of or, as appropriate, push it into the cover of the expander. Adjust to the desired height.
-
The aluminum profile engages with an audible click. Pull on the aluminum profile to check that it is securely locked in position.
-
Slip the product on to your shoulders and check that the articulation units are at the same height.
-
When the product is worn, the top edge of the articulation unit must match the shoulder height to within the range +/- 3 cm (+/- 1.2 in).
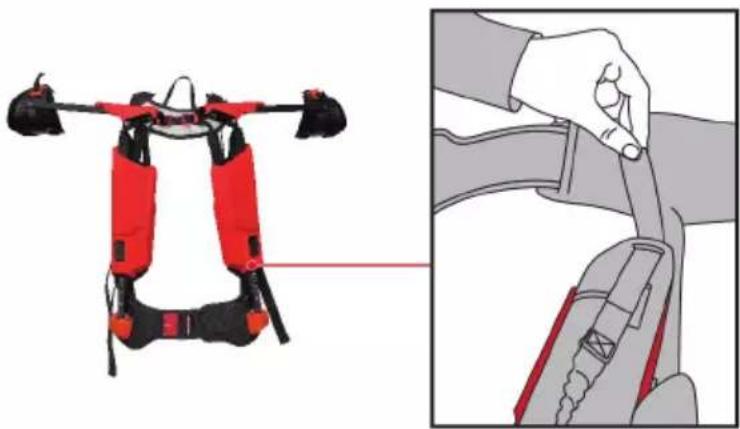
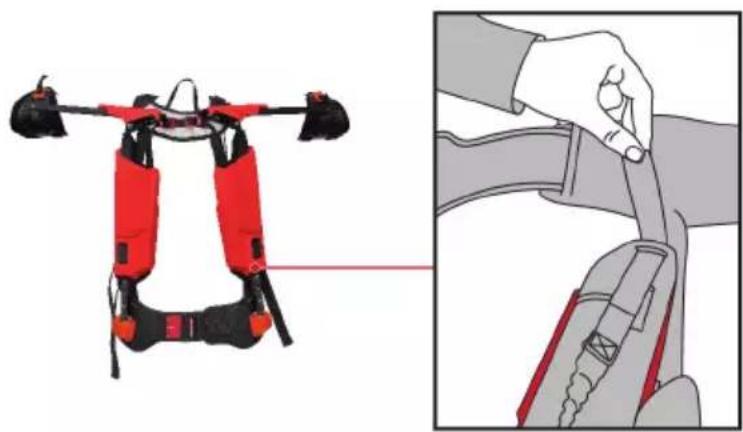
6.5 Adjusting length of back strap
- Open the burr fastener of the back strap.
- Adjust the length of the back strap and reclose the burr fastener.
6.6 Adjusting tension cord
The tension cord lets you adjust the position of the articulation units. Tightening the tension cord brings the articulation units and the expander covers closer to your body.
- Pull the appropriate end out to tension one of the tension cords.
-
To loosen a tension cord, tilt the ladder-lock buckle up.
-
Make sure that both tension cords are symmetrically positioned.
7 Removing

WARNING
Risk of injury caused by arm-rail snapping back. When under tension, the arm-rail can snap back and injure your head.
-
When disengaging the magnetic catch, hook a finger into the strap loop. This will prevent your grip from slipping, which would allow the arm-rail to snap back.
-
Slowly pull the strap loop and the magnetic catch up and disengage it from the hook of the arm support.
-
Draw the strap loop down, keeping the arm-support strap taut.
-
Remove your arm from the arm support and hold it in front of your body.
-
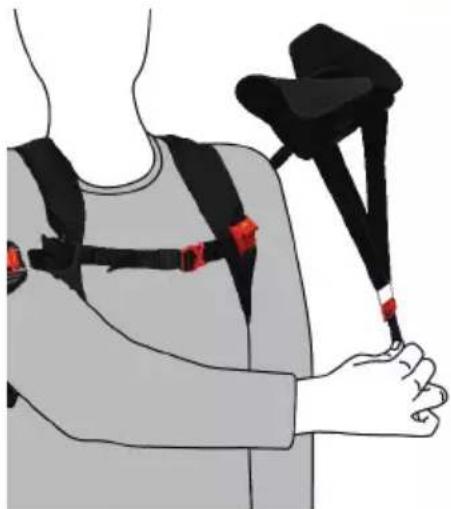
Slowly guide the arm support up.
-
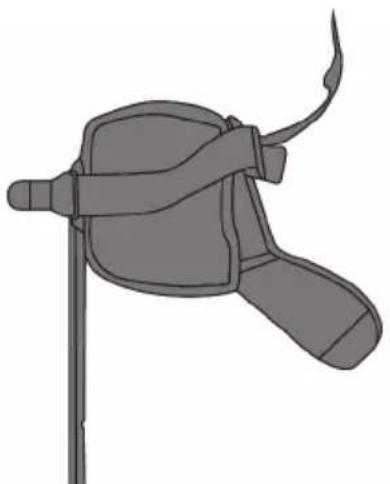
Let the magnetic catch engage fully at the parked position on the shoulder strap.
-
Check that the magnetic catch is correctly seated.
-
Repeat these steps with your left hand for the right arm support.
-
Open the clip catch of the chest strap.
- Disengage the ends of the waist belt from the belt holders.
- Loosen the waist belt.
- Open the clip catch of the waist belt.
- Shrug the product off your shoulders as if it were a backpack.
8 Optional accessories
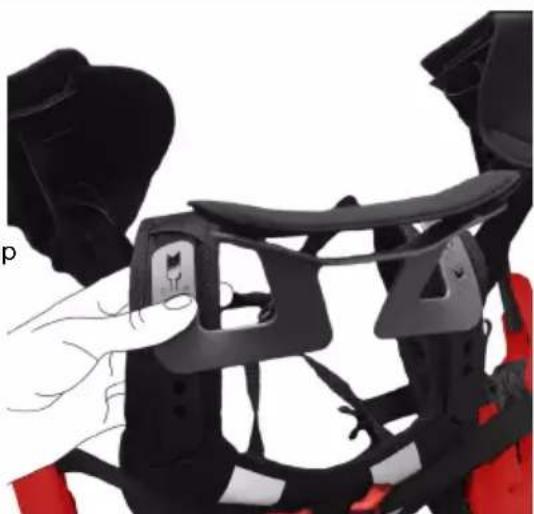
8.1 Installing/removing neck support
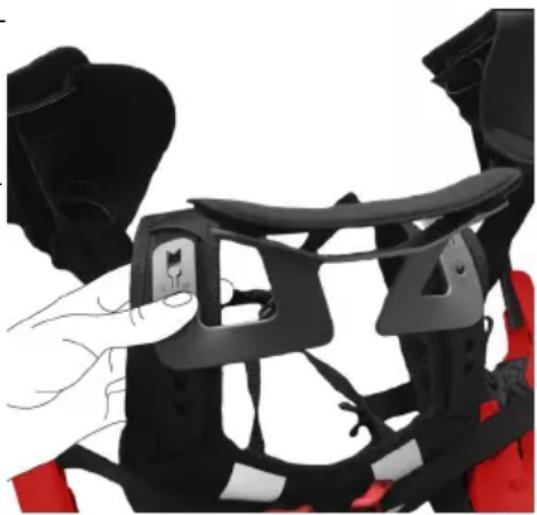
- Position the neck support on the mounts of the shoulder strap.
- Place your thumb on the ribbed surface and slide the neck support down to engage it in the desired position.
- Check that the neck support is set to the same he on both sides.
- To remove the neck support, place your thumb on the ribbed surface and slide the neck support up.
- Clean the neck pad in the same way as the arm pad → page 32
9 Care and maintenance

WARNING
Risk of injury caused by expanders under tension. Injuries during care and maintenance work.
- Carry out care and maintenance work only with the expanders at zero tension.
Care
- Carefully remove stubborn dirt from the tool.
- Do not clean the product with compressed air.
- Clean the product only with a slightly damp cloth and pH-neutral soap. Do not use cleaning agents containing silicone as they can attack the plastic parts.
Maintenance
- Check all visible parts and controls for signs of damage at regular intervals and make sure that they all function correctly.
- Do not operate the product if signs of damage are found or if parts malfunction. Have it repaired immediately by Hilti Service.
After cleaning and maintenance, fit all guards or protective devices and check that they function correctly.

To help ensure safe and reliable operation, use only genuine Hilti spare parts and consumables. Spare parts, consumables and accessories approved by Hilti for use with the product can be found at your local Hilti Store or online at: www.hilti.group.
9.1 Cleaning pads


- Remove the pads from the arm supports.
- Hand-wash the pads in water with pH-neutral soap.
- Thoroughly rinse the pads.
- Allow the pads to air-dry.
- Reinstall the pads.
9.2 Replacing pads
- Remove first the inner pad and then the outer pad from each arm support. The pads are held in place in the arm supports by burr fasteners.
- Install the new pads in reverse sequence in each arm support. Make sure that the pads are fitted right way round.

The pads and the arm supports are color-coded, with a blue dot for left and a red dot for right.
9.3 Replacing arm-support strap
- Open the burr fasteners at both ends of the arm-support strap.
- Remove the strap from the two tabs of the arm support.
- Position the top part of the magnetic catch at the parked position on the arm support.

- Starting from below, pass the new strap through the first tab. The burr fastener must face out.
HILTI
- Turn the arm support round.
- Pass the strap from above through the metal eye of the magnetic catch.
- Pass the strap through the second tab from the inside to the outside.
- Close the strap at the burr fastener.

9.4 Checking and cleaning ball socket
- Check the movement of the ball end in the ball socket. Do this by moving the aluminum profile.
Result 1/2
The ball moves freely.
No action necessary.
Result 2/2
The ball is stiff
- Undo the two screws in the ball socket and remove the cover.
- Remove the ball from the ball socket and clear the ball and the socket with a soft cloth.
- Reinsert the ball in the ball socket and place the cover in position.
- Tighten the two screws to a tightening torque of 0.5 Nm.
10 Transport and storage
Transport
Make sure that the equipment is held securely throughout all transport operations.
After transporting, always check all visible parts and controls for signs of damage and make sure that they all function correctly.
Transport and store the exoskeleton only with the expanders at zero tension.
Storage
- Store this product in a dry place, where it cannot be accessed by children or unauthorized persons.
After a long period of storage, always check all visible parts and controls for signs of damage and make sure that they all function correctly.
11 Troubleshooting
If the trouble you are experiencing is not listed in this table or you are unable to rectify the problem by yourself, contact Hilti Service.
| Trouble or fault | Possible cause | Action to be taken |
| Lack of expander tension | Expander unhooked | Check that the expanders are correctly seated. |
| Expander worn | Contact Hilti Service. | |
| Articulation unit sticks | Articulation unit worn | Contact Hilti Service. |
| Pads chafe | Pads dirty | Clean the pads.→page 32 |
| Pads folded over or worn out | Contact Hilti Service. | |
| Arm support slips over elbow | Arm support not centered on upper arm. | UpperCenter your upper arm in the arm support.→page 22 |
| Arm-support strap not pulled tight enough. | Adjust the arm-support straps so that they are snug, but do not constrict your upper arms.→page 22 | |
| Arm supports, pads and/or straps too big | Consult Hilti Service. | |
| Constraint of and/or pressure marks on the upper arms | Arm supports, pads and/or straps too small | Consult Hilti Service. |
| Arm-support strap pulled too tight. | Adjust the arm-support straps so that they are snug, but do not constrict your upper arms.→page 22 |
12 Disposal
Most of the materials from which Hilti tools and appliances are manufactured can be recycled. The materials must be correctly separated before they can be recycled. In many countries, your old tools, machines or appliances can be returned to Hilti for recycling. Ask Hilti Service or your Hilti representative for further information.
13 Manufacturer's warranty
- Please contact your local Hilti representative if you have questions about the warranty conditions.
14 Further information
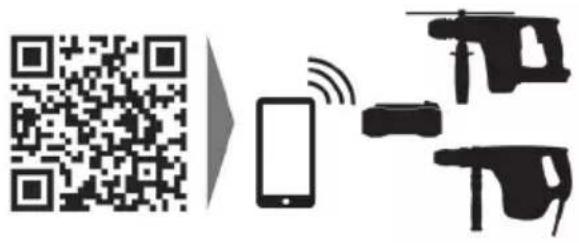
For more information on operation, technology, environment and recycling, follow this link: qr.hilti.com/manual/?id=2339613
This link is also to be found at the end of the documentation, in the form of a QR code.
4 Characteristicas techniques
| Peso | 2,4 kg (5,3 lb) |
| Temperatura ambiente durante o funciona | -10 °C ... 45 °C (14 °F ... 113 °F) |
| Temperatura de armazenamento | -10 °C ... 60 °C (14 °F ... 140 °F) |
| Dimensoes (comprimento x largura x alta) | 950 mm x 450 mm x 250 mm (37,4 in x 17,7 in x 9,8 in) |
5 Colocar

AVISO
Risco de ferimentos devido a campo magnético Os imanes contidos no produits causam fortes campos magnéticos que podem, entreculos, afercat implantes.
6.4 Stille inn hoyde

For a tilpasse hoyden ma exoskjelettet tas av.
- Trykk pa opplasingsknappen for hoydeinnstillingen.
- Trekk / skyv aluminiumsprofilen ut av / inn i dekselet til ekspanderen. Still inn onsket hcyde.
-
Aluminiumsprofilen festes med et hörbart klikk. Kontroller at aluminiumsprofilen er godt festet ved ä trekke i aluminiumsprofilen.
-
Ta pa deg produitet, og konntroller at leddenhetene sitter likt.
1.3 Tootepohised sumbolid
1.3.1 Sumbolid tootel
Tootel voib kasutada jargmisi sumboleid:

Cpok cnjx6bI n3dennn coCTaBnEeT 5 net.
- Pered Hauanom pa60tbi 3yHTe 3TO pyKOBOCTBO NO 3KcNlyatauH. 3TO ABnETCa 3Anorom 6e3onachOH n 6ecpe6oHoi pa60tbi.
CobIIOaIte yka3AHnNo TeXHnke 6e3OnacHOCTn n npedynpeKdaIOuJe yka3AHn, npnbEeHHbIE B 3TOM pyKOBOdCTBe no 3KcnnyatauHn Ha ycTpoiCTBe.
Bcerda xpaHnte pyKOBOCTBO no 3Kcnnyataun pRDOM C yCTPOIcTBOM n nepeDaBaTe yCTPOIcTBODpyrIM IIOdram TOJIbKO BMeCTe C 3TmM pyKOBOCTBOM NO 3Kcnnyataun.
1.2 POrcHeHne K 3HaKaM
1.2.1 PpeynpeKdaIoUcne yKa3aHnA
PpeynpeKdaUne yka3aHnCnykat npeynpeKeHnO6 onacHOCTx npn o6paueHH C yctponCTBOM. HcnoIb3yIOtca CneDyUoine CnHaJIbHbIe CNOBa:

ONACHO
ONACHO!
Obuee o6o3aueHHe HnOcpeDCTBeHHo OnaCHO CHTyaun, KOToPAB BJeET 3a CO6oTJKeIbE TpaBMbl INCMePTeJIbHbINCXOD.

PNEyPExKDEHNE
PENyPExKDEHNE!
Obuee 06o3aueHne noteuuaHbOn aacHO cnTuayuHN, KOtopa MoKet noBney 3a cooTae TpaBMbln CMepeTbnHbN HCxOJ.

OCTOPOXHO
OCTOPOXHO!
Obuee 063NaHHe NToEHuaNbHO OAnCHo CnTuaun, KOtOpAR MoKet NOBney 3a Co6oTpaBMblnn NobpeJeHHe O6OpUdoBaHn (MaTePnaIbHbY uep6).
1.2.2 ChmboJIb, HcnoJIb3yeMbIe B pykoBOdCTBe
B 3TOM pykoBoDCTBe HcNoJIb3yIOTc CneIeIyoUe ChMBOJIbI:

Co6nOdaTb pyKOBoIDCTBO no 3KcNpyatau

Yka3aHnno 3KcnnyatauH npyra none3Ha HOpMaua

O6paueHne c MaTePnAJaMn, pInroDhbIM nIa BToPnHOn nepepa60TK
1.2.3 CnmbolbHa H3o6paXeHHAX
Ha n3o6paXeHHAX HcNoJb3yIOTCA CJeNyIOUne CMMBOJIb:
3.5 KomnNeKT NoCTaBKn
3K0ckenET,pyKOBOCTBO NO 3KcnIyatauH
Ipyrhe CnCTeMHbIe npHaIaeKHOCTn, DOnyueHHbIe Ira HcNoJIb3OBAHnC 3TmN3dEHNEM, Bbl MoKeTe HaHTB Hilti Store nHa caTe www.hilti.group
4 TexHHueckne daHHbIe
| Macca | 2,4 Kr (5,3 ΦуNT) |
| Tempepatuya вechшень срены рри заclлуаташи | -10 °C ... 45 °C (14 °F ... 113 °F) |
| Tempepatuya xpanehи | -10 °C ... 60 °C (14 °F ... 140 °F) |
| Размеры (Д x Ш x В) | 950 MM x 450 MM x 250 MM (37,4 дюм x 17,7 дюм x 9,8 дюм) |
5 PacknaIbIbAHne

IPEDYNPEXDEHNE
Onachoctb TpaBMnPOBaHnBcNeIcTBHe MaHNTHoro noJa MaHHTbl, KOtOpbIMN OChaIeHO n3dJIne, CO-3daKOT cnIbHbIe MaHNTHbIe noJIa, cNoCo6HbIe, NOMMo npOyero, BInrA Tb Ha yHKUHOHPOBaHne IMnlaHTaTOB.
- Čeρχιte TaKHe yCtPoHCTBa, KaK aKTbHbIe HmNlaHTaTbI, 3JIeKTpOHHbIe N3dEJIIN MaHHTbIe KapTbI Ha 6e3oNaChOM pacCToHnO NT 3dEJIIN.
Co6nOdaTe yka3aHn H3ROTOBtEn, B YactHOCTn IaKTHBbIX NmNnAHTaTOB.
JIuca c aKTHBbIM HmIIaHTaTOM MOrTy IcNoIb3OBaTb N3dEJIe TOJbKO C pa3peHnra Bpaqa.

OCTOPOXHO
Onachoctb TpaBMPOBaHn H3-3a HenpaBHLbHOH HIN CnHsKOM NIOTHO INoCAKn. Bo3eCTBne DaBHeHn Ha OTdIbHbIe UyAcTK TeHa n CdaBnBaHne KpOBeHOChbIX COcyOB n HepBOB.
Y6eHntecb, yTO n3dJIne HaTeTo npaBnIbHO.
HILTI
-
HadeHbTe n3dJIne, KaK pIOK3aK. PpOdeHbTe pyKn YpeE3 pIeueBbIepEMHN HaDeHbTePJIeueBbIepEMHN Ha pIeyn.
-
3akpoTe 3acteKky-KJIncy norCHoro pemHa.
- Otperynpyte noaCHo peMeHb. cTpaHua 369
- 3akpoTe 3acteKky-KJIncy HarpyDHorO peMHr.
- Otperynpyte HarpyndbI pemeHb no Bblcote n nn-pnHe.

- Otperynpyte HanneuHbIe pemHn. NotaHTe KOHcBpeMHe Bn3, yTo6bl 3aTAYb IIeueBbIe pemHn. YTo6bl ocnaBt bIIeueBbIe pemHn, OTKINbTe CTyneHuAtyIO npAkky.
PneueBle pemHn DOnKhbl CBO6OHDNo neKaTb Hnnpeax He MeWaTb NOHaTHNO pyK.
Korda pykn noHnTbI, noCHOn peMeHb He doJIxH HATARNBaTbCBABepx. Ecnn noCHOn peMeHb MeHRe TNOJKeHne, Heo6XoDnMo Ocna6ntb PNe-ueBBie pemHn.

PENyPEXKDEHNE
Onachoctb TpaBMPOBaHNA BCNEdCTBne OTCKAKNBaHHa Hpyk. PpeHaTHyTaA WnHa dIy pyKn MoKET HeKOHTpOIpPyEMO OTCKOHt Ha3aI NopAHITb BaUy RoJIOBy.
Yto6bI paCCTeHryTbMaHHTHyO 3aCTeKKy,NOUeNTne naIbIeM neTIIO peMH. 3TO npeD0TbpAIT COCKaJIb 3bIbAHHe N OTCKaIKBaHHe UINHb I Dn pyKn Ha3a.I.
- NotarHnte neTIO peMH BBepx n octopoKHO paCteNITE MaHHTHyO 3aCTeKky.
8.C NOMOUII peTNI pEMHc TAHHTe NOJIOKOTHK BHN3. Pn 3OM NOIDHCITE CBOIO pyky K TeNy.
- Pa3MeCTIe npednneBb noDIOKOTHKe nOcepe- dHe.
HILTI
- C NOMOJIbI O neTIN peMHa 3aueHITe MaHHTHyIO 3aCTeKKy 3a KpHcOK Ha NOJNOKOTNIke.
Y6eHNTecb, YTO MaHHTHnA 3aCTeKKa NIOHOCTbIO 3aueKNHyIacb.

HapyxHa noKJaKa noIIOKOTnKa doJxHa 6bItb OTKpbTa, KOrda Bbl HaedeBaTe peMeHb noIIOKOTnKa Ha npednpeybe. Ppi Heo6xoDnMOCTN OTKPOITE NOkJaKy NOIIOKOTnKa nocne pa3MeueHna npednueyB NoIIOKOTnKe.
- NcnoIb3yIte 3aTeKKn-IlnyuKn, YTO6bI OtperyIInpoBaTb oXBaT peMHa NOJIOKOTHnKa Ha npeDnIeYbe. 3acterHITe 3aTeKKn-ILnyuKn no ceHTpy I NoIHOCTbHO.
PemeH IOJIOKOTNkA MOXHO perynipoBaTb c o6oNX KOHOB JAMKn.
- CnoXnTe BHeuHIO HaKJaIky NoJIOKOTnKa.
- TaKIM JHe 6pa3OM HadeHbTe NpOINOKOTnK C npOTHBONOLOXHO CTOpOHbI TeJa.
- PpOBePbTe CmmMeTpHnyo nocaKn y3dJIyra.
6NoIroHka

PENyPExDEHNE
Onachoctb TpaBMnpoBaHHB CnEaCTBHe 3aueMneHn. Onachocb 3aueMneHn naIbueB npn nonadHn B wapHnphb y3eI.
Perynpyn3dene, He XbataTecb 3a MexaHn3M 7apHnPHoro y3na.
6.1 PerynpoBka noDepKnBaOuIeO ycnIIa

Otperynpyte noedeepxmbaohue ycnne, nobopaunbarpeynpoBOHoe KOleco.
Pn noBopote no yacobon cTpeKe (+) noDepKNaUoue ycHne yBeJIuNbAeTc, npn nobopoTe npOTNB yacobon cTpeJIKN (-) -ymehbJwaeTc.
- Yem 60jbe nonoca Ha wkaJe, Tem Bbiwe ycHnne noDepKKn.

NoidepKnBaIOue ycnIne BbIcTaBHe NOpaBnIbHO, ecnn pyKn OnyckaIOTc 6e3 DoONHITeB HbIX ycNnI, npocTo nOd DeIeCTBnEM Cnbl TKeCTn. NoidepKnBaIOue ycnIne He doJXHO 6bIb Bblse 3TOro 3HaueHnra - Bbl MoKeTe CBO6OdHO BblbnpaTb 3HaueHnra Hnke 3TOrO.
6.2 Perynipobka noarcho pormHa
- POrchOn pemehb dOJIxhen pacnonaraTbca HaI rO-dHcHOMMbUeHHa yPoBHe Ta3a.
IpyrnnnoBKn BbICOTb 3K3OKeNt Heo6xOaHMO CHTb.

- HακMnte KhoNky pa36nKOpOBKn perynIpOBKn BBICOTbl.
- BbIaHHTe/BToJKNHHTeJIaOMHHeBBInpOΦnB n3/B KOxIy paCUnpnten. OtperyNpyTe HyKHyIO BbICOTy.
HILTI
-
AIIOMHHHeBb IpoOfnb fHKcHpyETcA CnblHMbIM cIeJHKOM. Y6eHTecb B TOM, yTO aJIOMHHHeBb IpoOfnb HaDeXHO 3aΦHKcHPOBaH, NotAHyB 3a Hero.
-
HadeheTe n3dene n y6eInTecb TOM, 7TO 7apHnPbIe y3nbI paCNOIOXeHbI paBHomepHo.
Korda n3dene HaeTo, BepxHn Kpaa shapHnphoro y3na dOnJhen COOTBETCTBOBaTb ypoBHIO nIeY +/-3 cm.
6.5 PerynpoBka nnHbI HacnnHoro peMH
- PacCTeRHTe 3aTeKKy-JIpyuKy Ha HacnHHom pemHe.
- OtperynHyte dHnHy HacHHHO ro pemH n CHOBA 3acteHnte 3acteKy-ynnyky.
6.6 PerynpoBka CTaXHOJ JeHTbI
Nocayu shapnnpbix y3noB moKHO peynilpoBaTc nOmoIbIO CTaXHO JENTbl. Pp60JIbIeM HATJKeHH CTAAHNO JENTbl shapnnpbIe y3nbI N HAknaIck paCunPteJe np6bnkaOTc K Tenty.
- NotaHInTe 3a COOTBcTcByOuIe KHeue JAMKn HApKy, YTObHaTHyTb ONDy N3 CTAAHHix JeHT.
- 4ro6bl ocna6nTb cTAAKHyIO neHTy, oTKpoTe cTyneHcyTu npAkky.
Y6eDntecb, YTO OBe CTAXHbIe IeHTbl CnMMETPNuHO NOcAKeHbI.
7 CknaDbibaHne

PENyPExJHHe
Onachoctb TpaBMnpoBaHHB CNeDCTBHe OTCKaKNBaHH Ha pyky. IpeHaTAYra HnHa dny pyKMOJET HEKOHTPoINpyeMo OTCKOHTb Ha3aI N npaHtB BaWy rnooby.
4To6bI paCCTeHTb MaHHTHyO 3aTeKkY, NOuienTe naIbIeM netIIO pEmHa. 3To npedotBpaNT COCKaJIb3bIBaHHe n OTCKaKNBaHne IINHb IJn pyKn Ha3a.i.
- Плавно Notянite nettno peMHЯ n MaHHTHyO 3a-CTeKKy BBepx n OTcENITE 3acteKky OT KpIouka Ha NOДLOKOTNIke.
-
Nepemecnte neTIOpeMH BnH3, ydepKnaB npN 3TOMpeMeHbNOJOKOTHKaBAHATyHTOMCOCTOHHN.
-
BbHbTe pyky n3 noJIOKOTnka n noJHeCHTe ero K TeIy.
4.Плавно NOДнHMITE NOДNOKOTNHК BВерх.
5.ДаTe MaHHTHOJ 3aCTeKHe NOIHOCTbHO 3aФИКсИpoBAtbCBy NapKOBOUHOM NIOLOXeHn Ha IIJIeYEBOMpeMHe.
- Поберп Te npabHbHocTb NOcaKn MaHHTHO 3a-CTeKKN.
- Nobtopte 3TN 8aHn IeBOy pyKO C npaBbIM NOJIOKOTHKOM.

- Otkpoite 3acteKky-Knncy Ha HarpydHom pemHe.
- BbICBO6OaTe KOHcI NOACHOPOeMHr H3 DepeKaTe- nei.
- Ocna6bTe nOaCHO peMeHb.
- OtkpoTe 3aTeKkY-Knncy NorCHoro pemHa.
- CnoKHTe n3dJIne, KaK pOJK3aK.
8.1 YctahOBka/CHrTne onOpbln 3aTblnKa
- Pπκρεπητe onopy Σλη 3aβικα K KρεπνηΗΜ πη-yeBOrO pεmH.
- NomecHTe 60JIbwoI napeu Ha npHneHyIO nobepx-HOCTb I CdBnHbTe ONOpY dIra 3aTbIka BHN3, YTO6bl 3aΦNKcnpOBaTb ee B HyKHom NIOJKeHHN.
- Y6eIntecb B TOM, yTO ONOPa IIN 3aTbINKa yCTaHOBJIeHa Ha OINHaKOBoB Blicote C o6eHX CTOpOH.
- Yto6bI cHrTb onopy dIa3aTbIlnka, nomecHTe 60nb- WOn naneu Ha npHJeHyIO NOBepxHOCTb I CdBnHbTe onopy BBepx.
- OuHuaTe NODKnlaKky ONOpby 3aTbIka TaK JKe, KaK n NOknaAkn dN pyK. cTpaHnca 375
9 YxOД n TexHnueeCKoe 06cnyKnBaHne

PNEyPEXKDEHNE
Onachoctb TpaBMnpoBaHHB CJIeIcTBHe HATyHbIX pauchpnteNe. TpaMbI npn yxoJe n o6cnyKNaBHH.
BbnoHnre pa6oTy no yxOdy n Texnueckomy o6cnykBaHNIO TOnbKO npn HeHaTAYtbIX pacuHpntTeIax.
yxo
- OctopoxHo ydaIaIte HaIIINuIyIO rpa3b.
He ouuauTe 3TO n3dJeHcKaTbIM BO3dyXOM.
Oueta Te 3dene ToIbKO CnerKa BnaJxHoi TkaHbIO MblOM C HeTpalbHbIM pH-3aueHHem. He nCnolb3yTe cpeCTBa No yXoYc COepeHaHHeM CNIKKHO, TaK KaK OH NOrpEHT NOBpeDITb PIACTMaCCOBbie Detanl.
TexHnueeckoe 06cnyxHBaHne
- Perylnapno npOBepnTe BCE BnIMbIe yactn H3dEHHa OTCyTCTBHe NOBpeKdEHH, a 3neMeHTbl ynpabHnna - Ha nCnpaBHOe FyHKUOHIpOBaHHe.
- Pn IOBpeKdEHNAX H/INH FyHKUHOHaJIbHbIX C6OaX He NcNoJIb3yIe H3JeJIne. Cpa3y cdaBaIte ero B cepBnchbl ueHTp Hilti dny peMOHTa.
- Nocne yxoda 3a n3dennem n ero texhnueckoro o6cnyknBaHn yCTaHOBtE BCE 3aunTHbIe npncnocO6- neHnHa MeTo n npOBepbTe nx nCnpabHoe fHKUOHIpOBaHne.

IЯ obecneueHЯ 6e3onacHoi 3KcnpnyatauH INCNoJIb3yIe TOJIbKO OpINHaJIbHbIe 3anaChIe qaCTn I paCXoHNbIe MaTePnaIbI. IOnyuEHHbIe HAMN 3anaChIbe qaCTn, paCXoHNbIe MaTePnaIbI I npHaJdNeKHOCTn IЯ daHHOrO n3deJIIn Bbl MOKeTe HaHTN B Hilti Store INN CMOTpNTe Ha www.hilti.group.
9.1 OuHCTka noKJaIaOk


- Chmnte noKnaKn c noIOKOTHKnOB.
- NoctnpaIte noKlaIbKn BpyHyB BOe CMbIOM C HeITpaIbHbIM pH.
- TuaTeNbHo npocuWnte nodknaKn.
4.ДaIte IM BbICOXHyTb Ha BO3dIyXe. - 3aTeM yCTaHOBnTE NOkJaKn Ha MeCTO.
9.2 3aMeHa noDknlaOk
- Chaayana CHIMITE c NOJNOKOTHNOB BHYTpEHHe, a 3aTeM HApyKHBie NOkJaIKn. NODKnaDKn NOJNOKOTHnKa KpenTcHa NInnyKe.
- YcTaHOBInTe HOBbIe NOdkJaKn B NOJIOKOTHnKn B O6paTHoN NocJeIOBaTeNbHOCTN. Y6eIInTEcb, YTO NOdkJaKn IpaBnJIbHO BbIPOBHeHbl.

IopKnlaKn I NOJIOKOTHnKn NMeIOT CBeTOByo MapKnPOBky C ToyKo; CInHra O6O3Haayet JeByo CTOpOHy, KpaCha - npaByo.
9.3 3ameHa pemHn noJIOKOTHMka
- OtkpoTe 3acteKn-nyC o6eHX cTOpOH peMHa NOJLOKOTHka.
2.ИЗВЛЕКЛТЕ ЛЯМКУ ИЗ OБОДХ HAкЛадOK Ha NOДПОКOT-NHKE. -
YctaHOBtBe BepxHIOU qactb MaHHTHO 3aCTeKKn B npapKOBOuHoe NOLOXKeHHe Ha NODIOKOTnke.
-
HauHHa CHN3y, npoTAHHe HOByIO JAMKy uepe3 nepByIO HaKnadKy. 3acteKka-nnyuKa DOJXHa 6bItb o6paueHa HApKy.
- NObepHnTe NOJIOKOTnIK.
- PpoJeHbTe JAMKy CBepxu Hepe3 MeTaJIHueckyIO npoyuHry MarHHTHOJ 3aCTeKKn.
36OpOHReTbCBAHOCHTBMINIOKHOCTpykuiBnpo6y,aTaKoJIOaBaTHO HbOrO npnaDn,Ke He DONYeHe Do 3ACTOCyBaHH 3 Hm.
3a6bopohraetbca npneDHyBatn do noorcho rpoemeh 6ydb-ri kO6'kT, kI MOKytb 3aBaKaTH HaneXHOMy fHKiohyBaHHIO ek3ockeeta. 3abopohraetbca npneDHyBatn do ek3ockeeta ctpaxyBaHt TPOCH.
Bnpi 3a6opohreTbC BnKOpHCTOByBaTH nIe 36IbWeHH CnIe OepaTopa, IINPiHIMAHH INHX OcI6, nIcny IIOeH Ha KaHati a6o RcpxyBaHn 3acio.
Bnpi 3a6opohrEbcr BnKOpncToByBaTu y Bn6yXoHe6e3neHOMy cepedOBnui.
3a60pOHaETbCa BnKOpNCtOByBaTH BuPi6 N6N3y NiHn BnCOKoI HanpyrH.
Doeknnyatauii Bnpo6y 3a6opohcBcnDonyckatn oci6,aki:
BHKOPNCOTBOYOBKAPDIOCTMMyNATOp a6o noDi6Hi do HbOro AKTNBH iIMnAHTaTn;
paHipe cTpaKdann 3axBOPHOAHnMn CKeNETHO-M'R3OBoI CNCTEMN B O6nacti nneey, pyk, cnHH Ta KnCTe;
MaOTb 3axBOpOBaHH, TpaBMn a6o 3anaJIeHHN WKIPn; MaOTb rineptpOphiHi py6i 3 H6pKaMn;
Maotb noepBOHHa Ta nIDBnueHHa TemnepaTyHa BIDNobIHx DIIHkax Tla (pyKax, Pneayx, Cterhax a6o cnnHi);
- CtpaKaDaIbB BapKo3Hm PO3uHpeHHM BeH BaKoi cTaii - Oco6JIbBO THM, IIO cynpOBdoXyEtbcpeFIOKCOM a60 NOpUeHHM BiTOKy JIMΦn, a60 MaIOTb HApRk M'JKNX TKaHH Tina HeBIDOMOIpnpOHi, PO3aWobAh Ni3a DInAHKaMn HaKnadaHH Bnpo6y;
- CtpaKaIbTb NopyuHnHmN yUJIbOcTI a60 KpOBoObiRy B Oblacti BepxHIX KInCIBOK, CTEROH Ta CnHH (ObyMOJIeHIMN, HApNKlaI, dia6ETNuHO Heponatieo).
3.5 KomnjeKT NoctaHaHr
Ek3ockeJeT, hctpykui 3 ekcnnyatauii
Inhe npinaa, donyuehe do ekcnnyatau3 Baunm Bnpobom, Bn mokepe npndatn y Hilti Store a6o Ha Be6-caTI www.hilti.group
4 TexhiuHa
IpeoBi peMeHi NOBHHI leXaTH Ha Ineayx, He 3daBIOOHy iX Ta He 3aBaKaHOH NiIHIMaTH pyKn.
PiJ yac NiIyOMy pyK noRCHn peMHb He NOBHeH 3CyBaTnC BROPy. KaO noRCHn peMHb 3CyBaTbC8 3CBORo noLOKeHH, Heo6xIDHO nocnaBnTI nJeUOBi peMeHi.

NONEPENXEHNA
He6e3neKa TpaBMyBaHHaYepe3 BiDcKaYBaHHpyHoi peKn.PyHa peKa nepebByac nI nonepenHim HATROM Ta MoKe panTOBO BiDcKOHTn Ha3aI BdAPNTroNoBy onepaTopa.
BidkpuBaOuM MarHITn 3aMOK, 3aenitb peMHHyneTIO nAInbem. Lc Do3BOINt b yHKHyTN 3iCKOB3yBaHHpyK Ta panTOBOro BIDCKOuyBaHH pyHOI peKN Ha-3aI.
- NotarHitb pemHHy netnO yropy Ta oBepeKHO bI-KpHte MarHITn 3AMOK.
- YtpmyoH peHHy neTIO, notarHITb onOpny dpyKn Bn3. PpN cboMy nepemictitb pyky y noNoJxehnnepeq tiom.
- Nomictitb nleeB onopy dny pykTakm YHOM, 06 BOHa 3haxoDnacb nocepeDnHi nyea.

-
3aKpHnTeMaHrHiTHm3aMOK: dIraBOrO3a DonOMoroOp peMiHHoI neTJI 3aHeniTB Ioro 3a raQok Ha onopi dny pyKN.
-
PpocniKyuTe 3a Tm, uo6 MarHITn 3amok no-BHICTU yBiuO B y 3auenneHH.

30BhiHnMa'ka NiKlaJaKa onOpn dny pyKn Ma6 6ytn BiDkPntOto, KOnn Bn OxonJIIOCTe nIpepeMeHem onOpn dny pyKn. 3a Heo6xIDHOCTi BiDkPnTe M'ky NiKlaJky onOpn dny pyKn nicna toro, kN Bu nomictnn nIpe BCEpeDInHy onOpn dny pyKn.
HIL
-
3a donomoro 3actioBekpobidperyHIOte 06'em po3aOBOHaORo Ha nlehi peMeHOnopn dny pyKn. 3aknTe 3actiKBeIkpO TaKHM uHOM, xO6 ixHi enemeHTN 6yn Po3aOBOHaPi BHO Ta NOBHicTIO npn IraHn ODNH DO ODHoro.
-
Pemihb onopn dny pykn MOxHa peryIIOBaTH OKpeMo 3 06ox KINHIB.
-
Cknaiaitb3OBHIHIO m'kyiikKaiaKyonopn dnyuK.
- AhaoruiHm yHOM BiDperyIHOte onopy dny pykn 3 nptonexKHOi CTopoHN.
- IpekeKaHaTeCe, 0o Bnpi6 cnntb Ha tini CmMeTpnuHo.
6 PerynobHH

PONEPEIXEHHA
He6e3neKa TpaBMyBaHnB HAcniDok 3aueMneHH. He6e3neKa 3aueMneHH naIbci y pa3i KOHTaKTy 3 BHyTpuihboIO qactINHOO cyrIooBOoro 6noKy.
-ПлдчacperyIIOBaHHBbpo6y yHnKaIe KOnTaKTy 3 BHyTpIiHbOIO qAcTHHOIO MExaHi3My cyrIo6oBOoro 6IOKy.
6.1 PerylloBaHHa cnHn niTpHMKn
Lio6 yctahOBHT noTpi6Hy cnly niTpHMKn, o6ePaTe KOleco perynoBaHHcnni ndpMKn.
ObepTaHHKoNEca 3a roHHNKOBIO cpiKOIO (+) 36ilbUy cNny niIDTPHMKn; o6epTaHHKoNEca npOTn rOHHNKOBOI cpiKN (-) 3MeHsuye cnny niIDTPMkn.
YHM Bnue CTOBnK WkaJIH, TM 6Jbwe cHa niIDTPmKn.

KuO pyKn OnyckAOTbcn BnKIOUHO nID DiEo CnN TAKHH 6e3 DOKnaDAHRA DOaTKOBx 3ycnbl, ce O3Naue, 10Cnna NiTpIMKn BCTaHOBHeHa HaneKHM YINOM. Cnna niTpIMKn He NOBHHa nepeBnuyBaTHne 3NaueHH, Ondak MoKe 6yTn HalaUTOBaHa Ha 6yDb-Ke MeHue 3NaueHH.
6.2 PerynHOBaHH NoCHoro pemeHa
- POrChn peMH nobHeH 3hAxOHTncHa d ciHnHuHNM M'3aMn Ha BnCOTI Norcy.
PiD yac BnKOpHCTaHH npHcTPOIO nORCHNI peMiHB He NOBHeH 3CyBaTHCA.

- Lio6 nocna6nT noRCHn peMHb, 3nerKa haxniiB CTyniHcuacty npKky.
- Lio6 HataRhyTN noaChn peMiHb, notarHITb 06nDb noro kiHci Bnepei.
Ponchn pemihb Mae uilbho npnraat do tina.
M'ka niklaika nochoro pemeha Mae 6ytn po3taWObaHa CmMetpnuHO.

- YcTaBTe KINi NOrCHOro pEmeHa y npn3Naehi dHnx TpMaayi.
6.3 PerynHOBaHH npomixky rHizKaYbKOBOrO wapHipa

Lio6 BiDperynBoTaH npomixok rhi3da KylboBOro wapHipa, cnid 3HATN ek3Ockenet.

-
DictaHbTe 3 netJI rayOK peryIOBaHHn npOMiKky.
-
Po3TARHITb a6o 3aTARHITb nORCHn peMH TaKIM YHOM, UO6 BIn 6yB yCTAHOBJIeHN Ha notpi6Hn po3Mip.
3HaueHHH uHN Hn Ta BnCOTn He 06OB'RAKOBO NOBHHI 36iratncr.
-
Nobhicto 3aenitb rayok peryioBaHHn npomixkky 3a notpiHy netno Ta tyro 3aTarrHtB noarChn peMiHb.
-
HadaHitb Bnpi6 Ta nepeBipTe, YI CHMeTpNHO CNDHTB NORCHM peMHb.
-
Ihi3da KylbKOBHX wapHipIB NOBHHI 6yTH 3aikcoBaHI BepTKaJIbHO DO NIIeOBOr cyTIO6a; KpIM TORO, 3aJeKHO BiD FOpmn BepXHbOI YactHN Tila BOH MoKyTB HaxINATNCRA HAOBI (3aMaHOV-NoDi6he po3TaUyBAHH). ODHouachO ue He MaC 3aBaKaHTN BiJbHO pyxATn pykAMn.
6.4 PerynIOBaHHB BnCOTn

Lio6 BiiperynHOBAtn BNCOTy, cnid 3Hrtn ek3OckeJeT.
- HatnchItb de6nOKyBaIbHy KNONKY npncToPO perynHOBAHH BVCOTN.
- IicTaHbTe anHomHieBn npophiIb i3 Koxyxa ecnAHepea a6o 3acyhBe TaHomHieBn npophiIb y KoxyxcnAHepea. 3adaTe notpi6Hy BnCOTy.
- AnomHicBn npoipnb noBHeH yBiTHy 3aenneHHI 3i YtKm XapaKTePHM 3BykOM. NotarHyBwN 3a anHomHicBn npoipb, nepeBipTe, H aHiiHO BIn 3akpinneHn.
- HadaHirb Bnip6 Ta nepeBipte, nn pibHomipno po3aWobahi cyrno6oBi 6JOKN.
KoNn Bnpi6 HaIarHytn, BepxHi KpaCyrnoBOrO 6NoKy NOBHeH 3haxOnTncHa pIBHi nIeey i3 MoKJIINBM BiXIneHHM +/- 3 cm (+/- 1,2 IIOMa).
6.5 PerynobHHIOBHH CnHHHOro pemeHa

- BIDKPNTe 3acti6ky BENKPO cnnHHoro peMeHa.
- BIDperynHte DOBXHH cyHHoro peMeHa, nicra yoro 3akpnTe 3act6ky BElkpo.
6.6 PerynobHHCTaXHoro nacka
3a DonomoroO CTAAHOro nacka MoXHa peryIIOBAtn po3aUyBaHHc cyIIObOx 6loKIB. Raio tyriwe HATryBaTn CTAAHNI nAcOK, cyIIObOBI 6LOKn Ta KOkxyN ecnaHepa 9iNbHiE npnraTmMyt do Tila.

- NotarHItb BiDnOBiDnK iHeCb pEmeHa3OBHi, 0o6 HataRHyT ODNH i3 CTaXKnHX nackIB.
- Lio6 nocna6nTn CTaHHn nacOK, 3nerKa haxnItb cTyinHvacty npAkky.
- IpepeKoHaIeTec, 10 o6nDa C7RkHi nackn po3aioBahi cHMeTpnuHO.
73HATTA

NONEPEDXEHHA
He6e3neka TpaBMyBaHHa Cheep BicckayBaHH pyHoi peKn. PcyHa peKa nepe6yBa c iD nonepeHIM HATROM Ta MoKe panTOBO BiCKOHTn Ha3a i BdAPHTn roNoBy onepaTopa.
BidkpuBaOuH MarHtHm 3AMOK, 3aenitb peMHny neTIO naIbem. Lcdo3BOINb yHnKHytn 3iCKOB3yBaHHpyKn ta panTOBOrO BiDcKOuyBaHH pyHOI peKN Ha3aJ.
- NobinbHO notarHITb pemHHy netIO Ta marHHTn 3aMOK yropy Ta 3HIMtB Noro 3 rauKa onopn dny pyKn.
- 3mictiB peMHHy neTIO BHN3, yTPMHyOuN npn cboMy peMHb onopn dny pyKn y HataHyToMy ctaHi.
- BnmiB pyky 3 onopn dny pykn i nepemictb pyky noJoxehn nepei TINOM.
- NobinbHo nepemictitb onopy dny pykn Bropy.
- Marhithn 3amok nobHHeH nobHicTIO 3aikCyBaTHc y BnXiDHomy noLoKeHHHa npeObOMy peMeHi.
- IpepeBipTe, Hn HaneXHm YHOM yCTaHOBneHn MarHiTHN 3aMOK.
- Nobtopitb zi kpoKn IIBOHO pykoHO Ha npaBn onopi dny pkyN.
- BiKpnTe 3aTnCKau HarpyDHoro pemeHa.

HILTI
9.ДICTaHbTe 3 TpImauiB KINi NOrCHOrO peMeHa.
10. Iocna6Te nOaCHn peMiHb.
11. BiiKpnIte 3aTnCKau noRCHOro pemeHa.
12.3HIMITb npncptpi k pIOK3aK

8 DoataKOBe npnaa
8.1 YctahOBJIeHHa/3HimaHHaONOpn JIINi
Texhiue o6cnyrobyaHHa
- PerylaHno nepeBipRte yci 3OBHIuHi qactHH Na HaeBHicTb noKoJKeHb, a opraHn KepyBaHHa - Ha npedmet cnpaBHOi p60tn.
- Raio Bn BnBnHn noKoJxehn Ta/a60 npuyenHHy fHKIOHaJbHOCTi BPO6y, npnnHITb Ioro BVKnOpctaHH. HeraHNO 3BepHItcdo cepBicHO CnyK6n KomnaHlt Hilt dIe 3diCHeHH peMOHTy.
- PioBedeHn DOrnady i TexHiuHoro 6cnyroBaHH BCTaHObit yci 3axnci npctpoi Ta nepeBipTe ixHIO pO60Ty.

Lio6 rapaHTyBaTHn HaleKHy po6OBy BInpo6y, BnKOpNCtOByTe TIlbKn opriHaJIbHi 3anaChi qactHn Ta BnDaTkoBI MaTePiAn. PekomeHDoBahi 3anachi qactHn, BnDaTkoBI MaTePiAn Ta npIaJaIra DnA BaWoRo BInpo6y Bn MoKeTe npIa6aTH y HaibNkQyOMy Mara3HNI Hilti Store a6o Ha Be6-caTi www.hilti.group.
9.1 YnueHHaM'kNXPiKnaDOK


- BidaeHaTe M'Arki nikklaaKn BiOnop dny pyK.
- PpomnTe M'aki NiiklaaKn y BoHOMy po3HHi Mnna 3 HeItpaBbHM noka3HkOM pH.
- PetenbHO nponolouitb M'aki ndknaKn.
- Bucyitb M'aki niknaekn Ha nobitpi.
- Picna yboro BCTaHObitb M'aki nikkaKn Ha Micue.
9.2 3aMiHa M'kKnX IIkKnlaDOK
- NocniIOBHO 3HIMITb 3 onop dny pyk cnoaTy BHy- TpiuHi, a notim 3OBHIuHi M'aki NiKnaAdKn. BOHN KpinnrTbcra do onop dny pyk 3a donomoro 3actiok BeJIko.
- YctaHObitb B onopn dna pyk HOBI M'ki niKNaIaKn y 3BOpOTHOMy nopAky. Ppr cybOMy nepekoHaIteCn, 10 M'aki NiKNaIaKn po3TaWOBaHi HanexHHM YINOM.

M'anki ndkOnop pyk Maotb KoIbOpOBe MapkyBaHH: CnH ToKa No3Haue LiBy CTOpOHy, a cepBOHa - npaBy.
DdaTkoBii He Notpi6Hi.
PeynbTaT 2/2
Pyx Kylbkn ycknaadHeHH.
BnKpyTb Dba rBnHTn i3 rHIsa KynbKOBOrO WapHipa Ta 3HIMiTb KOxyX.
BnMItb KyIbKy i3 rHi3da KylkbOBoro wapHipa Ta npOuHcTbe KyIbKy i rHi3Do M'AKoIO TKAHHHO.
- Po3aUyIte Kynbky B rHIsdi KynkoBoro WapHipata yctAHOBITb Ha Micue KOKx.
3akpyitb Dba TBHHTN 3 MOMENTOM 3aTAYBaHH0,5 H·M.

10 TpaHcnpTybaHH Ta 36epiraHH
TpaHcnopryBaHH
HadiHo 3akpinioTe Bpi6 niD qac TpaHcnOpTyBaHHa
Picnra TpaHcnpOpyBaHHBnpo6y 3aBxKnpeBipRte yci Noro 3OBHiNHa cactnHa HaraBHicTb noikokdxHe, a orpAHn KepyBaHH - Ha npedmet cnpaBHO p60tn.
TpaHcnopTyBaTu i 36epiratn ek3ockenet cnid BKNIOUHO 3 nocla6JeHmE cnaHepamn.
36epiraHHa
36epiraTe Bnpiy cyxomy micui, HeoctynHomy dIeT Ta cToPOHHix oci6.
JaKuo Bnpi6 3haxoDbCra Ha 36epirahHni npotrrom TpnbAoro yacy, 3aBKnnepeBipriyei Noro 30BhiHi qactHHHa HnABHicTb NookoJKeHb, a opraHn KepyBaHH - Ha npedmet cnpabHOi p60TH.
11 DOnomora y pa3i BHHNKHeHH HecnpabHocTei
Y pa3i BnHnKHeHH HeCnpaBHOte, Aki He 3a3Haehi y ui Ta6nui a6o Aki Bn He MoKeTe noIarOHTN camocTiHo, 3BepHITbCdo cepBicHO CIyKcKOMnHaH Hilti.
| Hecnpabhnicb Moxlnba prunha Piuehne | |
| Ecnandep He natayctbcn | Ecnandep Bniwob i3 3auepehneHnra |
| Ecnandep 3noeHn | |
| Hecnpabnictb MoxlnBa npuHa Piushen | |
| Cyrnoobn 6loK 3aklnHoc | 3Bepntcdo cepbcnoi cny-jk6n kompanii Hlti. |
| M'aki niKlndkn onop dlya pyk natoaotb | M'aki niKlndkn 3abpdnehi ▼ Pocnctbte M'aki niKlndkn. → cstop. 393 |
| M'aki niKlndkn BCTahOBnEHI y He-BipHomy nopAky a6o 3nOcnInscy | |
| Onopa dlya rykn 3cyBaCTbca chepez liKotb | Onopa dlya rykn 3haxodntbca He nocepedinHi pLeya. |
| Pemihb onopn dlya rykn prnilrae he doctb0 5iNbHO. | |
| 3anaTTO beNki onopn dlya ryk, M'aki niKlndkn ta/a6o peMeHi | |
| B obnaTcPi neuey 3'YBnIcR By3bKi micra Ta/a6o CTnc-KaHn | 3anaTTO mani onopn dlya ryk, M'aki niKlndkn ta/a6o peMeHi |
| Pemihb onopn dlya rykn prnilrae 3anaTTO 5iNbHO. |
12 Ytulizuaia
BinbuiCTb MaTepiAIB, 3 RnX BnroTOBneHO IHCTpyMeHTN KOMNaHII Hilti, npuaTHI dJI BTOHHOI nepePobKn. IpeedyMOBOIO dJI IXHBoI BTOpHHOI nepepo6Kn e HaJeKHe copTyBaHn BiIXoDIB 3a TINOM MaTepiAny. Y 6barTox KpaIHax CbiTy KOMNaHII Hilti npnaMae cTapi IHCTpyMeHTN dJI IXHBoI yTHBoI yTNIsaQII. Lio6OTpIMaTH IOdaTKOBy IHΦopMaζIO 3 cboI NHTAHn, 3BeptaIteCra DO cepBicHOI cnyKbN KOMNaHII Hilti a60 do CBORO TOPROBORO KOHCyNbTaHTA.
13 TapaHTiHi 306OB'3aHHBnPo6HnKa
3 nntaHb rapaHTi, 6yNb Iacka, 3BeptaTeCn Do hN6bnKQOro napThepa KOMnaH Hilti.
14ДоаТКОВa iHΦopMaia
Ioo6 O3HaHOMITnC H3 IdoaTKOBOIO IHoPMAciEIO npo 3actocyBaHHry TeXHiue O6cnyroBvBaHHry BnPo6y, Ioro BnINb Ha NaBkoJIiNHe CEpeIoBnSe, a TakoJ npo Noro yTInlIaCiio, 6ydb JaCKa, CKOpHCTaITeCra qm NocnlaHHM: qr.hilti.com/manual/?id=2339613
LcnoCnlaHnTaKoK HabeHe HapnKInuI DokyMeHa y BnraDi QR-KoNy.
TynHcyKa naIdaIaHy 6ObIHHa HycKayIbIK
1 PnIdaIaHy 6oIbIHwa HycKayIbIK TypaJIb MmIImTTeP
1.1 ByI KxKaTama TypaJIbI
EAC
HmnpTaybiXeHe eHdpyuiHin ekineTt yibmbi
(RU) Pecen Φeepauncbi
"XnTTn DnCTpn6bwoH JTIa" AK, 141402, Macekey o6JIbcbl, XmKn K., JeHHrpaDcKaeKeu. FIM. 25
(BY) Bénapycb Pecny6nkaebi
222750, MInck o6IbICbl, D3epKHHckn aydaHb, P-1, 18-ki KM, 2 (Cno6oJa aYbIbIH H JkaHbIHda), 1-34 6eini
(KZ) Ka3aKCTan Pecny6nKacbl
Ka3aKCTah Pecny6nIkacbI, INHeKc 050011, AnMaTbI K., PyraueB Keu., 4-yn
(KG) Kbipfb3 Pecny6nkaebi
"T AND T" JXUJK, 720021, Kbipfbl3ctaH, BiuKeK K., N6paunMoB Keu, 29 A yni
- (AM) Apmehra Pecnybukacbi
3iH-KoH KLIK, ApMeHHa Pecny6nKacbI, EpeBaH K., Ba6aH Keu., 10/1 y
EhdpinreH eI: Ka6dbkTaBb6enriney TaKaTaNacbH KapaHb3.
EHdpinreH KyHi: Ka6dbikTaBf6eJrIney TaKtaWacbH KapaHbI3.
Tnicti ceptnfnkattbMbHa MekeHka 6oBihua Ta6yfa 6oJaIb: www.hilti.ru
CaTay, TaCbIMaIay XHe NaIdaIaHy 7apTTapbHa naIdaIaHy 6oHbIHsa HcKayIbIKTa 6enrIneHReHHeBacKa apHaBt TanaTap KoIbIMaIbI.
EhimiH Kbl3Me t Ety Mep3iMi 5 Kbl.
- Icke Kocy andbihda ocbi naDanahy 6oBihwa HcKaybIKtbi OKbln WbIFbHb3. ByI Kayinci3 JxMbic neh akaycb3 6ackapy ywiH anfBiwapt 6oBIn TaBinaDbI.
Ocbi naIandaHy 6oBbIHwa HcyckaynbIKtafbj XHe eHIMderi Kayinc3ik XHe eCkepy HcKaynapbH opbIHdaHbI3. - PnDanaHy BoBihwA HyckaybIKbI epaBIM eHIMde caKaTHb3 XeHe eHIMdi backa TynFaNapFa TeK ocbi naDanaHy BoBihwA HyckaybIKneh biPre tancbipbHb3.
1.2 7apTb6enrinepeih anbikTaMaCb
1.2.1 EckepTy
EckepTyep eHIMdi KOndaHy 6apbcbHdaFbl Kayintep TypaIb eCkeptei. TeMeHderi cnHaIbIK ce3dep naDanaHbIaNbI:

KAYINTI
KAYINI!
Aybip kapaKaTapFa eKeIeIH HeMece eMipre Kayin TcHdpetIH TiKeJe Kayinti KaFdaIbH Kannbl 6enrInehy.i

ECKEPTY
ECKEPTY!
Aybp Kapakapra Kkenyi Hemece empre Kayin TeHipy i Mmkih bIKTIman Kayinti KaFdaIbIH Kaannbl 6enrinehyi.

ABAHJIAHbI3
ABAHbI3!
Kapakat anyfa Hemece MyiiktiH 3aKbIMdanybHa eKeenyi MymKiH bIKTmam Kayinti XaFdaIbH XaNNbl6enrineHyi.
1.2.2 PaiaIaIaHy 6oIbIHwa HcykayIbIKTaFbI 6enrinep
By naaanahy 6oBbHwa Hcckaybikta TeMeHderi 6enrine np aadanaHbnaab:

PaiDanaHy 6oBihua HyckaybIKtby YcTaHy

AcnanbI naDanaHy 6oBihua Hcykaynap KHe backa naDablaknapaT

KaIra naIandaHya 6oNaTbIH MATEpHaIaPMeH Kymbc icTey
1.2.3 Cyperteperi 6enrinep
CypetepTe TEmeHderi 6enrinep KondaHbnaIaIbI:

Byn caHap ocbi naIandaHy 6oBbIHwa HcckayIbIKtbH 6acbIHdaFbl TnicTi cpeTke caiKec KeJIeI.
3.2 OHIMHIn apTkbl KaFbHa WOny 2
8 MarHHnTik Jankbhu
⑨ Koi uHaCbi
10 BacepymexaHn3Mi
10 BaftTaybipoNk
12 Tipey KywiH peTteriU dHreIeK
③ Acnabl imek
TaptnabtaacnabH catbblTOFacbl
15 KeheHtkiu
16 Apka-nybK 6eJdiR
⑦ KeHeiTkii KaKaNaFbI
18 Bniktikpi peTey tetririH Kynbntan 6ocaty tyMeci
19 AnomnH npoPhiNi
20 1Japbl KocbInbIMdb6eKtkiu
② KaabkTBkTpeTey inreri
22 Lapbl KocblbIMdb6eKtkiu KaUbIKtbIFbH peTey
3.3 MaKcaTbHa cai KOnJaHy
CnataTaNFAH eHIM 6eTapan 3K0KaHa Ka 6oBIn Ta6bInaBly. On 6ac neH nBk DeHreHHe H Kofapbl ETKiIeIH KymbictapBbH 6apbcBHaJa KOI MeH NbIK 6enDeyHEn KYK TycipyRe apHaNFAH. OHIM TEK Kypblbic CanacbHdaFb JHe eHepKecinteri Kymbictap YwiH KEmekWi Kypal petHde JHe TK epecek aamdapdbH TapanbHaH naDalaHyra apHaNFAH.
Hilti 3K30KaHaKaHb Eki TyPi eIeWemDe YcbHaDbI. AByIPMaUbInbIK 6ine3IK Ka6bikwanaIapbIH, 6ine3IK TecemenepiH XHe 6ine3IK Ka6bikwanaIapbEeNikTepeHH eIeWemepinHe.
TexHnKaIbIK Kbl3Met KepeCy JyMbICTapBH TK eHIM HcaybIFb 6oBbHwa opbHday KaKeT. OHimDi TeK bIKTMaI Kayinti KaFdaJnap TypaJIb apHaBI Hyckay anFaH, eKInETTI, 6iNkTi nepcoHAN KOJaHybI JxHe OfAH KytIM KepeCety Tnic.
3.4 PauDanaHuy weKteyIepi KHe KaTe KOJaHaBIC
ΘHimDi naHaJaHaHybifa TəH eHIM peTeyiHci3 naDaHaYfa TbHbIM caBHaAbI.
ΘHimDi MoHΦnKaunayFa Hemece e3repyre 6oImaIdbI XeHe eHIM yuH pyKcat etiJmeren KepeK- KapaKTapDbI Kocyfa 6oImaIdbI.
Oh6yatbH 6eikke opHaTyfa 60ImaIdbI, ce6e6i 6yI 3K3OKaHaKaHbIH dypbic Kymbc icteyiHe Keepri KeTipyi MymkiH. 3K3OKaHaKaF aCaTaHdbIPbIw apKaHdapDbI opHaTyfa 60ImaIdbI.
ΘHimdi Kyaattb6ackapy yuin XeHe aamapdbkTepy, Tycipy Hemece caKaTahbyp yuH naindaNaHyFa TbIbIM cblHaDbI.
ΘHimDi JkapblfblOpTada naIdaIaNyFa TbIbIM caIbHaIbI.
ΘHimDi KOFapbl KepHeynl cbIMapDbH KaHbHda naDanaHyra TbibM cBHaDbI.
Ohimdi Keileci deaamnapra naIanahyra TbIbIM caIbHaIbI:
- KapdnocHmnyIaTOpbI Hemece YKcac 6eNceHdi NmnaHaTaTTapbI 6ap,
- NbIK, KON, apKa MeH 6ine3ik aMfBHaFbI KIMbl-TipeK annapaTbHbH aNDbHda 6acbHaH eTKi3reH aypynapb6ap,
- Tepi aypynapbl/kapakattapbl, kyiktepi; aiKbIH KepiHtih icin KETKeH TbIptbIKtapbl 6ap,
Katbictb DeHe MyweepiHc (Kon, NbIK, cAH MeH apKa) Kb3apbyj KHe KaTbI Kb3ybl 6ap,
KetamblipbH ackbH yIfAboB 6ap, ecipece Kepi afbH cbpkatapbl, nHMa dpeHaXbHbH 6y3blbCTapbl, cohBMeh KaTAP eHIMHeH anwak 6onFaH aHBk emec kymcaK Tih iciktepi 6ap, - KOI, cAH MeH apKa aIMaMbIHda ce3IMtaJIbIK JKeHe KaH aINHaJIbIMbIHbIH 6y3bIbICTapbl 6ap (MbICaJIb, dna6eTTIK HeIPonatra JkFaJaBihDa).
3.5 KeTkiinim KHHaftbI
3K3OKaHaKa, naDanaHy 6oBbHwa Hyckaynbik
OfAH KOca eHIMiH3 yWIn pyKcat etinreH KyyEnik eHIMepdi Hilti Store dyKeHHne Hemece MbHa Be6-caTTaH Tabyfa 6oJaDb: www.hilti.group
4 TexHHKaIbIK cnNaTTaMaJap
| Салмавы | 2,4 кг (5,3 ΦуNT) |
| ЖуMbIC KeziHderi Коршаfer opTa TempepatypacBs | -10 °C ... 45 °C (14 °F ... 113 °F) |
| Салтay TempepatypacBs | -10 °C ... 60 °C (14 °F ... 140 °F) |
| Өлшемерi (үүйдьбүхөніх 6иктiri) | 950 MM x 450 MM x 250 MM (37,4 дюм x 17,7 дюм x 9,8 дюм) |
5KnH

ECKEPTY
MarHnTtK epicten kapaat any Kayni 6ap EHMHI KypaMbHdaFb MaHHTtep KaTbI MaHHTtIK epicTepe Tdybpabbl, onap backanapdbh apacbHda HmNlaHTaTAPfa ecep etyi MymkiH.
BencnHmnnnHaTtap, 3neKtpoHdbIK KypbIIFbInap JHe MarHHTIK KapTaIAP CnKtbl 3aTTapDbI eHIMHe aJUwak YCTaHbI3.
Bencehdi HmnpaHTaTap eHdpywiciHHyckaynapbH eckepiH3.
BencenHn HmNnAHTb6ap aamnap eHimdi TK depirepn hykcatb 6oBHna naananaHa ana.

ABAHJIAHbI3
Kate Hemece TBIM TBIFb3 KIOHeH KapaKaT any Kayni 6ap.KeprinikTI KbICbIMHbIH naJa 6OlybI XeHe etin KaTKaH KaH TaMbIpaB MeH KyKeDeI Tapblny.
-
OHHH dypbic KinyiH XeHe npblic ophanacybH KaMTamacbi3 etiH3.
-
ΘΗΜΙ πρΟΚ3ακ εκίλιδι υωειν ΜΚι nαύβήνιδι.
KoIbHb3dbI nbIK bEndiKTepi apKbIbI eTKi3in, nbIK 6enDiKTepiH nbIFbHb3Fa opHaNactbipHb3.

HILT
- Ben 6yaTbH 6eNdiKTH KblckblBbH Xa6bHb3.
- Bén 6yatbH 6eJikri peTten wlbfbHbI3. → Bet 405
- Keye 6enirihn Kbickblibh Jka6bHb3.
- Keye 6enirih 6niktiri MeH eHH peTten WbIfbHbI3.
- NbIK 6eJIikTePiH petten WbIFbHb3. NbIK 6eJIikTePiH Kepy ywiH 6eJIik YwTapbH TeMeH TapTbHb3. NbIK 6eJIikTePiH 6ocaty ywiH catbbl ToFAhbl eKeiTiH3.
NbIK 6eNdiKtepi NbIKTa 6oc Kynde opHaNacybl Tnic KHe Kon KeTepy apeKeTeihe KeDepri Xacamaybl Kepek.
KoI KeTeprH Ke3e, 6en 6yatbH 6enik KOrapb TaPbIMaybTnic. 6en 6yatbH 6enik No3nucBcE3repreH KaFdaJa, NbIK 6enikTepih 6ocaty KaXKeT.

ECKEPTY
Cekipin Ketken Kon JIHHacbIHan KapaKaT any Kayni
6ap.KepinacactbHdaFbKoI uHaCb6aKnaycb3 cekipin KeTyj KHe 6acBb3Fa JapaKaT Kentipyi MymKiH.
MarHHTik XaIKbIHTb aBFtKaH Ke3de caycaFBHb3dbi 6enDik imMerine caBbHb3. Ocbnaa CbIPyFa KHe KOJ WInHaCbIHb H Kepi COKkbCbHa JOn BepMeic3.
- BenDikinMerHkoFapbIaPTbIn, MaHHITIKKaIKKbIHTbI a6aJlan aFBtBbHbI3.
- Béndik inmerimeh 6ine3ik Ka6bikwacbh TEmeH TaTbIbI3. ByI peTTE KOJIbIbI3dBi DeHeHi3re KaKbIHdaTbIHbI3.

- NbIfbHb3d6ine3ik Ka6bIKwacbHbIH opTacbHa op-HaIacTbIpblb3.
- MarHnTTIK XankbIwTb6eNik imMerHH KemerimEH 6ine3K Ka6kWacBHH inReKTePHe iniH3.
MarHnTtIK XaKbIbTbIH TOnbIK TipeIreHHe Ke3 XeTKi3iHi3.

Bine3ik Ka6bIKaacBHbH 6eNdiRiH NbIFbIHbI3Fa
oparaH Ke3de, cblptKbl 6ine3ik Ka6bIKaacBHbH
TeCEmi a7bIK 6onybTnic. KaXet 6onca,
NbIFbIHb3dBi 6ine3ik Ka6bIKaacBHa
OpHAnactbIPraHHah Kein 6ine3ik
Ka6bIKaacBHbH TeCEmi a7bIN KObIHbI3.
HIL
- Ka6bIckaK TyMEniKTepDIn KEmerImeH NbIKTaBfBi 6ine3ik Ka6bIkuacbl BeNdiirH KeJemIH peTten WbIFbHbI3. Ka6bICKaK TyMEniKTepDl OptacBHaH KHe ToJIbIKTaBekITHi3.
Bine3ik Ka6bikwacbihn 6endirin ep 6endk yubhaan aHbMaIby Tpyde petteyre 6onaabi.
- CbiptKb6ine3ik Ka6biWacbHbIH TceMiH XHaHbI3.
- Bineik Ka6bikwacbiH Kapama-KapcbI opHaIackaH DeHe KaFbHa dEe KcOMMeH opHaIacTbipBbI3.
- EHHH H CMMETPNJI Type opHaTbJIFaHbI TEKcePin 1bIfbHb3.
6 Beimdey

ECKEPTY
Kbicblbn kanydah kapaat any kayni 6ap. Backapy mexaHn3mhe Tycydeh caycaKtbH Kbcbbln KaIy kayni 6ap.
- ΘHIMdi peTTereh Ke3ne 6aKapy MexaHn3MiHi iWHe KOI cyKaNaHbI3.
6.1 Tipey Kyyiin pettey

- Petteriui Dehrenekti bypay apkblb tipey kyuih petten wbfblb3.
-
Cafat tiniin 6aftbimeh (+) 6yparaH Ke3de, tipey Kyyi ynaabbl, cafat tiniin 6aftbHa KapcbI (-) 6yparaH Ke3de, tipey Kyyi a3aabbl.
-
1kaadaaba cblbKaHaaBbKtby yKeH 6oNa, tipey Kyyi coHaaBbKtby XOFaBb 6oana.

KolbH3aybpIbIKyuiH hcepimEn fana, eWkaHdaN KOcBIMwa KUw canycb3 TeMeH TycKe3de, 6ynipey KyuhiH dypbic peTneTReHH 6iDipedi. Tipey Kywi Ocb MAnHeH Xofapbl 6oJMaBti Ntic, ODAH TEMeH mHdi epkih TaHdayFa 6oNaDbI.
6.2 Bén 6yatbH 6eJdkTI peTtey
- Bén 6yátbH 6eNdiK 6eBNIKTirIHderi 6eKceJIKTIHy ctiHne opHaJACBy Tnic.
Ben 6yatbH 6eNik naIanaHy 6apbcihda cbipfmbayi KepeK.
- 6e 6yatbH 6enjki 6ocaty yuih catbbl Tofa hbi eKeTIHi3.
-
6e 6yatbH 6eNdiKTI Kepy yuH OHbIH eP yuBH anFa TaptbHbI3.
-
6aTbH 6eJikr TbIf3 aay KaKer.
- Bei 6yatbH 6eJIkiTih TceMepei CmmMeTpnaIbI TypDe opHaTbIybl Tnic.
- Bén 6yatbH 6eNdiKTH yWtapbH 6eNdiK YCTaFbIHTapbIHda OPhaJAcTbIPbHb3.

6.3 ⅢapbI Kocblimdb6eKtkiw apanbfih peTey

Lapnb KocbHbMdb 6ekitkiWti npabfbn pettey ywiin 3K3OKaHKaHbI Wewy Kepek.
-
ApaBiktb peTey tetiriH inrERiH imMeKTeH aFBtBhlb3.
-
Ben 6yabH 6enikti KanaybI enWeMre co3bHb3 / XHaHb3.
EH MeH 6nIKtKi peTeyiH KepcetilreH enuemdepi MiHeTti Tpye 6ipDe 6onyb KaKet emec.
-
ApaBikTbipTeyTetiriH inerih KaKeTTi imMeKke TOnbIKtaiin, 6en 6yaTBH 6eNdiKiTbTFbI3an TapTBHbI3.
-
ΕΗΜΙΝΙ ΜΚΙΝ, 6eB 6aTbH 6eIgIκTlH CmMmTePnAJIb Type OPhaTbJFaHbH TeKcepin WbIfbHbI3.
-
ⅢapJIb6eKITKIHTep NbIK 6byHbHa TiriHeh6eKITiny KaKet XeHe OIaPbI NbIK niWiHHe Kapai cbiptKa eHKeIyTre 6oIaBb (V Tepi3di NiWIn). Byn peTte KOnbHb3 epKin TeHCenyi Tnic.
6.4 Bnikti peTey

Bniktikpi pettey ywiin 3k3okahkahbwewy kepeK.
- Bniktikpi pettey tetiriin H Kynbintan 6ocaty Tymecih 6acbHb3.
- Anomn H npoHn KHeeTKiTih KaNaFbHaH TapTbn WbIfapbHb3 Hemece iHHe Kipri3iH3. KaKetri 6nkiTti opHaTbHb3.
- AnomnH npoHNI wepty dibicbmei Tipenei. AnomnH npoHnIH tapTy apkblb OHbH 6epik KynltanHaHbHa Ke3 JeTki3iH3.
-
ΘHimdi KIn, 6ackapy MexaHn3MepiHbipkeNk opHaTbJFaHbH TeKcepin bfbHbI3.
-
ΘHIM KINrReH Ke3De, 6ackapy MexaHn3miH H KOrapfbl Hneri NbIK 6nIKtirImeH +/- 3 cm (+/- 1,2 hOIM) ayKbIMbIHda 6ipDeB 6onybl KaKeT.
6.5 Apka-nybIK 6eJdiRiH y3bIHdbIbfH peTey
1.Apka-nybIK 6endiirih JkaBbCKaK TyMEniriH aBHyI3.
2.Apka-hbIK 6endiirih y3bHdbfbH peTten, Ka6bickKaK TyMeNikTi KaTadaH KAYbin KOHyBIO.
6.6 TaptnabltacnabpeTey
TaptnabI tacnaBH KEMeIMeH 6ackapy MexaHmdepiHH opHanacybH petteyre 6oJabi. TbfB3 taptnanbl Tacna apkblb 6ackapy MexaHmdepi XHe KeHeiKlK KaKaNaTapbl DeHere XaKaBHaDaTbIaNbl.
- TapTnabI tacnanaepbI Kepy yuiH Tnicti Tacna uTapbIH cbiptKa TaPbHbI3.
- TaptnaIbI tacnaHbI 6ocaty yuHIN catbJIbI TOFaHbI eHKeTIiH3.
- Op TapTnAbl TaCnAhl CNMMetPnBbI TypE OPhaTbINFaHbHa Ke3 KETK3iH3.
7 Ljewy

ECKEPTY
Cekipin KeTKeH Kon UHHacBHaH JkapaKaT any Kayni 6ap. Kepinic actbHaFb Kon UHHacb 6aKbIaycb3 cekipin KeTy i KHe 6acBb3Fa JkapaKaT Kentipy MymkIn.
MarHnTTIK KAnKbIUtBt aBfTkaH Ke3e cayCaBbHb3dbl 6enik imMerHe caBbHb3. OcbnaJHa cbIPrFyFa XHe KOn IUnHaCbHbH Kepi cokkbicbHa Kon 6epMeci3.
- Bennik immerin Xhe MarHHTik XankbIHTb 6aay Kofapbl Kapai Taptbn, OHbl 6ine3ik Ka6bIKwacbIHbIn inrerinen H bIfapblH3.
- BeJik imerH TEme H KblKbItBn, 6yn pette 6ine3ik Ka6bkWacbHbH 6enirih KepinreH Kynde yctan TypbHb3.
- KolbHbI3db6ine3ik Ka6bIkwacbIHah WbIFapbIn, OHbI DeHeHi3re anapbHbI3.
- Binesik Ka6bikwacbih 6aay Kofapbl 6afblTahbl3.
- MarHHITIK JankbIka NbIK 6eNdiHne TypaK KyiHe TOJIbIKa Kipin KeTyIHe MymkiHik 6epiH3.
- MarHHITIK KAnKbIHTbIH Dypbc OPhaTbINFaHbIH TeKcepin WbIFbIH3.
- Byk Kaamapbbl con Koblh36eH OH kak 6ine3ik Ka6bikwacBHa KaTanaHbI3.
- Keye 6enirih Kbickbubn aubhbi3.
HILTI
- Bén 6yatbH 6endiKTH ywTapbH 6eNik yCTaftbIHTapbIHAN 6ocatbHb3.
- Bén 6yatbH 6enDiKiTi 6ocatbHbI3.
- Béen 6yaTbH 6eNdiKTIH KbICKblbIH aWbHb3.

- ΘHIMdi pIOK3ak ceKINdi ueWIn KObHbI3.

8 KocbIMwa akceccyapnap
8.1 Bac cyeriwi ophaty/6eKtey
- Bac cyneriustn bIK 6eNdiirih 6ekitkiuTepihe ophaTbIHb3.
- Bac 6apMaKtbl 6yDbip 6eTke Koyn, 6ac cyneriwi Kanaybl Kynde 6ekity yuH OH bTeMeH KblkblHb3.
- Bac cyeriw eki jkaTda 6ipdei 6niktke OPHAbIFaHbIH TEKCepin bIfbHbI3.
- Bac cyeriwi 6eJweKtey yuih bac 6apMaKtbi 6ydbip 6etke KoiBIn, bac cyeriwi JOFaPb JbIKbTbHb3.
- Bac TceMIn 6ine3ik TceMdepiHne Ta3anaHbI3. → Bet 411

ECKEPTY
KepiReH KeHeTkiuTeH KapaKaT any Kayni 6ap. KyTIM XeHe TexHHKaIbIK Kb3MeT KepCey KymblCTapbIH oTkiSy 6apbcihdaFbI KapaKaTTap.
Kytim KHe TexHnKaIbIK KbI3MeT KepeTy XyMbICTapbIH TeK KepiicTeH 6ocatbINFaH KeHeeTKiITepMeH eTKisiH3.
AcnantbkiTy
KaTbI Kaa6bIckaH KipDi MyKnAT KeTIpiHi3.
- EHHdi cbIFbIJaH ayaMeH ta3aJMaHaB3.
- ΘHIMDi TEK cαn cyNaHFaH WγβepeKneHKeHe pH MαHi 6eTapan ca6bHMeHTa3aHaB3. EUKKaHdaCnIKoH KaMTtBuH Kytim KypapnApBn NaDanaHa6aHb3, eHTkeHi onap nlaactMacca 6eIWeKTepi 3aKbIMdAbyi MYMKIn.
TexHnKaIbIK KbI3MeT KepeCy
Bapnblkke3rekepiHTeH6eIneKtepe3aKbIMdapdbH6ap-KoYbH XHe6ackapyaemeHTepiH aKaycb13 Kymbcih Hnn TeKcepin TypbH3.
- EHH 3aKbIMdaIaNfAH KHe/Hemec aKaaybl 6oNfAH KaFdaIa OHbl NaIaIaHybI 6oMaHbI. BipDen Hilti KbI3MeT KepeTy opTaIbIbHa KeHdetiHi3.
- KyTim Jxhe TexHkAibK Kbl3Met Kepcety XyMbictapbHaH KeiH 6apbIK Kopfayblu KypblnIapdbOpHaTbn, XyMbicBn TeKcepiH3.

Kayinci3 kondahy ywiH TK TynHyCKa Kocankb6eWeKTeP MeH JyMcaNaTbH MaTePhaIapDbI KOnda-HbIb3. Bi3 pyKcat etKeH Kocankb6eWeKTeP, bIbFbH MaTePhaIapbMeH eHIMRE apHaIFaH KepeKJapaTap Hilti Store dyKeHHde HeMece Keneci Be6-caTTa KOnKeTImDi: www.hilti.group.
9.1 KactbikwanaJapbl Ta3anay


- Kactbikwanaapdb6ine3ik ka6bkwanaapbHaH WbifapbHb3.
- XactbikapanpH mHi 6eTapan ca6bHMen cy iuiHne KOImen JyBHyI3.
- Kactbikwanaapdbi KaKcbinan waibHbI3.
- Xactbikwanaapdbiaawbkyaada Kentipihi3.
- CodaH KeiH JAcTbI KJUaIapDbI KaTaHaH OPhaTbIbI3.
9.2 KactbikwanaapdbaybcTbipy
- Bine3ik Ka6bikwanaapbHaH anDbimHe iuKi, cOan H Kein CbipTkbl 6ine3ik XactbikwanaapbH 6ipiH eKein 6ipi TaTbIn anBHB3. Bine3ik Ka6bikwanaapbH bH XactbikwanaapbH Xabickak TymeniknH 6ekitinedi.
- KaHa KaactbIkaanapdbi Kepi peTnIK 6oBihwa 6ine3ik Ka6bikwanaapbHa opHaTBHbI3. ByI pette KaactbIKwanaapdbH Dypbc TypaHaFahbHa Ke3 KEtki3iH3.

Kactbikwanaap MeH 6ine3ik Ka6bikwanaapbl HkyTe apkblbl TyCteMeH, coJ KAK yuH Kek XHe OH KAK YuH Kblbl TycnH BenrineHre.
9.3 Bine3ik Ka6bikwacbHbH 6endiir aybcTbipy
- Bine3ik Ka6bikwacbi 6endiirih eki Ka6fbiHaBfbi Ka6bickak tymEniKTepeDi aHbHb3.
- BeniKti 6ine3ik Ka6bikwacbHbH eki bCbIPmacbHaH aBn TactaHb3.
-
MarHHTTIK kAnKbIHTB H KOFapFb 6eNirH 6ine3ik Ka6bIKwacbIHda Tpyak KyiHe OPhaTbHb3.
-
KaHa 6eIikTi actbHfbl KaBfiHaH 6actan 6ipihwi bCbIpMa apKbInbTapTbHb3. Ka6bickKa TymMeiK cbiptKa Kapan Typyi Tnic.
-
Bine3ik Ka6bikwacbH aHaHdIpbHbI3.
- BéndiKTi actbHfbl JkaKtaH MarHHTIK TynMeJIKTiH MetaII 6iniri apkblbEtkisiH3.

- BeniKti iWTeH cbIpKa kapa eKiHwi bICbIpMa apKblbl eTKi3iH3.
- Beiikti Ka6bicka TynMeJIkneH Kaybin KoIbHbI3.
9.4 7apnb6ekitkiuTeKcepy HHe Ta3anay
Lapdbih wapbl 6ekitkiWteri Ko3FaIbIuTbIFbIH TeKcepHj3. On yuiH anHomHn npophiHIN KblJXbITbHbI3.
Hentke 1/2
LapepkinKo3raIaIbI.
EwkaHdaiwaopaKaKeTe mec.
Htne 2/2
Uap KnbH KO3FaJanaBbl
- Ⅲapnbl6ekitkiwth enki6ypaHacbH 6ocatbn, KaKnaKTb albn TactaHb3.
- ⅢapdbI wapbl6ekitkiwTeH sbfapbIn, wap MeH 6ekitkiwi JyMCAK WybepekneT Ta3anaHbI.
- Ⅱapdbi wapbl6ekitkiwi KaTadaH opHaJnactbipbn, KaKNaKTbOpHaTbHb3.
Eki 6ypandaHbI 0,5 Hm wamacbHaFbI tapTy MOMeHTimeH KaTadaH 6ypan 6ekitiH3.

10 TacbImaJnay XHe caKtay
TacbImaay
TacbImaIay Ke3iHde eHIMHi 6epik 6eKITirReHHe Ke3 JeTKisH3.
- 3p TacbMaIaFaHHa KeiH Ke3re KepiH6apbIK 6eNikTepe 3akbIMapdbH 6ap-KOFbH KHe 6ackpy 3neMeHTephiH akaycb3 XyMbICbH TeKcepin TypbH3.
- 3K3OKaHkaHbI TEK KepinicteH 6OcaTbIHaF KeHeiTkIiTpMeH TaCbMaIdAn, CaKTahbI3.
CaKtay
AtaIbIeHIMdi KypFAK KyiHde JHe 6aIaIap MeH pyKcTbIXoK aamdapBk KOJIb JeTneTIN HKepe CaKTaHbI3.
¥3ak yaKbIT caKaTaHaHAn KeiH Ke3re KeipHeTin 6apblk 6eIikTepe 3aKbIMapdbH 6ap-KOFbH KHe6ackapy 3neMeHTepHH akaycbI 3 KymbcBn TEKcepin WbIFbHbI3.
11 AkaynapdafbKemek
Eyn KeCTeKeNTipIMrERH Hemece 03iH3 Ty3e TaImaHTbH akaynap opbH anFaHda, Hilti Kbi3MeT Kepcety OptaIbIFbHa xa6apnacbHbI3.
| Акayльк | ыктумал себен | Шешим | |
| Кенистій керіпici жок | Кенистій afытbingды | « Кенистій дурьс opнатылfaнынTekсерin Шы fifын3. | |
| Кенистій тозfax | « Hilti Кызmet КерсETY opТалы fifина жолы fifин3. | ||
| Акayльк biktима сбен Шевim | |||
| Баскару менизmitысылп калды | Баскару менизmitошан» Hitti Кызmet Керсетуoptалыгына Кolyыгын. | ||
| Жастышалap кожайдыЖастышалap лactанган»Жастышалapды таразалы. → Бет 411 | |||
| Жастышалap 6угли_REн НемецТошан | » Hitti Кызmet Керсетуoptалыгына Кolyыгын. | ||
| Біиесік кабіksасы shыntak,aіmaftынан сырсын түсedi | Біиесік кабіksасы nbіktынoptасына кочьлмафан. | » Иыstыныды біиесікКабіksасынoptасынаoptалын.→Бет 401 | |
| Біиесік кабіksасынshьдiriжетkinіkti берік shaylaнбаган. | » Біиесік кабіksасынshьdінКабіктepін, опар тыгызбайда, оалда Кolyыгын.3дыКыспайтbingдай peTTENko bayын.→Бет 401 | ||
| Біиесік кабіksасы, тсесemжehе/Hemecse beldikтетр тым улken | » Hitti Кызmet Керсетуoptалыгына Кolyыгын.3. | ||
| Иыковая тар жени/нemecse оны KBICYDA | Біиесік кабіksасы, тсесemжehe/Hemecse beldikтетр тымkiшentай | » Hitti Кызmet Керсетуoptалыгына Кolyыгын.3. | |
| Біиесік кабіksасынshьдiri тым каллбайноган. | » Біиесік кабіksасынshьdінКабіктepін, опар тыгызбайда, оалда Кolyыгын.3дыКыспайтbingдай peTTENko bayын.→Бет 401 | ||
12 Kədere KapaTy
Hilti acnantapb KaT a eHdey ywiH japaMdb kENTere H MaTePnAndapdb H cHbH KaMTnDb. Kedere JapaTy anDbHa MaTePnAndapdb MyKnT CypbInay KepeK. KeTere H enepde Hilti KomnaHrc b ecki acna6bHb3db KaTa eHdey ywiH KaT a Ka6blndaDb. Hilti KbI3Met Kepcety optaIbfbHah HeMece dInepiHi3DeH cypaHb3.
13 Θндірші кенидіri
Keninik wapTapbI TypaIbI cypaKtapbIb3 6oIca, JepriiIKTI Hilti cepiktecHe KOnIbIbIbIb3.
14 KocbIMaaaknapaT
Backapy, Texnka, Kopwafan opta JHe KaTAteHdey TypalbKocbIMwa aKnapaATbMbHa ciIteMe 60nBuHsa KapaHb3: qr.hilti.com/manual/?id=2339613
Byi ciTme KxKaTTamaHbIH coHbHa QR KoDbI petiHe KOJIKeTImDi.
OpHnHaJIHo PbKOBOdCTBO 3a ekCnIooatauia
1 ⅡaHHn 3a PbKOBOCTBOTO 3a ekCnIooatauH
1.1 KbM PboKOoDCTBOTO 3a ekCnNoatauHa
- Ppei nyckahe B ekcnloaataun npouetete HactoTo PO bkoOCTBO 3a ekcnnoataun. ToBa e npednocTabka 3a 6e3onacha pa6ota n 6e3abapnHa ynoTpe6a.
Cna3BaIte yka3aHnra 3a 6e3oNaCHOCT n npEynpeKdHne B TOBa PkoBOcTBO 3a ekcnloataunn Bbpx npOdykta.
CbXpaHbAite PbKOBOCTBOTO 3a eKcNIOataunn BHNr 3aeEDo C npOdykTa npeDaBaTe npOdykTa Ha dpYtniua cAmO 3aeIDHO C HactoIooT O PbKOBOCTBO 3eKcNIOataun.
1.2 06RcHHe Ha 06O3HaeHHrTa
1.2.1 PpdeynpeDteJIHyka3aHn
IpeynpeinteHnte yka3aHH npeynpeKdaBt 3a onachoc B 30HaT a OKoN pOdykta. HsnoJ3BaT ce CneHNTE CnHaHn Dym:

ONACHOCT
ONACHOCT!
Othacr ce 3a HnocpeCTBeHa onachocr ot 3anlaXa, KOrTO BOnI Do TeKKN TeLeCHn HapaHbAHn IIN CMbPT.

PENyPEXJEHNE
PENyPExKDEHNE!
OthacCe 3a Bb3MOxHa onachOCT OT 3anlaXa, KOHTo MOKe Da DOBeDe Do TeKKn TeneCHn HapaHBAHn ININ CMBpT.

IPEIIIA3JIHBOCT
BHIMAHNE!
Othacr 3a Bb3MOxHa Onacha CnTyauN, KOrTO MoKe Da IOBeDe Do TeleChn HapaHraHn IIN MaTePnaJIHn UeTn.
1.2.2 CnMBOJI N PbKOBODCTBOTO 3a EKcNIOaTaun
B HactoIooTO PbKOBOcTBo 3a ekCnloaatauCe n3noJ3BaT CneHnTe CmBOJIN:

Ia ce c6bIIOdaBa PbKOBOdCTBOTO 3a EKcIIIOaTaUN

Ppenopbkn npn ynpTe6a n dpyra noJe3Ha HhOpMaun

IpoDyKTbT He MoKe Da 6bJe MoDnΦuPaH Hn IpOMeHn He MoKe Da ce Do6aBt PpHaJNeKHOCTN, KOHTo He ca ODo6peHn 3a npOdyKTa.
KbM Hnd6epeHn Kojan He Tpa6Ba da ce npikpenn Hnso, Koeto MoKe Da nonpeuHa npaBnHOTO fynknoHnpaHe Ha ek3ockeeta. He moKe da ce npikpenr npedna3n Bbxeta KbM ek3ockeeta.
IpoDyKTbT He TprBa Da ce H3non3Ba 3a yBeJIuHaBaHe Ha npOn3BOJnteJIHocCTTa HnN 3a NOBdnraHe Ha Xopa, cnYcKaHe Ha Xopa C BxKe HnN 3aunTa Ha Xopa B pNCK.
IpoDyKbT He TpA6Ba Da ce H3N013Ba BBB B3pHBOONacHa cpea.
IpoodykTbT He TpR6Ba Da Ce n3non3Ba B 6JIn3OCT Do eJeKTPponpoBOn C BnCOKo HanpeXeHHe.
PpOdykTbT He Tpr6Ba Da ce H3nOJ3Ba ot Xopa
CneHcMeKbPnnnCbNoCTaBMnAkTHBnHMnlaHTn,
C npednHn 3a6oBbAHn Ha onopHO-DbuHaTeHn anapat B oBnaCTTa Ha pameHete, pueTe, Ibpa HdoHata Yact Ha pueTe,
C KOxHn 3a6oJbAHn/ HapaHbAHn, Bb3naJIeHn; NOBdIHaTn 6eJIe3n C noDyBaHe,
CbC 3auePBBAHe n nperePBAe B 3acerHaTne yactn Ha TAnOTo (pBte, pameHete, Ta3a n Ib6a),
Cpa3upeHHBnBno-rolma CteH,OCo6eHO CppeyKCHN HApyuHnHa HApyuHnHa JIMMHN DpeHJ -CbIoo Hea CHN OTOU Ha MeKeHTbKaHn OTdaJeEHNOT npOdyKTa,
CbC cEH3OPH N CHPKynatopHN HApUeHnB OblactTa Ha rOpHnte KpaHnCi, Ta3a n Tbp6a (HaNP. npn Dna6eTHa HeBpOnatn).
3.5 06em Ha doCTaBkata
Ek30ckeJeT, PbKOBOCTBO 3a ekCIIIOaTaunr
Ipyn cncTeMHn npOyKtn, pa3peSeHn 3a Baun npOyKT, ue HamePte BbB Baun Hilti Store nn Ha: www.hilti.group
4 TexHHueCKn daHHN
| Терno | 2,4 кг (5,3 ΦуNT) |
| Околна Temпepатура прием ekсплоатаця | -10 °C ... 45 °C (14 °F ... 113 °F) |
| Temпepатура на съхсанни | -10 °C ... 60 °C (14 °F ... 140 °F) |
| Размери (дьлжина xширина x височINA) | 950 MM x 450 MM x 250 MM (37,4 дюм x 17,7 дюм x 9,8 дюм) |
5 NocTabnHe

PENyPExDENHE
PnCK OT HapaHbAhe npn MaHHTHO none CbIbpxaunte ce B npOdykTa MaHHTn 6pa3yBaT cnHn MaHHTN NOJETa, KOINTo BCbUHCT MOKe da BNrRt Ha NMIIaHTN.
-Дрьжтпрдmetи КATO aKTHBн ИМПlaHTN, eJeKTPoHn yCTpoiCTBa n MaHHTHn KapTn daley ot npodykta.
Cn3BaTe HNCTpyKunHe Ha npOn3BOOnTeHa npImeP 3a aKTbHn HmIaHTn.
Xopa c akTbeH mIpaHT moT da n3non3BaT npOdykTa cMo cneI noJyHe Odo6peHne OT nekap.

PNEIIN3NHBOCT
Pnck OT HapaHbAhe npn HenpabHnHO nIbTBpde npbTHo pa3noIarHe. IokaIIHN RAJIeHNA Ha HAIraHe i CTECHEH N KpbBOHOCHITE CbIOBe H HepBITE, IpemHaBaUpipe3 TIX.
YBepete Ce B npabnHOTo NOCTABRHe N IN npabNHTO NOIOKeHne Ha npOdyKta.
- NocTabete npodykta kaTo paHnca. PpekapaTe pBuce TE cn npe3 KOJAHnte 3a paMeHen NOcN NoCTabete KOJAHnte Ha BaWnte pamHe.
- 3aTbOpTe 3akonuaKata KInnc Ha HAd6epeHn KaHa.
- HanacheTe Hnd6epeHnKoHaN. cTpaHnua 422
- 3aTbopeTe 3aKoNuaJaKaTa KInnc Ha KOJaHa 3a rPbDeH KoU.
-
PerynpaTe BncounHaTa N uipnHaTa Ha KOJaHa 3a rpBDeH KoI.
-
Perynpaite KonaHite 3a paMeHen noC. H3IbPnaiTe Kpanuata Ha KonaHite HADony, 3a da 3aterHeTe KonaHite 3a paMeHEN noC. 3a da OTnycheTe KonaHite 3a paMeHen noC, HAKHOHeTe Katapamata 3a CTbI6a.
Kolahnte 3a pamHeH nOc Tp6Ba da JIeXaT CBO6oHO Bbpxy pamHeTe H He Tp6Ba da Ipe- Hat Ha NOBdHaHo Ha PbueTe.
Korato pbcTe ca noBdnHaTn, Hnd6eDpeHnAT KOJAH He TpRbBa da ce n3TerIHaRope. Ako Hnd-6eDpeHNr K0JAH npOMEHn PO3uHrTa cN, TpRbBa da OTnyCHete KOJAHHTe 3a paMeHeH NoAeC.

PENyPExKdEHH
Pnck OT HapaHbAhe npn OTchauaHa Ha3aD uHa 3a pKa. PpeBapnteHNO o6TerHata Ta uHa 3a pKa MoKe HeKOHTpOInpyEmo Da OTCKOu Ha3aN da HapaHrnaBaTa Bn.
- NocTabete npbct B npMkata 3a KOJah, KORato OTKaayate MaHHTHaTa 3aKoNuaJa. No To3n HaHHe H36erHete NOxJIb3BaHe n WInHaTa 3a pKa OTCKaHa3aJd.
7.Идьрайтпримкага 3a Колан Haropeи Внмателно OTkaayete MaHHTHaTа 3aKOnuaJIka.
- C nOMOuTa Ha npHMkata 3a KOan H3IbPnaTe HanaKbTHnka HaOny. N3BeDeTe pBkata cn nped BaWeto TAno.
- NocTabete rohpata yact Ha pBkata cn B cpeata Ha HalaKaBTHnka.
- NocpeDCTBOM npHMkata 3a KOJah 3aKaayete MarHHT Hata 3aKoJauJaKa 3a KyKaTa Ha HalaKbTHNuKa.
Ybepete ce, ye MaHHTHaTa 3aKoUaIka e 3acto-nopeHa dokpa.

BbHnHaTnNoJIOKKa Ha HanaKbTHnKa TpRBa Da e OTBOpEHa, KORATO NOCTABnTE KaIShkata 3 HanaKbTHnKa OKONO rOPHata qACT Ha pBkata cn. Ako e HeoBXOIMo, OTBopTe NOJIOKKATA Ha HanaKbTHnKa, CNEKDatoNOCtABnTE rOPHata qACT Ha pBkata cn B HanaKbTHnKa.
- 3nOJ3BaIe BeIKpo 3aKoNuaIKe, 3a Da peryIpaTe oBikonkata Ha KaIIskata 3a HanaKbTHnka npu rophata qact Ha pKaTa. 3aKpenete BeIKpo 3aKoNuaIKte ueHtpalno n H3qraNo.
Kanikata 3a HanaKbTHnka ce perynpa npomeH JINBO B DbaTa Kpar Ha KOJaHa.
- CrbHete BbHwHaTa NoDIOXKa Ha HanaKbTHnKa.
- No cblnHaHn noCTaBete HanaKbTHnka 3a npOTNBONONOxHata CTpaHa Ha TAnoto.
- IpoBepTe CImetpHTo NOLOKeHHe Ha npOdyKta.
6AanTnpahe

PENyPExEHH
PnCK OT HapaHbAHe npn npuunBaHe. PnCK OT npuunBaHe Ha npbCTnte npn XbaaHa He CTaBHOT 3BEHO.
Korato perylnpate npodykta, He noCraTte KbM MexaHn3Ma Ha CTaBHOto 3BeHO.
6.1 Aaantnphahe Ha onopHa cnla
3aadaiTe onopnata cnla, Kato 3abbpntte perynipauoTO KOJIeIO.
3aBbptaHTo no yacOBHNKOBATA cTpeNka (+) reheepnpa nobuee onopHa cnla, 3abptaHTo 6paTHo Ha yacOBHNKOBATA cTpeNka (-) HamaJIra onopata.
KoIkoTo no-roJaMa e neHTata Ha cKaJata, TOnKOba no-roJaMa e onOpHaTa cHa.

OnopHata cHa e npabnHo HactpoHa, Korato pBcTe nadat HaOny 6e3 DonbHHTenHO ycHHe, camo ot rpaBntaunrTa. OnopHata cHa He Tp6Ba Da e HAd Ta3n CToHOCT, CBO6OHD MoXeTe da H3bupate No-HnCKa CToHOCT OT Ta3n.
6.2 AaTnpaHe Ha Hnd6epeH KOJah
- HAnBepeHnT KOHaN TpRoBa Da 3aCTaHe HaI rnyTeaJIHHMyCKyHa HNBOTO Ha Ta3a.
HaBepenHr KOaH He Tp6Ba Da ce nIb3ra no BpeMe Ha ynotpe6a.
- HakoheTe KaTapamata 3a CTbJa, 3a Da OTnycHeTe HAdBepeHn KOnAh.
3.Идьрnaite HanpeДДВаТа Края Ha HAn6eDpeHnKoJah, 3a Da ro OINbHete.
Ha6epeHHKoJAH Tp6Ba da e cTeHAt.
- IopnoKkata Ha HaidepenH KonaH Tpa6Ba da e cHMeTpHa.
- NocTabete Kpaunata Ha Hnd6epeHnKoHaB DbP Kaunte 3a KOHaH.
6.3 HactpoKa Ha pa3cTOrHHeTo Ha rHe3dOTo 3a cΦepnHa CTaBa

Ek0KeJETbT Tp6BaJa 6bJe CBAeH dony, 3a da ce perynpa pa3cToHHeTOHa rHe3doto 3a cfepuHa CTaba.
-
Otkaute Kykata Ha perynipaHTo Ha pa3ctoHHeTo ot npHMkata.
2.ИЗдбрпайт /пьзнгеТинбдрени Коланdoжелану pa3мер. -
Посочене pa3мери Ha HabctpoynKeTe 3a WnpiHa n BncoynHa He e 3aJbJIxNteJIHo DA CbBnaadT.
-
3aKaHe Te N3qIIO Kykata 3a peRyInpaHe Ha pa3CToHnETo B JKeJHaTAt npIMKa I n3IbPnaTe Hnd6epeHHN KOnAH ONbHAT.
-
Pa3npnojke Te npdykta n npoBepeTe daHn Hnd6eDpeHHr KOJHa e CmEtprueH.
-
He3data Ha cfepa Ta Tp6Ba Da 6bDat fHKcpanu BepTKaHNO KbM pameHHata CTaba N cnopei fOpMaTa Ha rohata Yact Ha TJIto Morat Da 6bDat hAKIOHeH HABbH (V-phiMa). PbTe Tp6Ba da MORaT da Ce IIOeR CBO6OJHO.
6.4 HactpoKa Ha BncoounHa

3a da perynnpate BncoHHata, ek3OckeneTbT Tp6Ba da 6bde CbaJeH.
- HatncheTe 6yToHa 3a ocB6oKdBaHe 3a perynpaHeTo Ha BnCOuHa.
-
N3dbpnaTe / nIb3HeTe anyMnHneBn npoФn OT / B Kanaka Ha ekCnHaepa. BnCOuHa.
-
AnymHHneBnT npoHnCe 3actonopBa c rcho upaKbaHe. YbepTe ce, ye anymHHneBnT npoHn e 3dpaBO 3actonopeH, KaTo n3dbpNaTe anymHHneBn npoHn.
- NocTabete npodykta n npOBepete daHn cbCTaBHnTe 3BeHa ca pa3noJoxeHn paBHomepHo.
Korato npodykTBt e noCTaBeH, ropnrt p6 Ho cBCTaBHOTo 3BeHO Tp8Ba Da CbBnaDa B Dnana3OHa +/- 3 cm (+/- 1.2 nHa) C BnCOunHata Ha paMeHete.
6.5 PerynipaHe Ha nbJHKHaTa Ha KaHsKaTa 3a rpb6
- Otbopete BeIkpO 3aKoIyAJIkata Ha KaIIuKaT a 3a rpb6.
- PerynnpaTe IbIKNHATA Ha KaIshKaT3a rpb6 n 3aTBOpTe BeIKpo 3aKONyAikKaTAt OTHOBO.
6.6 Aaantipahe Ha o6Tgraa JneHa
NoIoxHeHTo Ha CTaBHnTe 3BeHa MoKe Da ce perynnpa C NOMouTa Ha ObTRAaata NaHTA. NocpeDCTBOM No-CTeHATA OoTgAua Ja NEHTA CTaBHnTe 3BeHa N KanaunTe Ha EKcnaHepa 3actabat NO-6JIn3O Do TAnoto.
- N3dbpnaTe cboTBeTHnHa KaHa KOlaHa HABbH, 3a Da onbHeTe eHa OT oBtRaunTe neHTN.
- Hakohe Te ynpabla Baata Kluoyanka, 3a Da OTnyche He Ha6peHnKoHaH.
YBepete ce, ue n Dbete oBtaraun neHTn ca CmMetpHn.

PENyPEXKDEHNE
Pnck OT HapaHbAhe npoOTcKaaHa3aJuMHa 3a pBka. IpeBaPHTeJHO oTeHataTa uHa 3a pBka MoKe HeKoHTpOJIpyE mo Da OTCKOu Ha3aI NaHapAnrnaBata Bn.
- NocTabete npbct B npimkata 3a KOlaH, KORato OTkaayate MarHHTHaT a 3akonyAknA. No To3n HauHH Ie 36erHETe NOxIb3BaHe I WnHata 3a pbKa OTcKaa Ha3ad.
1.БаВноиЗдьрnaiteHarope npimkaTa 3aKoJahIMarHHTHaTata 3aKoNuaJIkaЯ OTKaYeTe OT KyKaTa HaHaJaKbTHnka.
-
Pnpemctete HADONY oBTRAaata NaHTA, KATO B Cb- OTO BpeMe DbpxnTe KaHsKaTa 3a HanaKbTHnO nTbHata.
-
N3BaTepeBkata CN OT HanaKbTHnka IN a N3BeTe nped Tnoto CN.
-
BaBHO hAcOyTe HanaKbTHnKa Harope.
-
Octabete MaHHTaTa 3aKoUyAnka Da ce 3actOnOpn H3IIO B N3XODHa No3NcH Ha KOnaHa 3a paMeHeH NOrC.
-
Поберете пашиною поожене на магншату за konчanka.

-
NOBTOpeTe Te3n CtbnKn C JnBaTa PbKa Bbpy DeCHNA HanaKbTHNIK.
-
OTbopete 3aKoIyakata KInnc Ha KOlaHa 3a rpBdeH KOU.
- Pa3xna6eTe KpauncaTa Ha Hnd6epeHnKoHa OH TbPkaHTe 3a KOHa.
- OtnycheTe HaIbepeHnKoHaH.
- OTbopete 3akonuaikata Klnnc Ha Hnd6epeHn KaH.

- Pa3noJokTe npOyKta KaTo paHua.

8 OnuHaHa npHaadJeKHOCT
8.1 MoHTnpaHe/JeMoHTnpaHe Ha onopa 3a Bpata
- Ппкpenete onopata 3a Врета Кьм ГездOTO 3a Колан 3a раменг пос.
- NocTaBete naIeua onOpata Bbpxy Ha3b6eHaTATA noBbpxHOCT I nIb3HeTe onOpata 3a Bpata HADony, 3a Da a 3actONOpHTE B KcelaHOTo NOLOKeHne.
- IpoBepete daHn onopata 3a Bpata e MOHTnpaHa Ha eDHaKbBA BnCOUHa OT DBeTe CtpaHn.
- 3a Ддемонтinate onopata 3a Bpata, noctaBeTe naleca Bbpxy Ha3b6eHata NOBbpxHOCT I NIIb3Hete onopata 3a Bpata Harope.
- Nocntete noDIOKkata 3a Bpata no Cbunna HauHH KaTO noDIOKKNTe 3a pbce. ctpanua 428
9 06cnyXbaHe n noDpBkKa

PENyPEXKDEHNE
Pnck OT HapaHbAhenpOnbHaTeKcnaHep.HapaHbAHn npn DeHocTHn no 6cnykBaHe n noDnptbkKa.
H3BpbwBaIe DeHocTn No O6cnyXbaHe NIOdpbXka cAmO aKO EKcnaHepTe ca OTnyChaTn.
06cnyxBaHe
- OTepaHbBaIe BHIMATEJHO HAnlaCTeHNTE 3aMbpcBaHnA.
He nouchTbaIe npOdykTa cbc CbCTeH Bb3dyx. - NocntBaTe npOyKta cMo c IeKO hABNaJHHeHa Kbpna n CanyH C HeyTpalnHO pH. He 3nOlaBaiTe noNCTBaU npenapatn, CbIbPkaun CNlHKOH, TbN KATO Te MORaT da yBpeaT NactMacobte qactn.
NoDpBxxKa
- PeioBHO npOBepBaIe BCnUKN BnIMN Yactn 3a HAnuHne Ha Nobpei, a eJeMeHTnte 3a ynpabJIeHne - 3a n3npaBHO fynKcnoHnpaHe.
He pa6oTe c npOyKTA npn HauHne Ha noBpeDn n/nn CmyeHn BbB FyHKnHTe. He3a6abHO npdaIte npOyKTA B cepBn3 Ha Hilti 3a peMOHT.
CneiH3BbPbBaHe Ha DeHocTn no o6cnyKbaHe n OoIpIbXkKa MOHTnpaIe BCnU 3aIHTN yCTpoIcTBA n npOBepTe HK uHtne.

3a 6e3oNa cha pa6ota n3no3BaIte cAmO opnHnHaHn pe3epBn qactn i KOHCymaTHBn. Pa3peWeHnTe ot Hac pe3epBn qactn, KOHCymaTHBn n npHaJneKHOCTn 3a Baun npOdyKT ue hamePte BbB Baun Hilti Store nn Ha: www.hilti.group.
9.1 NocntBaHe Ha MeKn noDnpaTH


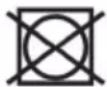


- OTePaHete MeKeHTe NOpNlaTn OT HanaKaBTHNuTe.
- N3nepeTe pBHyO MeKInTe POnnIaTN BbB BOa Cbc canyH C HeyTpalHo pH.
3.ИзплakHTe O6nHm MeKHTe NOДПАТN. - Octabete MeKIne NoDnnaTn da HcBxHAT Ha Bb3dyX.
- CJIeT OBa cIoxKeTe MEKIne IOJnnaT OTHOBO.
9.2 POnMaHa Ha MeKN NoDnLaTH
- Пьрви Идбпаиte снда pyra Втршни
и снед TOBA Вьншни NOДПлATN 3a рьuce OT Hana-
Кьтни.Te. MeKITE NOДПлATN Ha HanaKьтниKa ce
ЗakpenВAT C BENKPO 3aKONЧANKa.
2.ФИКСИРаTe HOВITE MEKN NOДПАТN B HANAKTHINuTe B OБразен peI. OCBEN TOBa ce yBepete, Que NOДПАТte NOДРaBHeH INpaBnHO.

MeKHTe NOdIaTHn HanaKaBTHuNTe Ca ZBeTHO MapKnpaHn CbOTBeTHo C TOUka, B CnHbO 3a JARBO N B UepBeHO 3a DcCHO.
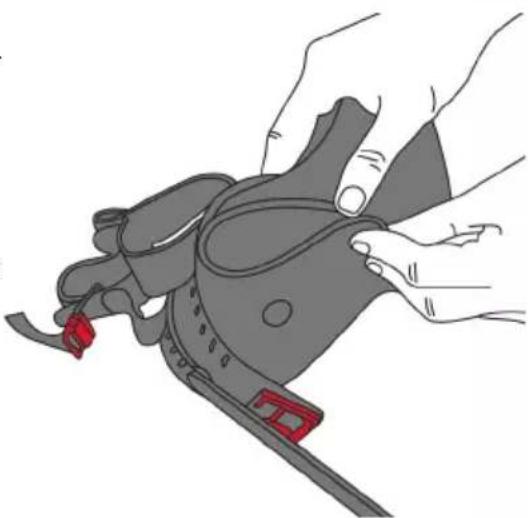
9.3 CmHa Ha pEmbK Ha HajaKaBTHNK
- OTbOpTe BEnKpo 3aKoIyAiknTe O T DBeTe CtpaHn Ha peMbka Ha HanaKbTHnKa.
- Cbanepe mbka ot DBete noIOKn 3a HanaKbTHNK.
- Noctabete rohpata hact Ha MaHHThata 3aekonuaIka Hn3XODHa IO3MUNPn HalaKaTHMKA.

- 3anoyBaHn OToDny, n3dbpnaTe HOBn peMbK npes pBpBaTnOJIOXKa. BeNko 3aKoIyAankata Tp6Ba da COHn HABhN.
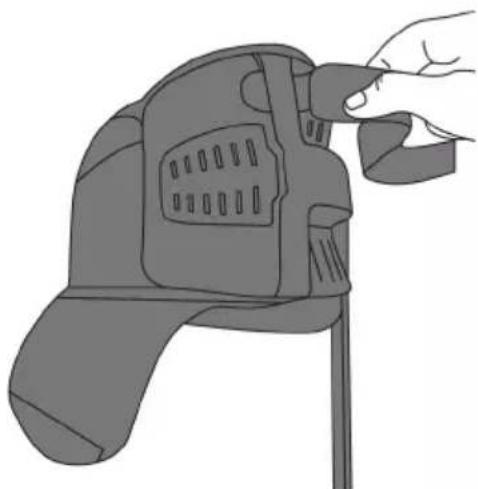

- 3aBbPTeHaNaKbTHnKa.
- Ппекаши ремькотrope npes3 MeTANO yxoHa marHHTHata 3aKoNuaKa.

- Ппекашие ремька пpe3 Btopata noДLOЖКа OTBbTppe HabbH.
- 3aTBOpTe KaIIKkata Ha BeIkpO 3aKoNHaKkata.
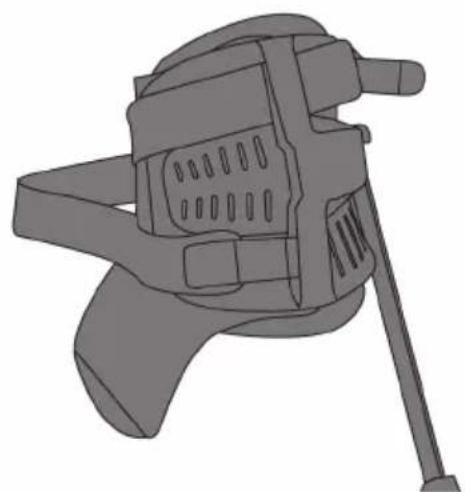
9.4 IpoBepka n nouHCTBaHe Ha cΦePmHOr rHe3do
PpOBepeTnoBnKHOCTTaHa cΦepaTa B cΦepuHOTo rHe3do.3a ceI Ta npemecTe anymHHneBn npoΦn.
Pezyntar 1/2
CfepaTAMoKeIaCeDnKCNbODoHO.
He ca Heo6xOdImM Meprn.
Pesytar 2/2
CfepaTe Tpydno NOBnKHa
Pa3xJa6eTe Dbata BnHTa Ha cfeepHOTOr He3do n CbaIe Kanaka.
- ⅢBaTe cΦepaTa OT cΦepuHOT O rhe3do n no- qHCTe TcΦepaTa N cΦepuHOT O rhe3do C MeKa Kbpna.
IocTabete cfepaTa OTHOBBO CfeepnHOTOrHe3doN OTROPE CNOXeTe KanaKa.
MoHTnpaTe OTHOBO Dbata BnHTa C Bbptau MoMeHT Ha 3aTgAhe 0.5 Nm.

10 TpaHcnpTnpaHe n cxbxpaHeHne
TpaHcnopTpupaHe
- Пи Трансорпане BНмаВаTe 3a НджДНОТ 3akpenBaHe.
CneBcKaToTpaHcnpOtnpaHe npOBepBaIte BcUKN BuIM qactn 3a NOpeN iCe yBepTe B n3npaBHOTo FyHKIOHpaHe Ha eJemEHTnte 3a ynpabNeHne.
TpaHcnpOptnpaTe n cbxpaHbAte ek3OckeIeta cAmO C OTnycHaTH eKcnaHdepn.
CbXpaHHe
CbxpaHbAte To3n npOdyKT Ha cyxo MCTO, daJeue ot DocTbN Ha deca n HeoTopn3npaHn Iua.
Cne npoIbIKNTeHNO cbXpaHeHne npOBepBaIte BCnUKN BnIM qAcTH 3a HauNue Ha nobpeHn 3a n3npabHNo fYHKUNOHnpaHne Ha enemeHTte 3a ynpabHeHne.
11 Tomooun npn haannne Ha cmyuene H
Pn haJnue He cmyuene, KOnto He ca nocouehn B ta6nuaTa nn KOnto Bne camn He moKeTe da OTCTpaHHe, MoJI, o6bphete ce KbM Haun cepBn3 Ha Hilti.
aabllg bglj n k a. aubliagb g l jdl sllg gdoJI Jlal G yu 1yauu uuuuauuauuauuauuauuauuauuauuauuauuauuauuauuauuauuauuauuauuauuauuauuuuuuuuuuuuuuuuuuuuuuuuuuuuuuuuuuuuuuuuuuuuuuuuuuuuuuuuuuuuuuuuuuuuuuuuuuuuuuuuuuuuuuuuuuuuuuuuuuuuuuuuuuuuuuuuuuuuuuuuuuuuuuuuuuuuuuuuuuuuuuuuuuuuuuuuuuuuuuuuuuuuuuuuuuuUU
uWgUguaaiI pSaw
Jlalllg wlllgl jk yj ggl glg aolaoa oosd jy J.aauioo ooi 1
g j 1000
xbalu.
jblaoJg cag aai aaiybaolsswug ayuJg oal jgljplssiwjg 2
. dic aii 59 jill
aaiiI piai i jia 10jia 1g labla 1e jao
Jao g Jg 10
puiu g l o o palaai juii jaiil npaae
aJg aUu uUauuuauiuuiuuiuueo
aawwosjg gabgulj pscgaaalJss
g 1 1 1 1 1 1 1 1 1 1 1 1 1 1 1 1 1 1 1 1 1
.111 111 111 111 111 111 111 111 111 111 11
aJU g aJgJlWgJl CUs 13498 aJx←.45jPg aJxCUs 131EJlSs uJl Sw gcbj
Hilti do sa jpa Julol
J 1 J 1 J 1 J 1 J 1 J 1 J 1 J 1 J 1 J 1 J 1 J 1 J 1 J 1 J 1 J 1 J 1 J 1 J 1 J 1 J 1 J 1 J 1 J 1 J 1 J 1 J 1 J 1 J 1
Jg 8.1g g 5u 5u uuaa2g aabagll dLs no gaoill paaai Jss
Hlti do sa jso 1 d a gj l. a jn o g s g agaull aod jy eaiall pia i I oJU U Jdclpo 1g 1pal . a jn o g s y biuol jlaal juaal uo jx
a
3
1.3
1
J1
LubaiJoaIolg ③
wui 1gdu
LJpJdaagjpuji! ⑤
jgJlajgjj! 6
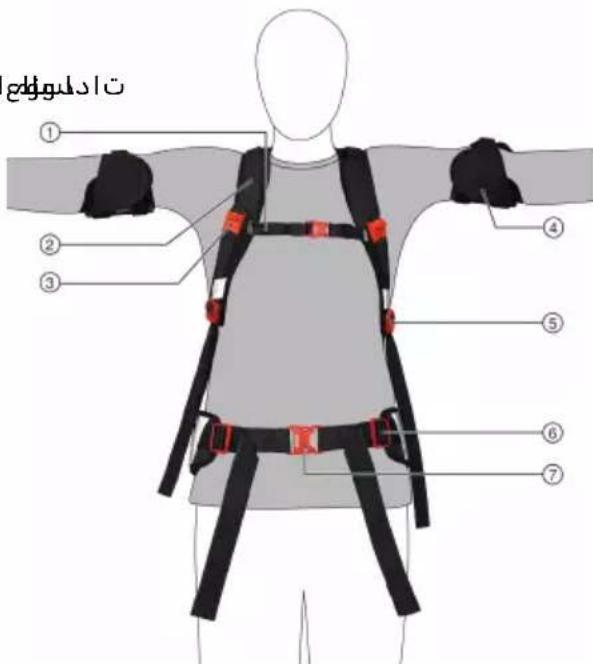
6
1
aJaaJI oagJI 10
oljI joo
aJIogbdojUb 12
gj
山Ijduyj! 14
J 15
16
17
EaJxblbduaWgJjJ j 18
goggl E U
aJgJJI aJUaJJI aJUJI Jla ②
aalal aalalb ②
IaagJJI aalaaal algll Jol 22
aLJl aLJl
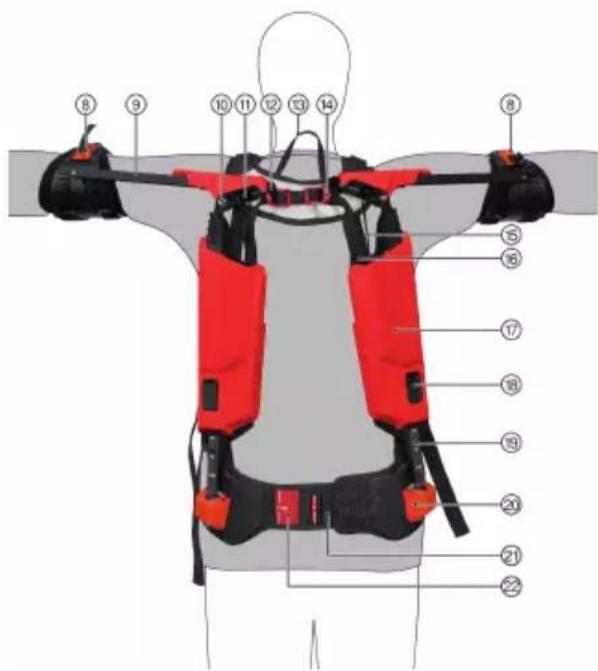
LaaIu [buaI pss
3.3
g j 11111111111111111111111111111111
JJIJI JIOI baoagclilg liJI
g g g g g g g g g g g g g g g g g g g g g g g g g g g g g g
.ELJ 11 sinnaaog
Jgj 2
.1jbl jIbai Ic Iolalgoligsgn Jxag
bI pIg I
4.3
aJgJgJgJgJgJgJgJgJgJgJgJgJgJgJgJgJgJgJgJgJgJgJgJgJgJgJgJgJgJgJgJgJgJgJgJgJgJgJgJgJgJgJgJg
aaii 1
j j 111111111111111111111111111
JU
g 1000000000000000000000000000000000000000
jJ 1 J 1 J j J 1 J 1 J 1 J 1 J 1 J 1
#
J 1 J 1 J 1 J 1 J 1 J 1 J 1 J 1 J 1 J 1 J 1 J 1 J 1 J 1 J 1 J 1 J 1 J 1 J 1 J 1 J 1 J 1 J 1 J 1 J 1 J 1 J 1 J 1 J 1 J 1 J 1 J 1 J 1 J 1 J
g d a bpa a yuulbuaaal Jaaai sic o g i g g jjla naeiaa Ia
1
JaaI 10g 1c8 pJal aolw .7
HILTI
.1J 111 111 111 111 111 .8
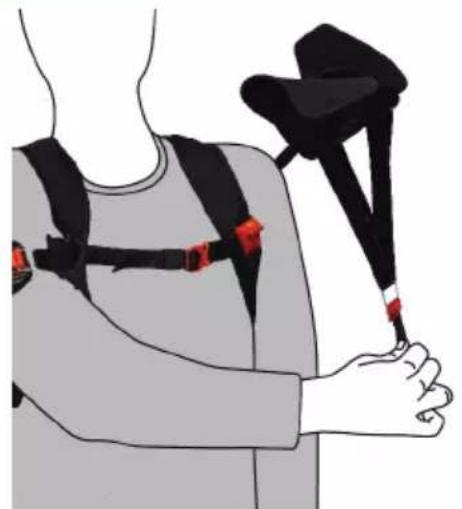
.9
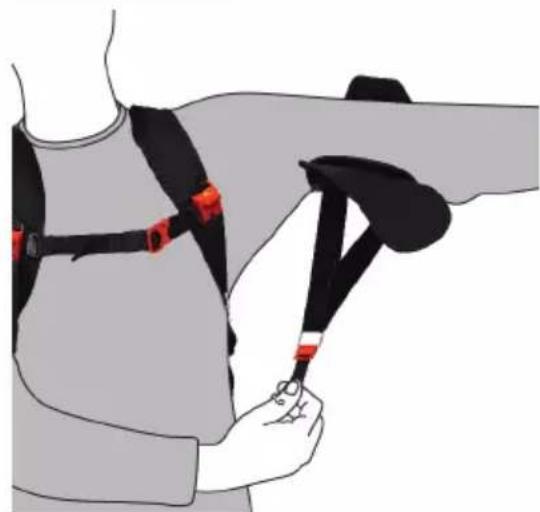
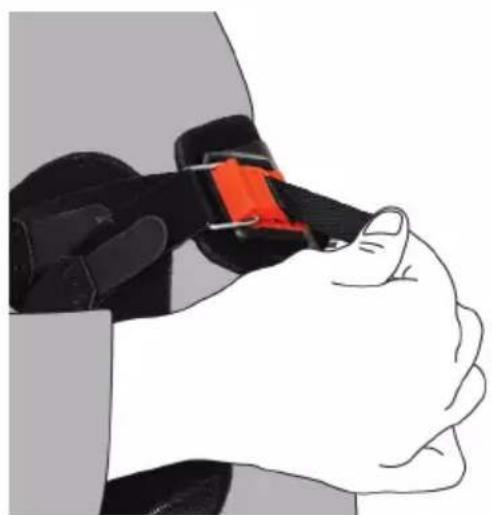
Jc Jgagall lblly yuublisal jaoJI bju 10 .pJal dala pI saiu Iy JI siu
Cua uubisall Jaall ngS uI Jc UaJ al Jalal
aJgJgJgJgJgJgJgJgJgJgJgJgJgJgJgJgJgJgJgJgJgJgJgJgJgJgJgJgJgJgJgJgJgJgJgJgJgJgJgJgJgJgJgJg
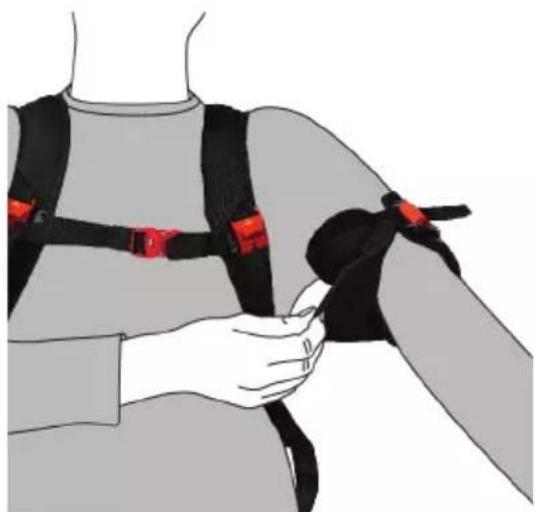
.aaJbIJI JnJnJnJnJnJnJnJnJnJnJnJnJnJnJnJnJnJnJnJnJnJnJnJnJnJnJnJnJnJnJnJnJnJnJnJnJnJnJnJnJnJnJnJnJnJnJnJnJnJnJn
1abua
1bgl 6
iA
aalaaol oagll g dla sic bloj jao jao jao jao jao jao
aJgldoic auaoJl oagll aJ 2
1.6

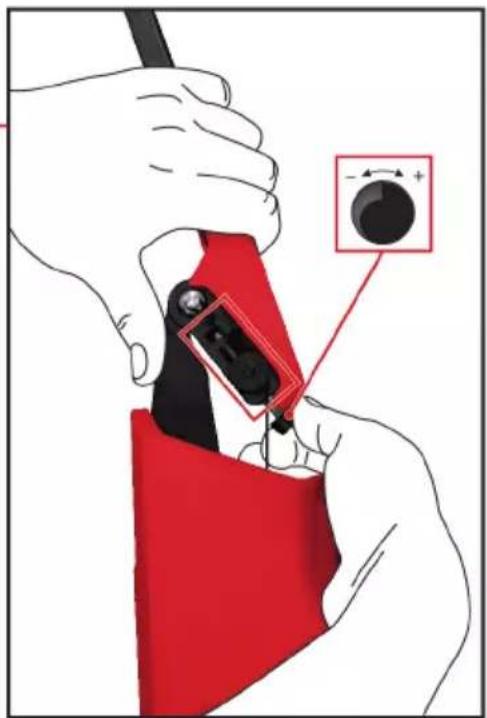
Jg j 10000000000000000000000000000000000000000000000000

auiu△ua
goljda 1go
2.6
1
psswsljgagalplja jji
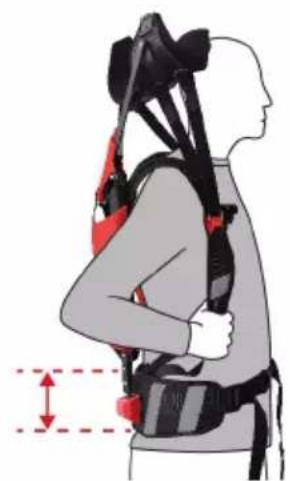
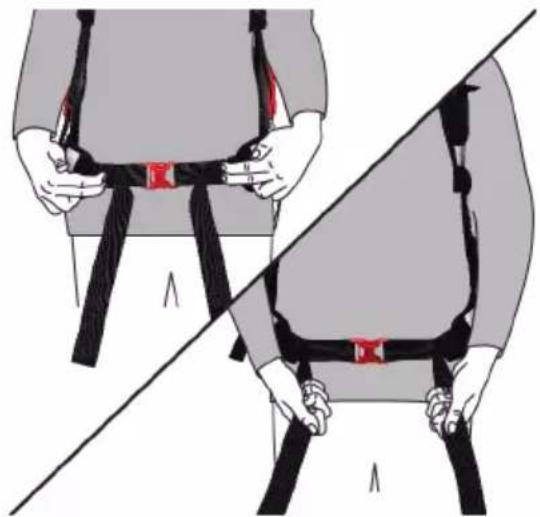
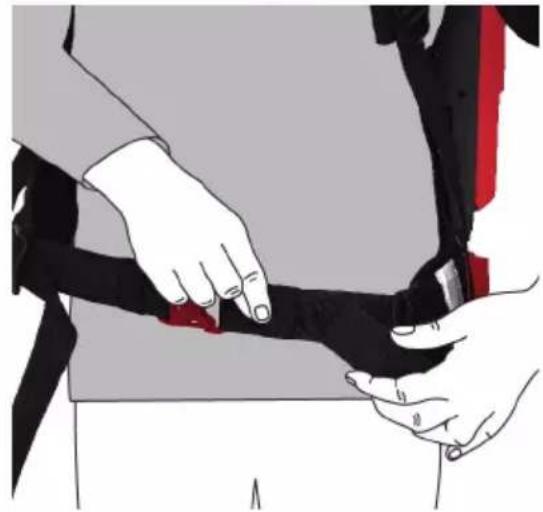
.2
JpOg 100000000000000000000000000000000000000
.0.0010S
JgJl pJdsW Jc Jdawj
aawliuogolpjdswuggSjU
.1JJI Jolg u gJl j 4
aJlll lI I 1111 1111 1111 1111

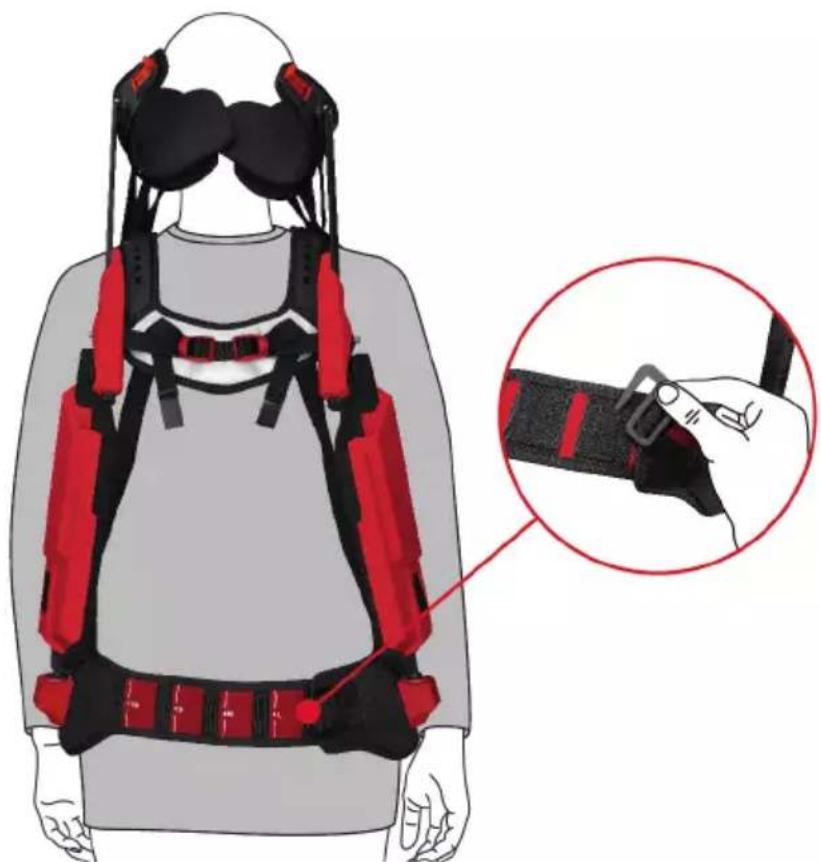
.ogjJJJ JdIaIJI aIwJI IuWg IbIaIe .1
.ugjall gaiuogai pja pa/2p 2
1g 0s
golal pja wawlg aggejll ogjll g jolk ksw alalal alwai bdoa wg cuiy.3
.0
.10gJpJUJIaJIU CuiI Uo gaiJI 4
Jgll jll kwl g,oiu aull algl lge gag gll Jolal
.aaJyI yIe oJ sIgS JgSicg.VJsW) jLl|J IJLo! Jss
6.4.1.1
a a a a a a a a a a a a a a a a a a a a a a a a a a a a a a a a a

.1
aagil pjI dIolp a, sW pJ a W L2.2
Jaljulaiuill oIe J
山
7
J 1 J 1 J 1 J 1 J 1 J 1 J 1 J 1 J 1 J 1 J 1 J 1 J 1 J 1 J 1 J 1 J 1 J 1 J 1 J 1 J 1 J 1 J 1 J 1 J 1 J 1 J 1 J 1 J 1 J 1 J 1 J 1 J 1 J 1 J
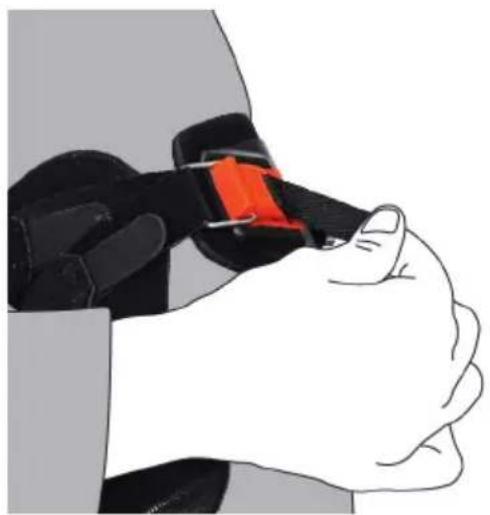
Uc8 sbu yublaaJoaalg pJall aol cawl .1 ElJJ Suao 0ba aI da Iacg

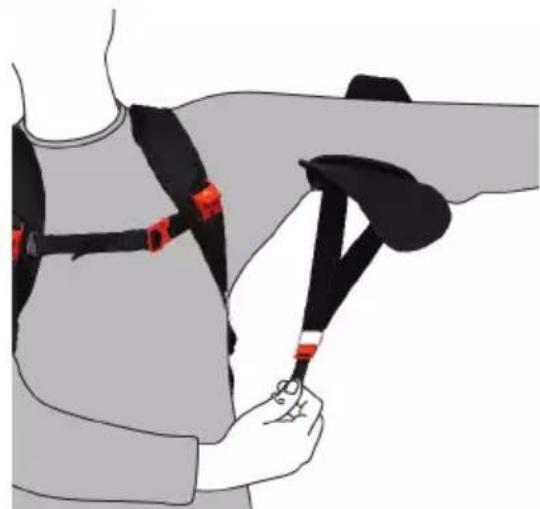
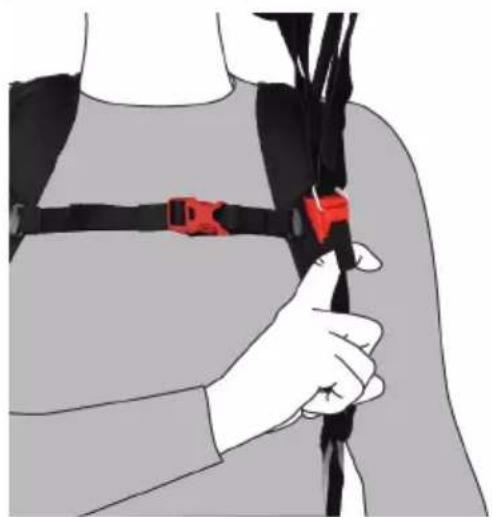
siwo pJdswIc bolag Jow 1jll aol .2
.
.1a 3
LuyIyIeIJJJsinuagguo .4
aIg lalwblJd.5
.oiSjI pJgLc
.6
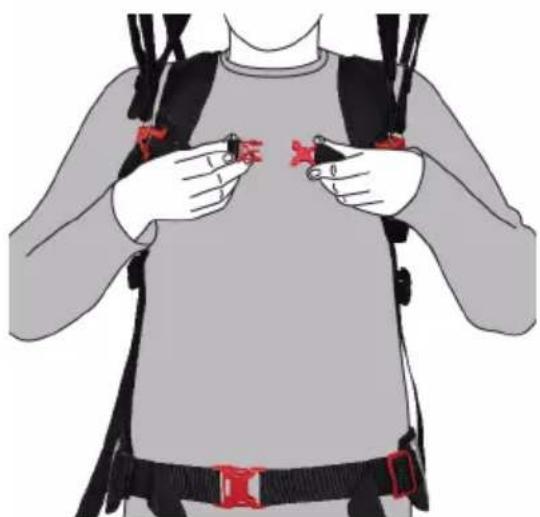
.7
JswI pJg Jg eJus g1 .8

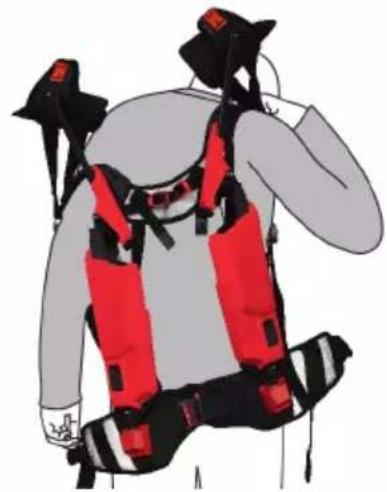
.12
Jlai
8
aJl aolcJ 1.8
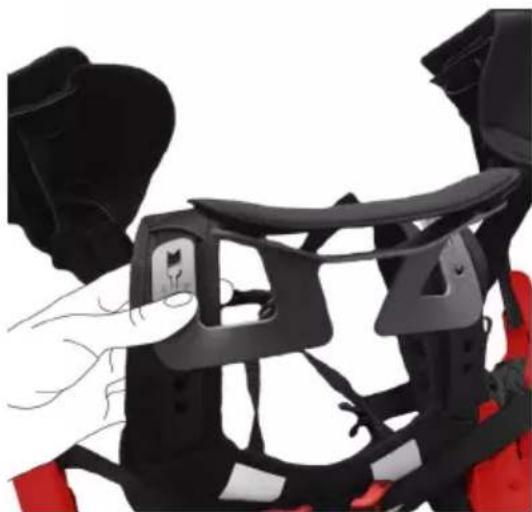
.1
.2
.3
aiu 4
.4
.5
498
aIg aIJI
9
江
.aaalg yai jll lac | 1u | u| .0 g aall o sssll jn aay klae
Iisil
auiJai2uul
.ogai 1gjy jaii y
1go p dni 2. ggiin jn jn n jn n jn n n n n n n n n n n n n n n n n n n n n n n n n n n n n n n n n n n n n n n nn
.
.
#
J 1 J 1 J 1 J 1 J 1 J 1 J 1 J 1 J 1 J 1 J 1 J 1 J 1 J 1 J 1 J 1 J 1 J 1 J 1 J 1 J 1 J 1 J 1 J 1 J 1 J 1 J 1 J 1 J 1 J 1 J 1 J 1 J 1 J 1 J


siipjla jilL 15 Jc aooJlloa.1
JL
.1JJJsinu JbLJnJpJJIgI .2
gog lgc uubliaiJaoJI gglJI jJI g 3
1J 1sW

UgJfJUeJUeJUeJUeJUeJUeJUeJUeJUeJUeJUeJUeJUeJUeJUeJUeJUeJUeJUeJUeJUeJUeJUeJUeJUeJUeJUe
J 1
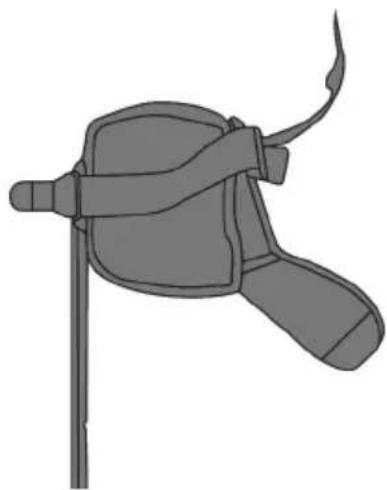
.5
Jooa Jaa aai Jau Jc Jol Jol Jai .6
H
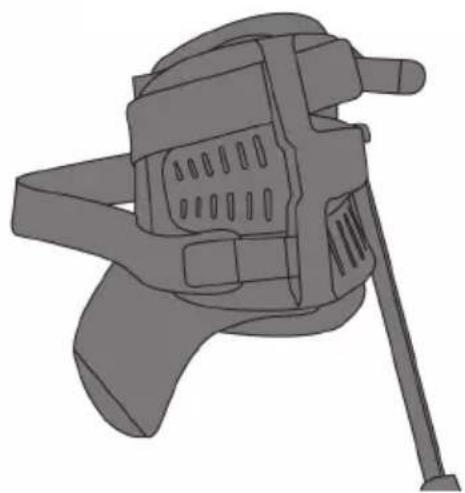
- _ij iigjUjI j Uliu 8
4.9
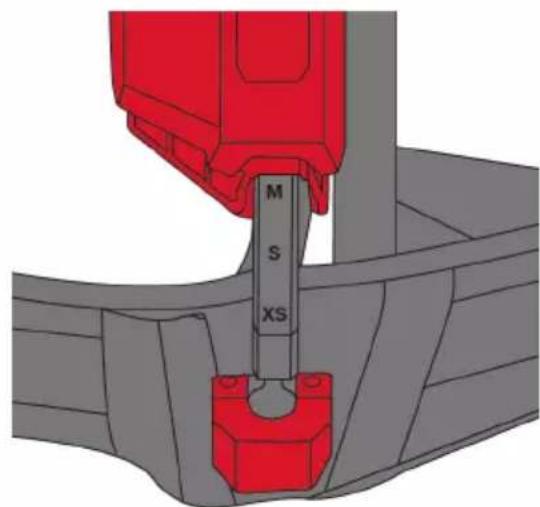
1g.5gJl JolJI g oJSL aJg
gogjgl Eblal 1y j y
2
.aaJj 0a0aJJgSj
-1j! 5i
2/2
aJl aJg aJg
gglg ggl 1
0jSll cai bui g (g) SJI JI JI JI JI JI
pclu sio pI sWU JolJlg
pog ggJl JolI g 1j o j
S OBC = S COD + S_ BOC
bui jj yai bui g jue jui J5 uui jui
j@
jJg 10
10
Jau
.
JUusssuJusie 1sagg Jaauc uJy jol gag aauaal alj
aagglglls
.1J 2
1
a aal j 1g lgl g iag aag aag aag aag
JuswIyolic aagb adawl Jai jalj ggsn ma n daa jal al jz
.aaaggl4jles
I
11
a a jao gaj daiy iie yiig biiw g gjg jg jg jg jg jg jg
.Hilti
J 1 J 1 J 1 J 1 J 1 J 1 J 1 J 1 J 1 J 1 J 1 J 1 J 1 J 1 J 1 J 1 J 1 J 1 J 1 J 1 J 1 J 1 J 1 J 1 J 1 J 1 J 1 J 1 J 1 J 1 J 1 J 1 J 1 J 1 J
aJalll 4JlJnJnJn
13
Hilti g is dabn n h .
13 三王朝人 5
24F., No. 16, Xinzhan Rd., Banqiao Dist., New Taipei City 220, Taiwan (R.O.C.)
Tel. 0800-221-036
14其他資訊
.0000000000000000000000000000
n nn nnnn nn nnnn nn nnnn nn
n nnnn ( - ) nnnn nn nnnn nnnn nnnn nnnn nnnn nnnn nnnn nnnn nnnn nnnn nnnn nnnn nnnn nnnn nnnn nnnn nnnn nnnn nnnn nnnn nnnn nnnn nnnn nnnn nnnn nnnn nnnn nnnn nnnn nnnn nnnn nnnn nnnn nnnn
nnnnnnnn nn nnnnnnnnnnnnnnnnnnnnnnnnnnnnnnnnnnnnnnnnnnnnnnnnnnnnnnnnnnnnnnnnnnnnnnnnnnnnnnnnnnnnnnnnnnnnnnnnnnnnnnn
nno n no n no n no n no n no n no n no
nnnnnnnnnnnnnnnnnnnnnnnnnnnnnnnnnnnnnnnnnnnnnnnnnnnnnnnnnnnnnnnnnnnnnnnnnnnnnnnnnnn

xnn nn nn
6.2
.1
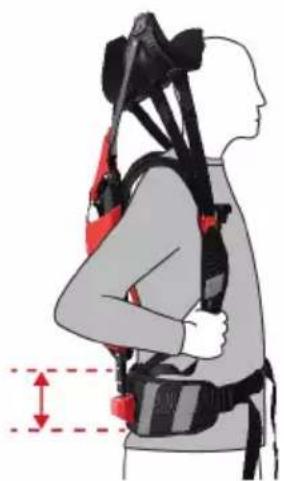
2.nunnnnT
nno 3.
XNN.
nynnnnnnnnnnnnnnnnn
n nn nnnnnnnnnnnnnnnnnnnnnnnnnnnnnnnnnnnnnnnnnnnnnnnnnnnnnnnnnnnnnnnnnnnnnnnnnnnnnnnnnnnnnnnnnnnnnnn
1
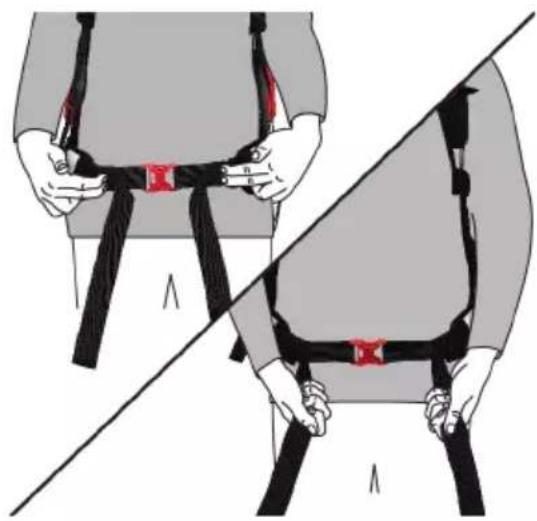
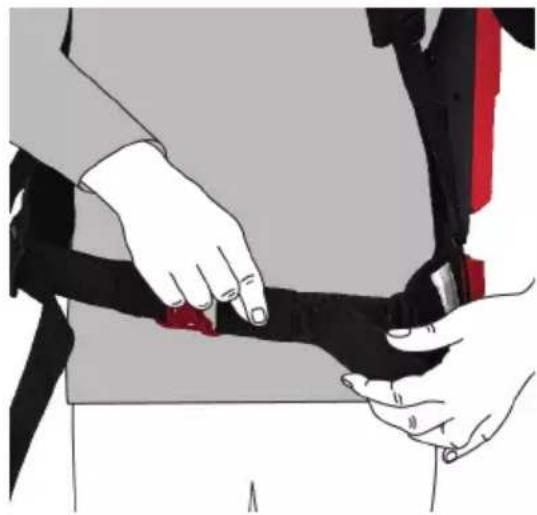
nnn nn nnn nn nn nn nn 4.
n nn nnn nn nn nn nnn
6.3
n nn n nn nn nn nn nn nn nn nn nn nn nn nn nn nn nn nn nn nn nn nn nn nn nn nn nn nn nn nn nn nn nn nn nn nn nn nn nn nn nn nn nn nn nn nn nn nn nn nn nn nn nn nn nn nn nn nn nn nn nn nn nn nn nn nn nn nn nn nn nn nn nn nn nn nn nn nn nn nn nn nn nn nn nn


1.
2.
n nn nnnnnnnnnnnnnnnnnnnnnnnnnnnnnnnnnnnnnnnnnnnnnnnnnnnnnnnnnnnnnnnnnnnnnnnnnnnnn
3.
4.
n nn nnnnnnnnnnnnnnnnnnnnnnnnnnnnnnnnnnnnnnnnnnnnnnnnnnnnnnnnnnnnnnnnnnnnnnnnnnnnnnnnnnnnnnnnnnnnnnnnnnnnnnnnnnn
n nn nnnn nn nnnnnnnnnnnnnnnnnnnnnnnnnnnnnnnnnnnnnnnnnnnnnnnnnnnnnnnnnnnnnnnnnnnnnnnnnnnnnnnnnnnnnnnnnnnnnnn
6.4
17nn nn nx 097 w nann nx dnn7

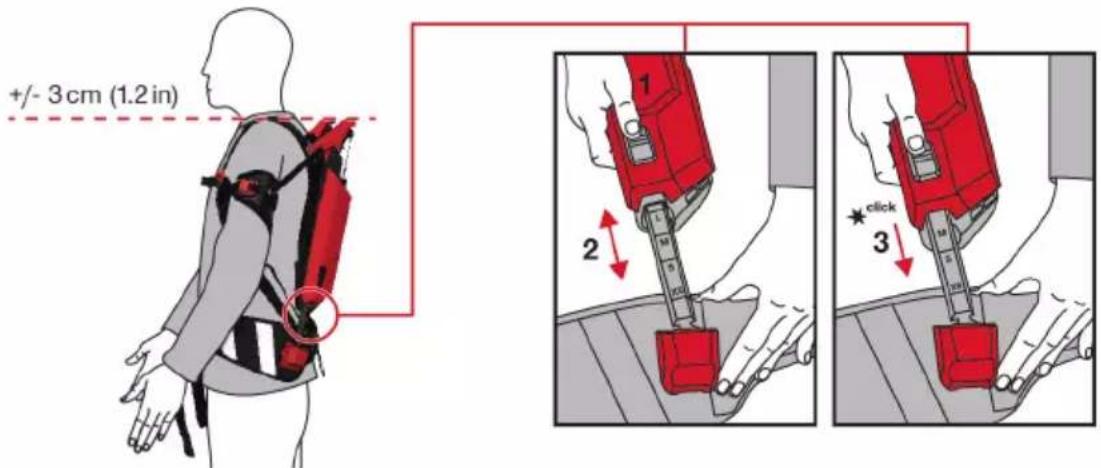
.1
2.
3.
nNnx mnn nnnnnnnnnnnn 4.
(1.2) 3-+ non nay ny xny nynnny nynny nynny
an mnnn
6.5
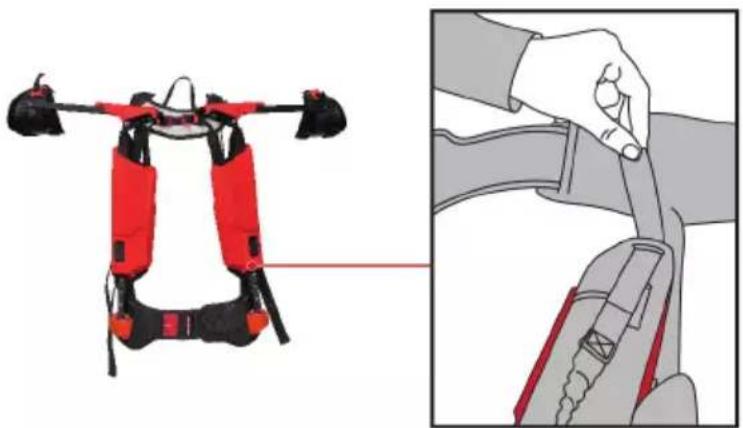
1.
.1111 1111 1111 1111 1111 1111 1111 2.
777777777 6.6
nnn nnnn nn nnnn nn nnnn nn nnnn nn nnnn nn nnnn nn
D'Onnn
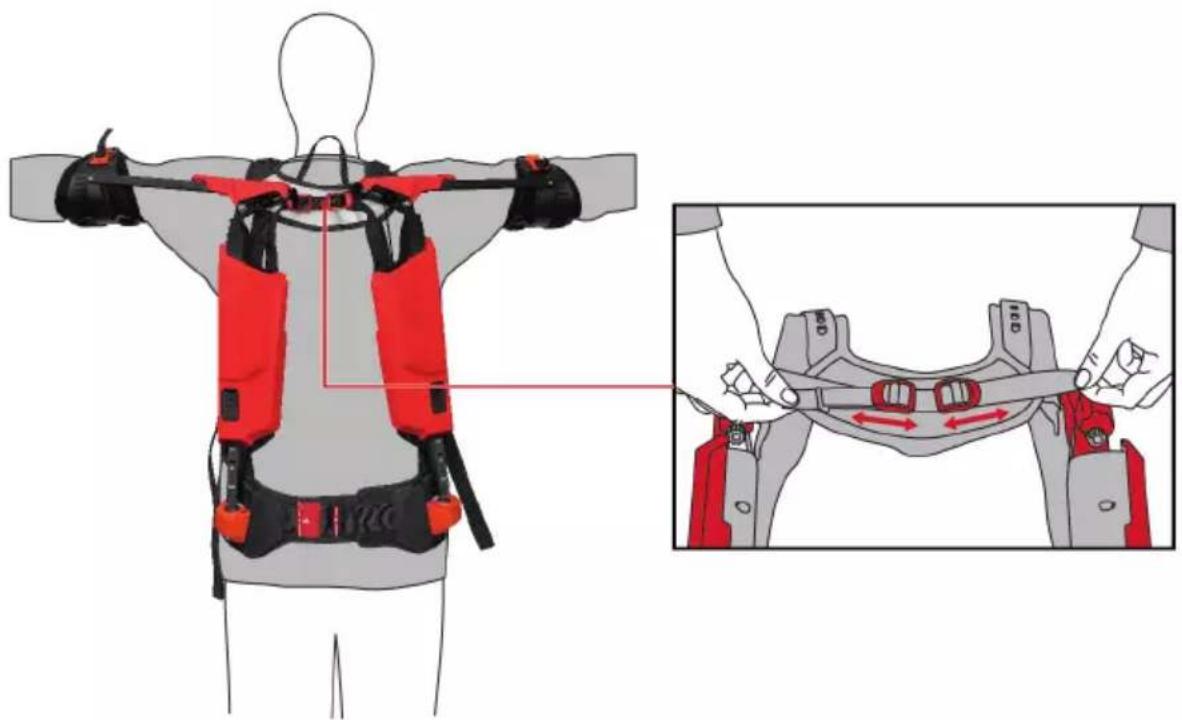
nix nnnn nn nn nn nn nn nn 1.
2.
nno nnnnnnnnnnnnnnnn
X7T
n nn nnnnnnnnnnnnnnnnnnnnnnnnnnnnnnnnnnnnnnnnnnnnnnnnnnnnnnnnnnnnnnnnnnnnnnnnnnnnnnnnnnnnnnnnnnnnnnnnnnnnnnnnnnnnnnnnnnnnnnn
xnnn.
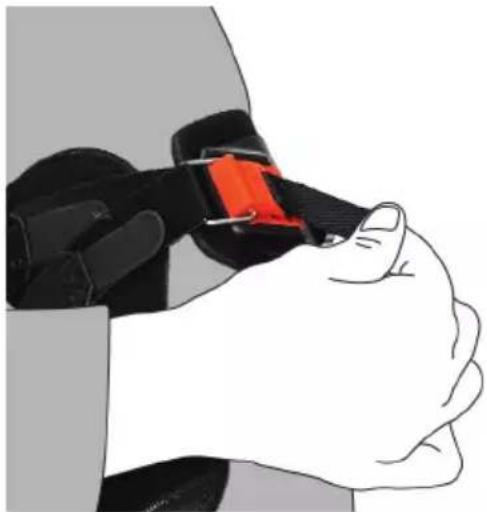
nroxnynnnnae nnnn nn 1.
n nn nnnnnnnnnnnnn

nane 197nn nn nnon 197nynn nxyn 2.
10
17y qan 57 anx xn, n nnnnn nn xxin 3.
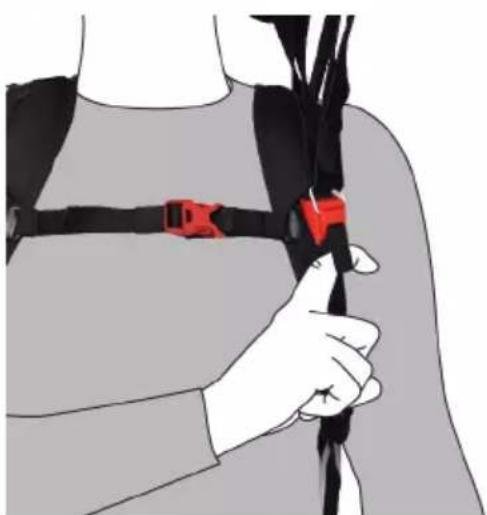
nnoynnnn 4.
non nn by 1ion nnnn nn 5.
6.
7.
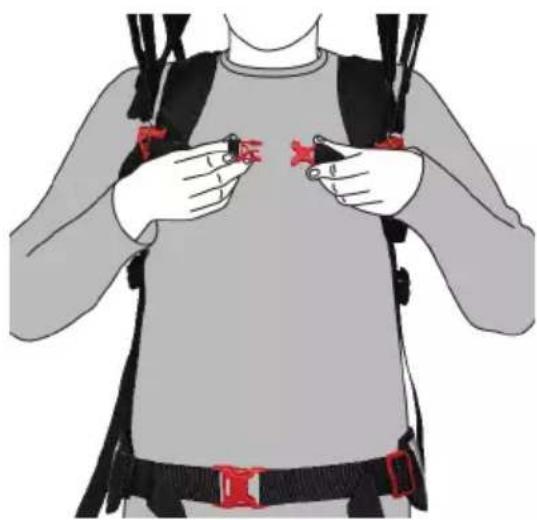
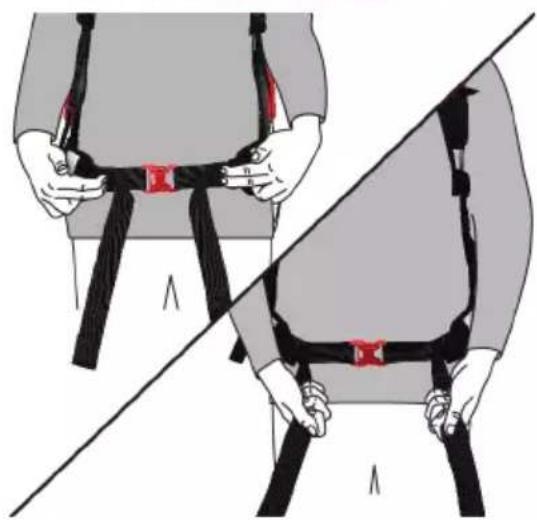
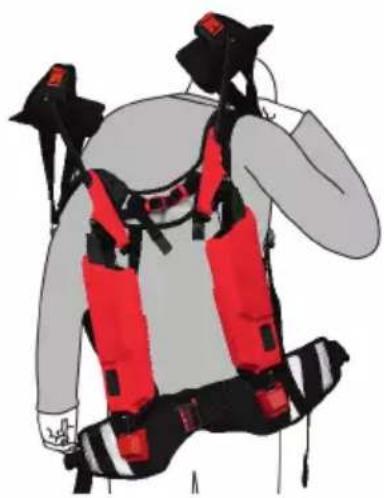
nannnnn nn nnnn 9.
.1n nn nn nnn 10.
.1n nn 097n nnn 11.
7nnn nn n 12.

nna nnnn nn nnnn
8.1
- 5.
nannn 1
9
X
n7nnn 190 nnnny 107 ny 500 .ninna nnna nn
.
0917
777777777777
.017
n 1770 0770 n 900 nnnn nn n 77n nnnn nn nnnn nn nnnn nn nnnn nn nnnn nn nnnn nn nnnn nn nnnn nn nnnn nn nnnn nn nnnn nn nnnn nn nnnn nn nnnn nn nnnn nn nnnn nn nnnn nn nnnn nn nnnn nn nnnn nn nnnn nn nnnn nn nnnn nn nnnn nn nnnn nn nnnn
nn7
17n 19x0y0y0y0y0y0y0y0y0y0y0y0y0y0y0y0y0y0y0y0y0y0y0y0y0y0y0y0y0y0y0y0y0y0y0y0y0y0y0y0y0y0y0y0y0y0y0y0y0y0y0
.
.
.
nnn n nn nn nn nn nn nn nn nn nn nn nn nn nn nn nn nn nn nn nn nn nn nn nn nn nn nn nn nn nn nn nn nn nn nn nn nn nn nn nn nn nn nn nn nn nn nn nn nn nn nn nn nn nn nn nn nn nn nn nn nn nn nn nn nn nn nn nn nn nn nn nn nn nn nn nn nn nn nn nn nn nn nn nn nn nn nn nn nn nn nn nn nn nn nn nn nn nn nn nn nn

D797n 1
9.1


.1
n 2.
3.
.111 4
.0n nn nnnn nn 5.
9.2nn79n791
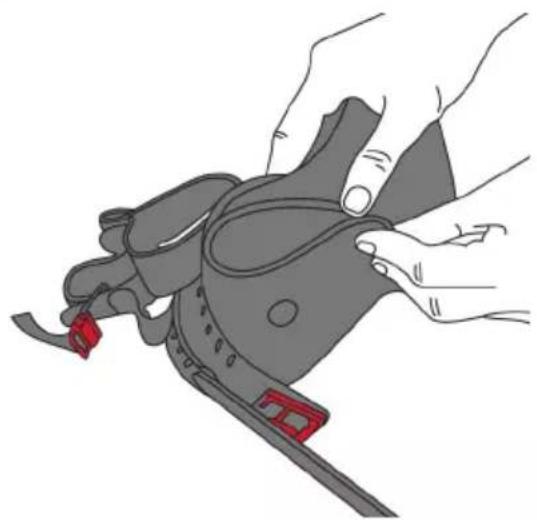
- 70 1970 7970 7970 7970 2.
1n 77

nnainn mnn no7nn
9.3
- n nn nn nn nn nn nn nn nn nn nn nn nn nn nn nn nn nn nn nn nn nn nn nn nn nn nn nn nn nn nn nn nn nn nn nn nn nn nn nn nn nn nn nn nn nn nn nn nn nn nn nn nn nn nn nn nn nn nn nn nn nn nn nn nn nn nn nn nn nn nn nn nn nn nn nn nn nn nn nn nn nn nn nn nn nn nn nn nn nn nn nn nn nn nn nn nn nn nn nn nn
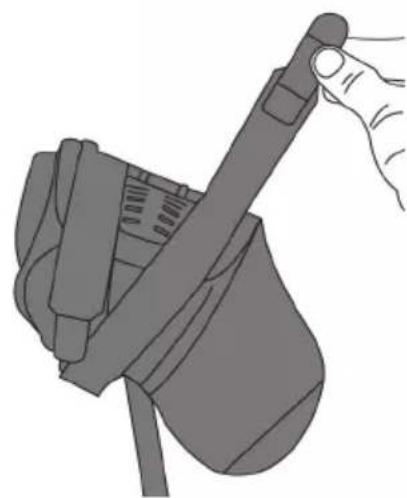
nynnnnnnnnnnnnnn 4. nnnnnnnnnnnnnnnnn

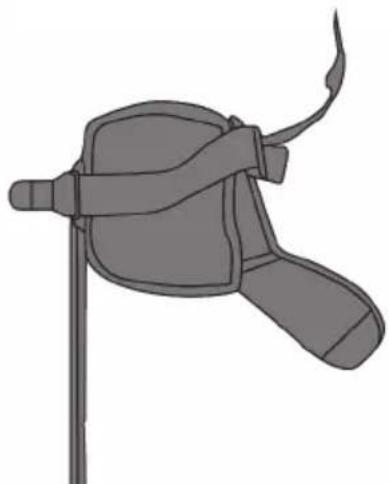

7.
.77777777777777 8.
non nnnn nn
9.4

nx yan nnon naon nn nyannn nx
.70
mna
nynnnnn
n90177y9 177
1
10'on nn nnnn nn nnnn nn nn
nnnnnnnnnnnnnnnnnnnnnnnnnnnnnnnnnnnnn
2007年月日
10n nn nnnnnnnnnnnnnnnnnnnnnnn
EC Declaration of Conformity | UK Declaration of Conformity

Manufacturer:
Hilti Corporation
Hilti (Gt. Britain) Limited
1 Trafford Wharf Road, Old Trafford
Manchester, M17 1BY
EXO-S (01)
EXO-S L (01)
Serial Numbers: 1-99999999999
2006/42/EC | Supply of Machinery (Safety)
Regulations 2008

Dr. Tahar Zrilli
Head of Quality and Process Management
Business Area Electric Tools & Accessories
Schaan, 20.09.2022

Johannes Wilfried Huber
Senior Vice President
Business Unit Diamond


Hitti Corporation
LI-9494 Schaan
Tel.:+423 234 21 11
Fax:+423 234 29 65
www.hitti.group