EXO-T-22 - Drill HILTI - Free user manual and instructions
Find the device manual for free EXO-T-22 HILTI in PDF.

| Product type | Cordless active lifting device for power tools |
| Brand | Hilti |
| Model | EXO-T-22 |
| Weight (without battery) | 7.75 kg |
| Permissible weight of attached tool | 6 kg to 17 kg |
| Power supply | Li-Ion battery 21.6 V (Hilti Nuron B 22 series) |
| Operating temperature | -17 °C to 60 °C |
| Storage temperature | -20 °C to 70 °C |
| Main functions | Lifting and holding tools, automatic weight detection, cable locking, remote control, shock absorber |
| Maintenance and cleaning | Clean with a slightly damp cloth; brush ventilation slots; do not use silicone-based cleaners |
| Safety | Emergency stop, cable locking, fall detection, cantilever locking, automatic shutdown in case of fault |
| Spare parts and repairability | Contact Hilti customer service; use only original parts |
| Manufacturer's warranty | Check the terms with your local Hilti partner |
Frequently Asked Questions - EXO-T-22 HILTI
User questions about EXO-T-22 HILTI
0 question about this device. Answer the ones you know or ask your own.
Ask a new question about this device
Download the instructions for your Drill in PDF format for free! Find your manual EXO-T-22 - HILTI and take your electronic device back in hand. On this page are published all the documents necessary for the use of your device. EXO-T-22 by HILTI.
USER MANUAL EXO-T-22 HILTI
EXO-T-22
Original operating instructions
1 Information about the operating instructions
1.1 About these operating instructions
- Read these operating instructions before the product is used or operated for the first time. This is a prerequisite for safe, trouble-free handling and use of the product.
- Observe the safety instructions and warnings in these operating instructions and on the product.
- Always keep the operating instructions with the product and make sure that the product is accompanied by these operating instructions only, when the product is given to other persons.
1.2 Explanation of symbols
1.2.1 Warnings
Warnings alert persons to hazards that occur when handling or using the product. The following signal words are used:

DANGER
DANGER!
- Draws attention to imminent danger that will lead to serious personal injury or fatality.

WARNING
WARNING!
- Draws attention to a potential threat of danger that can lead to serious injury or fatality.

CAUTION
CAUTION!
- Draws attention to a potentially dangerous situation that could lead to personal injury or damage to the equipment or other property.
1.2.2 Symbols in the operating instructions
The following symbols are used in these operating instructions:

Comply with the operating instructions

Instructions for use and other useful information

Dealing with recyclable materials

Do not dispose of electric equipment and batteries as household waste

Hilti Li-ion battery

Hilti charger
1.2.3 Symbols in illustrations
The following symbols are used in illustrations:

These numbers refer to the illustrations at the beginning of these operating instructions.
| 3 | The numbering reflects the sequence of operations shown in the illustrations and may deviate from the steps described in the text. |
| 11 | Item reference numbers are used in theoverview illustrationand refer to the numbers used in the key in theproduct overviewsection. |
| ! | These characters are intended to specifically draw your attention to certain points when handling the product. |
1.3 Product-dependent symbols
1.3.1 Symbols on the product
The following symbols can be used on the product:
 | The product supports near-field communication (NFC) technology compatible with iOS and Android platforms. |
 | Holder EXO-T-22 L-shaped |
 | Holder EXO-T-22 I-shaped |
| Li-Ion | Li-ion battery |
 | Never use the battery as a striking tool. |
 | Do not drop the battery. Never use a battery that has suffered an impact or is damaged in any other way. |
1.4 Product information
HILTI products are designed for professional users and only trained, authorized personnel are permitted to operate, service and maintain the products. This personnel must be specifically informed about the possible hazards. The product and its ancillary equipment can present hazards if used incorrectly by untrained personnel or if used not in accordance with the intended use.
The type designation and serial number are printed on the rating plate.
Write down the serial number in the table below. You will be required to state the product details when contacting Hilti Service or your local Hilti organization to inquire about the product.
Product information
| Wearable weight-bearing device EXO-T-22 | |
| Generation 01 | |
| Serial no. |
1.5 Declaration of conformity
The manufacturer declares, on his sole responsibility, that the product described here complies with the applicable legislation and standards. A copy of the declaration of conformity can be found at the end of this documentation.
The technical documentation is filed here:
Hilti Entwicklungsgesellschaft mbH | Tool Certification | Hiltistrasse 6 | D-86916 Kaufering, Germany
2 Safety
2.1 General safety instructions
WARNING Study all safety instructions and other instructions, images and technical data with which this product is provided. Failure to observe the instructions below can result in electric shock, fire and/or serious injury.
Keep all safety precautions and instructions for future reference.
In all cases, follow the operating instructions of the attached power tool.
Work area safety
- Keep your workplace clean and well lit. Cluttered or poorly lit workplaces invite accidents.
- Do not operate the product in explosive atmospheres, such as in the presence of flammable liquids, gases or dust. Power tools create sparks which may ignite the dust or fumes.
- Keep children and other persons clear when the product is in use. Distractions can cause you to lose control of the product.
▶ Always be aware of your surroundings while wearing the product and make sure that there is no-one in your vicinity. You can cause damage and injuries with the boom.
Personal safety
Stay alert, watch what you are doing and use common sense when operating a power tool. Do not use a power tool while you are tired or under the influence of drugs, alcohol or medication. A moment of inattention while operating the power tool may result in serious personal injury.
- Avoid accidental starting. Make sure that the product is switched off before connecting the battery and before you don or wear the product. Non-compliance with this precaution can lead to accidents.
- Avoid unaccustomed body positions. Maintain proper footing and balance at all times. This will allow you to control the power tool better, even in unexpected situations.
▶ Make sure you have a safe stance for using the attached power tool. A sudden break-through can affect your balance!
At all times, be prepared to take the full weight of the attached power tool. In unfavorable cases the cable could snap or the motor/brake fail, affecting your balance.
▶ Wear suitable work clothes. Do not wear jewelry or loose clothing. Keep your hair, clothing and gloves away from moving parts. Loose clothes, jewelry or long hair can be snagged by moving parts.
- When using the product, always wear safety footwear, a hard hat and eye protection. Supplement your personal protective equipment with all the elements necessitated by the attached power tool (e.g. ear protection, dust mask).
It is essential to follow the instructions for correctly donning the product. Buckle all the straps. If you do not fit the straps correctly, the weight to be borne cannot be transferred appropriately and can therefore lead to injuries.
- Do not lull yourself into a false sense of security and do not flout the safety rules for power tools, even if you are familiar with the power tool after using it many times. Careless handling could cause serious injury within fractions of a second.
Take the product off when you are not using it and when you are going to take a break. Wearing the product when it is not needed can lead to accidents and injuries.
Take the product off if you experience severe back pains. Excessive wearing of the product can lead to bodily harm.
- Do not use the product in combination with a safety harness.
- Do not work near a drop edge when using the product.
Using and handling the product
▶ Always hold the attached power tool firmly with both hands on the grips provided. Bring your arms into a position in which you can absorb the kickback forces.
- Do not use the product if it has a faulty switch. Any product that cannot be controlled with the switch is dangerous and must be repaired.
- Maintain the product carefully. Check that moving parts operate satisfactorily and do not jam, and make sure that no parts are broken or damaged in such a way that the product might no longer function correctly. Have damaged parts repaired before using the product. Many accidents are caused by poorly maintained products.
Remove the battery before making adjustments, changing accessories, or taking off the product. This precaution reduces the risk of the power tool starting accidentally.
▶ Use the product and accessories only when they are in perfect working order.
▶ Never tamper with or modify the product or accessories in any way.
Risk of injury by falling tools and/or accessories. Before starting work, check that the battery and installed accessories are secure.
Risk of injury if the power tool falls. Before starting work, check that the attached power tool is secure.
- Do not exceed the permissible weight (see "Technical data") for an attached power tool.
- Do not unreel the cable further than from the boom to the ground. If you unreel the cable further, at some point it will be reeled in again and wound in the wrong direction. In this condition, the EXO-T-22 will be unable to bear the weight of a power tool attached to the cable.
▶ Use power tools, accessories, insert tools, etc. only as described in this manual. Take the working conditions and the work to be performed into account. Use of the power tool for operations different from those intended could result in a hazardous situation.
▶ Do not use the product for lifting loads.
HILTI
- Do not suspend objects from the product. Use the product only as a lifting aid for power tools.
- Do not suspend from the product power tools not named in the section headed "Intended use".
▶ Do not use the product in the rain. - Do not work in tight spaces. Avoid contact with obstacles or walls.
- Do not deploy the product where high electrical voltage is present or in the vicinity of areas where there is a risk of explosion.
Using and handling the cordless power tool
▶ Recharge the batteries only with the chargers specified by the manufacturer. A charger that is suitable for a certain type of battery may present a risk of fire when used with other types of battery.
▶ Use only the specified batteries in power tools. Use of any other batteries may create a risk of injury and fire.
When the battery is not in use, keep it away from paper clips, coins, keys, nails, screws and other small metal objects that could cause bridging between the terminals. A short circuit between the battery terminals may cause burns or a fire.
- Liquid may leak from the battery if used incorrectly. Avoid contact with the liquid. If contact accidentally occurs, flush with water. If the liquid contacts the eyes, also seek medical attention. Liquid escaping from the battery can cause skin irritation or burns.
- Do not use damaged or modified batteries. Damaged or modified batteries may behave unpredictably and lead to fires, explosions or risk of injury.
- Do not expose batteries to fire or excessive temperatures. Fires or temperatures over 130 °C (265 °F) may cause an explosion.
▶ Follow all instructions on battery charging and never charge the battery or the battery-powered tool outside the temperature range stated in the operating instructions. Incorrect charging or charging outside the approved temperature range may destroy the battery and increase the risk of fire.
Service
- Have your power tool repaired only by qualified, skilled personnel, using only genuine Hilti spare parts. The safety of the tool can thus be maintained.
▶ Never repair damaged batteries. All battery repair should only be carried out by the manufacturer or authorized customer service centers.
2.2 Careful handling and use of batteries
- Comply with the following safety instructions for the safe handling and use of Li-ion batteries.
Failure to comply can lead to skin irritation, severe corrosive injury, chemical burns, fire and/or explosion.
▶ Use only batteries that are in perfect working order.
▶ Treat batteries with care in order to avoid damage and prevent leakage of fluids that are extremely harmful to health! - Do not under any circumstances modify or tamper with batteries!
- Do not disassemble, crush or incinerate batteries and do not subject them to temperatures over 80 °C (176 °F).
▶ Never use or charge a battery that has suffered an impact or been damaged in any other way. Check your batteries regularly for signs of damage.
▶ Never use recycled or repaired batteries.
▶ Never use the battery or a battery-operated power tool as a striking tool.
▶ Never expose batteries to the direct rays of the sun, elevated temperature, sparking, or open flame. This can lead to explosions. - Do not touch the battery poles with your fingers, tools, jewelry, or other electrically conductive objects. This can damage the battery and also cause material damage and personal injury.
- Keep batteries away from rain, moisture and liquids. Penetrating moisture can cause short circuits, electric shock, burns, fire and explosions.
▶ Use only chargers and power tools approved for the specific battery type. Read and follow the relevant operating instructions. - Do not use or store the battery in explosive environments.
If the battery is too hot to touch, it may be defective. Put the battery in a place where it is clearly visible and where there is no risk of fire, at an adequate distance from flammable materials. Allow the battery to cool down. If it is still too hot to touch after an hour, the battery is faulty. Consult Hilti Service or read the document entitled "Instructions on safety and use for Hilti Li-ion batteries".

Observe the special guidelines applicable to the transport, storage and use of lithium-ion batteries. → page 26
Read the instructions on safety and use of Hilti Li-ion batteries that you can access by scanning the QR code at the end of these operating instructions.
3 Description
3.1 Product overview
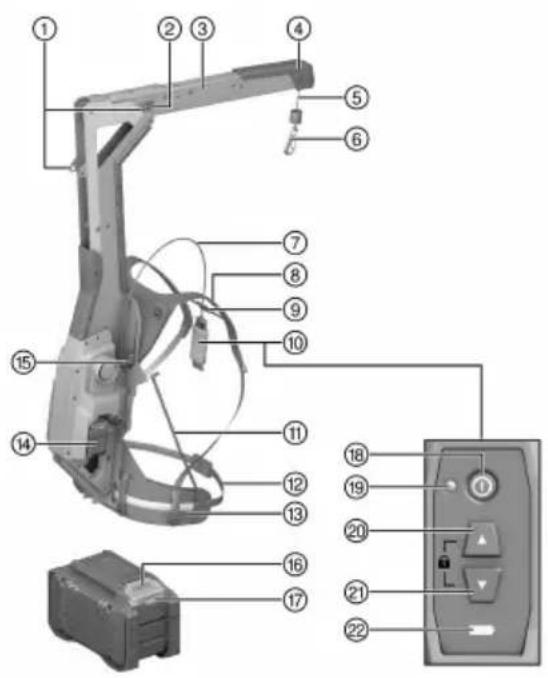
① Engaged position for boom
② Release button for boom
③ Boom
④ Buffer
⑤ Load-bearing cable
⑥ Hook
⑦ Cable for remote control unit
⑧ Shoulder strap
⑨ Chest strap
⑩ Remote control unit
⑪ Supporting strut
⑫ Length adjuster for waist belt
⑬ Waist strap
⑭ Battery
⑮ Height adjuster
⑯ Release button, battery
⑰ Battery state of health indicator
⑱ On/Off button
⑲ LED operating-status indicator (green)
⑳ Up button
②1 Down button
②2 Charge state indicator for battery
3.2 Intended use
The product described is a cordless, active human-augmentation device for bearing weight. It is designed for bearing the weight of an attached Hilti SDS-max combihammer, breaker or demolition hammer.
- For this product, use only Hilti Nuron lithium-ion batteries of the B 22 series. For optimum performance, Hilti recommends the batteries stated in the table at the end of these operating instructions for this product.
- For these batteries, use only Hilti chargers of the type series stated in the table at the end of these operating instructions.
3.3 Items supplied
Wearable weight-bearing device, holder for power tool, operating instructions
Other system products approved for use with this product can be found at your local Hilti Store or at: www.hilti.group
3.4 LED indicators, remote control unit
| Status Meaning | |
| LED operating-status indicator shows steady green | The product is switched on.The load-bearing cable is unlocked. |
| LED operating-status indicator flashes green • The | The product is switched on.The load-bearing cable is locked. |
| LED operating-status indicator shows steady red | The product has a temporary fault. Switch the product off and then on again. |
| LED operating-status indicator does not light up | The product is switched off. |
| State of charge indicator shows steady yellow | The state of charge of the inserted battery is less than 25 %. |
3.5 Status indicators of the Li-ion battery
Hilti Nuron Li-ion batteries can indicate state of charge, fault messages and the battery's state of health.
3.5.1 Indicators for state of charge and fault messages
WARNING
Risk of injury by a falling battery!
If the release button is pressed with a battery inserted in the product, subsequently check that the battery is correctly re-engaged and secure.
Short-press the release button of the battery to get whichever of the following status indications is applicable at the time.
State of charge and, if applicable, faults are indicated constantly as long as the connected product is switched on.
| Status Meaning | |
| Four (4) LEDs show constantly green State of charge: 100 % to 71 % | |
| Three (3) LEDs show constantly green | State of charge: 70 % to 51 % |
| Two (2) LEDs show constantly green | State of charge: 50 % to 26 % |
| One (1) LED shows constantly green | State of charge: 25 % to 10 % |
| One (1) LED slow-flashes green | State of charge: < 10 % |
| One (1) LED quick-flashes green | The Li-ion battery is completely discharged. Recharge the battery.If the LED again starts quick-flashing after the battery has been charged, consult Hilti Service. |
| One (1) LED quick-flashes yellow | The Li-ion battery or the product in which it is inserted is overloaded, too hot or too cold, or experiencing some other fault.Bring the product and the battery to the recommended working temperature and do not overload the product when it is in use.If the message persists, consult Hilti Service. |
| One (1) LED shows yellow | The Li-ion battery and the product in which it is inserted are not compatible. Consult Hilti Service. |
| One (1) LED quick-flashes red | The Li-ion battery is locked and cannot be used.Consult Hilti Service. |
3.5.2 Indicators showing the battery's state of health
To check the battery's state of health, press the release button and hold it down for longer than three seconds. The system does not detect a potential malfunction of the battery due to misuse, for example battery dropped or pierced, external heat damage, etc.
| Status Meaning | |
| All LEDs show in sequence, followed by one (1) LED showing constantly green. | The battery can remain in use. |
| All LEDs show in sequence, followed by one (1) LED quick-flashing yellow. | The check to ascertain the battery's state of health did not complete. Repeat the procedure, or consult Hilti Service. |
| All LEDs show in sequence, followed by one (1) LED showing constantly red. | If a connected product can still be used, the remaining battery capacity is below 50%. If a connected product can no longer be used, the battery has reached the end of its useful life and has to be replaced. Consult Hilti Service. |
4 Technical data
| Weight without battery | 7.75 kg |
| Permissible weight of the attached power tool, including accessories | 6 kg ... 17 kg |
| Ambient temperature for operation | -17 °C ... 60 °C |
| Storage temperature | -20 °C ... 70 °C |
4.1 Battery
| Battery operating voltage | 21.6 V |
| Weight, battery | See the end of these operating instructions |
| Ambient temperature for operation | -17 °C ... 60 °C |
| Storage temperature | -20 °C ... 40 °C |
| Battery charging starting temperature | -10 °C ... 45 °C |
4.2 Noise information in accordance with EN 62841-1:2015, AC:2015
The sound pressure values given in these instructions have been measured in accordance with a standardized test and may be used to compare one power tool with another. They can also be used for a preliminary assessment of exposure.
The data given represent the main applications of the power tool. However, if the power tool is used for different applications, with different accessory tools, or is poorly maintained, the data can vary. This can significantly increase exposure over the total working period.
An accurate estimation of exposure should also take into account the times when the power tool is switched off, or when it is running but not actually being used for a job. This can significantly reduce exposure over the total working period.
Identify additional safety measures to protect the operator from the effects of noise such as: maintaining the power tool and accessory tools, keeping the hands warm, organization of work patterns.
Noise information
| Sound power level ( ) | 83 dB(A) |
| Uncertainty for the sound power level _WA [K] | 3 dB(A) |
| Sound pressure level ( ) | 72 dB(A) |
| Uncertainty for the sound pressure level _PA [K] | 3 dB(A) |
5 Preparations at the workplace

WARNING
Risk of injury by inadvertent starting!
▶ Before inserting the battery, make sure that the product is switched off.
- Remove the battery before making any adjustments to the power tool or before changing accessories.
Observe the safety instructions and warnings in this documentation and on the product.
5.1 Charging the battery
- Before charging the battery, read the operating instructions for the charger.
- Make sure that the contacts on the battery and the contacts on the charger are clean and dry.
- Use an approved charger to charge the battery. → page 19
5.2 Inserting the battery
WARNING
Risk of injury by short circuit or falling battery!
Before inserting the battery, make sure that the contacts on the battery and the contacts on the product are free of foreign matter.
▶ Make sure that the battery always engages correctly.
- Charge the battery fully before using it for the first time.
- Push the battery into the product until it engages with an audible click.
- Check that the battery is seated securely.
5.3 Removing the battery
- Press the battery release button.
- Remove the battery from the product.
5.4 Installing holder for power tool
CAUTION
Hazard due to blocked air vents. If air vents are blocked the power tool can overheat, which can lead to burn injuries and damage to the power tool.
▶ Never block the air vents of the power tool.
Hilti offers different holders for the power tools to be attached. Use the holder that corresponds to the shape of the power tool.

Read the operating instructions for the holder!
- Wrap the black tape round the black grip of the power tool.
▶ If necessary, use the spacer to keep the control switch of the power tool from being blocked. - Hook the belt hook into the loop of the holder and pull the belt tight.
- Then wrap the loose end of the belt round the tightened length of the belt so that the end of the belt does not get in the way when work is in progress.
- Wrap the red belt round the red motor housing of the power tool.
- Hook the belt hook into the loop of the holder and pull the belt tight.
- Then wrap the loose end of the belt round the tightened length of the belt so that the end of the belt does not get in the way or snag in the power tool when work is in progress.
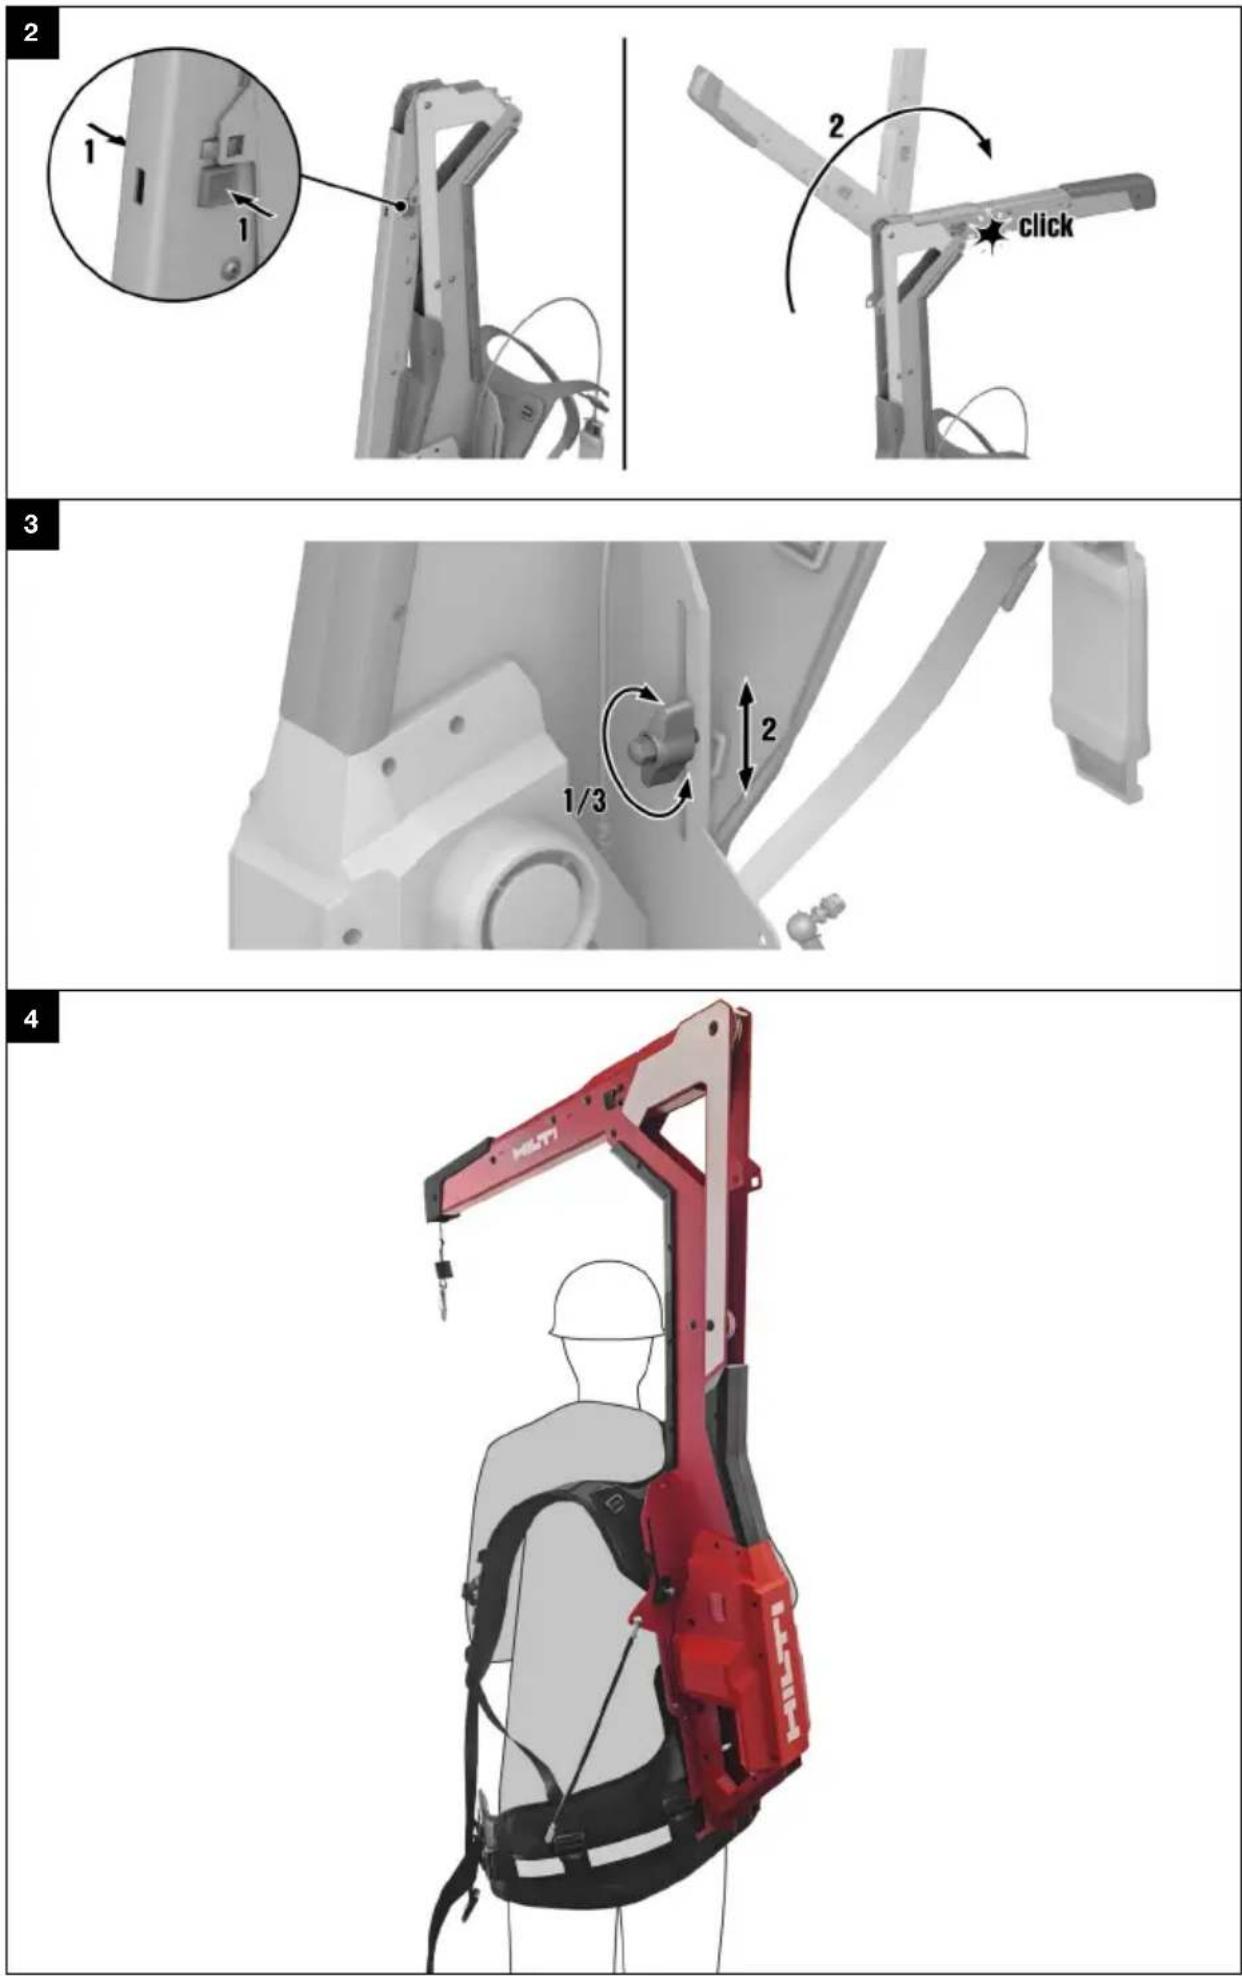
5.5 Extending boom
WARNING
Risk of injury when extending/retracting the boom. Risk of trapping the fingers when the boom is moved or when the cable is reeled all the way in.
▶ Wear protective gloves while extending/retracting the boom.
▶ Switch the product off before extending/retracting the boom.
▶ Detach the attached power tool and/or the power-tool holder before extending or retracting the boom.
▶ Make sure there is enough space around you before you extend or retract the boom.

WARNING
Risk of injury by incorrectly locked boom. Uncontrolled movement of the boom and the attached power tool.
▶ Make sure that the boom is locked correctly before you switch on and use the product.
▶ If the boom cannot be locked correctly, do not use the product.
- Press the release buttons on both sides of the boom.
- Pivot the boom 270^ forward.
- Make sure that the boom snaps securely into the engaged position on both sides.
6 Operation
Observe the safety instructions and warnings in this documentation and on the product.
6.1 Donning
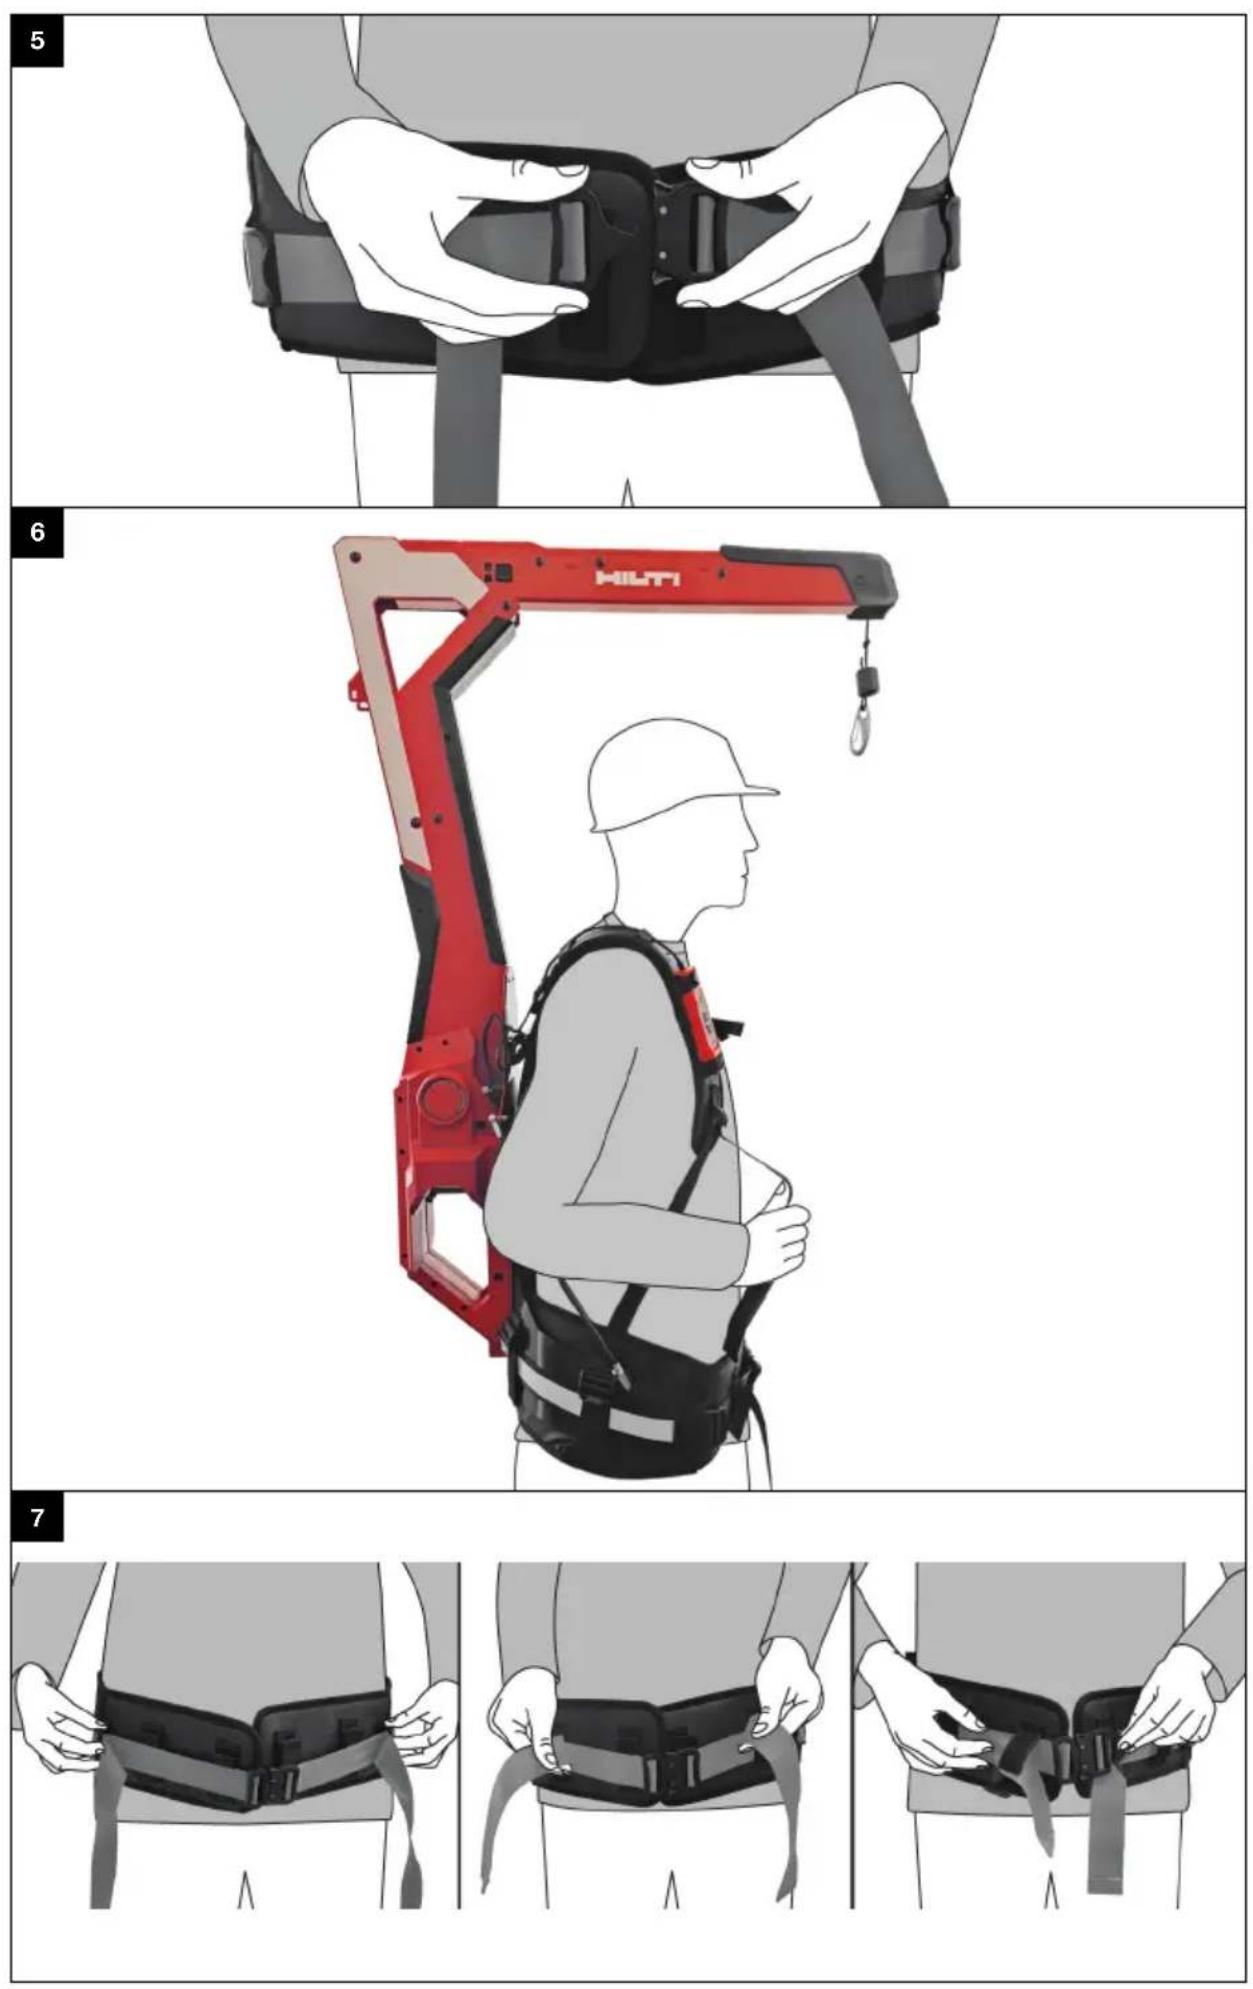
6.1.1 Adjusting height 3

You have to take the EXO-T-22 off your shoulders in order to adjust the height.
- Slacken the wingnuts of the height adjuster.
- Adjust to the desired height.
- Tighten the wingnuts of the height adjuster.
▶ Check that the height is the same on both sides.
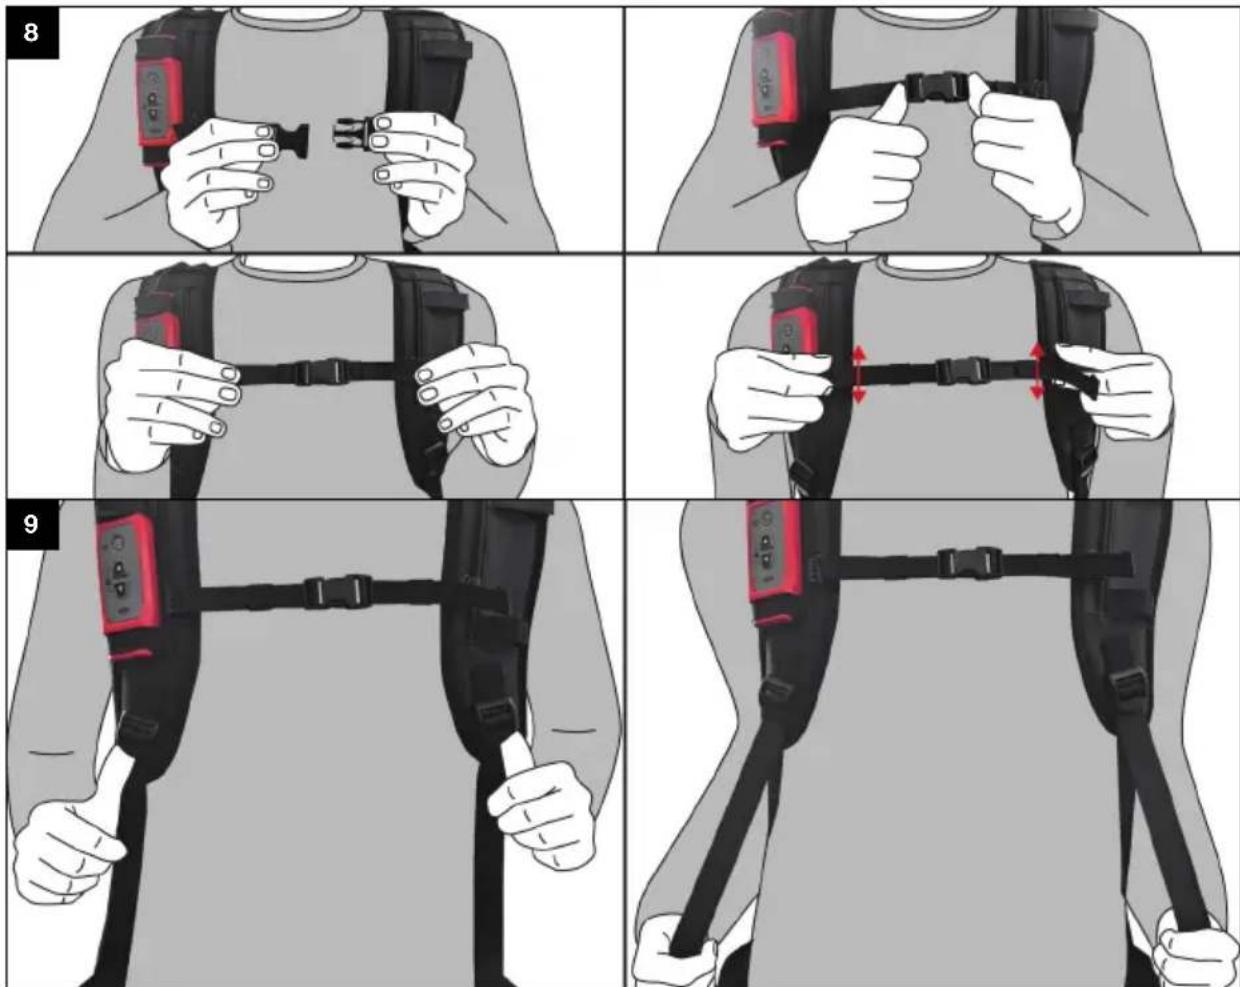
6.1.2 Donning 4, 5, 6, 7, 8, 9
- Shrug the product on to your shoulders as if it were a backpack. Slip your arms through the shoulder straps and position the shoulder straps on your shoulders.
- Close the clip catch of the waist belt.
- Position the waist belt.
The waist belt has to sit above the gluteal muscles and level with your pelvis.
It is important to make sure that the waist belt cannot slip while the product is in use.
- Adjust the fit of the waist belt.
▶ Flip the ladder-lock buckles up to loosen the waist belt.
▶ Pull both ends of the waist belt forward to tighten the belt.
-
Tuck the ends of the waist belt into the belt holders.
-
Close the clip catch of the chest strap.
- Adjust the height and the width of the chest strap.
- Adjust the shoulder straps. Pull the ends of the straps down to tighten the shoulder straps. To loosen the shoulder straps, tilt the ladder-lock buckle up.
- Raising your arms should not cause the waist belt to ride up. If the waist belt changes its position, you have to loosen the shoulder straps.
6.2 Switching on / off
- Press the On/Off button on the remote control unit to switch the product on.
▶ The LED status indicator shows steady green.

If the load-bearing cable is not in its end position it will be reeled in fully after the product is switched on. If the load of an attached power tool is detected this operation stops and the load-bearing cable remains at a standstill after a brief movement.
- Press the On/Off button on the remote control unit again to switch the product off.
▶ The LED operating-status indicator goes out.
6.3 Attaching power tool
- Install the holder on the power tool. → page 22
-
Switch the product on. → page 23
-
If the following conditions are met, also take this action:
Conditions: The power tool you want to attach is resting on the ground or on some other firm surface.
- Press the Down button to unreel enough load-bearing cable from the EXO-T-22 to attach the power tool without having to lift it yourself. Alternatively, pull the carabiner down slowly to unreel the load-bearing cable.

Note the maximum length of the load-bearing cable.
- Engage the hook of the EXO-T-22 in one of the two eyelets of the holder.
- Press the Up button. Do not manually assist the lifting operation.
▶ The attached power tool is lifted.
- Allow the attached power tool to dangle at the desired height for approx. 2 seconds.
The weight of the attached power tool is automatically registered and initialized.
If the user intervenes prematurely by pulling or lifting, the weight will not be correctly initialized and the attached power tool might be lowered or raised automatically.

The power tool, with all accessories and accessory tool, should be hanging as close to the horizontal as possible. If the attached power tool tilts too far in one direction, use the other eye of the holder. In this case, the weight of the attached power tool then has to be re-initialized.
- If the following conditions are met, also take this action:
Conditions: The power tool to be attached has to be hooked in while held in mid-air.
- Press the Down button to unreel the desired length of load-bearing cable.

Make sure there is a clear drop of at least 15 cm below the power tool to be attached.
- Engage the hook of the EXO-T-22 in one of the two eyelets of the holder.
▶ Abruptly drop the power tool. The EXO-T-22 detects the sudden acceleration and brings the attached power tool to a stop within a few centimeters. - Allow the attached power tool to dangle at the desired height for approx. 2 seconds.
The weight of the attached power tool is automatically registered and initialized.
If the user intervenes prematurely by pulling or lifting, the weight will not be correctly initialized and the attached power tool might be lowered or raised automatically.
- Press the Up button or the Down button if the attached power tool is not correctly initialized after being dropped.

You can also lock the load-bearing cable before you attach the power tool. The power tool is then initially suspended at a constant height. Then press the Up button or the Down button. The attached power tool moves accordingly and at the same time its weight is registered and initialized.

The power tool, with all accessories and accessory tool, should be hanging as close to the horizontal as possible. If the attached power tool tilts too far in one direction, use the other eye of the holder. In this case, the weight of the attached power tool then has to be re-initialized.
6.4 Working with the EXO-T-22
After the EXO-T-22 has registered and initialized the weight of the attached power tool, the power tool is always held suspended at the height at which you position it.
- To have the equipment raise the attached power tool, lift the power tool slightly.
The EXO-T-22 registers the reduction in weight and reels in the load-bearing cable, raising the power tool accordingly. - To have the equipment lower the attached power tool, press the power tool gently down.
The EXO-T-22 tool detects the increase in weight and slowly unreels the load-bearing cable accordingly. - To stop the movement, cease applying vertical force to the attached power tool.
- To prevent the load-bearing cable from being reeled in or unreeled, simultaneously press the Up button and the Down button and hold them down.
▶ The LED status indicator flashes green.
▶ The load-bearing cable is locked.
- To unlock the load-bearing cable, press either the Up button or the Down button, as appropriate.
▶ The LED status indicator shows steady green.
▶ The load-bearing cable is unlocked.

If increased resistance is encountered when the attached power tool is moved up or down, the weight of the attached power tool has to be re-initialized. To do this, briefly move the attached power tool either up by pressing the Up button or down by pressing the Down button and then allow the power tool to dangle freely for 2 seconds. The weight is re-initialized and the resistance to movement is reduced again.
6.5 Detaching power tool

CAUTION
Risk of injury by unexpected movement of the load-bearing cable. Injury and/or damage caused by upward movement or sudden drop of the attached power tool.
▶ Always lock the load-bearing cable before you detach the attached power tool.
- Lower the attached power tool until it rests on the ground or some other firm surface.

You can also remove the power tool while it is suspended in mid-air.
- Simultaneously press the Up and Down buttons and hold them down to block movement of the load-bearing cable.
▶ The LED status indicator flashes green.
▶ The load-bearing cable is locked.
- Disengage the attached power tool from the hook.
6.6 Removing
- Press the Up button to reel in the full length of the load-bearing cable.
- Switch the product off.
- Tilt the ladder-lock buckles of the shoulder straps up to loosen the straps.
- Open the clip catch of the chest strap.
- Open the clip catch of the waist belt.
- Shrug the product off your shoulders as if it were a backpack.
7 Care and maintenance

WARNING
Risk of injury with battery inserted!
▶ Always remove the battery before carrying out care and maintenance tasks!
Care of the product
- Carefully remove stubborn dirt.
- Carefully clean the air vents, if present, with a dry, soft brush.
- Use only a slightly damp cloth to clean the housing. Do not use cleaning agents containing silicone as these can attack the plastic parts.
- Use a dry, clean cloth to clean the contacts of the product.
Care of the Li-ion batteries
- Never use a battery with clogged air vents. Clean the air vents carefully using a dry, soft brush.
- Avoid unnecessary exposure of the battery to dust and dirt. Never expose the battery to high levels of moisture (e.g. by being dipped in water or left in the rain).
If a battery has been soaked by moisture, treat it as a damaged battery. Isolate it in a non-flammable container and consult Hilti Service. - Keep the battery free of extraneous oil and grease. Do not permit dust or dirt to accumulate unnecessarily on the battery. Clean the battery with a dry, soft brush or a clean, dry cloth. Do not use cleaning agents containing silicone as these can attack the plastic parts.
Do not touch the contacts of the battery and do not remove the factory-applied grease from the contacts
HILTI
- Use only a slightly damp cloth to clean the housing. Do not use cleaning agents containing silicone as these can attack the plastic parts.
Maintenance
- Check all visible parts and controls for signs of damage at regular intervals and make sure that they all function correctly.
- Do not use the product if signs of damage are found or if parts malfunction. Immediately have the product repaired by Hilti Service.
- After cleaning and maintenance, install all guards and protective devices and check that they are in full working order.

To help ensure safe and reliable operation, use only genuine Hilti spare parts and consumables. Spare parts, consumables and accessories approved by Hilti for use with your product can be found at your Hilti Store or online at: www.hilti.group
8 Transport and storage of cordless tools and batteries
Transport

CAUTION
Accidental starting during transport!
▶ Always transport your products with the batteries removed!
▶ Remove the battery/batteries.
▶ Never transport batteries loose and unprotected. During transport, batteries should be protected from excessive shock and vibration and isolated from any conductive materials or other batteries that may come in contact with the terminals and cause a short circuit. Comply with the locally applicable regulations for transporting batteries.
- Do not send batteries through the mail. Consult your shipper for instructions on how to ship undamaged batteries.
▶ Prior to each use and before and after prolonged transport, check the product and the batteries for damage.
Storage

WARNING
Accidental damage caused by defective or leaking batteries!
▶ Always store your products with the batteries removed!
- Store the product and the batteries in a cool and dry place. Comply with the temperature limits stated in the technical data.
- Do not store batteries on the charger. Always remove the battery from the charger when the charging operation has completed.
▶ Never leave batteries in direct sunlight, on sources of heat, or behind glass. - Store the product and batteries where they cannot be accessed by children or unauthorized persons.
▶ Prior to each use and before and after prolonged storage, check the product and the batteries for damage.
8.1 Retracting boom

WARNING
Risk of injury when extending/retracting the boom. Risk of trapping the fingers when the boom is moved or when the cable is reeled all the way in.
▶ Wear protective gloves while extending/retracting the boom.
- Switch the product off before extending/retracting the boom.
▶ Detach the attached power tool and/or the power-tool holder before extending or retracting the boom.
▶ Make sure there is enough space around you before you extend or retract the boom.
Retract the boom for transport and storage.
- Press the release buttons on both sides of the boom.
- Pivot the boom 270^ to the rear.
- Make sure that the boom snaps securely into the engaged position on both sides.
9 Troubleshooting
If a problem occurs, always observe the status indicator of the battery. See the section headed Status indicators of the Li-ion battery.
If the trouble you are experiencing is not listed in this table or you are unable to rectify the problem by yourself, contact Hilti Service.
| Trouble or fault Possible cause Action to be taken | ||
| The attached power tool descends slowly / its weight is not held | Battery is discharged ▶ Charge the battery. → page 22 | |
| Attached power tool too heavy ▶ | Observe the maximum weight of the attached power tool, see "Technical data". → page 21 | |
| Battery was removed while the product was in operation. | ▶ Insert the battery. | |
| ▶ Switch the product on. → page 23 | ||
| ▶ Press the Up button to re-initialize the attached power tool. Allow the power tool to dangle for 2 seconds. → page 23 | ||
| Weight of the attached power tool was not correctly initialized or the power tool was moved by hand while initialization was in progress. | ▶ Press the Up button to re-initialize the attached power tool. Allow the power tool to dangle for 2 seconds. → page 23 | |
| When the attached power tool is lifted, there is a delay before the load-bearing cable reacts. | Weight of the attached power tool was not correctly initialized or the power tool was moved by hand while initialization was in progress. | ▶ Press the Up button to re-initialize the attached power tool. Allow the power tool to dangle for 2 seconds. → page 23 |
| Attached power tool too light | ▶ Observe the minimum weight of the attached power tool, see "Technical data". → page 21 | |
| The attached power tool can not be moved. | -The load-bearing cable is locked. | ▶ To unlock the load-bearing cable, press either the Up button or the Down button, as appropriate. |
| The battery doesn't engage with an audible click. | The retaining lug on the battery is dirty. | ▶ Clean the retaining lug and push the battery in until it engages. |
| The LED operating-status indicator shows steady red. | The product has a temporary fault. | ▶ Switch the product off and then on again. |
| LEDs of the battery show nothing | Battery defective | ▶ Contact Hilti Service. |
10
Disposal

WARNING
Risk of injury due to incorrect disposal! Health hazards due to escaping gases or liquids.
▶ DO NOT send batteries through the mail!
▶ Cover the terminals with a non-conductive material (such as electrical tape) to prevent short circuiting.
- Dispose of your battery out of the reach of children.
- Dispose of the battery at your Hilti Store, or consult your local governmental garbage disposal or public health and safety resources for disposal instructions.

Most of the materials from which Hilti products are manufactured can be recycled. The materials must be correctly separated before they can be recycled. In many countries, your old tools, machines or appliances can be returned to Hilti for recycling. Ask Hilti Service or your Hilti sales representative for further information.
- Do not dispose of power tools, electronic equipment or batteries as household waste!
11 Manufacturer's warranty
▶ Please contact your local Hilti representative if you have questions about the warranty conditions.
12 Further information
For more information on operation, technology, environment and recycling, follow this link: qr.hilti.com/manual/?id=2375781
This link is also to be found at the end of the operating instructions, in the form of a QR code.
6.1.2 Colocar 4, 5, 6, 7, 8, 9
Kannatin EXO-T-22 L-shaped

Kannatin EXO-T-22 I-shaped
Li-Ion
Litiumioniakku

① Položaj blokiranja konzole
② Tipka za deblokadu konzole
③ Konzola
④ Odbojnik
⑤ Nosivo uže
⑥ Kuka
⑦ Kabel daljinskog upravljača
⑧ Naramenica
⑨ Remen za prsa
⑩ Daljinski upravljač
⑪ Podupirač
⑫ Namještanje duljine remena za zdjelicu
⑬ Remen za zdjelicu
⑭ Akumulatorska baterija
⑮ Podešavanje visine
⑯ Tipka za deblokadu akumulatorske baterije
⑰ Statusni prikaz akumulatorske baterije
⑱ Tipka uključivanje/isključivanje
⑲ LED indikator rada (zeleni)
⑳ Tipka Gore
⑳ Tipka Dolje
②2 Indikator stanja napunjenosti akumulatorske baterije
① Užlebljen položaj konzole
② Taster za deblokadu konzole
③ Konzola
④ Prigušivač
⑤ Noseće uže
⑥ Kuka
⑦ Kabl za daljinski upravljač
⑧ Rameni pojas
⑨ Grudni pojas
⑩ Daljinski upravljač
⑪ Potporni podupirač
⑫ Podešavanje po dužini trbušnog pojasa
⑬ Pojas za krilo
⑭ Akumulatorska baterija
⑮ Podešavanje po visini
⑯ Taster za deblokiranje akumulatorske baterije
⑰ Prikaz statusa akumulatorske baterije
⑱ Taster Uklj./lsklj.
⑲ LED prikaz rada (zeleni)
⑳ Taster Gore
②1 Taster Dole
⑳ Prikaz napunjenosti akumulatorske baterije
3.2 Namenska upotreba
Opisani proizvod je akumulatorska aktivna pomoć za podizanje. Namenjena je za zadržavanje Hilti kombinovanih udarnih bušilica SDS Max, kao i čekića za štemovanje i rušenje.
HILTI
- Za ovaj proizvod koristite isključivo Hilti Nuron litijum-jonske akumulatorske baterije serije B 22. Za optimalnu snagu Hilti preporučuje upotrebu akumulatorskih baterija koje su navedene na kraju ovog uputstva za upotrebu.
- Za ove akumulatorske baterije koristite isključivo Hilti punjače serija koje su navedene u tabeli na kraju ovog uputstva za upotrebu.
3.3 Sadržaj isporuke
① 캠틸레버 고정 위치
② 캔틸레버 잠금 해제 버튼
③ 캔틸레버
④ 충격 흡수 장치
⑤ 운반 로프
⑥ 후크
⑦ 리모컨용 케이블
⑧ 어깨띠
⑨ 가슴띠
⑩ 리모컨
⑪ 지지대
⑫ 허리띠 길이 조절
⑬ 허리띠
⑭ 배터리
⑮ 높이 조절
⑯ 배터리 잠금해제 버튼
⑰ 배터리 상태 표시기
⑱ ON/OFF 버튼
⑲ LED 작동 표시기(녹색)
⑳ 상향 버튼
②1 하향 버튼
②2 배터리 충전 상태 표시기
3.2 규정에 따른 용도
24F., No. 16, Xinzhan Rd., Banqiao Dist., New Taipei City 220, Taiwan (R.O.C.)
Tel. 0800-221-036
12 其他資訊
תְשָׁרִיַעֹתְרִיַעֹתְרִיַעֹתְרִיַעֹתְרִיַעֹתְרִיַעֹתְרִיַעֹתְרִיַעֹתְרִיַעֹתְרִם.
EC Declaration of Conformity | UK Declaration of Conformity

Manufacturer:
Hilti Corporation
Hilti (Gt. Britain) Limited
No. 1 Circle Square, 3 Symphony Park
Manchester, England, M1 7FS
EXO-T-22 (01)
Serial Numbers: 1-99999999999
2006/42/EC | Supply of Machinery (Safety) Regulations 2008
2014/30/EU | Electromagnetic Compatibility Regulations 2016
2011/65/EU | The Restriction of the Use of Certain Hazardous Substances in Electrical and Electronic Equipment Regulations 2012
EN IEC 55014-1:2021
EN IEC 55014-2:2021

Dr. Tahar Zrilli
Head of Quality and Process Management Business Area Electric Tools & Accessories
Schaan, 31.03.2023

Johannes Wilfried Huber
Senior Vice President Business Unit Diamond

natural_image
Icon of a person reading a book inside a circle with a right-pointing arrow (no text or symbols)

NURON
| B 22-55 (01) | 0,56 kg | 1.23 lb |
| B 22-85 (01) | 0,77 kg | 1.70 lb |
| B 22-110 (01) | 0,92 kg | 2.03 lb |
| B 22-170 (01) | 1,34 kg | 2.95 lb |
| B 22-255 (01) | 1,87 kg | 4.12 lb |

C 4-22
C 6-22
C 8-22

Hilti Corporation
LI-9494 Schaan
Tel.:+423 234 21 11
Fax:+423 234 29 65
www.hilti.group