AirFit P10 - Respiratory medical device ResMed - Free user manual and instructions
Find the device manual for free AirFit P10 ResMed in PDF.

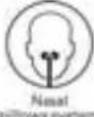
| Product Type | Nasal mask for CPAP device (continuous positive airway pressure) |
| Brand | ResMed |
| Model | AirFit P10 for AirMini |
| Intended Use | To provide non-invasive airflow for the treatment of obstructive sleep apnea (OSA) in adults weighing more than 30 kg |
| Clinical Benefits | Effective interface between the treatment device and the patient |
| Mask Types | Nasal pillows |
| Available Sizes | Extra Small, Small, Medium, Large |
| Dead Space (Internal Volume) | 40 ml (for Large cushion) |
| Treatment Pressure | 4 to 20 cm H₂O |
| Operating Temperature | +5°C to +40°C |
| Operating Humidity | 10% to 95% non-condensing |
| Storage Temperature | -25°C to +70°C |
| Storage Humidity | 5% to 95% non-condensing |
| Sound Level (Acoustic Power) | 22 dBA (uncertainty 3 dBA) |
| Sound Level (Pressure at 1 m) | 15 dBA (uncertainty 3 dBA) |
| Dimensions (Rigid Frame, Size Large) | 175 mm (H) x 149 mm (W) x 37 mm (D) |
| Materials | Recyclable polypropylene, natural rubber latex-free |
| Daily Cleaning | Cushions, rigid frame, mask tubing: warm water + mild liquid detergent |
| Weekly Cleaning | Headgear: soak in warm water + mild detergent, gentle brushing |
| Ventilation Module | Daily cleaning with warm water + mild detergent, soft bristle brush for vents |
| HumidX/HumidX Plus | Mandatory replacement 30 days after opening, not washable |
| Service Life | Varies with use and care; replace any damaged or worn component |
| Warranty | 90 days against defects in materials and workmanship (mask and non-disposable components) |
| Contraindications | Do not use with supplemental oxygen; patients with impaired laryngeal reflex; tracheobronchial aspiration |
| Symbols Present | Medical device, prescription only (USA), recyclable, replace after 30 days, etc. |
Frequently Asked Questions - AirFit P10 ResMed
User questions about AirFit P10 ResMed
0 question about this device. Answer the ones you know or ask your own.
Ask a new question about this device
Download the instructions for your Respiratory medical device in PDF format for free! Find your manual AirFit P10 - ResMed and take your electronic device back in hand. On this page are published all the documents necessary for the use of your device. AirFit P10 by ResMed.
USER MANUAL AirFit P10 ResMed
natural_image
Simple curved dotted line with black dots, no text or symbols presentResMed
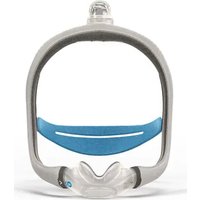
AirFit™ P10
for AirMini
Nasal pillows system
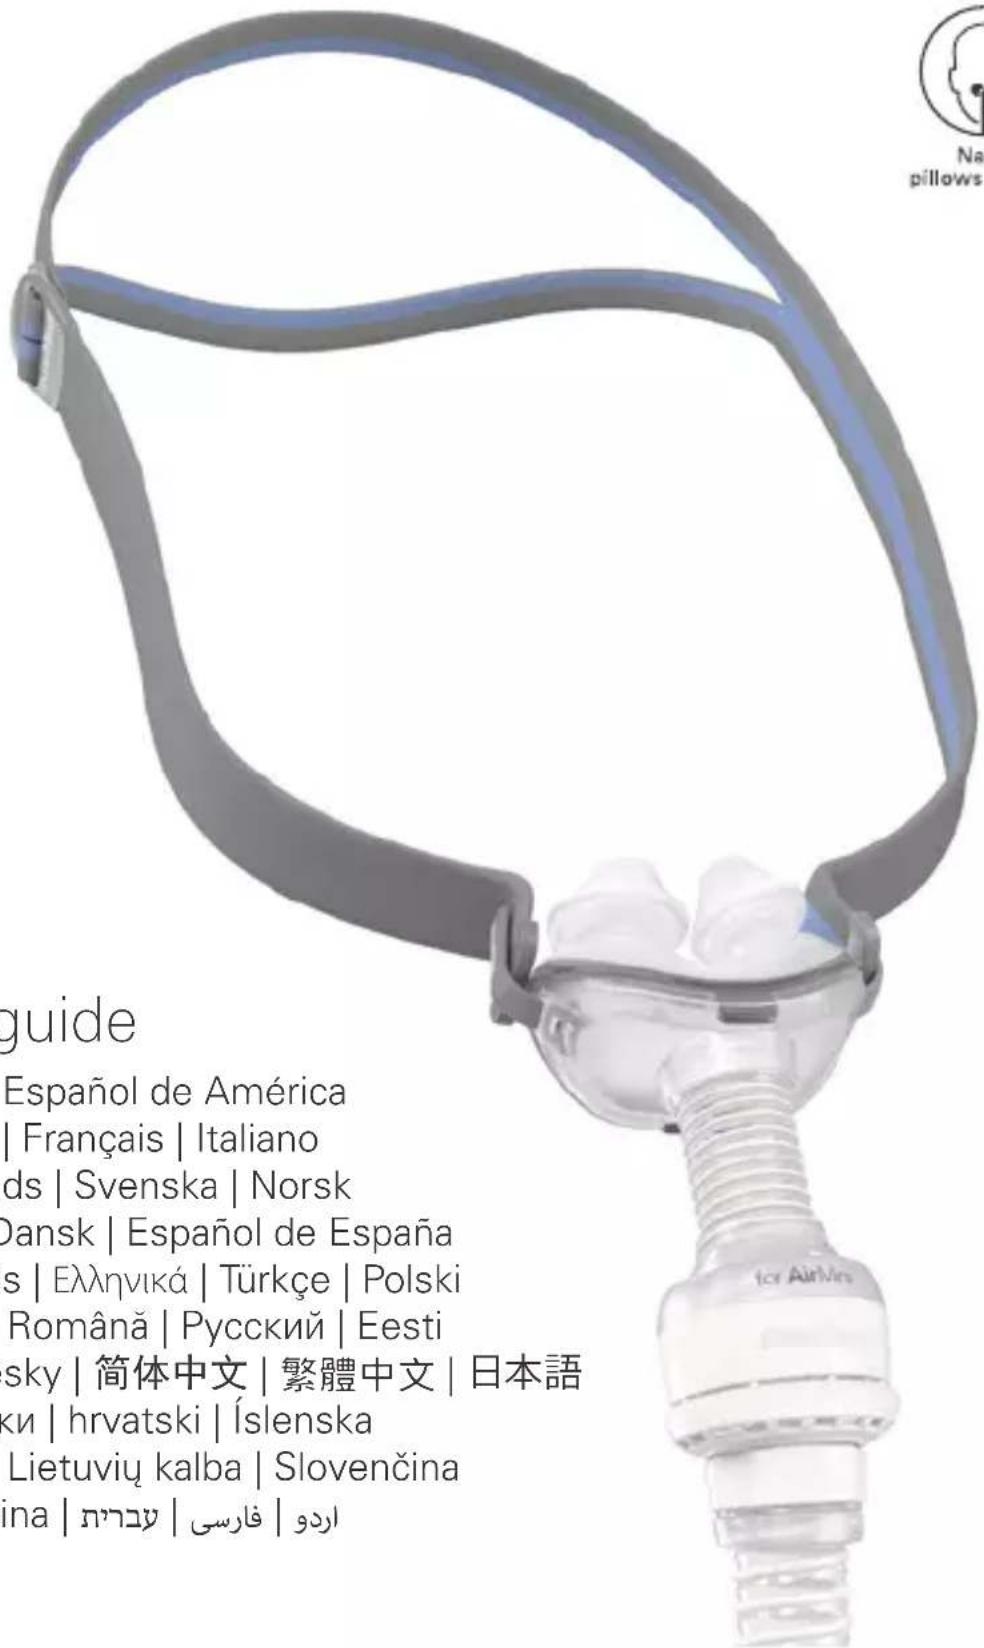
User guide
natural_image
Illustration of a person using a medical device to interact with another person (no text or symbols present)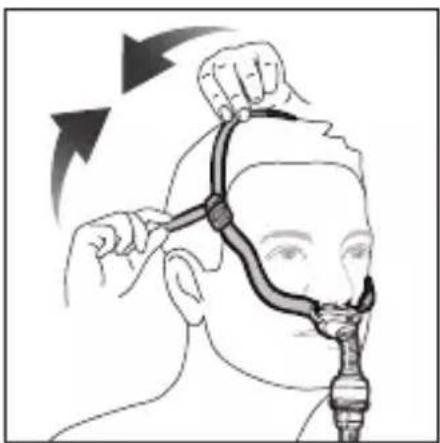
natural_image
Illustration of a person receiving a hair styling or facial treatment technique, with no visible text or symbols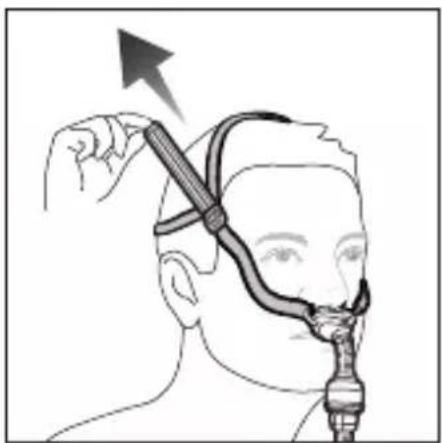
natural_image
Illustration of a person using a handheld device to interact with a medical device (no text or symbols visible)Removal / Remoción / Abnehmen / Retrait / Rimozione / Afnemen/ Borttagning / Fjerning / Pois ottaminen / Fjernelse / Retirada/ Remoção / Αφαίρεση / Çıkarma / Zdejmowanie / Eltávolítás / Îndepărtare / Снятие маски / Eemaldamine / عزنا / Sejmutí masky / 取下面罩 / 取下面罩 / 取り外し / Сваляне / Uklanjanje / Fjarlægja / Noņemšana / Nuèmimas / Snímanie / Odstranjevanje / ⁴⁰⁶⁵⁰ / بثانا / برداشتن
natural_image
Illustration of a person applying a neck massage to the ear with directional arrows indicating motion (no text or symbols)Disassembly / Desmontaje / Auseinanderbau / Démontage / Smontaggio / Demonteren / Demontering / Demontering / Maskin purkaminen / Adskillelse / Desmontaje / Desmontagem / Αποσυναρμολόγηση / Sökme / Demontaż / Szétszerelés / Dezasamblare / Разборка / Osadeks lahtivõtmine / كيکفتلا / Demontáž / 拆卸 / 拆卸 / 分解 / Разглобяване / Rastavljanje / Sundurtekning / Izjaukšana / Išardymas / Rozobratie / Razstavljanje / عليحده کرنا / جدا کردن قطعات

natural_image
Illustration of hands using a tool to adjust or install a component, with mountainous background (no text or symbols)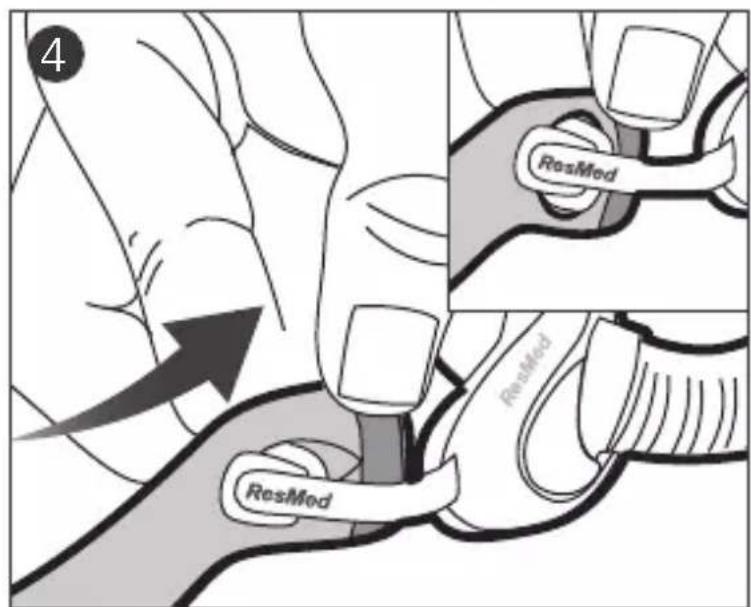
Reassembly / Montaje / Zusammenbau / Remontage / Riassemblaggio / Opnieuw monteren / Montering / Montering/ Maskin kokoaminen / Samling / Nuevo montaje / Nova montagem/ Епаваσυναρμολόγηση / Yeniden montaj / Składanie / Ismételt összeszerelés / Reasamblare / Повторная сборка / Uuesti kokkupanek / عيمجتلا قداعاً / Opětovné sestavení / 重新組裝 / 重新組裝 / 組立直し / Повторно сглобяване / Ponovno sastavljanje / Að setja aftur saman / Atkārtota salikšana / Pakartotinis surinkimas / Opätovné zostavenie / Ponovno sestavljanje / 乾ה בָּרַעֹל / اgzاء دوباره جوزنا / سرهم کردن قطعات

Cleaning the vent / Limpieza del orificio de ventilación / Luftauslassöffnung reinigen / Nettoyage de l'orifice de ventilation / Pulizia del dispositivo per l'esalazione / Reinigen van de ventilatieopening / Rengöra ventilöppningarna / Rengjøre ventileringsåpningen / Poistoilma-aukon puhdistaminen / Rengøring af lufthullet / Limpieza de los orificios de ventilación / Limpeza do respiradouro / Καθαρισμός ανοίγματος εξαερισμού / Hava deliğini temizleme / Czyszczenie odpowietrznika / A szellőzőnyílás tisztítása / Curățarea aerisirii / Чистка вентиляционного отверстия/ Ventilatsiooniava puhastamine / قيوهتلا بوقثف يظنّة / Čištění ventilačního otvoru / 清洗通气孔 / 清洗通氣孔 / ベントのクリーニング / Почистване на вентилационния отвор / Čišćenje odušnika / Að þrífa loftgatið / Ventilācijas atveres tīrīšana / Ventiliavimo angos valymas / Čistenie ventilu / Čiščenje prezračevalne odprtine / سوراخ صاف كرنا / قييز کردن دریچه تهویه /
natural_image
Technical illustration of a mechanical component with cross-sectional view and close-up detail (no text or symbols)ENGLISH
AirFit™ P10
for AirMini
Nasal pillows mask
Thank you for choosing the AirFit P10 for AirMini.
Using this guide
Please read the entire guide before use. When following instructions, refer to the images at the front and back of the guide.
Intended Use
The AirFit P10 for AirMini Mask System is an accessory that is used for channeling airflow to a patient non-invasively. It has custom connecting ports to ensure that it can only be connected to compatible ResMed CPAP devices.
The AirFit P10 for AirMini is:
- to be used by patients >66 lb (30kg) for whom positive airway pressure has been prescribed
- intended for single-patient re-use in the home environment and multi-patient re-use in the hospital/institutional environment.
Clinical benefits
The clinical benefit of vented masks is the provision of effective therapy delivery from a therapy device to the patient.
Intended patient population/medical conditions
Obstructive sleep apnoea (OSA).

GENERAL WARNINGS
- The mask must be used under qualified supervision for users who are unable to remove the mask by themselves. The mask may not be suitable for those predisposed to aspiration.
- This mask must only be used with listed compatible therapy device(s) and only as recommended by a physician or respiratory therapist. The AirFit P10 for AirMini requires connection to the listed compatible systems to provide therapy.
- The AirMini system comes with a vent system to prevent carbon dioxide build-up in the mask. The vent system must be kept clean and clear of contamination in order to function correctly. Blocking or modifying the vent system may result in excessive carbon dioxide rebreathing.
- This mask is not for use on patients with impaired laryngeal reflexes or other conditions predisposing to aspiration in the event of regurgitation or vomiting.
- This mask is not compatible with supplemental oxygen.
- Discontinue using this mask if you have ANY adverse reaction to the use of the mask, and consult your physician or sleep therapist.
- Using a mask may cause tooth, gum or jaw soreness or aggravate an existing dental condition. If symptoms occur, consult your physician or dentist.
- As with all masks, some rebreathing may occur.
- Refer to your therapy device manual for details on settings and operational information.
- The mask is not intended to be used simultaneously with nebulizer medications that are in the air path of the mask/tube.
- Remove all packaging before using the mask.
- Avoid connecting flexible PVC products (eg., PVC tubing) directly to any part of the mask. Flexible PVC contains elements that can be detrimental to the materials of the mask, and may cause the components to crack or break.
- The mask should not be used unless the device is turned on. Once the mask is fitted, ensure the device is blowing air. Explanation: CPAP devices are intended to be used with special masks (or connectors) which have vent holes to allow continuous flow of air out of the mask. When the device is turned on and functioning properly, new air from the device flushes the exhaled air out through the mask vent holes. However, when the device is not
operating, insufficient fresh air will be provided through the mask, and the exhaled air may be rebreathed. Rebreathing of exhaled air for longer than several minutes can, in some circumstances, lead to suffocation. This applies to most models of CPAP devices.
Note: For any serious incidents that occur in relation to this device, these should be reported to ResMed and the competent authority in your country.
Using your mask
For a full list of compatible devices for this mask, see the Mask/Device Compatibility List on ResMed.com/downloads/masks. If you do not have internet access, please contact your ResMed representative.
Humidification
The HumidX and HumidX Plus are waterless humidifiers. These are designed to provide more comfort by improving the moisture level in the air you breathe and offering relief from possible dryness.
The HumidX is a good starting point for finding the right level of humidification. The HumidX Plus will improve the humidity level further and is useful when the ambient humidity level is very low (eg. high altitudes, on an aircraft).
The HumidX and HumidX Plus must be replaced within 30 days of opening the HumidX/HumidX Plus pack.
Fitting
To set up your AirMini machine, refer to the AirMini user guide. Once you have set up your AirMini, follow these steps to fit your mask.
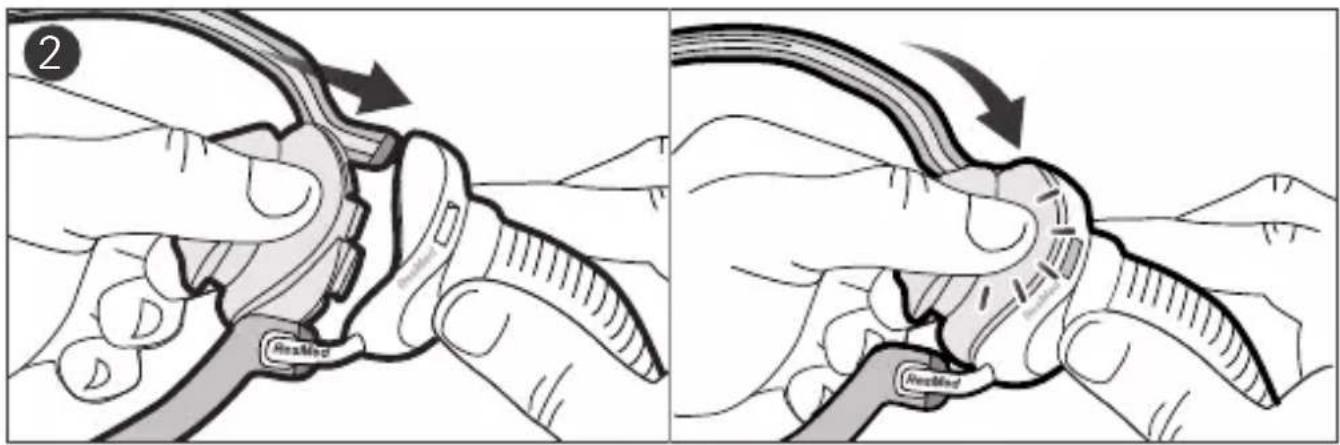
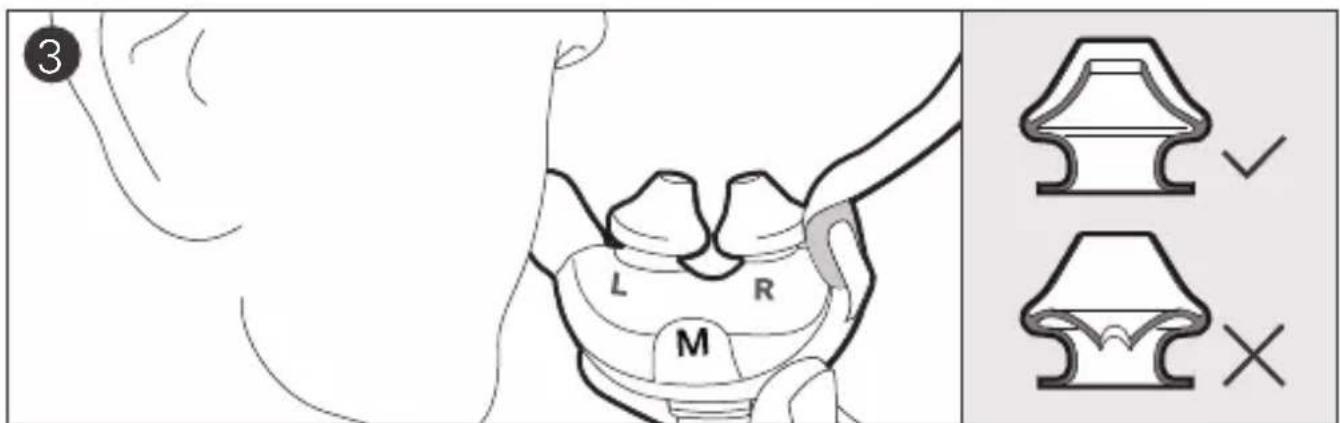
- Align your left (L) and right (R) pillows with your left and right nostrils. Pull the headgear bands over your head. Your lower headgear band should sit comfortably at the back of your head. The top band should sit comfortably on your crown.
- To ensure a comfortable fit, briefly pull your mask away from your nose and reseat the pillows. Ensure the nasal pillows fit securely into your nostrils with both pillows positioned upright.
- Your mask is now fitted and ready to use. When the device is running, a light breeze should be felt near the venting area around the tube
connection. To inspect the vent, place a finger close to the connection area and feel for air. Do not allow the venting area to become blocked.
Adjustment
To achieve a comfortable fit, adjust the upper and lower headgear bands - spread bands apart to loosen or draw closer together to tighten.
If your headgear comes with AirFit P10 Headgear clips, you may use these for additional adjustment. Refer to your Headgear clips instruction sheet for assistance.
Note: The headgear with AirFit P10 Headgear clips may not be available in all regions.
If your headgear comes with a buckle, adjust the headgear by pulling the the headgear band through the buckle to fix mask leaks. Adjust only enough for a comfortable seal and do not overtighten. You may need to adjust the headgear as it stretches over time.

WARNING
Do not overtighten the headgear bands.
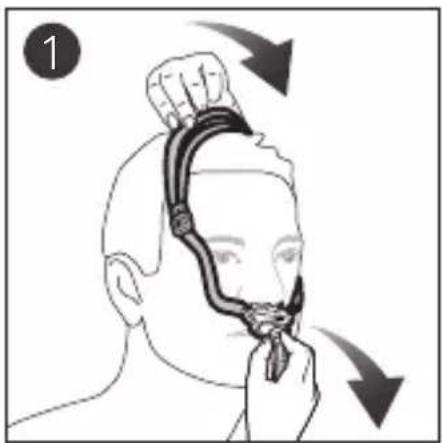
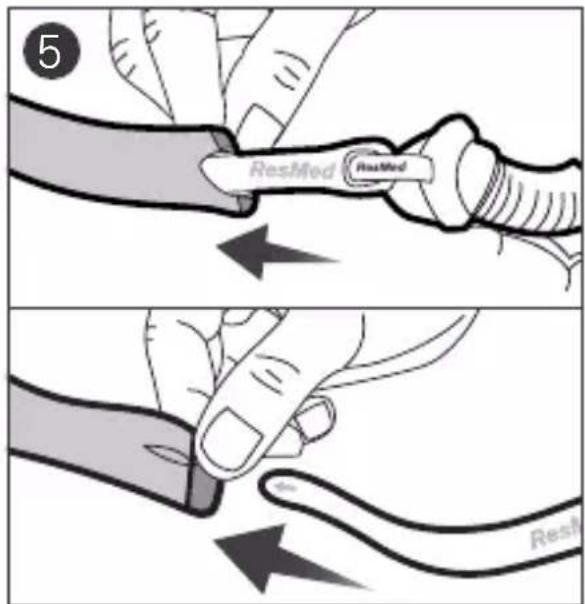
Removal
To take off your mask system, pull the mask and headgear by the split-band, up and over your head.
Disassembly
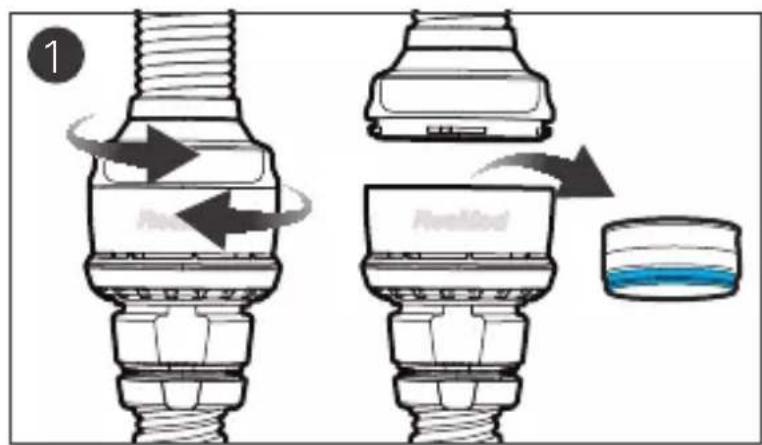
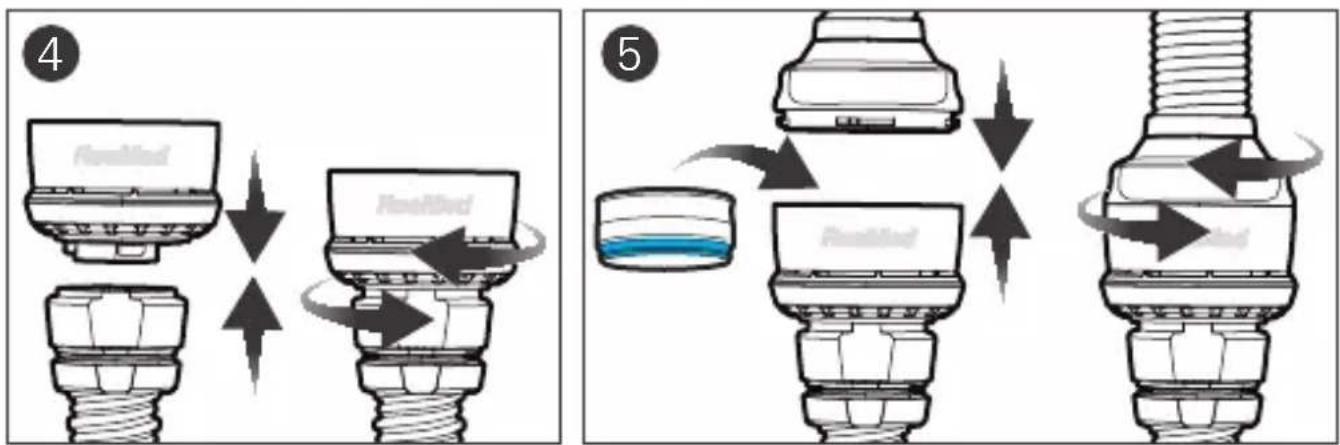
- Disconnect the mask tube from the vent module by gently twisting it and pulling apart. If you are using the HumidX or HumidX Plus, remove it from the vent module.
- Disconnect the vent module from the AirMini tubing by gently twisting it and pulling apart.
- Holding the top of the mask tube, squeeze and pull the pillows away from the mask frame.
- Unhook the headgear from the stabilizer by pulling on the end cap to reveal the buttonhole.
- Slide the headgear off the end of the stabilizer.
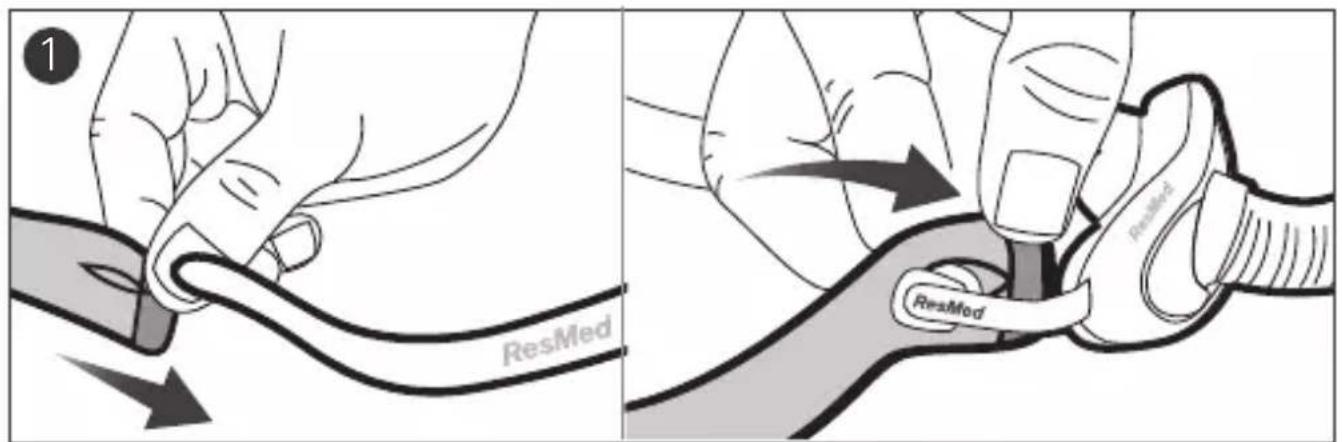
Reassembly
- With the gray side of the headgear facing out, thread the arms of the mask frame into the buttonholes of the headgear. Secure the headgear by pulling it over the edge of the frame closest to the nasal pillows. Holding the mask frame, stretch the headgear lightly to ensure it is securely attached.
- Attach the pillows to the mask frame by inserting the top and bottom clips into the correct slots.
- Ensure the inner walls of the nasal pillows are not compressed or collapsed. If required, a light squeeze can return each nasal pillow to the correct shape.
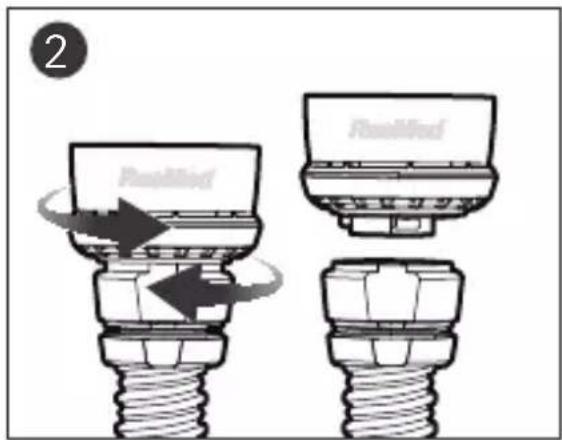
- Connect the AirMini tubing to the vent module by pushing the ends together and twisting until it locks in place.
- To add optional humidification, inset the HumidX/HumidX Plus into the vent module. Connect the mask tube to the vent module by pushing the ends together and twisting until it locks in place.
Cleaning your mask
Follow the cleaning instructions in this guide to maintain performance and safety of the mask.

WARNING
- Regularly clean your mask and components to receive optimal therapy and to prevent the growth of germs that can adversely affect your health.
- Do not iron the headgear as the material is heat sensitive and will be damaged.
- Regularly inspect the HumidX/HumidX Plus and follow the cleaning and maintenance instructions to prevent the growth of germs that can adversely affect your health.
- Always follow cleaning instructions and use mild liquid detergent for mask components and mild soap for headgear. Some cleaning products may damage the mask, its parts and their function or leave harmful residual vapors that could be inhaled if not rinsed thoroughly.
Inspect the HumidX/HumidX Plus
- Check daily for any signs of damage or blockages caused by dirt or dust.
Notes:
• HumidX/HumidX Plus cannot be washed.
- When HumidX/HumidX Plus is not being used, store it in a clean, dry location.
- HumidX/HumidX Plus must be replaced 30 days after opening.
Cleaning the AirMini tube
Refer to your AirMini user guide for cleaning instructions
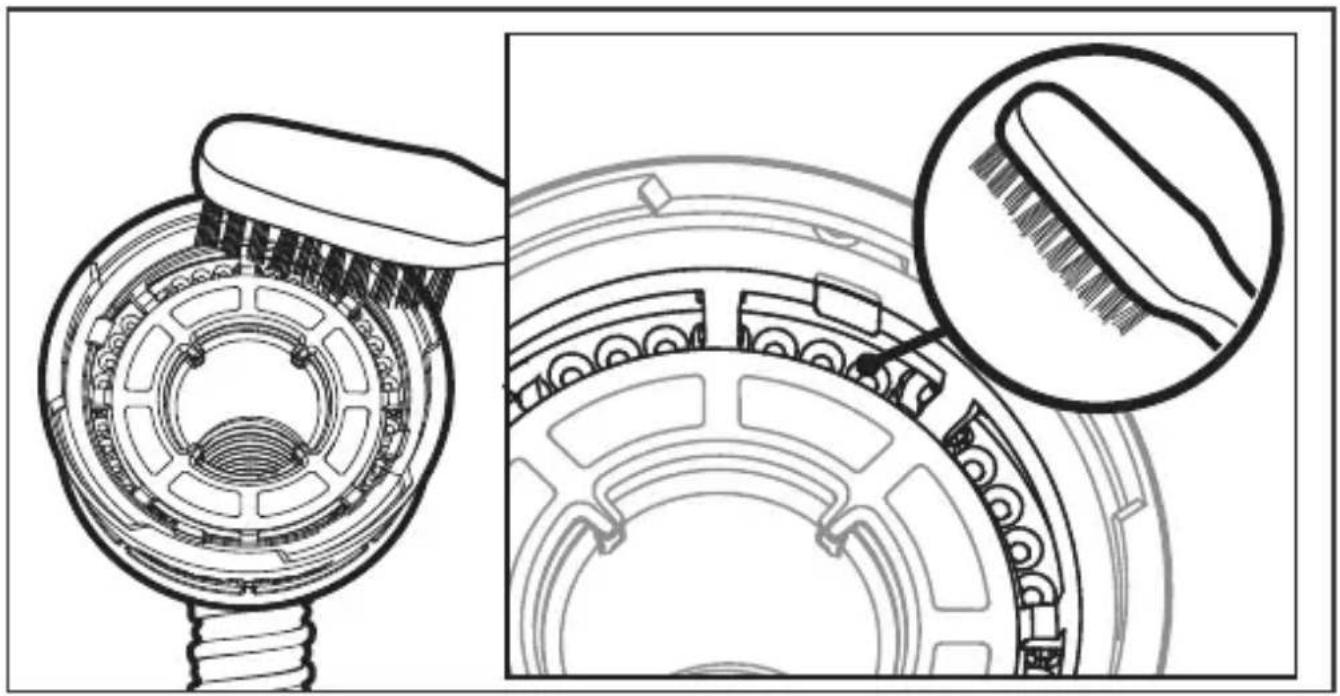
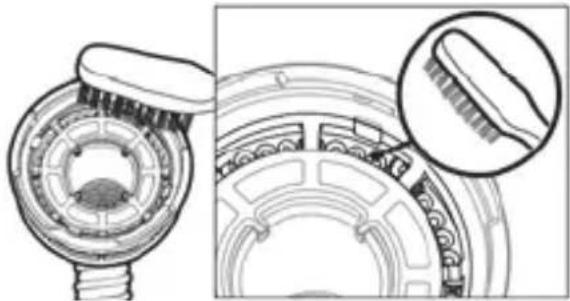
Cleaning the vent module
- Clean and check the vent module daily.
- Wash in warm water using a mild liquid detergent.
- Clean with a soft bristle brush paying particular attention to the vent holes
- Rinse well under running water. Shake to remove excess water and allow to air dry out of direct sunlight.
- Check that there is no dirt or dust in the vent holes.
Note: Do not wash in a dishwasher or washing machine.
natural_image
Technical illustration of a mechanical component with cross-sectional view and magnified detail (no text or symbols)Cleaning the mask pillows, frame and the mask tube
Daily:
- Clean the mask pillows, frame and mask tube daily. Gently rub in warm (approximately 86^ F or 30^ C) water using mild liquid detergent until visually clean.
- Rinse well under running water and allow to air dry out of direct sunlight.
In addition to daily cleaning, each week:
- Clean the mask frame and the end of the mask tube with mild liquid detergent using a soft bristle brush. Pay particular attention to the crevices and cavities.
- Rinse well under running water and allow to air dry out of direct sunlight.
Cleaning the headgear
Weekly:
- Soak the headgear in warm water with a mild liquid detergent.
- Hand wash the headgear with a soft bristle brush.
- Thoroughly rinse the headgear under running water.
- Leave the headgear to air dry out of direct sunlight.
Reprocessing the mask between patients
The AirMini tube, vent module and HumidX/HumidX Plus must be discarded and replaced with new ones as they cannot be disinfected and should not be used between other patients.
Reprocess this mask when using between patients. Reprocessing instructions are available on ResMed.com/downloads/masks.

CAUTION
Visual criteria for product inspection: If any visible deterioration of a system component is apparent (cracking, discoloration, tears etc), the component should be discarded and replaced.
Troubleshooting
For troubleshooting issues with HumidX/HumidX Plus, refer to the AirMini User Guide.
| Problem/possible cause | Solution |
| Pillows won’t seal properly, mask is uncomfortable or causes red marks | |
| Pillows or headgear may have been fitted incorrectly or adjusted incorrectly. | Check that the nasal pillows with the left (L) and right (R) indicators are inserted correctly. Re-fit your mask according to the fitting instructions. Readjust the headgear to ensure it is fitted comfortably. |
| One/both of the pillows are squashed or misshapen or inner wall of one or both pillows is incorrect. | Squeeze individual pillow sides to return each pillow to original shape. |
| Pillows are the wrong size. | Talk to your clinician. |
| Pillows may be dirty. | Clean pillows according to the instructions. |
| Headgear is too loose. | Adjust the headgear bands or use AirFit P10 headgear clips for additional adjustment. If your headgear comes with a buckle, pull the headgear through the buckle. |
| Component appears damaged or worn | Replace the part. Contact your local ResMed dealer. |
| Mask too noisy | |
| System is leaking air. | Refit or reposition your mask. Adjust your headgear. Check your mask is assembled correctly. |
Technical specifications
Notes:
- The AirFit P10 for AirMini, when connected to the AirMini system, contains a vent system to prevent CO_2 build-up in the mask.
- For technical Specifications related to venting, refer to the AirMini User Guide
| Dead Space Information | The physical dead space is the empty volume of the mask up to the compatible tubing connector. Using the large cushions it is 40mL. |
| Therapy pressure | 4 to 20 cm H2O |
| Environmental conditions | Operating temperature: 41°F to 104°F (+5°C to +40°C)Operating humidity: 10% to 95% non-condensingStorage and transport temperature: -13°F to 158°F (-25°C to +70°C)Storage and transport humidity: 5-95% relative humidity non-condensing |
| Sound | DECLARED DUAL-NUMBER NOISE EMISSION VALUES in accordance with ISO 4871. The A-weighted sound power level of the mask is 22 dBA, with uncertainty of 3 dBA. The A-weighted sound pressure level of the mask at a distance of 1 m is 15 dBA, with uncertainty of 3 dBA. |
| Gross dimensions | Large:6.89" (H) x 5.87" (W) x 1.46" (D)(175 mm (H) x 149 mm (W) x 37 mm (D))Mask frame system (no headgear) |
| Service Life | The service life of the AirFit P10 for AirMini mask is dependent on the intensity of usage, maintenance, and environmental conditions to which the mask is used or stored. As this mask and its components are modular in nature, it is recommended that the user maintain and inspect it on a regular basis and replace the mask system or any components if deemed necessary or according to the 'visual criteria for product inspection' in the 'Cleaning your mask at home' section of this guide. Refer to the 'Mask components' section of this guide for information of how to order replacement parts.For the Service life of the AirMini tube, vent module and HumidX/HumidX Plus refer to the AirMini device user guide. |
Note: The manufacturer reserves the right to change these specifications without notice.
Storage
Ensure that the mask is thoroughly clean and dry before storing it for any length of time. Store the mask in a dry place out of direct sunlight.
Disposal
This mask and packaging does not contain any hazardous substances and may be disposed of with your normal household refuse.
Symbols
The following symbols may appear on the product or packaging.
 | Nasal Pillows mask | 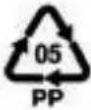 | Polypropylene recyclable |
 | Size - Extra small |  | Size - Small |
 | Size - Medium |  | Size - Large |
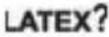 | Not made with natural rubber Latex |  | Replace 30 days after opening |
 | Importer | 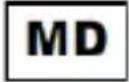 | Medical device |
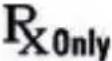 | Prescription only (In the US, Federal law restricts these devices to sale by or on the order of a physician) | ||
See symbols glossary at ResMed.com/symbols.
Limited warranty
ResMed Pty Ltd (hereafter 'ResMed') warrants that your ResMed mask system (including mask frame, cushion, headgear and tubing) will be free from defects in material and workmanship from the date of purchase for 90 days, or in the case of disposable masks and disposable mask components for 7 days. This warranty is only available to the initial consumer. It is not transferable. During the warranty period, if the product fails under conditions of normal use, ResMed will repair or replace, at its option, the defective product or any of its components. This limited warranty does not cover: a) any damage caused as a result of improper use, abuse, modification or alteration of the product; b) repairs carried out by any service organization that has not been expressly authorized by
ResMed to perform such repairs; c) any damage or contamination due to cigarette, pipe, cigar or other smoke; and d) any damage caused by exposure to ozone, activated oxygen or other gases. Warranty is void on product sold, or resold, outside the region of original purchase.
Warranty claims on defective product must be made by the initial consumer at the point of purchase.
This warranty replaces all other expressed or implied warranties, including any implied warranty of merchantability or fitness for a particular purpose. Some regions or states do not allow limitations on how long an implied warranty lasts, so the above limitation may not apply to you.
ResMed shall not be responsible for any incidental or consequential damages claimed to have resulted from the sale, installation or use of any ResMed product. Some regions or states do not allow the exclusion or limitation of incidental or consequential damages, so the above limitation may not apply to you. This warranty gives you specific legal rights, and you may also have other rights which vary from region to region. For further information on your warranty rights, contact your local ResMed dealer or ResMed office. Visit ResMed.com for the latest information on ResMed's Limited Warranty.
Consumer Warranty
ResMed acknowledges all consumer rights granted under the EU Directive 1999/44/EC and the respective national laws within the EU for products sold within the European Union.
natural_image
Technical illustration of a mechanical component with cross-sectional view and magnified detail (no text or symbols)natural_image
Technical illustration of a mechanical component with cross-sectional view (no text or symbols)natural_image
Technical illustration of a mechanical component with cross-sectional view and magnified detail (no text or symbols)⚠️ ALGEMENE WAARSCHUWINGEN
natural_image
Technical illustration of a mechanical component with cross-sectional view and magnified detail (no text or symbols)⚠️ ALLMÄNNA WARNINGAR
natural_image
Technical line drawing of a mechanical component with cross-sectional view (no text or symbols)natural_image
Technical illustration of a mechanical component with cross-sectional view and magnified detail (no text or symbols)natural_image
Technical illustration of a mechanical component with cross-sectional view and magnified detail (no text or symbols)natural_image
Technical illustration of a mechanical component with cross-sectional view and magnified detail (no text or symbols)natural_image
Technical illustration of a mechanical component with cross-sectional view and magnified detail (no text or symbols)natural_image
Technical illustration of a mechanical component with cross-sectional view and magnified detail (no text or symbols)natural_image
Technical illustration of a mechanical component with cross-sectional view and magnified detail (no text or symbols)natural_image
Technical illustration of a mechanical component with cross-sectional view and magnified detail (no text or symbols)natural_image
Technical illustration of a mechanical component with cross-sectional view and magnified detail (no text or symbols)natural_image
Technical illustration of a mechanical component with cross-sectional view and magnified detail (no text or symbols)natural_image
Technical illustration of a mechanical component with cross-sectional view and magnified detail (no text or symbols)natural_image
Technical illustration of a mechanical component with cross-sectional view and magnified detail (no text or symbols)natural_image
Technical illustration of a mechanical component with cross-sectional view and magnified detail (no text or symbols)natural_image
Technical illustration of a mechanical component with cross-sectional view and magnified detail (no text or symbols)ResMed.com/downloads/masks
تَبْدِهُ ⚠️ ⚠️
natural_image
Technical illustration of a mechanical component with cross-sectional view and magnified detail (no text or symbols)natural_image
Technical illustration of a mechanical component with cross-sectional view and magnified detail (no text or symbols)清洁面罩鼻枕、框架和面罩管路
每日清洁:
natural_image
Technical illustration of a mechanical component with cross-sectional view and magnified detail (no text or symbols)清潔面罩鼻枕、框架和面罩管路
每日:
natural_image
Technical illustration of a mechanical component with cross-sectional view and magnified detail (no text or symbols)natural_image
Technical illustration of a mechanical component with a magnified inset showing a detail (no text or symbols)natural_image
Technical illustration of a mechanical component with cross-sectional view and magnified detail (no text or symbols)Čišćenje umetaka, okvira i cijevi maske
Svakodnevno:
- Svakodnevno čistite umetke, okvir i cijev maske. Nježno ih trljajte u toploj vodi (otprilike 30 °C) uz uporabu blagog tekućeg deterdženta dok nisu vizualno čisti.
- Dobro isperite tekućom vodom i dopustite da se osuše na zraku podalje od izravne sunčeve svjetlosti.
natural_image
Technical illustration of a mechanical component with cross-sectional view and magnified detail (no text or symbols)natural_image
Technical illustration of a mechanical component with cross-sectional view and magnified detail (no text or symbols)ResMed.com/downloads/masks.

UZMANĪBU!
natural_image
Technical illustration of a mechanical component with a magnified inset showing a detailed detail (no text or symbols present)ResMed.com/downloads/masks.

DÈMESIO
natural_image
Technical illustration of a mechanical component with cross-sectional view and magnified detail (no text or symbols)Čistenie vankúšikov masky, rámu a trubice masky
Každodenne:
natural_image
Technical illustration of a mechanical component with cross-sectional view and magnified detail (no text or symbols)Čiščenje blazinic, okvirja in cevi maske
Dnevno:
.הכלההוּרָהוּרָהוּרָהוּרָהוּרָהוּרָהוּרָהוּרָהוּרָהוּרָהוּרָהוּרָהוּרָהוּרָהוּרָה
natural_image
Technical illustration of a mechanical component with a magnified inset showing a detailed detail (no text or symbols present).הכלההוּרָהוּרָהוּרָהוּרָהוּרָהוּרָהוּרָהוּרָהוּרָהוּרָהוּרָהוּרָהוּרָהוּרָהוּרָה
ת הַלְרָה אַעֹרִים
,AirMini is not to be a good thing, AirMini is not to be AirFit P10
natural_image
Technical illustration of a mechanical component with a magnified inset showing a detail (no text or symbols)natural_image
Technical illustration of a mechanical component with a magnified inset showing a detail (no text or symbols)Bella Vista NSW 2153 Australia
See ResMed.com for other ResMed locations worldwide. AirFit, AirMini, and HumidX are trademarks and/or registered trademarks of the ResMed family of companies. For patent and other intellectual property information, see ResMed.com/ip. © 2021 ResMed. 628192/3 2021-07