AirTouch N30i - Respiratory medical device ResMed - Free user manual and instructions
Find the device manual for free AirTouch N30i ResMed in PDF.

| Product Type | Nasal mask for CPAP or bi-level pressure ventilation |
| Brand | ResMed |
| Model | AirTouch N30i |
| Category | Respiratory medical device |
| Intended Use | Non-invasive CPAP or bi-level positive pressure treatment for patients over 30 kg |
| Patients | Obstructive sleep apnea (OSA), bronchopulmonary diseases, restrictive syndromes, obesity-hypoventilation |
| Pressure Range | 4 to 25 cm H₂O |
| Gross Dimensions (L x W x H, without headgear) | 236 mm x 165 mm x 125 mm (±10%) |
| Sound Pressure Level (with QuietAir vent) | 14 dBA at 1 m |
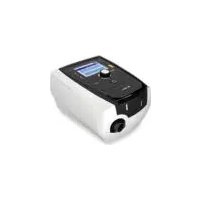
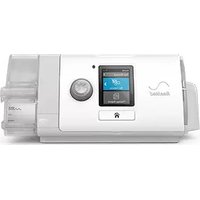
| Compatible Devices | ResMed AirSense, AirCurve, S9 (with Pillows setting) |
| Main Components | Elbow, ring, headgear, rigid frame, fabric nasal cushion (AirTouch), ventilation vents (QuietAir or multi-hole), fabric wrap |
| Materials | Fabric (cushion and wrap), silicone (on AirFit models), rigid plastic (frame) |
| Available Sizes | Rigid frame: standard and small; Cushion: SW, S, M, L, W (depending on model) |
| Cleaning | Cushion and vents: after each use; headgear, frame, elbow: weekly. Hand wash with mild detergent, rinse, dry away from sunlight. Do not use washing machine, dishwasher, ozone or UV. |
| Safety | Do not obstruct ventilation vents; do not use for life support ventilation; precautions with oxygen; stop device if adverse reaction. |
| Storage | In a dry place, away from direct sunlight, after complete cleaning and drying |
| Lifespan | Variable depending on use and maintenance; replace any damaged component |
| Warranty | Complies with European Directive 1999/44/EC and consumer rights |
| Symbols Present | Sizes, Pillows setting, latex-free, recyclable |
Frequently Asked Questions - AirTouch N30i ResMed
User questions about AirTouch N30i ResMed
0 question about this device. Answer the ones you know or ask your own.
Ask a new question about this device
Download the instructions for your Respiratory medical device in PDF format for free! Find your manual AirTouch N30i - ResMed and take your electronic device back in hand. On this page are published all the documents necessary for the use of your device. AirTouch N30i by ResMed.
USER MANUAL AirTouch N30i ResMed
natural_image
A curved dotted line with black dots, resembling a stylized wave or curve (no text or symbols)ResMed
AirTouch N30i
AirFit™ N30i
AirFit™ P30i

Device Setting
Pillows

natural_image
Close-up of a metallic, flexible head respirator device (no text or symbols visible)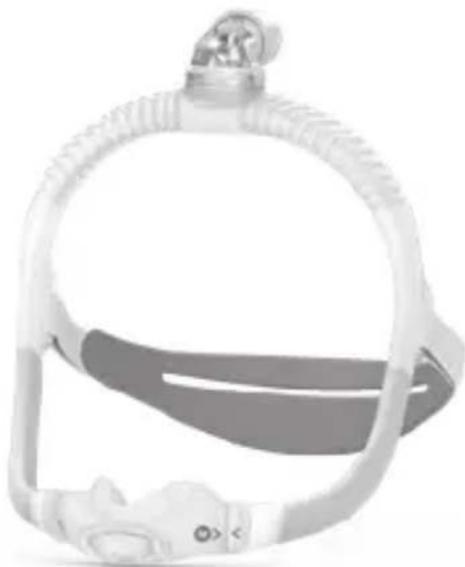
natural_image
Close-up of a medical or surgical device with a circular head and horizontal band (no visible text or symbols)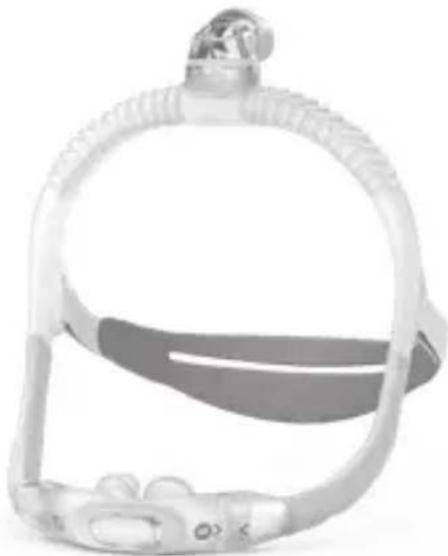
natural_image
Close-up of a medical or surgical device with a strap and connector (no visible text or symbols)User guide
English / Česky / Dansk / Nederlands / Suomi / Français / Deutsch / Italiano / Norsk / Polski / Português / Español / Svenska / العربية / نشره / فارسي
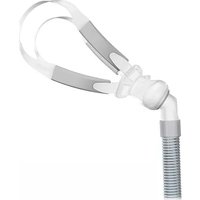
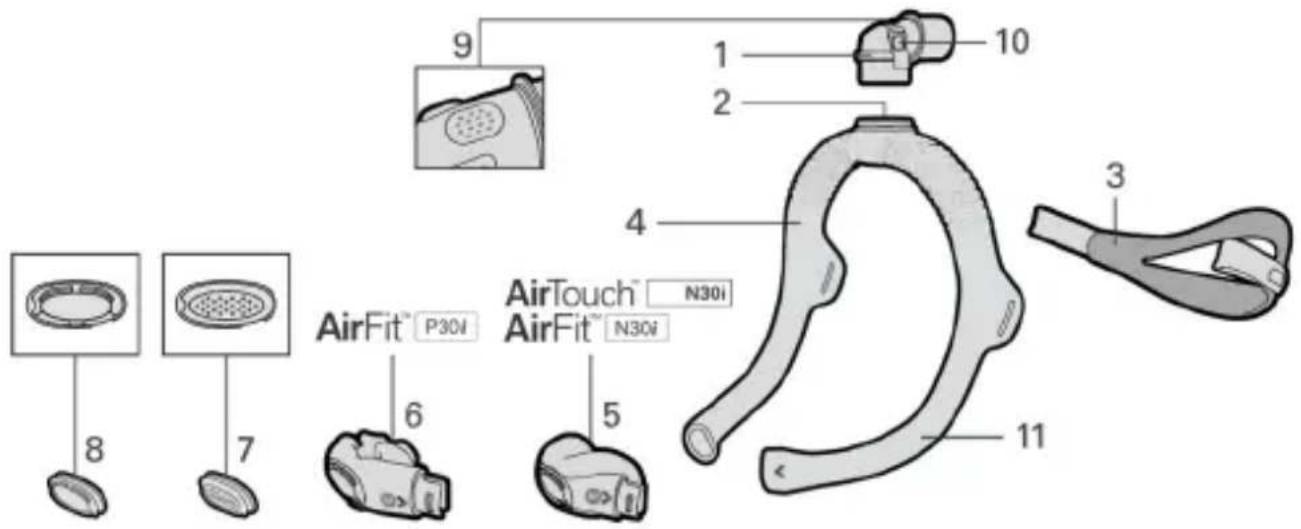
Mask components
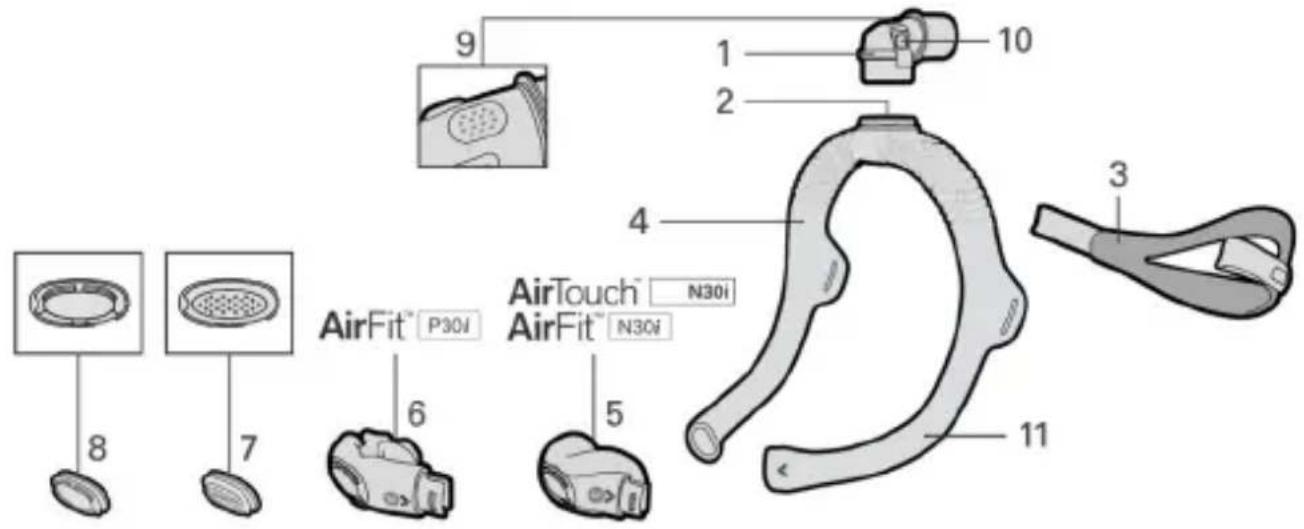
1 Elbow
2 Elbow ring
3 Headgear
4 Frame
5 AirTouch™ / AirFit™ N30i nasal cushion
6 AirFit P30i pillows cushion
7 Multi-hole vent
8 QuietAir™ vent
9 Elbow vent
10 Side buttons
11 Sleeve
Notes:
- The AirTouch N30i nasal mask uses a fabric cushion and a full fabric sleeve.
- The AirFit N30i nasal and the AirFit P30i pillows masks uses silicone cushions and short fabric sleeves.
- The cushions for these masks are interchangeable. The sleeves are not removable.
• Not all masks are available in all regions.
Intended use
The AirTouch N30i, AirFit N30i and AirFit P30i masks are intended for patients weighing more than 30 kg, who have been prescribed non-invasive CPAP or bi-level positive airway pressure (PAP) therapy. They are intended for single-patient reuse in the home environment and multi-patient reuse in the hospital/institutional environment.

WARNING
- The mask contains a specific safety feature, the vents, to enable normal breathing and exhaust exhaled breath. Occlusion of the vents needs to be prevented to avoid having an adverse effect on the safety and quality of the therapy. Regularly inspect the vents to ensure it is kept clean, clear of blockages and is not damaged.
- The mask is not suitable for patients requiring life support ventilation or who would experience serious deterioration of health or death with a loss or degradation of therapy.
- The mask must be used under qualified supervision for patients who are unable to remove the mask by themselves. The mask may not be suitable for those prone to aspiration.
- Regularly clean your mask to maintain the quality of your mask and to prevent the growth of germs that can adversely affect your health.
- If there is any visible deterioration of a mask component (cracking, crazing, tears etc.) the component should be discarded and replaced.
- Always follow cleaning instructions and only use a mild liquid detergent. Some cleaning products may damage the mask, its parts and their function, or leave harmful residual vapours. Do not use a dishwasher or washing machine to clean the mask. Ozone or UV light products have not been validated for use with the mask and may lead to discoloration or damage.
- Only use compatible CPAP or bi-level therapy devices. The technical specifications of the mask are provided for healthcare professionals to determine compatible devices. Use with incompatible devices may affect the performance or safety of the mask.
- Discontinue using the mask if you have ANY adverse reaction and consult your physician or sleep therapist.
- The mask is not intended to be used simultaneously with nebuliser medications that are in the air path of the mask/tube.
- Follow all precautions when using supplemental oxygen.
- Oxygen flow must be turned off when the CPAP or bilevel device is not operating, so that unused oxygen does not accumulate within the device enclosure and create a risk of fire.
- Oxygen supports combustion. Oxygen must not be used while smoking or in the presence of an open flame. Only use oxygen in well ventilated rooms.
- At a fixed rate of supplemental oxygen flow, the inhaled oxygen concentration varies, depending on the pressure settings, patient breathing pattern, mask, point of application and leak rate. This warning applies to most types of CPAP or bilevel devices.
- For any serious incidents that occur in relation to this device, these should be reported to ResMed and the competent authority in your country.

CAUTION
- Using a mask may cause tooth, gum or jaw soreness or aggravate an existing dental condition. If symptoms occur, consult your physician or dentist.
- When fitting the mask, do not overtighten the headgear as this may lead to skin redness or sores around the mask cushion.
- The mask should not be used unless the device is turned on. Once the mask is fitted, ensure the device is blowing air to reduce risk of rebreathing exhaled air.
• As with all masks, some rebreathing may occur at low pressures. - Do not iron the headgear as the material is heat sensitive and will be damaged.
Clinical benefits
The clinical benefit of vented masks is the provision of effective therapy delivery from a therapy device to the patient.
Intended patient population/medical conditions
Obstructive pulmonary diseases (eg, Chronic Obstructive Pulmonary Disease), restrictive pulmonary diseases (eg, diseases of the lung parenchyma, diseases of the chest wall, neuromuscular diseases), central respiratory regulation diseases, obstructive sleep apnoea (OSA) and obesity hypoventilation syndrome (OHS).
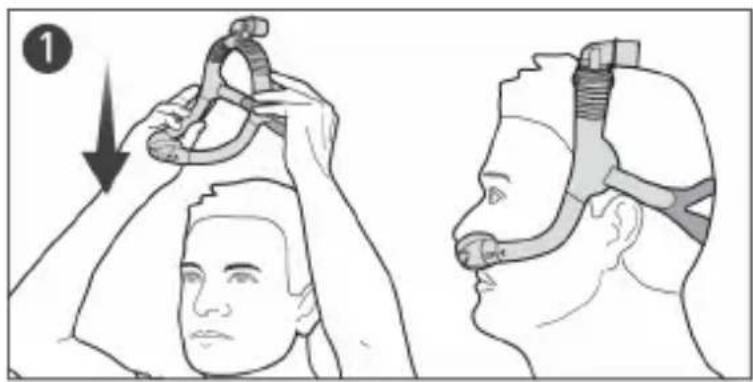
Fitting your mask
Remove all packaging before using the mask. Wrinkles on fabric components may occur and do not affect the performance or safety of the mask.
natural_image
Illustration showing two head positions with a hand adjusting a cable, no text or symbols present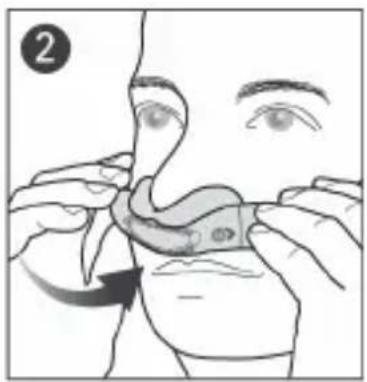
natural_image
Illustration of a person applying a nasal swab to their mouth, showing hand placement and motion arrow (no text or symbols)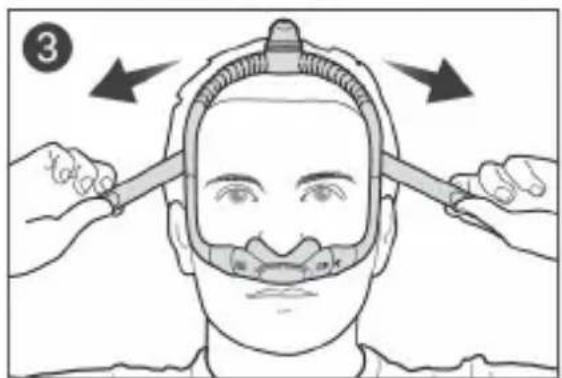

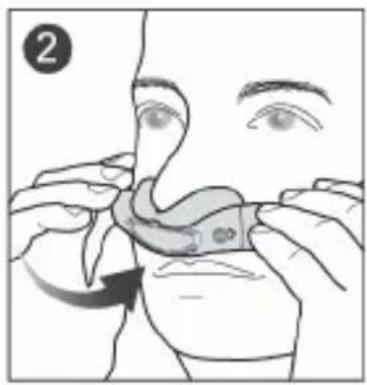
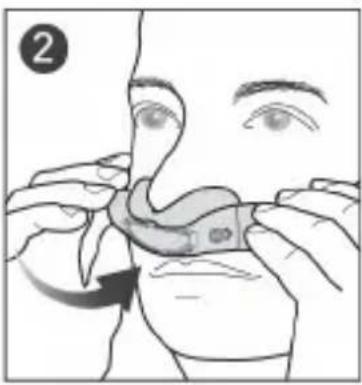
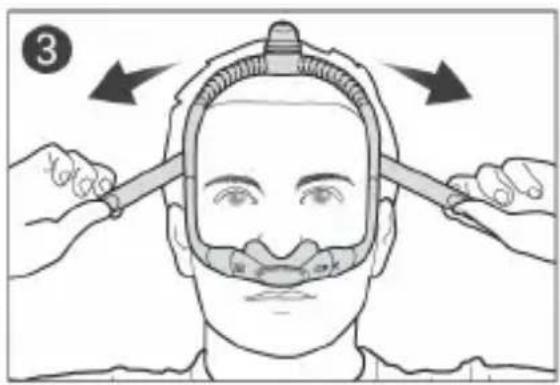
- Pull the frame and headgear over your head until the elbow is positioned on top and the headgear is behind your head.
- Place the cushion under your nose. For the AirFit P30i mask, align the pillows into your nostrils.
- Tighten or loosen the headgear until the cushion fits comfortably under your nose.
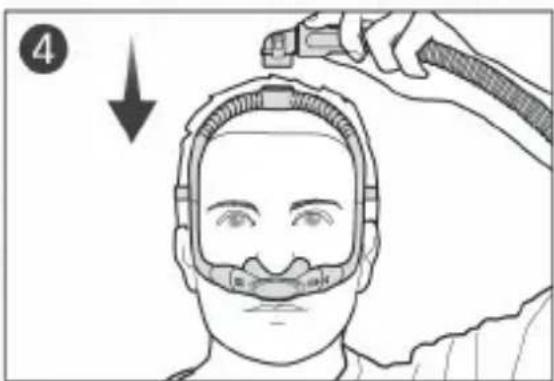
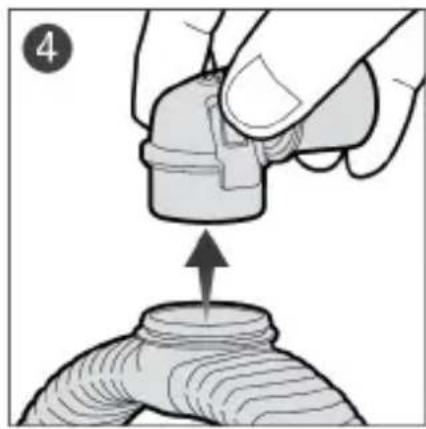
- Squeeze the side buttons on the elbow and detach from the frame. Connect the air tubing from your device to the elbow, then reattach to the frame.
Mask setting options

Device Setting
Ensure that Pillows is selected in the mask setting options of your ResMed device. For a full list of compatible devices for this mask, see the Mask/Device Compatibility List at ResMed.com/downloads/masks.
Pillows
Adjusting your mask
- When using the mask, air will flow out of the vents in the cushion and elbow. If air leaks from the side or top of the cushion, adjust the mask fitting to improve the seal.
- You can position the top of the frame forward or backwards over your head until the mask feels comfortable.

Scan this QR code with your mobile device or visit ResMed.com/downloads/masks for helpful documents and support videos for your mask.
Sizing the mask cushion
If available, your physician or sleep therapist will use the fitting template to assist in selecting the right size cushion based on nose shape. Note that sizing across different masks may not be the same.
| AirTouch N30i | AirFit N30i | AirFit P30i | |
| Narrower noses | M | S or M | Try each size for optimal comfort and seal. |
| Wider noses | SW or L | SW or W |
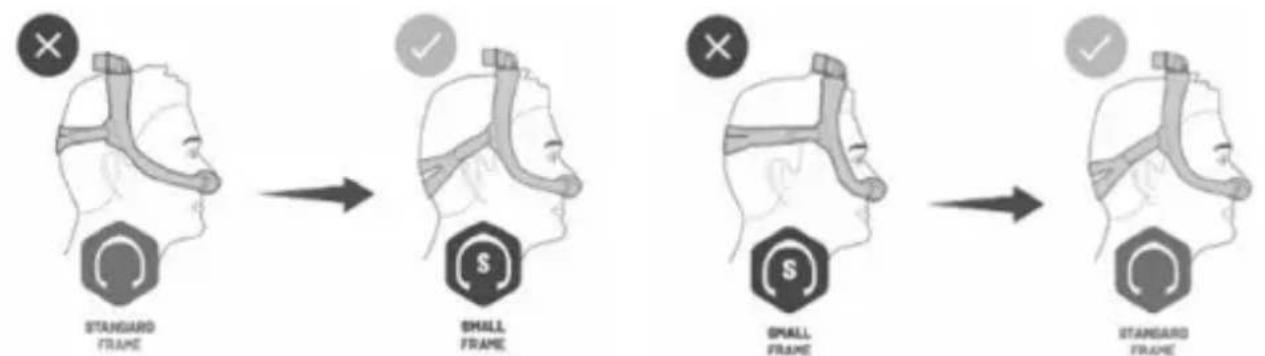
Sizing the mask frame
flowchart
graph LR
    A["Standard Frame"] --> B["Small Frame"]
    B --> C["Small Frame"]
    C --> D["Standard Frame"]
If the mask frame falls back over your head or sits too close to your ears, try a small frame size. If the mask falls forward on your head or sits too close to your eyes, try a standard frame size.
Disassembling your mask for cleaning
If your mask is connected to a device, disconnect the device air tubing from the mask elbow.

natural_image
Illustration of hands performing a finger manipulation or massage motion (no text or symbols)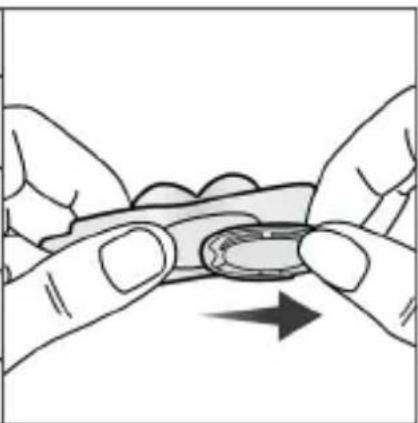
natural_image
Illustration of two hands holding a small object with an arrow indicating direction (no text or symbols)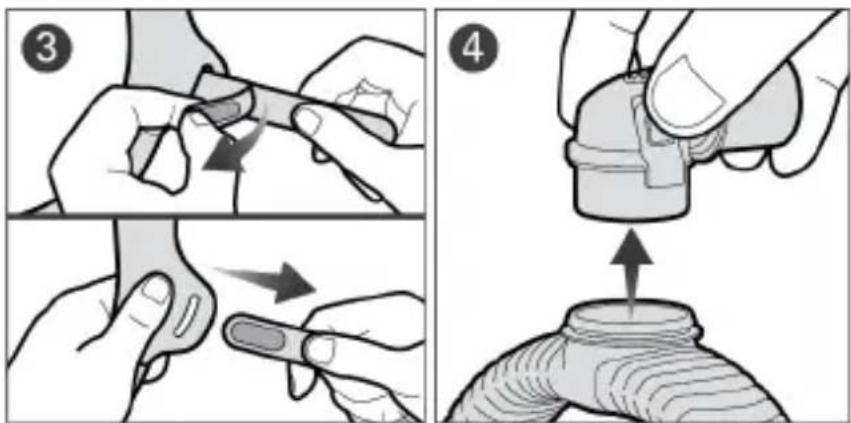
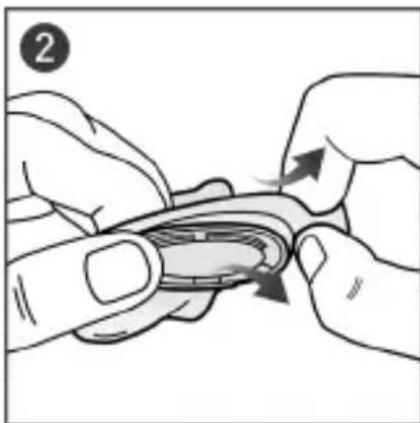
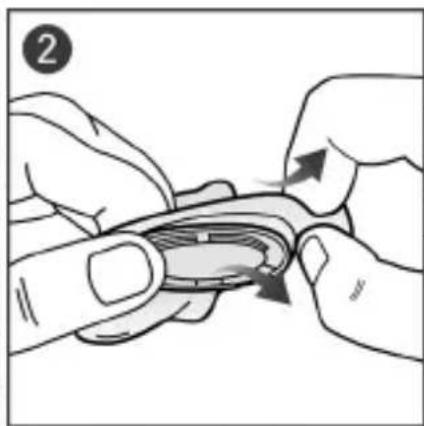
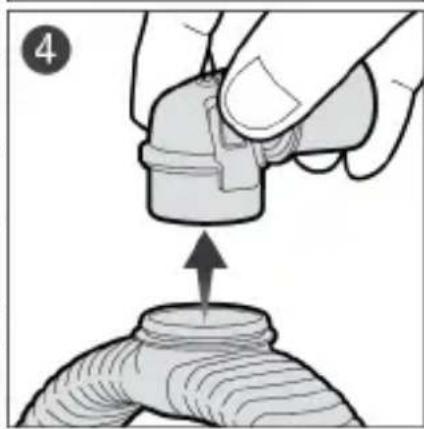
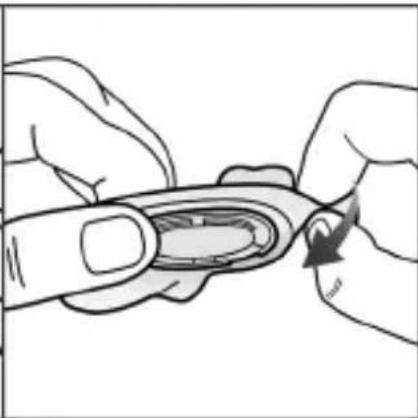
- Pull the cushion from the frame.
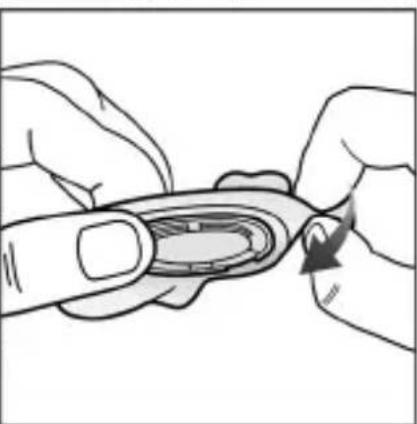
- Gently peel the cushion away and slide the vent out.
- Undo the fastening tabs on the headgear strap and pull it from the frame.
- Squeeze the side buttons on the elbow and detach from the frame.
Note:
- The QuietAir or multi-hole vent can be removed to allow inspection of the vent holes.
- After detaching the headgear, close the fastening tabs to prevent it from damaging the fabric sleeves when handling.
Cleaning your mask at home
If there is any visible deterioration of a mask component (cracking, crazing, tears etc.) the component should be discarded and replaced. Pilling and fraying of fabric components may occur and do not affect performance of the mask.
Thoroughly clean the mask components as follows:
After each use: Cushion, QuietAir vent, Multi-hole vent
Weekly: Headgear, frame and elbow
- Soak the components in warm water with a mild liquid detergent. Ensure that there are no air bubbles while soaking.
- Hand wash the components with a soft, non-metallic bristle brush (eg, soft bristle toothbrush). Pay particular attention to the vent holes. For the AirTouch N30i cushion, hand wash only without a bristle brush.
- Thoroughly rinse the components under running water. If the sleeve on the frame becomes twisted, it can be repositioned when wet.
-
Squeeze the fabric components with a clean towel to remove excess water. Shake the QuietAir vent to remove any excess water.
-
Leave the components to air dry out of direct sunlight.
If the mask components are not visibly clean, repeat the cleaning steps. Make sure that the vents are clean and clear.
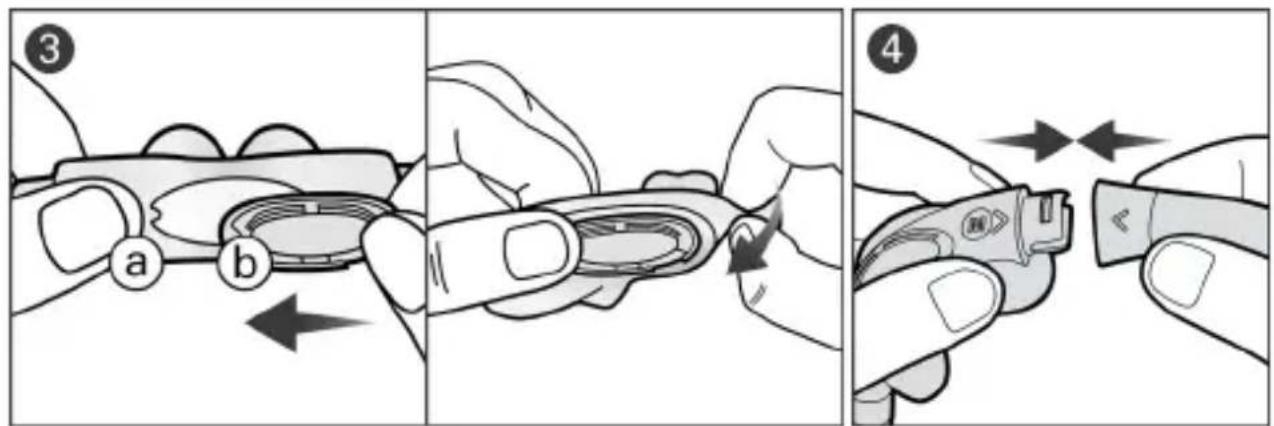
Reassembling your mask

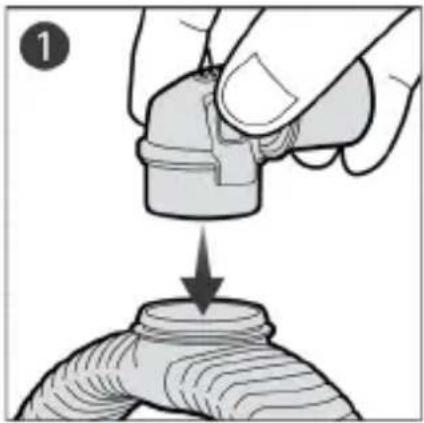
- Connect the elbow into the top of the frame until it clicks.
- Insert each end of the headgear strap into the frame and fold the fastening tabs backwards. Ensure that the ResMed logo is facing outwards and is upright.
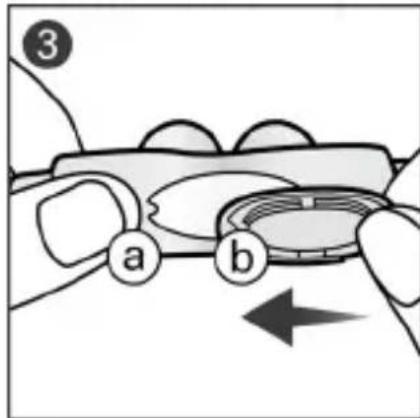
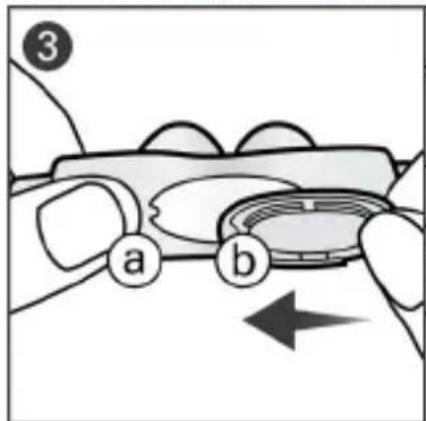
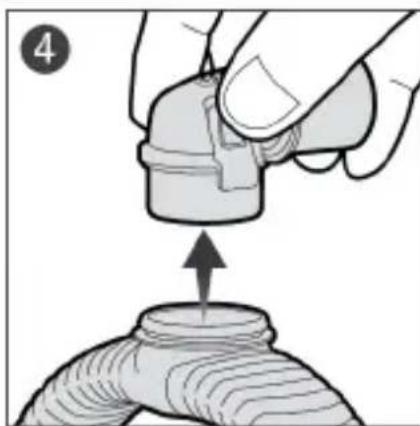
- Align the tab (a) on the cushion with the notch (b) on the vent, and then gently pull the cushion over the vent.
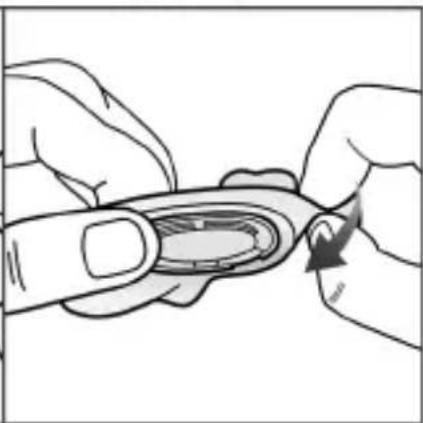
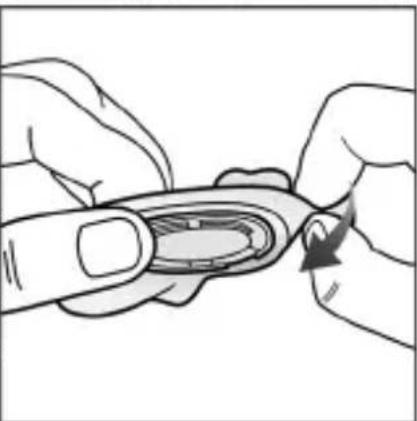
- Insert the ends of the frame into the cushion, ensuring that the arrows on the cushion and frame are aligned.
Note: If the elbow ring detaches, re-insert into the top of the frame.
Reprocessing the mask between patients
When using between patients, these masks must be reprocessed according to instructions available on ResMed.com/downloads/masks.
Technical specifications
Compatible devices
For a full list of compatible devices for this mask, see the Mask/Device Compatibility List at ResMed.com/downloads/masks. SmartStop may not operate effectively when using this mask with some CPAP or bi-level devices.
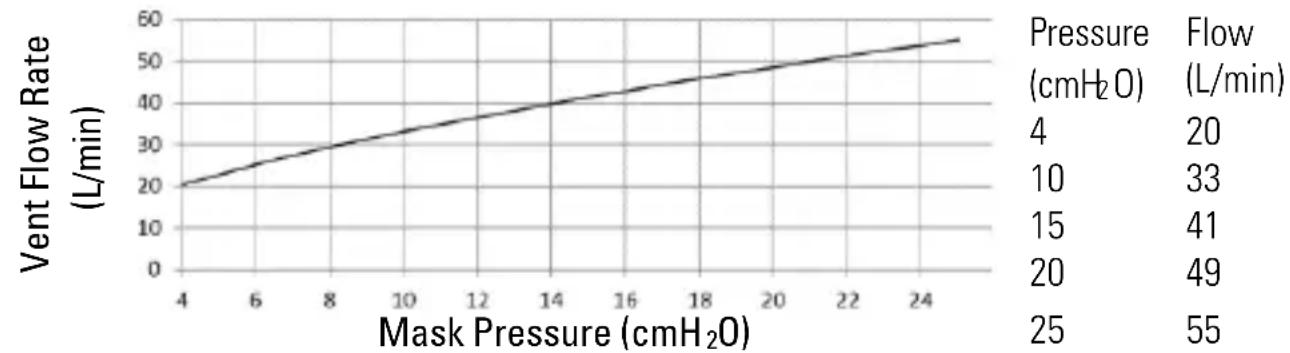
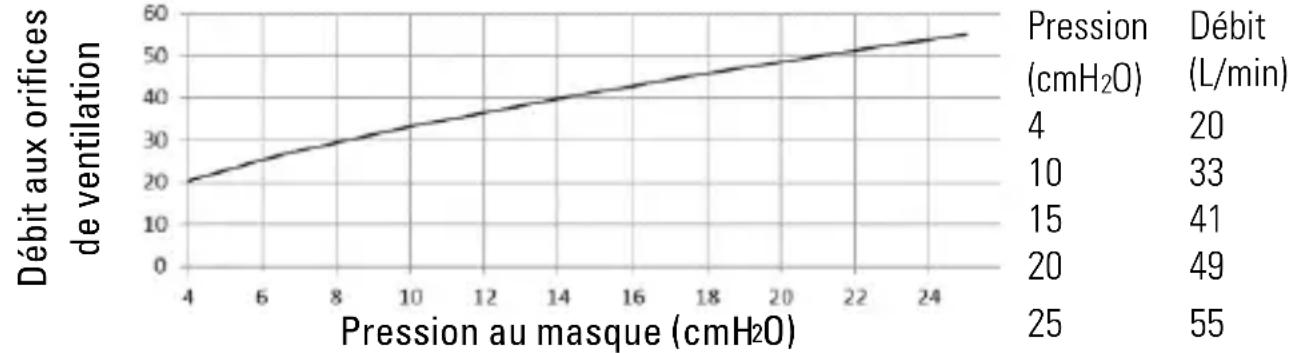
Pressure-flow curve
line
| Mask Pressure (cmH₂O) | Vent Flow Rate (L/min) | | ---------------------- | ---------------------- | | 4 | 20 | | 6 | 25 | | 8 | 30 | | 10 | 35 | | 12 | 40 | | 14 | 45 | | 16 | 50 | | 18 | 55 | Pressure (cmH₂O) | 20 | | 10 | 33 | | 15 | 41 | | 20 | 49 | | 25 | 55 || AirTouch N30i | AirFit N30i | AirFit P30i | |
| Mask setting options | |||
| For AirSenseTM, AirCurveTM or S9TM series | Pillows | Pillows | Pillows |
| Therapy pressure | 4 to 25 cmH2O | 4 to 25 cmH2O | 4 to 25 cmH2O |
| Resistance: Drop in pressure measured (nominal). Resistance may vary due to the flexible mask frame design | |||
| at 50 L/min | 0.5 cmH2O | 0.5 cmH2O | 0.4 cmH2O |
| at 100 L/min | 1.7 cmH2O | 1.7 cmH2O | 1.5 cmH2O |
| Sound: Declared dual-number noise emission values in accordance with ISO4871:1996 and ISO3744:2010. A-weighted sound power level and A-weighted sound pressure level at a distance of 1 m, with uncertainty of 3 dBA, are shown | |||
| Sound power level (with QuietAir vent) | 20 dBA | 21 dBA | 21 dBA |
| Sound pressure level (with QuietAir vent) | 14 dBA | 14 dBA | 14 dBA |
| Sound power level (with Multi-hole vent) | 24 dBA | 25 dBA | 24 dBA |
| Sound pressure level (with Multi-hole vent) | 17 dBA | 18 dBA | 17 dBA |
Gross dimensions - H x W x D
Mask fully assembled, excluding headgear: 236 mm x 165 mm x 125 mm (+/- 10% on all measurements)
Environmental conditions:
Operating temperature: 5°C to 40°C
Operating humidity: 15% to 95% relative humidity, non-condensing
Storage and transport temperature: -20^ to +60^
Storage and transport humidity: up to 95% relative humidity, non-condensing
Service life: The service life of the mask system is dependent on the intensity of usage, maintenance, and environmental conditions to which the mask is used or stored. As this mask system and its components are modular in nature, it is recommended that the user maintain and inspect it on a regular basis, and replace the mask system or any components if deemed necessary or according to the instructions in the 'Cleaning your mask at home' section of this guide.
Storage
Ensure that the mask is thoroughly clean and dry before storing it for any length of time. Store the mask in a dry place out of direct sunlight.
Disposal
This mask and packaging does not contain any hazardous substances and may be disposed of with your normal household refuse.
Symbols
The following symbols may appear on your product or packaging.

Frame size - standard

Frame size- small

Cushion size – small


Cushion size - small wide


Cushion size - large

Device settings - Pillows

Nasal cradle mask
LATEX?

Nasal pillows mask

QuietAir vent
NOT MADE WITH NATURAL RUBBER LATEX

The component is recyclable. Please recycle.
See symbols glossary at ResMed.com/symbols.
Consumer Warranty
ResMed acknowledges all consumer rights granted under the EU Directive 1999/44/EC and the respective national laws within the EU for products sold within the European Union.
Součásti masky
natural_image
Illustration of a person applying a nasal swab or cuff to their mouth, with a curved arrow indicating force direction (no text or symbols)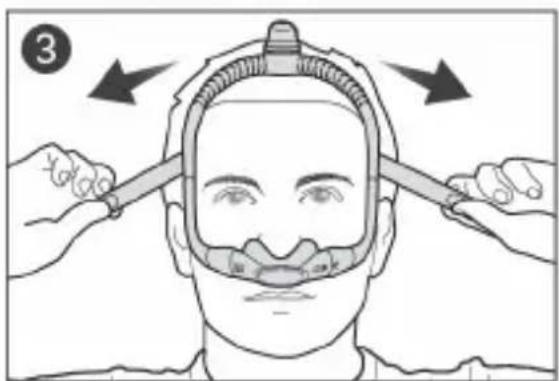

Device Setting
Pillows
natural_image
Illustration of a hand pouring liquid into a cylindrical container (no text or symbols)
natural_image
Illustration of hands performing a finger manipulation or tooling task (no text or symbols visible)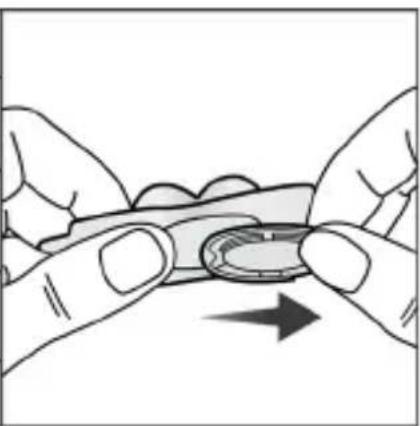
natural_image
Illustration of two hands holding a small object with an arrow indicating direction (no text or symbols)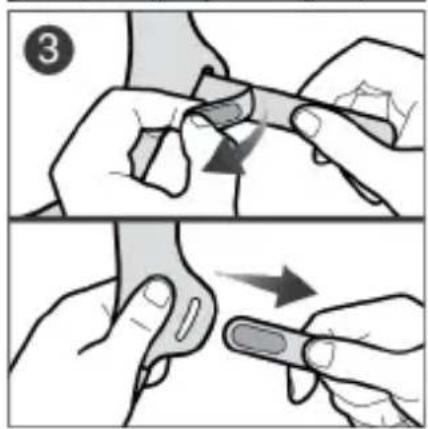
natural_image
Illustration of a hand holding a small object above a cylindrical object, with an arrow indicating upward motion (no text or symbols)natural_image
Illustration of a hand using a tool to lift a cylindrical object, with no visible text or symbols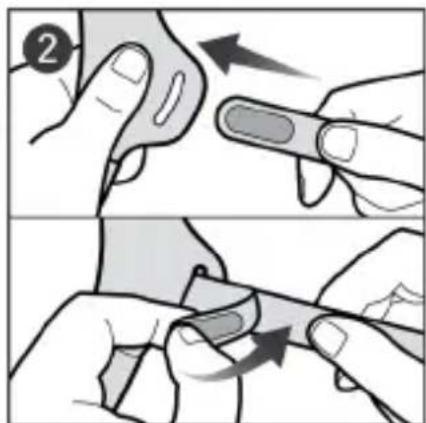
natural_image
Illustration of two hands performing a finger manipulation technique (no text or symbols present)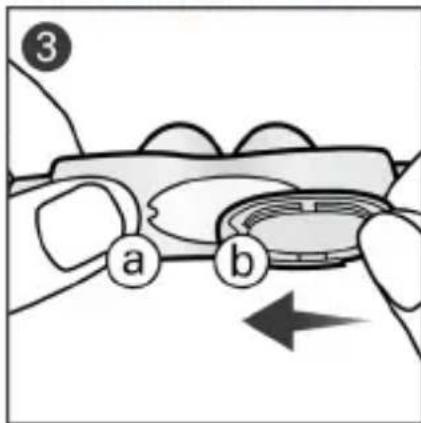
natural_image
Illustration of two hands performing a finger manipulation or tooling task (no text or symbols visible)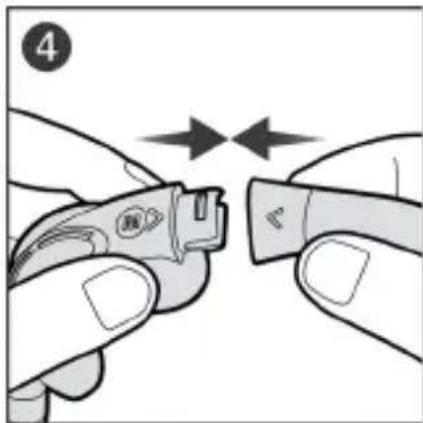
natural_image
Close-up of hands holding a small electronic device with two arrows indicating movement or alignment (no text or symbols visible)
Device Setting
Pillows
flowchart
graph TD
    A["Step 1: Hand grip"] --> B["Step 2: Grip closure"]
    B --> C["Step 3: Grip placement"]
    C --> D["Step 4: Tool positioning with handle"]
natural_image
Illustration of a hand pouring liquid into a cylindrical container (no text or symbols)
natural_image
Illustration of two hands performing a finger manipulation technique (no text or symbols present)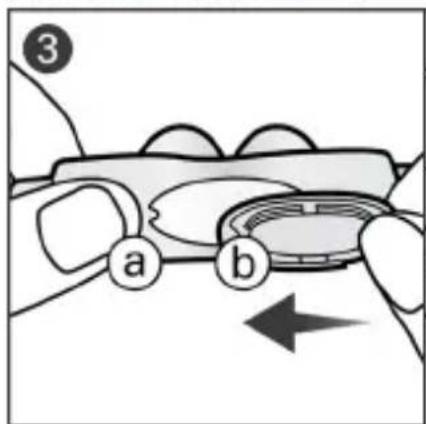
natural_image
Illustration of two hands performing a finger manipulation technique (no text or symbols present)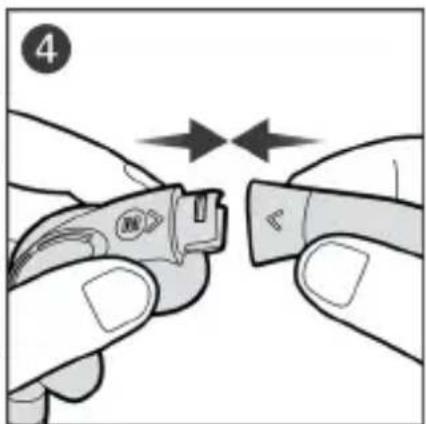
natural_image
Close-up of hands holding a small electronic device with bidirectional arrows indicating movement (no text or symbols)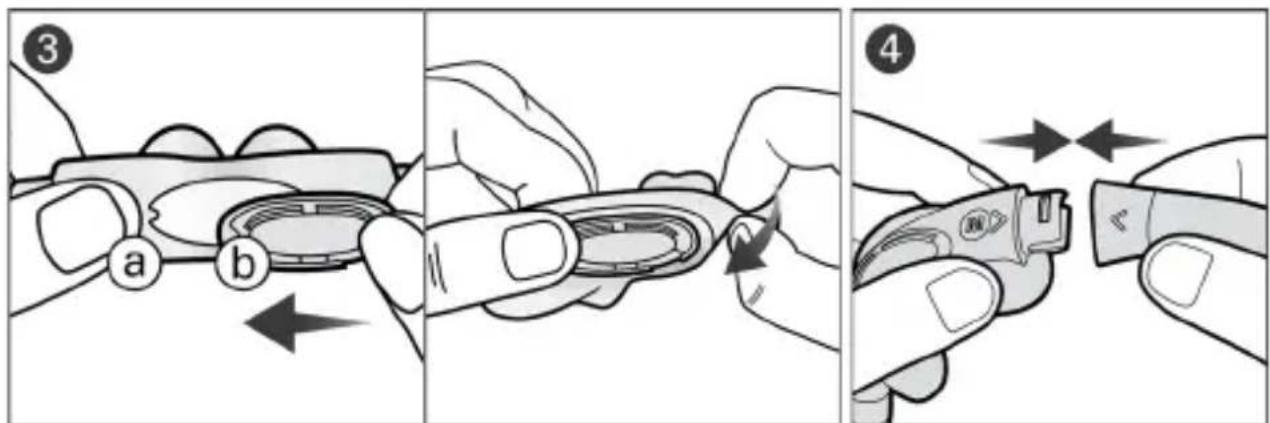
QuietAir-poistoilma-aukko
LATEX?
NOT MADE
WITH NATURAL
RUBBER LATEX
natural_image
Illustration of a hand holding a small object above a cylindrical object, with no visible text or symbols.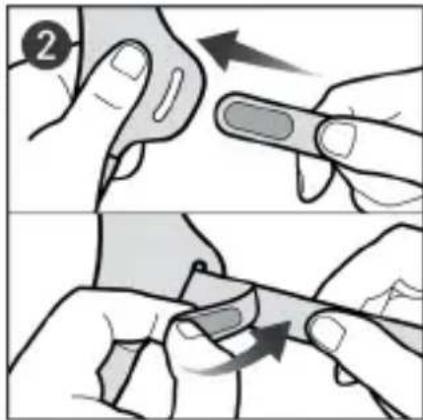
natural_image
Illustration of two hands holding a finger with a curved object and an arrow indicating rotation (no text or symbols)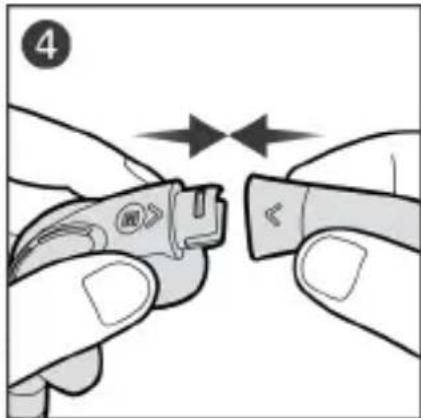
natural_image
Close-up of hands holding a small electronic device with two arrows indicating alignment or adjustment (no text or symbols visible)Courbe pression/débit
line
| Pressure au masque (cmH2O) | Débit aux orifices de ventilation | | -------------------------- | ---------------------------------- | | 4 | 20 | | 6 | 25 | | 8 | 30 | | 10 | 35 | | 12 | 40 | | 14 | 45 | | 16 | 50 | | 18 | 55 | | 20 | 60 | | 22 | 65 | | 24 | 70 |natural_image
Illustration of a person applying a nasal swab or cuff to their mouth, with a curved arrow indicating direction (no text or symbols)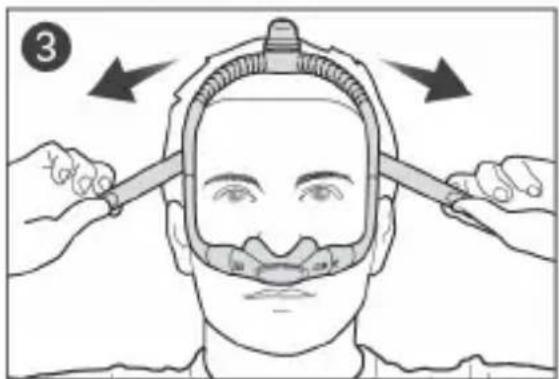


Device Setting
Pillows
natural_image
Illustration of a hand using a tool to lift a cylindrical object into a textured surface (no text or symbols)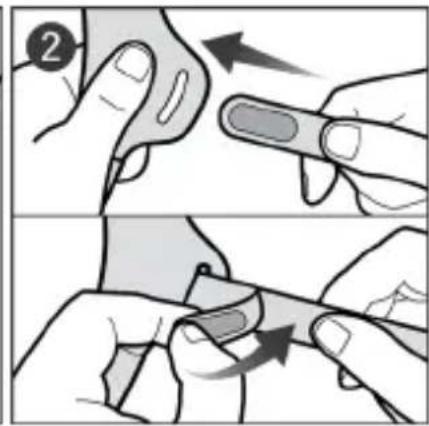
natural_image
Illustration of two hands performing a finger manipulation technique (no text or symbols present)

natural_image
Illustration of two hands performing a finger manipulation or cleaning task (no text or symbols visible)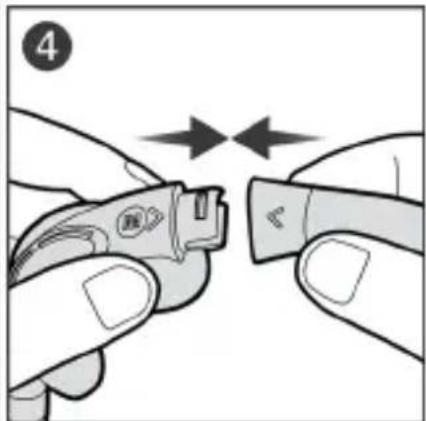
natural_image
Close-up of hands holding a small electronic device with two arrows indicating movement or alignment (no text or symbols visible)
Device Setting
Pillows
flowchart
graph TD
    A["Step 1: Hand grip with arrow"] --> B["Step 2: Hand grip with arrow"]
    B --> C["Step 3: Hand grip with arrow"]
    C --> D["Step 4: Needle insertion of needle"]
    D --> E["Step 5: Hand grip with arrow"]
natural_image
Illustration of a hand pouring liquid into a pipe fitting (no text or symbols)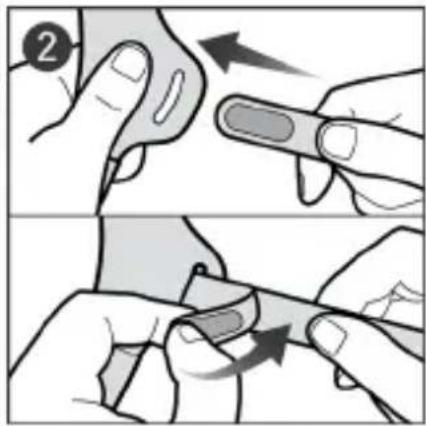
natural_image
Illustration of two hands performing a finger manipulation or cleaning task (no text or symbols visible)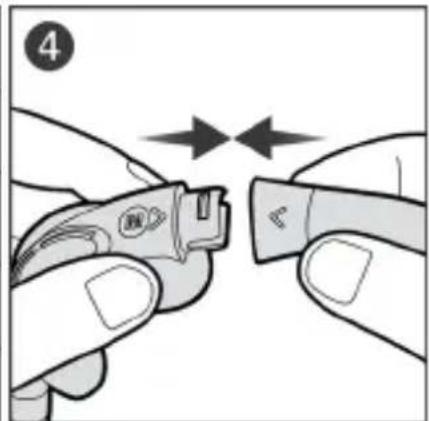
natural_image
Close-up of hands using a tool to cut a small electronic component, no text or symbols visibleResMed.com/downloads/masks.
Specifiche tecniche
natural_image
Illustration of a person applying a medical or cosmetic device to another person's neck (no text or symbols visible)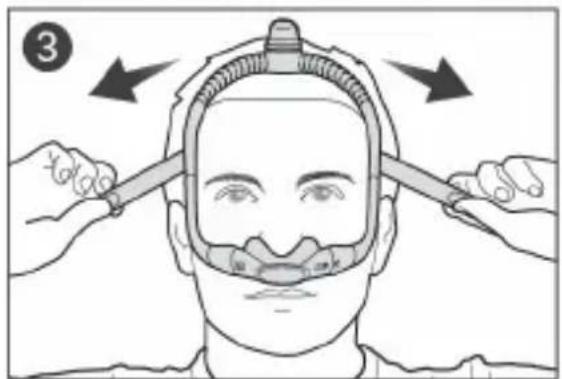


Device Setting
Pillows

natural_image
Illustration of hands performing a finger manipulation or massage motion (no text or symbols)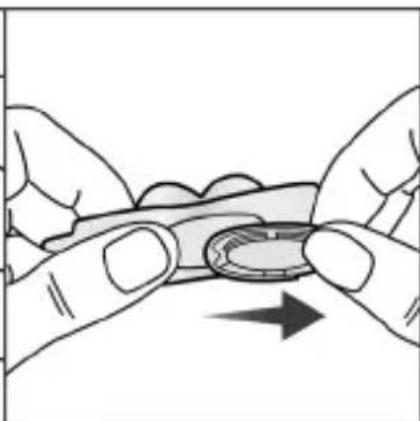
natural_image
Illustration of two hands holding a small object with an arrow indicating direction (no text or symbols)Norsk 5

Device Setting
Pillows
flowchart
graph TD
    A["Step 1: Hand holding a tool"] --> B["Step 2: Inserted fingers"]
    B --> C["Step 3: Inserted hand with a tool"]
    C --> D["Step 4: Reassembly of the tool into a device"]
flowchart
graph TD
    A["Step 1: Hand grip with arrow"] --> B["Step 2: Grip closure"]
    B --> C["Step 3: Insert grip"]
    C --> D["Step 4: Insert grip with arrow"]
natural_image
Illustration of a hand pouring liquid into a cylindrical container (no text or symbols)


natural_image
Illustration of two hands performing a finger manipulation or cleaning task (no text or symbols visible)
natural_image
Close-up of hands holding a small electronic device with two arrows indicating movement or alignment (no text or symbols visible)natural_image
Illustration of a hand pouring liquid into a cylindrical container (no text or symbols)


natural_image
Illustration of two hands performing a finger manipulation or cleaning task (no text or symbols visible)
natural_image
Close-up of hands holding a small electronic device with two arrows indicating movement or alignment (no text or symbols visible)
natural_image
Illustration of a person applying oral care to their mouth, showing a hand gesture with an arrow (no text or symbols)
natural_image
Illustration of a person holding a rope tied with a hook, showing hand positioning and motion direction (no text or symbols)
natural_image
Side profile illustration of a human head with surgical hardware inserted (no text or symbols)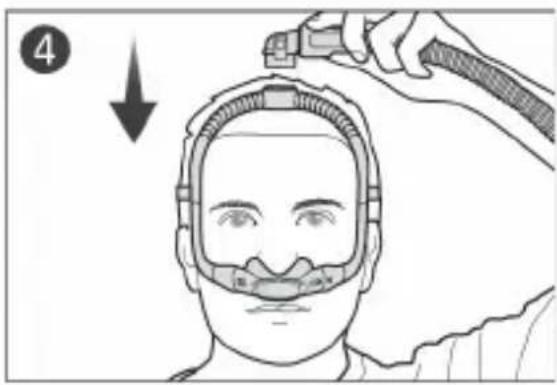
natural_image
Illustration of two hands holding a small object with an arrow indicating direction (no text or symbols)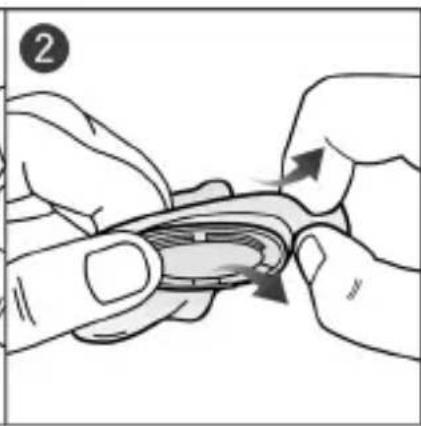
natural_image
Illustration of hands holding a small object with arrows indicating motion or force (no text or symbols)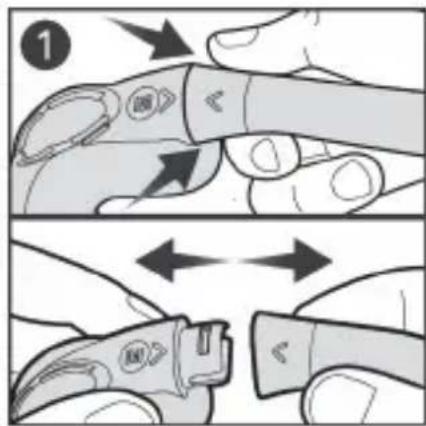
natural_image
Illustration of a hand holding a small mechanical component above a cylindrical pipe with an upward arrow (no text or symbols)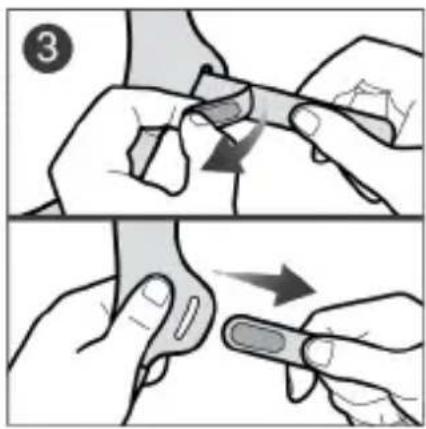
natural_image
Illustration of two-step robotic manipulation or tooling procedure (no text or symbols)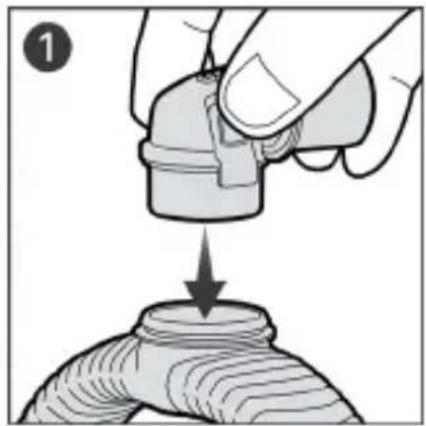
natural_image
Illustration of a hand pouring liquid into a cylindrical container (no text or symbols)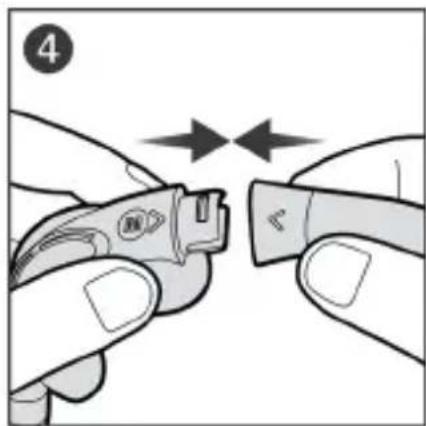
natural_image
Close-up of hands holding a small electronic device with two arrows indicating movement or alignment (no text or symbols visible)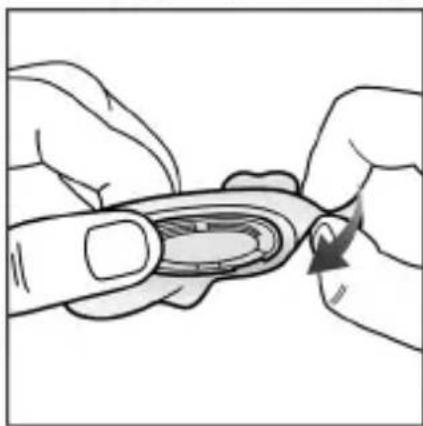
natural_image
Illustration of two hands performing a finger manipulation or tooling task (no text or symbols visible)
.ResMed.com/downloads/masks
المواصفات التقنية
الإجهزة المتوفقة
natural_image
Illustration of two hands holding a small object with an arrow indicating direction (no text or symbols)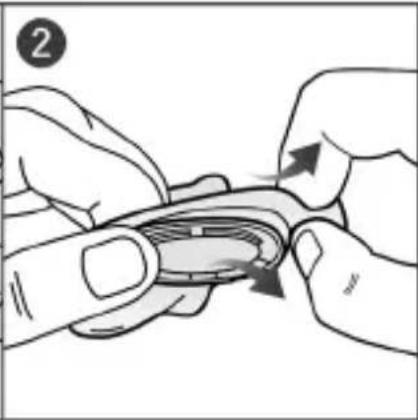
natural_image
Illustration of hands performing a finger manipulation or massage motion (no text or symbols)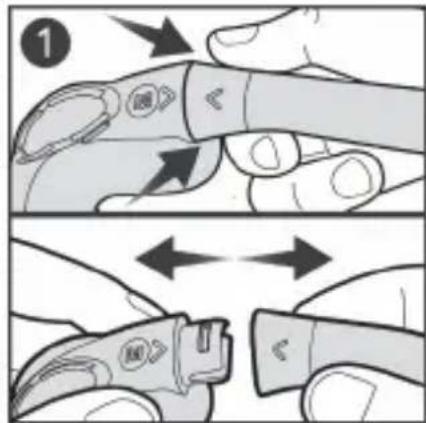
natural_image
Illustration of a hand holding a small mechanical component above a cylindrical object, with an arrow indicating upward motion (no text or symbols)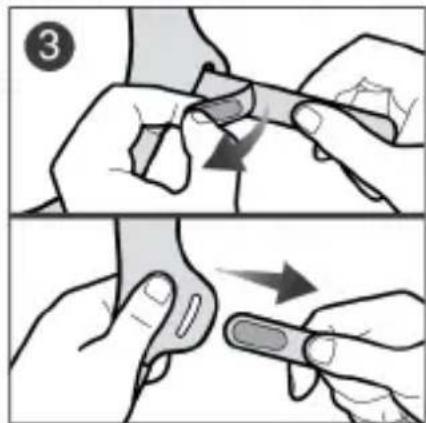
natural_image
Illustration of a hand holding a small mechanical component with a downward arrow indicating process (no text or symbols)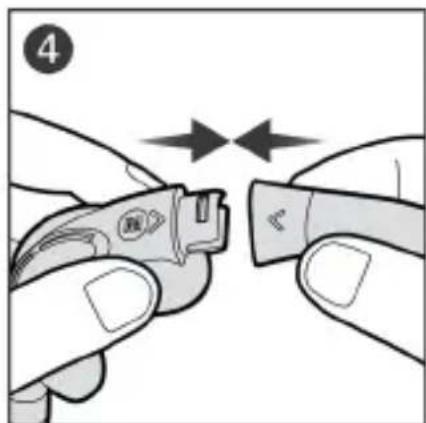
natural_image
Close-up of hands holding a small electronic device with two arrows indicating movement or alignment (no text or symbols visible)
natural_image
Illustration of two hands holding a small object with a curved arrow indicating rotation (no text or symbols)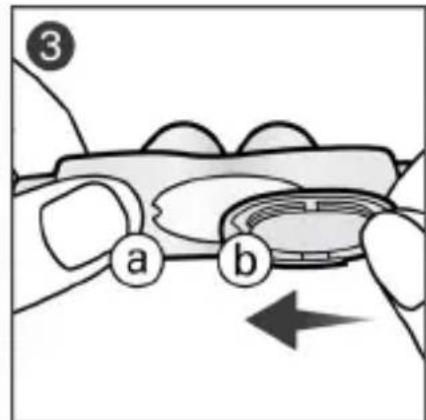
1 ..הַרְשָׁ