ClimateLineAir Oxy - Respiratory medical device ResMed - Free user manual and instructions
Find the device manual for free ClimateLineAir Oxy ResMed in PDF.

| Product Type | Heated breathing circuit with integrated oxygen connector |
| Brand | ResMed |
| Model | ClimateLineAir Oxy |
| Category | Medical respiratory device |
| Intended Use | Use with AirSense10, AirCurve10 and Lumis devices (excluding S9 Tx) |
| Circuit Length | 1.9 m |
| Inner Diameter | 19 mm |
| Material | Flexible plastic and electrical components |
| Adjustable Temperature Range | 16 °C to 30 °C (auto: 27 °C) |
| Shutdown Temperature | 41 °C |
| Maximum Recommended Pressure | 30 cm H2O (30 hPa) |
| Humidity Levels | Off or 1 to 8 |
| Climate Control | Auto (default) or Manual |
| Maintenance and Cleaning | Weekly cleaning with warm water and mild detergent; rinse and dry away from sun/heat |
| Nominal Lifespan | 6 months |
| Operating Conditions | +5 °C to +35 °C, humidity 10% to 95% RH, altitude up to 2,591 m |
| Storage Conditions | -20 °C to +60 °C, humidity 5% to 95% RH |
| Warranty | Refer to the device user guide |
| Environmental Information | Separate disposal, do not dispose of with household waste |
Frequently Asked Questions - ClimateLineAir Oxy ResMed
User questions about ClimateLineAir Oxy ResMed
0 question about this device. Answer the ones you know or ask your own.
Ask a new question about this device
Download the instructions for your Respiratory medical device in PDF format for free! Find your manual ClimateLineAir Oxy - ResMed and take your electronic device back in hand. On this page are published all the documents necessary for the use of your device. ClimateLineAir Oxy by ResMed.
USER MANUAL ClimateLineAir Oxy ResMed
natural_image
Close-up of a black coiled cable with a camera module attached, no visible text or symbols on the device itself.User guide
English | Deutsch | Français | Italiano | Nederlands | Español
Português | Dansk | Svenska | Suomi | Norsk | Eesti | Česky
Ελληνικά | Polski | Magyar | Slovenščina | Română | Русский
Türkçe | Български | Hrvatski | Lietuvių k. | Latviski | íslenska
Bahasa Melayu | Tiếng Việt | ภาษาไทย | 한국어 | 简体中文
繁體中文 | 日本語 | اردو | فارسی | العربية
ENGLISH
About your ClimateLineAir
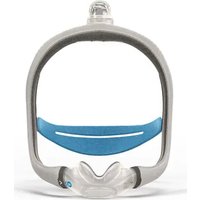
The ClimateLineAir™ is heated air tubing that delivers the desired temperature at your mask. ClimateLineAir Oxy is a variant of the ClimateLineAir that has a built-in oxygen connector to attach a supplemental oxygen supply.
When used with the HumidAir™ humidifier, ClimateLineAir heated air tubing allows you to use Climate Control. Climate Control is designed to make therapy more comfortable by enabling constant temperature and maintaining humidity.
Intended use
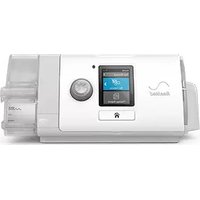
The ClimateLineAir heated air tubing is designed for use with AirSense 10 / AirCurve 10 and Lumis™ devices.
Read this entire user guide together with your device user guide before using your ClimateLineAir heated air tubing.
Notes:
• Not all types of air tubing are available in all regions.
- Lumis does not include S9 ^TM Lumis Tx.
Setup
natural_image
Illustration of a portable electronic device with a control panel and display (no text or symbols visible)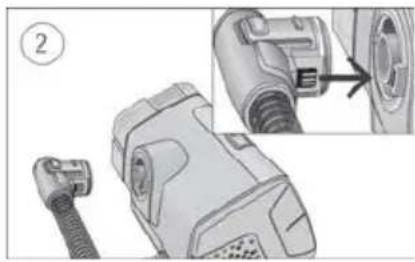
natural_image
Technical illustration of a mechanical device with a connector and close-up detail (no text or symbols)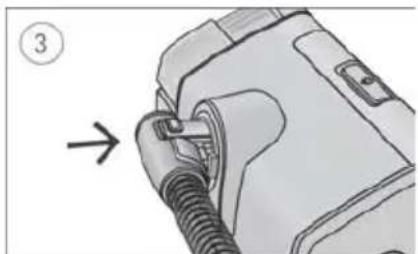
natural_image
Diagram of a mechanical device with a threaded component and an arrow indicating direction (no text or symbols)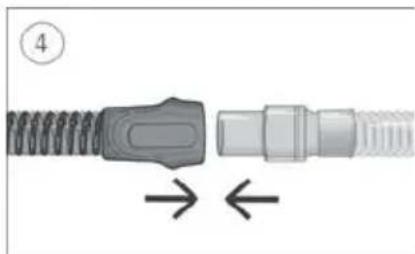
natural_image
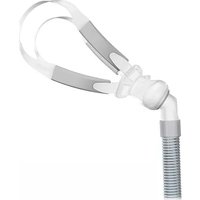
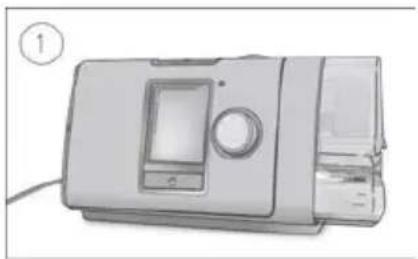
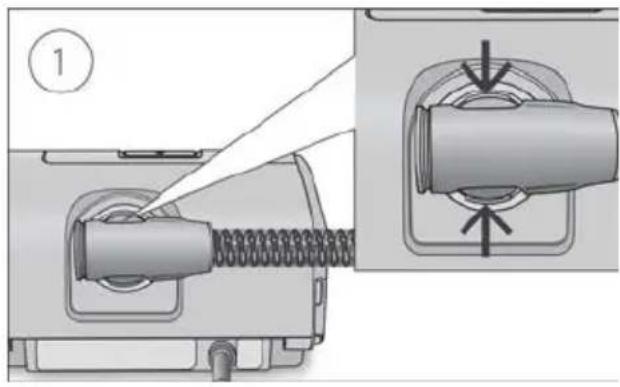
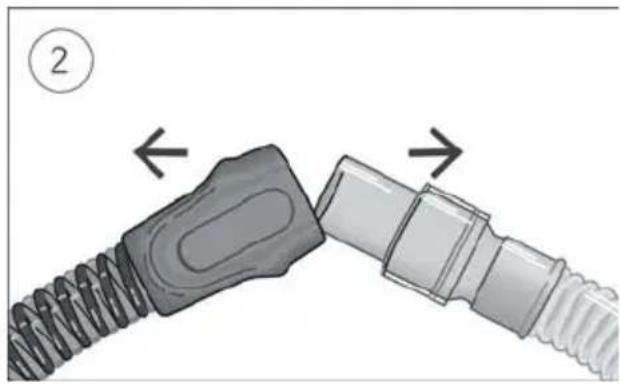
Diagram of a connector with coiled spring and threaded end, showing directional arrows (no text or symbols)- Make sure the device is connected and turned on.
- Hold the cuff of the air tubing and line up the air tubing connector with the connector port.
- Push the cuff until the connector clicks into place. ClimateLineAir connected will briefly display on the device screen.
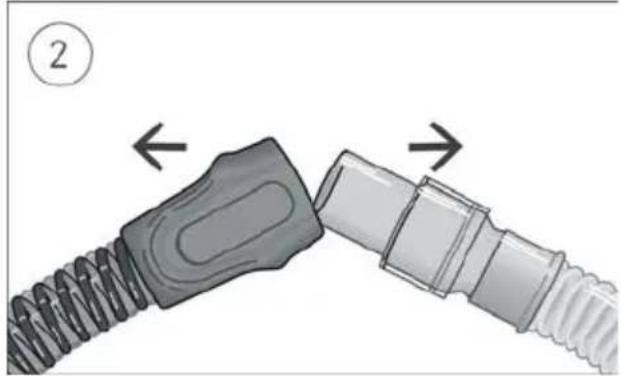
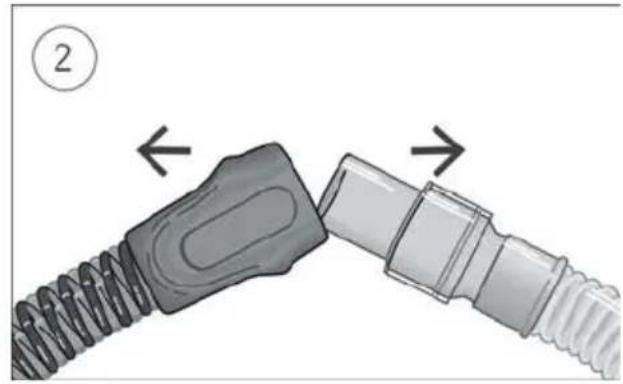
- Connect the assembled mask to the free end of the air tubing.

WARNING
Make sure that you arrange the air tubing so that it will not twist around the head or neck.
Setup with supplemental oxygen
To set up the ClimateLineAir Oxy with supplemental oxygen, perform the steps outlined in the setup section and the following additional steps.
natural_image
Mechanical assembly diagram showing two connected gears with shafts and housing (no text or symbols)
natural_image
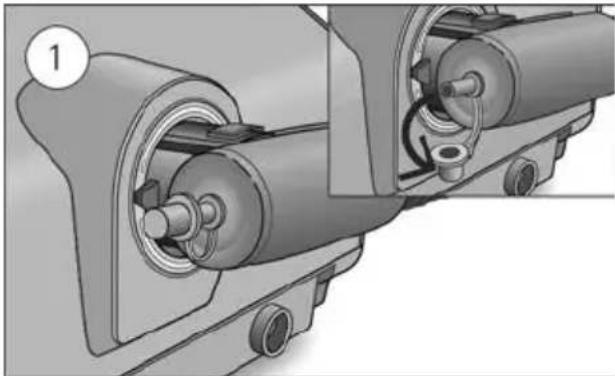
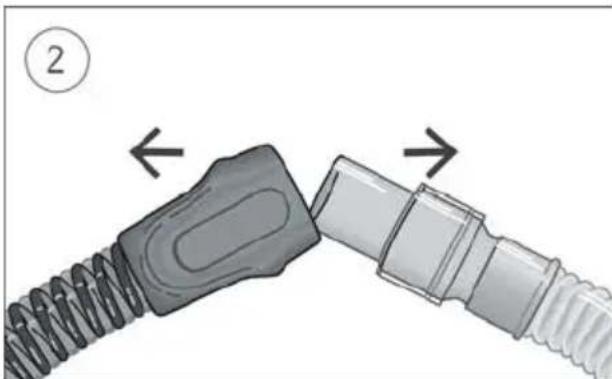
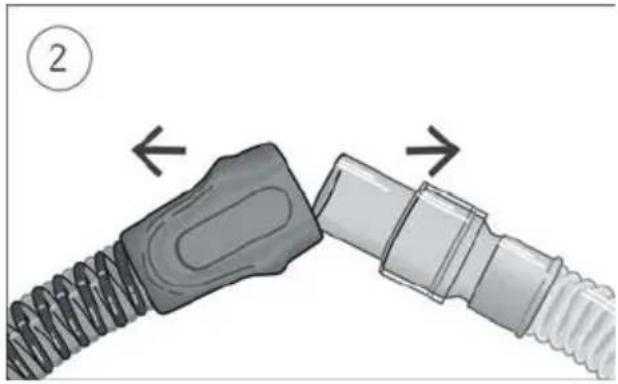
Mechanical assembly diagram showing two connected components with a numbered label (2), no visible text or symbols.- Remove the cap from the oxygen connector.
- Connect the oxygen supply tubing to the oxygen connector. Make sure it is firmly attached.
WARNING
Supplemental oxygen must not be used while smoking or in the presence of an open flame.
Notes:
- Before adding oxygen, familiarize yourself with the specific warnings relating to the use of supplemental oxygen. These can be found at the end of your device User Guide.
- If you use the ClimateLineAir Oxy without supplemental oxygen, make sure the cap of the oxygen connector is firmly attached.
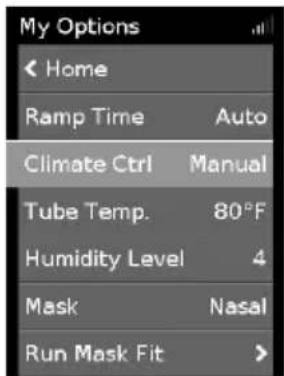
Climate Control
Climate Control is an intelligent system that controls the humidifier and the ClimateLineAir heated air tubing to deliver constant, comfortable temperature and humidity levels during therapy.
Designed to prevent dryness of the nose and mouth, it maintains the set temperature and relative humidity while you sleep. Climate Control can be set to either Auto or Manual and is only available when both the ClimateLineAir and the HumidAir humidifier are attached.
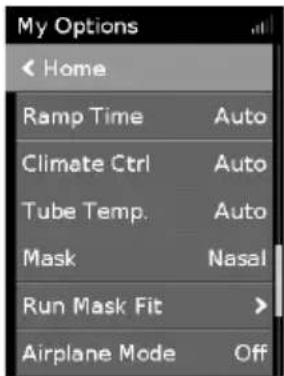
Climate Control Auto
Climate Control Auto is the recommended and default setting. Climate Control Auto is designed to make therapy as easy as possible, so there is no need to change the temperature or humidity settings.
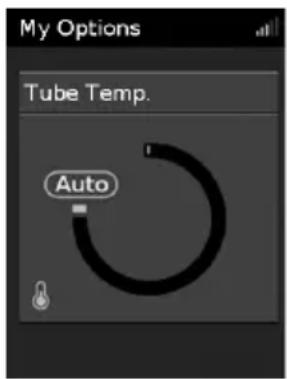
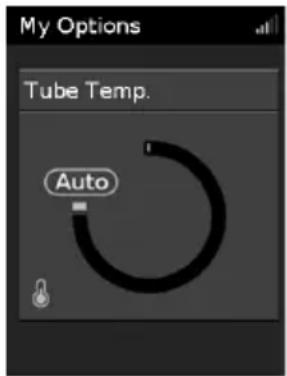
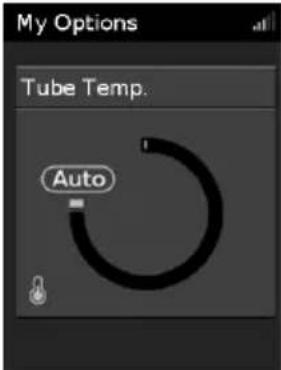
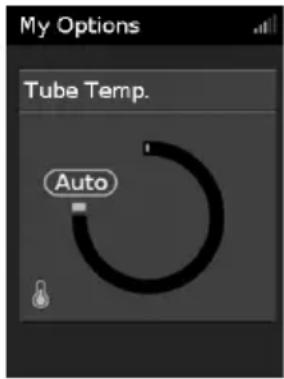
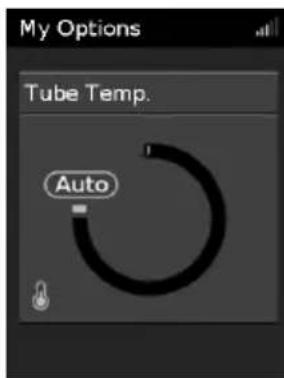
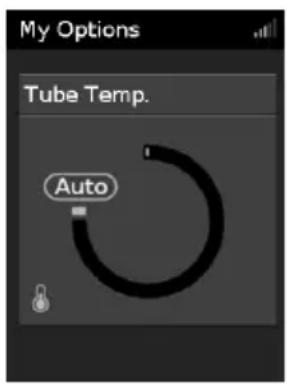
The Tube Temperature is set to Auto (27°C) and Climate Control adjusts the humidifier output to maintain a constant, comfortable humidity level of 85% relative humidity while protecting against rainout (water droplets in the air tubing and mask).
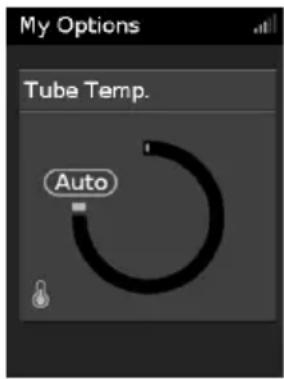
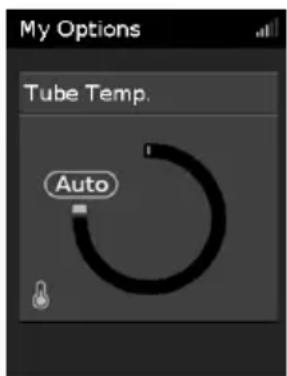
Tube Temperature
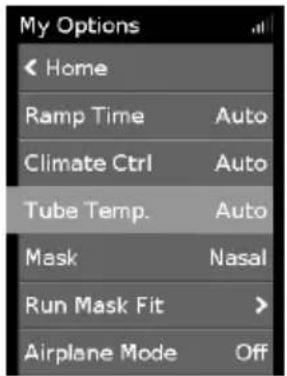
In Climate Control Auto there is no need to change any settings, but if the air in the mask feels too warm or cold you can adjust the tube temperature to find what is most comfortable for you. You can set the Tube Temperature to anywhere between 16–30°C, or turn it off completely.
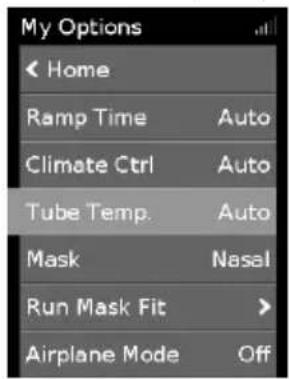

To adjust the Tube Temperature:
-
In My Options, turn the dial to highlight Tube Temp. and then press the dial.
-
Turn the dial to adjust the temperature and press the dial to save the change.
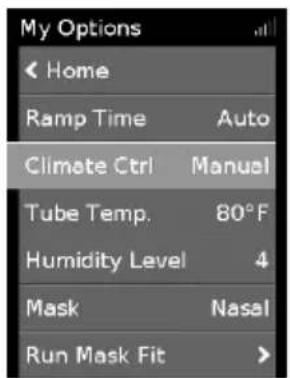
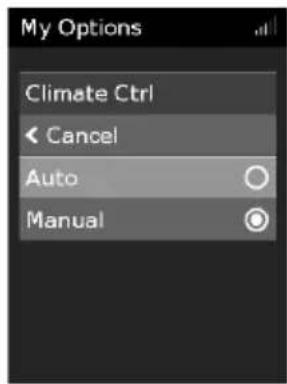
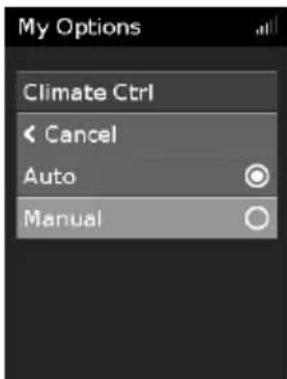
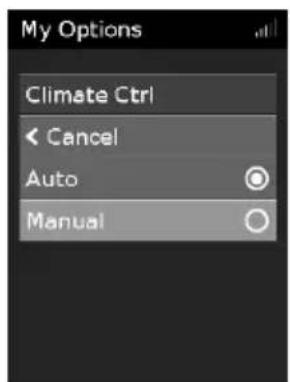
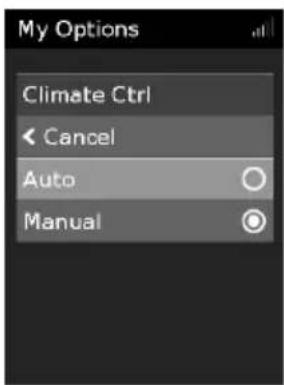
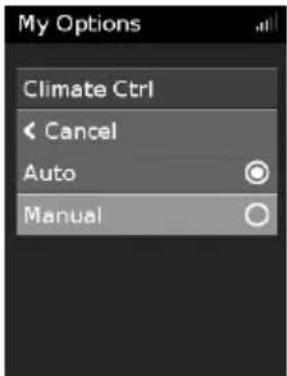
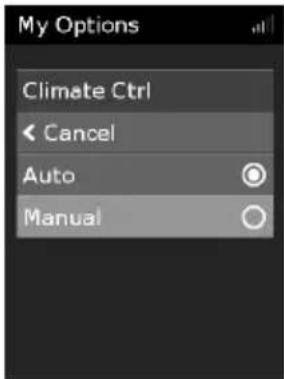
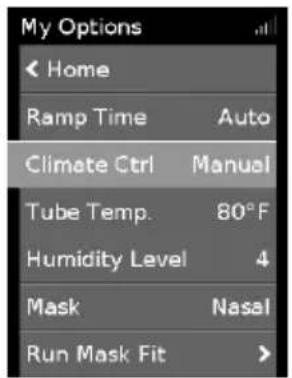
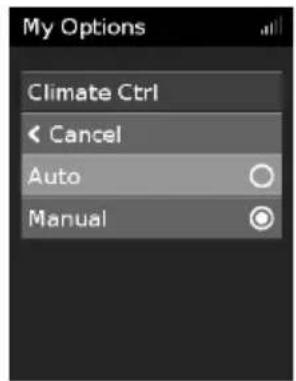
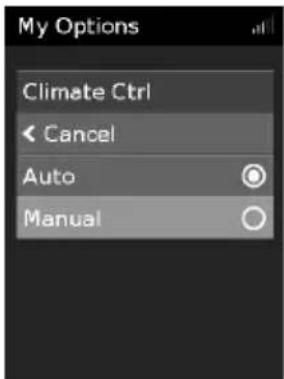
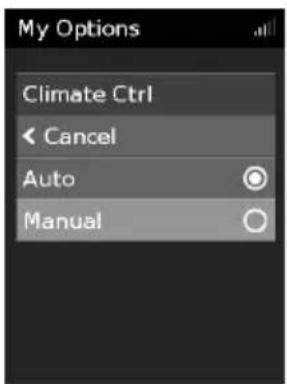
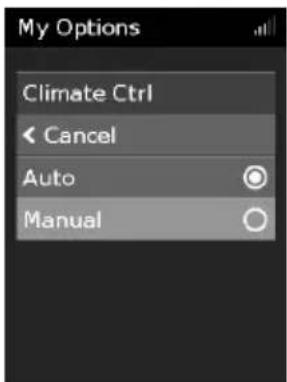
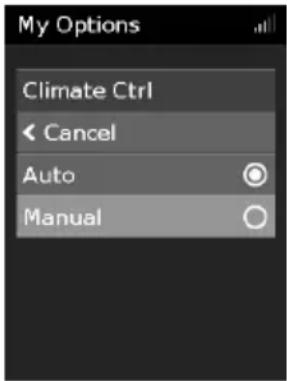
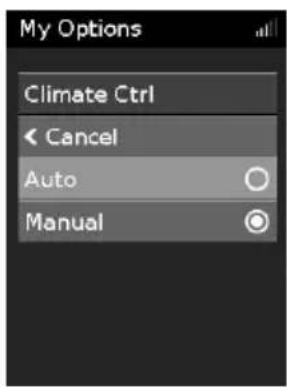
Climate Control Manual
Designed to offer you more flexibility and control over your settings, Climate Control Manual lets you adjust the temperature and humidity to the setting which is most comfortable for you.
In Climate Control Manual, the tube temperature and the humidity level can be set independently however, rainout protection is not guaranteed. If rainout does occur, first try increasing the tube temperature. If the air temperature becomes too warm and rainout continues, try decreasing the humidity.
To change to Climate Control Manual:
-
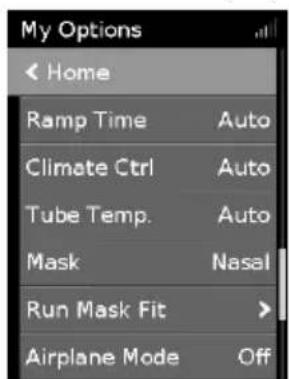
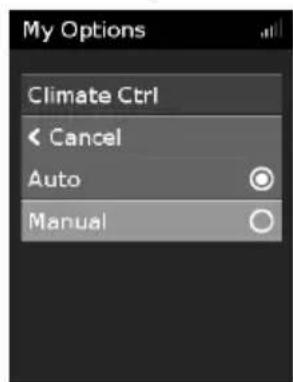
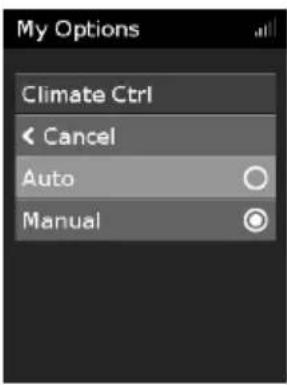
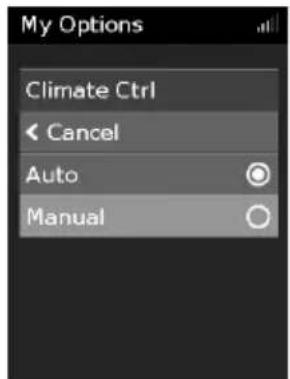
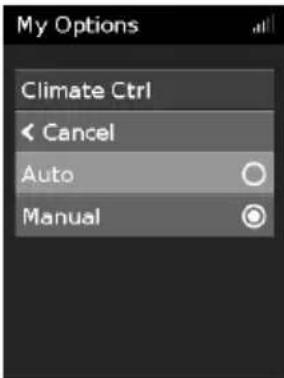
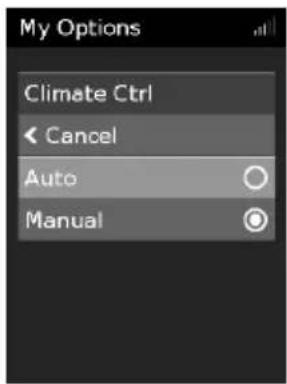
In My Options, turn the dial to highlight Climate Ctrl and then press the dial.
-
Turn the dial to select Manual and press the dial to save the change.
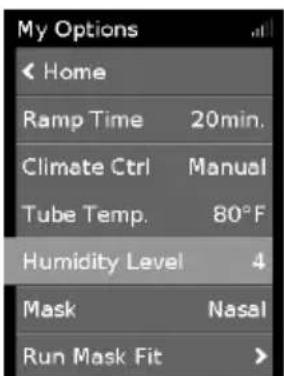
Humidity Level
The humidifier moistens the air and is designed to make therapy more comfortable. If you are getting a dry nose or mouth, turn up the humidity. If you are getting any moisture in your mask, turn down the humidity.
You can set the Humidity Level to Off or between 1 and 8, where 1 is the lowest humidity setting and 8 is the highest humidity setting.
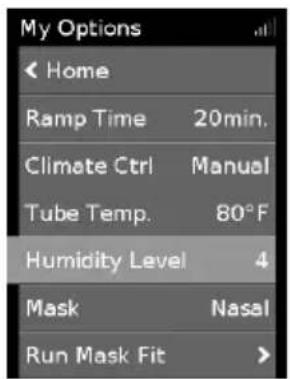

To adjust the Humidity Level:
-
In My Options, turn the dial to highlight Humidity Level and then press the dial.
-
Turn the dial to adjust the humidity level and press the dial to save the change.
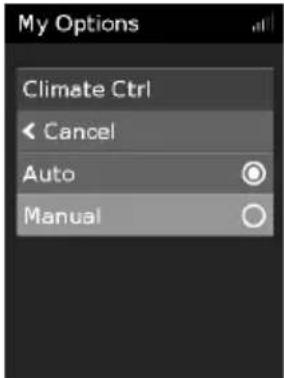
If you have been using Climate Control Manual and want to return to Climate Control Auto, follow the instructions below.
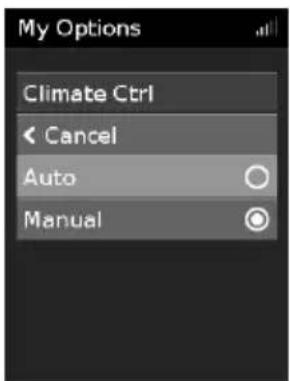
To change to Climate Control Auto:
-
In My Options, turn the dial to highlight Climate Ctrl and then press the dial.
-
Turn the dial to select Auto and then press the dial to save the change.
Caring for your ClimateLineAir
It is important that you regularly clean your air tubing to make sure you receive optimal therapy. The following sections will help you with disconnecting, cleaning, checking and reconnecting your air tubing.
Disconnecting

natural_image
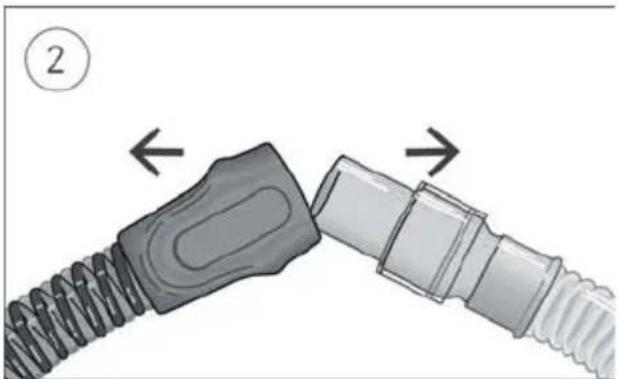
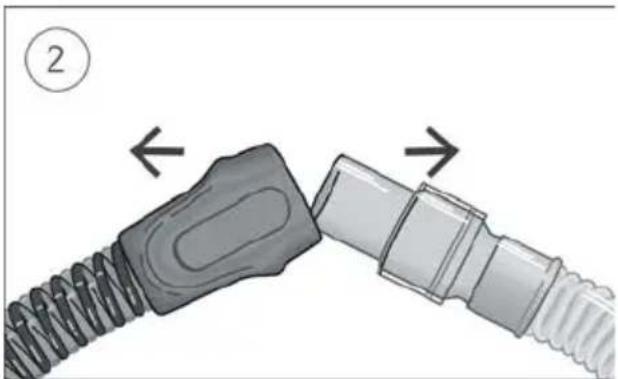
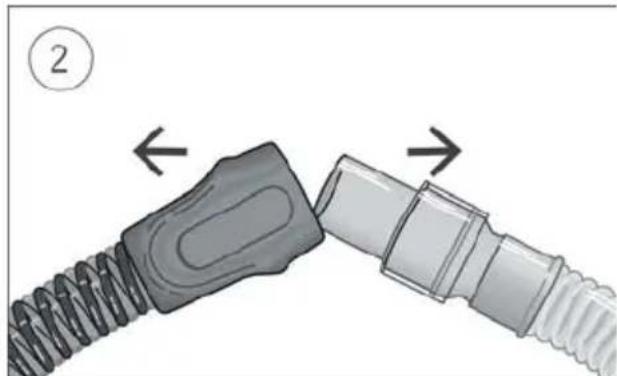
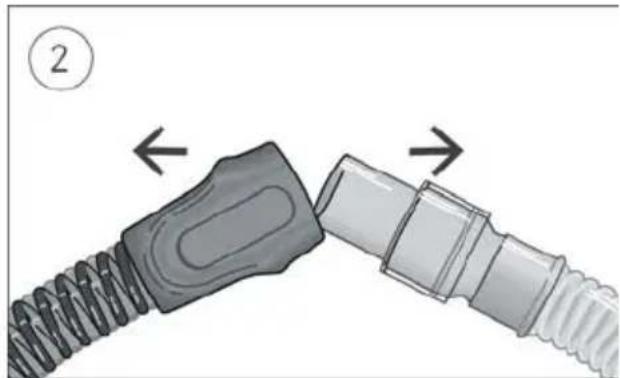
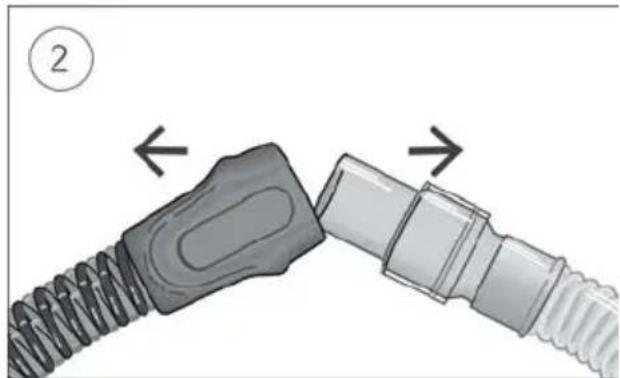
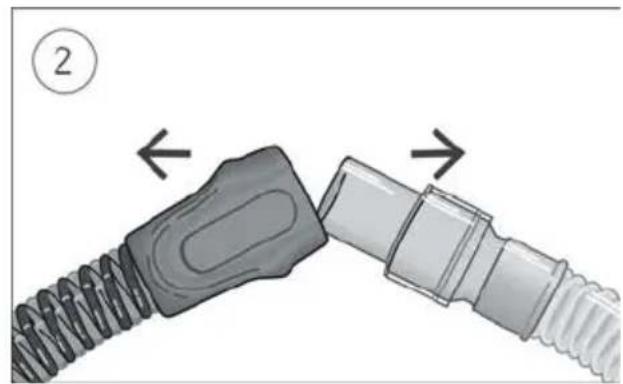
Diagram showing two connected cable connectors with directional arrows indicating movement (no text or symbols)- Hold the cuff of the air tubing, apply gentle pressure to the release buttons and pull it away from the device.
- Hold both the cuff of the air tubing and the swivel of the mask, then gently pull apart.
Note: Only hold and pull the cuff of the air tubing. Do not hold or pull the tubing itself as it may cause damage.
Cleaning
You should clean the air tubing weekly as described.
- Wash the air tubing in warm water using mild detergent. Do not wash in a dishwasher or washing machine.
- Rinse the air tubing thoroughly and allow to dry, out of direct sunlight and/or heat.
Checking
You should regularly check the air tubing for any damage. If there are any holes, tears or cracks you should replace it.
Reconnecting the air tubing
When the air tubing is dry, you can reconnect it to the device.
- Connect the air tubing firmly to the air outlet located on the rear of the device.
- Connect the free end of the air tubing firmly onto the assembled mask.
Troubleshooting
If you have any problems, refer to the troubleshooting section of your device user guide or www.resmed.com.
For any serious incidents that occur in relation to this device, these should be reported to ResMed and the competent authority in your country.
Technical specifications
Environmental conditions
| Operating temperature: | +5°C to +35°CNote: The air flow for breathing produced by this therapy device can be higher than the temperature of the room. Under extreme ambient temperature conditions (40°C) the device remains safe. |
| Operating humidity: | 10 to 95% relative humidity, non-condensing |
| Operating altitude: | Sea level to 2,591 m; air pressure range 1013 hPa to 738 hPa |
| Storage and transport temperature: | -20°C to +60°C |
| Storage and transport humidity: | 5 to 95% relative humidity, non-condensing |
Electromagnetic compatibility / Air tubing resistance to flow and compliance values
| Refer to the device User Guide or ResMed.com. | |||
| Temperature | |||
| Temperature range: | +16 to +30°C | ||
| Cut-out: +41°C | |||
| Operating pressure range | |||
| Maximum recommended pressure | 30 cm H2O (30 hPa) | ||
| Physical | |||
| Air tubing | Material | Length | Inner diameter |
| ClimateLineAir | Flexible plastic and electrical components | 2 m | 15 mm |
| ClimateLineAir Oxy | Flexible plastic and electrical components | 1.9 m | 19 mm |
| Design Life | |||
| ClimateLineAir, ClimateLineAir Oxy | 6 months | ||
Symbols
The following symbols may appear on the product or packaging.

Manufacturer. European Authorized
Representative. REF Catalog number. LOT Batch code.
Rx Only Prescription only (In the US, Federal law restricts these devices to sale by or on the order of a physician). Humidity
limitation. Temperature limitation. Atmospheric
pressure limitation. e China pollution control logo 1.10 20
China pollution control logo 2. Importer: Medical device.
See symbols glossary at ResMed.com/symbols.

Environmental information
This device should be disposed of separately, not as unsorted municipal waste. To dispose of your device, you should use appropriate collection, reuse and recycling systems available in your region. The use of these collection, reuse and recycling systems is designed to reduce pressure on natural resources and prevent hazardous substances from damaging the environment. If you need information on these disposal systems, please contact your local waste administration. The crossed-bin symbol invites you to use these disposal systems. If you require information on collection and disposal of your ResMed device please contact your ResMed office, local distributor or go to ResMed.com/environment.
Limited warranty
Refer to your device user guide.
DEUTSCH
Informationen zu Ihrem ClimateLineAir
natural_image
Exterior view of a modern office building (no signage)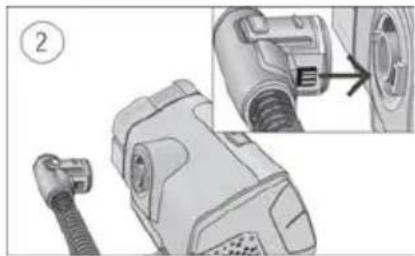
natural_image
Technical illustration of a mechanical device with a connector and close-up detail (no text or symbols)
natural_image
Illustration of a mechanical component with a threaded fitting and a numbered arrow indicating direction (no text or symbols present)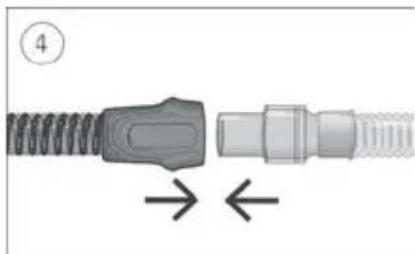
natural_image
Diagram of a connector with spring and threaded shaft, showing directional arrows (no text or symbols)natural_image
Mechanical assembly diagram showing two connected gears with shafts and housing (no text or symbols)
natural_image
Mechanical assembly diagram showing two stages of a pipe connection (no text or symbols present)
natural_image
Diagram of a connector being inserted into a cable, showing two different parts with arrows indicating direction (no text or symbols present)natural_image
Illustration of a portable electronic device with a screen and control panel (no text or symbols visible)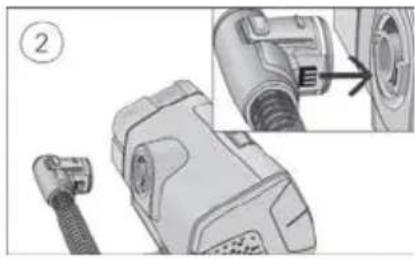
natural_image
Technical illustration of a mechanical device with a close-up view showing internal components (no text or symbols)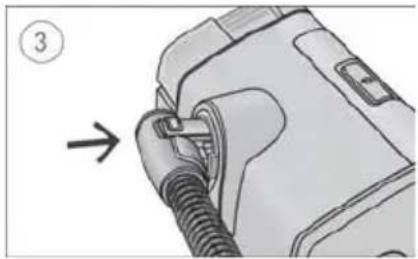
natural_image
Diagram of a medical device with a coiled tube being inserted, showing a directional arrow (no text or symbols present)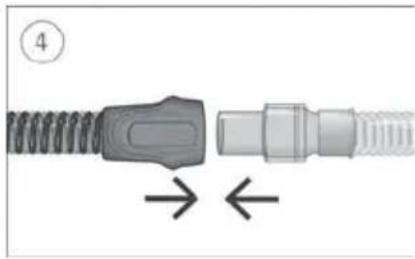
natural_image
Diagram of a connector with threaded body and internal connectors, showing directional arrows (no text or symbols)natural_image
Mechanical assembly diagram showing two connected gears with shafts and housing (no text or symbols)
natural_image
Mechanical assembly diagram showing two connected components with a pipe fitting and a circular component labeled '2' (no text or symbols present)Climate Control Auto
natural_image
Diagram showing two connected cable connectors with directional arrows indicating movement (no text or symbols)natural_image
Illustration of a portable electronic device with a screen and control panel (no text or symbols visible)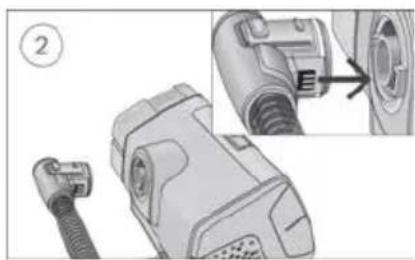
natural_image
Mechanical component diagram showing a connector with a cable and a close-up view of the internal structure (no text or symbols)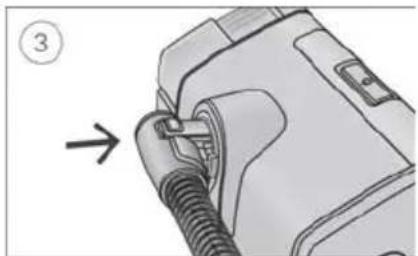
natural_image
Diagram of a car plug being inserted into a rubber hose, with no visible text or symbols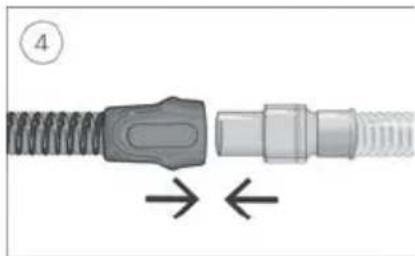
natural_image
Close-up of a mechanical connector with threaded ends and a central connector, showing directional arrows (no text or symbols)natural_image
Mechanical assembly diagram showing two connected gears with shafts and housing (no text or symbols)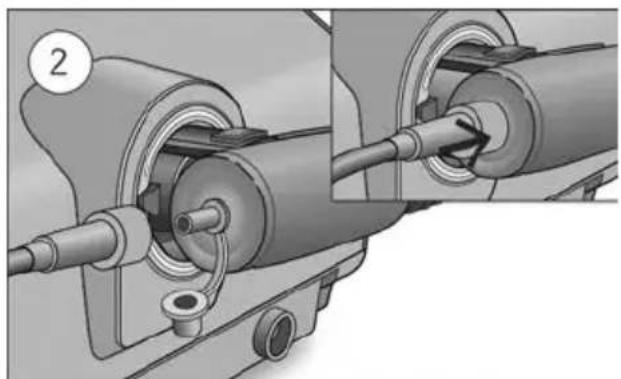
natural_image
Mechanical assembly diagram showing two connected components with a pipe and housing (no text or symbols)Climate Control Auto
natural_image
Diagram showing two connected cable connectors with directional arrows indicating movement (no text or symbols)natural_image
Illustration of a portable electronic device with a control panel and display screen (no text or symbols visible)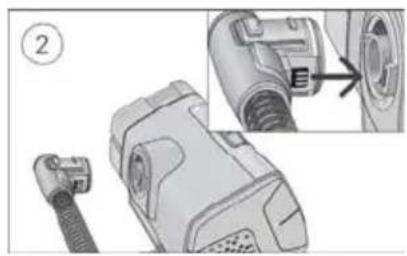
natural_image
Technical illustration of a mechanical device with a connector and close-up detail (no text or symbols)
natural_image
Diagram of a car plug being inserted into a device, showing a cable and connector (no text or symbols)
natural_image
Diagram of a connector with coiled cable and directional arrows indicating movement (no text or symbols)natural_image
Mechanical assembly diagram showing two connected gears with shafts and housing (no text or symbols)
natural_image
Mechanical assembly diagram showing pipe connection and component insertion (no text or symbols)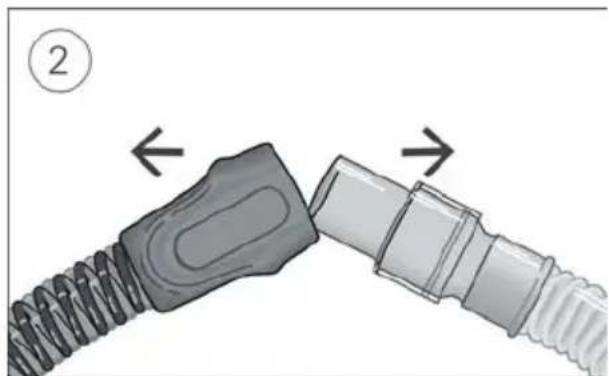
natural_image
Diagram of two connected cable connectors with directional arrows indicating movement (no text or symbols)natural_image
Illustration of a portable electronic device with a control panel and display (no text or symbols visible)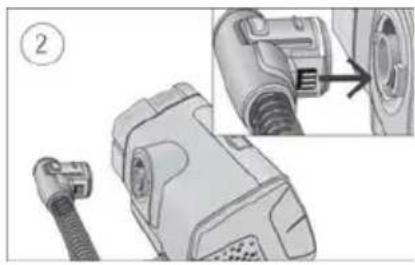
natural_image
Technical illustration of a mechanical device with a close-up view showing a component detail (no text or symbols present)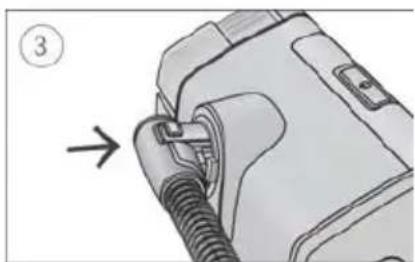
natural_image
Diagram of a mechanical device with a threaded connector and a numbered arrow indicating direction (no text or symbols present)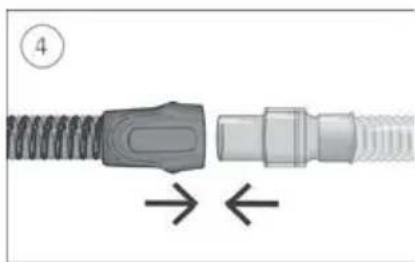
natural_image
Diagram of a connector with a coiled spring and threaded end, showing directional arrows (no text or symbols)natural_image
Mechanical assembly diagram showing two connected gears with shafts and housing (no text or symbols)
natural_image
Mechanical assembly diagram showing pipe connection and valve mechanism (no text or symbols)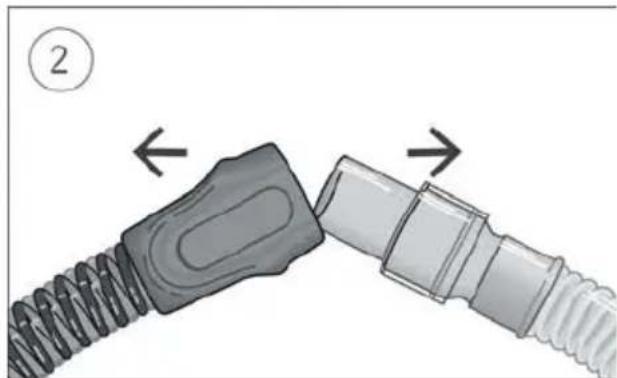
natural_image
Diagram showing two connected cable connectors with directional arrows indicating movement (no text or symbols)natural_image
Illustration of a portable electronic device with a control panel and display (no text or symbols visible)
natural_image
Technical illustration of a mechanical component with a close-up view showing a connector detail (no text or symbols present)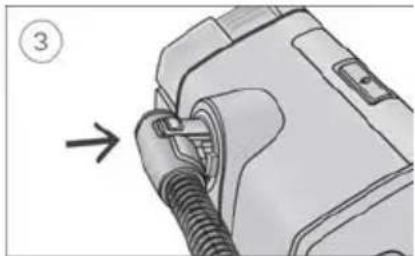
natural_image
Diagram of a device being inserted into a cable, with an arrow indicating the insertion direction (no text or symbols present)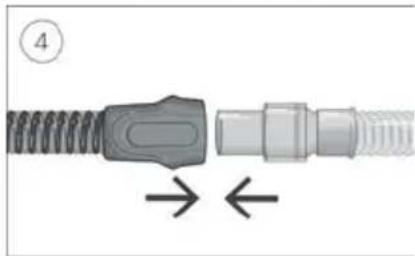
natural_image
Close-up of a mechanical connector with threaded ends and a central connector, showing directional arrows (no text or symbols)natural_image
Mechanical assembly diagram showing two connected gears with shafts and housing (no text or symbols)
natural_image
Mechanical assembly diagram showing two connected components with a pipe fitting (no text or symbols visible)Climate Control Auto
natural_image
Illustration of a portable electronic device with a control panel and display (no text or symbols visible)
natural_image
Illustration of a hairless vacuum cleaner with attached cable and connector, showing internal components and part outline (no text or symbols)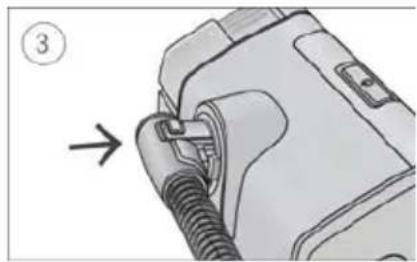
natural_image
Diagram of a mechanical device with a threaded connector and a numbered arrow indicating direction (no text or symbols present)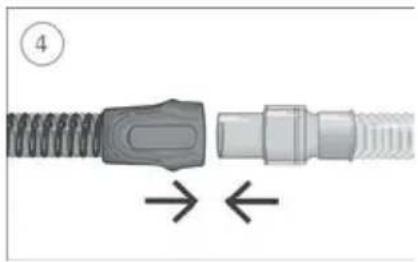
natural_image
Diagram of a connector with coiled spring and threaded shaft, showing directional arrows (no text or symbols)natural_image
Mechanical assembly diagram showing two connected gears with shafts and housing (no text or symbols)
natural_image
Mechanical assembly diagram showing two connected components with pipes and a valve (no text or symbols)Climate Control Auto
natural_image
Diagram showing two connected cable connectors with directional arrows indicating movement (no text or symbols)natural_image
Illustration of a portable electronic device with a control panel and display screen (no text or symbols visible)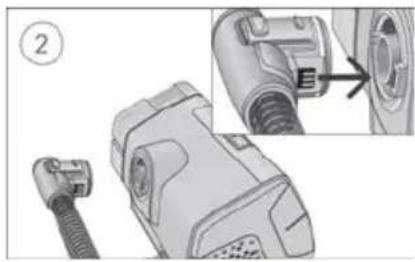
natural_image
Mechanical component diagram showing a connector with a cable, part highlighted by an arrow (no text or symbols present)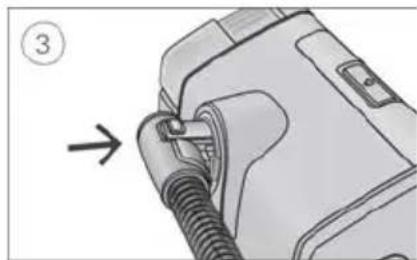
natural_image
Diagram of a mechanical device with a threaded connector and a numbered label (3), showing no readable text or symbols.
natural_image
Close-up of a mechanical connector with threaded end and internal shaft, showing directional arrows (no text or symbols)natural_image
Mechanical assembly diagram showing two connected gears with shafts and housing (no text or symbols)
natural_image
Mechanical assembly diagram showing two connected components with pipes and a valve (no text or symbols)Climate Control Auto
natural_image
Mechanical assembly diagram showing a spring-loaded component being inserted into a housing, with no visible text or symbols.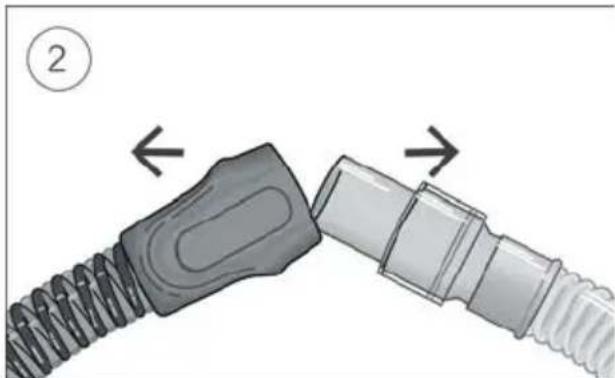
natural_image
Diagram showing two connected cable connectors with directional arrows indicating movement (no text or symbols)natural_image
Illustration of a portable electronic device with a control panel and display (no text or symbols visible)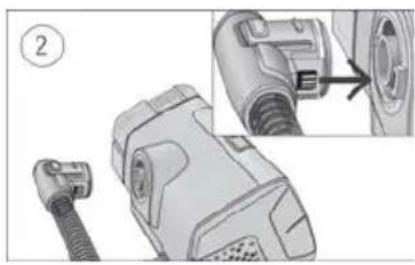
natural_image
Technical illustration of a mechanical device with a connector and close-up detail (no text or symbols)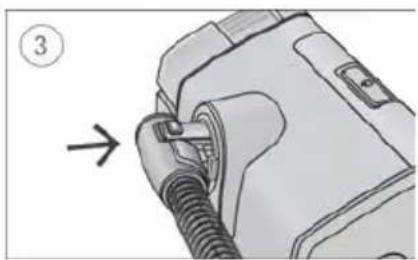
natural_image
Illustration of a medical device with a tube inserted, showing a connector and a directional arrow (no text or symbols)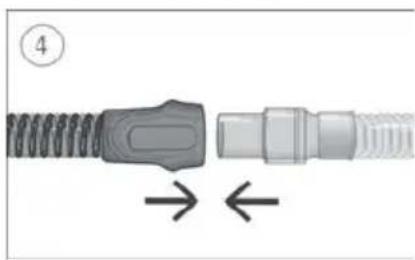
natural_image
Diagram of a connector with coiled spring and threaded shaft, showing directional arrows (no text or symbols)natural_image
Mechanical assembly diagram showing two connected gears with shafts and housing (no text or symbols)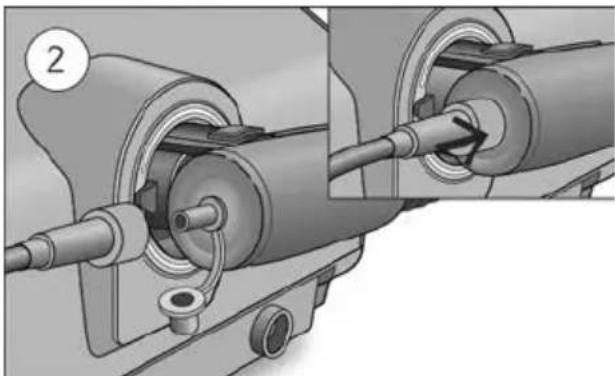
natural_image
Mechanical assembly diagram showing two connected components with a pipe fitting and a circular component labeled '2' (no text or symbols present)
natural_image
Diagram of a connector being inserted into a cable, showing two different parts with arrows indicating direction (no text or symbols present)natural_image
Illustration of a portable electronic device with a control panel and display (no text or symbols visible)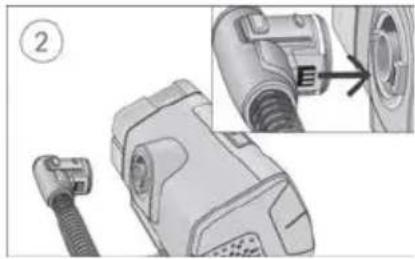
natural_image
Technical illustration of a mechanical component with a close-up view showing internal detail (no text or symbols)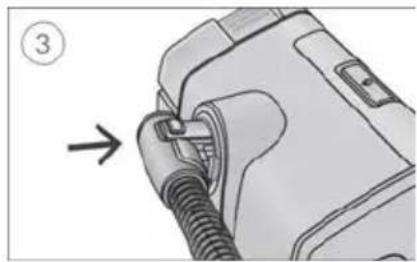
natural_image
Diagram of a medical device with a bulb inserted, showing a connector and a directional arrow (no text or symbols present)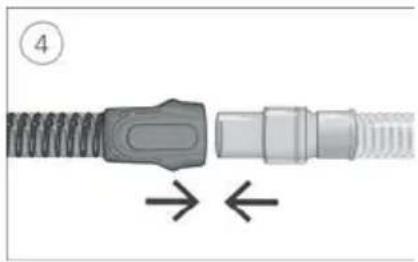
natural_image
Diagram of a mechanical connector with threaded ends and directional arrows indicating movement (no text or symbols)natural_image
Mechanical assembly diagrams showing two stages of a mechanical component with internal gears and shafts (no text or symbols)Climate Control Auto
natural_image
Mechanical assembly diagram showing a spring-loaded component being inserted into a housing, with an inset close-up highlighting the internal structure (no text or symbols present)
natural_image
Diagram showing two connected cable connectors with directional arrows indicating movement (no text or symbols)natural_image
Illustration of a portable electronic device with a screen and control panel (no text or symbols visible)
natural_image
Technical illustration of a plug connector with a close-up view showing internal components (no text or symbols)
natural_image
Illustration of a medical device with a coiled tube being inserted, no text or symbols present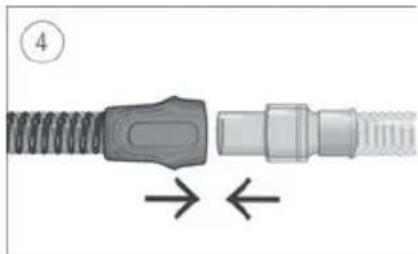
natural_image
Diagram of a connector with spring and threaded shaft, showing directional arrows (no text or symbols)natural_image
Mechanical assembly diagram showing two connected gears with shafts and housing (no text or symbols)
natural_image
Mechanical assembly diagram showing two connected components with a pipe fitting and a circular component labeled '2' (no text or symbols present)

natural_image
Diagram showing two connected cable connectors with arrows indicating movement (no text or symbols)natural_image
Illustration of a modern kitchen appliance with a digital display and control panel (no text or symbols visible)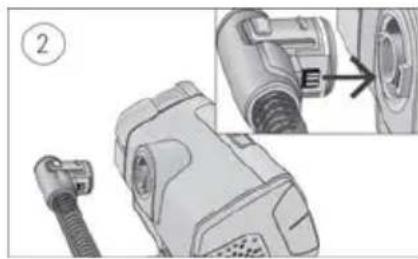
natural_image
Technical illustration of a mechanical device with a connector and close-up detail (no text or symbols)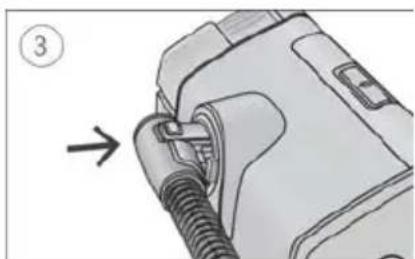
natural_image
Mechanical component diagram showing a pipe fitting with a numbered arrow indicating direction (no text or symbols present)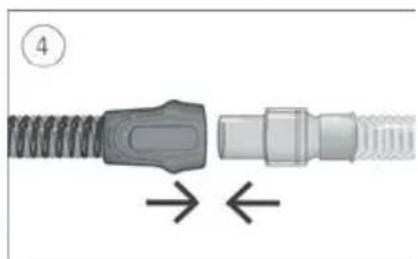
natural_image
Diagram of a connector with coiled spring and threaded end, showing directional arrows (no text or symbols)natural_image
Mechanical assembly diagrams showing two stages of a mechanical component with internal components and a cable insertion (no text or symbols)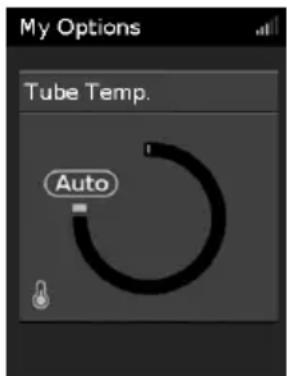
Úprava teploty hadice:


natural_image
Diagram showing two connected cable connectors with directional arrows indicating movement (no text or symbols)natural_image
Illustration of a portable electronic device with a control panel and display (no text or symbols visible)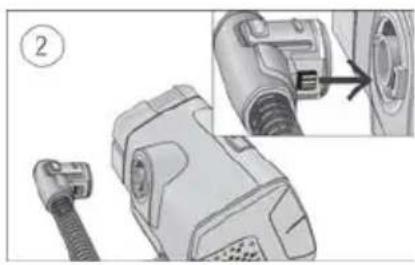
natural_image
Technical illustration of a mechanical device with a close-up view showing internal components (no text or symbols)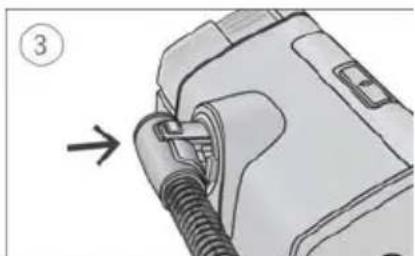
natural_image
Diagram of a mechanical component with a threaded fitting and an arrow indicating direction (no text or symbols)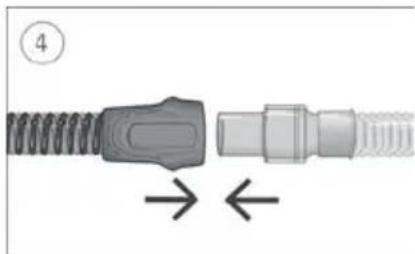
natural_image
Diagram of a connector with spring and threaded shaft, showing directional arrows (no text or symbols)natural_image
Mechanical assembly diagram showing two connected gears with shafts and housing (no text or symbols)
natural_image
Mechanical assembly diagram showing two connected components with pipes and a valve (no text or symbols)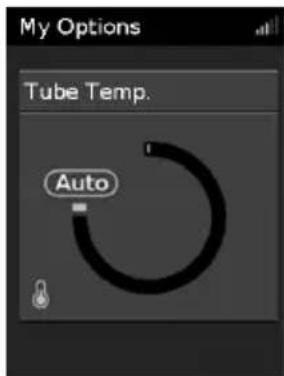


natural_image
Diagram showing two connected cable connectors with directional arrows indicating movement (no text or symbols)natural_image
Illustration of a portable electronic device with a control panel and display (no text or symbols visible)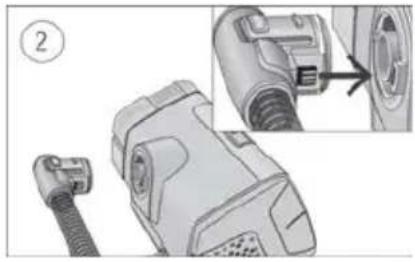
natural_image
Technical illustration of a hairless device with attached cable and connector, showing internal components and a close-up detail (no text or symbols)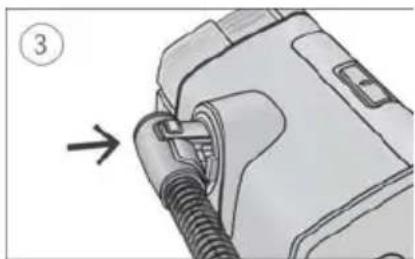
natural_image
Diagram of a device with a coiled cable and connector, showing a directional arrow (no text or symbols present)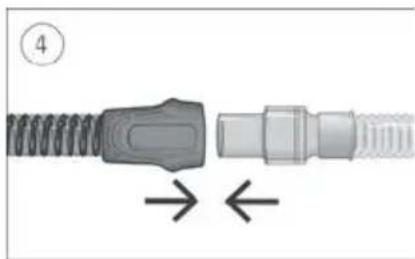
natural_image
Diagram of a connector with coiled spring and threaded end, showing directional arrows (no text or symbols)natural_image
Mechanical assembly diagram showing two connected gears with shafts and housing (no text or symbols)
natural_image
Mechanical assembly diagram showing pipe connection and cable insertion (no text or symbols)Climate Control Auto

natural_image
Diagram showing two connected cable connectors with directional arrows indicating movement (no text or symbols)natural_image
Illustration of a portable electronic device with a control panel and display (no text or symbols visible)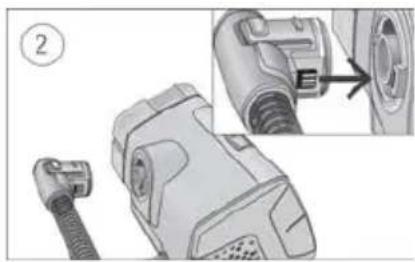
natural_image
Technical illustration of a mechanical device with a close-up view showing internal components (no text or symbols)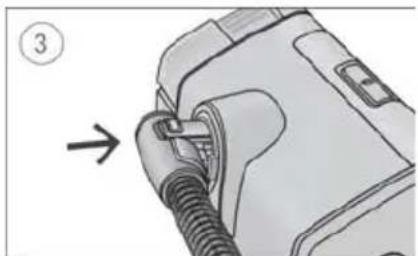
natural_image
Diagram of a car plug being inserted into a housing, with an arrow indicating the insertion direction (no text or symbols present)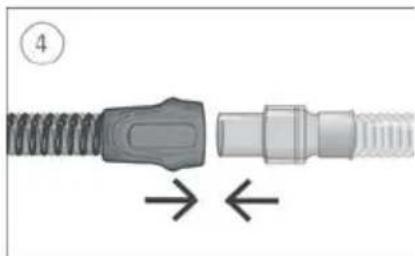
natural_image
Diagram of a connector with threaded ends and a central connector, showing directional arrows (no text or symbols)natural_image
Mechanical assembly diagram showing two connected gears with shafts and housing (no text or symbols)
natural_image
Mechanical assembly diagram showing two connected components with pipes and a valve (no text or symbols)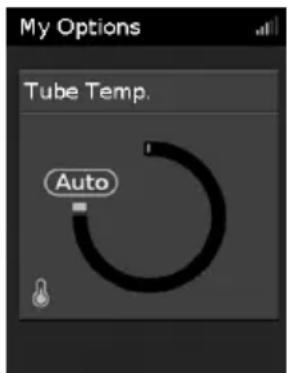

natural_image
Diagram showing two connected cable connectors with directional arrows indicating movement (no text or symbols)natural_image
Illustration of a kitchen appliance with a control panel and handle (no text or symbols visible)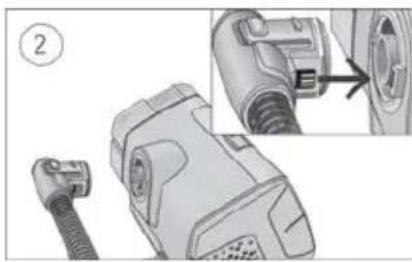
natural_image
Technical illustration of a mechanical device with a close-up view showing internal components (no text or symbols)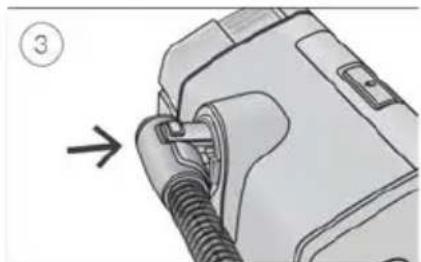
natural_image
Diagram of a mechanical device with a threaded component and an arrow indicating direction (no text or symbols)
natural_image
Diagram of a connector with spring and threaded shaft, showing directional arrows (no text or symbols)- Prepričajte se, da je pripomoček priključen in vklopljen.
- Držite manšeto cevi za zrak in poravnajte priključek cevi za zrak z vhodom za priključek.
- Potisnite manšeto vanj, tako da se priključek zaskoči. Na zaslonu pripomočka se na kratko prikaže napis ClimateLineAir connected (ClimateLineAir priključen).
- Sestavljeno masko priključite na prosti konec cevi za zrak.
OPOZORILO
Prepričajte se, da ste namestili zračno cev tako, da se ne bo zapletala okoli glave ali vratu.
natural_image
Mechanical assembly diagram showing two connected gears with shafts and housing (no text or symbols)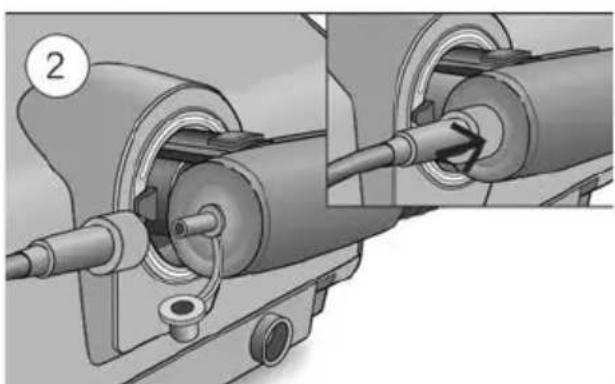
natural_image
Mechanical assembly diagram showing pipe connection and component alignment (no text or symbols)-
Odstranite pokrovček s priključka za kisik.
-
Cev za dovod kisika priključite v priključek za kisik. Prepričajte se, da je dobro pritrjen.
OPOZORILO
Prilagajanje temperature cevi:
-
Na zaslonu My Options (Moje možnosti) zavrtite okrogli gumb, da označite možnost Tube Temp. (Temp. cevi), in nato pritisnite okrogli gumb.
-
Obrnite okrogli gumb za prilagoditev temperature in ga pritisnite, da shranite spremembe.
Ročni nadzor temperature in vlažnosti
Spreminjanje samodejnega nadzora temperature in vlažnosti:
- Na zaslonu My Options (Moje možnosti) zavrtite okrogli gumb, da označite možnost Climate Ctrl (Nadzor temperature in vlažnosti), ter nato pritisnite okrogli gumb.
- Zavrtite okrogli gumb tako, da izberete možnost Auto (Samodejno), in nato okrogli gumb pritisnite, da shranite spremembo.
Nega cevi ClimateLineAir

natural_image
Diagram showing two connected cable connectors with directional arrows indicating movement (no text or symbols)- Držite manšeto cevi za zrak ter narahlo pritisnite gumba za sprostitev in cev povlecite stran od pripomočka.
- Primate manšeto cevi za zrak in zaponko maske ter ju nežno povlecite narazen.
natural_image
Illustration of a portable electronic device with a control panel and display (no text or symbols visible)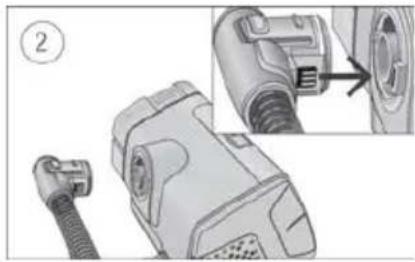
natural_image
Technical illustration of a mechanical device with a close-up view showing a component being inserted (no text or symbols present)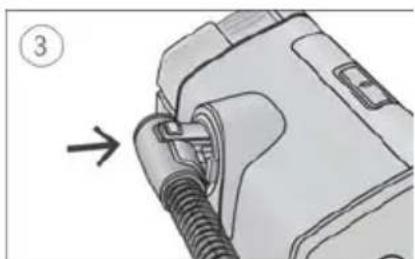
natural_image
Diagram of a mechanical component with a threaded fitting and an arrow indicating direction (no text or symbols)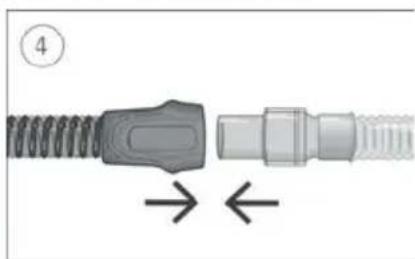
natural_image
Diagram of a connector with coiled spring and threaded end, showing directional arrows (no text or symbols)natural_image
Mechanical assembly diagram showing two connected gears with shafts and housing (no text or symbols)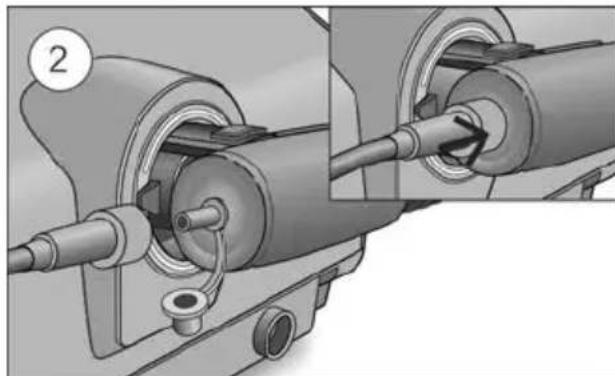
natural_image
Mechanical assembly diagram showing pipe connection and valve mechanism (no text or symbols)Climate Control Auto
Pentru a trece la Climate Control Manual:
natural_image
Diagram showing two connected cable connectors with directional arrows indicating movement (no text or symbols)natural_image
Illustration of a portable electronic device with a control panel and display (no text or symbols visible)
natural_image
Technical illustration of a mechanical device with a connector and close-up detail showing internal components (no text or symbols)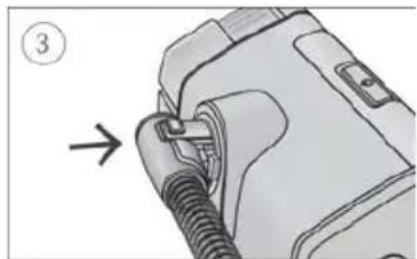
natural_image
Diagram of a mechanical device with a threaded connector and a numbered label (3), showing no readable text or symbols.
natural_image
Close-up of a mechanical connector with threaded ends and a central connector, showing directional arrows (no text or symbols)natural_image
Mechanical assembly diagram showing two connected gears with shafts and housing (no text or symbols)
natural_image
Mechanical assembly diagram showing two stages of a pipe connection (no text or symbols present)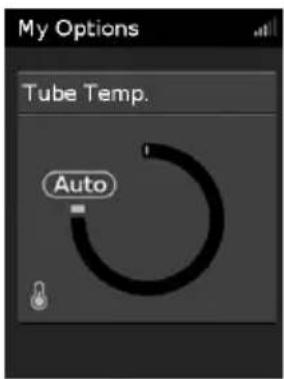

natural_image
Diagram showing two connected cable connectors with directional arrows indicating movement (no text or symbols)natural_image
Exterior view of a modern office building (no signage)
natural_image
Technical illustration of a mechanical device with a close-up view showing internal components (no text or symbols)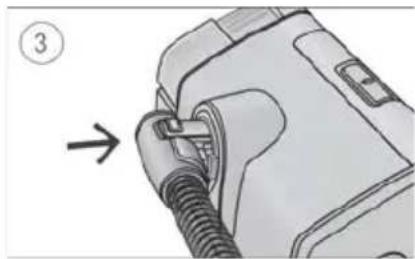
natural_image
Diagram of a medical device with a coiled tube inserted, showing a directional arrow (no text or symbols present)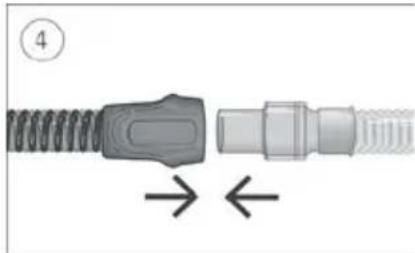
natural_image
Diagram of a connector with coiled spring and threaded shaft, showing directional arrows (no text or symbols)natural_image
Mechanical assembly diagram showing two connected gears with shafts and housing (no text or symbols)
natural_image
Mechanical assembly diagram showing two connected components with a numbered label (2), no readable text or symbols present.Climate Control Auto

natural_image
Diagram showing two connected cable connectors with directional arrows indicating movement (no text or symbols)natural_image
Illustration of a portable electronic device with a screen and control panel (no text or symbols visible)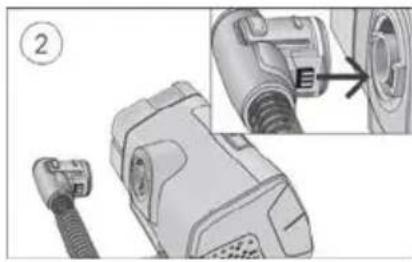
natural_image
Technical illustration of a connector with a cable and internal components, showing a close-up view of the connector (no text or symbols present)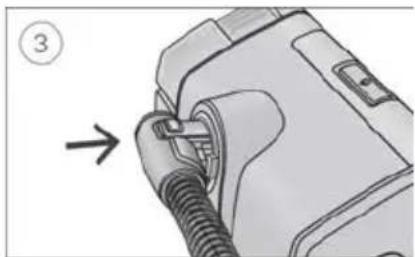
natural_image
Diagram of a mechanical device with a coiled cable and connector, showing an arrow pointing to a component (no text or symbols present)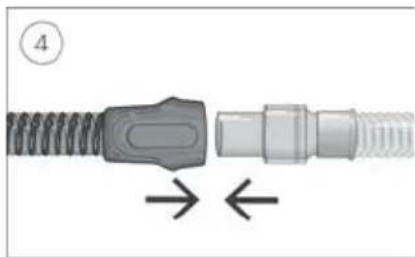
natural_image
Diagram of a mechanical connector with threaded ends and a central connector, showing directional arrows (no text or symbols)natural_image
Mechanical assembly diagram showing two connected gears with shafts and housing (no text or symbols)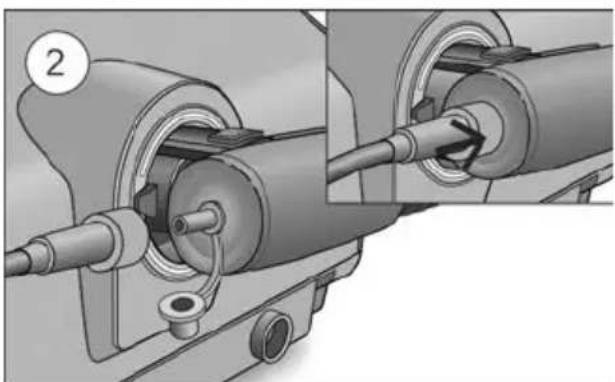
natural_image
Mechanical assembly diagram showing two connected components with a pipe fitting (no text or symbols visible)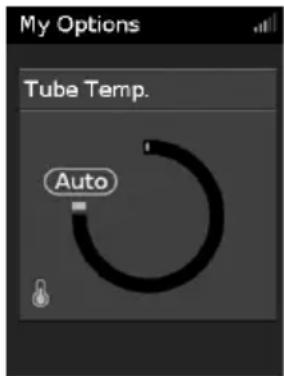
natural_image
Mechanical assembly diagram showing a spring-loaded component being inserted into a housing, with no visible text or symbols.
natural_image
Diagram showing two connected cable connectors with directional arrows indicating movement (no text or symbols)natural_image
Illustration of a portable electronic device with a screen and control panel (no text or symbols visible)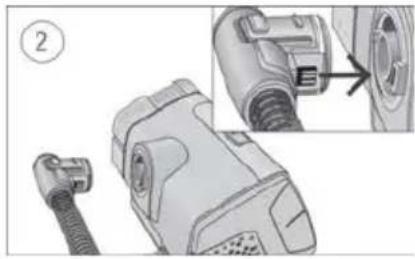
natural_image
Technical illustration of a mechanical device with a close-up view showing internal components (no text or symbols)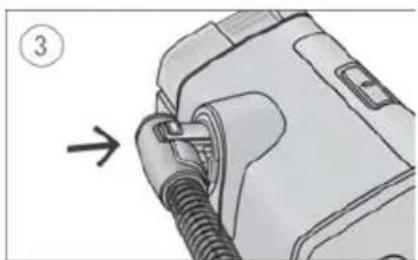
natural_image
Illustration of a mechanical component with a threaded fitting and an arrow indicating direction (no text or symbols)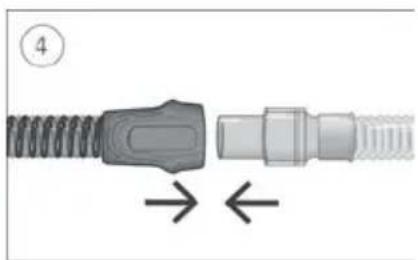
natural_image
Diagram of a connector with spring and threaded shaft, showing directional arrows (no text or symbols)natural_image
Mechanical assembly diagram showing two connected gears with shafts and housing (no text or symbols)
natural_image
Mechanical assembly diagram showing two connected components with a circular component labeled '2' (no text or symbols present)- Skinite poklopac s konektora za kisik.
- Spojite cijev za dovod kisika na konektor za kisik. Provjerite je li čvrsto pričvršćen.
⚠️ UPOZORENJE
Dodatni kisik ne smije se upotrebljavati dok pušite ili u prisutnosti otvorenog plamena.
Napomene:
- Prije dodavanja kisika proučite i upoznajte se sa specifičnim upozorenjima koja se odnose na upotrebu dodatnog kisika. Ona se mogu pronaći na kraju Korisničkog vodiča uređaja.
- Ako upotrebljavate uređaj ClimateLineAir Oxy bez dopunskog kisika, provjerite je li čep konektora za kisik čvrsto pričvršćen.
Climate Control (Regulacija klime)
Za podešavanje temperature cijevi:
- U My Options (Moje opcije) okrenite brojčanik za označavanje Tube Temp. (Temperatura cijevi), a zatim pritisnite brojčanik.
- Okrenite kotačić za podešavanje temperature i pritisnite kotačić za spremanje promjene.
Climate Control Manual (Ručna regulacija klime)
Osmišljen za pružanje veće razine fleksibilnosti i kontrole nad postavkama, Climate Control Manual (Ručna regulacija klime) omogućuje vam podešavanje temperature i vlažnosti na postavke koje su vam najugodnije.
U opciji Climate Control Manual (Ručna regulacija klime) Tube Temperature (Temperatura cijevi) i Humidity Level (Razina vlažnosti) mogu se podesiti neovisno, no nije zajamčena zaštita od kondenzacije. Ako dode do kondenzacije, prvo pokušajte povećati temperaturu cijevi. Ako temperatura zraka previše poraste i nastavi se stvarati kondenzacija, pokušajte smanjiti vlažnost.

Za promjenu opcije Climate Control Manual (Ručna regulacija klime):
- U My Options (Moje opcije) okrenite brojčanik za označavanje Climate Ctrl (Regulacija klime), a zatim pritisnite brojčanik.
- Okrenite kotačić da odaberete opciju Manual (Ručno) i pritisnite kotačić za spremanje promjene.
Razina vlažnosti
Ovlaživač ovlažuje zrak i namijenjen je za ugodniju terapiju. Ako vam se nos ili usta suše, pojačajte ovlaživanje. Ako vam u masku ulazi vlaga, smanjite ovlaživanje.
Razinu vlažnosti možete podesiti na Isključeno ili između 1 i 8, pri čemu je 1 najniža postavka vlažnosti, a 8 je najviša postavka vlažnosti.

Da biste podesili Razinu vlažnosti:
- U My Options (Moje opcije) okrenite brojčanik za označavanje Humidity Level (Razina vlažnosti), a zatim pritisnite brojčanik.
- Okrenite brojčanik za podešavanje razine vlažnosti, a zatim pritisnite brojčanik za spremanje promjene.
Ako ste koristili opciju Climate Control Manual (Ručna regulacija klime) i želite se vratiti na Climate Control Auto (Automatska regulacija klime), slijedite upute u nastavku.
Za prelazak na Climate Control Auto (Automatska regulacija klime):
- U My Options (Moje opcije) okrenite brojčanik za označavanje Climate Ctrl (Regulacija klime), a zatim pritisnite brojčanik.
- Okrenite brojčanik za odabir Auto (Automatski), a zatim pritisnite brojčanik za spremanje promjene.
Briga o vašem uređaju ClimateLineAir

natural_image
Diagram of a connector being inserted into a cable, showing two different parts with arrows indicating direction (no text or symbols present)- Držite manžetnu cijevi za zrak, lagano pritisnite tipke za otpuštanje i povucite je dalje od uređaja.
- Primate manžetu cijevi za zrak i okretni zglob maske i pažljivo ih razdvojite.
natural_image
Illustration of a portable electronic device with a control panel and display (no text or symbols visible)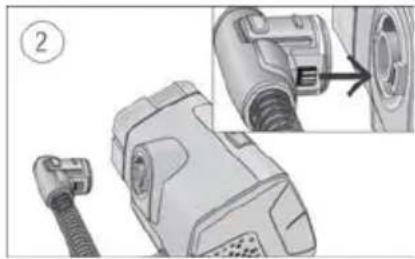
natural_image
Technical illustration of a mechanical device with a close-up view showing internal components (no text or symbols)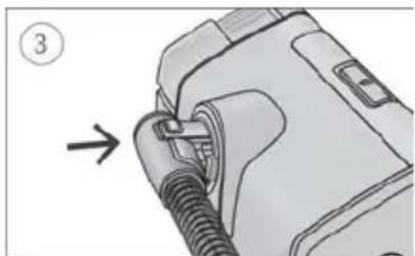
natural_image
Diagram of a mechanical device with a threaded connector and a numbered label (3), showing no readable text or symbols.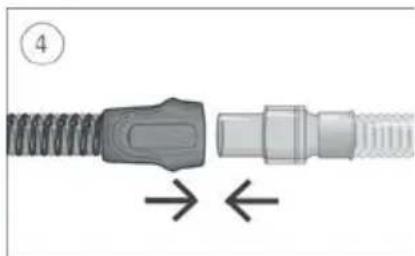
natural_image
Diagram of a connector with spring and threaded shaft, showing directional arrows (no text or symbols)natural_image
Mechanical assembly diagram showing two connected gears with shafts and housing (no text or symbols)
natural_image
Mechanical assembly diagram showing a shaft and housing with pipe connections (no text or symbols)- Nuimkite dangtelj nuo deguonies jungties.
- Deguonies tiekimo vamzdelj prijunkite prie deguonies jungties. Isitikinkite, kad jie laikosi tvirtai.
⚠️ JSPĖJIMAS
natural_image
Mechanical assembly diagram showing a spring-loaded component being inserted into a housing, with no visible text or symbols.
natural_image
Diagram showing two connected cable connectors with directional arrows indicating movement (no text or symbols)natural_image
Illustration of a portable electronic device with a control panel and display (no text or symbols visible)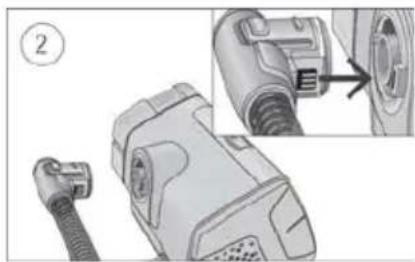
natural_image
Technical illustration of a mechanical device with a close-up view showing internal components (no text or symbols)
natural_image
Illustration of a mechanical component with a threaded fitting and a numbered arrow indicating direction (no text or symbols present)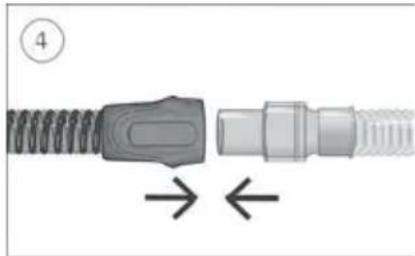
natural_image
Diagram of a connector with coiled spring and threaded end, showing directional arrows (no text or symbols)natural_image
Mechanical assembly diagram showing two connected gears with shafts and housing (no text or symbols)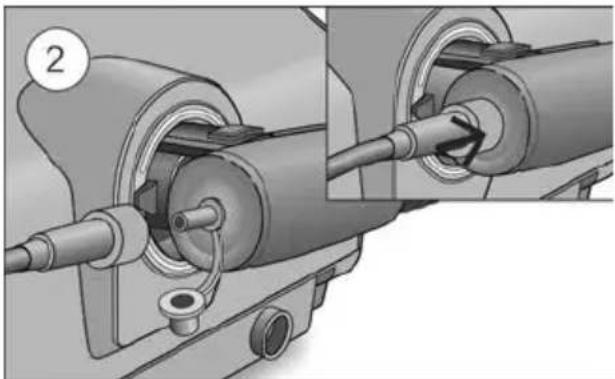
natural_image
Mechanical assembly diagram showing pipe connection and component alignment (no text or symbols)Climate Control Auto


natural_image
Diagram showing two connected cable connectors with directional arrows indicating movement (no text or symbols)-
Satveriet gaisa caurules manšeti, viegli piespiediet atbrivošanas pogas un pavelciet prom no ierices.
-
Satveriet gaisa caurules manšeti un maskas šarnīrsavienojumu un pēc tam uzmanīgi atvelciet vienu no otra.
natural_image
Illustration of a portable electronic device with a control panel and display screen (no text or symbols visible)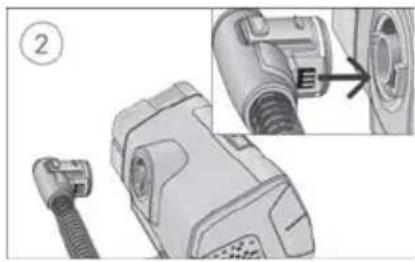
natural_image
Technical illustration of a mechanical component with a close-up view showing a pipe fitting (no text or symbols present)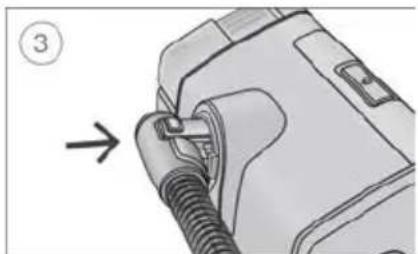
natural_image
Diagram of a mechanical device with a threaded connector and a numbered label (3), showing no readable text or symbols.
natural_image
Diagram of a connector with spring and threaded shaft, showing directional arrows (no text or symbols)natural_image
Mechanical assembly diagram showing two connected gears with shafts and housing (no text or symbols)
natural_image
Mechanical assembly diagram showing pipe connection and component alignment (no text or symbols)-
Fjarlægðu hettuna af súrefnistenginu.
-
Tengdu súrefnisgjafabarkann við súrefnistengið.


natural_image
Diagram showing two connected cable connectors with directional arrows indicating movement (no text or symbols)natural_image
Illustration of a portable electronic device with control panel and display (no text or symbols visible)
natural_image
Technical illustration of a mechanical component with a close-up view showing internal detail (no text or symbols)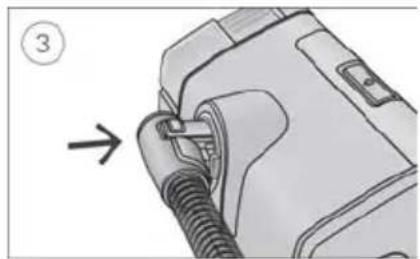
natural_image
Diagram of a medical device with a bulb inserted, showing a connector and a directional arrow (no text or symbols present)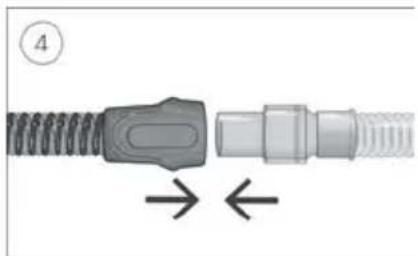
natural_image
Close-up of a mechanical connector with threaded ends and a central connector, showing directional arrows (no text or symbols)natural_image
Mechanical assembly diagram showing two connected gears with shafts and housing (no text or symbols)
natural_image
Mechanical assembly diagram showing two connected components with a numbered label (2), no visible text or symbols.

natural_image
Diagram showing two connected cable connectors with directional arrows indicating movement (no text or symbols)natural_image
Illustration of a portable electronic device with a control panel and display (no text or symbols visible)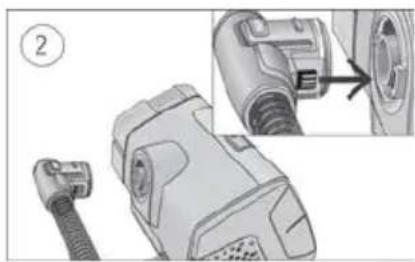
natural_image
Mechanical component diagram showing a connector with a cable and a close-up view of the internal structure (no text or symbols)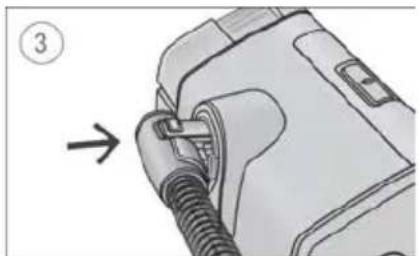
natural_image
Diagram of a medical device with a coiled tube inserted, showing a step number 3 (no text or symbols present)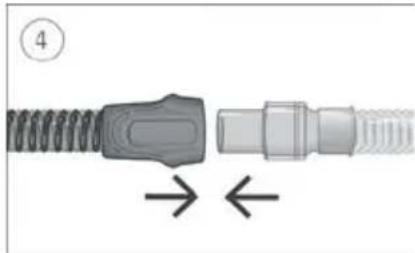
natural_image
Diagram of a connector with threaded body and internal connectors, showing directional arrows (no text or symbols)natural_image
Mechanical assembly diagram showing two connected gears with shafts and housing (no text or symbols)
natural_image
Mechanical assembly diagram showing two connected components with a numbered label (2), no visible text or symbols.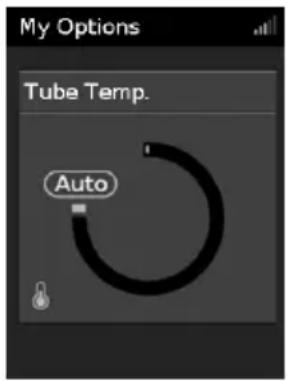


natural_image
Diagram showing two connected cable connectors with directional arrows indicating movement (no text or symbols)natural_image
Illustration of a portable electronic device with a screen and control panel (no text or symbols visible)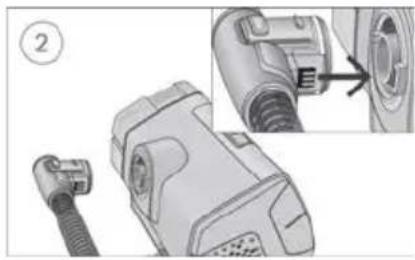
natural_image
Mechanical component diagram showing a connector with a cable and a close-up view of the internal structure (no text or symbols)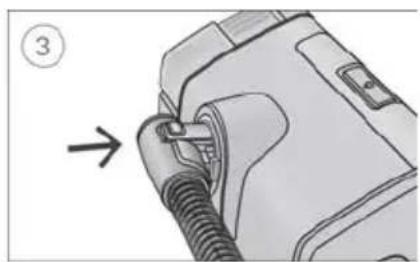
natural_image
Diagram of a medical device with a coiled tube inserted, showing a directional arrow (no text or symbols present)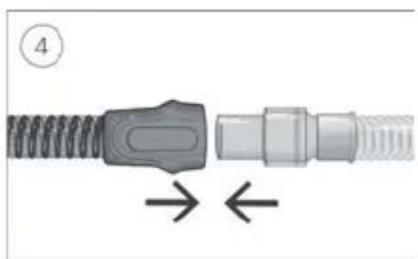
natural_image
Close-up of a mechanical connector with threaded shaft and internal connectors, showing directional arrows (no text or symbols)natural_image
Mechanical assembly diagrams showing two stages of a mechanical component with internal gears and shafts (no text or symbols)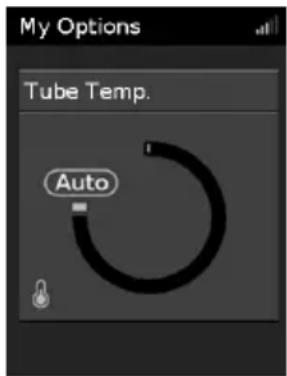

Caring for your ClimateLineAir
natural_image
Diagram showing two connected cable connectors with directional arrows indicating movement (no text or symbols)natural_image
Illustration of a portable electronic device with a screen and control panel (no text or symbols visible)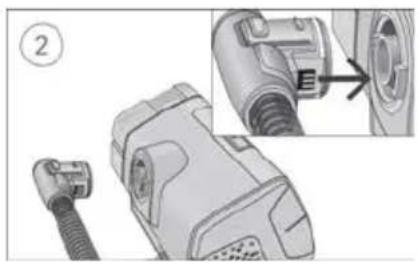
natural_image
Technical illustration of a mechanical component with an attached cable and a close-up view showing internal components (no text or symbols)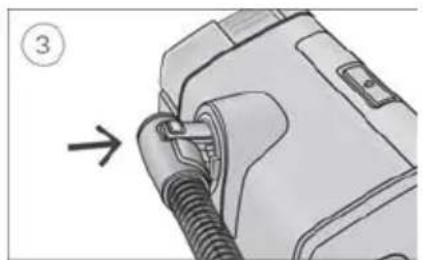
natural_image
Diagram of a mechanical device with a threaded connector and a numbered label (3), showing no readable text or symbols.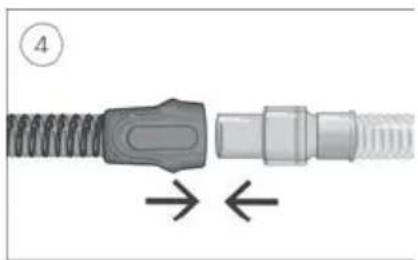
natural_image
Close-up of a mechanical connector with threaded ends and a central connector, showing directional arrows (no text or symbols)natural_image
Mechanical assembly diagram showing two connected gears with shafts and housing (no text or symbols)
natural_image
Mechanical assembly diagram showing two connected components with a numbered label (2), no readable text or symbols present.- 산소 커넥터에서 캡을 제거합니다.
튜브 온도를 조정하려면:
자동 온도 조절로 변경하려면:

natural_image
Diagram showing two connected cable connectors with directional arrows indicating movement (no text or symbols)ResMed.com/environment 를 방문하십시오.
제한 보증
기기 사용자 가이드를 참조하십시오.
简体中文
关于您的 ClimateLineAir
natural_image
Illustration of a portable electronic device with a screen and control panel (no text or symbols visible)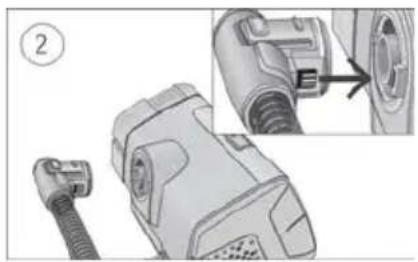
natural_image
Technical illustration of a mechanical device with a close-up view showing internal components (no text or symbols)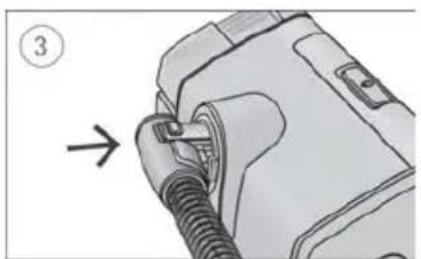
natural_image
Illustration of a medical device with a coiled tube inserted, showing a step number 3 (no text or symbols present)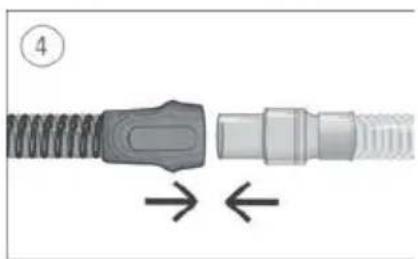
natural_image
Diagram of a connector with coiled spring and threaded end, showing directional arrows (no text or symbols)natural_image
Mechanical assembly diagram showing two connected gears with shafts and housing (no text or symbols)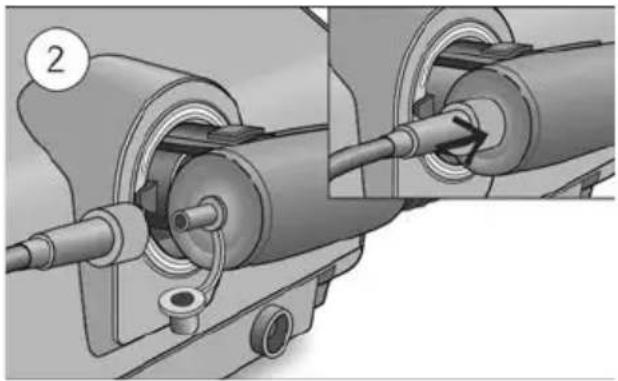
natural_image
Mechanical assembly diagram showing two connected components with a pipe fitting and a circular component labeled '2' (no text or symbols present)
natural_image
Diagram showing two connected cable connectors with directional arrows indicating movement (no text or symbols)natural_image
Illustration of a portable electronic device with a screen and control panel (no text or symbols visible)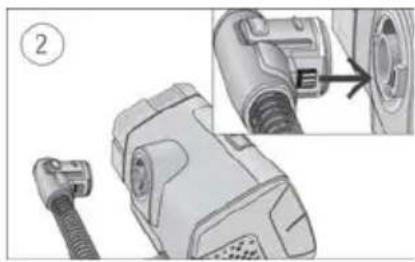
natural_image
Technical illustration of a mechanical device with a connector and close-up detail (no text or symbols)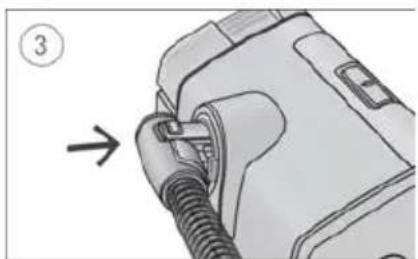
natural_image
Illustration of a medical device with a coiled tube inserted, showing a step number 3 (no text or symbols on the device itself)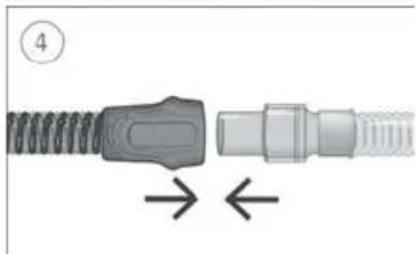
natural_image
Close-up of a mechanical connector with threaded end and spring, showing directional arrows (no text or symbols)natural_image
Mechanical assembly diagram showing two connected gears with shafts and housing (no text or symbols)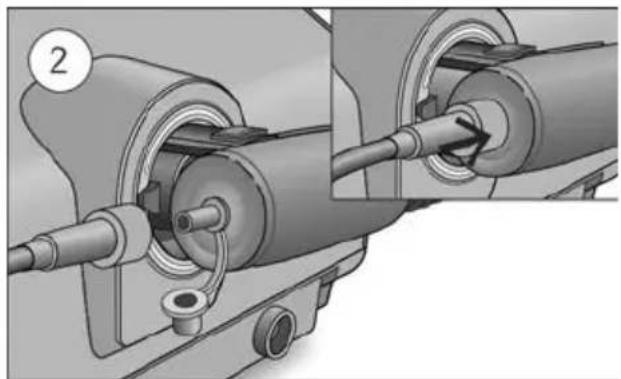
natural_image
Mechanical assembly diagram showing two connected components with a numbered label (2), no visible text or symbols.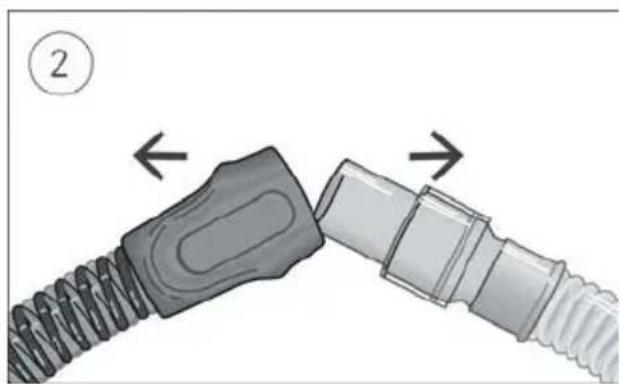
natural_image
Diagram showing two connected cable connectors with directional arrows indicating movement (no text or symbols)natural_image
Illustration of a portable electronic device with a control panel and display (no text or symbols visible)
natural_image
Technical illustration of a mechanical device with a close-up view showing internal components (no text or symbols)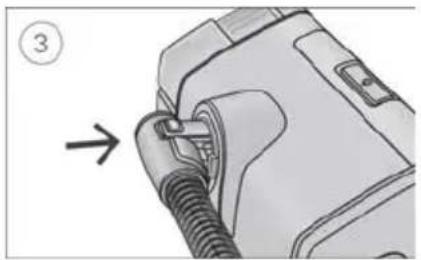
natural_image
Diagram of a mechanical device with a threaded connector and a numbered arrow indicating direction (no text or symbols present)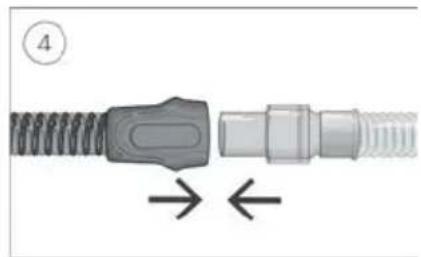
natural_image
Diagram of a connector with coiled spring and threaded shaft, showing directional arrows (no text or symbols)natural_image
Mechanical assembly diagram showing two connected gears with shafts and housing (no text or symbols)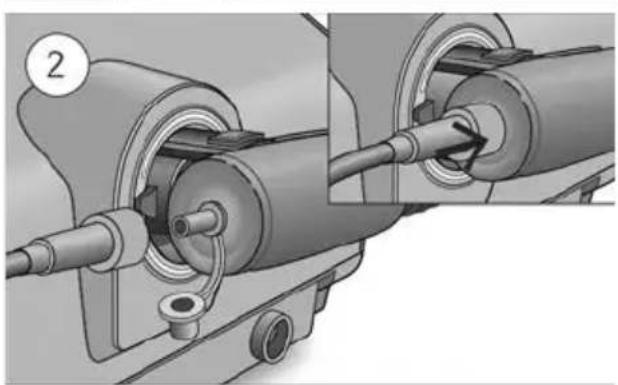
natural_image
Mechanical assembly diagram showing a shaft and housing with a pipe connection (no text or symbols)natural_image
Mechanical assembly diagram showing a spring-loaded component being inserted into a housing, with no visible text or symbols.
natural_image
Diagram showing two connected cable connectors with directional arrows indicating movement (no text or symbols)natural_image
Technical illustration of a mechanical device with a close-up view showing internal components (no text or symbols)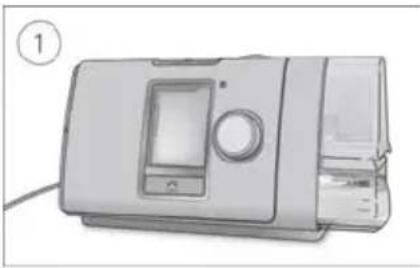
natural_image
Illustration of a portable kitchen appliance with a control panel and handle (no text or symbols visible)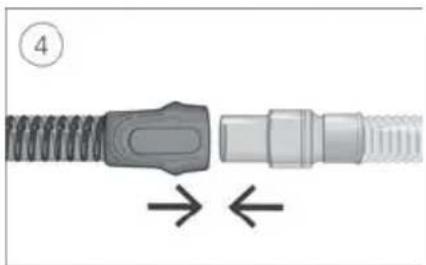
natural_image
Close-up of a mechanical connector with threaded ends and a central connector, showing directional arrows (no text or symbols)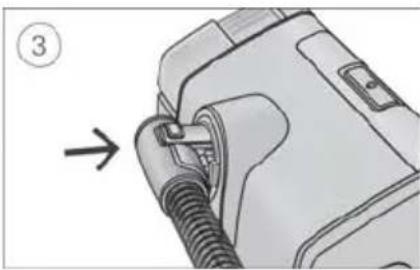
natural_image
Diagram of a medical device with a connector inserted, showing a cable being inserted (no text or symbols present)natural_image
Mechanical assembly diagram showing two stages of a mechanical component with no visible text or symbols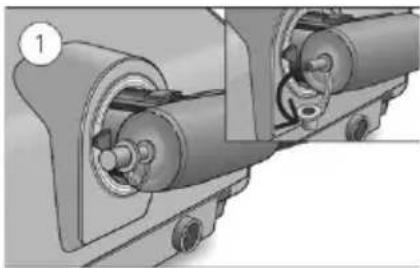
natural_image
Mechanical assembly diagram showing two connected gears with shafts and housing (no text or symbols)
natural_image
Diagram showing two connected cable connectors with directional arrows indicating movement (no text or symbols)natural_image
Technical illustration of a mechanical device with a connector and close-up detail showing internal components (no text or symbols)
natural_image
Illustration of a portable electronic device with control panel and display (no visible text or symbols)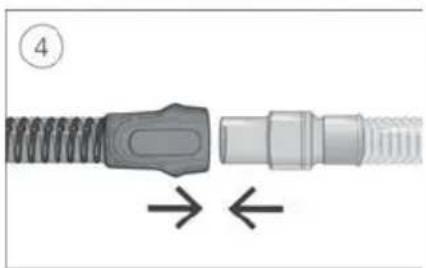
natural_image
Diagram of a mechanical connector with spring and threaded shaft, showing directional arrows (no text or symbols)
natural_image
Diagram of a device with a cable being inserted, showing a numbered step and directional arrow (no text or symbols present)natural_image
Mechanical assembly diagram showing two stages of a mechanical component with no visible text or symbols
natural_image
Mechanical assembly diagram showing two connected gears with shafts and housing (no text or symbols)-
آکسیجن کنیکثر سے کیب بٹئین-
-
آکسیjen سپلائی ثیوب کو آکسیjen کنیکتر سے جوزین یقینی بنانین کر یم مضبوطی سے منسلک بو-

Climate Control Auto
Climate Control Auto (خودکار طریقى سى موسم پر قابو کى) ایک تجویز کرده اور تیفالث ترتیب بى کو تھیرایی کو ممکنه حد تک آ Milan بنائى كى لیئ تیزانن کيا گیا بى تاكە درجه حرارت یا نمی کى ترتیبات مین تبیدلی کى کونى ضرورت نە رې- (تُوب کا درجه حرارت) آتو ( [27°C] 80°F) بیومیcheckafær آوت بث کو ايچست کرتا بى تاكە Climate Control کیا گیا بى اور بارش (بوا کى ئیوب اور ماسک مین پانی کى بوندين جمع بونى) سى بچاو کرتە بونى % 85% کى تناسبى نمی کى حامل ایک مستقل، آرام دە سطح کو برقرار رکها جلاک ۰.
Humidity Level My Options .1

natural_image
Mechanical assembly diagram showing a spring-loaded component being inserted into a housing, with an inset close-up highlighting the internal structure (no text or symbols present)
natural_image
Diagram showing two connected cable connectors with directional arrows indicating movement (no text or symbols)- ساته
دباو ئالنی اور اسى آلى سى دور کهینچ لین. 2. بوا کى ئيوب کى کف اور ماسک کى کنگى دونون کو تهامین auer، پهر آبستە سى алگ کر لین. نوع کرین: صرف بوا کى ئيوب کى کف کو تهامین اور کهینچین. صرف ئيوب کو مت تهامین یا کهینچین کیونکە اس کى وجب سى نقصان بو سکتا بى-
صفائى كرنا
أب کو وضاحت کرده کل مطابق بر بفتى بوا کی تُيوب کو صاف کرنا چابئى. 1. بلكى تُّرجنتّا استعمال کرتى بُنى گرم پانى مین بوا کی تُيوب کو دهونئين. دُشّ واشر یا واشنگ مشین مین نە دهونئين. 2. بوا کی تُيوب کو اچهی طرح کهنگالین اور براه راست دهوب اور/يا حراRT سى دور خشک بونى دین.
جانج کرنا
הכלהה. ClimateLineAir is a pro-apet in the U.S. and is a pro-apet in the U.S. and is a pro-apet in the U.S. and is a pro-apet in the U.S. and is a pro-apet in the U.S. and is a pro-apet in the U.S. and is a pro-apet in the U.S. and is a pro-apet in the U.S. and is a pro-apet in the U.S. and is a pro-apet in the U.S. and 10/10/10/10/10/10/10/10/10/10/10/10/10/10/10/10/10/10/10/10/10/10/10/10/10/10/10/10/10/10/10/10/10/10/
natural_image
Technical illustration of a mechanical device with a close-up view showing a component detail (no text or symbols present)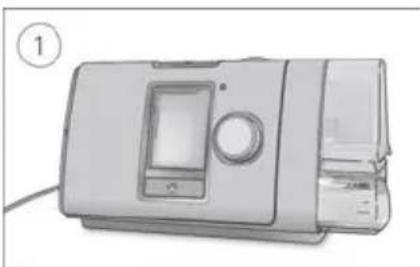
natural_image
Illustration of a modern kitchen appliance with a control panel and side panel (no text or symbols visible)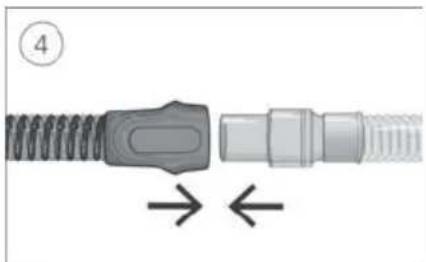
natural_image
Diagram of a connector with coiled spring and threaded shaft, showing directional arrows (no text or symbols)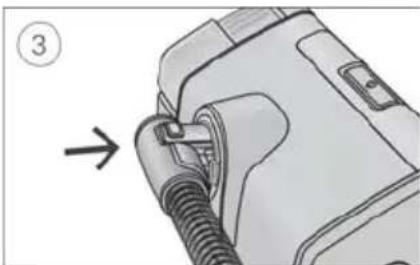
natural_image
Diagram of a car plug being inserted into a housing, showing a cable and valve (no text or symbols present)natural_image
Mechanical assembly diagram showing two stages of a pipe connection (no text or symbols)
natural_image
Mechanical assembly diagram showing two connected gears with internal components (no text or symbols)
תְרָה בְּרָה בְּרָה
natural_image
Diagram showing two connected cable connectors with directional arrows indicating movement (no text or symbols):הכלההוּרָהוּרָהוּרָהוּרָהוּרָהוּרָהוּרָהוּרָהוּרָהוּרָהוּרָהוּרָהוּרָהוּרָהוּרָה
:תְבָרִיֹם וְהַעָה
natural_image
Technical illustration of a mechanical device with a close-up view showing internal components (no text or symbols)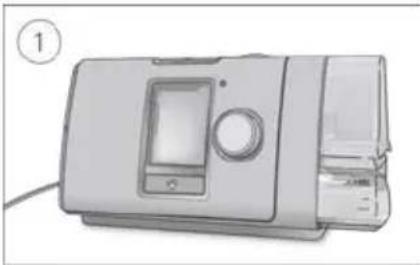
natural_image
Illustration of a microwave oven with control panel and tray (no text or symbols)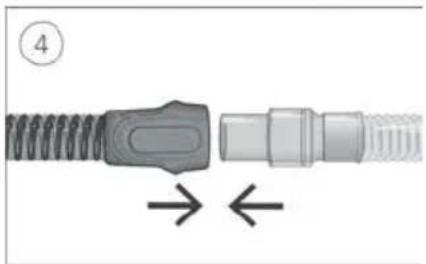
natural_image
Diagram of a mechanical connector with threaded ends and a central connector, showing directional arrows (no text or symbols)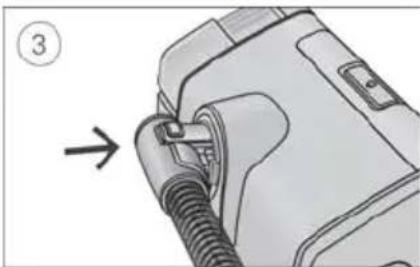
natural_image
Diagram of a mechanical device with a threaded connector and a numbered label (3), showing no readable text or symbols.natural_image
Mechanical assembly diagram showing two stages of a mechanical component with no visible text or symbols
natural_image
Mechanical assembly diagram showing two connected gears with shafts and housing (no text or symbols)
natural_image
Diagram showing two connected cable connectors with directional arrows indicating movement (no text or symbols)natural_image
Simple curved dotted line with blue, purple, and red dots (no text or symbols)ResMed

ResMed Pty Ltd
1 Elizabeth Macarthur Drive
MANUFACTURER
Bella Vista NSW 2153 Australia
See ResMed.com for other ResMed locations worldwide. AirSense, AirCurve, ClimateLine, HumidAir and Lumis are trademarks and/or registered trademarks of the ResMed family of companies. For patent and other intellectual property information, see ResMed.com/ip
© 2024 ResMed. 3781099/2 2024-06