AirFit F40 - Respiratory medical device ResMed - Free user manual and instructions
Find the device manual for free AirFit F40 ResMed in PDF.

| Product Type | Nasal pillows mask for CPAP or bi-level ventilation |
| Brand | ResMed |
| Model | AirFit F40 |
| Intended Use | Patients over 30 kg undergoing non-invasive positive pressure therapy |
| Target Populations | COPD, restrictive syndromes, central respiratory disorders, obstructive sleep apnea, obesity-hypoventilation syndrome |
| Treatment Pressure | 4 to 30 cmH₂O |
| Resistance with anti-asphyxia valve closed | 0.4 cmH₂O at 50 L/min; 1.7 cmH₂O at 100 L/min |
| Resistance with anti-asphyxia valve open | 1.1 cmH₂O at 50 L/min (inhalation and exhalation) |
| Sound Level (QuietAir vent) | Acoustic power 20 dBA, acoustic pressure 13 dBA |
| Sound Level (Multi-hole vent) | Acoustic power 34 dBA, acoustic pressure 26 dBA |
| Operating Temperature | 5 °C to 40 °C |
| Operating Humidity | 15 to 95 % RH non-condensing |
| Storage Temperature | -20 °C to 60 °C |
| Storage Humidity | 95 % RH max non-condensing |
| Magnetic Field (component surface) | < 400 mT |
| Magnetic Field (at 50 mm) | < 0.5 mT |
| Magnetic Components | Rigid frame and lower strap clips |
| Anti-Asphyxia Valve | Integrated, activates if device airflow is insufficient |
| Vent Options | QuietAir (silent) vent or Multi-hole vent |
| Size Options | Cushion Small Wide, Medium, Large; headgear Small, Standard, Large |
| Daily Cleaning | Cushion, elbow, short tube, vent: warm water + mild detergent |
| Weekly Cleaning | Headgear and rigid frame |
| Service Life | Varies by use and maintenance; replace any damaged component |
| Contraindications | Wearers of active medical implants or ferromagnetic objects (pacemakers, ICDs, etc.) |
| MRI Compatibility | Not compatible (do not use in an MRI suite) |
| Warranty | Complies with European Directive 1999/44/EC |
Frequently Asked Questions - AirFit F40 ResMed
User questions about AirFit F40 ResMed
0 question about this device. Answer the ones you know or ask your own.
Ask a new question about this device
Download the instructions for your Respiratory medical device in PDF format for free! Find your manual AirFit F40 - ResMed and take your electronic device back in hand. On this page are published all the documents necessary for the use of your device. AirFit F40 by ResMed.
USER MANUAL AirFit F40 ResMed
natural_image
A curved dotted line with black dots, resembling a stylized wave or curve (no text or symbols)ResMed
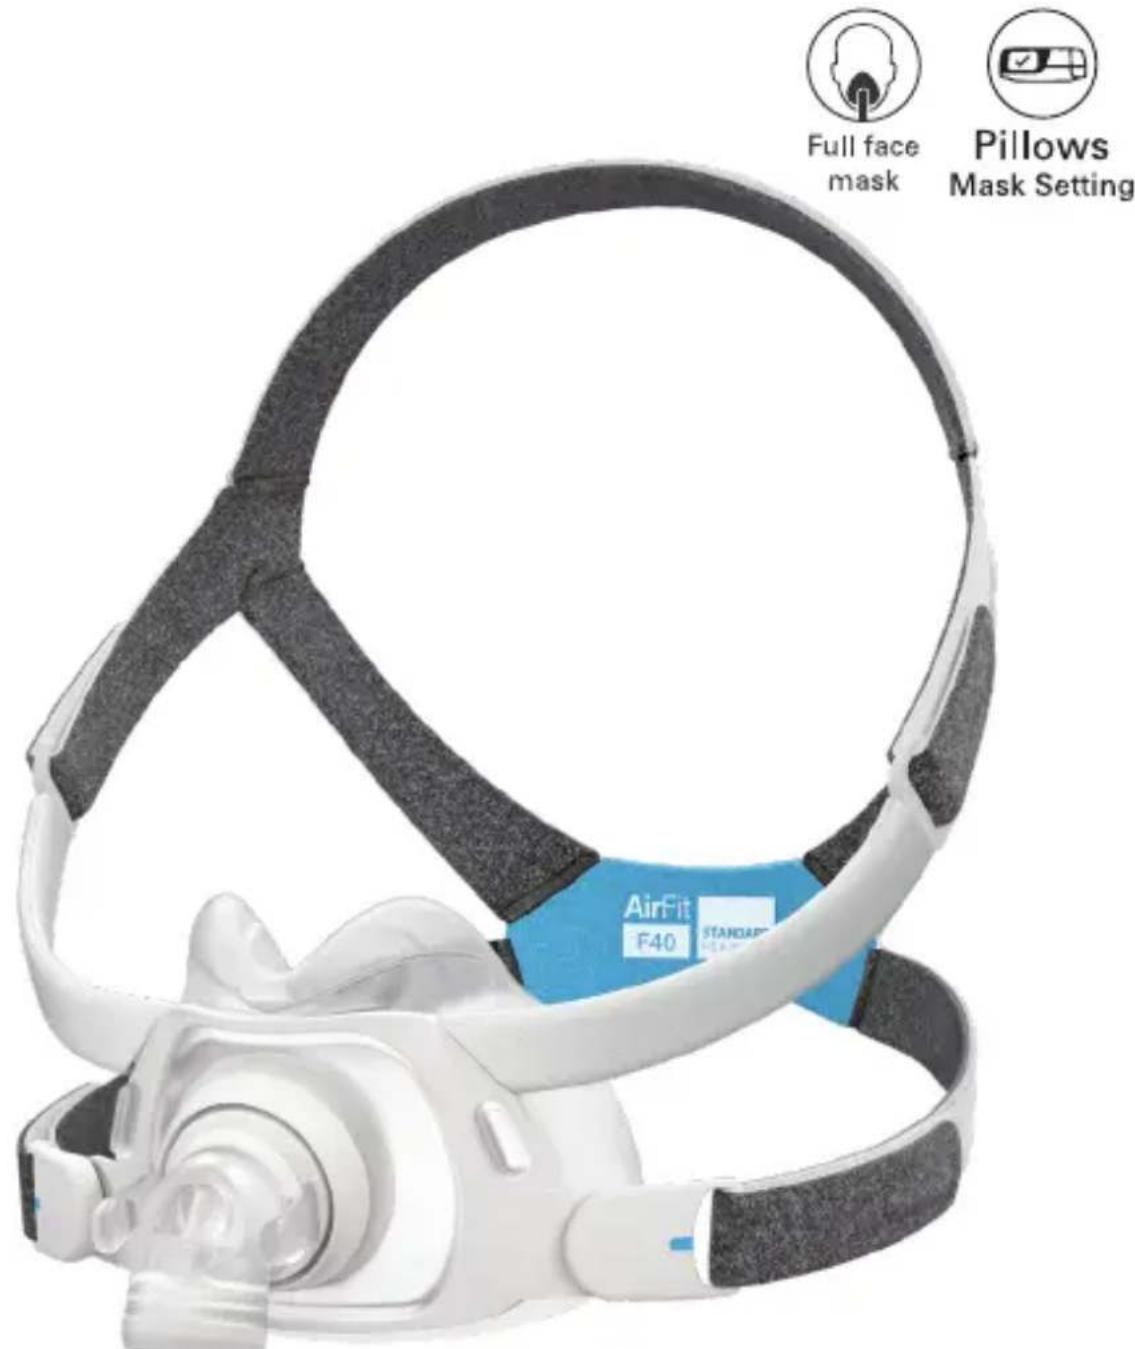
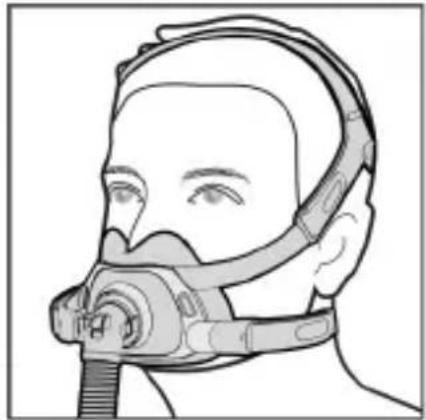
AirFit™
Full face mask
Full face mask
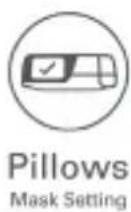
Pillows Mask Setting
User guide
English | Deutsch | Français | Italiano | Nederlands Dansk | Suomi | Norsk | Svenska | Português | Español Polski | Česky | العربية | نيسي | اردو

Not all products are available in all regions
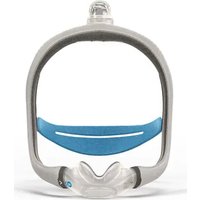
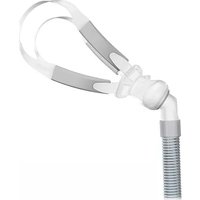
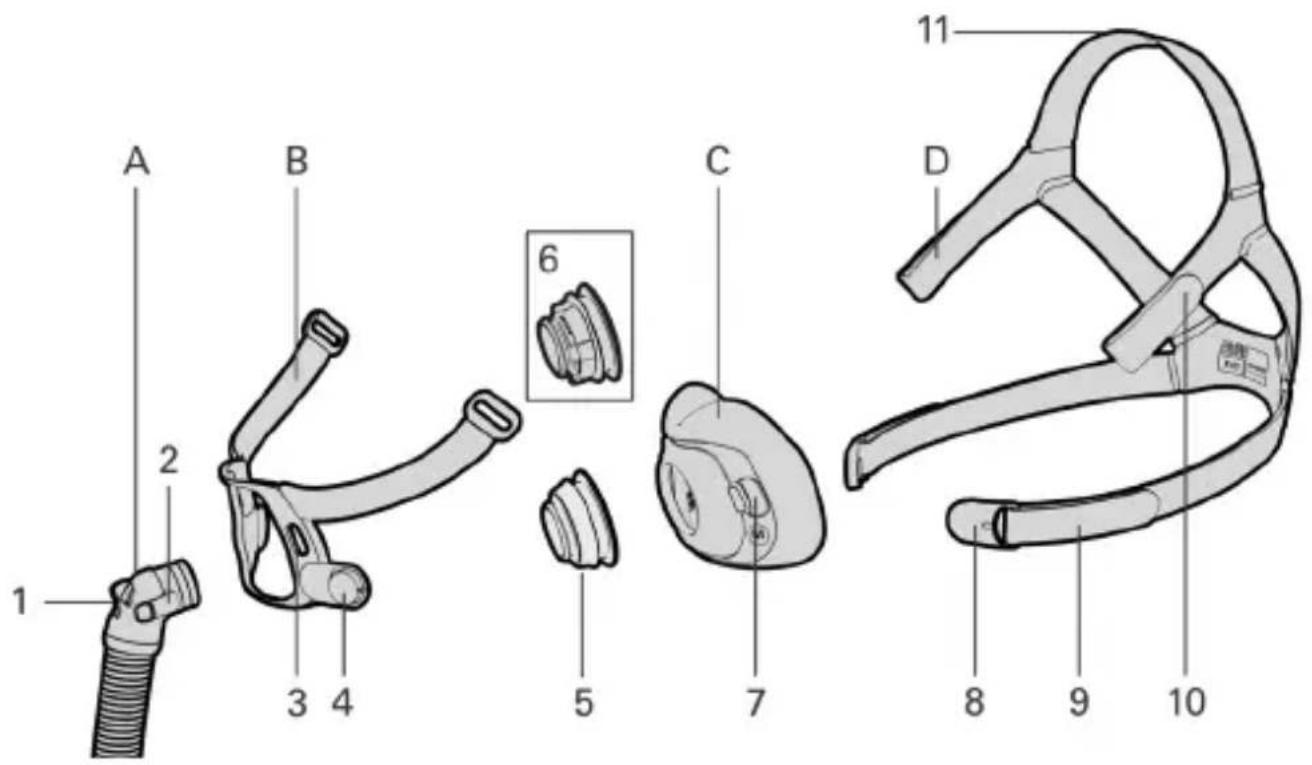
A Elbow and short tube
B Frame
C Cushion
D Headgear
1 Anti-asphyxia valve (AAV)
2 Side button
3 Frame stud hole
4 Frame magnet
5 QuietAir ^TM vent ring
6 Multi-hole vent ring
7 Cushion stud
8 Magnetic clip
9 Lower headgear strap
10 Upper headgear strap
11 Top headgear strap
Intended use
The AirFit F40 is intended for patients weighing more than 30 kg, who have been prescribed non-invasive CPAP or bi-level positive airway pressure (PAP) therapy. It is intended for single-patient reuse in the home environment and multi-patient reuse in the hospital/institutional environment.
Contraindications
Masks with magnetic components are contraindicated for use by patients where they, or anyone in close physical contact while using the mask, have the following:
- Active medical implants that interact with magnets (ie, pacemakers, implantable cardioverter defibrillators (ICD), neurostimulators, cerebrospinal fluid (CSF) shunts, insulin/infusion pumps)
- Metallic implants/objects containing ferromagnetic material (ie, aneurysm clips/flow disruption devices, embolic coils, stents, valves, electrodes, implants to restore hearing or balance with implanted magnets, ocular implants, metallic splinters in the eye).

WARNING
Keep the mask magnets at a safe distance of at least 6" (150 mm) away from implants or medical devices that may be adversely affected by magnetic interference. This warning applies to you or anyone in close physical contact with your mask. The magnets are in the frame and lower headgear clips, with a magnetic field strength of up to 400 mT. When worn, they connect to secure the mask but may inadvertently detach while asleep.
Implants/medical devices, including those listed within contraindications, may be adversely affected if they change function under external magnetic fields or contain ferromagnetic materials that attract/repel to magnetic fields (some metallic implants, eg, contact lenses with metal, dental implants, metallic cranial plates, screws, burr hole covers, and bone substitute devices). Consult your physician and manufacturer of your implant/other medical device for information on the potential adverse effects of magnetic fields.
Clinical benefits
The clinical benefit of vented masks is the provision of effective therapy delivery from a therapy device to the patient.
Intended patient population/medical conditions
Obstructive pulmonary diseases (eg, Chronic Obstructive Pulmonary Disease), restrictive pulmonary diseases (eg, diseases of the lung parenchyma, diseases of the chest wall, neuromuscular diseases), central
respiratory regulation diseases, obstructive sleep apnoea (OSA) and obesity hypoventilation syndrome (OHS).

WARNING
- The mask contains safety features, the exhaust vent holes and anti-asphyxia valve, to enable normal breathing and exhaust exhaled breath. Occlusion of the exhaust vent holes or anti-asphyxia valve needs to be prevented to avoid having an adverse effect on the safety and quality of the therapy. Regularly inspect the vent holes and anti-asphyxia valve to ensure they are kept clean, clear of blockages and are not damaged.
- Only use compatible CPAP or bi-level therapy devices or accessories. The technical specifications of the mask are provided for healthcare professionals to identify compatible devices. Use in combination with incompatible medical devices can decrease the safety or alter the performance of the mask.
- Regularly clean your mask and its components to maintain the quality of your mask and to prevent the growth of germs that can adversely affect your health.
- The mask must be used under qualified supervision for patients who are unable to remove the mask by themselves. The mask may not be suitable for those prone to aspiration.
- Discontinue using or replace this mask if the patient has ANY adverse reaction to the use of the mask. Consult your physician or sleep therapist.
- Follow all precautions when using supplemental oxygen.
- Oxygen flow must be turned off when the CPAP or bilevel device is not operating, so that unused oxygen does not accumulate within the device enclosure and create a risk of fire.
- Oxygen supports combustion. Oxygen must not be used while smoking or in the presence of an open flame. Only use oxygen in well ventilated rooms.
- At a fixed rate of supplemental oxygen flow, the inhaled oxygen concentration varies, depending on the pressure settings, patient breathing pattern, mask, point of application and leak rate. This warning applies to most types of CPAP or bilevel devices.

WARNING
- If there is any visible deterioration of a mask component (cracking, crazing, tears etc.) the component should be discarded and replaced.
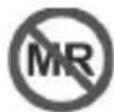
- The mask is Magnetic Resonance (MR) unsafe and must be kept outside of MRI scanner rooms.
- Always follow cleaning instructions and only use a mild liquid detergent. Some cleaning products may damage the mask, its parts and their function, or leave harmful residual vapours. Do not use a dishwasher or washing machine to clean the mask. Ozone or UV light products have not been validated for use with the mask and may lead to discoloration or damage.
- The mask is not intended to be used simultaneously with nebulizer medications that are in the air path of the mask/tube.
- For any serious incidents that occur in relation to this device, these should be reported to ResMed and the competent authority in your country.

CAUTION
- When fitting the mask, do not overtighten the headgear as this may lead to skin redness or sores around the mask cushion.
- Using a mask may cause tooth, gum or jaw soreness or aggravate an existing dental condition. If symptoms occur, consult your physician or dentist.
- The mask should not be used unless the device is turned on. Once the mask is fitted, ensure the device is blowing air to reduce risk of rebreathing exhaled air.
- As with all masks, some rebreathing may occur at low pressures.
- Do not iron the headgear as the material is heat sensitive and will be damaged.
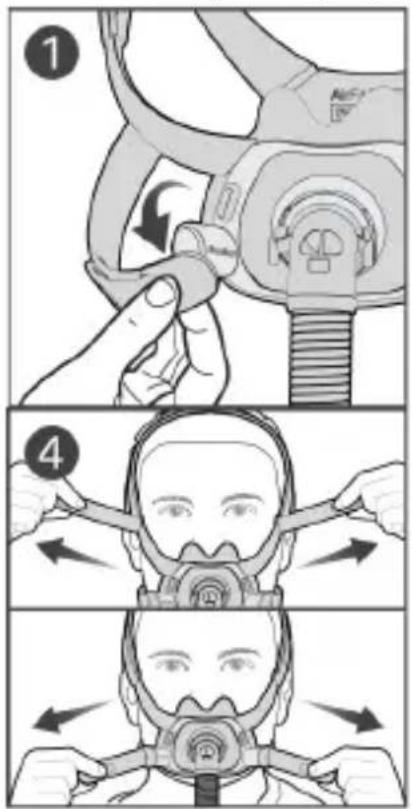
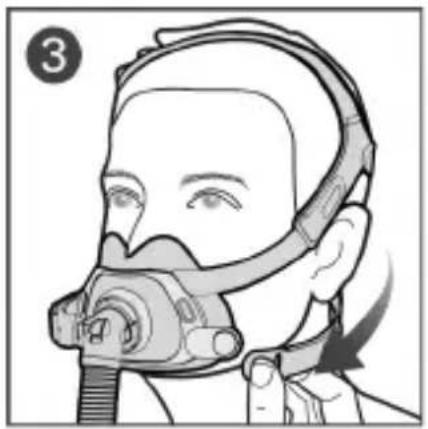
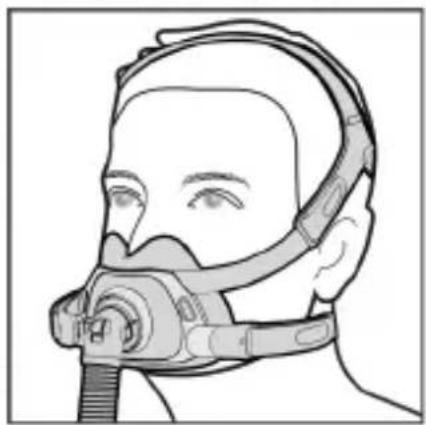
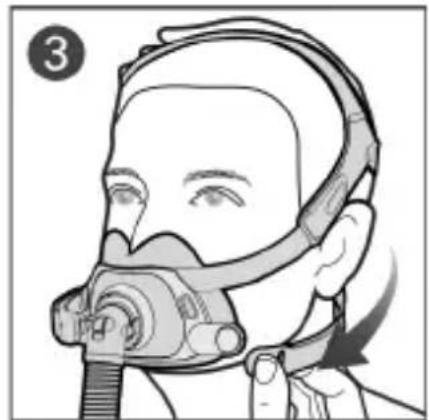
Fitting your mask
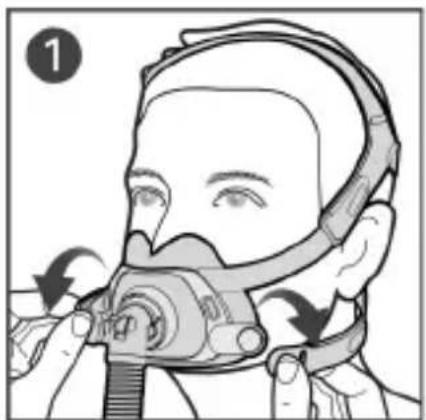
Remove all packaging before using the mask.
natural_image
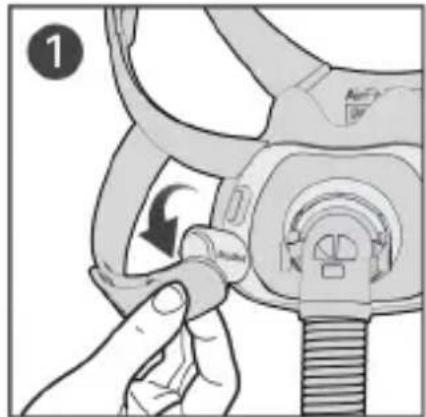
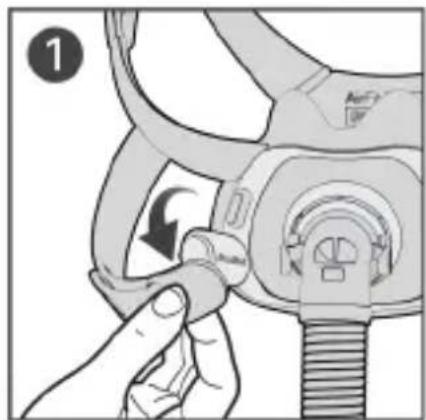
Illustration of a person wearing a respirator mask and head cover, with a hand adjusting the mask (no text or symbols present)- Twist and pull both magnetic clips away from the frame magnets.
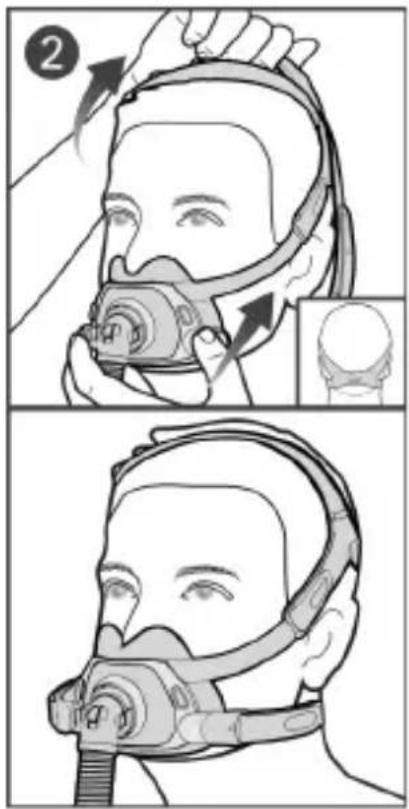
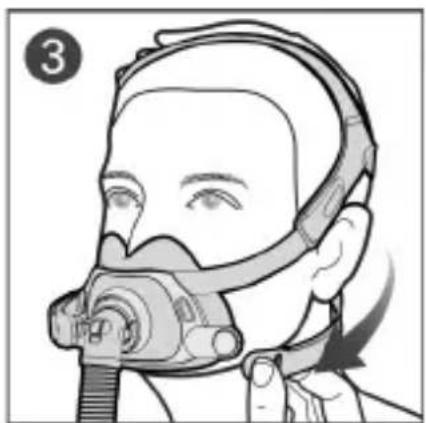
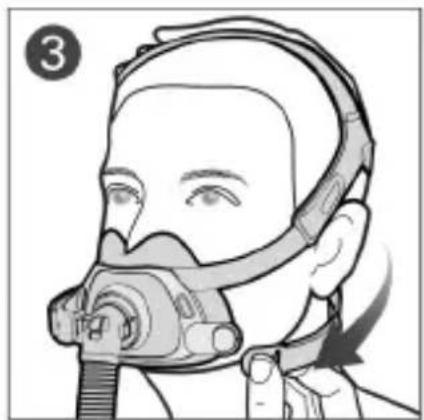
- Place the cushion under your nose and ensure it sits comfortably against your face. With the ResMed logo on the headgear facing out, pull the headgear over your head. The top headgear strap should sit on top of your head and not too far forward or back.
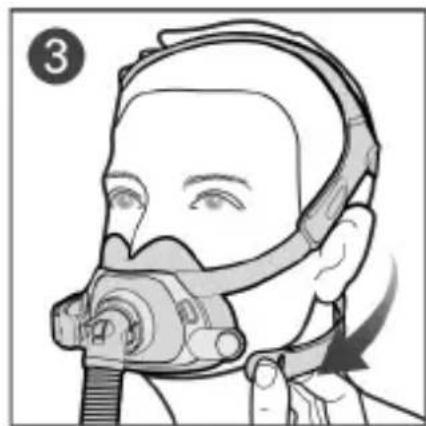
- Bring the lower headgear straps under your ears and attach the magnetic clips to the frame.
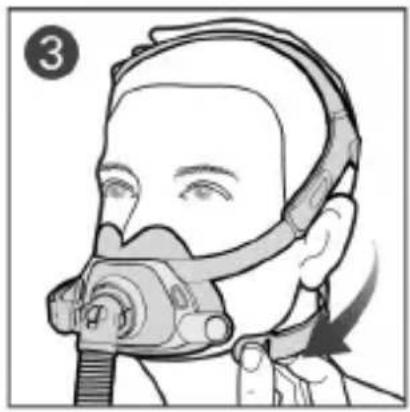
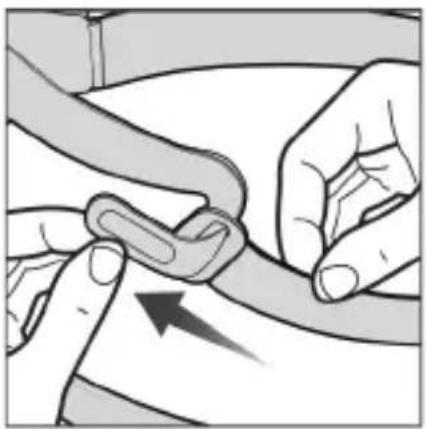
- If the mask needs adjusting, undo the fastening tabs on the upper headgear straps and pull evenly. Repeat with the lower headgear straps.
Mask setting options
Ensure that Pillows is selected in the mask setting options of your ResMed device. For a full list of compatible devices for this mask, see the Mask/Device Compatibility List at
ResMed.com/downloads/masks.
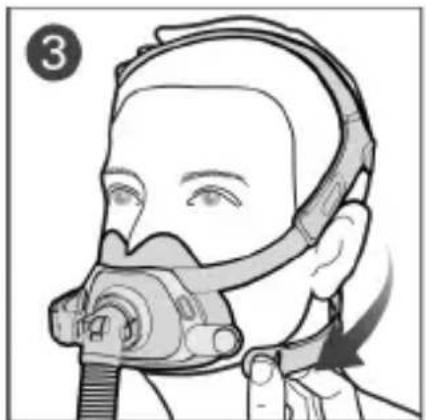
Adjusting your mask
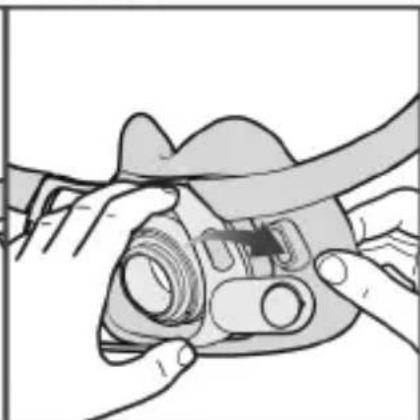
- With the device turned on and blowing air, adjust the position of the cushion for the most comfortable fit under your nose. Ensure that the cushion is not creased and the headgear is not twisted.
- The top headgear strap should sit on top of your head and not too far forward or back. Reposition the strap if needed to ensure the cushion has a good seal under the nose.
- To fix any leaks around the nose, pull the cushion slightly away from the face and reposition the cushion so that it sits comfortably under the nose. Adjust the upper headgear straps, if required.
- To fix any leaks around the mouth, adjust lower headgear straps. Adjust only enough for a comfortable seal and do not overtighten.
- If you continue to have leaks around the face, you may have the wrong mask size. Talk to your clinician to have your mask size checked. Note that sizing across different masks is not always the same.

Scan this QR code with your mobile device or visit ResMed.com/downloads/masks for helpful documents and support videos for your mask.
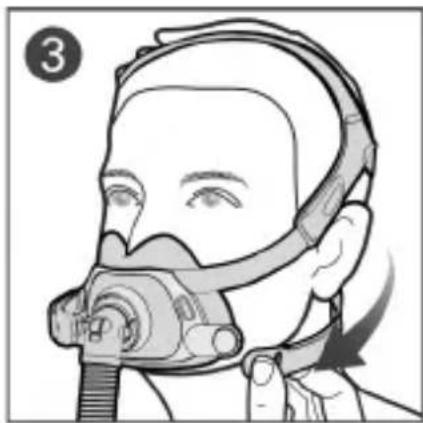
Removing your mask

natural_image
Illustration of a person using a respirator mask and cap, with arrows indicating motion (no text or symbols)
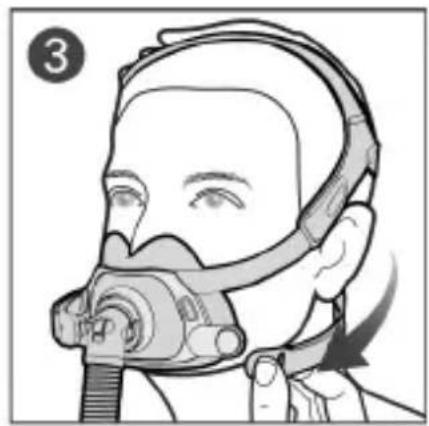
- Twist and pull both magnetic clips away from the frame magnets.
- Pull the mask away from your face and back over your head.
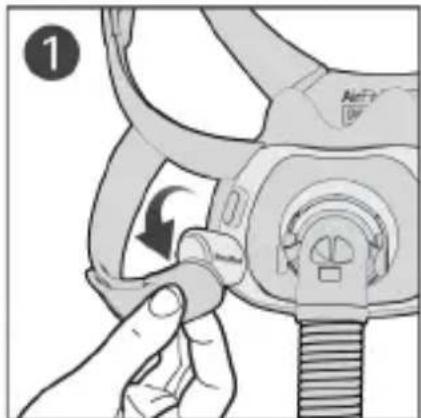
Disassembling your mask for cleaning
If your mask is connected to a device, disconnect the device air tubing from the short tube.
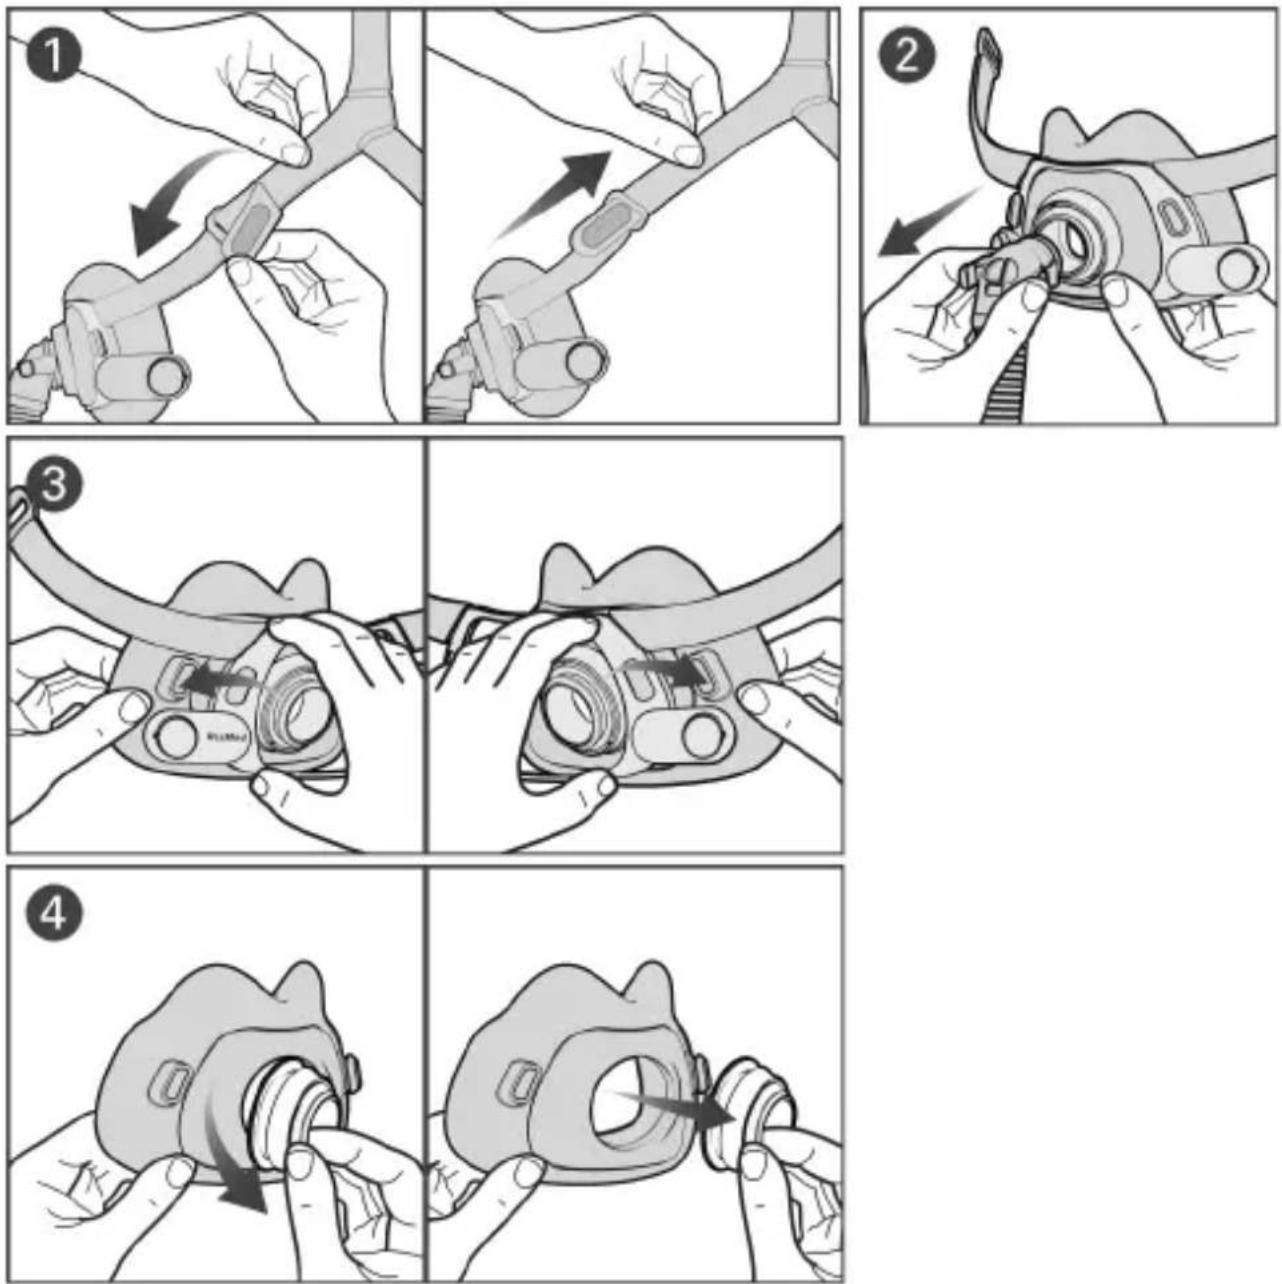
- Undo the fastening tabs on the upper headgear straps and pull from the frame.
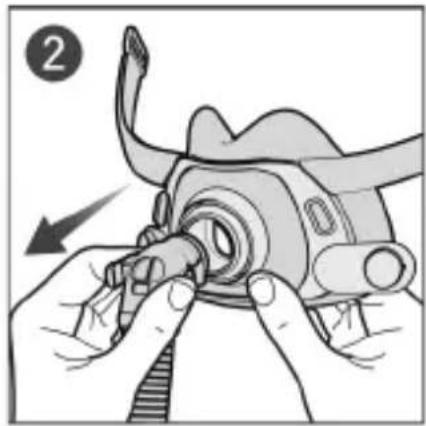
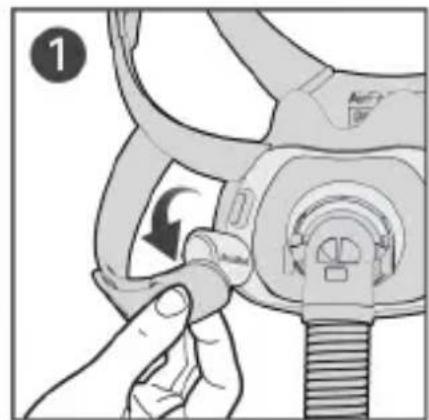
Tip: Keep the magnetic clips attached to the lower headgear straps to easily distinguish the upper and lower straps when reassembling. - Squeeze the side buttons on the elbow and detach from the vent ring.
- Pull the cushion stud out of the frame stud hole, repeat on the other side.
- Pull the vent ring from the cushion.
Cleaning your mask
If there is any visible deterioration of a mask component (cracking, crazing, tears etc.) the component should be discarded and replaced.
Daily/After each use: Cushion, elbow and short tube, vent ring
Weekly: Headgear, frame
- Soak the components in warm water with a mild liquid detergent. Ensure that there are no air bubbles while soaking.
- Shake the components vigorously in the water and hand wash with a soft bristle brush. Pay particular attention to the vent holes in the QuietAir/Multi-hole vent ring.
- Thoroughly rinse the components under running water.
- Squeeze the fabric components to remove excess water.
- Leave the components to air dry out of direct sunlight.
If the mask components are not visibly clean, repeat the cleaning steps. Make sure that the vents and anti-asphyxia valves are clean and clear.
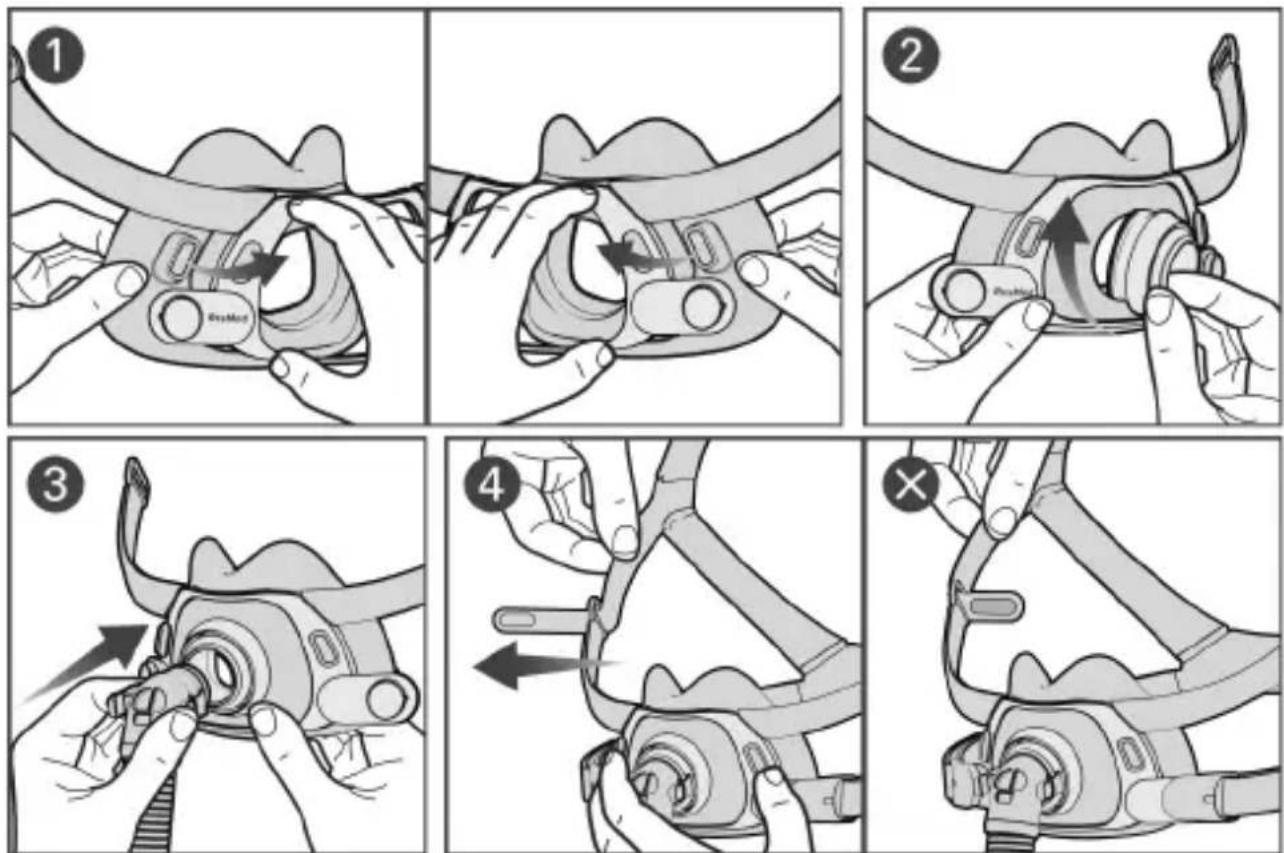
Reassembling your mask
natural_image
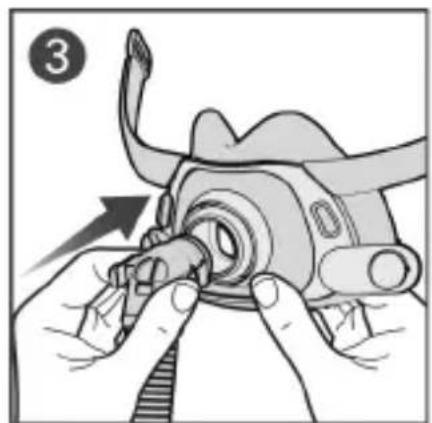
Illustration of hands performing a medical procedure on a wrist (no text or symbols visible)- Insert the cushion stud into the frame stud hole. Repeat on the other side.
- Align the vent ring groove against the cushion opening. Press firmly to secure in place and ensure that the cushion opening sits into the vent ring groove.
- Connect the elbow to the vent ring.
- With dark grey fabric side facing inwards, insert both upper headgear straps into the frame from the inside and fold the fastening tabs over to secure.
Reprocessing the mask between patients
When using between patients, these masks must be reprocessed according to instructions available on ResMed.com/downloads/masks.
Technical specifications
Mask setting options: For AirSense™, AirCurve™, and S9™ devices, select 'Pillows'.
Compatible devices: For a full list of compatible devices for this mask, see the Mask/Device Compatibility List at ResMed.com/downloads/masks.
SmartStart may not operate effectively when using this mask with some CPAP or bi-level devices.
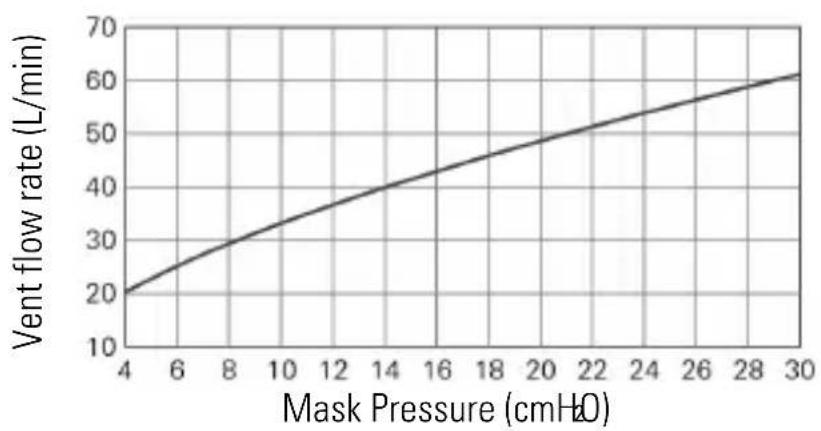
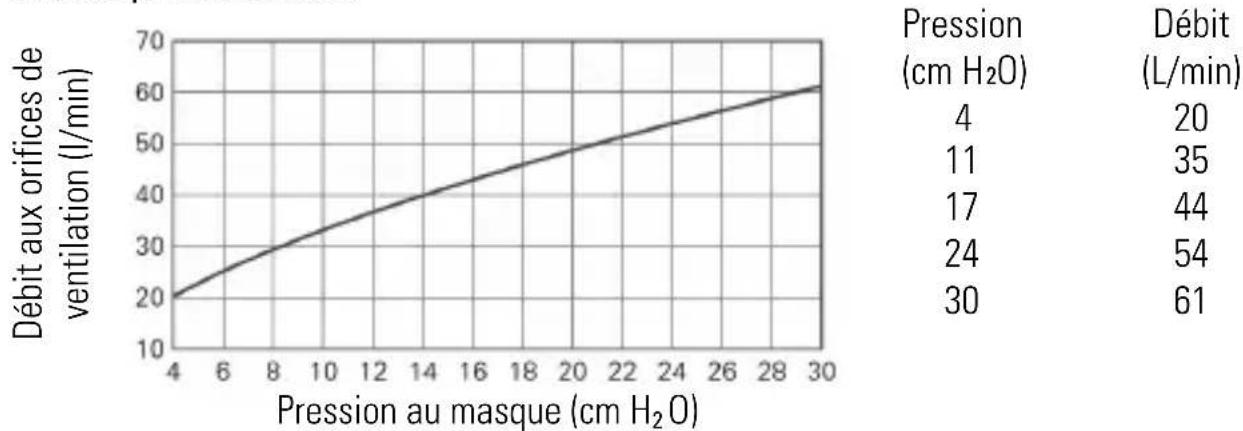
Pressure-flow curve
line
| Mask Pressure (cmH₂O) | Vent flow rate (L/min) | | --------------------- | ---------------------- | | 4 | 20 | | 6 | 25 | | 8 | 30 | | 10 | 35 | | 12 | 40 | | 14 | 45 | | 16 | 50 | | 18 | 55 | | 20 | 60 | | 22 | 65 | | 24 | 70 | | 26 | 75 | | 28 | 80 | | 30 | 85 || Pressure (cm H2O) | Flow (L/min) |
| 4 | 20 |
| 11 | 35 |
| 17 | 44 |
| 24 | 54 |
| 30 | 61 |
Therapy pressure: 4 to 30 cmH _2 O
Resistance with Anti-Asphyxia Valve closed to atmosphere
Drop in pressure measured (nominal)
at 50 L/min: 0.4 cmH₂O
at 100 L/min: 1.7 cmH₂O
Resistance with Anti-Asphyxia Valve open to atmosphere
Inspiration at 50 L/min: 1.1 cmH₂O
Expiration at 50 L/min: 1.1 cmH2O
Anti-Asphyxia Valve pressure
open-to-atmosphere (activation): <4 cmH₂O
closed-to-atmosphere (deactivation): <4 cmH2O
Sound: Declared dual-number noise emission values in accordance with ISO4871:1996
and ISO3744:2010. A-weighted sound power level with uncertainty of 3dBA and
A-weighted pressure level at a distance of 1 m with uncertainty of 3 dBA are shown:
Sound power level (with QuietAir vent ring): 20 dBA
Pressure level (with QuietAir vent ring): 13 dBA
Sound power level (with Multi-hole vent ring): 34 dBA
Pressure level (with Multi-hole vent ring): 26 dBA
Environmental conditions
Operating temperature: 5°C to 40°C
Operating humidity: 15% to 95% RH non-condensing
Storage and transport temperature: -20°C to 60°C
Storage and transport humidity: up to 95% RH non-condensing
International Commission on Non-Ionizing Radiation Protection (ICNIRP)
Magnets used in this mask are within ICNIRP guidelines for general public use. The static magnetic field strength is less than 400 mT at component surface and less than 0.5 mT at 50 mm distance.
Service life: The service life of the mask system is dependent on the intensity of usage, maintenance, and environmental conditions to which the mask is used or stored. As this mask system and its components are modular in nature, it is recommended that the user maintain and inspect it on a regular basis, and replace the mask system or any components if deemed necessary or according to the instructions in the ‘Cleaning your mask’ section of this guide.
Storage
Ensure that the mask is thoroughly clean and dry before storing it for any length of time. Store the mask in a dry place out of direct sunlight.
Disposal
This mask and packaging do not contain any hazardous substances and may be disposed of with your normal household refuse.
Symbols
The following symbols may appear on your product or packaging:
See symbols glossary at ResMed.com/symbols.
Consumer Warranty
ResMed acknowledges all consumer rights granted under the EU Directive 1999/44/EC and the respective national laws within the EU for products sold within the European Union.
natural_image
Illustration of a hand adjusting a mechanical component with a knob and threaded shaft (no text or symbols)
natural_image
Illustration of a person wearing a full-face respirator mask and head cover, with a hand adjusting the mask (no text or symbols present)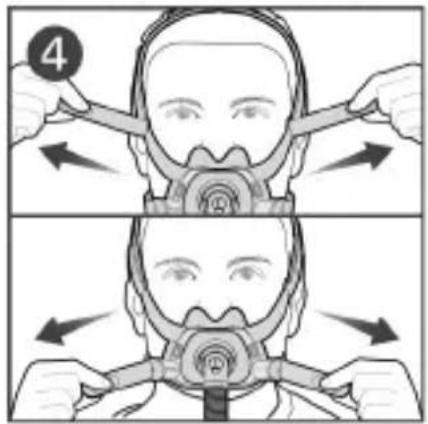

natural_image
Line drawing of a person wearing a full-face respirator mask (no text or symbols)
natural_image
Illustration of hands connecting a cable to a plug, showing a curved arrow indicating motion (no text or symbols present)
natural_image
Illustration of a hand adjusting a mechanical component with an arrow indicating motion (no text or symbols)
natural_image
Illustration of hands assembling a mechanical component with an arrow indicating motion (no text or symbols present)
natural_image
Illustration of hands assembling a mechanical component with a curved cable and valve (no text or symbols)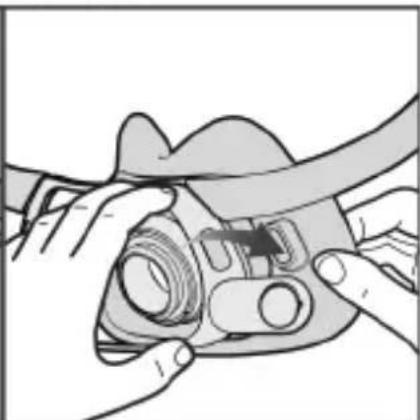
natural_image
Illustration of hands adjusting a mechanical component with a tool (no text or symbols visible)
natural_image
Illustration showing two-step medical procedure: one being adjusted for a device, the other adjusting a device with a needle (no text or symbols present)(International Commission on Non-Ionizing Radiation Protection – ICNIRP)
natural_image
Close-up of a hand adjusting a mechanical component with a knob and threaded shaft (no visible text or symbols)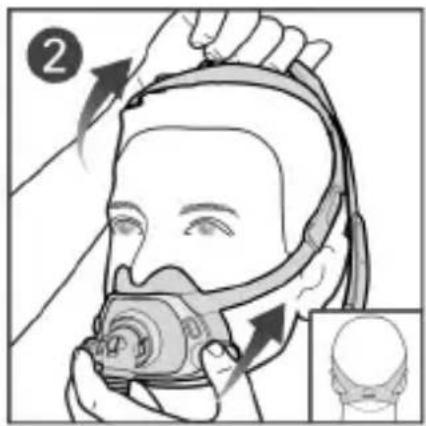
natural_image
Illustration of a person wearing a full-face respirator mask and head cover, with a hand adjusting the mask (no text or symbols present)
Pillows
Mask Setting
ResMed.com/downloads/masks.
natural_image
Illustration of a person using a respirator device with arrows indicating airflow direction (no text or symbols)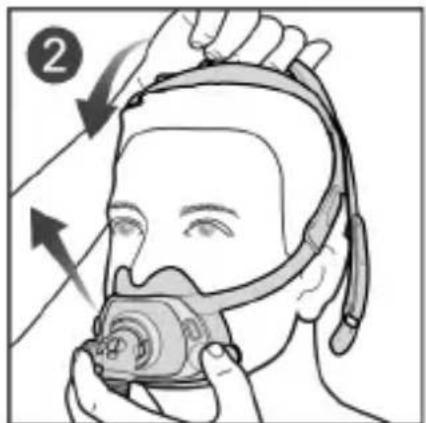

natural_image
Illustration of hands assembling a mechanical component with an arrow indicating motion (no text or symbols present)
natural_image
Illustration of hands using a tool to adjust or install a mechanical component, with no visible text or symbols.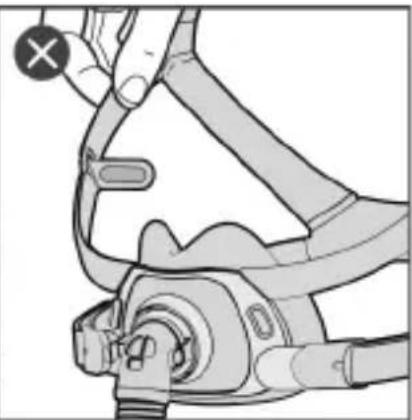
natural_image
Illustration of a hand using a medical or surgical device to adjust or install a component (no text or symbols visible)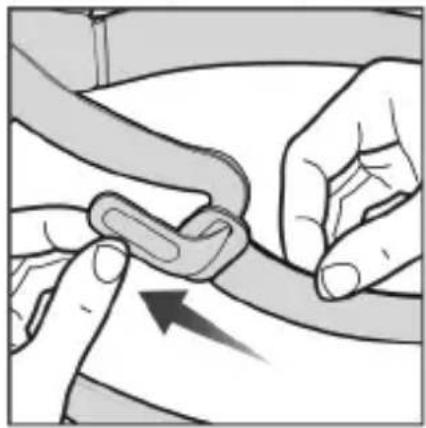
natural_image
Illustration of hands performing a medical procedure on a curved object, with an arrow indicating direction (no text or symbols present)Courbe pression/débit
line
| Pressure au masque (cm H₂O) | Débit aux orifices de ventilation (l/min) | | --------------------------- | ----------------------------------------- | | 4 | 20 | | 11 | 35 | | 17 | 44 | | 24 | 54 | | 30 | 61 |natural_image
Close-up of a hand adjusting a mechanical component with a knob and threaded shaft (no visible text or symbols)

natural_image
Illustration of a person wearing a full-face respirator mask and headlamp, with no visible text or symbols

natural_image
Line drawing of a person wearing a full-face respirator and head cover (no text or symbols)natural_image
Illustration of a person using a respirator mask and cap, with no visible text or symbols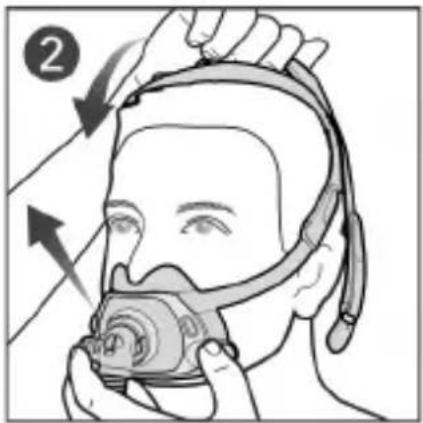
natural_image
Illustration of hands performing a cable or wire manipulation operation (no text or symbols present)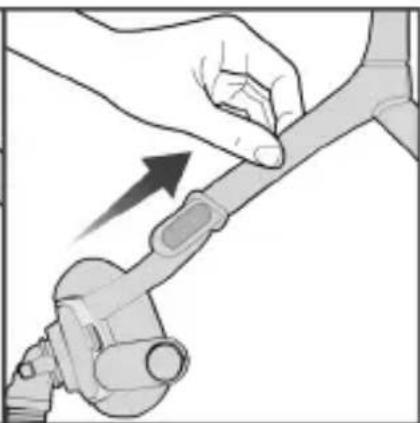
natural_image
Illustration of a hand adjusting a mechanical component with an arrow indicating motion (no text or symbols)
natural_image
Illustration of hands assembling a mechanical component with an arrow indicating motion (no text or symbols present)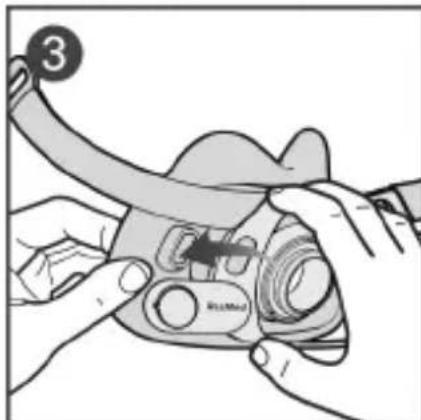
natural_image
Illustration of hands adjusting a camera lens with a handle (no text or symbols visible)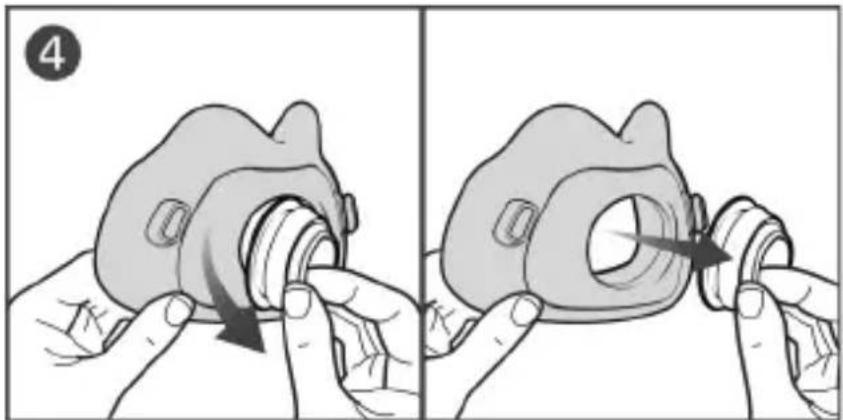
natural_image
Illustration showing two-step medical procedure: one being adjusted to a device, the other adjusting a device with an arrow (no text or symbols present)
Pillows
Mask Setting
Cuscinetto Small Wide
Cuscinetto Medium
Cuscinetto Large

Copricapo Small

Copricapo Standard

Copricapo Large

Esalazione QuietAir
natural_image
Illustration of a hand adjusting a mechanical component with a tool, no visible text or symbols
natural_image
Illustration of a person using a respirator device (no text or symbols visible)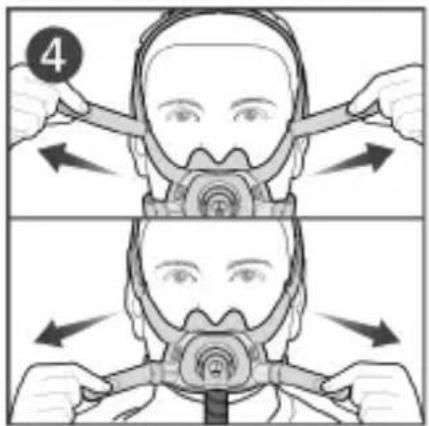

natural_image
Line drawing of a person wearing a full-face respirator mask and headband (no text or symbols)
Pillows
Mask Setting
ResMed.com/downloads/maskers.
Uw masker aanpassen
natural_image
Illustration of a person wearing a respirator mask and head cover, with arrows indicating airflow direction (no text or symbols)
natural_image
Illustration of hands connecting a mechanical component to a cable or connector, showing a curved arrow indicating motion (no text or symbols present)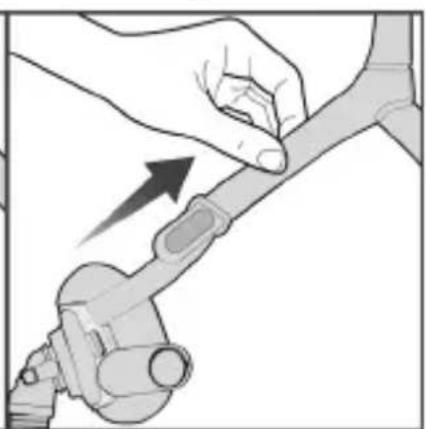
natural_image
Illustration of a hand holding a flexible hose with an arrow indicating direction (no text or symbols)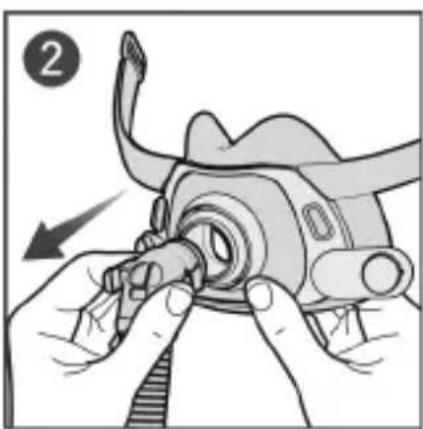
natural_image
Illustration of hands assembling a mechanical component with an arrow indicating motion (no text or symbols present)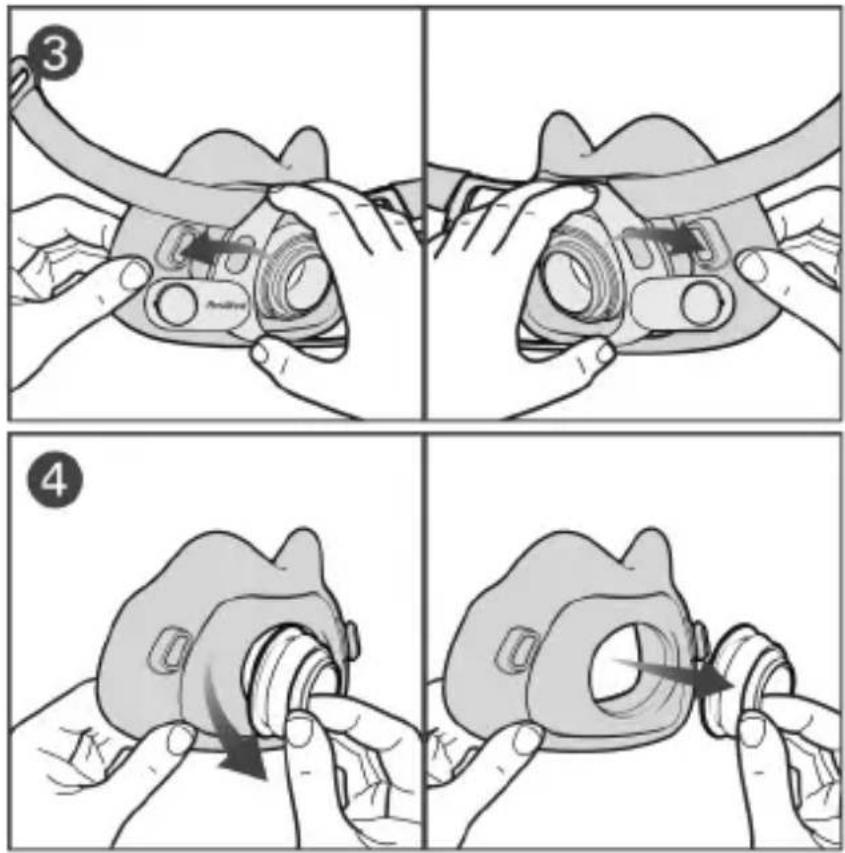
open (activering): < 4 cmH₂O
gesloten (deactivering): < 4 cmH₂O
natural_image
Illustration of a hand adjusting a mechanical component with a tool, no text or symbols present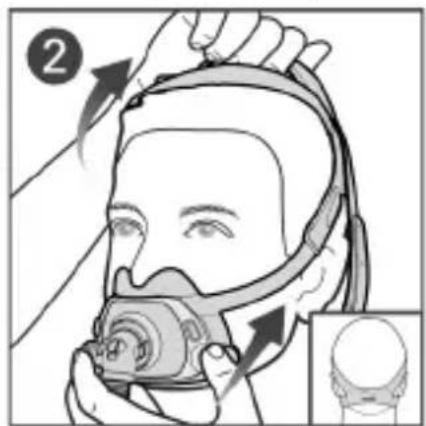
natural_image
Illustration of a person wearing a full-face respirator mask and headlamp (no text or symbols)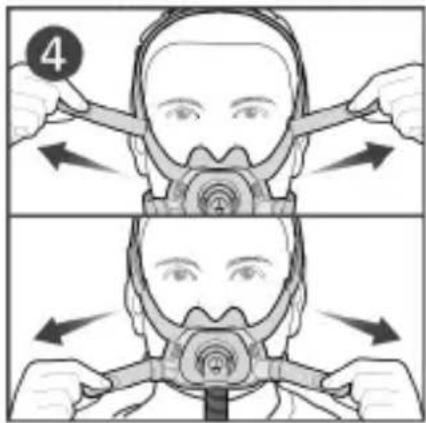

natural_image
Line drawing of a person wearing a full-face respirator and head cover (no text or symbols)Pillows Mask Setting
ResMed.com/downloads/masks.
Justering af masken
natural_image
Illustration of a person using a respirator mask and cap, with arrows indicating motion (no text or symbols)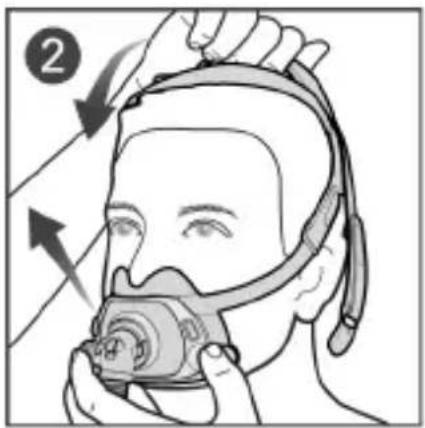
natural_image
Illustration of hands assembling a mechanical component with an arrow indicating motion (no text or symbols present)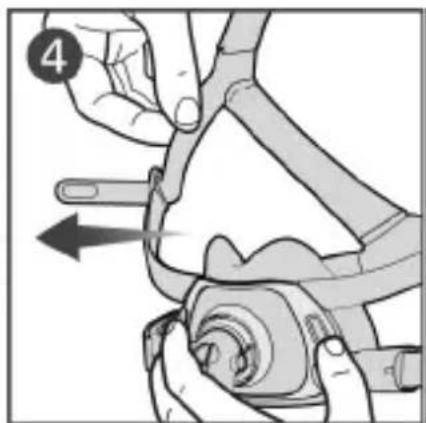
natural_image
Illustration of hands using a tool to adjust or install a mechanical component, with no visible text or symbols.
natural_image
Mechanical assembly diagram showing a hand operating a valve with a close button (no text or symbols)
natural_image
Illustration of hands performing a medical procedure on a patient's arm (no text or symbols visible)natural_image
Close-up of a hand adjusting a mechanical component with a circular arrow indicating rotation (no text or symbols visible)
natural_image
Illustration of a person wearing a full-face respirator mask and headlamp (no text or symbols)
natural_image
Line drawing of a person wearing a full-face respirator and head cover (no text or symbols)

natural_image
Illustration of hands assembling a mechanical component with an arrow indicating motion (no text or symbols present)
natural_image
Illustration of hands using a tool to adjust or install a mechanical component, with no visible text or symbols.
natural_image
Mechanical assembly diagram showing a hand operating a valve with a close button (no text or symbols)
natural_image
Illustration of hands performing a medical procedure on a patient's arm (no text or symbols visible)International Commission on Non-Ionizing Radiation Protection (ICNIRP)
5 QuietAir™ ventilring
6 Multi-hole ventilring
7 Putetapp
8 Magnetklips
9 Nedre hodestropp
10 ∅vre hodestropp
11 ∅verste hodestropp
Tiltenkt bruk
Pillows
Mask Setting
ResMed.com/downloads/masks.
Justere masken
natural_image
Illustration of a person using a respirator mask and cap (no text or symbols)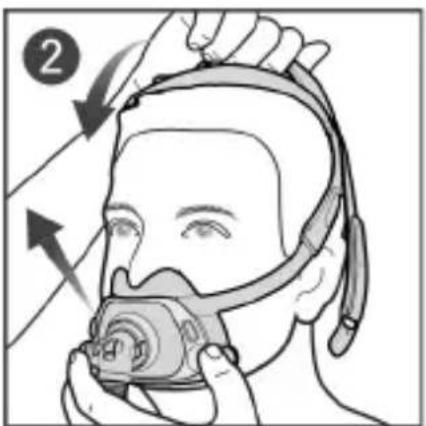
natural_image
Illustration of hands performing a medical procedure on a device (no text or symbols visible)
natural_image
Illustration of hands using a tool to adjust or install a mechanical component (no text or symbols visible)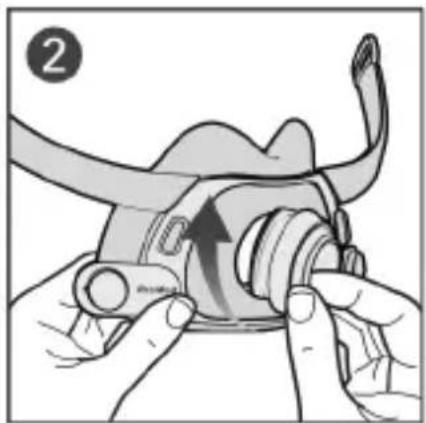
natural_image
Illustration of hands adjusting a mechanical component with an arrow indicating motion (no text or symbols)
natural_image
Illustration of hands assembling a mechanical component with an arrow indicating assembly (no text or symbols present)
natural_image
Illustration of hands using a tool to adjust or install a mechanical component, with no visible text or symbols.
natural_image
Illustration of a hand using a tool to adjust or install a mechanical component (no text or symbols visible)
natural_image
Illustration of hands performing a medical procedure on a patient's arm, showing finger placement and pressure point (no text or symbols)Komponenten er resirkulerbar. Sorteres til resirkulering.
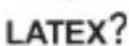
Ikke laget med naturgummilateks
natural_image
Illustration of a hand adjusting a mechanical component with a circular arrow indicating rotation (no text or symbols)

natural_image
Illustration of a person wearing a full-face respirator mask and head cover, with a hand adjusting the mask (no text or symbols present)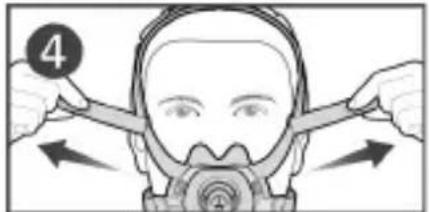
natural_image
Line drawing of a person wearing a full-face respirator and head cover (no text or symbols)
Pillows
Mask Setting
natural_image
Illustration of a person using a respirator mask and head cover, with directional arrows indicating motion (no text or symbols)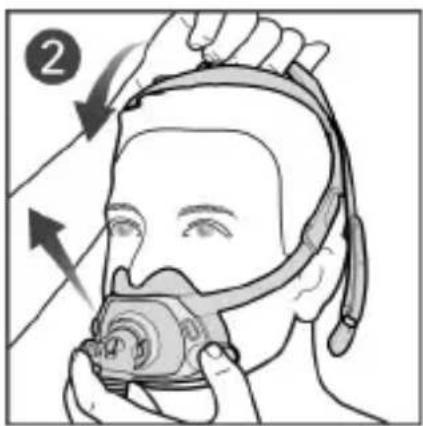
natural_image
Illustration of hands performing a medical procedure on a patient's arm, showing finger placement and pressure point (no text or symbols)International Commission on Non-Ionizing Radiation Protection (ICNIRP)
natural_image
Close-up of a hand adjusting a mechanical component with a circular arrow indicating rotation (no text or symbols visible)
natural_image
Illustration of a person wearing a full-face respirator mask and headlamp, with no visible text or symbols

natural_image
Line drawing of a person wearing a full-face respirator mask (no text or symbols)
Pillows
Mask Setting
natural_image
Illustration of a person wearing a full-face respirator mask and head cover, with arrows indicating airflow direction (no text or symbols)
natural_image
Illustration of hands connecting a mechanical component to a cable or connector, showing a curved arrow indicating motion (no text or symbols present)
natural_image
Illustration of a robotic arm joint with a hand adjusting the cable (no text or symbols)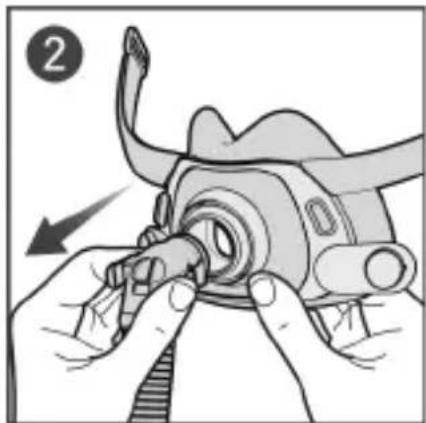
natural_image
Illustration of hands assembling a mechanical component with an arrow indicating motion (no text or symbols present)
natural_image
Illustration of hands assembling a mechanical component with a curved band (no text or symbols)
natural_image
Illustration of hands installing or adjusting a mechanical component with a scroll (no text or symbols visible)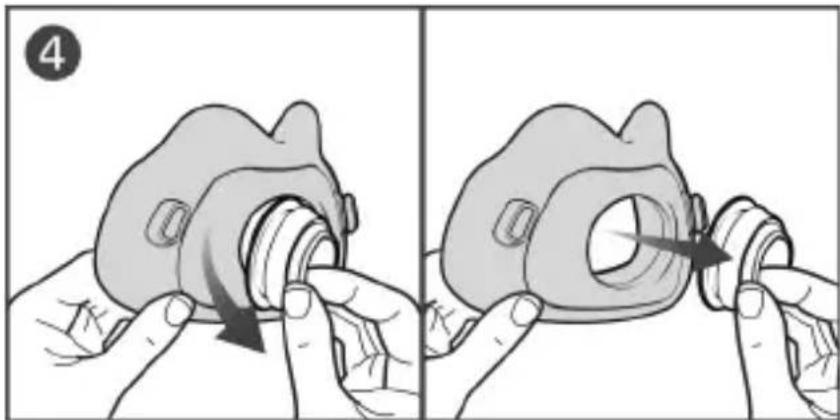
natural_image
Illustration showing two-step medical procedure: one being adjusted to a device, the other adjusting a device with a needle (no text or symbols present)natural_image
Illustration of a hand adjusting a mechanical component with a knob and threaded shaft (no text or symbols)

natural_image
Illustration of a person wearing a full-face respirator mask and head cover, with a hand adjusting the mask (no text or symbols present)

natural_image
Line drawing of a person wearing a full-face respirator mask (no text or symbols)
Pillows
Mask Setting
natural_image
Illustration of a person using a respirator device with arrows indicating airflow direction (no text or symbols)
natural_image
Illustration of hands performing a mechanical tool manipulation (no text or symbols visible)
natural_image
Illustration of a hand adjusting a mechanical component with an arrow indicating motion (no text or symbols)
natural_image
Illustration of hands assembling a mechanical component with an arrow indicating motion (no text or symbols present)
natural_image
Illustration of hands assembling a mechanical component with a curved cable (no text or symbols)
natural_image
Illustration of hands adjusting a mechanical component with a tool (no text or symbols visible)
natural_image
Illustration showing two-step medical procedure: one being adjusted to a device, the other adjusting a device with a needle (no text or symbols present)natural_image
Illustration of a hand adjusting a mechanical component with a circular arrow indicating rotation (no text or symbols present)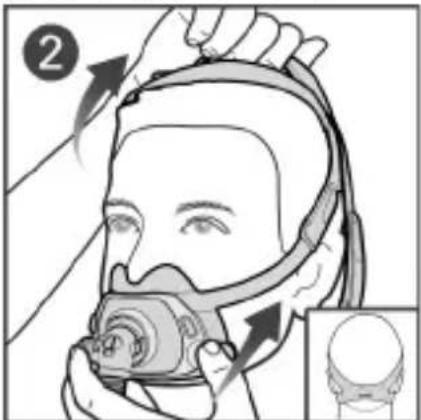
natural_image
Illustration of a person wearing a full-face respirator mask and headlamp (no text or symbols)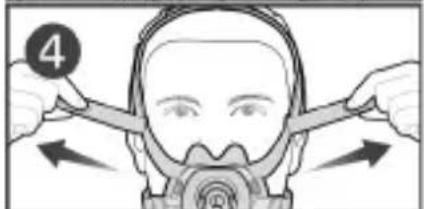
natural_image
Line drawing of a person wearing a full-face respirator device (no text or symbols)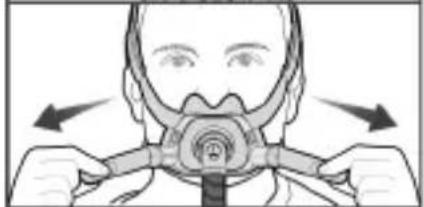
natural_image
Illustration of a person wearing a gas mask with arrows indicating pressure or movement (no text or symbols)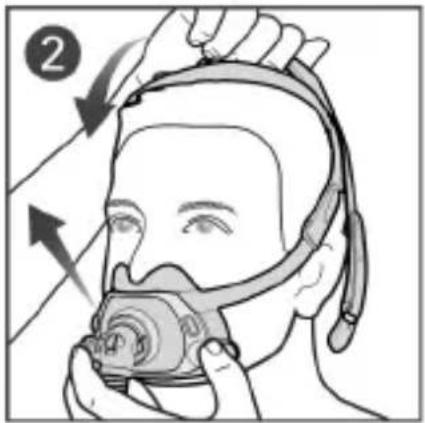
natural_image
Illustration of hands adjusting a cable or connector with a directional arrow (no text or symbols)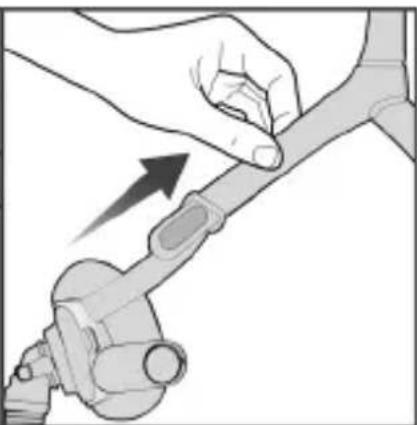
natural_image
Illustration of a hand adjusting a mechanical component with an arrow indicating motion (no text or symbols)
natural_image
Illustration of hands adjusting a mechanical component with an arrow indicating motion (no text or symbols present)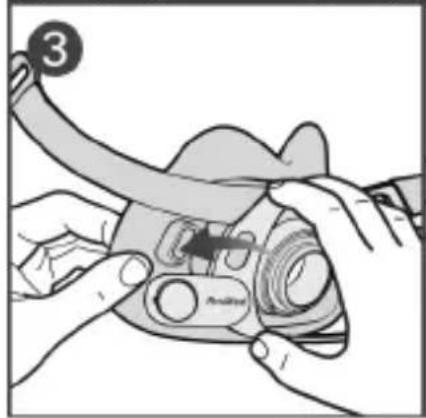

natural_image
Illustration of hands adjusting a camera lens component (no text or symbols visible)
natural_image
Illustration showing two-step medical procedure: one being adjusted for a device, the other adjusting a device with a needle (no text or symbols present)International Commission on Non-Ionizing Radiation Protection (ICNIRP)
natural_image
Illustration of a hand adjusting a mechanical component with a button and arrow (no text or symbols)
natural_image
Illustration of a person wearing a full-face respirator mask and headlamp, with a hand adjusting the mask (no text or symbols present)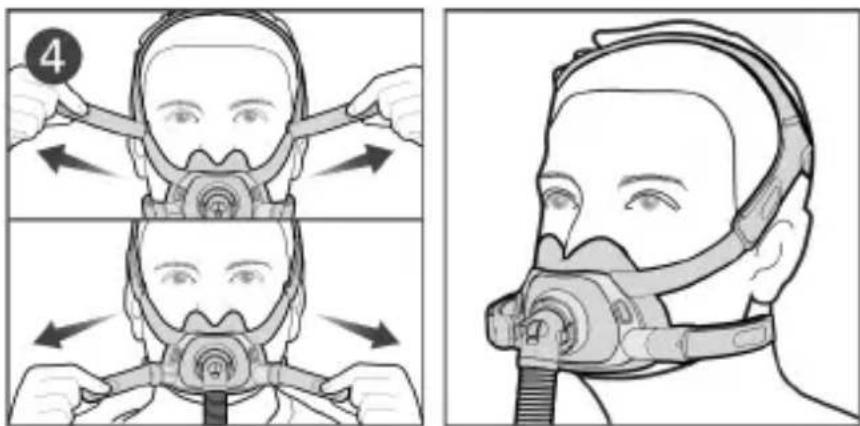
Pillows
Mask Setting
ResMed.com/downloads/masks.
Seřízení masky
natural_image
Illustration of hands assembling a mechanical component with an arrow indicating assembly (no text or symbols present)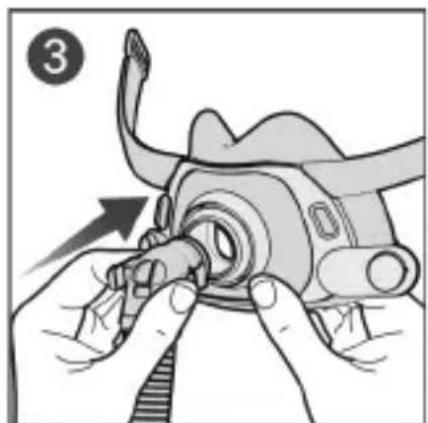
natural_image
Illustration of hands assembling a mechanical component with an arrow indicating motion (no text or symbols present)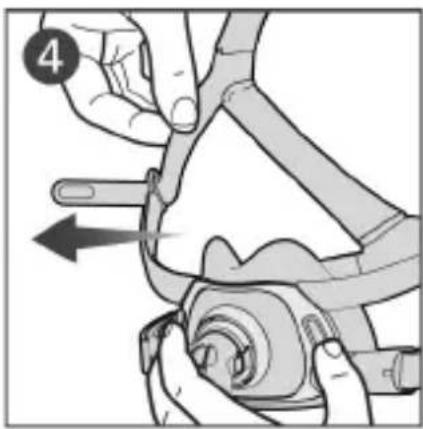
natural_image
Illustration of hands using a tool to adjust or install a mechanical component, with no visible text or symbols.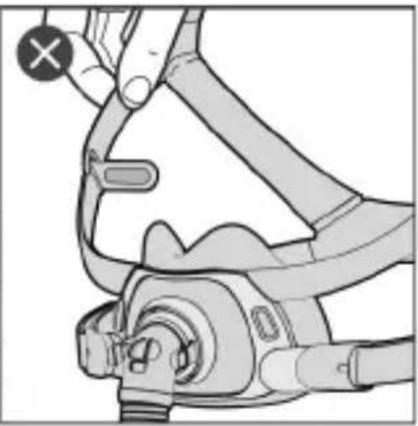
natural_image
Illustration of a hand using a medical or surgical device to adjust or install a component (no text or symbols visible)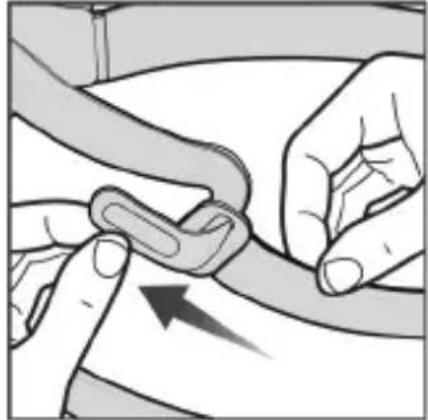
natural_image
Illustration of hands performing a medical procedure on a patient's arm, showing finger placement and pressure point (no text or symbols)natural_image
Illustration of a person wearing a full-face respirator mask and headlamp (no text or symbols)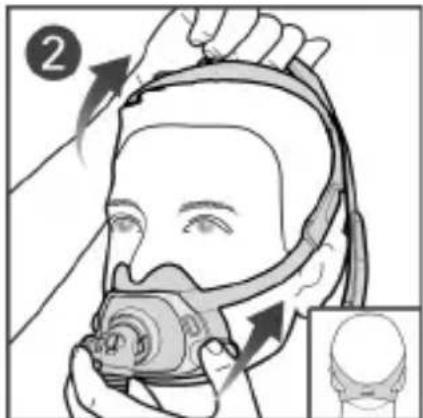
natural_image
Illustration of a hand adjusting a mechanical component with a circular arrow indicating rotation (no text or symbols present)
natural_image
Line drawing of a person wearing a full-face respirator mask and headband (no text or symbols)

natural_image
Illustration of a person using a respirator mask and cap, with arrows indicating airflow direction (no text or symbols)natural_image
Illustration of hands assembling a mechanical component with an arrow indicating motion (no text or symbols present)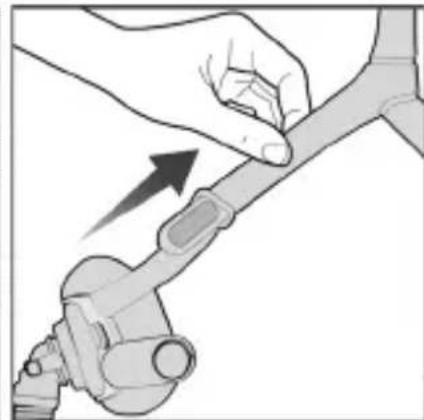
natural_image
Illustration of a hand adjusting a mechanical component with an arrow indicating motion (no text or symbols)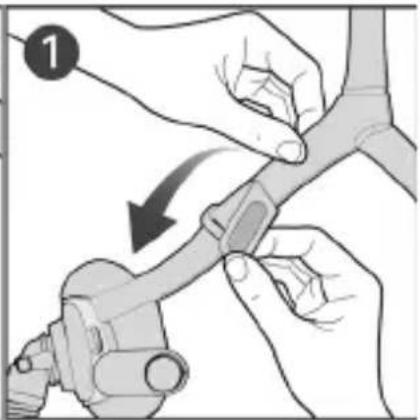
natural_image
Illustration of hands performing a mechanical clamp or grip operation (no text or symbols present)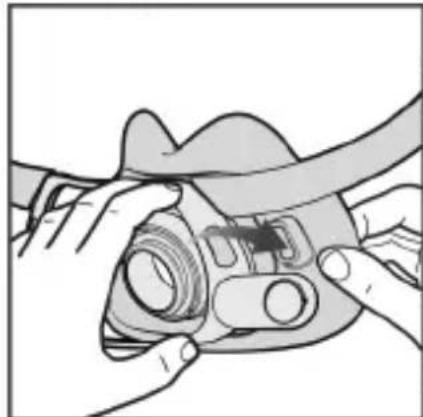
natural_image
Illustration of hands adjusting a mechanical component with a tool (no text or symbols visible)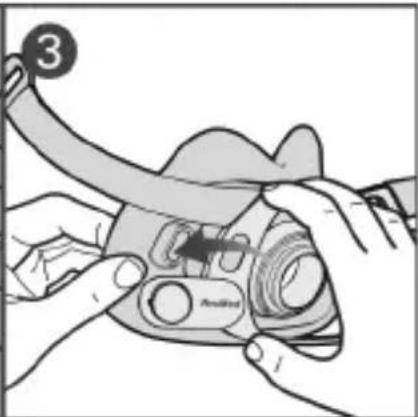
natural_image
Illustration of hands assembling a camera lens with a strap (no text or symbols)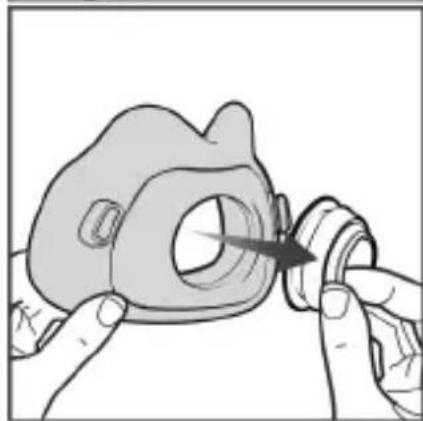
natural_image
Illustration of hands assembling a mechanical component with a circular arrow indicating direction (no text or symbols)
natural_image
Illustration of hands performing a mechanical press or disassembly operation on a circular component (no text or symbols visible)natural_image
Illustration of hands adjusting a mechanical component with an arrow indicating motion (no text or symbols)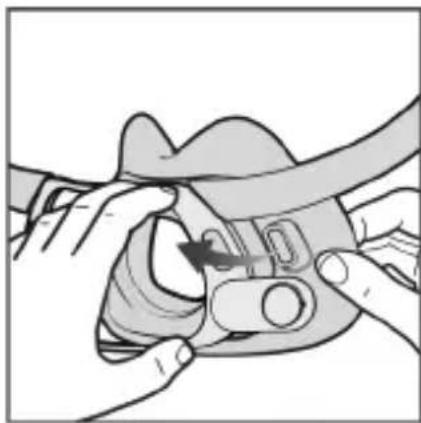
natural_image
Illustration of hands adjusting a mechanical component with a tool (no text or symbols visible)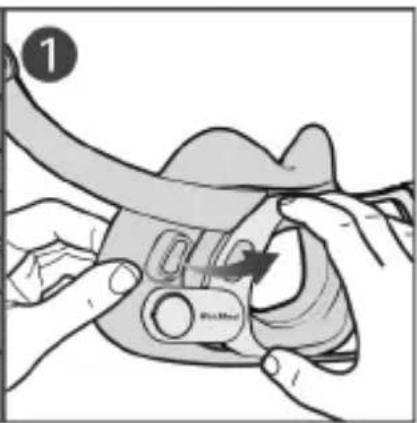
natural_image
Illustration of hands adjusting a device with a curved band and arrow (no text or symbols)
natural_image
Illustration of a hand holding a medical device with a cross symbol (no text or labels)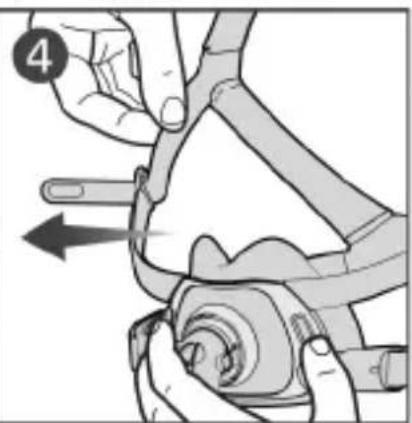
natural_image
Illustration of hands performing a mechanical tool manipulation (no text or symbols visible)
natural_image
Illustration of hands assembling a mechanical component with an arrow indicating motion (no text or symbols present)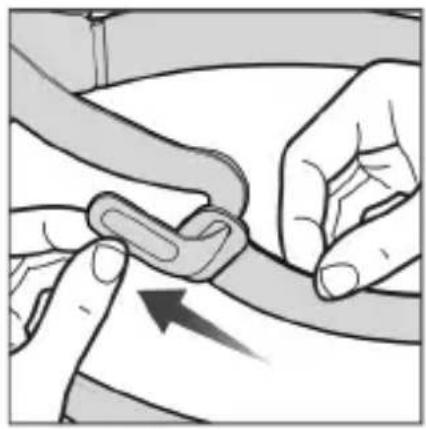
natural_image
Illustration of hands performing a medical procedure on a patient's arm, showing finger placement and pressure point (no text or symbols)Pillows Mail Tasting
natural_image
Illustration of a person wearing a full-face respirator mask and headlamp (no text or symbols)
natural_image
Illustration of a hand using a tool to adjust or install a mechanical component (no text or symbols visible)
natural_image
Line drawing of a person wearing a full-face respirator and head cover (no text or symbols)
natural_image
Illustration of hands assembling a mechanical component with an arrow indicating assembly (no text or symbols present)
natural_image
Illustration of a hand adjusting a mechanical component with an arrow indicating motion (no text or symbols)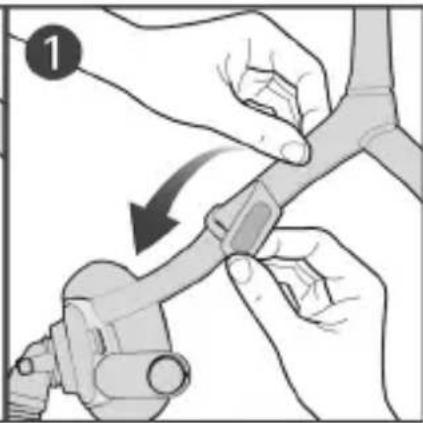
natural_image
Illustration of hands performing a manual switch or grip operation (no text or symbols present)
natural_image
Illustration of hands using a tool to adjust or install a mechanical component (no text or symbols visible)
natural_image
Illustration of hands assembling or adjusting a mechanical component with a numbered label (3), no visible text or symbols.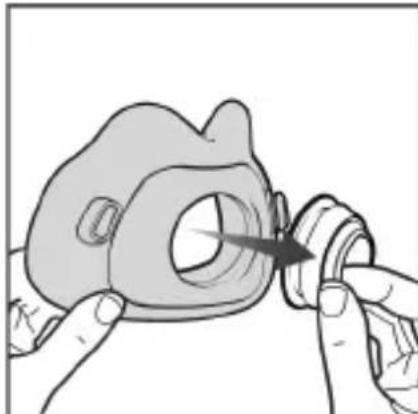
natural_image
Illustration of hands performing a mechanical tool on a circular component (no text or symbols visible)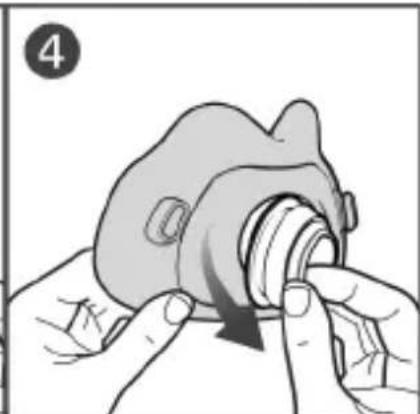
natural_image
Illustration of hands performing a mechanical press or adjustment operation on a cylindrical component (no text or symbols visible)natural_image
Illustration of hands assembling a mechanical component with an arrow indicating motion (no text or symbols)
natural_image
Illustration of hands adjusting a mechanical component with a tool (no text or symbols visible)
natural_image
Illustration of hands performing a manual task on a mechanical component, no text or symbols present
natural_image
Illustration of a hand holding a medical device with a cross symbol (no text or labels)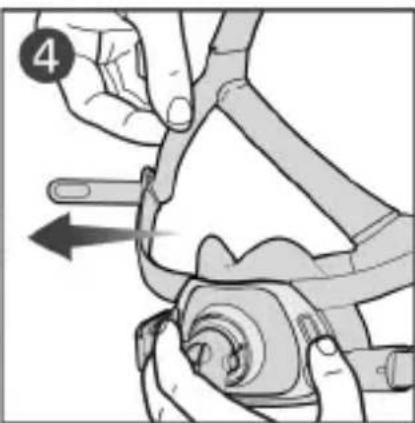
natural_image
Illustration of hands using a tool to adjust or install a mechanical component, with no visible text or symbols.
natural_image
Illustration of hands assembling a mechanical component with an arrow indicating motion (no text or symbols present)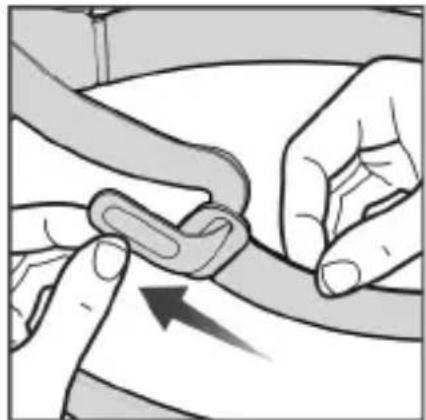
natural_image
Illustration of hands performing a medical procedure on a patient's arm (no text or symbols visible)Pillows Mass Setting
ماسک تمام صورت

Full Face Mask
بالشتك متوسط


بالشتك پهن كوجك


سربند کوچک

بالشتك بزرگ


سربند بزرگ

سربند استاندارد

نامن MR
WITH NATURAL RUBBER LATEX
natural_image
Illustration of a person wearing a full-face respirator mask and headlamp (no text or symbols)
natural_image
Illustration of a hand using a tool to adjust a mechanical component (no text or symbols visible)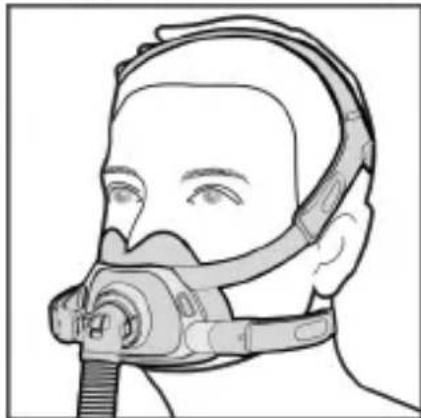
natural_image
Line drawing of a person wearing a full-face respirator and head cover (no text or symbols)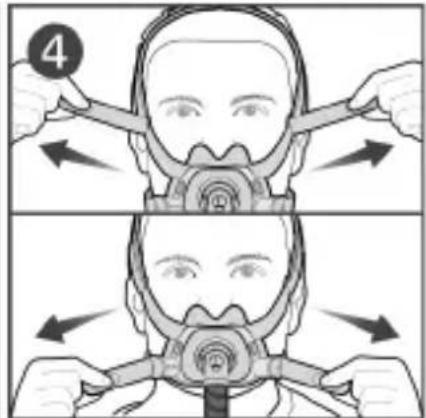
natural_image
Illustration of hands assembling a mechanical component with an arrow indicating motion (no text or symbols)
natural_image
Illustration of hands adjusting a mechanical component with a tool (no text or symbols visible)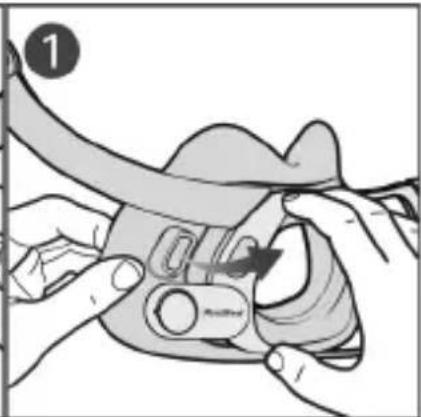
natural_image
Illustration of hands adjusting a mechanical component with an arrow indicating motion (no text or symbols present)
natural_image
Illustration of a hand using a medical or surgical instrument to adjust a device (no text or symbols visible)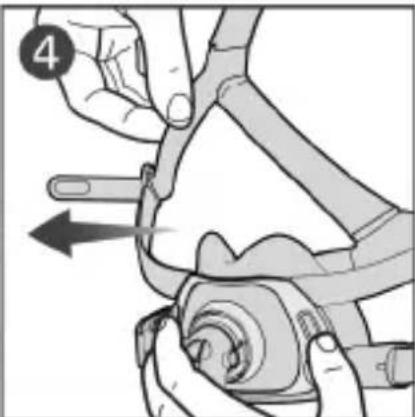
natural_image
Illustration of hands using a tool to adjust or install a mechanical component, with no visible text or symbols.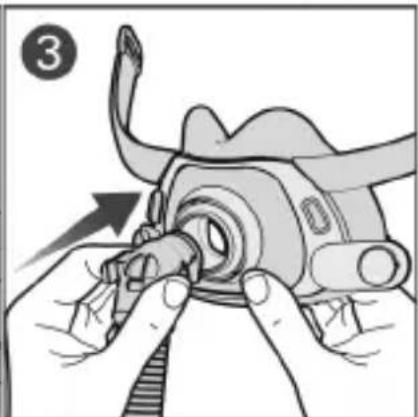
natural_image
Illustration of hands assembling a mechanical component with an arrow indicating motion (no text or symbols present)
natural_image
Illustration of hands performing a medical procedure on a patient's arm (no text or symbols visible).1. 2. 3. 4.
.ResMed.com/downloads/masks-1
בְרָה בַרִי
AirSense™, AirCurve™, and S9™ .(הכלה) 'Pillows' (הכלה) (הכלה) ,הכלההכלההכלההכלההכלההכלההכלההכלההכלההכלההכלההכלההכלההכלההכלההכלההכלההכלההכלההכלההכלההכלההכchia/הכchia/הכchia/הכchia/הכchia/הכchia/הכchia/הכchia/הכchia/הכchia/הכchia/הכchia/הכchia/הכchia/הכchia/הכchia/הכchia/הכchia/הכchia/הכchia/הכchia/הכchia/הכchia/הכchia/הכchia/הכchia
הכלה-הכלההוּרָהוּרָהוּרָהוּרָהוּרָהוּרָהוּרָהוּרָהוּרָהוּרָהוּרָהוּרָהוּרָהוּרָהוּרָה
(ICNIRP)
Pillovas Marsh Setting
הכלהה
Full Face Mark
תְבָרִי בְּרִי


natural_image
Illustration of a person wearing a respirator mask and headlamp (no text or symbols)
natural_image
Illustration of a hand adjusting a mechanical component with a circular arrow indicating rotation (no text or symbols present)
natural_image
Line drawing of a person wearing a full-face respirator mask and headband (no text or symbols)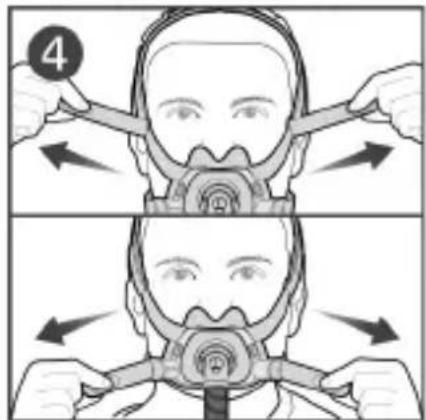
natural_image
Illustration of hands assembling a mechanical component with an arrow indicating assembly (no text or symbols present)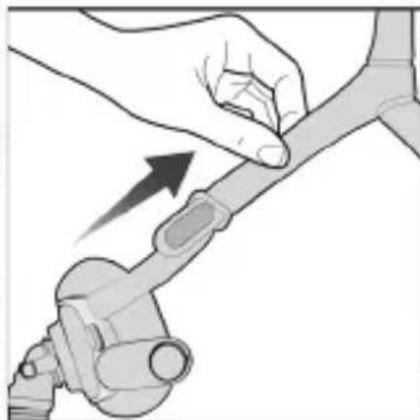
natural_image
Illustration of a hand using a tool to interact with a mechanical device (no text or symbols visible)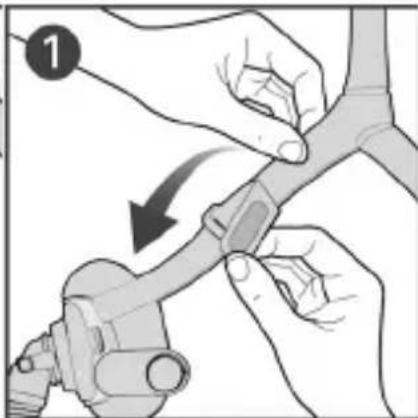
natural_image
Illustration of hands performing a manual switch or grip operation (no text or symbols present)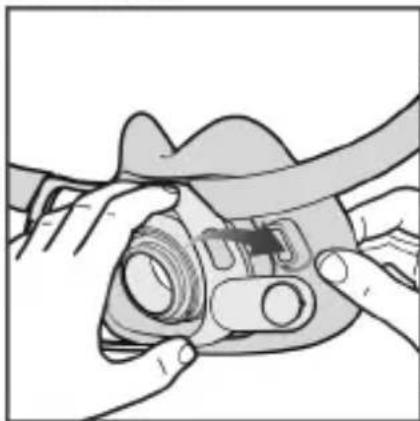
natural_image
Illustration of hands using a tool to adjust or install a mechanical component (no text or symbols visible)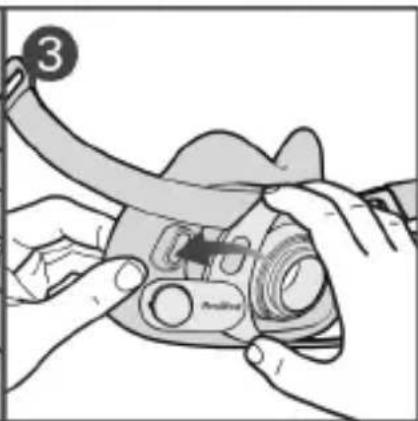
natural_image
Illustration of hands assembling a mechanical component with a numbered label (3), no text or symbols present.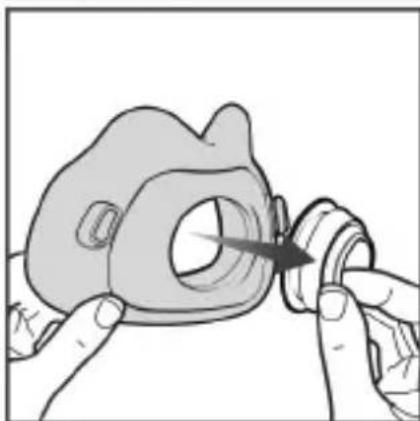
natural_image
Illustration of hands assembling a mechanical component with a tool (no text or symbols visible)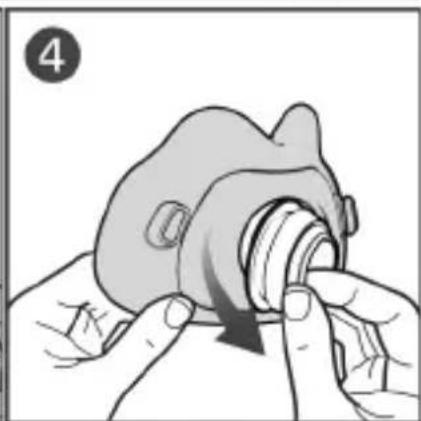
natural_image
Illustration of hands performing a mechanical press or disassembly operation on a cylindrical component (no text or symbols visible)-
بِدْ كَيْر كى بالانى پُتى پر باندهنى والى ئَيْبِز كَهولیين اور فريم سە دور کهینج لین. تجويز: م Concentطيسى کلپس کو بِدْ كَيْر كى نچلى پُتى كى ساتەه منسلک ركهین تاکد دوباره جورتى بونى بالانى اور نچلى پُتى مین آسانى سە فرق بو سکى.
-
ایلیو پر م baggageد سائیک بتنز کو سختی کے ساته دبائین اور وینک رنگ سے علیدده کرین.
- کُشن استنّ کو فریم استنّ بول سے بابر نکالین، دوسری جانب بهی يپی عمل دېرانین.
- کُشن سے وینک رنگ کو بابر کهینچ لین.
natural_image
Illustration of hands assembling a mechanical component with an arrow indicating direction (no text or symbols)
natural_image
Illustration of hands fastening a mechanical component with a tool (no text or symbols visible)
natural_image
Illustration of hands performing a manual task on a mechanical component, no text or symbols present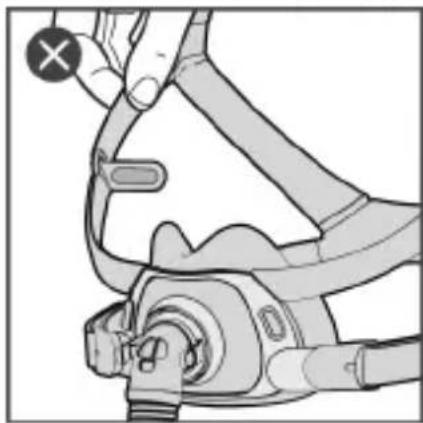
natural_image
Illustration of a hand adjusting a medical device with a cross symbol (no text or labels)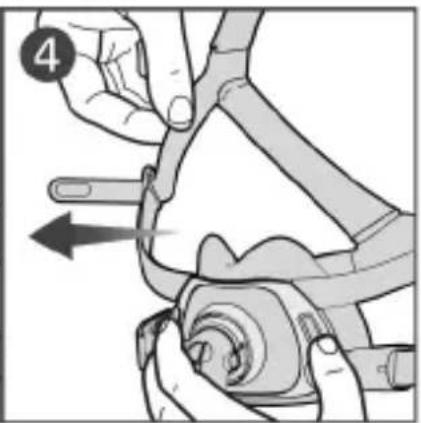
natural_image
Illustration of hands using a tool to adjust or install a mechanical component, with no visible text or symbols.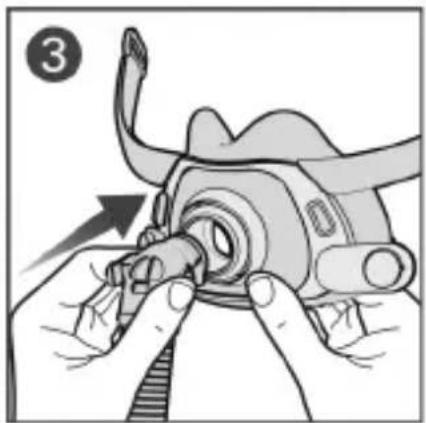
natural_image
Illustration of hands assembling a mechanical component with an arrow indicating motion (no text or symbols present)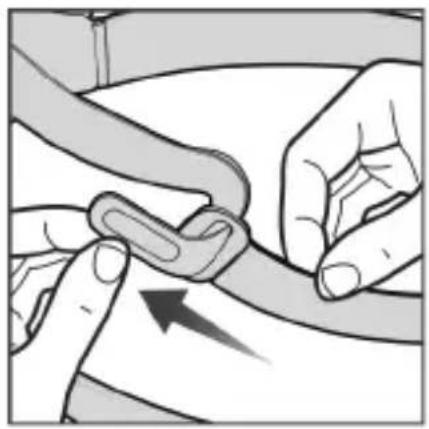
natural_image
Illustration of hands performing a medical procedure on a patient's arm, showing finger placement and a curved arrow (no text or symbols)natural_image
Simple curved dotted line with black dots, no text or symbols presentResMed
MANUFACTURER
ResMed Pty Ltd
1 Elizabeth Macarthur Drive
Bella Vista NSW 2153 Australia
See ResMed.com for other ResMed locations worldwide. AirFit, AirCurve, AirSense, QuietAir and S9 are trademarks and/or registered trademarks of the ResMed family of companies. For patent and other intellectual property information, see ResMed.com/ip. © 2023 ResMed. 638361/1 2023-11