USER MANUAL ENFINIGY Zwilling
natural_image
Line drawing of a grater with heat sinks and grilles, no text or symbols present
Bedienungsanleitung 2 | Operating instructions 20 | Mode d'emploi 38 | Instrucciones de uso 56 | Istruzioni per l'uso 74 | Gebruiksaanwijzing 92 | Instruções de funcionamento 110 | Kullanma Talimatlari 128 | Brugsanvisning 146 | Bruksanvisning 164 | Bruksanvisning 182 | Instrucțiuni de utilizare 200 | Instrukcja obsługi 218 | Provozní pokyny 236 | Návod na obsluhu 254 | Upute za uporabu 272 | Navodila za uporabo 290 | Használati utasítások 308 | Kasutusjuhend 326 | Lietošanas norādes 344 | Naudojimo instrukcijos 362 | Köyttöohjeet 380 | Οδηγίες λειτουργίας 398 | Руководство по эксплуатации 416 | Инструкции за работа 434 | Упутства за рад 452 | Інструкция з експлуатації 470 | Foydalanish qo'llanmasi 488 | δυδμυγβόσού οδυφήσυγβόσού 506 | Ορινωρησύμι ωηλησιλύμη 526 | 545 لي غشتلا تاميل عت
ZWILLING ENFINIGY® CONTACT GRILL
53113-0
text_image
A
B
K
J
I
H
G
C
D
F
E
A Griff G Display
natural_image
Line drawing of a hand holding a rectangular device with a handle (no text or symbols)
text_image
Technical diagram showing two views of a device with labeled components and directional arrows indicating rotation or assembly.
Betriebsmodi

natural_image
Diagram of a mechanical device with a rotating arrow and clamped parts (no text or symbols)
natural_image
Line drawing of a portable electric grill with grid panels and an open lid, showing internal structure and rotation arrow (no text or symbols)

text_image
3.
2.
3 Ofengrill
natural_image
Technical line drawing of a mechanical device with a close-up inset showing internal components (no text or symbols)
natural_image
Line drawing of an open portable electric stove with a cable inserted, showing internal grid and power cord (no text or symbols)
Inbetriebnahme
1 Anschließen
natural_image
Simple line drawing of a curved surface with icons and an arrow pointing to a point (no text or symbols)
Bedienung

text_image
1
= 230°C
= 230°C ⓣ 0004
2 OK
| 1x | | → | → | Medium rare |
| 2x | | → | → | Medium |
| 3x | | → | → | Done |
Burger
| 1x | → | → | Medium rare |
| 2x | → | → | Medium |
| 3x | → | → | Done |
Fisch
Würstchen
Sandwich
text_image
= 230°C
= 230°C @ 00:04
2.
OK
1. 3.
natural_image
Line drawing of an open portable electric stove with internal components and a cable inserted (no text or symbols)

text_image
°C
OK

natural_image
Line drawing of an open portable device with internal components and a cable inserted, showing no text or symbols.

text_image
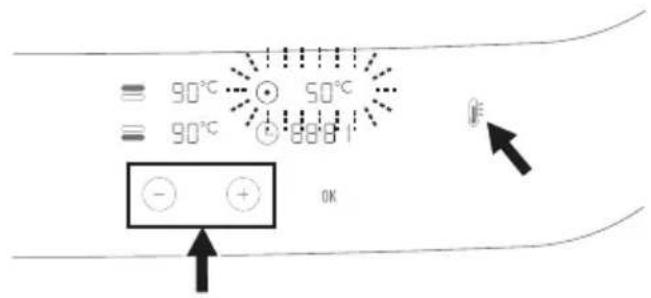
= 90°C - 50°C
= 90°C +88.81
OK

natural_image
Diagram of two rectangular grating or filter compartments with a tool inserted, no text or symbols present
natural_image
Illustration of a faucet pouring liquid into two square grilles (no text or symbols)
Read all safety information and instructions. Failure to comply with the safety information and instructions can result in electric shock, fire, and/or serious injuries.
The contact grill (hereinafter "appliance") is to be used solely to grill food items in enclosed spaces.
Any other use is regarded as improper and can lead to serious injuries or damage to the appliance.
The appliance is exclusively intended for use:
- in households
- in staff kitchens of shops, offices and other commercial areas
• in and on agricultural properties
- by guests in hotels, motels and other residential facilities
The appliance is intended for use in the household, not for commercial use.
This appliance must not be used or operated by children. Keep the appliance and the accompanying connection cable away from children.
The appliance may be used by persons who are affli cted by reduced physical, sensory or mental capacities, or who lack experience and/or knowledge only if such persons are previously instructed with regard to use of the appliance and have indicated their understanding of the resulting risks and hazards.
Children are not permitted to play with the appliance. Children should be supervised to ensure that they do not play with the appliance.
Cleaning and maintenance of the device must not be performed by children or by persons with reduced physical, sensory or mental capacities, or who lack experience and/or knowledge.
Children are not permitted to play with packaging materials. This presents a risk of suffocation.
Inspect the appliance for damage before each use. Should you determine that damages have occurred during shipment, contact customer service immediately (see "Customer Service"). Never use a broken or damaged appliance or defective accessories.
If a defect occurs, the appliance must be repaired. The appliance does not contain any components that you can repair yourself.
Never unscrew the appliance and do not perform any technical modifications.
Even when the appliance is turned off, there is voltage present in the appliance's interior as long as the power plug is plugged into the socket.
Remove the power plug after every use in case of danger or if damage has occurred. For this reason, keep the socket into which the power plug for the appliance has been plugged in a place where it will be easily accessible.
Do not transport or move the appliance while it is being used.
If the power cord for this appliance is damaged, it must be replaced by the manufacturer or by the manufacturer's customer service department or by a similarly qualified person in order to prevent hazards.
The appliance is not intended to be operated with a timer or separate telecontrol system (remote control).
Only operate the appliance if the voltage indicated on the type plate is the same as the voltage for your power socket.
Place the appliance on a dry, level, slip-free surface.
Do not place the appliance on a hot surface or in the vicinity of strong sources of heat.
Do not use the appliance outdoors or in rooms with high air humidity.
Never operate the device without a grill plate.
Food for grilling can burn. Never use the appliance in the vicinity of or under combustible materials (e.g. curtains or drapes, wall cupboards). The area above the appliance must always be clear and unobstructed.
Never operate the appliance in the vicinity of combustible materials that can be easily ignited e.g. gasoline or alcohol.
Do not place the appliance on surfaces that can easily ignite (e.g. paper napkins).
The external surface of the appliance can become very hot while the appliance is in operation. Always use the handle or, if necessary, oven mitts.
Remove the power plug from the socket when you are not watching the appliance. Do not leave the appliance unattended during grilling.
Turn off the appliance and remove the power plug from the socket before cleaning or servicing the appliance.
Never touch the power cord with wet hands. Do not touch the appliance with wet hands when it is in operation or when the appliance is on a wet surface.
When you remove the power plug from the socket, always pull directly on the power plug. Do not carry the appliance by the power cord.
Make sure that the power cord does not become bent or clamped and that the power cord and the appliance do not come into contact with sources of heat (e.g. hotplates, burner flames).
Do not allow the power cord to droop or sag. Store the cord in the cable compartment on the underside of the appliance after use.
Only remove or exchange the grill plates if the appliance has cooled down completely.
Never submerge the appliance in water or other liquids, do not clean it under running water and do not put it in the dishwasher.
Do not pour cold water or flammable liquids on the hot grill plates.
Transport and clean the appliance only after it has completely cooled down.
Do not use any hard cleaning utensils to clean the appliance, such as steel wool, and do not use aggressive or abrasive cleaning agents.
Before storing the appliance: Remove the power plug and let the appliance cool down completely.
Store the appliance in a cool, dry place that cannot be accessed by children or by pets.
Symbols Used
| Carefully read the operating instructions in their entirety and keep them for future use. |
| CAUTION! Possible risk of accident and injury as well as serious property damage. |
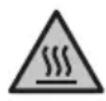
| Risk of burns due to hot surfaces |
| Do not use the appliance outdoors or in a damp environment. |
| Protection Class I |
| The appliance complies with the guidelines for CE marking. |
Technical Data
| Power supply 220-240 V, 50-60 Hz | |
| Energy consumption / Power output 2000 W | |
| Weight 8.13 kg | |
| Protection Class I | |
| Dimensions 398 x 321 x 150 mm | |
Contents
| Important Safety Information 1 |
| Overview | 4 |
| Overview / Operation 5 |
| Display | 5 |
| Before the first use 6 |
| Operating modes 7 |
| Commissioning | 9 |
| Operation | 10 |
| Cleaning and Maintenance 15 |
| Error messages 17 |
| Customer Service | 18 |
| Accessories | 18 |
| Disposal | 18 |
Overview
text_image
A
B
K
J
I
H
G
C
D
F
E
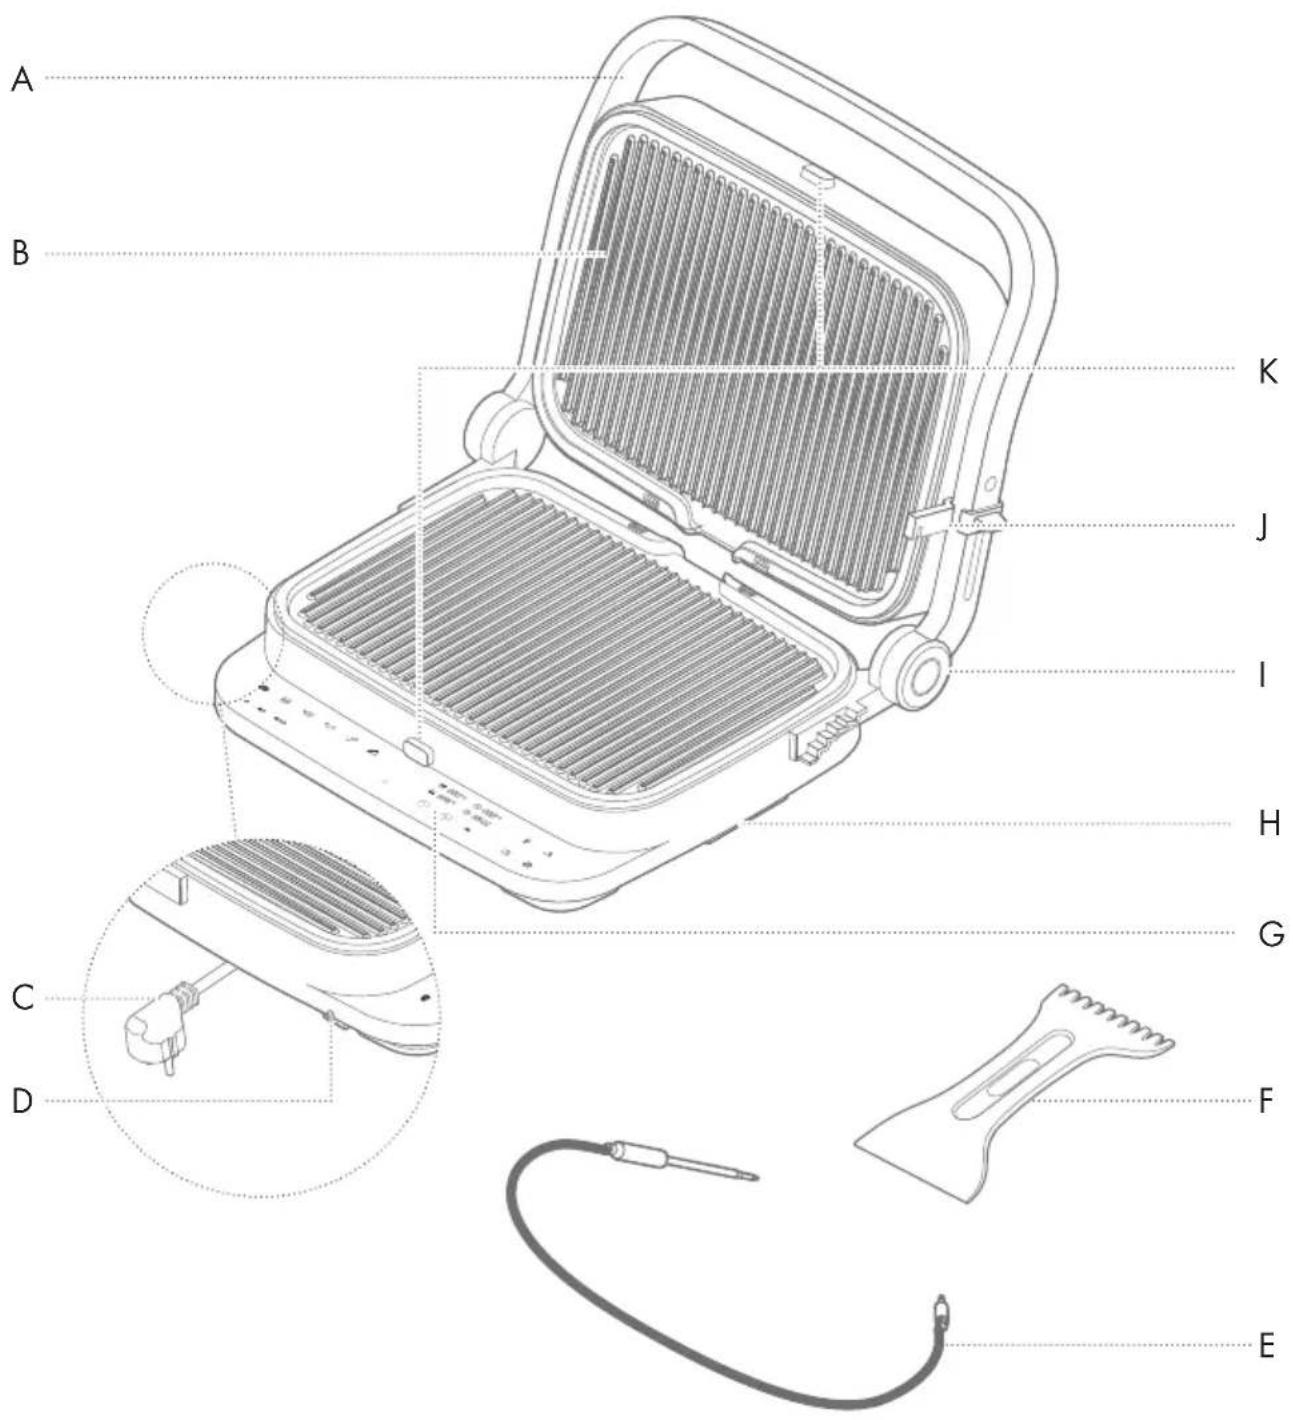
A Handle G Display
B Grill plate H Grease drip tray
C Power cable | BBQ unlocking device
D Thermometer connection J Spacers and locking mechanism
E Grill thermometer K Unlocking button for the grill plates
F Scraper
Display

text_image
1 2 3 4 5 6 7 8 9 10 11 12
= 888°C ⊙ 888°C
= 888°C ⊙ 88800 ...
21 20 19 18 17 16 15 14 13
1 Steak program 12 Boost feature
2 Burger program 13 Thawing feature
3 Fish program 14 Program duration
4 Sausage program 15 Confirmation key
5 Poultry program 16 Set key „+“
6 Panini program 17 Set key "-"
7 Temperature lower grill plate 18 On/off button
8 Temperature upper grill plate 19 Cooking level Done
9 Core temperature display (only with grill thermometer)
10 Timer display 21 Cooking level Medium rare
11 Change grill temperature
20 Cooking level Medium
Before the first use
Remove all packaging materials, dispose of them in an environmentally-friendly fashion or keep them for future storage of the appliance. Inspect the appliance and its accompanying accessories to ensure that they are undamaged and complete.
Note: Should you discover any missing or damaged parts, do not operate the appliance. Instead, contact our customer service department (see the chapter entitled "Customer Service").
Cleaning
Before use, wipe the appliance with a moist cloth.
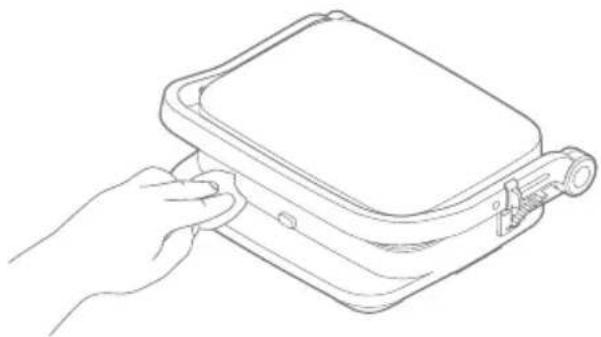
natural_image
Line drawing of a hand holding a rectangular device with a handle, no text or symbols present
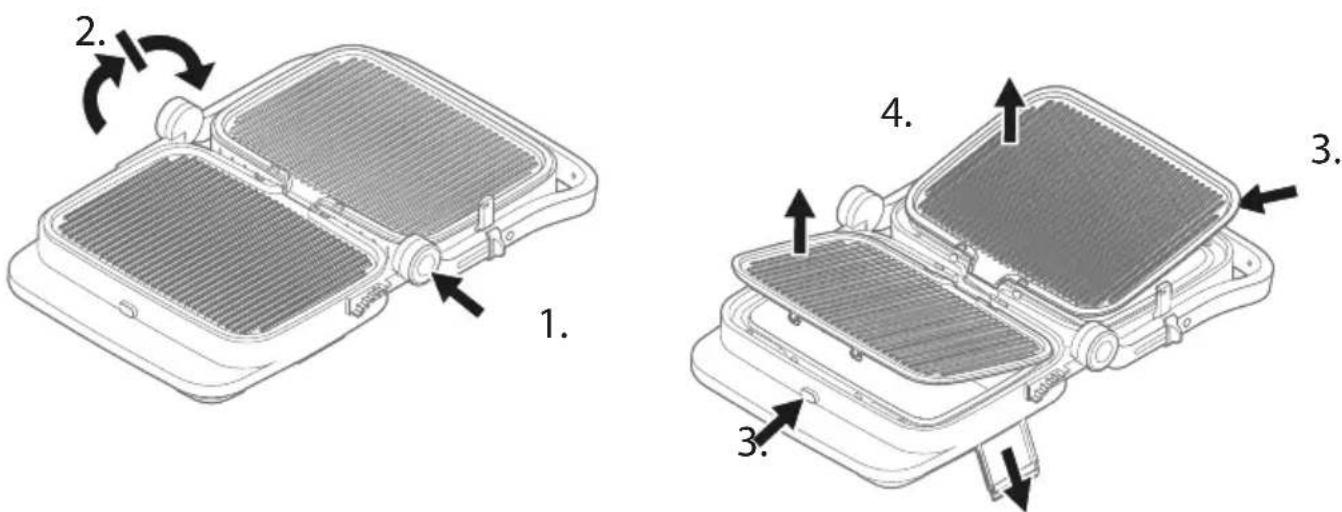
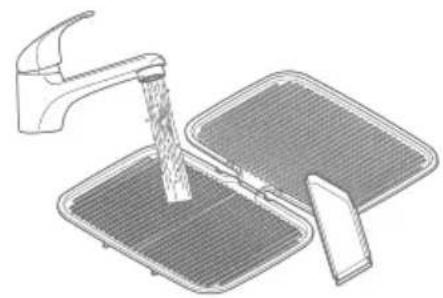
Press the BBQ unlocking device on the right-hand side and open the appliance completely. Press the unlocking appliance for the grill plates, remove the grill plates and the grease drip tray and clean with dishwashing detergent under running water. Dry the grill plates carefully and make sure that all residue from the cleaning agents has been removed.
text_image
Technical diagram showing two views of a device with labeled components and directional arrows indicating rotation or assembly.
Operating modes

CAUTION! Make sure that the grease drip tray has been inserted. Check the tray at regular intervals to prevent an excessive accumulation of grease.
The upper grill plate automatically adjusts to the thickness of the food placed on the lower grill plate. The food will cook evenly on both sides.

natural_image
Diagram of a mechanical device with a rotating arrow and internal components (no text or symbols)
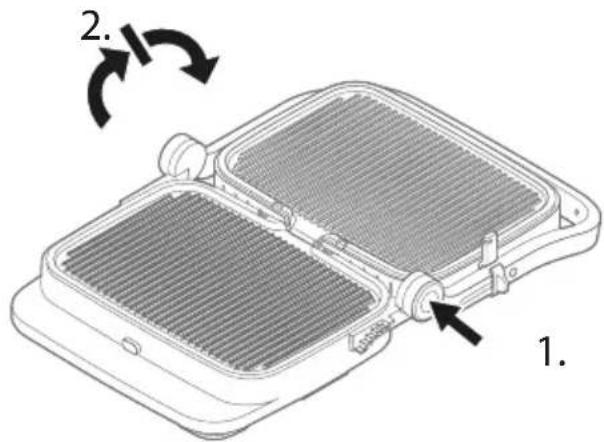
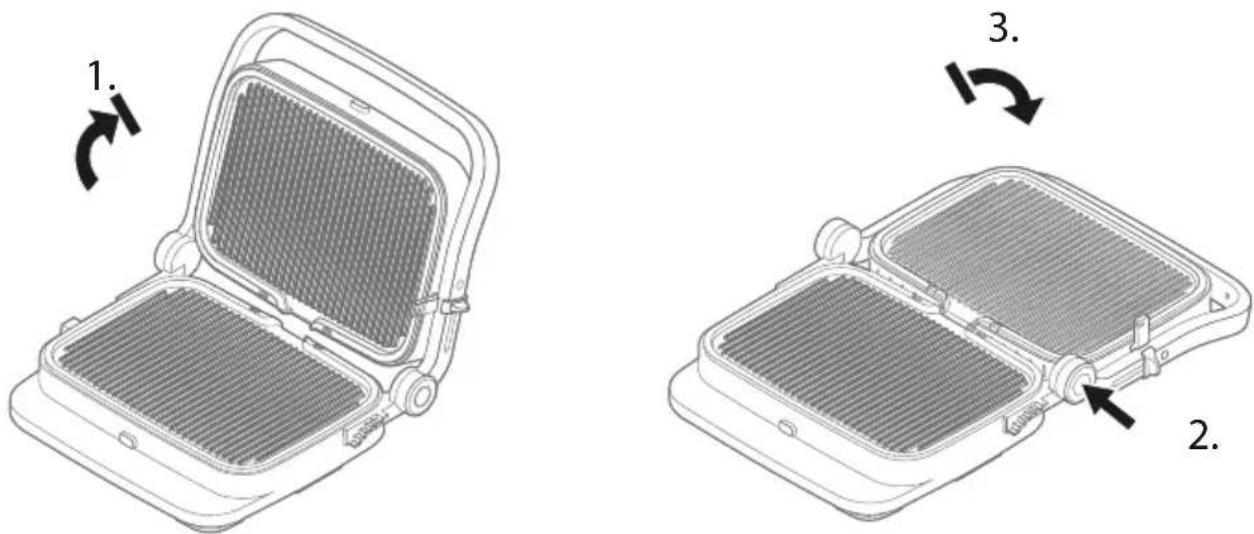
2 Open grill (BBQ mode)
When fully opened, both grill plates form a large grilling surface on the same level, on which different foods can be cooked without the grill juices blending together. Press the unlocking key for the hinge on the right-hand side and fold the upper grill plate backwards.

text_image
Technical diagram showing two open battery compartments with labeled rotation directions and component details
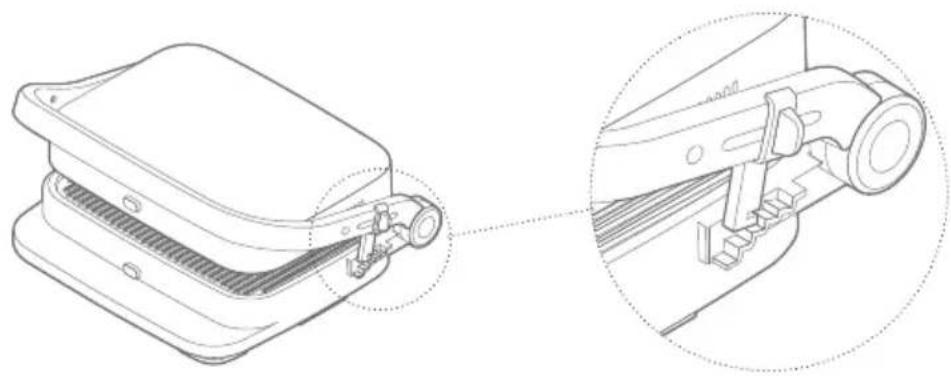
3 Oven grill
Use the spacer to adjust the desired distance between the two grill plates. Place the food on the lower grill plate and lower the upper grill plate until it is close to the food. This position is perfect for very thick food that must be cooked slowly and evenly, for preparing melted cheese dishes such as e.g. pizza or paddies and for preparing soft foods that should not be squashed. Its use is also recommended for vegetables with a high water content, since the water is permitted to evaporate unhindered.

natural_image
Technical line drawing of a mechanical device with a close-up inset showing internal components (no text or symbols)
4 Using the Grill Thermometer
The grill thermometer that comes with the appliance can be attached to measure the core temperature To do this, insert the jack connector for the thermometer into the left-hand, lower side of the appliance. The indicator for the core temperature will appear in the display, the symbols for the sandwich and program duration features will disappear. For adjustment options, see the chapter entitled Operation - Core temperature.

natural_image
Line drawing of an open portable electronic device with a cable inserted, showing internal grid and power cord (no text or symbols)
Commissioning
1 Connection
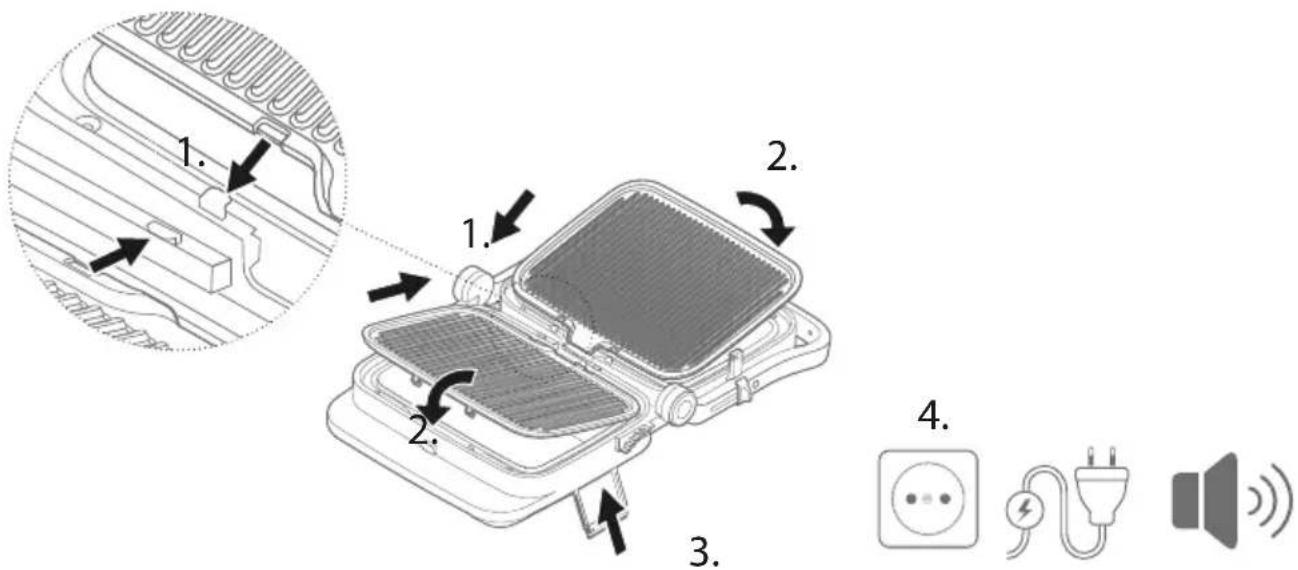
First, insert the grill plates by their rear sides into the corresponding hooks on the grill. Then push the outer sides downwards until they snap in audibly. Push the grease drip tray into the grill. Only afterwards should you connect the connecting cable to a suitable socket (see the chapter entitled "Technical Data"). You will hear a long chime, and all features will appear in the display. The On / Off button will remain visible.
text_image
1.
2.
3.
4.
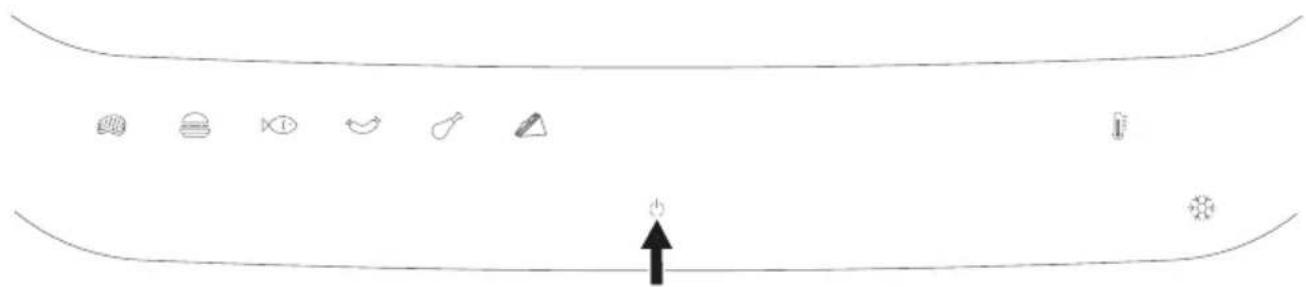
2 Switching on / off
Press the On / Off button and hold it down for 1 second. You will hear a long beep. The basic selection menu of symbols will appear in the display (see illustration) The core temperature will only appear if the grill thermometer has been connected.
natural_image
Pure diagram of a horizontal line with icons and an upward arrow, no text or symbols present
Operation

CAUTION! Risk of burns due to hot components. Only touch the grill by the handle or on the display during operation. Allow other parts to cool down completely before touching. Do not raise or otherwise move the hot grill.
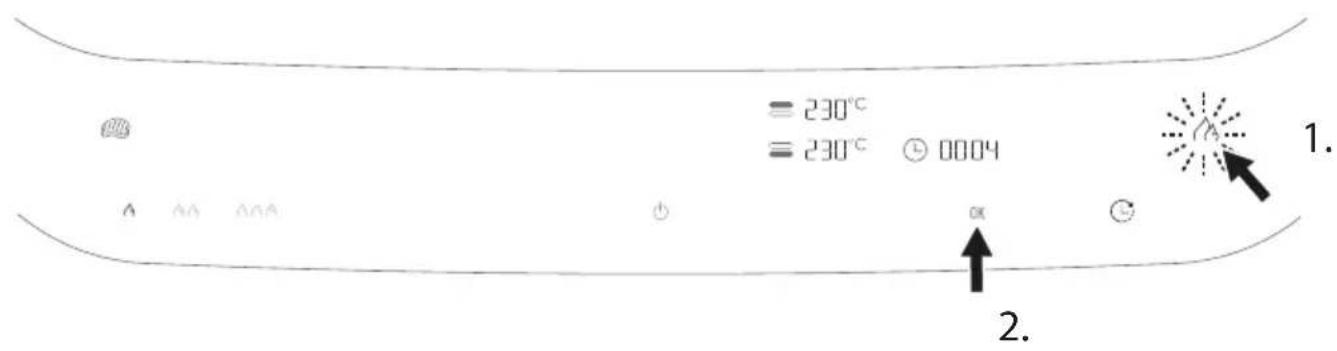
1 Select automatic cooking program

text_image
1
= 230°C
= 230°C ① 88.04
2 OK
Select an automatic cooking program and the cooking level from the chart by pressing on the corresponding symbol three times, and then confirm by pressing OK. You will hear a long beep. The preset time can be adjusted by pressing the timer symbol with the "+" and "-" buttons. It will flash until the adjusted temperature has been reached (two beeping tones). Press the Boost symbol as required to roast at full power for the last 30 seconds. At the end of the program, you will hear a long beep and the basic display will appear.
Steak
| 1x | | → | → | Medium rare |
| 2x | | → | → | Medium |
| 3x | | → | → | Done |
Burger
| 1x | → | → | Medium rare |
| 2x | → | → | Medium |
| 3x | → | → | Done |
Fish
Sausages
Sandwich
| 1x | → | → Roasting level 1 |
| 2x | → | → Roasting level 2 |
| 3x | → | → Roasting level 3 |
2 post function
For automatic programs, you can roast at full heat for the last 30 seconds by pressing the Boost symbol. The symbol will start to flash. Confirm the program selection with OK, you will hear a long beep.
Note: The boost symbol will continue to flash until the boost is complete, otherwise it is turned off.
text_image
= 230°C
= 230°C ⏱ 0004
1.
2.
3 Thawing
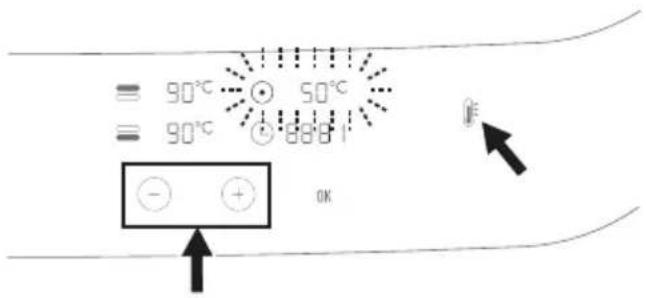
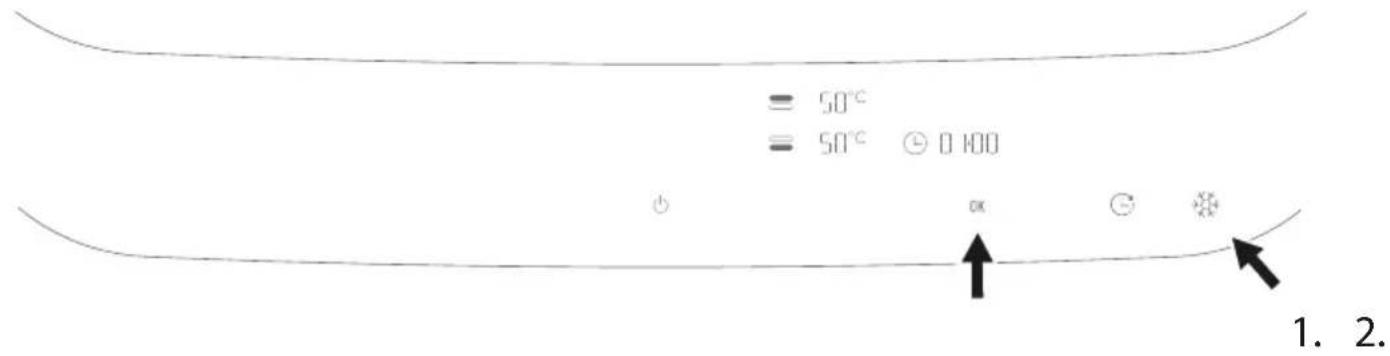
Press the Thaw symbol. The preset temperature of 50 °C will be displayed, together with the time. To change the thawing time, see the chapter entitled Change program duration. Confirm the program selection with OK, you will hear a long beep.

text_image
= 50°C
= 50°C ⏻ 0 HDD
OK
1. 2.
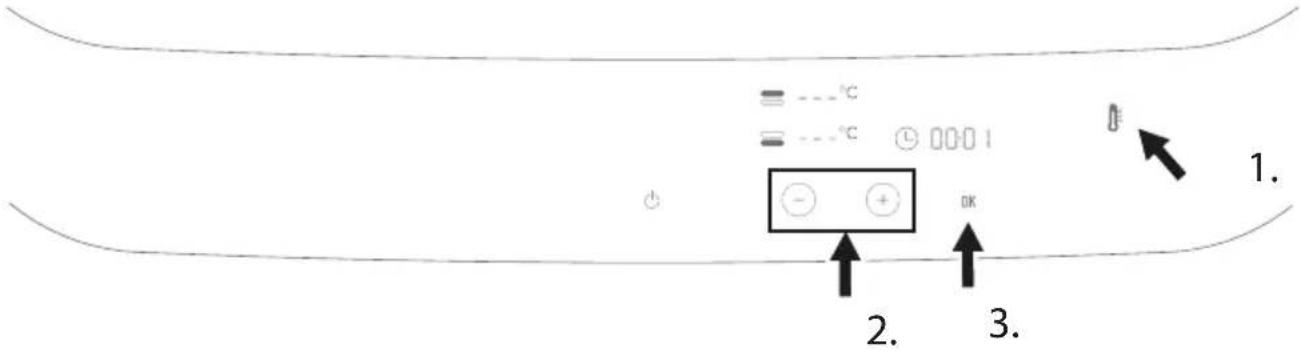
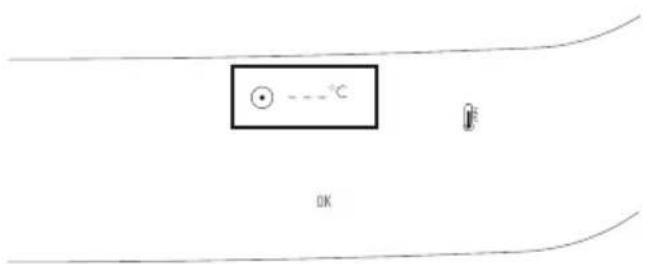
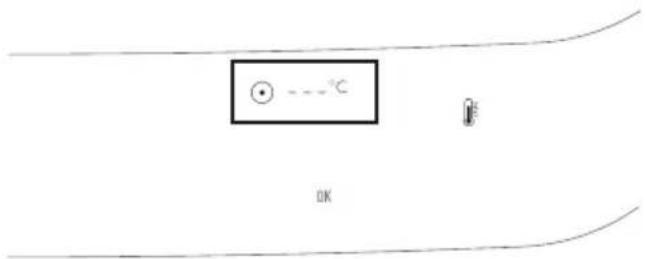
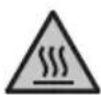
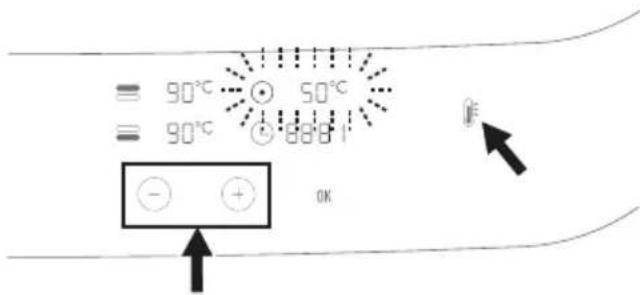
4 Manually adjust grilling temperature
Press the grill temperature symbol. After pressing once, the temperature for both plates can be adjusted immediately, while the temperature for the upper plate can be adjusted after pressing twice and the temperature for the lower plate can be adjusted after pressing three times. The respective temperature can be changed using the "+" and "-" adjustment keys. After confirming once with OK, a timer can be set using the "+" and "-" adjustment keys.
Note: The timer will beep four times once the time has elapsed. The grill must be turned off manually if the grill temperature was adjusted manually.
text_image
≡ ---°C
≡ ---°C 0001
①.
2. 3.
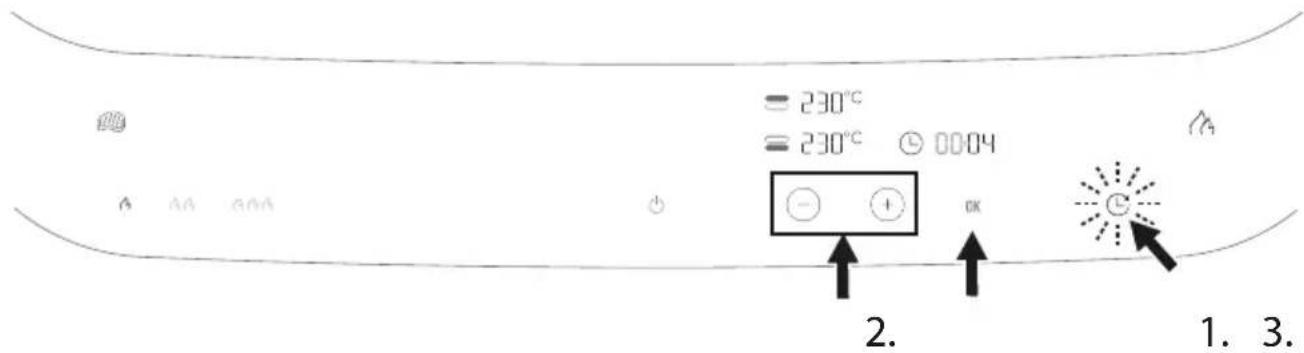
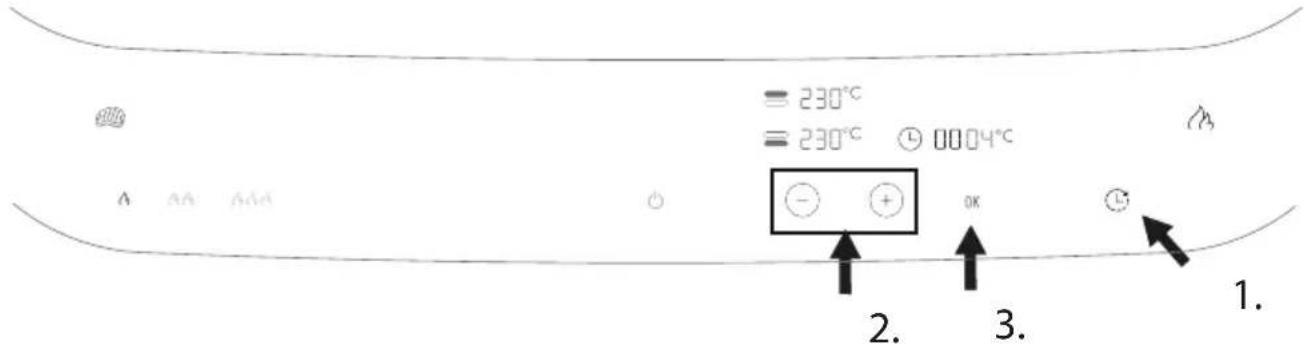
5 Manually adjust program duration / timer
text_image
= 230°C
= 230°C 00:04
A A A A A
2. OK
1. 3.
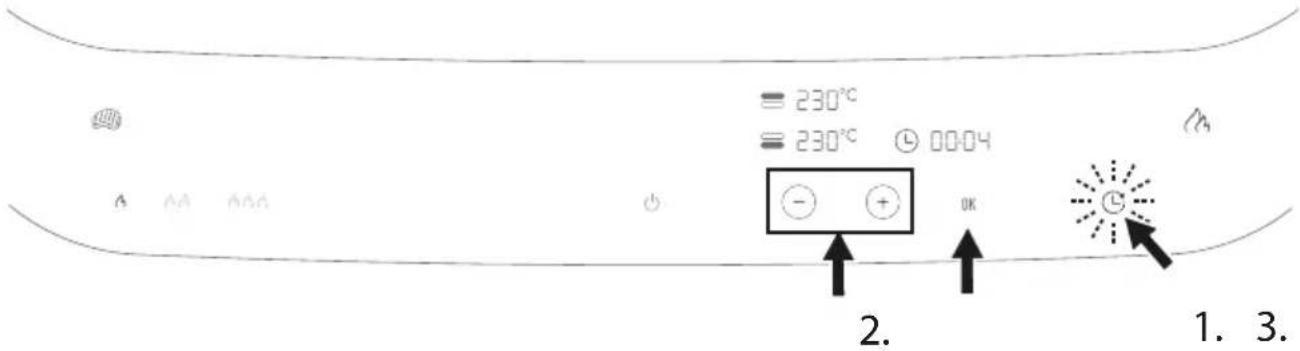
The timer symbol can be used to change the cooking time for automatic cooking programs or to set a timer for manual adjustment of the grilling temperature. The symbol will flash. Plus and minus symbols will appear. Adjust the desired duration using the plus and minus symbols and confirm with OK. The timer will start. For the automatic cooking program, the timer symbol will continue to flash until the selected temperature is reached. If the temperature has been reached, you will hear a double beep, the display will light up continuously and the timer display will start counting down.
Press the timer symbol to adjust the program duration and/or the timer. Plus and minus symbols will appear. Adjust the desired duration using the plus and minus symbols and confirm with OK. If nothing else is pressed for three full seconds, the timer display will reset and the plus and minus symbols will disappear.

text_image
230°C
230°C 0004°C
-
+
OK
1.
2. 3.
6 pre temperature - automatic cooking program
Connect the grill thermometer. The indicator for the core temperature will appear in the display, the symbols for the sandwich and program duration features will disappear.
Select the desired program, a preset value will appear in the core temperature display. Confirm the program selection with OK, you will hear a long beep. The core temperature display will continue to flash until the grill plate reaches the preset temperature (double beep). Insert the grill thermometer into the food sideways until the tip is in the center of the food and place it on the grilling plate. The current temperature and the adjusted core temperature will appear intermittently in the core temperature display. When the core temperature has reached the set value, four beeps will sound to signal that the program is complete.

natural_image
Line drawing of an open portable electric stove with internal components and a cable inserted (no text or symbols)

text_image
°C
OK

Risk of burns. Use long-handled barbecue utensils to move the food.
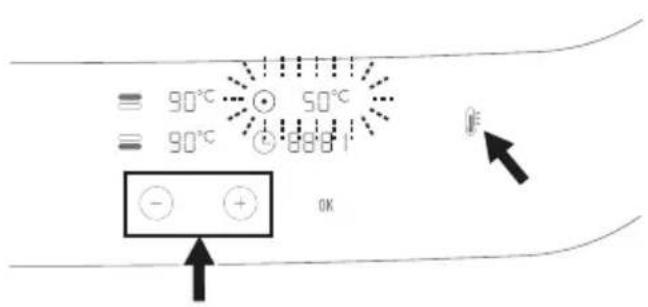
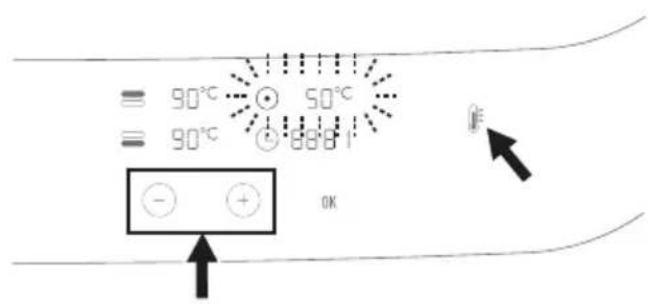
7 Core temperature - manual adjustment
Connect the grill thermometer. The indicator for the core temperature will appear in the display, the symbols for the sandwich and program duration features will disappear.

Press the grill temperature symbol and adjust the desired plate temperature using the "+" and "-" adjustment keys as described in 4. Manually adjust grilling temperature.
Confirm with OK. Now the core temperature can be changed. Then press OK and, if desired, program an additional timer up to 90 minutes in length for additional food. When the timer has been adjusted and the grill is being operated in manual mode, the grill must be adjusted by hand. The core temperature display will continue to flash until the grill plates reach the preset temperature.
Insert the grill thermometer into the food and place it on the grill plate. The adjusted temperature and the current temperature inside the food will be intermittently displayed in the core temperature display. You will hear three beeps once the core temperature reaches the preset value. You will hear four beeps once the timer period has elapsed. The grill must be turned off manually.

natural_image
Line drawing of an open dental appliance with a medical device inserted, showing internal components and a cable (no text or symbols)

text_image
= 90°C - + 50°C
= 90°C - +88.81
OK

Risk of burns. Use long-handled barbecue utensils to move the food.
8 Cancel an entry or a running program

Briefly press the On / Off button once. You will hear a short beep; the basic display will appear. After 5 minutes, the appliance will automatically enter standby mode.
Cleaning and Maintenance

Risk of burns due to hot components. Let the grill cool down completely before performing cleaning and maintenance tasks.
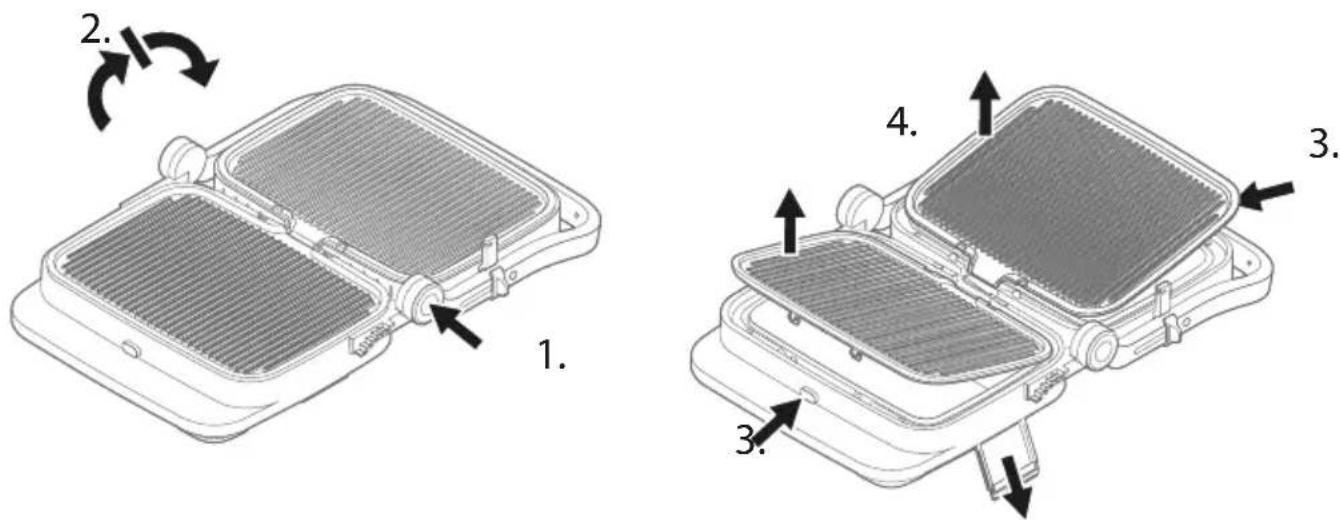
1 Remove and clean grill plates
Press the unlocking key for the hinge on the right-hand side and open the appliance completely. Remove the grill plates and the grease drip tray.
text_image
Technical diagram showing two views of a device with labeled components and directional arrows indicating rotation or assembly.
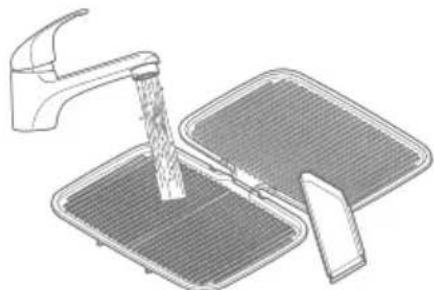
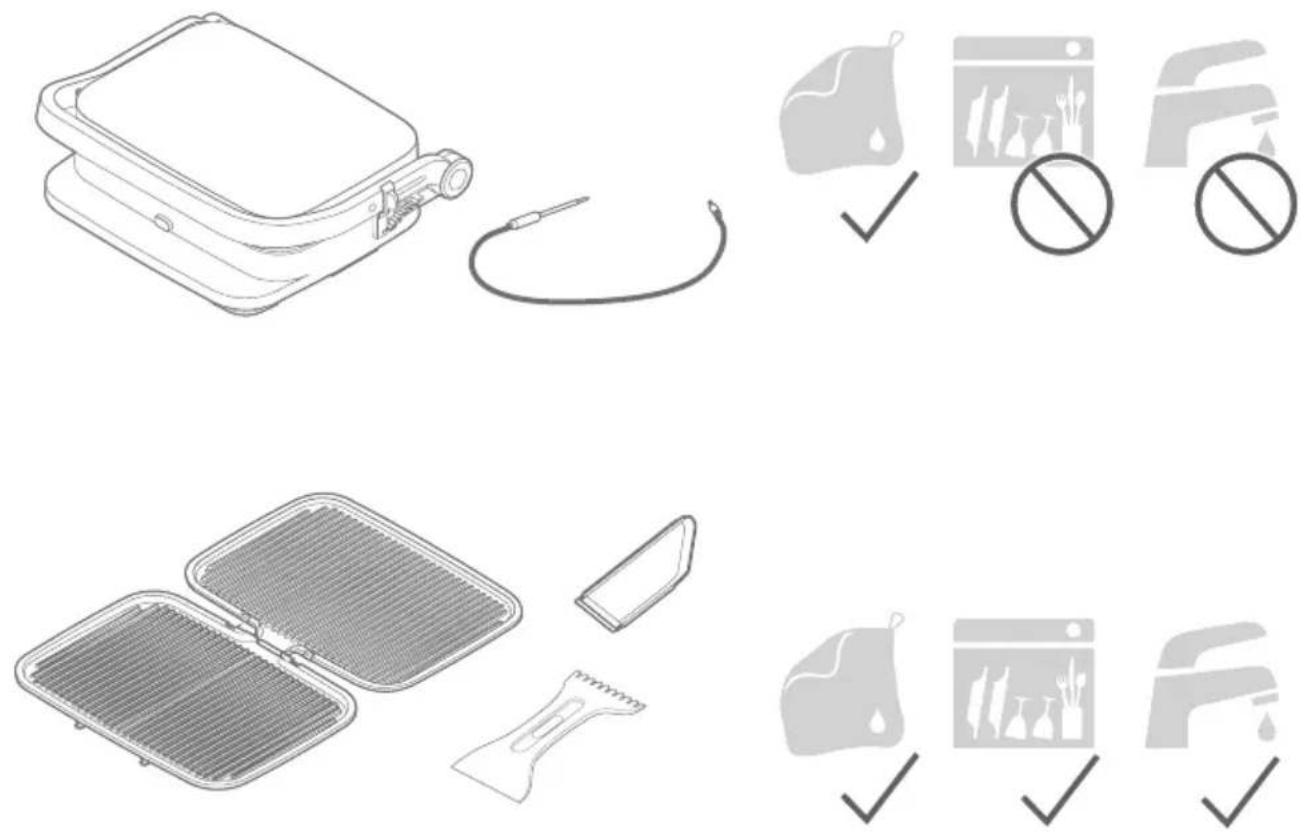
Then remove the chunkiest grill remains using the scraper provided upon delivery. Clean the grill plates and the grease drip tray under running water with dishwashing detergent.

natural_image
Two technical line drawings of a kitchen appliance with a handle and drain, showing internal components (no text or symbols)
After each use, wipe the appliance off with a damp cloth. Do not use any abrasive cleaning agents or any microfiber cloths, since these can cause fine scratches in the surface of the casing.

Error messages
An error message will be acoustically displayed by means of a ten-beep tone.
Risk of burns due to hot components. Let the grill cool down completely before performing troubleshooting and error resolution tasks.
| Problem Possible cause Remedy |
| The appliance does not function. | The appliance is not properly connected to the power supply. | Check to see whether the power plug has been inserted properly into the socket. |
| Check the fuse. |
| No program has been selected Select a program. |
| The program does not start after pressing OK. | No appropriate values have been adjusted. | Adjust the grill plate temperature to a minimum of 90°. |
| Adjust the program duration for automatic cooking programs to over 1 minute. |
| Err^ 180^ | The upper grill plate has not been properly inserted. | Turn off the appliance, insert the upper grill plate properly and re-start the appliance. |
| 180^ Err^ | The lower grill plate has not been properly inserted. | Turn off the appliance, insert the lower grill plate properly and re-start the appliance. |
| Err^ Err^ | Both grill plates have been incorrectly inserted. | Turn off the appliance, insert the grill plates properly and re-start the appliance. |
| Err^ --:-- | The grill thermometer has not been properly installed. | Turn off the appliance, insert the tip of the grill thermometer into the food and re-start the appliance. |
| EDI^ ---°C | The appliance is broken. | Turn the appliance off and contact customer service. |
| ---°C ED2^ | The appliance is broken. | Turn the appliance off and contact customer service. |
Customer Service
Should you have problems with your contact grill, contact our customer service department. You can find detailed information regarding service, repairs, warranties and product registration at www.zwilling.com/service.
Accessories
You can find suitable accessories for your appliance at www.zwilling.com.
Disposal
The "crossed-out trash can" symbol means that separate disposal is required for electrical and electronic appliances (WEEE). Appliances of this type can contain hazardous substances that are harmful to the environment. Do not dispose of this appliance or the packaging in which it was delivered in the unsorted household trash. Disposal must occur at a designated collection point for electrical and electronic old appliances. In doing so, you contribute to protecting resources and the environment. For additional information, please contact your dealer, ZWILLING (www.zwilling.com/service) or your local authorities.
Under no circumstances should children be permitted to play with plastic bags and packaging material since this presents a risk of injury and/or suffocation. Keep materials of this type safely stored away or dispose of them in environmentally-friendly way.
text_image
A
B
K
J
I
H
G
C
D
F
E
A Poignée G Écran
natural_image
Line drawing of a hand holding a rectangular device with a handle (no text or symbols)
text_image
Technical diagram showing two views of a device with labeled components and directional arrows indicating rotation or assembly.
natural_image
Diagram of a mechanical device with a rotating arrow and handle mechanism (no text or symbols)
natural_image
Line drawing of a portable electric stove with internal grid compartments and a 1° rotation indicator (no text or symbols)

text_image
3.
2.
3 Gril de four
natural_image
Technical line drawing of a mechanical device with a close-up inset showing internal components (no text or symbols)
natural_image
Line drawing of an open portable electric grill with a cable inserted, showing internal grid and power cord (no text or symbols)
Mise en service
1 Connexion
natural_image
Pure diagram of a curved channel with icons and an arrow, no text or symbols present
Utilisation

text_image
1
= 230°C
= 230°C 0004
2 OK
text_image
= 50°C
= 50°C Ⓛ 0 100
OK
1. 2.
text_image
= 230°C
= 230°C @ 00:04
2.
1. 3.
natural_image
Diagram of an open portable medical device with internal components and a cable inserted, showing no text or symbols.

text_image
°C
OK

natural_image
Line drawing of an open portable device with internal components and a cable inserted, showing no text or symbols.

text_image
= 90°C - 50°C
= 90°C +88.81
OK

natural_image
Diagram of two rectangular grating or filter compartments with a tool inserted, no text or symbols present

natural_image
Illustration of a faucet pouring liquid into two square grilles (no text or symbols)
text_image
A
B
K
J
I
H
G
C
D
F
E
A Asa G Pantalla
B Placa de parrilla H Bandeja de goteo de grasa
natural_image
Line drawing of a hand holding a rectangular device with a handle, no text or symbols present
text_image
Technical diagram showing two views of a device with labeled components and directional arrows indicating rotation or assembly.
natural_image
Diagram of a mechanical device with a rotating arrow and clamped components (no text or symbols)
2 Parrilla abierta (modo de barbacoa)
text_image
Technical diagram showing two views of a device with labeled parts and rotation arrows indicating assembly or positioning.
3 Parrilla de horno
natural_image
Technical line drawing of a mechanical device with a close-up inset showing internal components (no text or symbols)
natural_image
Line drawing of an open portable electric grill with a cable inserted, showing internal grid and power cord (no text or symbols)
natural_image
Simple line drawing of a curved surface with icons and an upward arrow, no text or symbols present.
Funcionamiento

text_image
1
= 230°C
= 230°C ① 00.04
2 OK
text_image
= 50°C
= 50°C ⏻ 0 100
OK
1. 2.
text_image
= 230°C
= 230°C 00:04
A A4 600
2.
OK
1. 3.
natural_image
Line drawing of an open portable device with internal components and a cable inserted, showing no text or symbols.

text_image
°C
OK

natural_image
Line drawing of an open portable medical device with internal components and a cable inserted (no text or symbols)

text_image
= 90°C - 50°C
= 90°C +88.81
OK

natural_image
Illustration of a grating tray with a tool inserted, showing internal grid structure (no text or symbols)

natural_image
Illustration of a hand washing a tray with a fork (no text or symbols)
text_image
C
D
G
F
E
natural_image
Line drawing of a hand holding a rectangular device with a handle (no text or symbols)
text_image
Technical diagram showing two views of a device with labeled components and directional arrows indicating rotation or assembly.
Modalità operative

natural_image
Diagram of a mechanical device with a rotating arrow and internal components (no text or symbols)

text_image
Technical diagram showing two views of a device with labeled parts and rotation arrows indicating assembly or positioning.
natural_image
Technical line drawing of a mechanical device with a close-up inset showing internal components (no text or symbols)
natural_image
Line drawing of an open portable electric grill with a cable inserted, showing internal grid and power cord (no text or symbols)
Messa in servizio
1 Collegamento
natural_image
Pure diagram of a curved channel with icons and an arrow, no text or symbols present
Funzionamento
text_image
1
= 230°C
= 230°C 0004
2 OK
text_image
= 50°C
= 50°C ⏱ 0 100
OK
1. 2.
text_image
= 230°C
= 230°C 00:04
A A4 600
2.
OK
1. 3.
natural_image
Line drawing of an open portable electric stove with internal components and a cable inserted (no text or symbols)

text_image
°C
OK
natural_image
Line drawing of an open portable medical device with internal components and a cable inserted (no text or symbols)

text_image
= 90°C - 50°C
= 90°C +88.81
OK

natural_image
Diagram of two rectangular grating or filter compartments with a tool inserted, showing internal grid patterns (no text or symbols)

natural_image
Illustration of a faucet pouring liquid into two square grilles (no text or symbols)
text_image
A
B
K
J
I
H
G
C
D
F
E
natural_image
Line drawing of a hand holding a rectangular device with a handle, no text or symbols present
text_image
Technical diagram showing two views of a device with labeled components and directional arrows indicating rotation or assembly.
Bedrijfsmodi

natural_image
Diagram of a mechanical device with a rotating arrow and internal components (no text or symbols)
2 Open grill (BBQ-modus)
text_image
Technical diagram showing two views of a device with labeled parts and rotation arrows indicating assembly or positioning.
3 Ovengrill
natural_image
Technical line drawing of a mechanical device with a close-up inset showing internal components (no text or symbols)
natural_image
Line drawing of an open laptop with a cable inserted, showing internal grid and power cord (no text or symbols)
Inbedrijfstelling
1 Aansluiting
natural_image
Pure diagram of a horizontal line with icons and an upward arrow, no text or symbols present
Bediening

text_image
1
= 230°C
= 230°C 0004
2 OK
| 1x | | → | → Medium rood |
| 2x | | → | → Medium |
| 3x | | → | → Gaar |
Hamburger
| 1x | | → | → | Medium rood |
| 2x | | → | → | Medium |
| 3x | | → | → | Gaar |
Vis
text_image
= 50°C
= 50°C Ⓛ 0 100
OK
1. 2.
text_image
= 230°C
= 230°C 00:04
2.
1. 3.
natural_image
Line drawing of an open portable electric stove with a plug inserted, showing internal components and a cable inserted (no text or symbols)

text_image
°C
OK

natural_image
Line drawing of an open dental appliance with a medical device inserted, showing internal components and a cable (no text or symbols)

text_image
= 90°C - + 50°C
= 90°C - +8881
OK

text_image
Technical diagram showing two views of a device with labeled components and directional arrows indicating rotation or assembly.
natural_image
Two technical illustrations of a kitchen sink with a tool and drain, showing internal components (no text or symbols)
text_image
A
B
K
J
I
H
G
C
D
F
E
A Pega G Ecrã
B Placa do grelhador H Bandeja de gotejamento de gordura
natural_image
Line drawing of a hand holding a rectangular device with a handle (no text or symbols)
text_image
Technical diagram showing two views of a device with labeled components and directional arrows indicating rotation or assembly.
Modos de funcionamento

natural_image
Diagram of a mechanical device with a rotating arrow and internal components (no text or symbols)
2 Grelhador aberto (modo BBQ)
text_image
Technical diagram showing two views of a device with labeled parts and rotation arrows indicating assembly or positioning.
3 Grelha de forno
natural_image
Technical line drawing of a mechanical device with a close-up inset showing internal components (no text or symbols)
4 Utilizar o termómetro do grelhador
natural_image
Line drawing of an open portable electric grill with a cable inserted, showing internal grid and power cord (no text or symbols)
natural_image
Pure diagram of a curved channel with icons and an arrow, no text or symbols present
Funcionamento

text_image
1
= 230°C
= 230°C 0004
2 OK
| 1x | → | → Vidrado |
| 2x | → | → Bem passado |
Salsicha
Sanduíche
text_image
= 50°C
= 50°C 0 100
OK
1. 2.
text_image
= 230°C
= 230°C 00:04
2.
1. 3.
text_image
= 230°C
= 230°C Ⓛ 0004°C
A A B C D E F G H I J K L M N O P Q R S T U V W X Y Z
2. 3. 1.
natural_image
Diagram of an open portable medical device with internal components and a cable inserted, showing no text or symbols.
text_image
°C
OK
natural_image
Line drawing of an open portable device with internal components and a cable inserted, showing no text or symbols.

text_image
= 90°C - 50°C
= 90°C +88.81
OK

natural_image
Diagram of two rectangular grating or filter compartments with a tool inserted, no text or symbols present

natural_image
Illustration of a faucet pouring liquid into two square grilles (no text or symbols)
text_image
A
B
K
J
I
H
G
C
D
F
E
A Tutamak G Ekran
B Izgara Ppakası H Yağ damlama tepsisi
natural_image
Diagram of a mechanical device with a rotating arrow and internal components (no text or symbols)
text_image
Technical diagram showing two open battery compartments with labeled rotation directions and component details
3 Firin izgarası
natural_image
Technical line drawing of a mechanical device with a close-up inset showing internal components (no text or symbols)
natural_image
Line drawing of an open portable electric grill with a cable inserted, showing internal grid and power cord (no text or symbols)
Devreye alma
1 Bağlantı
natural_image
Pure diagram of a curved surface with icons and an upward arrow, no text or symbols present
Çalıştırma

text_image
1
= 230°C
= 230°C ⓣ 00.04
2 OK
text_image
= 50°C
= 50°C ⏻ 0 100
OK
1. 2.
text_image
= 230°C
= 230°C 00:04
2.
1. 3.
natural_image
Line drawing of an open portable electric stove with internal components and a cable inserted (no text or symbols)

text_image
°C
OK
natural_image
Line drawing of an open portable electric stove with internal components and a cable inserted (no text or symbols)

text_image
= 90°C - 50°C
= 90°C +88.81
OK

text_image
Technical diagram showing two views of a device with labeled components and directional arrows indicating rotation or assembly.
natural_image
Two technical line drawings of a kitchen appliance with a handle and drain, showing internal components (no text or symbols)
text_image
A
B
K
J
I
H
G
C
D
F
E
natural_image
Line drawing of a hand holding a rectangular device with a handle (no text or symbols)
text_image
Technical diagram showing two views of a device with labeled components and directional arrows indicating rotation or assembly.
Driftstilstande

natural_image
Diagram of a mechanical device with a rotating arrow and internal components (no text or symbols)
2 Åben grill (grillposition)
text_image
Technical diagram showing two open battery compartments with labeled rotation directions and component details
3 Ovngrill
natural_image
Technical line drawing of a mechanical device with a close-up inset showing internal components (no text or symbols)
natural_image
Line drawing of an open portable electric grill with a cable inserted, showing internal grid and power cord (no text or symbols)
Ibrugtagning
1 Tilslutning
natural_image
Simple line drawing of a curved surface with icons and an arrow pointing to a point (no text or symbols)
Betjening

text_image
1
= 230°C
= 230°C ① 00.04
2 OK
text_image
= 50°C
= 50°C ⏱ 0 100
OK
1. 2.
4 Indstil grilltemperaturen manuelt.
text_image
= 230°C
= 230°C @ 00:04
2.
OK
1. 3.
natural_image
Line drawing of an open portable electric stove with internal components and a cable inserted (no text or symbols)
text_image
°C
OK

natural_image
Line drawing of an open portable device with internal components and a cable inserted, showing no text or symbols.

text_image
= 90°C - 50°C
= 90°C +88.81
OK

text_image
Technical diagram showing two views of a device with labeled components and directional arrows indicating rotation or assembly.
natural_image
Two technical line drawings of a food tray with a fork and water being poured into it (no text or symbols present)
text_image
A
B
K
J
I
H
G
C
D
F
E
natural_image
Line drawing of a hand holding a rectangular device with a scroll wheel (no text or symbols)
natural_image
Diagram of a mechanical device with a rotating arrow and internal components (no text or symbols)
2 Öppen grill (BBQ-läge)
text_image
Technical diagram showing two open battery compartments with labeled rotation directions and component details
3 Ugnsgrill
natural_image
Technical line drawing of a mechanical device with a close-up inset showing internal components (no text or symbols)
natural_image
Line drawing of an open portable electric grill with a cable inserted, showing internal grid and power cord (no text or symbols)
Driftsättning
1 Anslutning
text_image
Diagram illustrating the internal components of a portable device with labeled parts and an electrical plug symbol.
2 Slå på/av
natural_image
Pure diagram of a curved channel with icons and an arrow, no text or symbols present
Användning
text_image
1
= 230°C
= 230°C ① 88.04
2 OK
text_image
= ---°C
== ---°C 0001
- + OK
2. 3.
5 Justera programmets tid/timer manuellt
text_image
= 230°C
= 230°C @ 00:04
2.
1. 3.
natural_image
Line drawing of a portable electric stove with internal components and a cable inserted (no text or symbols)

text_image
C
OK

natural_image
Line drawing of an open portable electric stove with internal components and a cable inserted (no text or symbols)
text_image
= 90°C - 50°C
= 90°C +88.81
OK
text_image
Technical diagram showing two views of a device with labeled components and directional arrows indicating rotation or assembly.
natural_image
Two technical line drawings of a kitchen appliance with a handle and drain, showing internal components (no text or symbols)
text_image
A
B
K
J
I
H
G
C
D
F
E
A Händtak G Skjerm
B Grillplate H Dryppskål
natural_image
Line drawing of a hand holding a rectangular device with a handle (no text or symbols)
natural_image
Diagram of a mechanical device with a rotating arrow and internal components (no text or symbols)
2 Åpen grill (BBQ-modus)
text_image
Technical diagram showing two open battery compartments with labeled rotation directions and component details
3 Ovnsgrill
natural_image
Technical line drawing of a mechanical device with a close-up inset showing internal components (no text or symbols)
4 Bruke grilltermometeret
natural_image
Line drawing of an open portable electric grill with a cable inserted, showing internal grid and power cord (no text or symbols)
Igangkjøring
1 Tilkobling
natural_image
Simple line drawing of a curved surface with icons and an arrow pointing to a point (no text or symbols)
Drift

text_image
1
= 230°C
= 230°C ① 88.04
2 OK
text_image
= 50°C
= 50°C ⏱ 0 100
OK
1. 2.
4 Manuelt justere grilltemperaturen
text_image
= 230°C
= 230°C © 0004
A A4 A64
2.
OK
1. 3.
natural_image
Line drawing of an open portable electric stove with internal components and a cable inserted (no text or symbols)

text_image
°C
OK

Risiko for brannsår. Bruk grillredskaper med langt skaft til å flytte på maten.
7 Kjernetemperatur - manuell justering
natural_image
Line drawing of an open portable electric stove with a plug inserted, showing internal components and wiring (no text or symbols)
text_image
90°C
50°C
90°C
888.1
OK

Risiko for brannsår. Bruk grillredskaper med langt skaft til å flytte på maten.
natural_image
Diagram of two rectangular grating or filter compartments with a tool inserted, showing internal grid patterns (no text or symbols)

natural_image
Illustration of a faucet pouring liquid into two square grilles (no text or symbols)
text_image
A
B
K
J
I
H
G
C
D
F
E
A Mâner G Afi şaj
natural_image
Line drawing of a hand holding a rectangular device with a handle (no text or symbols)
text_image
Technical diagram showing two views of a device with labeled components and directional arrows indicating rotation or assembly.
Moduri de functionare

natural_image
Diagram of a mechanical device with a rotating arrow and internal components (no text or symbols)

Grătar deschis (mod grătar)
text_image
Technical diagram showing two views of a device with labeled parts and rotation arrows indicating assembly or positioning.
natural_image
Technical line drawing of a mechanical device with a close-up inset showing internal components (no text or symbols)
natural_image
Line drawing of an open laptop with a cable inserted, showing internal grid and power cord (no text or symbols)
natural_image
Pure diagram of a curved surface with icons and an upward arrow, no text or symbols present
Punere în funcțiune

text_image
1
= 230°C
= 230°C ⓣ 88.04
2 OK
text_image
= 50°C
= 50°C Ⓛ 0 100
OK
1. 2.
text_image
= 230°C
= 230°C 00.04
2.
OK
1. 3.
natural_image
Line drawing of an open portable electric stove with internal components and a cable inserted (no text or symbols)

text_image
°C
OK

natural_image
Line drawing of an open portable electric stove with internal components and a cable inserted (no text or symbols)
text_image
90°C 50°C
90°C 88.61
OK

natural_image
Illustration of two rectangular trays filled with grating, one with a tool inserted (no text or symbols)

natural_image
Illustration of a faucet pouring liquid into two gridded trays (no text or symbols)
text_image
A
B
K
J
I
H
G
C
D
F
E
natural_image
Line drawing of a hand holding a rectangular device with a handle, no text or symbols present
text_image
Technical diagram showing two views of a device with labeled components and directional arrows indicating rotation or assembly.
Tryby pracy

natural_image
Line drawing of a mechanical device with a rotating arrow and handle (no text or symbols)
text_image
Technical diagram showing two views of a device with labeled parts and rotation arrows indicating assembly or positioning.
natural_image
Technical line drawing of a mechanical device with a close-up inset showing internal components (no text or symbols)
natural_image
Line drawing of an open portable electric grill with a cable inserted, showing internal grid and power cord (no text or symbols)
Uruchomienie
1 Połączenie
natural_image
Simple line drawing of a curved surface with icons and an arrow pointing to a point (no text or symbols)
Obstuga

text_image
1
= 230°C
= 230°C 0004
2 OK
text_image
= 50°C
= 50°C ⊖ 0 100
OK
1. 2.
text_image
= 230°C
= 230°C © 00:04
2.
OK
1. 3.
natural_image
Line drawing of an open portable electric stove with a plug inserted, showing internal components and a cable inserted (no text or symbols)

text_image
°C
OK

natural_image
Line drawing of an open portable electric stove with internal components and a cable inserted (no text or symbols)

text_image
= 90°C - 50°C
= 90°C +88.81
OK

text_image
Technical diagram showing two views of a device with labeled components and directional arrows indicating rotation or assembly.
natural_image
Two technical line drawings of a food tray with a fork and water being poured into it (no text or symbols present)
text_image
A
B
K
J
I
H
G
C
D
F
E
A Rukojef G Displej
natural_image
Line drawing of a hand holding a rectangular device with a handle (no text or symbols)
text_image
Technical diagram showing two views of a device with labeled components and directional arrows indicating rotation or assembly.
Provozní režimy

natural_image
Diagram of a mechanical device with a rotating arrow and internal components (no text or symbols)
text_image
Technical diagram showing two open battery compartments with labeled rotation directions and component details
natural_image
Technical line drawing of a mechanical device with a close-up inset showing internal components (no text or symbols)
natural_image
Line drawing of an open portable electric grill with a cable inserted, showing internal grid and power cord (no text or symbols)
Uvedení do provozu
1 Připojení
text_image
Diagram illustrating the internal components of a portable device with labeled parts and an electrical plug symbol.
2 Zapnutí/vypnutí
natural_image
Pure diagram of a curved channel with icons and an arrow, no text or symbols present
Používání
text_image
1
= 230°C
= 230°C ⓣ 0004
2 OK
text_image
= 50°C
= 50°C ⏱ 0 100
αx
1. 2.
text_image
= 230°C
= 230°C 00.04
2.
OK
1. 3.
natural_image
Line drawing of an open portable electric stove with internal components and a cable inserted (no text or symbols)

text_image
°C
OK

natural_image
Line drawing of an open portable device with internal components and a cable inserted, showing no text or symbols.

text_image
= 90°C -○ 50°C
= 90°C ●88.81
OK

natural_image
Illustration of a grating tray with a tool inserted, showing two different compartments (no text or symbols)

natural_image
Illustration of a kitchen sink with a faucet pouring liquid into a tray (no text or symbols)
text_image
A
B
K
J
I
H
G
C
D
F
E
A Rukoväf G Displej
natural_image
Line drawing of a hand holding a rectangular device with a handle (no text or symbols)
text_image
Technical diagram showing two views of a device with labeled components and directional arrows indicating rotation or assembly.
Prevádzkové režimy

natural_image
Diagram of a mechanical device with a rotating arrow and internal components (no text or symbols)

text_image
Technical diagram showing two views of a device with labeled parts and rotation arrows indicating assembly or positioning.
3 Grilovacia rúra
natural_image
Technical line drawing of a mechanical device with a close-up inset showing internal components (no text or symbols)
natural_image
Line drawing of an open portable electric grill with a cable inserted, showing internal grid and power cord (no text or symbols)
text_image
Diagram illustrating the internal components of a portable device with labeled parts and an electrical plug symbol.
2 Zapnutie/vypnutie
natural_image
Pure diagram of a curved surface with icons and an upward arrow, no text or symbols present
Prevádzka

text_image
1
= 230°C
= 230°C ⓣ 00.04
2 OK
text_image
= 230°C
= 230°C 00.04
2.
OK
1. 3.
natural_image
Line drawing of an open portable electric stove with internal components and a cable inserted (no text or symbols)

text_image
°C
OK

natural_image
Line drawing of an open portable device with internal components and a cable inserted, showing no text or symbols.

text_image
= 90°C - 50°C
= 90°C +88.81
OK

natural_image
Illustration of a grating tray with a tool inserted, showing two different compartments (no text or symbols)

natural_image
Illustration of a kitchen sink with a faucet pouring liquid into a tray (no text or symbols)
text_image
A
B
K
J
I
H
G
C
D
F
E
A Ručka G Zaslon
B Ploča roštilja H Posuda za sakupljanje masti
C Kabel za napajanje I Uređaj za otključavanje roštilja
D Spajanje termometra J Odstojnici i mehanizam za zaključavanje
E Termometar roštilja
F Strugač
Tipka za otključavanje ploča za roštilj
Zaslon

text_image
1 2 3 4 5 6 7 8 9 10 11 12
= 888°C + 888°C
= 888°C + 8880 ...
21 20 19 18 17 16 15 14 13
| 1 Program za odreske 12 Značajka pojačanja |
| 2 Program za hamburgere 13 Značajka za otapanje |
| 3 Program za ribu 14 Trajanje programa |
| 4 Program za kobasice 15 Tipka za potvrdu |
| 5 Program za perad 16 Tipka za postavljanje "+" |
| 6 Panini program 17 Tipka za postavljanje "-" |
| 7 Temperatura niže ploče za roštilj 18 Gumb za uklj./isklj. |
| 8 Temperatura gornje ploče za roštilj 19 Razina jačeg pečenja |
| 9 Centralna temperatura na zaslonu (samo s termometrom roštilja) | 20 Srednja razina pečenja |
| 10 Zaslon tajmera | 21 Razina pečenja za srednje sirovo |
| 11 Promjena temperature roštilja |
natural_image
Line drawing of a hand holding a rectangular device with a handle (no text or symbols)
Pritisnite gumb za otključavanje roštilja na desnoj strani i potpuno otvorite uređaj. Pritisnite uređaj za otključavanje ploča za roštilj, uklonite ploče za pečenje i posudu za skupljanje masnoće te ih očistite deterdžentom za pranje posuđa pod mlazom vode. Pažljivo osušite ploče roštilja i provjerite jesu li uklonjeni svi ostaci sredstava za čišćenje.
text_image
1.
2.

text_image
3.
4.
3.
Radni načini

natural_image
Diagram of a mechanical device with a rotating arrow and internal components (no text or symbols)
2 Otvoreni roštilj (BBQ način)
Kada su potpuno otvorene, obje ploče za roštilj čine veliku površinu za pečenje na istoj razini, na kojoj se mogu kuhati različite namirnice bez miješanja sokova s roštilja. Pritisnite tipku za otključavanje šarke na desnoj strani i preklopite gornju ploču roštilja unatrag.
text_image
Technical diagram showing two open battery compartments with labeled rotation directions and component details
3 Roštilj u pećnici
Odstojnikom podesite željeni razmak između dviju ploča za roštilj. Stavite hranu na donju ploču roštilja i spustite gornju ploču dok ne bude blizu hrane. Ovaj položaj je savršen za vrlo gustu hranu koja se mora lagano i ravnomjerno kuhati, za pripremu jela od topljenog sira kao što su npr. pizza ili hamburgeri s pljeskavicom te za pripremu meke hrane koja se ne smije gnječiti. Preporuča se njegova uporaba i za povrće s visokim udjelom vode, jer je omoguće-no nesmetano isparavanje vode.
natural_image
Technical line drawing of a mechanical device with a close-up inset showing internal components (no text or symbols)
4 Korištenje termometra za roštilj
Termometar za roštilj koji dolazi s uređajem može se pričvrstiti za mjerenje temperature središta. Da biste to učinili, umetnite utičnicu za termometar u lijevu, donju stranu uređaja. Indikator temperature središta će se pojaviti na zaslonu, simboli za značajke sendviča i trajanja programa će nestati. Za opcije prilagodbe pogledajte poglavlje pod naslovom Rad - središnja temperatura.

natural_image
Line drawing of an open portable electronic device with a cable inserted, showing internal grid and power cord (no text or symbols)
Puštanje u rad
1 Spajanje
text_image
Diagram illustrating the internal components of a portable device with labeled parts and an electrical plug symbol.
natural_image
Pure diagram of a curved surface with icons and an upward arrow, no text or symbols present
Rad

text_image
1
= 230°C
= 230°C ① 00.04
2 OK
Odaberite automatski program kuhanja i stupanj kuhanja iz tablice pritiskom na odgovarajući simbol tri puta, a zatim potvrdite pritiskom na OK. Čut ćete dugi zvučni signal. Unaprijed postavljeno vrijeme može se podesiti pritiskom na simbol tsjmera s tipkama "+" i "-" . Treperit će dok se ne postigne podešena temperatura (dva zvučna tona). Pritisnite simbol pojačanja prema potrebi za pečenje na punoj snazi zadnjih 30 sekundi. Na kraju programa čut ćete dugi zvučni signal i pojavit će se osnovni prikaz.
Odrezak
| 1x | | → | → Srednje pečen |
| 2x | | → | → Srednje |
| 3x | | → | → Jače pečen |
Hamburger
| 1x | → | → Srednje pečen |
| 2x | → | → Srednje |
| 3x | → | → Jače pečen |
Riba
| 1x | → | → | Glazirana |
| 2x | → | → | Dobro pečeno |
Kobasice
Sendvič
| 1x | → | → | Razina pečenja 1 |
| 2x | → | → | Razina pečenja 2 |
| 3x | → | → | Razina pečenja 3 |
2 nkcija pojačanja
Za automatske programe možete peći na najvećoj temperaturi zadnjih 30 sekundi pritiskom na simbol pojačanja. Simbol će početi treperiti. Potvrdite odabir programa s OK, čut ćete dugi zvučni signal.
Napomena: Simbol pojačanja nastavit će treperiti dok se pojačanje ne završi, inače se isključuje.

text_image
= 230°C
= 230°C ⏱ 0004
1.
2.
3 Odleđivanje
Pritisnite simbol za odmrzavanje. Prikazat će se unaprijed postavljena temperatura od 50 °C, zajedno s vremenom. Za promjenu vremena odmrzavanja, pogledajte poglavlje pod naslovom Promjena trajanja programa. Potvrdite odabir programa s OK, čut ćete dugi zvučni signal.
text_image
= 50°C
= 50°C ⊖ 0.100
1. 2.
4 Ručno podesite temperaturu roštiljanja
Pritisnite simbol temperature roštilja. Nakon jednog pritiska, temperatura za obje ploče se može podesiti odmah, dok se temperatura za gornju ploču može podesiti nakon dva pritiska, a temperatura za donju ploču može se podesiti nakon tri pritiska. Odgovarajuća temperatura se može promijeniti pomoću tipki za podešavanje "+" i "-" . Nakon što jednom potvrdite s OK, mjerač vremena možete postaviti pomoću tipki za podešavanje "+" i "-" .
text_image
= 230°C
= 230°C 00:04
2.
OK
1. 3.
Simbol tajmera može se koristiti za promjenu vremena kuhanja za automatske programe kuhanja ili za postavljanje mjerača vremena za ručno podešavanje temperature pečenja. Simbol će početi treperiti. Pojavit će se simboli plus i minus. Podesite željeno trajanje pomoću simbola plus i minus i potvrdite s OK. Tajmer će se pokrenuti Za automatski program kuhanja, simbol timera će nastaviti treptati dok se ne postigne odabrana temperatura. Ako je temperatura postignuta, čut ćete dvostruki zvučni signal, zaslon će stalno svijetliti, a zaslon timera će početi odbrojavati.
Pritisnite simbol tajmera za podešavanje trajanja programa i/ili tajmera. Pojavit će se simboli plus i minus. Podesite željeno trajanje pomoću simbola plus i minus i potvrdite s OK. Ako se ništa drugo ne pritisne pune tri sekunde, prikaz tajmera će se resetirati, a simboli plus i minus će nestati.
text_image
= 230°C
= 230°C ① 0004°C
A A4 A4d
-
+
OK
-
2.
3.
1.
6 mperatura središta - automatski program kuhanja
Spojite termometar za roštilj. Indikator temperature središta će se pojaviti na zaslonu, simboli za značajke sendviča i trajanja programa će nestati.
natural_image
Line drawing of an open portable electric stove with internal components and a cable inserted (no text or symbols)

text_image
°C
OK

Rizik od opekotina. Za premještanje hrane koristite posuđe za roštilj s dugom drškom.
7 Središnja temperatura - ručna prilagodba
Spojite termometar za roštilj. Indikator temperature središta će se pojaviti na zaslonu, simboli za značajke sendviča i trajanja programa će nestati.
Pritisnite simbol temperature roštilja i podesite željenu temperaturu ploče pomoću tipki za podešavanje "+" i "-" kako je opisano u 4. Ručno podesite temperaturu roštiljanja. Potvrdite s OK. Sada se temperatura jezgre može promijeniti. Zatim pritisnite OK i po želji programirajte dodatni mjerač vremena do 90 minuta za dodatnu hranu. Kada je tajmer podešen i roštilj radi u ručnom načinu rada, roštilj se mora podesiti ručno. Zaslon centralne temperature nastavit će treperiti sve dok ploče za roštilj ne dostignu zadanu temperaturu. Umetnite termometar za roštilj u hranu i stavite ga na ploču za roštilj. Podešena temperatura i trenutna temperatura unutar hrane povremeno će se prikazivati na zaslonu temperature središta. Čut ćete tri zvučna signala kada središnja temperatura dosegne unaprijed postavljenu vrijednost. Nakon što istekne vremensko razdoblje, čut ćete četiri zvučna signala. Roštilj se mora isključiti ručno.

natural_image
Line drawing of an open portable electric stove with internal components and a cable inserted (no text or symbols)

text_image
= 90°C - 50°C
= 90°C +88.81
OK

Rizik od opekotina. Za premještanje hrane koristite posuđe za roštilj s dugom drškom.
8 Otkažite unos ili program koji je u tijeku

natural_image
Illustration of two rectangular trays filled with grating, one with a tool inserted (no text or symbols)

natural_image
Illustration of a kitchen sink with a faucet pouring liquid into a tray (no text or symbols)
Nakon svake uporabe obrišite uređaj vlažnom krpom. Ne koristite abrazivna sredstva za čišćenje ili krpe od mikrovlakana jer mogu izazvati sitne ogrebotine na površini kućišta.
Poruke s greškama
Poruka o pogrešci bit će zvučno prikazana tonom od deset zvučnih signala.
Opasnost od opeklina zbog vrućih komponenti. Pustite da se roštilj potpuno ohladi prije obavljanja zadataka rješavanja problema i grešaka.
Problem Mogući uzrok Rješenje problema
| Uredaj ne funkcionira. | Uređaj nije pravilno priključen na napajanje. | Provjerite je li utikač pravilno umet-nut u utičnicu. |
| Provjerite osigurač. |
| Program se ne pokreće nakon pritiska na OK. | Nije odabran niti jedan program. Odabir programa. |
| Nisu prilagođene odgovarajuće vrijednosti. | Podesite temperaturu ploče roštilja na minimalno 90°. |
| Podesite trajanje programa za automatske programe kuhanja na više od 1 minute. |
| ≡ Err°C≡ 180°C | Gornja ploča za roštilj nije pravil-no umetnuta. | Isključite uređaj, ispravno umetnite gornju ploču za roštilj i ponovno uključite uređaj. |
| ≡ 180°C≡ Err°C | Donja ploča za roštilj nije pravilno umetnuta. | Isključite uređaj, ispravno umetnite gornju ploču za roštilj i ponovno pokrenite uređaj. |
| ≡ Err°C≡ Err°C | Obje ploče za roštilj su nepravilno umetnute. | Isključite uređaj, pravilno umetnite ploče za roštilj i ponovno uključite uređaj. |
| ⊙ Err°C↓ ---:--- | Termometar za roštilj nije pravilno umetnut. | Isključite uređaj, umetnite vrh termo-metra za roštilj u hranu i ponovno uključite uređaj. |
| ≡ EDI°C≡ ---°C | Uređaj je u kvaru. | Isključite uređaj i obratite se službi za korisnike. |
| ≡ ---°C≡ ED2°C | Uređaj je u kvaru. | Isključite uređaj i obratite se službi za korisnike. |
Služba za korisnike
Ako imate problema s vašim kontaktnim roštiljem, obratite se našoj službi za korisnike.
Detaljne informacije o servisu, popravcima, jamstvima i registraciji proizvoda možete pronaći na www.zwilling.com/service.
Dodaci
text_image
C
D
G
F
E
natural_image
Line drawing of a hand holding a rectangular device with a handle (no text or symbols)
text_image
Technical diagram showing two views of a device with labeled components and directional arrows indicating rotation or assembly.
Načini delovanja

natural_image
Diagram of a mechanical device with a rotating arrow and internal components (no text or symbols)
text_image
Technical diagram showing two open battery compartments with labeled rotation directions and component details
3 Žar v pečici
natural_image
Technical line drawing of a mechanical device with a close-up inset showing internal components (no text or symbols)
4 Uporaba termometra za žar
natural_image
Line drawing of an open portable electric grill with a cable inserted, showing internal grid and power cord (no text or symbols)
Zagon
1 Povezava
natural_image
Simple line drawing of a curved surface with icons and an upward arrow, no text or symbols present.
Delovanje

text_image
1
= 230°C
= 230°C ① 00.04
2 OK
S trikratnim pritiskom na ustrezen simbol izberite samodejni program pečenja in raven pečenja iz tabele, in nato potrdite s pritiskom na OK. Slišali boste dolg pisk. Prednastavljeni čas lahko prilagodite s pritiskom na simbol časovnika z gumbi "+" in "-" -". Utripa, dokler ne bo dosežena prilagojena temperatura (dva piska). Po potrebi pritisnite simbol za pospeševanje za pečenje s polno močjo zadnjih 30 sekund. Ob koncu programa boste slišali dolg pisk in prikazal se bo osnovni prikaz.
Zrezek
| 1x | | → | → | Srednje surovo pečeno |
| 2x | | → | → | Srednje |
| 3x | | → | → | Pečeno |
Burger
| 1x | → | → | Srednje surovo pečeno |
| 2x | → | → | Srednje |
| 3x | → | → | Pečeno |
Riba
2x Dobro pečeno
Klobase
Perutnina
Sendvič
text_image
= 50°C
= 50°C ⏱ 0 100
OK
1. 2.
4 Ročno prilagodite temperaturo pečenja na žaru
text_image
= 230°C
= 230°C @ 00:04
2.
OK
1. 3.
natural_image
Line drawing of an open portable electric stove with internal components and a cable inserted (no text or symbols)

text_image
°C
OK

natural_image
Line drawing of an open portable device with internal components and a cable inserted, showing no text or symbols.
text_image
= 90°C - 50°C
= 90°C +88.81
OK
natural_image
Illustration of a grating tray with a tool inserted, showing two compartments filled with grating (no text or symbols)

natural_image
Illustration of a kitchen sink with a faucet pouring liquid into a tray (no text or symbols)
text_image
A
B
K
J
I
H
G
C
D
F
E
natural_image
Line drawing of a hand holding a rectangular device with a handle, no text or symbols present
text_image
Technical diagram showing two views of a device with labeled components and directional arrows indicating rotation or assembly.
Üzemmódok

natural_image
Line drawing of a mechanical device with a rotating arrow and handle (no text or symbols)
text_image
Technical diagram showing two open battery compartments with labeled rotation directions and component layouts.
3 Sütőgrill
natural_image
Technical line drawing of a mechanical device with a close-up inset showing internal components (no text or symbols)
natural_image
Line drawing of an open portable electric heater with a cable inserted, showing internal grid structure and a pointer indicating the component (no text or symbols present)
Üzembe helyezés
1 Csatlakoztatás
natural_image
Pure diagram of a horizontal line with icons and an upward arrow, no text or symbols present
Használat
text_image
1
= 230°C
= 230°C ① 00.04
2 OK
text_image
= 230°C
= 230°C © 0004
A A4 A64
2.
OK
1. 3.
natural_image
Line drawing of an open portable electric stove with internal components and a cable inserted (no text or symbols)

text_image
---°C
OK
natural_image
Line drawing of an open portable electric stove with internal components and a cable inserted (no text or symbols)

text_image
= 90°C - 50°C
= 90°C +88.81
OK

natural_image
Illustration of two rectangular trays filled with grating, one with a tool inserted (no text or symbols)

natural_image
Illustration of a kitchen sink with a faucet pouring liquid into a tray (no text or symbols)
text_image
A
B
K
J
I
H
G
C
D
F
E
A Käepide G Ekraan
B Grillplaat H Rasva tilkumisalus
C Toitejuhe I BBQ lukustuse avamise seade
natural_image
Line drawing of a hand holding a rectangular device with a handle (no text or symbols)
natural_image
Diagram of a mechanical device with a rotating arrow and internal components (no text or symbols)
text_image
Technical diagram showing two open battery compartments with labeled rotation directions and component details
3 Ahju grill
natural_image
Technical line drawing of a mechanical device with a close-up inset showing internal components (no text or symbols)
natural_image
Line drawing of an open portable electronic device with a cable inserted, showing internal grid structure and a pointer indicating the cable (no text or symbols present)
Kasutuselevõtt
1 Ühendamine
natural_image
Simple line drawing of a curved surface with icons and an arrow pointing to a point (no text or symbols)
Kasutamine

text_image
1
= 230°C
= 230°C 88.04
2 OK
text_image
= 230°C
= 230°C 00:04
2.
1. 3.
natural_image
Line drawing of an open portable electric stove with internal components and a cable inserted (no text or symbols)

text_image
°C
OK

natural_image
Line drawing of an open portable electric stove with internal components and a cable inserted (no text or symbols)

text_image
= 90°C - 50°C
= 90°C +88.81
OK

natural_image
Diagram of two rectangular grating or filter compartments with a tool inserted, no text or symbols present

natural_image
Illustration of a faucet pouring liquid into two square grilles (no text or symbols)
text_image
A
B
K
J
I
H
G
C
D
F
E
A Rokturis G Displejs
natural_image
Line drawing of a hand holding a rectangular device with a handle (no text or symbols)
natural_image
Diagram of a mechanical device with a rotating arrow and internal components (no text or symbols)
text_image
Technical diagram showing two open battery compartments with labeled rotation directions and component details
3 Krāsns grils
natural_image
Technical line drawing of a mechanical device with a close-up inset showing the internal components (no text or symbols)
natural_image
Line drawing of an open portable electric grill with a cable inserted, showing internal grid and power cord (no text or symbols)
natural_image
Simple line drawing of a curved surface with icons and an arrow pointing to a point (no text or symbols)
Lietošana

text_image
1
= 230°C
= 230°C ① 00.04
2 OK
natural_image
Line drawing of an open portable electric stove with internal components and a cable inserted (no text or symbols)

text_image
°C
OK

natural_image
Line drawing of an open portable electric stove with internal components and a cable inserted (no text or symbols)

text_image
= 90°C - 50°C
= 90°C +88.81
OK

natural_image
Illustration of two rectangular trays filled with grating, one with a tool inserted (no text or symbols)

natural_image
Diagram of a kitchen sink with a faucet pouring liquid into a tray (no text or symbols)
text_image
A
B
K
J
I
H
G
C
D
F
E
natural_image
Line drawing of a hand holding a rectangular device with a handle (no text or symbols)
text_image
Technical diagram showing two views of a device with labeled components and directional arrows indicating rotation or assembly.
Veikimo režimai

natural_image
Diagram of a mechanical device with a rotating arrow and internal components (no text or symbols)
text_image
Technical diagram showing two open battery compartments with labeled parts and rotation arrows
3 Orkaitės režimas
natural_image
Technical line drawing of a mechanical device with a close-up inset showing internal components (no text or symbols)
natural_image
Line drawing of an open portable electronic device with a cable inserted, showing internal grid and power cord (no text or symbols)
Paruošimas naudoti
1 Surinkimas
text_image
Diagram of a portable device with labeled parts including ventilation, power plug, and audio output
natural_image
Pure diagram of a curved channel with icons and an arrow, no text or symbols present
Valdymas

text_image
1
= 230°C
= 230°C ⓣ 0004
2 OK
text_image
= 50°C
= 50°C Ⓛ 0 100
OK
1 2
text_image
= 230°C
= 230°C 00:04
2
OK
1 3
natural_image
Line drawing of an open portable electric stove with internal components and a cable inserted (no text or symbols)

text_image
°C
OK

natural_image
Line drawing of an open portable electric stove with internal components and a cable inserted (no text or symbols)
text_image
90°C 50°C
90°C 8881
OK
text_image
Technical diagram showing two views of a device with labeled components and directional arrows indicating rotation or assembly.
natural_image
Illustration of two rectangular trays filled with grating, one with a tool inserted (no text or symbols)
natural_image
Diagram of a kitchen sink with a faucet pouring liquid into a tray (no text or symbols)
text_image
A
B
K
J
I
H
G
C
D
F
E
natural_image
Line drawing of a hand holding a rectangular device with a handle (no text or symbols)
text_image
Technical diagram showing two views of a device with labeled components and directional arrows indicating rotation or assembly.
Käyttötavat

natural_image
Diagram of a mechanical device with a rotating arrow and internal components (no text or symbols)
2 Avoin grilli (BBQ-tila)
text_image
Technical diagram showing two open battery compartments with labeled rotation directions and component details
3 Uunigrilli
natural_image
Technical line drawing of a mechanical device with a close-up inset showing internal components (no text or symbols)
natural_image
Line drawing of an open portable electric grill with a cable inserted, showing internal grid and power cord (no text or symbols)
Käyttöönotto
1 Kytkentä
natural_image
Simple line drawing of a curved surface with icons and an arrow pointing to the bottom (no text or symbols)
Käyttö

text_image
1
= 230°C
= 230°C ⓣ 0004
2 OK
text_image
= 50°C
= 50°C ⏱ 0 100
OK
1. 2.
text_image
= 230°C
= 230°C @ 00:04
2.
OK
1. 3.
natural_image
Line drawing of an open portable electric stove with a plug inserted, showing internal components and wiring (no text or symbols)

text_image
C
OK

natural_image
Line drawing of an open portable electric stove with internal components and a cable inserted (no text or symbols)

text_image
= 90°C - 50°C
= 90°C +88.81
OK

natural_image
Diagram of two rectangular grating or filter compartments with a tool inserted, showing internal grid patterns (no text or symbols)

natural_image
Illustration of a faucet pouring liquid into two square grilles (no text or symbols)
natural_image
Line drawing of a hand holding a rectangular device with a handle (no text or symbols)
text_image
Technical diagram showing two views of a device with labeled components and directional arrows indicating rotation or assembly.
Τρόποι λειτουργίας

natural_image
Line drawing of a mechanical device with a rotating arrow and handle (no text or symbols)
text_image
Technical diagram showing two views of a battery pack with labeled parts and rotation arrows
3 Σχάρα φούρνου
natural_image
Technical line drawing of a mechanical device with a close-up inset showing internal components (no text or symbols)
natural_image
Line drawing of an open laptop with a cable inserted, showing internal grid and power cord (no text or symbols)
Θέση σε λειτουργία
1 Σύνδεση
text_image
Diagram illustrating the installation of a portable air conditioner unit with labeled parts and an electrical plug symbol.
natural_image
Simple line drawing of a curved surface with icons for food, nutrition, and food items (no text or symbols)
Λειτουργία

text_image
1
= 230°C
= 230°C 0004
2 OK
text_image
= 230°C
= 230°C © 0004
2.
OK
1. 3.
text_image
= 230°C
= 230°C @ 00.04°C
- +
OK
1.
2. 3.
natural_image
Line drawing of an open portable electric stove with a plug inserted, showing internal components and a cable inserted (no text or symbols)

text_image
C
OK

natural_image
Diagram of a portable medical device with internal components and cable, showing no text or symbols

text_image
= 90°C - 50°C
= 90°C -88.81
OK

natural_image
Illustration of two rectangular trays filled with grating, one with a tool inserted (no text or symbols)

natural_image
Illustration of a kitchen sink with a faucet pouring liquid into a tray (no text or symbols)
text_image
A
B
K
J
I
H
G
C
D
F
E
А Ручка G Дисплей
natural_image
Line drawing of a hand holding a rectangular device with a handle (no text or symbols)
natural_image
Diagram of a mechanical device with a rotating arrow and internal components (no text or symbols)

text_image
Technical diagram showing two views of a device with labeled parts and rotation arrows indicating assembly or positioning.
3 Гриль-печь
natural_image
Technical line drawing of a mechanical device with a close-up inset showing internal components (no text or symbols)
natural_image
Line drawing of an open portable electric grill with a cable inserted, showing internal grid and power cord (no text or symbols)
Ввод в эксплуатацию
1 Подключение
natural_image
Pure diagram of a curved channel with icons and an arrow, no text or symbols present
Использование

text_image
1
= 230°C
= 230°C ⓣ 0004
2 OK
text_image
= 50°C
= 50°C ⏱ 0 100
OK
1. 2.
text_image
= 230°C
= 230°C 00.04
2.
OK
1. 3.
natural_image
Diagram of an open dental appliance with internal components and a cable inserted, showing no text or symbols.

text_image
= 90°C - 50°C
= 90°C +88.01
OK

natural_image
Illustration of two rectangular trays filled with grating, one with a tool inserted (no text or symbols)

natural_image
Illustration of a faucet pouring liquid into two square grates (no text or symbols)
text_image
A
B
K
J
I
H
G
C
D
F
E
А Дръжка G Дисплей
В Плоча на скарата
С Захранващ кабел
natural_image
Line drawing of a hand holding a rectangular device with a handle (no text or symbols)
text_image
Technical diagram showing two views of a device with labeled components and directional arrows indicating rotation or assembly.
Режими на работа

natural_image
Diagram of a mechanical device with a rotating arrow and internal components (no text or symbols)
text_image
Technical diagram showing two open battery compartments with labeled rotation directions and component details
3 Режим Фурна
natural_image
Technical line drawing of a mechanical device with a close-up inset showing internal components (no text or symbols)
natural_image
Line drawing of an open portable electric stove with a cable inserted, showing internal grid and power cord (no text or symbols)
natural_image
Simple line drawing of a curved surface with icons for food, vegetables, and symbols (no text or labels)
Работа

text_image
1
= 230°C
= 230°C 00.04
2 OK
text_image
= 50°C
= 50°C Ⓛ 0 100
OK
1. 2.
text_image
= 230°C
= 230°C @ 00:04
2.
OK
1. 3.
natural_image
Line drawing of an open portable electric stove with internal components and a cable inserted (no text or symbols)

text_image
°C
OK
natural_image
Line drawing of an open portable electric stove with internal components and a cable inserted (no text or symbols)

text_image
= 90°C - 50°C
= 90°C +88.01
OK

natural_image
Illustration of two rectangular trays with a tool inserted, showing internal grid patterns (no text or symbols)

natural_image
Illustration of a faucet pouring liquid into two square grates (no text or symbols)
natural_image
Line drawing of a hand holding a rectangular device with a handle (no text or symbols)
text_image
Technical diagram showing two views of a device with labeled components and directional arrows indicating rotation or assembly.
Режими рада

natural_image
Diagram of a mechanical device with a rotating arrow and clamped components (no text or symbols)
text_image
Technical diagram showing two open heat exchangers with labeled parts and rotation arrows indicating assembly or positioning.
3 Рерна
natural_image
Technical line drawing of a mechanical device with a close-up inset showing internal components (no text or symbols)
natural_image
Line drawing of a portable electric grill with a cable inserted, showing internal grid and power cord (no text or symbols)
Пуштање у рад
1 Повезивање
natural_image
Pure diagram of a curved structure with icons and an arrow, no text or symbols present
Рад

text_image
1
= 230°C
= 230°C ① 88.04
2 OK
text_image
= 50°C
= 50°C ⏱ 0 100
OK
1. 2.
text_image
= 230°C
= 230°C @ 00:04
2.
OK
1. 3.
natural_image
Diagram of a portable medical device with internal components and cable, no text or symbols present

text_image
C
OK

natural_image
Diagram of a portable electric stove with internal components and a cable inserted, showing no text or symbols.

text_image
= 90°C - 50°C
= 90°C +88.81
OK

natural_image
Illustration of two rectangular trays filled with grating, one with a tool inserted (no text or symbols)

natural_image
Illustration of a kitchen sink with a faucet pouring liquid into a tray (no text or symbols)
text_image
A
B
K
J
I
H
G
C
D
F
E
natural_image
Line drawing of a hand holding a rectangular device with a handle (no text or symbols)
text_image
Technical diagram showing two views of a device with labeled components and directional arrows indicating rotation or assembly.
Режими роботи

natural_image
Diagram of a mechanical device with a rotating arrow and internal components (no text or symbols)

text_image
Technical diagram showing two views of a portable device with labeled parts and rotation arrows
3 Закритий гриль
natural_image
Technical line drawing of a mechanical device with a close-up inset showing internal components (no text or symbols)
natural_image
Line drawing of an open portable electric grill with a cable inserted, showing internal grid and power cord (no text or symbols)
natural_image
Simple line drawing of a curved surface with icons and an upward arrow, no text or symbols present.
Експлуатація
text_image
1
= 230°C
= 230°C 0004
2 OK
text_image
= 50°C
= 50°C ⏻ 0 +100
OK
1. 2.
text_image
= 230°C
= 230°C 00.04
2.
OK
1. 3.
text_image
= 230°C
= 230°C Ⓛ 00:04°C
- +
OK
1.
2. 3.
natural_image
Diagram of an open medical device with internal components and a cable inserted, showing no text or symbols.

text_image
= 90°C - 50°C
= 90°C +88.01
OK

natural_image
Illustration of a grating tray with a tool inserted, showing internal grid structure (no text or symbols)

natural_image
Illustration of a kitchen sink with a faucet pouring liquid into a tray (no text or symbols)
text_image
A
B
K
J
I
H
G
C
D
F
E
A Tutqich G Displey
B Grill panjarasi H Moy tomchi patnisi
C Quvvat kabeli I BBQ ochuvchi qurilma
D Termometr ulanishi J Qistirmalar va qulflash mexanizmi
E Grill termometri K Grill panjarasi uchun ochuvchi tugma
F Kurak
Displey
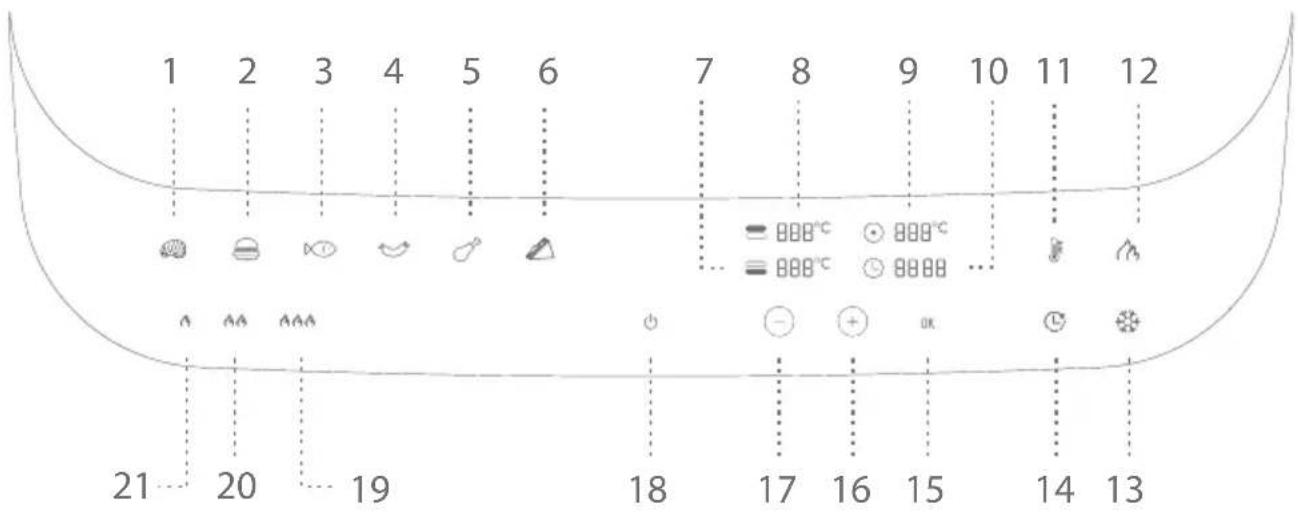
text_image
1 2 3 4 5 6 7 8 9 10 11 12
= 888°C + 888°C
= 888°C + 8880 ...
21 20 19 18 17 16 15 14 13
| 1 Steyk dasturi 12 Kuchaytirish funksiyasi | |
| 2 Burger dasturi 13 Muzdan tushirish funksiyasi | |
| 3 Baliq dasturi 14 Dastur davomiyligi | |
| 4 Sosiska dasturi 15 Tasdiqlash tugmasi | |
| 5 Parranda go'shti dasturi 16 "+" sozlash tugmasi | |
| 6 Panini dasturi 17 "-" sozlash tugmasi | |
| 7 Harorat pastki grill panjarasi 18 Yoqish/o'chirish tugmasi | |
| 8 Harorat yuqori grill panjarasi 19 Pishirish darajasi Tayyor | |
| 9 Ichki harorat displeyi(faqat grill termometri bilan) | 20 Pishirish darajasi O'rtacha |
| 10 Taymer displeyi | 21 Pishirish darajasi O'rtacha pishirish |
| 11 Grill haroratini o'zgartirish | |
Ilk foydalanishdan oldin
Barcha qadoqlash materiallarini olib tashlang, ularni ekologik usulda chiqitga chiqaring yoki kelgusida jihozni saqlash uchun olib qo'ying. Jihoz va uning aksessuarlarini shikastlanmagan va to'liqligiga tekshiring.
Eslatma: Agar birorta yetishmayotgan yoki shikastlangan qismlarni aniqlasangiz, jihozni ishlatmang. Aksincha, mijozlarga yordam markaziga murojaat qiling ("Mijozlarga xizmat" bobiga qarang).
Tozalash
Foydalanishdan oldin jihozni nam mato bilan arting.

natural_image
Line drawing of a hand holding a rectangular device with a handle (no text or symbols)
O'ng tomondagi BBQ ochuvchi qurilmani bosing va jihozni to'liq oching. Grill panjaralari uchun ochuvchi jihozni bosing, grill panjaralarini yechib oling va moy tomchi patnisini chiqaring va jo'mrak suvi ostida idish yuvish vositasi bilan yuving. Grill panjaralarini yaxshilab quriting va tozalash vositalarining barcha qoldiqlari tozalanganiga ishonch hosil qiling.

text_image
Technical diagram showing two views of a device with labeled components and directional arrows indicating rotation or assembly.
Ishlash rejimlari

DIQQAT! Moy tomchi patnisi qo'yilganiga ishonch hosil qiling. Haddan ortiq moy to'planmasligi uchun patnisni muntazam oraliqlarda tekshirib turing.
1 Kontakt grill (yopiq holat)
Yuqori grill panjarasi pastki grill panjarasiga joylangan taom quyuqligiga qarab avtomatik rostlanadi. Taom ikkala tomonidan bir tekis pishiriladi.
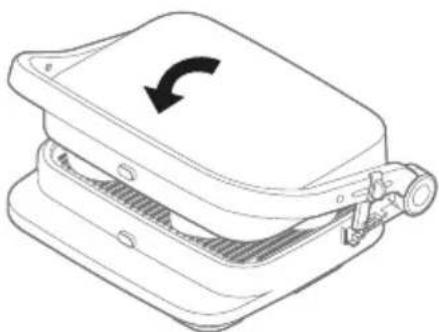
natural_image
Diagram of a mechanical device with a rotating arrow and internal components (no text or symbols)
2 Ochiq grill (BBQ rejimi)
To'liq ochilganda ikkala grill panjarasi teng darajadagi katta grill yuzasini hosil qiladi, unda grillda pishirish jarayonida ajralib chiquvchi sharbatlarning aralashishiga yo'l qo'ymasdan turli taomlarni pishirilish mumkin. O'ng tomonda sharnir uchun ochuvchi kalitni bosing va yuqori grill panjarasini orqaga buklang.

text_image
Technical diagram showing two views of a device with labeled parts and rotation arrows indicating assembly or positioning.
3 Pechli grill
Ikkita grill panjarasi orasidagi kerakli masofani rostlash uchun qistirmadan foydalaning. Taomni pastki grill panjarasiga joylang va yuqori grill panjarasini taomga yaqin bo'lguncha tushiring. Bu holat sekin va bir tekis pishirilishi zarur bo'lgan juda quyuq taom, eritilgan pishloqli taomlar, masalan, pitsa yoki guruch va ezilishi kerak bo'Imagan yumshoq taomlarni tayyorlash uchun ideal. Undan suv tarkibi yuqori bo'lgan sabzavotlar uchun foydalanish tavsiya etiladi, chunki suv yopilmagan holatda bug'lanishiga imkon beriladi.

natural_image
Technical line drawing of a mechanical device with a close-up inset showing internal components (no text or symbols)
4 Grill termometridan foydalanish
Jihoz bilan keladigan grill termometri asosiy haroratni o'Ichash uchun ishlatilishi mumkin Buni bajarish uchun termometr uchun shtekerini jihozning pastki chap tomoniga qo'ying. Ichki harorat indikatori displayda chiqadi, sendvich va dastur davomiyligi funksiyalari belgilari yo'qolib qoladi. Rostlash variantlari uchun belgilangan Ishlatish – Ichki harorat bobiga qarang.

natural_image
Line drawing of an open portable electric grill with a cable inserted, showing internal grid and power cord (no text or symbols)
Ishga tushirish
1 Aloqa
Avvalo grill panjaralarini orqa tomonlari bilan grilldagi tegishli ilgaklariga qo'ying. Tashqi tomonlarini tiq etgan tovush chiaqquncha pastga bosing. Moy tomchi patnisini grillga bosing. Faqat undan keyin tegishli kabelni mos rozetkaga ulash kerak ("Texnik ma'lumotlar" bobiga qarang). Uzoq signalni eshitasiz va barcha funksiyalar displayda chiqadi. Yoqish/o'chirish tugmasi ko'ringan holatda qoladi.

text_image
1.
2.
3.
4.
2 Yoqish/o'chirish
Yoqish/o'chirish tugmasini bosing va uni 1 soniya ushlab turing. Uzoq signalni eshitasiz. Belgilarning asosiy tanlovi menyusi displayda chiqadi (tasvirga qarang) Ichki harorat grill termometri ulangan bo'lsa chiqadi.
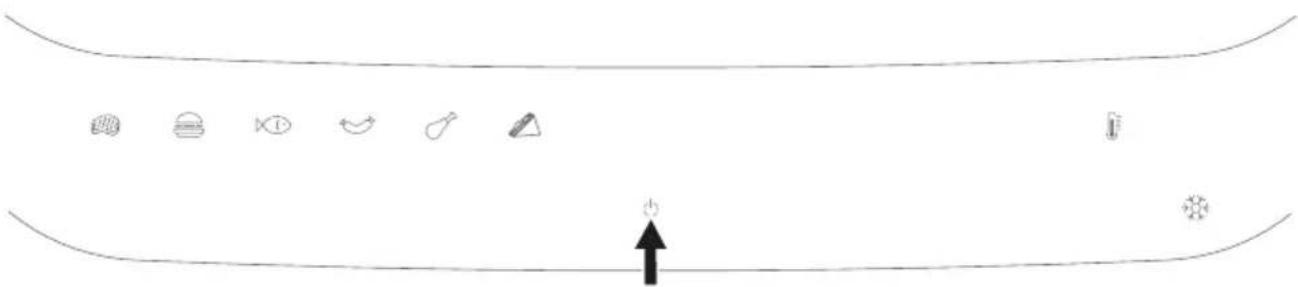
natural_image
Pure diagram of a curved channel with icons and an arrow, no text or symbols present
Ishlashi

text_image
1
= 230°C
= 230°C ⓣ 0004
2 OK
Avtomatik pishirish dasturi va pishirish darajasini jadvaldan tegishli belgini uch marta bosish orqali tanlang va OK tugmasi orqali tasdiqlang. Uzoq signalni eshitasiz. Oldindan berilgan vaqt taymer belgisini "+" va "-" tugmalarini bosish orqali sozlanishi mumkin. Sozlangan haroratga yetguncha (ikki marta "bip" etgan tovush) u yonib turadi. So'nggi 30 soniya davomida to'liq quvatda pishirish uchun Kuchaytirish belgisini keragicha bosing. Dasturning oxirida uzun "bip" etgan signalni eshitasiz va asosiy displey chiqadi.
Steyk
| 1x | → | → | O'rtacha |
| | | pishirish |
| 2x | → | → | O'rtacha |
| 3x | → | → | Tayyor |
Burger
| 1x | → | → | O'rtacha |
| | | pishirish |
| 2x | → | → | O'rtacha |
| 3x | → | → | Tayyor |
Baliq
| 1x | → | → | Glazurli |
| 2x | → | → | Yaxshi pishgan |
Sosiska
Sendvich
| 1x | → | → | Pishirish darajasi 1 |
| 2x | → | → | Pishirish darajasi 2 |
| 3x | → | → | Pishirish darajasi 3 |
text_image
= 230°C
= 230°C © 00:04
2.
OK
1. 3.
Taymer belgisi avtomatik pishirish dasturlari uchun pishirish vaqtini o'zgartirish yoki grill haroratini qo'lda sozlash uchun taymerni sozlashda ishlatilishi mumkin. Bu belgi yonadi. Plus va minus belgilari chiqadi. Plus va minus belgilari yordamida kerakli davomiylikni sozlang va OK tugmasi bilan tasdiqlang. Tatmer ishga tushadi. Avtomatik pishirish dasturi uchun taymer belgisi tanlangan haroratga yetguncha yonishda davom etadi. Agar haroratga yetsa, ikki marta signal eshitadi, displey muntazam yonadi va taymer displeyi teskari sanoqni boshlaydi.
Dastur davomiyligi va/yoki taymerni sozlash uchun taymer belgisini bosing. Plus va minus belgilari chiqadi. Plus va minus belgilari yordamida kerakli davomiylikni sozlang va OK tugmasi bilan tasdiqlang. Uch soniya davomida boshqa narsa bosilmasa, taymer displeyi asliga tiklanadi va plus hamda minus belgilari yo'qoladi.

text_image
= 230°C
= 230°C Ⓛ 0004°C
2. 3.
1.
6 hki harorat - avtomatik pishirish dasturi
Grill termometrini ulang. Ichki harorat indikatori displeyda chiqadi, sendvich va dastur davomiyligi funksiyalari belgilari yo'qolib qoladi.
Kerakli dasturni tanlang, oldindan sozlangan qiymat ichki harorat displeyida chiqadi. Dasturni tanlashni OK bilan tasdiqlang, uzoq signalni eshitasiz. Ichki harorat displeyi grill panjaralari oldindan sozlangan haroratga (ikki marta signal) yetguncha yonishda davom etadi. Uchi taom markazida bo’lgunicha grill termometrini taom yoniga qo’ying va uni grill panjarasiga joylang. Joriy harorat displeyi va sozlangan ichki harorat ichki harorat displeyida uzilib-uzilib chiqadi. Ichki harorat o’rnatilgan qiymatga yetgandan keyin to’rt marta signal chalinib dastur yakunlaganini ko’rsatadi.
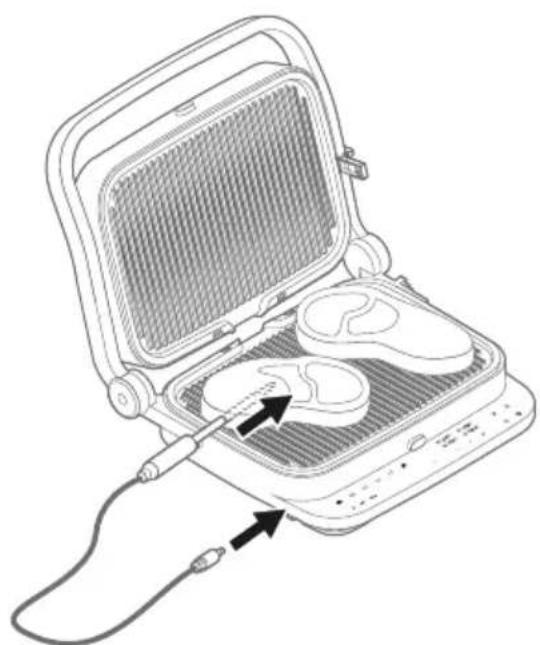
natural_image
Line drawing of an open portable electric stove with internal components and a cable inserted (no text or symbols)

text_image
°C
OK

Kuyish xavfi. Taomni surish uchun uzun dastakli barbekyu anjomlaridan foydalaning.
7 Ichki harorat – qo'lda sozlash
Grill termometrini ulang. Ichki harorat indikatori displeyda chiqadi, sendvich va dastur davomiyligi funksiyalari belgilari yo'qolib qoladi.
Grill harorati belgisini bosing va kerakli panjara haroratini 4 qismida tasvirlanganidek "+" va "-" sozlash tugmalari yordamida sozlang. Grill haroratini qo'lda sozlang. OK tugmasi bilan tasdiqlang. Endi ichki harorat o'zgartirilishi mumkin. So'ng OK tugmasini bosing, kerak bo'lsa, qo'shimcha taom uchun 90 daqiga davomiylikda qo'shimcha taymerni dasturlang. Taymer sozlangan va grill qo'l rejimida ishlatilayotganda grill qo'lda sozlanishi kerak. Ichki harorat displeyi grill panjaralari oldindan sozlangan haroratga yetguncha yonishda davom etadi.
Grill termometrini taomga kiriting va uni grill panjarasiga joylang. Sozlangan harorat va taom ichidagi ichki harorat ichki harorat displeyida uzilib-uzilib chiqishda davom etadi. Ichki haorat oldindan sozlangan qiymatga yetishi bilan uch marta signal eshitasiz. Taymer vaqti tugagandan keyin to'rt marta signal eshitasiz. Grill qo'lda o'chirilishi kerak.
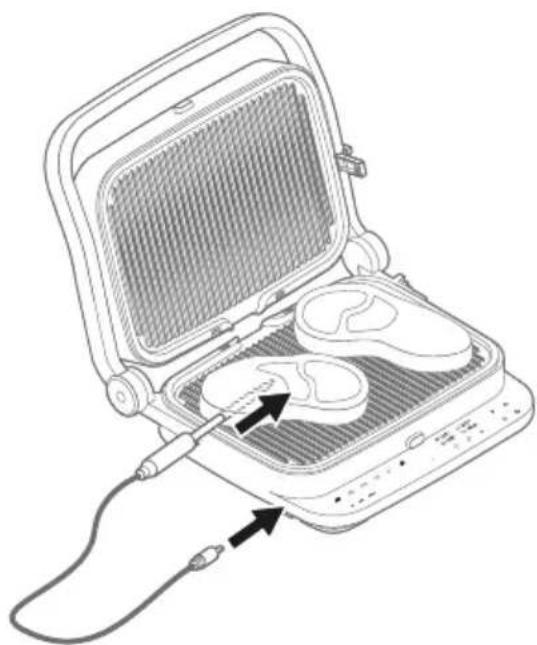
natural_image
Line drawing of an open portable device with internal components and a cable inserted, showing no text or symbols.

text_image
= 90°C -○ 50°C
= 90°C ●8881
OK

Kuyish xavfi. Taomni surish uchun uzun dastakli barbekyu anjomlaridan foydalaning.
natural_image
Diagram of two rectangular grating or filter compartments with a tool inserted, showing internal grid patterns (no text or symbols)

natural_image
Illustration of a faucet pouring liquid into two square grilles (no text or symbols)
Har bir foydalanishdan oldin jihozni nam mato bilan arting. Abraziv tozalash vositalari yoki har qanday mikrotola matolardan foydalanmang, chunki ular korpus yuzasida mayda tirnalishlarga sabab bo'lishi mumkin.

Xato xabarlari
Xato xabari o'n marta signal chalish orqali akustik paydo bo'ladi.

Issiq qismlar sababli kuyish xavfi. Muammolarni hal qilish va xatoni tuzatish vazifalaridan oldin grill butunlay sovishiga imkon bering.
Muammo Ehtimoliy yechim Davo
| Jihoz ishlamaydi. | Jihoz quvvat ta'minotiga tegishli tartibda ulanmagan. | Quvvat vilkasi rozetkaga tegishli tartibda qo'yilganini tekshiring. |
| Saqlagichni tekshiring. |
| OK tugmasini bosgandan keyin dastur ishga tushmaydi. | Dastur tanlanmagan. Dasturni tanlang. |
| Tegishli qiymatlar sozlanmagan. | Grill panjarasi haroratini minimal 90° qilib sozlang. |
| Avtomatik pishirish dasturlari uchun dastur davomiyligini 1 daqiqadan yuqori qilib sozlang. |
| Err°C 180°C | Yuqori grill panjarasi tegishli tartibda qo'yilmagan. | Jihozni o'chiring, yuqori grill panjarasini tegishli tartibda qo'ying va jihozni qayta ishga tushiring. |
| 180°C Err°C | Pastki grill panjarasi tegishli tartibda qo'yilmagan. | Jihozni o'chiring, pastki grill panjarasini tegishli tartibda qo'ying va jihozni qayta ishga tushiring. |
| Err°C Err°C | Ikkala grill panjarasi noto'g'ri qo'yilgan. | Jihozni o'chiring, grill panjaralarini tegishli tartibda qo'ying va jihozni qayta ishga tushiring. |
| Err°C ---:--- | Grill termometri tegishli tartibda qo'yilmagan. | Jihozni o'chiring, grill termometrini tegishli tartibda taomga qo'ying va jihozni qayta ishga tushiring. |
| ED1°C ---°C | Jihoz buzilgan. | Jihozni o'chiring va mijozlarga yordam xizmatiga murojaat qiling. |
| ---°C ED2°C | Jihoz buzilgan. | Jihozni o'chiring va mijozlarga yordam xizmatiga murojaat qiling. |
Mijozlarga yordam xizmati
Kontakt grill bilan muammolarga duch kelsangiz, mijozlarga yordam xizmatiga murojaat qiling.
Xizmat, ta'mirlash, kafolatlar va mahsulot registratsiyasi haqida batafsil ma'lumotni www.zwilling.com/service manzilidan topishingiz mumkin.
Aksessuarlar
Jihoz uchun mos aksessuarlarni www.zwilling.com manzilidan topishingiz mumkin.
Utilizatsiya qilish
text_image
A
B
K
J
I
H
G
C
D
F
E
A სახელური G ეკრანი
B 3mnmnlo gnoqngnfo H 3bndnl couusgmmzgdojmn y5mo
C ɔŋɡbnu ʒuðʒmni I BBQ ʒuδəmmʒznu ɑmθymɒnəmməs
D ογόμαθαγήμην χυζάσημο J χυδάστοβον ωυ ḥυδύθον θυγυδονδα
Ε ʒmɒŋnʊ ɒŋmədɪŋθμο K
3060mm33nl 9nnm3n 8mnmnbl
g0m03n0j0n0n3nl
F 55936930
நேநெ

text_image
1 2 3 4 5 6 7 8 9 10 11 12
= 888°C ⊙ 888°C
= 888°C ⊙ 8880
21 20 19 18 17 16 15 14 13
natural_image
Line drawing of a hand holding a rectangular device with a handle (no text or symbols)
natural_image
Diagram of a dual-panel electric fan or heat exchanger with rotating arrows indicating rotation (no text or symbols)

text_image
3.
4.
3.
სამუშაო რეციმები

natural_image
Diagram of a mechanical device with a rotating arrow and handle (no text or symbols)
text_image
Technical diagram showing two views of a battery pack with labeled components and rotation arrows
3
zsdmnygbjon zsbddzgbn zmnwnl mth qmngzhfu ldmnl bslym3gmn
dsbdnmnl qssmbgymnngdomo. dmsonzbjon bs3gdn zmnwnl d3gos
ongzdebg cos slbngon zmnwnl dgcos qmngzhfs, lsbsd nl bs3gdoms bcmml
sm ngbjos. gl smdngns dausbndbszn dsmnsb lgjmn bs3gdomn2n5,
mmdgmny gbcos dmdbsgoglu bgmns cos osbsdomo, dcobsim y3gmnl zgmdgdnl
dmlsdbsgogdomo, mmgmnhzu dis., 3nzo sb zmfngfgdn cos mdonm bs3gdnl
dmlsdbsgogdomo, mmdgmny sm y6po zunlmntml. dlnn zsdmnygbjos slg3y
mgzmdgcbgoymn s dmsmn bymn l dgd3gmmnol s dmhygbgmnbn2n5, mswgsb
bysmn bgdsqommymn, dgggmbgdomo smmondmcgl.
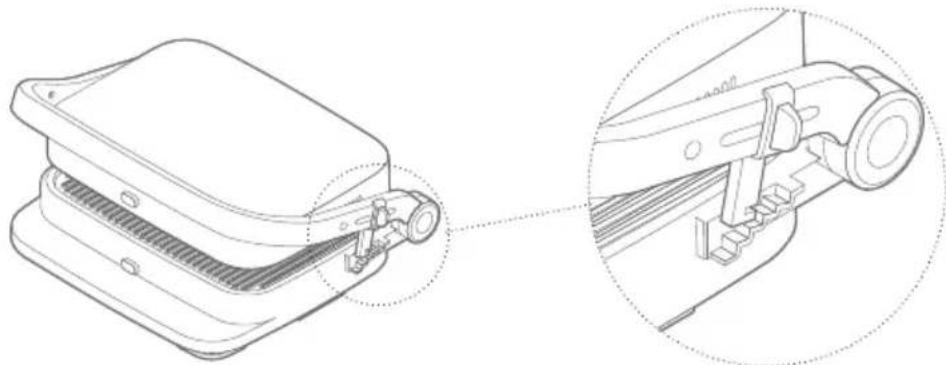
natural_image
Technical line drawing of a mechanical device with a close-up inset showing internal components (no text or symbols)
4 30000000000000000000000000000000000
azimuthnun ogmdmdgfmn, hmdgmnq dm3y3gds dm6ymdnmmds, dgndmgdss
dnadsmfoglu dncos fghd3gnsfghmnl zulsdmdsg. sdnbsomznl hucgom
ogmdmdgfmnl tuznl 3mbgdgmnn dm6ymdnmmdn l dsmbgbds dzgos
dbsmgl. g3msb8g zsdmh6g0ds dnhnonsqn fghd3gnsfghmnl nbcqnzsftmnn,
bgbcznhnl wz 3hmzfsdnl bub3mdmnzmndn ogybdjngdnl lnddmmmgdn
gugmgs. 3mgdgfnmgdnl zumsbfgdnlonznl obnrgon oszn lsousyfmnn
dsmcmzu — dncos fghd3gnsfghms.
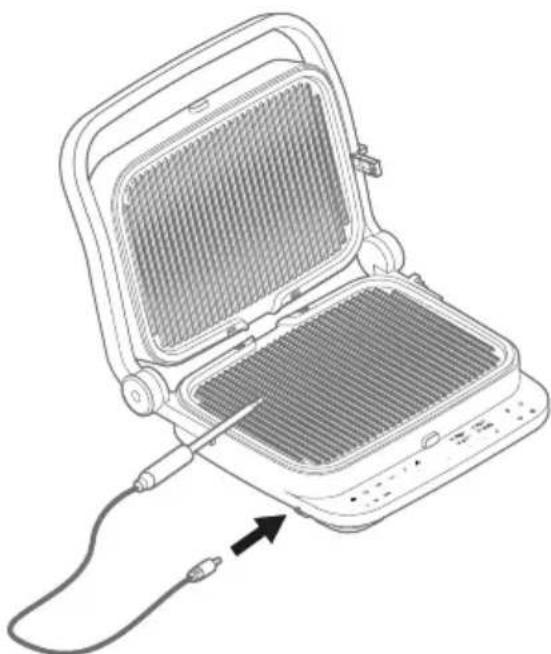
natural_image
Line drawing of an open portable electric grill with a cable inserted, showing internal grid and power cord (no text or symbols)
natural_image
Simple line drawing of a curved surface with icons and an arrow pointing to the bottom (no text or symbols)
งดมยุธงดง
晉晉晉晉晉晉晉晉晉晉晉晉晉晉晉晉晉晉晉晉晉晉晉晉晉晉晉晉晉晉晉晉晉晉晉晉晉晉晉晉晉晉晉晉晉晉晉晉晉晉晎晉晉晉晉晉晉晉晉晉晉晉晉晉晉晉晉晉晉晉晉晉晉晉晉晉晉晉晉晉晉 Uzbek 6660000, 1000000000000000000000000000000000000000000000000000000000
text_image
1
= 230°C
= 230°C 00.04
2 OK
text_image
2x ⋅ → ♂♂♂ → 35m350°
∂m∂850°∂γ∂γπη
bmbngd

உஞஞஞஞஞஞஞஞஞஞஞஞஞஞஞஞஞஞஞஞஞஞஞஞஞஞஞஞஞஞஞஞஞஞஞஞஞஞஞஞஞஞஞஞஞஞஞஞஞஞ
სენდვირი
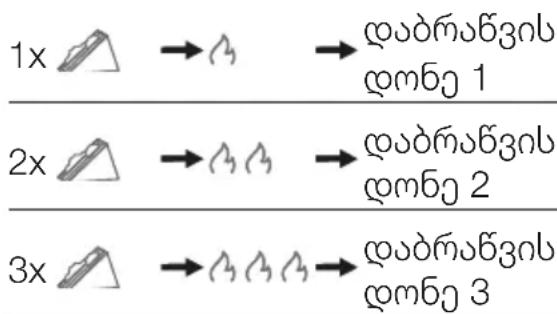
flowchart
graph TD
    A["1x"] --> B["→"]
    B --> C["φωδόμοδʒnʊ φομδρ 1"]
    D["2x"] --> E["→"]
    E --> F["φωδόμοδʒnʊ φομδρ 2"]
    G["3x"] --> H["→"]
    H --> I["φωδόμοδʒnʊ φομδρ 3"]
text_image
= 50°C
= 50°C ⏱ 0 100
OK
1. 2.
4 3000000000000000000000000000000000000000
text_image
= 230°C
= 230°C © 00:04
2.
OK
1. 3.
natural_image
Line drawing of an open portable electronic device with a probe inserted, showing internal components and wiring (no text or symbols)
###
natural_image
Diagram of a medical device with internal components and a cable inserted, showing no text or symbols
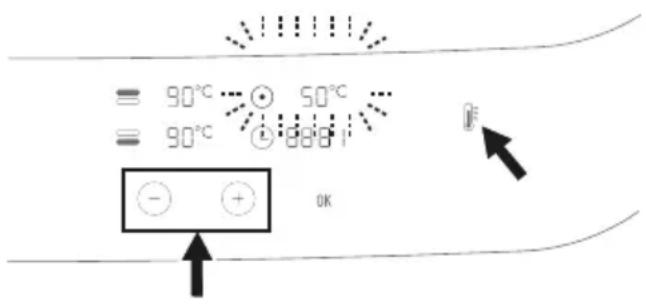
text_image
= 90°C ... 50°C
= 90°C +88.01
OK

natural_image
Illustration of a grating tray with a tool inserted, showing internal grid structure (no text or symbols)

natural_image
Illustration of a kitchen sink with a faucet pouring liquid into a tray (no text or symbols)
zinjunjunjunjunjunjunjunjunjunjunjunjunjunjunjunjunjunjunjunjunjunjunjunjunjunjunjunjunjunjunjunjunjunjunjunjunjunjunjunjunjunjunjunjunjunjunjunjunjunjunj მოცვარების ამოცანებს.
3670520100000000000000000000000000000000000
UUUUNWUQNIPJWU YWNLNN untntlywnunl Nepalnu
Öwlnpəwgtp wluŋnwuqnlpəjwlu
wúpnng ʊntntlywnuynlpəjwlu nl
gnlgnluutnhlu: uluŋnwuqnlpəjwlu
ntntlywnuynlpəjwlu l
gnlgnluutnhlu zhtunutln ywnnn
t hwuqtgutl tltlynnwhwndju,
hnnthh l/ywuf lnlnz
ylwwuwóputnh:
^1 whwwltp wluunwuqnlpjwu
wupnnz untntlywnuynlpjnlnp
lu gnlgnluttnp htunwqw
oqunwqnnduwu hwufwn:
Чнлунwlунwjhu qnhln (wjunlhtun` «uwnp») wltnp t oqunwqnnotl pwgwnwwtu ihwly unwnwóputnnlu wwntluwjhu wwnwúputn hunnuṭlni hwu̱wn:
Swuwrgwó wjl yhnwnnlf
hwuwwnluf t nε wwwn2w6 u ywnnn
t hwuqtgutl lntn2 yluwwuwóputnh
yww uwnph yluwwuwun:
Uwnpn pwgwnwwtu
luwhwuntuulwó t oqnwnannóutlnl.
• unuwjhu wwju wulut nnlu
- hwwunlputnh, qnwutljwylutnh
lu wjl wnluunnwjhu unwnwóputnh
wuǒuwlywquh hunhwungutnnu
• qjnlwnluntuwlywu opjtynutpnu
- hjnlntph ynnuhg
hjnlnwlngutnnlu, unpatlutnnlu u
wjl pluwytih wnwnwóputnnlu
Uwnpn uwhuwintuulwó t
unluwjhu wjufuwulutnh, wjl nε
pεt wnluunnwjhu oqunwqqnnδuwu
hwufwn:
Uju uwnpn zwtunp t oqinwqnnoúh
lywú 2whwqnnoúh tnthuwutnh
lynnúhg: Uwnpn u nntgugnn
uhwgufwu uwlnchun htrnnl wuhtp
uhu5u 8 unwntlywu tnthuwutnhg: Uwnpn uhwju wju ntwjpnluf lwnnn t oqnwwqnnoútl 8 unwntlywuhg pwnán tnthuwutnh u \$hqhlwywu, hwwwqqwjwljwu lwwf uunwulnn lqwnnnnlpajnluitnh wwwlywnu unwnwwunn wluówug lwwf unwug lynnuhg, nulptn znlutu yhnna lu/ lwwu qhuntlhputn , trat wjnwhuh wluóhup uwhwuwtu gnlgnluitn tu uunwgtl uwnph oqnwwannóuwu uttnwptnjwi l u gnjg inutl, nn hwulywuniu tu nnwuhg phunn zhultnu nl uunwluqutnp:
Bnthuwutnhu zh renujwnnunl huwnwl uwnph htun: Bnthuwutnhu wtunp t utnwhuyl, nn zhuwnwu uwnph htun:
Uwnph ʃwɒpnnlʊŋ ʌ uŋwʊwnlʊŋn ʒwɪtɪnp t hnuŋwʊwɡʊh 8
unwntlywʊhg guðn tnthuːwʊtnh
luwʊ \$hqhlʊwʊwu, hωμαqωjʊwʊwu
luwʊ ʃuənwʊnn ljuənnnliəjnlʊtɪnh
wʊwlʊwʊnʊ wʊðwʊg lyuː lʊnwʊg
lynnu̸hg, nuptn ʒnliːtu ʊhhndə ʌ/
luwʊ qħuntlihputn, tprət ˌuŋwʊp ɛtu
ʊtnwhʊhʊŋnlu:
θnθuωutnhu wnqtiynlu t hwnw
θwprəwulnnuwu ujnpatnh htun:
Uw 2uωhtnánlajwu ulnwluq t
utnjuwjwgunlu:
ЗпнWWPUUYNn oqunwqnDnLUhgh
wnw2 hwUnqutp, nn uwnpn
ylwwuUwO ET: Traf hwJnUwPtntp,
nn wnwpUwu npAwgpNLD yluwUtn
tu wnwZwgtL, wluH2wwWtu
nhutp hw6whunnNUTnh
uwwwwnyUwU dwnwnlPajwUH (untu
«3w6whunnNUTnh uwwwwnynLd»):
Tnptp UH' oqunwqnDtp ynunnUwO
lywU yluwUwO uwnpwUnnnLUN hywU
text_image
A
B
K
J
I
H
G
C
D
F
E
A Fnluwly G Eynwu
B 9nhlh uwllhly H 3nlnh hwwlpwlu wluwly
C 3nuwuph uwnlhu I Fwnptpnlu wwwwplnlywulnnnn uwnp
D Ωτημωξωμh μħωgnLJ
E 9nhlh 2tnuwewh K
F Ωtnhε
Fudwuhzutn u whuwuwjhu
uthuwuhqu
9nhlh uwlhyttnq wwwwplnywwlnnnn
ynówly
Eynwu
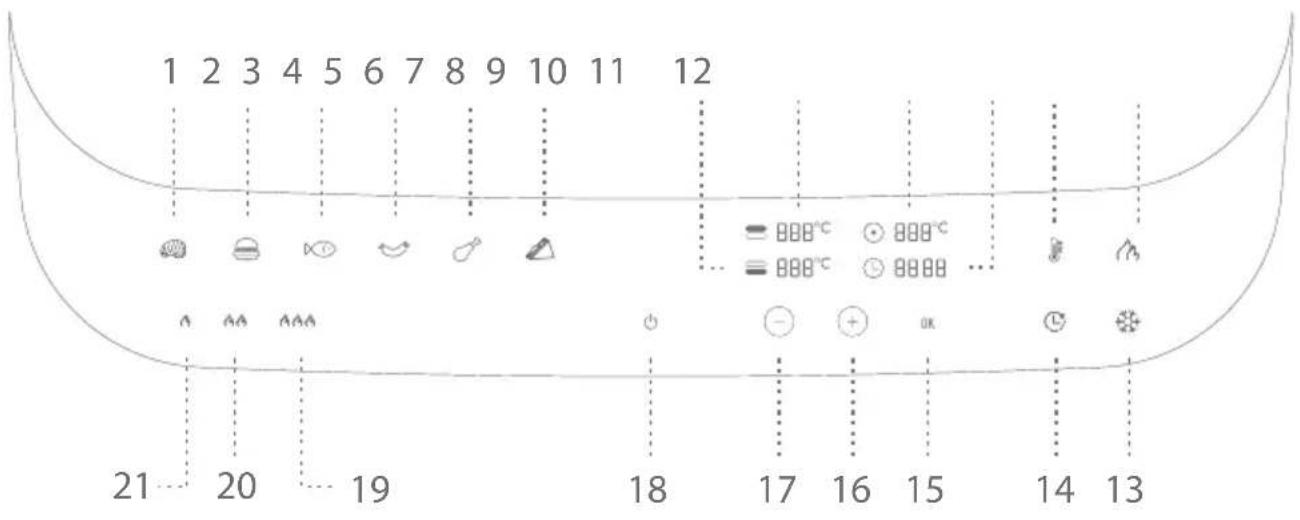
text_image
1 2 3 4 5 6 7 8 9 10 11 12
21 20 19 18 17 16 15 14 13
| 1 | Uptjph wwnnwnunfuw u dwnqhn 12 | Unwqwguwu qnnównnuja |
| 2 | Fnlnqtnh wwnnwnunfuw dwnqhn | 13 Rwltgufwu qnnównnuja |
| 3 | 2yuwu wwnnwnunfuw u dwnqhn 14 | Dwnqnh unlunnllpjnluŋ |
| 4 | Unptn2hlyh wwnnwnunfuw u dwnqhn | 15 Rwnwnwnfuw lynówu |
| 5 | Onzluwufuh wwnnwnunfuw u dwnqhn | 16 Ywnqwulnnfuw lynówu «+» |
| 6 | Nwuhluhh wwnnwnunfuw u dwnqhn | 17 Ywnqwulnnfuw lynówu «-» |
| 7 | Qnhlh uunnnhu uwlhlyh 2tnuwwunháwu | 18 Uhwgufwu/wluzwnunfuw lynówu |
| 8 | Qnhlh utnhu uwlhlyh 2tnuwwunháwu | 19 Nwnwnwnunfuw wwnháwu` Uthylwó |
| 9 | Utnuh 2tnuwwunháwu h tynwu (Uhwju qnhlh 2tnuwwzwhh ntwpnu) | 20 Nwnwnwnunfuw wwnháwu` Uhzhlu |
| 10 | dwnfuwuwywwwh h tynwu 21 | Nwnwnwnunfuw wwnháwu` Uhzhuhg wwwywu |
| 11 | Φnhutl qnhlh 2tnuwwunháwuŋ | |
Lwhupwu wnw2hlu oqunwqnnonlún
Rwutp uhwtatpwulnnuwu pnlnn wwnwqwuttn, rwhutp tynlnqhwwytu uwpnln ytnwnu lywu uh lynu nntp` htinwqwjnluf uwpn p wwhtlnl uwwunwnynu: Unniqtp uwpnp l hwnwlyhg wwnwqwuttn` hwunqutlnl hwuwn, nn nnwup wluluwu tu l wupnnzwywu:
U2nLU. 6:47 pwgwluyw yuw yluwuiwó ywutn hwjnluwptntp, uh' 2whwqnntp uwnpn: Φnhwntln nhutp utn hwáwhunnŋutnh uwwuwnyufwu pwchlu (untu «3wáwhunnŋutnh uwwuwnynlu» utnluwqnnu qlnlhuŋ):
Uwppnnlu
Oqunwqnótlnig wnw2 uwnpn unptp hunluwú 2nnnu:
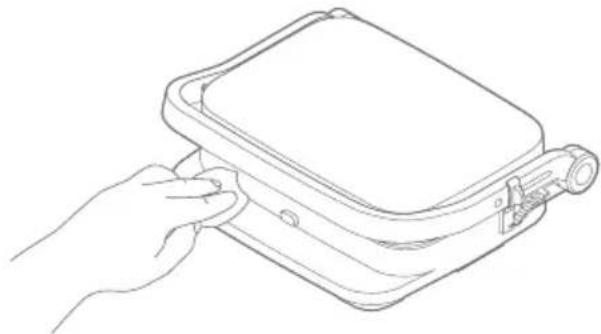
natural_image
Line drawing of a hand holding a rectangular device with a handle (no text or symbols)
Utnutp w2 lnnuh pwnptpjnlu wwwprlnlywulnnnn uwnppn u
wupnnynlajwup pwgtp uwnpn: Utnutp qnhlh uwllhyuttn
wwwrplnywulnnnn ynδwyn, hwutp qnhlh uwllhyutnu nl jnlnh hwulwpufwu
wluwyn l u wufwu lluwgn htnnlynu lluwgtp hnunn znh unwl: 2qnL2nntu
znnwgntp qnhlh uwllhyuttn u hwunqutp, nn uwpnnn uh2ngutnh pnlnn
uwwgnnnuttn htnwgultl tu:

text_image
1.
2.

text_image
3.
4.
3.
cwhwqnòu wù nìchūn

NTCUNH3N1U! 3wunqutp, nn jlnh hwulwpuwu wluwn
untwnwnlwo t: 4wunluwnn ytnwnu wwnptnwpwn uunnlqtp wuwyn`jnlnh zwwhg wulth ynlnwnynlun ywhutnl hwdwn:
1 Чнунwlунwjhu qnh (чhw чндwlynlu)
Qnhlh ʊtnhʊ uwlhyŋ wuunnuwn ʊtnwnŋ hwnfwnynlu t qnhlh uunnhʊ uwlhyŋ ynw untnwnnywó ʊrətnph hwuunnləjwun: Uratnpn tnlyn lynnuhg hwuwwwnwytu tchynlu t:

natural_image
Diagram of a mechanical device with a rotating arrow and handle (no text or symbols)
2 Awgulwó qnhl (pwnptpjnlh ntchul)
Uupnnynlajwup ewgutlni ntwpnuq qnhlh tnynl uwllhyuttn unju hwnpanlajwu ulnw ywqunlu tu qnhlh uto uwytntu, nnh ulnw ywnth t unwptn ytnwynlnutn wwnnnwuntl` wnwug qnhlh hjnlattn hwnh hwnutlni: Utnutp wz lynuh ohuhh wwwprlnywnluwu ynówln l ówltp qnhlh utnhu uwllhyn ntwh htun:

natural_image
Line drawing of a portable electric grill with grid panels and heat sink (no text or symbols)
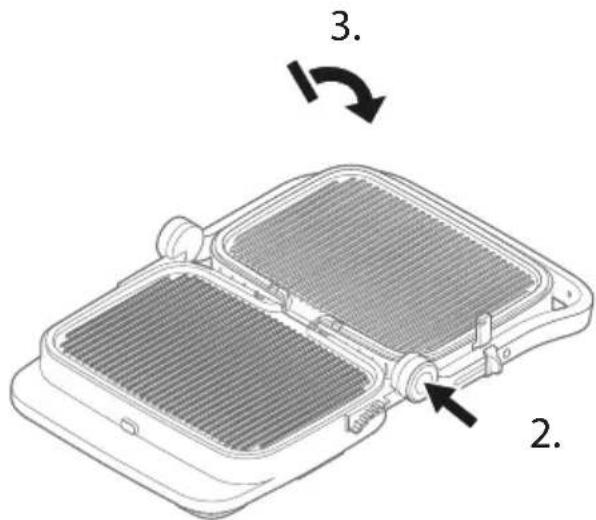
text_image
3.
2.
3 2tng-qnhl
Oqunwqnntótp pwdwuhξuttnn` qnhlh tnlnl uwlhhyutnh uhzu gwulhywlh htnwynnnlæjnlnp lwwnqwulnntlnl hwufwn: Uptnpn nntp qnhlh uunnnhu uwllyh ynw u hgtgntp qnhlh ytnhu uwllhyn` uhuzlu wju unin lhuh uratnphu: Uju nhnpn εwwhwqwug hwndwn t 2wn hwun uratnputnh hwudwn, nnnup wtung t nwnwn u hwuwεwwh tghutu, huεwhtu luwl hwylwó wwlnnnl nlntuunutn wwwnnwuuntlnl hwudwn, huεwhuhp tiu, onhlwly, whggwú lwwú plhæutnn, lwwú chwuhnl y nlntlhputn wwwnnwuuntlnl hwudwn, nnnup εwtung t δhulutu: hnnnhnlnn t nnnunl u wju oqunwqnntótl luwlu pwnón znh wwnnluwynlæjwup pwulgwtnttuh hwudwn, pwuh nn znnn lwwnn t wluwnqti aqlnnzhwluwl:
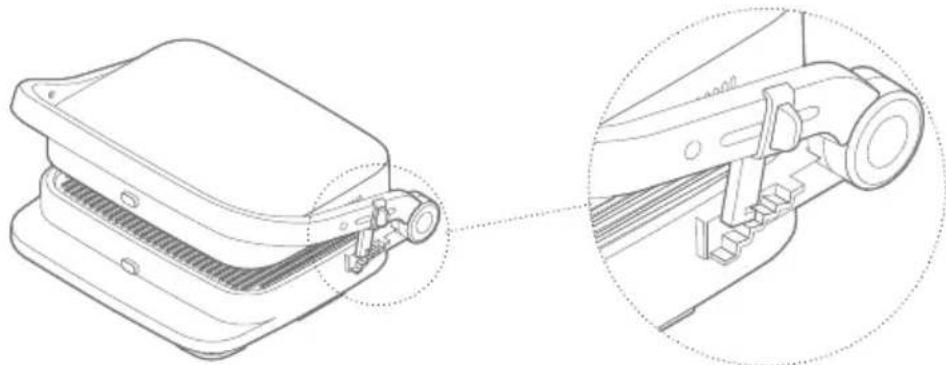
natural_image
Technical line drawing of a mechanical device with a close-up inset showing internal components (no text or symbols)
4 9nhlh 2tnuwrwhh oqunwqnonlu
Uwnph htun unnuwwnnunn qnhh 2tnuwswnh ywnnn t wunwgutl` utnuh 2tnuwwunh6wun zwihtln hwuun: Ujn uwwwnwnyl 2tnuwswnh uhwlghen uhwqntp uwnph dwhu ynnuh uunnhu dwuhg: Eynwuh ynw yhwjunluh utnuh 2tnuwwunh6wuh gnighen, huy utunuhsh l onwqh ununnlajwu gnighzutnn ywu2wnutlu: Qwnqwulnnuwu unwptnwylutnh hwuun unt'u «Cwhwqnnonlu. utnuh 2tnuwwunh6wu» utnuwannu qlnluh:
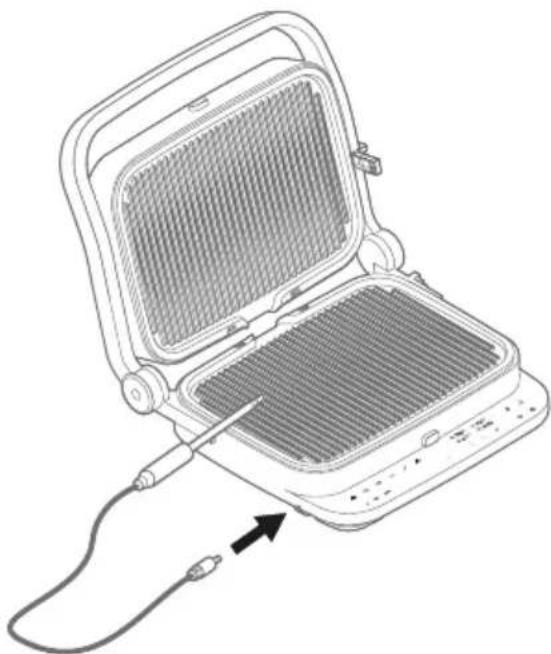
natural_image
Line drawing of an open laptop with a cable inserted, showing internal grid and power cord (no text or symbols)
cwhwqnóu wlu uqhqe
1 UhwgnLU
Uqqnlu qnhlh uwlhyuttnn htunlh lynuttnnu uttnwnntp qnhlh uwnph hwufwwuunwuhuwu ytnhlyutnh utg2: Ujunihtunlu utnutp wnnwphu lynuttnn ntwh utnplu, uhuzlu nnwup lutlh ytnwnny uttnlu nluyutlu: 3nlnh hwufwpfuwu wuwyn hntlnu uttnwnntp qnhlh utg2: Uhwju nnwuhg htunn lwwnn tp uhwgfuwu lwnn uhwgutli hwufwwuunwuhuwu ywnnwlyhu (unt'u «Sthuhlywlywu unljwlutn» uttnuwannnu qlnlhn): Qlutp tnlywn wqnwu2wu, u tlynwuhu yhwjunluytu pnllnn gnlghzuttnn: Uhwgfuwu/ wugwinfuwu ynówyn lyfuuw intuwutlh:
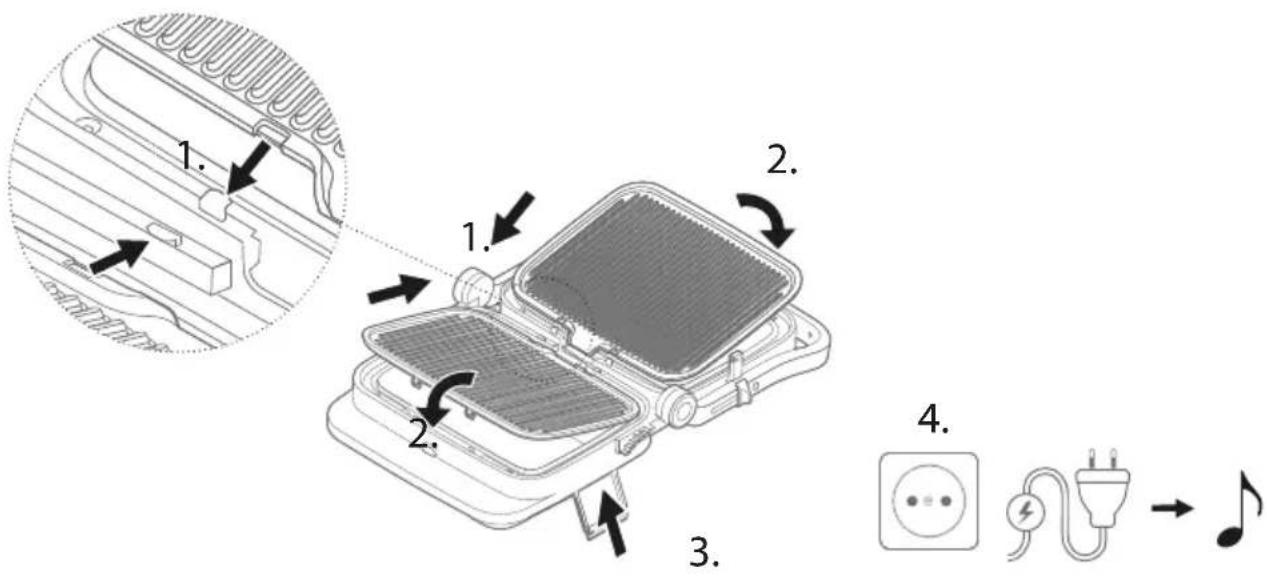
text_image
1.
2.
3.
4.
2 Uhwgutlu nl wlugwuntln
Utnutp uhwguwu/wu2wunfuwu yn6wyn l u utnuwó wuhtp 1
qujnlyjwu: qutp tnlywn wqnwu2wu: U2wulutnh hhuuwwyu
quunnwgwuyn yhwjunluh tynwuhu (untu uywn): Utnuh ztnufwunh6wyn
yhwjunluh uhwju wju ntwpnu, tnp qnhlh ztnufwzwnh uhwguwó t:
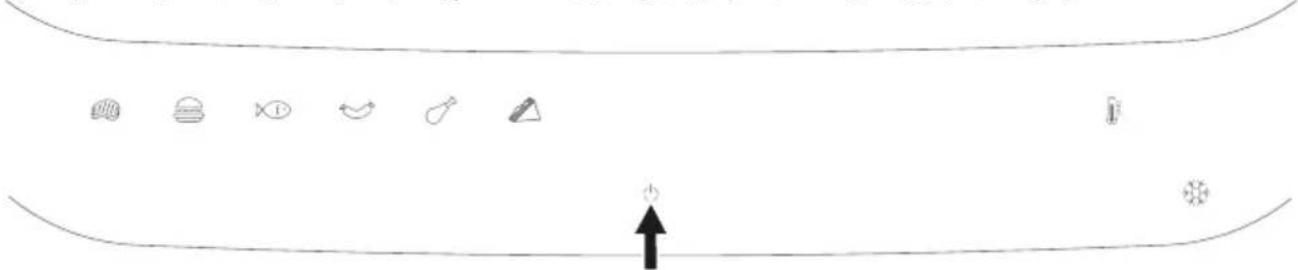
text_image
Diagram showing a sequence of icons above a curved line, with an arrow pointing to the bottom.
الله الحرفية

NTCUTNATCT! Swp pwnlywgnlghzutnh wwnnawnnu wnlyw t
wnlywoputnh ynwuq: Uhwglwó yháwlnlu ðtnp unltp uhwju
qnhlh pnuwuhu yww lynwihu: Ujl uwwytntutnhu nhwztlng
pnll unltp, nn nnwup wúpnngnlpejwup uwnztu: Uh'
nwgntp ywwi nnut wjl ytnw 2wndtp unwp qnhln:
text_image
1
= 230°C
= 230°C 00.04
2 OK
£iunnwgwluhg nluntp wuinnfuwn wwinnwuunfuw uðnwqhnn l u
wwinnwuunfuw wuinháwuln` utnutlnu hwulfwwunwuhuwlu u2wuh
ynw tntp wluqwú, www hwuinnwntp` utnutlnu «OK»: 4lutp tnlywn
wqnwu2wu: Uwhuwwtu uwhufuwluwó dwufuwlwn lyuntlh t ywnqwulnntl`
utnutlnu dwufuwluwzwiuh h u2wuln «+» l «-» lynáwylutnnu: Uju lyəwnrəh`
uhuʒu uwhufuwluwó ztnfuwunháwuhu hwultln (tnlyn wqnwu2wu):
Utnutp «Unwqwglt» u2wuln, trat wuhnwdt2un t, nn ʊtnŋhu 30
ywjnljwiuh njuəwgpnlu urætnpn unwwuwylh wupnnz hqnnnləjwiup: 6nwqnh
ytngnuI ylutp tnlywn wqnwu2wu, u yhwjunluh hhfuwwyuw tuynwuln:
Uptip
| 1x | | → | | → | Uh2huhg |
| | | | | wuuuuu |
| 2x | | → | | → | Uh2hu |
| 3x | | → | | → | tuhluwo |
Enlnqtn
| 1x | → | → | Uh2huhg |
| | | wuwluu |
| 2x | → | → | Uh2hu |
| 3x | → | → | tuhluwo |
2nly
text_image
= 50°C
= 50°C ⓣ 0 100
OK
1. 2.
4 9nhlh 2tnuwwunhówuh őtnpnú lymphwulnnnlú
Utnutp qnhlh 2tnuwwunh6wuh lu2wuh: Uty wluqwuf utnutlng htunn lwnnn tp wluuh2wwtu lwnqwunntl tnynl uwllhyutnh 2tnuwwunh6wuh uhwuhu: Uhwu ultnhu uwllyh 2tnuwwunh6wuh lwnnn tp lwnqwunntl tnynl wluqwuf utnutlnu, huy uunnnhu uwllyh 2tnuwwunh6wuh lwnnn tp lwnqwunntl tntp wluqwuf utnutlnu: Rwuwwwwunwhuw 2tnuwwunh6wuh lwnth t hnhtul` oqnwannotlnu «++» L «--» lwnqwulnnfuw u n6wylutnn: «OK» lyn6wuh uhngnu hwwunwuntlng htunn lwnth t uhwgutl dwuwuwlywzwhn` oqnwannotlnu «++» L «--» lwnqwulnnfuw lyn6wylutnn:
U2nLf. dwwuwlwlywzwnh znnu wqnwu2wu lwnawlyh, tnpe dwuwwlwn
lnwluw: qnhln wtunp t atnpnu wluzwuntl , trat qnhlh ztnuwwunhawlu
lwnqwulnnultl t atnpnu:
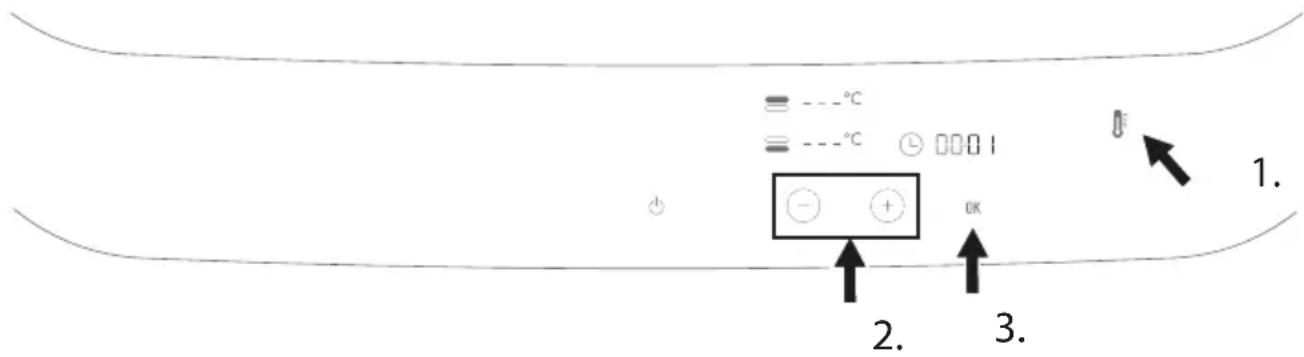
text_image
---°C
---°C 0001
1.
2. + OK
3.
text_image
= 230°C
= 230°C 00:04
- +
OK
1. 3.
Ujunnlwin wwnnnwnundwu ônwqntnh wwnnnwnundwu σwufuwyn
uhnhutln lwwl qnhlh ʒtnfwwunhówun ðtnpnul ywnqwulnntln
uwwunwlnl σwufuwly uwhfuwutln hwiwn lwwnn t oqnwqnndutl
dwnfuwlywzwhh lu2wun: U2wun lhyuh rawnatl: Yhwjunultu «+» L «-»
U2wuttn: Ywnqwulntp gwluwih unlnnnlpjnlu` utnutlnu «+» L «-»
U2wuttn, www hwwunwntp` utnutlnu «OK»: σwnfuwlywzwhn lhyuh
w2hwuntl: Ujunnlwin wwnnnwnundwu ônwqh ntwpnu
dwnfuwlywzwhh lu2wun lzywnnlwuh rawnatl` uhui plunnylwo
ʒtnfwwunhówuh hwiutln: bnp ʒtnfwwunhówun hwuh, ylutp lynfuwrh
wqnwu2wu, tynwun wwnptnwpwn lynluwwunnuh, u σwnfuwlywzwhh
tynwuhu lyhuuh htunhw2lwnyn:
Utnutp dwuwluwlywzwhh u2wun` dwnqnh unlnnnlyjnlun l/uwwu
dwuwluwlywzwhn ywnqwulntlnl hwufwn: Ghwjntuhtu «+» l «-»
u2wuiutnp: Gwnqwulntp gwulywih unlnnnlyjnlun` utnutlnu «+» l «-»
u2wuiutnp, www hwuunwntp` utnutlnu «OK»: Grt tntp ywnjnyjwh
npuwgpnu ll nat wjl pwu zutnutp, dwuwluwlywzwhn yqnjiwluw, hul «+»
l «-» u2wuiutnp ywhhwjunwluwu:
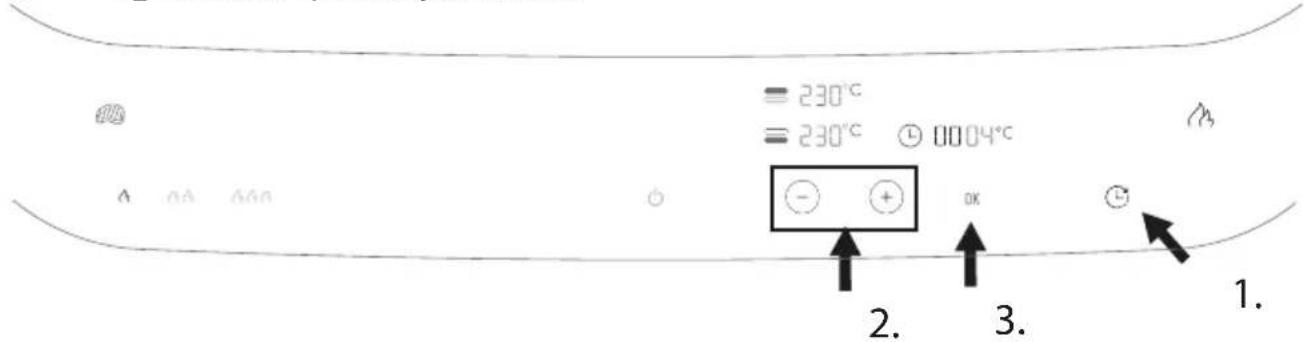
text_image
= 230°C
= 230°C Ⓤ 0004°C
2. 3.
1.
6 gnuh 2tnfwwunh6wU. wqunnfwn wwwnnwwunfWU ônwqh
Uhwqntp qnhlh 2tnuwwzwnh: Eynwuh unw lyhwjunluuh utnuh 2tnuwwunhówuh gnlghen, hul utunuhzh u ônwqh ununnljejwu gnlghzutnn lwwuzwunutlu:
£unnp wuhnwdt2n ðnwqhnn, l utnuh ʒtnuwwunhówuh tynwuhu yhwjnluh uwhwnnluwó ʒtnuwwunhówuh: ʒwuunwntp ðnwqnh nlunnləjnlu n «OK» lynówuh uhzngnu, l ylutp tnlywn wqnwu2wu: utnuh ʒtnuwwunhówuh gnighen y2wnnluwuh pawnatl, uhuzl qnhlh uwllhyn hwuh uwhwwtu uwhfuwulwó ʒtnuwwunhówuh (ynfuwuh wqnwu2wu): 9nhlh ʒtnuwswnh lynptnhg iungntp uratnph ut2, uhuzl ówjnn hwuuh ytuunnnuhu, l nntp wju qnhlh uwllhuh ynw: Curaughy ʒtnuwwunhówuh u utnuh uwhwwtu uwhfuwulwó ʒtnuwwunhówuh wwnptnwpwn yhwjnlultu utnuh ʒtnuwwunhówuh tynwuh ynw: 6np utnuh ʒtnuwwunhówuh hwuh uwhwuwuwóhu, znnu wluqwuf wqnwu2wu yhuzh'untntlywgutlnl hwuwn, nn ðnwqhnu wylwnnluwó t:
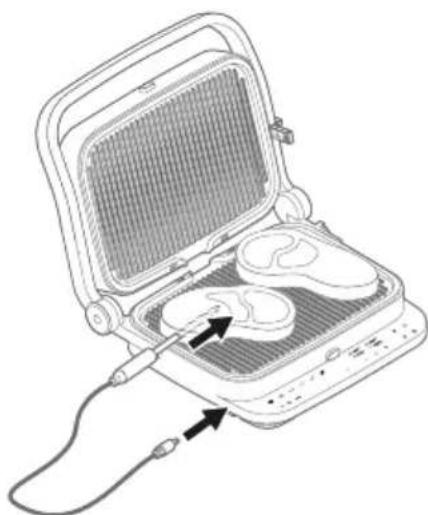
natural_image
Diagram of a portable oven with internal organs and a cable inserted, showing no text or symbols


OK
Unlyw t wjnlwóputnh
lunwúq: Uunlún
ntnwnhnnl hwiðwn
oqnwnqnótp pwnptpjnlh hwiðwn
luwhwintuulwó tnlywn pnluwlnl
wwnwqu:
7 tnuh 2tnuwwunh6wu. 8tnpnj lwnqwulnnnlu
Uhwqntp qnhlh 2tnuwzwihn: Eynwuh ynw yhwjunluh utnuh 2tnuwwunháwiuh gnlghen, huly utlunuhzh l u ónwqh ununnujajuw gnlghzuttn ywuzuwinuhtu:
Utnutp qnhlh ztnuwwunhówuh u2wun l u ywnqwulntp uwllyh gwulywih ztnuwwunhówun` oqnwqnótlnl «++» l «--» ywnqwulnnufwu lynáwuhutnn, húzwtu uywnwqnluwó t 4. Qnhlh ztnuwwunhówuh átnpnu lynnqwulnnnu: Rwuunwntp` utnútlnl «OK»: Ujdú utnuh ztnuwwunhówun lynn n t yhnhhui tl: Ujunchtunl utnutp «OK» l, gwulynlajwu ntwpnu lónwqnwlnntp lnwgnlghs dwuwluwly uhülu 90 nnwt` lnwgnlghs uvulnh hwufwn: Btət dwuwluwlywzwnh ywnqwulnnultl t, huly qnhlu w2huunnnu l t átnpnu lynnqwulnnfu wntchunlu, www qnhln wtup t lynnqwulnnuh átnpnu: Utnuh ztnuwwunhówuh gnighen y2wnnuuwh pwnrətl, uhülu qnhh uwllhyutnp hwultu luwhuwwtu uwhúwuhluwó ztnuwwunhówuhu:
Stnwnntp qnhlh 2tnuwzwhn uulnh ut2 u nntp qnhlh uwlhyh ynw: Фnhnhuulwó 2tnuwwunhówwn l u ulunh npurwghy 2tnuwwunhówwn wwnptnwpwn yhwjunlultu utnuh 2tnuwwunhówuh tynwuh ynw: 4lutp tntp wqnwu2wu, tnpr utnuh 2tnuwwunhówwn hwuh uwhwwtu uwhuwluwóhu: 4lutp znnu wqnwu2wu, tnpr dwuwluwlywzwhnu uwhuwluwó 6nwuwluwlu wluwnunh: 9nhln wtnp t wluzwuntl ótnpnu:
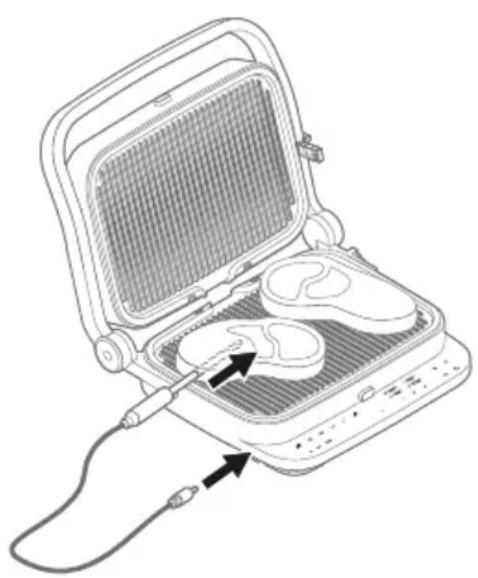
natural_image
Line drawing of an open portable device with internal components and a cable inserted, showing no text or symbols.
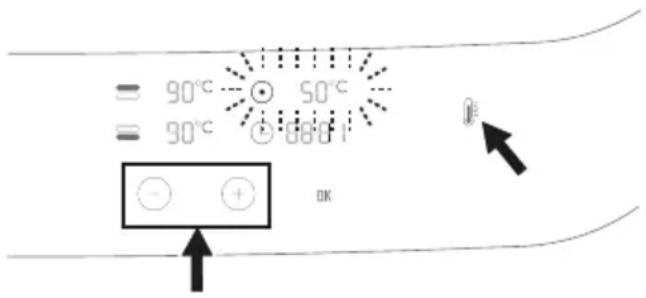
text_image
= 90°C - 50°C
= 90°C +80°C
OK
Unlyw t wjnluwóputnh
lunwuq: Uunluŋn
untnuwnhni hwuwn
oqnwnqnnotp pwnetpjinh hwufwn
luwhwintuulwó tnlywn pnluwynl
wwwnwqw:
8 uunnlajwu hyu npawghy dwnqnh ztnwnynlu
@tral utnutp uhwguwu/wu2wunfuwu lyn6wln: 4lutp lwn6 wqnwu2wu, u lhwjunluh hhfuwlywu tynwln: 5 nnwt wug uwnpu hupluwptnwpwn yfunuh uuwwuwlu ntchul:
Uwpnnlu u wwhwwwnlu

Swp pwnlywgnlghzutnh wwnn6wnny wnlyw t wjnluwóputnh uunwq: Uwhupwu uwpntlu nl wwhwwuufwu wwnnnwuntln uwwutp, uhuzlu qnhln wufpnngnuhlu uwnzh:
1 Rwutp u uwptp qnhlh uwlhyttn
Utnutp w2 lnnuh` ytnhyn wwwplnywwunnh hwunuwon u
wupnnznlajwup pwgtp uwnpn: 3wutp qnhih uwlhyttnq u jnlnh
hwulwpuwu wluwyn:
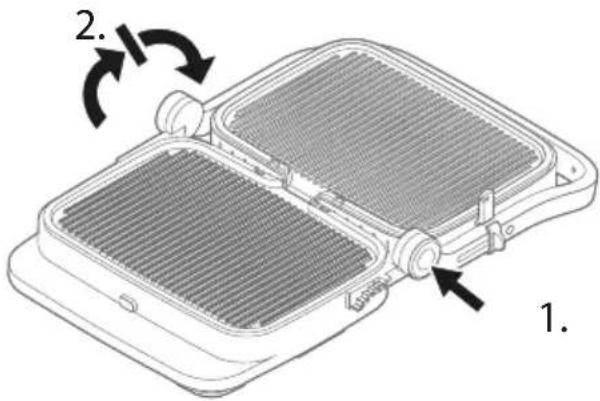
text_image
1.
2.
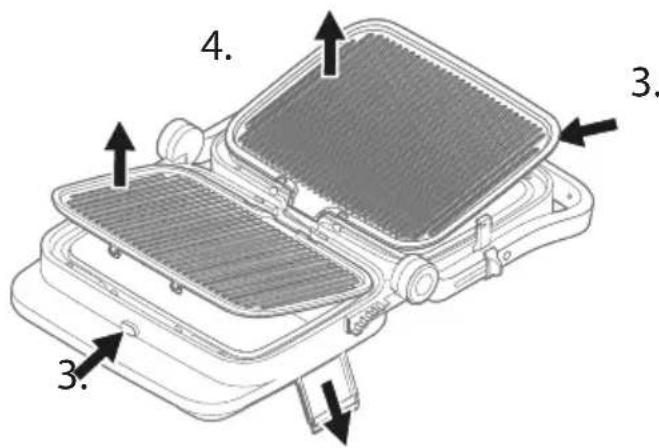
text_image
4.
3.
3.
Ujunihtunl htnwqntp qnhlh wutluwutó uuwgnnnutnn` oqunwqnnotlnu
wwwnwuph htn unnwufwnnunn ptnhzn: Uwpntp qnhlh uwllhyutnn l u jnlnh
hwulwpufwu wluwyn hnunn znh unwyl u wuuwl ljuwgnn htnnnlynu:
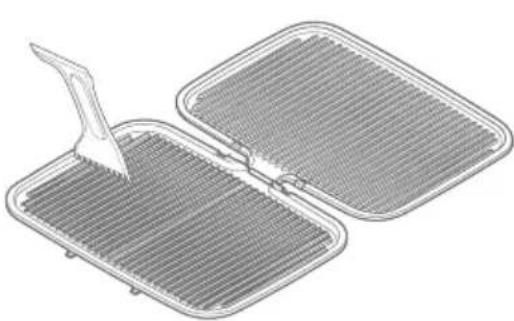
natural_image
Diagram of a grid-patterned container with a triangular handle, no text or symbols present

natural_image
Illustration of a kitchen sink with a faucet pouring liquid into a tray (no text or symbols)
3n1nwpwluynln oqunwqnnonluhg htunn uwnpn uwpntp hunluwul 2nnnu: Uh' oqunwqnnotp nnut ptnnn uwpnnn uhzng ywu ihyunn\$hent lynn, pwuh nn nnwup lynnnn tu uwun ptnóuwoóputn wnwzwgutl wwnjwuh wnunwphu lynnuh ynw:

Uhwlutnh dwuhu hwnnnwqnlpjnluutn
Uhuih uuhu hwnnnwnqnlpjwi ntwpnu unwu wiuqwu yhuzh wqnwu2wun:

Swp pwnlywgnlghsutnh wwwndwnnu wnlyw t wjnylwóputnh yunwuq: Uwhupwu huienh 2unlynluŋ u uhuwlh nlnnnluŋ uwwutp, yhuzli qnhln wufennznuhú uwnzh:
| Uwnpn zh w2huwunnlu: | Uwnpn wwwin2w6 ytnwnu luhwgulwó et hnuwuphu: | Unnlqtp, pt wnnjnp hnuwuph hunngn wwwin2w6 ytnwnu luhwgulwó et ywnnwuhu: |
| Unnlqtp wwwwnuhyn: |
| Onwqhno zh utlywnunlu «OK» utnutlng htunn: | Onlut onwqhno uunnluwó et: Cunntp onwqhno: |
| Rwuwwwwwnuwlu wwnquwnnnluuttnp unnuwó etu: | Qnhlh uwllhuh 2tnuwwunhówwn wtinp t lhuh luwqwqnljun 90°: |
| Uyunnfuwn wwwnnwwundwu ônwantnh ununnnlæjnluŋ wtinp t lhuh 1 nnwthg wultih: |
| = Err°C = 180°C | Qnhlh utnhu uwllhyn wwwin2w6 ytnwnu luntwnnnluwó et: | Uu2wntp uwnpn, wwwin2w6 ytnwnu luntwnntp qnhlh utnhu uwllhyn u lynhju qnnównlytp uwnpn: |
| = 180°C = Err°C | Qnhlh uunnnhu uwllhyn wwwin2w6 ytnwnu luntwnnnluwó et: | Uu2wntp uwnpn, wwwin2w6 ytnwnu luntwnntp qnhlh uunnnhu uwllhyn u lynhju qnnównlytp uwnpn: |
| = Err°C = Err°C | Qnhlh tnlynl uwllhyluttnp wwwin2w6 ytnwnu luntwnnnluwó etu: | Uu2wntp uwnpn, wwwin2w6 ytnwnu luntwnntp qnhlh uwllhyluttnp u lynhju qnnównlytp uwnpn: |
| ○ Err°C ● --- | Qnhlh 2tnuwwzwnh wwwin2w6 ytnwnu luntwnnnluwó et: | Uu2wntp uwnpn, qnhlh 2tnuwwzwnh ówjnn untnwnntp uratnph utg u lynhju qnnównlytp uwnpn: |
text_image
A
B
K
J
I
H
G
C
D
F
E
晝اشة G مقبض A
natural_image
Line drawing of a hand holding a rectangular device with a handle (no text or symbols)
natural_image
Technical illustration of a dual-chamber electric fan device with heat exchangers and mounting brackets (no text or symbols)
الأضاء التشفيل
natural_image
Diagram of a mechanical device with a rotating arrow and handle (no text or symbols)
natural_image
Two technical illustrations of a portable device with internal compartments and heat sinks, showing side and top views (no text or symbols)
3 فرن الشواية
natural_image
Technical line drawing of a mechanical device with a close-up inset showing internal components (no text or symbols)
natural_image
Line drawing of an open portable electric grill with a cable inserted, showing internal grid and heat distribution (no text or symbols)
بدء التشفيل
التوصيل 1
text_image
Diagram illustrating the installation of a portable appliance with labeled components and directional arrows indicating motion.
2 التشغيل/ الإيقاف
natural_image
Simple line drawing of a curved surface with icons for food, nutrition, and food items (no text or symbols)
تشغيل
text_image
= 230°C
= 230°C @ 0004
A D1 D2 D3
OK
text_image
= 230°C
= 230°C ⏱ 0004
قَك التجَمَد
3
text_image
= 50°C
= 50°C Ⓧ 0 100
α
.γ
.!
text_image
= ---°C
== ---°C 0001
- +
OK
text_image
= 230°C
= 230°C 00:04
A A B C D E F G H I J K L M N O P Q R S T U V W X Y Z
natural_image
Line drawing of an open portable device with internal components and a cable inserted, showing no text or symbols.
natural_image
Line drawing of an open portable device with internal components and a cable inserted, showing no text or symbols.
natural_image
Two technical diagrams of a device's internal structure, showing top and side views with arrows indicating movement (no text or symbols present)
natural_image
Two technical illustrations of a food tray with a fork and a tool, showing different states of processing (no text or symbols present)
natural_image
Red square sign with white stick figure holding a megaphone (no text or symbols)
ZWILLING

DOWNLOAD APP


text_image
QR code image with red border, containing encoded data for scanning
MORE INFORMATION
www.zwilling.com