20000 Aquasensor - Water pump GARDENA - Free user manual and instructions
Find the device manual for free 20000 Aquasensor GARDENA in PDF.
| Brand | GARDENA |
| Model | 20000 Aquasensor (ref. 9044) |
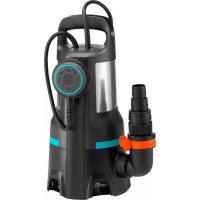
| Product type | Submersible dirty water drainage pump |
| Nominal power | 750 W |
| Mains voltage / Frequency | 230 V AC / 50 Hz |
| Max flow rate | 20,000 l/h |
| Max delivery head | 9 m (0.9 bar) |
| Max immersion depth | 7 m |
| Max particle diameter | 35 mm |
| Max liquid temperature | 35 °C |
| Power cable | 10 m (H07RN-F) |
| Weight (without cable) | 5.0 kg |
| Water outlet connection | G 1 1/2" (female thread) |
| Connection possibilities | 1 1/4" / 1 1/2" / 2" or GARDENA system |
| Operating modes | Automatic (sensor), manual, time-limited manual |
| Switch-on level min/max | 42 mm / 242 mm |
| Switch-off level min/max | 35 mm / 205 mm |
| Residual water level (flat suction) | 35 mm (feet open) |
| Safety | RCD (30 mA), thermal protection, cardiac arrest (implants) |
| Maintenance and cleaning | Clean the suction foot and impeller after use; rinse with warm water if dirty or chlorinated water |
| Wear parts | Impeller (replacement by GARDENA after-sales service) |
| Warranty | 2 years (private use) |
Frequently Asked Questions - 20000 Aquasensor GARDENA
User questions about 20000 Aquasensor GARDENA
0 question about this device. Answer the ones you know or ask your own.
Ask a new question about this device
Download the instructions for your Water pump in PDF format for free! Find your manual 20000 Aquasensor - GARDENA and take your electronic device back in hand. On this page are published all the documents necessary for the use of your device. 20000 Aquasensor by GARDENA.
USER MANUAL 20000 Aquasensor GARDENA
natural_image
Line drawing of a mechanical device with threaded component and handle (no text or symbols)11000 CLEAR
Art. 9034
17000CLEAR
Art. 9036
Likaveden uppopumppu
NO Bruksanvisning
Nedsenkbarrentvannspumpe/
natural_image
Technical line drawing of a mechanical device with no visible text or symbols20000DIRT
Art. 9044
SK Návod na obsluhu
Translation of the original instructions.
This product may be used under supervision, or if instruction regarding the safe use of the product has been provided and the resulting dangers have been understood, by children aged 8 and above, as well as by persons with physical, sensory or mental disabilities or a lack of experience and knowledge.
Children must not be allowed to play with the product. Cleaning and user maintenance must not be performed by children without supervision. The use of this product by young people under the age of 16 is not recommended.
Intended use:
The GARDENA Submersible Pump is intended for drainage purposes if flooding occurs but also for transferring water to and from tanks and pumping them out, for drawing water from wells and shafts, for draining boats and yachts and for aerating and circulating water for limited periods and for pumping water containing chlorine and detergents in private domestic gardens and allotments.
Liquids to be pumped:
The GARDENA Submersible Pump must only be used to pump water.
The pump is fully submersible (water-tight encapsulation) and is submerged in water (for max. submersion depth, see 7. TECHNICAL DATA).
The product is suitable for pumping the following liquids:
- Clear Water Submersible Pump: clean to slightly dirty water with a max. particle size of 5 mm.
- Dirty Water Submersible Pump: dirty water with a max. particle size of 35 mm.
The product is not intended for long term use (continuous circulation operation).

NGER! Risk of physical injury!
The pump should not be used for the delivery of salt water, corrosive, easily inflammable or explosive liquids (e.g. petrol, paraffin, thinners), oil, heating oil or foodstuffs.
1. SAFETY
IMPORTANT!
Read the operator's manual carefully before use and keep for future reference.
Symbols on the product:
Read operator's manual.
General safety warnings
Electrical safety

DANGER! Electric shock! Risk of injury due to electric shock.
→ The product must be supplied through a residual current device (RCD) having a rated residual operating current not exceeding 30 mA.
→ Contact GARDENA Service if the residual current device (RCD) has triggered.

DANGER! Risk of injury! Risk of injury due to electric current.
→ Disconnect the product from the mains before you maintain or replace parts. Thereby the disconnected socket must be in the visual range.
Safe operating practices
The water temperature should not exceed 35^ C. The pump must not be used when people are in the water.
Pollution of the liquid could occur due to leakage of lubricants.
Keep bystanders away from the water. Operate the pump only with the elbow connector.
N
The hose end should be lower than the maximum delivery head.
Circuit breakers
Thermal protection switch:
In the event of an overload, the pump is switched off by the built-in thermal motor protection. After sufficient cooling of the motor, the pump is operational again.
Automatic venting
This pump is equipped with a vent valve which eliminates any air pockets in the pump. Depending on the function, a small amount of water can escape from the side of the housing.
Additional safety warnings
Electrical safety

DANGER! Cardiac arrest!
This product makes an electromagnetic field while it operates. This field may under some conditions interfere with active or passive medical implants. To decrease the risk of conditions that can possibly injure or kill, we recommend persons with medical implants to speak with their physician and the medical implant manufacturer before you operate the product.
Cables
If extension cables are used, these must comply with the minimum cross-sections in the table below:
Voltage Cable length Cross section
| 230 – 240 V / 50 Hz Up to 20 m 1.5 mm | ^2 |
| 230 – 240 V / 50 Hz 20 – 50 m 2.5 mm | ^2 |

DANGER! Electric shock!
With a cut off mains plug, moisture can get into electrical parts via the mains cable and cause a short circuit.
→ Never cut the mains plug off (e. g. to feed through wall).
→ Don't use the power cable for plugging off.
→ If the supply cord is damaged, it must be replaced by the manufacturer, its service agent or similarly qualified persons in order to avoid a hazard.
Mains plug and extension connections must be protected from water splashes.
Ensure that the electrical connections for plugs and sockets are made in areas safe from flooding.
Protect the mains plug and the mains power cable from heat, oil and sharp edges.
Observe the mains voltage. The information on the name-plate must be in agreement with the data for the mains power grid.
The pump's mains plug must be disconnected before anybody enters the swimming pool or touching the surface of the water.
The mains power cable must not be used for fastening or transporting the pump.
For submerging or lifting / securing the pump, please use a fastening rope.
Please regularly check the connecting line.
Before using, always subject the pump (especially the power cables and the power connections) to a visual inspection.
A pump which is damaged should not be used. In the event of damage, have the pump checked by the GARDENAService.
Assembly instructions: Retighten all screws by hand.
Before use after maintenance, make sure that all parts are screwed together.
When using our pumps with a generator, the warnings of the generator manufacturer must be observed.
Personal safety

DANGER! Risk of suffocation!
Small parts can be easily swallowed. There is also a risk that the polybag can suffocate toddlers. Keep toddlers away when you assemble the product.
Observe the minimum water level in accordance with the characteristics given for the pump.
Allow the pump to run no longer than 10 minutes against a closed pressure side.
Sand and other abrasive substances cause increased wear and reduce the pump's output.
The sensor fields may may only be operated outside the water.
The hose must not be disconnected during operation.
Allow the pump to cool down before troubleshooting.
2. ASSEMBLY

GER! Risk of physical injury!
ury when the product starts accidentally.
→ Disconnect the product from the mains before you assemble the product.
Connection possibilities of the connection nipple [Fig. A1]:
The hose can be connected via the connection nipple ④ with different hose diameters or the GARDENA Connection System.
| Large hose diameter | Cut off nipple at a[Fig. A2] |
| GARDENA Connection System / Art. 9036 / 9044: Medium hose diameter | Cut off nipple at b[Fig. A3] |
| Small hose diameter Do not cut off nipple[Fig. A4] | |
When using the largest hose diameter, the pump has the maximum delivery capacity.
| Pump Art. 9034 Art. 9036 | ||
| Art. 9044 | ||
| Small hose diameter | 25 mm (1") | 32 mm (1 1/4") |
| Art. GARDENA Hose Clamp | Art. 7193 | Art. 7194 |
| Medium hose diameter | GARDENA Connection System G 1" | 38 mm (1 1/2") |
| Art. GARDENA Hose Clamp | 32 mm (1 1/4") * Art. 7194 | Art. 7195 |
| Large hose diameter | 38 mm (1 1/2") | 51 mm (2") |
| Art. GARDENA Hose Clamp | Art. 7195 | Art. 7196 |
When using the 38 mm (1 1/2") hose, we recommend the GARDENA Flat Hose Set Art. 5005 with 10 m hose and hose clamp.
* For Art. 9034 an additional connection nipple ④ for 1 1/4" hoses is supplied.
To connect the hose via the connection nipple:
- When using the large diameter hose, cut off the connection nipple ④ at ⓐ.
- Only for Art. 9036 / 9044: When using the medium hose diameter, cut off the connection nipple ④ at ⑥.
- Push the hose onto the connection nipple ④
- Fix the hose to the connection nipple ④ e.g. with a GARDENA Hose Clamp.
Connect hose via the GARDENA Connection System:
With 17000 CLEAR/20000DIRT (Art. 9036/9044) the hose cannot be connected via the connection nipple ④ with the GARDENA Connection System.
3. OPERATION
DANGER! Risk of physical injury! Injury when the product starts accidentally. → Disconnect the product from the mains before you connect, adjust or transport the product.
To pump water:
If the pump cannot be immersed via the handle, the pump must always be immersed via a rope. Attach the rope by pulling it through the eyelets provided and knotting it. Minimum immersion depth during initial operation see 7. TECHNICAL DATA.
19 mm (3/4") / 15 mm (5/8") and 13 mm (1/2") hoses can be connected via the GARDENA Connection System.
We do not recommend hose diameters smaller than 25 mm (1"), otherwise there will be a significant reduction in the output of the delivery rate.
Hose diameter Pump connection
13 mm (1/2") GARDENA Pump Connection Set Art. 1750
15 mm (5/8") GARDENA Pump Connection Set Art. 1750
19 mm (3/4") GARDENA Pump Connection Set Art. 1752
- Cut off the connection nipple ④ at ⓑ.
- Connect the hose to the connection nipple ④ via the appropriate GARDENA Connection System.
To assemble the pump connection [Fig. A5]:
DANGER! Risk of physical injury! Injured cut by the impeller.
→ Operate the pump only with the elbow connector.
The hose can be easily connected and disconnected using the locking devices ② on the elbow connector ①.
With Art. 9034 / 9036 a non-return valve is supplied which prevents water from flowing back through the hose. The max. delivery rate is only achieved without the non-return valve.
If only a small amount of reflux is expected, e. g. if the hose is laid flat, we recommend dispensing with the valve due to the better delivery and suction performance.
- Only for Art. 9034 / 9036: Insert the non-return valve into the pump. Observe the installation direction.
- Screw the elbow connector ① clockwise into the pump until it stops. (If the hose is to be installed horizontally, the elbow connector ① can be screwed out again up to half a turn. When using the non-return valve, increased force is required.)
- Screw the connection piece ③ into the connection nipple ④.
- Push the connection nipple ④ of the hose into the elbow connector ① until it stops until it engages audibly and visibly.
The hose is securely connected to the pump.
Take care that the pump is located where the inlet openings at the suction base are not obstructed neither completely nor partly.
Stand the pump on a brick if using in a pond.
If the suction process is close to the minimum water level at start-up, the suction process may take longer.
- Immerse the pump.
- Connect the pump to the mains. Attention! The pump begins operating immediately. The sensor is initialised and indicated by a running light.
EN
Automatic operation [Fig. 01]:
In automatic operation the pump switches on automatically when the water level reaches the switch-on level and switches off automatically when the water level reaches the switch-off level.
Switch-on / switch-off heights of the sensor fields:
The sensor has nine sensor fields (S) to (S) from bottom to top), which are located to the right of the LEDs.
The sensor fields are about 1 cm high (no finger or changed water level is detected between the sensor fields).
| Sensor field | S1 | S2 | S3 | S4 | S5 | S6 | S7 | S8 | S9 |
| Art. 9034/9036Switch height[mm] | 5 | 19 34 | 53 77 | 105 | 136 | 170 | 207 | ||
| Art. 9044Switch height[mm] | 42 54 | 69 | 88 11 | 12 140 | 171 | 205 | 242 |
Art. 9034/9036: When the feet are folded in, the values are 4 mm higher in each case.
After plugging in the pump the 9 LED's light up one after the other.
The pump starts at the factory in automatic mode with sensor field switch-on height 8 and sensor field switch-off height 4 .
To adjust the switch-on / switch-off heights [Fig. 01]:
The sensor fields can only be adjusted outside the water.
When the pump has been removed from the water, the sensor should be dried for programming.
The upper sensor field is always the switch-on height, the lower sensor field is always the switch-off height.
- Operate the sensor field until the input is acknowledged with a short double flash of all LEDs.
- Keep the sensor field 7 pushed until the double flashing of all LED's has acknowledged the input. The currently set switch-on and switch-off heights are briefly displayed. After that all sensor fields light up.
- Push the desired upper sensor field for the switch-on height.
The LED of the selected sensor field switches off. - Push the desired lower sensor field for the switch-off height.
The LED of the selected sensor field switches off. After 3 seconds, the set switch-on and switch-off heights are accepted and displayed.
Automatic clear water suction for very low water levels:
Sensor field Ⓢ can be selected both as switch-on and switch-off point.
If the sensor field ⑤ still detects water within 10 minutes after starting the pump, the pump switches off to prevent damage due to dry running.
The pump will still start if sensor field detects water. In this case, however, the sensor should be cleaned to ensure exact water level detection.
If the sensor field 1 is activated several times within a short time by water flowing back from the hose line, there is a pause of 10 minutes.
If the water level reaches sensor field Ⓜ, the pump switches on automatically, even within the pause of 10 minutes. If this is the case regularly, please select the next sensor field as the switch-on point.
In order to ensure quick suction, the pump switches off briefly for the sensor field Ⓓ – sensor field Ⓓ to vent. After 20 seconds of operation, the pump switches off once for approx. 2 seconds and then on again.
To display switch-on and switch-off heights:
→ Keep the sensor field Ⓢ pushed until the double flashing of all LED's has acknowledged the input.
The currently set switch-on and switch-off heights are displayed.
Disable the water level tracking:
In automatic operation, the LEDs follow the water level. This can be deactivated.
→ Keep the sensor field Ⓗ pushed during initialisation until the double flashing of all LED's has acknowledged the input (see To pump water).
To switch the water level tracking back on, push and hold the sensor field 8 again during initialisation until the double flashing of all LED's has acknowledged the input.
Demo mode:
For presentation purposes, the pump can be put into demo mode. In this mode, the LEDs simulate the pump's functions via flashing sequences and the sensor fields react to touch.
→ Keep the sensor fields ⑤ and ⑧ pushed during initialisation when switching on or during the self-test after plugging in until the double flashing of all LED's has acknowledged the input.
To switch off the demo mode again, push and hold the sensor fields Ⓢ5 and ⚫8 during initialisation when switching on or during the self-test after plugging in until the double flashing of all LED's has acknowledged the input.
Manual operation [Fig. 01]:
In manual mode the pump runs until the pump is disconnected from the mains. This mode is particularly suitable for flat suction.
In manual operation the sensor fields are deactivated. The pump then runs until the pump is disconnected from the mains or another operating mode is selected.
→ Keep the sensor fields Ⓞ and Ⓢ pushed until the double flashing of all LED's has acknowledged the input.
All LEDs will light up and within 5 seconds all the LEDs will switch off one after the other. The pump starts.
During these 5 seconds the pump should be placed in the water. A start will only take place if the pump detects water. If this is not the case, the countdown is repeated up to three times.
If you need more time to put the pump into the water, please disconnect the pump from the power supply. The countdown will continue after the sensor is plugged in again.
The manual operation remains active even after disconnecting the power supply.
To stop manual operation, disconnect the pump from the mains and take it out of the water. Connect the pump to the power supply again and keep sensor field 69 pressed until it is acknowledged by double flashing of all LEDs. Now you are again in automatic mode.
Only operate the manual mode under supervision.
Time-limited manual operation:
In time-limited manual operation, the sensor fields are deactivated for 10 minutes. The pump then runs for 10 minutes and then switches off automatically.
→ Keep the sensor fields ⑥7 and ⑧9 pushed until the double flashing of all LED's has acknowledged the input. All LEDs will light up and within 10 seconds all LEDs will switch off one after the other. The pump starts.
After 10 minutes the pump automatically switches back to automatic operation.
After disconnecting the power supply, the pump automatically switches back to automatic operation.
To return to the automatic mode again, push and hold the 2 sensor fields Ⓡ7 and Ⓢ8 simultaneously until the double flashing of all LEDs has acknowledged the input.
Flat suction / normal operation (only for the clear water submersible pumps) [Fig. O2]:
Normal operation:
Recommended operating mode for maximum pumping capacity and grain size up to 5 mm, especially in automatic mode.
→ Fold the 3 folding feet Ⓕ inwards.
Flat suction:
The residual water height of approx. 1 mm is only achieved with flat suction in manual operation. Please note that in this mode the delivery and suction capacity is reduced.
→ Fold the 3 folding feet Ⓕ outwards.
4. MAINTENANCE
DANGER! Risk of physical injury! Injury when the product starts accidentally.
→ Disconnect the product from the mains before you maintain the product.
To clean the pump:
DANGER! Risk of physical injury! Risk of injury and risk of damage to the product.
→ Do not clean the product with a water jet (in particular high-pressure water jet).
→ Do not clean with chemicals including petrol or solvents. Some can destroy critical plastic parts.
→ Clean the surface of the pump with a damp cloth.
To flush the pump:
After pumping water containing chlorine, detergents or heavily soiled water, the pump must be flushed.
- Pump lukewarm water (max. 35 °C), possibly adding a mild cleaning agent (e.g. detergent) until the pumped water runs clear.
- Remove residuals according to the waste disposal laws applicable in your area.
5. STORAGE
To put into storage:
The pump is not frost-proof!
The product must be stored away from children.
- Disconnect the pump from the mains.
- Turn the pump upside down until no more water runs out.
- Clean the pump (see 4. MAINTENANCE).
- Store the pump in a dry, enclosed and frost-free place.
Disposal:
(in accordance with RL2012/19/EC)

The product must not be disposed of to normal household waste. It must be disposed of in line with local environmental regulations.
IMPORTANT!
→ Dispose of the product through or via your municipal recycling collection centre.
EN
6. TROUBLESHOOTING

DANGER! Risk of physical injury! Injury when the product starts accidentally.
→ Disconnect the product from the mains before you troubleshoot the product.
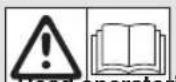
To clean the suction base and the impeller [Fig. T1]:
-
Only for Art. 9044: Unscrew the 5 Phillips screws ⑨ and remove the cover ⑩.
-
Unscrew the 4 Phillips screws ⑥.
-
Pull the suction base ⑦ off the pump.
- Clean suction base ⑦ and impeller ⑧ (the warranty does not become void as a result of this maintenance work).
- Clean the sealing surfaces carefully to avoid damage and leakage.
- Reassemble the suction base ⑦ in reverse order.
A damaged seal must be replaced.
For safety reasons a damaged impeller can only be exchanged by the GARDENA Service Centre.
Problem Possible Cause Remedy
| Pump is running, but doesn't deliver water | Low water level and filled hose with built-in non return valve. | → Remove the check valve or empty the hose manually |
| Air cannot escape, because the pressure line is closed. (Possible kink in the pressure hose.) | → Open the pressure line (e. g. shut-off valve, delivery units). | |
| Air in suction foot. → Wait for about 60 seconds until the pump has vented; if necessary, turn off and then on again. | ||
| Error code 2 | Suction opening is clogged. | → Clean the suction opening with a water jet. |
| Hose is clogged. → Remove the clog from the hose. | ||
| Error code 1 Impeller is blocked. → Clean the impeller. | ||
| Error code 2 Water level below minimum water level when put into operation. | → Submerge the pump deeper. | |
| Error code 3 Sensor is dirty. → Clean the sensor. | ||
| Error code 4 Time is exceeded. → Place the pump in water within the countdown. | ||
| Pump does not start, or stops suddenly during operation | Thermal switch has turned the pump off because of overheating. | → Clean the suction opening. Observe the max. media temperature (35 °C). |
| Pumping without electricity. → Check fuses and electrical plug connections. | ||
| RCD has triggered (residual current). | → Disconnect the pump and contact the GARDENA Service. | |
| Pump is running but the delivery drops suddenly | Suction opening is clogged. → Clean the suction opening with a water jet. | |
| Hose is clogged. → Remove the clog from the hose. | ||
| Pump starts and stops several times in succession | Returning water from the hose → Select the next higher switch-on point and insert the non return valve. | |
| Pump does not start with activated sensor field Ⓢ | Sensor field Ⓢ was activated several times within a short time and the pump is paused. | → Wait for the break. Select the next higher switch-on point and insert the non return valve. |
![GARDENA 20000 Aquasensor - To clean the suction base and the impeller [Fig. T1]: - 1](/content/2026/04/605566/images/06f4322143db7784dbbaac41ca90e4fd3e99af022b86bb166b86b8aaff1eab1a.jpg)
NOTE: For any other malfunctions please contact the GARDENA service department. Repairs must only be done by GARDENA service departments or specialist dealers approved by GARDENA.
- TECHNICAL DATA
| Submersible Pump Unit Value | (Art. 9034) | Value (Art. 9036) | Value (Art. 9044) | |
| Rated power W 450 750 750 | ||||
| Mains voltage V (AC) 230 230 230 | ||||
| Mains frequency Hz 50 50 50 | ||||
| Max. delivery capacity | l/h | 11,000 | 17,000 | 20,000 |
| Max. pressure/ Max. delivery head | bar/ m | 0.7 / 7.0 | 0.9 / 9.0 | 0.9 / 9.0 |
| Max. submersion depth | m | 7 | 7 | 7 |
| Min./max. cut-in height | mm | 5 / 207 | 5 / 207 | 42 / 242 |
| Min./max. cut-out height | mm | 1 / 170 | 1 / 170 | 35 / 205 |
| Residual water level | mm | 1 | 1 | 35 |
| Dirty water with max. particle diameter (* Flat suction) | mm | 1* / 5 | 1* / 5 | 35 |
| Minimum water depth for operation (approx.) | mm | 5 | 5 | 42 |
| Power cable | m | 10 (H05RN-F) | 10 (H05RN-F) | 10 (H07RN-F) |
| Weight without cable (approx.) | kg | 4.0 | 4.7 | 5.0 |
| Connection thread water outlet | Inch | G 1 1/2" | G 1 1/2" | G 1 1/2" |
| Connection options | Inch | 1" / 1 1/4" / 1 1/2" / G 1" | 1 1/4" / 1 1/2" / 2" | 1 1/4" / 1 1/2" / 2" |
| Max. media temperature °C 35 35 35 | ||||
Note: The switch on/switch-off heights and the minimum water level on start-up were calculated without the height differences to be negotiated. Pump heads of approx. 1 m or more may result in longer suction times of up to 1 minute, or higher minimum water levels of up to +5 cm.
* When the feet are folded in, the values are 4 mm higher in each case.
- ACCESSORIES
| GARDENA Flat Hose Set 10 m 38 mm (1/2") hose with hose clamp. Art. 5005 | |
| GARDENA Hose Clamp For 25 mm (1") hoses via the connection nipple. Art. 7193 | |
| GARDENA Hose Clamp For 32 mm (1 1/4") hoses via the connection nipple. Art. 7194 | |
| GARDENA Hose Clamp For 38 mm (1 1/2") hoses via the connection nipple. Art. 7195 | |
| GARDENA Hose Clamp For 51 mm (2") hoses via the connection nipple. Art. 7196 | |
| GARDENA Pump Connection Set For 19 mm (3/4") hoses via the GARDENA Connection System. Art. 1752 |
EN
9. SERVICE/WARRANTY
Service:
Please contact the address on the back page.
Warranty statement:
In the event of a warranty claim, no charge is levied to you for the services provided.
GARDENA Manufacturing GmbH grants a warranty for all original GARDENA new products for two years from the date of original purchase from the retailer, provided that the devices have been for private use only. This manufacturer's warranty does not apply to products acquired second hand. This warranty includes all significant defects of the product that can be proved to be material or manufacturing faults. This warranty is fulfilled by supplying a fully functional replacement product or by repairing the faulty product sent to us free of charge; we reserve the right to choose between these options. This service is subject to the following provisions:
- The product has been used for its intended purpose as per the recommendations in the operating instructions.
- Neither the purchaser nor a third party has attempted to open or repair the product.
- Only Original GARDENA replacement parts and wear parts have been used for operation.
- Presentation of the receipt.
Normal wear and tear of parts and components (such as blades, blade fixing parts, turbines, light bulbs, V-belts / toothed belts, impellers, air filters, spark plugs), visual changes, wear parts and consumables are excluded from the warranty.
This manufacturer's warranty is limited to replacement and repair of products in accordance with the abovementioned conditions. The manufacturer's warranty does not constitute an entitlement to lodge other claims against us as a manufacturer, such as for damages. This manufacturer's warranty does not, of course, affect statutory and contractual warranty claims against the dealer / retailer.
The manufacturer's warranty is governed by the law of the Federal Republic of Germany.
In case of a warranty claim, please return the faulty product, together with a copy of the receipt and a description of the fault, with postage paid to the service address.
Consumables:
The impeller is a consumable and is not included in the warranty.
FARE! Fare for kvelning!
Bomba Ref. 9034 Ref. 9036
| Ref. 9044 | ||
| Diámetro de la manguera pequeño | 25 mm (1") | 32 mm (1 1/4") |
| Ref. GARDENA abrazadera de manguera | Ref. 7193 | Ref. 7194 |
| Diámetro de la manguera medio | Sistema de conexión GARDENA G 1" | 38 mm (1 1/2") |
| Ref. GARDENA abrazadera de manguera | 32 mm (1 1/4") * Ref. 7194 | Ref. 7195 |
| Diámetro de la manguera grande | 38 mm (1 1/2") | 51 mm (2") |
| Ref. GARDENA abrazadera de manguera | Ref. 7195 | Ref. 7196 |
natural_image
Black portable electronic device with handle and control buttons (no visible text or symbols)Performance characteristics
Courbes de performance
Prestatiegrafiek
Kapacitetskurva
Ydelses karakteristika
Pumpun ominaiskäyrä
Pumpekarakteristikk
Curva di rendimento
ROBERTO C. RUMBO S.R.L.
Predio Norlog
Lote 7
Benavidez. ZC:1621
Buenos Aires
Husqvarna Australia Pty. Ltd.
Locked Bag 5
Central Coast BC
NSW 2252
Phone: (+61) (0) 2 4352 7400
customer.service@
husqvarna.com.au
Brampton, Ontario L6T 4X3
Phone: (+1) 905 792 93 30
info@gardenacanada.com
Chile
REPRESENTACIONES
JCE S.A.
No207, Song Hong Rd.
Chang Ning District,
Shanghai
PRC. 200335
上海市长宁区淞虹路207号明
基广场B座3楼,邮编:200335
Colombia
Husqvarna Colombia S.A.
Calle 18 No. 68 D-31, zona
Industrial de Montevideo
Bogotá, Cundinamarca
Tel. 571 2922700 ext. 105
jairo.salazar@
husqvarna.com.co
Costa Rica
Compania Exim
Euroiberoamericana S.A.
Los Colegios, Moravia,
Aycliffe Industrial Park
Newton Aycliffe
County Durham
DL5 6UP
info.gardena@
husqvarna.co.uk
Greece
Π.ΠΑΠΑΔΟΠΟΥΛΟΣ ΑΕΒΕ
Λεωφ. Αθηνών 92
Αθήνα
T.K.104 42
Ελλάδο
Tηλ. (+30) 210 5193 100
info@papadopoulos.com.gr
Hungary
Aycliffe Industrial Park
Newton Aycliffe
County Durham
DL5 6UP
info.gardena@
husqvarna.co.uk
Italy
23868 VALMADRERA (LC)
Phone: (+39) 0341.203.111
assistenza.italia@
it.husqvarna.com
Japan
Husqvama Zenoah Co., Ltd
1-9 Minamidai
Kawagoe
350-1165 Saitama
gardena-ip@
husqvarnagroup.com
Kazakhstan
LAMED Ltd.
155/1, Tazhibayevoi Str.
050060 Almaty
IP Schmidt
Abayavenue 3B
110 005 Kostanay
Korea
Kyung Jin Trading CO.,LTD.
107-4, SunDuk Bld.,
YangJae-dong,
Seocho-gu
Seoul, (zipcode: 137-891)
Phone: (+82) (0)2 574-6300
Latvia
Husqvarna Latvija SIA
Ulbrokas 19A
LV-1021 Rīga
Info@gardena.lv
Lithuania
UAB Husqvarna Lietuva
Ateities pl. 77C
LT-52104 Kaun
info@gardena.lt
Luxembourg
Magasins Jules Neuberg
Husqvama New Zealand Ltd.
PO Box 76-437
Manukau City 2241
Phone: (+64) (0) 9 9202410
support.nz@husqvarna.co.nz
Norway
Husqvama Norge AS
Gardena Division
Trøskenveien 36
1708 Sarpsborg
info@gardena.no
Peru
Husqvama Perú S.A.
Jr. Ramón Cárcamo 710