6300 SilentComfort - Water pump GARDENA - Free user manual and instructions
Find the device manual for free 6300 SilentComfort GARDENA in PDF.
| Product type | Surface irrigation pump |
| Brand | Gardena |
| Model | 6300 SilentComfort |
| Reference | 9058 |
| Nominal power | 1050 W |
| Mains voltage | 230 V / 50 Hz |
| Max flow rate | 6300 l/h |
| Max pressure / Max delivery head | 4.9 bar / 49 m |
| Max self-priming height | 8 m |
| Permissible internal pressure (pressure side) | 6 bar |
| Max liquid temperature | 35 °C |
| Power cable | 1.5 m (H07RN-F) |
| Weight (without cable) | 10.7 kg |
| Sound pressure level (L_pA at 1 m) | 59 dB(A) |
| Sound power level (L_WA) | 68 / 70 dB(A) (measured/guaranteed) |
| Main functions | Pumping of clear water, Bluetooth control via app, safe pump function, optional humidity sensor |
| Maintenance and cleaning | Clean the filter, rinse after chlorinated water, drain before frost |
| Safety | RCD 30 mA, thermal protection, automatic shutdown on overheating |
| Spare parts and accessories | Suction hoses (ref. 1411/1412/1418), adapters (1723/1724), filters, humidity sensor (1188/1867) |
| General information | Warranty after registration on gardena.com, after-sales service available |
Frequently Asked Questions - 6300 SilentComfort GARDENA
User questions about 6300 SilentComfort GARDENA
0 question about this device. Answer the ones you know or ask your own.
Ask a new question about this device
Download the instructions for your Water pump in PDF format for free! Find your manual 6300 SilentComfort - GARDENA and take your electronic device back in hand. On this page are published all the documents necessary for the use of your device. 6300 SilentComfort by GARDENA.
USER MANUAL 6300 SilentComfort GARDENA
natural_image
Technical line drawing of a mechanical pump or motor assembly (no text or symbols)
natural_image
Technical line drawing of a mechanical pump or motor assembly (no text or symbols)5600 Silent+ Art. 9057 6300 SilentComfort Art. 9058
6500 SilentComfort Art. 9059
natural_image
Diagram of a pipe fitting with a checkmark indicating alignment, no text or symbols present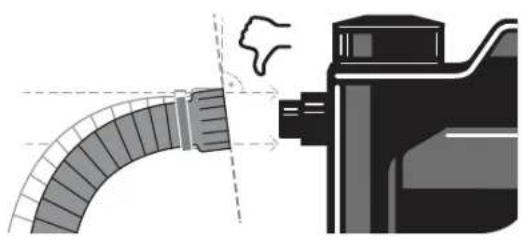
natural_image
Diagram of a pipe connection with a valve and pump, showing fluid flow direction (no text or labels)A2
text_image
MAX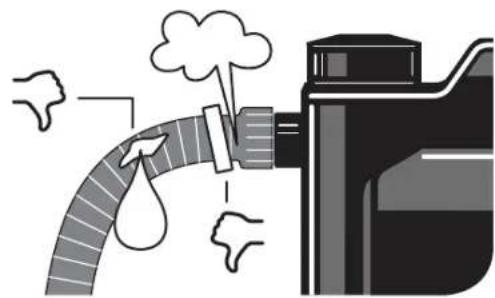
natural_image
Illustration of a pipe with a droplet and smoke, emitting vapor or pollution (no text or symbols)A3
Art. 1411
Art. 1418
text_image
1411 1418 BACKFLOW STOP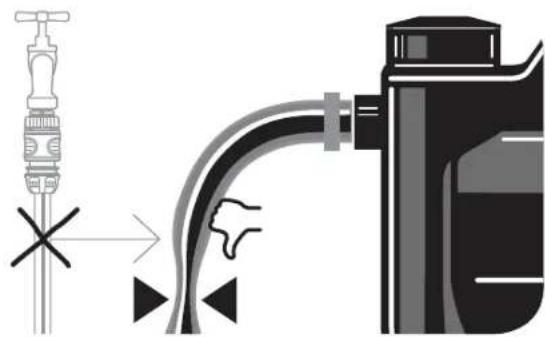
text_image
Diagram illustrating a pipe insertion process with labeled components and directional arrowsA4
text_image
min. 2 l FULL ON ✓ ✓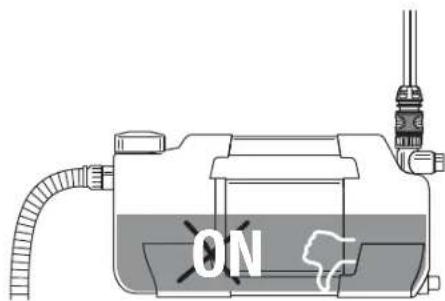
text_image
ONA5
text_image
A5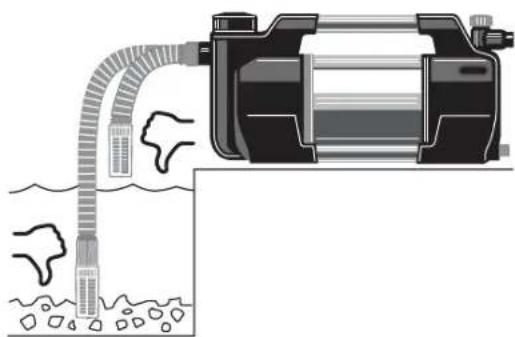
natural_image
Diagram of a water purifier with pipe and reservoir, showing internal components (no text or labels)A6 | A7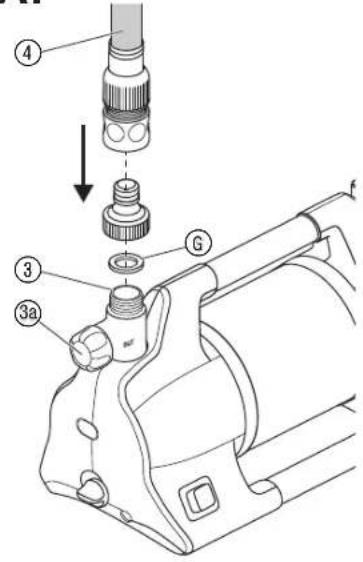 | A8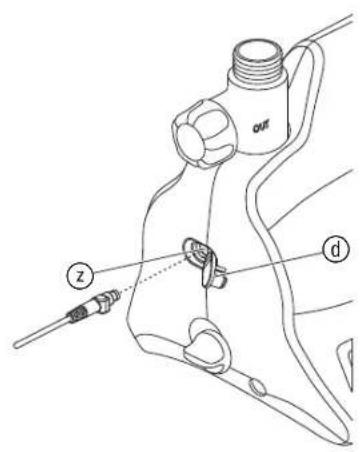 |
O1 | O2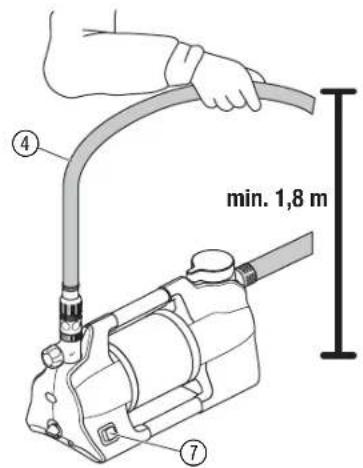 | S1 |
 | T2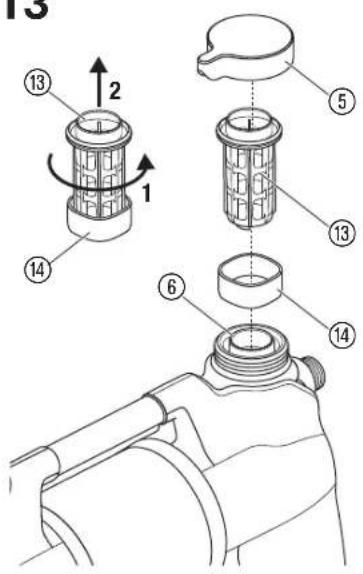 | T4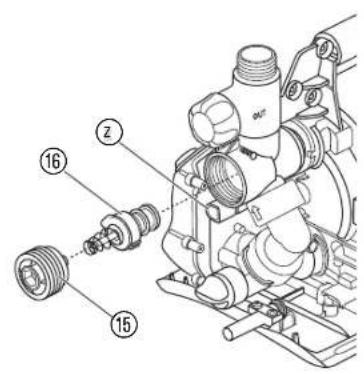 |
T2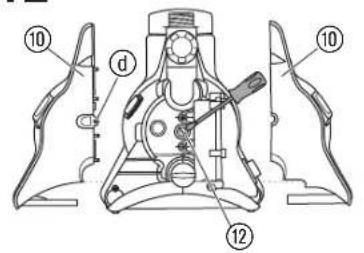 |
de Gartenpumpe 5600 Silent+ / 6300 SilentComfort/6500 SilentComfort
Translation of the original instructions.
1. SAFETY WARNINGS
1.1 Explanation of the symbols
Read operator's manual.
1.2 General safety warnings
1.2.1 General pump safety warnings

DANGER!
Electric shock!
Risk of injury due to electric current.
→ The product must be supplied through a residual current device (RCD) having a rated residual operating current not exceeding 30 mA.
→ Disconnect the product from the mains before you put into storage, maintain it or replace parts. Thereby the disconnected socket must be in the visual range.
1.2.2 Garden pump safety warnings
1.2.2.1 Safe operating practices:
The water temperature should not exceed 35 °C.
The pump must not be used when people are in the water.
Pollution of the liquid could occur due to leakage of lubricants.
1.2.2.2 Circuit breakers:
Thermal protection switch:
In the event of an overload, the pump is switched off by the built-in thermal motor protection. After sufficient cooling of the motor, the pump is operational again.
1.3 Additional safety warnings
1.3.1 Intended use
This product may be used under supervision, or if instruction regarding the safe use of the product has been provided and the resulting dangers have been understood, by children aged 8 and above, as well as by persons with physical, sensory or mental disabilities or a lack of experience and knowledge. Children must not be allowed to play with the product. Cleaning and user maintenance shall not be carried out by children unless they aged 8 years and above and supervision.
The use of this product by young people under the age of 16 is not recommended.
The GARDENA Garden pump is intended to pump ground water and rain water, tap water and water containing chlorine in private domestic gardens and allotments.
The product is not intended for long term use (professional use).
The product is not intended for continuous running.
1.3.1.1 Liquids to be pumped:
The GARDENA Garden Pump must only be used to pump water.

DANGER!
Risk of injury!
The pump must not be used for the delivery of salt water, muddy water, corrosive, easily inflammable or explosive liquids (e.g. petrol, paraffin, thinners), oil, heating oil or foodstuffs.
1.3.1.2 Pressure amplification:
The inlet pressure must be protected by an adjustable pressure relief valve. When the pump is used for pressure amplification, the maximum permissible internal pressure must not exceed 6 bar. The maximum inlet pressure is therefore:
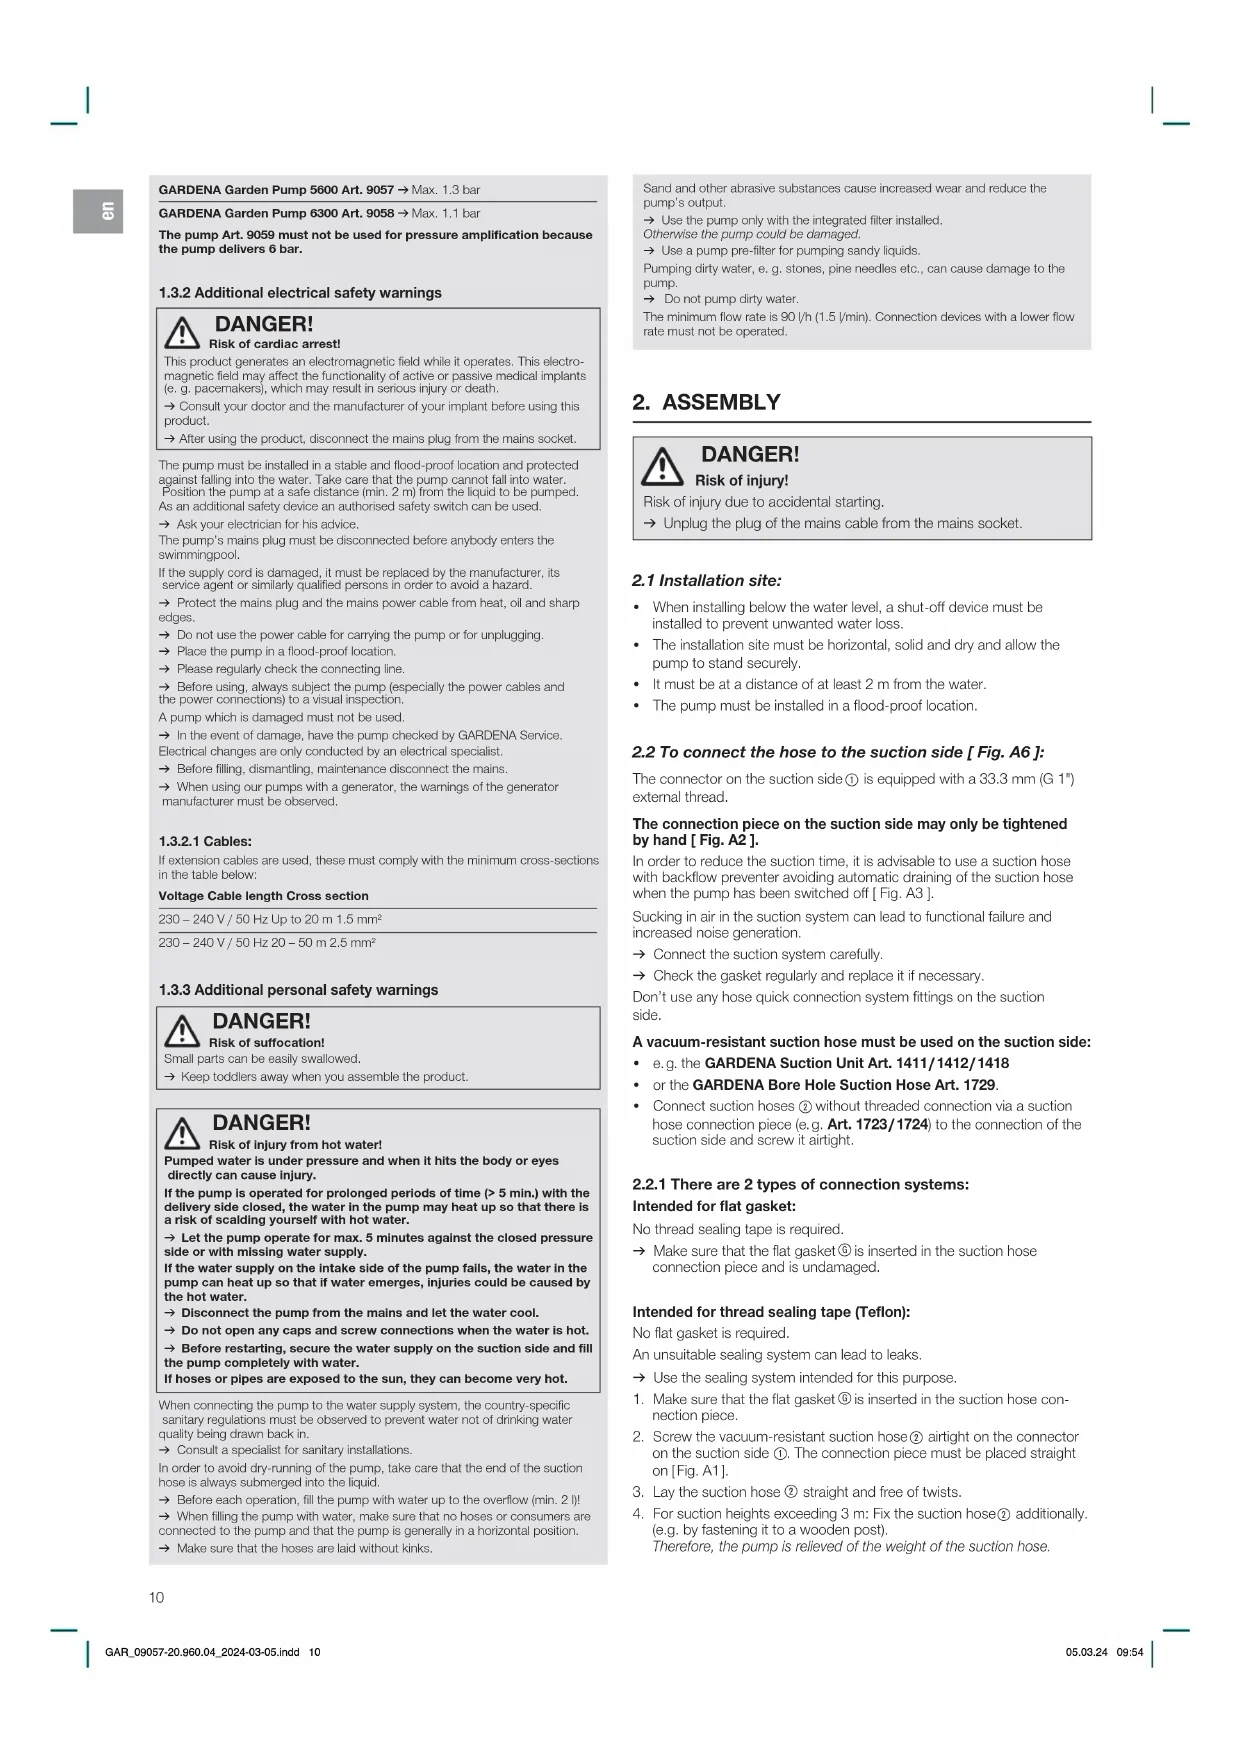
GARDENA Garden Pump 5600 Art. 9057 → Max. 1.3 bar
GARDENA Garden Pump 6300 Art. 9058 → Max. 1.1 bar
The pump Art. 9059 must not be used for pressure amplification because the pump delivers 6 bar.
1.3.2 Additional electrical safety warnings

DANGER!
Risk of cardiac arrest!
This product generates an electromagnetic field while it operates. This electromagnetic field may affect the functionality of active or passive medical implants (e.g. pacemakers), which may result in serious injury or death.
→ Consult your doctor and the manufacturer of your implant before using this product.
→ After using the product, disconnect the mains plug from the mains socket.
The pump must be installed in a stable and flood-proof location and protected against falling into the water. Take care that the pump cannot fall into water. Position the pump at a safe distance (min. 2 m) from the liquid to be pumped. As an additional safety device an authorised safety switch can be used.
→ Ask your electrician for his advice.
The pump's mains plug must be disconnected before anybody enters the swimmingpool.
If the supply cord is damaged, it must be replaced by the manufacturer, its service agent or similarly qualified persons in order to avoid a hazard.
→ Protect the mains plug and the mains power cable from heat, oil and sharp edges.
→ Do not use the power cable for carrying the pump or for unplugging.
→ Place the pump in a flood-proof location.
→ Please regularly check the connecting line.
→ Before using, always subject the pump (especially the power cables and the power connections) to a visual inspection.
A pump which is damaged must not be used.
→ In the event of damage, have the pump checked by GARDENA Service. Electrical changes are only conducted by an electrical specialist.
→ Before filling, dismantling, maintenance disconnect the mains.
→ When using our pumps with a generator, the warnings of the generator manufacturer must be observed.
1.3.2.1 Cables:
If extension cables are used, these must comply with the minimum cross-sections in the table below:
Voltage Cable length Cross section
230 - 240 V / 50 Hz Up to 20 m 1.5 mm²
230 - 240 V / 50 Hz 20 - 50 m 2.5 mm ^2
1.3.3 Additional personal safety warnings

DANGER!
Risk of suffocation!
Small parts can be easily swallowed.
→ Keep toddlers away when you assemble the product.

DANGER!
Risk of Injury from hot water!
Pumped water is under pressure and when it hits the body or eyes directly can cause injury.
If the pump is operated for prolonged periods of time (> 5 min.) with the delivery side closed, the water in the pump may heat up so that there is a risk of scalding yourself with hot water.
→ Let the pump operate for max. 5 minutes against the closed pressure side or with missing water supply.
If the water supply on the intake side of the pump fails, the water in the pump can heat up so that if water emerges, injuries could be caused by the hot water.
→ Disconnect the pump from the mains and let the water cool.
→ Do not open any caps and screw connections when the water is hot.
→ Before restarting, secure the water supply on the suction side and fill the pump completely with water.
If hoses or pipes are exposed to the sun, they can become very hot.
When connecting the pump to the water supply system, the country-specific sanitary regulations must be observed to prevent water not of drinking water quality being drawn back in.
→ Consult a specialist for sanitary installations.
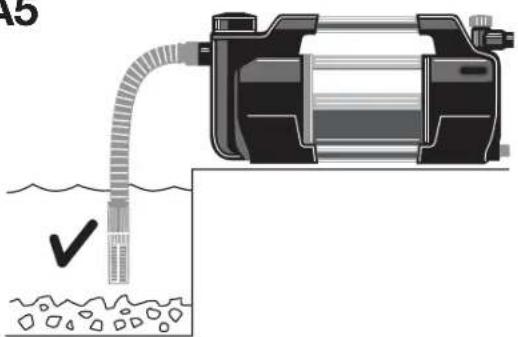
In order to avoid dry-running of the pump, take care that the end of the suction hose is always submerged into the liquid.
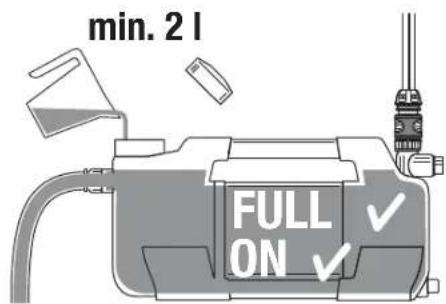
→ Before each operation, fill the pump with water up to the overflow (min. 2 l)!
→ When filling the pump with water, make sure that no hoses or consumers are connected to the pump and that the pump is generally in a horizontal position.
→ Make sure that the hoses are laid without kinks.
Sand and other abrasive substances cause increased wear and reduce the pump's output.
→ Use the pump only with the integrated filter installed.
Otherwise the pump could be damaged.
→ Use a pump pre-filter for pumping sandy liquids.
Pumping dirty water, e. g. stones, pine needles etc., can cause damage to the pump.
→ Do not pump dirty water.
The minimum flow rate is 90 l/h (1.5 l/min). Connection devices with a lower flow rate must not be operated.
2. ASSEMBLY

DANGER!
Risk of injury!
Risk of injury due to accidental starting.
→ Unplug the plug of the mains cable from the mains socket.
2.1 Installation site:
- When installing below the water level, a shut-off device must be installed to prevent unwanted water loss.
- The installation site must be horizontal, solid and dry and allow the pump to stand securely.
- It must be at a distance of at least 2 m from the water.
• The pump must be installed in a flood-proof location.
2.2 To connect the hose to the suction side [Fig. A6]:
The connector on the suction side ① is equipped with a 33.3 mm (G 1") external thread.
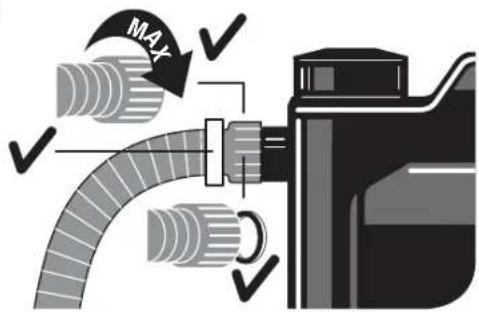
The connection piece on the suction side may only be tightened by hand [Fig. A2].
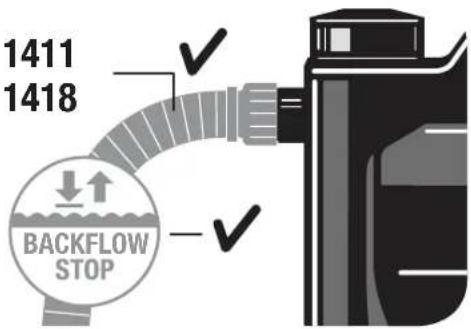
In order to reduce the suction time, it is advisable to use a suction hose with backflow preventer avoiding automatic draining of the suction hose when the pump has been switched off [Fig. A3].
Sucking in air in the suction system can lead to functional failure and increased noise generation.
→ Connect the suction system carefully.
→ Check the gasket regularly and replace it if necessary.
Don't use any hose quick connection system fittings on the suction side.
A vacuum-resistant suction hose must be used on the suction side:
• e.g. the GARDENA Suction Unit Art. 1411/1412/1418
• or the GARDENA Bore Hole Suction Hose Art. 1729.
- Connect suction hoses ② without threaded connection via a suction hose connection piece (e.g. Art. 1723/1724) to the connection of the suction side and screw it airtight.
2.2.1 There are 2 types of connection systems:
Intended for flat gasket:
No thread sealing tape is required.
→ Make sure that the flat gasket © is inserted in the suction hose connection piece and is undamaged.
Intended for thread sealing tape (Teflon):
No flat gasket is required.
An unsuitable sealing system can lead to leaks.
→ Use the sealing system intended for this purpose.
-
Make sure that the flat gasket ⑥ is inserted in the suction hose connection piece.
-
Screw the vacuum-resistant suction hose ② airtight on the connector on the suction side ①. The connection piece must be placed straight on [Fig. A1].
-
Lay the suction hose ② straight and free of twists.
-
For suction heights exceeding 3 m: Fix the suction hose ^② additionally. (e.g. by fastening it to a wooden post). Therefore, the pump is relieved of the weight of the suction hose.
2.3 To connect the hose to the pressure side [Fig. A7]:
To guarantee a good venting, connect the pressure hose only after the pump has been filled (see 3.1.3 Initial operation of the pump).
The connector on the pressure side ③ is equipped with a 33.3 mm (G 1") external thread.
The connection pieces on the pressure side may only be tightened by hand.
Optimised use of the pump capacity is achieved by connecting 19 mm (3/4") hoses with:
• e.g. the GARDENA Pump Connection Set Art. 1752
- or by connecting 25 mm (1") hoses with the GARDENA Quick Thread Coupling with female thread Art. 7109 / Quick Coupling Hose Connector Art. 7103.
There are 2 connectors on the pressure side. One horizontal (180° rotatable) and one vertical connector. The unused connector must be closed with the sealing cap Ⓢ.
Hold or fix the pressure hose vertically to avoid kinking of the pressure hose at the vertical pump outlet.
Lay the hose flat on the ground; avoid u-shaped elevations of the hose and coiling it. In order to allow the air to escape optimally, lay out the pressure hose completely and give it a rising course as seen from the pump.
- Connect the pressure hose ④ with the connector on the pressure side ⑦.
- Screw the sealing cap Ⓜ onto the unused connector on the pressure side.
2.3.1 To connect the pressure hose via the GARDENA quick connection system:
19 mm (3/4") / 16 mm (5/8") and 13 mm (1/2") hoses can be connected via the GARDENA Connection System.
Hose diameter Pump connection
| 13 mm (1/2") GARDENA Pump Connection Set Art. 1750 | |
| 16 mm (5/8") GARDENA Tap Connector | Art. 18202 |
| GARDENA Hose Connector | Art. 18216 |
19 mm (3/4") GARDENA Pump Connection Set Art. 1752
2.3.2 Parallel connection of more than 2 pressure hoses:
When connecting more than 2 pressure hoses in parallel, we recommend the use of:
• e.g. the GARDENA 2- or 4-Channel Water Distributor Art. 8193/8194
• or the GARDENA Twin-Tap Connector Art. 940.
These can be screwed directly onto the connector of the pressure side ③.
2.4 Art. 9058/9059:
To connect the Soil Moisture Sensor (optional) [Fig. A8]:
In addition to time-dependent control (see Bluetooth® Display operator's manual), it is also possible to include soil moisture.
If the soil moisture is sufficient, the scheduled irrigation is not performed.
- Place the Soil Moisture Sensor in the area to be irrigated.
- Open the dirt cover ⓐ.
- Plug the plug of the sensor into the sensor socket ② of the pump.
3. OPERATION

DANGER!
Risk of injury!
Risk of injury due to accidental starting.
→ Unplug the plug of the mains cable from the mains socket.
3.1 To start / To stop the pump [Fig. 01 / 02]:
![GARDENA 6300 SilentComfort - To start / To stop the pump [Fig. 01 / 02]: - 1](/content/2026/04/658672/images/66fbe1252d8dadb717ef9dab6b2cc08168976f8c550568c14467815f60e57f7b.jpg)
CAUTION!
Dry-Running of the pump!
Make sure that the pump is filled with water up to the overflow (min. 2 l) before each starting procedure.
3.1.1 Art. 9058/9059:
Operation via the GARDENA Bluetooth® App:
The GARDENA Garden Pump Bluetooth® can be controlled at any time with the free GARDENA Bluetooth® App.
It can be downloaded from the Apple App Store or from the Google Play Store.
→ See the enclosed instructions for operating the GARDENA Bluetooth® Display.
3.1.2 Art. 9058/9059:
Operation via the display on the pump:
→ See the enclosed instructions for operating the GARDENA Bluetooth® Display.
3.1.3 Initial operation of the pump:
- Disconnect the pressure hose (Out).
Therefore, the pump is better vented during filling.
-
Unscrew the screw connection ⑤ on the filling opening ⑥ by hand.
-
Remove the filter.
This makes it easier to see the water level when filling.
- Slowly fill in at least 2 l of water via the filler opening ⑥ until a stable water level is reached at the level of the suction side connection [Fig. A4].
The filling process can take up to 2 minutes.
-
If a non-return valve is used: Fill the suction hose with water. This speeds up the suction process.
-
Empty the residual water in the pressure hose ④ before connecting. This allows the air to escape during the suction process.
-
After filling the pump: Connect the pressure hose (Out) to the pump.
-
Put the filter back in place.
-
Tighten the screw connection ⑤ on the filling opening ⑥ by hand until it stops (do not overtighten and do not use pliers).
-
Open any shut-off valves in the pressure line (connection devices, water stop, etc.). All consumers must be opened to the max. possible position.
-
Insert the plug of the mains cable into a mains socket.
Art. 9058/9059: See Bluetooth® Display operator's manual.
-
For high suction heights: Lift and hold the pressure hose ④ at least 1.8 m vertically above the pump during the suction process.
-
Art. 9057: Push the On / Off switch ⑦ to the position On. The On / Off switch lights.
Art. 9058 / 9059: See Bluetooth® Display operator's manual.
The pump starts and pumps the water after the suction process.
The suction process can take up to 5 minutes.
Art. 9057:
If the pump does not pump water after 5 minutes:
- Push the On / Off switch ⑦ to the position Off. The pump stops.
- Let the pump cool down.
- Search in the 6.4 Troubleshooting table for possible causes.
- Start the pump again (see 3.1.3 Initial operation of the pump).
3.1.4 To stop the pump:
→ Art. 9057: Push the On / Off switch⑦ to the position Off.
The pump stops and the On/Off switch does not light anymore.
→ Art. 9058/9059: See Bluetooth® Display operator's manual.
3.1.5 Art. 9058/9059:
If the pump does not pump water after 5 minutes:
→ See Bluetooth® Display operator's manual.
3.2 Only for Art. 9058 / 9059: safe-pump-function:
→ See Bluetooth® Display operator's manual.
3.3 Hints to pump:
3.3.1 General tip on suction:
The specified maximum self-priming height is only reached when the pump is filled to the overflow via the filling opening and the pressure hose ④ is held upwards during the priming process so that no water can escape from the pump via the pressure hose ④. Fill the pump before
en
hoses, fixed piping etc. are connected to the pump on the pressure side. This ensures that the pump can be completely filled with water (2 l) (air can escape).
The pump is to be filled with 2 l of water.
3.3.2 Silent operation:
The pump is silent. This advantage can only be maintained with the correct installation:
→ Choose a low-vibration base (e.g. do not place on metal sheets or plastic tanks).
3.3.3 Max. flow values:
The pump has a bypass valve to enable short suction times. If the hose end is open and there are no devices connected, or if the hose diameter is very large, the valve may not be able to switch from suction to pumping mode due to the hydraulic pressure conditions. This may cause increased operating noise. In order to enable the full pumping capacity, close the water outlet for approx. 1 second while the engine is running (e.g. by kinking the hose). This allows the valve to assume its correct position, which is audible as one click. In standard applications with connection devices such as showers or sprinklers, this happens automatically.
3.3.4 Assembly of prefilter:
If a prefilter is too long, it can be assembled in another position (e.g. horizontally) instead of vertically downwards.
4. MAINTENANCE

DANGER!
Risk of injury!
Risk of injury due to accidental starting.
→ Unplug the plug of the mains cable from the mains socket.
4.1 To clean the pump:

DANGER!
Risk of injury!
Risk of injury and risk of damage to the product.
→ Do not clean the product with water or with a water jet (in particular high-pressure water jet).
→ Do not clean with chemicals including petrol or solvents. Some can destroy critical plastic parts.
→ Clean the pump housing with a damp cloth.
4.2 To flush the pump:
After pumping chlorinated water, the pump must be flushed.
- Pump through lukewarm water (max. 35 °C), possibly adding a mild cleaning agent (e.g. detergent) until the pumped water runs clear.
- Dispose of the residues in accordance with local waste disposal regulations.
5.STORAGE
5.1 To put into storage [Fig. S1]:
![GARDENA 6300 SilentComfort - To put into storage [Fig. S1]: - 1](/content/2026/04/658672/images/d463e1613e585dedbcfd653a5d98cec7602f9e207f67149fc0b3d6e7dca628ac.jpg)
CAUTION!
Damage to the pump due to frost!
→ Store the pump in a frost-free place.
The product must be stored away from children.
- Unplug the plug of the mains cable from the mains socket.
- Close any shut-off valves in the suction line.
- Open any shut-off valves in the pressure line (accessories, water stop, etc.).
Therefore the pressure line is depressurised.
- Unscrew the screw connection ⑤ of the filler neck ⑥ and the water drain screw ⑧ by hand.
Therefore the pump is drained. - Tilt the pump in the direction of the drain (approx. 80°) so that the pump empties completely.
- Unscrew the suction hose and the pressure hose.
- Tighten the screw connection ⑤ on the filling opening ⑥ and the water drain screw ⑧ by hand (do not use pliers).
- Clean the pump (see 4. MAINTENANCE).
- Store the pump in a dry, enclosed and frost-free place.
6. TROUBLESHOOTING

DANGER!
Risk of injury!
Risk of injury due to accidental starting.
→ Unplug the plug of the mains cable from the mains socket.
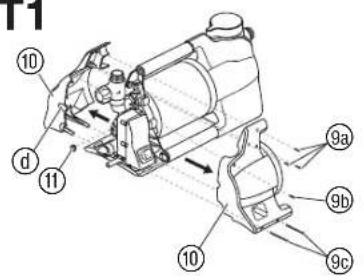
6.1 To loosen the impeller [Fig. T1 / T2]:
An impeller blocked by dirt can be loosened.
1. Only for Art. 9058/9059:
Pull off the dirt cover @ of the soil moisture sensor or unplug the connected soil moisture sensor.
-
Unscrew the 6 screws ⓝ, Ⓟ and Ⓥ.
-
Pull off the two shells ⑩.
-
Remove the rubber plug ⑪ from the shaft of the impeller ⑫.
-
Turn the shaft of the impeller ⑫ clockwise with an insulated screw driver. Therefore the blocked impeller is loosened.
-
Reassemble the rubber plug ⑪ and the two shells ⑩ in reverse order. Make sure that you match the screws, ⑨ and ⑳ to the correct screw holes depending on the length.
7. Only for Art. 9058/9059:
Reinsert the dirt cover Ⓓ of the soil moisture sensor or reinsert the soil moisture sensor.
6.2 To clean the filter [Fig. T3]:
If the pump does not start or stops suddenly during operation, this may be due to a clogged filter.
- Close all existing shut-off valves on the suction side.
- Open any shut-off valves in the pressure line (connection devices, water stop, etc.).
This depressurises the pressure side.
- Unscrew the screw fitting ⑤ of the filler neck ⑥ by hand.
- Pull the filter ⑬ vertically out of the filler neck ⑥.
- Hold the cup ⑭ firmly and turn the filter ⑬ counterclockwise out of the cup ⑭ (bayonet lock).
- Clean the cup ⑭ under running water.
- Clean the filter ⑬ e.g. with a soft brush.
- Reassemble the filter ⑬ in reverse order.
6.3 Only for Art. 9058 / 9059:
To clean the non-return valve [Fig. T1 / T4]:
1. Only for Art. 9058/9059:
Pull off the dirt cover Ⓐ of the soil moisture sensor or unplug the connected soil moisture sensor.
- Unscrew the 6 screws Ⓞ, Ⓞ and Ⓟ (see 6.1 To loosen the impeller).
- Pull off the two shells ⑩.
- Unscrew the cap ⑮ counterclockwise with an Allen key (width 10).
- Pull the flow sensor ⑯ out of the sensor opening ⑦.
- Clean the flow sensor ⑯ under running water.
- Clean the sensor opening ② with a damp cloth (without detergent).
- Check the mobility of the flow sensor ⑯.
- Reassemble the flow sensor ⑯ in reverse order.
- Reassemble the two shells ⑩ in reverse order.
11. Only for Art. 9058/9059:
Reinsert the dirt cover ⓐ of the soil moisture sensor or reinsert the soil moisture sensor.
6.4 Troubleshooting table:
For Art. 9058 / 9059: See additional explanation of the displays in the Bluetooth® Display Operator's manual.
Problem Possible Cause Remedy
| Pump is running,but the suction actiondoesn't take place | Leaky or damaged suction line[Fig. A2]. | → Check the suction linefor damage and seal sois airtight. |
| Pump sucks in air at a con- nection point [ Fig. A2 ]. | → Seal the suction sideconnectionsairtight. | |
| No water available in the cistern, water tank, water pipe, etc. | → Make sure that the watersupply is on the suction side. | |
| Pump was not filled withwater [ Fig. A4 ]. | → Fill the pump(see 3.1.3 Initial operationof the pump). | |
| Water escapes duringthe suction process viathe pressure hose. | 1. Fill the pump again.2. Hold up the pressure hose.3. Start the pump again(see 3.1.3 Initial operationof the pump). | |
| Absolutely vacuum-resistant connection is achieved by usingGARDENA Suction Hoses (sec 8. ACCESSORIES/SPARE PARTS). | ||
| Screw fitting on the filler neckis leaking [ Fig. A2 ]. | → Check the seal (replaceif necessary) and tightenthe screw fitting by hand(do not use pliers). | |
| Air cannot escape, since thedelivery line is closed orremaining water is in thepressurehose. | → Open any shut-off valves(e.g. nozzle) in the deliveryline, or drain the pressurchose. | |
| Air cannot escape becausethe pressure hose is coiled. | 1. Lay out the pressure hosestraight along its entirelength.2. Lay the hose from the pumpoutlet upwards.3. Do not kink the pressurchose at the pump outlet.4. Open all consumers maxi-mum. | |
| Suction time of 5 min. wasnot waited for. | → Wait up to 5 minutes for thepump to pump water. | |
| Suction filter or backflowpreventer in the suction hoseare clogged. | → Clean the suction filter orthe backflow preventer. | |
| The end of the suction hoseis not in the water [ Fig. A5 ]. | → Submerge the end of thesuction hose deeper in thewater. | |
| Suction height is too high[ Fig. A5 ]. | → Reduce the suction height. | |
| In case of any other difficulties concerning the suction action,use GARDENA Suction Hoses with Backflow Preventer(see 8. ACCESSORIES/SPARE PARTS). Fill the pump withwater before starting it. | ||
| Pump does not start,or stops suddenly duringoperation | Thermal switch has turnedthe pump off because of over-heating. | → Let the pump cool down,empty the pump and fill itagain.→ Observe the max. mediaTemperature (35 °C). |
| No power supply to the pump. → | Check the fuses and electricalplug connections. | |
| RCD has triggered(residual current). | → Unplug the plug from themains socket and contactthe GARDENA Service. | |
| Pump is not switched on. → Push the On / Off switch tothe position On. | ||
| Pump is running but thedelivery drops suddenly | The end of the suction hoseis not in the water [ Fig. A5 ]. | → Submerge the end of thesuction hose deeper in thewater. |
| Suction filter or backflowpreventer in the suction hoseare clogged. | → Clean the suction filter orthe back flow preventer. | |
| No water available in thecistern, water tank, waterpipe, etc. | → Make sure that the watersupply is on the suction side. | |
| Suction line is leaking[ Fig. A2 ]. | → Eliminate the leak. | |
| Impeller is blocked. → Loosen the impeller. | ||
Problem Possible Cause Remedy
| Pump is running but the delivery drops suddenly | Pressure hose is kinked. Lay the pressure hose with-out kinks and do not kink the pressure hose at the pump outlet. |
| The screw connection of the filter cannot be unscrewed by hand | Tread is dirty. Use a water pump pliers to unscrew it. Clean the thread on the filter and in the pump. |
NOTE:
Repairs must only be done by the GARDENA service departments or specialist dealers approved by GARDENA.
→ For any other malfunctions please contact the GARDENA service department.
- TECHNICAL DATA
| Garden pump | Unit | Value (Art. 9057) | Value (Art. 9058) | Value (Art. 9059) |
| Rated power | W | 900 | 1050 | 1300 |
| Mains voltage | V (AC) | 230 | 230 | 230 |
| Mains frequency | Hz | 50 | 50 | 50 |
| Max. delivery capacity | I/h | 5600 | 6300 | 6500 |
| Max. pressure/ Max. delivery head | bar / m | 4.7 47 | 4.9 49 | 6.0 60 |
| Max. self-priming suction height | m | 8 | 8 | 8 |
| Permitted internal pressure (delivery side) | bar | 6 | 6 | 6 |
| Power cable | m | 1.5 (H07RN-F) | 1.5 (H07RN-F) | 1.5 (H07RN-F) |
| Weight without cable (approx.) | kg | 10 | 10.7 | 11.8 |
| Sound pressure level L_pA Distance: 1 m 5 m 10 m | dB | 58 45 38 | 59 45 39 | 60 46 40 |
| Sound power level L_WA^b : measured/guaranteed Uncertainty k_WA | dB (A) | 67 / 69 2.67 | 68 / 70 2.29 | 68 / 71 2.78 |
| Max. media temperature | °C | 35 | 35 | 35 |
Measuring process complying with: 1:RL 2000/14/EU
- ACCESSORIES / SPARE PARTS
| GARDENA Suction Hoses | Kink-proof and vacuum-proof, optionally available by the metre Art. 1720/1721 (19 mm (3/4") / 25 mm (1") without connecting fittings or in fixed length Art. 1411/1418 complete with connecting fittings. | |
| GARDENA Suction Hose Fitting | For connection on the suction side. | Art. 1723/1724 |
| GARDENA Pump Connection Set | For connection on the delivery side. | Art. 1750/1752 |
| GARDENA Suction Filter with backflow preventer | To equip suction hoses with backflow preventer sold by the meter. | Art. 1726/1727/1728 |
| GARDENA Pump Preliminary Filter | Recommended for pumping sandy water. | Art. 1730/1731 |
| GARDENA Bore Hole Suction Hose | For vacuum-resistant connection of the pump to boreholes or pipe networks. Length 0.5 m. With 33.3 mm (G1) female thread at both ends. | Art. 1729 |
| GARDENA Floating suction system | For dirt-free suction below the water surface. | Art. 1417 |
| GARDENA Quick coupling | For pressure-side connection of 1" pressure hoses. | Art. 7109/7103 |
| GARDENA Soil Moisture Sensor | For irrigation depending on the soil moisture. | Art. 1188/1867 |
| GARDENA Extension Cable (length: 10 metres) | Used to extend the sensor cable to max. 105 metres. | Art. 1868 |
9. WARRANTY/SERVICE
9.1 Product registration:
Please register your product at gardena.com/registration.
9.2 Service:
Please find the current contact information of our service on the back page and online:
• United Kingdom: https://www.gardena.com/uk/support/advice/contact/
• USA: https://us.gardena.com/pages/contact
• Canada: https://www.gardena.com/ca-en/c/support/contact
• Australia: https://www.gardena.com/au/support/advice/contact/
• New Zealand: https://www.gardena.com/nz/support/advice/contact/
• South Africa: https://www.gardena.com/za/support/contact/
• Other countries: https://www.gardena.com/int/c/support/contact
10. DISPOSAL
10.1 Disposal of the pump:
(according to Directive 2012/19/EU)

The product must not be disposed of to normal household waste. It must be disposed of in line with local environmental regulations.
IMPORTANT!
→ Dispose of the product through or via your local recycling collection centre.
fr Pompe d'arrosage de surface 5600 Silent+/6300 SilentComfort/6500 SilentComfort
- CONSIGNES DE SÉCURITÉ....14
- MONTAGE....15
- UTILISATION....16
- MAINTENANCE....17
- ENTREPOSAGE 17
- DÉPANNAGE 17
- CARACTÉRISTIQUES TECHNIQUES....18
- ACCESSOIRES / PIÈCES DE RECHANGE....18
- GARANTIE / SERVICE APRÈS-VENTE......19
- MISE AU REBUT....19
Registreer uw product op gardena.com/registration.
9.2 Service:
→ Undlad at pumpe tilsmudset vand.
1.2.2.2 Vernebryter:
Termo-vernebryter:
Ved overbelastning kobler den integrerte termiske starkontaktoren ut pumpen.
1. Kun for art. 9058/9059:
7. Kun for art. 9058/9059:
6.3 Kun for art. 9058 / 9059:
1. Kun for art. 9058/9059:
1. Kun for art. 9058/9059:
3.1.1 Ref. 9058/9059:
3.1.2 Ref. 9058/9059:
3.1.5 Ref. 9058/9059:
2.4 N.° ref. 9058 / 9059:
Ligar o sensor de humidade no solo (opcional) [fig. A8]:
• Portugal: https://www.gardena.com/pt/suporte/advice/contacto/
- Outros países:
https://www.gardena.com/int/support/advice/contact/
10. ELIMINAÇÃO
- https://www.gardena.com/int/support/advice/contact/
10. УТИЛИЗАЦИЯ
- https://www.gardena.com/int/support/advice/contact/
10. ODLAGANJE U OTPAD
10.1 Odlaganje pumpe u otpad:
(u skladu sa Direktivom 2012/19/EU)

Proizvod ne sme da se baci u običan komunalni otpad. Morate da ga odložite u skladu sa važećim lokalnim propisima o zaštiti životne sredine.
VAŽNO!
→ Rashodovan proizvod predajte lokalnom reciklažnom odlagalištu.
3.1.1 Apt. 9058/9059:
3.1.2 Apt. 9058/9059:
3.1.5 Apt. 9058/9059:
• Romania: https://www.gardena.com/ro/asistenta/advice/contact/
- Alte țări: https://www.gardena.com/int/support/advice/contact/
10. ELIMINARE CA DEŞEU
3.1.1 Apt. 9058/9059:
- https://www.gardena.com/int/support/advice/contact/
10. ASGJËSIMI
9. GARANTIJA/SERVISAS
9.1 Gaminio registracija:
Užregistruokite gaminj svetaineje gardena.com/registration.
9.2 Servisas:
9. GARANTIJA/SERVISS
9.1 Produkta registrēšana:
Registrejiet produktu vietne gardena.com/registration.
9.2 Serviss:
- https://www.gardena.com/iv/serviss-un-atbalsts/meklet-veikalu-servisa-centru/
10. UTILIZĀCIJA
Performance characteristics
Courbes de performance
Prestatiegrafiek
Kapacitetskurva
Ydelses karakteristika
Pumpun ominaiskäyrä
Pumpekarakteristikk
Curva di rendimento
Ameria AES Systems LLC
MES Systems LLC
Marshall Bebaqamari Avenue 50/2
022 Yerekan
Phone (-374) 60 Eb1 Eb1
mesterchanyan@cloud.com
Australia
Australia
Husqama Australia Pty Ltd
Locked Bag 5
Central Coast BC
NSW 2252
Phone (-61) 101 2 4352 7400
customer.service@husama.com.au
A. is a result of
Alyar Alşiv 212, Baku, Azerbaijan
Sacs: -994 70 326 07 14
Allersales: +934 77 325 07 14
www.compress.garden.02
nfo/PROTE8-13/190.87
The following
Bahrain
M.H. Al-Mahmas
BUILDING 208, BLOCK 3:5
HONG 325
Sabion
Phone: +073-1740 9060
13.15.215 1142 0330
amances@amances.com
Belarus / Бедарусь
ОСС «Мастер Гаршев»
The following table is in Chinese.
403E, 58/161 109 325
rfc@salknade.com.ba
Brazil
Nordoch Marvinas e Motors Ltd.
Ard. S. W. E. C. (1)
de Oliveira O. riche
2500
3.10 国金
garden customer service plan agroep.com
Chile
Sr. Delo Square 15, 46-207, Sano Long Rd.
“Chang Hui”
(4) 拉图 10.25/15
Shanghai, PRC 200355
Colombia
Equipes de Towama Colombia SAS
Cn 86 D Ar 25 E 98 O C 819
Cafe 254, B°. Monoburgic
Zapote
San Jose
Costa Rica
Phone: 5061222-565471-5382221-5859
exmonstarica@gmail.com
Croatia
Нукинара, Буда Соло
Iodstratolia, 26
4010 Line
NOTE LHD
Phone: (143) 732 77 01 01-485
s.r.t.2.gardraeluspatagroup.com
Сургия
Daplofa Fawalgrasda S.à
Panders Papaspecios SA 52 Alhima Awara
- Ammon A&G
10148.16
1442 1860
Phone: (+30) 21 (2518 3100)
inlocy@sepedupartics.com
Czech Republic
SECUR
Gardena
Service Conserv
2013.12.20
Manufacturing CZ s.r.o.
Jesnicki 146
79326 Vttnn pod Pradecem
Phone: 8001 100 425
serde@cardena.02
(1)
Denmark
GORCHAS DONNANIK
Larani 18. st.
2500 Veresca
11:045 70 26 47 70
- (42, 15-20-4-13)
garciaVesikovinogroup.com
www.galccna.501406
Dominican Republic
BOSUESA
Davonera Santiago, London
Bellebre Gains,
图1.1
Esquina Copet.
51000 Dominican Republic
Phone: (+1) 609 562 0476
portacto@boresesa.com,co
Egypt
Egypt
Universal Agencies Co
- Joel Hamlin Lally St.
G78
Phone: (+20) 3761 57 57
Estonia
Estonia Huronese (red)
Hargate
YUDEKU 132
EE-1216 alm
info@gardena
Finland
Dr. Huszostu Ab
by https://is.nas.
JLFAK003562
(1510 Variazol
www.gamena.fi
France
France
H. Equivalents
+70, Bellashell street
C158 Tills, Georgia
Number (+095) 322 14 71 71
jolo@transportu.com
1132 Transporto.com.
www.berpster
Service Address and
Importer to Great Britain
[Unaware UK]
Hesqor E. UK Ltd. Eversen Poo
Preston P.O.
Hydroelectric Park
Newton Cycline
County Durham
DLS6UF
Phone: (1-4) 063449444558
info@adlena@uasvarie.co.uk
- 2017年1月1日
Greece
Π.ΠΑΓΑΔΟΠΟΥΛΟΣ ΑΕΒΕ
A##. Alln## 32
4019
LK 104 42
E2500
In 1-306210
H(2) (1.50) 2-10,37-83-160
https://spaccpdics.com.cn
Hong Kong
Hong Kong Tuna Tin Currency
Tung Tar Company 151 152 Hai Du Pan
31-133 Hol Bullhead Krup Tone: Kankos
BACO TO CO _2 3A100
Hong Kong
Pfcne: (18:2) 3:83 1662
admin@tungtao
11
Hungary
H.E.P. 18, M.J. 2015
Excl u. 1 - 3
104 Budapest
Phone: (+38) 1251-4161
eswazocalat, husevarna@husevarna.hu
1.1
Iceland
B-KD en
Skemuvegi 2a
200 Képavegur
Phone: (0354)515-2000
hukoumko
The image is too blurry to recognize any text content.
MHC Versuricht
viu-mar 9
203 Кёсамонг
Phone: i+354 544 4856
-
- (+55, 6
India
B.K. RAMAN AND CO
Flu No. 185 Industrial Area
Phase-2. Burt Caribe
Cocciarch
160802
6002 Fdd
Phone: (191) 98140 (6532)
ramer@jagcnardware.com
Iraq
Iraq Nevsomal Alveh
NSTEMMAL & CAR COMPANY
A. Pirsodson, Rev. Ettie Berk
MUSL
Phone: (+954) 78 18 18 46 75
Ireland
Ireland
Lilley Distributors Ltd.
309 NW Business Park, Babycolen
15 Dublin
Phone: (1353) 1924 2603
info@iflexi.com
Israel
HONGXIN LI
(1) Meier He## 17
215201 You
012220118716
internet@nacarr.co.1
Phone: (+672) 8 932 0400