CEXACT 2 Professional - Electric soldering iron BOSCH - Free user manual and instructions
Find the device manual for free CEXACT 2 Professional BOSCH in PDF.

User questions about CEXACT 2 Professional BOSCH
0 question about this device. Answer the ones you know or ask your own.
Ask a new question about this device
Download the instructions for your Electric soldering iron in PDF format for free! Find your manual CEXACT 2 Professional - BOSCH and take your electronic device back in hand. On this page are published all the documents necessary for the use of your device. CEXACT 2 Professional by BOSCH.
USER MANUAL CEXACT 2 Professional BOSCH
C-EXACT 1 | C-EXACT 2 | C-EXACT 4 | C-EXACT 6
Robert Bosch Power Tools GmbH
70538 Stuttgart
GERMANY
www.bosch-pt.com
1609 92A 6L4 (2021.05) 0/293

natural_image
Illustration of two Bosch electric shock absorbers with attached wires (no text or symbols)English ...... Page 13
Français......Page 20
text_image
D (23) (22)Deutsch
Sicherheitshinweise
www.bosch-pt.com/serviceaddresses
Entsorgung
General Power Tool Safety Warnings
WARNING
Read all safety warnings, instructions, illustrations and specifica-
tions provided with this power tool. Failure to follow all instructions listed below may result in electric shock, fire and/or serious injury.
Save all warnings and instructions for future reference.
The term "power tool" in the warnings refers to your mains-operated (corded) power tool or battery-operated (cordless) power tool.
Work area safety
▶ Keep work area clean and well lit. Cluttered or dark areas invite accidents.
▶ Do not operate power tools in explosive atmospheres, such as in the presence of flammable liquids, gases or dust. Power tools create sparks which may ignite the dust or fumes.
▶ Keep children and bystanders away while operating a power tool. Distractions can cause you to lose control.
Electrical safety
▶ Power tool plugs must match the outlet. Never modify the plug in any way. Do not use any adapter plugs with earthed (grounded) power tools. Unmodified plugs and matching outlets will reduce risk of electric shock.
▶ Avoid body contact with earthed or grounded surfaces, such as pipes, radiators, ranges and refrigerators. There is an increased risk of electric shock if your body is earthed or grounded.
▶ Do not expose power tools to rain or wet conditions. Water entering a power tool will increase the risk of electric shock.
▶ Do not abuse the cord. Never use the cord for carrying, pulling or unplugging the power tool. Keep cord away from heat, oil, sharp edges or moving parts.
Damaged or entangled cords increase the risk of electric shock.
When operating a power tool outdoors, use an extension cord suitable for outdoor use. Use of a cord suitable for outdoor use reduces the risk of electric shock.
▶ If operating a power tool in a damp location is unavoidable, use a residual current device (RCD) protected supply. Use of an RCD reduces the risk of electric shock.
Personal safety
▶ Stay alert, watch what you are doing and use common sense when operating a power tool. Do not use a power tool while you are tired or under the influence of drugs, alcohol or medication. A moment of inattention while operating power tools may result in serious personal injury.
▶ Use personal protective equipment. Always wear eye protection. Protective equipment such as a dust mask, non-skid safety shoes, hard hat or hearing protection used for appropriate conditions will reduce personal injuries.
▶ Prevent unintentional starting. Ensure the switch is in the off-position before connecting to power source and/or battery pack, picking up or carrying the tool. Carrying power tools with your finger on the switch or energising power tools that have the switch on invites accidents.
14 | English
Remove any adjusting key or wrench before turning the power tool on. A wrench or a key left attached to a rotating part of the power tool may result in personal injury.
▶ Do not overreach. Keep proper footing and balance at all times. This enables better control of the power tool in unexpected situations.
▶ Dress properly. Do not wear loose clothing or jewellery. Keep your hair and clothing away from moving parts. Loose clothes, jewellery or long hair can be caught in moving parts.
If devices are provided for the connection of dust extraction and collection facilities, ensure these are connected and properly used. Use of dust collection can reduce dust-related hazards.
▶ Do not let familiarity gained from frequent use of tools allow you to become complacent and ignore tool safety principles. A careless action can cause severe injury within a fraction of a second.
Power tool use and care
▶ Do not force the power tool. Use the correct power tool for your application. The correct power tool will do the job better and safer at the rate for which it was designed.
▶ Do not use the power tool if the switch does not turn it on and off. Any power tool that cannot be controlled with the switch is dangerous and must be repaired.
▶ Disconnect the plug from the power source and/or remove the battery pack, if detachable, from the power tool before making any adjustments, changing accessories, or storing power tools. Such preventive safety measures reduce the risk of starting the power tool accidentally.
▶ Store idle power tools out of the reach of children and do not allow persons unfamiliar with the power tool or these instructions to operate the power tool. Power tools are dangerous in the hands of untrained users.
- Maintain power tools and accessories. Check for misalignment or binding of moving parts, breakage of parts and any other condition that may affect the power tool's operation. If damaged, have the power tool repaired before use. Many accidents are caused by poorly maintained power tools.
▶ Keep cutting tools sharp and clean. Properly maintained cutting tools with sharp cutting edges are less likely to bind and are easier to control.
▶ Use the power tool, accessories and tool bits etc. in accordance with these instructions, taking into account the working conditions and the work to be performed. Use of the power tool for operations different from those intended could result in a hazardous situation.
▶ Keep handles and grasping surfaces dry, clean and free from oil and grease. Slippery handles and grasping surfaces do not allow for safe handling and control of the tool in unexpected situations.
Service
▶ Have your power tool serviced by a qualified repair person using only identical replacement parts. This will ensure that the safety of the power tool is maintained.
Safety Warnings for Screwdrivers
▶ Hold the power tool by insulated gripping surfaces, when performing an operation where the fastener may contact hidden wiring or its own cord. Fasteners contacting a "live" wire may make exposed metal parts of the power tool "live" and could give the operator an electric shock.
▶ Use suitable detectors to determine if utility lines are hidden in the work area or call the local utility company for assistance. Contact with electric lines can lead to fire and electric shock. Damaging a gas line can lead to explosion. Penetrating a water line causes property damage or may cause an electric shock.
▶ Hold the power tool securely. When tightening and loosening screws be prepared for temporarily high torque reactions.
▶ Secure the workpiece. A workpiece clamped with clamping devices or in a vice is held more secure than by hand.
▶ Always wait until the power tool has come to a complete stop before placing it down. The application tool can jam and cause you to lose control of the power tool.
Products sold in GB only:
Your product is fitted with an BS 1363/A approved electric plug with internal fuse (ASTA approved to BS 1362). If the plug is not suitable for your socket outlets, it should be cut off and an appropriate plug fitted in its place by an authorised customer service agent. The replacement plug should have the same fuse rating as the original plug. The severed plug must be disposed of to avoid a possible shock hazard and should never be inserted into a mains socket elsewhere.
Product Description and Specifications

Read all the safety and general instructions. Failure to observe the safety and general instructions may result in electric shock, fire and/or serious injury.
Please observe the illustrations at the beginning of this operating manual.
Intended Use
The power tool is intended for (un)screwing screws and tightening/loosening nuts in the specified dimension and performance range. It must only be connected to the mains via a PUC-EXACT series power supply unit.
The power tool is not intended for drilling; in order to prevent personal injury and damage to property, power tools with a shut-off clutch should never be used for drilling.
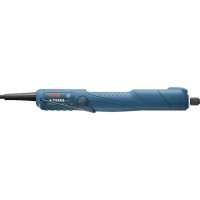
Product Features
The numbering of the product features refers to the diagram of the power tool on the graphics page.
(1) Application tool (e.g. screwdriver bit)
(2) Tool holder
(3) Quick-change chuck 1/4"
(4) Marking ring
(5) Rotational direction switch
(6) LED indicator for screwdriving applications
(7) Tool cable for connecting to the PUC-EXACT power supply unit
(8) Hanging hook
(9) On/off switch
(10) Slider for preselecting the torque
(11) Tool cable sleeve
(12) Worklight
(13) Connection socket on the PUC-EXACT power supply unit
(14) On/off switch on the power supply unit
(15) Groove in the clutch of the tool cable (7)
(16) LED "ready for use" indicator
(17) LED fault indicator (overload)
(18) Mains cable connector plug
(19) Mains cable
(20) Mains plug
(21) Mains cable connection socket
(22) Adjustment tool
(23) Setting disc
(24) Handle (insulated gripping surface)
Technical data
| Electric straight screwdriver with push start C-EXACT 1 C-EXACT 1 C-EXACT 2 | ||||
| Article number | 0 602 495 | 0 602 495 | 0 602 495 | |
| 207 | 218 | 208 | ||
| Rated voltage V 36 36 36 | ||||
| Rated current A 1.0 1.0 1.0 | ||||
| No-load speed rpm 1000 500 500 | ||||
| Maximum torque, hard/soft screwdriving application according to ISO 5393 | Nm in lbs | 0.2 - 0.8 | 0.2 - 0.8 | 0.5 - 2.0 |
| 1.8 - 7.1 | 1.8 - 7.1 | 4.4 - 17.7 | ||
| Direction of rotation | ΩΩ | ΩΩ | ΩΩ | |
| Marking ring light green light green white | ||||
| Max. screw diameter M 2.5 M 2.5 M 4 | ||||
| Weight according to EPTA-Procedure 01:2014 | kg | 0.87 | 0.87 | 0.87 |
| Ibs | 1.4 | 1.4 | 1.4 | |
| Protection rating | IP 20 | IP 20 | IP 20 | |
| Electric straight screwdriver with push start C-EXACT 4 C-EXACT 4 C-EXACT 4 | ||||
| Article number | 0 602 495 | 0 602 495 | 0 602 495 | |
| 205 | 206 | 217 | ||
| Rated voltage V 36 36 36 | ||||
| Rated current A 1.0 1.0 1.0 | ||||
| No-load speed rpm 1000 1000 275 | ||||
| Maximum torque, hard/soft screwdriving application according to ISO 5393 | Nm in lbs | 0.5 – 3.5 | 0.5 – 3.5 | 0.5 – 3.5 |
| 4.4 – 31.0 | 4.4 – 31.0 | 4.4 – 31.0 | ||
| Direction of rotation | ΩΩ | ΩΩ | ΩΩ | |
| Marking ring | grey grey | grey | ||
| Max. screw diameter | M 4 | M 4 | M 4 | |
| Weight according to EPTA-Procedure 01:2014 | kg | 0.87 | 0.87 | 0.87 |
| Ibs | 1.4 | 1.4 | 1.4 | |
| Protection rating | IP 20 | IP 20 | IP 20 | |
16 | English
| Electric straight screwdriver with push start C-EXACT 6 C-EXACT 6 | ||
| Article number | 0 602 495 | 0 602 495 |
| 215 | 216 | |
| Rated voltage V 36 36 | ||
| Rated current A 1.0 1.0 | ||
| No-load speed rpm 1000 500 | ||
| Maximum torque, hard/soft screwdriving application according to ISO 5393 Nm | 1.0 – 6.0 | 1.0 – 6.0 |
| in lbs | 8.9 – 53.1 | |
| Direction of rotation | ΩΩ | ΩΩ |
| Marking ring black black | ||
| Max. screw diameter M 5 M 5 | ||
| Weight according to EPTA-Procedure 01:2014 kg | 0.87 | 0.87 |
| Ibs | 1.4 | |
| Protection rating IP 20 IP 20 | ||
| Electric straight screwdriver with lever start | C-EXACT 1 C-EXACT 1 C-EXACT 2 | |||
| Article number | 0 602 495 | 0 602 495 | 0 602 495 | |
| 202 | 213 | 203 | ||
| Rated voltage | V 36 36 36 | |||
| Rated current | A 1.0 1.0 1.0 | |||
| No-load speed | rpm 1000 500 500 | |||
| Maximum torque, hard/soft screwdriving application according to ISO 5393 | Nm in lbs | 0.2 - 0.8 | 0.2 - 0.8 | 0.5 - 2.0 |
| 1.8 - 7.1 | 1.8 - 7.1 | 4.4 - 17.7 | ||
| Direction of rotation | ΩΩ | ΩΩ | ΩΩ | |
| Marking ring | light green | light green | white | |
| Max. screw diameter | M 2.5 | M 2.5 M 4 | ||
| Weight according to EPTA-Procedure 01:2014 | kg | 0.87 | 0.87 | 0.87 |
| Ibs | 1.4 | 1.4 | 1.4 | |
| Protection rating | IP 20 IP 20 IP 20 | |||
| Electric straight screwdriver with lever start | C-EXACT 4 | C-EXACT 4 | C-EXACT 4 | |
| Article number | 0 602 495 | 0 602 495 | 0 602 495 | |
| 200 | 201 | 212 | ||
| Rated voltage | V 36 36 36 | |||
| Rated current | A 1.0 1.0 1.0 | |||
| No-load speed | min^-1 | 1000 | 1000 275 | |
| Maximum torque, hard/soft screwdriving application according to ISO 5393 | Nm in lbs | 0.5 - 3.5 | 0.5 - 3.5 | 0.5 - 3.5 |
| 4.4 - 31.0 | 4.4 - 31.0 | 4.4 - 31.0 | ||
| Direction | ΩΩ | ΩΩ | ΩΩ | |
| Marking ring | grey grey | grey | ||
| Max. screw diameter | M 2.5 | M 2.5 M 4 | ||
| Weight according to EPTA-Procedure 01:2014 | kg | 0.87 | 0.87 | 0.87 |
| Ibs | 1.4 | 1.4 | 1.4 | |
| Protection rating | IP 20 | IP 20 IP 20 | ||
| Electric straight screwdriver with lever start | C-EXACT 6 | C-EXACT 6 |
| Article number | 0 602 495 | 0 602 495 |
| 210 | 211 | |
| Rated voltage V 36 36 |
Electric straight screwdriver with lever start C-EXACT 6 C-EXACT 6
| Rated current A 1.0 1.0 | |||
| No-load speed rpm 1000 500 | |||
| Maximum torque, hard/soft screwdriving application according to ISO 5393 Nm | in lbs | 1.0 – 6.0 | 1.0 – 6.0 |
| 8.9 – 53.1 | 8.9 – 53.1 | ||
| Direction of rotation | ΩΩ | ΩΩ | |
| Marking ring black black | |||
| Max. screw diameter M 5 M 5 | |||
| Weight according to EPTA-Procedure 01:2014 kg | 0.87 | 0.87 | |
| Ibs | 1.4 | 1.4 | |
| Protection rating IP 20 IP 20 | |||
Noise/Vibration Information
Noise emission values determined according to EN 62841-2-2.
Typically, the A-weighted sound pressure level of the power tool is 70 dB(A). Uncertainty K = 3 dB. The noise level when working can exceed 80 dB(A).
Wear hearing protection
Total vibration values a_h (triax vector sum) and uncertainty K determined according to EN 62841-2-2:
Screwdriving: a_h < 2.5 m/s^2 , K = 1.5 m/s ^2 .
The vibration level and noise emission value given in these instructions have been measured in accordance with a standardised measuring procedure and may be used to compare power tools. They may also be used for a preliminary estimation of vibration and noise emissions.
The stated vibration level and noise emission value represent the main applications of the power tool. However, if the power tool is used for other applications, with different application tools or is poorly maintained, the vibration level and noise emission value may differ. This may significantly increase the vibration and noise emissions over the total working period.
To estimate vibration and noise emissions accurately, the times when the tool is switched off or when it is running but not actually being used should also be taken into account. This may significantly reduce vibration and noise emissions over the total working period.
Implement additional safety measures to protect the operator from the effects of vibration, such as servicing the power tool and application tools, keeping their hands warm, and organising workflows correctly.
Assembly
▶ Disconnect the power supply before adjusting the tool settings, changing accessories or storing the power tool. This safety measure prevents the power tool from being started accidentally.
Operating and storage conditions
The power tool is suitable only for operation at enclosed work sites.
To ensure smooth operation, the permitted ambient temperature should be between -5 °C and +50 °C (23 °F and 122 °F), at a permitted relative humidity of between 20% and 95%, free of condensation.
The electric straight screwdriver should be stored at a temperature of between -20 °C (-4 °F) and 70 °C (158 °F) in order to prevent damage to the electronics.
Suspension device
You can use the hanging hook (8) to attach the power tool to a suspension device.
▶ Regularly check the condition of the hanging hook and the catch in the suspension device.
Changing the tool
Inserting the application tool
Pull the quick-change chuck (3) forwards. Insert the application tool (1) into the tool holder (2) and release the quick-change chuck again.
Only use application tools with a matching shank (1/4" hexagon).
When fitting an application tool, make sure that it is held securely in the tool holder. If the application tool is not held securely in the tool holder, it may become loose and consequently uncontrollable.
Removing the application tool
Pull the quick-change chuck (3) forwards. Take the application tool (1) out of the tool holder (2) and release the quick-change chuck again.
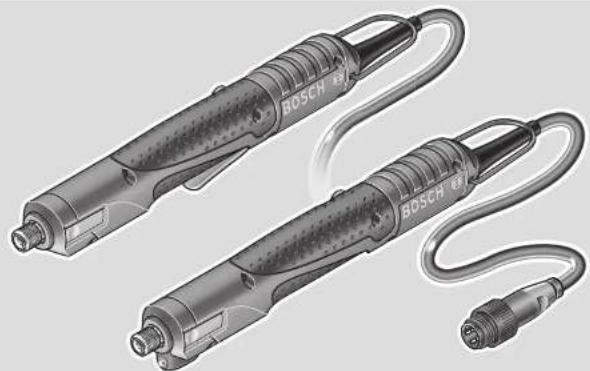
Connecting to the power supply (see figures A-B)
The power tool is supplied without a power supply unit. The PUC-EXACT power supply unit is required to connect the tool to the power supply.
The PUC-EXACT power supply unit must only be used with the power tools that are intended for it. Using the PUC-EXACT with other electric tools may damage the unit and these tools.
18 | English
▶ Never try to connect the C-EXACT power tool directly to the mains. Do not use an extension cable. This may damage the C-EXACT power tool.
▶ Only the originally supplied cables should be used. Always check the tool, cables and plug for damage before use. If damaged, the cables must be replaced rather than repaired.
▶ Have maintenance and repair work performed exclusively by a qualified specialist. This will ensure that the safety of the power tool is maintained.
Always connect the power tool with the PUC-EXACT power supply unit before connecting the power supply unit to the mains.
Plug the tool cable (7) into the connection socket (13) on the PUC-EXACT power supply unit. Make sure that the groove (15) in the clutch of the tool cable fits onto the pin in the connection socket. Screw the sleeve (11) onto the connection socket by turning it clockwise.
When using electric straight screwdrivers with lever start, make sure that you do not place the screwdriver on the lever before connecting the PUC-EXACT power supply unit to the mains. This will prevent the screwdriver from being started unintentionally.
When using electric straight screwdrivers with push start, make sure that you do not exert axial pressure on the screwdriver when connecting the PUC-EXACT power supply unit to the mains. This will prevent the screwdriver from being started unintentionally.
Firstly, plug the connector plug (18) of the mains cable (19) into the connection socket (21) on the PUC-EXACT power supply unit. You can now connect the PUC-EXACT to the power supply by plugging the mains plug (20) into a socket with a with a protective earth contact.
Always connect the power cable to the PUC-EXACT power supply unit before plugging the mains plug (20) into the socket; there is a risk of electric shock otherwise.
Operation

Use personal protective equipment. Always wear eye protection. Protective equipment such as a dust mask, non-skid safety shoes, hard hat or hearing protection used for appropriate conditions will reduce personal injuries.
Setting the Rotational Direction
Clockwise: Upon delivery the power tool is set to drive in screws or bolts and nuts (clockwise rotation). The rotational direction switch (5) is not pressed.
Anti-clockwise: To loosen screws and bolts or nuts, press the rotational direction switch (5). Turn the rotational direction switch to lock it.
▶ Only operate the rotational direction switch (5) when the power tool is not in use.
Switching the PUC-EXACT power supply unit on/off (see figure A)
The PUC-EXACT power supply unit must be switched on before the C-EXACT power tool can be switched on (see "Connecting to the power supply (see figures A-B)", page 17).
To switch on the power supply unit, set the on/off switch (14) on the power supply unit to position 1.
The green LED indicator (16) lights up when the power supply unit is ready for use.
PUC-EXACT-1: If the LED indicator (17) lights up, a fault has occurred.
To switch off the power supply unit, set the on/off switch (14) on the power supply unit to position 0.
Switching the power tool on/off
The screwdrivers have a torque-dependent shut-off clutch that can be set to a value in the specified range. It activates when the set torque is reached.
Electric straight screwdriver with lever start
To switch on the power tool, press the on/off switch (9) down fully.
The power tool will switch off automatically when the set torque is reached.
▶ If the on/off switch (9) is released too early, the pre-set torque will not be reached.
Electric straight screwdriver with push start
To switch on the power tool, place the application tool on the screw and exert light axial pressure on the screwdriver. The power tool will switch off automatically when the set torque is reached.
▶ If the screwdriver releases prematurely, e.g. if the screwdriver's application tool slips off the screw, the preset torque has not been reached.
Switching on the power tool or briefly pressing on the rotational direction switch (5) will activate an LED worklight. The LED goes out approx. two minutes after the tool was last used to drive in/loosen a screw.
▶ Do not look directly into the worklight; it can blind you.
Practical advice
▶ Disconnect the power supply before adjusting the tool settings, changing accessories or storing the power tool. This safety measure prevents the power tool from being started accidentally.
▶ Only apply the power tool to the screw/nut when the tool is switched off. Rotating tool inserts can slip off.
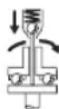
Setting the torque (see figures C–D)
The torque depends on the spring preload of the shut-off clutch. The shut-off clutch is triggered upon reaching the set torque, both in clockwise and anti-clockwise rotation.
Only use the supplied adjustment tool (22) to set the individual torque.
- Slide the slider (10) on the power tool back completely.
- Place the application tool (22) into the tool holder (2) and turn it slowly.
- Once a small protrusion (setting disc (23)) in the clutch can be seen through the opening of the housing, insert the adjustment tool (22) into this protrusion and turn it.
Turning clockwise will result in a higher torque; turning anticlockwise will result in a lower torque.
- Remove the adjustment tool (22). Slide the slider (10) to the front again to protect the clutch from contamination.
Note: The required setting is dependent on the type of threaded connector and can be best determined by practical trials. Check a trial screw application with a torque spanner.
▶ If you set the torque to a value outside the specified power range, the shut-off clutch will not be triggered.
Marking the torque setting
To label individually set torques, you can replace the marking ring (4) with a marking ring of a different colour.
Press the marking ring (4) with a thin screwdriver blade, a spatula or similar implement.
Always use the power tool with a marking ring to be certain that the housing is protected against dust and dirt.
Screwdriving indicator (green/red LED)
The shut-off clutch is triggered upon reaching the preset torque. The LED indicator (6) lights up green.
If the preset torque has not been reached, the LED indicator (6) lights up red and the tool emits a sound. The screw must be driven in again.
Repeat protection on electric straight screwdrivers with lever start
If the shut-off clutch is triggered while driving a screw, the motor will switch off. You will need to wait 0.3 seconds before you can switch the tool on again. This prevents you from accidentally retightening screws that are already firmly in place.
Repeat protection on electric straight screwdrivers with push start
These power tools do not have repeat protection and can be switched on again immediately after automatic switch-off.
Maintenance and Service
Maintenance and Cleaning
▶ Disconnect the PUC-EXACT power supply unit from the mains before carrying out any cleaning. This avoids the risk of electric shock. Simply switching off the power supply unit does not guarantee sufficient protection.
In order to avoid safety hazards, if the power supply cord needs to be replaced, this must be done by Bosch or by an after-sales service centre that is authorised to repair Bosch power tools.
Lubricating the power tool

Lubricant:
Special gearbox grease (225 ml)
Article number 3 605 430 009
Molykote grease
Motor oil SAE 10/SAE 20
- Clean the gearbox with a mild solvent after the first 150 operating hours. Follow the solvent manufacturer's instructions on use and disposal. Then lubricate the gearbox with Bosch special gearbox grease. Repeat the cleaning process once every 300 operating hours after cleaning has been carried out for the first time.
- After driving 100,000 screws, oil the moving parts of the shut-off clutch with a couple of drops of SAE 10/SAE 20 motor oil. Lubricate the sliding and rolling parts with Molykote grease. Use this occasion to check the clutch for wear to ensure that accuracy and reproducibility have not been affected. You will need to reset the clutch torque once you have done this.
▶ Have maintenance and repair work performed exclusively by a qualified specialist. This will ensure that the safety of the power tool is maintained.
An authorised Bosch after-sales service point will handle this work quickly and reliably.
▶ Dispose of lubricants and cleaning products in an environmentally friendly manner, taking legal regulations into account.
Accessories
You can obtain PUC-EXACT series power supply units from your dealer.
Information about the complete quality accessory range can be found online at www.bosch-pt.com and www.boschproductiontools.com or obtained from your dealer.
After-Sales Service and Application Service
Our after-sales service responds to your questions concerning maintenance and repair of your product as well as spare parts. You can find explosion drawings and information on spare parts at: www.bosch-pt.com
The Bosch product use advice team will be happy to help you with any questions about our products and their accessories.
In all correspondence and spare parts orders, please always include the 10-digit article number given on the nameplate of the product.
Malaysia
Robert Bosch Sdn. Bhd.(220975-V) PT/SMY
No. 8A, Jalan 13/6
46200 Petaling Jaya
Selangor
Tel.: (03) 79663194
Toll-Free: 1800 880188
Fax: (03) 79583838
E-Mail: kiathoe.chong@my.bosch.com
www.bosch-pt.com.my
20 | Français
Great Britain
Robert Bosch Ltd. (B.S.C.)
P.O. Box 98
Broadwater Park
North Orbital Road
Denham Uxbridge
UB 9 5HJ
At www.bosch-pt.co.uk you can order spare parts or arrange the collection of a product in need of servicing or repair.
Tel. Service: (0344) 7360109
E-Mail: boschservicecentre@bosch.com
You can find further service addresses at:
www.bosch-pt.com/serviceaddresses
Disposal
The power tool, accessories and packaging should be recycled in an environmentally friendly manner.

Do not dispose of power tools along with household waste.
Only for EU countries:
According to the European Directive 2012/19/EU on Waste Electrical and Electronic Equipment and its implementation into national law, power tools that are no longer usable must be collected separately and disposed of in an environmentally friendly manner.
Français
Robert Bosch Morocco SARL
53, Rue Lieutenant Mahroud Mohamed
20300 Casablanca
Tel.: +212 5 29 31 43 27
E-Mail: sav.outillage@ma.bosch.com
France
Robert Bosch (France) S.A.S.
www.bosch-pt.com/serviceaddresses
Calle Robert Bosch No. 405
www.bosch-pt.com/serviceaddresses
Eliminación
www.bosch-pt.com/serviceaddresses
Eliminação
www.bosch-pt.com/serviceaddresses
Smaltimento
www.bosch-pt.com/serviceaddresses
Afvalverwijdering
Bosch Service Center
Telegrafvej 3
2750 Ballerup
På www.bosch-pt.dk kan der online bestilles reservedele eller oprettes en reparations ordre.
Tlf. Service Center: 44898855
Fax: 44898755
E-Mail: vaerktoej@dk.bosch.com
www.bosch-pt.com/serviceaddresses
Bortskaffelse
Bosch Service Center
Telegrafvej 3
2750 Ballerup
Danmark
Tel.: (08) 7501820 (inom Sverige)
Fax: (011) 187691
www.bosch-pt.com/serviceaddresses
Avfallshantering
www.bosch-pt.com/serviceaddresses
Deponering
www.bosch-pt.com/serviceaddresses
Hävitys
www.bosch-pt.com/serviceaddresses
Απόσυρση
www.bosch-pt.com/serviceaddresses
Tasfiye
Robert Bosch Sp. z o.o.
www.bosch-pt.com/serviceaddresses
Utylizacja odpadów
Bosch Service Center PT
K Vápence 1621/16
692 01 Mikulov
www.bosch-pt.com/serviceaddresses
Likvidace
www.bosch-pt.com/serviceaddresses
Likvidácia
www.bosch-pt.com/serviceaddresses
Eltávolítás
www.bosch-pt.com/serviceaddresses
Утилизация
www.bosch-pt.com/serviceaddresses
Утилізація
www.bosch-pt.com/serviceaddresses
Кәдеге жарату
Service scule electrice
Strada Horia Măcelariu Nr. 30-34, sector 1
013937 Bucureşti
www.bosch-pt.com/serviceaddresses
Eliminare
Service scule electrice
Strada Horia Măcelariu Nr. 30–34, sector 1
013937 Bucureşti, România
www.bosch-pt.com/bg/bg/
www.bosch-pt.com/serviceaddresses
Бракуване
www.bosch-pt.com/serviceaddresses
Отстранување
www.bosch-pt.com/serviceaddresses
Uklanjanje dubreta
www.bosch-pt.com/serviceaddresses
Odlaganje
Električno orodje, pribor in embalažo je treba dostaviti v okolju prijazno ponovno predelavo.

www.bosch-pt.com/serviceaddresses
Zbrinjavanje
www.bosch-pt.com/serviceaddresses
www.bosch-pt.com/serviceaddresses
www.bosch-pt.com/serviceaddresses
Šalinimas
www.bosch-pt.com/serviceaddresses
廃棄
www.bosch-pt.com/serviceaddresses
处理废弃物
www.bosch-pt.com/serviceaddresses
廢棄物處理
www.bosch-pt.com/serviceaddresses
처리
www.bosch-pt.com/serviceaddresses
การกำจัดขยะ
Palma Tower 10th Floor
Jalan RA Kartini II-S Kaveling 6
Pondok Pinang, Kebayoran Lama
www.bosch-pt.com/serviceaddresses
Cara membuang
www.bosch-pt.com/serviceaddresses
Sự thải bổ
Robert Bosch Morocco SARL
www.bosch-pt.com/serviceaddresses
www.bosch-pt.com/serviceaddresses
Declaration of Conformity
| Electric straight screwdriver with push start/Electric straight screwdriver with lever start | Article number |
| C-EXACT 1 | 0 602 495 207 |
| 0 602 495 218 | |
| 0 602 495 202 | |
| 0 602 495 213 | |
| C-EXACT 2 | 0 602 495 208 |
| 0 602 495 203 | |
| C-EXACT 4 | 0 602 495 205 |
| 0 602 495 206 | |
| 0 602 495 217 | |
| 0 602 495 200 | |
| 0 602 495 201 | |
| 0 602 495 212 | |
| C-EXACT 6 | 0 602 495 215 |
| 0 602 495 216 | |
| 0 602 495 210 | |
| 0 602 495 211 |
We declare under our sole responsibility that the stated products comply with all applicable provisions of the regulations listed below and are in conformity with the following standards.
Technical file at: Robert Bosch Ltd. (PT/SOP-GB), Broadwater Park, North Orbital Road, Uxbridge UB9 5HJ, United Kingdom
Supply of Machinery (Safety) Regulations 2008
Electromagnetic Compatibility Regulations 2016
The Restriction of the Use of Certain Hazardous Substances in
Electrical and Electronic Equipment Regulations 2012
EN 62841-1:2015
EN 62841-2-2:2014
EN 61000-6-4:2007+A1:2011
EN 61000-6-2:2005
EN IEC 63000:2018
ii
UK CA

BOSCH
Robert Bosch Power Tools GmbH, 70538 Stuttgart, Germany represented (in terms of the above regulations) by Robert Bosch Limited, Broadwater Park, North Orbital Road, Uxbridge UB9 5HJ, United Kingdom
Vonjy Rajakoba
Managing Director - Bosch UK

text_image
Damm JahnayMartin Sibley
Head of Sales Operations and Aftersales

text_image
hulu dlyRobert Bosch Ltd. Broadwater Park, North Orbital Road, Uxbridge UB9 5HJ, United Kingdom, as authorised representative acting on behalf of Robert Bosch Power Tools GmbH, 70538 Stuttgart, Germany
Place of issue: Uxbridge Date of issue: 26/04/2021