WOE80AH0IN - Dryer BOSCH - Free user manual and instructions
Find the device manual for free WOE80AH0IN BOSCH in PDF.

User questions about WOE80AH0IN BOSCH
0 question about this device. Answer the ones you know or ask your own.
Ask a new question about this device
Download the instructions for your Dryer in PDF format for free! Find your manual WOE80AH0IN - BOSCH and take your electronic device back in hand. On this page are published all the documents necessary for the use of your device. WOE80AH0IN by BOSCH.
USER MANUAL WOE80AH0IN BOSCH
natural_image
Line drawing of a microwave oven unit with front panel and side panels (no text or symbols)Register your
new device on
MyBosch now and
get free benefits:
bosch-home.com/
welcome
CONTENTS
1 Safety....1-5
2 Parts Name....6
3 Installation and Adjustment 7-10
4 Maintenance ....11
5 Control panel Instruction 12-13
6 Prepare before Operation....14
7 Load Laundries ....15
8 Programme Overview ....16
9 Troubleshooting....17-18
10 Technical data....19
11 Warranty Terms & Conditions....20-22
12 Environmental protection....23
13 Customer Service ....24
SAFETY
1. Safety
Observe the following safety instructions.
1.1 General information
■ Read this instruction manual carefully.
- Keep the instruction manual and the product information safe for future reference or for the next owner.
■ Do not connect the appliance if it has been damaged in transit.
1.2 Intended use
Only use this appliance:
■ for washing machine-washable fabrics and hand-washable wool in accordance with the care label.
■ with tap water and commercially available detergents and care products suitable for washing machines.
■ in private households and in enclosed spaces in a domestic environment.
■ Up to an altitude of 2000 m above sea level.
1.3 Restriction on user group
This appliance may be used by children aged 8 or over and by people who have reduced physical, sensory or mental abilities or inadequate experience and/or knowledge, provided that they are supervised or have been instructed on how to use the appliance safely and have understood the resulting dangers. Do not let children play with the appliance. Cleaning and user maintenance must not be performed by children unless they are being supervised. Keep children under the age of 3 years and pets away from the appliance.
1.4 Safe Installation
⚠ WARNING - Risk of electric Shock!
Incorrect installation is dangerous.
■ Connect and operate the appliance only in accordance With the specifications on the rating plate.
SAFETY
■ Connect the appliance to a power supply with alternating current only via a properly installed socket with earthing.
■ The protective conductor system of the domestic electrical installation must be properly installed. The installation must have a sufficiently large cross section.
■ When using a residual current circuit breaker, only use a type with the ≈ mark.
Never equip the appliance with an external switching device, e.g. a timer or remote control.
■ When the appliance is installed, the mains plug of the power cord must be freely accessible.
■ If free access is not possible, an isolating switch must be integrated into the permanent electrical installation according to the installation regulations.
■ When installing the appliance, check that the power cable is not trapped or damaged.
If the insulation of the power cord is damaged, this is dangerous.
■ Never let the power cord come into contact with hot appliance parts or heat sources.
■ Never let the power cord come into contact with sharp points or edges.
■ Never kink, crush or modify the power cord.
⚠ WARNING - Risk of fire!
It is dangerous to use an extended power cord and non-approved adapters.
■ Do not use extension cables or multiple socket strips.
■ Only use adapters and power cords approved by the manufacturer.
■ If the power cord is too short and a longer one is not available, please contact an electrician to have the domestic installation adapted.
⚠️ A WARNING - Risk of Injury!
■ The heavy weight of the appliance may result in injury when lifted.
■ Do not lift the appliance on your own.
⚠ WARNING - Risk of suffocation!
■ Children may put packaging material over their heads or wrap themselves up in it and suffocate. Keep packaging material away from children. Do not let children play with packaging material.
⚠️ CAUTION - Risk of Injury!
The appliance may vibrate or move when in use.
■ Place the appliance on a clean, even, solid surface.
■ Align the appliance using the appliance feet and a spirit level.
If hoses and power cords have been laid incorrectly, this causes a tripping hazard.
■ Lay hoses and power cords in such a way that there is no risk of tripping.
If the appliance is moved by holding onto protruding components, such as the appliance door, the parts may break off.
■ Do not move the appliance by holding onto protruding parts.
SAFETY
⚠️ CAUTION - Risk of cutting!
Touching sharp edges on the appliance may lead to cuts.
■ Do not touch the sharp edges on the appliance.
■ Wear protective gloves when installing and transporting the appliance.
1.5 Safe use
⚠ WARNING - Risk of electric shock!
If the appliance or the power cord is damaged, this is dangerous.
■ Never operate a damaged appliance.
■ Never pull on the power cord to unplug the appliance. Always unplug the appliance at the mains.
■ If the appliance or the power cord is damaged, immediately unplug the power cord or switch off the fuse in the fuse box and turn off the water tap.
■ Call customer service.
An ingress of moisture can cause an electric shock.
■ Only use the appliance in enclosed spaces.
■ Never expose the appliance to intense heat or humidity.
■ Do not use steam- or high-pressure cleaners, hoses or sprays to clean the appliance.
⚠ WARNING - Risk of harm to health!
Children can lock themselves in the appliance, thereby putting their lives at risk.
■ With redundant appliances, unplug the power cord. Then cut through the cord and damage the lock on the appliance door beyond repair so that the appliance door will no longer close.
When spinning larger, waterproof items of laundry, imbalances may arise and lead to injuries.
■ Do not wash and spin larger items of laundry, such as blankets or mattress covers, in the appliance.
⚠ WARNING - Risk of suffocation!
Children may breathe in or swallow small parts, causing them to suffocate.
■ Keep small parts away from children.
■ Do not let children play with small parts.
⚠ WARNING - Risk of poisoning!
Detergents and care products may result in poisoning if consumed.
■ If accidentally swallowed, seek medical advice.
- Keep detergents and care product out of the reach of children.
SAFETY
⚠ WARNING - Risk of explosion!
Laundry that has been pretreated with flammable cleaning agent that contain solvent may cause an explosion in the appliance.
■ Rinse pretreated laundry thoroughly with water before washing.
⚠️ CAUTION - Risk of injury!
The door may break if you stand on or climb onto the appliance.
■ Do not stand on or climb onto the appliance.
The appliance may tip over if you sit on or lean against the open door.
■ Do not sit on or lean against the appliance door.
■ Do not place any objects on the appliance door.
Reaching into the drum while it is still turning may cause hand injuries.
■ Wait for the drum to come to a complete stop before reaching inside.
CAUTION - Risk of scalding!
When you wash at high temperatures, the detergent solution gets hot.
■ Do not touch the hot detergent solution.
⚠️ CAUTION - Risk of chemical burns!
If the detergent drawer is opened, detergent and care product may spray out from the appliance.
Contact with eyes or skin may cause irritation.
■ Rinse eyes and/or skin thoroughly with clean water if they come into contact with detergent or care product.
■ If accidentally swallowed, seek medical advice.
- Keep detergent and care product out of the reach of children.
1.6 Safe cleaning and maintenance
⚠ WARNING - Risk of electric shock!
Improper repairs are dangerous.
■ Never make any technical modifications to the appliance or its features.
■ Repairs to the appliance should only be carried out by trained specialist staff.
■ Only use genuine spare parts when repairing the appliance. If the power cord of this a appliance is damaged, it must be replaced by the manufacturer, the manufacturer's
■ Customer service or a similarly qualified person in order to prevent any risk.
An ingress of moisture can cause an electric shock.
■ Before cleaning, pull out the mains plug or switch off the fuse in the fuse box.
■ Do not use steam- or high-pressure cleaners, hoses or sprays to clean the appliance.
SAFETY
⚠ WARNING - Risk of injury!
The use of non-original spare part and non-original accessories is dangerous.
■ Only use the manufacturer's original spare part and original accessories.
⚠ WARNING - Risk of poisoning!
Poisonous fumes may be given off if you use cleaning agent that contain solvent.
■ Do not use cleaning agent that contain solvents.
PARTS NAME
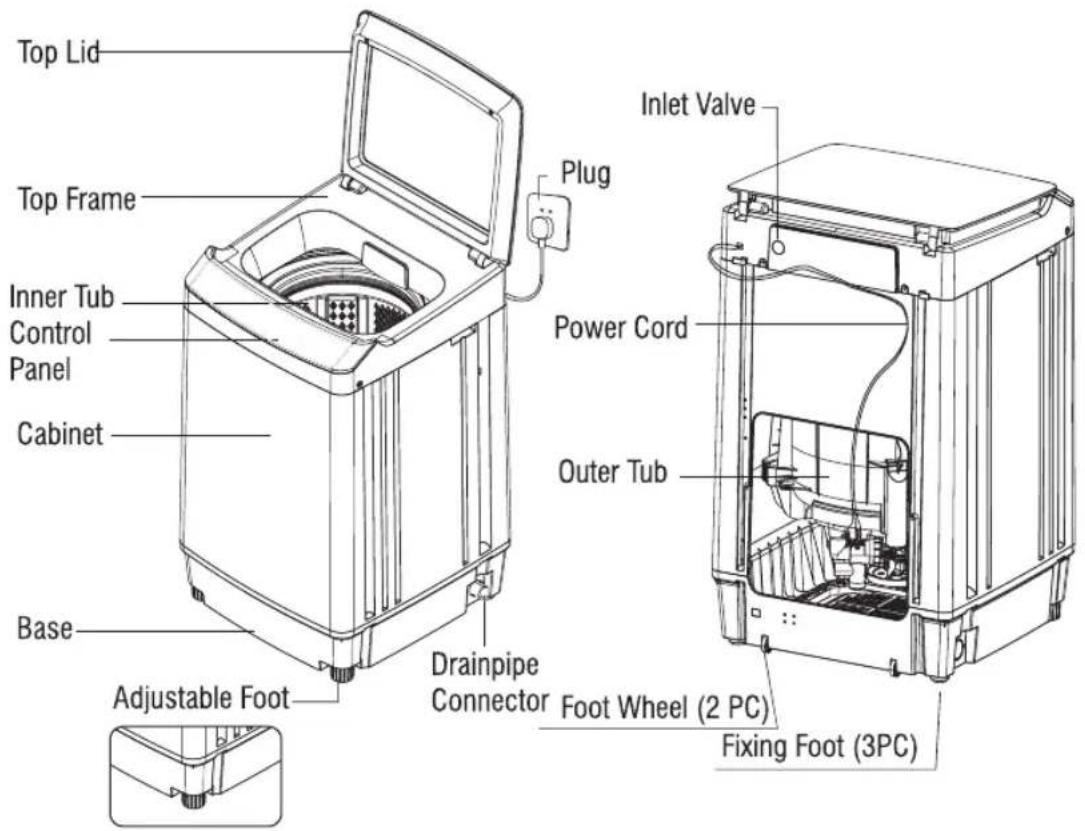
text_image
Top Lid Top Frame Inner Tub Control Panel Cabinet Base Adjustable Foot Drainpipe Connector Plug Inlet Valve Power Cord Outer Tub Foot Wheel (2 PC) Fixing Foot (3PC)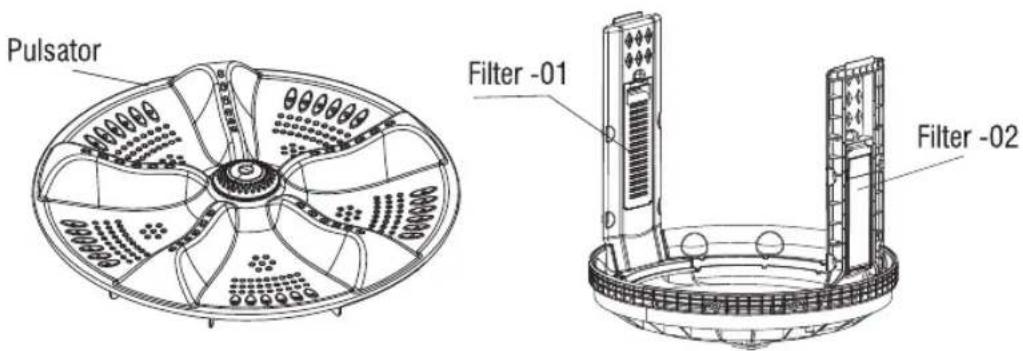
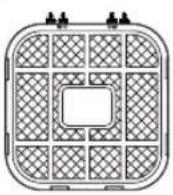
text_image
Pulsator Filter -01 Filter -02Accessories
 |  | [KT] |
| Bottom Cover(1PC) Screw (2 PC) | Water inlet hose (1pc) water inlet hose connector(1 pc) | Drainpipe(1 pc) Drainpipe clip(1 pc) |
INSTALLATION AND ADJUSTMENT
Please install and adjust the machine according to the requirements of the manual. Correct operation is very important for your safety.
Unpacking
- Unpack the carton and take out the bottom cover.
- Open the top lid of washing machine and take out all of the accessories.
- Remove all wrappers, including the polystyrene base.
You are advised to keep all the packaging for reuse in case the machine is to be transported again.
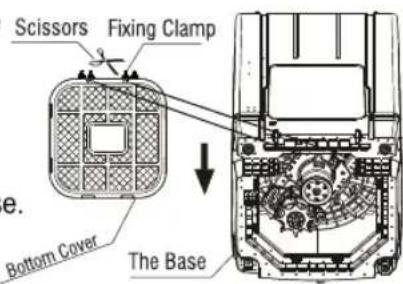
Installing the bottom cover
- Let the back of washing machine incline forward, insert to the bottom of washing machine along the direction of arrow.
- Remove the two fixing clamps using scissors. Insert the clamps into the holes as indicated by the black lines (they should not come out when gently pulled). Then attach the bottom cover and secure it to the base.
• Fixed the Bottom cover with base
text_image
Scissors Fixing Clamp e. Bottom Cover The BaseAligning the appliance
The distance between the washing machine and the wall should be more than 50mm, and the maximum allowed angle of the shank base of the machine is 1°. The slanting or rough ground may cause operating stopped or unstable, please adjust It with the following methods:
- The right front foot of the washing machine can be adjusted. If the machine is not level, lift the front slightly and rotate the foot clockwise or counterclockwise to raise or lower it. Use the level indicator on the top cover to ensure the washing machine is properly balanced.
natural_image
Two cartoon characters holding hands, one smiling and the other looking down with a falling arrow (no text or symbols)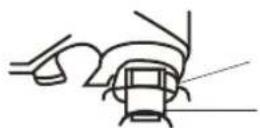
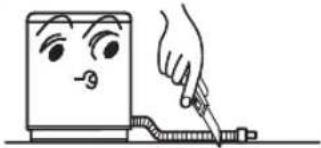
HOW TO USE DRAINPIPE
Install Drainpipe
Set drainpipe clip Into the drainpipe between 2-3cm from the drainpipe end that without pothook. Then install the drainpipe Into the right drainpipe connector and fix the drainpipe and drainpipe connector with the clip. After that, put up the drainpipe clip on the cabinet.
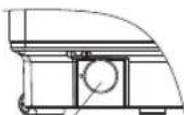
How to change the direction of the drainpipe.
1 Take off the drainpipe and drainpipe clip from drainpipe connector, put some soft mat on the floor. Positioned washing machine front side adown and gently put down the washing machine front side on the mat. Demount the screws on the back cover with screwdriver and take out the back cover. Demount one screw that fixed the drainpipe connector (on right of the washing machine) and loosen the drainpipe connector.
text_image
Drainpipe Clip Drainpipe Connector Drainpipe(Section sketch map for washing machine's right side) 3. With proper force, take down drainpipe gate stopper on left side of the washing machine. The drainpipe gate stopper is fixed on washing machine base with two clips.
Drainpipe gate stopper (Section sketch map for washing machine's leftside)
- Extrude the drainpipe with proper forced and take out drainpipe hoop (on right of the washing machine), then loosen the inner drainpipe.
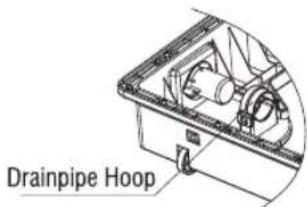
text_image
Drainpipe Hoop(Section sketch map for washing machines)
- Pull the inner drainpipe to another side. Fix inner drainpipe with drainpipe hoop, with one screw fix drainpipe connector. Install the drainpipe gate stopper to another side, make washing machine standing gently. Fix back cover with screw and install the drainpipe and drainpipe clip into the drainpipe connector.
Water Drainage
The drainpipe should drain smoothly:
- The height of the drainpipe should be less than 10cm, otherwise the drainage will not be smooth and need a long time to drain, the machine may stop during working.
2.Do not step on or press the drainpipe.
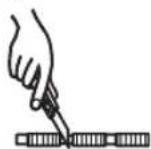
- Cut the drainpipe if it is too long. Cut the front end of the drainpipe slantingly to make drainage ge smoothly
natural_image
Cartoon illustration of a hand using a tool to write or print a document (no text or symbols present)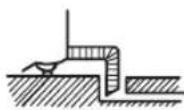
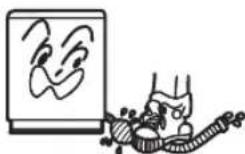
- Purchase a proper hose if you need additional drainpipe. Its diameter should not be less than 30mm and length should not exceed 1.5m.
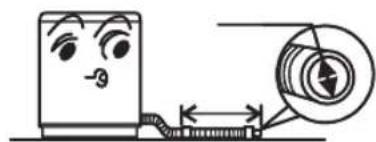
text_image
Cartoon illustration showing a computer with a surprised face next to a magnified circular detail, likely illustrating a device or process.If the additional drainpipe is too long, cut some at A or Bpoint
WATER INLET INSTALLATION
Tap Selection

text_image
Suitable tap ≥10mm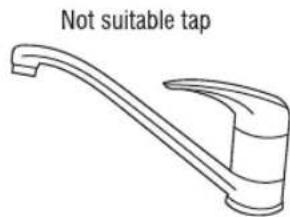
text_image
Not suitable tapThe front end should be longer than 10mm. The tap exit end face should be flat and smooth, if not file it to avoid leakage.
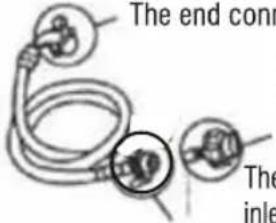
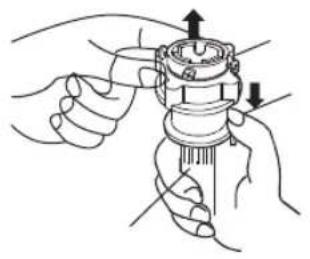
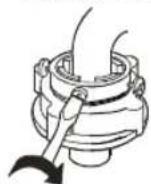
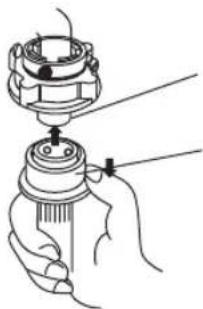
Connect the Inlet Hose Connector to the Tap
- Press down the slider and remove the inlet hose connector from the inlet hose, like below illustration 1.
- Loosen the four screw on the inlet hose connector till the ta can be accessed, then set the inlet hose connector in the tap, see illustration 2. (If the tap caliber is too large and could not set the inlet hose end, unscrew the four bolts and take out the bushing, tap exit end nut to be flat, otherwise It will leak, see illustration 3
natural_image
Illustration of hands performing a mechanical tool manipulation (no text or symbols present)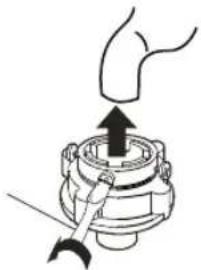
natural_image
Diagram of a mechanical device with a tool and a curved component, no text or symbols present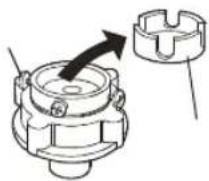
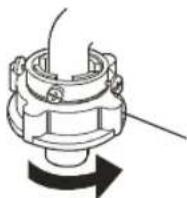
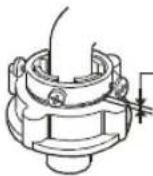
- Fasten the four screws in the inlet hose connector evenly, see illustration 4.
- Twist the fastening nut as the illustration, see illustration 5. Remark: before twisting the nut, the threading is about 4mm above the upper surface of the nut, after twisting, the threading is less than 2mm above the upper surface of the nut, see illustration 6.
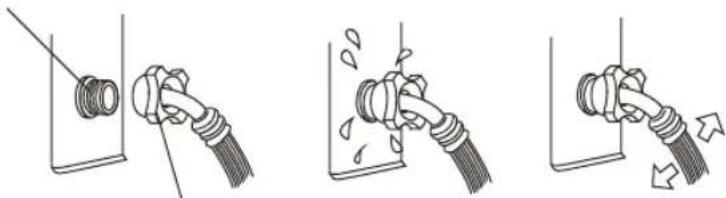
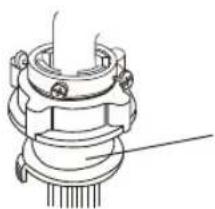
Connect the Inlet Hose to the Washing Machine
- Put the inlet hose connector on the inlet valve connector.
- Fasten the inlet hose connector and swing it gently to make sure if it is seated.
natural_image
Three-step diagram showing pipe fittings and tubing installation (no text or symbols)Caution: When installing the washing machine, please use a new hose. Do not reuse old hose
Connect the Inlet Hose Connector to the Inlet Hose
- Put the slider down and insert the inlet hose into the inlet hose connector.
- Insert the hose firmly and the click sound is heard.
natural_image
Illustration of a hand holding a mechanical device with a tool, no text or symbols presentCheck the connection between inlet hose connector and the tap
- Swing the inlet hose gently to confirm if it is fastened.
- After installation, open the tap and check if it leaks.
- Do not bend the inlet hose.
- Before each usage, check the connection between inlet hose connector and the tap, and the installation of inlet hose. Make sure they are firmly fitted to prevent dropping from improper installation position.
text_image
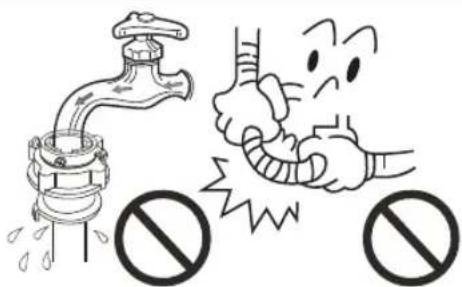
Illustration showing a faucet and a bicycle with no symbols indicating no traffic, suggesting a public health or safety warning.Dismantle the Inlet Hose
- Close the tap.
- If you use the washing machine more than once a week, there is no need to remove the inlet hose connector to avoid damaging the fixing screw.
natural_image
Technical line drawing of a mechanical assembly with no visible text or symbolsMAINTENANCE
Maintenance Methods
| After the end of the ProgrammeThe machine stops automatically, and music buzzer will remind you to take out the laundries or start again.Once you have finished using the machine, you are advised to unplug it and turn off the water taps to avoid unexpected leak or fire. | External cleaningClean the exterior cabinet of the appliance with soft cloth. Do not use cleanser, volatile chemical materials to clean the machine, which will damage plastic parts and the surface. |
Lint filter cleaningPull out Lint filterOpen the box and clean itClose it and reinstall itCheck if the lint block part is in good Condition.press this part and pull out to take out the magic filter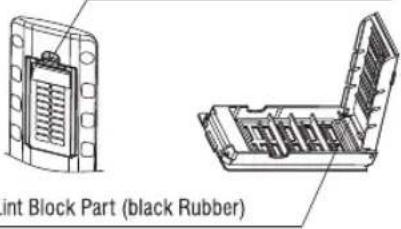 | Clean the Inlet FilterIt is possible that the inlet filter net can be blocked by the dust, please clean it according to the following:1. Close the tap and turn on the power switch.2. Start the washing machine for 5 seconds (make the water in the inlet hose flows to the tub), and cut off the power supply.3. Pull off the inlet hose, remove and clean the inlet valve and the inlet net, and install again.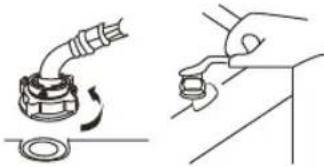 |
- After using the machine, you are advised to turn off the water taps, (if necessary, pull out the inlet hose).
- Do not keep water in tub for a long time. When washing is finished, drain it right away.
- Once you have finished using the machine, you are advised to unplug it.
- Put the electric cable and the drain hose in order.
- Wipe the water on the surface and in the tub with soft cloth and keep the top lid opening for a while. It helps to prevent mold and smell forming inside the appliance.
If the water in the inner tub has possibility to freeze, please do like below:
- In winter, if remaining water freeze, it can cause the washing machine trouble, please take off the water inlet hose and drain out the water in the hose and inner tub.
- If the water freezes, please don't operate the washing machine. Put 30°C hot water in the tub, the hot water should submerge the pulsator, after a few minutes, rotate the pulsator by hand gently, then you can operate the washing machine.
CONTROL PANEL INSTRUCTIONS

text_image
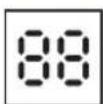
Water Level High 09 - 10 Medium 05 - 08 Low 01 - 04 88 Soak Wash Rinse Spin Lock Wash Program 01 Normal 04 Quick 07 Water Save 10 Tub clean 02 Eco wash 05 Mix 08 Spin 03 Delicates 06 Cotton 09 Heavy Wash Cycle Water Delay P Power
- Press Power Button to Start/Off the machine

- After selecting the PROGRAM and WATER LEVEL, press this button to start. Press this button to pause during working, press again to continue.

- When starting a New Cycle:
At the beginning of the cycle, you can select the desired program by pressing the Program button. Then, press the Water Level button to choose the water level between 1 to 10 liters as per your requirement.
• During the Cycle:
If you need to add more water during the wash function (including the rinse stage), first press the Start/Pause button to pause the cycle. Then, press the Water Level button and select the desired water level (1 to 10 liters). After setting the water level, press the Start/Pause button again to resume the cycle.

At the beginning of the cycle, you can select the desired program by pressing the Program button. Each program is designed for different types of laundry, so you can choose one according to your requirement. As you press the button, program numbers from 1 to 10 (as printed on the control panel) will appear on the digital display. This allows you to clearly see which program is currently selected and ensures the selection is in the correct 1 to 10 sequence. After selecting the desired program, you can proceed to set the water level as needed.
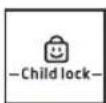
Child Lock
- During machine operation, press the WATER LEVEL and DELAY HOURS buttons to activate the CHILD LOCK. The digital timer will display the remaining time and "CL" alternately. To cancel the child lock, press the WATER LEVEL and DELAY HOURS buttons again.
- If select SPIN, the digital timer displays SPIN time, unit is minute.
- During program, the digital timer shows the remaining time (In minutes) of the running program,
- When any error appear, the display time shows error code.
CONTROL PANEL INSTRUCTIONS

The Delay Hours feature allows you to set a delayed start time for washing machine, ranging from 2 to 24 hours. To use this function, turn on the machine, select the desired wash program and settings, then press the Delay Hours button and choose the required delay time. Once selected, press the one start/pause button, the machine will automatically begin operation after the set time. This feature is convenient for scheduling wash cycles as per your preference, ensuring efficiency and flexibility.

By pressing the Wash cycle Button, you can add or remove specific steps such as soak, Wash, Rinse, and Spin from your wash cycle Operation as per your requirement.
Troubleshooting - Error details
| No. | Error Type | Description | Error Code | Alarming | Delete Alarm |
| 1 | Inlet water error | If there is no change in water level within 30 minutes or 5 minutes of water inflow/ replenishment | E4 | — | Open and close the cover once, then press the Start/Pause button |
| 2 | Drain error | Drainage for more than 8 minutes or 2 minutes with no change in water level | E3 | — | Cover once, then press the Start/Pause button |
| 3 | Door open alarming | Lid open during wash operation/appointment or lid open during dehydration | E1 | Alarm one time in 30s | During drainage or dehydration: press Start/Pause to release after closing lid; automatically releases for other processes |
| 4 | Unbalance alarming | Dehydration collision bucket 3 times | Un | — | Place clothes evenly, close cover, then press Start/Pause to release |
| 5 | Child Protection | Door opened during Child-lock mode | E1 | — | Details in Child-lock |
| 6 | Overflow Protection | Water level reaches overflow level | E8 | — | Auto drains to set level & releases. After 3 consecutive times, drain valve stays open and power restores |
| 7 | Water level error | Water level sensor is loose | E5 | — | Turn off power or restore the sensor |
| 8 | Low Voltage Error | Voltage supply is lower than rated voltage- lower than 160V | P1 | Alarm one time in 10s | Turn of power supply check voltage, Voltage should be 230V after that start the machine again. |
| 9 | High Voltage Error | Voltage Supply is higher than rated voltage- Higher than 270V | P2 |
Notice: if there is still fault after check above items, please remove the plug from power supply and contact with local service team
Notice:
- Imbalance adjustment:
During spinning, if the laundries are not placed equally in the tub, it would cause Violent vibration. This machine has imbalance adjustment function, and the vibration testing system will supervise the running. Once vibration is beyond certain level, the adjustment system will start automatically to adjust the imbalance.
- Power supply is cut off automatically:
1) If you did not start the program in 10 minutes after pressing the power supply button, the power supply will be cut off automatically.
2) After the washing is finished, alarm buzzes and the power supply will cut off automatically.
3. Child lock function:
1) When child lock function is set, all the buttons will be locked including POWER. If the top lid is opened during the washing machine working, the washing will be stopped and give an alarm.
Preparation before washing
- Connect the inlet hose and open the tap.
- This appliance must be earthed. Confirm the socket is earthed reliably and insert the power plug. The earth terminal should not link to gas pipeline, tap pipeline etc.
- Put down the drainpipe.
Warning: The Temperature of the Water should be less than 30°C!
natural_image
Two cartoon characters interacting with a screwdriver, one pointing at the screw and the other holding a magnifying glass (no text or symbols)Before washing the laundry, please pay attention to the following:
| Make sure if there is pecial requirements for the Laundries | Before washing, empty all pockets of small objects which may have been left inside (coins, keys, screws etc.  | Knot the long band, fasten the buttons and close the zippers  | Do not overload the machine. Load the laundry loosely alternating large items with small ones.  | Sort the laundry according to the type of fabric, color-fastness and how dirty it is. Put thin laundries, woolens and such prone to wear and tear laundries into washing bag.  |
| A. Make sure the laundries are washable.B. It is essential to wash new colored items separately when washing for the first time. White items should not be washed with colored items.C. Please immerse the non-absorbable laundries by hand.D. Sometime few stains are difficult to remove and should be treated with specific product before washing. In some cases it may be required to soak the stain before washing with a special pre-soak product (biological detergent).E. Overturn the nap fabric and longfloss laundries before putting them into the machine.F. Do not put the laundries polluted by chemicals into the machine directly.G. Very small item(handkerchiefs, ribbons, socks etc) should be washed in a washing bag or a pillow case. | ||||
LOADING THE LAUNDRY
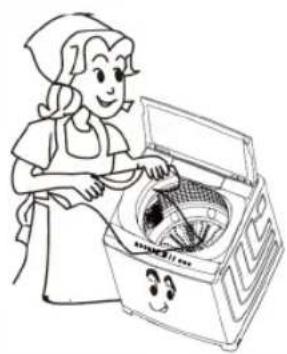
natural_image
Illustration of a woman in a hooded garment holding an open box containing a small object, with no visible text or symbols.- The capacity of washing and spinning of the machine is refer to the largest weight of the standard laundries under dry condition. Washing quantity shall be lower than the rated capacity.
- Different thickness, size and type of the laundries will influence the actual washing capacity.
- Do not select high water level when laundries are less than 1.5kg to avoid water splashing.
Use Of Detergent
How to use Bleach
- Fill water to the selected level, dilute the bleach in the container, and pour it slowly into the washing tub.
- Do not use bleach for colored or figured laundries Do not bleach colored laundry, as it is prone to losing colour.
- Do not put bleach to laundries directly.
- Refer to the manual for the usage and quantity of the bleach.
- Please dissolve powder bleach before use.
How to use the Washing Powder
- Dissolve in the machine directly (not suitable for preset program)
- Low water level.
- Add the washing powder, and run for 30 seconds to dissolve it completely.
- Put laundries in and select suitable water level.
● The instant dissolving of the washing powder - Prepare warm water of 30°C in a container.
- Pour the powder while stirring to fully dissolve it.
- Washing powder with poor quality or not used for a long period may get blocked, please clean the detergent box in time.
PROGRAMME OVERVIEW
*Programs will vary based on the models.
Refer the user interface in the machine for available programs.
| Program/type of laundry/information | Load size |
| Name of programBrief explanation of the program and the items for which it is suitable. | |
| NormalSuitable for mix fabric. | Full drum |
| Eco washEco wash programme for saving water and energy. | Full drum |
| DelicatesFor delicate washable items, e.g made of satin, synthetic fibres or blended fabrics.Note : This program is not meant for silk sarees and silk clothes. | 50% of your drum |
| QuickSuitable for small items of lightly soiled laundry. | 30% of your drum*this programme is for lesser load with default water level 2 |
| MixSuitable for mix of different fabric types and colors. | Full drum |
| CottonsHard-wearing items made of cotton, linen or blended fabrics | 60% of your drum |
| Water saveProgram for synthetic material clothes, gym wear or sports wear. | 50% of your drum |
| HeavySuitable for heavily soiled laundry, bigger loads like curtains, bedsheets, liners, etc. | 60% of your drum |
*Clothes up-to balance ring is full drum.
Before contacting the technicians, please make the following checks:
| Trouble shooting | Possible Reason | Troubleshooting |
| Control panel has no display | Plug is not inserted tightlyNo electricity in the socketPower switch is not turned on Power supply is cut off | Insert the plug tightlyCheck the socket or change to another socketPress power switch Check power supply |
| Inlet hose leaks | Inlet hose connector(connecting with the tap)is not fixed tightlyInlet hose and washing machine connector is loose | Install the inlet hose again Tighten the connector of the machine |
| It does not drain | Drainpipe is not put downDrainpipe is bend or is blocked | Put down the drainpipe Straighten or clean the drainpipe |
| No inflow of water | No water supply Tap is not open Inlet hose is blocked | Check the water supply and Open the tap when its resumedRemove the mesh from the water inlet valve backside and clean the mesh with tap water |
| Spin stops and water inflow begins during spin program | Laundries is too much or too little or the Machine is not placed stably | The machine is adjusts automatically |
| Press the program button to select SPIN, but It does not spin | Top lid is not closed | Close the top lid |
| The spin is intermittent when spin starts | Balance the laundries to reach to the best spin effect | Normal |
| First time use, some water flows out from the drainpipe | The remaining water from factory's testing | Normal |
Notes : If there is still a fault after the above checks, please pull out the plug and contact the service team. It is dangerous to repair this product by yourself.
TROUBLE SHOOTING
Troubleshooting - Error details
| No. | Error Type | Description | Error Code | Alarming | Delete Alarm |
| 1 | Inlet water error | If there is no change in water level within 30 minutes or 5 minutes of water inflow/ replenishment | E4 | — | Open and close the cover once, then press the Start/Pause button |
| 2 | Drain error | Drainage for more than 8 minutes or 2 minutes with no change in water level | E3 | — | Cover once, then press the Start/Pause button |
| 3 | Door open alarming | Lid open during wash operation/appointment or lid open during dehydration | E1 | Alarm one time in 30s | During drainage or dehydration: press Start/Pause to release after closing lid; automatically releases for other processes |
| 4 | Unbalance alarming | Dehydration collision bucket 3 times | Un | — | Place clothes evenly, close cover, then press Start/Pause to release |
| 5 | Child Protection | Door opened during Child-lock mode | E1 | — | Details in Child-lock |
| 6 | Overflow Protection | Water level reaches overflow level | E8 | — | Auto drains to set level & releases. After 3 consecutive times, drain valve stays open and power restores |
| 7 | Water level error | Water level sensor is loose | E5 | — | Turn off power or restore the sensor |
| 8 | Low Voltage Error | Voltage supply is lower than rated voltage- lower than 160V | P1 | Alarm one time in 10s | Turn of power supply check voltage, Voltage should be 230V after that start the machine again. |
| 9 | High Voltage Error | Voltage Supply is higher than rated voltage- Higher than 270V | P2 |
Notice: "If your issue is not listed in the error list above, please unplug the device from the power supply and contact your local service team.
Notice:
1. Imbalance Adjustment:
During spinning, if the laundries are not placed equally in the tub, it would cause Violent vibration. This machine has imbalance adjustment function, and the vibration testing system will supervise the running. Once vibration is beyond certain level, the adjustment system will start automatically to adjust the imbalance.
2. Power supply is cut off Automatically:
1) If you did not start the program in 10 minutes after pressing the power supply button, the power supply will be cut off automatically.
2) After the washing is finished, alarm buzzes and the power supply will cut off automatically.
3. Child lock Function:
1) When child lock function is set, all the buttons will be locked including POWER. If the top lid is opened during the washing machine working, the washing will be stopped and give an alarm.
TECHNICAL DATA
Note:
Check the voltage, frequency and maximum load on your appliance's rating plate.
Models:
| Dimensions (in mm) | Weight (in kg) | Rated voltage | Rated power (in W) | Rated frequency (in Hz) | Maximum load (in kg) |
| 54 (L) X 56.5 (W) X 95 (H) cm | 32 Kg | 230V | 550 W | 50Hz | 7.0~8.0 kg |
Energy efficiency testing program:
Select Eco wash programme, select the water level- 10 for full load and after the water will filled in machine press the start/pause button to start the test.
WIRING DIAGRAM
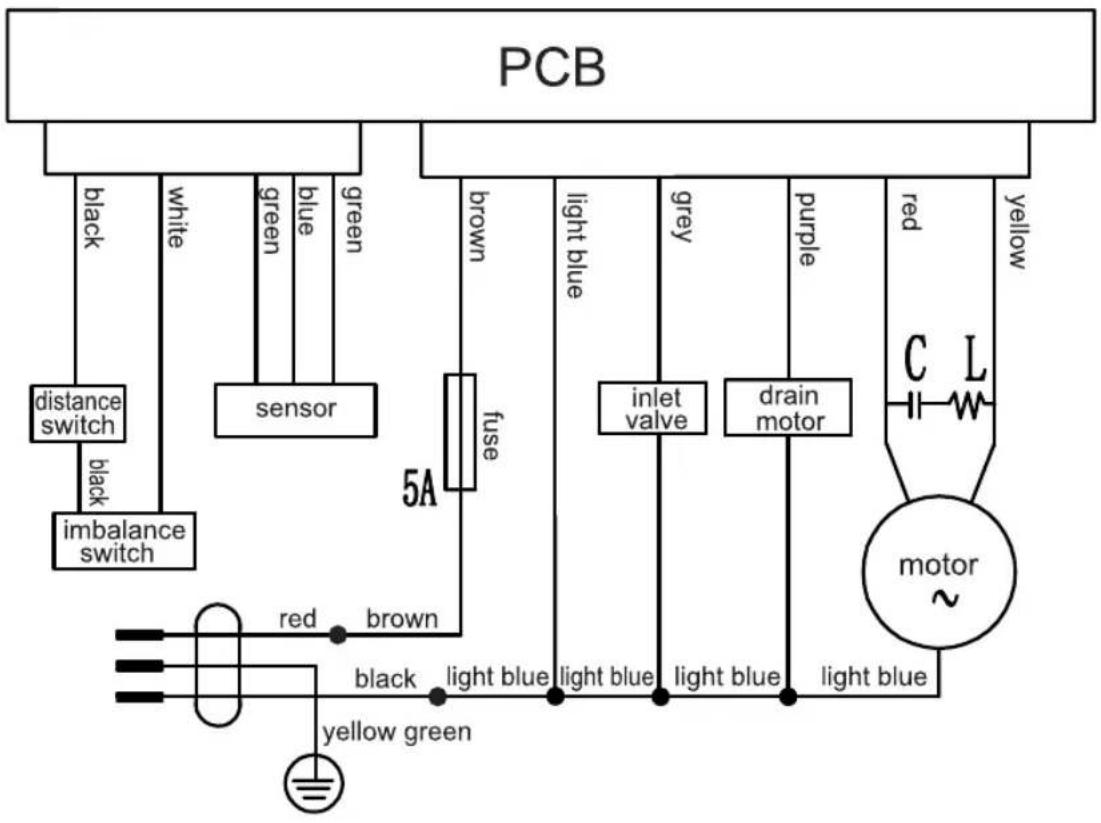
flowchart
graph TD
    A["PCB"] --> B["black"]
    A --> C["white"]
    A --> D["green"]
    A --> E["blue"]
    A --> F["green"]
    A --> G["sensor"]
    G --> H["5A"]
    H --> I["fuse"]
    I --> J["brown"]
    J --> K["red"]
    J --> L["brown"]
    K --> M["black"]
    L --> N["light blue"]
    M --> O["light blue"]
    N --> P["light blue"]
    O --> Q["light blue"]
    P --> R["light blue"]
    Q --> S["light blue"]
    R --> T["motor ~"]
    S --> U["motor ~"]
    V["red"] --> W["yellow"]
    X["blue"] --> Y["green"]
    Z["white"] --> AA["black"]
    AB["imbalance switch"] --> AC["black"]
    AD["red"] --> AE["blue"]
    AF["green"] --> AG["green"]
WARRANTY TERMS AND CONDITIONS
| Product | Standard warranty period | Warranty on parts |
| Top loading washing machine | 2 years | 10 years (Eco silence drive motor) |
- The warranty is confined only to the first purchase of the appliance and is non-transferable. This warranty card shall be presented to our staff at the time of service and the warranty shall be void if the warranty card is altered / tampered with or lost.
- The Warranty period (both Standard Warranty Period and Extended Warranty Period) starts from the date of purchase of the appliance.
- The warranty covers only manufacturing defect in material and workmanship that may arise despite normal operation and usage of the appliance, as prescribed in the instruction manual.
- Repairs, installations and removal of the appliance shall be carried out only by an Authorized Service Personnel, failing which this warranty will be void.
- In the event Of change Of address, the new address shall be intimated to the Authorised Service Center by calling our after-sales service. Enclosed after-sales service directory.
- Repairs & replacements of parts would be purely at the discretion of the Authorised Service Personnel only. The company's obligation under this warranty shall be limited to repair and providing replacement of defective parts only. It is hereby clarified that after the Standard Warranty Period, visiting charges will be applicable for all visits and the same will be borne by the customer. In the Extended Warranty period, in case the appliance needs to be transported to the Authorised Service Centre for repair, the transportation charges from and to the place of installation shall be borne by the customer.
- The customer shall provide a reasonable, sufficient and safe working space to access the appliances for service. The customer is liable to move away all blocking objects or move the appliance to an appropriate location with electricity/ water supply and drainage for testing of the appliance.
- In case repair cannot be completed onsite, the company reserves the right to carry the appliance to its authorised service centre and return the same after repair.
WARRANTY TERMS AND CONDITIONS
- In case of appliances installed beyond municipal limits of the jurisdiction of company's Authorised Service Center, all expenses incurred in transportation of the appliance or parts thereof from and to the company's Authorised Service Center, as well as expenses incurred on deputing of service personnel/ technician towards conveyance and other incidental expenses, will be borne by the customer.
- In case of repairs the appliance and/or the replaced spare part will be warranted only for the remaining of the original warranty period and the replaced components will become property of the company.
- The company shall be under no obligation or deemed to be in default for any delay or failure in performance resulting from causes beyond its reasonable control (e.g. strikes, floods, earthquakes etc.) including but not limited to delay in servicing due to non-availability of spare parts and / or accessories.
- In case of repair, the company owns the right to repair or replace the spare part, which are tested thoroughly to ensure the appliance is operational.
- Authorised Personnel appointed and trained by the company will provide installation, demonstration and repair services to the customer.
WARRANTY TERMS AND CONDITIONS
WARRANTY CARD
Customer's name: ____
Address:
City:
Pin:
State:
Mobile:
Email:
Model/E-Nr:
Serial No:
Date of Purchase:
Date of Expiry:
WARRANTY CARD - copy
Customer's name:
Address:
City:
Pin:
State:
Mobile:
Email:
Model/E-Nr:
Serial No:
Date of Purchase:
Date of Expiry:
Dealer's name:
Customer's Signature:
ENVIRONMENTAL PROTECTION
Dispose of packaging and the appliance in an environmentally responsible manner.
This appliance is certified in accordance with the guidelines on E-waste (Management) Rules 2022 which govern waste electrical and electronic equipment. The guidelines provide a framework for the return and recycling of used Appliances.
Note: This product doesn't contain any of hazardous substances as specified in the E-waste.
Do's
- Please visit our website to find out more details regarding e-waste disposal.
- Consult the authorized service center as to whether the Electronic Equipment can be repaired or not, before discarding.
- Consult the retailer about appliance take back schemes.
Don'ts
- Don't dump the discarded Electronic Equipment in the open or in any land fill site, as this will result in contamination of the soil and the ground water.
- Don't dispose Of the discarded Electronic Equipment in household bins or Municipal bins.
- The product is not meant for re-sale to any unauthorized agencies/scrap dealers.
- Don't keep any replaced spare parts from the product in an exposed area.
CUSTOMER SERVICE
If you cannot rectify the error yourself by turning the appliance off and on again, please contact our after-sales service.→ Enclosed after-sales service directory
We will always find an appropriate solution and, where possible, prevent the need for an engineer to visit.
Please provide the after-sales service with the product number (E no.) and the production number (FD) of the appliance.
E-Nr. ____ FD.
E nr. Product number
FD Production number
You can find this information:
On the inside of the lid and on the back of the appliance.
You can trust in the manufacturer's expertise.
Contact us for assistance. This will ensure that the repair is carried out by trained service engineers with genuine spare parts.
Helpline no.: 1800-266-1880
(Monday to Saturday - 8 am to 8 pm)
Email ID: service.in@bosch-home.com
Chat with us (WhatsApp):
+91-8451000555
DISPOSAL & RoHS DECLARATION

This product is RoHS compliant.
This marking indicates that this product should not be disposed with other household wastes. To prevent possible harm to the environment or human health from uncontrolled waste disposal, recycle it responsibly to promote the sustainable reuse of material resources. To return your used device for environmental safe recycling please use the collection systems or contact the brand help desk.
RoHS
COMPLIANT
Thank you for buying a Bosch Home Appliance!
Register your new device on MyBosch now and profit directly from:
Expert tips & tricks for your appliance
Warranty extension options
Discounts for accessories & spare-parts
Digital manual and all appliance data at hand
Easy access to Bosch Home Appliances Service
Free and easy registration – also on mobile phones:
www.bosch-home.com/welcome
Looking for help? You'll find it here.
Expert advice for your Bosch home appliances, need help with problems or a repair from Bosch experts.
Find out everything about the many ways Bosch can support you:
www.bosch-home.com/service
Contact data of all countries are listed in the attached service directory.
BSH Household Appliances Manufacturing Pvt. Ltd.
Arena house, 2nd floor, Main building,
Plot no 103, Road no 12,
MIDC, Andheri, Mumbai - 400 093
www.bosch-home.in