M.Zuiko Digital ED 150400mm F4.5 TC1.25x IS PRO - Lens OLYMPUS - Free user manual and instructions
Find the device manual for free M.Zuiko Digital ED 150400mm F4.5 TC1.25x IS PRO OLYMPUS in PDF.
Frequently Asked Questions - M.Zuiko Digital ED 150400mm F4.5 TC1.25x IS PRO OLYMPUS
User questions about M.Zuiko Digital ED 150400mm F4.5 TC1.25x IS PRO OLYMPUS
0 question about this device. Answer the ones you know or ask your own.
Ask a new question about this device
Download the instructions for your Lens in PDF format for free! Find your manual M.Zuiko Digital ED 150400mm F4.5 TC1.25x IS PRO - OLYMPUS and take your electronic device back in hand. On this page are published all the documents necessary for the use of your device. M.Zuiko Digital ED 150400mm F4.5 TC1.25x IS PRO by OLYMPUS.
USER MANUAL M.Zuiko Digital ED 150400mm F4.5 TC1.25x IS PRO OLYMPUS
date of issue 2020.07.
OLYMPUS

MICRO FOURTHS
OLYMPUS
04-取級説明書
10-INSTRUCTIONS
17- MODE D'EMPLOI
23-3 INSTRUCCIONES
29-05 BEDIENUNGSANLEITUNG
35-BE HCHCTPYKUIN
41-95 NAVOD KPOUZITI
47 - DA BETJENINGSVEJLEDNING
53-0AHHIE2
59-3JUHISED
65- KAYTTOOHJEET
71-UPUTE
77- HASNZALATI UTMUTATO
83-ISTRZIONI
89-INSTRUKCJIA
95-NORADIJUMI
101-AANWJZINGEN
107- INSTRUKSJONER
113-FL INSTRUKCJA
119-INSTRUÇÖS
125- INSTRUCTION
131- HCHCTPYKUN
137 - SK NAVOD NA POUZITIE
143-NAVODILA
149-SRUPUTSTVOZAUPOTREBU
155 - SV BRUKSANVISNING
161-TRALIMATLAR
167-IX IHCTPYKLIJ
178-45
179-使用說明書
185-国
191-40
197- W CAC HUONG DAN

取级説明書
Thank you for purchasing this Olympus product.
To ensure your safety, please read this instruction manual before use, and keep it handy for future reference.
Please use the latest firmware for the camera. Operations will vary depending on the camera. For more information, please visit our home page.
Contact the other manufacturer to mount the lens on another manufacturer's camera.
Precautions: Be Sure to Read the Following

Warnings: Safety Precautions
- Do not view the sun through the lens. It may cause blindness or vision impairment.
- Do not leave the lens without the cap. If solar light is converged through the lens, a fire may result.
- Do not point the camera lens at the sun. Sunlight will converge in the lens and focus inside the camera, possibly causing a malfunction or fire.

Precautions for Use
- Be sure to support the lens while it is attached to the camera. Supporting only the camera could result in damage to the lens mount or cause the lens to fall. It could also adversely affect splashproof and optical performance.
- When carrying the camera with the lens attached, use a strap attached to the lens, not the strap attached to the camera.
- When using a tripod, attach the tripod to the lens tripod mount, not to the camera.
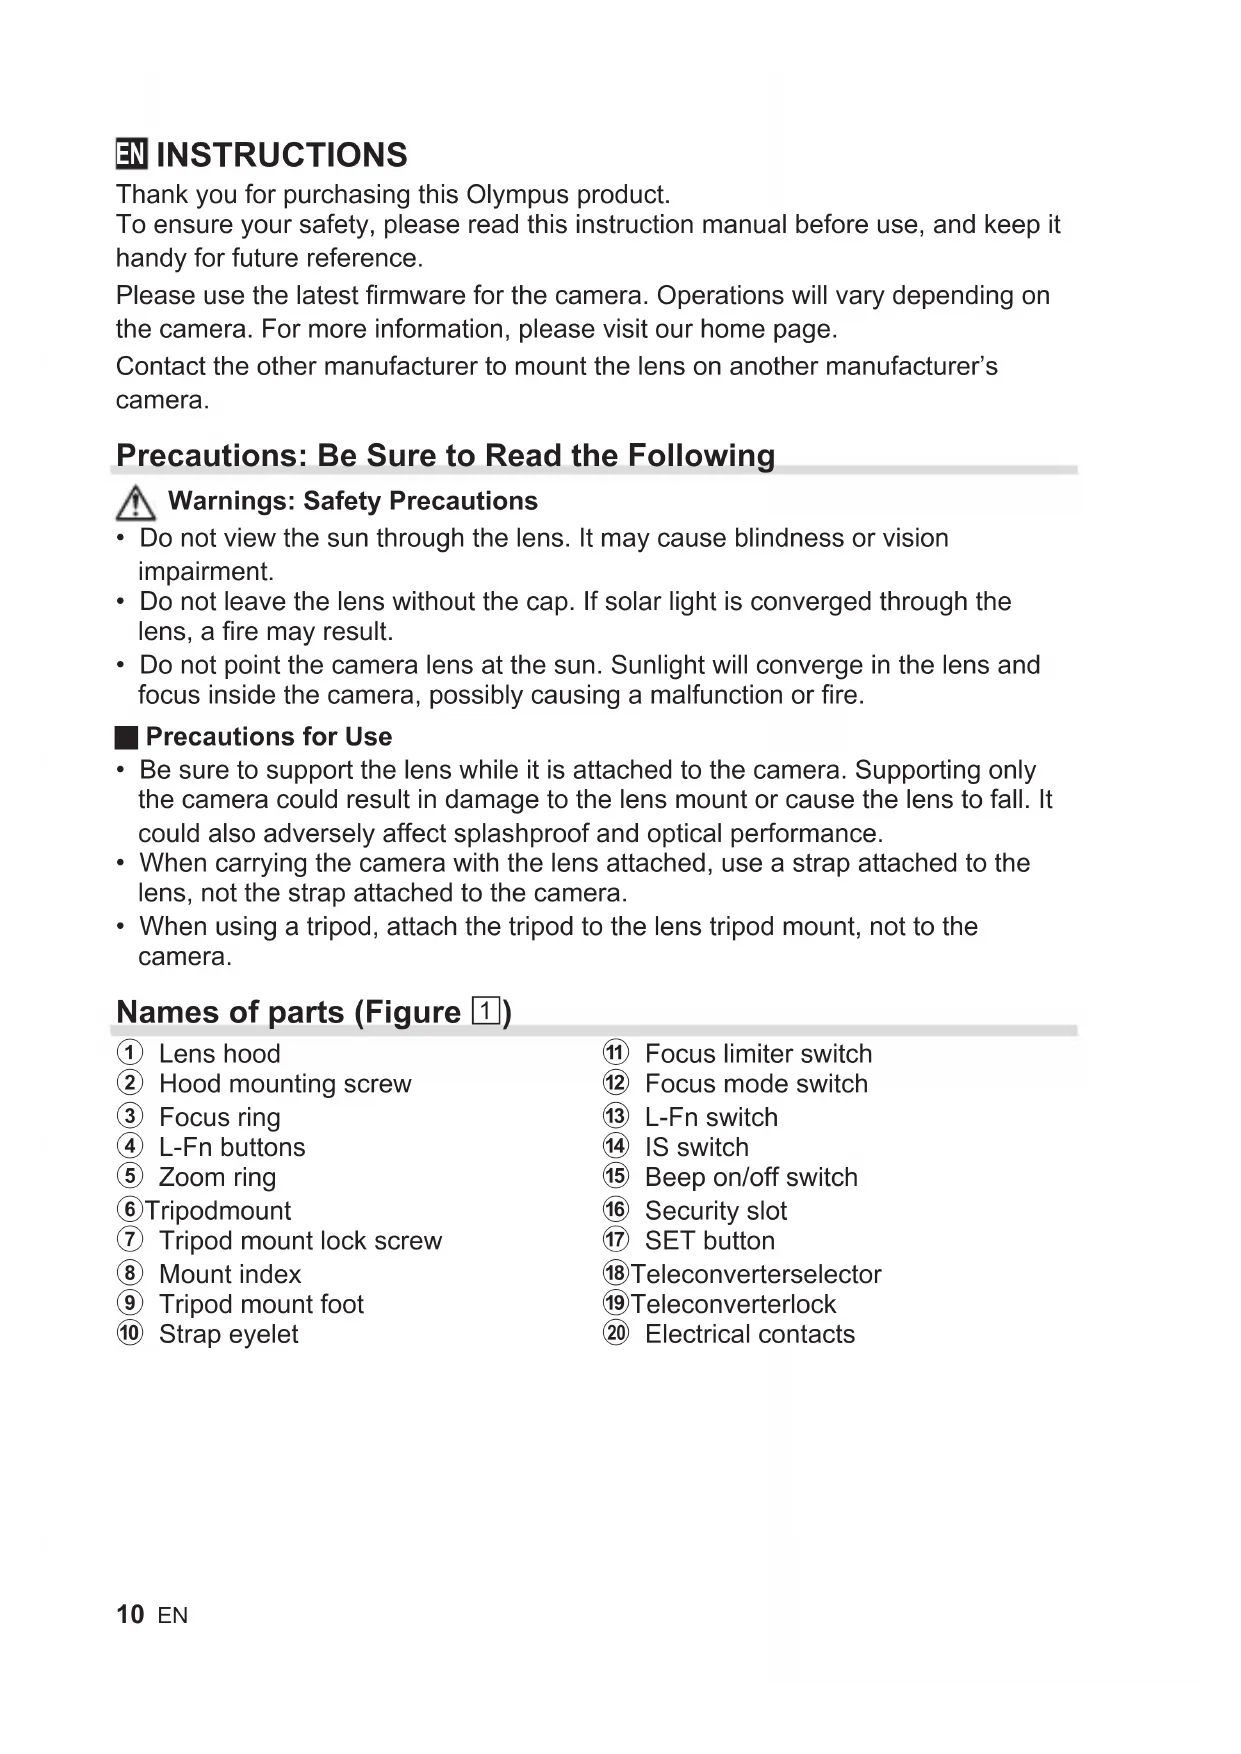
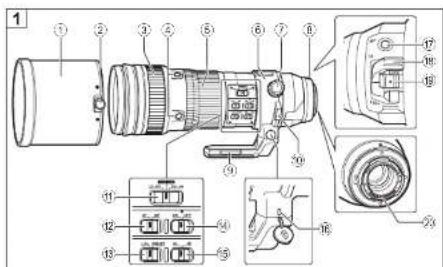
Names of parts (Figure 1)
① Lens hood
② Hood mounting screw
③ Focus ring
4 L-Fn buttons
⑤ Zoom ring
⑥ Tripodmount
⑦ Tripod mount lock screw
⑧ Mount index
⑨ Tripod mount foot
⑩ Strap eyelet
1 Focus limiter switch
12 Focus mode switch
13 L-Fn switch
14 IS switch
15 Beep on/off switch
16 Security slot
⑰ SET button
18 Teleconverter selector
19 Teleconverterlock
② Electrical contacts
Focus limiter switch
Sets the range of the photographing distance. Focusing is done within the range that is set.
Focus mode switch
Switches between AF/MF.
L-Fn switch
Choose the role played by the L-Fn buttons.
L-Fn: Pressing any of the L-Fn buttons suspends the autofocus operation and locks focus. Other roles can be assigned using camera controls.
PRESET: Press any of the L-Fn buttons to focus at a preset distance.
L-Fn buttons
The role played by the four L-Fn buttons depends on the position of the L-Fn switch. The selected role is performed by all four buttons.
SET button
The SET button can be used to save the current focus position for later recall.
IS switch
Turn image stabilization (IS) on or off.
ON: Stabilizing functions in the lens and camera operate.
The IS operates according to the IS setting in the camera.
OFF: Stabilizing functions in both the lens and camera are off.
Beep on/off switch
Turn preset focus beep notifications on or off.
Security slot
An attachment point for third-party security cables.
Focusing at a Preset Distance
A selected focus position can be saved for instant recall as described below.
Saving a Focus Position
1 Focus on the desired subject or at the desired distance.
2 Press the SET button.
- The lens will save the current focus position.
- If the beep on/off switch is in the (on) position, a beep will sound once to notify you that the focus position has been saved. Three beeps in succession indicate that the focus position was not saved; repeat Steps 1 and 2.
The saved position will be stored until a new focus position is saved.
Recalling the Saved Focus Position
1 Slide the L-Fn switch to PRESET.
2 Press an L-Fn button.
The lens will focus at the saved distance.
- If the beep on/off switch is in the (on) position, a beep will sound twice to notify you that the lens has focused at the saved distance. Three beeps in succession indicate that the focus position could not be recalled and that you will need to save a new focus position as described in "Saving a Focus Position".
Note that you may need to refocus if you change the focal length or the position of the teleconverter selector after saving the focus position.
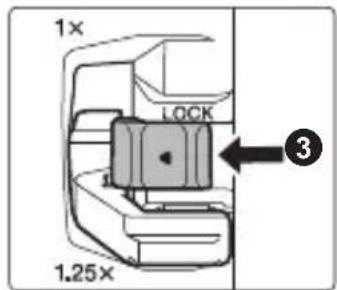
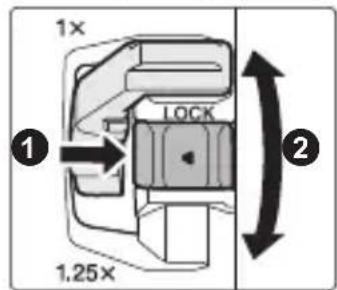
Using the Built-in Teleconverter
Rotate the teleconverter selector to switch between the 1 × and 1.25 × focal length positions.
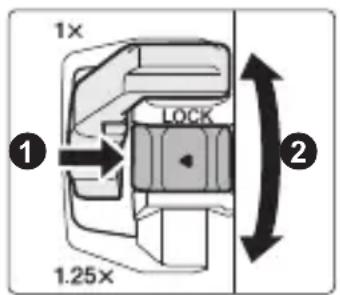
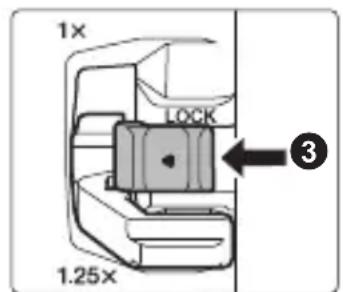
1 Unlock the teleconverter selector by sliding the teleconverter lock in the direction shown (1).
2 Rotate the teleconverter selector (2).
3 Slide the teleconverter lock in the direction shown to lock the teleconverter selector (3).
Cautions: Using the Built-in Teleconverter
- Refocus after using the teleconverter selector to change the focal length.
- Changing the position of the teleconverter selector may change the aperture. Adjust exposure compensation after using the teleconverter selector.
- To prevent unintended operation, be sure to lock the teleconverter selector after use.
-
Using the teleconverter selector under the conditions listed below will result in unintended operation, requiring adjustments to focus or the like. Do not use the teleconverter selector:
-
while the shutter button is pressed halfway or all the way down or
-
while operating the lens and/or camera.
-
Depending on the camera, the viewfinder or monitor may briefly go dark when you operate the teleconverter selector, but this is not a malfunction.
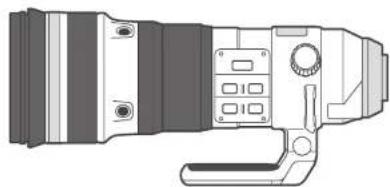
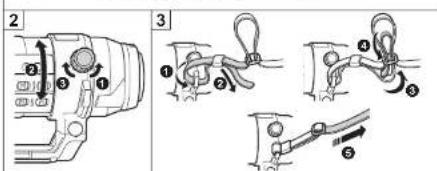
Using the Tripod Mount (Figure 2)
1 Loosen the tripod mount lock screw (1).
2 Rotate the lens as desired (2).
- There is a click position every 90^ to help orient the lens.
3 Tighten the tripod mount lock screw (3).
The tripod mount and tripod mount foot cannot be removed.
Attaching the Strap (Figure 3)
Attaching the Hood (Figure 4)/Reversing the Hood (Figure 5)
1 Loosen the hood mounting screw (1).
2 Slide the hood straight onto the lens (2).
3 Tighten the hood mounting screw to secure the hood in place (3).
Reverse the hood when it is not in use.
Attaching the Lens Cap (Figure 6)
Notes on Shooting
- Edges of pictures may be cut off if more than one filter is used or if a thick filter is used.
- When using a flash, flash light may be blocked by the lens body, lens hood, etc.
- Usage conditions may lower the number of images that can be captured.
- Sudden changes in temperature, as for example may occur when the lens is taken from a cold outdoor environment into a heated area, may cause condensation inside the lens. Placing the lens in a plastic bag prior to entering a heated area allows it to adjust gradually to the change in temperature.
- Do not touch electric contacts on cameras.
Maintenance
Blow dust off the lens with a commercially available blower. For the lens, wipe gently with a lens cleaning paper. Mold may form on the lens surface if the lens is left dirty.
Main Specifications
| Mount Micro Four Thirds mount | |
| Focal distance 150 mm – 400mm (equivalent to 300 mm to800 mm on a 35 mm camera) | |
| With built-in teleconverter 1 | 187.5 mm – 500 mm (equivalent to 375 mm to1000 mm on a 35 mm camera) |
| Max. aperture f4.5 | |
| With built-in teleconverter f5.6 | |
| Image angle 8.2° – 3.1° | |
| With built-in teleconverter 6.6° – 2.5° | |
| Lens configuration 18 groups, 28 lenses (built-in teleconverter4 groups, 7 lenses) | |
| Iris control f4.5 to f22 | |
| With built-in teleconverter f5.6 to f29 | |
| Shooting range | 1.3 m (51.2 in.) to ∞ (infinite) |
| Focus adjustment AF/MF switching | |
| Dimensionsø 115.8 mm/4.6 in. (maximum diameter) ×314.3 mm/12.4 in. (length) | |
| Weight 1875 g (66.1 oz.) (excluding hood and cap) | |
| Filter sizeø 95 mm | |
| Lens hood Slip on | |
This lens can be used with an M.ZUIKO teleconverter. For more information on compatible teleconverters and notes on combining them with the lens, please visit our home page.
- Specifications are subject to change without any notice or obligation on the part of the manufacturer.
Micro Four Thirds and the Micro Four Thirds logo are trademarks or registered trademarks of OLYMPUS CORPORATION.
Olympus will not be held liable for violations of local regulations arising from use of this product outside the country or region of purchase.
FCC Notice
This equipment has been tested and found to comply with the limits for a Class B digital device, pursuant to part 15 of the FCC Rules. These limits are designed to provide reasonable protection against harmful interference in a residential installation. This equipment generates, uses and can radiate radio frequency energy and, if not installed and used in accordance with the instructions, may cause harmful interference to radio communications. However, there is no guarantee that interference will not occur in a particular installation. If this equipment does cause harmful interference to radio or television reception, which can be determined by turning the equipment off and on, the user is encouraged to try to correct the interference by one or more of the following measures:
- Reorient or relocate the receiving antenna.
- Increase the separation between the equipment and receiver.
- Connect the equipment into an outlet on a circuit different from that to which the receiver is connected.
- Consult the dealer or an experienced radio/TV technician for help.
- Only the OLYMPUS-supplied USB cable should be used to connect the camera to USB enabled personal computers.
FCC Caution
Changes or modifications not expressly approved by the party responsible for compliance could void the user's authority to operate the equipment.
For customers in North America, Central America, South America and the Caribbean
Declaration of Conformity
Model Number : IM017/IM017-L
Trade Name : OLYMPUS
Responsible Party : OLYMPUS AMERICA INC.
Address: 3500 Corporate Parkway, P. O. Box 610, Center Valley, PA 18034-0610, USA
Telephone Number: 484-896-5000
Tested To Comply With FCC Standards
FOR HOME OR OFFICE USE
This device complies with part 15 of the FCC Rules. Operation is subject to the following two conditions:
(1) This device may not cause harmful interference, and
(2) this device must accept any interference received, including interference that may cause undesired operation.
CANICES-3(B)/NMB-3(B)
Technical Support (U.S.A. / Canada)
24/7 online automated help : http://www.olympusamerica.com/support
Phone customer support: Tel.1-800-260-1625 (Toll-free)
Our phone customer support is available from 9 am to 9 pm (Monday to Friday) ET
E-Mail: distec@olympus.com
For customers in Europe

This symbol [crossed-out wheeled bin WEEE Annex IV] indicates separate collection of waste electrical and electronic equipment in the EU countries.
Please do not throw the equipment into the domestic refuse.
Please use the return and collection systems available in your country for the disposal of this product.
- European Technical Customer Support
Please visit our homepage
http://www.olympus-europa.com
or call:
Tel. 00800-67108300 (Toll-free)
+49 40 - 237 73 899 (Charged)
The software in this lens may include third party software. Any third party software is subject to the terms and conditions, imposed by the owners or licensors of that software, under which software is provided to you.
Those terms and other third party software notices, if any, may be found in the software notice PDF file stored at
http://www.olympus.co.jp/en/support/imsg/digicamera/download/notice/notice.cfm
FR MODE D'EMPLOI
HannMeHOBaHHa Ha qactnte (Fnrypa 1)
① CehnHK Ha o6eKtNbA
② MoHTaXeH BnHT Ha CeHHnKa
③ ΓρυνΗ 3a φόκύςηρα
④ L-Fn6yToHn
⑤ Пь tcTeH 3a yBeJIInuYeHne
⑥ CTOnKa 3a CTAtNB
⑦ 3aKJIIOUbBaU, BnHT 3a CToIka 3a CTAuB
⑧ MoHTaxeH MapKepe
9 Πeta Ha cToiKa 3a cTaTINB
10 OTBOP Ha JIeHTata 3a HOceHe
11 PpeBknIOyBaTeJ 3a orpaHnUbaHe Ha oKyca
12 PpeBknIOyBaTeI 3a peKIMn Ha OKycupaHe
13 L-Fn npebKniOyBaTeI
14 IS npebKJIIOUbaTeJ
15ПревкнIOчВATEЛ 3a BKN./N3KЛ.Ha 3ByKOBnA CnHaJ
16 Cnot 3a cnryphnoct
⑰ ByToH SET
18 CeNeKTop Ha TeNeKOHBepTopa
19 3aKIOUbaHe Ha TeNEKOHBepTopa
20 EneKtpnueckn KJemn
PpeBkIIOUbaTeJ 3a OrpaHnUaBaHe Ha fokyca
3aaba 0xbata Ha pa3ctoHHeTo 3a 3aChemaHe. OkycupaHTo ce n3BbPwBa B pAMKnte Ha 3aadeneHnO6xBaT.
PpeBkIIOUyBaTeJ 3a peXIMn Ha fokycupaHe
IpeBkJIIOUBA MeKdy aBTOMaTnueH n pbueH (AF/MF).
L-Fn npeBkIIOUbaTeJ
I36epete yHKunraTa, KOrTo ue n3nbJnRaBat 6yTOHnte L-Fn.
L-Fn:HaTnCKaHTo Ha KOIto N da e ot 6yToHnte L-Fn npEkpataBa aBTOMaTHNHO To fokycupaHe n 3akIIOvBa fokya.C nOmoTuHa KOHTpONTe Ha fotoanapata Morat da 6bDat 3aadaeHN dpyrn poln.
PRESET: Hatachete KoTo n da e ot 6yToHnte L-Fn 3a foKycipaHe Ha 3adaedeHO pa3CTOHNHe.
L-Fn 6bytoHn
2 HaTnchete 6yToHa SET.
- 06ekTnBbT Ⅲe 3ana3n Tekyuata NaosnaHa fokya.
- Ako npeBknIOuBaTeTn 3a BkN./n3Kn. Ha 3ByKOBn CnHaN e Ha nO3nUra (BKn.) 3ByKOBnT CnHaN Ie npo3Byu N BeDhJx, 3a Da BN yBeDOMN, Ye nO3nUraTa Ha φokyc a e 3ana3eHa. TpN nocJeDoBATELH N 3ByKOBn CnHaN o3HaayBaT, ye nO3nUraTa Ha φokyca He e 6nla 3ana3eHa; nobTopeTe cTbKn 1 n 2.
3anameteHaTaNo3nueIe Ce 3ana3n,doKato He 6bJe 3anameTeHa HOBa No3nueHaΦokyca.
N3BnKBaHe Ha 3anaMeTeHaTa No3nua Ha φokyca
1ПьзHeTe L-Fn npeBknOuBaTeЯ Ha PRESET.
2 HaTnchHeTe 6yToHa L-Fn.
- 06eKtNBbT ue φokycupa Ha 3ana3eHOTo pa3CTOaHne.
- Ako npEbkIIOUbATEJIaT 3a BkN./n3KJI. Ha 3ByKOBna CnHaN e Ha nO3nCn (BKn.), 3ByKOBnA T CnHaN Ie npO3ByuAba DBA nbTN, 3a Da BN yBeDOMn, Ye obekTINBbT e fOKucpaJn Ha 3ana3eHOTo pa3CToHnne. TpN nocJeDoBaTeHNn CnHaJa O3HaUaBaT, Ye nO3nUraTa Ha fOKyCa He MoKe da Ce n3BnKa OT nAmETTa n Ye Tpr6Ba Da 3ana3nte HOBa nO3nCnHa fOKyCa, KaKTo e ONncAoB "3ana3BaHe Ha nO3nCnTa Ha fOKyCa".
Obphe TBnmaHne, Ye moKe da ce HanoKn da fokycupaTe NOBtOPO, aKO npomeHnte fokychoto pa3ctoHne nn no3ueta Ha TelekeOHbepTopa, cNei KaTO 3ana3nte no3ueta Ha fokyca.
OsbpHeTe cEHnka, KOraTo ToH He Ce N3NoJ3Ba.
NocTaBЯHe Ha KaNaUkKaTa Ha oBeKtNbA (Фиrgypa 6)
3a6eJekn OTHOCHO CHMaHeTo
KpanaTaHa CHIMKITE MOKe Da Ce NOBpeT, aKO Ce n3NoJ3BaT NOBeue OT eINH cNITbP INIcNITbP C NtTeH PbCTeH.
- Пи n3noJ3BaHe Na CBeTKaBnca CBeTlnHaTa MoKe Da 6bde 3aceHueHa OT obekTnBa, ceHHnKa n np.
- YcnoBnraHa n3noJ3BaHe MoRaT Da HamaJr 6poHa n3o6paXeHnra, KOnTo Morat Da ce 3aChemaT.
- Pe3KITE TemnepaTyPhN npomeH, KOnto Morat Da ce noBrt, KOrato Hanpimep o6eKtNbT 6bJe npemecTeH OT CTydeHa BbHsHa CpeDa B 3aToPnHeo MxCTO, MORAT Da npuHrT KOndeH3aunB O6eKtNa Ha foTOanapata. NocTabrHe Ha o6eKtBa Ha foTOanapata B HauNoHOBA TOp6nUka npedn Bn3aHe B 3aToPnHeo MxCTO My No3BOJRA NOCTeHNO Da Ce akImMaTHn3npa CnopeD npomHaTa Ha TemnepaTypaTa.
He doKocBaIte eIeKtpnuecknte KIemHa KaMepata.
PoaepbXka
I3dyxaIte npaxa ot obekTbA C NOMOuTa Ha npednaHa Ha na3apa rymeHa dyxaIka. I36bpweTe obekTbA BHNMaTeHNo CX xapTn 3a NOUcTbaHe Ha obekTbN. Ako obekTbBt ce OCTaBn 3aMbpcen, no Hero MoKe da ce pa3Bne PnceH.
OCHOBHN TexHnueckn DaHHN
Micro Four Thirds n Ioroto Ha Micro Four Thirds ca TbproBckn Mapkn nI npereNcTprpaHn TbproBckn MapKn Ha OLYMPUS CORPORATION.
Olympus He NOEMA OTROBOPHOCT 3a HapuShen Ha MeCTHnTe pa3nopei6n, npOn3TuHaun OT n3NoJ3BaHeTo Ha npOdyKTA n3BbH CTPaHaTa nn peRnoHa Ha NOKyPkA.
3a KJIneHTN B Ebpona

To3n cIMBOJ [3auepkhata kofa 3a 6oknyk cnopei DnpeKTHBaTAta 3a OTnaDbuHOTo eNeKtpnuecko n eNeKtpoHNO o6OpyDbaHe WEEE, npINOxKeHne IV] yka3Ba pa3deJHOTO cb6bnpaHe Ha OTnaDbuHo eNeKtpnuecko n eNeKtpoHNO o6OpyDbaHe B cTpaHnte ot EC.
He n3xBbpyeqa 3aeDHO C 6ntOBITE OTnAdbu.3a n3XBbpyrHTo HA TO3N pOdyKT n3NoJ3BaIte CNCTeMaTa 3a BpBuahe N cb6npaHe Ha OTnAdbu, DeiCTBaUa BB BaWata CTpaHa.
- Ebponeecka texnuecka nooppbjka 3a KJneHTN
Iocetete Haata yebctpaHua
http://www.olympus-europa.com
NIN NO3BbHeTe Ha
Tei. 00800 - 67 10 83 00 (6e3nlaTHo)
+49 40 - 237 73 899 (TaKcyBa ce)
CoΦTyepbT B TO3N ObekTnB MoKe Da BKNIOUBy CoΦTyep, CO6CTBeHOCt Ha TpeTa CtpaHa. BCEKn CoΦTyep, CO6CTBeHOCt Ha TpeTa CtpaHa, e npedMet Ha ycNoBnTa, HANOJcHn OT CO6CTBeHnCHTe IIN JInCeH3OdaTeJInte Ha TO3N CoΦTyep, n pRn KOnTO CoΦTyepbT BN Ce npedocTabr.
Te3n ycnoBna, kaTOn n npytn 3a6eJekn no OTHoWeHne Ha npTeXaBaHn o TpeTn cTpaHn coOfTyep, aKO nMa TaKnBa, mOrat da 6bDaT hamepeHn B PDF paINa 3a coOfTyepa, HJIuYeH na
http://www.olympus.co.jp/en/support/imsg/digicamera/download/notice/notice.cfm
CS NÁVOD K POUŽITÍ
Dekujeme vam za zakoupeni tohoto vyrobku Olympus.
Specifications principal
HaHMeHOBaHnJa DeTaJIeN (pnc. 1)
①Бленьдаобъektива
② BnHT KpenneHn 6JehDbI
③ KoIbIcOΦOKyCnPOBKn
④ KhoNkL-Fn
⑤ KoIbUo TpaHcΦokaTopa
6 KpenneHne nla WtataNa
⑦ 1KcnpuyouiBnHT KpeHnIyIaTtBa
8 Yka3aTeIb KpeIeHnIa
9 IaIka KpenJIeHnI dIy ITuTaNBa
10 NeteIbka dIpapeMeIka
11 PepeKIOUaTeIb orpaHnHTeJI KOKyCnPOBKn
12 PepeKIOUaTeJIb peKIMa OKYCINPOBKN
13 PepeKluOuataTeIb L-Fn
14 NepekeIouaTeJIb IS
15 PepeKJIIOUaTeIb BKJIIOUeHnIy/ BbIKJIIOUeHnI 3ByKOBOrO CnHaJa
16 THe3do Jn npOTNBOKpaxHOro Ka6eJra
17 Khonka SET
18 NpeeknouaTeNb TeNeKOBepTepa
19БлOKИРOBKa TeJIeKOHBepTepa
20 ΘЯкtpnueckne KOHTaKtbl
IpeeknouaTeIb orpaHnUHTeJIy fokycnpOBKn
3aadaet dnaana3OH paccctoHnA FOOTOCbEMKn. FOKycnpOBKa BbINOJIHReTcB npeJeJax 3aDaHHoro dnaana3OHa.
IpeeknouateIb pexma fokycnpOBKn
Ipeeknouaet Mekjy AF/MF.
PepeklouateIb L-Fn
Micro Four Thirds n Iorotn Micro Four Thirds yBnIOTc TOBapHbIMN 3HaKaMn nn 3apeTnpoBaHHbIMN TOBapHbIMN 3HaKaMn OLYMPUS CORPORATION.
KOMnHaNya Olympus He HecET OTBETCTBEHHOCt b 3a HapuWeHnA MeCTHbIX npaBnI, BO3HNKwne B pe3yJIbTaTe NCNoJIb3OBaHnA 3TOrO pOdyKTa BHe CTpaHbI NJIpeRHOHa erO npno6peTeHnA.
Для поуралей вЕрone

3TOT CnMBOJ [pepeepKHyTBm MycOpHbI 6aK Ha KOleCnKax, DnpeKTHBa EC o6 otXoJax WEEE, npInnoKeHne IV] yka3bIBaet Ha pa3deJIbHbI c6op Mycopa dJa 3JeKtpueeCKoro n 3JeKTPoHHoro 06OpyIDOBAHnB CtpaHax EC. IoxaIynCTa, He Bbl6pacbBAiTe 3TO yCTPOINCTBO BMeCTe C 6bITOBIMN OTXODAMn. IoxaIynCTa, dJa yTnIn3aun DaHHoro npOdykTa noJb3yIteCb DeiCTByIOUImn B BaWei cTpaHe cnCTeMaMn BO3Bpata N c6opa dJa yTnIn3aun.
- TexHnuecka noDpekka noIb3ObaTeJeB Ebpone
ПосетиTe haшу стpanиу в ИntepнeTe: http://www.olympus-europa.com Ип NOЗBOHnTe:
ТeI.: 810-800 67 10 83 00 +49 40 - 237 73 899 (плаTHо)
Ha3Bn DeTaJeN (PncyHOK 1)
①Бленьдаоб'ekТиВа
② ΓΒνΗΤ κρίπηνΗ ἔ Μεύημι
③ KInbueΦOKyBaHHa
④ KhonKu L-Fn
⑤ KInbueMacwTa6yBaHHa
⑥ KpinJIeHHaIITaTnBa
⑦ 1KcyuOyI rBnHT KpInnHnHnTAtnBa
⑧MiTka KpinneHnHa
9 Jana Ka KpinnneHHa TATnBa
10 ByuKo dny pemHcra
11 Peremkauch obmexyBaua okycyBaHHa
12 Nepemnkau pekmy okycbaHHa
13 Nepemka L-Fn
14 Nepemkaay IS
15перемкач 3ByKOBOrO cnHaJy
16 ⅢiHnHa dny KpInnHeHHa 3anobixxHoro TPOcNka
17 Khonka SET
18 CeNeKTop TeNeKOHBepTopa
19 BLOKYBaHHaTeNEKOBHePTopa
20 EneKtpnHi KOHTaKTn
YCTaHOBJIIOE iIana3OH IIN BIDCTaHI 3HOMKn. FOKyCBaHHr 3iINCHIOCTbCBy MEXAX YCTaHOBJIeHOrO iIana3OHy.
2 Hatncihb KhoNky SET.
- O6'ekTnB 36epeKe noToUHe noJoxKeHHa okyca.
- RaKIo nepeMnKauch 3ByKOBOrO CnHAnly BCTaHOBNeHO B NOLOXeHHa (YbIMKHeHO), CnHAn npOnyHaC OOnH pa3, NobiDOMJryOuH, IIO NOLOXeHHa FOkUca 36ePexEHO. Tpr 3ByKOBi CnHAnn Nocnilb CbiDuaTb npo Te, IIO NOLOXeHHa FOkUca He 6byNo 36ePexEHO; NobTopitb KpOKn 1 i 2.
36epexe He nooxeHHa 3aIIuataTumetbCra He3miHnM,doKHe 6yde 36epexeHO HOBe nOIOxehnA OKyca.
Buknk 36epexeHoro noLoXeHHa fokyca
1 Nepecyhble Te nepemkau L-Fn y noJoxeHH PRESET.
2 HaTnCiHtB KhoNkY L-Fn.
- O6'ekTnB cΦokycetybca Ha 36pekehi BiDCTaHi.
-Якшо посяпимьач 3ByKOBOrO CnHany BCTaHOBJIeHnВ NOLOXeHHa (yBIMKHeHO), CnHaN npolyHaC dBiHi, nobIDOMJIOUCh, lo 6'EKTNB cfoKycyBaBCa Ha 36epexeHi BicTaHi. Tpu 3ByKobI CnHaN nocinb CBiDaTb npo Te, lo NOLOxeHHa FOkyca He BdANoCBAKNIkaTu i Bam 6yde noTpio 36epeTn HOBe NOLOXeHHa FOkyca, k OnncAoH B po3diI «36epexeHHa NOLOXeHHa FOkyca».
3ayBaXTe, 6o Bam MoKe 6yTu NoTpi6Ho NOBtOPO CcOKycyBaTnC8, kUo BV 3MiHnte fokucHy BiDCTaHb a6o NIOxKeHHa CeJIeKTopa TeJIeKOHBeptopa nicra 36epexehnI NIOxKeHHa fokyca.
aagaae aae aee aee aee aee aee aee aee aee aee aee aee aee aee aee aee aee aee aee aee aee aee aee aee aee aee aee aee aee aee aee aee aee aee aee aee aee aee aee aee aee
aaiiaal 45 jll jol jil g l k
(2)
1
2
·a#
3
a aal aal aal aal aal aal aal aal aal aal aal aal aal aal aal aal aal aal aal aal aal aal aal aal aal aal aal aal aal aal aal aal aal aal aal aal aal aal aal aal aal aal aal aal aal aal aal aal aal aal aAL
aal
J 15
120 1
J 1
.×1.25,×1JgLgJgJgJgJgJgJgJgJgJgJgJgJgJgJgJgJgJgJgJgJgJgJgJgJgJgJgJgJgJgJgJgJgJgJgJgJgJgJgJgJgJgJg
J 1 J 1 J 1 J 1 J 1 J 1 J 1 J 1
S OBC = S BOC + S_ BOC
(1)
11
a#dallcbc ①
J 12
1 ②
L-Fn ③
yjzjj ③
IS 14
L-Fn ④
jai 15
5
jlaia 16
6
SET ⑦
J ⑦
aJ 18
S j 8
aJaa Joo Ja 19
JzjL JdJI ⑨
yS11 Jaiblai 20
joll 10
CHT使用說明書
感謝您購買奥林巴斯產品。
ON: RENZ AND KAMARALA OF THE ANARCHOCHING.
1 Hua T
2 Rienz to hae Hndt to kto
3.
Ie RnM.ZUIKO bllrRerRrTtoHtRtRtRtRtRtRtRtRtRtRtRtRtRtRtRtRtRtRtRtRtRtRtRtRtRtRtRtRtRtRtRtRtRtRtRtRtRtRtRtRtRtRtRtRtRtRtRtRtRtRt
Micro Four Thirds & Micro Four Thirds
·aayaaeyyaaeyyaaeyaaeyaaeyaaeyaaeyaaeyaaeyaaeyaaeyaaeyaaeyaaeyaaeyaaeyaaeyaaeyaaeyaaeyaaeyaaeyaaeyaaeyaaeyaaeyaaeyaaeyaaeyaaeyaaeyaaeyaaeyaaeyaaeyaaeyaaeyaaeyaaeyaaeyaaeyaaeyaaeyaaeyaaeyaaeyaaeyaaeyaaeyaaeyaaeyaaeyaa
- 570701701701701701701701701701701701701701701701701701701701701701701701701701701701701701701701701701701
#
- 77777777777777777777777777777777777777777777777777
·
· 1
aavuaunu(1)
1
②
③
④ L-Fn
5
⑥
⑦
⑧
⑨
10
11
12
13 L-Fn
14
15
16
17 SET
18
19
②
aannnnnnae
nunnnnnaaunnsnnw nnnaanrnnnss
a
n
L-Fn
L-Fn
L-Fn: nssnn L-Fn u nnnae aen nnnnns wneauu neunnuuauuauu
PRESET: nauu L-Fn 1 wonwawwnnnn
L-Fn
nunnnnuu L-Fn uuaaueuguuuuaaun L-Fn uuvauuyn
SET
VNTANATNNTI SET WAAUUNNNWNAUUAUUUUUU
IS
(IS)
ON: 11nnsvnuuauunnuuunnuuauauauauuauuauuauu uIS aunnuuuuuuuuuuuuuuuuuuuuuuuuuuuuuuuuuuuuuuuuuuuuuuuuuuuuuuuuuuuuuuuuuuuuuuuuuuuuuuuuuuuuuuuuuuuuuuuuuuuuuuuuuuuuuuuuuuuuuuuuuuuuuuuuuuuuuuuuuuuuuuuuuuuuuuuuuuuuuuuuuuuuuuuuuuuuuuuuuuuuuuuuuuuuuuuuuuuuuuuuuUU
OFF: 1nnnnaaannnnnnnnnnnnnnnnnnnnnnnnnnnnnnnnnnnnnnnnnnnnnnnnnnnnnnnnnnnnnnnnnnnnnnnnnnnnnnnnnnnnnnnnnnnnnnnnnn
a/
1
2
y
nW
ywnnnnnae nn nnuwne neanrnnnrnnnne
nuiunuunw
1 Wnwnnnn nn nnnnnnnnnnnnnnnnnnnnnnnnnnnnnnnnnnnnnnnnnnnnnnnnnnnnnnnnnnnnnnnnnnnnnnnnnnnnnnnnnnnnnnnnnnnnnnnnnnnnnnnnnnn
2 nau SET
aunauunnnuuWna
- nnaa/1naiuuaaunnu (10) 1uauuunnuuau u uuuuunnuu uuuuuuuuuuuuuuuuuuuuuuuuuuuuuuuuuuuuuuuuuuuuuuuuuuuuuuuuuuuuuuuuuuuuuuuuuuuuuuuuuuuuuuuuuuuuuuuuuuuuuuuuuuuuuuuuuuuuuuuuuuuuuuuuuuuuuuuuuuuuuuuuuuuuuuuuuuuuuuuuuuuuuuuuuuuuuuuuuuuuuuuuuuuuuuuuuuuuuuuuuUU
aannananaananaananaananaananaananaananaananaananaananaananaananaananaananaananaananaananaananaananaananaananaananaananaananaananaananaananaananaananaananaananaananaananaananaananaananaananaananaananaananaananaananaananaananaananaananaananaananaananaananaanara
http://www.olympus.co.jp/en/support/imsg/digicamera/download/notice/notice.cfm
CÁC HU'ONG DÁN
Cám on ban dā mua san phám Olympus nay.
Dé dam bao an toan, vui long doc sach huóng dān su dung nay that ky truck hi dung, va giu sach trong tam tay de tham khao sau nay.
Vui long su dung firmware moi nhat cho may anh. Cac hoat dong se khac nhau tuy thuoc vao may anh. Vui long truy cap vao trang chu cua chung toi de biét them thong tin.
Lapl Duy deo (Hinh 3)
Lap Nap ong kinh (Hinh 6)
Ghi chu vè viêc chup
- Céc canh cua anh chup có the duoc cat bo néu su dung nhieu hon môt bo loc hoac su dung bo loc day.
Khi su dung flash, den flash co the bi chan boi than ong kinh, loa che nang, V.V...
Dieu kien su dung co the lam giam so luong anh co the chup duoc.
Tinh trang thay doi dot ngot vê nhiet do, ví du nu hú co the xay ra khi ong kinh duoc dura tu ngoài troi lanh vao khu vu c nong, co the gay ra ngung tu bêntron gong kinh. De ong kinh vao tui nhua truc o khi vao khu vu c nong de ong kinh diu chinh dan theo su thay doi nhiet do. - Khong cham vao tiép diem dien trén may anh.
Baoquan
Thoi sach bui trén ong kinh bang dung cu thoi bui co san. Dloi vovi ong kinh, nhé tay lau bang giay lau ong kinh. Nam moc co the hinh thanh trén be mát ong kinh néu ong kinh bi ban.
Cac dac diem ky thuat chinh
| Ng amendment Ng amendment Micro Four | Thirds |
| Tiếu cúp 150 mm - 400 | mm (tú順 duong tür 300 mm dén 800 mm trèn may anh 35 mm) |
| Vérique bô chuyén doi tù xα gán sàn | 187,5 mm - 500 mm (tú順 duong tür 375 mm dén 1000 mm trèn may anh 35 mm) |
| Khàu do tí发展目标 f4.5 | |
| Vérique bô chuyén doi tù xα gán sàn | f5.6 |
| Góc anh 8,2° - 3,1° | |
| Vérique bô chuyén doi tù xα gán sàn | 6,6° - 2,5° |
| Cάu先进技术 kinh 18 | nhém, 28 tháu kinh (bô chuyén doi tù xα gán sān có 4 nhím, 7 tháu kinh) |
| Kiên soat mân sân f4.5 dén f22 | 5 dén f22 |
| Vérique bô chuyén doi tù xα gán sàn | f5.6 dén f29 |
| Khoản cháp chup | 1,3 m dén ∞ (vô cúc) |
| Diếu chinh lát nét Chuyén doi AF/MF | Chuyén doi AF/MF |
| Kích huếc 0 115,8 mm (dòng kinh tói da) × 314,3 mm (chihu dài) | khòng bao gòm loa che và nám) |
| Trùng lrtc 1875 g (khòng bao gòm loa che và nám) | khòng bao gòm loa che và nám) |
| Kích huếc bô lóc 0 95 mm | 95 mm |
| Loa che nang Trú试点工作 trèn | Trú试点工作 trèn |
Ong kinh nay có the duoc su dung voi bo chuyen dai tam xa M.ZUIKO. Vui long truy cap trang chu cua chung toi de biet them thong tin ve bo chuyen dai tam xa tuong thich va luu y vé két hop thiet bi nay voi ong kinh.
* Dác diem ký thai sê thay doi khòng bó truc hoac khong có bát ký nghia vu nào tú phía nhà sân xuát.