
Klang bar5 mr - Soundbar LOEWE - Free user manual and instructions
Find the device manual for free Klang bar5 mr LOEWE in PDF.
| Product type | Soundbar with wireless subwoofer |
| Brand | Loewe |
| Model | Klang bar5 mr |
| Dimensions (W x H x D) | 1200 x 71 x 160 mm |
| Weight (soundbar) | 6.5 kg |
| Weight (subwoofer) | 8.8 kg |
| Power supply | 100 V – 240 V AC, 50/60 Hz |
| Total output power | 220 W RMS |
| Frequency response (soundbar) | 60 Hz – 20 kHz |
| Frequency response (subwoofer) | 35 Hz – 150 Hz |
| HDMI connectivity | 1 HDMI input (eARC/ARC) + 2 HDMI inputs |
| Supported audio formats (HDMI) | Dolby Atmos, Dolby Digital, DTS, DTS:X, LPCM |
| Bluetooth | Version 4.2 + EDR, A2DP and AVRCP profiles |
| Wi-Fi | IEEE 802.11 a/b/g/n/ac |
| Built-in Chromecast | Yes |
| AirPlay 2 | Yes |
| Multiroom | Yes, via DTS Play-Fi |
| Special features | Night mode, preset equalizer, surround mode, auto standby |
| Additional inputs | Optical, AUX 3.5 mm, USB (MP3) |
| Wireless extension WDAL 2.0 | Up to 6 external speakers |
| Ambient temperature | 5°C to 35°C |
| Relative humidity | 20% to 80% (non-condensing) |
| Power consumption in standby | < 0.5 W |
| Maintenance and cleaning | Unplug before cleaning; use a dry cloth only |
| Safety | Double insulation (class II); do not open; do not expose to water |
| Remote control batteries | 2 x CR2032 (included) |
Frequently Asked Questions - Klang bar5 mr LOEWE
User questions about Klang bar5 mr LOEWE
0 question about this device. Answer the ones you know or ask your own.
Ask a new question about this device
Download the instructions for your Soundbar in PDF format for free! Find your manual Klang bar5 mr - LOEWE and take your electronic device back in hand. On this page are published all the documents necessary for the use of your device. Klang bar5 mr by LOEWE.
USER MANUAL Klang bar5 mr LOEWE
natural_image
Modern living room interior with a large TV, wooden flooring, and minimalist furniture (no visible text or symbols)DE Umfassendes Benutzerhandbuch
EN Comprehensive user guide
NL Uitgebreide gebruikershandleiding
FR Guide de l'utilisateur complet
IT Guida utente completa
ES Guía completa del usuario
PT Guia exaustivo do utilizador
PL Kompleksowa instrukcja obstug
CS Kompletní uživatelská příručka
SK Komplexná používatelská príručka
LV Visaplyveroša liejolāja rokasgrāmala
LT Bendrasis naudoj mo vadovas
ET Üdine kasutusjuhend
DA Omfattende brugervejedning
SV Omfaltande användarhandbok
FI Kattava kayttoopas
NO Detaljert bruksanvisning
HR Sažeti vodič za korisnike
SL Popoln uporabniški priročnik
SQ Uchëzues githëpërfshirës i përdoruesit
RO Ghid de utilizare detaliat
EL Συνοπτικός οδηνός χρήσης
RU Общее руководство пользователя
UK Докладний посбник користувача
AR دليل استخدام الشامل
TR Kapsamlı kullanım kılavuzu
11.
BG Подробно ръководство на потребителя
HU Át fogó felhasználói útmutató
SR Kompletan korisnički vodič
BS Detajni korisnički priručnik (vodič)
КК Только пайдаланушы ускаулығы
KA əməbəsɪŋɡəʊnə bɪŋɡm
ləsɒɡmədʒəsəɡm
AZ Hertarefli istifadeçi telimatı
HY Oqunwqnndawd 5w6wwwnthwl
nnggn.g
Vielen Dank,
| × | ○ | |
| ○ | ◎ | |
| → | ↓↓↑ | |
| ← | → | |
| →|| | ||
| - | + | |
| • treble | • | |
| • bass | • | |
| LOEWE. | ||
Option 1 – eARC/ARC (Audio Return Channel)
flowchart
graph TD
    A["BMHIN"] --> B["BMHIN 1"]
    A --> C["BMHIN 2"]
    B --> D["BMHIN OUT"]
    C --> E["BMHIN OUT"]
    D --> F["BMHIN"]
    E --> G["BMHIN"]
    F --> H["BMHIN OUT / eARC / ARC"]
    G --> I["BMHIN OUT / eARC / ARC"]
    H --> J["BMHIN OUT / eARC / ARC"]
    I --> K["BMHIN OUT / eARC / ARC"]
    J --> L["BMHIN OUT / eARC / ARC"]
    K --> M["BMHIN OUT / eARC / ARC"]
    L --> N["BMHIN OUT / eARC / ARC"]
    M --> O["BMHIN OUT / eARC / ARC"]
    N --> P["BMHIN OUT / eARC / ARC"]
    O --> Q["BMHIN OUT / eARC / ARC"]
    P --> R["BMHIN OUT / eARC / ARC"]
    Q --> S["BMHIN OUT / eARC / ARC"]
    R --> T["BMHIN OUT / eARC / ARC"]
    S --> U["BMHIN OUT / eARC / ARC"]
    T --> V["BMHIN OUT / eARC / ARC"]
    U --> W["BMHIN OUT / eARC / ARC"]
    V --> X["BMHIN OUT / eARC / ARC"]
    W --> Y["BMHIN OUT / eARC / ARC"]
    X --> Z["BMHIN OUT / eARC / ARC"]
Option 1
SR - Rear Right Speaker (hinterer rechter Laut-sorecher)
SUB - Subwoofer (Subwoofer)
CEN - Centre Speaker (Center-Lautsprecher)
www.spotify.com/connect/third-party-licenses
14 Software-Update
for choosing a Loewe product. We are happy to have you as a customer. At Loewe, we combine the highest standards of technology, design and user friendliness. This applies equally for TV, video, audio and accessories. Neither technology nor design accomplishes an end in itself, but together should facilitate the highest possible audio and visual experience for our customer.
Our design has not even been guided by short-term, fashionable trends. Because after all, you have purchased a piece of high-quality equipment, that you want to enjoy tomorrow and the next day.
Content
Scope of delivery 13
Position of the rating plate 13
Important safety instructions....14
Remote control 16
Main unit Components....17
Subwoofer components.....18
Placement....18
Connecting the soundbar 18
Multi-roomaudio....20
Chromecast built-in....20
BasicOperation 20
AUX/OPTICAL/COAXIAL/HDMI
Operation....21
BluetoothOperation....22
USB Operation 22
Spotify 22
Softwareupdate....22
Troubleshooting....23
Technical data 24
Disposal 24
Scope of delivery
Carefully unpack the device and make sure all accessories are present
Soundbar
■ Wireless subwoofer
■ 2 x Power cable
■ HDMI cable
■ Remote control (incl. 2 x CR2032 batteries)
- Userguide
Position of the rating plate
Labels with model number and operating voltage can be found on the bottom of the product.
1 Important safety instructions
Attention: Read this page carefully to ensure safe operation of the device.
Follow all safety and operating instructions when using this product.
You should keep the safety and operating instructions for future reference.
You should strictly follow all warnings provided on the product; and listed in the operating instructions.
Explanation of symbols

Double insulated (Class II) Equipment. This electrical appliance has been designed in such a way that it does not require a safety connection to electrical earth (ground).

This symbol indicates risks caused by high voltages.

This symbol is to alert the user to other, more specific risks.

This symbol indicates dangers caused by the development of fire.
1.1 Installation
1.1.1 Placement
Place the unit on a stable, even surface.
Do not place this unit close to strong magnetic fields.
1.1.2 Cables
Lay the power cables so that they cannot be damaged. The power cable may not be kinked or laid over sharp edges, stood on or exposed to chemicals; the latter also applies to the system as a whole. A power cable with damaged insulation can cause electroshocks and poses a fire risk. As such, it must be changed before the unit is used again.
1.1.3 Do not use this device near water

The device should never be exposed to water drop ets or water splashes, such as those found near a bathtub, wash basin, kitchen sink, washing machine, wet basement or swimming pool. Never place containers filled with liquids, such as e.g. flower vases, on the device.
1.1.4 Ventilation

Slots and openings in the housing are used to ventilate the device to ensure reliable operation of the device and to protect the device from overheating. Do not block the ventilation holes. Install the device according to the manufacturer's instructions. Never block the ventilation holes by placing the device on a bed, sofa, rug, or similar soft surfaces. This device should not be installed in a bookshelf or built-in wardrobe unless adequate ventilation is ensured.
1.1.5 Heat

Do not install the device near hot surfaces, such as radiators, fan heaters, stoves or other devices (including amplifiers) that can be hot. Never place objects with open flame, such as candles or lanterns, on or near the device. The installed batteries should not be exposed to excessive heat such as direct sunlight, fire or the like.
1.1.6Accessories
Use only the accessories specified by the manufacturer.
1.1.7 Network connection
Please make sure that the firewall function is activated at your network access point (router). Consult your router's instruct on manual.
1.2 Usage
1.2.1 Intendeduse
This device is intended exclusively for the reception and playback of sound signals.
1.2.2 Remotecontrol
Exposing the remote control sensor to direct sunlight or high-frequency fluorescent light may cause malfunction. In such cases, you should move the system to a different location to avoid such malfunction.
The supplied batteries are intended for functional testing and may have a limited lifetime. If the range of the remote control decreases, replace the old batteries with new ones.
1.2.30overload

Never overload mains sockets, extension cords or multiple sockets, otherwise there is a risk of fire or electric shock.
1.2.4 Thunderstorm

The device should be disconnected from the mains during thunderstorms and if it is not used for a long time.
1.2.5 Penetration of foreign material and liquid

Be careful not to allow foreign material or liquid to enter this device through ventilation holes, otherwise it may come into contact with high voltage components or short circuit resulting in a fire or electric shock. Never spill liquids of any kind on this device.
1.2.6 Risks associated with high volume

The device is not designed for listening with headphones. To prevent possible hearing damage, do not listen at high volume for long periods.
1.2.7 Disconnection from power supply
The power button does not completely disconnect the power supply in any position. To completely disconnect the device from the mains, unplug the mains cable from the socket.
The mains plug must be easily accessible so that the unit can be disconnected from the mains at any time.
1.3 Maintenance
1.3.1 Devicemaintenance
Never attempt to carry out the maintenance of this device yourself, because live parts can be exposed through the openings or by removing covers, contacting which can be hazardous. Leave all maintenance to qualified service personnel.
1.3.2 Clean only with a dry cloth!
Unplug the mains adapter of this device from the mains socket before cleaning this product. Never use liquid cleaning detergents or cleaning sprays. Use only a damp cloth for cleaning.
1.4 Batteries
Caution! Do not ingest battery!

The remote control supplied with this product contains a coin cell battery. If the coin cell battery is swallowed, it can cause severe internal burns in just 2 hours and can lead to death.
Keep new and used batteries away from children.
If the battery compartment does not close securely, stop using the product and keep it away from children.
If you think batteries might have been swallowed or placed inside any part of the body, seek immediate medical attention.

Caution!
Risk of explosion if the batteries are replaced with the wrong type.
Do not heat or disassemble batteries. Never throw batteries into fire or water.
Do not carry or store batteries with other metallic objects. The batteries could short circuit, leak or explode.
Never recharge a battery unless it is confirmed to be a rechargeable type.
When the Remote Control is not to be used for a long time (more than a month), remove the battery from the Remote Control to prevent it from leaking.
If the batteries leak, wipe away the leakage inside the battery compartment and replace the batteries with new ones.
Do not use any batteries other than those specified.
EU Declaration of Conformity
Hereby, Loewe Technology GmbH declares that the radio equipment type Loewe klang bar5 mr complies with Directive 2014/53/EU. The full text of the EJ declaration of conformity is available at the following Internet address: https://www.loewc.tv/dc/support
This product can be used across all EU member states.
Due to the 5 GHz frequency range of the built-in WLAN module, use in the following countries is only permitted inside buildings:
| AT | BF | RG | CZ | DK | FF | FR | DF | IS | IF | IT |
| EL | ES | CY | V | LI | LT | LU | HU | MT | NL | NO |
| PL | PT | RO | SL | SK | TR | FI | SF | CH | UK | HR |
1.5 Repair
1.5.1 Damages requiring repair
Maintenance and repair work should only be carried out by a qualified customer service. Maintenance/repair is required if the device has been damaged (e.g. the mains adapter) if liquid has entered the device, if objects have entered the device, if the device has been exposed to rain or moisture, when it stops working properly or has fallen down.
1.5.2 To minimize the risk of electric shock, fire, etc.
Do not remove screws, covers or body parts.
1.6 Automatic energy saving function
The device is equipped with an automatic energy saving function. This switches the device to standby mode within 15 minutes if it is played at a very low volume or if the device is muted. Please note that the setting can't be changed.
2 Remote control
| × | ○ | |
| ○ | ◎ | |
| → | ↓↓↑ | |
| ← | → | |
| →|| | ||
| - | + | |
| • treble | • | |
| • bass | • | |
| LOEWE. | ||
| × | Sound Mote / Unmute. |
| Switches the soundbar on or switches to standby mode. | |
| Turns on/off the right modePress and hold to turn the display on / off (of by default). This feature displays additional information on the front panel display in certain situations. | |
| Switches between surround sound modes.Press and hold to open the volume setting for external speakers. | |
| Press to change input source.Press and hold in stand-by mode to show the software version on the display. | |
| Equaliser - choose from pre-set audio modes:OFF, SPEECH, CLASSICAL, POP, CUSTOM FILM, CUSTOM MUSIC. | |
| Skip to the previous audio track in USB / Bluetooth / PLAY-Fi mode. | |
| Skip to the next audio track in USB / Bluetooth / PLAY-Fi mode. | |
| Play/pause audio track in USB / Bluetooth / PLAY-Fi mode. | |
| Press and hold for 8 seconds in stand-by mode to restore the factory settings.Press and hold to activate the pairing function in the Bluetooth mode or disconnect the existing paired Bluetooth device. | |
| — | Reduce volume level. |
| + | Increase volume level. |
| treble | Adjusts the treble level. |
| bass | Adjusts the bass level. |
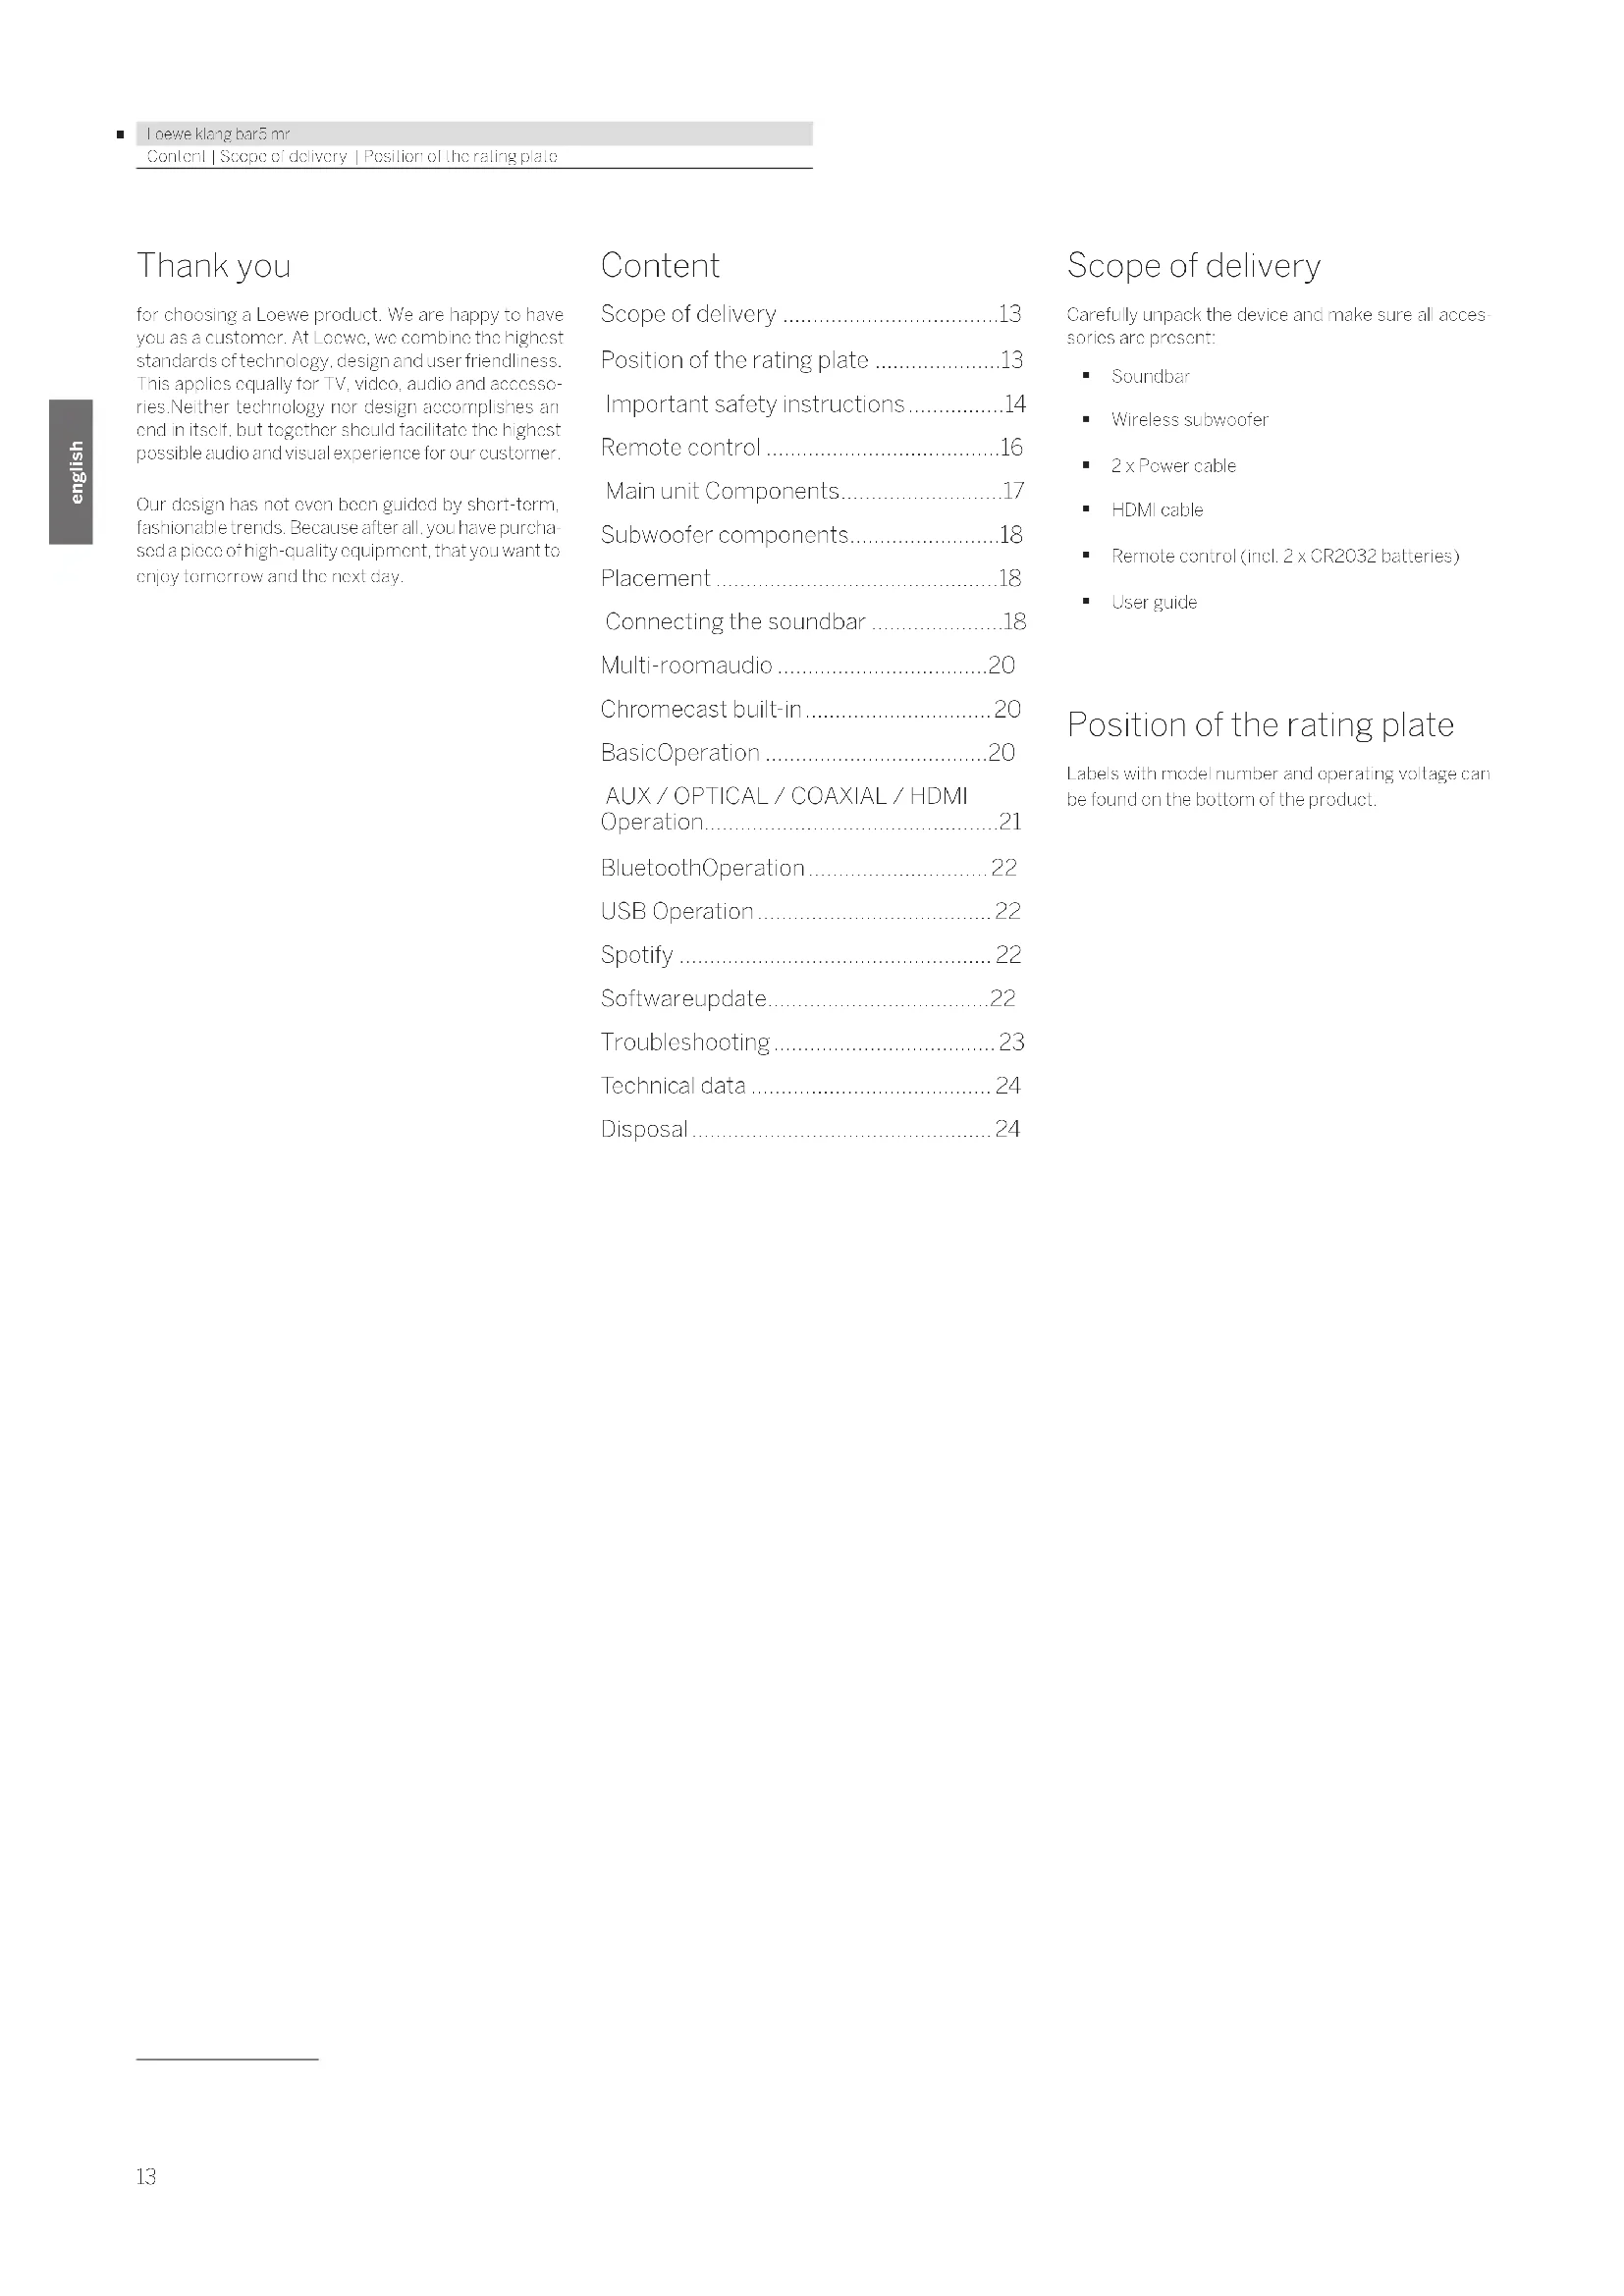
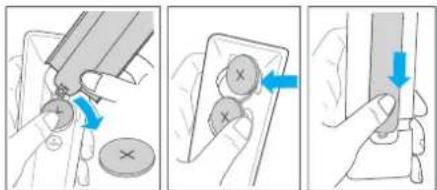
First time use
The unit has a pre-installed lithium 2×CR2032 battery. Remove the protective lab to activate the remote control battery.
- Press and slide the back cover to open the battery compartment of the remote control.
- Remove the protective tab.
- Push the battery cover back into place.
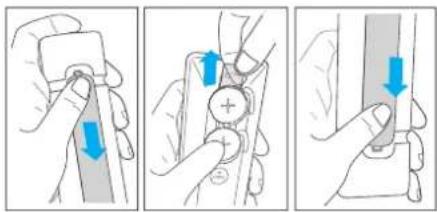
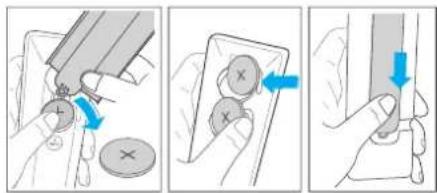
Replacing the remote control batteries
The remote control requires 2 pcs of CR2032, 3V Lithium battery. Press and slide the back cover to open the battery compartment of the remote control.
- Use a tool (such as the battery compartment cover) to pry up the groove between the two batteries to remove the old batteries.
- Insert the new batteries from the side and push them firmly into the original battery position. Make sure the (+) side of the battery is facing up.
- Push the battery cover back into place
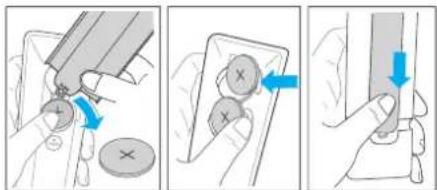
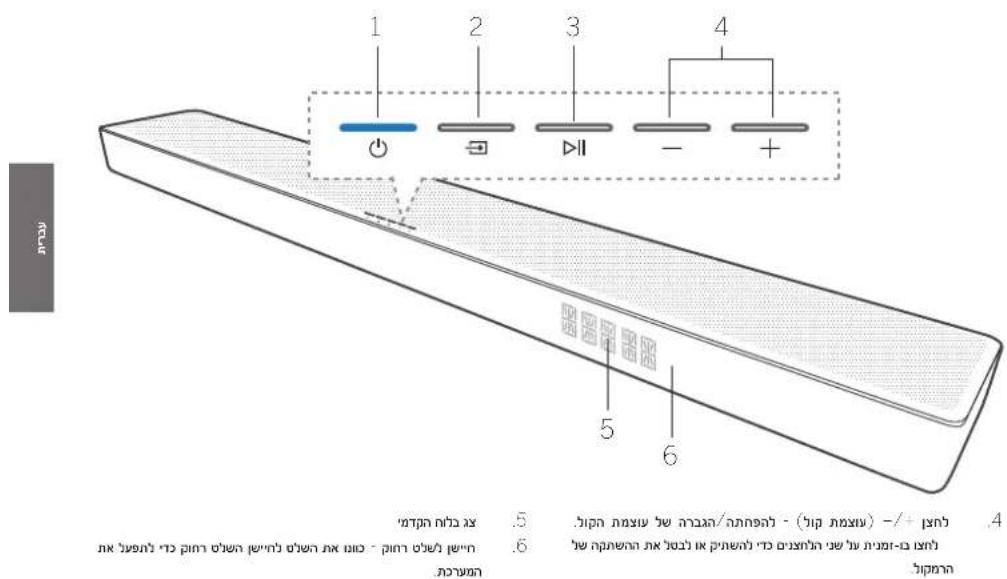
3 Main unit Components
3.1 Main unit front panel
- (Standby) button/indicator Switches the soundbar on or switches to standby mode.
LED indicator colour information
| LED colour Status | |
| White Standby mode | |
| Light is off | Soundbar is on and nothing is playing |
| Green | Receiving PCM track / AUX mode |
| Blue Bluetooth mode | |
| Turquoise Decoding Dolby Audio track | |
| Purple Decoding Dolby Atmos track | |
| Red Decoding DTS/DTS:X track | |
| Yellow USB mode / MP3 playback | |
| Orange Play-Fi / Multiroom mode | |
-
(Source) button - Press to change input source. Press and hold in standby mode to show the software version on the display.
-
▶II (Play/Pause) button - Play/pause audio track in USB / Bluetooth / PLAY-Fi mode. Press and hold for 8 seconds in standby mode to restore the factory settings. Press and hold to activate the pairing function in Bluetooth mode or disconnect the existing paired Bluetooth device.
3.2 Main unit rear panel
Multichannel
- Rear flap - You will need to remove the rear flap of your Sound Bar before using WDAI 2.0 control keys.
- WDAL 2.0 control keys - Use these switches to connect additional external wireless speakers via the WDAL2.0 as SUB / REAR / FRONT / CENTRE channel. Set the switch to SMALL for small speakers. LARGE for large speakers. To disconnect the speaker for a specific channel, set the switch to OFF.
- PAIRING button - for WDAL 2.0 pairing
Multiroom
- WPS (Wi-Fi Protected Setup) button/indicator - Triggers Wi-Fi setup for Play-Fi. Press and hold the button for 3 seconds to activate the WPS mode. Press and hold the button for 8 seconds to activate the AP mode.
| LED indicator state | Status |
| LED slowly pulsing | Wi-Fi Access Point (AP) mode |
| LED flashes twice | Wi-Fi Protected Setup (WPS) mode |
| LED is on | Connected / Pairing successful |
- AUX IN - connect to the audio source via 3.5mm audio cable.
- USB - connect a USB storage device.
- HDMI OUT (TV eARC/ARC) - connect to the HDMI jack on a TV.
- /-(Volume) button - Reduces/increases the volume level. Press both buttons simultaneously to mute /umnute the soundbar.
-
Front panel display
-
Remote control sensor - Point the remote control at the remote control sensor to operate the system.
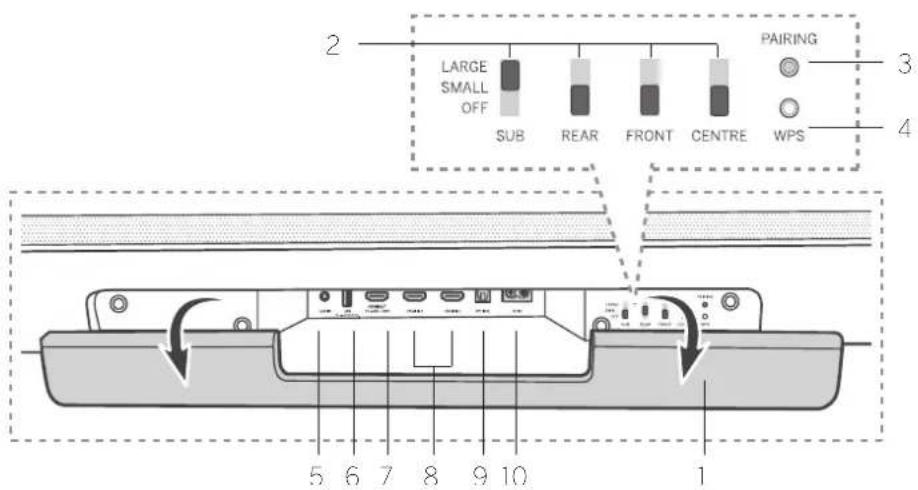
- HDMI IN 1/HDMI IN 2 - connect to the HDMI output of an external devices (e.g. game consoles, DVD and Blu-ray players).
- OPTICAL - connect to the digital (optical) output of an external device.
- AC IN - connect to the power supply.
4 Subwoofer components
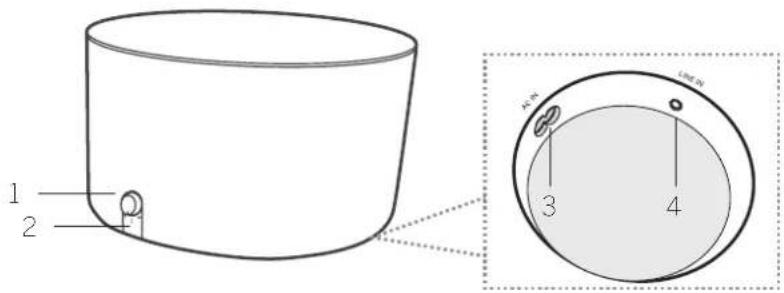
- Volume knob
Rotate to adjust the bass level.
Press and hold to enter the pairing mode.
- Subwoofer LED indicator
FD indicator state Status
| LED flashes quickly | Subwoofer is in pairing mode |
| LED is on | Connected / Pairing successful |
| LED flashes slowly | Connection / Pairing failed |
5Placement
Place the soundbar and subwoofer on a stable even surface.
Place the subwoofer at least 1 meter (3 feet) away from your soundbar, and 10 centimeters (4 inches) away from the wall. We recommend the front area of the room in a way that the basses can freely flow to the sides.
Place the soundbar on a table underneath the TV.
Below is an example of the correct placement.

6Connectingthe soundbar
Before you make or change any connections, make sure that all devices are disconnected from the power outlets.
6.1 Dolby Atmos®
Dolby Atmos® gives you immersive listening experience by delivering sound in three dimens onal space, and all the richness, clarity, and power of Dolby sound.
For more information, please visit dolby.com/technologies/dolby-atmos
For using Dolby Atmos®
Dolby Atmos® is available only in HDMI mode.
For the details of the connection, please refer to "Connecting with HDMI" chapter.
- To use Dolby Atmos® in HDMI 1 / HDMI 2 / HDMI ARC mode, your TV has to support Dolby Atmos®.
- Make sure that "No Encoding" is selected for bits-ream in the digital audio output of the connected external device (e.g. Blu-ray, TV etc.).
- While entering Dolby Atmos / Dolby Digital / PCM format, the Soundbar will show DOLBY ATMOS / DOLBY AUDIO / PCM AUDIO / DOLBY SURROUND.
Note
The Full Dolby Atmos® experience is only available when the Soundbar is connected to the source via a High Speed HDMI cable.
Dolby formats appear on the front panel display only when the display function is turned on. Press and hold to turn on / off the display function.
The Soundbar will still function when connected via other methods (such as a Digital Optical cable) but these are unable to support all of the Dolby features. Given this, our recommendation is to connect via HDMI, in order to ensure full Dolby support.
- AC IN socket - connect to the power supply.
- LINE IN socket - for connecting to an external audio device via 3.5mm audio cable.
6.2 Connecting with HDMI
Some 4K HDR TVs require the HDMI input or picture settings to be set for HDR content reception. For further setup details on HDR display, please refer to the operating instructions of your TV.
Option 1 - eARC/ARC
(Audio Return Channel)
Your Soundbar supports HDMI with Audio Return Channel (eARC/ARC). If your TV is HDMI ARC compliant, you can hear the TV audio through your Soundbar by using a single HDMI cable.
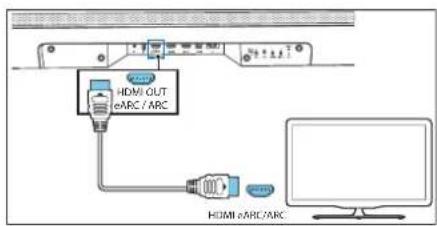
- On your TV, turn on HDMI-CEC operations.
- Using a High Spect HDMI cable (included), connect the HDMI OUT (TV eARC/ARC) connector on your Soundbar to the HDMI ARC connector on the TV. The HDMI ARC connector on the TV might be labeled differently. For details, see the TV user manual.
- "ARC" appears on the display of the soundbar and the soundbar plays the TV sound. When the TV sound is not output, press the → (Source) button repeatedly until you see "ARC" on the display and TV sound is played.
When HDMI ARC connection is properly set up. you can enjoy these features:
• The soundbar turns on automatically when you turn on the TV.
• The soundbar turns off automatically when you turn off the TV.
- You can mute/unmute or adjust the volume of the soundbar using the TV remote control.
Note
- Your TV must support the HDMI-CEC and ARC function. HDMI-CEC and ARC must be set to On.
- The setting method of HDMI-CEC and ARC may differ depending on the TV. For details about ARC function, please refer to your TV operating instructions.
- Only cables compatible with HDMI version 1.4 or higher can support the ARC function.
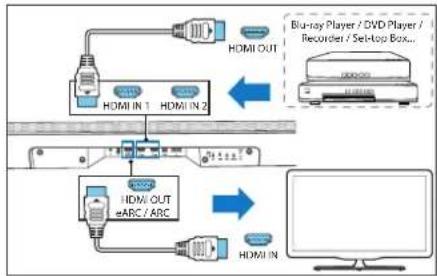
Option 2 - Standard HDMI
If your TV is not HDMI ARC-compliant, connect your Soundbar to the TV through a standard HDMI connection.
flowchart
graph TD
    A["Blu-ray Player / DVD Player / Recorder / Sei-top Box"] --> B["Blu-ray In 1"]
    A --> C["Blu-ray In 2"]
    B --> D["Blu-ray Out"]
    C --> E["Blu-ray Out"]
    D --> F["Computer Monitor"]
    E --> F
    style A fill:#f9f,stroke:#333
    style B fill:#ccf,stroke:#333
    style C fill:#ccf,stroke:#333
    style D fill:#cfc,stroke:#333
    style E fill:#cfc,stroke:#333
    style F fill:#fcc,stroke:#333
- Use an HDMI cable to connect the Soundbar's HDMI IN (1 or 2) connector to your external devices (e.g. game consoles, DVD players and blu-ray).
- Use an HDMI cable to connect the Soundbar's HDMI OUT (TV eARC/ARC) connector to the TV's HDMI IN connector.
Note
This connection option allows only playback o* video/audio from external devices connected directly to the HDMI 1 or 2 inputs on the soundbar. If your TV does not have an HDMI ARC connector and you wish to play sound from TV on the soundbar, you will need to use alternative connection (e.g. Opt cal or Analogue).
6.3 Connecting with an optical cable
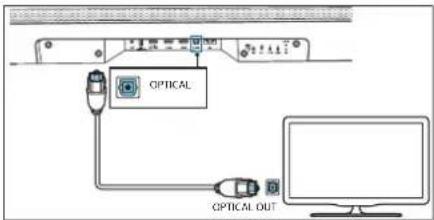
Using an optical cable (not included), connect the OPT CAL connector on your soundbar to the OPTICAL OUT connector on the TV or other device.
- The digital optical connector might be labeled SPDIF or SPDIF OUT.
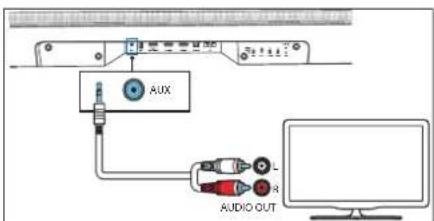
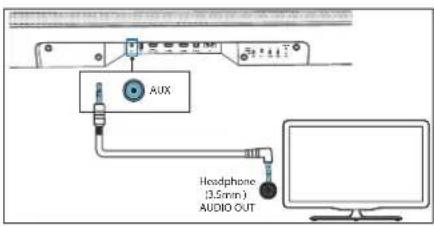
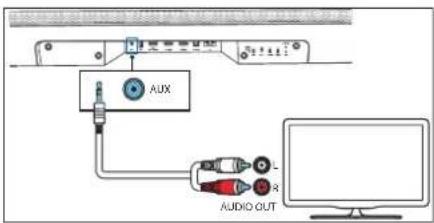
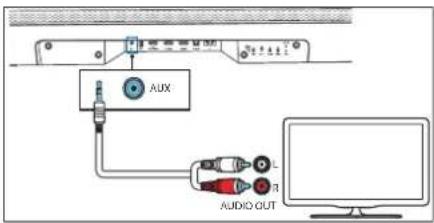
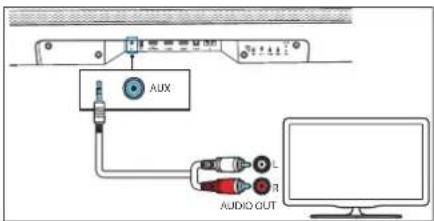
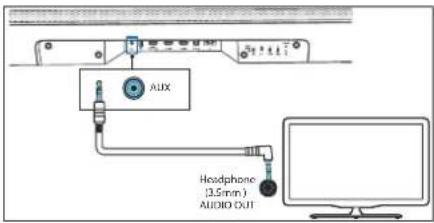
6.4 Connecting with an analogue audio cable
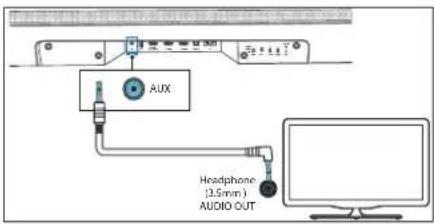
Option 1
Use a 3.5mm to 3.5mm audio cable (not included) to connect the TV's or external audio device headphone socket to the AUX N socket on the unit.
Option 2
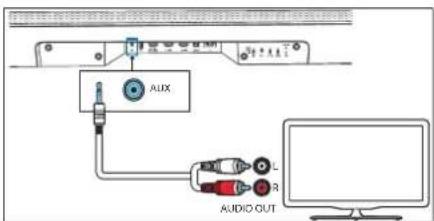
Use an RCA to 3.5mm audio cable (not included) to connect the TV's audio output sockets to the AUX IN socket on the unit.
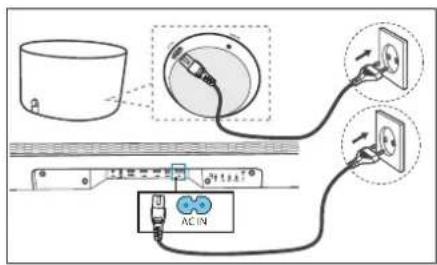
6.5 Connecting the power
Note
- Before connecting the AC power cord, ensure you have completed all other connections.
- Risk of product damage! Ensure that the power supply voltage corresponds to the voltage printed on the underside of the unit.
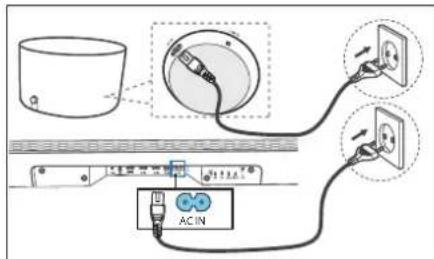
- Connect the mains cable to the AC IN Socket of the soundbar and then into a mains socket.
- Connect the mains cable to the AC IN Socket of the subwoofer. Secure the cable to the cable management compartment on the bottom side of the subwoofer. Finally, plug the power cable to the mains socket.
6.6 Connecting the subwoofer
Automatic Pairing
The subwoofer provided is a WDAL 2.0 device. This means that for the subwoofer to work, the WDAL 2.0 switch labelled SUB must be set to SMALL or LARGE. Remove rear flap from soundbar and check the position of the SUB switch. If it is in OFF position, please change its position to SMALL or LARGE.
Plug the soundbar and the subwoofer into the mains sockets and then press ⏻ on the unit or remote control to switch the unit to ON mode. The subwoofer and soundbar will automatically pair.
- Determine the status based on the wireless subwoofer indicator.
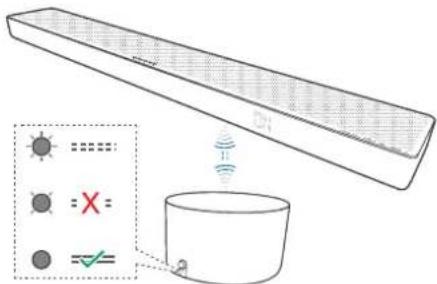
LED indicator state Status
| LED flashes quickly | Subwoofer is in pairing mode |
| LED is on | Connected / Pairing successful |
| LED flashes slowly | Connection / Pairing failed |
Note
Do not press volume knob on the rear of the subwoofer, except for manual pairing.
Manual Pairing
If no audio from the wireless subwoofer can be heard, pair the subwoofer manually.
- Unplug both units from the mains socket, then plug them in again after 3 minutes.
- Press and hold the Volume knob on the rear of the subwoofer for 5 seconds.
• The pairing indicator on the subwoofer will flash quickly. - Press and hold ⏻ for 5 seconds on the unit or remote control to switch the unit to ECO STANDBY mode.
- Then press ⏻ on the unit or remote control to switch the unit ON.
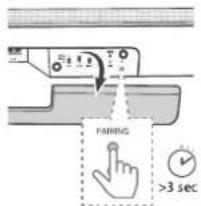
- Remove the rear flap of the soundbar, then press the PAIRING button for 5 seconds.
- The pairing indicator on the subwoofer will light up after success.
- If the pairing indicator still flashes, please repeat the above steps.
Note
- The subwoofer should be within 6 m of the soundbar in an open area (the closer the better).
- Remove all objects between the subwoofer and the soundbar.
- If the wireless connection fails again, check the area for conflict or strong interference (e.g. interference from an electronic device). Eliminate these conflicts or strong interferences and repeat the above procedure.
6.7 Multiroom: Connecting to Wi-Fi
WPS mode
If your router has Wi-Fi Protected Setup (WPS), you can setup the connection without entering a password.
- Press and hold the WPS button for 4 seconds. You will hear a tone and the Wi-Fi indicator will flash twice continuously.
- Press the WPS button on your router. The button is usually marked with the WPS logo.
Note
- WPS is not a standard feature of all routers. If your router does not have WPS, follow standard Wi-Fi setup.
- Press the WPS button once if you want to exit the WPS mode or it will automatically exit after 2 minutes.
Airplay setup
Use AirPlay to set up the Wi-Fi connection of iOS device (iOS/ or later) and soundbar.
- Press and hold the WPS button located at the rear side of soundbar for 8 seconds to trigger the Wi-Fi connection until the speaker makes a second tone, and then release the button.
- Wait until the Wi-Fi light indicator turns from a fast blink to a slow pulse. A slow pulse indicates that the speaker is entering the Wi-Fi setup mode.
- On your iOS device go to Settings > Wi-Fi > select network [Play-Fi device (xxxxxx)]
- Soundbar will be automatically recognized as Air play device. Tap on [Setup new Air Play speaker].
- Tap on [Show Other Networks...] and select your home network to which you want soundbar to connect.
- After a successful Wi-Fi connection, the Wi-Fi light indicator stops pulsing and stays on. After setting up this product on your Wi-Fi network, you can control it from any smartphone or tablet on the same network.
Google Home setup
- Download the Google Home app on your mobile device.
- iPhone/iPad only: Turn on your mobile device's Bluetooth.
- Press and hold the WPS button located at the rear side of soundbar for 8 seconds to trigger the WiFi connection until the speaker makes a second tone, and then release the button.
- Wait until the Wi-Fi light indicator turns from a fast blink to a slow pulse. A slow pulse indicates that the speaker is entering the Wi-Fi setup mode.
- Open the Google Home app.
- Follow the steps to set up your device.
If you can't find the steps to set up your soundbar.
- At the top left of the Google Home app home screen, tap Add + > Set up device > New device.
- Follow the setup steps.
7Multi-roomaudio
This soundbar can be used as part of multi-room speaker setup. This means that the same music can be played from your soundbar and other compatible speakers simultaneously throughout your home.
To use this feature, make sure the soundbar and your smartphone / tablet are on the same network. You can use Google Home, Airplay 2 or DTS Play-Fi app to control compatible multi room speakers. You can then play the music on multiple speakers at the same time, assign speakers to different groups, control the volume individually, or use master volume to change the volume on all speakers at the same time.
8 Chromecastbuilt-in
This soundbar supports Chromecast built-in feature that allows you to cast music from Chromecast compatible apps to your soundbar. To use this feature, make sure the soundbar and your smartphone / tablet are on the same network. Start playing music on a Chromecast enabled app and cast it to your soundbar simply by tapping the 📄 (cast) button and selecting the soundbar from the list.
9BasicOperation
9.1 Turn ON and OFF
When you first connect the unit to the mains socket, the unit will be in STANDBY mode. The STANDBY indicator will light up white.
Auto Standby
The unit will automatically switch to standby mode after about 15 minutes if the TV or the external device is disconnected (or USB, Bluetooth, Play-Fi function playback is paused) or turned off.
Automatic Wake up
If the unit is connected to the TV or external device with an HDMI cable, the unit turns on automatically when the TV or external device is turned on.
Note
- For automatic wake up to work, the TV or external device must support HDMI CEC function and must be activated. Read the operating instructions of your TV/external device.
9.2 Multiroom mode
By pressing (alandby) on the soundbar or remote control while soundbar is on, it will enter default standby mode. In this standby mode all network functions will be turned off.
It is possible to activate the multiroom mode, where Wi-Fi is always on and Play-Fi and AirPlay2 are also available. This mode is recommended if you want to use the soundbar as a Play-Fi device that can be woken up remotely at any time.
In standby mode, press (Night) -> (around) -> (Night) on the remote control to switch on the multiroom mode.
From now on, each time you turn off the soundbar, it will enter the multi-room mode. Please note that multi-room mode has higher power consumption than standard standby.
To reactivate standard standby mode again, press (Night) -> (around) -> (Night) on the remote control.
9.3 Input mode
Press the (Source) button recoatedly on the unit or on the remote control to select BT (Bluetooth), HDMI 1, HDMI 2, ARC, OPT (Optical), AUX, USB mode. The display shows the selected mode.
9.4 Volume control
Press +/- (Volume) to increase or decrease a volume level. To mute the sound, press ×(Mute). To restore the sound, press ×(Mute) again or press +/- (Volume).
9.5 Equalizer effect
Press the Equalizer) button or the remote control to select the desired pre-set equaliser effect: OFF, SPEECH, CLASSICAL, POP, CUSTOM MUSIC, CUSTOM FILM.
9.6 Bass/Treble Level
Press the bass +/- buttons on the remote control to adjust bass level (BAS-12 - BAS +12).
Press the treble +/- buttons on the remote control to adjust treble level (TRB 12 \~ TRB +12).
9.7 Surround Sound Mode
Experience immersive audio in surround mode
Press the (Surround) button on the remote control to change the surround mode.
9.8 Night Mode
Press the night) button on the remote control to turn on/off night mode. This function ensures that there is less range between quiet and loud sounds in movies. Recommended for late night listening.
9.9 Display Brightness
If you do not press any button for 10 seconds, the display will turn off automatically. Pressing any button restores the brightest level.
9.10 Factory Reset
Resets the device to the default settings. In standby mode, press and hold the ▶|| button for 8 seconds, "RESET" appears on the display and the device returns to the original settings.
9.11 WDAL 2.0 control
Remove the rear flap of your soundbar before using the WDAL 2.0 control keys.
Use these switches to connect additional external wireless speakers via the WDAL2.0 as SUB / REAR / FRONT / CENTRE channel. Set the switch to SMALL for small speakers, LARGE for large speakers. To disconnect the speaker for a specific channel, set the switch to OFF.

SUB

REAR

FRONT

CENTRE
Connecting the subwoofer
The subwoofer provided is a WDAL 2.0 device. This means that for the subwoofer to work, the WDAL 2.0 switch labelled SUB must be set to SMALL or LARGE
Connecting another WDAL 2.0 device
You can wirelessly connect up to 6 additional speakers that support WDAL 2.0 to the soundbar. To connect a WDAL 2.0 compatible speaker to the soundbar, you must:
-
Press the PAIRING button on the soundbar. To access the PAIRING button, you must remove the rear lap on the soundbar.
-
Press the PAIRING button on the WDAL 2.0 speaker.
-
Set the speaker role on the speaker itself. Options: Front left, Front right, Centre, Rear left, Rear right.
- Depending on the type of speaker, set the WDAL 2.0 switch corresponding to the selected speaker role to SMALL or LARGE.
For details on setting the external speaker to pairing mode, changing its role and whether to select SMALL or LARGE on the soundbar switch, please refer to the user manual of the speaker.
Note: If you switch the WDAL 2.0 switch on the soundbar from OFF to another position, the soundbar speakers of that channel will be turned off. So if you connect the Front External Speakers via WDAL 2.0, the speakers on the front channels of the soundbar will be turned off.
Volume offset
You can adjust the offset volume for external speakers connected via WDAI 2.0. This is useful if the character of your room does not allow the speakers to be evenly distributed and some speakers are much closer to the listener than others. You can adjust the overall volume of each speaker individually:
- Press and hold remote con display.
(Surround) button on the .FL appears on the soundbar
- Use
/Buttons to select a channel.
- Use + / - button to change the volume offset of the selected channel.
Display abbreviations explained:
FL - front left speaker
FR - front right speaker
SL - rear left speaker
SR - rear right speaker
SUB - subwoofer
CEN - centre speaker
10 AUX / OPTICAL / COAXIAL / HDMI Operation
Make sure the unit is connected to a TV or audio device.
- Press → (Source) button on the unit or remote control repeatedly to select HDMI1, HDMI2, ARC, OPT, AUX mode.
- Control your TV/audio device directly for play back functions.
- Press +/- button on the unit or remote control to adjust the volume to desired level.
Note
- If the soundbar is in HDMI1/HDMI2/ARC/OPT (Optical) mode and there is no sound output from it, you may need to activate PCM or Dolby Digital signal output on the source device (e.g. TV, DVD or Blu-ray player).
- The unit may not be able to decode all digital audio formats from the input source. In this case, the unit will be muted. This is not a defect. Make sure the audio setting of the input source connected via HDMI 1 / HDMI 2 / ARC / OPT (optical) input is set to PCM or Dolby Digital. For details on audio settings, refer to the user manual of the input source device.
- In HDMI mode, when DOLBY ATMOS audio format playback starts, "DOLBY ATMOS" appears on the audio panel display.
- When DOLBY DIGITAL audio playback starts, if surround sound is turned on, the soundbar display will display "DOLBY SURROUND". If surround sound is turned off, it will display "DOLBY AUDIO".
- When PCM audio format playback starts, "PCM AUDIO" appears on the soundbar display.
- When entering non-PCM or DOLBY DIGITAL audio formats, if there is no sound output from the unit. "ERROR" appears on the display.
11BluetoothOperation
Connect the soundbar to a Bluetooth device (such as an Pad, iPhone, iPod touch, Android phone, or laptop) via Bluetooth, and then you can listen to audio files stored on the device through the soundbar.
- Press the → (Source) button on the unit or remote control repeatedly to switch the soundbar to BT (Bluetooth) mode.
NO BT is displayed on the display panel.
-
Turn on Bluetooth on the Bluetooth device, search for and select "Klang bar5 mr" to connect. For information on enabling Bluetooth, see the user guide of the Bluetooth device.
-
Wait until you hear the voice prompt from the soundbar.
If the successfully connected, BT will appear on the display panel.
Select and play audio files or music on your Bluetooth device.
If a call is made during playback, the music pauses. When the call is completed, playback resumes.
If your Bluetooth device supports AVRCP profile, you can press ▶/ ▶ in the remote control to skip a track or press ▶∥ to pause/resume playback.
- To exit Bluetooth, select another source.
When you switch back to Bluetooth mode, the Bluetooth connection is re-established.
To connect the soundbar to another Bluetooth device, press and hold the ▶|| button on the remote control to disconnect the currently connected Bluetooth device.
Note
- The minimum requirements for a Bluetooth device are: Bluetooth profile A2DP, AVRCP and Bluetooth version 4.2 + EDR
- The maximum operating range between the soundbar and a Bluetooth device is approximately 10 meters.
- Compatibility with all Bluetooth devices is not guaranteed.
- The music streaming may be interrupted by obstacles between the device and soundbar, such as wall, a metal case covering the device, or other devices in the vicinity that operate on the same frequency.
12USBOperation
Enjoy audio on a USB storage device, such as an MP3 player or USB flash memory, etc.
- Insert the USB device.
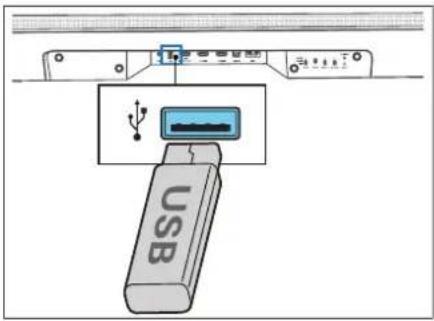
-
Press → (Source) on the unit or remote control repeatedly to select the USB mode.
-
During playback, press ▷|| to start / pause / resume playback. Press ▶/ ▶ skip to the previous or next track.
Note
This product may not be compatible with certain types of USB storage devices.
- If you use a USB extension cable, USB hub or USB multifunctional card reader, the USB storage device may not be recognized.
- Do not remove the USB storage device while reading files.
- The unit can support USB devices with up to 32 GB of memory.
- This unit can play MP3.
13Spotify
Use your phone, tablet or computer as a remote control for Spotify. Go to Spotify.com/connect to learn how.
The Spotify Software is subject to third party licenses found here:
www.spotify.com/connect/thirc-party- censes
14 Softwareupdate
To upgrade soundbar firmware:
- Download the latest software from the website.
- Extract the file to the USB root folder.
- Connect USB to the soundbar while in power-on mode.
- The installation starts and the display shows the update progress from 0 to 99.
Warning: It may take a few minutes for the software to update. Do not unplug your speaker, turn off the device, or disconnect the USB stick or network during the update. These actions can potentially destroy your soundbar. - When the update is complete, the display turns off.
- Disconnect the soundbar from the mains.
- After one minute, connect the soundbar back to the mains.
The soundbar is now updated to the new software version.
To upgrade the multi-room function of your soundbar:
- Download and install the DTS Play-Fi app on your mobile device.
- Connec: the soundbar to the app.
- If new Play Fi software is available, the application notifies you.
- Follow the instructions in the application to run the multi-room feature update.
Warning: It may take a few minutes for the software to update. Do not unplug your speaker, turn off the device, or disconnect the USB stick or network during the update. These actions can potentially destroy your soundbar.
Apps
Scan the QR code below with your phone and download the recommended app.

"my Loewe" is an entry point to the Loewe world and gives you access to all user manuals for your Loewe products.
Troubleshooting
In the event of a device failure, we recommend that you check the list below before calling the helpline.
Problem Possible cause Remedy/notes
| The system does not respond to button press | A software error may have caused the device to stop receiving commands from the buttons, and the device must be restarted by unplugging it. | Unplug the unit from the power supply for a few minutes, then plug it in again. |
| No sound from the soundbar. | a. Incorrect source input is selectedb. The soundbar is mutedc. A software error may have caused this problem.d. The soundbar cannot decode the input audio signale. Some or all of the WDAL2.0 switches are in the incorrect position. | a. On the remote control, select the correct audio input.b. Press the MUTE buttonc. Reset the unit to factory settings (see chapter "Basic Operation")d. Try to change Digital output sellings on source device to PCM.e. If you do not have any external speakers connected, make sure all the switches on the rear are set to OFF and the SUB switch is set to SMALL or LARGE. |
| No sound from the wireless subwoofer. | a. Automatic pairing failedb. The volume is too lowc. The subwoofer switch on the back of the soundbar is set to OFF. | a. Pair the subwoofer manuallyb. Increase the volume. Press the + button on the sound bar or on the remote control.c. On the back of the soundbar, change the position of the SUB switch to SMALL or LARGE. |
| The subwoofer is idle or the subwoofer indicator does not light. | A software error may have caused this problem. | Unplug the power cord and plug it in again after 3 minutes, to reset the subwoofer. |
| Distorted sound or echo. | The TV speakers may cause echo if they are not synchronized with the sound of the soundbar. | If you play TV audio through this product, make sure the TV is muted. |
| A Bluetooth device cannot connect to the soundbar. | a. The device does not support compatible profiles required for the soundbar.b. You have not enabled the Bluetooth function of the device.c. The Soundbar is already connected to another Bluetooth device. | a. Only devices with Bluetooth profile A2DP, AVRCP are compatible.b. For information on enabling this function, see the device user guide.c. Disconnect the connected device, then try again. |
| The audio playback quality of the connected Bluetooth device is poor. | Bluetooth reception is poor. | Move the device closer to the soundbar or remove obstacles between the device and the soundbar. |
| Wi-Fi connection cannot be established. | a. Wi-Fi network may be unavailable.b. Wi-Fi signal is very weak.c. You are entering an incorrect password. | a. Check the availability of WLAN network on the router.b. Place the Wi-Fi router closer to the unit.c. Make sure that the password is correct. |
| Cannot achieve outstanding Dolby Atmos® effects. | For non-HDMI connections (such as USB, Bluetooth, OPTI-CAL or AUX), limited surround effects are generated. | For information on how to get the best Dolby Atmos effects, see the "Dolby Atmos®" chapter. |
| Cannot discover the Play-Fi supported device from the app. | Device may be disconnected from Wi-Fi. Make sure the device is connected to the Wi-Fi. | |
| Cannot play Play-Fi music. | a. Service or content has been terminated.b. First setup of soundbar failed.c. You have used the soundbar previously as Stereo Pairs or Surround Sound in the Play-Fi app. | a. Certain network services or content available through the device may not be accessible in case the service provider terminates its service.b. If the first setting is not successful, close the DTS Play-Fi Application. Restart the application.c. If the speaker is set as Stereo Pairs or Surround Sound, it must be disconnected in the app before being used separately. |
Technical data
| Loewe device type: klang bar5 mr | |
| Part number: 60601D10 | |
| Power supply: AC 100 V - 240 V - 50/60 Hz | |
| Audio output power: 220W (RMS) | |
| Power consumption in standby mode: <0.5W | |
| Frequency response: 60Hz - 20kHz | |
| WLAN supported Standards: | IEEE 802.11a/b/g/n/ac |
| WLAN power/frequency range: | Maximum power <100 mW at 2400 - 2483.5 MHzMaximum power <100 mW at 5150 - 5350 MHzMaximum power <100 mW at 5470 - 5725 MHzMaximum power <100 mW at 5725 - 5850 MHz |
| Bluetooth version V4.2 + FDR | |
| Bluetooth power/frequency range: Maximum power <10 mW at 2402 - 2480 MHz | |
| Bluetooth protocols: A2DP, AVRCP | |
| USB playable files: MI ^2 S | |
| Device dimensions (W x H x D): 1200 x 71 x 160 mm | |
| Device weight: 6.5 kg | |
| Ambient temperature: 5°C - 35°C | |
| Relative humidity (non-condensing): 20 - 80% | |
| Video passthrough: | 4K Video Pass-through, Dolby Vision, HDR10, HDR10+ |
| Supported Audio formats | HDMI: DTS, DTS-HD, DTS X, DTS Virtua ^TM , Dolby Digital, Do by Digital plus, Dolby True HD, Dolby Atmos ^ , LPCM 2ch/Mch, Dolby MATOPTICAL: DTS, Dolby Digital, LPCM 2ch |
| Loewe device type: klang sub5 | |
| Part number: 60603D10 | |
| Power supply: AC 100 V - 240 V ~ 50/60 Hz | |
| Audio output power: 180W (RMS) | |
| Power consumption in standby mode: | <0.5W |
| Frequency response: | 35Hz - 150Hz |
| Device dimensions (W x H x D): | 380 x 214 x 380 mm |
| Device weight: 8.8 kg | |
| Ambient temperature: 5°C - 35°C | |
| Relative humidity (non-condensing) | 20 - 80% |
Disposal


Disposal of used electrical and electronic equipment and batteries.
The crossed-out wheeled bin symbol on the product or its packaging indicates that this product must not be treated as normal household waste, but must be returned to a collection point for the recycling of electrical and electronic equipment and batteries. By helping to properly dispose of this product, you are protecting the environment and the health of your fellow human beings. Improper or incorrect disposal endangers the environment and health. For more information about the recycling of this product, please contact your local authority or your municipal waste disposal service. Attention: The "Pb" sign under the battery symbol indicates that this battery contains lead.
Hartelijk dank
Bluetooth-bediening....33
USB-bedicning....34
Spotify 34
Software-update....34
Problemoplossing....35
| × | ○ | |
| ○ | ◎ | |
| → | ↓↓↑ | |
| ← | → | |
| →|| | ||
| - | + | |
| • treble | • | |
| • bass | • | |
| LOEWE. | ||
(Audio Return Channel)
flowchart
graph TD
    A["Input"] --> B["HDMI OUT"]
    B --> C["HDMI IN 1"]
    C --> D["HDMI IN 2"]
    D --> E["Output"]
    E --> F["HDMI OUT"]
    F --> G["HDMI IN"]
    G --> H["Computer"]
    I["Blue-ray Player / DVD Player / Recorder / Set-top Box..."] --> J["Image of the device"]
Optie 1
| Status led-indica-helampje | Status |
| Led knippert snel | De subwoofer staat in de koppelingsmodus |
| Led brandt | Verbonden/koppelen succesvol |
| Led knippert langzaam | Verbinding/koppeling mslukt |
Let op:
9.5 Equalizer-effect
www.spotify.com/connect/thirc-party- censes
14 Software-update
| × | ○ | |
| ○ | ◎ | |
| → | ↓↓↑ | |
| ← | → | |
| →|| | ||
| - | + | |
| • treble | • | |
| • bass | • | |
| LOEWE. | ||
flowchart
graph TD
    A["Blu-ray Player / DVD Player / Recorder / Set-top Box..."] --> B["Blu-ray Player / DVD Player / Recorder / Set-top Box..."]
    B --> C["HDMI OUT"]
    B --> D["HDMI IN 1"]
    B --> E["HDMI IN 2"]
    C --> F["Blu-ray Player / DVD Player / Recorder / Set-top Box..."]
    D --> G["Blu-ray Player / DVD Player / Recorder / Set-top Box..."]
    E --> H["Blu-ray Player / DVD Player / Recorder / Set-top Box..."]
    F --> I["Blu-ray Player / DVD Player / Recorder / Set-top Box..."]
    G --> J["Blu-ray Player / DVD Player / Recorder / Set-top Box..."]
    H --> K["Blu-ray Player / DVD Player / Recorder / Set-top Box..."]
    I --> L["Blu-ray Player / DVD Player / Recorder / Set-top Box..."]
    J --> M["Blu-ray Player / DVD Player / Recorder / Set-top Box..."]
Option 1
www.spotify.com/connect/third-party-licenses
Audio multi-stanza 56
Chromecast integrato 56
| × | ○ | |
| ○ | ◎ | |
| → | ↓↓↑ | |
| ← | → | |
| →|| | ||
| - | + | |
| • treble | • | |
| • bass | • | |
| LOEWE. | ||
(Audio Return Channel)
Opzione 1
7 Audio multi-stanza
9.11 Controllo WDAL 2.0
www.spotify.com/connect/third-party- censes
Chromecast built-in....68
| × | ○ | |
| ○ | ◎ | |
| → | ↓↓↑ | |
| ← | → | |
| →|| | ||
| - | + | |
| • treble | • | |
| • bass | • | |
| LOEWE. | ||
flowchart
graph TD
    A["Blu-ray Player / DVD Player / Recorder / Set-top Box..."] --> B["Blu-ray Player / DVD Player / Recorder / Set-top Box..."]
    B --> C["HDMI OUT"]
    B --> D["HDMI IN 1"]
    B --> E["HDMI IN 2"]
    C --> F["Blu-ray Player / DVD Player / Recorder / Set-top Box..."]
    D --> G["Blu-ray Player / DVD Player / Recorder / Set-top Box..."]
    E --> H["Blu-ray Player / DVD Player / Recorder / Set-top Box..."]
    F --> I["Blu-ray Player / DVD Player / Recorder / Set-top Box..."]
    G --> J["Blu-ray Player / DVD Player / Recorder / Set-top Box..."]
    H --> K["Blu-ray Player / DVD Player / Recorder / Set-top Box..."]
    I --> L["Blu-ray Player / DVD Player / Recorder / Set-top Box..."]
    J --> M["Blu-ray Player / DVD Player / Recorder / Set-top Box..."]
Opción 1
8 Chromecast built-in
www.spotify.com/connect/third-party-licenses
| × | ○ | |
| ○ | ◎ | |
| → | ↓↓↑ | |
| ← | → | |
| →|| | ||
| - | + | |
| • treble | • | |
| • bass | • | |
| LOEWE. | ||
Opção 1
Use um cabo de áudio de 3,5mm para 3,5mm (incluido) para ligar a tomada de auscultadores de televisor ou de um dispositivo de áudio externo à tomada AUX IN da unidade.
Opção 2
9.11 Controlo WDAL 2.0
www.spotify.com/connect/thirc-party-licenses.
| × | ○ | |
| ○ | ◎ | |
| → | ↓↓ | |
| ← | → | |
| →|| | ||
| - | + | |
| • treble | • | |
| • bass | • | |
| LOEWE. | ||
- Pr/ycisk/wsk/a/nik WPS (Wi-Fi Protected Setup)
flowchart
graph TD
    A["HDMI OUT"] --> B["Blue-ray Player / DVD Player / Recorder / Set-top Box..."]
    C["HDMI IN"] --> D["Blue-ray Player / DVD Player / Recorder / Set-top Box..."]
    E["HDMI OUT"] --> F["Blue-ray Player / DVD Player / Recorder / Set-top Box..."]
    G["HDMI IN"] --> H["Blue-ray Player / DVD Player / Recorder / Set-top Box..."]
    I["HDMI OUT"] --> J["Blue-ray Player / DVD Player / Recorder / Set-top Box..."]
    K["HDMI IN"] --> L["Blue-ray Player / DVD Player / Recorder / Set-top Box..."]
Opcja 1
Stan wskaznika LED Stan
| × | ○ | |
| ◎ | ||
| || | ||
| - | + | |
| treble | • | |
| bass | • | |
| LOEWE. | ||
Možnost 1
Slavy LED kontroly Status
www.spotify.com/connect/third-party-licenses
| × | ○ | |
| ○ | ◎ | |
| → | ↓↓↑ | |
| ← | → | |
| →|| | ||
| - | + | |
| • treble | • | |
| • bass | • | |
| LOEWE. | ||
Možnost'1
Slav indikáfora LED Slav
www.spotify.com/connect/third-party-licenses
| × | ○ | |
| ○ | ◎ | |
| → | ↓↓↑ | |
| ← | → | |
| →|| | ||
| - | + | |
| • treble | • | |
| • bass | • | |
| LOEWE. | ||
natural_image
Three-step illustration showing hand positioning of a device with blue arrows indicating movement (no text or symbols)Imantojot optisko kabeli (navietverls komplexlacija), piovienojot skanas sistemas OPTICAL savienotaju pic televizora val citas ierices OPTICAL OUT savienotaja
- Digitalais optiskais savionotájs var but apzimöts SPDIF var SPDIF OUT.
6.4. Savienojumaizveide, izmantojot analogo audio kabeli
1. opcija
Izmantojiot savienojuma no 3,5 mm u2 3,5 mm audio kabeli (letverts komplektacja), lai televizora val arejas audio ierices austiru izvadu savienotu ar ierices AUX IN ligzdu.
2. opcija
Lictojiet savienojuma no RCA uz 3,5 mm audio kabeli (navietverts komplektacija), ai televizora audio izvades lig/du previenolu pie lerices AJX lig/das.
6.5. Pievienošana stravas padeves avotam
Piezime
- Pievieno let stravas kabeli skanas sistemas AC IN lig/cai un pec tam kontaktig/dai.
- Pevienojei stravas kabeli zemfrekvenču skalruna AC IN ligzda. Nostipriniet kabeli pr kabelu parvaldibas nodaljuma zemfrekvenču skalruna apakša. Pec tam previenojei stravas vadu pr kontaktigzdas.
6.6.Pievienošanazemfrekvenču skalrunim
| Gaismas diodes indikatora stavokis | Statuss |
| Gaismes diode atni mirgo | Zemlrekverču skarunis savienošanas pani režirna |
| Gaismes diode deg | Sekmigi savienots/savienots pani |
| Gaismes diode leni mirgo | Saviencjums / savienojums pani nei/devas |
Piezime
Nespiediet skaljuma pogu zemírekvenču skalruja aizmugurč, iznomot gacijumus, kad voicat manušu saparošanu
9.11 WDAL 2.0 vadiba
www.spotify.com/connect/thirc-party- censes
| × | ○ | |
| ○ | ◎ | |
| → | ↓↓↑ | |
| ← | → | |
| →|| | ||
| - | + | |
| • treble | • | |
| • bass | • | |
| LOEWE. | ||
1 variantas
www.spotify.com/connect/thirc-party- censes
14 Progr. jr. naujinimas
Chromecast built-in....152
| × | ○ | |
| ○ | ◎ | |
| → | ↓↓↑ | |
| ← | → | |
| →|| | ||
| - | + | |
| • treble | • | |
| • bass | • | |
| LOEWE. | ||
1. variant
LED náidiku olek Olek
8 Chromecast built-in
www.spotify.com/connect/thirc-party-licenses
| × | ○ | |
| ○ | ◎ | |
| → | ↓↓↑ | |
| ← | → | |
| →|| | ||
| - | + | |
| • treble | • | |
| • bass | • | |
| LOEWE. | ||
Mulighed 1
LED-indikator-t-stand Status
- Parringsindikatoren på subwooferen lyser op efter gennemførsel.
- Hvis parringsindikatoren stadig blinker, skal du gentage ovenstående trin.
Bemærk
9.7 Surroundsound-tilstand
Oplev medrivende yc i surround-ti stand
www.spotify.com/connect/thirc-party-licenses
14 Softwareopdatering
| × | ○ | |
| ○ | ◎ | |
| → | ↓↓↑ | |
| ← | → | |
| →|| | ||
| - | + | |
| • treble | • | |
| • bass | • | |
| LOEWE. | ||
Alternativ 1
www.spotify.com/connect/thirc-party-licenses
14 Programvaruuppdatering
| × | ○ | |
| ○ | ◎ | |
| → | ↓↓↑ | |
| ← | → | |
| →|| | ||
| - | + | |
| • treble | • | |
| • bass | • | |
| LOEWE. | ||
Vaihtoehto 1
www.spotify.com/connect/thirc-party-licenses
| × | ○ | |
| ○ | ◎ | |
| → | ↓↓↑ | |
| ← | → | |
| →|| | ||
| - | + | |
| • treble | • | |
| • bass | • | |
| LOEWE. | ||
6 Koble til lydplanken
Du kan bruke en optisk edning (kke inkludert) til å koble del OPTISKE koblingspunklet på ydplanker til OPTICAL OUT-koblingspunktet på TV-on ollor en annen enhet.
Alternativ 1
Bruk en 3,5 mm til 3,5 mm lydkabel (inkudert) t l å koble hodetelefonninggangent TV ens eksfermelyden hot til AUX IN-inrtaket på enhoten.

Alternativ 2
- Koble strømledningen til AC IN-inngangen til lydplanken og deretter til stikkontakten.
- Koble strømledningen til AG IN-ingangen til subwooferen. Fest lodningen i ledningsrommet på undersiden av subwooferen. Koble til slutt strømledningen til et støpsel.
6.6 Koble til subwooferen
LED-indicator-status Status
| LED blinker raskt | Subwooferen er i tilkoblingsmodus |
| LED cr på | Tilkoblet / tilkoblinglyktos |
LED blinker sakte Tilkooling mislyktes
Merk
AirPlay-innstillinger
www.spotify.com/connect/thirc-party-licenses
| × | ○ | |
| ○ | ◎ | |
| → | ↓↓↑ | |
| ← | → | |
| →|| | ||
| - | + | |
| • treble | • | |
| • bass | • | |
| LOEWE. | ||
| × | Prigušivanje/uključivanje zvuka. |
| Uključuje soundbar ili preba- cuje u stanje pripravnosti. | |
| Uključuje/isključuje noćni način rada. | |
| Držite prit snuto kako biste uklju- čili / isključili /zaslon (isključeno po zadanim postavkama). Ova funkcja prikazuje dodatne informacije na precnjoj ploči u nekim okolnostima. | |
| Prebacuje između načina re- produkcije surround zvuka. | |
| Držite prit snuto za prikaz postav- ki glasnoče vanjskih zvučnika. | |
| Pritisnite za promjenu ulaznog izvora. | |
| Držite prit snuto u stanju pripravnosti za prikaz verzije softvera na zasonu. | |
| Ekvilizator - braje izme- du gotovih audionačina: | |
| ISKLJUČENO, GOVOR, KLASI- KA, POP, PRILAGODENI FILM. PRILAGODENA GLAZBA. | |
| Povralak na prethodni audiozapis u USB / Bluetooth / PLAY-Fi načinu. | |
| Prebacivanje na sljedeći audiozapis u USB / Bluetooth / PLAY-Fi načinu. | |
| Reprodukcija/pauza audiozapisu u USB / Bluetooth / PLAY-Fi načinu. | |
| Držite prit snuto 8 sekundi za povratak na tvorničke postavko. | |
| Pritisnite za aktvaciju uparivanja u Bluetooth načinu ili odspajanje poslo- joćeg uparonog Bluetooth uredaja. | |
| Smanjivanje glasnoće. | |
| Povećavanje glasnoće. | |
| treble | Podešavanje visokih tonova. |
| bass | Podešavanje dubokih tonova (basa). |
Prva upotreba
natural_image
Three-step illustration showing hand positioning of a device with blue arrows indicating movement (no text or symbols)- Pritisnite i pomaknite stražnji poklopač kako biste olvorili odje jak balerija na daljinskorn upravljaču.
- Uk onite zaštitni ezičak.
- Ponove postlavile stražnji ook opac.
- Gurnile alai (npr. poklopac ocjeljka baterija) u žlijob izmođu dviju baterija kako biste ih izvadili.
- Umelnite nove baterijs bočne strane i čvrsto ih pritisnite na mjesto starih baterija. Provjerite je li (+) strana bateri e okrenuta prema gore.
- Ponovo postavite stražnji ook opac.
6Povezivanjesoundbara
(Audio Return Channel)
Opcija 1
Upotrijebile (isporučeni) audiokabel 3,5 mm - na - 3,5 mm za povezvanje utičnice slušalica na televizoru ili vanjskom audiouređaju s utičnicom AUX IN na uređaju.
Opcija 2
Jpotrijebite audiokabe RCA na 3,5 mm (nije sporučen) za povezivanje audiocizlaza televizora s utičnicom AUX IN na uređaju.
- Priključite kabel napajanja na utičnicu AC IN na soundbaru, a zatim u strujnu utičnicu.
- Priključile kabel napajanja na uňičnicu AC IN na subwooferu. Učvrst te kabel u odjeljak za pohranu kabela s donje strane subwoofera. Zatm priključile kabel u strujru ut činću.
Stanje LED indikatora Stanje
- Nakon upar vanja upalit će se odgovarajući indikator na subwooferu.
- Ako indikator uparivanja i dalje treperi, ponovite prethodne postupke.
Napomena
- Subwoofer treba biti na razmaku do 6 m od soundbara i na otvorenom području (šlo bliže).
- Uklonite sve predmete između subwoofera i soundbara.
- Ako bežično boveživanje ponovo ne uspije, provjerite dolazili do ometanja od strane drugih elektrončkih uredaja. Uklonite ove uzroke ometanja i ponovile pre.hodni postupak.
www.spotify.com/connect/thirc-party-licenses
14 Ažuriranje softvera
Nadogradnja softvera soundbara:
- Preu/mite najnoviji softvers web mjesta.
- Raspakirajte datoteku u konjenski imenik USB uređaja.
- Prik jučite USB uređaj na soundbar dok je u ukjučenom stanju.
- Pokreće se instalacija, a na zaslonu se prikazuje lijek od 0 do 99.
Upozorejje: Ažuniranje softvera može potrajat rekolko minuta. Nemojte iskapčati /vučnik, isključivati urodaj ni odspajati USB urodaj ili mrežu tijekom ažunranja. Tako biste mogli un šti soundbar. - Zaslon se isključuje po dovršetku ažuriranja.
- Isključite soundbar iz napajanja.
- Nakon jedne minute penovo priključile scundbar u napajanje.
Soundbar je sada ažuriran na novu ver/iju softvera.
Nadogranja soundbara za funkciju upotrebe u više prostorija:
- Preuzmite i instalirajo aplikaciju DTS Play-Fi na mobilni uređaj.
- Povežite soundbar s aplikacijom.
- Ako je costupan novi Play-Fi softvor, aplikacija vas o tome obavleštava.
- Pratile upule u aplikaciji kako biste obavili ažuri- ranje za funkcije upotrebe u više prostorija.
Warning: It may take a few minutes for the software to update. Do not unplug your speaker, turn off the device, or disconnect the USB stick or network during the update. These actions can potentially destroy your soundbar.
Aplikacije
| × | ○ | |
| ○ | ◎ | |
| → | ↓↓↑ | |
| ← | → | |
| →|| | ||
| - | + | |
| • treble | • | |
| • bass | • | |
| LOEWE. | ||
- S primernim orodjem (npr. s pokrovom) odprite vdolino med oberna baterijama, da odstrante stari.
- Vstav te novi bateriji s strani in ju trono pohsnite na mesti originalnih bateriji. Propričajte se, da je stran (+) baterije obrnja navzgor.
- Potisnite zaščitni jeziček nazaj na svoje mesto.
3 Komponente glavne enote
Stanje LED-Indikatona Stanje
Možnost 1
Uporacole avdio kabel 3,5 mm v 3,5 mm (priložen) za povezavo avdio vtiča za slušalke zuranje avdio naprave al televizorja v vt č AUX N na enoti.
Možnost 2
www.spotify.com/connect/thirc-party-licenses
| × | ○ | |
| ○ | ◎ | |
| → | ↓↓↑ | |
| ← | → | |
| →|| | ||
| - | + | |
| • treble | • | |
| • bass | • | |
| LOEWE. | ||
| Zeri hesht / nuk hesht. | |
| Ndiz radion ose kalon ne modalitelin e galishmērisē. | |
| Aktivizon / çaktivizon modalitelin e natēs. | |
| Shlypnidhe mbani tē shtypur pēr te ndezur / fikur okranin (fikur si parazgjedhje). Kjo veçori sotaq informacione shlesē né ckranin e panclit tō pōroarmō né situata te caktuara. | |
| Ndōrron mos mōnyrave te tīngullit rethues. | |
| Shlypnidhe mbani tē shtypur pēr te hapur cilesimin e volumit pēr altoparlantēt e jashtēm. | |
| Shtypni pēr te ndryshuar burimin e hynjes. | |
| Shtypni dhe mbani né modalitetin e galishmērisē pēr tē lregular versionin e softucrit né ckran. | |
| Barazues- zgjidhnī nga modalitetet e paravendosura tē audics:OFF, FJALA, KLASIKE, POP, FILM DOGANOR, MJZIK F Zakonshme. | |
| Kaloni te pista audio e mēparshme ne modalitelin USB / Bluetooth / PLAY-Fi. | |
| Kaloni te piosa tjctār audio nō modalitetin USB / Bluetooth / PLAY-Fi. | |
| Luaļ / ndalo kōngen audio nō modalitelin USB / Bluetooth / PLAY-Fi. | |
| Shtypni dhe mbajcni pēr 8 sekonda pēr te rivendosur cilesimet e fabrikes. | |
| Shtypni dhe mbani tē shtypur pēr te aktivizuar funksionin e ēiftimit ne modalitelin Bluetooth ose shkēputni pajisjon ckzistuoso Bluetooth to ēiftuar. | |
| U ni nivolin e vēllimit. | |
| Rritni nive in e vellimit. | |
| treble | Rregullon nivolin e trofishtō. |
| bass | Rregullon nivelin e bas t |
Opsioni 1
Gjendja o tregussit LED gjendja
9.9 Shfaq shkëlqimin
www.spotify.com/connect/thirc-party- censes
Stare Indicator LED Status
Focsind un cablu optic (neinclus), conectat conectorul OPTIC de pe sourdbar la conectorul IESIRE OPTICA de la televizor sau alt dispozitiv.
- Conectorul optic digital poate fi et chetat SPDIF sau IEŞIRE SPDIF.
6.4 Conectarea cu cablu audio analogic
Varianta 1
Stare indicator LED Status
9.11 Control WDAL 2.0
| Kanácián évőičnç LED | Kanácián |
| LED ovábetažnvei yprývopa | To subwoofer βpíoketai os kanácián (čučnç) |
| LED ovapmuévo | Συδόθηκε / επιτυχής čaučn |
| LED ovábetažnvei oryá | Συδόση / Apotuxia čaučnç |
Επιλογή 1
www.spotify.com/connect/third-party-licenses
Chromecast built-in....272
| × | ○ | |
| ◎ | ||
| || | ||
| - | + | |
| treble | • | |
| bass | • | |
| LOEWE. | ||
Вариант 1
8 Chromecast built-in
www.spotify.com/connect/thirc-party-licenses
14 Обновление ПО
| × | ○ | |
| ○ | ◎ | |
| → | ↓↓ | |
| ← | → | |
| →|| | ||
| - | + | |
| • treble | • | |
| • bass | • | |
| LOEWE. | ||
6 Під панелі
Варіант 1
www.spotify.com/connect/third-party-licenses
rav.....OPTICAL/COAXIAL/HDMI
٢٩٧ تشفيل البلوتوث
19V....USB تشفيل
۶۹۸ سبوتیفای
تحديث البرامج
Connectivity och the contact with a particular contact with a particular contact with a particular contact with a particular contact with a particular contact with a particular contact with a particular contact with a particular contact with a particular contact with a particular contact with a particular contact with a particular contact with a particular contact with a particular contact with a particular contact with a particular contact with a particular contact with a particular contact with a particular contact with a particular contact with a particular contact with a particular contact with a particular contact with a particular contact with a particular contact with a specific contact with a particular contact with a particular contact with a particular contact with a particular contact with a particular contact with a particular contact with a particular contact with a particular contact with a particular contact with a particular contact with a particular contact with a particular contact with a particular contact with a particular contact with a particular contact with a particular contact with a particular contact with a particular contact with a particular contact with a particular contact with a particular contact with a particular contact with a particular contact with a particular contact with a certain contact with a particular contact with a particular contact with a particular contact with a particular contact with a particular contact with a particular contact with a particular contact with a particular contact with a particular contact with a particular contact with a particular contact with a particular contact with a particular contact with a particular contact with a particular contact with a particular contact with a particular contact with a particular contact with a particular contact with a particular contact with a particular contact with a particular contact with a particular contact with a particular contact with a several contacts and two points of interest.
| × | ○ | |
| ○ | ◎ | |
| → | ↔↑ | |
| ← | → | |
| →|| | ||
| - | + | |
| • treble | • | |
| • bass | • | |
| LOEWE. | ||


الخيار 1
Bluetooth Household (1)
www.spotify.com/connect/third-party-licenses
٤١ تحديث البرامج
Chromecast built-in....308
| × | ○ | |
| ◎ | ||
| || | ||
| - | + | |
| treble | • | |
| bass | • | |
| LOEWE. | ||
Seçenek 1
8 Chromecast built-in
www.spotify.com/connectl/third-party-licenses
!הכלההוּרָהוּרָהוּרָהוּרָהוּרָהוּרָהוּרָהוּרָהוּרָהוּרָהוּרָהוּרָהוּרָהוּרָהוּרָה

.1
| × | ○ | |
| ○ | ◎ | |
| → | ↔↑ | |
| ← | → | |
| →|| | ||
| - | + | |
| • treble | • | |
| • bass | • | |
| LOEWE. | ||
- WDAL 2.0 mps wpn .2
(###) SUB ### WDAL2.0
CENTER / (הַרְׁ) FRONT / (הַרְׁ) REAR / (הַרְׁ)
| .הכלהה-ACIN vps | .3 |
| .הכלהה-LINE IN vps | .4 |
| .הכלהה-3.5 |
| הכלהה/הכלהה/הכלהה/הכלהה/הכלהה/הכלהה/הכלהה/הכלהה/הכלהה/הכלהה/הכלהה/הכלהה/הכלהה/הכchia/הכchia/הכchia/הכchia/הכchia/הכchia/הכchia/הכchia/הכchia/הכchia/הכchia/הכchia/הכchia/הכchia/הכchia/הכchia/הכchia/הכchia/הכchia/הכchia/הכchia/הכchia/הכchia/הכchia/הכchia/הכeria/הכchia/הכchia/הכchia/הכchia/הכchia/הכchia/הכchia/הכchia/הכchia/הכchia/הכchia/הכchia/הכchia/הכchia/הכchia/הכchia/הכchia/הכchia/הכchia/הכchia/הכchia/הכchia/הכchia/הכchia/הכicia/הכchia/הכchia/הכchia/הכchia/הכchia/הכchia/הכchia/הכchia/הכchia/הכchia/הכchia/הכchia/הכchia/הכchia/הכchia/הכchia/הכchia/הכchia/הכchia/הכchia/הכchia/הכchia/הכchia/הכchia/הכopia/הכopia/הכopia/הכopia/הכopia/הכopia/הכopia/הכopia/הכopia/הכopia/הכopia/הכopia/הכopia/הכopia/הכopia/הכopia/הכopia/הכopia/הכopia/הכopia/הכopia/הכopia/הכopia/הכopia/הכopia/הכalia/הכalia/הכalia/הכalia/הכalia/הכalia/הכalia/הכalia/הכalia/הכalia/הכalia/הכalia/הכalia/הכalia/הכalia/הכalia/הכalia/הכalia/הכalia/הכalia/הכalia/הכalia/הכalia/הכalia/הכalia/הכemia/הכemia/הכemia/הכemia/הכemia/הכemia/הכemia/הכemia/הכemia/הכemia/הכemia/הכemia/הכemia/הכemia/הכemia/הכemia/הכemia/הכemia/הכemia/הכemia/הכemia/הכemia/הכemia/הכemia/הכemia/הכalia/הכalia/הכalia/הכalia/הכalia/הכalia/הכalia/הכalia/הכalia/הכalia/הכalia/הכalia/הכalia/הכalia/הכalia/הכalia/הכalia/הכalia/הכalia/הכalia/הכalia/הכalia/הכalia/הכalia/הכ Race/הכ Race/הכ Race/הכ Race/הכ Race/הכ Race/הכ Race/הכ Race/הכ Race/הכ Race/הכ Race/הכ Race/הכ Race/הכ Race/הכ Race/הכ Race/הכ Race/הכ Race/הכ Race/הכ Race/הכ Race/הכ Race/הכ Race/הכ Race/הכ Race/הכ race/הכ race/הכ race/הכ race/הכ race/הכ race/הכ race/הכ race/הכ race/הכ race/הכ race/הכ race/הכ race/הכ race/הכ race/הכ race/הכ race/הכ race/הכ race/הכ race/הכ race/הכ race/הכ race/הכ race/הכ race/הכ Race/הכ race/הכ race/הכ race/הכ race/הכ race/הכ race/הכ race/הכ race/הכ race/הכ race/הכ race/הכ race/הכ race/הכ race/הכ race/הכ race/הכ race/הכ race/הכ race/הכ race/הכ race/הכ race/הכ race/הכ Race/הכ Race/הכ Race/הכ Race/הכ Race/הכ Race/הכ Race/הכ Race/הכ Race/הכ Race/הכ Race/הכ Race/הכ Race/הכ Race/הכ Race/הכ Race/הכ Race/הכ Race/הכ Race/הכ Race/הכ Race/הכ Race/הכ Race/הכ Race/הכRace/הכ Race/הכ Race/הכ Race/הכ Race/הכ Race/הכ Race/הכ Race/הכ Race/הכ Race/הכ Race/הכ Race/הכ Race/הכ Race/הכ Race/הכ Race/הכ Race/הכ Race/הכ Race/הכ Race/הכ Race/הכ Race/הכ Race/הכ Race/הכ Race/הכ Class/הכ Class/הכ Class/הכ Class/הכ Class/הכ Class/הכ Class/הכ Class/הכ Class/הכ Class/הכ Class/הכ Class/הכ Class/הכ Class/הכ Class/הכ Class/הכ Class/הכ Class/הכ Class/הכ Class/הכ Class/הכ Class/הכ Class/הכ Class/הכ Class/הכClass/הכ Class/הכ Class/הכ Class/הכ Class/הכ Class/הכ Class/הכ Class/הכ Class/הכ Class/הכ Class/הכ Class/הכ Class/הכ Class/הכ Class/הכ Class/הכ Class/הכ Class/הכ Class/הכ Class/הכ Class/הכ Class/הכ Class/הכ Class/הכ Class/הכ class/הכ class/הכ class/הכ class/הכ class/הכ class/הכ class/הכ class/הכ class/הכ class/הכ class/הכ class/הכ class/הכ class/הכ class/הכ class/הכ class/הכ class/הכ class/הכ class/הכ class/הכ class/הכ class/הכ class/הכ class/הכ Class/הכ Class/הכ Class/הכ Class/הכ Class/הכ Class/הכ Class/הכ Class/הכ Class/הכ Class/הכ Class/הכ Class/הכ Class/הכ Class/הכ Class/הכ Class/הכ Class/הכ Class/הכ Class/הכ Class/הכ Class/הכ Class/הכ Class/הכ Class/הכ CLASS/הכ Class/הכ Class/הכ Class/הכ Class/הכ Class/הכ Class/הכ Class/הכ Class/הכ Class/הכ Class/הכ Class/הכ Class/הכ Class/הכ Class/הכ Class/הכ Class/הכ Class/הכ Class/הכ Class/הכ Class/הכ Class/הכ Class/הכ Class/הכ Class/הכ Classification/ |
בְרַעָה בְרַעָה
.1
1 בַרָא
(2 in HDMI IN (1, 2007, 2008) HDMI 2007, 2008), 2009, 2010, 2011, 2012, 2013, 2014, 2015, 2016, 2017, 2018), DVD, or video and image (data), or video and image (data), (Bu-ray
TV) HDMI OUT - n'jahm k'jahm HDMI jahm jahm .2 n'jahm jahm HDMI IN jahm (eARC/ARC
:
(שַׁהָרִים) New device
•
.6
•
:
•
•
•
Wi-Fi 6.7
WPS
in WPS men men men men men men men men men men men men men men men men men men men men men men men men men men men men men men men men men men men men men men men men men men men men men men men men men men men men men men men men men men men men men men men men men men men men men men men men men men men men men men men men men men men men men men men men men men men men men men men men men men men men
AirPlay
Spotify, email, email, email, email, email, email, email, email, email, email, email, email, email, email, email, email, email, email, email, email, email, email, email, email, email, email, email, email, email, email, email, email, email, email, email, email, email, email, email, email, email, email, email, email, email, email, email, email, email, email, Email:
www.spotify.com/connect/third-party-licenses
14
K by yinsh jnu, AVRCP senes jnin Bluetooth n jpn on / minent to D|| by yinsh ik, nvin sh by zinsh to pnn obe a D/ nynenon ik wth
.4
- Bluetooth - n 100, Bluetooth - n 100,
Bluetooth 1000 in Bluetooth 1000 non-1000 non-1000 EDR + 4.2 non-1000 Bluetooth-AVRCP, A2DP
• Off WDAL 2.0 • WDAL 2.0
תְקָה בַרִי הַלְאָה
OPT / ARC / HDMI 2 / HDMI 1 in PCM is the video of the video (voc) in DVD is the video of the video (Dolby Digital .(Blu-ray-n
| × | ○ | |
| ○ | ◎ | |
| → | ↓↓↑ | |
| ← | → | |
| →|| | ||
| - | + | |
| • treble | • | |
| • bass | • | |
| LOEWE. | ||
Опция 1
www.spotify.com/connect/third-party-licenses
Chromecastbuilt-in....344
Alapfunkciók....344
| × | ○ | |
| ◎ | ||
| || | ||
| - | + | |
| treble | • | |
| bass | • | |
| LOEWE. | ||
1. lehetőség
8 Chromecastbuilt-in
www.spotify.com/connect/thirc-party- censos
14Szoftverfrissítés
| × | ○ | |
| ○ | ◎ | |
| → | ↓↓↑ | |
| ← | → | |
| →|| | ||
| - | + | |
| • treble | • | |
| • bass | • | |
| LOEWE. | ||
| Bez zvuka / Sa zvukom. | |
| Prebacuje zvučnu traku na uključeno ili prebacuje u režim pripravnosti. | |
| Uključuje/isključuje noćni režim. | |
| Pritisnite i držite prikaz uključenim / isključenim (sključenim kao podra zumovano). Ova funkcija prikazuje dodatne informacije na prednjem prikazu panela u odrečenim situacijama. | |
| Prolazi između zvučnih okolnih režima. | |
| Pritisnite i držite da olvorite podošavanje jačino za eksterne zvučnike. | |
| Pritisnite da promenito izvor ulaza. | |
| Pritisnite i držite u režimu pri pravnost ca biste prikazal verziju softvera na prikazu. | |
| Ekvilajver - izaberite iz audio unaprod podešćnih režima: | |
| ISKLJUČENO, GOVOR, KLASIČNO, POP, PRILAGODEN FILM, PRI-LAGODENA MUZIKA. | |
| Preskočite na pretnodnu audio numeru u JSB / Bluetooth / PLAY-Firežimu. | |
| Preskočite na sledeću audio numeru u USB / Bluetooth / PLAY-Firežimu. | |
| Reprodukcija/pauza audio numero u USB / Bluetooth/ PLAY-Firežimu. | |
| Pritisnite i držite na 8 sexundi urežimu pripravnosti da biste vratili fabričko podešavanje. | |
| Pritisnite i držite da aktivirato funkciju uparivanja u Bluetooth režimu ili isključite postojeći upareni Bluetooth uređa]. | |
| Smenjite nivo jačine. | |
| Povoćajte nivo jačine. | |
| treble | Prilagodite trebl nivo. |
| bass | Prilagodile bas nivo. |
Prvo korišćenje
Jed nica ma unaored instaliranu litijum-sku 2 x CR2032 bateriju. Uklonile zašti ln labulator da aktivirate daljins- ku kontrolu baterije.

- Prtisnite i sklizrite zadnji poklopac da otvorite odeljak baterije caljinske kontrole.
- Uklonite zaštitn tabulator.
- Pritisnite poklopac baterije na mesto.
Zamena baterija daljinske kontrole
Daljinska kontrola zahtova 2 de la CR2032, 3 Vlitjumsko baterije. Pritisnite i skliznite zadnji poklopac da otvor te odeljak baterije dal jinske kontrole.
- Korislite alat (kao što je poklopac odeljka baterje) da otvorite otvor između dvo baterije da biste uklonili stare baterije.
- Ubacite novo baterije sa stranc i gurnite ih čvrsto u originalan položaj baterije. Postarajte se da (+) dec balerije bude okrenul na gore.
- Pritisnite poxlopač baterije na mesto
3 Glavna jedinica komponenti
3.1 Prednji panel glavne jedinice
6Povezivanjezvučne trake
Pre nego što izvršite li promenite bilo kakvo povozi- vanje, postarajte se da svi uređaji bodu isključeni iz ulava/va napajanje.
6.1 Dolby Atmos®
Dolby Atmos® daje imerzivno iskustvo slušanja dostavljajući zvuk u prostor od tri dimenzije, i sva bogatstva, jasnoća napajanje Dolby zvuka.
Za više informacija, poset te dolby.com/technologies/dolby-atmos
Opcija 1
LED stancic indicatora Status
| LED bržo blješti | Podvuferr u režimu uparivanja |
| LED je uključen | Povezano / Uparivanje je uspešno |
| LED sporo blješti | Povezivanje / Uparivanje nije uspolo |
Napomena
No pritiskajte dugme jačine na zadnjoj strani podyutera, osim za manuelno uparivanje.
- Uklonito zadnji preklop zvučne traxe, zatim pritisnite dugme UPARIVANJE na 5 sekundi.
- Indikator uparivanja na podvuferu će se uključiti nakon uspeha.
- Ako indikator uparivanja još uvek blješt, ponovite korake iznad.
Napomena
- Pocvuler treba da bude u okviru od 6 m na zvučnoj traci na otvornom području (što je bliže to je bolje).
- Uklon te sve objekte između podvufera i zvučne trake.
- Ako bezčno ovez vanje opet ne uspe, provente područije za konflikt ili jaku interferenciju (nor. interferencija sa elektronskog uređaja). Eliminišite ove konflikte ili jake interferencije i ponovite gornju proceduru.
6.7 Više soba: Povezivanje na Wi-Fi
WPS režim
Ako vaš rutor ima Wi-Fi zaštićeno podešavanje (WPS), možete ca pocesite povez van e bez unosa lozinke
- Pritisnite i držite WPS dugme na 4 sekunde. Čućele ton a Wi-Fi indikator će dvapula oještalí neprekidno.
- Prit snite WPS dugme na svom ruteru. Dugme je obično obelčeno sa WPS logom.
Napomena
- WPS nije standardna funkcija svih rutera. Ako vaš ruter nema WPS, sledite standarde Wi-Fi podešavanja.
www.spotify.com/connect/thirc-party-licenses
14Ažuriranjesoftvera
Za ažuriranje firmvera zvučne trake:
- Preuzmite najnoviji softver sa veb okacije
- izvucite datoteku u USB korensku fasciku.
- Povežile USB na žvučnu traku dok je režim napajanja uključen.
-
Instalacija počinje i prikaz pokazuje progres ažuriranja od 0 do 99.
Upozerenje: Trebaće možda nekoliko minuta za softver da se ažunira. Ne isključuje zvučnik, isključte uređaj ili isključite USB ili mrežu u toku ažuriranja. Ovo radnje mogu potencijalno da unište vašu zvučnu traku. -
Kada je ažuniranje završeno, pri kaz se isključuje.
- Isključite zvučnu traku sa glavnih kablova.
- Nakon jednog minuta, povežite zvučnu traku natrag na glavne.
Zvučna traka je sada ažurirana na novuverziju softvera.
Za nadogradnju funkcije više soba vaše zvučne trake:
- Preuzmito i instaliraje DTS Play-Fi aplikaciju na svoj mooli uredaj.
- Povežite zvučnu traku na aplikaciju.
- Ako je novi Play-Fi softver dostupan, aplikacija vas obavešlava.
- Sledite uputstva u aplikaciji da pokrenele ažuri ranje funkcijo više soba.
Ugraden Chromecast (Chromecast built-in)....368
| × | ○ | |
| ◎ | ||
| || | ||
| - | + | |
| treble | • | |
| bass | • | |
| LOEWE. | ||
| Isključivanje (prigušivanje)/uključvanje zvuka. | |
| Uključuje soundbar zvučnike ili proclazi u stanjo pripravnosti. | |
| Uključuje/isključuje noćni način rada.Pritisnite i držite za uključivanje/isključivanje ekrana/prkava (isključeno prema zadanim postavkama). Ova funkcija prikazuje docatne informacije na ekranu/prikazu prednjo ploče u određenim situacijama. | |
| Prebacuje između načina prostornog zvuka.Pritisnite i držite da otvorite postavku jačinc zvuka za varjske zvučnike. | |
| Pritisnite za promjenu ulaznog izvora.Pritisnite i držite u stanju pripravnosti ca se na ekranu prikaže verzija softvora. | |
| Ekvilizator - birajte između unaprijed postavjenih audio načina:ISKLIJUČENO, GOVOR, KLASIČNA, POP, PRILAGODENI FILM, PRI-LAGODENA MUZIKA. | |
| Preskočite na pretnodní audio zapis u USB / Bluetooth / PLAY-Fi načinu rada. | |
| Preskočite na sljedeći audio zapis u USB / Bluetooth / PLAY Fi načinu rada. | |
| Reproduciraj/pauziraj audio zapis u USB / Bluetooth / PLAY Fi načinu rada.Pritisnite i držite 8 sexundi u stanju pripravnosti ca vratite fabička postavke.Pritisnite i držite da b ste akt virali funkciju uparivanja u Bluetooth načinu rada ili da prokiniete vozu sa postojećim uparenim Bluetooth urečajem. | |
| Smanjite nivo jačine zvuka. | |
| Povoćajte nivo jačine zvuka. | |
| treble | Podešava nivo visokih tenova. |
| bass | Podešava nivo basa. |
Prva upotreba
Uređaj ima unaprijed instalranu litijumsku bateriju 2 x CR2032. Jklenite zaštitri jevičak kako biste aktivirali baterju da jinskog upravljača.
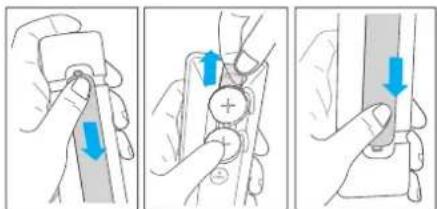
- Upotrijeb te alat (kao što je peklopać odjeljka za baterije) da podignite žljeb između dvije baterije kako biste uklonli stare baterije.
- Umelnite nove balerije sa strane i čvrsto in gurnite u originalni položaj baterje. Uvjerite se da (+) strana baterije bude okrenuta premagore.
- Gurnite ook opac baterije nazad na svoje mesto
Stanje LED Indikatora Status
Opcija 1
- Povežite mrežni kabl na "AC IN" utičnicu sounč bar zvučnika, a zalirn u mrežnu utičnicu.
- Povežite mrežni kabl na "AC IN" utičicu niskotonskog zvučnika. Pričvrstite kabl za odeljak za upravljanje kablovima na conjoj strani nskotonskog zvučnika. Konačno, priključite kabl za napačanje utičnicu.
Slanje LED indicatora Status
| LED brzo troperi | (Subwoofer)Niskolonski zvučnje u načinu rada za uparvanje |
| LED je uključen | Povezano / Uparivanje uspješno |
| LED poako troperi | Povezivanje /uparvanje nije usojelo |
Napomena
Nemojle pritiskati dugme za jačinu /vuka na /adnjoj stran niskotonskog zvučnika, osim za ručno uparivanje.
Ručno uparivanje
Ako se ne čuje zvuk iz bežičnog niskotonskog zvučnika, ručno uparite niskotonski zvučnik.
- Isključte oba urečaja iz mrežne utičnice, a zatim ih porovno uključ le naxon 3 minuće.

- Pritisnite i držite dugme za ačinu zvuka na /adrijoj strani niskotonskog /vučnika 5 sekund.
- Indikator uparivanja na niskotonskom zvučniku će brzo trepeniti.
- Pritisnite i držite 5 sekundi na uredaju ili daljinskom upravljaču za prebacivanje uređaja u načn rada "ECO STANDBY".
- Zatim prit snite 📍 na uređaju ili daljinskom upravljaču za prebacivanje uređaja na 'ON'.
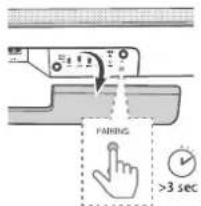
- Uklenite zadnji poklopac soundbar zvučnika, a zatim prit snite dugme "PAIRINGI (UPARIVANJE) na 5 sekundi.
- Indikator upar vanja na niskolonskom /vučniku će zasvi etliti nakon uspjcha.
- Ako indikator uparivanja i dalje treper, ponovite gore navedenc korako.
Napomena
- Niskotonski zvučnik bi trebao biti unutar 6 m od soundbar zvučnika u otvorenom prostoru (što bliže, lo belje).
- Uklonite sve predmete između niskotonskom zvučnika i soundbar zvučnika.
- Ako bežična ve za ponovo ne uspije, provjerite da li postoji konflikt ili jaka smetnja (npr. smetnje od elektronskog uredaja). Uxlonite ove konflikte ili jake smetnje i ponovite gore navedeni postupak.
6.7 Višesobni (višeprostorni): Povezivanje na Wi-Fi
WPS način rada
Ako vaš usmjerivač (rutor) ima Wi-Fi zaštćeno podešavanje (WPS), možete da podesite vezu bez unosa lozinke.
- Pritsnite i držile WPS dugme 4 sekunde. Čučete ton i Wi-Fi indicator će zatreperiti dva puta neprekidno.
- Pritisnite dugme WPS na vašem usmjerivaču. Dugme je obično označeno WPS logotipom.
Napomena
8UgradenChromecast (Chromecast built-in)
Ovaj soundbar zvučnik podržava Chromecast ugrađenu funkciju koja varn omogućava da emilujete muziku iz Chromecast kompatibilnih aplikacija na soundbar zvučnik. Da biste koristli ovu funkciju, uvjerite se da su soundbar zvučnik i vaš pametni telefon/tablet na istoj mreži. Započn te reprodukciju muzike u aplikaciji koja podržava Chromecast i prebacite je na soundbar zvučnik jednostavnim dodirom na dugme (cast) i odabirom soundbar zvučnika sa liste.
90snovneoperacije
- If the soundbar is in HDMI1/HDMI2/ARC/OPT (Optical) mode and there is no sound output from it, you may need to activate PCM or Dolby Digital signal output on the source device (npr. TV. DVD ili Blu-ray uređaje zareprodukciju plejen).
- Uredaj moždanoće moći dekodrati sve digitalne audio formate iz ulaznog izvora. U tom slučaju, urecaj će bili iskljušen (origušen). Ove nije kvar. Uvjente se da je audio postavka ulaznog izvora povezanog preko HDMI 1 / HDMI 2 / ARC / OPT (optčkog) ulaza postavljena na PCM ili Dolby Digital. Za detalje o podešavanjima zvuka, poglédaje uputslvo za upotrebu uređaja izvora ulaza.
- U HDMI načinu rada, kada započne reprodukcija DOLBY ATMOS audio formala, na ekranu (prika zu) audio ploče se pojavljuje "DOLBY ATMOS".
- Kada počne DOLBY D GITA audio reprodukcija i ako je uključen prostorni zvuk na ekranu (pri- kazu) soundbar zvučnika će se prikazati „DOLBY SURROUND”. Ako je prostorni zvuk 'sključen, prikazaće se "DOLBY AUDIO".
- Kada /apočne reprodukcija PCM audio formala, na okranu (prikazu) soundbar zvučnika pojavljuje se "PCM AUDIO".
- Prilikom unosa audio formata koji nisu PCM ili DOLBY DIGITAL, ako nema iz aza zvuka iz urečaja, na ekranu (prika/u) se pojavljuje "ER ROR" (GREŠKA).
11Bluetoothrad
Povežile soundbar zvučnik sa Buclooth urodajem (xao što je iPad. iPhone, Pod touch, Andro d telefon ili laptop) preko Bluetooth a. a zatim možele da slušale audio da totoxo sačuvano na urodaju preko soundbar zvučnika.
- Pritisnite → više puta dugme (lzvor) na uredaju ili daljinskom upravljaču da biste soundbar /vučnik prebacili u BT (Bluelcoth) način raca.
Na oloči ekrana (prikaza) se prikazuje NEMA (NO) BT.
www.spotify.com/connect/thirc-party-licenses
14Ažuriranjesoftvera
Za nadogradnju ugrađene programske opreme soundbar zvučnika:
- Preuzm te najnoviji softver sa web lokacije.
- Raspakujte datoteku u USB osnovnu fasciklu.
- Povežite USB na soundbar zvučnik dok ste u ukjučenom načinu rada.
- Instalaci a počirije i na ekranu se pri kazuje napre dak ažuriranja od 0 do 99.
Upozorenje: Ažuriranje softvera može potrajati nekolko minuta. Nomojte isključivati zvučnik, sključivat uređaji isključivat USB memoriju ili mrežu lokorn ažuriranja. Ove radnje potencijalno mogu uništi vaš soundbar zvučnik.
- Kada se ažuriranje završi, ekran se isključuje.
-
Isključite soundbar zvučnik iz električne mreže.
-
Nakon jednog minuta, ponovo priključite soundbar zvučnik na e ektričnu mrežu.
Soundbar zvučnik je sada ažuriran na novu verziju softvera.
Za nadogradnju funkcije za više prostorija vašeg soundbar zvučnika:
| × | ○ | |
| ○ | ◎ | |
| → | ↓↓↑ | |
| ← | → | |
| →|| | ||
| - | + | |
| • treble | • | |
| • bass | • | |
| LOEWE. | ||
1-нуска
| Диодшаминдикаторынын куй | Куй |
| Диодшам тезхыпылыктайды | Сабзуфер жуптаурехим нде |
| Диодшам жанады | Жалғанған / Жуптауорындалуды |
| Диодшам баяухыпылыктайды | Байлапыс / Жуптаусотев |
Ескертпе
Колмен жуптаудан баска хагдайда саввуфердін артын- дать дыбысты рептеутетігін баспаңыз.
Колмен жуптау
Егер сымсыз сабвуферден дыбыс естямессе, сабвуферд колмен хултаңыв.
bān bān 3sāngmān dāngmāngdōu ......390
gù unibāmān dāngānmāngdō bānqāmā dāoānān gāsmāgān fēnlāgāng

al undomem amlu dmabesngamu asgfbmbengda ubas, ygfm udcyngngfmo mnugdru dguabga.

am gusugcmmn sb qasugmmn gmgdgbggdn. afnsumggu husgmmn gmgdgbggdn 600bmdo sb Byugmdn.
a) agnbnm sb dgnbsmn gengdgbgcn baza gnommbni buzgnoe# gfnngg. dgbudmn gengdgbgcn dmzng dghngs, gagmbgs sb aggngjga.
amalunggi goudgbhman gngdgbh, an am smlu goudgbhnggngn, fmd ob goudgbgagna.
sā dān māng yān bādmyu bāgāo sāgndmāgāo sāgīmāgān māu bāgān sāgīmāgān.
| × | ○ | |
| ○ | ◎ | |
| → | ↓↓↑ | |
| ← | → | |
| →|| | ||
| - | + | |
| • treble | • | |
| • bass | • | |
| LOEWE. | ||
| <× | bānlu hǎnngz / gādmǎngz. |
| bānmuglu bānlu àsþgɔnl, ső gāguñnəzgo gvmgónblu fúgyndög. | |
| bānmuglu/gaðmánnəzglu guānlu fúgyndóu. gossfárnqen qos gossymgðgen ʒfúhölnu Pauoftnəzgg / gæðmúðnəzgg (bāggjcmúðgðzgg gæðmánggmn), aðmágárgen ünþgúayngdóan glu egtrðjnu ahzágjolu gossádgónan náegmínðagynu ʒfúhölnu činša ðsþgomág. | |
| gossfárnəzga guānlu bānlu fúgyndögü dámńlu. gossfárnqen qos gossymgðgen bānlu àmúðgýngdóan gaububógmcog gvmg gcnibúðnʒgólnu mgnlu. | |
| gossfárnqen ágðugsznó unágbármni úyufimlu čigluwázgmcog. gossfárnqen qos gossymgðgen gvmgónblu fúgyndátn dámágúndgymn gyányíbʒgymnigásu agfúnnlu ʒfúhödeg buhžgðgmcog. | |
| gásgacpnáðgítva - aránfángen čiñsúbásm fossybógyem zgopm fúgyndágóncpó. gaðmíðngqn, ágdygcsgngos, gonsúðgjfin, ómá, loðműbášmágógn m ggncén, loðműbáðufgógn m ágúlnza. | |
| bénbu ayqom árçmngág gossulgens USB / Bluecoth / PLAY-Fi fúgyndôn. | |
| čéðpóng uýqom árçmngág gossulgens USB / Bluecoth / PLAY-Fi fúgyndôn. | |
| ayqom árçmngzlu ayósmángdós/ gossybógyes USB / Blue tootn / PLAY-Fi fúgyndátn. | |
| gsfídógyen ármiðgýngfónlu agluwqgáðus, gossfárnqen qos gossymgðjen 8 šeðnlu gobásgymnosádn gvmgónblu fúgyndátn. gossfárnqen qos gossymgðgen gossygncgónlu ggbdjynlu gosságdíngfóngdógnou Blue tootn fúgyndátn ső gáðmíngnun ombgággen gossygncgógnon Bluecoch ámšymángmós. | |
| bánlu gombni guáðgza. | |
| bánlu gombni úðgza. | |
| treble | bóqas ubáðnínggónlu gombni fúgygcníngdós. |
| bass | ásgqas ubáðnínggónlu gombni fúgygcníngdós. |
- ζασχαίνηση κος γασελίνησεργοι γμεδ φαταβαδύξηγήση δαθόμακυ δημησυ αγμβάξβανα γαδυμησημόνοι λαγαφία.
- ambugbon quidyago gofm.
- ผู้ส่งก่อจําหนังนักงาน สูงอื่น สูงอื่น สูงอื่น
- dacmo gengdgbgdu admlwegdo, submnygcm bgnlubym (fmgmfngus gengdgbu gubymgnmgbdu luggnni mln gengdgbu dmlnu maftlu admlwegdo).
- 10000 abugan genggagngn 836699954 6a 8yufang hugan genggagnglu 6abynu smtengyun, genggagngn, finl genggagnglu (1) daugng 8gdmn sfrnlb dndufmycqn.
- φασόμηδοι ομεθοβίου υυγεμη συρού συρομησι.
3 dnhnnssqn dmmznl 3m83mb6b6g0n
| āyāqānqān nāoāngsājīmǎn bāqāmāsāmgān s | bāqāgān |
| āyāqānqān uāmāgāng yānāgnāgān s | uāsgāggān qāoāgāngāngān bāgānādān s |
| āyāqānqān hāmāngān s | qāoāgānāngān / qāoāgāngāngān bānfāsāgān qāobānmāgāngān s |
| āyāqānqān bāgān yānāgnāgān s | qāoāgānāngān / qāoāgāngāngān 399 dāmbgānqān s |
5 356033200
6 bān lā 3s6gqnnlā dngfongdōs
عَجْمُنْعَدَّدِعَ あ だお ดَجْمُنْدَّدِعَ, ๑๕๖๐๓๔๙๗, ๕๖๖๏๘๙ ๒๕๖๏๘ ๒๕๖๏๘.
6.1 Dolby Atmos®
35706601
bān bān bān bān bān bān bān bān bān bān bān bān bān bān bān bān bān bān bān bān bān bān bān bān bān bān bān bān bān bān bān bān bān bān bū
Budgubogno Chromecast | domonogn gbladmyfugno
- bānǚ zǒngmù yǎbùgǎn yāsōu lǎoquīn, dādāqā gān jātāmān φαδyāngmǎngán lāoquāu 5 bānǚ yǎbùgǎmnǎxīn
- 6amdaqgcnb agdabgggaon, udaggggfnb
pssbygnngcnb abqn3yfmnn anfghos.
• ος φαδγαπερού αβεραγφίμην πυσα γιαλγαθόν, δαδγαπερού λυκραγφίμην δαθάτων.
მენიმვნა
• Usāgjāngm yīpāng yīmū bānū dāgāngqūb 6 āngfān mū sāgāngrūu (muy jāgām abgīns, ānn gāgāngn).
• Ls#gjngfmlu ge b#nb da#gmlu dm#nb dma#ngmgn y30me lo#s6o.
ng yuaggān zādānfa niugz gān dāngfāngā, ēyāmābān zhāgāngdīyān afg ab dāngfān hūnqācāg (dāguānnaq, gāngdānfeēgān dāngyāmānqānmān bīdāndāgāngās), arāngfānfa, gl zhāgāngdīgān ab dāngfāngān dāngfān āgāndgāgāncu bīyām fēu gāndgāngān āgāndwāndgān zhāngfāngās.
my glujhen nangma: mcgān bānu daōgānsu maqāgāngb boggāgāngbān
• Google Home sainb babynbn agfngnbl bqgs bwnngdn
dafngbng, agggqn qsdsgjds + > dmbymonmmnbl
qssyggjds > abgcnn dmbymonmmnds
• ∂ασμήσειον αρασμήσειον ωυγαβυμέσει.
8 Rsāgōgōyān Chromecast
gù bān lùu shēng zhōfū gājǐlè Chromecast nù huāyīgāgāng gājǐgāgnǎ, fēmāgāng xiāgāqāgān sāu guāngzān gāguānshān dībān chīu Chimecast nù huāyīgāgāng xiāgāqāpān oqāgālì bān lù sāu shēng yāo gājǐgāng xiāgāqāgāng sāu guānshān gāguānshān fēmā bān lùu shēng yào uqāgān liuāyīgāgānshān wāu shēng ghēng yào rùyīgāgāng xiāgāqāpān oqāgān xiāgāqāpān Chimecast-nù huāyīgāgāng xiāgāqāpān yào guānshān sōu uqāgān xiàu suāgāng yuōu shēng gājǐgāng xiàu guānshān yào uqāgān liu shēng yào guānshān yào uqāgān liu
9 8m3s20n ∂y4s3m6s
9.1 Romania Romania
fimogluq omfaggengg agugmangon amfymongemou glugemu fimgngdn, amfymongemou ndgngss grombnbi fnggndn, grombnbi nfqnzjylnn unbngds orgafuga.
உதமாஜந மைஷாவ மேஷாவ
G. G. G. G. G. G. G. G. G. G. G. G. G. G. G. G. G. G. G. G. G. G. G. G. G. G. G. G. G. G. G. G. G. G. G. G. G. G. G. G. G. G. G. G. G. G. G.
gādāmāyāgān gū zāpudāmāzgāngān gādāyāgān gāfēng gāwāgān gānbānzhāpān bāu wājuzhīngfāqng wDAI 2.3-nb dāgāmān, hīmārīng yuō / yuōs / bēbu / gāpudāmāgān sāmbu gāuayāgān gāpudāmāzgān "sāguīn" - gāpudān gānbānzhāpabqna, "qunpi" - gānqn gānbānzhāpabqna, gānbānzhāpabqna gānduahansag mādāyīngfāqng sānbānzhāpabqna, gānuayāgān gāpudāmāzgān OFF-89.
LARGE SMALL OFF

SUB

REAR

FRONT

CENTRE
საბუელირი მეეროება
www.spotify.com/connect/third-party-licenses
14 36mmgfsdymn y8mny63gmymogs z6b6bmgds
bān bān bān bān bān bān bān bān bān bān bān bān bān bān bān bān bān bān bān bān bān bān bān bān bān bān bān bān bān bān bān bān bān bān bū
- hsdmghzamnggng gubengbo dmmgmdyqng yidngfgequemgg 30dssangnqde.
- 8x6006600 gongm USB-ou dfrnggm lodjumxnggjbn
- őgőfőrőző USB bőnu ábbzemu Römfőrgő főggnődön.
- n61famayno n6ydo g5 g3nabn shg6g0u gabegngou dimginglu 0 qo6 99-899.
a a g a h a m a g a s . a d a m a h a g a m a g a m a g a m a g a m a g a m a g a m a ga .
- fimogoue adabengjous gubfengjous, gubuagugomongjous.
- 30am/manga: banu 3abggrn duggangusb
- jhmon bgnol dghgj, gssuzdhnqon, banl sibgqn, glugrda
a b c d e g o n o g o h o g o n o h o g o h o g o n o h o n o h o n o h o n o n .
mg3gbn bdnb 356gmnb dms3sgmmonabn5bn g36gjnnb 356lssabmgtdmsq:
- 3a#m#g#n#ngm ## ###b#p##m#ngn DTS Play-F s#n
b# m#ngm #m#y#m#m#o8g.
| × | ○ | |
| ○ | ◎ | |
| → | ↓↓↑ | |
| ← | → | |
| →|| | ||
| - | + | |
| • treble | • | |
| • bass | • | |
| LOEWE. | ||
Optik kabelden (daxil doyil) istifade ctmekle ses panelinizaki OPTİK konnektoru TV-doki vo ya digor cihazdaki OPTİK CIXİŞ konnektoruna koşun.
- Roqamsal optik konnektor SPDIF va ya SPDIF OUT kimi qeyd edilmiş ola bilar.
Seçim 1
www.spotify.com/connect/third party licenses
Sangnub Awgup Awpru whupuwqnnug Lguwngug, nn wqiu ba pppu wupwqudapp.
■ 8amjahu qunqawu
■ Uaup unzulnşun
■ 2 x Ĉnuwūph jωn
■ HDMI jwn
■ Chowuqunqunqunqunqunqunqunqunqunqunqunqunqunqunqunqunqunqunqunqunqunqunqunqunqunqunqunqunqunqunqunqunqunqunqunqunqunqunqunqunqunqunqunqunqunqunqunqunqunqunq
■ Oqunwqnpàðwá n.ηbŋug
Sthuúhlywlywà undjuwlátph gnigwàwwlyh nhnpn
Unpluh Kauwumlu qupowabuwu wajuruwop whunwylbuplquynq trp qublq wunwnqnwhph abnpuh duwuml.
1 Uulunwugnupwug lwnunn gnignudtn
Ogunpmpn. Uorph uukunwq yu6uwonpndk wqufndbni GwJwn ngwhe yunnwgap wju tqn
J_0 wajnawq q oqnwqn n u na koulup waij. nwaqniqjuw u 2w6wqn n duw pnnp guwqablnh :
Crip wb.np E wju6uubb o bujnuqajwà u zu guqnāduwà Gnuwugabng Sbuuqai eqnuqnāduwà Guuun:
Cnip aylbep E huannnbè Gounbep wupwnqnàp dpu unipuò d e qnpòwnàwlpuiè Spu6huāqālpniù dʒuìà cn no āwjuwqonpu gniūbhpì:
Inppnnwuh2utph pwgwwnnpnjntu

Helyawh blymwogwao (II nuu) owngwnwnn Up hlynwwnn wwnp hwnwnwnn h, wjwnpu, np wja zh wuwwnwnd wduwnwnwnn dhwgnn Lbwnwnwnd 6mnh (abwwnn):

Jju hunshpwnwahg gnug tcnwju puanh junawu Gunuwangn wngguqiu nhuylqn:

Jju hunfqnuihz: equiuqrnannh: qngwuguniu h: wij wujh lynacnun nhupn: uuwu:

Jin junp6pnwurze genig i inwihu 5nq6h founwapnc, wunwugwud qinwagzng.
1.1 Stnwnnni#
1.1.1 Stnwnnniu
Sbnuqngbe dhuwqnp quynbi, Sumpa d.uqrbuh jlnur; Jh unbnuqngbe wja uwnpp niotn Surrzhuwquda quwuhj lnur;
1.1.2 Lwptn
Stunwchp finweph wurp, wjoubu, np nywop, jhuwuhj: Snawph jwnp zuwp L uaph lqu wugeh unp bqnph dwnp, nph npu jbnni lqu bwrupj: phwulwq bmpsh wqngnquw ybnphu unpwuhmht hdua mwnp Siwduuupsh ynw qwnuwq aotnuugrnyf finwaph jwnp wgnp L unwuwgwh Lykunwulwq gqnndtwn u Sanbgh ywnuwq bntuwugdtp Cbwnwnwn, wprp ynwh oqnwnqnndpg wrwq wja wtnp Ldmwnwnhkl
1.1.3 Uh oqunwqnnpdp wju uwnpn gnh ünun

Jupen spnq yutang h bupwuhgh gnh lquphzhng quwl gh zhepns, huguuho ba inawpwnh, lunquwuh, fucwungh pluqwnush, duga- obpwn, unwaljulmch, wui pnuju qubh dum Enbap uh npg cnwuhdunl gudw unuwuopn, ophua, durquwuhdunl, mung hus
1.1.4 Onwuhhunid

Etoniumugnigh lge puqquapbpe u wagptn aouwaplns b da wupg onwahrjgn. wadup wuqh 6nuuh yuukapqnnd a uqudnl n da uuug abrunwugmihg uquwnwahni wadup: Chy whylu onwahrjunajwa wagplng: Surnwag wuwr pun supumwurgh qngn34hph: Lprhp d h qubs oowhrjunja wa wagplng: wuwr pucny ldu6wulqin, puqngh qngh lyuü duwuhwuh guhnhly duwuhwuh pru: up wuwr gutnp eunwargh qwuua suuwaniy lyuü duwunwujd qiuunuaquwunzmi, tph uquasruhw yt suwunwushwa onwahrjunpia:
1.1.5 Ωπύπηρηνιώ

Luppe thn ibtwnpap, nap upd, bwnpapbn, dwn, hizwuhg bā wunghwnncbng, onwuhnhghzng, quwnpuabldhng lwa uq wungppn (btpwnqun nidswgnghzng), nprap luppn bā unu jhag. Noup pug cnwlny, wnwnquabn, hizwuhg bā ndtbn lwa puynpbn, swnph lnuq lwa dwn ch' npo. Swnwnquwē wunnyngzng zjubn bī bwnplbā wubpn, gpnānwqwa, rnguhrp bā wnp shn ngwnquapbn, lwnp lwr
1.1.6 Πωρωρωθη
Cquu qnpòu yhuì yùnununpnnh lyn Shg àzluò tānpuqukbpp:
1.1.7 Swàgwjhù ûhwgnì
Cuánquāp, n'wénqiuwunǎzh fǎnǎghwā wùnhuìwāg, tǎbī guògh bùnph lǐbūnniā (bīnánng), Sǒu bīnánngh fǎnwèqābnā abīzuwūp.
1.2 Oqunwqnδniδ
1.2.7 U#winnu U#yunw#wnwnwnwnn#hg
Uwuguwu yngwugng sh qingnu wupengmuywup sh wupgwnwnh hblunwnwnnwnwupwnn jwn Wupg gwugng wupengmuywup wugwnwnjn. Guwup gwuggh wung quunwujhg Guobao:
Cruwabh quwnuqg wzmp t 5b2nnrjaiwdu Guwabh jsh, mpuqgh wunp guwluwqud qwsh Guwnuuq hjuh wuqwnb giwighg:
1.3 Sthuahlywlywù uwwwwnyniú
1.3.1 Uwnph unthuahlywlywà uwwuuwnlynü
Cnbp chhnpap npbwnqunwupb jwr unpp, guah n enwegh swolng lqnwn ta guyabuqngwlpapthp ihnd lqud trp lquwphzbng wucjna ta, uzhnsp lqnwn t yuwacwchn jhshp quwwurqcn pwn wuhunwepbn jhwafqnpwuwqncw suwuu pyn wadhuwqgh
1.3.2 Uwpnt'p ühwjü znn 2nnnq:
bujfuguā wu wunwuhg huphā, uagukshp wu wungh guāguwā hū wunwunng guāgh dqunwuhg. Eplug āh oqnuqnolēg Āhuŋtā dquwnī āhengjēn ljuā āwprnn wuhbjash. Uwspuāwī Gujiā p oqnuqnolēg āhuŋtā hunwuzgān
1.4 Uwpunlyngutn
9qn12wgn'16 4n11 18h' unltp dwnpnlyngn:

Uja wupwabj 6bn diunwajwnpwnj Bunwawqundwa qubwukwnj wapnwalwnj L diunwajwnpwnbghd dwnlng: Danwajwnpwnbgh dwnlngg uni, unwaj wunn j bcnpho jing wupwabjun wapnwalwnj pwnwabj 2 duwnd a Gutagbghd dwnlng:
| × | ○ | |
| ○ | ◎ | |
| → | ↓↓↑ | |
| ← | → | |
| →|| | ||
| - | + | |
| • treble | • | |
| • bass | • | |
| LOEWE. | ||
| <× | Suijih wqguunnaihwngni: |
| Jhuajm#i #uujunju .juwunlje luyu wqgan#i b uwwuwic ndchnh: | |
| Jhuajm#iwuqwnni# hqhbrwn# obchhp. Ubnltp u wquklp Lpwnlp Shugdun/ wqguunjpi Guwun jyuwhwnplw# wqguunjw# Bx Lsp fniuighw# npzyuluh hnuu, hsuwqbn# gngwnprn# t jwgnighy urbblwundnjepni# wagln qiuwduwuh Lpwnsh: | |
| Ubnltp gnpuunwnq obchslthp dhp: Ubnltp u wquklp uwnungho nu papwnunukh zujih wqnquinnm# pagwrni su#un: | |
| Ubnltp i snungwqnswa wnjnying cnhuzjn Su#un: Ubnltp u wquklp uwnu#u# abch#nd onwqnwzuph unwpapwnp Etpw#he gngwnrqn. Su#un: | |
| Tpiluqnppn. pluapp ewuwnnpju# awinjhn obchslthng. UusLSU, KUS, WUUWU6, φ70, MUSNQU8 5TU, MUSNH4U6 SNUGSNKB3NK: | |
| Uagb# wuhunpn wunhne nyn# USB / Bluetooth / PLAY-Fi oshhmin: | |
| Uagb# fwgnp wunjhn mng & USB / Bluetooth / PLAY-Fi oshhmin: | |
| bjuwqnplb/nwau,ngb#j wunjhn ninh# USB / Bluetooth / PLAY-Fi oshhmin: | |
| Ubnltp u wquklp 8 qujngu# uwwu#u# aodhrn# anr#wnw#nj# uqnquinnm#bp mbpulqabzjn Su#un: Ubnltp u wquklp Bluetooth oshhmin sngwulg#la# appewnrg# aalpuhjwg#jlnu luyu w## agnulgqu# Bluetooth uwnp# wqguunjni Su#un: | |
| Sjuwqg#b, dwjah dwlguunnwcp: | |
| Punanwgob, dwjah dwlguunnwlp: | |
| treble | Quanqulnpm#.t pujn# Fw#wqw#u#pyw# dauupnwnlp |
| bass | Quanqulnpm#.t pujn# dauupnwnlp: |
Unwghù wùqwù oqunwqnpnòniǔ
Shuunnà núh āwūwūqū bùnquāpjuē ħhērnu 2 x CR2032 Jupinlóng. Čhūwūqūwūqūwū qīwūwūjī hāu pūcāngā wūnriqūgābīnī Gǔwūn Ġhūwūqnāp wāwūwūwāh Ļbprnhg.
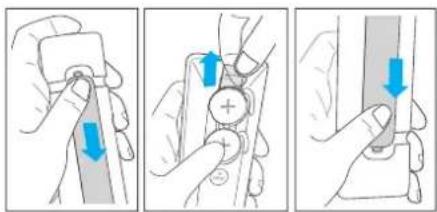
- Ububu la su bignup Shunlu qunhuuhyn Shou, unwurdua qiu wudwgh Jununluyh hugnup puqhn Guuup:
- Chou-gnbo uqunuqunh2 abrqnpe:
3 Cptp du pulege luanbuphen lan hn obqpc
- Cymuqnpdip qnpdhp (cphdu) dwnpungh (ughin lquhwng) brjni dwnpunganglnr dghu wunp gubjni kudur shu dwnpungangl gnuwugjmi kudur:
- Sbwnnpap 3nn 0wnunlyngabng lynphg ti wunp ubrufap nnaig 0wnunlgh ayqptoukaiq nphg tby: Cauinqubp, nn 0wnunlyng (-) lynfgn nyuh qbn t
- Cnlp SupoLyrge: Quichurhen Ben hn vllrnp
3 Chūwuyu shwynh pwnwnnhyutn
3.1 Chūwūwù shuǐngh wngzh yu6wāwǔ
- (Starboy) yn6wylgn.gwuh2 - Shuguniu t Zuwjuhho qu6wulqln ywa wegmi uaywudawu nbochuh
LED gnghh qniwjha untaiwunlnejna
| LED from jibuunquid-6buly | |
| Udohouly Uduuau5w0 nbdh0 | |
| Inpuu uubuucnjuw0 t | Suurbuuhj auauawulyn ohuuguw0t, u nghyg jtuuupuupuiu3 |
| Huduay PCM nurni pbnni### / AUX nbdh0 | |
| Huduupu Bluetooth nbdh0 | |
| Ohmuguaguja Dolby Aucta nurni qbnndw## | |
| Uubinguwuuguji Dolby Atmos nurni qbnndw## | |
| Huduhp DTS/DTSX nurni qbnndw## | |
| Hsdh0 USB nbdh0 / MP3 uubuupuiu1 | |
| Iubuhuwmj0 | PlayH / Multiroom(puaqiuubhujuwjhe) nbdh0 |
- (Source) ln### - Ubr#bp ünnpwqr### unprpwn chrljlnn GuSwn Ubr#bp l uq#ep wqu###ndh#rdl# gnuwrqngh unprpwng Eunw## hgnwngtnn GuSwn:
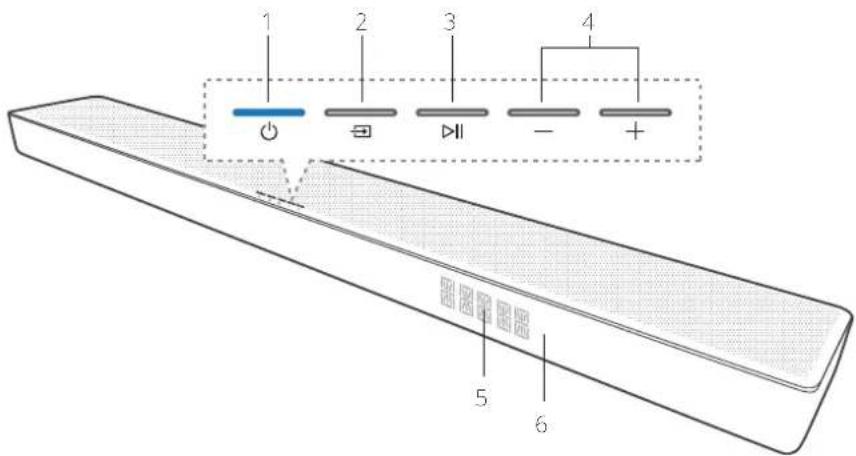
B. ▶II (Play/Pause) InSau - bjuquupb/pjuquupbagwningh ngb USB / Bluetooth / PLAY-FI nterunid Ubr6p u qu6p 8 qu6puc wuwdua nchdrud enpuwduwuh lupouwpuwdug npulqudugqn Guwup Ubr6p u qu6p1 Bluetooth nchdrud qnuqugdua pnuqunngd wuwduugbn Ipu3 undus qnuqugluab Bluetooth uwnb wuwdubn Guwup;
- (Volume) lnSbly - bajunqgénü/papängugendt, Quah Guwupnuly: Urdap spum anwukjärp dhuadu wudyl' daubuhö quwukulyp uigwunbyn/Chugutjär Suwap.
- Ungz h uwukulyp grigunmnd
- Conucunwukjundw üquwukruchudurp - Guwukupa gepenuptlun Suwap Struulpurwukjundh üquwukluyingbo Struulpurwukjundw uebunh upw
3.2 Chūwūwù Shuǐngh 6tunh yu6wāwǔ
Fwqüwjhpwjhà
- Gunluh quwunhg: WDAL 2.0 qunwqunwou unbnjou na aqunwqnabing wunu g abq Gunluwuhn h Sboughh aquwuhu quwubuwh Gunluh quwunhg:
- WDAI 2.0 lumuslu, pala, uutnghap - Oqnunqnphep wu wuguwhyabng WDA-2.0-h ühgnengj, pnugnghg upwugph wupun cuipapuwunde rdwagbyn Suwun nquha. SUB / REAR / FRONT / CENTER Ump: Ugwunhyp ngbe SMALL nhph hwn pan pumapuwunabph Suwun LARGE 365 pumapuwunabph Suwun Cmpuujuhp nuw suwun pumapuwunab wuguwbni Suwun ugwunhyp ngbe OFF nhph upw
- PAIRING yn6wq - WDAL 2.0 qniqwnrduw Guuwn
Multiroom
- WPS (Wi-Fi Protecteo Setup (uwzynwuwqiwu lquwqwnpni)) Inbawlygwngwuhy - 9nnpwnpwrnd E Wi-Fi-h qwnwwnpnuug Play-Fi-h GsuSun: Unbup la wupfip Inbawp 3 wupjuwj WPS nbohdu wphwjuglun GsuSun: Unbup la wupfip Inbawp 8 qwnjuwj AP sbdhdu wphwjuglun GsuSun:
| LED qngqlyh ubwulp | Wuqnqullhswl |
| LED-h ruqunquang nuwunq b2 | Wi-Fi ürunch ubush (AP) nadhü |
| LED-p gnuni w2quá puwnpniú L | Wi-Fi-h uqunquwubjou d quanquynpuwá (WPS) nadhü |
| LED p Shwgawá z | Uhwagwá z / 9nquajupm3p &uwapig |
- AUX IN - dhuàwù wùnàn wùp, núrǎ 3.5 dǔ wùnàn wùh shēngrù
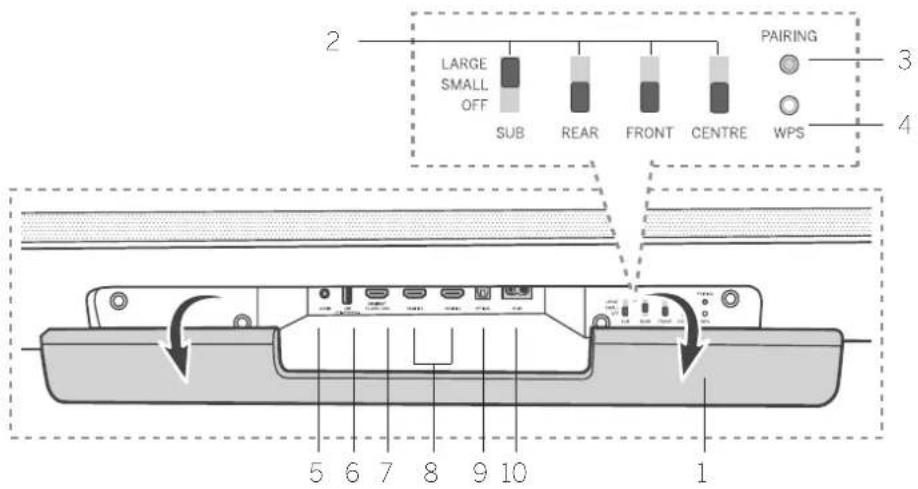
- USB - chuguel USB wu 4bouwjho uwnpp
- HDMI OUT (IV eARC/ARC) - (huogao) (Shenwuwen, ge) HDMI jupuwlyha:
- HDMI IN 17 HDMI IN 2 - chungdu wupwgha uqunph HDMI agha (ophouly' wupwgha yuunpbn, DVD la Blu-ray duquwnlghzbn):
- OPTICAL - Chught, wnwnp#h wunph jaiw#h (ownlpuu#o) bipn#
- AC IN - ühwäsi zbbunwüwnwlpwpnupün:
4 Uwpulništph pwnwnnhʒʌtn
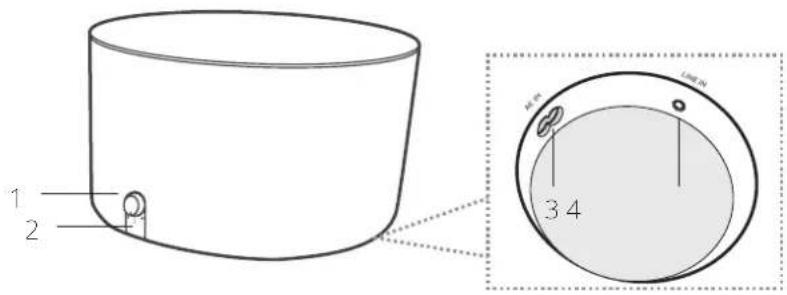
- Swajh dawqunpup luyquwjnbni yn6yuj Tunnab' pnuuh dawqunpup luyquwjnbni swabup Ubrdip la yqufop' qruquwnuui nudh undbne swabup
- Urupunipbnh LED gn.gh2
5 Stnwnnniu
Sbruqnpap dawuujhduu6u3w1jn du un pajnjeepu yujmni 6wna dawuujuh qnu
S###npap unipun#p, ##awu#h# quw#w#l#g ur#a#q# 1 ##np (3 nu#u#w#) in ##an#g 10 nu#an#dmpn (4 np#) S###nnnpajw# u##. U#p f##snp b#p unu#h u#awu#h ang#h ##awu#h a#w#e un#ar#p#, nn p#o#p #wnnpabw# ##awu#p#u unu p#a#j# abuj hnpap:
Slurunplg àujàwihà yuǎcàwlg Strnuclwagnigh onaly qutújnn utquèch upu.
unopu papuiud - Shun unhuangduw, ephewu:

LED gn ghn jnhwlp hunqw jhwhl
| LED 3 a puq pumpnu L | Jhugn6pc qiuquijnndwabuhdnu L |
| LED-2 ahugquw t | Jhwgquw L /Bniquijnndw Bwnnyjug |
| LED-2 nuqwnq z pumpnu | Jhwgnjug /Bniquijnndw Bwnnyjug |
6 2wjuwjhù yuwhu wlyh shwgniu
Buchapuà sput, chwengniǔ Guuànwenlǚ lquā chnjuān, guāngqùbān; ne pén aunpánā wāguwūnluè bǎ ānuādgh āuynuāhāg;
6.1 Dolby Atmos®
Dolby Atmos®-p daq Sowpuwnpnajn.à t unwihu juzni gǔzānn qhenǎ yu wunwnpnl.ú dawjīn 3D āunl." Dolby dawjāh nǐng sowwnpnajwīp, lwwjān p, wujrì b Sqnpiyujān:
Lnugnigh2 u-lqbluynpymdablnh 6wulwn wglglo dolby.com/technologies/dolby-atmos
Sumptnwly 1 - eARC/ARC
(Unin, hn qtnwnwnah wihp)
8bn Scundbar-4 upugn#1 HDM-hu Rauh ibpunupah wjrenl (eARC/ARC): Gpa ibp ibnnunwgnugg baunupunwgnwn#d L HDM, ARC hu, nnp ibpunnig bpu yibpunupungh awnig ibp ibuufuh gufuwulip dhenenl oqwnwnndpnd lbl yHDMI dwnjru:
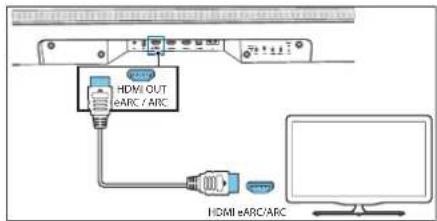
- 86p Sbentouwgnughà dhwgnlp HDVI CEC qpnénqniqnlücbnp
-
Furpān wuāqiqwūp HDMI yunh ōhengni (būpuuniwāt), ōhuugbp āsp ōuŋghū yu Kauiyuh HDMI OUT (TV eARC/ARC) ōhuulghp fūranuwugngh HDMI ARC ōhuulghp; Členuwugngh HDMI ARC ōhuulghp luypon k uwnbp b hunwluqfnnni n izdawj; Uwāpwudwūbngh kūwup oru fūranuwugngh qunuwqnāsu ōbēnwupj;
-
«ARC»-Ganunujnju t āw, Œuŋhā qūwāwūn Lynuāhī hú, Œuŋwārī yuīwāwūn pūwāqyīmū L Ebnunuwugngh Œuŋp: Upr Ebnunuwugngh Œuŋp npu zh qūwhu, ūn puēh wūqwū obnūbs→ (Source) lúnuālpu, āhāyī lúnuāhī yuāwūn p «ARC» la Ebnunuwugngh Œuŋp (202):
Bnp HDMI ARC lquw-6ryn lquwqwnpuio L, qmp lquwnp up oqunlq uju Rquwqwnpwnpniabng.
Oqunwqnabin, oujnhlyu, uq unh (btpwnu, z h), uhwgnup aun aunu, uqswudu, OPTICAL shuighp btonunwugngh lqu wq upgh OPTICAL OUI shu.ghyb:
• Spidif quod SPIDIF LQWSPDIF OUT:
6.4 Uhwgnü wüwjnqwihü wnühn üwjnhunü
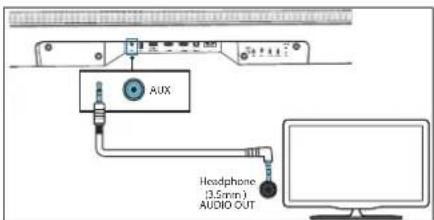
Swnptpwly 1
Oqnwnenp#tp 3,5-3,5 10 un##n ##wngh ##bnwnjwa yL' ##pn ##cnwnugnugh lqw# ##nunagh# ##nghm ##nph wulqugwaljuqabnh hsglnp ##nph AUX IN ##njuq.h# Shuqbjn fwdapri
Swnptpwly 2
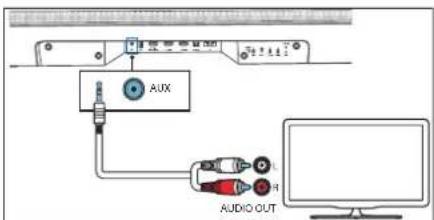
Cranunwugngh wunzhi bguh2 qunnwuglnp uangh AUX IN qunnwulgh dhwughm Suiwn oqunwompzip RCA-hg dhuyl 3,5 d3 dwjuwh h uwnpu (bepnwuwr g):
6.5 Cnuwaph jwnuðhwgnid
2n16
• Burjupuò AC 6nuadgh juren Shugālín, Sanfuglán, np wujunab bo peryn Sniu Shugnizbeng:
• Uphunwuhugh dawuwaq uwnaq: Ewunwug, np Etywnpwnwnwuhwupwud jwrniug fawwwwnuwwhm# t uwnqn blnpgh eweni# dylwunwuhm;
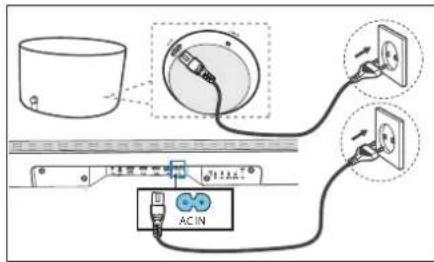
- Uhugrbc guqgh du pihan dawquhdufuwulje AC IN quunwuhg, wjuni6bnu guqgh quunwulhg
- Uhwugbp gwugh dwuphp unpulnstrb AC IN quunwuhg: Uwuphp wawugrhp ampunfjnh bonge daumid quedjnh dwuprh quunwupnauu hughjnda bungwutu uhwugbp gnulhpr jung gwugh quunwuhg.
6.6 Unipunistbn shwgniu
LED graph d6wup wonqwuh6wq
| LED-bruwrq puipeniš t | Um rujsbep on cuwjpnõuža nzhõniš t |
| LED-p ühwqluš t | Uhwqluš t / Rnuqwnrnišp Guwgnjbag |
| LED-p nu brun t puipeniš | Uhwgnjdn / Snuqwnrniš/ Zuhqnjbag |
2n16
Jh ubrgbo awjuh lynówup umpynśbph Gbunuh áwumid, cuqwnmp,wóp ángnd qniqwlprpóluk
96npny qniqwynnnu
bān wāqun unipuāshēng āwūjī jǔnǚ, unipuāshāpp ābōgǔl Shuāgntpī
- Udyawab bplyn pntdupr gwagh dwnpwqng, wjcnSbnu ##ng Shwgnp qnuao 3 pnub wqg:

- Ucnflg la uqwflg sanjir lpr6wlp unipunfopn-6uclu
duun d 5 quynpjuwa:
• Uwupunšbn: dnu oniqunnduša grighen upura graunahi: - Uhuiqih yua's Gbawuqunwunwdu quwabuwh jpu ubnqup u ayuShp 5 duapipad' gwnjnnn LCN UmaLUU's (ECO STANDBY) ndchshu wagbni GuuJn
- Uşničlunč olnšup Uwungh vudš klnučjansučjunduč qušučujih ynu' Shučnpr Chugăsini Gučiun.

- Cnawgntp 2w1w1h 4w1w1gh 6bunr 4w1w1wnhp, wpn6bunr uwnlbg FAIRING Un6wnp 5 Jwnlqw:
- Cweng shengniang Sbun unipuqianh qniqiuqnouwa yngyng yuunch;
• Lp5 qniquijnouw gongye nbo suunpiu h, Lp4b pupc upiuw puynpc
Uzbek
• Unp#n#bn #bnp h j## pug ##unw#gn #dawhujh
yufw#wuhg 6 a#enw#nmejwa lnu (npuw ##un,
w#pwu w)
- Cthw-gnsp anjnp wnu-plywz bnp unipyghqbnh l adwjswrni yquwzwlqh uhgla
Lpt. uqun shwgnup ahng zh uqunwnn, uniqup uqnwapg ynqjhlunaph lqu ndtn ihguunmpu bunup tonbuly tblpnuwuhu uunph shuunmpnagy abwgnap wu ynqjhlunaph lqu ndtn ihguunmpnakabm uqjlpus qing buzw popuguwang
6.7 Multiroom' Uhwgnü Wi-Fi-hù
WPS ntduhui
Lap Abn bpan nghu ndh Wi-Fi wupunwqutlue Lpupaujcnol (WPS), lqunn be lquyn lqupuwjcnol wnug qunntcwpun Smerguapljnc
- UqnlSb2 la qquKb2 WPS unSuwr: 4 quynjqu: 7ing jupu aunjuwha wqnuaqw: la Wi-Fi-gnighyp bnljn wagui wbnanfuun ljuwgn:
- Ubróbp WPS lynfuyla ábp smpaninhzh ypu: 466uup unjnpwoup ózumiú t WPS aqwnlytnwáguwán;
Uzbek
• WPS-2 pryn spenirhyabnh uwnwunpun fwanlywuhng yl, Grb, abn lppnnhyn ynbn WPS, Gluunug Wi Hi wnwunpun lyupou dprniabha
• ubly wagwud abnjha WPS unswu, bpe gubuwanu sp nnpu quy WPS rduhohg, lquw uwi wqunmawun lypumui nnpu lquw 2 nnujs fbuin.
Upi Zawbawha qiuwabwun (yuanin L. aquiwapndaj, npuwa paupwabwuhuwahj, pwndawwnubnepn untanpurdua duu: Jia yawwabwun L, np shlomna bwndwamnpnng (yuanin L. fagui dian zawbawha qiuwabwuhuwahj, a ny fauwabwuhwuhwahj, pwndawwnubneph, uwudwabwuhwuhwahj, cwndawn unwag
dju Guwunwynapnizda oqunwannptna Swudan Swuencjsp, np awgwnph dwuwulip Lzqn wurpncnp / upwukwn Shlsmg guangni bǎ: “Pup lúnnnn tp oqunwannptna Google Home, Airpay 2 yuā DTS Play-F wuujquwadqnl wuujwubtajn puqswubtayl puqpwunwabcn puanwuhrtam swudan pLjyshkrdi baqwn sp trwudzwnqngn pduwurqly dN paeh puqpwunwabcn nw shudwudwud, puqpwunwabcn zhuwutl cnwnptn waebh, wnwuhthu qunwuhunty daojen lyuā eonwagnpct dwudwuyda daojen ühwudwucw, pnng puqpwunwabcn daojen gnhfum swudan
Obn'tp, Obn'tp, Obn'tp, Obn'tp, Obn'tp, Obn'tp, Obn'tp, Obn'tp, Obn'tp, Obn'tp, Obn'tp, Obn'tp, Obn'tp, Obn'tp, Obn'tp, Obn'tp, Obn'tp, Obn'tp, Obn'tp, Obn'tp, Obn'tp,
9.6 Swàn/pwnàn 6w6whuwlywàniājniǎutnh úwlywnŋwú
Ulnqng 6b wqunwqunwq unwqunwqh -7 yn6u0jbnp' cuuh dwlqunwqlp yunqw.1mph Suiup (BAS-12 - BAS-12);
Lungluq SultupansuljwrSowduwouwuh -7 Lnswubng'puran Su6uhuqwalpugnquh Sultupangulqn Luapwujphmi Sutuun (TRB -12 - TRB +12):
9.7 Cngwwwnnn awjah ndchu
- wǒ bǎo pě qǔ jīn, dā jiù zìng wù wūn nǐ zhōu lù:
UlnfUp (Surround) Lp-Swup 6lnwqwnwqwnwq JwGwWwn Jpu' Zngwqwnwn nzhup lnhfubni GwUwn
9.8 9h2tnwjhà ntduhù
Enjungwah# adchup shuogbwn/wuogwnlnti fustun uqngfa shuogpwn/guugn## suwukwuh (Nght) Ipeulup: Ugu apouwnnapp bruogwuhnnni b, np shuopna# fuoghua a cunp# aduopbn shyla wufgri py shuogwuh for Unuspanjnu# l qayapwuh nklp#ndu# fusup
9.9 ۱۲۷۸۶۹۷۰۱۶۳۱۶۲
Tel ng âir lyówú yénqùp 10 quinjωδ, lynwà wqunnòu sāpuyī lyuōguānǎ: Suālāugwà lyówú yāqūbù dhuāwāqānǎ - wǎbāwāqāwēn bāwāqnāg;
9.10 9nnδwnwawjhu vtnwlwyniu
sptwnqwduqnü t uwnpp rtegwjä lquqnqwnpmüdöphä: Uquwnduh nluqndnü vntöp u apuuklju d'ouyn 8 quplpuä. «RESET»-g Sujwndujnü t zijnwihä, u uwnpp jbnwnwnzü L uusqawuwä lquqnqwnpmüdöphä
9.11 WDAL 2.0 4wnwylwniδ
buhupwà WDA 2.0 wunwqunwù wunbrdng oatwnwnndg, S###grb2 dawuwhè dawuwhè h S###h Luwunhp:
Oquna qnpeap uju wagwnu2bng WDAL2.0-h ihengnu pugmighy wunwuphe jubun puanapwunodtn ihwuzhni fudup nubu SUB / RFAR / FRONT / CFNTR who: ubguwuhgn ntge SMALL qnhgh' thnpr puanapwunodtnf fudup, LARGE' dba puanapwunodtnf fudup: pncwuhh wuhh fudup puanapwunou wagwnuqn fudup wagwnh2g nnte OFF qhngh jhu:

Unipunl\thh shwgnl\
S###un###u### unipun###p WDAL 2.0 u### p E: Uw ##w###y## Lnp unipun###ph wghwn###gh S###p WDAL 2.0 u###w###### SJB u###w###### u###p # ###h SWALL Iq#t LARGE qhhgh upus
Uth wij WDAL 2.0 uwnph dhwgnid
‘nap lqunnp bp wqwn lpwqndl druggbl dhlgl 6 gnughghy pwndunhnu, npnbp wswulgnwl Lb WDAL 2.0 kwjwhhfo qufuwuljha: WDAL 2.0 kwjwnznhj h pwnpwnunap dwjwhhfo qufuwuljha dlnu gblny-wwwn pnp uwna L
Uhnpb PARING unswp aupwuhq daqshwuhh unw. PARING unswp aquwqnptn. Gwwn npup wjung b. Gwlp aupwuhq daqshwuhh Santh wauphphr
2. Ucn0bp PAIRING Un6wUp WDAL 2.0 pu###whunuh unw:
3. Uulabuug puapauujunh qpp sbay puapauujunh unw. Sunptnuqobn Linguh awu, Linguh wg, abunno, Quunluh awu, Quunluw ug:
4. Guwulwə pwnānwunuh inbuwlgh, pwnuqlwə pwnānwunuh nqnfo Gwudwunuwufwulnn WDAL 2.0 uqouunyn qnpb SMAI liwā LARGE nphgh upw
FL - wnguh âwhe puñârwhune
FR - tunguh wq ruapānwu
SL - 6unluh àuìu puànǎpuwjuò
SR-65inluh w9 cuu nāpuwunu
SJB - unipun\$lp
CEN - yuàn pòu wǒu pūnán wǒu
10 AUX / OPTICAL / COAXIAL / HDMI 9nnδwnlnni
Cudnqubp, no uurpn ühwugluò L Gbnnuunwagnghà lqu d uruqn..uuphè
- Uh puàn wàquā ubnǚsp → (Source) Unśwūp uuŋoh lóng 6braulquēnwāsp,śwā qnā HDMI 1, HDMI 2, ARC, OPT, AUX abchūbān phuāpāni Sutūn:
- 4unwqunlp âln 6nnwnuugrign/ăwnəwiħu uωρον aŭihgwuwzu iqluqwpljuħ aqpāuncujēbnc 6wūun.
- Ubrup +/- lmbulq uwnqh cuu/- bnuqunwujnwha lbuSwuwlgh upw/- dwnqn guuqluwgh wuqunnwuhh bnuqwujnbn-6wwnqn
u2nlu
- Ego - Quhugh de Quhugh HDVI 1 / HDMI 2 / ARC/ OPT (quhugh) quad, nodpiniu t, u prwuhg. Quh gua, qumng L wuhpudugn fhan uunpudugn PCM yud Doloy Digital quhugh span uwnpinh unprnup (epnual), finnausugnug, DVD yud Blu; rey duquuphg;
Chuanqunlp 1, ne unang yuqunpukdu unapukuprnp puqunpuk uningh abuwunhp unupuwu unpmpng: Lip nquqnul unang quuguwuh: Uw plunpujn yt. Eudnupp, np HDMI 1 / HDMI 2 / ARC / OPT (ouphyukuw) ununh Shengru shuqiu unupuwu wnpmpn uninh lunquwumnnd npud L PCM luoD Dol by Digital-h qnu: Uningh unquwunnnduh dwnupwju dwnupwuwuh fuwun ura unupuwqudu: wnpmpn wnph oqunqupduu kbouuplpr
HDMI nachhöme, ane DOLBY ATMOS u.ohre duwzyuwh beluquuplyade u.oujnuð L, würgen duðuðvulgh Upruðrða sujunájnuð t. «DOLBY ATMOS» - Grp DOLBY DIGITAL UMBH: 10.000000000000000000000000000000000000000000000000000000000000000000000000000000000
- Erp olqulnu L PCM uonjhn dluqungh bjuqunlqnup, awjcwra quwubulgh hynuha Sgnoulnu E «PCM AUDIO»
PCM-hg buu DOLBY DIGITAL-hg unwnpap unwnh duwqunhcn aunnpwqrbh, bpb uwnphe duyjgh nn.nu quihn, Lupuukhju GuwundujmL, cERRO-3:
11 Bluetooth-h qnnδwnργηιδ
Baiqiauha qiuwauu yin uhuapap Bluetooth unipnhi (opnui) iPad, Phone, iPod touch, Android Gbawuru Luü Zmupnipi Bluetooth fi Shongnd, wjimkunlu Iqapni ng jiu wangmi aqusquw uninhn jaiyapu aaiwahu qiuwauu uuh hongnu.
- Uh gakāw wāqwā dōn lùp wuqng bās Sūnwunwānwānwāwā quīwāwūjīn → (Source) yīnāwīyī ǎuāwāwhā quīwāwūjī BT (Bluetooth) ndhāhā wāgālju kāwān: Eynawīh wāfāwāwīh jhu wānguànqnāb t NO BT:
- Unwqngp: Bucloo.h; p: Buclooh: uwnpnd, nprabg; l: p#u#np: «Klang bar5 mns» dhu#wnp: Kuibun: Bluetooth-p: dhu#gdua duwnr uwnltynlpn#bgh Fu#up urb's: Blu- loo.h: uwnph eqm##p#d#u# mbgnjgn
- Uucuup, üfēya dūnbu jìd qùsāwǎuǐgh āwānqu hā Enizniú juzp.
Epl. Suiyunniqwuphugh, B1 & Lguyungh Hynuh qusuwh h pwa
Cunetp b dhaquqlybp iunqhn swybp lwa brudzunnipnlo abr Bluetooth wponm:
Lipb 2qiuqunjniu papaugpniq quwq t. yiuunp.ni, bnpdzinnipjnig qnuwnnui t: Gnp quwq uwrungh, blywqunjniug qcnjyqnui t:
Lab. 16: Bluetooth uwp#u wugulgn#t E AVRCP uynghh#, lqungn lg ulqnlb, 1/2/4/4/4/4/4/4/4/4/4/4/4/4/4/4/4/4/4/4/4/4/4/4/4/4/4/4/4/4/4/4/4/4/4/4/4/4/4/4/4/4/4/4/4/4/4/4/4/4/4/4
- Bluetooth ng nu quin: wodun poumup July will urpmpn:
Cnp ubpwnwnuni bp Bluetooth abdhuh, Bluetooth lawup ubpwwhquniu L
Suiwuhhā wu wu wu yu du yu wu Bluetooth uungh yhuqzhīn Suiwūn uunwāp u unwāp b oonwunwunwūn yu wu wu yu yu yu yu yu wu
62n15
- Bluetooth uyngh duquqnju uyu kubqapu b'Blue tooth uynjng A2DP, AVRCP U Bluetooth inappbwnly 1.2 + EDR
• Suihuajh, qiuXuJutjhi b Bluelcoin uu. poh. Shyu qngang unwujuanju uhrnupg ürunuwunwuju 10 übun t:
Anpnn Bluetooth uwpptnh foun suuwunbnqrn.aynup luwguwunrnuo yk
Gnudzunipuwa Sfung quinnk t gndwunybi uwnoh k dawbuhe qufuwalyr ndgh w##w ungnp#nnlph wnun###d hnyuuhg to upwn, uwnng dawdn o#tunwnalw awnw,wa ywa fuputunipuwr pqnolm ay, uwnyn, npnag wwhwnm# to ##, sufuuaulquanipuwr:
12 USB qnnδwnρηνιδ
4w165p w179n JSB 2w165w1w1h4 w1wnah jwn, h2yqunp sb MP3 6jxuqunplyn lju0 USB \$ by Epnimpandru la w18
- Struunpap USB uupon

- Uh zuāh wè quā obuāp (source) uunph luāi Shuālānunqānpūdā qùsāduwī pūn' USB rōdhāc pūnplām fēuān;
- 10aqupluaw papugn5 uqjib2 ▷||a.uquplunup ulqubinq.unwabgazmAbpulqbni Swdwn. Uqjib2 / ▷dujunqlywdi Gwengn nqnda uagabinr Swdwn
^2
Uyu suponunpuang, supon E Sanluwabgh yihbly USB lphgh neng unzuwubne Burs:
- USB oqunuqnpns3 kg USB brjwnwugdaw dwnm, USB guheng lqw USB cuqduwniughnai, puwrh gjaugrn, www USB ljnhg cwnpn cwnpn L26wuzul;
• Swijn Qunqunju ah Guubp USB Lrgh wwnpp:
Umwjngq lqnnn f, u.gu.1qbi. dhtbyi 32 9P 6pnnnn auiup USB uwpebn:
• Uqu oupe quane f. dui wou pab MP3:
13 Spotify
Oqunwqnnp&p &p &lnwuhunp, wqujzgung lqu's Gw#u#wqng npqbu Spotify-h Gwnjumwjuwdu, juw#wlp, Lgfbhp Sotify.com/connect' wqupqbini Gw#up, pt h#gubt:
Sootify Software p. Straulju. E. truppnq. Uncih, jeg:dehudbph, nonap quubnuu Bù ujuunbn
www.spotify.com/connect/third-party-licenses
14 δρωρηρ ρωριωρι
Aujuwju uwswuwj h utnuwnulwopn powndwgutni Gwudun.
. 10pctn4up 1ungho dnuqnw2wng quiyng
2. Upn.u6w0hp 4w0p USB wp.lu.unw0h# e9ewuqw0u.ni#.
3. Uhwignup USB-p adwajwnho juwawwnp ahwgswu ndhjainu
4. Sonwunpnuq ulqunuu L, u. Uynwug gnug s unwuhu pumuwugluu wunupapauge 0-eg shayu 99:
Pangyagnid Epangyagnuph pangyagnuph lqungn Luhub yh pudh pnub. Pungyagnuwa gnpugen a Uwagwunbp pungyunnupn qunwuhg yh wagwunbp uugn b yh wagwunbp USB lphyn lpuqguugp uu angongpugnabtpg nqungn bta unubghw lqnujny ngyagnupd dln baquwhe yukwubupn
- ৪র হুপুয়নুদু দুল্লারুনুদু t, টুপুদু দুল্লারুনুদু t:
-
Ugwrug huihhe uuwunp guqng
-
Ubjnnuja wag dawjawjhü quwwawup ünnhg ühwgnsp guugrör
Sthuahlywlywu undjwjutn
| Loewe uwnph untuwyn' klang bar5 mr | |
| Uwwh 6wuwph' 60601D10 | |
| bjgwnpwnwnwnwnwnwnwnwnwnwnwnwnwnwnwnwnwnwnwnwnwnwnwnwnwnwnwnwnwnwnwnwnwnwnwnwnwnwnwnwnwnwnwnwnwnwnwnwnwnwnwnwnwnwnwnwnwnwnwnwnwnwnwnwnwnwnwnwnwnwnwnwnwnwnwnwnwnwnwnwnwnwnwnwnwnwnwnwnwnwnwnwnwnwnwnwnwnwnwnwnnnwnwnwnwnwnwnwnwnwnwnwnwnwnwnwnwnwnwnwnwnwnwnwnwnwnwnwnwnwnwnwnwnwnwnwnwnwnwnwnwnwnwnwnwnwnwnwnwnwnwnwnwnwnwnwnwnwnwnwnwnwnwnwnwnwnwnwnwnwnwnwnwnwnwnwnwnwnwnwnwnwnwnwnwnwnwnwnwnwnwnwnwnwnwnwnwnwnwnwntnwnwnwnwnwnwnwnwnwnwnwnwnwnwnwnwnwnwnwnwnwnwnwnwnwnwnwnwnwnwnwnwnwnwnwnwnwnwnwnwnwnwnwnwnwnwnwnwnwnwnwnwnwnwnwnwnwnwnwnwnwnwnwnwnwnwnwnwnwnwnwnwnwnwnwnwnwnwnwnwnwnwnwnwnwnwnwnwnwnwnwnwnwnwnwnwnwnwnwnnwnwnwnwnwnwnwnwnwnwnwnwnwnwnwnwnwnwnwnwnwnwnwnwnwnwnwnwnwnwnwnwnwnwnwnwnwnwnwnwnwnwnwnwnwnwnwnwnwnwnwnwnwnwnwnwnwnwnwnwnwnwnwnwnwnwnwnwnwnwnwnwnwnwnwnwnwnwnwnwnwnwnwnwnwnwnwnwnwnwnwnwnwnwnwnwnwnwnwnnmwnwnwnwnwnwnwnwnwnwnwnwnwnwnwnwnwnwnwnwnwnwnwnwnwnwnwnwnwnwnwnwnwnwnwnwnwnwnwnwnwnwnwnwnwnwnwnwnwnwnwnwnwnwnwnwnwnwnwnwnwnwnwnwnwnwnwnwnwnwnwnwnwnwnwnwnwnwnwnwnwnwnwnwnwnwnwnwnwnwnwnwnwnwnwnwnwnwnwnwmwnwnwnwnwnwnwnwnwnwnwnwnwnwnwnwnwnwnwnwnwnwnwnwnwnwnwnwnwnwnwnwnwnwnwnwnwnwnwnwnwnwnwnwnwnwnwnwnwnwnwnwnwnwnwnwnwnwnwnwnwnwnwnwnwnwnwnwnwnwnwnwnwnwnwnwnwnwnwnwnwnwnwnwnwnwnwnwnwnwnwnwnwnwnwnwnwnwnwnawnwnwnwnwnwnwnwnwnwnwnwnwnwnwnwnwnwnwnwnwnwnwnwnwnwnwnwnwnwnwnwnwnwnwnwnwnwnwnwnwnwnwnwnwnwnwnwnwnwnwnwnwnwnwnwnwnwnwnwnwnwnwnwnwnwnwnwnwnwnwnwnwnwnwnwnwnwnwnwnwnwnwnwnwnwnwnwnwnwnwnwnwnwnwnwnwnwnwnwnnwwnwnwnwnwnwnwnwnwnwnwnwnwnwnwnwnwnwnwnwnwnwnwnwnwnwnwnwnwnwnwnwnwnwnwnwnwnwnwnwnwnwnwnwnwnwnwnwnwnwnwnwnwnwnwnwnwnwnwnwnwnwnwnwnwnwnwnwnwnwnwnwnwnwnwnwnwnwnwnwnwnwnwnwnwnwnwnwnwnwnwnwnwnwnwnwnwnwnwnwwnnnnnnnnnnnnnnnnnnnnnnnnnnnnnnnnnnnnnnnnnnnnnnnnnnnnnnnnnnnnnnnnnnnnnnnnnnnnnnnnnnnnnnnnnnnnnnnnnnnnnnnnnnnnnnnnnnnnnnnnnnnnnnnnnnnnnnnnnnnnnnnnnnnnnnnnnnnnnnnnnnnnnnnnnnnnnnnnnnnnnnnnnnnnnnnnnnnnnnnnnwwnnnnnnnnnnnnnnnnnnnnnnnnnnnnnnnnnnnnnnnnnnnnnnnnnnnnnnnnnnnnnnnnnnnnnnnnnnnnnnnnnnnnnnnnnnnnnnnnnnnnnnnnnnnnnnnnnnnnnnnnnnnnnnnnnnnnnnnnnnnnnnnnnnnnnnnnnnnnnnnnnnnnnnnnnnnnnnnnnnnnnnnnnnnnnnnnnnnnnwhwwwwwwwwwwwwwwwwwwwwwwwwwwwwwwwwwwwwwwwwwwwwwwwwwwwwwwwwwwwwwwwwwwwwwwwwwwwwwwwwwwwwwwwwwwwwwwwwwwwwwwwwwwwwwwwwwwwwwwwwwwwwwwwwwwwwwwwwwwwwwwwwwwwwwwwwwwwwwwwwwwwwwwwwwwwwwwwwwwwwwwwwwwwwwwwwwwwwwwwwwwwwwwwwwwwwwwwwwwwwwwwwwwwwwwwwwwwwwwwwwwwwwwwwwwwwwwwwwwwwwwwwwwwwwwwwwwwwwwwwwwwwwwwwwwwwwwwwwwwwwwwwwwwwwwwwwwwwwwwwwwwwwwwwwwwwwwwwwwwwwwwwwwwwwwwwwwwwwwwwwwwwwwwwwwwwwwwwwwwwwwwwwwwwwwwwwwwwwwwwwWWWWWWWWWWWWWWWWWWWWWWWWWWWWWWWWWWWWWWWWWWWWWWWWWWWWWWWWWWWWWWWWWWWWWWWWWWWWWWWWWWWWWWWWWWWWWWWWWWWWWWWWWWWWWWWWWWWWWWWWWWWWWWWWWWWWWWWWWWWWWWWWWWWWWWWWWWWWWWWWWWWWWWWWWWWWWWWWWWWWWWWWWWWWWWWWWWWWWWWWWWWWWWWWWWWWWWWWWWWWWWWWWWWWWWWWWWWWWWWWWWWWWWWWWWWWWWWWWWWWWWWWWWWWWWWWWWWWWWWWWWWWWWWWWWWWWWWWWWWWWWWWWWWWWWWWWWWWWWWWWWWWWWWWWWWWWWWWWWWWWWWWWWWWWWWWWWWWWWWWWWWWWWWWWWWWWWWWWWWWWWWWWWWWWWWWWWWWWWWWWWWWWWWWWWWWWWWWWWWWWWWWWWWWWWWWWWWWWWWWWWWWWWWWWWWWWWWWWWWWWWWWWWWWWWWWWWWWWWWWWWWWWWWWWWWWWWWWWWWWWWWWWWWWWWWWWWWWWWWWWWWWWWWWWWWWWWWWWWWWWWWWWWWWWWWWWWWWWWWWWWWWWWWWWWWWWWWWWWWWWWWWWWWWWWWWWWWWWWWWWHWWWWWWWWWWWWWWWWWWWWWWWWWWWWWWWWWWWWWWWWWWWWWWWWWWWWWWWWWWWWWWWWWWWWWWWWWWWWWWWWWWWWWWWWWWWWWWWWWWWWWWWWWWWWWWWWWWWWWWWWWWWWWWWWWWWWWWWWWWWWWWWWWWWWWWWWWWWWWWWWWWWWWWWWWWWWWWWWWWWWWWWWWWWWWWWWWWWWWWHHWWWWWWWWWWWWWWWWWWWWWWWWWWWWWWWWWWWWWWWWWWWWWWWWWWWWWWWWWWWWWWWWWWWWWWWWWWWWWWWWWWWWWWWWWWWWWWWWWWWWWWWWWWWWWWWWWWWWWWWWWWWWWWWWWWWWWWWWWWWWWWWWWWWWWWWWWWWWWWWWWWWWWWWWWWWWWWWWWWWWWWWWWWWWWWWWWWWWWWWMWWWWWWWWWWWWWWWWWWWWWWWWWWWWWWWWWWWWWWWWWWWWWWWWWWWWWWWWWWWWWWWWWWWWWWWWWWWWWWWWWWWWWWWWWWWWWWWWWWWWWWWWWWWWWWWWWWWWWWWWWWWWWWWWWWWWWWWWWWWWWWWWWWWWWWWWWWWWWWWWWWWWWWWWWWWWWWWWWWWWWWWWWWWWWWWWWWWWWWVVWWWWWWWWWWWWWWWWWWWWWWWWWWWWWWWWWWWWWWWWWWWWWWWWWWWWWWWWWWWWWWWWWWWWWWWWWWWWWWWWWWWWWWWWWWWWWWWWWWWWWWWWWWWWWWWWWWWWWWWWWWWWWWWWWWWWWWWWWWWWWWWWWWWWWWWWWWWWWWWWWWWWWWWWWWWWWWWWWWWWWWWWWWWWWWWWWWWWWWGGWWWWWWWWWWWWWWWWWWWWWWWWWWWWWWWWWWWWWWWWWWWWWWWWWWWWWWWWWWWWWWWWWWWWWWWWWWWWWWWWWWWWWWWWWWWWWWWWWWWWWWWWWWWWWWWWWWWWWWWWWWWWWWWWWWWWWWWWWWWWWWWWWWWWWWWWWWWWWWWWWWWWWWWWWWWWWWWWWWWWWWWWWWWWWWWWWWWWWW | IEEE 802.11a/b/g/n/ac |
| WLAN wgwugunn nn wnwunnwnwnwnwnwnwnwnwnwnwnwnwnwnwnwnwnwnwnwnwnwnwnwnwnwnwnwnwnwnwnwnwnwnwnwnwnwnwnwnwnwnwnwnwnwnwnwnwnwnwnwnwnwnwnwnwnwnwnwnwnwnwnwnwnwnwnwnwnwnwnwnwnwnwnwnwnwnwnwnwnwnwnwnwnwnwnwnwnwnwnwnwnwnwnwnwnwnwnn | Umwllbwwqnjdu 6qnpnnipnniug <100 64-10 2400 - 2483,5 UCg 6w6w6w6w6w6w6w6w6w6w6w6w6w6w6w6w6w6w6w6w6w6w6w6w6w6w6w6w6w6w6w6w6w6w6w6w6w6w6w6w6w6w6w6w6w6w6w6w6w6w6W |
| WLAN 6qnpnnipuua/6w6w6w6w6w6w6w6w6w6w6w6w6w6w6w6w6w6w6w6w6w6w6w6w6w6w6w6w6w6w6w6w6w6w6w6w6w6w6w6w6w6w6w6w6w6w6w6w6w6 | Umwllbwwqnjdu 6qnpnnipnniug <100 64-10 2400 - 2483,5 UCg 6w6w6w6w6w6w6w6w6w6w6w6w6w6w6w6w6w6w6w6w6w6w6w6w6w6w6w6W |
| Bluetooth wnunnptnuy V4.2 + EDR | |
| Bluetooth 6qnpnnipuua/6w6w6w6w6w6w6w6w6w6w6w6w6w6w6w6w6w6w6w6w6w6w6w6w6w6w6w6w6w6w6w6w6w6w6w6w6w6w6w6w6w6w6w6w6w | Umwllbwwqnjdu 6qnpnnipnniug <100 64-10 2400 - 2483,5 UCg 6w6w6w6w6w6w6w6w6w6w6w6w6w6w6w6w6w6w6w6w6w6w6w6w6w6w6w6 |
| Bluetooth wnunnptnuuayniug A2DP, AVRCP | |
| USB dylwquuplnnSwwbn, MP3 | |
| Uwph wwhubn (jwhunpniu) x jwhunpniu x jwhunpniu x jwhunpniu x jwhunpniu x jwhunpniu x jwhunpniu x jwhunpniu x jwhunpniu x jwhunpniu x jwhunpniu x jwhunpniu x jwhunpniu x jwhunpniu x jwhunpniu x jwhunpniu xjwhunpniu x jwhunpniu x jwhunpniu x jwhunpniu x jwhunpniu x jwhunpniu x jwhunpniu x jwhunpniu x jwhunpniu x jwhunpniu x jwhunpniu x jwhunpniu x jwhunpniu x jwhunpniu x jwhumppnuiu | 1200 x /1 x 160 mm |
| Uwph puyni 6.5 4q | |
| Uplunnnpnunwhu gtndunwhunwhu | 5°C - 35°C |
| Cuwunpntnuuwa hununpntnuuwa (ng hununpntnuu) 20 - 80% | |
| Sbuwuljnauh wugniu 4K uhnbn wugniu, Dolby Vision, HDR10, HDR10+ | |
| Ugwugunn wnunntn ahuwuyhun HDMI: DTS, DTS-HD, DTSX, DTS VirtualXTM, Dolby Digital, Dolby Digital plus, Dolby True HD, Dolby Atmos@, LPCM 2ch/Mch , Dolby VAT OPTICAL DTS, Dolby Digital, LPCM 2ch |
| Loewe uwnph untuwln' klang sub5 | |
| Uuwuh 6iwuwnp' 60603D10 | |
| Ijibyunnwduwnwlpwwpnui AC 100 q - 240 q - 50/60 Cg | |
| Swujih bipuwjhu fqnnpnjnu' 180 qun (RMS) | |
| Ejibyunnwtaqngwhuh uwwnnug uvquwuuw ubdhuniu' <0.5 qun | |
| Cuwshuwwuywnrjnu wnpawquup' 35 Cg - 150 Cg | |
| Uwnph yuwutng (juwjmpjnu x hnnpnjnu x pwnpwnpni): | 380 x 214 x 380 00 |
| Uwnph puza' 8,8 qq | |
| Urānnpwnwuh uynwuwh6wu' 5°C - 35°C | |
| Cwnwpwnwuh uynwuwnpiu (ny hwnwgunn) 20 - 80% |
Ctnwgnis


For DTS patents, see http://patents.dts.com. Manufactured under license from DTS, Inc. (for companies headquartered in the U.S./Japan/Taiwan) or under license from DTS Licensing Limited (for all other companies). DTS, DTS PlayFi, Play-Fi and the DTS Play-Fi and Play-Fi logos are registered trademarks or trademarks of DTS, Inc. in the United States and other countries. © 2021 DTS, Inc. ALL RIGHTS RESERVED.
dtsx
For DTS patents, see http://palents.dts.com Manufactured under license from DTS, Inc. (for companies headquartered in the U.S./Japan/Taiwan) or under license from DTS Licensing Limited (for all other companies). DTS, DTS:X, Virtual:X, and the DTS:X logo are registered trademarks or trademarks of DTS, Inc. in the United States and other countries. © 2020 DTS, Inc. ALL RIGHTS RESERVED.
COMPATIBLE WITH
Dolby Vision Dolby Atmos
Dolby, Dolby Vision, Dolby Atmos, Dolby Audio, and the double-D symbol are registered trademarks of Dolby Laboratories Licensing Corporation. Manufactured under license from Dolby Laboratories. Confidential unpublished works. Copyright © 2012-2020 Dolby Laboratories. All rights reserved.

The Wi-Fi CERTIFIED™ Logo is a registered trademark of Wi-Fi Alliance®.
Bluetooth®
The Bluetooth® word mark and logos are registered trademarks of Bluetooth SIG Inc. and any use of such marks by Loewe Technology GmbH takes place under license. Other trademarks and trade names are those of their respective owners.
HDMI ^TM
The terms HDMI, HDMI high-Definition Multimedia Interface, and the HDMI Logo are trademarks or registered trademarks of HDMI Licensing Administrator, Inc.
Spotify
The Spotify Software is subject to third party licenses found here:
www.spolify.com/connectl/third-party-licenses

Chromecast built-in
Google, Google Play and Chromecast built-in are trademark of Google LLC. Google Assistant is not available in certain languages and countries.

Apple® and AirPlay® are Trademarks of Apple Inc., registered in the U.S. and other countries.
To control this AirPlay 2-endabled speaker, iOS 11, 4 or later is required. Use of the Works with Apple badge means that an accessory has been designed to work specifically with the technology identified in the badge and has been certified by trademarks of Apple Inc., registered in the U.S. and other countries.
All product and company names are trademarks™ or registered® trademarks of their respective holders. Use of them does not imply any affiliation with or endorsement by them.
Local Loewe Service partner

Customer Care Center
Industriestraße 11
Subject to modifications


- Vielen Dank,
- Option 1 – eARC/ARC (Audio Return Channel)
- Option 1
- Software-Update
- Content
- Scope of delivery
- Position of the rating plate
- Important safety instructions
- Explanation of symbols
- Installation
- Placement
- Cables
- Do not use this device near water
- Ventilation
- Heat
- 1.1.6Accessories
- Network connection
- Usage
- Intendeduse
- Remotecontrol
- 1.2.30overload
- Thunderstorm
- Penetration of foreign material and liquid
- Risks associated with high volume
- Disconnection from power supply
- Maintenance
- Devicemaintenance
- Clean only with a dry cloth!
- Batteries
- Caution! Do not ingest battery!
- Caution!
- EU Declaration of Conformity
- Repair
- Damages requiring repair
- To minimize the risk of electric shock, fire, etc.
- Automatic energy saving function
- Remote control
- First time use
- Replacing the remote control batteries
- Main unit Components
- Main unit front panel
- Main unit rear panel
- Multichannel
- Multiroom
- Subwoofer components
- 5Placement
- 6Connectingthe soundbar
- Dolby Atmos®
- For using Dolby Atmos®
- Note
- Connecting with HDMI
- Option 1 - eARC/ARC
- (Audio Return Channel)
- Connecting the power
- Connecting the subwoofer
- Automatic Pairing
- Manual Pairing
- Multiroom: Connecting to Wi-Fi
- WPS mode
- Airplay setup
- Google Home setup
- 7Multi-roomaudio
- Chromecastbuilt-in
- 9BasicOperation
- Turn ON and OFF
- Auto Standby
- Automatic Wake up
- Multiroom mode
- Input mode
- Volume control
- Equalizer effect
- Bass/Treble Level
- Surround Sound Mode
- Night Mode
- Display Brightness
- Factory Reset
- WDAL 2.0 control
- Connecting the subwoofer
- Connecting another WDAL 2.0 device
- Volume offset
- AUX / OPTICAL / COAXIAL / HDMI Operation
- 11BluetoothOperation
- 12USBOperation
- 13Spotify
- Softwareupdate
- To upgrade soundbar firmware:
- To upgrade the multi-room function of your soundbar:
- Apps
- Troubleshooting
- Disposal
- Hartelijk dank
- Optie 1
- Let op:
- Equalizer-effect
- Opzione 1
- Audio multi-stanza
- Controllo WDAL 2.0
- Opción 1
- Chromecast built-in
- Opção 1
- Opção 2
- Controlo WDAL 2.0
- Opcja 1
- Možnost 1
- Možnost'1
- Savienojumaizveide, izmantojot analogo audio kabeli
- opcija
- opcija
- Pievienošana stravas padeves avotam
- Piezime
- 6.6.Pievienošanazemfrekvenču skalrunim
- WDAL 2.0 vadiba
- variantas
- Progr. jr. naujinimas
- variant
- Mulighed 1
- Bemærk
- Surroundsound-tilstand
- Softwareopdatering
- Alternativ 1
- Programvaruuppdatering
- Vaihtoehto 1
- Koble til lydplanken
- Alternativ 2
- Koble til subwooferen
- Merk
- AirPlay-innstillinger
- Prva upotreba
- 6Povezivanjesoundbara
- Opcija 1
- Opcija 2
- Napomena
- Ažuriranje softvera
- Nadogradnja softvera soundbara:
- Nadogranja soundbara za funkciju upotrebe u više prostorija:
- Aplikacije
- Komponente glavne enote
- Možnost 2
- Opsioni 1
- Shfaq shkëlqimin
- Conectarea cu cablu audio analogic
- Varianta 1
- Control WDAL 2.0
- Επιλογή 1
- Вариант 1
- Обновление ПО
- Під панелі
- Варіант 1
- تحديث البرامج
- Seçenek 1
- !הכלההוּרָהוּרָהוּרָהוּרָהוּרָהוּרָהוּרָהוּרָהוּרָהוּרָהוּרָהוּרָהוּרָהוּרָהוּרָה
- 14
- Опция 1
- lehetőség
- 14Szoftverfrissítés
- Prvo korišćenje
- Zamena baterija daljinske kontrole
- Glavna jedinica komponenti
- Prednji panel glavne jedinice
- 6Povezivanjezvučne trake
- Više soba: Povezivanje na Wi-Fi
- WPS režim
- 14Ažuriranjesoftvera
- Za ažuriranje firmvera zvučne trake:
- Za nadogradnju funkcije više soba vaše zvučne trake:
- Ručno uparivanje
- Višesobni (višeprostorni): Povezivanje na Wi-Fi
- WPS način rada
- 8UgradenChromecast (Chromecast built-in)
- 90snovneoperacije
- 11Bluetoothrad
- Za nadogradnju ugrađene programske opreme soundbar zvučnika:
- Za nadogradnju funkcije za više prostorija vašeg soundbar zvučnika:
- 1-нуска
- Ескертпе
- Колмен жуптау
- dnhnnssqn dmmznl 3m83mb6b6g0n
- 356033200
- bān lā 3s6gqnnlā dngfongdōs
- 35706601
- მენიმვნა
- Rsāgōgōyān Chromecast
- 8m3s20n ∂y4s3m6s
- Romania Romania
- உதமாஜந மைஷாவ மேஷாவ
- საბუელირი მეეროება
- 36mmgfsdymn y8mny63gmymogs z6b6bmgds
- bān bān bān bān bān bān bān bān bān bān bān bān bān bān bān bān bān bān bān bān bān bān bān bān bān bān bān bān bān bān bān bān bān bān bū
- mg3gbn bdnb 356gmnb dms3sgmmonabn5bn g36gjnnb 356lssabmgtdmsq:
- Seçim 1
- Sthuúhlywlywà undjuwlátph gnigwàwwlyh nhnpn
- Uulunwugnupwug lwnunn gnignudtn
- Inppnnwuh2utph pwgwwnnpnjntu
- Stnwnnni#
- Stnwnnniu
- Lwptn
- Uh oqunwqnnpdp wju uwnpn gnh ünun
- Onwuhhunid
- Ωπύπηρηνιώ
- Πωρωρωθη
- Swàgwjhù ûhwgnì
- Oqunwqnδniδ
- U#winnu U#yunw#wnwnwnwnn#hg
- Sthuahlywlywù uwwwwnyniú
- Uwnph unthuahlywlywà uwwuuwnlynü
- Uwpnt'p ühwjü znn 2nnnq:
- Uwpunlyngutn
- 9qn12wgn'16 4n11 18h' unltp dwnpnlyngn:
- Unwghù wùqwù oqunwqnpnòniǔ
- Chūwuyu shwynh pwnwnnhyutn
- Chūwūwù shuǐngh wngzh yu6wāwǔ
- Chūwūwù Shuǐngh 6tunh yu6wāwǔ
- Fwqüwjhpwjhà
- Uwpulništph pwnwnnhʒʌtn
- Stnwnnniu
- 2wjuwjhù yuwhu wlyh shwgniu
- Sumptnwly 1 - eARC/ARC
- (Unin, hn qtnwnwnah wihp)
- Uhwgnü wüwjnqwihü wnühn üwjnhunü
- Swnptpwly 1
- Swnptpwly 2
- Cnuwaph jwnuðhwgnid
- 2n16
- Unipunistbn shwgniu
- 96npny qniqwynnnu
- Uzbek
- Multiroom' Uhwgnü Wi-Fi-hù
- WPS ntduhui
- Swàn/pwnàn 6w6whuwlywàniājniǎutnh úwlywnŋwú
- Cngwwwnnn awjah ndchu
- 9h2tnwjhà ntduhù
- ۱۲۷۸۶۹۷۰۱۶۳۱۶۲
- 9nnδwnwawjhu vtnwlwyniu
- WDAL 2.0 4wnwylwniδ
- Unipunl\thh shwgnl\
- Uth wij WDAL 2.0 uwnph dhwgnid
- AUX / OPTICAL / COAXIAL / HDMI 9nnδwnlnni
- u2nlu
- Bluetooth-h qnnδwnργηιδ
- 62n15
- USB qnnδwnρηνιδ
- 2
- Spotify
- δρωρηρ ρωριωρι
- Aujuwju uwswuwj h utnuwnulwopn powndwgutni Gwudun.
- Ctnwgnis
- dtsx
- COMPATIBLE WITH
- Dolby Vision Dolby Atmos
- Bluetooth®
- HDMI TM
- Spotify
- Chromecast built-in
Brand : LOEWE
Model : Klang bar5 mr
Category : Soundbar