klang bar3 mr - Soundbar LOEWE - Free user manual and instructions
Find the device manual for free klang bar3 mr LOEWE in PDF.

| Product type | Soundbar |
| Brand | Loewe |
| Model | klang bar3 mr |
| Dimensions (W x H x D) | 950 x 68 x 160 mm |
| Weight | 5.9 kg |
| Power supply | 100-240 V AC, 50/60 Hz |
| Standby power consumption | < 0.5 W |
| Output power | 180 W RMS |
| Frequency response | 60 Hz – 20 kHz |
| Wireless connectivity | Wi-Fi 802.11 a/b/g/n/ac, Bluetooth 5.0 + EDR |
| Supported audio formats (HDMI) | DTS, DTS-HD, DTS:X, DTS Virtual:X, Dolby Digital, Dolby Digital Plus, Dolby True HD, Dolby Atmos, LPCM 2ch/Mch, Dolby MAT |
| Video inputs | 2 x HDMI, 1 x optical, 1 x AUX (3.5 mm), 1 x USB |
| Outputs | 1 x HDMI eARC/ARC, 6 x RCA (external speakers), 1 x 12 V trigger |
| Main features | Built-in Chromecast, AirPlay 2, DTS Play-Fi, Dolby Atmos, multiroom mode, Spotify Connect, night mode, sound presets |
| Compatible external speakers | Up to 6 wireless speakers WDAL 2.0 or wired active speakers |
| Streaming support | Spotify Connect, Chromecast, AirPlay 2 |
| Maintenance and cleaning | Disconnect before cleaning; use only a dry cloth |
| Safety | Double insulation (class II), overload protection, auto shut-off after 15 minutes |
| Repairability | Repair by qualified personnel only; no spare parts supplied |
| Disposal | Do not dispose of with household waste; recycle according to WEEE directive |
Frequently Asked Questions - klang bar3 mr LOEWE
User questions about klang bar3 mr LOEWE
0 question about this device. Answer the ones you know or ask your own.
Ask a new question about this device
Download the instructions for your Soundbar in PDF format for free! Find your manual klang bar3 mr - LOEWE and take your electronic device back in hand. On this page are published all the documents necessary for the use of your device. klang bar3 mr by LOEWE.
USER MANUAL klang bar3 mr LOEWE
natural_image
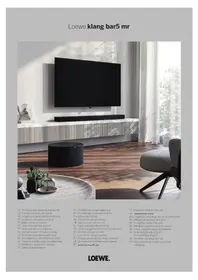
Modern living room interior with wooden paneling, a black TV wall, and a stone coffee table with books (no visible text or symbols)DE Umfassendes Benutzernandbuch
EN Comprehensive user guide
NL Litgebreide gebruikershandleiding
FR Guide de l'utilisateur complet
IT Guida utente completa
ES Guía completa del usuario
PT Guia exaustivo do utilizador
PL Kompleksowa instrukcja obstug
CS: Kompletní uživatelská přiručka
SK Komplexná použivatelská príručka
LV Visaplveroša Ielolāja rokasgrāmala
LT Bendrasis raudoj mo vadovas
ET Üdino kasutusjuhend
DA Omfattende brugervejedning
SV Omfaltande användarhandbok
F1 Kattava kayttoopas
NO Detaljert bruksanvisning
HR Sažeti vodič za korisnike
SL Popoln uporabniški priročnik
RO Ghid de utilizare detaliat
EL Συνοπτικός οδηνός χρήσης
RU Общее руководство пользователя
UK Докладний посбник користувача
AR دليل استخدام الشامل
TR Kapsamlıkullan m k lavuzu
HE
ВС Подробно ръководство на потребителя
HJ Átogó felhasználói útmutató
SR Kompletan korisnički vodič
BS Detajni korisnički priručnik (vodič)
КК 10лык пайдалануны ускаулығы
KA əməbəsɪŋgəŋnə bɪŋɡən
ləʊbɡəndəgəsəɡənm
AZ Hertarəfli istifadeçi telimat
HY Oqunwannodu & wuwujwnchwl
nnagnjg
Vielen Dank,
natural_image
Line drawing of a room layout with a monitor, tablet, and sofa (no text or symbols)(Enhanced / Audio Return Channel)
CEN - Centre Speaker (Center-Lautsprecher)
www.spotify.com/connect/third-party-licenses
15 Software-Update
for choosing a Loewe product. We are happy to have you as a customer. At Loewe, we combine the highest standards of technology, design and user friendliness. This applies equally for TV, audio and accessories. Neither technology nor design accomplishes an end in itself, but together should facilitate the highest possible audio and visual experience for our customer.
Our design is not guided by short-term, fashionable trends. Because after all, you have purchased a piece of high-quality equipment, that you want to enjoy tomorrow and the next day.
Content Scope of delivery
Scope of delivery 2
Position of the rating label....2
1 Important safety instructions.....3
2 Remote control....5
3 Main unit components....6
4 Placement....7
5 Connecting the soundbar......7
6 Multiroom audio 8
7 Basic Operation....8
8 External speakers....9
9 Bluetooth Operation....9
10 USB Operation....10
11 12V Trigger....10
12 Chromecast built-in.....10
13 Dolby Atmos ^® ..... 10
14 Spotify 10
15 Software update....10
16 Apps....10
Troubleshooting....11
Technical data....12
Disposal 12
Carefully unpack the device and make sure all accessories are present
Soundbar
Power cable
■ HDMI cable
■ Remote control (incl. 2 x CR2032 batteries)
■ Quick start guide
■ Safety instructions
■ Technical data sheet
Position of the rating label
Label with model number and operating voltage can be found on the bottom of the product.
1 Important safety instructions
Attention: Read this page carefully to ensure safe operation of the device.
Follow all safety and operating instructions when using this product.
You should keep the safety and operating instructions for future reference.
You should strictly follow all warnings provided on the product and listed in the operating instructions.

Explanation of symbols
Double insulated (Class I) Equipment. This electrical appliance has been designed in such a way that it does not require a safety connection to electrical earth (ground).

This symbol indicates risks caused by high voltages.

This symbol is to alert the user to other more specific risks.

This symbol indicates dangers caused by the development of fire.
1.1 Installation
1.1.1 Placement
Place the unit on a stable, even surface
Do not place this unit close to strong magnetic fields.
1.1.2 Cables
Lay the power cables so that they cannot be damaged. The power cable may not be kinked or laid over sharp edges, slook on or exposed to chemicals, the latter also applies to the system as a whole. A power cable with damaged insulation can cause electric shocks and poses a fire risk. As such, it must be changed before the unit is used again.
1.1.3 Do not use this device near water

The device should never be exposed to water droplets or water splashes, such as those found near a bathtub, wash basin, kitchen sink, washing machine, wet basement or swimming pool. Never place containers filled with liquids, such as e.g. flower vases, on the device.
1.1.4 Ventilation

Slots and openings in the housing are used to ventilate the device to ensure reliable operation of the device and to protect the device from overheating. Do not block the ventilation holes. Install the device according to the manufacturer's instructions. Never block the ventilation holes by placing the device on a bed, sofa, rug, or similar soft surfaces. This device should not be installed in a bookshelf or built-in wardrobe unless adequate ventilation is ensured.
1.1.5 Heat

Do not install the device near hot surfaces, such as radiators, fan healers, stoves or oth or devices (including amol fliers) that can be hot. Never place objects with open flame, such as candles or lanterns, on or near the device. The insta ed batteries should not be exposed to excessive heat such as direct sunlight, fire or the like.
1.1.6 Accessories
Use only the accessories specified by the manufacturer.
1.1.7 Network connection
Please make sure that the firewall function is activated at your network access point (router). Consult your router's instruction manual.
1.2 Usage
1.2.1 Intended use
This device is intended exclusively for the receipt and playback of sound signals.
1.2.2 Remote control
Exposing the remote control sensor to direct sunlight or high-frequency fluorescent light may cause malfunction. In such cases, you should move the system to a different location to avoid such malfunction.
The supplied batteries are intended for functional testing and may have a limited lifetime. If the range of the remote control decreases, replace the old batteries with new ones.
1.2.3 Overload

Never overload mains sockets, extension cords or multiple sockets, otherwise there is a risk of fire or electric shock.
1.2.4 Thunderstorm

The device should be disconnected from the mains during thunderstorms and if it is not used for a long time.
1.2.5 Penetration of foreign material and liquid

Be careful not to allow foreign material or liquid to enter this device through ventilation holes, otherwise it may come into contact with high voltage components or short circuit resulting in a fire or electric shock. Never spill liquids of any kind on this device.
1.2.6 Risks associated with high volume

The device is not designed for listening with headphones. To prevent possible hearing damage, do not listen at high volume for long periods;
1.2.7 Disconnection from power supply
The power button does not completely disconnect the power supply in any position. To completely disconnect the device from the mains, unplug the mains cable from the socket.
The mains plug must be easily accessible so that the unit can be disconnected from the mains at any time.
1.3 Maintenance
1.3.1 Device maintenance
Never attempt to carry out the maintenance of this device yourself, because live parts can be exposed through the openings or by removing covers, contacting which can be hazardous. Leave all maintenance to qualified service personnel.
1.3.2 Clean only with a dry cloth!
Unplug the mains adapter of this device from the mains socket before cleaning this product. Never use liquid cleaning detergents or cleaning sprays. Use only a damp cloth for cleaning.
1.4 Batteries

Caution! Do not ingest battery!
The remote control supplied with this product contains a coin cell battery. If the coin cell battery is swallowed, it can cause severe internal burns in just 2 hours and can lead to death.
Keep new and used batteries away from children.
If the battery compartment does not close securely, stop using the product and keep it away from children.
If you think batteries might have been swallowed or placed inside any part of the body, seek immediate medical attention.

Caution!
Risk of explosion if the batteries are replaced with the wrong type.
Do not heat or disassemble batteries. Never throw batteries into fire or water.
Do not carry or store batteries with other metallic objects. The batteries could short circuit, leak or explode.
Never recharge a battery unless it is confirmed to be a rechargeable type
When the Remote Control is not to be used for a long time (more than a month), remove the battery from the Remote Control to prevent it from leaking.
If the batteries leak, wipe away the leakage inside the battery compartment and replace the batteries with new ones.
Do not use any batteries other than those specified.
EU Declaration of Conformity
Hereby: Loewe Technology GmbH declares that the radio equipment type Loewe klang bar3 mr comples with Directive 2014/53/EU. The full text of the EU declaration of conformity is available at the following Internet address: https://www.loewe.tv/int/support
This product can be used across all EU member states.
Due to the 5 GHz frequency range of the built-in WLAN module, use in the following countries is only permitted inside buildings:
| AT | RF | RG | CZ | DK | FF | FR | DF | IS | IF | IT |
| FL | ES | CY | LV | LI | LT | LU | HU | M- | NL | NO |
| PL | PT | RO | SL | SK | TR | FI | SE | CH | UK | HR |
1.5 Repair
1.5.1 Damages requiring repair
Maintenance and repair work should only be carried out by a qualified customer service. Maintenance/repair is required if the device has been damaged (e.g. the mains adapter) if liquid has entered the device, if objects have entered the device, if the device has been exposed to rain or moisture, when it stops working properly or has fallen down.
1.5.2 To minimize the risk of electric shock, fire, etc.
Do not remove screws, covers or body parts.
1.6 Automatic energy saving function
The device is equipped with an automatic energy saving function. This switches the device to standby mode within 15 minutes if it is played at a very low volume or if the device is muted. Please note that the setting can't be changed.
2 Remote control
 |  |
 |  |
 |  |
 | [S53H] |
 | |
 |  |
•  | • |
•  | • |
 | |

Sound Mute / Unmute.

Switches the soundbar on or switches to standby mode.

Turns on/off the night mode.
Press and hold to turn the display on / off (off by default). This feature displays additional information on the front panel display in certain situations.

Switches between surround sound modes.
Press and hold to open the speaker level adjustment.
Press to change input source.

Press and hold to switch on/off DTS® Virtual:X™ and DTS® Neural:X™
Press and hold in standby mode to show the software version on the display.
Sound presets - choose from preset audio modes:

OFF. SPEECH, CLASSIC, POP, FILM, MUSIC.
Press and hold in standby mode to ad just distance between listening position and speakers.

Skip to the previous audio track in USB / Bluetooth / PLAY-Fi mode.

Skip to the next audio track in USB / Bluetooth / PLAY-Fi mode.
Play/pause audio track in USB / Bluetooth / PLAY-Fi mode.

Press and hold to activate the pairing function in the Bluetooth mode or disconnect the existing paired Bluetooth device.
Press and hold for 8 seconds in standby mode to restore the factory settings.

Reduce the volume level.

Increase the volume level.
treble
Increase / decrease the treble level.
bass
Increase / decrease the bass level.
First time use
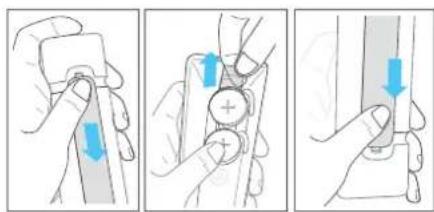
The unit has a pre-installed lithium 2 x CR2032 battery. Remove the protective tape to activate the remote control battery.
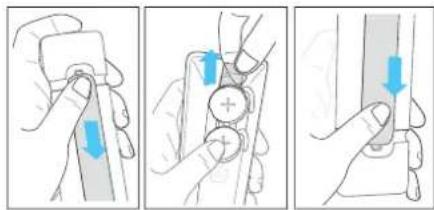
- Press and slide the back cover to open the battery compartment of the remote control.
- Remove the protective tape.
- Push the battery cover back into place.
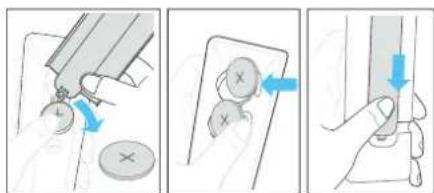
Replacing the remote control batteries
The remote control requires 2 pcs of CR2032, 3V lithium batteries. Press and slide the back cover to open the battery compartment of the remote control.
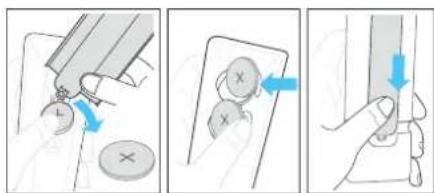
- Use a tool (such as the battery compartment cover) to pry up the groove between the two batteries to remove the old batteries.
- Insert the new batteries from the side and push them firmly into the original battery position. Make sure the (+) side of the battery is facing up.
- Push the battery cover back into place
3 Main unit components
3.1 Main unit front panel
1 (Standby) button/indicator- Switches the soundbar on or switches to standby mode.
LED indicator colour information
| LED colour Status |
| White Standby mode |
| Green Receiving PCM / AUX source |
| Blue Bluetooth mode |
| Turquoise Decoding Dolby Audio |
| Purple Decoding Dolby Atmos |
| Red Decoding DTS/DTS:X |
| Yellow USB mode / MP3 playback |
| Orange Play Fi / Multiroom mode |
2 (Source) button-Press to change input source. Press and hold in standby mode to show the software version on the display.
3 ▷|| (Play/Pause) button - Play/pause audio track from USB / Bluetooth / Play-Fi sources.
Press and hold to activate the pairing function in Bluetooth mode or disconnect the existing paired Bluetooth device.
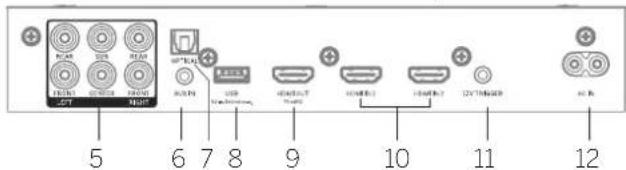
3.2 Main unit rear panel
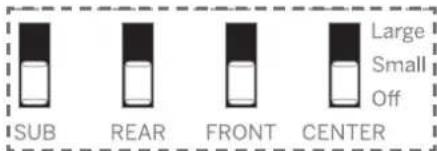
1 Rear flap - You will need to remove the rear flap of your soundbar before using external speaker switches.
2 External speaker switches - Use these switches to connect additional external speakers as SUB/ REAR/ FRONT/ CENTRE channel. Set the switch to SMALL for small speakers. LARGE for large speakers. To disable the speaker for a specific channel, set the switch to OFF.
3 PAIRING button for pairing with external wireless speakers.
4 WPS (Wi-Fi Protected Setup) button/indicator - triggers Wi-Fi setup for Play-Fi. Press and hold the button for 3 seconds to activate the WPS mode.
| LED indicator state | Status |
| LED slowly pulsing | Wi-Fi Access Point (AP) mode |
| LED flashes twice | Wi-Fi Protected Setup (WPS) mode |
| LED is on | Connected / Pairing successful |
Press and hold the button for 8 seconds to activate the AP mode.
5 6x cinch output - for external amplifier or active speakers.
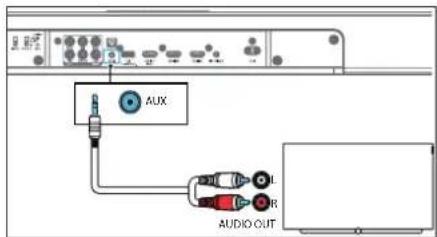
5 AUX IN - connect to the audio source via 3.5mm audio cable.
7 OPTICAL - connect to the digital (optical) output of an external device.
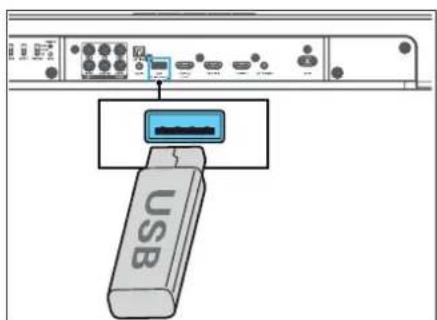
8 USB - connect a USB storage device.

Press and hole for 8 seconds in standby mode to restore the factory settings.
4 -/+ (Volume) button - Reduces/increases the volume level. Press both buttons simultaneously to mute / unmute the soundbar.
5 Front panel display
- Remote control sensor - Point the remote control at the remote control sensor to operate the system.
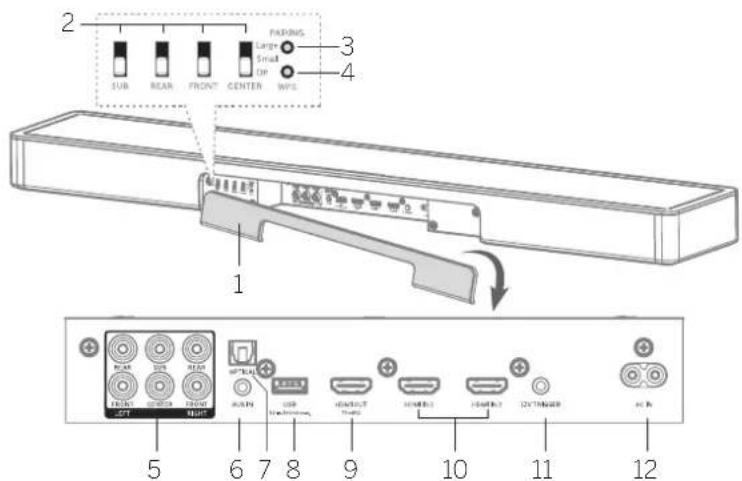
9 HDMI OUT (TV eARC/ARC) connect to the HDMI ARC/eARC jack on a TV.
10 HDMI IN 1/HDMI IN 2 - connect to the HDMI output of an external devices (e.g. game consoles, DVD and Blu-ray players).
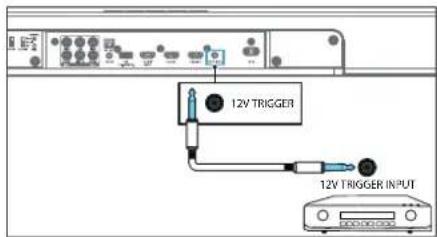
11 12V trigger - wake up a connected AVR/amplifier or active speaker system from standby when the soundbar is turned on.
Warning
Do not connect the headphones to the 12V trigger! Do not connect any external device that does not support the 12V trigger function, otherwise you may damage or destroy the device!
12 ACIN - connect to the power supply.
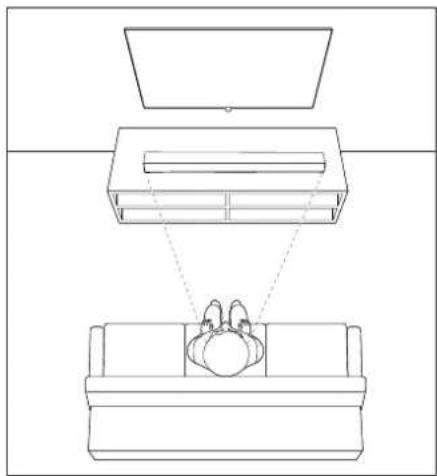
4 Placement
Place the soundbar on a stable even surface.
Place the soundbar on a table underneath the TV. For best experience place the soundbar as close as possible to the screen.
Below is an example of the correct placement.
natural_image
Line drawing of a room layout with furniture and a monitor (no text or symbols)You may also buy one of available setup solutions from your Locwe dealer.
• Loewe wall mount klang bar
- Locwe spacer
5 Connecting the soundbar
Before you make or change any connections, make sure that all devices are disconnected from the power outlet.
5.1 Connecting with HDMI
Option 1 - eARC/ARC
(enhanced / Audio Return Channel)
Your klang bar supports HDMI with enhanced Audio Return Channel (cARC/ARC). If your TV is HDMI ARC compliant, you can control your klang bar via HDMI CEO and transmit TV sound to your klang bar by using a single HDMI cable.
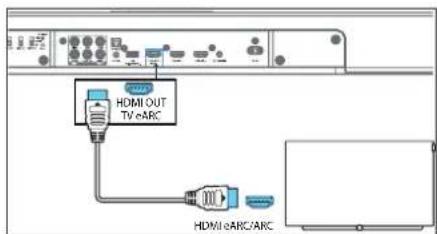
- On your TV, turn on HDMI CEC operations.
-
Using a High Speed HDMI cable (included), connect the HDMI OUT (TV eARC/ARC) connector on your Soundbar to the HDMI ARC connector on the TV. The HDMI ARC connector on the TV might be labeled differently. For details, see the TV user manual.
-
"eARC/ARC" appears on the display of the soundbar and the soundbar plays the TV sound. When the TV sound is not output, press the → (Source) button repeatedly until you see eARC or ARC on the display and TV sound is played.
When HDMI ARC connection is properly set up, you can enjoy these features:
• The soundbar turns on automatically when you turn on the TV.
- The soundbar turns off automatically when you turn off the TV.
- You can mute/unmute or adjust the volume of the soundbar using the TV remote control.
Note
- Your TV must support the HDMI-CEC and ARC function. HDMI-CEC and ARC must be set to On.
- The setting method of HDMI CFC and ARC may differ depending on the TV. For details about ARC function, please refer to your TV operating instructions:
- Only cables compatible with HDMI version 1.4 or higher can support the ARC function. We recommend using the included HDMI cable.
- For the eARC function, use the HDMI cable that came with the soundbar or look for a cable marked "with Ethernet".
- Some 4K HDR TVs require the HDMI input or picture settings to be set for HDR content reception. For further setup details on HDR display, please refer to the operating instructions of your TV.
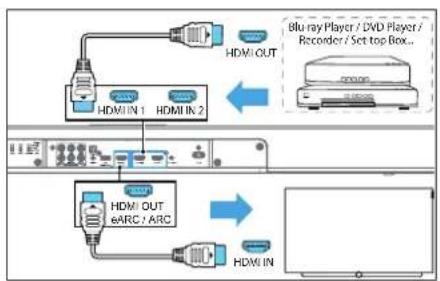
Option 2 - Standard HDMI
If your TV is not HDMI ARC-compliant, connect your Soundbar to the TV through a standard HDMI connection.
flowchart
graph TD
    A["Blu-ray Player / DVD Player / Recorder / Set top Box.."] --> B["HDMI OUT"]
    A --> C["HDMI IN 1"]
    A --> D["HDMI IN 2"]
    C --> E["HDMI OUT & ARC / ARC"]
    D --> F["HDMI IN"]
- Use an HDMI cable to connect the soundbar's HDMI IN (1 or 2) connector to your external devices (e.g. game consoles, DVD players and blu-ray).
- Use an HDMI cable to connect the soundbar's HDMI OUT (TV eARC/ARC) connector to the TV's HDMI IN connector.
Note
If your TV does not support HDMI ARC and you wish to play sound from TV on the soundbar, you will need to use alternative connection (e.g. Optical or Analogue).
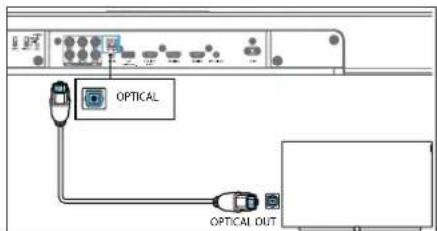
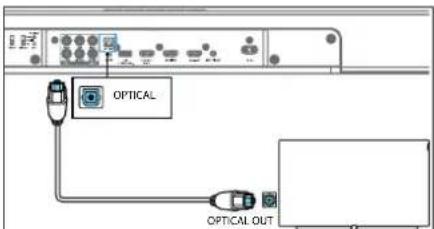
5.2 Connecting with an optical cable
Using an optical cable (not included), connect the OPTICAL connector on your soundbar to the OPTICAL OUT connector on the TV or other device.
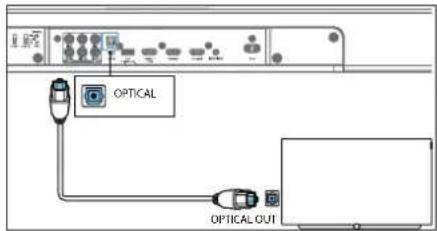
- The digital optical connector might be labeled SP-DIF or SPDIF OUT.
- This connection method only supports up to 5.1 channels of audio. Dolby Atmos is not supported.
• The soundbar will not turn on automatically when the TV is switched on.
• Volume must be adjusted manually using the soundbar remote control buttons.
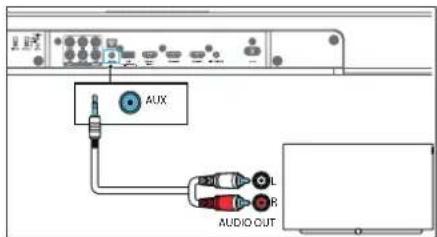
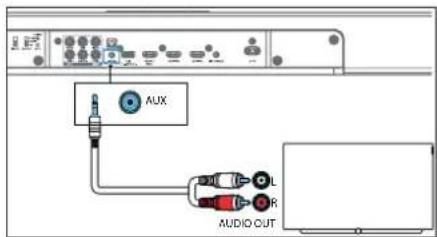
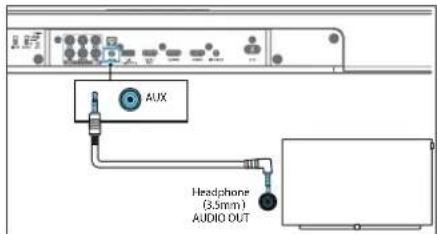
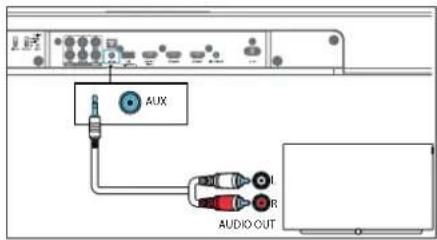
5.3 Connecting with an analogue audio cable
Option 1
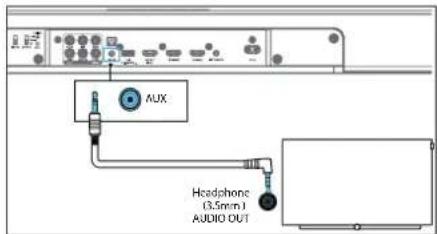
Use a 3.5mm to 3.5mm audio cable (not included) to connect the TV's or external audio device headphone socket to the AUX IN socket on the unit.
Option 2
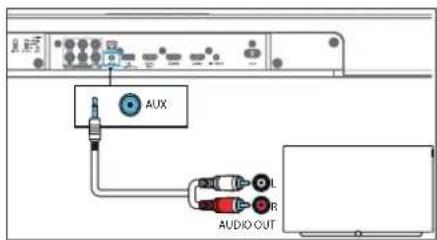
Use an ROA to 3.5mm audio cable (not included) to connect the TV's audio output sockets to the AUX IN socket on the unit.
- The soundbar will not turn on automatically when the TV is switched on.
- Set the TV to adjusted/variable volume for analogue output. Please refer to the TV manual.
5.4 Connecting the power
Note
- Before connecting the AC power cord, ensure you have completed all other connections.
- Risk of product damage! Ensure that the power supply voltage corresponds to the voltage printed on the underside of the unit.

- Connect the mains cable to the AC IN Socket of the soundbar and then into a mains socket.
6 Multiroom audio
This soundbar can be used as part of multiroom speaker setup. This means that the same music can be played from your soundbar and other compatible speakers simultaneously throughout your home.
To use this feature, make sure the soundbar and your smartphone / tablet are on the same network. You can use Chromecast. Airplay 2 or DTS Play-Fi app to control compatible multirecom speakers. You can then play the music on multiple speakers at the same time, assign speakers to different groups, control the volume individually, or use master volume to change the volume on all speakers at the same time.
6.1 Connecting to Wi-Fi
Wi-Fi setup via WPS
If your router has Wi-Fi Protected Setup (WPS), you can set up the connection without entering a password.
- Press and hold the WPS button until you hear a tone and the Wi-Fi indicator will flash twice continuously.
- Press the WPS button on the router. The button is usually marked with the WPS logo.
Note
- WPS is not a standard feature of all routers. If your router does not have WPS, follow AirPlay or Google Home setup.
- Press the WPS button once if you want to exit the WPS mode or it will automatically exit after 2 minutes.
AirPlay setup
Use AirPlay to set up the Wi-Fi connection of OS device (iOS7 or later) and soundbar.
- Press and hold the WPS button located at the rear side of soundbar for 8 seconds to trigger the Wi-Fi connection until the speaker makes a second tone, and then release the button:
- Wait until the Wi-Fi light indicator turns from a fast blink to a slow pulse. A slow pulse indicates that the speaker is entering the AirPlay setup mode.
- On your iOS device go to Settings > Wi-Fi > Setup new AirPlay speaker [Play-Fi device (xxxxxx)]
- Soundbar will be automatically recognized as Air play device. Tap on [Set up now AirPlay speaker].
- Tap on [Show Other Networks...] and select your home network to which you want soundbar to connect.
-
Give soundbar a proper name. Press "next" to connect kiang bar with the selected network.
-
After a successful Wi-Fi connection, the Wi-Fi light indicator stops pulsing and stays on. After setting up this product on your Wi-Fi network, you can control it from any smartphone or tablet on the same network.
- If you're having trouble setting up Wi-Fi, check out the myLoewe app for more detailed information on the setup process. Use the QR code from the "Apps" chapter.
Google Home setup
- Download the Google Home app on your mobile device.
- iPhone/iPad only: Turn on your mobile device's Bluetooth.
- Press and hold the WPS button located at the rear side of soundbar for 8 seconds to trigger the Wi-Fi connection until the speaker makes a second tone, and then release the button.
- Wait until the Wi-Fi light indicator turns from a fast blink to a slow pulse. A slow pulse indicates that the speaker is entering the Wi-Fi setup mode.
- Open the Google Home app.
- Follow the steps to set up your device.
If you can't find the steps to set up your soundbar:
- At the top left of the Google Home app home screen, tap Add + > Set up device > New device.
- Follow the setup steps.
6.2 Multiroom mode
By pressing ⬆ Standby) on the soundbar or remote control while soundbar is on, it will enter default standby mode. In this standby mode all network functions will be turned off.
It is possible to activate the multiroom mode, where Wi-Fi is always on and DTS Play-Fi and AirPlay2 are also available. This mode is recommended if you want to use the soundbar as a mult-room device that can be woken up remotely at any time:
Please note that multiroom mode has higher power consumption than standard standby.
To activate / deactivate multiroom mode, press > > on the remote control.
7 Basic Operation
71 Turn ON and OFF
When you first connect the unit to the mains socket, the unit will be in standby mode. The ⏻ indicator will light up white.
Auto Standby
The unit will automat cally switch to standby mode after about 15 minutes if the TV or the external device is disconnected (or USB, Buelcoth, multiroom function playback is paused) or turned off.
Automatic Wake up
If the unit is connected to the TV or external device with an HDMI cable, the unit turns on automatically when the TV or external device is turned on.
Note
- For automatic wake up, the TV or external device must support HDMI CEO function and must be activated. Read the operating instructions of your TV/external device.
7.2 Input source
Press the → (Source) button repeatedly on the unit or on the remote control to select BT (Bluetooth), HDMI 1, HDMI 2, ARC. OPT (Optical). AUX. USB mode. The display shows the selected source.
7.3 Volume control
Press +/-(Volume) to increase or decrease a volume level. To mute the sound, press ×(Mute). To restore the sound, press ×(Mute) again or press +/(Volume).
7.4 Sound presets
Press the (bound presets) button on the remote control to select the desired preset sound effect: OFF, SPEECH, CLASSIC, POP, FILM, MUSIC.
7.5 Equalizer (Bass/Treble)
Press the bass + buttons on the remote control to adjust bass level (BAS -12 \~ BAS +12).
Press the treble + - buttons on the remote control to adjust treble level (TRB -12 \~ TRB +12).
All settings (bass/treble levels) will be stored individually for every sound preset.
7.6 Surround Sound Mode
Experience immersive audio in surround mode.
Press the ⊙ (Surround) button on the remote control to change the surround mode.
STEREO only the left and right channels are used.
DUAL STEREO - stereo sound will be played on front and rear speakers. With the dual stereo function, you can use the rear speakers by duplicating a content of the front channels to the rear speakers.
Note: Only available when rear channels are configured.
PANORAMA - only the left, right and centre channels are used.
SURROUND - all channels are used, including virtualization.
7.7 Night Mode
Press the (light) button on the remote control to turn on/off right mode. This function ensures that there is less dynamic between quiet and loud sounds in movies. Recommended for late night listening.
7.8 Display
Press and hold (slight) for 3 seconds to turn the display on / off (off by default). This feature displays additional information on the front panel display in certain situations.
7.9 Factory Reset
Resels the device to the default settings. In standby mode, press and hold the ▶|| button for 8 seconds. "RESET" appears on the display and the device returns to the original settings.
710 Software version
To display the current klang bar software version, press and hold the → (Source) button in standby mode. The software version will appear on the display.
8 External speakers
8.1 External speaker switches
Remove the rear flap of your soundbar before using the switches.
Use these switches to configure additional external speakers as SUB / REAR / FRONT / CENTRE channel. Set the switch to SMALL for small speakers (120Hz / 20kHz), LARGE for large speakers (20Hz / 20kHz). Setting SUB to LARGE will add +6dB more sound pressure than SMALL. To disable the speaker for a specific channel, set the switch to OFF.
8.2 Connecting Loewe Wireless Digital Audiolink (WDAL 2.0) speakers
You can wirelessly connect up to 6 additional speakers that support WDAL 2.0 to the soundbar. To connect a WDAL 2.0 compatible speaker to the soundbar, you must:
- Remove the rear flap on the soundbar and press and hold the PAIRING button on the soundbar.
- Press and hold the PAIRING button on the WDAI 2.0 speaker. After successful pairing, "P-OK" will appear on the display of the soundbar.
- Alter successful pairing, configuration of the reproduced channel is to be selected on the speaker: Front left, Front right, Centre, Rear left, Rear right. Please refer to the speaker manual.
- Depending on the type of speaker, set the switch on the back of soundbar corresponding to the selected speaker to SMALL or LARGE.
Recommended setup for Lcewe speakers:
klang mr1:SMALL
klang mr3: LARGE
klang mr5: LARGE
For details on setting the external speaker to pairing mode, changing its role, and whether to select SMALL or LARGE on the soundbar switch, please refer to the user manual of the speaker.
8.3 Connecting wired speakers
Aside from wireless speakers, analogue amplifiers or active speakers can be connected to the soundbar via the 6 cincn outputs on the rear. Only active speakers or external analogue AVRs/amplifiers can be connected to the soundbar. The soundbar is not able to power passive speakers by itself. Please refer to the user manual of the amplifier for more information about connecting passive speakers.
Please connect the speakers to the correct soundbar outputs according to the speakers position in your room.
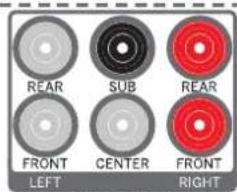
- REAR LEFT (white coloured connector) – connect rear left speaker
- FRONT LEFT (white coloured connector) - connect front left speaker
- SUB - connect a subwoofer
- CENTER - connect front centre speaker
- REAR RIGHT (red coloured connector) - connect rear right speaker
- FRONT RIGHT (rec coloured connector) - connect front right speaker
Depending on the type of speaker, set the switch on the back of soundbar corresponding to the selected speaker to SMALL or LARGE.
8.4 Volume offset
If you're experiencing speaker level mismatch, the soundbar supports different volume offsets for each channel. You can adjust the overall volume of each speaker individually:
- To enter the menu, press and hold (Surround) button on the remote control. FL appears on the soundbar display and the corresponding channel starts to play reference noise.
- Use + / - button to change the volume offset of the selected channel.
- Use ▶/▼ buttons to select a channel
- Switch between all channels and adjust the volume until all channels are equally loud.
Display abbreviations explained:
FL-front left speaker
FR - front right speaker
SL - rear left speaker
SR - rear right speaker
SUB - subwoofer
CEN - centre speaker
8.5 Distance adjustment
External speakers are usually not evenly spaced around the fsterer. For example, the front speakers
may be further away than the rear speakers. Due to a relatively slow speed of sound, an audio output from different speakers may reach the listener out of sync.
To avoid this, you can synchronise the speakers by specifying the distance of each speaker from the listening position.
Follow these steps to set the distance:
- Press and hold 🐘 (Equalizer) button for 3 seconds on the remote control. FL appears on the soundbar display.
- Use the + / - button to change the distance of the selected speaker from the listening position.
- Use ▶/ ▶buttons to select a speaker.
Example: when the display shows "FL3,0", it means that the current set distance for the left front speaker is 3 meter. You should now measure the distance from this speaker to the listening position and adjust it.
For example, if the distance is 2.5 meters, press the + button until "FL2.5" is displayed. When you have finished adjusting this speaker, press the ▶ button and adjust the distance for the next speaker.
Note: In this way, you can also make a correction if there are echo problems due to different signal processing times of the connected devices.
9 Bluetooth Operation
Connect the soundbar to a Bluetooth device (such as an iPad, iPhone, iPod touch, Android phone, or laptop) via Bluetooth, and then you can listen to audio files stored on the device through the soundbar.
- Press the → (Source) button on the unit or remote control repeatedly to switch the soundbar to BT (Buelcoth) mode.
- Turn on Bluetooth on the smartphone, search for and select "klang bar3 mr" to connect. For information on enabling Bluetooth, see the user guide of the Bluetooth device.
- Wait until you hear the sound from the soundbar. Select and play audio files or music on your Blue tooth device.
- To exit, Bluetooth, select another source.
When you switch back to Bluetooth mode, the Bluetooth connection is re-established.
To connect the soundbar to another Bluetooth device, press and hold the ▶|| button on the remote control to disconnect the currently connected Bluetooth device.
Note
- The minimum requirements for a Bluetooth device and Bluetooth profile A2DP, AVRCP and Bluetooth version 4.2 - EDR
- The maximum operating range between the soundbar and a Bluetooth device is approximately 10 meters.
- Compatibility with all Bluetooth devices is not guaranteed.
■ Lceweklang bar3 mm
Bluetooth-Operation USB Operation | 12V Trigger Chromecast built in Delby Atmos
Spotify | Software update | Apps
- The music streaming may be interrupted by obstacles between the device and soundbar, such as wall, a melal case covering the device, or other devices in the vicinity that operate on the same frequency.
10 USB Operation
- Insert the USB device.
- Press (Source) on the unit or remote control repeatedly to select the USB mode.
- During playback, press ▶|| to start / pause / resume playback. Press◀/◀ skip to the previous or next track.
Note
This product may not be compatible with certain types of USB storage devices.
- If you use a USB extension cable, USB hub or USB multifunctional card reader, the USB storage device may not be recognized.
- Do not remove the USB storage device while reading files.
- The unit can support USB devices with up to 32 GB of memory.
• This unit can only play MP3.
11 12V Trigger
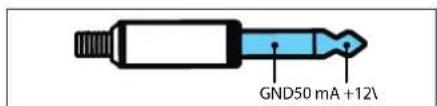
The 12V trigger is a soundbar output that can wake up a connected AVR/amplifier or active speaker system from standby when the soundbar is turned on. To connect the soundbar and an external device, use only a mono TS (lip/sleeve) cable with 3.5mm jack.

Warning
Do not connect the headphones to the 12V trigger! Do not connect any external device that does not support the 12V trigger function, otherwise you may
damage or destroy the device!
Only connect external devices that have a 12V trigger input and their user manual explicitly states that waking via the 12V trigger is supported. Please refer to the user manual of the external device for more information on connecting via the 12V trigger.
12 Chromecast built-in
This soundbar supports Chromecast built-in feature that allows you to cast music from Chromecast compatible apps to your soundbar. To use this feature, make sure the soundbar and your smartphone / tablet are on the same network. Start playing music on a Chromecast-enabled app and cast it to your soundbar simply by tapping the ☐(cast) button and selecting the soundbar from the list.
13 Dolby Atmos®
Dolby Almos ^® gives you immersive listening experience by delivering sound in three dimensional space, and all the richness, clarity, and power of Do by sound.
For more information, please visit dolby.com/technologies/dolby-atmos
For using Dolby Atmos®
Dolby Atmos® is available only in HDMI and eARC mode.
For the details of the connection, please refer to "Connecting with HDMI" chapter.
- To use Dolby Atmos® in HDMI ARC mode, your TV has to support Dolby Atmos® and eARC.
- Make sure that "No Encoding" or "Paestrough" is selected for bitstream in the digital audio output of the connected external device (e.g. Blurray, TV etc.).
Note
The full Dolby Atmos® experience is only available when the klang bar is connected to the source via a High Speed HDMI cable. You can also use provided cable.
Dolby formats appear on the front panel display only when the display function is turned on. Press and hold to turn on / off the display function.
The klang bar will still function when connected via other methods (such as a Digital Optical cable) but these are unable to support all of the Dolby features. Given this, our recommendation is to connect via HDMI, in order to ensure full Dolby support.
14 Spotify
Use your phone, tablet or computer as a remote control for Spotify. Go to spotify.com/connect to learn how.
The Spotify Software is subject to third party licenses found here:
www.spotify.com/connect/third-party-ccenses
15 Software update
To upgrade soundbar firmware:
- Download the latest software from the website www.lcewe.de.
- Extract the file to the USB root folder.
- Connect USB to the soundbar while in power-on mode.
- Switch to USB source on the soundbar.
- The installation starts and the display shows the update progress.
- Warning: It may take a few minutes for the software to update. Do not unplug your speaker, turn off the device, or disconnect the USB stick or network during the update. These actions can potentially destroy your soundbar.
- When the update is complete, the display turns off.
- Disconnect the soundbar from the mains and remove the USB.
- After one minute, connect the soundbar back to the mains.
The soundbar is now updated to the new software version.
To upgrade the multiroom function of your soundbar:
- Download and install the DTS Play-Fi app on your mobile device.
- Connect the soundbar to the Wi-Fi.
- If new Play-Fi software is available, the application notifies you.
- Follow the instructions in the application to run the multi-room feature update.
Warning: It may take a few minutes for the software to update. Do not unplug your speaker, turn off the device, or disconnect the USB stick or network during the update. These actions can potentially destroy your soundbar.
16 Apps
Scan the QR code below with your phone and download the recommended app.

The "my Loewe" app is an entry point to the Loewe world and gives you access to all user manuals for your Loewe products.
Troubleshooting
In the event of a device failure, we recommend that you check the list below before calling the helpline.
Problem Possible cause Remedy/notes
| The system does not respond to any button press | A software error may have caused the device to stop receiving commands from the buttons, and the device must be restarted by unplugging it. | Unplug the unit from the power supply for a few minutes, then plug it in again. |
| No sound from the soundbar. | a. Incorrect source input is selectedb. The soundbar is mutedc. The soundbar cannot decode the input audio signald. Some or all of the external speaker switches switches are in the incorrect position.e. A software error may have caused this problem. | a. On the remote control, select the correct audio input.b. Press the MUTE buttonc. Try to change Digital output settings on source device to PCM.d. If you do not have any external speakers connected, make sure all the switches on the rear are set to OFF.e. Reset the unit to factory settings (see chapter "Basic Operation") |
| Echo between external speakers | Uneven placement of speakers around the listener or different signal processing times of the connected devices. | Adjust the distance settings of the speakers. See the chapter "Distance adjustment". |
| A Bluetooth device cannot connect to the soundbar. | a. The device does not support compatible profiles required for the soundbar.b. You have not enabled the Bluetooth function of the device.c. The Soundbar is already connected to another Bluelcoth device. | a. Only devices with Bluetooth profile A2DP, AVRCP are compatible.b. For information on enabling this function, see the device user guide.c. Disconnect the connected device, then try again. |
| The audio playback quality of the connected Bluetooth device is poor. | Bluetooth reception is poor. | Move the device closer to the soundbar or remove obstacles between the device and the soundbar. |
| Wi-Fi connection cannot be established. | a. Wi-Fi network may be unavailable.b. Wi-Fi signal is very weak.c. You are entering an incorrect password. | a. Check the availability of WLAN network on the router.b. Place the Wi-Fi router closer to the unit.c. Make sure that the password is correct. |
| Cannot achieve outstanding Dolby Atmos® effects. | a. HDMI eARC may be disabled on the TV.b. For non-HDMI connections (such as USB, Bluetooth, OPTI-CAL or AUX), limited surround effects are generated. | a. Enable HDMI eARC in the TV menu.b. For information on how to get the best Dolby Atmos effects, see the "Dolby Atmos®" chapter. |
| Cannot discover the Sound-bar from the app. | a. Klang bar may not be in multiroom mode.b. Device may be disconnected from Wi-Fi. | a. Enable Multiroom Mode of the klang bar by connecting it to a Wi-Fi.b. Make sure the device is connected to the Wi-Fi. |
Technical data
| Loewe device type: klang bar3 mr | |
| Part number: 60614D10 | |
| Power supply: AC 100 V - 240 V ~ 50/60 Hz | |
| Audio output power: 180 W (RMS) | |
| Power consumption in standby mode: < 0.5 W | |
| Frequency response: 60Hz - 20kHz | |
| WLAN supported Standards: IEEE 802.11a/b/g/n/ac | |
| WLAN power/frequency range: | Maximum power <100 mW at 2400 - 2483.5 MHzMaximum power <100 mW at 5150 - 5350 MHzMaximum power <100 mW at 5470 - 5725 MHzMaximum power <100 mW at 5725 - 5850 MHz |
| Bluetooth Version: 5.0 + EDR | |
| Bluetooth power/frequency range: Maximum power <10 mW at 2402 - 2483 MHz | |
| USB playable files: MP3 | |
| Device dimensions (W x H x D): 950 x 68 x 160 mm | |
| Device weight: 5.9 kg | |
| Remote control battery: 2 x CR2032 | |
| Ambient temperature: 5°C - 35°C | |
| Relative humidity (non-condensing): | 20 - 80% |
| Video passthrough: | 4K Video Pass-through, Dolby Vision, HDR10, HDR10+ |
| Supported Audio formats: | HDMI: DTS, DTS-HD, DTS:X, DTS Virtual:XTM, Dolby Digital, Dolby Digital plus, Dolby True HD, Dolby Atmos®, LPCM 2ch/Mch , Dolby MATOPTICAL: DTS, Dolby Digital, LPCM 2ch |
Disposal
Disposal of used electrical and electronic equipment and batteries.
The crossed-out wheeled bin symbol on the product or its packaging indicates that this product must not be treated as normal household waste, but must be returned to a collection point for the recycling of electrical and electronic equipment and batteries. By helping to properly dispose of this product, you are protecting the environment and the health of your fellow human beings. Improper or incorrect disposal endangers the environment and health. For more information about the recycling of this product, please contact your local authority or your municipal waste disposal service. Attention: The "Pb" sign under the battery symbol indicates that this battery contains lead.
Hartelijk dank
| × | ○ | |
| ○ | ◎ | |
| → | ↔ | |
| ← | → | |
| ▶|| | ||
| - | + | |
| • treble | • | |
| • bass | • | |
| LOEWE. | ||
natural_image
Line drawing of a furniture setup with a sofa, cabinet, and monitor (no text or symbols)7.5 Equalizer (Bass/Treble)
www.spotify.com/connect/third-party-licenses
15 Software-update
| × | ○ | |
| ○ | ◎ | |
| → | ↔ | |
| ← | → | |
| ▶|| | ||
| - | + | |
| • treble | • | |
| • bass | • | |
| LOEWE. | ||
natural_image
Line drawing of a furniture setup with a cabinet and sofa, no text or symbols presentConfiguration Wi-Fi via WPS
8.2 Connexion de haut-parleurs Loewe Wireless Digital Audiolink (WDAL 2.0)
www.spotify.com/connect/third-party-licenses
| × | ○ | |
| ○ | ◎ | |
| → | ↔ | |
| ← | → | |
| ▶|| | ||
| - | + | |
| • treble | • | |
| • bass | • | |
| LOEWE. | ||
natural_image
Line drawing of a room layout with a sofa, a cabinet, and a monitor (no text or symbols)6 Audio multi-stanza
www.spotify.com/connect/third-party-licenses
12 Chromecast built-in....68
13 Dolby Atmos ^® 68
14 Spotify 68
15 Actualizar software....68
natural_image
Line drawing of a room layout with a sofa, a cabinet, and a monitor (no text or symbols)8.2 Conexión de altavoces Loewe Wireless Digital Audiolink (WDAL 2.0)
12 Chromecast built-in
www.spotify.com/connect/third-party-licenses
15 Actualizar software
| × | ○ | |
| ○ | ◎ | |
| → | ↔ | |
| ← | → | |
| ▶|| | ||
| - | + | |
| • treble | • | |
| • bass | • | |
| LOEWE. | ||

natural_image
Line drawing of a room layout with a sofa, a cabinet, and a monitor (no text or symbols)flowchart
graph TD
    A["Blu-ray Player / DVD Player / Recorder / Set-top Box..."] --> B["Output"]
    C["HDMI OUT"] --> D["Blu-ray Player / DVD Player / Recorder / Set-top Box..."]
    E["HDMI OUT eARC / ARC"] --> F["Blu-ray Player / DVD Player / Recorder / Set-top Box..."]
    G["HDMI IN"] --> H["Blu-ray Player / DVD Player / Recorder / Set-top Box..."]
www.spotify.com/connect/thirc-party-licenses.
natural_image
Line drawing of a room layout with furniture and lighting fixtures (no text or symbols)kang m1: SMALL (maty)
klang mr3: LARGE (duzy)
kang mr5: LARGE (du/y)
12 Chromecast built-in.... 101
13 Dolby Atmos ^® 101
14 Spotify 101
natural_image
Line drawing of a ceiling-mounted air conditioner unit with a sofa and a top panel, showing no text or symbols.12 Chromecast built-in
www.spotify.com/connect/thirc-party- censes
- Pomccou nástroja (napriklad krytu priestoru pre batériu) vypáčte drážku medzi dvoma batériami, aoy ste vybrali staré batérie.
- V ožte nové batérie zboku a pevne ich zatlačte do pôvodnej polchy balérii. Ulistile sa, že strana (+) balérie smeruje nancr.
- Kryt batérie zatačte spat na miesto.
natural_image
Line drawing of a ceiling-mounted device with a separate sofa and a top panel, showing no text or symbols.flowchart
graph TD
    A["Blu ray Player / DVD Player / Recorder / Set-top Box..."] --> B["HDMI OUT"]
    C["HDMI IN 1"] --> D["HDMI OUT"]
    E["HDMI IN 2"] --> F["HDMI OUT"]
    G["HDMI OUT eARC / ARC"] --> H["HDMI IN"]
- Pomocou kábla HDMI pripojte konektor vstupu HDMI IN (1 alcbo 2) zvukovéno panela k externým zariadeniam (napr, herné konzoly, prehrávače diskov DVD a Blu-ray).
- Pomocou kábla HDMI oripojte konektor výstupu HDMI OUT (TV eARC/ARC) zvukového panela ku konektoru vslupu HDMI IN televizora.
Poznámka
8.2 Pripojenie reproduktorov Loewe Wireless Digital Audiolink (WDAL 2.0)
www.spotify.com/connect/third-party-licenses
| × | ○ | |
| ○ | ◎ | |
| → | ↔ | |
| ← | → | |
| ▶|| | ||
| - | + | |
| • treble | • | |
| • bass | • | |
| LOEWE. | ||
| Skapas izslegšana/ieslegšana. | |
| lesledz skanas sistemu vai pārslôcz gaidstāves režimā. | |
| los ōdz/izslôdz nakts režimu.Turiel nospiestu, lai ieseglu/izslegtu disploju (põc noklusčjuma izslôgts). Ar šo lunkoju notciktās situácijās priekšć-ja pare a displeja redzama papildinfor-mácija. | |
| Parsledz telpiskas skanas režimus.Nospiedlet un turiet nosp estu, lai at-vertu skaljruna limena pie agošanu. | |
| Nospiedlot, lai maintu iovados avotu.Nospiedlet un turiet nospiestu pogu, lai ioslôgtu/izslôgtu DTS® Virtual:XTM un DTS® Neural:XTM.Nospiedlet un turiet nospiestu gaidstā-ves režimā, lai disploja parādītu progr-rammaturas versiju. | |
| Skaņas sācotnějie iestatījumi — atlasa venu no sācotněja iestatījurma audio rožimiem.IZSLEGTS, RUNA, KLASISKS, POPS, FILMA, MÜZIKA.Caidstāves režima nospiedlet un turet nospieslu, lai prelāgolu allālurnu sharp klausīšanās poziciju un skaljruniem. | |
| USB/Bluetooth/PLAY-Fi režima pariet už iepriekšejo audio ierakstu. | |
| USB/Bluetooth/PLAY-Fi režima pariet už nākarno audio icrakstu. | |
| USB/Bluetooth/PLAY-Fi režimā alska-ņo/pauze audio ierakstu.Nospiedlet un turiet nospiestu, lai Blu-ctooth režimā veiklu savienošanu pārī vai atvienotu esošu pārī savienotu Blu-etooth ierici.8 sekundes turiet nospiestu gaidstaves režima, lai alaunotu rupnicas iestatīju mus. | |
| Samazina skaljuma limeni. | |
| Palielina skaljuma limeni. | |
| treble | Palielina/samazina augsto frekvenču skanas limeni. |
| bass | Palielina/samazina zemo frekvenču skanas limeni. |
- Nospiediet vacinu un slumiet to uz aizruguri, lai atvortu tāvadības pults bateriju nodalījumu.
- Noçemiet a/sargienti.
- Spiedlet bateriju nodalijuma parsegu atpakai v eta.
natural_image
Line drawing of a furniture arrangement with a cabinet and sofa, no text or symbols presentflowchart
graph TD
    A["Blu-ray Player / DVD Player / Recorder / Set-top Box..."] --> B["HDMI OUT"]
    C["HDMI IN 1"] --> D["HDMI OUT"]
    E["HDMI IN 2"] --> F["HDMI OUT"]
    G["HDMI OUT eARC / ARC"] --> H["HDMI IN"]
    I["HDMI OUT"] --> J["HDMI OUT"]
- Lieojie! HDMI kabeli, lai skanas sistemas HDMI IN (1 vai 2) savienotaju pievienotu arejam iericem (piemeram, spelu konsolei, DVD atskanotajiem un Blu-ray atskanotajiem).
- Lietojlet HDMI kabeli, lai skapas sistemas HDMI OLT (TV eARC/ARC) savienotaju pievienotu te cvizora HDMI IN savienotajam.
Piezime
Ja televizors neatbalsta HDMI ARC un velaties televizora skanu alskaro: skanas sistema, nepediešams izmantot citu savienojumu (piemčram, optisko vai analogo).
Lietojiet 3.5 mm PHONO audio kabel (nav ielverts komplektacija). lai televizora vai citas arõjas audio licences austinu pieslegvietu savienotu ar liences lgzdu AUX.
2. opcija
Lietojiet savienojuma no ROA uz 3,5 mm audio kabel (nav ietverts komplektacija), lai televizora audio /va dos ligzdu picvienotu pie icricos AUX ligzdas.
- Skanu sistema netiek iesległa automatiski, iesle dzot televizoru.
- Iestatiet te evizora analogajam izvaciam pielągotu/mainigu. skalumu. Skatiet telev /ora rokasgramatas informāciju.
8.2 Savienojuma izveide ar Loewe Wireless Digital Audiolink (WDAL 2.0) skalruniem
Bezvadu režimá varat pievienot tiz pat. 6 papildu skajruniem, kas albalsta WDAL 2.0, skanas sistěmai. Lai skanas sistěmai pievierotu WDAL 2.0 sade-igu skajruni, jázpilda talák norāditās daribas.
- Noqemiet skaņu sistēmas aizmugurejo vaku, nospiedet un turiel nospiestu skaņu sistēmas pogu PAIRING.
- Nospedict un turiet nospiestu skajruja WDAL 2.0 pogu PAIRING. Pec sekmiga savienojuma pari skaju sistemas displeja redzams "P-OK".
- Põc sokrtniga savicnojurna pärī, skalrunī ir jäallasa nodrošināta kanala konfiguracija, Priekšejais kreisais, Priekšejais labais. Centralais. Aizmugurejais kroisais. Aizmugurejais labais. Skatict skalruna rokasgramatas informaciju.
- Atkaribă no skalruna veida, iostatiet slodzi skalruna sistemas aizmugurč atbilstoši izvočtajam skalrunim uz SMALL vai LARGE.
Loowo skairupu ieteicarnais estatijums.
klang mrl SMALL
klang mr3: LARGE
klang mr5: LARGE
Detalizotu informaciju par arčiša skalruņa iestatīšanu savienojuma pani režirna, ta lomas maiņu un to, vai skanas sistemas sledzi iestaht SMALL vai LARGE.
skatiet skalruna lietotaja rokasgrāmatu.
- Nosopediet ierices vai talvadibas pults pogu (Avots), lai atlas tu USB režimu..
- Atskanošanas laikė nospiediet ▶|| a saktu/pauze-tu/atsaktu atskanošanu. Nospiediet pogu ▶/□ lai párietu uz icpriekščjo vai nákarno icerakstu.
Piezīme
Šs izstradajums var neodt saderigs ar notoikta voida USB atminas iencem.
- Ja izmantojat USB kaboli. USB centrmezglu vai USB daudzfunkcionalo karšu lasitaju. USB at minas verice var netikt atpazita.
- Neatvienojet USB atminas lici. kamér notiek failu las šana.
- Ierice var atbalstit lidz 32 GB ielas USB ierices.
- Šaja lence var atskanot tikai MP3 formata failus.
11 12 V slēdzis
12 V slõdžis ir skanu sistlõnas izvads. kurš var aktivizet olevienoto AVR/pastiprataju va aktve skajruņu sistlemu no gaidstaves režima, kad skanu sistema liek icslogta. Lai savionotu skanu sistõmu un arõo ioriči, izmantojiet tikai mono TS (letverošais/aptverošais) kabelar 3,5 mm spräudni.
Brīdinājums
Nepievienojet austiņas pie 12 V slēdža! Nepievienojet nekacu arejo ieriči. kas neatbalsta 12 V slēdža funkciju, preteja gadijuma varat sabojat val iznicinal ieriči!
www.spotify.com/connect/thirc-party-licenses
natural_image
Line drawing of a room layout with a sofa, a cabinet, and a monitor (no text or symbols)flowchart
graph TD
    A["Blu-ray Player / DVD Player / Recorder / Set-top Box..."] --> B["HDMI OUT"]
    C["HDMI IN 1"] --> D["HDMI OUT"]
    E["HDMI IN 2"] --> F["HDMI OUT"]
    G["HDMI OUT eARC / ARC"] --> H["HDMI OUT"]
    I["HDMI IN"] --> J["HDMI OUT"]
- Norécarni, jungli USB režima, valdymo skydelyje arba nuotoinio valdymo pulte paspauskite (šaltinio) mygtuka.
- Porklausos motu, norčdami palcisti / pr stabdyti / atraujinti perklausa, spauskite ▶ || Spauskite ▶ ▶ norčdami loisti ankstosni / kitajraša.
Pastaba
www.spotify.com/connect/thirc-party-licenses
12 Chromecast built-in.... 145
13 Dolby Atmos ^® 145
14 Spotify 145
15 Tarkvara värskendamine.... 145
16 Rakendused....145
Törkeotsing....146
Tehnilised andmed....147
Utiliseerimine 147
| × | ○ | |
| ○ | ◎ | |
| → | ↔ | |
| ← | → | |
| ▶|| | ||
| - | + | |
| • treble | • | |
| • bass | • | |
| LOEWE. | ||
natural_image
Line drawing of a ceiling-mounted device with a separate sofa and a top panel, showing no text or symbols.Võite oma Loewe edasimcujait osta ka che olemas-levatesi seac stuslahendustest:
• Loewe klang bari seinakinnitus
• Loewe vaneosa
flowchart
graph TD
    A["Blu-ray Player / DVD Player / Recorder / Set-top Box..."] --> B["HDMI OUT"]
    C["Blu-ray Player / DVD Player / Recorder / Set-top Box..."] --> D["HDMI OUT"]
    E["Blu-ray Player / DVD Player / Recorder / Set-top Box..."] --> F["HDMI OUT"]
    G["Blu-ray Player / DVD Player / Recorder / Set-top Box..."] --> H["HDMI OUT"]
    I["Blu-ray Player / DVD Player / Recorder / Set-top Box..."] --> J["HDMI OUT"]
    K["Blu-ray Player / DVD Player / Recorder / Set-top Box..."] --> L["HDMI OUT"]
    M["Blu-ray Player / DVD Player / Recorder / Set-top Box..."] --> N["HDMI OUT"]
8.2 Loewe Wireless Digital Audiolink (WDAL 2.0) kölarite ühendamine
- Sisestage USB seace.
Loeweklang bar3 m
Bluetoothi kasutamine | USB kasutamine | 12 V päästik | Chromecast built-in | Dolby Atmos |
Spotify | Tarkvara varskordamine | Rakendused
12 Chromecast built-in
www.spotify.com/connect/thirc-party- censes
natural_image
Line drawing of a ceiling-mounted device with a separate sofa and a top panel, showing no text or symbols.flowchart
graph TD
    A["Blu-ray Player / DVD Player / Recorder / Set top Box..."] --> B["HDVI OUT"]
    C["HDVI IN 1"] --> D["HDVI OUT"]
    E["HDVI IN 2"] --> F["HDVI OUT"]
    G["HDVI OUT eARC / ARC"] --> H["HDVI OUT"]
    I["HDVI IN"] --> J["HDVI OUT"]
- Brugel HDMI kabel til at slutte soundbarens HDMI IN-stik (1 er 2) till dino eksterne enhoder (f.exs. spilkonsoller, DVD-afspillere og Blu-ray).
- Brug et HDMI-kabel til at slutie soundbarens HDMI OUT-stk (TV eARC/ARC) til TV'ets HDMI IN-stik.
Bemærk
7.6 Surroundsound-tilstand
Oplev medrivende lyd i surround-tilstand.
www.spotify.com/connect/thirc-party-licenses
15 Softwareopdatering
Sådan opgraderer du soundbar-firmwaren:

natural_image
Line drawing of a ceiling-mounted cabinet and a sofa with a lamp, no text or symbols present8.2 Ansluta Loewe Wireless Digital Audiolink (WDAL 2.0) högtalare
www.spotify.com/connect/thirc-party- censes
15 Programvaruuppdate- ring
12 Chromecast built-in....178
13 Dolby Atmos ^® 178
14 Spotify 178
natural_image
Line drawing of a ceiling-mounted device with a separate sofa and a top panel, showing no text or symbols.flowchart
graph TD
    A["Blu-ray Player / DVD Player / Recorder / Set-top Box..."] --> B["Output"]
    C["HDMI OUT"] --> D["Blu-ray Player / DVD Player / Recorder / Set-top Box..."]
    E["HDMI OUT eARC / ARC"] --> F["Blu-ray Player / DVD Player / Recorder / Set-top Box..."]
    G["HDMI OUT"] --> H["Blu-ray Player / DVD Player / Recorder / Set-top Box..."]
Bluetooth in Kaytto | USB in kaytto | 12 V trigger | Chromecast built-in | Do by Atmos
Spotify | Jarjeste mapäiv tys | Sovellukset
11 12 V trigger

12 Chromecast built-in
www.spotify.com/connect/third-party licenses
| × | ○ | |
| ○ | ◎ | |
| → | ↔ | |
| ← | → | |
| ▶|| | ||
| - | + | |
| • treble | • | |
| • bass | • | |
| LOEWE. | ||
natural_image
Line drawing of a room layout with a cabinet and sofa, no text or symbols presentflowchart
graph TD
    A["Blu-ray Player / DVD Player / Recorder / Set-top Box..."] --> B["HDMI OUT"]
    C["Blu-ray Player / DVD Player / Recorder / Set-top Box..."] --> D["HDMI OUT & ARC / ARC"]
    D --> E["HDMI IN"]
- Bruken HDMI lecning til å koble lydplankens HDMI In-koblingspunktet (1 eller 2) til de okstørne cnhotene (f.eks. spollkonsøller. DVD- og Blu-ray-spillere).
- Bruk en HDMI-leanning til å koble til lydplankens HDMI OUT-koblingspunkt (TV eARC/ARC) til TV-ens HDMI IN-koblingspunkt.
Merk
Hvis TV en din ikke støtter HDMI ARC, og du vi spille av lyd fra TV-en på lydplanken, må du bruko en alternativ tilkooling (f.eks, optisk eller analog).
5.2 Koble til med en optisk ledning
Du kan bruke en botisk lecning (ikke inkludert) til å koble det OPTISKE-koblingspunktet på lyoplarken til OPTICAL OUT-koblingspunktet på TV-en eller en annier enhel.
- Det digitale optiske koblingspunktet kan være merkel SPDIF eller SPDIF OUT.
-
Derne t koblingsmåten støtter kun opptil 5.1-lydkanaler. Dolby Atmos sløtes ikke.
-
Lydolanken slår sog ikke automatisk på när TV-en slås på.
- Volumet må justeres manuelt ved hjelp av lydplan kons fjornkontroll/knappor.
Bruk en lydledning på 3,5 mm til 3,5 mm (Ikke inkluderl) til å koble hodetelelonningangen til TV-ers eksterne lydenhet til AUX IN-in-taket på enheten.
Alternativ 2
Bruk en RCA-lydledning på 3,5 mm (ikke inkludert) til å kobre TV-ens lydulganger til AUX IN-inntakel på enheten.
Wi-Fi-innstilling via WPS
AirPlay-innstillinger
Google Home-innstillinger
12 Chromecast built-in
www.spotify.com/connect/third-party-licenses
- Gurnite alat (npr. pokloac odjeljka baterija) u žlijeb između dviju baterija kako biste ih izvadili.
- Urnicnile nove balerije s bočne strane i čvrsto ih pritisnite na mjesto starih baterija. Provjenite je li (-) strana balerije okrenuta prema gore.
- Ponovo postavite stražnji ook opac.
natural_image
Line drawing of a ceiling-mounted air conditioner unit with a close-up of its base panel (no text or symbols)Upotnjeoite audlokabel 3.5 mm - na - 3.5 mm (nije isporučen) za povezivanje utčnice slušalca na televizoru ili vanjskom audicuređaju s uličnicorn AUX IN na uređaju.
Opcija 2
Upolrijeoile audlokabel RCA - na - 3,5 mm (nije isporučen) za povezivanje audieizlaza televizora s ulični-com AUX IN na uredaju.
8.2 Povezivanje zvučnika koji podržavaju Loewe Wireless Digital Audiolink (WDAL 2.0)
Sa soundbarom možete povezati do 6 zvučnika koji podržaveju WDAL 2.0. Da biste sa soundbarom povezali zvučnik koji podržava WDAL 2.0. napravle sljedeće:
- Uk onite stražnju klapnu soundbara, a zatim držite pritisnutu tipku PAIRING na soundbaru.
- Držte pritisn.tu tipku PAIRING na zvučniku koji podržava WDAL 2.0. Naken uspješnog uparivanja, na zaslonu soundbara prikazat će se "P-OK".
- Nakon usoješnog upaivanja potrebno je odabratl konfiguraciju reproduciranog kanala na zvučniku; prednji lijevi, prednji desni, sredšnji, stražnji lijevi, stražnji desni. Potražile informacije u priručniku zvučnika.
- Ovisno o vrsli /vučnika, prekidač na poledini soundbara postavite na SMALL ili LARGE.
Preporučene poslavke za Loewe zvučnike:
klang mr1 SMALL
klang mr3: LARGE
klang mr5: LARGE
U konsničkom priručniku zvučnika pronaći ćete informacije o postavljanju vanjskog zvučnika u način rada za uparivanje, promjeni njegove uloge i o tome treba ili odabrati postavku SMALL ili LARGE na prekidaču soundbara.
www.spotify.com/connect/third-party-licenses
15 Ažuriranje softvera
Nadogradnja softvera soundbara:
- Prouzmite najnoviji softver s web-mjesta www.loewe.de.
- Raspakirajte datoteku u korijenski imcnik USB uređaja.
- Priključite USB uređaj na soundbar dok je uključen.
- Prebacite na USB izvor soundbara.
- Pokreće se instalacija, a na /aslonu se prika/uje tijek ažuriranja.
- Upozorenje: Ažuriranje softveramože potrajali niekolko minuta. Nemojte iskapčati zvučnik, isključivati uredaj ni odspajati USB uredaj ili mrežu tijekom ažuriranja. Tako bisle mogli uništiti soundbar.
- Zaslon se isključuje po dovršetku ažuriranja.
- Iskopčajte scundbar iz napajanja i uklonite USB.
- Nakon jedne minute ponovo priključite soundbar u napajanje.
Soundbar je sada ažuriran na novu verziju softvera.
Nadogradnja soundbara za funkciju upotrebe u više prostorija:
- Preuzmite i instalirajte aplikaciju DTS Play-Fina svoj mobilni uredaj.
- Povežite soundbars s Wi-Fi mrežom.
- Ako je dostupan novi Play-Fi softver, aplikacija vas o lome obavještava.
- Pratite upute u aplikaciji kako biste obavili ažuriranje funkcije upotrebe u više prostorija.
Upozorenje: Ažuriranje softvera može potrajati ne- koliko minuta. Nemojte iskapčati zvučnik, isključivati uređaj ni odspajati USB uređaj ili mrežu tijekom ažuri-
ranja. Tako biste mogli uništiti soundbar.
16 Aplikacije
| × | ○ | |
| ○ | ◎ | |
| → | ↔ | |
| ← | → | |
| ▶|| | ||
| - | + | |
| • treble | • | |
| • bass | • | |
| LOEWE. | ||
10 HDMI IN 1/HDMI IN 2 - /a pove/avo / i/hodorn HDMI zuranj h naprav (npc igralne konzole, predvajalniki DVD in Blu-ray).
natural_image
Line drawing of a ceiling-mounted air conditioner unit with a close-up of its base panel (no text or symbols)Uporabite avdio kapel 3,5 mm v 3,5 mm (ni priložen) za povezavo avdio vtiča za slušalke zunanje avdio naprave ali televizorja v vlič AUX IN na eroti.
Možnost 2
8.2 Povezovanje zvočnikov Loewe Wireless Digital Audiolink (WDAL 2.0)
www.spotify.com/connect/thirc-party licenses
12 Chromecast built-in.... 222
13 Dolby Atmos ^® 222
14 Spotify 222
15 Actualizare software....222
16 Aplicații....222
Depanare 223
Date tehnice 224
Eliminare 224
natural_image
Line drawing of a ceiling-mounted air conditioner unit with a close-up of its base panel (no text or symbols)flowchart
graph TD
    A["Blu-ray Player / DVD Player / Recorder / Set-top Box..."] --> B["HDMI OUT"]
    C["Blu-ray Player / DVD Player / Recorder / Set-top Box..."] --> D["HDMI OUT"]
    E["Blu-ray Player / DVD Player / Recorder / Set-top Box..."] --> F["HDMI OUT"]
    G["Blu-ray Player / DVD Player / Recorder / Set-top Box..."] --> H["HDMI OUT"]
    I["Blu-ray Player / DVD Player / Recorder / Set-top Box..."] --> J["HDMI OUT"]
    K["Blu-ray Player / DVD Player / Recorder / Set-top Box..."] --> L["HDMI OUT"]
    M["Blu-ray Player / DVD Player / Recorder / Set-top Box..."] --> N["HDMI OUT"]
8.2 Conectarea boxelor Loewe Wireless Digital Audiolink (WDAL 2.0)
Loeweklang bar3 mm
Functionarea prin Bluetooth | Functionarea prin USB | 12V Trigger | Chromecast built-n | Dolby Atmos
12 Chromecast built-in
www.spotify.com/connect/thirc-party-licenses
15 Actualizare software
| × | ○ | |
| ○ | ◎ | |
| → | ↔ | |
| ← | → | |
| ▶|| | ||
| - | + | |
| • treble | • | |
| • bass | • | |
| LOEWE. | ||
natural_image
Line drawing of a device with a top panel and a bottom panel, showing alignment between components (no text or symbols)www.spotify.com/connect/Third-party-licenses
12 Chromecast built-in.... 244
13 Dolby Atmos ^® 244
14 Spotify 245
| × | ○ | |
| ○ | ◎ | |
| → | ↓↓ | |
| ← | → | |
| →|| | ||
| - | + | |
| • treble | • | |
| • bass | • | |
| LOEWE. | ||
natural_image
Three-step illustration showing hand positioning and adjustment of a device (no text or symbols)natural_image
Line drawing of a room layout with a monitor, a cabinet, and a sofa (no text or symbols)flowchart
graph TD
    A["Blu-ray Player / DVD Player / Recorder / Set-top Box..."] --> B["Output"]
    C["HDMI OUT"] --> D["Router 1"]
    C --> E["Router 2"]
    F["HDMI OUT eARC / ARC"] --> G["Router 1"]
    F --> H["Router 2"]
12 Chromecast built-in
www.spotify.com/connect/third-party-licenses
15 Обновление ПО
natural_image
Line drawing of a device with a top panel and a bottom sofa, showing alignment lines (no text or symbols)flowchart
graph TD
    A["Blu-ray Player / DVD Player / Recorder / Set-top Box..."] --> B["Blu-ray Player / DVD Player / Recorder / Set-top Box..."]
    C["HDMI OUT"] --> D["Blu-ray Player / DVD Player / Recorder / Set-top Box..."]
    E["HDMI OUT"] --> F["Blu-ray Player / DVD Player / Recorder / Set-top Box..."]
    G["HDMI OUT"] --> H["Blu-ray Player / DVD Player / Recorder / Set-top Box..."]
    I["HDMI OUT"] --> J["Blu-ray Player / DVD Player / Recorder / Set-top Box..."]
www.spotify.com/connect/third-party-licenses
Expected non-st Estimated Knowledge on the Internet of the Internet.
flowchart
graph TD
    A["Blu-ray Player / DVD Player / Recorder / Set-top Box..."] --> B["HDMI OUT"]
    C["HDMI IN"] --> D["HDMI OUT"]
    E["HDMI IN 1"] --> F["HDMI OUT"]
    G["HDMI IN 2"] --> H["HDMI OUT"]
    I["HDMI OUT"] --> J["HDMI OUT"]
    K["HDMI OUT"] --> L["HDMI OUT"]
    M["HDMI OUT"] --> N["HDMI OUT"]
natural_image
Line drawing of a furniture setup with a cabinet, sofa, and lamp (no text or symbols)www.spol fy.com/connect/third party licenses
12 Chromecast built-in.... 278
13 Dolby Atmos ^® 278
14 Spotify 278
natural_image
Line drawing of a room setup with a cabinet, sofa, and lamp (no text or symbols)flowchart
graph TD
    A["Blu-ray Player / DVD Player / Recorder / Set-top Box..."] --> B["HDMI OUT"]
    C["HDMI IN 1"] --> D["HDMI OUT"]
    E["HDMI IN 2"] --> F["HDMI OUT"]
    G["HDMI OUT eARC / ARC"] --> H["HDMI OUT"]
    I["HDMI IN"] --> J["HDMI OUT"]
12 Chromecast built-in
www.spotify.com/connect/third-party-licenses
2 (###) REAR / (###) SUB YR N S O P R N S O P R N S O P R N S O P R N S O P R N S O P R N S O P R N S O P R N S O P R N S O P R N S O P R N S O P R N S O P R N S O P R N S O P R N S O P R N S O P R N S O P R N S O P R N S O P R N S O P
Bluetooth - 3
Wi 4 Play-Fi Wi-Fi - (F) WPS 3
| الله | الله |
| WiFi (AP) | WiFi LED |
| WiFi (WPS) | WiFi LED |
| الله / (WPS) | الله |
AP
USB jonx jpn n isn - USB 8
HDMI yph nivn (eARC/ARC nivbu) HDMI OUT 9 ARCO ARC/eARC
2 מַרְשָׁ
תְרָה בַרִי אַלְבָם
הכלה 2032, 1967.
Wireless Digital Audiolink
(WDAL 2.0)
- NDAL 2.0 - NDAL 2.0
PARING (Bluetooth)
.2. WDAL 2.0 PARING P-OK
in Android on Android 15- Android, Android is not to be used in Android. Android is not to be used in Bluetooth, USB, Android is not to be used in Android.
תְפַרָה בְּרָה
POP (nokop) CLASSIC (nok) SPEECH (nok) OFF (nok) MUSIC (nok) FILM (nok)
(בַרְה/ה) 7.5
BAS -12) oan nian nian to pinn oans -/+ oan nian to nian (- BAS +12
(TRB-12 - TRB +12)
תְקַרָה בְּשִׁ
(1) WPS (WPS) W-FI (WFS)
Wi-Fi-n jinni, 1786 10000 WPS jinni 1786 10000
WPS men in his party, and WPS men in his party.
:
WPS men in Israel. WPS men in Israel. Google Home in AirPlay.
.הכלההוּרָהוּרָהוּרָהוּרָהוּרָהוּרָהוּרָהוּרָהוּרָהוּרָהוּרָהוּרָהוּרָהוּרָהוּרָה
OH TICAL Optical OH TICAL OUT
SPDIF OUT IN SPDIF - 5.1 • Dolby-2 nonin PK, 5.1 nonin PK, 5.1 nonin PK, 5.1 nonin PK, 5.1 nonin PK, 5.1 nonin PK, 5.1 nonin PK, 5.1 nonin PK, 5.1 nonin PK, 5.1 nonin PK, 5.1 nonin PK, 5.1 nonin PK, 5.1 nonin PK, 5.1 nonin PK
•
•
4 dipin
natural_image
Line drawing of a furniture setup with a cabinet and sofa, no text or symbols presentLOCWE
www.spotify.com/connect/third-party-licenses
15 בְּרָה
הכלההוּרָהִיַעֹרְהָהִיַעֹרְהָהִיַעֹרְהָהִיַעֹרְהָהִיַעֹרְהָהִיַעֹרְהָהִיַעֹרְהָהִיַע (בְבָה) → 50,767.2 .USB
.3
USB: 100%
• USB USB USB USB USB
• USB
. lipin nisn 10 / k oynsna weonn .3
"FL3.0"
12 Chromecast built-in....300
13 Dolby Atmos ^ 300
14 Spotify 301
natural_image
Line drawing of a device with a top panel and a bottom panel, showing alignment between components (no text or symbols)12 Chromecast built-in
www.spotify.com/connect/third-parly-licenses
12 Chromecast built-in.... 312
13 Dolby Atmos ^® 312
14 Spotify 312
natural_image
Line drawing of a furniture setup with a monitor, cabinet, and sofa (no text or symbols)flowchart
graph TD
    A["Blu-ray Player / DVD Player / Recorder / Set-top Box..."] --> B["HDMI OUT"]
    C["HDMI IN 1"] --> D["HDMI OUT"]
    E["HDMI IN 2"] --> F["HDMI OUT"]
    G["HDMI OUT"] --> H["HDMI OUT"]
    I["HDMI OUT"] --> J["HDMI OUT"]
    K["HDMI OUT"] --> L["HDMI OUT"]
    M["HDMI OUT"] --> N["HDMI OUT"]
12 Chromecast built-in
www.spotify.com/connect/thirc-party-ccenses
| × | ○ | |
| ○ | ◎ | |
| → | ↔ | |
| ← | → | |
| ▶|| | ||
| - | + | |
| • treble | • | |
| • bass | • | |
| LOEWE. | ||
| Bez zvuka / Sa zvukom. | |
| Prebacuje zvučnu traku na uključeno ili probacuje u režim pripravnosti. | |
| Uključuje/isključuje noćni režim.Pritisnite i držite prikaz uključenim / isključenim (isključenim kao podrazumovano). Ova funkcija prikazuje docatne informacije na prednjem orikazu panela u određenim situacijama. | |
| Prelazi između zvučnih okolnih režima.Pritisnite i držite da otvorite nivo prila-godavanja zvučnika. | |
| Pritisnite da promonite izvor ulaza.Pritisnite i držite da uključite/isključite DTS® Virtual.XTM i DTS® Neural.XTM.Pritisnite i držite u režimu pripravnosti da oste prikazali vorziju softvera na prikazu. | |
| Unapred podešcn zvuk -izaborite z audio unapred podešenih režima!ISKLJUČENO, GOVOR, KLASIČNO, POP, FILM, MUZIKA.Pritisnite i držite u režimu pripravnosti da prilagodite razdalj nu između pozicije slušanja i zvučnika. | |
| Preskočite na prethodnu audio numeru u USB / Bluetooth / PLAY-Firežimu. | |
| Preskočite na sleoceću audio numeru u USB / Bluetooth / PLAY-Firežimu. | |
| Reprodukcija/pauza audio numeru u JSE / Bluetooth/ PLAY-Firežimu.Pritisnite i držite da aktivirate funkciju uparivanja u Bluetooth režimu ili isključite postojeći upareni Bluetooth uređaj.Pritisnite i držite na 8 sekundi u režimu pripravnosti da oste vratili fabričko podešavanje. | |
| Smanjito nivo jačine. | |
| Povećajte nivo jačine. | |
| treble | Povećajte / smanjte nivo trebl. |
| bass | Povećajte / smanjte nivo basa. |
Prvo korišćenje
Jedinča ima unapred instaliraru lilijumsku 2 x CR2032 bateriju. Jklonite zašlitnu traku da aktivirate daljinsku kontrolu baterije.
- Pritisnite i skliznite zadrnji poklopač da otvorite ode ljak oaterije daljinske kontroće.
- Ukonite zašitnu traku.
- Pritisnite poklopac baterije na mesto.
Zamena baterija daljinske kontrole
Da jinska kontrola zanleva 2 dela CR2032, 3 V litijurnske batenje. Pritisnite i skliznite zadnji poklopac da otvonte cde jak batenje daljinske kontrole.
- Koristite alat (kao što je poklopac odeljka baterije) da olvorite olvor izrneđu dve balerije da biste uklo-nili stare baterije.
- Ubacite neve baterije sa strane igurnite ih čvsto u originalan položaj baterije. Postarajte se da (1) deo baterije bude okrenut na gore.
- Pritisnite poxlopac baterije na mesto
3 Komponente glavne jedinice
3.1 Prednji panel glavne jedinice
1 (Dipravnost) dugme/indikator - Prebacuje /vučnu Iraku na uključeno ili prebacuje u režim prioravnosti.
Informacija boje LED indikatora
| LED boja Status | |
| Bejo Režim pripravnosti | |
| Zoleno Prijemni PCM / AUX izvor | |
| Plavo Bluetooth režim | |
| Tirkizno Dekodiranje Dolby audió | |
| Ljubičasto Dekodiranje Dolby Atmos | |
| Crveno Dekodiranje DTS/DTS.X | |
| Žuto USB režim / MP3 roproducija | |
| Narandža sto Play-F / Režim više soba | |
2 → (Ivor) dugme. Pritisile da promenite Ivor ulaza.
Prilisnite i držite u režimu pripravnosti da biste pri kazali vorziju softvera na prikazu.
- ▶II (Reprodukcija/Pauva) dugme - Reprodukcija/pauza audio numera u USB / Bluetooth / PLAY-Fizvore.
Pritisnite i držite da aktivirate funkciju uparivanja
3.2 Zadnji panel glavne jednice
1 Zadnji prekop - Treba da ukonite zadnji preklop zvučne trake pre korišćenja prekidača ekstornog zvučnika.
2. Prekidači eksternog zvučnka - Koristite ove prekidače da povežete dodatne eksterne zvučnike kao SUB / ZADNJI / PREDNJI / CENTAR kanal. Posta- vite prekidač na MALI za male zvučnike VELIKI za velike zvučnike. Za onemogućavanje zvučnika za određenii kanal, pocesite prekidač na ISKLJUČENO.
3. Dugme UPARIVANJA - za uparvanje sa eksternim bežičnim zvučnicima.
4 WPS (Wi-Fi zaštićeno podešavanje) dugme/indikator - pokreće Wi-Fi podešavanje /a Play-Fi. Pntisnite i držite dugme na 3 sekuncie da aktivirate WPS režim.
| LED stanje indikatora | Status |
| LED polako pulsira | Wi-Fi lačka prislupa (AP) režim |
| LED bljočti dva puta | Wi-Fi zašličeno podešavanje (WPS) režim |
| LED je uključen | Povezano / Uparvanje je uspešno |
Prilisnilė i držite dugme na 8 sekund da aktivirale AP režim.

10 HDMI IN 1 / HDMI IN 2 - povožite na HDMI izlaz ekstemih uredaja (npr. konzola za igru. DVD i Blu-ray pejere).
11 12 V okidač - pokrenilo povezan AVR/amollikator ili aktivan sistem zvučnika sa pripravnosti kada je zvučna traka uključena.
Upozorenje
natural_image
Line drawing of a ceiling-mounted air conditioner unit with a close-up of its base panel (no text or symbols)- Digitalni optički konektor može da se označi kao SPDIF ili SPDIF OUT.
- Ovaj metod pove/ivanja podržava sarno do 5.1 ka nala ili audio. Delby Atmos nije podržan.
- Zvučna Iraka se reće automratski uključiti kada se TV uključi.
- Jačina mora manuelno da se podesi koristeći da ljinsku kontrolu/dugmac na zvučnoj traci.
5.3 Povezivanje sa analognim audio kablom
Opcija 1
Koristite 3,5 mm do 3,5 mm audio kabla (nije uključen) za povezvanje na TV ili externe audio urečaje uličnice slušalica na AUX IN uličnicu na jedinici.
Opcija 2
Koristite RCA za 3.5 mm audio kabl (nje uključeno) za povezivanje na TV audio izlaz utičnice na AUX IN uličnicu jedinice.
8.2 Povezivanje Loewe bežične digitalne audio veze (WDAL 2.0) zvučnika
Možete bežično da se povežete do 6 dodatnih zvučnika koji pocržavaju WDAL 2.0 na zvučroj traci. Za poveživanje WDAL 2.0 kompalibilnog zvučnika na zvučroj traci, morate:
- Ukionite zadnji preklop na zvučnoj traci i pr tisnite i držte dugme UPARIVANJE na zvučnoj traci.
- Pratisnite držite cugme JPARIVANJE na WDAL 2.0 zvučniku. Nakor uspcšnog uparivanja, "P-OK" će se pojaviti na prikazu zvučne trake.
- Nakon usočnog upaivanja, konfiguracija reoprodukovanog kanala će se izabrati na zvučniku: Prednje levo, prednje desno, centar, zadnje levo, zadnje desno. Pogledajte uputstvo za zvučnik.
- U zavisnosti od tipa zvučnika, podesite prekidač na /adnjej slrani /vučne trake koji odgovara /abra nom zvučniku za MALO ili VELIKO.
Preporučeno podešavanje /a LOEWE /vučnike:
klang mr1: MALO
klang mr3: VELIKO
klang mr5: VELIKO
- Pr lisn le (zor) na jedinici ili da jinskoj kontroli neprekidno da biste izabral USB režim.
- U loku reprodukcije, prilisnite ▶bokrelanje / pauzu / povralak reprodukcije Prilisnite ▶/ Dis preskočite na prethodnu ili sledeću numeru.
Napomena
Ovaj pro izvod možda nije kompatibilan sa određenim lipovima USB uredaja za čuvanje.
- Akokorist te produžni USB gajtan, USB ulazili USB multifunkcionalan čilač kartice, USB urođaj za čuvarje možda neće biti prepoznat.
- Ne uklanja te JSB urečaj za čuvanje dok čitate datotcko.
- Jedinica može da podrži USB uređaje do 32 GB memorije.
- Ova jedinica može da reprodukuje samo MP3.
Loeweklang bar3 mr
Bluetooth radnja | USB radna | 12 V ok dač | Ugračen Chromecast | Dolby Azmos |
Spotify | Ažunranje softvera /Aplkac jo
11 12 V okidač
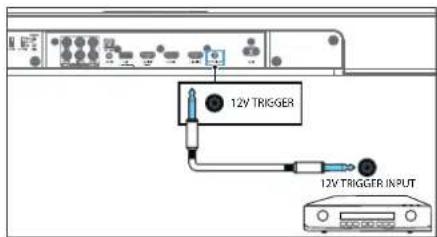
www.spotify.com/connect/third-party-licenses
15 Ažuriranje softvera
Za ažuriranje firmvera zvučne trake:
- Preuzmite najnovi softver sa veo lokacije www.loewc.de.
- Izvučite datoteku u USB korensku fasciku
- Povež te USB na zvučnu traku dok je režim napa- janja uključen.
- Prepacite se na USB izvor na /vučnoj traci.
- Instalacija počinje i pri kaz pokazuje progres ažuriranja.
- Upozorenje: Trebaće možda nekolko minuta za softver da se ažurira. Na isključuje zvučnik, isključite uredaj ili isključite USB ili mrežu u toku ažuniranja. Ove radnje mogu potencijalno da unište vašu zvučnu traku.
- Kada je ažuriranje završeno, pri kaz se isključuje.
- Isključile /vućnu traku sa glavnih kablova iuklonite USB.
- Nakon jednog minula, povežle zvučniu draku natrag na glavne.
Zvučna traka je saca ažurirana na novu verziju sof- lvora.
Za nadogradnju funkcije za više soba vaše zvučne trake:
-
Preuzmite i instaliraje DTS Play - Fiaplikaciju na svoj mobilni uređaj.
-
Povežite zvučnu traku na Wi-Fi.
-
Ako je novi Play-Fi softver dostupan, aplikacija vas obaveštava.
-
Sledite upurstva u aplikaciji da pokronete azuriranje funkcije više soba.
12 Ugraden Chromecast (Chromecast built-in)....334
13 Dolby Atmos ^® 334
14 Spotify 334
15 Ažuriranje softvera 334
16 Aplikacije....334
Rješavanje problema .... 335
Tehnički podaci 336
Odlaganje....336
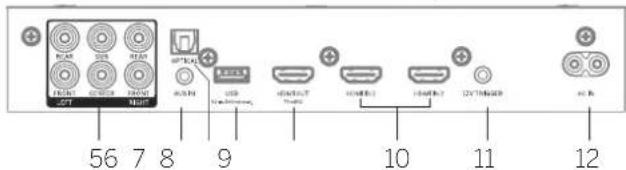
10 HDMI IN 1 / HDMI IN 2 - povežte se na HDMI / la z ekstemih uredaja (npr. konzole za igre, DVD i Blu-ray uredaje za reprodukciju plejeni).
11 12V izlaz - probudite povezani AVR/pojačalo ili aktivni sistem zvučnika iz stanja pripravnosti kada je soundbar zvučnik uključen.
Upozorenje
Nemo te spajati slušalice na 12V izlazi Nemojte spajati bilo koji vanjski uredaj koji ne podržava funkciju izlava od 12 V, inače možele ošteliti ili uni štiti uredaj.
natural_image
Line drawing of a room layout with furniture and a monitor (no text or symbols)-
Digitaln optički kencktor može bit označen kao "SPDIF" ili "SPDIF OUT".
-
Ova metoda povezivanja podržava samo do 5.1 kanala zvuka. Dolby Atmos nije podržan.
- Soundbar zvučnik se neče automatski uključiti kada se TV uključi.
- Jačina /vuka se mora podesiti ručno pomoću da ljinskog upravljača/d.gmadi soundbar zvučnika.
5.3 Povezivanje sa analognim audio kablom
Opcija 1
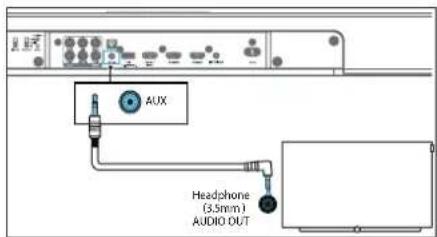
8.2 Povezivanje zvučnika Loewe Wireless Digital Audiolink (WDAL 2.0)
Možete božčno povezati do 6 dodatnih zvučnika na soundbar zvučnik koj podržavaju WDAL 2.0. Za povozivanje zvučnika kompatib Inog se WDAL 2.0 na soundbar zvučnik, morale:
- Ukonite /adnji poklopac na soundbar /vučniku i pritisnite i držite dugme "PAIRING" (UPARIVANJE) na soundbar zvučniku.
- Pritsnite držito dugmo "PAIRING" na WDAL 2.0 zvučniku. Nakon uspješrog ušanivanja, na ekranu soundbar zvučnika pojaviće se "P-OK".
- Nakon uspješnog uparivanja, konfiguraciju reproduciranog kanala treba odabrati na zvučnikoj: Prednji lijevi, prednji dosni, contar, zadnji lijevi, zadnji dosni, Molmo pogledajte priručnik za zvučnike.
- U zavisnosti od vrste zvučnika, podesite proki-dač na poledini soundbar zvučnika koji odgovara odabranom /vučniku na MALI (SMALL) ili VELIKI (LARGE).
Preporučena podešavanja za Loewe zvučnike:
klang mr1 SMALL
klang mr3 LARGE
klang mr5 LARGE
Za detalje o podešavanju ekstemog zvučnika u način uparivanja, promjena njegove ukoge i da li da izaberele (SMALL) ili VELIKI (LARGE) na prekidaču soundbar zvučnika, poglodajte uputstvo za upotrebu zvučnika.
Loeweklang bar3 mm
Bluetooth rad | USB rad | 12V izlaz | Chromecast ugraden | Dolby Atmos |
Spotify | Azunranje softvera aplikacije
- Pritisite → vše puta (Izvor) na uredaju ili daljinskom upravljaču da odaberete USB način rada.
- Tokom reprodukcije, pritisnite početak/pau-ziranje/nastavljanje reprodukcije. Pritisnite da pređele na prelchodni i sljedeći zapis.
Napomena
12 Ugraden Chromecast (Chromecast built-in)
Ovaj soundbar zvučnik podržava Chromecast ugrađenu funkciju koja varn omogućava da emtujele muziku iz Chromecast kompatibilnih aplikacija na soundbar zvučnik. Da biste kor stili ovu funkciju, uvjente se da su soundbar zvučnik i vaš parnelni telefon/tablet na istoj mreži. Započnite reprodukciju muzike u aplikaciji koja podržava Chromecast i prebacile je na soundbar zvučnik jednostavnim dodiromi na dugme (cast) i ocabirom soundbar zvučnika sa listo.
13 Dolby Atmos®
Dolby Atmos® vam pruža impres vno iskustvo slušanja isporučujući zvuk u trodimenziona norn prostoru i svo bogatstvo, jasnoću i snagu Dolby zvuka.
Za više informacija posjetite dolby.com/technologies/dolby-atmos.
Za korištenje Dolby Atmos®
www.spotify.com/connect/thirc-party- censes
15 Ažuriranje softvera
Za nadogradnju ugrađene programske opreme soundbar zvučnika:
- Preuzmite najnoviji softver sa weo lokac i e www.loowe.dc.
- Raspakujte datoteku u USB osnovnu fasciklu.
- Povež te USB na soundbar /vučnik dok ste u uklju čenom načinu rada.
- Prebacite se na USB izvor na soundbaru /vučniku
- Instalacija počinje inalekranu se prikazuje napredak ažurirana.
- Upozorenje: Ažuriranje softvera može potrajati nekoliko miruta. Nemojte isključivati zvučnik, isključivati uređaj ili isključivati USB memoriju ili mrežu tokom ažuriranja. Ove radnje potencijalno mogu unišiti vaš soundbar zvučnik.
- Kada se ažuriranje završ, ekran se isključuje.
- Isključite soundbar zvučnik iz električne mreže i uklonite USB.
- Nakon jednog minuta, ponovo priključte soundbar /vučnik na električnu mrežu.
| × | ○ | |
| ◎ | ||
| || | ||
| - | + | |
| treble | • | |
| bass | • | |
| LOEWE. | ||
natural_image
Three-step illustration showing hand positioning of a device with blue arrows indicating movement (no text or symbols)natural_image
Line drawing of a room layout with a sofa, a cabinet, and a monitor (no text or symbols)flowchart
graph TD
    A["Blu-ray Player / DVD Player / Recorder / Set-top Box..."] --> B["Blu-ray Player / DVD Player / Recorder / Set-top Box..."]
    C["Blu-ray Player / DVD Player / Recorder / Set-top Box..."] --> D["Blu-ray Player / DVD Player / Recorder / Set-top Box..."]
    E["Blu-ray Player / DVD Player / Recorder / Set-top Box..."] --> F["Blu-ray Player / DVD Player / Recorder / Set-top Box..."]
    G["Blu-ray Player / DVD Player / Recorder / Set-top Box..."] --> H["Blu-ray Player / DVD Player / Recorder / Set-top Box..."]
    I["Blu-ray Player / DVD Player / Recorder / Set-top Box..."] --> J["Blu-ray Player / DVD Player / Recorder / Set-top Box..."]
    K["Blu-ray Player / DVD Player / Recorder / Set-top Box..."] --> L["Blu-ray Player / DVD Player / Recorder / Set-top Box..."]
    M["Blu-ray Player / DVD Player / Recorder / Set-top Box..."] --> N["Blu-ray Player / DVD Player / Recorder / Set-top Box..."]
    O["Blu-ray Player / DVD Player / Recorder / Set-top Box..."] --> P["Blu-ray Player / DVD Player / Recorder / Set-top Box..."]
    Q["Blu-ray Player / DVD Player / Recorder / Set-top Box..."] --> R["Blu-ray Player / DVD Player / Recorder / Set-top Box..."]
    S["Blu-ray Player / DVD Player / Recorder / Set-top Box..."] --> T["Blu-ray Player / DVD Player / Recorder / Set-top Box..."]
    U["Blu-ray Player / DVD Player / Recorder / Set-top Box..."] --> V["Blu-ray Player / DVD Player / Recorder / Set-top Box..."]
    W["Blu-ray Player / DVD Player / Recorder / Set-top Box..."] --> X["Blu-ray Player / DVD Player / Recorder / Set-top Box..."]
    Y["Blu-ray Player / DVD Player / Recorder / Set-top Box..."] --> Z["Blu-ray Player / DVD Player / Recorder / Set-top Box..."]
    AA["Blu-ray Player / DVD Player / Recorder / Set-top Box..."] --> AB["Blu-ray Player / DVD Player / Recorder / Set-top Box..."]
    AC["Blu-ray Player / DVD Player / Recorder / Set-top Box..."] --> AD["Blu-ray Player / DVD Player / Recorder / Set-top Box..."]
    AE["Blu-ray Player / DVD Player / Recorder / Set-top Box..."] --> AF["Blu-ray Player / DVD Player / Recorder / Set-top Box..."]
    AG["Blu-ray Player / DVD Player / Recorder / Set-top Box..."] --> AH["Blu-ray Player / DVD Player / Recorder / Set-top Box..."]
    AI["Blu-ray Player / DVD Player / Recorder / Set-top Box..."] --> AJ["Blu-ray Player / DVD Player / Recorder / Set-top Box..."]
    AK["Blu-ray Player / DVD Player / Recorder / Set-top Box..."] --> AL["Blu-ray Player / DVD Player / Recorder / Set-top Box..."]
    AM["Blu-ray Player / DVD Player / Recorder / Set-top Box..."] --> AN["Blu-ray Player / DVD Player / Recorder / Set-top Box..."]
    AO["Blu-ray Player / DVD Player / Recorder / Set-top Box..."] --> AP["Blu-ray Player / DVD Player / Recorder / Set-top Box..."]
    AQ["Blu-ray Player / DVD Player / Recorder / Set-top Box..."] --> AR["Blu-ray Player / DVD Player / Recorder / Set-top Box..."]
    AS["Blu-ray Player / DVD Player / Recorder / Set-top Box..."] --> AT["Blu-ray Player / DVD Player / Recorder / Set-top Box..."]
    AU["Blu-ray Player / DVD Player / Recorder / Set-top Box..."] --> AV["Blu-ray Player / DVD Player / Recorder / Set-top Box..."]
    AW["Blu-ray Player / DVD Player / Recorder / Set-top Box..."] --> AX["Blu-ray Player / DVD Player / Recorder / Set-top Box..."]
    AY["Blu-ray Player / DVD Player / Recorder / Set-top Box..."] --> AZ["Blu-ray Player / DVD Player / Recorder / Set-top Box..."]
12 Chromecast built-in
www.spotify.com/connect/third-party-licenses
Loewe - 3h1m0g0g0n5 a9h2g0n50gn5. 3mbsf0g0n5 g0n5, 6m8 h2g0n 3mdb0g0g0mn b0n5, Loewe - 8h2m0g0g0n5y8a g0n50gn5n y8b6gm0g0n5 dmb0g0g3 a4g0m0m0gn5u, 8sab0g0g0n5 p6bn6n5u 4msh0g 3mdb0g0g3u, 4u sab0d0g0n5 gfr3gm0g0n5 a4gm0n5nmf0g, ayqam1u5 u5 a6lg0g0m0g0g, 3h2mm0m a4g0m0mgn5 n6 p6bn6n5n a9 h2m0m0g0g3b h2g0b1 onnoa#n6b1, 3a2gh0d gfr3m0gm0m7a3n daun y2p5o y6bf2g2gm0m6 h2g0n dmb0g0g0mn5 a8glndwngf0m6 a8lbsom0g0mn a4qam u5 gfb2gm0n5a3m8gm0n5.
hǎgōn gānāsōn bān sān bān bān fāmāgāgāma āmāgāgāsāgnān bān, dāngfēn bān gāngbāgān mān, aŋdāgā dāgāndāgān dāgāgām bān hānbān uādāgāngmīn mās, dāmāgāmāsī gāgān bān uādāgāngmīn mās,
2 _0_0351
3 dānānānān àqīmān bù 3mā3m6g6g0àn 352
4 3560321905 353
5 bān bān bān bān bān bān bān bān bān bān bān bān bān bān bān bān bān bān bān bān bān bān bān bān bān bān bān bān bān bān bān bān bān bān
ndg65 d3a6f0e g6e5 g0n2s0m y8g0e a0g7m0b0ng0s, f0d9g0ng d0n0n0g0g0ns a0m0g0d0g 0s g0l6m0g0g0gnls a0b6f0g0jng0d0s.
நாமங்காடு வெகாதிதே

asāmāyǎngān ābēngāngā ādānāmāgāngān āngm ānāmāmāgāngān aḍuāgāngāngān.
sān shēngdōn bānmyāgās dāndēgās oāmāgān hūngb bāngb bān daqubān.
hodgbdgymn WLAN dmagymn 5 g3y bnpdmn conssabmmbu gdm, gadmycbgou bgugamfimgymn dbmgnm gfdgmogdn gdaqnga dcaybdgdn
| AI | BE | BC | CZ | DK | EE | FR | DE | IS | IE | IT |
| LL | LS | CY | LV | LI | LI | LU | HU | MI | N_ | NO |
| PL | PT | RO | SL | SK | TR | FI | SE | CH | UK | HR |
- dsgm gmggbggbnu sdmwgggsg, gsmnygbsn gmmubym (fngzmfngus gmggbgbnu gbbmgngbnu lsggm) mth gmggbgblu dmfnu gufnu sdmwgggsg.
- Aaqqon abson gmggcbgdn aagfmcnqob qo ayafmog Babgnm gmggcbgnu babyu dmbngsdn, gufbgbgqnom, mnd gmggcbgnu (+) dhsfng dgjma afnu ndafmangma.
- φωσαθηξομ ηγηθηξομ ιωσαθη ιωσαθη ιωσαθη
3 dnmnssgn oqmmznl 3m3m6g6φgàn
g g m n s g m s g m n s n s n s n s n s n s n s n s n s n s n s n s n s n s n s n s n s n
natural_image
Line drawing of a room setup with a sofa, a cabinet, and a monitor (no text or symbols)flowchart
graph TD
    A["Blu-ray Player / DVD Player / Recorder / Set-top Box..."] --> B["HDMI OUT"]
    C["HDMI IN 1"] --> D["HDMI OUT"]
    E["HDMI IN 2"] --> F["HDMI OUT"]
    G["HDMI OUT eARC / ARC"] --> H["HDMI OUT"]
    I["HDMI IN"] --> J["HDMI OUT"]
• ৩৭৪১৭৯০ πάζημα δυξιπογόζημα δησεργάς ηγκτά δυξιπογόζημα SPDIF σδ SPDIF OUT.
• ad agohongolu agonmpann abusfugdghmingo abmngmp 5.1 agonmaufbsägg. Dalby Atmos ofi amniu abusfugdghmingo.
• வரைக்காமா. பங்தியா, ஒந்சேதா. அஷாட்டுவா. உயான்டெ.
- bās bāgān m gāo φαμgāgāmāfāq bān lās bāgān φαμgāgāngfēi dāmāgān 3gāmāgāl/ qαμgāgān lāgāgāmān.
bān lā gōmbu shu bggg uō gāu bggg uō, gāu gān fēng + - (bās), bān lā gāu gān gān gān, gāu gān fēng (αυαγαδας), bān lā αυαγαδας uō, gāu gān fēng (αυαγαδας) nǎg gā uō gāu gān fēng + - (bās).
03m6n5a6f8g9g10g11g12g13m14g15
FL - 6nbs dsmgbgbo qnbodn3n
9 Bluetooth-nu 3s8myg6g0s
- USB mgynānbu obuñfīggap, mādāgōbādāgān φωσfāngon → (byuñnbu) āmbyāmānmādāgā 65 gmbuābāgūnma ādāmāgnu 3gymhāg.
- φωδημος φόμμος, φωδημος δ∥ φωδημος / φωδημος / φωδημος ωδημαργάσις φωδημος κ/ δούς δό δαξαρε δόπερησίας ωδημαργάσις
მენიშვნა
glānāmāngdōn āgndēngdōu sīn nymb oszglāgāoqūn āgm3899gān φηλαδu USB āgblāngfāngāls āmbyrmāngmmāgānsb.
• angygbgdm USB gsdaghdgnggdm ssogemu, USB 3abu 65 USB dngzgmggjbjgynm daftannu bsdgnonggemu, USB dgaugfghgdm amgymommmos dgludgmu af nymb smgpmongmu.
• 36 âmbüðan USB âglungfängöb ömõymönçemõs ügongfängöb 6şönognöb.
• άπδυγμόσμπόλε άργδρησ 32 δά θος USB
Δπδυγμόσμπόλε άρχιπραξησ.
• əð əmðymənɡməsəl ðçyəgəns ðbmæmər
gəŋʒməs MP3.
11 123 8500000
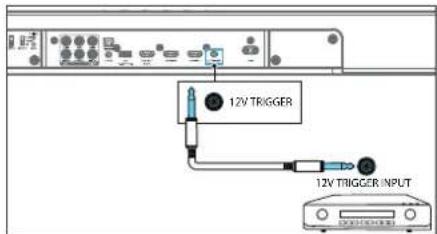
www.spotify.com/connect/third-party-licenses
15 36mmgmsdŋμn γ86mγ63gμmμος gs6s6mγος
bān bān 3a6gymn bāmghmdyqng ybdmy63gymymgyn bāsabgmjónbuzn:
 |  |
 |  |
 |  |
 |  |
 | |
| — |  |
| DAH10 | DRAH10 |
| [1740] | [20110] |
| LOEWE. | |
natural_image
Three-step illustration showing hand positioning of a device with blue arrows indicating movement (no text or symbols)- Köhne balareyaları qixarmaq üçün ikl batareya arasındaki boşluğu açmaq maqsadile bir alacteden (mesaları, batareya bölməsinin qapağı) istifada edin.
- Yeni batareyaları kanardan daxil edin ve asas batareya yerina möhkamca oturması üçün onları bark italayin. Batareyanın (+) terefinin yuxarı doğru ist tiqamatlandıyıncan amin olun.
- Batareyanın qapağını takrar yerine italayin
natural_image
Line drawing of a room layout with a sofa, a cabinet, and an open refrigerator (no text or symbols)Homçinin siz Loewe dilerinizoen móvcud quraşdırma seçimlerinden birini ala ölers niz:
• Divara montaj üçün Loewe kang bar
• Loewe ayindi
flowchart
graph TD
    A["Blu-ray Player / DVD Player / Recorder / Set-top Box..."] --> B["HDMI OUT"]
    C["HDMI IN 1"] --> D["HDMI OUT"]
    E["HDMI IN 2"] --> F["HDMI OUT"]
    G["HDMI OUT eARC / ARC"] --> H["HDMI IN"]
- Sas panelinin HDMI LN (1 ve ya 2) konnektorunu xarci cihazlara (maselən, oyun konsollar, DVD pleyerlar ve blu-ray) qosmaq üçün HDMI kabelinden istifade edin.
- Sas panelinin HDMI OUT (TV eARC/ARC) konnektorunu TV nin HDMI IN konnektoruna koşmaq üçün HDMI kabelından istifada edin.
Qeyd
www.spotify.com/connect/third-party-licenses
The way of the way of the way of the way of the way of the way of the way of the way of the way of the way of the way of the way of the way of the way of the way of the way of the way of the way of the way of the way of the way of the way of the way of the way of the way of the way of the way of the way of the way of the way of the way of the way of the way of the way of the Way
Onp wlnp L fuwrnpla 6bnulp wnwnpnwaph qnu wnpuwa L qnpwwnwlyu a 6nw5wqbpnni a2yuwa pnjn dawhwqqngwgnuihnh:
Hunnqnwhuhzutnh pwgwnnlpjnlu

ayiujih jiyunwuglui (II qiu) uwngwnpnu. Uju btyunnwyu wuyn dwkwnoqyu t uiwu, nn uja yh uwfuqnui wadunwaoqjau dhwgnu btyunnwyu sengh (qunn):

Uu junnqnuwzhz gng z unju puqn pun wnuw kunluwqn lwnwquwshnhulphn: Uu junnqnuwzhz oqnwnqnwnh uqnwgnniu z wij, wubjh lnuynbu nhulphn shuwha:

Uu hunfqnwahn gnug E unujhu Enngh Sunwuhnd wunwugwod qunwqalnp:
1.1 Un Dunwudni
1.1.1 StwnnnuS
Stwnrnp dwnqng ywnd, 6upe dwnqnbuh ywh:
Un unununpap wju uwnpn nicbn duwqshuwlqwz huzunbnh dun
1.1.2 Lwptn
S###n###p ###w###ph ##ntng w###yba, np qn### p##w###b#. C###### p##g ##tnp b papu#h w###w###h ###n###bph ##ynj, np#h qnw ##wni# l### ##wnlquh ph###wjuw j###### p##### wqntgnipajub: qbnghau wnwnw#ni# t ##wl wypngs ###w#uwqungh jnw W####w# ##lnwnwngnndy ###w###ph jump ##wnp # ##wnwagb#. h#lywnpwjuw gagni#tion u ##nsh jlnw## abnywjugb# Csnl###pwn, uwnpg ynlhhe oqnwnqratng wnug w## ####p # shrhaunphujh:
1.1.3 Uh oqunwqnndap wju uwnpn gnh ünun

Uwngn tnptg yutung t bāpawrpljh gnh yuwphuhnh luwā gnh zhebnh, hēzuhuŋp bā jnqunwuh, pluugnwuh, hunfuangh pluugnwuh, pluugpn ütptabuwj, hunduu dylngh luwā jnquwquwh ānuu, grbe mī nptg Stqnulatnd guwā uuwuātn, onhuwl āwnyuwutābr, wungh dwa
1.1.4 Onwuhhunid

Etnunwugnigh dug puquwapotra L wugptnq oqnwnqnohu to uupen onwuhnhulina kwodwn' cuwph snuwph zuwuhqnonuwa wuwhrjuni L uupeng gtnunwugnudhg upuznuwubjmi fwodwn: Uri whutbp onwuhnfuniejwa wugptnq Stwnuptp uuppg quan wnunwnph gngniutph: Gptg aih whutbp onwuhnfuniejwa wugptnq uuppg nbjnl dwkwluywh, pawqungh, qnqh yuad buwuhnhy chuwmily owlybnubgh yhu: Ugu cuwph yutang L untwnrjh qnwwuukwurduu yuw abpwnmigjuli qaswnuwukwnwumid, tsa wuwhrjuw zt kwudwukwnuwhuiw onwuhnfungjnha
1.1.5 Ωπησηρησι

Uwng pān untnwnnp unpg duybnungjubh nun, hozuhuhp ta wnwnwnngtng, onguhuhjutng, qunwnwabang bua w, uwnptn (slprwnqu, ndtrwugmghzatn), npnpap lwnng tā unpg jha: Cnapg puq lwnund wnwnluwàn, hozuhuhp ta əntng yuā wunwnbng, uwnph ywa yua ənn qhi npap: Sqnwnpjus dwnlnungjutng zutap t bupwnpjdu wubinpr, gtpunpuju, hozuhuhp ta unph ninhe gurauwujestng, lwnup la wja:
1.1.6 Uputuniwnptn
Oqunwqnnpdp uhwj awnwnwngh yrngh aziwdo wwnwqwutpng:
1.1.7 Swāgwīhù dhuwgnǔ
Cuiangqubp, nn wngbjuwuwunabzh fniuughuu wunhlywqylwa t dan guiagh unungh younnu (tnaninhy): Stu tnaninnyh gnu6wagulph abnawupg:
1.2 Oqunwqnpnniŋ
Cnawqunwunwnw a wuhwahj wuph nhgh gnawqwjshh yua pwnp wuhwuhwuhwnw yua yuhtwugbwnwh jngh wanbnipiwu cnul qwrnn t wnwugwuj wuhwnpwnj: buw ntuptwnu gnp cytng t suwulwqn unwuhnhg up wij duw' buw wuhwnpwnjng hnuuwhajni suwun
Snjuá Šuynungdāpn āwjuwunsujuwā tā ānàighnuā āhnpāwplywā āwūnw k āwnng bā nǎsāw āwǎwūwǔhy duīlān ģpa Ġanwūnwujpūwā qēwāwǔyī zhānnuŋ ājuxuǐ L. zhīnwuhhātp Shā Šuynungdāpn ānptnǔ
1.2.3 9tnptnùluwònniŋniù

Enpte 皖 皖皖皖皖皖皖皖皖皖皖皖皖皖皖皖皖皖皖皖皖皖皖皖皖皖皖皖皖皖皖皖皖皖皖皖皖皖皖皖皖皖皖皖皖皖皖皖皖皖皖皖皖皖皖皖皖皖皖皖皖皖皖皖皖皖皖皖皖皖皖皖皖皖皖皖皖皖皖皖皖皖皖皖皖皖皖皖皖皖皖皖皖皖皖皖皖皖皖皖皖京
1.2.4 Uδωρημ

Uwupngh dwuawly l bplwn dwuawly yoqunwqnndajni ntwpni uwng wtbng t wapwnbi gwaghg:
1.2.5 Ounwn yjniqh u 6tnniqh ytnpewuhwugniq

Ony sh untp, nn oonun unisang yuo bqnuuugng atpnuwuhugtu wju uuwnp cnwuhnhnupiwu puguwugpapnu, kulqunuu lytupnuu wju uuwnp t zoupi purap jupudus puqnunwudwutnh yuo yuop uhwuguus stn'wukugpapnu dppfbn yuoc Ljolynwuwa ggnuubnh: Untp agh puupsp npt, intuwuh btnnyi wju uuwph dnu.
1.2.6 Pwnan odwuwujbnh 6tun ywwuwawnhuljan

Uwqn āwhuwunbuqus āt uquutgwulwubnnd juaŋi 6wūwn: lungnupjia 6wunpujn qjuu n quāhujni 6wūwn btnwn dwuawuŋ āh' jub pwnān āwjān;
1.2.7 Uàguunniu tibyunnwùwnwnwynwnwnuŋhg
Uhwguw ynswuŋ ng u̅h nhprunā wūpningniqwūp zh wāguwnnā t būnwudwnuqwupwnnān: Uwpg gwuqgh wūpningniqwūp wāguwntni gwuqgh wuŋ pūnwujhg guēbp; Cnuwaph qunwujg wuŋo t fāzunpiwūp guuwaqih hàn, nuhtuqh uwrqn guāyuqwū guwī fānwujwn jhār wāguwnti gwuqgh;
1.3 Sthuúhlywlywà uwwwwwnyniú
1.3.1 Uwnph unthuahlywlywà uwwwwnlnniü
| × | ○ | |
| ○ | ◎ | |
| → | ↔ | |
| ← | → | |
| ▶|| | ||
| - | + | |
| • treble | • | |
| • bass | • | |
| LOEWE. | ||
Unwghù wùqwǔ oqunwqnpnóniǔ
Unwunpà nàh āwphwubu unbnwnprjuā jhehnū 2 x CR2032 āwnlóng: Čanwjwnwujnpuāt ŽuGwāwijh āwnlnungā wynhJwgābīni āwāwn Āonwugntg āwznnwuhy dawwwjutān;

- Ubnbap le wafagnup Sbaruh yuqhunhg? 6tnwqwnwqunw#a yuqw#wth ywnenlugh fughlp pwgtini sw#wn:
- Ctonghtp wqwnwwhz dwwwultqn:
- Grap Awunlungh yuwunhyn tan hr wbnn:
Ctnwlywnwylwnlwwu lww6wawlyh wnnunyngutnh yhnhuwphāniu
S###w###un###p###d ###w###gh Sw###n w###npdbzn t 2 wwn CR2032, 3V jhenmuh dw###ng: Ubn#bp Leu##glnp S###h ##w###### S###w###un###p###d ###w###gh S####yngh hghlgn pwgbini Sw###n
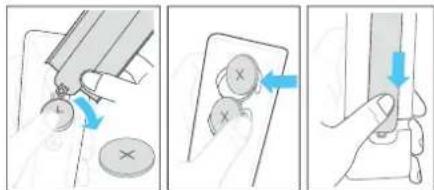
- Oqunwannnδαρ qnrρός (orhǎwǔ) ὁwnunlyng h fughf yuunwurghyī sŋyni ὁwnunlyngālnh shēu wlnug Siwābīnī Siwūnw Shà ὁwnunlyngātrō fūnwūgājmi Siwūnw.
- Sarunqap &n &wnunlngztrg lynphg & wünin abndap &nuu &wnunlngh uqpawlqu & nhph g &wunqup, np &wnunlgh (-) ynup &nuqh ytp;
- Crap duunungh yuwhunh20 bun hn unbnn
3 Chduwlywù dhwulnnh pwnwnnphzutn
3.1 Chūwuyuā yhuynh wnguh yuwudwuy
1 (standby) yn6wU/gnguuH2 - jhwgānuś ē āujāuwjhu yu6wūwuh yuś wēgānuś uāwāwūa ntdhūh:
LED gnighzh aniwihā shnbiqununve nià
| LED-h qniú Yuŋnawuhśwú | |
| Uuħniuł Uuqwutu wą ndshú | |
| 4wśwú | PCM / AUX wnpyniph uwnwgnű |
| 4uwynjųn Bluetooth rdbhú | |
| Ochniqwanija | Dalby Audio-h ubtnówānuű |
| Uwàngwtywqnja | Dalby Atmos-h ubtnówānuű |
| 4wurīhr DTS/DTS:x-h ubtpówānuű | |
| 7tnhú | USB rdbhú / MP3 àluwquynjuű |
| 6uwąguqnja | PlayFi / Multirom (puqwówubānwulwihú) rdbhú |
2 (Source) Unwly. Utnbtp unnpwnnswu wngping unhuiqni swuwn: Utnbtp la uwaftp uwwuwu ndfhanu' dnaqnwnwn hwnptnwg tynwuh a gnigwnptni swuwn:
3.2 Chūwùwù yìhuàngh 6tūn lù yùwǔwùwù
- Cunlun yuuhunh duhugwù unanugh puwānujunutān wāguinhāng aqunuqnādīl, nig uubng t fānwgātg āpn āwīuwihà yuāfuōuih āguulh yuuhunhī;
2 Upunughā pwnāpwunuutbn h wǒguwihǎtn Oqunwagnrǎta wju wǒguwihǎtn pwnghī wpunughā pwnānwuhuutn ǔhugātni fuāwūn npuāu SUB / REAR / FRONT / CENTER wihg. Uǒguwihē qnp SMALL nhph' ihqn pwunwuhuruutbn pwn huàn, LARGE úbā pwunwuhuruutbn fuāwūn, fnnzulh wihgh fuāwūn pwnānwuh u wǒguwihī n fuāwūn wǒguwihā qnp OFF nhph jhuì
3 PAIRING In6uly - aunuphù wājūn guānwufuutbgh 5bn qiuqulgutni kāwūn:
4 WPS (Wi-Fi Protected Setup (quupnuquabjluó quupquánnu)) ynówü/gnigüng - qnpäupjnuč E Wi-Fi-n quupquánni-jn Play-Fi-h Suwün: Ubögb u quöbp ynówü 3 quinjpuč WPS nbdhůu wlnuhjugabni Suwün:
| LED gnighyn uħśwug įwnquwħbūwǔ | |
| LED h ħūwnquūārnqnūānwū gǔ | Wi F ānünph lybuh (AP) nbdhǔ |
| LED - g tlnyī wǒqwǔpwūnpuū t. | Wi F-ħ wqzņuqwējluwālywnquūhnpūwǔ (WPS) nbdhǔ |
| LED-p āhwugluwǎ t. | Uhwugluwǎ t / 2πια w ūμn p niú ñkwaņnuāg |
Utrutap U wuutap Yr6uup 8 quinpjuwà AP nddhù wunhjuwàtmi guòwn:
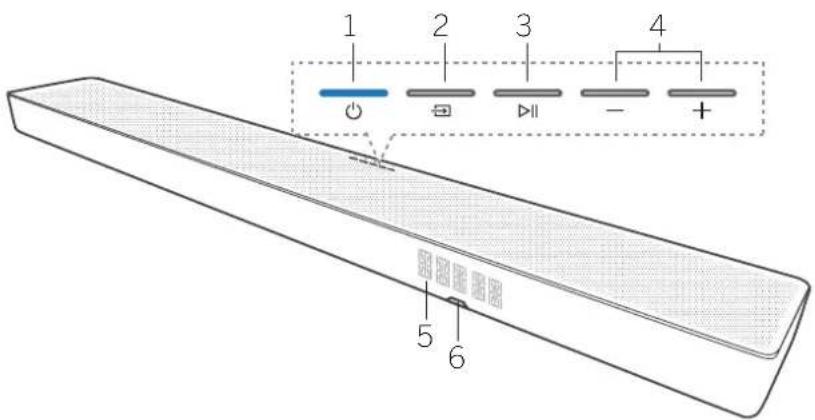
natural_image
Line drawing of a furniture setup with a sofa, a cabinet, and an open lid (no text or symbols)Anp yunnq to aulu qui ywnqwurnnj niainuabrhg dbyp alr Loewe nhlurhg.
• Loewe klang bar ujuwuh würwynq
• Loewe uwbjubn
5 9wjawjhù yuwāwuh uhwgniǔ
• 12juwhò oawnhlywquè chwlyghzh yuunnè t aujhouwù niàbāwǔj SPDIF lyu wā SPDIF OUT:
• Uhugdawu wju abrenng wqwlygniu t ohuu ahaq
5,1 wihg wniqhn: Dolby Atmos-njh wqwlygniu:
• Suijawihu jiuwuwun wqunruwnzh shuai, trp 6thnuunwgnjn qhwguud t;
• Swijan wibn p t ângnú yunquinruih' oqunwqnptynú âwjωjñu yu6wuwuh fbnwjuwnwjuunwúyun6wutbnp:
5.3 Uhwgnü wäwnqwjhå wninhn äwiniħunu
Swnptnwl 1
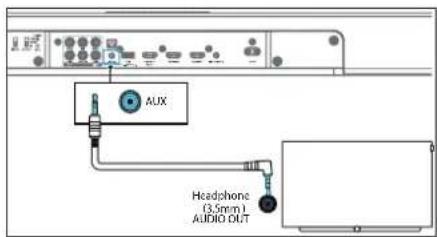
Oqunwqnnpdp 3.5-3.5 da uningh uwngh (abnwnduo zh) aon abnnwnwngh qud wwnwgh, uningh wngh wquagwulwdegh hughp wnph AUX IN wnwnwlhdu whugabni fuwwn:
Swnptnwly 2

Cnniuunwgnigh wnghn bipwihā yuqnwqng wngh AUX TN yuqnwghā dhwgātni 6wūw oqnuqnngb RCA hg dhwā 3,5 jǔ āwjāwihā āwjrch (atniunluwēt);
Wi-Fi-h lymphungln WPS-h uhsngnu
Lgab dtn lprnnghz niuh Wi Fi wuznuwduuud luqnauwnniu (WPS), qunnn bp yuiuP lqnqulnntl wnwug quunawpwn üniupwqntb nc
- Ubnqsp u wqw6p WPS lncwup, chydu zuto wqnwapwu, u Wi Fi h gnigh20 bnyi wqwui wapwnjto yawneh:
- Uanubp WPS yn6wup bpanungh unw: yn6wup undnnwpwn apynu L WPS wwnlytnwizwang;
Uzbek
WPS-P prnn lqnenhzhph wunwunwn
6wnlquhw2p 2t: Gpt zbn tpannghp yniuh
WPS, 6aunlub AirPlay lqu Google Home h
lyunquwnpmuabnhu:
Ubl wǎo wǒu ǔnětāg WPS yǒu wùp, bùp guǎy wǒn lǚ bù pīnju quij WPS abchōng, lǚ wǔ jǎ wǔ jìn nǚ wùn yǔu yǔ nǐ qīnju bìqū 2 pūu tǐ bēn:
AirPlay lymphoma
Oqunwqrndap AirPay-p iOS uwnpn (iOS7 ywi wujgh &np unwnptnul) u danwujh duwujwuh Wi Fi lwwp qunwqwrnjni 5wujwn:
- Ubnbtp u wuRbpWPS yn###, npa qn### b, aw###h# quw###wn k###h ##un##, 8 qwnjpuwWi-fi yuwu aynh###gbjm sk###, o###puppwnwn uplnnp w### ##awu ##w, wjmcflnl pug rnnpg yn###;
- Uquwap, jhāyu Wi-Fi-n gnghh jinju nqnwnph wunq pwnpā ti lu buh nuànwn qurybnwup; hànwn qunyknwug gnug L ungu, nn pwnpānwunu uànniūt AirPlay yuņawuynpnūtgh nachū:
- 8tn iOS uwnpniú wàgtp Чuwqwwчнпнufutp > Wi-Fi > Stnwnti Unn AirPlay pwnānwunu [Play-Fi uwnp (xxxxxx)]
- Suwjuuha yuwuuuun wunnwnun lupnuu lguuuh npubu Airplay cung: Cupap [Set up new AirPlay speaker] ([wunquhntj un AirPlay pwnpwhunu]):
- Yuninwqntp [Shigwnpt] wjl gwugtn...] u pauuisp atn unuwjhe gwugn, nnhagwujwunu apuhwgut awjuwjhe wukwujwuh:
- 9wjowhā qù5wàuìhū 5wǎnqwēnwòu wùnà uúp: Ubŋdāp «4wgnnn» kang bar-p gāunjūwā guòghā jhuāgābīnī 6wāwn:
- Wi-Fi-h Guqnn ühwgnühg sbunn Wi-Fi-h niuh gnighe nuqnwnü t quny inu ü chugluö t dànič: Uju wnunwnügp ábr Wi-Fi guăgniš luwauynpnbjng sbunn Guqnn lap Luniwulupi wju dnja guăgh guătyugwă uăwnpfnhg lwič ujuwătunhg;
- Spa Wi-Fi, lwnqwnbni, fian lwnqwnbwnjwnhwnp niubp, unniqtp myi oewe sultquwnlwnqwnwdua qnnnqnquw gwnpwnjwnbjh wwnnwuuu ontnynpnntbn swunr Cqnwnqnnp QR lynn «wutjwndtn» qihhg:
Google Home lymphoma
- bnpbrnabe Google Home kwultquwen zbn zurdwjuwa wunpnu:
- Uhwi@iPhone/iPad: Uhwqntg @p pggwih# uungh Bluetooth-0:
- Utnutg u wuStp WPS ynówug, nnp qunzyni L āwūwuhā yuwaowuyn Œaunlā āwunō 8 yuwaquiwī Wi-Fi yuawq qnpàwnybjīn Œuāwūn, ūhōyì pwnāpwunen bùnprnn, uǎwūlā āwūjā yuwa, wànǐsībùlī, pug pēnhtp ynówug;
- Uqwubp, Jhāyu Wi-Fi-n gnignyh Injun qunwnph unuq peunebi L uluh nuànwn quipénwubp 'huànwn quipénwubg gnug L unuhe, np puànpu hunup dūnámú E Wi-Fi-Quinquynnnüzh puchó
- Puqtp Google Home 6wutylwic:
- 9bn uwnpg qunquwynpqn: 6w#wn 6bndbp gwnltnphs:
Dea yap qunuδ δω,δωjδι υωδωδωρ γωραωμηβην pwjβng.
• Google Home Guubiquwah Ghāawuwa tyruwah yānjuh āwju āwunw Œuip Uultiwgutl + > 4wnqulnntl uwnpn > Unp uwnp:
• Čanlute intnunpūwā puīténhā
6.2 FwqSwutUjWlyWJh# ntDh#
Uŋnθŋu (Standby) āw/awhā qw/uəwgh yuā bānwuəwqupuā wāwūwūn yuā, tnp āw/awhā qw/uəwāw iwuguwō t, uā lyuāh jpuuā wuquwūw ndzhā: Uy uu wu wu wu nǎchūn gudgh pnnp anpəwnrjeztrg yuēgwundtā:
Qunwuhn b, wuhnhuwagb, pueoawubd, wuywha ndohup, mntn Wi-Fi-p, Uyun Ghugluw c t u Awuwubn bi dwu DTS Play-F-b mi AirPlay2-p: Oju nachup hunfengq L upnuhã, lpu guàuwurã lpu oqnuwannóu āwàuwha yu-kuwuhn nnuha
puqduwubajwlywihu wunp, npq lwnqn z guqlywgua wukh kbnwju lwnqn y wneawigatj
hānɡniǔ bùp bùwuh niàbāw, nì puqāwubājulqujhā nbchōu wǔbīn dāo lǎbnghwih uwwnniū niúh, puà uwrāwnun uwrāwūwū nǎdhūg
Pauquwabuujwah naohu wunhuiwabin/ wugwunni 6wup abnubp >
7 Chūwùwù qùnònnuìyì
7.1 Uhwgutl u wugwintl
bne uwnpg unwugnà wàqwè jhuāgābp gwāgh lwnqnwlhg, uwnpg lqnāh uqjuwāwà nǎdhūnù: gnighg Ljluwqh uu hnuwú:
8.2 Loewe Wireless Digital Audiolink (WDAL 2.0) pwnānwunuutnh uhwgniū
Anip quinni up wajup qwunq dwugdly dhyu 6 gnwnighy punnawjunu, nnnp ugualgnia b2 WDAI 2.0 awuwihfa qwuwahja: WDAI 2.0 kwuwanbnt h punnawjunu awuwihfa qwuwahja dwugdini kwuwan qnip wabap t
- Cunwgrup āwiðwihð Žuðwáðwlyh āunluh yuðwahrhyg ß cunóbp ß ujuštrp PAIRING ynówlyg čwiðwihð Žuðwáðwlyh újnu:
- Ubnubp u wuAsp PAIRING Unwup WDAI 2.0 pwnapunuh ynw. Cwqn qnuqwnnuyg fann «-OK» Lfuwjnauhawujwhu wuWauyn lwnwah:
- Cwpn qncwjnnnihg Obnr pwnrwhunh unw wung t pnuuh ybnwnwnngh, wihen lquwawuniug Unguh aoh, Unguh wg, 4barnpu, Obuluh auly, Obuluh wg, Wannwagp pwnrwnuh aunwung;
- Guhuiwa wananwunuh unawlyhg, nounjuwa wananwunuhu 6wuwuwunwuhuw daujuwih uuwuwuh 6bunuh waguwhg ngb SMALL yuw LARGE nyhgniu:
Unuugwnlqlnn lquunqwlnpnui Loewe pwnanwuhunuubph 6wduqn.
klang mr1' SMALL klang mr3' LARGE klang mr5' LARGE
Unwunghā pwnānwuhunq qniawlgōuā nǎchīhā nǎjānī, npu ntng jnhubīn lù āwūwihā juāwūwūn wǒgwungh yhuì SMALL LǚJ LARGE pānrhtyī lǚtnwprtyuj āwānwūwutph fēuwīn hēnpiū bōg āwūnwāwuj pwnānwuhn uqunwqnāwā ātěnwujhī
8.3 Lwnwjhù pwnànwuhunuàtgh u̅hwgniu
Pugh wājūn pūpārwunuātṛng, wāwīnwujhā nìdtnugnighzāng yuā wūnghy pūnānwunuātṛng lquwūn bā āhwujhā āwēwāuwjha ābūn lù 6 lǚwujhā lǚpūnh āchengnu; Œwāwujhā jǔwāuwjha lquwūn bā āhwujwā jhāojī āhwuj wūnghy pūnānwunuātṛn lyuā wūnguhā wāwīnwujhā AVR/nìdtnugnighzān. Œwāwujhā dūwāuwjln āhōuwj hī nùpānwujhā āhwujgī yuawu hī pūnānwunuātṛng; āwūnw yu pūpārwunuātṛnh āhwujwā āwuhā inwugnighz āwēwīnwunuātṛnh āwujwūn uǎn nìdtnugnighj hāqunwqnpràwū ābēnwujn;
wārnnu bāp shuqāl, pwnānwunuālnp āwjuwihā yuwaawuh nghzī bigtrhú guo āsp utāwuh pwnānwunuālnp nhrgh:
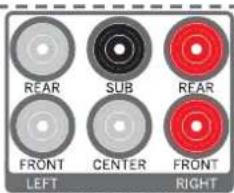
- REAR LEFT (uwhurwly anilah ahwugh) - ahwgnap 6thuh dahu pwnanwunun
-
REAR LEFT (uwuhuwu qniujh uhwugh)- uhwgnap wunguh awu puwānwuhunup
-
SUB - shwngtq unipun#bn
-
CENTER - ühwgnap winguh ıbbünnäwjuwən pwnänwuhunup
-
REAR RIGHT (Lunjhnqni,ah chwugh) - uhwnap 6thuh w2 pwn#wnwnug
-
FRONT RIGHT (Lawnohn qnyah jhwugh2) - jhwignup wnguh wq awrānwurup
Wuhyuǎ pūnānwunuh unbuuylgh, pūnpuwà pūnānwunuh 6wùwwuwuwuhwà āwīdujhì yuksutuulh 8aunuh wāguunhyg qnap SMALL yuò LARGE ngngniú:
8.4 9wjuh 2tnniδ
Cpt yu pwnānwunwutph duiywnnwuh wudwuwunwuhwuhwuhpjn, wuw āwjownju yuwawynuwugnu t āwih cnwnptn panwutbn jnnwpuwqin wijph Siwun: Tnip yuwrn btp wuwuthy uqnwnrnbjninwguwyn pwnānwunuh pānSuwunr āwijn.
- Ubānī dūn bānī wāu wān bān bāp lùwān bāp (Sur round) yīn bān lǐng fān wāu quān wāu pān bāu yīn wāu wāu jīng yīn bān fēp fān wāu nǔ ně ā wāu wān hǎ yīn kāu wāu jīng yīn bān lǐng fān wāu quān wāu bān wāng yīn bǎ ně ā wāu quān bǎ, sīn wāu jīhǎ wān bān bāp
- Cquwqnqap + / - lnówyn' pàcnpuwó w nhph āwjāh zlnniūp unnhujn 6wūwn:
- Oqunwqnrǎbp √/ √ln6wlyǎbṛn' wihg nàunbtīn 6wūwūn:
- Liugte pinn a hputrh ohu u yunquunnto awjuh owywnqwup, ahhup pinn a hputnp suulwwprwutu puynpudau jhuts:
Eupwah Swwwnwnabth pwgwwnnajniu
FL - angluh âwhu pu nânwuhui
FR wngluh wq pwnānwhunu
SL - 6tunlu āwju piunānwju
SR - 61unth wg puwānwuru
SUB - unipunip
Ophawy, spt 6thwynp pym2g 2.5 dwn t, utn0g +
Loeweklang bar3 mm
Bluetooth - qnnouwnjnu | USB h qnnouwnj | 12V Trigger | bunluurniquwè Chromecast | Do by Atmos
Spolly | 6pueph peumfugn d | Quwlbjuw#tn
Inbuly, shizu zgn guynh «Fl 2.5»: Gnp wjwnnup wju pwnanuhunh ywnqwnnnup, ubrnap Inbuly u ywnqwnnap 5wngn pwnanuhunh Sbwnnnpnnup
Ugnu. Uju ytnuy nyip yurun sp ewu ningnu uwunwnt, bap ihugylw wungtnh wanwizwuh yuwjuw a wupnptn dwuwawujutnh wuwawund wrawquwagutnh fian yuwylw henghnutn yiw
9 Bluetooth-h qnnδwnlynni
Suijiauwhā uqwāuālīp āhwugnap Bluetooth uunphā (ophāuwī IPad, IPone, iPod touch, Android fēnjuhu wū līnnuāpng) Bluetooth h āhengnu, wujānāsōru luànqng bō juā yuānwnā uqwāluā waunghu Suyjbn āwujiauwhā uqwāuālīp āhengnu;
-
Uh guzh wǎquā wānǚp wuqgh luǒ kānāyúnwāwjuŋwā yuǎwàwǔn → (Source) yīnwùp' āwījāwjhā yuǎwàwūp BI (Bluetooth) abdhūhā wǎgàbjī kāwūwū
-
Uhugrtp Bluetooth-p uwupnqnniu, npratp u pünatp «klang bar3 mr» jhuwujn, fuwujn; Bluetooth-p jhuuguwu dwuhu unbqynapinbubnh fuwujn unlu Bluetooth uwnph oqnuwapduwa nintgnugg:
-
Uwunbp, chybu wunjwnu quhwawu yhg dwu jup; Cunntg u bywawnbp wunhn twijan lwwl unwdzumipniu dun Bluetooth wunjniu;
Wuhuwā āan wungh, qwnn sp usnūti / 6tnwluwunwunwū uwhuwuqh dnu' nul ninh puq pennbujni 6wūun luyu usnūti 11f ayuquwniug npwnuntgatni/vipulyutni 6wūun:
- Bluetooth-hg rnnu qwjnl 6w0wn gāunptp ǎty wjj wqynn:
Cnp ubpwnwnuniu bp Bluetooth nbdhuh, Bluetooth lwwup ubpwnlywagduniu t:
Sawuwaqwaqwaqwaqwaqwaqwaqwaqwaqwaqwaqwaqwaqwaqwaqwaqwaqwaqwaqwaqwaqwaqwaqwaqwaqwaqwaqwaqwaqwaqwaqwaqwaqwaqwaqwaqwaqwaqwaqwaqwaqwaqwaqwaqwaqwaqwaqwaqwaqwaqwaqa
u2nu6
- Bluetooth uwnph âuquwqnja uww6w6gatnö bû Bluetooth uwnpħl A2DP, AVRCP u Bluetooth wnpþnuly 4.2 + FDR
• 6ujāwihā yuōwāuwīh Li Bluetooth uwnph āhqū qnρόnn wunu bīwqī jiù zhàn jiāng jīnuiu jìnnuu jītu 10 Jibun t:
• Anjrn Bluetooth uwnpljn 5un 6w0wintb1hniipin 8g bnw2hwu1nnuwa 2c
- Uh paùh wàquā uánqūp → (Source) uànph lúnā 67nulqunwqunwāu 1984uǎwgh qnu' USB nǎchū pàunpāmī kāwūn.
- Uquwunljuu gpreugpnu ulnjbup ▷|| bluwunlun uqubni/wnwnptagabini/ubrulubini guwun: Utnjbup ▷/ ▷tawhanna, lquw wgnnn mgnia wagabini guwun:
Uzbek
Uyu wunwnwnwapq yunnn h, 6wuwntbgh zhubl USB yphyn npp2 unbuwlybnn 6au:
• Cptroqnwnqnnnnälp USB lpynupugüwä wünnhu USB kauqnng lywi USB puqnwnmälghänwq puynh päpangrn, wuuw USB lyrhen awung lpwnn t yäudwylt;
• 3wijbn ywnnwju sh guòu p USB lnhzh owngn:
• Unwijnng Iqunnn L wgwulgbl jhj2u 32 9P
Sh2nnmiajwup USB uwnpbn:
• Uja uwng qunnn Lauuqunjbl ahuià MP3:
11 12V Trigger
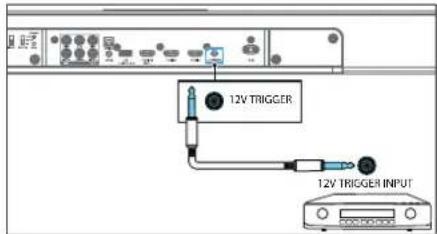
12V trigger-p âw,âujhâ qukûwûun bip E,np qunpn E wŋêwûgû B ĥwqulâ AVR/nidtwnugnighen lquê wunphî puânwuhuh fωûwüyunp uwwuûwû ndbhîng, ap âwûjñhâ qukûwûun p ĥwqulâ E. ñwûjñhâ qukûwûun unnuqhâ uwnghâ ühwûgûni fωûwn oqnwnnpõtp ñwûj â nàn TS (êwûlmys/pé) ÿwnphî 3,5 Jü qunnnulnu
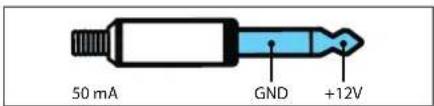
Ωαπιζωησιδ
Uh uhugnup wylwagulwugtng 12v unphabnh (12V trigger); Uh uhugnup nnut, wnunwgha uwng, npqzh wglugnul 12V aquiduwa qnpawwnjph, wjluwbu ywnnn tg ujuut Lwui nyaywugbuj uwng;
Uhwqntp 5huiu wnwnghu wnnpng, npnup niabu 12V trigger uunup, l npwug oqnwnjng danwnwnnu 5wnu y bpyuw t, np 12V trigger h zhongnu wnpswngnl wqwugynu t: Pngnnu bup dwnwnpuwuh unwnghu uurgh oqnwnnduu danwnwnh 12V trigger nu 4hwuwrni 4wuhu inwnighz untnywnpnidatph 5wnup:
12 Utplywnnigluwò Chromecast
Uju āwūwūhā yuōwūwūyā a guāgnǔ t bṛpūwūnǐgǔwā Chromecast-p, nng jīnǚ t ānwǔhu bṛwūdʒuānǐwā Sanunǎwǔlì, Chromecast-h, bùn ŋwūwūnǐgh Šwūbǐwūdǎlnhī gǔn āwūwūnù yuōwūwǔ; Uju āwūwūnǐnpríjǔwā oguāqnǎněti nǐ Šwūwūn Šwūnqǔbp, nng āwūwūhā yuōwūwǔp lā bṛn wūnwējnānp / yuōwēzǔng űhliànǚ gǔāgnǔ tāo lǐuqāp bṛwūdʒuānǐwā bùnwǔqǔbp lāb ārromecast- nǐ Šwūgǔwā Šwūbǐwūdǎnl u ārzuņāwǔyī bṛn āwūwǔhā yuōwūwǔhī yuǒu wūnwēqubu bṛnθǔjǔny (Kanunǎwǔnǔ); yuōwǔn lā guādǐhg pàunntnú bṛn āwūwǔhā yuōwūwǔyī;
13 Dolby Atmos®
Dolby Atmos®-p âq 6wupunpniqniâ Luiqhu juajni pûroünu unnă' uqnununpniŋ ăwiug 3D âluf Dolby âujuh nng 6wupunpiwup, uqnunpiwup U aqnupneuwup.
Inwgn gny unbblnirajniubbn 4w3wn wjgbtbe dolby. com/technologies/dolby atmos
Dolby Atmos®-h oqunwqnpduwi 6wifwn
Delby Atmos®-p 6www.duhi L. Uhuji HDMI Lu eARC
www.spotify.com/connect/third-party-licenses
15 ορωρη ρωρύωρισ
9wjuwjht yuwwuhgh utnuwnylwop pwnuwgutni 6wwn.
-
00plan6ap dungho drwqnqjuq5p www.loewe.de lqujphg
-
Upnu6wabp 5010 USB undwunjih penwuqawulniu:
- Unwugte USB-p dawuujihu luwadwup dhwuguih ndbhuniu.
- Suijawihā yu6wàwgh yhu gānrbp yhu USB wnpynin:
- Surquqnup uluynu L, u Llnwug gnyg Lcnjha pwnpugdwa wnwgnapwg:
- Rangwugnui, Dngwugwurh eunwugwnug luyunn f, uubj uh guan pinjs: Eguwugwuw papugwnu oh wagwnb puanwnhunun yunnwuhg, oh wagwnbp wunpg u oh wagwnbp USB lynp yuw guan: Uu annnnnipinwabgn luyunn biy unnbaghru lytnny nybywugui dan awtwnh yuwwawug;
-
Επρ ωωηώωωημά ωωωρωσυμιή Ε, Ελπωδά ωώγωσυμιή Ε
-
Uqgwnbp duijau,ho quwuouye gwughg li guugp USB p:
- Ubl pnuq wug dujwjhà yuwuawup bnpng
dhwugng guāgnà:
Shujuhhu yuwaawu uud puwugut [t. dwnqnuzunh unnpbwnyn]
9tn ǎwjuwjhù qù6wùwlḥ pwqúwutújwlqwjhù \$nìǔghwù pwnúwgutjni 5wùwn
- Ugnabnábg u unqnwnnpap DTS Play Fi Suqbljluon átn pggujná uwnpnu:
- Uhwgnp adwjuwihu quw6w6wyc Wi-Fi-nà:
- Deu Guwubujh L unn Play-Ti dnuqnwalquq, Guwubujwang dwnigniu F abo:
- Chunlup 6wujquwoh 6nwahqutnhā' puquwutuulwuhā qnpawnnijah puwnugniug qnpawnyjni guwun:
Bagnugniv. Bupuqwunph pwnuwgnig uqnwn 3, nuiy 0h puuh nnut: Bupuugjutu pnpugnai un wugwunte pwnapwnunp qwnwujhg, 0h wugwuntp uwng u h wugwunte USB Unge Uw gugen: Uu apnbnnnqntubng yqnwn b uynuwgnur Lcnwnu nguyugbti aon awuujha juwuwulgu
16 Lewuqiuwodtn
36p 6tnuJhunui ulwaiwJnhtp uunnpu btpyujwuglyw# QR lynn a bapetnabg wawqwnlqn kwytjuw#bn:
«my Loewe» Suhtjuang abp Unungh ytunu t ntujh Loewe-h wghunp s Rauwujrnnjndi L unwju Unup qnnqaj abp Loewe wnwnwnughgqnnp oquwnhng atnwnplatp:
For DTS patents, see http://patents.dts.com. Manufactured under license from DTS, Inc. (for companies headquartered in the U.S./Japan/Taiwan) or under license from DTS Licensing Limited (for all other companies). DTS, DTS Play-Fi, Play-Fi and the DTS Play-Fi and Play-Fi logos are registered trademarks or trademarks of DTS, Inc. in the United States and other countries. © 2021 DTS, Inc. ALL RIGHTS RESERVED.
dtsx
For DTS patents, see http://patents.dts.com. Manufactured under license from DTS, Inc. (for companies headquartered in the U.S./Japan/Taiwan) or under license from DTS Licensing Limited (for all other companies), DTS, DTS:X, Virtual:X, and the DTS:X logo are registered trademarks or trademarks of DTS, Inc. in the United States and other countries. © 2020 DTS, Inc. ALL RIGHTS RESERVED.
COMPATIBLE WITH
Dolby Vision Dolby Atmos
Dolby, Dolby Vision, Dolby Almos, Dolby Audio, and the double-D symbol are registered trademarks of Dolby Laboratories Licensing Corporation. Manufactured under license from Dolby Laboratories. Confidential unpublished works. Copyright © 2012-2020 Dolby Laboratories. All rights reserved.

The Wi-Fi CERTIFIED™ Logo is a registered trademark of Wi-Fi Alliance®.
Bluetooth®
The Bluetooth® word mark and logos are registered trademarks of Bluetooth SIG Inc. and any use of such marks by Loewe Technology GmbH takes place under license. Other trademarks and trade names are those of their respective owners.
HDMI
The terms HDMI, HDMI High-Definition Multimedia Interface, and the HDMI Logo are trademarks or registered trademarks of HDMI Licensing Administrator, Inc.
Spotify
The Spotify Software is subject to third party licenses found here:
www.spotify.com/connect/third-party-licenses

Chromecast built-in
Google, Google Play and Chromecast built-in are trademark of Google LLC. Google Assistant is not available in certain languages and countries.

Apple ^® and AirPlay ^® are trademarks of Apple Inc., registered in the U.S. and other countries.
To control this AirPlay 2 -endabled speaker, iOS 11. 4 or later is required. Use of the Works with Apple badge means that an accessory has been designed to work specifically with the technology identified in the badge and has been certified by trademarks of Apple Inc., registered in the U.S. and other countries.
All product and company names are trademarks™ or registered® trademarks of their respective holders. Use of them does not imply any affiliation with or endorsement by them.
Local Loewe Service partner

Customer Care Center
Industriestraße 11
Subject to modifications