
DWP 10 - Drill HILTI - Free user manual and instructions
Find the device manual for free DWP 10 HILTI in PDF.
User questions about DWP 10 HILTI
0 question about this device. Answer the ones you know or ask your own.
Ask a new question about this device
Download the instructions for your Drill in PDF format for free! Find your manual DWP 10 - HILTI and take your electronic device back in hand. On this page are published all the documents necessary for the use of your device. DWP 10 by HILTI.
USER MANUAL DWP 10 HILTI
text_image
Labeled diagram of a portable blender with numbered parts for identification2
text_image
Diagram illustrating three-step procedure for a device operation, showing tool insertion, dialing, and cleaning steps.3
text_image
Illustration showing a step-by-step cooking process of a blender with labeled steps 1 to 6.4
text_image
Diagram illustrating a step-by-step procedure for adjusting a device, with numbered steps and a stopwatch below.5
natural_image
Illustration of a pipe fitting with a valve and connector, showing a directional arrow (no text or symbols)
natural_image
Illustration of a hand using a mechanical presser to lift a component, with a close-up of the dial showing approximately 6 degrees (no text or symbols present)
DWP 10
text_image
Labeled diagram of a portable blender with numbered parts for identificationOriginal operating instructions
1 Information about the operating instructions
1.1 About these operating instructions
- Warning! Read and understand all accompanying documentation, including but not limited to instructions, safety warnings, illustrations, and specifications provided with this product. Familiarize yourself with all the instructions, safety warnings, illustrations, specifications, components, and functions of the product before use. Failure to do so may result in electric shock, fire, and/or serious injury. Save all warnings and instructions for future reference.
-
HILTI products are designed for professional users and only trained, authorized personnel are permitted to operate, service and maintain the products. This personnel must be specifically informed about the possible hazards. The product and its ancillary equipment can present hazards if used incorrectly by untrained personnel or if used not in accordance with the intended use.
-
The accompanying documentation corresponds to the current state of the art at the time of printing. Please always check for the latest version on the product's page on Hilti's website. To do this, follow the link or scan the QR code in this documentation, marked with the symbol.
- Ensure that these operating instructions are with the product when it is given to other persons.
1.2 Explanation of symbols
1.2.1 Warnings
Warnings alert persons to hazards that occur when handling or using the product. The following signal words are used:

DANGER
DANGER!
- Draws attention to imminent danger that will lead to serious personal injury or fatality.

WARNING
WARNING!
- Draws attention to a potential threat of danger that can lead to serious injury or fatality.

CAUTION
CAUTION!
- Draws attention to a potentially dangerous situation that could lead to personal injury or damage to the equipment or other property.
1.2.2 Symbols in the operating instructions
The following symbols are used in these operating instructions:

Comply with the operating instructions

Instructions for use and other useful information

Dealing with recyclable materials

Do not dispose of electric equipment and batteries as household waste

Hilti Li-ion battery

Hilti charger
1.2.3 Symbols in illustrations
The following symbols are used in illustrations:

These numbers refer to the illustrations at the beginning of these operating instructions.

The numbering reflects the sequence of operations shown in the illustrations and may deviate from the steps described in the text.

Item reference numbers are used in the overview illustration and refer to the numbers used in the key in the product overview section.

These characters are intended to specifically draw your attention to certain points when handling the product.
1.3 Product-dependent symbols
1.3.1 Symbols on the product
The following symbols are used on the product:

Wear eye protection

Wear light respiratory protection

Wear protective clothing
1.4 Product information
HILTI products are designed for professional users and only trained, authorized personnel are permitted to operate, service and maintain the products. This personnel must be specifically informed about the possible hazards. The product and its ancillary equipment can present hazards if used incorrectly by untrained personnel or if used not in accordance with the intended use.
The type designation and serial number are printed on the rating plate.
Write down the serial number in the table below. You will be required to state the product details when contacting Hilti Service or your local Hilti organization to inquire about the product.
Product information
| Water supply unit DWP 10 | |
| Generation: 01 | |
| Serial number: |
2 Safety
2.1 General safety instructions
WARNING Study all safety instructions and other instructions, images and technical data with which this product is provided.
Keep all safety precautions and instructions for future reference.
Work area safety
- Keep your work area clean and well lit. Cluttered or dark work areas invite accidents.
- Do not operate the machine in explosive atmospheres, such as in the presence of flammable liquids, gases or dust.
▶ Make sure that the product cannot roll away or fall down. - Do not transport the product by crane or with hoists. The product has to be depressurized for transport.
Personal safety
- Stay alert, watch what you are doing and use common sense when working with the product. Do not use a product while you are tired or under the influence of drugs, alcohol or medication. A moment of inattention while operating the product can result in serious personal injury.
- Wear your personal protective equipment and always wear protective glasses. Depending on the type of product you are using and its purpose, wearing personal protective equipment such as a dust mask, non-slip safety shoes, hard hat, or hearing protection reduces the risk of injury.
- Avoid unusual body positions. Keep proper footing and balance at all times.
- Wear suitable work clothes. Do not wear jewelry or loose clothing. Keep your hair, clothing and gloves away from moving parts. Loose clothes, jewelry or long hair can be snagged by moving parts.
- Comply with national health and safety requirements.
- When pumping, always keep the pressure gauge under observation so as not to exceed the maximum spray pressure. The product has to be depressurized before filling, after use, before maintenance work is undertaken and for storage.
Careful handling and use of the product
▶ Use the product and accessories only when they are in perfect working order.
▶ Never tamper with or modify the product or accessories in any way.
- Keep children and everyone else at a safe distance while the product is in use.
▶ Only persons who are familiar with it, who have been trained on how to use it safely and who understand the resulting hazards are permitted to use the product. The product is not intended for use by children. Children must be supervised to ensure that they do not play with the product.
At temperatures below the freezing point, make sure that no water remains in the product. Freezing water can cause damage when it expands inside components of the product.
▶ Always use compressed air to blow out hoses and valves. This helps prevent contact with substances that could be hazardous to health.
Do not leave the product in the sun. Make sure that the product is not heated above the maximum operating temperature. Protect the product from frost and ammonia.
▶ Use the product in combination with water only. Do not pour chemicals or other liquids into the tank.
Fill the product with clean water only. Foreign matter can cause damage to the pump. Keep the tank free of sand, drilling slurry and other foreign matter.
Take the influences of the surrounding area into account. Do not use the appliance where there is a risk of fire or explosion.
- Store the product in a secure place when not in use. Products which are not in use must be stored in a dry, high place or locked away out of reach of children.
Service
- Have your product repaired only by qualified, skilled personnel, using only genuine Hilti spare parts. The safety of the product can thus be maintained.
3 Description
3.1 Product overview
text_image
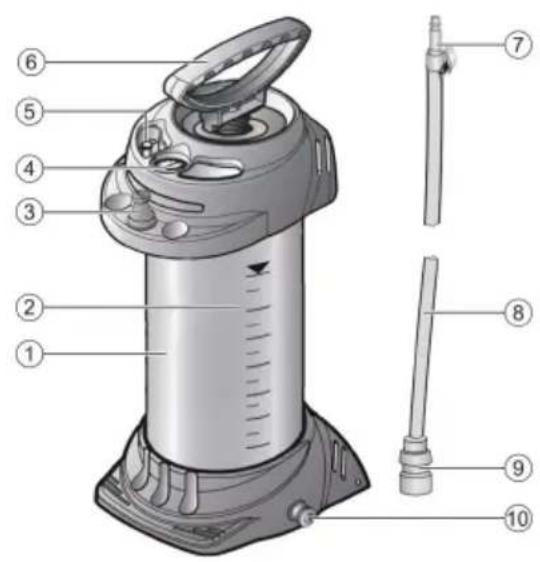
Labeled diagram of a portable blender with numbered parts for identification① Tank
② Filling quantity display
③ Locating pin
④ Pressure gage
⑤ Safety valve
⑥ Pump
⑦ Hose plug-in nipple with ball valve
⑧ Hose
⑨ Hose plug-in nipple
⑩ Drain opening
3.2 Intended use
The product described here is a water pressure tank for distributing coolants and flushing liquids on drilling rigs, concrete saws or angle grinders. Water is generally used for this purpose.
3.3 Possible misuse
This product is not suitable for:
- Flammable liquids
• Hydrogen peroxide and similar oxygen emitting media - Caustic substances (certain disinfectants and impregnating agents, acids, alkaline solutions)
• Liquids containing ammonia - Solvents and liquids containing solvents
- Viscous or sticky liquids or those that form residues (paints, grease)
- Use in food sector
This product may not be used under any circumstances:
- With external pressure sources
- For warehousing and storage of liquids
- As an eye wash
3.4 Items supplied
Tank with pump, hose with connectors, operating instructions

Other system products approved for use with this product can be found at your local Hilti Store or at: www.hilti.group
4 Product properties
The tank material consists of steel with a polyester coating.
| Tare weight | 5.2 kg |
| Total content | 13 |
| Maximum filling quantity | 10 |
| Technical residual quantity | 0.03 |
| Maximum operating pressure | 6 bar |
| Maximum operating temperature | 40 °C |
5 Preparations at the workplace
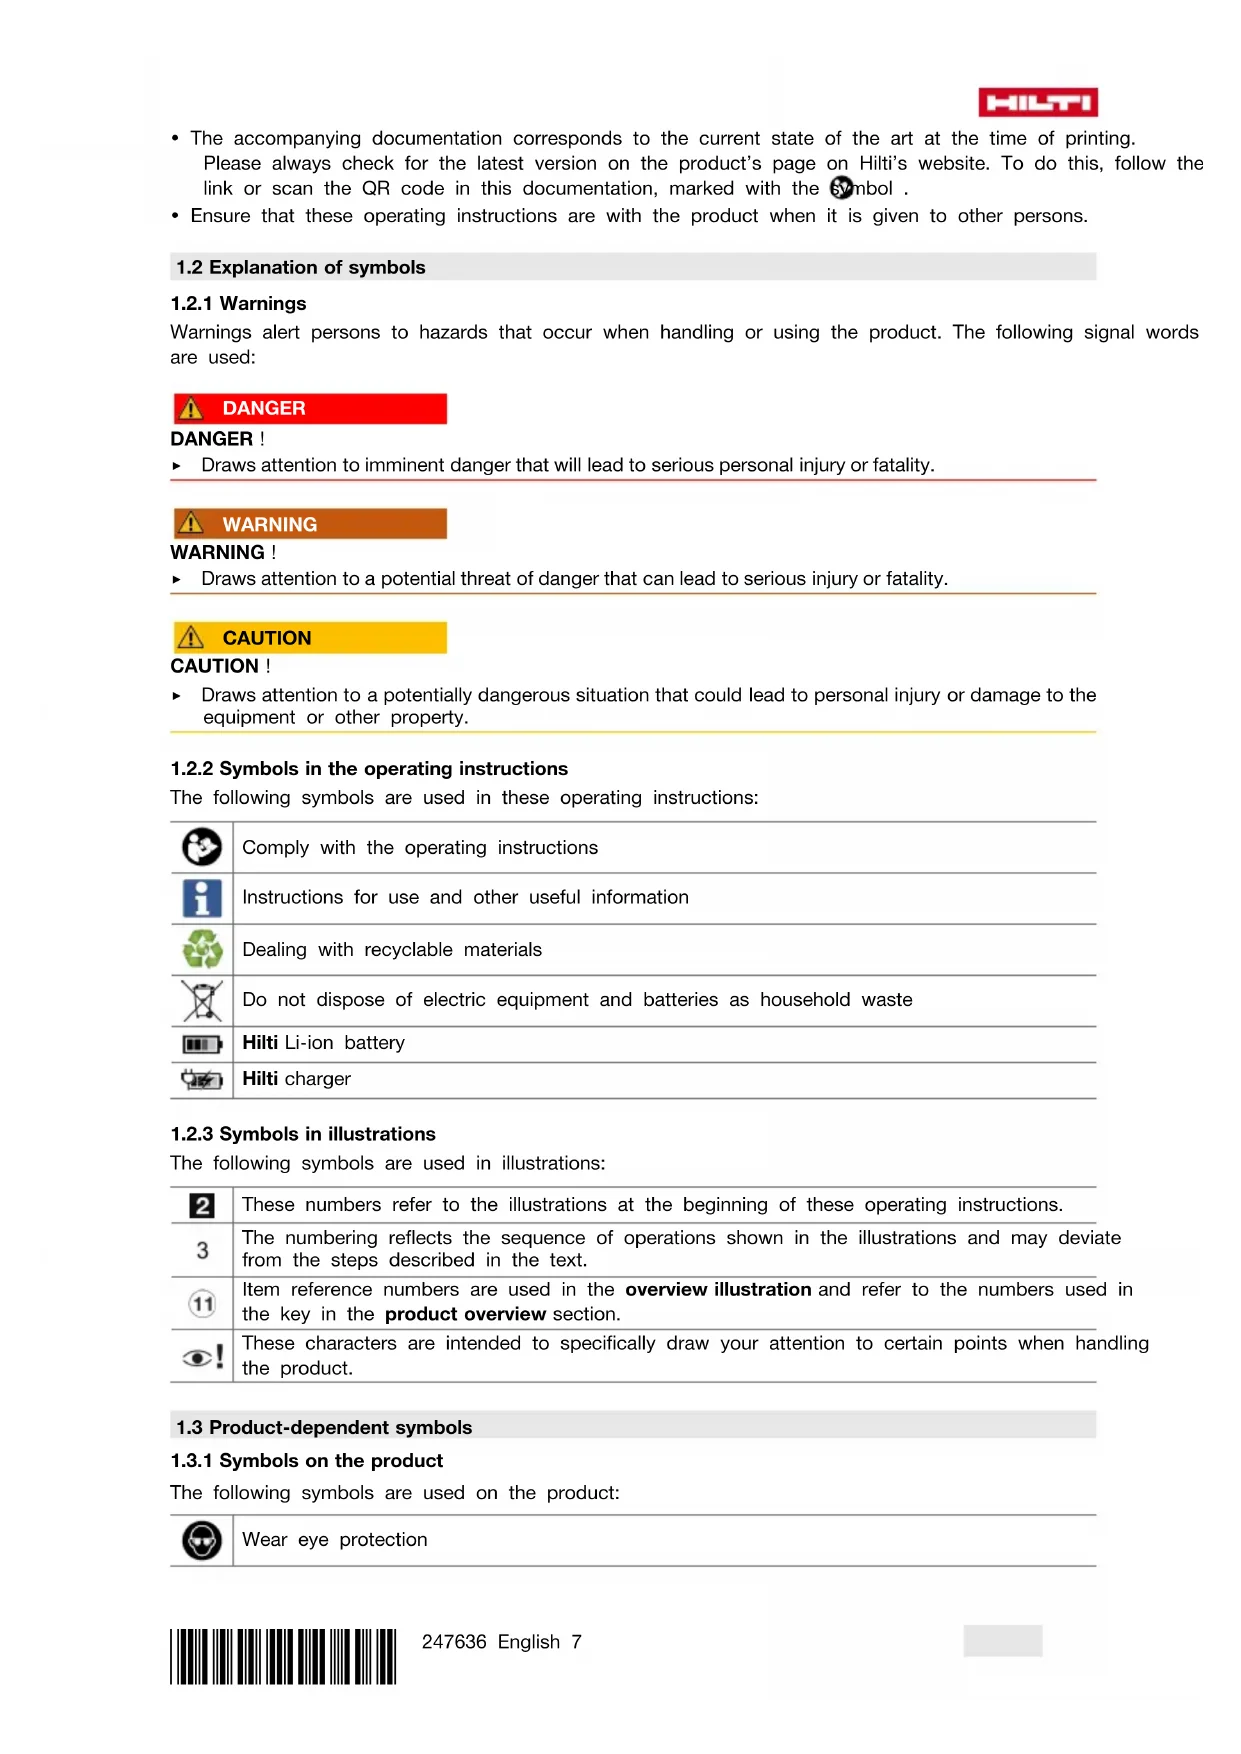
5.1 Assembling water supply unit 2
- Check that the tank, pump and hose are undamaged before assembly.
- Connect the hose to the outlet (1).
- Pump the pressure in the empty water supply unit up to 2 bar (2).
The pressure must not drop by more than 0.5 bar within 30 minutes!
- Check by pulling the red button of the safety valve (3).
▶ The pressure must be released.
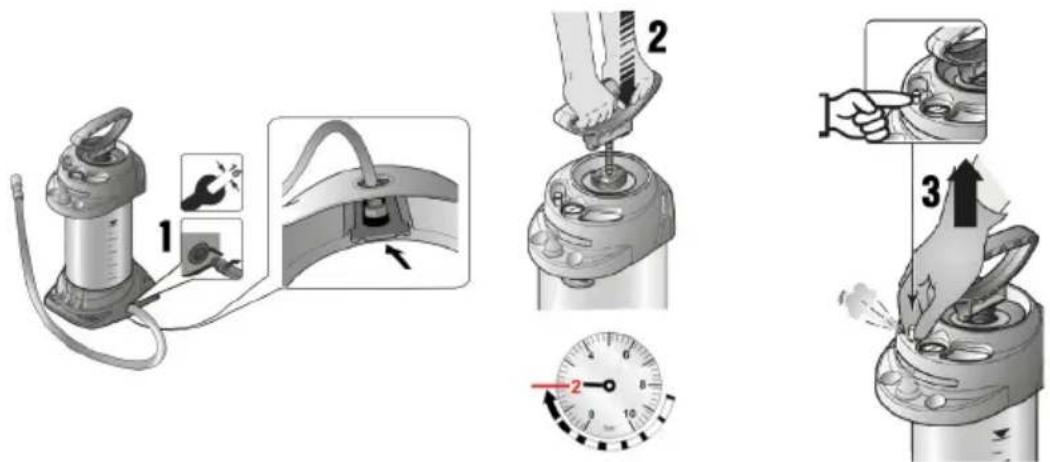
5.2 Filling and preparing water supply unit 3, 4
- Pull up the red button of the safety valve until the tank is completely depressurized (1).
- Push the pump handle down and turn the pump handle counter-clockwise (2).
▶ The pump handle is locked.
- Unscrew the pump from the tank (3).
- Pour the water into the tank (4).
- Check the fill level in the hose.
- Pass the transparent hose several times from top to bottom beside the tank (5).

The liquid levels in hose and tank equalize. The liquid level visible in the hose now corresponds to the fill level in the tank, which you can read from the scale.
- Screw the pump into the tank (6).
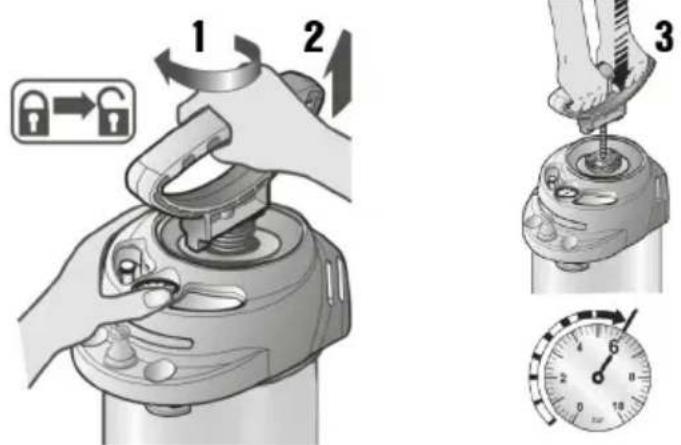
- Push the pump handle down and turn the pump handle clockwise (1).
▶ The pump handle is unlocked (2).
- Build up pressure in the tank to approx. 2(3)ar
The maximum pressure should not exceed 6 bar (red line on the pressure gage).
If the maximum pressure is exceeded, the safety valve is actuated and releases the excess pressure.
- Push the pump handle down and turn it counterclockwise.
▶ The pump handle is locked.
6 Operation
6.1 Use
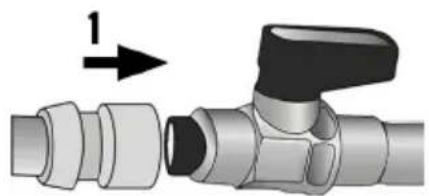
- Connect the plug-in connector of the pressurized water tank to the plug-in nipple (1).
- Actuate the ball valve.
▶ The liquid supply begins.
▶ The liquid quantity can be regulated with the ball valve.
- When pressure drops below 1 bar, operate the pump again to build up pressure (2).
- Refill the tank when it is empty 10.
6.2 After use 6
- Pull up the red button of the safety valve until the tank is completely depressurized.
- Close the ball valve and disconnect the plug-in connector from the plug-in nipple (1).
- Lock the pump handle.
- Screw the pump out of the tank.
- Drain the remaining water from the tank.
- Wipe off the water supply unit with a damp cloth.
- Coil the hose round the tank and seat the plug-in connector on the locating pin of the water supply unit (2).
- Keep the water supply unit in a dry, frost-free environment protected from direct sunlight for drying and storage.
7 Care and maintenance
7.1 Care and maintenance work
- Check the unit at regular intervals.
We recommend having an expert conduct an external inspection every 2 years and an internal inspection every 5 years, as well as a strength test every 10 years
- Dismantle the pump [1] and grease the O-ring [a] is and the sleeve [b].
- Always carry out this maintenance after using the unit 50 times, however at least once a year!

To help ensure safe and reliable operation, use only genuine Hilti spare parts and consumables. Spare parts, consumables and accessories approved by Hilti for use with the product can be found at your local Hilti Store or online at: www.hilti.group.
8 Troubleshooting
If the trouble you are experiencing is not listed in this table or you are unable to remedy the problem by yourself, please contact Hilti Service.
8.1 Troubleshooting table
| Trouble or fault Possible cause | Action to be taken | |
| The water supply unit does not build up any pressure | Pump is not screwed on tightly | Screw on the pump tightly. |
| O-ring on the pump is defective | Have the power tool repaired by Hilti Service. | |
| Sleeve is defective | Have the power tool repaired by Hilti Service. | |
| Liquid escapes from the pump at the top | Valve disk is dirty or defective | Clean the valve disk or have the unit repaired by Hilti Service. |
| Safety valve vents too early | Safety valve is defective | Have the tool repaired by Hilti Service. |
| Pressure gage indicates no tank pressure | Pressure gage is defective | Have the power tool repaired by Hilti Service. |
9 Disposal

Do not dispose of this product in household waste!
Most of the materials from which Hilti tools, appliances and devices are manufactured can be recycled. The materials must be correctly separated before they can be recycled. In many countries, your old tools, machines or appliances can be returned to Hilti for recycling. Ask Hilti Service or your Hilti sales representative for further information.
10 Manufacturer's warranty
▶ Please contact your local Hilti representative if you have questions about the warranty conditions.
11 Further information
For more information on operation, technology, environment and recycling, follow this link: qr.hilti.com/manual/?id=247636
This link is also to be found at the end of the documentation, in the form of a QR code.
12 Manufacturer's information
The products HILTI DWP10 of the series 3585 meet the requirements of the Pressure Equipment Directive 2014/68/EU and bear the CE marking.
Please contact your local Hilti representative if you have questions about the warranty conditions.
text_image
Labeled diagram of a blender with numbered parts for identification▶ De pomphandgreep is vergrendeld.
▶ De pomphandgreep is ontgrendeld (2).
▶ De pomphandgreep is vergrendeld.
6 Bediening
6.1 Gebruik 5
text_image
Labeled diagram of a blender with numbered parts for identificationtext_image
Labeled diagram of a portable blender with numbered parts for identificationtext_image
Labeled diagram of a blender with numbered parts for identificationtext_image
Labeled diagram of a blender with numbered parts for identificationtext_image
Labeled diagram of a portable blender with numbered parts for identificationtext_image
Labeled diagram of a portable device with numbered parts for identificationtext_image
Labeled diagram of a blender with numbered parts for identificationtext_image
Labeled diagram of a blender with numbered parts for identificationtext_image
Labeled diagram of a blender with numbered parts for identificationtext_image
Labeled diagram of a portable blender with numbered parts for identificationtext_image
Labeled diagram of a portable blender with numbered parts for identificationtext_image
Labeled diagram of a blender with numbered parts for identificationtext_image
Labeled diagram of a blender with numbered parts for identificationtext_image
Labeled diagram of a blender with numbered parts for identificationtext_image
Labeled diagram of a blender with numbered parts for identificationtext_image
Labeled diagram of a blender with numbered parts for identificationtext_image
Labeled diagram of a blender with numbered parts for identification① Spremnik
② Indikator količine punjenja
③ Utični trn
④ Manometar
⑤ Sigurnosni ventil
⑥ Pumpa
⑦ Utična nazuvica crijeva s kuglastim ventilom
⑧ Crijevo
⑨ Utična spojnica crijeva
⑩ Otvor za ispuštanje
text_image
Labeled diagram of a blender with numbered parts for identification① Posuda
② Prikaz napunjenosti
③ Utična igla
④ Manometar
⑤ Sigurnosni ventil
⑥ Pumpa
⑦ Utični nastavak creva sa kuglastom slavinom
⑧ Crevo
⑨ Utična spojnica creva
⑩ Otvor za ispuštanje
3.2 Upotreba u skladu sa odredbama
Ovde opisani proizvod je rezervoar za vodu pod pritiskom za izbacivanje tečnosti za hlađenje i ispiranje kod bušilica, testera za beton ili ugaonih brusilica. Za to se po pravilu upotrebljava voda.
text_image
Labeled diagram of a blender with numbered parts for identificationtext_image
Labeled diagram of a blender with numbered parts for identificationtext_image
Labeled diagram of a blender with numbered parts for identificationtext_image
Labeled diagram of a blender with numbered parts for identificationtext_image
Labeled diagram of a blender with numbered parts for identificationtext_image
Labeled diagram of a blender with numbered parts for identificationtext_image
Labeled diagram of a blender with numbered parts for identificationtext_image
Labeled diagram of a portable blender with numbered parts for identificationtext_image
Labeled diagram of a blender with numbered parts for identificationtext_image
Labeled diagram of a portable blender with numbered parts for identification24F., No. 16, Xinzhan Rd., Banqiao Dist., New Taipei City 220, Taiwan (R.O.C.)
Tel. 0800-221-036
11 其他資訊
text_image
Labeled diagram of a portable blender with numbered parts for identificationtext_image
Labeled diagram of a blender with numbered parts for identificationהכלה 3.2