EXOO1 - Safety harness HILTI - Free user manual and instructions
Find the device manual for free EXOO1 HILTI in PDF.
| Product type | Passive exoskeleton (professional work equipment) |
| Brand | Hilti |
| Model | EXOO1 |
| Weight | 1.99 kg |
| Dimensions (L x l x h) | 850 mm x 400 mm x 200 mm |
| Operating temperature | -10 °C to 45 °C |
| Storage temperature | -10 °C to 60 °C |
| Maximum wearing duration | 8 hours per day |
| Maximum service life | 10 years |
| Power supply | None (passive system) |
| Primary function | Relieve arms and shoulder girdle during overhead and shoulder-level work |
| Assistance force adjustment | Via magnetic dial with graduated scale |
| Closures | Magnetic closures for straps and arm shells |
| Materials | Fabric, plastic, magnets (in closures) |
| Care and cleaning | Damp cloth with pH-neutral soap; do not use silicone-based cleaners |
| Spare parts | Extensors, cushions (arm and sub-abdominal), straps, locking clips, magnetic adjustment screws |
| Safety | Do not use by wearers of pacemakers; keep at least 100 mm away from magnets |
| Manufacturer warranty | Contact local Hilti partner |
| Package contents | Exoskeleton, bag, 4 magnetic adjustment screws, 2 spare clips, instruction manual |
Frequently Asked Questions - EXOO1 HILTI
User questions about EXOO1 HILTI
0 question about this device. Answer the ones you know or ask your own.
Ask a new question about this device
Download the instructions for your Safety harness in PDF format for free! Find your manual EXOO1 - HILTI and take your electronic device back in hand. On this page are published all the documents necessary for the use of your device. EXOO1 by HILTI.
USER MANUAL EXOO1 HILTI
text_image
Labeled diagram of a person wearing a full-body exercise vest with eight numbered safety harnesses.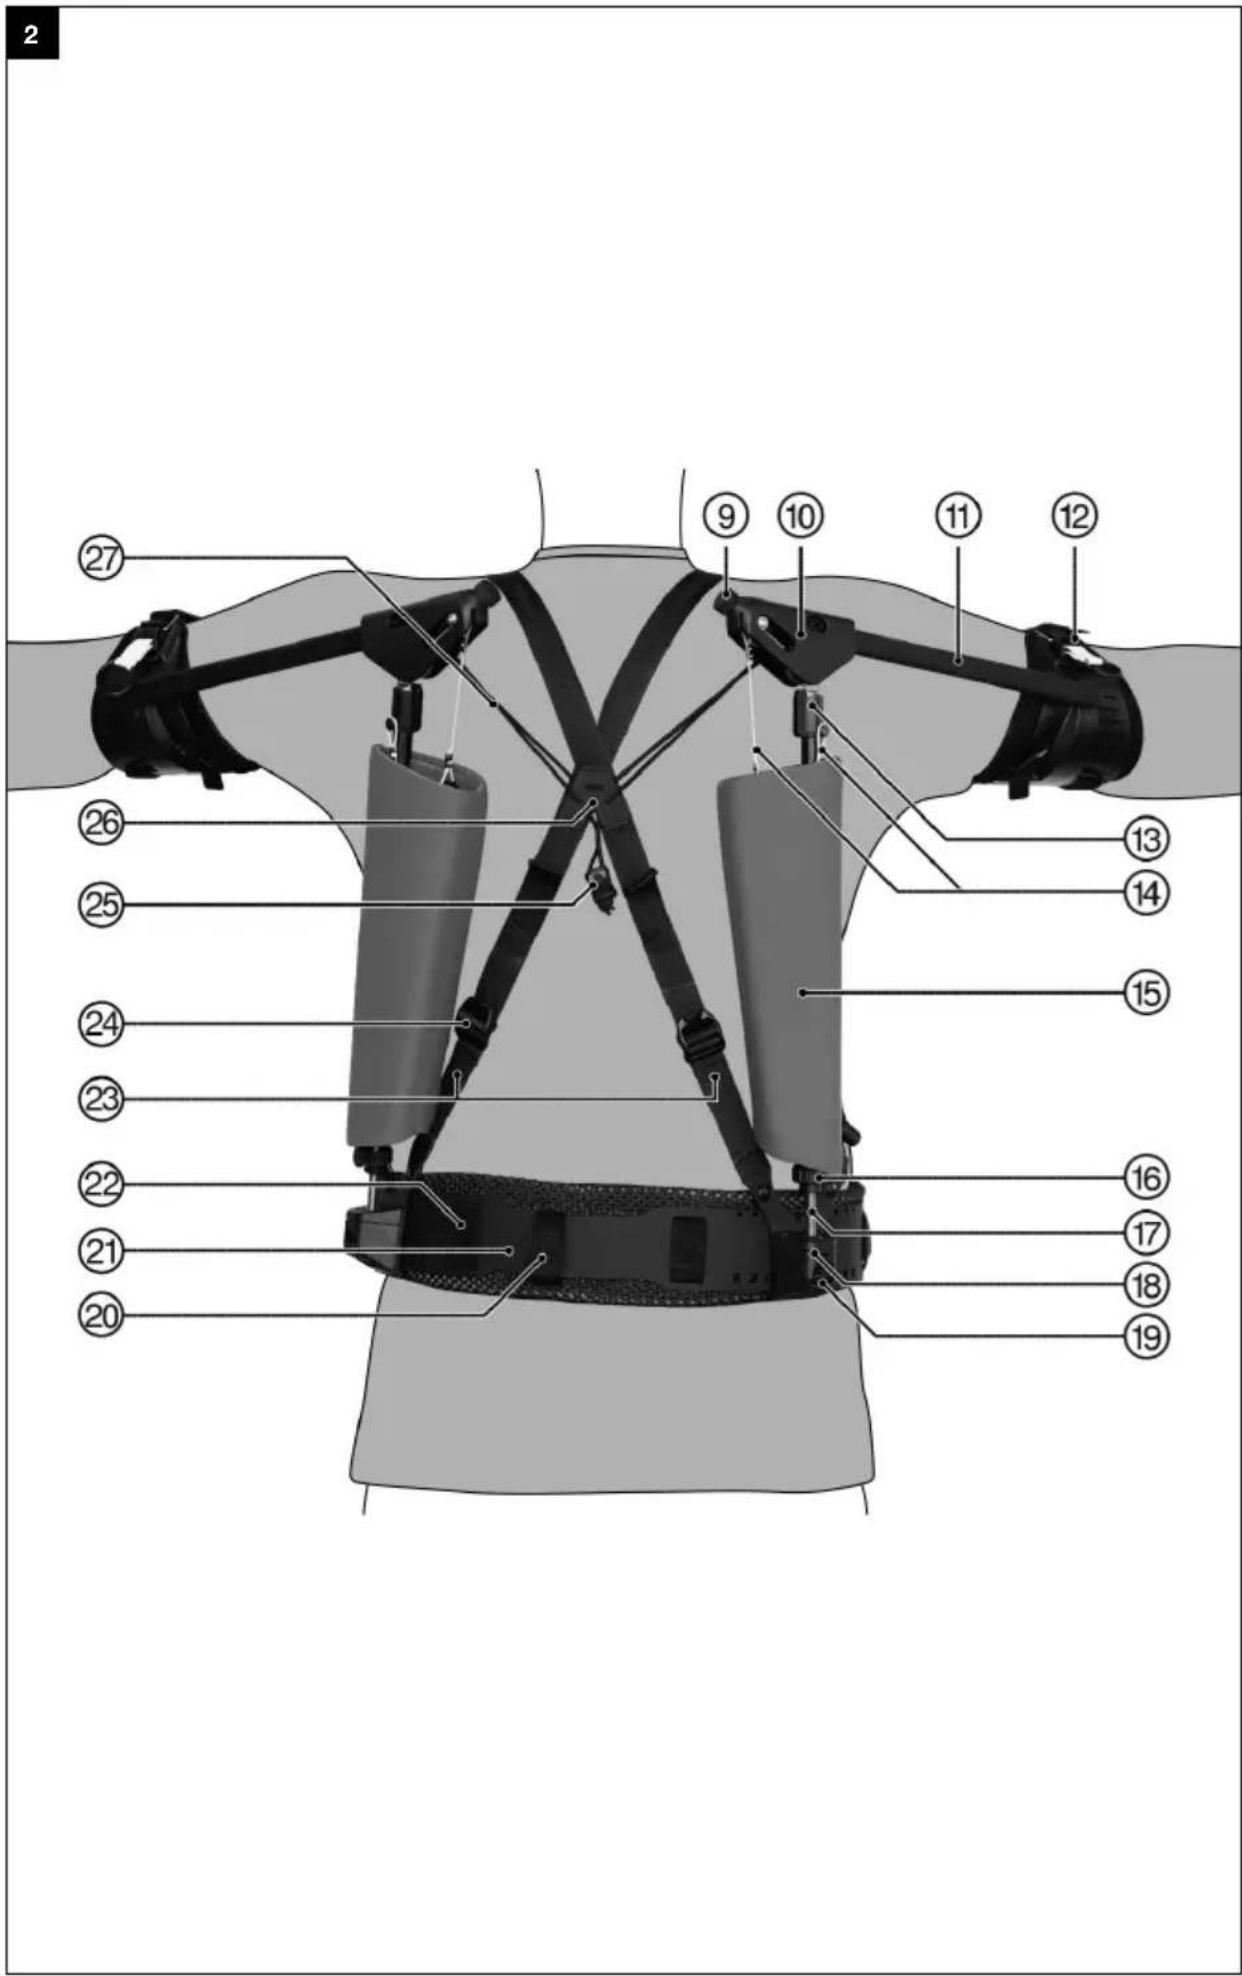
text_image
Labeled diagram of a sports equipment with numbered parts for identificationHA EXO-01
en Original operating instructions 1
Original operating instructions
1 Information about the documentation
1.1 About this documentation
- Read this documentation before initial operation or use. This is a prerequisite for safe, trouble-free handling and use of the product.
- Observe the safety instructions and warnings in this documentation and on the product.
- Always keep the operating instructions with the product and make sure that the operating instructions are with the product when it is given to other persons.
1.2 Explanation of symbols used
1.2.1 Warnings
Warnings alert persons to hazards that occur when handling or using the product. The following signal words are used:

DANGER
DANGER!
- Draws attention to imminent danger that will lead to serious personal injury or fatality.

WARNING
WARNING!
- Draws attention to a potential threat of danger that can lead to serious injury or fatality.

CAUTION
CAUTION!
- Draws attention to a potentially dangerous situation that could lead to personal injury or damage to the equipment or other property.
1.2.2 Symbols in the documentation
The following symbols are used in this document:


Read the operating instructions before use.
Instructions for use and other useful information
Dealing with recyclable materials
Do not dispose of electric equipment and batteries as household waste
1.2.3 Symbols in the illustrations
The following symbols are used in illustrations:

These numbers refer to the corresponding illustrations found at the beginning of these operating instructions

The numbering reflects the sequence of operations shown in the illustrations and may deviate from the steps described in the text

Item reference numbers are used in the overview illustrations and refer to the numbers used in the product overview section

This symbol is intended to draw special attention to certain points when handling the product.
1.3 Product-dependent symbols
1.3.1 Symbols on the product
The following symbols can be used on the product:

The power tool supports near-field communication (NFC) technology, which is compatible with iOS and Android platforms.
Warning: Magnetic field
1.4 Product information

products are designed for professional users and only trained, authorized personnel are permitted to operate, service and maintain the products. This personnel must be specifically informed about the possible hazards. The product and its ancillary equipment can present hazards if used incorrectly by untrained personnel or if used not in accordance with the intended use.
The type designation and serial number are printed on the rating plate.
Write down the serial number in the table below. You will be required to state the product details when contacting Hilti Service or your local Hilti organization to inquire about the product.
Product information
| Exoskeleton HA EXO-O1 | |
| Generation 01 | |
| Serial no. |
2 Safety
2.1 Safety instructions

WARNING Study all safety instructions and other instructions, images and technical data with which this product is provided. Failure to comply with the instructions below can cause serious injuries. eep all safety precautions and instructions for future reference.
Personal safety
The catches of the shoulder straps and the arm supports contain magnets. The magnets can affect cardiac pacemakers or comparable implants. A cardiac pacemaker can be switched to test mode and cause indisposition. Under certain circumstances, a defibrillator might cease to function. Wearers of devices of this nature should keep at least 100 mm clear of the magnets. Warn wearers of devices of this nature to keep clear of magnets. These persons are not permitted to use the product.
▶ Wear suitable work clothes. Do not wear jewelry or loose clothing. Keep your hair, clothing and gloves away from moving parts. Loose clothes, jewelry or long hair can be snagged by moving parts.
- Avoid unusual body positions. Keep proper footing and balance at all times.
▶ Only persons who are familiar with it, who have been trained on how to use it safely and who understand the resulting hazards are permitted to use the tool.
- Keep children and other persons clear when the product is in use.
▶ The product can be used by only one person.
- Do not use the product to lower a person by rope or to secure a person. Do not secure a tool tether to the product.
- Do not attach to the waist belt objects that could restrict correct operation of the product.
▶ Make sure that you do not snag with the product on fixed or movable objects.
It is not permissible for the product to interfere with the functionality of your personal protective equipment.
Product safety
- Avoid overstraining the load-bearing components. A sudden loss of function can lead to injuries. Use the product only within its specified limits.
▶ Always check the product prior to use to ensure that it is in full working order, free of wear and undamaged. Do not continue to use the product after it has been dropped or if it is damaged. Contact Hilti Service.
To avoid damage, do not expose the product to sources of heat. Comply with the stated temperature limits for storage and operation.
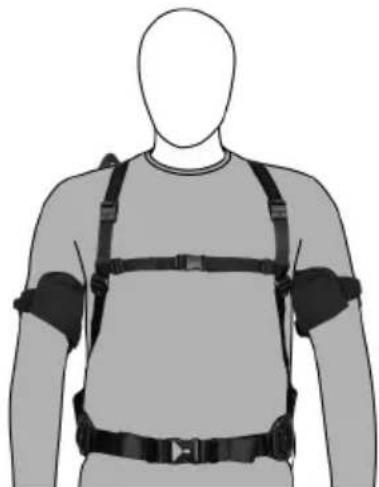
3.1 Product overview, front
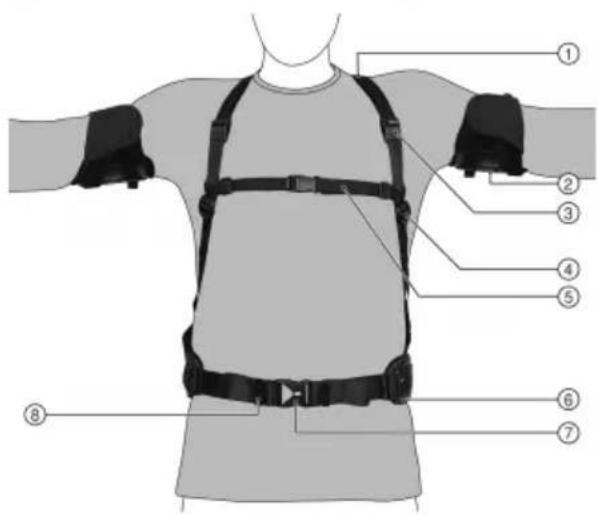
text_image
Diagram of a human torso with numbered safety harnesses and straps labeled 1 through 8① Shoulder strap
② Arm support with padding
③ Parked position, magnetic catch
④ Strap clip of the shoulder strap
⑤ Chest strap
⑥ Waist-belt pad
⑦ Clip catch
⑧ Belt holder, waist belt
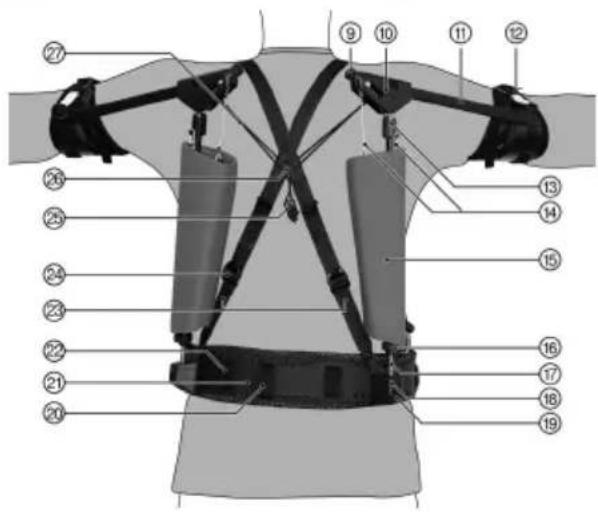
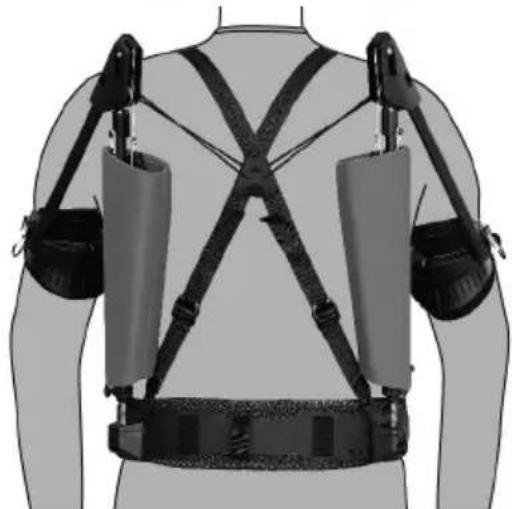
3.2 Product overview, rear 2
text_image
Labeled diagram of a human torso with numbered anatomical components for fitness or safety testing.⑨ Adjusting knob for assistance
⑩ Articulation unit (cover not available in all markets)
⑪ Arm-rail
⑫ Magnetic catch
⑬ Pivot stop
⑭ Expander
⑮ Cover for expander
⑯ Locknut
⑰ Threaded rod
⑱ Adjustment unit with ball socket
⑲ Locking clip
⑳ Hang-up loop
②1 Waist-belt reinforcement
②2 Burr fastener, waist-belt pad
②3 Back strap
⑳ Strap clip of the back strap
⑳ Tensioner
②6 Back cross
⑳ Tension cord
3.3 Intended use
The product described is a passive exoskeleton. It is to be used only as an assistance system by trades and only by adults. It is designed to relieve the strain on the arms and pectoral girdle during overhead and over-shoulder work.
The product is to be used and maintained only by trained, authorized personnel who have received special instruction regarding the hazards that may be encountered.
The maximum wearing period is 8 hours per working day.
The maximum service life is 10 years.
3.4 Restrictions on use and misuse
Do not use the product in environments where there is a risk of explosion.
Do not use the product without user-specific product fitting.
Do not use the product for performance enhancement and do not use it to lift persons.
HILTI
The product is not be used by persons
• with cardiac pacemaker or comparable active implants
• with pre-existing debilitating conditions of the musculoskeletal system in the area of the shoulders, arms, back and hands
• with skin diseases/injuries, inflammations; raised scars with swellings
- with reddening and above-normal temperature in the body areas affected (arms, shoulders, hips and back)
- with pronounced varicose veins, especially with venous insufficiency, lymphatic drainage disorders – also unexplained soft-tissue swelling in parts of the body away from the product
- with sensory and circulatory disorders in the area of the upper extremities, hips and back (e.g. diabetic neuropathy)
Do not continue to use the product if you experience discomfort, develop a rash or notice increased sensitivity of the skin.
3.5 Items supplied
Exoskeleton, bag, 4 magnetic adjusting screws, 2 spare clips, operating instructions
Other system products approved for use with this product can be found at your local Hilti Store or at: www.hilti.group
4 Technical data
| Weight | 1.99 kg |
| Ambient temperature for operation | -10 °C ... 45 °C |
| Storage temperature | -10 °C ... 60 °C |
| Dimensions (length x width x height) | 850 mm x 400 mm x 200 mm |
5 Donning

CAUTION
Risk of injury if product is worn incorrectly or too tightly. Local pressure points and restrictions of blood vessels and nerves.
▶ Be sure to don and wear the product correctly.
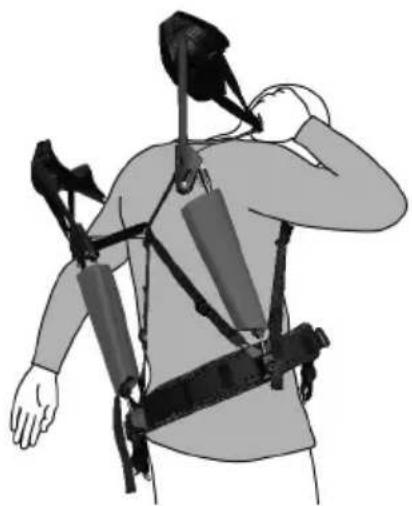
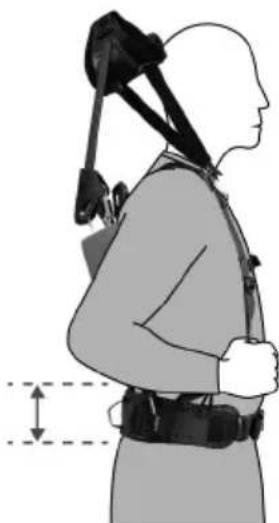
- Shrug the product on to your shoulders as if it were a backpack. Slip your arms through the shoulder straps and position the shoulder straps on your shoulders.
natural_image
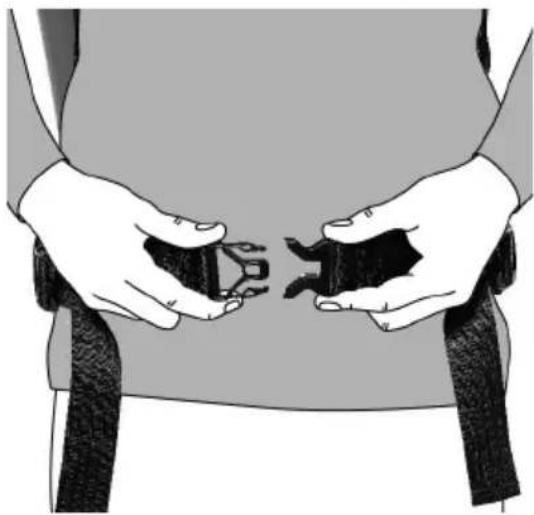
Illustration of a person wearing a multi-robotic exoskeleton device, viewed from the side (no text or symbols present)- Close the clip catch of the waist belt.
natural_image
Illustration of hands holding two small objects, possibly medical or mechanical components, against a plain background (no text or symbols)- Adjust the waist belt. → page 10
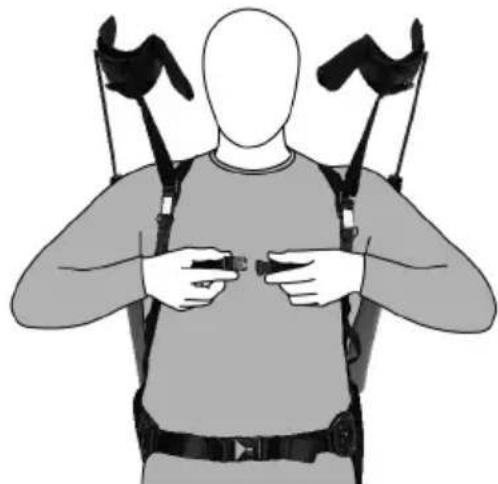
- Close the clip catch of the chest strap.

natural_image
Illustration of a person wearing a full-body exoskeleton device with straps and straps (no text or symbols)- Adjust the shoulder straps. Pull the ends of the straps down to tighten the shoulder straps. To loosen the shoulder straps, flip the strap clip up.
The shoulder straps must sit loosely on your shoulders and should not hinder you from raising your arms.
- Raising your arms should not cause the waist belt to ride up. If the waist belt changes its position, you have to loosen the shoulder straps.
natural_image
Illustration of a hand holding a belt with a hock, no text or symbols presentHILTI
- Tuck the ends of the shoulder straps into the rubberized strap holders.

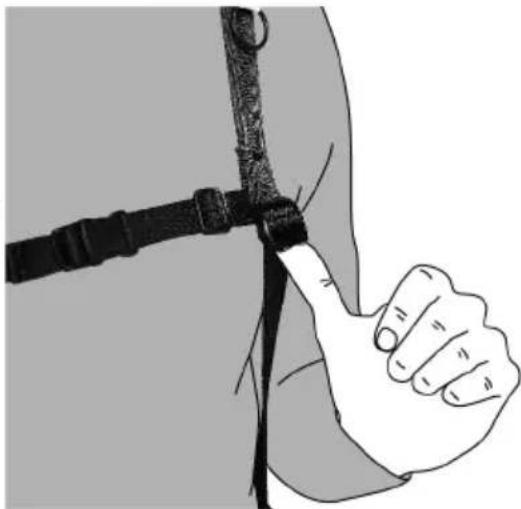
WARNING
Risk of injury caused by arm-rail snapping back.
When under tension, the arm-rail can snap back and injure your head.
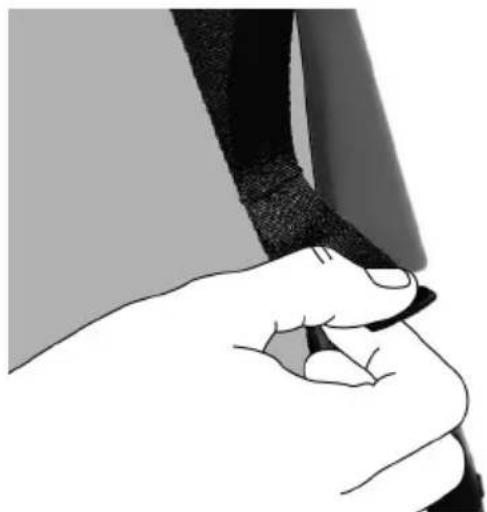
- When disengaging the magnetic catch, keep your finger hooked into the pull loop until the magnetic catch is securely engaged in the parked position.
-
Slip the index finger of your right hand into the pull loop of the left magnetic catch.
-
Pull the pull loop up and carefully disengage the magnetic catch.
natural_image
Illustration of a hand holding a pen, no text or symbols present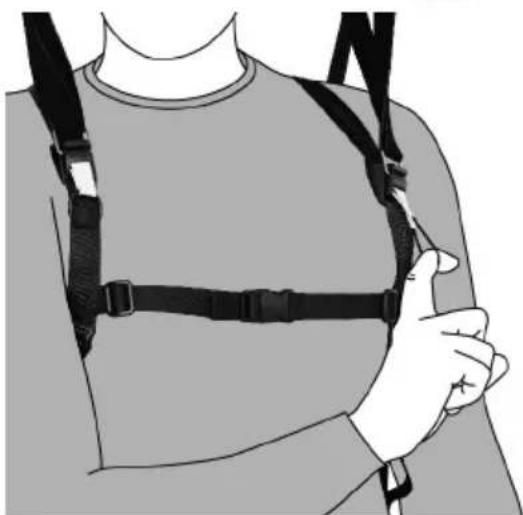
natural_image
Illustration of a person wearing a full-body medical harness and chest cover (no text or symbols)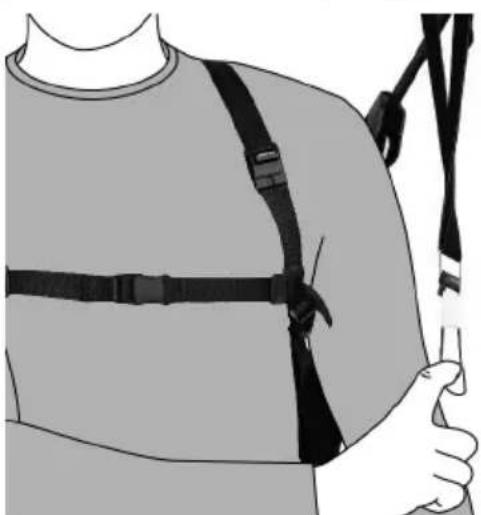
natural_image
Illustration of a person wearing a full-body shoulder support harness (no text or symbols)-
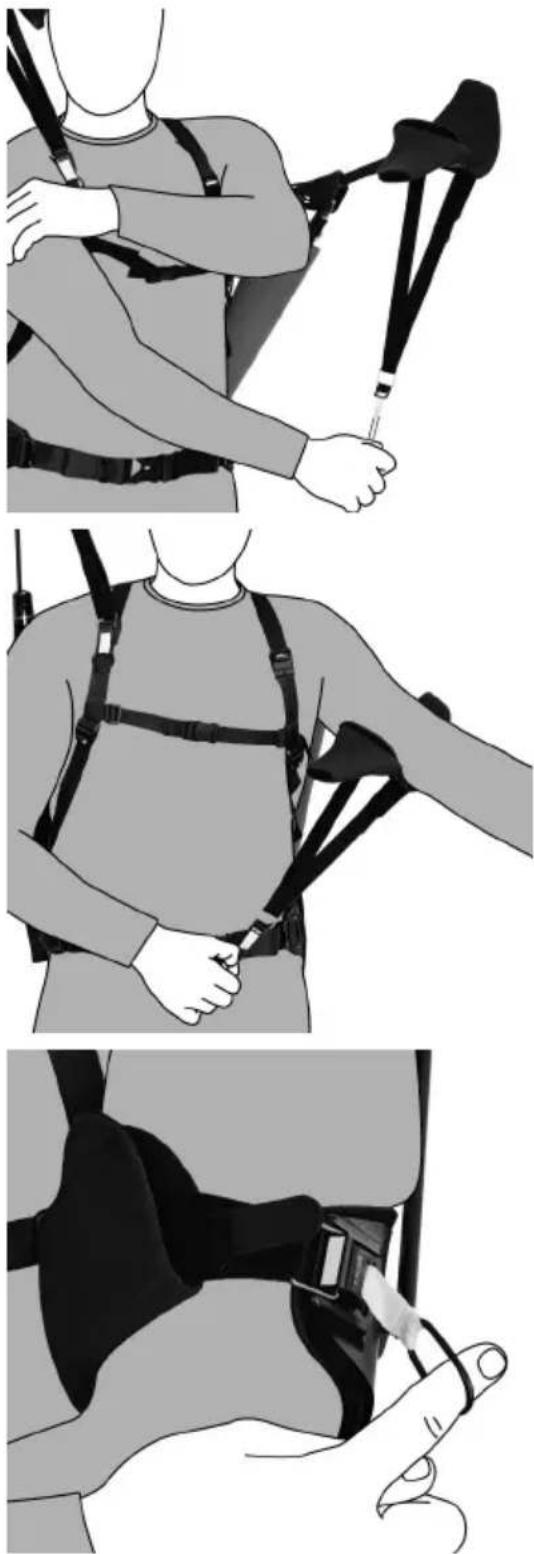
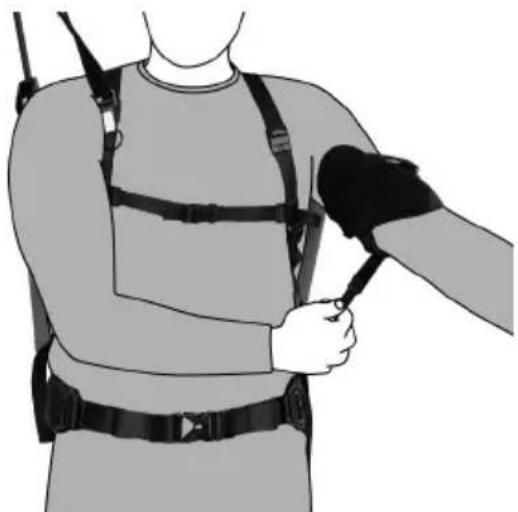
Pull the arm support down with the pull loop. As you do so, hold your arm out in front of your body.
-
Center your upper arm in the arm support.
-
Use the pull loop to engage the magnetic catch in the hook on the arm support.
▶ Make sure that the magnetic catch engages fully.
natural_image
Three-panel illustration showing a person wearing a full-body harness and holding a cable, with no visible text or symbols.HILTI
- Use the burr fasteners to adjust the fit of the arm-support strap round your upper arm. Center the burr fasteners and close them completely.
The arm-support strap is adjustable at both ends.
natural_image
Illustration of a person wearing a full-body medical harness and holding a medical device (no text or symbols visible)-
Secure the arm support on the other side of your body in the same way.
-
Check that the product is fitted symmetrically. The clip catches do not necessarily have to be centered.

Make sure that the waist belt is correctly seated. Use the padding on the waist belt to make sure that it is seated symmetrically.
natural_image
Human body with full-body medical equipment including a full-body exoskeleton and straps (no text or symbols visible)- Center the back cross between your shoulder blades. The back cross should not chafe your back.
natural_image
Human body with two exoskeletons and a device, viewed from the side (no text or symbols visible)6 Adjusting

WARNING
Risk of injury caused by crushing. Risk of crushing the fingers in the articulation unit.
- When adjusting the product, keep your fingers well clear of the articulation unit's mechanism.
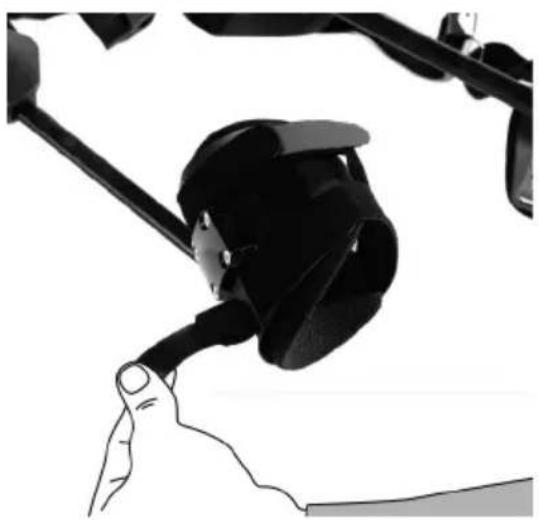
6.1 Adjusting assistance
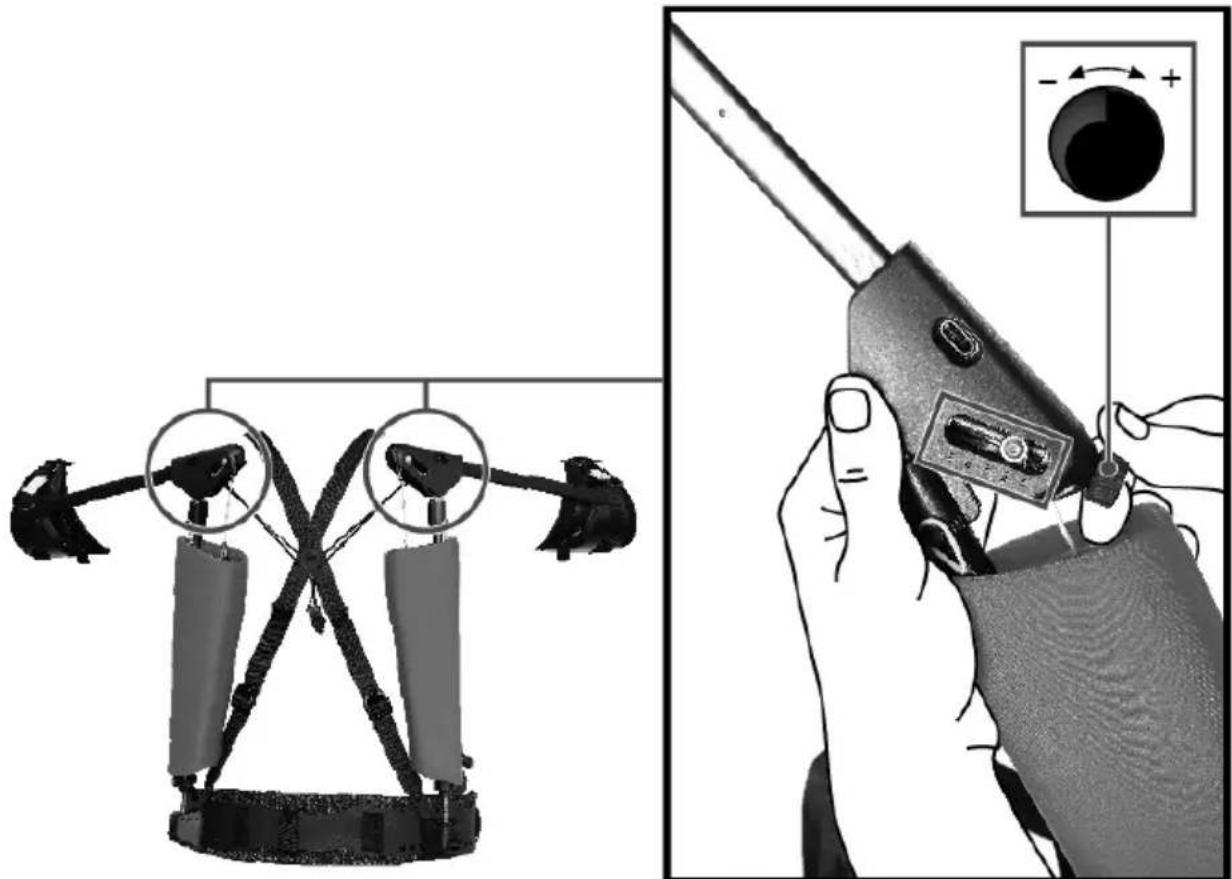
text_image
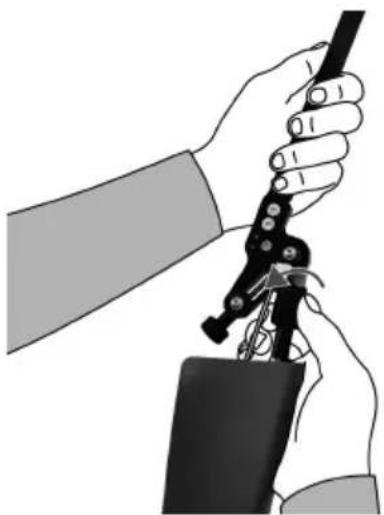
Diagram illustrating a robotic device with labeled parts and a close-up of its tool, showing mechanical assembly and control mechanism.- If applicable, attach the magnetic adjusting knob to the articulation unit.
- Adjust the assistance by turning the magnetic adjusting knob.
▶ Turn the knob clockwise (+) for more assistance, turn it counter-clockwise (-) for less assistance.
The scale on the articulation unit is merely an indicator marking the position.

Assistance is correct when gravity is enough to make your arms drop, without further exertion on your part. Do not attempt to set assistance to a value higher than this; any lower setting is possible, in accordance with your preference.
- Engaging the second expander is an option, if more assistance is necessary.
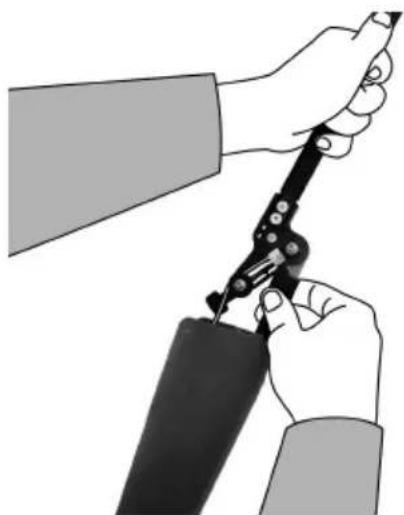
6.2 Engaging second expander
Step through the following procedure for each side of the exoskeleton in turn.
- Zero the tension on the articulation unit and open the pivot stop.
natural_image
Illustration of hands using a tool to adjust or install a mechanical component (no text or symbols visible)HILTI
- Turn the product so that the side normally toward the body is up.
- Take hold of the second expander and pass it over the guide pulley.

The expanders determine the assistance provided. Try out the assistance provided by only one expander by increasing it step by step. If more assistance is necessary, the second expander can be used as well.
- Tension the articulation unit and close the pivot stop.
natural_image
Illustration of two hands using a compass to measure a piece of paper or tool (no text or symbols present)
natural_image
Illustration of a hand holding a tool with a black tool, no text or symbols present6.3 Adjusting waist belt
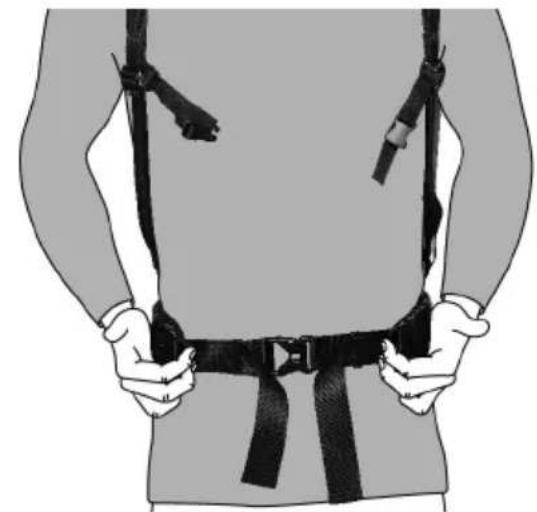
- The waist belt has to sit above the gluteal muscles and level with your pelvis.
It is important to make sure that the waist belt cannot slip while the product is in use.
natural_image
Side profile illustration of a person wearing a high-stance exercise vest and harness, with no visible text or symbols.-
Flip the strap clips up to loosen the waist belt.
-
Pull both ends of the waist belt forward to tighten the belt.
-
Tuck the ends of the waist belt into the belt holders.
natural_image
Illustration of a person wearing a full-body safety harness (no text or symbols)
natural_image
Illustration of a person wearing a full-body belt with straps (no text or symbols)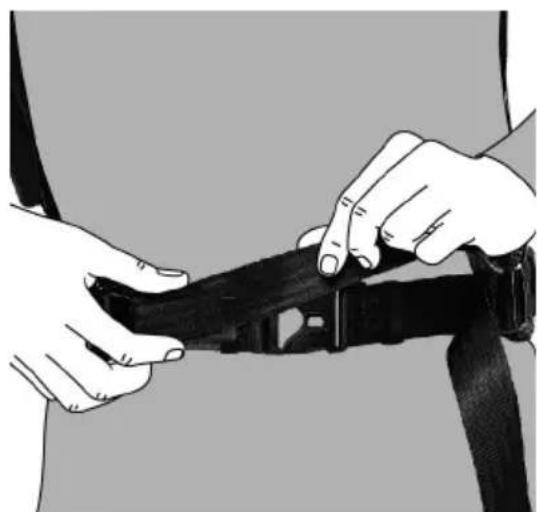
natural_image
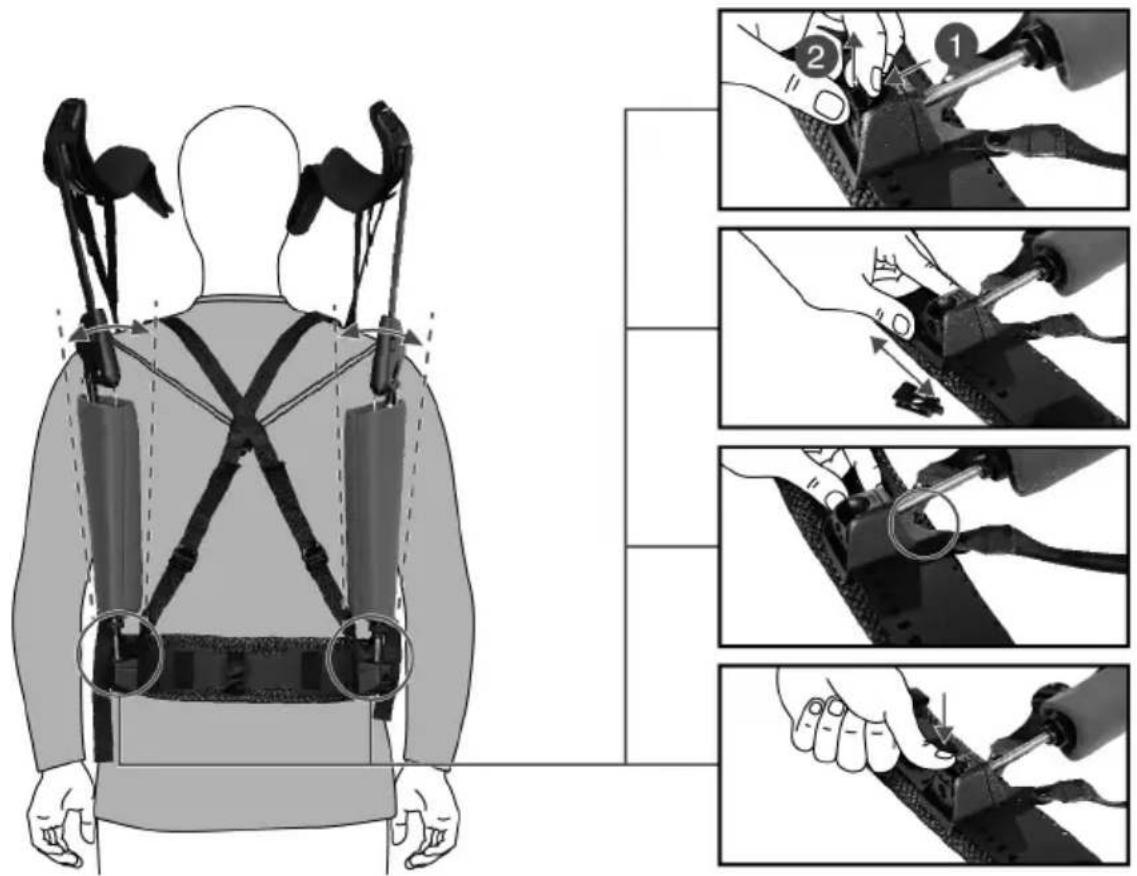
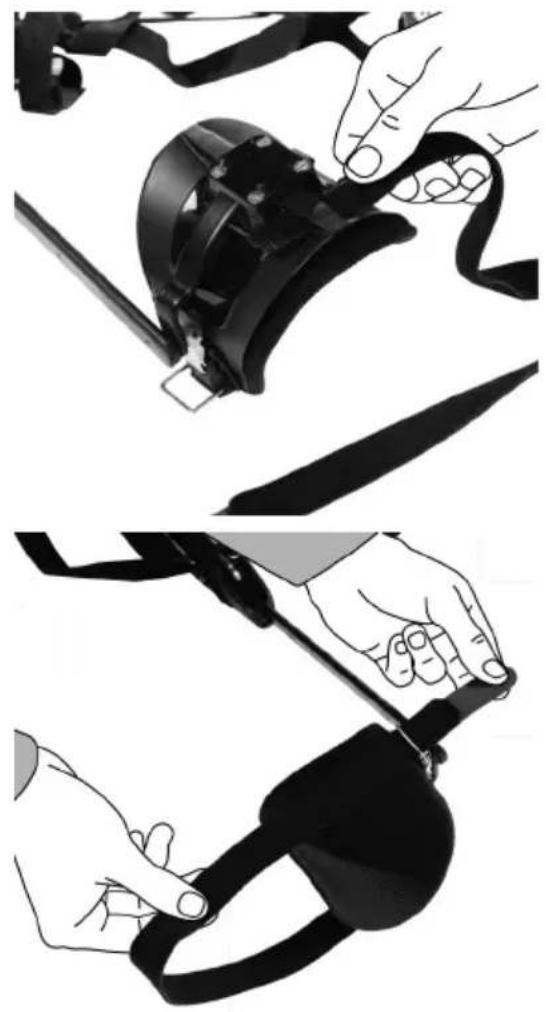
Person adjusting a black belt buckle (no text or symbols visible)6.4 Adjusting articulation unit

You have to remove the exoskeleton in order to adjust the articulation unit.
text_image
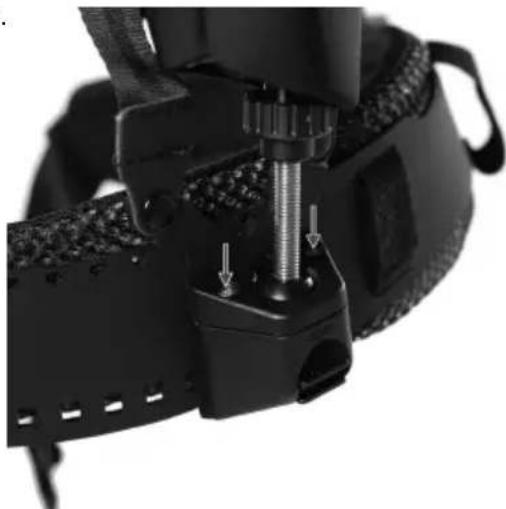
Diagram illustrating the use of a wearable device to adjust the back of a person using a multi-part assembly, with labeled steps and illustrations.Horizontal alignment
- Squeeze the sides of the locking clip in.
- Pull the locking clip out of the adjusting unit.
- Move the adjusting unit with the ball socket on the belt web of the waist belt. Use the mark at the top edge to determine the latching position.

Set both sides to the same latching position.
- Insert the locking clip to maintain this position.
- Slip the product on to your shoulders and check the symmetrical positioning of the waist belt.
The ball sockets must be fixed vertically relative to the shoulder articulations and can be tilted outward (V-shape), depending on the wearer's upper-body build. The wearer's hands must be free to swing without hindrance.
text_image
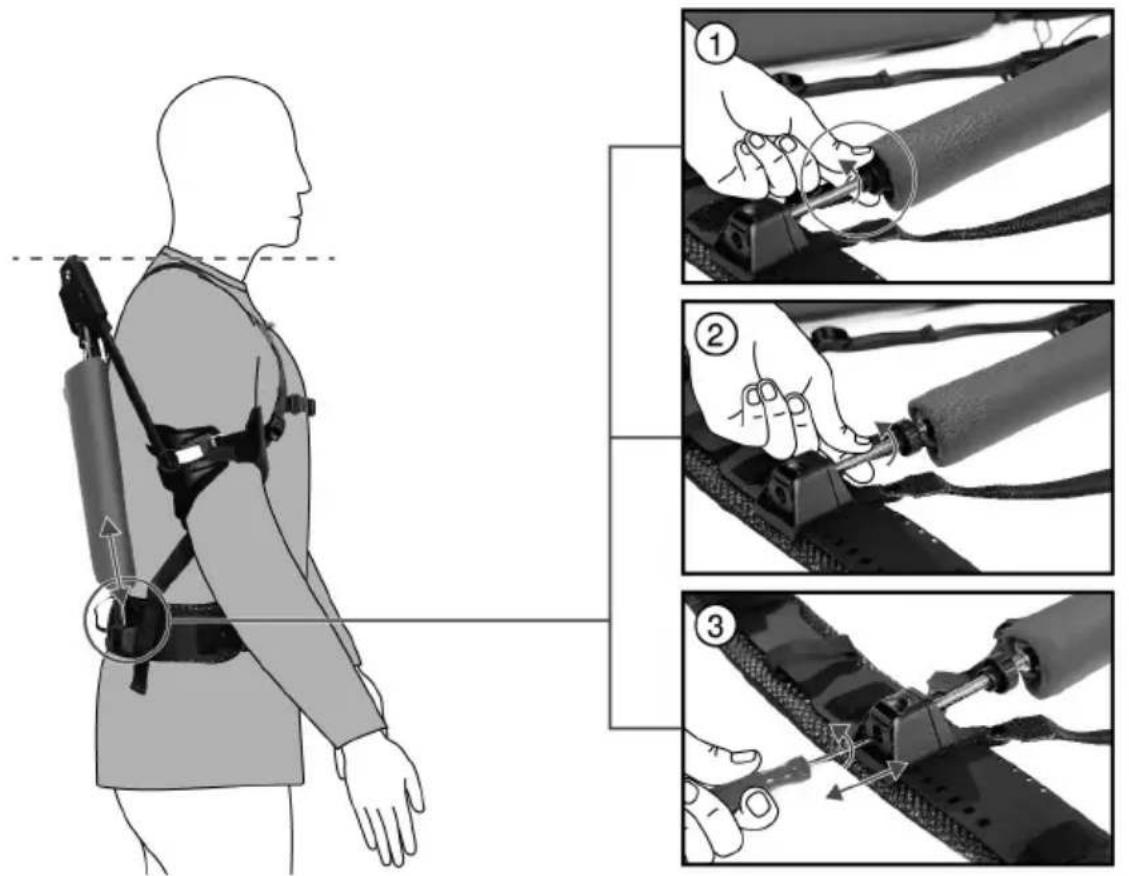
Medical illustration showing human body with oxygen balance device and three-step instructions for adjusting cable or connector components.Adjusting height
- Slacken the locknut.
- Adjust the height of the threaded rod by hand.
- Retighten the locknut.
- Slip the product on to your shoulders and check that the articulation units are at the same height.
- When the product is worn, the top edge of the articulation unit must match the height of the shoulder.
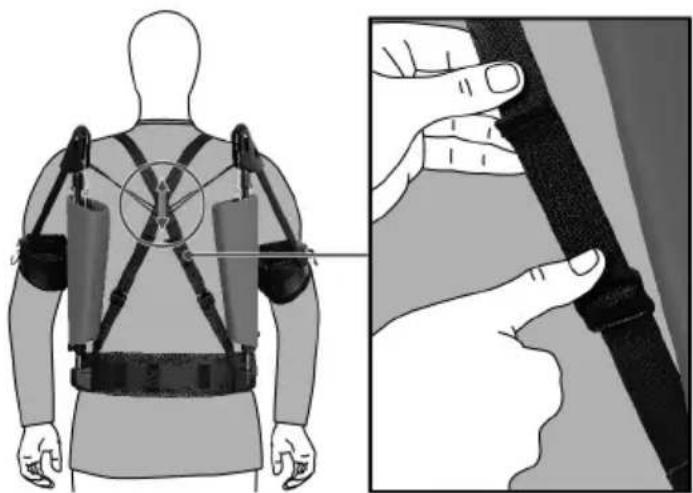
6.5 Aligning back cross
natural_image
Illustration of a person wearing an ejectioner with attached straps and a close-up of hands adjusting the back panel (no text or symbols present)- Flip the strap clip of the back strap up to loosen the strap.
- Pull the end of the strap to tighten the strap.
- Check the position of the back cross.
The back cross must be centered between the shoulder blades.
6.6 Adjusting tension cord
The tension cord forms a wide-open Vee between the shoulder blades. The tension cord lets you adjust the position of the expander covers. Tightening the tension cord brings the covers closer to your body.
text_image
Diagram illustrating the use of a cable clamp to adjust the seatbelt, showing hand positioning and force application.- Open the top and bottom parts of the tensioner on the tension cord.
- To shorten the tension cord, pull the ends of the tension cord taut and push the top part of the tensioner up.
▶ Make sure that the tension cord is symmetrically positioned. - To lengthen the tension cord, pull the bottom part of the tensioner down.
▶ Make sure that the tension cord is symmetrically positioned. - To secure the tension cord in position, push the top and bottom parts of the tensioner together.
7 Removing

WARNING
Risk of injury caused by arm-rail snapping back. When under tension, the arm-rail can snap back and injure your head.
- When disengaging the magnetic catch, keep your finger hooked into the pull loop until the magnetic catch is securely engaged in the parked position.
- Slip the index finger of your right hand into the pull loop of the left magnetic catch.
- Slowly pull the magnetic catch up and disengage it from the hook of the arm support.
natural_image
Illustration of a hand adjusting a black seatbelt buckle (no text or symbols visible)- Draw the pull loop down, keeping the strap taut.
- Remove your arm from the arm support and hold it in front of your body.
natural_image
Illustration of a person wearing a full-body medical harness and holding a medical device (no text or symbols visible)- Slowly guide the arm support up.
- Let the magnetic catch engage fully at the parked position on the shoulder strap.
- Check that the magnetic catch is correctly seated.
natural_image
Illustration of a person wearing a full-body medical harness and chest cover (no text or symbols)- Repeat these steps with your left hand for the right arm support.
- Open the clip catch of the chest strap.
natural_image
Illustration of a person wearing a full-body exoskeleton device with straps and straps (no text or symbols)HILTI
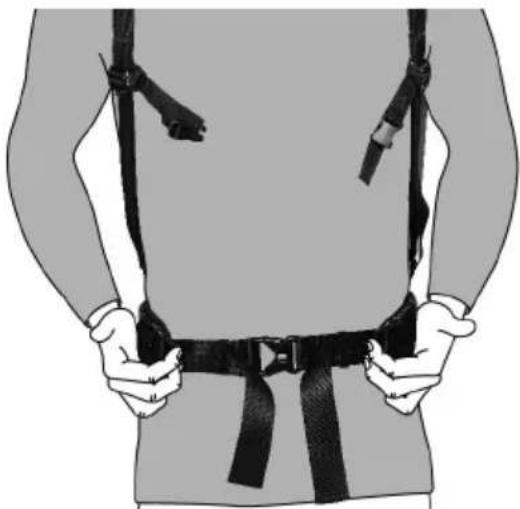
- Disengage the ends of the waist belt from the belt holders.
- Loosen the waist belt.
-
Open the clip catch of the waist belt.
-
Shrug the product off your shoulders as if it were a backpack.
natural_image
Person wearing a full-body safety harness and belt, hands visible (no text or symbols)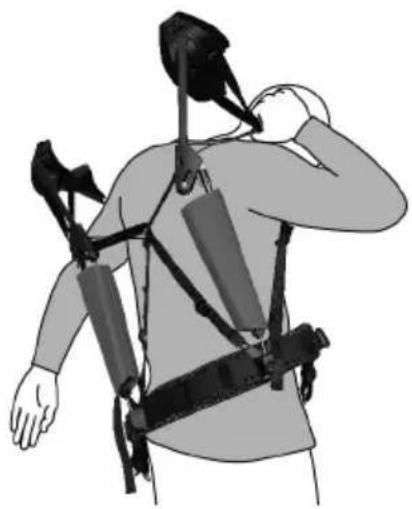
natural_image
Illustration of a person wearing a multi-robotic exoskeleton device, hand gesture near chest (no text or symbols)8 Care and maintenance
WARNING
Risk of injury caused by expanders under tension. Injuries during care and maintenance work.
- Carry out care and maintenance work only with the expanders at zero tension.
Care
- Carefully remove stubborn dirt from the tool.
- Clean the product only with a slightly damp cloth and pH-neutral soap. Do not use cleaning agents containing silicone as they can attack the plastic parts.
Maintenance
- Check all visible parts and controls for signs of damage at regular intervals and make sure that they all function correctly.
- Do not operate the product if signs of damage are found or if parts malfunction. Have it repaired immediately by Hilti Service.
• After cleaning and maintenance, fit all guards or protective devices and check that they function correctly.

To help ensure safe and reliable operation, use only genuine Hilti spare parts and consumables. Spare parts, consumables and accessories approved by Hilti for use with the product can be found at your local Hilti Store or online at: www.hilti.group.
8.1 Cleaning pads


-
Remove the pads from the arm supports and the waist belt.
-
Hand-wash the pads in water with pH-neutral soap.
- Thoroughly rinse the pads.
- Allow the pads to air-dry.
- Reinstall the pads.
8.2 Replacing pads
- Remove first the inner pad and then the outer pad from each arm support. The pads are held in place in the arm supports by burr fasteners.
- Install the new pads in reverse sequence in each arm support. Make sure that the pads are fitted right way round.

The pads and the arm supports are color-coded, with a blue dot for left and a red dot for right.
natural_image
Illustration of hands adjusting a black athletic belt (no text or symbols visible)- Open the burr fasteners of the waist belt pad and remove the pad.
- Pass the burr fasteners of the new pad though the openings in the belt web and close the fasteners.
natural_image
Close-up of hands holding a black mechanical device with textured grip (no visible text or symbols)8.3 Replacing arm-support strap
- Open the burr fasteners at both ends of the arm-support strap.
- Remove the strap from the two tabs of the arm support.
- Position the top part of the magnetic catch at the parked position on the arm support.
natural_image
Close-up of a hand gripping a black mechanical component (no visible text or symbols)HILTI
-
Starting from below, pass the new strap through the first tab. The burr fastener must face out.
-
Turn the arm support round.
-
Pass the strap from above through the metal eye of the magnetic catch.
-
Pass the strap through the second tab from the inside to the outside.
-
Close the strap at the burr fastener.
natural_image
Three-panel illustration showing hands adjusting a black mechanical device with a clip, no text or symbols present.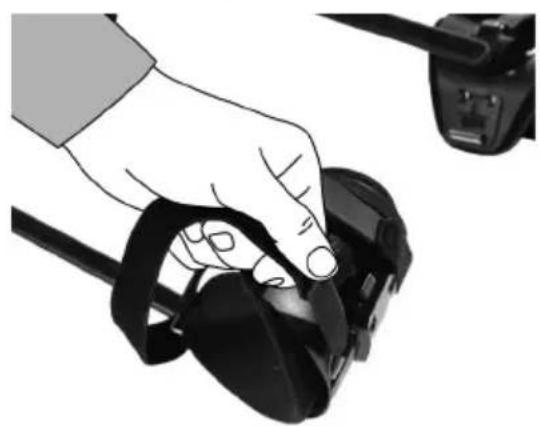
natural_image
Hand holding a black remote control device with a camera module attached (no text or symbols visible)8.4 Checking and cleaning ball socket
▶ Check the movement of the ball end in the ball socket. Do this by moving the threaded rod.
Result 1 / 2
The ball moves freely.
▶ No action necessary.
Result 2 / 2
The ball is stiff
▶ Undo the two screws in the ball socket and remove the cover.
- Remove the ball from the ball socket and clean the ball and the socket with a soft cloth.
▶ Reinsert the ball in the ball socket and place the cover in position.
- Tighten the two screws to a tightening torque of 0.5 Nm.
natural_image
Close-up of a black mechanical device with threaded component and mounting bracket (no visible text or symbols)9 Transport and storage
Transport
▶ Make sure that the equipment is held securely throughout all transport operations.
▶ After transporting, always check all visible parts and controls for signs of damage and make sure that they all function correctly.
▶ Transport and store the exoskeleton only with the expanders at zero tension.
Storage
- Store this product in a dry place, where it cannot be accessed by children or unauthorized persons.
▶ After a long period of storage, always check all visible parts and controls for signs of damage and make sure that they all function correctly.
10 Troubleshooting
If the trouble you are experiencing is not listed in this table or you are unable to remedy the problem by yourself, please contact Hilti Service.
| Trouble or fault | Possible cause | Action to be taken |
| Lack of expander tension | Expander disengaged or incorrectly installed | ▸ Check that the expanders are correctly seated. |
| Expander worn | ▸ Contact Hilti Service. | |
| Articulation unit sticks | Articulation unit worn | ▸ Contact Hilti Service. |
| Pads chafe | Pads dirty | ▸ Clean the pads. → page 16 |
| Pads folded over or worn out | ▸ Contact Hilti Service. |
11 Disposal
Most of the materials from which Hilti tools and appliances are manufactured can be recycled. The materials must be correctly separated before they can be recycled. In many countries, your old tools, machines or appliances can be returned to Hilti for recycling. Ask Hilti Service or your Hilti representative for further information.
12 Manufacturer's warranty
▶ Please contact your local Hilti representative if you have questions about the warranty conditions.
13 Further information
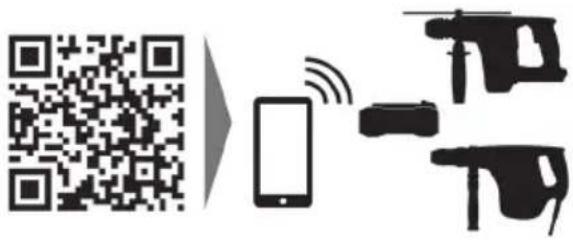
For more information on operation, technology, environment and recycling, follow this link: qr.hilti.com/manual?id=2282599
This link is also to be found at the end of the documentation, in the form of a QR code.
text_image
Diagram of a human torso with numbered safety harnesses and straps labeled 1 through 8text_image
Labeled diagram of a human torso with numbered anatomical components for fitness or safety testing.natural_image
Illustration of a person wearing a multi-robotic exoskeleton device, hand gesture near chest (no text or symbols)HILTI
natural_image
Illustration of two hands holding small black buttons or clips, no text or symbols presentnatural_image
Illustration of a person wearing a full-body medical or fitness device with straps and straps, no text or symbols present.natural_image
Illustration of a person holding a belt and a hand gesture (no text or symbols)natural_image
Three-panel illustration showing a person adjusting a backpack, wearing a vest and harness (no text or symbols)HILTI
natural_image
Three-panel illustration showing a person wearing a full-body safety harness, demonstrating different postures of using the same device (no text or symbols present)natural_image
Illustration of a person wearing a full-body medical harness and holding a handheld device (no text or symbols visible)natural_image
Two views of a human body with various athletic and safety harnesses, shown from top and front views (no text or symbols present)6 Adapter

AVERTISSEMENT
text_image
Diagram illustrating a camera setup with labeled components and a close-up of the tool's handle, showing motion control and adjustment.natural_image
Illustration of hands using a tool to handle a device (no text or symbols visible)natural_image
Illustration of hands using a compass to measure a piece of material (no text or symbols present)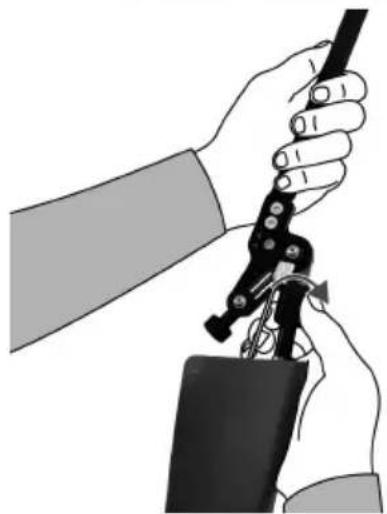
natural_image
Illustration of hands using a tool to adjust or install a device (no text or symbols visible)natural_image
Side profile of a person wearing a high-stance exoskeleton device, showing torso and torso alignment (no text or symbols)HILTI
natural_image
Person wearing a full-body safety harness and belt, hands visible (no text or symbols)
natural_image
Illustration of a person wearing a full-body seatbelt with hands holding two belt bands (no text or symbols)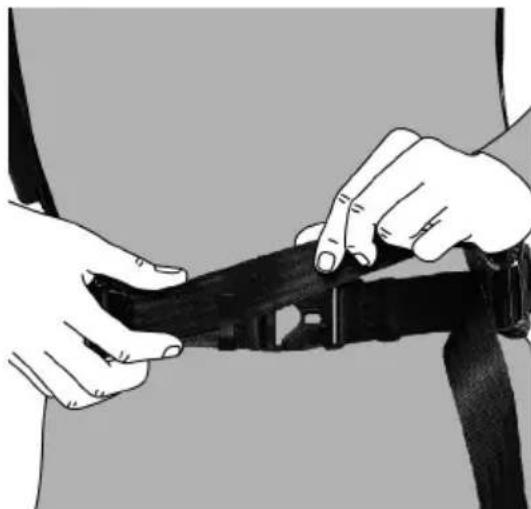
natural_image
Illustration of hands adjusting a black belt buckle (no text or symbols visible)text_image
Diagram illustrating the use of a wearable device to adjust the backrest and grip, with labeled steps for each step.Alignment horizontal
text_image
Diagram illustrating human body exercise with labeled steps for tracking and adjusting a device, showing progressive movement from left to right.Adapter la hauteur
natural_image
Illustration of a person wearing an ejection bridge with a hand adjusting the cable (no text or symbols present)text_image
Diagram illustrating a person's seatbelt usage technique with labeled arrows and hand positioning instructionsnatural_image
Illustration of a hand adjusting a black belt buckle (no text or symbols visible)HILTI
natural_image
Illustration of a person wearing a full-body medical harness and belt, no text or symbols presentnatural_image
Illustration of a person wearing a full-body medical harness and chest cover (no text or symbols)natural_image
Illustration of a person wearing a full-body medical or fitness device with straps and straps, no text or symbols present.natural_image
Person wearing a full-body safety harness and belt, hands visible (no text or symbols)natural_image
Illustration of a person wearing a multi-robotic exoskeleton device, viewed from the side (no text or symbols present)natural_image
Illustration of hands holding a black athletic helmet with a strap (no text or symbols)natural_image
Close-up of a hand gripping a black belt buckle (no text or symbols visible)natural_image
Four-panel black-and-white illustration showing a hand adjusting a device with a tool, no text or symbols present.HILTI
natural_image
Hand holding a black virtual reality headset, next to a camera module (no text or symbols visible)natural_image
Close-up of a black athletic wristwatch with mechanical adjustment and mounting bracket (no visible text or symbols)text_image
Diagram of a human torso with labeled safety harnesses and numbered components for identification.text_image
Labeled diagram of a human torso with numbered anatomical markers for body positioning and safety equipment.natural_image
Illustration of a person wearing a high-altitude ejection device, showing front and side views (no text or symbols)natural_image
Person wearing a full-body medical harness with straps, no text or symbols visible
natural_image
Illustration of a hand giving a thumbs-up gesture against a dark background (no text or symbols)
natural_image
Illustration of a hand holding a pen, no text or symbols present
ADVERTENCIA
natural_image
Illustration of a person wearing a full-body medical harness and chest cover (no text or symbols)
natural_image
Illustration of a person wearing a full-body shoulder harness and holding a medical device (no text or symbols visible)
natural_image
Illustration of a person wearing a full-body safety harness and holding a black exoskeleton (no text or symbols)HILTI
natural_image
Illustration of a person wearing a full-body medical harness and sling, no text or symbols presentnatural_image
Illustration of a hand inserting a belt into a seatbelt (no text or symbols visible)natural_image
Illustration of a person wearing a full-body medical harness and holding a medical device (no text or symbols visible)natural_image
Two views of a human body with various exoskeleton straps and straps, shown from top and front views (no text or symbols)6 Adaptación

ADVERTENCIA
text_image
Diagram illustrating a camera setup with labeled components and a close-up of the tool's handle, showing motion control and adjustment.natural_image
Illustration of hands using a tool to grip a device (no text or symbols visible)natural_image
Illustration of hands using a compass to measure a piece, no text or symbols present
natural_image
Illustration of hands using a tool to adjust or install a mechanical component (no text or symbols visible)natural_image
Side profile of a person wearing a full-body exoskeleton device (no text or symbols visible)HILTI
natural_image
Person wearing a full-body safety harness and belt, hands visible (no text or symbols)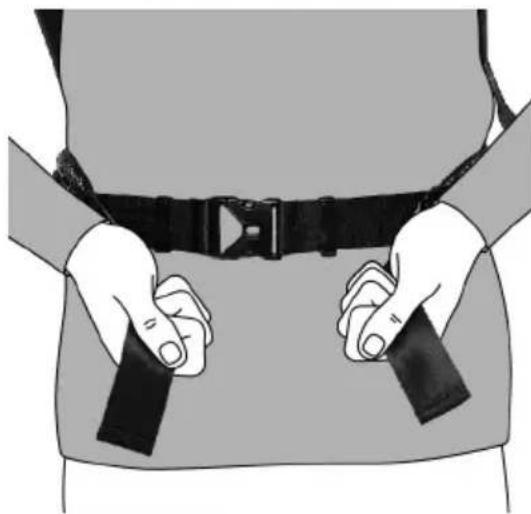
natural_image
Illustration of a person wearing a full-body seatbelt with hands holding two belt bands (no text or symbols)
natural_image
Close-up of hands adjusting a black belt buckle (no text or symbols visible)text_image
Diagram illustrating the use of a wearable device to adjust the backrest and grip, with labeled steps for each step.text_image
Diagram illustrating human body exercise with labeled steps for tracking and adjusting a device, showing progressive movement from left to right.Ajuste de la altura
natural_image
Illustration of a person wearing an ejection bridge with a hand adjusting the cable (no text or symbols present)text_image
Diagram illustrating the use of a cable clamp device to adjust the seatbelt, with instructional text and labeled parts.natural_image
Close-up of a hand adjusting a black seatbelt buckle (no text or symbols visible)HILTI
natural_image
Illustration of a person wearing a full-body medical harness and belt, no text or symbols presentnatural_image
Illustration of a person wearing a full-body medical harness and chest cover (no text or symbols)natural_image
Illustration of a person wearing a full-body medical or fitness device with straps and straps, no text or symbols present.natural_image
Person wearing a full-body safety harness and belt, hands visible (no text or symbols)natural_image
Illustration of a person wearing a multi-armed ejection bridge device, viewed from the side (no text or symbols present)natural_image
Illustration of hands holding a black athletic belt or cushion (no text or symbols visible)natural_image
Close-up of hands holding a black belt buckle, no text or symbols visiblenatural_image
Four-panel black-and-white illustration showing a hand adjusting a device with a lens, demonstrating the process (no text or symbols)HILTI
natural_image
Hand holding a black VR headset with a camera module attached (no text or symbols visible)natural_image
Close-up of a mechanical device with threaded component and mounting bracket (no visible text or symbols)text_image
QR code image containing encoded data, no visible human-readable text
text_image
HILTIHilti Corporation
LI-9494 Schaan
Tel.:+423 234 21 11
Fax:+423 234 29 65
www.hilti.group