USER MANUAL Salia Elite RECARO
40 cm up to 105 cm tall · up to approx. 4 years www.recaro-kids.com


SALIA ELITE
Thank you very much for choosing a RECARO child car seat.
Drawing on our unique experience, we have been revolutionising seats in cars, planes and racing cars for over 100 years. Our unrivalled expertise is reflected in the very last detail of each of our child safety systems.
Our ultimate goal is to be able to offer you products that exceed your expectations time and time again - whether it be in terms of safety, comfort, user friendliness or design.
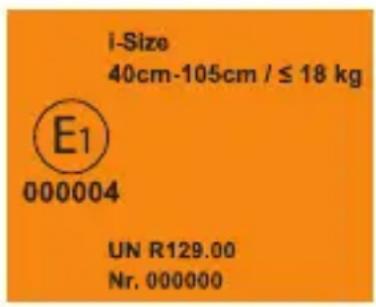
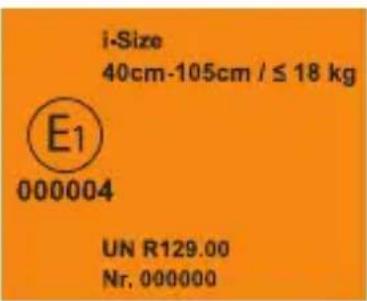
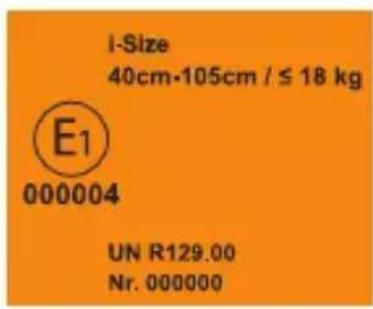
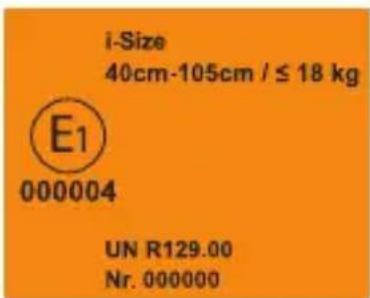
This i-Size car seat for children is approved for children up to a body height of 105 cm and a maximum body weight of 18 kg, to be attached using the ISOFIX system only. Using the child car seat in the rear-facing configuration is mandatory for children up to age 15 months and a body height of up to 76 cm.
The child car seat corresponds to ISOFIX-size classes D and B1 respectively. Please review the vehicle owner's manual to determine the approved vehicle seats for this child car seat.
Tested and approved according to UN R129/00 i-Size.
Subject to printing errors, mistakes and technical changes.
ATTENTION - Keep manual for future reference. There is a compartment for the manual in the back of the child car seat.
CONTENT
1.Description 17
2. Safety Instructions 17
3. Before The First Use 18
4. Installing The Child Car Seat 18
5.1 Using the infant carrier 18
5.2 Buckling Up The Child (with height adjustment of the seat belts) 19
6. Front-facing/Rear-facing 20
7. Setting Up The Resting Position 20
8. Removing The Child Car Seat 20
9.1 Removing Of Cover And Cleaning Of The Child Car Seat 20
9.2 Removing Of Cover And Cleaning Of The Infant Carrier 21
10.1 Installing The Sun Canopy (not present in all variants) 21
10.2 Installing the infant carrier sun canopy 21
11. Infant Carrier Adapter For Strollers (optional) 21
12. General instructions 21
13. Warranty 22
14. Protecting your car 22
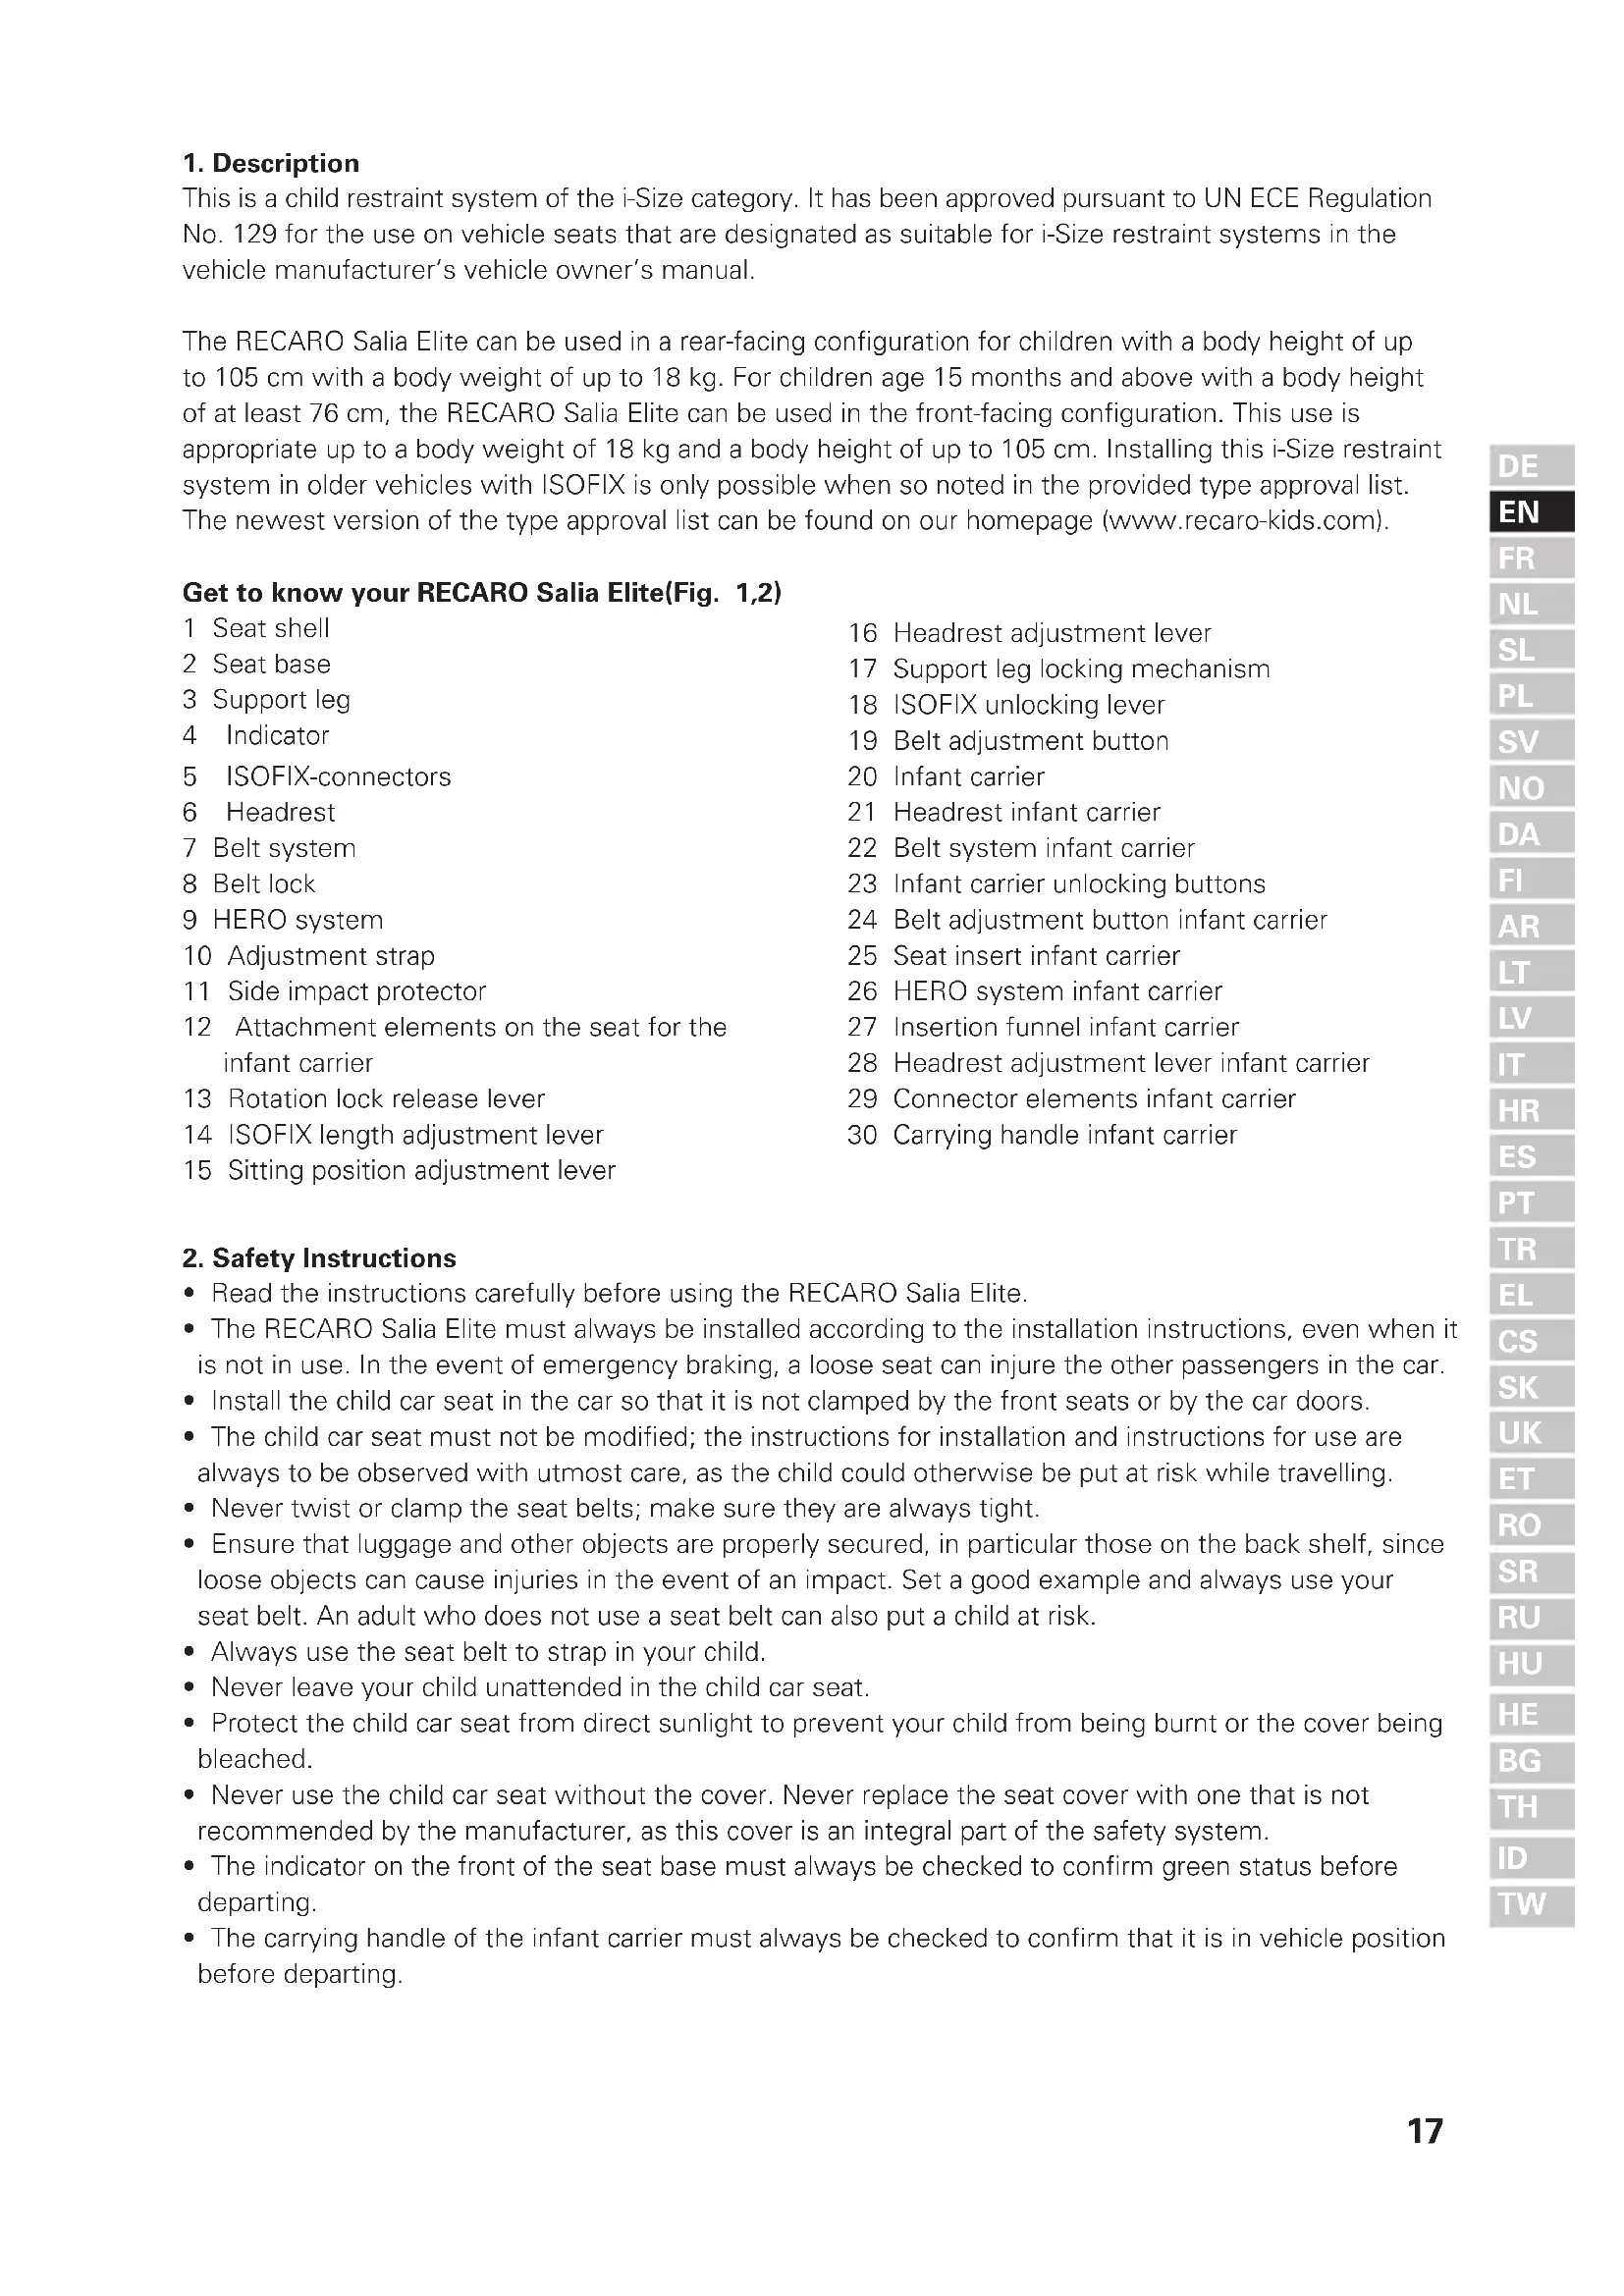
1.Description
This is a child restraint system of the i-Size category. It has been approved pursuant to UN ECE Regulation No. 129 for the use on vehicle seats that are designated as suitable for i-Size restraint systems in the vehicle manufacturer's vehicle owner's manual.
The RECARO Salia Elite can be used in a rear-facing configuration for children with a body height of up to 105cm with a body weight of up to 18kg . For children age 15 months and above with a body height of at least 76cm , the RECARO Salia Elite can be used in the front-facing configuration. This use is appropriate up to a body weight of 18kg and a body height of up to 105cm . Installing this i-Size restraint system in older vehicles with ISOFIX is only possible when so noted in the provided type approval list. The newest version of the type approval list can be found on our homepage (www.recaro-kids.com).
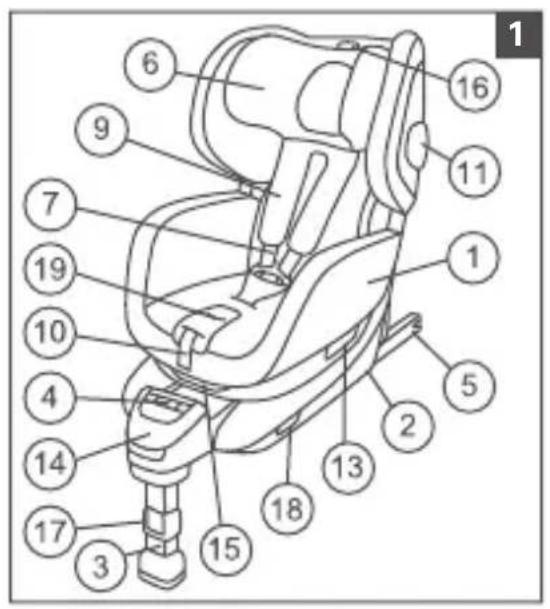
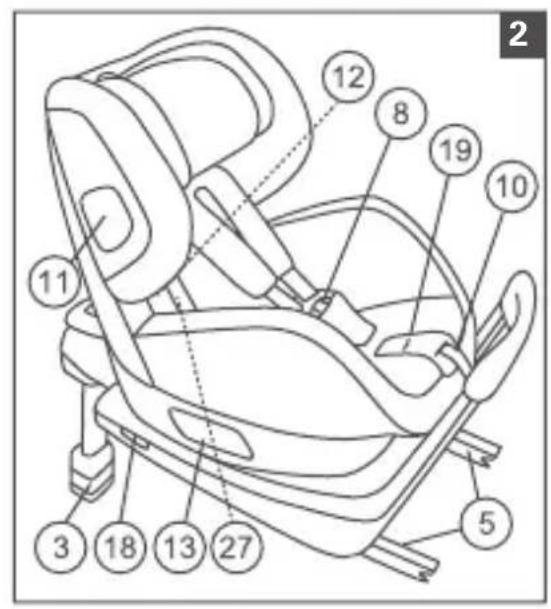
Get to know your RECARO Salia Elite(Fig. 1,2)
1 Seat shell
2 Seat base
3 Support leg
4 Indicator
5 ISOFIX-connectors
6 Headrest
7 Belt system
8 Belt lock
9 HERO system
10 Adjustment strap
11 Side impact protector
12 Attachment elements on the seat for the infant carrier
13 Rotation lock release lever
14 ISOFIX length adjustment lever
15 Sitting position adjustment lever
16 Headrest adjustment lever
17 Support leg locking mechanism
18 ISOFIX unlocking lever
19 Belt adjustment button
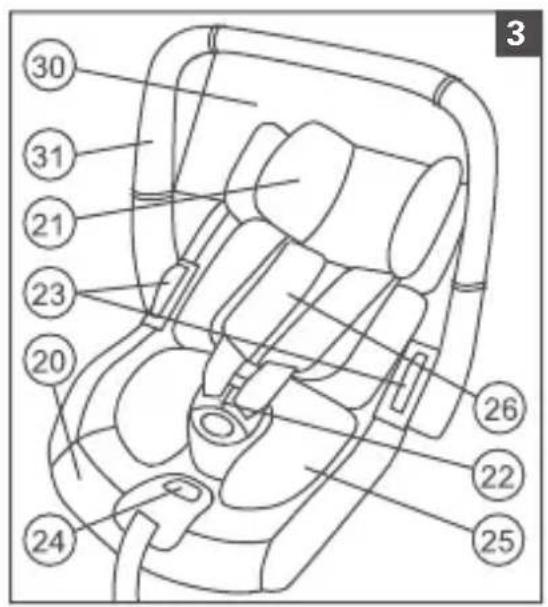
20 Infant carrier
21 Headrest infant carrier
22 Belt system infant carrier
23 Infant carrier unlocking buttons
24 Belt adjustment button infant carrier
25 Seat insert infant carrier
26 HERO system infant carrier
27 Insertion funnel infant carrier
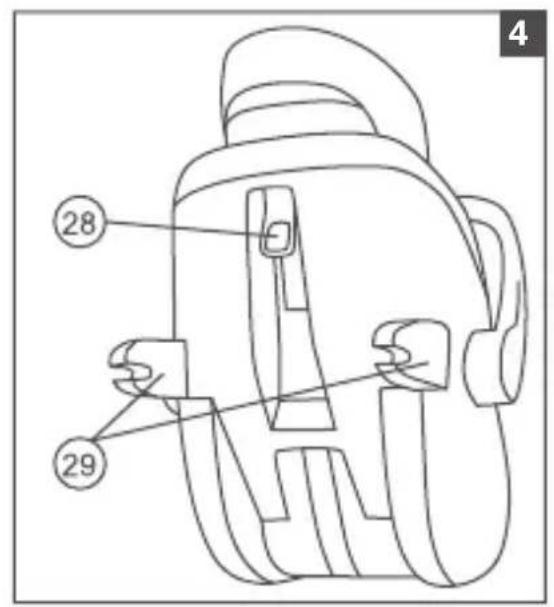
28 Headrest adjustment lever infant carrier
29 Connector elements infant carrier
30 Carrying handle infant carrier
2. Safety Instructions
- Read the instructions carefully before using the RECARO Salia Elite.
- The RECARO Salia Elite must always be installed according to the installation instructions, even when it is not in use. In the event of emergency braking, a loose seat can injure the other passengers in the car.
- Install the child car seat in the car so that it is not clamped by the front seats or by the car doors.
- The child car seat must not be modified; the instructions for installation and instructions for use are always to be observed with utmost care, as the child could otherwise be put at risk while travelling.
- Never twist or clamp the seat belts; make sure they are always tight.
- Ensure that luggage and other objects are properly secured, in particular those on the back shelf, since loose objects can cause injuries in the event of an impact. Set a good example and always use your seat belt. An adult who does not use a seat belt can also put a child at risk.
Always use the seat belt to strap in your child.
- Never leave your child unattended in the child car seat.
- Protect the child car seat from direct sunlight to prevent your child from being burnt or the cover being bleached.
- Never use the child car seat without the cover. Never replace the seat cover with one that is not recommended by the manufacturer, as this cover is an integral part of the safety system.
- The indicator on the front of the seat base must always be checked to confirm green status before departing.
- The carrying handle of the infant carrier must always be checked to confirm that it is in vehicle position before departing.
3. Before The First Use
At delivery, the RECARO Salia Elite comes with a forward-facing seat shell. To use it for babies below the age of 15 months and with a body height of less than 76cm , the back of the shell must face towards the direction of travel.
4. Installing The Child Car Seat
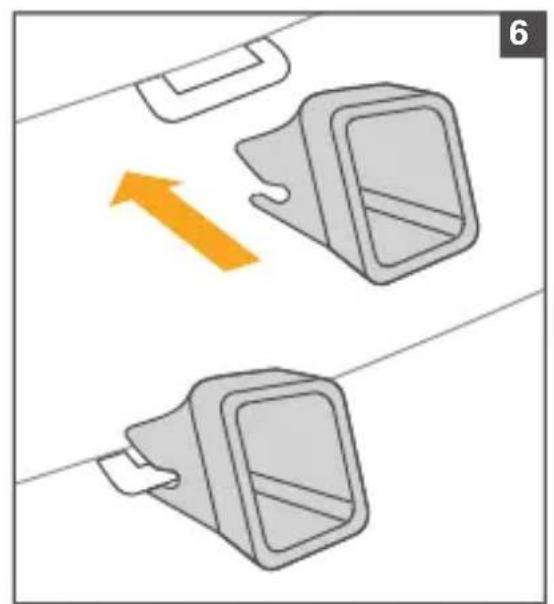
- Insert the insertion aids through the upholstery slit in the backrest and seat and attach to the ISOFIX attachment brackets. Make sure that the open side is facing upwards (Fig. 6). This is not necessary where insertion aids are already permanently installed in your car.
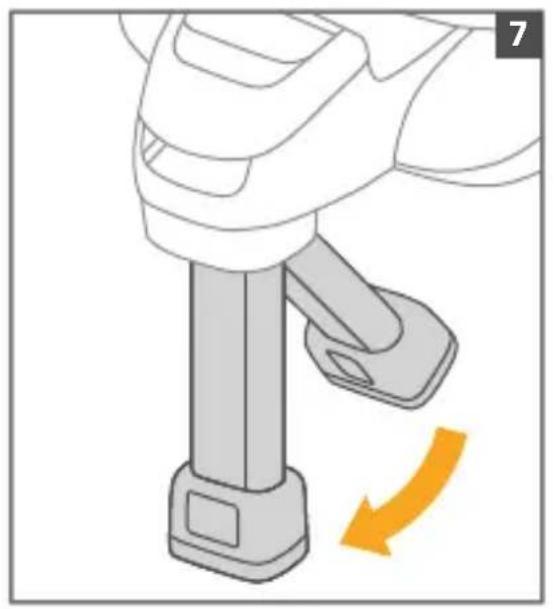
- Fold out the support leg before installing the child car seat in your vehicle (Fig. 7).
- IMPORTANT: The support leg must always be folded out before the seat is installed in the vehicle.
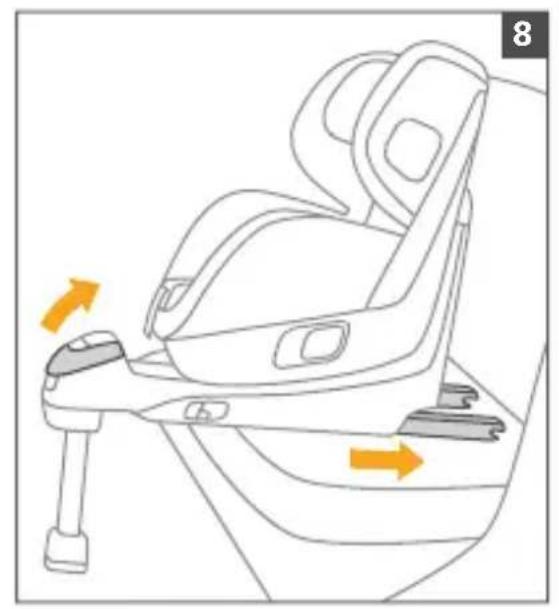
- To extend the ISOFIX connectors, operate the ISOFIX length adjustment lever (14) front, located above the support leg, and pull out the ISOFIX connectors (5) all the way to the dead stop (Fig. 8).
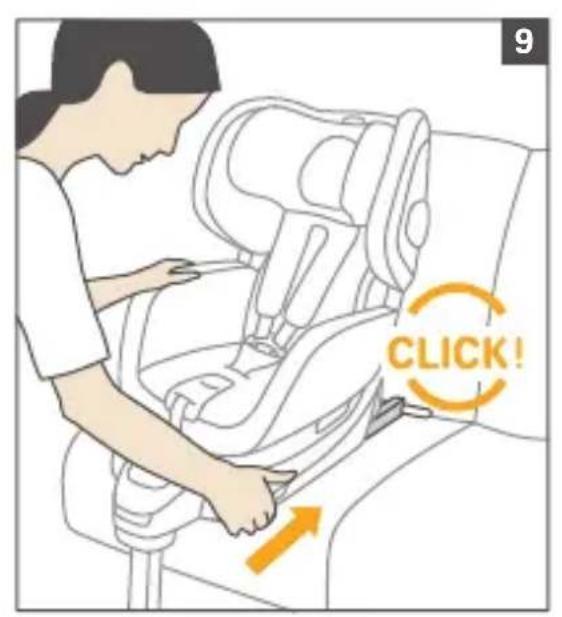
- Next, position the RECARO Salia Elite on the ISOFIX attachment brackets, making sure you can audiably hear the connectors lock into place (Fig. 9).
- IMPORTANT: When using the child car seat on the front passenger seat, the passenger seat must be moved to its rearmost position before the child car seat is installed. Make sure that the child car seat is not trapped by the dashboard or the vehicle door.
- IMPORTANT: Both ISOFIX indicators must turn green. Check proper locking of the child car seat by pulling on it (Fig. 10).
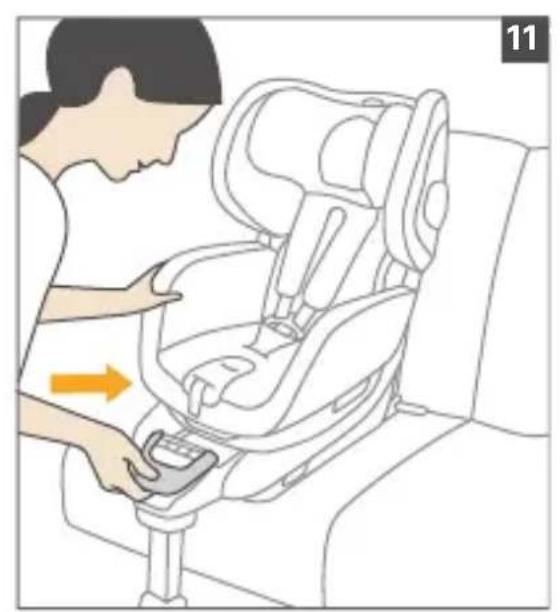
- Pull the ISOFIX length adjustment lever (14) upwards and push the RECARO Salia Elite at least one position towards the backrest until it fits closely (Fig. 11). You have to hear an audible engaging.
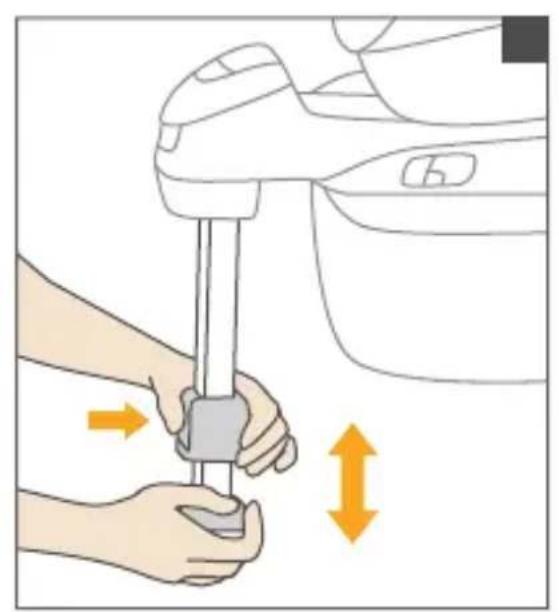
- To adjust the height of the support leg, first push the support leg upwards all the way to the dead stop, and then actuate the locking mechanism of the support leg (17) located on the front of the support leg (Fig. 12).
- Now, pull out the support leg until it rests safely on the vehicle floor. Make sure that the support leg is securely locked in after releasing the lock button.
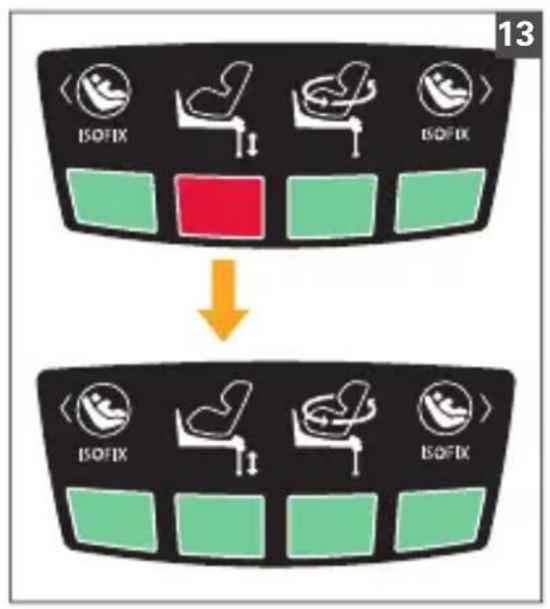
- When the length has been set correctly, the support leg indicator turns green as soon as the support leg is set down on the car floor. If this is not the case, extend the support leg a little further as described above.
- IMPORTANT: The indicator must switch to green (Fig. 13).
- In order to increase safety in the event of an accident, activate the side impact protection of the child car seat. To do so, lift the impact protector on the side of the child car seat facing the vehicle door. Check proper locking of the impact protector by pushing on it (Fig. 14).
- NOTICE: Even without the side protectors, the seat provides sufficient protection against side impact. If the vehicle has enough space available, we recommend activating the side impact protector on the side pointing towards the vehicle door.
5.1 Using the infant carrier
Your RECARO Salia Elite is equipped with a removable infant carrier for smaller children up to the approximate age of 12 months, a body height of approximately 76cm and up to a maximum weight of 10kg . Before using the infant carrier for the first time, you will have to prepare the child car seat. First, place the seat shell into the maximum resting position (see Chapter 7). Thereafter, place the headrest into its top-most position, as shown in Chapter 5.2.
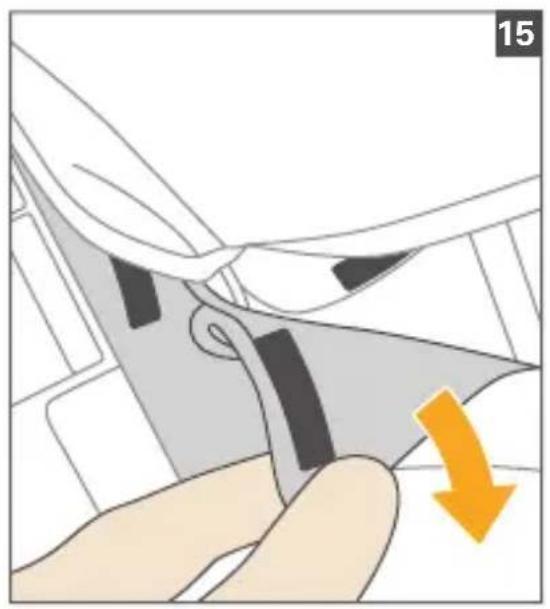
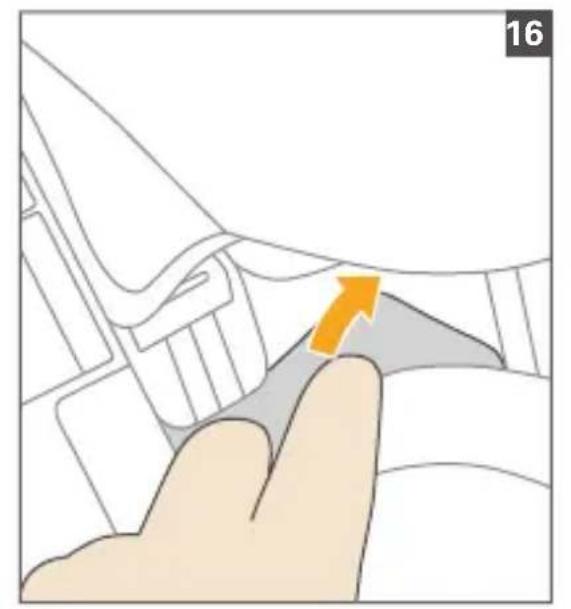
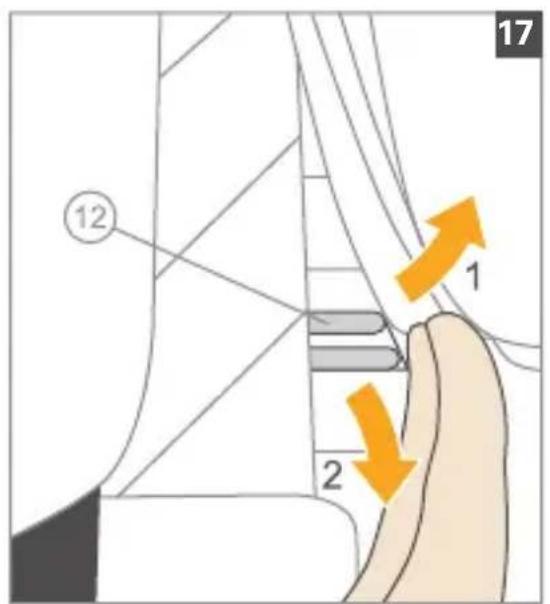
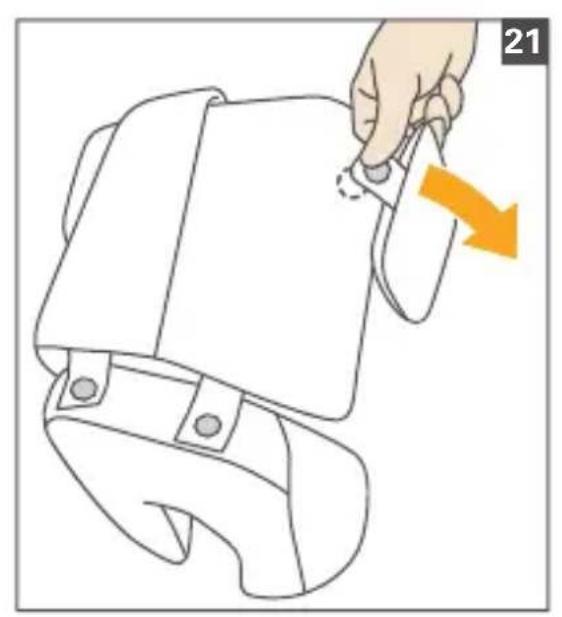
Now, fold up the lateral tabs of the cover as shown and secure them in this position using the Velcro fasteners. You can now fold the attachment elements (12) of the removal infant carrier forward.
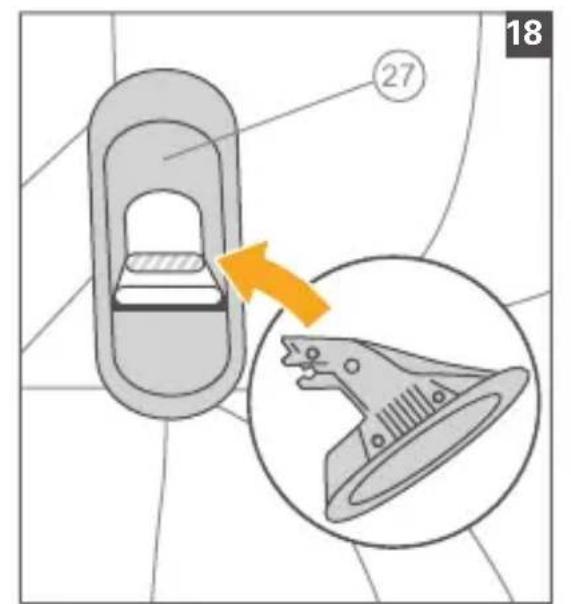
Plug the included insertion funnels (27) onto the rear crossbars of the attachment elements (12).
Pay special attention to ensuring a firm connection with the seat.
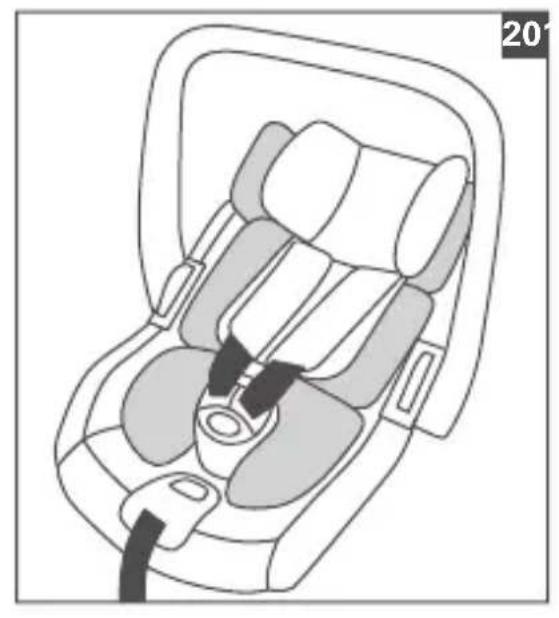
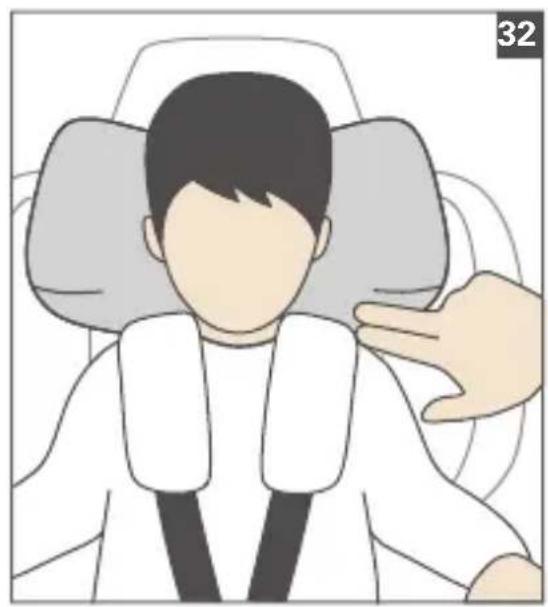
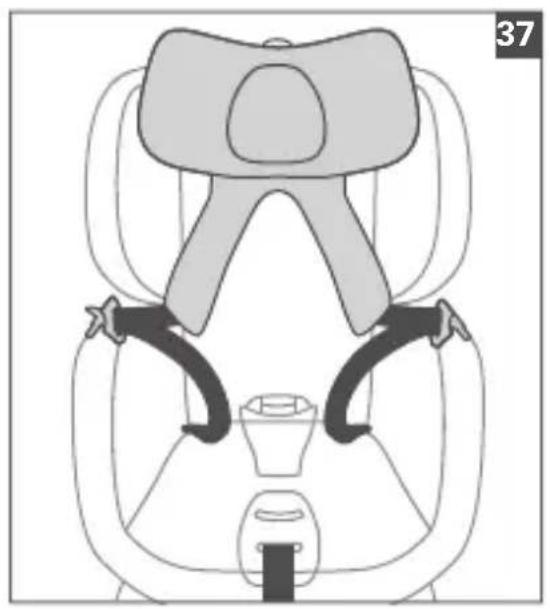
To adjust the infant carrier to the size of your child, actuate the lever on the back of the infant carrier (28), and push the headrest to the desired height. The shoulder belt outlets with the Hero system (26) should now be at the height of the child's shoulders. Ideally, the lower edge of the headrest should be located approximately 2 finger-widths above the shoulders of the child (Fig. 32).
The infant carrier is fitted with an additional seat insert (25) which makes the seat smaller. This needs to be removed before the head rest is height-adjusted for the first time.
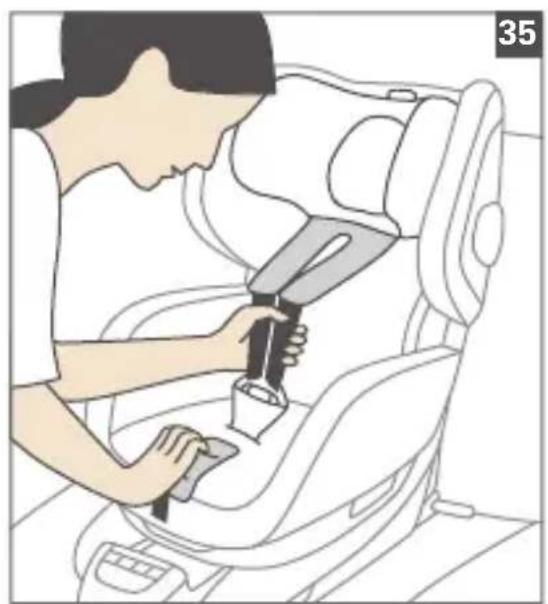
Strapping-in the child
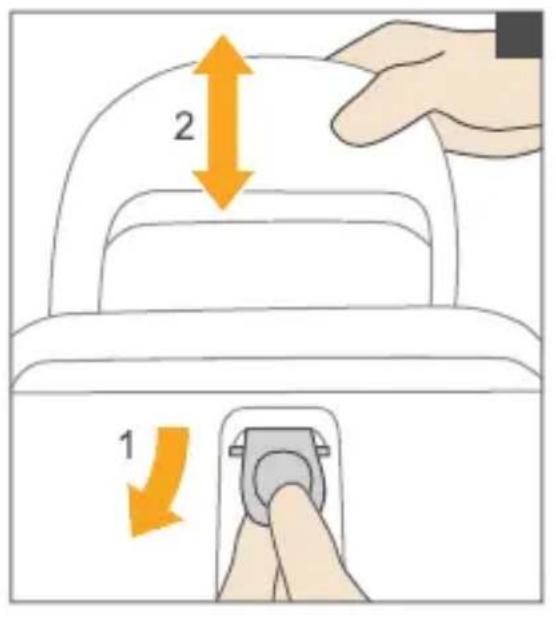
Loosen the seat belt by pressing the belt adjustment button (24) and pulling the belts out towards the front. To adjust the carrying handle (31) for easier placement of the child, push the two grey buttons on the carrying handle simultaneously and move the handle into the desired position.
IMPORTANT: Once the child has been placed in the infant carrier and buckled in, the carrying handle (31) must be returned into the upright position. Once you have released the buttons, make sure that the carrying handle is properly locked in.
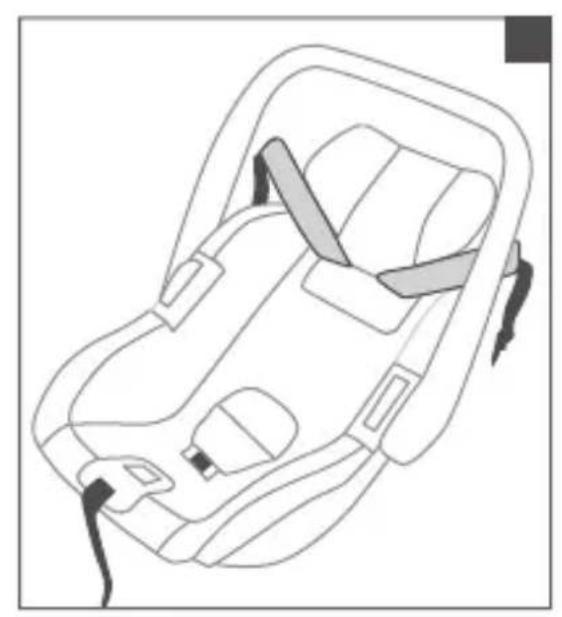
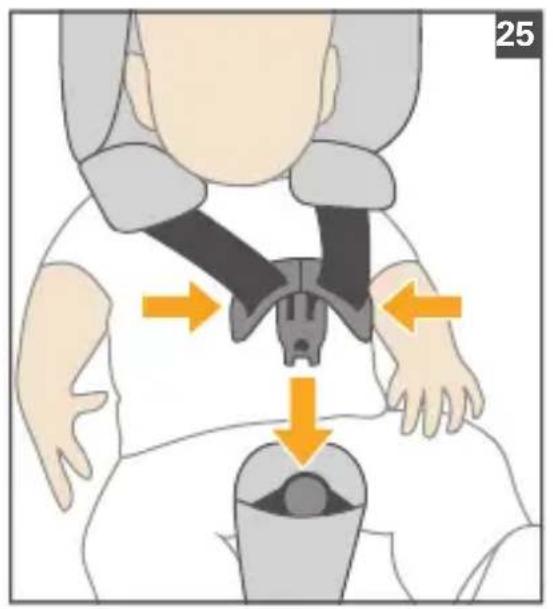
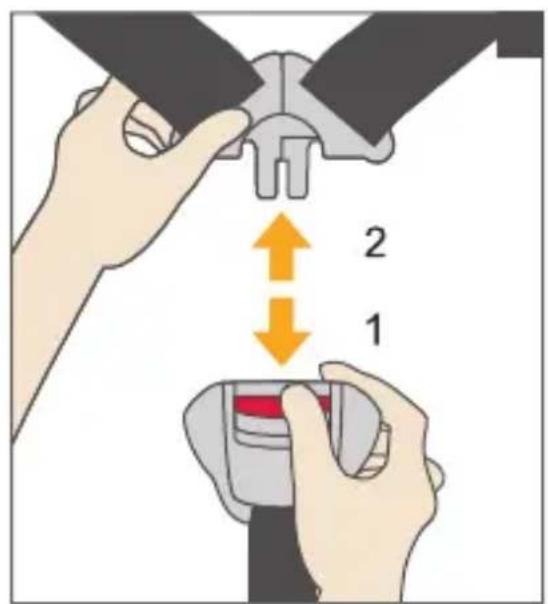
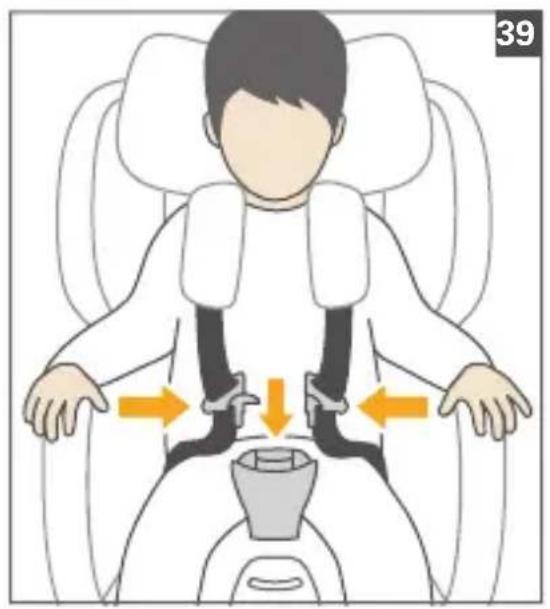
Place the seat belts outwards to the sides before putting your child into the infant carrier. Lay the seat belts across the child's shoulders towards the front and then the belt tongues on top of one another.
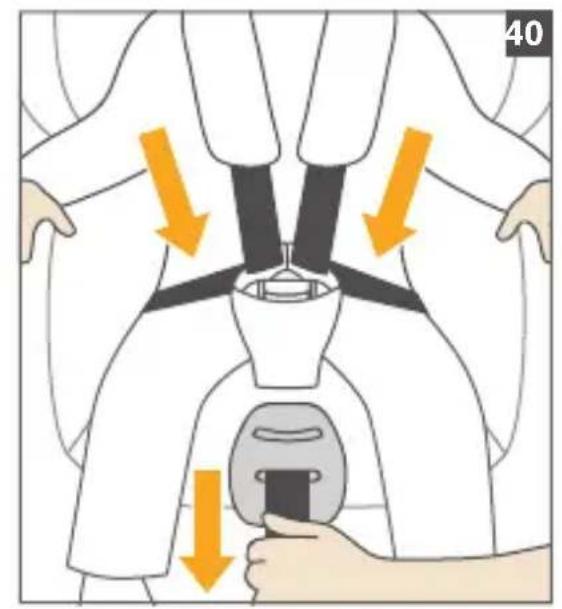
Next, insert the belt tongues into the belt lock, making sure you can audiably hear them lock into place.
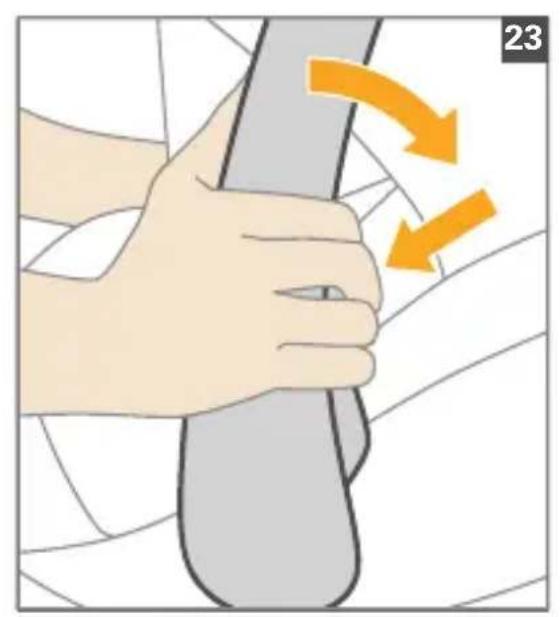
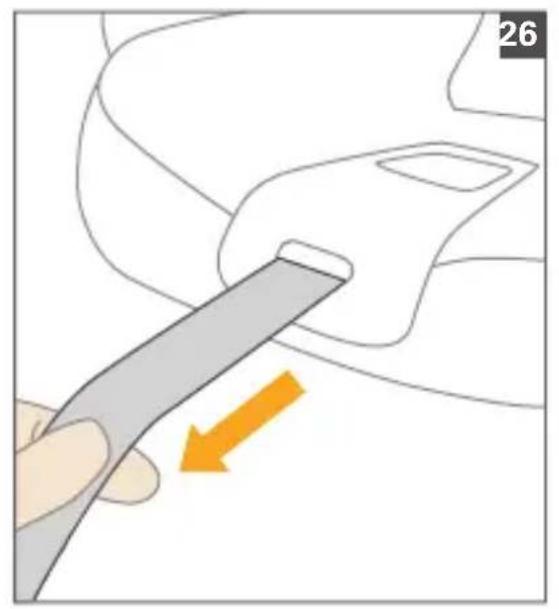
Tighten the seat belt by pulling on the adjustment strap. The tighter the belt is strapped across your child, the safer it will be in the baby seat. Therefore, it is always advisable to take off thick jackets or jumpers in the car before use.
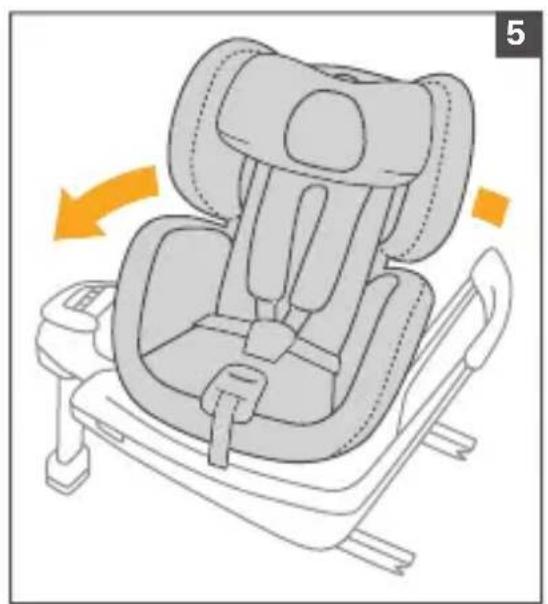
Inserting the infant carrier shell into the Salia Elite
To insert the infant carrier, it is recommended to rotate the Salia Elite towards the door first (see Chapter 6). Important: The headrest of the seat must be in its topmost position (see Chapter 5.2), in order to be able to insert the infant carrier into the seat.
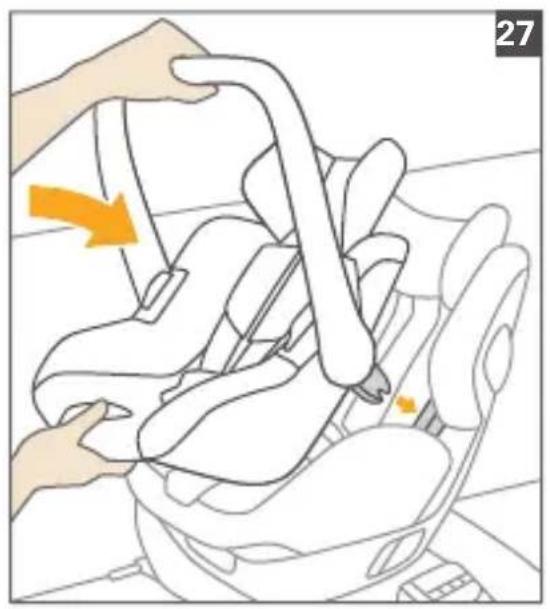
Now, with the carrying handle in the upright position, insert the infant carrier in such a manner that the connecting elements (29) penetrate the insertion funnels (27). Then, push the infant carrier firmly into the child car seat. The connection must lock in audibly. Ensure the infant carrier is properly locked in the seat by pulling on the carrying handle.
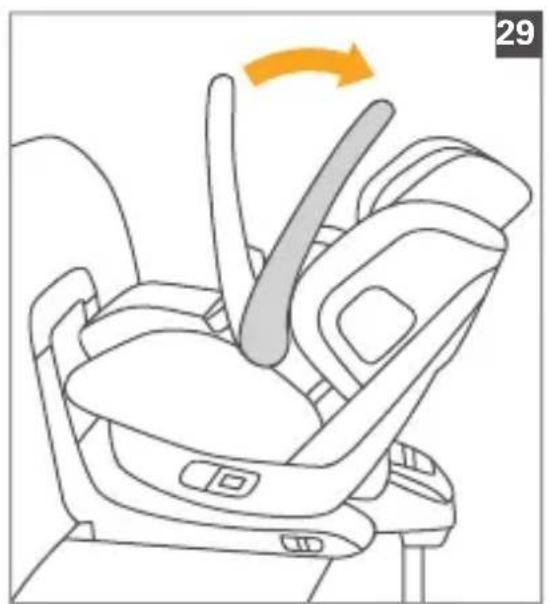
IMPORTANT: Now fold the carrying handle back into vehicle position (Fig. 29).
After buckling the child into the infant carrier, rotate the child car seat back into the rear-facing position.
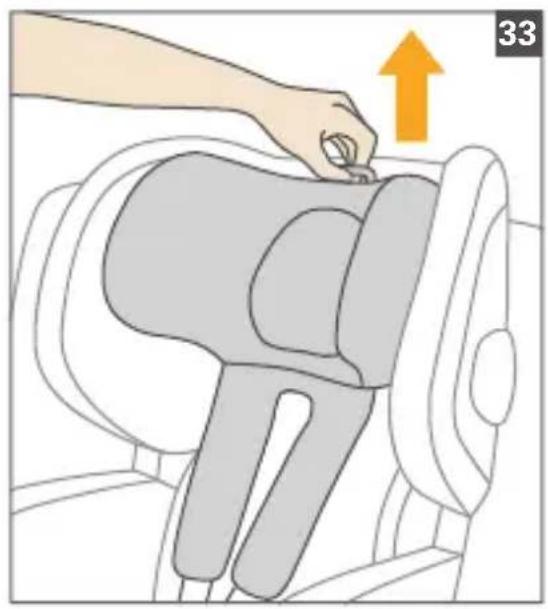
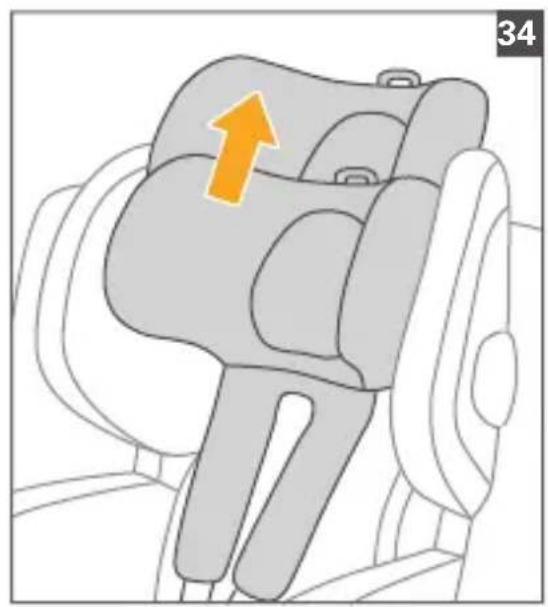
Removing the infant carrier
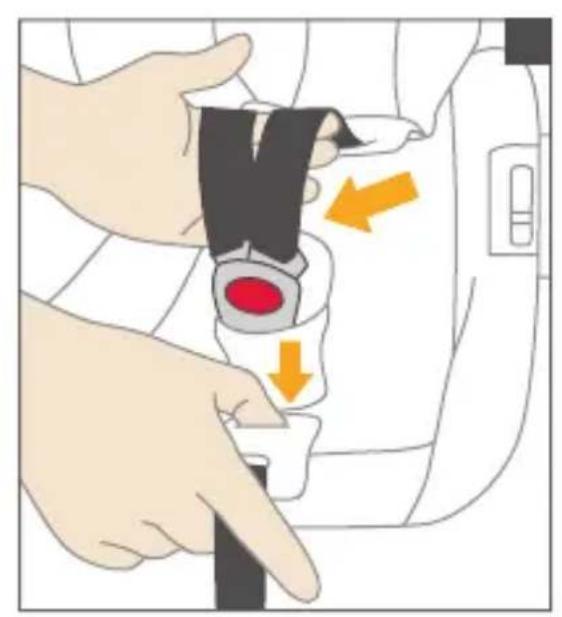
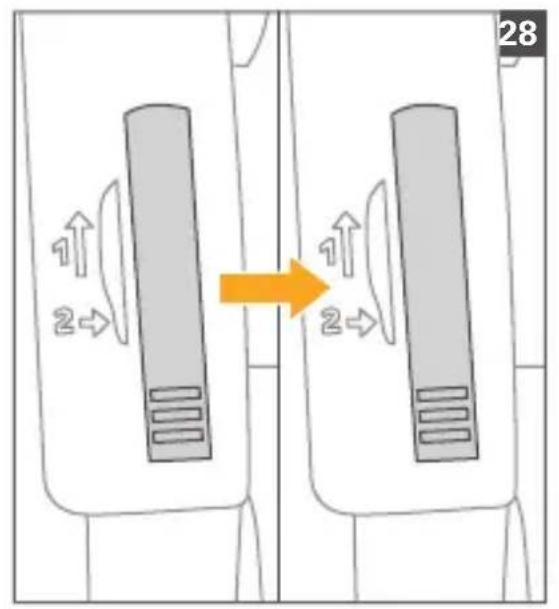
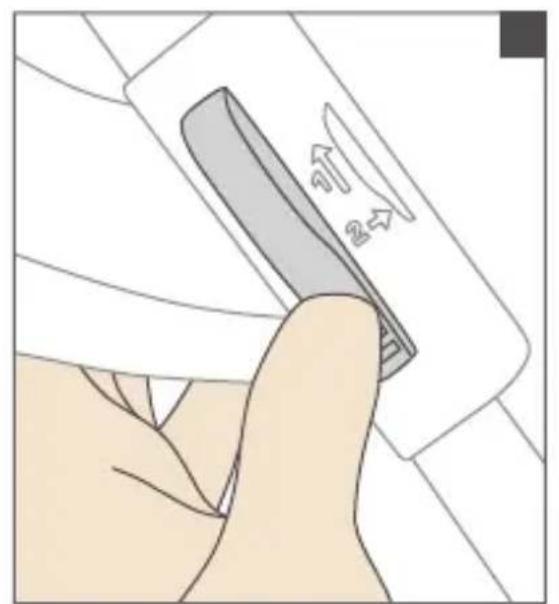
You can remove the infant carrier from the child car seat with your child placed in it. Here too, rotating the seat towards the door first (see Chapter 6) will facilitate the removal. Move the carrying handle into carrying position. To remove it, first push both infant carrier unlocking buttons (23) towards the upper rim of the shell and then, when they have reached the dead-stop, push them downwards. The infant carrier is now unlocked and can be removed from the child car seat.
Important: Your child must always be buckled in when placed in the infant carrier and never left unattended.
5.2 Buckling Up The Child (with height adjustment of the seat belts)
The height of the shoulder belts together with the headrest can be adjusted to the height of your child. Ideally, the shoulder belts should run from the shoulders of your child towards the rear at the height of the shoulders or slightly above.
IMPORTANT: Ideally, the lower edge of the headrest should be located approximately 2 finger-widths above the shoulders of the child.
Now, push the headrest into the desired position and allow the locking mechanism to lock.
Ensure proper locking by pushing the headrest downwards. It may be necessary to loosen the belt first. To loosen the belt, actuate the belt adjustment button (19) and pull the shoulder belts forward as shown. Open the belt lock (8) by pushing the red button, and pull out the belt tongues in an upward direction. Place the belts outward.
Rotate the shell to the side (see Chapter 6).
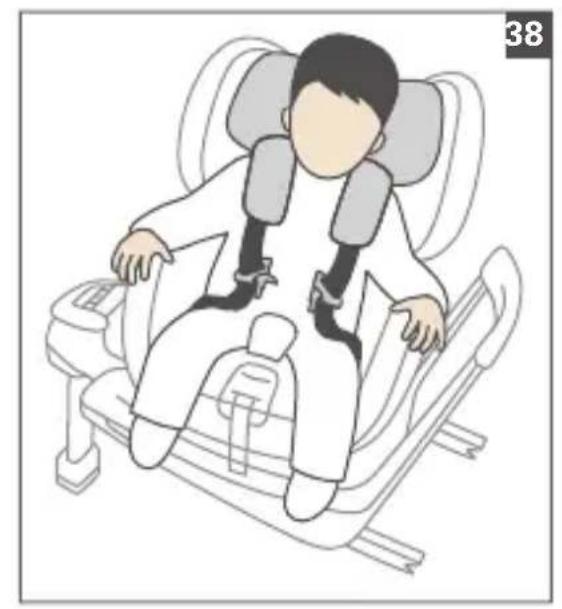
Seat your child in the child car seat. When buckling on the belts, make sure that you do not twist them. Join the belt tongues and push them into the belt lock (8) together. Ensure they lock in audibly.
Tighten the seat belt by pulling on the adjustment strap (10). The tighter the belt is strapped across your child, the safer it will be in the child car seat. It is therefore recommended to take of thick jackets or sweaters when in the child car seat.
IMPORTANT: Pay particular attention to the lap belts being fastened tightly, crossing the pelvis at the lowest possible point. Once your child is buckled in, rotate the seat shell back into the driving position.
6. Front-facing/Rear-facing
In order to facilitate buckling in, the seat shell of the RECARO Salia Elite can be rotated towards the door. To unlock the seat rotation, push the button at the centre of the rotation lock release lever (13) downwards first, and then pull the unlocking lever (13) outwards. You can now rotate the seat shell to the side. Once your child is buckled in, rotate the seat shell back into the starting position.
Make sure the seat shell locks into place securely.
IMPORTANT: The seat rotation indicator must switch to green.
We recommend to transport your child in the rear-facing position for as long as possible. From age 15 months and a body height of at least 76~cm on, it is also permissible transport your child in the forward-facing position.
7. Setting Up The Resting Position
To adjust the sitting position, loosen the locking mechanism by pulling the sitting position adjustment lever (15) on the front of the seat shell. You can now push the seat shell into the desired position. Once the desired position is achieved, release the sitting position adjustment lever (15) and let it lock in. Check secure locking by pushing or pulling the seat shell.
8. Removing The Child Car Seat
To remove the RECARO Salia Elite, lift the ISOFIX length adjustment lever (14) on the front of the child car seat up, and pull the child car seat forward a little bit. Now, push the light-grey buttons on the ISOFIX unlocking lever (18) down, and unlock the ISOFIX connectors by pulling these levers on both sides as illustrated. You can now remove the RECARO Salia Elite from the vehicle.
The support leg can now be folded in.
9.1 Removing Of Cover And Cleaning Of The Child Car Seat
The seat and seat belt may be cleaned with lukewarm water and soap. The belt lock can be rinsed out with water if necessary. RECARO seat covers can be machine-washed. We recommend washing the covers at 30^ using a delicate wash to protect the environment. Higher temperatures may cause the colours to fade. Never spin or dry the covers in a dryer, as the fabric may come apart from the padding. Remove the Velcro fastener as illustrated to remove the shoulder padding from the fastening belts.
As a next step, open the press studs on the pads and remove the shoulder belts.
Now, open the press studs on the back of the headrest.
You can now remove the head rest cover with a forward motion.
The back padding is attached to the headrest with press studs. After opening the press studs, you can pull off the padding downwards.
To remove the bottom cover part, open the Velcro fasteners in the back area.
Pull the belt lock from the groin strap padding as shown in the illustration.
Loosen the cover by opening the Velcro fasteners on the outside of the seat shell. You can now remove the cover from the seat shell.
The cover in the shoulder area can be removed once the press studs on the outside have been opened and the cover has been detached from the hooks.
Thereafter, open the press studs in the back area.
You can now remove the shoulder cover as shown. After washing, please let the cover dry completely before you re-install it in the reverse order.
9.2 Removing Of Cover And Cleaning Of The Infant Carrier
The seat and seat belt may be cleaned with lukewarm water and soap. The belt lock can be rinsed out with water if necessary. RECARO seat covers can be machine-washed. We recommend washing the covers at 30^ using a delicate wash to protect the environment. Higher temperatures may cause the colours to fade. Never spin or dry the covers in a dryer, as the fabric may come apart from the padding. Remove the Velcro fastener as illustrated to remove the shoulder padding from the fastening belts.
As a next step, open the press studs on the pads and remove the shoulder belts.
Remove the padded headrest and pull the shoulder belts out through the shoulder padding as illustrated.
IMPORTANT: The headrest cover and the HERO system of the infant carrier (26) consist of 2 parts which have to be connected before use.
Next, pull the buckle out downwards through the belt lock padding.
Detach the cover from the hooks on the edge of the shell.
Before cleaning the cover of the seat insert infant carrier (25), please remove the foam insert from its pocket on the inside.
Open the press studs behind the headrest of the infant carrier. You can remove the cover after you have detached it from the circumferential groove, the covers of the unlocking buttons and the belt adjustment of the infant carrier (24).
After washing, please let the cover dry completely before you re-install it in the reverse order
10.1 Installing The Sun Canopy (not present in all variants)
On both sides, guide the locking pin of the sun canopy into the shoulder support of the RECARO Salia Elite at the marked locations.
Now, plug the cover into the circumferential cover groove.
The sun canopy can be opened or closed by pulling at its front end.
There is, furthermore, and additional foldable element at the front end of the sun canopy.
10.2 Installing the infant carrier sun canopy
Attach the 4 elastic bands of the infant carrier sun canopy to the carrying handle. Stretch the infant carrier sun canopy over the infant carrier headrest (21).
11. Infant Carrier Adapter For Strollers (optional)
WARNING: This adapter is NOT a toy. Fits the infant carrier of the RECARO Salia Elite only.
Never leave your child unattended with this product. The adapter must audibly lock onto the RECARO stroller adapter or select other models (a type list is available at www.recaro-kids.com).
Before each use, ascertain the firm connection of the adapter to the stroller adapter.
Inspect the adapter for damages, tears and deformations regularly.
See Chapter 5.1 regarding the removal of the infant carrier from the adapter.
To remove the adapter from the stroller adapters, push the two grey unlocking buttons of the adapter.
12. General instructions
The instructions for use are in the compartment on the back of the child car seat. After use, they should always be placed back there. The RECARO Salia Elite is suitable for children up to a body height of 105 cm and with a maximum body weight of 18 kg.
13. Warranty
The following warranty regulations shall only apply in the respective country in which this product was initially sold to a consumer by a retail store.
- The warranty covers any and all production- and material faults which have existed at the time of purchase or which have appeared within two (2) years from the date of the first sale of this product to a consumer by a retail store (manufacturer warranty). Please inspect the product for completeness and manufacturing- or material faults immediately after your purchase or, if purchased by mail-order, immediately upon receipt.
- If any faults should be present, the product must not be used. In order to be able to submit claims under this warranty, the product must be returned completely and in clean condition to the retailer of initial sale, together with the original proof of sale (receipt or invoice). Please do not bring or mail the product directly to the manufacturer!
- The warranty does not cover damages which are the result of misuse, external impacts (water, fire, accident, etc.), normal wear and tear or which are the result of treatment and use in a manner which is not in compliance with these instructions for use. The warranty will only be honoured when repairs or alterations were made by persons which were duly authorised to do so and only if original production and accessory parts were used.
- This warranty shall not affect existing consumer rights nor any rights against the retailer based on a lack of conformity of the product.
- All our fabrics fulfil high requirements in terms of colour-fastness. However, fabrics may still bleach under UV light. This is not a material defect, but simply a normal sign of wear for which no warranty can be given.
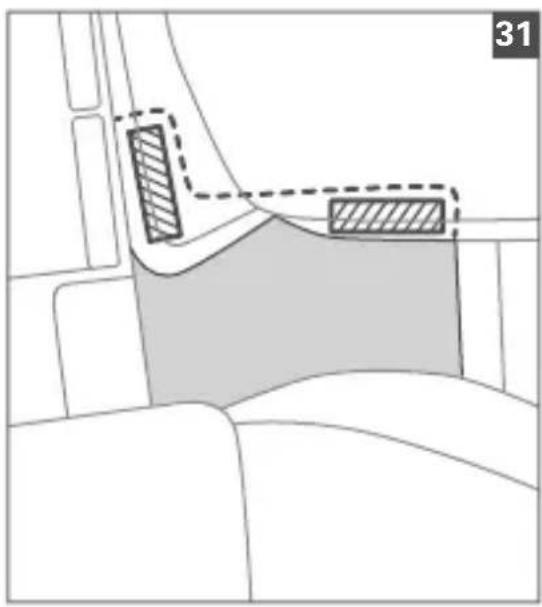
14. Protecting your car
We would like to point out that the use of child car seats may cause damage to the vehicle seats. Safety Directive ECE R129.00 requires fixed installation of the seat. Please take appropriate measures to protect your vehicle seats (e.g. use a RECARO Car Seat Protector).
The Recaro Kids s.r.l. company or its distributors shall not be liable for any damage to vehicle seats.
SALIA ELITE
Satta babyliften in i Salia Elite
Aa a a a a a a a a a a a a a a a a a a a a a a a a a a a a a a a a a a a a a a a a
. UN R129/00 i-Size
Aa 1
y 4
Jlll lgl Jaae 2
s g i 1
75
75. 2
75. 3
76. 4
76. 5.1
77. (a)
77. 6
77. 7
77. 8
78. 9.1
78. 9.2
78. (1)
78. 10.2
78. (s)
79. 12
79 13
79 14
129 (UN ECE) 48
105 18 18 18 18 18 18 18 18 18 18 18 18 18 18 18 18 18 18 18 18 18 18 18 18 18 18 18 18 18
.(www.recaro-kids.com)
(2g1 1 (RECARO Salia Elite)
16
aalal 17
ISOFIX 18
19 4
20 ISOFIX 5
jabll 21
jai 22
j23 8
jbl 24
jibll 25 10
jbl 26
jbb 27
Jabll 28
Jblll 29 Jgbl l ISOFIX 14
Jabll Jalll 30
aallll 2
.(RECARO Salia Elite)
a a a a a a a a a a a a a a a a a a a a a a a a a a a a a
g 1
J 1
aljally sllb jolil gale
aai jai jai ai aai
I (RECARO Salia Elite)
J 1
y
.(10)Jzall Jzai jzj 1
(RECARO Salia Elite) (14)
Jie quan ci elaw no jssrally sll. (11 8all) jayy j! yall snaal
(17) alalall pail jai ge baiol y gaii alalal pail ayd jai dai
(12) (all) all
a a
j 15 j 15
0xai jzjgao laagai jia jia lalall yajn jay jai jie
j 10. (13 o
a 1
(14 8all) 15
j 1
.3yallalalalalalalal
jbjlln 5.1
12 10 76
5 5 5 5 5 5 5 5 5 5 5 5 5 5 5 5 5 5 5 5 5 5
(12) yie jie 8y
pall lll jll jall jall aalld
(12) 1111111111111111111111111111111111111
J 1
.0oJgJgJgJgJgJgJgJgJgJgJgJgJgJgJgJgJgJgJgJgJgJgJgJgJgJgJgJgJgJgJgJgJgJgJgJgJgJgJgJgJgJgJgJgJgJgJgJgJgJgJ
jbjil pJb
(24) al jall bia jic bi aill jll
Jal Jaa a jaa a a a a a a a a a a a a a a a a a a a a a a a a a a a a a a a a
gall
j j 31) (31)
A
a a a a a a a a a a a a a a a a a a a a a a a a a a a
gaaa aagaae gaae gaae gaae gaae gaae gaae gaae gaae gaae gaae
y 1 y
aJyIeI JdI 1000
(Salia Elite)
Sall sll (Salia Elite) 11111111111111111
Sill jalll aoljiln jssii (1,5 jaiil jaiil) jall
(27) (29) 150000000000000000000000000000000000000000000000
Jaa
(29) (28)
y 1
(6 Jll) 5d d 1234567890123456789012345678901234567890123456789012345678901234567890123456789012345678901234567890123456789
()5.2
a 1
Joo Joo joo Joo Joo Joo Joo Joo Joo Joo Joo Joo Joo Joo Joo Joo Joo Joo Joo Joo Joo Joo Joo Joo Joo Joo Joo Joo Joo Joo Joo
j 1
aegall aagaaal gllgssal jaiSsol all
15) 15
4
Jabai Jaa 8
(14) JgIgIgISOFIXgRgRgRECARO Salia Elite) 11111111111111111111111111111111111111
(RECARO Salia Elite)
aalall aai
RECARO 30 30
jai jia laa aai yai ai jai 21, yai ai i jai 2, jaiyai
a a a a a a a a a a a a a a a a a
p01 11 jil jil iin cie bc ie ciS ay
aaii iie aiee eae ee eae eae eae eae eae eae eae eae eae eae eae eae eae eae eae eae eae eae eae eae eae eae eae eae eae eae eae eae eae eae eae eae eae eae eae eae eae eae eae eae eae eae eae eae eae eae
a a a a a a a a a a a a a a a a a a a a a a a
aallll lallll lallll lallll lallll lallll
yabia 1
J 1 1
jabi jao a jbi y bai 9.2
RECARO 30 30
12 1
aai 1 aai iai ai
aalalalalalalalalalalalalalalalal
12 20 (25) jall aai iiaa
j j j j j j j j j j j j j j j j j j j j j j j j j j j j j j j j j j j j j j j j j j j j j j j j j j j j j j j
Jaaa aalaaa aalaaa aalaaa aalaaa aalaaa aalaaa
.(21)Jaball aay wll dian gajaball axa yaae alae
(sj) jabla 1000
.(RECARO Salia Elite)
(RECARO)
. (www.recaro-kids.com 15 e 15y 15a 15e 15b 15i S kay*) e gaa a y
pssss 15
a 1
1.5 Julll jilj jll jilj lal
a a a a a a a a a a a a a a a a a a a a a a a a
13
12
J 1000000000000000000000000000000000000000000000000000000
2
Jalll alall lill (a la a c y c e) a jlll gil gil
(RECARO: jdll aee aee ae eae aee aee aee aee aee aee aee
.
"RALIA ELITE"
UN R129 · "i-Size" · Nuo 40 cm iki 105 cm kuno dydis Iki maždaug 4,5 metu amziaus
Dékojame, kad pasirinkote „RECARO" vaikiška kédute.
Sukaupe iiskirtine patirtj, daugiau nei 100 metu tobuliname automobiliu, lektuvir lenktyiniu automobiliu sedynes. Sios nepralenkiamos technines zenios taip pat atsispindi iki smulkmenur visose musu vaiku saugos sistemose.
10.1 BctaHOBHeHH KaTpya (doCTynHo He y Bcix BapiaHTax)
BCTABTe 7nTnT KaTpya 3 o6ox cTopiH y no3HaueHomy Micci B nIeOBy onOpy dntraHoro ABToKpicna RECARO Salia Elite.
Iicnla cbofo BcTaBte HoXoN B KaHaBky, 10 npoxOuNTb N nepImeTp.
KanTyp moXHa BiDkPITn i 3akPITn, NotTHyBUn 3a NOro nepeNHi kpa.
Kpim TOrO,Ha nepeHbomy Kpaio KanTpya 3HaxoIITbcra PO3KJIaIHN eIemeHT.
10.2 BctaHOBHeHHKaTpyaABToJIbKu
3akpinitb 4 rymoBI CTJKK KANTypa Ha dyKU iJn HepeHeceHHHaTARHtB KanTp aBTOHOBKn Ha NiIroNIBHK ABTOHIOBKn (21)
11. Aanterp abToIoubnk nIy dntayoro Bi3ka (onui)
IIOPEJKEHH: Ie an Tep HE irpaokoi. Bn nixoNtB nwe dna aTOJIbKn BiD nITyoro abTOKpica RECARO Salia Elite.
Hikon He 3aIIIaIe dITnHy 6e3 Hargy 3 daHIM BInpObOM. AaIaTep nobHeN 3aIKCyBaTncs 3 do6pe yTHMM 3BykOM Ha aIaIaTePax dITayoro Bi3ka RECARO Ta BIn6paHnx iHxM moJe*. (*PepeiK Tniv Bn 3naIte Ha Be6-ctopinCi www.recaro-kids.com).
Ipeep KOxHIM BnKOpNCtAHNm IpeBipAte HadiHicTe kpiInneHHa aanTepa aanTepi dntyoro Bi3ka.
Perynepno nepebipre Te aanTep Ha ykoKeHHa o doeopmaui.
IINBID'cHnHHABTOJIIOJIbIKBIDaIANTepaIb.ΓIaby5.1.
ДлбВID'ЕнHaHHaаNTepa BiД aanTepeBДТЯчOrO B3ka HaTnCHiB O6nDbciP KHOKN p036NOKyBaHHaаNTepa.
12.3araanbhi Bka3iBkn
Ihctpykui KopnctyBaay 3naoxntbC B CneuaHomy BiDineHHi Ha 3BopOTHi CTOpOH iHTaYoro ABTOKpicna. Iicna KopnctyBaHH iHctpykuo Heo6xio Ho Klaactn Ha Micue. DITrue aBToKpICNo RECARO Salia Elite npu3Hauehe dInr diTei 3poCTOM do 105 cm Ta MaKcmaJIbHOIO BaroIO 18 kr.
13. rapaHTria
HaCytnHi yMoBN rapaHTi DiIOb IINe B KpaIH, B JaKi ue Bnpi6 Bnepwe 6yB npOaHn cnoKuBaueyi po3dp6hi TOpribni.
1.Дя rapaHTi po3noBcOJxCyTbCn Ha BcI DeΦeKTH Bnpo6HnTBA Ta MaTepiJIIB,Як 6yJIu HauBHi Ha MOMENT npi D6aHHa 60 aki BnHKn npoTgrom dBox (2) pokib nicna nepworo npoJaxy zuoro Bnpo6y B po3di6Hni TopriBn CTOXNBaueBi (rapaHTi Bnpo6Hnka). HeraHNo nepeBipte ue Bnpi6 nicna KyniBNI a60, y BnnaKny KyniBNI 3doctabKOIO -nicIAI NO OTpMaHHHa npedmet KOMNKeTHOCTI Ta DeΦeKTH Bnpo6HnTBA i MaTepiJIIB.
2.Пи ВИВЛЕNHи NOrkOДжЕн ecKnpyataiBnO6by 3abOpOHeHa.ДЯ OTpIMaHnNoCnyr,nepe6aueHxciIg rapaHTICIO, Heo6xIDHO NOBepHyTN BnPb y NOBHOMy KOMJIeKTI Ta B YNCTOMy CTaHI B opraHl3aIIO po3dpi6HoIT TopriBni,de BIn b6yB npu6bAHn Bnpese, a TAKoX NiTBePdKeHHN npu6bAHn (eK a6o paxyHok) B opurinani. He DoCTaBJIte Ta He BiINpaBJIte BnPb 6e3nocepEnHb Bnpo6Hnky!
3.Дя rapaHTI He po3NOBcIOJxCyTbCn Ha N0WKOJKeHHN, 1O BuHKnI B pe3yIbTaTI HeHaJeKHOI ekCnJIyatauII, 3OBHIIX YHHNKIB (BOa, NOyM'ay, abapii i T. n.), HOpMaNbHOrO 3HOWeHHa 6O NOBODKeHHa Ta BIKOpNCtAHN 3 NopyeHHaM N0NoXeHb ci iHCTpyKci 3 ekCnLIyatauII. RaapaTHia HadaCTbcra JInse Toi, KOnI pEmOHTHi po6OTn Ta 3MiHN BKNoHYBaJIncB BINrTKOBO yNoBHObaKeHHmHa ue OCObAMn Ta 3a yMOB NOCTIHORo BIKOpNCtAHN TiNbKn OpurHahhix DeTanei Ta akcecyapib.
4. La rapaHTI He BnINBa cK Ha HauBHi npaba CnoXnBaui, TaK i Ha npaba y BiHoueHHI Do npoabuq uepe3 HeiD nobiHicTb BnO6y noNoxKeHHM DorOBOpY.
5. Bci TkaHnH, kI M N BnKOpNCTOByEmO y Bnpo6HnTBI, BiNIObIAoTB BnCOKM BnMOrA M Do CTiIKOcTI 6apBHNkIB. Ondak, TkaHHn BnroPraHObI nd iEYO btpaioJeTOBO rBnpOMHeHHa. He BBAxKaETbc8 6paKOM MaTepiany, a e IInwe npOBm 3BnuaHOrO 3HOuBaHHa, Ha aKe He po3NOBCIOJxyeTbca rapaHTia.
14.3axuctBaworoabtomo6in
Mn nonepaKyEMO, 0 np KOpNCTBaHHi dIITaUMn ABTOKpIClAmn He BKNIOeHa MOXJIbICtB NOIKoJKeHHcuiNb TpaHCnOpTHoro 3ac6by. 3riHNO i3 DnpeKTIBOIO 3 6e3neKn ECE R129.00, nITrue aBTOKpIClMo c6ytu NaHIO 3aFikCoBaHe. BapTo BxNTn BiINOBiHNx 3axOIDB 0do 3axNCTy CNDIHn BaWOrO aBTOMoBIn (HaNP., BkOpNCtaTniKaJaKy RECARO Car Seat Protector).
KoMaHia RECARO Kids s.r.l. a60 ii dIeepn He Hecytb BiIOBdaIbHiCTb 3a MoKJIbI NOIKoJKeHHa CNDiHb TpaHCnoptHoro 3acoby.
SALIA ELITE
OTcyTCTBnE oneaTOK n OoN6OK He rapaHTnpyETcR, npaBO Ha TexHnueckne N3MeHeHn COxpaHEnO.
BHUMAHNE-683aTeIbHO COxpaHnTe DaHHoe pyKOBOCTBO JaJaBHeJ Wero nCNoIb3OBaHn. Jnra 3TOrHa 3aHne CTOpOHe DeTCKOro ABtOKpeCna IMeETcR CneuaJIbHOE OTdJeHnE dJaXpaHEny pyKOBOCTBa.
CODEPJKAHNE
- OnicsaHne 171
2.Инструкци no 6e3onacnoctn 171
3.Пердпрвимиспьзованem.. 172
- YctahOBka detckoro ABtOKpecna 172
5.1 IcnoIb30BaHne aBtOKpeCna-JIOJIbKn 172
5.2 PnpcternBaHne pe6eHka (cperyIupOBKO pemHe no BBicote) 173
- YctahOBka no xOdy/npOTnB XoJa DmXeHna 174
- YctanOBka B noLoXeHne Ira OTbIXa 174
8.ДeMoHTaxДeTCKOrO aBtOKpeCna 174
9.1 Chrtne yexna n ounstka detckoro abtokpecna 174
9.2 ChTne yexna n ounctka aBToKpeCna-1IOJIbKn 175
10.1 YctahOBka Ko3bIpbKa (IOCTyneH He IJI BCEx BapnAHTOB) 175
10.2 YcTahOBKa KO3bIpbKa aBtOKpeCna-JIIOJbKn 175
- AanTep abToKpeCna-IOIbKn dJa detcko KOnaCKn (onzra) 175
- 06uime yka3aHnra 175
- TapaHTy 176
- 3aunTa Bawero aBtOMo6nla. 176
1. OnmcaHne
I3dennpeedctabnaretco6oJdtckoe ydepknBaouieyctpoiCTBO kateropnn i-Size.IpaBnAmUN ECE N 129 daHnoe aBtOKpeCNO pa3peuaeTcyaTaHaBnBaTb Ha aBTOMO6nIbHbIX cNdeHbx, KOtOpble cornaCHO daHHbIM aBTOnpOn3BOIDTeIN B pyKOBODCTBE K aBTOMO6nIIO npncnOC6neHb I nncnO30aHnI CNCTem i-Size.
Abokpecno RECARO Salia Elite moxho nCnoB3OBaB B nooKeHn npOTNB DnBKeHn dI nepeBO3Kn deTei poCTOM do 105 cm n Becom do 18 kr. Abokpecno RECARO Salia Elite moxho nCnoB3OBaB B nooKeHn nO xOdy DnBKeHn dI nepeBO3Kn deTei B Bo3pacte ot 15 mecaueB, poCTOM ot 76 cm do 105 cm n Becom do 18 kr. YcTaHObKa ydepKBAIOJero yctpoiCTBa kateropnn i-Size B 60nee cTapbIX moJeJX abTomobNeJc KpeJIeHnMn ISOFIX dOnyckaetc TOnbKO B TOM Cnyae, eCN coOTBeTCTByUQaJ MaOeJIb BKIOUeHa B npEJaRaembl CnICOK. PocneHnBercn 3TOrO cnNcKa PpeCTabHeHa Ha Hauem Be6-caite (www.recaro-kids.com).
067a KOnCTpyKmIaTeckoro aBtOKpeCna RECARO Salia Elite (pnc. 1,2)
1 CnDHeHbe aBtOKpeCna
2Ba3a aBToKpeCna
3 OnopnacToiKa
4 NaHeJIb INHdNkAToPOB
5 KOHHeKTopbI cIcTeMbI ISOFIX
6 POnrONoBnIK
7 CnCTema pemHe 6e3OnaCHOCTN
8 3aMOK peMHei 6e3OnaCHOCTI
9 CnCTema HERO
10 PerynipoBOchnyi peMewoK
11 Bokobar npotnBoydpna 3aunTa
12 KpeIeKhble 3JIeMeHbI Ha cnIeHbe IJIa bTOkpeCna-IOJbKN
13 OtnyckHO npbuaq fynKuIN NOBOPota
14 Pbyar perynipobkn nHb ciNCTembl ISOFIX
15 Pbyar perynipOBKn HaknoHa cndeHb
16 Pbyar peynilpoBkn noIroBnka
17Фнкcatop onopHOn CTOnKn
18 OTnyckHOpyar cncTeMbIsOFiX
19 KhoNka peynilnpobKn pemHnei
20 ABToKpeCNo-ⅢnBka
21 PoiIroIobHnK ABToKpeCna-JIIOJIbKN
22 CnCTema pemHne 6e3oNaChOcTN abTOKpeCna-ⅡIbKN
23 Khonkn pa36noikopOBKn ABTOKpeCna-nIobKn
24 Khonpa peryinpobkn pemHe n abToKpeCna-JnIbKn
25BknaibIyIyMeHbWeHnCnDEHbA BTOKpec - na-ⅡOJIbKIn
26 CnCTema HERO abToKpeCna-JIOJbKn
27 HanpaBnaIoune dny yCTaHOBKN aBTOKpeCna-ⅡIOJIbKN
28PburperynipOBKnnoIroOBnka aBTOKpeCna-NIOJBKN
29 CoeINHInTeIbHbte 3JIeMeHTbI aBTOKpeCJIa-JIOlbKIN
30 Puyka Длп перенockи abToKpeCna-нькn
2.Интукши no 6e3onachoctn
-Перед Испонтовиметдсгогавокесна RECARO Salia Elite BHIMATEЛьно ознakомьтсь с данhhim pykooboctbOM.
-Детскoe abToKpeCNo RECARO Salia Elite Bcerda DoJxHo 6bItb 3aKpeNHeo B COOTBeTCTBn C INHCTpyKcnei NO yCTaHOBKe,Даже ecnВ hem He nepeBo3ntcpe6eHok.Пи AkTepeHOM TopMOxeHn He3aKpeNHeHoe abToKpeCNo MoKet TpaBMIpOBaTb IIOdE BHyTpIn aBTOMo6nIa.
XCTAHOBIIeHHoe B aBtOMo6JIe IETCKOE aBTOKpeCIO He JOnJHX OYnpaTbCS B nepeHne CNDHeBnIIN DBePN aBtOMo6JIa.
He BHOcHTe I3MeHEnIb KOHCTpyKUIO DeTCKOro aBTOKpeCna I cTporO CneDyTe NHCPTpyKuIN No yCTaHOBKe INKcNllyaTaun aBTOKpeCna, B nPOTnBHOM Cnyueae CyueCTBye TpNC TpaBMnPOBaHnpe6eHka npi nepeBO3ke.
- He donnyckaia Te nepekpyuBaHn Hn 3aIeMJIeHn peMHn ABTOKpeCna, pMHN Bcerda IOnJXhbl 6bItb HaTAYtbl.
Cneinte 3a Tem, yTo6bI 6araK n dpyrHe npedMeTb 6bln HadeXHO 3akpePnHbI, Oco6eHHo Ha 3aHne noJIke, TaK KaB Cnyuae cToIKNHOBEHnO Hn MOyT CTaTB npuHNO TpaBM. POKAKnte pe6eHKy xopoWNI pImep N pInCTeHTecb CamN. B3pocbl ueOBek, He npinCTerHytb pemHMy 6e3OnacHoctN, cam MoKeT npedCTabTb onacHoctb DnpepeHka.
Bcerda npicTeRbaiTe pe6eHka npedyCMOTpeHHbIMn pemHAM.
- HNKoIa He ocTabnaiTe pe6eHka BJeTCKOM aBtOKpeCne 6e3 npuCMOTpa.
- N36eRaIte dIITeBHORO BO3dEInCTBnHa Ha DeTCKoe ABTOKpeCNO npAmbix COJIHeuHbIX Lyuei, 3TO MOKeT Bbl3BaTb OXoRy pe6eHka nnnpuBectn K BblcBeTaHnIO ueXna.
- He nCnoIb3yIte DeTCKoe ABTOKpeCNO 6e3 Yexna. 3anpeaetc3aMeHbT opnHnHbN 3aunTHbY cheXoHaDpyro, He peKomeHDoBaHHbI pOnu3BOUInTeM, TaK KaK YexOJ RBLAE TCACTbIO CnCTEmbl 6e3OnacHOCTn ABTOKpeCNa.
-П配电и Кадд� КОЕБЕДИТСЕС,ЧТО ИДИКАТОРБИ НЕРЕДЕЧАСТУВТOKPEССА IMEЛТZELEHБИ CBET.
- IpeepaKaJIOIpoe3IKoINpOBepeHHTe, HaxoNTcIpykaIJIpeHOCKN B HyxHOM IOIOKeHN IJIyCTaHOBKN B TpaHCnOpTHOM CpeCDBe.
.00000000000000000000000000000000000000000000
.UN R129/oo i-Size 7y by
.
Xn Oo 1007 1007 1007 1007 1007 1007 1007 1007 1007 1007 1007 1007 1007 1007 1007 1007 1007 1007 1007 1007 100
口
184 1
184. 2
184 3
185
185 5.1
186 (nnnnnnnnnnn) 5.2
186 6
186 7
186 8
186 9.1
187 9.2
187. (nKoTn 0000) unwn nn nnn 10.1
187. 10.2
187. (x) 11
188 12
188 13
188 14
UN ECE 129 npn by nwnk noyn .i-Size 77777777777777777777777777777
w 105 n w y,nyn mRECARO Salia Elite-wnynn n"76 w nn an 15 nynn RECARO Salia Elite-wnynn n"18
ISOFIX-0 105 w nub y 18 ty npwn, mnn
.(www.recaro-kids.com)
(1,2) RECARO Salia Elite-n
wnn npnn n 16
nannnnn 17
ISOFIX 18
19
PNNN20
pnn nn nyn 21
wn nn noyn 22
wnnn nnynn 23
wnnn nannn np 24
pwn knn 25
WnN XnHb HERO nyn 26
wnn 27
wnn nn wnn nynn npnn 28
wn nn 29
wnn nn 30
Xn 1
wnn 2
nnn 3
4
ISOFIX 5
wnnywn 6
mnnn7
yynnn 8
HERO 9
nnnnn 10
11
wnxwn bynn 12
13
ISOFIX 14
wnnnn nnn 15
nniin.2
.RECARO Salia Elite-wwnn nn n
wwnn nn nnnn nnnn RECARO Salia Elite-n nn nnnn
an nbn bny npn nn anynnnn nn
.
y 1
mnnn nn nnnnnnnnnnnnnnnnnnnnnnnnn
w npn nnnn nn nnnn nnnn nnnn nnnn nnnn nnnn nnnn nnnn nnnn nnnn nnnn nnnn nnnn nnnn nnnn nnnn nnnn nnnn nnnn nnnn nnnn nnnn nnnn nnnn nnnn nnnn nnnn nnnn nnnn nnnn nnnn nnnn nnnn nnnn
omnnn mnn by nnnn nn by 10000000000000000000000000000000000
n nnnn nn nnnn nn nnnn nn nnnn nn nnnn nn nnnn nn nnnn nn
nannnnnnnnnnnnnnnnnnnnnnnnnnnnnnnnnnnnnnnnnnnnnnnnnnnnnnnnnnnnnnnnnnnnnnnnnnnnnnnnnnnn
"an" ann nn nnnn nn nnnn nnnn nnnn nnnn nnnn nnnn
RECARO Salia Elite-n n nn nnnn (ISOFIX (14 w nn n
nynnnn nn nnnn nn nnnn nn nnnn (28) knnnn nn nnnn by nnnn, aonn nn nn
nuynnna nynn npnnn nn nnnn (Hero (26 noynnnn noon
.(32)yoxx2nnynnynwn
.ynn nywn b naab nwn nn mnn npb .(25) nnnnn noon nn noon npn nn
.annnnn (24) annnn nyn nyan myxk nn nn
nxynn nn nnnnnnnnnnnnnnnnnnnnnnnnnnnnnnnnnnnnnnnnnnnnnnnnnnnnnnnnnnnnnnnnnnnnnnnnnnnnnnnnnnnnnnnnnnnnnnnnnnnnnnnnnnnnnnnnnnn
.
n nn nnnn nn nnnn (31) nn nn nn nn nn nn nn nn nn nn nn nn nn nn nn nn nn nn nn nn nn nn nn nn nn nn nn nn nn nn nn nn nn nn nn nn nn nn nn nn nn nn nn nn nn nn nn nn nn nn nn nn nn nn nn nn nn nn nn nn nn nn nn nn nn nn nn nn nn nn nn nn
nnpn npnn n
nwn nn nnnnnnnnnnnnnnnnnnnnnnnnnnnnnnn
nynnn nnnn nn nnnn nn nnnn nn nnnn nn nnnn
- 50n nnnn nn nnnn nn nnnn nn nnnn nn nnnn
nnnnnnnnnnnnnnnnnnnnnnnnnnnnnnnnnnnnnnnnnnnnnnnnnnnnnnnnnnnnnnnnnnnnnnnnnnnnnnnnnnnnnnnnnnnnnnnnnnn
Salia Elite-n xnnn
w wnn npwn .(6 pni) nni Salia Elite -n nn nnn nnn npwn nn np
.2n nn nnn nnn nnn nnn (5.2 nnn) 1yn nn nn nn nn
ny.27) noannn nna wov (29) ananane 1,nnn nn nnnn nn nn
wnn nn nnnn nn nnnn nn nnnn nn nnnn nn nnnn
W
wnnnn nn nwwn (6 pn) nnnn nn nnnn nn nnnn nn nnnn nn nnnn nn nnnn nn nnnn nn nnnn nn nnnn nn nnnn nn nnnn nn nnnn nn nnnn nn nnnn nn nnnn nn nnnn nn nnnn nn nnnn nn nnnn nn nnnn nn nnnn nn nnnn nn nnnn nn nnnn nn nnnn nn nnnn
.737
nwn nn nwn bn oynn npnn Knynn nn nn nn nn nn nn
(nnnn nn noaay) 5.2
n nn nnnnnnnnnnnnnnnnnnnnnnnnnnnnnnnnnnnnnnnnnnnnnnnnnnnnnnnnnnnnnnnnnnnnnnnnnnnnnnnnnnnnnnnnnnnnnnnnnnnnnnnnn
.1n7yynynx
.ynx2 ann nn nnn nn bye xnn npn nn npn nn npn nn
wnb nwnn nnynnnn nn nnnn
n nn nnnn nn nnnn nn nnnn nn nnnn nn nnnn nn nnnn nn nnnn nn nnnn nn nnnn nn nnnn nn nnnn nn nnnn nn nnnn nn nnnn nn nnnn nn nnnn nn nnnn nn nnnn nn nnnn nn nnnn nn nnnn nn nnnn nn nnnn nn nnnn nn nnnn nn nannn nn nnnn nn nnnn nn nnnn nn
.19) nnnn nn n 1
. nnnn nn nn nn nn nn nn nn nn nn nn nn nn nn nn nn nn nn nn nn nn nn nn nn nn nn nn nn nn nn nn nn nn nn nn nn nn nn nn nn nn nn nn nn nn nn nn nn nn nn nn nn nn nn nn nn nn nn nn nn nn nn nn nn nn nn nn nn nn nn nn nn nn nn nn nn nn nn nn nn nn nn nn nn nn nn nn nn nn
.
.6n7
nNnNnNnNnNnNnNnNnNnNnNnNnNnNnNnNnNnNnNnNnNnNnNnNnNnNnNnNnNnNnNnNnNnNnNnNnNnNnNnNnNnNnNnNnNnNnNnNnNnNn
.7p2b2a1nab 1n .(8)nnnn nnnnnnnnnnnnnnnnnnn
nyn n ,n . (10) mnn nn nnnn nn nnn
n nn nnnn nn nn nn nn nn nn nn nn nn nn nn nn nn nn nn nn nn nn nn nn nn nn nn nn nn nn nn nn nn nn nn nn nn nn nn nn nn nn nn nn nn nn nn nn nn nn nn nn nn nn nn nn nn nn nn nn nn nn nn nn nn nn nn nn nn nn nn nn nn nn
n 100, n nn nn nn nn nn nn nn nn nn nn nn nn nn nn nn nn nn nn nn nn nn nn nn nn nn nn nn nn nn nn nn nn nn nn nn nn nn nn nn nn nn nn nn nn nn nn nn nn nn nn nn nn nn nn nn nn nn nn nn nn nn nn nn nn nn nn nn nn nn nn nn nn nn nn nn nn nn nn nn nn nn nn nn nn nn nn nn nn nn nn nn nn nn nn nn
yynnnn nn
n/6
RECARO Salia Elite-n neynn nnnn nn nnnn nnnn nnnn nnnn nnnn nnnn nnnn nnnn nnnn nnnn nnnn nnnn nnnn nnnn nnnn nnnn nnnn nnnn nnnn nnnn nnnn nnnn nnnn nnnn nnnn nnnn nnnn nnnn nnnn nnnn nnnn nnnn nnnn nnnn
xynnnn nn nnnn nn nyn (13) nyin
nnnnnnnnnnnnnnnnnnnnnnnnnnnnnnnnnnnnnnnnnnnnnnnnnnnnnnnnnnnnnnnnnnnnnnnnnnnnnnnnnnnnnnnnnnnnnnn
nnpn nnnnnnnnnnnnnnnnnnnnnnnnn
. p 1
nx yronn n,76 mnab w nan own 15 bnnn nn nnnn nn nnnn nn
nnnnnnnnnnnnnnnnnnnnnnnnnnnnnnnnnnnnnnnnnnnnnnnnnnnnnnnnnnnnnnnnnnnnnnnnnnnnnnnnnnnnnnnnnnnnnnnnn
an nnnn .7
ny.ynn nn nnn (15) anan ann nnn nnn nnn nnn nnn nnn nnn
mnnn nn nnnn nn nnnn
y by npn nniinipb ywnne npn nn (15) 7nnn nnnn nn
Xoynnwnnynnn
Tbn nn.8
Nx yovnnn (ISOFIX (14-n nn n,RECARO Salia Elite-n nn nn) by ISOFIX nn nn (18) nn nn nn nn nn nn nn nn nn nn nn nn nn nn nn nn nn nn nn nn nn nn nn nn nn nn nn nn nn nn nn nn nn nn nn nn nn nn nn nn nn nn nn nn nn nn nn nn nn nn nn nn nn nn nn nn nn nn nn nn nn nn nn nn nn nn nn nn nn nn nn nn nn nn nn nn nn nn nn
RECARO Salia Elite-nn nn nnnn nn nnnnnnnnnnnnnnnnnnnnnnnnnnnnnnnnnnnnn
nannnnn nn n bopn npny
mnnn nn nnn 9.1
n nn nnnn nn nn nnnnnnnnnnnnnnnnnnnnnnnnnnn
mN by nnnn by Co 30 w npnnn nn nnnn nnnn nnnn nnnn nnnn nnnn nnnn nnnn nnnn nnnn nnnn nnnn
n nn nnnn nn nn nn nn nn nn nn nn nn nn nn nn nn nn nn nn nn nn nn nn nn nn nn nn nn nn nn nn nn nn nn nn nn nn nn nn nn nn nn nn nn nn nn nn nn nn nn nn nn nn nn nn nn nn nn nn nn nn nn nn nn nn nn nn nn nn nn nn nn nn nn nn nn nn nn nn
mnn.13
Nn nn nnnn nn nnnnnnnnnnnnnnnnnnnnnnnnnnnnnnnnnnnnnnnnnnnnnnnnnnnnnnnnnnnnnnnnnnnnnnnnnnnnnnnnnnnnnnnnnnnnnnnnnnnnnnnnnnnnnnnnnnnnnnnnnnnnnnnnnnnnnnnnnnnnnnnnn
.
n nn nnnn nn nnnn nn nnnn nn nnnn nn nnnn nn nnnn nn nnnn nn nnnn nn nnnn nn nnnn nn nnnn nn nnnn nn nnnn nn nnnn nn nnnn nn nnnn nn nnnn nn nnnn nn nnnn nn nnnn nn nnnn nn nnnn nn nnnn nn nnnn nn nnnn nn nannn nn nnnn nn nnnn nn nnnn nn nnnn nn nnnn nn nnnn nn nnnn nn nnnn nn nnnn nn nnnn nn nnnn nn nnnn nn nnnn nn nnnn nn nnnn nn nnnn nn nnnn nn nnnn nn nnnn nn nnnn nn nnnn nn
.0nnn nn nnnn nn nnnn
n nn nnnnnnnnnnnnnnnnnnnnnnnnnnnnnnnnnnnnnnnnnnnnnnnnnnnnnnnnnnnnnnnnnnnnnnnnnnnnnnnnnnnnnnnnnnnnnnnnnnnnnnnnnnnnnnn
nnuuunnnn nnnn nn nnnn nn nnnnnnnnnn nn 5
nnnn nn nnnn nn nnnn nn nnnn nn nnnn
mnnn.14
ECE R129.00 mnnn nnn .nnnn nn nnnn nn nnnn nn nnnn nn nnnn nn nnnn nn nnnn nn nnnn nn nnnn nn nnnn nn nnnn nn nnnn nn nnnn nn nnnn nn nnnn nn nnnn nn nnnn nn nnnn nn nnnn nn nnnn nn nnnn nn nnnn nn nnnn nn nnnn nn nnnn nn nnnn nn nnnnn nn nnnn nn nnnn nn nnnn nn nnnn nn nnnn nn nnnn nn nnnn nn nnnn nn nnnn nn nnnn nn
.(RECARO
Recaro Kids s. r. l. mon
SALIA ELITE
UN R129·i-Size·40 cm 10 105 cm BncoHHa·do OK.4,5 roHn
Blaqapm Bn,pepeunxTe da 3akynnte dcTcKO cToJue RECARO.
C haHn yHnKaJIeH OINr, Hne npabIM peBOJIOUcH OIT HaI 100 roHN npi ceJaIKte B aBTOMoBnla, cAmOJeTn npn CbCTe3aTeHHn CnOPT. ToBa HOy-xay 6e3 KOHKpyEHcHn Ce OTPa3raBa BbB BCEKn eDTH JaHa HauHTe CnCTEMN 3a ObE3OpacBaHe Ha deca.
Haata rnaBha e da Bn npednoKIM npOdykTN, KOTo HaDMHaBaT BaWnte n3NCKBaHn - 6nIO TO NO OTHOseHHe H63oNaCHocTTa, KOMoPTa, IecHOTo o6CnyKBaHe nn dnaHa.
Toba detcko ctonue 3a abTomobun i-Size e npedHa3nueho 3a deca C Bncoynha do 105 cm n MaKcImanHO terno ot 18 Kf camo 3a fikcnpahe cbc cnctema ISOFIX. N3non3BaHeto Ha detckoto ctonue o6bphato Hazad e npednicaHo do Bb3pact Ha deteto 15 Meceua n pbCT MaKcImanHO 76 cm.
TeKOTcONue OTROBapHa KlaCObe BucOunHa cbTnacHO ISOFIX DnnB1.MoJn,HHOpMpaIte Ce B pkoBDCTBOTo Ha ABTOMObUa 3a pa3peSeHHe 3a cenTa Mecta 3a cyaHe.
TecBaH n oO6peH cBflacHo UN R129 / 00 i-Size.
3ana3eHO npaBO Ha neaATn rpeuK, 3a6nyd n TeXnueck npomeHn.
BHIMAHHE - He npemehno cbxpaHbAte pkoBODCTBOTO 3a NO-Kbcha yntpe6a.3a zenta ot 3aHaTcPbHa Ha Detckoto cToJe mAm OTdeneHne 3a INCTpykuiyra.
CbIbPJKAHNE
- OnicsaHne 190
- Ka3aHn 3a 6e3oNaCHOCT 190
- Ipeu nIbPBOHaJHaTa ynoIpe6a 191
- MoNTaX Ha deTcKaTa cedalka 191
5.1 3no3BaHe Ha 6e6ewkoTo cTOnue.. 191
5.2 06e3oNaBaHe Ha DeTeTo c KolaHn (cpeylnpaHnHa BucOuHaTa Ha KolaHnTe) 192
- Hanpei/Ha3a.. 193
- HactpoKa B noJoxeHne Ha nokoi 193
8.ДeMoHTaK Ha DeTcKaTa ceJaIka 193
9.1 CbAaHe Ha KaIbfo nNoUcTbaHe Ha DetCKOTo cToJIe 193
9.2 CbajHe Ha KaIbfo I NoOcHBaHe Ha 6e6ekoto cTOnue... 194
10.1 MoTax Ha ceHHK (He e BkIooH BbB BCnKn BapnaHTn) 194
10.2 MoTax Ha cehnK Ha 6e6eKTo CTOnYe 194
- AanTep Ha 6e6eKoTo cToJe 3a JeTcKa KOnuKa 194
- 06uynka3aHn 194
- 195
- 3aunTa Ha Baunr aBtOMo6n.. 195
1. OnmcaHne
ToBa e cnCTema 3a o6e0nacBaHe Ha deca ot kateropnia i-Size. To e ono6peHO B cbOTBETCTBne c perIament N° 129 Ha UN ECE 3a ynoTpe6a Bbpxy TaKnaBa cedalKn Ha aBTOMO6nIn, KOInTO ca nOxOJaun CbrrNaCHO INHCTpykUnTe Ha npOn3BOIDTEBA pBkoBOIDCTBOTO Ha aBTOMO6nla 3a cnCTeMa 3a o6e0nacBaHe i-Size.
RECARO Salia Elite moxe da ce n3no3Ba o6bphato 06paTHo Ha dBnkeHneTo 3a deca c pbct do 105 cm n terno do 18 kg. RECARO Salia Elite moxe da ce n3no3Ba o6bphato no nocoka Ha dBnkeHneTo 3a deca ot Bb3pact 15 meceua n pbCT MInmym 76 cm do terno 18 kg n pbct 105 cm. MoHTaKbT Ha cnCTema 3a obe2onacBahe i-Size B no-ctapn ABTomobu n c ISOFIX e b3MOxehcMo, KOrato TOBa e OTBeJHaHO B npdeIOCTabeHata CneuΦkaun. NocJeHata BepCnHa To3n Tn n Cnnck Moxe da 6bnde HamepeHa Ha HauHa Ta HauJaHa CTpaHua (www.recaro-kids.com).
3ana03haTe ce c bawna RECARO Salia Elite (Pur. 1,2)
16e6ewko cTOnue
2 ochoba 3a cejaika
3 onopenhpaK
4 INДИКaTOp
5 ISOFIX KOHeKTopN
6 06nneranka3a rnaBa
7 CNTema OT npeIpa3H N KOlaH
8 3aKoNuaJaKa 3a npeJna3HnKoJaH
9 HERO CnCTema
10 perynipauKoJah
11 ctpaHnHa 3aunTa npu ynap
12 3aTgau n enemEnn Ha ceanKaTa 3a 6e6koTo CTOnue
13 yHKzna 3a 3aBbPtaHe Ha loCTa 3a ocBO6OxJaBaHe
14 noct ISOFIX 3a perynipane Ha nbknHaTa
15 perynipau noct 3a no3nraTa Ha cToJeTO
16 perynipau noct 3a o6nerankata 3a rnaBa
17 6nokipobka onopeh kpaK
18 noCT ISOFIX 3a ocbo6oxkdaBaHe
19 6yToH 3a peryIuipaHe Ha KOnaHa
20 6e6eiko cTOnue
21 06neraJa 3a rnaBa Ha 6e6eKoTo CTOnue
22 cnCTema OT npeIpa3Hn KOJIaHI Ha 6e6eKOTO CTOnue
23 6yToHn 3a ocB6oxkDaBaHe Ha 6e6eKoTO CTOnue
24 6yToH 3a peYunpaHe Ha 6e6eKoTO CTOnue
25 npncno6neHne 3a ctechrahe Ha 6e6koTo CTOnue
26 HERO cnctema Ha 6e6ekoto CTOnue
27 BXOJU XJIe6 Ha 6e6eKoTo cTOnue
28 perynipaui noct 3a o6nerankata 3a rnaBa Ha 6e6eKOTO cTOnue
29 Cbbp3Baun eJeMeHTn Ha 6e6eKoTO CTOnue
30 npbka 3a HocHe Ha 6e6eKoTo cTOnue
2.Yka3aHn3a6e30nachOCT
- Пожутete Вимаелно Инстукципто педи уnotpe6ata на RECARO Salia Elite.
- RECARO Salia Elite Tp86Ba Ja e fikcapaHO BnHaRcBflacHO INCTpyKmnte 3a MoHTax, dOpn I KOraTo He ce n3non3Ba. HenpknpeHOTcONue MoKe Da HapaHn DpyrN PbTHUcB CnyaH Na abapuHo cnnpaHe.
-ДeТСКОТО CTONUE TРЯБа Да ce ФИКСИра В abTOMOБила Тaka, Ye Дa He CE 3akneи OT npedHnTe ceDAJIKN IINBpaTIne Ha abTOMO6Nla.
- DeTCKOTO CTOnue He TpA6Ba Da Ce npOMeHn PbKOBOCTBOTO 3a MOHTax n EKCnloatauia TpA6Ba Da ce CneBb BHNMaTeJIHO, TbN KATO B INOTUBeH CUYaH He MOrat Da 6bDaT N3KIOUeHn CbOTBeTHIne OINACHOCTn PnTpaHCnOp-TnpaHe Ha DeTeTo.
KonaHHTe He Tp6Ba Da ce ycYkBt Nn npntuCKaT n Tpr6Ba Ja 6bdaT o6terHaTn.
- YBepete ce, ye 6aagbt i npynte npedmetn ca do6pe o6e0anaceH, oc6eHO ha Kopata 3aJ 3aHaT a cdaJaKa, Tb KaTO mOrat da npuHHr HapaHbAHn B cnyaH naCbck. bDeTe 3a npimep n 3aterHeTe KOaHnte. CbIo N Bb3paCTeh 6e3 noCTabeH npdna3eH KOaH moKe da npedctablaBa onaCHOCT 3a deTeTo.
BnHaHn noCTabraTe KOJaHa Ha BaWeTo DeTe.
Hnkora He octabnTe BaWTo DeTe 6e3 Hnd3Op B dTeCKOTo CTOnue.
- Na3eTe DeTCKOTO CTOnue OT npKa CbHueBa CBETnHa, 3a Da npeDnA3nTe DeTeTO CN OT N3rapAHe, a cbUo N 3a Da 3ana3nTE UBeTa Ha KaIbΦa.
- DeTCKOTO CTOnue He Tp86Ba Da Ce I3NoJ3Ba HNKORA 6e3 KaIbΦ. NOpNOKkata Ha CTOnueTo He Tp86Ba Da Ce CMeHnHKORA C pa3NlUHa OT npenopbUHaHATA OT npON3BOIDNTeJI TaKaBA, Tb' KATO Ta3N NOpNOKk e CbCTaBHa cact OT 6e3ONaCHOCTTa Ha cnCTeMaTa.
-ПпсдИВСЯКОпьТУВАЕпpoВЕряБаΙTeДaЛИИнДИΚAТОПΙTEOTпpeДиТаСтpaHаHa OCHOВаΤΗСeДАЛΚΑТА
NOKa3BAt 3eNEHO.
- Pnpn BcAko nBtyBaHe npOBepaTe daHn dpbKkata 3a HocHe Ha 6e6eKOTO cTOnue Ce HAMpa B no3uua 3a aBTOMO6nI.
3.ПпсдппьрвонаннауynоТpe6a
RECAROSalie Elite ce npednara c obpno Happe.3a ynoptpe6a np6e6eta Ha Bb3paTdo 15 meceau n pbcT no76 cm kowteo Tpa6Ba da e obpno C rp6bKbM Nocokata Ha dNkHeHne.
4. Mohtax Ha deTcKaTa ceJaKa
BkapaTe BbBekdaaTe enemHTn npe3 cNoTa Ha noDIOKKaT MEXy OoNerAknKaTu N ceaIknTa Bbpy Cko6nte ISOFIX. BnIMBaTe 3a TOBa, OTkpNTata CTpaHnHa NOBbpxHOCT da e OTrope (Orr. 6). ToBa He e Heo6xOIMO, aKO Baunr abTomobn Beue mMa MoHTnpaHn fNKCaTOPu.
Pa3nBheTe onOpHnKa, npedJa moHTnpate DetCKOTcTOnue B aBTOMObua (Φn.7).
BHIMAHHE:OnopnHt KpaK Tp6Ba BnHarNa e pa3NbHaT nped MoTaxa B aBtOMo6una.
- 3a pa3nbBaHe Ha KOHeKTOpHTe ISOFIX HaTncHeTe NoCTa 3a perylnpaHe Ha nbJxHnHaTa Ha ISOFIX (14) otnped, Hnd onopHnKpA n pa3nbHeTe KOHeKTOpHTe ISOFIX (5) JOKpaI (PhiR.8).
Cera noctabete RECARO Salia Elite ha ckobite ISOFIX n octabete KOHEKTopine da upaKaHAT cbc 3Byk (Dnrg.9).
BHIMAHIE: 3a ynoTpe6ata Bbpxy cedankata Ha nbTHnka Do BOdaay, cedankata Ha nbTHnka Do BOdaay Tp8BaBpbBO da e Hactpoeha Ha ha 3aHaTa PO3nui, npedi DetCKOTO CTOnue da 6bde MOHTnpaHO. BHIMaBAIte, DeTCKOTO CTOnue da He 6bJe npITNCATO OT apMaTyPHOTo Ta6JIO INN BpaTata Ha ABTOMO6nla.
BAxHO:BaTa HnDkaTopa Ha ISOFIX Tp6Ba Da CBeTHaT B 3eNeHo. KoHTpOIpaIte 3a HaJeKdHoo fNkCupaHe upe3 n3dbpNaHe Ha dTeCKOTcToJe (PhiR.10).
- N3dbpnaTe loCTa ISOFIX 3a perynipaHe haDbIknHata (14) harope n 36ytaTe RECARO Salia Elite nohe c edHa
no3nua B nocoka KbM o6JIeRanKaTa, dOKaTO npInerHe (fnr. 11).
HempemHNO BHMABAte fIKCupaHeTo da e C OTYeTINBO upaKbaHe.
- 3a perynipaHe Ha BnCOuHHaTa Ha onOpHna KpaK nbpBO nIb3HeTe onOpHna KpaK do ynpo HArope nHaTncHeTe 6Iokinpobkata Ha onOpHna KpaK (17) ot npedHata ctpaHa Ha onOpHna KpaK (Dnr. 12).
Cera pa3nhe Te onopnna KpaK,doKaTO CTbnn 3npaBO Ha noHa aBtOMoBuJa. YbepeTe ce, ye onopnrt KpaK IIpaKbHa HMACTOTOCN, CJIeI KaTO OTyChETe 6yToHa 3a 3aKnIOuBaHe.
- Ppi npabnHO hAcTpoeha DbJxHa, INdkKaTOBt 3a ONOpHna KpaK CTBa 3eJIeH, CJIeK KaTO CTe CnYCHann ONOpHna KpaK Bbpxy Noda Ha ABTomO6nla. Ako TOBa He e Taka, pa3IbHeTe ONOpHna KpaK OSe MaJIKO, KaKTo e ONicaHo No-rope.
BAXHO: INHdkaTopbT Tp6Ba da cTaHe (Φn. 13).
- 3a da noio6pnte 6e3oNaCHocTt B CnyaHnHa 3IIOJNYka, aKTHBnpaTte 3auNTata OT ctpaHnueH ynap Ha detCKOTcTOnue. 3a ceTn TNOBnHHeTe 3auNTata OT ynap OT ctpaHATA KbM BpTaTnHa ABTOMObna Ha detCKOTcTOnue. KOHTponpaTte 3a HndexKnHO fHKcnPae Upe3 HATNCK Bbpxy 3auNTata OT ynap Ha detCKOTcTOnue (Dnr.14).
- YKA3AHIE:Дори 6e3 CTpaHnUHInTe npoTeKTopi CToJueTo OCnIpyBa DoCTaTbUHa CToPAHnUHa 3aUnTa npu ydap. Ako B aBtOMO6nHa mHa DoCTaTbUHO MrcTo, npenOpbUBaMe da ce AKTNbPa cTpaHnUHa T3aUnTa npu ydap OT cTpaHaTa, O6bPHaTa KbM BpaTaTa Ha aBTOMO6nHa.
5.1 N3noI3BaHe Ha 6e6ewkoTo cTOnue
Baata RECARO Salia Elite e obopudbaHa c n3Baxdaio ce 6e6eKo CTOnue 3a no-MaKn Deua Ha Bb3pact Do npn6n. 12 Meeca n pbi6n.76 cm n MaKcImaHIO terno 10 kg. Ppei IIpbTO u3NoI3BaHe Ha 6e6eKOTO CTOnue Tpa6Ba da noTROBNTte DetCKOTcTOnue. IpbBO npuBeTe 6e6eKOTO CTOnue B MaKcImaHATA No3uNra 3a CbH (BnK rna7). Cera no3uioHnpaTe o6JIeAkanata 3a rnaB Hn-TopHATA No3uN, KaKTo e NOKa3Ho B rnaBa 5.2. Pa3rhe Te cTpaHnHTe xanKaIbfo ha Hope, KaKTo e NOKa3Ho, n n O6e3OncTe B Ta3n No3uN C NOMUta Ha IenEHNKe 3a 3akOnyabaHe. Cera MoKeTe da pa3rhe He HanpeD 3aTgAunTe enemeHTn (12) 3a n3BaXdaUto Ce 6e6eKo CTOnue.
BkapaTe BkIoueHnTe B IOCTaBkATo BXOJaUx JXle6OBe (27) B 3aHNITE HAnpeuHn IpbTu Ha 3aTgauNTe enemeHTN (12).BHMabaTe Oco6EHO 3a 3dpaba Bp3ka Cbc CTOnueTO.
3a aanTnpahe Ha 6e6eKOTO cTOnue KbM pBCTa Ha BaWTo DeTe HAncHeTe NocTa OT 3aHaTa CTpaHa Ha 6e6eKOTO cTOnue (28) n 36ytaTe o6nErAankata 3a rnaBa Do JxenaHata BncoUHa. IVxOJte Ha KOlaHnte 3a pamHeTe C Hero cnCTema (26) cer6 bN Tp8BaNo da ce HAMnPa H BAcoUHaTa Ha pamHeTe Ha Deteto. DOnHnT Pb6 Ha 06nerAknata 3a rnaBa B INdeAnHnCnyaH ue 6bDe 2 npbCTa Hn pamHeTe Ha Deteto (DInr. 32).
KaTo DOnbHnTeHe nEmeHT 3a aHaTnpAne 6e6eKoTO cToJe e Cha6deHO c npncOcoNeHne 3a CTecHraBaHe Ha ceJaKaTa (25). To Tp86Ba Da ce otCTpaHn, ppei OBeIerAkkata 3a rnaBa da 6bJe peryu npaHa Ha BnCOUHa 3a NbpBn PbT.
06e3onacBaHe Ha DeTeTo cKoJaH
Pa3xna6eTe npednna3HnKaH qpe3 HATNcKaHe Ha 6yToHa 3a perynipaHe Ha KOnaHa (24) n n3TeTnHe Ha KOnaHnTe Hanpei.
3a perynipaneHa npbkkata 3a Hoche (31), kato ynecheHne npn octabHne Ha nTeTo, hATNCHe eEDHOpeMeHHO dBata cnu b6ytoHa Ha npbkkata 3a Hoche H npBedeTe npbkkata 3a Hoche B JekaHaTPO3u.
BAKHO: CneI KaTo DeTeTo e NoctabeHo B 6e6eKToC ToUe N O6e3onaceHo C KOnaHn, DpbXkTa 3a HocHe (31)
Tp6Ba Da ce npBBeNe OTHOB B xOpN3OHTaHa I03uHr. CneI KaTO OCBO6oJTe 6yTOHnTe, BHIMaBaIe Dp6KkTa 3a HocHe Da e 3npaBO oHKCuPaHa.
IocTabete npedna3HnTe KOJAHn CTpaHnUHO HABbN nCIOKeTe DeTeTO CN B 6e6eKOTO CToJe. IpekapaTe KOJAHn Te npes pameHeTe Ha DeTeTo HAppei n NoCTabeTe e3uNTe Ha npedna3HnKoJAH eINBbpy Dpyr. Cera BkapaTe e3uNTe Ha 3aKoJauJIkata B 3aKoJauJIkata 3a npedna3HnKOJAH n OfIKcnpaTe COTueTInBO UpaKaBaHe.
3aTeHETe KOnaHa Upe3 N3dbPbBaHe Ha peryIuipaunia KOnaH. KOnkTo INo-tnbTHo KbMaBSeTO DeTe e npInenHaJ KOnaHbT, TOnKOBa No-3aUHTeHO e To B 6e6eKoTO cTOnue. 3aTObA e npenopbUHTeHNO De6eJIte JaKeta nn PyNobepn Da Ce Cb6nuaT B ABTOMO6nla.
I3noJI3BaHe Ha KooUeTo 3a HocHe B Salia Elite
3a n3no3BaHe Ha 6e6eKOTO cTOnue ce npenopbUba Salia Elite nbpBO da ce 3abbpTN B Nocoka KbM BpaTaTa (BnK rna6).BaxHo: O6neralkata 3a rnaBa Ha detCKOTO cTOnue Tp6Ba da e B haN-TopHa no3uign (BnK rna6 5.2), 3a da MoKe 6e6eKOTO cTOnue da ce noCTaBn B detCKOTO cTOnue.
Cera noctabete 6e6eKOTO cTOnue Cn3npaBeHa IpbXka 3a HocHe B DetCKOTO cTOnue TaKa, Ye CbeHHTenHInTe enemEn (29) da Bn3at BbB BxOJaun XJle6 (27). Cera Hatnche TdpaBO 6e6eKOTO cTOnue B DetCKOTO cTOnue.
CbeHNHTeHnT enemt Tpa6Ba da ce fKcnpa c OTueTnBO upaKaBaHe. IpOBepTe npabHnHO To fNKcnpaHe Ha 6e6eKOTO CTOnue B DetCKOTo CTOnue, KaTO rN3TeIInTE O T dpXkata 3a HocHe.
BAKHO:pa3bHeTe dpkKaTa 3a HocHe Ha3aB No3nua 3a aBTOMo6n (DnR.29).
Cnei o6e3oNaCBAHTo Ha Deteto C KOHaHnTe B 6e6eKOTO cTOnue 3aBbPTeTe JeTCKOTO cTOnue O6paTHO B 06bpHaTa HaaI No3uia.
dEmoHTaX Ha KowteTo 3a HOceHe
Moxete da n3baaite 6e6ekoto cToJe 3aeHc C DeTeo ot Detckoto cToJe. N Tyk 3abbpTaHeTo Ha cToJeTo no nocoka ha Bpaata (BnK rnaBa 6) yneChra Ba DEMOHTaKa. PnpBeTe dpbXkaTa 3a HocHe B No3uN 3a HocHe. 3a DEMOHTaK PbBO n3byaTte DBeTe KOnHeTa 3a OCbo60JaBaHa h6e6ekoto cToJe (23) B nocoka BbHnHnPBb6 Ha KOuye To n HATNCHeTe HADony, Korato DoCTnHHeTe do onopata. Cera 6e6ekoto cToJe e de6lOkpHo n MoKe da ce n3BaAnOT Detckoto cToJe.
Baxho:BnHaBn BnHmBaaiTe DeTeTo Bn da e 3aKoNaHo C npedna3HnTe KOlaHn, KOrato Jexn B 6e6eKOTO CTOnue HNKORA He ro octabayte 6e3 Ha3Op.
5.2 06e3oNaBaHe Ha DeTeTo c KonaHn (c perylnpaH e H BnCOuHnHa Ta Ha KonaHnTe)
BnuocuHaTa Ha KolaHnTe 3a paMeHeTe MoKe Da ce aanTnpa KbM BaWeTo DeTe 3aeHc O6nerAikata 3a rnaBa. KoJaHnTe 3a paMeHeTe B ndeAinr Cnyau Nte npemHabat Ha BnuCOnHa Ha paMeHeTe Nn HaaM MaIKo Ha pameHete Ha BaWeTo DeTe.
BAXHO:Долнгпьб Ha oblerajkata 3a naba B ndealnna cnyuah ue 6bde 2 npbcta ha pamehe Ta He Na TeTO.
Cera npemecTe o6nerankata 3a rnaBa B keNaHaTa No3uZn, DOKaTO 6bOKnpOBkTa UpaKHe.
PpOBepeTe 3a cnIpyHNo fNkCnpaHe, KaTo n36yTaTe o6IeRanKaTa 3a rnaBa HAnony. MoKe da ce HANOKn npEni ToBa KoJaHbT da ce pa3xna6n.
3a pa3xla6baHe Ha KonaHnTe HATNCHe 6yToHa 3a perynpaHe Ha KonaHa (19) n n3terne TcKonaHnTe 3a pameHe, KaTTo e NOKa3aHo, Hanpei.
OToBopTe 3aKoIyAikKaTa Ha KOnHa (8) Upe3 HaTnCKaHe Ha UepBeHna 6byToH n N3BaJeTe e3uYte Ha 3aKoIyAikKaTa Harope.
NoctabeteKoJahHHeHaBbH.
3aBbpteteKoUeToHaCTpaHa(BNXTe rna6).
IocTabeBaWeToDeTeBdETCKOTcTOnue.PnNoCTaBHeTOHaKoJaHHTeBHMaBaTeDaHeceycyuaT.
CIOXeTe e3nIte Ha 3aKoNuaKInTe 3aeHNO n rN BkapaiTe 3aedHO B 3aKoNuaKata 3a npedna3HH KOJAH (8).Heka ce fNKcupat cbc upaKaBaHe.
3aTetHeKoHaHape3n3bPnBaHeHa perylnpaunKaonH(10).KoKOTO NO-NTBTHO KbM BaWeTo DeTe e npInenHan KOnaHbT, TONKOBA No-3aUnTeHO e To B DetCKOTO CTOnue. 3aTOBa e npenopbUnTeHNO De6eN JaKeTa nn NynOBepn Da Ce Cb6nUaT B DetCKOTO CTOnue.
BAxHO:YbepTe ce,ue Ha6epeHnTe KOaHn ca cTeHaTn n IpemHaBaT B3MOxHO Hau-HnCKo HaTa3a.Cne 0e3oNaCraBaHTo Ha TeTeO C KOaHn,3aBbPteTe CTOnHeTo OTHOB N03uN3a DnHexHe.
6. Hanpei/Ha3a
3a yIeChraBaHe Ha 3aKoHuaBaHeTo C KOnAH, CTOnyTe Ho RECARO Salia Elite MoKe da 6bJe O6bpHaTO KbM BpaTaTa. 3a OTKIOUbaHe Ha fYHKUHTa 3a BbPteHe IbPBO HATNCHe To bToHa B cHTbPa Ha OTKIOUBAUIN JOCT 3a fYHKUHTa 3a BbPteHe (13) HADONY n CnE ToBa N3DbpNaIe NoCTa 3a OCBo6oxJaBaHe (13) HABhN. Cera MoKeTe Da 3abbpTInTe CTOnyTe HAcTpaHn.
CJIeI OBe3ONacBaHHeTo Ha JeTeTo C KOJAHn, 3aBbPTeTe CTOnJeTo OTHOBo B I3XoJHa NIO3uJy.
BHHMaaIte 6e6eKoTo cTOnJe da ce fikcnpa cT6nHIO.
BAXHO: INHnkaTopb3a FyHKunraTa 3a BbPteHe Tp8Ba da cTaHe 3eJeH.
IpeopbVbAme DeTeTo Da ce Bo3n O6paTHo Ha Nocokata Ha DnBxKeHne KOKOTO e Bb3MOxHO No-dbJrO.OT Bb3pact 15 Meceua nPbCT noHe 76 cm ce pa3peWabA DeTeTo Da ce Bo3n NO Nocoka Ha DnBxKeHneTO.
7. HactpoKa B noLoXeHne Ha nokoi
3a perynipaneHa no3uetaHa ctonyeTo ocbo6oedeTe 6nokupobkata upe3 n3terIHe Ha perynipauiaNoCT 3a no3uetaHa ctonyeTo (15)Ha npednata ctpaHa ha 6e6ekoto ctonue.Cera moxete da npemecntte ctonyeTO B jenaHATA No3uina.
Ako jehaHa nO3nue e doctnHaTa, oCbo6oTe peynpaunna noCT 3a no3nua Ta h cToueTo (15) u ro qncpaite.
PpOBepe 3a HAnExJdHO fNkCnpaHe ype3 HaTnCKaHe NIN N3DbpNbHa He cToIHTo.
RECARO Salia Elite 105 W. 18
n. RECARO Salia Elite 15
a'auu76 76 W. uauuua 18 nn. uauuua 105 W. aunauuuuauuuuuuuuuuuuuuuuuuuuuuuuuuuuuuuuuuuuuuuuuuuuuuuuuuuuuuuuuuuuuuuuuuuuuuuuuuuuuuuuuuuuuuuuuuuuuuuuuuuuuuuuuuuuuuuuuuuuuuuuuuuuuuuuuuuuuuuuuuuuuuuuuuuuuuuuuuuuuuuuuuuuuuuuuuuuuuuuuUU (www.recaro-kids.com)
nana nna nna nna nna nna RECARO Salia Elite (nwn1,2)
1
2 14
3 6
4 1
5 5uuaauiu uiau ISOFIX
6 Wzwnwn
7
8
9 HERO
10
11 4
12 电
13
14 15
15
16
17 0
18 1uuaaio ISOFIX
19 1
20 1
21 WwWwWvWvWvWvWvWvWvWvWvWvWvWvWvWvWvWvWvWvWvWvWvWvWvWvWvWvWvWvWvWvWvWvWvWvWvWvWvWvWvWvWvWvWvWvWvWvWvWvWvWvW
22
23 1
24 1
25 1
26 HERO
27 1647777777777777
28 1
29 5
30 WwW
2. 17467777777777
RECARO Salia Elite
RECARO Salia Elite enuonnauonauauauauuauuauuuuauuuuuuuuuuuuuuuuuuuuuuuuuuuuuuuuuuuuuuuuuuuuuuuuuuuuuuuuuuuuuuuuuuuuuuuuuuuuuuuuuuuuuuuuuuuuuuuuuuuuuuuuuuuuuuuuuuuuuuuuuuuuuuuuuuuuuuuuuuuuuuuuuuuuuuuuuuuuuuuuuuuuuuuuuuuuuuuuuuuuuUU
·
- 1
· 1
1
·0776977435
- 10000000000000000000000000000000000000000000
·
- ·
3. nuiy
RECARO Salia Elite 15676
4. n
- 100000000000000000000000000000000000000000000000000000000
Wuuuuaaannnueauunueanuunueanu (ww7)
·TJUSSS:uuuueeepnwnnnneunnnnnaee
- uunuunuunuunuunuunuunuunuunuunuunuunuunuunuunuunuunuunuunuunuunuunuunuunuunuunuunuunuunuunuunuunuunuunuunuunuunuunuunuunuunuunuunuunu
RECAROSalia Elite n ISOFIX uouuueoovooaee (n9)
- 555555555555555555555555555555555555555555555555555555555555555555555555555555555555
- 10
ISOFIX (14) RECARO Salia Elite 077777777777777777777777777777
- 17
- 0111111111111111111111111111111111111
oan anananaananaananaananaananaananaananaananaananaananaananaananaananaananaananaananaananaananaananaananaananaananaananaananaananaananaananaananaananaananaananaananaananaananaananaananaananaananaananaananaananaananaananaananaananaananaananaananaananaananaan ana
- 10
10 10
1 1
5.1 n
RECARO Salia Elite vuaanannnnnnaaennnnnnaaannnnnnaaannnnnnaaannnnnnaaannnnnnaaannnnnnaaannnnnnaaannnnnnaaannnnnnaaannnnnnaaannnnnnaaannnnnnaaannnnnnaaannnnnnaaannnnnnaaannnnnnaaannnnnnaaannnnnnaaannnnnnaaannnnnnaaannnnnnaaennnnnnaaannnnnnaaannnnnnaaannnnnnaaannnnnnaaannnnnnaaannnnnnaaannnnnnaaannnnnnaaannnnnnaaannnnnnaaannnnnnaaannnnnnaaannnnnnaaannnnnnaaannnnnnaaannnnnnaaannnnnnaaannnnnnaaa
WuTuTuTuTuTuTuTuTuTuTuTuTuTuTuTuTuTuTuTuTuTuTuTuTuTuTuTuTuTuTuTuTuTuTuTuTuTuTuTuTuTuTuTuTuTuTuTuTuTuTuTuTuTuTuTuTuTuTuTuTuTuTuTuTuTuTuTuTuTuTuTuTuTuTuTuTuTuTuTuTuTuTuTuTuTuTuTuTuTuTuTuTuTuTuTuTuTuTu
(27)(12)
Hnunnnn nn nnnnnnnnnnnnnnnnnnnnnnnnnnnnnnnnnnnnnnnnnnnnnnnnnnnnnnnnnnnnnnnnnnnnnnnnnnnnnnnnnnnnnnnnnnnnnnnnnnnnnnnnnnnnnnnnnnnnnnnnnnnnnnnnnnnnnnnnnnnnnnnnnnnnnnnnnn nn
(25) 1
n
(24)
(31) 202020202020202020202020202020202020202020202020202020202020202020
1
1
1
nSalia Elite
n 5.2 w o
vuaa 27
WnBnBnBnBnBnBnBnBnBnBnBnBnBnBnBnBnBnBnBnBnBnBnBnBnBnBnBnBnBnBnBnBnBnBnBnBnBnBnBnBnBnBnBnBnBnBnBnBnBnBn
8. 77700175
ECE R129.00 nnuuunnuuunnuuunnuuunnuuunnuuunnuuuuuuuuuuuuuuuuuuuuuuuuuuuuuuuuuuuuuuuuuuuuuuuuuuuuuuuuuuuuuuuuuuuuuuuuuuuuuuuuuuuuuuuuuuuuuuuuuuuuuuuuuuuuuuuuuuuuuuuuuuuuuuuuuuuuuuuuuuuuuuuuuuuuuuuuuuuuuuuuuuuuuuuuuuuuuuuuuuuuuuuuuuuuuuuuuuuuuuuuuUU
RECARO Kids s.r.l. 1
SALIA ELITE
11. Adaptor baby carrier until kereta bayi (opsional)
Web: www.recaro-kids.com