CS 100e - Saw STIGA - Free user manual and instructions
Find the device manual for free CS 100e STIGA in PDF.
| Product type | Battery chainsaw for pruning |
| Brand | STIGA |
| Model | CS 100e |
| Power source | Lithium-ion battery (not included) |
| Chain brake | Yes, mechanical anti-kickback |
| Lubrication | Automatic with oil reservoir |
| Chain tension adjustment | By screw or quick tension ring |
| Handles | Front and rear with safety devices |
| Intended use | Pruning, branch cutting, felling of small trees (wood only) |
| Safety | Chain brake, front hand guard, throttle lock |
| Compatible battery | See list in manual (specific models) |
| Charger | Sold separately, use original charger |
| Routine maintenance | Cleaning after each use, check tension and lubrication |
| Chain sharpening | To be carried out by an authorized center or according to instructions |
| Spare parts | Recommended original guide bars, chains, batteries, and chargers |
| Storage | Dry place, temperature -20°C to 85°C, battery stored separately |
| Transport | Remove battery, attach guide bar cover, point guide bar backward |
| Warranty | According to manufacturer's conditions (see manual) |
Frequently Asked Questions - CS 100e STIGA
User questions about CS 100e STIGA
0 question about this device. Answer the ones you know or ask your own.
Ask a new question about this device
Download the instructions for your Saw in PDF format for free! Find your manual CS 100e - STIGA and take your electronic device back in hand. On this page are published all the documents necessary for the use of your device. CS 100e by STIGA.
USER MANUAL CS 100e STIGA
EN Battery powered chainsaw for tree service OPERATOR'S MANUAL
WARNING: read thoroughly the instruction booklet before using the machine.
[1]BG-TEXHNUECHN DAHHN
[2]3axpaHbauo HanpeKeHMe MAHC
[3] 3axpaHbAio HanpeKeHne HOMHAJIHO
[4]MaKcHmAlHa cKOpocHa BepnraTa
[5]MaKcHmHaJha YecToHa BbPteHe Ha 1nnHnDa
[6]ДынинаHa cpa3BaHc
[7]ДебелинаHaВеригаТa
[8]3b6m/ctbnaHaHHbOHaBaBepnra
[9] BmecTnMoCT ha pe3epBoapa Ha macIaTO
[10] Ternio (6e3 aHymnatop, 6e3 uHa n Bepira)
[11] N3MepeHO HnBO Ha aKcyCTMHa MOHOCT
[13] HnBO Ha n3MepeHa aKcTnHa MouHOCr
[14]「apaHTnpaHO HnBO Ha 3ByKOBA MOUHOC
[15] Hnbo Ha Bn6paun
[18] INHADJIENHOCTN NO 3AABHA
[19]BLOKHa akyMylatopa,MOI.
[20]3apeHdaHeHaakymyIaTopa
[23] TÁBЛИЦА 3A IПAPВИНHA HOMEINHALIHA IJIHANBEPIΓA (Г.15.3)
[24]CTbIIHA
[25] UNINA
[26] BEPNFA
[27] Panu/ mm
[28]ДыннИа:Палу.
[29] 甲图甲Ha Jkne6a:Panu / mm
[30]KoI
a)3A6EJIENHKA:JeNapnpaHaTaObSa cToHocT HBaBpaunE hmepeHa npAdbPkaHnCe KbM CTaNapTn3paHm ToDc Ha n3nTbaHe NMOE Da ce hNoI3Ba 3 naPaBHe Ha cpABHeHMeJdy EHN Hpyr HCTpyMeHT. O6uata CToHocT Ha Bn6paun MoKeJa ce hNoI3Ba H 3a npEdBaPntHa OceHkA Ha h3nIraHETo.
b) NPEDUYPENHEHNE: H3daBaHETo Ha Bn6paunpipeaHOTo H3NOJ3BaHe Ha HNCTpyMeHTa MOHe da 6bde pa3nHuHa OT o6uata DeKnapnpaHa cToHIOCT,B 3AHCIMOCT OT HAChNHTE Ha H3NOJ3BaHe Ha HNCTpyMeHTa. TOpadnTOBaE HeO6xOdmo No BPeme Ha paOta Da ce B3eMaTc CneHNHe PpeJa3HmEPeKpIeJIynpEJa3BaHETo Ha OepaTopa: HOcTe pBkABnUNo BPeme HA H3NOJ3BaHETo, ORpaHwTe BPemehaTa HA H3NOJ3BaHe MA MaunHATA n HamaJeTe BPemehata, PpE KOTHO Ce DpRnHaNTchAT LoCTa 3a ynpabHeHHe Ha YCHOPHTeJ.
[1] BS-TEHNICKI PODACI
[2] MAKS. napon napajanja
[3] NOMINALNI napon napajanja
[4] Maksimalna brzina Ianca
[5] Maksimalna frekvencija okretanja vretena
[6]Duzina reza
[7] Deblina Ianca
[8] Zupci / korak gonjenog zupčanika lanca
[9] Kapacitet spremnika za ulje
[10] Tezina (bez baterije, bez vodilice lanca i Ianca)
[5] Méyiotn ouxvotnta nepiotppohç tou took
[6]MnKoc konns
[7] έxος αλυσίδας
[8] OV /
[19] Batarya grubu, mod.
[20] Batarya sarj cihazi
[21] Batarya sirt cantasi
[22] Batarya simulatoru
[23] DOGRU PALA VE ZINIR BIRLESIIMI IGIN TABLO (Bol. 15.3)
[24] ADIM
[25] PALA
[26] ZINCIR
[27] / mm
[28]Uzunluk:Inc/cm
[3] HOMINHAJIbHOE HanpJKeHne nHTaHHN
[4]MaKcHmAbIbHae ChOpocTb cENI
[5] MaKcImaJIbHaN aYCTOaBpaUeHnA WInHdEJa
[9] EMKOCbMaCJHoro 6aKa
[15] YpOBeHb Bn6paun
[18]DIOIOLHINTEJIbHOEOBOPUOBAHNE
TPOTEBOAHNIO
[19] BaTapeiHbI 6nok, MoD.
[20] 3aapndnoe yctpoictBO
[23] TÁBÍNÇA IPNAPBUNHbIX KOMBNUHALCNIU HNA-LENb (rπ. 15.3)
[24] LJAG
[25] LUNHA
[26] LENb
[27]ДИОМьI/MM
6. USO DELLA MACCHINA
1) Be3onacHOCT Ha pa6oTHaTa 3OHa
a)ПодьрхаiteЧиста и дбpe ocBeTeHa pa60THata 3OHa.ТьMHN 3OHN И рa3XBbPJIHn 3OHN,уLECHRAВВБЗИКBAHETOHA INHUNDEHTN.
b) He n3no3BaIte eJeHTpueckn HNCTpyMeH T B CpeDa C pNCH OT EHCNIO3n, TaM KbDeTo NMa 3aNaIMN TeuHOCTn, Ra3OBe Nn npax. EJeHTpuecknTe HNCTpyMeHTn Cb3da-BaT NcKpn, KOINTo MOHe Da NOpnaJrT npax Nn napn.
c)Дрьнгte Далу龟цаиnpсьctBaunite, KOrato N3PON3BaTe eIeHTpHueChn HNCTpyMeHT. Pa3ceuBaHTo MoKe da npuHn 3aRy6a Ha KOHTpOJ.
2) EneKtpnuecka 6e3onacnoct
a) Μεπεζητe Ha eJEHTpUeCKH INHCTpyMeHT TpI6Ba Da CbOTBETCTBaT Ha KOHTaHa. HNHOra He npOMeHnTE ΜεπCελNo HNHaKbB HAuHN. He n3PON3BaTe npexOHy ΜεπCεHn C eJEHTpUeCKH INHCTpyMeHTn, CHa6DeHn CbC 3a3EmBAHe. HEmoHΦnUpaHnTe ΜεπCεHn OTOBAPaΨte KOHTaKTn Με HaMaJIr T PnCKa OT eJEHTpUeCKn ydap.
b) N368RaBte KOHTaKT Ha TAnOTo Cbc 3a3eMeHH NOBbPxHOCTn Hn CBbp3aHn KbM 3a3eEMBaHe KaTO Tpb6n, paHaTOpn, KxHHeHCn neHN, XnaHInu. Ima NOBUnE h pck OT eJIeKTPnuecKn yDap, aKO TaIOT Bn E B KOHTaKT Cbc 3a3eMeHH NOBbPxHOCTn Hn CBbp3aHn KbM 3a3eMaBaHe.
c) He n3laraIte eIeKtpnuechNte HnCtpyMeH Tn Ha dBHHd NnHa Bnara. IpoHnKBaHTo Ha BOda B eJIeKtpnueChn ypeD yBeJIuHaBa pNcKa OT eJIeKtpnueChn ydp.
d) He 3noynotpe6BaIte c Ka6eHa. HnKora He n3noJ3BaIte Ka6eHa, 3a Da TpaHcnpTnpaTe, DbPNaTe Nn N3KnIOuBaTe eJeKTPueChn IHCtpyment. CbXpaHaNBaIte Ka6eJaLey OT N3TOUHN Ha TOJIINHa, MaCNo, OCTPN Pb6OBe Nn DBNHeu Ce YactN. POBedeHn Nn ONIeTeHn Ka6eN NOBnJABaT pNcHa OT eJeKTPueeKn yIap.
e) Korato n3noJ3BaTe eJeKtpnueChn HnCtpyMeHT Ha OTHPnTO, n3noJ3BaIte ydbJnxIeIeH Ka6eI, noXoJaIz 3a yNtpe6a Ha OTHPnTO. N3noJ3BaHeTo Ha Ka6eI, nOxOJaIz 3a yNtpe6a Ha OTHPnTO, hAmJIraBa PnCKa OT eJeKTPnueChn Ydap.
f) Ako e Hn36eHHo da H3noJ3BaTe eJenKTPnuecHn HHCTpyMeHT Ha BnaJHo MrcTo, H3noJ3BaIte 3axpaHbAhe, 3aunTeHO OT yCtPOiCTBO 3a OCTaTbUeH ToH (RCD). H3noJ3BaHeTo Ha RCD hAmajBa pNcKa OT eJenKTPnueckn ydap.
3)Лична6e3oNaCHOCT
a)БbTe BnHaBn BHMaTeJIHn, KOHTpOlnpaIte TOBa, HoETO Ce BbpHn MNCJeTe pa3ymHO, KOrato H3NoJ3BaTe eEeHTpuYeCKn IHCTpyMeH. He H3NoJ3BaTte eEeHTpuYeCKn IHCTpyMeH, KOrato CTe yMopeHN IIN NOB Bb3DeiCTBHeTo Ha HApKOTn, aIKOXoJ IIN IekapCTBa. Moment HeBHMaHne, DOkato ce H3NoJ3Ba eEeKTpuYeCKn IHCTpyMeH, MOKe Da npuHHn cepno3Hn IunHn HapaHBaHn.
b) N3noJ3BaIe npedna3Hn dpexn. ClaraIte BHHarnpedna3Hn OuHa. YnoTpe6aTa Ha IInyHN npedna3Hn cpeIcTBa KaTO MaChn IpOTnB npax, 06yBKn IpOTnB IOxJIb3BaHe, 3aUHTN KaCKn INI HayuHnCn 3a CnyXa, HamaJIraBa JInyHnte HapaHbAHn.
c) N36aRbaTe cIyauHOTo BkIIOUbaHe. Y6eDeTe ce, ye ypeBt e H3KluOyen npedn daNoCTaBte aKymlaTopHnte 6aTePNn, daXBaatae nn Da TpaHCnOpTnpaTe eEnKtpnYeckna ypeD. TpaHCnOpTnpaHTo Ha eJeKTPnYeckn ypeD c npbCT Bbpx npekbcBaHa NNMOHTpHaTe Ha aKymlaTopa C npekbcBaB N03nua "ON" ("BKn") yleChra b HnCnDEHTne.
d)OTCTpaHete BCnKn KIOOBE nIN INHCTpyMeHTn 3a HAcTPOHa, npEn Da BnIOUHTe eEKeTpueckn HNCTpyMeHT. KIOU nn HNCTpyMeHT, OCTaBauB KOHTaKT C BbPTaCa ce Yact, MoKe da IOBeDe Do IInHn HapaHraBaHHa.
e) He ry6eTe paBHOBeCne. 3ana3BaIte BnHa-rn IIOxOJHn OJopa n paBHOBeCne. Toba I03BOJIyBa Da HMaTe IO-ROJAM KOHTPOJ HaI NHCTpyMeHTa B HeOuaKbAHn CNTyaUHn.
f) O6JIuHaTe ce noxOJa. He 6JIuHaTe shpOHN dpexn nn yHpaSeHn. DpbHTe Ha pa3cTOnHne OT dBNHeUeNTe ce qactn HocHTe cn, dpexnte n pbHabnUte. ShpOKn dpexn,
yKpaewHnI Nn DbIgN KOCh MoKe Da ce OnneTATB DnKHeuNTe Ce YactN.
g) AHO HMa INHCTpyMeHTn 3a Cbbp3BaHe KbM CnCTemN 3a N3BnUaHe N Cb6nPaHe Ha npax, y6eJeTe Ce, ye Ca Cbbp3aHN N3NoJ3- BAHN NO NOxOJaH aHuH. Ynotpe6ata Ha Te3N INHCTpyMeHTn MOKe Da HamaJIIN PnCKOBete, Cbbp3aHN C npaxTa.
h) He no3BOLBAITE BaWETo 3aNo3HbAHe C MaunHaT, DJIHnAo ce Ha YecTaT a N ynoTpe6a, Da BN HApBaN TBbPde YBePeHN, 3a Da npEne6perHete npHHnnte 3a 6e3oNacHOCT. ENo He6peHHo DeiCTBne MOKe da npuHHn cepno3Hn HapaHbAHn 3a Yact OT CeHyHdTa.
4) YnOTope6a n cbXpaHeHne Ha eJekTpHuYecknHa HhCTpyMeHT
a) He npetobapbaTe eIeKtpnueckn HNCTpyMeNT. N3noJ3BaTe NOxOJaun 3a pa6oTa Ta eIeKtpnuechn HNCTpyMeNT. IOnXoJaunT eIeKtpnueckn INCTpyMeNT ⅢBbPmH NaHdo6pe n Ha-6e30ancho pa6oTaTa, Ha CKopocT-Ta, 3a KOrTo e npoeKtnpaH.
b) He n3no3BaTe eNeKtpnueckn HNCTpyMeHT, aHO npBHKIOUyBaTeJrT He e B CbCToHHe Da rO BHKIOUH Nn Da rO n3HIOUH HopMaIHO. EneKtpnueckn HNCTpyMeHT, KOITo He MoKe Da 6bDe BHKIOUeH OT npBHKIOUyBaTeJI, e OnaceH n Tpr6Ba Da 6bDe nonpaBeH.
c) CbaIeTe anMylaTopa OT HerOBOTrHe3do, npEn Da N3BbPwBaTe KaKbATO n da e Ha-CTpOJa HnCmHa Ha npHnAdJeHHoCTn, HnnpEn Da np6epete eJenKtpueckn HHCTpyMeHT. Te3n ppeBaHTBn MePKn 3a 6e3-ONaCHOCT HamaJIbAT PnCKa OT ClyuAHO 3aBnKBaHe Ha eJekTprueckn HHCTpyMeHT.
d)ПибираиTe 3a CBxpaHHe HeH3NoI3BaHHTe eIeHTpUeChn HNCTpyMeHTn N3BbH O6cera Ha Deua n He No3BOJRAaTe H3NoI3BaHETo Ha eIeHTpUeChn HNCTpyMeHT OT Xopa, KOnTO He Ca 3aNo3HaTH cbc Camna HNCTpyMeHT n C Te3n HNCTpyHcH. EJIeKtpuYeCKHTe INCHCTpyMeHTn Ca OnaCHn B pLcTe Ha He3aNo3HaTH nOTpe6nteJI.
e) TpHHeTe ce 3a NOdPbHHata Ha eEnTpNueCHNTe HNCTpyMeHTn. Y6eTe ce, Ye NDBHHTE qACTn Ca H3paBHeH N CBO6OHN npn DnHHeHHeTo, Ye HMa CuyneH qactn nn dpyro yCIOBHe, KOEt MOHe Da Bb3-DeIcTba Ha pa6oTaHa eEnTpNueChn HNCTpyMeHT. B clyuai Ha nobpeH, eEnTPnueChnT HNCTpyMeHT Tp8Ba da 6bJe nonpaBeH npdH n3NoJ3BaHeto My.MHoro HHUeHTn ca npedn3BnKaHn OT loWa noDpBkka.
f) PnDbpaHte HatoeHn YnCTn peKeunTe yactn. PnOxOraata NoaPbKa Ha peKeun-Te yactn, C do6pe HatoeHn pe3u, rnpaBn
No-MaIko NoDaTnBn Ha 6IoknpaHe n No-JeCHN 3a KOHTpOIpaHe.
g) N3noJ3BaIte eJeHTpueeCKnT HNCTpyMeH n CbOTBeTHnTe npHaadJIeHXHOCTn CbIaCHO npedocTaBeHnTe HHCTpyKu,HaTO HMaTe npedBnU yCIOBnTa Ha pa6ota u BnDa Ha n3BbPwBaHata pa6ota. N3noJ3BaHeTo Ha eJeETpueeCKnT HNCTpyMeH 3a Oepaun Pa3- JInuHN OT Te3n PpeBnDeHnTe,MOKe Da ppeH3-BnKa ONaCHN CNTyaUn.
h) PpHnTe DpbHHnTe/pbHOXBaTHnTe cyxuHCTn 6e3 CneiOn OT MacNo rpec. Xb3raBnTe dpbHKn/pbKOXBaTHn He No3BOJBAr 6e3oNaChpa60Ta n 6e3oNaCHO ynpabHe Hne Ha HHCTpyMeHTa B HenpeDbndEHn CNTya-
5) N3noJ3BaHe n npedna3Hn MepKn 3a N3noJ3BaHe Ha aKymJaTOpHnTe HnCTpyMeHTn
a) 3apeHdaIte cAmO cbc CbOTBeHTO 3apdHO yCTPOINCTBO, KOETe IIOCOUeHO OT npOn3-BOINTeJI. 3apdHO yCTPOINCTBO NOxODaIoo 3a DaHeHa rpyna akymyIaNtOpHn 6aTePHN, MoKe da npuHHn pICH OT NoXap, aKO CE N3NoJ3Ba 3a DpyrN rpyn akymyIaNtOpHn 6aTePHN.
b) N3noJ3BaIte eIeHTprueChnTe ypeHcAmO cNoDxOJaUN 3a TEx aHyMylatOpN. H3noJ3- BaHeTO Ha KaKbaTo I da 6nlo dpyra rpyna aHyMylatOpN, MoHe Da Cb3daDe pNCK OT HapaHbAHHN I NOkApN.
c) Korato rpynata anymylaTOPn He ce n3noJ3Ba, e Heo6xOdHMo Da ce cBxpaHraDaJeOT dpyrMaTALn HpeMeTH KATO MOHeTN, HIOUObE, INPOHN, BnHTOBe N dpyrMaHmMeTAHn PpeMeTH, KOHO T MaT Da Cb3daT Bp3Ha MeHdy DBe KHeM. Kbco CbeHnHeHne Ha Klemte Ha aKymylaTopHnTe 6aTePNMOKe Da ppeN3BnKa H3rapHn nn noHapn.
d) AHO CE HAMIPA B looB CbCTOaHHe, aHy MyLaTOPHaTa 6aTePnA MoHe Da N3NpyCa eEeKTPoIHT: N36RBAIte KaHbBTO N da 6HIO HOHTaKT. PnClyuAeH HOHTaHT, N3NlaKHeTe He3a6abHO C BOJa. AHO TeUHOCTTa BLe3e B HOHTaKT C OUYTe, NOTbpcTe He3a6abHO JeHapcKa NOMou. N3TeKJIra OT aHyMyLaTOPHaT a6aTePnA eEeKTPoIHT, MoKe Da npEdu3Bnka pa3Dpa3HeHHa NN N3rapaHHa.
e) He n3noJ3BaIte NOBpeH nIIMoNΦnIpaH 6Iok OT aKymyIaTOPHbATEPnH, KaHTOn MoNΦnIcHpaH nIIN NOBpeH hNCTpymENT. NOBpeHnTe nIIMoNΦnIcpaHn aKymyIaTOPHb 6aTePNMOraT da npOraBt HnpeDcKa3yeMoNOBeHHe, c pON3TuHaUITE OT TOBA IOnkap, EKCnIO3nI IN pNCK OT HapaHbAhe.
f) He n3laarate 6loha oT aHymylatopn6 bate pnn Ha orbH nn npekomepHn TemnepaTypn. H3laraheto Ha orbH nn TemnepaTypn no-BincoHN ot 130^ Mohe da npuHHn ekcnnoHN. BENEHHA. Temnepaypata ot, 130^ moke da 6bde 3ameHeHa c Temnpaypata ot, 265^
g) CJIeBaiTe BChHn HNCTpyHcHn 3a 3apeHdaHe n He 3apeHdaTe aKymlaTopa n3BbH TempepaTyHn DnAna3OH, NOCOeH B NHCTpyHcHnTe. HenpaBnHTo 3apeHdaHe nIIN 3apeHdaHe npn TempepaTypn n3BbH NOcoYeHn TEmpepaTypeH dHaana3OH MOKe da NobpeDi aKymlaTopa n Da yBeLInu pNcKa OT NOJap.
6) CepBn3
a) DaBaIte eIeKtpnueckn HNcTpyment 3a no- npabka camo Ha KBaIINΦnucpan nepcohaI, KATO h3NoJ3BaTe camo opnHnHaIIHn pe3epBHN qactn. Toba nO3BOJRA Da ce noDJIbPka 6e3OnacHOCTT a Ha eIeKtpnueckn HNcTpyment.
b) HnHora He nonpaBnTe NOBpeHn AnymyIaTOPHN 6aTepnn. IopdpkKaTa Ha anymyIaTOpHNTe 6aTepnn Tp86Ba Da ce n3BbpwBa camo OT npOn3BOIDNTeJI NII OToPn3npAHIOCTaBnU, KOINTo npEOCTaBt Ta3N ycLyra.
2.2 INPABNIA 3A BE30NACHOCT CNEUΦNCHN 3A MOTOPH NJIEN EJEKTPNUECHN TPNOHN.
a) PoiDbpHaIte BCnHn Yactn Ha TAnOTo DaJeUOT 3b6uataTabeBepna,doKATO BepHHNHT TpNoH e B DeInCTBne. IpeDu Da 3aDeInCTBaTe BepHHNHT TpNoH ce y6eTe, Ye 3b6uataTabe BepnA He DOHOcBA HnO. MOMENT HeBHIMAHNE,doKATO Ce 3aDenCTBaT BepHHNHT TpNoH,MOKe Da CE npEi3BnKa 3aJIHTaHe Ha dpexnte NIN TAnlOTO B 3b6uataTabe Bepna.
b)ДяснаТа рьна Виharу Тряба Ддьрн 3аднаТа рьховата,а Лвata -пpeнота рьховата.ИнкORA He Tpr6Ba Da ce pa3mehrт рьцete пriДьрЖане Ha BepnHnT rpoH,ТьКATO CE yBelenuhaba pисka OT INHundentn 3a onepaTopa.
c) XbaaIte eIeKTPnueChn HNCTpyMeHT cAmO 3a N30IpaHnte NOBbpxHOCTn Ha pBHOXBaTHNe, TbN Hato 3b6yataT a Bepnra MoHe Da BLe3e B KOHTaNT Cbc ChpTN Ka6eN. KOHTaKTbT Ha 3b6- YaTaT a Bepnra C Ka6e NOD HAnpeXeHne MOKe Da NoCTaBn POnd HAppeXeHne MetaHInTe YacTn Ha ypeDa N Da npuHH eIeKTPnueCk N yap Ha OnpaTopa.
d)Да ce n3noI3BaT npedna3Hn OvHn H wymonpepa3Baun cpeCTBa.ПpenopbUbat ce pyrnnnpedna3HNcpeDCTBa 3a rnaBata,pbueTe nKpaKaTa.N3noI3BaHeTo Ha noXoJn npedna3HndpexnHaMaJIraPnCKa OT hapaHBAhe Ha TAnTO, npuHHeHO OT IeTnnapETa, KaKTo NOT ClyuaEH KOHTaKT CbC 3b6TuTHn TpOH.
e) He pa6oTeTe C MOTOpHnRA TpNoH, HORaTO ce HaMnpaTe Bbpxy DbPBO, Ha CTbJIb6a, Bbpxy NOpRnB HnI dpyra Hecta6nHa onopa. H3noJ3BaHeTo Ha MOTOpHnRA TpNoH IO TO3n HaChnMoKe Da IpruHH JInuHn HapaHraBaHn.
f) Bnhar noidbpaHnHa onopHa To4 Ka Ha Kpaka H 3aedCTBaHTe BepHHn Tpnoh camo aHO CTOnTe Ha HeNodBnHHa, 6e30NaCHa H
HNBeIHpHa NOBbpxHOCT. Xlb3raBNTe HnH HeCTa6nnH NOBbpxHOCTN, KATO CTbJb6n, MoKe Da DOBeaTdo 3aY6a Ha paBHOBeCne Nn KOHTpOHa MToPnHn TpNOH.
g) Horato ce pehe KIOH NOH HANpeHHeH, Tp6Ba Da BHIMaBaTe 3a PnCKa OTOTCHOK. Korato ce otnyche o6TraHTo Ha DbPBeHIne Fn6pn, ONbHaTnRT KIOH MoKe C OTCKoK Da yDapn OnepaTopa N/nn da n3Kapa BepnKHNrT TpNOH N3BbH KOHTpOi.
h) BHMaBaIte OcObeHo MHoro KOrato peKeTe Xpactn mIaIbIeauHKn. TbHKn MaTePnaJIIMoRat Da ce 3aKJIeUaT B 3b6UaTaT a BepuHa N da 6bDaT n3XBbPJIeHN BbB BaWata NOCOKa N/IIIN Da BN pNHyHrT 3aRy6a Ha paBHOBeCne.
i) TpaHcnpTnpaIte BepHHNt TpnoH, XbaaaiHn ro 3a npedHaTa pbHOXBaTHa HORato e n3KIOueH, DbpKeHNr Ro daJeU OT BaWTo TAno. HORato BepHHNr TpnoH ce TpaHCnpTnpa Hn Ce np6n pa 3a cbxpanHeH, Tp6Ba BNHar Da ce ClaRa npedna3nteHa Ha uHata-Bodau. PpaBnHaTa pa-60ta C BepHHNra TpnoH ue HaMaJIb BepoTHOCTTA OT clyuaeH KOHTaKT C NOdBnHnTa 3b6yTa Bepira.
j)Пидьржаite ce KbM ИСТPyKUINHe 3a Cma3Ba- he,обягане Ha Bepnata N 3a CMraHa Na UHHaT a N Bepnata. Bepira, KoTo He e o6TeHata N Cma- 3aHa npabNlHO,MOKe KaHTO da Ce ChyHn,TaKa N Da NOBnH pNCKa OTOTCHOK.
k) PeHete camoDbpBO. He noJI3BaIte BepHHHnT TpnoH 3a HnpeBnDeHn ceHn. HanpImep: He n3NoJ3BaIte BepHHHnT TpnoH 3a P3aHe Ha MetaHn MaTePnAhn, INaCTMaCOBn MaTePnAhn, MaTePnAhn 3a CToPOnTeLCTBOTO Hn He DbPBeHN MaTePnAhn. Ynotpe6aTa Ha BepHHHn TpnoH 3a Onpaun, pa3JIuHn OT ppeBnDeHnTe, MoKe da npoBOKupa OnaChn CNTyaun.
I) He ce onntBaHte Da OTeeTe DbPBO, DOHaTo He pa36epete pncOBete H KaH Da rH N36BerHe-Te. Morat Da Bb3HNKHAT Cepno3Hn HapaHraBnHa OnepaTOP IIN MNHyBaun PpN OTcNuHaTe Ho DbPBO.
m) CneBaTe BCnHKn HnCTpyKuIm 3a OTCpaHaBHe Ha 3aceHaMaTePnaI, KaTOn 3a CbXpaHeHne N/nn NoDpBkHa Ha MOTOpHnra TpNoH. YBepeTe Ce, Ye npeBKnIOUbaTeJIe e N3KIOUeH, KaTOn I, Ye 6aTePnraTa e N3BaDeHa. Cepno3HO HapaHbaHeMOKe Da Bb3NkHe B pe3yJITaT Ha HeoayKaBaHO 3aDeiCTBaHe Ha BepnKHHra TpNoH, DOKaTO NOcHCTBaTe 3aceHaJa MaTePnaI nn N3BbPwBaTe NoDpBkHa.
n) PpenopbHTeHNO e, NOHe 3a NpBBOTo H3NoJ3-BAHe, DbHepnte da ce peKaT Ha npncnoc6JeHNHe 3a pr3aHe.
o) IpenopbHTeH0 e 3aToUbaHeTo n NOdApbKHaTa Ha BepnraT ha TpNoHa da Ce N3BbPWBat OTOTOpn3npaHc cepBn3HN cHTpoBe.
p) POpIbpaHnpe pbKoXBaTHne cyx,nuCTn n 6e3 cIeHNOT macNo rpec. OmacJIeHnTe, Ma3HnTe pbKoXBaTHn ca XJIb3raBn H MoRat Da InpEiN3BnKaT 3aIy6a Ha KOHTpol.
2.3 IPIUHHN 3A OTCHAHAE (OBPAH N ydAPn) N 3AUHTA HA ONEPATOPA
MoHe da HMa OTCKaHaHe (O6paTHn yApn), KOraTo Bbpxa Nn Kpar Ha HAnpaBIAuTa 7nHa DOKoChe npEdMeT nH, KOraTO dPbBOTo ce 3aTBOpN B c6e Cn, 3aTraKn 3b6NaTa BeprA no BpeMe Ha pR3aHe.
HoHTaTbT C BbPxA B HЯKON CnyaM MoKe Da npedn3BnKa BHe3aHNO O6paTHa peakun, N36yTBaHKn Ha-npabJbRaUaTa UHa Harope N Ha3ad, KbM onepaTopa.
3aTnraHTo Ha 3b6yata Ta Bepna Bbpx y ropnata Yaact Ha HnpaBnBaauata uHa, MoKe Da n36yTa 6bp30 3b6yata Ta Bepna 6bp3o Ha3ad KbM opepato.
EHa Hpyra OT nocouehnte peaKun, MoHe da npuHH 3ary6a Ha ynpabLeHneTo Ha TpnoHa N da npedn3BnKa NO TO3n HauH TeKKn 3IIOJyKn C IInceto. He 6nBa Da pa3HTate cAmo Ha npedna3Hnte ycTPOiCTBa, KOITO Ca BrrpaDeHN B TpnoHa.
Iobpe e IOn3BaTeJrT Ha BepnHn TpnoH da B3eMe pa3nUHmepKn 3a n36raBHe Ha pncKa OT nHnDentn Hn HapAHBaHn NO BpeMe Ha pa6oTa. OtckaHaTeO (6bpaTHn yApn) e pe3yIaT OT He npabuHn 3n0J3BaHe Ha INCTpyMeNTa N/nnn HnpabuHn IpOceDypn nn HeNOxOJaN yCIOBn Ha pa6oTa n TOBa MoKe Da ce n36erHe, KaTO Ce B3eMaT IOXODA NpEaNa3HN MepK, IocOeHn Tyk No-DoJy:
a)ДрьнтTe TpnoHa HeNoBnHc C DBeTe pbue, c NaIuN I npbCTn OKOLO pbKoXBaTKnte Ha BepnKnHn TpnoH, KaTO CbUeBPemEH No3nHOpHpaTe TJIOTo n PbucTe CN Taka, Ye Da yCTOBaTe Ha CInlte Ha OTchaUHe (O6paTHn YdApn).CInlTe Ha OTCKOK MOrat Da ce KOHTpOJInpaT OT onepaTopa, aHO ca B3ETn CbOTBETNtE PpeNa3HN MepKn. He OCTabRyTe BepnKHHrT TpNOH Da TpbHre.
b) He npotraaTe pueTe MHO daJeu He peHHe Ta BncounHa TpaMOTo. ToBa DOpnpHacr 3a N36raBHe Ha HeKeJaan KOnTaHTN C KpanuaTa H No3BOJRA Ba NO-dO6bp KOHTPOHa BEpHHNr TpNOH B HEnpeDbndenCITyaun.
c) H3noJ3BaIte eHnCTBeHo HAnpaBlaBaUHTe ⅢHH N BepHrTe, NocOeyH N Opon3BOaNTeJI. HenoJxOJaN pe3epBHN BOaH N BepRn MORaT da npuHnHT ChyPbHe Ha BepRaTa N/INn Da npuHnHT OTCKOK.
d) PnpdbpkaTe ce KbM HNCTpyKunTe Ha npoH3BODHTeJI, OTHACaIc Ce Do 3aTOUbaHETo I NOdApbHKaTa Ha BepHHn TpnoH. ENo HAmaJIraBaHe Ha JbIoOuHNAta, MoKe Da DOBeDe Do yBeliuHaBaHe Ha OTCKaHaHTo.
- TexHHa 3a ynoTppe6a Ha eJeHTpueecka BepnHexe TpnoH (3axpaHbA c aHyMylaTOpHa 6aTePna)
BnHa n CnA3BaIe yKa3aHnIa 3a 6e3oNaCHOCT N I3- NOJ3BaIe Hau-nOxDxOJaTa TexHnka 3a pra3aHe BbB
Baunn Cnya, Cnopeyka3aHnraTn npImepnte, nMeCTeHN B INcTpyKuNTte 3a yNoTpe6a.
- Be3onacHO npemecTbaHe Ha eIeKtpnuechn BepHHen TpnoH (3axpaHbAH c aHyMylaTopHa 6aTepe)
BceHn bT, KOraTo Tp6Ba Da npemecTBate NIn TpaHCnpTpapTe MaunHaTa, e HEO6XoNMO:
-ДаИЗгСТЕМOTOPA,ДaИЗЧАКАТСПИРАНToHaВериГАТa ИДaИЗКЛЮЧNTeMaшINHATAOTELEKТPNYeCKaTAmpeKa;
-Да NOCTaBnTe npeDna3nteHa SHHnHaTa;
-Да XBaHTe MaUnHaTa eINHCTBeHO 3a ДрБЖКНTe И Да HAcOHTe ShHATA B NocOKa, ObaPaTHa Ha npNDbNKBaHTo.
Korato TpaHcnpTnpe MaunHaTa C npeBO3HO cpeICTBO, Tp6Ba Da Ja pa3NoJXNe TaKa, Ye Da He npedCTaBJIbA OnaCHOCT 3a HnKOrO n 3dpaBO Da J 3aKePENITE.
- PpenopbHn 3a Naunnae
Ipei Da npntbnte 3a nbpBn nT KbM pa60Ta, Cbbp3aHa c OTcHuaHe Ha DbpBeTa nn Otpra3BaHe Ha KIOHn, 6n 6nlo Do6pe:
-Да CTe CnEuaJIHo 06UyeH 3a yNoTppe6aTa Ha To3N BIVI INHCTpyMeHTN;
-Да CTe npOeJIи BHNMaTeJHNO ppeIpypeKdEHHaTa 3a 6e3oNaChOCT n HcTpyKuInTe 3a yNoTppe6a, CbIbPkaUc CE B HAcToAIOTO pBkoBOdCTBO;
- da ce ynpaXHBAte Bbpy NOBaJIeH NbHepn nn DbHepn, 3aKpeHn Bbpy NoCTabKn 3a pr3aHe, C qel Da npNdo6neTe Heo6xOJmNr ONt 3a pa60Ta C MaunHaTa n PoXoJUHTe TexHKn 3a pr3aHe.
-Правлна маниулачи n ynoTe6a Ha eelenTpueechnTe ypeDn c anMylaTopHa 6aTeprna
a) Ppei Da NoctabnTE aHymyIaTopHaTa 6aTePnra, yBepTe Ce, Ye ypeTbTe n3KJIoueH. MoHTnpa- HeTo Ha aKymyIaTopHaTa 6aTePnra BBB BKNIOueH eJeKTPnuYeCKn ypeD MOHe Da PpeiN3BnKa 3INO- POnyKn.
b) 3a 3apeKdane Ha aKymlaTopHaTa 6aTepeHn H3noJ3BaIte eHNCTBeHo npeOpbuaHnte OT npOn3BODInTe 3apAnH yCTpoNCTBa. 3apAnHte yCTpoNCTBa ca O6nKHObeHO cneuΦuHn 3a BnDa aKymlaTopHaTa 6aTepeHn; aKO ce n3- noJ3BaT C Dpyn BNDObE, hMa pNCK OT NOxap.
c) N3noJ3BaIte cAmO aKymyIaTOPH 6aTePnN, CneuHaNo ppeBnIeHn 3a BaIyra ypeD. N3- POnJ3BaHeTo Ha DpyrN aKymyIaTOPH 6aTePnM OMe Da npEiN3BnKa HapaHЯBaHe n OnaCHOCT OT noJap.
d) CbxpaaBaiTe HeH3noJI3BaHHTe aKymyIaTOpHn 6aTePN DaJeU OT KIamePm, MOHeTn, KIOOObE, rBO3deN, BnHTOBe HIN dpyrMaIKM MeTAHN HpeDMeTN, KOTo MOraT da npEiN3BnKAT KbCO CbeDInHeHne Ha KOHTaKTtTE. KbCO cBeDInHeHne MeJdy KOHTaKTtTE MoKe Da DOBeDe Do N3rapA- He HIN NOHapN.
e) AkymlyaTopHn 6aTePnB loo c bCTOHRHe MoKe Da npuHHn H3TNUaHe Ha TeUHOCTTA. N3- 6raBaTe KOHTA C TeUHOCTTA. B clyuaHa HeBOJEn KOHTA K, H3JIaKHeTe C BOda. B clyuaHa Ha KOHTA Hc TeUHOCTTA C OUYte, KOHCyIITnpaTe Ce n C nekap. N3TEKlata OT aKymlyaTopHaTa 6aTePnRA TeUHOCT, MOKe Da npeDIN3BnHa KOxHN pa3dpa3HeHn INI IN3rApHn.
f)ПроверетдалуakymlyaTophaT6aTePnEв Добpo cбсToHHeиДалунЯMa np3HaциHa NOBpeHa. He n3NoI3BaIte MaunHaTc NOBpeHENiN n3TOSeHa akymlyaTopha 6aTePnA
2.4 ACHMUYIATOPHA BATEPNA/3APADHO YCTPOICTBO

BHIMMAHNE
CneHnTe npabnla 3a 6e30nacHOCT DonbIbAT npedncaHnraTa 3a 6e30nacHOCT, KOtO ce CbIbP-HaT B CbOTBeTHaT KHHHa C HNcTpYKuHn 3a 3a-pAHDHTO yCTPOINCTBO.
3a 3apejdahe Ha aKymylaTopa H3noI3BaTe edHCTBeHO npenopbuaHnte OT npoI3BODnteJ 3apJdNHyctpoIcTBA. HeoJxOJaIO 3apJdHO yctpoIcTBOMOHe da npuHH eJeKTpueChn yIap, npeprBaHe IIn npelNBae Ha KOpO3NoHHa aKymylaTopHa TeHOCt.
- I3noJ3BaIte cAmO aKymyIaTOPH6aTePnN, CneuIaJIHO npEdbIeHN 3a BaIINy ypeD. I3noJ3BaHeTO HaIpyrN aKymyIaTOPH 6aTePnM MoKe Da npEdu3BnKa HapaHbAHe N ONaCHOCT OT NOxAp.
CbxaHBAIte HeIN3NOJ3BaHInTe aKymyIaTOpHN 6a- Tepn DaJIeU OT KlaMepN, MOHeTn, KLIIOYObE, TB03- Den, BnHTOBe NII pPyrMaJIH MToAHI NpeDMETN, KOHTo MoRat Da IpEdu3BnKaT Kbco CbeDInHeHne Ha KOHTaKTITE. Kbco CbeDInHeHne MeXdY KOHTaKTITe MOKe Da IOBeDe Do n3rapJe Hnn POKApn.
He n3noI3BaIte 3apJHOTO yCTPOINCTBO B MeCTa, KbTeTO hMa HAIyHe Ha napi, 3aIaIMM BeueCTBa IIN Bbpy LeCHO 3aIaIMN NOBbpxHOCTn, HAp. xapTna, PJIAT N.T.H. No BpeMe Ha 3apeXdane, 3apJHOTo yCTPOINCTBO ce 3aIpRABa N MOKe da npuHH noKap.
- Ito BpeMe Ha TpaHcnpTnpuHe Ha akyMylatOpnte, BHIMaBaIte KOHTaKTnTe Da He Ce CbbpXaT NOMeKdy CN H3NoJ3BaIte MeTaJIHn KOHTeHepn 3a TpaHCnpTnpuHaTeO.
2.5 ONA3BAHE HA OHOJIHATA CPEDA
Ona3BaHeTo Ha OKoHaTa CpeDa Tp86Ba Da 6bDe npno-pntET N BaxKeH acNeKT npu yNoTpe6aTa Ha MaunHaTa, B NOI3a Ha rpaKaDaHCKOTO O6ueCTBO Hn Ha CpeDaTa, B KOrTO JKNBEem.
- N368BaIte Da npITeCHRAte CbCeIITE. I3noJI3BAIte MaINHaTa cMo NO pa3ymHO Bpeme (He paHO
CytprH Hn HbCHO Beuep, KOraTo MoHe da 06e3noKoHTe XopaTa).
- IIO BpeMe Ha pa6oTa B OOKHaTa Cpea Ce pa3nIyBa ONpeDeJeHo KOJIYeCTBO MacNo, HeO6XoJMo 3a Cma3BaHe Ha BepnRaT; 3aTOBa H3noJ3BaIe TcAmo 6bOpa3rpaKDaun Ce Macna, CneuФHn 3a Ta3n yNtpe6a. YNtpe6aTa Ha MInHepaHn Macna Hm MacNo 3a DBrIaTei NpeDn3BnKBa CepNo3Hn EKOIoRnHH nEtn.
CleBaTe CTPNKTHO MeCTHnTe pa3nope6n 3a H3XbPJIHeTo Ha ONaKOBKn, N3HOceHN YactN IIN KaKBATo n Da e Yact, CInHO 3aMbpcraBaUa OKOJHaTa cpeDa; Te3n OTnAbuH He Tp6Ba Da ce N3XBbPJIrT B 6oknyka, a Tpr6Ba Da ce Cb6npaT pa3dElnHO n Da ce npedabat B CneuaHnTe NyHKTOBe, KbDeTo Ue ce NOrpnKaT 3a peunKIInpaHe Ha MaTePnaHnTe.
CneBaTe CTpNKTHO MecTHHe HOpMN 3a N3XBpbJIHETo Ha OTnAbCHMaTepeHaJI.
B MOMENTa Ha n3BaXdAne OYyOtnpe6a, He 3axBbpyIaIte MaunHaTa B OKoJHaTa CpeDa, a ce o6bPHeTe KbM Cb6nPaTeIeH NyHKT, CbIJaCHO DeIcTbaUHTe MeCTHN pa3nOpE6n.
He n3xBbpyIe eIeKtpnuecknte ypeDn 3a- eJHO c 6nTOBnTe OTnabu. CnopeE Bpo- neckata DnpekTnBa 2012/19/UE 3a OTnabu- nTE OT eIeKtpnueckn H eIeKtpoHHn anapatn Bn3aHTo N B DeNCTBne B CbOTBETCBne C
HaunohaHnHO 3aKoHOdaTeJCTBO, n3xa6eHNte eJeKTPnueckn anapattn Tp86Ba Da ce Cb6npaT pa3dElnHO, 3a Da 6bDaT OOnl3OTBopeHn EKOLOrHuO HCb6pa3HO. Ako eJeKTPnuecknte ypeHn Ce n3xBbPnTn HA cmTeHne Hn B 3emrTa, BpeHnTE BeUeCTBa MOrat Da DOCTnHAT BODOCb6npauiTe 3Emn PnaCTOBe N da HABnIaT B XpanHTeJIHaTbepnra, YbpeKaDn Kn 3dpABeTo BN. 3a No-3aDbIbOcHApuNTe 3mHn PnaCTOBe N da HABnIaT B XpanHTeJIHaTbepnra, YbpeKaDn Kn 3dpABeTo BN. 3a No-3aDbIbOcHApuNTe 3mHn PnaCTOBe N da HABnIaT B XpanHTeJIHaTbepnra, YbpeKaDn Kn OOMNTeHTHaTcLyn6bA 3a N3XBbPnIHe Ha 6ntOBn OTNaIbCn IIN C npOdaBaY a Ha MaunHata.
Li-ion
B KpaHa TexHnI NOle3eH Hn3HeH cKbI, n3XbPneTe aKymlaTOPHnTe 6aTepeHHaTO IOxOAnTe C Heo6XoDmOTO BnMaHne 3a ona3BaHe Ha OKoJHaTa CpeA. AkymlaTopHaTa 6aTepeNcBDbPka MaTepnaJI, KOIT o
onaceh 3a Bac n okolnata cpea. ToTpr6ba da ce Cbann npede OTeJHo B pneMaTeJeH NyKt, KOI-TO pnpema JNTHeBO-IOHHn aKymyLaTOPH 6aTePHN.

Pa3dJIHOTo c6bnpaHe Ha n3nOJ3BaHn npOdyKTn ONaKOBKn, P03BOLyBa peuNKInpaHe Ha MaTePnaJIte N TExHOTo NOBTOHO n3nOJ3BaHe. NobTO HO n3nOJ3BaHe Ha peuNKInpaHN MaTePnaJI, NOMa 3a npedOTbpaTBAHe Ha Ha 3aMbPCraBaHeTo Ha OKoJHaTa CpeDa
HamaJRABa H3NoJ3BaHeTo Ha cypOBHH.
3. 3AINO3HABAHE C MAUHHATA

BHIMAHNE
To3n HNCTpymEnT MoHe Da npuHn CnHpOM Ha Bn6paun pKa-pamO, aNo ynoTppeBaTa My He ce ynpablaRa no nOxDxOJaHauH.
3a da 6bDEM TOHn, 3a OceHkata Ha HNBOTo Ha EKNO3nU npn DeiCTBNTeHNHTe YCNOBnHa yNOTpe6a, TpA6Ba CbTO TaHa Da Ce HMaT PpeBnD BCNUHn Fa3n Ha pa60THn UIKbI KaTO HAnPmep BpeMeTO, KOrato INHCTpyMeHTbTe n3KIOueH N KOrato pa60TN Ha npa3EH XoI, HO BCbUHOCT He BbpNI pa60TaTa.
ToBa MoKe 3HaChIteJIHo Da HaMaJIH HnBOTO Ha ekCNo-3nUra Ipe3 ueJIra pa6OteH nepIO, KaTO DoOpnHacr 3a MInHMn3npaHe Ha pNcKa OT ekCNo3nUra Ha Bn6pa-
BnHaHn n3noJ3BaIte ocTpN dIeTa, CBpeJa n ocTpne-Ta.
IopbKaHTe To3n IHCTpyMeHT CBOTBETBHe C Te3n INHCTpyKcHm N Do6pe Cma3aH (KbDeTo e yMeCTHO). Ako INHCTpyMeHTbT Tp8Ba Da ce n3NOJ3Ba peoBOHO, npenOpBChTEJIHO e Da n3NOJ3BaTe aHTNB6paQIOHHn akcecoapn n akcecoapn npOTNB Wym.
Планнарайтаботенграфик,зада pa3прededит e n3ПОЛ3ВaHToHa BCЯКВИNCHTpymeHTN C BnCOKa Bn6paциЗа HЯКOLKOДи.
3.1 OINCAHNE HA MAUHHATA IN PPEBUNDEHO 3NOJ3BAHE
MaunHaTa Ce CbCToN OCHOBHO OT MOTOP 3axpaHbaN c aHyMylaTOp N OT HApBaBlaBaUa 5uHa, KOrTO CnyKn 3a IpeDaBaHe Ha DmKeHneTO OT MOTopa Ha 3b6OaTaTa Bepira, KOrTO n3PbIbRaΦyHKpyTa Ha NCTINHcN TpnoH.
OnepaTopbT DbPmMaunHaTa CDbTe pbc, KaTo n3nol3Ba npedHaTa N 3aHata PbKoXBtHa N MoHe da 3aDeiCTBa IraBHTe KOMAHN, KaTO cTOn BnHarn Ha be30NaCHO pa3cTOrHHe OT INHCTpyMeHTA 3a pr3aHe.
3.1.1 Ппсдндау nnoTpe6a
Ta3n MaunHa e npoeKtnpaHa n 13pa6ToHa 3a:
- pe3nt6a n pr3aHe Ha KopoHnTe Ha IbPBeTa C BnCOKO CTb6I;
-p3aHe Ha xpactn,DbHepn nn DbPBeHN rpeN, HnTo DnaMeTbp 3aBnCn OT DbJHKHaTa Ha HapablaBaatauHa;
-pa3aHe cAmo Ha IbPBO;
-ИЗПОЛЗВАЕ сAMоТ eДиН onepaTop.
3.1.2 HeymecTHO n3nOJI3BaHe
BcKaHBO npyro n3nO13BaHe, pa3nUHO OT TOBa cnTnpaHOTo nO-rope, MoKe Da ce OKaKe ONaCHO n da npuHHn TeHn Ha xopa H/nn npedMeTn. B heNoDxo
ДицаууOTpe6a ce BKNIOUcBaT (kaTo HeN3uepNaTeIeH npIMep):
-npa3BaHe Ha KINB nIeT;
-Дьрбоpe36a;
-pa3p3BaHe Ha naleTn, KyTnN I ONaKOBKn No npHHn;
-pa3p83BaHe Ha Me6eHIN HIN DpyrN, KOHTO MOKe Da CbDbP9aT rBO3dEIN, BnHTOBe HIN BCaKaBn MeTaJIHN KOMNOHEHTN;
-3nblHraBeHa MeCapckN DeHocTn;
-и3noI3BaHe Ha MaunHaTa 3a py3aHe Ha HeIbPBeHn MaTePnaJI (IIaCTMaCOBn MaTePnaJI, CToPHTeHH MaTePnaJI);
-ИЗПОЛЗВАЕHaMaшИнHAТaKaTOЛСТаПОВДИгА- He,псемecтBaHeип раЧУнБаHеHaпpeДмETN;
-ИЗПОЛЗВАнеHaMaшинЧаТa,БLOКИраНaВьрхуФИКСИРаHnCynOpTи;
- H3noJ3BaHeTo Ha yCTpoiCTBa 3a pR3aHe, pa3nHn OT Te3n H3IOKeHIne B Tabnua "Texnueckn daHHn". OnachOcT OT cepNo3Hn paHH n HapaHbAHn;
-и3ПОЛЗВаHe Ha MaшИнHaTа OT NOБеYe OT eДиH YOBEK;
BAHHO HeymecTHOTO H3noJI3BaHe Ha MaunHaTa BOI Do OTnAaHe Ha rapaHnraTn OTXBbPnHE KaKBATO n da e OTROBOPHOCT Ha Ipon3BOIDTeJI, KATO pa3XoIte npOn3TuauN OT HaheCENuIeTI Nn HapaHnBaHe Ha cAmn Notpe6nteN Nn Ha TpeTI Nua, Ca 3a CMeTKa Ha Notpe6nteJI.
3.1.3 Tn np notpe6nteI
Ta3n MaunHa e npedHa3NaYeHa 3a n3noJ3BaHe cAmO OT onepaTopn, o6yehn Da n3BbPWBat noDpBkKa Ha DbpBeTa.
3.2 3HAUH3A B6E3OJACHOCT
Ha MaunHaTa ca nocTaBeHn pa3NHyHcMBOJn (Phr..2).TaxHaTa FyHKuY e Ta3N,da npHnomHrT Ha onepaTopa KaHb NOBedeHne Tp6Ba da npednpHeme, 3a da H3NoJ3Ba MaunHaTa C HyKHOTo BHMaHne I npedna3JIbOcT.
3HaueHHe Ha CUMBOJNTe:

BhImaHne!IpooyTeTe BnMaTeJIHO INCTpyKcNITe IpeDIn yNoTpe6a Ha MaunHaTa.

Onachoct! Ako MaunHaTa Ce n3noJ3Ba HnpaBnHO, MoKe Da ce OKaKe onacHa 3a Bac n 3a Dpyrnte.

BHHMaHHe! HocTe WymOnpeNa3Baun CpeCTBa, OUnla N 3aUnTHa KaKa.


BhImaHne! HocTe npedna3nnpbKaBnI npedna3nO6yKn IpOTNB NOxlb3BaHe!

Onachoc! He n3laar Te Ha IbXkI nn Bnra.
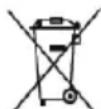
Onachoct OT OTCaHaHe (Kickback)!
OTchauaHTo npEIN3BnKb pR3KO npemeCTBaHe n 6e3 KOHTpO Ha MToPOnHr TpNOH KbM OepaTopa. Pa6oTe BnHa r np NbIna 6e30nacHOCT. H3No3BaIte Bepn CHa6DeHN C npEpa3HN MPeHN, KOHTO orpaHuaBAr OTchauaHTo.

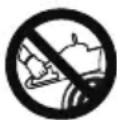
BHHaHHe HIXORA He XbaaJTe Ma- mHaTc cAmo C eHa pKa! XbaHeTe 3dpaBO MaunHaTa C DBeTe PbCe, C cen Da Ce N03BOJN KOHTPOJ BbPxy MaHnHata N Da Ce HamaJIOn ONaCHOCTTa OTOTCKaHaHe.


BhimaHne! 0 ce oTHacdo aKymyIaTopa n 3apAnHOTo ycTPOiCTBO,BnHTe 3a CnpabKa CbOTBETHOTOpbKOBoDCTBO.
BAHHO IOBpeHnTe Hn HeeTINBnTe CTNKe Tp6Ba da ce 3aMeHrT C HOu. IOnckaHTe HOu etHe- TN OT Baunr cepBn3eH ueHtp.
3.3 OCHOBHNI KOMNOHEHTN
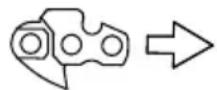
MaunHaTa e n3rpaDeHa OT CnEHNTE OCHOBHN KOMNOHeHTN, Ha KOnTO OTROBApra CnEHaT a FyHKUHOHIOCT (fnr.1):
A. Motop:празда вдвижениTo Ha Инстум enta 3a рязаHe.
B. PpeHa pBHOXBaTHa: onOpHa pBkoXBaTHa, pa3- noJIOKeHa B npeHaTa yact Ha MOTOPHnTpnoH. XbaIa ce c IaBaTa pKa
C. 3aHa pBHOXBaTHa: OnOpHa pBkoXBaTHa, pa3- NoJIOKeHa B 3aHaTa Yact Ha MOTOpHn TpHoH. XBaUa ce C JcHata pBka. Ha He r Ce HAMnpaT OCHOBHIne KOMaHN 3a yChOpRaHe.
D. Ппедна зашита на рькata: ппедна зустю CTBO, pa3нложено Meнду ппедна та рьховатka И 3ьбчата ворига, за д ce ппедна срькata OT hapанвае B с lyчай, по КОТо ce xЛьзЕ OT рьховатka.Ta3и зашита силолэba KaTO yстю за aHTINВИране Ha спирачkaда на Ворига.
E. HanpaBlaBaHa 3b6HaTaTa Bepna.
F. 3b6yata Bepura: eIemEn TpeHa3Hauen 3a pR-3aHe, CbCToJc Ce OT dpBxKn 3a TeJIeHe, Cha6-DeHN C MaIKN OCTpneTa HapeeyH "3b6u" N OT CTpaHNUH Bp3KN, KOINTO Ce DbpJkAT 3aeDHO OT HHTOBe.
G. Μινότ 3a 6ποκηραne Ha BepnraTa: πpeɪna3Hɒ npɪncno6ɒhne, KoETo Bb3npenTCTBa HeKoHTpOJInpaHn DBnHexHn Ha 3b6yataTb Bepnra, B cIyauHa CuynBaHe nIpaXla6BaHe.
H. Paine: npncnocoblenhe hannno nped Toka-Ta Ha MOHTaJ HA HnpaBnaaata Ta uHa, KOeTo DeiCTBa KaTO ONOPHa ToKa, KOraTO e B KOHTaKT C DbPBO NnC dBHeP.
I. ПьбтЕновида raиka 3a 6bp3O o6TЯганe ha Bepurata: (ako e npednideHo).
J. Претаител Ha WHa: npncoc6JIeHne 3a nokpmbaHe Ha BepnKHHa Tpnoh Bbpxy HappaBIAaata WHa, Da ce n3NoI3Ba no BpeMe Ha npemecTbaHe, TpaHCnpTupaHe n npnbipaHe 3a CbXpaHHeHa MaunHata.
K. Anymylatopha 6aTepe (aHo He e DoCTaBeHa C MaunHata, Bn. nap. 15.1 "PpHaJJeHHoCTn no 3aBka): yCTpoiCTBO, KoTo DoCTaB eJeKTpn- yeCKn TOK Ha HnCTpyMeHTa; HerOBITE XapaKtepe nTKN IN pabNlaTa 3a yNoTpe6aTa ca OINcaHn B OTdEInHO pbKOBOcTBO.
L. 3apAnho yctpoiCTBO (aKo He e oCTaBeHo C MaunHaTa, BHK nap. 15.2 "PpHnAJIeJHKHO 3aBka): yctpoiCTBO, KoETo ce n3noJ3Ba 3a 3apeHdaHe Ha aHyMyIaTOPHaTb6aTePN.
M. 3aunHa Ha pe3eua: yCTPOINCTBO INPOTNB OTCKaHHe (kickback)
m. Ihe3do Ha aKymyLatopa: MRCTO, KbDeTo aKymyLatopa Tp6Ba Da 6bIe NOCTABEN B MaunHata.
0. RaIIKa nIIN pBcHa 3a 3aTgAraHe
3.4 IDAENTHINKHAUHOHEETHKET
Ha ndeHTnФнkaUHnna etNKeT ca no-coueHN cIeHnTe daHHn (ΦnR. 2):
- HNBO Ha 3BykoBa MOUHOCT
- Mapknipobka 3a CbOTBcTCTBnE
- Meceu/ToDHaHa npOn3BOdCTBO
- BnMaHHa
- 3axpaHbAso HanpeKeHne
- CepneH Homep
- Ime n aipec Ha npou3BODHTeIa
- KoJ Ha apTnKyJa
9.ДьнИнHaHa HapablaBaunaSHA - Onncnne Ha npodykTa
IpenuTe IeHTnKauHnTe DaHHn Ha MaunHaTa Ha cBOTBHTHe MecTa Ha etKeTa, KOITo Ce HAMpa OT3aHa Kopuata Ha pbKOBOCTBOTO.
BAHHO
H3noJ3BaIte IeHTnΦuKaUHOHHTe JaH
H, KOTo Ca nocOeyH Ha NdeHTnФuKaUHOHHa eTn-KeT Ha npOdyKta BCEKNbT, KOraTO Ce Cbbp3Ba OTOpuHa pa6oTuHnua.
4. MOHTNPAHE
IpaBnIata 3a 6e3onacHocT, HOnTO Tp6Ba da ce cna3BaT, ca onncAHn B rI.2. Cna3BaIteCTPNHTHO Te3n yHa3aHHn, C qen npedOTbpaTBAHe Ha cepno3HN pNCHOBe nHn ONaCHOCTn.
3apaH cnlaHnpaHTo n TpaHCnOpTa, HAKON KOMNoHHTHa MaunHata HeMoraT da 6bDaT CIno6eHH BbB fapnKaT, a TpRbBa Da 6bDaT MOHTpaHn CneCBAJHeTO Ha ONaKOBkATo, KaTO ce CJIeDbAT CJIeDHNTE HHCTpyKcHn.
Pa30nakOBaHTo n 3abbpwBaHTo Ha MOHTaHa Tp6Ba Da ce N3BbPmN BbPxy paBHa n 3dpaBa NOBbPxHOCT, CdoCTaTbYHO IpocTpaHCTBO 3aDbHXeHHe Ha MaunHaTn I pemeCTBaHe Ha ONaHOBHNTe, Hato N3No13BaTe BNHar NODXoAun HHCTpyMeHTn. Da He ce N3No13Ba MaunHaTa, npednDa CTe 3abbpwnn OepaunHte No MOHTnpaHTo, Yka3aHn BpaDeJ "MOHTAH".
4.1 KOMNOHEHTN 3A MOHTHPAHE
B onaKOBkata Ca BKNIOUeHn KOMNHOENTHe 3a MoHTnpaHe, KOINTO ca n36pOeHN B CJIeDbaUcaT aTabInuca:
H3nBJIHBAIte BCNUOpeaUN npH n3NIO-yeH MOTOp.
Hocete3dpabnpa60THnpbhABu.
7.2.3 MoHTnpaHHe Ha aKymyIaTopHa-Ta 6aTePnHa MaunHaTa.
CneKaTo 3aBbPm 3apeKdHaHeTo:
- ɪЗbaɪte aʌkʌmʌlaɪtophɑrə 6aɪepɪnə OT Heɪhʊto rɪeɪd B 3aɪpʌhɒtɔʊ yctpɔɪcTBɔ (ɪzɪsɪrBAɪnte Daɪ ἀbɒpʌhɪte B C bCTɔrHne Ha 3aɪpʌkʌdahe 3a ἀbɪlro Bpɛme npɪ 3aɪbɒpseHo npe3aɪpæKʌdaHe)ɪ NɪsɪLɪʊ- yete 3aɪpʌhɒtɔʊ yctpɔɪcTBɔ OT eɪeɪktpuueckɑTa Mpeɪka (Φɪr. 28);
- NocTabeTe aKymyIaTopHaTa 6aTePnB HeH HOTO OTdEJIeHHe, pa3NoIooKeHO Ha MaunHaTa (ФИг.13.K);
- 136yTaTe DOKpa aHymylaTopHaTb6aTepeN,doKaTo yceTne "UpaKBaHe", KOeTo 6IoknpaB No3n- nOcHpyraBa eJIeKTpueeChN KOHTaKT;
7.3 3APEHDAHE HA PE3EPBOAPA 3A MACJIO HA BEPHATA
БЕLEEHHA Бинзко до побкота на pe-3epBoapa 3a MacNo Ha Bepurata (ФИ.29.A) e NOCTaBeH CJIeDnIcNIMBOJ:
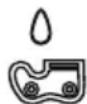
Pe3epBoap 3a Maclo Ha BepnraTa
BAHHO 3nno3BaIe eHCTBeHO Cma30UHO Maclo, npedHa3NaueHo 3a MOTOpHn TpnoHn IIn IpnIeBauo Maclo 3a MOTOpHn TpnoHn. He n3no3BaIte Maclo, cIbIbpKaIo npimecH, 3a da He 3anyuHTe FIIbpa B pe3epBoapa N 3a Da He NOBpeHnTE OKOHaTeIHO MacJeHaTa NOMna.
N3NoJ3BaHeTo Ha KaueCTBeHO MaCIO e OT N3HIOUHTeJIHO 3HaueHne 3a Do6pTO CMa3BaHe Ha peKeuTE 3BeHa; N3NoJ3BaHO JIN HnCKOKaueCTBeHO MaCIO BODrT DO Heo6pO CMa3BaHe n CKbCBaT XHBOTA Ha BepnIgata NsHHata.
BAHXHO He 3aedcTbaHTe HNKora Bepnata 6e3 IOCTaTB4HO MacNo, KOeTo MOKe Da IOBeDe BpeJdaHe Ha MOTOpHna TpNOH N Da KOMN HerOBata 6e30NaCHOCT.
PpOBepTe KOJIueCTBOTo Ha MaCJIoTO B MOTOpHnTpOH Ha HndKaTopa 3a HnBO Ha MacJIoTO (ΦnIg.29.B).
Ako HnBToHaMacIToeHnCKo,doJeTe MacIo KaTO CneBaTe CneHNHe eTAni:
- Pa3BnTe n CbaIe Te npo6KaTa (Φnrg. 29.A) ot pe-3epBoapa 3a MacNo.
- HajeTe MacNo B pe3epBoapa N MOHnTOpnpaTe HNBOTO NOCpeDCTBOM CbOTBeTHNr INHnKAtOP (Фиг. 29.B).
- YBepTeCe, Ye He BIn3aT HeuHcTOTN Bpe3epBO-apa Ha MacIOTO NO Bpeme Ha HAnbBaHETo.
- NocTabete npo6kata Ha macIoTO n 3aTeHHeTe.
7.4 NOUHCTBAHE
7.4.1 Почистване На Машинота И На MOTOPA
Korato npnkIouHte pa6ota, nouchTeMaunHaTa no nOdoaHn HauHH ot HATpynaHn npax n OTnabHn MaepnAHI.
3a da ce HamaJIIN pIcKa OT NOxHAp, NOUHCTBaIe Ma- uHHata N Oco6eHO MOTopa,OT OCTaTbU ON IJNCTa, KIOHN INI INpeKaJIeHO MacIo.
-ПочнстытЕ Виаги Машинота след Изпольваим Като Изпольразе чоста Кьрna, Hablaжна в Heytpалендетергent.
- OTCpaHraBaTe BcKaHbA CneJa OT Bnara, KaTo cn nocIyKHe C MeKa N cyXa KbPna. Bnarata MoKe da npEiN3BnHa pncKOBe OT eJeKTPnueckn ydApn.
He n3no3BaIte arpeCnBHN DeTepeRHTn nn pa3TBOpnteJN 3a NOUcTBaHc Ha INaCTMaOBHTe Yactu NnPbKoXBaTKITE.
He n3noJ3BaIte ctpyn B0da n 1368raBaiTe da MoKpIte MOTOPa n eJIeKTPnueCKHTe YaCTH.
3a da ce n36erHn nperepBaHe n nobpeKdaHe Ha MToTopa nn akyMylatopHaTa 6aTePn, npOBepBaTeBnHa nn daHn acnnpauOnHHnTe peWetKn Ha OxJaKaDaun Bb3dyx Ca NCTn n CBO6OHN OT OtnaDbu.
7.4.2 Почиствано ВеригаТa
CleB BCaKO H3NOJ3BaHe,OTCTpaHJaBaTe OT BepnTaBCNCHIOCTaTbUO NT CTbPROTNH INIIMACNo.
B cIyuaH a CINHO 3aMbpcBaHe nH H bTbPdIbAe Ha cMOla, pa3rIIOBeTe BepnraT a I NOCTabeTe 3a HkoKo Yaca B CbD CbC CneuaneH DeTeprEHT. PocJe I3NlakHeTe C uCTa BOda I TpeTpapTe C IOXODa AHTNKOpO3NoHEcnpeI, PpeDi a MoHTnpaTe naK Ha MaunHaTa.
7.5 附T3A BLOKHPAHE HA BEPNFATA
PpeBnBCaHO3NOJ3BaHe npOBepraBaTe cbCTOHaHTo eTAPta 3a 6loKnpaHe Ha Bepurata (Hr.1.G) n B cnUa,Ye e NOBpeDeH,ro Bb3TaHOBeTe.
7.6 IPOBEPKA HA OTBOPITE 3A CMA3-BAHE HA MAUHHATA H A UHHATA
IpeH BcAHO eKeHbHO n3nOJ3BaHe, CBAJeTe KaNaKa (nap. 4.2), DEMoHTnpaIte uHaTa n npOBepTe DaII N OTBOpIte 3a CMa3BaHe Ha MaunHaTa (ΦIr. 30.A) H anpaBIAaata uHa (ΦIr. 30.B) He ca 3anyuWeH.
7.7 ΦИнсраи Гайки виHTOBE
-
IopdbpkaTe 3aTeHaTu raKnTe n BnHTOBeTe, 3a Da cTe CnpyHn, Ye MaunHaTa Ce HAMpa BNHaN B CbCTOJHHe Da FyHKUOHnpa 6e3oNaCHO.
-
Поберяваite рedoвно далпъхватуte са зкpenen 3dpaBO.
8.ИЗВьнРЕДHA NOДРьЖКА
8.1 INHbOH 3A TEJIIEHE HA BEPNIATA
IepnoHNo npOBepaBaiTe cbCToHneTo Ha nHbOHa npBaun KoHCyIaHT-npOdaBau N KOraTO n3HocBaHeTo npBeuShaBA DoNcyTmMte rpaHn,rO cMeHete.
He MoHTnpaIte HOBa Bepnra C n3HOceH nHbOH nn O6paTHOTO.
8.2 NOДРьЖHA HA 3bБЧАТATA BEPINA
I IIO npuHn 3a 6e3oNaCHOCT n ePHNacHOCT e H3JIIOHTeJIHO BAHHO INCHTpMeHNTte 3a P3aHe da ca dO6pe HaToyeHN.
H3noJ3BaIe BnHaN pJIbTHn pa6OTHN pbKaBnU npn n3BbPwBaHe Ha onepaunu Bbpx uHaTn Bepnrata.
HaIara ce HatoBaHe Ha Bepirata Korato:
- CtbprotHnHTe ca npaxOBnHn.
- YnpaHHBa Ce NO-TOJIma Cnla 3a pR3aHe.
-PraHaTeHo He e npaBoJIHneHNo.
-Bn6pnpaHeTo e 3acnJeHo.
Ako Bepurata He e doctaTbHNo octpa, ce yBeJnUaBa onachocTta OT OChauaHe (kickback).
BAHHO IpenopbUba Ce HatoBaHeTo Ha BepnraTa Da ce NOBepnB Cneuann3pan 3a ueT Ta eHTbp, Tb KaTO ce n3BbPbBA C NOxOJaN ypeNi, KOnTO rapaTHnpaT MInHMaHNO h3NocBaHe Ha MaTePnaJIte N TpaH Ho HatoBaHe Ha BCNU peKeun qactn.
8.2.1 CmHa Ha 3b6yataTa Bepnra
Bepnata Tp6Ba Da ce 3aMeH KOraTo:
-ДьлжинаТаHa pezeca ce HamaJIЯBa c 5mm ИИNo-МaJIko;
JyΦTbMeKdypeWetKHTe/MpeKHTeBbpxy HHTOBETe e npeKaIeHO roJAM.
- CkopoocTaHa p3aHe e 6abHa n nobTopHnTe HaTOUbAHn He NDo6pBaT cKopoCTTa Ha p3aHe. Beprata e n3HoceHa.
BAHHO
CneA
CMHa
Ha
Bepn
ra e
Heo6xoJN
MOB cyxo nomeueHne;
-3aunTeHa OT He6laRonpnaTHn aTMocΦepHn ABJIeHn;
- Ha MRCTO HeOCTbNHO 3a Deua;
- yBepnte ce, ye cTe OTcTpaHnI INKIOOBeTe nINHCTpyMeHTne, KOInTO ca 6nIN N3PON3BaHN 3aN3BbPwBaHe Ha NOIDpBxKkata;
-прп Temпера Ка НОЛнота Среда ВИЮЧЕСМ endy -20°C n 85°C.
-3aunTeHa OT He6laRonpnaTHn aTMocΦepHn ABJIeHnI;
- Ha MRCTO HeOCTbNHO 3a Deua;
- yBepnte ce, ye cTe OTcTpaHnIN KIIOOBeTe INn HNCTpyMeHTne, KOINTo Ca 6nIN N3NoJ3BaHN 3a N3BbPwBaHe Ha NOdRpBxKkata;
Ha- -npn TemnepaTypa Ha OKoJHaTa cpeDa BKnIOueHa. MeKdY -20°C n 85°C .
Ia ce N3BbPwBa No-YeCTO npOBepKa Ha HeHHTO OStraHe, nopadn yJraHe Ha Bepurata.
8.3 NOДРьЖHA HA HANPABJIBAUATA WIHA
BENJIEXHA
Bcya
eHa
Oeepaia
3acraa
Ha-
npabnlaBaata
LInHa
npedCTaBIABA
onepaui,
TO H3NCKBa HaMeCaTa Ha KOMnTeHTHO IInCe, a CbUO TaKa H3NoJ3BaHeTo Ha CbOTBeTHN INHCTpyMeHTN, 3a Da MoKe Da Ce N3BpShn npaBnHO; NO pRnuHH6e3oNaChoc t e 3a npednoHTaHe, da ce OobpHeTe KbM BaWnjaPoaBaay.
3a da n36eHHeTe acnMeTpnuHo n3HocBaHe Ha uHaTa e Heo6xOuMo da ra o6pbUaTe nepNouHO.
3a da ce 3ana3n efeKTHBHOCTTa Ha uHaTa Tp86Ba:
- cMa3BaIe CbC CneuHa CnpHcObKa (He e BkIIOueHa B DOCTaBkata) IaRepuTe Ha Bb3BpaTHnI INHboh (aKO HMa TaKbB);
- nouHCTeTe Hule6a Ha uHHaTa cbc CneuaHIO CTbpraIHO (He e BkIoueHO B doctabKaTAt) (Anr. 31.A);
- NOUHCTeTe OTBOPHTe 3a CMA3BaHe (ФИг. 31.B);
- C ПLOСКА ПИЛА OTСТРане СмAZOЧиTe OCTaTbUHOT CTРанчнITE YacTN I N3PabHete HepaBHOCTNTeMeKdY BODaHTe, aKO ИMa TaKnBa.
8.3.1 CmHa Ha shHaTa
LInHaTa Tp6Ba Da ce 3aMeH Korato:
-ДьлбочинотаHa JIe6a e NO-MaJIka OT BnCOUHATA Ha Nlb3rauNTe 3BeHa OT Bepurata (HOnTO He Tp6Ba B HnKaHbB CnyaJ Da OINpaT B DoJHaTa Yact);
- BbTpewHaTa YacT Ha BODaYa e N3HOceHa Do TaKaBa CTeneH, Ye HauJaHc TpaHnUHo BepnRaTa.
9. ПИБИРАЕ 3A СьхРАЕнE
9.1 INPUNPAHE HA MAUHATA 3A CbXPAHEHNE
Horato MaunHaTa Tpr6Ba Da ce npi-6epe 3a cbxpanenHe:
- Cbale Te aKymnaTopnata 6aTePnO T HeHTo rHe3do N npCtBneTe KbM 3apeKaHaTeO n.
- CnokeTe 3aunTaHa Ha uHaHa;
- -ИЗчakай TeДOKаTOи3CTиHe MOTOpbT.
4.ИЗВьршeteNouchТвае(nap.7.4). - Повере Te Ддун Няma pa3xla6eHи Ил NOBpeHn KOMnoHENTn. Ako e Heo6xoDmO, CMeHete NOBpeHnTe KOMnoHENTn 3aTeHHeTe eBEHTyaHn pa3xla6eHи BnTOBe N 6OToBe HIn CE CBbPKeTe C OToPiHa n cepBn3eH ueHTbp.
- Пиберете мшината за съханения:
OdHMOB CyXO NOMEUHNE;
9.2 IPNBIPAHE HA AHYMJATOPA 3A CbXPAHEHNE
AkyMaIatopa Tp6Ba Da ce CbXpaHraB B 3aTBOpEHn NOMEeHn6e3 BlaKHOCT, PnTempePaTypa BHIOyeHa MeJdy:
- 0^ C - 60^ C 3a1 meceu
- 0^ C-45^ C 3a 3 meceua
- 0^ C - 25^ C3a1rodnha
BENEKHA B cIyauHa npoDJIHKeTHeHO
IOL3BaHe, 3apeKdaIte aKMyJatopa Ha BCEKN Meceua, 3a da yDbJIHNTe HEROBHT KIN3HeN cIKbl.
10. INPEMECTBAHE I TPAHCNOPTNPAHE
BceHn nT, KOrato TpI6Ba Da InpemecTBate, NOBnIaTe, TpaHcnpOpTpape NIn HaklaHrTe MaunHaTa, e He-06xOIMo:
CnpeteMaunHaTa;
-Изчakайт ecnupaHToHaBepnraTa;
CbaIeTe aKymyIaTOphata 6aTePnO rHeHOTOrHe3-Do I npCTbneTe KbM 3apeJkaHeTo N;
CLOXeTe 3aunTaHa HuaHata;
-ИЗчакай TeДOKaTOи3CTINHe MOTOpT.
HocTe 3dpabn pa60THn pbKaBnci;
XBaUaTe MaunHaTa eHCTBeHO 3a dpbKHTe n HacOte uHaTa B NocOKa, opaTHa Ha npuDnKBAHeTo.
Horato ce TpaHcnpTnpa MaunHaTa C TpaHCnOpTHO cpeCTBO e Heo6xOdmo:
- npn TpaHcnpOpTnpaHe 06e3oNacTe nO nOxOJaU HaYnn KaTO N3NoI3BaTe BbKeTa nnBepn;
MaunHata da ce no3nOHHpa TaKa, ye da He npedCTaBnBa ONaCHOCT 3a HNKoro.
11. TEXHnueCHO OBCJyHXBAHE NNONPABHN
ToBa pBHOBOCTBO npedocTABR BCnHn yTBaHn, Heo6XODIMN 3a ynpabJIeHHeTO Ha MaunHaTa n 3a H3- BbpWbAHe Ha npabINHa OCHOBn NOdpBkKa OT NtPte6nteJr. BcHKn OepauHH No perylnpaHEno NpOdPbKKaT, KOHTo HE ca ONscAHn B TOBa pBKOBOCTBO, Tp6Ba Da 6bDaTn3BbPbWBn Prn Baunn Dnctpn6yTOp Hn B CneuHaUN3npaH cHTbp 3a ObcIyKBaHe, KOHTo pa3noJa r C Heo6XODIMNE To3HaHn INHCTpyMeHTn 3a npabNJHOTo n3BbPbWAhe Ha pa60Ta, KaTO ce 3ana3n CTeneHTa Ha be3OnacHOCT N ppBOHaJHoTO CbCTOHN He MaunHATA.
Onepaun, n3BbpseHn OT HeKOMPteHTn Iua a nn PhnpMn BODrT Do OTnaDaHe Ha BCaKaBa rapaHnra BCaKaBO 3aDbJKeHne Nn OTROBOPHOCT Ha Ppon3BOdntela.
-
Camo pa60tHnHn, OToH3npaHn Da n3BbPWBat TexHHuecKO 06CnyKBaHe, MOraT Da n3BbPWBat NoI npaBn N NOdApkKa, KOraTO MaunHaTa e B rapaHzra.
-
Otopn3npaHnte pa60TnHnUHTe 3a TexHuecKO 6cbLyKBaHe n3POn3BaT eINHCTBeHO opuHaJIHN pe3epBn qactN. OpunHaJIHNTe pe3epBn qactN n PpInHaJNeHHoCTn ca cneuaJIHo pa3pa6OteHn 3a MaUnHnte.
HeopnHaHHTe pe3epBHu actu npHaJKeHocTn He ca oO6peH 3a N3POn3BaHe; N3POn3BaHeTo Ha HeOpnHaHnPe3epBHu actu npHaJLeKHOCTN BODI DO OTnadahe Ha rapaHcuiTa. - IpenopbUba ce da 3a KaapaTe MaunHaTa BeHbK B 13- roHNATA B OTOpN3nPaHa pa6OTnHnua 3a TexHnueCKO 06cnyKBaHe, 3a n3BbPwBaHe Ha NOdPbKHa, TExHnuecko 06cnyKBaHe n pOBepKa Ha npedna3- Hnte yCTpoiCTBa.
12.「APAHUHNOHO NOKPNTHE
IapaHnraTaNOKPnBa BCnKn DeFeKeTHHa MaTePnAaN, KaKTo n npOn3BOndTBeHN DeFeKeTHn. NpTe6bTeJrT Tpa6Ba Da CLeDBA BnMaTeJIHO BCnKN PpeOCTaBeHN HnCTpyKuIN B pNiIOKeHaTa DOkymeHTaCnY.
IapauhuiTa He noKpmba BpeDn/ueTn DbJkaN ce Ha:
- Heno3HaBaHe Ha npDpyKabaAaTa DOkymeHTaun.
HeBHHMaHne.
- HenpaBnHIO n3NoJ3BaHe n MoHTaK nJIH HeCBOI-CTBeHO n3NoJ3BaHe.
- I3noJI3BaHe Ha HeOpnHHaJIHn pe3epBHN qactN.
- I3noJI3BaHe Ha npHaJleKHOCTn, KOINTo He ca DoctaBeHn IIN TaKInBa, KOINTo He ca Odo6peHn OT npOn3BOUHTeJI.
OcbEN TOBa, rapaHcIyTa He nOKpNbA:
HopmaJIHOTO n3HOCBaHe Ha n3HOCBaUc Ce MaTepnAaN KaTO IHCTpyMeHTn 3a pr3aHe, npedna3HN 60JTOBe.
- HopmaJIHOTO n3HOCBaHe.
Notpe6nteIe 3aunTeH OT DeNCTBaUTo HaUNoHaJIHO 3aKOHoTaTeJCTBO. PpaBata HA Notpe6nteJI ppeBnDEHOT DeNCTBaUTo HauNoHJIHO 3aKOHoTaTeJCTBO NO HnKaTbH aunHe ce OrpaHnUbaT OT Ha-CTOaTa rapaHcIy.
13. TABJIHua HA ONEPAUHNTE NO NODPbXHATA
| Операця Перношист Рарраф | |||
| Пьрв пьт | След товаВCEEN | ||
| MAшина | |||
| Пробека на BCИЧКи ФИСИРАнIA | -Прedi | ВСЯКо ИЗПОЛЗВанe 7.7 | |
| Пробеки за 6еЗоласноCT /Пробека на KomандITE | -Прedi | ВСЯКо ИЗПОЛЗВанe 6.2 | |
| Пробека на сиФТа за 6еLOКИрАне на ВеригагаТa | -Прedi | ВСЯКо ИЗПОЛЗВанe 7.5 | |
| Общо поисвае и Prобека | -В Краз | На BCЯКоИЗПОЛЗВанe | 7.4 |
| Почиствае на ВеригагаТa | -В Краз | На BCЯКоИЗПОЛЗВанe | 7.4.2 |
| Пробека на OTВорITE за сMaЗВанe На машина.Tа и На Шина.Ta. | -Прedi | ВСЯКо ИЗПОЛЗВанe 7.6 | |
| Пробека на пINьОнa за ТEGлЕнe на ВеригагаТa | -ВЕДь | ЖВ Мecesa 8.1* | |
| Подрьжka на ВеригагаТa | -- 8.2* | ||
| Подрьжka на ШинаТa | -- 8.3 | ||
| Доливае на Масло на ВеригагаТa -Прedi BCЯКо ИЗПОЛЗВанe 7.3 | |||
- Onpaun, kOTo Tp6Ba da ce n3BbpUn OT Baun Dnctpn6yTop nnOT CepBn3eH ueHtp
14. INDEHTNΦHUNPAHE HA HEN3NPABHOCTN
15.1 AkyMylATOPH BATEPHN
HaunuHn ca akymlyaTopnp c pa3nueh kanaqtnt, 3a npncnocobrahe KbM cneuPhiuHn pa60THn HjDN (fnr. 32). CnncbKa Ha oO6peHnTe aKymlaTOpHN bAtePN 3a Ta3n MaUNHa ce Hamnpa B Ta6nucata "TexHHueKn DaHHN".
15.2 3APEXDAHE HA AHYMULA-TOPHATA BATEPINA
YcTpoNCTBO, KOeTO Ce n3nOJ3Ba 3a 3apeKdAHe Ha aKyMylaToPHaTa 6aTePn (ΦnR. 33).
15.3 ⅢHHN I BEPNI
B“Ta6nHa 3a npabHnHaT a KOMnHa nHa 5nHa n Bepnra"Ca nocOeHN BCnKn Bb3MOxH N KOMnHa n MeJdy 5nHa n Bepnra. B cbuata Ta6nHa e nocOeHa INΦopMaun 3a TexHuecNte XapaKTepnCTnHa Odo6peHnTe BepnIu 5nH, 3a BCKa MaunHa.
3a cMaHa H3nO13BaIe cAmo uHHu BepHn, KOnTO ca unTnpAHN B Ta6nUcaTa. YnOtpe6aTa Ha HeoOobPeHN KOMbHaUN MoKe Da DOBeE do CepNo3HN JInHn HapaHbAHNu N da NobpeDu MaunHata.
Hato ce nma npedn, ye n36opa, noctabryHeTo Hn3no13BaHeTo Ha uHaTa N Bepurata Ce n3Bbpwa OT notpe6nteIa, NO herOBO ycmOTpeHne,TO3n noCleHNrT Noema OTROBOPHOCT 3a HaHeceHN 7eTN OT pa3nueh xapakTe. B cnyan Ha cbmHeHn nn HeoCTaTb4uHn PO3HaHn 3a Oc06HoCTHTe Ha BCaHa uHa Hn Bepura, e Heo6xOJMo Da ce CBpHexe C Baun npodabay-KOHcyIantAHTnn CneuaHn3npaH ueTbp 3a rpaundHCHN HHCTpyMeHTN.
SADRžAJ
- OPCE INFORMACIJE 1
- SIGURNOSNI PROPISI 2
- UPOZNAVANJE S MAŠINOM 6
6.4 PRACOVNI CINNOST
3.1 Description of the machine and planned use 6
3.2 Safety signs 7
3.3 Main components 7
3.4 Identification label 7
4.ASSEMBLY 8
4.1 Assembly components 8
4.2 Assembly of the guide bar and toothed chain 8
5.CONTROLS. 8
5.1 Throttle trigger lever 8
5.2 Interlock BUTTON 8
5.3 Chain brake 8
- USING THE MACHINE 9
6.1 Preliminary procedures 9
6.2 Safety checks 9
6.3 Start-up 10
6.4 Working 10
6.5Forestry work 11
6.6 Stop 12
6.7 After use 12
- ROUTINE MAINTENANCE 12
7.1 General information 12
7.2 Battery 13
7.3 Topping up the chain oil tank 13
7.4 Cleaning 13
7.5 Chain catcher 14
7.6 Machine and bar lubrication holes .... 14
7.7 Nuts and bolts 14
- OCCASIONAL MAINTENANCE 14
8.1 Chain drive sprocket 14
8.2 Maintenance of the toothed chain 14
8.3 Guide bar maintenance 14
9.STORING 15
9.1 Storing the machine 15
9.2 Storing the battery.. 15
-
HANDLING AND TRANSPORTATION 15
-
ASSISTANCE AND REPAIRS 15
- WARRANTY COVERAGE 15
- MAINTENANCE TABLE 16
14.TROUBLESHOOTING 16 - ATTACHMENTS ON REQUEST 18
15.1 Battery 18
15.2 Battery charger 18
15.3 Bars and chains 18
1. GENERAL ASPECTS
1.1 HOW TO READ THE MANUAL
Some paragraphs in the manual contain important information regarding safety and operation and are emphasized in this manner:
NOTE or IMPORTANT These give details or further information on what has been previously indicated and aim to prevent damage to the machine or cause other damage.
The symbol highlights danger. Failure to observe the warning can lead to the risk of injury to oneself and others and/or damage.
The paragraphs inside a grey dotted frame refer to optional features not available on all the models referred to in this booklet. Check if the characteristic is on this model.
Whenever reference is made to a position on the machine "front", "back", "left" or "right" hand side, this refers to the operator's working position.
1.2 REFERENCES
1.2.1 Figures
The figures in these instructions for use are numbered 1, 2, 3, etc. The components indicated in the figures are identified with letters A, B, C, and so on. Reference to component C in figure 2 is indicated with the wording: "See fig. 2.C" or simply "(Fig. 2.C)". The figures are given as a guide only. The actual pieces can differ from those illustrated in this document.
1.2.2 Titles
The manual is divided into chapters and paragraphs. The title of paragraph "2.1 Training" is a subtitle of "2. Safety regulations". References to titles or paragraphs are marked with the abbreviation chap. or par. and the relevant number. Example: "chap. 2" or "par. 2.1.
2. SAFETY REGULATIONS
2.1 GENERAL SAFETY GUIDELINES FOR POWER TOOLS
Read all safety warnings and all instructions and specifications provided with this power tool. Failure to follow the warnings and instructions may result in electric shock, fire and/or serious injury.
Save all warnings and instructions for future reference.
The term "power tool" in the warnings refers to your battery-operated (cordless) power tool.
1) Work area safety
a) Keep the work area clean and well lit. Cluttered and dark areas invite accidents.
b) Do not operate power tools in explosive atmospheres, such as in the presence of flammable liquids, gases or dust. Power tools create sparks which may ignite the dust or fumes.
c) Keep children and bystanders away while operating a power tool. Distractions can cause you to lose control.
2) Electrical safety
a) Power tool plugs must match the outlet. Never modify the plug in any way. Do not use any adapter plugs with earthed (grounded) power tools. Unmodified plugs and matching outlets will reduce risk of electric shock.
b) Avoid body contact with earthed or grounded surfaces, such as pipes, radiators, ranges and refrigerators. There is an increased risk of electric shock if your body is earthed or grounded.
c) Do not expose power tools to rain or wet conditions. Water entering a power tool will increase the risk of electric shock.
d) Do not abuse the cord. Never use the cord for carrying, pulling or unplugging the power tool. Keep cord away from heat, oil, sharp edges or moving parts. Damaged or entangled cords increase the risk of electric shock.
e) When operating a power tool outdoors, use an extension cord suitable for outdoor use. Use of a cord suitable for outdoor use reduces the risk of electric shock.
f) If operating a power tool in a damp location is unavoidable, use a residual current device (RCD) protected supply. Use of an RCD reduces the risk of electric shock.
3) Personal safety
a) Stay alert, watch what you are doing and use common sense when operating a power tool. Do not use a power tool while you are tired or under the influence of drugs, alcohol or medication. A moment of inattention while operating power tools may result in serious personal injury.
b) Use personal protective equipment. Always wear eye protection. Protective equipment such as a dust mask, non-skid safety shoes, hard hat or hearing protection used for appropriate conditions will reduce personal injuries.
c) Prevent unintentional starting. Ensure the switch is in the off-position before connecting to power source and/or battery pack, picking up or carrying the tool. Carrying power tools with your finger on the switch or energising power tools that have the switch on invites accidents.
d) Remove any adjusting key or wrench before turning the power tool on. A wrench or a key left attached to a rotating part of the power tool may result in personal injury.
e) Do not overreach. Keep proper footing and balance at all times. This enables better control of the power tool in unexpected situations.
f) Dress properly. Do not wear loose clothing or jewellery. Keep your hair and clothing away from moving parts. Loose clothes, jewellery or long hair can be caught in moving parts.
g) If devices are provided for the connection of dust extraction and collection facilities, ensure these are connected and properly used. Use of dust collection can reduce dust-related hazards.
h) Do not let familiarity gained from frequent use of tools allow you to become complacent and ignore tool safety principles. A careless action can cause severe injury within a fraction of a second.
4) Power tool use and care
a) Do not force the power tool. Use the correct power tool for your application. The correct power tool will do the job better and safer at the rate for which it was designed.
b) Do not use the power tool if the switch does not turn it on and off. Any power tool that cannot be controlled with the switch is dangerous and must be repaired.
c) Disconnect the plug from the power source and/or remove the battery pack, if detachable, from the power tool before making any adjustments, changing accessories, or storing power tools. Such
preventive safety measures reduce the risk of starting the power tool accidentally.
d) Store idle power tools out of the reach of children and do not allow persons unfamiliar with the power tool or these instructions to operate the power tool. Power tools are dangerous in the hands of untrained users.
e) Maintain power tools and accessories. Check for misalignment or binding of moving parts, breakage of parts and any other condition that may affect the power tool's operation. If damaged, have the power tool repaired before use. Many accidents are caused by poorly maintained power tools.
f) Keep cutting tools sharp and clean. Properly maintained cutting tools with sharp cutting edges are less likely to bind and are easier to control.
g) Use the power tool, accessories and tool bits etc. in accordance with these instructions, taking into account the working conditions and the work to be performed. Use of the power tool for operations different from those intended could result in a hazardous situation.
h) Keep handles and grasping surfaces dry, clean and free from oil and grease. Slippery handles and grasping surfaces do not allow for safe handling and control of the tool in unexpected situations.
5) Battery tool use and care
a) Recharge only with the charger specified by the manufacturer. A charger that is suitable for one type of battery pack may create a risk of fire when used with another battery pack.
b) Use power tools only with specifically designated battery packs. Use of any other battery packs may create a risk of injury and fire.
c) When battery pack is not in use, keep it away from other metal objects, like paper clips, coins, keys, nails, screws or other small metal objects, that can make a connection from one terminal to another. Shorting the battery terminals together may cause burns or a fire.
d) Under abusive conditions, liquid may be ejected from the battery; avoid contact. If contact accidentally occurs, flush with water. If liquid contacts eyes, additionally seek medical help. Liquid ejected from the battery may cause irritation or burns.
e) Do not use a battery pack or tool that is damaged or modified. Damaged or modified batteries may exhibit
unpredictable behaviour resulting in fire, explosion or risk of injury.
f) Do not expose a battery pack or tool to fire or excessive temperature. Exposure to fire or temperature above 130^ may cause explosion. NOTE The temperature "130 ^ C'' can be replaced by the temperature 265^''
g) Follow all charging instructions and do not charge the battery pack or tool outside the temperature range specified in the instructions. Charging improperly or at temperatures outside the specified range may damage the battery and increase the risk of fire.
6) Service
a) Have your power tool serviced by a qualified repair person using only identical replacement parts. This will ensure that the safety of the power tool is maintained.
b) Never service damaged battery packs. Service of battery packs should only be performed by the manufacturer or authorized service providers.
2.2 SPECIFIC SAFETY RULES FOR CHAINSAWS AND ELECTRIC CHAINSAWS.
a) Keep all parts of the body away from the saw chain when the chain saw is running Before you start the chain saw, make sure the saw chain is not contacting anything. A moment of inattention while operating chain saws may cause entanglement of your clothing or body with the saw chain.
b) Always hold the chain saw with your right hand on the rear handle and your left hand on the front handle. Holding the chain saw with a reversed hand configuration increases the risk of personal injury and should never be done.
c) Hold the chaisaw by insulated gripping surfaces only, because the chainsaw may contact hidden wiring. Saw chains contacting a "live" wire may make exposed metal parts of the chain saw "live" and could give the operator an electric shock
d) Wear safety glasses protection. Further protective equipment for hearing, head, hands, legs and feet is recommended The wearing of protective clothing will reduce accidents caused by hurled workpieces and accidental contact with the toothed chain.
e) Do not operate a chain saw in a tree, on a ladder, from a rooftop, or any unstable
support. Operation of a chain saw in this manner could result in serious personal injury.
f) Always keep proper footing and operate the chain saw only when standing on fixed, secure and level surface. Slippery or unstable surfaces may cause a loss of balance or control of the chain saw..
g) When cutting a limb that is under tension, be alert for spring back. When the tension of the wood fibres is released, the spring loaded limb may strike the operator and/or throw the chain saw out of control..
h) Use extreme caution when cutting brush and saplings. The slender material may catch the saw chain and be whipped toward you and/or pull you off balance.
i) Carry the chainsaw by the front handle with the chain saw switched off and away from your body. When storing or transporting a chainsaw always use the guide bar cover. Proper handling of the chain saw will reduce the likelihood of accidental contact with the moving saw chain.
j) Follow the instructions concerning lubrication, chain tension and changing the bar and chain. Chains with incorrect tension and lubrication can break and increase the risk of kickback.
k) Cut wood only. Do not use the chainsaw for purposes for which it is not intended. For example: do not use an chainsaw for cutting metal, plastic, masonry or other non-wood materials. Using the chainsaw for operations other than those intended could result in a hazardous situation.
I) Do not attempt to fell a tree until you have an understanding of the risks and how to avoid them. Serious injury could occur to the operator or bystanders while felling a tree.
m) Follow all instructions when clearing jammed material, storing or servicing the chain saw. Make sure the switch is off and the battery pack is removed. Unexpected actuation of the chain saw while clearing jammed material or servicing may result in serious personal injury.
n) Recommendation that the first-time user should, as a minimum, practise cutting logs on a saw-horse or cradle.
o) Recommendation to have sharpening and maintenance of the saw chain performed by authorised service centres.
p) Keep handles dry, clean and free from oil and grease. Greasy and oily handles are slippery and can cause loss of control.
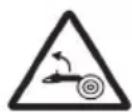
2.3 CAUSES OF KICKBACK AND OPERATOR PROTECTION
Kickback may occur when the nose or tip of the guide bar touches an object, or when the wood closes in and pinches the saw chain in the cut.
Tip contact in some cases may cause a sudden reverse reaction, kicking the guide bar up and back towards the operator.
Pinching the saw chain along the top of the guide bar may push the guide bar rapidly back towards the operator.
Either of these reactions may cause you to lose control of the saw which could result in serious personal injury. Do not rely exclusively upon the safety devices built into your saw. As a chain saw user, you should take several steps to keep your cutting jobs free from accident or injury.
Kickback is the result of chain saw misuse and/or incorrect operating procedures or conditions and can be avoided by taking proper precautions as given below:
a) Maintain a firm grip, with thumbs and fingers encircling the chain saw handles, with both hands on the saw and position your body and arm to allow you to resist kickback forces. Kickback forces can be controlled by the operator, if proper precautions are taken. Do not let go of the chain saw.
b) Do not overreach and do not cut above shoulder height. This helps prevent unintended tip contact and enables better control of the chain saw in unexpected situations.
c) Only use replacement bars and chains specified by the manufacturer. Incorrect replacement guide bars and saw chains may cause chain breakage and/or kickback.
d) Follow the manufacturer's sharpening and maintenance instructions for the saw chain.
Decreasing the depth gauge height can lead to increased kickback.
- Techniques for using the electric chainsaw (battery-operated)
Always observe the safety regulations and use the most suitable cutting techniques according to the work to be performed, following the instructions and examples in the user instructions. - Safe carrying of the electric chainsaw (battery-operated)
Whenever the machine is to be handled or transported you must:
- turn off the motor, wait for the chain to stop and unplug the machine from the mains;
- apply the protection bar cover;
- only hold the machine using the handles and position the bar in the opposite direction to that used during operation.
When using a vehicle to transport the machine, position it so that it can cause no danger to persons and fasten it firmly in place.
- Recommendations for first-time users
Before felling or delimbing for the first time, make sure:
to have been specifically trained to use this type of equipment;
- to have carefully read the safety regulations and user instructions contained in this manual;
- you practise first on logs on the ground or attached to trestles, in order to get familiar with the machine and the most suitable cutting techniques.
- Handling and correct use of battery-operated power tools
a) Make sure that the machine is switched off before inserting the battery. Inserting a battery in an electric device which is switched on can cause accidents.
b) Charge battery packs only with the chargers recommended by the manufacturer. Battery chargers are generally specific for each battery type; use with other types can cause fire risks.
c) Use only batteries specifically designed for your power tool. The use of other batteries may cause injuries and fire risks.
d) Keep all unused batteries at a distance from paper clips, coins, keys, nails, screws or other small metal objects as contact with the same can cause short circuits. Short circuits between battery contacts can lead to explosion or fires.
e) Batteries in poor condition can cause liquids to leak. Avoid contact with the liquid. In the case of accidental contact flush with water. If the liquid comes into contact with the eyes, also seek medical advice. Liquid leaking from the battery may cause skin irritation or burns.
f) Check that the accumulator is in good condition and there are no signs of damage. Do not use the device with a damaged or worn accumulator.
2.4 BATTERY/BATTERY CHARGER
ATTENTION
The following safety rules complement the safety rules contained in the battery charger manual.
- Only use battery chargers recommended by the manufacturer to recharge batteries. An inadequate battery charger may cause electric shock, overheating or corrosive liquid to leak from the battery.
- Use only batteries specifically designed for your power tool. The use of other batteries may cause injuries and fire risks.
- Keep all unused batteries at a distance from paper clips, coins, keys, nails, screws or other small metal objects as contact with the same can cause short circuits. Short circuits between battery contacts can lead to explosion or fires.
- Never use the battery charger in environments in the presence of vapours, flammable substances or on easily flammable surfaces such as paper, fabric, etc. The battery charger heats up during recharging and may cause a fire.
- When transporting batteries, make sure the contacts never come into contact with each other and never use metal containers to transport them.
2.5 PROTECTING THE ENVIRONMENT
Safeguarding the environment must be a relevant and priority aspect of machine use, of benefit to the community and the environment we live in.
- Avoid being a disturbance to the neighbourhood. Use this machine at reasonable times of the day only (not early morning or late evening when the noise could cause disturbance).
- A certain amount of chain lubricating oil is released into the environment when the machine is running, so only use biodegradable oils made specifically for this use. Use of a mineral oil or motor oil causes serious damage to the environment.
- Comply with local regulations for the disposal of packaging, deteriorated parts or any elements with a strong environmental impact; this waste must not be disposed of as normal waste, it must be separated and taken to specified waste disposal centres where the material will be recycled.
- Comply with local regulations for the disposal of waste materials
- When the machine is withdrawn from service, do not dispose of it in the environment, but take it to a waste disposal facility in accordance with the local regulations in force.

Do not throw electrical equipment away with domestic waste. According to the European Directive 2012/19/EU on electrical and electronic equipment waste and its implementation, according
to UK Regulation "The waste electrical and electronic equipment regulations 2013 (as amended)" and according to national regulations, old electrical equipment must be collected separately, for eco-compatible recycling. If electrical equipment is disposed of in landfills or in the ground, hazardous substances can leak into the groundwater and contaminate the food chain, damaging your health and well-being. For further information on the disposal of this product, contact your dealer or a domestic waste collection service.
Li-ion
At the end of their working life, dispose of batteries paying due attention to the environment. Batteries contain material classified as hazardous for you and the environment. They must be removed and
disposed of separately at a facility that accepts lithium-ion batteries.

Separate waste collection of the products and packaging used allows the materials to be recycled and reused. Reuse of recycled materials help to prevent environmental pollution and reduces the demand for raw materials.
3. GETTING TO KNOW THE MACHINE

ATTENTION
This tool may cause hand-arm vibration syndrome if its use is not adequately managed.
To be accurate, an estimation of exposure level in the actual conditions of use should also take account of all parts of the operating cycle such as the times when the tool is switched off and when it is running idle but not actually doing the job. This may significantly reduce the exposure level over the total working period.
Helping to minimise your vibration and noise exposure risk.
Always use sharp chisels, drills and blades.
Maintain this tool in accordance with these instructions and keep well lubricated (where appropriate).
If the tool is to be used regularly then invest in anti vibration and noise accessories.
Plan your work schedule to spread any high vibration tool use across a number of days.
3.1 DESCRIPTION OF THE MACHINE AND PLANNED USE
The machine is essentially composed of a battery powered motor and a guide bar that takes the power from the battery to the motor which drives the cutting chain.
The operator is able to operate the machine with two hands, using the front and rear hand grips, and can use the main controls, always remaining at a safe distance from the cutting means.
3.1.1 Intended use
This machine was designed and manufactured for:
- trimming and cutting of tall tree tops;
- cutting hedges, trunks or wooden beams, the diameter of which depends on the length of the guide bar;
- cutting wood only;
- use by one operator only;
3.1.2 Improper use
Any other usage not in keeping with the above-mentioned ones may be hazardous and harm persons and/or damage things. Examples of improper use may include, but are not limited to:
- trimming hedges;
- carving operations;
- sectioning pallets, crates and various packing materials;
- sectioning furniture or other materials with nails, screws or other metal components;
- butchering meat;
- using the machine to cut materials other than wood (plastic materials, building materials);
-
using the machine to lift, move or split objects;
-
using the machine while fastened to fixed supports;
-
using cutting means other than those found in the "Technical Data" table; Serious injury and wound hazard;
- use of the machine by more than one person.
IMPORTANT Improper use of the machine will invalidate the warranty, relieve the Manufacturer from all liability, and the user will consequently be liable for all and any damage or injury to himself or others.
3.1.3 User types
This machine is intended for use only by operators trained in forest maintenance.
3.2 SAFETY SIGNS
The machine has various symbols on it (fig. 2). They are used to remind the operator of the behaviour to follow to use it with the necessary attention and caution.
Meaning of symbols:

Warning! Read the instructions before operating the machine.

Danger! The failure to use this machine correctly can be hazardous for oneself and others.

Warning! Wear ear protectors, safety goggles and a protective helmet.

Warning! Wear gloves and non-skid safety boots!

Danger! Do not leave the machine in the rain or in damp conditions.
Beware of kickback! Kickback is the rapid and uncontrollable backward motion of the chainsaw in the direction of the operator. Always work in complete safety. Use chains with safety links that limit kickback.

Warning! Never hold the machine with one hand! Hold the machine firmly with both hands to control the machine and reduce the risk of kickback.

Warning! For battery and battery charger see the dedicated manual
IMPORTANT Any damaged or illegible decals must be replaced. Order replacement decals from an authorised service centre.
3.3 MAIN COMPONENTS
The machine is composed of a series of main components that have the following functions (Fig.1):
A. Motor: supplies the drive power to the cutting means.
B. Front hand grip: support hand grip located on the front of the chainsaw. This should be grasped using the left hand.
C. Rear hand grip: support hand grip located on the rear of the chainsaw. This should be grasped using the right hand. This hand grip is fitted with the main throttle controls.
D. Front hand guard: protection device seated between the front hand grip and the toothed chain, to protect the hand against injuries should it slip off the hand grip. This guard is used as a device to trigger the chain brake.
E. Guide bar: supports and guides the toothed chain.
F. Toothed chain: cutting element, consisting of drive links fitted with small blades called "teeth" and side connections held in place by rivets.
G. Chain restraint pin: safety device that prevents uncontrolled movements of the toothed chain should it break or slacken.
H. Spiked bumper: device present opposite the guide bar assembly point acting as a pivot when it comes into contact with a tree or trunk.
I. Quick tensioning: ring nut for quick chain tensioning (if provided)
J. Bar cover guard: chainsaw cover on the guide bar to be fitted during handling, transportation or storage of the machine.
K. Battery (if not supplied with the machine, see par. 15.1. "accessories on request): device that supplies electric current to the tool; its specifications and regulations for use are described in a specific manual.
L. Battery charger (if not supplied with the machine, see par. 15.2 "accessories on request): device used to recharge the battery.
M. Tip Guard: anti-kickback device
N. Battery location: place where the battery is inserted in the machine.
O. Nut or tightening knob
3.4 IDENTIFICATION LABEL
The identification label holds the following data (fig. 2):
- Sound power level
- Conformity marking
- Month/Year of manufacture
- Type of machine
- Power voltage
- Serial number
- Name and address of Manufacturer
- Article code
- Length of the guide bar
- Machine description
Write the identification data of the machine in the specific space on the label on the back of the cover page.
IMPORTANT Quote the information on the product identification label whenever you contact an authorised service centre.
4. ASSEMBLY
The safety regulations to follow are described in chap. 2. Strictly comply with these instructions to avoid serious risks or dangers.
For storage and transport purposes, some components of the machine may not be installed in the factory and have to be assembled after unpacking. Follow the instructions below.
Unpacking and completing the assembly should be done on a flat and stable surface, with enough space for machine handling and its packaging, always making use of suitable equipment. Do not use the machine until all the instructions provided in the "ASSEMBLY" section have been carried out.
4.1 ASSEMBLY COMPONENTS
The packaging holds the components needed for assembly as listed in the table below:
| Guide bar fitted with bar cover |
| Toothed chain |
| Key (if provided) |
| Documentation |
4.1.1 Unpacking
- Carefully open the packaging, paying attention not to lose components.
- Consult the documentation in the box, including these instructions.
- Remove all the unassembled parts from the box.
- Remove the machine from the box.
- Dispose of the box and packaging in compliance with local regulations.
4.2 ASSEMBLY OF THE GUIDE BAR AND TOOTHED CHAIN
Always wear heavy duty gloves when handling the bar and chain. Mount the bar and chain very carefully so as not to impair the safety and efficiency of the machine. If in doubt, contact your dealer.
Perform all operations after removing the battery.
Before assembling the bar, check that the chain brake is not engaged (par. 5.4).
- Using the supplied wrench unscrew the nut or use the tightening knob (Fig. 3.A) and remove the chain guard (Fig. 3.B) to access the drive pinion and bar seat.
- Mount the bar (Fig. 4.A) by inserting the stud bolt (Fig. 4.B) in the groove (Fig. 4.C) and push it towards the back of the machine body.
- Make sure the chain tension adjuster pin (Fig. 4.D) is correctly inserted in the corresponding hole in the bar; otherwise use a screwdriver to tighten the chain tension adjuster screw (Fig. 4.E), until the pin is inserted completely (if provided).
- Tilt the machine to make it easier to wind the chain around the drive sprocket (Fig. 5).
- Mount the chain (Fig. 6.A) around the drive sprocket (Fig. 6.B) and along the bar guide (Fig. 6.C) being careful to follow the sliding direction.
Direction in which the chain runs
- If the tip of the bar is equipped with a nose sprocket, make sure the drive links are correctly inserted in the sprocket rims (Fig. 7).
- Refit the guard (Fig. 8.A), without fully tightening the nut or knob (Fig. 8.B).
- Turn the chain tension adjuster screw or act on the ring nut (Fig. 9.A) to achieve the desired tension (Fig. 10) (par. 6.1.3).
- Raise the bar and tighten the guard nut or the knob securely using the wrench supplied (Fig. 11.A).
5. CONTROLS
5.1 THROTTLE TRIGGER LEVER
It allows the activation of the chain.
The activation of the throttle trigger lever (Fig. 12.A), is possible only after that the throttle lock buttom is pressed (Fig. 12.B).
The cutting means stops automatically when the throttle safety lever is released.
This is a safety braking system that blocks the chain movement when kickback occurs during
cutting. Kickbacks occur following an irregular contact of the tip of the bar, with a rapid upward movement of the bar that causes the hand to strike the front guard (Fig. 1.D) It must be manually released to disengage the chain brake.

Chain brake engaged. This is achieved when the front hand guard is pushed all the way forward.

Chain brake disengaged. This is achieved when the front hand guard is pulled all the way back, towards the machine body, until it clicks into position.

Do not use the machine if the chain does not function correctly and be it inspected by your dealer.
6. USING THE MACHINE
The safety regulations to follow are described in chap. 2. Strictly comply with these instructions to avoid serious risks or dangers.
IMPORTANT For instructions regarding the motor and the battery (if supplied), read relevant manuals.
6.1 PRELIMINARY PROCEDURES
Before starting to work, it is necessary to carry out several checks and operations to ensure you can work efficiently and in maximum safety.
6.1.1 Checking the battery
Purchase the battery with the capacity that most suits your operational requirements and fully charge it according to the instructions in the battery booklet.
The list of approved batteries for this machine is found in the "Technical Data" table (sheet ii).
-
Before each use:
-
check the battery charge status according to the instructions in the battery booklet.
6.1.2 Filling with chain lubrication oil
Fill with chain lubrication oil before using the machine. For oil filling methods and precautions see par. 7.3.
6.1.3 Checking the chain tension

Perform all operations with the motor off.

Always wear heavy duty work gloves.
Lock the chain tension.
The tension is correct when the drive links do not slip out of the chain guides if you hold the chain in the middle of the bar (Fig. 10).
To adjust the chain tension:
- loosen the cover nut, using the supplied wrench or loosen the knob (Fig. 3 A);
- turn the chain tension adjuster screw or act on the ring nut (Fig. 9 A) to achieve the desired tension;
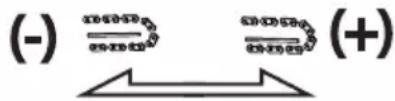
- raise the bar and tighten the guard nut securely using the wrench supplied or tighten the knob (Fig. 11 A)
Never work with the chain loose, as it can be hazardous if the chain slips out of the bar guides.
IMPORTANT During the first period of use (or, after replacing the chain) it must be checked more frequently due to settling of the chain.
6.2 SAFETY CHECKS
Run the following safety checks and check that the results correspond to those outlined on the tables.

Always carry out the safety checks before
Always carry out a daily inspection of the machine before use, after a fall or other impact to detect any damage or significant defects.
6.2.1 General safety check
| Object Result | |
| Grip and guards | Clean, dry, without traces of oil and grease, and fixed correctly and firmly to the machine. |
| Screws on the machine and blade | Correctly tightened (not loose) |
| Cooling air ducts Not clogged |
| Guide rod Properly installed |
| Chain Sharp, not damaged or worn, mounted and tensioned correctly. |
| Guards Intact, undamaged. |
| Battery No damage to the casing, no liquid leakage |
| Machine No signs of damage or wear |
| Throttle trigger lever, safety buttom The levers must move freely and not be forced. |
| Test driving No abnormal vibrations. No abnormal sound |
6.2.2 Machine operating test
| Action Result | |
| Fit the battery inside its housing (par. 7.2.3) Activate the throttle trigger lever. (Fig. 12 A) (without pressing the throttle lock buttom (Fig. 12 B) | The throttle trigger lever remains blocked. |
| Press the throttle lock button (Fig. 12 B) and throttle trigger lever (Fig. 12 A) | The levers must move freely and not be forced. The chain moves. |
| Release the throttle trigger lever (Fig. 12 A) or press the lock button (Fig. 12 B). | The lever automatically and rapidly returns to the idle position. The chain should stop. |
| CHECKING THE CHAIN BRAKE | |
| 1. Start the machine (par. 6.3) | |
| 2. Grasp the hand grips firmly with both hands. | |
| 3. Use the throttle lever to keep the chain moving, push the front hand guard forwards using the back of your left hand (par. 5.3) | 3. The chain must stop moving immediately. When the chain has stopped, release the throttle trigger lever and disengage the chain brake (par. 5.3). |
If any of the results fail to match the instructions provided in the tables, do not use the machine! Contact a service centre to have it checked and repaired if necessary.
6.3 START-UP
- Remove the bar cover guard (Fig. 1.J).
- Make sure the bar and the chain are not touching the ground or any other object.
- Insert the battery correctly into its housing (par. 13 K) (par. 7.2.3).
- Disengage the chain brake (par. 5.3)
- Press the throttle lock buttom (Fig. 12.B) and throttle trigger lever. (Fig. 12.A).
6.4 WORKING
Before felling or delimbing for the first time, make sure:
to have been specifically trained to use this type of equipment;
- to have carefully read the safety regulations and user instructions contained in this manual;
- you practise first on logs on the ground or attached to trestles, in order to get familiar with the machine and the most suitable cutting techniques.
To use the machine proceed as follows:
Always disengage the chain brake, pulling the lever towards you before using the throttle.
- The machine must always be firmly held in both hands, with the left hand on the front hand grip and the right hand on the rear hand grip, even if the operator is left-handed.
Stop the machine immediately if the chain stops during sawing.
NOTE During use, the battery is protected against total drainage with a protective device that switches off the machine and stops it from working.
NOTE If the chainsaw stops working during the cutting, wait 15mins to cool down the machine, then re-start it.
6.4.1 Checks to be conducted whilst working
6.4.1.a Checking the chain tension
The chain tends to stretch gradually as you work, so you need to check its tension frequently (par. 6.1.3).
6.4.1.b Checking the oil delivery
IMPORTANT Never use the machine without lubrication!
Make sure the bar and the chain are in place when you check the oil delivery.
Start the motor (par. 6.3) and check if the chain oil is delivered as shown in (fig. 14).
6.5 FORESTRY WORK
6.5.1 Delimbing a tree
Make sure there is nothing or nobody in the area where the branches will fall.
- Stand opposite the branch you want to cut.
- Start cutting lower branches followed by the higher ones.
- Make first cut from the bottom towards the top (Fig. 15.A). Complete delimbing by cutting from top to bottom, as shown in (Fig. 15.B).
6.5.2 Felling a tree
IMPORTANT Where two or more persons are working together on felling and bucking operations, such operations must be performed in separate areas at a distance from each other of at least 2.5 times the height of the tree being felled. Do not fell trees if this involves risks people, coming into contact with a power line or causing any form of damage. If the t come into contact with a main power line, report the incident immediately to the network provider.
Before commencing the felling operations:
- it is necessary to evaluate the natural inclination of the tree, the part where the branches are larger and the wind direction, to assess how the tree will actually fall;
- remove any dirt, stones, pieces of bark, nails, metal staples and wire;
- clear the area around the tree and find a stable place to stand;
plan obstacle-free escape routes at a 45^ angle back and away from the direction of the fall (Fig. 16) which allow the operator to escape to a safe zone, about 2.5 times the height of the tree being felled; - Stand uphill of the land onto which the tree will probably roll or fall over after felling.
Performing a face notch
- Stand to the right of the tree, behind the chainsaw.
- Saw a horizontal face notch to 1/3 of the diameter of the tree, perpendicular to the direction in which it will fall (Fig. 17.A).
Felling back cut
- Perform the felling back cut at least 5 cm higher than the horizontal face notch (Fig. 18.B).
- Perform the felling back cut leaving sufficient wood to act as a "hinge" (Fig. 18.C). The hinge wood will prevent the tree from twisting and falling in the wrong direction. Do not cut through the hinge.
- Reduce the thickness of this hinge without pulling out the bar, until the tree falls.
- If there is any risk of the tree not falling in the desired direction, or that it might lose its balance moving backwards and bending the toothed chain, stop cutting before completing the felling back cut and use some wooden, plastic or aluminium wedges (Fig. 19.D) to open the cut. Force the tree to fall along the desired line by hitting the wedges with a sledge hammer.
- When the tree starts to fall, it is necessary to withdraw the machine from the cut, switch it off (par. 6.6), lie it on the ground and take the foreseen exit route. Beware of falling branches and pay attention where you put your feet.
6.5.3 Limbing tree branches
bimbungirineans removing the branches from a felled tree.
tree should
Be careful of where the branches are lying on the ground, the risk of them being under tension, the direction the branch may go during cutting and the risk of the tree being unstable after the branch has been cut.
When limbing, it is necessary to leave the lower, larger branches to support the trunk on the ground. Remove the small branches with a single cut (Fig. 20.A).
It is recommended to cut the tensioned branches working from the bottom upwards to prevent the chainsaw from bending (Fig. 20.B).
6.5.4 Bucking the trunk
Bucking means sawing a tree trunk into logs.
It is essential to make sure your feet are positioned firmly on the ground, and your weight is distributed equally on both feet. If possible, it is recommended to raise and support the trunk using branches, logs or blocks of wood.
It is easier to saw a log using the spiked bumper (Fig. 1H):
- plant the spiked bumper into the log and use it as a pivot. Cut with an arched motion to make the bar penetrate the wood (Fig. 21);
- repeat several times if necessary, changing the point where you plant the spiked bumper.
- Trunk lying on the ground
When the entire trunk is lying on the ground, it is bucked from the top down (overbucking) (Fig. 22.A).
- Cut up to half the diameter, roll the log over and finish sawing on the other side.
- Trunk resting on one end only
When the trunk is resting on one end only:
-
saw through 1/3 of the diameter from the bottom up (underbucking) (Fig. 23.A);
-
then perform the final cut, overbucking to reach the first cut (Fig. 23.B).
- Trunk resting on both ends
When the trunk is resting on both ends:
-saw through 1/3 of the diameter from the top down (overbucking) (Fig.24.A);
- then perform the final cut, underbucking the lower 2/3 to reach the first cut (Fig. 24.B).
- Sloping trunk
Always stand uphill when bucking a sloping trunk (Fig. 25).
During the operation, to maintain control when the cut is almost complete, reduce the bucking pressure without removing removing your hands from the machine hand grips. Take all necessary precautions to prevent the machine from coming into contact with the ground.
6.6 STOP
To stop the machine:
- Release the throttle trigger lever (Fig. 12.A).
After releasing the throttle control it takes a few seconds for the toothed chain to stop.
Always stop the machine:
- when moving between work areas.
Do not keep your finger on the safety button when moving the machine to avoid accidentally enabling the machine.
6.7 AFTER USE
- Press the lock push-button placed in the battery on the machine (Fig. 26 A), remove the battery from its housing (Fig. 26.K) and recharge it (par. 7.2.2);
-
Mount the protection bar cover (Fig. 1.J);
-
allow the motor to cool before storing in an enclosed space;
- loosen the bar fastening nut or the knob to reduce chain tension (par. 6.1.3);
- carefully remove any dust and debris and remove all traces of sawdust or oil deposits from the chain (par. 7.4);
- check there are no loose or damaged components. If necessary, replace the damaged components and tighten any screws and loose bolts.
IMPORTANT Always remove the battery (par. 7.2.2) and fit the blade guard whenever the machine is unused or left unattended.
7. ROUTINE MAINTENANCE
7.1 GENERAL INFORMATION
The safety regulations to follow are described in chap. 2. Strictly comply with these instructions to avoid serious risks or dangers.
Before conducting any inspections, cleaning or maintenance/adjustment interventions on the machine:
- Stop the machine and turn off the motor;
- Wait until the chain is stationary;
- Remove the battery from its housing;
- Apply the bar cover, except when working directly on the chain or bar itself.
- Wait until the motor is sufficiently cold;
- Read the relevant instructions;
-
Use suitable clothing, protective gloves and goggles;
-
The frequency and types of maintenance are summarised in the "Maintenance Table". This table will help you maintain your machine's safety and performance. It summarises the main interventions to be made and the frequency applicable to each of them. Carry out the relevant intervention according to the first deadline.
- The use of non-genuine and/or incorrectly assembled spare parts and attachments could adversely affect machine operation and safety. The manufacturer shall decline all liability in the event of injuries or damages caused by such parts.
- Genuine spare parts are supplied by authorised assistance workshops and dealers.
IMPORTANT Any maintenance and adjustment operations not described in this manual must be carried out by your dealer. Authorised Service Centre.
7.2 BATTERY
7.2.1 Battery power reserve
Battery autonomy is mainly influenced by:
a. environmental factors, that cause higher energy requirements:
- cutting trees and branches that are too thick.
b. operator behaviour that should be avoided:
-
switching the machine on and off frequently whilst working;
-
adopting a cutting technique that is unsuitable for the work to be performed (par. 6.5).
To optimise battery power reserve it is always recommended to:
- cut wood when dry;
- use the most appropriate technique for the work to be performed.
If the need arises to use the machine for sessions which exceed the capability of a standard battery, it is possible to:
- purchase a second standard battery to immediately replace the discharged battery, without compromising the continuity of operations.
7.2.2 Battery removal and recharging
- Press the lock push-button placed in the battery (Fig. 26.A) and remove the battery (Fig. 26.K).
- Fit the battery in the battery charger housing and connect the battery charger to a mains power socket with voltage matching the one indicated on the rating plate (Fig. 27).
- Fully charge the battery according to the instructions in the battery/battery charger booklet.
NOTE The battery is equipped with that inhibits recharging if the environmental temperature is not between 4 40^
NOTE The battery can be recharged time, even partially, with no risk of damaging it.
7.2.3 Refitting the battery on the machine
When recharging is completed:
-
Remove the battery from the housing in the battery charger (do not keep charging when recharging is completed) and disconnect the battery charger from the electrical outlet (Fig. 29).
-
Insert the battery into its housing on the machine (Fig. 13.K).
- Push down the battery all the way until you hear a "click" that locks it in place and guarantees the electrical contact.
7.3 TOPPING UP THE CHAIN OIL TANK
NOTE The following symbol is found near the chain oil tank cap (fig. 29.A):
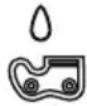
Chain oil tank
IMPORTANT Only use chainsaw oil or adhesive oil for chainsaws. Do not use oil containing impurities so as not to block the oil filter and to prevent irreparable damage to the oil pump.
It is essential that you use good quality oil to lubricate the cutting parts effectively. Used or poor quality oil does not guarantee good lubrication and reduces the working life of the chain and bar.
IMPORTANT Never run the chain without sufficient oil, this could damage the saw and compromise safety.
Check the amount of oil in the chainsaw by checking the oil level indicator (Fig. 29.B).
If the oil level is low, top up as follows:
- Unscrew and remove the cap (Fig. 29.A) from the oil tank.
- Pour oil in the tank and monitor the level on the indicator (Fig. 29.B).
- Make sure no impurities penetrate the oil tank when filling.
- Screw on the oil cap and tighten it.
7.4 CLEANING
a guard
7.4.1 Cleaning the machine and the motor
After every work session, clean the machine thoroughly to remove all dust and debris.
- To reduce fire hazards, keep the machine and, in particular, the motor free of leaves, branches or excessive grease.
Always clean the machine after use with a damp cloth dipped in neutral detergent. - Remove all traces of humidity using a soft damp cloth. Humidity can generate risks of electric shocks.
- Do not use aggressive detergents or solvents to clean the plastic parts or hand grips.
-
Do not spray water onto the motor and electrical components and prevent them from getting wet.
-
To avoid overheating and damage to the motor or the battery, always keep the cooling air vents clean and free of debris.
7.4.2 Cleaning the chain
Remove any traces of sawdust or oil deposits from the chain every time it is used.
If there is excessive dirt or resin build-up, disassemble the chain and place it in a container with a specific cleanser for a few hours. Then rinse it with clean water and treat it with a suitable anticorrosive spray, before reassembling on the machine.
7.5 CHAIN CATCHER
Check the chain stop pin conditions before each use (Fig. 1.G) and repair in the event of damages.
7.6 MACHINE AND BAR LUBRICATION HOLES
Before daily use, remove the guard (par. 4.2), disassemble the bar and check that machine lubrication holes (Fig. 30.A) and guide bar (Fig. 30.B) are not clogged.
7.7 NUTS AND BOLTS
- Keep all nuts, bolts and screws tight to be sure the equipment is in safe working condition.
- Check regularly that the handles are fixed firmly.
8. OCCASIONAL MAINTENANCE
8.1 CHAIN DRIVE SPROCKET
Regularly check the condition of the sprocket with your local dealer and replace it when wear exceeds the accepted limits.
Do not mount a new chain with a worn sprocket or vice-versa.
8.2 MAINTENANCE OF THE TOOTHED CHAIN
To ensure that the chainsaw works safely and efficiently, it is essential that the cutting means are well-sharpened.
Always wear heavy duty gloves when handling the bar and chain.
Chain sharpening is necessary when:
- The sawdust looks like dust.
- Cutting becomes more difficult.
- The cut is not straight.
Vibrations increase.
Kickback may occur if the chain is not sufficiently sharpened
IMPORTANT It is recommended to have an Authorised centre sharpen the chain using the right tools to ensure minimum removal of material and even sharpness on all the cutting edges.
8.2.1 Replacing the toothed chain
Replace the chain whenever:
- the length of the cutting edges reduces to 5 mm or less;
- there is too much play between the links and the rivets.
- the cutting speed is too slow and the repeated sharpening does not improve the cutting speed. The chain is worn.
IMPORTANT After replacing the chain, its tension level must be checked more frequently due to settling of the chain.
8.3 GUIDE BAR MAINTENANCE
NOTE Any work on the guide bar requires specific experience and special tools in order to achieve top workmanship standards; for safety purposes, we recommend you contact your dealer to ensure work is done correctly.
To avoid asymmetrical wear on the bar, make sure it is turned over periodically.
To keep the bar in perfect working order, proceed as follows:
- grease the bearings on the nose sprocket (if present) with the syringe (not included).
- clean the bar groove with the scraper (not included) (Fig. 31.A);
- clean the lubrication holes (Fig. 31.B);
- with a flat file, remove burr from the edges and level off the guides.
8.3.1 Replacing the bar
Replace the bar whenever:
- the groove is not as deep as the height of the drive links (which must never touch the bottom);
- the inside of the guide is worn enough to make the chain lean to one side.
9. STORING
9.1 STORING THE MACHINE
When the machine is to be stored away:
- Remove the battery from its housing and recharge it;
- Mount the bar cover.
- Wait until the motor is sufficiently cold;
- Clean (par. 7.4).
- Check there are no loose or damaged components. If necessary, replace the damaged components and tighten any screws and loose bolts or contact the authorised service centre.
- Store the machine:
-in a dry place
- protected from inclement weather
- in a place where children cannot get to it
- making sure that keys or tools used for maintenance are removed.
- at an ambient temperature between -20 to 85^ C
9.2 STORING THE BATTERY
The battery must be stored indoors and free from humidity, to a temperature between:
0^ - 60^ for 1 month
- 0^ - 45^ for 3 months
- 0^ C-25^ C for 1 year
NOTE If unused for any length of recharge the battery every two months to prolong its working life.
10. HANDLING AND TRANSPORTATION
Whenever the machine is to be handled, raised, transported or tilted you must:
- Stop the machine;
- Wait until the chain is stationary;
- Remove the battery from its housing and recharge it;
- Mount the bar cover;
- Wait until the motor is sufficiently cold;
- Wear heavy work gloves;
- Only hold the machine using the hand grips and position the bar in the opposite direction to that used during operation;
When transporting the machine on a vehicle, always:
fasten the machine securely with cables or chains;
- position it so that it does not cause a hazard to anyone
11. ASSISTANCE AND REPAIRS
This manual provides all the necessary information to run the machine and for correct basic maintenance operations which can be performed by the user. Any regulations and maintenance operations not described herein must be carried out by your Dealer or Authorised Service Centre, which have the necessary knowledge and equipment to ensure that the work is carried out correctly, maintaining the correct degree of safety and the original operating conditions of the machine.
Any operations performed in unauthorised centres or by unqualified persons will totally invalidate the Warranty and all obligations and responsibilities of the Manufacturer.
- Only authorised service centres can carry out guaranteed repairs and maintenance.
- The authorised service centres only use genuine spare parts. Genuine spare parts and accessories have been designed specifically for machines.
- Non-genuine spare parts and accessories are not approved. Use of non-genuine spare parts and accessories cause the warranty to be invalidated.
- It is advisable to send your machine once a year to an authorised service centre for servicing, assistance and safety device inspection.
time,
12. WARRANTY COVERAGE
The warranty covers all material and manufacturing defects. The user must follow all the instructions provided in the accompanying documentation.
The warranty does not cover damages caused by:
- Failure to become familiar with the documentation accompanying the machine.
- Carelessness.
- Incorrect or prohibited use or assembly.
- Use of non-genuine spare parts.
- Use of accessories not supplied or approved by the manufacturer.
The warranty does not cover:
- Normal wear and tear of consumables, such as cutting means, safety bolts.
Normal wear and tear.
The purchaser is protected by his or her own national legislation. The purchaser's rights under the national laws or his or her own country are not in any way restricted by this warranty.
13. MAINTENANCE TABLE
| Intervention Frequency Paragraph | |||
| First time | And then after every | ||
| MACHINE | |||
| Check all fasteners | - Before each use 7.7 | ||
| Safety checks/check controls | - Before each use 6.2 | ||
| Check the chain catcher | - Before each use 7.5 | ||
| General cleaning and inspection | - After each use 7.4 | ||
| Cleaning the chain | - After each use 7.4.2 | ||
| Check the machine and bar lubrication holes | - Before each use 7.6 | ||
| Check the chain drive sprocket | - Once a month 8.1* | ||
| Chain maintenance | -- 8.2* | ||
| Bar maintenance | -- | 8.3 | |
| Topping up the chain oil level | - | Before each use | 7.3 |
- Interventions which must be carried out by your dealer or an authorised service centre
14. TROUBLESHOOTING
| PROBLEM | PROBABLE CAUSE | SOLUTION |
| 1. Activating the throttle trigger lever and the throttle lock button, the machine does not start | Battery is not inserted or is inserted incorrectly | Make sure that the battery is inserted correctly (par. 7.2.3) |
| Low battery | Check the battery status and recharge if necessary (par. 7.2.2). | |
| Machine damaged | Do not use the machine Remove the battery and Contact a Service Centre | |
| 2. The motor shuts down whilst working | Battery is not inserted correctly | Make sure that the battery is inserted correctly (par. 7.2.3) |
| Low battery | Check the battery status and recharge if necessary (par. 7.2.2). | |
| Machine damaged | Do not use the machine Remove the battery and Contact a Service Centre. | |
| A motor protection trips | wait 15min for the machine to cool down and then restart it | |
| 3. With the throttle lock button and throttle trigger lever on, the chain does not turn | Excessive chain tensioning Retension | sion the chain (par. 6.1.3). |
| Bar and chain problems Check that | at the chain runs freely and the bar guides are not deformed (par. 8.2, 8.3). | |
| Machine damaged. Do not use the machine. Immediately turn off the machine, remove the battery and Contact an Authorised Service Centre. | ||
| 4. The chain heats and emits smoke on the end part of the bar. | Excessive chain tensioning Retension | sion the chain (par. 6.1.3). |
| Lubricant oil tank empty. Fill the lubricant oil tank (par. 7.3). | ||
| 5. The motor runs irregularly and lacks power when revved | Bar and chain problems Check that | at the chain runs freely and the bar guides are not deformed. |
| 6. No oil is released | Poor quality oil When the motor is cold, empty the tank, clean it and the pipes with liquid detergent and change the oil. | |
| Lubrication holes are clogged Cleanthe lubrication holes (chapter 7.6) | ||
| 7. The machine has struck a foreign body. | Damaged or loose parts. Stop the machine (chap. 6.6). Inspect for damage. Check for and tighten any loose parts. Have all checks, repair work and replacements carried out by an Authorised Centre only. | |
| 8. Excessive noise and/or vibration is experienced whilst working | Loose or damaged parts Turn off the machine, remove the battery and: – inspect for damage; – check for and tighten any loose parts; – have any damaged parts replaced or repaired with parts having equivalent specifications. | |
| 9. The machine gives off smoke whilst working | Machine damaged Do not use the machine. Immediately turn off the machine, remove the battery and Contact an Authorised Service Centre. | |
| 10. Battery power reserve is low | Severe working conditions requiring greater current absorption | Optimise operations (par. 7.2.1) |
| Battery is insufficient for operating requirements | Use a second battery or extended battery (par. 7.2.1) | |
| Decrease in battery capacity | Purchase a new battery | |
| 11. The battery charger is not recharging the battery | Battery is not correctly inserted in the battery charger | Check it is correctly inserted (par. 7.2.2) |
| Unsuitable environmental conditions | Recharge the battery in places with suitable temperatures (see battery/battery charger instruction manual) | |
| Dirty contacts Clean the contacts | ||
| The battery charger is not energised | Check it is plugged in and the power socket is energised | |
| Faulty battery charger Replace with an original spare part | ||
| If the problem persists, refer to the battery/battery charger manual | ||
If problems persist after having performed the above operations, contact your dealer.
15. ATTACHMENTS ON REQUEST
15.1 BATTERY
Different capacity batteries are available to suit specific operating requirements (Fig. 32). The list of approved batteries for this machine is found in the "Technical Data" table.
15.2 BATTERY CHARGER
Device used to recharge the battery (Fig. 33).
15.3 BARS AND CHAINS
The "Correct bar and chain combination table" contains a list of all possible combinations between bar and chain. The same table also provides the specification data for all chains and bars approved for use on each machine.
Only use the replacement bars and chains listed in the table. The use of unapproved combinations may be hazardous and cause serious injuries to operators and damage the machine.
In consideration that the selection, application and use of the bar and chain are actions made solely by the user, at his own discretion, the latter assumes responsibility for damages of any kind arising from such actions. When in doubt or if lacking knowledge of the specifics of each bar or chain, contact your dealer or an authorised garden centre.
INDICE
- INFORMACION GENERAL 1
- NORMAS DE SEGURIDAD 2
- CONOCER LA MAQUINA 6
1.1 KUIDAS KASUTUSJUHENDIT LUGEDA
10. MANUTENTION ET TRANSPORT
3.1 OINCHAMMAHHTA IN PPEBNEHA YNOTPEBA
MaunHaTa Ce CoCTOn OJ MOTOp WTo Ce HanojyBa Ha 6aTepeNJa I NoCT 3a HabeDyBaHe KoJWoTO CnyKn Da rO npEnecyBa DnHexeHbETo HA MOTOp Bp3 CnHPsiPOT CO 3aI\Pu PaBnHIO N TOUHO CeYeHe.
OnepaTopoJ ja npK MaunHaTa CO DBeTe paue 3a npedHaTn 3aHata paKa N MoKe Da rN aHTNBpa rLaBHnTe KOMaHn ODPKyBajKn CeKOraW 6e36eHOpacToJaHne OD ypeDcO ceYHBOT.
3.1.1 Праздундаууnotpe6a
Obaa maunHa e npoeKtupaHa n KOHcTpynpaHa 3a:
-cehebe npacnctybahe Ha 3eHnIto Ha BnCOKHe dpBja;
-ceheIe rpmuHn, TpynU ININ dpBeHN rpeN nnjwTo dJamaTeap 3aBNCn Od,doJHKHaTa Ha loCTOT 3a HabeDyBaHe;
- Camo 3a ceuehe Ha npBO;
- Camo eén onepaTop MOKe Ja ja KOpncTn.
3.1.2 HecooDbetHa ynoTpe6a
Koja n da e npyra ynoTpe6a,nonHaKaBa od ropeHabeDeHnte, MoHe Da npetCTaByBa ONaCHOCT n da npedn3Bnka noBpeN i WTeN 3a Nla u/nn npedmetn. Ce otpnaat npn HnpabuHa ynoTpe6a (kano npimep, Ho He ce orpaHcyBa Ha cJeHOTO):
-peryanaunjaHaJnBaOrhoda;
-06nKyBaHbe;
-ceKaHBe rpaHKn, caHaauN IdpBeHN am6aJAAHn Od CeKaHOB BnD;
-cehebe MebeI nn ITO 6nIO npyTO 1TO COpKn KInHcN, WpaOBN cekoj dpYBn Ha MeTaJIH N KOMNoHEHTN;
-Mecapcn pa60n;
- ynoTpe6a Ha MaunHata 3a ceYeBe MaTepnjaJIH KOIHTO He ce Od npBO (PnaCTnKa, rpaedKeH MaTepnjA);
-ynoTpe6aHa MaunHaTa KaKo paKa 3a IOnnHyBaHBe, CnyTaHbe NkPWeHBe npEdMeTn; - ynoTpe6a Ha MaunHaTa Kora e 6IoknupaHa Bp3 ΦKcH a Notnopa;
- ynoTpe6a Ha ypei co ceYBa wTo He ce HabeDeHn BO TabelaT a,TexHnUKN noTaTOuN. OnacHocT od cepNo3Hn NobpeDi N oWTeTyBaHa; -ynoTpe6a Ha MaunHaT aO, cTpaHa Ha NoBeKe lyfe.
BAHHO HeoDbetHaTa ynoTpe6a Ha MaunHaTa DOBeyBa Do OTpnaHe Ha rapaHnja Ta ja OTpLa cekoJa ODROBOPHOCT Ha npou3BOJNTeIOT, npePnyBajKn Hn Ha KopncnKOT npou3Je3EHnTe OBPCKn Ppeu3BnKaHN Od Nobpeu nn OHTeYBaHaTa InuHo Nn Ha TpeTuNla.
3.1.3 BnHa KOpncnK
Obaa MaunHa e HameHeta 3a KopnCTeHe cAmo Oc TpaHa Ha oByeHn OepaTopn 3a OdpKyBaHe Ha dpBja.
3.2 BE3BEdHOCHA CnHAlIN3AUINJA
Ha Maunha Tma CmboJn (c.. 2). HnBnata 3aadae da ro notceTybaat onepaTOpOT Ha noCTanKHe TTO Tpe6a da rH cJeN BnMaTeJIHO n CO 3aDoJIKNTeJIH MepKn 3a npetna3JIBOCT.
3NaueHe Ha cIM6OJIHTe:

BHMaHne!IpoHTajTe ro yNaTCTBOTO nped da ja KaKOpNCTNTe MaUNHaTa.

Onachoct! Obaa MaunHa MoKe Da 6nnde onacha 3a Bac nnn 3a npynte DOKOLky He ce KopncTn npabnHO.

BHMaHHe! KopnCTeTe3aHTHa 3a yuN, 3aHTTHN OvNla N 3aHTNTHa Kaunra.


BHHMaHHe! HocTe paKaBnI n 3aHTTNu YEBnI

Onachoct! He n3noJyBajTe ja Ha DOJKnBn Bnara.
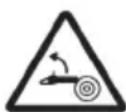
Onachoct oKoHTpaydap!
KoHTpaydapOT npeIN3BnkyBa HeHaJeJHO DnIXKeHBe 6e3 KOHTpOla Bp3 MOTOpHaTApNlA KOH ONePaTOpOT. Cekoraaw paOteTe 6e36eNo. KopIcTeTe CnHupco 6e36eHocHi 3aunuTo ro nonpeyuBaat KOHTpaydapOT.

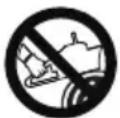
BHHMaHHe! He dpxKeTe ja HnKorau MaunHaTc mo co eHa paka! DpxTe ja cBpCTo MaunHaTc co Dbete paue 3a da imate KOHTpoJa BP3 Hea n Da ro HaMaJIte pN3IKOT OJ KOHTpaydap.


BHMaHne! 3a 6aTepnjaTn IIOHaHT 3a 6aTePN, IORJIeHNHeTe rO pIINIOKeHNOT npnpauHnK
BAHHO DaehnTe eHTKETU TO CE cKNHaJIe
He ce yuTnBv, Tpe6a da ce 3ameHaT. NobapajTe HOBN
eTNKeTn Od COOBeTeH UENTap HJN O
cepbncep.
3.3 TJIABHNI DEJIOBN
MaunHaTa ce cocToN oD, CneHnTe rnaBn deLoBn, KOuTc Ce HameHeTn 3a CneHn FyHKuIN (Cn.1):
A. Motop: 06e36eDyBa DnHKeHe Ha ypeDoT CO CEYHBOTO.
B. Празда рачka: рачka 3a NOTпора NOCTаberha BO npedHnot DeI Ha MOTOPHaTЯ пILA. Ce дрн co leBaTa paka.
C. 3aHa paKa: paKa 3a NOTnopa NOCTaBeHa BO 3aHnO T DeI Ha MOtOpHaT a Nla. Ce dpxN co DeChaTa pKa. TyKa ce HAOraT rIaNHTe KOMaHN 3a 3a6p3yBaHe.
D. Ппебна заштanta 3а paнота: урета 3а заштanta постaven Meу ппдны рачka и синширOT co 3anu 3a ja 3aштNTn paKATA od noBpeDi BO clyujaj da ce ly3ne od paHkata. Obaa 3aштNTa ce KOPNCTN И нако урета 3a aKTHBnpaBe Ha coINpauKaTа 3a синширOT.
E. IocT 3a HabeYBaHe: Ha Hero ce HaoTa n ro ynpaByBa CnHpnpOT co 3anu.
F.CnHnp co 3anu: eJeMeHT npedBnDeH 3a ceyehe KoJTo CE COCTOn OD npeHOChNK Co MaIN CeYBa HapeeyN ,3anu" N CTPaHnHN NOBp3yBaHaCo YNBn.
G. HInn 3a coNnpaBe Ha CnHIpOTo: 6e36eHocen ypei KoJwTo CnPeyBa HeKoHTpOJInpaHn DnHexHa CnHIpOTo Co 3aIu Bo ClyujA Ha deΦeKT nIpa3la6aByBaHe.
H. Xapnyh: ypeI NOCTaBeH HAppeI, Ha MeCTOTO 3a MOHTnPaHe Ha IocTOT 3a HaBeDyBaHe KOJUTo ClyHn KaKo NtNopa KOra e 3aKaueH 3a DpBO Nn Tpyneu.
I. IpnTeH 3a 6p3o 3aterHyBaHe Ha CnHUnpoT: (ako e npedBnDeno).
J. 3aHTa 3a loCTOT: ype3a nOKpNBaHe Ha nnIata co cHnnp KoJTo ce CTaba Bp3 loCTOT 3a HabeDyBaHe KOJTo CE KOpNCTn Pn HOceHe, TpaHCnOPT N IpemecTyBaHe Ha MaunHaTa.
K. BaTepnja (OkoNHy He e DocTaBeHa CO MaunHaTAt, nIeHete ro nac. 15.1 "DOnoHnTeHa onpeMa Ha bapahe): ypeK KOJwTo OBO3MOyBa eKeTpnuHO HanojYBaHe 3a MaunHaTAt; HeJ3HNrte OdInKn HycIOBHTe 3a yNoTpe6a ce OnuHaN BO 3ace6Ho ynatCTBO.
L. Полнаа 3a 6atepnja (dOKnHy He e docTabeH co MaunHaTa, norehTe ro nac. 15.2 "DOnONHTeHa onpMa Ha 6apaBe): ypei wTo ce HNN KOpNCTn 3a noIHeBe Ha 6atepnjata.
M. 3aunrta 3a npctnte: ypei npotnb noBpaTeH TcHnDap
N. Mecto 3a 6aTepnjata: MeCTO Ha Koe 6aTepnjata CE BMETHyBa BO MaUNHaTa.
O. HabpTha nnn konue 3a 3aterhyBahe
3.4 ETHKETA 3A INDEHTNPHKALNJA
ETnKeTa 3a ndeHTnФkaunja rN coDpHn CneHNTe npaTou (cI.:2):
- HnBO Ha aKcTnHa MOHOCr
- O3HaKa 3a yCorIaceHoCT
- Meceu/roDHa Ha npOn3BOdCTBO
- TnHaMaunHata
- HanoH ha HanojyBaHe
- Cepinckn 6poj
- Ime n aDpeca Ha npOn3BODnTeIOT
- HoJ ha npOn3BOd
9.ДолжинHa NaOCTOT 3a HabeDyBaHc - Onnc Ha npoN3BODoT
3aHWeTe rnoIpoaToUte 3a HDeHTnΦnKaunja 3a MaunHaTa Ha COoDBeTHnTe MeCTa Ha daJeHaTa etHKeTa OD BHaTpeShHaTa CTpaHa Ha KaNaKOT.
BAHHO Kopnctete rna daennte noaTOu 3a ndeHTnphiKauncaeKoJnat Kora KOHTaKTnpate CO OBlaCTeh ceHTap.
4. MOHTNPAHbE
Bé36eHocnTe Ope6n wTo Tpe6a da rN cIeHNTe ce daeHN BO norlaBe 2. Ctporo npdpnyBaJte ce do Tne ynatCTBa 3a da n36erHete cepno3HN pN3nU nNOn aNaCHOCTN.
3a noTpe6nTe Ha cHlaIpaHBe H TpaHCnOpT, OndeHN KOMNoHEHTHa MaunHaTa BepoJatHO He Ce MOHTnpaHb BO a6pKaTa, TyKy Tpe6a Da ce MOHTnpaAT No BaHe Ha a6baJaKaTa CLeJejKn rN CLeHNr YeNaTCTBa.
PacnayBaIeTo n ceIata MoTHa Tpe6a da ce n3BpWat Ha cBpCTa H pamHa NobpHnHa co DOBOHNO pOcTOp 3a NOMecTyBaHe Ha MaunHATA H aAm6aJAHATA KopncTeJn CekOraw COoDBETNu anATu. He KopncTeJe maunHata nped Da 3aBpuNTe Co cHTe NOcTAnHn HabedeHN BO norlaBJeTo,MOHTPAHbE".
4.1 DJIIOBN 3A MOHTNPAHBe
Bo ambaJkaTa mMa n DeJIOBn 3a MOHTnpaHe HabeDeHn Ha cIeHaTa Ta6ela:
O3BOJyBa aKTHINBpuHa He Ha CnHIpOT.
PaKaTacoKOMaHdata3a3a6p3yBaHeMoHe da ce aKTbBnpa(Cn.12.A)camoOTkHoKece npNTnche KOJIeTo 3a6loKnpaBeHa3a6p3yBaO(TcN.12.B).
YpeoT CO CEuBOTO 3aCTaHyBa aBTOMaTcKn Co nyTaHe Ha paKaTa 3a 3a6p3yBaHe.
KORA cTe6I0To eNoLoXeHO cAmO Ha eHNOT KpaJ:
- Tpe6a da ce cye 1/3 BO dujameTap Ha cTpaHaTa uTo e haora doLy (3aHNo ceKhaBe) (Cn. 23.A);
- nocneIOBATEJIHO Tpe6a ce n3BpHn FHHaHHTO ceyehe, 3anoyHybajKn co ceyKaHe oDrope 3a da ce dojde co npBOTo ceehe (Cn.23.B).
CTe6IIO NOJOHcHo Ha DBaTa Kpaja
Kora cTe6Ito e nIoJKeHo Ha DaBaTa Kpaja:
- Tpe6a da ce ceue 1/3 BO dujameTap Ha cTpaHaTa uTo e haora rope (ropho cekahe) (Cn. 24.A);
- nocJeIOBATEJIHO Tpe6a ce H3BpHn FHHaHHTO ceyeHe, 3aOpHyBajKn co CeYKaHbe Oo3doJa 3a 2/3 noDoy 3a da ce dojde co npBOTo ceyeHe (CJ.24.B).
CTe6No Ha 3aHocen Tepeh
Hora ce cye cte6no Ha 3akocen Tepeh, Tpe6a da ce cton oDrope (Cn.25).
Bo TEKOT Ha pa6oTaT, Kora ceYeHbETo e 3aBpWeHo, 3a Da ce ODPKn KOHTPOnaT, PnITnCOKOT Ha ceYeHbETo Tpe6a Da CE HAMn 6e3 Da CE OCIObOu n PnITnCOKOT Bp3 paKInTe Ha MaunHaT. Tpe6a Da CE CNpeu MauHHaT Da DoJDe BO KOHTaKT CO NOVBata.
6.6 3ACTAHYBAHbE
3a da ja nckIyUHTe MaunHaTa:
- Пуштete Г рачkaраза Команда На ЗабрзвачOT (Сл. 12.A).
Hora ke ja nywntte paohata 3a HOMaHaTa Ha 3a6p3yBaoy, Ke NOMHaT HeOHnHy cEHyn nped da 3actane CNHPOT CO 3anHTe.
3actahejeaceKormaMaHHata:
-прмMeHyBaHé Na loKaunjaTa Ha pa6Ota.
I npn npemecTyBaHbe, HNKORAw He dpHeTe ro npctot Bp3 6e36eHocHOTo KOnye 3a da n36erHete cnyajHo naJeBe.
6.7 IPO PABOTATA
1.ПиTNCHETe ro konyeTo 3a 6IoHpaHe nocTaBeHO BO 6aTePnJaTHa MaunHaTata (Cn.26.A), n3BaTeJe ja 6aTePnJaTAtO nd leHHuTeTo (Cn.26.K) n cTaBeTe ja da ce noHn (nac.7.2.2);
2. noctabeTe ja 3awtntata Ha loctot (Cn. 1.J);
3. OCTaBeTe MOTopoT Da ce n3laI nped Da ce OCTaBn MaunHaTa BO KoJa 6nlo IpocToPnja;
4. pa3la6aBeTe ja HABpTHaTa 3a ΦHKcnpaHbe Ha loCTOT 3a da Ce HAMaJI 3aTeHrHaTOcTa Ha JIaHeUOT (nacyc 6.1.3);
5.y6aBO nCnCTeTe ja MaunHaTa OJ npaunHa N HeuCTOTTN N OTCTpaHete Tn CNTe OCTaTOUO
ceyeheTo H TaIO3HTe Od MacIto Od CnHIpOT (nacyc 7.4);
- npOBepTe daJIIN DeIOBHTe ce pa3JIa6aBeHn IIN OwTeTEn. Ako e nOTpe6Ho, 3aMeHeTe rN OWTeHENTE DeIOBn H 3aTeHHeTe rN pa3JIa6aBeHnTe UpaΦOBN Hn HabPTKn.
BAHHO Cekoraa BaTe ja 6atepnjata
7.2.2)истаыт eя заштита та 3a ceчвOTO cehojnat Kora ja OCTabate MaunHaTa 6e3 NaДзОр ИИ НEMA da paбOTHTe.
7. PEOBHO ODPKHYBAHbE
7.1 ONWTO
Be36eHocnTe Ope6n wTo Tpe6a da nn CneIte ce daene Hb nornaBe 2. Ctporo npdpHyBajTe ce do Tne yNaTcTa 3a da n36erHeTe cepno3HN pN3nHnn OnaCHOCTn.
Ipea H3BpWHTe KaHb 6nlo KOHTpOJa, HCnCTe Hnn HnTepBeHnpajTe kaj OdpHyBaHeTo/ peryanaJata Ha MaHHata:
3anpete ja Maunnata n NcNnyte ro MotopoT;
- Noyekajte da 3actane cHHmuPOT;
- N3BaTe je 6atepujata od leHHwTeTo;
- Ctabete ja 3awntata 3a loctot dypn n npn HHTepBenejha cAmnot loct nn Ha cHmuPOT;
- PpOBepete daH N MOTOPe cOoBcTeHO n3naJeH;
- Ipoountajte rH COoBETHnTe yNaTCTBa;
Hocete cooBetheHa oIeHa, pa60THn YEBIN 3aHTTHOuHa.
3aueCTeHocTa H BnCOT Ha HHTepBHeuJa ce DaJeHN BO, TaBeJaTa 3a ODPKHyBaHe". TaBeJaTa ro npKaJyBa ONcEROT uTo Ke BN NOMOrHe npN ODPKHyBaHe Ha ePknacHocTa N 6e36eHocTa Ha MaunHaTb. Bo Hea ce npKaKaHn rIabHnTe HHTepBHeuHH npeBndeHnTe HHTepBaHn 3a CekoJa OD CTaBKnTe. IVBpWeTe ja cooDbetHaT a NoctanKa npEi npBaTa nojaba.
- YnOtpe6aTa Ha pe3epBHN DeIOBn I DoONHInTeHa ONpema KOnITo He ce OpINHaJIHn N/IIHn He ce npabNHO NoCTaBeHn, MoHe Da DOBede Do HecakAHn eΦeHTn Bp3 pa6oTaTn 6e36eHocTa Ha MaunHaTa. POn3BOJNTelOT ja OTpPa caTa ODROBOPHOCT Bo Cnyaj Ha WTeHn, INHCINDeHTN NII NOBpeDn PpeIN3BnKaHn Od TaKBN POn3BOJN.
OpnHnHaJIHnTe pe3epBHN deIOBN ce Ha6aByBaAT BO cepBnCHnTe ueHTpn Nn Kaj aBTOpn3npaHnTe 3actaHnU.
BAHHO Cnte pa60Tu 3a oPjyBaIbe n peryaJia KOHTO He ce OnHaHbN BO Oba yNaTcTBo Tpe6a da Ce N3BpTaKaj 3actaHKnOT NNBO OBlaCTeCepBnC.
7.2 AHMYJIATOP
7.2.1 ABTOHOMnja Ha 6aTepnjata
ABTOHOMnjaTaHa6aTepuJaTaTnlaBHOeycloBeHaCo:
a. aHTOpnte Ha cpeHnHa Ta ha pa6oTa KOnuTo npeIN3BnKyBaat HajroIema NotpoWbAka Ha 6aTepnjata:
- ceYeHe Ha rPmUkN qHrpanKc Ce MHOry roJeMn.
b. OndecyBaHBeTo Ha onepaTopoT KoJ Tpe6a Da H36erHyBa:
- YecTo NaIeHBe I racheHe Bo TeKoT Ha pa6oTaTata;
- ynoTpe6a Ha HecooDbetHa Texnka 3a Ceuehe Bo Ondoc Ha paobota Ta wTo Tpe6a Da ce 3abpwn (nacyc 6.5).
3a da ce 3rolemn aBTOHOMnjaTa Ha 6aTepnjata, ceKoraw Tpe6a:
- ceyeTe ja rpmuKaTa Kora e cyBa;
- Kopnctete ja hajcooDBetHaTa TexHnka 3a pa6ota.
Bo clyuj kora cakate da ja kopncntte MaunHata 3a MHory doJra pa6ota n KopnCTnte cTaHapdHa 6aTepejna, moKe:
-Да hababinte Btopa CTandaPHa 6atepnja 3a da ja 3ameHnTe BeDnA nToPoWeHaTa 6atepnja 6e3 Da Tpe6a Da ja npeknHyBaTe paBoTaTata;
7.2.2 NcIyBaHe n noJIHe He Ha 6aTepnjata
- Пи捜сichte ro konчeto 3a 6loKnpaHbe BO 6atepnjata (Cn. 26.A) n n3BaTe je ja 6atepnjata (Cn. 26.K);
- Поврете Го полначота 6асторьа BO ИЗВОп ha eл. eнергija co coODbeteh habон Кадо OHOJ wTO e nocouhen ha etNKetata (Cл. 27).
- Cekoraш понеше дokraj сдеджгуразТВаТа Даден BO упатбOTO 3a 6atepnjata/нларOT 3a 6atepnjata.
3A6EJIeHHA BaTepnjata ce DoCTaByBa co 3aHTIa ITO ro npeknHyBa nOJHeBETO aKO Tempepatypata BO cpeDnHaTa He e nomery 4 n 40^
3A6EJIeHKA BaTePnJaTa MoKe Da ce NOLHBO CeHOJ MOMENT, Dypn H DeLymHo 6e3 Pn3HK OwTeTyBaHe.
7.2.3 NOBTOPO NoCTaByBaHe Ha 6atepnjata BO MaunHata
Kora noJIHeIeTo e 3aBpuJeHo:
- ɪəbaɪdete ja 6aTepeŋjata oɪ nɒlHaʊt 3a 6aTeepnɪ (ɪsəbɪrHyBajte ᵠ Ja ἀρχιnte HɑnɒlHeta Dɔlɪr O Bpeme ILOIHeHbETo) NɪckIyUeTe ITO nɒlHaʊt O d eɪeKtpuHata mpeɪka (Cɪ. 28);
-
BmTeHe ja 6aTeepnjaT a Bo IeKnIeTeTo Ha MaunHata (CJ.13.K);
-
npntnckajn ja 6aTepnjata doKpaj cdoeka He cnyuHete 3Byk Ha KInKHyBaHe wTo ja 6loKnpa Ha MeCTO n 06e36eDyBa eIeHTPNueH KOHTAHT.
7.3 IOJIHEHe HA PE3EPBOAPOT CO MACJIO 3A CnHUPOT
3A6EJIeUHa
Bo 6n3Ha Ha Kaanayeto
3a pe3epBoapOT CO MacIIOTo 3a CnHUnpOT (CJI.29.A) ro nMa CneHnOT Cm60JI:
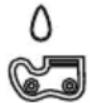
Pe3epBoap 3a MacNo 3a CnHIpO
OTCTpaHete rncnte TpaHn Ha BlaRa co MeKa n cyBa Kpna. Blaara octaba npocTOp 3a pn3NK od eIeKTPuHEn ydap.
He KopncTeTe a6pa3nBHN DeTepeHTN npactbOpyBaHn Da rN NcHCTNTe PnaCTNUHNTe JeIOBn IIN paKHTe.
He noIeBajTe Boga n H36erHyBajTe MOKpeHBe Ha MOTOPOTnHa eJIeKTPuHHTe DeIOBn.
3a da n36erHeTe nperepeBaHe nIn OuTeTyBaHe Ha MOTOPOT H a 6aTeepjata, cekoraI npOBepyBajte daH peWetkata 3a BO3dYx 3a JaedeHe e YnCTa H 6e3 octatoU.
7.4.2 Ynctehe Ha cHnnpOT
BAHHO KopnteTe NCHnyuHBO MacNo HameHeTo
3a MOTOPHIN INIIN INI IN MacNo CO aINTNB 3a MOTOPHIN INIIN. He KOpNCTeTe MacIO wTO cOpJHK HeNCTOTNI
3a Da He ro 3anyuHTe fHNTepOT Bo pe3e TpaJHO da ja OWTeHTe Nymnata 3a MacNo.
KopncTeHe MaCNo Od BpBeH KBaJIHTe E BaKeH npedycIOB 3a OdpKyBaHe eHnHa cHnOdMaUHaHOCT Ha CnTe DeIOBn 3a CeueHe; KopncTeHe MaCNo CO loW KBAJIHTe rO CnpeyBa NODMaUKyBaHbETo n rO HamaIyBa BpeMeTpaeheTo Ha CNHnIpOT n HA loCTOT.
No cekoja ynoTpe6a,OTCTpaHHe Tn Od CInHIpO TcTe TpaRn Od CeHeBeTo Hn TaI03N Od MacNo.
Bo cnyaj ha rolemn HeuHCTOTn nn 3aMaCTeHOCT, n3BaTe ro CnHypot n octabeTe ro da NOcTOn BO caD co Ondepen DeTePrenr Hekolky YacOBn.
Itoa, nCnepeTe ro BO uNCTa BODa H nCnpckajTe ro CO cooDBeTeH cnpej npOTnB Kopo3nJa nped Da ro NOCTaBnTe Ha MaunHaTa.
7.5 HONU 3A BLOKHPAHE HA CHHUPOT
BAHHO HnKoraaH He BnIyBajTe ro cnHnpOT
6e3 DOBOJHO MacNo 3aUTo TaKa MoKe Da Ce OUtTeN MOTOPHaTnIa N da ja 3arPo3n 6e36eHocTa.
Проветуьajte ja КолиуннаТа MacNo BO MOTOPHaTа ПИla CO NOMOsh Ha ИДиКaTOpOT 3a HnBO Ha MacILOTO (Cл.29.B).
Ako HnBOTO Ha MacNoTo e HnCKo, DOnoHHeTe CneJeKn rN CneHNrte YeKOpn:
- OtspafeTe n 3BaTe ro kanaeTo (Cn. 29.A) Ha pe3epBoaopT 3a MacNo.
- CtabajTe MacNo BO pe3epBoapot n cneJeTe ro HnBOTo npeku HndkaTopoT (Cn. 29.B).
3.Bopeepboapot 3a MacNo He cMee Da HABJIe3e HeHNCOTnJa DoNeKa PONHInTe. - Ctabete ro kanaeTo 3a macIoTo n 3aupafeTe ro.
7.4 YNCTEHe
7.4.1 ChteHe Ha MaunHaTa H Ma MOTOPOT
Ha kpaot Ha cekoja pa60ta, nchctete ja MaunHaTa DeTalHO od npab N octaTOU np pa60ta.
3a HamaIyBaHBe Ha pI3IKOT oD 3anaIyBaHe, ODPKByBajTe rMaunHaTa, a OcO6eHO MOTOPOT oOCTaTOU nO JnCja, rpaHKn InpEkyMepHo MaCIO.
- Cekoraш чистete ja Maшинота no ynoTpe6ata co ChCTa mOKpa Kpna NotoneHa BO HeyTpaleH detepreHT.
PpOBepTe ro KInHot 3a 3anipaHe Ha CnHmuPOT nped cekoja ynoTpe6a (Cn. 1.G) nPpOBepTe ja pa6oTaTa aHO mAm OwTeTyBaHe.
7.6 OTBOPN 3A NOДMAUCHYBAHBE HA MAUNHATA N HA JIOCTOT
Ipei cekoJHeBHaTa pa6Ota, n3BaTeTe ro KapTepot (nacyc 4.2), n3BaTeTe ro loCTOT n npOBepeTe daHn OTbOpHTe 3a noMaHyBaHe Ha MaunHaTa (C1. 30.A) Hn loCTOT 3a HBeDyBaHe (C1. 30.B) ce 6loKnpaHn.
7.7 HABPTKNI WPAFOBN 3A ΦHKCUPAHE
OdpkyBaJTe rH upafoBte Hn HabpTKHe 3aTeHaTH 3a da 6nDeTe cHpyHn DeKa MaunHaTa e ceKorau 6e36eHa 3a paOta.
- PeioBHO npOBepyBajTe daJIpaHnTe ce ubpcTo fKcapaHn.
8. BOHPEdHO OdPxyBAhE
8.1 KJIIN3A INPEHOC HA CINHUPOT
Co nomou Ha 3acTaHnKoT, peoBHO KOHTpOJnpajTe ja coctoj6aTa Ha 3anuTE u 3ameHeTe rKa Ke 6nDat n3a6eHn.
He MoHTnpajTe HOB cHnHnp co cTap 3a6eU nn o6paTHo.
8.2 ODPKHYBAHbE HA CINHUPOT CO 3AJIu
Od 6e36eHocn npuHH n nopauN ePHNaCHOC BO pa6oTata, MHORY e BaHHo ypeDot CO CEuHBOT da 6nDE Do6po HaoCTpeH.
CekoraHoceteMacHBnpaKabu3a paBota Kora paHyBaTe CO loCTOT N CO CnHpyPOT.
OctpheTo Ha cInHIpOT e HeonXoJHO Kora:
-CTpyrotINHTeIuHaHpaunHa,
-ceyeheToCeOdBnBaCoMHOryCnla,
-ceyeheTo He e JInHeapHo,
-Bn6paunTe ce 3roJemEnH.
Ako cHnnpot He e doBolno Haoctpeh, nocToN pU3NK OJ npOTnByap.
BAHHO PpenopaayBaMe ocTeHeTo Ha CnHypoT
da ce ODBNA BO CneuJaunn3npaH ueHTap, MOHeOpaMaunHaTa TpeBa da Ce OJIOKn:
Ce n3Bede CO COODeBteHn anapaTu KOn 0e36eDyBaAT
MNHIMaJIHO paCnPcHyBaHBe Ha MaTePN H KOHCTaHTHO 3a CNTe BNDOBn CeYeHa.
8.2.1 3aMeHa Ha cHnHnpOT co 3aIz
CnHnpot Tpe6a da ce cMeHn Kora:
-ДолинотаHa ceHyBaTa Ke ce
HamaJI3a HajMaJIky 5 MM;
-ДИнжHeHbToHa3aIHTeTeuKo;
-6p3nHaTa Ha ceuehe e 6aBHa n NOBTOpeHnte octpeHa He ja noo6pyBaat 6p3nHaTa
Ha ceuehe. CnHunpoTe n3a6eH.
BAHHO No 3aMeHaTa Ha cHnIpOT, Tpe6a Yda ja npOBepyBaTe 3aterHaTOCTa Ha cHnIpOT 3a Dro npOBepTE JeknWTeTo Ha cHnIpOT.
8.3 OДРнУBAиЕ HA JIOCTOT 3A HABEDYBAHbE
3ABELESHA CTe onepaunu To ce odHecyBaat
Ha JIOCTOT 3a HABeDyBaHc ce pa60Tu CNEUΦuHa KOMTeHTHOCT CO aHraKnpaHe
COOdBETHa Onpema 3a Da MoKe pa6oTaTa H3Bede npabnH0; od 6e36edHOCHN pnuHn, cekoraW e Hajdo6po Da ce KOHTaKTnpa npoDaBaOT.
3a da ce n36erHe acnMeTpnuHo KOpNCTeHb Ha loCToT, notpe6Ho e Toj nepnoDnUHO da ce npOBepyBa.
3a eФикасоОджУBaHьHa loCTOT Tpe6a:
- da ce IOMaKyBaat nepHnHuHaTa 3a OIOKByBaHe Ha 3aHuaHKnOT co npNIOKeHNOT IIpNc (aKO nMa);
- Да се Исунсту Левский на лесот CO COODBEHTA rpebaika (He ce doctabyBa) (Cn. 31.A);
-
Za ce YnCTaT OTBOpNTe 3a NOMaHcyBaHe (Cn. 31.B);
-
co pamHa TypnJa, Da ce n3BaadT CTpaHnHnTe HaTaIIOxKyBaHa N Da Ce nopAMHaT eBHeTyaHnTe pa3IINK BO BnCnHaT a Mery BoDnKnTe.
8.3.1 3aMeHa Ha JIOCTOT
IocToT Tpe6a Da Ce CMeHn Kora:
-Длбочинata Ha 3anuTe Ke 6nde noHnCk a OJ BnCHHaTa Ha NoyehaTAtoUKa Ha npeHoCHnKOT (KOn HnKoraw He Cmee Da Donpat Do DOnHata cTpaHa);
-BHATpeuHHOT SNHa BOINKaTa e NCHOpNCTeH ToUka Ha DonnpaHe Bp3 NaHeOToT.
9. OJIOHyBAHbE
9.1 OJIOKByBAHbE HA MAUNHATA
MOHeIOaMaHnHaTape6a da ce OIOHN:
ocTepe H3BaTe ja 6atepnjata oJ neKnHTeTo n npOBepTe ro noJIHeBTo.
- CTabete ja 3aWHTnTaT a 3a loCTOT.
3.Поберете ддИМOTOPe COODBeTHO nIJIaIeH.
4.Исунсте jo машинна (nacyc 7.4). - IpoBepTe daH JeIOBHe ce pa3Ja6aBeHn nn OwTeHen. AKe e Notpe6Ho, 3ameHeTe Hn OwTeHENe DeIOBn n 3aTeHHe Tn pa3Ja6aBeHnTe UpaΦOBn n HabpTKn nn KOHTaKTHpaJte Co OBlaCTeH cepBncep.
- Ondoxte ja maunHaTa:
-BO cyBa npocToPiJa;
-иЗаCoJHetaOД loшиВрemeHcN yCLOBn;
-иHaMeCTOHaBOPoIdoΦaTOTHaDeuTa;
-
yBepyBajKn DeKa CTe rN TprHane KnyYeBnTe N OnpMaTa wTo ja KopncTeBte npn OdpKyyBaHeTO;
-
Ha co6ha TemnepaTypa nomery -20°C n 85°C.
9.2 OJIOHOYBAHbE HA BATEPNJATA
Batepnjata Mopa da ce yBa BO 3aTBopeHn npocTopnna,Ha TempepaTypa NOMery:
TapaHunjata He Hn NOKpNBA WTeNTHe HacTaHaTH 3aToa
He cte ce 3a03hae co npJIOKeHaTa DOKymeHTaunja.
HeCTeBHIMaTeJIHN.
- YIOTpe6ata mMOHTnpaHbeto He ce npabnHn nn KOH3NCTeHTHn.
- Ce KOpHCTaT pe3epBHN DeIIOBN KOINTO He ce opuHaJIHN.
- Ce Kopructn DoOnJIHHTeJIHa Onpema Koja He e Odo6peHa HHTy DoCTaBeHa OD npOn3BOJNTeIOT.
Гаранцида Н покрва n:
- HopmaJIHO a6eHe Ha NtpoUHInTe MaTePnjaJIi KaHO uTo ce ypeDoT co CEuHBOTo, 6e36eHOnCHIne CBETla.
- HopmaJIHO a6eHBe.
KnyBaOT e 3aHTteH CO COOBETHTE dpKaBn 3aHO. PpaBata Ha KnyBaOT KOI CE npedBnDEHN BO DaHeNTe DpKaBn 3aHOH Na HneDeH HauH He ja JIMMInpaaT Obaa rapaHnja.
13. TABEJA 3A ODPKHYBAHbE
| Иntервенциja | Пелегд | Пасус | |
| Пр<bnat> | ПосLEMДователно селиор | ||
| MAшинна | |||
| Конtrpoла на сiTе Фиксаньа | - | Пред секоja уnotpeбa | 7.7 |
| Бezбedlyостни КОНТРОЛ / поверка наkomандпe | - | Пред секоja уnotpeбa | 6.2 |
| Конtrpoла на кLINOT за запралье на синцирот | - | Пред секоja уnotpeбa | 7.5 |
| Општо чисné и КОНТРОЛ | - | На краjet на секоja уnotpeбa | 7.4 |
| Чисné на синцирот | - | На краjet на секоja уnotpeбa | 7.4.2 |
| Провета на OTВорITE за поdmачкување на машината и на лобстot | - | Прead секоja уnotpeбa | 7.6 |
| Провета на кLINOT за пөнoc на синцирот | - | Еднош месуно | 8.1* |
| Одожеве на синцирот | - | - | 8.2* |
- Pa60ta wTo Tpe6a da ja n3BeDe 3acTaHnKoT nIi CneuJaIIn3npaH ueHTap 3a cepBncnpaHe.
| Интувени ща Регов Пасус | ||
| Првацп Последователно сеньи | ||
| Од��унные на постот | -- 8.3 | |
| Над OPолны вая на НИВОТе на MACЛOTO за синцирот | - Р paed секоja у鞘тpeба 7.3 |
- Pa60ta wTo Tpe6a da ja n3BeDe 3acTaHnKOT nIi CneuJaIIn3npaH ceHTap 3a cepBncnpaHe.
14. HECOOBETHA PABOTA
| HAJDEHA MOJHNA ПИЗHA PELSEHNE | |
| 1.Со припскада не на рачкatinga 3a Контrolа на гаста и Контето за зakлочье, Машинatable не се вklочь. | Hema 6ateprija поlene He ctabeHa ntpabilno |
| Празна 6ateprija Поровервajte ja oocto6bata Na HanoJIteOTcN noHanoJIte je 6ateprijata (nacyc 7.2.2). | |
| Машинatable e oshteteha. He koprstete ja mashinata, n3baTeje na 6ateprijata noобатete ce bo cepbincen ceHTAP. | |
| 2.Моторот се racn BO TECOT ha pa6otata | Бateprijata He eprabilno BMETHATA |
| Празна 6ateprija Поровервajte ja oocto6bata Na HanoJIteOTcN noHanoJIte je 6ateprijata (nacyc 7.2.2). | |
| Машинatable e oshteteha. He koprstete ja mashinata, n3baTeje na 6ateprijata noobatete ce BO cepbincen ceHTAP. | |
| Актуватори за зakлочь на motopotПочекajte 15 minuTn 3a Ду се олдmmaшинatable, па pectaprtipajte ja | |
| 3.CsinzirpoT He se DBINK co AKTINBIRpaHI KONue 3a 6lOKada Ha 3a6p3yBauchot i pachkata 3a KomanDATA 3a 3a6p3yBaIbe | Прекumepha 3ateharatoct Na cinzirpot |
| Пробlemс co loCTOT i cinzirpot | |
| Машинatable e oshteteha. He koprstete ja mashinata. BEdnauw 3actahete ja mashinata, n3baTeje ja 6ateprijata noobatete ce BO oblaacteh Cepbincen ceHTAP. | |
| 4.CsinzirpoT Na KpajnOt DeI Ha Iocoto e bpeI n HcpiUtsa dIM. | Прекumepha 3ateharatoct Na cinzirpot |
| Праsezн rezeerboar 3a PodmauchyBaIbe. | |
| 5.Motorot p6oTNI HENPABINHO IINI Hema moiВрз onTOBAPYBaIteTo | Пробlems co loCTOT i cinzirpot |
2.5 BESCHERMING VAN DE OMGEVING
7.7 MOEREN EN SCHROEVEN VOOR BEVESTIGING
- ORDIN/AERT VEDLIKEHOLD 13
- EKSTRAORDIN/AERT VEDLIKEHOLD 14
8. EKSTRAORDIN/AERT VEDLIKEHOLD
8.1 KJEDEDREV
Kontroller ofte dewets tilstand hos forhandleren, og bytt det ut nar slitasjen overstiger de akseptable grensene.
8.2 VEDLIKEHOLD AV SAGKJEDET
8.3 VEDLIKEHOLD AV SVERDET
13. VEDLIKEHOLDSTABELL
6.1 CZYNNOSCI WSTEPNE
7.5 PINOTRAVA CORRENTE
8. MANUTENÇAO EXTRAORDINALA
8.1 PINHÃO DE ARRASTE DA CORRENTE
11. ASSISTÊNCIA E REPARACÔES
2.3 PnHbIOTCHOHA MEpbI PPEO-CTOPOXHOCTN IJI ANEPATOPA
OTCKOK MOKET BO3HNHHTb, ecNI KOHCOJIb HAppaBJIHOUeI uINbI cOpnKacaetc C npeTCTBHeM IINI ECNI DEpeBO CKlaDbIBaETc, 3aMbIKaI NIIbHyIO ueBBo BpEM paCNIIOBKn.
COnpIKOCHOBHHe C KOHCOJIbIO UINHbI MOJHeT B HeKOTOpbIX Clyuayx Bbl3BaTb OTdAHy, PnH KOTOpOi UINHa O6paCbIbaeTcB BBepx N Ha3aD, B HApPaBLeHHN OpepaTopa.
3aXaTne NnIbHOJ cENN B BepxHeJ YacTN HAnpaBJIHO- 1e IINHbIMoKET BbI3BaTb 6bICTpbI INOTCHOK NnIbHOJ cENN K Opepatopy.
3TN YBJIeHnMOry TnpNBecrN K NOTepe KOHTpOHaI NNIOI K NOCJeDyUoUm TpaBMam. HeIb3a HaJeTbCra NCKJIOUHTeNbHO Ha npEdoXpaHnteNbHbIe yCTpoINCTBa NNbl.
PoiB3OBaTeJIb cENHOI NIIbI DOJIKeH pINHrTb Mepbl IJn PpeDToBpaUeHn pyNcKa Hecuacthblx ClyuAeB IN TpaBM BO BpemraPabObl.OTcKoR ABJRETCa pe3yIbTaTOM HePpABHbHOrO POJIb3OBaHn IHCTpyMeHTOM N/ HIn HEnpABHbHbIX PPOeDyp NIn YCLOBn pa60TbI. Ero MoJHo N36eHaTb, pINHrB CLeDyUOuNe MEPbl PpeDIOCTOpOHooCTN:
a)Ппрпсздерхнтплу крпно обeHMn pyHAMN,oxBaTBiBAЯ obe pyHOHTN zuHON pIbI 6OJIbWIM nalbcem N dpyrIMn naIbcaMn pyKn. PacnoLoHNTe CBOE TeNo HpyN taHm O6pa3OM, yTO6bI Bbl mOrJn coxpaHrtb KOHTPOB hAid nILOB B clyuae OTcKoHa. OnepaTOp MOKeT npOTHBoDeHCTBOBaT bCIne OTcKoHa npN yCIOBn, YTO 6bln npINrTaH NaIeJaUHe MEPb IpeOcTOpOxHocTn. He DOnychAte 6ecHOHTpoBhORo nepeMeueHn rIIbl. b) He npOTarHbAte pyHn cInuHOM daJeHo n He peHbTe Bblwe yPOBHra CBOero nLeya. 3TO NO3BOJNT n36eKaTb ClyuaHbIX COpNIHOCHOBeHn PIIbl C KOHeuHOCTaMn n NOMOHT LyUWe KOHTPOJIUPOBaT b CEHNy NNy B HnepeDbHdEHHbIX O6CTOReTbBax.
c) HcnoIb3yIte TOnbHO HanpaBnaIOUe 1Hnbl I NIIbHbIe cEN, yHa3aHHbIe npOn3BOdnteMe. HenoJxOJaUe 1INHbI IN IIbHbIe cEN MOrYT npNBecCTN K pa3pbIBy cEN N/INK OTCKOky. d) CLeNyIte IHCTpyKcIaM npOn3BOdnteJI Na 3aToUHe N TexO6CnyJBNAHnIO cENHOI INbI. CHJKeHHe rIy6InHbI npONla MOJET npNBecTNI K yuaeeHNIOOTCKOKOB.
- MeToDnHa HcNoJIb3OBAHnueIHHoJ 3JIeKtpNuEchOn nIIbl (c 6aTapeNHBIM NHTAHmE)
Bcerda co6IoudaIte npaBnla 6e3oNaChocTn npimHeHrTe MeToDbI pe3Kn, Han6OJIee NOxODaUne dIy Tnna BbIOJHReMo pa60Tb I COOTBeTCTBn C yKa3aHNMy n pRIMepAMN, N3LOKeHHbIMN B pyKOBODCTBE NO 3KcPnyatauH.
- Be30nacHoe nepemeeHne 9eHHo3JeKtpnueckOH nHblc6aTapeHHbIM nHTaHEm
KaKdbi pa3, KOrda Tpe6yeTcnepeDbHyTb HnPi nepeBe3TN MaunHy, cNeDuYeT:
-BbIKIIOHTb DBNrataTeIb,DOJDAbC8 OCTaHOBa 电H NOTCOEOHNHTb MaunHy OT 3JIeKTPocETn; -yCTaHOBHTb KOHX HnPaBnHOuCe Nnbl;
B3aTb MaunHy NCHIOHTeIbHO 3a pyKoRTN HAnpaBnTb WnHy B HanpaBHeHn, npoTbONIOJOKHOM HanpaBHeHn DnKeHn.
Pn nepeBO3Ke MaunHbHa aBTOtpaHcNOpTe Heo6XoIMo pacnoJIOHNt b ee TaKIM o6pa3OM, YTObI OHa Hn dJa KOrO He npeDCTaBnla OnaCHOCTN, N npOHO 3aKpeNTb ee.
- PekomeHdaqunДЯнHaunHaIOxN
IpeKHe, Yem BnepBbIe npncTyNtB K BaIKe Ieca nn O6pe3Ke BcTBBe, peKOMeHdyeTcR:
-
npoTn CneuHaBbKypc oOyuHna pa6oTe Ha 06OpydoBaHH 3TOrTO nHa;
-BHMaTeIbHO O3HaKOMITbCn PpaBnlaMn 6e30- NaCHOCTN yKa3aHnA M N O 3KcNlyaTauN, n3No- XEHbIMN B HAcTOnUeM pyKOBOdCTBe;
-NoynpaKHeTbcHa NnX,PaCTuux H3 3eMn nn npKpeIeHHbIX K NOdCTabKe, YTObI O3HaKOMtbcr pa60ToMaunHbI HAn6OJeepoXODAum MeToaam PaCnIOBKn. -
06paueHne n npabnIbHaJ 3KcnIyataunia 3JIeKtpnueChoro obOpudOBaHHa, pa6oTaIOUero Ha 6aTapeX
a) PpeKHe Yem BCTaBnTb 6aTapeO yOcToBepbTeCb, YTO O6OpYIOBaHne BblKIIIOueHo. YcTaHOBKa 6aTapeN BO BkIIOHeHHoe 3JIeKTPnueECHO6O6OpYIOBaHne MoKeT npINBeCTn K HeChactHOMy CInyauIO.
b)ДЯЗAPAN6aTapeH nCNoB3yIte TOnbHO 3apAHyIe yCTpoIcTBa,peKOMeHDoBaHHbIe N3- roTOBHTeIeM.ObIyHO 3apAHyoe yCTpoIcTBO npEdHa3NaHeO dJa 6aTapeNOpDeJeHnHO Tnna;HX nCNoB3OBaHne c 6aTapeMn HnpeDy CmOTpeHHOrTo Tnna MoKeT Bbl3BaTb NoJap.
c) Ncnoj3yIe ToIbHO OnpeJeHhIe 6aTapeN, npedymOTpeHHIe Ira BaIero O6OpydoBaHn. NcnoJb3OBAHHe 6aTapeI pyrOro TIna MoKeT npINBecTN K TpaBMam IN PNCHy NOHaAPA.
d) XpaHnTe HeHCNoB3yEmyO 6aTapeHO Ha pacCToHNOT KaHcJIepCHNX CKePONK, MOHeT, KIOUeI, TBO3DeN, BnHTOB IN DpyrNx MaJeHbKnX MetaJIInueCKNX IpeDMETOB, KOToPbIE MOrYT Bbl3BaTb KOpOTKe 3AmbKaHne KOHTaKTOB. KopOTKe 3AmbKaHne 3JIeKTPuYeCKoI cENm MeJdy KOHTaKTAMMOKeT Bbl3BaTb BO3rOpaHne NII NOkAp.
e) BaTapeB IIIOXOM COCTOHN MOKeT npoteKaTb. N36eRaTB KOHTaKTa C KNDKocTbI. EcNn OHa cIyauHNo Ha Bac nonana, cMOte ee BO-don. B cLnyae nonadHna HNDKocTN B rla3a 06paTntecb TaKHe 3a MeDnUHcHcN OMOuH. HNDKocTb, BBITEkua H3 BaTapeH, MOKeT Bbl-3BaTb pa3dpaKeHne nn Okor Ha KoKe.
f) PpOBepbTe, YTO aKHyMylrTop B XopoWem COCTOHN H He NMeET NOBpeJdeHNI. He NoJIyIeTcB MaUNHO C N3HOCNBWMcR NIN NOBpeJdeHHbIM aKKMyJrTopOM.
2.4 BATAPER/3APADHOE YCTPOICTBO

BHIMAHNE
HnHexeJeUoIne npaBnla 6e3OnacHOCTN DO- NOJIHOT npeDnucAHn IO TexHnke 6e3OnacHOCTN, H3IOKeHHbIe B INHcTpYKuIN 3apAHorO yCTpOInCTBa.
-Дязарднбатavenиncnoь3уп TeToIbHOЗapHbIe yCTpoNCTBa,peKOMeHDoBAHHbIe n3rTOBHTeIem.HenOxOJaUee 3apHdHoe yCTpoNCTBO MoKeT npINBeCTn K 3JeHtPnuechOMy yDapY,nepeRpeBy nIyTeueke edHOn JnIDKoCTn n3 sbatpen.
- NcnoB3yIe ToJIbKO OnpedeJIeHHbIe 6aTapeH, npedycMOrpeHHbIe dIra BaUero o6OpdyObaHn. IcNoJIb3OBaHne 6aTapeN dpyrOro Tnna MoKeT npNBecTn K TpaBMam n pNCKy noKapa.
XpaHnTe HncNoB3yEmyO 6aTapeo Ha pacCToHHN OT KaHcEJaPCKNX CkpeNOK, MOHeT, KIOUeH, TBO3DeN, BnHTOB N DpyrNx MaIeHbKnx MToAJINuCeCKNX PpeMToB, KOtOpBle MOrY BbI3BaTb KOPOTKOE 3AmbIKaHne KOHTAKTOB. KOpOTKoe 3aMbIkaHne 3JeHTpueckOu CEIN MeJdy KOHTaHTAMN MoKeT BbI3BaTb BO3rOpAHne INI NOxap.
He nCnoB3yIte 3apAHOe yCTPOiCTBO B MecTax C hAIINHem napOB, BOCnIaMeHraIOxxCr BeUeCTB, a TaKHe Ha IerKOBocNlAmehraIOxxCr NOBepXHOcTAX, HApPIMep, Ha 6ymare, TkaHn N.T.D. Bo BpEma 3apAKn 3apAHOe yCTPOiCTBO HArpeBaETcR N MoKet BbI3BaTb NoHap.
Bo Bpemra TpaHcnpTnPOBHN aHHyMyJrTOPOB CJIeDHTe, YTO6bl KOHTaKTBHe COpNHacAINCb MeHdYco60i, H He hCNoIb3yHTe MeTaJIInueChkyIO Tapy IAnx TpaHCnOpTnPOBKN.
2.5 OXPAHA OKPYHAIOUCEI CPEdbI
3a60Ta 6 oxpaHe okpykaHoue CpebldoJHKHa 6bITb onpeIeJIIOUIM fakTopom npn nCNoIb3OBAHIN Ma- uHHbl.
- CtapaIteCb He 6ecnOKoHTb OKpyHaiOuX. HcnoJIb3yIe MaunHy TOnbKO B pa3ymHOe Bpemr (He paHO yTpOM H He P03dHO BeuepOM, KOrDa Bbl MoKeTe NOMeMaTb OKpyHaiOuM).
- Bo Bpemra pabotb I Okpykaohy cpey nonaetaT HeKOTOpoe KOJIHcTeBO Macna, Heo6xOIMORO dIg CMa3bIBAHnI cenI; No 3ToI npUHne HcNoIb3yIe ToIbKO 6nopa3JaraembIe Macna, npEHa3NaeHbIe CNEuJIbHO dI TaKOrO nCIOJb3OBaHH. NcNOJb3OBaHHe MInHepaJIbHO rIIN MOTOPHO Macna HaHOCIT cepBe3hB yUePb OkpykaOHc epe.
CTPoro c6bIIOaIte MeCTHbIE HOpMbI NO yTHIN3a- uyn ynaKOBKn, NOBpeJdeHHbIX YAcTeH nn JIO6bIX 3JIeMeHTOB CO 3HaHTeJIbHbIM BInrHHeM Ha OKpyJ HAOcUcpey; 3TN OTXoDbI He DOJIHbI Bbl6paCbI BaTbcR MycOpHbI KOHTeHepbl, a DOJIHbI 6bITb OTJeIeHbI IN PepeDaHbIB CneuaJIbHbIe CEHTpbl c6opa OTxODOB, 3AnHMaIOuNecn Ix Nepepa6OTko. - Ctporo co6JIIOdaTb DeIcTByIOUne Ha MeCTHOM yPOBHe npaBnla NO BbIO3y OTXoIDOB.
- Iocne 3aBepseHnra cpoKa CnyK6bMaunHbI He Bbl6paCbBaIe ee C 6bITOBbIM MycOpOM, a ObaPATnteCbB UeHTP c6opa OTXoOIB B COOTBETCTBUN C DeICTByKOUIM MECTHBIM 3aKHOHOaTeJIbCTBOM.
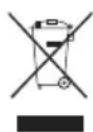
He BbIbpaCbIbAaTe 3JIeKtpOo6OpyIOBaHnE BMeCTe C 6bITOBbIMN OTxOdaMn. B COOTBeTCTBmC EbponeNcKOn DnpEHTBOv 2012/19/ EC OTHOCHTeNbHO BbIEDeHHoro N3 3KcNpyaTaun 3JIeKTPnueckOrO n 3JIeKTPoHHoro 06o
pydoBaHnIe npimHeHemcOrlaCHO npaBnIam CTpaHbI 3KcnLyaTaun, BbIBedeHHoe n3 3KcnLyaTaun 3JeKtpoo6OpyDoBaHne DOJHXO OTnpaBnTbcn Ha nepepaboTy B COOTBeTCTBN C Tpe6oBaHnMn NO oxpae OKpykaIOSe Cpebl OT DeJIbHO OT pyrNx OTXoOB. Ecln 3JeKtpoo6OpyDoBaHne BbIpcabIbAeTCR Ha CBaIKy IIN 3aKaNbIBaEtCB B 3EMNIO, BpeHbIE Be- uectBa MOrYt PPOHNKHyTB B CNO NOD3EmhIX BOI NONACTB B NIISeBBle PPOyKTbl, YTO pNBEdET K HaneHIO yUePb6a BaWemy 3DopOBbIO H XopoWemy camOyBCTBN. IIN NOlyeHn6OJee NoDpO6HO INHOpMaunNo nepepaboTke 3TORO n3deJInr ObaaaiTeCb B yUpeKeHne, OTBeTCTBeHHoe 3a nepepa60Ky OTxoDOB, IIN K BaWemy DnCTpn6bIoTopy.

Li-ion
No 3aBepHenn cpoKa cnJkb6bI 6batapeo obecepeTe nx yHnHTOKeHHe, KOtOpoe He HAnecet BpeDa OKpyKaIOUe n CpeDe. Batapeo codepKNT MaTePnaI, onaChbI dIbaC n dIOKpyKaIOUe CpeDbI. Batapeo Heo6-
XOIMMO N3BLeuH N OTDeJIbHO CdaTb B ueHTp Nepepa-60TKN OTXoIDOB, KOTOpbI INPHMaET JInTH-NOHHbIE 6aTapen.

Pa3dIbHbI c6Op IcNoIb3OaHHbIX N3deJIn H ynaHOBOHyBix MaTePnAIOB IO3BOJReT nepepaBaIBaTb NOBTOpHO IcNoIb3OBAbMaTePnAJI. NobTOpHO IcNoIb3OBAHne BTOpHNO nepepa6oTaHHbIX MaTePnAIOB NOMraet YMeHbWHTb 3arPra3HeHne OkpyKaIOUeJ
CpeBn CHN3NTb NOTpe6HOCTb B NepBnHOM cbIpbe.
3. O3HAKOMJIEHNE C MAUNHOI
BHIMAHNE
3TOT HNCTpyMeHT MOHET BbI3BaTb BN6paHNOHHyO 60Je3Hb pyKN,ecnHe 6ydyT npHrtbl He-OBxODHMbIE Mepbl ppeoctopoxHOCTn.
B yactnoctn, npi oueHke BO3dEJCTBnB N6paunu IyMa B fakTHuecknx ycNoBnX 3KcNpyaTaunn Heo6xOIMo TaKHe yHTbIBaTb BCE 3TaIbI pa6Oero UKJa, HapnMep, MOMeHTbl, KOrDa nHCTpyMeHT BbIKIOueH nn pa6Otaet BXIoCTyU, He BblONHra CBONX yHKcu.
3TO CNOOC6CTByET 3HaunTeIbHOMy CHINKeHNIO yPOB-HA BO3DeNCTBnB T TeueHne Bcero BpeMeHn pa60TbI, IN PO3BOJAE TCBECTN K MmHmMy pICH BO3DeNCTBnB N6paunn n Wyma.
Bcerda nCnoIb3yIte xopoio 3aTooyHHbIe DOJIOTa, CBePna HOKn.
IopdepHnBaTe DaHHbIN HNCTpyMeHT B COCTOHN, yKa3aHHOM B pyKOBODCTBE, IN XopoWcMaa3bIBaHTe ero (Korda 3TO Tpe6yETc).
Pn peryIaHOM nCNoJIb3OBAHn HNCTpyMeHTa peKOMeHnyETcN CNOJIb3OBAb cpeDCTBa 3aUNTbl OT Bn6paunn Nwma.
CocTaBbTe rpaФnK pa60Tb TaK, YTO6bI paCnppeJNTb NCIOJIb3OBaHHe INHCTpyMeHTOB C BbICOKIM yPOBHeM Bn6paun Ha HeCKoJIbKO dHei.
3.1 ONICAHNE MAUINHbI IN PEPYCMOTPEHHOE NPMMEHEHNE
OCHOHbIMN COCTABHbIM NactMn MaunHbI YBJIOTcA DBIRATEJI B C NITaHHeM OT BaTapeN HappaBIAIOUaJ WINHa, KOTOPa NEpeJaET DBNKeHne OT DBIRATeJI K NNbHOI cEN, BblONHIOUe FyHKNUO NIIbl.
OnepaTop ydepnBaeT MaunHy DByMa pyKaMn 3a nepeHIOU n 3aHIOU pyKoAeN, u npabIe T eB, Bcerda HaxOJaCb Ha 6e30NaChom pacCToAHN OT peKyuJero npncno6JeHn.
3.1.1 PpeymOTpeHHa 3KcnIyaTaun
3TaMaunHa pa3pa60TaHa Hn3rOToBHeHa Dnla:
-
noDpe3aHnI n Cpe3aHnI KPOH BbICOKOCTBOJIbHbIX DepeBbeB;
-ПОДРЕЗАнHA KUCТAPНИКOB, PACNINIBaHЯ 6peBEN NII DEPEBRAHbIX 6aJIOK,ДиamEtP KOToPbIX3aBNCIT OT DInHbI HAnpaBIAUOSeI ShHbI; -
pacnninBaHnN ICKJIIOHTeBHo DpeBecnHbI;
- MaunhoJdoJIKeH ynpaBJIaTb TOnbHO Odn H YeIIOBEK.
3.1.2 HenpaBnIbHoe nCnoIb3ObaHne
JIO6oe npyroe nCNoIb3ObaHne,OTnUHoe OT Bbluey-nOMaHyTOrO,MOxET CO3dAeB ONaCHOCt b IN PnHHHTb yuep6 IIOJAM N/INN NMyuEcTBy. BxOHT B NOHrTHe HEnpaBnIbHO rncOJIb3ObaHna(B KaueCTBe pPmepa,Ho He OrpaHnUBaRcB 3TNMI ClyuaM):
- BbIpaBnBaHHe HINBOH N3rOpOaN;
pa60TbI NO Bblpe3aHnIO;
pa3deneHHe Ha Yactn POnDoHOB, RUnKOB N yNa-KOBOK B CEJOM;
-pa3deneHHe Ha qactn Me6eHn Ipyrnx npedMeTob, KOtOpbIe MOyT COepKaTb rB03n, BHTbl NIN dpyrne MeTaJIInueckne KOMNoHEHTbl;
-BbIIOJIHeHne pa6oT no pa3eJIke MraCa;
-NCIOJIb3OBAHHe MaUNHbI DnIpaCnNla HepeBecHbIX MaTePnaJIOB (IIaCTMaCCOBble, CTPONTeJIbHbIe MaTePnaJIbI);
-NCIOJIb3OBAHHe MaUNHbI B KaueCTBe pbUcaraДлпоьEMA,перemeшени ИИ pa3JIaMbIBaHHnnpedMeTOB;
-NoJIb3OBAHHe MaUHHoH, 3a6IOKInpOBaHHoH Ha HeNoDnXHbIX ONopax; - npimHeHne peKyuix npncnOc6JeHn, OTJHbIX OT yKa3aHHbIX B rIabe "TexHnueckne xapakTepcntnKn". OnachocTb cepbe3hblx paH n TpaBM;
-NOJIb3OBAHHe MaUHHoH HeCKOJIbKIMn ONepaTOpamn.
BAHXO HeaJIeJaee IcNoJIb3OBaHne MaUN-HbI BLeueT 3a cO6oYtpaTy CnIbI rapaHTN IN CHMa-et C n3rOToBnteJy BCIO OTBETCTBEHHOCtB, BO3laRaHa nOJIb3OBaTeJy OTBETCTBEHHOCtB 3a N3depKHN E cnlyae nopCu HmUyEcTBA, NOJyEHHa TpaBM NIn HaHeceHry Uyep6a TpeTbIM nnqam.
3.1.3 TnnoBb3oBaTeJra
JaHnHa MaunHa npedHa3HaueHa dIy IOnb3OBaTeIe, IMeIoUHX CneuaJIbHyIO NOIroTOBky dIy BblONHeHHa lecoceuHbIX pa60T.
3.2 3HAHNBE3ONACHOCTN
HaMaHInHe HMeOTcpa3NnUHbIe CmBOnbl(pnc..2). OHn npn3BaHbI HanOMnHaTb OepaTOpy O Heo6xOIMoCTn BHMaTeJbHO N OCTOpOJHO N EKcnIyaTaun.
3HaueHHe CnMBOJIOB:

BHHMaHHe!IpeepncnoJb3OBAHNEM MaunHb npouHTaTe yKa3aHn.

Onachoctb! DaHnMaunHa npn He npabnblHom nCnoJb3OBaHm MoKet 6bitb onachon dJa Bac n dJa OKpykaiox.
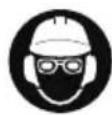
BHHMaHHe! NcnoIb3yInTe 3aunTy dIra cIyxa, ouKn n 3aunTHyo KaChy.

BnmaHne!HaedeBaTe 3a- uHTbIe nepaTkn N O6yBb Ha HeckoJIb3raJe IIOOuBE!

Onachoctb! He noBepraTe Bo3-DeiCTBIO DOKJN NIN BIAKKHOCTN.
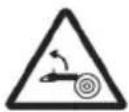
Onachoctb OTCHOA (Kickback)! B pe3yIbTaTe OTCKOKa nIIa COBepsaet pe3Hoe n Heynpablaemoe DvNKeHne K onepatopy. Bcerda pa6oTaTe B yCIOBnIX 6e3OanachocTn. NcNoJIb3yInTe uei, OCHASeHHBe 3aunTHbIMN 3BeHbAMN, ORpaHUYBaUQIMN OTCHOK.
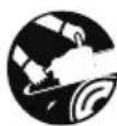
BHHMaHHe HnKOrDa He depKeHTe MaunHy OndHou pyKo! KpenkoepKeHTe MaunHy oBeHMn pyKaMn, TTo6bI KOHTpOIpOBaTb ee DnHexHne n CHN3NTb pNCHOTCKOka.
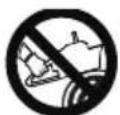


BHHMaHHe! HΦopMaunO 6aTapee n3aprHOM yCTpOInCTBe n3IoKeHa B CneuaJIbHOM pyKOBoDCTBe.
BAHHO IOBpeKHeHHbI IIN HeuNTaEmbI KJIeIKn HJxJaOTcB 3aMeHe. 3aKaHNte HObIe HAJIeKN B aBOTpN3OBAHHOM CepBnCHOM ueHTpe.
3.3 OCHOBHbIE KOMNOHEHTbl
Maunha coctoHT n3 CLeDyIOxOCHOBhIX COCTaB-HbIX yacteN, KOtOpBie BbIOnHrOT CLeDyIOxne FyHK-
A.ДИгATEЛБ:обеспуньeТДВИЖЕнepeжуцeto npncnoc6JIeHnI.
B. Npeepnry pykOHTka: onOpHn pyKoTHa, pacnoJIOKeHHa B nepeDHeu cactn nIbI. 3a Hee Hado 6paTbcra IeBOy pyKoI.
C. 3aHnpyKoTHa: onOpHa pyKoTka, paCnoIooKeHHaB 3aHeu qactn nIbI. 3a Hee Hado 6paTbc npabOy pyKo. 3decb paCnoLoKeHbI
OCHOBhIe OpraHbI ynpaBHeHHy YCKOpEHnEM DnHexHH.
D. ΦpoHTaJIbHOe 3aUHTHOe yCTPOIcTBO: 3auNTHOe npncnOcO6JeHne, pacnoJIOKeHHoe MeKdy nepeHHe pyKoTko I nnlbHoN cIbIO, KOTOpoe 3auNTpyKoY O pAH, eCIn OHa COCKoJIb3HET C pyKoTkn. 3To 3aUHTHOe npncnOcO6JeHne NCIOJIb3yETcR dIy BKNIOUeHn TOPMO3a cIeN.
E. HanpaBlaIOUaIa: yIepKnaBaET n HappaBJIaTe TIIbHyIO cIeNb.
F.Пиьнаяць:Пиьный элемп, COCTOушИ N3 3BEHbeB,OBopyДОВаHHbIX MaJIeHbKIMN HOKa-MN, KOTOpBIE Ha3bIBAIoT "3y6cAmN", N 6OKOBblM N COeINHeHnIMN, 3aKpeIIeHHbIMN 3aKJIeNKamN.
G. ZeneyIOBNTeIb: 3TO npdeOxpaHnTeJIbHOe npCnOCo6JIeHHe npedOTbPaUaet HeKoHTpOJIpyE-Moe DBNKeHHe NIIbHOJ cENB CcLyuae pa3pbIbA nnOcna6JIeHn.
H. 3y6a7bI ynp: npncnocobHe, pacnoJxHHoe HAnpoTnB TOnKn PnpcoeINHeHnHa- npaBnaIOUe IINHbI, KOTOpoe DeNCTByET B KaueCTBe TOOKN ONOpblIdpeBa NII CTBOJa.
I. HoiBuo 6bICTporo HataJHeHn cenn: (ecnn npdeDycmOTpeHo).
J. Konyx Hapablaioe nnbl: Konyx ceHNOH nnbl, yCTaHaBnBaembHa HApabLaIOUyIO uHHy, KOtOpBn HCNoB3yETc npn nepemeHnn, TpaHCnOPTnpOBKe nN XpaHeHN MaunHbI.
K. BaTapee (ecn OHa He NoCTaBJIeTcH C Hoi, CM. NyHKT 15.1 "DOnOJHNTeJIbHOe O6OpyIOBaHHe NO Tpe6oBAHIO): yCTpOInCTBO, KOTOpoe ObecneuBAe TJIeKTPoNITAHne INHCTpyMeHTa; ee XapaHTepnCTnH N npaBnla EKcnIyataun ONnCAhbl B OTDeJIbHOM PYKOBOdCTBe.
L. 3apraHoe yctpoiCTBO (ecnno OHO He noCTaBJIeTcC Maunho, cm. nyHKT 15.2 "DOnoHNTeIbHoe o6OpyOBAHne n0 Tpe6OBAHIO): 3TO yCTPOiCTBO, KOTOPoe NcNoJb3yETcR dJa 3apraKn 6baTapen.
M. 3aunTa KOHcOJI: 3auNTa OTOTCKOKa
N. BatapeHbI OTeK: MeCTo pa3MeueHn8 batapeB MaUNHe.
O. RaHa HnBnHT dJa 3aTAAHH
3.4 INDEHTNΦHKAUHOHHbI AJPbIK
Ha ndeHTnФнKaUHOM npIbIke yka3a-Ha cIeDyIOUa HΦOpMaUra (Pnc.2):
- YPOBEHb 3ByKOBOI MOUHOCTN
- 3HaK COOTBETCTBnA HpeKTINBE
- Meca/ToI n3rOToBJIeHnA
- TIN MAUINHBI
- HanpKaHeHne nTaHn
- 3aBoDcKoHOMep
- HanmeHOBaHHe n aDpec H3ROTOBNTeJIa
- Kod n3deJn
9.ДИнHa HanpaBraIOUeIshHbI - OncaHne n3dJIeNIA
MaaH-
BnwnTe ndeHTnKauHbIe daHHbIe MaunHbI CneuaJIbHbI eNoHa npIbIke, NOMEueHHOM Ha 6paTHoN CTOpOHe OboJKN.
BAHHO Yka3bIbaIte NdeHTnФHkaUHOHHbI DaH HbIe, yka3aHHbIe Ha NdeHTnФHkaUHOHHOM RaJIbKaJdbI pa3 npN O6paueHN B aBTopu3OBaHHbCEPBCHbI ueHTp.
4. MOHTAHK
IpaBnla 6e3oNaChOCTn npBBeHb B rI.2. Ctporo co6nOaHTe yHa3aHH dIy npedOTbpa- uenHcpeB3HbIX pncOB n ONaCHOCTn.
B cB3n C nOTpe6HocTm ChJaHnpoBaHn I TpaHCnopTnOpBn, HeKOTOpbIe COCTaBHbIe Yactn MaunHbIMorYt He 6bITb yCTaHOBJIeHbI HENOCpeDCTBeHHo Ha 3aBOe, IN He06XoJMo yCTaHOBITb NocIe ydaJIeHryyNAKOBOUHO MaTePnaJa, corlaCHO HINKeCJeDyOu-UM yKa3aHNrM.
PacnaOBHa n 3aBepWeHne MOHTaHa dOJIHbI BbINOJHrTbCn Ha TBepDoN u POBHOn NOBepX-HocTH, rJe DOCTaTOUHO MeCTa DnNEpeMeUeHHMaunHbI N ee yNaOBHN, Heo6xOHMo BcerdaNoB3OBAtbcra COOTBeTcTByIOUHMn HnCTpyMeHTAMn. NpeD hCnoB3OBAHHeM MaunHbI Heo6xOIMo BbINOJHHTb BCE yHa3aHn, N3IOKeHHbI Bpa3dene "MOHTAH".
4.1 KOMNOHEHTbI DJI MOHTAXA
ByaKOBKe IMeOTcKOMIOHeHTbI JIA MOHTaKa, npBedeHHbIe B CJeDyOuSe TaJIne:
4.2 MOHTAH HANPABJIOUeI UINbI INNJIbHOJ CENI
Ipn o6paueHn c uHOn n cenbIO Bcerda HadeBaIte TOnCTbIe pa6Oyne nepaTHN. Co
6IIOaIte OcO6yIO OCTOpOHOCb npn MOHTaHe 1Hb H cenn, yTo6b I He CHN3NTb ypoBeHb 6e30 NaCHOCTn N 3ΦΦeKTHBHOCTn MaunHb; eCIn y Bac BO3HNHHY COMHeHNA, ObaaauTeCb B Mara3HN. Ipeep BblOnJIHeHem KaHX-Jn6o Oepa4nn n3BLeHnte 6aTaPeIO.
IpeHde, yem yCTaHOBnTb uHHy, ydo-CTOBepbTecb, yTO TOPMO3 cENn He BHLIOUeH (nyHKT 5.4).
1.CnOMOuI npHraeMoro KIOUa OTBHTte raKy IIN NOBepHTE BINT dIa3aTJKN (Pnc. 3.A) IN CHIMTe Kopnyc cENn (Pnc. 3.B), YTO6bl NOnyunTb DOCTyn K BeDyue 3Be3doUKe N K THe3dy uHNbl.
2. YctaHOBHTe 1HHy (Pnc. 4.A), BCTaBnB 1nnIbKy (Pnc. 4.B) B BblE Mky (Pnc. 4.C) n npToJIKNHTe ee K 3aHeN YaCTn Kopnyca MaunHbl.
3. YdOCTOBeBpTEcB,TO CTepeHb peYIaTopa HATJKeHnA cenn (Pnc. 4.D) npabNbHO BCTaBHe B CneuaHbHoe OTBePCtne uHHb; B npOTnBHom Clyuae,OTBePTKoB03DeiCtBynte Ha BNHT peYIaTopa HATJKeHnA cenn (Pnc. 4.E),doTexnop, NOKa CTepKeHb NOJIHoCTbIO He BOIeT B OTBePCtne.(ecnnpedyCMOTpeHo).
4. HauhoHte MaunHy, TTo6bl 06JIeHTb 06epTbBaHHe ZENBOKpyr Bedyuee 3Be3doUKN (Pnc.5).
5. 06epHnTe ueNB (Pnc. 6.A) BOKpyr BeDyuei 3Be3- doUKN (Pnc. 6.B) N BdoJIb HappaBIAUx UINHbI (Pnc. 6.C), co6IouaH npabLeHne BpaueHnA.
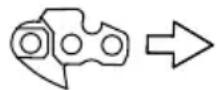
HanpaBHeHne BpaueHnIeHn
- EcHn Ha KOHCOHn HnHbI NmEeTcB EaOMa 3Be3-DOuHa, CLeDHTe, YTO6bI 3BEHbI cENI npabNtBHO BCTaBnIINCB ByrJy6JIeHn 3Be3OuKn (Pnc.7).
- BHObB yCTaHOBnTE KOpnyc (Pnc. 8.A), He 3aTnBa rAHy nIi BNHT Do KOHca (Pnc. 8.B).
8.Bo3dienCTbYnteHaBnHTpeyIaTopaHaTaKeHnAeHNnHaKoJIbUO(Pnc.9.A)DnA noLyuHnTpe6yEmoHaTaKeHnAeHNn(Pnc.10)(nyHKT 6.1.3). - YdepHnBaI WnHy B npnnoDnTOM NOJIOKeHN, 3aTnHTe Do ynpa raNky Kopnyca npn NOMOu n npnaeraMoro KJIouHa NN 3aTnHTe BNHT (Pnc.11.A).
5. CPEДСТВАУПAPВALEHЯ
5.1 PbIyAr UYPABLeHnA DPOCCEJIEM
I03BOJrET BKIOUHTb cenb.
BKnIOuHTb pbur ynpabJIeHnA DpocceIeM (Pnc. 12.A)
MOxHO ToJIbKO IocNe HaKaTnA KHOpKN 6IoKInpOBKn
dPoCCeIa (Pnc. 12.B).
Pexkyuee npncnocoblenie BbIKIOuaeTcra aBToMaTuYeckn nocle OTnyckaHn pyHuara ynpabLeHn dPoCcelem.
5.2 KHOHKA BLOHINPOBKN DPOCCEJI
KhoKa 6loKnOpOBKn DpocceIa (Pnc.12.B) no3BolnaTe BkNoCuTa bpyar ynpabLeHn IpocceIeM (Pnc.12.A).
5.3 TOPMO3 LENN
3To npdeoxpahnteIbHaTOpmo3HaCnCTema, KOTOPa 6loKnpyET BpaueHne cENB Cnyuae OTCKOKOB (OTdau) BO BPem pa6oTbI. OTCOK 6bIbAet Bbl3BaH aHOMaIbHbIM KOHTaHcTOM C KOHCOJIbIO uINbI, B pe3yJIbTaTe Yero uHa pe3KO NODcKaHNBAET BBepx I pyka yIapraTcR o φpoHTaJIbHOe 3aunTHoe yCTPOINCTBO (Pnc.1.D).
TTOYTO6bI BbIKHQUHTb TOPMO3eEN,HEo6xOIMBpyHyIO eO pa36loKINPOBaTb.

Topmo3 cenBkIouhen. JnA
3TOrHOeO6xOIMO yCTaHOBnTb
fpoHTaJIbHOe 3aunTHoe yCTpOInCTBO
B npeDHee noIOKeHne.

TopMo3 cen BBkIIOueH.ДЯ 3TOrO Heo6xOIMo IOnHOCTbO OTTHyTb Ha3aD, K KopnyCy MaunHbl, ΦpOHaJIbHoe 3aUHTHe yCTpoiCTBO, cTO6bl CbIiEHN eJIYOK.
He nCnoB3yInTe MaunHy, ecn TOpMo3 ueHpa6Otae HncnpaBHo, n 6opatntecb K BaWemy dNCTpr6bIOTOpy Ira npOBedeHna Heo6xoDmblx npOBepok.
6. 3KcπIyATAURA MAHHBi
IpaBnla 6e3oNaChOCTn npBedeHb B rI.2. Ctporo co6nOdaIte yHa3aHnI dI npedOTbpa- uenHn cepbe3hblx pncOB n OnacHOCTn.
BAHHO NHTpyKuHn no DBNrTaTeJIIO H 6a (ecn OHa npedyCMOTpeHa) N3IOKeHbI B CC CTByIOxN pyKOBOCTBaX.
6.1 PPEBAPHTIELHbIE ONEPAUIN
Ipeed hauaIom pa6oTbI Heo6xOJHMo BblIOJIHNHTb He-CHOJIbKO npOBepOK H ONEpaun, YTObI ObecneHTb 3ΦeHTHBHyIO pa6oTy B yCIOBnX MaKcHMaJIbHOJ 6e30NaChOCTN.
Pnno6peTne 6atapeo c eMHocTBIO, HAnboJee noXOJaIe Ipa6OuNX Ntpe6HOCTeN, nNoJIHOCTbIO
3apAnTe ee,co6IIOda yKa3aHn, H3IoKeHHbIe B pyKOBoDCTBe 6aTapeN.
Ipeuehenb 6aTaapei, OMOIOrnpoBaHHbIX IaHHO MaunHbI, PnBedeH B TaSnIe "Texnueckne xapaKTePncTNI.
- BcKn pa3 nepei nCnoJIb3OBAHHeM: - npOBepaIte coCToHHe 3apJa 6aTapeN, cJeDy yKa3aHnA M, H3IOKeHHbIM B pyKOBoDCTBe 6aTa- pen.
6.1.2 3anpaBHa macIom IЯ cMa3Hn cenn
Ipejde yem noJb3ObaTbcMaunHoi, 3anpaBte ee Maclom dIa cMa3Kn ceII. Iopadok BblnoJIHeHnI MepblipedeocTopoKHOCTn np3anpaBke Maclom H3- loKeHb IBnyHKe 7.3.
6.1.3 Поберka haTЯженяцп
Bce onepaun BBINOLHJOTc npn BbIHIO-ueHHOM ABHrataTe.
Bcerda HaneBaTe nnotbIe pa6Oue nepaTHN.
Поверпь натужени.
Натяжени явлaretс有很大,在а,пгд,在3axba-teцни на сеadingишны,3beHЯ He BbIXOДТИЗ hapablaюшen(Pnc.10).
TTO T06bl OTperyJInpoBaTb HATKHeHne cenn:
- ocna6bte raikky Kopnyca npn nmoi npnlaeraemoro KIOUa nn BHTa (Pnc. 3.A);
- Bo3dEeCTByTe Ha BnHT peryIaTopa HataJKeHnI cENn IIN Ha KOJIbQo (Pnc. 9.A) do NOnyuHnI Tpe6yEmOro HATaJKeHnI cENn;
- YdepHnBaI uHb B npHIOHrTOM noJIOHeHH, 3aTHHTe Do ynpa raHy KOpNyCa npN NOMO-
Uu npHaeraMOro KJIoua HIN 3aTAHHTe BNHT (Pnc.11.A).
He pa6otaTe c ocna6neHHo YenbIO, 4TO-6bl 3TO He npBEno K OnaCHO CHTyaun, ecnUeNb BbiJdET N3 HappaNIOx WnHbl.
BAHHO B nepBoe Bpemn (nnn nocne 3aMeHbI ueH) Heo6xOJIMo npOBODntb npOBepKn yaue obly-Horo H3-3a Heo6xOJIMOCTN NOdROHN HaTJeHnA ceHn.
6.2 IPOBEPKN B30NACHOCTN
BbINOJIHnTe cIeIyUoIe npOBepK 6e3OpaCHOCTN yIOCTOBepbTecb, YTO pe3yIbTaTbI npOBepOK COOTBeTCTByIOT daHHbIM, pINBEDeHHbIM B Ta6JInce.
IpeHde yem npnctyntb H pa6ote, Bcerda npoBepaTe 6e3onacHOCTb MaunHbl.
EeHHeBHO BbINONHnIte npOBepHy MaHHbI nepeI npImHeHem, nocne na- DeHn Hn Dpyrux yapOB, YTO6bl BbIBNTb NOBpeHdHn Hn CepBe3hbl yep6.
6.2.1 06ua npoBepHa 6e3onacHocTn
7.7 KPENEKHBIEI RAHKN BINTbI
CleTe 3a Tem, TTo6bI raiKn IN BInTbI 6bln 3aTHyTbI, IJIy yBepenHocTN B TOM, YTO MaunHa BceTa6e3onacha npi pa6ote.
-Периондуесн npOBeprYTe npOuHocTb 3aKpeJIeHHa pykoTOK.
8. BHEOUEPEDHOE TEXHNUECKOE OBCJyHKINBAHNE
8.1 BEDUJ3BE3DOYKA CEIN
IepnoDnueck npOBepaTe COCTOAnHe 3Be3doKu cen, o6paTnBunncb Ira 3TOrK OoHuaJIbHOMy DnCTPn6bHTOpny, n 3aMeHnte ee, KOrda H3HOC ppeBbcNT DOpyCTMblE PpeJebl.
He yctaHaBnBaIte HOByIO ueNb C H3HOWeHON 3Be3doUHoi HAO6OpOT.
8.2 TEXHnueECHOE OBCJYHXBAHNE NINb-HOHN
H3 coo6paHHeH 6e30nacHocTH n 3ΦΦeHTBHOCTn pa6Otbl OueHb BaHHo, YTO6bl peHyuNe npncnoc6JIeHn 6blnn XopoWIO 3aToyeHbl.
Ipn o6paueHn c uHHo H cenbIO Bcerda HaeBaHTe TOnCTbIe paOChne nepaTHN.
Heo6xOIMO BbINOJIHrTb 3aToCHy ceHH, KOrJa:
-BnD onnIOH HAnOMNHaET nbIb.
-ДЯпileHЯТpe6yeTc npILOKHTb 6OJIbUyIO cnly.
-Пиелене He npraMoe.
-YBeJIuIyBaetcBn6paIy.
Ecnn cenb HeoctatoHNo 3aToueHa, nobblwaetc npch otchoha (kickback).
BAHHO PeKOMeHdyETcBbIIOJIHrTb 3aTOUky B CNEuHaJIH3nPOBaHHom cepBvCHOM cEHTrpe, TOrda OHa 1. ByTe BblONHeHa HcNeuaJIbHOM 6OpyIDoBaHn; oBeCneuHbAUoIeM MInHMaJIbHbI Cpe3 MaTePnaIa n paBHomepHyIO 3aTOUKy BCEx peKuXx KpOMOK. 2.
8.2.1 3aMeHa nIbHoi ceEN
Heo6xOaHMo 3aMeHHTb cenb, KOrDa:
-Дина peKуцeн КрOMКИ CHNJa-etcdo5MMnIMMeHee;
-3a3Op 3BeHbEb Ha 3aKlEnKkx CInuKOM BeINK;
-CKOpOCTb NIIeHnMaMeIeHHa,IMHOKpaTHoe BbIOJIHeHne 3aTOckn He NOBbIaet CKOpOCTb NIIeHn. LcNb n3HOseHa.
BAHHO PocJIe 3aMeHbI cENn Heo6xOdmo npoBO- HIOBepKHe HaTJKeHn YaUe OblyHoro N3-3a Heo6XoDmOCTn NOrOHKn HaTJKeHn cENn.
8.3 TEXHnueCHOE OBCJyHXNBA HNE HANPABJIIOUeI SHHbI
PIMMEAHNE IpaBbHOBbINONHeNn
OcbNyHBaHnHaPabJIIOUeIuHbI Tpe6yOTcR
OCo6aKOMPeTeHcNn CneuaJIbHbI INCTpyMeHT;
13 COo6paKeHn Be3OpNaCHOCTn PpeINOHTeJIbHO
BbIOJHrTb OcbNyHBaHn Yepe3 OfNuJIbHO
dNCTpNbIoTOPa.
Bo n36eKaHne acmmMeTpnuHoro n3HOca uHbI Heo6XoIMO nepnoDnueckn nepeBopaunBaTb ee.
NaCHOCn IN BOCCTaHOBJIeHnI NEPBOHaayalbHOrO COCTOHHMaUNHbl.
Onepaun, BbINOJIHeHHbIe B HeNoJXOJaUNx DnA 3TO- ro CtpyKtypax NnH HeKBaIIuΦNcIPoBAHHbIMN IIOBm, npINBOJrK aHHyIIpOBaHIO BCEX BVIOB rapaHTHN HCHMaIOT C n3rTOBNTeJI BCI0 OTBETCTBeHHOCt b N o6ra3aTeJIbCTBa.
ToIbko aBTopn3ObaHHbIe cepBnchIbe IeHTpbI MOryT BbIOJNHaTb rapaHTnHbI peMOHT n 06cJyKnBaHne.
- ABTOPIN3OBAHHbIe cepBnCHbIe ueHTpbl nCIOJb3yIOT TOJIbKO opINHnAJIbHbIe 3aIacHbIe qactN. OpiHnHaJIbHbIe 3aIacHbIe qactN i DOIOJIHnTeJIbHO o6OpyIDOBaHHe 6blI IN CNEuHaJIbHO pa3pa6OtaHbI dJI MaunH DaHHOrToTnA.
- NcnoIb3ObaHne HeopnHaJIbHbIX 3aNaChbIX YacTeN IdoNoJIHNTeJIbHO O6OpyOBAHn He yTBePKeDeHO H3rOToBHTeJIem N npNbOJNT K yTpAte DeiCTBnra Ra-paHTn.
- PeKOMeHnyETcRa3BRODOTBO3NtB MaWHy B aBTopn3OBaHHbI CepBnCHbI ueHTp Ira O6ClyKHNBaHHaYxOda HnpOBepH NcnpaBHOCTn PpeOXPaHITeNbHbIX yCTPOINCTB.
10. INPEMEUEHNE ITPAHCNOPTNPOBHA
KaHbI pa3, KOrda Tpe6yeTcnepeBnHyTb, NOHrTb, NpeBE3TN HJN HAKIOHNb MaunHy, CJeDyET:
- OctaHOBnTe MaunHy;
-IOHHNTecbOCTaHOBA cenn; - N3BLeKeHte 6aTapeIO n3 COOTBeTCTByIOeero rHe3da n 3apAInTe ee;
- UcTaHOBnTe KOHx HAnpaBraIooJIe NIIbI;
- POnOxHnTe, nOKa DnRatB octbHeT;
- HaJeHbTe pIoTHbIe pa6OuHe nepUaTkn;
Bo3bMHTe MaunHy NCHIOHTeBHO 3a pyKoTKn HnPaBTe WnHy B HaPpABLeHn, PpOTHBOIOnJHOM HaPpABLeHnIO DnHexHn.
PnpeBO3Ke MaunHbHa aBTOtpaHcnpTe Heo6xO- dmo:
3aKpeNtB MaunHy npn NOMOu COOTBeTCTByUoX TpocOB HnIeNei.
paonolooHTb ee TaKIM O6pa3OM,TO6bI OHa Hn DnKOr He npedctabnaIOnaCHOCTN.
11. CEPBNUCHOE OBCJLYHINBAHNE IN PEMOH
B 3TOM pyKOBODCTBE n3I0KeHb BCE yHa3aHnA, Heo6XOIMMbIe Iy npabJIeHnMaunHOI nIpaBnIB-HORo BblIOJIHeHnO CCHOBhIX ONepaI INTexHueCKOro 6CbIyHNBaHn, KOToPOe DOnJHe H BblIOJIHTb NOLb3OBATEJI. Iy BblIOJIHeHn BCEx DeIcTBNI POpeRyIInpOBKe I O6ClyKINBaHnIO, He OINCAHHbIX B 3TOMpyKOBODCTBe, O6paauTeCB K BaWemy DInCTPbIO-TOpTy IIN B CneuaIIIN3npOBaHHbI CepBNCbHI cEHTp, pacnoIaraoIIN PNOrTOBJIeHHbIM NepcoHaIOM INobopydOBaHnEM, Heo6XoDNIMbIM Iy IpaBnIBHO RBOIIOJIHeHn pa60TbI, NOIdepKaHnYPOBnI 630-
12. YCJIOBnRA TAPAHTN
IapaHTNIOKpbIbAE T BCE DepeKtbl MaTePnaIOB n 13ROTOBJIeHn. Nolb3OBaTeNb DOJIKeH 6yJET CkpyNJe3HO CLEDOBaTb BCEM yHa3AHnM, N3IOXHeHHbIM B npINIOXeHHoDOKymENTaun.
TapaHTnHe NOKpbIbAeT yuepe6,BbI3BaHHbI:
HeIOCTaTOHbIM O3HaKOMJIeHNEM C COpOBODITeIbHOJ DOKymeHTaUnei.
- HeBHHMaTeJIbHOCTbIO.
- HenpaBnIbHbIMN IIN Hepa3peWeHHbIMN 3KcNlyaTaUeN MOHTaXOM.
- IcnoIb3ObaHnem HeOpuHaHaJIbHbIX 3aunacteI.
- IcnoIb3ObaHnEM dOnoJIHnTeJIbHbIX npncnocO6JIeHH, He nocTaBHeHHbIX Hn He yTbePckDeHHbIX U3-rotOBHTeIeM.
TapaHTaKaKe He pacnpoocTaPahReTcHa:
- ECTECTBENHbI IN3HOC TaKHX pacXoDhIx MaTePnaLIOB, KaK peKHyUe npncnOco6JeHHra, npedoxpaHITeJIbHbIe 60JTbl.
- ECTECTBHeHHbI IN3HOC.
IpaBa nokyNaTeJIaUHuaeT 3aKoHOdaTeJIbCTBO ero cTpaHbI. HactOraJra rapAHTnHnKaH He orpaHnUBAe T npab nokyNaTeJI, npedYCMOTpeHHbIX 3aKoHaMn erO cTpaHbI.
13. TABJIUNCA TEXHNUECKOTO OBCJUYKINBAHNA
6.4 PRACOVNA CINNOST
7.7 FIXACNÉ SKRUTKY A MATICE
- Uchovávajte skrutky a matice dotiahnute, aby ste si mohli byt stale isti bezpečnou cinnostou stroja.
- Pravidelne kontrolujte riadne upevnenie rukovati.
8. MIMORIADNA UDRZBA
8.1 HNACIE OZUBENE KOLESO RETAZE
INNEHALLSFÖRTECKNING
- ALLMÄN INFORMATION 1
- SÄKERHETSNORMER 2
- LÄRA KÄNNA MASKINEN 6
7.6 APPARATENS OCH SVARDETS SMÖRJHAL
UK DECLARATION OF CONFORMITY
(Supply of Machinery (Safety) Regulations 2008, S.I. 2008 No. 1597, Annex II, part A)
- The company: ST. S.p.A. - Via del Lavoro, 6-31033 Castelfranco Veneto (TV) - Italy
- Hereby declares under its own responsibility that the machine (function): Battery powered pole-mounted pruner (felling, bucking, delimbing trees)
a) Homologation type: CS 100 Li 20 A - CS 100 Li 20 S
c) Serial number: 23A CHA000001 ÷ 99L CHA999999
d) Engine: battery-operated
- Conforms to UK Regulations:
S.I. 2008/1597 - Supply of Machinery (Safety) Regulations 2008
e) Notified body:
N. 0359 - Intertek Testing & Certification Ltd
Intertek House, Cleeve Road, Leatherhead, Surrey, KT22 7SA, United Kingdom
f) EC type-examination: UK-MCR-00137
S1. 2001/1701 - Schedule 8 - Noise Emission in the Environment by Equipment for use Outdoors Regulations 2001
S.I. 2016/1091 - Electromagnetic Compatibility Regulations 2016
- S.I. 2012/3032 - The Restriction of the Use of Certain Hazardous Substances in Electrical and Electronic Equipment Regulations 2012
- Reference to harmonised standards:
EN 62841-1:2015 + AC:2015
EN 62841-4-1:2020
ENIEC55014-1:2021
EN IEC 55014-2:2021
ENIEC63000:2018
g) Measured sound power level: 97.5 dB(A)
h) Guaranteed sound power level: 101 dB(A)
k) Net power installed:
n) Person authorised to compile the technical file:
o) Castelfranco Veneto, 01/02/2023
ST.S.p.A.
Via del Lavoro, 6
31033 Castelfranco Veneto (TV) - Italia
CEO Stiga Group
Sean Robinson

UK Importer: ST
STIGALTD
Unit 8, Bluewater Estate Plympton,
Devon, PL7 4JH, England

| FR (Traduction de la notice originale) | EN (Translation of the original instruction) | DE (Ubersetzung der Originalbetriebsanleitung) |
| Déclaration CE de Conformité(Directive Machines 2006/42/CE, Annexe II, partie A)1. La Société2. Déclaré sous sa propre responsabilité que la machine : Scie à chaine alimentée par batterie portative, abattage/tronconnage/ébranchage d'arbresa)Type / Modèle de Basec)Seried)Moteur: batteried3. Est conforme aux prescriptions des directives :e) Organisme de certificationf) Examen CE du Type4. Renvoy aux Normes harmoniséesg) Niveau de puissance sonore mesureh) Niveau de puissance sonore garantiik) Puisance installee)Personne habilitée à établier le Dossier Technique :o) Lieu et Date | EC Declaration of Conformity(Machine Directive 2006/42/EC, Annex II, part A)1. The Company2. Herby declares under its own responsibility that the machine: Portable battery powered chainsaw,Felling/bucking/delimbing treesa) Type / Base Modelc) Serial numberd) Motor: battery-operated3. Conforms to directive specifications:e) Certifying bodyf) EC examination of Type4. Reference to harmonised Standardsg) Sound power level measuredh) Sound power level guaranteedk) Power installedn) Person authorised to create the Technical Folder: o) Place and Date | EG-Konformitätserklärung(Maschinenrichtlinie 2006/42/EG, Anhang II, TellA)1. Die Gesellschaft2. Erikt auf eigene Verantwortung, dass die Maschine: Tragbare batterietriebeneKettensäge, fällen/schneiden/entasten vonBäumena) Typ / Basismodellc) Seriennummerd) Motor: Batterie3. Den Anforderungen der folgenden Richtlinien entspricht:e) Zertifizierungsstellef) EG-Baumusterprüfung4. Bezugnahme auf die harmonisierten Normeng) Gemessener Schalleleistungspeggelh) Garantieter Schalleleistungspeggelk) Installierte Leistungn) Zur Verfassung der technischen Unterlagenbefugte Person:o) Ort und Datum |
| NL (Vertaling de voraanspronkelijke gebruiksaanwijzing)EG-verklaring van overeenstemming(Richtlijn Machines 2006/42/CE, Bijlage II, del A)1. Het bedrif2. Verkaart onder zijn eigen verantwoordelijkheid dat de machine: Kettingzaag met accuvoeding, vellen/snijden/noosenielen van bomena) Type / Basismodelc) Serienummerd) Motor: accu3. Voldoet aan de specifications van de richtlijnen:e) Certificatie-instituutf) EG-onderzoek van het Type4. Verwijzing maar de Geharmoniseerde normeng) Gemeten niveen van geluidsvermogenh) Gegerandeerd niveau van geluidsvermogenk) Geinstalleerd vermogenn) Bevoedperson voor het opstellen van het Technisch Dossiero) Plaats en Datum | ES (Traduzione del Manual Original)Declaración de Conformidad CE(Directiva Máquinas 2006/42/CE, Anexo II, parte A)1. La Empresa2. Declara bajo su propria responsabilitad que la máquina: Motosierra de cadena alimentada por bateria portáltila, tala/seccionamento/poda de árbolesa) Tipo / Modelo Basec) Matriculad) Motor: bateria3. Cumple con las espécificaciones de las directivas:e) Ente certificadorf) Examen CE del Tipo4. Referencia a las Normas armonizadasg) Nivel de potência sonora medidoh) Nivel de potência sonora garantizoak) Potencia instaladan) Persona autorizada a realizar el Manual Técnico: o) Lugar y Fecha | PT (Traduição do manual original)Declaração CE de Conformidade(Directiva de Máquinas 2006/42/CE, Anexo II, parte A)1. A Empresa2. Declara sob apropria responsabilitadque amáquina: Motosserra alimentada por bateria portáltila, abate/seconamento/desramaçãoa) Tipo / Modelo Basec) Matriculad) Moto: Bacteria3. É conforms à as espécíficações das direitivas:e) Úrgão certificadorf) Exame CE do Tipo4. Referência às Normas harmonizadasg) Nivel medio de potência sonorah) Nivel garantido de potência sonorak) Potência instaladan) Pessoa autorizada a elaborar o CadernoTécnicoo) Local e Data |
| EL (Metáφροηtou πρωτότου τυν Μθημών χρήσηςEK-Dιλιωπούσμρρρωσης(Obηγia Mmχανύν 2006/42/CE, Ποράρτημί Α, μέροςΑ)1. H Etariρia2. Διλιωνει πτεύδυν στη Μιχανή: Φόρητολοιστρούν μιταρίας,Kαταρβρημίκαταρικόντη κλοδιδιν δέντρωμa) Túroç / Baixikov Monitópolo3. Apiθός μητρώνd) Kivηρός μητρών4. Σμμορρρόνεται με τέροβαγραές τηςobηγίας:e) Oργανιαύς ποτοποίŋηςf) Εξταση CE tou Túròu4. Aνοφροσa στούς Kevoviouρίας ευφαύνηςg) Στάβμι μερτρούσεις ακούτοικις iαχούςh) Στάβμι ευγμύνενης ακούτοικις iαχούςi) ᵋκαταστην έγμεύνης οκαύτοικις iαχούςj) Εκυσιαστην έγμεύνης οκαύτοικις iαχούςo) Εκυσιαστην έγμεύνης οκαύτοικις iαχούςo) Ετυσιαστην έγμεύνης οκαύτοικις iαχούςo) Tývικου Φύλαβίουo;o) Tótroç Kai Xóvóç | TR (Orijinal Talimatariin Tercümesi)AT Uygunluk Beyani(2006/42/CE Makine Direktifi, Ek II, böümüm A)1. Sirket2. Şahsi sorumluluğ-altinda asaçidaki makinenin:Batarya beslemeli tasinabilir zincirli testere,Açáclarin kesilip devrilmési(paralara,böünnmési/dallarmin budanmasi)a) Tip / Standart modelc) Sicil numarasadi) Motor:bataya3. Asaçidaki direktiflerin özellekilerine uygun oldu gunu byenan emdektedir:sertifikalandiran kurumf)... Tipi CE incelesieme4. Harmonize standartlara atifg) Ölçügen ses gucseviyesiHaragiatis edilen ses gucseviyesi k) Kurulu gucnj) Teknik Dosayi olusturnaya yetkili:iksi:o) Yer ve Tarih | MK (Πρενοίνη ha oprinhañalnetaу latctba)Декnapaúja 3a yocorgacehoct co EU(Dímpétrna 3a maшини 2006/42/CE,Anekc II,den A)1. Kompanhija2. nizábaуba co色泽ocma liuhya odorobopnoctDeka cnéndata maшиha: motopra hi na h6aterini, Cɔobopybahe/cechéke/kactpehbe naDpa8a) Túnl / ochobnen modelnpoinzhodCTBOB) ETMKETAgnEromotap:3.Ycorgnaceno co cnéuzhiФицamite cnpoe ndekKTNBITE:di Tezzo 3a ceptnhiФицamajigfI) Tect CE 3a tnoT94.Pedepereuqui 3a yocrgacehenn hopmatnbni e) Akysthkn prinitncokx)Измеренино на зауну мoknoctS) obem ha ceehneH) oblacteño liune 3a coctababyahe naTekhnckata 6poùyopaMepto nDatym |
| NO (Overset卖出 av original bruksanvising)EF-Samsvarserklaring(Maskindirektv 2006/42/EF, Vedlegg II, del A)1.Firmae2.Erkræper à eget ansvar at maskinen: Baerbar batteridrevet kjedesag,nedfelling/kuttkvisting av træa)Type / Modelc)Serienummerd)Motor: bateri3.Oppyfler kravene i direktivene:e)Sertifiseringsorganf)EF-typeproving4.Henvising til harmoniserte standardg)Målt lydeffektnivah)Garantert lydeffektniva)k)Installer effektn)Person som har fullmakt til à utderige teknik dokumentasjon: o)Sted og dato | SV (Översätting av bruksanvising i original)EG-försakran om överensstämmele(Maskindirektv 2006/42/EG, bilaga II, de la)1.Företaget2.Försakrar à eget ansvar att maskinenBatteridrivén bärbar kedjesag,fällning/kapngrenkllipinning av träda)Type / Basmodellc)Seriennummerd)Motor: bateri3.Overensstämmer med foreskriftna i direktivete)Intysgorsorgan_Annmäl organf)EG typgodkännande4.Referens till harmoniserade standarderg)Uppmatt ljdiffektniva)h)Garanterad ljdiffektniva)k)Installer ereffektn)Auktoriserad person für upprättandev dentekniska dokumentationen: o)Ort och datum | DA (Oversätteile af den originabrugsanvising)EF-overensstammelseserklaring(Maskindirektv 2006/42/EF, bilag II, del A)1.Firmaet2. Erklaer à eget ansvar, at maskinen: Baerbar batteridreven kdesesay, faldning af træer/udskarcing af stykker/opskarcing af grene)Type / Modelc)Seriennummerd)Motor: bateri3. Er i overensstammelse medspecifikationere ifolge direktiverme: e)Certificeringsorganf)EF-typeafprøvnig4.Henvising til harmoniserede standarderg)målt lydeffektniveauh)Garanteret lydeffektniveauk)Installer ereffektn)Person, der har bemyndigelse til atudarbejdet det tekniske dossier:o)Sted og dato |
| FI (Alkuperäisten ohjelden kännös)EY-VAATIMUSTENMUKAISUUSVAKUUUTUS(Konedirektlivi 2006/42/EY, Lite II, osa A)1.Yritys2.Vakuuttta omalla vastuillaan, etta kone: Käsinnannettava akkukäytönen moottorisaha,Puiden kataminen/pilkkominen/karsinta)Tyyppi / Perusmalli)Sarjanumeroo)Moortori: akku3.On hydenmukainen seuraavien direktivienasettamien vaatimumen kanssa:e)Sertifointiyrff)EY-typpitarkastus4.Vittaus harmonisoituihin standardeihing)Mitattiä aänitehotasa)Taatuä aänitehotasa)Asennettto he9)nTeknisten asiakirjoen laatimisen valtuutettu henklik: o)Paikka ja päävämaärä | CS (Pfeklad pūvodniho návodu k používání)ES - Prohläseni o shodé(Smörnice o Strojnic nažízenich 2006/42/ES, Přilohal,ćast A)1.Společnost2.Prohlásu je vlastni odpopěžnost, ze stroj:Přenosna akumulátorová fěžová motovorová pilaKácení/rožěžaváni/odvétováni stromu a)Typ / Zákliadni modelc)Výrobní cislo d)Motor: akumulator3.Je ve shodé s nažízeními směnica;e)Certifikacni organf)ES zkouška Typu4.Odkazy na Harmonizováne normyg)Nameřenić urovečnakhustického výkonu h)Zarcená urovečnakhustického výkonu k)Instalovaný výkonnOsoba autorizovaná pro vytrověné TECHnického spisu:o)Mistro a Datum | PL (Thumaczenie instrukcji oryginalej)Deklaracja zgodnosci WE(Dyrektywa maszynowa 2006/42/WE, Zalacznik II,czěsć A)1.Spólka2.Oswiadzna na wlasno odpopiewdiazinalość, ze maszyna:Przenosna pilarka lançuchowa za zaslaniem akumulatorowym,Scinanie,obalanie/przerzynamie/okrzesywanie drzewa)Typ / Model podstawowyc)Numer seryjnydSilnik:akumulator3.Spelnla podstawowe wymogi nastepujacychDyrektyw:e)Jedostka certyfikujacaf)Badanie typu WE4.Odniesienie do Norm zharmonizawanychg)Zmierzony poziom mocy akustycznejh)Gwarantowny poziom mocy akustycznejk)Moc zaintalowan)Osoba upowszónia do zredagowania Dokumentaçji technicznej: o)Miejscowosc i data |
| HU (Eredeti hasznaliati utasits fordítása)EK-megfeleloségi nylatkozata(2006/42/EK gépiarylnyel, il. melléklet "A" rész)1.Aluïrott Vällalat2.Felelósségnek teljes tutadaban kijelenti, hagyaz alabbi gèp: Hordozható akumulátoroslancfúresz,Fák kidontésa/darabolása/gallyazása)a)Tipus / Alaptipus)c)Gyartásiz szamb)Motor: Akumulátor3.Megfele az alabbi irányelvek elórisainak:a)Tunútsó szervf)CE vizşalgat tipusa4.Hivatkozas a harmonizált szabványokra | RU (Переворо оригиньх Иструкци)Демлароча сооветствия Нормам EC(Dímpečtna o MaшинимобуroduвануN2006/42/EC,Пробожение II,часыA)1.Pindropintne2.Zámberгелюпiod coobstvenhuу obvetctbennoctbyчто мшина:Протатиная центсяпima c6batäreны питанимВалка/pazdello/kópeczka ветец дөрөөвeB)Ти/NБавая мodyльпспСпосторb'teбубяшпспдіректпВe(CentrucciрируюшпспОрганурпспОрганурпспОрганурпспОрганурпспОрганурпспОрганурпспОрганурпспОрганурпспОрганурпспОрганурпспОрганурпспОрганур? CértichiungурпспчпспОрганурпспОрганурпспОрганурпспОрганурпспОрганурпспОрганурпспОрганурпспОрганур? CértichiungурпспчпспОрганурпспОрьс; CértichiungурпспчпспОрьс; CértichiungурпспчпспОрьс; CértichiungурпспчпспОрьс; CértichiungурпспчпспОрьс; CértichiungурпспчпспОрьс; Cértichiungурпспwhite Cértichiungурпспчпс. Cértichiungурпспчпс. Cértichiungурпспчпс. Cértichiungурпспчпс. Cértichiungурпспчпс. Cértichiungурпспчпс. Cértichiungурпспчпс. Cértichiungурпc. Cértichiungурпс. Cértichiungурпс. Cértichiungурпс. Cértichiungурпс. Cértichiungурпс. Cértichiungурпс. Cértichiungурпс. Cértichiungурпс. Cértichiungурпс. Cértichiungурпс Cértichiungурпс. Cértichiungурпс. Cértichiungурпс. Cértichiungурпс. Cértichiungурпс. Cértichiungурпс. Cértichiungурпс. Cértichiungурпс. Cértichiungурпс. Otrokajtejtsmétychszintc Béepiletten teltesmétychszintc mùszaki Dosszé szerkesztésère felhatalmazottsemzemly:Ohelye és ideje | HR (Prijevod originalinh uputa)EK Izjava o sukladnosti(Direktva 2006/42/EZ o strojevima, dodatak II,dio A)1.Tyrkta:2.pod vlastimod odgovornócu izjavljuce da jestro: Prijenosna motorna lançana pila s baterjskim napajanjem, Obranje/prerezivanje/obrezivanje stabalaRvsta / Osnovnvi modelcMatićni robdMotor: baterija3.sukladan s temlinm zhitjevima direktiva:Certifikacjsko tijelofTipskoispitvanje EZ4.Primijeniye su silejedece harmonicizarenorme:gzlmjerena razina zvučne snagehajzajměcna razina zvučne snagekinstaliranagunaOsoba ovlăstena za pravljenje Tehničke datoteke:Ovjstei i datum |
| SL (Previd ozvirnih navodil) ES izjava o skladnosti (Direktiva 2006/42/ES), priloga II, del A) 1. Družba 2. podlastno odgovornostjo izjavla, da je stroj: Prenosna akumulatorska veržna zaga, podiranjee/rezanje/odstranjevanje vej a) Tip / osnovni model c) Serijska številká d) Motor: baterija 3. Skladen je z dolocili direktiv : e) Ustanova, ki izda potrdo l f) ES pregled tipa 4. Sklicoveanje na uskladjene predipse g) Izmerjen nivo vvočne moč h) Zagotovljen nivo vvočne moč k) Instalirana moč n) Oseba, pooblasčena za sestavo tehnčne knjižice: o) Kraj in datum | BS (Prijevod originalinh uputa) EZ izjava o skladnosti (Direktiva mašinama 2006/42/EZ, Prilog II, deo A) 1. Firma 2. Daje izjavu pod vastitom odgovnosću da je masina: Ručna lanžana motorna pila na bateriju, obaranje i sjeda dreva/rezanje grana a) Tip / Osnovni model c) Serijski broj d) Motor: akumulator 3. sukladna s osnovim nahtjevima direktive: e) Certifikaciono tijelo f) EZ ispitvanje tipa 4. Pozivanje na uskladene norme g) Izmjerieni nivo vvočne snage h) Garantovanji nivo vvočne snage k) Instalisana snaga n) Osoba ovlăstena za izradu tehnickhe brošure: o) Mjesto i datum | SK (Preklad povodného nadvodu na použitie) ES vyhlasenie o zhode (Smerica o Strojnjch zariadienich 2006/42/ES, Prilohä II, Čast' A) 1. Spolocnost' 2. Vyhlasije na vastnú zodpovednost', ze stroj: Prenosna akumulatorová re'tazová motorová pila, stinanie/rozrezávanie/odvetvovanie stromov a) Typ / Základný model c) Výrobné Číso l d) Motor: akumulator 3. Je v zhode s nariadeniami smernic: e) Certifikačný orgán f) Skúška typu ES 4. Odkaz na Harmonizované normy g) Nameranova urovečn akustického vykonu h) Zarucená urovečn akustického vykonu k) Inšalovaný vykon n) Osoba autorizovaná na vytvorenie Technického spisu: o) Mesto a Datum |
| RO (Traducerea manualului fabricantului) CE-Declaratie de Conformitate (Direktiva Mašini 2006/42/CE, Anexa II, parte A) 1. Societatea 2. Declarare p propria raspundenere că masina: Ferăstrau cu lanț alimentat cu baterie portabili, Doborâre/sectionare/täirea ramurilor de copaci a) Tip / Model de bază c) Numar der sele d) Motor: baterie 3. Este in conformitate cu specificaile directiver: e) Organism de certificare f) Examinare CE de Tip 4. Referinţă la Standardele armonizate g) Nivel de putere sonora măsurat h) Nivel de putere sonora garantat k) Putere instalata n) Persoană autorizata s ântocmească Dosarul Tehnic o) Locul Ş Data | LT (Originaliu instrukciju vertimas) EB atitikties deklaracija (Masinu direkttyva 2006/42/CE, Priedas II, dalis A) 1. Bendrové 2. Prisilima atsakomybe, kad jrenginys: Nesiojamas akumulatoriins gradininiis piñuklas, medziu kirtimas/pjaustymas/genéjimas a) Tipas / Bazinis Modelis c) Serijos numeris d) Variklis: baterija 3. Atitinka direktyvose pateiktas specifikacijas: e) Sertifikavimo [staiga f) CE tipo tyrimas 4. Nuoroda i suderintas Normas g) Ismatuotas garso galios lygis h) Užtikrinamas garso galios lygis k) Instaliunta galia n) Autorizuotas asmuudary technine Dokumentaciţa: o) Vieta IR Data | LV (Instrukciju tulkojums no originalvalodas) EK atbilistibas deklaracija (Direktiva 2006/42/EK par masinam, pielikums II, dela A) 1. Užjěmums 2. Uzmemoties par to pilnu atbildubu, pazijo, ka masina: Ar bateriju darbinams portafivs kēdés záglis, Koku găsana/zágăsana/atzarošana a) Tips / Bazes modelis c) Serijas numurs d) Motors: akumulators 3. Atbilst šādu direktivu prasibam: e) Sertifikacijas iestáde f) CE tipcevida pärbaude 4. Atsauce uz harmonizetiemi standartiem g) Izmeritais skapas intensitätes limenis h) Garantéais skagas intensitätes limenis k) Uststädtä jauda n) Pilinarovala darbineks, kas sagatavoja tehnisko dokumentáciu: o) Vieta un datums |
| SR (Previd originalinh uputstval) EC deklaracija o usaglašenosti (Direktiva o masinama 2006/42/EC, Prilog II, deo A) 1. Preduzće 2. Daje izjavu pod vastitom odgovnosću da je masina: Ručna lançana motorna testera na bateriju, obaranje i sjeda dreva/rezanje grana a) Tip / Osnovni model c) Serijski broj d) Motor: akumulator 3. u skladu s osnovim nahtevimă direktiva: e) Sertifikaciono telo f) EC ispitvanje tipa 4. Pozivanje na uskladne norme g) Izmereni nivo vvučne snage h) Garantovani nivo vvučne snage k) Instalisana snaga n) Osoba ovlăstena za sastavljane tehnicke brošure o) Mesto i datum | BG (Преовскаду оригиналиме Иструкши) EO dekkapaurma 3a chôtêtстбпдп (Диретгимва Машени 2006/42/EO, Рлиложенье II, чат A) 1. Дураство 2. На собстVENA OTROBOPORT DEКAPURA, чу машинота: Могорен вержени Трион ззарань с пенихама akumylaportna на батега, Сец/hаряразва на trуши/kokastрипке клонITE на дърета a) Вид / Бasmис�м поел b) Сераим Homep r) Могор: akumулаго 3. E в съютев���ы сьс ссяцфалька на діректвite: d) Сcertиши рausprан 3. Vida ütlustatud standardite 4. Vide ütlubihindamine 5. Mootor: aku | ET (Algupärase kasutusjuhendi tõge) EU vastusvusdekarlatosoon (Masinadrektiv 2006/42/EU, Lisa II, osa A) 1. Firma 2. Kinnitab omal vastutusel, et masin: Kaaskaskantav akutoitega kettsaag, Puude langetamej kärkamine/laasimine a) Tüüip / Pöhimudel c) Matrikkel d) Mootor: ak 3. Vastab direktivide nõutele: e) Kinnitav asutus f) EU tüübihindamine 4. Vide ühlustatud standardite 4. Vide ühlustatud helvömsuse tase h) Garanteerituh helvömsuse tase k) Instalserituv vómsus n) Tehnilise Lehe autoriseritud koostaja: o) Koot ja Kuupäev |
EN · The content and images in this User Manual were produced expressly for ST. S.p.A. and are protected by copyright - any unauthorised reproduction or modification to the document, either partially or in full, is prohibited.