CS 300e - Saw STIGA - Free user manual and instructions
Find the device manual for free CS 300e STIGA in PDF.

| Product type | Cordless electric chain saw for pruning |
| Brand | Stiga |
| Model | CS 300e |
| Power source | Lithium-ion battery (2 batteries required) |
| Main functions | Pruning, cutting wood (logs, trunks), felling |
| Chain brake | Yes, anti-kickback safety |
| Chain lubrication | Automatic, built-in reservoir (biodegradable oil recommended) |
| Guide bar | Removable, with groove and sprocket nose |
| Chain | Toothed, with safety links limiting kickback |
| Safety | Front hand guard (brake activation), throttle lock, anti-kickback protection, stop button |
| Routine maintenance | Cleaning after use, checking chain tension, filling oil, cleaning lubrication holes |
| Periodic maintenance | Sharpening or replacing chain, checking sprocket, turning guide bar |
| Storage | Dry place, sheltered, temperature -20°C to 85°C (machine), battery between 0°C and 60°C |
| Battery charging | Directly on the machine (charging base) or with external charger |
| Compatible accessories | Additional batteries, charger, different guide bars and chains |
| Intended use | Single operator, for cutting wood only (no metal, plastic, etc.) |
| Warranty | Defects in materials and workmanship, excluding normal wear and improper use |
Frequently Asked Questions - CS 300e STIGA
User questions about CS 300e STIGA
0 question about this device. Answer the ones you know or ask your own.
Ask a new question about this device
Download the instructions for your Saw in PDF format for free! Find your manual CS 300e - STIGA and take your electronic device back in hand. On this page are published all the documents necessary for the use of your device. CS 300e by STIGA.
USER MANUAL CS 300e STIGA
EN Battery powered chainsaw for tree service OPERATOR'S MANUAL
WARNING: read thoroughly the instruction booklet before using the machine.

natural_image
Mechanical assembly diagram showing gear and chain components (no text or labels)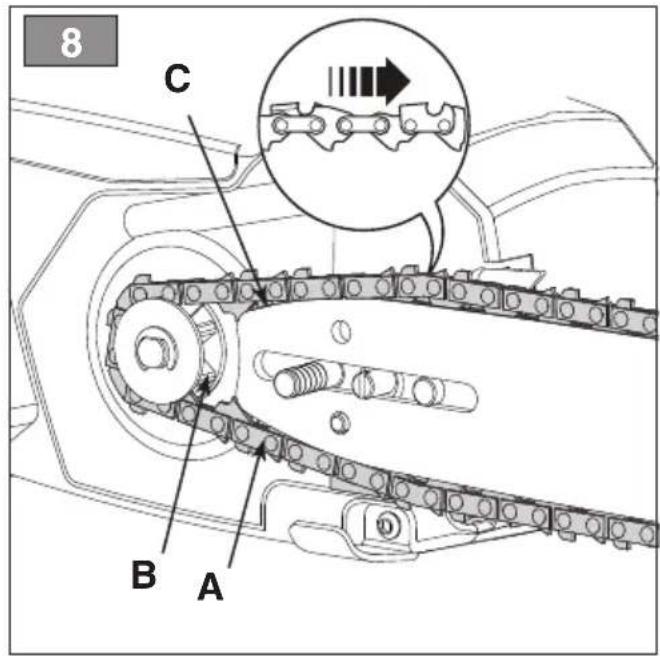
natural_image
Illustration of a hand using a chain to interact with a gear (no text or symbols)
natural_image
Line drawing of a person using a chain to lift a tree stump, no text or symbols present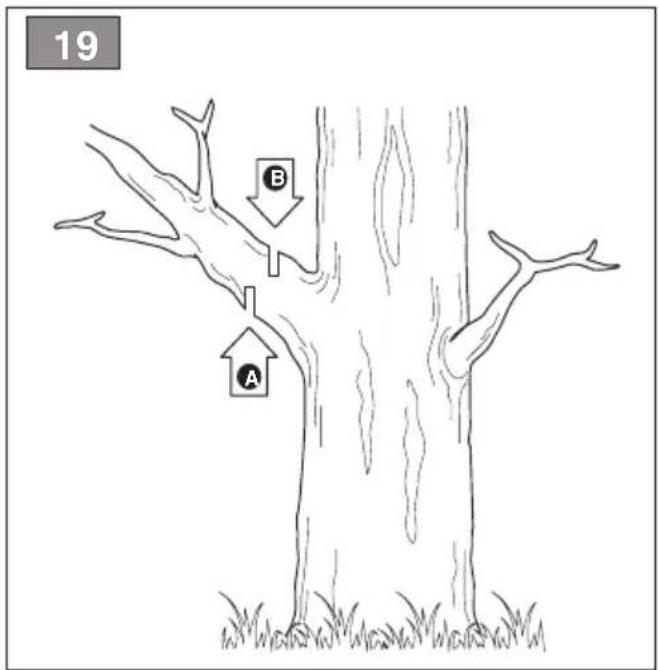
flowchart
graph TD
    A["Brain"] --> B["Warning: Inverted Triangle"]
    A --> C["Warning: Inverted Triangle"]
    A --> D["Warning: Inverted Triangle"]
    A --> E["Warning: Inverted Triangle"]
    A --> F["Warning: Inverted Triangle"]
    A --> G["Warning: Inverted Triangle"]
    style A fill:#f9f,stroke:#333
    style B fill:#ccf,stroke:#333
    style C fill:#ccf,stroke:#333
    style D fill:#ccf,stroke:#333
    style E fill:#ccf,stroke:#333
    style F fill:#ccf,stroke:#333
    style G fill:#ccf,stroke:#333
natural_image
Illustration of hands using a chain saw to cut a piece of material, with a numbered label '25' in the top-left corner (no text or symbols on the diagram itself)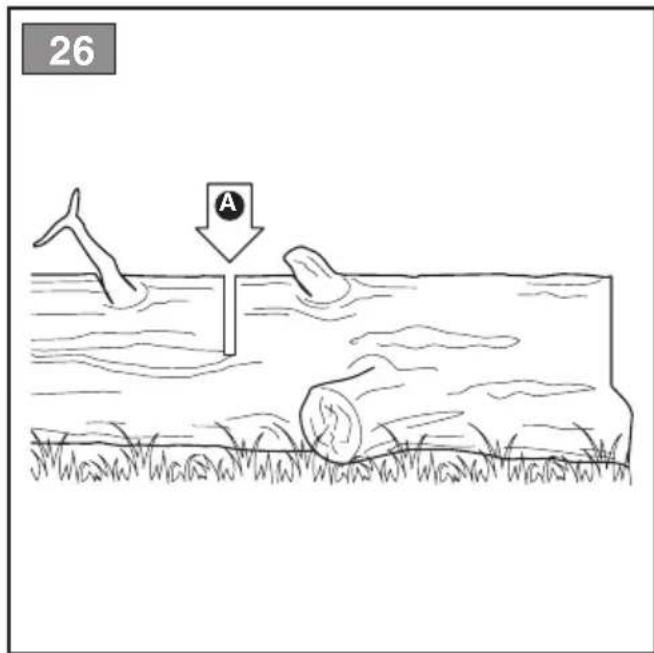
natural_image
Line drawing of a person using a power saw in a forest setting (no text or symbols)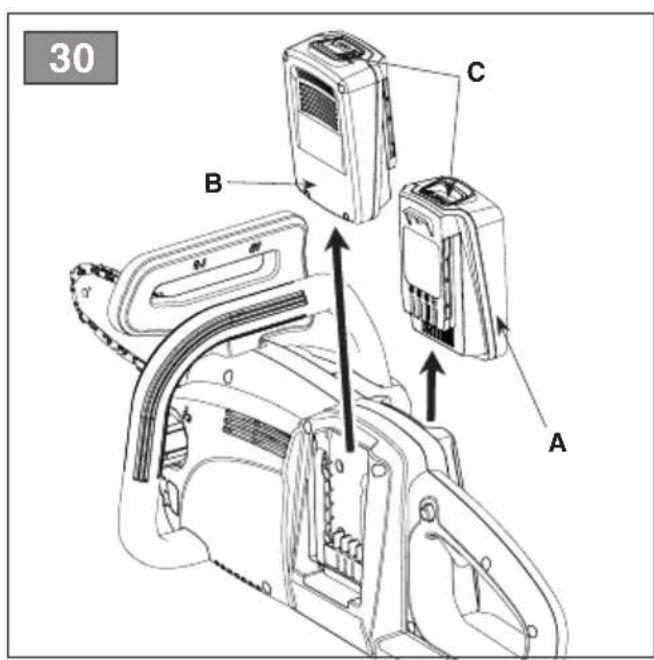
natural_image
Line drawing of a rectangular electronic device with a port and label '35' (no text or symbols on the device itself)
natural_image
Line drawings of three different electronic devices with plug connectors and power connections (no text or symbols)[19] Batarya grubu, mod
ENGLISH - Translation of the original instruction ...... EN
6. USO DELLA MACCHINA
4.2 MONTÁŽ NABÍJECÍ ZÁKLADNY (OBR. 3)
6.4 PRACOVNÍ ČINNOST
7.4 SM∅REHULLER I MASKINEN OG I SVÆRDET
- XEIPISTHPIA EΛΕΓΧΟΥ 9
- GENERAL ASPECTS....1
- SAFETY REGULATIONS....2
- GETTING TO KNOW THE MACHINE......6
3.1 Description of the machine and planned use....6
3.2 Main components 7
3.3 Identification label 7
3.4 Safety signs 7
- ASSEMBLY....8
4.1 UNPACKING 8
4.2 Assembly of the charging DOCK (Fig. 3) 8
4.3 Assembly of the Rail for wall fixing (Fig. 4)....8
4.4 Assembly of the guide bar and toothed chain 8
- CONTROLS....9
5.1 Throttle trigger lever (Fig. 14.A)....9
5.2 Interlock BUTTOM (Fig. 14.B)....9
5.3 Chain brake....9
- USING THE MACHINE....9
6.1 Preliminary procedures 9
6.2 Safety checks....10
6.3 Start-up 10
6.4 Working....11
6.5 Forestry work 11
6.6 Stop 12
6.7 After use....12
- ROUTINE MAINTENANCE 13
7.1 General information....13
7.2 Topping up the chain oil tank....13
7.3 Chain catcher....13
7.4 Machine and bar lubrication holes ..... 13
7.5 Nuts and bolts....13
7.6 Cleaning....14
7.7 Battery 14
- OCCASIONAL MAINTENANCE....15
8.1 Chain drive sprocket 15
8.2 Maintenance of the toothed chain ..... 15
8.3 Guide bar maintenance....15
- STORING 15
9.1 Storing the machine 15
9.2 Storing the battery....15
-
HANDLING AND TRANSPORTATION ..... 16
-
ASSISTANCE AND REPAIRS....16
12.WARRANTY COVERAGE 16
13.MAINTENANCE TABLE.... 17 - TROUBLESHOOTING.....17
- ATTACHMENTS ON REQUEST 19
15.1 Battery (Fig. 35) ...... 19
15.2 Battery charger (Fig. 36) ...... 19
15.3 Bars and chains 19
1. GENERAL ASPECTS
1.1 HOW TO READ THE MANUAL
Some paragraphs in the manual contain important information regarding safety and operation and are emphasized in this manner:
NOTE or IMPORTANT These give details or further information on what has been previously indicated and aim to prevent damage to the machine or cause other damage.
The symbol highlights danger. Failure to observe the warning can lead to the risk of injury to oneself and others and/or damage.
The paragraphs inside a grey dotted frame refer to optional features not available on all the models referred to in this booklet. Check if the characteristic is on this model.
Whenever reference is made to a position on the machine "front", "back", "left" or "right" hand side, this refers to the operator's working position.
1.2 REFERENCES
1.2.1 Figures
The figures in these instructions for use are numbered 1, 2, 3, etc.
The components indicated in the figures are identified with letters A, B, C, and so on.
Reference to component C in figure 2 is indicated with the wording: "See fig. 2.C" or simply "(Fig. 2.C)".
The figures are given as a guide only.
The actual pieces can differ from those illustrated in this document.
1.2.2 Titles
The manual is divided into chapters and paragraphs. The title of paragraph "2.1 Training" is a subtitle of "2. Safety regulations". References to titles or paragraphs are marked with the abbreviation chap. or par. and the relevant number. Example: "chap. 2" or "par. 2.1."
2. SAFETY REGULATIONS
2.1 GENERAL SAFETY GUIDELINES FOR POWER TOOLS
Read all safety warnings and all instructions and specifications provided with this power tool. Failure to follow the warnings and instructions may result in electric shock, fire and/or serious injury.
Save all warnings and instructions for future reference.
The term “power tool” in the warnings refers to your battery-operated (cordless) power tool.
1) Work area safety
a) Keep the work area clean and well lit. Cluttered and dark areas invite accidents.
b) Do not operate power tools in explosive atmospheres, such as in the presence of flammable liquids, gases or dust. Power tools create sparks which may ignite the dust or fumes.
c) Keep children and bystanders away while operating a power tool. Distractions can cause you to lose control.
2) Electrical safety
a) Power tool plugs must match the outlet. Never modify the plug in any way. Do not use any adapter plugs with earthed (grounded) power tools. Unmodified plugs and matching outlets will reduce risk of electric shock.
b) Avoid body contact with earthed or grounded surfaces, such as pipes, radiators, ranges and refrigerators. There is an increased risk of electric shock if your body is earthed or grounded.
c) Do not expose power tools to rain or wet conditions. Water entering a power tool will increase the risk of electric shock.
d) Do not abuse the cord. Never use the cord for carrying, pulling or unplugging the power tool. Keep cord away from heat, oil, sharp edges or moving parts. Damaged or entangled cords increase the risk of electric shock.
e) When operating a power tool outdoors, use an extension cord suitable for outdoor use. Use of a cord suitable for outdoor use reduces the risk of electric shock.
f) If operating a power tool in a damp location is unavoidable, use a residual current device (RCD) protected supply. Use of an RCD reduces the risk of electric shock.
3) Personal safety
a) Stay alert, watch what you are doing and use common sense when operating a power tool. Do not use a power tool while you are tired or under the influence of drugs, alcohol or medication. A moment of inattention while operating power tools may result in serious personal injury.
b) Use personal protective equipment. Always wear eye protection. Protective equipment such as a dust mask, non-skid safety shoes, hard hat or hearing protection used for appropriate conditions will reduce personal injuries.
c) Prevent unintentional starting. Ensure the switch is in the off-position before connecting to power source and/or battery pack, picking up or carrying the tool. Carrying power tools with your finger on the switch or energising power tools that have the switch on invites accidents.
d) Remove any adjusting key or wrench before turning the power tool on. A wrench or a key left attached to a rotating part of the power tool may result in personal injury.
e) Do not overreach. Keep proper footing and balance at all times. This enables better control of the power tool in unexpected situations.
f) Dress properly. Do not wear loose clothing or jewellery. Keep your hair and clothing away from moving parts. Loose clothes, jewellery or long hair can be caught in moving parts.
g) If devices are provided for the connection of dust extraction and collection facilities, ensure these are connected and properly used. Use of dust collection can reduce dust-related hazards.
h) Do not let familiarity gained from frequent use of tools allow you to become complacent and ignore tool safety principles. A careless action can cause severe injury within a fraction of a second.
4) Power tool use and care
a) Do not force the power tool. Use the correct power tool for your application. The correct power tool will do the job better and safer at the rate for which it was designed.
b) Do not use the power tool if the switch does not turn it on and off. Any power tool that cannot be controlled with the switch is dangerous and must be repaired.
c) Disconnect the plug from the power source and/or remove the battery pack, if detachable, from the power tool before making any adjustments, changing accessories, or storing power tools. Such
preventive safety measures reduce the risk of starting the power tool accidentally.
d) Store idle power tools out of the reach of children and do not allow persons unfamiliar with the power tool or these instructions to operate the power tool. Power tools are dangerous in the hands of untrained users.
e) Maintain power tools and accessories. Check for misalignment or binding of moving parts, breakage of parts and any other condition that may affect the power tool's operation. If damaged, have the power tool repaired before use. Many accidents are caused by poorly maintained power tools.
f) Keep cutting tools sharp and clean. Properly maintained cutting tools with sharp cutting edges are less likely to bind and are easier to control.
g) Use the power tool, accessories and tool bits etc. in accordance with these instructions, taking into account the working conditions and the work to be performed. Use of the power tool for operations different from those intended could result in a hazardous situation.
h) Keep handles and grasping surfaces dry, clean and free from oil and grease. Slippery handles and grasping surfaces do not allow for safe handling and control of the tool in unexpected situations.
5) Battery tool use and care
a) Recharge only with the charger specified by the manufacturer. A charger that is suitable for one type of battery pack may create a risk of fire when used with another battery pack.
b) Use power tools only with specifically designated battery packs. Use of any other battery packs may create a risk of injury and fire.
c) When battery pack is not in use, keep it away from other metal objects, like paper clips, coins, keys, nails, screws or other small metal objects, that can make a connection from one terminal to another. Shorting the battery terminals together may cause burns or a fire.
d) Under abusive conditions, liquid may be ejected from the battery; avoid contact. If contact accidentally occurs, flush with water. If liquid contacts eyes, additionally seek medical help. Liquid ejected from the battery may cause irritation or burns.
e) Do not use a battery pack or tool that is damaged or modified. Damaged or modified batteries may exhibit
unpredictable behaviour resulting in fire, explosion or risk of injury.
f) Do not expose a battery pack or tool to fire or excessive temperature. Exposure to fire or temperature above 130 °C may cause explosion. NOTE The temperature „130 °C“ can be replaced by the temperature „265 °F“.
g) Follow all charging instructions and do not charge the battery pack or tool outside the temperature range specified in the instructions. Charging improperly or at temperatures outside the specified range may damage the battery and increase the risk of fire.
6) Service
a) Have your power tool serviced by a qualified repair person using only identical replacement parts. This will ensure that the safety of the power tool is maintained.
b) Never service damaged battery packs. Service of battery packs should only be performed by the manufacturer or authorized service providers.
2.2 SPECIFIC SAFETY RULES FOR CHAINSAWS AND ELECTRIC CHAINSAWS.
a) Keep all parts of the body away from the saw chain when the chain saw is running Before you start the chain saw, make sure the saw chain is not contacting anything.
A moment of inattention while operating chain saws may cause entanglement of your clothing or body with the saw chain.
b) Always hold the chain saw with your right hand on the rear handle and your left hand on the front handle. Holding the chain saw with a reversed hand configuration increases the risk of personal injury and should never be done.
c) Hold the chaisaw by insulated gripping surfaces only, because the chainsaw may contact hidden wiring. Saw chains contacting a "live" wire may make exposed metal parts of the chain saw "live" and could give the operator an electric shock
d) Wear safety glasses protection. Further protective equipment for hearing, head, hands, legs and feet is recommended The wearing of protective clothing will reduce accidents caused by hurled workpieces and accidental contact with the toothed chain.
e) Do not operate a chain saw in a tree, on a ladder, from a rooftop, or any unstable
support. Operation of a chain saw in this manner could result in serious personal injury.
f) Always keep proper footing and operate the chain saw only when standing on fixed, secure and level surface. Slippery or unstable surfaces may cause a loss of balance or control of the chain saw..
g) When cutting a limb that is under tension, be alert for spring back. When the tension of the wood fibres is released, the spring loaded limb may strike the operator and/or throw the chain saw out of control..
h) Use extreme caution when cutting brush and saplings. The slender material may catch the saw chain and be whipped toward you and/or pull you off balance.
i) Carry the chainsaw by the front handle with the chain saw switched off and away from your body. When storing or transporting a chainsaw always use the guide bar cover. Proper handling of the chain saw will reduce the likelihood of accidental contact with the moving saw chain.
j) Follow the instructions concerning lubrication, chain tension and changing the bar and chain. Chains with incorrect tension and lubrication can break and increase the risk of kickback.
k) Cut wood only. Do not use the chainsaw for purposes for which it is not intended. For example: do not use an chainsaw for cutting metal, plastic, masonry or other non-wood materials. Using the chainsaw for operations other than those intended could result in a hazardous situation.
I) Do not attempt to fell a tree until you have an understanding of the risks and how to avoid them. Serious injury could occur to the operator or bystanders while felling a tree.
m) Follow all instructions when clearing jammed material, storing or servicing the chain saw. Make sure the switch is off and the battery pack is removed. Unexpected actuation of the chain saw while clearing jammed material or servicing may result in serious personal injury.
n) Recommendation that the first-time user should, as a minimum, practise cutting logs on a saw-horse or cradle.
o) Recommendation to have sharpening and maintenance of the saw chain performed by authorised service centres.
p) Keep handles dry, clean and free from oil and grease. Greasy and oily handles are slippery and can cause loss of control.
2.3 CAUSES OF KICKBACK AND OPERATOR PROTECTION
Kickback may occur when the nose or tip of the guide bar touches an object, or when the wood closes in and pinches the saw chain in the cut.
Tip contact in some cases may cause a sudden reverse reaction, kicking the guide bar up and back towards the operator.
Pinching the saw chain along the top of the guide bar may push the guide bar rapidly back towards the operator.
Either of these reactions may cause you to lose control of the saw which could result in serious personal injury. Do not rely exclusively upon the safety devices built into your saw. As a chain saw user, you should take several steps to keep your cutting jobs free from accident or injury.
Kickback is the result of chain saw misuse and/or incorrect operating procedures or conditions and can be avoided by taking proper precautions as given below:
a) Maintain a firm grip, with thumbs and fingers encircling the chain saw handles, with both hands on the saw and position your body and arm to allow you to resist kickback forces. Kickback forces can be controlled by the operator, if proper precautions are taken. Do not let go of the chain saw.
b) Do not overreach and do not cut above shoulder height. This helps prevent unintended tip contact and enables better control of the chain saw in unexpected situations.
c) Only use replacement bars and chains specified by the manufacturer. Incorrect replacement guide bars and saw chains may cause chain breakage and/or kickback.
d) Follow the manufacturer's sharpening and maintenance instructions for the saw chain.
Decreasing the depth gauge height can lead to increased kickback.
- Techniques for using the electric chainsaw (battery-operated)
Always observe the safety regulations and use the most suitable cutting techniques according to the work to be performed, following the instructions and examples in the user instructions.
- Safe carrying of the electric chainsaw (battery-operated)
Whenever the machine is to be handled or transported you must:
– turn off the motor, wait for the chain to stop and unplug the machine from the mains;
– apply the protection bar cover;
– only hold the machine using the handles and position the bar in the opposite direction to that used during operation.
When using a vehicle to transport the machine, position it so that it can cause no danger to persons and fasten it firmly in place.
- Recommendations for first-time users
Before felling or delimbing for the first time, make sure:
– to have been specifically trained to use this type of equipment;
– to have carefully read the safety regulations and user instructions contained in this manual;
- you practise first on logs on the ground or attached to trestles, in order to get familiar with the machine and the most suitable cutting techniques.
- Handling and correct use of battery-operated power tools
a) Make sure that the machine is switched off before inserting the battery. Inserting a battery in an electric device which is switched on can cause accidents.
b) Charge battery packs only with the chargers recommended by the manufacturer. Battery chargers are generally specific for each battery type; use with other types can cause fire risks.
c) Use only batteries specifically designed for your power tool. The use of other batteries may cause injuries and fire risks.
d) Keep all unused batteries at a distance from paper clips, coins, keys, nails, screws or other small metal objects as contact with the same can cause short circuits. Short circuits between battery contacts can lead to explosion or fires.
e) Batteries in poor condition can cause liquids to leak. Avoid contact with the liquid. In the case of accidental contact flush with water. If the liquid comes into contact with the eyes, also seek medical advice. Liquid leaking from the battery may cause skin irritation or burns.
f) Check that the accumulator is in good condition and there are no signs of damage. Do not use the device with a damaged or worn accumulator.
2.4 BATTERY / BATTERY CHARGER
ATTENTION
The following safety rules complement the safety rules contained in the battery charger manual.
- Only use battery chargers recommended by the manufacturer to recharge batteries. An inadequate battery charger may cause electric shock, overheating or corrosive liquid to leak from the battery.
- Use only batteries specifically designed for your power tool. The use of other batteries may cause injuries and fire risks.
- Keep all unused batteries at a distance from paper clips, coins, keys, nails, screws or other small metal objects as contact with the same can cause short circuits. Short circuits between battery contacts can lead to explosion or fires.
- Never use the battery charger in environments in the presence of vapours, flammable substances or on easily flammable surfaces such as paper, fabric, etc. The battery charger heats up during recharging and may cause a fire.
- When transporting batteries, make sure the contacts never come into contact with each other and never use metal containers to transport them.
2.5 PROTECTING THE ENVIRONMENT
Safeguarding the environment must be a relevant and priority aspect of machine use, of benefit to the community and the environment we live in.
- Avoid being a disturbance to the neighbourhood. Use this machine at reasonable times of the day only (not early morning or late evening when the noise could cause disturbance).
- A certain amount of chain lubricating oil is released into the environment when the machine is running, so only use biodegradable oils made specifically for this use. Use of a mineral oil or motor oil causes serious damage to the environment.
- Comply with local regulations for the disposal of packaging, deteriorated parts or any elements with a strong environmental impact; this waste must not be disposed of as normal waste, it must be separated and taken to specified waste disposal centres where the material will be recycled.
- Comply with local regulations for the disposal of waste materials
- When the machine is withdrawn from service, do not dispose of it in the environment, but take it to a waste disposal facility in accordance with the local regulations in force.
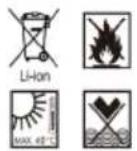
Do not throw electrical equipment away with domestic waste. According to the European Directive 2012/19/EU on electrical and electronic equipment waste and its implementation, according to UK Regulation “The waste electrical and electronic equipment regulations 2013 (as amended)” and according to national regulations, old electrical equipment must be collected separately, for eco-compatible recycling. If electrical equipment is disposed of in landfills or in the ground, hazardous substances can leak into the groundwater and contaminate the food chain, damaging your health and well-being. For further information on the disposal of this product, contact your dealer or a domestic waste collection service.
At the end of their working life, dispose of batteries paying due attention to the environment. Batteries contain material classified as hazardous for you and the environment. They must be removed and disposed of separately at a facility that accepts lithium-ion batteries.

Separate waste collection of the products and packaging used allows the materials to be recycled and reused. Reuse of recycled materials help to prevent environmental pollution and reduces the demand for raw materials.
3. GETTING TO KNOW THE MACHINE

ATTENTION
This tool may cause hand-arm vibration syndrome if its use is not adequately managed.
To be accurate, an estimation of exposure level in the actual conditions of use should also take account of all parts of the operating cycle such as the times when the tool is switched off and when it is running idle but not actually doing the job. This may significantly reduce the exposure level over the total working period.
Helping to minimise your vibration and noise exposure risk.
Always use sharp chisels, drills and blades.
Maintain this tool in accordance with these instructions and keep well lubricated (where appropriate).
If the tool is to be used regularly then invest in anti vibration and noise accessories.
Plan your work schedule to spread any high vibration tool use across a number of days.
3.1 DESCRIPTION OF THE MACHINE AND PLANNED USE
The machine is essentially composed of a batteries powered motor and a guide bar that takes the power from the battery to the motor which drives the cutting chain.
The operator is able to operate the machine with two hands, using the front and rear hand grips, and can use the main controls, always remaining at a safe distance from the cutting means.
3.1.1 Intended use
This machine was designed and manufactured for:
– trimming and cutting of tall tree tops;
– cutting hedges, trunks or wooden beams, the diameter of which depends on the length of the guide bar;
– cutting wood only;
– use by one operator only;
3.1.2 Improper use
Any other usage not in keeping with the above-mentioned ones may be hazardous and harm persons and/or damage things. Examples of improper use may include, but are not limited to:
- trimming hedges;
– carving operations;
– sectioning pallets, crates and various packing materials;
– sectioning furniture or other materials with nails, screws or other metal components;
– butchering meat;
– using the machine to cut materials other than wood (plastic materials, building materials);
– using the machine to lift, move or split objects;
– using the machine while fastened to fixed supports;
– using cutting means other than those found in the "Technical Data" table; Serious injury and wound hazard;
– use of the machine by more than one person.
IMPORTANT Improper use of the machine will invalidate the warranty, relieve the Manufactur from all liability, and the user will consequently be liable for all and any damage or injury to himself or others.
3.1.3 User types
This machine is intended for use only by operators trained in forest maintenance.
3.2 MAIN COMPONENTS
The machine is composed of a series of main components that have the following functions (Fig.1):
A. Motor: supplies the drive power to the cutting means.
B. Front hand grip: support hand grip located on the front of the chainsaw. This should be grasped using the left hand.
C. Rear hand grip: support hand grip located on the rear of the chainsaw. This should be grasped using the right hand. This hand grip is fitted with the main throttle controls.
D. Front hand guard: protection device seated between the front hand grip and the toothed chain, to protect the hand against injuries should it slip off the hand grip. This guard is used as a device to trigger the chain brake.
E. Guide bar: supports and guides the toothed chain.
F. Toothed chain: cutting element, consisting of drive links fitted with small blades called "teeth" and side connections held in place by rivets.
G. Chain restraint pin: safety device that prevents uncontrolled movements of the toothed chain should it break or slacken.
H. Spiked bumper: device present opposite the guide bar assembly point acting as a pivot when it comes into contact with a tree or trunk.
I. Quick tensioning: ring nut for quick chain tensioning (if provided)
J. Bar cover guard: chainsaw cover on the guide bar to be fitted during handling, transportation or storage of the machine.
K. Batteries (if not supplied with the machine, see par. 15.1. “accessories on request): device that supplies electric current to the tool; its specifications and regulations for use are described in a specific manual.
L. Battery charger (if not supplied with the machine, see par. 15.2 "accessories on request): device used to recharge the battery.
M. Tightening knob
N. Rail for wall fixing
O. Charging dock
P. Tool compartment
Q. Screws and plastic dowels supplied
IMPORTANT The machine only works with both batteries inserted.
IMPORTANT The batteries can be recharged directly on the machine using the charging dock.
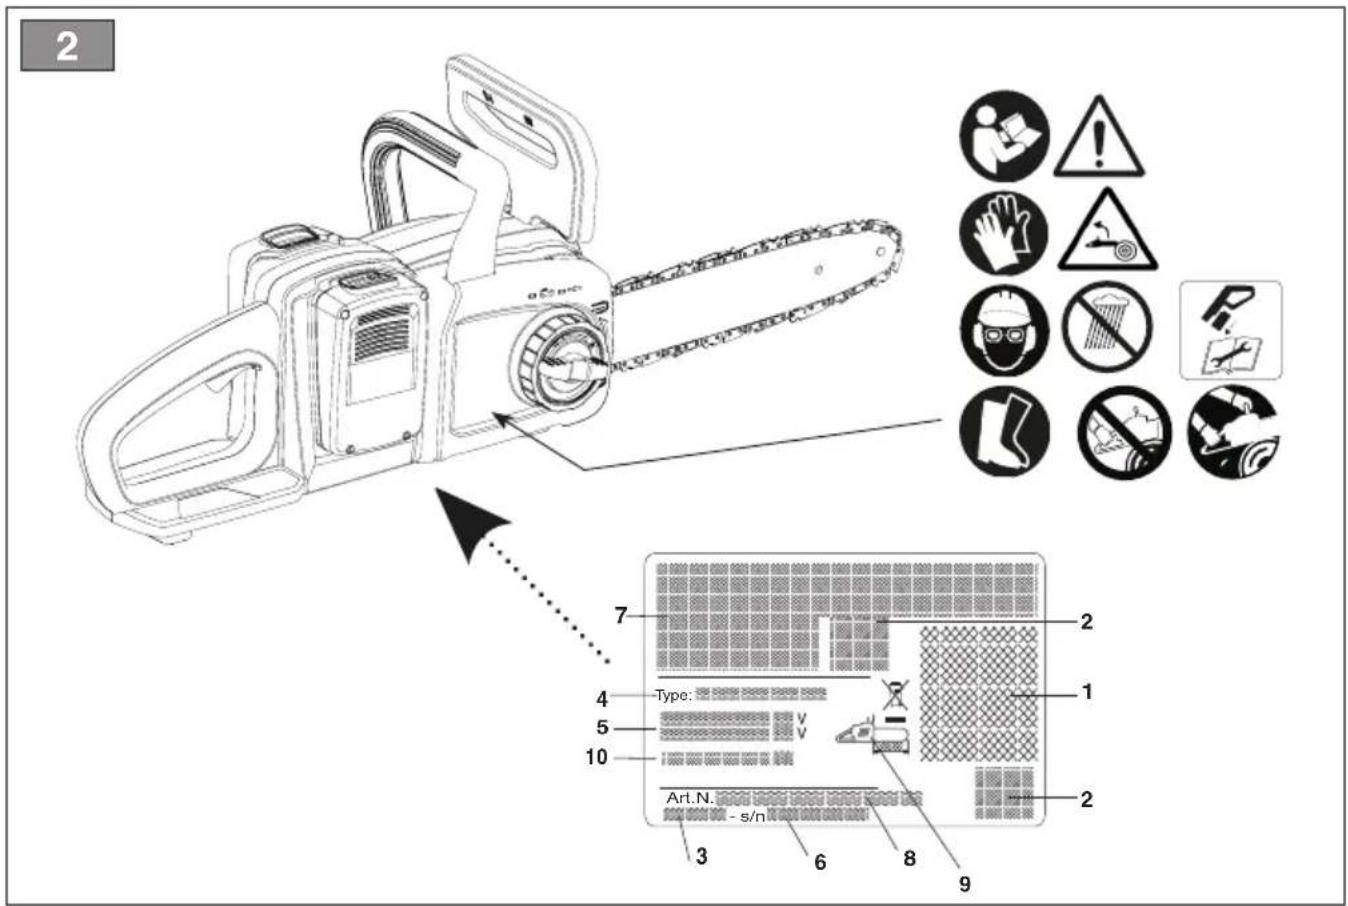
3.3 IDENTIFICATION LABEL
The identification label holds the following data (fig. 2):
- Sound power level
- Conformity marking
- Month/Year of manufacture
- Type of machine
- Power voltage
- Serial number
- Name and address of Manufacturer
- Article code
- Length of the guide bar
- Machine description
Write the identification data of the machine in the specific space on the label on the back of the cover page.
IMPORTANT Quote the information on the product identification label whenever you contact an authorised service centre.
3.4 SAFETY SIGNS
The machine has various symbols on it (fig. 2). They are used to remind the operator of the behaviour to follow to use it with the necessary attention and caution.
Meaning of symbols:

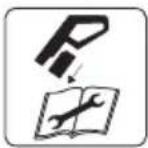
Read the instructions before operating the machine.

Danger! The failure to use this machine correctly can be hazardous for oneself and others.

Warning! Wear ear protectors, safety goggles and a protective helmet.

Warning! Wear gloves and non-skid safety boots!

Danger! Do not leave the machine in the rain or in damp conditions.
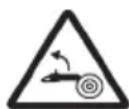
Beware of kickback! Kickback is the rapid and uncontrollable backward motion of the chainsaw in the direction of the operator. Always work in complete safety. Use chains with safety links that limit kickback.

Warning! Never hold the machine with one hand! Hold the machine firmly with both hands to control the machine and reduce the risk of kickback.
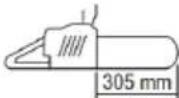
length of guide bar
Remove the battery before any inspection, cleaning or maintenance/adjustment operation on the machine
Warning! For battery and battery charger see the dedicated manual
IMPORTANT Any damaged or illegible decals must be replaced. Order replacement decals from an authorised service centre.
4. ASSEMBLY
The safety regulations to follow are described in chap. 2. Strictly comply with these instructions to avoid serious risks or dangers.
For storage and transport purposes, some components of the machine may not be installed in the factory and have to be assembled after unpacking. Follow the instructions below.
⚠ Unpacking and completing the assembly should be done on a flat and stable surface, with enough space for machine handling and its packaging, always making use of suitable equipment. Do not use the machine until all the instructions provided in the "ASSEMBLY" section have been carried out.
4.1 UNPACKING
- Carefully open the packaging, paying attention not to lose components.
- Consult the documentation in the box, including these instructions.
- Remove all the unassembled parts from the box.
- Remove the machine from the box.
- Dispose of the box and packaging in compliance with local regulations.
⚠️ Before assembling (if necessary), make sure the batteries are not inserted in their housing.
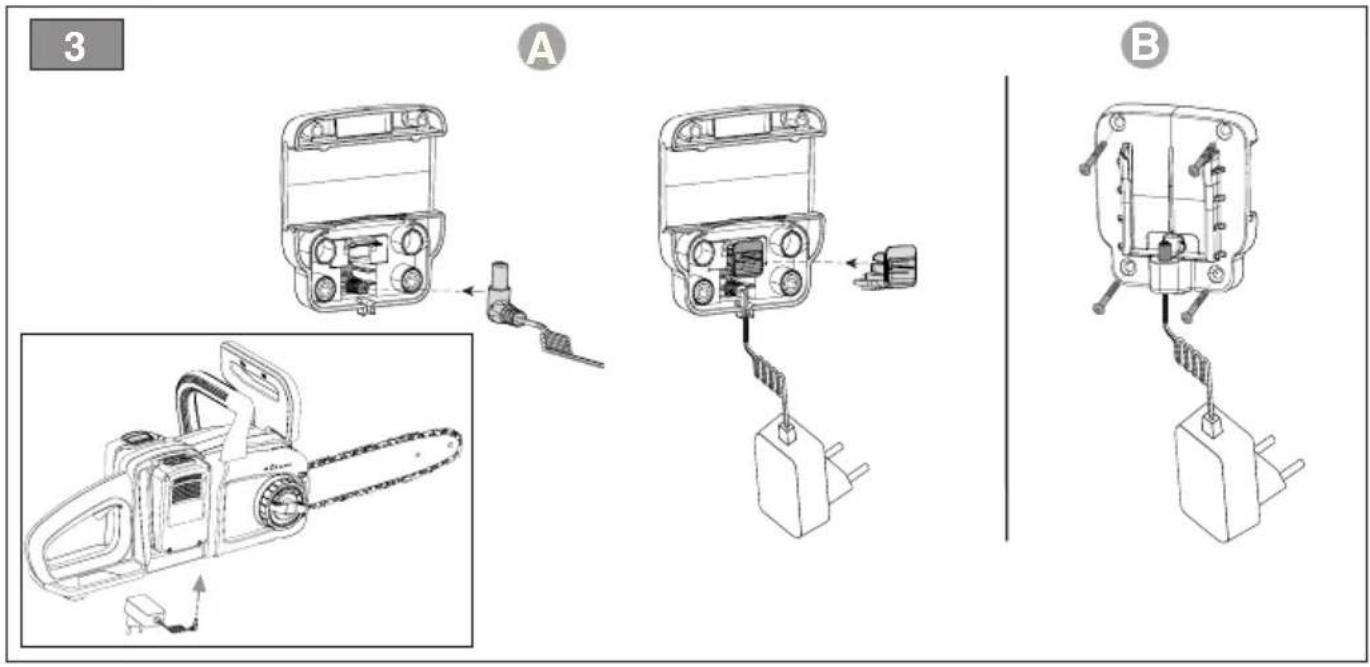
4.2 ASSEMBLY OF THE CHARGING DOCK (Fig. 3)
NOTE The tool can be hung on the wall.
The batteries can be recharged directly on the machine with the charging dock (Fig. 3. A).
NOTE The charging dock can be fixed to the wall (Fig. 3.B) (with the screws and the plastic dowels supplied, Fig. 1. K).
4.3 ASSEMBLY OF THE RAIL FOR WALL FIXING (Fig. 4)
Once the rail (Fig. 1. H) has been fixed to the wall (with the screws supplied), slide the charging dock (Fig. 4. A) and the tool compartment (Fig. 4. B).
4.4 ASSEMBLY OF THE GUIDE BAR AND TOOTHED CHAIN
Always wear heavy duty gloves when handling the bar and chain. Mount the bar and chain very carefully so as not to impair the safety and efficiency of the machine. If in doubt, contact your dealer.
⚠ Perform all operations after removing the batteries.
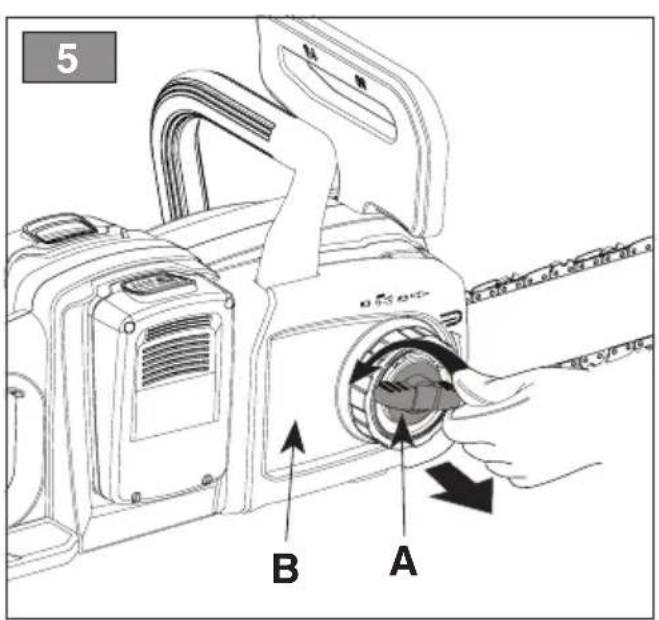
Before assembling the bar, check that the chain brake is not engaged (par. 5.3).
-
Using the tightening knob (Fig. 5.A) and remove the chain guard (Fig. 5.B) to access the drive pinion and bar seat.
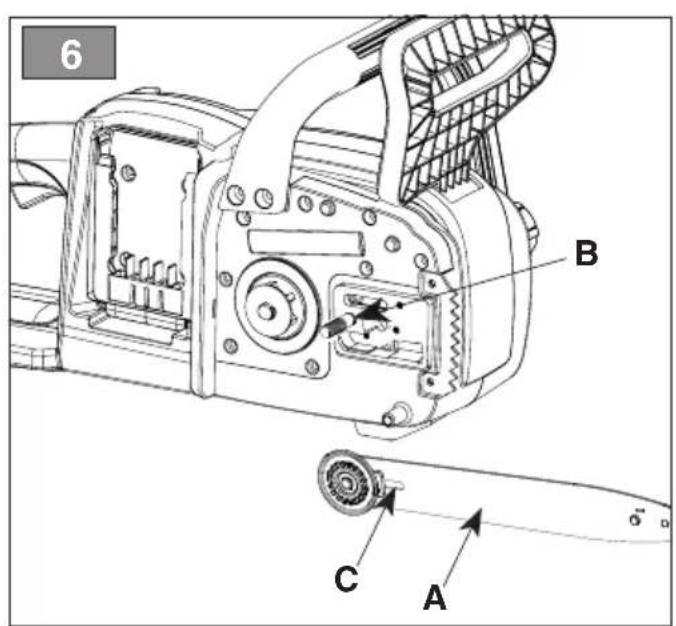
-
Mount the bar (Fig. 6.A) by inserting the stud bolt (Fig. 6.B) in the groove (Fig. 6.C) and push it towards the back of the machine body.
-
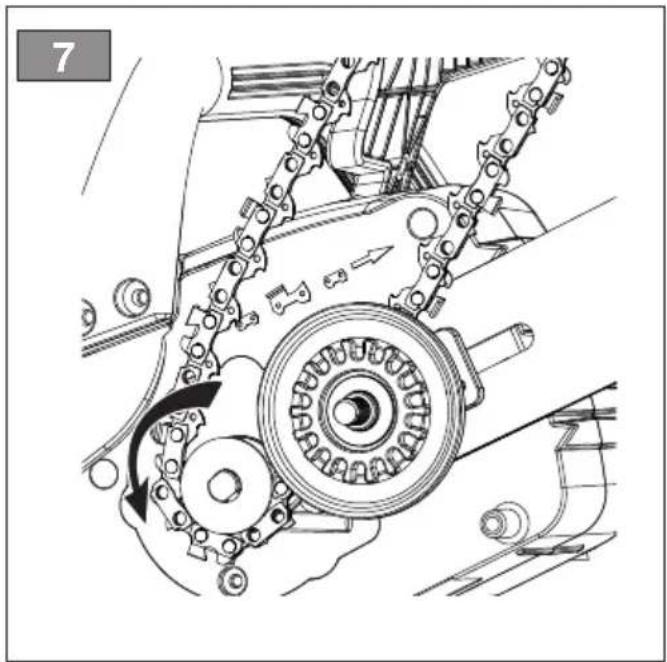
Tilt the machine to make it easier to wind the chain around the drive sprocket (Fig. 7).
-
Mount the chain (Fig. 8.A) around the drive sprocket (Fig. 8.B) and along the bar guide (Fig. 8.C) being careful to follow the sliding direction.
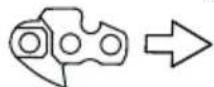
Direction in which the chain runs
-
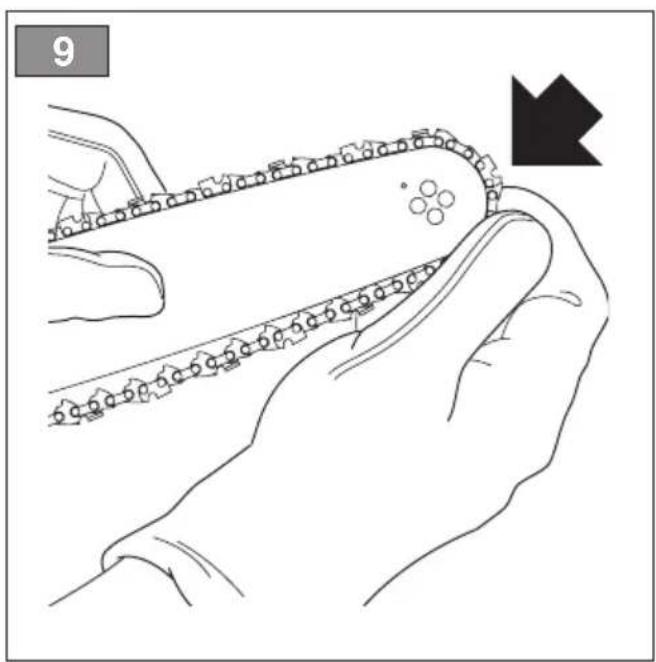
If the tip of the bar is equipped with a nose sprocket, make sure the drive links are correctly inserted in the sprocket rims (Fig. 9).
-
Refit the guard (Fig. 10.A), without fully tightening the nut or knob (Fig. 10.B).
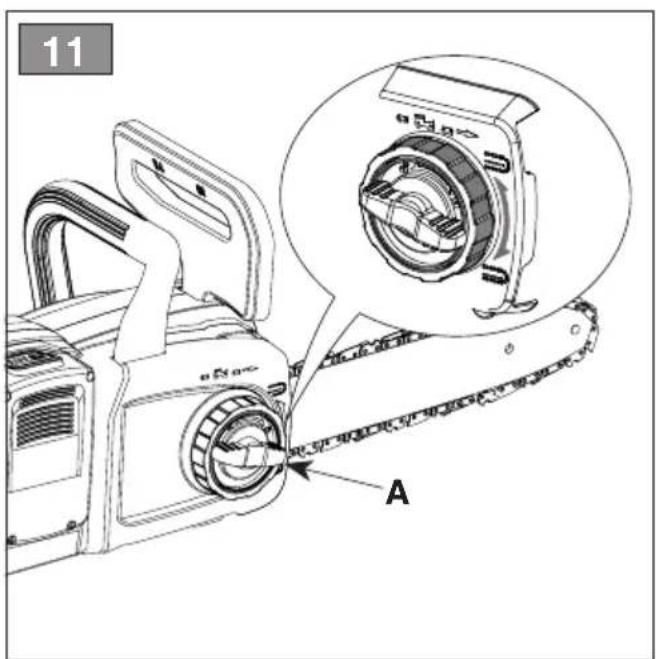
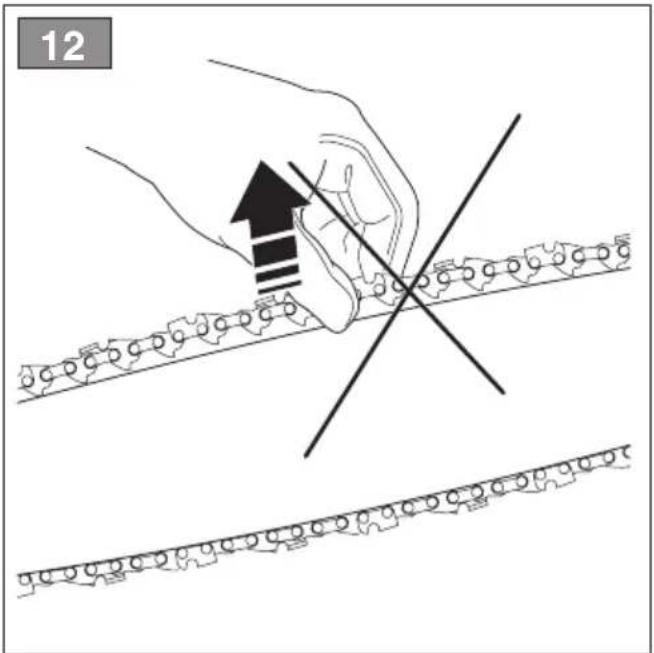
- Turn the chain tension adjuster screw or act on the ring nut (Fig. 11.A) to achieve the desired tension (Fig. 12) (par. 6.1.3).
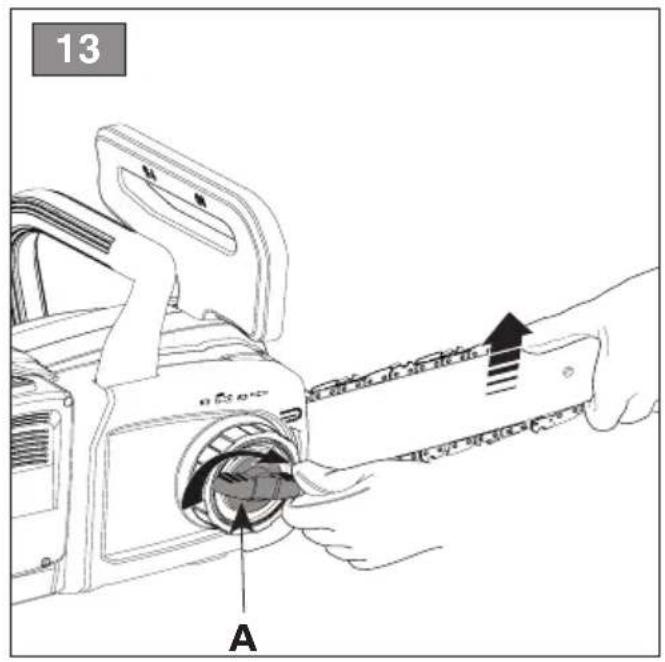
- Raise the bar and tighten the guard nut or the knob securely using the wrench supplied (Fig. 13. A).
5. CONTROLS
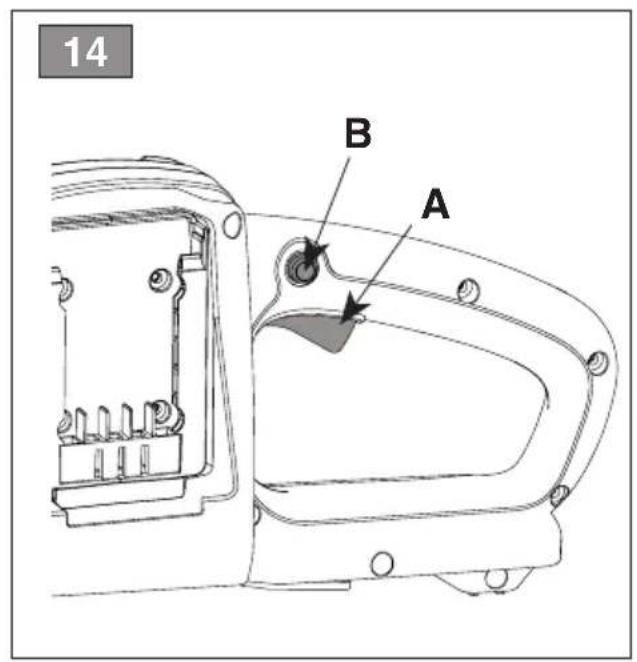
5.1 THROTTLE TRIGGER LEVER (Fig. 14.A)
It allows the activation of the chain.
The activation of the throttle trigger lever is possible only after that the throttle lock button is pressed (Fig. 14.B).
The cutting means stops automatically when the throttle safety lever is released.
5.2 INTERLOCK BUTTOM (Fig. 14.B)
It allows the throttle trigger bottom to be used (Fig. 14.A).
5.3 CHAIN BRAKE
This is a safety braking system that blocks the chain movement when kickback occurs during cutting. Kickbacks occur following an irregular contact of the tip of the bar, with a rapid upward movement of the bar that causes the hand to strike the front guard (Fig. 1.D)
It must be manually released to disengage the chain brake.

Chain brake engaged. This is achieved when the front hand guard is pushed all the way forward.

Chain brake disengaged. This is achieved when the front hand guard is pulled all the way back, towards the machine body, until it clicks into position.
Do not use the machine if the chain brake does not function correctly and have it inspected by your dealer.
6. USING THE MACHINE
The safety regulations to follow are described in chap. 2. Strictly comply with these instructions to avoid serious risks or dangers.
6.1 PRELIMINARY PROCEDURES
Before starting to work, it is necessary to carry out several checks and operations to ensure you can work efficiently and in maximum safety.
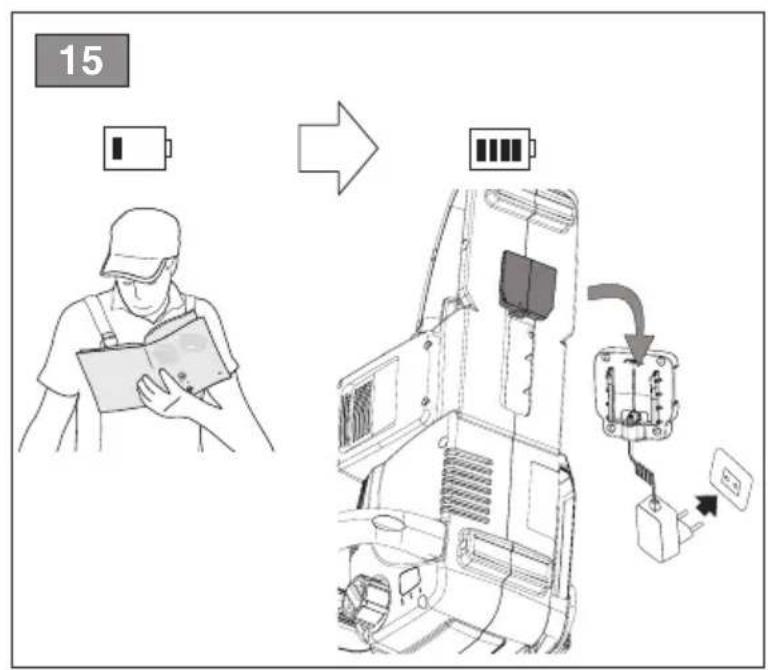
6.1.1 Checking and charging the battery (Fig.15)
Before each use check the batteries charge status according to the instructions in the battery booklet.
NOTE The machine works only with both batteries inserted.
6.1.2 Filling with chain lubrication oil
Fill with chain lubrication oil before using the machine. For oil filling methods and precautions see par. 7.3.
6.1.3 Checking the chain tension
⚠ Perform all operations with the motor off and remove the batteries from their housing.
⚠️ Always wear heavy duty work gloves.
Check the chain tension.
The tension is correct when the drive links do not slip out of the chain guides if you hold the chain in the middle of the bar (Fig. 12).
To adjust the chain tension:
- loosen the cover nut, using the supplied wrench or loosen the knob (Fig. 5. A);
- turn the chain tension adjuster screw or act on the ring nut (Fig. 11 A) to achieve the desired tension;
- raise the bar and tighten the guard nut securely using the wrench supplied or tighten the knob (Fig. 13 A)
⚠️ Never work with the chain loose, as it can be hazardous if the chain slips out of the bar guides.
IMPORTANT During the first period of use (or after replacing the chain) it must be checked more frequently due to settling of the chain.
6.2 SAFETY CHECKS
Run the following safety checks and check that the results correspond to those outlined on the tables.

Always carry out the safety checks before

Always carry out a daily inspection of machine before use, after a fall or other act to detect any damage or significant effects.
6.2.1 General safety check
| Object Result | |
| Grip and guards Clean, | dry, without traces of oil and grease, and fixed correctly and firmly to the machine. |
| Screws on the machine and blade | Correctly tightened (not loose) |
| Cooling air ducts Not clogged | |
| Guide rod Properly installed | |
| Chain Sharp, not damaged | or worn, mounted and tensioned correctly. |
| Guards Intact, undamaged. | |
| Battery No damage to | the casing, no liquid leakage |
| Machine No signs of | damage or wear |
| Throttle trigger lever, safety buttom | The levers must move freely and not be forced. |
| Test driving No abnormal | vibrations.No abnormal sound |
6.2.2 Machine operating test
| Action Result | |
| Fit the batteries inside their housing Activate the throttle trigger lever. (Fig. 14 A) (without pressing the throttle lock buttom (Fig. 14 B) | The throttle trigger lever remains blocked. |
| Press the throttle lock button (Fig. 14 B) and throttle trigger lever (Fig. 14 A) | The levers must move freely and not be forced. The chain moves. |
| Release the throttle trigger lever (Fig. 14 A) or press the lock button (Fig. 14 B). | The lever automatically and rapidly returns to the idle position. The chain should stop. |
| CHECKING THE CHAIN BRAKE1. Start the machine (par. 6.3)2. Grasp the hand grips firmly with both hands.3. Use the throttle lever to keep the chain moving, push the front hand guard forwards using the back of your left hand (par. 5.3) | 3. The chain must stop moving immediately. When the chain has stopped, release the throttle trigger lever and disengage the chain brake (par. 5.3). |
⚠️ If any of the results fail to match the instructions provided in the tables, do not use the machine! Contact a service centre to have it checked and repaired if necessary.
6.3 START-UP
NOTE It is recommended to use the machine at a temperature between -10^ and 60^
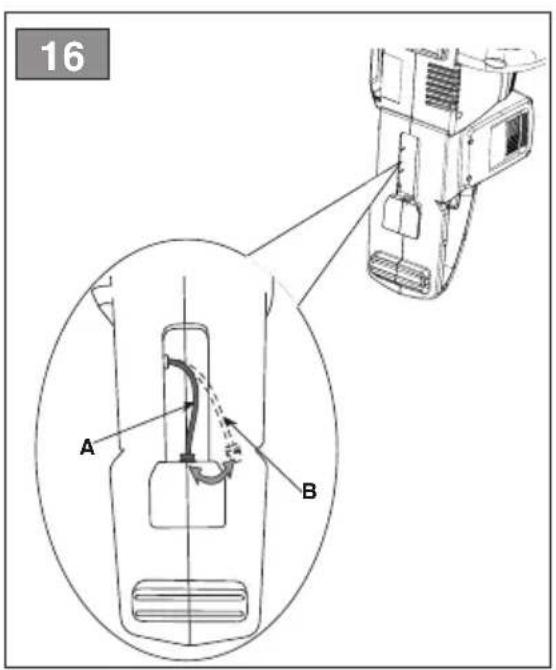
NOTE Before each use, make sure that the cap is inserted (fig.16.A.). This prevents dust (sawdust) going into the charging terminal.
Don't start the machine when it's under charging status.
- Remove the bar cover guard (Fig. 1.J).
- Make sure the bar and the chain are not touching the ground or any other object.
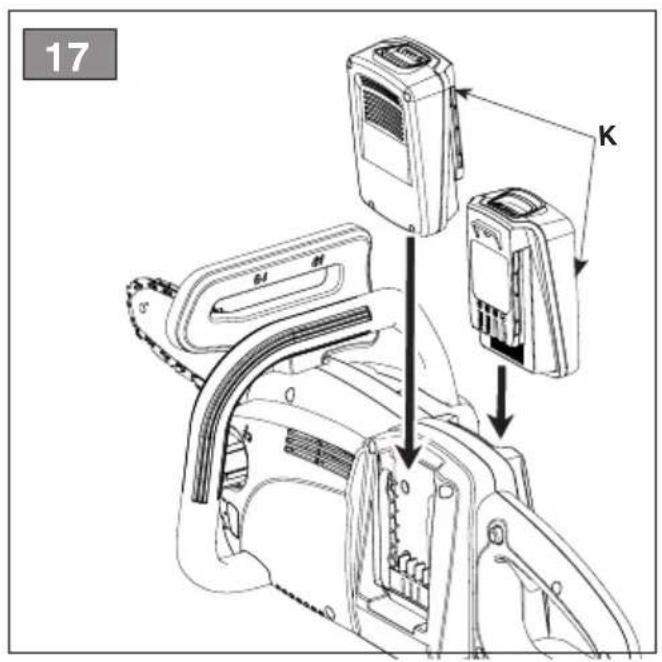
- Fit the batteries inside their housing (Fig. 17. K) pressing down until you hear the "clicks" firmly into position and assure the electrical contact;
NOTE The machine works only with both 6.5 FORESTRY WORK
batteries inserted.
- Disengage the chain brake (par. 5.3)
- Press the throttle lock button (Fig. 14.B) and throttle trigger lever. (Fig. 14.A).
6.4 WORKING
Before felling or delimbing for the first time, make sure:
– to have been specifically trained to use this type of equipment;
– to have carefully read the safety regulations and user instructions contained in this manual;
- you practise first on logs on the ground or attached to trestles, in order to get familiar with the machine and the most suitable cutting techniques.
To use the machine proceed as follows:
• Always disengage the chain brake, pulling the lever towards you before using the throttle.
- The machine must always be firmly held in both hands, with the left hand on the front hand grip and the right hand on the rear hand grip, even if the operator is left-handed.
⚠️ Stop the machine immediately if the chain stops during sawing.
NOTE During use, the battery is p against total drainage with a protective device that switches off the machine and stops it from working.
NOTE If the chainsaw stops working during the cutting, wait 15mins to cool down the machine, then re-start it.
6.4.1 Checks to be conducted whilst working
- Checking the chain tension
The chain tends to stretch gradually as you work, so you need to check its tension frequently (par. 6.1.3). - Checking the oil delivery
IMPORTANT Never use the machine without lubrication!
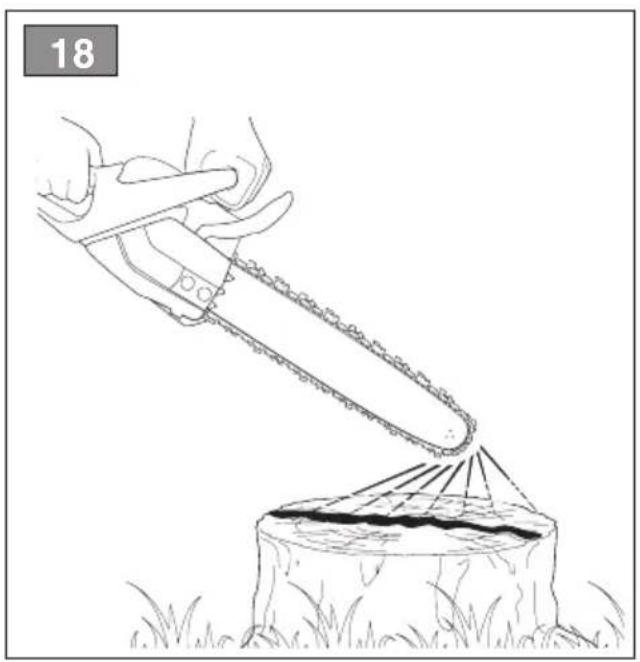
⚠️ Make sure the bar and the chain are in place when you check the oil delivery.
Start the motor (par. 6.3) and check if the chain oil is delivered as shown in (fig. 18).
6.5 FORESTRY WORK
6.5.1 Delimbing a tree
⚠️ Make sure there is nothing or nobody in the area where the branches will fall.
- Stand opposite the branch you want to cut.
- Start cutting lower branches followed by the higher ones.
- Make first cut from the bottom towards the top (Fig. 19.A). Complete delimbing by cutting from top to bottom, as shown in (Fig. 19.B).
6.5.2 Felling a tree
IMPORTANT Where two or more persons are working together on felling and bucking operations, such operations must be performed in separate areas at a distance from each other of at least 2.5 times the height of the tree being felled. Do not fell trees if this involves risks of people, coming into contact with a power line or causing any form of damage. If the tree come into contact with a main power line, report the incident immediately to the network provider.
Before commencing the felling operations:
- it is necessary to evaluate the natural inclination of the tree, the part where the d branches are larger and the wind direction, to assess how the tree will actually fall;
– remove any dirt, stones, pieces of bark, nails, metal staples and wire;
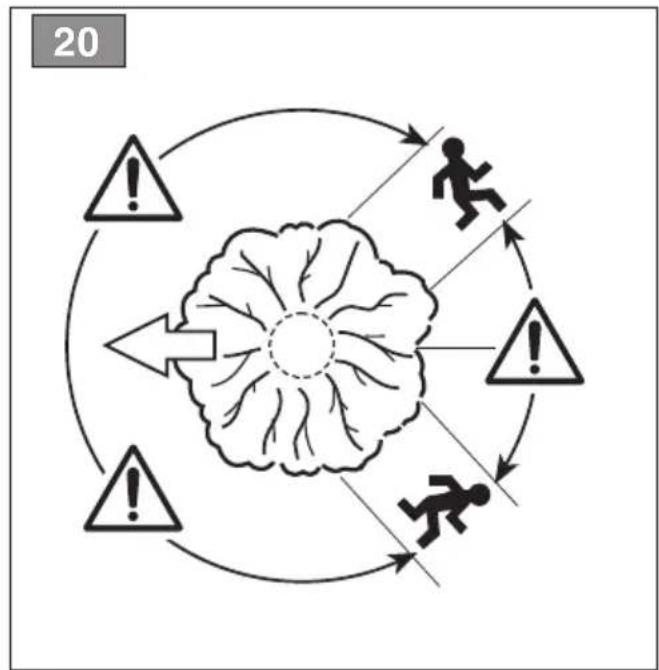
– clear the area around the tree and find a stable place to stand; - plan obstacle-free escape routes at a 45^ angle back and away from the direction of the fall (Fig. 20) which allow the operator to escape to a safe zone, about 2.5 times the height of the tree being felled;
- Stand uphill of the land onto which the tree will probably roll or fall over after felling.
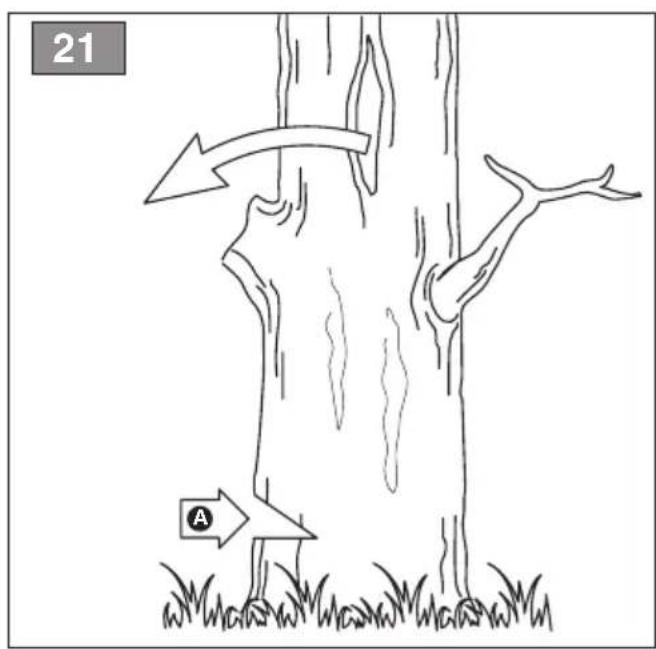
• Performing a face notch
- Stand to the right of the tree, behind the chainsaw.
- Saw a horizontal face notch to 1/3 of the diameter of the tree, perpendicular to the direction in which it will fall (Fig. 21. A).
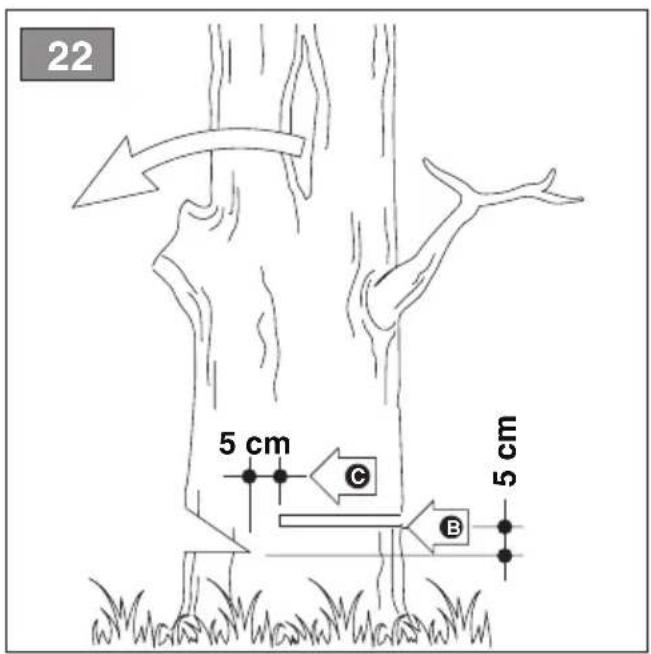
- Felling back cut
- Perform the felling back cut at least 5 cm higher than the horizontal face notch (Fig. 22.B).
- Perform the felling back cut leaving sufficient wood to act as a "hinge" (Fig. 22.C). The hinge wood will prevent the tree from twisting
and falling in the wrong direction. Do not cut through the hinge.
- Reduce the thickness of this hinge without pulling out the bar, until the tree falls.
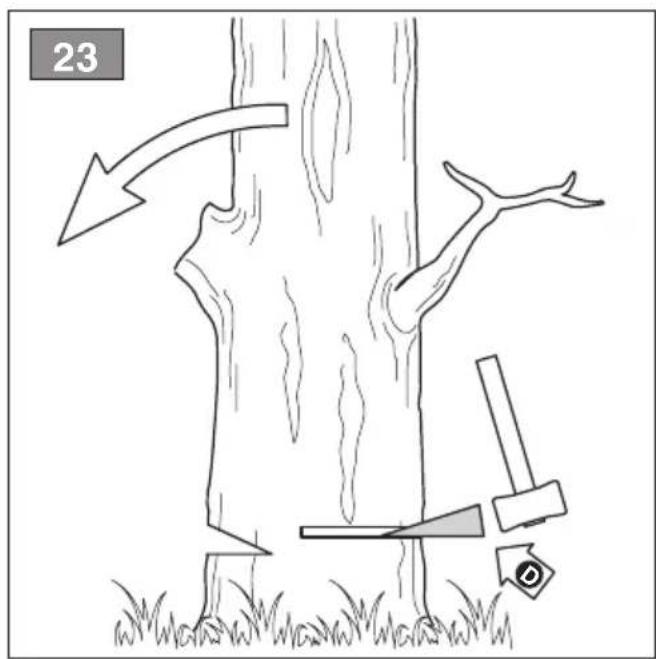
- If there is any risk of the tree not falling in the desired direction, or that it might lose its balance moving backwards and bending the toothed chain, stop cutting before completing the felling back cut and use some wooden, plastic or aluminium wedges (Fig. 23. D) to open the cut. Force the tree to fall along the desired line by hitting the wedges with a sledge hammer.
- When the tree starts to fall, it is necessary to withdraw the machine from the cut, switch it off (par. 6.6), lie it on the ground and take the foreseen exit route. Beware of falling branches and pay attention where you put your feet.
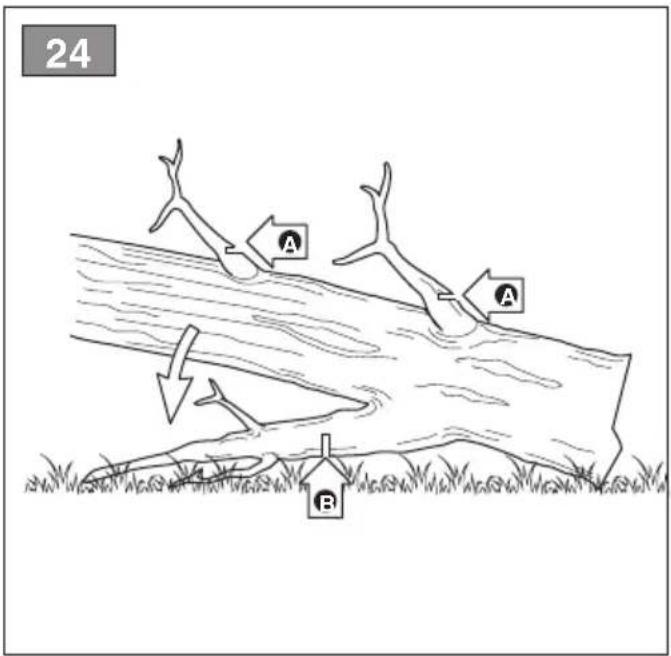
6.5.3 Limbing tree branches
Limbing means removing the branches from a felled tree.
⚠️ Be careful of where the branches are lying on the ground, the risk of them being under tension, the direction the branch may go during cutting and the risk of the tree being unstable after the branch has been cut.
When limbing, it is necessary to leave the lower, larger branches to support the trunk on the ground. Remove the small branches with a single cut (Fig. 24.A).
It is recommended to cut the tensioned branches working from the bottom upwards to prevent the chainsaw from bending (Fig. 24.B).
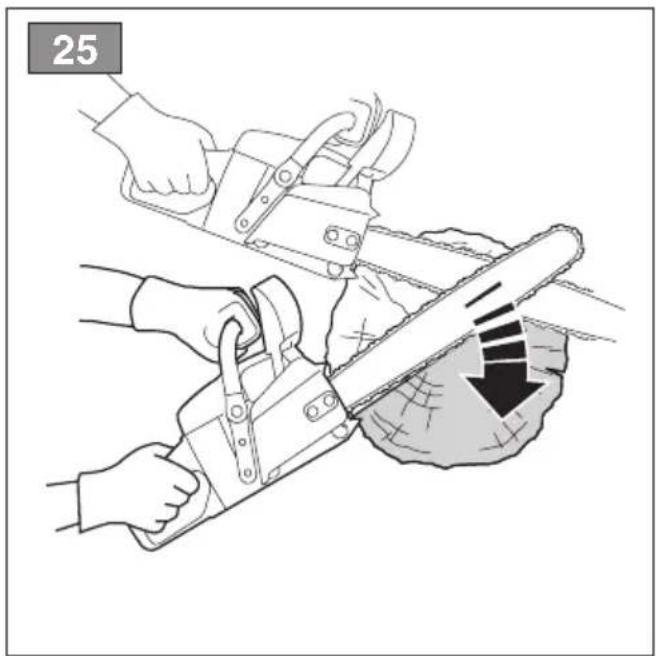
6.5.4 Bucking the trunk
Bucking means sawing a tree trunk into logs.
It is essential to make sure your feet are positioned firmly on the ground, and your weight is distributed equally on both feet. If possible, it is recommended to raise and support the trunk using branches, logs or blocks of wood.
It is easier to saw a log using the spiked bumper (Fig. 1H):
- plant the spiked bumper into the log and use it as a pivot. Cut with an arched motion to make the bar penetrate the wood (Fig. 25);
- repeat several times if necessary, changing the point where you plant the spiked bumper.
- Trunk lying on the ground
When the entire trunk is lying on the ground, it is bucked from the top down (overbucking) (Fig. 26.A).
– Cut up to half the diameter, roll the log over and finish sawing on the other side.
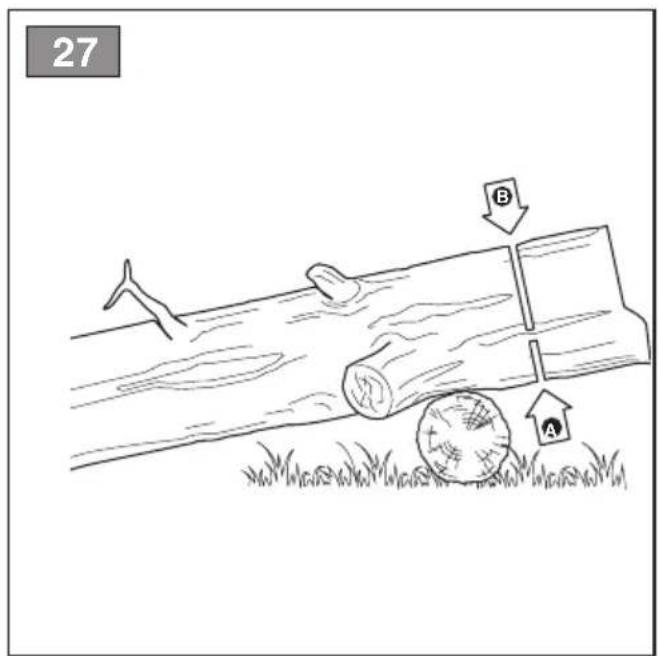
- Trunk resting on one end only
When the trunk is resting on one end only:
– saw through 1/3 of the diameter from the bottom up (underbucking) (Fig. 27.A);
- then perform the final cut, overbucking to reach the first cut (Fig. 27.B).
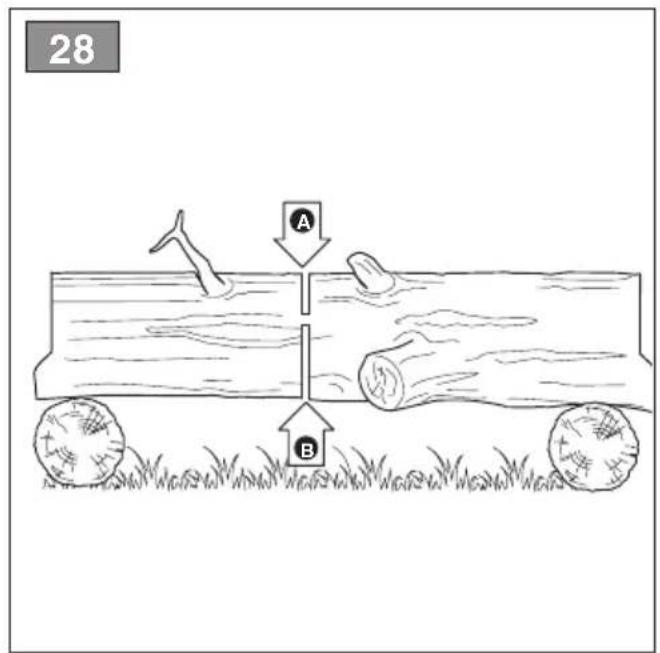
- Trunk resting on both ends
When the trunk is resting on both ends:
– saw through 1/3 of the diameter from the top down (overbucking) (Fig. 28.A);
– then perform the final cut, underbucking the lower 2/3 to reach the first cut (Fig. 28.B).
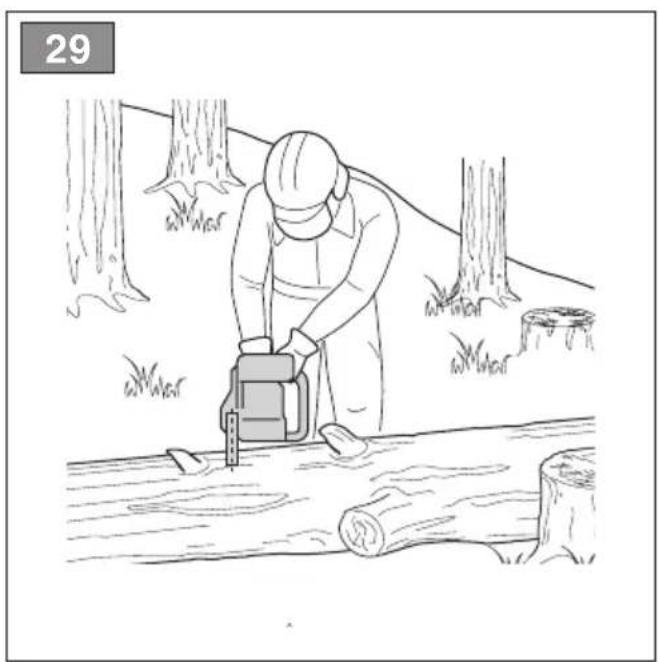
- Sloping trunk
Always stand uphill when bucking a sloping trunk (Fig. 29).
During the operation, to maintain control when the cut is almost complete, reduce the bucking pressure without removing removing your hands from the machine hand grips. Take all necessary precautions to prevent the machine from coming into contact with the ground.
6.6 STOP
To stop the machine:
- Release the throttle trigger lever (Fig. 14.A).
After releasing the throttle control it takes a few seconds for the toothed chain to stop.
Always stop the machine when moving between work areas.
Do not keep your finger on the safety button when moving the machine to avoid accidentally enabling the machine.
6.7 AFTER USE
- If the machine isn't in charge, remove the batteries from its housing;
- Mount the protection bar cover (Fig. 1.J);
- allow the motor to cool before storing in an enclosed space;
- loosen the knob to reduce chain tension (par. 6.1.3);
-
carefully remove any dust and debris and remove all traces of sawdust or oil deposits from the chain (par. 7.6);
-
check there are no loose or damaged components. If necessary, replace the damaged components and tighten any screws and loose bolts.
IMPORTANT Always remove the batteries and fit the blade guard whenever the machine is unused or left unattended.
6.7.1 Removing the batteries
To remove the batteries press the lock button on the battery (Fig. 30. C).
7. ROUTINE MAINTENANCE
7.1 GENERAL INFORMATION
The safety regulations to follow are described in chap. 2. Strictly comply with these instructions to avoid serious risks or dangers.
⚠️ Before conducting any inspections, cleaning or maintenance/adjustment interventions on the machine:
- Stop the machine and turn off the motor;
- Wait until the chain is stationary;
- Remove the battery from its housing;
- Apply the bar cover, except when working directly on the chain or bar itself.
- Wait until the motor is sufficiently cold;
- Read the relevant instructions;
-
Use suitable clothing, protective gloves and goggles;
-
The frequency and types of maintenance are summarised in the "Maintenance Table". This table will help you maintain your machine's safety and performance. It summarises the main interventions to be made and the frequency applicable to each of them. Carry out the relevant intervention according to the first deadline.
- The use of non-genuine and/or incorrectly assembled spare parts and attachments could adversely affect machine operation and safety. The manufacturer shall decline all liability in the event of injuries or damages caused by such parts.
- Genuine spare parts are supplied by authorised assistance workshops and dealers.
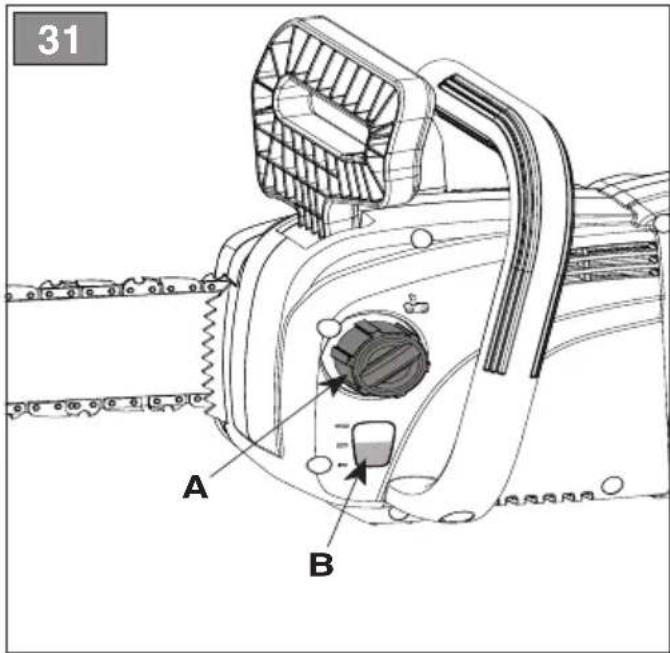
7.2 TOPPING UP THE CHAIN OIL TANK
NOTE The following symbol is found near the chain oil tank cap (fig. 31.A):
Chain oil tank
IMPORTANT Only use chainsaw oil or adhesive oil for chainsaws. Do not use oil containing impurities so as not to block the oil filter and to prevent irreparable damage to the oil pump.
It is essential that you use good quality oil to lubricate the cutting parts effectively. Used or poor quality oil does not guarantee good lubrication and reduces the working life of the chain and bar.
IMPORTANT Never run the chain without sufficient oil, this could damage the saw and compromise safety.
Check the amount of oil in the chainsaw by checking the oil level indicator (Fig. 31.B).
If the oil level is low, top up as follows:
- Unscrew and remove the cap (Fig. 31.A) from the oil tank.
- Pour oil in the tank and monitor the level on the indicator (Fig. 31.B).
- Make sure no impurities penetrate the oil tank when filling.
- Screw on the oil cap and tighten it.
7.3 CHAIN CATCHER
Check the chain stop pin conditions before each use (Fig. 1.G) and repair in the event of damages.
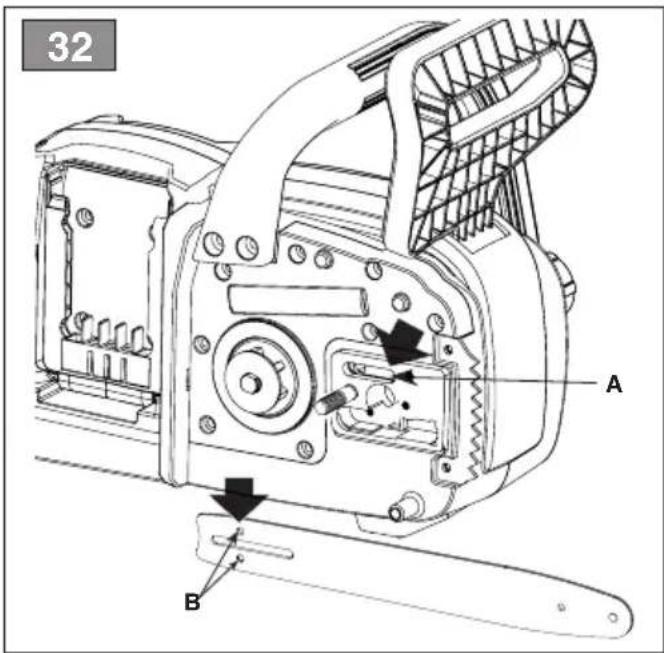
7.4 MACHINE AND BAR LUBRICATION HOLES
Before daily use, remove the guard (Fig. 5. B), disassemble the bar and check that machine lubrication holes (Fig. 32.A) and guide bar (Fig. 32.B) are not clogged.
7.5 NUTS AND BOLTS
- Keep all nuts, bolts and screws tight to be sure the equipment is in safe working condition.
- Check regularly that the handles are fixed firmly.
IMPORTANT Any maintenance and adjustment operations not described in this manual must be carried out by your dealer or Authorised Service Centre.
7.6 CLEANING
7.6.1 Cleaning the machine and the motor
After every work session, clean the machine thoroughly to remove all dust and debris.
- To reduce fire hazards, keep the machine and, in particular, the motor free of leaves, branches or excessive grease.
- Always clean the machine after use with a damp cloth dipped in neutral detergent.
- Remove all traces of humidity using a soft damp cloth. Humidity can generate risks of electric shocks.
- Do not use aggressive detergents or solvents to clean the plastic parts or hand grips.
- Do not spray water onto the motor and electrical components and prevent them from getting wet.
- To avoid overheating and damage to the motor or the battery, always keep the cooling air vents clean and free of debris.
7.6.2 Cleaning the chain
Remove any traces of sawdust or oil deposits from the chain every time it is used.
If there is excessive dirt or resin build-up, disassemble the chain and place it in a container with a specific cleanser for a few hours. Then rinse it with clean water and treat it with a suitable anticorrosive spray, before reassembling on the machine.
7.7 BATTERY
7.7.1 Battery power reserve
Battery autonomy is mainly influenced by:
a. environmental factors, that cause higher energy requirements:
– cutting trees and branches that are too thick.
b. operator behaviour that should be avoided:
– switching the machine on and off frequently whilst working;
- adopting a cutting technique that is unsuitable for the work to be performed (par. 6.5).
To optimise battery power reserve it is always recommended to:
- cut wood when dry;
- use the most appropriate technique for the work to be performed.
If the need arises to use the machine for sessions which exceed the capability of a standard battery, it is possible to:
• purchase other two batteries to immediately replace the discharged battery, without compromising the continuity of operations.
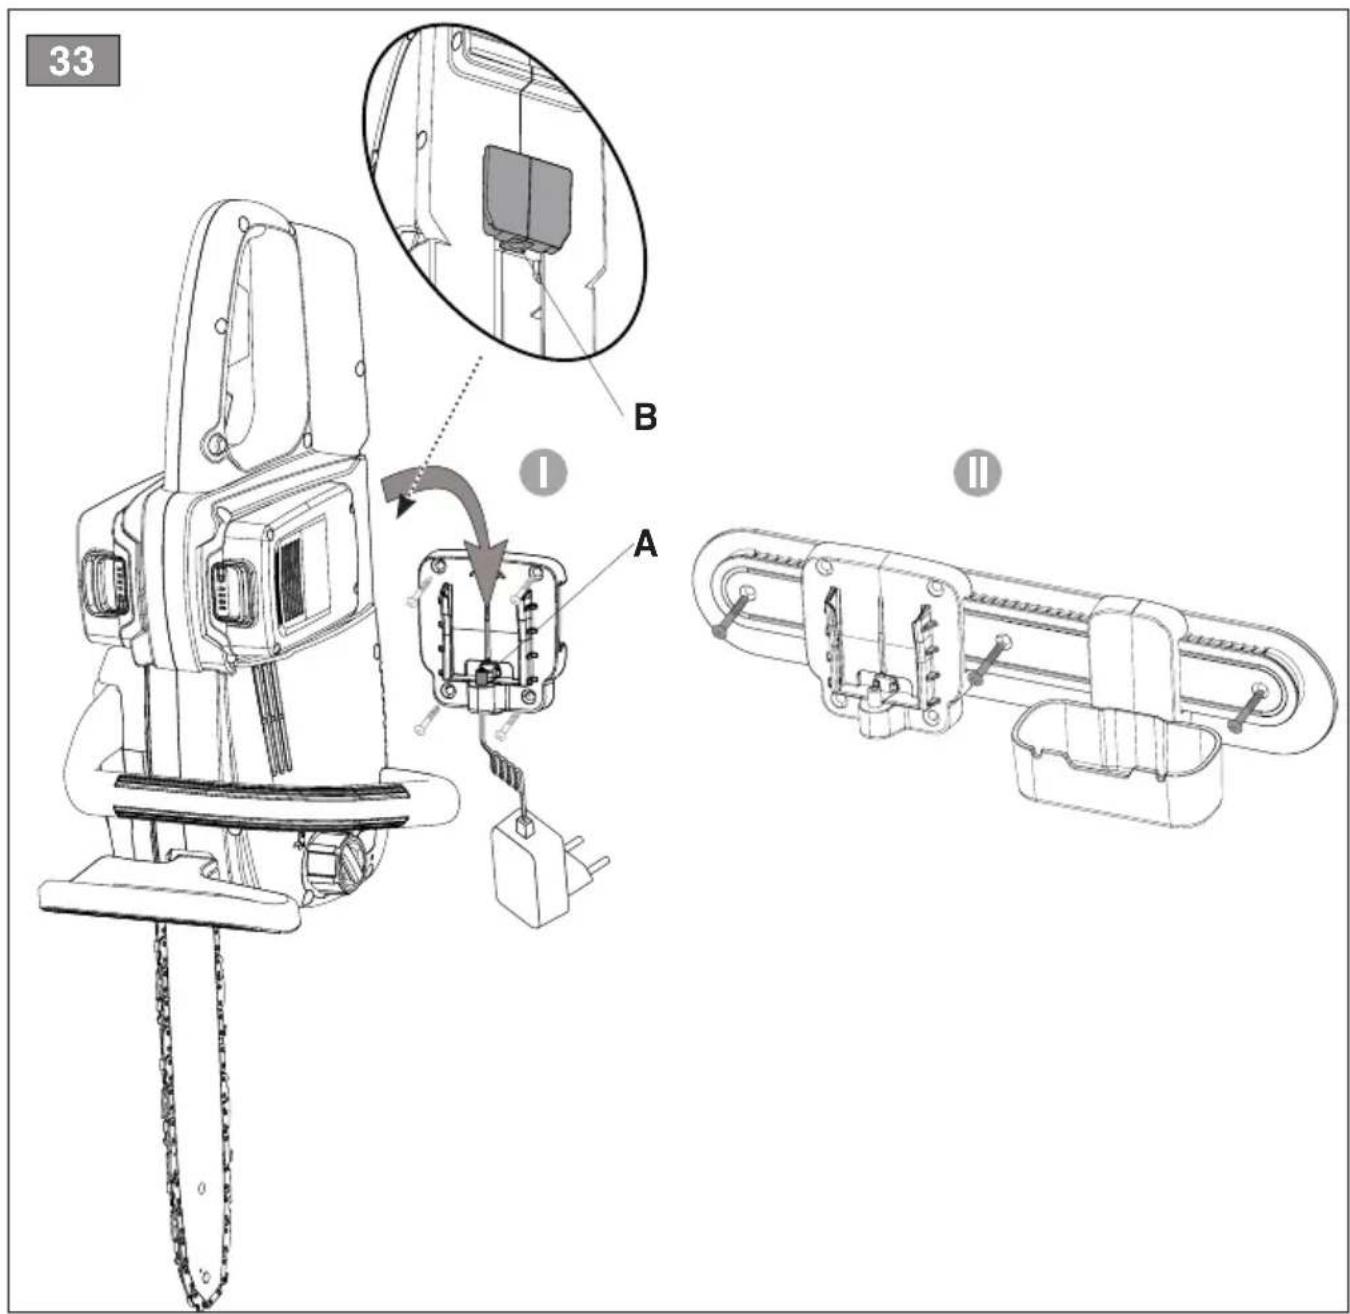
7.7.2 Battery charge directly on the machine (Fig. 33)
NOTE Before charging, remove the cap (Fig. 16.B.)
The batteries can be charged directly on the machine by connecting the connector (Fig. 33. A) to the machine (Fig. 33. B) via its charging dock.
The machine can be hung on the wall:
- by fixing the charging dock directly to the wall (Fig.33. I);
- by fixing the rail on the wall on which to slide the charging dock and the tool compartment (Fig.33. II).
⚠️ Fit the bar cover and activate the chain brake before hanging the machine on the wall
The battery is equipped with a guard that inhibits charging if the environmental temperature is not between 0^ C - 40^ C.
IMPORTANT The battery can be charged any time, even partially, with no risk of damaging it.
The batteries are partially charged in sequence, as per the scheme:
| Phase Battery(Fig. 30) | Charger | |
| 1 | A (right) | 40% |
| 2 | B (left) | 40% |
| 3 | A (right) | 100% |
| 4 | B (left) | 100% |
NOTE Partial charge allows you to use the machine to finish the job without waiting for a full charge.
NOTE Don't remove the batteries when the machine is under charging.
NOTE Don't start the machine when it's under charging.
8. OCCASIONAL MAINTENANCE
8.1 CHAIN DRIVE SPROCKET
Regularly check the condition of the sprocket with your local dealer and replace it when wear exceeds the accepted limits.

Do not mount a new chain with a worn pocket or vice-versa.
8.2 MAINTENANCE OF THE TOOTHED CHAIN

To ensure that the chainsaw works safely efficiently, it is essential that the cutting ons are well-sharpened.

Always wear heavy duty gloves when dlling the bar and chain.
Chain sharpening is necessary when:
– The sawdust looks like dust.
– Cutting becomes more difficult.
- The cut is not straight.
- Vibrations increase.

Kickback may occur if the chain is not ciently sharpened
IMPORTANT It is recommended to have an Authorised centre sharpen the chain using the right tools to ensure minimum removal of material and even sharpness on all the cutting edges.
8.2.1 Replacing the toothed chain
Replace the chain whenever:
– the length of the cutting edges reduces to 5 mm or less;
– there is too much play between the links and the rivets.
– the cutting speed is too slow and the repeated sharpening does not improve the cutting speed. The chain is worn.
IMPORTANT After replacing the chain, its tension level must be checked more due to settling of the chain.
8.3 GUIDE BAR MAINTENANCE
NOTE Any work on the guide bar specific experience and special tools in order to achieve top workmanship standards; for purposes, we recommend you contact your dealer to ensure work is done correctly.
To avoid asymmetrical wear on the bar, make sure it is turned over periodically.
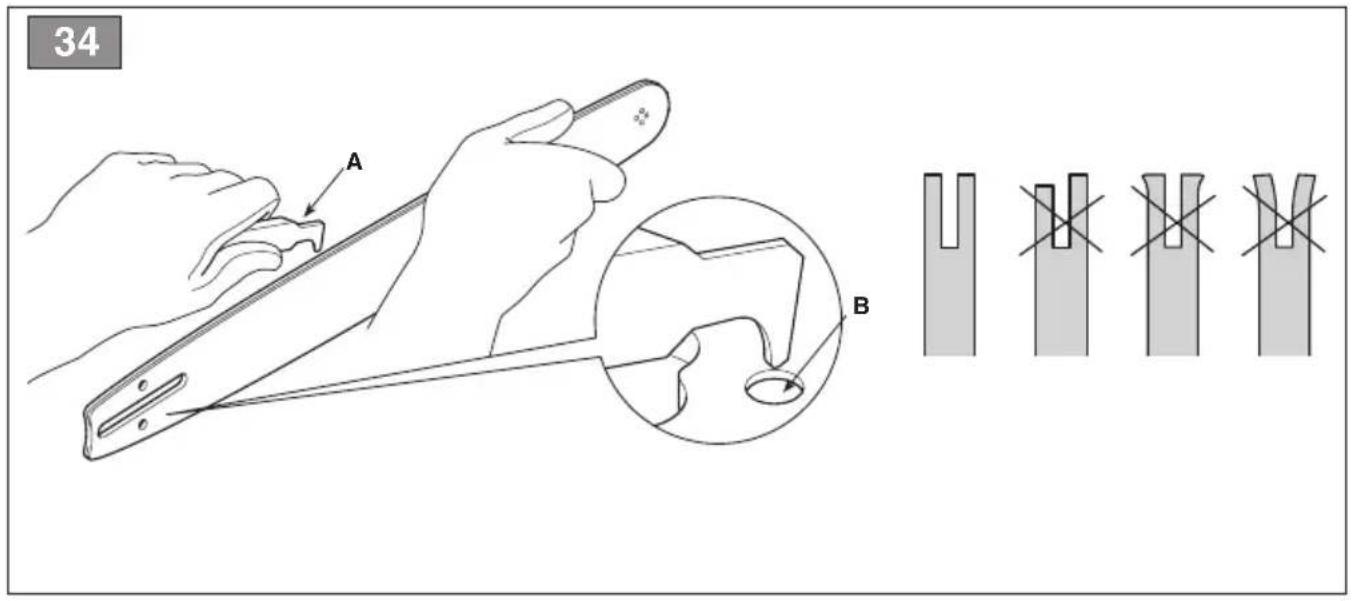
To keep the bar in perfect working order, proceed as follows:
- grease the bearings on the nose sprocket (if present) with the syringe (not included).
- clean the bar groove with the scraper (not included) (Fig. 34.A);
- clean the lubrication holes (Fig. 34.B);
- with a flat file, remove burr from the edges and level off the guides.
8.3.1 Replacing the bar
Replace the bar whenever:
- the groove is not as deep as the height of the drive links (which must never touch the bottom);
– the inside of the guide is worn enough to make the chain lean to one side.
9. STORING
9.1 STORING THE MACHINE
When the machine is to be stored away:
- Remove the battery from its housing and recharge it;
- Mount the bar cover.
- Wait until the motor is sufficiently cold;
- Clean (par. 7.4).
- Check there are no loose or damaged components. If necessary, replace the damaged components and tighten any screws and loose bolts or contact the authorised service centre.
- Store the machine:
-in a dry place
– protected from inclement weather
– in a place where children cannot get to it - making sure that keys or tools used for maintenance are removed.
-
at an ambient temperature between -20 to 85°C
-
the machine can be hung on the wall (Fig. 32. I - II).
freqNOTE Make sure that the wall can hold loads of minimum 20 kg
9.2 STORING THE BATTERY
requires
Charge the battery (par. 7.2.2)
safety
The battery must be stored in closed and humidity-free environments, at a temperature between:
0^ - 60^ for 1 month
0°C - 45°C for 3 months
0°C-25°C for 1 year
NOTE If unused for any length of time, charge the battery every two months to prolong working life.
10. HANDLING AND TRANSPORTATION
Whenever the machine is to be handled, raised, transported or tilted you must:
- Stop the machine;
- Wait until the chain is stationary;
- Remove the battery from its housing and recharge it;
- Mount the bar cover;
- Wait until the motor is sufficiently cold;
- Wear heavy work gloves;
- Only hold the machine using the hand grips and position the bar in the opposite direction to that used during operation;
When transporting the machine on a vehicle, always:
- fasten the machine securely with cables or chains;
- position it so that it does not cause a hazard to anyone
11. ASSISTANCE AND REPAIRS
This manual provides all the necessary information to run the machine and for correct basic maintenance operations which can be performed by the user. Any regulations and maintenance operations not described herein must be carried out by your Dealer or Authorised Service Centre, which have the necessary knowledge and equipment to ensure that the work is carried out correctly, maintaining the correct degree of safety and the original operating conditions of the machine.
Any operations performed in unauthorised centres or by unqualified persons will totally invalidate the Warranty and all obligations and responsibilities of the Manufacturer.
- Only authorised service centres can carry out guaranteed repairs and maintenance.
- The authorised service centres only use genuine spare parts. Genuine spare parts and accessories have been designed specifically for machines.
- Non-genuine spare parts and accessories are not approved. Use of non-genuine spare parts and accessories cause the warranty to be invalidated.
- It is advisable to send your machine once a year to an authorised service centre for servicing, assistance and safety device inspection.
12. WARRANTY COVERAGE
The warranty covers all material and manufacturing defects. The user must follow all the instructions provided in the accompanying documentation.
The warranty does not cover damages caused by:
- Failure to become familiar with the documentation accompanying the machine.
- Carelessness.
- Incorrect or prohibited use or assembly.
- Use of non-genuine spare parts.
- Use of accessories not supplied or approved by the manufacturer.
The warranty does not cover:
- Normal wear and tear of consumables, such as cutting means, safety bolts.
• Normal wear and tear.
The purchaser is protected by his or her own national legislation. The purchaser's rights under the national laws or his or her own country are not in any way restricted by this warranty.
13. MAINTENANCE TABLE
| Intervention Frequency | ||
| First time | And then after every | |
| MACHINE | ||
| Check all fasteners | - Before each use | |
| Safety checks/check controls | - Before each use | |
| Check the chain catcher | - Before each use | |
| General cleaning and inspection | - After each use | |
| Cleaning the chain | - After each use | |
| Check the machine and bar lubrication holes | - Before each use | |
| Check the chain drive sprocket | - Once a month | |
| Chain maintenance | - | - |
| Bar maintenance | - | - |
| Topping up the chain oil level - Before each use | ||
* Interventions which must be carried out by your dealer or an authorised service centre
14. TROUBLESHOOTING
| PROBLEM PROBABLE CAUSE SOLUTION | ||
| 1. Activatingthe the throttle trigger lever and the throttle lock button, the machine does not start | Battery is not inserted or is inserted incorrectly | Make sure that the batteries are inserted correctly |
| Low battery Check the battery status and recharge if necessary. | ||
| Machine damaged Do not use the machineRemove the batteries and Contact a Service Centre | ||
| 2. The motor shuts down whilst working | Battery is not inserted correctly Make sure that the batteries are inserted correctly | |
| Low battery Check the battery status and recharge if necessary. | ||
| Machine damaged Do not use the machineRemove the batteries and Contact a Service Centre. | ||
| A motor protection trips | Wait 15min for the machine to cool down and then restart it | |
| 3. With the throttle lock button and throttle trigger lever on, the chain does not turn | Excessive chain tensioning | Retention the chain. |
| Bar and chain problems | Check that the chain runs freely and the bar guides are not deformed. | |
| Machine damaged. | Do not use the machine. Immediately turn off the machine, remove the batteries and Contact an Authorised Service Centre. | |
| 4. The chain heats and emits smoke on the end part of the bar. | Excessive chain tensioning Retension the chain. | |
| Lubricant oil tank empty. Fill the lubricant oil tank | ||
| 5. The motor runs irregularly and lacks power when revved | Bar and chain problems Check that the chain runs freely and the bar guides are not deformed. | |
| 6. No oil is released | Poor quality oil When the motor is cold, empty the tank, clean it and the pipes with liquid detergent and change the oil. | |
| Lubrication holes are clogged Cleanthe lubrication holes | ||
| 7. The machine has struck a foreign body. | Damaged or loose parts. Stop the machine. Inspect for damage. Check for and tighten any loose parts. Have all checks, repair work and replacements carried out by an Authorised Centre only. | |
| 8. Excessive noise and/or vibration is experienced whilst working | Loose or damaged parts Turn off the machine, remove the batteries and: - inspect for damage; - check for and tighten any loose parts; - have any damaged parts replaced or repaired with parts having equivalent specifications. | |
| 9. The machine gives off smoke whilst working | Machine damaged Do not use the machine. Immediately turn off the machine, remove the batteries and Contact an Authorised Service Centre. | |
| 10. Battery power reserve is low | Severe working conditions requiring greater current absorption | Optimise operations |
| Battery is insufficient for operating requirements | Use other batteries | |
| Decrease in battery capacity Purchase a new battery | ||
| 11. The battery charger is not recharging the battery | Batteries not correctly inserted in the battery charger or plug not properly connected to the machine | Check they are correctly inserted |
| Unsuitable environmental conditions | Recharge the battery in places with suitable temperatures (see battery/battery charger instruction manual) | |
| Dirty contacts Clean the contacts | ||
| The battery charger is not energised | Check it is plugged in and the power socket is energised | |
| Faulty battery charger Replace with an original spare part | ||
| Battery too hot or too cold Bring the battery to an ambient temperature between 4-40°C | ||
| If the problem persists, refer to the battery/battery charger manual | ||
If problems persist after having performed the above operations, contact your dealer.
15. ATTACHMENTS ON REQUEST
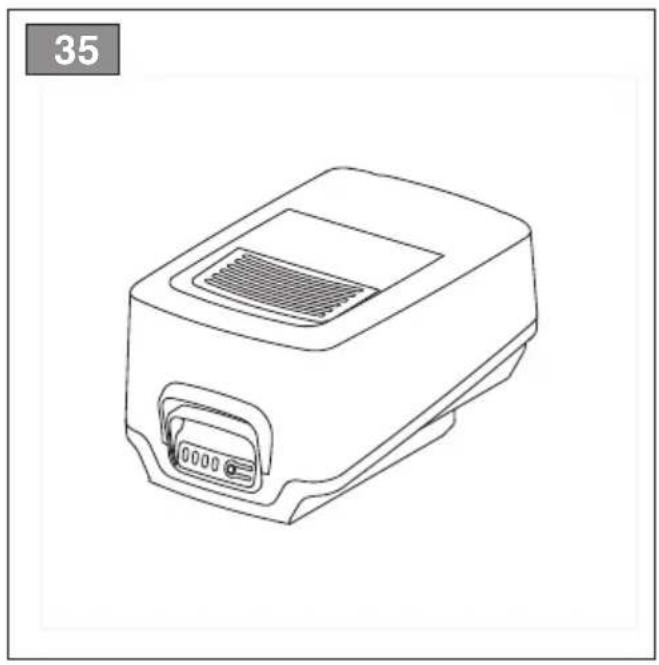
15.1 BATTERY (Fig. 35)
Different capacity batteries are available to suit specific operating requirements.
The list of approved batteries for this machine is found in the "Technical Data" table.
15.2 BATTERY CHARGER (Fig. 36)
There are several devices for recharging the battery.
The list of homologated battery chargers for this machine can be found in the "Technical Data" table
15.3 BARS AND CHAINS
The "Correct bar and chain combination table" contains a list of all possible combinations
between bar and chain. The same table also provides the specification data for all chains and bars approved for use on each machine.
Only use the replacement bars and chains listed in the table. The use of unapproved combinations may be hazardous and cause serious injuries to operators and damage the machine.
In consideration that the selection, application and use of the bar and chain are actions made solely by the user, at his own discretion, the latter assumes responsibility for damages of any kind arising from such actions. When in doubt or if lacking knowledge of the specifics of each bar or chain, contact your dealer or an authorised garden centre.
ÍNDICE
1.1 KUIDAS KASUTUSJUHENDIT LUGEDA
10. MANUTENTION ET TRANSPORT
7. PLĀNOTĀ TEHNISKĀ APKOPE
7.1 VISPĀRĒJA INFORMĀCIJA
2.5 BESCHERMING VAN DE OMGEVING
9.2 OPSLAG VAN ACCU'S
3. BLI KJENT MED MASKINEN

ADVARSEL
7. ORDINÆRT VEDLIKEHOLD
7.1 GENERELT
8. EKSTRAORDINÆRT VEDLIKEHOLD
8.1 KJEDEDREV
8.2 VEDLIKEHOLD AV SAGKJEDET
8.3 VEDLIKEHOLD AV SVERDET
13. VEDLIKEHOLDSTABELL
6.1 CZYNNOŚCI WSTĘPNE
6.4 PRACOVNÁ ČINNOST
INNEHÅLLSFÖRTECKNING
- ALLMÄN INFORMATION ...... 1
- SÄKERHETSNORMER....2
- LÄRA KÄNNA MASKINEN 6
7.4 APPARATENS OCH SVÄRDETS SMÖRJHÅL
15.1 BATARYALAR (RES. 35)

UK DECLARATION OF CONFORMITY
(Supply of Machinery (Safety) Regulations 2008, S.I. 2008 No. 1597, Annex II, part A)
- The company: ST. S.p.A. – Via del Lavoro, 6 – 31033 Castelfranco Veneto (TV) – Italy
- Hereby declares under its own responsibility that the machine (function):
Battery powered pole-mounted pruner (felling, bucking, delimbing trees)
a) Homologation type: CS 20 Li B
c) Serial number: 23A••CHA000001 ÷ 99L••CHA999999
d) Engine: battery-operated
- Conforms to UK Regulations:
• S.I. 2008/1597 - Supply of Machinery (Safety) Regulations 2008
e) Notified body:
• S.I. 2001/1701 - Schedule 8 - Noise Emission in the Environment by Equipment for use Outdoors Regulations 2001
• S.I. 2016/1091 - Electromagnetic Compatibility Regulations 2016
• S.I. 2012/3032 - The Restriction of the Use of Certain Hazardous Substances in Electrical and Electronic Equipment Regulations 2012
- Reference to harmonised standards:
EN 62841-1:2015 + AC:2015 +A11:2022
EN 62841-4-1:2020
EN IEC 55014-1:2021
EN IEC 55014-2:2021
EN IEC 63000:2018
g) Measured sound power level: 99,2 dB(A)
h) Guaranteed sound power level: 101 dB(A)
k) Net power installed: /
n) Person authorised to compile the technical file:
ST. S.p.A.
Via del Lavoro, 6
31033 Castelfranco Veneto (TV) - Italia
o) Castelfranco Veneto, 25/09/2023
CEO Stiga Group
Sean Robinson

UK Importer:
STIGA LTD
Unit 8, Bluewater Estate Plympton,
Devon, PL7 4JH, England

| FR (Traduction de la notice originale)Déclaration CE de Conformité(Directive Machines 2006/42/CE, Annexe II, partie A)1. La Société2. Déclare sous sa propre responsabilité que la machine : Scie à chaîne alimenté par batterie portative, abattage/tronçonnage/ébranchage d'arbresa) Type / Modèle de Basec) Séried) Moteur: batterie3. Est conforme aux prescriptions des directives :e) Organisme de certificationf) Examen CE du Type4. Renvoi aux Normes harmoniséesg) Niveau de puissance sonore mesuréh) Niveau de puissance sonore garanti k) Puissance installéen) Personne habilitée à établir le Dossier Technique :o) Lieu et Date | EN (Translation of the original instruction)EC Declaration of Conformity(Machine Directive 2006/42/EC, Annex II, part A)1. The Company2. Herby declares under its own responsibility that the machine: Portable battery powered chainsaw, Felling/bucking/delimbing treesa) Type / Base Modelc) Serial numberd) Motor: battery-operated3. Conforms to directive specifications:e) Certifying bodyf) EC examination of Type4. Reference to harmonised Standardsg) Sound power level measuredh) Sound power level guaranteedk) Power installedn) Person authorised to create the Technical Folder:o) Place and Date | DE (Übersetzung der Originalbetriebsanleitung)EG-Konformitätserklärung(Maschinenrichtlinie 2006/42/EG, Anhang II, Teil A)1. Die Gesellschaft2. Erklärt auf eigene Verantwortung, dass die Maschine: Tragbare batteriebetriebene Kettensäge, fällen/schneiden/entasten von Bäumena) Typ / Basismodellc) Seriennummerd) Motor: Batterie3. Den Anforderungen der folgenden Richtlinien entspricht:e) Zertifizierungsstellef) EG-Baumusterprüfung4. Bezugnahme auf die harmonisierten Normen g) Gemessener Schallleistungspegel h) Garantierter Schallleistungspegel k) Installierte Leistungn) Zur Verfassung der technischen Unterlagen befugte Person:o) Ort und Datum |
| NL (Vertaling van de oorspronkelijke gebruiksaanwijzing)EG-verklaring van overeenstemming(Richtlijn Machines 2006/42/CE, Bijlage II, deel A)1. Het bedrijf2. Verklaart onder zijn eigen verantwoordelijkheid dat de machine: Kettingzaag met accuvoeding, vellen/snijden/snoelen van bomena) Type / Basismodelc) Serienummerd) Motor: accu3. Voldoet aan de specificaties van de richtlijnen:e) Certificatie-instituutf) EG-onderzoek van het Type4. Verwijzing naar de Geharmoniseerde normeng) Gemeten niveau van geluidsvermogenh) Gegarandeerd niveau van geluidsvermogenk) Geinstalleerd vermogenn) Bevoegd persoon voor het opstellen van het Technisch Dossiero) Plaats en Datum | ES (Traducción del Manual Original)Declaración de Conformidad CE(Directiva Máquinas 2006/42/CE, Anexo II, parte A)1. La Empresa2. Declara bajo su propia responsabilidad que la máquina: Motosierra de cadena alimentada por bateria portátil, tala/seccionamiento/poda de árbolesa) Tipo / Modelo Basec) Matrículad) Motor: batería3. Cumple con las especificaciones de las directivas:e) Ente certificadorf) Examen CE del Tipo4. Referencia a las Normas armonizadasg) Nivel de potencia sonora medidoh) Nivel de potencia sonora garantizadok) Potencia instaladan) Persona autorizada a realizar el Manual Técnico:o) Lugar y Fecha | PT (Tradução do manual original)Declaração CE de Conformidade(Diretiva de Máquinas 2006/42/CE, Anexo II, parte A)1. A Empresa2. Declara sob a própria responsabilidade que a máquina: Motosierra alimentada por bateria portátil, abate/secionamento/desramaçãoa) Tipo / Modelo Basec) Matrículad) Moto: Bateria3. É conforme às especificações das diretivas:e) Órgão certificadorf) Exame CE do Tipo4. Referência às Normas harmonizadasg) Nivel medido de potência sonorah) Nivel garantido de potência sonorak) Potência instaladan) Pessoa autorizada a elaborar o Caderno Técnicoo) Local e Data |
| EL (Μετάφραση του πρωτοτύπου των οδηγιών χρήσης)ΕΚ-Δήλωση συμμόρφωσης(Οδηγία Μιχανών 2006/42/CE, Παράρτημα II, μέρος A)1. H Εταιρία2. Δηλώνει υπεύθυνα ότι η μηχανή: Φορητό αλυστοπρίονο μπαταρίας, Κατάρριψη/κατατομή/κοτή κλαδιών δέντρωα) Túτος / Βασικό Μοντέλοc) Αριθμός μητρώουd) Κινητήρας: μπαταρία3. Συμμορφώνεται με τις προδιαγραφές της οδηγίας:e) Οργανισμός πιστοποίησηsf) Εξέταση CE του Túτου4. Αναφορά στους Κανονισμούς εναρμόνισηςg) Στάθμη μέτρησης ακουστικής ισχύοςh) Στάθμη εγγυημένης ακουστικής ισχύοςk) Εγκαταστημένη ισχύςη) Εξουσιοδοτημένο άτομο για την κατάρτιση του Τεχνικού Φυλλαδίου:o) Tóπος και Χρόνος | TR (Orijinal Talimatlarin Tercümesi)AT Uygunluk Beyanı(2006/42/CE Makine Direktifi, Ek II, bölüm A)1. Şirket2. Şahsi sorumluluğu altında aşağıdaki makinenin: Batarya beslemeli taşınabilir zincirli testere, Ağaçların kesilip devrilmesi/parçalarabölünmesi/dallarının budanmasia) Tip / Standart modelc) Sicil numarasıd) Motor: batarya3. Aşağıdaki direktiflerin özelliklerine uygun olduğunu beyan etmektedir:e) Sertifikalandıran kurumf) ... Tipi CE incelemesi4. Harmonize standartlara atıfg) Ölçülen ses güç seviyesih) Garanti edilen ses güç seviyesik) Kurulu güçn) Teknik Dosyayı oluşturmaya yetkili kişi:o) Yer ve Tarih | MK (Превод на оригиналните упатства)Декларација за усогласеност со ЕУ(Директива за машини 2006/42/CE, Анекс II, дел A)1. Компанијата2. изјавува со целосна лична одговорност дека следната машина: моторна пила на батерии, Соборување/сечење/кастрење на дрваа) Тип / основен модел производствов) етикетаг) мотор: акумулатор3. Усогласено со спецификациите според директивите:д) тело за сертификацијаf) тест CE за типот4. Референции за усогласени нормативие) Акустички притисокж) измерено ниво на звучна мо́кностς) обем на сечењен) овластено лице за составување на Техничката брошурао) место и датум |
| NO (Oversettelse av orginal bruksanvisning)EF- Samsvarserklæring(Maskindirektiv 2006/42/EF, Vedlegg II, del A)1. Firmaet2. Erklærer på eget ansvar at maskinen: Bærbar batteridrevet kjedesag, nedfelling/kutt/kvisting av trær a) Type / Modell c) Serienummer d) Motor: batteri3. Oppfyller kravene i direktivene: e) Sertifiseringsorgan f) EF-typeprøving4. Henvisning til harmoniserte standarder g) Målt lydeffektnivá h) Garantert lydeffektnivá k) Installert effekt n) Person som har fullmakt til å utferdige teknisk dokumentasjon: o) Sted og dato | SV (Översättning av bruksanvisning i original)EG-försäkran om överensstämmelse (Maskindirektiv 2006/42//EG, bilaga II, de la)1. Företaget2. Försäkrar på eget ansvar att maskinen Batteridriven bärbar kedjesåg, fällning/kapning/grenklipping av träd a) Typ / Basmodell c) Serienummer d) Motor: batteri3. Överensstämmer med föreskrifterna i direktivet e) Intygsorgan_Anmält organ f) EG typgodkännande4. Referens till harmoniserade standarder g) Uppmätt ljudeffektnivá h) Garanterad ljudeffektnivá k) Installerad effekt n) Auktoriserad person för upprättandet av den tekniska dokumentationen: o) Ort och datum | DA (Oversættelse af den originale brugsanvisning)EF-overensstemmelseserklæring (Maskindirektiv 2006/42/EF, bilag II, del A)1. Firmaet2. Erklærer på eget ansvar, at maskinen: Bærbar batteridreven kædesav, fældning af træer/udskæring af stykker/opskæring af grene a) Type / Model c) Serienummer d) Motor: batteri3. Er i overensstemmelse med specifikationerne ifølge direktiverne: e) Certificeringsorgan f) EF-typeafprøvning4. Henvisning til harmoniserede standarder g) Målt lydeffektniveau h) Garanteret lydeffektniveau k) Installeret effekt n) Person, der har bemyndigelse til at udarbejde det tekniske dossier: o) Sted og dato |
| FI (Alkuperäisten ohjeiden käännös)EY-VAATIMUSTENMUKAISUUSVAKUUTUS (Konedirektliv i 2006/42/EY, Liite II, osa A)1. Yritys2. Vakuuttaa omalla vastuullaan, että kone: Käsinkannateltava akkukäyttöinen mootorisaha, Puiden kaataminen/pilkominen/karsinta a) Tyyppi / Perusmalli c) Sarjanumero d) Moottori : akku3. On yhdenmukainen seuraavien direktiivien asettamien vaatimusten kanssa: e) Sertifiolntiyritys f) EY-tyypitarkastus4. Viittaus harmonisoituihin standardeihin g) Mitattu äänitehotaso h) Taattu äänitehotaso k) Asennettu teho n) Teknisten asiakirjojen laatimiseen valtuutettu henkilö: o) Paikka ja päivämäärä | CS (Překlad původního návodu k používání)ES – Prohlášení o shodě (Směrnice o Strojních zařízeních 2006/42/ES, Přiloha II, část A)1. Společnost2. Prohlašuje na vlastní odpovědnost, že stroj: Přenosná akumulátorová fetězová motorová pila Kácení/rožřezávní/odvětvování stromů a) Typ / Základní model c) Výrobní číslo d) Motor: akumulátor3. Je ve shodě s nařízeními směrnic: e) Certifikační orgán f) ES zkouška Typu 4. Odkazy na Harmonizované normy g) Naměřená úroveň akustického výkonu h) Zaručená úroveň akustického výkonu k) Instalovaný výkon n) Osoba autorizovaná pro vytvoření Technického spisu: o) Místo a Datum | PL (Tiumaczenie instrukcji oryginalnej)Deklaracja zgodności WE (Dyrekywa maszynowa 2006/42/WE, Załącznik II, częśc A)1. Spółka2. Oświadcza na własną odpowiedzialność, że maszyna: Przenošna pilarka łańcuchowa z zasilaniem akumulatorowym, Šcinanie, obalanie/przerzynanie/okrzesywanie drzew a) Typ / Model podstawowy c) Numer seryjny d) Silnik: akumulator3. Spełnia podstawowe wymogi następujących Dyrektyw: e) Jednostka certyfikująca f) Badanie typu WE 4. Odnieslenie do Norm zharmonizowanych g) Zmierzony poziom mocy akustycznej h) Gwarantowany poziom mocy akustycznej k) Moc zainstalowana n) Osoba upoważniona do zredagowania Dokumentacji technicznej: o) Miejscowość i data |
| HU (Eredeti használati utasítás fordítása)EK-megfelelőségi nyilatkozata (2006/42/EK gépírányelv, II. melléklet "A" rész)1. Alulirott Vállalat2. Felelősségének teljes tudatában kijelenti, hogy az alábbi gép: Hordozható akkumulátoros láncfűrész, Fák kidöntése/darabolása/gallyazása a) Típus / Alaptipus c) Gyártási szám d) Motor: akkumulátor3. Megfelel az alábbi irányelvek előírásainak: e) Tanúsító szerv f) CE vizsgálat típusa 4. Hivatkozás a harmonizált szabványokra g) Mért zajteljesítmény szint h) Garantált zajteljesítmény szint k) Beépitett teljesítmény n) Müszaki Dosszié szerkesztésére felhatalmazott személy: o) Helye és ideje | RU (Перевод оригинальных инструкций)Декларация соответствия нормам EC (Директива о машинном оборудовании 2006/42/EC, Приложение II, часть A)1. Предприятие2. Заявляет под собственную ответственность, что машина: Портативная цепная пила с батарейным питанием, Валка/разделка/обрезка ветвей деревьев a) Тип / Базовая модель c) Паспорт d) Двигатель: батаря 3. Соответствует требованиям следующих директив: e) Сертифицирующий орган f) Испытание EC типового образца 4. Ссылки на гармонизированные нормы g) Измеренный уровень звуковой мощности h) Гарантируемый уровень звуковой мощности k) Установленная мощность n) Лицо, уполномоченное на подготовку технической документации: o) Место и дата | HR (Prijevod originalnih uputa)EK Izjava o sukladnosti (Direktiva 2006/42/EZ o strojevima, dodatak II, dio A)1. Tvrtka:2. pod vlastitom odgovornošću izjavljuje da je stroj: Prijenosna motorna lančana pila s baterijskim napajanjem, Obaranje/prerezivanje/obrezivanje stabala a) Vrsta / Osnovni model c) Matični broj d) Motor: baterija 3. sukladan s temeljnim zahtjevima direktiva: e) Certifikacijsko tijelo f) Tipsko ispitivanje EZ 4. Primijenjene su slijedeće harmonizirane norme: g) Izmjerena razina zvučne snage h) Zajamčena razina zvučne snage k) Instalirana snaga n) Osoba ovlaštena za pravljenje Tehničke datoteke: o) Mjesto i datum |
| SL (Prevod izvirnih navodil)ES izjava o skladnosti(Direktiva 2006/42/ES), priloga II, del A)1. Družba2. pod lastno odgovornostjo izjavlja, da je stroj:Prenosna akumulatorska verižna žaga,podiranje/rezanje/odstranjevanje vej a) Tip / osnovni modelc) Serijska številkad) Motor: baterija3. Skladen je z določili direktiv :e) Ustanova, ki izda potrdilo f) ES pregled tipa4. Sklicevanje na usklajene predpiseg) Izmerjen nivo zvočne močih) Zagotovljen nivo zvočne močik) Instalirana močn) Oseba, pooblaščena za sestavo tehničneknjžice:o) Kraj in datum | BS (Prijevod originalnih uputa)EZ izjava o sukladnosti(Direktiva o mašinama 2006/42/EZ, Prilog II, deo A)1. Firma2. Daje izjavu pod vlastitom odgovornošću da jemašina: Ručna lančana motorna pila na bateriju,obaranje i sječa drveća/rezanje granaa) Tip / Osnovni modelc) Serijski brojd) Motor: akumulator3. sukladna s osnovnim zahtjevlma direktive:e) Certifikaciono tijelof) EZ ispitivanje tipa4. Pozivanje na uskladene normeg) Izmjereni nivo zvučne snageh) Garantovani nivo zvučne snagek) Instalisana snagan) Osoba ovlaštena za izradu tehničke brošure:o) Mjesto i datum | SK (Preklad pôvodného návodu na použitie)ES vyhlásenie o zhode(Smernica o Strojnych zariadeniach 2006/42/ES,Príloha II, časť A)1. Spoločnosť2. Vyhlasuje na vlastnú zodpovednosť, že stroj:Prenosná akumulátorová ret'azová motorovápila,stínanle/rozrezávanie/odvetvovanje stromova) Typ / Základný modelc) Výrobné číslod) Motor: akumulátor3. Je v zhode s naradeniami smerníc:e) Certifikačný orgánf) Skúška typu ES4. Odkaz na Harmonizované normyg) Nameraná úroveň akustického výkonuh) Zaručená úroveň akustického výkonuk) Inštalovaný výkonn) Osoba autorizovaná na vytvorenieTechnického spisu:o) Miesto a Dátum |
| RO (Traducerea manualului fabricantului)CE -Declaratie de Conformitate(Directiva Mašini 2006/42/CE, Anexa II, partea A)1. Societatea2. Declará pe propria răspundere că mašina:Ferăstrău cu lanț alimentat cu baterie portabilă,Doborâre/sectionare/tăierea ramurilor de copaci a) Tip / Model de bazác) Număr de seried) Motor: baterie3. Este în conformitate cu specificațiiledirectivelor:e) Organism de certificaref) Examinare CE de Tip4. Referință la Standardele armonizateg) Nivel de putere sonoră măsurath) Nivel de putere sonoră garantatk) Putere instalata _n Persoană autorizată să întocmească DosarulTehnico) Locul și Data | LT (Originalių instrukcijų vertimas)EB atitiktles deklaracija(Mašinų direktyva 2006/42/CE, Priedas II, dalis A)1. Bendrovė2. Prisiima atsakomybę, kad įrenginys: Nešiojamasakumullatorinis grandlininis pjūklas,medžių kirtimas/pjaustymas/genėjimasa) Tipas / Bazinis Modelisc) Serijos numerisd) Variklis: baterijae) Atitinka direktyvose patelktas specifikacijas:e) Sertifikavimo įstaigaf) CE tipo tyrimas4. Nuoroda i suderintas Normasg) Išmatuotas garso galios lygish) Užtikrinamas garso galios lygisk) Instaliuota galian) Autorizuotas asmuo sudaryti TechninęDokumentaciją:o) Vieta ir Data | LV (Instrukciju tulkojums no originálvalodas)EK atbilstības deklarācija(Direktīva 2006/42/EK par mašinām, pielikumsII, dala A)1. Uzpēnums2. Uzpemoties par to pilnu atbildību, pazlno, kamasīna: Ar bateriju darbināms portatīvs kēdeszāgis,Koku gāšana/zāgēšana/atzarošanaa) Tips / Bāzes modelisc) Sērijas numursd) Motors: akumulators3. Atbilst šādu direktivu prasībām:e) Sertifikācijas iestädef) CE tipvelda pārbaude4. Atsauce uz harmonizētiem standartiemg) Izmērītais skaņas intensitātes līmenish) Garantētais skaņas intensitātes līmenisk) Uzstādītā jaudan) Pilnvarotais darbinieks, kas sagatavojatehnisko dokumentāciju:o) Vieta un datums |
| SR (Prevod originalnih uputstval)EC deklaracija o usaglašenosti(Direktiva o mašinama 2006/42/EC, Prilog II, deoA)1. Preduzeće2. Daje izjavu pod vlastitom odgovornošću da jemašina: Ručna lančana motorna testera nabateriju,obaranje i seča drveća/rezanje granaa) Tip / Osnovni modelc) Serijski brojd) Motor: akumulator3. u skladu s osnovnim zahtevima direktiva:e) Sertifikaciono telof) EC ispitivanje tipa:4. Pozivanje na uskladene normeg) Izmereni nivo zvučne snageh) Garantovani nivo zvučne snagek) Instalisana snagan) Osoba ovlašćena za sastavljanje tehničkebrošureo) Mesto i datum | BG (Превод на оригиналните инструкции)EO декларация за съответствие(Директива Машини 2006/42/EO, Приложение II,част A)1. Дружеството2. На собствена отговорност декларира, чемашината: Моторен верижен трион захранван спреносима акумулаторна батерия, Сеч/нарязванена трупи/окастряне клоните на дърветаa) Вид / Базисен моделв) Сериен номерг) Мотор: акумулатор3. Е в съответствие със спецификата надирективите:д) Сертифициращ органе) EO изследване на вида4. Базирано на хармонизираните нормиж) Ниво на измерена акустична мощности) Гарантирано ниво на акустична мощностл) Инсталирана мощностр) Лице, упълномощено да състави ТехническатаДокументация:o) Място и дата | ET (Algupārase kasutusjuhendi tõlge)EÜ vastavusdeklaratsioon(Masinadirektiiv 2006/42/EÜ, Lisa II, osa A)1. Firma2. Kinnitab omal vastutusel, et masin:Kaasaskantav akutoitega kettsaag,Puude langetamine/järkamine/laasiminea) Tüüp / Põhimudelc) Matrikkeld) Mootor: aku3. Vastab direktiivide nõuetele:e) Kinnitav asutusf) EÜ tüübihindamine4. Vilde ühtlustatud standarditeleg) Möõdetud helivõimsuse taseh) Garanteeritud helivõimsuse tasek) Installeeritud võimsusn) Tehnilise Lehe autoriseeritud koostaja:o) Koht ja Kuupäev |
EN • The content and images in this User Manual were produced expressly for ST. S.p.A. and are protected by copyright – any unauthorised reproduction or modification to the document, either partially or in full, is prohibited.