
KD-50X80L - TV SONY - Free user manual and instructions
Find the device manual for free KD-50X80L SONY in PDF.
User questions about KD-50X80L SONY
0 question about this device. Answer the ones you know or ask your own.
Ask a new question about this device
Download the instructions for your TV in PDF format for free! Find your manual KD-50X80L - SONY and take your electronic device back in hand. On this page are published all the documents necessary for the use of your device. KD-50X80L by SONY.
USER MANUAL KD-50X80L SONY
* In the actual model names, the "x"/"xx" indicates numbers and/or characters specific to each model.
FW-85BZ4xL / 85BZ3xL / 75BZ4xL / 75BZ3xL / 65BZ4xL / 65BZ3xL / 55BZ4xL / 55BZ3xL / 50BZ3xL / 43BZ3xL
KD-85X8xL / 85X8xBL / 75X8xL / 75X8xBL / 75X7xL / 75X7xAL / 75X7xWL / 65X8xL / 65X8xBL / 65X7xL / 65X7xAL / 65X7xWL / 55X8xL / 55X8xBL / 55X7xL / 55X7xAL / 55X7xWL / 50X8xL / 50X7xL / 50X7xWL / 43X8xL / 43X7xL / 43X7xWL
For product protection and safety reasons, Sony strongly recommends that installation of your TV or LCD Monitor be performed by Sony dealers or licensed contractors. Do not attempt to install it yourself.
To Sony Dealers and Contractors
Provide full attention to safety during the installation, periodic maintenance and examination of this product.
Sufficient expertise is required for installing this product, especially to determine the strength of the wall for withstanding the TV's or LCD Monitor's weight. Be sure to entrust the attachment of this product to the wall to Sony dealers or licensed contractors and pay adequate attention to safety during the installation. Sony is not liable for any damage or injury caused by mishandling or improper installation.
For Safety and proper installation, follow the Wall-Mount Bracket Operation Instructions, TV or LCD Monitor Setup Guide and the directions in this manual.
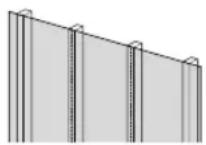
Wall-Mount Bracket
On Safety
Thank you for purchasing this product.
To Customers
Installing the TV or LCD Monitor to the Wall

WARNING
PROFESSIONAL INSTALLATION REQUIRED
This product should only be installed by a professional installer who is trained to determine the strength of the wall for withstanding the TV's or LCD Monitor's weight. If it is not properly secured during installation, the TV or LCD Monitor may fall and cause serious injury. Sony is not liable for any damage or injury caused by mishandling or improper installation, or installing any other than the specified product. Your Statutory Rights (if any) are not affected.
To Sony Dealers
Sufficient expertise is required for installing this product. Be sure to read this instruction manual thoroughly to do the installation work safely. Sony is not liable for any damages or injury caused by mishandling or improper installation. Please give this manual to the customer after installation.
This instruction manual shows the correct handling of the product and important precautions necessary to prevent accidents. It is your responsibility to read, thoroughly understand, and follow all instructions in this instruction manual. Failure to do so may result in serious personal injury or property damage, and may void the warranty. Keep this manual available for future reference.
Products by Sony are designed with safety in mind. If the products are used incorrectly, however, it may result in a serious injury through fire, electric shock, the product toppling over, or the product dropping. Be sure to observe the precautions for safety to prevent such accidents.
CAUTION
Specified products
This Wall-Mount Bracket is designed for use with the products specified TVs or LCD Monitors. For TVs or LCD Monitors, refer to their Reference Guide to verify that the Wall-Mount Bracket can be used.
To Customers
WARNING
If the following precautions are not observed, serious injury or death through fire, electric shock, or the product dropping can result.
Be sure to subcontract the installation to licensed contractors and keep small children away during the installation.
If the Wall-Mount Bracket or the TV or LCD Monitor is not installed correctly, the following accidents may occur. Be sure licensed contractors carry out installation.
- The TV or LCD Monitor may fall and cause a serious injury such as a bruise or a fracture.
- If the wall on which the Wall-Mount Bracket is installed is unstable, uneven, or not perpendicular to the floor, the unit may fall and cause injury or property damage. The wall should be capable of supporting a weight of at least four times the TV or LCD Monitor weight. (Refer to your TV's or LCD Monitor's Reference Guide for its weight.)
- If the installation of the Wall-Mount Bracket on the wall is not sufficiently sturdy, the unit may fall and cause injury or property damage.
Be sure to subcontract moving or dismounting of the TV or LCD Monitor to licensed contractors.
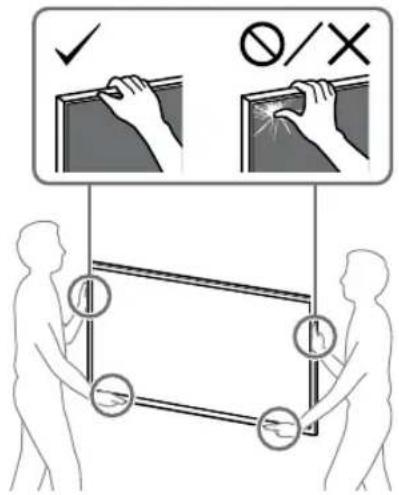
If persons other than licensed contractors transport or dismount the TV or LCD Monitor, it may fall and cause injury or property damage. Two or more persons (three or more persons for 189.3 cm (75 inches) and above TV or LCD Monitor) are needed to transport a large TV or LCD Monitor (except Egypt).
Two or more persons (three or more persons for 75 inches (189.3 cm) and above TV or LCD Monitor) are needed to transport a large TV or LCD Monitor (Egypt only).
Do not remove screws, etc., after mounting the TV or LCD Monitor.
If you do so, the TV or LCD Monitor may fall and cause injury or property damage.
Do not make alterations to the parts of the Wall-Mount Bracket.
If you do so, the Wall-Mount Bracket may fall and cause injury or property damage.
Do not mount any equipment other than the specified product.
This Wall-Mount Bracket is designed for use with the specified product only. If you mount equipment other than specified, it may fall or break, and cause injury or property damage.
Do not apply any load other than the TV or LCD Monitor on the Wall-Mount Bracket. Do not shake the TV or LCD Monitor left/right, up/down.
If you do so, the TV or LCD Monitor may fall and cause injury or property damage.
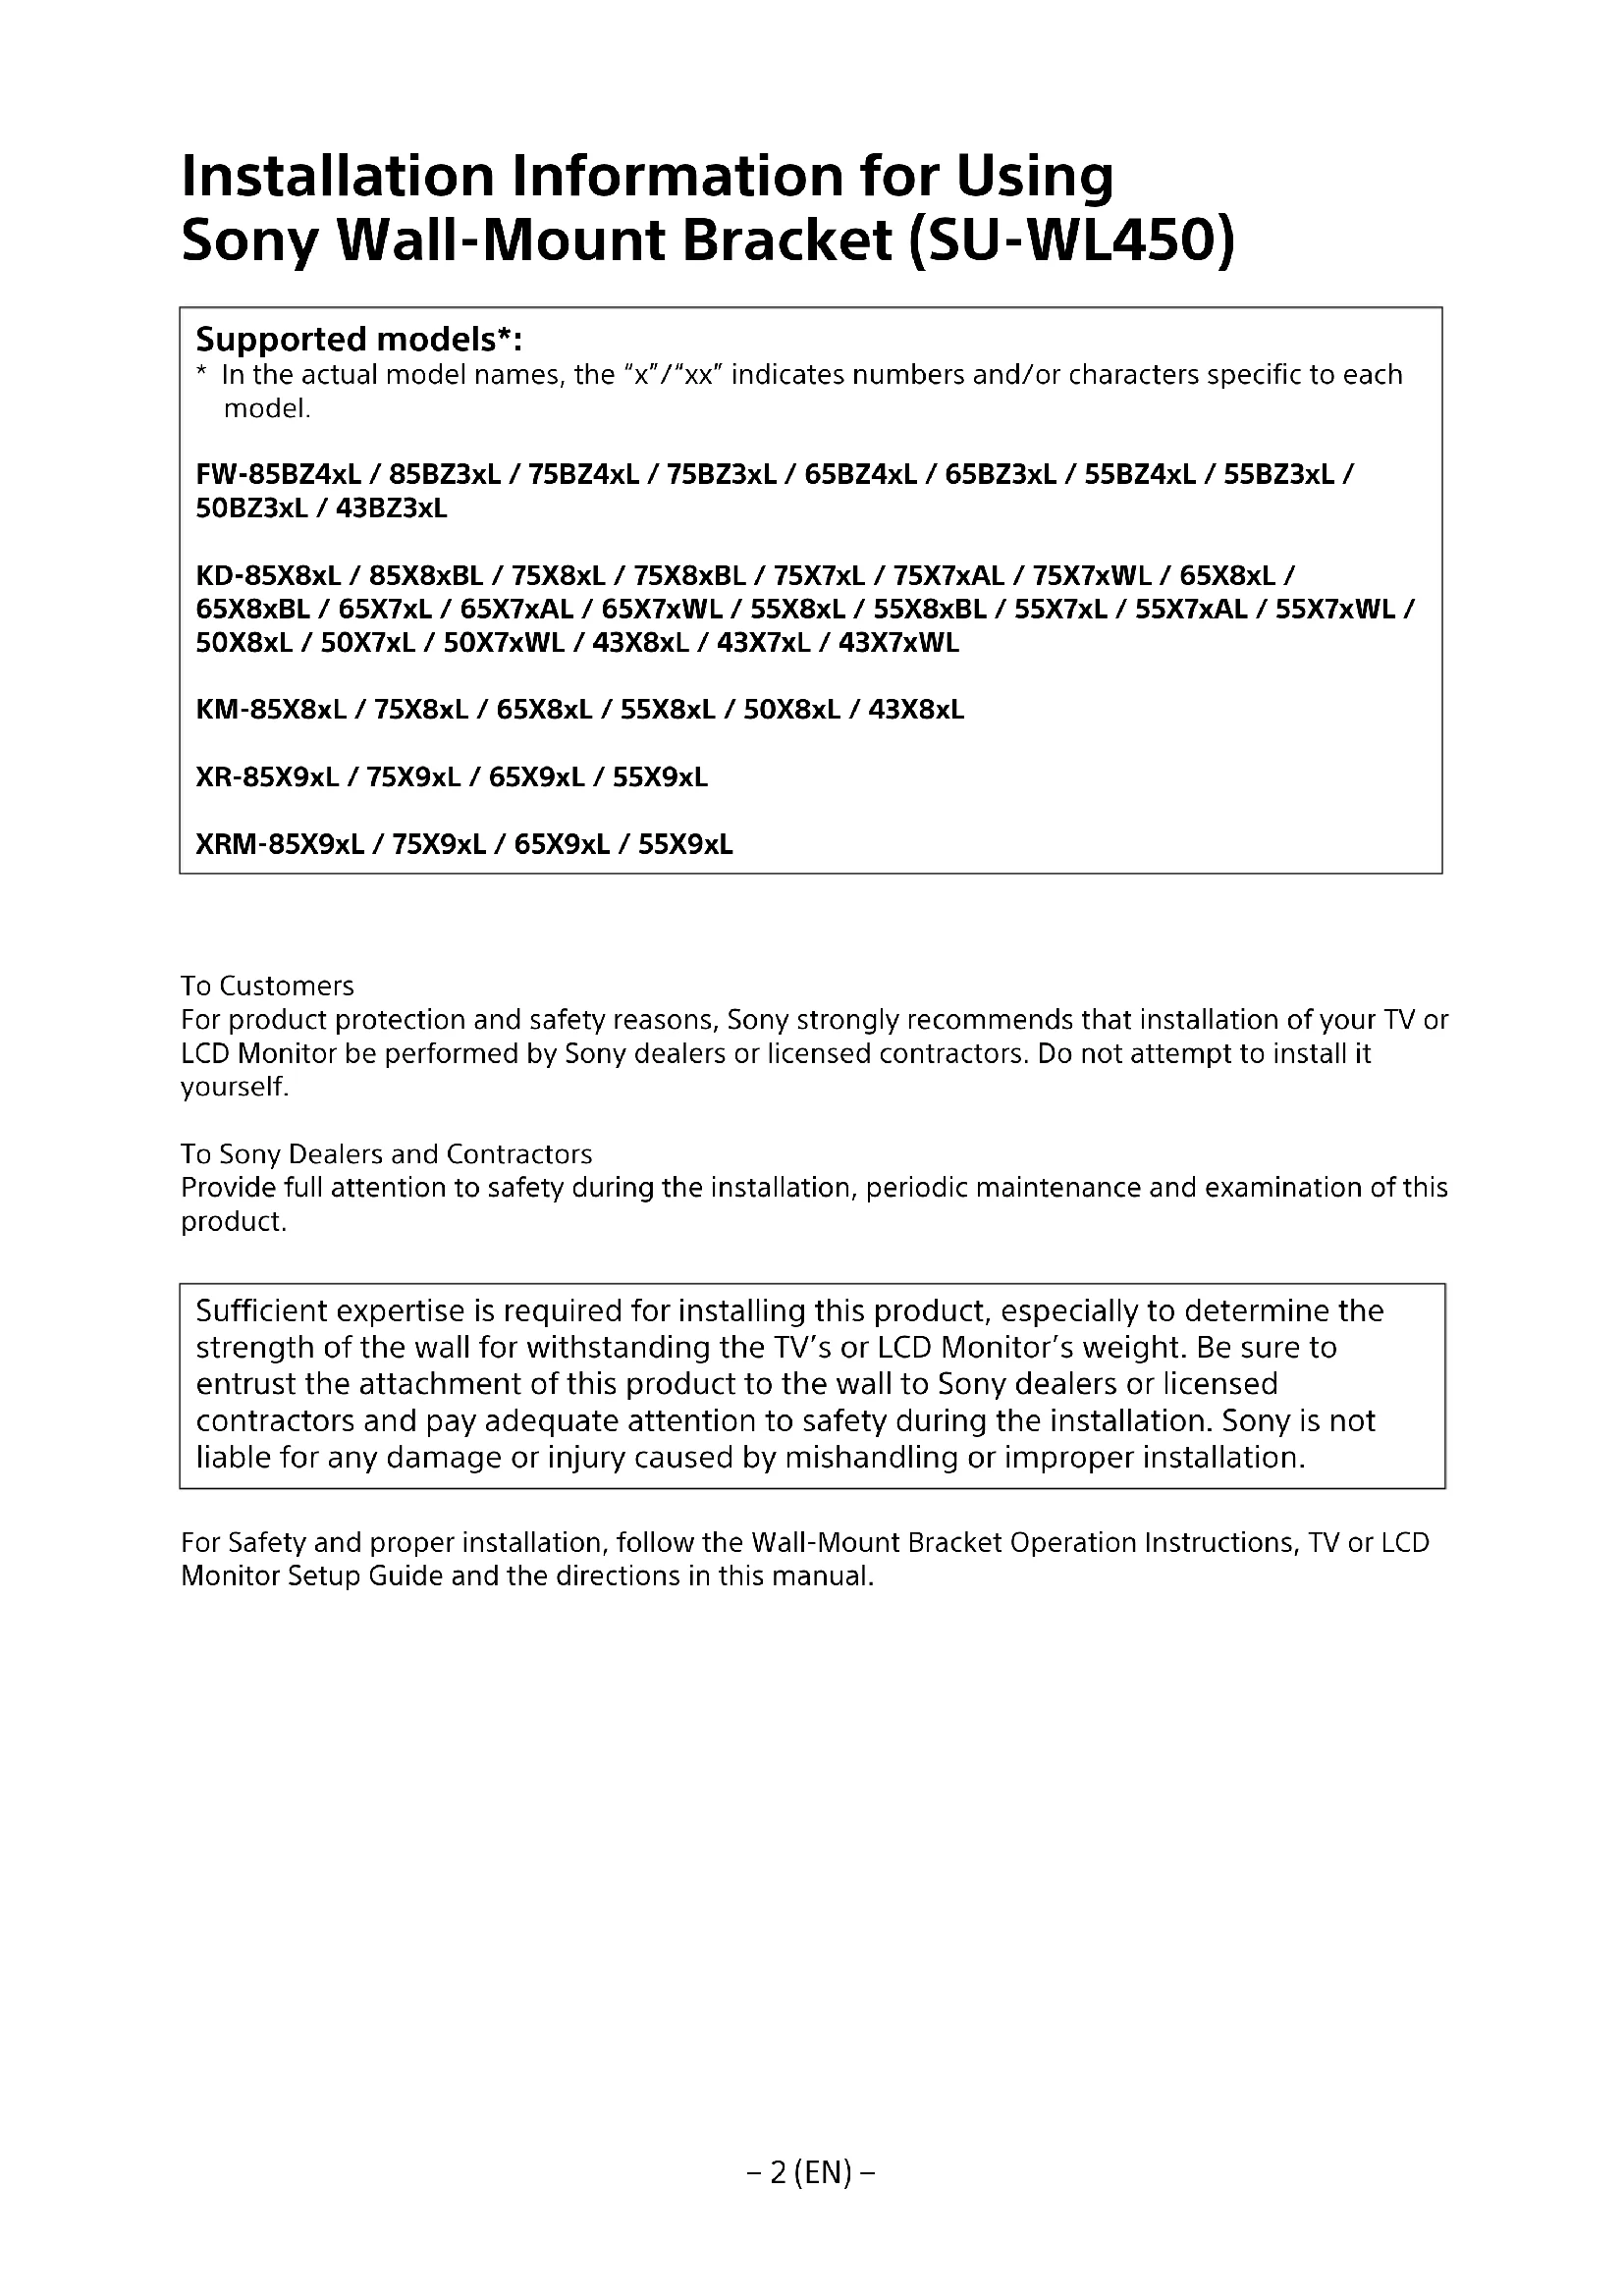
Do not lean on or hang from the TV or LCD Monitor.
Do not lean on or hang from the TV or LCD Monitor as it may fall on you and cause serious injury.
CAUTION
If the following precautions are not observed, injury or property damage may occur.
- Be sure to store the unused parts in a safe place for future use. Keep them away from children.
Do not handle the product with excessive force during cleaning or maintenance.
Do not apply excessive force on the topside of the TV or LCD Monitor. If you do so, the TV or LCD Monitor may fall and cause injury or property damage.
Precautions
- If you use the TV or LCD Monitor installed on the Wall-Mount Bracket for a long time, the wall behind or above the TV or LCD Monitor may become discolored or the wallpaper may come unstuck, depending on the material of the wall.
- If the Wall-Mount Bracket is removed after installing it on the wall, the screw holes are left.
- Do not use the Wall-Mount Bracket in a place where it is subjected to mechanical vibrations.
Installing the Wall-Mount Bracket
To Sony Dealers
WARNING
The following instructions are for Sony dealers only. Be sure to read safety precautions described above and pay special attention to safety during the installation, maintenance and checking of this product.
Do not install the Wall-Mount Bracket on wall surfaces where the corners or the sides of the TV or LCD Monitor protrude away from the wall surface.
Do not install the Wall-Mount Bracket on wall surfaces such as a pillar, where the corners or the sides of the TV or LCD Monitor protrude away from the wall surface. If a person or object happens to hit the protruded corner or side of the TV or LCD Monitor, it may cause injury or property damage.
Do not install the TV or LCD Monitor over or under an air-conditioner.
If the TV or LCD Monitor is exposed to water leaks or air current from an air conditioner for a long time, it may cause a fire, an electric shock or a malfunction of the TV or LCD Monitor.
Be sure to install the Wall-Mount Bracket securely to the wall following the instructions in this instruction manual.
If any of the screws are loose or fall out, the Wall-Mount Bracket may fall and cause injury or property damage. Be sure to use the appropriate screws for the material of the wall and install the unit securely using four or more screws of 8 mm diameter (or equivalent).
Be sure to use the supplied screws and attachment parts properly following the instructions given in this instruction manual. If you use substitute items, the TV or LCD Monitor may fall and cause bodily injury to someone or damage to the TV or LCD Monitor.
Be sure to assemble the bracket properly following the instructed procedure explained in this instruction manual.
If any of the screws are loose or fall out, the TV or LCD Monitor may fall and cause bodily injury to someone or damage to the TV or LCD Monitor.
Be sure to tighten the screws securely in the designated position.
If you fail to do so, the TV or LCD Monitor may fall and cause bodily injury to someone or damage to the TV or LCD Monitor.
Be careful not to subject the TV or LCD Monitor to shock during installation.
If the TV or LCD Monitor is exposed to shock, it may fall or break apart. This may cause injury.
Be sure to install the TV or LCD Monitor on a wall that is both perpendicular and flat.
If you fail to do so, the TV or LCD Monitor may fall and cause injury.
After proper installation of the TV or LCD Monitor, secure the cables properly.
If people or objects get tangled with cables, this may result in injury or damage to the TV or LCD Monitor.
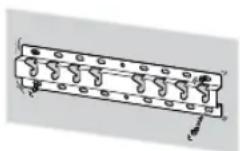
Do not allow the AC power cord (mains lead) or the connecting cable to be pinched.
If the AC power cord (mains lead) or the connecting cable is pinched between the unit and the wall or is bent or twisted by force, the internal conductors may become exposed and cause a short circuit or an electrical break. This may cause a fire or an electric shock.
The screws needed to secure the Wall-Mount Bracket to the wall are not supplied.
Use the appropriate screws for the wall material and structure when mounting the Wall-Mount Bracket.
Before Getting Started
- The TV or LCD Monitor illustrations shown in this manual are examples used to provide clear explanations of the operations. For this reason, the illustrations may appear different from your actual TV or LCD Monitor.
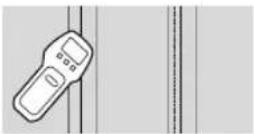
What Is Your Wall Made Of?
Firstly, check the type of the wall to install the TV or LCD Monitor.
Dry wall with studs
Precautions
• Maximum dry wall thickness: 16 mm.
- Ensure that the inner wood stud size is at least 51 mm × 102 mm for common or 38 mm × 89 mm for nominal.
Solid concrete or concrete block
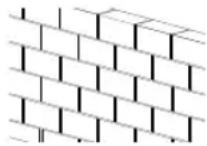
Precautions
- Mount the Wall-Mount Bracket directly onto the solid concrete wall.
- Ensure that the thickness of solid concrete wall is at least 203 mm.
- Ensure that the size of each concrete block is at least 203 ~mm × 203 ~mm × 406 ~mm .
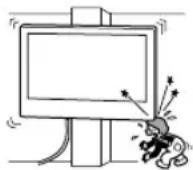
Checking the Parts
Supplied with SU-WL450
- Verify that all the parts are included.
A Base (20) (×1) | B Pulley (×2) | C Screw (+PSW 6 × 20)(×4) | E Spacer (20 mm) (×2)[4782] |
F Belt (×1) | I Base Adaptor (×2) | J Screw (+PSW 4 × 10)(×8) | K Spacer (60 mm) (×2) |
L Screw (+PSW 6 × 50)(×2)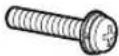 | |||
• These parts may not be used for your model.
D Screw (+PSW 4 × 20) with Bush (×2) | G Bush (20) (M4) (×2) H Screw (+PSW 4 × 20) (×2) |  | M Bush (M4) (×2)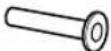 |
| N Screw (+PSW 4 × 50) (×2)[IMAGE] | |||
Supplied with the TV or LCD Monitor
Wall-Mount Attachment
VS
* Only for limited region/country/model.
Preparing for Installation
- Have the TV's or LCD Monitor's Reference Guide and Setup Guide at hand before installation.
- Confirm the installing position of your TV or LCD Monitor.
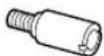
- Prepare four or more screws of 8 mm diameter and one screw of 5 mm or equivalent (not supplied). Select screws suitable for the material of the wall.
• Prepare the following tools:
*1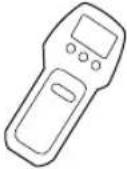 | 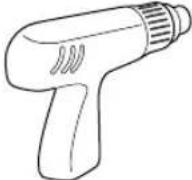 | 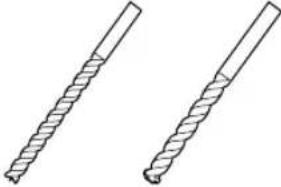 5.5 mm 10 mm 5.5 mm 10 mm |  | |
*2 *3 |  |  1.5 N·m{15 kgf·cm} 1.5 N·m{15 kgf·cm} | 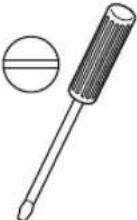 1.5 N·m{15 kgf·cm} 1.5 N·m{15 kgf·cm} | |
 | *2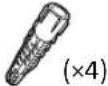 | 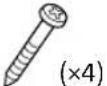 8 mm × 60 mm 5 mm 8 mm × 60 mm 5 mm |  | |
*4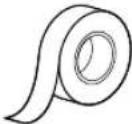 | ||||
*1 Only for dry wall with studs
*2 Only for solid concrete or concrete block
*3 Depending on models
*4 Only for TV or LCD Monitor 189.3 cm (75 inches) and above (except Egypt)
Only for TV or LCD Monitor 75 inches (189.3 cm) and above (Egypt only)
Installing the Wall-Mount Bracket to the Wall
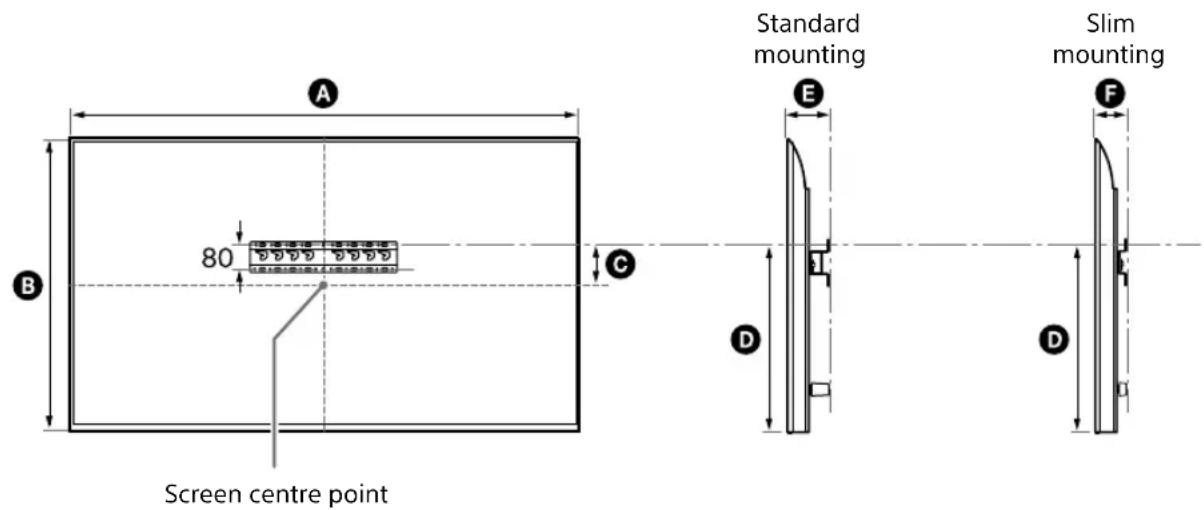
1 Decide on the installation location.
Make sure that the wall has enough space for the TV or LCD Monitor and is capable of supporting a weight of at least four times that of the TV or LCD Monitor. Refer to your TV's or LCD Monitor's Reference Guide for the TV's or LCD Monitor's weight.
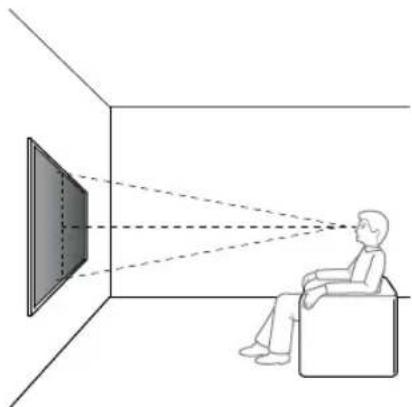
Note
- When your TV or LCD Monitor is installed on the wall, the upper side of the TV or LCD Monitor slightly leans forward.
• We recommend you to check the position of TV or LCD Monitor in the viewing environment.
natural_image
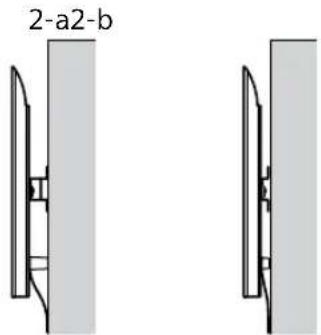
Diagram showing a person sitting in a chair facing a screen with dashed lines indicating perspective projection (no text or symbols present)2 Select wall mounting style as shown below.
2-a: Standard mounting
2-b: Slim mounting
- Refer "Measurement for Wall-Mount Bracket installation on the wall" on page 19.
WARNING
- When 2-b is selected, rear terminal access is limited.
text_image
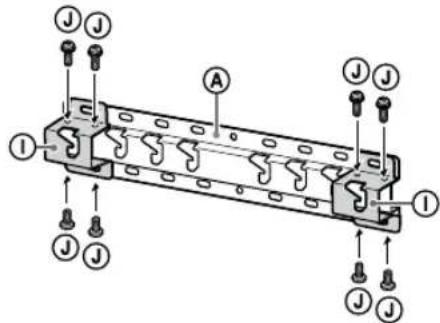
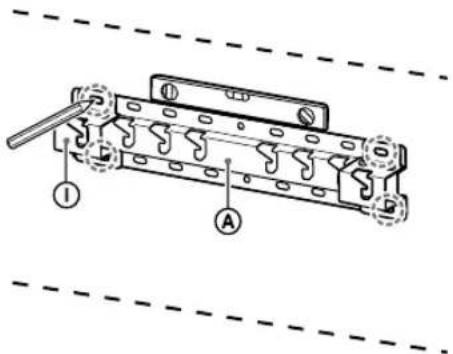
2-a2-b3 If standard mounting (2-a) is selected:
Fit Base Adaptor ① by using Screw (+PSW 4 × 10) ② to Base (20) ③.
- Refer "Base Adapter ① fitting location" on page 21.
text_image
Technical diagram of a mechanical component with labeled parts and directional arrows indicating assembly or assembly.Eg. Fitting Base Adaptor ① at location "a"
If slim mounting (2-b) is selected:
Skip this step.
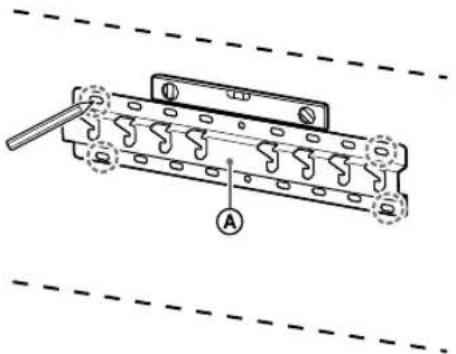
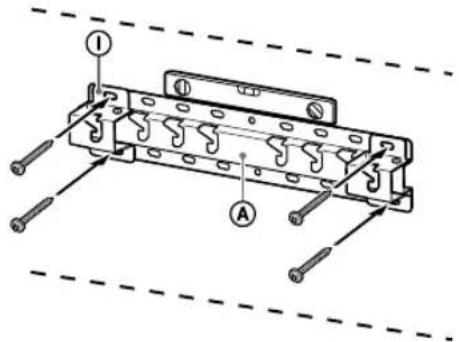
4 Decide the positions of the screws for installing the Base (20) Ⓐ.
• Refer "Specifications" on page 18.
WARNING
- Determine the strength of the wall the TV or LCD Monitor will be mounted on. Reinforce the wall sufficiently, if necessary.
- The wall that the TV or LCD Monitor will be mounted on should be able to support a weight of at least four times that of the TV or LCD Monitor. (Refer to your TV's or LCD Monitor's Reference Guide for its weight.)
If standard mounting (2-a) is selected:
Use the hole positions of Base Adaptor ①.
text_image
Technical diagram of a mechanical assembly with labeled parts A and B, showing internal components and alignment indicators.Eg. Marking at location "a" to fit Base (20) Ⓐ
If slim mounting (2-b) is selected:
text_image
Technical diagram of a mechanical component with labeled parts and annotation AEg. Marking at location "a" to fit Base (20) Ⓐ
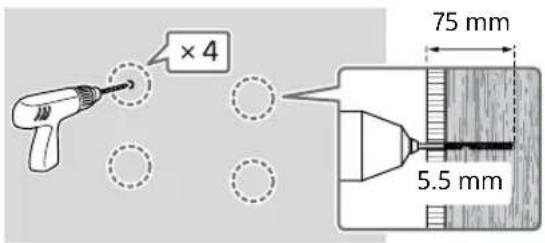
5 Drill pilot holes on the marks.
Make sure the location on the wall to drill the holes are strong enough to support a weight of at least four times that of the TV or LCD Monitor.
Drilling on dry wall with studs:
text_image
×4 75 mm 5.5 mmNote
- Pilot holes must be drilled to a depth of 75 mm, using a 5.5 mm diameter drill bit.
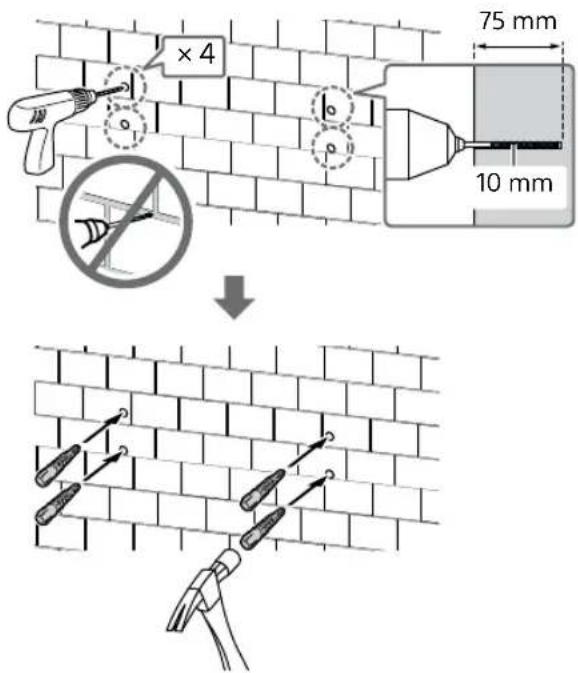
Drilling on solid concrete or concrete block:
text_image
×4 75 mm 10 mm6 Install the Base (20) Ⓐ on the wall using suitable screws (not supplied).
Note
- Use four or more screws of 8 mm diameter or equivalent (not supplied).
- Use a level to check whether the Base (20) Ⓐ is level.
If standard mounting (2-a) is selected:
Fit four screws to the holes of Base Adaptor ① with Base (20) Ⓐ.
text_image
Technical diagram of a mechanical assembly with labeled parts I and A, showing bolted connections and dashed reference lines.Eg. Fitting Base (20) Ⓐ at location "a"
If slim mounting (2-b) is selected:

text_image
Technical diagram of a mechanical component with labeled parts and mounting holes, showing alignment and assembly relationships.Eg. Fitting Base (20) Ⓐ at location "a"
7 FW-85BZ4xL / 85BZ3xL /
75BZ4xL / 75BZ3xL, KD-85X8xL / 85X8xBL / 75X8xL / 75X8xBL / 75X7xL / 75X7xAL / 75X7xWL, KM-85X8xL / 75X8xL, XR-85X9xL / 75X9xL, XRM-85X9xL / 75X9xL only
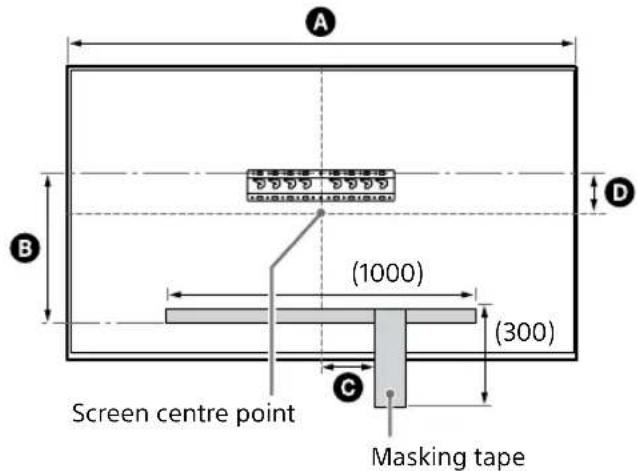
Mark the installation location on the wall.
Use masking tape, etc. (not supplied) to mark the location of the TV or LCD Monitor near the Base (20) Ⓐ or Base Adaptor ①.
- Refer "Wall marking for TV or LCD Monitor installation location" on page 22.
Except FW-85BZ4xL / 85BZ3xL / 75BZ4xL / 75BZ3xL, KD-85X8xL / 85X8xBL / 75X8xL / 75X8xBL / 75X7xL / 75X7xAL / 75X7xWL, KM-85X8xL / 75X8xL, XR-85X9xL / 75X9xL, XRM-85X9xL / 75X9xL Skip this step.
Preparing for the Installation of the TV or LCD Monitor
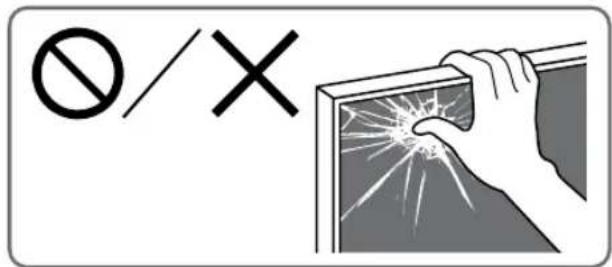
Note
- Be sure to store the removed screws and unused parts in a safe place, keeping them away from children.
text_image
∅/XInstalling the TV or LCD Monitor to the Wall from Carton\*
* Only for limited region/country/model.
FW-85BZ40L / 85BZ35L / 85BZ30L / 75BZ40L / 75BZ35L / 75BZ30L / 65BZ40L / 65BZ35L / 65BZ30L / 55BZ40L / 55BZ35L / 55BZ30L / 50BZ30L / 43BZ30L only
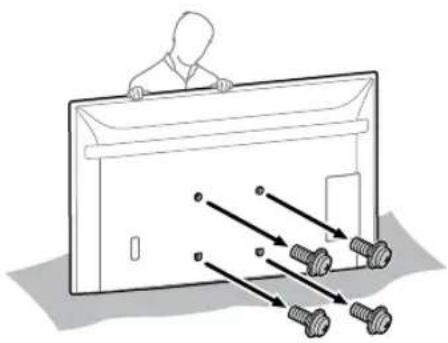
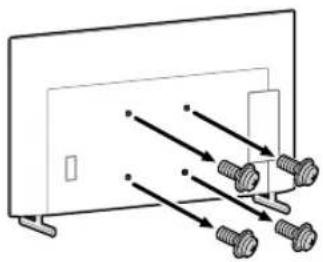
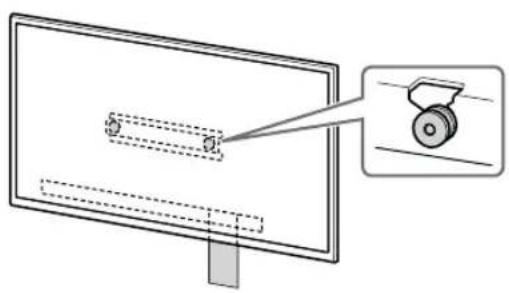
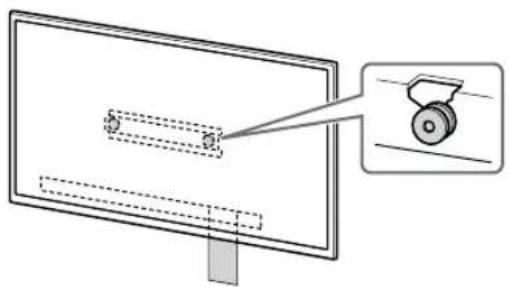
1 Remove the screws from the rear of the TV or LCD Monitor.
natural_image
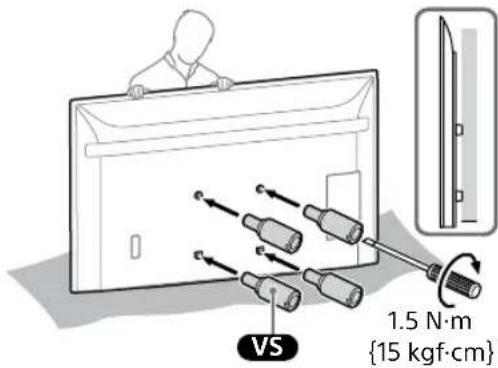
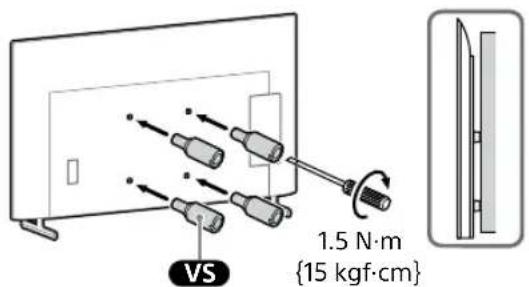
Diagram of a person standing behind a rectangular device with multiple bolts and arrows indicating motion or assembly (no text or symbols)2 Attach the Wall-Mount Attachment VS (supplied with the TV or LCD Monitor) to the rear of the TV or LCD Monitor (to make it parallel with the wall).
text_image
VS 1.5 N·m {15 kgf·cm}Note
- Be sure to fasten the Wall-Mount Attachment VS when attaching them to the TV or LCD Monitor. Use only a flat head screwdriver to install the Wall-Mount Attachment VS. Use of another tool might result in over torqueing the Wall-Mount Attachment VS and damaging the TV or LCD Monitor.
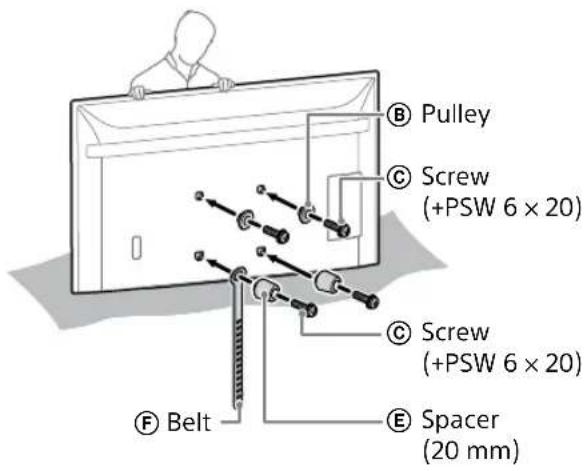
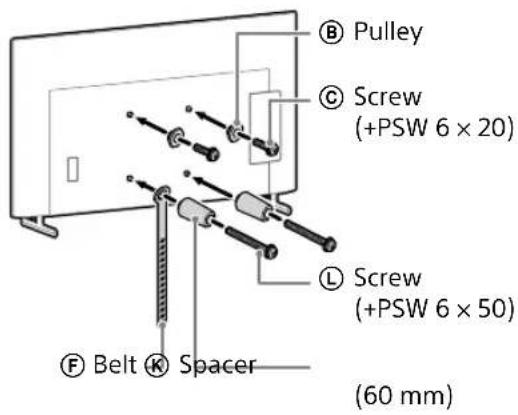
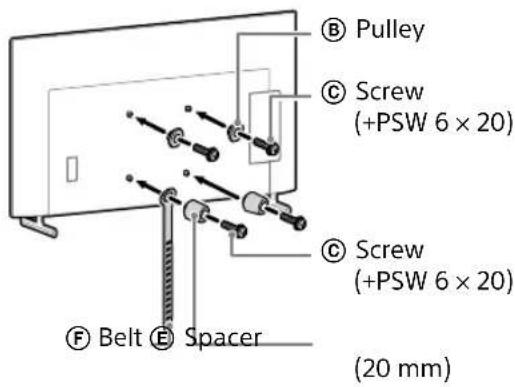
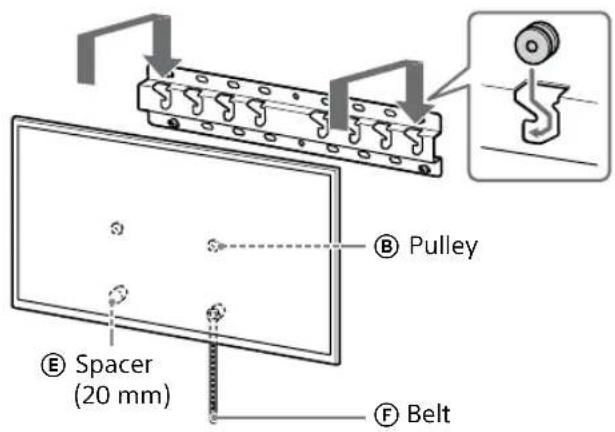
3 Attach the Attachment parts for Wall-Mount Bracket. Check the Attachment parts by referring to "Supplied with SU-WL450" in "Checking the Parts" on page 6.
Note
- Firmly secure the Attachment parts using screws. - When using an electric screwdriver, set the torque setting to approximately 1.5 N·m {15 kgf·cm}.
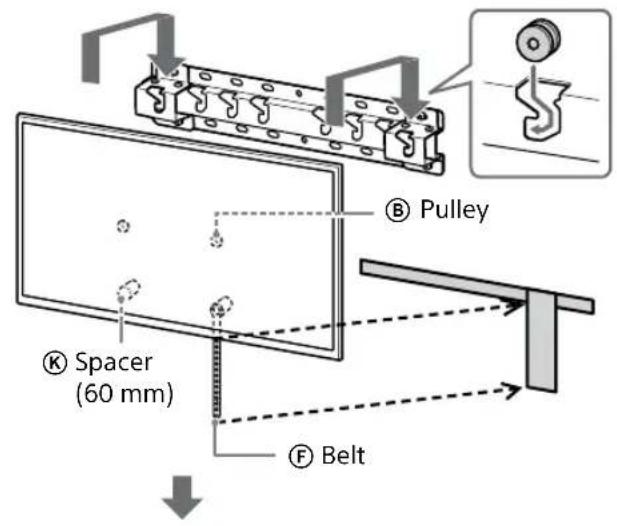
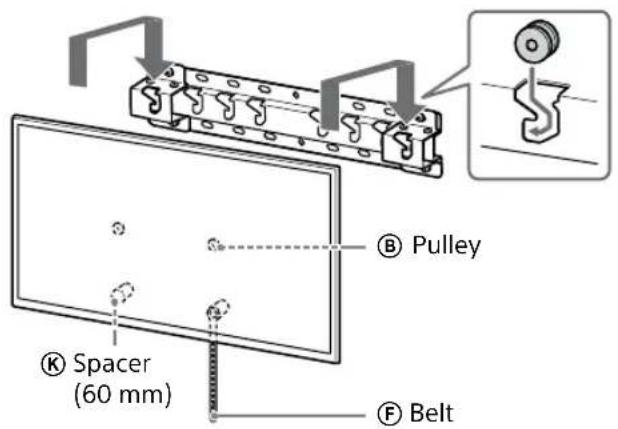
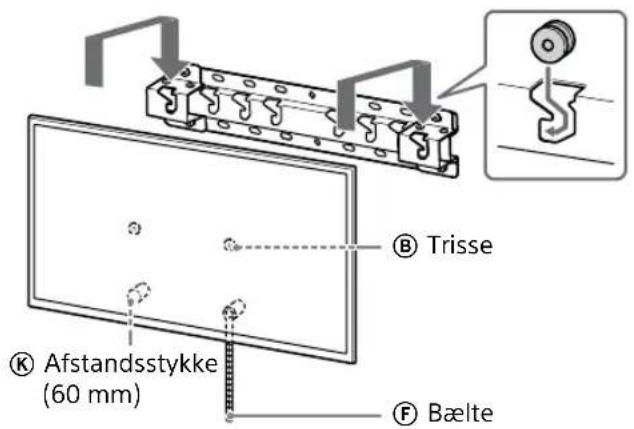
If standard mounting (2-a) is selected:

text_image
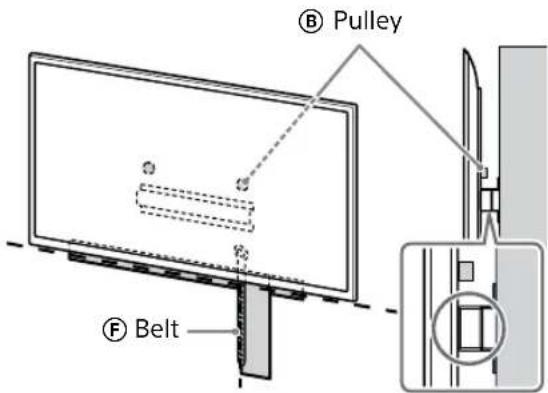
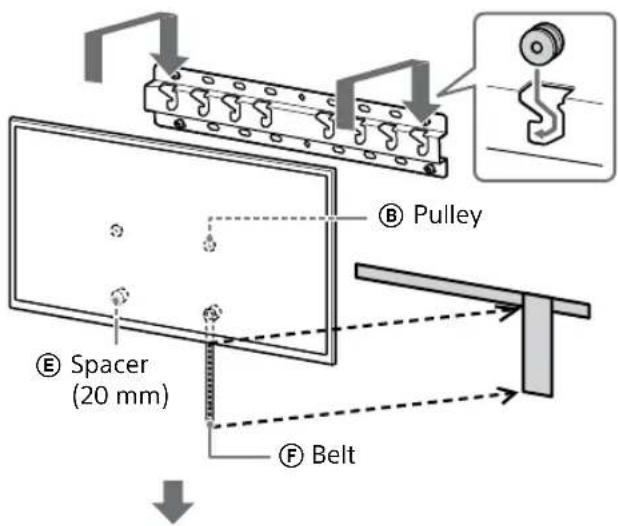
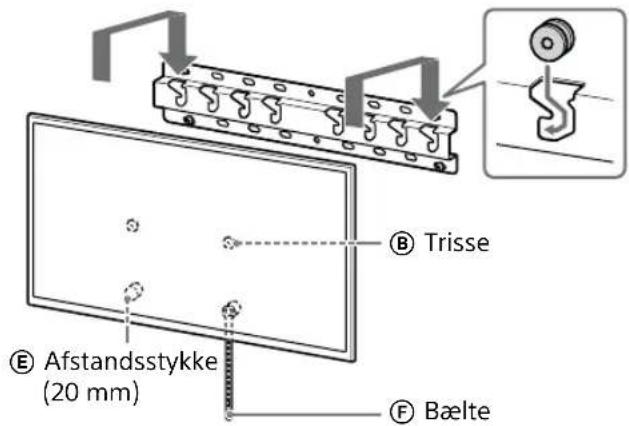
B Pulley C Screw (+PSW 6 × 20) L Screw (+PSW 6 × 50) F Belt K Spacer (60 mm)If slim mounting (2-b) is selected:
text_image
B Pulley C Screw (+PSW 6 × 20) C Screw (+PSW 6 × 20) E Spacer (20 mm) F Belt4 Connect the necessary cable(s) to the TV or LCD Monitor.
Make sure to connect the cables before installing the TV or LCD Monitor on the wall. You will be unable to connect the cables when the TV or LCD Monitor is installed.
Note
- Subcontract the cable routing in the wall to a licensed contractor.
- Bundle the connecting cables to prevent stepping on them before wall mounting.
Installing the TV or LCD Monitor to the Wall from Table-Top Stand\*
* Only for limited region/country/model.
1 Attach the Table-Top Stand to make the TV or LCD Monitor standing.
- Refer to your TV's or LCD Monitor's Setup Guide.
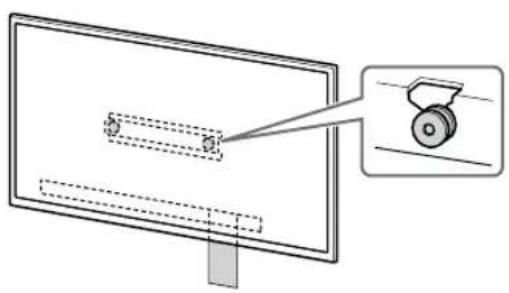
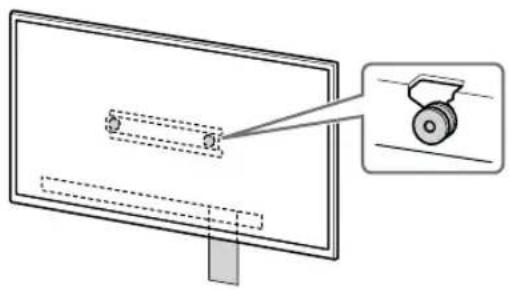
2 Remove the screws from the rear of the TV or LCD Monitor.
natural_image
Diagram of a monitor with four screws and connecting wires, no text or symbols present3 Attach the Wall-Mount Attachment VS (supplied with the TV or LCD Monitor) to the rear of the TV or LCD Monitor (to make it parallel with the wall).
text_image
VS 1.5 N·m {15 kgf·cm}Note
- Be sure to fasten the Wall-Mount Attachment VS when attaching them to the TV or LCD Monitor. Use only a flat head screwdriver to install the Wall-Mount Attachment VS. Use of another tool might result in over torqueing the Wall-Mount Attachment VS and damaging the TV or LCD Monitor.
4 Attach the Attachment parts for Wall-Mount Bracket. Check the Attachment parts by referring to "Supplied with SU-WL450" in "Checking the Parts" on page 6.
Note
- Firmly secure the Attachment parts using screws. - When using an electric screwdriver, set the torque setting to approximately 1.5 N·m {15 kgf·cm}.
If standard mounting (2-a) is selected:
text_image
B Pulley C Screw (+PSW 6 × 20) L Screw (+PSW 6 × 50) F Belt K Spacer (60 mm)If slim mounting (2-b) is selected:
text_image
B Pulley C Screw (+PSW 6 × 20) C Screw (+PSW 6 × 20) F Belt E Spacer (20 mm)5 Connect the necessary cable(s) to the TV or LCD Monitor.
Make sure to connect the cables before installing the TV or LCD Monitor on the wall. You will be unable to connect the cables when the TV or LCD Monitor is installed.
Note
- Subcontract the cable routing in the wall to a licensed contractor.
- Bundle the connecting cables to prevent stepping on them before wall mounting.
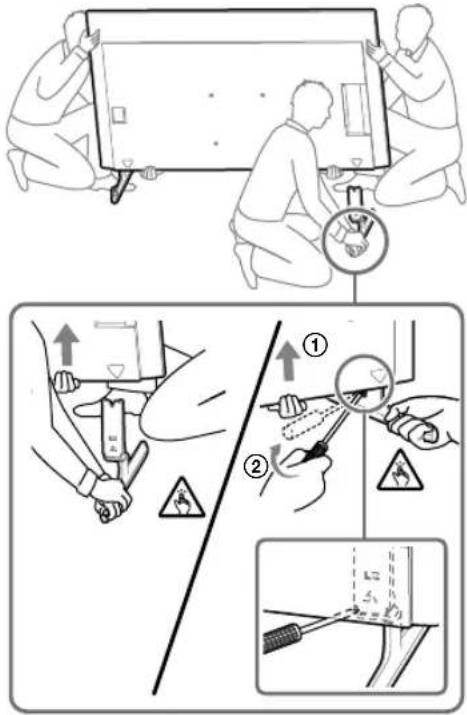
6 Detach the Table-Top Stand from the TV or LCD Monitor.
The following illustration is an example of the operation.
Except FW-85BZ40L / 85BZ35L / 85BZ30L / 75BZ40L / 75BZ35L / 75BZ30L / 65BZ40L / 65BZ35L / 65BZ30L / 55BZ40L / 55BZ35L / 55BZ30L / 50BZ30L / 43BZ30L, KD-75X85L / 75X78AL / 75X77L / 75X75WL / 65X85L / 65X85BL / 65X78AL / 65X77L / 65X75WL / 55X85L / 55X78AL / 55X77L / 55X75WL / 50X77L / 50X75WL / 43X77L / 43X75WL, KM-75X85L / 65X85L / 55X85L, XR-85X90L / 75X90L / 65X90L / 55X90L, XRM-85X90L / 75X90L / 65X90L / 55X90L
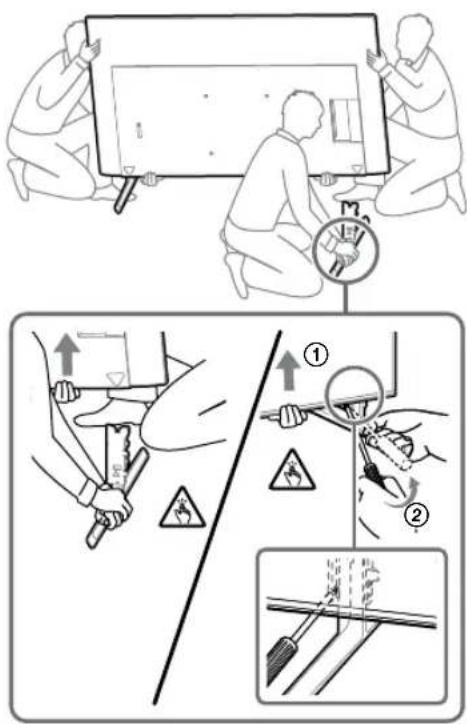
- Remove one side of the Table-Top Stand at a time. Firmly hold the Table-Top Stand securely with both hands while the other people lift up the TV or LCD Monitor.

text_image
Diagram illustrating safety instructions for installing a device, with labeled steps and warning symbols- Repeat the previous step and remove the other side of the Table-Top Stand.
FW-85BZ40L / 85BZ35L / 85BZ30L / 75BZ40L / 75BZ35L / 75BZ30L / 65BZ40L / 65BZ35L / 65BZ30L / 55BZ40L / 55BZ35L / 55BZ30L / 50BZ30L / 43BZ30L, KD-75X78AL / 75X77L / 75X75WL / 65X78AL / 65X77L / 65X75WL / 55X78AL / 55X77L / 55X75WL / 50X77L / 50X75WL / 43X77L / 43X75WL only
- Remove one side of the Table-Top Stand at a time. Firmly hold the Table-Top Stand securely with both hands while the other people lift up the TV or LCD Monitor.

text_image
Medical procedure diagram showing steps to adjust a patient's abdomen and grip, with magnified views highlighting safety warning.- Repeat the previous step and remove the other side of the Table-Top Stand.
KD-75X85L / 65X85L / 65X85BL / 55X85L, KM-75X85L / 65X85L / 55X85L only
- Remove one side of the Table-Top Stand at a time. Firmly hold the Table-Top Stand securely with both hands while the other people lift up the TV or LCD Monitor.
text_image
Technical diagram illustrating a procedure for installing or adjusting a device, with numbered steps and safety warning symbols.- Repeat the previous step and remove the other side of the Table-Top Stand.
XR-85X90L / 75X90L / 65X90L / 55X90L, XRM-85X90L / 75X90L / 65X90L / 55X90L only
- Remove one side of the Table-Top Stand at a time. Firmly hold the Table-Top Stand securely with both hands while the other people lift up the TV or LCD Monitor.

text_image
Diagram illustrating safety inspection steps with labeled diagrams and warning symbols- Repeat the previous step and remove the other side of the Table-Top Stand.
Note
- Three or more people are required to detach the Table-Top Stand.
- Be careful not to use excessive force while detaching the Table-Top Stand from the TV or LCD Monitor as it may cause the TV or LCD Monitor to fall resulting in personal injury or physical damage to the TV or LCD Monitor.
• Take care when handling the Table-Top Stand to prevent damage to the TV or LCD Monitor. - Be careful when lifting the TV or LCD Monitor as the Table-Top Stand is detached, the Table-Top Stand may topple over and cause personal injury.
• Take care when removing the Table-Top Stand from the TV or LCD Monitor to prevent it from falling over and damaging the surface that the TV or LCD Monitor is sitting on.
Installing the TV or LCD Monitor on the Wall
FW-85BZ4xL / 85BZ3xL / 75BZ4xL / 75BZ3xL, KD-85X8xL / 85X8xBL / 75X8xL / 75X8xBL / 75X7xL / 75X7xAL / 75X7xWL, KM-85X8xL / 75X8xL, XR-85X9xL / 75X9xL, XRM-85X9xL / 75X9xL only
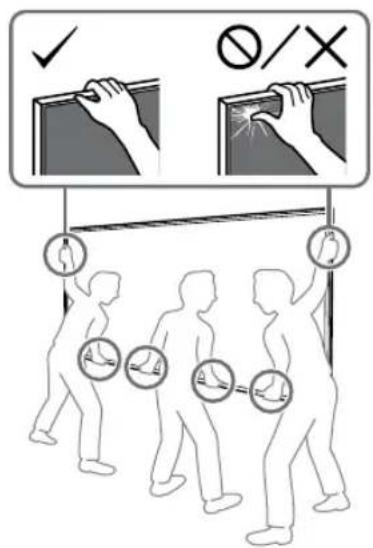
WARNING
- Two or more persons (three or more persons for 189.3 cm (75 inches) and above TV or LCD Monitor) are needed to transport a large TV or LCD Monitor (except Egypt).
Two or more persons (three or more persons for 75 inches (189.3 cm) and above TV or LCD Monitor) are needed to transport a large TV or LCD Monitor (Egypt only).
text_image
Safety instruction diagram showing hand protection and human behavior with checkmark and no/x mark symbols1 Lift the TV or LCD Monitor.
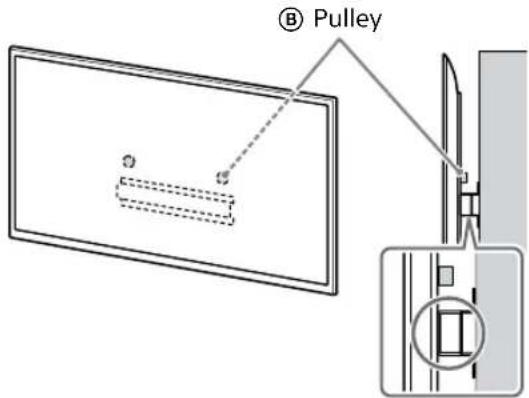
- For the location of the Pulleys Ⓑ to hang on the Base (20) Ⓐ or Base Adaptor Ⓓ, refer to "Base Adapter Ⓔ fitting location" on page 21.
- Make sure that the rear of the TV or LCD Monitor touches the Base (20) Ⓐ or Base Adaptor ① when holding the TV or LCD Monitor.
Note
- Hold the TV or LCD Monitor securely with both hands and make sure the Belt Ⓕ and the bottom of the TV or LCD Monitor align with the masking tape.
- Carry the TV or LCD Monitor with three people and the person who is in front of the TV or LCD Monitor leads the others to adjust the position.
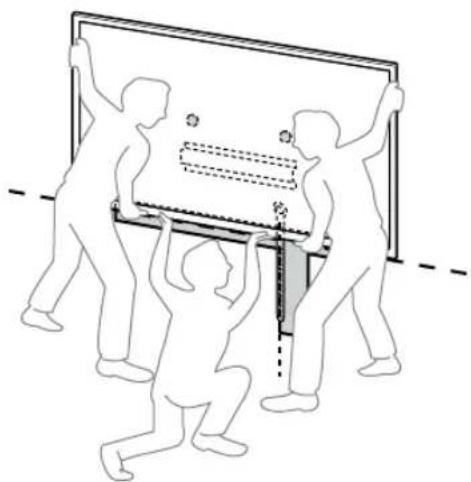
natural_image
Illustration of three human figures lifting a large rectangular object with dashed lines indicating measurement or alignment (no text or symbols)• Take great care when installing the TV or LCD Monitor to the wall especially for the person who is supporting the TV or LCD Monitor from below, the television or LCD Monitor may fall, causing serious bodily injury or even death.
text_image
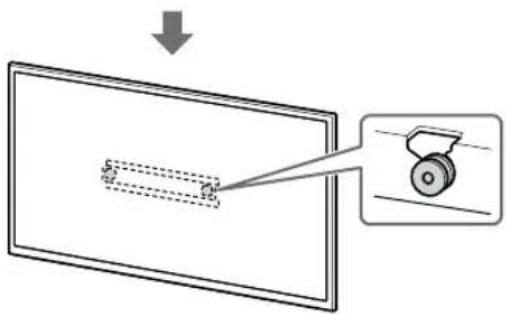
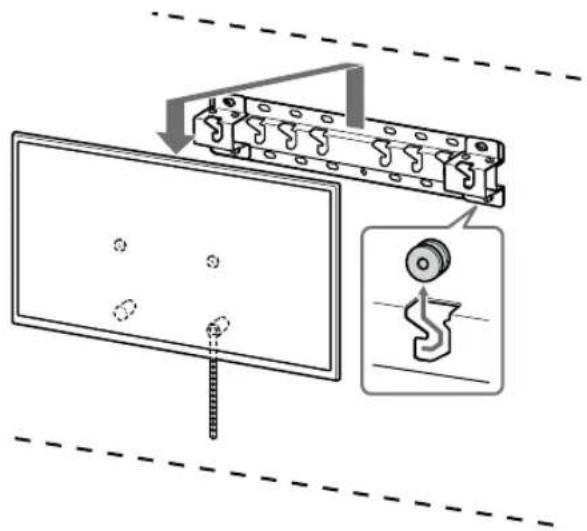
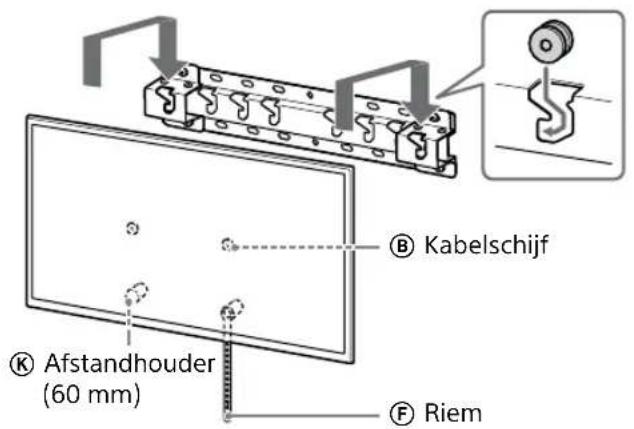
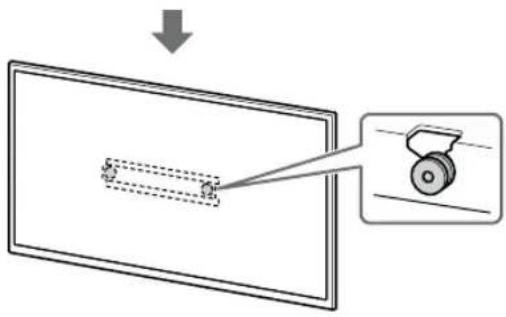
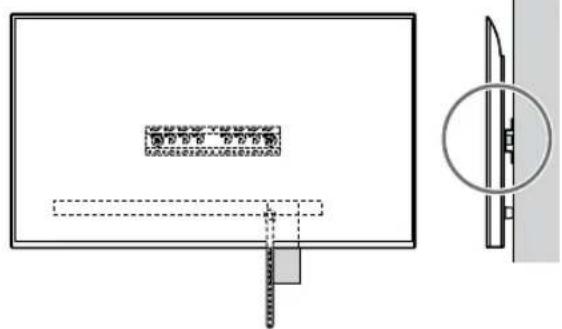
B Pulley F Belt2 Install the TV or LCD Monitor onto the Base (20) Ⓐ or Base Adaptor Ⓔ.
- Gently slide down the TV or LCD Monitor and hang the Pulleys ⑧ attached to the rear of the TV or LCD Monitor to the Base (20) ⑨ or Base Adaptor ⑪, making sure to confirm the shape of the holes.
- After installing the TV or LCD Monitor on the wall, confirm the Pulleys Ⓑ are firmly latched into the Base (20) Ⓐ or Base Adaptor Ⓔ.
- Release both hands slowly to ensure that the TV or LCD Monitor does not fall.

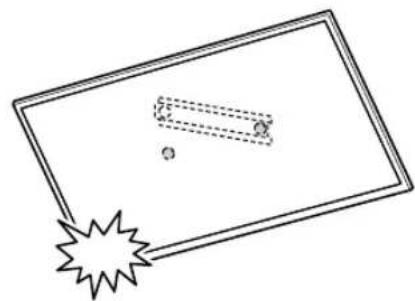
natural_image
Simple line drawing of a rectangular frame with a starburst shape at the bottom (no text or symbols)• After installing the TV or LCD Monitor on the wall, remove the masking tape, etc. from the wall.
If standard mounting (2-a) is selected:
text_image
⑧ Pulley ⑨ Spacer (60 mm) ④ Belt
text_image
Diagram illustrating a mechanical or structural assembly with labeled components and directional arrows indicating movement or force.
natural_image
Diagram of a monitor with a scroll wheel and a magnified inset showing the wheel (no text or symbols)
text_image
Technical diagram showing a rectangular panel with internal components and a close-up view of a mechanical component with cross-sectional view.If slim mounting (2-b) is selected:
text_image
B Pulley E Spacer (20 mm) F Belt
text_image
Technical diagram showing a mechanical assembly with labeled components and directional arrows indicating process flow.
natural_image
Diagram of a monitor with a magnified view showing a wheel (no text or symbols present)
text_image
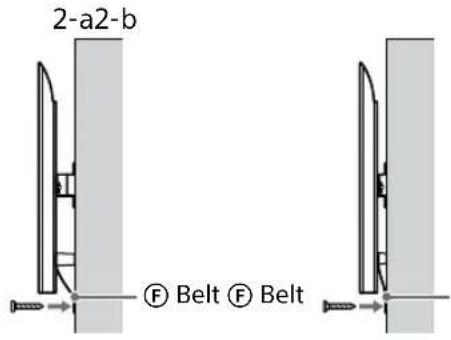
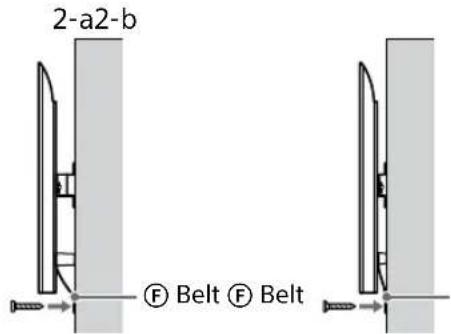
图1-10 - 2014 图2-10 - 2014 图3-10 - 20143 Preventing the bottom of the TV or LCD Monitor from shifting.
• Take up the slack of Belt Ⓕ and attach it to the wall tightly.
text_image
2-a2-b ⑤ Belt ⑤ Belt- Use a 5 mm diameter screw or equivalent (not supplied).
Note
- Try to pull the bottom of the TV or LCD Monitor towards yourself slightly, to make sure that it does not move forward. If there is any movement, it is not fixed correctly, and the Belt Ⓕ should be secured firmly again.
Except FW-85BZ4xL / 85BZ3xL / 75BZ4xL / 75BZ3xL, KD-85X8xL / 85X8xBL / 75X8xL / 75X8xBL / 75X7xL / 75X7xAL / 75X7xWL, KM-85X8xL / 75X8xL, XR-85X9xL / 75X9xL, XRM-85X9xL / 75X9xL
WARNING
- Two or more persons (three or more persons for 189.3 cm (75 inches) and above TV or LCD Monitor) are needed to transport a large TV or LCD Monitor (except Egypt).
Two or more persons (three or more persons for 75 inches (189.3 cm) and above TV or LCD Monitor) are needed to transport a large TV or LCD Monitor (Egypt only).
text_image
Safety instruction diagram showing hand protection with checkmark and no/x mark symbols1 Lift the TV or LCD Monitor.
- For the location of the Pulleys Ⓑ to hang on the Base (20) Ⓐ or Base Adaptor Ⓔ, refer to "Base Adapter ① fitting location" on page 21. - Make sure that the rear of the TV or LCD Monitor touches the Base (20) Ⓐ or Base Adaptor Ⓔ when holding the TV or LCD Monitor.
text_image
⑧ PulleyNote
- Hold the TV or LCD Monitor securely with both hands.
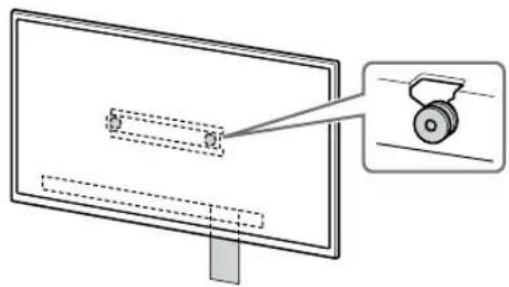
2 Install the TV or LCD Monitor onto the Base (20) Ⓐ or Base Adaptor Ⓔ.
- Gently slide down the TV or LCD Monitor and hang the Pulleys ⑧ attached to the rear of the TV or LCD Monitor to the Base (20) ⑨ or Base Adaptor ⑪, making sure to confirm the shape of the holes.
- After installing the TV or LCD Monitor on the wall, confirm the Pulleys ⑧ are firmly latched into the Base (20) ⑨ or Base Adaptor ⑪.
- Release both hands slowly to ensure that the TV or LCD Monitor does not fall.
natural_image
Simple line drawing of a rectangular frame with a starburst shape at the bottom (no text or symbols)If standard mounting (2-a) is selected:
text_image
B Pulley K Spacer (60 mm) F Belt

text_image
Diagram illustrating a mechanical or optical setup with a slide and a pulley, showing an arrow indicating direction.
natural_image
Diagram showing a mechanical component with a downward arrow and a circled section view (no text or symbols)If slim mounting (2-b) is selected:
text_image
⑧ Pulley ⑨ Spacer (20 mm) ④ Belt
text_image
Diagram illustrating a mechanical or optical setup with labeled components and directional arrow
natural_image
Pure mechanical diagram showing a cutting tool inside a circular opening, with no text or symbols present.3 Preventing the bottom of the TV or LCD Monitor from shifting.
• Take up the slack of Belt Ⓕ and attach it to the wall tightly.
text_image
2-a2-b ⑤ Belt ⑤ Belt- Use a 5 mm diameter screw or equivalent (not supplied).
Note
- Try to pull the bottom of the TV or LCD Monitor towards yourself slightly, to make sure that it does not move forward. If there is any movement, it is not fixed correctly, and the Belt (F) should be secured firmly again.
Confirming the Completion of the Installation
Check the following points.
- The Pulleys Ⓑ are firmly hung onto the Base (20) Ⓐ or Base Adaptor Ⓘ.
- The cord and the cable are not twisted or pinched.
• The Belt Ⓕ is tight with no slack.
WARNING
- Improper placement of the AC power cord (mains lead), etc. may cause fire or electric shock through a short circuit. Be sure to confirm the completion of the installation for safety.
Other Information
When removing the TV or LCD Monitor, reverse the previous installation procedure.
text_image
Technical diagram showing a mechanical assembly with labeled components and a close-up of a gear mechanism.WARNING
- Two or more persons (three or more persons for 189.3 cm (75 inches) and above TV or LCD Monitor) are needed to transport a large TV or LCD Monitor (except Egypt). Two or more persons (three or more persons for 75 inches (189.3 cm) and above TV or LCD Monitor) are needed to transport a large TV or LCD Monitor (Egypt only).
Specifications
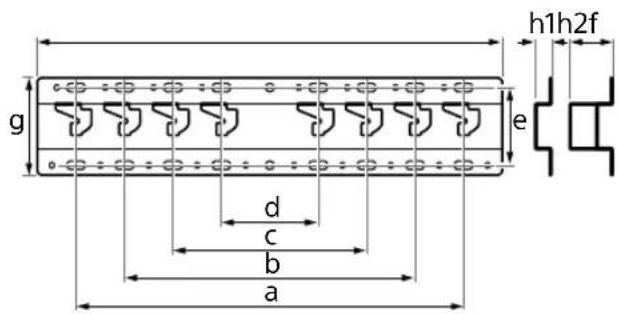
text_image
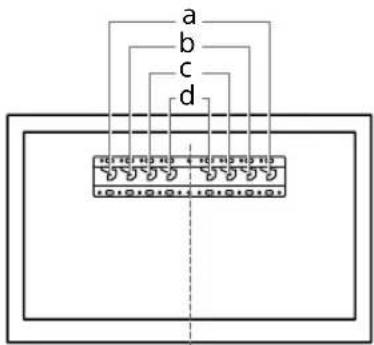
g h1h2f e d c b aDimensions: (Approx.) [mm]
h1 : 20 (for slim mounting, 2-b)
h2 : 60 (for standard mounting, 2-a)
Mass (base only): (Approx.) [kg]
0.8
Design and specifications are subject to change without notice.
References
Measurement for Wall-Mount Bracket installation on the wall
Figures in the table may differ slightly depending on the installation.
(mm)
| Model Name | A | B | C | D | E | F |
| FW-85BZ40L / 85BZ35L / 85BZ30L | 1899 | 1089 | 43 591 | 136 94 | ||
| KD-85X81BL / 85X80LKM-85X80L | 1901 | 1090 | 43 592 | 138 96 | ||
| XR-85X90L XRM-85X90L | 1891 | 1085 | 58 607 | 125 83 | ||
| FW-75BZ40L / 75BZ35L / 75BZ30L KD-75X78AL / 75X77L / 75X75WL | 1686 | 969 | 8 495 | 137 95 | ||
| KD-75X85L KM-75X85L | 1671 | 960 | 21 508 | 123 81 | ||
| KD-75X81BL / 75X80L KM-75X80L | 1675 | 962 | 12 493 | 137 95 | ||
| XR-75X90L XRM-75X90L | 1668 | 959 | 21 508 | 123 81 | ||
| FW-65BZ40L / 65BZ35L / 65BZ30L KD-65X78AL / 65X77L / 65X75WL | 1462 | 842 | 71 | 494 | 135 | 93 |
| KD-65X85L / 65X85BL KM-65X85L | 1447 | 832 | 85 505 | 123 81 | ||
| KD-65X81BL / 65X80L KM-65X80L | 1452 | 836 | 76 | 494 | 135 | 93 |
| XR-65X90L XRM-65X90L | 1445 | 831 | 85 505 | 123 81 |
(mm)
| Model Name | A | B | C | D | E | F |
| FW-55BZ40L / 55BZ35L / 55BZ30LKD-55X78AL / 55X77L / 55X75WL | 1243 | 721 | 133 | 494 | 135 | 93 |
| KD-55X85LKM-55X85L | 1228 | 709 | 146 | 505 | 122 | 81 |
| KD-55X81BL / 55X80LKM-55X80L | 1233 | 713 | 133 | 494 | 135 | 93 |
| XR-55X90LXRM-55X90L | 1225 | 707 | 146 | 505 | 122 | 81 |
| FW-50BZ30LKD-50X77L / 50X75WL | 1126 | 653 | 63 | 393 | 134 | 92 |
| KD-50X80LKM-50X80L | 1119 | 649 | 63 | 392 | 133 | 91 |
| FW-43BZ30LKD-43X77L / 43X75WL | 972 | 567 | 106 | 392 | 133 | 91 |
| KD-43X80LKM-43X80L | 964 | 563 | 111 | 392 | 133 | 91 |
Base Adapter ① fitting location

text_image
a b c d| Model Name Hook location | |
| FW-85BZ40L / 85BZ35L /85BZ30LKD-85X81BL / 85X80LKM-85X80LXR-85X90LXRM-85X90L | a |
| FW-75BZ40L / 75BZ35L /75BZ30LKD-75X85L / 75X81BL /75X80L / 75X78AL / 75X77L /75X75WLKM-75X85L / 75X80LXR-75X90LXRM-75X90L | b |
| FW-65BZ40L / 65BZ35L /65BZ30LKD-65X85L / 65X85BL /65X81BL / 65X80L /65X78AL / 65X77L /65X75WLKM-65X85L / 65X80LXR-65X90LXRM-65X90L | b |
| Model Name Hook location | |
| FW-55BZ40L / 55BZ35L /55BZ30LKD-55X85L / 55X81BL /55X80L / 55X78AL / 55X77L /55X75WLKM-55X85L / 55X80LXR-55X90LXRM-55X90L | b |
| FW-50BZ30LKD-50X80L / 50X77L /50X75WLKM-50X80L | c |
| FW-43BZ30LKD-43X80L / 43X77L /43X75WLKM-43X80L | c |
Wall marking for TV or LCD Monitor installation location
text_image
A B (1000) (300) Screen centre point C Masking tape D(mm)
| Model Name | A | B | C | D |
| FW-85BZ40L / 85BZ35L / 85BZ30L | 1899 471 200 43 | |||
| KD-85X81BL / 85X80L KM-85X80L | 1901 472 200 43 | |||
| XR-85X90L XRM-85X90L | 1891 486 200 58 | |||
| FW-75BZ40L / 75BZ35L / 75BZ30L KD-75X78AL / 75X77L / 75X75WL | 1686 375 150 8 | |||
| KD-75X85L KM-75X85L | 1671 388 150 21 | |||
| KD-75X81BL / 75X80L KM-75X80L | 1675 373 150 12 | |||
| XR-75X90L XRM-75X90L | 1668 388 150 21 |
natural_image
Illustration of a person sitting in a chair viewing a screen from a perspective cone, with dashed lines indicating perspective focus (no text or symbols)text_image
Technical diagram of a mechanical component with labeled parts and directional arrows indicating assembly or assembly.text_image
Technical diagram of a mechanical device with labeled parts A and I, showing internal components and alignment lines.text_image
Technical diagram of a mechanical component with labeled parts and annotation Atext_image
Technical diagram of a mechanical assembly with labeled parts and directional arrows indicating assembly or movement.text_image
Technical diagram of a mechanical assembly with labeled parts and mounting holes, including a marked section A.natural_image
Diagram of a person standing behind a rectangular device with multiple bolts and arrows indicating motion or force (no text or symbols)natural_image
Diagram of a computer monitor with screw arrangement and directional arrows indicating motion (no text or symbols)text_image
Diagram illustrating safety inspection steps with labeled arrows and warning symbolstext_image
Diagram illustrating safety inspection steps with labeled instructions and warning symbolstext_image
Technical diagram illustrating a procedure for installing or adjusting a device, with numbered steps and safety warning symbols.XR-85X90L / 75X90L / 65X90L / 55X90L, XRM-85X90L / 75X90L / 65X90L / 55X90L uniquement
text_image
Diagram illustrating safety inspection steps with labeled diagrams and warning symbolstext_image
Safety instruction diagram showing hand holding a screen with checkmark and no/x symbol, leading to three silhouettes of human walking with circular icons indicating safety measures.natural_image
Illustration of three human figures assembling a large rectangular panel with a ruler and scale (no text or symbols)natural_image
Simple line drawing of a rectangular frame with a dashed rectangle and a starburst shape at the bottom (no text or symbols)text_image
Diagram illustrating a mechanical assembly or mounting process with labeled components and directional arrows indicating movement.
natural_image
Diagram of a monitor with a magnified inset showing a mechanical component (no text or symbols present)
natural_image
Technical diagram showing a rectangular panel with internal components and a close-up view of a mechanical component (no text or symbols present)text_image
Diagram illustrating a mechanical or electrical assembly with labeled components and directional arrows indicating process flow.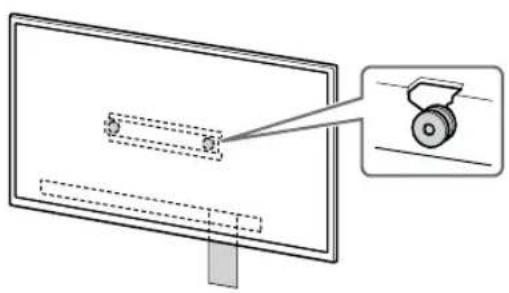
natural_image
Diagram of a monitor with a slide and a wheel, showing no text or symbols
natural_image
Technical diagram showing a rectangular panel with internal components and a close-up view of a mechanical component (no text or symbols)text_image
Safety instruction diagram showing hand protection with check and no/x options for handling a panel, accompanied by two human silhouettes.natural_image
Simple line drawing of a rectangular frame with a dashed rectangle and a starburst shape at the bottom (no text or symbols)text_image
Diagram illustrating a mechanical or optical setup with a slide and a pulley, showing an arrow indicating direction.
natural_image
Diagram showing a mechanical component with a downward arrow and a magnified inset (no text or symbols)text_image
Diagram illustrating a mechanical or optical setup with labeled components and directional arrow
natural_image
Diagram of a mechanical component with a circular inset showing internal structure (no text or symbols)text_image
Technical diagram showing assembly of a mechanical component with labeled parts and a close-up detail view.AVERTISSEMENT
Dimensions : (Environ) [mm]
natural_image
Diagram showing a person sitting in a chair facing a screen with dashed lines indicating perspective projection (no text or symbols present)text_image
Technical diagram of a mechanical component with labeled parts and directional arrows indicating assembly or assembly.text_image
Technical diagram of a mechanical device with labeled parts and connection pointstext_image
Technical diagram of a mechanical component with labeled parts and annotation Atext_image
Technical diagram of a mechanical assembly with labeled parts I and A, showing bolted connections and dashed reference lines.text_image
Technical diagram of a mechanical component with labeled parts and mounting holes, including a marked section A.natural_image
Diagram of a person standing behind a large appliance with multiple bolts and arrows indicating motion (no text or symbols)natural_image
Diagram of a computer monitor with screw arrangement and directional arrows indicating assembly or movement (no text or symbols)text_image
Diagram illustrating safety instructions for installing a device, with labeled steps and warning symbolstext_image
Medical procedure diagram showing steps to adjust a device with pressure gauge and safety warning symboltext_image
Technical diagram illustrating a procedure for installing or adjusting a device, with numbered steps and safety warning symbols.Solo XR-85X90L / 75X90L / 65X90L / 55X90L, XRM-85X90L / 75X90L / 65X90L / 55X90L
text_image
Diagram illustrating safety inspection steps with labeled diagrams and warning symbolstext_image
Safety instruction diagram showing hand protection and human behavior with checkmark and no/x symbol1 Levante el televisor o monitor LCD.
natural_image
Illustration of three human figures assembling a large rectangular object with a dashed line indicating assembly (no text or symbols)natural_image
Simple line drawing of a rectangular frame with a dashed rectangle inside and a starburst shape at the bottom (no text or symbols)text_image
Diagram illustrating a mechanical assembly or mounting process with labeled components and directional arrows indicating movement.
natural_image
Diagram of a monitor with a magnified view showing a mechanical component (no text or symbols present)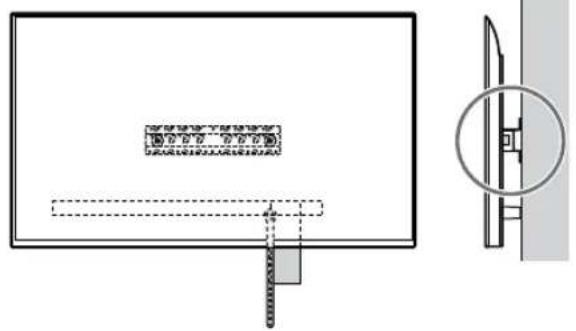
natural_image
Technical diagram showing a rectangular panel with internal components and a close-up view of a mechanical component (no text or symbols present)text_image
Diagram illustrating a mechanical or electrical assembly with labeled components and directional arrows indicating process flow.
natural_image
Diagram of a monitor with a magnified view showing a wheel (no text or symbols present)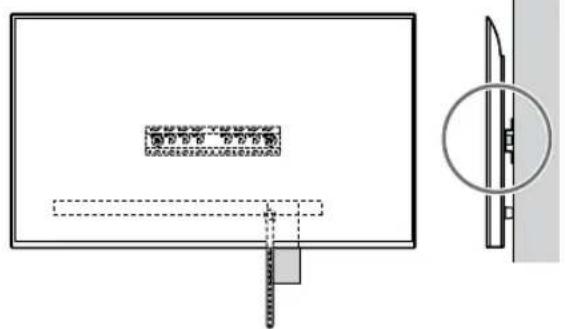
text_image
Technical diagram showing a rectangular panel with a labeled section and a close-up view of the right side of a circular component.text_image
Safety instruction diagram showing hand protection with checkmark and no/x mark options1 Levante el televisor o monitor LCD.
natural_image
Simple line drawing of a rectangular frame with a starburst shape at the bottom (no text or symbols)text_image
Diagram illustrating a mechanical or optical setup with a slide and a pulley, showing an arrow indicating direction.
natural_image
Diagram showing a mechanical component with a downward arrow and a circled section view (no text or symbols)text_image
Diagram illustrating a mechanical or optical setup with labeled components and directional arrow
natural_image
Diagram of a mechanical component with a circular inset showing internal structure (no text or symbols)text_image
Technical diagram showing a mechanical assembly with labeled components and a close-up of a gear mechanism.ADVERTENCIA
natural_image
Diagram showing a person sitting in a chair facing a screen with dashed lines indicating perspective projection (no text or symbols)text_image
Technical diagram of a mechanical component with labeled parts and mounting pointstext_image
Technical diagram of a mechanical assembly with labeled parts A and I, showing internal components and alignment lines.text_image
Technical diagram of a mechanical component with labeled parts and annotation Atext_image
Technical diagram of a mechanical assembly with labeled parts I and A, showing bolted connections and dashed reference lines.text_image
Technical diagram of a mechanical assembly with labeled parts and mounting holesnatural_image
Diagram showing a person standing behind a device with multiple bolts and arrows indicating motion (no text or symbols)natural_image
Diagram of a computer monitor with screw arrangement and directional arrows indicating motion (no text or symbols)text_image
Diagram illustrating safety instructions for installing a device, with labeled steps and warning symbolsnatural_image
Illustration of three people assembling a large rectangular device with a magnified inset showing a globe (no text or symbols)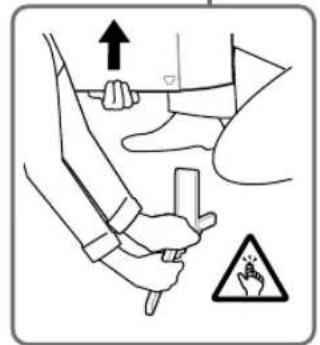
text_image
Safety instruction diagram showing hand positioning and warning symbols for safetynatural_image
Line drawing of three people assembling a large rectangular device with a magnifying glass nearby (no text or symbols)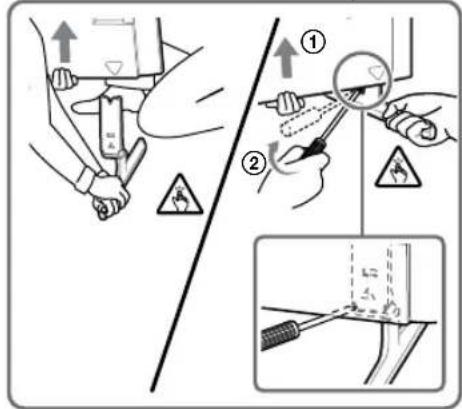
text_image
Technical diagram illustrating cable clamp installation steps with labeled diagrams and warning symbolsNur XR-85X90L / 75X90L / 65X90L / 55X90L, XRM-85X90L / 75X90L / 65X90L / 55X90L
natural_image
Line drawing of three people assembling a large rectangular panel with a magnifying glass (no text or symbols)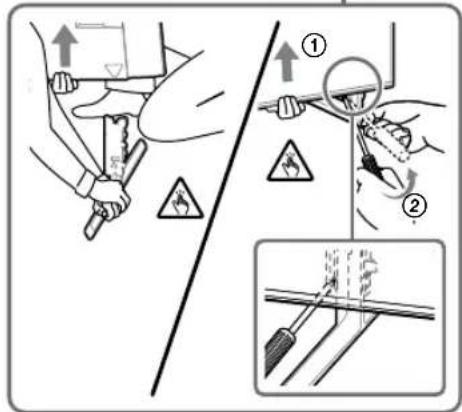
text_image
Technical diagram illustrating safety inspection steps with labeled diagrams and warning symbolstext_image
Safety instruction diagram showing hand protection with checkmark and no/x mark symbolsnatural_image
Illustration of three human figures lifting a large rectangular object with a ruler, no text or symbols presentnatural_image
Simple line drawing of a rectangular frame with a starburst shape at the bottom (no text or symbols)natural_image
Pure electrical circuit lines without any symbols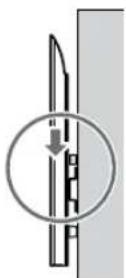


natural_image
Diagram of a monitor with a wheel and a separate view showing a wheel handle (no text or symbols present)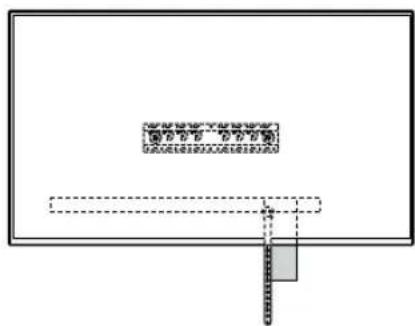
text_image
Scanned document fragment showing a QR code and a vertical line with a shaded rectangle at the bottom.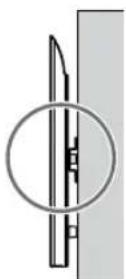
text_image
Diagram illustrating hand protection and collision rules with checkmark and cross symbolsnatural_image
Simple line drawing of a rectangular frame with a starburst shape and two internal geometric shapes (no text or symbols)text_image
Diagram illustrating a mechanical or optical setup with a slide and a magnified inset showing a rotating component.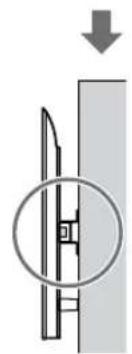
natural_image
Diagram showing a mechanical component with a downward arrow and a circled section view (no text or symbols)text_image
Diagram illustrating a mechanical or optical setup with a slide and a pulley, showing an arrow indicating direction.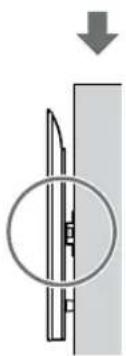
natural_image
Diagram showing a mechanical component with a circular inset view and an arrow indicating downward motion (no text or symbols)text_image
Technical diagram showing a mechanical assembly with labeled components and a close-up of a gear mechanism.WARNUNG
natural_image
Diagram showing a person sitting in a chair facing a screen with dashed lines indicating perspective projection (no text or symbols)natural_image
Two identical mechanical component diagrams showing front and side views (no text or symbols)3 Als standaardmontage (2-a) is gekozen:
text_image
Technical diagram of a mechanical component with labeled parts and mounting pointstext_image
Technical diagram of a mechanical assembly with labeled parts A and I, showing internal components and alignment lines.text_image
Technical diagram of a mechanical component with labeled parts and annotation Atext_image
Technical diagram of a mechanical assembly with labeled parts and alignment indicatorstext_image
Technical diagram of a mechanical assembly with labeled parts and directional arrows indicating assembly or movement.natural_image
Diagram showing a person standing behind a device with arrows pointing to bolts (no text or symbols present)natural_image
Diagram of a computer monitor with screw arrangement and directional arrows indicating motion (no text or symbols)text_image
Diagram illustrating safety instructions for installing a device, with labeled steps and warning symbolstext_image
Medical procedure diagram showing steps to adjust a patient's abdomen and hand positions with warning symbolstext_image
Technical diagram illustrating a procedure for installing or adjusting a device, with numbered steps and safety warning symbols.Alleen XR-85X90L / 75X90L / 65X90L / 55X90L, XRM-85X90L / 75X90L / 65X90L / 55X90L
text_image
Diagram illustrating safety inspection steps with labeled diagrams and warning symbolstext_image
Safety instruction diagram showing correct and incorrect hand actions for a person holding a device, with three silhouettes representing different positions.1 Til de tv of lcd-monitor op.
natural_image
Illustration of three figures lifting a large box with dashed lines indicating motion (no text or symbols)natural_image
Simple line drawing of a rectangular frame with a small rectangle inside and a starburst shape at the bottom (no text or symbols)natural_image
Pure architectural or mechanical diagram with no visible text, numbers, or symbols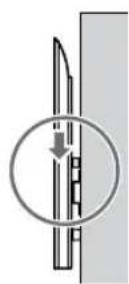
natural_image
Diagram showing a monitor with dashed lines and a magnified view of a wheel (no text or symbols present)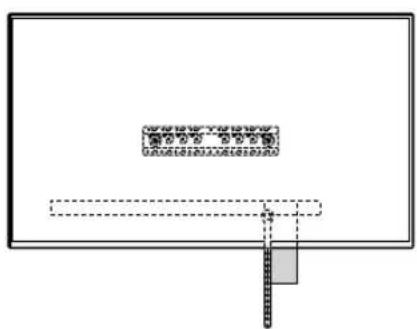
text_image
Safety instruction diagram showing hand protection with checkmark and no/x mark symbols1 Til de tv of lcd-monitor op.
natural_image
Simple line drawing of a rectangular frame with a starburst shape at the bottom (no text or symbols)Als standaardmontage (2-a) is gekozen:
text_image
Diagram illustrating a mechanical or optical setup with a slide and a pulley, showing an arrow indicating direction.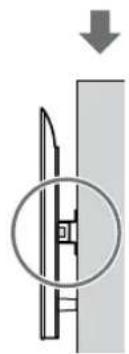
natural_image
Pure mechanical diagram showing a lever and pivot mechanism without any text or symbolstext_image
Diagram illustrating a mechanical or optical setup with a slide and a pulley, showing a downward arrow and dashed lines indicating motion or alignment.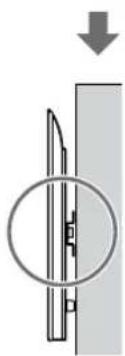
natural_image
Diagram showing a mechanical component with a circular inset view and downward arrow (no text or symbols)text_image
Technical diagram showing a mechanical assembly with labeled components and a close-up of a screw mechanism.WAARSCHUWING
natural_image
Diagram showing a person sitting in a chair facing a screen with dashed lines indicating perspective projection (no text or symbols present)natural_image
Two identical mechanical component diagrams showing front and side views (no text or symbols)text_image
Technical diagram of a mechanical component with labeled parts and directional arrows indicating assembly or assembly.text_image
Technical diagram of a mechanical device with labeled parts A and I, showing internal components and alignment lines.text_image
Technical diagram of a mechanical component with labeled parts and annotation Atext_image
Technical diagram of a mechanical assembly with labeled parts and directional arrows indicating assembly or movement.text_image
Technical diagram of a mechanical component with labeled parts and mounting holes, including a marked section A.natural_image
Diagram of a person standing behind a large appliance with multiple bolts and arrows indicating motion (no text or symbols)natural_image
Diagram of a computer monitor with screwdrivers and directional arrows indicating assembly or connection (no text or symbols)text_image
Diagram illustrating safety instructions for installing a device, with labeled steps and warning symbolstext_image
Medical procedure diagram showing steps to adjust a device with pressure gauge and safety warning symboltext_image
Technical diagram illustrating a procedure for installing or adjusting a device, with numbered steps and safety warning symbols.Solo XR-85X90L / 75X90L / 65X90L / 55X90L, XRM-85X90L / 75X90L / 65X90L / 55X90L
text_image
Diagram illustrating safety inspection steps with labeled diagrams and warning symbolstext_image
Safety instruction diagram showing hand gesture and safety symbols for lung diagnosisnatural_image
Illustration of three stylized human figures lifting a large rectangular object with dashed lines indicating motion (no text or symbols)natural_image
Simple line drawing of a rectangular frame with a starburst shape and two dashed lines inside, no text or symbols present.text_image
Diagram illustrating a mechanical assembly or mounting process with labeled components and directional arrows indicating movement.
natural_image
Diagram of a monitor with a magnified view showing a mechanical component (no text or symbols present)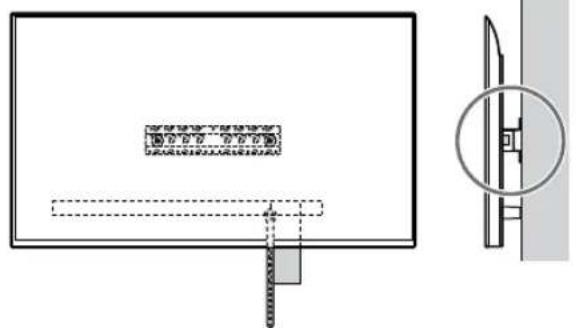
natural_image
Technical diagram showing a rectangular panel with internal components and a close-up view of a mechanical component (no text or symbols)text_image
Diagram illustrating a mechanical or electrical assembly with labeled components and directional arrows indicating process flow.
natural_image
Diagram showing a monitor with internal components and a magnified view of a wheel (no text or symbols)
text_image
Technical diagram showing a rectangular panel with a labeled section and a close-up view of the right side of a circular component.text_image
Safety instruction diagram showing hand protection with checkmark and no/x mark optionsnatural_image
Simple line drawing of a rectangular frame with a starburst shape at the bottom (no text or symbols)text_image
Diagram illustrating a mechanical or optical setup with a slide and a pulley, showing an arrow indicating direction.
natural_image
Diagram showing a mechanical component with a downward arrow and a magnified inset (no text or symbols)text_image
Diagram illustrating a mechanical or optical setup with labeled components and directional arrow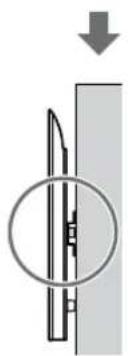
natural_image
Diagram of a mechanical component with a circular inset showing internal structure (no text or symbols)text_image
Technical diagram showing a mechanical assembly with labeled components and a close-up of a gear mechanism.AVVERTENZA
A Bas (20) (×1)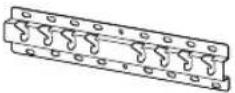 | B Block (×2) | C Skruv (+PSW 6 × 20)(×4) | E Distans (20 mm) (×2) |
F Rem (×1)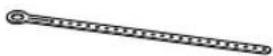 | I Basadapter (×2) | J Skruv (+PSW 4 × 10)(×8) | K Distans (60 mm) (×2) |
L Skruv (+PSW 6 × 50)(×2) | |||
natural_image
Diagram showing a person sitting in a chair facing a screen with dashed lines indicating perspective projection (no text or symbols present)natural_image
Two identical mechanical component diagrams labeled 2-a2-b, showing vertical and horizontal views with no text or symbols.text_image
Technical diagram of a mechanical component with labeled parts and directional arrows indicating assembly or assembly.Ex.: Montering av basadapter ① på plats "a"
text_image
Technical diagram of a mechanical assembly with labeled parts I and A, showing internal components and alignment lines.text_image
Technical diagram of a mechanical component with labeled parts and annotation Atext_image
Technical diagram of a mechanical assembly with labeled parts I and A, showing bolted connections and dashed reference lines.text_image
Technical diagram of a mechanical assembly with labeled parts and mounting holes, including a marked point A.natural_image
Diagram of a person standing behind a large rectangular device with multiple bolts and arrows indicating motion or force (no text or symbols)text_image
Block Skruv (+PSW 6 × 20) Skruv (+PSW 6 × 50) Rem Distans (60 mm)natural_image
Diagram of a computer monitor with screw fasteners and directional arrows indicating motion (no text or symbols)text_image
Block Skruv (+PSW 6 × 20) Skruv (+PSW 6 × 50) Distans (60 mm) Remtext_image
Diagram illustrating safety instructions for installing a device, with labeled steps and warning symbolstext_image
Diagram illustrating safety inspection steps with labeled instructions and warning symbolstext_image
Technical diagram illustrating a procedure for installing or adjusting a device, with numbered steps and directional arrows indicating movement.XR-85X90L / 75X90L / 65X90L / 55X90L, XRM-85X90L / 75X90L / 65X90L / 55X90L endast
text_image
Technical diagram illustrating a procedure for installing or adjusting a component, with numbered steps and safety warning symbols.text_image
Safety instruction diagram showing hand protection with check and no/x options, illustrated with silhouettes of people carrying circular symbols.1 Lyft TV:n eller LCD-bildskärmen.
natural_image
Illustration of three stylized human figures carrying a large rectangular object with dashed lines indicating alignment or positioning (no text or symbols)text_image
Block Rem2 Montera TV:n eller LCD-bildskärmen på basen (20) Ⓐ eller basadaptern Ⓘ.
natural_image
Simple line drawing of a rectangular frame with a dashed rectangle inside and a starburst shape at the bottom (no text or symbols)text_image
Block Distans (60 mm) Rem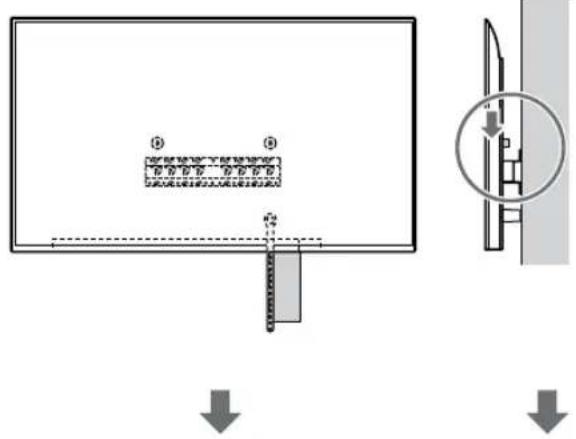
text_image
Diagram illustrating a mechanical assembly or mounting process with labeled components and directional arrows indicating movement.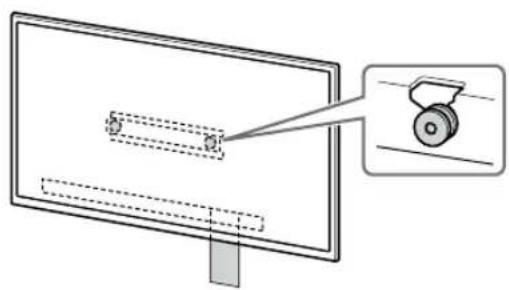
natural_image
Diagram of a monitor with a magnified view showing a mechanical component (no text or symbols present)
natural_image
Technical diagram showing a rectangular panel with internal components and a close-up view of a mechanical component (no text or symbols present)text_image
Diagram illustrating a mechanical or electrical assembly with labeled components and directional arrows indicating process flow.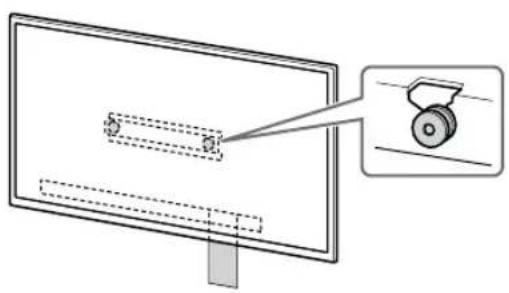
natural_image
Diagram of a monitor with a magnified view showing a wheel (no text or symbols present)
text_image
Technical diagram showing a rectangular panel with a labeled section and a close-up view of the right side of a vertical structure.text_image
Diagram illustrating hand protection and cleaning process with checkmark and no/x marks, showing two hands holding a rectangular frame.1 Lyft TV:n eller LCD-bildskärmen.
natural_image
Simple line drawing of a rectangular frame with a dashed rectangle inside and a starburst shape at the bottom (no text or symbols)text_image
Block Distans (60 mm) Rem
text_image
Diagram illustrating a mechanical or optical setup with a slide and a pulley, showing an arrow indicating direction.
natural_image
Diagram showing a mechanical component with a downward arrow and a circled section view (no text or symbols)text_image
Diagram illustrating a mechanical or optical setup with labeled components and an arrow indicating direction
natural_image
Pure mechanical diagram showing a cutting tool inside a circular opening, with no text or symbols present.text_image
Technical diagram showing a mechanical assembly with labeled components and a close-up of a gear mechanism.WARNING
natural_image
Diagram showing a person sitting in a chair facing a screen with dashed lines indicating perspective projection (no text or symbols present)text_image
Technical diagram of a mechanical component with labeled parts and directional arrows indicating assembly or assembly.text_image
Technical diagram of a mechanical device with labeled parts and connection pointstext_image
Technical diagram of a mechanical component with labeled parts and annotation Atext_image
Technical diagram of a mechanical assembly with labeled parts A and I, showing bolted connections and dashed reference lines.text_image
Technical diagram of a mechanical component with labeled parts and mounting holes, including a marked section A.natural_image
Diagram showing a person standing behind a large appliance with multiple bolts and arrows indicating motion (no text or symbols)natural_image
Diagram of a computer monitor with screw arrangement and directional arrows indicating motion (no text or symbols)text_image
Diagram illustrating safety instructions for installing a device, with labeled steps and warning symbolstext_image
Medical procedure diagram showing steps to adjust a device with pressure gauge and safety warning symboltext_image
Technical diagram illustrating a procedure for installing or adjusting a device, with numbered steps and safety warning symbols.Tylko model XR-85X90L / 75X90L / 65X90L / 55X90L, XRM-85X90L / 75X90L / 65X90L / 55X90L
text_image
Technical diagram illustrating a procedure for installing or adjusting a component, with numbered steps and safety warning symbols.text_image
Safety instruction diagram showing hand holding a device with checkmark and no/x symbol, accompanied by silhouettes of three human figures carrying circular symbols.natural_image
Illustration of three human figures lifting a large rectangular object with dashed lines indicating motion or alignment (no text or symbols)natural_image
Simple line drawing of a rectangular frame with a small rectangle inside and a starburst shape at the bottom (no text or symbols)text_image
Diagram showing a device with labeled components and an inset close-up of a mechanical component with a downward arrow indicating motion.


natural_image
Diagram of a monitor with a magnified view showing a wheel (no text or symbols present)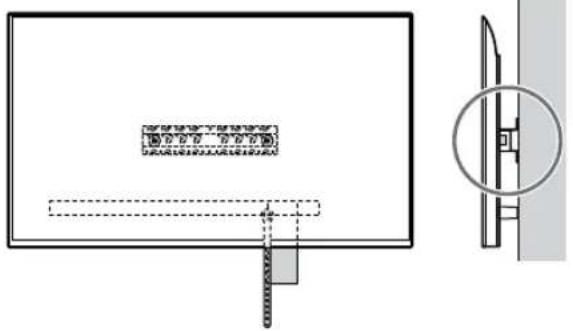
natural_image
Technical diagram showing a rectangular panel with internal components and a close-up view of a mechanical component (no text or symbols)text_image
Technical diagram showing a mechanical assembly with labeled components and a magnified detail view highlighting a specific part.


natural_image
Diagram of a monitor with a scroll wheel and a magnified inset showing the wheel (no text or symbols)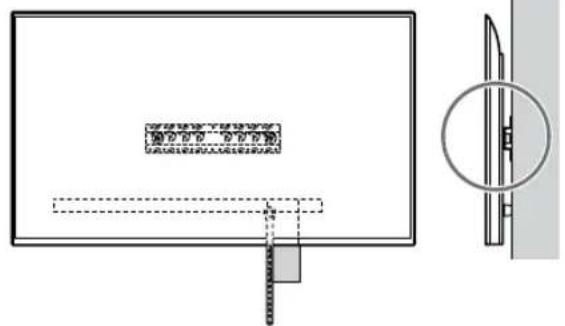
text_image
2-a2-b ⑤ Pasek ⑤ Pasektext_image
Diagram illustrating hand gesture and safety check with checkmark and no/x mark symbolsnatural_image
Simple line drawing of a rectangular frame with a starburst shape at the bottom (no text or symbols)text_image
Diagram illustrating a mechanical or electrical component with labeled parts and an arrow indicating direction, alongside a magnified view of the component.
natural_image
Diagram showing a mechanical component with a downward arrow and a circled section view (no text or symbols)text_image
Diagram illustrating a mechanical or optical setup with labeled components and directional arrow
natural_image
Diagram showing a mechanical component with a downward arrow and a circular inset view (no text or symbols)text_image
2-a2-b ⑤ Pasek ⑤ Pasektext_image
Technical diagram showing a mechanical assembly with labeled components and a close-up of a gear mechanism.OSTRZEŻENIE
natural_image
Diagram showing a person sitting in a chair facing a screen, with dashed lines indicating perspective projection (no text or symbols present)2 Seleccione o estilo de montagem na parede como mostrado abaixo.
text_image
Technical diagram of a mechanical component with labeled parts and directional arrows indicating assembly or assembly.text_image
Technical diagram of a mechanical component with labeled parts I, A, and D, showing internal structure and alignment lines.text_image
Technical diagram of a mechanical component with labeled parts and a marked point Atext_image
Technical diagram of a mechanical assembly with labeled parts and directional arrows indicating assembly or movement.text_image
Technical diagram of a mechanical component with labeled parts and mounting holes, showing alignment and assembly relationships.natural_image
Diagram of a person standing behind a large appliance with bolts and arrows indicating motion (no text or symbols)natural_image
Diagram of a computer monitor with screw arrangement and directional arrows indicating motion (no text or symbols)text_image
Diagram illustrating safety instructions for installing a device, with labeled steps and warning symbolstext_image
Diagram illustrating safety inspection steps with labeled instructions and warning symbolstext_image
Technical diagram illustrating a procedure for installing or adjusting a device, with numbered steps and safety warning symbols.text_image
Diagram illustrating safety inspection steps with labeled instructions and safety symbolstext_image
Safety instruction diagram showing hand protection and safety symbols with pictograms of human figures carrying gear.1 Levante o Televisor ou Monitor LCD.
natural_image
Illustration of three human figures lifting a large rectangular object with dashed lines indicating measurement or alignment (no text or symbols)natural_image
Simple line drawing of a rectangular frame with a small rectangle inside and a starburst shape at the bottom (no text or symbols)- Após instalar o Televisor ou Monitor LCD na parede, remova a fita de pintura, etc. da parede.
text_image
Diagram showing a device with labeled components and an inset close-up of the component's internal structure.↓
natural_image
Diagram of a monitor with a magnified view showing a wheel (no text or symbols present)
natural_image
Technical diagram showing a rectangular panel with internal components and a close-up view of a mechanical component (no text or symbols)↓
text_image
Technical diagram showing a component layout with labeled parts and a magnified detail view highlighting a specific section.↓
natural_image
Diagram of a monitor with a magnified inset showing a wheel (no text or symbols present)↓
natural_image
Technical diagram showing a rectangular panel with internal components and a close-up view of a mechanical component (no text or symbols)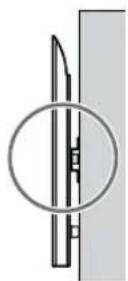
text_image
Safety instruction diagram showing hand protection with checkmark and no/x mark options1 Levante o Television ou Monitor LCD.
natural_image
Simple line drawing of a rectangular frame with a dashed rectangle and a starburst shape at the bottom (no text or symbols)text_image
Diagram illustrating a mechanical or optical setup with a slide and a pulley, showing an arrow indicating direction.
natural_image
Diagram showing a mechanical component with a downward arrow and a circled section view (no text or symbols)text_image
Diagram illustrating a mechanical or optical setup with labeled components and directional arrow
natural_image
Diagram of a mechanical component with a circular inset showing internal structure (no text or symbols)text_image
Technical diagram showing a mechanical assembly with labeled components and a close-up inset of a screw mechanism.AVISO
Klargøring for installation
natural_image
Diagram showing a person sitting in a chair facing a screen, with dashed lines indicating perspective projection (no text or symbols present)text_image
Technical diagram of a mechanical component with labeled parts and directional arrows indicating assembly or assembly.text_image
Technical diagram of a mechanical component with labeled parts I and A, showing internal structure and alignment lines.text_image
Technical diagram of a mechanical component with labeled parts and annotation Atext_image
Technical diagram of a mechanical assembly with labeled parts I and A, showing bolted connections and dashed reference lines.text_image
Technical diagram of a mechanical assembly with labeled parts and mounting holesnatural_image
Diagram showing a person standing behind a rectangular device with multiple bolts inserted, illustrating mechanical assembly or mounting process (no text or symbols present)natural_image
Diagram of a computer monitor with four screws and directional arrows indicating assembly or connection (no text or symbols)text_image
Diagram illustrating safety instructions for installing a device, with labeled steps and warning symbolstext_image
Diagram illustrating safety instructions for a device, showing step-by-step installation and inspection steps with warning symbols.text_image
Technical diagram illustrating a procedure for installing or adjusting a device, with numbered steps and safety warning symbols.Kun XR-85X90L / 75X90L / 65X90L / 55X90L, XRM-85X90L / 75X90L / 65X90L / 55X90L
text_image
Technical diagram illustrating a procedure for installing or repairing a board, with labeled steps and safety warning symbols.text_image
Safety instruction diagram showing hand protection and human behavior with checkmark and no/x symbolnatural_image
Illustration of three human figures lifting a large rectangular object with dashed lines indicating measurement or alignment (no text or symbols)natural_image
Simple line drawing of a rectangular frame with a starburst shape and a dashed-line rectangle inside (no text or symbols)text_image
Technical diagram showing a mechanical assembly with labeled components and a magnified detail view highlighting a specific part.
natural_image
Diagram of a monitor with a scroll wheel and a magnified inset showing the wheel (no text or symbols present)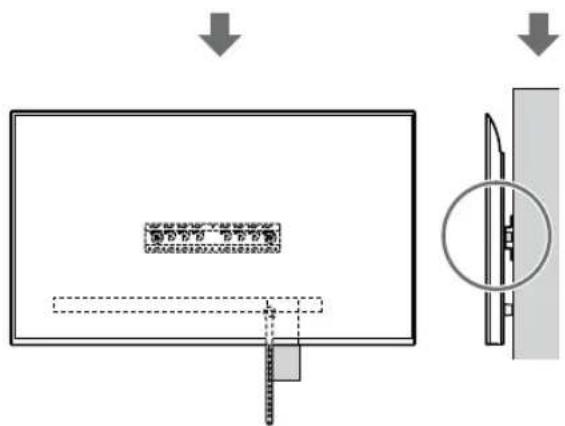
text_image
Technical diagram showing a device with a labeled component and a close-up view of its internal structure.text_image
Safety instruction diagram showing hand protection with check and no/x options for handling a panel, accompanied by two silhouettes.natural_image
Simple line drawing of a rectangular frame with a starburst shape at the bottom (no text or symbols)Hvis der er valgt standardmontering (2-a):
text_image
Diagram illustrating a mechanical or optical setup with a slide and a pulley, showing a downward arrow and dashed lines indicating motion.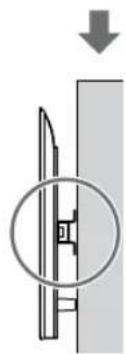
natural_image
Pure mechanical diagram showing a blade and mounting bracket without any text or symbolsHvis der er valgt smal-montering (2-b):
text_image
Diagram showing a device being processed into a screen, with an arrow indicating process direction and a magnified view of the device.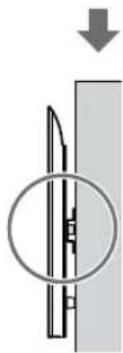
natural_image
Pure mechanical diagram showing a lever and pivot point without any text or symbolstext_image
Technical diagram showing a mechanical assembly with labeled components and a close-up inset of a screw mechanism.ADVARSEL
Monteringssted for baseadapter ①
text_image
a b c d| Modelnavn Krogplacering | |
| FW-85BZ40L / 85BZ35L / 85BZ30LKD-85X81BL / 85X80LKM-85X80LXR-85X90LXRM-85X90L | a |
| FW-75BZ40L / 75BZ35L / 75BZ30LKD-75X85L / 75X81BL / 75X80L / 75X78AL / 75X77L / 75X75WLKM-75X85L / 75X80LXR-75X90LXRM-75X90L | b |
| FW-65BZ40L / 65BZ35L / 65BZ30LKD-65X85L / 65X85BL / 65X81BL / 65X80L / 65X78AL / 65X77L / 65X75WLKM-65X85L / 65X80LXR-65X90LXRM-65X90L | b |
| Modelnavn Krogplacering | |
| FW-55BZ40L / 55BZ35L / 55BZ30L | |
| KD-55X85L / 55X81BL / 55X80L / 55X78AL / 55X77L / 55X75WL | b |
| KM-55X85L / 55X80L | |
| XR-55X90L | |
| XRM-55X90L | |
| FW-50BZ30L | |
| KD-50X80L / 50X77L / 50X75WL | c |
| KM-50X80L | |
| FW-43BZ30L | |
| KD-43X80L / 43X77L / 43X75WL | c |
| KM-43X80L | |
DK
natural_image
Diagram showing a person sitting in a chair facing a screen with dashed lines indicating perspective projection (no text or symbols present)text_image
Technical diagram of a mechanical component with labeled parts and mounting pointstext_image
Technical diagram of a mechanical device with labeled parts I and A, showing internal components and alignment lines.text_image
Technical diagram of a mechanical component with labeled parts and annotation Atext_image
Technical diagram of a mechanical assembly with labeled parts and alignment indicatorstext_image
Technical diagram of a mechanical assembly with labeled parts and mounting holes, showing alignment and assembly relationships.natural_image
Diagram of a person standing behind a large cabinet with bolts, showing motion arrows (no text or symbols)natural_image
Diagram of screw fasteners entering a monitor frame (no text or symbols)text_image
Diagram illustrating safety instructions for installing a device, with labeled steps and warning symbolstext_image
Diagram illustrating safety instructions for a device, showing step-by-step installation and inspection steps with warning symbols.text_image
Technical diagram illustrating a procedure for installing or adjusting a device, with numbered steps and safety warning symbols.Vain XR-85X90L / 75X90L / 65X90L / 55X90L, XRM-85X90L / 75X90L / 65X90L / 55X90L
text_image
Technical diagram illustrating a procedure for installing or adjusting a component, with numbered steps and safety warning symbols.text_image
Safety instruction diagram showing hand holding a screen with checkmark and no/x symbol, leading to three silhouettes of human figures carrying circular symbols.natural_image
Illustration of three human figures lifting a large rectangular object with dashed lines indicating measurement or alignment (no text or symbols)natural_image
Simple line drawing of a rectangular frame with a dashed rectangle and a starburst shape at the bottom (no text or symbols)text_image
Diagram showing a device panel with labeled components and an inset close-up of the component's internal structure.


natural_image
Diagram of a monitor with a magnified view showing a wheel (no text or symbols present)
natural_image
Technical diagram showing a rectangular panel with internal components and a close-up view of a mechanical component (no text or symbols)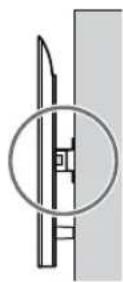
text_image
Technical diagram showing a mechanical assembly with labeled components and a magnified cross-section view.


natural_image
Diagram of a monitor with a slide and a wheel, showing no text or symbols
text_image
Safety instruction diagram showing hand protection with checkmark and no/x mark symbolsnatural_image
Simple line drawing of a rectangular frame with a starburst shape and two small geometric shapes inside (no text or symbols)text_image
Diagram illustrating a mechanical or optical setup with a slide and a pulley, showing an arrow indicating direction.
natural_image
Diagram showing a mechanical component with a downward arrow and a circled section view (no text or symbols)text_image
Diagram illustrating a mechanical or optical setup with labeled components and directional arrow
natural_image
Diagram of a mechanical component with a circular inset showing internal structure (no text or symbols)text_image
Technical diagram showing a mechanical assembly with labeled components and a close-up of a gear mechanism.VAROITUS
* Kun for begrenset region/land/modell.
natural_image
Diagram showing a person sitting in a chair viewing a screen from a perspective cone, with dashed lines indicating perspective projection (no text or symbols present)2 Velg veggmonteringsstil som vist nedenfor.
2-a: Standard montering
2-b: Tynn montering
natural_image
Diagram showing two identical mechanical components with no text or symbols, labeled '2-a2-b' (no other symbols or text)3 Dersom standard montering (2-a) er valgt:
text_image
Technical diagram of a mechanical component with labeled parts and directional arrows indicating assembly or assembly.text_image
Technical diagram of a mechanical assembly with labeled parts I and A, showing components like bolts and fasteners.text_image
Technical diagram of a mechanical component with labeled parts and annotation Atext_image
Technical diagram of a mechanical assembly with labeled parts I and A, showing bolted connections and dashed reference lines.text_image
Technical diagram of a mechanical component with labeled parts and mounting holes, showing alignment and assembly lines.* Kun for begrenset region/land/modell.
Kun FW-85BZ40L / 85BZ35L / 85BZ30L / 75BZ40L / 75BZ35L / 75BZ30L / 65BZ40L / 65BZ35L / 65BZ30L / 55BZ40L / 55BZ35L / 55BZ30L / 50BZ30L / 43BZ30L
natural_image
Diagram showing a person standing behind a large appliance with multiple bolts inside, illustrating mechanical assembly or mounting (no text or symbols present)* Kun for begrenset region/land/modell.
natural_image
Diagram of screw fasteners entering a monitor frame (no text or symbols)text_image
Diagram illustrating safety instructions for installing a device, with labeled steps and warning symbolstext_image
Medical illustration showing instructions for procedure to monitor a patient's abdomen, with magnified views of the procedure.text_image
Technical diagram illustrating a procedure for installing or adjusting a device, with numbered steps and safety warning symbols.Kun XR-85X90L / 75X90L / 65X90L / 55X90L, XRM-85X90L / 75X90L / 65X90L / 55X90L
- Fjern den ene siden av bordstativet om gangen. Hold bordstativet godt fast med begge hender mens den andre personen løfter opp TV-en eller LCD-skjermen.
text_image
Diagram illustrating safety inspection steps with labeled diagrams and warning symbolstext_image
Safety instruction diagram showing hand holding a device with checkmark and no/x symbol, accompanied by three silhouettes of human walking.natural_image
Illustration of three human figures lifting a large rectangular object with dashed lines indicating alignment or measurement (no text or symbols)natural_image
Simple line drawing of a rectangular frame with a starburst shape at the bottom (no text or symbols)text_image
Technical diagram showing a mechanical assembly with labeled components and an inset close-up of a blade cross-section.


natural_image
Diagram showing a monitor with a scroll wheel and a magnified view of the screen (no text or symbols)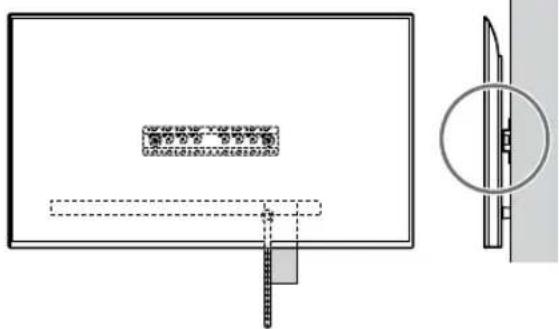
text_image
Safety instruction diagram showing hand protection with checkmark and no/x mark symbolsnatural_image
Simple line drawing of a rectangular frame with a dashed rectangle inside and a starburst shape at the bottom (no text or symbols)text_image
Technical diagram showing a mechanical assembly with labeled components and a close-up of a gear mechanism.ADVARSEL
natural_image
Diagram showing a person sitting in a chair facing a screen, with dashed lines indicating perspective projection (no text or symbols present)text_image
Technical diagram of a mechanical component with labeled parts and mounting pointstext_image
Technical diagram of a mechanical assembly with labeled parts A and B, showing components like a rod and flanges.text_image
Technical diagram of a mechanical component with labeled parts and annotation Atext_image
Technical diagram of a mechanical assembly with labeled parts I and A, showing bolted connections and dashed reference lines.text_image
Technical diagram of a mechanical assembly with labeled parts and directional arrows indicating assembly or movement.natural_image
Diagram of a person standing behind a device with multiple bolts and arrows indicating motion (no text or symbols)natural_image
Diagram of a device with three screws and connecting wires, no text or symbols presenttext_image
Diagram illustrating safety instructions for installing a device, with labeled steps and warning symbolstext_image
Diagram illustrating safety instructions for using a device, showing correct and incorrect states with magnified views.natural_image
Line drawing of three people assembling a large rectangular device with a dial indicator (no text or symbols)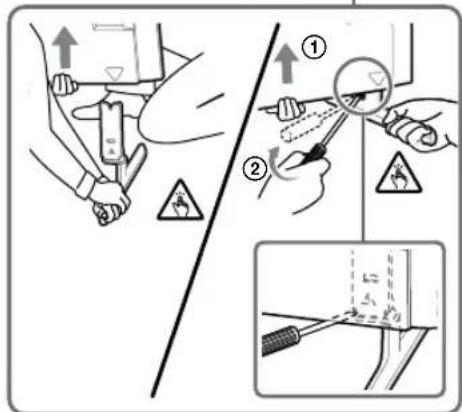
text_image
Technical diagram illustrating a procedure for using a tool, with numbered steps and warning symbols indicating safety or hazard.text_image
Technical diagram illustrating a procedure for installing or adjusting a component, with numbered steps and safety symbols.text_image
Safety warning illustration showing incorrect and correct hand actions for lifting a device, with silhouettes of people carrying weights.natural_image
Illustration of three human figures assembling a large rectangular object with dashed lines indicating alignment (no text or symbols)natural_image
Simple line drawing of a rectangular frame with a dashed rectangle inside and a starburst shape at the bottom (no text or symbols)text_image
Diagram illustrating a mechanical assembly or mounting process with labeled components and directional arrows indicating movement.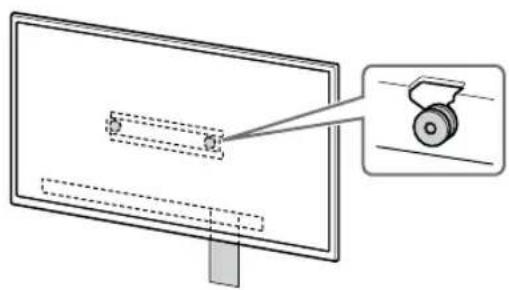
natural_image
Diagram of a monitor with a slide and a magnified view of a wheel (no text or symbols)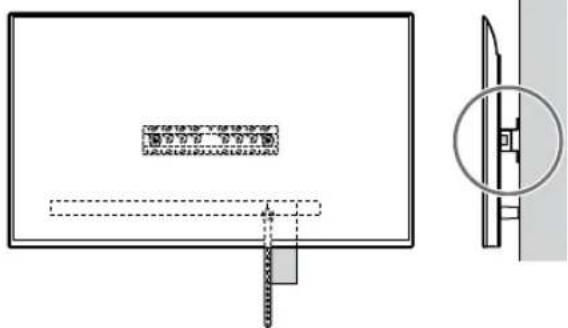
natural_image
Technical diagram showing a mechanical assembly with a bracket and a close-up view of a cylindrical component (no text or symbols)text_image
Diagram illustrating a mechanical or electrical assembly with labeled components and directional arrows indicating flow or movement.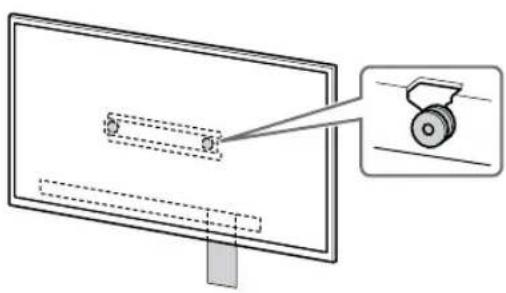
natural_image
Diagram showing a monitor with a scroll wheel and a magnified view of the screen (no text or symbols)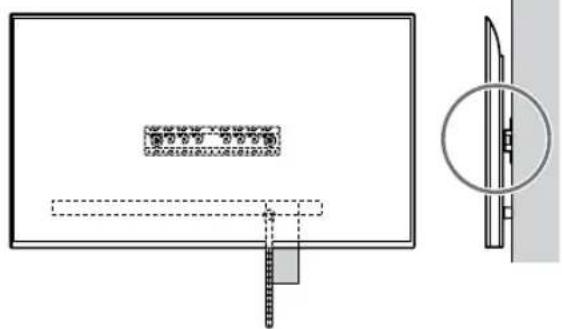
text_image
Safety instruction diagram showing hand protection with checkmark and no/x mark optionsnatural_image
Simple line drawing of a rectangular frame with a starburst shape at the bottom (no text or symbols)text_image
Diagram showing a mechanical component being cut with an arrow, labeled with dimensions and a magnified inset.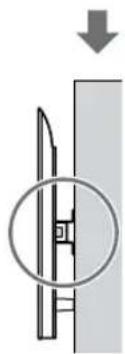
natural_image
Pure diagram of a mechanical component with a downward arrow, no text or symbols presenttext_image
Diagram showing a device with a slide and a magnified view of the slide, indicating a process or assembly step.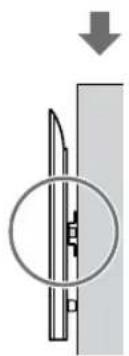
natural_image
Diagram showing a mechanical component with a downward arrow and a circular inset view (no text or symbols)text_image
Technical diagram showing a mechanical assembly with labeled components and a magnified inset of a gear mechanism.ΠΡΟΕΙΔΟΠΟΙΗΣΗ
natural_image
Diagram showing a person sitting in a chair viewing a screen from a perspective, with dashed lines indicating perspective direction (no text or symbols present)text_image
Technical diagram of a mechanical component with labeled parts and mounting pointstext_image
Technical diagram of a mechanical assembly with labeled parts A and I, showing internal components and alignment lines.text_image
Technical diagram of a mechanical component with labeled parts and reference linestext_image
Technical diagram of a mechanical component with labeled parts A and I, showing bolted connections and dashed reference lines.text_image
Technical diagram of a mechanical component with labeled parts and mounting holes, including a marked section A.Ör., tabani (20) Ⓐ "a" konumuna takma
7 Sadece FW-85BZ4xL / 85BZ3xL / 75BZ4xL / 75BZ3xL, KD-85X8xL / 85X8xBL / 75X8xL / 75X8xBL / 75X7xL / 75X7xAL / 75X7xWL, KM-85X8xL / 75X8xL, XR-85X9xL / 75X9xL, XRM-85X9xL / 75X9xL
Sadece FW-85BZ40L / 85BZ35L / 85BZ30L / 75BZ40L / 75BZ35L / 75BZ30L / 65BZ40L / 65BZ35L / 65BZ30L / 55BZ40L / 55BZ35L / 55BZ30L / 50BZ30L / 43BZ30L
natural_image
Diagram of a person standing behind a large appliance with arrows pointing to three bolts (no text or symbols present)natural_image
Diagram of a computer monitor with screw arrangement and directional arrows indicating motion (no text or symbols)text_image
Diagram illustrating safety instructions for installing a device, with labeled steps and warning symbolstext_image
Diagram illustrating safety instructions for installing a device, with labeled steps and warning symbolstext_image
Technical diagram illustrating a procedure for installing or adjusting a component, with numbered steps and safety symbols.Sadece XR-85X90L / 75X90L / 65X90L / 55X90L, XRM-85X90L / 75X90L / 65X90L / 55X90L
text_image
Technical diagram illustrating a procedure for installing or repairing a board, with labeled steps and warning symbols.text_image
Safety instruction diagram showing hand holding a device with checkmark and no/x symbol, accompanied by silhouettes of three human figures carrying circular symbols.natural_image
Illustration of three silhouetted figures lifting a large rectangular object with dashed lines indicating alignment or measurement (no text or symbols)natural_image
Simple line drawing of a rectangular frame with a small rectangle inside and a starburst shape at the bottom (no text or symbols)text_image
Diagram illustrating a mechanical assembly or mounting process with labeled components and directional arrows indicating movement.
natural_image
Diagram of a monitor with a scroll wheel and a magnified inset showing the wheel (no text or symbols)
text_image
Technical diagram showing a rectangular panel with internal components and a close-up view of a mechanical component with cross-sectional view.text_image
Technical diagram showing a mechanical assembly with labeled components and directional arrows indicating process flow or assembly steps.
natural_image
Diagram of a monitor with a scroll wheel and a magnified inset showing the wheel (no text or symbols)
text_image
Safety instruction diagram showing hand protection with check and no/x options for handling a devicenatural_image
Simple line drawing of a rectangular frame with a starburst shape at the bottom (no text or symbols)text_image
Diagram illustrating a mechanical or optical setup with a slide and a pulley, showing an arrow indicating direction.
natural_image
Diagram showing a mechanical component with a downward arrow and a circled section view (no text or symbols)text_image
Diagram illustrating a mechanical or optical setup with labeled components and directional arrow
natural_image
Diagram of a mechanical component with a circular inset showing internal structure (no text or symbols)text_image
Technical diagram showing a mechanical assembly with labeled components and a close-up of a gear mechanism.UYARI
natural_image
Diagram showing a person sitting in a chair facing a screen with dashed lines indicating perspective projection (no text or symbols present)text_image
Technical diagram of a mechanical component with labeled parts and mounting pointstext_image
Technical diagram of a mechanical device with labeled parts A and B, showing internal components and alignment indicators.text_image
Technical diagram of a mechanical component with labeled parts and annotation Atext_image
Technical diagram of a mechanical assembly with labeled parts A and I, showing bolted connections and dashed reference lines.text_image
Technical diagram of a mechanical clamp or bracket with labeled parts and mounting holesnatural_image
Diagram showing a person standing behind a device with multiple bolts and arrows indicating motion (no text or symbols)natural_image
Diagram of a computer monitor with screw and cable connectors, no text or symbols presenttext_image
Diagram illustrating safety instructions for installing a device, with labeled steps and warning symbolstext_image
Diagram illustrating safety instructions for installing a device, with labeled steps and warning symbols.natural_image
Line drawing of three people assembling a large screen with a magnifying glass (no text or symbols)
text_image
Technical diagram illustrating a procedure for using a tool to adjust or inspect a component, with numbered annotations and warning symbols.natural_image
Line drawing of three people assembling a large rectangular panel with a magnifying glass (no text or symbols)
text_image
Technical diagram illustrating safety inspection steps with labeled diagrams and warning symbolstext_image
Safety instruction diagram showing hand protection with checkmark and no/x mark optionsnatural_image
Illustration of three human figures assembling a large rectangular object with dashed lines indicating assembly or alignment (no text or symbols)natural_image
Simple line drawing of a rectangular frame with a starburst shape and a dashed rectangle inside (no text or symbols)text_image
Diagram illustrating a mechanical assembly or mounting process with labeled components and directional arrows indicating movement.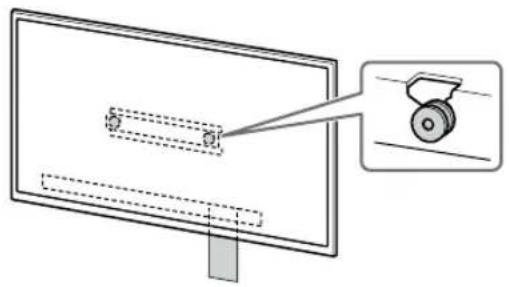
natural_image
Diagram of a monitor with a scroll wheel and a magnified inset showing the wheel (no text or symbols)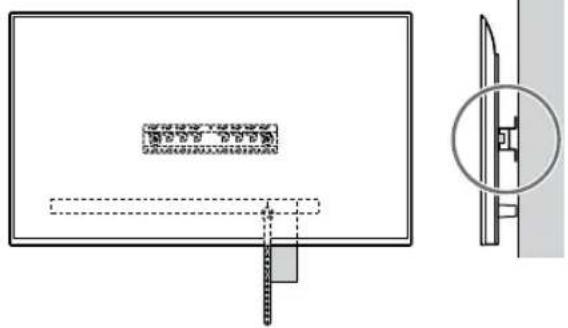
text_image
Technical diagram showing a rectangular panel with internal components and a close-up view of a mechanical component with cross-sectional view.text_image
Technical diagram showing a mechanical assembly with labeled components and directional arrows indicating process flow.
natural_image
Diagram of a monitor with a scroll wheel and a magnified inset showing the wheel (no text or symbols)
text_image
Safety instruction diagram showing hand protection with check and no/x marks, illustrated above a person holding a frame.natural_image
Simple line drawing of a rectangular frame with a starburst shape at the bottom (no text or symbols)text_image
Diagram illustrating a mechanical or optical setup with a slide and a pulley, showing an arrow indicating direction.
natural_image
Diagram showing a mechanical component with a downward arrow and a circled section view (no text or symbols)text_image
Diagram illustrating a mechanical or optical setup with labeled components and directional arrow
natural_image
Pure mechanical diagram showing a cutting tool inside a circular opening, with no text or symbols present.text_image
Technical diagram showing a mechanical assembly with labeled components and a close-up of a screw mechanism.FIGYELMEZTETÉS
natural_image
Diagram showing a person sitting in a chair facing a screen with dashed lines indicating perspective projection (no text or symbols)text_image
Technical diagram of a mechanical component with labeled parts and mounting pointstext_image
Technical diagram of a mechanical assembly with labeled parts A and B, showing internal components and alignment indicators.text_image
Technical diagram of a mechanical component with labeled parts and reference linestext_image
Technical diagram of a mechanical assembly with labeled parts I and A, showing bolted connections and dashed reference lines.text_image
Technical diagram of a mechanical component with labeled parts and an 'A' mark indicating a specific feature.natural_image
Diagram of a person standing behind a large device with multiple bolts and arrows indicating motion (no text or symbols)natural_image
Diagram of a computer monitor with screw arrangement and directional arrows indicating motion (no text or symbols)text_image
Diagram illustrating safety instructions for installing a device, with labeled steps and warning symbolsnatural_image
Illustration of three people assembling a large electronic device with a magnified inset showing a small globe (no text or symbols)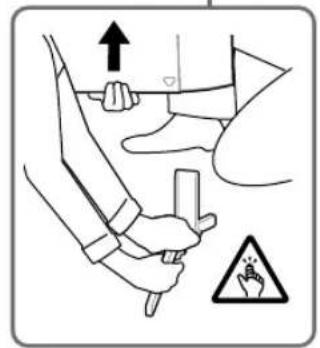
text_image
Diagram illustrating safety instructions with hand holding a tool and warning symboltext_image
Technical diagram illustrating a procedure for installing or adjusting a device, with numbered steps and safety symbols.Pouze modely XR-85X90L / 75X90L / 65X90L / 55X90L, XRM-85X90L / 75X90L / 65X90L / 55X90L
text_image
Technical diagram illustrating a procedure for installing or adjusting a floor plan, with labeled steps and safety warning symbols.text_image
Safety instruction diagram showing hand holding a device with checkmark and no/x symbol, accompanied by three silhouettes of human walking.natural_image
Illustration of three human figures lifting a large rectangular object with dashed lines indicating motion or alignment (no text or symbols)natural_image
Simple line drawing of a rectangular frame with a starburst shape and two small circles inside (no text or symbols)text_image
Diagram illustrating hand protection and damage detection with checkmark and no/x marks, showing two human figures holding a rectangular frame.natural_image
Simple line drawing of a rectangular frame with a dashed rectangle inside and a starburst shape at the bottom (no text or symbols)text_image
Diagram illustrating a mechanical or optical setup with a slide and a pulley, showing a downward arrow and dashed lines indicating motion.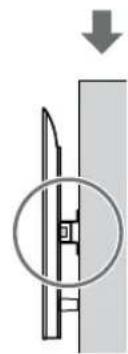
natural_image
Diagram showing a mechanical component with a downward arrow and a circled section view (no text or symbols)text_image
Diagram illustrating a mechanical or optical setup with labeled components and directional arrow
natural_image
Diagram of a mechanical component with a circular inset showing internal structure (no text or symbols)text_image
Technical diagram showing a mechanical assembly with labeled components and a close-up of a gear mechanism.VAROVÁNÍ
natural_image
Diagram showing a person sitting in a chair viewing a screen from an angle, with dashed lines indicating perspective projection (no text or symbols present)natural_image
Two identical mechanical components with mounting holes, labeled '2-a2-b' (no additional text or symbols)text_image
Technical diagram of a mechanical component with labeled parts and mounting pointstext_image
Technical diagram of a mechanical device with labeled parts A and B, showing internal components and alignment lines.text_image
Technical diagram of a mechanical component with labeled parts and section linetext_image
Technical diagram of a mechanical assembly with labeled parts I and A, showing bolted connections and dashed reference lines.Pr., montáž podstavca (20) Ⓐ na mieste „a“
text_image
Technical diagram of a mechanical component with labeled parts and directional arrows indicating assembly or alignment.Pr., montáž podstavca (20) Ⓐ na mieste „a“
7 Len FW-85BZ4xL / 85BZ3xL / 75BZ4xL / 75BZ3xL, KD-85X8xL / 85X8xBL / 75X8xL / 75X8xBL / 75X7xL / 75X7xAL / 75X7xWL, KM-85X8xL / 75X8xL, XR-85X9xL / 75X9xL, XRM-85X9xL / 75X9xL
natural_image
Diagram of a person standing behind a large appliance with multiple bolts and arrows indicating motion (no text or symbols)natural_image
Diagram of a computer monitor with screw arrangement and directional arrows indicating motion (no text or symbols)text_image
Diagram illustrating safety instructions for installing a device, with labeled steps and warning symbolstext_image
Diagram illustrating safety inspection steps with labeled instructions and warning symbolstext_image
Technical diagram illustrating a procedure for installing or adjusting a device, with numbered steps and safety warning symbols.Len XR-85X90L / 75X90L / 65X90L / 55X90L, XRM-85X90L / 75X90L / 65X90L / 55X90L
text_image
Diagram illustrating safety inspection steps with labeled diagrams and warning symbolstext_image
Safety instruction diagram showing hand protection and safety symbols with pictograms of human figures carrying gear.natural_image
Illustration of three silhouetted figures lifting a large rectangular object with a ruler, no text or symbols presentnatural_image
Simple line drawing of a rectangular frame with a small rectangle inside and a starburst shape at the bottom (no text or symbols)text_image
Diagram illustrating a mechanical or structural assembly with labeled components and directional arrows indicating movement or force.
natural_image
Diagram of a monitor with a scroll wheel and a magnified inset showing the wheel (no text or symbols)
text_image
Technical diagram showing a rectangular panel with internal components and a close-up view of a mechanical component with cross-sectional view.text_image
Technical diagram showing a mechanical assembly with labeled components and directional arrows indicating process flow.
natural_image
Diagram of a monitor with a scroll wheel and a magnified inset showing the wheel (no text or symbols)
text_image
图1-10 - 2014 图2-10 - 2014 图3-10 - 2014text_image
Diagram illustrating hand protection and damage detection with checkmark and no/x marks, showing correct and incorrect actions on a device.natural_image
Simple line drawing of a rectangular frame with a dashed rectangle and a starburst shape at the bottom (no text or symbols)text_image
Diagram illustrating a mechanical or optical setup with a screen, a lens, and a magnified inset showing the lens component.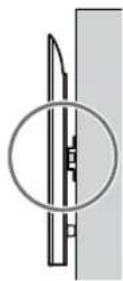
text_image
Technical diagram showing a mechanical assembly with labeled components and a close-up inset of a screw mechanism.VÝSTRAHA
Rozmery: (pribl.) [mm]
D Şurub (+PSW 4 × 20)cu bucşă (×2)![SONY KD-50X80L - Rozmery: (pribl.) [mm] - 1](/content/2026/04/643507/images/c607c8fe8be03052dd08d9dd874d68b7225e313b365c2a397eadbf45ed8fa2f7.jpg) | G Bucşă (20) (M4) (×2) H | Surub (+PSW 4 × 20)(×2)![SONY KD-50X80L - Rozmery: (pribl.) [mm] - 3](/content/2026/04/643507/images/3c028d398b133cd741f5db55850b16454207849987f29e11d013f7fe779c4697.jpg) | M Bucşă (M4) (×2)![SONY KD-50X80L - Rozmery: (pribl.) [mm] - 4](/content/2026/04/643507/images/120d3923d1c34a4ed35891663e61be23f3608b89439cdcf1e6e7fda6815f917d.jpg) |
| N Şurub (+PSW 4 × 50)(×2)[IMAGE] | |||
natural_image
Diagram showing a person sitting in a chair facing a screen with dashed lines indicating perspective projection (no text or symbols present)text_image
Technical diagram of a mechanical component with labeled parts and directional arrows indicating assembly or assembly.text_image
Technical diagram of a mechanical component with labeled parts A and 1, showing internal structure and mounting features.text_image
Technical diagram of a mechanical component with labeled parts and dashed reference linestext_image
Technical diagram of a mechanical assembly with labeled parts A and ①, showing bolted connections and dashed reference lines.text_image
Technical diagram of a mechanical assembly with labeled parts and directional arrows indicating movement or forcenatural_image
Diagram of a person standing behind a device with arrows pointing to bolts (no text or symbols present)natural_image
Diagram of a computer monitor with screw arrangement and directional arrows indicating motion (no text or symbols)text_image
Diagram illustrating safety instructions for installing a device, with labeled steps and warning symbolstext_image
Diagram illustrating safety inspection steps with labeled instructions and warning symbolsnatural_image
Line drawing of three people assembling a large rectangular device with a circular inset showing a device (no text or symbols)![SONY KD-50X80L - Rozmery: (pribl.) [mm] - 5](/content/2026/04/643507/images/37cdeb159f04bb44e331dd2932216761a4c1cc07e008a436f12c68eefdfceb5e.jpg)
text_image
Technical diagram illustrating a procedure for using a tool to adjust or inspect a component, with numbered steps and warning symbols.Numai XR-85X90L / 75X90L / 65X90L / 55X90L, XRM-85X90L / 75X90L / 65X90L / 55X90L
natural_image
Line drawing of three people assembling a large rectangular panel with a magnifying glass (no text or symbols)![SONY KD-50X80L - Rozmery: (pribl.) [mm] - 6](/content/2026/04/643507/images/05b3e2e93e0a3d0baa5a88abc2c73eddafd26305f0ca3bbb2ef074cfdd8c2251.jpg)
text_image
Technical diagram illustrating safety inspection steps with labeled diagrams and warning symbolstext_image
Safety instruction diagram showing hand holding a device with checkmark and no/x symbol, accompanied by silhouettes of three human figures carrying circular symbols.natural_image
Illustration of three silhouetted figures lifting a large rectangular object with a ruler, no text or symbols presentnatural_image
Simple line drawing of a rectangular frame with a dashed rectangle inside and a starburst shape at the bottom (no text or symbols)text_image
Diagram illustrating a mechanical assembly or mounting process with labeled components and directional arrows indicating movement.![SONY KD-50X80L - Rozmery: (pribl.) [mm] - 7](/content/2026/04/643507/images/423e2192d87380eaa36eb96d4e9c0dc4c95c5ddb97219f1845c4a2848003d1ee.jpg)
natural_image
Diagram of a monitor with a scroll wheel and a magnified inset showing the wheel (no text or symbols)![SONY KD-50X80L - Rozmery: (pribl.) [mm] - 8](/content/2026/04/643507/images/e25f49835231d7038b89c864cda58afe9053524c472171c35429b26387049e4b.jpg)
text_image
Technical diagram showing a rectangular panel with internal components and a close-up view of a mechanical component with cross-sectional view.text_image
Technical diagram showing a mechanical assembly with labeled components and directional arrows indicating process flow.![SONY KD-50X80L - Rozmery: (pribl.) [mm] - 9](/content/2026/04/643507/images/ec3817ed6b999ff943345e86dfb9b400e8da4ffc715aea89e564be31b8bc45f7.jpg)
natural_image
Diagram of a monitor with a scroll wheel and a magnified inset showing the wheel (no text or symbols)![SONY KD-50X80L - Rozmery: (pribl.) [mm] - 10](/content/2026/04/643507/images/2aa9ebf96b2c0a6c21f4b862ea10ab805f469f4ee87856d34d7bbf5f492a047e.jpg)
text_image
图1-2-10 - 100% 图2-2-10 - 100%RO
text_image
Safety instruction diagram showing hand protection with checkmark and no/x mark optionstext_image
© ScripeteNotă
natural_image
Simple line drawing of a rectangular frame with a starburst shape at the bottom (no text or symbols)text_image
Diagram illustrating a mechanical or optical setup with a slide and a pulley, showing an arrow indicating direction.
natural_image
Diagram showing a mechanical component with a downward arrow and a circled section view (no text or symbols)text_image
Diagram illustrating a mechanical or optical setup with labeled components and directional arrow
natural_image
Diagram of a mechanical component with a circular inset showing internal structure (no text or symbols)text_image
Technical diagram showing installation of a mechanical component with a magnified inset view highlighting the internal structure.AVERTISMENT
| Numele modelului Cârlig locație | |
| FW-55BZ40L / 55BZ35L / 55BZ30LKD-55X85L / 55X81BL / 55X80L / 55X78AL / 55X77L / 55X75WLKM-55X85L / 55X80LXR-55X90L XRM-55X90L | b |
| FW-50BZ30LKD-50X80L / 50X77L / 50X75WL KM-50X80L | c |
| FW-43BZ30LKD-43X80L / 43X77L / 43X75WL KM-43X80L | c |
natural_image
Diagram showing a person sitting in a chair facing a screen with dashed lines indicating perspective projection (no text or symbols present)natural_image
Two identical mechanical or architectural diagrams showing vertical supports with a central component, no text or symbols present.text_image
Technical diagram of a mechanical component with labeled parts and mounting pointstext_image
Technical diagram of a mechanical assembly with labeled parts A and I, showing structural components and alignment lines.text_image
Technical diagram of a mechanical component with labeled parts and reference linestext_image
Technical diagram of a mechanical assembly with labeled parts I and A, showing bolted connections and dashed reference lines.text_image
Technical diagram of a mechanical assembly with labeled parts and directional arrows indicating assembly or movement.Само FW-85BZ40L / 85BZ35L / 85BZ30L / 75BZ40L / 75BZ35L / 75BZ30L / 65BZ40L / 65BZ35L / 65BZ30L / 55BZ40L / 55BZ35L / 55BZ30L / 50BZ30L / 43BZ30L
natural_image
Diagram showing a person standing behind a large appliance with multiple bolts and arrows indicating motion (no text or symbols)natural_image
Diagram of a computer monitor with screw arrangement and directional arrows indicating motion (no text or symbols)text_image
Diagram illustrating safety instructions for installing a device, with labeled steps and warning symbolstext_image
Diagram illustrating safety instructions for installing a device, with labeled steps and warning symbolsnatural_image
Line drawing of three people assembling a large rectangular electronic device (no text or symbols)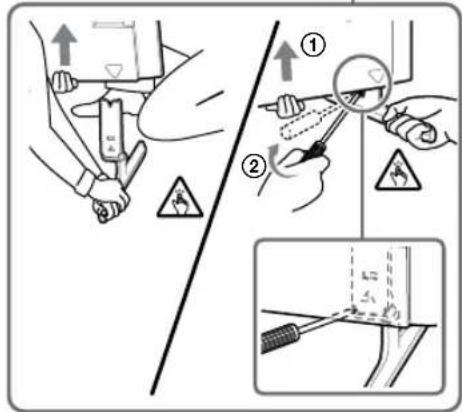
text_image
Technical diagram illustrating a procedure for using a tool, with numbered steps and warning symbols indicating safety or hazard.Camo XR-85X90L / 75X90L / 65X90L / 55X90L, XRM-85X90L / 75X90L / 65X90L / 55X90L
natural_image
Line drawing of three people assembling a large rectangular panel with a magnifying glass (no text or symbols)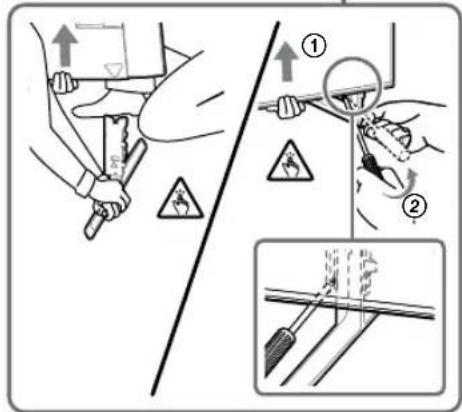
text_image
Technical diagram illustrating hand tool application steps with labeled diagrams and warning symbolstext_image
Safety instruction diagram showing hand protection and human behavior with checkmark and no/x symbol1 Повдигнете телевизора или LCD монитора.
natural_image
Illustration of three human figures lifting a large rectangular object with a ruler, no text or symbols presentnatural_image
Simple line drawing of a rectangular frame with a starburst shape and a dashed-line rectangle inside (no text or symbols)natural_image
Pure electrical circuit lines without any symbols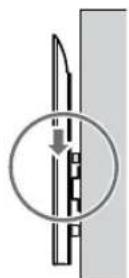


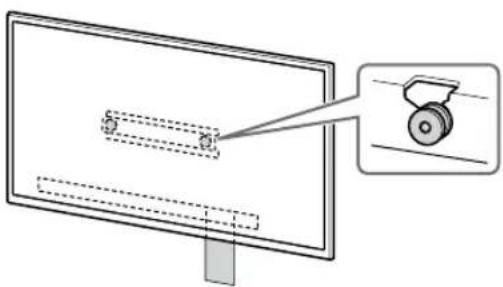
natural_image
Diagram of a monitor with a magnified inset showing a wheel (no text or symbols present)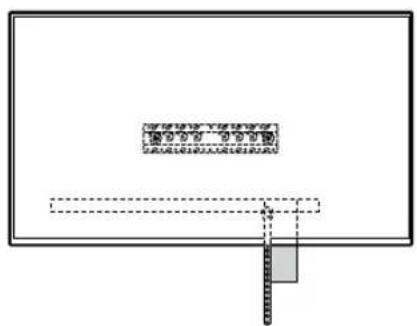
text_image
Diagram showing a rectangular frame with a grid of labeled boxes and a vertical bar, likely representing a layout or layout.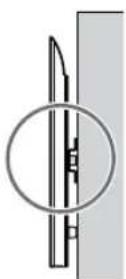
text_image
Safety instruction diagram showing hand protection with checkmark and no/x mark symbols1 Повдигнете телевизора или LCD монитора.
natural_image
Simple line drawing of a rectangular frame with a dashed rectangle and a starburst symbol at the bottom (no text or symbols)text_image
Technical diagram showing a mechanical assembly with labeled components and a magnified inset showing a screw mechanism.ПРЕДУПРЕЖДЕНИЕ
natural_image
Diagram showing a person sitting in a chair facing a screen with dashed lines indicating perspective projection (no text or symbols present)natural_image
Two identical mechanical component diagrams labeled 2-a2-b, showing front and side views (no text or symbols on the components themselves)text_image
Technical diagram of a mechanical component with labeled parts and mounting pointstext_image
Technical diagram of a mechanical device with labeled parts A and B, showing internal components and alignment lines.text_image
Technical diagram of a mechanical component with labeled parts and reference linestext_image
Technical diagram of a mechanical assembly with labeled parts A and I, showing bolted connections and dashed reference lines.text_image
Technical diagram of a mechanical component with labeled parts and alignment indicatorsnatural_image
Diagram of a person inspecting a battery with bolts and arrows indicating mechanical assembly (no text or symbols)natural_image
Diagram of a computer monitor with screw fasteners and cable connectors (no text or symbols)text_image
Diagram illustrating safety instructions for installing a device, with labeled steps and warning symbolstext_image
Diagram illustrating safety instructions for installing a device, with labeled steps and warning symbolsnatural_image
Line drawing of three people assembling a large rectangular panel with a circular indicator (no text or symbols)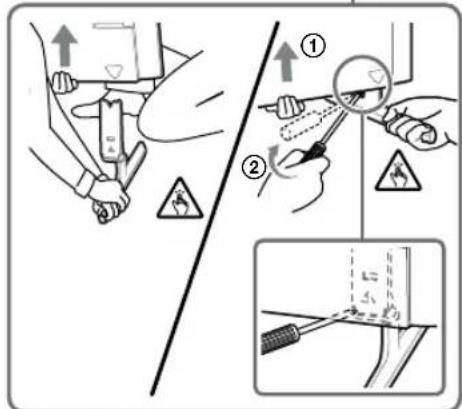
text_image
Technical diagram illustrating a procedure for using a tool, showing step-by-step instructions with labeled arrows and warning symbols.natural_image
Line drawing of three people assembling a large rectangular object with a gauge, no text or symbols present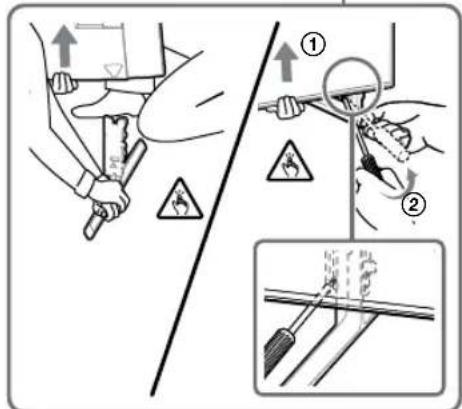
text_image
Technical diagram illustrating safety inspection steps with labeled diagrams and warning symbolstext_image
Safety instruction diagram showing correct and incorrect hand actions for lifting a device, with human silhouettes indicating correct/incorrect handling.natural_image
Illustration of three silhouetted figures lifting a large rectangular object with dashed lines indicating motion or alignment (no text or symbols)natural_image
Simple line drawing of a rectangular frame with a dashed oval and a starburst shape at the bottom (no text or symbols)text_image
Diagram illustrating a mechanical or structural assembly with labeled components and directional arrows indicating movement or force.
natural_image
Diagram of a monitor with a scroll wheel and a magnified inset showing the wheel (no text or symbols)
text_image
Technical diagram showing a rectangular panel with internal components and a close-up view of a mechanical component with cross-sectional view.text_image
Technical diagram showing a mechanical assembly with labeled components and directional arrows indicating process flow.
natural_image
Diagram of a monitor with a magnified view showing a wheel (no text or symbols present)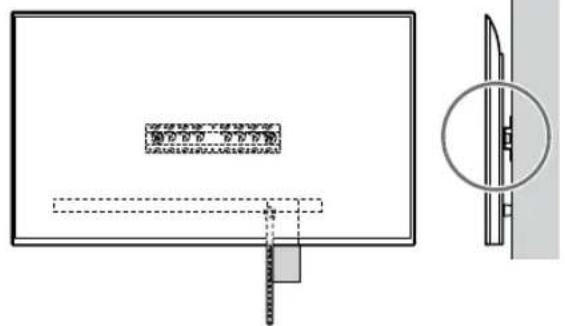
text_image
Safety instruction diagram showing hand protection with checkmark and no/x mark symbolsnatural_image
Simple line drawing of a rectangular frame with a starburst shape at the bottom (no text or symbols)text_image
Diagram illustrating a mechanical or optical setup with a slide and a pulley, showing an arrow indicating direction.
natural_image
Diagram showing a mechanical component with a downward arrow and a magnified inset (no text or symbols)text_image
Diagram illustrating a mechanical or optical setup with labeled components and directional arrow
natural_image
Diagram of a mechanical component with a circular inset showing internal structure (no text or symbols)text_image
Technical diagram showing installation of a mechanical component with a close-up view and detail viewПРЕДУПРЕЖДЕНИЕ
natural_image
Diagram showing a person sitting in a chair facing a screen with dashed lines indicating perspective projection (no text or symbols present)text_image
Technical diagram of a mechanical component with labeled parts and mounting pointstext_image
Technical diagram of a mechanical assembly with labeled parts A and B, showing internal components and alignment indicators.text_image
Technical diagram of a mechanical component with labeled parts and annotation Atext_image
Technical diagram of a mechanical assembly with labeled parts A and 1, showing bolted connections and dashed reference lines.text_image
Technical diagram of a mechanical assembly with labeled parts and directional arrows indicating movement or assembly.natural_image
Diagram of a person standing behind a rectangular device with multiple bolts and arrows indicating motion or force (no text or symbols)natural_image
Diagram of a monitor with four screws attached to its side, showing wiring or connection (no text or symbols)text_image
Diagram illustrating safety instructions for installing a device, with labeled steps and warning symbolstext_image
Diagram illustrating safety inspection steps with labeled instructions and warning symbolstext_image
Diagram illustrating safety inspection steps with labeled instructions and safety symbolstext_image
Safety instruction diagram showing hand protection with checkmark and no/x mark symbolsnatural_image
Illustration of three human figures assembling a large panel with a ruler, no text or symbols presentnatural_image
Simple line drawing of a rectangular frame with a starburst shape at the bottom (no text or symbols)text_image
Diagram illustrating a mechanical or structural assembly with labeled components and directional arrows indicating movement or force.
natural_image
Diagram of a monitor with a scroll wheel and a magnified inset showing the wheel (no text or symbols)
text_image
Technical diagram showing a rectangular panel with internal components and a close-up view of a mechanical component with cross-sectional view.text_image
Technical diagram showing a mechanical assembly with labeled components and directional arrows indicating process steps.
natural_image
Diagram of a monitor with a scroll wheel and a magnified inset showing the wheel (no text or symbols)
text_image
图1-2-10 - 100% 图2-2-10 - 100%text_image
Safety instruction diagram showing hand protection with checkmark and no/x mark symbolsnatural_image
Simple line drawing of a rectangular frame with a starburst shape at the bottom (no text or symbols)text_image
Diagram illustrating a mechanical or electrical component with labeled parts and an arrow indicating direction, alongside a magnified view of the component.
natural_image
Diagram showing a mechanical component with a downward arrow and a magnified inset (no text or symbols)text_image
Diagram illustrating a mechanical or optical setup with labeled components and directional arrow
natural_image
Diagram of a mechanical component with a circular inset showing internal structure (no text or symbols)text_image
Technical diagram showing a mechanical assembly with labeled components and a magnified inset showing a gear mechanism.ЗАСТЕРЕЖЕННЯ
| D Kruvi (+PSW 4 × 20)koos vahepuksiga (×2) | G Puks (20) (M4) (×2) H Kruvi (+PSW 4 × 20)(×2) | | M Puks (M4) (×2) |
| N Kruvi (+PSW 4 × 50)(×2)[IMAGE] | |||
natural_image
Illustration of a person sitting in a chair facing a screen, with dashed lines indicating perspective projection (no text or symbols)2-b: Ōhuke paigaldus
text_image
Technical diagram of a mechanical component with labeled parts and mounting pointstext_image
Technical diagram of a mechanical assembly with labeled parts A and B, showing components like bolts and fasteners.text_image
Technical diagram of a mechanical component with labeled parts and annotation Atext_image
Technical diagram of a mechanical assembly with labeled parts A and I, showing bolted connections and dashed reference lines.text_image
Technical diagram of a mechanical assembly with labeled parts and mounting holes, including a marked point A.natural_image
Diagram of a person standing behind a cabinet with bolts, showing mechanical assembly or installation (no text or symbols)natural_image
Diagram of a computer monitor with screw arrangement and directional arrows indicating motion (no text or symbols)text_image
Diagram illustrating safety instructions for installing a device, with labeled steps and warning symbolstext_image
Medical procedure diagram showing steps to adjust a patient's abdomen and hand positions with warning symbolstext_image
Technical diagram illustrating a procedure for installing or adjusting a device, with numbered steps and safety warning symbols.Ainult XR-85X90L / 75X90L / 65X90L / 55X90L, XRM-85X90L / 75X90L / 65X90L / 55X90L
text_image
Technical diagram illustrating a procedure for installing or repairing a board, with numbered steps and safety warning symbols.text_image
Safety instruction diagram showing hand holding a device with checkmark and no/x symbol, accompanied by silhouettes of people carrying circular symbols.natural_image
Illustration of three silhouetted figures lifting a large rectangular object with dashed lines indicating alignment or positioning (no text or symbols)natural_image
Simple line drawing of a rectangular frame with a starburst shape and a dashed rectangle inside (no text or symbols)text_image
Diagram illustrating a mechanical assembly or mounting process with labeled components and directional arrows indicating movement.
natural_image
Diagram of a monitor with a scroll wheel and a magnified inset showing the wheel (no text or symbols)
text_image
Technical diagram showing a rectangular panel with internal components and a close-up view of a mechanical component with cross-sectional view.text_image
Technical diagram showing a mechanical assembly with labeled components and directional arrows indicating process steps.
natural_image
Diagram of a monitor with a magnified view showing a scroll wheel (no text or symbols present)
text_image
图1-2-10 - 100% 图2-2-10 - 100%text_image
Diagram illustrating hand protection and damage technique with checkmark and no/x marks, showing two human figures holding a rectangular frame.natural_image
Simple line drawing of a rectangular frame with a starburst shape and a small geometric shape inside (no text or symbols)Kui valitud on standardpaigaldus (2-a):
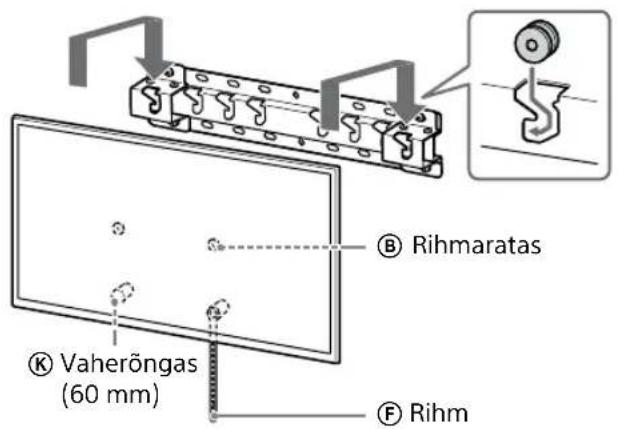
text_image
Rihmaratas Vaherōngas (60 mm) Rihm

text_image
Diagram illustrating a mechanical or optical setup with a slide and a pulley, showing an arrow indicating direction.
natural_image
Diagram showing a mechanical component with a downward arrow and a circled section view (no text or symbols)text_image
Diagram illustrating a mechanical or optical setup with labeled components and directional arrow
natural_image
Diagram of a mechanical component with a circular inset showing internal structure (no text or symbols)text_image
Technical diagram showing a mechanical assembly with labeled components and a close-up of a gear mechanism.HOIATUS
Mass (ainult alus): (umbes) [kg]
0,8
natural_image
Diagram showing a person sitting in a chair viewing a screen from a perspective cone, with dashed lines indicating perspective projection (no text or symbols present)text_image
Technical diagram of a mechanical component with labeled parts and directional arrows indicating assembly or assembly.text_image
Technical diagram of a mechanical assembly with labeled parts A and I, showing structural components and alignment lines.text_image
Technical diagram of a mechanical component with labeled parts and annotation Atext_image
Technical diagram of a mechanical assembly with labeled parts I and A, showing bolted connections and dashed reference lines.text_image
Technical diagram of a mechanical component with labeled parts and mounting holes, including a marked section A.natural_image
Diagram of a person standing behind a rectangular device with multiple bolts and arrows indicating motion (no text or symbols)natural_image
Diagram of a computer monitor with three screws and directional arrows indicating assembly or movement (no text or symbols)text_image
Diagram illustrating safety instructions for installing a device, with labeled steps and warning symbolstext_image
Medical procedure diagram showing steps to examine a patient's abdomen with pressure gauge and foot safety warning symboltext_image
Technical diagram illustrating a procedure for installing or adjusting a device, with numbered steps and safety warning symbols.Tikai modeliem XR-85X90L / 75X90L / 65X90L / 55X90L, XRM-85X90L / 75X90L / 65X90L / 55X90L
text_image
Diagram illustrating safety inspection steps with labeled diagrams and warning symbolstext_image
Safety instruction diagram showing hand holding a device with checkmark and no/x symbol, accompanied by silhouettes of three people carrying circular objects.1 Paceliet televizoru vai LCD monitoru.
natural_image
Illustration of three silhouetted figures lifting a large rectangular object with dashed lines indicating alignment or positioning (no text or symbols)- levērojiet piesardzību, kad uzstādāt televizoru vai LCD monitoru pie sienas, īpaši tas attiecas uz personu, kas atbalsta televizoru vai LCD monitoru no apakšas — televizors vai LCD monitors var krist, izraisot smagas traumas vai pat nāvi.
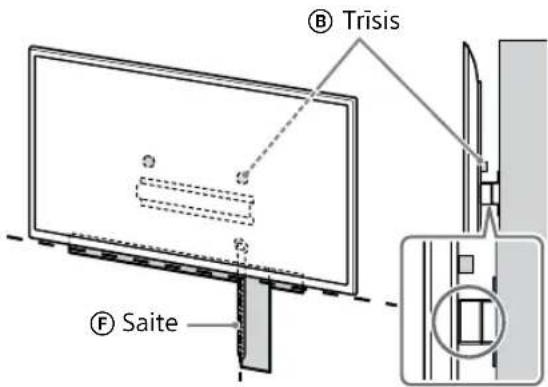
text_image
B Trisis F Saite2 Uzstādiet televizoru vai LCD monitoru uz pamatnes (20) Ⓐ vai pamatnes adaptera ①.
natural_image
Simple line drawing of a rectangular frame with a starburst shape and two internal geometric shapes (no text or symbols)text_image
Diagram illustrating a mechanical or structural assembly with labeled components and directional arrows indicating movement or force.
natural_image
Diagram of a monitor with a scroll wheel and a magnified inset showing the wheel (no text or symbols)
text_image
Technical diagram showing a rectangular panel with internal components and a close-up view of a mechanical component with cross-sectional view.text_image
Technical diagram showing a mechanical assembly with labeled components and directional arrows indicating process flow.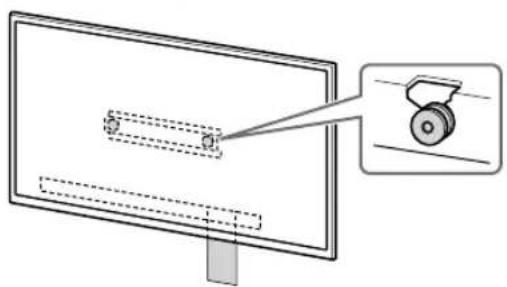
natural_image
Diagram of a monitor with a scroll wheel and a magnified inset showing the wheel (no text or symbols)
text_image
Safety instruction diagram showing hand protection with check and no/xan symbols1 Paceliet televizoru vai LCD monitoru.
natural_image
Simple line drawing of a rectangular frame with a starburst shape at the bottom (no text or symbols)text_image
Diagram illustrating a mechanical or optical setup with a slide and a pulley, showing an arrow indicating direction.
natural_image
Diagram showing a mechanical component with a downward arrow and a circled section view (no text or symbols)text_image
Diagram illustrating a mechanical or optical setup with labeled components and directional arrow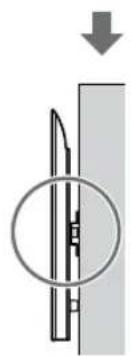
natural_image
Pure mechanical diagram showing a cutting tool inside a circular opening, with no text or symbols present.3 Nesasveriet televizora vai LCD monitora apakšpusi.
- Satveriet saites Ⓔ galu un cieši piestipriniet to pie sienas.
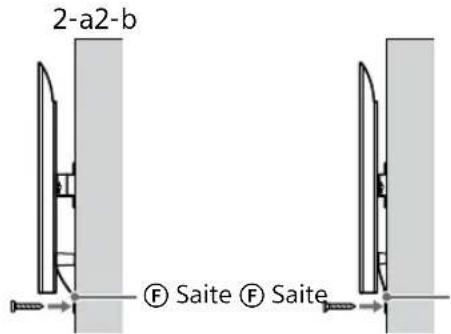
text_image
2-a2-b ⑤ Saite ⑤ Saitetext_image
Technical diagram showing a mechanical assembly with labeled components and a close-up inset of a screw mechanism.BRĪDINĀJUMS!
| D Sraigtas (+PSW 4 × 20)su jvore (×2) | G Ivorè (20) (M4) (×2) H Sraigtas (+PSW 4 × 20)(×2) | | M Ivorè (M4) (×2) |
| N Sraigtas (+PSW 4 × 50)(×2)[IMAGE] | |||
Tiekiama kartu su televizoriumi arba LCD monitoriumi
Prie sienos tvirtinamas elementas VS (×4)*

natural_image
Diagram showing a person sitting in a chair facing a screen with dashed lines indicating perspective projection (no text or symbols)text_image
Technical diagram of a mechanical component with labeled parts and mounting pointstext_image
Technical diagram of a mechanical component with labeled parts and reference linestext_image
Technical diagram of a mechanical component with labeled parts and annotation Atext_image
Technical diagram of a mechanical assembly with labeled parts I and A, showing bolted connections and dashed reference lines.text_image
Technical diagram of a mechanical component with labeled parts and mounting holes, including a marked point A.natural_image
Diagram of a person standing behind a large appliance with bolts and arrows indicating motion (no text or symbols)natural_image
Diagram of a monitor with screw installations and connecting lines indicating wiring (no text or symbols)text_image
Diagram illustrating safety instructions for installing a device, with labeled steps and warning symbolstext_image
Diagram illustrating safety inspection steps with labeled instructions and warning symbolstext_image
Technical diagram illustrating a procedure for installing or adjusting a device, with numbered steps and safety symbols.Tik XR-85X90L / 75X90L / 65X90L / 55X90L, XRM-85X90L / 75X90L / 65X90L / 55X90L
text_image
Technical diagram illustrating a procedure for cleaning or repair, with steps numbered ① and ② showing hand positioning and safety warning.text_image
Safety instruction diagram showing hand holding a device with checkmark and no/x symbol, accompanied by silhouettes of people carrying circular symbols.natural_image
Illustration of three human figures assembling a large panel with a ruler, no text or symbols presentnatural_image
Simple line drawing of a rectangular frame with a dashed rectangle and a starburst shape at the bottom (no text or symbols)text_image
Diagram illustrating a mechanical or structural assembly with labeled components and directional arrows indicating movement or force.
natural_image
Diagram of a monitor with a scroll wheel and a magnified inset showing the wheel (no text or symbols)
natural_image
Technical line drawing of a mechanical component with cross-sectional view (no text or symbols)text_image
Technical diagram showing a mechanical assembly with labeled components and directional arrows indicating process flow.
natural_image
Diagram of a monitor with a scroll wheel and a magnified inset showing the wheel (no text or symbols)
text_image
Safety instruction diagram showing hand protection with checkmark and no/x mark symbolsnatural_image
Diagram showing a monitor with a dashed outline and an inset view of a door (no text or symbols)Pastaba
natural_image
Simple line drawing of a rectangular frame with a starburst shape at the bottom (no text or symbols)text_image
Diagram illustrating a mechanical or optical setup with a slide and a pulley, showing a downward arrow and dashed lines indicating motion.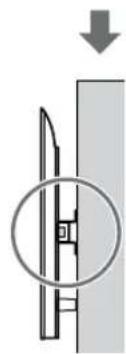
natural_image
Diagram showing a mechanical component with a downward arrow and a magnified inset (no text or symbols)text_image
Diagram illustrating a mechanical or optical setup with labeled components and directional arrow
natural_image
Diagram of a mechanical component with a circular inset showing internal structure (no text or symbols)text_image
Technical diagram showing a mechanical assembly with labeled components and a close-up of a gear mechanism.JSPÈJIMAS
| D Vijak (+PSW 4 × 20) spušo (×2) | G Puša (20) (M4) (×2) H Vijak (+PSW 4 × 20)(×2) | | M Puša (M4) (×2) |
| N Vijak (+PSW 4 × 50)(×2)[IMAGE] | |||
natural_image
Diagram showing a person sitting in a chair facing a screen with dashed lines indicating perspective projection (no text or symbols present)natural_image
Two identical mechanical component diagrams labeled 2-a2-b, showing vertical supports and mounting holes (no text or symbols beyond labels)text_image
Technical diagram of a mechanical component with labeled parts and mounting pointstext_image
Technical diagram of a mechanical device with labeled parts and connection pointstext_image
Technical diagram of a mechanical component with labeled parts and section line Atext_image
Technical diagram of a mechanical component with labeled parts A and ①, showing bolted connections and dashed reference lines.Npr., podstavek (20) Ⓐ na mestu »a«
text_image
Technical diagram of a mechanical component with labeled parts and alignment indicatorsNpr., podstavek (20) Ⓐ na mestu »a«
7 Samo FW-85BZ4xL / 85BZ3xL / 75BZ4xL / 75BZ3xL, KD-85X8xL / 85X8xBL / 75X8xL / 75X8xBL / 75X7xL / 75X7xAL / 75X7xWL, KM-85X8xL / 75X8xL, XR-85X9xL / 75X9xL, XRM-85X9xL / 75X9xL
Na steni označite mesto vgradnje.
natural_image
Diagram of a person standing beside a rectangular device with bolts, showing motion arrows (no text or symbols)natural_image
Diagram of a computer monitor with screw arrangement and directional arrows indicating motion (no text or symbols)text_image
Diagram illustrating safety instructions for installing a device, with labeled steps and warning symbolstext_image
Medical procedure diagram showing steps to adjust a device with pressure gauge and warning symboltext_image
Technical diagram illustrating a procedure for installing or adjusting a device, with numbered steps and warning symbols.Samo XR-85X90L / 75X90L / 65X90L / 55X90L, XRM-85X90L / 75X90L / 65X90L / 55X90L
- Odstranite vsako stran namiznega stojala posebej. Namizno stojalo trdno primite z obema rokama, drugi pa naj dvignejo televizor ali monitor LCD.

text_image
Technical diagram illustrating a procedure for installing or adjusting a component, with numbered steps and safety warning symbols.text_image
Safety instruction diagram showing hand protection and human behavior with checkmark and no/x symbol indicators1 Dvignite televizor ali monitor LCD.
natural_image
Illustration of three stylized human figures carrying a large rectangular object with dashed lines indicating alignment or positioning (no text or symbols)natural_image
Simple line drawing of a rectangular frame with a starburst shape at the bottom (no text or symbols)- Po vgradnji televizorja ali monitorja LCD na steno s stene odstranite maskirni trak itd.
text_image
Diagram illustrating a mechanical assembly or mounting process with labeled components and directional arrows indicating movement.
natural_image
Diagram of a monitor with a scroll wheel and a magnified inset showing the wheel (no text or symbols)
text_image
Technical diagram showing a rectangular panel with internal components and a close-up view of a mechanical component with cross-sectional view.text_image
Technical diagram showing a mechanical assembly with labeled components and directional arrows indicating process steps.
natural_image
Diagram of a monitor with a scroll wheel and a magnified inset showing the wheel (no text or symbols)
text_image
Safety instruction diagram showing hand protection with checkmark and no/x mark options1 Dvignite televizor ali monitor LCD.
natural_image
Simple line drawing of a rectangular frame with a starburst shape and a dashed-line rectangle inside (no text or symbols)text_image
Diagram illustrating a mechanical or optical setup with a slide and a pulley, showing an arrow indicating direction.
natural_image
Diagram showing a mechanical component with a downward arrow and a circled section view (no text or symbols)text_image
Diagram illustrating a mechanical or optical setup with labeled components and an arrow indicating direction
natural_image
Diagram of a mechanical component with a circular inset showing internal structure (no text or symbols)text_image
Technical diagram showing a mechanical assembly with labeled components and a close-up inset of a screw mechanism.OPOZORILO
| D Vijak (+PSW 4 × 20) s Čahurom (×2) | G Čahura (20) (M4) (×2) | Vijak (+PSW 4 × 20) (×2) | M Čahura (M4) (×2) |
| N Vijak (+PSW 4 × 50) (×2) | |||
natural_image
Diagram showing a person sitting in a chair facing a screen with dashed lines indicating perspective projection (no text or symbols present)text_image
Technical diagram of a mechanical component with labeled parts and directional arrows indicating assembly or assembly.Npr., montaža adaptera za bazu ① na mjestu »a«
Ako je odabrano tanko postavljanje (2-b):
text_image
Technical diagram of a mechanical assembly with labeled parts A and B, showing internal components and alignment lines.text_image
Technical diagram of a mechanical component with labeled parts and annotation Atext_image
Technical diagram of a mechanical assembly with labeled parts A and I, showing bolted connections and dashed reference lines.text_image
Technical diagram of a mechanical assembly with labeled parts and mounting holes, including a marked point A.natural_image
Diagram of a person standing behind a large rectangular device with multiple bolts and arrows indicating motion (no text or symbols)2 Pričvrstite priključak nosača za postavljanje na zid VS (isporučen uz TV ili LCD monitor) na stražnju stranu TV-a ili LCD monitora (kako bi bio paralelan sa zidom).
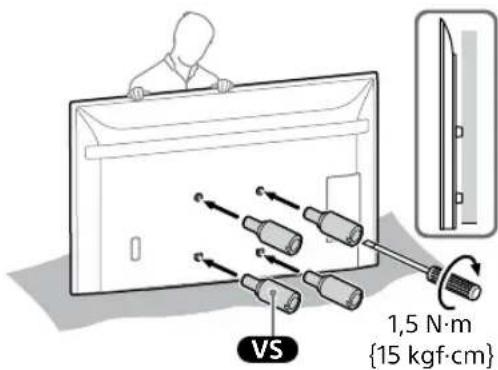
text_image
VS 1,5 N·m {15 kgf·cm}Napomena
natural_image
Diagram of a computer monitor with four screws and directional arrows indicating assembly or connection (no text or symbols)3 Pričvrstite priključak nosača za postavljanje na zid VS (isporučen uz TV ili LCD monitor) na stražnju stranu TV-a ili LCD monitora (kako bi bio paralelan sa zidom).
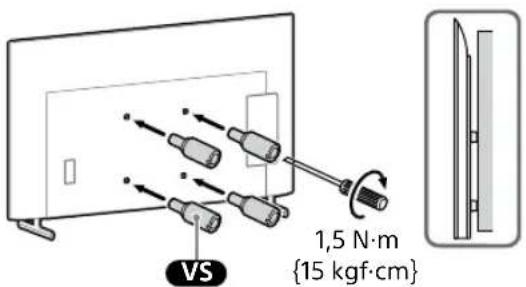
text_image
VS 1,5 N·m {15 kgf·cm}Napomena
text_image
Diagram illustrating safety instructions for installing a device, with labeled steps and warning symbols- Ponovite prethodni korak i uklonite drugu stranu postolja za stol.
Samo FW-85BZ40L / 85BZ35L / 85BZ30L / 75BZ40L / 75BZ35L / 75BZ30L / 65BZ40L / 65BZ35L / 65BZ30L / 55BZ40L / 55BZ35L / 55BZ30L / 50BZ30L / 43BZ30L, KD-75X78AL / 75X77L / 75X75WL / 65X78AL / 65X77L / 65X75WL / 55X78AL / 55X77L / 55X75WL / 50X77L / 50X75WL / 43X77L / 43X75WL
- Uklonite jednu po jednu stranu postolja za stol. Čvrsto držite postolje za stol objema rukama dok druge osobe podignu TV ili LCD monitor.

text_image
Medical procedure diagram showing steps to adjust a patient's abdomen with pressure gauge and safety warning symbol- Ponovite prethodni korak i uklonite drugu stranu postolja za stol.
Samo KD-75X85L / 65X85L / 65X85BL / 55X85L, KM-75X85L / 65X85L / 55X85L
- Uklonite jednu po jednu stranu postolja za stol. Čvrsto držite postolje za stol objema rukama dok druge osobe podignu TV ili LCD monitor.
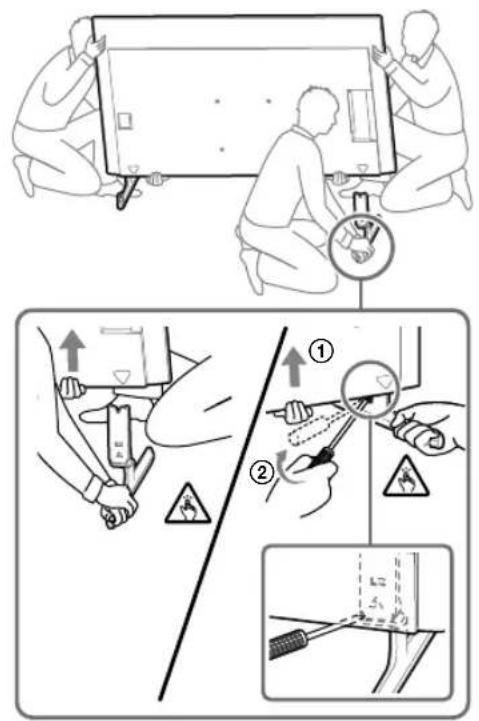
text_image
Technical diagram illustrating a procedure for installing or adjusting a device, with numbered steps and safety warning symbols.- Ponovite prethodni korak i uklonite drugu stranu postolja za stol.
Samo XR-85X90L / 75X90L / 65X90L / 55X90L, XRM-85X90L / 75X90L / 65X90L / 55X90L
- Uklonite jednu po jednu stranu postolja za stol. Čvrsto držite postolje za stol objema rukama dok druge osobe podignu TV ili LCD monitor.
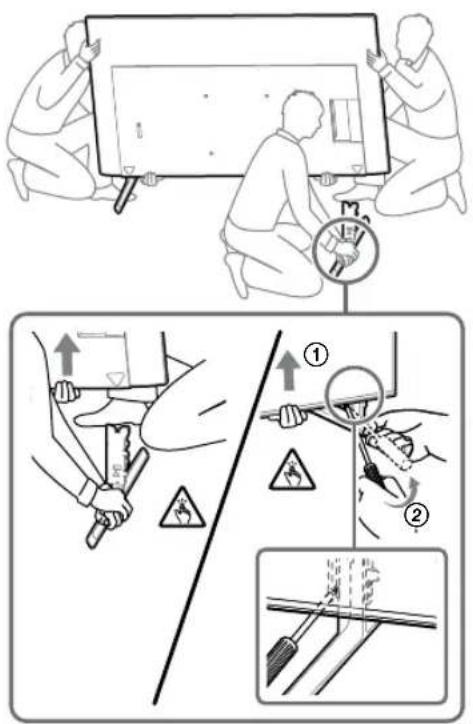
text_image
Technical diagram illustrating a procedure for installing or adjusting a component, with numbered steps and safety warning symbols.- Ponovite prethodni korak i uklonite drugu stranu postolja za stol.
Napomena
text_image
Safety instruction diagram showing hand holding a device with checkmark and no/x symbol, accompanied by silhouettes of people carrying circular symbols.1 Podignite TV ili LCD monitor.
- Za položaj kolotura Ⓑ koje treba objesiti na Bazu (20) Ⓐ ili adapter za bazu ①, pogledajte »Mjesto ugradnje adaptera Baze ①« na stranici 21.
- Pobrinite se da stražnja strana TV-a ili LCD monitora dodiruje bazu (20) Ⓐ ili adapter za bazu ① kada pridržavate TV ili LCD monitor.
Napomena
- Čvrsto držite TV ili LCD monitor objema rukama i pobrinite se da se remen Ⓕ i donja strana TV-a ili LCD monitora poravnaju s ljepljivom trakom.
- TV ili LCD monitor moraju nositi tri osobe, a osoba koja se nalazi ispred TV-a treba voditi druge pri postavljanju TV-a ili LCD monitora na mjesto.
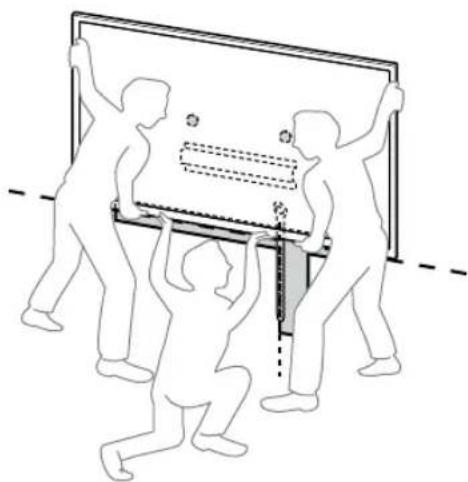
natural_image
Illustration of people lifting a large object with a ruler, no text or symbols present- Budite iznimno pažljivi prilikom instaliranja TV-a ili LCD monitora na zid, a posebice osoba koja podržava TV ili LCD monitor od ispod, kako televizor ili LCD monitor ne bi pao i uzrokovao ozbiljne ozljede ili čak smrt.
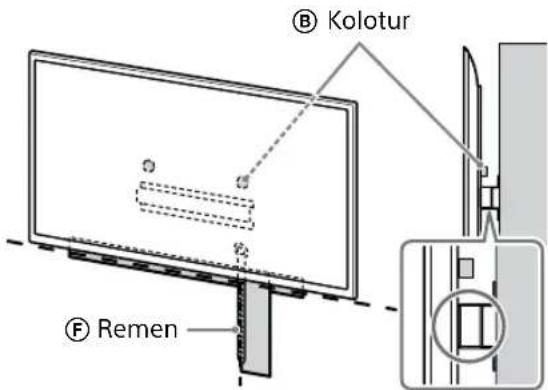
text_image
B Kolotur F Remen2 Postavite TV ili LCD monitor na bazu (20) Ⓐ ili adapter za bazu Ⓘ.
natural_image
Simple line drawing of a rectangular frame with a starburst shape at the bottom (no text or symbols)- Nakon instaliranja TV-a ili LCD monitora na zid, uklonite ljepljivu traku sa zida.
Ako je odabrano standardno postavljanje (2-a):
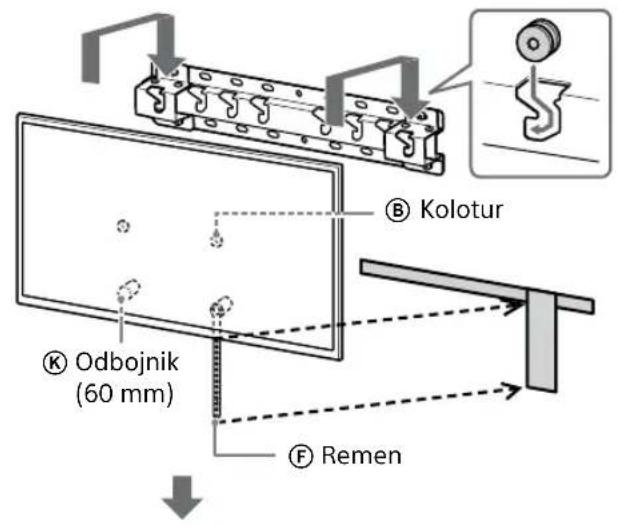
text_image
Kolotur Odbojnik (60 mm) Remen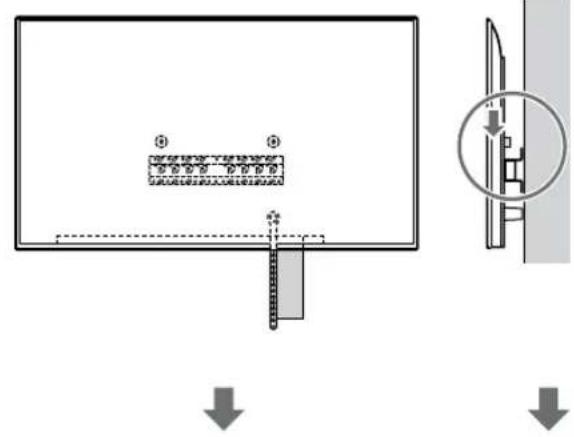
text_image
Diagram illustrating a mechanical assembly or mounting process with labeled components and directional arrows indicating movement.
natural_image
Diagram of a monitor with a scroll wheel and a magnified inset showing the wheel (no text or symbols)
text_image
Technical diagram showing a rectangular panel with internal components and a close-up view of a mechanical component with cross-sectional view.Ako je odabrano tanko postavljanje (2-b):
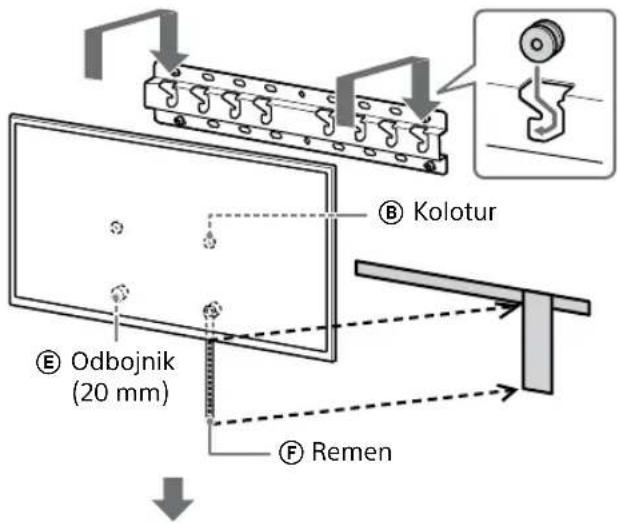
text_image
B Kolotur E Odbojnik (20 mm) F Remen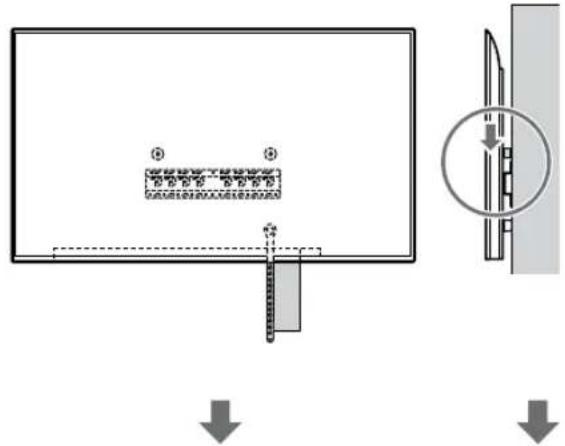
text_image
Technical diagram showing a mechanical assembly with labeled components and directional arrows indicating process steps.
natural_image
Diagram of a monitor with a scroll wheel and a magnified inset showing the wheel (no text or symbols)
text_image
Safety instruction diagram showing hand protection with check and no/x marks, featuring two human silhouettes holding a frame.1 Podignite TV ili LCD monitor.
- Za položaj kolotura Ⓑ koje treba objesiti na Bazu (20) Ⓐ ili adapter za bazu ①, pogledajte »Mjesto ugradnje adaptera Baze ①« na stranici 21.
- Pobrinite se da stražnja strana TV-a ili LCD monitora dodiruje bazu (20) Ⓐ ili adapter za bazu ① kada pridržavate TV ili LCD monitor.
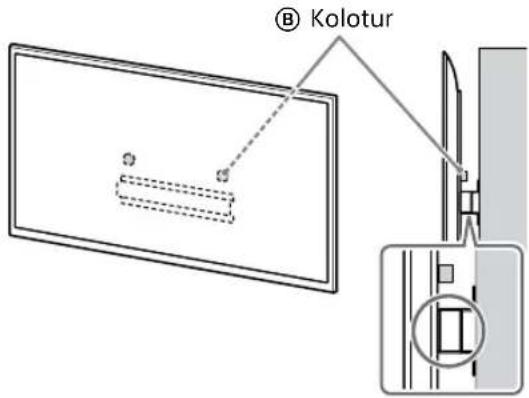
text_image
⑧ KoloturNapomena
- Čvrsto držite TV ili LCD monitor objema rukama.
2 Postavite TV ili LCD monitor na bazu (20) Ⓐ ili adapter za bazu Ⓘ.
natural_image
Simple line drawing of a rectangular frame with a starburst shape and two internal geometric shapes (no text or symbols)Ako je odabrano standardno postavljanje (2-a):

text_image
B Kolotur K Odbojnik (60 mm) F Remen
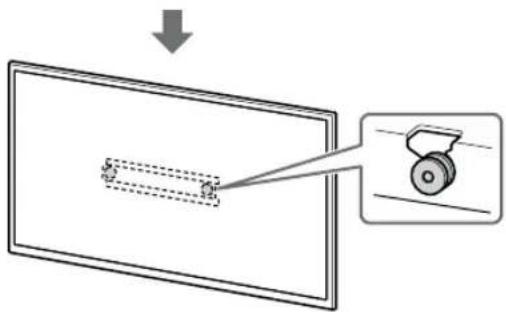
text_image
Diagram illustrating a mechanical or electrical component with labeled parts and an arrow indicating direction, alongside a magnified view of the component.
natural_image
Diagram showing a mechanical component with a downward arrow and a magnified inset (no text or symbols)Ako je odabrano tanko postavljanje (2-b):
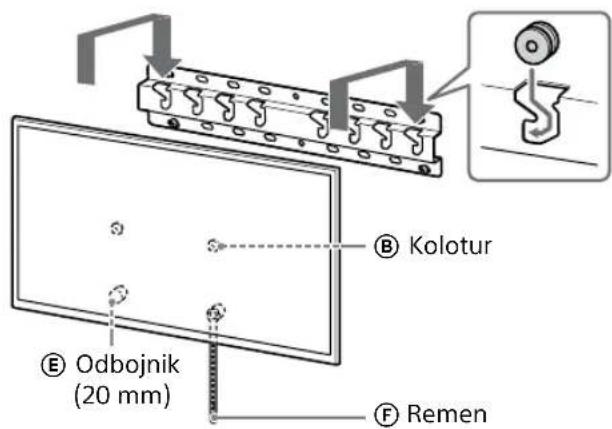
text_image
B Kolotur E Odbojnik (20 mm) F Remen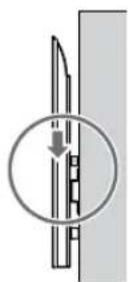
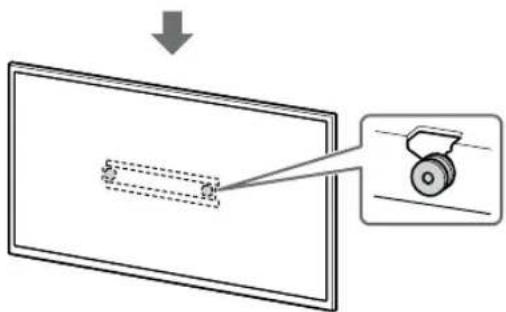
text_image
Diagram illustrating a mechanical or optical setup with labeled components and directional arrow
natural_image
Diagram of a mechanical component with a circular inset showing internal structure (no text or symbols)3 Sprječavanje prevrtanja televizora ili LCD monitora.
- Uzmite komad remen Ⓕ i lagano je pričvrstite za zid.
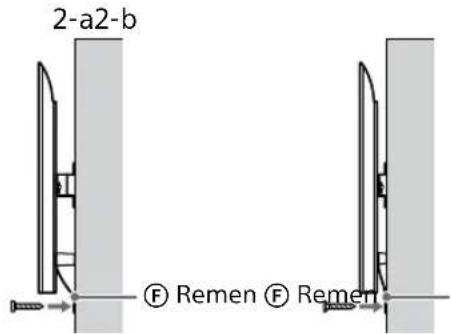
text_image
2-a2-b ⑤ Remen ⑤ Rementext_image
Technical diagram showing a mechanical assembly with labeled components and a close-up inset of a screw mechanism.UPOZORENJE
- Za prijenos velikog TV-a ili LCD monitora potrebne su dvije ili više osoba (tri ili više osoba za TV ili LCD monitor od 189,3 cm (75 inča) i više) (osim Egipat). Za prijenos velikog TV-a ili LCD monitora potrebne su dvije ili više osoba (tri ili više osoba za TV ili LCD monitor od 75 inča (189,3 cm) i više) (samo Egipat).
Specifikacije
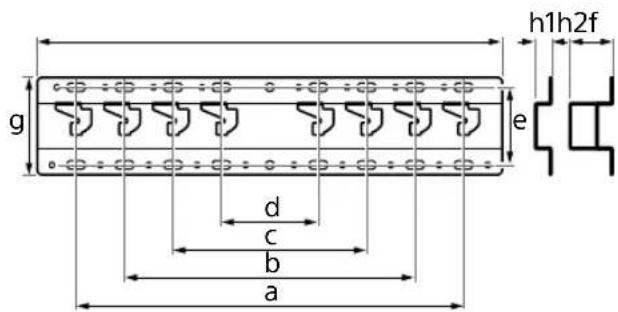
text_image
g h1h2f e d c b aDimenzije: (približno) [mm]
natural_image
Simple line drawing of a hand holding a computer monitor connected to a wire, with no text or symbols present.natural_image
Diagram showing a person sitting in a chair facing a screen with dashed lines indicating perspective projection (no text or symbols present)text_image
Technical diagram of a mechanical component with labeled parts and mounting pointstext_image
Technical diagram of a mechanical assembly with labeled parts A and B, showing internal components and alignment lines.text_image
Technical diagram of a mechanical component with labeled parts and dashed reference linestext_image
Technical diagram of a mechanical assembly with labeled parts I and A, showing bolted connections and dashed reference lines.text_image
Technical diagram of a mechanical component with labeled parts and an 'A' mark indicating a specific feature.natural_image
Diagram of a person standing behind a large appliance with multiple bolts and arrows indicating motion (no text or symbols)natural_image
Diagram of a computer monitor with screw arrangement and directional arrows indicating motion (no text or symbols)text_image
Diagram illustrating safety instructions for installing a device, with labeled steps and warning symbolstext_image
Diagram illustrating safety instructions for a device, showing steps from heating to cleaning and monitoring.natural_image
Line drawing of three people assembling a large rectangular device with a magnifying glass (no text or symbols)![SONY KD-50X80L - Dimenzije: (približno) [mm] - 1](/content/2026/04/643507/images/b752d3cad7b20b0a5ea4aefd2f6557759c6b09c2064cedb69f939348ea5d2007.jpg)
text_image
Technical diagram illustrating a procedure for using a tool, showing steps to inspect or inspect the component with warning symbols.natural_image
Line drawing of three people assembling a large rectangular object with a circular inset showing a hand holding a tool (no text or symbols)![SONY KD-50X80L - Dimenzije: (približno) [mm] - 2](/content/2026/04/643507/images/d9e06d8a39bed579b2ac020b1c1613b119c9a811ab031c87e398a66a8d3b86d2.jpg)
text_image
Technical diagram illustrating hand tool application and safety instructions with labeled steps ① and ②text_image
Safety warning illustration showing correct and incorrect hand actions for handling a device, with human silhouettes and safety symbols.natural_image
Illustration of three human figures assembling a rectangular object with a ruler, no text or symbols presentnatural_image
Simple line drawing of a rectangular frame with a starburst shape and two small geometric shapes inside (no text or symbols)text_image
Technical diagram showing a mechanical assembly with labeled components and directional arrows indicating motion or assembly.![SONY KD-50X80L - Dimenzije: (približno) [mm] - 3](/content/2026/04/643507/images/175f2a277e5213a894fca7b9cfcd93ded3bbda1489a35637de4bbceb967350ad.jpg)
natural_image
Diagram showing a monitor with a scroll wheel and a magnified view of the screen (no text or symbols)![SONY KD-50X80L - Dimenzije: (približno) [mm] - 4](/content/2026/04/643507/images/1dfc6607c13bb9036c01832e50527b0d2d08cfb0cc5af25e4cbc845e9cb8684c.jpg)
text_image
Technical diagram showing a rectangular panel with internal components and a close-up view of a mechanical component with labeled parts.text_image
Technical diagram showing a mechanical assembly with labeled components and directional arrows indicating process flow.![SONY KD-50X80L - Dimenzije: (približno) [mm] - 5](/content/2026/04/643507/images/a55b6f4c1fa8f91f4ef2c388130a8adea03984649dd333d28b99f99aa53e5bdc.jpg)
natural_image
Diagram showing a monitor with a slide and a magnified view of a wheel (no text or symbols present)![SONY KD-50X80L - Dimenzije: (približno) [mm] - 6](/content/2026/04/643507/images/e1f54f0c3e67576b6c12d182d88a892113120adf629bd97e4910941f09e06078.jpg)
text_image
Safety instruction diagram showing hand protection with checkmark and no/x mark symbolstext_image
© TerepwikНускау
natural_image
Simple line drawing of a rectangular frame with a dashed rectangle and a starburst shape at the bottom (no text or symbols)Стандартты орнату (2-а) тандалса:

text_image
Diagram illustrating a mechanical or optical setup with labeled components and an arrow indicating direction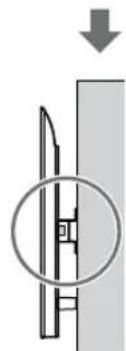
natural_image
Diagram showing a mechanical component with a downward arrow and a magnified inset (no text or symbols)Жакын орнату (2-b) тандалса:
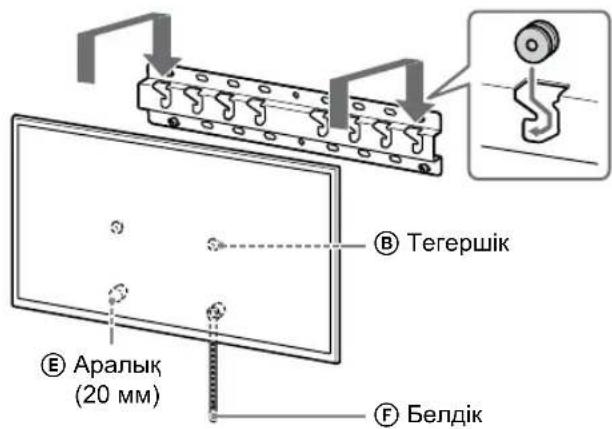
text_image
Tegershik Аралык (20 мм) Белдік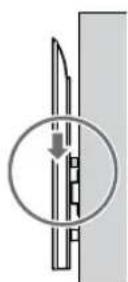
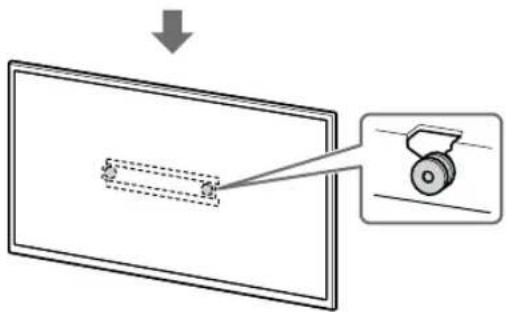
text_image
Diagram illustrating a mechanical or optical setup with labeled components and directional arrow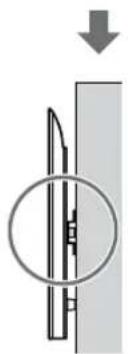
natural_image
Diagram of a mechanical component with a circular inset showing internal structure (no text or symbols)text_image
Technical diagram showing assembly of a mechanical component with labeled parts and a close-up view of the internal structure.ECKEPTY
D Vijak (+PSW 4 × 20) sačaurom (×2) | G Čaura (20) (M4) (×2) H Vijak (+PSW 4 × 20)(×2) |  | M Čaura (M4) (×2)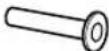 |
| N Vijak (+PSW 4 × 50)(×2)[IMAGE] | |||
Isporučeno uz TV ili LCD monitor
natural_image
Diagram showing a person sitting in a chair facing a screen with dashed lines indicating perspective projection (no text or symbols)2 Izaberite stil montaže na zid kao što je prikazano ispod.
2-a: Standardna montaža
2-b: Uzana montaža
- Pogledajte „Postavljanje za instalaciju za Nosač za postavljanje na zid“ na strani 19.
UPOZORENJE
- Kada se izabere 2-b, pristup priključku na zadnjoj strani je ograničen.
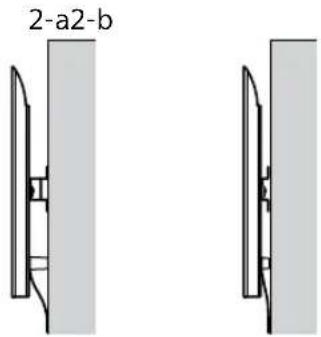
natural_image
Two identical mechanical component diagrams showing front and side views (no text or symbols)3 Ako se standardna montaža (2-a) bira:
Postavite spojnicu za osnovu Ⓘ pomoću Vijka (+PSW 4 × 10) Ⓙ na osnovu (20) Ⓔ.
- Pogledajte „Lokacija postavljanja spojnice za osnovu ①“ na strani 21.
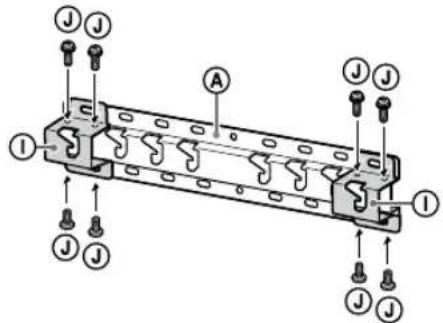
text_image
Technical diagram of a mechanical component with labeled parts and mounting pointsNpr., postavljanje spojnice za osnovu ① na lokaciju „a”
text_image
Technical diagram of a mechanical assembly with labeled parts A and B, showing internal components and alignment lines.Npr., obeležavanje na lokaciji „a“ da odgovara osnovi (20) Ⓐ
text_image
Technical diagram of a mechanical component with labeled parts and reference linesNpr., obeležavanje na lokaciji „a“ da odgovara osnovi (20) Ⓐ
5 Probušite vodeće rupe na oznakama.
text_image
Technical diagram of a mechanical assembly with labeled parts A and ①, showing bolted connections and dashed reference lines.Npr., postavljanje osnove (20) Ⓐ na lokaciju sa „a“
text_image
Technical diagram of a mechanical component with labeled parts and directional arrows indicating assembly or alignment.Npr., postavljanje osnove (20) Ⓐ na lokaciju sa „a“
7 Samo FW-85BZ4xL / 85BZ3xL / 75BZ4xL / 75BZ3xL, KD-85X8xL / 85X8xBL / 75X8xL / 75X8xBL / 75X7xL / 75X7xAL / 75X7xWL, KM-85X8xL / 75X8xL, XR-85X9xL / 75X9xL, XRM-85X9xL / 75X9xL
Obeležite mesto postavljanja na zidu.
Koristite krep-traku (nije isporučena) ili sličan proizvod da biste obeležili mesto TV-a ili LCD monitora blizu osnove (20) Ⓐ ili spojnice za osnovu Ⓓ.
- Pogledajte „Postavljanje TV-a ili LCD monitora na zid instalacije lokacije“ na strani 22.
Osim za FW-85BZ4xL / 85BZ3xL / 75BZ4xL / 75BZ3xL, KD-85X8xL / 85X8xBL / 75X8xL / 75X8xBL / 75X7xL / 75X7xAL / 75X7xWL, KM-85X8xL / 75X8xL, XR-85X9xL / 75X9xL, XRM-85X9xL / 75X9xL Preskočite ovaj korak.
Priprema za postavljanje TV-a ili LCD monitora
Napomena
natural_image
Diagram showing a person standing behind a large appliance with multiple bolts and arrows indicating motion (no text or symbols)natural_image
Diagram of a computer monitor with screw arrangement and directional arrows indicating motion (no text or symbols)text_image
Diagram illustrating safety instructions for installing a device, with labeled steps and warning symbols- Ponovite prethodni korak i uklonite drugu stranu postolja za sto.
Samo FW-85BZ40L / 85BZ35L / 85BZ30L / 75BZ40L / 75BZ35L / 75BZ30L / 65BZ40L / 65BZ35L / 65BZ30L / 55BZ40L / 55BZ35L / 55BZ30L / 50BZ30L / 43BZ30L, KD-75X78AL / 75X77L / 75X75WL / 65X78AL / 65X77L / 65X75WL / 55X78AL / 55X77L / 55X75WL / 50X77L / 50X75WL / 43X77L / 43X75WL
- Uklanjajte jednu po jednu stranu postolja za sto. Čvrsto držite postolje za sto sa obe ruke dok drugi ljudi podižu TV ili LCD monitor.
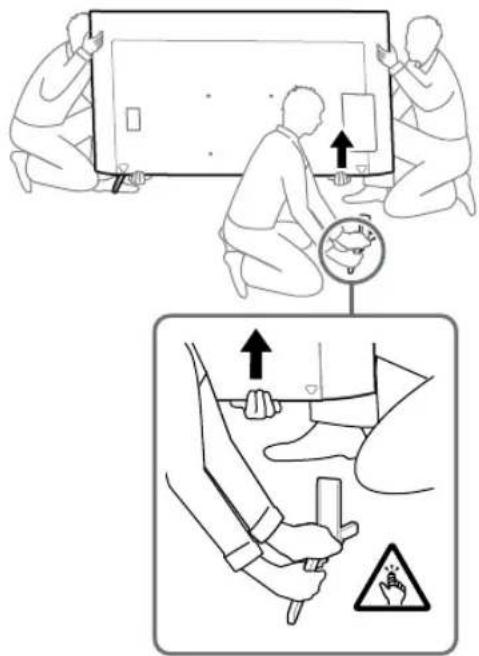
text_image
Medical procedure diagram showing steps to adjust a device with pressure gauge and warning symbol- Ponovite prethodni korak i uklonite drugu stranu postolja za sto.
Samo KD-75X85L / 65X85L / 65X85BL / 55X85L, KM-75X85L / 65X85L / 55X85L
- Uklanjajte jednu po jednu stranu postolja za sto. Čvrsto držite postolje za sto sa obe ruke dok drugi ljudi podižu TV ili LCD monitor.

text_image
Technical diagram illustrating a procedure for installing or adjusting a device, with numbered steps and safety warning symbols.- Ponovite prethodni korak i uklonite drugu stranu postolja za sto.
Samo XR-85X90L / 75X90L / 65X90L / 55X90L, XRM-85X90L / 75X90L / 65X90L / 55X90L
- Uklanjajte jednu po jednu stranu postolja za sto. Čvrsto držite postolje za sto sa obe ruke dok drugi ljudi podižu TV ili LCD monitor.

text_image
Technical diagram illustrating a procedure for installing or adjusting a component, with numbered steps and safety warning symbols.- Ponovite prethodni korak i uklonite drugu stranu postolja za sto.
Napomena
- Troje ili više ljudi je potrebno za odvajanje postolja za sto.
- Vodite računa da prilikom odvajanja postolja za sto od TV-a ili LCD monitora ne koristite prekomernu silu jer to može da dovede do pada TV-a ili LCD monitora i izazove telesnu povredu ili fizičko oštećenje TV-a ili LCD monitora.
- Pažljivo rukujte sa postoljem za sto da ne biste oštetili TV ili LCD monitor.
- Pažljivo podižite TV ili LCD monitor dok odvajate postolje za sto da se ne bi prevrnulo i izazvalo povredu.
- Pažljivo odvojite postolje za sto od TV-a ili LCD monitora da ne bi palo i oštetilo površinu na kojoj se nalazi TV ili LCD monitor.
Postavljanje TV-a ili LCD monitora na zid
Samo FW-85BZ4xL / 85BZ3xL / 75BZ4xL / 75BZ3xL, KD-85X8xL / 85X8xBL / 75X8xL / 75X8xBL / 75X7xL / 75X7xAL / 75X7xWL, KM-85X8xL / 75X8xL, XR-85X9xL / 75X9xL, XRM-85X9xL / 75X9xL
UPOZORENJE
- Dve ili više osoba (tri ili više osoba za TV ili LCD monitor od 189,3 cm (75 inča) i više) potrebne su za transport velikog TV-a ili LCD monitora (osim Egipta). Dve ili više osoba (tri ili više osoba za TV ili LCD monitor od 75 inča (189,3 cm) i više) potrebne su za transport velikog TV-a ili LCD monitora (samo Egipat).
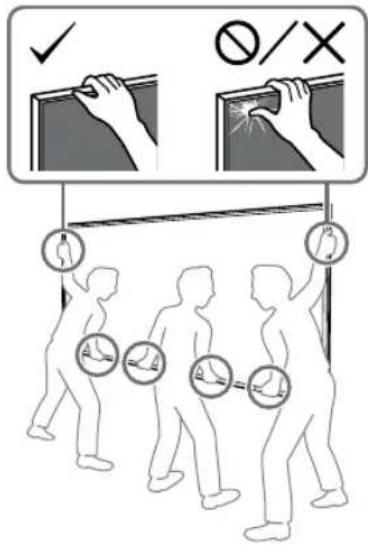
text_image
✓ Ø/×1 Podignite TV ili LCD monitor.
- Za lokacije remenica Ⓑ koje treba da vise na osnovi (20) Ⓐ ili spojnici za osnovu ①, pogledajte „Lokacija postavljanja spojnice za osnovu ①“ na strani 21.
- Uverite se da zadnja strana TV-a ili LCD monitora dodiruje osnovu (20) Ⓐ ili spojnicu za osnovu Ⓞ kada držite TV ili LCD monitor.
Napomena
- Čvrsto držite TV ili LCD monitor sa obe ruke i poravnajte remen Ⓕ i donji deo TV-a ili LCD monitora sa krep-trakom.
- TV ili LCD monitor treba da nose tri osobe, pri čemu osoba ispred TV-a ili LCD monitora treba da navodi druge dve na odgovarajuću poziciju.
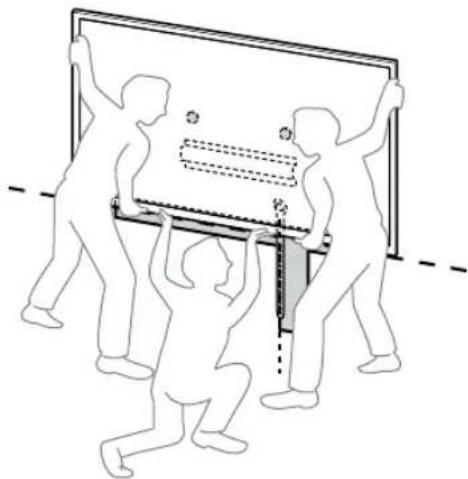
natural_image
Illustration of three silhouetted figures lifting a large rectangular object with dashed lines indicating alignment or measurement (no text or symbols)- Budite veoma oprezni kada postavljate TV ili LCD monitor na zid, naročito osoba koja pridržava TV ili LCD monitor odozdo, jer TV ili LCD monitor može da padne i izazove ozbiljnu povredu ili čak smrt.
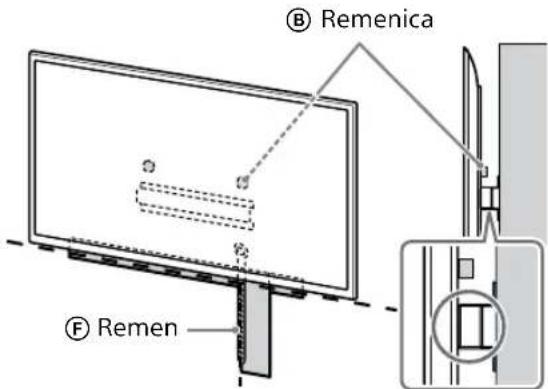
text_image
B Remenica F Remen2 Postavite TV ili LCD monitor na osnovu (20) Ⓐ ili spojnicu za osnovu Ⓘ.
- Pažljivo pomerite TV ili LCD monitor i okačite remenice Ⓑ na zadnjoj strani TV-a ili LCD monitora na osnovu (20) Ⓐ ili spojnicu za osnovu ① vodeći računa da odgovaraju obliku otvora.
- Nakon montaže TV-a ili LCD monitora na zid, proverite da li su remenice Ⓑ čvrsto pričvršćene u osnovu (20) Ⓐ ili spojnicu za osnovu Ⓜ.
- Polako otpustite obe ruke da TV ili LCD monitor ne bio pao.
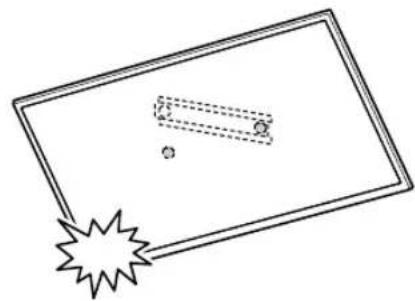
natural_image
Simple line drawing of a rectangular frame with a starburst shape and two small geometric shapes inside (no text or symbols)- Kada postavite TV ili LCD monitor na zid, uklonite krep-traku sa zida.
Ako se standardna montaža (2-a) bira:
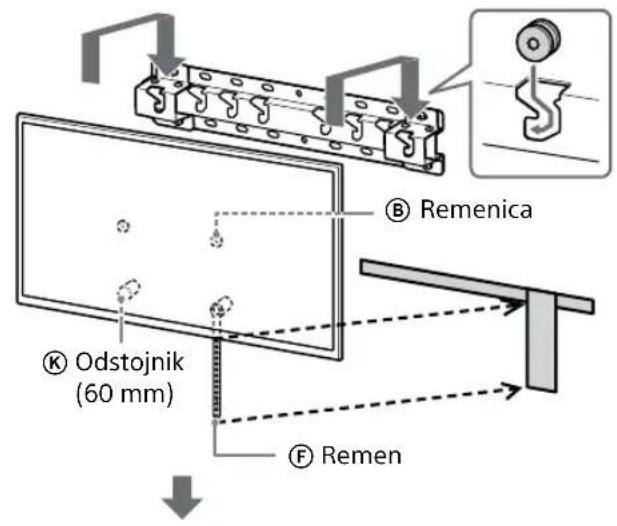
text_image
Remenica Odstojnik (60 mm) Remen
text_image
Diagram illustrating a mechanical or structural assembly with labeled components and directional arrows indicating movement or force.
natural_image
Diagram of a monitor with a scroll wheel and a magnified inset showing the wheel (no text or symbols)
text_image
Technical diagram showing a rectangular panel with internal components and a close-up view of a mechanical component with cross-sectional view.text_image
Technical diagram showing a mechanical assembly with labeled components and directional arrows indicating process flow.
natural_image
Diagram of a monitor with a magnified view showing a wheel (no text or symbols present)
text_image
Safety instruction diagram showing hand protection with checkmark and no/x mark symbols1 Podignite TV ili LCD monitor.
- Za lokacije remenica Ⓑ koje treba da vise na osnovi (20) Ⓐ ili spojnici za osnovu ①, pogledajte „Lokacija postavljanja spojnice za osnovu ①” na strani 21.
- Uverite se da zadnja strana TV-a ili LCD monitora dodiruje osnovu (20) Ⓐ ili spojnicu za osnovu ① kada držite TV ili LCD monitor.
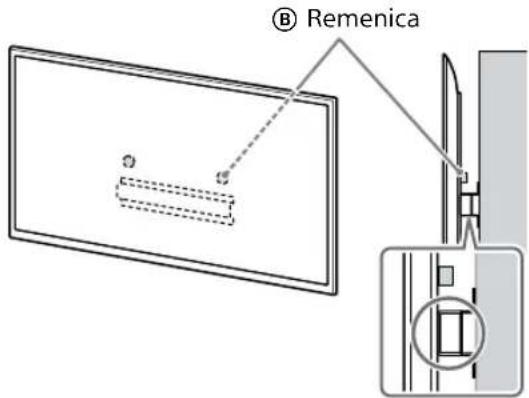
text_image
B RemenicaNapomena
natural_image
Simple line drawing of a rectangular frame with a dashed rectangle and a starburst shape at the bottom (no text or symbols)Ako se standardna montaža (2-a) bira:
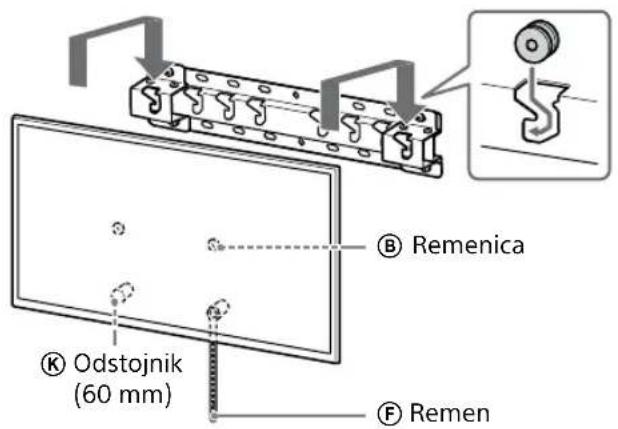
text_image
B Remenica K Odstojnik (60 mm) F Remen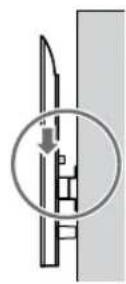

text_image
Diagram illustrating a mechanical or optical setup with a slide and a pulley, showing an arrow indicating direction.
natural_image
Diagram showing a mechanical component with a downward arrow and a circled section view (no text or symbols)text_image
Diagram illustrating a mechanical or optical setup with labeled components and directional arrow
natural_image
Diagram of a mechanical component with a circular inset showing internal structure (no text or symbols)3 Sprečavanje pomeranja dna TV-a ili LCD monitora.
- Podignite labavi deo remena Ⓔ i pričvrstite ga čvrsto na zid.

text_image
2-a2-b ⑤ Remen ⑤ Remen- Upotrebite vijak prečnika 5 mm ili ekvivalentan (nije isporučen).
Napomena
text_image
Technical diagram showing a mechanical assembly with labeled components and a close-up of a gear mechanism.UPOZORENJE
- Dve ili više osoba (tri ili više osoba za TV ili LCD monitor od 189,3 cm (75 inča) i više) potrebne su za transport velikog TV-a ili LCD monitora (osim Egipta). Dve ili više osoba (tri ili više osoba za TV ili LCD monitor od 75 inča (189,3 cm) i više) potrebne su za transport velikog TV-a ili LCD monitora (samo Egipat).
Specifikacije

text_image
g h1h2f e d c b anatural_image
Diagram showing a person sitting in a chair facing a screen, with dashed lines indicating perspective projection (no text or symbols present)2 选择如下所示的挂壁式安装样式。
2-a: 标准安装
2=b:窄安装
text_image
Technical diagram of a mechanical component with labeled parts and directional arrows indicating assembly or assembly.text_image
Technical diagram of a mechanical device with labeled parts and connection pointstext_image
Technical diagram of a mechanical component with labeled parts and a marked point Atext_image
Technical diagram of a mechanical assembly with labeled parts and directional arrows indicating assembly or movement.例如,将底座(20)④安装到“a”位置
如果选择的是窄安装(2-b):

text_image
Technical diagram of a mechanical component with labeled parts and directional arrows indicating assembly or alignment.natural_image
Diagram of a person standing behind a rectangular device with multiple bolts and arrows indicating motion (no text or symbols)natural_image
Diagram of a computer monitor with four screws inserted, showing alignment arrows (no text or symbols)text_image
Diagram illustrating safety instructions for installing a device, with hands operating a tool and warning symbols.text_image
Diagram illustrating safety instructions for a device, showing step-by-step installation and hazard warning.text_image
Technical diagram illustrating a procedure for installing or adjusting a device, with numbered steps and safety symbols.仅限 XR-85X90L / 75X90L / 65X90L / 55X90L, XRM-85X90L / 75X90L / 65X90L / 55X90L
text_image
Diagram illustrating a procedure for installing or repairing a wall-mounted component, with labeled steps and safety warning symbols.text_image
Safety instruction diagram showing hand gesture and safety symbols for lifting a weight, with silhouettes of people carrying weights.1 抬起电视机或 LCD 监视器。
natural_image
Illustration of three human figures lifting a large rectangular object with dashed lines indicating measurement or alignment (no text or symbols)natural_image
Simple line drawing of a rectangular frame with a dashed rectangle inside and a starburst shape at the bottom (no text or symbols)text_image
Technical diagram showing a mechanical assembly with labeled components and an inset view of a ladder mechanism.


natural_image
Diagram of a monitor with a magnified view showing a wheel (no text or symbols present)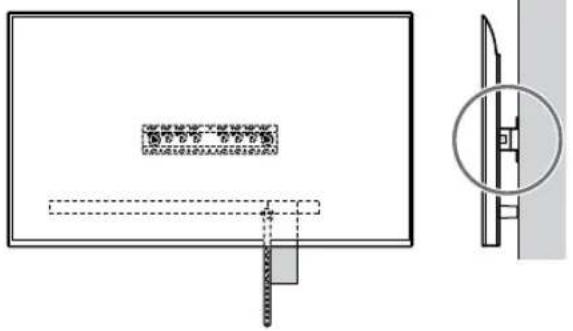
natural_image
Technical diagram showing a rectangular panel with internal components and a close-up view of a mechanical component (no text or symbols)如果选择的是窄安装(2-b):

text_image
Technical diagram showing a panel with labeled components and a magnified view of a mechanical component with directional arrows.


natural_image
Diagram showing a monitor with a slide and a wheel, no text or symbols present
text_image
Technical diagram showing a device panel with labeled components and a close-up view of the screen edge detail.text_image
Safety instruction diagram showing hand protection with checkmark and no/x mark options1 抬起电视机或 LCD 监视器。
natural_image
Simple line drawing of a rectangular frame with a starburst shape at the bottom (no text or symbols)如果选择的是标准安装(2-a):

text_image
①滑轮 ②垫片 (60 mm) ③皮带
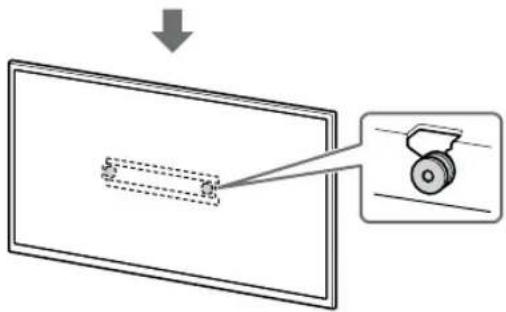
text_image
Diagram illustrating a mechanical or optical setup with labeled components and an arrow indicating direction.
natural_image
Diagram showing a mechanical component with a downward arrow and a magnified inset (no text or symbols)如果选择的是窄安装(2-b):
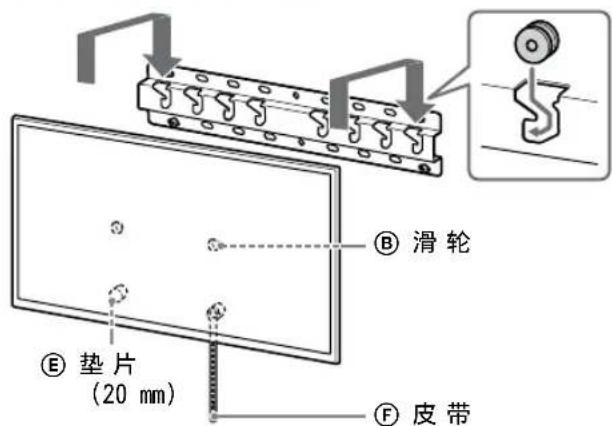
text_image
Diagram illustrating a mechanical or optical setup with labeled components and an arrow indicating direction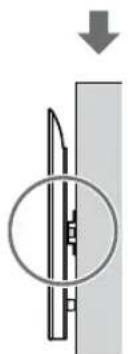
natural_image
Diagram of a mechanical component with a circular inset showing internal structure (no text or symbols)text_image
Technical diagram showing a mechanical assembly with labeled components and a close-up of a gear mechanism.警告
natural_image
Diagram showing a person sitting in a chair facing a screen, with dashed lines indicating perspective projection (no text or symbols present)2 選擇如下所示的壁掛式安裝樣式。
2-a: 標準安裝
2=b: 簡易安裝
text_image
Technical diagram of a mechanical component with labeled parts and directional arrows indicating assembly or assembly.text_image
Technical diagram of a mechanical component with labeled parts I and A, showing internal structure and dashed reference lines.text_image
Technical diagram of a mechanical component with labeled parts and annotation Atext_image
Technical diagram of a mechanical assembly with labeled parts and directional arrows indicating assembly or movement.text_image
Technical diagram of a mechanical component with labeled parts and directional arrows indicating assembly or alignment.natural_image
Diagram of a person standing behind a large appliance with bolts and arrows indicating motion (no text or symbols)natural_image
Diagram of a computer monitor with four screws inserted, showing alignment arrows (no text or symbols)text_image
Diagram illustrating safety instructions for installing a device, with labeled steps and warning symbols- 重複上一步並拆下桌面底座的另一側。
僅限 FW-85BZ40L / 85BZ35L / 85BZ30L /
75BZ40L / 75BZ35L / 75BZ30L / 65BZ40L /
65BZ35L / 65BZ30L / 55BZ40L / 55BZ35L /
55BZ30L / 50BZ30L / 43BZ30L, KD-75X78AL /
75X77L / 75X75WL / 65X78AL / 65X77L /
65X75WL / 55X78AL / 55X77L / 55X75WL /
50X77L / 50X75WL / 43X77L / 43X75WL
text_image
Diagram illustrating safety instructions for a device, showing step-by-step installation and hazard warning.- 重複上一步並拆下桌面底座的另一側。
僅限 KD-75X85L / 65X85L / 65X85BL / 55X85L, KM-75X85L / 65X85L / 55X85L
text_image
Technical diagram illustrating a procedure for installing or adjusting a device, with numbered steps and safety symbols.- 重複上一步並拆下桌面底座的另一側。
僅限 XR-85X90L / 75X90L / 65X90L / 55X90L, XRM-85X90L / 75X90L / 65X90L / 55X90L
text_image
Diagram illustrating a procedure for installing or repairing a wall-mounted component, with labeled steps and safety warning symbols.- 重複上一步並拆下桌面底座的另一側。
註
text_image
Safety instruction diagram showing hand gesture and safety symbols for lifting a weight, with silhouettes of people carrying weights.1 抬起電視機或 LCD 顯示器。
natural_image
Illustration of three people lifting a large object with a ruler, no text or symbols presentnatural_image
Simple line drawing of a rectangular frame with a dashed rectangle inside and a starburst shape at the bottom (no text or symbols)text_image
Diagram showing a mechanical assembly with labeled components and an inset view of a ladder mechanism.


natural_image
Diagram showing a monitor with a slide and a magnified view of a wheel (no text or symbols present)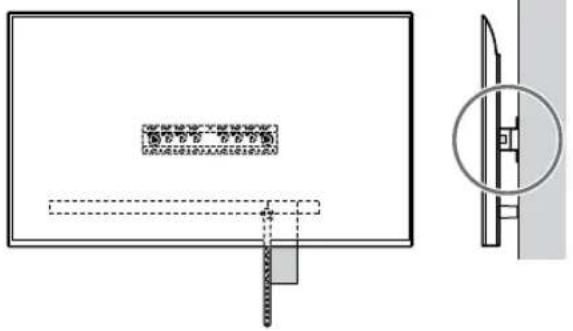
natural_image
Technical diagram showing a rectangular panel with internal components and a close-up view of a mechanical component (no text or symbols)如果選擇的是簡易安裝(2-b):
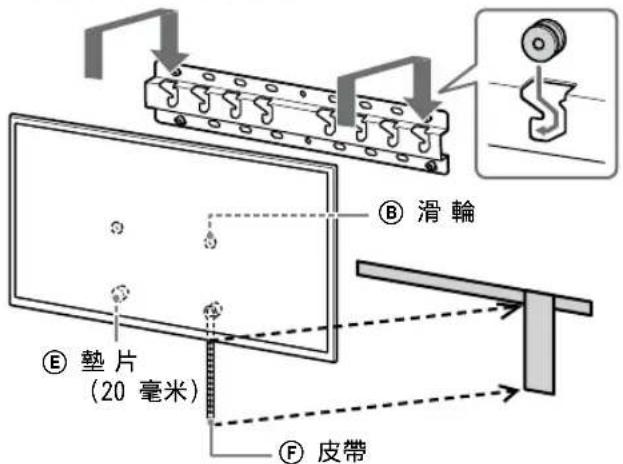
text_image
Technical diagram showing a mechanical assembly with labeled components and a magnified detail view of a cutting tool.

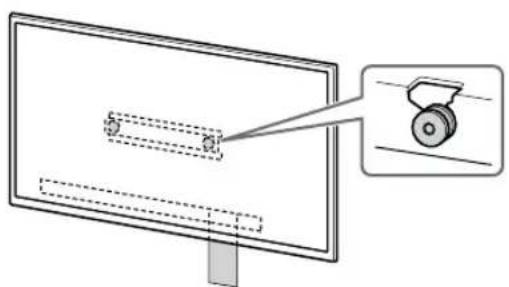
natural_image
Diagram showing a monitor with a slide and a wheel, no text or symbols present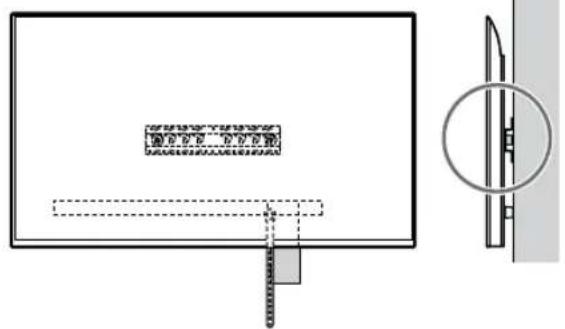
text_image
Technical diagram showing a rectangular panel with a ruler and a close-up view of a mechanical component with a circular inset detail.text_image
Diagram illustrating hand protection and damage technique with checkmark and no/x mark symbols1 抬起電視機或 LCD 顯示器。
natural_image
Simple line drawing of a rectangular frame with a starburst shape at the bottom (no text or symbols)如果選擇的是標準安裝(2-a):
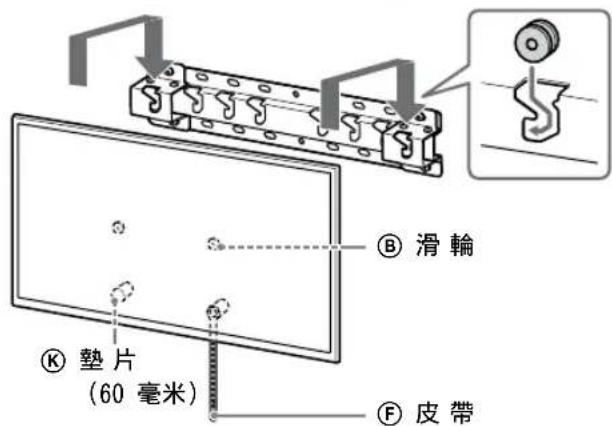
text_image
Diagram illustrating a mechanical or optical setup with labeled components and an arrow indicating direction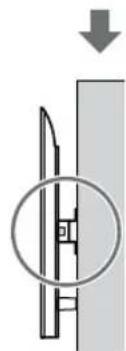
natural_image
Diagram showing a mechanical component with a downward arrow and a magnified inset (no text or symbols)如果選擇的是簡易安裝(2-b):
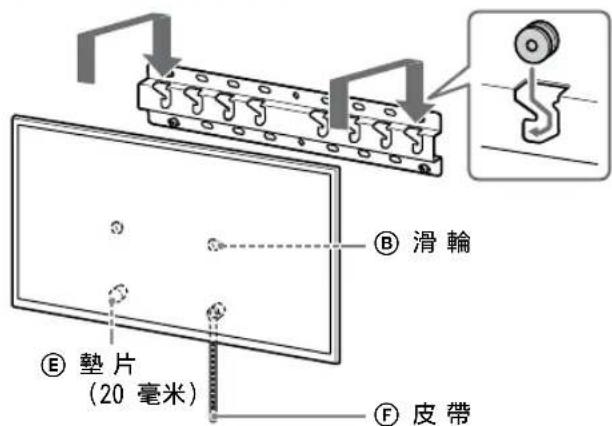
text_image
Diagram illustrating a mechanical or optical setup with labeled components and an arrow indicating direction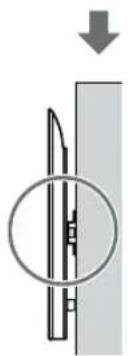
natural_image
Diagram showing a mechanical component with a circular inset view, no text or symbols presenttext_image
Technical diagram showing a mechanical assembly with labeled components and a magnified inset showing a gear mechanism.警告
natural_image
Diagram showing a person sitting in a chair facing a screen with dashed lines indicating perspective projection (no text or symbols)natural_image
Diagram showing two identical mechanical components with no text or symbols, labeled '2-a2-b' above the left panel.text_image
Technical diagram of a mechanical component with labeled parts and directional arrows indicating assembly or assembly.text_image
Technical diagram of a mechanical device with labeled parts and directional arrows indicating assembly or movement.text_image
Technical diagram of a mechanical component with labeled parts and an arrow indicating directiontext_image
Technical diagram of a mechanical assembly with labeled parts and alignment indicatorstext_image
Technical diagram of a mechanical bracket with labeled parts and mounting holes, showing assembly alignmentChỉ với mẫu FW-85BZ40L / 85BZ35L / 85BZ30L / 75BZ40L / 75BZ35L / 75BZ30L / 65BZ40L / 65BZ35L / 65BZ30L / 55BZ40L / 55BZ35L / 55BZ30L / 50BZ30L / 43BZ30L
natural_image
Diagram of a person standing behind a large appliance with arrows indicating mechanical components (no text or symbols)natural_image
Diagram of a computer monitor with screw arrangement and directional arrows indicating motion (no text or symbols)text_image
Diagram illustrating safety instructions for installing a device, with labeled steps and warning symbolstext_image
Medical procedure diagram showing steps to adjust a device with a pressure gauge and warning symboltext_image
Technical diagram illustrating a procedure for installing or adjusting a device, with numbered steps and safety symbols.text_image
Diagram illustrating safety inspection steps with labeled diagrams and warning symbolstext_image
Safety warning illustration showing correct and incorrect hand actions for a person holding a device, with pictograms indicating safety symbols.natural_image
Illustration of three silhouetted figures lifting a large rectangular object with dashed lines indicating motion or alignment (no text or symbols)natural_image
Simple line drawing of a rectangular frame with a starburst shape and a dashed-line rectangle inside (no text or symbols)text_image
Technical diagram showing a mechanical assembly with labeled components and an inset view of a gear mechanism.


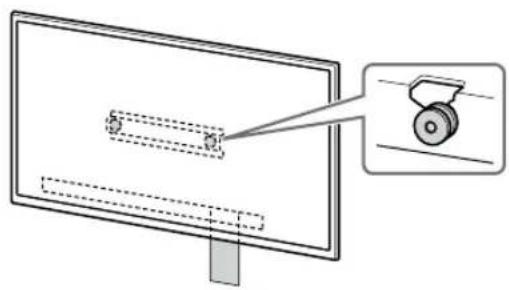
natural_image
Diagram showing a monitor with a magnified view of a mechanical component (no text or symbols present)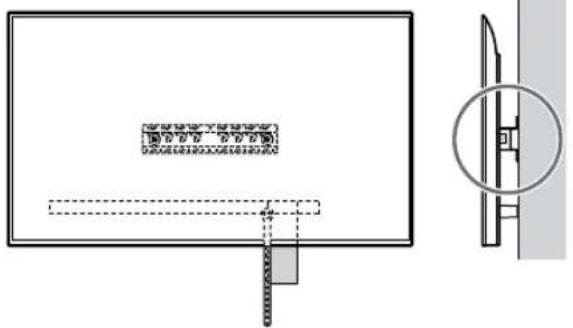
natural_image
Technical diagram showing a rectangular panel with internal components and a close-up view of a mechanical component (no text or symbols)text_image
Technical diagram showing a mechanical assembly with labeled components and a magnified detail view of a cutting tool.


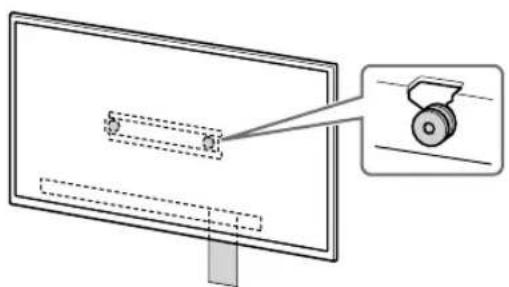
natural_image
Diagram of a monitor with a pulley and a magnified view showing the blade (no text or symbols)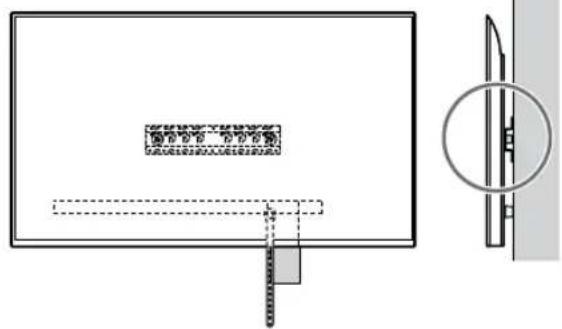
text_image
Safety instruction diagram showing hand protection with check and no/x options for handling a devicenatural_image
Simple line drawing of a rectangular frame with a starburst shape at the bottom (no text or symbols)text_image
Diagram illustrating a mechanical or optical setup with labeled components and an arrow indicating direction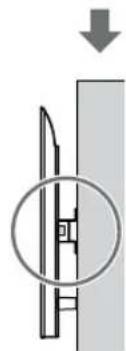
natural_image
Diagram showing a mechanical component with a downward arrow and a magnified inset (no text or symbols)text_image
Diagram illustrating a mechanical or optical setup with labeled components and directional arrow
natural_image
Diagram of a mechanical component with a circular inset showing internal structure (no text or symbols)text_image
Technical diagram showing a mechanical assembly with labeled components and a close-up view of a gear mechanism.CÀNH BÁO
natural_image
Diagram showing a person sitting in a chair facing a screen with dashed lines indicating perspective projection (no text or symbols present)text_image
Technical diagram of a mechanical component with labeled parts and mounting pointstext_image
Technical diagram of a mechanical assembly with labeled parts A and 1, showing internal components and alignment lines.text_image
Technical diagram of a mechanical component with labeled parts and section linetext_image
Technical diagram of a mechanical assembly with labeled parts A and ①, showing bolted connections and dashed reference lines.text_image
Technical diagram of a mechanical assembly with labeled parts and directional arrows indicating assembly or alignment.natural_image
Diagram of a person standing behind a large appliance with bolts and arrows indicating motion (no text or symbols)natural_image
Diagram of a computer monitor with screw fasteners and directional arrows indicating motion (no text or symbols)text_image
Diagram illustrating safety instructions for using a device, showing step-by-step installation and hazard warning.text_image
Diagram illustrating safety instructions for installing a device, with labeled steps and warning symbolsnatural_image
Line drawing of three people assembling a large rectangular device with a circular inset showing a device (no text or symbols)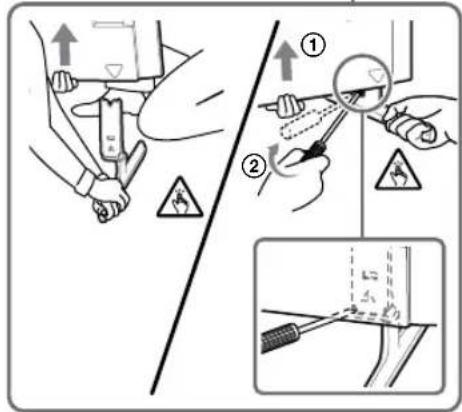
text_image
Technical diagram illustrating a procedure for using a tool to adjust or inspect a component, with numbered annotations and warning symbols.natural_image
Line drawing of three people assembling a large rectangular object with a magnifying glass nearby (no text or symbols)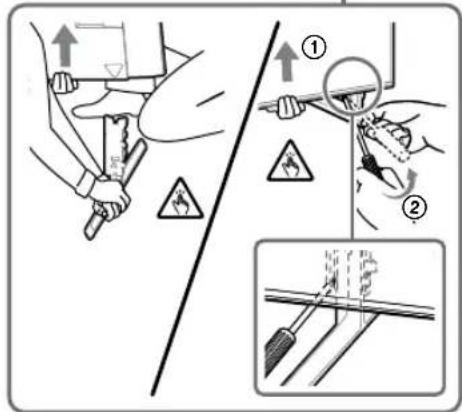
text_image
Technical diagram illustrating safety inspection steps with labeled diagrams and warning symbolstext_image
Safety instruction diagram showing hand holding a device with checkmark and no/x symbol, accompanied by silhouettes of three human figures carrying circular symbols.natural_image
Illustration of three silhouetted figures lifting a large rectangular object with dashed lines indicating motion or alignment (no text or symbols)natural_image
Simple line drawing of a rectangular frame with a starburst shape and two small circles inside (no text or symbols)text_image
Diagram illustrating a device panel assembly with labeled components and directional arrows indicating assembly steps.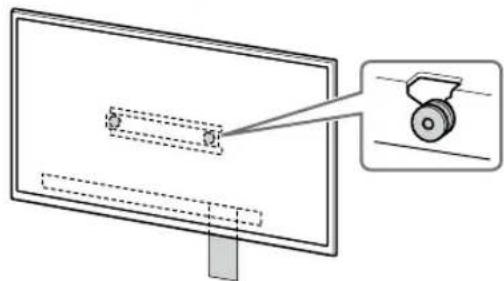
natural_image
Diagram showing a monitor with a scroll wheel and a magnified view of the screen (no text or symbols)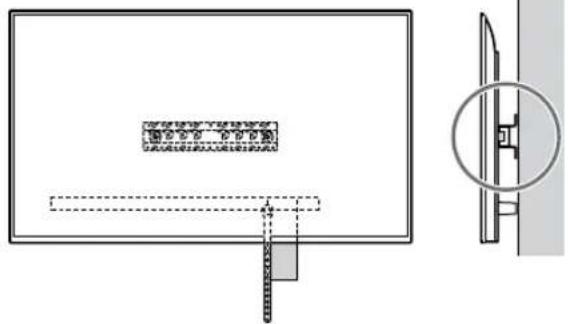
natural_image
Technical diagram showing a rectangular panel with internal components and a close-up view of a mechanical component (no text or symbols)text_image
Technical diagram showing a mechanical assembly with labeled components and a magnified detail view of a cutting tool.


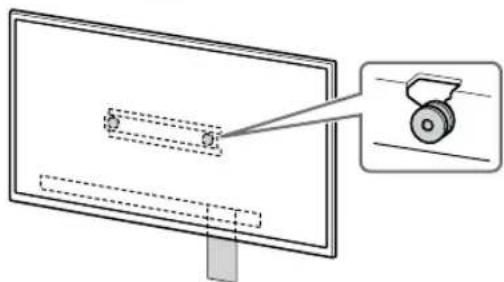
natural_image
Diagram of a monitor with a scroll wheel and a magnified view of the screen (no text or symbols)
text_image
C:\Program Files\Program Files\Program Files\Program Files\Program Files\Program Files\Program Files\Program Files\Program Files\Program Files\Program Files\Program Files\Program Files\Program Files\Program Files\Program Files\Program Files\Program Files\Program Files\Program Files\Program Files\Program Files\Program Files\Program Files\Program Files\Program Files\Program Files\Program Files\Program Files\Program Files\Program Files\Program Files\Program Files\Program Files\Prtext_image
Safety instruction diagram showing hand protection with checkmark and no/x absence symbolsnatural_image
Simple line drawing of a rectangular frame with a dashed rectangle inside and a starburst shape at the bottom (no text or symbols)text_image
Diagram illustrating a mechanical or optical setup with labeled components and an arrow indicating direction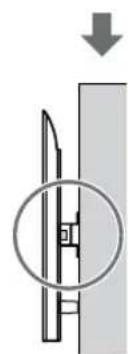
natural_image
Diagram showing a mechanical component with a downward arrow and a circled section view (no text or symbols)text_image
Diagram illustrating a mechanical or optical setup with a slide and a pulley system, showing a downward arrow and dashed lines indicating motion.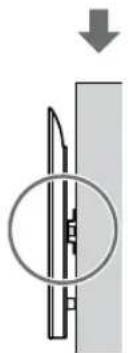
natural_image
Diagram of a mechanical component with a circular inset showing internal structure (no text or symbols)text_image
Technical diagram showing a mechanical assembly with a component being inserted into a panel, accompanied by a close-up of the component's internal structure.คำเตือน
natural_image
Diagram showing a person sitting in a chair facing a screen with dashed lines indicating perspective projection (no text or symbols present)text_image
Technical diagram of a mechanical component with labeled parts and mounting pointsMis.: Memasang Penyesuai Alas ① di lokasi "a"
text_image
Technical diagram of a mechanical assembly with labeled parts A and 1, showing structural components and alignment lines.text_image
Technical diagram of a mechanical component with labeled parts and annotation Atext_image
Technical diagram of a mechanical assembly with labeled parts I and A, showing bolted connections and dashed reference lines.Mis.: Memasang Alas (20) Ⓐ di lokasi "a"
text_image
Technical diagram of a mechanical component with labeled parts and mounting holes, including a marked section A.Mis.: Memasang Alas (20) Ⓐ di lokasi "a"
7 Khusus FW-85BZ4xL / 85BZ3xL / 75BZ4xL / 75BZ3xL, KD-85X8xL / 85X8xBL / 75X8xL / 75X8xBL / 75X7xL / 75X7xAL / 75X7xWL, KM-85X8xL / 75X8xL, XR-85X9xL / 75X9xL, XRM-85X9xL / 75X9xL
Tandai lokasi pemasangan di dinding.
natural_image
Diagram of a person standing behind a cabinet with bolts, showing motion arrows (no text or symbols)natural_image
Diagram of a computer monitor with four screws and directional arrows indicating assembly or connection (no text or symbols)text_image
Diagram illustrating safety instructions for installing a device, with labeled steps and warning symbolstext_image
Diagram illustrating safety instructions for installing a device, with labeled steps and warning symbolsKhusus XR-85X90L / 75X90L / 65X90L / 55X90L, XRM-85X90L / 75X90L / 65X90L / 55X90L
text_image
Technical diagram illustrating a procedure for installing or repairing a board, with labeled steps and safety warning symbols.text_image
Safety instruction diagram showing hand protection and safety symbols with labeled diagrams of walking and passing through a fence.natural_image
Illustration of three human figures lifting a large rectangular object with dashed lines indicating measurement or alignment (no text or symbols)natural_image
Simple line drawing of a rectangular frame with a small 3D object and a starburst shape at the bottom (no text or symbols)text_image
Diagram illustrating a mechanical or structural assembly with labeled components and directional arrows indicating movement or force.
natural_image
Diagram of a monitor with a scroll wheel and a magnified inset showing the wheel (no text or symbols)
text_image
Technical diagram showing a rectangular panel with internal components and a close-up view of a mechanical component with cross-sectional view.text_image
Technical diagram showing a mechanical assembly with labeled components and directional arrows indicating process flow.
natural_image
Diagram of a monitor with a magnified view showing a wheel (no text or symbols present)
text_image
Safety instruction diagram showing hand protection with check and no/x options for handling a panel, alongside two silhouettes of hands holding a frame.natural_image
Simple line drawing of a rectangular frame with a starburst shape at the bottom (no text or symbols)text_image
Diagram illustrating a mechanical or optical setup with a slide and a pulley, showing an arrow indicating direction.
natural_image
Diagram showing a mechanical component with a downward arrow and a circled section view (no text or symbols)text_image
Diagram illustrating a mechanical or optical setup with labeled components and directional arrow
natural_image
Diagram of a mechanical component with a circular inset showing internal structure (no text or symbols)3 Mencegah dasar TV atau Monitor LCD bergeser.
text_image
Technical diagram showing a mechanical assembly with labeled components and a close-up of a gear mechanism.PERINGATAN
in LCD is in menihon by war
by LCD is in men who do so
תְקּוֹת
(×2) (M4) Ⓡ 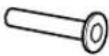 | (+PSW 4 × 20) Ⓡ (×2)  | (×2) (M4) (20) Ⓡ  | (+PSW 4 × 20) Ⓡ (×2) Ⓡ  |
(+PSW 4 × 50) Ⓡ (×2) Ⓡ 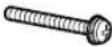 | |||
text_image
Technical diagram of a mechanical component with labeled parts and mounting pointstext_image
Technical diagram of a mechanical assembly with labeled parts I and A, showing internal components and alignment lines.natural_image
Diagram showing a person sitting in a chair facing a screen with dashed lines indicating perspective projection (no text or symbols present)הכלה 2
text_image
Technical diagram of a mechanical assembly with labeled parts I and A, showing bolted connections and mounting features.text_image
Technical diagram of a mechanical component with labeled parts and arrows indicating assembly or assembly stepsnatural_image
Diagram showing two pliers securing a brick wall with two clips attached (no text or symbols)natural_image
Diagram of a person standing behind a rectangular device with four bolts inserted, showing mechanical assembly (no text or symbols)natural_image
Diagram of a computer monitor with screw fasteners and directional arrows indicating motion (no text or symbols)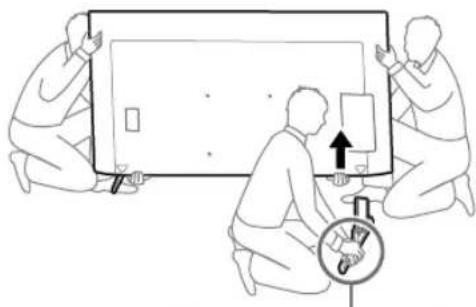
natural_image
Illustration of three people assembling a large electronic device with a magnifying glass (no text or symbols)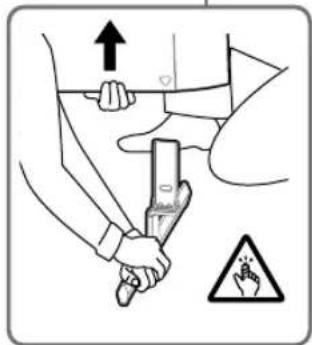
text_image
Diagram illustrating a hand holding a tool with an upward arrow and warning symbol, likely depicting a safety or hazard detection scenario.•
FW-85BZ40L / 85BZ35L / 85BZ30L /
75BZ40L / 75BZ35L / 75BZ30L /
65BZ40L / 65BZ35L / 65BZ30L /
55BZ40L / 55BZ35L / 55BZ30L /
50BZ30L / 43BZ30L,
KD-75X78AL / 75X77L / 75X75WL /
65X78AL / 65X77L / 65X75WL /
55X78AL / 55X77L / 55X75WL /
50X77L / 50X75WL / 43X77L /
7050 43X75WL
.
natural_image
Illustration of three people interacting with a large screen and a globe, no text or symbols present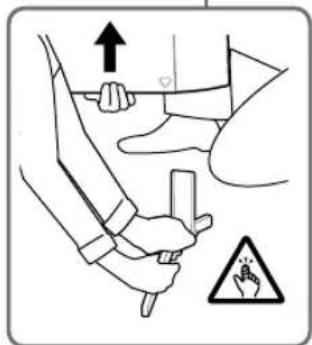
text_image
Safety instruction diagram showing hand positioning and hazard symbol with upward arrow and warning trianglenatural_image
Pure mechanical assembly diagram showing a mounted device with bolts and connectors (no text or symbols)B
(+PSW 6 × 20) ©
(+PSW 6 × 20) ©
75BZ30L / 65BZ40L / 65BZ35L /
65BZ30L / 55BZ40L / 55BZ35L /
55BZ30L / 50BZ30L / 43BZ30L,
KD-75X85L / 75X78AL / 75X77L /
75X75WL / 65X85L / 65X85BL /
65X78AL / 65X77L / 65X75WL /
55X85L / 55X78AL / 55X77L /
55X75WL / 50X77L / 50X75WL /
43X77L / 43X75WL, KM-75X85L /
65X85L / 55X85L, XR-85X90L /
75X90L / 65X90L / 55X90L,
XRM-85X90L / 75X90L / 65X90L /
55X90L
.
natural_image
Line drawing of three people assembling a large rectangular object with a clock and scale (no text or symbols)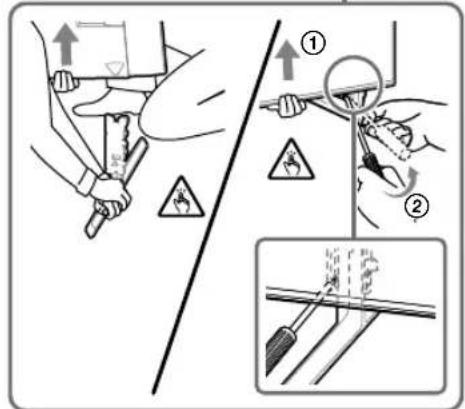
text_image
Technical diagram illustrating cable safety instructions with labeled steps and warning symbols•
natural_image
Line drawing of three people assembling a large rectangular device with a magnifying glass nearby (no text or symbols)
text_image
Technical diagram illustrating a procedure for using a tool to measure a component, with numbered annotations and directional arrows.•
תאַעְרָה בְרִיּוֹם
XR-85X90L / 75X90L / 65X90L /
55X90L, XRM-85X90L / 75X90L /
75065X90L / 55X90L
•
natural_image
Simple line drawing of a rectangular frame with a dashed rectangle inside and a starburst shape at the bottom (no text or symbols)text_image
Safety instruction diagram showing hand protection and safety symbols with pictograms of human figures carrying bags.LCD 1
natural_image
Illustration of three human figures lifting a large panel with a ruler, no text or symbols presentnatural_image
Pure diagram of a rectangular frame with internal geometric shapes and dashed lines, no text or symbols present.↓
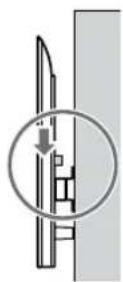
↓
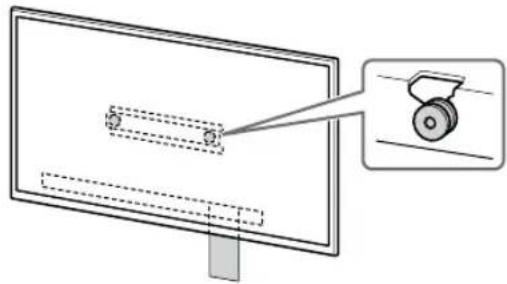
natural_image
Diagram of a monitor with a wheel and a magnified inset showing the wheel handle (no text or symbols)
text_image
Diagram showing a rectangular frame with a dotted line and a gray rectangle, containing Chinese text labels.natural_image
Pure electrical circuit lines without any symbols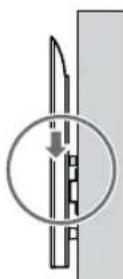
↓
↓
HE

natural_image
Diagram showing a monitor with a scroll wheel and a magnified view of the screen (no text or symbols)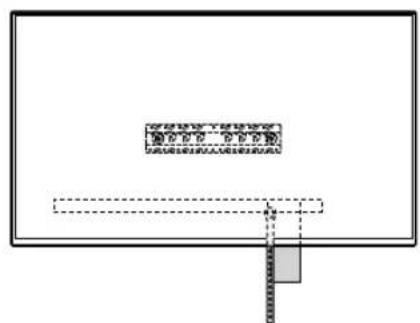
natural_image
Pure diagram of a rectangular frame with internal dashed lines and a small gray rectangle at the bottom (no text or symbols)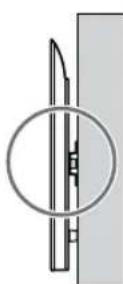
.LCD
•
natural_image
Simple line drawing of a rectangular frame with a dashed rectangle and a starburst shape at the bottom (no text or symbols)1
text_image
Diagram showing two hand positions with checkmark and prohibition symbols, likely illustrating a correct or incorrect operation.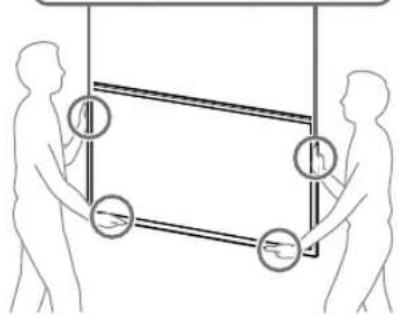
natural_image
Illustration of two human figures holding a rectangular frame with circular symbols and arrows indicating motion or movement (no text or labels)text_image
Diagram illustrating a mechanical or optical setup with labeled components and an arrow indicating direction.
natural_image
Diagram showing a mechanical component with a downward arrow and a circular inset view (no text or symbols)text_image
Diagram showing a device with a slide and a magnified view of the slide, indicating a process or assembly.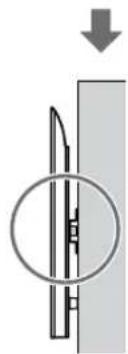
natural_image
Pure mechanical diagram showing a lever and pivot point without any text or symbols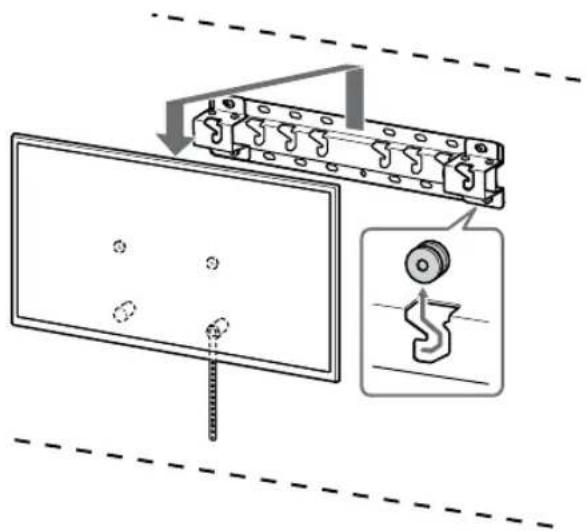
text_image
Technical diagram showing a mechanical assembly with labeled components and a close-up view of a gear mechanism.תָרְשָׁ
2* Healthcare Strictly Strictly Strictly Strictly Strictly Strictly Strictly Strictly Strictly Strictly Strictly Strictly Strictly Strictly Strictly Strictly Strictly Strictly Strictly Strictly Strictly Strictly Strictly Strictly Strictly Strictly Strictly Strictly Strictly Strictly Strictly Strictly Strictly Strictly Strictly Strictly Strictly Strictly Strictly Strictly Strictly Strictly Strictly Strictly Strictly Strictly Strictly Strictly Strictly Strictly StrictLY Strictly Strictly Strictly Strictly Strictly Strictly Strictly Strictly Strictly Strictly Strictly Strictly Strictly Strictly Strictly Strictly Strictly Strictly Strictly Strictly Strictly Strictly Strictly Strictly Strictly Strictly Strictly Strictly Strictly Strictly Strictly Strictly Strictly Strictly Strictly Strictly Strictly Strictly Strictly Strictly Strictly Strictly Strictly Strictly Strictly Strictly Strictly Strictly Strictly Strictally Strictly Strictly Strictly Strictly Strictly Strictly Strictly Strictly Strictly Strictly Strictly Strictly Strictly Strictly Strictly Strictly Strictly Strictly Strictly Strictly Strictly Strictly Strictly Strictly Strictly Strictly Strictly Strictly Strictly Strictly Strictly Strictly Strictly Strictly Strictly Strictly Strictly Strictly Strictly Strictly Strictly Strictly Strictly Strictly Strictly Strictly Strictly Strictly Strictly Strictably
3* بناءً على الطرز
4*
text_image
Technical diagram of a mechanical component with labeled parts and mounting pointstext_image
Technical diagram of a mechanical assembly with labeled parts A and I, showing components like bolts and fasteners.natural_image
Diagram showing a person sitting in a chair facing a screen with dashed lines indicating perspective projection (no text or symbols present)text_image
Technical diagram of a mechanical assembly with labeled parts I and A, showing bolted connections and dashed reference lines.text_image
Technical diagram of a mechanical assembly with labeled parts and a marked point Atext_image
Technical diagram of a mechanical component with labeled parts and reference linestext_image
Diagram showing brick wall corner with two clips and arrows indicating alignment or positioning, plus a hand holding a tool.natural_image
Diagram of a person standing behind a large appliance with bolts and arrows indicating assembly or inspection (no text or symbols)natural_image
Diagram of a computer monitor with screw fasteners and directional arrows indicating motion (no text or symbols)
text_image
Diagram illustrating safety instructions for installing a device, with labeled steps and warning symbolstext_image
Diagram illustrating safety inspection steps with labeled arrows and warning symbolstext_image
Technical diagram illustrating safety inspection steps with labeled diagrams and warning symbolstext_image
Technical diagram illustrating a procedure for installing or adjusting a device, with numbered steps and safety symbols.XRM-85X90L / 75X90L / 65X90L / 55X90L
natural_image
Simple line drawing of a rectangular frame with a small rectangle inside and a starburst shape at the bottom (no text or symbols)text_image
Safety instruction diagram showing hand protection and safety symbols with pictograms of three human figures.natural_image
Illustration of three silhouetted figures lifting a large rectangular object with dashed lines indicating measurement or alignment (no text or symbols)text_image
Diagram showing a rectangular frame with labeled sections and a vertical bar, likely illustrating a measurement or layout concept.↓
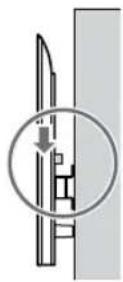
↓
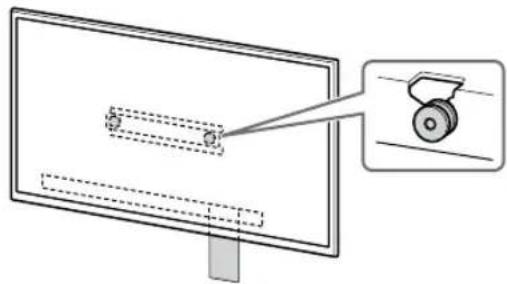
natural_image
Diagram of a monitor with a scroll wheel and a magnified inset showing the wheel (no text or symbols)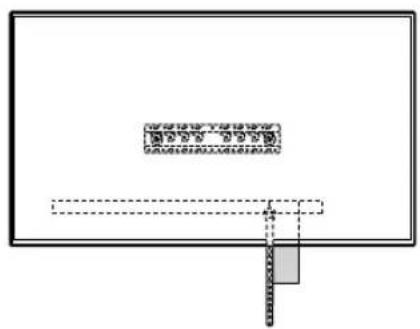
natural_image
Pure diagram of a rectangular frame with internal dashed lines and a small gray rectangle at the bottom (no text or symbols)text_image
Diagram showing a rectangular frame with labeled sections and a vertical bar, likely illustrating a measurement or alignment concept.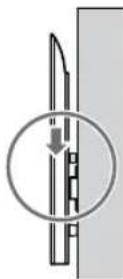
↓
↓

natural_image
Diagram of a monitor with a scroll wheel and a magnified inset showing the blade (no text or symbols)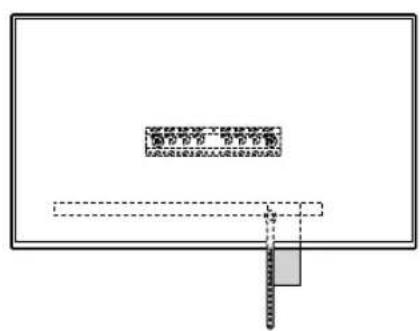
natural_image
Pure diagram of a rectangular frame with internal dashed lines and a small gray rectangle at the bottom (no text or symbols)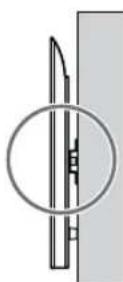
AR
natural_image
Simple line drawing of a rectangular frame with a small rectangular cutout and a starburst shape at the bottom (no text or symbols)1
text_image
Diagram illustrating hand gesture and selection rules with checkmark and cross symbols, showing correct and incorrect actions for a mechanical or electrical component.text_image
Diagram illustrating a mechanical or optical setup with labeled components and an arrow indicating direction.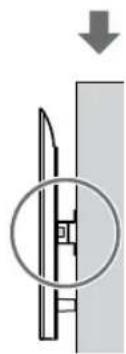
natural_image
Diagram showing a mechanical component with a downward arrow and a magnified circular detail (no text or symbols)text_image
Diagram illustrating a mechanical or electrical component with labeled parts and an arrow indicating direction, alongside a magnified view of the component.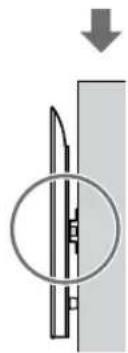
natural_image
Pure mechanical diagram showing a cutting tool inside a circular opening, with no text or symbols present.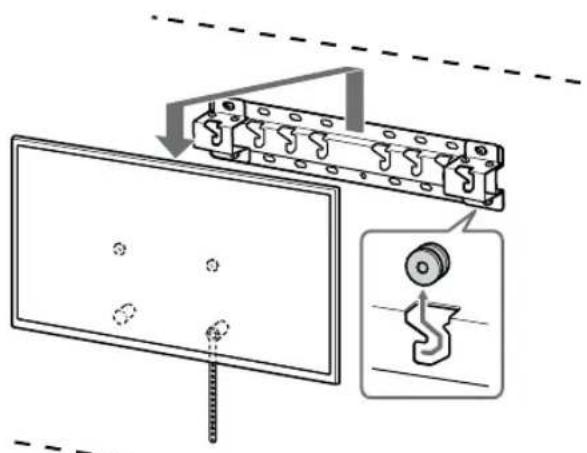
text_image
Technical diagram showing a mechanical assembly with labeled components and a close-up of a gear mechanism.text_image
Technical diagram of a mechanical component with labeled parts and mounting pointstext_image
Technical diagram of a mechanical assembly with labeled parts and reference linesnatural_image
Diagram showing a person sitting at a desk facing a screen, with dashed lines indicating perspective projection (no text or symbols present)text_image
Technical diagram of a mechanical assembly with labeled parts I and A, showing bolted connections and mounting features.text_image
Technical diagram of a mechanical component with labeled parts and arrows indicating assembly or assembly stepstext_image
Technical diagram of a mechanical component with labeled parts and dashed reference linestext_image
Diagram showing brick wall corner with two clips and arrows indicating alignment or positioning, plus a hand holding a tool.75BZ30L / 65BZ40L / 65BZ35L / 65BZ30L / 55BZ40L / 55BZ35L / 55BZ30L / 50BZ30L / 43BZ30L
natural_image
Diagram of a person standing behind a rectangular device with multiple bolts and arrows indicating motion (no text or symbols)natural_image
Diagram of a computer monitor with screw fasteners and arrows indicating motion (no text or symbols)
text_image
Diagram illustrating safety instructions for installing a device, with labeled steps and warning symbolstext_image
Diagram illustrating safety inspection steps with labeled instructions and warning symbolstext_image
Diagram illustrating safety inspection steps with labeled diagrams and warning symbolsnatural_image
Line drawing of three people assembling a large rectangular device with a magnifying glass nearby (no text or symbols)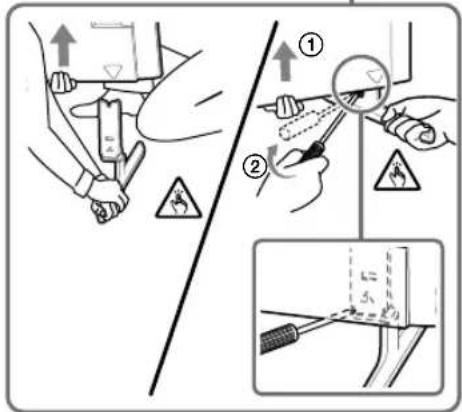
text_image
Technical diagram illustrating a procedure for using a tool, with numbered steps and warning symbols indicating safety or hazard.XR-85X90L / 75X90L / 65X90L / 55X90L, 觀ط
XRM-85X90L / 75X90L / 65X90L / 55X90L
natural_image
Simple line drawing of a rectangular frame with a starburst shape at the bottom (no text or symbols)text_image
Safety instruction diagram showing hand holding a device with checkmark and no/x symbol, leading to three human silhouettes with safety symbols.natural_image
Illustration of three stylized human figures lifting a large rectangular object, with no visible text or symbols.natural_image
Pure diagram of a rectangular frame with internal geometric shapes and no text or symbols↓

↓

natural_image
Diagram of a monitor with a scroll wheel and a magnified inset showing the wheel (no text or symbols)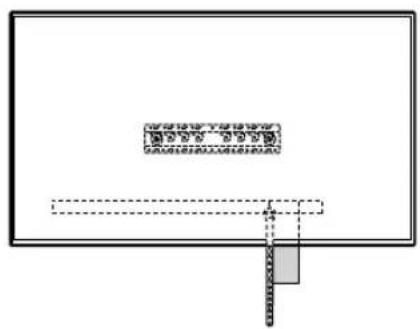
natural_image
Pure diagram of a rectangular frame with internal dashed lines and a small gray rectangle at the bottom (no text or symbols)natural_image
Pure electrical circuit lines without any symbols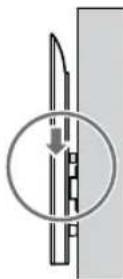
↓
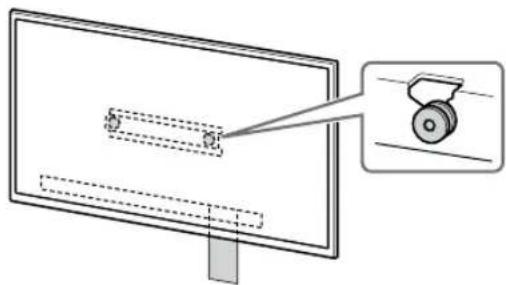
natural_image
Diagram of a monitor with a scroll wheel and a magnified inset showing the blade (no text or symbols)↓

natural_image
Pure diagram of a rectangular frame with internal dashed lines and a small gray rectangle at the bottom (no text or symbols)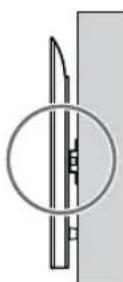
PR
natural_image
Simple line drawing of a rectangular frame with a small rectangle inside and a starburst shape at the bottom (no text or symbols)1
