Solution G iFix - Car seat CYBEX - Free user manual and instructions
Find the device manual for free Solution G iFix CYBEX in PDF.
| Product type | Child car seat (booster seat with backrest) |
| Brand | CYBEX |
| Model | Solution G iFix |
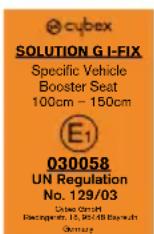
| Safety standard | UN R129/03 |
| Recommended height | 100 cm to 150 cm |
| Recommended age | Approximately 3 to 12 years |
| Fixation type | ISOFIX + 3-point seat belt |
| Approximate weight | 5.5 kg |
| Headrest adjustment | Height adjustable via wheel at the back |
| Recline adjustment | 2 positions (upright and reclined) via button under the booster |
| Tiltable headrest | 3 positions to prevent head drop during sleep |
| Side protection | Removable Linear Side Impact Protection (L.S.P.) |
| Cover maintenance | Wash at 30°C, delicate cycle, no tumble drying |
| General cleaning | Soft cloth and lukewarm water, no harsh products |
| Manufacturer warranty | 3 years |
| Maximum lifespan | 11 years |
Frequently Asked Questions - Solution G iFix CYBEX
User questions about Solution G iFix CYBEX
0 question about this device. Answer the ones you know or ask your own.
Ask a new question about this device
Download the instructions for your Car seat in PDF format for free! Find your manual Solution G iFix - CYBEX and take your electronic device back in hand. On this page are published all the documents necessary for the use of your device. Solution G iFix by CYBEX.
USER MANUAL Solution G iFix CYBEX
GO TO www.CYBEX-ONLINE.COM TO WATCH AN INSTRUMENTATIONAL VIDEO
DE 2
EN 5
IT 8
FR. 11
NL 14
PL 17
HU 21
CZ. 24
SK. 27
ES. 30
PT. 33
SE 36
NO 39
F1 42
DK 45
SL 48
HR 51
RU 54
UK 57
EE 60
LT. 63
LV 66
TR. 69
AR 72
BG 75
SR 79
EL 82
RO 86
SQ 89
BS. 92
MK. 95
CNR. 99
HI. 102
TH. 105
VI 108
MS 111
HY. 115
CMN 119
YUE 122
JA 125
KO 128
ZULASSUNG
UN R129/03
CYBEX Solution G i-Fix with automatic three-point belt: 100 cm - 150 cm
Age: from approx. 3 years to approx. 12 years
Thank you for deciding on the Solution G i-Fix when choosing your car seat.
Carefully read the instructions before installing the seat in your car and always keep these instructions to hand in the designated compartment (12).
IMPORTANT INFORMATION
Without the approval of the Type Approval Authority, the car seat may not be modified or added to in any way.
In order to keep your child properly protected, it is absolutely essential that you use the car seat as described in this manual.
Do not use before the child reached a size of 100~cm
This car seat may only be installed on vehicle seats which are approved for the use of child restraint systems according to the vehicle manual.
Only suitable for vehicle seats with automatic three-point belts approved in accordance with UN Regulation No. 16 or a comparable standard.
Do not use any load bearing contact points other than those described in the instructions and marked on the child restraint.
The full surface of the backrest of the car seat must make contact with the backrest of the vehicle.
The shoulder belt must run upwards and back at a recline. It must never run forward to the upper belt point in your vehicle.
The vehicle belt buckle must never cross the arm rest of the seat. If the belt whip is too long, the car seat is not suitable for use in this position in the vehicle.
The three-point belt must only be passed through the designated routings. The belt routings are described in detail in this manual and are marked in green on the car seat.
The lap belt must run as low as possible across your child's groin to have optimum effect in the event of an accident.
Before each use make sure that the automatic three-point vehicle belt is correctly adjusted and fits tightly to the child's body. Never twist the belt!
Only an optimally adjusted headrest can offer your child maximum protection and comfort while ensuring that the shoulder belt can be fitted smoothly.
The car seat must always be secured correctly in the vehicle even when not in use.
Always ensure that the car seat is not jammed when closing the car door or adjusting the back seat.
The car seat is also tested and homologated without the Linear Sideimpact Protectors.
Luggage or any other objects present in the vehicle must always be firmly secured. Otherwise, they may be thrown within the car, which could cause fatal injuries.
The car seat must never be used without the seat cover. Ensure that only an original CYBEX seat cover is used, as the cover is a key element of the seat's function.
Never leave your child unattended in the car.
The parts in the child restraint system heat up in the sun and could potentially burn your child's skin. Protect your child and the car seat from direct sun exposure.
An accident may cause damage to the car seat that is not identifiable with the naked eye. Please replace the seat after an accident. In case of doubt, please consult your dealer or the manufacturer.
Do not use this car seat for more than 11 years. The car seat is exposed to high stress during its product life span, which leads to changes in the quality of the material with increasing age.
The plastic parts can be cleaned with a mild cleaning agent and warm water. Never use harsh cleaning agents or bleaches!
On some vehicle seats made of sensitive materials, the use of car seats may leave marks and/or cause discolouration. To prevent this, you can place a blanket or towel or similar underneath the car seat to protect the vehicle seat.
PRODUCT PARTS

(1)
Backrest
(2) Adjustable Headrest
(3) Booster
(4) Headrest Height Adjuster
(5) Shoulder Belt Guide
(6) Linear Side-impact Protection (L.S.P.)
(7) Lap Belt Guide
(8) ISOFIX Locking Arms
(9) ISOFIX Anchorage Points
(10)ISOFIX Release Buttons
(11) ISOFIX Safety Indicator
(12) User Guide Storage Compartment
(13) Side Impact Protection Release Button
(14) Position Adjustment Button
(15) Reclining Headrest
THE CORRECT POSITION IN THE VEHICLE
With retracted ISOFIX-locking arms (8) the car seat can be used on vehicle seats which are equipped with an automatic three point belt. For using ISOFIX please refer to the enclosed vehicle type list for approved vehicles. You can obtain the most up-to-date version from www.cybex-online.com.
Above a child's stature of 135cm , the compatibility between the Solution G i-Fix and your vehicle might be reduced. Please review the vehicle type list to check whether the child seat can be used in all headrest positions without restrictions. In exceptional cases, the child car seat may also be used on the front passenger seat. Always comply with the recommendations of the vehicle manufacturer.
INSTALLING THE CAR SEAT IN THE VEHICLE
-
Always ensure that...
-
the backrests in the vehicle are locked in their upright position.
-
when installing the car seat on the front passenger seat, adjust the vehicle seat as far back as possible without affecting the belt routing.
-
Before installation, make sure that the car seat is in the seating position.
- Release the ISOFIX Release Buttons (10) to extend the ISOFIX Locking Arms (8).
The ISOFIX Release Buttons can both be released independently allowing the ISOFIX Locking Arms to be adjusted independently.
- Push the ISOFIX Locking Arms (8) out of the base to their furthest extent.
-
Place the car seat on an appropriate seat in the car.
-
Push the ISOFIX Locking Arms (8) into the ISOFIX Anchorage Points (9) until these lock into place with an audible "CLICK". The two ISOFIX Safety Indicators (11) will switch from red to green.
- Ensure the seat is secure by trying to pull it out of the ISOFIX Anchorage Points (9).
- Push the car seat towards the backrest of the vehicle seat until it is fully aligned with the backrest.

The headrest of the vehicle is in the way, pull it upwards to its furthest.
extent or remove it completely (except in rear-facing vehicle seats).
9. The seat can be brought into a sitting or recline position by pressing the position adjustment button (14) and moving the seat forward or push back.
REMOVING THE CAR SEAT FROM THE VEHICLE
Perform the installation steps in the reverse order.
- Unlock the ISOFIX Locking Arms (8) on both sides by pushing the ISOFIX Release Buttons (10) and pulling them back simultaneously.
- Pull the seat away from the ISOFIX Anchorage Points (9)
- Remove the car seat and push the ISOFIX Locking Arms (8) fully back into the transport position.
ADJUSTING THE HEADREST
The Adjustable Headrest (2) can be adjusted by using the Headrest Height Adjuster (4) at the back of the headrest (2). Adjust the headrest so that max. 2 cm (approx. 2 finger's width) remain between the child's shoulder and the headrest.
The height of the headrest can still be adjusted while the seat is installed in the car.
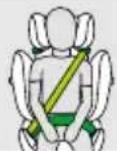
CORRECT INSTALLATION MODE
100cm-150cm

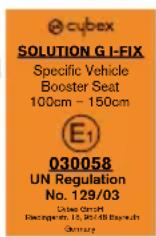
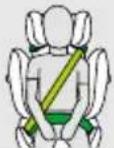
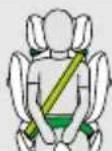
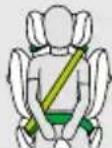
SECURING THE CHILD
- Place the lap belt in the green coloured Lap Belt Guides (7) of the car seat.
- Pull the shoulder belt to tighten the lap belt.
- On the side of the car seat next to the belt buckle, the shoulder belt and the lap belt must be inserted together in the Lap Belt Guide (7).
- Feed the shoulder belt through the green Shoulder Belt Guide (5) until it is inside the belt guide.
- Ensure that the shoulder belt runs across your child's clavicle and does not touch your child's neck. If necessary, adjust the height of the Adjustable Headrest (2) to change the position of the belt.
- To put the seat in the recline position, press the Position Adjustment Button (14) on the underside of the front area of the booster (3).
- To return the seat from the recline position to the sitting position, press the Position Adjustment Button (14) again and guide the seat upwards with light pressure against the booster (3).
LINEAR SIDE-IMPACT PROTECTION (L.S.P.)
If the Linear Side-impact Protection (6) is in conflict with the car door or if it affects the amount of space left on the passenger seat, it is possible to detach it. To do so, press the Side Impact Protection Release Button (13). To reach this button, the cover of the backrest needs to be removed. To reattach the L.S.P. (6) to the seat, follow the removal instructions in the reverse order.
RECLINING HEADREST
The Reclining Headrest (15) helps to prevent the child's head from dangerously tipping forward during sleep.
It can be set to one of three positions.
Push the Reclining Headrest (15) forward until the desired position is reached.

child's head should always be in contact with the Reclining Headrest.
REMOVING AND REATTACHING THE SEAT COVER
The cover of the car seat consists of three parts (headrest, backrest, booster). These are held in position at several places by press studs and elastic bands. Once all attachments have been released, the single parts of the cover can be removed.
In order to put the covers back on the seat, follow the removal instructions in the reverse order.
The cover may only be washed at 30^ with a delicate wash program otherwise it may result in discoloration of the cover fabric. Please wash the cover separately from other laundry and do not dry in the dryer or in direct sunlight!
MANUFACTURER'S WARRANTY AND DISPOSAL REGULATIONS
CYBEX GmbH (Riedingerstr. 18, 95448 Bayreuth, Germany) gives you 3 years warranty on this product. The warranty is valid in the country, where this product was initially sold by a retailer to a customer. The contents of the warranty and all essential information required for the assertion of the warranty can be found on our homepage go.cybex-online.com/manufacturer-warranty-car-seats. If a warranty is shown in the article description, your legal rights against us for defects remain unaffected.
Please observe the waste disposal regulations in your country.
CERTIFICAZIONE
UN R129/03
CYBEX Solution G i-Fix con cintura automatica a tre punti: 100cm - 150cm
MODE D'INSTALLATION ADEQUAT
100cmà150cm
SECURISATION DE L'ENFANT
(6) Linear Side-impact Protection (L.S.P.)
(14) Positie-instelknop
(7)Bukgordelgeleider
CORRECTE INSTALLATIEMODUS
100cm-150cm
HET KINDERSLOT
go.cybex-online.com/manufacturer-warranty-car-seats. Jesli w opisie
REPOSACABEZAS RECLINABLE
(14) Knapp for lagesjustering
(7)Hoftbaltetsspar
JUSTERE LIGGEPOSISJONEN
BpeyIbTaTe abapn ABToKpeCNo MOKeT nOnyUHTb NOBpeXdHnKOTOpBle He 3aMeTHb BN3ayAbHo, 3aMeHrTe aToKpeCNo NOcne abapn. Ecnn COMHeBaTeCe, o6paTntCe b K MeCTHOmy dUnepy INnpoINBOuNTeNo.
He3KcIpyaTpyte ABTOKpeCNo 60Jee 11 JET. ABTOKpeCNo NOBepKeHO 60JIbHM Harpy3kAM BO BpeM Cpoka Cnyk6bl, N CO BpeMeHem yxudaaetcKaueCTBO eO MaTePnaIOB.
TnactIKOBBe DeTARMOXHO MbIb CnaBIM MOIOHm CpEDCTBO m TENNO BDOI. He nCnOJb3yTe CINbHbIE MOKUne CpEDCTBA INI 08enBateII
ABTOKpeCnA MOrY OCTaBnTb OTMeTHHbHa HHeKOTOpbIX ABTOMOBnHBHX CnDEhEax, CnDeaHbIX N3 YCbETBnTeHbX MaTEpnaNOB, H/INN INMHeHrBX NxCBet, TObb N3BekeXaT0To N3aUHTb ABTOMOBnHOE CnHEbE, Bbl MOKeTe NOIOKnTB NOKpbHbANO, NOONTEHc NIN NKaBH NOI ABDTOKpeCNo.
DETAINN3DENNA
(1) CnHka
(9)ToKn KpEnJIeHnI ISOFIX
(2)Perynpyembl noDroJOBHNK
(10) KhoNKn DnIa OTcoeDnHeHnIA ISOFIX
(3) Bycep
(11)ISOFIX-Инданкатор 6e3oNaChOCTN
(4) PernyrTop BbICOTbI NOIroIOBnKA
(12) OToENIgXpaHEnpyKoBocCTBaNoJIb3ObaTeTae
(6) LInHeHnHa 3aunTa O T 60koBoro ydapa (L.S.P.)
(13) KhoNka DnIaOTcoeHHeHHa CNTEmbl 3auNTbI OT 60KOBORO yDapa
(7) Happablaiooia noaCHOPO pemH 6e3oNaCHOCTN
(14) Khonka peyunipobwn nooxhenn
(8)ФИКСИРУПОЛЕ рБИЧАN ISOFIX
(15)OTKNDHOI NOIROBHNK
INPABUNbHOE PACNOJIOXHEHBE ABTOMOBJNE
PnBbINHbYbIXΦMkCpIyUxpbHaraxISOFIX(8)ABTOKpeCNO M0XHO
NCIOJIb3OBAbTHaABTOMOBbHBbIXcNDeHbXcABOTMATNueCKHMN3-TOeHbIMn
peMHMM6Be3oNACHO,PnINcIOJIb3OBAHHIOFIIXCMOTnPeINARAOUINcRA
peYeHbTINOBabTOMOBneIpyTBepKdEHHbIXabTOMOBneIe.M0XHO
CKaATb6OBHbENHHyEOBcHIOpeHryTINOBabTOMOBneIHaCaITe
www.cybex-online.com
PpnpocTepe6eHaBbIe 135cmCoBMeCTHMOcTbMeKdySolutionG-i-Fixn BaaMIMABTOMO6HNMeoXETbblrOpaHueHa.PnoBepbTe no nepeuHIO TINOB ABTOMO6NHe,MOxHOJINcNOIb3OaTBabAToKpeCNo 63orpaHneHmCO BCEMNIPOJOKeHHMnIOIgONOBHnKa. BckNIOHTeNbHbIXcnyaRxABTOKpeCnTOAKKE MeOTNCIOJIb3OaBtcbNa HpeJeHMnRaccKpCKOM CndHe. Bcerda BbINOHNrTe peKOMeHdauHn PpOnBDOiNTeRAABTOMO6NJL.
YCTAHOBKA ABTOKPECJIAB ABTOMOBJNE
- Bcerda npoBepaTe, yTo6bl...
CINHn CnDEHn ABTOMOBnA BbIn npeBeDeHbB KpaHHe BepxHee noJKeHne.
PnYcTaHOBKe AToKepHeN HApCkAUPCKOM CnDHeB, 3aDbHbTe CnEhBe MaCmAbNo HA3ad B TaKoe NIOKeHne, YTObO HOn He MeuAno XOdy PemHa Be3onacHOCTn PnI pNCTeRBAHN.
- Npey yctahOBko y6eNTecb, YTO ABtOKpecno HaxoNTcB NOJIOKeHNn DnA CnDEHn.
3.BbCBO6OAnTe KHOKNI pONKIOOTCOeHNHeHIN ISOFIX (10),YTO6BbBHyTbФKcnpUOnne pTuHn ISOFIX (8).
Oe KhoNk nIaT OTOcDnHHeN hISOFIX Moryt 6bIbT OTnyuCHeB H3eAusbmIo dpyr O t pyra, YTO no3BOnrTe He3aBncMo perynipoBaT bFHKcKypUoJne pbHaH mISOFIX.
- Bbtonknte pKcnpyoune pbHn ISOFIX (8) n3 ochobnaHa noNHyo DnHHy.
5.YctAHOBNTA BTOKpcnO HA COOTBETCTBYOUue ABTOMOHbHOe CmHeHbe. - BДаВиTe ΦИКсИчуЮше рБИгИ rISOFIX (8) B TOUKN KpENJIHЯ ISOFIX (9), NOKA OHI He BCTaHIT Ha MecTO C RAHbIM IeIYKOM,ДBa INHДNKATOPa Be3OJnACHOCTN ISOFIX (11) NepeKIOuHaTc KpACHOrO Ha 3eJIeHbI.
7.Y6eHNTcB,HTOABTOKpeCnHO HAdEHXHO 3aФнкpOBaHO,NONbTAbuHcB BbITaHyTB erO n3 ToeK KpenneHn ISOFIX (9).
8.ДИВIÀrAte ABTOKpeCNo K CnIHKe ABTOMO6NJIbHOrO CnDEHbR Do NOIHorO BbIPaBHHBaHrco CnIHKOJ.
MnMeIaETNOITONOBHINK CnDEhB aBTOMOHN, BbIDBNHbTe E0MakCmIaHbBO BEPxN Hn y6pePte ETO He KacaTcR CNdeHn, HnPApBHeHHbX npOTNB DnBXKeHn)
9.ABToKpeCnO MoXHO yCTaHOBnTb B CnDyuee Nn OTKHyTOe NOxKeHne, HAKAB KHOKNy peryIuropBkn (14) npeEduhyB CnDEHbe Bpeep nn OTODbNHyB HA3a.
CHRTNE ABTOKPECNA B ABTOMOBNJTE
BbINOHNHTe DeIeCTBnYcTaHOBKn B OpaTHOM npaRKe.
- Pa36nKpyIe pKcnpyioue pbyaun ISOFIX (8) c obexn ctopon, haxab KhoKN DnI OTCoepHHeNIA ISOFIX (10) nOHOBpeMeHHo NotraHyb NHa3ad.
2.ДocTaHbTe aBtOKpeCnO n3 ToueK KpennneHn ISOFIX (9).
3.ДocTaHbTe aBtOKpeCnNo nOTAHnTEФKcnpUOuNne pBuArn ISOFIX (8) NOHOCbTO Ha3aB NnoJKeHHe nIra TpaHCnOpTupOBKn.
RU
PERYIINPOBKAIOIΓONOBHNA
PerynpemybnoIgroOBnK (2)MOxHOOTpeynpoBaT,ncNoB3ypepyrTop Bicotb noIgROBnKa (4) no3aNi noIgroOBnKa (2).
Otperynpyte noIroNoBnK TAK, YTO6bI MaKcMym 2 CM (npImepHa IwnpuHa
2 naIbue) octabaioocb Mekdy npeohm pe6eHka nnoDroJIOBHNKOM.
BcOTy NOrONOBHnka MOxHO perynpobatb, KOrda ABTOKpeCNO yCTaHOBJeHO B cAlOHe ABTOMoBnIa.
PABUNbHbIN PEXHM YCTAHOBKIN
100cm-150cm
3AΦHKCUPYNE ΦKCATOP PEGEHKA
1.BCTabBe TnOraCHOn peMeHb 3eJIeHbIe HapPabTIOUcne nOraCHOpeMHr 6eONaCHOCTN (7)B ABTOKpecne.
2. NotarHnte nneueboe peMeHb, yTo6bl 3aTHyTB IORcHOn peMeHb.
3. Ha6koBo CTopoHe AToKpeCna PraDom C npJxKo CneJeYeBCTaBnTb PnueBOI peMeHb I NOrCHOI peMeHb BmEcTe B HApPabJIIOUyIO NOrCHOrO PEMHgBe3OpNaChOCTn (7).
4. IpoDHeTe nneBEOBpeMeHb 3eNeHyIO HAnpaBnIOUyIO nneBEOI peMHRA(5), noka OH He OKaKeTc BHTpN HApBaNIOUe peMHRA.
5.YoocOBepeTecb,TOIneueBoPemHb npoxoNT NO KIOHOUE BaWero pe6EKA H He Kacaetcera 0e Hn. Pn Heo6xOIMOCTN,OTpyrnpyTe BlicOTy NOrOBOHnka (2)C cIeIb IO3MeHeHnNOLOKeHHa peMHa.
PERYINPOBKA OTKNDHORO NONOXEHNA
- UTo6bl yctaHOBNTb CnDEHBe B OTKnIHoe NIOJOKeHHe, HAKMNTE KHOKNY peynipOBK nNOJOKeHn (14) CBHTpeHHe CTOpOHb nepeHne qactn 6yctepa (3).
- Tó6bI BepHyTb ABToKpeCnO n3 OTKNHYTO RNOJXEHnB CnDyee NoJXeHHe, HAKMITE KHOKNY peRyNIpOBKn NOJXeHnA (14) ChBa N HApBaJIrTe CnDEHbe BBepxC nERKMn HaadABnBaHmE Ha 6yctep (3).
JINHEHAR3AUNITAOTBOKOBOROyDAPA(L.S.P.)
EcnnnHHeHHa 3aunTa OT bokOBoro yapa (6) KOHcHKnKTyet CDbepbO ABTOMOBnI, nncn OHa BnIeT HA KOnmHeCTBO CBO6oHOrO MeCTa, OCTabWeRoHa NaccKaNpCKCN mJeHbe, ee BO3MoxHOOTcOeDNHT. JnI 3TO RnKMMTE KNKny dI INOTcOeDNHEINCHCTMeBt 3aunTbI OT bokOBoro yapa (13).YTo6bl NoNYuHTb DcTyn K3TOn KONHKe, HeoBXoNDMO CHRTb Yexon IJn CnHNK. YTo6bl CHOBA pnpcoeDNHIn HnHeHHy 3aunTy OT bOKOBOrO yapa (6) K cndEHIO, BblONHJIte NHCtpkUIN NO ChrtNU B o6paTHOM npAKe.
OTKNDHO NOIROJOBHNIK
OTKnHNOI NOrOBNHK (15) NOMORAET npeoTbpATnTB onaChb HAKHOH rONOBI pe6eHa BnepeB BO Bpemc Cha.
EroMOxHOyCTaHOBbB OdHO nTpeXnOJKeHn.
ToKNHHe OTKnDHOI NOrOBoHNK (15) BnepeI Do IOocTnxKeHHxKeHaEMORo NOIOXeHHN.
OIOBApe6eHkaDOnJXHa BceTda KOHTaKTnpoBaTb COTKnDHBIM IOIROOBHKOM.
CHRTNE HADEBAHHE YEXNA ABTOKPECNA
Exon nIa ABtOKpeCna cocoNTn3 Tpex Yacte (noIroNoBHK, cnHka, 6yctep). OHI KPNETCA KABTOKpeCny KHONKAMN N 3JtACTNUhBMn peMHRM B HECKOBKnx MecTx. Nocne OTdEHHBcX pNkPpENHbIX aacte MoXHO CHrB OTdEHNbHie cactYexJa.
HnHaDeBaHnYexNa BbINOJHnTe DeIcTBnB ObpaTHOM npaKe.
HxNbI DOnyKaTc TnpaTb np3 30C, HcNoB3y npOrpAmMy
DnKaTHoCTnPKn. HNaHe,TKaHb YexNob MoKeT 5bTb ObecuBeHeHa.
CTpaTe QExNbOTdEhNO HcyeuNT B CuyuHbHO MaunHe Mnn No
PnmaIMM CONNeHcyHM NpyAMn
TAPAHNTI PON3BOIDTEIN I N PABUNA YTNIN3AUIN
KOMnHnCyBEXGmbH(Riedingerstr.18,95448Bayreuth,FepMaHn) npedocTabnert rapaHTNO B TeueHne 3 nT Ha daHHoe N3dJeNHe.RapaHTn
deCTyEB T CtpAne, TRe DaHHoe N3dJeNHe bIIO nepBOHaayabHO npOdaHo
nOKynaTeIIO p03NHybIM npOdaBuOM.CoepJxHaee rapaHTn INBC
HeoXOnmAA HOpmauN, TpeSyemarNo nOITBepKDeHnra paHTnY,
yk3aHbHa caTte go.cybex-online.com/manufacturer-warranty-car-seats.
EcnB O nncn H Toba npa yka3aHa rapaTna, 3TO He Bnrae Ha Baun 3aKoHbIe npaba B OTHOseHn Hac B OTHOseHn DepekToB.
Co6IIOaIte npabnla no yTINH3aun OTxoDob, DeiCTBvUOue B BaWe cTpaHe.
CEPTNΦIKALI
UN R129/03
CYBEX Solution G i-Fix 3 aBTOMaTHHIM TpNTOuKOBHM peMeHem 6e3neKn:100 cm-150 cm
Bik: npn6n. BID 3 pokIB do npn6n. 12 pokIB
JaKyEmo 3a Te, zo Bn6pann ABToKpicNo Solution G i-Fix.
YBaXHo 03HaNoMToe3 IHCTpyKciEIO, nepH HIX yCTaHOBnTn ABTOkPicNo Ha CBOcMy ABtOMoBnIi, I 3aBXdN TpMaIte TUO IHCTpyKciIO KOpNCtByBaVa nID pyKOy CneiaIaNbHiuAphi(12).
BAXJINBAIHΦOPMAUJI
E3 CXBaJIeHnO oprAHIB CTaHApTn3aIiB 6yIb-RA Ka MoINΦIkaIg YI DoaTkoBe 6bNaHAnHH aTOkPicNla 3a6OpOHReTbcR.
Ira 3a6e3neueHHa 63neKn BaWoo DTUNH BkpaBakNBO DoTpMByTaCn IHCTpyKu3 KopncTyBaHHa ABTOKpiCnO y DaHOMy Noci6Hky. He cnD uKOpncTObyBatn, kUo DNTHHa He DocrHa 3pocty 100 cm.
BctahOBKnOBaTnCe aBtOKpicNo MoKHa Nmue Ha KpcNaX aBTOMo6iIB, 00 6ynn3aTBePdxKeHdNn BnKOpNCaTHn3 CnCTeMaMn HataRyBaHHn NaCIB 6e3neKn, 3riHNO 3 noci6HnKOM Do aBTOMo6iI.
M0ke BnKOpNCToBbTaTcN TaNbKn Ha CnDiHnX ABToMo6iHa 3 aBtOMaTHHMn 3-ToKOBHMn peMeHmN, CXBaJIeHmN nOKeHHm OOH N16 a6o anaIorHm CTaHapTom.
He BnKOpNCbOByTe HeCyHi ToChK KOHTaKy KpIM OINcAHnx y Liin HCTpyKlI i 3aHaueHn Ha CnCTeMI HATryBaHnpeMeHIB Be3neKn.
ABTOKpicIO NOBUNHO npNJraTn DO CnHKn ABTomO6iRa BCiEIO NOBepxHeIO.
Jneuobn peimnb nobunen npoxoHn Bropny Ha3ad nd Kytom.Bin He nobunen npoxoHn doBepxhboI TOckn peemna Haaowmy ABTOMOJI. aMOK peemna ABTOMOiHa NE nobunen npoxoHn Kp3b nIDNKITNk cnIHHHaKuo bInhN KHeuepeMe HAto DOBn, ABOTpicNo he npndaThe do BHKOPNCtAHNA ABTOMOiB TAKOM NOJOKeHHe.
TpntoukOBn peMHb cnI npOnyckatn TiNbKn Kpi3b BiNobHy yknady. YknadKn peMeHn deTanbHO onncaHO bui iHctpykui i noHaueHo Ha ABTOKpicni 3eNEHM.
TnONTMaJIbHOrO 3axNCTy B pazi abapii nOcHm peMH b NOBHeH npOXoNTn YAKOMORA HXKYe, NpOIMK HIR BaWoi DHTNH.
PepeKoKHMM BnKOpNCtAHHm nepeBipyTe, 06 abTomatuHa TpntOtuKOBa CnCTema peMeHIB ABtOMoBjIb 6yna BiDperyNboBaHa Ta uibHO npnraRana do Tina dttnn. HikOnn He nepekpyuYte peMHb!
TINKONTHMABHOBiDPERYNBOBAHNIPIIIGRIIBHK3a6e3NEHTB MAKCIMAMBHNI pBeHb 3axCTy Ta 3pyHOCTI BAIJI DNITHI, JIKUO PIIeouBI pemIH CNIDITMEA KcIIN.
AbToKpicNo 3aBxNIO NobHHO 6yTN npabnHbHO 3akpinne He nacOM 6e3neKn abTomO6ijra, HabItb RkUO BOHO HE BHKOpNCTOByTcR.
KoHn 3aKpNbBaTe Dbepi ABToM06In a6o peryIIOe 3aHc cnDINH, 3aBXn NepeBipraIte, nHe 3aYeHNIOc ABtOKpicNo.
AToKpIcNo npoiuNo nepeBipKy uyno CxbanHe 6e3 nHHO cNCTEMn 3axncty BID 6okoboro yapy.
PpeMetn 5baraxy Ta iHni npEmtn B aBtOMo6ini Heo6xioHO 3aBxNn HadiiHo 3akpinIOBaTn. JkIo cIbOro He 3po6ntn, IX MoKe po3KnDaTn BCEpeHHI ABtOMo6II N cnpuHHInr CmepTeJIbHi TpaBMn.
Hikojn He BnKOpncTOByte ABToKpIcNo 6e3 Qoxna. BnKOpncTOByte TiNbKn OpriHaJIbHi QoxNk KpIcNA CYBEX, OckInbKn QoxON E BaXKnBm eIemEMTOM, kyn 3a6e3neuey fHyKUioHyBaHnKpIcNA.
HikonHe 3aunuTe CBOIO dntnHy B aBtOMo6i 6e Harny.
Etani ciTcEMn HATrAByHnpeMeHIB 63eNk MoKyb Harpitncn Ha coHt Ta CnpuHnHT OniHa WkiPi Bauoi DTmHn. BepexiTb CBOI DTmHy Ta ABTOKPCIO BID II pnpMO CoHyHO CBITHa.
AbapirMoKe npn3BecTu do noKoKeHHaBToKpicna, kke MoKe 6yTN He nOITHM dnn Heo36poeHoro oka. ByNb naKa, 3amHtB KpICNo nicra abapii. Y pa3i cyMHIBi, 6yNb NaCa, 3BepHtcb Do CBOro npOabu a60 Bupo6nHa.
He BIKOPICTOByIe ue ABTKpicIO IOBwe 11 pOKi. YnpoOBK cTPOKy Cnyk6n ABTKpicIO BNTPUMyC nIbHI HabaHTaKeHHRA, kI 3 BIKOM 3MiHOOTb KICTb NOrO MaTepiAny.
TnactIKOBI Detani MOKHA IpOTHPATN deniKAthIM MIOHMM 3ACOBM 3 TENIO BOIOJ. HIKOI HE BHKOPCTOByTe arpeCBHI MIOHJI 3ACOBU YBIDINBOU!
Ha cnDinHnX deJeKnx aBToM6iNIB, 3pO6JIeHNx 3 denikaTHNX MaTepiAIB, BID NKOPICHTAHN ATOKPCIEIN MOKYTB 3aJInuNTNC CNIi TA/aBO 3MIHTNC KoiJIp. Uo6 yHKnHYt cBoTa 3axNCtNTn CNDiHHN ATOM6iNn, MOKHna iNknpactn 3nH3y KObpy a60 pyuHNK N uOcB noDi6He.
DETANI BINOBY
(1) CnHHka
(9)Tockn KpinnneHHN ISOFIX
(2)Пдг罗инк i3perynIOBaHHaHm HaxuNy
(10) Khonkn φikcatopa ISOFIX
(3) Nodyuka dny cnDinHH
(11) INdkaTop 6e3neke ISOFIX
(4)PykoTka peryIIOBaHHB BucOTn nIrodNIBHnKa
(12) Wapka dnni iHCTpykuii 3 KOpncTyBaHHa
(5) HanpMaHa nneuObero pemeHr
(13) KhoNka pikcatorpa 3axncty BiD 60koBoro ydapy
(6)JIiHnHa CnCTema 3axncty BID 60koBoro ydpay (L.S.P.)
(14) Khonka perynioBaHH noJoxhenn
(7) Hanpma norecho pemeH
(15)PiDronBHHk i3 peryIIOBaHHm Haxnny
(8)3aniphi baxeni ISOFIX
INPABUNbHE NONOXEHHBABTOMOBIJI
3 HATRANKHIM 3aipHHIM BAKENHM ISOFIX (8) DNTHRE KPCNO MOKHA BIKOPINCTOBYBaTN Ha ABTOMO6JIbHN CnIHHNX 3 ABOTAMNCHHM TPTHOKOBIM PemeHHM 6e3NEKN. O3HAnOMTEc 3 cINCKOM ABTOMO6JIb,
cymichx 13 ISOFIX, y doataky. Hainbsh aktyanby Bepciio dnbitbcn ha caTIT www.cybex-online.com.
KIO spCT dHINH nepeBnUy 135 cm, pBeH cymicHO tBaIoro abTOMO6Ira Ta Solution G i-Fix MOe 3HNsITNC. ByNb IaNcA, O3HaONMTec 3 nepENIKOM TINIB ABTOMO6iIN, Uo6 yNEBHNTNC, Y MOKHA BHKOPNCTOBYBATn DHTRue KpICNO 3 dyb-IAKMM NOXKeHHM NIDrOINHnka Be3 oMExKeH. BVKNKIOHNN BnAPkx DITRAe aBTOKpICNO Moke TAOKBCTAHOBnOBATNC Hn CnIHNI pePeHbOro nacKaHpa. 3abXdN DOTPmMyTEcpeKoMeHdauii abTOBnPO6Hnka.
BCTAHOBJEHHABTOKPICJA B ABTOMOBII
- 3aBxDn nepeBipRyTe...
- 006 cinnk ndiHb ABtOMo6iHa 6yNo 3aqiKcoBaHO y BepTKaJIbHomy noJoxehHi.
KPII BCTAHOBIOeTe ATOKpICnHO HnDIIHHI nepeHbOro Nacaxnpa, IIO6 KpICNO ABTomobIIg 6yIO MaKcMmAbHo BiDeEHO Ha3aI i He 3aBaKaIANO ykndz pemeHa.
2.Пелед yctahOBKOIO nepeKOHTeC8,Ю abTOKpicNo 3haxOHTbcB NOJIOKeHHI DnI CyDINH - Hatachihb Ha Khoonkn fikcatopa ISOFIX (10), 06 po3BcTn 3aniphi Baxeni ISOFIX (8).
BnDi KhoKn fikcatopa ISOFIX MoKHa HaTnCKaTn He3aJIeXHO OHa BId OHOI Ta perynloBatn 3aniphi BaKeNl ISOFIX y DoInbHOMy npRAnky.
- BntarHITb 3aniphi BaKeni ISOFIX (8) 3 OCHOB IN KpaHNE NOJIOXeHHA.
- NocTabeBtOKpICNoHaBjIDNobIDHeCnIHnABTOMO6iIa
6.BCTABTe 3anipHi BaxKenI ISOFIX (8) y TOKn KpinneHnI ISOFIX (9), 6yde yTuN «KJIIK.ДBa IINaKATOp n 6e3neKn ISOFIX (11) 3mIHrTb KOnip 3 cepBOHOrO Ha 3eHeHH.
7.Ди nepeBipKn HadiHocTi KpiIneHHKpIcna CnpO6yTe BHTaTm NOro 3 ToTOK KpIneHHA ISOFIX (9). - PnTNCiHb ABTOKpICNo DO CnIHKn CnDINHr ABOMO6Inr, 0o6 BOHO nBHO npnIraNo Do Hei.
HIOIITRONIBHKN ABTOMO6IN3ABXae, BHTARHITb NORo DO KINcBROPy aO or B3arani 3HIMtB (KPM CNDHB ABTOMO6IN, CNPMAOBAHx O6nUqYm Ha3a).
- Kpicno MoKHa cKnactn B noNoXeHHa nna cnDHHa 6o BiKHyTHCnHky, HATNCyBm Ha KHONKy peYIIOBAHHa noNoXeHHa (14) Ta WTOBxAOCHn KpicNo BnepeA a6o Ha3aJ.
COTyPiIroNIBHnKaMOxHa peryHOBaTn, HABITb RaKIO KpICNo BKe BCTAHOBHeHO Ha CnDInHi ABToMObiIa.
PEXIM NIPABUNbHOY YCTAHOBKN
100cm-150cm
ΦIKCALI3AMKA
- Po3aWyIe nOaChn peMInb y 3eNeHIX HxHx HAnpMaHnx peMeHx (7) abToKpIcna.
- NotarHtB 3a IneYOBm peMHb, 106 3aTARHTN norChn peMHb.
- Ha 60KOBHHi ABToKpIcIa, nopJi 33amKOM pemHe IJIeObHn pemHb 3 NOrCHMmpeMeHem Heo6XiHO pa3OM BCTabNTB HAnpRmHy pemHe (7).
- IpoTARHITb IIeOuBn peMHb Kpi3b HAnpMHy 3eNeHOro IIeUOBoro peMeHa (5).DOKI BIN HE ONNHITcB CBepeNHi HAnpMHOI peMeHa.
5.Плесовскийпеминь понинец рххогину чеге Зночиь валоДиNTH, ane He TopkaTNCSII WJI.Y pa3i NotpeBn BiDperyNIOte BUCOTY niIroNIBHKa 3 perynbOBAHNM HaxNY (2), IO6 3MHNTO NOJOKEHNA peMeHra.
PERYIIOBAHHHAXINHEHOI NOXEHHH
- Ⅲo6 nepeBecTn KpICNo B HaxUNHe NonoXeHHaHtCHb KHONky perynIOBaHHN ONoXeHHa(14) y nepeDHi HxKHi YacTHHi NoDyUKN dIra cnIHn(3).
- Ⅲo6 noBepHytn KpicnO c HaxInHeHoro nonoJxHH B noJoxeHHn Dnna CnDHHN, HATNCihtb KHONky perynIOBaHHn noJoxeHHN (14) ue pa3 i BNPOCTyIte CnDINHn, TPOXn NiDUTOBxOHyOn NoDyWKy Dnna CnDINHn (3).
JIHIIHA CNTEMA 3AXNCTY BID BOKOBORO yDAPY (L.S.P.)
Kuo nihin 3axnct BiD 60koBoro ydapy (6) 3abaxae DBePm ABtOMo6iHa 60 3aImae Micue nacakpckbKO ruiHHN, Ioro MOxHa 3HHTN. IyIbOro HATNCHTb KHONky fikcataopba 3axncty BiD 60koBoro ydapy (13). Uo6 nobepHyTu 90 KHONky Ha Micue, Heo6XiHO 3HHTN qChnIKu 3i CnHN. Uo6 nobepHyTu Ha Micue L.S.P. (6), BkOHaTe Bka3iBKn 3i 3HHTT y 3BOPOTHom npAky.
HAXINENHHIITGONIBNKA
PiirnBHK i3 peryioBaHHm Haxny (15) 3axuae Bauy DHTNY BID He6eaneHoro Haxny ronOBn Bnepe nacchy.
YoroMOXHbBCTaHOBHTNBODHOMY3TpboxNOIOKeHb.
HaxinntiB ndronibnK i3 peryIIOBaHHaM haxiny (15) Bnepe,doKe He Bn6epTe nOpiE HNOJxehn.
OIOBA DITINH NOBHHA BeCb HaC npnraTn Do NiIroNIBHnKa 3peynoBaHHM HAXNY.
3HRTTA BCTAHOBNEHHY OXNA KPICNA
yoxon abTOKpicna cKnaadaetb3 3 Tpbox qactHn (niDronIBHK, cnHk a noDyUka dnA CINIH).BOHn TPMaTOBc 3a DonOMORO KOHNOK Ta eACTuHHN CTpyOH y kInkoX MICx. Nicr BnBInbHeHHB BCIX enemertB fikcaui MoKH 3HTn OKPm XactHn OxyNa.
IO6 3HOBy Bnrrn yOxON Ha KpICNO, BnKoHaIe BkAzIBKn 3i 3HRTy 3BOPOTOMy NOPrky.
pTaH OXON MOXHa NIIe npn TemnepaTyPi 30 °B pexkmi deiikatHoro npHH, Ihakse MaTePiaO XOXA MoXe BUNNHrT. BybI NaCKa, nepITb OXON OKPemB Bd II HUoi6 BImNHI n He cyuHTy bapabAHu HA COH!
INPABNBA BINO6HNA 3 TAPAHITI TA YTNJI3AU
CYBEX GmbH (Riedingerstr. 18, 95448 Bayreuth, Germany) dac
3 pOKn rapaHTiHa Nae npOyKT. FapaHTi Die B kpaHl Mara3Hy, B kOMy
KNIEHT KYNMB npOyKT. IIOKKeHHra pArHTi Ta BCs OCHOBa IHpOpMaJi,
HEo6xIDHa DnBa BN3HaueHH Da rapaHTi, 3hAxOJaTbCn Ha Haui CTopiHui
go.cyBX-online.com/manufacturer-warranty-car-seats. RaTO rapaHTi
3hAoxOHTbcr y cneuФikaui, ue He BnHHe Ha BAuy 3abOcbKy rapaHTIO
BiDcyTHoCTI DepeKtIB.
Bybna,doTpytepe npabun ytniaui,0o diotyBaaiin kpaH.
Tāname, et valisite turvatooli Solution G i-Fix.
Enne turvatooli soidukisse paigaldamist lugege kasutusjuhend hoolikalt Iabi. Hoidke juhendit alati kaeparast selleks ettenahtud hoitaskus (12).
OLULINE TEAVE
GALVAS BALSTA REGULESANA
Reguljamo galvas balstu (2) var noregul, izmantojot galvas balsta (2) aizmugure esoso galvas balsta augstuma regulatoru (4). Pielagojot galvas balstu, parliecinieties, ka starp berna pliciem un galvas balstu paliek ne vairak k2 cm (apm. 2 pirkstu platums) attalums.
(.Type Approval Authority)
y 1
100 JdJdJdJdJdJd
aalipssssssssssssssssssssssssssssssssssssssssssssssssssssssss
0
aaii aai iaii liie, siaee, baiii aaiyai yai jaiyai yai jai ai jai ai ae lae
16
pplai gaaagall clalllgaaagall blll lgl aal al
iibix
jss
aaii aai i 1
124 125
yjplal jbjl 1
a aagaaagaaagaaagaaagaaagaaagaaagaaagaaagaaagaaagaaagaaagaaagaaagaaagaaagaaagaaagaaagaaagaaagaaagaaagaaagaaagaaagaaagaaagaaagaaagaaagaaagaaagaaagaaagaaagaaagaaagaaagaaagaa
Ldl 10
jia jai jy jay jai jai jai jai jai jai jai jai jai jai jai jai jai jai jai jai jai jai jai jai jai jai jai jai jai jai jai jai jai jai jai jai jai jai jai jai jai jai jai
.0
y
1pajj jie jie jie jie jie jie jie jie jie jie jie jie jie jie jie jie jie jie jie jie jie jie
aaiy 1
x
aalaa aaii gaiyssgai y
aaiy jaiy jaiy jaiy jaiy jaiy jaiy jaiy jaiy jaiy jaiy jaiy jaiy jaiy jaiy jaiy jaiy jaiy jaiy jaiy jaiy jaiy jaiy jaiy jaiy jaiy jaiy jaiy jaiy jaiy jaiy jaiy jaiy jaiy
.
11 11
y
aannnns
y 11 1
y 1
aaii aiee iie 15 paae 5. gao ayiaeaiaiaiaiaiaiaiaiaiaiaiaiaiaiaiaiaiaiaiaiaiaiaiaiaiaiaiaiaiaiaiaiaiaiaiaiaiaiaiaiaiaiaiaiaiaiaiaiaiaiaiaiaiaiaiaiaia
1
Jil 10
a 1
- 3.1.2.2.2.2.2.2.2.2.2.2.2.2.2.2.2.2.2.2.2.2.2.2.2.2.2.2.2.2.2.2.2.2.2.2.2.2.2.2.2.2.2.2.2.2.2.2.2.2.2.2.
| ISOFIX###(9) | ###(1) |
| ISOFIX###(10) | ###(2) |
| ISOFIX###(11) | ###(3) |
| ###(12) | ###(4) |
| ###(13) | ###(5) |
| ###(14) | (L.S.P.)###(6) |
| ###(15) | ###(7) |
| Solution G-I-Fix 135 |
aallll lallll lallll lallll lallll
4555555555555555555
AR
a a a a a a a a a a a a a a a a a a a a a a a a a a a a a
aaii jia jia jia jia jia jia jia jia jia jia jia jia jia jia jia jia jia jia jia jia jia jia jia jia jia jia jia jia jia jia jia jia jia jia jia jia jia jia jia
30 30 30
y
jaiyaiyaiyaiyaiyaiyaiyaiyaiyaiyaiyaiyaiyaiyaiyaiyaiyaiyaiyaiyaiyaiyaiyaiyaiyaiyaiyaiyaiyaiyaiyaiyaiyaiyaiyaiyaiyaiyaiyaiyaiyaiyaiyaiyaiyaiyaiyai
gaii jn galiin gilgl aiaa iiaia
3 CYBEX GmbH (Riedingerstr. 18, 95448 Bayreuth, Germany)
a jaiy 100
y 1
jaiy jiai liisio jix jiai
gocybex-online.com/manufacturer-warranty-car-seats
y jy yj yj yj yj yj yj yj yj yj
y
CEPTNΦUUNPAHE
OH R129/03
CYBEX Solution G i-Fix c aBTOMaTHueH TpNTouKOB KOJAH: 100 cm - 150 cm
Bb3pact:ot np6Jn3.3 roDHN Do np6Jn3.12 roDHN
Blaoradapm Bn, che cnpxte Ha Solution G i-Fix npn n36opa Bn ha ceaJka 3a aBTOMo6nI.
BnMaTeJIHO npOeTete HnCTpyKcIMTe, pIeN da MoHTnPATE cEdaIKATA Bb BaIIsh ABOtMObUN h BuHAR dpXkTe Te3n HnCTpyKcIMNoD pKa B o onpeDeneHTo 3a Ta3n ceN otDneHene (12).
BAXHA INHOPMALIJA
5e3 oOobpeHneTo Ha OpraHa 3a TINOBo OoobpeHne, cedankata 3a ABTOMObUN No HNKaKBb HAuH He MoKe Da 6bDe IpomehraHa INN KbM He da Ce npabRT DonbHeHn.
Ba da 6bnde Deteto Bn HauJeKJHo 3aunTeHo,OT n3KJIOUHTeHNO 3aueHne e da n3noJIbaTe cedanKaTa 3a aBtOMoBn KaKTo e OINCAHO TOBa pkoBOCTBO.
He n3no3BaIte ceIaIckata npEi dTeTo da e DocTnHaio pct 100 cm.
CedanKaTa 3a ABToMOnBnMOKe Da CE MoHTnpa EINHCTBeHo Ha CeaJIKN Ha PpeBO3Hn CpeDCTBa, KOIn To Ca OIOObPeHH 3a IINOIN3BAHe Ha CNCTeMI 3a ObEONacBaHe Ha DeEu, B CbOTBeTCTBnE C pIbKOBoDCTBOTO Ha ABToMOnBnHa.
IopxOja e cAmo 3a ceanKn Ha npEBo3Hn CpeCTBa c ABToMaTuHn TpTOUcOBn KOJIaHn, Oo6peHn B cbOTBeTCTBne C PernameHn OH N2 16 nn CpABHM CTaHdpT.
He n3no3BaIte OonpHn KOHTKTHN TOckn,OCBeH Te3n,KOHTO Ca ONcaHN B HNCTpykUnITE nCa OTBeJra3Ha HcNCTeMaT3a 06e3oNacBaHe Ha Deua. TaNoBbpxHOCT Ha oJneraljkata Ha cedanikata 3a ABtOMobn Tpr6Ba Da ce dOnnpa Do oBneralnkata Ha cedanikata Ha npEBo3HOTo CpeDCTBO.
KoNaHbT 3a npes pamo Tp86Ba da ce DnNk Harope n Ha3a npn HauHaHe. Hnkora He Tp86Ba da ce DnNk HanpeD KbM rOpHaTa ToKa Ha KOnaHa B PpeBO3HOTo CpeDCTBO.
aKaONHAnKATA 3a KOHnHa npeBO3HOTo CpeCTBO HNKORA He Tp86Ba da npeCua NoNkBtHNUte Ha cedANKaTa. Ako pEmbkbT Ha KOHnAe TBbPd eBbR, cedANKaTa 3a ABTOmOuHa He nOxOpaJz 3a N3NO3BaHe B TOBA NOJoxHe N peBO3HOTo CpeCTBO.
TpntoukOBnT KOnaH Tp6Ba Da ce npBeBeEe EINHCTBeHO npes 0npoeBeneHt MeCtA. MeCtTa 3a npBoEeJaHe Ha KOnaHa ca OncaHn NpOpoBHO ToBA pKbOBOcTBO H Ca OToBEn3aHN B3eNeHO BbPxy CeDAnKaTa 3a ABTomoBn.
IOnBnKnHrT KOJAN TpR6Ba Da ce NOCTABN Bb3MOXHO Hau-HNcKO npe3 cna6HHnte Ha BaWeto DeTe 3a ONtImaEN eFeKT B Cnyuai HA NHCNDENT.
IpeiBcKa ynoTpe6a npOBepaBaTe daHn ABOMaTHHnT TpHTOyKOB KOHa HnpeBO3HO TcpeCTBO e peYnnpaH nPapBnHO n daH e NOCTABeH NtBTHo No TnTNO To Ha Deteto. HkORA He ycKbAte KOHa!
CAMOn OTNHAMnHO peryniapa 6bneraKna 3a gnaba MoKeJa npednoknHa deTeTo Bm KcMnMaHna 3aunTa N ydo6ctBO, nO3BolraBauKn Ha konaHa 3a npes pamo da ce perynipa nnbaHo.
Cedankata 3a ABtOMo6n Tp86Ba BnHaRn Da 6bDe o6e0naceHa npabINHO B npeBO3HOTcpeCTBO, DOpN KOrATo He Ce N3NOJ3BA.
Korato 3aTbaprTe BpTaTaHa npBeo3HTo CpeDCTBO uNn peYnnpaTe 3aHaTa CeJaKa, BnHar npOBepBaIe DaIi CeJaKaTa 3a ABTomO6uN He e pNTCHaTc KbM HRAkBA NOBpXHOCT.
eDankkata 3a ABTOMO6n Cbto Taka e TeCTBaHa n Odo6peHa 6e3 JInHeHATA 3aUHTa OT cTaHmHn yapn.
BaraK ININ DpyrN ppeMeTn,HAMpiuCe B npeBO3HOTOp cpeCTBO, TpRbBA BnHarn Da 6bDat ObEzONacBaHN. B npotBEN cnYaAe Te 6XHaM MoRN Da 6bDat NxHBpIeHn B ABTOMoBnla, KOeTo Da npeN3BnKa fatahnn HapaHbAHn.
Cedankata 3a aBtOMo6n HNKora He Tp8Ba Da CE n3nON3Ba 6e3 KaIbpa 3a CeaIaNka. N3nON3BaTe eMHCTBeHO opHmAnHeN KaIbΦ 3a CeIaNka CYBEX, Tb KaTO KaIbΦT e KIOOBOKOMNoHEr 3a fHyKUHOHpaHETo Ha ceIaNkata.
HnKora He octaBnTe TeTeTo CN BaTOMo6nna 6e3 Ha6IIODeHne.
HaCTnTe Ha CnCTeMaTa 3a 06e3oNacBaHe Ha DeuCa Ce HapRaBt Ha CbHne N 6nXa MoTn Da N3rOpykKoKaTa Ha Deteto BN. Na3eTe Deteto CN n CeJaNKaTa 3a ABTomO6nOT N3naRaeH a PpKa CbHueBa CBetnHa.
Pn HnHnEHT B cedankata 3a aBtOMo6nMoraT da ce nOBRT nobpei, KONTO HE MORAT da CE yCTAHOBRT c npocTo OK. CneI INHnDEHT CMEHETe cedankata. Pn cbmHeHne c CBpKeTe c Baunr dNCTpnbTyOp nnn c nponBDOITeJ.
He n3non3BaIte ceaJIkata 3a aBTOMo6nIO NOBEe ot 11 rOHNH.
Cedaikata 3a ABTOMoBnE n OJNOKeHa Ha CINHO HAToBapBaHe No BpeMe Ha JxN3EHnI CN ZKbJI, KOEt BOiD N O I3MeHHe H KaueCTBOTo Ha MATEpnaIc TceHHe Ha BpeMeTO.
CHOBHnTe HACTM MoTJ Da Ce NoCTaC M EK NoCTBaI npenapAT n XlaJa Boga. HnKora He n3No3BaIe arpeCBHn NoCTBaIu npenapatn nn6BnHi!
bIpxy cedanknTE Ha HJKON ABTomO6nH, HApBaEHn OT YyBCTBnTeHOMatepnni, yNtPO6bTa HA cedankn 3a KOn MoKe da OCTABn CneDn n/nn da npuHn OH6e3BETBaHe. 3a da ppeoTbPaTHe TOBA, MOKeTe da noctenHe DEIO nn Kbpna IN Heu NOdo6HO ND cedanknata 3a ABTomO6nH, 3a da 3aunHTne cedankaHa NpeBO3HO TcpeCTBO.
ACTHNAPODKTA
(1)06neranka
(2) Perynipyema oBneranka 3a rnaBa
(3) Bycep
(4) Perynatop 3a BncounHaTa Ha o6nerankata 3a rnaBa
(5) Bódau Ha KaIaHa 3a npe3 pamo
(6) LInHeHa 3aunTa OT cTpaHnHn yapn (L.S.P.)
(7) BoidaH naoDnBnKHHn KOnaH
(8)3aKJIIOUBaIu paMeHa ISOFIX
(9)ToUKN3a3akpenBaheISOFIX
(10) ByToH 3a oCBo6oJdaBaHe ISOFIX
(11) INHINKaTOp 3a 6e3oNaCHOCT ISOFIX
(12) OTrdeneHne 3a cbxpaHne Hn PbkoBOcTBoTO Ha nTope6nteIa
(13) ByToH 3a ocBo6oxJaBaHe Ha 3aunTata OT cTpaHNH ydapn
(14) ByToH 3a perympaHe ha nOIOXeHHeTO
(15) Haklahaça ce o6neranka 3a rnaBa
PABUNHO NOJXEHNE B PPEBO3HOTC PECTBO
C npn6paHn 3akJIOUbaaun paMeHe ISOFIX (8) cedanKata 3a aBtOMO6NJ MOKe da ce nIIOJBA HA cedanKHa npeBO3HN cpeCTBa, o6OpyDbAHn C abTOMaTHEN TpNTOCHKOB KOJIa. 3a nIIOJ3BaHETo Ha ISOFIX, moJI BNXTe pnpINOHKeTHN0B CNICbK 3a OIO6peHIne npeBO3HN cpeCTBa. MokeTe da nonyUHTe HAI-AkTyAINHATA BEpcrO t WwCybx-online.com.
Pn pct Ha deTeTo ha 135 cm, cBmecTmocCTTa MeKdy Solution G i-Fix N Baweto npeBO3HO cpeCTBO MOKe da 6bDe hAmaneHa. Moa npereNaite TINOBNA CnBCk 3a Oo6peHnTE npeBO3HN cpeCTBa, 3a da npoeBpnte dann DetCKata cedAnka MOKe da ce nOJ3BA 6e3 orpaHueHn Bb BCnuN noNoKeHn Ha oIerAnKa. B nKnUHTenHn Cnyan detCKata ceJaika MOKe da ce nOJ3Ba Ha npedHata cedAnka 3a nbTHNK. BnHar nca3BaTne npenopbKHe Ha npou3BOinteHa npeBO3HO tceCTBO.
MOHTIPAHE HA CEJAIKATA 3A ABTOMOENB I PPEBO3HOTOCPEICTBO
-
Binhari npoBepaBte daH...
-
06nErAaKInTe Ha ceJaIKInTe Ha aBToMo6Hna ca 3aKnIOueHN B nIpaBeHO nIoXeHne.
PnMOHTIpaHa He cdaIaKaTa 3a ABTOMoBnH Na ppeHata cdaIa Ka 3a PbTHNK,peyHpaIe Ce daIaKa H a PpeBO3HOTo CpeCTBO Bb3MOKHO HaHa3d,63 Da 3aceHRe ToOHTe Ha npOBexDaHe HA KOHa.
2.ПпeДи монтірахе пpoВереTe ДаJIи сedaIGNkaTа 3a abTomo6nI e B
пложжнe 3a сяданe.
3.OCBO6OeTe 6yTOHnTe 3aOCBO6OXdAbaHe ISOFIX(10),3a Da yDbNknte 3aknouBaunTe pamHe ISOFIX (8).
Ibata 6ytoha 3a ocbo6kdaBaHe ISOFIX moraT da 6bDat ocbo6oHeH He3aBNCmO eINH OT dpyr, n03BOJRAuHKn Ha 3akIouvBaunTe pameHISOFIX da 6bDat perynnpaHn He3aBNCmO.
- Bythe Taeknoubaune paeme HE ISOFIX (8) HabbH ot ochobata,do KpaHOT mU ydbJIkeHne.
- NocTaBeTe CeJaIkaT a a ABtOMo6nHa CbOTBeTHaTa CeJaIka B abTomO6nla.
- Hatnche 3aknoubaune pameha ISOFIX (8) B Toyknte 3a 3akpenBaHe ISOFIX (9),doKATO ce 3aknouchat Ha MrcTo C upaKaBaHe. Dbata CBETNIHH INdikaTopa 3a 6e0nachoct ISOFIX (11) TpR6Ba Da ce npEbkniOuat OT cpeBHeoB 3eNEHO.
7.Поверете дал садакета e obezonaceha kato ce onntate ja n3dbpnaTe OT TOKHTe Ha 3akpenbahe ISOFIX (9).
8.И36ytaIte cedanikata 3a ABTomO6nKbM O6nerankata Ha cedanikata Ha npeBO3HOTo cpeCTBO,ДOKATO CE I3paBHN HAnbNHO C6nerankata.
Aho Ha cdaIkata Ha npEBo3HOTo cpeCTBO HMA oBneralka 3a rnaBa,
HbPnAte r Harope Do kpaHOTo uDybnKHeHMe IINr OTCpTaHeTe
HaBJIHO (C hKIOUeHHe Ha cdaJKN B npEBo3HOTo cpeCTBO, rIeDaun
Ha3d).
- Cédaikata Moke da 6bde noctabeHa B noJoxeHne 3a cyahe nnB HAKNoHEHO noJoxeHne Ype3 HaTnCKaHe Ha 6yToHa 3a peryInpaHe H noJoxeHneTO (14) n 3dbpBaHe Ha cedaikata HanpeDnn 6yTaHe Ha3a.
CBANHE HA CEANDKATA 3A ABTOMOBNJ OT IPEBO3HOTOCPEDCTBO
V3BbPwTe CTbIKnTe NO MOHTnpaHTo B o6paTeH peI.
- OTKIOHETe 3aKIOHbAunITE pAMEHE ISOFIX (8) OT INBETe CTpaHN KATO HATNCHTe 6byTONITE 3a OCBO6OJDABaHE ISOFIX (10) IINnI3NbPnate eHOBPemEHHOHAad.
2.Издрайе саддкета OT touнгte 3a 3akpenbahe ISOFIX (9). - Cbane Ce daikata 3a aTOMobn H 36ytaite 3aknohyauite paMeHE ISOFIX (8) DOKpaHaaB nnoJxehneTo 3a TpaHCnpTupahe.
PERYINPAHE HA OSEIETAKATA 3A FJABA
Perynpemyama obneranka 3a rnaBa (2) moKe da ce perynpa KaTo ce n3no3Ba perynatopa 3a BmocunHa ha obnerankata 3a rnaBa (4) O3ad Ha obneranka 3a rnaB(2). PerynpaiTe obnerankata 3a rnaBa, taka ye da mka MAnk.2 cm (np6n13. upiHna 2 npbcta) Mexdy paMeHeTe Ha deteto n obneranka 3a rnaBa.
CocnHata Ha oIerankata 3a rnaBa MoKe da ce perynpa nKorato
ceJaKaTa e MOHTnpaHa B aBtOMoBuHa.
PABUNEH HAHMH HA MOHTNPAHE
100cm-150cm
OBE3ONACRAHE HA DETETO
- Noctabete noDnBxHnKaONaH B OuBeteHIne B3eJeHO Boaun 3a NODbNkHNKoJAH (7)Ha cedankata 3a ABTomObUn.
2.ИЗьрай Te KОнаHa 3a npe3 paMo, 3aДа 3aTeHHe NOBnHnKoNan. -
Konahta npe3 pamo H noDnBnHnT KOan Tpr6Ba da ca noctabeHH 3aeHb Bb BOnaHa 3a noDnBnHnKoan (7) ot cpaHata Ha ceJaKaTa Ha ABTomObnHa,do 3akonHajKaTa 3a KOJAH.
4.ПюбendeКолана3aпpe3 pamo пe3 3eelenHЯ BODaY 3a KOLaHa 3a npe3 pamo(5),DOKATO BnE3e BBB BOdaY. -
YBepete ce, Ye KonaHbT 3a np3 pamo npemHaaba np3 knOuHaTa Ha deTeTo Bn Hne DOKoBa Bpata My. AKe e Heo6xOmo, perynpaIte BnCOOHATA Ha o6nerankata 3a rnaBa (2), 3a da npomeHnte nOnoxKeHNeTo Ha KonaHa.
PEYIINPAHE HA HAKIOHEHOTO NOIOXEHME
- 3a da nocTaBnTE cedanKATA B HAKNOHEHO NOIOXeHHe, HATNCHeTe 6yToHa 3a peYunpahe Ha noONKeHHeTo (14) B donHaT aCt OTnped Ha 6yctepa (3).
- 3a Da BbphTe CeDAkKaTa OT HAKNoHeHO NOIOKeHne B NoIOKeHne 3a CyaHa, HaTnChTe OTHOBo ByToHa 3a peryInpapa He Na INOKeHMeTo (14) IN BdHHTe CeDAkKaTa HArOpE KATO NEKo HATnCKaTe 6yCTepa (3).
JIINHEHHA3AUNTAOTCTPAHNHHYDAPN(L.S.P.)
AkoIHHeHnata3aunitaOTcpaHnHnYUpan6 (6cnnpenCbpaTata Ha ABTOMObna HnHnHAMANBA npocpHaCTBOTo HA cedankata 3a nTHNka, Bb3MOKHO e Ta da CE OKy.3a Ta3n CEHNATNCHe 6ytoHa 3a OCBOkDaBaHa H aauNTaO tcaHnHnYUpan (13).3a Da DCHTHe 6ytoHa, Tp8BaDA cBaNITE KAnbFba O b6nerankA.3a Da 3akAHte OTHOBO L.S.P.(6) KbM cedankata, CneDbaTe YkazHnraTa 3a CBaNHe B o6paTHnpe
HAKNAHA CA CE OBLERJKA 3A TINABA
HaKnaHaaTa ce 6nneranka 3a rnaBa (15) nomara da 6bne npeoTbpateHo onachoto KlnBaHe Hanpei Ha rnaBata Ha BaWeto dete no Bpeme Ha cbH.
TMOXe da sbde noctabeHa B eHNO OT Tpnte NOJIOKeHHa.
H36ytaTe HaknHaJuaTa ce 06neraKa 3a rnaBa (15) Hanpei,doKato DoCTnHe JKeNaHTo NonoXeHne.
TnabaTa Ha Deteto Tp8bBa BnHaHn Da Onnpa B HaknaHnAata Ce 6nneranka 3a rnaB.
CBJIaHE IIOBTOPO 3AKaUaHE HA KAnbΦA 3A CEJaIKA
KanbΦbT ha ceaIankata 3a abTomObnce cbcton OT tnp aactn (oBneranka 3a rna, oBneranka, bcycep). Te ca cbeHHeHn Ha HKOKNMeCTa Ype3 cekeTHN KOHTeHa JAcTNUHNeHn. CneJ KaTO ce OTKONyAer BCNUHn 3aOKPauKn, KaNbΦbT MoKe Da 5bDe CBaNen.
3a da noctabute KaIbpa 6paTHo Ha cedalkaTa, cneBaTe yka3aHnraTt 3a CBAJIHe B o6pateH pei.
KaIbΦbT MoKe Da ce nepe cAmo Ha 30^ , Cnporpama 3a DeNikkaTHO pAne, B npOTBeH cnayn nnatBt HA kaIbΦa MoKe da ce o6eUbetn. Monj nepete KaIbΦa OTeJHO OctaHAnOTO npae H He ro cyuete B cyuINHnn H npraKcIbHeBa CBETnHa!
TAPAHUNHAIPON3BOIDTEINPA3IOPEEN3A N3XBbPJIHE
CYBEX GmbH (Riedingerstr. 18, 95448 Bayreuth, Germany) Bn daBa 3 roDHH rapaHua 3a To3n npOyKT. Ta3n rapaHua e B cNtA B cTpaHaTa, KbTeTo npOyKbTb NpBBOHauAHO e npOdaEN OT TbPBOEu Ha Dpe6Ho Ha KInENT. CbIbPjXaHMeTO Ha rapaHuaTA uCnTA BaxHa INΦOpMaJNa, Heo6xOdima 3a ynpaxKaBaHeTo Ha rapaHuaTa, Moke Da ce HamePi Ha HauNw ye6 caT go.cybc-online.com/manufacturer-warranty-car-seats. Ako B onncaHHeTo Ha npOkyTa e noka3aHa rapaHua, BaWnte 3akOHn npaba CpeUy Hac npn Heu3npaBHOCTn OCTabat He3aceHAtn.
Molna3BaTe pa3nope6nte 3a n3xBbpyne Ha otnaBcN BbB Baata CTpHa.
BERTIFIKACIJA
UN R129/03
CYBEX Solution G i-Fix sa automatiskim pojasem na tri tačke gezivanja: 100 cm - 150 cm
EHMANTIKEESNAHPOΦOP'IE
Xwpi TnEv kpi TnC apoia Cva Tn Ev kpi Ttu ApxN,To Kaioa autokivTou Ee mtoepi va TpoTTOINtheta i na PooTei KATI e auto e oIOVOHNTOTE TPOTIO.
Ppokieevou va diaaepaiote tn awotn ppoataia tou naioa c, evai atolutw cattapainto va xnpoiotoine to kaiogau autokivitou otwcs Tepiypapetai aeuto to exyeiipio.
Na uny xpnoiopoTeiTa TpoTu To TaIaIg fTaeI Ta 100 ek. eUyoC
To ouykepiévo kaioa autokivntou mtopei va ykataotaotei Kaiauata oxnatw ta otla eival ykepiéva t n xpnoan ouotnata w npooeans taibow oupwva e to yxepidio tou oxnatos.
Kataaannlo mvo ia kaiajmaata oxnauov me autouatec wve cpiwv onuiv wou evkiie oov uov kavoviao tou OHE 16 n eva oovaqo npottu.
Mny xnpoiotnoieite onneia eTnapic nou poeuv opoptia diaopepetika ato auta tou TEPiypapovtai otic oyniec kai ettnmaivovtai oto ouotna ouykpatnns taillowv.
Oakn np n Etipaveia ts tAtns Tou kaioaatoa autokivntou pTei va akoumtai otN Ttou KAeioaatoa tou oxjauo.
H CwvN wou npTTEI va avebaive I pOc ta T avw kai nioe KION. 7ev npTei note va tinyaive I pOc ta EPTPOS IPOs to avw anueio nC zovns Tou oxmuatoC oC.
To koumtwa tnc zwns tou oxnatoc dev tpette tnte va diattepva to mpatao tou kaolajatoc. Av n bao n ts zwnc evai trolu jacpi, to kaiautokivntou dev evai kalalnlo ia xpran oe autn tn theo oto oxnja.
H Cwv Tpiov Oneiw TpTei va Tepaei Movo aTc Kaeopieves diabpoques. Oi diaobopues Twv cwwv Tepipapovtai aeutoepws e auto To Exyepidio kai oneivovtai pe pao xpwma oTo Kaiau autoKIVTOU.
H Cwv an aphaeia TpeTVE va tavao o to duvatov xaunotepa kata uko ts BouBwviKx wpaTou taiou oac vla va exei to bEATIOto atotetaeua oe pittwn atuxmuato.
Piv aT6 kaTe xPhon 8eBaiWteIe oT n autOpatn zwn oxmuotc Tpvw onueiw exei puthetai eoiota kai kpatae iqixta to owa taou taiou. Not e uotpefete t zwn!
Móvo éva βéltiota puθμiúévo πoʊképalo μtɒopei va πoʊpεpei oTo Taδi oac t n μeviatn tpoaia kai aven, diaαpaλicovtrac npapaaλa ot nζων ψou μtɒepei va totoθeɪŋe i kalλλλ.
To Kaioa autokivnou pTei va eivai navta oot aopaiaevo oTo oxma, akoua kai otav dev xpnoiopoitoeia.
NaBaeiawveTe TAVOTe OTo KaTHiaua autOKivHTou EV EeI opNVwoei kata To KIAEIAIO TnTIOPTaC Tou OXHAtos n Tnpuhian Tou mow KAthiauotc.
To kaθiαμa autoKivntou doKiμaζετai kai avaywpiζετai xwiç tyn paμiikn TpOaTIA NλeupiKns KPOUANS.
Oi aookeuec n aaavikeeva Tou utpaxovt o oxeta tpeiteva Taivata v eivatotepewvea aeaaapnTpTO. Diapopetik, evexeta va diaakopntiou taot autokinto, yevovocTou aTropouoeva TPOkAeai Teavaiouo
To Kaioiua autokivntou dev Ptei ve xpnaiotoietai toe xupic To kaiuia kaioiatoC. Beaiwtheta otx npoiotoeite mvo auvtiko Kauiua kaioiato CYBEX, kaoho To kaiuia atotea i anavtiko otoxeio TnI LEIOUPyiaocu taou kaiiogatoc.
Flote mny apnveTe To TiaDi OaC OTo autokivnto xwpiE tiriBaeyn.
Ta μeρη του συθηματος Μυγκραπης ταιδιού Θερμαίνονται στον ἀλιο και μιθορου ενδεόμενως τον προκαλεσουν ἔκαμα στο δερμα του ταιδιού ας. Προστάγμε το ταιδιος και το καβίσμα autokivntou αἰότην atteuθείας ἐκθεδησιστον ἀλιο.
Ev atuxma tiopeia vttpokaleoi oto kaiama autokivntou bafn tou va mvi elvai opatne yuvov aI. AvikataoTNE TO TAIIDKO kaioma ma taTO atuxma. 2e TEPITWON aqipoliac, anteBuvBEITE OTV TTANT ao n otov kataoekuaaon.
Mny xpaiaotoiite auto to kaiaua autokivntou tepiaotepo ato 11 xovia.To kaiogaa autokivntou ekitbetaai oe meyAn katatovnonkata n diapkeia zwnc tou, yevovoc Tou pokaale alawaeic otny Tioiota tau uukoiu te npaeaou Tou pvou.
Ta Taaotika epn mtopoov va kaqapiouov ne nio atoppuvavko Ka ZeTo vepo. Not e npoiotoiite ioxupa atoppuvatki na xawpio!
Ee opiaeva kaiojata oxnatov kataokvaaoueva ato euaiaotna uikai, n xpnan kaipatuv autokivntou mtopei va apnoei onuadia n/ kai va tpokaaleoi e0wpiaaou tou xpawatoc. ia va to atotpetyete auto, mtopeite va totoBtetae mioukoubepa n petoet, n katipapuoio katao ato ta kaiopa auto kukivnou ia va tpootatyeet Ta kaiajata tou oxnatos.
EEAPTHMATA IPOIONTO
INSTALAREA SCAUNULUI PENTRU COPIL IN VEHICUL
HnKorau He octaBajTe ro DeTeTO BO ABTomO6nIOT 6e3 Hnd3Op.
JeNoBInTe Ha cHCTeMOT 3a Bp3yBaHBe Deca Ce 3aRpeBaat HA COHcE IN MOKeJa npeIMBbKaAaT INrOpeHNuHa DetCKaTA KOxa. 3auNTte Tn DETo INCeIMTuTeTO 3a ABTomoBnI ON dIpuKTHO INIOxkyBaHe Ha COHyeBa CBETNHa.
Coo6paKaJaHa Hecpeka MoKe Da npEni3BnKa OwTeYBaHe Ha ceNlWTeTo 3a ABTomO6Hn UTO He MOKe Da ce BNn CO rno OKo. 3aMeHete Ro ceNlWTeTo 3a ABTomO6Hn No co6pekaJaHa Hecpeka.Ako Ce DBOyMnte, COBeYBaJte Ce o 3aCTAnHHKOT UNn Co pOn3BODHTeNTOT.
HeKOpNcTeTo rObaCeNiUte 3a ABTomO6Hn NODIOrO od 11 roHNi. CeNiUteTo 3a ABTomO6Hn E 3NIOXeHO H RaONEMO ONTOBAPyBAHbe 3a Bpeme HA pOKOT HA TpaHBe HA POnN3BOJOT, WTO BOIN DO npPOMEHBO KBaINTeTOT HA MaTePiJANOT CO TEKOT HA BpeMeTO.
MK
IJIactuHnTe DeNoB MoKe Da ce YcCTaT co 6laRo cpeCTBO 3a YncTeHb E nToNa BOa. HnkoraW He KopucTe OcTpri CpeCTBa 3a YncTeHb nn6eNna!
Ha HeKoN CeINHTa Ha BO3HNOTo I3pa6OteHN Od YyBCTBnTeJIHn MaTePJIaJI, KOpNtEHeTo MOKe DA OCTABN DAJKN N/INN Da ppeIN3BnKA 6IeJHHe.3a da ro cnpueHTE OBA,MOKe Da CTABNTe Ke6e,KPNa INCnHn HpeMET NOc CeINHTeTO 3a ABTOMoBn 3a da Ro 3aWHTNTe CEINHTeTO Ha BO3HNOTo.
ENOBH H PON3BOO
(1) Hacnoh 3a rp6
(2) CtpaHueH HacnoH 3a rnaBa
(3) NepHnue
(4) Paika 3a npncnocobyBahe Ha BnCnHaTa Ha HacnoHOt 3a rnaBa
(5) Bɔdɪnka ha kaii 3a paMo
(6)Пинэарнастарашина заштета od ydapn (L.S.P.)
(7) Bɔdɪnɪkæ Na ckyTeH kʌni
(8) Pauchn 3a 3aknyybahe ISOFIX
(9)TOUKN3a3aKoTbByBaHbeISOFIX
(10) KonyuHa 3a ocno6oYBaHBe ISOFIX
(11) Cnryphoceh nokaaTei ISOFIX
(12) Onden 3a YyBaHe Ha YNaTCTBOTO 3a KOpNCHnK
(13) Konue 3a ocno6ybahe Ha cTpaHnHata 3aHTnTa OD ydpn (14) Konue 3a npncnoc6yba Ha no3nuija
(15)PncnoocnHnB Hacnoh 3a rnaBa
TOUHA N03NUNJA BO BO3NJOTO
CeNiHTeTo 3a ABTomO6nMoKJe da ce yNtpe6yBa co BOBneHn paKn 3a 3aKnYbAbe ISOFIX (8) ha CeDnUHa HO3NIo ONpeMeHN co ATOmatcKn KaIN Co TPN TOKN 3a fKnCupaHe. 3a KopNCTeHo HA ISOFIX oCBpHeTe ce Ha npINOKeHn CTnCKo Odo6peHn TInNOBn BO3nJa. MoKe da ja do6nete HajHOBA Ta Bep3nJa Ha www.cybx-enl-online.com.
Kora deTeTo Ke 6nne Nobucko od 135 cm, KomnataNbHnOcTa Mery Solution G-IFix n Bo3nIto MoKe da ce hAmnn. PaarneJaTe ro cnncokot co TnIOBn BO3nla 3a da npOBepre Daan DeTCKTo cednWte MoKe da ce ynotpe6yBa BO CITE no3nUn Ha HacNoHOT ha IraBa 6e3 OrpanuYbaHa. Bo oc0beHn Cnyan, DeTCKTO cednWte 3a ABTomoBn MOKe, NcTo TaKa, da ce ynotpe6yBa Ha npDeHnO To nTHnKo cednWte. CeKorau NoHTyBaJte rnpenopaknte Ha npOnBDOInTeLoT HA BO3nIto.
MOHTNPAHbE HA CEIMITE 3A ABTOMOENI BO BO3NJOTO
-
Cekoraw tpe6a da 6nnde ciyprnh deka...
-
HacIIOHnTe 3a Ip6 BO BoB3nIto Ce 3aKoUeHN BO nCnpaBeHa N03uJia,
KORA TO MOHTHPATE CeDINIHTETo 3a aBTOMO6bUH Na IpeJHO To naTHUcKO ceDINITe, ToA e pncnco6eHTo E moKHO noHa3ad, 6e3 da BnJaae Bp3 XJIe6BOITE 3a BODeHe Ha KAMUOT.
2.Ппддя монтicapte,бидete cnryphn дka ceinuTeTo 3a abTomobn e BOceNeUka nOuNJa.
3.Ocno6oTe rKoNnHbata 3a ocno6OyBaHbe ISOFIX (10) 3a da r npoterHepe paKaHTe 3a zKnpyBaHbe ISOFIX (8).
KoHbTa 3a ocNoBvBaHe ISOFIX MoKe Da ce ocNoOaTc amocToJHo Cb IIO IM Ce Do3BOyBa Ha paKInTe 3a 3akNpyBaHe ISOFIX Da ce npncnOco6at He3aBnCHO.
- Tpyhete n paayknte 3a 3aknyybahe ISOFIX (8) od ochobata OHONKY konky wTO ce OTbopaat.
- NocTabeTe ro CeiHHTeTo 3a ABTomo6nHa COOdBETHO TO CeiHtE BO abTomo6nIOT.
- TypheTe rnaPaknte 3a 3aknyyBaBe ISOFIX (8) BO TOOKnte 3a 3akOTbYBaBe ISOFIX (9) cdeOdoKeHa He ce 3akny4aTb COoDBETHATA NOImuJa Hne CyeUhTe 3Bky Ha 3aknyyBaBe. Bojata Ha DbaTa INHdkatopn ISOFIX (11) Ke ce ImMeHN OJ UpeBHe BA 3eJeHa
- BnTe CnpyHn Deka CeDnTTo E Odobpo PnpuBpCteHo,ObnyBajKe ce da ro N3BneyeTe OD ToKNTe 3a 3akotByBaHe ISOFIX (9).
- TypheTo ceDnWTeTo 3a ABTomO6nKOH HacNoHOT 3a rp6 Ha cedNtTeTo HA BO3nNToCe DoEka He Ce npamHn UenocHO HacNoHOT 3a rp6.
A NOITNIPAOT 3a rnaBa Ha BO3nIOTo npETCTaByBa npenpeKa, NOBnepeTe
TO CEJIOCHO HaroPe INI N OTCTpaHete Ro (OCBeH Kaj ceiMIta Bo BO3nIO
3ABPTEH HAHa3aD).
- CeiHHTo MoKe Da ce HameCTn BO CeeueKa nn JIeKeUka no3uJa co npITnCKaHe Ha konue 3a npncnoCo6yBaHe Ha no3uJa (14) n DvXeHe Ha ceHHTo HHaHpei nn TypKaHe HHaHa3aJ.
OTCTPAHYBAHbE HA CEIMHTETO 3A ABTOMOBNIOB03NIO
I3BpTe Tn YekOpnte 3a MoNTaKa no o6paTeH peoCnei.
- OTKnyeTe rpaKIne 3a 3aknyuBaHe ISOFIX (8) HaDbTe cTpaHn Typkajn rKoTHNbTa 3a ocNo6OyBaHe ISOFIX (10) nIcTOBpeMeHO Bneeykn HHaHa3a.
- ⅢaBaeTe ro ceDnWteTo oT Tooknte 3a 3aKoTBByBaHBe ISOFIX (9).
- OcTpaHHeTo cedHteto 3a ABtOMoBn H TpyHTe n paKHTe 3a 3akIyhyBaHe ISOFIX (8) cIeNoCHO hAha3ad BO HMBHIne TpaHCnOpTHN NO3NIUM.
PNCIOCOBBAHE HA HACNOHOT 3A FJABA
CTpaHnHnOHT HacnOH 3a rnaBa (2) MoKe Da ce npncnoc6b co nomow Ha paKaTata 3a npncnocobyBaHe Ha BnCmHa Ha HacNoHOT 3a rnaBa (4) WTo ce HAOta BO 3aHNOT DeHa CTpaHnHnOHT HACNOH 3a rnaBa (2). PnpncocoBeTe ro HACNOHOT 3a rnaBa TAK ToM KACmHnHOt POctoJAHne NOMEy pAMOno H deTeTo HACNOHOT 3a rnaBa DA He e Noronemo Od 2 cm (npnbNkXho 2 npctA).
HnHaHa HacnoHot 3a rnaMoXe da ce npncnocOdoeka CeMHTo CE MOHTnpa BO ABTOMOHNT.
PEKIM 3A IPNABUNHO MOHTPAH
100cm-150cm

3AKONHAJTEJAETCKATA
- Noctabete ro ckyTHnoT KaIu Bo 3eNeHnTe BOINKn Ha ckyTeH KaIu (7) Ha ceiHTeTo 3a ABTOMOBnI.
- NobJeHETe ro kAnoT 3a pAmo 3a da ro npnterHeTe ckyTHnO T KaI.
- Ha ctpaHATA Ha ceDmHTeTo 3a ABTOMO6nI ITO CE HAOrA DO 3aKONyBaJkATA, KaHOT 3a pAMO IN CkyTHNOT KAnM MOPa Da CE BHeCAt 3aeHNO BO BODINKATA HA CkyTHNOT KAnu (7).
-
BneheTe ro KaHOT 3a pAMo Hn3 BODnKkata Ha KaH 3a pAMO (5) cde Odoeka He BnEe BO BODnKkata Ha KaH.
-
BnTe CnpyH nKa KaHOT 3a pAmo MNHyBa npKy KnyHATA KCKA H aTeTO nKeA He ro Donnpa BpatoT Ha dTeTo.Ako e NotpeHo, npcocobete ja BncnHaT hA CTpaHnHnOHT Hacnoh 3a rnaB (2) 3a da ja nMeHnTE No3nJnta H KAHOT.
PNCIOCO6YBAHbE HA JEXEUYKATA NO3nJNA
1.3a Da ro nocTABnTe CeDnWTeTO BO NExeKHa No3uJa, npHTNCHETe Ro KOnHeTo 3a PnncnOco6yBaHc He NaNo3uJa (14) BO DnHO To Ha npEHNOT den HA nepHMHeTo (3).
2. 3a da ro bpaTne ceiHHTeTo od nekeyKa BO cepeyKa no3uJa, npNTnCHete ro nobTOPO HO KONHTe 3a npncnoc6yBaHe Ha no3uJa (14) n BoTe ro ceiHHTeTo HArope n npTuNcKajTe 6naro Bp3 nepHnHTe (3).
JIHHEAPHA CTPAHNUH3AUTNTA OD YDAPN (L.S.P.)
Ako IINHeaHATA cTpaHnHa 3aWHTa OJ ydApN (6) DoaRa BO KOnpIInKT CO BpaTata HA ABtOMoBnOITNNK ABO BnJaE Bp3 KOINHATA HcNo6OJeH npocTo Ha NtHmKTO CeDmTe, MOKe Da ja Ia HBaNTe. 3a da Ro HapBaNTe ToA, pntncHeTe RONHeT0 3a ocNo6OyBaHe Ha JINHeaHATA cTpaHnHa 3aWHTa OD ydpAr (13). 3a Da ro HajTe OBA ONHe, Tpe6a Da ceOTCPaHn HABNaKaTA Ha HacNoHOT 3a rnaBa. 3a Da ja NoctaBte NObTOpHO L.S.P. (6) Ha cDenHtETo, CneDeTe rynatCTbTa 3a OTCTpaHyBaHe no ObpaTeH peDoCneI.
JIEXEUYHACIOB3A TJABA
Pnncoc6bnBnot Hacnoh 3a rnaBa (15) nomara da ce cnpeyn onacnocta rnaBata Ha deteTo da naHaHAnpeD odeKa cIne.
Moxe da ce nocTaN BO eHa oD Tpu no3uIN.
Typkajre ro npncocobnnot hacnoh 3a rnaBa (15) Hanpei ce dokeka He ro noctabite BO cakaHaT a no3uja.
TnabaHa HeTeTo cekoraTpe6a Da ro Donnpa npncnocobnnot Hacno 3a rna.
MK
OTCTPAHBYBAHBEI NOBTOPHO NOCTABYBAHBE HA HABNAKATA HA CEINUITE
HabnakaHa ceMHTeTo 3a ABTOMOBnCe COCTOn OD TPN DeNa (Hacnoh 3a rnaBa, HACNO 3a rp6 n nepHmYe).Tne Ce npuBPCTEH BO COODBeTHa no3uJa Ha HeKoNky MeCTa Co pInKeP-KoNHy a EnaCTNuHn IeHTn. HTom Ke rN OKONHate DoaTOUc, Ke MoKe Da rN OTCTpaHNTe NoEINHeYHNTe DeNoBN Ha HabnakaTa.
3a da rnoocabnte noBTOPO HABNAKNTe Ha ceDnWTeTo, cneJeTe rnyaTcTBata 3a oCTpaHbBaHe no o6paTe peoocne.
Hbnakata moke da ce nepe camo Ha temnepaIpaO od 30^ ,Ha nporpama 3a 6naro nepehe, 6ujekn BO cnptoNBHO MOKe da ce jabN 6neDHeHe H a MaTePnJAnOT Ha HabNaKata. Iepete ja HabNaKaT a OndeHNO OD pyra 6nega N he cyuete ja BO MAUINHa 3a cyuEbe anuTa Hn H n DInPeKTHa COHHeBa CBeTIuHa!
TAPAHUNJA HANPOIN3BOJNTJEOT N PEGYNATNBN 3A OTCTPAHYBAHBE BO OTIAD
CYBEX GmbH (Riedingerstr. 18, 95448 Bayreuth, Германija) 3a oboj ponm3bOu Bn Daba 3 roDHN rapaHUnja. Гаранида Вжи BO зemjata BO koja npom3bOOT My e npoDAeH Na KIneHTOT BO MAJONpOdaK6a. CodprkHATA Ha rapaHUnjata N cTne OCHOBH INHΦopMaUNI NOtpe6Hn 3a NOTpBdYBaHe Ha rapaHUnjata Moke Na ce Hajdat Ha HauWATy NOvETHa CTpaHUnca go.cybx-online.com-may-warranty-car-seats. Ako rapaHUnjata e pinnakaxha-BO ONICOT Ha npoM3bOToT ToA HEMA da BnJae bp3 BaWnte 3aKOHKn Pnaba KOH Hac BO NORJe H a DeΦeKtN.
Iountybajte npepytaNBITE 3a OTcpanHyBaHBe BO OTnad BO BAaata 3emja.
MK
CERTIFIKACIJA
UN R129/03
CYBEX Solution G i-Fix sa automatiskim pojasem na tri tačke gezivanja: 100 cm - 150 cm
Laiyinjivakr SaaBc- -
yadit lalijrur sasdd-epkvekt prtevckn (6) kar ke deravajke kse shay tckr r hia y aay dhya hagrai sot 4hdojgi gagg kpr mamabivat kcrata ,to iae algeg kcnna sahvi Eeasa kranne ke liet, saedz icpevt prtevckn rniliz jkctan (13) dkaai I hss kxtn tuk pahcuyaneke liet eokresetke kcvkr kco hctana HsA L.S.P. (6) koi siat se kiir se jaoceke liet, hctane ne ki nirdsrki ka paalan n o ckm me k
伊尔拉姆纳 乌兹别克
Rekalaiadinaing Heidezot (15) Nidef ke darran kvee de kisir kfo zaratnakr larekse Aroe n e rokne
aannnnnnaan anananaananaananaananaananaananaananaananaananaananaananaananaananaananaananaananaananaananaananaananaananaananaananaananaananaananaananaananaananaananaananaananaananaananaananaananaananaananaananaananaananaananaananaananaananaananaananaananaananaananaanaraananaananaananaananaananaananaananaananaananaananaananaananaananaananaananaananaananaananaanana
aayasahre
mni n 1
Wnnaaanae 1nnnsnaanennnneauu uuaaae aae
100
nannnnnne nnnnne nnnnne nnnnnnne nnnnnnne nnnnnnne nnnnnnne nnnnnnne nnnnnnne nnnnnnne nnnnnnne nnnnnnne nnnnnnne nnnnnnne nnnnnnne nnnnnnne nnnnnnne nnnnnnne nnnnnnne nnnnnnne nnnnnnne nnnnnnne nnnnnnne nennnnnne nnnnnnne nnnnnnne nnnnnnne nnnnnnne nnnnnnne nnnnnnne nnnnnnne nnnnnnne nnnnnnne nnnnnnne nnnnnnne nnnnnnne nnnnnnne nann
mnnnnaaannnnnnnnnnnnnnnnnnnnnnnnnnnnnnnnnnnnnnnnnnnnnnnnnnnnnnnnnnnnnnnnnnnnnnnnnnnnnnnnnnnnnnnnnnnnnnnnnnnnnnnnnnnnnnnnnnnnnnnnnnnnnnnnnnnnnnnnnnnnnnnn
aanaanana aanaananaananaananaananaananaananaananaananaananaananaananaananaananaananaananaananaananaananaananaananaananaananaananaananaananaananaananaananaananaananaananaananaananaananaananaananaananaananaananaananaananaananaananaananaananaananaananaananaananaanana
CHOT BOPHAN KHOA TREM VAO
- DātDAY buoc dui vao Ranh Dan Day That Qua Dui mau xanh la cay (7) cuaghe xetre em.
- Kéo day that vai de that chat day that qua dui.
- ò ben phia ghe xe tre em ben canh phan khoa day, day buoc vai va day buoc dui phi cung duoc luon vao trong Ranh Dan Day That Qua Dui (7).
- LuonDAY buoc vai qua Ranh DAN Day Buoc Qua Vai (5) cho den khi day nam ben trong ranh dan.
- Bao dam day that vai vat ngang qua ba vai cua em be chu khong cham vao co cua em be. Neu can, dieu chinh chiue cao cua phan Tya Dau Co The Dieu Chinh (2)de thay dai vi tri day.
THAO VA LAP LAI TAM BOC GHE
Tém bóc cua ghé xé tré em co ba phàn (phàn tuya dαu, phàn tuya lung vā phàn ghé náng). Cac bó phàn nay duoc giú cor djinh o nhieu vi tri bang cac khuy bám vā bang co gián. Sau khi dà nhá tát ca phu kien gán kēm ra, co the tháo tung bó phàn cua tí mòc.
De lap tam bac lai vao ghe, lam theo cac hroung dan ve thao tam bac theo thu ty ngucc lai.
Chiduoc phep qiat tam boc o nhiet do 30^ va o ché do giat nhe nhang, neu khong co the lam phan vua tam boc bj bot mau. Vui long khong giang Chung tam boc voi cac do vat khac va khong say kho trong may say hoac hong kho duoi nang mat troi truc tiep!
BAO HANH CUA NHA SAN XUAT VA QUY DINH VE VUT BO
CYBEX GmbH (Riedingerstr. 18, 95448 Bayreuth, Duc) bao hanh cho san pham nay trong 3 nam. Bao hanh co già tri o quoc gia non san pham nay duoc ban cho khach hang luc ban daiu qua mot co so ban le. Nói dung bao hanh va tát ca cac thong tin quan trunc can tié de thuc hiem bao hanh co tren trang chu cua chung tāi: go.cybex-online.com/manufacturer-warranty-car-seats. Neu tong phan mô tâ san pham co néi dung bao hanh, cac quyen phap ly cua ban doi voci kièn chung tōi ve cac lòi san pham vān khong thay doi.
Vui long tuan thu cac quy dinh vêt vúr bó rac thai tai quoc gia cua ban.

PENSIJILAN
UN R129/03
CYBEX Solution G i-Fix dengan tali pinggang keledar tiga titik: 100cm - 150cm
go.cybex-online.com/manufacturer-warranty-car-seatswherehichelshowed.
会用。
有
海当国的用将自
CYBEX GmbH
Riedingerstr. 18 | 95448 Bayreuth | Germany
INFO@CYBEX-ONLINE.COM / WWW.CYBEX-ONLINE.COM
WWW.FACEBOOK.COM/CYBEX.ONLINE