0511 AB - Laser pointer SKIL - Free user manual and instructions
Find the device manual for free 0511 AB SKIL in PDF.
User questions about 0511 AB SKIL
0 question about this device. Answer the ones you know or ask your own.
Ask a new question about this device
Download the instructions for your Laser pointer in PDF format for free! Find your manual 0511 AB - SKIL and take your electronic device back in hand. On this page are published all the documents necessary for the use of your device. 0511 AB by SKIL.
USER MANUAL 0511 AB SKIL
- The measuring tool is intended for determining and checking horizontal and vertical lines
- The measuring tool is suitable exclusively for operation in enclosed working sites
This tool is not intended for professional use. - Save these instructions for future reference and include them with the measuring tool when giving it to a third party
TECHNICAL DATA
Working range to approx. 10m
Levelling accuracy ± 0.5mm / m
Self-levelling range ± 4^
Levelling time ≤ 6 seconds
Operating temperature +5^ to +40^
Storage temperature -20°C to +70°C
Relative humidity (max.) 90%
Laser class 2
Laser type 650 nm, <1 mW
Tripod mount 1/4"
Batteries (included) 2 x AA (LR6) 1.5V
Operating life time (approx.) ≥15 hours
Weight
$$ 0, 3 \mathrm {k g} $$
Dimensions (length x width x height)
75 × 63 × 83.5 mm
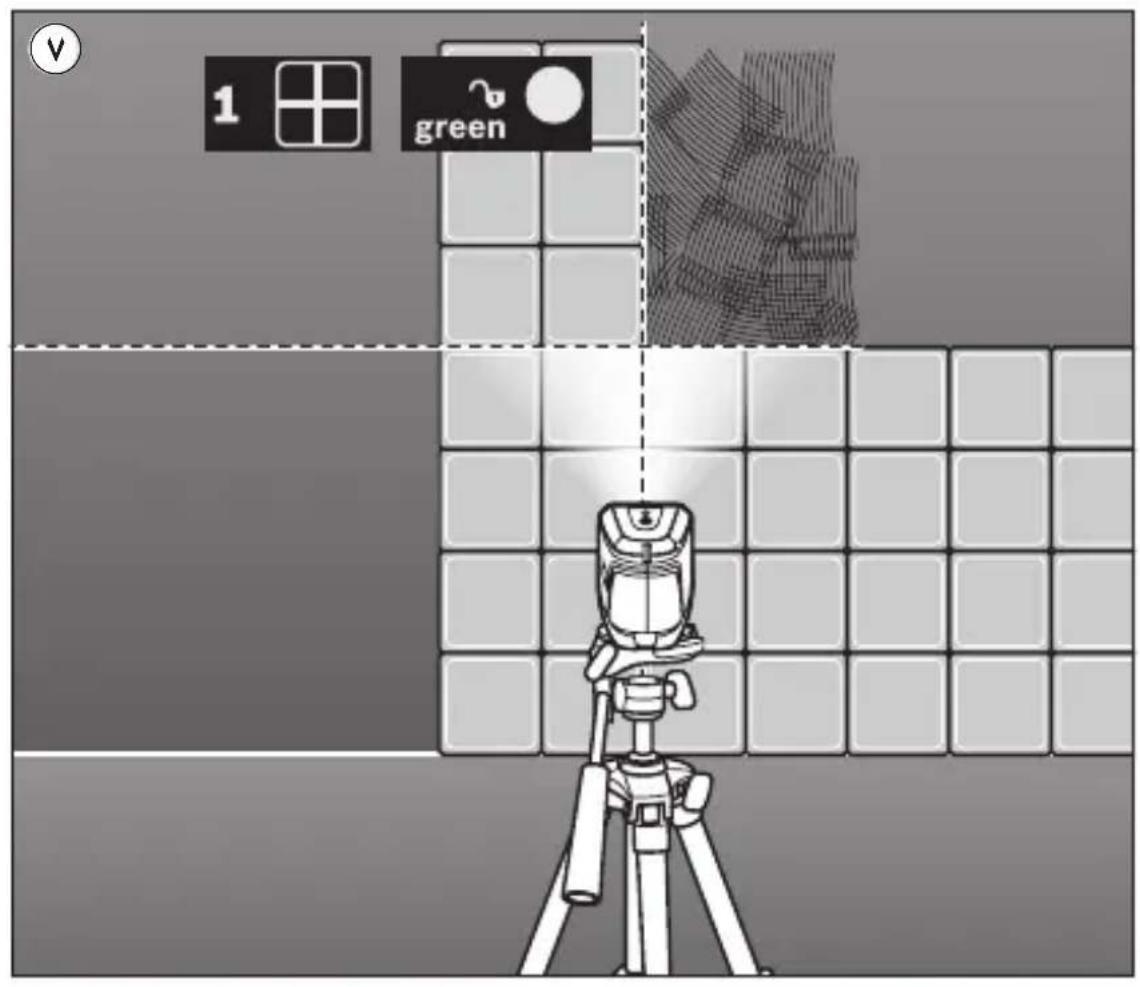
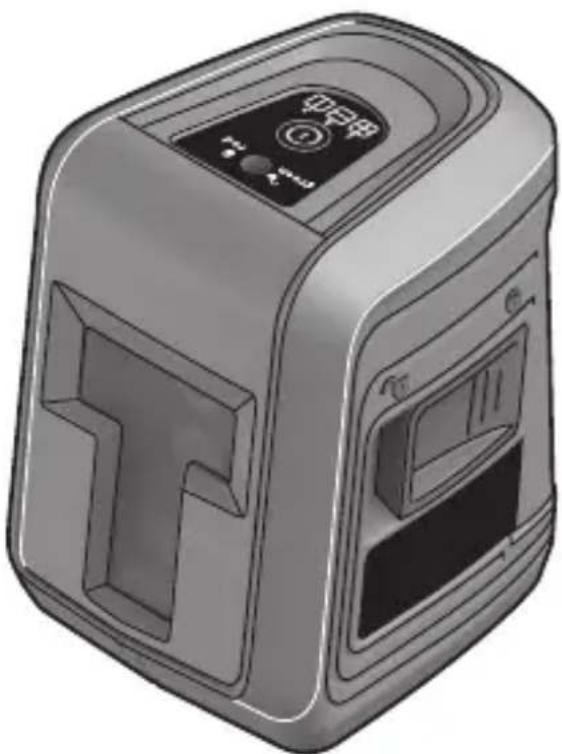
TOOLELEMENTS 1
A Battery lid
B Latch of battery lid
C On/Off button / Mode button
D Exit opening for laser beam
E Automatic levelling indicator
F Switch for automatic levelling / locking the levelling unit
G Holder
H Fastening screw of holder
J Tripod mount 1/4"
K 1/4" screw of holder
L Locking screw for holder
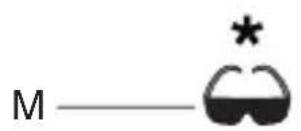
M Laser viewing glasses
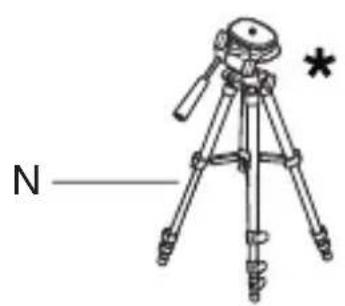
N Tripod
* NOT STANDARD INCLUDED
SAFETY
- All instructions must be read and observed in order to work safely with the measuring tool ②
- Never make warning signs on the measuring tool unrecognisable
-
The use of other operating or adjusting equipment or the application of other processing methods than those mentioned here can lead to dangerous radiation exposure
-
Do not direct the laser beam at persons or animals and do not stare into the direct or reflected laser beam yourself, not even from a distance (you could blind somebody, cause accidents or damage your eyes) ③
- If laser radiation strikes your eye, you must deliberately close your eyes and immediately turn your head away from the beam
- Do not make any modifications to the laser equipment
- Have the measuring tool repaired only through qualified specialists using original spare parts (this ensures that the safety of the measuring tool is maintained)
- Do not allow children to use the laser measuring tool without supervision (they could unintentionally blind other persons or themselves)
- Do not operate the measuring tool in explosive environments, such as in the presence of flammable liquids, gases or dusts (sparks can be created in the measuring tool which may ignite the dust or fumes)
EXPLANATION OF SYMBOLS ON TOOL
② Read the instruction manual before use
3 Laser radiation / Do not stare into beam / Class 2 laser product
④ Do not dispose of electric tools and batteries together with household waste material
USE
-
Inserting/replacing the batteries
-
alkali-manganese batteries are recommended for the measuring tool
- do not use rechargeable batteries
- to open the battery lid A, press on the latch B and fold the battery lid up
- insert 2 x AA/LR06 batteries (pay attention to correct polarisation)
- always replace all batteries at the same time
- only use batteries from one brand and with the identical capacity
-
remove the batteries from the measuring tool when not using it for extended periods (when storing for extended periods, the batteries can corrode and self-discharge)
-
On/off
-
to switch on the measuring tool, press on/off button C (immediately after switching on, the measuring tool sends a laser beam out of exit opening D)
I do not point the laser beam at persons or animals and do not stare into the laser beam yourself, not even from a large distance - to switch off the measuring tool, press on/off button C repeatedly until indicator E goes out
- slide switch F into position ⑥ to lock the levelling unit
- do not leave the switched on measuring tool unattended and switch the measuring tool off after use (other persons could be blinded by the laser beam)
-
when not using the measuring tool, switch it off in order to extend the battery life
-
Operating modes
-
all modes can be selected WITH automatic levelling (position ⑤) and WITHOUT automatic levelling (position ⑥)
- press button C repeatedly until the desired mode is set
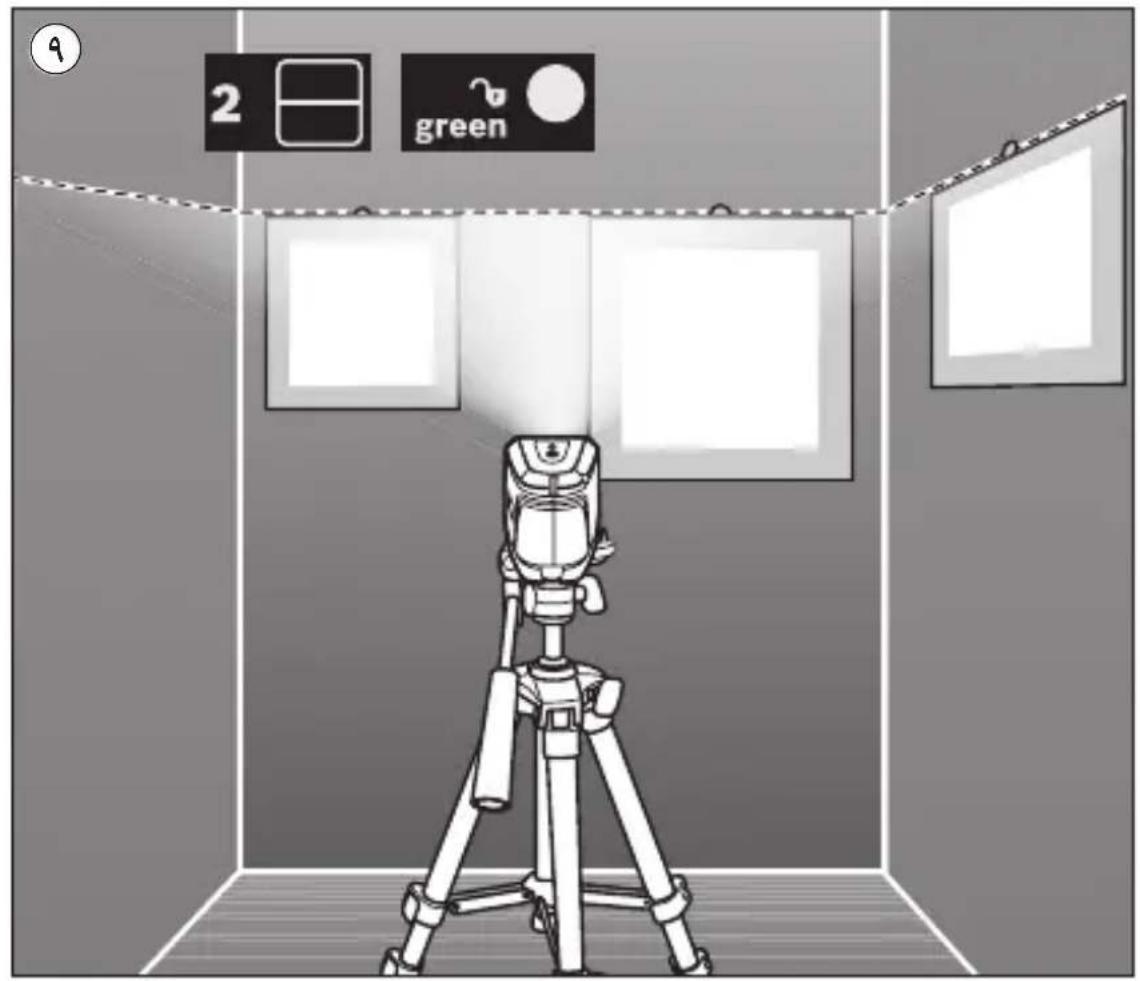
1) Cross-line mode: the measuring tool generates a horizontal and a vertical laser line ⑦ ⑧
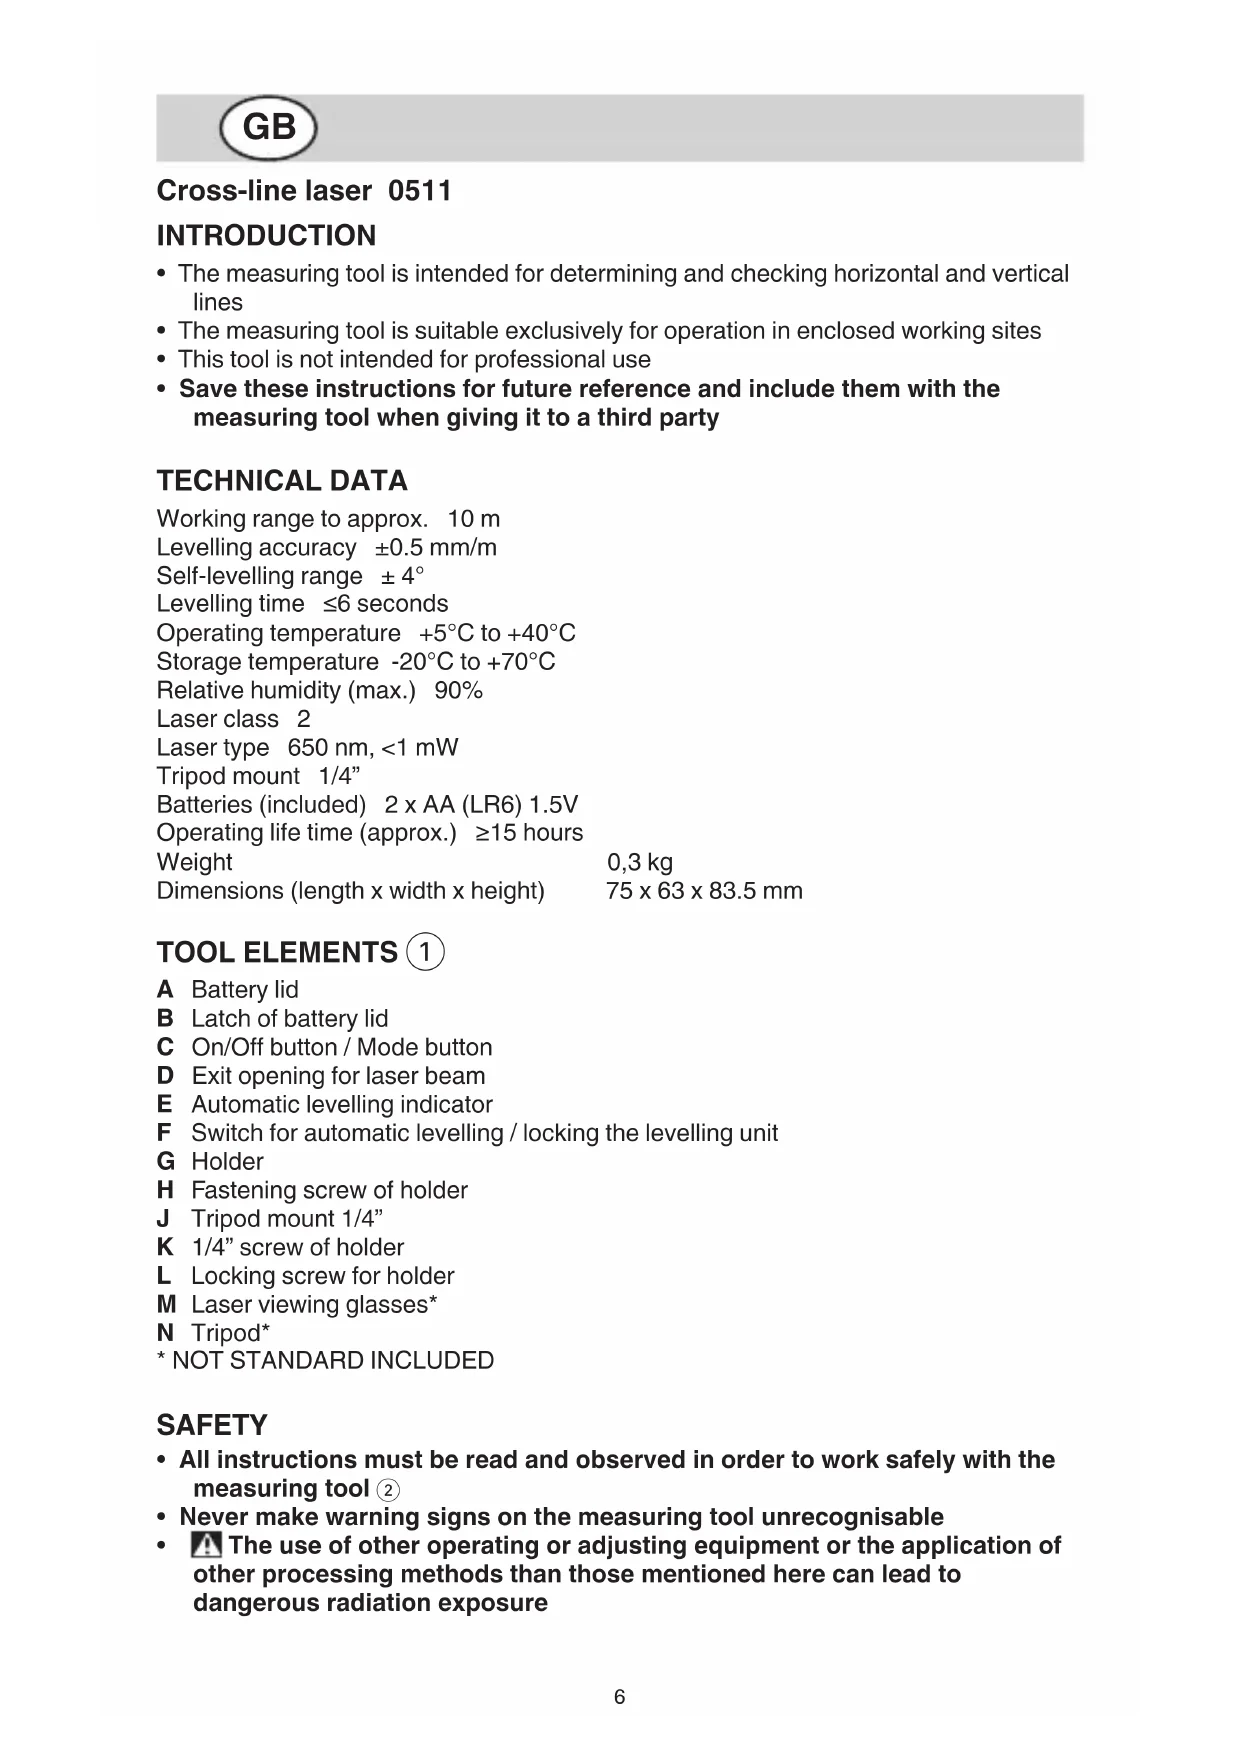
2) Horizontal mode: the measuring tool generates a horizontal laser line 9
3) Vertical mode: the measuring tool generates a vertical laser line 10
-
Working with automatic levelling
-
position the measuring tool on a level, firm support or attach it to tripod N or to the supplied holder
-
slide switch F to position ⑤ (indicator E lights up green)
- if the automatic levelling function is not possible, e.g. because the surface on which the measuring tool stands deviates by more than 4^ from the horizontal plane, the laser lines flash and indicator E lights up red
- if this is the case, set up the measuring tool in a level position and wait for the self-leveling to take place
- as soon as the measuring tool is once again within the self-levelling range of ± 4^ , the laser lines light up continuously and indicator E lights up green
- when not within the self-leveling range of ± 4^ , working with automatic levelling is not possible, because it cannot be assured that the laser lines run at a right angle to each other
- in case of ground vibrations or position changes during operation, the measuring tool is automatically levelled in again
-
to avoid errors, check the position of the horizontal and vertical laser line with regard to the reference points upon re-levelling
-
Working without automatic levelling
-
slide switch F in position (indicator E lights up red)
- when automatic levelling is switched off, you can hold the measuring tool freely in your hand or place it on an inclined surface
-
the laser lines no longer necessarily run vertical to each other
-
Attaching with the holder
-
with holder G you can fasten the measuring tool to different objects ranging in thickness between 10 and 60~mm , such as vertical or horizontal boards or pipes
- loosen fastening screw H, mount the holder to the desired location and tighten the fastening screw again
- place the measuring tool via tripod mount J onto the 1/4 male thread K of the holder and screw it on applying moderate force
I do not overtighten the measuring tool, otherwise it can become damaged
- adjust the holder roughly before switching on the measuring tool; for this, loosen locking screw L, move the measuring tool until horizontally positioned at the desired height and retighten the locking screw
APPLICATION ADVICE
- Always use the centre of the laser line for marking (the width of the laser line changes with the distance)
-
Laser viewing glasses (1) (not standard included)
-
laser viewing glasses M ① filter out the ambient light
- this makes the red light of the laser appear brighter for the eyes
- do not use the laser viewing glasses as safety goggles (the laser viewing glasses are used for improved visualisation of the laser beam, but they do not protect against laser radiation)
-
do not use the laser viewing glasses as sun glasses or in traffic (the laser viewing glasses do not afford complete UV protection and reduce colour perception)
-
Working with the tripod (not standard included)
-
tripod N ① offers a stable, height-adjustable measuring support
- place the measuring tool via tripod mount J onto the 1/4 male thread of the tripod and screw the locking screw of the tripod tight
MAINTENANCE / SERVICE
- This tool is not intended for professional use
-
Protect the measuring tool against moisture and direct sun light
-
Do not subject the measuring tool to extreme temperatures or variations in temperature (the accuracy of the measuring tool can be impaired)
-
as an example, do not leave it in vehicles for long time
-
allow the measuring tool to adjust to the ambient temperature before putting it into operation
-
Avoid heavy impact to or falling down of the measuring tool
-
damage to the measuring tool can impair its accuracy
-
after heavy impact or shock, compare the laser lines with a known horizontal or vertical reference line
-
Push switch F ① into locking position ⑥ when transporting the measuring tool (this locks the levelling unit, which can be damaged in case of intense movement)
-
Keep the measuring tool clean at all times
- Do not immerse the measuring tool in water or other fluids
- Wipe off debris using a moist and soft cloth
- Do not use any cleaning agents or solvents
- Regularly clean the surfaces at the exit opening of the laser in particular, and pay attention to any fluff of fibres
-
If the tool should fail despite the care taken in manufacturing and testing procedures, repair should be carried out by an after-sales service centre for SKIL power tools
-
send the tool undismantled together with proof of purchase to your dealer or the nearest SKIL service station (addresses as well as the service diagram of the tool are listed on www.skil.com)
ENVIRONMENT
-
Do not dispose of electric tools, batteries, accessories and packaging together with household waste material (only for EU countries)
-
in observance of European Directive 2012/19/EC on waste of electric and electronic equipment and its implementation in accordance with national law, electric tools that have reached the end of their life must be collected separately and returned to an environmentally compatible recycling facility
symbol 4 will remind you of this when the need for disposing occurs

Laser croix 0511
INTRODUCTION
VEDLIKEHOLD / SERVICE
Humedayed relatiya (max.) 90%
Clase de laser, 2
Tipode laSer 650 nm. < 1 mW
MANUTENÇÂO / SERVICO
Hhi3do nid wTaTnB 1/4"
BaTapei (BxOyTb y KOMnIeKT) 2 x AA (LR6) 1,5B
Pobochny pecypc (npn6). ≥ 15 roDInH
Bara 0,3Kr
Po3mipn (OOBHHa x uHpHa x BnCota) 75x63x83,5MM
EJEMEHN IHCTPymeHTA 1
A KpnuKa ceKuiI Ia6aTapeiok
BΦikcaTop cekii Ira 6aTapeNoK
C Bumnka/ Khonka nepemkahanpeKmmy po60TH
D BuxiHn O'TBip IaIa3epHoro npomeHa
E IHHaTOp aBTOMaTHHOrO HIBeJIHOBaHHA
F BmHKaay aBTOMaTHUHO HiBeJIIOBaHHa / BaJIb 6IoKHyBaHHa MaTHNKOBORO By3la
G KpinJIeHHa
H KpinnIbHn rBnHT KpinIeHHa
J Hizdo nid wTaTnB 1/4"
K ΓΒνΗΝΤ 1/4" κριπηλενΗ
LΦikcyuoyn rBnHT KpinJIeHHA
M OkyIaIpy IaI py po6Otn 3 Ia3epoM*
N LtataNB
*CTAHДAPTHO B KOMПЛЕKT HE BKJIQUAETbCЯ
B6E3NEKA
- IpouHTaIte Bci Bha3iBKn i DotpmyTeecx, 06 npauoBaTH 3 BmipIOBaJIbHnM IHcTpymeHOM 6e3neuHO Ta HadiHo ②
Hikoln He doobte nonepeJyBaIbHi Ta6nUKN Ha BmipIOBaIbHOMy IHcTpymEnti Do HeBni3HaHHocTi
BnHOpncTaHHa 3ac06iB o6cIyroByBaHHa I HAcTpoOBaHHa, 0o BiDi3HaOTbc8 BId 3a3NaeHHx B ciI iNCTpyKciI, a6o BnKOpncTaHHa D03BOJeHHx 3ac06iB y Heo3BOJIeHH nCnocI6, MoHe npn3BoDHTn Do He6e3neueHHx Bn6yxIB BnnpomIHOBaHHa
He HaprabIaTe Ia3epHn npomihb Ha IIOdei a6o TBapHH, i cami He DnBITbcra Ha npamn a6o BiO6paKHyBaHn Ia3epHn npomihb (BiH MoKe 3aclinHTn IHnx IIOdei, cnpuHNHTn HeuaChi BnnaDKn a6o NowKOHTN Oci) ③ - Y pa3i notpanlaHHa3epHoro npomeHa B OKO, HABMnche 3anlloitb ooi i BiDpa3y BiDBeprHtbcra BiD npomeHa
Hiyor He minaTe B Ia3epHomy npncTpoi
BidaBaTe Cbi BmipOBAIbHn npHa ha peMOHT IHe KBaIiΦIKOBaHm faxIBqam Ta IHe 3 BnKOpNCTaHHaM oprInaIbHnx 3aunactn (TJIbKn 3a TaKHX yMoB BaW BmipIOBaIbHn npHa i Haadai 6yde 3aIIuataTcra 6e3neuHm)
He do3BolnTe dIyH KopnctyBaTncs 6e3 Hargny Ia3epHbHMipOBaIbHm npnaDOM (BOHN MOKytb HeHaBMNChe 3acInnI INHX JIOde)
He npaioTe 3 BmipOBaIbHnM npnaJOM y cepeoBnui, de icHyec He6e3neHa BV6yXu BNaIIOH npncTyHocTi rOpoux piHN, ra3iB a60 nNly (y BmipOBaIbHomy npnaDi MOKytb YTbOPIOBaTnCra iCKpn, BiD JIKX MoKe 3aImaTnCn PnI a6o napn)
IORCHEHRA DO yMOBHNX NO3HAQOK HA IHCTPYMEHTI
② IpepeBnKOpncTaHHm npOHTaIe iHCTpyKciIO i3 3acTOcyBaHH
③ La3epHe BnnpomimIOBaHHa / He nBtbcB npomihb / Ja3epHn npoayKT 2 Klaacy
He BnKndaTe eNeKTpoiHCTpyMeHT Ta 6aTapei pa3OM 3i 3BnuaHNM CMITTM
BHKOPNCTAHH
BCTaBHeHHa/3amHa6aTapeNoK
-ДЯВИМIPIOBAJIbHOrOпрILAуpeKOMeHdYETbCЯBNKOpNCTOByBaTHBnKJIIOUHO LyxHo-MapraHcEbi6aTapei
- He BnKOpNCToBvIte aKymyIaTOpHi 6aTaapei
- ьдкгпн Кршну ceuцдя 6atapeHok A, haTncHITb Ha φikcaTop B i nDhiMItb Kprshky
- BCTaBTe 2 6aTapei AA/LR06 (pepeKoHaITeC, lo nIoUcN cNoJyHeO npaBnIbHo)
- 3aBHKmHnTe OndHocHO Bc6aTaepKn
- BHKOPNCTOByTe JIiSe 6aTapeKn OJHO RINPO6HnKa i OJHaKOBoI EMHOCTi
- BnMaTe 6aTapeeHH, Anu O Bn TpNbAun Yac He 6yJeTe HOpNCTyBaTHcBbMIPIOBaIbHm npHaDom (npn TpNbAOnMy 36epiraHHi 6aTapeHMOKHTb KopoOdyBaTN i camOpO3paJHaTnC)
-
BmKahHbBmKahHH
-
yBIMHHTN BIMipIOBaJIbHN npHa, HaTnCHiTb Ha BIMnKaC (BiDpa3y nICJBAmKahHBAIMipIOBaJIbHN npHaBnPOMIHoe Ja3epHn IpOMiHb 3 BHXIDHOOTBOPY D)
! He cnpyMOByte Ia3epHn npomInb Ha IIOdei TBapnH i He nBItbcy Ia3epHn npomInb, BKNIOUaOOni 3 BeINHOI BiDCTaHI - yBIMKHyTN BIMiPBOBaIbHn IHCTpyMeHT, HATNCKaIte Ha BIMnKaU C Do Tnx nip, noHn iHNkAToP E He norache
-ДябLOKByaHHMaTHNKOBOrOBy3laBCTaHOBITbBIMnKaUFBNIOJKeHH 6 -
He 3aHnauTe yBIMKHyTn BmMipIOBaIbHn npHaad 6e3 dOrJa, nicJy 3aHInHcHHe p6oToN BmHKaTe BmMipIOBaIbHn npHaad (iHsi oco6n MoKyTB 6Tu 3acJIinJIeHi Ia3epHm IpOMeHem)
-3 MeToO eKoHOMiI eJIeKTpoeHepriB BmNkaTe BmIpIOBaIbHn iHCTpyMeHT, RaIcO Bn Hm Came He KopncTyETecr -
PeKIMn po6OTn
-
Bci peHMM pO6OTn MOxHa BMnKaTn 3 aBTOMaTHHm HBeJIIOBaHHaM (noJooHeHHa ⑤ ) iBE3 (noJooHeHHa ⑥
- HATNCKaIte Ha KONky nepemkaHnpeKIMy po6OTn C do Tnx nip, noHN He 6ynde BCTaHOBJIeHn Heo6xIDHn peKHM
1)PENm nepexpechnx liH: BnMipIOBaJIbHN iHCTpyMeHT BNpOMiHOc ONDy rOpN3OHTaIbHy i ONDy BEpTINHaIbHy Ia3epHy LiHiO ⑦ ⑧
2) TOpn3oHTaIbHn peHm: BImipIOBaJIbHn IHCTpyMeHT BNIpOMiHOe OdHy TOpn3oHTaIbHy Ia3epHy liHiO ⑨
3) BepTKaIbHn peHm: BnMipIOBaJIbHn iHCTpyMeHT BnIpOMiHOe OdHy BepTKaIbHy Ia3epHy IiHiO 10
-
Po60Ta y peKIMi aBtOMaTHORo HIBeJIIOBaHHA
-
BCTaHOBIb BImipIOBaIbHn iHcTpymeHT Ha TBepdy rOpN3OHTaIbHy NOBepXHIO a6o 3akpiiTb NOro Ha wTaTnBi N a6o Ha KpinJIeHHi, 0o DoJaεTbcra
-
BCTaHOBIb BmNKaF B NOLOKeHHa ⑤ (iHdNkATOp E CBiITbCra 3eJIeHM KOJIbOpOM)
- RAHQU aBTOMaTnue HIBeJIIOBaHHr HEMOJINBE, HAp. RaHQU NOBepxHr, Ha JKi CToITb BmIPIOBaIbHn IHCTpyMeHT, HaxInHeHa 6IbH HiK Ha 4^ , Na3epHi IiHII MIRaOTb i INdHAtOp E CBITbcra YepBOHm KOlbopom
- y TaKomy pa3i BcTaHOBITb BmMIPBOBaHn iHCTpyMeHT B rOpN3OHTaJIbHe NOLOJKeHHra i 3aueKaIte, nOKn He 6yde 3diIChEhe aBTOMaTUnHe cMOHIBeJIIOBaHHRA
- TijbKN-HO BnMipIOBaJIbHn iNCTpyMeHT 6yde 3HaXoIITncB DiaNa30Hi ABTomaTHUHO HBeJIIOBaHHa ± 4^ , Ia3epHi IiHII 6e3nepePBHO CBITbC a IHINKaTOP E CBITNbC3eJIeHIM KOJIbOpOM
- 3a MeKamn Diana3OHy aBTOMaTHUHO HiBeJIIOBaHHa ± 4^ npaIIOBAHTN 3 aBTOMaTHHm HiBeJIIOBaHHaM He MOJINBO, OCKIbHN He MOJHa 3a6e3neHTN nepEniKyIpyHicTB Ia3epHnx LiHiMiX Co6oIO
- npn ctpycax Ta 3miHax nolOHeHHn pOToTROM eKcnIyatauBnMipIOBaIbHn npnlaad 3HOBy aBTOMaTHUHO HIEJIHOETbcra
-
nicra NOBTOPHORO HIBELIOBAHHa, 063anobirn nomnikam, nepeBipTe NIOJXeHRA TOpN3OHTaJIbHOI YN BepTKaJIbHOI Ja3epHOI IiHII BiIDHO DO 6a3OBHX TOOK
-
Po60ta 6e3 aBtOMaTHHOrO HIBeJIHOBaHHA
-
BCTaHOBIb BmNkau F B NOLOKeHHra ⑥ (iHdNHaTOp E CBiITbcr YepBOHm KOIbOpOM)
- npn BnMKHyTomy aBTOMaTHyH iBeJIIOBaHHi BmIpIOBaIbHn npnaM OJHa TpIMaTH BilbHO bpyci a6o nocTaBHTn Ha noxNly nobepxHIO
-
na3ephi liHii He o6OB'raKoBO 3haxOaTbcS nepneHdkyIrpHO OHa Do OHOi
-
MoNTaK Ha KpiJIeHHi
-
3a donomoroio kpiinlenna G BnMipobalbHni IHctpymeHT moKHa 3aKpinIOBAH na pi3hnx npedMeTAX TOBUNHO BID 10 do 60 MM, HAp., Ha BepTKaIbHnx a6o ropnOHTaJIbHnx dOwKax a6o Tpy6ax
- BiDnyctiTb KpiinnbHn RBnHT H, npncTaBte KpiInnenB Heo6xIDHomy Micci Ta 3HOBy 3aTARHITb KpiINbHn TBnHT
- HacadiTb BmipobaIbHn iHCTpymeHT rHi3dom niD wTaTnB J Ha rBnHT 1/4" K KpinJIeHHI i 3aKpyTiB NOrO Ha KpiInJeHHI 3 NOMIPHOIO CnIoIO
!He 3aKpyuYTe BmIpIOBaIbHn IInCTpymeHT 3aHaTO CnIbHO,BM OMeTe HOro NOnKoDHTN
- rpy6o BnipBnIe KpInJeHH, nepH HIX BMnKaTH BmMipIOBaJbHN iHCTpyMeHT; Ira zboR BiDnyCtITb fICcyOChr TBnHT L, nepemictITb BmMipIOBaJbHN IHCTpyMeHT BROP3OHTaJIbHe NOLOKeHHa HEO6xDiHi BNCOTi i 3HOBy MiHO 3aKpyTiB fIKCyOChr TBnHT
IOPADNIIO BHKOPNCAHIO
-Дяпознayehня 3aBнд ВнКОристову Te cepeHy JIa3epHOJIiHII (ширноа ЛаЗерноЛиHII мИЯЕТбСВЗ B 3aJIeKHOCTI BiД BiIDCTaHI)
- Okyjarydny po60Tu 3 na3epom (He BnIouaEbC8 B CtaHApTHN KOMPJIeHT NOCTaBKN)
- OkyIaIpaO6OTn 3 Ia3epom M ① BiIbTpOByIOCTB CBIIO 3OBHiuHbORO cepeoBua
-
3aBdIKN YbOMy YepBOHe CbiTIO Ja3epa 3daeTbcra dIy Oey CBiTlIiIM
-
He BnHOpNCTObYIe OkyIapn IJIa PO6OTn 3 Ja3epOM B JHOcTI 3axnCHNX OkyIapIB (OkyIapn IJIa PO6OTn 3 Ja3epOM npn3HaueHi IJIa KpaUoro po3ni3HaBaHHaJa3epHOro IpomHe, aJIe BOHn He 3axnUaIOb BiJ Ja3epHOro npomHHa)
-
He BnHOpNCTObyIe OhyIapn IJra po6OTn 3 Ja3epOM IJIra 3axHcTy BiD coHcIa 3a HcpMOM (OKyIrpN IJIra po6OTn 3 Ja3epOM He 3axNuAIOb IOBHCITU BiD yΦ-mpOMHHI i NOripSyIOTb po3ni3HaBaHHaKoJIbOpIB)
-
Pojoba 3i ŠtataHbOM (He BHLIOyAcTbCBy CStaHApTHN KOMnJIeKTH NOCTaBKN)
-
トATN B N ① 3a6e3neue cTa6iBHy niDcTabHy dIy BmIpIOBaHH, BnCOTy rHOIMKHa peryIIOBaTu
- NOCTaBTe BmipIOBaJIbHn npIaI rHI3dOM nI d wTaTb J Ha pI3b6y 1/4" WtATnBa i 3aTnCHiTB NOro fIKCyUOUM TBnHTOM wTaTnBa
OIGJIAD/OBCJYROBYAHHRA
- Léi iHCTpymeHT He npndaTHNДЯ nPOMNCIOBOrO BnKOpncTaHHa
3axnauTe BmipuBaIbHn npnaB iD BOJor n coHnynx npomeHB
He donychaIte BnJIbBy Ha BHMipIOBaJIbHn npJlaed eHCTpeMaJIbHnx TemnepaTyp Ta TemnepaTyphNX nepenadIB (MOKytb nOriipSyBaTH TOUHiCTb BmIPIOBaJIbHOrO npJlady)
-
3OKpema, He 3aIIuIe Te IHO Na TpINBaJIH Yac B MaUNHi
-першни BMнкати Но,дану саблзьати свю Temnéратуру -
YHnKaIte CnJIbHnx NOStOBxIB Ta naIHHB HmIpIOBaIbHO rnpHa
-
B pe3yIbTaTI NOxKOJxEHHB BnMIPIOBaJIbHOrO npNlaDy MoKe nOripuNTncr NOro ToCHCTb
- nicnBHO NOIbOxy a6o naHHnpeBipTe Ia3epHy liHIO 3a DonomorO Bxke icHyOoi rOpNtAlbHO i6o BePTNaJIbHO KOHTPObHOI liHii
Pa6oTeH dHaana30n Do npn6J. 10m
ToHocT Ha HnBeJInpaHe ± 0,5mm / m
O6xBaT ha camOperyJnpaHe ±4°
Bpeme 3a HnBeInpaHe ≤ 6 cekyHdN
Pa60tha TemnepaTypaoT +5^ 1o +40^
TeMnepaTpaHa cxbxpaHHeHneoT -20°C dO +70°C
OTHOCHTeHa BnaXHOCT (MaHC.) 90%
Klnac na3ep 2
TnIa3ep 650HM, <1 mW
OTBOP 3a MOHTnpaHe KbM CTAInB 1/4"
BaTeepn(BKJIIOyeHn) 2xAA(LR6)1.5V
PpOdbJIKHTeHOCT Ha pa60Ta (npn6n.) ≥15 Yaca
Tero 0,3 kg
Pa3mepn (dIbIKNHa x IwpoUHa x BncoUHa) 75x63x83,5mm
EJEMEHTN HA NHCHTPYMEHTA ①
A Hanak Ha rHe3doTo 3a 6aTepeH
B Bytoh 3a 3acToonopBaHe Ha KaNaKa Ha rHe3doTo 3a 6aTepeH
C NyckOB npekbcBa/ ByToH 3a peKIma Ha pa6oTa
D OTbOp 3a n3xoJaunna3epen JbU
E CBeToOnoHa cnCTeMaTa 3a aBtOMaTHUHO HnBeJInpaHe
F HIOy aBTOMaTHUHO HNBELIPAHe / 6IOKHPOBka Ha KOJIe6aTeJIHHTe DINKeHHN
G CToiKa
H 3aTOnOpBaU BnHT Ha cToiKaTa
J Pe360Bn OTBOP 3a CTAINB 1/4"
K BnHT 1/4" Ha cToiKaTa
L ByToH 3a 3acToNopBaHe Ha cToiKaTa
M Ouila 3a Na6IIOdaBaHe Ha Ia3epHnI bY
NCTaTnB*
- HE E BHKIIOUeHA CTAHДAPTHO
BE3ONACHOCT
3a da pa6oTnTe 6e3oNaCHO n cnrypHo c n3MePBATeHnHa ype, Tpr6Ba da npOyeTe N Cna3BaTe BCnUHN YHa3aHnA ②
Hnkora He octaBnTe npedynpdntelnTe Ta6eKn No n3MePbTeHHype Da 6bDaT HeueTnBu
Ako 6bdaT n3noI3BaHn pa3nUHN OT npNBedeHnte Tyn npncnoc6leHna 3a 06cnyKBaHe nHn HactpoBbHe nHn aKO ce
n3nJIHBArDpyrnpnoepdpyr,TOBa moHe da Bn n3JIOHN Ha onaCHO 06JIbYBaHe
He haoBaIte Ia3epHnI bY KbM Xopa N HNBOTHN IN BHNMaBaITe da He nOrJeHHeTe HENOCpeDCTBeHO CpeSy Ia3epHnI bY NN CpeSy HerOBO OtpaJHeHne (Taka MoKeTe Da 3acJIeNTe Xopa, Da npuHHnte TpyoBn 3IoNoLyKn nn Da npedn3BnKaTe yBpeKdaHe Ha OHTe) ③
- Ako Jla3epHnT JbU nonaIHe B OcHTe, rN 3aTBOpTe Bb3MOJHo Hau-6bp30 n OTdpbHnTe rJaBaTa Cn OT Jla3epHnR JbU
He n3BbpuBaIte n3MeHEnn no Ia3epHoTo 6OpyDbaHe
-Донускайт eнзмерВаTeлнгуpeДа 6ьдe ремоNTиран само ot KBaHnФицпанН Тхнци n само C n3ПОЛЗВаHe Ha OPNHnHaJIHn pe3epBHNч actN (c TOBa ce rapaHTnpa 3ana3BaHeto Na ФункциTe, OCHryprBaUn 6e3ONaChOCTTa Ha n3МерВaTeIHLngуpeД)
He octabraye deca 6e3 npaHnHa3Op da pa6oTc n3MepBaTeHHypei (MoraT HeBolno Da 3aclenr T pyrX opa)
He pa6oTe c n3MepBaTeHnna ypeB CpeDa c NOBnSeHa onaCHOCT O EKcIIO3H, B KOrTO hMa IecHO3aNaHmN TeuHOCTn, Ra3OBe Hn npaxOBe (B n3MepBaTeHnna ypeD MoRaT Da Bb3HNKHAT NCKPn, KOnTO da Bb3JIaMeHrT npaxa nn napHTe)
OBRCHEHNE HA CUMBOJNTE NO HHCTPYMEHTA
②Прдуnotpe6a npooyetepe bkoOCTBOTOc yka3aHnA
③Ja3epHo IbueHne / He rIeJaIte B Ibua / Ja3epen npOdyKT KlaC 2
He n3xBbpyIe eIektpoypednte n 6aTeepn 3aeDnC 6HTOBN OTpaBc
yNOTPEBA
- NocTaBnHe/cmHa Ha 6aTepuNTe
-преничва ce 3a pa6ota c Измерваелня урд да ce плзватajkaюMaнганови бateрни
- He n3no3BaIte npe3apeDm6aTepn
- 3a OTbaprHe Ha KaNaHa Ha rHe3dOTo 3a 6aTePnA H aTncHeTe 3actOnopBaunr 6yToH B n OTbOpTe KaNaHaHarope
- noctabete 2 x AA/LR06 6aTePN (o6bpe Te BnMaHne Ha npaBnHOTO HacOyBaHe Ha nolocnte)
- BINHARI 3aMeHrTe BCnKbAtepIn eHOBpeMeHHO
-ИЗПОЛЗВайтЕ само баТериN OT eДИN И CBьц ПрОИЗВODИТЕЛ И C eДнaКыВ КалaцNTeT
- aKO npoDbIJIHnTeJHo BpeMe Hama Da n3NoJ3BaTe ypeDa, n3BaJHaTe 6aTePnnte ot Hero (pni npoDbIJIHnTeJHo cBxpaJYBaHe 6aTePnnte MoRaT da npOTeKAT I da ce camOpa3peJrT)
BkIIOUBaHe/u3KIOUBaHe
- 3a BKNIOUbaHe Ha N3MepBaTeJIHHy ypei HaTNCHeTe NycKOBnI ppeKbcBaC (BedHa rCa Cnei BKNIOUbaHe N3MepBaTeJIHHY T ypei H3JIbYBa Ia3epeH IbY Ipe3 n3XODaIg OTBOP D)
! He haoBaIte Ia3epHnI NbU KbM Xopa IIIN JHBOTn; He rIeJaIte Cpeu Ia3epHnI NbU, CbUO N OT TOrJMo pa3CToRHe - 3a IN3KJIIOUBAHe HaTNCHETe NyCKOBnI ppeKbcBaC HeKOJIIOKpaTHO, DOKaTO CBETINHHNRT INDnKATOp E yrache
- npemecTe Te nIb3raa F do no3nue ⑥ 3a da 6loKnpaTe Moyla 3a KOle6aTeHN DnHexHn
- He octabraye ypea BkIouyen 6e3 Ha3Op; cIeH Hato npHKIOUHTe pa6ota, ro n3HIOUBAIte (dpyr nn mOrat da 6bdaT 3acJeHn OT Ia3epnra Ib)
-
KOraTo He H3NoJ3BaTe H3MePBATeJHnY ypei, ro H3KJIIOUyBaITe, 3a da neCTuTe eHeprnA
-
PeKIMn Ha pa6oTa
-
BCNUpeKIMN MOraT da ca KaHTo c BKHIOUcEHO (no3nue ⑤) TaKa n C H3KJIIOUcEHO aBtOMaTHUHO HNBeJInpaHe (no3nue ⑥)
- HaTncheTe HeKoJIkoKpaTHO 6yToHa C Do DocTnraHe Ha JeJaHnpeXHM
1) PeHHM KpbcTocaHn JInHn: n3MePbaTeJHnT ypeI reHepnpa eHaXOpN3OHTaJIHa n eJHa BepTKaJIHa Jla3epHn JInHn ⑦ ⑧
2) Xopn3oHTaJIeH peHIM: n3MepBaTeJIHHaT ypeI reHepnpa eHaXOpn3oHTaJIHa Ja3ePHa JInHna ⑨
3) BepTKaJIeH peHHM: n3MePbATEJIHHaT ypeI reHepnpa eHa BepTKaJIHa Na3ePha JInnna 10
Pa6ota cbc cnCTemaTa 3a aBTOMaTHUHO HNBeJIpaHe
- NOCTaBeTe H3MePbAteJIHHa ypeH Na XOpN3OHTaJIHa TBbPda OCHOBA, MOHTpaIe TcTaTnB N nII Ha BKNIOUeHaTa B OKOMNJIeKTOBkAta CToIka
- npemeCTe nIb3raa F do no3nue ⑤ (cMbOJIbT E CBETBa Cbc 3eJeha CBETlnHa)
- aKO aBTOMaTnHOTo HnBeJInpaHe He e Bb3MOxHo, HaNP. 3aOTo NOBbpxHOCTTa, Ha KOrTO e NoCTaBeH ypeDa, ce OTKIOHRABa OT XOpN3OHTaIaTa C NOBuee OTe 4^ , Ia3epHnte JInHmMraT, a CBETJIHHnT INdHKaTop E CBeTu C YepBeHa CBeTJnHa
- B TaKbB CnyaH NoCTaBeTe H3MePBATeJHnY ypeD XOpN3OHTaJIHo N I3UHaKaIte aBTOMaTNUHOTo My HNBeJInpaHe
- KOraTO n3MePbATEJIHHrT ypeI 6bIe NOCTaBeH Bbpxy NOBbpxHOCT, YnATo I03nue E B pAMKHTe Ha dHaNa3OHa 3a aBTOMaTHUHO HNBeJInpaHe OT ±4°, La3ePHHTe LInHH CBETrH HeNpeKbCHaTO, a CBeTJIHHrT INdIKaTOP E CBeTN CbC 3eJIeHa CBeTIHa
- B NO3HnI3BbN dHaIaNa3OHa Ha aBTOMaTHUHO HNBeJInpaHe oT ±4° pa6oTaTa BpeKIM C aBTOMaTHUHO HNBeJInpaHe He e Bb3MOJHa, Tb' KaTO He MoJc Da 6bDe rapaHTnPaHo, Ye Ia3epHInTe IHHn Ca NpOd IpaB bTbI eDHa cnpraMo dpyra
-При силни Вибрацни помяна на положенeto NO Врeme Ha pa6oTa ypeдт ce HINBEлпа aBTOMaTNUH0 OTHOBO - CLEД NOBTOPOHTo HINBeJIIPAHe IpoBepTe N03nUHTe Ha XOpN3OHTaJIHaTa, pecn. BepTnKaJIHa JIa3epHn JInHn CnpRAMo peΦepeHTH ToUKN, 3a Da n36erHeTe rpeuKn
Pa60Ta c n3KJIoueHa cnCTema 3a aBTOMaTHUHO HNBELIPAHe
- npemecTeTe nIb3raa F B no3nue ⑥ (CBeTInHHNRT HndnKaTop E cBeTn C cepBena CBeTnHa)
-при ИЗКЛЮЧЕНО aВТOMaTИЧО HИВeЛиРаH e MожeTe Дa ДьрЖИte ИЗМерВaTeЛнЯ урeding ha рьka Илд a Го пocтавITE Ha NaKJILOHeHa NOBbpxHOC T - Na3epHnTe JINHH He ca cTporo nepneHnKyIaRPHn eHa cnPraMo dpyra
3axBaIaHe B cToiKa
- c nOMOuTa Ha cToiKaTa G moKeTe da 3aKpeHnTe H3MePBaTeHnry ypeD KbMa pa3nUHn DeTaN C de6eHnHa ot 10 do 60 mm, Hanp. KbM BepTKaHn, peCn. XOpN3oHTaHn DbCKn Nn Tpb6n
- pa3BnIe 3aCTOOpRAuNBAHT H, NOCTaBeTe CToHkata Ha JKeHaHOTo MRCTO N OTHOBO 3aTeTHeTe 3aCTOOpRAuNBAHT
- KaTO H3NoJ3BaTe OTBopa 3a 3axBaUaHe KbM CTaTnB J HaBnIe H 3aTeHrHeTe CymepHa Cnla H3MePbAteJIHHypeD KbM BnHTa 1/4" K Ha cToHata
!He 3aTraIte n3MepBaTeHnY ypeD TBbPde CnIHNO,B npOTNBEN CnyaM OMOHe Da ro NOBpeDNTe
-прешида вклочи Te ИзмерВаTeння урд, поразовете CTOnKaTа Губо; 3a Zeелт acBO6OeTe 3acToNopraBaUHn BnHT L, npemecTeTe n3MepBaTeHnny upeДdo JHeJahata BInCOnHb INpH6JIIN3nteJIHo XOpN3OHTaJIHn NOLOXKeHne I OTHOBO 3aTeHHeTe 3acToNopraBaUHn BnHT
YKA3AHN3A PABOTA
MapnpaTe BnHaTToUHO cpeTa Ha Ja3epHaTa LHHa (HnpOuHaTa Ha Ja3epHaTa LHHa Ce npOMeHc pa3CToHNeto)
OuHa Ha6IIOdaBaHe Ha Ia3epHnIbU (He e cTaHApTeH akcecoap)
- Ochilata 3a Ha6IIOdaBaHe Ha Ia3epHnIbY M ① fHITpnpaT OKoHaTa CBETInHa
- Taka YepBeHaTa CBeTInHa Ha Ia3epHnIbY Ce Bb3npHema NO-JeCHO OT OKOTO
- He n3noI3BaIte OuHJaTa 3a Ha6JIoDaBaHe Ha Ja3ePHnHa bY KaTO npEpa3HN pa6OTHN OUYla (Te3n OUYna CnyKaT 3a No-dOpTo Ha6JIoDaBaHe Ha Ja3ePHnHa bY, Te He npEpa3BaT OT Hero)
- He n3noJI3BaIte OuIIaTa 3a Ha6IIOdaBaHe Ha Ia3epHnIbU KaTO CJIbHueBn OUYIa NII DOHaTo UyAcTBaTe B YIINuHOTo DBNHeHne (OuIIaTa 3a Ha6IIOdaBaHe Ha Ia3epHnIbU He OcNIpyraBt 3aIITa OT yIITpaBnIOJETOBITE JbUH N OgraHuaBAt Bb3npHemaHETo Ha CBETOBETe)
Pa60Ta cBc cTaNb (He e cTaHApTeH akcecoap)
- cTaTINB N ① OCHrpyra B CTA6HnHa OCHOBa 3a MOHTnpaHe npn H3MePbaHe C Bb3MOHHOCT 3a H3MEcTBaHE NO BHCOuHa
- noctabete pe36obnra OTbop J Ha n3mepBaTeHnry ypei Bbypxy BNHTa C pe36a 1/4" u ro 3aterheTe
ПОДРьЖHA/CEPBИЗ
To3n HNCTpymENT He e npedHa3HaueH 3a npofoecnoHaJHa ynoTpe6a
- ПразаЗВайтЕ ИзМерВаTeЛньпр оТ OBлжнЯВаHe И ДиpeHTHO nonадане на сльнчеви льчи
He n3laarTe n3MepBaTeHnHa ypeHa eKCTpeMHn TeMnepaTpyn nn pe3Hn TemnepaTyPhn npomeHn (TouHocTTa Ha n3MepBaTeHnHa ypeMa MoKe da ce BLOUH)
- Hap. He ro octaBnTe npoDbIknHbpeMe b aBTOMO6nJ
-
OCTaBnTe H3MepBaTeJIHnIr Tyepe Da ce Temneepnpa, npei Da ro BKnIOuHTe
-
I36aRbAte cHn ydApn Hn H3nycHaHe Ha H3MePbTeJHn ypeI
-
BCJIeIcTBHe Ha yBpeJdaHnI NO I3MePBATeHNr ypeI ToHOCCTTa My MoKe da 6bJe BLOWeHa
-
CJIeD CJIeH yIap IJIH I3NysKHe 3a npOBepKa cpaBnBaIte Ja3epHnTe JINHH C N3BeCTHa XOpN3OHTaJIHa IJIH BepTnKaJHa peΦepeHTHa JINHH
-
Horato npehacrte n3MepBaTeHnna ype, npemecTe Te npebKIOUbaTeJ F
① B 3aHIOUeHO NOLOKeHne ⑥ (TaKa MoIyIbT 3a KoJIe6aTeHNi DBHXeHn, KOITOMOKe Da 6bIe NOBpeHn OT CINHn CbTpceHn, Ce 6IoKnpa)
- Пдьркай TeизмерВаTeHня урд винг чИСТ
He notonBaIte n3mepBaTeHnna ypeB BbB BOa nn npyT TeHocTn - N36bpcBaIte 3aMbpcBaHnraTc MeHa, IeKo HABlaXHeHa KbpNa
He n3noJIbaIteNoHCTBaU npenapaTn nn pa3TBOpHTeIN - Почистваite peodOBHcneuaJIHO NOBbpxHOCHTe Ha n3XoJa Ha Jla3epHnJbU HBMaBaITe Da He OCTaBat BlaCINHKI
-
Ako Bbnpen npeun3HOTOpON3BOcTBO IN BHIMaTeJIHO N3NTBaHe Bb3HNKHe NOBpeDa, HnCTpyMeHTa da ce 3aHece 3a peMOHT B OTOpN3npaH cepBN3 3a eJeKTPoHHCTpyMeHTn Ha SKIL
-
3aHeceTe INHCTpyMeHTa B Hepa3rIIO6eHN BnD 3aeEDHO C DOKa3aTeJICTBO 3a NOKyPkata My B TbprOBckn OBeKT, OTKbDeTO CTe FO 3aKuNlN, NIN B Na-6bn3kn cepBn3 Ha SKIL (aJpeCnTe, KaKTo n cxemata 3a cepBn3Ho 06cJyXBaHe Ha eJeKTPoIHCTpyMeHTa, MoKeTe Da HaMePnTe Ha aJpeC www.skil.com)
ОПАЗВАЕ HA OKОЛHATA CРEDA
He n3xBpIaIte eIeHTpoypeIte, 6aTePnI, npncnoc6JeHnraT a OnaHOBnTE 3aeDIO C 6ntOBN OTpaBcN (cAmO 3a cTpaHn ot EC)
- cbo6pa3Ho DnpeKTHBaTa Ha EC 2012/19/EG oTHocHO n3HOCeHN eIekTpuecHn I eJeKtpoHHu ypeDN I OTPa3raBaHeTO N B HauNoHaJIHOTo 3aKHOdaTeJCTBO n3HOCeHNTe eJeKtpoYpeDN CLeDBA Da ce c6bnpaT OTdEJIHO N da Ce npedabat 3a peunKlnipaHe cnopeDN I3NCHBaHnraTa 3a Ona3BaHe Ha OKOJIHaTa CpeDa
- 3a TOBa yKa3Ba CnMbOJbT ④ Toraba KOraTo Tp6Ba Da 6bDaT yHnOxKeHN
SK
Križový laser 0511
UVOD
APKALPOŠANA / APKOPE
- Sis darbariks nav paredzets profesionālai lietošanai
- Sargajiet merinstrumentu no mitruma un saules staru tiešas iedarbības
-
Nepaklaujiet instrumentu loti augstas vai loti zemas temperaturas iedarbibai un straujam temperaturas izmainam (var nelabveligi ietekmet t a precizitate)
-
piemērām, neatstājiet mérinstrumentu uz ilgaku laiku automašīnā
-
vispirms nogaidiet, lidz izlidzinas temperaturas starpiba, un tikai pec tam uzsaciet merinstrumenta lietošanu
-
Nepielaujiet stipru triecenu iedarbošanos uz mérinstrumentu vai tā krisanu
-
bojajumi mérinstrumenta var nelabveligi ietekmēt tā darbības precizitäti
-
ja mērinstrumentes ir sanēmis stipru triécenu vai kritis, pārbaudiet tā precizitäti, savietojot lāzera stara veidoto linju ar limenisku vai statenisku atskaites liniju
-
Transportejot merinstrumentu, parbidiet sledzi F ① bloketa stavokli ⑥ (lidz ar to tiek fiksets merinstrumenta svarsta mezgls, kas preteja gadijumavaretu tik bojats strauju kustibu del)
Uzturiet merinstrumentu tiru - Neiegremdejiet merinstrumentu udeni vai citos skidrumos
- Apslaukiet izstradajumu ar mitru, mikstu lupatiu
- Nelietojiet apkopei kimiski aktivus tirišanas lidzeklus vai organiskos skidinatajus
- Regulari un ipaşi rupigi tiriet lazera stara izvadluku virsmas un sekojiet, lui uz tam neveidotos nosedumi
-
Ja, neraugoties uz augsto izgatavošanas kvaliti un rupigo pecražošanas parbaudi, instruments tomér sabojājas, tas jánogādā remontam firmas SKIL pilnvarotā elektroinstrumentu remonta darbnica
-
nogadajiet instrumentu neizjaukta veida kopa ar iegades dokumentiem tuvakaja tirdzniecibas vieta vai firmas SKIL pilnvarotapeciegades apkalposanas un remonta iestade (adreses un instrumenta apkalposanas shema ir sniegta interneta vietne www.skil.com)
APKÄRTEJAS VIDES AIZSARDZIBA
$$ \therefore \xi > 0 $$
$$ \downarrow \downarrow \downarrow \downarrow \downarrow \downarrow \downarrow \downarrow \downarrow \downarrow \downarrow \downarrow \downarrow \downarrow $$
(g 6 F
$$ \Delta \Delta \Delta \Delta \Delta \Delta \Delta \Delta \Delta \Delta \Delta \Delta \Delta \Delta \Delta \Delta \Delta \Delta \Delta \Delta \Delta \Delta \Delta \Delta \Delta \Delta \Delta \Delta \Delta \Delta \Delta \Delta \Delta \Delta \Delta \Delta \Delta \Delta \Delta \Delta \Delta \Delta \Delta \Delta \Delta \Delta \Delta \Delta \Delta \Delta \Delta $$
$$ \log_ {2} \left(\frac {1}{2}\right) = \frac {1}{2} $$
$$ \Delta \Delta \cup \Delta \Delta \leq L, \quad \cup \cup \leq \cup \cup \geq $$
1.L)·gLoalssayolloaLwajbyjgsjGooGdo
$$ \Delta \leq \text {J a g} \text {s o g a c} L _ {2} \text {a d} \text {a j} L _ {1} \text {a d} \text {a i s} \text {a i i} L _ {0} \text {j i a l y} $$
$$ \cos \alpha = \frac {1}{2} \cos \alpha + \frac {1}{2} \sin \alpha $$
$$ \therefore i \leq i = a w l, o a i s $$
Lg oJr JgK 1/2 j0gJ gJdJwJlwl Lj y
$$ \downarrow \downarrow \downarrow \downarrow \downarrow \downarrow \downarrow \downarrow \downarrow \downarrow \downarrow \downarrow \downarrow \downarrow \downarrow \downarrow \downarrow $$
$$ \left. \right.\left. \right.\left. \right.\left. \right.\left. \right.\left. \right.\left. \right.\left. \right.\left. \right.\left. \right.\left. \right.\left. \right.\left. \right.\left. \right.\left. \right.\left. \right.\left. \right.\left. \right.\left. \right.\left. \right.\left. \right.\left.\left.\left.\left.\left.\left.\left.\left.\left.\left.\left.\left.\left. \text {i} _ {j} ^ {j} = j ^ {j} + 1, j ^ {j} + 1, j ^ {j} + 1, j ^ {j} + 1, j ^ {j} + 1, j ^ {j} + 1, j ^ {j} + 1, j ^ {j} + 1, j ^ {j} + 1, j ^ {j} + 1, j ^ {j} + 1, j ^ {j} + 1, i ^ {j} + 1, i ^ {j} + 1, i ^ {j} + 1, i ^ {j} + 1, i ^ {j} + 1, i ^ {j} + 1, i ^ {j} + 1, i ^ {j} + 1, i ^ {j} + 1, i ^ {j} + 1, i ^ {j} + 1, i^ {j} + 1, i ^ {j} + 1, i ^ {j} + 1, i ^ {j} + 1, i ^ {j} + 1, i ^ {j} + 1, i ^ {j} + 1, i ^ {j} + 1, i ^ {j} + 1, i ^ {j} + 1, i ^ {j} + 1, i ^ {\prime} + 1, i ^ {\prime} + 1, i ^ {\prime} + 1, i ^ {\prime} + 1, i ^ {\prime} + 1, i ^ {\prime} + 1, i ^ {\prime} + 1, i ^ {\prime} + 1, i ^ {\prime} + 1, i ^ {\prime} + 1, i ^ {\prime} + 1, i ^ {\prime} \right]\right]\right]\right]\right]\right]\right]\right]\right]\right]\right]\right]\right] $$
$$ \lim _ {x \rightarrow - \infty} \frac {\sin x}{x ^ {2}} = \frac {\sin x}{x ^ {2}} $$
$$ \left. \right.\left. \right.\left. \right.\left. \right.\left. \right.\left. \right.\left. \right.\left. \right.\left. \right.\left. \right.\left. \right.\left. \right.\left. \right.\left. \right.\left. \right.\left. \right.\left.\left.\left.\left.\left.\left.\left.\left.\left.\left.\left.\left.\left.\left.\left.\left.\left.\left. \text {l a s i g m a} ^ {\prime} \right] _ {j} ^ {\prime} \right] _ {j} ^ {\prime} \right] _ {j} ^ {\prime} \right] _ {j} ^ {\prime} \right] _ {j} ^ {\prime} \right] _ {j} ^ {\prime} \right] _ {j} ^ {\prime} \right] _ {j} ^ {\prime} \right] _ {j} ^ {\prime} \right] _ {j} ^ {\prime} \right] _ {j} ^ {\prime} \right] _ {j} ^ {\prime} \right] _ {j} ^ {\prime} \right] _ {j} ^ {\prime} \right] _ {j} ^ {\prime} \right] _ {j} ^ {\prime} \right] _ {j} ^ {\prime} \right] _ {j} ^ {\prime} $$
$$ \therefore \leq \therefore \text {a w} 1, \text {o a i s} \text {j e} \text {i} \text {w} \text {g} \text {s} $$
sL sA
go y Lola Li jai jg (i) ais oiai wj jb baw j 4aas g j
- i.5
$$ \left. \left(\omega_ {0} + \frac {\omega}{2}\right) \frac {\partial f _ {1}}{\partial t} + \frac {\partial f _ {2}}{\partial t} + \frac {\partial f _ {3}}{\partial t} + \frac {\partial f _ {4}}{\partial t}\right) \left(1\right) \quad \text {当} \quad \text {当} \quad \text {当} \quad \text {当} \quad \text {当} \quad \text {当} \quad \text {当} \quad \text {当} \quad \text {当} $$
$$ \leq \text {g} _ {j} \text {j} _ {j} \text {j} _ {j} \text {j} _ {j} \text {j} _ {j} \text {j} _ {j} \text {j} _ {j} \text {j} _ {j} \text {j} _ {j} \text {j} _ {j} \text {j} _ {j} \text {j} _ {j} \text j j j j j j j j j j j j j j j j j j j j j j j j j j j j j j j j j j j j j j j j j j j j j j j j j j j j j j j j j j j j j j j j j j j j j j j j j j j j j j j j j j j j j j j j j j j j j j j j j j j j $$
$$ \Delta \text {j} \text {j} \text {j} \text {j} \text {j} \text {j} \text {j} \text {j} \text {j} \text {j} \text {j} \text {j} \text {j} \text {j} \text {j} \text {j} \text {j} \text {j} \text {j} \text {j} \text {j l} $$
$$ \left. \right.\left. \right.\left. \right.\left. \right.\left. \right.\left. \right.\left. \right.\left. \right.\left. \right.\left. \right.\left. \right.\left. \right.\left. \right.\left. \right.\left. \right.\left. \right.\left. \right.\left. \right.\left. \right.\left. \right.\left. \right.\left. \right.\left.\left.\left.\left.\left.\left.\left.\left.\left.\left.\left.\left. \text {i} _ {j} ^ {j} = j + 1, j + 1, j + 1, j + 1, j + 1, j + 1, j + 1, j + 1, j + 1, j + 1, j + 1, j + 1, j + 1, j + 1, j + 1, j + 1, j + 1, j + 1, j + 1, j + 1, j + 1 , j + 1 , j + 1 , j + 1 , j + 1 , j + 1 , j + 1 , j + 1 , j + 1 , j + 1 , j + 1 , j + 1 , j + 1 , j + 1 , j + 1 , j + 1 , j + 1 , j + 1 , j + 1 , j + 1 , j + 1, j + 1 , j + 1 , j + 1 , j + 1 , j + 1 , j + 1 , j + 1 , j + 1 , j + 1 , j + 1 , j + 1 , j + 1 , j + 1 , j + 1 , j + 1 , j + 1 , j + 1 , j + 1 , j + 1 ; \right]\right]\right]\right]\right]\right]\right]\right]\right]\right]\right]\right] $$
$$ \left(\sum_ {i = 1} ^ {n} \sum_ {j = 1} ^ {m} \sum_ {k = 1} ^ {n} \sum_ {l = 1} ^ {m}\right) $$
$$ \leqslant \left. \frac {1}{2} \sum_ {i = 1} ^ {n} \sum_ {j = 1} ^ {m} \sum_ {k = 1} ^ {n} \sum_ {l = 1} ^ {m} \sum_ {m = 1} ^ {n} \sum_ {n = 1} ^ {m} \sum_ {l = 1} ^ {n} \sum_ {m = 1} ^ {n} \sum_ {n = 1} ^ {m} \right] $$
$$ \dot {j} \dot {s} \dot {l} s \dot {l} \dot {l} \dot {l} \dot {l} \dot {l} \dot {l} \dot {l} \dot {l} \dot {l} \dot {l} \dot {l} \dot {l} \dot {l} \dot {l} \dot {l} \dot {l} \dot {l} \dot {l} \dot {l} \dot {l} \dot {l}. $$
$$ (1 0 0) $$
$$ \left. \left(\omega_ {1} - \omega_ {2}\right) \omega_ {1} + \omega_ {2} \omega_ {1} \omega_ {2}\right) \omega_ {1} \omega_ {2} \omega_ {1} \omega_ {2} $$
$$ \therefore \text {a d} _ {j} \text {a d} _ {j} \text {a d} _ {j} \text {a d} _ {j} \text {a d} _ {j} \text {a d} _ {j} \text {a d} _ {j} \text {a d} _ {j} \text {a d} _ {j} \text {a d} _ {j} \text {a d} _ {j}, g, j, o l o l a s i s ① N a l a $$
$$ J L a c l \mathrm {L} g o d a r y _ {j} \text {d i s t i n g 1 / 2 j o g j g j J d i a l j l a s i t i e w L} 1, \mathrm {g} _ {j} \text {s i g m a} $$
$$ \therefore \text {i s} \quad j i j b w g i o, L i v i e $$
Lds -w g/
$$ \therefore \text {L i o} \left. \right.\left. \right\rvert \dot {\phi} \left. \right.\left. \right\rvert \dot {\phi} \left.\right.\left.\right.\left.\right.\left.\right.\left.\right.\left.\right.\left.\right.\left.\right.\left.\right.\left.\right.\left.\right.\left.\right.\left.\right.\left.\right.\left.\right.\left.\right.\left.\right.\left. 1 ^ {\prime} \right. ^ {\prime} \left. \right. ^ {\prime} \left. \right. ^ {\prime} $$
$$ \therefore \text {i s} \quad \text {c h i t a l o} = \text {a d} \dot {\omega} g \dot {g} \text {p e r} \text {a i n} \text {a u g g i g} \text {g c u g b p r o j} \text {d r} \text {j i} $$
$$ \left. \dot {L} \dot {L} \dot {L} \dot {L} \dot {L} \dot {L} \dot {L} \dot {L} \dot {L} \dot {L} \dot {L} \dot {L} \dot {L} \dot {L} \dot {L} \dot {L} \dot {L} \dot {L} \dot {L} \dot {L} \dot {L}\right) $$
$$ (2) 1 2 \geq g \leq s \leq a \geq d \leq j \leq l \leq $$
$$ \downarrow \downarrow \downarrow \downarrow \downarrow \downarrow \downarrow \downarrow \downarrow \downarrow \downarrow \downarrow \downarrow \downarrow \downarrow \downarrow \downarrow \downarrow \downarrow \downarrow \downarrow \downarrow \downarrow \downarrow \downarrow $$
$$ \begin{array}{l} \text {a g} \dot {\text {w}} \text {j} \text {L} \text {e} _ {j} \text {L} \text {w} \text {b u n o} \text {g L o s} \text {L} \text {u d e} \text {o j} \text {L} \text {i} \text {s} \text {o s} \text {L e a} \text {w l} \text {g r} \text {s} \text {o j} \text {d i j} \text {j} \text {j} \text {d} \text {s i f} \text {j} \text {j} \text {d} \text {s i f} \text {j} \text {j} \text {d} \end{array} $$
$$ j _ {1} = 1, g _ {2} = g L e s L e g a d L e $$
$$ \Delta \leqslant \Delta \text {J} \Delta \text {J} \Delta \text {J} \Delta \text {J} \Delta \text {J} \Delta \text {J} \Delta \text {J} \Delta \text {J} \Delta \text {J} \Delta \text {J} \Delta \text {J} \Delta \text {J} \Delta \text {J} \Delta \text {J} \Delta \text {J} \tag {2} $$
$$ \left. \left[ j _ {j} \right] \omega_ {j} \leq \left| j _ {j} \right| \omega_ {j} \text {与} \omega_ {j} \leq \left| j _ {j} \right| \omega_ {j} \text {与} \omega_ {j} \leq \left| j _ {j} \right| \omega_ {j} \text {与} \omega_ {j} \leq \left| j _ {j} \right| \omega_ {j} \text {与} \omega_ {j} = 0 \right. $$
$$ \therefore \text {d i s} \quad \text {d i s} \quad \text {d i s} \quad \text {d i s} \quad \text {d i s} \quad \text {d i s} \quad \text {d i s} \quad \text {d i s} \quad \text {d i s} \quad \text {d i s} \quad \text {d i s} \quad \text {d i s} \quad 1, \quad \text {d i s} \quad \text {d i s} \quad \text {d i s} \quad \text {d i s} \quad \text {d i s} \quad \text {d i s} \quad \text {d i s} \quad \text {d i s} \quad \text {d i s} \quad \text {d i s} \quad \text {d i s} $$
001
LgjLjzgj/12
$$ \dot {s} \dot {s} \dot {s} \dot {s} \dot {s} \dot {s} \dot {s} \dot {s} \dot {s} \dot {s} \dot {s} \dot {s} \dot {s} \dot {s} \dot {s} \dot {s} \dot {s} \dot {s} \dot {s} \dot {s} \dot {s} $$
$$ \therefore \dot {s} \dot {s} \dot {s} \dot {s} \dot {s} \dot {s} \dot {s} \dot {s} \dot {s} \dot {s} \dot {s} \dot {s} \dot {s} \dot {s} \dot {s} \dot {s} \dot {s} \dot {s} \dot {s} \dot {s} \dot {s}. $$
$$ \leq L \lambda L _ {1} \text {与} _ {1} \text {与} _ {1} \text {与} _ {1} \text {与} _ {1} \text {与} _ {1} \text {与} _ {1} \text {与} _ {1} \text {与} _ {1} \text {与} _ {1} \text {与} _ {1} \text {与} _ {1} \text {与} B \quad A \quad g _ {1} L _ {1} \dot {\omega} \dot {\omega} \dot {\omega} \dot {\omega} \dot {\omega} \dot {\omega} \dot {\omega} \dot {\omega} \dot {\omega} \dot {\omega} \dot {\omega} \dot {\omega} $$
$$ (a) \leq a + b, (b - c) \geq 0, (c - d) \geq 0, (d - e) \geq A A / L R \cdot 1, y _ {i} y _ {j} y _ {k} $$
$$ \Delta \leqslant \text {j o g c} \cup L o j a - 1, L a \text {g y l} \rho L i \Delta \omega - $$
$$ \therefore \leq s o L a: w l \leq L i n e o c h e d s L, s j L s, s J L o, s j I n o $$
$$ \left. \right.\left. \right.\left. \right.\left. \right.\left. \right.\left. \right.\left. \right.\left. \right.\left. \right.\left. \right.\left. \right.\left. \right.\left.\left.\left.\left.\left.\left.\left.\left.\left.\left.\left.\left.\left.\left.\left.\left.\left.\left.\left.\left.\left.\left. \text {一} ^ {\prime} \right] ^ {\prime} \right] ^ {\prime} \right] ^ {\prime} \right] ^ {\prime} \right] ^ {\prime} \right] ^ {\prime} \right] ^ {\prime} \right] ^ {\prime} \right] ^ {\prime} \right] ^ {\prime} \right] ^ {\prime} \right] ^ {\prime} \right] ^ {\prime} \right] ^ {\prime} \right] ^ {1} - \right.\right.\right.\right.\right.\right.\right. $$
$$ \left. \right.\left. \right.\left. \right.\left. \right.\left.\left.\left.\left.\left.\left.\left.\left.\left.\left.\left.\left.\left.\left.\left.\left.\left.\left.\left.\left.\left.\left.\left.\left.\left.\left.\left.\left.\left.\left.\right.\right.\right.\right.\right.\right.\right.\right.\right.\right.\right.\right.\right.\right.\right.\right.\right.\right.\right.\right.\right.\right.\right.\right.\right.\right.\right.\right.\right.\right. $$
$$ (2) 1 2 \geq g > g L a j a. L a j g L a $$
$$ \dot {\bar {u}} \bar {u} g _ {0} L / \bar {u} \bar {u} g _ {0} $$
$$ \left. \right.\left. \right.\left. \right.\left. \right.\left. \right.\left. \right.\left. \right.\left. \right.\left. \right.\left. \right.\left. \right.\left. \right.\left. \right.\left. \right.\left. \right.\left. \right.\left. \right.\left. \right.\left. \right.\left. \right.\left. \right.\left. \right.\left. \right.\left. \right.\left. \right.\left.\left.\left.\left.\left.\left.\left.\left.\left. \text {一} ^ {\prime} = 1 ^ {\prime} + 1 ^ {\prime} + 1 ^ {\prime} + 1 ^ {\prime} + 1 ^ {\prime} + 1 ^ {\prime} + 1 ^ {\prime} + 1 ^ {\prime} + 1 ^ {\prime} + 1 ^ {\prime} + 1 ^ {\prime} + 1 ^ {\prime} + 1 ^ {\prime} + 1 ^ {\prime} + 1 ^ {\prime} + 0 ^ {\prime} + 1 ^ {\prime} + 1 ^ {\prime} + 1 ^ {\prime} + 1 ^ {\prime} + 1 ^ {\prime} + 1 ^ {\prime} + 1 ^ {\prime} + 1 ^ {\prime} + 1 ^ {\prime} + 1 ^ {\prime} + 1 ^ {\prime} + 1 ^ {\prime} + 1 ^ {\prime} + 1 ^ {2} \right| _ {0} - 1 ^ {2} \right| _ {0} - 1 ^ {2} \right| _ {0} - 1 ^ {2} \right| _ {0} - 1 ^ {2} \right| _ {0} - 1 ^ {2} \right| _ {0} - 1 ^ {2} \right| _ {0} - 1 ^ {2} \right| _ {0} - 0 ^ {2}\right) $$
$$ (D \circ g \dot {w} \omega \omega \omega \omega \omega \omega \omega \omega \omega \omega \omega \omega \omega \omega \omega \omega \omega \omega \omega \omega \omega \omega \omega \omega \omega \omega \omega \omega \omega \omega \omega \omega \omega \omega \omega \omega \omega \omega \omega \omega \omega \omega \omega \omega \omega \omega \omega \omega \omega \omega \Omega $$
$$ j _ {i} \left. \right.\left. \right.\left. \right.\left. \right.\left. \right.\left. \right.\left. \right.\left. \right.\left. \right.\left. \right.\left. \right.\left. \right.\left. \right.\left. \right.\left. \right.\left. \right.\left. \right.\left. \right.\left. \right.\left. \right.\left. \right.\left. \right.\left. \right.\left. \right.\left. \right.\left. \right.\left. \right.\left. \right.\left.\left.\left.\left.\left.\left. j _ {i} \right\right) \right\right) \right\right) \right\right) \right\right) \right\right) \right\right) \right\right) \right\right) \right\right) \right\right) \right\right) \right}\right}\right}\right}\right}\right} $$
$$ \therefore \dot {g} = \dot {g} _ {1} \dot {g} _ {2} \dot {g} _ {3} $$
$$ E \leqslant \lim _ {j \rightarrow \infty} \left{1, \frac {1}{2}, \frac {1}{2}, \frac {1}{2}, \frac {1}{2}, \frac {1}{2}, \frac {1}{2}, \frac {1}{2}, \frac {1}{2}, \frac {1}{2}, \frac {1}{2}, \frac {1}{2}, \frac {1}{2}, \frac {1}{2}, \frac {1}{2}, \frac {1}{2}, \right. $$
$$ \omega \dot {\omega} \dot {\omega} \omega g o l $$
$$ \text {⑥} \quad \text {C a n g e} \quad \text {F} \quad \text {J i j} \quad \text {J i j} \quad \text {J i j} \quad \text {J i j} \quad \text {J i j} \quad \text {J i j} \quad \text {J i j} \quad \text {J i j} \quad \text {J i j} $$
$$ j _ {1} \quad j _ {2} \quad j _ {3} \quad j _ {4} \quad j _ {5} \quad j _ {6} \quad j _ {7} \quad j _ {8} \quad j _ {9} \quad j _ {1 0} \quad j _ {1 1} \quad j _ {1 2} \quad j _ {1 3} \quad j _ {1 4} \quad j _ {1 5} \quad j _ {1 6} \quad j _ {1 7} \quad j _ {1 8} \quad j _ {1 9} \quad j _ {2 0} \quad j _ {2 1} \quad j _ {2 2} \quad j _ {2 3} \quad j _ {2 4} \quad j _ {2 5} \quad j _ {2 6} \quad j _ {2 7} \quad j _ {2 8} \quad j _ {2 9} \quad j _ {3 0} \quad j _ {3 1} \quad j _ {3 2} \quad j _ {3 3} \quad j _ {3 4} \quad j _ {3 5} \quad j _ {3 6} \quad j _ {3 7} \quad j _ {3 8} \quad j _ {3 9} \quad j _ {4 0} \quad j _ {4 1} \quad j _ {4 2} \quad j _ {4 3} \quad j _ {4 4} \quad j _ {4 5} \quad j _ {4 6} \quad j _ {4 7} \quad j _ {4 8} \quad j _ {4 9} \quad j _ {5 0} \quad j _ {5 1} \quad j _ {5 2} \quad j _ {5 3} \quad j _ {5 4} \quad j _ {5 5} \quad j _ {5 6} \quad j _ {5 7} \quad j _ {5 8} \quad j _ {5 9} \quad j _ {6 0} \quad j _ {6 1} \quad j _ {6 2} \quad j _ {6 3} \quad j _ {6 4} \quad j _ {6 5} \quad j _ {6 6} \quad j _ {6 7} \quad j _ {6 8} \quad j _ {6 9} \quad j _ {7 0} $$
$$ \left. \right.\left(\partial_ {t} \omega \omega \omega \omega \omega \omega \omega \omega \omega \omega \omega \omega \omega \omega \omega \omega \omega \omega \omega \omega \omega \omega \omega \omega \omega \omega \omega \omega \omega \omega \omega \omega \omega \omega \omega \omega \omega \omega \omega \omega \omega \omega \omega \omega \omega \omega \omega \omega \omega \omega \right) d x d t d s d t d t d t d t d t d t d t d t d t d t d t d t d t d t d t d t d t d t d t d t d t d t d t d t d t d t d t d t d t d t d t d t d t d t d t d t d t d t d t d t d t d t d t d t d t d t d t d t d t d t d r e f e r e n c e $$
$$ \leq \dot {s} \dot {s} \dot {s} \dot {s} \dot {s} \dot {s} \dot {s} \dot {s} \dot {s} \dot {s} \dot {s} \dot {s} \dot {s} \dot {s} \dot {s} \dot {s} \dot {s} \dot {s} \dot {s} \dot {s} \dot {s}. $$
$$ \left. \begin{array}{l} s L \leq s L \leq \dots L \end{array} \right.. $$
$$ \therefore \text {a l l} \left(\left(6\right) \text {c u t h e f o r m a l y}\right) \text {j} \leqslant \text {d} \text {g} \text {j} \text {j} \text {j} \text {j} \text {j} \text {j} \text {j} \text {j} \text {j} \text {j} \text {j} \text {j} \text {j} \text {j} \text {j} \text {j} \text {j} \text {j} \text {j} \text {j} \text {l} \text {L} \text {L} \rho L _ {\cdot}\left. \right) $$
$$ \Delta \Delta \Delta \Delta \Delta \Delta \Delta \Delta \Delta \Delta \Delta \Delta \Delta \Delta \Delta \Delta \Delta \Delta \Delta \Delta \Delta \Delta \Delta \Delta \Delta \Delta \Delta \Delta \Delta \Delta \Delta \Delta \Delta \Delta \Delta \Delta \Delta \Delta \Delta \Delta \Delta \Delta \Delta \Delta \Delta \Delta \Delta \Delta \Delta \Delta \Delta $$
$$ ⑦ \quad \text {a s} \quad \text {g o} \quad \text {d i g} \quad \text {s g a c} \quad j _ {j} \leq_ {j} g \quad \text {a d i f} \quad j _ {j} \leq_ {j} g \quad \text {a d i f} \quad j _ {j} \leq_ {j} g \quad \text {a d i f} \quad j _ {j} \leq_ {j} g \quad \text {a d i f} \quad j _ {j} \leq_ {j} g $$
$$ ⑧ $$
$$ ⑨ \quad \text {d i s} \quad \text {s o} \quad \text {d i j} \quad \text {i} \quad \text {j} \quad \text {j} \quad \text {i} \quad \text {b} \quad \text {c} \quad \text {s} \quad \text {s} \quad \text {s} \quad \text {s} \quad \text {s} \quad \text {s} \quad \text {s} \quad \text {s} \quad \text {s} \quad \text {s} \quad \text {s} \quad \text {s} \quad \text {s} \quad \text {s} \quad \text {s} $$
$$ ⑩ \quad \text {a s} \quad \text {g a l g i} \quad \text {s o g a c} \quad j _ {j} \quad j _ {j} \quad j _ {j} \quad j _ {j} \quad j _ {j} \quad j _ {j} \quad j _ {j} \quad j _ {j} \quad j _ {j} \quad j _ {j} \quad j _ {j} \quad j _ {j} \quad j _ {j} \quad j _ {j} \quad j _ {j} $$
$$ j L \leq j _ {2} j _ {1} j _ {L} L $$
$$ \left. \right.\left. \right.\left. \right.\left. \right.\left. \right.\left. \right.\left. \right.\left. \right.\left. \right.\left. \right.\left. \right.\left. \right.\left.\left.\left.\left.\left.\left.\left.\left.\left.\left.\left.\left.\left.\left.\left.\left.\left.\left.\left.\left.\left.\left. \text {的} \right]\right]\right]\right]\right]\right]\right]\right]\right]\right]\right]\right]\right]\right]\right]\right]\right]\right]\right]\right]\right]\right] $$
$$ \Delta \leq \lim _ {n \rightarrow \infty} a _ {n} $$
$$ \left. \left(\omega_ {i} \omega_ {j} \omega_ {k} \omega_ {l} \omega_ {m} \omega_ {n} \omega_ {o}\right) E _ {r} \xi_ {i j k l m n}\right) \text {d i f f} \text {f o r} ⑤ $$
$$ \left. \right.\left. \right.\left. \right.\left. \right.\left.\left.\left.\left.\left.\left.\left.\left.\left.\left.\left.\left.\left.\left.\left.\left.\left.\left.\left.\left.\left.\left.\left.\left.\left.\left.\left.\left.\left.\left.\right.\right.\right.\right.\right.\right.\right.\right.\right.\right.\right.\right.\right.\right.\right.\right.\right.\right.\right.\right.\right.\right.\right.\right.\right.\right.\right.\right.\right.\right. $$
$$ \Delta \omega \dot {g} \dot {s} \dot {s} \dot {s} \dot {s} \dot {s} \dot {s} \dot {s} \dot {s} \dot {s} \dot {s} \dot {s} \dot {s} \dot {s} \dot {s} \dot {s} \dot {s} \dot {s} \dot {s} \dot {s} \dot {s} \dot {S} \dot {S} \dot {S} \dot {S} \dot {S} \dot {S} \dot {S} \dot {S} \dot {S} \dot {S} \dot {S} $$
$$ \dot {\vec {u}} $$
$$ \Delta \leq L a c \Delta g \dot {w} \dot {w} \Delta b i i o g o s d j r g j r g \Delta l o g h w g y 1, g y \leq o j d i j l j l j l j l j l j l j l $$
$$ \mathrm {s g} \dot {\mathrm {s}} J L \dot {\mathrm {s}} \dot {\mathrm {s}} \mathrm {s} j L w j \mathrm {s} - \mathrm {s} \dot {\mathrm {s}} $$
$$ j \leq j \leq j \leq j \leq j \leq j \leq j \leq j \leq j \leq j \leq j \leq j \leq j \leq j \leq j \leq j \leq j \leq j \leq j \leq j \leq j \leq j \leq j \leq j \leq j \leq j \leq $$
$$ \Delta \Delta \Delta \Delta \Delta \Delta \Delta \Delta \Delta \Delta \Delta \Delta \Delta \Delta \Delta \Delta \Delta \Delta \Delta \Delta \Delta \Delta \Delta \Delta \Delta \Delta \Delta \Delta \Delta \Delta \Delta \Delta \Delta \Delta \Delta \Delta \Delta \Delta \Delta \Delta \Delta \Delta \Delta \Delta \Delta \Delta \Delta \Delta \Delta \Delta \Delta $$
$$ \left. \right| _ {j} \leqslant \therefore \text {L W} \Delta_ {j, j} V + L \Gamma - \quad s _ {j} \Delta_ {j} \leqslant J = 0. 5 0 2 $$
$$ 9 \cdot 1 \times (\frac {1}{2} \div 5, 1) = 5 $$
$$ \left{ \begin{array}{l} \omega x \leq j, \ \omega y \leq j. \end{array} \right. $$
$$ \therefore \lg \frac {1}{2 0} < 1, \quad \text {i o g i L i} 7 0. \quad \text {j i j} \text {E g i} $$
$$ \frac {1}{2} \frac {1}{2} \frac {1}{2} \frac {1}{2} \frac {1}{2} \frac {1}{2} \frac {1}{2} \frac {1}{2} \frac {1}{2} $$
$$ A A (L R 1) \text {e x i s t e r m a l} 1, 0 \text {a n d} f \quad (\text {o u t}) $$
$$ \therefore c L _ {\omega} \geq 1 0 \quad (j) j \leq j L _ {j} \text {二} $$
$$ \rho \leq g _ {1} \leq \dots , r \quad \text {i j} g $$
$$ j i a l l o V \Delta \times I r ^ {\prime} \times \Lambda r ^ {\prime}, 0 (J g b \times j a r c x e L a j) ] L e _ {1} $$
1
A
B
JLd0s/ogoljagcC
D
J≤jJjE
j>1g Jz/ j<2g- j
G
H
1/2 4.4w Cg
00j1g≤c11/2K
L
*g
A. _ A_ C W N
wolai d1j 1d1iwl g
1g j g 10000000000000000000000000000000000000000000
②
jLwJgO 1, gSgSgSgSgSgSgSgSgSgSgSgSgSgSgSg
jI jSgSgJoslaWl odii L gSsUjLwJoslaWf
1 1
225
J 1 J 1 1 1 1 1 1 1 1 1 1 1 1 1 1 1 1 1 1 1 1
Jg Jg g 1
③
8j0j0j0j0j0j0j0j0j0j0j0j0j0j0j0j0j0j0j0j0j0j0j0j0j0j0j0j0j0j0j0j0j0j0j0j0j0j0j0j0j0j0j0j0j0j0j0
()
$$ \begin{array} { l } \text { ~ ~ ~ ~ ~ ~ ~ ~ ~ ~ ~ ~ ~ ~ ~ ~ ~ ~ ~ ~ ~ ~ ~ ~ ~ ~ ~ ~ ~ ~ ~ ~ ~ ~ ~ ~ ~ ~ ~ ~ ~ ~ ~ ~ ~ ~ ~ ~ ~ ~ ~ ~ ~ ~ ~ ~ ~ ~ ~ ~ ~ ~ ~ } \ \quad \text { 一 } \quad \text { 一 } \quad \text { 一 } \quad \text { 一 } \quad \text { 一 } \quad \text { 一 } \quad \text { 一 } \quad \text { 一 } \quad \text { 一 } \quad \text { 一 } \quad \text { 一 } \quad \text { 一 } \quad \text { 一 } \quad \mathrm { 一 } \quad \text { 一 } \quad \text { 一 } \quad \text { 一 } \quad \text { 一 } \quad \text { 一 } \quad \text { 一 } \quad \text { 一 } \quad \text { 一 } \quad \text { 一 } \quad \text { 一 } \quad \text { 一 } \quad \text { 一 } \quad \text { 一 } \quad \text { 一 } \quad \text { 一 } \quad \text { 一 } \quad \text { 一 } \quad \text { 一 } \quad \text { 一 } \quad \text { 一 } \quad \text { 一 } \quad \text { 一 } \quad \text { 一 } \quad \text { 一 } \quad 1 \ & \qquad \qquad \qquad \qquad \qquad \qquad \qquad \qquad \qquad \qquad \qquad \qquad \qquad \qquad \qquad \qquad \qquad \qquad \qquad \qquad \qquad \qquad \qquad \qquad \qquad ( ) \ & \qquad \qquad \qquad \qquad \qquad \qquad \qquad \qquad \qquad \qquad \qquad \qquad \qquad \qquad \qquad \qquad - \ & \qquad - \ & - \ & - \ & - \ & - \ & - \ & - \ & - \ & - \ & - \ & - \ & - \ & - \ & - \ & - \ & - \ & - \ & - \ & - \ & - \ & - \ & - \ & - \ & - \ & - \ & - \ & - \ & - \ & - \ & - \ & - \ & - \ & - \ & - \ &- \ &- \ &- \ &- \ &- \ &- \ &- \ &- \ &- \ &- \ &- \ &- \ &- \ &- \ &- \ &- \ &- \ &- \ &- \ &- \ &- \ &- \ &- \ &- \ &- \ &- \ &- \ &- \ &- \ &- \ &- \ &- \ &- \ &-< nl> \end{array} $$
$$ \begin{array}{c} \text {a b s i l o n} \ \text {J g d)} \text {a b s i l o n} \ \text {J g d)} \text {a b s i l o n} \ \text {J g d)} \text {a b s i l o n} \ \text {J g d)} \text {a b s i l o n} \ \text {J g d)} \text {a b s i l o n} \ \text {J g d)} \text {a a b s i l o n} \ \text {J g d)} \text {a a b s i l o n} \ \text {J g d)} \text {a a b s i l o n} \ \text {J g d)} \text {a a b s i l o n} \ \text {J g d)} \text {a a b s i l o n} \ \text {J g d)} \text {a b s i l o n} \ \text {J g d)} \text {a b s i l o n} \ \text {J g d)} \text {a b s i l o n} \ \text {J g d)} \text {a b s i l o n} \ \text {J g d)} \text {a b s i l }\end{array} $$
FA
011 1g jj
JaaJIy bRg 10000000000000000000000000000000000000000000
p
(2015上海)
()①
1MjjI 1Jg jp
jueell jhuw jhy jssg jia Joo
a 8
(jLlEeJg≤JJ
111 1
(1g)21 joo Jiaag aaiaaai ggeae 20 aLolSJI aLod
(gJyjnnnnae)
HnU JgEgJgR ①N g
J 1/2 JgJgJgJgJgJgJgJgJgJgJgJgJgJgJgJgJgJgJgJgJgJgJgJgJgJgJgJgJgJgJgJgJgJgJgJgJgJgJgJgJgJgJgJg
pLgaiy jL LjLjLjLjLjLj
JLo
② ③ (1) ( \left{ \begin{array}{l} \text{一} \quad \text{一} \quad \text{一} \quad \text{一} \quad \text{一} \quad \text{一} \quad \text{一} \quad \text{一} \quad \text{一} \quad \text{一} \quad \text{一} \quad \text{一} \quad \text{一} \quad \text{一} \quad \text{一} \quad \mathrm{~\mu~}\right. \ \text{一} \quad \text{一} \quad \text{一} \quad \text{一} \quad \text{一} \quad \text{一} \quad \text{一} \quad \text{一} \quad \text{一} \quad \text{一} \quad \text{一} \quad \text{一} \quad \text{一} \quad \text{一} \quad \left{ \begin{array}{l} \text{一} \quad \text{一} \quad \text{一} \quad \text{一} \quad \text{一} \quad \text{一} \quad \text{一} \quad \text{一} \quad \text{一} \quad \text{一} \quad \text{一} \quad \text{一} \quad \text{一}\right. \ \text{一} \quad \text{一} \quad \text{一} \quad \text{一} \quad \text{一} \quad \text{一} \quad \text{一} \quad \text{一} \quad \text{一} \quad \text{一} \quad \text{一} \quad \text{一} \quad \text{一} \quad \text{一}\right. \ ① (\text{二}) ^ {2} (\text{三}) ^ {2} (\text{四}) ^ {2} (\text{五}) ^ {2} (\text{六}) ^ {2} (\text{七}) ^ {2} (\text{八}) ^ {2} (\text{九}) ^ {2} (\text{十}) ^ {2} (\text{十一}) ^ {2} (\text{十二}) ^ {2} (\text{十三}) ^ {2} (\text{十四}) ^ {2} (\text{十五}) ^ {2} (\text{十六}) ^ {2} (\text{十七}) ^ {2} (\text{十八}) ^ {2} (\text{十九}) ^ {2} (\text{二十}) ^ {2} (\text{十三}) ^ {2} (\text{十四}) ^ {2} (\text{十五}) ^ {2} (\text{十六}) ^ {2} (\text{十七}) ^ {2} (\text{十八}) ^ {2} (\text{十九}) ^ {2} (\text{二十}) ^ {2} (\text{十三}) ^ {2} (\text{十四}) ^ {2} (\text{十五)}} \ ② ③ (3) ^ {2} (\text{四}) ^ {2} (\text{五}) ^ {2} (\text{六}) ^ {2} (\text{七}) ^ {2} (\text{八}) ^ {2} (\text{九}) ^ {2} (\text{十}) ^ {2} (\text{十一}) ^ {2} (\text{十二}) ^ {2} (\text{十三}) ^ {2} (\text{十四}) _ {\circ}\right)
JLJLJLJLJLJLJLJLJLJLJLJLJLJLJLJLJLJLJLJLJLJLJLJLJLJLJLJLJLJLJLJLJLJLJLJLJLJLJLJLJLJLJLJLJLJLJLJLJLJLJ L
.01) 2bla Jj
四四
a. wIg a. 281 Iog h31 Jnag ynnj wIg all oJ paa
aJol JooJI gblio g Jiei Ljraa a wlo jwai all o
1281 p1234567890
aie wai j 10 gao aiai iag Jaaill gaojg aoiai
Jl
a. i. 12 Ll.
$$ \rho 1 \cdot \quad g _ {i j} = \rightarrow \rightarrow J a e J i j l n i $$
$$ \rho / \rho \pm \dots , 0 \quad a _ {i j} = w i l t \quad a _ {i j} $$
$$ a _ {j j} \pm 2 a _ {j j} \text {i l l} a _ {j g} w i l l j l b; $$
$$ \mathrm {j} \mathrm {g} \mathrm {i} \leq 7 \quad \mathrm {a g m i n} \quad \mathrm {c} \cdot \mathrm {e} _ {\mathrm {g}} $$
$$ \Delta g = \Delta g _ {1} + \Delta g _ {2} $$
$$ \Delta_ {i j} = \Delta_ {j i} + V \cdot \left| - 1 - f \right| \cdot \left| - 1 - f \right| $$
$$ 9. 7. (5 g - a l l) a _ {i} = m i l l a _ {i} g b _ {j} J $$
$$ f _ {j \div L} a \div b $$
$$ \lim _ {g \to 0} g \left| \frac {1}{g ^ {2}} \right| < 1, \quad \lim _ {g \to 0} g \left| \frac {1}{g ^ {2}} \right| > 0. $$
$$ a _ {i j} = 1 / 2 \quad a _ {i j} = a _ {j i} + a _ {j i} $$
$$ \therefore \mathrm {J} _ {\mathrm {g}} \dot {a} A A (L R 1) 1. 0 \dot {a} _ {j} L b _ {j} f (\dot {a} _ {i} a _ {i} a _ {o}) \dot {c} L _ {j} L b _ {j} J $$
$$ \therefore \quad \therefore \quad \therefore \quad \therefore \quad \therefore \quad \therefore \quad \therefore \quad \therefore \quad \therefore \quad \therefore \quad \therefore \quad \therefore \quad \therefore \quad \therefore \quad \therefore $$
$$ \left. \right.\left. \right.\left. \right.\left. \right.\left. \right.\left. \right.\left. \right.\left. \right.\left. \right.\left. \right.\left. \right.\left. \right.\left. \right.\left. \right.\left. \right.\left. \right.\left. \right.\left. \right.\left. \right.\left. \right.\left. \right.\left.\left.\left.\left.\left.\left.\left.\left.\left.\left.\left.\left.\left. \text {左} ^ {\prime} = 1 0 0 0 0 0 0 0 0 0 0 0 0 0 0 0 0 0 0 0 0 0 0 0 0 0 0 0 0 0 0 0 0 0 0 0 0 0 0 0 0 0 0 0 0 0 0 0 0 0 0 1\right) = \right| - \right| - \right| - \right| - \right| - \right| - \right| - \right| - \right| - \right| - \right| - \right| $$
①
A
a_i a b
gj j/ LJIJJ
jL1 Ee Csoa D
aLalil aagwJyE
a g wJl a o g Jae / a jLalJI a g wll Cliio F
LwLo G
H
1/2 10
LwLa 1/2 K
LwLaJaaJI L
M
N
01x120LwLgjgj


| 1 | 2 | 3 |
| P max < 1mW, λ=650nm IEC/EN 60825-1: 2014 | ||
| 4 | 5 | 6 |
| 7 | 8 | 9 |
(1)
x
JL
l( 1) l( 2) l_( 3)