
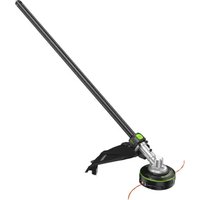
PTX5100 - Multitools EGO - Free user manual and instructions
Find the device manual for free PTX5100 EGO in PDF.
| Product type | Hedge trimmer attachment for EGO power head |
| Brand | EGO |
| Model | PTX5100 |
| Blade length | 510 mm |
| Cutting capacity | 26 mm |
| Weight | 2.67 kg |
| Voltage | 56 V battery (compatible with EGO POWER+ range) |
| Protection rating | IPX5 (water jet resistant) |
| Guaranteed sound power level | 95 dB(A) |
| Sound pressure level | 82 dB(A) |
| Vibration level (front handle) | 1.3 m/s² (uncertainty K=1.5 m/s²) |
| Vibration level (rear handle) | 1.5 m/s² (uncertainty K=1.5 m/s²) |
| Recommended operating temperature | 0 °C to 40 °C |
| Recommended storage temperature | -20 °C to 70 °C |
| Articulation angle adjustment | From -68° to 90° (6 positions) |
| Radial rotation | 2 positions (right/left) |
| Applications | Hedge trimming, brush, shrubs – use in rainy weather possible |
| Blade maintenance | Lubrication after each use with anti-rust oil; gear lubrication every 100 hours |
| Power head compatibility | EGO PPX1000 |
| Warranty | Consult EGO warranty policy at egopowerplus.eu |
Frequently Asked Questions - PTX5100 EGO
User questions about PTX5100 EGO
0 question about this device. Answer the ones you know or ask your own.
Ask a new question about this device
Download the instructions for your Multitools in PDF format for free! Find your manual PTX5100 - EGO and take your electronic device back in hand. On this page are published all the documents necessary for the use of your device. PTX5100 by EGO.
USER MANUAL PTX5100 EGO
BA2242T, BA2800, BA2800T, CH5500E,
BA3360T, BA4200, BA4200T, CH3200E,
BA5600T, BA6720T CH7000E,
CH7000E-T
B


READ ALL INSTRUCTIONS!

READ OPERATOR'S MANUAL
WARNING: To ensure safety and reliability, all repairs and replacements should be performed by a qualified service technician.
SAFETY SYMBOLS
The purpose of safety symbols is to attract your attention to possible dangers. The safety symbols and the explanations with them deserve your careful attention and understanding. The symbol warnings do not, by themselves, eliminate any danger. The instructions and warnings they give are no substitutes for proper accident prevention measures.
WARNING: Be sure to read and understand all safety instructions in this Operator's Manual, including all safety alert symbols such as "DANGER," "WARNING," and "CAUTION" before using this tool. Failure to follow all instructions listed below may result in electric shock, fire, and/or serious personal injury.
SYMBOL MEANING
SAFETY ALERT SYMBOL: Indicates DANGER,WARNING, OR CAUTION. May be used in conjunction with other symbols or pictographs.

WARNING: The operation of any power tools can result in foreign objects being thrown into your eyes, which can result in severe eye damage. Before beginning power tool operation, always wear safety goggles or safety glasses with side shields and a full face shield when needed. We recommend a Wide Vision Safety Mask for use over eyeglasses or standard safety glasses with side shields.
SAFETY INSTRUCTIONS
This page depicts and describes safety symbols that may appear on this product. Read, understand, and follow all instructions on the machine before attempting to assemble and operate it.
| Safety Alert | Indicates a potential personal injury hazard. | |
| Read Operator's Manual | To reduce the risk of injury, user must read the operator's manual. | |
| Keep sufficient distance away from electrical power lines | To prevent electrocution, do not operate within 15m of overhead electrical lines. Contact with or use near power lines may cause serious injury or electric shock resulting in death. | |
| XX | Noise | Guaranteed sound power level. Noise emission to the environment according to the European community's Directive. |
| CE | CE | This product is in accordance with applicable EC directives. |
| UK | UKCA | This product is in accordance with applicable UK legislation. |
| WEEE | Waste electrical products should not be disposed of with household waste. Take to an authorized recycler. | |
| Keep hands and feet away from the cutting tool | Never attempt to operate your power tool with one hand. Loss of control of the power tool resulting in serious or fatal injury may result. To reduce the risk of cut injuries, keep hands and feet away from the cutting tool. Never attach a moving cutting tool with your hand or any other part of your body. | |
| Wear eye and head protection | Always wear eye and head protection when operating this product. | |
| IPX5 IP Symbol Protection | against water jets | |
| V Volt Voltage | ||
| mm Millimeter Length or size | ||
| cm Centimeter Length or size | ||
| kg | Kilogram Weight | |
| --- | Direct Current | Type or a characteristic of current |
EN
EN
HEDGE TRIMMER SAFETY WARNINGS
-
Do not use the hedge trimmer in bad weather conditions, especially when there is a risk of lightning. This decreases the risk of being struck by lightning.
-
Keep all power cords and cables away from cutting area. Power cords or cables may be hidden in hedges or bushes and can be accidentally cut by the blade.
-
Wear ear protection. Adequate protective equipment will reduce the risk of hearing loss.
Hold the hedge trimmer by insulated gripping surfaces only, because the blade may contact hidden wiring or its own cord. Blades contacting a "live" wire may make exposed metal parts of the hedge trimmer "live" and could give the operator an electric shock.
-
Keep all parts of the body away from the blade. Do not remove cut material or hold material to be cut when blades are moving. Blades continue to move after the switch is turned off. A moment of inattention while operating the hedge trimmer may result in serious personal injury.
-
When clearing jammed material or servicing the hedge trimmer, make sure all power switches are off and the power cord is disconnected. Unexpected actuation of the hedge trimmer while clearing jammed material or servicing may result in serious personal injury.
-
Carry the hedge trimmer by the handle with the blade stopped and taking care not to operate any power switch. Proper carrying of the hedge trimmer will decrease the risk of inadvertent starting and resultant personal injury from the blades.
-
When transporting or storing the hedge trimmer, always use the blade cover. Proper handling of the hedge trimmer will decrease the risk of personal injury from the blades.
EXTENDED-REACH HEDGE TRIMMER SAFETY WARNINGS
Always use head protection when operating the extended-reach hedge trimmer overhead. Falling debris can result in serious personal injury.
Always use two hands when operating the extended-reach hedge trimmer. Hold the extended-reach hedge trimmer with both hands to avoid loss of control.
To reduce the risk of electrocution, never use the extended-reach hedge trimmer near any electrical power lines. Contact with or use near power lines may cause serious injury or electric shock resulting in death.
- Check the hedge for foreign objects before operating, e.g. wire fences and hidden wiring.
- Hold the power tool by insulated gripping surfaces only.
The hedge trimmer is intended to be used by the operator at ground level and not on ladders or any other unstable support
Use only with the battery packs and chargers listed in Fig.A2
SAVE THESE INSTRUCTIONS
ADDITIONAL SPECIFIC SAFETY RULES CAN BE FOUND IN THE APPLICABLE ATTACHMENT'S OPERATOR'S MANUAL.
SPECIFICATIONS
| Blade Length 510 mm | ||
| Cutting Capacity 26 mm | ||
| Recommended Operating Temperature | -10°C-40°C | |
| Recommended Storage Temperature | -20°C-70°C | |
| Weight 2.67 kg | ||
| Measured sound power level LWA | 94 dB(A) K=3 dB(A) | |
| Sound pressure level at operator's ear LPA | 82 dB(A) K=3 dB(A) | |
| Guaranteed sound power level LWA (measured according to 2000/14/EC) | 95 dB(A) | |
| Valuation of vibration ah | Front handle | 1.3 m/s² K=1.5 m/s² |
| Rear handle | 1.5 m/s² K=1.5 m/s² | |
The above parameters are tested and measured equipped with power pole PPX1000;
The declared vibration total value has been measured in accordance with a standard test method and may be used for comparing one tool with another;
The declared vibration total value may also be used in a preliminary assessment of exposure.
NOTICE: The vibration emission during actual use of the power tool can differ from the declared value in which the tool is used; In order to protect the operator, user should wear gloves and ear protectors in the actual conditions of use.
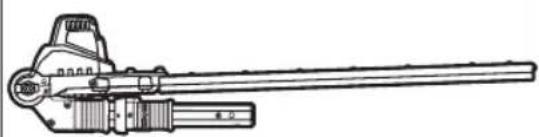
DESCRIPTION
KNOW YOUR HEDGE TRIMMER ATTACHMENT (Fig. A1)
- Rear Bushing
- Front Bushing
- Motor Housing
- Blade Sheath
- Blade
PACKING LIST (A2)
ASSEMBLY
WARNING: If any parts are damaged or missing, do not operate this product until the parts are replaced. Use of this product with damaged or missing parts could result in serious personal injury.
WARNING: Always remove the battery pack from the product when you are assembling parts, making adjustments, cleaning, or when the product is not in use.
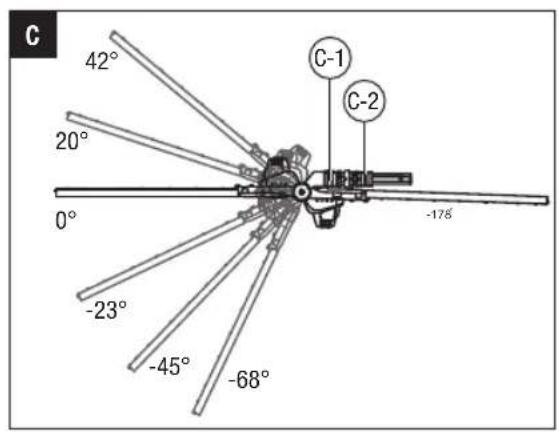
CUTTING HEAD ANGLE ADJUSTMENT
When the hedge trimmer attachment is taken out from the package, it has been folded in its storage position (Fig. B). The articulation angle and radial rotation of cutting head can be adjusted independently. Adjust the cutting head to a suitable working position before operation.
Articulation Angle Adjustment
There are six working positions. The angle of the cutting blade can be adjusted from -68^ to 42^ (Fig. C).
- Pull back the front bushing, and then firmly hold the motor cover to rotate the cutting angle to the desired position.
| C-1 Front Bushing |
| C-2 Rear Bushing |
- Once the desired angle is reached, push forward the bushing to lock the position of cutting head.
Radial Rotation Adjustment
There are two vertical cutting positions (Fig. D). It can be adjusted to the left or right 90^
- Pull back the rear bushing, and then firmly hold the motor cover to rotate the blade to the desired position.
- Once the desired angle is reached, push forward the bushing to lock the position of cutting head.
WARNING: To reduce the risk of injury, remove
the battery before making adjustments and make adjustments only when the blades are at a standstill. Never touch the blades while making adjustments.
WARNING: The casting alloy gear case is hot. Never touch the casting alloy gear case surface without wearing a PPE gloves.
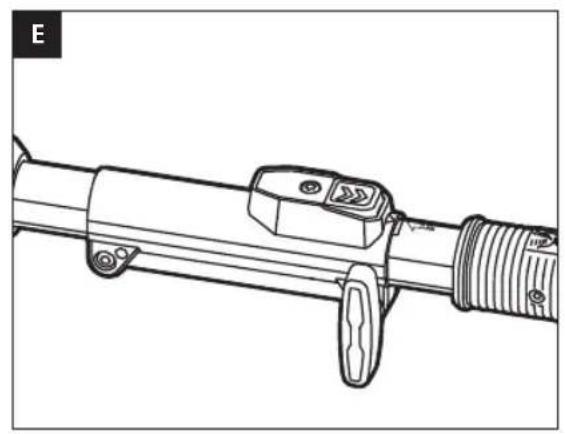
CONNECTING/REMOVING THE HEDGE TRIMMER ATTACHMENT TO THE TELESCOPIC POWER POLE (FIG.E)
This hedge trimmer attachment is designed for use with EGO telescopic power pole PPX1000.
See "INSTALLING AN ATTACHMENT TO THE TELESCOPIC POWER POLE" section in the telescopic power pole PPX1000 operator's manual for connecting the hedge trimmer to the power pole.
See "REMOVING THE ATTACHMENT FROM THE TELESCOPIC POWER POLE" section in the telescopic power pole PPX1000 operator's manual to remove the hedge trimmer from the power pole.
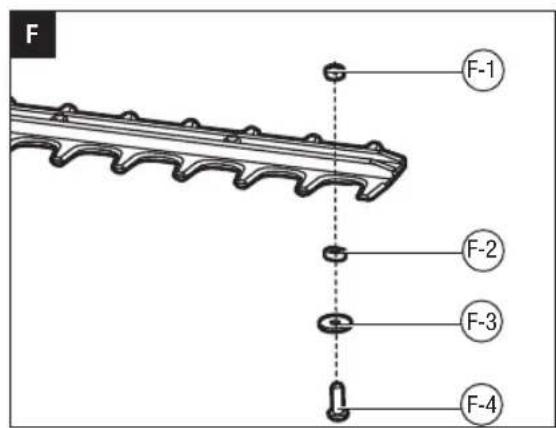
MOUNTING THE TIP PROTECTOR (Optional)
- Use a hex wrench (not included) to remove the short bolt, plain washer, bush and nut at the end of the cutting blade Save the plain washer, bush and nut for reassembly (Fig. F).
| F-1 Nut F-3 Plain Washer | |
| F-2 Bush F-4 Short Bolt |
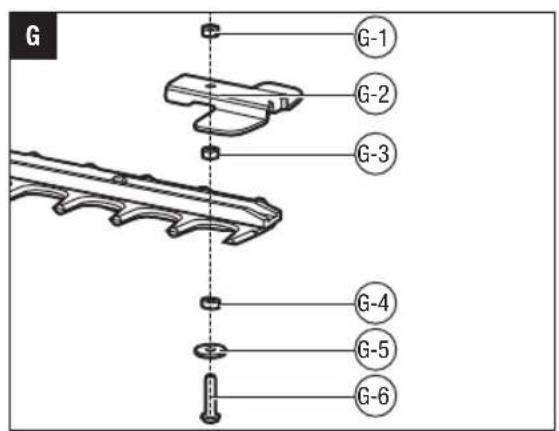
- Align the tip protector with the bulge on the cutting blade and mount it into place. Secure it with the new long bolt and nut as well as the saved washer, bush and nut (Fig. G).
| G-1 Nut G-4 Bush | ||
| G-2 Tip Protector G-5 Plain Washer | ||
| G-3 Nut G-6 Long Bolt | ||
OPERATION
DANGER: Never cut near power lines, electric cords, or other electric sources. If the cutting blades jam on any electrical cord or line, DO NOT TOUCH THE BLADE OR THE ALUMINUM POLE! THEY CAN BECOME ELECTRICALLY LIVE AND MAY BE VERY DANGEROUS.
Continue to hold the hedge trimmer attachment by the insulated handle or lay it down and away from you in a safe manner. Disconnect the electrical service to the damaged line or cord before attempting to free the blade from the line or cord. Contact with the blade, other conductive parts of the hedge trimmer attachment, or live electric cords or lines will result in death by electrocution or serious injury.
EN
WARNING: Do not allow familiarity with this product to make you careless. Remember that a careless fraction of a second is sufficient to inflict serious injury.
WARNING: Always wear eye protection. Failure to do so could result in objects being thrown into your eyes and other possible serious injuries.
WARNING: Do not use any attachments or accessories not recommended by the manufacturer by EGOTM . The use of attachments or accessories not recommended can result in serious personal injury.
APPLICATIONS
The product may be used in rain.
You may use this product for trimming the hedges, shrubs, scrub, bushes and similar material with a branch diameter of less than 026 mm.
USING THE HEDGE TRIMMER WITH TELESCOPIC POWER POLE
WARNING: Dress properly to reduce the risk of injury when operating this tool. Do not wear loose clothing or jewelry. Wear eye and ear/hearing protection. Wear heavy, long pants, boots, and gloves. Do not wear short pants or sandals or go barefoot.
PREPARATION FOR CUTTING:
- Adjust the cutting head to the desired working position.
- Remove the blade sheath from the cutting blade.
- For safe and better operation, put on the shoulder strap across the shoulder. Adjust the shoulder strap into a comfortable operating position. Following the instructions in the section "MOUNTING THE SHOULDER STRAP" in PPX1000 operator's manual to attach the shoulder strap onto the power pole.
WARNING: The shoulder strap is also a quick release mechanism in hazardous situation. When an emergency occurs, take it off your shoulder immediately, no matter what way the strap is in.
WARNING: Always use two hands when operating the extended-reach hedge trimmer. Hold the extendedreach hedge trimmer with both hands to avoid loss of control. Following the instructions in the section "HOLDING THE TELESCOPIC POWER POLE" in PPX1000 operator's manual
WORKING TECHNIQUES
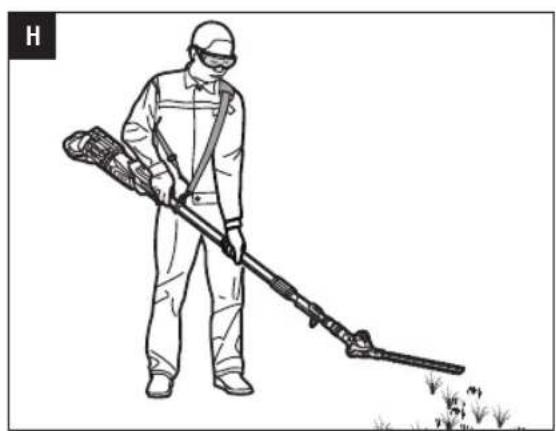
Horizontal Cutting (with cutting head at an angle)
Cut close to the ground from a standing position, e.g. for
trimming low shrubs.
Swing the cutting head right and left as you move along the hedge-use both sides of the blades and do not rest the cutter blade on the ground (Fig. H)
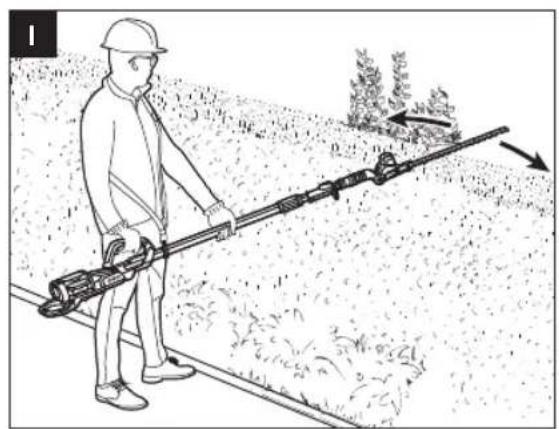
Horizontal Cutting (with straight cutting head)
Hold the cutting head at an angle of 0^ as you slowly swing the hedge trimmer horizontally. Swing the cutting head in an arc towards the outsides of the hedge so that the cuttings are swept to the ground (Fig. 1).
Recommendation: Cut hedges that are no more than chest height in this working position.
Vertical Cutting (cutting head at an angle)
Cutting without standing directly next to the hedge, e.g. flowerbed between operator and hedge.
In this cutting position, for your better control of the hedge trimmer, it is recommended that connect the hedge trimmer with the cutting head at the side cutting position.
Swing the cutting head up and down in an arc as you move along the hedge - use both sides of the cutting blade (Fig. J).
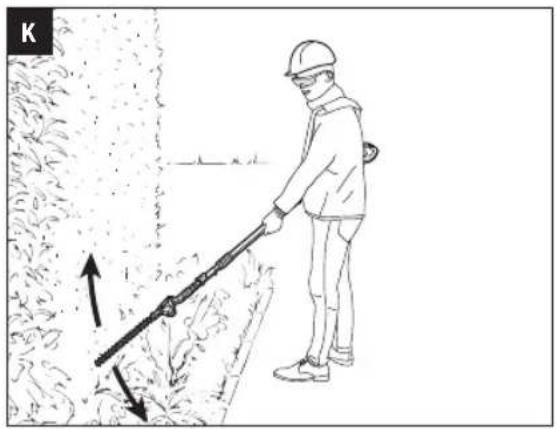
Vertical Cutting (with straight cutting head)
Extra long reach without the need for other aids. Swing the cutting head up and down in an arc as you move along the hedge - use both sides of the cutting blade (Fig. k).
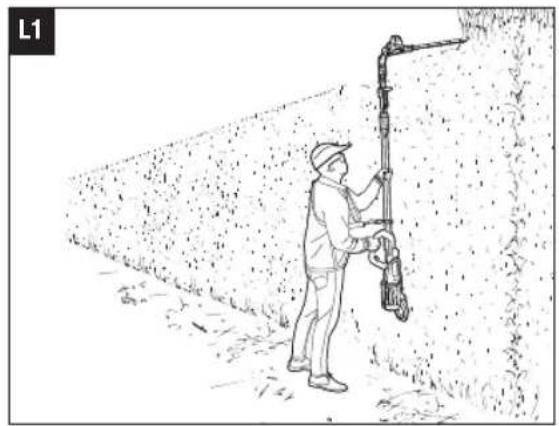
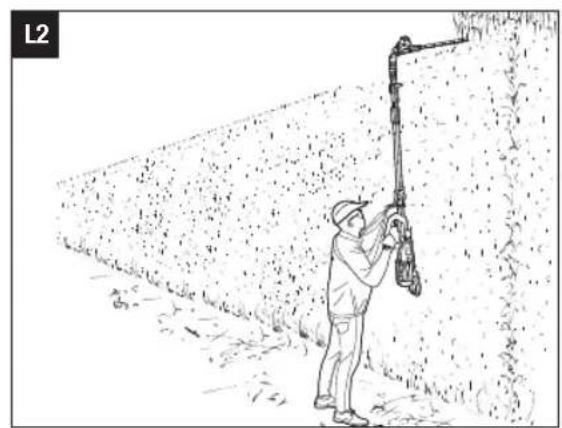
Overhead Cutting (with cutting head at an angle)
Hold the hedge trimmer vertically and swing it in an arc to make maximum use of its reach (Fig. L1&L2). For extreme high hedge, the extension pole is suitable for aids in trimming.
WARNING: Any working position above head height is tiring. To minimize the risk of accidents, work in such positions for short periods only. Set angle of adjustable cutting head to maximum so that the tool can be held in a lower, less tiring position (with shoulder strap) while still providing adequate reach.
TO START/STOP THE TOOL
See "STARTING/STOPPING THE TELESCOPIC POWER POLE" section in the power pole PPX1000 operator's manual.
MAINTENANCE
WARNING: When servicing, use only identical replacement parts. Inspect and maintain the machine regularly. To ensure safety and reliability, all repairs should
be performed by a qualified service technician.
WARNING: Before inspecting, cleaning or servicing the unit, stop the motor, wait for all moving parts to stop, and remove the battery pack. Failure to follow these instructions can result in serious personal injury or property damage.
A NOTICE: Before each use, inspect the entire product for damaged, missing, or loose parts such as screws, nuts, bolts, caps, etc. Tighten securely all fasteners and caps and do not operate this product until all missing or damaged parts are replaced. Please contact customer service or a qualified service technician.
GENERAL MAINTENANCE
Avoid using solvents when cleaning plastic parts. Most plastics are susceptible to damage from various types of commercial solvents and may be damaged by their use. Use clean cloths to remove dirt, dust, oil, grease, etc.
CLEANING THE HEDGE TRIMMER ATTACHMENT
- Stop the motor and remove the battery pack.
- Clean dirt and debris from the hedge trimmer attachment using a damp cloth with a mild detergent.
NOTICE: Do not use any strong detergents on the plastic housing or the handle. They can be damaged by certain aromatic oils such as pine and lemon.
STORING THE HEDGE TRIMMER ATTACHMENT
- Stop the motor and remove the battery pack from the telescopic power pole.
- Remove the hedge trimmer attachment from the telescopic power pole.
- Clean all foreign material from the hedge trimmer attachment.
- Store it in a place that is inaccessible to children.
- Keep away from corrosive agents such as garden chemicals and deicing salts.
REPLACING THE BLADE
WARNING: Always wear gloves when handling the blade; these components are very sharp and may contain burrs.
- Switch off the tool and remove the battery pack.
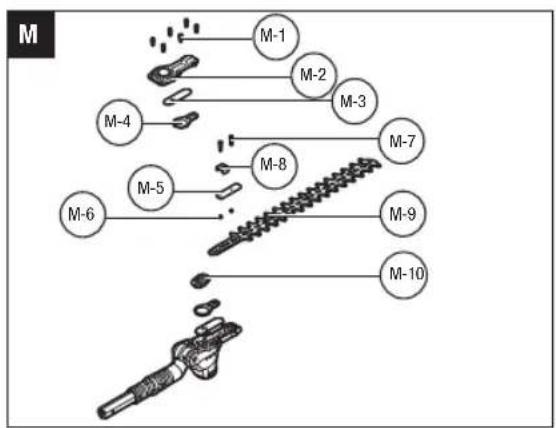
- Adjust the blade to the horizontal position, ensuring that the blade assembly is in line with the hedge trimmer shaft for easy mounting (Fig. M).
| M-1 | Screw 1# (short screws) | M-6 Bushing |
| M-2 | Bottom Cover M-7 Screw 2# (long screws) | |
| M-3 | Support Plate 3# M-8 Support Plate 2# | |
| M-4 | Link Lever M-9 Blade Assembly | |
| M-5 | Support Plate 1# M-10 Eccentric Block |
EN
- Use a hex wrench (not included) to loosen the 6 screws 1# (short screws) in the bottom cover and remove them.
- Continue loosening the 2 screws 2# (long screws) to remove the support plate 1# & 2#, as well as the 2 bushings. The 2 bushings are separately located inside the two rounded rectangle slots in the blade assembly.
- Remove the support plate 3#.
- Carefully remove the link lever from the blade.
- Remove the blade assembly from the tool and ensure that the eccentric block assembly position remains unchanged.
- Align the inward bulge on the new blade assembly with the hole inside the link lever to install the new blade assembly into place.
- Insert the two bushings into the two rounded rectangle separately.
- Mount the support plate 1# and then mount the support plate 2#.
- Keep the inside holes in the blade, the bushings, and the holes in the support plates in line with the screw holes in the gear case. Install the 2 long screws into the aligned holes and tighten them securely.
- Slightly move the upper blade back and forth to check whether the blade can move freely. If not, reassemble the blades until the upper blade can move freely.
- Install the link lever.
- Align the hole of support plate 3 #with the bulge on the eccentric block to install the support plate into place, ensuring that the plate is exactly located in the center, parallel to both edges.
- Mount the bottom cover onto the gear case and secure it with 6 short screws.
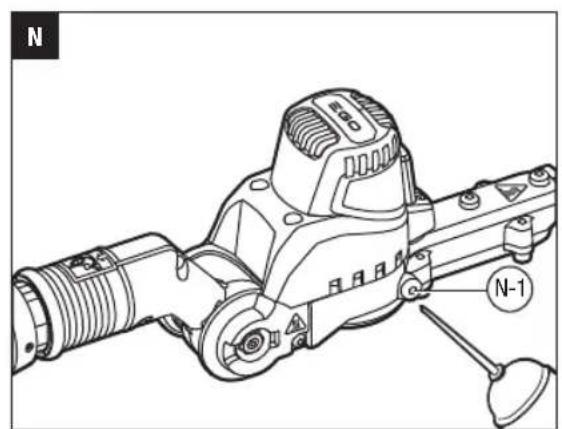
LUBRICATING THE BLADE (Fig. N)
For best operation and longer blade life, lubricate the hedge trimmer blade with anti-rusting oil after each use. DO NOT FULY FILL OIL HOLE WITH THE OIL.
- Remove the oiling hole screw on the gear case by a hex wrench (not included).
EN
N-1 Oiling Hole Screw
- Inject 5g grease through the greasing hole to the gearcase.
- Tighten the screw once finished.
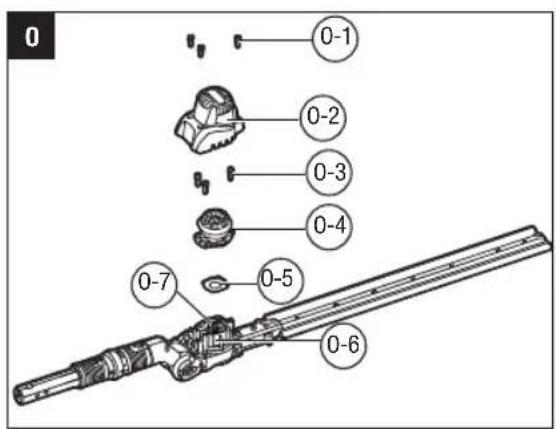
LUBRICATING THE DRIVE GEAR
For best operation and longer lifetime, lubricate the hedge trimmer attachment drive gear with a special grease every 100 hours operation.
The grease should meet the following requirements:
- NLGI Grade Penetration: NLGI-2;
Thickener Type: Polyurea;
Recommended Operating Temperature Range: -40^ to 180^ ; - Other than above, the grease should also be shear stable with exceptional pressure characteristics and excellent anti-wear property, and perfect oxidation stability.
Follow the steps below to fill with the grease:
- Switch off the tool and remove the battery pack.
- Use a hex wrench (not included) to loosen and remove 3 short screws (0-1) on the motor cover (0-2) and then detach the motor cover (Fig. 0).
| 0-1 Short Screw 0-5 Washer | |
| 0-2 Motor Cover 0-6 Gear Case | |
| 0-3 Short Screw 0-7 Planet Gears | |
| 0-4 Motor |
- Loosen the 3 short screws (0-3) on the motor and then detach the motor and the washer.
- Use a grease gun (not included) to inject 5g grease at the center of the 3 upper planet gears (0-7) into the gear case.
NOTE: Ensure the position of other parts near the gear case remains unchanged during injection.
- Reassemble the washer and the motor by tightening the 3 short screws (0-3).
-
Reassemble the motor cover by tightening the 3 short screws (0-1).
-
Start the tool to check whether it can work normally. If it does not, reassemble by following above steps.
NOTE: After removing the motor cover, clean up the sawdust around the motor.
Protecting the environment

Do not dispose of electrical equipment, battery charger and batteries/ rechargeable batteries into household waste!
TROUBLESHOOTING
EN
| PROBLEM | CAUSE SOLUTION | |
| Hedge trimmer doesn't work. | ■ No electrical contact between the trim and battery. ■ The battery pack is depleted. ■ The battery pack or tool is over-temperature protection ■ The blade is jammed. | ■ Remove battery, check contacts and reattach the battery pack. ■ Charge the battery pack. ■ Allow the battery pack or power pole to cool until the temperature drops below 67°C. ■ Remove the battery pack from the tool. Remove the obstruction carefully and then reinsert the battery and restart the tool. |
| Excessive vibration or noise. | ■ Dry or corroded blades. ■ Blades or blade support is bent. ■ Bent or damaged teeth. ■ Loose blade bolts. | ■ Lubricate the blades. ■ Replace with a new blade or support following the section“ REPLACING THE BLADE” in this manual or contact EGO service center for replacement. ■ Replace with a new blade following the section“ REPLACING THE BLADE”in this manual or contact EGO service center for replacement. ■ Tighten the blade bolts. Using a hex wrench (not included), turn the bolt clockwise to tighten. |
WARRANTY
EGO WARRANTY POLICY
Please visit the website egopowerplus.eu for full terms and conditions of the EGO Warranty policy.
VEILIGHEIDS-WAARSCHUWINGSSYMBBOOL:
VEILIGHEIDSWAARSCHUWINGEN VOOR HEGGENSCHAREN
UDSKIFTNING AF KNIVEN
GENERELT VEDLIKEHOLD
IPEIOCTEPEXEHN O5 ONACHOCTN IPNI NCIOJIb3OBAHNI KYCTOPE3A
He nCnoB3yIte Kcytope3 npn nNooxnx norOaHbIX ycNoBnaX, ocObeHBO rpo3y. 3TO nO3BOJNT CHN3HTb pNUCK yDapa MoHNHei.
-ДеркпгБСеКабипNTаньNOДаьшOT pa6oey 30нbl.Bo ВремИсПОЛьбоаньКабел MOжET 3aTeРЯТьСВ КуCTax И СLYчайнопonaCTь NOД peЖуши злЕмENT.
Mcnonb3yTe cpeDCTBa 3aunTb1 opraHOB cnya. PooXoJauee 3aunTHoe chapJKeHne yMeHbaet pck notepn cnya.
ДерхиTe KycTope3 TOnbKO 3a NOBepxHocTn C 3aUHTbIM NOKpbITNeM, TAK KAK peKxyuN 3JemeHT MOKET KOCHyTBcR cKpbIToH 3JIeKTPoPBOdKn IIN CO6CTBeHHOrO Ka6EJa. KacaHne peKyuIm 3JIeMeHTOM IPOBOkN IOD HAnpRjKeHEm MOKET NepeDaTb HAnpRjKeHne Ha MeTaIIuYeCKne YactN 3JIeKTPoINHCTpyMeHtA IN PnVBecT N KnpaXeHIO ONEpaTopa 3JIeKTPuYeCKm TOKOM.
Cneinte 3a Tem, YTO6bI cactn TeHa haxoHIncb Ha pacctOHHN OT pexyUero 3IeMeNTa. He ybnpaTte Cpe3aHHbIe Yactn H He depKInTe o6pe3aembie YacTN BO BpemBpaeHnpeXpyUero 3IeMeNTa. Nocne BbIKIOueHnYcTpoiCTBa HOx npoJNOJAOT BpaaTbcE ue HeKOTOpoe Bpem. Daxe KpATKOpeMHnA HeBHIMaTeNbHOCTb Pn INCNoJIb3OBAHn YcTPOIcTB MoKeT PnPBecTN K cepbe3HbIM TpaBMam.
Pn n3Bneeynn 3acptpaewero matepna
npeMOHTe Kcyctope3a y6eintecb, YTO BCE BbIKIOUATEJIN NITAHN HAXOJrTcB B BbIKIQUEHHom NOLOXeHHN, a KaBeJIb NITAHN OTcoEduHEn. CnyaHna AKTNBaUNK cyctope3a npn 13BNEueHHN 3actpRBwero MaTePnAa NIN peMOHTe MOKeT nPiBecNT K cepbe3hBM TpaBMam.
Ipehenochtye Kcytoe3a pykortky npn octahOBJIeHHoM pexysem 3neMeHTe n CneHTe 3a TEM, YTO6bI He HaxaTb Ha BbIKIOuYaTeB NITAHN. HaJNejkaaee obaueHne C Kcytope3OM CHXKaET PNC clyaHnHO 3anycka n ONyueHnra TpaBM B pe3yIbTaTe KOHTAKTcpexuymm3neMeHTAMN.
Bo Bpem TaPcHcnpTnPoBKn HIn XpaHeHnpeKyuun 3JeMeHt DoJXeH 6bIt 3aKpbIt YexIOM.HaJIeKaUee IcNoJIb3OBAHne KcyTope3a ChIJaet PnCKnoYueHn TpaBM B peyIbTaTe KOHTaTc CpeKyumm3JeMeHTAMN.
A IPNABNIA BEE3OINACHOCTNIPN
NCHOBAHNYKCTOPE3C YBEJIYEHHOJDOcraAEMOCTbIO
PnncnoB3oBAHm yctpoCTBa Bblwe ypOBHr roNoBb BCerda nCNOJb3yIte 3aunTHbI rOIOBH0y6op.PaeneMycopa MoKET npuBeCTN K nonyuEHHO cepbe3hIX TpaBM.
Bcerda ynpabnIte ycIpoIcTBOM o6eMn pykamn. Bo n36eXaHne notepn KOHTpOJI DEpIXTe KycTope3 DByMa pykamn.
-Дяснженпса nopaxени 3лкгчecKM TOKOM HNKOrda He Испь3уTe KycTope3 C yBENuHNoДocraeMocTbIO рdOM C LINHIMN 3лкгponepeda. KoNTaKT C INHIMN 3лкгponepeda UNI NcNoJIb3OBAHne yCtpoiCTBa
PRAOM C HMMMOKET PnBecNT K cepbe3HO TpaBMe INI CMEPTeHbOMY NopaxKeHHO 3NEKTPueCkIM TOKOM.
Ipepa60to npoBepbTe KnByu n3rpoDb Ha Hauynue noctopohnx o6bekTOB (Hapnpme, npBOONOHybIX orpaxdeHn nCKpbITOn npOBODKn).
ДерхиTe 3нeКТПОнHCTPyMeNT TOnьк 3a H3OЛИРОВАнHьIe NOBepXHOCTH.
Kyctope3 npedHa3HaueH nIg IcNoIb3ObaHnHa hypOBHe 3eMn, a He Ha JecTHnuaX mIu dpynx HeyctOnuBBix ONopax.
IcnoIb3yIteToIbKOaKMyJrTOpBn3apArdhe yctpoCTBa,yka3aHHBeHaPnc.A2.
COXPAHNTE HACTOURYIHNCTPYKUNIO IONOLHNTEJIbHbIE CNEUJAJIbHbIE IPNABILA TEXHNI B30NACHOCTM MOXHO HAHTN B INHCTPYKUNX IO 3KCNYATAUIN IPNMEHREMBIX INHCTPYMEHTOB
TEXHWECKME XAPAKTEPNCK
YACTN HACADKN KYCTOPE3A (Pnc.A1)
1.3aHnBtynka
2.передявтулka
3. Kopnyc dbratetra
4. Koxuyx pexyuzero 3nemeta
5. Pekyulm 3nement
KOMNIEKT NOCTABKN (A2)
CBOPKA
A PEPENPEXDEHNE.EcnnKaKne-ln6oactn NOBpeXeHbI NnO TcyTCTByOT, He nCNOJb3yUte yCTPOINCTBO, NOKA OHN He 6yDyt YCTAHOBNeHbI. IcnoJIb3OBAHHe yCTPOINCTBa B Cnyuae NOBpeXeHn HnO TcyTCTBnY qACTe MoKeT pInBeCTN K NOnyuEHNO cepbe3HO TpaBMbl.
PPEyPExEHE. Pepe c6opko, perynpoBko, oucKo, a TAKKe KOrda ycTPOiCTBO He nCnoJIb3yeTcA, BcERda u3BNeKaite N3 Hero akkymIyTop.
PEYUNPOBKA YIAP EKUYUEI TOIOBKN
PnH3BneHn HacaKn Kyctope3a n3 ynaKOBKn OHa cnOKeHa B noIOXeHHe dIra XpaHHeN (Pnc. B).Yron coUHeHn npaNaIbHoE BpaSeHne pexyueen rOIOBkn MOrTy peYnnpoBaTcR He3aBNCmO dpyrOTdpyra. IpeD hauJom pa60tby yctaHOBe tpe kuyuyo rOIOBky B noDxOJauee pa60ye noIOXeHHe.
PerynpobKa yrra coynehenn
PpeDyCMOTpeHO 8eCTb pa6OuHX noOKeHn. YrO1 peKyuIero 3JIeMeHTa peryIINpyETcB Dnana3oHe OT-68o do 42^ (Pnc.C).
- OTTHIte nepeDHO BTyKny Ha3aJ, 3aTeM KpeNko HIO ydepKnaBte KpbIuKy DnRaTeNa N yCTaHOBNTe HyKbIyroJ.
C-1 HepeDnBtynka
C-2 $aДнЯВТУЛКА
- KaK ToIbKO KeJaemBMyrON 6yDen DOCTINHyT, CDbHbTe BtYnky BnpeD, YTObbl 3aФNKcnpoBaT NOLOKeHHe pexyuee TOnOBKn.
Hacroka padnabhoro bpaueHna
PpeyCMTOpeHO DBA BepTKaJIbHbIX NOIOXeHnpeKyuIero 3IeMeNTA (Pnc. D). Ero MoKHO NOBepHyTB BIEBO IIN BnpaBO Ha 90^
1.OTTHHTe3aHIOBtIkyHa3a,I3aTeM KpENKO yepKnBaIte KpbIuKy DnIraTeIry NOBepHITe pekuyiN 3JEMeHb HyXHOE NOLOKeHne.
2. KaT tonbKO XeNaembl yOrn 6yDen IOCTINrHyT, CdBHbTe BtYkNky Bnepei, YTO6bl 3aФNKcnpoBaT bnoJoxHe pexyuee roJOBKn.
A PEPYIPPEXDEHNE. YTO6bI CHN3nTb PNCK NOyehnra TpaBmbl, npeD BblONJIHeHnEM peRyIpOBKn N3BNeKITe AKKyMnyTAOp N BblONJIrTe peRyIpOBKy TOJbKO npHnEOBnKbIX Je3Bnx. HkOrda He npNKacaiTeCb K pexyUIM 3JeMeHTam BO BpeMa peRyIpOBKn.
A PEPENPEXKDEHNE. Kopnyc peyktopa BbIOJIHeH nIIToro cIIaBA HArpeBaETcB BO Bpempa60tI. HIKoRda He npKacaiTeCb K NOBepxHocTN Kopnyca peyktopa nIIToro cIIaBA 6e3 3aunTHbIX nepuAtok.
YCTAHOBKA HACADKN KYCTOPE3A HA TEIECKONUeCKN PIPBODHO BLOK IN CHRTVE C HEFO (Pnc. E)
3Ta HacaIka KyCTope3a npedHa3NaHcHeaHnIgNcIOb3OBAHHa TceNECKOnuHeckm npuBODhM6IokOM EGO PPX1000.
HnCTpykunno yCTaHOBKe HacKn Kyctope3Ha
TeNECKONUeCKn npuBOHO6bOKcm.BpaDene «YCTAHOBKA
HACADKN HA TELECKOINUECKN INPBOHO6BLOKpykoBDCTBa onepatopnpuBOHO6bokaPPX1000.
HnCTpykunno CHaTnIO HacaKn Kcytope3a C TeNeckOnuueckoro npBODnHO 6JOKa CM. B pa3deIe «CHrTne HACADKNC TEJECKONUueCKOTo IPNBODHO BOLOKA» pykoBoDcTaBa onepatopa npBODHO 6JOKa PPX1000.
YCTAHOBKA 3AUNTbI HAKOHEHINKA (dONOHnTeBHO)
1.CNOMOJIbU WecTnRpaHHO KIIIOVA (He BxOJNT B KOMIJIeKT) N3BJIeKHTe KopoTKn 6oIT, NIOCKYU 7aIbY, BKNAdIbIu IraKy Ha KOHcpe pexyIero 3IeMeHa. CoXpAHTe PNOckyU 7aIbY, BKNAdIbIu IraKy dIra NoCneDyUoSe c6OpKn (Pnc.F).
F-1 Taima F-3 Tnpkaa wai6a
F-2 BknaDbIiH F-4 KopoTkn 6oTn
- BbipOBHnIte 3aunTy hakoHeHHnka C BbICTynom Ha pexkyuem 3JemeHTe n yctahOBITE Ha MeCTO. 3akpeNTe C NOMOJIbIO HOBOr DInHHOro 60JI TaRkN, a TAKKe coXpAHHeHHbx 5aIb6I, BKnAbl7u raiKn (Pnc.G).
PENPYPEXDEHNE. OeBaITeCb HAdnEaMm 6pa3OM, YTObI CHN3NTb PNCK NOnyHeHNA TpABM npi NCNoJIb3OBAHIM DaHHOrO IHCTpyMeHTa. He HadeBaIte CBO6oHyO OeKdy UykpaHeHNA. NcNoJIb3yIte cpeCTBa 3aunTbI opraHO BpeHNA n CnyxA. HadeBaIte IIOTHbIe DInHHbIe bpoKNI pOuyHO oByBn nepuATKn. He HadeBaIte WOpTbI, CaHaJINN n He pa6oTaIte BoCnKOM.
IIOIFTOTOBKA K OSPE3KE
- BbIepnTe IaIpeXyueI roIOBKn IOxOJaee pa6ooye noJoxHe.
- Chmnte yexon c pekyjero 3nementa.
3.ДЯболгсьун HeHnpeHb.OTperpynpyTe HnneHbpeMeHbdo yO6HOro nOJKeHnHaTobipnKpENtB HnpeHbpeMeHb K npBOHOmy6IOKy, cIeDyIte INCTpyKuHM B pa3dene «YCTAHOBKA HANJIeHORO PEMHpyPykoBDCTBa OepaTopa npBoHDoro 6Ioka PPX1000.
A PEPENPEXDEHNE. HanneHybI peMeHb TAKKIE RBLIETC8 6bICTpOpa3bEMHbIM MExaHn3MOM, NCNOB3yHOUcMcB OAnchbIX CNTyaunx. B Cnyae BO3HNHOBEHnYpe3BbYauHOn CNTyaun HEmeJInHo CHHMTE erO cPiNea JIObIM CNOCOBm.
A PEPYPEXKDEHNE. Bcerda ynpabnTe yctpoiCTBOM 6eHNm pykamn.Bo n36exkanne NOTepu KOTpOJIa DEpXHTe KcTOpe3 C yBeJIuHHO JDCsraemocTbIO DByMa pykAmn.CneDuIte NCHtpKJIM B pa3dene «OBPAUeHNE C TENECKONUeCKM INPBODHBIM BOKOM» pykoBodCTBa onepatopa npnbDHorO 6noka PPX1000.
PPIEMbI PABOTbl
Topn3oHTaIbHnaO6pe3ka (peKyuza rOJOBkapacnoJoxHe na yrnom)
BbINHnIte 06pe3Kg 6n3Ko K 3emne CTOr Ha MeCTe (Haep, nIg 6pe3Kn Hn3Kx KyCTOB).
IpepeeuaitepexyuoyroNOBkyBnpaBOuBNEBO no Mepe npoDBHXeHNA BDOJIb N3rOPOaNI. IcnoJIb3yIte 06eCTOpOHblpexyueroJeMeHNTa HHe KacaITecb NOBepxHOCTn 3emn (Pnc.H).
Topn3oHTaJIbHЯ o6pe3ka (peKyuza rOJIOBka pacnoJoxHe npmo)
YdepKnBaItepeKyuyro roNOBky noy rTOM 0^ MeHHeHNo nepemEuaite yctpoiCTBO roPn3OHTaJIbHO. PackaunBaItepeKyuyro roNOBky dyroo6pa3HbIM
DINKHEHMAOTCEpeINHbkyctaKpam,TO6bIO6pe3n naanHaZemI(Pnc.1).
PekomeHdaa. B 3TOM pa6oem nonoxeHNn 06peaTe n3ropo, pacnooxeHHbI He Be bIwe ypoBHa rpydN.
BepnkaHna 6pe3ka (peKyuza rOIOBka pacnoonKeHa noI yrnom)
Pn pa6ote He pacnonaraiTecb HenocpeDCTBeHHo Praom C n3ropoBIO. Hanpimep, meKdy onepatopom n n3ropoBIO doJxHa HaxoDITbc KnyM6a.
B TAKOM NOLOXeHn DnI LyuJeTo KOHTpOJn HAD
HNCTpyMeHTOM peKoMeHdyEtCn OndCoEaHnTb KcTOpe3 K
NpINBOHOmy 6nOKy B NoLoXeHn DnI 60KOBoI pe3Kn.
PepemeaAte pexyUyIO rONOBky BBepx N Bn3 no
Mepe npOdBvKeHn BDoNb n3rOpOIn. NcNoIb3yIte oBe
ctOPOnbI peKyuTe aJIemEHa (Pnc.J).
BertnkaIbHaO6pe3Ka (peKyuza rOJOBka pacnoJoxHe npmo).
B 3TOM cIyae DoCTraeTcMaKCMaJIbHaa DIIHnHa 6e3 IcNoIb3OBAHINr DOIOINHTeNBbIX npICNOC6HeHNI. IpeMeuaiTe pexyuTo rIOBky BBePx IN Bn3 NO Mepe PpOdbXKeHNr BDoNb NtropOn. NcNoIb3yIte O6e CTOpOnbl peKyUero 3neMeHNTa (Pnc.K).
Bepxna 6pe3ka (pexya rnoBka pacnooxeHa noy yrnom).
YdepKnBaTe NHTCPyMeHT BepTKaJIbHO n nepeMeaIte No dyre, yTO6bl MAkCmAlbHO nCNOJb3ObaT b erO dInHy (Pnc. L1 n L2). Ecnn n3ropoDb ouehb Bblcokar, notpe6byetc nCNOJb3ObaT nobXODyH yDNIHITenbHyIO wTaHry.
A PEPYPEXKDEHNE. IIO6oe pa6ooye noIoxKeHne BbIe yPOBn rONOBbl ABnreTcRyTOmNTeNbHbIM. YTO6bl CBECTN K MNHMMy pNCK HeCuaCThIX CnyaEB,pa6OtaTe B TAKOM NOLOXeHN TObKO B TeueHne KOPOTKIN NpOMExyTKOB BpeMeHN. UcTAHOBtE MaKCMMaNBbHbYrOg peYnnpyemOro pexUeRrIONOBKN, YTO6bl HnCTpyMeHT MoXHO 6bIOn yDepxNBaTB B 60one Hn3KOM n yO6HOM NOLOXeHN (C HAnNeuHBIM pemHEM) INPn 3TOM oBeCEneHTb Heo6xOdmyko 3ΦΦeKTnBHOCTb.
BKIIIOUOEHNE IVBbIKIOUOEHNE IHCTPYMEHTA
CM.pa3dienBKKIOUHHEN BbIKIOUHNE TEJECKOINIECKOPOINBOHOFO BLOKApyko0oCTBe noIb3oBaTeTn npBboHoro 6noka PPX1000.
OBCJYKUBAHNE
PPEyPExDEHNE. PnpeMOHT nCNoB3yIte TOnbKO NDeHTNHe 3aNaChbE qactn. PerynHO npOBepaIte yCTPOCTBO N BblONHnTe erO bcnyBaHne. Ira oecneueHna6e3oNaCHcTn HaDexKcHnY cTPOCTBA ero peMOHT DoJIKeH BblONHrTB KBaINΦuINpOBaHHn CneuaHnCT.
PNDYNPKDEHNE. PpeKne Yem BblnoHnTb npOBepky, OCHTKy INN ObcIyXnBaHne yCTpOcTBA, BblIOHHTe DBnRatB, DOxINTEcB, NOKA BCE DmIKyUncEa DeTAn NOHOCTbO OCTaHOBTcA, a 3aTeM h3BNeKtMe akkMyrTOp. Hec6bNOHeHne daHHbIX INCTpyKlmoKet pnpBeCtN K cepbe3hbl TpaBMam INN MaTePAaNBHomy Uyepeby.
A PIMMEAHNE. IpeaKdIbIM NcNoIb3OBAHnEM NOHOCbIO npOBepRte yCTpOcTBo Ha HAnuHne NOBPEJDeHHbIX,OTCYTCTByUxix INN INNOXO 3aKpeJIeHHbIX YacTei, TaIKX KAK BNHTbI, RaIK, BoITbI, 3aRnyuKINr T.D. HAdEKeHO 3akpeJIte BCE qHKcaTOpbI IN3aRnyuKINr HE NOpIb3yTEcB yCTPOcTBOM Do TEX NOP, NOKa He 6yDyT 3ameHeHBI NOBpeJdeHHbIe INN OTCYTCTByUxue YacTI. ObpaTtEcB B cepBCHbI YeHTP INN K KBaIINFmIPOBAHHomCneuaJIncTy.
OBUEE OBCJYKBAHNE
He nCnOJb3yIte pactBOpNTen IIN ONUCTKn
IInactIKOBbIX qACTe. BoJIbUNHCTBO IInactIKOBbIX qACTe
YUBCTBNTeJIbHI K pa3NHyBM 6bITOBIM pactBOpNTeJAM
MOnr7 6bITb NOBpeXJeHb.I IN ONUCTKN OT rpa3N, PbJIN,
MaCna, CMA3Kn T.I. INCnOJIb3yIte NCTYIOTKaHb.
OCHNTKA HACADKIN KYCTOPE3A
- OctaHOBIne DnBraTeIb N H3BNeKIne AKKyMnyTOp.
- OuHCTIe HacaIky KcyTOpe3a OT pR3N M Mycopac C NOMOJIb BO BnJXHO TkaHn C MRAKIM MOIOUM CpeCDTBOM.
INPMUEAHNE. He nCnOJb3yIte aKTINBHe I MOUJIe cpeCTBa DnI OUnCTKn IIaTKeIOBOrO KOpNcA INI pyKoRtKn. OH N MOrY T 6blb NobpeXKeHbI ONpeJeHHbIM apOMaTHueCKmM MaClAm, TaKMM KaK XBOHoe I JIMMOHHe Macna.
XPAHEHNE HACADKIN KYCTOPE3A
- OCTaHOBnTE DnIRATeJIb IN3BNEKInTe AKKyMnyTOp n3 TeneCKONHecKOrO npHBODHOrO 6Noka.
- CHIMITE HACADKY KCYTOPE3a C TENECKONHueCKORO npMBODHORO 6noka.
- OuICTe HacaKy OT BCex HOpOHyMATEpnaIOB.
- XpaHnTe B HeNoCTynHOM nIa DeTeMecTe.
- XpaHInTe BdAnOT NCTOCHNKOB Koppo3nn, TaKx KaK caOboBie yO6peHnI nTexHHueckar CoNb.
3AMEHA PEXKYUIEFO 3JIEMEHTA
A PEPDYNPEXKDEHNE. O6raTeIbHO HadeBaHTe IepaTkn npn paOte C pexyIm 3nEmeHtOM, TAK KAK OH OChb octpbn Ha HEM MOrTy 6bItb 3a3y6pnHbl.
- BbIKIOHHTe INHCTpyMeHT N 3BNEKNTe AKKyMnyTApOp
2.YCTAHOBHTe pexyun3n 3nemH T BROP3oHTaIbHOe NOIOXKeHHe N y6eHITcB, YTO OH HAXOHTC H A ODHON C BAOM KYCTope3a (Pnc.M).
CMA3KA IPNBODHOI SECTEPHN
IЯMaKcMmaJIbHoH 3ΦΦeKTHBHOCTn I npOJneHnCpoka CnyK6bl CMA3bIABaTe pNBOHHyIO WecTePHIO HacaIK Kyctope3a CpeuaJIbHoH CMA3KO KaKDbIE 100 YacOB 3KcIIyatauIN.
Cma3ka doJnxHa yDobIeTBoprTb CneDyIOUIM Tpe6oBaHnM.
CTeneH npohuaemoctn no NLGI: NLGI-2.
Tun 3aryctyntema: nonhypetah.
PekomEnyemampaobayemepatypa:ot-40do 180^
Kpome toro, CMA3ka DoJnKhA 6bItb yctOuHOB K cBmry,
0bnadaTb NCKIIOHTeJIbHbIMXapaKTEpNCIKAMN
DaBNEHINOTNIHHbIMN pOTBOIN3HOChbIMN CBOICTBaMn,
a TAKKE OTNIHHOYCTOuHBOCTbKOOKCNEHNO.
IЯСMa3KN BbIINHHTe CNeDyIOUHne DeIcTBNA.
- BbIKHNoHTe INCTpyMeHT N 3BNeKKeTae AkkMyJrTOp.
2.C NOMOuBIO WecTnRpaHHoro KIOUa(He BXoNIT B KOMPNeKT) BbIKpyTnte 3 KopoTknX BNHTa (O-1) n3 KpbIuKN DnIRaTeJr (O-2) n CHIMInTe ee (Pnc. O).
POLITYKA GWARANCYJNA EGO
A CSOMAG TARTALMA (A2)
OSSZESZERELES
FIGYELMEZTETES:Ha barmely alkatresz seruit
Opiovtia kott (e iota Kepaan Kottns):
KpatnoTe Tn aeTIDA KOtNc UTo ywia 0° EwS 10° KaWc
MeTakivEite OpiOvTi o paIbI MToPvtoupaC. KInote
TNV KEpaHn KOtNc Tnepa DwE ToeoiDwEgTEPIKa Tou
BauVooPaxtn, EtOI WOTE TA UToIAEImuTa KOtNc va
TIeFtouv OTo Edoaoc (Eik. I).
UoTaon: KOBETe 8aivopaxTe Tou Ev utepbaivouv To uoc Tou oBouc oC ot n eO npEpyaia.
A NONEPEDXEHHA. Nepu Hix KOPNCTyBaTnca
IHCPTyMeHOM,06OB'3K0BO 03HaONOMTec3 Ycima IHCTPyICIMN 36e3neKN,HabeDEHNMB Vcbomy NociBHKO KOpICTyBaCA,3OKPema3Ycima CNMBOJAMN NOpeEKeHb, TAKIMN K《HEBE3NEKA》,「NONEPENKEHHRA Ta 《3ACTEPEXEHH》.HeoTpmaHnHaBeDeHNHX Hkue BkazIBOK MOKe CnpuHHHTupaKeHHNeEKeTPNHM CTpymOM,POKeKyTa/a6 cepno3Hi TpaBMn.
3HAUH H CUMBOJY
CMMBOJ NONEPEDXHEHHI OIO BOE3NEKN: Bka3ye Ha HE6E3NEKY, NONEPEDXHEHHa60 3ACTEPEXEHH. Moke BnKOpNCTOBvBaTcra pa3OM 3 IHIMN CmBONAMn a6o nIKTORpamnn.

ONEPEDXEHHA. BIKOPCTAHH
6ydb-RAKINX eNEKTPoIHCTPymeHTIB MOKe
pN3BecTN Do NOTpannHr CTOpOHIX
npedTIB BOi, 0O MoKE cPnHHNTI
cepHOne OouKOxHEHNAOey. NpeD
NoaTOMK EOKNpyatauJI eNEKTPoIHCTPymeTA
3aBXnHaHraIte 3aKpNI 3axNCHI OKyIpaN
abo BIkPNI 3axNCHI OKyIpaN 3bHNMM
UHTAMn Ta, AIO NOPTIO, NOBHONPOPIbHy
3axHCMy Macky. M peKOMHeYMo 3axHCMy
MACKy UInPOKOro PO3mipy DnB BIKOPCTAHH
NOBepx OKyIpaN 6O CTaNapTHI BIkPNI
3axNCHI OKyIpaN 3bHNMM UHTAMn.
ПРавида.TEXHIКИБЕЗПЕКИ
Ha ciu CTopiu 3o6paKeHO Ta onncaHo CmBOnn, NOB'3aHl 3 6e3nekoIO, kI MOKytb BiO6paKaTncb Ha cboMy Bnpo6i. Iepu HIX HAMaratncr 3i6patn Ta EKcNpyaTyBaNTu NOrO, O3HaOMTeC3 Ycima IHCTpyKJIaMn HA IHCTpymEnTI Ta Dotpmyntecix.
| Понереджени шоб do bezieki | Вразус на поtenции небаэну Травуваши. | |
| Почиайто посibник 3 еклayaразцii | З метою зменчени ризниу OTРIMАнь Трав Мористувач nobINEN Почиайто посibник 3 ekcплayaразцii. | |
| 3бэрaite достаю Вidстань вд пин еекрөрөдөч | Дял Заловагни урахенни еектүйнм СтүмOM He працюte бликve 15 M вд пobITрянхеileтчнix пін. КоТАКТ IЗ пиням eekртэрөдөч abo BИКОрstаю пылзу рин Mоже српчнинп српозну ТравMu abo смртөнhe урахенни eekртүйнm СтүмOM. | |
| XX | ШуМ | Гарантовани рIVEN Звковоюnotухноcti. Розновдоженни шуМВ habkonilшпс сөрөдовише 3rdNo 3 дөрөдевю Бөрөньськог спВТВарпсгБа. |
| CE | CE | Чeь Вириб bID nobiDAe ChINHIM dmepeKTHBAM CC. |
| UK | UKCA | Чeь рдаук bID nobiDAe ЧИНHOMU зakohodabCTby Велкобританii. |
| WEEE | ВдхODи eilektrpvнix ВирбIFи He спд ВикDiATn pazOM l3 noobTuBIM смTTЯm. 3berhiTься до abTOruZOBaHORO pyHKTu пeррбКи. | |
| Тримайто руки Та Ноги пади Вid piЖучо iHCTprymenta | Hikoliи He Hamarai Teesca Kepybatni eilektroinHCTprymentom odniEko pykuO. Btrpata koNTporllo Had eilektroinHCTprymentom prin3bende Do ceRyO3HORO abo смретлыногу TrabMVbaHry. Lio6 3meHUnTi psinik ТравMuBaHry, Тримайто руки Та Ноги пади BID piXyUro iHCTprymenta. Hikoiи He нabлЖучоу рухомп рixyчу iHCTprymetn Do ryk abo Do Бyd-Якови ChIоIч actinu tin. | |
| Надягайто за保养 Зхасу ооч i rogobи | Пд чac роботи 3цIM ВирбОБ mZavkdi ВИКОрмСТУВЕТES ZACOB ЗхИСТу ооч i ГOLOBи. |
| IPX5 Cnmb | IP 3axnst BID CTpymeHIB BOДN |
| V BoIbT | Happyra |
| mm MinimetrДовЖина abo po3mip | |
| cm SaNTM | MetrДовЖина abo po3mip |
| kg KInorpam Bara | |
| --- | ПocstийнистуМ |
A NONEPEDXEHN I ODO B3NEKN BHKOPUCTAHH TPNMEPAIPIIPI3AHH JKBONIOTY
He BnKOpHCTOByTe TpHMeP dIa KINBONIOTy B norAHx NoroDHNx yMObax, OcO6NBO, KaIO icHy e pn3NK 6nckabKn. Lc 3nKye p3NK ypaKeHHra 6nCKABKOIO.
TpmaTe Bci eEnktpnHi uHpy Ta KaBeni noaB iD 30HN pisaHH. Pid cac poobtneektpnHi uHpy a6o KaBeni moxyb 3axOBaTnc b y XNBONlOTi abo KyuaX i BNanADKOBO nopiaATnc ne3OM.
HaarraTe 3ac06n 3axncty opraHb cnxy. BiNoBInHe 3axnche cnopAaKeHHa 3HNHTb pN3NK ytpaTn cnxy.
TpmaTe TpMepIaXJbONNoTMyIne3a pyuK3 iOIObOBAHm NOKpTTAM, OCKINbKn ne3o MoKe KOtAKTyBaTN 3 npxOBaHO npOBdKOHO a6o BlaCHNM uHypom. KoHTaK Tne3 aDpOTOM nHaNPyTO pN3BOIDNb Do NOBn HAnpyrB M MetaJIeBXuACTnHex TpIMepa DnA XJBONNOTy, IO MOKe np3BeCTn Do ypaXeHHr OpeatopA eNeKTpUHM CTpyMOM.
TpmaTe Bci qactnHtina knaHdani BiJ ne3a. He bdaIne Matepiann, kci cnipnopizatni nac pyxnye3a.Je3a npodBkyIOb pyxaTncn icnBIMKHeHHBIMNKaHa.MtB HeyBaXHOCTi nD acpo60tn 3 KyuOpizom MoKe npnaBeCTn Do cepno3HX TpaBM.
■PiJvacOuHHe3aCTparrnoMATEpiany a6o 06cnyrobyBaHHr TpIMepaIJIgXNBONOTy nepeKoHaTeCn,IO Bci BmNkaiXNBLeHHBMMKHeHO iUHPxNBLeHHBID'cDHaHO. Hecnodibahe cnpaobByaHHr TpIMepaIJIg XNBONOTy nIqac OuyueHHaCTparrNO MATEpiany a6o 6cnyrobyBaHH MoKe npIN3BeCTn Do cepNo3HNx TpaBM.
IpehenocbTe TpHmep dJnKJBONNtOy 3a DOnomoroo pykoTKn, KOJIne3o 3ynHHIOcR, I He DonyckaTe BBIMKHeHH6yDb-RAKO BUMNKaay KMBNeHH.
PpabnIbHe nepenecHn TpImepa dnn KINBOIOTy 3MeHNtB pniNK Hepepe6aueHoro 3anycky Ta TpaMbYBaHH ne3amN.
ДяТрасноруВаньi36epirahn3aBxDn BKNOPcTOByTe yoxonДЯNe3.IpaBnHe NOBOXeHHN3 TpIMePOMДЯЖINBOIOTy 3MeHUNTb pN3NK TpaBMvBaHHJNe3amN.
NONEPEJXEHH JIOO B3NEKNBVKOPUCTAHNTPIMEPA JIA XNBONOTY 3I3bJIbJEHM PADIYCOM II
PiD qac po60tN 3 TpIMePOM dnn KINBONnOry 3i 36iNbweHO DaIbHCTIO II HA# rONBOO 3aBXKn BHKOPcTOByTe 3acObN 3axnCtY rONOB. NaIHn CMITTMOKE pnp3BeCTN DO cepno3HNTPaBM.
PiD qac po60tn 3 TpIMepOM dnn JKNBONNtOy 3i 36iNbweHO DaIbHcHIO dII 3aBKn TpMaHTe NOro 6Oma pykam. TpMaHTe TpIMe pIra JKNBONNtOy 3i 36iNbweHO DaIbHcHIO dII O6oma pykam, 0o6 He BtpaTnKepyBaHH.
1063MeHHTn pN3NK ypaKeHH eNeKTPuHMMCTpymOM, HIKONHe BUNKOpHcTOByte TpHmepdIa JKBONNtOy 3i 36InbueHO daNBHCIO DIINO6nn3y nii eEeKTPonepea. KOHTAKT i3 NiHIMMeEeKTPonepea aBO BUKOpCTaHH NOB3y HIXMOXe CnpuHHnTn cepNo3Hy TpaBMy aOc CmePeTeBHeypaKeHH eNEKTPuHMMCTpymOM.
- IpepebiTe KINBONIT Ha HABBHCtB CTOPOHHIX npedmetIB, HanpNKnad DpoTAHX oropoxi npuxOBaHOI npoBOKn.
TpMaTe eNeKToPiHcTpymeHTnIe 3a pyuK3 i0JIbOBAHm NOKpTTM.
TpMep dna JxNBONnOy npn3haeHn dnn BnKOpNCtAHn Onepatopom, 10c cToiHa pibH 3emnI, a He Ha dpabihax abo HInnx HectiKnx onopax.
BnKOpNCToByTe IuIe AkymyIaTOpN Ta 3apAHi npCTpoi, nepeniehi Ha pnc. A2
3EPEXKITbLIO IHCTPYKLIIO
ODATKOBICNEUJIbHI INPABUNA B3NEKNMOXHA 3HAHTN B IHCTPYKII KOPNCYBAUABIBIIOBIDHOHACADKN.
Bn MoKeTe BnKOpNCTOByBaTn ue Bnpi6 Inni np3aHn H KBNONOTIB, YarapHnKIB, KUcIB TOuO 3 diametpom nIOK MeHue 026 MM.
BKNOPUCTAHHTRPMEPAJXKIBONIOTY3 TEJECKONIHYOINPBBOHOIO WTAHOIO
A NONEPEDXEHHA. OraaTeCn npabInbHo, 63meHunr pN3NK TpaBm NiD Yac po60Tu 3uM IHCTpyMeHOM.He Hocit BilbHorO OJy a6o npKpac. OraaTe 3axNCi OKynaprTa HabyuHnKn.Hocit uJIbHi, DOBri wTahN, Miue B3yTTa pykABuHKn. He Hocit b WOpTN, CaHaJIi, He npauKeIe 6ocOHIX.
A NPMITKA. Ipeed KOxHM BIKOPNCTAHHIM
nepebipTe BeB Bpi6 Ha npEaMeT NOKoJKeHb, BiCyTHOCTI a60 Nocla6nHnA deTanei, TaKx RaHTN, raKN, 6oNTN, KpUkN ToIO. 3akpinITb yci 3aTnCKaYi Ta KOBnaCNI He BVKOpNCTOByte CEi npuJa, DOKn He 6yDyTB 3amHehi BcI BiCyTHi a60 NoKoJKeHi DeTani. 3BepHtBCa Do cnyKb NiTpumKn a6o KbAnifikOBaHoro Cneuiianicta 3 occyroBaHHra.
3AΓΑJIbHmTEXHlYHmДΟΓλd
He BnKOpNCToBMyTe po3HHNKn dIra OunueHnnaCTMACOBHX Detanei. BinbWicTB nactMac yTuNbi do p3HOMaHTHX npomCNoBX po3HHNKIB iMOkyTb 6yTN HmN noKoJKeH.IIra BuaJeHn6pydy,nny,maCTtna ToOIO KOpNCTyTEcB YnCTOIO raHhipKOIO.
OuHueHH HACADKN DnI PI3AHHJXIBONJOTY
- BmKHiTb MOTop i BmMiTb akMyJnTOp.
三GO
- OuCTbe 6pyd i cMTTHa Hacaui nI niipiaHHn KINBONNOTy, BIKOPNCTOBYOuH BOIry raHypKy 3 M'KIM MmHm 3acO6OM.
PIMITKA. He BnKOpNCbOByTe CnBHi MmOHi 3ac06n Ha nactKObOMy Kopnyci abo pyu. BOH MoKyTb 6ytN NoxKDxHeJeKMM apomTuHMM Macamn, HapNKJaXBOHMM I NMOHHM.
36EPIAHHH HACADKN DnI PI3AHN KINBOONJOTY
- 3yninHb MOTOp IBnIMtB aymyIaTOp i3 TeneckonHHOI npNBOHOI WTAHN.
- 3HimtB HacaKy dIy nipi3aHHKINBOONOTy 3 TeneckonHoi npBODHOI uTaHn.
- Buaanitb yci ctopoHm MaTePiAn 3 hacAnn n npipiaHH HINBOHOTy.
- 36epiraite II Bmicui, HeoctynHomy dneiTe.
- TpmaTe noDani Kopo3nHi areHTu, taki KaObi XIMKATa coI npOTn OKeJeDi.
3AMIHA JIE3A
A PONEPEIXEHH. 3aBxH Hocitb pykabuynK, KOJI 6epeTe pykamn ne3o.Li KOMnoHEHTn roctpi i MOxyt b MaTH 3aDnPKN.
- BumkhHb ihcTpymeH i Bmmitb akmyJrTOp.
2.YctahOBitbNe3oBROPnOHTaJIbHeNoJNOKeHHa, nepeKoHABWncb,IOne3oB36opi nepe6yBaHa OHIJIiH3BAIOMTpImepaIraXuBOIOTy,IO6 nonerwnMOHTax(pnc.M).
UCYHEHHH HECPABHOCTEIN
A I P E D U N P E X K J E H N E: Y b e p e t e c, y c t e
npoeHINOCb3HaIN BCNCHN INCTpyKUHN 3a6e3OnaCHOCTB TOBA PkoBOcTO HO ANepaTOpA, BKIOuHTeHOBCNH N3BecTBAUN CMBOJN 3a6e3OnaCHOCT,KATO
"ONACHOCT, "PENEДУПЕХДЕНЕ, "и "ВИМАне"
Ipei Da n3no3BATE TO3n IHCTpyMeH. Hecna3BaHeTo Ha BCnHK INHCTpyKUIN 3bpoEH N0Jy MoKe da DOBeDe Do eNEkTPnueckn WOK, NOxap n/nn Cepno3Ho HapaHbaHe.
3HAUHHE HA CUMBOJNTE
CNMBOJ CNHAN3NPAU 3A
BE30NACHOCT: O3HaHbA ONACHOCT,
PPEyPPEKDEHNEIINBHHMAHNE,MOKe Da
6bIe H3NO3BaH BbB Bp3Ka C DpyrN CNMBOJIN NNIKTOrpaMn.

PNEpyPEXEHEN: EKcnoaTaHnHa BCHN eNktpneCKn INCTpymeHTn,MOKe Da DOBede Do n3XbPnHe Ha YyKnnpdmETn KbM BaWnte Ouy, KOEtO MOKe Da DOBeDe DO cepno3HO HapAHBaHe Ha OHTe. Ppei 3AnoYBaHe Ha paBota C enEkpnuceKn IHCTpymeHT, BnHarn Hocete ppeNa3Hn OUna CbC cTpaHnHa 3aUnTa n Bn3bOp 3a QNoTo IInCe, Korato e Heo6xOmo. Hne npenopbVbame npedna3Ha Macka C WIpOK Bn3bOp 3a yIOTpe6a Na dOn OUna Nn CTaNapTHn npedna3Hn OUnHa CbC cTpaHnHa 3aUnTa.
HCHTPYKLIIM 3A BE3OJNACHOCT
Ta3n CtpaHnua n3o6pa3raBa n ONcBA CmMBOJNTe 3a 6e30nacHOCT, KOITO MOKe Da CE NOBRT NTO3N IpOdyKT. IpooyTe, OCB3HaIte IN CNeDbaIte BCNUK INHCTpykUn No MaunHata npEi npEipnEmaHe Ha CrNo6BaHe npapota.
| Сиган 3a 6e3o9a9oc7 | Показа риска от пotingларно наразрахе на човек. | |
| Почуете ръковдстота на осяратoga | За наразрахе на разрахоста от наразрахе, notребитял差别ю в почуете ръковдстота на осяратoga. | |
| Спastsайы достаьчно разсториме от еvelктучески kaбени. | За наPre徴ТВРУТЕ ТOKОВ у导航,н не PREБOTЕ НаPreSTОМЕ до 15 m ot Бьзdyшни селКТРОПОВODи. Кontakтьт сьс ил уnotPreбstata в Бьз�OST до evelктурповodи може даPreчИNH серNo3H нараяразны ИМТOKОВ у导航 вODEцdo smbpt. | |
| XXY | ШуM | Гaramпторазно НИВО на Мошюоста на 3byka. ЗевковITE emICSM NьМ okonнота среDA сВ сьOTВETCTBVE с ДИPEKTIVITE набалейскatingа obShOCT. |
| CE | CE | ТозиPrepondут e B сьOTВETCTBVE c прилжIMNTe ДИPEKTIVIBn н ec. |
| UKCA | UKCA | ТозиPrepondут e В сьOTВETCTBVE сPrepondIMOTO ЗадондатelNTBO на Вelenkoobpitania. |
| WEEE | Опадычине селКТРУЧESК пpondуктNi He Trябва da sbdДAT n3XbRPlIHy ЗадиC дOMAKINCHKIA Опадыk.Опесete ro do учнOLMOSeH NO MЯСTO 3a peziknlnipanae. |
PENyPExEHE: BnHaN n3BaXdaTe
akymatopnata 6aepn oT npdykta, koraTo MOHTnpate yactn, npabte hactpOKN, NOUCTBaTe nnKorato npodkytbt He e B ynoTpe6a.
PERYUNPAHE HA bTbNA HA PEXELATA TJIABA
Korato n3BaInte ot onakOBkata npictaBkata HOKnua 3a JKNB PNET, TRe e CbHATA B NOJKeHne 3a cbxpanHeHne (PnR.B).BbIbT Ha CByHeHaBe H paanHTo 3abpTaH He pexeUata rnaBA Moar Ta 6bDat perynpaHn He3aBNCmo. PerynpaTe pexeUata rnaBa Do noDxOJaHa pa60THa no3nua npedn pa6ota.
Perynpahe Ha bbrna Ha cbyneHaBaHe.
Ima wecpTa0THnNo3nHbBbTHapeKeuToOctpne Moke da 6BepeyunpaHOT-68°do42°(fM. C).
1.ИЗдрайеHa3aДnpedHATAВунkaиСпдTOBA XbaHETe 3dpaBOKanakaHaДBnIaTeJIЯ,3aДa 3aBbPTte bIbNaHaPra3aHe BKeJeaHATANo3uIy.
| C-1 | Преда втулka |
| C-2 | Задна втулka |
2.Cne katoKeJaanHbIb6n6deDocTHnat, HATNCHETe HanpeBtYkata,3a Da 3akNIOHTe NO3uetaHa peKeeaaT raaba.
PerynpaneHa paDnaHNoToBbptHe
Ima DBe BepTnKaHn No3uHm Ha p3aHe (fM. D). To MoKe da 6bJe peRyInpao HauBa BO mHaJrCho Ha 90^
三GO
1.ИЗдьрайеHa3aДзадаВТулкaИСпeДTOBA XbaHETe 3ДраBOKanakaHaДВитael,3aД a3aBbPTHTe OCTpNETo BЖeJIaHATA NO3nUЯ.
2.Cne KaTo XeHaHrT bBn 6bE DoCTnHAT, HATNCHETe HanpeD BTyNkata,3a Da 3akNIOHTe N03uHTa Ha peXeUaTa rnaBa.
A PEPENPEXDEHNE: 3a HamaIbAHe Ha pIcKa OT HapaHbAHe,OTCTpaHbAte 6atepna, npEi Da npABITE peryIpOBKn n npABeTE peryIpOBKn cAmO KOrato ocptneTata ca cnpeN. Hnkora He doKocBaTe HOXOBeTe DOKATO npABITE HAcTPOKn.
A NPEYNPEXDEHNE: KopnycBT Ha npedabatenhata kytnoT OT OTnHa cnilab e ropeu. Hnkora He doKocBaTe NOBbpxHocTa Ha Kopnyca Ha npedabatenhata kytnoT OT OTnHa cnilab 6e3 da Hocnte 3aunTHn pbkabUN.
CBbP3BAHE/N3BAXDAHE HA IPIPUCTABKATA HOXNtA 3A KMB PJIET KbM TEJECKOINHn3AXPAHBAUI PPbT (pnr.E)
Ta3n npncTabKa Hoxuca 3a XmB PnTe npoeKtnpaHa 3a ynoTpe6a c EGO TeneckonHnna 3axpaHba, npbT PPX1000.
BvckTe paanen MOHTNPAHE HA IINCTABKA KbM TEJIeCKOINHATA 3AXPAHBAUJA ITIABA
B pkoBOCTBOTO Ha onepaTopa 3a TeneckOnuHnna 3axpaHbau npbT PPX1000 3a Cbpb3BaHe Ha Hoxuata 3a KMB NPT KbM 3axpaHbau npbT.
Bxte pa3den "N3BAKDAHE HA IPNUCTABKA OT TEIECKONUHNR 3AXPAHBAU INPbT
pbkoBDCTBTO Ha onepatopa 3a TeneckonuHnna 3axpaHbau npbT PPX1000 3a n3baKaHa He HoKuTa 3a KINB PNT OT 3axpaHbau npbT.
MOHTIPAHE HA IPOTEKTOPA 3A BbPXA (onuohaJeH)
1.ИЗнOLБАМТЕ KINOH YIeSTOrpAM (He e BKNIOHcH),3a ⅡA N3BaIITe KbCn8 6oT,ПLOCKATA WAI6a,ВTuNkata nRAKATA OT Kpar HapeXeUToO OCTPne.3ana3e TIOCKATA WAI6a,BTuNkata n RAKATA 3a NOBTOPHM MOHTAX (ФИR.F).
N-1 Diling Hole Screw
saoaoggmoaagbdous36g0 Goo
o000000000000000000000000000000000000000000000000000000000000000000
aogoo y3000 b0000 00 3800
Lgdoom gdo3607 000. ddoosobssb doo950
538000 agbsdooms 0000
OgB1u 5Bo8g3000 aqdoob39300 50f65b
Qsbo dog.
3000g600b030.00500 030dmyo0a030060b b0b 830b0b3b
oogogogogogobssgfoabommo
oobomgogogogogogogogogogogogogogogogogogogogogogogogogogogogogogogogogogogogogogogogogogogogogogogogogogogogogogogogogogogogogogogogogogogogogogogogogogogogogogogogogogogogogogg
oosoofoagobagodggobu ggsy60b0s0s0s0s0s0s0s0s0s0s0s0s0s0s0s0s0s0s0s0s0s0s0s0s0s0s0s0s0s0s0s0s0s0s0s0s0s0s0s0s0s0s0s0s0s0s0s0s0s0s0
aansnogon onj360 bngmow ygmo 6890
us3607 c65u. 6n aamsgon mbgusny
amno bs8500 5b gnooos
sss360mo bs8500, 60s os80
amnsmbol sncgabos. 6560 saedgcb
amnsmsbbs603gcmob asood30
agcogas. agjbol bs36000 bs8ggaomds
ayogds yggmasgmeaegd agodmg
amsgybo ngmco 3600 bosfo.
aagooo aobgogobd amgoogobsb
5b gobu bsngobgog
amabsgogobols cosgogboom
gyos Baoogmo soobgdamog
oadmsgmoos os 3300bbsgfo
smonos. gobu bsngobg yosqods
B6m03d aggcoo mo bsbgobd amgoogobsb
5b bocysycbs gboqno bu6gobols
godogos daggcmo ngoe 306s0
bosfo.
Ssngn 8yBj0b ssgno 5sbgmo
o sBnog no bsGoo, yOxogos
osdgoom ma bmo oosgmo
Bsdgoom 8oJb0bssGooBbmo
Sgsos 8o3oogob 8o3oogob
Qo agmco 8o5oogobdoagcdo
8o6o6ofo 8o6ofo
BbJbIb I3gob 86560sbs 56
86563m60gobolsygm3cognol m630
8656osd8o osmoos.86JbIb I36gob
86mo0do3y6oos ydsOgojdu
86oosbdoqoyem qbsdcm 86b6eym
86o3y6bosbl.
300ab 0s0g0s0b 0s0a50ggs (ogoggs) 30
- ydooygfo j5b0u gusggo (6660
yogoo38o), 60s oabubso 430
fjfo, agusggo, dogobo 5556
Lgocno osol dmoa. agosbgno
agssggo, dogobo qo J55bo bgsbsco
sygobogosol (5sb.F).
| F-1 | f568o | F-3 | gssssssss |
| F-2 | doomob | F-4 | gssssssssss |
- 2000000000000000000000000000000000000000000000000000000000000000000000000000000000
| G-1 | G-4 | ||
| G-2 | G-5 | ||
| G-3 | G-6 |
300800
A bsmbo: sssumboa 860060b
bsbsdo b6b0n, bsqbo 56
bb3s cmmfo6gnoo hysmgoob
bsmcogmaso. mbsfmoos
80000000000000000000000000000000000000000000000000000000000000000000000000000000000000000000000000000
A 800000000000000000000000000000000000000000000000000000000000000000000000000000000000
A 88000000000000000000000000000000000000000000000000000000000000000000000000000000
A aagobogaa: 6a aodmo500
bgs bgaobao 6bfoa 5s sbgyso,
oogcogss 6gcoogog
sa bgsbgyab 4aedogogob EGOTM-
doq. sasgcoagboogogog 6foocog
sdmygaa dglsdmoa dgsy600
bnoanbgno bosfo.
ggyggyg0
36mogyolgsdmygbsagusdggos 200
Ogdo 000000000000000000000000000000000000000000000000000000000000000000000000000000000
A aagabogaa: bs0300 agwssdolso,
bsos agsagomn osbsb6gols nobjo
bgmsgnoo bsagmndolss.
Bss300 g5gno, gmoos 05bsagcoo
os d0ngsboaoss. ao0800 m3c00s
os gnoo/udgbol oasgs30 bsgsogoo.
B0300 usdgam odgaon as3c00, bgs
os bsosod6go. gsggacmoos 8330
Omgdo, bsqgnoo 5 osmmn
ggbdogcnds.
fobogobabgoggs:
-
gssgogogogogogogogogogogogogogogogogogogogogogogogogogogogogogogogogogogogogogogogogogogogogogogogogogogogogogogogogogogogogogogogogogogogogogogogogogogogogog
-
aBbIgboaagcogosbbsnoo
-
15200000000000000000000000000000000000000000000000000000000000000000000000000000000000000000
A 8800000000: Ram aagc000000s: abo 23000 sb030 fomdoa06b bcmssymo 16600 dmbobu bsagosb sboogm booyosao. oogusg bgs 89030 mofobogoo agdowb33s, adob3d dmblgfo 3300 dbogosf, dobgoc 0000000000 abs6g abogosgmo 080
A 8gobogos: y03c0030b aadmo860
0039 bcoo 86000000000
0062 gcbob u360000688888888
0070000 86000000000
8619 8300000, 6305 8300
8620 8300000 8305
8633. 830000 8305
"gcbob gcbob PPX1000 dmabbsgocol
O6
1s0g0s00d03s
3m60606060606060606060606060606060606060606060606060606060606060606060606060606060606060606060606060606
306060606060606060606060606060606060606060606060606060606060606060606060606060606060606060606060606060
gagagagaaagno 3aogaoos5 33600
daasssb bannu, aagaaooq qoossn
agfbsmo agsss
ssbsgno bsfo 0330dsx2603
dsb6o3 08jol ssu73003 -sdooyog
osbol moo89 dbng osn oosqmo hao
osbs do586 (5sb.H).
306060606060606060606060606060606060606060606060606060606060606060606060606060606060606060606060606060
0000000000000000000000000000000000000000000000000
000000000000000000000000000000000000000000000000000000000000000000
630a60s: 80000000000000000000000000000000000000000000000000000000000000000
360000000000000000000000000000000000
gog gog gog gog gog gog gog gog gog gog gog gog gog gog gog gog gog gog gog gog gog gog gog gog gog gog gog gog gog gog gog gog gog gog gog gog gog gog gog gog gog gog gog gog gog gog gog gog gog gog gog
Sbmo 3608080808080808080808080808080808080808080808080808080808080808080808080808080808080808080808080808080
6560000000000000000000000000000000000000000000000000000000000000
360038000000000000000000000000000000000000000000000000000
bbsa bbsb bsbsb bsbsb bsbsb
sbsbsbsbsbsbsbsbsbsbsbsbsbsbsbsbsbsbsbsbsbsbsbsbsbsbsbsbsbsbsbsbsbsbsbsbsbsbsbsbsbsbsbsbsbsbsbsbsbsbsbsbsbsbsbsbsbsbsbsbsbsbsbsbsbsbsbsbsbsbsbsbsbsbsbsbsbsbsbsbsbsbsbsbsbsbsbsbsbsbsbsbsbsbsbsbsbs
dsmo03o 16s (usnmo oossoqobocos
Gogon Gogob Lsagto 300000000
Gogob Gogooo oogooo oogdoo000,
Gogogogdo dofo bogdydgdbsocg (6b. L1&L2). dmo5 dsosso agjgbogogol,
Gogogogogogoo oo ooho fohod agusdsobo
Gogabdsng ssagcoggs.
A 8gmboggs: 5gobdgo bssgdo
3mboos osgbsaegsme
smoos oasemmo. 6000gobb mo3o
ausagcoggsoo sbo aodnssgoss
adgsnnnno agmno agoog 3gmoog
cossoan no gno oos30s200
dsjngbg og, nnd bocssg noos0
gaoaagaae, bsomoe oos
3mboos (abol cagcoo bssggo) os
ds05doomnlo sbggtgno
bcbbsymybbsmsgss/gdmbssmsgss
obogmboaos"Gcymo
omdofo dgoobbfo3s/oadmo3s PPX1000 geo doqol
dabosgocbol bs
mms
A aogobowos: 0d03o bo63olbsb
aagoboo abcmo oogbo
bocnoo bfoon. 830000000000000000000000000000000000000000000000000000000000000000000000000000000000
A aagooobogos: bgaoluyms
aegnagssdgg, gaggcaaaqg cgsbghoalaeg.
aagnoan noa, gocgmoon y300s
amdo 56fnoovs agybsb qdsmblyfoom
sagcnoe mo. sdoommo o5bgojdoo
agagcnoe gnoaagd aqusdemns saodmbooml
ngomboo goofo 66 doosmo
A a50365: yg39mo 3d4y68ab 605
a50365: d00260bgb5yym ag50365
cos60365, 03365 5d 03365
b50365, 03365 b03365
150365, 03365
150365, b03365 03s.4. 03065
cog365 g390s 150365 03b290 03s
sdg365 g390s, 150365 03b290 03s
S cos60365 03b290 03g390s
oogomg oogdoogomdabdsogomss
daubogogobgobgob 63300000000000000000000000000000000000000000000
Bmgo aomgol figlo
dggg gaaagaaagaaagaaagaaagaaagaaagaaagaaagaaagaaagaaagaaagaaagaaagaaagaaagaaagaaagaaagaaagaaagaaagaaagaaagaaagaaagaaagaaagaaagaaagaaagaaagaaagaaagaaagaaagaaagaaagaaagaaagaaagaaagaaagaaagaaagaaagaaagaaagaaagaa
yjbjobu3gjobdoosgogobgogog
-
00000000000000000000000000000000000000000000000
-
afoobooafoobbfoafoofofofofofofofofofofofofofofofofofofofofofofofofofofofofofofofofofofofofofofofofofofofofofofofofofofofofofofofofofofofofofofofofofofofofofo
g6035s: s6 yamoyg6mo dwoog6o saqy6500
lsagcog8o 3osbsbol 8og8b 5
lsbgoc6g. ooboo agusdoos gosbos6gb
olgoo smdsfo60000, mgsno35
5d30s 5 modbol 900.
Bbdo b3mgfoaodsggboagabgol
- 3ssgmo dmo mno qo dmbugboo 3dggmo 0gcbm3n gndg 0gdb.
- aubgboon dabdol bs6ofo daos60s 0gugmge gme gme
- 0506000000000000000000000000000000000000000000000000000000000000000000
- 065600 ob 8330800301 doy300000000sbl.
- 000000000000000000000000000000000000000000000000000000000000000000000000000000
g5b0g3m
A aogbocg: y300030b 80g300
boosoad600 mggusg3ymmoo
o5ab; jg 3m36660 dsc0s6 agcnoos
gymnoid
- 000000000000000000000000000000000000000000000000
- 000000000030000000000000000000000000000000000000000000000000000000000000000
| M-1 | b6s6b6o 1# (d3c0g b6s6b6g) | M-6 | d0c0b0 |
| M-2 | d3c0g b6c0 | M-7 | b6s6b6o 2# (d6d9c0 b6s6b6c0) |
| M-3 | l5y6c0g6o 3# | M-8 | l5y6c0g6o 306c0g6c2# |
| M-4 | d3c0g6o 3# | M-9 | q05ob 3d3c0d3c0 |
| M-5 | l5y6c0g6o 306c0g6c1# | M-10 | d3c0b6c0 3c0c0 3c0c0 |
-
j560b gssgob bsagcogoo (s6 s6ob 3o3ofo) oogoo 6 b6sbfo 1# (omggy b6bbgo) 300s b80os 0s 0dabgbo oofo.
-
26860000000000000000000000000000000000000000000000000000000000000000000000000000000000000000000000000000
- ambgboom bgyggo 3#.
- 6000000000000000000000000000000000000000000000000000
- aobb600 g5b3ob 3d3o0 bcbbsybn 0s 666666666666666666666666666666666666666666666666666666666666666666
- 8500500300000000000000000000000000000000000000000000000000000000000000000000000000000000
- 000000000000000000000000000000000000000000000000000000000000000000
- 206 2#
- yjybnmgoo 0056g,doomolgbds qs
bgyofo goofo 0036g 00
5u3nogoo 000s3dsos mmmg 0
bssbgaonot 00sugno 00
qssdaogno 2 agdyco bbsbo yfmoq
5u3nogao 00 agofoq - 000000000000000000000000000000000000000000000000000000000000000000000000000000000000
- 0006000000000000000000
- ybfofo bgy6gfo gogos 3#- o5 b5u360o jbg6fo hnoy 8m3b j agosng sdoagocgmo, 6s0s dsooglmn go6goa bguoq 6560, 6030 3000s
- 00000000000000000000000000000000000000000000000000000000000000000000000
23000 4ydsmbol00s 0s0sb0 6037
3000 0s660000000000000000000000000000000000000000000000000000000000000000000000000000000
- 0mbug5oo 6gmo 5b36g0b b6s6o
8oogdoos 3mogbu 56ob 8bs2g0b (6
6ofo3d3cgo) bsogoo
N-1 9g0oob5b36g0obb6sb5o
- 0g0y3600589000000000000000000000000000000000000000000000000000
- 3000000000000000000000000000000000000000000000000
ssosos s0606030 1
b0s0yob m0dsogno dyosobonq
bs6o0o0a oabdofo000g000
bs6o0o doa0600b 000gsosos 560
b08osombo bsmbow gno 100 ssosso
360800b 360000b
bsmbo 60s sdsymgoogogjg jdg
ammbg6gbl:
NLGI 3056bob 33c0b b06800: NLGI-2 303ols;
aBbgggob Gdo:3mogoggo;
630d95gogggyo bgsb3gys8c00
8036s6yGoh qos3s6m5o-40C-0s6
180C-0qg;
60000000000000000000000000000000000000000000000000000000000000000000000000000000000
03y0000 000000000000000000000000000000000000000000000000
- 00000000000000000000000000000000000000000000000000000
- 8a0y6o j5b0u 8a5goo (s6 s0b 3d300 b6b0(O-1) dmofo bgyo (O-2) 8a0g8 a0b1600 mofo bgyo bgsfysms (Sb. O).
| O-1 | dμmμmμμbμbμo O-5 | |
| O-2 | dμmμmμμbμbμo O-6 | |
| O-3 | dμmμmμμbμbμo O-7 | |
| O-4 | dμmμmμμo |
- 3000000000000000000000000000000000000000000000000000000
- 300000000000000000000000000000000000000000000000000000000000000000000000000000000000000000000000000
SAÇUVAJTE OVO UPUTSTVO.
DODATNE POSEBNE SIGURNOSNE PROPISE MOZETEPRONACI U PRIRUCNIKU ZA RUKOVAOCA ODGOVARAJUCEG DODATKA.
SPECIFIKACIJE
| Dužina noža 510 mm | |
| Kapacitet sećenja 26 mm | |
| Preporučena radna temperatura | 0°C-40°C |
| Preporučena temperatura skladištenja | -20°C-70°C |
| Masa 2,67 kg | |
| Izmereni nivo zvučne snage LWA | 94 dB(A) K=3 dB(A) |
| Nivo zvučnog pritiska na uhu rukovaoca LPA | 82 dB(A) K=3 dB(A) |
| Zagarantovani nivo zvučne snage LWA (izmereno u skladu sa Direktivom 2000/14/EZ) | 95 dB(A) |
| Procena vibracija \( {\mathrm{a}}_{\mathrm{h}} \) | Prednja drška | \( 1,3\mathrm{\;m}/{\mathrm{s}}^{2} \) \( K = {1.5}\mathrm{\;m}/{\mathrm{s}}^{2} \) |
| Zadnja drška | \( 1,5\mathrm{\;m}/{\mathrm{s}}^{2} \) \( K = {1.5}\mathrm{\;m}/{\mathrm{s}}^{2} \) |
Gore navedeni parametri su ispitani i izmereni za uredaj opremljen pogonskom šipkom PPX1000.
- Deklarisana ukupna vrednost vibracije je izmerena u skladu sa standardnim metodom testiranja i moze se koristiti za uporedivanje jegnod alata sa drugim;
Deklarisana ukupna vrednost vibracije moze se koristiti u preliminarnoj proceni izlaganja.
aalall brrnne 6 0.6 (O-1)
15 jaii aill 200 jia jia jia jia jia 2.2
julil jla jgala 1e 02 gaa a yjy d 1g y jn alisi .3
4
CglgS Jn Uill aall al gll 5
0j
J 1
aJ 2
| M-6 | julius) 1# jauwali (sjusss) | M-1 | |
| M-2 | |||
| M-8 | 3# acall j | M-3 | |
| M-9 | M-4 | ||
| M-10 | 1# acall j | M-5 |
0gall cllll gdlg jaiil lcllll 11
gaii gaiiailll iaiia gaiiaiaiae all gl aiial
aiialllalaii gaijyglal jaiai. asgai
CIS 12
Lao aaii plal yaiy jia gaiy jaiy jaiy .12
aaiy ayay ayay ayay ayay ayay ayay ayay ayay ayay ayay ayay ayay ayay ayay ayay ayay ayay ayay ayay ayay ayay ayay ayay ayay ayay ayay ayay ayay ayay ayay ayay ayay ayay ayay ayay ayay ayay ayay ayay ayay ayay ayay ayay ayay ayay ayay ayay ayay ayay ayay ay
J 150000000000000000000000000000000000000000000000000000000000000000
A 124
A
Jg 1000
#
Jaeol jie aai Jie gao poa: jia 4
Jauu Juaai plaiy ayj yaa, yaa jai all
Jia jia no xay Jue aoy yaa LAc 21
A
154
154
154
154
154
154
J 1000000000000000000000000000000000000000000000000000000000000000000000000
Aolal
aie aiee eae ee eae eae eae eae eae eae eae eae eae eae eae eae eae eae eae eae eae eae eae eae eae eae eae eae eae eae eae eae eae eae eae eae eae eae eae eae eae eae eae eae eae eae eae eae eae eae eae eae eae eae eee
Culai jj 1
aJlJIJIJIJIJIJIJIJIJIJIJIJIJIJIJIJIJIJIJIJIJIJIJIJIJIJIJIJIJIJIJIJIJIJIJIJIJIJIJIJIJIJIJIJIJIJIJIJIJIJIJIJIJIJIJIJIJIJIJIJIJIJIJIJIJIJIJIJIJIJIJIJIJIJIJIJIJIJIJIJIJIJIJIJIJIJIJIJIJIJIJIJIJIJIJIJIJIJIJIJIJ
J 1
Clll 0j j j j
aal 2 aag aag aag aag aag aag aag
y 1 y 1 1 1 1 1 1 1 1 1 1 1 1 1 1 1 1 1 1 1 1 1 1 1 1 1 1 1 1 1 1
gall 1
jgl jgl jgl jgl jgl jgl jgl jgl jgl jgl jgl jgl jgl jgl jgl jgl jgl jgl jgl jgl jgl jgl jgl jgl jgl jgl jgl jgl jgl jgl jgl jgl jgl jgl jgl jgl jgl jgl jgl jgl jgl jgl jgl jgl jgl jgl jgl jgl jgl jgl jgl
a 15
sall gll s jg aie 1k kssal: j A
jgl sall qai iay lkiy sall gll s jg alal
jgl g "sall atell aga ean" p PXP1000
#
(a)()
J 1
j 100000000000000000000000000000000000000000000000000000
()
0j j 0 0 0 0 0 0 0 0 0 0 0 0 0 0 0 0 0 0 0 0 0 0 0 0 0 0 0 0 0 0 0 0 0
gall 2 gall g jll g jll g jll g jll g jll g jll g jll g jll g jll g jll g jll g jll g jll g jll g jll g jll g jll g jll g jll g jll g jll g jll g jll g jll g jll g jll g jll g jll g jll g jll g jll g jll g jll g jll
| \( \lambda_{\text{jus}} \) | G-4 | \( \lambda_{\text{jus}} \) | G-1 |
| \( \lambda_{\text{jus}} \) | G-5 | \( \lambda_{\text{jus}} \) | G-2 |
| \( \lambda_{\text{jus}} \) | G-6 | \( \lambda_{\text{jus}} \) | G-3 |
#
A 151 151 151 151 151 151 151 151 151 151 151 151 151 151 151 151 151 151 151 151 151 151 151 151 151 15
1 1
y 1
A 1
#
Jb#yI Cai jiai Iie plaiu Juy
JauyI yI iJIyI yI yI yI yI yI yI yI yI yI yI yI yI yI yI yI yI yI yI yI yI yI yI yI yI yI yI yI yI yI yI yI yI yI yI yI yI yI yI yI yI yI yI yI yI yI yI yI yI yI yI
(A2)
eannnnn
12 1234567890123456789012345678901234567890123456789012345678901234567890123456789012345678901234567890123456789
J 1 J 1
Jaa Jb
aalldl dwlgldls gaii kaiia i aaiia j
i 1
a 100
aai aai ai 1i i 1i 1i 1i 1i 1i
m - 1 0 ;
1
aai 151 gabla alal gally aai gae baaal abal jai iaiy lai y ai jaii jaii oai jaii
J 1 J 1 1 1 1 1 1 1 1 1 1 1 1 1 1 1 1 1 1 1 1 1 1 1 1 1 1
j j 1 1 1 1 1 1 1 1 1 1 1 1 1 1 1 1 1 1 1 1 1 1 1 1 1 1 1 1 1 1 1 1 1 1 1 1 1
aaiial aaiai iaiai 0j jiaai aiai ai j
Jss
cIe 83, y uuiy d lauill p bll
dul, sall glal ojl jia jai tse ay liss pssu
.
yie jaojaiyqgtaaal jao jao aaii 1. jia bgs i jn yjll yaaal gaaal o jj kai paaai iuyiy d ie gao jayl gaoaiu ay jayll sbal gao u j sdy d ayjyqgtaaal jao qil gaoaiu e g
.
Jia Jiaaii jie aie g jie cuiyao
Bae algeaal
n nnnn nn nnnn nn nnnn nnnn nnnn nnnn nnnn nnnn nnnn nnnn nnnn nnnn nnnn nnnn nnnn nnnn nnnn nnnn nnnn nnnn nnnn nnnn nnnn nnnn nnnn nnnn nnnn nnnn nnnn nnnn nnnn nnnn nnnn nnnn nnnn nnnn nn
(Nnnn)nnn
y n nn nn nn nn nn nn nn nn nn nn nn nn nn nn nn nn nn nn nn nn nn nn nn nn nn nn nn nn nn nn nn nn nn nn nn nn nn nn nn nn nn nn nn nn nn nn nn nn nn nn nn nn nn nn nn nn nn nn nn nn nn nn nn nn nn nn nn nn nn nn nn nn nn nn nn nn nn nn nn nn nn nn nn nn nn nn nn nn nn nn nn nn nn nn nn nn nn nn nn nn
N-1
n on n nn n no n 5 n .2 nnn nn n nn n nn n nn n nn n nn n nn n nn n nn n nn n nn n nn n nn n nn n nn n nn n nn n nn n nn n nn n nn n nn n nn n nn n nn n nn n nn n nn n nn n nn n nn n nn n nn n nn n nn n nn
yannan yin
y, n nn nn nn nn nn nn nn nn nn nn nn nn nn nn nn nn nn nn nn nn nn nn nn nn nn nn nn nn nn nn nn nn nn nn nn nn nn nn nn nn nn nn nn nn nn nn nn nn nn nn nn nn nn nn nn nn nn nn nn nn nn nn nn nn nn nn nn nn nn nn nn nn nn nn nn nn nn nn nn nn nn nn nn nn nn nn nn nn nn nn nn nn nn nn nn nn nn nn nn nn
;NLGI-2:NLGI nnnn
nN 1
180°C-40°C:
yinnn nn nnnn nn nnnn .12
xN xN nnnn nn nn nn
T
.
.13
00n 00nn nnn nn nnn nnn nnn nnn nnn nnn nnn nnn nnn nnn nnn nnn nnn nnn nnn nnn nnn nnn nnn nnn nnn nnn nnn nnn nnn nnn nnn nnn nnn nnn nnn nnn nnn nnn nnn nnn nnn nnn nnn nnn nnn nnn nnn nnn nnn nnn nnn nnn nnn nnn nann
nnn nn nnnn pynnnn nn nnnn
(nnnnn)
n nn nnnn nn nnnnnnnnnnnnnnnnnnnnnnnnnnnnnnnnnnnnnnnnnnnnnnnnnnnnnnnnnnnnnnnnnnnnnnnnnnnnnnnnnnnnnnnnnnnnnnnnnnnnnnnnnnn
Tn nnnn nn nnnn nn nnnn nn nnnn nn nnnn nn nnnn nn nnnn nn nnnn nn nnnn nn nnnn nn nnnn nn nnnn nn nnnn nn nnnn nn nnnn nn nnnn nn nnnn nn nnnn nn nnnn nn nnnn nn nnnn nn nnnn nn nnnn nn nnnn nn nnnn nn nnnn
nwnnnnnnnnnnnnnnnnnnnnnnnnnnnnnnnnnnnnnnnnnnnnnnnnnnnnnnnnnnnnnnnnnnnnnnnnnnnnnnnnnnnnnnnnnnnnnnnnnnnnnnnnnnnnnnnnnnnnnnnnnnnnnnnnnnnnnnnnnnn
(wnnnn)
n nn nnnnnnnnnnnnnnnnnnnnnnnnnnnnnnnnnnnnnnnnnnnnnnnnnnnnnnnnnnnnnnnnnnnnnnnnnnnnnnnnnnnnnnnnnnnnnnnnnnnnnnnnnnnnnnnnnnnnnnnnnnnnnnn
(nnnnn)yin
INN NNN NNN NNN NNN NNN NNN NNN NNN NNN NNN NNN NNN NNN NNN NNN NNN NNN NNN NNN NNN NNN NNN NNN NNN NNN NNN NNN NNN NNN NNN NNN NNN NNN NNN NNN NNN NNN NNN NNN NNN NNN NNN NNN NNN NNN NNN NNN NNN NNN NNN NANN
A 1n nnnn nn nn nn nn nn nn nn nn nn nn nn nn nn nn nn nn nn nn nn nn nn nn nn nn nn nn nn nn nn nn nn nn nn nn nn nn nn nn nn nn nn nn nn nn nn nn nn nn nn nn nn nn nn nn nn nn nn nn nn nn nn nn nn nn nn nn nn nn nn nn nn nn nn nn nn nn nn nn nn nn nn nn nn nn
n nn nnnn nn nnnnnnnnnnnnnnnnnnnnnnnnnnnnnnnnnnnnnnnnnnnnnnnnnnnnnnnnnnnnnnnnnnnnnnnnnnnnnnnnnnnnnnnnnnnnnnnnnnnnnnnnnnnnnnnnnnnnnnnnnnnnnnnnnnnnnnn
A
NNTIINN NNNN NNNNNNNNNNNNNNNNNNNNNNNNNNNNNNNNNNNNNNNNNNNNNNNNNNNNNNNNNNNNNNNNNNNNNNNNNNNNNNNNNNNNNNNNNNNNNNNNN
A 1
Dniv
ywnn
n 26-n n
1970nnn nn Dn
"ohnnnnn nn nnnn nnnn nnnn nnnn nnnn nnnn nnnn nnnn nnnn nnnn nnnn nnnn nnnn nnnn nnnn nnnn nnnn nnnn nnnn nnnn nnnn nnnn nnnn nnnn nnnn nnnn nnnn nnnn nnnn nnnn nnnn nnnn nnnn nnnn
10000000000000000000000000000000000000000000
PPX1000
"ipohnnnnnnnnnnnnnnon, yoo
91070nnn nn wwnn
.annnnn nnnn nn nnnn Ppx1000
()n
N N N N (N) nnnn nn nnnn .1
DINNIIN,NOVNN70TN,NN
nwn nwn nn nnnn
(F)
DINNI NUN, NIOOTN NK | DI KINNI UTNN
(Gn)nnn
n nn nnn nnn nnn nnn nnn
y,ynnnn y nnn nn y;wnn nn
ywnnyn 19997nnnn
.uyyn7
#
(A1)
ninnnnn .1
nnon 2
yinn.3
n7n.4
27.5
(A2) nnnn
#
on IX 07n 07n 07n
197n 17n 17n 17n 17n
yonixnny
nannnnny
n nn nnnnnnnnnnn
117n nn nn nnn nn nn
.
nnn nn nnn
n nn nnnnnnnnnnnnnnnnnnnnnnnnnnnnnnnnnnnnnnnnnnnnnnnnnnnnnnnnnnnnnnnnnnnnnnnnnnnnnnnnnnnnnnnnnnnnnnnnnnnnnnnnnnnnnnnnnnnnnnnnnnn
ynnn nn n nn nn nn nn nn nn nn nn nn nn nn nn nn nn nn nn nn nn nn nn nn nn nn nn nn nn nn nn nn nn nn nn nn nn nn nn nn nn nn nn nn nn nn nn nn nn nn nn nn nn nn nn nn nn nn nn nn nn nn nn nn nn nn nn nn nn nn nn nn nn nn nn nn nn nn nn nn nn nn nn nn nn nn nn nn nn nn nn nn nn nn nn nn
nynnn nnnn
777771111
NNTNNTNNNTNNNNNN
Cn42°68--nn
1
Nn 107 nnn nn nn nnn nnn
nnnnnnnnnnnnn
n nnnn nn nnnn nnnn nnnn nnnn nnnn nnnn nnnn nnnn nnnn nnnn nnnn nnnn nnnn nnnn nnnn nnnn nnnn nnnn nnnn nnnn nnnn nnnn nnnn nnnn nnnn nnnn nnnn nnnn nnnn nnnn nnnn nnnn nnnn nnnn
NITIy NvIn D
yannnnn nnnn nn nnnn nn nnnn nn nnnnnnnnnnnnnnnnnnnnnnnnnnnnnnnnnnnnnnnnnnnnnnnnnnnnnnnnnnnnnnnnnnnnnnnnnnnnnnnnnnnnnnnnnnnnnnnnnnnnnnnnnnnnnnnnnnnnnnnnn
nynnnn nn nnnn nn nnnn nn nnnnnnnnnnnnnnnnnnnnnnnnnnnnnnnnnnnnnnnnnnnnnnnnnnnnnnnnnnnnnnnnnnnnnnnnnnnnnnnnnnnnnnn
wnnnn nntan
nntan 7y no nynnnno nn

Nn
HE
238
nnnnn nn nnn
JINNIN JINN IN

y7n nnnn nn nnnn nn nn
ninnno
n nn nnnn nn nnnn nn nnnn nn nnnn nn nnnn nn nnnn nn nnnn nn nnnn nn nnnn nn nnnn nn nnnn nn nnnn nn nnnn nn nnnn nn nnnn nn nnnn nn nnnn nn nnnn nn nnnn nn nnnn nn nnnn nn nnnn nn nnnn nn nnnn nn nnnn nn nannn nn nnnn nn nnnn nn nnnn nn nnnn nn nnnn nn nnnn nn nnnn nn nnnn nn nnnn nn nnnn nn nnnn nn nnnn nn nnnn nn nnnn nn nnnn nn nnnn nn
Nn nnnn nn nnnnnnnnnnnnnnnnnnnnnnnnnnnnnnnnnnnnnnnnnnnnnnnnnnnnnnnnnnnnnnnnnnnnnnnnnnnnnnnnnnnnnnnnnnnnnnnnnnnnnnnnnnnnnnnnnnnnnnnnnnnnnnnnnnnnnnnnnn nn nannn nn nannn nn nannn nn nannn nn nannn nn nannn nn nannn nn nannn nn nannn nn nannn nn nannn nn nannn nn nannn nn nannn nn nannn nn nannn nn nannn nn nannn nn nannn nn nannn nn nannn nn nannn nn nannn nn nannn nn nannn nn nennn nn nannn nn nannn nn nannn nn nannn nn nannn nn nannn nn nannn nn nannn nn nannn nn nannn nn nannn nn nannn nn nannn nn nannn nn nannn nn nannn nn nannn nn nannn nn nannn nn nannn nn nannn nn
inon viiD
1 1 1 1 1 1 1 1 1 1 1 1 1 1 1 1 1 1 1 1 1 1 1 1 1 1 1 1 1 1 1 1 1 1 1 1
NIN'03 NIXIN
n nn nnnnnnnnnnnnnnnnnnnnnnnnnnnnnnnnnnnnnnnnnnnnnnnnnnnnnnnnnnnnnnnnnnnnnnnnnnnnnnnnnnnnnnnnnnnnnnnnnnnnnnnnnnnnnnnnnnnnnnnnnnn


- READ ALL INSTRUCTIONS!
- READ OPERATOR'S MANUAL
- SAFETY SYMBOLS
- SYMBOL MEANING
- SAFETY INSTRUCTIONS
- EN
- HEDGE TRIMMER SAFETY WARNINGS
- EXTENDED-REACH HEDGE TRIMMER SAFETY WARNINGS
- SAVE THESE INSTRUCTIONS
- ADDITIONAL SPECIFIC SAFETY RULES CAN BE FOUND IN THE APPLICABLE ATTACHMENT'S OPERATOR'S MANUAL.
- DESCRIPTION
- KNOW YOUR HEDGE TRIMMER ATTACHMENT (Fig. A1)
- PACKING LIST (A2)
- ASSEMBLY
- CUTTING HEAD ANGLE ADJUSTMENT
- Articulation Angle Adjustment
- Radial Rotation Adjustment
- CONNECTING/REMOVING THE HEDGE TRIMMER ATTACHMENT TO THE TELESCOPIC POWER POLE (FIG.E)
- MOUNTING THE TIP PROTECTOR (Optional)
- OPERATION
- APPLICATIONS
- USING THE HEDGE TRIMMER WITH TELESCOPIC POWER POLE
- PREPARATION FOR CUTTING:
- WORKING TECHNIQUES
- Horizontal Cutting (with straight cutting head)
- Vertical Cutting (cutting head at an angle)
- Vertical Cutting (with straight cutting head)
- Overhead Cutting (with cutting head at an angle)
- TO START/STOP THE TOOL
- MAINTENANCE
- GENERAL MAINTENANCE
- CLEANING THE HEDGE TRIMMER ATTACHMENT
- STORING THE HEDGE TRIMMER ATTACHMENT
- REPLACING THE BLADE
- LUBRICATING THE BLADE (Fig. N)
- N-1 Oiling Hole Screw
- LUBRICATING THE DRIVE GEAR
- Protecting the environment
- TROUBLESHOOTING
- WARRANTY
- EGO WARRANTY POLICY
- VEILIGHEIDS-WAARSCHUWINGSSYMBBOOL:
- VEILIGHEIDSWAARSCHUWINGEN VOOR HEGGENSCHAREN
- UDSKIFTNING AF KNIVEN
- GENERELT VEDLIKEHOLD
- IPEIOCTEPEXEHN O5 ONACHOCTN IPNI NCIOJIb3OBAHNI KYCTOPE3A
- A IPNABNIA BEE3OINACHOCTNIPN
- NCHOBAHNYKCTOPE3C YBEJIYEHHOJDOcraAEMOCTbIO
- YACTN HACADKN KYCTOPE3A (Pnc.A1)
- KOMNIEKT NOCTABKN (A2)
- CBOPKA
- PEYUNPOBKA YIAP EKUYUEI TOIOBKN
- PerynpobKa yrra coynehenn
- Hacroka padnabhoro bpaueHna
- YCTAHOBKA HACADKN KYCTOPE3A HA TEIECKONUeCKN PIPBODHO BLOK IN CHRTVE C HEFO (Pnc. E)
- YCTAHOBKA 3AUNTbI HAKOHEHINKA (dONOHnTeBHO)
- IIOIFTOTOBKA K OSPE3KE
- PPIEMbI PABOTbl
- Topn3oHTaIbHnaO6pe3ka (peKyuza rOJOBkapacnoJoxHe na yrnom)
- Topn3oHTaJIbHЯ o6pe3ka (peKyuza rOJIOBka pacnoJoxHe npmo)
- BepnkaHna 6pe3ka (peKyuza rOIOBka pacnoonKeHa noI yrnom)
- BertnkaIbHaO6pe3Ka (peKyuza rOJOBka pacnoJoxHe npmo).
- Bepxna 6pe3ka (pexya rnoBka pacnooxeHa noy yrnom).
- BKIIIOUOEHNE IVBbIKIOUOEHNE IHCTPYMEHTA
- OBCJYKUBAHNE
- OBUEE OBCJYKBAHNE
- OCHNTKA HACADKIN KYCTOPE3A
- XPAHEHNE HACADKIN KYCTOPE3A
- 3AMEHA PEXKYUIEFO 3JIEMEHTA
- CMA3KA IPNBODHOI SECTEPHN
- POLITYKA GWARANCYJNA EGO
- A CSOMAG TARTALMA (A2)
- OSSZESZERELES
- Opiovtia kott (e iota Kepaan Kottns):
- 3HAUH H CUMBOJY
- ПРавида.TEXHIКИБЕЗПЕКИ
- A NONEPEDXEHN I ODO B3NEKN BHKOPUCTAHH TPNMEPAIPIIPI3AHH JKBONIOTY
- NONEPEJXEHH JIOO B3NEKNBVKOPUCTAHNTPIMEPA JIA XNBONOTY 3I3bJIbJEHM PADIYCOM II
- 3EPEXKITbLIO IHCTPYKLIIO
- ODATKOBICNEUJIbHI INPABUNA B3NEKNMOXHA 3HAHTN B IHCTPYKII KOPNCYBAUABIBIIOBIDHOHACADKN.
- BKNOPUCTAHHTRPMEPAJXKIBONIOTY3 TEJECKONIHYOINPBBOHOIO WTAHOIO
- 三GO
- 36EPIAHHH HACADKN DnI PI3AHN KINBOONJOTY
- 3AMIHA JIE3A
- UCYHEHHH HECPABHOCTEIN
- 3HAUHHE HA CUMBOJNTE
- HCHTPYKLIIM 3A BE3OJNACHOCT
- PENyPExEHE: BnHaN n3BaXdaTe
- PERYUNPAHE HA bTbNA HA PEXELATA TJIABA
- Perynpahe Ha bbrna Ha cbyneHaBaHe.
- PerynpaneHa paDnaHNoToBbptHe
- CBbP3BAHE/N3BAXDAHE HA IPIPUCTABKATA HOXNtA 3A KMB PJIET KbM TEJECKOINHn3AXPAHBAUI PPbT (pnr.E)
- BvckTe paanen MOHTNPAHE HA IINCTABKA KbM TEJIeCKOINHATA 3AXPAHBAUJA ITIABA
- Bxte pa3den "N3BAKDAHE HA IPNUCTABKA OT TEIECKONUHNR 3AXPAHBAU INPbT
- MOHTIPAHE HA IPOTEKTOPA 3A BbPXA (onuohaJeH)
- 300800
- ggyggyg0
- fobogobabgoggs:
- mms
- Bmgo aomgol figlo
- g5b0g3m
- SAÇUVAJTE OVO UPUTSTVO.
- DODATNE POSEBNE SIGURNOSNE PROPISE MOZETEPRONACI U PRIRUCNIKU ZA RUKOVAOCA ODGOVARAJUCEG DODATKA.
- A
- #
- Aolal
- Culai jj 1
- Clll 0j j j j
- (a)()
- ()
- (A2)
- eannnnn
- Jaa Jb
- (Nnnn)nnn
- yannan yin
- (nnnnn)
- (wnnnn)
- (nnnnn)yin
- Dniv
- 1970nnn nn Dn
- ()n
- (A1)
- (A2) nnnn
- nnn nn nnn
- 777771111
- nnnnn nn nnn
- ninnno
- inon viiD
- NIN'03 NIXIN
Brand : EGO
Model : PTX5100
Category : Multitools