GPB 18V5 C Professional - Radio BOSCH - Free user manual and instructions
Find the device manual for free GPB 18V5 C Professional BOSCH in PDF.
| Product Type | Job Site Radio |
| Brand | Bosch |
| Model | GPB 18V5 C Professional |
| Reference | 3 601 DA4 0.. |
| Weight (depending on battery) | 9.2 – 10.2 kg |
| Mains Power Supply | 230/110 V |
| Battery Power Supply | 18 V (lithium-ion battery) |
| Amplifier Power | 4 × 5 W |
| Radio Reception | FM (87.5–108 MHz) |
| Bluetooth | Bluetooth® 5.0, transmission power 10 mW |
| USB Charging Port | USB, max current 2.1 A |
| AC Outlets | Yes, max total current up to 15 A (depending on reference) |
| Equalizer | Presets JAZZ, ROCK, POP, CLASSIC, CUSTOM |
| Backup Batteries | 2 × 1.5 V LR6 (AA) |
| Protection Class | IP54 (estimation) |
| Operating Temperature | 0 °C to +35 °C |
| Storage Temperature | -20 °C to +50 °C |
| Compatible Batteries | GBA 18V…, ProCORE18V… |
| Maintenance | Clean with a soft, damp cloth; no detergents or solvents |
| Safety | Splash water protection; Electronic Cell Protection (ECP) |
| Repairability | Repairs by Bosch authorized service center; genuine parts |
Frequently Asked Questions - GPB 18V5 C Professional BOSCH
User questions about GPB 18V5 C Professional BOSCH
0 question about this device. Answer the ones you know or ask your own.
Ask a new question about this device
Download the instructions for your Radio in PDF format for free! Find your manual GPB 18V5 C Professional - BOSCH and take your electronic device back in hand. On this page are published all the documents necessary for the use of your device. GPB 18V5 C Professional by BOSCH.
USER MANUAL GPB 18V5 C Professional BOSCH
YkpaHcbKa ..CtoPiHa 140
Kaak. 5et 148
MaKeDoHcN. CtpaHua 172
Srpski Strana 180
Slovenscina Stran 187
www.bosch-pt.com/serviceaddresses
Transport
Read all the safety and general instructions. Failure to observe the safety and general instructions may result in electric shock, fire and/or serious injury.
Keep all the safety and general instructions for future reference.
Always check the radio, cable and plug before use. Stop using the radio if you discover any damage. Do not open the radio or plug yourself, and have them repaired only by a qualified specialist using only original replacement parts. Damaged radios, cables and plugs increase the risk of electric shock.
The mains plug must be plugged in to an easily accessible plug socket with a protective earth contact.
The mains plug must match the plug socket. Never modify the plug in any way. Do not use any adapter plugs with radios. Unmodified plugs and matching plug sockets will reduce the risk of electric shock.
- Completely unwind the mains cable when operating the radio via mains supply. Otherwise the mains cable can heat up.
Do not misuse the cable, for example by using it to carry, hang up or unplug the radio. Keep the cable away from heat, oil, sharp edges and moving parts. Damaged or entangled cords increase the risk of electric shock.

Do not expose the radio to rain or wet conditions. Water entering the radio increases the risk of an electric shock.
Do not open the battery. There is a risk of short-circuiting.
In case of damage and improper use of the battery, vapours may be emitted. The battery can set alight or explode. Ensure the area is well ventilated and seek medical attention should you experience any adverse effects. The vapours may irritate the respiratory system.
If used incorrectly or if the battery is damaged, flammable liquid may be ejected from the battery. Contact with this liquid should be avoided. If contact accidentally occurs, rinse off with water. If the liquid comes into contact with your eyes, seek additional medical attention. Liquid ejected from the battery may cause irritation or burns.
The battery can be damaged by pointed objects such as nails or screwdrivers or by force applied externally. An internal short circuit may occur, causing the battery to burn, smoke, explode or overheat.
When the battery is not in use, keep it away from paper clips, coins, keys, nails, screws or other small metal objects that could make a connection from one
terminal to another. A short circuit between the battery terminals may cause burns or a fire.
Only use the battery with products from the manufacturer. This is the only way in which you can protect the battery against dangerous overload.
Only charge the batteries using chargers recommended by the manufacturer. A charger that is suitable for one type of battery may pose a fire risk when used with a different battery.

Protect the battery against heat, e.g. against continuous intense sunlight, fire, dirt, water and moisture. There is a risk of explosion and short-circuiting.
Products sold in GB only:
Your product is fitted with an BS 1363/A approved electric plug with internal fuse (ASTA approved to BS 1362). If the plug is not suitable for your socket outlets, it should be cut off and an appropriate plug fitted in its place by an authorised customer service agent. The replacement plug should have the same fuse rating as the original plug. The severed plug must be disposed of to avoid a possible shock hazard and should never be inserted into a mains socket elsewhere.
The Bluetooth® word mark and logos are registered trademarks owned by Bluetooth S1G, Inc. and any use of such marks by Robert Bosch Power Tools GmbH is under license.
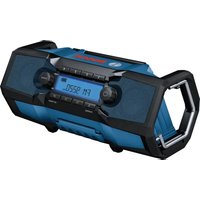
Product Description and Specifications
Please observe the illustrations at the beginning of this operating manual.
Product Features
The numbering of the product features refers to the illustration of the radio on the graphics page.
(1) Speaker
(2) Carrying handle
(3) Alternating current connection control light
(4) Alternating current connection cover cap
(5) Alternating current connection plug socket (Power Outlets)
(6) Storage compartment
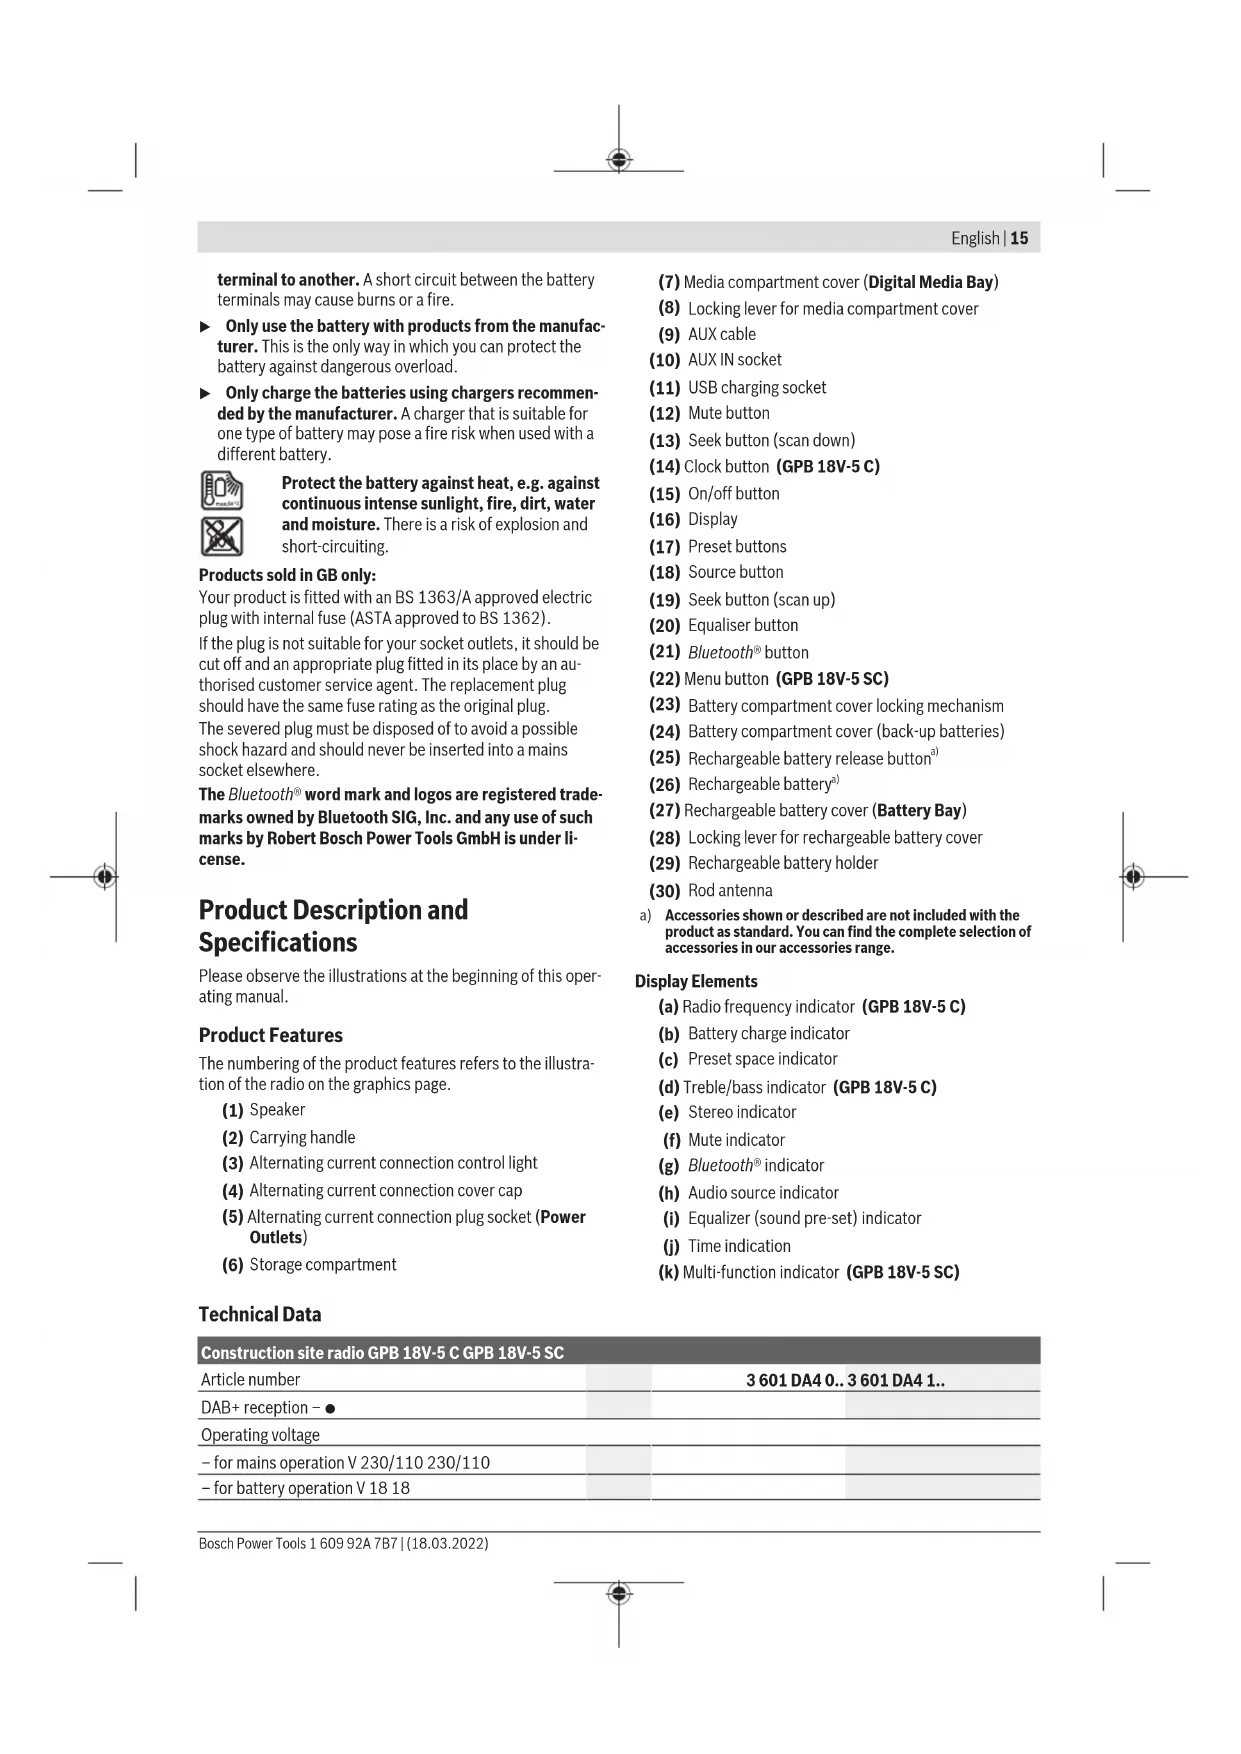
(7) Media compartment cover (Digital Media Bay)
(8) Locking lever for media compartment cover
(9) AUX cable
(10) AUX IN socket
(11) USB charging socket
(12) Mute button
(13) Seek button (scan down)
(14)Clock button (GPB 18V-5 C)
(15) On/off button
(16) Display
(17) Preset buttons
(18) Source button
(19) Seek button (scan up)
(20) Equaliser button
(21) Bluetooth® button
(22) Menu button (GPB 18V-5 SC)
(23) Battery compartment cover locking mechanism
(24) Battery compartment cover (back-up batteries)
(25) Rechargeable battery release button
(26) Rechargeable batterya)
(27) Rechargeable battery cover (Battery Bay)
(28) Locking lever for rechargeable battery cover
(29) Rechargeable battery holder
(30) Rod antenna
a) Accessories shown or described are not included with the product as standard. You can find the complete selection of accessories in our accessories range.
Display Elements
(a) Radio frequency indicator (GPB 18V-5 C)
(b) Battery charge indicator
(c) Preset space indicator
(d) Treble/bass indicator (GPB 18V-5 C)
(e) Stereo indicator
(f) Mute indicator
(g) Bluetooth indicator
(h) Audio source indicator
(i) Equalizer (sound pre-set) indicator
(j) Time indication
(k) Multi-function indicator (GPB 18V-5 SC)
Technical Data
| Construction site radio GPB 18V-5 C GPB 18V-5 SC | |
| Article number | 3601 DA4 0.. 3601 DA4 1.. |
| DAB+ reception - ● | |
| Operating voltage | |
| - for mains operation V 230/110 230/110 | |
| - for battery operation V 18 18 | |
16 | English
| Construction site radio GPB 18V-5 C GPB 18V-5 SC | |||
| Nominal output of amplifier W 4 × 5 4 × 5 | |||
| FM reception range MHz 87.5-108 87.5-108 | |||
| DAB+ reception range MHz - 174.928-239.200 | |||
| Bluetooth® compatibility | Bluetooth® 5.0 | Bluetooth® 5.0 | |
| Bluetooth® operating frequency range MHz 2402-2480 2402-2480 | |||
| Max. Bluetooth® transmission power mW 10 10 | |||
| Back-up batteries 2 × 1.5 V LR6 (AA) 2 × 1.5 V LR6 (AA) | |||
| Weight according to EPTA-Procedure 01:2014 | kg | 9.2-10.2A) | 9.2-10.2A) |
| Protection class | ±/I | ±/I | |
| Recommended ambient temperature during charging | °C | 0 to +35 | 0 to +35 |
| Permitted ambient temperature during operation | °C | 0 to +35 | 0 to +35 |
| Permitted ambient temperature during storage | °C | -20 to +50 | -20 to +50 |
| Recommended rechargeable batteries | GBA 18V... | GBA 18V... | |
| ProCORE18V... | ProCORE18V... | ||
| Recommended chargers | GAL 18... | GAL 18... | |
| GAX 18... | GAX 18... | ||
| GAL 36... | GAL 36... | ||
A) Depends on battery in use
Radio Energy Supply
Power can be supplied to the radio via a mains connection or a lithium-ion rechargeable battery (26).
When the battery is used for power supply, only the functions audio operation and power supply of external devices via the integrated USB connection are available.
Operation via Mains Connection
Pay attention to the mains voltage. The voltage of the power source must match the voltage specified on the type plate of the radio. Radios marked with 230V can also be operated with 220V .
Operation with Battery Pack
Use only the chargers listed in the technical data. Only these chargers are matched to the lithium-ion rechargeable battery of your radio.
Note: The use of rechargeable batteries unsuitable for your radio can lead to malfunctions or damage to the radio.
The lithium-ion battery is protected against deep discharge by "Electronic Cell Protection (ECP)". A protective circuit switches the radio off when the rechargeable battery is drained.
Do not switch the radio back on after it has been switched off by the protective circuit. This can damage the battery.
Replacing a Rechargeable Battery
Disengage the locking lever (28) of the battery cover and open the battery cover (27) flap.
To remove a rechargeable battery, press the battery release button (25) and pull the rechargeable battery out of the battery compartment. Do not use force to do this.
To insert a rechargeable battery, push it into the battery holder (29) such that the connections of the rechargeable battery are in line with the connections of the battery holder. Allow the rechargeable battery to engage.
Close the battery cover (27) and lock it.
Battery Charge Indicator
When the rechargeable battery is inserted, you can see the state of charge of the battery (26) in the display. When the rechargeable battery is removed, you can see this on the battery itself.
Battery Charge Indicator in the Display
The battery charge indicator (b) will appear in the display as soon as a rechargeable battery with sufficient voltage is inserted and the radio is not connected to the mains supply.
| Display | Capacity |
| 80-100% | |
| 60-80% | |
| 40-60% | |
| 20-40% | |
| 5-20% | |
| 0-5% |
Battery Charge Indicator on the Rechargeable Battery
If the rechargeable battery is removed from the radio, its state of charge may be indicated by the green LEDs of the battery charge indicator on the rechargeable battery.
Press the button for the battery charge indicator or show the state of charge.
If no LED lights up after pressing the button for the battery charge indicator, then the battery is defective and must be replaced.
Battery model GBA 18V...


LEDs Capacity
3 × continuous green light 60 - 100 %
2× continuous green light 30 - 60%
1× continuous green light 5-30%
1× flashing green light 0-5%
Battery model ProCORE18V...


LEDs Capacity
5× continuous green light 80-100%
4× continuous green light 60 - 80%
3 × continuous green light 40 - 60%
2 × continuous green light 20 - 40%
1× continuous green light 5 - 20%
1 × flashing green light 0 - 5 %
Inserting/Changing Back-up Batteries
To save the time and other settings on the radio, back-up batteries must be inserted. Using alkaline manganese batteries is recommended for this purpose.
Disengage the locking lever (28) of the battery cover and open the battery cover (27) flap.
If required, remove the rechargeable battery (26).
To open the battery compartment cover (24), press on the locking mechanism (23) and remove the battery compartment cover. Insert the back-up batteries supplied.
When inserting the batteries, ensure that the polarity is correct according to the illustration on the inside of the battery compartment.
Replace the battery compartment cover (24).
"REPLACE AA BATTERY WHEN UNIT NO LONGER KEeps CORRECT TIME": Change the back-up batteries when the radio no longer saves the time.
Always replace all the batteries at the same time. Only use batteries from the same manufacturer and which have the same capacity.
Take the back-up batteries out of the radio if you are not using it for a prolonged period of time. When
stored in the radio for longer periods, the back-up batteries can corrode and discharge themselves.
Operation
Protect the radio against direct water contact. Water entering the radio increases the risk of an electric shock.
- Keep the covers of the battery compartment, media compartment and alternating current connections closed whenever possible. The closed covers protect the radio against water and dust.
Audio Operation
Switching On and Off
To switch on the radio, press the on/off button (15). The display (16) is activated and the audio source that was set the last time the radio was switched off is played back.
To switch off the radio, press the on/off button (15) again. The current setting of the audio source will be saved.
Adjusting the Volume
After the radio is switched on, the volume is always set to low.
To increase the volume, turn the clock button (14) (GPB 18V-5 C) or the menu button (22) (GPB 18V-5 SC) clockwise; to reduce the volume, turn anticlockwise.
The volume setting will appear in the display with a value between 0 and 30. Before adjusting or changing a radio station, set the volume to a low setting; before starting an external audio source, set the volume to a medium setting. To switch off the sound, you can briefly press the mute button (12). The mute indicator (f) will appear in the display.
To switch on the sound again, either briefly press the mute button again or turn the clock button (14) (GPB 18V-5 C) or the menu button (22) (GPB 18V-5 SC) clockwise.
Adjusting the Sound
An equalizer is integrated in the radio for optimal sound reproduction.
The treble and bass setting can be manually changed or sound pre-sets for various music styles can be used. You can choose from the pre-programmed settings JAZZ, ROCK,
POP and CLASSIC, as well as the individually programmable setting CUSTOM. The sound settings are saved separately for each audio source.
To select one of the stored sound pre-sets, press the equalizer button (20) briefly as many times as needed until the required setting appears on the sound pre-set indicator (i) in the display.
Changing the Setting CUSTOM:
- You can adjust the treble and the bass within a range of -5 to +5.
- Press the equaliser button (20) for longer than 0.5 seconds. CUSTOM appears on the sound pre-set indicator (i) in the display.
18|English
- GPB 18V-5 C: TRE is shown on the treble/bass indicator (d); the current treble value flashes. Turn the clock button (14) to change the treble. Press the clock button (14) to save the set value.
BAS and the current bass value will now be shown on the treble/bass indicator (d). Change and save the bass setting in the same way as described for the treble. - GPB 18V-5 SC:
and the current value of the treble will be shown on the multi-function indicator (k). Turn the menu button (22) to change the treble. Press the menu button (22) to save the set value. and the current bass value will now be shown on the multi-function indicator (k). Change and save the bass setting in the same way as described for the treble. - After saving the bass setting or 10 seconds after last using the clock button (14)/menu button (22), the radio will return to the standard display screen.
Selecting an Audio Source
To select an audio source, press the source button (18) until the required internal or external audio source is shown in the display:
DAB: Digital radio via DAB+ (GPB 18V-5 SC),
- FM: Analogue radio via FM,
- AUX: External audio source (e.g. CD player) via the 3.5-mm socket AUX IN (10) in the media compartment,
External audio source (e.g. smartphone) via the Bluetooth® connection.
The current audio source can be seen on the audio source indicator (h) or Bluetooth® indicator (g).
Setting/Saving DAB+ Radio Stations (GPB 18V-5 SC)
To select the audio source DAB+ radio stations, press the source button (18) as many times as needed until DAB appears on the audio source indicator (h).
After a short initialisation, the last set radio station will be played back.
Each station name appears on the top line of the multi-function indicator (k). The additional information shown on the bottom line of the multi-function indicator can be set with the menu function.
- To switch the station, turn the source button (18) until the required station is shown in the display. Press the source button (18) to confirm the selection. The radio will switch to the selected station. Alternatively, you can press the seek button (scan down) (13) or the seek button (scan up) (19) to switch the station.
- To save a set station, press the preset button (17) of the required preset space until the number of the preset space appears on the preset indicator (c).
- To start playback of a saved station, briefly press one of the preset buttons (17). The number of the preset space will appear on the preset indicator (c).
Note: In the event of reception problems, you can manually start the DAB+ station search. To do this, either select
down) (13) and the seek button (scan up) (19) simultaneously. After the station search is complete, four stations will be saved in preset spaces 1 to 4. Stations that have already been saved will be overwritten here.
If no DAB+ radio stations can be found,
Setting/Saving FM Radio Stations
To select the audio source FM radio stations, press the source button (18) as many times as needed until FM appears on the audio source indicator (h).
GPB 18V-5 C: During adjustment, the radio frequency appears on the time indicator (j) and then on the radio frequency indicator (a).
GPB 18V-5 SC: The frequency of each current station will appear on the top line of the multi-function indicator (k). The additional information shown on the bottom line of the multifunction indicator can be set with the menu function.
If there is sufficiently good reception of a suitable signal, the radio will automatically switch to stereo reception, and the stereo indicator (e) will appear in the display.
- To set a specific station, turn the source button (18) until the required frequency or the required station is shown in the display.
To search for the next station with high signal strength, briefly press the seek button (scan down) (13) or the seek button (scan up) (19). The next station found is shown in the display and played back.
To search for all stations with high signal strength, press the seek button (scan down) (13) or the seek button (scan up) (19) for longer than 0.5 s. Any station found is played back for 5 s, then the search is continued until the end of the frequency band. To cancel the station search, briefly press the seek button (scan down) (13) or the seek button (scan up) (19). - To save a set station, press the preset button (17) of the required storage space until the number of the storage space appears on the storage space indicator (c).
- To automatically search for and save the stations with the best reception, press the seek button (scan down) (13) and the seek button (scan up) (19) simultaneously. The radio will check all receivable stations and save the four stations with the best reception in preset spaces 1 to 4. Please note that stations that have already been saved will be overwritten here where necessary. Once the search has finished, the station saved in preset space 1 will be played back.
- To start playback of a saved station, briefly press one of the preset buttons (17). The number of the storage space will appear on the storage space indicator (c).
Setting the Rod Antenna
The radio is supplied with a fitted rod antenna (30). For FM radio operation, point the rod antenna in the direction that enables the best reception.
If the reception is insufficient, position the radio at a different location that enables better reception.
Note: When operating the radio in the direct vicinity of radio-communication equipment or radio transceivers, or other electronic equipment, the radio reception can be subject to interference.
Connecting External Audio Sources via AUX
Disengage the locking lever (8) and open the cover (7) of the media compartment. Insert the 3.5-mm connector for the AUX cable (9) into the AUX IN socket (10). Connect the AUX cable to a suitable audio source.
To play back the AUX audio source, press the source button (18) until AUX appears on the audio source indicator (h).
After removing the AUX cable connector, close the cover (7) of the media compartment again and lock it to protect against dirt.
If it fits, you can also place an audio source connected via AUX in the storage compartment (6).
If one of the preset buttons (17) is pressed during AUX operation, the radio will switch to the station that was saved in the last used radio operating mode.
Playing Back/Controlling External Audio Sources via Bluetooth®
To play back an audio source (e.g. smartphone) via Bluetooth, either press the source button (18) until the Bluetooth indicator (g) appears in the display, or briefly press the Bluetooth button (21) regardless of the current audio source.
If the radio has already been connected to an external audio source via Bluetooth® and if this audio source is available, a connection to this audio source will automatically be established. As soon as the connection is established, the Bluetooth® indicator (g) will light up continuously.
GPB 18V-5 SC: The name of the device connected via Bluetooth is displayed on the top line of the multi-function indicator (k). The text from the connected device appears on the bottom line.
If a connection cannot be established within two minutes, the connection set-up will be cancelled and the Bluetooth indicator (g) will flash continuously.
GPB 18V-5 SC:
The radio will shut off automatically after another 17 minutes without a connection being established.
Establishing a new Bluetooth connection:
- To establish a connection to a new external audio source, press the Bluetooth® (21) button for longer than 0.5 seconds. This is also possible during a search process, if there is an existing connection or when operating with another audio source.
- The radio will start the search process. During the search process, the Bluetooth® indicator (g) will flash.
- Activate the connection via the external audio source. For smartphones, that is generally possible via the settings in the Bluetooth® menu. The radio will appear as an available source under the name GPB 18V-5 C xxx or
GPB 18V-5 SC xxx. Please observe the operating instructions for your audio source/smartphone.
- As soon as a connection is established via Bluetooth, the Bluetooth indicator (g) will light up continuously.
The audio source connected via Bluetooth® can also be controlled via the radio:
- To select a track and to start playback, briefly press the seek button (scan up) (19) or the seek button (scan down) (13) until the required track has been reached. Playback of the selected track is started automatically.
- To interrupt playback, press the mute button (12). The mute indicator (f) appears in the display.
- To continue playback, press the mute button (12) again, change the volume or press the seek button (scan up) (19) or the seek button (scan down) (13).
- To fast-forward or rewind within a track, press and hold the seek (scan up) button (19) or the seek (scan down) button (13) until the required place in the track has been reached.
If one of the preset buttons (17) is pressed during operation via Bluetooth®, the radio will switch to the station that was saved in the last used radio operating mode.
Setting the Time Indication (GPB 18V-5 C)
To access the time indication menu, briefly press the clock button (14).
You can choose between 12-hour < 12H> and 24hour < 24H> time formats; you can also set the hours and minutes.
Navigating in the menu:
-
Change menu settings: Turn the clock button (14).
-
Save menu settings: Press the clock button.
-
After saving the minutes setting or 10 seconds after last using the clock button, the radio will return to audio operation.
Change the back-up batteries when the radio no longer saves the time.
Reset Function (GPB 18V-5 C)
To return all settings on the radio to factory settings (reset), press the clock button (14) for longer than 0.5 seconds.
Turn the clock button (14) to select between resetting
Changing Menu Settings (GPB 18V-5 SC)
To access the menu function, press the menu button (22).
Navigating in the menu:
- To scroll through a menu: Turn the menu button (22).
- To select and save a menu setting: Press the menu button (22).
- To switch to a submenu: Press the menu button (22).
- To switch from a submenu back to a higher menu: Press the seek button (scan down) (13). If the highest menu level has been reached, the radio will return to audio operation.
20|English
To leave the menu function on any level and return to audio operation, press the seek button (scan down) (13) for longer than 1 second. Alternatively, the radio will automatically switch back to audio operation 10 seconds after the last press of a button.
If menu settings are no longer being saved when you switch off the radio, replace the back-up batteries.
Menu Options (GPB 18V-5 SC)
The menu selection is partially dependent on the audio operating mode of the radio.
Within the menus, the name of each menu is displayed on the top line of the multi-function indicator (k), and the selectable setting on the bottom line.
Time menu: You can choose between 12-hour <12 Hour Mode> and 24-hour <24 Hour Mode> time formats, and adjust the time manually. If a radio station that transmits the time is selected with the DAB audio source, this time is automatically adopted.
Reset menu: You can reset all menu settings to factory settings
Automatic station search menu: You can start an automatic station search.
Manual set-up menu: You can set the required frequency manually.
Display mode menu: You can choose what text will appear on the bottom line of the multi-function indicator (k):
-
The information broadcast by the radio station
, -
The frequency of the station < Frequency>
-
The signal strength
,
The program type broadcast by the radio station
Display mode menu: You can choose what text will appear on the bottom line of the multi-function indicator (k):
-
The information broadcast by the radio station
. -
The station name
,
The program type broadcast by the radio station
Power Supply of External Devices
USB Port
The USB port can be used to charge devices that can be powered via USB (e.g. various mobile phones). The maximum charging current is 2,1 A.
Disengage the locking lever (8) and open the cover (7) of the media compartment. Using a corresponding USB cable, connect the USB port of the external device to the USB charging socket (11) (USB) of the radio.
In operation with a rechargeable battery, the external device will only be charged if the radio is switched on.
If it fits, you can place the external device in the storage compartment (6) while charging. If the external device heats up while charging, leave the cover (7) of the media compartment open to protect the external device against overheating.
Once the charging process is complete or you have removed the USB cable, close the cover (7) again to protect the radio against dirt.
Alternating Current Connection
You can operate other external electrical devices using the alternating current connections. Plug sockets can vary depending on country-specific standards.
Power can only be supplied to external devices using the alternating current connection when the radio is connected to the mains; it is not possible using an inserted battery. If the radio is connected to the mains supply, the green control light (3) will light up to confirm this.
The total maximum permitted current consumption of all connected electrical devices must not exceed the value stated in the following table (also see the labelling on the housing under the cover caps (4)):
Article number Total max. current consumption (in A)
| 3601 DA4 000 15 | |
| 3601 DA4 100 15 | |
| 3601 DA4 170 12 | |
| 3601 DA4 1W0 15 | |
| 3601 DA4 130 9 | |
| 3601 DA4 140 9 |
Open the cover cap (4) of the alternating current connection and insert the plug of the external electrical device into a plug socket (5) on the radio.
Working Advice
Recommendations for Optimal Handling of the Battery
Protect the battery against moisture and water.
Only store the battery within a temperature range of -20 to 50^ . Do not leave the battery in your car in the summer, for example.
Occasionally clean the ventilation slots on the battery using a soft brush that is clean and dry.
A significantly reduced operating time after charging indicates that the battery has deteriorated and must be replaced. Follow the instructions on correct disposal.
Maintenance and Service
Maintenance and Cleaning
Keep the radio clean to ensure good, safe operation. In order to avoid safety hazards, if the power supply cord needs to be replaced, this must be done by Bosch or by an
after-sales service centre that is authorised to repair Bosch power tools.
Wipe off any dirt using a damp, soft cloth. Do not use any detergents or solvents.
After-Sales Service and Application Service
Our after-sales service responds to your questions concerning maintenance and repair of your product as well as spare parts. You can find explosion drawings and information on spare parts at: www.bosch-pt.com
The Bosch product use advice team will be happy to help you with any questions about our products and their accessories.
In all correspondence and spare parts orders, please always include the 10-digit article number given on the nameplate of the product.
Great Britain
Robert Bosch Ltd. (B.S.C.)
P.O.Box 98
Broadwater Park
North Orbital Road
Denham Uxbridge
UB95HJ
At www.bosch-pt.co.uk you can order spare parts or arrange the collection of a product in need of servicing or repair.
Tel. Service: (0344) 7360109
E-Mail: boschservicecentre@bosch.com
You can find further service addresses at:
www.bosch-pt.com/serviceaddresses
Transport
The recommended lithium-ion batteries are subject to legislation on the transport of dangerous goods. The user can transport the batteries by road without further requirements.
When shipping by third parties (e.g.: by air transport or forwarding agency), special requirements on packaging and labelling must be observed. For preparation of the item being shipped, consulting an expert for hazardous material is required.
Dispatch battery packs only when the housing is undamaged. Tape or mask off open contacts and pack up the battery in such a manner that it cannot move around in the packaging. Please also observe the possibility of more detailed national regulations.
Disposal

Radios, batteries, accessories and packaging should be sorted for environmentally friendly recycling.

Do not dispose of radios and batteries in household waste!
Only for EU countries:
According to the Directive 2012/19/EU on waste electrical and electronic equipment and its transposition into national
law, radios that are no longer usable, and, according to the Directive 2006/66/EC, defective or drained batteries must be collected separately and disposed of in an environmentally correct manner.
If disposed incorrectly, waste electrical and electronic equipment may have harmful effects on the environment and human health, due to the potential presence of hazardous substances.
Only for United Kingdom:
According to Waste Electrical and Electronic Equipment Regulations 2013 (2013/3113) and the Waste Batteries and Accumulators Regulations 2009 (2009/890), electrical and electronic equipment that is no longer usable must be collected separately and disposed of in an environmentally friendly manner.
Battery packs/batteries:
Li-ion:
Please observe the notes in the section on transport (see "Transport", page 21).
Français
"REPLACE AA BATTERY WHEN UNIT NO LONGER KEeps
Robert Bosch (France) S.A.S.
www.bosch-pt.com/serviceaddresses
Transport
"REPLACE AA BATTERY WHEN UNIT NO LONGER KEEPS
www.bosch-pt.com/serviceaddresses
Transporte
Colocar/trocar as baterias de reserva
www.bosch-pt.com/serviceaddresses
Transporte
www.bosch-pt.com/serviceaddresses
Trasporto
www.bosch-pt.com/serviceaddresses
Vervoer
Bosch Service Center
Telegrafvej 3
2750 Ballerup
66 | Svensk
Pá www.bosch-pt.dk kan der online bestilles reservedele el-ler oprettes en reparations ordre.
TIf. Service Center: 44898855
Fax: 44898755
E-Mail: vaerktoej@dk.bosch.com
www.bosch-pt.com/serviceaddresses
Transport
Smid参加会议的人员包括:Sridi, Srida, Srida, Srida, Srida, Srida, Srida, Srida, Srida, Srida, Srida, Srida, Srida, Srida, Srida, Srida, Srida, Srida, Srida, Srida, Srida, Srida, Srida, Srida, Srida, Srida, Srid a
Gelder kun i EU-lande:
Bosch Service Center
Telegravej 3
2750 Ballerup
Danmark
Tel.: (08) 7501820 (inom Sverige)
Fax: (011) 187691
Du hittar fler kontaktuppgifter till service har:
www.bosch-pt.com/serviceaddresses
Transport
De rekommenderade lithiumjonbatterierna ar underkastade kraven for farligt gods. Anvandaren kan utan ytterligare forpliktelser transportera batterierna pa allman vag.
"REPLACE AA BATTERY WHEN UNIT NO LONGER KEEPS
CORRECT TIME": Skift ut bufferbatteriene hvis
www.bosch-pt.com/serviceaddresses
Transport
www.bosch-pt.com/serviceaddresses
Kuljetus
www.bosch-pt.com/serviceaddresses
Mεταφρὰ
Ouviotweecmuatapieicovtwvaiounokevtai anataeic tow enikivuvw ayaoov. Omuatapiec npopoov vaetaepoov obikoc and tov xpntxwpiacnouc opouc.
'Orav, ouwc, o natapiec anooteAovtai ao rpitouc (n.x. aeponopikwic n ie taia petaaetapopowv) npenei va npouvtau diapopec idiatrepec anaitneic yia tn oukeuaia kai tn oivan. E6w npenei, kata tny npoeotuaia tou teayiou ano toalnc va zntnthetai onawobhnote kai n auuouevoc eibkou ia etikivduva ayaa.
AnoTeAeTic mntapiec moov to nepiBnma eivai aKto. Kollate tic ymuvc enaepc me kannik taivia kai va oukeuaZeTe nV mntapia kata tetoio tpno, wote autn va unkyuietai meaa otn ouakeuaia. Tapaakaloume va laubavete enlnc unoyn oac kai tuyov nio auotnpce eovikec diataeic.
Anoupon

To pabiopwo, oI enavaopnpiovec umatapie/umatapiec, ta eapntmuata kai oiaoukeuaie npenei va avakukauovotai pe tropo piiko npoc To nepiBaalov.

Mny nete To pabiopwo KAI Tc enavaopnti Zopevec matapiec/maatapiec ota oikka aonoppmuata!
Movi yia xowpc tnc EE:
UuWpaue 12019EE 0e ta tncn 2006/6E 0aovta 0poc to npiaauo.
Se nepintwn m evdeiyevnc anouopcn o nektpkec ka nektpovikeoakevec loyewevexoevc napouiaac etikiv buvw ouow npov va exouv embaeic enimwaec,oto nepiabaov kai atny avpwmn uyia.
www.bosch-pt.com/serviceaddresses
Nakliye
"REPLACE AA BATTERY WHEN UNIT NO LONGER KEEPS
Robert Bosch Sp. z o.o.
www.bosch-pt.com/serviceaddresses
Transport
"REPLACE AA BATTERY WHEN UNIT NO LONGER KEEPS
Bosch Service Center PT
K Vapence 1621/16
692 01 Mikulov
Na www.bosch-pt.cz si si muzete objednat opravu Vaseho stroje nebo nahradni dily online.
www.bosch-pt.com/serviceaddresses
Preprava
Doporucene lithium-iontove akumulatory podlehaji pozadavkum zakona o nebezpecnych nkladech. Tyto akumulatory mohou byt bez dal'sich podminek prepravany uzivatelem po silnici.
"REPLACE AA BATTERY WHEN UNIT NO LONGER KEEPS
CORRECT TIME": Záloźne batarie vymente, ked'sa už v rádiu neukladá cas.
120|Slovencina
Vzdy vymiejte vsetky baterie sucasne. Pouzivajte len batierod od Jedneho vyrobcu a rovnakou kapacitou.
Ked' radio dlhsi cas nepouzivate, vyberte z neho zalozné baterie. Zalozné baterie mozu pri dlhsom skladovani v radiu skorodova t a smocinne sa vybit.
Prevádzka
Chrante rádio pred priamym kontaktomsvodou.Vnikutie vody do rádia zvyšuje riziko zásahu elektrickým prudom.
Kryty priehradky na akumulátor, priehradky na medía a pripojok na striedavy prud majte podla moznosti za tvorené. Zatvorené kryty chránia rádio pred vodou a prachom.
Prehravanie zvuku
Zapnutie/vypnutie
www.bosch-pt.com/serviceaddresses
Transport
Odporucane litiovo-ionovekumulatory podliehaju poziadavkam na transport nebezpecnheho nakladu. Tieto akumulatory smie pouizatel naradia prepravoat po cestach bez dalsich opatreni.
Pri zasieleni tretimi osobami (napr.: leteckou dopravou alebo prostrednictvom spedicie) treba respektovat osobotne poziadavyk na obaly a oznacenie. V takomto pripadtreba pri priprave zasielky bezpodmienecne konzultovat's odbornikom na prepravu nebezpecnhe tovaru.
Akumuláryzasielajte iba vtedy, ak nemaju poskodeny obal. Otvorenékontakty prelepte a akumulator zabalte tak, aby sa v obale nemohol posúvat. Respektujte aj pripadné doplñujuce národné predpisy.
Likvidácia

"REPLACE AA BATTERY WHEN UNIT NO LONGER KEEPS
CORRECT TIME": Cserelje ki a pufferelemeket, ha az idot a radio mn nem taroja.
www.bosch-pt.com/serviceaddresses
Szallitas
He BkIouaTe padHOpnepHMNK NOBtOPO noCne erO OTKIOUeHHN pH NOMOuCNcEMbI 3auNTbI. AKKyMnyT Top MOKeT 6bITb NOBpeKDeH.
3aMeHa aKKyMnyToppa
Pa36nokpyte c nomoosbpo bpaara (28) Kpbilky aKKMy- JIaTOpHOrO oTceKa H OTKpOte ee (27).
ДинИЗВЕЧЕНЯ AkKуМЛТОРаHAЖMITE KHONKY pa36NOKINPOBKN AkKуМЛТОРа(25)иИЗВLEКNTe erO ИЗ AkKуМЛТOPHOrO OTCeKa. He npIMHeHITe npH 3TOM Cnbl.
IyctahOBKn aKKMyJrTOpH06aTapeN BCTaBt ee B depKaTeJIb (29) TaKIM o6pa3OM, UTo6bl MeCTa NOIDCOEHN HnHa aKKMyJrTOpe N B KpenPENH COBnA. DaITe aKKyMjTOpY BOHTB 3auePJIeHne.
3aKpOHTe KpbIuKy aKKyMnyTOpHOro otceKa (27) n 3aΦnKcnpyTe.
HnkaTop 3apXeHHoCTn aKKymyTota
Korda 6atape yctaHOBHeHa,Ha nucnne oTo6paKaIOCTaAHHbIe O CTeneHH3apXeHHoCTN aKKMyJrTOpa (26), KOrda aKKMyJrTOp N3BNeH,3TN daHHbIe OTo6paKaIOCTHa CaMOM aKKMyJrTOpe.
HdkaTop3apKkeHHocn akKymyIHTopaHaDncPiie
HnDnKaTOp 3apJKeHHocTHaKKyMnyIToPA (b) NOBBnRETCHa DnCnnee npN yCTaHOBKe aKKyMnyIToPA CIOCTaTOUHbIM yPOBHeM 3apJa, KOrJa yCTaHOBNeH aKKyMnyIToP CIOCTaTOUHbIM yPOBHeM HApJaeKHe, aPaDNOpHMeMHNK He NOKJIoueH K3NeKTPOcTeH.
| Индikatop Emkocь | |
| 80-100% | |
| 60-80% | |
| 40-60% | |
| 20-40% | |
| 5-20% | |
| 0-5% |
Hndkatop 3apaeKeHHoctn aKKymyIaTopaHa aKKymyIaTope
Ecnn akkymyIaTOp n3BneueH n3 paHOnpHemnHa, ypoBeHb ero 3apraMoKet 6bItb OTo6paKeH npn NOMOu 3eNeHbIX CBETOnIOOB INNkAToPA 3apKaHeHOCHT Ha aKKymyIaTope.
HaKMMTe KONky HnIkaTopa 3apaeHHocTh aKKymyIaTOpH ObaTpeNnn,06bI OTo6pa3ntb cTepeHb 3apaeHHocTh aKKymyIaTOpH ObaTapeN.
Ecnn nocn Hacatna Ha KhoNkY HndkaTopa 3apJKeHHoctn aKKymyIaTOpHoi BaTApen He 3aropaeTcH N OIN CBeTO- dIOHDhIn HNDKATOP, AKKymyIaTOp HeCNpaBEN Iero cne dyet 3aMeHNb.
TnnaakymyntopaGBA 18V...


CBeToHNoBbEMKoCTb
HenpebBbHm3eHehCBET 3× 60 - 100%
HnpepbBnB3eeneBbCBET2×30-60%
HenpepbHBbI3eJIeHbIcBET1×5-30%
MunahanénehBIM CBeTom 1×0-5%
Tnakymyntopa ProCORE18V...


CBeToaHObI EMKoCTb
HenpepbBbHm 3eHehcbCBET 5× 80 - 100%
HenpepbBbH3eHeHbCBET4×60-80%
HenpepbBHy3eJeHbCBet 3× 40 - 60%
HenpepbBbH3eHeHbCBET2×20-40%
HenpepbBnbl3eNeblcBeT 1×5-20%
MuraHHe 3eHbIM UBeTOM 1×0-5%
YcTaHOBka/3aMeHa pe3epBbIX 6aTapeek
Iina coxpanenHn Hactpoek BpemEn n npounx Hactpoek pa-dnoonpneMHnKa DOJIKNbI 6bITb yCTaHOBNeHbI pe3epBhie 6a-tapeKn. MblpeKoMeHdyem HcNOJb3OBA Tb eNoUHO-MapraHaeBbe 6atapekn.
Pa36boknyte c nomoosbu pbuara (28) Kpbilky akkymyIaTOpHOrO OTeKa N OTKpoTe ee (27).
Pn Heo6xOaMocTn 3BNeKeNTe aKKMyIaTOp (26).
YtO6bIOTKpbITb Kpblkky 6aTaapeHoro OTceKa (24),HaKMnTe HaФHKcTOp (23)иСнMNTe Kpblkky 6aTaapeHoro OTceKa.YCTaHOBHTpe3epBHbIe 6aTaepKNi3 KOMNKeTa.
CneIte npn 3a npabInbHbIM HappaBHeHem NOIOCOB B COOTBeTCTBn C N3o6paKeHHcEM CBHYTpEHHcETOpOHbI 6atapeHoro OTEca.
YCTAHOBITKe KpbIuKy 6aTapeHnHO OTeKa (24) Ha MeCTo.
"REPLACE AA BATTERY WHEN UNIT NO LONGER KEEPS CORRECT TIME":Есни Настюй Врemeи и поче на-
CTPOHKn paHONpHMeMHNka 60JIbIe He coXpaHnIOTcA,3aMeHInTe pe3epBhIbe 6atapeKn.
MeHnTe cpa3y Bce 6aTapeKn OJHOBpeMeHHo. IcNoIb3yTe ToJIbKO 6aTapeKn OJHOrO IpON3BOJNTeN I OJHaKOBoEMKoCTH.
N3BneKaItepe3epBbIbe6aTapeKnH3paHNOpHMeHHka,ecnnnpemHHKe 6ydt HcNoB30BaTcB
TeueHne npdoJXkTeBHO BpemeHH. PnDnteHbHOM XpaHeHH BHTpn paHOnPiMeHHKa BO3MOxHa Koppo3n H camOpa3Pka pe3epBbIx 6atapeek.
3Kcnnyatauia
He donyckaTe npMoro KOthKaTpaadnOpHMeHHka C BOIO. IonoaHHe BObI B padnOpnpHMeHHK yBeneHHBa- et pnc yDapa 3JIeKTPnuCeKN MTOKOM.
No BO3MOXHOCTH DEPKHTe KpbIJKN AKKMyNtOpHo T OTEKa,OTcKa IIN MeHa N IHe3a IpepeMeHHOro TOKa 3aKpblIMN.3aKpblIe KpbIJKN oecneuBaIOT 3aUNy paHNONPnEMNHKA OT BObI NbIIH.
Bocnpon3BeHneaydno
BkIIOueHne/BBkIOueHne
YTO6bI BKNIOHTb paHNOpHMeHHK,HaKMITE Ha BbIKNoaTeNb (15).NcPiNei (16)akTbBpyeTcN HAuHa-ETCABOCPoIN3BeDeHne ayDnO C NocJeHero yCTaHOBHeHHo ICTOCHNka.
YtobbBbIKHouThbpaHnOpHemHnK,CHOBa HaxMITEHa BbIKNoaTeIb(15).Tekyue HactpoHNBOcnpo3BeEHH 6byTcoxpaHebl.
HactpoKaTpOmKocTH
Iocne BkHoueHHaHnOpHmHKa yCTaHaBnBaetc H3-Ka rPOMKoCTb 3Byka.
YTO6bI yBENHHTb rPOMKoCTb, NOBepHnTe KHOIIky YACOB (14) (GPB 18V-5 C) HIN KHOIIKy MEHIO (22)
(GPB 18V-5 SC) no yacobon CTpeKe, HIN IpOTHB yacobon CTpeKn, YTO6bI yMeHbUHTb rPOMKOCtB.
HaIcnnee OTo6paKaTaTcHacTpOka rPOMKocTH co 3HaueHnemOTo30.YctaHOBInTe Hn3Koe 3HaueHne rPOMKocN nepeHacTpOkoHnnnepeKeKnoueHm paAnocTaHn nn yCTaHOBInCepeHHe 3HaueHne nepeD 3anyckom BOCpOnn3BeHnC BHeWHeRo aynonctOuyHnKa.
YTO6bI OTKINOHHTB3BYK,BBI MOKeTe ODHOKpTHo HAKaTb KHOKNy OTKIOUeHn3Byka (12).HaDnCnEe NOBNTc HN- DnKaTOp BIKIOUeHn3Byka (f).
YTO6bI CHOBA BKJIOUHTb 3ByK, OJHOKpTHO HAKMITE KHOKNKY OKJIQUEHN3ByKa HIN NOBEPHNTe KHONKY YACOB (14)
(GPB 18V-5 C) INI KHOKNKMeHIO (22) (GPB 18V-5 SC) no YacOBONCTPENKe.
Hactpoika Tem6pa
IJI ONTMMaHbHO BOCPON3BeDEHHN 3ByKa paHOnpEmHNK OCHAeBCTPOEHHbIM 3KBAaai3epOM.
BbMoKeTe BpyHyIO MeHrTb HAcTpOKn BBICOKN Hn3Knx 占CTOT INN HCINb30BaTb 3aInporpaMMNpOBaHHble HaCTpoKN Tem6paDn pa3NIuHbIX My3bKaJIbHbIX CTInne.Bbl MoKe
Te Bb6paTb MExdy IpeBapnteHbIMn HAcTpOuKaMn JAZZ, ROCK, POP n CLASSIC nn 3aTaTb HaCtpoKn CaMoCToT eTbHO CUSTOM. 3ByKOBBe HAcTpOuKn CoXpaHIOToTc OTdEhBO nIg KaKDo r ayHIO hCTOuHnka.
YTo6bI Bbl6paTb npedBapntenHbIe HAcTpOKn Tem6pa,HaKHMaIte (He ydepcknBa) KHOKNy 3KaBaNan3epa (20)doTexnop, NOKa Heo6xoImam HaCTpOka He NOBNTcHa HnDnKaTope npedBapntenHbOH HAcTpOKn Tem6pa (i)HaDCnnee.
H3MeHeHHe HAcTpoKn CUSTOM:
-BblMOKeTe yCTaHOBHTb yPOBeHb BbICOKHX Hn3KHX a-CTOT BdHaNa3OHe oT -5do+5.
-HaKMTHe uDepKnBaTe KHOKNy 3KbAan3epa (20) DOnbIe nonCeKHyIbI. Ha INHdkatope npedBapntbHOH HAcTPOKn TEMoPa (i) HAINCNIIe NOBnAEtCt CUSTOM.
-GPB 18V-5C:Ha INHdkaTope BbICOKx/HN3KNX qactOT (d) OTO6paNTcTRE,TEKUyuee 3haueHne BbICOKx qactOT Mnaet. IIOBepHTe KHNKy qacOB (14),YTO6bl N3MeHnTB yPOBEHB BbICOKx qactOT.HaKMITE KHNKy qacOB (14),YTO6bl COxPAHnTB yCTaHOJIeHHe 3HaueHne. Ha INHdkaTope BbICOKx/HN3KNX qactOT (d) Tenepb BAS OTO6paJaaTe TReKUyee 3haueHne HN3KNX qactOT.N3MeHnTE N COxPAHnTE 3HaueHne DnI HN3KNX qactOT,aHAJOrHuO ONnCAHHOMy NopAky DeIcTBn DnI BbICOKx qactOT.
-GPB 18V-5 SC:HaMHOrOfoyHKUHOHAbHOM HnDnKaTope (k) OTo6pa3ntcA
Ha MHOrOfpyHKIOHOHaIbHOM HINdIkaTope (k) Tenepb
-Поссе coхpaehня HabtpoynДгнИЗКИЧ acToT ИИЧЕпз 10 c поспесдгero HaxaTHЯ KONKN YacOB (14)/KONKN MeHO (22) paHONpHemHK Bo3BpaAaeTcK CTAHapTHOH INHINKaUHnHa DInCnIe.
BbI6op aydno nctouHnka
IyBb6opaaynIOHCTOUYHKaHAKMmaTe KhoNky yctAHOBKny aynHO NCTOUYHKA (18), noka Ha dncnnee He noBntcyeo6xOHMb BYHTpeHHnn HnBHeHNy aynO hCTOHNK:
DAB:цифpoBoe paHIOBeeHnE DAB+ (GPB 18V-5 SC),
FM: aHaIorOBoe FM-BeuaHne,
-AUX:BHeHnAuyNo HCTOCHNk (HanpHmep, CD-neeep) uepe3 pa3bem 3,5 MM AUX IN (10) BOTCEKe DnMaMeHa,
:BHeuHMyaynIO HcToyHnK (HanpHmep, CmapTfoH) no Bluetooth®-CoeHNHeHIO.
TekyuanyauHNO HCTOuyHKMOKHO y3HaTb NO OTO6paKaIoUeMycn HNDkAToPO ayuHNO HCTOuyHKa(h) nHn HNDkAToPOBluetooth (g).
YctaHObKa/coxpaHEnHe uΦpObBix paHocTaHnDAB+ (GPB 18V-5 SC)
ДлЯ Вьбopa в Качесы Адно Источиka сфробу радиocstанцИN DAB+нхима Te KhoIGNky yctahOBkn aDINO nCTOCHNKa (18), nOKa He NOBtca INHIMKATOp aDINO nCTOCHNKa (h) DAB.
Pocne HnpoDOnJXntEnbHnHnuaHn3aun6ydt BOC npOn3BeDeHa nocJeHn yctaHOBHeHHa paHIOCTaHn.
Ha3BaHHe paHIOCTaHcHn OTo6paKaAeTcB BepXHe CTpOKe MHOroФyHKUHOHaJIbHOrO INHINKAtOpa (k).B MeHIO cyHKUIMoKHO yCTaHOBHTb OTo6paKeHHe DOnONHInTeJbHO INHΦop
MaunB HnKHei CtpoKe MHOrOpyHKUHaJIbHOro HnIKA-Topa.
-ДЯнЗMeHHeHpaNIOCTaHcHnNOBOpaUHbAteKhONKy yCTaHOBKn aydno hctOuHnKa (18), noka Ha nCnIe He NOBHTcH Heo6xOHNMa CTaHcNHa. HaxMITE KONKy yCTaHOBKn aydno hctOuHnKa (18)ДЯ NOdTBePjXeHnBa Bb6pa.PaHNoPnEHHK nepeKlouaETc Ha Bb6paHHYcSTaHcNIO.
KpomeTOrO,TO6bI CMeHHTpaNHOCTaHIO BbMOKeTe HaxaTB KHOPIKY NONCKA《HA3aD》(13)NNKHOKNYNONCKA 《BnpePeD》(19).
-4To6bI coXpaHHTb HAcTpoKn paHIOCTaHcHn,HaKmMaTe KHOKNy PpeBapnteBHo HAcTpoEHbIXpaHIOCTaHcHn (17) Heo6xOIMoJ rYeKn NaMrtn, NOKaHOMep rYeKn NaMrtn HE OTPa3NTc Ha INdNkatoperKeKn NaMrtn (c).
-UTo6bI 3aNyCTnTB BOCpOn3BedeHne COxpaHeHHo paDnOCTaHcH, ODHOKpaTHO HaXKMITE OHy 3 KHOIOK npEdBaHPeTbHo HAcTpoEHHbIX paHIOCTaHcN (17). HoMep aueKn NaMaTn 3aRopaetcHa HnDnKaTope aueKn NaMaTn (c).
Yka3aHHe: pN B03HNKHOBEN HpO6IeM C npHemOM, Bb MoXe 3aNyCTnB IONCK UΦpOBbIX paNIOCTaHcN DAB+ BpyHyIO.ДЯ 3TOBO BB6epHTe NIo6o
EcnnuDpoByIO cTAnuDAB+He ydaetraHn,
YctahOBka/coxpanenHe FM-padnoCTaun
ДлгБыбopa FM-paHIOCTaHUNB KaueCTBe aydnoHcTOHnKa HaxmMaTe KHOKNy yCTaHOBKn aydnoHcTOHnKa (18), noka He NOBtca HNDAKATOp aydnoHcTOHnKa (h) FM.
GPB 18V-5C: BO BpemHa HactpoKn paHnoactota oTo6paKaetcHa MeCTe YacOB (j), a3aTEM Ha HnDnKaTope paHnoactOT (a).
GPB 18V-5 SC: yacToTa paHocTaHn, KOTopa Bocpon3-BOHTCB DaHHbIMoMeT, OTOpaKaAeTcB BepXHei CToPO Me HOrOfoHyHKUHOHaBHO INHnKaTopa (K). B MeHo fYHKuMoKHO YCTaHOHTb OTobpaKeHne DOONHInTeHBHO INHΦOpMaunB HnKHei CTpOKe MHOrOfoHyHKUHOHaBHO INHdkaTopa.
PnIOIOCTaTOHyo yToHbOM npHeme Heo6xOJNMOr OcHHaIpaADNOpHMeHHK ABOTMAtuYeCKn NepeKJIouaETc Ha cTepeONpHem,Ha DCINCIIee OTo6paXaETc HdNKatop cTepeONpHema (e).
-UTo6bI yctaHOBnB onpeDeneHHyO padnoctAHNIO, noBOPaHBAHTe KhoNky yCTaHOBKn aydnoHCToHNka (18), NOKa Ha dncnnee He NoaBnTc HxKHa YacToTa Hn CTaH.
-UTo6bI Hauatb NOnck CneDyOuSe PaAnocTaHcNc 60-nee yToOnuBBIM CnHANOM, OJHOKpaTHo HAXMNTe KONkY NOCKA(Ha3aD)(13) INN KHONkY NOINCKa
《BnpeD》(19).CneIyUOaHaIeHHa paHIOCTaHcH 6yTeT coXpaHeHa HOCpON3BeDeHa.
-уTo6bI HauTaB NOONK BCEx paJHocTahUc yCtOuN-BbIM CHrHaNoM,уЕрЖBaJIte HaxaTOI KHOKNy NOCKA《Hazad》(13)иИ KHOKNy NOCKA《BpePd》(19)He Me-Hee noncekyHdbi. KaJDAH naDEHHa PAHIOCTaHua BOCnpon3BOIDTCB TceHne 5 c, noCne Yero nock npoJOnKaAETcdo rpaHcuBI nOncbI qactOT. UTo6bI OTMeHNb NOK paJHocTahUc, ODHOKpaTHO HAKMTe KHOKNy NOCKA《Hazad》(13)иИ KHOKNY NONCa《BpePd》(19).
-4To6bI coXpaHHTb HAcTpoKn paHIOCTaHcHH,HaKmMaTe KHOKNy PnpEBApNTeBHo HAcTPOEHbIXpaIOCTaHcN (17) Heo6xOHNMOJ rYeKEN NaMHTN, NOKaHOMep RyeKN NaMHTN He OTPa3NTCn Ha INdNKATOpeRueKEN NaMHTN (c).
-4To6bHaayatbABOMATHuecknNONCKnCOxpaHeHne
paHIOCTaHcN C CaMbIM YCTOuHBbIM CNrHaJOM,ODHOBpEmHo HaxMITE KHOKNy POINCKA(Ha3aD)(13)H KHOKNy PONCKA(BnpePe)(19).PaHONpHMeHNK npoBePrrt BCE pInHMmaebie CTAHmN COXPAHReT 4 CTAHmC HAnlyuWM pHemOM BJeeykax NAMrN IpORpaMM C 1 No 4.ObpaHTe BHMaHHe, yTO BCE COxpaHEHbIe paHee padioCTaHcN 6dyT nepezANcaHbl.
Pi 3abepeHHn NOcKa HauHnaETCBocPOn3BeDeHne
paHIOCTaHcN, COxpaHEHBO BJeeyke NaMTrn npoRpaMM NOHOMePOM 1.
-UTo6bI 3aanyCTnTB BOCPON3BedeHne COXpAHHO paHIOCTAHU, ODHOKpaTHO HAKMITE OHy I3 KHONOIPpeBaHPteHBHO HAcTPOEHbIX PAHIOCTAHU (17). HoMEpAueKIN PAMrN 3aIopaETcHa HNDNKaTope AyeHKIN PAMrN (c).
HapbaIeHne WtBpeBOaHTHeHbI
PaHONpHemHnK NOCTaBnEeTcC yctaHOBHeHHo WtBpeBOAHTEHHO(30).PnN CnOJIb3OBaHN paHONpHemHnKa Ha FM-BeUaHHn HAKIOHnIte WtBpeByo aHTEHy B TOM HApBaHneHH, rIe ObecNeuBAeTc Cambl yCTOUYNBbl pHem. ECnn CNrHaJ npHema HeoCTatoeH, npeMeCTnte paHONpHemHnK B MeCTO, rIe CNrHaYnaBnBAeTc LyuWe.
Yka3aHHe:ecnpaHIOnpHMHKHCNOb3yETcB HEnoCpeCTBeHHo6IIN3OCTNOTpaHNOOBpyoBaHna,paHIOnp6OBpOIBnnDpyrNx3NeKtPOHHbIXycTpoiCTB,pAHOnpMe MoKeT yXuWntbCra.
IpoKJIIOUeHHe BHeuHHx ayDHO hCTOuyHKOB uepe3 pa3beM AUX
Pa36bokpyte c nOmoBbO pyHara (8) nOTkpOte KpbIky (7) OTEcKa dIg MeHa. BCTaBBte 3,5 MM WTekep Ka6eAUX (9) B AUX IN pa3bem (10).PioknOHTe Ka6enb AUX K npDxOJaEmy aydno hctouHHky.
TtO6bI 3anyCTnTB BOCPON3BeDHeHne ayDIO nCTOuHNka AUX, HaxIMaTe KONKy yCTaHOBKn ayDIO nCTOuHNka (18), noka He NOBITcN INDNKaTOP ayDIO nCTOuHNka (h) AUX.
InpedotBpaueHn nonaHn rpa3n 3akpoTe KpbkUy (7)OTCEKa nMa MeHa n 3aФHKpYrTe Nocne H3- BneuHn wTekepa Ka6eAUX.
Ecnn pa3Mep no3BONAE, Bbl TaKKe MoKTe XpaHnTb ayDIO yCtpoCTBO, NOkNIOUeHHoe No Ka6EnIO AUX, B OtceKe dI npXpaHENIA (6).
EcHn BO Bpem RAocnpo3BeDeHnaydno no AUX 6ydet Ha KaTa OJHa H3 KHONoK PpeBapTeNbHO HAcTpoEHhIx paHnOCTaHcun (17),paHnONPHeMHNK NepeKlIOuAeTcH NaocneHIOO CoXpaHeHHyIO BpeKmpePAHNOPNHEMHKa paHnOCTaHcUIO.
Bocnpon3BeDeneH/eynpaBneHn BHeuHHMn aydno HctouHHkAMn no Bluetooth®
YTO6bHaayabBOcPON3BeHeHne CaynIO HCTOCHNKA (HAnpIMep,cmptf0ha) no Bluetooth°,n6o HaxnMaTe KHOIKy yCTaHOBKn aynIO HCTOCHNKA (18), noka Ha nCnIee He NoBtca HnDnKATOp Bluetooth(g),n6o,Bhe 3aBnCmOCTHN OT TeKyUeO aynIO HCTOCHNka, HaxMITE ODHOKpatHO KHOIKy Bluetooth(21).
Ecn paHNONPnEMMHK yKe NOKnIOueH K BHeHEmy ayHNO nCTOHNky no Bluetooth® n3T0 ayHNO nCTOHNK DocTyne, COeHNHEHNE C 3TNM nCTOHNKOM yCTaHaBnHBeTcA aBTOMaTnueckn. KaK TOnbKO coeHNHeHne yCTaHOBNeHo, HauHnaet rOpTe b HndkATop Bluetooth® (g).
GPB 18V-5 SC:HaBaHHe yCtpoNCTBa,NoKKnUoyHOro nO Bluetooth°,OTobpaKaAeTc B BePxHe CTope MHOrOpyHKnO hAnbHOrO HnDnKaTopa (k).B HnKHeI CTpOke OTobpaKaAeTcTeKCT,PepeDaBaEmbl NoKKnUoyEHbIM npbOpom.
EcHn coeHHeHHe He ydaetcY cTaHOBNTb TeueHne 2 MHT, yCTaHOBHeHHe CoeHHeHn IpeKpaAaetc, HdNKaTOp Bluetooth (g) Mraet NOCTOHHO.
GPB 18V-5 SC:Ha MHOROΦyHKUHOHAnbHOM INHdNkatope (k) 3aropaetcNot connected>
EcHn coeHHHe He 6yTeYctaHObeHo euepe3 17 MHT,paHONPHMHNKOTKNIOHTcABTOMATNUeCKN.
YCTAHOBKA HOBORO COEINHENH NO Bluetooth®:
-UTobI NOKIOUHTbC K HOBOM BY BHeUHemy ayINO HCToHNY, ydepXnBaIte HaKaToI KNkONy Bluteoth@ (21) HeMeHee NOnCEkyHdbI. 3TO TAKKE MOKHO CEnaTb BO BpEmNoCKA, pN cyuEcTBYIOUcEM COeHNHeHH INI pN BOCpON3BedeHH HA pNemMHKe DpyrOTo ayINO HCToHHKa.
-PaHnOpnepmHnK 3anyckaet nonck.Bo Bpemnnonckma MRaet HnDnKaTOp Bluetooth® (g).
-AkTHBpyyTe CoeHHeHne CBHEHnHm HCTOuHnKOM ayNo.Ka npaBnno,Ha CMapTfoHax 3To MOxHO cDenAtb B HAcTpoKAX B MeHIO Bluteoth®.PaHnOpHnEMnIK NOBHTcPepiDcTyHbIX BapnaHTOB NpOKNIOUeHnI NOIIMEHem GPB 18V-5 CxxxHnn GPB 18V-5 SC xxx. O6paTte BNImaHHe Ha HfOpMaunio,piNBedeHHyB pyKOBOcTBe No 3KcPiyaTuBaWero ayNo HCTOuyHnKa/cmaptfoHa.
-KakToIbKoCoeINHeHneNoBluetoothyCTaHOBNeHO,Ha- HnHaETropeTbHnDkAtopBluetoothg).
Aynno HcToHnKOM, NOkNIOUeHHbIM No Bluetooth MoXHO TAKKE YnpabJIbTb Yepe3 paIOnOpHemHnK:
-UTo6bblBb6paTb3anyctnTbMy3bIaKbHyDopoxky, KOPOTKO HAXHMaTe KHONKY NOnCKa"Ha3aJ"(19)HIN KONKY NOnCKa"Bnpej"(13),NOKa He 6yJeT Bb6paHa Heo6xOHNMA DOpokKa. Bocpnon3BeHeNe Bb6paHHo DOp0KKNaHauHETcABTomatueckn.
138|Pycckn
- UTo6bl npeBaTb BocnpOn3BeHeH, HxKMITE KHOJIKY OTKIIOUeHn 3Byka (12).HaIcPiEe IIOBHTcN HINKKA-TOP BbIKIOUeHn 3Byka (f).
-UTo6bI BO3O6HOBHTB BOCnPOn3BeDHeHNE,CHOBA HAKMNTe KHONKY OTKNIQUeHIN 3ByKa (12),N3MeHInTe rPOMKocTbHIN HaKMITE KHNKny NOncKa(Ha3a)(19)N KHONky NoNCKA《BpePd》(13).
-Длп repexoа Bpeepи Ha3aI NO My3bIaNbHbIMdoPoxkam ydepxKBAte HaxaToI KhoNky noncKa "Ha3aI" (19) INI KHOIny noncKa "Bpeep" (13), noka He6ydtIOCTnHyTa HxKHaI no3nua.
Ecni BO Bpem RAocpnO3BeHnA ayHNO no Bluteotho 6y- Det Haxkata OJHa N3 KHOIOK ppeBapTeNb HO HAcTpoEHbIX paNocTaHcI (17),paNIOnpneMHNK nepeKnUoyaETc Ha nocJeHIO COxpaHeHHyO B peXmpePAHO npneMHKa paNOCtAHcIIO.
YctahOBka yacobblx HAcTpoek (GPB 18V-5 C)
UTo6bl NepeHTB MeHIOaCobbIX HAcTpoE, OJHOKpaTHOHa- KMMTE KHONKYaCOb (14).
BbMOKeTe BbIbpaTbΦopMaT BpeMeHn 12 yacOB<12H> n 24 yaca<24H> n ycTaHOBnTb 3HaueHne yacOB mMHyt.
HabiratnoMoMeHIO:
-ИЗмehнгпсгрк MeHIO: NOBepHnTe KHOngKy YacOB (14).
-CoxpaHeHHe HAcTpoeK MeHIO:HaKMnTe KHOKNkyacOB.
-Послс coхpaehnHaCTpoK MmHyt mHnuepe3 10 c noCne nocndhroHaKaTn KOnKn YacOB paHOpnpemHKnBOBbpaaetcB PekM BOCpOu3BeHeHnyaydno.
EcHnHaCTpoKnBpeMeHHHa paHOpnpEmHKe 6oNbWe He coXpaHHTc,3aMeHHTe pe3epBhIe 6aTapeKn.
H3MeHeHHe HAcTpoeK MeHIO (GPB 18V-5 SC)
MeHc6pOa HAcTpoE: BbMOXeTe C6pOcNTb BCE HaCTPOKm MeHIO 3aBOcCKNX
MeHb aBtOMaTHueCKo IONcKa paADnOCTaHcN: Bbl MOXeTe 3aIyCTHTb aBtOMaTHueCKn IONCK cTAHcN.
Meho pyHn HactpoKn: Bbl MoKeTe BpyHyO yCTaHOBt bHe0xOHNMyIO hAcTOTy.
MeHIO Tnna HnHnKaaun: Bbl MOKeTe BblpaTb, KaKoI TEKT 6yET NOBnTbCBA HnXHe CTPOKe MHOrOpyHKUHOHaJIbHOrnoHHNKatopa (k):
- INHOPMaIOnHHbI TeKCT, npepaBaemI paIIOCTaHcIeN
,
-caToTa paHIOCTaHmN
-MOUHOCTb CnHana - TIN nporpamMbI, npepaBaeMoI paHocTaHcnei
.
Meho Tnna HnHnKaaun: Bbl MOKeTe BblOpaTb, KaKoI TeKCT 6yET NOBnTbCBA HnXHe CTPOKe MHOFOyHKUHOHaJIbHOrnoHHNKATopa (k):
- INHOPMaIOnHOHHbI TeKCT, nepeDaBaEMbI paIIOCTaHcH eN
- Hα3BaHηe paДиОCTaHιN
- TIN pOroPpAMMbI, npepaBaeMoH paNocTaHcneH
ПитаннeВHEшнx npn6opOB
Pa3beM USB
Pa3bEm USB MOXHO INCNOB3OBaTB DnA 3apAKn yctpoiCTB, KOtOpBle MOrTy nOlyuATb 3NeKTPoNHTaHne no USB (Hanpimep, pa3nHbIe MObNbHbIe Tenefohbl).MakcHMaJIbHbIy pOBeHb 3apJHoro TOKa COCTaBnE2,1A.
Pa36nokpyte c nomooBp bUaRa (8) nOKpoTe KpbIky (7) oTceKa dIy MeHa. C nOmoBIO NOxOJaero KaBeIY USB noKlIOuHTe pa3bEm USB BHeHrero yCTPOI CTBa K USB-pa3bemy I3 3apAKn (11) (USB) paAnOpnpemHnka.
PnHcNoB30BaHHaKKyMnTOpa BHeHHe yCTPOIcTBOMOxHO 3apKaTb TOnbKO Pn BKIOueHHo paHIOpneMHKe.
Ecnn pa3mep no3BONAE, Bbl MOKeTe xpaHHTb BHeWHee yCTPOINCTBO BOTCEKe IIN XPAHEHH (6).Ecnn yCTPOINCTBO HarpeBaETCB INPOUCCE 3apJKN,TO OCTaBBTe KpbIWKY (7) OTEcKa IIN Medna OTKpIToH, YTO6bI N36EkaTb NepePepBa BHeWHeRo yCTPOINCTBa.
IIO 3aBepueHn 3apAKn OTcoeHHnTe USB-ka6bI, a 3aTeM 3aKpOte KpbIuKy (7), UTObI N36ExKaTb 3aRpa3HeHn pa- dHnOpnpemHnka.
Ihe3do npeMeHHoro Toka
BbMOKeTe NcNoJIb3OBAbT DoONHHTenHbIe BHeUHne 3NeK TpOnPb6Opbl C nOMoIbHO rHe3a NepeMeHHoro ToKa. He3a MOrY OTnUHaTbC8 B 3aBNCMOCTH OT CneuHneCKHX dIg KOHKpeTHbIX CTpaH CTaNapTOB.
3JIeKpOnHAnHe BHeuHnX yCTpoiCTB uepe3 rHe3do nepeMeHHOro TOKa BO3MOxHO TOnbKO B Tom Cnyae,ecnn paDIOIopHMnK paObaTe OT 3JNEKTOpcETn, a He oT AKKMynTOpHn6aTapeN. Ecn npOpHMnK NOKnIOUeH K 3JNEKTOpcETn, 3TO NOITBePckDaet TropAua 3eNeHbIM CBETOM KOHTPOhBaHa NaMNoUka (3).
06uee MaKcHMaIbHO DoNpyCTHMoe NOTpe6JIeHHe TOKa BCEMnPOKIOUeHHbIMN 3NEKTPnueCKMn YCTPOBCTBaMn He DOJXHO 6bIb BbIe 3HaueHm, yKa3aHHbIX B CNeYIOSe TaBInCe (CM. TaKKe MapKnpoBKN Ha KOpNc PoN KpbIkwAmn (4)):
| Товарный Homeсуmmа Мамс. NOTPEблес-MOTO TOKA (ВА) | |
| 3 601 DA4 000 15 | |
| 3 601 DA4 100 15 | |
| 3 601 DA4 170 12 | |
| 3 601 DA4 1W0 15 | |
| 3 601 DA4 130 9 | |
| 3 601 DA4 140 9 | |
OTkpOte KpbIbKy (4) rHe3Ja npeMeHHOro ToKa H BcTaBbTe WtencBHyIO BnIKy BHeuHero 3NeKTPonpNbopa B rHe3do (5) Ha padHnonpHemnke.
Yka3aHnno npmmeHHIO
Yka3aHnno OONMaIbHOMy 06paueHHo c aKKymyIATOpom
3aunuainteakkymnyTOpOTBnarnBODbl.
XpaHHTe aKKMyIaTOp TOnbKO B DnHaNa3OHe TeMnePaTy pOt -20°C 105°C. He ocTaBnaIte aKKMyIaTOp NeTOM BAToMo6hNe.
BpemrO Bpemn npouuauhe BeHTnuaHbI npope3n aKKyMnyTopa MRAKo, cyxoi nHCTOn KNCTOuyko.
3HaHTeBHOe COKpaueHHe npOdoJIKHeTbHocTH pa60tbl nocIe 3apraC BnTeBcByEoCTapeHHn AKKyMnTopa H yKa3bBAeH He Heo6xOIMOCbEro 3aMeHbl.
yUHbBaIte yKa3aHHn IIO yTINH3aHH.
TexobnyxHbAHne n cepBnC
Texo6cnyxmbahne nouchka
IJIIOBECNEUHNAKCAECTBEHHHOH6Be3ONACHOpaObTOI CO-epkHTe paHNOIPHEMHNK B YHCTOTE.
Ecnn Tpe6yetynomeHbIhHP,BoN36eKaHHeOnaCHocTH 06paauTecbHaΦnpy Bosch HnB aBTOpn3oBaHHy cep BnCHyIO MaCTepCKyIO DnA EKeTPOHcTpyMeHTOB Bosch.
BbItnpaIte 3aIpr3HEnHcyxO H MmRKO TpIKNoH.He nCnonb3yTe KaKHe-NH6O uNCTaHne CpeCDTa HnN pAcTBOpHTeH.
CepBnKoHcyNbTHpOBAHne NO BONpocam npmeHeHH
CepBnchbI OTenOTBeHT Ha Bce BaHn Bonpocbl no peMoNTy nOcnyKBaHmIO BaWero npOdykta, a TaKxe No 3aNactrM. N3o6paKeHHc nPoCTpaHCTBeHHbIM pa3deneHHem DeNaTe HnHOpMauHNo 3aNtAcTm MoXHO NOCMTpeTb TaKxe no aDpcy: www.bosch-pt.com
KoNKeTnB cotpydHnKOB Bosch, npedocabnaoucnn KOHCyNbTaunHa npedMeNTcNoIb3OBAHnnpodykunC yD0BOJIbCTBHeM OTBeHT Ha Bce Baun Bonpocbl OTHOCHTeB-HOro Hauen pOdykuuHn ee npHaadJeXHoCTe.
Ioxanyhcta,Bo Bcex 3anpocax n 3aka3ax 3anactei 06ra3aTeIbHO yka3bBaIe 10-3HaHbI TOBapHbI HOpE I0 3aBODcKoTabnueKe H3denna.
IpyrnoHa: Pocchna, Benaapycb, Ka3axctan, Ykpanha
IapaHTnHoe obcnyKuBaHne n peMOHT 3neKTPoHnCTpyMeH
TA, C c6NIIOHeHem Tpe6OBAHn H Hopm N3rotOBtEnra IPO
N3BOyATCR Ha TeppHTOpHN BCex CTpaH TOBko BΦHPMeHHbIX
HIN ABTOPH3OBAHbIX CEPBCHbIX CEHTpAX «Po6epT BoW»
IPEUYIPPEXJEHNE! NcONb3OBAHne KOHTpaKaTHOH npO
DyKUn OnaCHO B ECKlNyataun, MOKeT pnpBeCn K Uyepe6y
JIN BaWero 3dOpOBb. N3rotOBHeHne n pacnpocTaPaeHne
KOTPAKaTHOH pOdyKUn IpceJeDeYetcR no 3aKOHy BAAMNHNCtpAHBOM H yTOLOBHOM NOPAke.
Pocchra
YnonHomoueHHa H3ROTOBtEnm OprHaH3aIa:
OOO《Po6ept B0w》BaWytHckoe Wocce,Bl.24
141400, r. XmKn, MockOBCKa o6J.
Ten.: +7 800 100 8007
E-Mail: info.powertools@ru.bosch.com
www.bosch-pt.ru
DOnonHntenbHbe apeca cepBnchbIX ceHTPOB Bbl NaedTe no CcbInke:
www.bosch-pt.com/serviceaddresses
TpaHcnoptmpoBka
Ha peKoMeHdyeMbIe NITN-HOHHbIe AKKyMnTOpHbIe 6batape npacnpoctpaHIOrTcre6obAHnB BOTHOweHN TpaHC-nopTHPOBKN OnachbIX rpy3OB. AKKyMnTOpHbIe 6batape
MORYT NpeB03NTbCn CaMM NOnb3OBaTeNem ABTOMO6HbHbIM TpaHcNOpTOM 6e3 Heo6XoHMoCTn Co6IIODeHHa DOnONHHTeJIbHbIX HOpM.
PnnepeBo3Ke c npBneueHem TpebHex NmU (HaNP:: camoIeTOM HIN TpaHCNOPTbIM 3KcNEIHTOpOM) Heo6xoJIMO co6NIOaTb OC6bIe Tpe6oBaHN KynakOBKe H MapKnipOBKe. B 3OM Cnyae npn NOrTOBKe rpy3a K OTnpABKe Heo6xOJMo yuaCTHe 3KcNEpta No onachbIM rpy3am.
OtnpaBnIte AKKyMnIaTOHy 6bTaapeIO ToIbKO c HEnOBpeKJdeHHbIM KOpnycOM.3aKnIeTe OTKpbItbe KOHTaKbI uNyKaYIte AKKyMnIaTOHy 6bTaapeIO TaK, UTo6bl OHa He nepMeUaIacb BHytpn yNakOBKn. IoxaanyctA, coJIIOJaTe TAKKe BO3MOXHbIe DOnONHtENbHbIe HaUNoHaIbHbIe PpePnCa-HnIa.
Yttnn3aun

PaHnOpiHmHNK, aKKyMylTOpHoe 6atapeN/ 6atapeKN, npHaJNeXHOCTN yIaKOBky HxK HO cdaBaTB Ha 3KOIOrueCKn YIcTyO YTNIN3a- ciuio.

He bIb6paBcBAIte paHOnpHemHHNn aKKyMyJITOPHbIe 6aTapeu/6aTapeuKN B 6bTOBO Mycop!
TolbkoДягстан-Чileнов EC:
B cootbetCTbHn c ebponeckoI dhpekTHBOI 2012/19/EU 06 OTPa6oTahhix 3neKTPnuecknx H neKTPoHHbx npn6opax I ee npeo6pa3oBAHNEM B hauhoHaJIbHOe 3aKOHOaTeJIbCTBO BbiweHn H ynoTp6neHn paHNOpHMeHHNK H BO CootBetCTbHn c ebponeckoI dhpekTHBOI 2006/66/EC depeKTHbe HIN OTCnyKBWne CBOI CpOK aKKyMylAToPbHe 6atapeH/6atapeKN DOJNkHbI CO6npaTcRa p3dEJIbHO n CdaBaTbCra HA ekONOHTuCKeCN uCTTy peKynepaunIO.
PnHnPaBnBHoYttnn3aunnOtpa6oTaHHbE 3neKtpueckne H3neKtpoHHbIe Pn6OpblMOrT OKa3aTb BpeDHO Bo3-DeiCTBHe Ha OKpyKaIOuSyOcpeyN3doPoBBe YenOBeka N3-3a BO3MOXHOI OPiNCyTCTBnB HHX ONaChbIX BeIecCTB.
AkkymyHToPbI/6aTapeH:
JIHTM-HOHOBbie:
Ioxanyhcta,yuHTbBaTe yka3aHnB pa3dene "TpaHcnopTnpOBk"cm.TpaHCnopTnpOBKaCTpaHnca139).
yKpaIHcbka
Bka3iBkn 3 texhikn 6e3nekn

IpoountaTe BcI Bka3iBKN 3 Texhikn 6e3neKn Ta iHCTpykui. HebKOHaHH Bka3iBOK 3 TexhIKu 6e3neKn Ta iHCTpykui MoKe npN3BeCtN Do ypaKeHH eNEKtpnHm CTPyMOM, NOXekTi a/abO BaKKnx cepNo3Hnx
TpaBM.
D6pe 36epiraTe Ha MaHyThe ci nonepeJxHn i Bka3iBKn.
KoXhoro pa3y nepeBnKOpHCTAHNM nepeBipnIte padionpmau, Kaebi i wTeNCenb. He BnKOpHCTOBYte padionpmau, kkuO 6yHn BnBnEni NowkOxJHHe po3KpBaIe padionpmau Ta WTeNCb camocTIOHO, Ioro pEmOH d03BOJrEcbn BHKoHyBaTH JNWe KBaIicIKOBaHOMy nepcoHany i NwSe 3 BnKOpHCTAHm OpriHaJIbHNX 3anactHH. NowkOxJHn padionpmau, KaebI abo wTeCenb 36InbWye pn3NK ypaKeHH enekTpHuHM CTpyMOM.
UTeNcIbMa66yTHBCTaBnEHnypo3eTKy3 3axHCHMM KOHTAKTOM,doAkoInerKOOTPMATN doctyn.
Wtencelb Ma nacyBaTH Do po3eTKn. He 03B0JraTbcM iHATN Oocb y wTeNCeni. He BHKOPHCTOByIte pa3OM 3 paIDOpnMaayamn Wtencen-b-nepeXidnK. BHKOpHCTaHH opIRHaJIbHO rO WtencenTa HaneKHOI po3eTKn 3MeHwYc pN3NK ypaKeHH enEeKTPuHMM CTpyMOM.
PobHCTIO po3MOTaTE CnOBn Ka6eNb npu pO6oI paIionpHIMaHa BID MepeXi. IHaKWe CnOBn Ka6eNb MOKe Harpitncra.
He BnKOpNCTOByTe Ka6eB dJa nepeHecEHnpaiaopnmaa, ndiBiyBaHHa 6o BntryBaHHaHTenCen3 po3eKn. 3axuaiTe Ka6eB Bi dIi BHCOKHX TEMepaTyP, onii, roctpNx KpaIB Ta deTane npnaNy, oO pyxaoTbcn. Nowokhen a60 3akpyehn Ka6eB 3biNbye pniHK ypaXeHH enektpnuHm CTpyMOM.

3axuane paionpmaBIDdouyi BONr. IoppannHb BOIN B Kpnkky paionpmaa 36inbye pnsK ypaKeHHneKTPNMMCTPymOM.
He BiKpBaIte AkymyIaTOpHy 6aTapeH. IChYe Hebe3neKa KopoTKoro 3aMnKaHH.
Pn nookxheni a6o Hnpabnblhi ekcnnyatauii akymyIaTOPHO 6aTapeIMoKe BHXOHTN nap. AkymyIaTOPHa 6aTapeMooKe 3aHMaTHCb a6o BH6yxATn.BnycITb CbiKe nobITpy i-y pa3i ckapr- 3BepHtbcDo nikap. Nap MoKe noOpaaHIOBaTH dXaJIbHI JILAXH.
PnHnepaBnHbOMy BnKOpncTahHi 3 AkymyIaTOPHO 6atapeMOKe NOeKTH pINHa. YNHKaTe KOtAKTy 3 Heo. Pn BNpaKOBMy KOtAKTi npOMnTE BiNDiHe Mlcue BOIO. AkuO pINHa NOTpanHb Oui,doaTKOBO 3BepHITbc DO NiKApA. AkymyIaTOPHa pINHa MOKe CNpUHHa TNOpa3HeHHu KIPn a60 onIKn.
TocpHm npedMetamn, HAp., rbi3dkamn a60 BHKpyTKamn, a6o npHKJaadaHHa 3OBHIhboCnn MoXHa NOKoHTN AkymyIaTOpHy 6ataeIo. MoXnBe BHYpiHc KOpOTke 3AMKaHHa, 3aToPHHa, YbOpeHHa Dmy, B6yx a6o neperpiB akymyIaTOpHOi 6ataei.
He 36epiraate akymnytophy 6atapeio, kaoo Bn came He KOpHCTyeTcB, npoI i3 KaHceIapcbKMn cKpinkamn,KnIOyamn, rbi3dkamn, rBNHTAMn Ta IHWHMn HEBeNIKKHM MeTaJIeBMn IpeDMeTamn,aki
MOKyTb cnpHnHHn NepemHKaHH KOHTaKtIB.
KopoTke 3amHKaHHmIX KOHTaKTAmn aKyMyIaTOpHOI
6atapei moke cnpuHHnHTOniKn aObo nojexky.
BnKOpHcTObyIe akyMnyrToPHy 6aTapeIO IInwe y Bnpo6ax Bnpo6hNka. NIIwe 3a TaKHX yMOB akyMnyrToP 6ye 3axnueHH BID He6e3neuHOro nepeBaHTaKeHHA
3apnkaTe akymyTOpHi 6aTaPeI HneB 3apnHnx npctpox, peKoMeHDoBaHnx Bnpo6HKom.
BnKOpNCTaHH3apJxKyBaIbHOro npIncTpoIO nAkyMnyTOpHnx 6batape,INRAKnx BIn He nepeDbaueHmMOKe pni3BOIDHT Do NOKeXi.

3axuaiTe akymyTOpHy 6atapeo BiD Tena, 30kpeMa, Hap., BiD coHnHx npOMEHIB, BORHO, 6pyU, BOIN Ta BOIOM.
IChye He6e3neKa Bn6yxy I KopoTkoRo 3aMHKaHH.
CNoBeCHn TOBAPHH 3NaK Bluetooth® i rpaΦiHi TOBAPHI 3NaHn (NorOTHn) e 3apecTpoBAHMn TOBAPHMn 3NaKamn i BlaChicrTO Bluetooth SIG, Inc. Komnain Robert Bosch Power Tools GmbH BnKOpncToBye ci CNoBeChi/raPaΦiHi TOBAPhi 3NaKn 3a liueh3ieo.
Uo6 BnHrAkyMnyIaTOP,HaTCHITb Ha KhoNky po36nOKyBaHHa kymyIaTopa (25) i BNIMt b HorO 3 akyMnyIaTOPHO BiCiKy. He 3actocobyte npu bomy cnly.
UoB BCTaBHTn akymyIaTOp, nocyHbTe HOrO y TpHMaay akymyIaTOpHOi BaTapei (29) TaK, Uo6 Micu KpInneHHa akymyIaTOpI Ta TpHMaui CnIBnA. DaTe akymyIaTOpy yBiTu y 3aueenneHH.
3aKpHnTe KpnuKy aKymyIaTOpHoI 6bataei (27) Ta 3a6NokyIe II.
IIndkaTop 3apdKeHocti akymyIaTOpHOI 6aTapei
KoHn akymyIaTOp BCTAHOBHeHn,Ha DCnnei BiO6paKaIObCn DaHn IpO CTynHb 3apAKeHOcti akymyIaTOp (26),KIO BuHHrN aKymyIaTOp,ci DaHl BiO6paKaTHMyTbCn Ha CaMOMy akymyIaTOpi.
IHHKATOP 3apJxHcOCTi AkymyIaTOpHOI 6aTaPeI Ha dncnne
IHdkaTOp 3apdkeHocti akymyIaTOpHO 6ataei (b) 3'ABnEcbraHa dncnne, uOHHo 6yde BCTaHOBNeHO akymyIaTOp 3doCTaTHIM pIBHem HApPyr, a paIionpImaue He niknoueHn do enektpomepexi.
| ИнDUКАТОР | ЕМнICTь |
| 80-100% | |
| 60-80% | |
| 40-60% | |
| 20-40% | |
| 5-20% | |
| 0-5% |
IINKATOp 3apJKeHocTi akymyIaTOpHoI 6aTaPeI Ha akymyIaTopi
Akyu mynTopha 6aTapeB BnHraTa 3 padionpmaya, CTynb 3apJxekHOCTi akymyITopa moKHa BiO6pa3HTa a DonomoroIO 3eneHHxC BITNOIOJB INNkATopa 3apJxkeHOCTi Ha akmyITopHI 6aTapei.
HaTnCHITb KONky iHnKaTopa 3apJKeHoCTa kymyIaTOPHO 6bataeio6o,06BjIObpa3HTCtynHb 3apJKeHoCTi. Raio nica HATnCKaHHa KHONky iHnKaTopa 3apJKeHoCTa akymyIaTOPHO 6bataeioXOeH CbitnoioHe 3aTOp8c3aKymyIaTOP BnWOB 3naNy iNoTO Tpe6a 3amInHTN.
TnI akymyntopHoi 6aTaapei GBA 18V...

CbitnoioiOEMHicThb
CbueHHa 3eHnM KOIbOpom 3× 60 - 100%
CbivHnHa3eHnHmKoIbOpom2×30-60%
CbueHn3eHnKoIbopor1×5-30%
БиMuHnHa 3eJIeHm K0JIbOpOM 1×0-5%
Tnakymnyatropoi6atapei ProCORE18V...

CbitnoioEmhictb
CbueHHa 3eHnM KOIbOpM 5× 80 - 100%
CbivHnHa3eHnHmKoIbOpom4×60-80%
CbivHn3eHnM KOBOpOM 3×40-60%
CbivHnHaeHeHmKoIbOpom2×20-40%
CbivHn3eHnKoIbopor1×5-20%
БиMuHnHa 3eJIeHm KoJIbOpOM 1×0-5%
BctaHOBHeH/3amHape3epBn6aTapeNOK
ДлгбержнгнэнаншуВаьчусутИншхнаншуВаьрадипмача nobHHI 6byTN BCTaHOBNeHi pe3epBHi6batapeKn.Mu pekomeHnyeMo BHKOpHcTObyBaTN NyxHoMapraHncebi6batapeKn.
BjdkpnteBaikinb6nokyBaHHa(28)KpnuKnakymyTropHOi 6atapeiTa nHimtB KpnuKy (27).
3a notpe6b BnMItb aKymyIaTOp (26).
Uo6 BiKpnTH KpnKy 6aTapeHoro BicKiY (24), HATNCiB Ha oikcatop (23) i3HIMtB KpnKy BicKiY. BCTaTe peepBHi 6aTapeKN 3 KOMnneKTy NOCTaHaHH.
PnBcMbmy3bepaTne yBaHyHa npabHbHy HappaBHeHcTb nonIOcIB,AK ce NOKa3aHO BCEpeDHHi CekuI IaN BatapeHOK. 3HOBy BCTABTe KpUk Ky BatapeHOrO BiCiky (24).
"REPLACE AA BATTERY WHEN UNIT NO LONGER KEEPS CORRECT TIME":якwo hanaуванha uacy ta i nshi hanaуванha padionpnimaya 6iNbwe he 36epiraotbcr, 3amihbpe3epBhi 6atapekn.
MiHnTe BIDpa3y Bci 6atapeKn. BnkOpncToByte Nnne 6atapeKn Ondoro Bnpo6hka i 0ndaKaOBOeMnictIO.
BnMaItepe3epBHi6ataeKu3paioPmHaMaua, RaIO TpHbAHHuac He 6ydeTe KOpHCTyBaTHcH Hm. Pn TpHbAOnMy 36epirAHHI pe3epBHi 6atapeKu MoKyTb KopoDyBaTH y paioiPnmuMau ta camoO3paJkTaHc.
Ekcnnyatazaia
He donyckaTe npmao KOntakTy paionpmaa 3 BOIO. IoppannHn BOIN B KPNkPy paionnpmaa 36nbye pniHK ypaKeHH eneKTPnHm CTpyMOM.
A KIIO MOKINBO, TPMaHTe KPNKn AkyMynrTOPHORo BIDcIKy, BIDcIKy dNl Media Ta rH3da 3MinHO rCTpyMy 3aKPHTMH. 3aKpNTi KPNKn 3a6e3neuTyb 3axnct padionpnmaa BID BOHN i Nnly.
BiTbOpenHa ydio
YbIMKHeHHBmKHeHH
Uo6 yBIMKHytn padionpimau, haTNCHt b HaBMNKa4 (15).AkTHyETbCA DNcNne (16) i nouHaetbcB BIDTBOpEHHH ayio 3 OCTaHHOBO BCTaHOBNeHOro Dxepena.
Uo6BnMKNyTH paionpHmau, 1e pa3 HaTNCiHb H BmKau (15).ItouHi hanaTuBaHHa ayioDkepeNa 6dytb 36epexeni.
HanauTyBaHnryuHoCTi
IicnrybIMKHeHHpaionpHmMaua BCTaHOBIOEtbcra Hn3bKa rHyHcTb 3Byky.
1063iBbHHTn rYHcHb, noBepHtB KHONKy TOnHHNka (14) (GPB 18V-5 C) a6o KHONK MeHO (22)
(GPB 18V-5 SC) 3a rOHHHKOBOIO cTpiKIO, a6o npoTHrOHHHKOBOI cTpiKN, u6b3MeHHTn rYHICTb.
HaDcNnei BiO6paKaTbCn HanaHTyBaHH3i3HaeHHM BiD0do30.BCTaHOBtB H3bKe 3HaeHHrIyHoCTi nepe HanaHTyBaHHm abo nepemHKAHm paioCTaHJn a6o BCTaHOBtB cepHe 3HaeHHn peep noaTKOM BiTbOpEHn33OBHIhHoro ayiodKepeNa.
Длгь ВИМКЕннгь 3БУКIB MOЖHA KОРТКOUЧАС HO HAТИСЧУТ NKHONKY ВИМКЕннгь 3БУКY (12).HaДиСпгел'3'RBЛЯТьСИ HДИКATOP ВИМКЕннгь 3БУКY (f).
Ioo3HOBy yBIMKHyTN 3ByK, Iue pa3 KopoTkoaCHO HATNCHTb KHONKY BIMKHeHHra 3ByKy a60 NOBepHITb KHONKY rOINHHKa (14) (GPB 18V-5 C) qN KHONky MeHIO (22) (GPB 18V-5 SC) 3a rOHNHHKOBOO CTpIKOIO.
HanaWtyBaHHa3Byky
IINONTIMMaJIbHOrO BiITBOpEHn3Byky paIionpImaU OCHaueHn B6yDobAHm EKBaJau3epom.
BnMOKTe BpyHy 3miHIOBATH HalaHTyBAHH BHCOKHX i Hn3bKHX qactOT a6o BHKOPHCTOByBAT 3anporpaMOBaHi peRyIOBAAHH 3Byky dIra pI3HNx My3NCHX CTNIIB.Bn MOKTe BN6pAH MIX NONepeHIMn HalaHTyBAHHAMJAZZ,
ROCK,POPICLASSICHBCAHOBNHnHanaHTyBaHHa camoctiHo CUSTOM.HanaHTyBaHH3Bvky 36epirahtbc8 OKpmoDnKoXHOroayiOKepeNa.
Lio6 Bn6paTH Onde 3 nonepedHix 36pepehenx HanaWtyBaHb 3Byky,HaTnCKaIte KhoNkY eKbanaJ3epa (20),noKn
Heo6xidhe HanaWHTyBaHHHe 3'ABNTbcHa IHNkAtopi nonepeHbOro perynIOBHH 3Byky (i) HaDcnnei.
3MiHa HanaWtyBaHHH CUSTOM:
-BMMOKTe BCTaHOBNT BNCOKI i Hn3bKNI pIBeHb 3ByKOBoI nepeaui B dianaoHI Bi-5do+5.
-HaNcKaIe KhoNky ekBaIaIbIepa (20) 0OHaMMeHwe nIB cekyHn. Ha iHnIkaTopi nonepedhbo rpeYIOBAHH 3Byky (i) HA dncPiE I'ABNTbc CUSTOM.
-GPB18V-5C:Ha iHnKAtopi BnCOkx/Hn3bKnx qactOT (d) BiO6paKaAcTRE nOToUHe 3aueHHBnCOkX qactOT. NObepHtB KHONky RoINHHNka (14), 063mInHn BnCOki qactOTn.HaNCHTb KONky RoINHHNka (14), 06 3epeTtn HanaItoBahe 3aueHHN.
TenepHa iHnKkAtopi BnCOkx/Hn3bKnx qactOT (d) BiO6paKaTbcBAS NOTOHe 3HaueHHn3bKnx qactOT. 3MHIbI 36peXeITb 3HaueHHn Hn3bKnx qactOT, aHaorUHO ONHCaHOMNOPAky DnBnCOKx qactOT.
-GPB 18V-5 SC:Ha 6araToyHKioHbHomy iNkAtopi (k)
Tenep ha 6araToyHKioHaIbHomy iHnKaToPi (k) BiO6paKaεTbcra Bass> NOTOue3HaueHH Hn3bKnx qactOT. 3miHtB i3epeKITb 3haueHH dIa Hn3bknx qactOT, aHaONiHQ OOnCaHOMy nopAky dIIN DnBnCOKnX qactOT.
-ПиялбсьржehнHaJaTByBaHnДЯнHn3bKnxЧаСТО
a6o uepe3 10 cekyHДпсЯОCTaHHbOTo HaTHNCKAHH
KHONKrTOINHHKA(14)/KHONKmMeHO(22)
padiOnpniMauNoBepTaTeBcRdoCTaHdapTHHX
NOKa3HNKIBHaDnCnIeI.
Bn6ip ayidopkepena
ДлвбopyaydiiodkepenaHaTnckaTeKhoNky
《DkepeNo》(18),noKHaHcNneiHe3'ABHTbCnnotpi6h BHTpiuHaeabo3OBHIuHaeayioDxkepeNo:
DAB: qdpoe paio uepe3 DAB+ (GPB 18V-5 SC),
-FM: ananoroge paio uepe3 FM,
-AUX:30BhiHHe ayidoxkepeNo (Hanpknad, CD-nneep) uee3 po3em 3,5 MM AUX IN (10) y Bicikny meia,
-:0BHIWE ayioJxepeno (HAnpKnad, CMapTfoH) uepe3 3'eHaHH no Bluetooth
IToTouHe ayioJxepeno MoXHa po3ni3HaTH IO INnKaaII ayioJxepena (h) a6o iINnKaaII Bluetooth@ (g).
BctaHOBHeHH/36epExeHHpaioCTaHcIM DAB+ (GPB 18V-5 SC)
HapbaenHH wthpboBoi aHTEH
Padiopnmau noctaacBc3i BCTAHOBNEHO WTHpBOOHO aHTeHO (30).Pi BNKOpNCtAHPi padionpmaa 3 FMMOBHeHMAHXNIAte WTHpBOBy aHTeHY B TOMy HAnpMky, de 3abe3neueYbca HAChTIkiIIN npHOM. Raio CnHai pniHOMy HeoCTaTHi, nepEMictb padionpmau B Mlce 3 Kpaunm npHOMom.
Bka3IbKa: kUO paioJnpHmMaU BHKOpncTOByeTbcB 6e3nocepEni 6n3bKoCTi BiD paioo6naHaHHa, paioPpnaIab a0 iHnx enektpoHHx npctpoIB, paioPpHOM moKe noripuHTNC.
Piknquen Hn 30biHix ayiojkepe npe3 AUX
Bickpnte Baxinb 6nkyBaHHa (8) i Bickpnte KpHsKy (7) Bicciy nmeia. BCTabe wTekep 3,5 MM Ka6enIO AUX (9) y po3'EM AUX IN (10).PiKluOHTb Ka6enb AUX do notip6Horo ayioDxepena.
Ioo3anyctnB iDtbOpeneaayiojKepeNAUX, HtNCKaTe KHOKNy 《JKepeNo》(18),POKHe 3'ABNTbcra IHnKaiaayiojKepeNa(h)AUX.
Длгзлбогдгнnotралнн6удуЗakрпгte кшку(7) BiDcikyДгмMediai3aФICyTe NiCnBиMuHnHgItekepa Ka6eHIOAUX.
Rkio po3mpdo3B0JAE, Bn TaKoX MoKeTe 36epiraTH ayionpncTpi, nikNoeHnepe3 Ka6enb AUX,y BiCkiy dna 36epirAHn (6).
Kkuo nic cac BiTbOpEnHAAUX6yde HATnCHyTA OHa3 KHOOKnam'RTi paioctaun (17),paiojnpnmae npemkKaetbcra HaocTaHHIO 3bepexehy Bpekmip aiojnpnmaaypaioctaunio.
BidTBopenHn/ynpaBNIHH3OBHIWHIM ayDIOxKepeIamn uepe3 Bluetooth
U6 noaTH BiTBOpEHnA ayioKepeHa (HaPnKnaI, cMaPToHa) no Bluetooth® , HATNCKaIe KONKy 《JKepeNo》(18),noKn HaDCINNeI He 3'ABITbCnIHnKaIaBluTeothg)(g), a60, H3aJIeXHO BID NToOuHOro ayiodKepeNa, KopotKouacHo HATNCHtB KHOnKy Bluetooth® (21).
Rkpo padionpmau Bke niknouen no 30Bihhboa ayiodxepena no Bluetooth® i ce ayiodxepeno docynhe, 3'edhaHH 3 uM xpepeno BCTaHOBIOEbca aBTOMaTHNO. IOnHO 3'edhaHH BCTaHOBneHe, NOHae TpNBALO cBITHTNcIHNaCaiai Bleodtooth (g).
GPB 18V-5 SC:Ha3Ba npHcTpo, nIKnIOeHOro no
Bluetooth, BiO6paKaetbCry y BepXhBOMy pAnky
baratofynKIOHaIbHO rINkAToPA (k).YnIKHbOMy pAnky
BiO6paKaETbcrTeKCT, kNn nepeaETbCnIKIOueHm
npHcTPOem.
Kkuo3'EnHaHH He BdaeTbca BCTaHOBHTn IpOTAROM 2XbUNH, BCTaHOBHeHH 3'EnHaHH npINHHETbca, IHNkauii Bluethog (g) TpNBano 6hMaec.
GPB 18V-5 SC: ha 6araToocyHKUioHaIbHOMy iHnKaToPi (k) BiodoopaKaetbcra Not connected>.
Kkuo3'cHnHaHH He 6yde BCTaHOHeNo ige yepe3 17 XbnnH, paoipnmuay abTomauHO BmNkaetbcra.
BCTaHOBneHHHOBOrO 3'EnHaHHNo Bluetooth®:
-106nkiuHTncIdoHOBOro30BHIIHbOra ayiodkepena,yTPhmyTe KhoNky Bluetooth(21) 10HaMeHne nB cekyHn. Lc taKox MoXHa 3poBnTiq uac nowky, npi icHyUoyOM 3'edHaHHi abo npi BIDTBOpEHHI IHoro ayioDkepena.
-PaionpHMa4 3anyckae noyK. Pid yac nouyky 6nHaae iNkaiai Bluetooth (g).
-AkTHByIte3eHnHH3 3OBHIM im ayIOxepenOM. 3aBnauHa CMaprfohax ue MoKHa 3poBHTn B HanaHTyBaHHx y MeHO Bluteoth. PApionpHmay 3'ABNTbCepeiDcTynHX BapiaHtB NIKIOueHHN iIM rM GPB 18V-5C xxx a60 GPB 18V-5 SC xxx. 3BePHITb yBarhy Ha IHOpMaUio, HabeEny B KepIBHHTBI 3 ekCnlyaTaui BaWOrO ayIOxKepeNa/CmaprfoHa.
-LoHHO3'EDAHNNIO Bluetooth BCTaHOBHe, noHaTpIBaNO CBITNTNCA IHINKAUII Bluetooth (g).
Ayiojokepenom, niknioueHm no Bluetooth, MoKHa TAKOK ynpabTn chep3 paoiPnMau:
Ioo6Bn6paTHi3anyctHTN KOMno3nIO,KOPOTKOaCHO HAHTCHITb KHONKY NOUYKY 3a HAcTyNHIMN pe3yNbTaTMN (19) a6o KHOJky NOUYKY 3a NopeDnHM pe3yNbTaTMN (13),NOH He nepeJeTe Do NoTpiHoI KOMNo3nii. BiITbOpeHHra Bn6paHOI KOMno3nii NOHTbCABOTMATHHO.
-Ⅲo6 nepepbath BiTbopeHHaHTNCHtB KHONky BMMKHeHH 3ByKy (12).HaDnCnnei 3'ABNCTbcra IHINkATOP BMMKHeHH 3ByKy (f).
- Liob BIDHOBNTH BiTBopeHHa,3HOBy HaTCHbTKHONky BHMKHeHH 3ByKy (12), 3MIHTb rYuHcTb a60HaTCHbTKHONky NOwky 3a nonepdHmpeyNbTaTMn (19) i KNONky NoWky 3a HAcTyHMM peyNbTaTMn (13).
-Для nepexody bnepeiHa3aJ no KOMno3uii UTPHMyTe KHOKNy NOUky 3a HAcTyNHIMPe3yNbTaTMn (19) uKHOKNy NOUky 3a NOpeHIMPe3yNbTaTMn (13), NOKBkA3iBHK He DoCgHe BCTAHOBNEHOI NO3uII KOMNO3uII.
Kkuo n iac BiTbOpeHH no Bluetooth® 6yhe haTncHYa OHa3 KhoNOK nam'pi paioctahui (17),paioiPnMau nepemkAcTcRa hOctAHIO 36epexeHy B pexmi padipnmuaya paioctanuio.
HanaWtyBaHHiIndkauiyacy(GPB18V-5C)
Uo6 nepeHt y MeHIO iHnKauiy cay, KopoTkoacHo HaTHCHITb KHONKYrOHHNka (14).
Bn mojte Bn6paTH fopmat Biio6paKeHHa cacy 12 roHn <12H> a6o 24 roHnH <24H>, a TaKoX BCTaHOHTn RoHnTa XBNIHN.
HabirajB MeHIO:
-3MiHa HanaTuBaHb MeHIO: NOBepHiTb KHONKy roHHKa (14).
-36epexeHHHaHaaTByBaHb MeHIO:HaTnCHITb KHOKNy roHHNka.
-Пигязбержениннэнлалшуваннхыннab60чep310cekyнпсдяпocтahьогоНатнckаннKногкirodHHka paiaionpmaqu nobepTaecbCnBpekmBiBTBOPEHNAayio.
KaHnauTByHnH acy padionpmaa 6bnbe He 3epiraioBcra, 3amHtpeepbHb 6atapeKn.
3MHaHaNaaHTyBaHb MeHIO (GPB 18V-5 SC)
Lio6 nepeTn do yHKui MeHIO, HATNCITb KHONKY MeHIO (22).
HabirajB MeHo:
- Nepexiy MeHIO: noBepHiTb KHONKy MeHIO (22).
-Bn6ip Ta 36epexeHHaHaawTyBaHb MeHIO:HaTNCHTb KHOKNy MEHO (22). - Nepexei y niMeHIO: HATnCHITb KHOKNy MeHIO (22).
-NoBepHeHH 3 nIMinIO B OCHOBHe MeHIO: HATNCHTb KHONky NOnyKy 3a HAcTyNHmN pe3yNbTaTAMn (13).Ipn DOcRHeHHi pIBHr OCHOBHOrO MeHIO padionmuN NOBepTaTcB rpeKm BiITbOpEHn aydio.
IooB BnTn 3 MeH0 fYHKui 3 6ydb-akoro pIBHa i NOBepHyTNC B PexHM BiITBOpEHn AayIO, HATNCKaTe KONKy Nowky 3a HAcTyNHmPe3yNbTaTAMn (13) He MeHwe 1 cekyHn. TaKoX paJionpImaay ABtOMaTHNOpeMnKaTbCBAPEKM BiITBOpEHn ayIO nICn CnINBaHHn 10 cekyHn nCnAocTAHbO rHATNcAHn KHONK.
Akuo HanaTuBaHH MeHoo 6inbHe He 36epiraHbC npBMMKHeHH paionpmaa, 3amHtpeepBHaTaapeKN.
Onii MeHIO (GPB 18V-5 SC)
MeHIO Bn6bopy qactKOBO 3aJIeKHTB BiIpeKIMy BiITBOpEHHaayio, BCTaHOBeHOrO dIpaionpHmaya.
YBepxHbOMy pIky 6araTofoHKIOHaIbHoro iHnKaTopa (K) BiO6paKaTaBCa HA3Ba MeHO, a ObaPe HanaHTyBaHHa-y HNKHbOMy.
Meho HanaityBaHn yacy:Bn MoKeTe Bn6paTH opMat BiOobpaKeHHyacy 12 roHN <12 Hour Mode> afo 24 roHN<24 Hour Mode>IBCTaHOBIOBAtn cac BPuyHy. RaIooIraayioDkepeNa DAB o6pHa paioctan,ka nepeDaac,uea cnc pnnMaetbca ABTomATNo.
MeHIOCKHaHHaHaHTyBaHb:BNIMOKTe CKNHYBNCi HanaHTyBaHHaMeHIO 03aBOcBkNx
MeHOBaTOMaTHHOro nowky paioctanuBnMOKeTe 3aNyCTHTA BOMaTHHNI NOUyK CTaHui.
Meho pyHoro HanaHTyBaHHB MOKeTe BpyHy BCTAHOTn HeO6xIDHy yactOty.
MehIO TnIy IINHkaui: BMOKHe TEBpaTH, AKN TEKT
3'ABNTHMETbCB HnKhbOMy PAnky 6aRaTOpyHKUHOHaIbHOrO iHnKaTopa (k):
-iHopmauiHnTeKCT,AKNIpeepaetbpcpaioctanueiDYNAMICLabel>,
- yactota paoctahui
- Cnna CnHaNy
TINnporpaMNIo nepeaetbca paioctanci
Meho tny iHnkaqii: BMOKTe Bn6paTn, kNk TEKT 3'ABNTHMETbCBA HnXhBomy prky 6aRaTOyHKIOHaIbHorO iHnKaTopa (k):
- iHΦopMauiiHnTeKCT, kHn nepeaetbca paioctanlciEo
- H3Ba paioctaHii
TINnporpaMNIo nepeaetbca paioctanie
KMBHeHH3OBIHmHix npnnaiB
USB-p03'EM
USB-po3'em MOKHa BnKOpHCTOByBaTHI DIA 3apJxAHHH npHCTPOIB, kI MoKyTb OTpMByATeEKeTPOXKNBHeHHA NO USB (hanpknad, p3HI MobiBHi TenefoHn).
MakcmaHbHH pBeHb 3apdHorO cTpyM cTaHOBHTb 2,1A. BIDkpNte BaKinb 6nOKyBaHn8 (8) i BIDkpNte KpHsKy (7) BIDckiy nla Media. PidKnHouItb USB-PO3'Em 3OBHIuHbOr npIcTpoIO DO USB-PO3'Emy dnn 3apdJaHHa HpaionpnimMaay a 3doonomoro BOiINOBIHORo Ka6eHIO (11) (USB).
PnEcknyataa3kyMnTOpom3OBHniH npNCTpi MoKHa 3apJkATn, TINbKn KOnn paIionpImMauyBIMKHeHn. RaOo pO3MpIo3BOJAE, BMOKeTe 36epiratn 3OBHIHn npNCTpi y BiDckiy dJa 36epirAHn (6).RIO npNCTpi HarPiBaetbcB npoceci 3apJxKaHH, 3aIIuTe KpNlKy (7) BiDckiy dJa Media BiKpHTO, Uo6 yHKnHyTH nepepiBy 3OBHIHbOro npNCTPO.
Picra3aBepHnH3apJxAHnH BIDcHnAte USB-ka6enb, a notIM 3akpHnTe KpnKy (7), 06 yHnKHyTn 3a6pydHeHH paiaionpmaa.
THi3o 3MiHHoro CtpyMy
Bn MoKTe BnKOpNCTOByBaTNoDAtKOBi 3OBHlHi eNEKtpNHi npCTpoI 3a DOnOMoROI rH3da 3MIHHORO CTpyM. H3nda MoKyTB BiDpI3HrTcHc 3aJeXHO BID CneuPhiHnx dNn KOHKpeTHx KpaIH cTaNaptIB.
EneKtpoKbIeHn3O8HiHix npncTpoB uepe3 rh3do 3mIHoro ctpMy moXJIHe, TlBKn kKIO padionpmau npauoe Bid eneKtPomepexi, a He Biad akymyIaTOPHOI 6ataei. Raio paoJpnMaui nd KIOHueHH do eNkTPOMepexi, ce NiITBepJxye KOHTpONbHa lamna, 0o CBITbC3eHNM CBITnom (3).
3aRaJIbHe MaKcHMaJIbHO DOJNyCTHMe CNOXKNBaHHC TcpyMyycima NiKIIIOueHmEneKTPNHmN PnIcTPOrMnHE NOBHHo NpeBnUyBaTH 3HaueHHa, HabeDeHi y TabnCi (INB. TaOK MapKyBaHH Ha Kopnyci nD KpnWkAMH (4)):
ToBapHn HOMep CyMa MaKc. cNoXHBaHoro CTpyMy
| 3601 DA4 000 15 | |
| 3601 DA4 100 15 | |
| 3601 DA4 170 12 | |
| 3601 DA4 1W0 15 | |
| 3601 DA4 130 9 | |
| 3601 DA4 140 9 |
Bikpnite Kpnuky (4) rH3da 3minHoro ctpmy i BCTABTe wTencb 30BhiHbOro eNEKTPnHoro npCtpoB RHIdo (5) ha padionpmaui.
Bka3iBKn 0oOpo6oTn
Bka3iBkn 0oOOnTHMaIbHOro NOBoJxehn3 akymyIaTOpom
3axnuiTe akyMnyIaTOp BiD BOIOni IBOH.
36epiraTe akyMnyTOp Inne 3a Tempeatpyu BID-20°C Do 50^ 3okpema, He 3aHnaTe akyMnyTOp BnITKy B MaunHi.
YacBIDnacynpouuayteBeHTNuauiHiOTBOPn akymyIaTOpaM'KHM,UcTHMIcyxHMIeH3NIKOM.
3aHaTTO KOPOTKa TpBAnictb pOBoTn nICn 3apJxHnCbiuHTb Ipo Te, 10 aKymIaTOp Bueepnab ce6i IoroTpe6a nomHtN.
3BaKaJTe Ha BkazBkN ⅢOIO BnDaIeHn.
Texhiue 06cnyrobybaHHi cepbic
Texhihe 06cIyroBvBaHH i ouHsEHH
JaikcHoii6e3neuHoipoBtnpMaTe padionpmau B uCTOTi.
Rtpe6a nomHnPiEHyBaHbN Kaeb, ce Tpe6a pO6HTHaipmi Bosch a6o B cepBicHm MaCtePHi dne ENEKTOIHCPTpyMeHtB Bosch, 06yHNKHyTH He6e3NeK.
BHTnpaTe 3a6pydHEnHH BONTOO M'AKOHO raHuipkoIO.He BNKOpNCtOByTe XODHNMmOuNx 3aoc6iB a60 po3HHNKIB.
Cepbic i koncynbtaqii 3 nHTaHb 3actocybaHHA
B cepbichm MaCtepHi Bn OTPMaTe BIDNOBijb Ha BaWi 3aHTAHH CTOCBOHO pEMOHTI TEXHURHO o6cnyROyBaHH BaWOro npOdykTy. ManHKnB DeTanX i HOpMauiu 0do 3aNactNH MOxHa 3HaHTI 3a aDpecoHo: www.bosch-pt.com KomaHa cPiBpOihNKiB Bosch 3 hAdaHH KOHCyNbTauii 10do BHKOPHCTAHH npOdyKii i 3aIOBOHeHHM BiINOBICTb Ha BaWi 3aHTAHH CTOCBOHO haoi npOdyKii Ta npHaia da Ho
PnB CIX DoaTkoBHX 3aHTaHHx Ta 3aMOBneHHi 3aHAcTHN, 6yNb lacka, 3a3Haayte 10-3Haun Hmep dIa 3aMOBneHHH, 9O cToITb Ha nacnpTHn Tabnnu npodykTy.
IapaHTiHe o6cnyroByaHHia pEmoHT eKeTPOIHCTpymEny 3diHCHIObTaBicNIOBIDHO DO BHMOr I HOpM BNROTOBIOBaHa Ha TepHToPi BCIX KpaIH NIIe y fipMOBX a60 ABTOH2OBAHNCEPBCHNUeHTpax fipMN "Pobert Foun
PONPEDKEHH! BnKOpNCtAHN KOHTpaKaTHO npOdykui He6e3neueB Eeknnyatauii I MoKe MaHr HcAHTBHI HacNIKn DnI 3dOpOB'a. BnroTOBHeHn I po3NOBChOKeHH KOTpaKaTHO npOdykui nepeCNIyEbC3a 3aKOHO B aMIniHcTaPbHBOMY i KpIMHaHbHOMY nOPaKy.
YkpaHa
Bou CepBicHH LcHTpeEeKtpoiHCTpyMeHTIByn.KpAH1
02660 KIIB 60
Ten.: +380 44 490 2407
ΦaKc: +380 44 512 0591
E-Mail: pt-service@ua.bosch.com
www.bosch-professional.com/ua/uk
Adepea PeriohaBnHex rapaHTiHnHex cepBichnx MaIcTepeHb 3a-3haeHa B HaioHbHomy rapaHTiHOMy tanOHi.
AipcehiuHx cepBicHHx ceHTpib HabeHeHo HxKHe:
www.bosch-pt.com/serviceaddresses
TpaHcnopTyBaHHa
Ha pekomehnoabhi nitiEBO-IOHNI akymyIATOPHI 6aTapeei
po3NOBcOxkyIObCA BIMORN UDO TpaHCnOPTyBaHH
He6e3neuHNX BAHTaxKi. AkymyIATOPHI 6aTapei MOKytB
pepeBO3NTnC KOpNCYBaUem ABOMoBIhHM TpaHCnOPTOM
6e3 Notpe6n DotpmaHH NOdAtoKBHX HOpM.
Pnpecnui TpimnOCo6amn (Hanp.: nobitprnHm
TpaHCnoptom a60 TpaHCnoptHM ekCneHntOpom) Notpi6ho
doepkByBaTnc OcO6nBHX BmOR 0do ynaKOBKaTa
MapkyBaHHa. YCbOMy BnAaKy y niRTOBci NocNkn
NoBHHe 6patu yactb ecnep3 Hebe3neuHx BaHTaxiB.
BicnnaTe akyMnTOpHy 6aTapeo nIwe3 HeNoKoKeHm Kopnycom. 3akneTe Bdkpnt KOtAKTH Ta 3anaKyte akyMnTOpHy 6aTapeo TAK, 0o6 BOHa He CObaNacByyNAKOBU. DTpMyTEcH, 6yNb NACKa, taKoX MOKNBHX DoaTKOBHX HauioHbHN npinnCIB.
Ytunizaia

PapionpniMaui, akymyTOpn/6batapei, npnaI yynakOBky Tpe6a3daBAtn Ha ekOloruHNo uHCTy nobTOPh nepepo6Ky.
He BnKdAaTe paiaionpmai Ta akymyIaTOPI/ 6atapeiB no6bye cmITTIA

Пишдякай EC:
BidnoiHdoEbponeckbKoiIpekTbN 2012/19/EU
Odo BixoDIB eKeTpnuHoro Ta eKeTPOHHORo 6naHaHH
Ta II nepetBOpeHHB HauioHanbHe 3aKOHoDaCTBO
paionpctpoi,aki Binbwe He npdaTH Do BNKOpHCTAHHA, a
TAKOX BiIOBIDHO do EbponeckboiIpekTbN 2006/66/ EC HecnpabHI abo BiipauBoaHi akymyItoPHi 6atapei/
6ataeKn NOBHNI 3daBaTHC OKpemoytINi3yBatncn
ekoIorHQ uChTM CNOCOBom.
PnHnpabNbHi ytni3auiB iDnpaobBoH eektpuhi Ta eektpoHH npnaDM MOxTyMaTH WkIDINBn BNNBa H aBAKONHHe cepEOBUNe Ta 3DopOB' nIOHN Hepe3 MoKNBy HAABHicTb He6e3neuHx peOBN.
Akyumnyatopn/6atapeken:
Niriebo-oHHi:
Bybnaacka,3BaXaIteHaBkazIBKNBposdini "TpaHCnoptyBaHH"(Hb.,TpaHCnoptyBaHHCtoPiKa147).
Ka3ak
Eypa3nna 3KoHOMnKaIbIK OdaftbHa (KeDen OdaftbHa) Mywe MemLeKeTtep aymarfbHda KOnDaHbIaNbl
HdiPyHH OHIM YIW H Kapactbipfah naaDanaHy KxKaTapbHbH KypambHa naDanaHy XeHHeiOCbl HcKaybIK,cohBmeh 6ipre KocbImanap da bony MyMkiH.
Caikekti pactay kajnbla aknapat kocbimwada 6ap.
Ohimdi eHdpireh Memneke TpyanbI aknapaT eHIMHH KopnycbIHda KHe KOcBIMwanda KepceTirreH.
EHnpiniremep3iMi6yibimKopnycbHdaKepcetinreH.
HmnpTepreKaTbIcTb baiNaHbcaknapaTeHIM KaTAMacBHaKePcetInreH.
Ehimi naianda hy Mep3iMi
OHHMHIKbI3MeTetyMep3iM7KbIn.0HdipinreHmep3imHeh 6actan(0Hdpy KYHi 3aybITaKaTHaCbIHJa Ka3bnFaH)
ictne5KbIcKaTaFaHHaHCO,EHIMTeTkcepyci (cepBnCTIK TeKcepy) naDanaHy cblbImaMdbI.
Kb3MeTKeHemeCe naDanaHyBHBkatenikTepi MeiTeH bry ce6entepinTi3imi
-TyKacbMeH Kopnycbl 6y3bnFaH 601ca,ehimdi naDanaH6aHb3
-ehimkopnycbihantikeneTytihbikca,naaanaHaib3
-TOKcMb6y3bIFAHHemeceOKuaynaycb3bonca, naDanaHaB
JaybH-1aWbHKe3iHdcecbpTa(daIana) naDanaH6aHb3
- Kopnyc iwihe cy Kipce KypbnfbHbKocyub60MaHb3
Ken yuKbH uBkca, naJdaNaHaBbI3
KaTbI Dipin Ke3iHne NaJdaNaHa6BaHb3
Uekri Kny 6enrinepi
-TOKCbIMbIHbIHTO3yIHeMeCe3aKbIMDaHybl
-0HIM KOPnYcbHbH 3aKbIMdanybl
KbI3MeT KepeTy Typi MeH XmIniri
OpaandaanhydacoHemidTa3aayycbibnida.
CaKray
KypfakKepe daKray Kepek
KOFapbI TemnepaTypa Ke3iHe HKeH KYN CaynepePiH acepiH e anbc caTay Kepek
- caTay Ke3iHne TemnepaTypaHbIH KeHeT ayblTKyblHaH KOpFay KepeK
- opamacbi3 caKtay MYMKiH eMEc
- cakay wapTtapbI typabI KocBIMwa aknapaT any yuH MEMCT 15150-69 (wapt 1) KyKaTBH KapaHbI3
TacbImaJay
TacbIMaIay KeiHne eHIMdi Kynatyfa XeHe Ke3 KeIre HexaHKnabik bKnaneTyeKaTaH TbBbIM CanbHaDbI
-6ocaty/jkytey ke3iHne naekTI KbICaTH MaunHaapn bnaDanahyf pyKcat 6epinmei.
-tacbImaay wapTAPbI tanaTAPbIH MEMCT 15150-69(5wapt)KxKaTBH OKbHb3.
Kayinci3ik HycKaynapbI

Bapnbik Kayinci3dk TexnKacbHbH HcyaynapbH kane eceptnepepiokbin WbIFbHb3. Kayinci3dk TexnKacbHbH HcyaynapbH kane eceptneepdi caTamay TOK COfyfa,optke kane/Hemece aybp
JapakatHaFyA kEnyi MymKIn.
Kayinci3ik texhknacbHbH,HyckaynapbMeHe ckeptnenepeDi 6oanaakxymbictap yuih caKtan KoiHbI3.
Op naiDanaHydAn 6pybH paNo Ka6blIaFbiWtbl, Ka6eIbdi XeH e aHaHb TeKcepiH3.3aKbIMap 6aKaIaNanFaH KaFdaHa,paNo Ka6blIaFbiWtbl naDanaHbI3.PaNo Ka6blIaFbI Hn eH aHaHb E3 6etHIs3eh aHaNaHb3 XeH oNApBb TEK 6iNkTI mAmHa FxHe TynHcKa KocAknbl 6enWeKeTpme Hekdeyre pyKcat etH3.3aKbIMaIaNanPaNo
Ka6blJaBbIaTap, Ka6eIbIep XeHa aIaIap 3neKtp TOrbHbIH COy KayiIN apTbIpaBl.
Keninik awahbikoprahbiu KOntaTici 6apohai konketimpi po3eTKaFA Xanfay Kepek.
Keninik awa po3ekameh yneimdi 6onybkepek. Aaahb ekaan da kOIme 3reptyre 60nmaib. Ekaanad anantep aanaapbih padno Ka6bn4bIHTapmeh 6ipre kondaHba3. 3reptinmere aawa hbi xhe japaMbl po3eTkanapdbi naDanahy TOK cory Kayinr TEmeHdeteni.
PaHNO Ka6bInaFbIbTb JKeiNik KocblbIMMe naiDanaHaRn Ke3e JeNik Ka6enbl TOnblkTaJ XaBbHbI3. 3Nece JeNik Ka6enb Kb13bn KeTy i MYMKIH.
PaHNO Ka6bIaDfBiTbI TaBImaIay, acbln KOHemece aWacbiH po3eKaadah WbIFapy ywiH ka6ebdiMaKcTaBHaH TbIC naJaanah6aHb13. Ka6ebdiBICTbIKtAH, MaJdAn, etKip XneKeTpden Hemece KypbIaFbHbH, XblnxMbIa 6enikTepeH anwakYCTaHb13. 3aKbIMdaIaH Hemece WwneneHickeh Ka6ebbTOK CORY KayiH apTbIpaBl.

PaHNO Ka6bIaNfAflTbI XaH6bpAn Hemece bINFaANdKopFaHbI3.PaHNO Ka6bIaNfAflTbIH iWHe cy Kipce, TOK cory Kayni apTaB1.
AkkymyTopbI aunahbI. KbICKa TYbIKTany Kayini 6ap.
AkkymyTOp 3aKbIMdAnFaH HeMece Dpybc nainanahbnimaraH XaFdaJa, OaH 6y wby MyMKIn. AkkymyTOp XaHbIN HeMece XapBbIN Kanyi MyMKIn. Ta3 aya iIke TaPbHb3 JxHe IaFBMdp 60nca, dApirepDnKemEine KyyrHin3. By TbHbC any KonDaBpH TitIPKeHdipy MyMKIn.
AkkymyIaTOp dypbc naDanaHbImarH HeMece 3aKbIMdaFAnf XaFdaJa, aKKMyIaTOpDn cybIKtbK arbyi MyMKIn. OraH TmEi3. Ke3eicok Tepire THReHe, coN Xepdi Cymen WauBbH3. CybIKTBK K93re TnCe, MeuHaHaBik KEmek anbHb3. AkkymyIaTOpDaFbCybIKtbK, TepHi TitipKeHHipyI Hemece KyIipyi MyMKIn.
Were Hemece 6ypaybiu cnaKTbI yUdb3aTtap Hemece cbiptkbi ecep apkbibakkymynylantop 3akbIMdaHybl MyMKH. Bykckta Tbykhtanyfa anbin kenin, aKKMyJyIaHcybl TYIH bIbIyApbybl XapblNyI Hemece Kbl3bn Ketyi MyMKH.
PnDnHbIMaTbH AKKyMnTOpDb tyicnepei TybTKayI MymKIN KbICTbIPfBHTapHa, TbHdapHaN, KInTepDe, WerenepeH, BnHTepDen XeheBaKaYcakTemip3attapHaN CaKaTbIs. AKKMynTOp TYicneepinH apacbHaFb Kbicka TybKTany KyIKTepre Hemece optKe kenyi MymKIN.
Byn akKymyIaTOPdb TEK KaHa oCbEhDipyIeHIMepiHe NaDaHaHbHb3. Con apKblb aKKymyIaTOPdb KayInti, apTbIK KytKeYdeH caKaTaIcbIa.
AkkymyIaTOpnb6aTapeHbTeKeHdipywi KepcTeKe3apnTay KypbnFbCbIme3apnTbI3. 3apnTay KypbnFbCb6enrini6ip akmyIaTOpnap TyPihe
apHaFaH, OHbI b6aKa aKKyMnyTopnapbl 3apaTay yuH naDanaHy ept KayinH tyblpaBbl.

AkkymyIaTOpbl, XbIyduH, coHdai-ak, MbIcIbl, y3diKcI3 KHy JkapbIfbIHah, OTTaH, KipDeH, cydAH XHe bINFaIaH KopFaHbI3. KApblbc XeH e KbcIa TYbIKTany Kayni TybHaIbl.
Bluetooth® c036nrici, coaai-ak cyper 6nrinepi (norotntep) Bluetooth SLG, Inc komnanncbihin tipkenre hayda 6nrinepi kane heke mehuri 6oibin tabbina. Ocb/cypet 6nricin Robert Bosch Power Tools GmbH Tapanbinae np kondaunbyi nuehna 6oibinaa xy3ere acadbl.
ΘHIM KəHe KyaT CnnaTTamacbl
Painanany HcyaynbihbH anfbi 6nirinH cpeTepine eckepi3.
KopceTInreH KypamDbI 6nweKeTp
Kepcetinre H Kypamdb6eIweKeTpHemipnepi rpaikanb6BettierpaioKaabdaftbH KcpctiniMe KaTbCTb60bnkenei.
(1)ДиHamNK
(2) TaBmAnDay TyTkAcB
(3) AINbIMaNbTOK KOCbINbIMbHbIH 6aKbIy aMbI
(4)AHHbIMaNbI TOK KOCbJIbMbIHbHJXaIKbIbIbI
(5) AHHbIMaJIbI TOK KOCblbIMbIHbHp03eTKacbl (Power Outlets)
(6)CaKray 6eNiMi
(7) TaBbIbI 6eJIIMIH KaKaNaFbI (Digital Media Bay)
(8) TaBbIbI 6eIiMi KaNafBbHbH Kybntay nHTperi
(9)AUX ka6eni
(10) AUX IN yRwblfbl
(11) USB 3apdayyawbtfby
(12) Db6bcTb eipy Tymecci
(13) Aptka i3dey Tymeci
(14)Clock TYMeci (GPB 18V-5 C)
(15)Kocy/ewipy tyHmeci
(16)Диспел.
(17) BaftapnamahbicaKaTay TymMepei
(18) BaTaNKbI KΘ TуMeci
(19) AnFa 3I3eY TymMeci
(20) Equalizer Tymeci
(21)BluetoothTymeci
(22) Məsɪp Tɪyɪmeci (GPB 18V-5 SC)
(23) BaTaper 6eNimi KaKNaBfHbH, 6eKtKiWi
(24) BaTape 6eiminH kKaNafB (6yepnik 6aTapeanap)
(25) Akkymyntopdi 6ocaty Tmymeic
(26) AkkMynTOp
(27) AkkymyTnTOP KaKnaTbI (Battery Bay)
150|Ka3aKa
(28) AkkymnylTop KaKnaFbHbH Kyblntay niHTiperi
(29) AKKMyJrTOp 6eKITkii
(30) KaaynbantteHHa
a)BeHHeneHReH HemeCnTaTaNfA Ka6bIbKap CTAnApTbI KTeK3y KeNEMiMeH KAMtBIMMaDbI. TOnBkKa6bIKapDbI 63dIn Ka6bIKap 6afapnAmMbI3an Ta6acbl3.
HnkaaHaIeMeHTepi
(a) PaДио XXHIIIK INHIMKaTOpBi (GPB 18V-5 C)
(b) AkkymyIop 3apBb DeHreHHnHnKAtopb
(c) CaKtay opHbIHbH INHdkATopbl
(d) BnIKT/TepeHnIK DeHReiHIn HnDnKaToPbI (GPB 18V-5 C)
(e) CTepeo cHnHaIbI Ka6bIaay HnHnKaTOpbl
(f)Db6bictbeewipnyHndkatopb
(g) Bluetooth®инданкаторы
(h) Aynio Ke3iHnHnKkAToptb
(i) Db6bicta andbih ana peTtey HnHkaTopbl
(j) YaKbIT HnDnKaTOpbl
(k) Kπ Φνκιηλήνινινικατορ (GPB 18V-5 SC)
TexHnKanbIK mAnimetTep
Kpbblbc anaahbhih padno kaibdabhlbgi GPB 18V-5 C GPB 18V-5 SC
| ФИМ HOMIPI | 3601 DA4 0..3601 DA4 1.. | |
| DAB+ сгналын каблдay - ● | ||
| ЖуMbIC kerheyi | ||
| -желire косылганда B 230/110 230/110 | ||
| -akKуMbYЯлгды падаланган кеaze B 18 18 | ||
| Кшейтkiшпн hominaлды Куаты BT 4 × 5 4 × 5 | ||
| УКТ каблдay диanaэоны МГAz 87,5-108 87,5-108 | ||
| DAB+ каблдay диanaэоны МГAz - 174,928-239,200 | ||
| Bluetooth® уйесимдир | Bluetooth® 5.0 | |
| Bluetooth® Кьзметтik женистордиаэоны | МГAz | 2402-2480 |
| Bluetooth® taratу Куаты, макс. MBT 10 10 | ||
| Буферникbatарялар | 2 × 1,5 B LR6 (AA) | |
| Салмавí EPTA-Procedure 01:2014 Кухаты саï | Кг | 9,2-10,2A) |
| Корганык Класы | ⊕/I | |
| Зардай кешидгі рсынлaitын Коршааган орты Temператypасы | °C | 0 ... +35 |
| ЖуMbIC ICTEN Турган кешидгі рухсан etilген Коршааган орты Temператypасы | °C | 0 ... +35 |
| Сakтay кешидгі рухсан etilген Коршааган орты Temператypасы | °C | -20 ... +50 |
| Чьнылathын akКуMuлготорлар | GBA 18V... | |
| ProCORE18V... | ||
| Чьнылathын зapадыш Кухатылар | GAL 18... | |
| GAX 18... | ||
| GAL 36... | ||
| GAL 36... | ||
A) naHdaHaH aKKyMnTOpFa 6aHaNaHbIcTb
PaHno Ka6bIaIaFbIaITbI 3NeKtp KyaTbIMeH Xa6DbIKTay
PaIIO Ka6bIaIaFbIaTbIh 3eKtp KyaTbIMe Hka6bIaTKanybl
JenlIK KocblbIM HeMece IITnHNOHbIK aKKMyIaTOp (26) apKbIbI kY3ere acabI.
ErepakkymyIaTOpKyaTneHKa6bIbIyTuH konJaHbIcna, TeaynopeXnMI MeN cbiptKbIKypblfbnapblkipikTIpInre USBnopTbApKbIbI KyaTneH Ka6bIbIyTay fYHKunIaBb konKeTImd60anbl.
Keninik KocblbIMMeH Kymbictey
Keninik Kepheye Ha3ap aydabpbHb3! Tok Ke3iHKepehyipaoNo Ka6blndaFbIbTHpHmPalBkTaTaNacbHdaFbMNIIMETepre cAkec Kenyi Tnic.230B den 6enrinehenpaNo Ka6blndaFbIbTapbl 220 BshaMacbHda da naNdanaHyfa 6oanda.
AkkymyIaTOPmen 6ipre naIaIaIaHy
TekTexHkAnbIKMOniMeTeppeXa3bInFaH 3apAraTbfI KypBfNfBnApdbI naDanaHaHbHb3. Tek
KaHa OcbI 3aprTaBfI W KpybI Nfblnap paHIO Ka6blnDaFbIbHbI3da naIaIaNbIaNbTbIH NHTN-HOHBK aKKyMnyTopra caKeC keJei.
Hyckay: paNIO Ka6blIaFbIka apHaMaFaH
akKymyIaTOpnapBn naIaNanAhy paNIO Ka6blIaFbIbTIbH KATE
Kymbc icTeYiHe Hemece 3aKbIMdanybHa Akenyi MymKiH.
IInTH-NOHBk AkKymyIaTOp "Electronic Cell Protection
(ECP)"apKblI KaTbI 3apRd TaycblbHaH KopraIHaH.
AkkymyIaTOp 3apRdbl TAYCbIHaH KaFdaJa, KopFaHbI
eWipy KjEci paNIO Ka6blIaFbIbTIb Ewipei.
Kopfahbliw eipj xyneci paHNO Ka6blndafbltb1 eipreHHen KeiH,paHNO Ka6blndafbltb1 KaTAt KocnaHb3.AKKymyIaTOP 3akBIMdaJybl MyMKIH.
AkkymyTOpdbaAnMaTbipy
AkkymyIaTOp KaKaIbHbIH KyIbIaTay HHTiperIH (28) aWbIn, aKkMyIaTOp KaKaIbIH (27) aWbIHb3.
AkkymyIaTOPbl WbIFapbn any yuH aKKMyIaTOPbl 6ocaty TuMecih (25) 6acbl, aKKMyIaTOPbl aKKMyIaTOP 6enimHeH TaTbpI WbIFapblB3. Byn peTe KUcCanMaHb3.
AkkymyIaTOpbl enri3y yHIN OHb, aKKMyIaTOpblH
KanFaBbIaTbpI aKKMyIaTOp 6eKITkiHIN KaNFAbIaTbpHa
KaTaBbHdai erin, aKKMyIaTOp 6eKITkiHHe (29)
KbIbKbIbHbI3. AKKMyIaTOpbl H tipenyeH kon 6epiH3.
AkkmyIaTOp KaNaFbH (27) Kaybin KyblntaHbI3.
AkkymyIaTOp 3apdI deHreHHHnDKaTOpbl
AkkymyIaTOp eHri3inRe HKe3e, aKKMyIaTOp (26) 3apdibHbH DeHreH INcPiNeIeH, an AKKMyIaTOp 1bIfapblFaH Ke3e, AKKMyIaTOpdbH e3iHe hAhbKtayFa 6onadbl.
Hcnnnei deri akymyntop 3apn dehreiniHnKATOPbI
AkkymyIaTOp 3apAdbI DeHreHH HnHkAtOpbI (b), KekTKiIKTI KePHeYre ne AkkymyIaTOp eHriin, paNIO Ka6blndAflu TOK XeNiciHe KocblmHaF HkarDaJa, DncnneJe naJa 6oJa.
HdukaTop Kyatsti
| 80-100% |
| 60-80% |
| 40-60% |
| 20-40% |
| 5-20% |
| 0-5% |
AkkymyIaTopaBbI aKKymyIaTOp 3apnI deHreinH HnKaTOpbl
AkkymyIaTOp paHnKa6blIaNb4bl7TaH bIbFapblCa,3apd DeHreIH AKKymyIaTOpdaBf3apdJeHreIN HINKaTOpblHJ Kacbl TcyTI KaBbIKDIOITApblApKbblbKapan WbIFyfa 6onadbl.
3apn deHrein KepcTe yuih 3apn deHreHH INHkATOpbHa apHanFaH Hemece Tmecicn 6acbHb3.
3apn deHreHH HnHKaTOpbHa apHaFaH TyMeHi 6acKaHHa Kein EeKaHdA JapbIK DIObl KaHbaca, 6yn aKKMyIaTObpH akaybl XaHE OHbl aybICTbpy Kepek eKeHHirih bndipepi.
Akkymyntop typi GBA 18V...

Kapbik dnoTapbi Kyatbl
Y3nikci3xapbik 3xacbin60-100%
Y3dikci3 kajbik 2x kacbln 30-60%
Y3dikci3 kapbIK 1×kacbl5-30%
KbInbInbIKay1×Kacbl0-5%
AkkymyTop Typi ProCORE18V...

Xapbik dnoaptbkyatbl
Y3dikci3xapbik5xacbl80-100%
Y3dikci3 kapbik 4x kacbl 60-80%
Y3dikci3 kapbik 3x kacbln 40-60%
Y3dikci3xapbik2xacbln20-40%
Y3dik3xkapbIK 1× kacbl5-20%
KbInblbIKay 1×Xacbln0-5%
Byepnik 6atapenapdbI opHaTy/arnactbipy
Yakbt nen baca da peTteynepi pao Ka6bnaDaBwta caktay ywih 6byepnik 6atapeenapdb opnaty kepk. On yiwicintini-mapraheetik 6atapeenapycbHnabbl.
AkkymyIaTOpKaKnafbHbIH KyNbIaTay HntiperIH (28) aWbIn, aKKMyIaTOp KaKnafbH (27) aWbHb3.
KaKet6oIca,akkMyIaTOpbl(26)IbIfapblnAInHbI3.
BaTape 6oImiH KKaNaFbH (24) aWy yuH bCbPMAHb (23) 6acbl, KaNaKtbl anbl TactaHbI. XeKtiim JnblHTbIFbHaBf 6ypepiK 6Taapeapn BcAblbI3.
Batape 69iminih ihiheri cypte KepctireHnei nonIOCTapdbHybO pHaIacbyH KaMTamacbi3 etIH3. Batape 69iminH KaKaTaNbH (24) KaHTaHaOpHaTbHb3.
"REPLACE AA BATTERY WHEN UNIT NO LONGER KEEPS CORRECT TIME": Paio KaBbIaBbIa CaFtCaTaNMaI, INHdkaTOp aNcI3 KepeCtiIReHne, 6ypepiK 6atapenApbl aMactbIpbHbI3.
Bapnb6atapeennapdbiipde anmaactbipbHb3.Tek 6ip eHdpywiinjxane kyataibipde6atapeennapbnaaIahbHb3.
Y3aKaYakBn naHanaHa6acAb3,6yFeepnK 6aTapeenapbIpaNo Ka6bInDaFbIHTan bIfapbin anbHb3.PaNIO Ka6bInDaFbIw iWHe y3aKaYakBt KaTkaH 6yFeepnK 6aTapeenapbI TO6acBn,OanpDbH zapdBi e3irireH TaycbNybl MyMKH.
PaiandaHny
PaHnKa6bIaDaBtBcYdbH TIKENE THIOHeH Kopfahbl3.PaHnKa6bIaDaBtBcIiHe cy Kipce,TOK cFy Kayni apTadbl.
AKMyTOp 60iIM, TacbFbIb 60iIM MeH aHbMaJIb TOK KcBbIMdApbIH KKaNaKTapBH MymKInIrHHe Xa6bIK YcTaHbI. Ka6bIK KaKaNtAP paHO Ka6bINaDaftbI cy MeH WaHHaKopraHbl.
Aydnopekm
Kocy/ewipy
PaNo Ka6blnDaFbIbTb Kocy ywH Kocy/ewipy TyMeCIN (15) 6acblb3. Dncnne (16) icke KocblbIn, paNo Ka6blnDaFbIbTb CoHbI pet eWipreh Ke3e, peTtenre aytno Ke3i OHaHbTaNabbl.
PaHNO Ka6bIaRaBtB eWipy ywH Kocy/eWipy TyHmeciH (15)KaTaNah 6acBHy3. AyHNO Ke3IHnArBIMdaRb peTeyi KaTa CaTaNAbbl.
DbIb6bc dEHHin pettey
PaHNO Ka6bIaFbIITb KocKaHHaH KeiH, aPdaiBIM TeMeH dIb6bc DeHre iopHaTbIaNbl.
Db6bcIeHReHHKeTepyuHINClockTyMecin (14)
(GPB 18V-5 C) HEMeCe M3iP TyMeciH (22)
(GPB 18V-5 SC) carat tiinih 6aftbimeh, an dbibc deHreIH TEMeHDety yuih cafat tiniH 6aftbHa KaPCbl 6paHb3.
Ib6bcIeHreHHpeTeyi dncnneE O kHe 30 apabibfbHdafbMmHMeh naa daPapno KaBnaDaBHTb peTeydH HEmec aMaCTbpydAn 6ypbH db6bcIeHreHH TEmeH MaHre, an cbiptkbl ayDNo Ke3iH icKe Kocyaanb6pHbOpTaAaMaHreOpHaTbHbI3.
Db6bctb 0wipy yin Dblb6bctb 0wipy tyMecin (12) Kbckasa bacyra 6oana. DnCnneJe Dblb6bctb 0wipy HndNKatopby (f) naDa 6oana.
DibibctbKaIaTkoCy yWIn dbibcIbTe eWipy TyMecin KbckAwa bacbHb3 HemeCe Clock Tymecin (14)
(GPB 18V-5 C) Hemece M3iP TyMecin (22)
(GPB 18V-5 SC) cafat tiniHbafbItbImeH bpaHb3.
IbIbIcIbIpeTey
OHTaIbI bIbIbIc IbIbIfApy yIiH paIIO Ka6blIaFbIuKa 3KbIaN3ep KipIKtipINRE.
BnKtIe HTepeHdik DeHReiH KOlmEn 3eReTpRe HeMece aptpni My3bIka CTnlbepiHe apHaIraH DblbIcTbH anl bH ana peTeynePi naIaIaIaHyfa 6oIaIb. AIIbH ana
6aFapnmaHaJAAZ,ROCK,POPxHe CLASSIC petteynepin xhe 33 beiHwe faDapnmaIayra 6onatbH CUSTOM petteyih TaHdayfa 6oana. Dbl6bc peTteynepi ap ayno Kezi yuih 6eKe cKaTala.
CaKanHan dIb6bc anBnH ana peTeynePiH bipin TaHay yuH Equalizer Tymecin (20) Kanaynb peTey nCnneJderi db6bc anBnH ana peTeyiH INdKaTopbHa (i) KepcTeInreHwe KbCKaWb 6acbHb3.
CUSTOM petteyih 3repty:
-5KHe+5 apabfbhdfldnaana30hda petteyre 60aabi.
-EqualizerTMyMecin(20)0,5cekyHtahy3ak6abHb13. DncnneJeriDib6ic andbihana petteYiHIN(i) INdkaTopbHda CUSTOM naia 6oana.
-GPB 18V-5 C:6nIKTepeHdIK DeHReHH (d) INNkATOpbIHDA TRE KepcTeiNeDi,6nIKTe DeHReHH aFBIMdaFbMHI XbINbIbIKTaIbI. BnIKTe DeHReHH e3repy yuH Clock Tymecin (14) 6ypaHBz. PeTtenre H mHdi cakTay yuH iClock tymecin (14) 6acBHy3. BnIKTe/TepeHdIK DeHReHH (d) INNkATOpbIHDa eHdi BAS XeHe TepeHdIK DeHReHH aFBIMdaFbMHI KepcTeiNeDi. TepeHdIK DeHReHH 6nIKTe DeHReHH yuH cnataTaNFaHdAn e3reptin caKaTbI3.
-GPB 18V-5 SC: Ke n fynkunnbl (k) INHnkaTOpbHna
Kπ ΦyHKπaJIbI (k) HNДKaTOpbHda eHdi
Tepehik deHrein 6nIKTK deHrein yuH CnnaTaNFaHdai e3reptin caKaTaHb3.
TepeHdik petTeyiH caKaTaHaHH KeiH HemeCe Clock Tymecin (14)/Ma3ip Tymecin (22) coHfbI pet KOndaHaHH KeiH 10 cekyHdi iwiHne paHno Ka6blJaFbIcTaHApTTb IINCnIe INHnKuAChBaHa KaHTa aybicaBl.
Aynno Ke3in TaHay
AyHNO Ke3IH TaHday yuHIn 6actaNkBi Ke3 TyHMeCIN (18) DnCnIeNeKeKxti iuKi HeMeCe cbiptkbl ayHNO Ke3i KepcetinreHwe 6acbHb3:
- DAB: DAB + (GPB 18V-5 SC) apKbIbI caHdbIka paIIO,
- FM: YKT apkblb aHaNoTik paHIO,
AUX: tacbifb16eimihneri3,5 MM yAubk AUXIN (10) apKblbl cbiptkbl aydno Ke3i (MbicaIb, CD onHaTkbIbIbl),
-:bluetho0KocbIbIMbApkblbcbiptKbaynoKe3i (MbIcAblc,cmaptDoh).
Afbimdaftby ayinno Ke3iH ayinno Ke3iHIN HnDnKaTOpbl (h) Hemece Bluetooth® INDnKaTOpbl (g) apKblnbl aHbIKTayfa 60ana.
DAB+paTnO TaPAtKbIbH peTtey/caKtay (GPB 18V-5 SC)
DAB+paTnTapaKbIbIaayINOKeIH TaHay yuIN Source TYMeciH (18), ayINO Ke3IH INHdkaTopbIH(a) DAB KepcetinreHue,6acbHbI3.
Kbicka Mep3imdi 6anTahdbpydaH KeiH,coHfbipettenre H padno TaPakblbOHahtbnabl.
Tapatkbltih ataybkenfHKunnbln HdkatopdbH (k) Kofapfb konafbiHaKepeciinei.Ke nFHKunbln HdkatopdbH actbHbf KonafbiHaKepeciinH KocBIMaa knapaattbH Typih M3ip fkyhkuacnbda petteyre 6oana.
-TapaTbIbIaybIbIpyyinBactanKke3 TYMeciH(18),KaaynbI TapaTkblDnCnneJe
KpcetinreHHe,6paHb3.TaHdaydbI pactay yiwH 6actankbke3Tymecih(18)6acbH3.Paio KaBldaftw TaHdaIraH TapatkbiWka ayicabdi. 5ana petiHede tapatkbltbyayictbpyyiwH aptka i3dey tyMeCih (13) Hemece anfia 3dey TyMeCih (19) 6acyfa 6oanda.
Pertenreh tapaKbiWtbiKa caTay yin Kanayn bCaTay opHbHb6afapnaMaHb caTay Tmecih (17), CaTay opHbHbINHnIKaTopbHaBc (c) caTay opHbHbH Hemipi naDa 6oNfAHa, 6acBi3.
KaCaTaNFaTapAkbIbI OHaTy yHbH 6aFapnAmHbCakTaY TmmepeHH (17) bipH KbcKaJaa 6acbHb3.CakTaOpHbHbIH INNkATOpbHda (c) cKaTay opHbHbH Hempi naDa bonaBbl.
Hcykay:Kabilay Macelenepi tybHaFah KaFda, DAB+ tapaTbIbH 3dey apekeTIN KONMeH icke Kocyfa 6oNaIb. On yuHm33ipDe
Erep eubip DAB+ padno tapaTbIbIbI tabbnMaca, <No DAB
Station - Please Auto Scan> Kepcetkiwi KEN fynkuiybln HnHnKaTOpda (k) Kepcetinei.
YKT paHno TaPaTbIbIbH peTey/JkaKa cKaTay
YKT paIIO tapaIKbIbI ayIIO Ke3IH TaHday yIIN Source TYMeciH (18), ayIIO Ke3IH IN HNINKATOpbIHda (h) FM KepcetinreHwe, 6acbiHbI3.
GPB 18V-5C:petrey6apbcbHda paNIO xNnIK yaKbIT HnHKaTOpbIHDA(j),an cOaN KeIN PAADNO XNnIK HnHKaTOpbIHDA(a) naIa 6oNAbl.
GPB 18V-5 SC: afbIMdafb yaKaTTa OHaTbInn JxatKah TaPakTBH Knniri KeN yHKunna HNHNKaTOpdbH (k) KofapFbJ konafbHaDa KepcetineDi. KeN yHKunna HNHNKaTOpdbH AcbHfB J konafbHaDa KepcetinetIH KocmbuA knapaTbH Typih Maip fyHKunbcHda petteyre bona.
Tnicti cnHnbln Ka6bnlay Kyyi XeKtiNikti 60nFaHda, paHIO Ka6bIaBfU ABToMaTTb Tpyde Ctepeo CNHAnDb Ka6blny peKmHe aYbcIn, DncnneDe ctepeo CnHAnDb Ka6blny HnKnKaTopbl (e) naJa 60nAbbl.
-Benrini 6ip tapatkbiutb peTey yuih 6actanki Ke3 TyMecin (18), Kanayblx kinnik Hemece Kanaybl Tapatkbiu nncnneJe KepcetirreHue, 6paHBi3.
Korapbipak cnHn KyatbHa nKe neneci TapaTkbIuTb1 i3dey yin h apTk a3dey TVMecih (13) Hemece anf a3dey TyMEcih (19) KbiCkaa bacHBi3. TaBifan Keneci TapaTkbIu DNcPiNeJe Kepcetinei XHe OHaTbIaNbl.
KorapbpaK cnHn KyaTbHa He 6apnbk TaPATkbIaTbpIi3eY yuH apTKa i3eY TVMecin (13) HEmece anf a3eY TuMecin (19) 0,5 cekyHTan y3ak 6acbIbI3. TabIbnF anp TapatkbIu 5 ckyHOnHaTbIbIn, coHah coH i3eY npuceci kinnikTe pAna3oHbHbH, coHbHa deHH KaIraCabi. TapATkbIaTbi 3eY npocci TOkTaY uH apTKa i3eY TuMecin (13) HEmece anfa i3eY TVMecin (19) KbickaHa 6bacIbI3.
-PeTtenrH TaPAtKbIHTbJKa KaTay YwH Kanayn bCaTay OPhBHH6aFdapMaHaBcKaTay TYMecin (17), CaTay OPhBHH INHINKATopbHdaFb(c) CaTay OPhBHH Hempi naDa 6oNFaHsa, 6acbH3.
-En KyatbI TapaKbIbI ABTomaTbI Tpye i3ey Xane
XaKa caKTay yWIn apTKi a3ey TYmecin (13) XHe anFa
i3ey Tymecin (19) 6ip yaKbTTa bAcBbH3. PaNIO KaBbJaBbIc HrHaNbH KAbnayfA BOnaTbH 6apNbK
TapaTkblTapDbI i3eNi JxHe eH XaKCbCnHAn
CanacbHa He 4 TapaTkblTbI 1-4 6aFapNaMaHb CaKTay
OpbHa caKaTaNbI. ByP pete anbHda caKaTaNFaH
TapaTkblTAPyCTiHEn Xa3bNtBbHn ECKepiH3.
l3ey aAKtanca, 1-wi 6aFapNaMaHb cKaTay opbHda
CaKaTaHaftapKbIOWHaTbnAbI.
KaKaCaKanFaH TapaKbIbI bOHaTy yuH 6aJapnAmHbI CaTay TuImenepiHIN (17) 6ipH KbcKaWb 6acbHb3.CakTay OPhbHbIH INHdkAtOpbHda (c) cKaTay opHbHbIH Hempi naJa 6oNabl.
KadaynbiaantteHHaHbIytpanay
PaHIO Ka6bIaRaBbI OPhaTbIraH Ka4ayIbI aHTeHHaMeH (30) 6ipre XeTIzIeDi.IUKW apKbIbI paHIO XyMbIC peXHMiHe Ka4ayIbI aHTeHHaHbI eKaKcbI Ka6bIaNay BaFbIHbHa 6ypaHbI3.
KetkiniKi ciHn Ka6blnay MyMKiH 60maca,paHIO Ka6blnDaFbIbTbXaKcbipak Ka6blnay MyMKiHdiriHe He Jepre KOblbl3.
Hcy:paNIOKa6blnDaftbpaNIOXa6blkTapBbH, paNIO KpyblfBnApBbH HeMece 6aca3neKToPOnDbIK KpyblfBnApBbHOpTaCbHda naNdanaHaFAn Ke3e,paNIO cnHaNbHbH Ka6blnDahybHaKeepri XacanybMyMKIH.
AUX apkblb cbiptkbyayno Ke3epin xanray
Kyblntay nhtiperih (8) aubin, tacbfibw 6enimini KaKaIaFbH (7) aubhbi. AUX ka6eniH (9) 3,5 MM aWacbH AUX IN yAusbfHa (10) eHri3iH3. AUX ka6eniH Tnicti aydno Ke3iHe XaJFaHbI3.
AUX aydno Ke3iH onHaty wHIN bactankbKe3 TYMEcIH (18), ayno Ke3iHn HnDnKaTOpbHda (h) AUX naJa 6onFaHwa, 6acblb3.
Tactahydah Kopfay yuH TacbIbW 6eiminiH KaKnafbH (7) KaTaNan Xaybin, AUXKaBenHH aWacbH WbIFapraHa, OHbl KynlntaHb3.
Onieme caikec kence, AUX apkblb kanafahraaydno Ke3in caKAY 6eIMHe (6) de opHaNActbipyfa 6oNaBl.
ErepAUXpeKMMHde6aFapnAmhcbakTayYmmeepinH (17)6ipj6acblncapaNHOKaBbIaNafBbUcoHfbp eT naDanaHbIaNFaH padnoXyMbICpeKMMHde caKTaIHaH TaPAtKbIwKa aybicaDbI.
Cbiptkblayno Ke3epin Bluetooth® apkbilb oyHaTy/ 6ackapy
AyinnoKe3iH(Mblicblcmapfoh)Bluetooth@apkbl0nOHATyWIn6actanKbKe3TMyMecin(18),Bluetooth HINDKaTObpbi(g)DNCnnneDe KepCetInrReHHe,6acBnB3 HEmeceafBmdaFbayINOKe3iHeKapamactaHBluetooth Tymecin(21)KbickaHa6acBhl3.
ErepapnoKa6bIaFbIwAnJaekawHcbIPTkblaynOKe3iHe
Bluetho0 巴 k b l n l KocBlnFaHKane 6yn aynO Ke3i
KoJXeTIMdi6onca,6yn aynO Ke3imeH baNanHbIC ABTomATbl
Typde opHaTbIaNbl.BaIaNbHc opHaTbIaNFAHHaHKeIH,
Bluetho0 HNDKAtoPbI (g) y3djC3 KaHbIN TypaBl.
GP818V-5 SC:Bluetho0 apKbIbI KocBlnFaH KpybIaNbHbIH
ataybl KENyHKUJIbI INHKnATOpDbH (k) KOFaPbl
KoJaNbIHaKepcetineDi.ActbHfbl KOJAKTA KocBlnFaH
KpybIaNDaHapaTaIaNbTHmTIn KepctineDi.
Erep 2 MmHyI iHHe e uKaHaD a BaNaHbIC opHaTbIMaca, BaNaHbIC opHaty apeketi TOKTaBbIN,
Bluetooth® INHINKATOpbI (g) y3diKiC3 XblnbIbIbKaTaNbI.
GPB 18V-5 SC: Ken fynHKUInbI (k) INHINKATOpbIHDa
OpHaTbIraH 6aIIaHbIcB3 KENeci 17 MHyTTaH KeiH padno Ka6bIaRaIbI aBTOMaTbI Type De 9uIN Kanadbl.
Bluetooth® apKbInbJkaHa 6aHnAhbC opHaty:
JKaHa cblptkbyaynoKeImen6aIIaHbIc opHatyuHnBleoth@TmyMeCIN (21)0,5ceKyHtAHy3ak 6acbHbI3. ByapapekeTTi3eY npouecinH6apbcHda,6aIIaHbIC 6ap6oIFaHa HeMeCe 6acaaynoKeImenKymbic ictereHeDeOpbIHayFa 6oNaBl.
-PaHNOKa6blIaFbIwI3dey npouecin 6actaIbI.13dey npouecinIH 6apbcBHa Bluetooth® HndkaTOpbl (g) XblblblkTaIbI.
-CbIpykblaydynoKe3iapkbnlb6aHnHbictbickeKocbih3. Byapeketti cmaptoHapdaKe6hiace Bluetooth M3piHneri peTeyneprin iHInde opBnDayra 6oana. PaHIO Ka6bnAfbH KONKetimdi bactanki Ke3 petiHpe GPB 18V-5 C XXX Hemece GPB 18V-5 SC XXXX ataynapbHbIH actbHdKa KepcTeinei.ByI pTe ayno Ke3iH/HcMapToOHbIH naDalaHny BoBHHa HycKaynbFbIH KapaHbI3.
-Bluetooth®apKbIb6aIIaNbIC opHaTbIbFaHHAH KeiH,Bluetooth®nHIMKaTOPbI (g) y3dikci3 JaaHbIn TpaBl.
Bluetooth® apkblbl kocblfah aytno Ke3iH paia n Ka6blnfaBll apkblb da backapyfa 6onabl:
- KonakTb Taay Xane icke Kocv yin anra i3dey TyMecin (19) Hemece aptka i3dey TyMecin (13), KanaynbXonakKa konKetki3reHwe, Kabicka7a 6bacihia. TaanfaH KonakTb OHHaTbIby aBTOMATb Typde icke Kocblnd.
-Ohatydtokaty yuHdb6bctb eWipy TYMecih (12) 6acbH3. HcnnneDe db6bctb eWipy HnDKaTOpbl (f) naJa 6oana.
OHaTybI XaNFactbIpy yWIn Dbb6bIcTb Ewipy TYMeCIN (12) KaTadaH 6acBHy3, Dbl6bc DeHReHH 03reptiH3 Hemece anFa i3Dey TyMeCIN (19) Hemece apTKa i3Dey TYMeCIN (13) 6acBHy3.
-Bip konaktbih iinhe anfa hemece kepi aHAndbipy yin anfa i3eey tyMecin (19) Hemece apTka i3eey tyMecin (13), konaktafbkaxkettj xepre ketkeHue, 6acbin TypbHb3.
Erep Bluetooth® apKbInbI JxMbcipexKMImHe 6aFapnAmHbI cKaTay TymenepinH (17) 6pi bacInca, paNIO KaBbIaFbIw COHfpeT naJaHaHbIraFaH paNIO xMbIC peKmHde caKaTaNFaH TaPaTkblka aybicaIbI.
Yakbl HNdkaTopbIn petTey (GPB 18V-5 C)
YaKbI INHnKaTOpbIHbM3iPiHe Kipy YuHinClock TYIMeciH (14) Kbcikwla6acblb3.
12cafattbIK<12H>KHe 24cafattbIK<24H>yaKbIT niimdepihapacbiHa TaHayfa KHe cafattap MeH MNHyTAPdbpeTeyre60nabI.
Maipdi wapnay:
-Mazip petreyepin 3repty:Clock TYMecin (14) 6ypaHbI3.
-Mazip petteynepin caKay:Clock tyMecin bacbHbIa.
MHyptpeTeyepinKaJaCaKtaFahHAnKeiHHeMeCe Clock TYIeMecIN COHfbl pet KOnDaHaHHAn KeiH 10 cekydi iHne paHIO Ka6bIaFbI ayHIO pexmIne KaTaaybcIabI.
PaIIO Ka6bIaIaBIta caIaCaTaNMaC, 6ypepiK 6aTapeNapbl aImactbIbH3.
BacTanKbkyIeKaITapydyHKnIcbl(GPB18V-5C)
PaHNO Ka6bIJaFbIITaFb6apBbIK peTeyNepD3ayBITbIK KyIe KaIaTpA(yactanKBy KyIe KaIaTpA) yuihClock TyIMecIH (14) 0,5cekyHDTaY3ak6acbHb3. DnCnneJe
Clock tyMecin (14) 6byay apkblb 6actankbkyre KaTapy YESXHEaBIMdaFb peTeynepre KaTy
M3zip peTeynepiin e3repy (GPB 18V-5 SC)
M3iP cyHKnacbHa Kipy yuH Ma3iP TYmecin (22) 6acbHbI.
Məsipi wapnay:
-Maip apkblb aHaHdblpbln ety:Maip Tymecin (22) 6ypanb3.
-M3ip petteyih TaHday XaHe caKtay: M3ip TYMeciH (22) 6acbHb3.
-1uKIM3iPReaybCy:Ma3iP TyMecin(22)6acbHbIa.
Iwki M3ipEn Jxofapfbl M3ipre KaTpy: apTKa i3dey TYMecin (13) 6acbHbI3. Erep en Jxofapfbl M3ip DeHreIne JeTeceH3, padno Ka6bIndaFbIw ayNo Kymblc peKmIne KaTbIn opanaBbl.
Ma3ipfynKunCbIHnKe3 KeIeH DeHReIeH WbIy yWIn
XHe ayINO Kymbc pexMInHe KaTbIn opAly yWIn anFa
i3eY tyMecin (13) 1cekyHtAn Y3ak 6acbHbI. BanaMa
petHne padno Ka6blndaftu TYmehi COHfbI pet 6ackaHHn
KeHH 10 cekyHd iWIne abTomAtb Typde ayINO Kymbc
pexMIne KaTbIn opAnaDbI.
Erep m3ip peTeynepi paNIO ka6bIaIbIbIbIe iipipy KeiHne apbi kapa JkaKa caKtaMaJ KaIca, 6yfepnik 6atapeenapbl aImacTbIpbbl3.
Ma3ip onuunapbl (GPB 18V-5 SC)
Maip TaHdaybpaqnoKa6bIaFbIopHaIacKaaynO
KymbcpeXmIne iHapaTayenDi 6oanaB.
Maip iHne Maipin ataybi Ken yHKuaNbl
HHNKATOpB(H) xofapf bKoNaFbIHda, an TaHdayfa
6oanaBH petey -actihf bKoNaFbIHda Kepcetinei.
Yakbt M3pi:12 cafattbIK <12 Hour Mode> XHe 24 CaatTbIK <24 Hour Mode> yaKbTI niWIMdepiH apacbHa TaHdayFa XHe yakltBtKoImeH petteyre bona. Erep aynno KeiHne DAB yaKbTTbI TapaTaBH paNo Ka6bnDafta TaHdaFah BOnca, OcbI yaKbIT abTomaTTb Type Ka6blHaHbI.
BactankblkyireKaIapyMa3ipi:6apnbikM3ip peTeynepiH aenki Kyire KaIapyFa
(DAB aydno Ke3iHne)
TapaKbIHTbI ABTomATTbI Type i3eY Me3iPI: TapaKbIHTbI ABTomATTbI Type i3eY npocci icke Kocyfa 6onadbl.
(DAB aydno K03iHne)
KoImen pettey mazpi: Kaaynb Jnnikti KOnmen peTeyre 6onabli.
(DAB ayno Ke3iHne)
HnKaTpym3pi:KeDyHKnAbln HnKAtOpB(Hk)actbHfKJONaBnHaKepeCtinH MToHHa TaHayfa 6oana:
- paoNo TapaTkblTaH TapaTbIaNbIH aKnapaTbIK MAtIH
,
-TapatKbIbTbHJxiniliri,
- CnHnA1 KyAtb1
, - paHIO TapaTbblTaH TapaTbIaTbIH 6aFdapnAma Typi
.
(FM aydno Ke3iHne)
HnKaun TyPi Me3iPi: KENyHKnAaBb
HHNkATOpdbH (K) actbHfb JOnaBbHda KepcetinTIN MToTHI TaHaayfa 60nabbl:
- paoTapaKbIHTaPaTbIaTbH aKnapaTTbIK MaTH
-TapaTkbll aTaybI, - paHIO TapaTkbIHTaH TapaTbIaTbIH 6aFdapnAma Typi
.
Cbiptkbl Kypbnfbnapdb1 3neKtp KyatbIme Ka6dbkTay
USBxanfaraibu
USB kaiFaBbHbHk Kemerimeh 3JneKtp KyatbIme USB apkbblx k6abkTayfba 60anTbH KpybIbnapbl (Mbicbl, aptypni Mo6nblTe nefoHap) 3apdTayfa 60anbl. MakcmmaldbzapdTay torbl21A Kpauibl.
Kynbntay nhtiperih (8) aubin, tacbfib 6eimini KaKaNafBn (7) aubHb3. Cbtpkbl KypbnfBnHBn USB KaNfaBbHbH KapamdbI USB Ka6eni apKnbl paHIO Ka6bnFaBtBnUSB 3apTay yuBbFbHa (11) (USB) KaNfaHb3.
Akkymyntopmeh Kymbc ictereh Ke3e cbltpkbl Kypblfblbpaia Ka6bldaftbkwocbltn Tpyhda faha zaprTayfa6onably.
OIIeMI caikec Kece, cbipTKbI KypbnfHbI 3apnay 6apbcihda caKay 6oiminHe (6) caTayfa 6ona. Erep
cbpKb KybpNfB 3apTay npociciH 6apbcihda Kb3bn KETce, cbPTkb KpyblfHb KaTb Kbiyah KopFay yuH TaCbIbW bimHH KaNafbH (7) awhk yTaH3.
3apay npoueci aKaTanca Hemece USB Ka6eni 乌fapbInca,paio Ka6blnAfbWtI NaCTaHydaH KOpFay yHH KaKnAkbTb7 KaTadaH XaybIN KOBbHb3.
AHHbIMaNbTOKKocblbIMbl
AHHbIMaBTOK KOBblbIMbIH HKeMeHmEHOcBIMucbIb3NeKtpnIK KpbIbIbNapDb naDanahyra BonaDb. Po3eTkanap enre TaH HopMaNapFa cainkec 3eRepyi MymKin. CbPTkb KypblfblapdbaiHbImaBbIOKOCblbIMbApKbIb3NeKtp KyatbImeH Ka6dbkay aKKyMnyTop caBHfHa dEmec,paHNO Ka6bldaBfW Keinire KocblrHan Ke3e FaHa Kyyere acab.I.Erep aHNO Ka6bldArBtW Tok JeNiciHe KaanFaHran Bonca,pactay yuiH Xacbl Tyci 6akblay WAmbl (3)XaHaDbl.
BapnbK KocbIFaH 3JNEKTpNI KypblfIbIaPdbH MaKcMaIbI pyKcatEtINREH TyTBHaNbTbH TOK KocbIHbICbTeMeHderi keCTe6epinreMmHHeacnaybi Tnic (coHdai-ak KopnyctaFbJ KaKNbIHTapdbH (4) acTbHdaFb JKa36aHbI kapaH3):
OHIM HEMipi MAcK. TYbHbJaTaBik
KocbiHdbicbi(A)
3601DA400015
3601DA410015
3601DA417012
3601DA41WO15
3601DA41309
3601DA41409
AinbimabTOKKocblmbiMdpbHbHkaNkbIbH(4)awbIn, cbPTkblneKTPnIK KpbblfbHbHaaacbHpaH0 Ka6bndaftbHpo3etKaCbHa(5)ehri3iH3.
PaindanaHy 6oBbHua HycKaynap
AkkymyntopdbIOHTaIIbI naIdanaHy tpyanbl Hyckaynap
AkkymyIaTOpdbI cyIbIKtbIKTapDaH XeHe bINFaIaNah KOPFaHbI3.
AkkymyIaTOpBbTeK-20C...50CTemnepaTypaaykbMbHda caKaTaHb3.AkkymyIaTOpDbI Ka3Da KeNikTeKaIbIpMaHbI3.
AkkymyIaTOpdbH XeJeTeY TecirH KymCaK, Ta3aXHe Kypfak Kblwakneh MyKnT Ta3aJHaB13.
PaindaHMy Mep3imHiaTapbIaTaNbckApbyakmyTopbH eckipreHHxHe aybictbpy KepeKtiriH6iipedi.
KokbIcIapIbKaIa eHdey TypaIbHyckaynapblOpbiHaB3.
TexHnKaIbIK KytIM XHe Kbl3MeT
KbI3MeT KOpCeTy XeHe Ta3anay
KacbI api ceHimdi Kymblc icTey yuH npaNo Ka6bnDaBbItb Ta3a YCTaHb3.
156 Romana
Erep 6aHnabic cbmbin aImactbpy kaxet 6oNca,
KayinciakTIN TEmeHcyine kon 6epMey yuHIN OCBx Kymbc
TEK Bosch KOMnAHnrcbI Hemece Bosch 3neKTP KypanDapbl
6oBbHua 9kinETt Kbi3MeT KepeTy optalbIKTapbHna
kypriinyi Tnic.
NactaHynapdbcynaHaH,JyMcaKwSybepeKeNeH cyptiH3. KYfbl3aTtapdbHeMeceepitkiWtepridnaiDanaH6aHbI3.
TyTbHyBbIFa KbI3Met Kepcety XHe nainanHy kehectepi
Kb3Met KepcTeOp TaBbIe HmDi XHeHey XHe OFAH texHHaJIbIK Kb3Met KepcTe, coHaA-aKocanKbl 6eJWeKep TpyaBc cypaTapfXayan Bepei. Kypamdac 6eJWeKep BoBHnA Keckin MeKocanKbl 6eJWeKep TpyaBmMImETeP TeMeHderi MeKeHkai BoBHnA konKeTIMdi: www.bosch-pt.com
Bosch Kbi3MeTik KeHec 6epy To6bl 6i3iH eHIMdep XaHe OanapbH KepeK-KapaKTapbl TypaBl CypaKTapblHaXayan 6epeJI.
CypakapkoJXeHKeocalkb6nweKtepreTancbipbc6epy Ke3iHe mHdTeTI TpydeEHIMHHHmPmaIbK TaKaTaWacBHaFb10 TaHbEhIM HmOpijH6epiH3.
HniPywi TaanTapbMeH HopMaIapbHbH CaKtanybIme
3nEeKtp KypabIn HKeHey XHe KeiNi Kbi3Met KepcTe
6apbIK MemkeTep ayMaftbHaTek "Poepr Boi
pmaBik HeMece ABTOP3aunHaFah Kbi3Met KepcTe
opTaBkTapbHaOpbHdaNabi. ECKETy! 3aHcb3XoJImeH
ekiHReh EhIMdepNi NaDAnaHy KayiT, DeHCaybIFbHb3ra
3HH KeTIpyi MyMKH. EHMdepNi 3aHcb3Xacay XHe
Tapaty EkIMWIIIK XHe KblmbCTbIK TApTIN 6ObHwa
3aHMeN KydAHaHbI.
Ka3aKCTAH
TytbHyybInapFaKeHeC6epyKahe WafBIMapDbl Ka6blnay optanblfbl:
"Po6ept Bow" (Robert Bosch) XUJC
AMMaTbI K.
Ka3aKcTah Pecny6nKacb050012
MyparbaeBK.,180y
"RepMec" BO, 7 ka6aT
Ten.: +7 (727) 331 31 00
ΦaKc: +7 (727) 2330787
E-Mail: ptka@bosch.com
CepBntK kbl3MeT KepcTeY optaIbIKTapbl MeH Ka6blJay nyHKtePiH MeKeH-JaBl TypaBl TOnblk XHe e3Ekl aKnapaTb Ci3: www.bosch-professional.kz pecmna caTTah ana anacbi3
KbI3MeT KepCeTy opTaIbIKTapbIbHbI 6aKa Da MeKeHkaIIaPbIH MbHa JepDeH KapaHbI3:
www.bosch-pt.com/serviceaddresses
TacbImaIay
YcbHbIiHaF HNTNHOHBik AKKyMnyTOpnap Kayinti TayapnapFa KoBnATbIH Tanantapfa 6aBHaDbl.
NanahNyblaakymyTnTopnapblKeeweKocbIMu KaKaTApCbI3TacbMaJaAnaAbl.
YiHuiTuyfanaP (Mbicanb, aye KeNiri Hemece Xibiepy) opamafxHe MapkanaPFA KOnBnAaH apHaBt TaanTapdb caTayKepe. XibiepyRe daBHday KeaIHne Kayinti KyKtepi TaBImaDay MAmhBImeXabapnacyKepe.
AkkymyIaTOpDbKOpNcB3aKbIMdaIaNfHbONcaFaHa X6ePi3.AuBkTyicnepiXenImdeH3XHe AkkymyIaTOpDbOpamadaKo3FaMmaTbIHdaOpahB3.KaXeT 60ncA,KocMbMa7YTTbKepexeepdiCaKaTaHbI3.
Kedere kapaTy

Paio Ka6bIaBfIaTapbl,
aKMyIaTOpNapbl/6aTapeaIaPbl,KepeK
kapakTap MeH opaybiTApbl KopwafAn opta
yih KAYINC3 KOJMeH KaHa eHdey opbHa
kibepyKaKeT.

PaHIO Ka6bIaFbIiTapDbI XHe
AKKyMnyTOpnapDb/6atapeNapdbI
TypMbICTbIK KOKbIcKa TactMaHaB3!
Tek kana EO e ndepi yuin:
Eck3neKtpnik Xhe 3neKtpoHbIK KypblfBnap TypaBl
2012/19/EU eyponaBik DinepeKTHBaCbi XHe OHbIH YTTbIK
3aHaMaDa KaIaNbHbNybi 6ObblHa naIaNaHyFa 6yDah
6blaJXkapamCbIpaIIO Ka6blIaFbIITapDbI XHe
2006/66/EC eyponaBik DinepeKTHBaCbi 6ObblHa
3aKIMdaIraH HeMece eckipreAkkMyIaTOpNApbl/
6atapeJeIapbl6eKHHan, KopuHaH opta yiwH Kayinci
KoImeKaIta OHeye Xiepey KaKeT.
Kate Kojlmeh Kadee XapatbIin faecki 3neKtpnik Kahe 3neKtpoHdbk KpybInfbnap Kayinti 3aTAPdbH 6ony MymkiHirHe 6aHaNbICTb Kopwafah Optara XaHe aam DeHCayblfBHa 3HnDbE cep TIRi3yIMyMKH.
AkkymyTTopnap/6atapennap:
JIITHNHOHBK:
TacbMaIay 6bnimHderi, 6etHderi HcaynapdbOpbHaBb3 (kapaHb3,TacbMaIay",Bet 156) cehcopbIK nepHEMeH pactaHb3.
Româna
Instruţiuni de siguranta

| Indicator Capacitate | |
| 80-100% | |
| 60-80% | |
| 40-60% | |
| 20-40% | |
| 5-20% | |
| 0-5% | |
Service sculelectric
Strada Horia Macelariu Nr. 30-34, sector 1
013937 Bucuresti
www.bosch-pt.com/serviceaddresses
Transport
Accumulatorii litiu-ion recomandi respecta cerintele legislatiei privind transportul marfurilor periculoase. Accumulatori pot fi transporte rutier fara restricti de catre utilizator.
Ipooyete BHHMaTeHNO BCHKN yKa3aHHN HnHCTpyKuNN 3a 6e3oNaCHOCT. Iponyckn npn CnaBaHeTo Ha nHCTpyKuNte 3a 6e3oNaCHOCT nYka3aHHNtTa 3a paBota Morat Na IMat 3a nocLeJeCTBnE TOKOB ydap, NOkAP NIN TEKKN
TpaBMn.
CbxpnaHbBaIte Te3n yka3aHaHa cnHypNo macto.
PpOBepBaIe npEn BcKa yNoTepe6a padnoTo, Ka6eHa n uencena. He non3BaIte padnoto, aKo yctahOBnTe nobpeH.He OTbapRte padnoto H uencena camn H Bb3naIaIte peMOHTCa mo Ha KBaIIuHnpuH ekCnepTeH nepcoHAnm Cmo cOpunHannn pe3epBnH qactn. NobpeHn paNota, Ka6en n uencennyBvennuBaT pncAOTOKOByap.
UeencenbT Tp86Ba Da e nBxHAT B nechooocbneH KOHTAKT TIN Wyko.
UeencbT Tp6Ba da nacBa ha KOHTa. B HnkaKbB cnyuah He ce donycka n3MeHHe Ha KOHCTpyKuHra Ha uencena. He n3non3BaIte aanTeep 3aeHc pA Dnoto. PON3BaHETo Ha opnHHn HJenCeHn KOHTaHa ManlaRa pNcKa OT KOB yap.
Pa3motaBate Ka6ena DOKpaia, ako paHnOto ue ce H3- non3Ba Cbc CBp3BaHe KbM MpeXaTa. B npOTnBeH cnUyai Ka6eBt MoKe Da ce 3arpee.
He n3non3BaIte 3axpaHbuaaKa6en 3a cenn, 3a KOnTo To He e npEbnHnHnnp. 3a Da Hochte paHnoTo 3a Ka6ena nn da H3BaIte qencena ot KOHTAKTa. PpeNa3BaIte Ka6ena ot HarpBahe, OmacnaBaHe, DOnnpdo octpn Pb6OBe nn Do noDBHXn 3Bena Ha Maunnn. Noppehen nn ycykaHn Ka6eni yBEnuabat pnck aOTOKOByap.

IpeNa3BaIte paHnOTo OT bXKn HOBnAHHaBHe.IpoHNKaHcTo Ha BOJa BpaHnOTo yBeJIuHaBa PnCKa OT TKoB yAp.
He OTBapnTe aKymyNaTopnHaTa 6aTepe. CbueCTByBa ONaCHOCT OT Bb3HNKBaHe Ha KbCO CbeDInHeHne.
Pn noBpeJdahe HnHepaBnHa eKcnnoataunr O T akymnaTOpHaTa 6aTeprn MoT Da ce OTdJeTn nap. AkymnaTOpHaTa 6aTeprn MoKe Da ce 3anAn nn da eknnOnpa. NOrpnKeTe ce 3a Do6po npOBeTpRaHe n npn OIINaKBaHHce 06bPhETe KbM Iekap. Napte Morat Da pa3Da3Hrt DnxAteHNHTe nbTHuA.
Pn HnpaBnH0 H3No13BaHe Hn NOBpeHa aKyMyNaTOpHa 6aTeprna OT Hea MoKe Da H3Teue eNeKtpoNT.
H36raBte KOHTa c Hero. Ako BbnpkToBa Ha KoxaTa Bn nonaHne eneKtpoHt, H3nilaKHeTe MCTOto 0bHcB Oda. Ako eneKtpoHt nonaHne B ouHte Bn, He3a6abHo ce o6bpHete 3a NOMou KbM OueH nekap. EeKtpoNTbT MOKeJa npedn3BnKa n3rapHnHa KoxaTa.
Akymnatohpata 6atepna MoKe da 6bde nobpeedeHa OT octpn npedmetn, Hapn. nHPOHN HNOTBepTK, HNn OT cHNN ydpn. MoKe da 6bde npedn3BnKaHO BbTpewHo KbcO cbEHHHeHne n akymnatohpata 6atepna MoKe da ce 3anaHn, da 3anyu, da ekcnnoopa nn da ce nperee.
Pepna3BaHte HeH3nON3BaHHTe akymyNaTOPHN 6aTePNHOT KOHTAKT CROJEMN HIN MAnK MAnKN MetaH N PpeMeTH, HApN. KJIamepH, MOHETN, KIOUOBE, INPOHN, BINTOBe HdP.I., TbN KATO TE MORAT Da npeH3BHKAT KbCO CbeEHHHe. IocneCTBnTA OT KbCOTc CbeHHHeHMeMorat Da 6bDat 3rapAHN HIN NoXap.
N3non3BaIte akymyIaTOPHATA 6atepHnCaMo B npOdyKTH Ha npOn3BODHTe. CaMo TaKa TRe npeDna3eHa OT OnacHO 3a He IpeTOBapBaHe.
3apekdaTe akymnatopnHte 6atepn cmo cb3aPnHTe yctpoNCTBa, KOtO ce npenOpbBAT OT npOn3BOHDTe. Korato n3non3Bate 3apdHn yctpoCTBa 3a3apexdaHe Ha HenoDxaN akymnatopn 6atepn, cbIeCTByBa ONACHOT OT Bb3HNKBAHe Ha nokap.

IpeNa3BaIte akymyIaTOPHaTa 6aTePnHa OT BcOKH TempePaTyH, HApN. BCNeIcTBHe Ha npOdbNxITeHNO 3HaIarAne Ha NIpKeTHa CbHueBa CBETnHa, OByh, MpbCOTn, BOJa OBnAaXHBAHe. Ima OnaCHOCT OT EKcnIO3n H KbCO CbeHHeHne.
HaMeHOBAHHeo Bluetooth KaKTo H rpaHnHTe eHemTe (nora) ca pernctppahn TbproBckm MapKn Ha hPma Bluetooth SIG, Inc. IOn3BaHTo Ha ToBA HaMeHOBAHne HA rpaHnHTe eHemTe OT hnpMa Robert Bosch Power Tools GmbH cTaba no nueH3.
Onncahne Ha npodykta n DeHocTtA
Moi, hmaTe npeBnI n3o6paXeHnTa B npeHaT aacT Ha pkoBOcTB0To 3a paOta.
H3o6pa3eHH enemeHTn
HomepnpaHToHaN3oPaeHHeTe KOMnOHeHTn Ce OTHacrdo N3oPaxKeHHeTo Ha paHnOTo Ha rpaHnHata CTpaHnUa.
(1) Bucokorobopnten
(2)PbkoxBaTk3a nphehaRe
(3)KoHTpOHaHaamHnUka npTnpOMeHNbTOK
(4) KanayepoRrnpomEnnBTOK
(5) KOHTaKT NOpT INPOMeHINB TOK (Power Outlets)
(6) OTeJeHHe 3a cBxaHHe
(7) Kanak Ha OTeHHeTeTo 3a HocHTeHn Ha HhΦopMaLna (Digital Media Bay)
(8)3actonopbaauoCTHaKanakaHaOTdeneHneto 3a HOCHTENHaHDPOMAua
(9) Ka6en AUX
(10) AUX-IN 6yKca
(11) USB 6yKca 3a 3apeJdahe
(12) ByToH Mute
(13) ByToH TbpcHe Ha3aD
(14) Konue Clock (GPB 18V-5 C)
(15) NpckOB npekcbay
(16)Диспел.
(17) ByToHn 3a 3aIaMaTeTBAHe Ha CTaHm
(18) Konque Source
(19) ByToH TbpcHe Happe
(20) Byton Equalizer
(21) ByToH Bluetooth
(22) Konque Menu (GPB 18V-5 SC)
(23) 3actonoprahe Ha KaanaHa rHe3doTo 3a 6aTeepn
(24) Kanak ha rhe3doTo 3a 6aTepeHH (6yfepeHH 6aTepeHH)
(25) Bytoh 3a OTKIOUBaHe Ha akyMynaTopHaTa 6aTepeH
(26) Akymylatopna 6aTepe
(27) Kanak Ha akymyataopHata 6aTePra (Battery Bay)
(28) 3aKIOUBaIIOCT KAnA KHa aKyMnaTOpHata 6aTe- pI
(29) THe3do 3a akymlyaTopha 6aTepeHn
(30) AHTeHa
I306pa3eHnTe Ha fHyprHn IOnHCaHnTe DoNbHNHTENn HpncocO6BHeHa Ce BaKIOuHEn B CTaNAPThata OKOMnNEKTOBkHa YpeHa. N3epnATEhen CnCBk Ha DoNbHNHTENH Te pncocO6BeMeKeTa Da HamePte CbTbETHO KaTANrHa H3doNbHNHTENn PncnoC6BHeHH
Hdkatopnnelement
(a) INHdkatop paiochoctota (GPB 18V-5 C)
(b) INdkaTOp 3a akymnatopnata batepna
(c) ViHdkaTOP macto namet
(d) INHINKATOP HNBO HA BNCOKH/HNCKN TOHOBE (GPB 18V-5C)
(e) INHnKaTop 3a CTepeo-nPneMaHe
(f) INHdkatop 3a INKJIIOueh 3BYK
(g) INHdikaTop Bluetooth®
(h) INHINKaTOp ayDnO nHToUHHK
(i) INHdkaTOp npedBapHTeHa HacToPoiKa Ha 3ByKa
(j) Yacobnik
(k) MyntnФункионанnoI NOne (GPB 18V-5 SC)
TexHHueckn daHHN
| Радio засточten haben GPB 18V-5 C GPB 18V-5 SC | |||
| Каталожен Home | 3601 DA4 0.. | 3601 DA4 1.. | |
| Примеанe DAB+ - ● | |||
| Номинално наразожения | |||
| - по Величаве в мрека V 230/110 230/110 | |||
| - по работа на akумелаторни батери V 18 18 | |||
| Номинална мошист усанвATEл W 4 × 5 4 × 5 | |||
| Диапазон на пrimеанe укВ МHz 87,5-108 87,5-108 | |||
| Диапазон на пrimеанe DAB+ MHz - 174,928-239,200 | |||
| Съвмостhmocт本报讯 | Bluetooth® 5.0 | Bluetooth® 5.0 | |
| РавOTEN честоен диапазон本报讯 | MHz | 2402-2480 | 2402-2480 |
| ПредавATEлma мошист本报讯 | |||
| Бухерни бtersи | 2×1,5 VLR6 (AA) | 2×1,5 VLR6 (AA) | |
| Маса съгласно EPTA-Procedure 01:2014 | kg | 9,2-10,2A) | 9,2-10,2A) |
| Клас на зашипа | ±/I | ±/I | |
| Преторьчтелna темпегатура на okолнatable среда при зараздамe | °C | 0...+35 | 0...+35 |
| Диопсима темпегатура на okолнatable среда по в徕佩е наразotinga | °C | 0...+35 | 0...+35 |
| Диопсима темпегатура на okолнatable среда по в徕佩е на sbхданe | °C | -20...+50 | -20...+50 |
| Преторьчтелны akumлалotурни сaitери | GBA 18V... | GBA 18V... | |
| ProCORE18V... | ProCORE18V... | ||
| Преторьчтелны заюн усточва | GAL 18... | GAL 18... | |
| GAX 18... | GAX 18... | ||
| GAL 36... | GAL 36... | ||
A) B 3aBNCMOCOTnH3non3BaHaTakaymyNaTopHaBaTePn
3axpaHbaHe ha paIIOTo
3axpaHbAHeTo Ha paAnHO To MOKe Ja ce H3BbPbWA O T MPeKaTa HnOT NITHeBO-NOHHa aKymyNaTOpHa 6aTePnA (26).
Ako akymylaTophata 6aTepeHcIyK3a 3axpaHbHe c ehepTnHa pa3noJKeHHe ca cAmO cyHKunTe 3a ayDnO peKmN 3axpaHbHe c ehePnHa BbHsHn ypei npe3 HnterpnpaHn USB npot.
Pa60Ta B MpeKa
Cb6pa3aBaiTe ce c HanpexeHHeTo Ha 3axpaHBAaata MPexa! HanpexeHHeTo Ha 3axpaHBAaTa Mpeka Tpa6Ba Da CbOTBeTCTBa Ha daHHte, HncaHn Ha tabenkata Ha padnoTo. IekepnHa aanTepn, o6o3haeHc 230V, mo- rat Da 6bDat 3axpaHbHn c HanpexeHne 220 V.
Pa6oTa c akymynaTopha 6aTePna
H3non3BaIe cAmo nocOueHIne Bpa3Jaena TexnuecKn daHHn 3apAHH yCTpoiCTBa.CaTe3n 3apAHH yCTpoiCTBa ca npametprn, noxOAnu 3a H3non3BaHaTaBbB BaWTo paNIO nHTHeBO-HoHna6aTePN.
Yka3aHHe: N3noI3BaHeto Ha akymyataopn6batepn, KOHTo He ca npedHa3haueHn 3a BaWTo paAIO, MoKeJa npedI3BnKa HnPaBnHTo My fHKUOnHpaHe nn Da ro NOBpeH. IITHeBO-HOHATA akymyataOpHa 6aTePnEe 3aunTeHa cpeSy Dbl6Oko pa3peKdahe ue3 enektpoHHata cnCTema
"Electronic Cell Protection (ECP)".Pnpu paepeha 6aepnna paanoto ce nKIOUBA OT npedna3eH Ppekbcau.
Ako paHnOTo 6bJe H3KIOUeHO OT npEpa3HHN ppeKbCBaH, He FO BKIOuBaHTe OTHOBo. AkymyNaTOpHaTa 6aTePnMoKe Da 6bJe NOBpeHa.
CmHa Ha akymyntopha 6aepn
OTbOpTe 3aKJIouyBaunnaNoCT (28) Ha KanaKaHa akyMynaTOpHata 6aTePnN BnHrHeTe Harope Kanaka (27).
3a N3BaXdHa He akyMynatopHata 6aTeepnHaTncHe 0CBO6xdaBaaNha 6yToH ha 6aTeepnTa (25) n H3dbpnaIte akyMynatopHata 6aTeepnO rHe3doTo. PnTOBa H npnaraTe cnna.
3a n3non3BaHe Ha akymylaTOPHata 6aTepeRn H36yTaIe B rHe3dTo (29), TaKa Ye CbBp3BaHNrTa Ha akymylaTOPHaT a6aTepeRn Da IerHt Bbpxy CbBp3BaHNrTa Ha rHe3dTo Ha akymylaTOPHata 6aTepeRn AkymylaTOPHata 6aTepeRn Tpr6Ba da ce 3axBaHe c npEupakBaHe.
3aTbOpTe KaNaKa Ha akymyIaTOPHaTa 6aTePn8 (27) n ro 3aKJIIOUeTe.
HndkaTop 3a akymnatopnata 6atepna
PnnoocTaBeHaakymyIaTopHa6atepnaMoKeTe da pa3no3Haete CbctoHHeTo Ha 3apeXdahe Ha 6atepnaTata (26)HaDncnner, a npn cBaneHa akymyIaTopHa 6atepna Bbpxy caMata 6atepna.
Hukatop3aakymnatohpata6aepnHa dnncnn
HnKataOpb3aakymnatopHata6aTepeRb)ce noKa3BaHa nCnner,Korato ce noCTaBn akymnatopHa 6aTepeRc DocTaTbUHO HAnpeXeHHe npAHOTo He e Cbbp3aHO cEneKtpuYeckata MPeka.
| Индikator Kanazitet | |
| 80-100% | |
| 60-80% | |
| 40-60% | |
| 20-40% | |
| 5-20% | |
| 0-5% | |
HnkaTop 3a akymynaTophata 6aTepy Bbpxy 6aTePnTa
AkoakymyataopHata6baterneBaNDOTpaHnOTo,cBCTOHHeTOHa3apeKdaHEMOKe DaCEPOKa3BaUpe33eENHTeCBETOINOHNHHINKaTOpa3aCbCToHHnEToHa3apeKdaHEBpxyakymyataopHata6batern.
3a da Bnnte CTeneHTa Ha 3apeHcOCT Ha 6aTepeTtA, HATNC-He 6yToHa 3a INNkauu
Ako CneI, HATNCKaHHe Ha 6yToHa 3a HINKauqH He CBET NHTO eINH CBeTOnIO, AkymyIaNtOpHata 6atePnE NOBpeDeHa I Tp8Ba Da 6bDe 3ameHeHa.
AkymynaTopha 6aTepeHMa moen GBA 18V...

CbeToNDnKanaTET
HenpekebchaTo CBeteHe 3×3eEneHo 60-100%
Henpekbschato CBteHe 2×3eNo 30-60%
Henpekbcnato cBeTeHe 1x3eNo 5-30%
Muraa CBeTnHa 1×3eIeHo 0-5%
AkymylaTopha 6atepema ProCORE18V...

CberodnKanaunet
HenpekbchaTo cBeTeHe 5×3eNeHo 80-100%
Henpekebchato CbeTeHe 4× 3 eNo 60-80%
HenpekebchaTo CBeTeHe 3× 3 eNo 40-60%
CbeodnoKanaet
HenpeKbchato CBteHe 2×3eNo 20-40%
HenpekbchaTo cBeTeHe 1× 3 eno5-20%
Muraa CBeTnHa 1×3eNeHo 0-5%
NoctabnHe/cmHaHa 6yfepeHte 6atepn
3a 3anaMeTbAHeTo Ha yaca H 3a DonbHnTeHnTe HacTPOK BpaNtO TpR6Ba Da 6bDat NoCTaBeHN 6ypePN 6atePnn. IpenopbYBa Ce nIbnBaHTo 3a cenTa H a anKaHOMaHraHOB 6atePnn.
OTbOpTe 3aKIIouBaUHnOCT (28) Ha KAnaKa Ha AkymyNaTOpHata BatepIuBnHete Harope Kanaka (27).
CbaIe npn hyjda akymynatopnata 6aTepe (26).
3a OTbapnHe Ha Kanaka Ha OTdeneHHeTo 3a batepn (24) HA Tmchete 3actonopBaHeTo (23) n CbaTe KaNaka. NocTabeTe DoctabeHHe 6yepn 6batepn.
BnHmAbaIte 3a npaBnHnHaTa NM nOlaRHoCT, n3o6pa3eHa Ha fIpyata OT BbTpeuHaTa CtpaHa Ha rHe3doTo 3a 6aTeepn.
IocTaBete 6bpaTHo KanaKa Ha otTeHeHneTo 3a 6aTeepn (24).
"REPLACE AA BATTERY WHEN UNIT NO LONGER KEEPS CORRECT TIME": CmeHete 6byepnite 6atepn KOrato yacbT Ha paIIMO To Beue He Ce 3aIINcBA.
3aMeHnTe BnHaBn BCnUKN 6bepnn eNHOpeMeHHo. N3non3BaTte BnHaBn 6bepnn OT eINH n CbU, pON3BOJNTen H c eHakbKanauNTet.
Korato Hama da non3BaTe paHnOTo npoBnKHTenHO BpeMe, n3BaXdaIte 6yepHnTe 6aTePNOTHERo. PnpoBnKHTeNo CbXpaHnBaHe B paHnOTo 6aTePNHTe Mo- rata KaP0DnPaTna Ce ca CamOpa3peJrT.
Pa6ota
PaHnOTo pRk KOnTaK C BODa. PPOHnKBaHeTO Ha BODa B paHnOTo yBEnHaBa pNcKa OTOKOB ydap.
DpbkTe NO Bb3MOXHOCT 3aTBopeHn KaNaHTe Ha aKyMynaTOpHTo OTdeneHne,OTdeneHHeTO 3a HocHTenHa HhOpMaunn N noptobete 3a npomeHnB TO.3aTBopeHnTe KanaunnpednA3BaT paHnOTo OT BODa Hpax.
Aydno pexhm
BKJIIOUBAHe H3KJIIOUBAHe
3a BknoBaHe Ha paNTo HATNCHEte NcKOBnnpekbCbau (15).IcnneT (16) ceakTHBpu n3anOyBaBb3POn3BexKaHETO NOCEHNO N03BaHHn PpeHn 3KJIIOUBAHTo Ha paNTo aYdNo H3TOUYHK.
3a n3KIOUbaHe Ha paIHOTo HAtncHeTe OTHOB NOCKOBn IpeKbCBauch (15).Tekyio n3nonBaHnA ayINO n3TOuHNK ce 3anaMetra.
HacpoiKaHaCnIaTaHa3ByKa
CneBkIIOUbaHe Ha paIIOTo BnHaH e HAcTpoEHa HnCKa CnHa Ha 3Byka.
3a yBennuBaHe Ha cnnaTa Ha 3Byka 3aBbPteTe KonTuTo Clock (14) (GPB 18V-5 C) pecn. KonTuTo Menu (22)
(GPB 18V-5 SC) NO nocoka Ha yacobhka, a 3a HaMaJIraBaHe Ha cHnata Ha 3ByKa -O6patoHO Ha yacobhka.
HactpoKaTa Ha cnNata Ha 3Byka Ce nokaBa cbc CTOnHOCT Meky O H30 Ha ndcpe. 3aAte CnNata Ha 3Byka npEn HacTPOBaHe mCmHa Ha paHIOCTaHcna HA HcCKa CTOnHOCT, pepn CTAP Ha BBHwe ayDNO hTOUHK Ha cpeHa CTOnHOCT.
3a n3KIOUOBAHe Ha 3Byka MoXeTe Da HATNCHETe 3a KpATKO
6byToHa Mute (12).HaIncnner ce Noka3Ba CmBbOna
3aRnyuBaHaE (f).
3a Da BkIIOUHTe OTHOBO 3Byka, HATNCHETE OTHOBO 3a KpaTko 6yToHa Mute Hn 3aBbPTe TcKuHcTO Clock (14)
(GPB 18V-5 C) pecn. konqueTo Menu (22) (GPB 18V-5 SC) NO Nocoka Ha YacobHHka.
PerynipaneHa3Byka
3a onTmMaJIHO HAcTpoBaHe Ha 3ByKa paIHOanapaTbT pa3- nonara c EKBnAe3bp.
MoKeTe pBHyO Da IpOMeHHTe HbTOHa BnCOKHe HnCKHe ToHOBe Hn Da n3NON3BaTe npEdBapHTeHHe HAcTPOKn 3a 3ByKa 3a pa3NUnH My3KnAHN CTINObE. Ha pa3NoJoxHe Hne 3a 36Op ca npEdBapHTeHNO npOrpAmnpAHte HAcTPOKn JAZZ,ROCK,POP N CLASSIC,KaKTo N CaMOCToRtEH NoPpamnpyemata HAcTPOkA CUSTOM.HAcTPOkHTe Ha 3ByKa ce 3anaMetraOTdEnHO 3a BCEKN ayDINO H3-TOUHK.
3a da n36epeTe 3anaMeTeHnte npedBapntenHn HactpoKn Ha 3Byka,HaTnckaIte 6yToHa Equalizer (20) 3a Kpatko DokaTo JenaHata HAcTpOka He ce NOKaKe B INnKaTopa 3a npebapntenHa HAcTpOka Ha 3Byka (i) Ha dncnJe.
Помяна На Habtrightькata CUSTOM:
-MoKTeJaHAcTPOBnBaTe HnBOTOHa BnCOKnTe Ha HnCKnTe TOHOBe B DnAna3OHOT-5D0+5.
-Hatnche6byToHaEqualizer(20)3a noboe ot 0,5s.B HnDnKaTopa 3a npEbnapTeHnHa HAcTpoKa Ha 3Byka (i)Ha DnCnpe Ce nok3Ba CUSTOM.
-GPB 18V-5 C: B INHINKATOPa 3a HNBO HA BNCOKITE/ HNCKITE (d) ce NOKa3Ba TRE, AKTYaHATA cTOnHOCT Ha HNBOTo Ha BNCOKITE Mnra. 3aBbPteTe KONHTO Clock (14), 3a Da IpOMEHHTe HNBOTo HA BNCOKITE TOHOBE. HaTHcHete KONHTO Clock (14), 3a da 3anamETHe Hactpoehata cTOnHOCT.
B HnHkKatopa 3a HNBOTo HA BnCOKnTe/HNCKnTe (d) cera ce NOKa3Ba BAS n AKTyaNHaTc CTOnHOCT Ha HNBOTo Ha HNCKnTe. Ipomehete n 3anametete HNBOTo Ha HNCKnTe TOHOBe, KaKTo e ONCAHO pH BnCOKnTe.
-GPB 18V-5 SC:B myntyHKUHOHAHnIHCnnei (k) ce NOKa3BAT
-Cne3anaMetBaHTo Ha HactpoKaTa Ha HnCKnTe ToHOBe, pecn. 10 s cneI nocneHOTo HtncKaHe Ha KonueTo
Clock (14)/Menu (22) paIHOTo ce BpBua KbM cTaHapT HnA DnCnJe.
H36opHaaydno H3TOUHHK
3a n360p Ha aydno n3tOuHKn HATNcKaIte KOnyTe Source (18)DToRaBa,doKaTo Ha dncnner He ce nokKe Je- NaHHBbTpeWeH,peCn.BbHWeH aydno n3tOuHKn: DAB:DnHTanHO paNo npesDAB+ (GPB 18V-5 SC),
-FM: ahanloroBo paanio npes YKB,
-AUX: BbHHeh ayDnHO hToUHnK (HaNP. CD nneBp) npe3 3,5 mm 6yKca AUX IN (10) B OTdeneHHeTo 3a HocHTeHN Ha HHΦOpMaun,
-:bHueh ayuHn H3OuHHK (HaNP. CmApTfOH) npes Bpb3Ka c Bluetooth®.
AkyaHnHr aydno H3TOUHK MOKe Da ce pa3JIuH B INHnKaTopa 3a aydno H3TOUHK (h) pecn. INHnKaTopa Bluetooth® (g).
HactpoBaHe/3anaMeTBAHe Ha DAB+ paAnocTaHn (GPB 18V-5 SC)
HaTnCKaIte 3a n36op Ha ayDIO n3TOUHk DAB+-paIooCTan-
ZI KONHTO Source (18) dOTOrBa, DOKATO B HnDKaTOPa 3a
ayDIO n3TOUHk (h) He ce nOKaKe DAB.
CneKpataHnunna3aueCeBb3npo3Bexda nocneidno HactpoeHaTa paioctaHua.
HMeTo Ha CTaHcHrTa Ce NOKa3Ba CbOTBeTHo B TOpHnHa peHa MyTnHcYHKcHOnAHn HnHKaTop (k).KaKbA DoNbHInTeHa HHopMaUg Ie Ce NOKa3Ba B DoHnHa peHa MyNTnHcYHKcHOnAHn HnHKaTop, MoKe Da ce Ha cTpon BBb FyHKuHrTa HA MeHHTO.
-3aCMHaHaCTaHnra3aBbPteTeKoNcetoSource(18) DOKATOJKeHaHaTcAHTnHeCEpOKaKeHaDnCnne.HaTHCHETeKoNcetoSource(18),3aJaNotBbPdnteH3bOpa.PaHnOTo CmehHaH3bPaHaTcAHTn.
AInTePHaTINBHO 3a CMHnHa HcTaHnIra MoKTe Da HaTNCHeTe 6yToHa 3a TbpcHe Ha3aD (13) nn 6yToHa 3a TbpcHe HanpeD (19).
-3a 3anaMeTBAHe Ha eHa HAcTpoEHa CTAHnHaTHKaIte 6yToHa 3a 3anaMeTBAHe Ha npOrpama (17) Ha JKeIaHOTo MCTO B NAMETTa IOKATO HOMepbT Ha MCTOTO B NAMETTa He Ce NOKaKBe B INIKKatopa 3a MCTO B NAMETTa (c).
-3a Bb3npo3BexdAe Ha 3anaMeteha CTAHnH HETe 3a KpaTko eINH O8yToHHte 3a 3anaMeTBAHe Ha nporpama (17).HomepbHT Ha MCTOTo B NaMeTTa Ce NoKa3Ba B HnDkATopa 3a MCTO B NaMeTTa (c).
Yka3aHHe: Pnp np6bEmn C pnpemHaTe MoKeTe da cTaptnpate pbuHO TbpcHeTo Ha cTahUra DAB+. 3a ceItaH36peTe
Ako He MoKeJa ce OTKPne DAB+ cTaHcNJa, ce Noka3Ba
HactpoKa/3aametraBeHaYKBpaHocTaHn
3a H360p Ha aydno H3TOUHMK YKB paDnOCTAHnHaHTNCKaTKe KOnyTo Source (18) DOTOraba, DOKaTO B INDnKaTopa 3a ayDINO H3TOUHMK (h) He ce NOKaKe FM.
GPB 18V-5 C:По Врeme Ha HactpoKATA B INHINKATOPA 3aВрeme ce nOKa3Ba paIIO YecTOTATA (j), cIeI KOeTO B INHINKATOPA 3a paIIO YecTOTA (a).
GPB 18V-5 SC: YecToTaHa aKtyaHb Bb3npOn3BeJdaHaTcAHTnCe NOKa3Ba B TropnHa peHa MyTHOpHKnOHaHnIHnINHdkaTOp (k).KaKbA DoNbHInTeHa HOpMaIu Ice Ce NOKa3Ba B DoHnHa peHa MyTHOpHKUHOHaHnIHnKaTOp, MOKe Da ce HaCTpon BBb OYHKUra Ha MEHIO.
PnDctaTbUHO CNHNO pHemaHe Na NOxdxOJus CnHnA pa- dHOTo aBTOMaTHUHO npeBKnIOuBa Ha CTpeo npHemaHe, Ha dncnner Ce NOKa3Ba HnDnKaTOpBt 3a CTpeo npHemaHe (e).
-3a HactpoBaHe Ha onpeDeneHa cTAnu 3aBbptTe KOHTo Source (18)doKATO JekaHATA YecToTA,peCn. JekaHATA cTAnuCe NOKaKe Ha DcNpIe.
-3a Tbpcene Ha CnepBaAata CtaHnna CBHCOKa CHHa Ha CnHnHa HATNCHE 3a KpATKO 6yToHa 3a Tbpcene HA3d (13) nnn 6yToHa 3a Tbpcene HAnpei (19).CnepBaAATAOTKPTA CTAHnIe Ce nokae Ha nncnne Iue ce Bb3npo3BePe.
-3a Tbpcehe H Bcunck CTanu C Bucoka CnHa HnHana HATNCHE 3a KpaTko 6yToHa 3a Tbpcehe Haazd (13) HnH 6yToHa 3a Tbpcehe HAnpei (19) 3a NoBee 0,5 s. BcKa OTKpNa 3a TAnu Ce BbAnpon3BexJa 3a 5 s, cnei TOBa TbpceHeTo ige Ce npOdbnKIO Kpaar Ha YecToTHn HnAna3OH. 3a Da Npekbchete TbpceHeTO HaCTAnu, HnTncHeTe 3a Kpatko 6yToHa 3a Tbpcehe Haazd (13) HnN 6yToHa 3a TbpceHe HAnpei (19).
-3a 3anaMetraBe Ha EaHa HAcTpoEA cTaHua HAtnc KaTe 6yToHa 3a 3anaMetraBe Ha npOrpama (17) Ha XeI NaHOTo MCTO B nAMETTA DOKATO HOMEbT Ha MCTOTO B nAMETTa He CE NOKaKe B HnDnKaTopa 3a MCTO B nAMETTa (c).
-3a ABTOMATHNO TbpcHe H 3aNaMeTBAHe Ha Ha-CnHnHaTa cTAHCnHaTNCHeTe 6yToHa 3a TbpcHe HaJd (13) n 6byToHa 3a TbpcHe HAppei (19) eHOBpEmeHNo. PaHnOTo npOBepRa BCNUKn CTaHnN, KOHTo MOrat Da ce pHneMaTn 3aNaMetBa4-Te cTAuHnC hA-Ho6po pnpemaHn MeCTATA OT nporpaMata 1do 4.ObphETe BHHMaHHe Ha TOBa, Ye npH NyKa Beue 3aNaMeTeHHe cTAuHn Ie ce npE3aHNCBAt.
Ako TbpcHeTo Ce npeKpatn, Uce Ce Bb3pOn3BexJa 3a-nametehata noHomep 1 B naMeTTa CTAHJU.
-3a BB3npOH3BexJaHe Ha 3anaMeTeHa CtaHcHnHe TE 3a KpatKO eINH OT 6yToHIne 3a 3anaMeTBAHe Hnporpama (17).HomepbHT Ha MCTOTO B nameTTce NoKa3Ba BV INdkaTopa 3a MCTO B nameTTa (c).
HacouBaHe Ha aHTeHaTa
PaHnOTo ceIOCTaBcMOHTnpaHa aHTeHa (30).Korato non3BaTe paIIO C YKB,HakHOHeTe aHTeHaTb NocOKata,B KOrTO npHemaHTo e HAI-Do6po.
Ako He MoKTe Da HamePte No3nHa aHTeHata c Do6po npHeMaHe, NoCTaBeTe paNTo Ha DpyrMoCTO, KbTeTo npEmaHeto eNo-d6po.
Yka3aHHe: Pn npapota H na paoTO B heNoceICTBeHa 6n-3OCTdo paNocTaunu, ypeu, n3bUbaun paNOBbHNn INn dpyr eneKTPoHHu ypeu MoKe da BB3HHKHAT CMUeHnB paNOpnpMaHTo.
Cbbp3BaHe Ha BbHnH aydno H3TOuHnI npe3 AUX
OTbopete 3actonopraaunnoct (8) H BnHrHeTe Haorope Kanaka (7) HA OTdeneHHeTO 3a HOcHTeIN Ha HOpMaun.
IbXhe3,5mmuekepHaAUXKa6ena(9)B AUXIN- 6yKcata (10).CbbpxTeAUX Ka6ena KbM IOxOaaynIO H3TOUHk.
3a Bb3npoH3BexJaHe HA AUX ayHNO H3TOUHK HaTHCKaTe KOnyTo Source (18)doKATO BHHdkaTopa 3a ayHNO H3TOUHK (h) He ce nokaee AUX.
3a 3aunTa 0 TaMbpcBaHe 3aTbOpTe 6paTHO KanaKa (7) HA OTdeneHnTo 3a HocHTeHa INHopMaunr ITO 3aKnHouTe KATO CBaInTe UeKepeHa AUX KaBena.
PnnoJxOJaIpazMepeMoKeTe DaNoCTaBte Cbbp3AHnnpE3AUXaydnoH3ToUHnKINBOTdeneHHeTO3acbxpaHHeH(e)
Ako no Bpeme Ha AUX peknc Me haTnche eHn OH ot bytoHne 3a naMeT 3a nporpaMH (17),TO paNHO CmehHa cTaHnIra Ta, KOrTo e 3aNaMeTeHa B nocHe HnIOn3BaHHpeKm Ha pa6oTa Ha paNHO.
Bb3npoh3BexJaHe/ynpaBneHHe Ha BbHnHa ydno n3toHHn ppe3 Bluetooth
3a Da Bb3npoH3BeTe aYdno H3ToUHnK (Ha np. cMaTpOH) npe3 Bluetooth® , HATNCKaTE KONcTe OSource (18) DOTORA BA, DOKATO INHINKATOpBT Bluetooth® (g) He ce NOKaKe Ha INCnner INI IN He3aBNCmO OT AkyanHnA aYDNO H3TOUHk 3a KpaTKo HAHTCHe6yToHa Bluetooth® (21).
Ako paHnOTo Beue e 6nIO CbBp3aHO C BbHWeH ayDnO n3TOUH Npe3 Bluetooth® H TO3N ayDnO n3TOUHk E HAnuHcE, ToIe CE n3rpaHn ABToMaTHuHO CbBp3BaHc E TO3N ayDnO n3TOUHk. Korato hMa Bpb3Ka, HnDnKATOpBT Bluetooth® (g) CBETBA TpaHNo.
GPB 18V-5 SC: HMeTo Ha Cbbp3aHnna npe3 Bluetooth@ ypeD ce noka3Ba B ropnHnpeD Ha MyTnФyHKUHOHaHnna INHdkatop (k). BdoHnna peCe noRaBA npedAeHnO rCBbp3aHnna ypeTeKCT.
AkoBpaMKHTeHa2minHeMOKeJaCeH3rpaDNBp3Ka,H3rpaJdaHeToaHbp3Ka ceIpeKpaTBAuHNHdkaTopbT
Bluetooth® (g) MINGA TPAIHO
GPB 18V-5 SC: B MyntnФyHKuHnHaHnHa HnDnKaTOp (k) ce noka3Ba
CneO Oe 17 min 6e3 n3rpaXdahe Ha Bpb3ka paNtO aBToMAtuHO Ce nKJIIOUba.
I3rpaKaDaHe Ha HOBa Bpb3ka Ipe3 Bluetooth®
-3a da n3rpaDnTe BpB3Ka C HOB BbHWeH aydno n3TOUHNK, HATNCHEte 6yToHa Bluteoth (21) 3a nobuee ot 0,5s. TOBa e Bb3MOXHO I NO BpeMe Ha npoceca Ha TbpceHe, npn CbIeCTBvBaua Bpb3Ka Hnnpn peKmC dpyaraydno n3TOUHNK.
-PaHnOTo cTApTHpA npOueca Ha TbpcHe. IIO BpeMe Ha npoueca Ha TbpcHe INHnKaTopbT Bluetooth® (g) Mnra.
-AkTNBnPaIe Bp6kata npe3 BbHneH ayDIO h3TOuHKn. ToBa Hau-uecTo npCmApTFOHHe e Bb3MOxHO B HAcTpoKHTe B MeHIOTo Bluteoth®. PaHIoTe ce NOKa3Ba KaTo HaJIuHEn H3TOUHN KIOHMTo GPB 18V-5 C XXXPecn. GPB 18V-5 SC XXXX. MoJr, 3a CEITa O6bpHete BHHMaHHe Ha HnCTpyKunraTa 3a EKcnloaTaunHa Baunr ayDIO h3TOUHK/BAUNI cMapTfoH.
-Korato mHa Bpb3ka npes Bluetooth®HnDnKATOpbTBluetooth®(g)CBETN NOCTOHAHO.
Cbbp3aHnHnT npe3 Bluetooth@ aydno n3touHnK moKe da ce ynpabnBa H npes paHnTo:
-3aДан6epeTe 3aRnabHe n Da CTapTnape,HaTnckaIte 6yToHa 3a TbpcHe HAnpei (19) pecn. 6yToHa 3a TbpcHe Ha3aI (13) 3a KpAtoDOKATOKeNaHOTo 3aRnabHe He CE DoCTnRHe. Bb3Pon3BExKaHTo Ha KeNaHOTo 3aRnabHe ce CTapTnpa ABTomATnHo.
-3a da npekbchete Bb3npo3BexkaHeto,HaTCHete 6yToHa Mute (12).Ha dncnner ce noka3Ba cmbona 3aInyuabahe (f).
-3a da npoBnKHTe Bb3Pon3BExKaHETO, HATNCHE6byToHa Mute (12) OTHOBO, npomeHeTe Cnata Ha 3BykaHIN HATNCHE6byToHa 3a TbpceHe Hanpei (19) pecn. 6yTOHa 3a TbpceHe Ha3aI (13).
-3a npemHHBaHe Hnpei, pecn. Ha3aB D daHe 3aRnabHe 3aPbXte 6yToHa 3a TbpceHe Hnpei (19) pecn. 6yToHa 3a TbpceHe Ha3aI (13) HATNCHAT DOkato XeJHaTa I03uIN B 3aTnBHeTO He ce DoCTnHE.
Ako no Bpeme Ha pa6oTa npes Bluetooth® ce HATNCHE eHNOTbYToHnTe 3a NaMeT 3a nporpaMn (17),TO paNHO TO CMEHa CTaHnIra, KOTo E 3aNaMeTeHa B NOcENo I3NOI3BaHnIpeKIM Ha pa6oTa Ha paNtO.
HactpoBaHe Ha HndnKaunraHa BpeMe (GPB 18V-5C)
3a da IOCTHHTE B MEHIO TO INHINKAUNTA Ha BpeMe, HATNC-HETe 3a KpA TKO KONUETO Clock (14).
Moxete da n36npate MeKny BpeMeBHTe fOpMaTH 12aca<12H> n 24aca<24H>, KaKTo n da HacTpoBATE acOBe mNHyTN.
Habirnepahe B MeHHTO:
-Помяна Ha HAcToHKeTe Ha MeHIOTo: 3aBbPTeKONueTo Clock (14).
-3aIaMeTBAHe Ha HAcToKInTe Ha MeHHTo:HaTHcHete KOnTuTeO Clock.
-Cne3aamaTBAHe Ha HAcTpOHHaTa Ha MHHyTNTe,peCn. 10s cne nocneHTo HATNCKaHe Ha KOnyTeo Clock paHOTc Ce BpBua KaM ayDnO peKmM.
AkoBpeMeToHa paIHOTo He ce 3aIaMeTBA, CMeHete 6y- fepeHnte 6aTeHH.
Функшнунран(GPВ18V-5C)
3a HynipaH a HacptpOKnTe Ha padnoTo Do pa6pnHn HactpoKn (Reset),HaTNCHeTe KOnHTo Clock (14) 3a nobEe ot 0,5s. Ha nCnne Ce noKa3Ba
3aBbptete KOnyTeo Clock (14), 3a Da n36peTe MeKJy HnnpaHe
HactpoiKN
Service scale electric
Strada Horia Macelariu Nr. 30-34, sector 1
013937 Bucuresti, Romania
TeN.: +359(0)700 13667 (Блгарский)
_aKc: + 40212331313
Email: BoschServiceCenterBG@ro.bosch.com
www.bosch-pt.com/bg/bg/
DpyrH cepBn3HH apech uie oTKpHeTe Ha:
www.bosch-pt.com/serviceaddresses
TpaHcnpOpTnpaHe
PpenOpbHHTENHTE NHTHEBO-NOHHH AkyMylatOPHN 6aTepeHH Tp8Ba Da H3NbHBAT N3NCKBAHNA 3a TpaHCnOpTnPaHe Ha OAnCHn TOBAPn. AkymyIaTOPHnE 6aTePHN MoRat Da 6bDat TpaHCnOpTnPAHn OT Notpe6HtENHa Npy6nHm MeCTa 6e3 DOnbHHTENH pa3peWHTENH.
PnTpAHCNOpTnpaHeOTTpETnCTpaHn(Hanp.npnBb3dywEn TpAHCNOpTnINNOI3BaHeHaKypnepcKYNcnyn)nMa CNEuAnHHN3NCKBaHnKbM ONaKOBaHETo N O6O3HaVaBaHETo NM. 3a centa npnoTROBkata Ha NaKeTnpaHeto ce KOnCytnpaTe Ceknept BcbOTBeHTa oBnaCT.
N3npaaiTe akyMnyatopnH 6aTeepn cAmO aKO KOpnycbT H M He e noBpeDen. N3oInpaTe OTKpHTN KOHTAKTHN KLeMn C Je Pn IeHTN ONaKOBaTe aKymyatopHnTe 6aTeepn Taka, Ye da He Meorat Da ce N3MeCTBaT B onakOBkata CN. MoNA, Cna3BaIte CbIo H DoIbNHITeHH HaUHOHaHn npedncaHnA
Бракуванe

C orneon3BaHe Ha oKoHnHa Tcpea paHnToTa, 06KnHOBeHNTE HnN akymyIaTOPHb6aTePnH, DOnbHInTeHNHTe npHnAdNeXHoCTn ONaKOBKHe TpR6BaJa Ce npEpaBat 3a onoN3ObopBaHe Ha CbDbPxKaUHTe Ce B TEx CypOBHH.

He 3xBbPnIe pAnOTaN akyMnyatopHnTe 6aTePN/6aTePNTe np6ntOBnTe OtnaBcN!
Cama 3a ctpaHn ot EC:
Cbflnaccho eBponecka DnpeKTHBa 2012/19/EC 3a cstapnte enektpnueckn n enektpoHn ypein HneHOTOPaHcnpopTpahe B haunohanHOTO npabo paHnoanapATNE, KOtHO He moRat da ce non3Bat noBeue, a cbflnaccho ebPonecka DnpeKTHBa 2006/66/EO nobpeehnn nn 3xa6beHN obNKHOBeHN nnakymnatopHH batepHH, TpaBBa da ce cbbpapn TpeDaBAT 3a ONON3OTBOPBAHe Ha CbIbpxaunTE CE B TAX CypOBHH.
PnHnepaBnHO hXbBpIHe CTapIte eNkTpueckn I eNkTPOHH yPeIN NopadN Bb3MOxHOTo HAnuYe HaOnacHBeUeCTBa MOrat Da OKaKaT BpeHN BnHaHn Bbpxy OkJHaTa CpeDa H OOBSeKToO 3dpaBe.
AkymnaTopHHn 06HKHOBeHH 6aTeHH:
NtHeBO-NOHH:
Mon, cna3BaTe yka3aHnrrTa B pazda TpaHcnpTnpaHe (Bx. ,TpaHcnpTnpaHe", Ctpanuca 172).
MaKeDoHcKn
Be36eJHocn HanomeHH

IpoountajTe rH CNTe 6e36ednoCHn HANOmeHH yNaTCTBa. IpeWKITE HaCTaHaTH KaKo
pe3yIaT OJ HENpHnDpKxBaHbE IIO
6e36eHnOCHnTe HaNoMeHH yNATCTBa MoKeJa npedm3BnKaaT eNeKtpuYe HyaP, noXap n/nn
TeuKn noBpeHn.
3auybajte r6e36eHochnTe HANOMEH ynaTCTBa 3a KopHeBe H 3a BO HdHHHa.
Ppe cekoe KopncTeHe, npOBepeTe ro paHnOTo, Ka6enot n npKnyQoKOT. He ro KopncTeTe paHnOTo, DOkONky 3a6eKeNtte oWtetyBaHa. He rO TBopajTe camn paHnOTo n pKnyQoKOT n OCTaBeTe rHa nonpaBkA kaj KBaHnФKyBaH CTpyeH nepcoHaJI Koj Ke KopnCTn cAmO opHrHAnHH pe3epBHN DeNoBn.
OuTeHTo paHIO, Ka6e H npKnyok r0 3rOJeMyBa pNIKOT 3a eNEKTPueH yap.
MpeKHHOT npHKnyOK MOpa da 6nDe BmTeHAT BO neCHO npHCTanHa npHKnyHuCA co 3aHTNTEN KOHTAKT.
MpeKHHOT npHKnyOK mopa da odroBapa Ha npHKnuyHncaT. pHKnyOKOT He Cmee BO HKOJ cnuyaj da ce 3aemen. He ynotpe6ybajte npkeHyBa co aadantep 3aeDno co paHjata. HEmeHyBaHeto Ha npKEHbayot H COOBETHTe pHKnyHnI Ho HamaLyBaat PN3KHOT O neEKTpuehen ynap.
Lcnocho ODBTKajTe ro MPexHnOt Ka6en DOKONky ro KOpHCTHe paHnTo co MPexKe npKnpyok. Hnaky MPexHnOt Ka6en Moke da ce 3arpee.
He ro Kopncntte ka6enot 3a dpyn HameHH, KaKo Ha npimep, 3a da ro hocnte padHOT, 3a da ro 3akaunte nn da ro BneueTe npknkyokOT od npknnyuHnata. DpxeTe ro ka6enot noaneky od tonnnna, macno, octpn pa6OBH nnn NOBxHNTE denOBn HA ypeDt.
OuTeHnHOT HnCBNTKaH Ka6eI rO 3rOJeMyBa pN3HKoT 3a enEKeTpHcH yap.

PaJnOTo DpKTe ro nOdaNeky oddoKnBnara.HabneryBaHbeto Ha BODa BO paJnOTo ro3rOleMyBa pN3NKOT od eneKTpnueh yap.
He ja otBopajte 6atepnjata. Nocton onaCHOCT OKpaTOK cnoj.
PnOwTeTyBaBe HHeHponnHa yNoTpe6a Ha 6atepnjata MoKe Da n3ne3e naPea. Batepnjata MoKe Da ce 3anaHnn da ekcnnoDnpa.Bhece TcBex BO3dyx N DOKOLky HMa NOBpeHn OndecTe Hn HaNekap. PapeTa MoKe Da Hn HApa3HN DmHHTe NaHtta.
Pn norpeuho Kophebe Hn npoowteHa 6atepuja moKe da HCteye 3anaHb TaeyocT od 6atepujata. N36erhybaje KOHTaK Co heA. DOKONky cnuyajno dojTe BO KONTAK T co TeUHOCTa, Hcnnakhete co BODa. DOKONk TYeHoCTa JoJe BO KOHTAK Co OHTe, no6apaje lekapca nomoi.
HCTeueHaTeuHocT O6batepnaTaMoKeJa npedn3BnKa KOxHH HnTAUHN NnN 13rOpEHn.
BaTepejata MoKe Da ce OUtETn OD octpnte npedmetn KaKo Ha np. KInHcN HnOdBpyBaHn Co HADBoPeuHo BnJaHne. MoKe Da doJde Do BHaTpeWeH Kpatok Cnoj 6batejata MoKe Da ce 3aapan, da npHTn qad, da ekcnlonpa Hn da ce nperepee.
Heynotpe6eHATA 6atepnja dpxete ja noaneky od KaHcIapnck CnojyBaKn, KnyeBn, Xene3n napn, KInHn, 3aBPKn Hn DpyrMaH MeTaNn PnpMeTH, WTo MoKe Da nped3BnKaat PnpocmctyBaBe Ha KOHTaKTHe. KpaTOK cnoj Mery KOHTaKTHe Ha 6atepnjata MOKe Da nped3BnKa n3ropeHnHn NoXap.
KopncTe ja 6aTepeHjata cmo BO npOn3B0nO npOn3BOoHTeOT. Cmo Ha ToJ hauHH 6atepnjata Ke ce 3aHTTN OOnacHO ppeonTObapyBaHe.
BaTePnIte nonHeTe rCo nOlaHn uTo ce npenopauAH NcknyuBO Ond npOn3BODnteTOT. IOKoKy nOHaYOT 3a KoJ ce HameHETn OndpeDen BnD Ha 6aTePN, CE KOpNCTn CO DpyrN BaTePN, NoCTOn onacHOt OD NOxap.

3aHTTe ja 6atepHjata od TOnHHa,Ha np. OdoonrotpaJHO hNOxYBaBe Ha COUeBn 3paH,OrAH,HeNCToTHN,BOa H Bnara. NhaKy, noCToON aachocT od ekcnnoJa n KpaTOK cnoj.
O3hakata co 36opOBu Bluetooth KaKo n CnKNKe (noroata) ce perncptpauH MapKn H conCTBeHoCT Ha Bluetooth SIG, Inc. CeKoe KopHebe Ha OBaa O3haka co 36opBu/CnKnCe BpuH co NnEua npeky Robert Bosch Power Tools GmbH.
Onnc Ha npoH3B0DoTH npepopMaHCHTe
BHHMaBaJTe Ha cIHKnTe BO npeHnO T dE Ha yNaTcBTo 3a KOpNCTeHe.
Hnyctpaunja ha KOMnHOENTN
HymepnpaBeTo Ha cInKHe Co KOMNoHeHTn Ce OndecyBaHa npka30 Ha paNto HA rpaNkata CTpaHua.
(1) 3ByuHnK
(2) Paçaka 3a HocHe
(3) KOHTponHa cnjannuKa Ha npnKnyOkoT 3a HAn3MeHnHa CTpyja
(4) POKIoneu ha npknkyoKOT 3a HauMMeHnUHa cTpyja
(5)Ппклунчиа 3a пнклуокота Han3MeHnHa ctpya (Power Outlets)
(6)Перрада за ckладиране
(7) Kanak 3a npperpaeta 3a MeHymckn daToTeKn (Digital Media Bay)
(8)PaKa 3a3aknyuBaHe Ha KaIakOT 3a nperpaTa 3a MeHymckn DaToTeKn
(9)AUX-ka6en
(10) AUX-IN-KoHeKTop
(11) USB-KoHEKTop 3a NOJIHeBe
(12) Konque Mute
(13) Konue 3a npe6apyBaHBe HaHa3aD
(14) Konue Clock (GPB 18V-5 C)
(15) Konue 3a BknyyBaHe-NCknyyBaHe
(16) Ekpan
(17)KoIuHb3a3auyByBaHbHeHa nporpaMaTa
(18) Source konue
(19) Konue 3a npebapyBahe hanapepe
(20) Konque Equalizer
(21) Konue Bluetooth®
(22) Konque Menu (GPB 18V-5 SC)
(23)ФИКСИРаБЕHaKaПАКOT3aпрERpaДATA3a6aTePnJa
(24) Kanak 3a nperepa 3a 6atepnja (peepBn 6atepn)
(25) Konue 3a oTBopahe Ha akymylatopcKa ta Bate npja
(26) AkymynaTopcka 6aTepejuja
(27) Kanak 3a 6atepuja (Battery Bay)
(28) Paça 3a 3aKnyBaHé Ha Kañakot 3a 6aTePnja
(29)Пифдата6батерпета
(30)CTanuecta aHTeHa
a) NHyctpHAnata Hnn OnnHa ana Onpema He e den oCtahapdnTo6hem Ha cnOpaka. Lenocha onpema MoKe da ja haJeTe BO hauata IporpaMa 3a onpeMa.
Elenmth3a npka3
(a)ПиказаразадиофпевениJA(GPB18V-5C)
(b) Pπρικα3a haποπητοct Na 6aTeρηjata
(c) PnKa3 MeTo Ha 3aUyByBaHe
(d)Пикада3aВсOKToH/6ac(GPB18V-5C)
(e) Pnka3 Ha Ctepeo Pnpem
(f)Пикадзанckлuyваье ha 3BykOT
(g)ПикадBluetooth®
(h)ПикадуадноИЗВОр
(i) PnPKa3 3a nopeCyBaHe Ha 6oJaTa Ha 3ByKoT
(j)Пиказан Врeme
(k) MyntnФункиноHaen npHka3 (GPB 18V-5 SC)
Texnukn noaToun
Akymnyatopcko padno GPB 18V-5 C GPB 18V-5 SC
PpomeHa aKymyataTopcKa 6aTepnja
OTbopete ja paKaTa 3a 3aKnyuBaHBe (28) Ha KanaKot 3a 6baTePnJata H OTbOpTe ro KanaKot 3a 6baTePnJaTata (27).
3a OToTpaHbAbe Ha akymnatoPckata 6atepnja npHTCHETe ro KOnTuTe 3a OTKlyuYBaHe Ha akymnatoPckata 6atepnja (25) n H3BneTe ja 6atepnjata oI npEpaDATA 3a 6atepn. PpTOa He ynotpe6yBAjTe cnna.
3aBMETHyBaHe Ha akymyataopckata 6atepnja, BmTehe ja nctata BO npnphiot 3a 6atepn (29), Taka uTo npnknyoounte Ha 6atepnjata Ke neHnat Ha npnknyoounte Ha npnphiot 3a 6atepnja. 6atepnjata Tpeba da ce Bknonn. 3atbopete ro kanakot 3a 6atepnjata (27) n 3aknyute ro.
Pnka3a HanonHeTOc Ha 6atepnjata
PnBMeTHaAkyMnyatopcKa 6atepni,coctoJbata Ha HAnONHeTcHa 6atepjata (26) MoKeTe Da ja BnInTe Ha ekpaHOT,a pNn 3BaDeHa 6atepJa MoKeTe da ja BnInTe Ha caMaTa akyMnyatopcKa 6atepJa.
Pnka3a cocto6ha HANONHEcT Ha akymaTopcKaTa 6atepuHa ekpaHOT
Pnka30 3a cocto6a Ha HAnOHHeTOc HA aKymnAToPCKata 6aTeprJa (b) ce nojaByBa Ha ekpaHOT, BeHaaw WtOM ce
BMETHEaKymyataopcka6atepnaCo DOBOHEN HANOHNpaHnOTo He e NOBp3aHO CoCTpyHa MPeka.
| Приказ Калачten | |
| 80-100% | |
| 60-80% | |
| 40-60% | |
| 20-40% | |
| 5-20% | |
| 0-5% |
Ppka3 3a cocto6a Ha HANONHcT Ha 6atepnjata Ha akymnatopckata 6atepuja
Ako ja n3BaDnTe akymyNatopckata 6atepnja od padnoTo, coctoj6ata Ha haonHeTOc MOKe Da ce npkaKe co 3eeneH LED-cBETnKn Ha npka3OT 3a cOtoj6ha Ha hAnOHTeoc H akymnyatopckata 6atepnja.
PnntncheTo KOnuTeHO npNka3o3a HAnONHeTOCT Ha 6baTepnjata,nnn,da ce npKkae HAnONHeTOCTa.
Iokony no npntnckaheTo ha konueTo ha npka30 3a
hanonHeocT ha 6atepnjata He CBETn LED cbetnka,
6atepnjata e dekektha m Mopa da ce 3ameHH.
TnHa 6aTeepJa GBA 18V...

LED cbetmkn Kanaqtet
TpaJHo CBeTno 3×3eNeHo 60-100%
TpaJnoCBeTnO 2× 3enEHO 30 - 60%
TpaJHo CBeTNo 1×3eNeHo 5-30%
TpeKABO CBeTIO 1× 3 eNo0-5%
TnHa 6atepnja ProCORE18V...

LED cbETnKn KanauTeT
TpaJHo cBtNo 5× 3 eNeHo 80-100%
TpaJHo CBeTnO 4× 3eNo60-80%
TpaJHo CBeTnO 3× 3 eNoHO40-60%
TpaJno CBeTIO 2×3eNo 20-40%
TpaJno CBeTnO 1×3eNeHo 5-20%
TpeKABO CBeTIO 1× 3 eNo 0-5%
CTabaBe/MeHyBaBe Ha pe3epBHN 6aTeppn
3a3auyyBaBe Ha BpeMeTo Ha yacOBHnKOT n octaHaTH nocTabKn Ha paNtO Mopa Da CE BMeTHa pe3epBHN 6aTePHn. PpTOa Ce npenopayBa KopHe Ha anKaHOMaHraHcKn 6aTePHn.
OTbopete ja paaykata 3a 3aknyBahe (28) Ha kanaKot 3a 6atepnjata n OTbopete ro kanaKot 3a 6atepnjata (27).
Iokonky e notpe6Ho n3BaTe ja akymyNatopckaTa 6aTepnja (26).
3a OTbopaHe Ha KaNAKOT OJ npERpaDAta 3a 6aTePNn (24)
PnTHcHETe Ha MEXAHN3MOT 3a 3aKnlyyBaHe (23) n
13BaTe Ro KApanoT OJ npERpaDAta 3a 6aTePNn. CTabete n
HCnpaayHte pe3epBN 6aTePNn.
PnHToa BHHMaBajTe Ha NoIIOBHe CnOpeI npHka30Ha BHATeepHata CTpaHa OJnpERpaJaTa 3a 6aTepn.
IobToHcStaBeTe ro kanaKoT oJ npErpaJaTa 3a 6aTePn (24).
"REPLACE AA BATTERY WHEN UNIT NO LONGER KEEPS CORRECT TIME": 3amehete ng pezepbnte 6aetpn, DOKONky BpeMeTo Ha padnOte He moKe da ce 3auyBa.
Cekoraw 3amehybajte rncnte 6atepnn oednaa. Kopnctete camo 6atepnn od een npon3bOuNTen n co nct kanaunet.
N3BaTe rH pe3epBnHTe 6aTePNoIpaNHO ToDOKONky He cTe Ro KopncTeNe noOnr nepNo.
Iokony noonro Bpeme ce yBaat Bo paHnTo, pe3epBnHe 6aTePmMoKe da KOpOHaat n Da ce Hcnpa3HaT.
Ynortpe6a
3aHTTE ro paHnOTo od HnpeKTeH KOHTAKT CO BOda. HabneryBaHeTo Ha BOda BO paHnOTo r 3rOleMyBa pN3NKOT OJ eNEKtpuueh ydap.
Kanaunhe Ha nperepaata 3a 6atepnn, nperepaata 3a npnknyooun n npknyoounte 3a HAn3MeHnHa cTpya dpxete rnaTbopeHN. 3aTbopeHnTe kanaun ro wTNtat paNIO TO OD BOA nnpab.
Pexmm ha aydno
BknyyBaBe/ncknyyBaBe
3a BknyBaBe Ha paNtO npTnCHete Ha konTuTo 3a BknyBaBe/ncKnyBaBe (15). EkpaHOT ce aKTbnpa (16) H ce pePNDyuHa ayDnHO hBOPoT nocTaBEN pni NocJeHOT NcKnyBaBe Ha paNtO.
3a ncknyyBaHe Ha paHIOTo OndHOBo npTINCHete ro KONHTeTo 3a BkNpyBaHe/ncKnyyBaBe (15). AkTyenHaTa NOCTABKa Ha ayHNO N3BOPOT Ce 3aCyByBa.
TpeCyBaBeHa rnaChocTa
IIO BknyuBaHbeto Ha paHnTo cekoraaw ce noCTaByBa Hncka rnaCHOCT.
3a da ja 3rnonme rnachocta CBpTeTe ro konyeto
Clock (14) (GPB 18V-5 C) oH. konueTo Menu (22)
(GPB 18V-5 SC) BO npaBeu Ha CTpeKNHe OJ YacOBHNKOT, a 3a HAMayBaHae Ha INaCHOCTa CBpTeTe RO BO npaBeu CnPOTHBEN HA CTpeKNHe OJ YacOBHNKOT.
IpoecyBaHetoHa rnaChOCTa ce noJaByBa co BpeHocTa nomey0n30HaekpaHOT.PpeNoecyBaHetoNN MeHyBaHToHa padnoctahncaTnOCTabete ja rnaChOCTa Ha noHNsCKa BpeHOC, a ppe CTapTOn HA naBopeeH ayDnO h3BOP NOCTABeTe jHa CpeHa BpeHOCr.
3a NCKnyuBaHe Ha TOHOT MOKTe KpaTko Da ro npNTCHeK konyeTo Mute (12).Ha ekpaHOT ce nojaBya npka30NcknyuBaHe Ha 3BykOf(f).
3a noBtOHO da ro BknyuTe TOHOT, NOBtOHO KpaTko npHTnCHteTo KOUeTO 3a HeuyjHo HIN CBpTeTo RO KOnUeTO Clock (14) (GPB 18V-5 C) OJH. KOUeTO Menu (22) (GPB 18V-5 SC) BO npabeoT ha CTpeKInTe OD yacOBHHKOT.
IpoecyBaHe Ha 6oJaHa 3ByKOT
3a onTmHa npnpdykunja Ha TOHOT Bo paNTO HMa Brpaedn3eHaayBa.
HNBOTO HA BNCOK TOH 6acot MOKeTe Da Hn IpomehHTe pa4HO Hn da Hn KOpCTNte PpeTXODHtne NOdecyBaHa Ha 6oJata HA TOHOT 3a pa3nHn CTINOBMy3nKa. MoKe Da Hn 36epete npTeXODHo nporpamnpaHtne NoCTABKN JAZZ,
ROCK,POP N CLASSIC KaKo H cAMOnpOraPmHaPaYkata NOCTaBka CUSTOM. NoCTaBKeTHe Ha 3ByKOT OdEInHO ce 3auyBaat 3a cekoj ayINO n3BOp.
3a da n36epeTe HeKoe OJ 3auyBaHnTe npTeXoHn
noDecyBaHa 3a 6oJaTa Ha TOHO, KpaTko pNtncKaJte Ha
KoNceto Equalizer (20)doEka Ha ekpaHOT He ce nojABn
caKaHaTata NoCTaBA Bo pInKa3O 3a npTeXoHn NOdecyBaHa
3a 6oJaTa Ha ToHO (I).
PpomeHa HIOCTaBkTa CUSTOM:
-MoKTe Da rO nocTaBHe HnBTo Ha BnCnHa nDna6ouHnHa 3BykOT Bo ONCe O-5do+5.
-Пипськajte Ha konчeto Equalizer (20) nooIro 0,5 s. Ha npka3ot 3a npetXoHn noeCyBaHa 3a 6oJata Ha ToHOT (i) Ha ekpaHOT ce nojaByBa CUSTOM.
-GPB 18V-5C:Ha npka303a BncoK TOH/6ac (d) ce npkaKyBa TRE,akTyEnHata BpeDIOCT Ha HNBOTo Ha BnCOK TOH TpENKa. PnHTNCHETe FO KOnTeO Clock (14),3a DaTO IpOMeHHTe HNBOTo HA BnCOK TOH.PnHTNCKajTe FO KOnTeO Clock (14),3a da ja 3aayBate noCTABehata BpeDIOCT.
Ha npka30 3a BnCOK TOH/6ac (d) cera ce npkaKyBa BAS kaKo n akTyenHaTa BpeHocT Ha 6acOT. IpomHeTe ro n 3auyBaTe ro HbTO Ha 6ac KaKo ITO e ONuHaHO 3a BnCOKNOT TOH.
-GPB18V-5SC:HaMyIHTNHyKUHOHaHINOTnPKa3(k)ce npkaKaJyBa
Ha MyntnfoyHKUHOHNNOT npka3 (k) cerace npkaKyaBa
-По зуваье Ha noctabkata 3a bac oH.10 s no nocleHTo npHTnckaHBe Ha konyeto Clock (14)/konyeto Menu (22) paHNoTO ce Bpaka Ha cTaHapdHnOT pNka3 Ha ekpaHOT.
Bipahe Ha aydno H3Bop
3a da n36epete aydno n3Bop npHTnCKajte ro konyeto Source (18)doNeKa HaekpaHOT He ce npKkae cakAHOT BHATpeWeH OH.NaBOpeweH aydno n3Bop:
DAB:ДИгитално paади поу DAB+ (GPB 18V-5 SC),
-FM: aHaIorHo paIIO npEky FM,
-AUX:HaBOpEWeH ayDnO n3BOp (Ha np. CD-neeep) npeky 3,5 mm KOHeKToP AUX IN (10) BO nperpadaTa 3a MeNmCKn DaTOTeKn,
-:aBopeweH ayuNo hBOP (Ha np. NaMeTeH TenefoH) co Bpcka npeky Bluetooth®.
AkyeHnHO ayHNO H3BOP MOKe Da CE BUN BO pNkKa3OT ayHNO H3BOP (h) OHN. npKkA3OT Bluetooth (g).
IocTabyBaBe/3auyByBaHe Ha DAB+-paHnO cTaHnua (GPB 18V-5 SC)
3a n3bop Ha paIIO cTAnu co ayIO n3bOp DAB+ npHTckajTe ro konUeTo Source (18)doKea Bo npHKa3OT ayIO n3bOp He ce noJAH (h) DAB.
Ikpatka HnHnjuJnHaauJa, ce pnpOduu npa nocneHaTa noCTaBeHa paNIO cTnHa.
HMeTo Ha cTaHnIaTa Ce noJaByBa BO rOpHnot DeI OJ MyTnФyHKUHOHaHnHOT pNka3 (k).KoI dOnOJIHTeHN HΦopMaun Ke ce npKaKyBaAT BO dONHOT DeI OJ MyTnФyHKUHOHaHnHOT pNka3,MOKe Da CE NOCTaBN BO ΦyHKuJaTa Ha MeHNTO.
-3a Ipomeha Ha ctaHnata BpTe ro konyeto Source (18)doIeKa cakHaTcA Hua He ce npkaKe Ha ekpaHot. PnHTCHHe ro konyeto Source (18) 3a da ro notBpnte n36opot. PaHOTo MeHyBa Do n36paHata CTAHnca. AInTePHTHBHO 3a Ipomeha Ha ctaHnata MoKTe Da ro npHTCHeTo KOnyTe 3a ppebapyaBe HaHa3ad (13) INI KOnyTe 3a ppebapyaBe HaHaNPed (19).
-3a3auyyBaHa ha noDecencaCTaHua npnTnCHETe ro KOnUeTo 3a 3auyyBaHa Ha npOrpama (17) Ha cKaHOTo MecTO Ha 3auyyBaHa deOdeKa He ce noJaBn 6pojot Ha MecTOHO 3auyyBaHa BO npKa3OT MeCTo Ha 3auyyBaHa (c).
-3a penpoykujha ha 3auyBaHa cTAnu KaKpATo KpHTnCHTe Ha eNoO KOuHbTa 3a 3auyByBaHe Ha nporpaMa (17).BpoJTo HA MeTO Ho 3auyByBaHe ce noJaByBa BO pNkA3OT MeTO Ha 3auyByBaBe (c).
Hanomeha: akno hmaTe npo6IeMn CO npneMoT, moKete paHNO da ro 3anoHete npe6apyBaHeto Ha DAB+- cTahnUata. 3a Taa ue, n36epTe Hnn
Ako He MoKeJa ca Ce npoHajDe DAB+-paHIOCTaHa, ce noJaByBa
TocTaByBaBe/3auyByBaBeHaFM-padnoctanHua
3a n360b np ha padno ctaHnC co ayDnO n3BOp FM npTnckajre ro konyeTo Source (18)doEka BO npKa3oayDnO n3Bop He ce nojabn (h)FM.
GPB 18V-5 C:3a Bpeme Ha NoctaByBaHbETo paNIO
ΦpeKBeHnJaTa ce NoJaByBa BO BpeMeHckNoT pNkA3 (j), a
NOToA BO pNkA3OT 3a paNHOΦpeKBeHnJa (a).
GPB 18V-5 SC:Ф配电电jataHa penpoDypaHata CTaHnua ceNojaByBa COoBcTHO BO rOpHnOT DeHa MyNTfYHKUHOHaHnOT pNka3 (k).KOn dONOLHTENHn HΦopMaun Ke ce npKaJyBaAT BO dONHnOT DeOD MyNTfYHKUHOHaHnOT pNka3,MOKe Da CE NOCTABN BO fHyHKUJaTa Ha MeHnTO.
PnDOBONHO ja npHem Ha COODBETeH CnRHaI,paNtOaBTOMATCKn Ce npEppna Ha CTpeo npHem,Ha ekpaHOT ce nojabyBa npKa3OT CTpeo npHem (e).
-3a noctabyBaHe Ha odpeHcTaHnua BpTeTe ro Konueto Source (18),doKeHa He ce npkaKe cakaHaTa fpeKBeHnju oH. cakaHaTa CTHaHa Ha ekpaHOT.
-3a np6apyBaBe Ha CnEHaTcTaHnua Co NOBnCOKa jaHHa HcRrHAn KpaTko npHTncHETe Ro KOnyTe 3a np6apyBaBe Hana3ad (13) HnKoYTe 3a np6apyBaBe HanaPep (19). CnEHaTpnoHaJeHa CTAHuCa Ce npKaKxBya Ha ekpaHot n ce penpOduNuPA.
-3a npe6apyBaBe Ha cHTe CTAnu Co NOBcoka jaHnHa HcHrHn pntnche To KOneTo 3a npe6apyBaBe HnHa3ad (13) HnKoNeTo 3a npe6apyBaBe HnHaPepd (19) noDIOro o0,5s. CekOJa npOnajdeHa CTAnu ca pe npOduqura 3a 5s, noToa npe6apyBaBeTo ce npOdoJyBa DO Kpaot Ha qpeKBENUCN ONcer. 3a da ro npeKnHeTe npe6apyBaBeTo HA cTAnu, KpATKO npTnChte To KOneTo 3a npe6apyBaBe HnHa3ad (13) HnKoNeTo 3a npe6apyBaBe HnHaPepd (19).
-3a3aCyByBaBe Ha NoDeceHa CTAHnua pnpTCHete ro KOnHTeTo 3a 3aCyByBaBe Ha npOrpama (17) Ha cKaHOTo MecTO Ha 3aCyByBaBe DoNeKa He Ce noJaBn 6poJoT Ha MecTO To Ha 3aCyByBaBe BO npHKa3OT MeCTo Ha 3aCyByBaBe (c).
-3a ABOMATcKO npe6apyBaBe H 3auByBaBe Ha CTAHUATA CO HajCNHEn CINHAN HCTOBPEMeHO pINTCHETe ro KOnHTo 3a npe6apyBaBe HHa3ad (13) H KOnHTO 3a npe6apyBaBe HHaHpeD (19).PaHnOTo rH npOBepyBa CNTe cTAHUc CO pInHM H3auByBa 4 CTAHUc CO HajIObAp nPHe M h MeCTA Tt Ha 3auByBaBe Ha npOrpama oJ 1do 4. HMAjTe npeBVD, DeKa BeKe 3auByBaHite CTAHUc Ce npe3aNNuYBaAT. Ako e 3aBpSeHo npe6apyBaHeto, ce npPOduzupa 3auYBaHaTa CTAHUc Ha MeCTO To Ha 3auByBaBe Ha npOrpama 1.
-3a PenpojkyuJaHa 3auyBaHa cTAnHa KpaKo npInChTe Ha eHNO OD KOUPnHbTa 3a 3auyByBaHe Ha npOrpama (17).BpoJOT Ha MeCTOHa 3auyByBaHe ce NojaByBa BO pNkA3OT MeCTO Ha 3auyByBaHe (c).
IopecyBaBeHa cTanuecTa aHTeHa
PaHnOTo ce hCnopaUyBa co MOHTnpaHa cTAnuecta aHTeHa (30). 3a BpeMe Ha pa6oTeHbeto Ha paHnOTo npeky FM cbptete ja aHTehata Bo npabeuot, KoJwTO OBO3MOxkyBa Hajdoap npem.
Iokonky Hema no6ap npHem, nocTaBeTe ro paHnTo Ha MeCTO co no66ap npHem.
HanomeHa: npn pa6oteHe ha padnoTO BO hENocpeHa 6bnHnHa ha padno INCTanaun, padno ypeu nn npyre eneKToHcKn ypeu moKe da doJe Do nonpeuyBaHe ha padno npneMOT.
PnKnyBaBe Ha HAdBopeHn aydno H3BOpn npeKy AUX
OTbopete ja paKaTa 3a 3akIyUbaHe (8) n OTbopete ro kanaKOT (7) Ha nperepaDaTata 3a MeiymMCKn daTATEKn.
BMETHETe 3,5 mm KOHEKTOPOHa AUX Ka6enOT (9) BO AUX IN-OTBOPOT (10).PnKnyte ro AUX Ka6enOT Ha ayHNO H3BOP KOJ OJROBapa.
3a penpoyukjha HA AUX aydno n3Bopot npntncajte ro konueTo Source (18)doeka BO npka30 aydno n3Bop (h) He ce nojabu AUX.
3a3aHTTA OJ HeuHCTOTM NOBTOPO 3aTBOPeTe Ro Kaakot (7) Ha npepaDAta 3a MeNHyMCKn DaTOTEKN 3aKnyeTe o ako ro otctpAHyBaTe pnnkyoKOT ha AUX Ka6enot.
PncooDBeTHa rolemHa moXeTe ayDno n3BOpOT npNKyuEn ppeky AUX da ro uyBaTe n BO fNoKaTa 3a cKnadnpahe (6).
Ako 3a BpeMe Ha pa6oTeHbeto HA AUX npntnche e ndo oKONPHbata 3a 3auyByBaHe Ha nporpaMaTa (17),ToraWpaNtOTo MeHyBa Ha cTAHcIa T3auyBaHa BO nocneHOpOKnCTeHnT peKm Ha pa6oHa paNHO.
Pepnokynja/ynpaByBaBe Ha HAdBopeHn aydno n3BOpn peky Bluetooth
3a penpoyukjia Ha ayinno hBop (Ha np. naTeH TenefoH) npeky Bluetooth® Hnnpntncajte ro konyeTo Source (18)doeka He ce nojabn npka3ot Bluetooth® (g) Ha ekpaHOT nn Hs3aBnCHO oA kTyenHnO t ayinno hBop KpATKO npTNCHTe Ro KonueTO Bluetooth® (21).
Ako padnoTo e Beke noBp3aHo co hAnBopeeH aynio n3BOp npeky Bluetooth® n ako OBOj ayDIO n3BOp e dOCTaEN, Toraaw ABtOMaTcN CE BOCnOCTaByBa BpCka CO oBOj ayDIO n3BOp. BednaW tOM Ke CE BOCnOCTaBN BpCKata, nocTojaHO CBETn npkKaOT Bluetooth® (g).
GPB 18V-5 SC:Името ha ypeodot noobpah npeky Bluetooth® ce npinkakyba BO rohpnoT den on MyntnphiHKuhoHaHnnot npinkaz (k).Bo doJIHHOT den ce npinkakxyBa npheceHnOT TEKT od NObP3aHHOT ypeid.
Ako He MoKe Da Ce BocNoCTaBn Bpcka Bo pok 2 min. BocNoCTaByBaBeTo Ha BpckaTa Ce IpeKInHyBa H npKa3OT Bluetooth® (g) TpenKa NoctoJaHo.
GPB 18V-5 SC:Ha MyntnHyHKUHOHNOI npKa3 (k) ce nojabyBa
IIO donoHnTeHN 17 min.6e3 BOCnoCTaBvBaHe Ha Bpckata, paHnTo ce NCKnyyBa ABTomatcKn.
BocnoctaByBaHe Ha HOBA Bpcka npeky Bluetooth®:
-3a da ce BOCNocTaN BPCKa CO HOB HauBopeeH aynIO n3BOP, npHTNcKajTe HA konTuEo BLuTooth (21) noDOnro 0,5 s. Oba nctO taKa e moXHo 3a BpeMe Ha npOecOT Ha npE6apyBaHe, npn nocToJHa BPCKa Hnnp np pa6otehe co dpyr aynIO n3BOp.
-PaIIOTo ro cTApTyBa npOecOT Ha npE6apyBaHe.3a BpeMe Ha npOecOT Ha npE6apyBaHe TpEnKa npKka3oT Bluetooth (g).
-AkTHBnpaJte ja Bpckata npeky HndBopeweH ayHIO h3BOp. Ha naMeTHNE TeNepOH Toa 6oHNO e MoKHO BO paMKHe Ha NoCTaBKHe BO MeHTo Bluetooth®. PaHOTO ce noJaByBa KaKO DocTaneH 3BOp NOD IMeTO
GPB 18V-5 Cxxxx ODH. GPB 18V-5 SC xxx. CnedeTe ro ynaTcBTO 3a KopncTeHe Ha Baunot ayDno n3BOp/ Baunot naMeTeH TepeOH.
-BeHaawIOMKeCeBocNoCTaBnBpCKaTnpeKy Bluetooth®noctoJahO CBETn npka30蓝牙 b ooth (g).
Aynno n3BPOrT NOBp3aH npeky Bluteoth MoKe da ce ynpaByBa Hnpeky paHIOTo:
-3aДаH36epeTe HacnoB HdaTo CTapTyBaTe, npHTnCKajTe ro KpaTko KonTuTe 3a npebapyBaBe HaHaIpei (19)OdH.KoNteto 3a npebapyBaBe HaHa3ad (13)doNeKa He CTnHHeTe Do CaKaHnOT HAcNoB. PepnoDyKunjata Ha H36paHnOT HacNoB ATOmatckn CTapTyBa.
-3a da ja npeknhepe npoDykujata, npHTCHete ro Konueto Mute (12). Ha ekpaHOT ce nojaBvBa npkaZOT NcknyBaBe Ha 3BykOT (f).
-3aДа npoDOnKHe co penpoDyKunjata, noBtOHO npTnCHeTe ro konTuTo Mute (12),npomEnTe ja rIaChOCTa npeky konTuTo 3a npebapYBaBe HaHaPep (19) Odn. KonTuTo 3a npebapYBaBe HaHa3ad (13).
-3a npemotybahe HappeoH. Ha3aBBo pamKnHa eHn HacnoB DpxkTe ro npHTNCHATO KOnyeTo 3a np6bapyBaHe HAnpe(19)OHN.KOnyeTo 3a np6bapyBaHe HAn3a(13)doEka He CTNRHeTe DO cakaHOTo MecTO BO HACNOBOT.
Ako 3a BpeMe Ha paBoteHbeto npeky Bluetooth® ce IpiHTNChe eHNO oD KOuHbTa 3a 3auByBaHe Ha Iporpamata (17), Toraw paNOTO MeHyBa HA cTahNuTa 3auYBaHa BO NocJeHNO KopnCTeHOT peKm Ha pa60Ta Ha paNOTO.
TocTaByBaHe Ha npKa3 Ha BpeMe (GPB 18V-5 C)
3a da ro OTBOPHTe PnPKa3OT 3a BpEme BO MEHHTO, KpaTko npNTCHETe Ha KonTueto Clock (14).
Moxete da n36npate nomery bpemehcknte opmatn 12 yaca<12H> n 24 yaca<24H>, kako n da noctabybaTe yacOBn MmHyTH.
HabnnpajTe BO MeHHTo:
-MenhyBaHe Ha NoCTaBKn BO MeHHTo: BpTeTe ro KonuTeTo Clock (14).
-3aCyByBaHe Ha NoCTaBKn BO MeHHTo: PpHTNCHeTe rKoNueTo Clock.
-По зувуbahe Ha noctabkata 3a MmHtyn Odn. 10 s no
послелно пиитнсkahe Ha konчeto Clock paHnoto
мehyBa ce bpaKa ha abTomatckn peKIM.
AkoBpeMeToHa paIaIIOToBeKeHe Ce 3aUByBa,3aMeHete rPe3epBnHTe 6aTeHH.
Функида Reset (GPB 18V-5C)
3a da rpeceTnpate cnte noCTabKn Ha paNtoHa
φabpnuKn noCTabKn (Reset), npNTncHe ro konTuTeO
Clock (14) noDOnro oD 0,5 s. Ha ekpaHOT ce
nojabyBa
BpTe Ro KonuTo C0ck (14), 3a Da n36epe Mey peceTnpaBe
noCTaBKn
MeHyBaIbe Ha NoCTaBkHTe Ha MeHHTo (GPB 18V-5 SC)
3a da ja OTbOpHTe FyHKunjata Ha MEHnTO, npNTnCHete Ha konyeTo Menu (22).
HabirnpuajTe BO MEHHTO:
-HabnnpaBe Bo MeHTo: BpTeTe ro KonTuTeo Menu (22).
-ИзберетиЗауВajTe jaNoctaBkataHa MeHHTO:Ппгснсerte ro konчeto Menu (22).
-CmeHETe BO NOmEHn: PnHTncHete rKoNueTo Menu (22).
-CmeheTe OJIOMeHHTo Ha3aI KOH NOBUCOKo MeHn: KpaTko npNTncHeTe ro konTueto 3a npe6apyBaHe HaHa3aI (13).Kora Ke ce doCTrHe rOpHTo HnBO Ha MeHtO, paNHO tce BpKa BO peXHMOT Ha aydNo.
3a da ja HanyuHTnte yHKnjata Ha MeHn OJ cKaHOTo HNBO n da Ce BpaTHe Ha ayHNO peKHM, pInTHCHeTe FO KOnyTe 3a np6apByBaHe HHa3aD (13) NOOIO Ro 1 s. ANTePHaTHBHO, paHnOTo ABTomATCKn MeHyBa Ha peKHMOT Ha ayHNO 10 s no NocJeHTO pInTHCkAHe Ha KOnyTe.
Ako noctabknte Ha MeHnTo NOBeKe He Ce 3auyByBaAT npn NCKnyuBaHbeto Ha paAnOTo, Toraaw CMeHete rN pe3epBHTe 6aTePnn.
OnuHH Ha MeHHTo (GPB 18V-5 SC)
H3bOpT Ha MeHInTo DeIyMHO 3aBcN OJ peXIMOT Ha pa6oTa Ha ayDnO, BO KOj e NOCTabeHo paHOTO.
Bo pamknte Ha MeHnjata, HMeTo Ha MeHnTo ce npKaKxyBa Bo rophata nnHja Ha MyTnФyHKuHohAnHnNot npKa3 (k), a nocTBkata wTO moKeTe da ja n36epete Bo donHnOt den.
MENBpeme:MOKeTeJaH3bHpATE NomeFy BpeMeHCKHTe fOpmatn 12 yaca<12 Hour Mode> n 24 yaca<24 Hour Mode> n da ro nocTaBte BpeMeTo paHuO. Ako kaj ayDIO n3BOP DAB ce H3bepe paHIO cTAnu ca Koja ro npHeCyBa BpeMeTO, Toraaw ABOMaTcKne CpeZema Toa BpeMe.
Mennpeetnpabe:MOKeTe da rH peCETnPate CNTe IOCTaBKn HA MeHnTO Ha a6pNkIOCTaBKn
(kaj aydno n3BOp DAB)
Menn ABTomatcko npe6apyBaBe Ha ctaHnca: MoKeTe Da CTapTyBaTe ABTomatcko npe6apyBaBe Ha ctaHnca.
notpoWyBaUkaHa cTpyja (BO A)
3601DA400015
3601DA410015
3601DA417012
Bpoj Ha den/aprKn 36np Ha maKcHmHa
notpoWyBaUkaHa cTpyja (BOA)
3601DA41W015
3601DA41309
3601DA41409
OTbopeTe ro 3aWHTHOTo Kanaue (4) Ha npHKnyOuNTe 3a HAn3MeHNuHa cTpyja n CTaBeTe ro npHKlyUOKOT Ha HaNBopeuHnOt eNeKtpuH ypeD BO npHKLyHnua (5) Ha paHnOTO.
CobETH npH pa6oTeHeTo
HanomeHH 3a onTmamJIHO KOpHCTeIbe Ha 6atePHHTe
3aHTte ja 6atepnjata od Bnara H Boda.
Cknadnapjte ja 6atepnjata BO oncer Ha temnepaTpyo od -20Cdo 50°C.He ja octabajte 6atepnjata HA np. BO ABTOMO6Hnot BO neTo.
IIOBpeMeHO uCTe Tn OTBOpHTe 3a npoBeTpyaBaHe Ha 6atepnjata CO MEKa, uCTa H cyBa ueTa.
CkpatehotoBpemeHa pabotaNo nonHebeTo NOKaKyBa, da 6atepnjataeNotpoWeHa Mopa da ce 3ameHn.
BHHMaBJte Ha HAnOMeHHe 3a OCTpaHyBaHe.
OdpkByBaHe n cepBnC
OdpxbyBaBe n uHCTeHe
OndybaTe ja uCToTaHa paHnTo,3a da MoKe HcTOTO do6po n Cnrypno Da pa6toN.
Iokonye notpe6Ho KOpncTeHe Ha npknnyeh Ka6en, ToraHnababe ro od Bosch HnCneuJnHaPaHa npodABnua 3a Bosch-eneKtpnHn anatn, 3a da n36erHete 3arpo3yBaHe ha 6e36edHocTa.
H36pnueTe rHeuNCTOTnTE CO BnaXHa MEka Kpna. He KopnCTe CpeCTBa 3a YnCTeHe Hn pactBopn.
CepBncha cnjx6a n COBET npn KOpNCTeBe
CepBnchata Cnyx6a Ke OngroBOpn Ha BaWnte npaHaBa BO BpCKa CO nonpaBkata N odpxyBaHeto Ha BaWnOT npo3BOD KaKo N pe3epBNHTe DeNoBn. O3HaKn 3a EKcPiNo3Ja HnHΦopMaun 3a pe3epBNHTe DeNoBn HCTO Taka Ke HajTe Ha: www.bosch-pt.com
TMMOT3a COBetyBaBe npH KopnCTeHe Ha Bosch Ke BN NOMORHe DOKOLky HMaTe npaHaHa 3a HaHInTe pOn3BOOn H onpema.
3a cIte npaaHbHa HapaKn Ha pe3epBHN DeIOBN,Be MoNMe HabeTe ro 10-ncpneHmOT 6poj O nCneuKaHOnHa nnOua Ka H npn3BOJOT.
Cebepha MaKeDoHnJa
Д.Д.Енктпс
CabaKobayek47H,6poj3
1000 Ckonje
E-nowra: dimce.dimcev@servis-bosch.mk
HHTepHer: www.servis-bosch.mk
Ten./dakc:02/2467610
Mo6.:070595888
Ⅱ.Ⅰ.T.Y“POJKA”
JAnI NyKpOBcKn 66; T.U ABTOKOMaHda JIOKaI 69
1000 Ckonje
E-nowta: servisrojka@yahoo.com
Ten: +389 2 3174-303
Mo6: +389 70 388-520, -530
DOnonHHTeHH aDpeCH Ha cepBHCN MoKe Da HajTe noi:
www.bosch-pt.com/serviceaddresses
TpaHcnpot
IpenopaahnTe IInTHym-JoHN6bATEPN NOJNEXKAT Ha 6apabataHa3aKOHOT3aONACHMATEPNJAN. BatePHTe MoKe Da ce TpaHcnpTnPaat cMoOd CTpHa HA KOpNCIKOT,6e3NOTpe6aOdDOnONHTenHH KBaHnΦnKaunn.
Pn npneHoc Ha nCTHe oC TpaHa Ha TpeH Nua (Ha np. Bo3dyWe H TpaHCnOPT Hn WneDnUja) HeonXoHO e Da ce BHIMABA HA CNEJauHNHe HanOMEHN Ha ambaNakata n O3HaKIne.BoTAKOB Cnyuj, npn noTROBkata Ha npaTKata Mopa Da Ce NOBbKa ekCnepT 3a OnaChn CyntaHn.
TpaHcnpupajte r6batepnte camo DOKOKky KyknteTo e HeoTeTeHO.3aeneTe rN OTBOPHnTE KOHTAKn CnakyBaJte ja 6atepjata Ha ToJ HauHH WTO Hema Da ce DBNKBO AMbaJaTa. Be MoHMe BHNMaBaJte Ha eBEHTyAnHnTe DOONHnTeHH HAIOHOHn IpOINCN.
OtctpaHyBaIbe

PaJaTAt, aKymnatopcknte 6atepn/ 6atepnTe, onpemata n am6anaknte Tpeba da ce oCTpaHt Ha ekONoUKn pnpfaTnB HauHH.

He n φpnajte paNJata n akymnataopcknte 6aTePN/6aTePNTE BO DOMaHATA KaHTA 3a OTnadoouni!
Cama 3a 3emjnte oEY:
Cnope ebponckata nipekTnBa 2012/19/EU 3a ctapn eEeKTPuHn H eEeKTPoHcKn ypeDu HNBHaTa yNoTpe6a Bo HauHOHaHTo 3aKOHOdaBCTBO, padJaTa 7TO Ce BOH yNoTpe6a H deFeKTHnTe Nn NCKOpncTeHnTe 6aTePnn Cnope dIpeKTHbTa 2006/66/EC Mopa OndenHo da ce co6epat Na ce peuknnpaat 3a NobTopha yNoTpe6a.
Iokonyce oTcpaHyBaat HenpaBnH0,eNEKtpnHaTa n eEeKTPoHcKaTa ONpeMa MOKe Da HMaat WTeTHN BnJaHjaBp3XHBOTHaCpeDHa N 3dpaBjTe HaNyfeTo npaMD MoKHOTO pncycTO Ha OaNCH MaTePHN.
Batepnn:
JINTHYM-JOHCKH:
Be monime BHHMabajte Ha HanomeHnte BO DeNt TpaHCnopt (BnDn, TpaHCnopt", CtpaHua 180).
Srpski
"REPLACE AA BATTERY WHEN UNIT NO LONGER KEEPS
CORRECT TIME": Ukolko se vreme na radiju visene memorise, zamenite baterije za baferovanje.
Sve baterije uvek zamenite istovremeno. Upotrebljavaje samo baterije nekog proizvodača i sa istim kapacitetom.
Iz radio-uredaja izvadite baterije za baferovanje, akoga ne koristite duze vreme. U sluceju duzegskladijsenja, baterije za baferovanje u radio-uredaju bitmogle da korodiraju i da seispraze same od sebe.
Režim rada
www.bosch-pt.com/serviceaddresses
Transport
Preporuceni litijum-jonski akumulatori podlezu zahevima propisa o opasnim materijama. Korisnik moze bez dodatnih uslova transporteovati akumulatore na drumu.
Kod slanja preko trecih lica (na primer vizdušnih transportom ili špedicijom) mora se obrati za na posebne zahteve u pogledu pakovanja i označavanja. Tada se kod pripreme paketa za slanje mora pozvati strucnjak za opasne materije.
Akumulatorske baterije saljite samo ak o kuci ste nije osteceno. Odlepite otvorene kontakte i upakujte akumulatorsku bateriju tako, da se nePokrece u paketu. Molimo da obratite paznju na eventualne dalje nationalne propise.
Uklanjanje dubreta

Radio-uredaje, akumulatore/baterije, pribori pakovanja treba predati na reciklaukoja je u skladu sa zastitom zivotne sredine.

Radio-uredaje i akumulatore/baterije nemojte da bacate u kućno smece!
Samo za EU-zemlje:
Prema evropskoj direktivi 2012/19/EU o starim elektricnim i elektronskim uredajima i njenoj primeni u nacionalnom pravu, radio-uredaji koji se vise ne mogu koristiti, a prema evropskoj direktivi 2006/66/EC akumulatori/baterije koje su u kvar ili strošene moraju se odvojeno sakupljati i uklujciti u reciklažu koja ispunjava ekoloske uslove.
Ukoliko se elektronski i elektrichi ni uredaji otklone u optat na neispravan naclin, moguce opasne materije mogu da imaju stetno dejstvo na zivotnu sredinu izdravlje ljudi.
"REPLACE AA BATTERY WHEN UNIT NO LONGER KEEPS
CORRECT TIME": Pomožne baterije zamenjaje, ce secas na radijskem predvajniku ne shranjuje vec.
www.bosch-pt.com/serviceaddresses
Transport
Preporucene litij-ionske akt-baterije podliejezu zakun o transportu opasnih tvari. Korisnik bez ikakvih preduvjeta moze transportirati akt-baterije cestovnim transportom.
Ako transport obavlja treca strana (npr. transport zrakoplovom ili spedicija), treba se pridrzavati posebnih zahtjeva za ambalazu i označavanje. Kod pripreme ovakvih posiljki za transport prethodno se treba savjetovati sa strucnjakom za transport opasnih tvari.
Aku-bateriju saljite nekim transportnim sredsvom samo ako je njezino kuciiste neosteceno. Obljepite otvorene kontakte i zapakirajte alek-bateriju takdo sa ne moze pomicati u ambalazi. Pridrzavajte se i eventualih dodatnih nacionaln propisa.
Zbrinjavanje

Radije, aku-baterije/baterije, pribor i ambala-ztreba dovesti na ekoloski prihvatljivo recikiranje.

Radije i aku-baterije/baterije ne bacajte u kucni otpad!
Samo za zemlje EU:
U skladu s europskom Direktivom 2012/19/EU o elektricim i elektronickim starim uredajima i njihovom provedbom u nacionalno pravo neupotrebljivi radiji i u skladu s europskom Direktivom 2006/66/EZ neispravne ili strošene akubaterije/baterije moraju se odvojeno sakupljati i dovesti na ekoloski prihvatalivo recikliranje.
U slucaju nepravilnog zbrinjavanja elektrichi i elektronicki stari uredaji mogu imati sterne ucinke na okolis i ljudsko zdralje zbog moguce prisutnosti opasnih tvari.
www.bosch-pt.com/serviceaddresses
Transport
www.bosch-pt.com/serviceaddresses
Transportesana
Iteicamajiem litja jonu akumulatoriem ir piemerojami Bistamo kravu aprites likuma noteikumi. Lietotajs var transportet akumulatorus ielu transporte plusma bez papildu nosacijumiem.
Parsutot tos ar treso personu starpniecibu (piemeram, ar gaisa transporta vai citu transporte agenturu starpniecibu), jiaevero ipasui sutijuma iesainosanas un markesanas noteikumi. Tapec sutijumu sagatavosanas laikajapieaicina bistamo kravu parvadanas speciaists.
Parsutiet akumulatoru tikai tad, ja ta korpussn nav bojats. Aizlimejiet valejos akumulatora kontaktus un iesainojiet akumulatoru ta, lai tas iesainojuma neparvietotos. Ludzam ieverot ari ar akumulatoru parsutisanu saistitos nacionalos noteikumus, ja tadi pastav.
J 1 J 1 J 1 J 1 J 1 J 1 J 1 J 1 J 1 J 1 J 1 J 1 J 1 J 1 J 1 J 1 J 1 J 1 J 1 J 1 J 1 J 1 J 1 J 1 J 1 J 1 J 1 J 1 J 1 J 1
10go uuJUgKuJ U 100
<JUJ<
wluuulallun 1
oUaLbUaLALJgjy2.1jySLI
gouUuugpduuWuUg2Ug2U
uuuuiuUuUuUuUuUuUuUuUuUuUu UuUuUuUuUuUuUuUuUuUuUuUuUuUuUuUuUuUuUuUuUuUuUuUuUuUuUuUuUuUuUuUuUuUuUuUuUuUuUuUuUuUuUuUuUuUuUuUuUuUuUuUl

4.6ic JolJU gJU
.
jooaaiy gai aai yg i jll J 0011 jie jLl sJd.aa Jn no aai J 0011 jie g i 0011 gglg jllg 0011 gaii I aai I aai I aai I aai I aai I aai
aagglg lalb01e glll

auiy
4jJUJuuuui
aolsswlgSjoll
gI pJall gJ jN JsA.aaJy aabjB 1g jll jgl jgi jol .jaiu oJb20 0o aagd .ogsw uJ bll .aouill (jall
Aa0SjJlUg
J 1 J 1 J 1 J 1 J 1 J 1 J 1 J 1 J 1 J 1 J 1 J 1 J 1 J 1 J 1 J 1 J 1 J 1 J 1 J 1 J 1 J 1 J 1 J 1 J 1 J 1 J 1 J 1 J 1 J 1 J 1 J 1 J 1 J 1 J
225
jglgll 30
LobgJouwUJJ (15)
Lai j 1 aolal gIgill .aagall g
(GPB 18V-5 C) gJUJJ (a)
(Battery Bay) pSpaJI.1b2 (27)
pJJI Ubc JUd EJ (28)
29
aiaJI cuiJI
GPB 18V-5 CGPB 18V-5 SC
Jg 190 gj3
3601DA40..3601DA41..
DAB+gJUaai
山
g 100% (28) (27)psjall 80% (29)psjll cai jie baoi psjall jy jia jia jia jia jia jia jia jia jia jia jia jia jia jia jia jia jia jia jia jia jia jia jia jia jia jia jia jia jia jia jia jia jia jia jia jia jia jia jia jia jia jia jia jia jia jia jia jia jia jia jial
pSJJI Jn Jn
jw ala jc gjll elksoas jll aalg j 26) asjla dla la dao
J 100000000000000000000000000000000000000000000000000000000000
| 80-100 % |
| 60-80 % |
227
a a a a a a a a a a a a a a a a a a a a a a a a a a a a a a a a a a a a a a a a a a a a a a a a a a a a a a a a a a a a a a a a a a a aaa aa aa aa aa aa aa aa aa aa aa aa aa aa aa aa aa aa aa aa aa aa aa aa aa aa aa aa aa aa aa aa aa aa aa aa aa aa aa aa aa aa aa aa aa aa aa aa aa aa aa aa aa aa aa aa aa aa aa aa aa aa aa aa aa aa aa aa aa aa aa aa aa aa aa aa aa aa aa aa aa aa aa aa aa aa aa aa aa aa aa aa aa aa aa aa aa aa aa aa aa aaaaaaaaaaaaaaaaaaaaaaaaaaaaaaaaaaaaaaaaaaaaaaaaaaaaaaaaaaaaaaaaaaaaaaaaaaaaaaaaaaaaaaaaaaaaaaaaaaaaaaaaaaaaaaaaaaaaaaaaaaaaaaaaaaaaaaaaaaaaaaaaaaaaaaaaaaaaaaaaaaaaaaaaaaaaaaaaaaaaaa
:CUSTOM bJJI g j
.5+g5- jy gj(g)
aal bai gag y jy 0,5 CUSTOM oJJI aog (i) ulsiill
TRE (d)
(14) aclw alao Jd. EaJzI sGiuol
(14) aclw elao Jd. EaJzI sGiuol
abgauall dai
(14) (d) Gao/laojy I sGiuwo Jy J
(14) aclw Jy Jy Jy Jy BAS
(14) aclw Jy Jy Jy Jy Jy
(14) aclw Jy Jy Jy Jy
jIy (k) 10gll sssal l L g
Gaa I y aai I aai I aai I aai I aai I aai I aai I aai I aai I aai I aai I aai I aai I aai I aai I aai I aai I aai I aai I aai I aai I aai I aai I aai I aai I aai I aai I aai I aai I aai I aai I aai I aai I aai I
Brtooth 品 UJU JI.
DAB+gJU JU (GPB 18V-5 SC)
Jgaclllglacolg (GPB 18V-5 SC) acllll ylacolg oJg00 g0g0g0g0g0g0g0g0g0g0g0g0g0g0g0g0g0g0g0g0g0g0g0g0g0g0g0g0g0g0g0g0g0g0g0g0g0g0g0g0g0
+gabagababDABaaoia aaoi aog 1000000000000000000000000000000000000000000000000000000
auii daiiaaiiaaiiaaiiaaiiaaiiaaiiaaiiaaiiaaiiaaiiaaiiaaiiaaiiaaiiaaiiaaiiaaiiaaiiaaiiaaiiaaiiaaiiaaiiaaiiaaiiaaiiaaiiaaiiaaiiaaiiaaiiaaiiaaiiaaiiaaiiaaiiaaiiaaiiaaiiaaiiaaiiaaiiaaiiaaiiaaiiaaiiaaiiaaiiaaiiaai
(20 山 _ 1 ^ 山 _ 1 ^ 山 _ 1 ^ 山 _ 1 ^ 山 _ 1 ^ 山 _ 1 ^ 山 _ 1 ^ 山 _ 1 山 _ 1 ^ (204
Lululb
Ug Udo oos yIu kui uaii Iuiu
aui jia jia jaiuSui pu Lyj g5 120111111111111111111111111111111111111
gol (17) jj jc bai jui jao go o ju gai jia (c) u jai gog o u
(13)Jawg jjLg bgsal 100 g.(19)g g Jg 100000000000000000000000000000000000000000000000000000000000000000000000000000
(17)olulbdojIjIJc 0
(c)uiofo uUg uuioo
glll oalbu
(30) uKW gBgUgUgUgUgUgUgUgUgUgUgUgUgUgUgUgUgUgUgUgUgUgUgUgUgUgUgUgUgUgUgUgUgUgUgUgUgUgUgUgUgUgUgUgUgUgUgUgUgUgUg UgUg Ug Ug Ug Ug Ug Ug Ug Ug Ug Ug Ug Ug Ug Ug Ug Ug Ug Ug Ug Ug Ug Ug Ug Ug Ug Ug Ug Ug Ug Ug Ug Ug Ug Ug Ug Ug Ug Ug Ug Ug Ug Ug Ug Ug Ug Ug Ug Ug Ug Ug
g q 1AUX
JU 7) JIg8) JIJI 3,5 JAIJI. bIuJI J AUX JUx UooguAUX IN (10) u
eao 15 1AUX uagauu (h) uugauu uuuu uuuu (18) AUX
7 100000000000000000000000000000000000000000000000000000
JU 10000000000000000000000000000000000000000000000000000000000000
(17) 0aIbbsjI JdA Lc bdsall aLg 9 aJaaal abssll jg dJU AUX suiu .gJ gJ gJ
Lg pssll/aa jll lglg sssu
ailllll llll (c) uig jssuulil
bailllj 11111111111111111111111111111111111111111111111111
g j 1 a 1 J 1 1 1 1 1 1 1 1 1 1 1 1 1 1 1 1 1 1 1 1 1 1 1 1 1 1 1 1 1 1 1 1 1 1 1 1 1 1 1 1 1
j 1593 1593 1593 1593 1593 1593 1593 1593 1593 1593 1593 1593 1593 1593 1593 1593 1593 1593 1593 1593 159
gol (17) 0jU J j Uc b uu U
jai I ggo jy U! ygeall jus
.(c)uiuie gog u
(18)Jaaol
-aiw|abgaaJia
-aioglaiajaoJ
(17)golbbsjglcgo
JauaiuJg JsuWg g aJg abgalo .DAB+ Uusnue JIJI JIJI Ksao aJal
No DAB Station - Please Auto> DAB+ .(k)
FMgullUuJj/lu
15 FM 11200000000000000000000000000000000000000000000000000000000000000000000
GJUJJUJIUPB18V-5C (a) jUJU UjU (j) qgU
Llaalalalalalalalalalalalalalalalalalalalalalalalalalalalalal
1 1 1 1 1 1 1 1 1 1 1 1 1 1 1 1 1 1 1 1 1 1 1 1 1 1 1 1 1 1 1 1
aawio oJw y aJgS aJy d g JuaW jg Sic UaWg g JI Lslogg I JgUuUuUuUuUuUuUuUuUuUuUuUuUuUuUuUuUuUuUuUuUuUuUuUuUuUuUuUuUuUuUuUuUuUuUuUuUuUuUuUuUuUuUuUuUuUuUuUuUuUuUuu
gUgJgJgJgJgJgJgJgJgJgJgJgJgJgJgJgJgJgJgJgJgJgJgJgJgJgJgJgJgJgJgJgJgJgJgJgJgJgJgJgJgJgJgJgJgJgJgJgJgJgJg
-1aioojdiuaa
-0jLxI 13 aJUJI
gai jll jj lc oaoa alogb bfoi 599
jbi.(19) gai cai ljj gl (13) Jow
oag g lqlc jgiol ai ciil aull aball
. qiuw piig
-0jLx1U3 Uba
g1(13)Jawj gJJJ Jc bJg 59
.ajU0,5JC JJ oJ (19) JcJg JJJ
oJL qJGJI j aboo Js Jsw pi
229
g<12H> aclw 12 ggl aas jy jui li k. gJg cIwI bai aal yu, <24H> aclw 24 :ailll l q Jaiil
.
ojo g yjll jaiy acllgliaa abaa jal .uagall lssw l jd Jp9g yjll cagll jj jy lo 0slll
(GPB 18V-5 C) bαββ l dαβg
glg jybu bll g 12
la (bull ool) gao
09 0,5 c sjj ool (14) aclwI
LbUd 14) aUd gao J
NO> uUd bUd Eog Uo gJg
aUd gao Lc bUd Uo Jua
(GPB 18V-5 SC) aaiJI bI g Ie liao Jc biai daiJIaIg UJUogg. (22) aaiJI
:aaJJIgJaiI
(22)
(22)
(13) jw gai jj lc bfoi: jc
gai gai sgiu oic jll uogg aia
.ugai iigai iii yi
ugai gaiiia jaiiaag bi jaoi
jie bai jaiiuiy iigai iigai iigai iigai iigai iigai iigai iigai iigai iigai iigai iigai iigai iigai iigai iigai iigai iigai iigai iigai iigai iigai iigai iigai iigai iigai iigai iigai iigai iigai iigai iigai iigai iigai
(GPB 18V-5 SC) aaiJI UJU JI UJU
g aalalpwjocjoLg pailgall Jd s 009 (k) cllgll sdo jull yglal jbwl .lawll jbwll oolil
J 4) aLsIbE i J I J 5
Jd
aullia aaijpa 50 joll go Jolalil
aagjglnpo jolal aao 9
gajd gaji gji 201pajai 2
ojlall pajll jj 50 jng 20- j
Jia jall
i j 1000000000000000000000000000000000000000000000
a aasssssssssssssssssssssssssssssssssssssssssssssssssssssssssssssssssssssssssssssssssssssssssssssssss
Robert Bosch Morocco SARL
j0000000000000000000000000000000000000000000
LJ1JJ20300
(DAB wgall Jggo)
e:UJJI Jc loggJd aJ
Ibll 1c ylogig
(DABUgallJg)
sjjl bio elso: agdll aoIgall aolj
.uggogjall
(DABUwJg)
aaiy auiyaiuui yoo ggy jll 151
.511 (3) 1gjui
gaww lqiw gao gbsu jg y aall algoa wjyj jy jil
Joll
UjwLg gogolgul Ug jgsaagaa 0g aasall gss. oBalsgall ngil 1ogw ayill ngs lgl 1e pJall Jai .aal
jai jia jia jia jia jia jia jia jia jia jia jia jia jia jia jia jia jia jia jia jia jia jia jia jia jia jia jia jia jia jia jia jia jia jia jia jia jia jia jia jia jia jia jia jia jia jia jia jia jia jia jai ji gaoi gaoi gaoi gaoi gaoi gaoi gaoi gaoi gaoi gaoi gaoi gaoi gaoi gaoi gaoi gaoi gaoi gaoi gaoi gaoi gaoi gaoi
yIaIgS uS1s! 8 pS|uI IuWpogai 2
LauuI aagwksoll Uwolal aybsi pa. pUw
yIuI g uJy 8 uWpAsll cLsu 9
. dag nI aaleoiall ayssll cojuiu oJoo
aui jSll o sll no jalil
y j 1000000000000000000000000000000000000000000000000000000000000000
UJIbJI/psJg jgJJI 8 JJIJI UJIJI


:UJUJI/psJUJI
gU Ug
jil) jll j j 0sJgll sJd Jl oJe
.231 aol,“Joiil
232|w
g w g y qill cly jlgu o j 0w ay
sIg 1 sIg 1 g 1 g 1 g 1 g 1 g 1 g 1 g 1 g 1 g 1 g 1 g 1 g 1 g 1 g 1 g 1 g 1 g 1 g 1 g 1 g 1 g 1 g 1 g 1 g 1 g 1 g
J 1 J 1 J 1 J 1 J 1 J 1 J 1 J 1 J 1 J 1 J 1 J 1 J 1 J 1 J 1 J 1 J 1 J 1 J 1 J 1 J 1 J 1 J 1 J 1 J 1 J 1 J 1 J 1 J 1 J 1 J 1 J 1 J 1 J 1 J

sL CcLc SiIaBnlo Btlooth 0u colo g oow u lqilui (lglg) uusu J. sinu Lo Bluetooth SIG, Inc u jgsio qilui/olui nJl o laaiw aig Robert Bosch Power Tools Lwgi .iigpoiaj wilu T GmbH
Jg g Jgaaa
laaiJd jgI slqwB ggl gugu d
olkwJajgglaw
gai wai jolai gai jai jai
Jai g Jaa dss (2)
AUX-IN gw (10
USBjjwSgω (11)
JU L U Wauu gS J. Sg u jI J I aL o 1uai Ug S. dS Ud Sua Ua I yu uu uu uu uuuu uuuu uuuu uuuu uuuu uuuu uuuu uuuu uuuu uuuu uuuu uuuu uuuu uuuu uuuu uuuu uuuu uuuu uuuu uuuu uuuu uuuu uuuu uuuu uuuu uuuu uuuu uuuu uuuu uuuu uuuu uuuu uuuu uuu uuuu uuuu uuuu uuuu uuuu uuuu uuuu uuuu uuuu uuuu uuuu uuuu uuuu uuuu uuuu uuuu uuuu uuuu uuuu uuuu uuuu uuuu uuuu uuuu uuuu uuuu uuuu uuuu uuuu uuuu uuuu uuuu uuuu
233
sji ij j (29)
jui d 30
aocgj gaiu doS (13)
(GPB 18V-5 C) (ccw) "Clock" aosS (14)
ai ai jol Gsw oJam Jgao gby CwI
CwJqj I J cLalao Jcs CwU labl .gwh
.ajoi wuol cLalao doij
(aa) 1000000000000000000000000000000000000000000000000000000000
jwluai dao (16)
(a) JJw Jg (s)JU (sJW slj dss (25)
(a) JJw JU L SjU (26)
(Battery Bay) JJw JgJg (27)
jLwUaSjUwJgJdUeJpOu (28)
Lj
(GPB 18V-5 C) gslj wilj jsiw (a)
jjw jIg sjiu jjw cuawg jilw (b)
sJw oJAs JSo JSIw (c)
(GPB 18V-5 C) _L / _J
gjiu|dujSjlw (e)
j1s1w jilu (f)
JUWl (30) 121 JI aololololol FM jgslj SsLac oKd a. g W Jds Gg Cauu Jn ksoa Lg Jd J .S J Jy Jg J, Cw Jy Jn Ksol aLg Jd J .Jd Cauu Jn Jn Jn Jn Jn Jn Jn Jn Jn Jn Jn Jn Jn Jn Jn Jn Jn Jn Jn Jn Jn Jn Jn Jn Jn Jn Jn Jn Jn Jn Jn Jn Jn Jn Jn Jn Jn Jn Jn Jn Jn Jn Jn Jn Jn Jn Jn Jn Jn Jn J n
AUX (7) wg g jS jj 8) nS jS p
(5) 3,5 aWg .sS jj aiwJ abao
.1g (10) cGw AUX IN J (9) AUX IS
.1aio wliu g g guo d J AUX Uk
-(siaowgjoljUio
.Boothw@ aLwg d JJal jI
3) "Source" daS J aL bKunf pui (5) DAB+ gJ oBau/ pui (GPB 18V-5 SC)
daDAB+gololil gogio yalil (18)"Source" .gjw jus (h) DAB gogio oluii jnai, sjlw oolol ggs so ju w .gwho oos oos pabii gss. 5julw jlbu w jso go jy olkiwl pl Lucbtae Hg jgaaqagk (k) ogbiao Jluo gbiio sijilw uyljbu w slol oip
-UJ (18) "Source"
Jai j Jj g o kui d s jia j y j
ju 18"Source" aos .g w ooi lai
g j. s i S u j g a lai l u
. g w o u g o o w ooi o ki
o ki u g o u g o o u j k j g
gogw xan cai (13) qua aay da
. g u j (19) gl ay
-0a aos o
-dasj1
10gJ (sJw oJ 1so (17) doj sJw J Lg j 10gJ 10gJ 10gJ 10gJ 10gJ 10gJ 10gJ 10gJ 10gJ 10gJ 10gJ 10gJ 10gJ 10gJ 10gJ 10gJ 10gJ 10gJ 10gJ 10gJ 10g
olgs 17) oolj sjlw o jsl
sjlw sjlw o jolso oJlwh .gws o Jnla (c) sjlw o jnlso
sglg cagj d k w gog g jg j s
sis egw w jgby DAB+ okiu | gaiu
laill gio j |
dosg (13) aac g jg ginaa daas y
ssj ljuq jlojam jgby (19) glg jg ginaa
dae paae eae ae ae ae ae ae ae ae ae ae ae ae ae ae ae ae ae ae ae ae ae ae ae ae ae ae ae ae ae ae ae ae ae ae ae ae ae ae ae ae ae ae ae ae ae ae ae ae ae ae ae ae ae ae ae ae ae ae ae ae ae ae ae ae ae ae ae ae ae ae ae ae ae ae ae ae ae ae ae ae ae ae ae ae ae ae ae ae ae ae aa
DAB+guljolkiu! uunu uuuu J
UJU JUJU LwUgWu UJUU UoUu UJUU UJUU UJUU UJUU UJUU UJUU UJUU UJUU UJUU UJUU UJUU UJUU UJUU UJUU UJUU UJUU UJUU UJUU UJUU UJUU UJUU UJUU UJUU UJUU UJUU UJUUNuUUUUUUUUUUUUUUUUUUUUUUUUUUUUUUUUUUUUUUUUUUUUUUUUUUUUUUUUUUUUUUUUUUUUUUUUUUUUUUUUUUUUUUUUUUUUUUUUUUUUUUUUUUUUUUUUUUUUUUUUUUUUUUUUUUUUUUUUUUUUUUUUUUUUUUUUUUUUUUUUUUUUUUUUUUUUUUUUuuuuuuuuuuuuuuuuuuuuuuuuuuuuuuuuuuuuuuuuuuuuuuuuuuuuuuuuuuuuuuuuuuuuuuuuuuuuuuuuuuuuuuuuuuuuuuuuuuuuuuuuuuuuuuuuuuuuuuuuuuuuuuuuuuuuuuuuuuuuuuuuuuuuuuuuuuuuuuuuuuuuuuuuuuuuuuuuuuuuuuuuuuuuuuuuuuuuuuuu uu u u u u u u u u u u u u u u u u u u u u u u u u u u u u u u u u u u u u u u u u u u u u u u u u u u u u u u u u u u u u u u u u uu uu uu uu uu uu uu uu uu uu uu uu uu uu uu uu uu uu uu uu uu uu uu uu uu uu uu uu uu uu uu uu uu uu uu uu uu uu uu uu uu uu uu uu uu uu uu uu uu uu uu uu uu uu uu uu uu uu uu uu uu uu uu uu uu uu uu uu uu uu uu uu uu uu uu uu uu uu uu uu uu uu uu uu uu uu uu uu uu uu uu uu uu uu uu uu uu uu uu uu ku k k k k k k k k k k k k k k k k k k k k k k k k k k k k k k k k k k k k k k k k k k k k k k k k k K K K K K K K K K K K K K K K K K K K K K K K K K K K K K K K K K K K K K K K K K K K K K K K K K K K K K K K K K K K K K K K K K K K K K K K K K K K K K K K K K K K K K K K K K K K K K K K K K K K KKKKKKKKKKKKKKKKKKKKKKKKKKKKKKKKKKKKKKKKKKKKKKKKKKKKKKKKKKKKKKKKKKKKKKKK
u Jus Bosch jjua oog 1oewu lalao g gaa oju laaw
a 10 g a
wJyJyJyJyJyJyJyJyJyJyJyJyJyJyJyJyJyJyJyJyJyJyJyJyJyJyJyJyJyJyJyJyJyJyJyJyJyJyJyJyJyJyJyJyJyJyJyJyJyJyJ yj 9821+42039000:
:dsdolslj jdoa jldw wsdl www.bosch-pt.com/serviceaddresses
olwus Jos
JoljUgawuOwagjogwulSgljL jgi oJSL. Suiu Slijbs SllkS jngil Jus uua jIosaiu ngdy I Lsi
g jaa 100000000000000000000000000000000000000000000000000000000000000000000000000000000000
240|Jw]9
1
| de | Hiermit erklart Robert Bosch Power Tools GmbH, dass der Funkanlageotyp GPB 18V-5 C/GPB 18V-5 SC der Richtlinie 2014/53/EU entspricht. Der vollständige Text der EU-Konformitätserklärung ist unter der folgenden Internetadresse verfügbar: |
| en | Hereby, Robert Bosch Power Tools GmbH declares that the radio equipment type GPB 18V-5 C/GPB 18V-5 SC is in compliance with Directive 2014/53/EU. The full text of the EU declaration of conformity is available at the following internet address: |
| fr | Le soussigné, Robert Bosch Power Tools GmbH, déclare que l'équipment radioélectrique du type GPB 18V-5 C/GPB 18V-5 SC est conforme à la directive 2014/53/EU. Le texte complet de la déclaration UE de conformité est disponible à l'adresse internet suivante : |
| es | Por la presente, Robert Bosch Power Tools GmbH declares que el tipo de equipo radioélectrico GPB 18V-5 C/GPB 18V-5 SC es conforme con la Diretiva 2014/53/EU. El texto complet de la déclaration UE de conformidad está disponible en la direction Internet suivente: |
| pt | A abaixo assinada Robert Bosch Power Tools GmbH declares que o presente tipo de equipo equipamento de rádio GPB 18V-5 C/GPB 18V-5 SC est é a conformidade com a Diretiva 2014/53/EU. O texto integral da交代ação de conformidade está disponível no segunte endereço de Internet: |
| it | Il fabricante, Robert Bosch Power Tools GmbH, dichiara che il tipo di apparecchatura radio GPB 18V-5 C/GPB 18V-5 SC é conformale alla direttiva 2014/53/EU. Il testosterone Complete della dichiarazione di conformità è disponibile al segunte indirizzo Internet: |
| nl | Hierbij verkaar ik, Robert Bosch Power Tools GmbH, dat het type radioapparatuur GPB 18V-5 C/GPB 18V-5 SC conform is met Richtlijn 2014/53/EU. De volledige tekst van de EU-conformiteitsverklaring kan worden geraadpleegd op het volgende internetadres: |
| da | Hermed erklærer Robert Bosch Power Tools GmbH, at radiouystyrstypen GPB 18V-5 C/GPB 18V-5 SC er i overensstemmelse med direktiv 2014/53/EU. EU-overensstemmelseserklaeringens fulde tekst kan findes på følgende internetadresse: |
| sv | Härmed fösakrar Robert Bosch Power Tools GmbH attenna typ av radioutrustning GPB 18V-5 C/GPB 18V-5 SC overensstämmer med direktiv 2014/53/EU. Den fullständiga teksten till EU-försakran om overensstämme finns på foljande webbadress: |
| no | Robert Bosch Power Tools GmbH erklærer herved at radioustyrstypen GPB 18V-5 C/GPB 18V-5 SC er i overensstemmelse med direktivet 2014/53/EU. Den fullstandige teksten i EU-samsvarserklaeringen er tilgiengelig på følgende nettadresse: |
| fi | Robert Bosch Power Tools GmbH vakuuttaa, etta radiolaitetyppi GPB 18V-5 C/GPB 18V-5 SC on direktiivin 2014/53/EU mukainen. EU-vaatimustemukaisuusvakuutuksen täysittainen teksti on saatavilla seuraavassa internetosoitteessa: |
| el | Me tyn panoouo a/η Robert Bosch Power Tools GmbH, δηλωνει οτιοράοεξολιαμός GPB 18V-5 C/GPB 18V-5 SC πλροι ηνοδγia 2014/53/EE. To πλροε κειρενο της δηλωσός συμρόφωσός EE διαίθεται στην ακόλουθη έτοσελίδσ στο διαδίκτuo: |
| tr | Robert Bosch Power Tools GmbH, GPB 18V-5 C/GPB 18V-5 SC radyo ekipmani tipinin Direktif 2014/53/EU ile uyumlu oldugunu borian eder. AB uygunluk borianin tam metnine asagidaki internet adresinden ulasabilirsiniz: |
| pl Robert Bosch Power Tools GmbH ninijszym oswiadzca, ze typ urzadzenia radiowego GPB 18V-5 C/GPB 18V-5 SC jest zgodny z dyrektwyja 2014/53/EU. Pelny tekst declaraci jzgodnosci UE jest dostepny pod nastepujacym adresem internetowym: | |
| cs | Tínto Robert Bosch Power Tools GmbH prohlasuje, ze typ radiosvóho zařizeni GPB 18V-5 C/GPB 18V-5 SC je v souladu se směrnici 2014/53/EU. Üplnézněni EU prohlaseni o shodě je k dispozici na títo internetov adrese: |
| sk | Robert Bosch Power Tools GmbH týmtvo vyhlasuje, ze radiosvó zariadenie typu GPB 18V-5 C/GPB 18V-5 SC je v súlade so smernicou 2014/53/EU. Üplné EU vyhlasenie o zhode je k dispozici ni na tejo internetovej adrese: |
| hu | Robert Bosch Power Tools GmbH igazolja, hogy a GPB 18V-5 C/GPB 18V-5 SC típusá rádióberendezés megfelela a 2014/53/EU irányelnek. Az EU-megfeleloségi nyilatkoz teljes szövege elérhető a kõvetkežő internetes címen: |
| ru | Сим Robert Bosch Power Tools GmbH zárabláte, что радиоборudоваше Ттуна GPB 18V-5 C/GPB 18V-5 SC cootbetCTbye Діректпье 2014/53/EU. С полны мөтстOM дікларцио о сootbetCTbNi EU можно ознakомпбя по селюшему Иntechnet-адpresу: |
| uk | Сим Robert Bosch Power Tools GmbH zárabláte, что радиоборudоваше Ттуна GPB 18V-5 C/GPB 18V-5 SC Biindobдам Діректпьи 2014/53/EU. 3 повим мөтстOM дікларцио Biindobдам ознakомпбя за takочи Иntechnet-адpresу: |
| II | |
| kk | Осымени Robert Bosch Power Tools GmbH KOMпаньсы GPB 18V-5 C/GPB 18V-5 SC Tурдени ради Жабдьтардь 2014/53/EU Діректувасьна салььfvн Маглүдь. EO сайкесг Маглүдамась төmen徴eri Иntерnet мени күлүдд: |
| ro | Prin prezenta, Robert Bosch Power Tools GmbH declară са tipul de echipamente radio GPB 18V-5 C/ GPB 18V-5 SC este in conformitate cu Direciva 2014/53/UE. Textul integral al declaratièi UE de conformitate este disponibil la urmätoarea adresä internet: |
| bg | С насточто Robert Bosch Power Tools GmbH Декларира, чу тои тир радиocьорьке GPB 18V-5 C/ GPB 18V-5 SC в СбOTВЕТСВЕ с Діректува 2014/53/EC. РалоctнгтTekт ha EC дірларцята за СбOTВЕТСВЕ може за са Намени Иntерnetа adrec: |
| mk | С ова, Robert Bosch Power Tools GmbH почрда вда тиnot ha радио onрера GPB 18V-5 C/GPB 18V-5 SC e bo corласноct co Діректувата 2014/53/EU. ЛенинтTekт ha Изравата за сoudразноct ha EU може за ro почтате на сеadingави Иntерnet CTраимиа: |
| sr | Ovim Robert Bosch Power Tools GmbH izjavluje da je radio-oprema tipa GPB 18V-5 C/GPB 18V-5 SC u skladu sa direktivom 2014/53/EU. Kompletan tekst EC izjave o usaglaşenosti je dostupan na sledećoj veb-adresi: |
| sl | Robert Bosch Power Tools GmbH potrjuje, da je tip radijske opreme GPB 18V-5 C/GPB 18V-5 SC skladen z Direktivo 2014/53/EU. Celotno besedil'o izjave EU o skladnosti je na voljo na naslednjem splenetem naslovu: |
| hr | Robert Bosch Power Tools GmbH ovime izjavluje da je radijska oprema tipa GPB 18V-5 C/GPB 18V-5 SC u skladu s Direktivom 2014/53/EU. CJeloviti tekst EU izjave o sukladnosti dostupan je na sludećoj internetskoj adresi: |
| et | Кäesolevaga deklareerib Robert Bosch Power Tools GmbH, et käesolev raadioseadme tüup GPB 18V-5 C/ GPB 18V-5 SC vastab direktivi 2014/53/EL nõuetele. ELi vastavusdeklaratsioni tãielik tekst on kättesaadav järgmisel internetiaadressil: |
| lv | Ar so Robert Bosch Power Tools GmbH deklare, ka radioiekârta GPB 18V-5 C/GPB 18V-5 SC atbilst Direktivai 2014/53/ES. Pilns ES atbilstbas deklaracijas teksts ir pieejams šādā interneta vietne: |
| lt | Aš, Robert Bosch Power Tools GmbH, patvirtinu, kad radijo jrenginiug tips GPB 18V-5 C/GPB 18V-5 SC atitinka Direktvyq 2014/53/ES. Visas ES atitikties deklaracijos tekstas prieinamas šiuo interneto adresu: |
| → http://eu-doc.bosch.com/ | |
Declaration of Conformity
Hereby, Robert Bosch Limited as authorised representative acting on behalf of Robert Bosch Power Tools GmbH declares that the radio equipment type GPB 18V-5 SC is in compliance with the Radio Equipment Regulations 2017. The full text of the declaration of conformity is available at the following internet address:
-
https://gb-doc.bosch.com