G923 - Game controller LOGITECH - Free user manual and instructions
Find the device manual for free G923 LOGITECH in PDF.
| Product type | Racing wheel with pedals |
| Brand | Logitech |
| Model | G923 |
| Compatible platforms | Xbox One, PC |
| Power supply | External power adapter |
| Connections | USB, DB-9 port for optional shifter, pedal jack |
| Rotation angle | Up to 900 degrees (adjustable in G HUB) |
| Force feedback | Dual motor with TRUEFORCE high definition |
| Dual clutch | Yes, programmable via LSB/RSB buttons |
| Paddle shifters | Yes, left and right |
| Pedals | 3 pedals: accelerator, brake, clutch |
| Configuration software | Logitech G HUB (sensitivity, rotation, force, mapping settings) |
| Indicator light | Engine RPM indicator lights compatible with select games |
| Mounting | Integrated desk mounting system with removable extenders |
| Housing dimensions | Approximately 30 x 28 x 28 cm (estimated) |
| Weight | Approximately 2.5 kg (estimated) |
| Care and cleaning | Unplug before cleaning; use a soft, dry cloth |
| Safety | Overheating protection circuit; unplug after extended use |
| Spare parts and repairability | Contact Logitech support for any parts or repairs |
| General information | Complete manual available in 25 languages at notice-facile.com |
Frequently Asked Questions - G923 LOGITECH
User questions about G923 LOGITECH
0 question about this device. Answer the ones you know or ask your own.
Ask a new question about this device
Download the instructions for your Game controller in PDF format for free! Find your manual G923 - LOGITECH and take your electronic device back in hand. On this page are published all the documents necessary for the use of your device. G923 by LOGITECH.
USER MANUAL G923 LOGITECH
Racing Wheel and Pedals For Xbox One and PC
SETUPGUIDE

logitech


English 3 Ceska verze 168
Deutsch 14 Slovenica 179
Francais 25 ykpaHcbKa 190
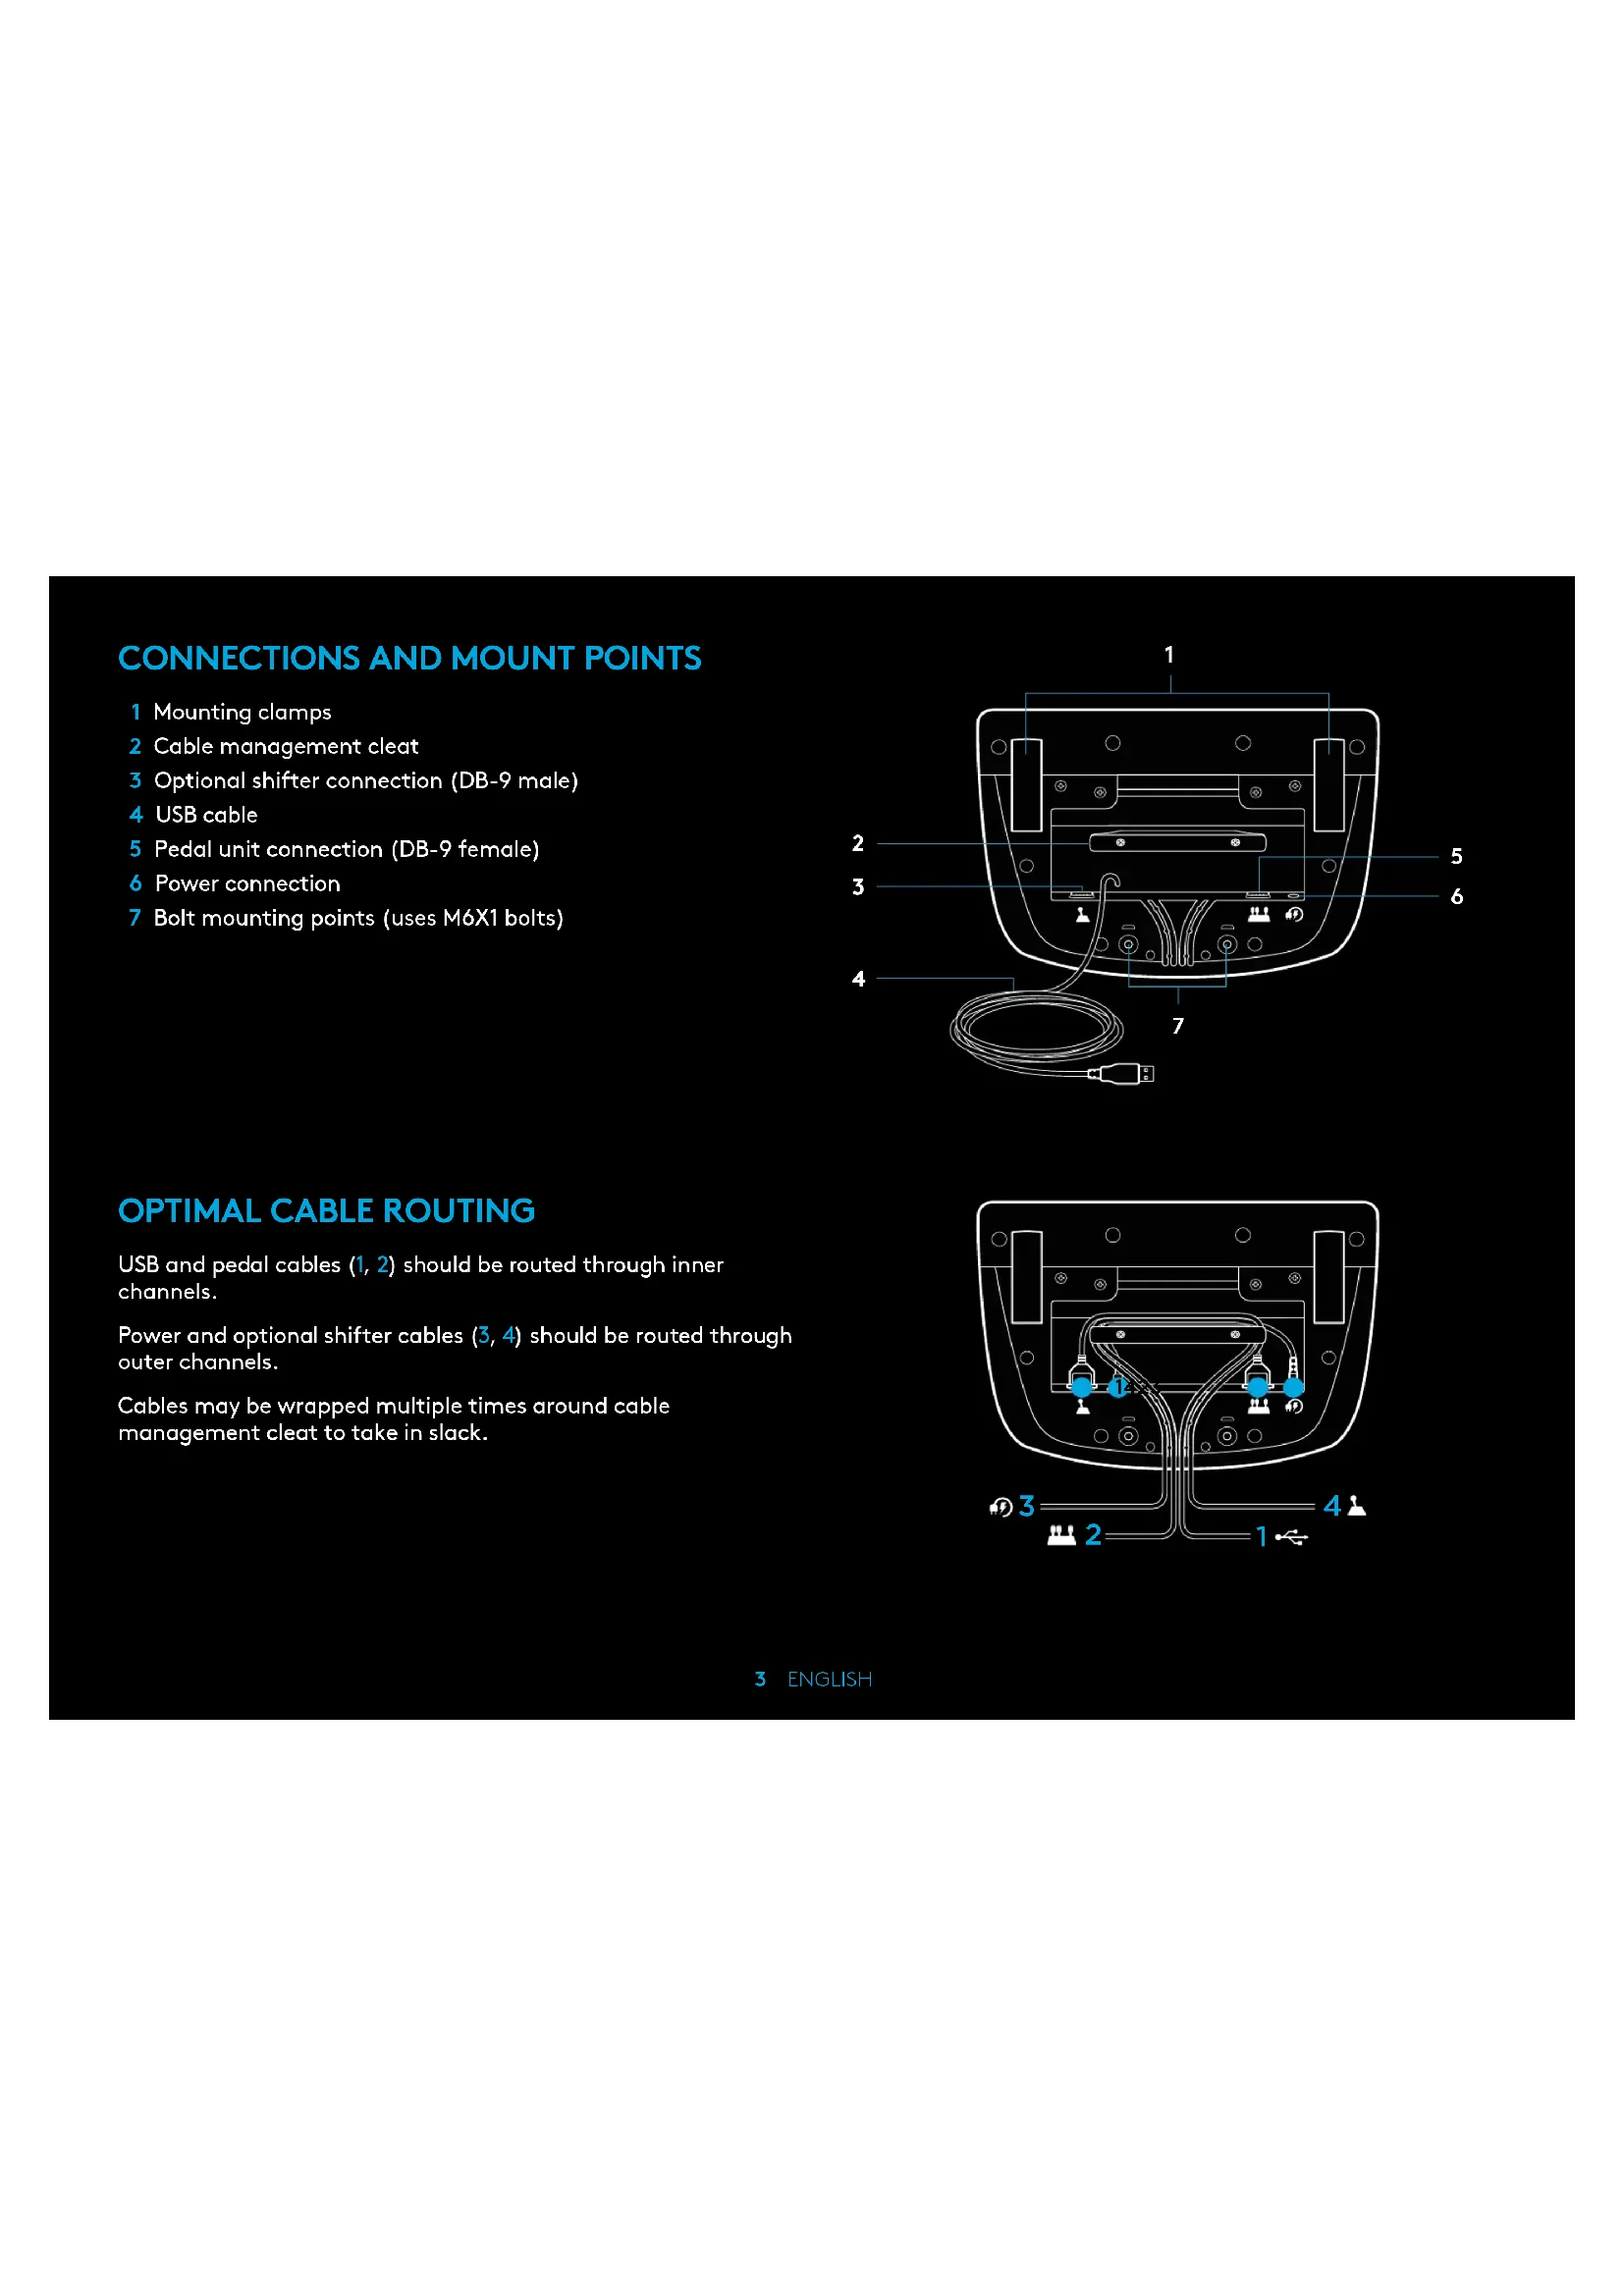
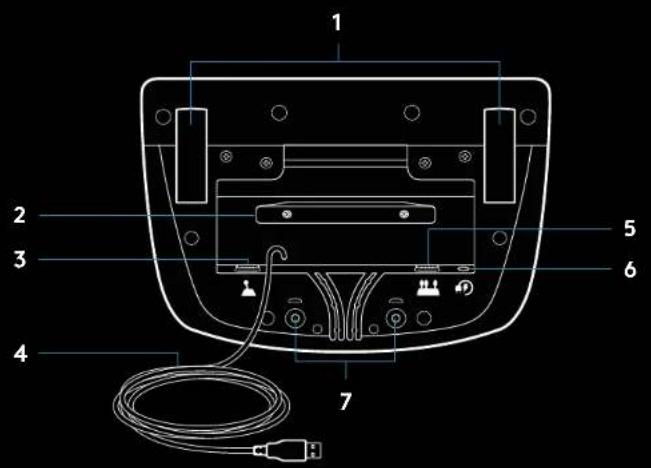
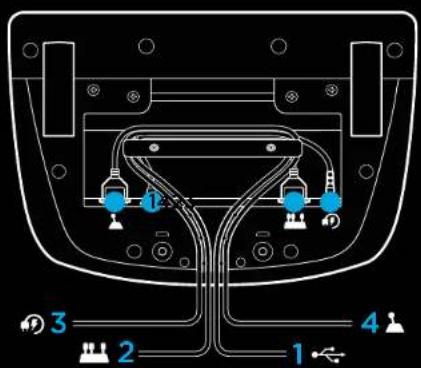
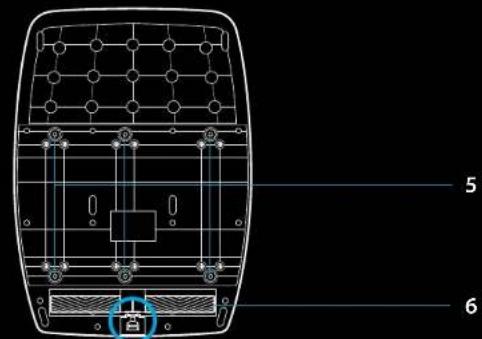
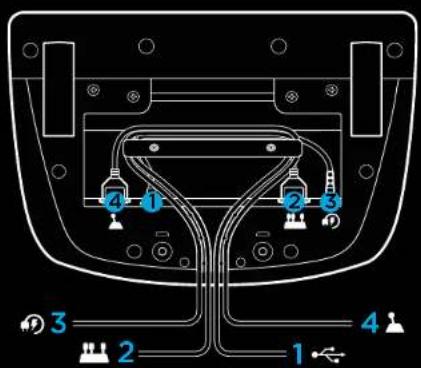
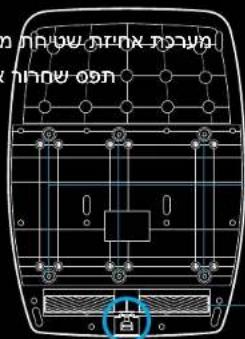
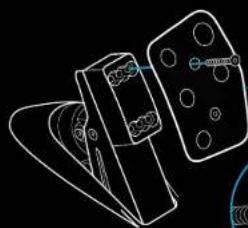
CONNECTIONS AND MOUNT POINTS
1 Mounting clamps
2 Cable management cleat
3 Optional shifter connection (DB-9 male)
4 USB cable
5 Pedal unit connection (DB-9 female)
6 Power connection
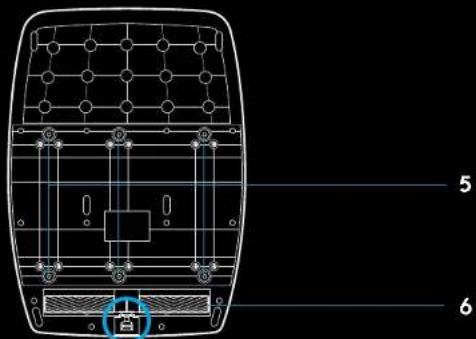
7 Bolt mounting points (uses M6X1 bolts)
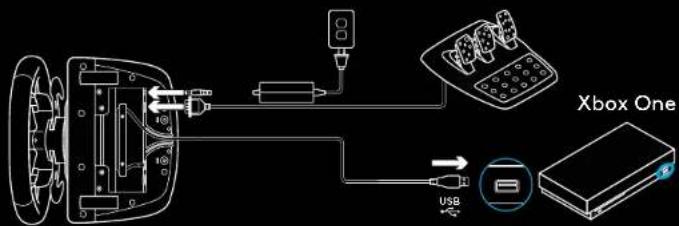
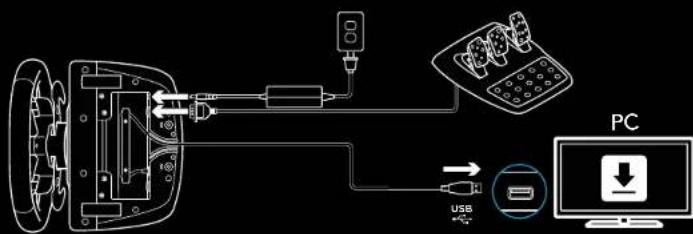
OPTIMAL CABLE ROUTING
USB and pedal cables (1, 2) should be routed through inner channels.
Power and optional shifter cables (3, 4) should be routed through outer channels.
Cables may be wrapped multiple times around cable management cleat to take in slack.

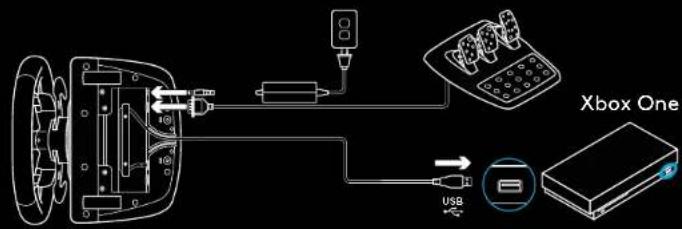
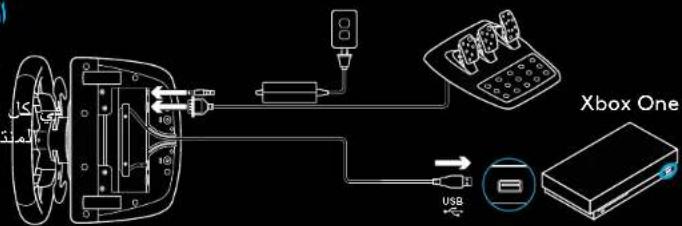
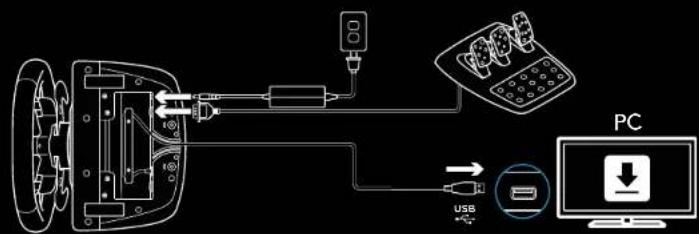
INSTALLATION -XBOX ONE -PC
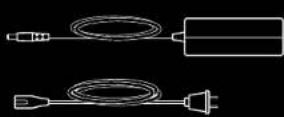
Attach power adapter and USB cables as shown.
Every time your racing wheel connects with your system, it will rotate fully to each side and then to the center to calibrate. Your wheel will be ready once this calibration is completed.
For PC to enable the force feedback and RPM LED features on your G923 Wheel and Pedals you must install the Logitech G HUB software. This can be found at logitechg.com/support/g923-xb1
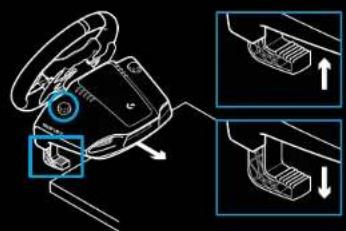
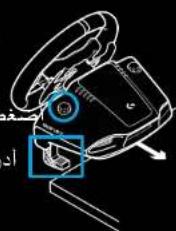
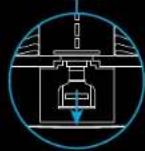
MOUNTING CLAMPS
G923 Racing Wheel is equipped with a built in clamping system for mounting to a table.
Push down and rotate clamp knobs to lock or unlock.
Rotate clamp knobs to tighten or loosen clamps.


Note:
Clamp extenders should be removed for attachment to thicker tables.
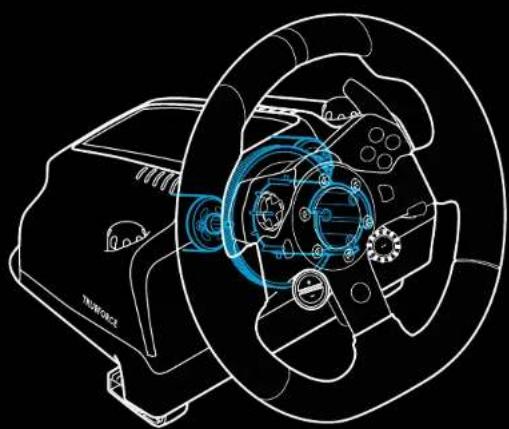
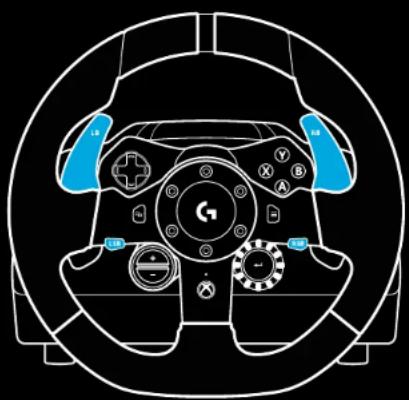
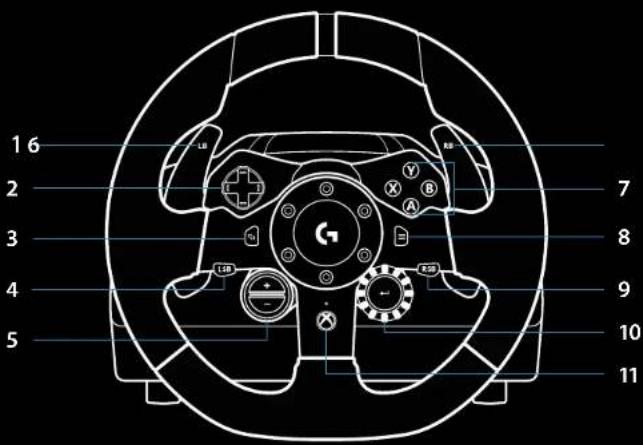
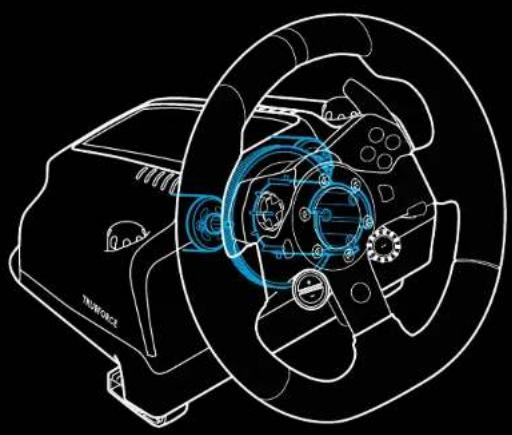
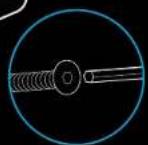
BUTTONS
1 Left bumper
2 Directional pad
3 View button
4 Left stick button
5 +/- Setting Adjustment buttons
6 Right bumper
7 A, B, X, Y buttons
8 Menu button
9 Right stick button*
10 Setting Selection Dial and select button*
11 Xbox button
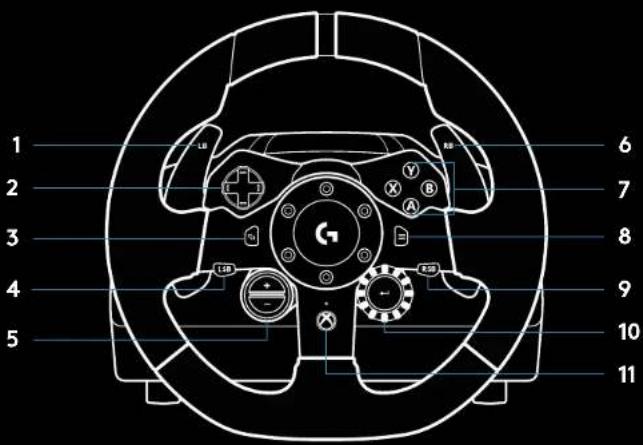
- requires supported games on Xbox One. Assignable in any game on PC using either in-game assignment or Logitech G HVB software.
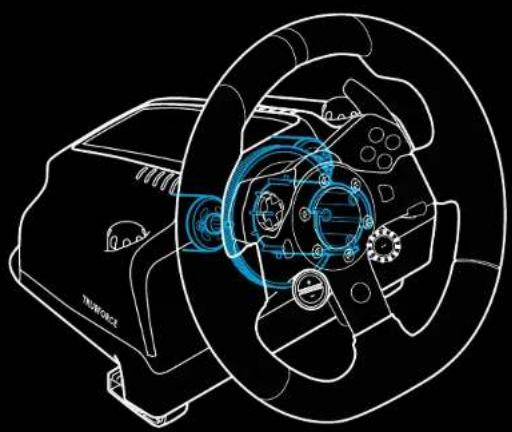
FORCE FEEDBACK
Your Racing Wheel contains dual motors that will provide force feedback with supported games and systems.
In supported titles you will also experience our next generation approach to force feedback: TRUEFORCE.
TRUEFORCE integrates directly with game physics and audio to unlock high-definition, real-time force feedback. Tire grip, suspension, weight, horsepower—even unique engine sound resonance—are immediately and accurately felt through the wheel.
Supported titles on Xbox One and PC may implement TRUEFORCE high-definition force feedback. For a list of supported titles visit logitechg.com/support/g923-xb1

Note:
Your Racing Wheel has an overheat protection circuit safeguard to protect it under high-temperature operating conditions. In rare instances, force feedback features may shut down during use while controls continue to operate.
If this occurs, allow the wheel to cool down and power it down by unplugging it. If this occurs frequently, contact product support.
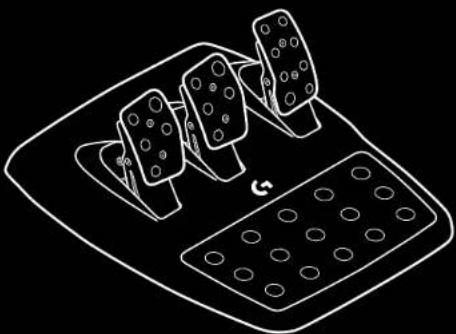
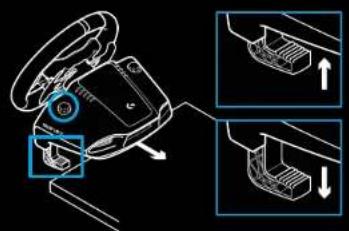
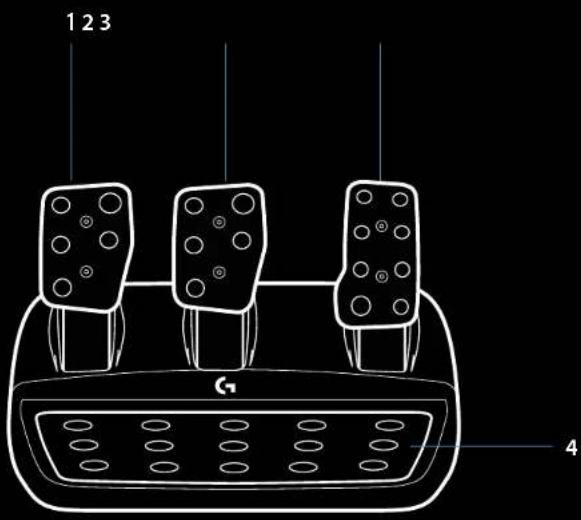
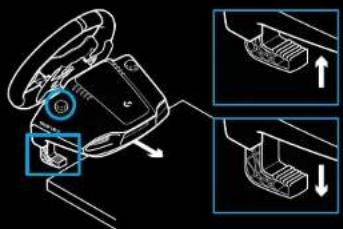
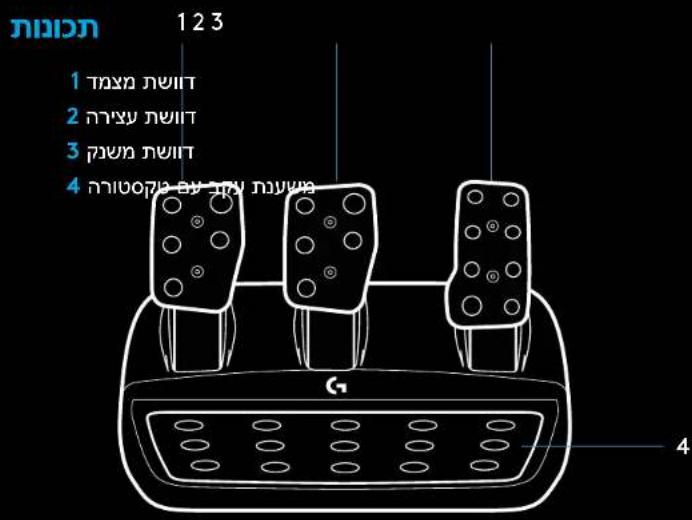
FEATURES
1 Clutch pedal
2 Brake pedal
3 Throttle pedal
4 Textured heel rest
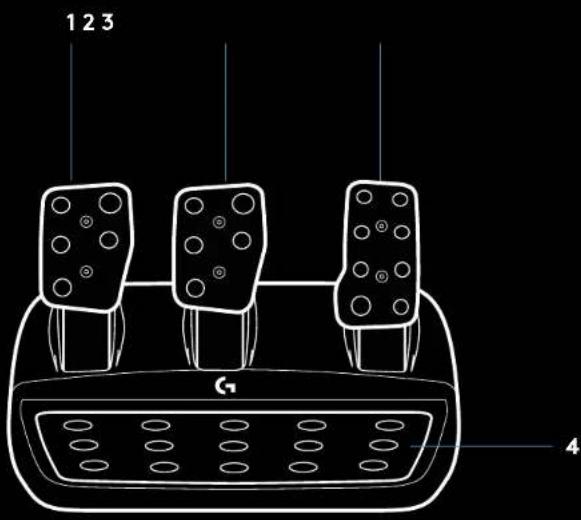
5 Bolt mounting points (uses M6X1 bolts)
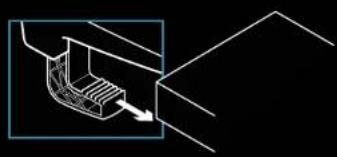
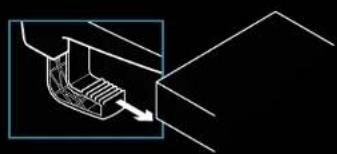
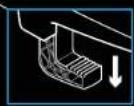
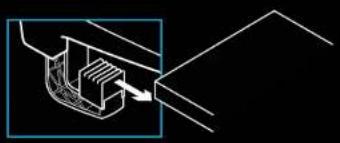
6 Patented carpet grip system
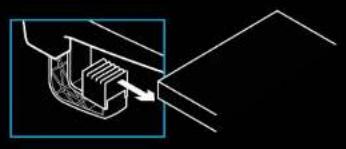
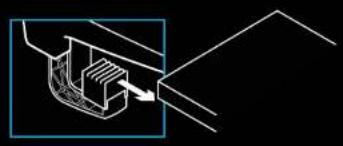
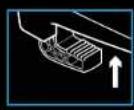
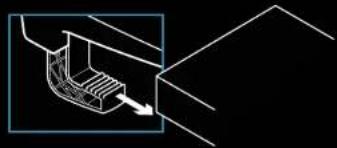
7 Carpet grip release clip Push towards rear of pedal unit to release
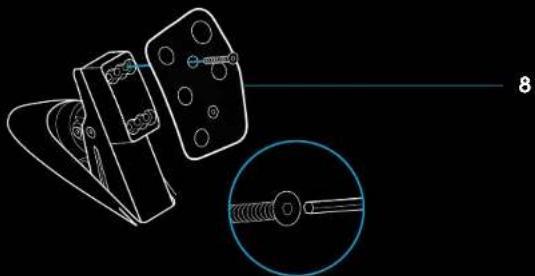
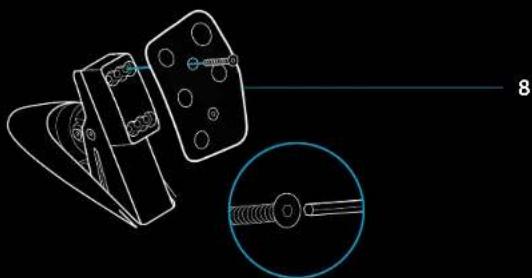
8 Change pedal face position (requires 2.5mm hex key)

7
USING THE DUAL CLUTCH IN-GAME
Using a dual clutch system from a grid start in a race enables you to achieve maximum traction without the need to find the bite point of your clutch pedal - this can give you a significant advantage at the start of a race.
To use the dual clutch system in-game:
1 At race start, fully depress the clutch pedal and the button assigned to the dual clutch function (see next section for setting instructions).
2 Select first gear using the Gear Up Paddle and fully depress the gas pedal.
3 As soon as you get the green light for race start, immediately release the Dual Clutch button. The car should start moving as the bite point of the clutch is engaged.
4 Smoothly release your foot from the clutch pedal in order to achieve maximum traction. It's worth practicing this last step and modifying the bite point setting several times to find a method that works for you. Once you have it perfected, this feature can help make up several places on the grid.
Note:
Support for the dual clutch function is not possible in some games. A list of games that support the dual clutch feature can be found at logitechg.com/support/g923-xb1
SETTING UP THE DUAL CLUTCH SYSTEM
1 Press and hold the left and right gear paddle and Left stick button and Right stick button together for two seconds to enter dual clutch setting mode. The RPM LEDs will illuminate blue and flash slowly:
Note:
Whilst in the Dual Clutch setting mode the RPM LEDs will not respond to the game/SDK
2 Press the button you want to set as the dual clutch button. The only valid buttons for this are the left stick button (LSB) and right stick button (RSB). The RPM LEDs will flash red to show that you're in clutch position setting mode.
3 While in your chosen simulation or game with the car still on a track, fully depress the clutch and gas pedals. Engage first gear and keep pressing the minus button down until the car begins to move in-game. You can adjust the precise bite point of the clutch by using the plus and minus buttons until you are happy with the setting.
4 At this point you may test the dual clutch without leaving the setting mode. It is recommended you attempt a race start, stop the car and adjust the bite point and then try again until you are satisfied with the performance of the dual clutch.
5 Press the Select button in the middle of the dial on the wheel to exit dual clutch setting mode. The RPM LEDs will flash in a sequence from green to blue to show that the setting is saved. The RPM LEDs will then go out and begin responding again to RPM output from supported games.


RESETTING DUAL CLUTCH SYSTEM
Press and hold the left gear shift, right gear shift, and X button for two seconds.
The RPM LEDs will all flash four times and then extinguish to indicate that the Dual Clutch system has been reset.
The button assigned to the Dual Clutch system (LSB or RSB) will revert to its normal function.
USING LOGITECH G HUB
Logitech G HUB enables the following features on the G923:
- Button programming with profiles that can be linked to games.
- Adjustment of wheel settings, such as Rotation Angle and TRUEFORCE strength.
- Testing of the various buttons, wheel and pedal functions.
G HUB WHEEL SETTINGS
Sensitivity
Alters the output response of the wheel to be more or less sensitive. Leaving this slider at 50% will provide a linear 1:1 output. Between 51% and 100% will make the wheel increasingly more sensitive around the centre movement of the wheel. Between 0% and 49% will make the wheel decreasingly sensitive around the centre movement of the Wheel.
Operating Range
The G923 is capable of up to 900 degrees of rotation. Reducing this setting will change the point at which the wheel will reach full steering lock. This is especially useful if you're driving a car with a smaller actual steering lock angle, such as a Formula 1 or GT3 car.
Centering Spring (for games without force feedback)
Most games that support force feedback already model the correct return to center function of the G923 based on the virtual car. It is recommended that the Centering Spring option be turned off for these games.
Enabling the Centering Spring option will allow you to override the game features and adjust the strength of the return to center force using the provided slider.
Torque
Only available for TRUEFORCE supported games. Torque controls the overall force feedback strength for your G923.
Audio Effects
Only available for TRUEFORCE supported games.
Controls the overall strength of the audio-related effects (engine note, rumble strips etc.) when using TrueForce-compatible titles.
If you are using your G923 in older titles that do not support TRUEFORCE then adjustment of the force feedback can be performed from the settings menus of the game title.
G HUB PEDALS SETTINGS
Sensitivity
Alters the output response of the pedals to be more or less sensitive. Leaving this slider at 50% will provide a linear 1:1 output. Between 51% and 100% will make the pedal increasingly more sensitive around the initial movement of the pedal. Between 0% and 49% will make the pedal decreasingly sensitive around the initial movement of the Pedal.
Combined Pedals
If checked, this will set the gas and brake pedals to become two halves of a single axis. This will help the pedals operate correctly in older racing titles that do not support separate axes for pedals.
Note: if left checked then the pedals will not behave correctly in modern racing titles. If you find that just one of your pedals is functioning by accelerating when pressed and braking when released then you should make sure that this option is not checked.
TESTING YOUR WHEEL AND PEDALS
On the wheel and pedals screens in G HUB you can check every button and axis on your G923 in order to ensure everything is functioning correctly. For the wheel you can also see the effect of altering the Operating range.
QUESTIONS?
logitechg.com/support/g923-xb1
XPHSH TOY LOGITECH G HUB
To Logitech G HUB eVepyoioi te napakatw leitoupyie oTO G923:
- Ppoypaumouc koupiouv e npoipia nou mtopovv va ouvdeltaouv oTa naividia.
- PpogapouynTowpuOuiaoeWtouTiuoviou, onwC eivai n yovia πeipotpoqnc kal Ioxuc tou ouotnuaatoc TRUEFORCE.
Aokijun Tov biapopwv aeitoupyiw Tov KOUPIOW, TOU TIOVIOKAI Tov NNTa.
PYOMIZEIIZTIMONIOY G HUB
Euao0hoiia
Tpononoei tvn anokpian tou tioviou, wote va eivai nepicooteo n liyotepo evaiothetain. Av aepnoete to puthetaioiko oto 50%, n anokpion th eivai ypaumik 1:1. H pvthian ano to 51% ec to 100% th auvhoia avaloyika tvn euiaoetaia tnc kevtpiknc kivnonc tou tiovioiu. H pvthian ano to 0% ec to 49% ta eiwocia avaloyikacnv evaioetaia tnc kevtpiknc kivnonc tou tiovioiu.
Euoclambda
To G923 éxéi duvatoTnTa neipotpoqnc éwc kai 900 μoipw. H μeiown autic ntc puθmuanc θa aaläéi to onμeio πlnpouc nepiotpoqnc tou tiovoiu. H pθμian εiva iiaitepa xphoiun otav obnyite eva autokivnto με μikpotepn yovia neipotpoqnc tiovoiu, oπwac autokivnta Formula 1 ngT3.
EaTnpio KeVtppiaoatoc (ya naYviDia xwpiavadpaon)
Ta nepiaotepa naividia tou unoontpocov to ouatnua avaspanc npogoiowovu tn owotn leitoupyia emiotpocnc oTo Kevto tou G923, aaloya me To Eikoviko autokivnto. suviotatal n anevepyonoin tonc eiloync tou Eaatnpiou kevtppiaqmuoc ae auta ta naividia.
H epeytoian tnc eniaync 5aatnpiou kevtpapigatoct ba aac
etippeia va npapaBaepte Tc aeitoupyie tou naixviidou kal va
tpogapuoaeTe n duvaun tnc eniataooc oTo Kevtpo, xnoiiooiuvtc
to papexoevo puotikó.
Pomn orpepsi
Aiaheaiun mvo oe naixviia tou unooTnpicuv TRUEFORCE. H potn otpeync eleyxie tn gvoaiik dvaum ntc avadpaonc tou G923.
Hxntukεφε
Aioeia ma ovo oe naixviia nou uooTnpicov TRUEFORCE. Exyektn ouoAikn evtaan twv nxntikwv epe (hxc umxavnc, LwpiDcE ME TpaXIEC EIIPavieK.AI.) OTV XPOIOIOIETE TITLOUC NOU UTOOtnpiciov TrueForce.
Hooepnannnepepepepepepepepepepepepepepepepepepepepepepepepepepepepepepepepepepepepepepepepepepepepepepepepepepepepepepepepepepepepepepepepepepepepepepepepepepepepepepepepepepepepepepepepepepepe pe
OBPATHAR CBA3b IIO YCNJINIO
CnpTnBbIpyIbOcHaueHdByMa DBrAteJIaM, KOtOpBle o6ecneuBaHT o6paTHyIO CBa3b IIO YcNIIIO B IOndepXkBaEmbIX INrpax N CNTeMax.
CHeKOTOpbIMN IrgpAMN TepeBpa6oTaETpepeOBAaTexHOIoTnO 6pbTHNO CB8N No ycuiIO:TRUEFORCE.
BlaTOpApa HEnocpeCTBeHHOMBy B3aIMoDeIcTBnIO CΦN3HueckIM DBrXKOM Urpyi N 3ByKObIM CoIpOBoXdHeHm ETeHXoHOrn TRUEFORCE oecneuBaET PpeJeBHO YeTKyIO o6paTHyIO CB8bNo ycNlIO B peAlbHOM BpeMeHN. CuenJIeHnE IINH cDopoxHbIM NOKpbITNeM, Kone6aHnnoDBeCKN, MoCb N Bec MaunHbI, a TaKke Bn6bpnpuyoUm 3ByK DBNrTaTeI — BCE 3TO MOXHO OUYTNb C NOMOUsbpyJIA.
Poiepxmbaembte nprbI dN Xbox One n PK Moryt nCnoB3OBaTbTexHOIOIO TRUEFORCE - npedeHbHO ueKoJ o6paTHo CBn no ycnlNO. Co cnicKOM COBmectMbIX npr moXHO O3HaKOMMTbCa na ctpanue logitechg.com/support/g923-xb1
PnmeaHne.
Blaqopa CnCTeMe 3aunTbOT nepepeBa cnoptNBbI pylb HaedxHo
H630ancho pa6oTaET BycOBnX BbcOKnx TempeaTyP. B peKnx
Cnyaax CNCTeMa O6paTHO CB3N NO yCNIIIO MOxET BbIKIOuTaCb
pni NCNOB3OBAHN, B TO BPEMa KaK 3JeMeHTb YnpabNeHnA
npoONKaOT pa6oTaTb.
B taKnx cnyaax Heo6xOJIMo OTKIOUHTb pynb IdoXaTbcaero oxnaXeHnI,OTcoEINHnIB ka6eNB.Ecnn 3TO pOn30JeT NOBtOpHo, o6paNTteCb B ceHTp TexHNuecko NODiePxxN.


XAPAKTEPNUCTNIKU
1 PendaB cuenenne
2 PegaTb TopMo3a
3 PedaIbra3a
4 TektypoBaHHaOnopa dHn

TouKn KpEnIeHn6oJIIOB (ncnoIb3yIOrca 6oJIbM6X1)
3anaTeHToBaHHa CNCTeMa npOTuBocKoIb3aUero NOKpbITIN
7 KpeIJIeHHe IIN CHATN NpOTnBocKoB3aUeI OOKpbITnA To6bI ChTb NOKpbITNe, CnBnHbTe erO No HApPabNeHIO K 3aDne NaHEI 6Ioka NeJaIe
8 N3meHnTe nOJoxHe HAKJaKn PnJaNN (Tpe6yETcA WecTnPaHHbIKIou 2.5 MM)

7

NCHONBJ3OBAHNE BINGPE DBOHOGO CLIENHEHNA
NcTb3OBaHne CNTeMb I DOBHOrO CuENHeHn B TOrHe Co CTApTOBOI No3UIM DaET BO3MOXHOCTb DoCTuYb MaKCMMaJIbHOrTO TArBOrO YoINIA IN DfA 3TOrHO He PpNDTeCn NCKaTb MoneHT CuENHeHn —3TO MOxET DaTb CyueCTBeHHoe PpenMHyEeCTBO B HaVaJe ToHKn.
YTO6bI NcNoJIb3OBAbT CnCTeMy DBOHOro CcENJIeHnB INrpe, CdenaIte CnEduJUe.
1 B haayane rohkn haxmnte do ynopa neaIb cquenlneHn KhoNky, Ha KOtopyIO Ha3naYeHa yHKnIa DBOHoro CcienIeHn (INCTpyKUNIO HAcTPOKe BBa HaidTe B CJeDyUoem pa3dene).
2 NpeiDHTe Ha nepByo ckOpocTb, BOCNlB3OBaBWCb nepeKIOHAtenem CKOpOCTei, IN DO yNopa 3axMITE neaJIb r3a.
3 YBnDECBuHAnO hauane roHKN, cpa3y Xe OTnyCTNE KHOKny DBOHoro CuenHe. KaT OToBko npOn3oJET CuenHe, MaunHa NaHET DnuXeHne.
4 Плавно OTNуСТиTeпeДаьсцeПeHЯ,ЧTOБы ДОCTИь MaKсIMaMbHorO TЯROBO YCINIA. Cobetyem ДОПОЛHInTeьн HO
ПОпраКТИКOBaTBСНД ПОСLEДнHM ЗТАПOM И
ПОэКсЕрIMeHTIPOBaTB CHaCTPOnIkaMМОмEHТа ChEПЕHЯ,
ЧTOБы ПОДБpaTB ONTIMaMbHь NорДOK ДeICTBи. KaK TOLБKO
Вbl OBlaadeeTe IM B COBERшЕHCTBE — CMOxKeTe JERKO BbIPBaTbCSB
В ЛДeрbl yJke Ha CTapTe.
PpimmeaHne.
HeKOTOpBieIrpgbI He NpOJIepKINBAIOt FyHKUIO DBOHOrO cUeJIeHNA. CnICOK Irp, NpOJIepKINBAIOx FyHKUIO DBOHORO cUeJIeHNA, npIBeEN Ha cTpaHnce logitechg.com/support/g923-xb1
HACTPOIKA CNTEMblDBOHOrO CUENJIENNA
1 Haxmnte u yedeKnBaIte npaBIO nLeBIO neaII, a taKke leBIO n npaBIO KHOKNy DkoJCTNka B TeueHne DByX cekHyND, UTObbl BOITN B pexIM HaCTPOIKN DBOHORO cquenHeN. CBeTOnoHbI Taxometp 3aTOpITcNHNM N HAHTeMeJeHNO MRatb:

PpmeaHne.
Bpekime HaCTPOIKN DBOHORO cUeJIeHNA CBEToIONDHbIe TaXOMETpbI He peaIrpIOT NaCnHaN I3 IVpbl/NaKeTa CpeDCTB pa3pa6OTKN.
2 HaxMMTE KONKY, KOtOpO HiXHO Ha3HaHTb DBOHoe CcENJIeHne.ДЯ 3TOrO NODxOaT ToIbKO JEBaN I npaBaJ KONKN dKoJCTnKA.CBToIOJNDhIE TaxOMeTpbl HaCyHT MIRaTB KpACHbIM, CNHAn3uPyA O nepexoBe B pexIM HaCTpoiKN cUeJIeHnIA.
3 YnpabJy ABtOMo6HmE BByb6paHHo CmMyIuNn NnIrpe, Do ynpa 3aXMMte neJaINc cIeHNHe nra3. IpeepInTe Ha nepByO CKOpocTb uYepXnBaJIte KHOPIKy «—», NOKa MaUNHa B INrpe He NaHET DnIXKeHne. Heo6xoIMMbM MOMENT cIeJIeHN MoxHO 3aDaTb C NOMOsbIO KHOONK «+» N «-».
4 Ha 3TOM 3Tane npOBepaTB DBOHoe CcENHeMe MOxHO, He BbXOJa IV3 pexIMHaCTPOIKn. PekomeHdyem nPoTeCTnPOBaT hauano TOnKn: octAHOBITE MaUNHy N HAcTPOeTE MOMeT CcENHeN (NOBTOpeI Te Ipouecc Do TEX nop, noka He NpOBepeTe KOMΦOpTHbIe HAcTPOIKN).
5 Haxmte KhoNy Bb6opa B ceHTpe nepeKluOaTeIHa puJe, yTo6bBbITn n3 pexkma HAcTPOIK NBOHOro CuenHeHra. CBeTOIOHOIbe TaxometPbI 6yUyt NocleIOBAteNbHO MrrA Tb 3eHbIM nCINHM, CnHaNIm3npy o TOM, YTO HAcTPOIK COxPAHeHbl. Iocne 3TORo CBeTOIOHOIbe TaxometPbI NotyHHT n CHOba HaHyT pearnpoBaTb Ha cnHAI TaxometPra n3 noIDepXNAeMbIXIrp.


CБСОС HACTPOEK CNTSTEMblДBOИНΟСЦЕПLEHЯ
Haxmte u ydepKmbaTe B TeueHne DByx cekyHd JleBbI n npabbl nepeKlouatEn CKopocTe, a TAKKe KHONKy
CBeTOnIOHbIe TaXoMeTpbl MMHyT YeTbIpe pa3aN NOTyHXyT - 3TO 3HaHT, YTO HAcTpoKIN CNTEmbl DBOHOrO CuENHeHg 6bJIIN cOpOWeHbI.
KhONka,Ha KOTOpUHO3NaHaeHa CNTeMa IBOHOrO CuENHeNn (IpaBaA INI NEBa KhoNk IN DxOyCTnKa), CHoBa CTAHeT BbINOnJIrTb CTAndApThbIe FyHKlIM.
ПРИМЕHEHME LOGITECH G HUB
B NO Logitech G HUB no3B0JAEr BblnoJHrTb dna G923 cneyuOuie NaCTPOKn.
- PpOpaMMPOBaHHe KHOJOK IN PpOΦmJIeN, KOToPbIe MOXHO CBa3blBaTb CnFpaMn.
- PeryuipobkA Hactpoek pyJ, Hanpimep yrIa nobopoTa nINTeHcNBHOCTN TRUEFORCE.
- TéchnopobaHnne pa3nUChbIX ΦyHKcM KHOpOK, pyJa n PedaJIe.
HACTPOIKI PUYI B G HUB
UyBCTBNTeJIbHOCTb
I3MeHReT OKnIK pyJI, NOBbIaJyINIOHIXaYPOBeHbero yBCTBnteJIbHOCTN. PpI NOJIOKeHN ION3YHKa HnO3uIN 50% OTKIMK 6yDeT JInHeINbIM (1:1). EcII NOn3YHOK paCNoIaAetcB INpeJenax OT 51 % Do 100%, yBCTBNTeJIbHOCTb PpI BpaUeHNpyJIa, COOTBeTCTBeHHo, NOBbIaEcR. EcII NOn3YHOK paCNoIaAetcB INpeJenax OT 49%, yBCTBNTeJIbHOCTb PpI BpaUeHN IOHIXaETc.
Yrion nobopota
PyrB G923 noDaepxkmbaet nobopot Ha 900 rpayncoB.
UmeHbueHHe 3NaueHnE 3ToHnactpOnKn N3MeHnT ToKy, DaJIbee KOTOpO pyIb He CMOxET NOBepHyTBc.3To Oco6eHNO BaxHo, eCNI BBI BeJeTe MaunHy C MeHbIuM yTlOM NobOPoTa pyIa, KaK, HApPImep, B ABTomO6nJx FOpMya-1 nnn GT3.
Lentpnpuyioa npyxna (nla nrg 6e3 o6paTHo CBa3n no ycnnnio)
B 6oJIbIINHCTBe Irp, PIOIepeKINBAIOUxO6paTHyIO CBA3b IO yCINIO, yXe CMOeIINPOBaHa FoHKUa KOPPeKTHOrO CEHTpnpOBaHnma OMeIIN G923 B 3aBNCIMOCtN OT BbI6paHHoBNPtpAynHO MaunHbI. PeKomeHnyem OKIIouaTb NapaMeTp ceHTpnpYIOuei npyKinHbI DnE 3TNX INrP.
EcnBkIOuHTb daHnbl npaMetp,TO MoXHO 6yET npePncTaB NrPOBbIe NaCTPOKIN C NOMOUBIO COOTBEcTBcyIOUeRO NO3YHKa OTpeYlnPOBaT CNly,C KOTOPo PyNB 6yET BO3BpaUaTbcra B cENTpaJIbHOe NINOxKeHne.
KpytraaM MOMENT
OctynenToIbkoIgIrpCnOdEpxkKoTRUEFORCE.KpyTmMOMeHT ynpabnaet 06uei HNTecnBHOCTbIOOTKlnkaNoycnNIOJ4G923.
3ByKobBie 3ΦΦeKTbl
OctynbToIbKOJnIgCnOaepKoTUEFORCE.Hactpoika
No3BOJnAETynpaBnTbNHTeHCNBHOCTbO30fKeKTOB,CBA3aHHbIXCO3BYKOM
(pabotaDBiratela, npoe3nNO ppeoxpaHHTeHBIM NOIocam N.T.D.)
BIRpax n CmMyJaux, noDepknaiauux TrueForce.
Дяболесааннхигрисулд,在Туншагькотуг�епспоггИТУТСТЕНOLIOMIO TRUEFORCE,надосточьбогathукCBВБп NOUCNIIIOДЛG923 moxHOB MeHOb HAcTpoeK IGpblnCmUyJIaUN.
HACTPOIKN IENDAJIEN BG HUB
UyBCTBNTeIbHOCtB
HacpoKaNo3BOAeT N3MeHnB oTKNk NeaIe, NOBbIaA nn INONHXaYPOBeHbero YyBCTBnTeNbHOCTN.PrnnNOXKeHN N03YKHa No3uMn 50% oTKNk 6yDenT IInHeHbIM (1:1).EcnN OIN3yHOKpaccnolaraeTcB npeJenaxoT 51%do 100%, yyBCTBnTeNbHOCTbPnNCxOHDm DBNXKeHNNeaIe, COOTBeTCTBEHHO, NOBbIaEtC.EcnN OIN3yHOK paccnolaraeTcB npeJenaxoT 0%do 49%, YyBCTBnTeNbHOCTb PnNCxOHDm DBNXKeHNneaIe N0NHxaetC.
KombuHropobAHbIe neaII
Ecnn Bbl6paH 3OT npaMeTp, neaIIN ra3a I TOpMo3a fHyHKUHOHpyIOT KaK DBe NIOBUNKN EINHOJ OCN. BlaRogapr AToMg NeaIIN 6yUT KoppeKTHO pa6oTaTB B 6Oone paHHIX INpax, B KOToPbIX OTCYTCTBYET noDnepXka OTdEnbHbIX oCey npeJaJe.
PpimmuHne. PnBb6ope 3Toro npaMeTpna neaHn He 6ydt KoppeKTHO pa6oTaB C COBpeMeHHbIMN FOHOHbIMN INrpaMn IN CTMYJTAOPAMN. EcIn Bbl o6hApXHTe, YTO ONaHa n3 NeaJeB BblONJIHReT fynHKunr Ra3a nTOPMO3a pRn, COOTBeTCTBeHHO, HaxaTM N OTnyCKAHIN, PPOBepbTe, He 3aDaHn 3TOT npaMeTp B HaCTPOIKAx.
TECTIPOBAHNE PUYI N IPEDAJEI
Ha ekpaḥax pyīn iη ādāneB INO G HUB moxHo πρOBepuMb kαχdyu Khoŋky iocb iŋra moDeiN G923, yTo6bI y6eɪntbcs, yTo OH nEjCTbyOT mEmHHO Tak, kαK Tpe6yETc. Tam jxe moXHo iCnblTaTb BO3dɛjCTBne pa3niuNbIX hAcTPOeK yrla nobOpota pyJia.
BO3HKNJIN BONPOCbl?
logitechg.com/support/g923-xb1
POLACZENIA I PUNKTY MOCOWANIA
Ka6eni MoXHa NekIbKa pa3iB 06MoTaH HaKoJIo cKo6N, He 3aTAYOuH, 106 yHnKHyT npeRnHIB.
BCTAHOBJIEHHRA -XBOX ONE -IIK
Pi'deHaIte aadTep XmBnHn i USB-ka6eni,ay noka3aHo Ha cxemi.
NcIa Yac KOxHOro nIKKIOUeHHn CnOpTnBHorO KepMa Do CNTEmn
NOTpIbHO NOBHCIO pOKpyTnM NOrO B OOnH, a NotIM y DpyrN 6iK, a dani NOBepHyTN B cHTpaJIbHe NOnOXeHHn DnA KAI6pyBaHHa.
NcIa 3aBePseHHN KaI6pyBaHHn KepMO MoXHa BkOpNCtOByBaTN.
Ioo6 yBIMKHyTN cBITIOJIOHN TaxoMeTp i fynKUIO CINIOBOrO 3BOPOTHO 3B'3Ky nIq uac BnKOpNCaHnHa 6Noka neaJe i KepMa G923 iz PIK, Heo6xioHO BCTAHOBHTn PB Logitech G HUB. NOro MoXHa 3aBaHTaxHTn Ha cTropiHc logitechg.com/support/g923-xb1.

3ATNCKAчДЯФIKCYBAHH
CnpTINBHe KepMo G923 Racing Wheel ochaueHo CnCTeMoIO 3aTnCKaIb, 3a DOnOMoROIO AKNX Ioro MoXHa 3aΦIKCyBaTI Ha CTOnJI.
HaTnCHiB Ha 3aTnCKaui o6epTaIe ix, uo6 3aΦikCyBaTH a60 3HnKePmo.
PobertaTe 3aTnckayi, uo6 3aTaryntix a60 ocna6nTu.


PnMMtKa.
KepMO BCTAHOBIOETbCA HA TOBCTI CTINbHMIi, i3aTnCKaIB CnID 3HATN HAcADK.
KHONK
1 JIbIM φikcatop
2 MaHInyIaTOp HnPaMky
3 Khoŋka orny
4 JIba KHOIIKaJXOJICTNka
5 KhoNkpeRyIeIOBaHnHaHaJStyBaHb: + i->>
6 PpaBmΦikcataop
7 Khonkn A, B, X, Y
8 Khonka MeHO
9 Pnaba KhoTNka JKOJCTNka
10 NepemikaHanaaHTyaBn iKhoNka Bn6opy*
11 Khonka Xbox
H XhooXonePnIeTINKUyNtNTHWYBHXxipXn H N K HIOHTYMOKHO BPNHNNATJBNNNTA 111111111111111111111111111
CINIOBNI 3BOPOTHNI 3B'AR3OK
CnpTMBHe KepMO OchaueHO DbOMa DnBryHAM, kki 3a6e3neyOToB cnOBNI 3BBOPOTHNI 3B'3OK y NiDTPMByAHINx irpax I CNTeMax.
IINBHX iROP MOXHa TAKOX BIKOPNCTOBYBaTN Hauy HOBITHO TexHOrIO CnIOBORO 3BOPoTHORO 3B'3kY TRUEFORCE.
3aBdAn Tichin B3aEMoDii 3i3nHIM pyuiEi i3ByKOBIM CynpOBOOM
rpn Texhonoria TRUEFORCE 3a6e3neuey Hau3BnuAHO uTkn cunOBNI
3BOPOTHI 38'ABOK y pexmimi pealbHorO yacy.PyIb ToHIO NocIIOBHO
BIDTBPOIOc efeKn, kI MoXHa BiDuTyu Chepe3 HboroY cnpaBXHBOMy aBTO:
3YeJIeHHa IIN I 3NOKpTTAM Doporn, KOINBaHHa NiDbickn, Bary MaHHN,
peBHHa Bi6paCiIO NotxHOrO dBNHyHa.
MoxnboctrTRUEFORCE MoxHa BnKopncToByBaTu y nItpmYBaHIN irpax Ha Xbox One i PI. Pepenik cix irop BnKaJeHo Ha ctopiHci logitechg.com/support/g923-xb1.
PnIMItKa.
CnpTINBHe KepMO Mae CnCTEmy 3axNCTy BJD npeperpiBaHHa, TOMY BnCOKITemNepaTpynOMy He 3aXKOJaTB. HODI TpaJIaETbCA, LIO CTeMaCINOBORO 3BOPOTHO 38'3kY BMMKaETbCa NOCePeJ rpn, XOa eJeMeHTNKepyBaHNN PpOBoxKyUTo bPauOBAuN.
Ytakomy p3i NoTpi6Ho BIDKIOUHTN KepMO, BiE'ENHaTN BiCnCTEMTa 3aueKaTH, NOKBOHO OXOLOHe. AkuTo TpAnIeTBcA Yacto, 3BepHITbca y Cnyk6y TexHiO HiDTPMKN.

XAPAKTEPNUCTNIKU
1 PedaJIb 3yueJIeHHa
2 PnabIraIbMyBaHHa
3 PegaIbra3y
4 TekctypobaHa onopa nHorn
5 ToKn fikcyBaHHH 60TAMN (BVKOPNCTOBYIOTBc 60NTM M6X1)
3anaTeHTObaHa CNTema 3uennneHH i3 noKpTTTAM
7 0ikcatop cnCTemn 3yennneHHa i3 nOKpTTAM 3cyhble fikcatop y 6ik 3aandboi naHeni a6o 6noky nepaJIe, 0o6 3HRTN cnCTemy 3yennneHHa 3 NOKpTTAM
8 3MiHtB nIooXeHHaKnaKn peJani (noTpipeH ueCTnrgpaHHN KIOU 2,5 MM)

BVKOPNCTAHH YA PIP IOBIMHO3YENJIENH
BnKOpNCTaHHcNCTeMM NODBHOrO 3uenneHHa 3i CTAPTOBI N03uii dae MoXnMBICTb DOCAHTM MaKcMaJIbHoro TAROBORO 3ucnnla 6e3 Bu3HaueHHa MOMHTy 3uenneHHa a ce cTTcBA nepeBaHa NoayATky peperOHIB.
ДаліВИКладено прIHцин 3aCTocyBaHHa CnCTeMn nOdBiHOro 3uENenneHHaу rpi.
1 Ha noyatky neperoHIB HATNCHTb Do Meki neaIb 3eHnEHHa i KhoNkY, kI npn3HaueHo fHKuio nOdbHoro 3eHnEHH.
2 NepemKHbCHa Ha nepuy wBnKicTb 3a DOnOMoToI npemKaHa WBnKocTei Do MEXi HATNCHTb NeaJIb ra3y.
3 Bidaay niCnna CunHany npo noaTOK neperohB iDnyctItb KhoNky noDbHoro 3uenHeHH. LooHo 6yJe doCaryHyTo 3uenHeHH, MaunHa noOHe pyxatncra.
4Плавно BiДусчыпь Neаль 3Чeнгнг,иб ДОСТМAKСИМАБHOROTAROBOrO 3ucnI.ТуВВAPTO TPOXINONPakTKyBaTnC,аЗоДНОЕКСЕРIMENTYBaTи 3HaJIaWITyBaHHMIMOMEHTU 3Чeнгнг,иб NiIb6paTN HaIbIbIbIbIbIbIcIeBY TaKTIky. BiДирaIOBabuNц eem MOMeHT,BN 3MOxTe BUPBaTnCBA NidepRuBxHe cTapTi.
PpMmITka.
IodBiiHe 3uennnHn npaioe He bYcix irpax. Iepenik irop,aki niTprMHyOt bFyHKLIO NOBIIHORO 3uennnHn, BIKNaedeHO Ha cToPiHl logitechg.com/support/g923-xb1.
HAJIATYBAHHCNCSTEMI NOДВIHHO 3YENJIENH
1 HaTnCHiB iIyTPmUyTe npToaRm DBOX ceKHyD npaBy Ta IiBy neJaI, a TAKoX npaBy Ta IiBy KONKn dXkoNCTkA, UO6 yBIITN B pEXIM HanaIHTyBaHnnoDBiHoro 3eENHeHH. Taxometp 3acBITbCnHIM KOJIbOpOM iNoHne NobiBHO 6lMaTn.

PnMmITKa.
B pexmmi HanaHTyBaHnnoBBIHoro 3uePHeHH cBtIIOIOHi Taxometpn Ha peaTyOtb H a cnHaJIIN 3 rpi a6o naKeTa 3ac06iB po3p06kn.
2HaTNCHTb KHNky, AkiN Notpi6HO npn3HaunH cyHKuio NOdbiHoro 3eHHeHH. IaI cybOro nixxOaHbT tIbKn Iiba i npBa KHONK IxOJCTnKa.CBtIOJIOHi taxOMETPN 3acBITraC8 cepBOHM KOlbOpom Ta noCHyTB 6nIMATn, CnHJI3yOuN npo nepexid y pexIM HanaWtBuHH 3eHHeHH.
3 Kepyiou nABTIBKOIO y BN6paHIN Cmmyauii nn rpi,do MExHaTnCHITb neaI 3uePJIeHHa IraSy. NpeMKHITbc Ha nepuy wBnIDKicTB iYTPMMyTe KHONKY ,NOKn ABTIBKa y rpi He noUHe pyXaTncb. IOTpi6Hm MOMENT 3uePJIeHHa MOxHa BN6paTHa DOIOMOIO KHOJOK + i -
4 Ha zbomy etani moxha nepebipatn noDBiHe 3eennneHn863nocepednbo B pexmI hanaHTyBaHHa. PdIMo pyuHTnHa cTApTi,3ynHNTn aBTiBky, HanaHTyBaTN MOMENT 3eennneHH i ce pa3cTAPTyBaTN - i TaK DoTn, DOKn npaMeTpN IOdbHOrO 3eennneHHaBcHe 3aDOBOhBnTb.
5 Hatnchtb KhoNky Bn6Opy BcHtripepeMkaHa Ha KepMi, 06BnTn3 pexmMy hanaTuBaHHa NODBIHoro 3eHHeHH. CbitnoioDiHtaxometprn 6dyTb NociIOOBHO MiroToTI 3eEHIM i cHIM KOIbopAMn, CnHaiI3yUO npo Te, 00 HanaTuBaHHa 36epeXeHO. IicraIzboro cBtIoioDiHtaxometprn 3raChYb i 3HOBy NOHyTB pearybatn Ha CnHan Taxometpa i3 niDTPmMyBaHHx Irop.


CKIДАнгHAJIАшТУBAHb CNTSTEMI NOДВИНΟ 3ЧЕПЛECHNЯ
HaTnCHiB iIyTPMMyTe npOTAROM DBOX CEkyHd NIBN i npABN nepemKaui WBnDKoCTi, a TAKOX KHOKNKY «X».
CbitIOjNDHITaxOMETPN6NIMHyTBOTINpPA3i3raChyTb-ue3NaHTb, 0HOHAaHTyBaHHCNCTEMNIPODBIHorO3YeHNHeHH6yNoCKnHYTO.
KhONKa, kI npn3NaueHo fHKuio NOBbHoro 3eennen (npaBa YIJIba KONKn JKOCTNKA), 3HOBy NOUHE BIKOHyBaTn CTaHdaTpHi fHKuII.
3ACTOCYBAHHA LOGITECH G HUB
Ycbomy npo3di OnncaHanauTyBaHHa, kMOxHa BkOHyBaTN dJa G923 yPi3 Logitech G HUB.
- PporpaMybaHHK Honok i npophiinB, kki MoXHa 38'3yaBtN 3 irpaMn.
- PeryIIOBaHHa HanaIaHTyBaHb KepMa, 3OKpeMa KyTa NOBOpOry INTEHCINBHOCTI TRUEFORCE.
- TéctуbaHnI p3HOMaHiTHNX ΦyHKuJi KHOPIK, KePMa I neJaNeI.
HAJIATYBAHHA KEPMA Y G HUB
UytTnBicTb
3MiHa BiDnyKy KePMA 36IbJHHeHH 3MeHHeHH NOro yTINBOCTI. AkiO NOB3YHOK PO3aUOBAHO No CEHTpy 50%, BiDryK 6yde NiHIM (1:1). AkiO NOB3YHOK NepeCyBaTN BiD 51% do 100%, yTINBICTb KepMa NiD Yac OBeptAHN 3pOCTaTIme. AkiO NOB3YHOK nepeCyBaTN BiD 49% Do 0%, yTINBICTb KepMa NiD Yac OBeptAHN BiDIOBIDHM YIHOM 3HNJyBaTMETbCra.
Kyt nobopoTy
KepMo G923 MoKe JIOBepTaTnCg Ha 900 rpaDyciB. 3i 3MeHHeHHM LbOTo NOKa3HnKa NocyHeTbcra MExa BInbHOrO OeBpTaHHa KepMa. Cc BaXJIbBO, RkUo BV KePMyTe aBtIBKOIO 3 o6MEXeHm KytOM NobOpOTy KepMa, HApNkLaI aBtOMo6iIm FOpMyI-1 a6o GT3.
ZeHTpyBaJIbHa npyJInHa (Igna irop 6e3 nIaTpIMKn cINOBoro 3BOPoTHOrO 3B'3Ky)
y6iNbwocti Irop, 10 NiItpMMyOtB CINOBn 3BOPoTHN 3B'3OK, yXe B6yIOBaHO fynKUIO npaBNbHORo NOBepHeHH KepMa G923 y CEHTpaIbHy N03uQIO 3ypaxyBaHHaM B6paHOrO TnY aBTiBKn.Дla TaNX irop 3actocyBaHHN ceHTpyBaJbHoI npyxHN paIMMo BMmKaTn.
YbIMKHyTA onqjra dae MoXJIINBICTb nepenncatn irpoBI hanaHTyBaHHi i3a donOMorIO BIDNOIBINOHO NOB3yHka BiDpeRyIOBATn CNY, 3 KKOIO KEpy 6ynde NOBePTaTNCRA CEHTpaJIbHe POStaUyBAHN.
KpyTHNI MOMENT
Docytnn trbkn dna irop 3 niTpMMKOIO TRUEFORCE. Kpytnm MOMENT Kepye 3araalboHOIO iHTeHCNBHcTIO cunOBORO 3BOPoTHORO 38'3ky dna G923.
3BykoBieΦeKTe
Docytni tibn dIra Irop i3 niTpumkoIO TRUEFORCE. LHe halaTuBaHHa 3MOry peYIbOaTI INTEHCINBHiCT b eEeKtIB, NOB'raAHx 3I 3BykOM (ruiHna DnRgamma, nepeTINH 3actepexHNX nOIC Ha dopo3i too), B irpax i Cmmyiax, kni NiDTPmUyIbTexHonorio TrueForce.
YdabHIiXirpaxicmyaix6e3nIITPMKTRUEFORCE ci eefkTINDAg923 moxHa BiipreynIOBATN B MeHIO HanaHTyBaHb.
HAJAHTYBAHHI PENDJIEN YG HUB
yTnmbicb
PeryIOBAHH Bjryky neaIe IJXxom 36IbIeHnY nI 3MeHHeHH
IXhBoI cyTNIBOCTI. KIIO NOB3yHOK PO3TaWOBaHO NO CEHTpy shKAIIN
(50 %), BiDyK 6Ye IIniHIM (1:1). KIIO NOB3yHOK nepeCyBaTH BID 51 % do
100 %, neaI pearyBaTMyTB Na ONUATKOBe HATNCKaHH iTEHCNBHIe.
KIO IOB3yHOK nepeCyBaTH BID 49 % Do 0 %, neaI pearyBaTMyTB
Ha NoaTkoBe HATNCKAHH Cna6Ie.
KombiHOBaHnIepanl
Kkyo BBIMKHyTNIOOnIIO, nedaIraIbM I r3y fynHcioHyOTb JK Dei noNoBnKn OOnHoiOci. Ce cnpouye KepMyBaHHB DabHiXn irpax, de OkpeMi oci dna neaale He niTpmyOIBcR.
PpMMtKa.ДЯ cyachnx irop icMmYnATopB IOOnIO noTpi6HO BmNKaTN, iHaKwpe neaI IpaQOBaTMyTb HnPaBnMbHO. RaIO BnBnTcBcA, 0O OHa 3 NeaIe NIE AOKneaIb rAzy, KOnI III HaNTCKaE, iKNeaIb raIbMa, KOnI II BiDnyCkAeW, npeBipTe, YH He Bn6pao CEI npaMeTp y HanaTuBaHHX.
TECTYBAHHK KEPMAI PEAJIEN
Ha ekpaḥax KepMa i nepaJIeB IV3 G HUB MoXHa nepeBipNTu KopeKTHicTb
po6OTu KoxHoi KhoIKNi oci dJa G923. A ige Tyt MoXHa BnIpO6yBaTu
BnIMB 3MiHI KyTa NobopoTy KepMa.
BMHIKIN 3AINTAHH?
logitechg.com/support/g923-xb1
LIIDESED JA KINNITUSKOHAD
aagaa aagaaan anh HbOcN. IepnabpHHTo Hdagha HpaHa KcHtPcTbC cnoaHa HbaHaaHae Hqga Hpa Hpa, Hpa, Hpa, Hpa, Hpa, Hpa, Hpa, Hpa, Hpa, Hpa, Hpa, Hpa, Hpa, Hpa, Hpa, Hpa, Hpa, Hpa, Hpa, Hpa, Hpa, Hpa, Hpa, Hpa, Hpa, Hpa, Hpa, Hpa, Hpa, Hpa, Hpa, Hpa, Hpa, Hpa,
PEAΓΨΑΗ ΚΙΝΑ
BaWnT CbCTe3aTeEN BOJAH CbIbpxKa DBOH N DBNAtEJI, KOITO OcNpyPBArCBIOB pexIM Ha DeIcTBne 3a IODNbPxAHInTe INrpn IN CNTEM.
Upe3 noDlbpKaHnTe 3aIgnaBnCbIoo Ie N3NITATE NOxOda HNOT CneBaIo nokolenHe 3a pearnpaHe npn B3aAmOdeCTBVE:TRUEFORCE.
TRUEFORCE ce nHTerpnpa dIpeKTHo KbM fN3NKaTa n ayDnOTo Ha nRpaTa, 3a da oTKHIOU pearipane npB3aIMoJeCTBne C BnCOKa pe3OHOuBA peALHO BpeMe.CuenIeHNTo H a rymTe, OKaYBaHcTO, TerlOto, KOHCKNTe cIN - DOpN yHNIKAJINrT 3ByKOb pe3OHaHC Ha DBnraTeNa CE yceuaT MNRHOBeHO IN TOHNO Upe3 BonaHa.
PoiBbpxaHNTe 3aRnabria 3aXboxOneN KOMNIObP MoKe Da BbVeIaT peaHnpaHTo npi B3aIMoDeICTBne C BVCoka pe3OIOuINa B peaIHO bpeMe TRUEFORCE.3a cInCbKa C PoiBbpxaHNTe 3aRnabria NocTe Te logitechg.com/support/g923-xb1
3a6eJexka:
Baunr cbrte3aTeEN B0an pa3nolara c6c 3aunr Cpeuy nperepaBaHe, KOrTo e npedHa3NaYeHa da ocInpyraBa 3aUnr BA yCIOBna HA BNCOka TEMepaTypa. B peKn cnuayn fynKUHOHNOHIOCTnE Ha CNIOBna pexm Ha deNCTBnM OarT Da 6bDat n3aKTINBpuAHn NO BpeMe HA yNtpe6a, DOkATO KOHTpONITE ue npoDbNkABaT da 6bDaT aKTNBn.
AkoToBaCeCnyuOCTaBeTeBOJaHaDaCeOxJaN INpeyctaHOBeTe 3axpaHbAHetoMy,KaTO rN3KJIIOUHTe.AKOToBaCe CnyuBaYeCTo, ceCBbPKeTe cOTdela3aNoDpBjXkaHa npOdykTa.

XAPAKTEPNUCTNIKU
1 CbeDnHnten
2 Pedi3a cnipauka
3 Pegaan 3a raga
4 CtrpykTpynpaHa onopa Ha netnTe

5 ToUKN 3a MOHTaX Ha 6oJTOBe (n3IOn3Ba 6oJTOBe M6X1)
6 PateHToBaHa cNCTeMa 3a 3aXbAuaHe KbM KUNIM
7 Ⅲnka 3a ocbo60xqdaBaHe Ha 3axBauaHETO KbM KNJIM3a da ocbo6oDHTe,HaTCHETe neDaHaHa3aI
8IpomeHHe nIOxKeHnETo Ha NcEbaTa CtpaHa Ha neJaHa (3a 1eTBA Heo6xoIm 2,5 MM IeCTOrpaMeH KIOU)


7

UPORABA PROGRAMSKE OPREME LOGITECH G HUB
Programska oprema Logitech G HUB omogoča naslednje funkcjie na volanu G923:
CIFT DEBRIYAJ SISTEMINI SIFIRLAMA
G HUB PEDAL AYARLARI
Hassaiyet
Aulallalal (USB1.2,clalalalalal
a 4.3
XBOX ONE
gai jia jia jia jia jia jia jia jia jia jia jia jia jia jia jia jia jia jia jia jia jia jia jia jia jia jia jia jia jia jia jia jia jia jia jia jia jia jia jia jia jia jia jia jia jia jia jia jia jia jia j
e 1
Logitech G HUB 923
logitechg.com/support/g923-xb1
C. a_1 + a_2 + a_3 = 6( p - 1)
al 1le clll G923 1
Lssj dlllal jjjdlll jai


4k > 3k
1 jaii iia jaii jilj, jaii aie jaiy bai jaiy
(1) 2011 Juaaia 15 Juaaill jaiil
Gear Up Paddle 2
Dua 3
abii jni laie daii gaiyai yj j (gai) Clutch
aiee
J 1 1 1 1 1 1 1 1 1 1 1 1 1 1 1 1 1 1 1 1 1 1 1 1 1 1 1 1 1 1 1

S OBC = S COD + S_ BOC
A( 1,0) .B( -34,34)
y 1
logitechg.com/support/g923-xb1 1c jj j j j j j j j j j j j
SDK 1/4aill 4a2d3y
JSSRSB) jssllnss (LSB) jssllnss Lg JSSL 1
2 dlll lllllllllllllllllllllllllllllll

3 Jalsly bial jnae jy aal clay gai jia jai jai slall
jglal g jaiy jaiy jaiy jaiy jaiy jaiy jaiy jaiy jaiy jaiy jaiy jaiy jaiy jaiy jaiy jaiy jaiy jaiy jaiy jaiy jaiy jaiy jaiy jaiy jaiy jaiy jaiy jaiy jaiy jaiy jaiy jaiy jaiy jaiy
4
5
5
5
5
5
5
5

:G923 Logitech G HUB
y 900 G923
Cis 1jolai gai jie ddi yiy. Jalll aagill jia jiaall lae jay
GT3 1 yS
(1)
gll gll gll gll gll gll gll gll gll gll gll gll gll gll gll gll gll gll gll gll gll gll gll gll gll gll gll gll gll gll gll gll gll gll gll gll gll gll gll gll gll gll gll gll
jai jia jiai i jiai jiai jiai jiai jiai jiai jiai jiai jiai jiai jiai jiai jiai jiai jiai jiai jiai jiai jiai jiai jiai jiai jiai jiai jiai jiai jiai jiai jiai jiai jiai jiai jiai jiai
1
jysallgglssglaasgaaaalcljya jzaiyajyjs
jajai jjjai jiaai jiauiy
.
J 1
TRUEFORCE
1
y by nnnn nn noon nn G923 anan
nynnnn nn nnnnnnnnnnnnnnnnnnnnnnnnnnn
.09nn nn n 7n7 n 09nn nT nx


:
D09nn nn nn n7 nnonn nn nnnn
0x7
17
2nnn
3n
4*7NwUIN
5 nntan 1n7-
6 1
7A,B4X,Yn
87n7
9nbnn
10*nna nnnn nn nnnn
Xbox yn7 11
NDVIU
nwnnnn nn nnnnnnnnnnnnnnnnnnnnnnnnnnnnnnnnnnnnnnnnnnnnnnnnnnnnnnnnnnnnnnnnnnnnnnnnnnnnnnnnnnnnnnnnnnnnnnnnn
.
n nnnn nn nnnn nn nnnn nn nnnn
TrueForce
wnn nnn nn nn nn nn nn nn nn nn nn nn nn nn nn nn nn nn nn nn nn nn nn nn nn nn nn nn nn nn nn nn nn nn nn nn nn nn nn nn nn nn nn nn nn nn nn nn nn nn nn nn nn nn nn nn nn nn nn nn nn nn nn nn nn nn nn nn nn nn nn nn nn nn nn nn nn nn nn nn nn nn nn nn nn nn nn nn nn nn nn nn nn nn nn nn nn nn nn nn nn nn
nannnnn nn nnnn nn nnnn PC-1Xbox One-1nnnn nnnn logitechg.com/ nnnn ,nnnnn nnnnn .TrueForce w nnnn support/g923-xb1

:
y oxnna nnnn nn nnnn nn nn nn nn nnnn nn nnnn nn nnnn nn nnnn nn nnnn nn nnnn nn nnnn nn nnnn nn nnnn nn nnnn nn nnnn nn nnnn nn
wennnnnnaaann
x. 1n nnnn nn nnnn nnnn nnnn nnnn nnnn nnnn nnnn nnnn nnnn nnnn nnnn nnnn nnnn nnnn nnnn nnnn nnnn nnnn nnnn nnnn nnnn nnnn nnnn nnnn nnnn nnnn nnnn nnnn nnnn nnnn nnnn nnnn nnnn nnnn

(M6X1)
5
n 2.5 nnnn nnnn nn
6
ww
7 NOW INN
innno
8
5
6
7
8
7nun 19nn nn
hnnn nn nnnn nn
yinnn nnnn nn nnnn nnnn nnnn nnnn nnnn nnnn nnnn nnnn nnnn nnnn nnnn nnnn nnnn nnnn nnnn nnnn nnnn nnnn nnnn nnnn nnnn nnnn nnnn nnnn nnnn nnnn nnnn nnnn nnnn nnnn nnnn nnnn nnnn nnnn nn
?n7xu
logitechg.com/support/g923-xb1

logitech
© 2019 Logitech, Logitech, Logitech G and the Logitech and Logitech G logos are trademarks or registered trademarks of Logitech Europe S.A. and/or its affiliates in the U.S. and other countries. All other trademarks are the property of their respective owners. Logitech assumes no responsibility for any errors that may appear in this manual. Information contained herein is subject to change without notice.