
WS Alert XPI - Earphones Peltor - Free user manual and instructions
Find the device manual for free WS Alert XPI Peltor in PDF.
User questions about WS Alert XPI Peltor
0 question about this device. Answer the ones you know or ask your own.
Ask a new question about this device
Download the instructions for your Earphones in PDF format for free! Find your manual WS Alert XPI - Peltor and take your electronic device back in hand. On this page are published all the documents necessary for the use of your device. WS Alert XPI by Peltor.
USER MANUAL WS Alert XPI Peltor
MRX21A2WS6, MRX21A3WS6 (all product variants) EN 352-1:2002 Headband with foam cushion HY82
| A:1 Frequency (Hz) (f) 125 250 500 | 1000 200 | 00 4000 | 8000 SNR | ||||
| A:2 Mean attenuation (dB) (M) 13.8 | 19.3 30.4 | 34.5 37 | .7 39.5 36.2 | 30 | |||
| A:3 Standard deviation (dB) (s) 2.7 2 | 4 2.7 3.6 | 2.3 2.7 | 4.1 | ||||
| A:4 Assumed protection value, (dB) 1 | 11.1 16.9 | 27.7 30 | 9 35.4 36.8 32.1 |
A:5H=35dB,M=27dB,L=18dB
:411g
MRX21P3E2WS6, MRX21P3E3WS6 (all product variants) EN 352-3:2002 Helmet Attachment with foam cushion HY82
| A:1 Frequency (Hz) (f) 125 250 500 | 1000 200 | 00 4000 | 8000 SNR | ||||
| A:2 Mean attenuation (dB) (M) 14.2 | 19.7 29.6 | 33.4 36 | 3 39.5 34.6 | 30 | |||
| A:3 Standard deviation (dB) (s) 3.9 1 | 9 2.5 1.8 | 2.5 2.7 | 4.9 | ||||
| A:4 Assumed protection valuef(dB) | 10.3 17.8 | 27.1 31 | 6 33.8 36.8 29.7 |
A:5H=34dB,M=27dB,L=18dB
:431g
MRX21A2WS6, MRX21A3WS6 (all product variants) EN 352-1:2002 Headband with gel cushion HY80
| A:1 Frequency (Hz) (f) 125 250 500 | 1000 2000 4000 | 8000 SNR | ||||
| A:2 Mean attenuation (dB) (M) 12.6 | 19.6 30.4 | 32.4 40.1 | 40.5 38.0 | |||
| A:3 Standard deviation (dB) (s) 2.9 2 | 0 3.0 2.8 | 3.3 3.3 | 2.8 | |||
| A:4 Assumed protection value, (dB) | 9.7 17.6 | 27.4 29.6 | 36.8 37.2 | 35.2 |
A:5H=36dB,M=27dB,L=18dB
:473g
MRX21P3E2WS6, MRX21P3E3WS6 (all product variants) EN 352-3:2002 Helmet Attachment with gel cushion HY80
| A:1 Frequency (Hz) (f) 125 250 500 | 1000 20 | 00 4000 | 8000 SNR | ||||
| A:2 Mean attenuation (dB) (M) 11.8 | 18.6 | 28.4 | 33.2 37 | 9 39.1 | 36.9 | ||
| A:3 Standard deviation (dB) (s) 2.3 2 | 0 2.0 | 2.7 2.4 | 3.2 4.1 | ||||
| A:4 Assumed protection valuef (dB) | 9.5 | 16.6 | 26.4 | 30.5 | 35.5 | 35.9 | 32.8 |
A:5H=35dB,M=26dB,L=17dB
495g
EN 352-4:2001/A1:2005
A:6 Criterion Levels
| H 119 | dB(A) |
| M 107 | dB(A) |
| L 96 | dB(A) |
Quick guide
Reset to factory default
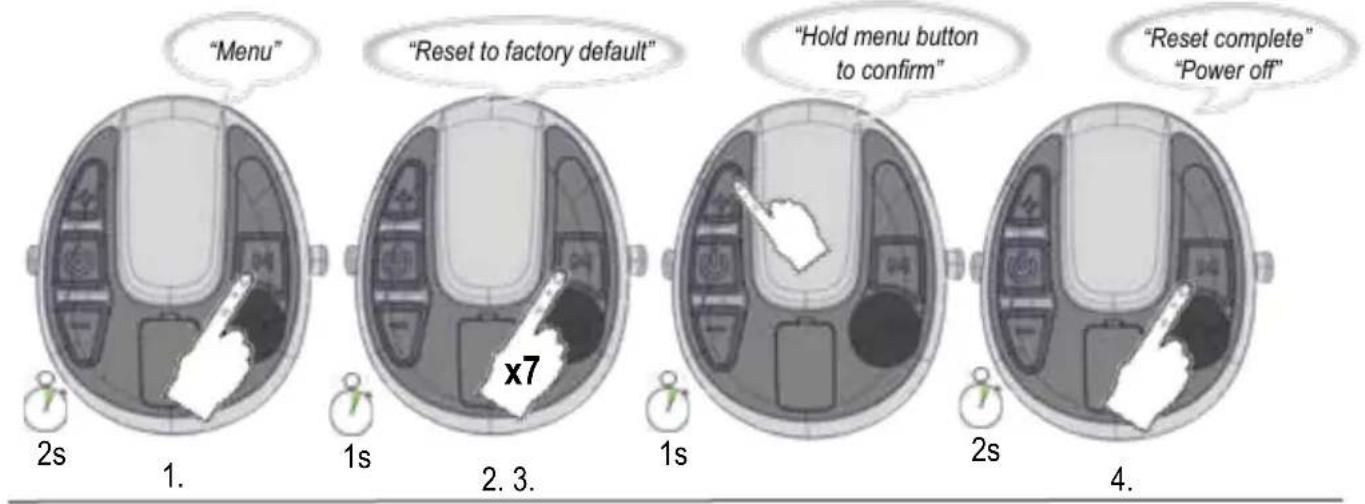
fig 12

(E:1) (E:2) (E:3)

(E:4)

(E:5)
(E:6)

(E:7)
(E:8)
(F:1) (F:2) (F:3)


(G:1)

(B) COMPATIBLE INDUSTRIAL SAFETY HELMETS EN 352-3, Helmet Attachment with foam cushion HY82
| B:1 Helmet Manufacturer B:2 Helmet model B:3 Attachment B:4 Head Size | ||
| 3M SecureFit Safety Helmet X5000 E S, M, L | ||
| 3M SecureFit Safety Helmet X5500 E S, M, L | ||
| 3M G3000 Basic set E L | ||
| 3M H-700 E L | ||
| 3M G3501 E L | ||
| 3M G500 Headgear E S, M, L | ||
| 3M Versaflo M306/307 AF L | ||
| Auboueix Iris 2 E L | ||
| Grolls Balance AC | EL | |
| Grolls Balance HD | N S, M, L | |
| Petzl | Vertex Best | EL |
| Petzl | Vertex Vent | EL |
| Petzl | Vertex ST | EL |
| Protector / Scott | Style 600 | EL |
(B) COMPATIBLE INDUSTRIAL SAFETY HELMETS EN 352-3, Helmet Attachment with gel cushion HY80
| B:1 Helmet Manufacturer B:2 Helmet model B:3 Attachment B:4 Head Size | |||
| 3M SecureFit Safety Helmet X5000 E S, M, L | |||
| 3M SecureFit Safety Helmet X5500 E S, M, L | |||
| 3M G3000 Basic set E L | |||
| 3M H-700 E L | |||
| 3M G3501 E L | |||
| 3M G500 Headgear E S, M, L | |||
| 3M Versaflo M306/307 AF L |
3MTM Safety Helmets, www.3M.com
3MTM PELTORTM WSTM ALERTXP Headset 3MTM PELTORTM WSTM ALERTXPI Headset
| EN | 1-6 |
| BG | 7-14 |
| CZ | 15-21 |
| DE | 22-28 |
| DK | 29-35 |
| EE | 36-42 |
| ES | 43-49 |
| FI | 50-56 |
| FR | 57-63 |
| GR | 64-71 |
| HR | 72-78 |
| HU | 79-85 |
| IS | 86-91 |
| IT | 92-98 |
| KZ | 99-105 |
| LT | 106-112 |
| LV | 113-119 |
| NL | 120-126 |
| NO | 127-133 |
| PL | 134-140 |
| PT | 141-147 |
| RO | 148-154 |
| RS | 155-161 |
| RU | 162-170 |
| SE | 171-176 |
| SI | 177-182 |
| SK | 183-189 |
| TR | 190-196 |
| UA | 197-203 |
3MTPELTORTMSTALERTXP Headset MRX21A2WS6,MRX21A2WS6-ACK MRX21P3E2WS6,MRX21P3E2WS6-ACK
3MTPELTORTWSTMLERTM XPI Headset MRX21A3WS6,MRX21A3WS6-ACK MRX21P3E3WS6,MRX21P3E3WS6-ACK
INTRODUCTION
Congratulations and thank you for choosing 3M^TM PELTOR™ communication solutions! Welcome to the next generation of protective communication.
INTENDED USE
These 3M^TM PELTOR™ headsets are intended to provide workers with protection against hazardous noise levels and loud sounds while allowing the user to communicate with built-in Bluetooth® technology, hear the surroundings via the ambient microphones, and listen to radio. It is expected that all users read and understand the provided user instructions as well as be familiar with the use of this device.
IMPORTANT
Please read, understand and follow all safety information in these instructions prior to use. Retain these instructions for future reference. For additional information or any questions, contact 3M Technical Service (contact information listed on the last page).

WARNING
This hearing protector helps reduce exposure to hazardous noise and other loud sounds. Misuse or failure to wear hearing protection at all times when exposed to hazardous noise may result in hearing loss or injury. For correct use, consult supervisor and User Instructions, or call 3M Technical Service. If your hearing seems dulled or you hear a ringing or buzzing during or after any noise exposure (including gunfire), or for any other reason you suspect a hearing problem, leave the noisy environment immediately and consult a medical professional and/or your supervisor.
Failure to follow these instructions may result in serious injury or death:
a. Listening to music or other audio communication may reduce your situational awareness and ability to hear warning signals. Stay alert and adjust the audio volume to the lowest acceptable level. The audibility of warning signals at a specific workplace may be impaired while using the entertainment facility.
b. To reduce the risks associated with igniting an explosion, do not use this product in a potentially explosive atmosphere.
Failure to follow these instructions may reduce the protection provided by the earmuff and may result in hearing loss:
a. 3M strongly recommends personal fit testing of hearing protectors. Research suggests that users may receive less noise reduction than indicated by the attenuation label value(s) on the packaging due to variation in fit, fitting skill, and motivation of the user. Refer to applicable regulations for guidance on how to adjust attenuation label values. In the absence of applicable regulations, it is recommended that the SNR be reduced to better estimate typical protection.
b. Ensure the hearing protector is properly selected, fit, adjusted, and maintained. Improper fit of this device will reduce its effectiveness in attenuating noise. Consult the enclosed instructions for proper fit.
c. Inspect the hearing protector before each use. If damaged, select an undamaged hearing protector or avoid the noisy environment.
d. When additional personal protective equipment is necessary (e.g. safety glasses, respirators, etc.), select flexible, low profile temples or straps to minimize interference with the earmuff cushion. Remove all other unnecessary articles (e.g. hair, hats, jewelry, headphones, hygiene covers, etc.) that could interfere with the seal of the earmuff cushion and reduce the protection of the earmuff.
e. Do not bend or reshape the headband, and ensure there is adequate force to hold the earmuffs firmly in place.
f. Earmuffs, and in particular cushions, may deteriorate with use and should be examined at frequent intervals for cracking and leakage, for example. When used regularly, replace the ear cushions and foam liners at least twice a year to maintain consistent protection, hygiene and comfort.
g. If the recommendations above are not adhered to, the protection afforded by the earmuffs will be severely impaired.
EN 352 Safety Statements:
- The output of the level-dependent circuit of this hearing protector may exceed the external sound level.
- The fitting of hygiene covers to the cushions may affect the acoustic performance of the earmuffs.
- Performance may deteriorate with battery usage.
- This product may be adversely affected by certain chemical substances. Further information should be sought from the manufacturer.
-
The helmet mounted earmuffs are of large size range. Earmuffs complying with EN 352-3 are of medium size range or small size range or large size range. Medium size range earmuffs will fit the majority of wearers. Small size range or large size range earmuffs are designed to fit wearers for whom medium size range earmuffs are not suitable.
-
The output of the audio circuit of this hearing protector may exceed the exposure limit level.
CAUTION
To reduce the risks associated with fire, explosion and burns, which if not avoided, could result in minor or moderate injury or property damage:
a. Use only 3M^TM PELTORTM USB charger FR09 and 3M^TM PELTORTM USB wall adapter FR08 with 3M^TM PELTORTM LR6NM rechargeable batteries.
b. The battery may not be charged if the ambient temperature exceeds +45^ .
CAUTION
- Risk of explosion if battery is replaced by an incorrect type.
- Always use product-specific 3M replacement parts. Use of unauthorized replacement parts may reduce the protection you receive from this product.
NOTE:
- When worn according to the user instructions, this hearing protector helps reduce exposure to both continuous noises, such as industrial noises and noises from vehicles and aircraft, as well as very loud impulse noises, such as gunfire. It is difficult to predict the required and/or actual hearing protection obtained during exposure to impulse noises. Proper selection, fit and use of hearing protection, proper care of hearing protection, and other variables will impact performance. To learn more about hearing protection for impulse noise, visit www.3M.com.
- This earmuff is provided with level-dependent attenuation. The wearer should check correct operation before use. If distortion or failure is detected, the wearer should refer to the manufacturer's advice for maintenance and replacement of the battery.
- This earmuff is provided with safety related audio input. The user should check correct operation before use. If distortion or failure is detected, the user should refer to the manufacturer's advice.
- This earmuff is provided with electrical audio input. The wearer should check correct operation before use. If distortion or failure is detected, the wearer should refer to the manufacturer's advice.
- This hearing protector limits the entertainment audio signal to 82 dBA effective to the ear.
- Operating temperature range: -20^ to 55^
Storage temperature range: -20^ to 55^
APPROVALS
Hereby, 3M Svenska AB declares that the radiobroadcast receiver and Bluetooth® radio communication is in compliance with Directive 2014/53/EU and other appropriate directives to fulfill the requirements for the CE marking.
3M Svenska AB also declares that the PPE type headset is in compliance with Regulation (EU) 2016/425 or Community Directive 89/686/EEC.
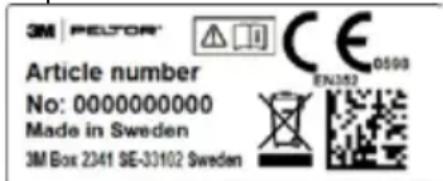
The applicable legislation can be determined by reviewing the Declaration of Conformity (DoC) at www.3M.com/pelter/doc. The DoC will also show if some other type-approvals are also applicable. When retrieving your DoC, please locate your part number. The part number of your earmuffs can be found at the bottom of one cup. An example can be seen in the picture below.
The PPE is audited annually by SGS Fimko Ltd., Takomotie 8, FI-00380 Helsinki, Finland, Notified Body No. 0598, and type approved by PZT GmbH, Notified Body No. 1974, Bismarckstrasse 264 B, 26389, Wilhelmshaven, Germany. The product has been tested and approved in accordance with EN 352-1:2002 / EN 352-3:2002, EN 352-4:2001/ A1:2005, EN 352-6:2002, EN 352-8:2008 or EN 352-1:2020, EN 352-3:2020, EN 352-4:2020, EN 352-6:2020, EN 352-8:2020. The applicable version can be found in the DoC. A copy of the DoC and additional information required in the Directives can also be obtained by contacting 3M in the country of purchase. For contact information, see last pages of this user instruction.

This product contains electrical and electronic components and must not be disposed of using standard die collection. Please consult local directives for disposal of electrical and electronic equipment.
LABORATORY ATTENUATION
Explanation of attenuation tables
EN 352-1/EN 352-3/EN 352-4
3M strongly recommends personal fit testing of hearing protectors. Research suggests that users may receive less noise reduction than indicated by the attenuation label value(s) on the packaging due to variation in fit, fitting skill, and motivation of the user. Refer to applicable regulations for guidance on how to adjust attenuation label values. In the absence of applicable regulations, it is recommended that the SNR be reduced to better estimate typical protection.
A:1 Frequency (Hz)
A:2 Mean attenuation (dB)
A:3 Standard deviation (dB)
A:4 Assumed protection value, APV (dB)
A:5
H = Hearing protection estimation for high frequency sounds (f≥ 2000Hz)
M = Hearing protection estimation for medium frequency sounds (500 Hz < f < 2000 Hz).
L = Hearing protection estimation for low frequency sounds (f ≤ 500Hz) .
A:6 Criterion Level
H = Criterion level for high frequency noise
M = Criterion level for medium frequency noise
L = Criterion level for low frequency noise
Compatible Industrial Safety Helmets EN 352-3
These earmuffs should be fitted to and used only with, the industrial safety helmets listed in Table B. These earmuffs were tested in combination with the following industrial safety helmets and may give different levels of protection if fitted to different helmets.
Explanation of the industrial safety helmet attachment table:
B:1 Helmet manufacturer
B:2 Helmet model
B:3 Attachment
B:4 Head size: S = small, M = medium, L = large
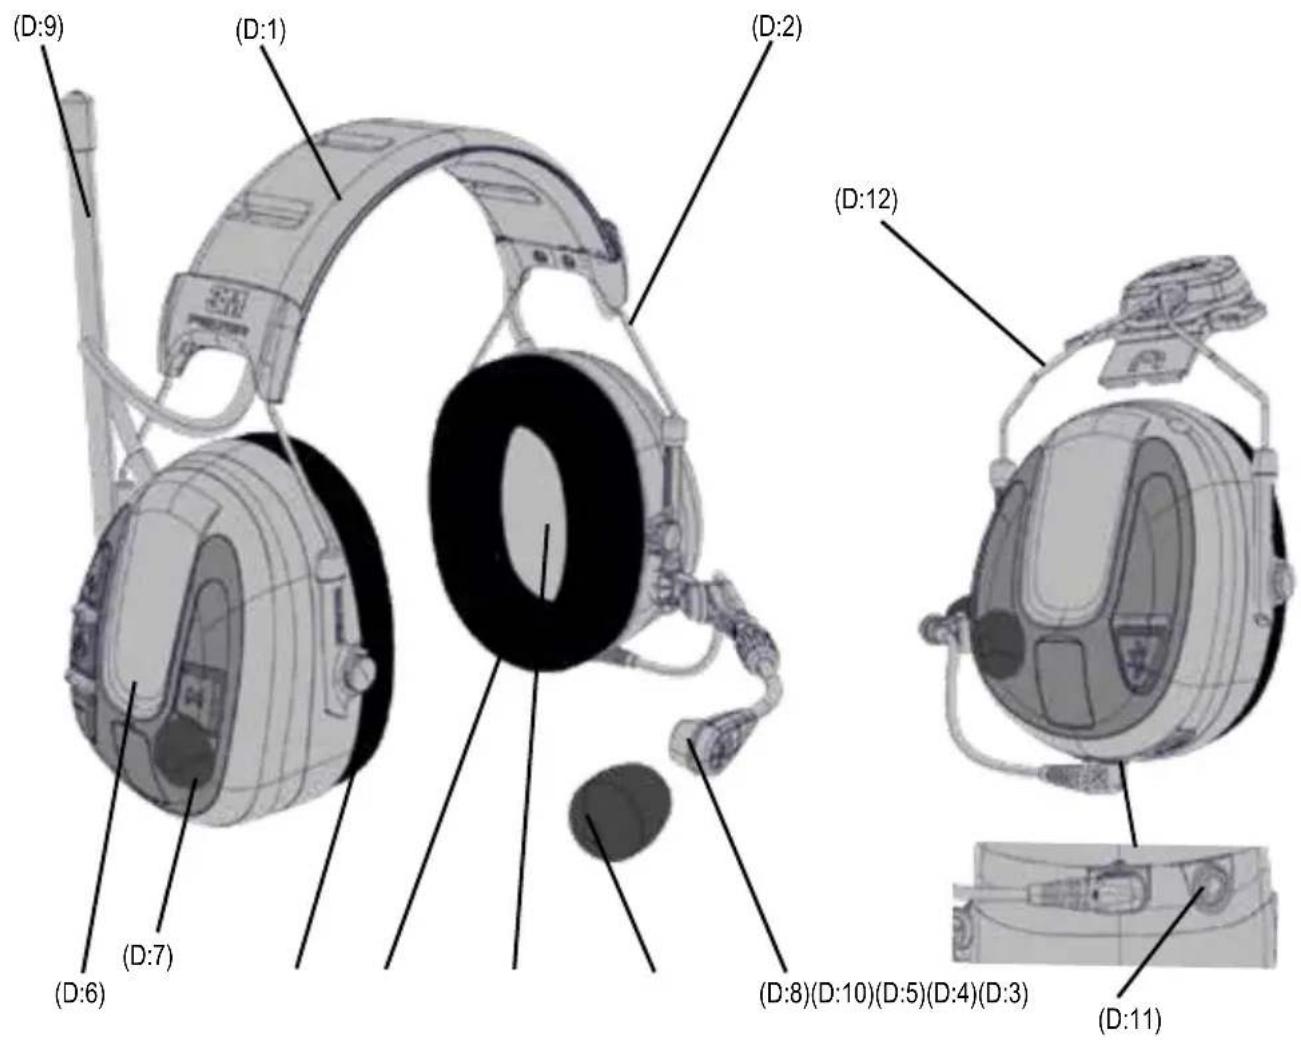
Headband
MRX21A2WS6, MRX21A3WS6 (all product variants)
D:1 Headband (PVC, PA)
D:2 Headband wire (stainless steel)
D:3 Two-point fastener (POM)
D:4 Cushion HY82 (PVC foil and PUR foam)
D:4 Cushion HY80 (PUR foil, PUR foam and silicone gel)
D:5 Foam liner (PUR foam)
D:6 Cup (ABS)
D:7 Level-dependent microphone for ambient listening (PUR foam)
D:8 Speech microphone (ABS, PA)
D:9 Antenna (PE, ABS, TPE)
D:10 Wind shield (foam)
D:11 Charger jack (stainless steel)
Helmet attachment/Hardhat
MRX21P3E2WS6, MRX21P3E3WS6 (all product variants)
D:12 Cup supporting arm (stainless steel)
FITTING INSTRUCTIONS
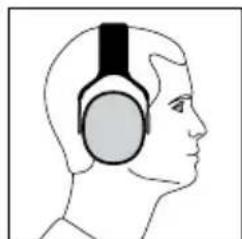
Headband
E:1 Slide out the cups and tilt the top of the shell out, as the cable must be on the outside of the headband.
E:2 Adjust the height of the cups by sliding them up or down while holding the headband in place.
E:3 The headband should be positioned across the top of the head as shown and should support the weight of the headset.
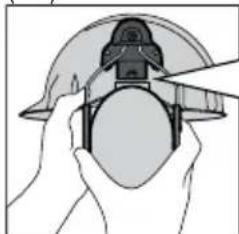
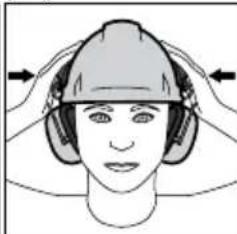
Safety helmet attachment
E:4 Insert the hard hat attachment in the slot on the hard hat and snap it into place (E:5).
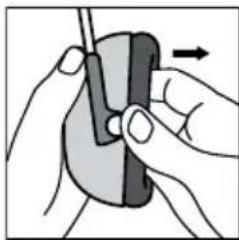
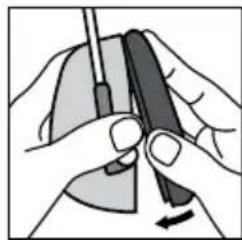
E:6 Ventilation mode: To switch the unit from work mode to ventilation mode, pull outward on the ear cups until you hear a click (E:7).
E:8 Avoid placing the cups against the hard hat as this prevents ventilation.
OPERATING INSTRUCTIONS
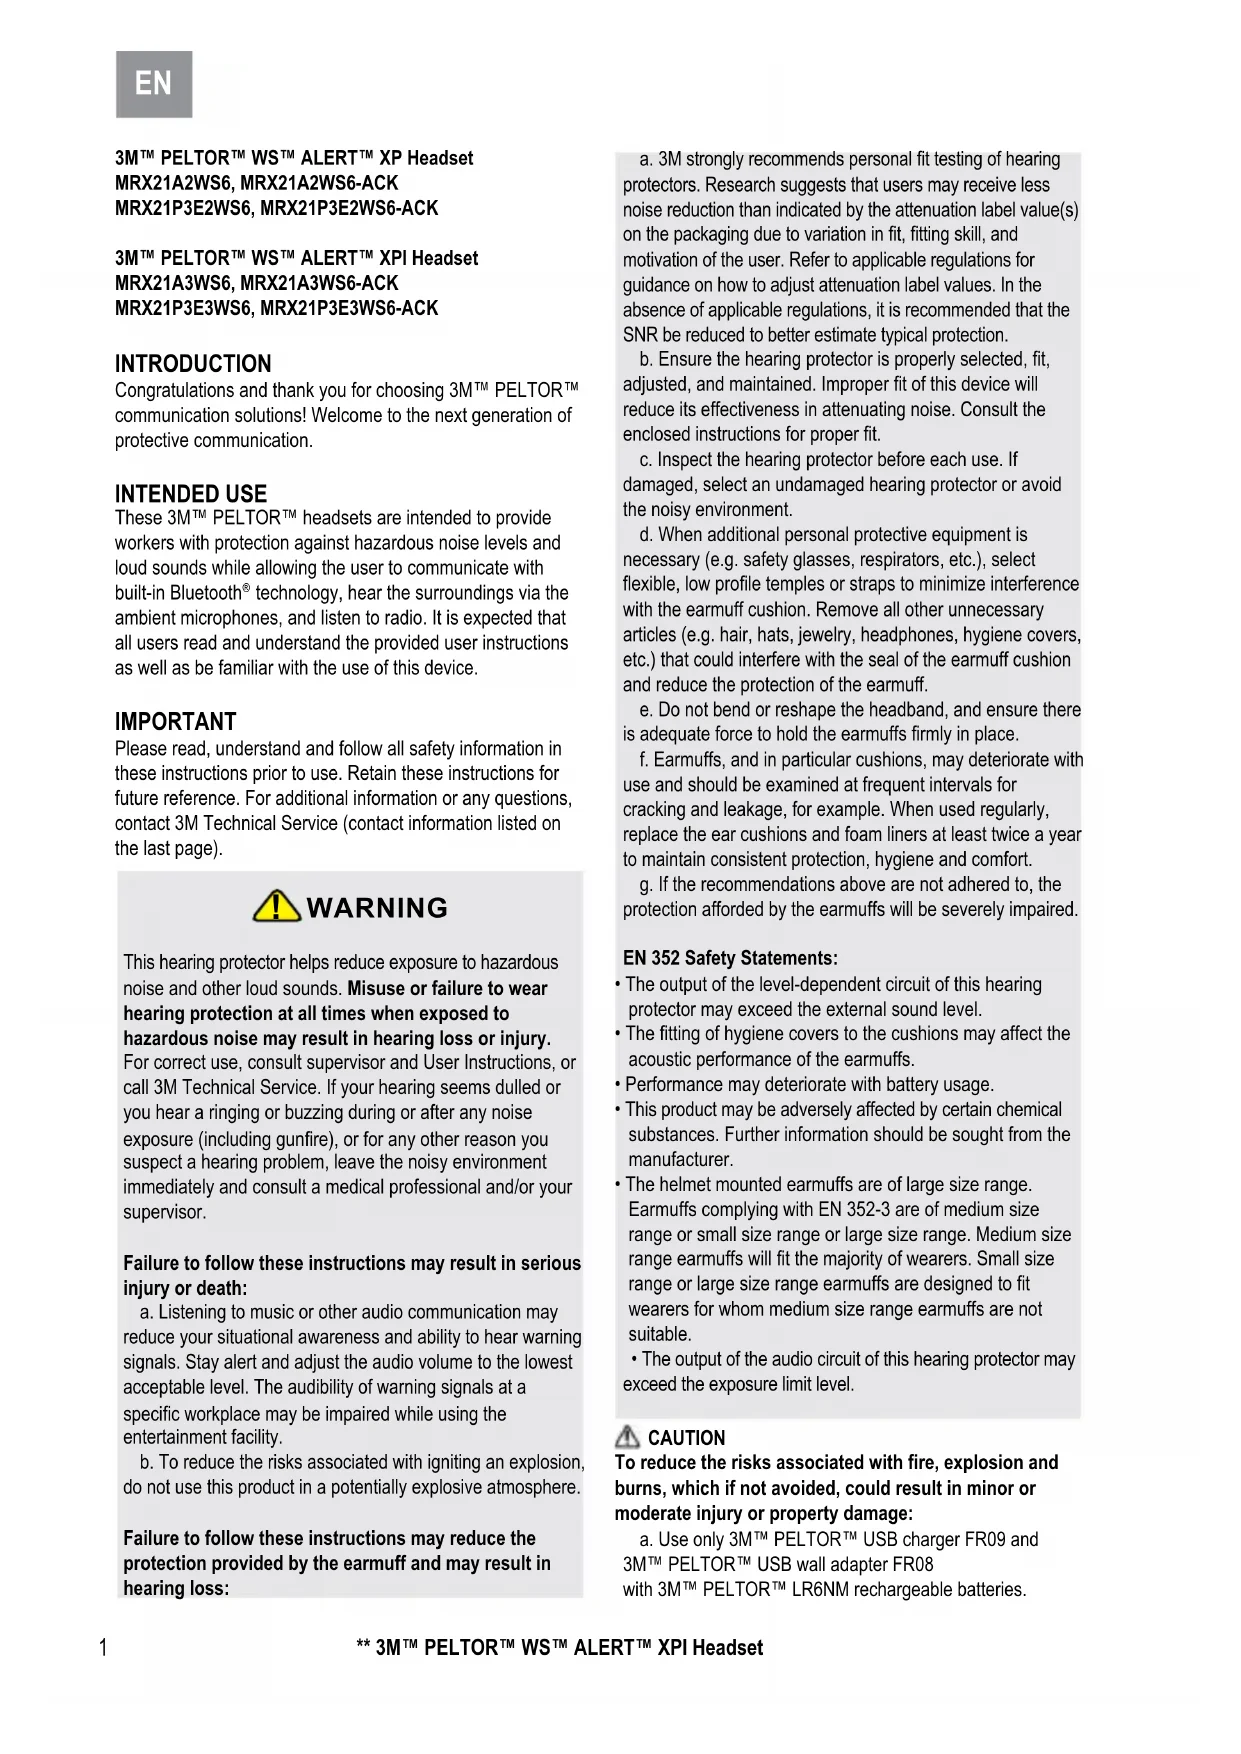
CHARGING AND REPLACING THE BATTERIES (fig. 1)
- Detach the latch on the left cup with your fingers.
- Open the cup.
- Insert or replace the batteries. Make sure the polarity corresponds to the markings.
- Close the cup and lock the latch. Change the battery type if you are switching from rechargeable to non-rechargeable.
Long press (2 s) the Menu button [M] to access the configuration menu, see "Configuring your headset".
CAUTION: Use only 3M^TM PELTOR™ USB charger FR09 EU and 3M^TM PELTOR™ USB wall adapter FR08 with 3M^TM PELTOR™ LR6NM rechargeable batteries.
CAUTION: The battery may not be charged if the ambient temperature exceeds +45^ .
NOTE:
- Do not charge alkaline batteries as this may cause damage to the headset.
- Only use AA non-rechargeable or Ni-MH rechargeable battery.
- Do not mix old and new batteries. Do not mix alkaline, standard, or rechargeable batteries. To properly dispose of the battery, follow local solid waste disposal regulations.
OPERATION TIME
Approximate operation time with new AA alkaline batteries and fully charged LR6NM rechargeable batteries (2100 mAh):
- FM radio and level-dependent: approx 58 hours
- Bluetooth® streaming and level-dependent: approx 78 hours NOTE:
Depending on the environment, temperature, and battery age/ condition, the operation time may vary.
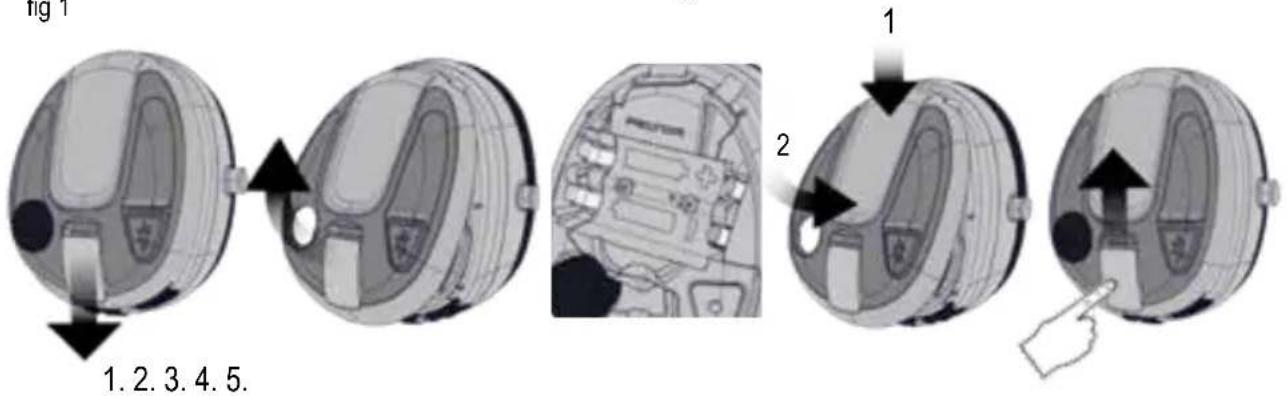
POWER ON/POWER OFF (fig. 2)
Long press (2 s) the Power button [ ] to power the headset on or off.
A voice message will notify "Power on" or "Power off". The first time the headset is powered on, it automatically enters pairing mode.
NOTE: If no button has been pressed for 4 hours, the headset will automatically be powered off. A voice message will notify "Automatic power off".
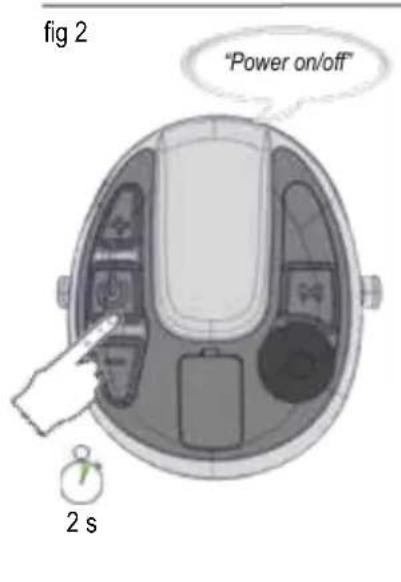
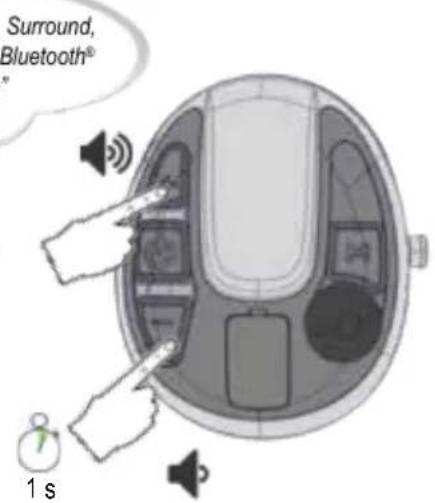
ADJUSTING THE SOUND SOURCE VOLUME LEVEL (fig. 3)
To adjust the sound volume level, short press (1 s) the ([+] or ([-]) button. Change the active sound source by short press (1 s) the Power button [].
The sound source can either be:
FM radio
Phone
- Surround
Music
- Bluetooth®
SMART TIP: You can configure bass boost, surround balance, and surround equalizer. Long press (2 s) the Menu button [M] to access the configuration menu. See "Configuring your headset".
Surround sound (level-dependent microphone for ambient listening)
Helping protect your hearing from potentially harmful noise levels. Constant rumbling and other potentially harmful noises are reduced to a level below 82 dB, but you can still speak normally and make yourself heard.
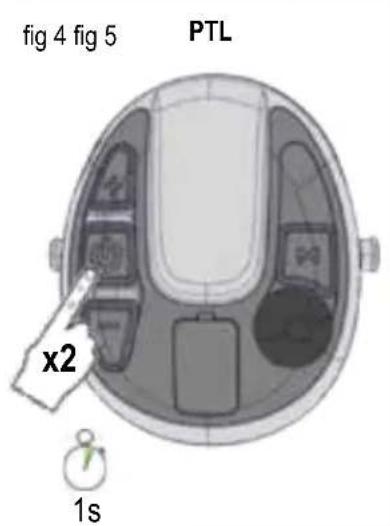
COMMUNICATION FACE TO FACE (PUSH-TO-LISTEN, PTL) ** (fig. 4)
The Push-To-Listen feature enables you to instantly listen to your environment by muting the FM radio and Bluetooth® audio volume and activating the level-dependent microphones. Short press (1 s) the Power button [ ] two times to activate Push-To-Listen. Short press any button to deactivate Push-To-Listen.
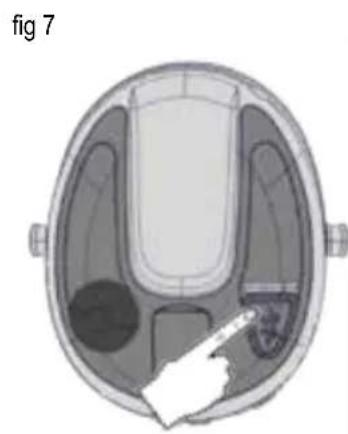
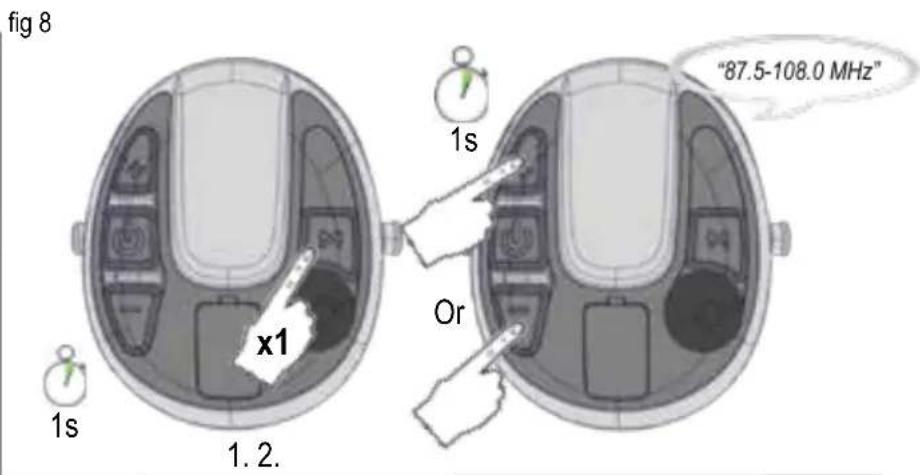
LISTEN TO FM RADIO
Search station (fig. 8)
Short press (1 s) the Menu button [M] to enter search station mode. Short press (1 s) the [±] or [-] button to initiate a search. The radio station frequency will be confirmed by a voice message.
SMART TIP: If you short press (1 s) the Menu button [M], you will always start the FM radio.
NOTE: Radio reception depends on the topography and the environment you are in. If the reception is poor, try to change area if possible.
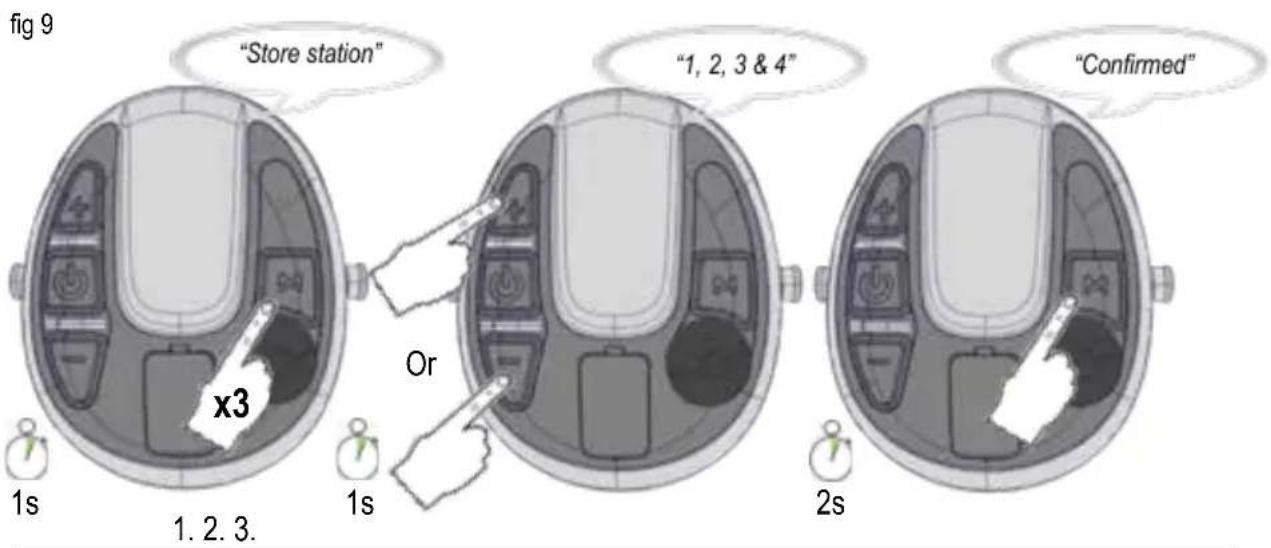
Store station (fig. 9)
Short press (1 s) the Menu button [M] three times, voice message "Store station". Short press (1 s) the [+] or [-] button to select position. Long press (2 s) the Menu button [M] to store the station. A voice message will confirm "Confirmed".
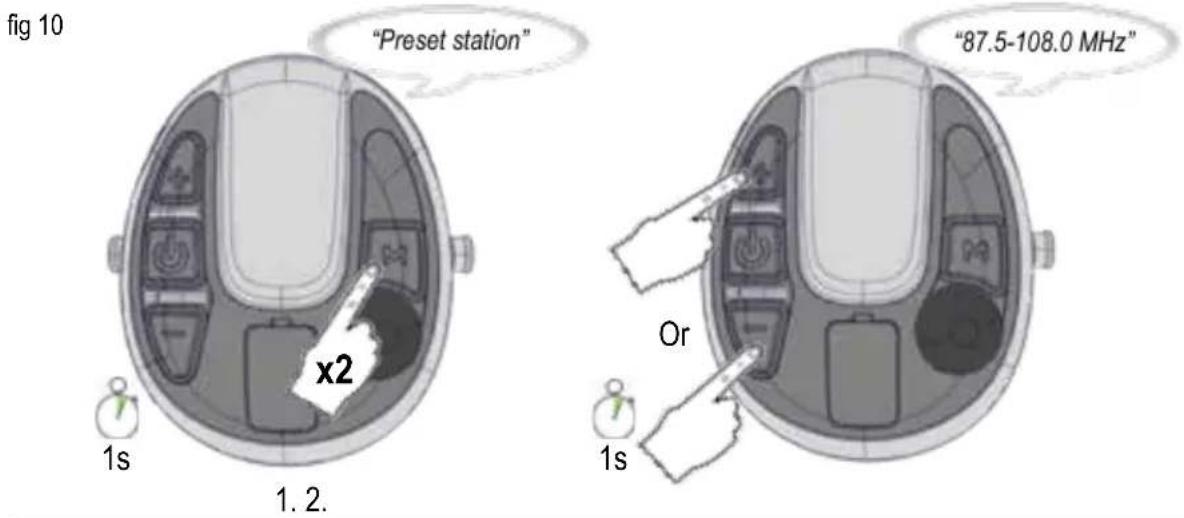
Preset station (fig. 10)
Short press (1 s) the Menu button [M] two times to enter the preset station mode. A voice message will confirm "Preset station". Short press (1 s) the [+] or [-] button to browse and select preset station. The radio station frequency will be confirmed by a voice message.
3M™ CONNECTED EQUIPMENT, Mobile application **
Connect your "WS™ ALERT™ XPI Headset" with the "3MTM Connected Equipment" mobile application supporting both Android and iOS. When connected to the mobile application you will have access to settings, configurations, user instruction etc.
NOTE: For more information go to the "App Store" or "Google Play" and download the 3M^T Connected Equipment" application. For support on the 3M^T Connected Equipment", please see information in the mobile application.
Bluetooth® Multipoint technology **
This headset supports Bluetooth® Multipoint technology. Use Bluetooth® Multipoint technology to connect your headset to two Bluetooth® devices at the same time. Depending on the type of Bluetooth® devices connected and their current activities, the headset controls the Bluetooth® devices in different ways. The headset prioritizes and coordinates activities from the connected Bluetooth® devices.
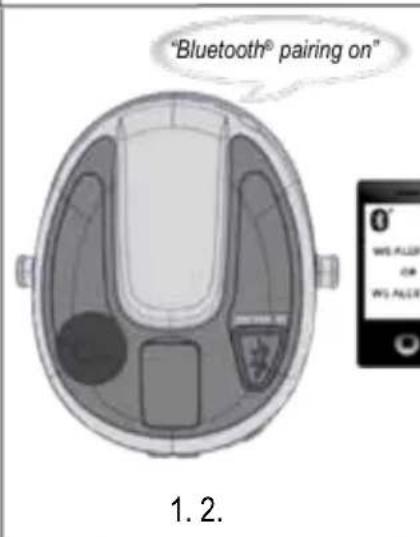
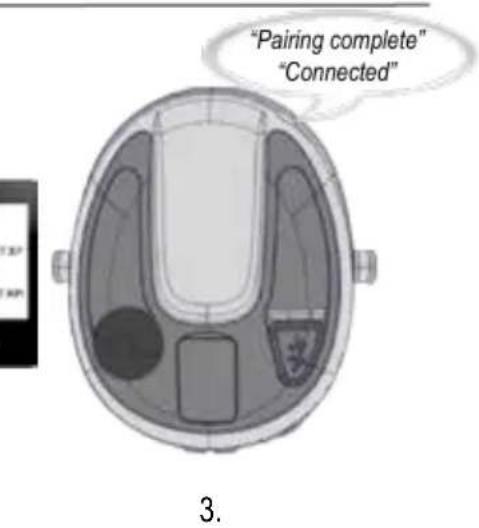
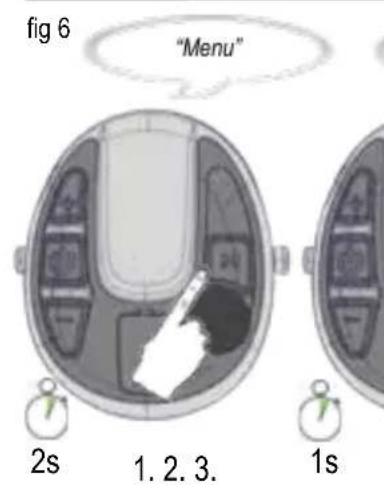
Pairing a Bluetooth® device (fig. 2, fig. 5)
The first time the headset is powered on, it automatically enters pairing mode. A voice message confirms, "Bluetooth pairing on". Pairing mode can also be entered from the menu. This is necessary for pairing a second device (fig. 6). See "Configuring your headset".
Make sure that Bluetooth communication is activated on your Bluetooth device. Search and select "WS ALERT XP" or "WS ALERT XPI" on your Bluetooth device. A voice message confirms when the pairing is complete, "Pairing complete" and "Connected".
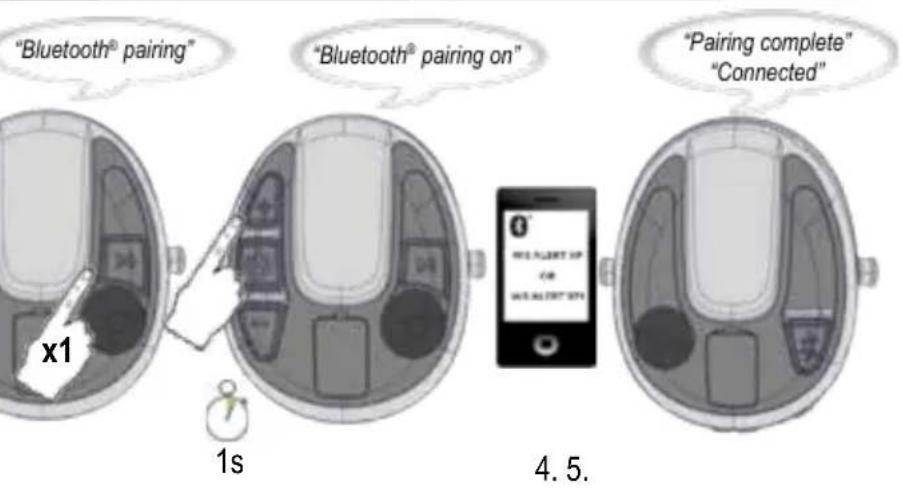
NOTE: You can always stop the pairing process by a long press (2 s) on the Bluetooth® button [ ] (fig. 7).
NOTE: Only one of the two paired devices can be a two-way radio. ** The headset only supports two-way radio with 3M^TM PELTORTM Push-To-Talk protocol. If you have any questions, please contact your local distributor.
NOTE: When a 3rd Bluetooth device is successfully paired, one of the previous paired devices is removed from the headset. If one of the devices is connected, the unconnected device is removed. Otherwise, the 1st paired device is removed.
RECONNECTING BLUETOOTH DEVICES
When the headset is powered on, it tries to reconnect to all paired devices during 5 minutes. A voice message will confirm the connection "Connected".
NOTE: If the link is lost, the headset will try to reconnect during 30 seconds. A voice message will inform you if you get link loss, "Disconnect".
Connected and operating one phone.
Connected and operating two phones. ** (see fig. 7)
| Bluetooth® button | State Action | |
| Short press | No activity Voice control Play ** | |
| Streaming Voice control Pause ** | ||
| Incoming call Ar swer | ||
| Outgoing call/Call in progress | End call | |
| Call in progress on one phone, incoming call on second phone ** | End ongoing call, answer incoming call ** | |
| Long press | No activity/ Streaming | Call the last dialed number Voice control on the last paired device ** |
| Incoming call Reject | ||
| Call in progress | Toggle call between phone/headset | |
| Call in progress on one phone, incoming call on second phone ** | Reject incoming call | |
Connected to two-way radio.
Connected to two-way radio and phone.
**Operating two-way radio. (see fig. 7)
| Bluetooth® button | State Action | |
| Press | No activity/ Streaming | Start transmitting on two-way radio |
| Release | Transmitting on two-way radio | Stop transmitting on two-way radio |
Connected to phone and two-way radio. ** Operating phone. ** (see fig. 7)
| Bluetooth® button | State Action | |
| Short press | Incoming call Answer | |
| Outgoing call/Call in progress | End call | |
| Ongoing reception on two-way radio and incoming call | Answer | |
| Ongoing phone call and reception on two-way radio | End call | |
| Long press | Incoming call Reject | |
| Call in progress | Toggle call between phone/headset | |
NOTE: When connected to a two-way radio you cannot control the audio playback unit from the headset. **
NOTE: If you have an ongoing phone call, you will hear two beeps for incoming calls on the two-way radio. To end the call and switch to the incoming two-way radio call, short press (1 s) the Bluetooth button []. Short press (1 s) the Bluetooth button [] one more time to listen to the two-way radio or wait for the next incoming two-way radio message. **
NOTE: To maintain noise cancelling performance, the speech microphone should be positioned very close to your mouth (less than 3 mm) (G:1).
DID YOU KNOW: The headset supports Bluetooth® streaming A2DP 1.3 from different apps or from the phone's media player.
DID YOU KNOW: Audio playback will be automatically paused from audio playback unit when you have a call in progress or a two-way radio message. ** After ending the call / message the audio playback will automatically start again.
SMART TIP: If the headset has been reset to factory default, it automatically enters pairing mode the first time the headset is powered on again.
Bluetooth® 4.2
Bluetooth® is a global wireless communication standard that connects devices together over a certain distance. Think headset and phone, speaker and PC to smartphone and more. Read more on www.bluetooth.com.
Bluetooth® profiles HSP 1.2, HFP 1.6, A2DP 1.3, AVRCP 1.6. More info on https://www.bluetooth.org(tpg/listings.cfm.
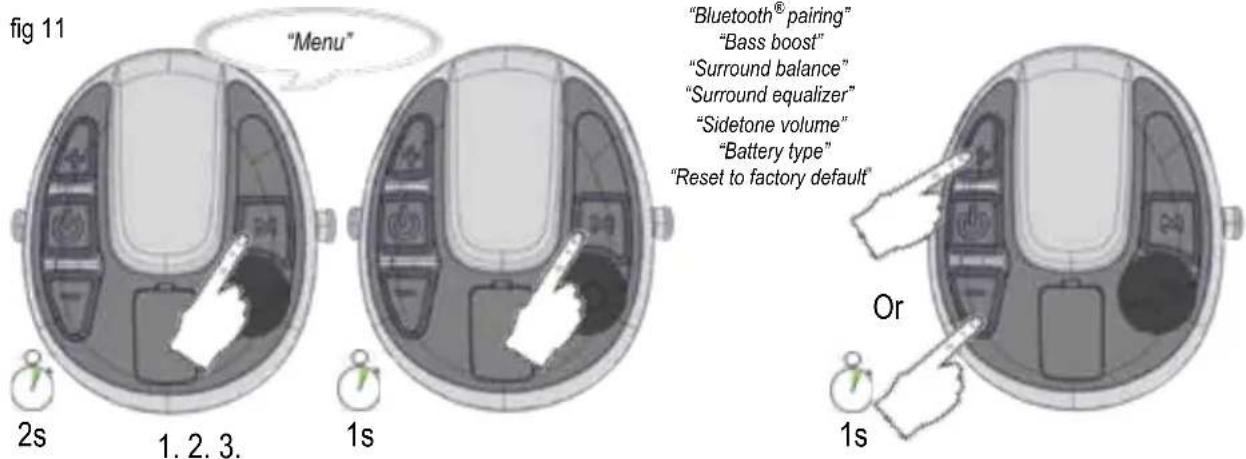
CONFIGURING YOUR HEADSET (fig. 11)
Long press (2 s) the Menu button [M] to access the configuration menu. A voice message will confirm "Menu". Short press (1 s) the Menu button [M] to navigate through the menu. A voice message will confirm each menu step. Short press (1 s) the [+] or [-] button to activate/deactivate/change different configurations.
The following options exist in the configuration menu:
1. Bluetooth® pairing (fig. 6)
When the voice message says "Bluetooth® pairing", short press (1 s) the [+] button to start pairing. Short press (1 s) the [-] button to stop pairing. A voice message will confirm "Bluetooth® pairing on". Search and select "WS ALERT XP" or "WS ALERT XPI" on your Bluetooth® device. A voice message will confirm when pairing is complete, "Pairing complete" and "Connected". Short press (1 s) the [-] button to stop the pairing. A voice message will confirm, "Pairing off".
2. Bass boost
Bass boost gives a fuller bass sound to streamed stereo music. Short press (1 s) the [+] or [-] button to enable/disable bass boost.
3. Surround balance
Short press (1 s) the [-] button to increase left side and reduce right side. Short press (1 s) the [+] button to increase right side and reduce left side. A voice message will notify when the surround balance is centered, "Center".
4. Surround equalizer
Surround equalizer changes the frequency characteristics of the surround sound. Short press (1 s) the [-] or [+] button to change the surround equalizer levels, "Low - Normal - High - Extra high".
5. Sidetone volume
Sidetone is audible feedback to the headset user during a conversation. Short press (1 s) the [-] or [+] button to change the sidetone volume, "Off - Low - Normal - High".
6. Battery type
Short press (1 s) the [-] or [+] button to change the battery type to either rechargeable or alkaline.
7. Reset to factory default (fig.12)
Short press (1 s) the [-] or [+] button, then long press (2 s) the Menu button [M]. A voice message will guide you.
TROUBLESHOOTING
I have a problem with the FM radio reception
Check that the batteries are new or fully charged.
Radio reception depends on topography and the environment you are in. If the reception is poor, try to change area.
I have a Bluetooth® connection problem
- Check that the batteries are new or fully charged.
- Remove all Bluetooth® devices that are synchronized to your phone.
- Reboot the phone (power on/off your phone).
- Do a factory reset on the headset.
- Pair your headset to your phone.
- If the problem remains, try to pair another phone to see if it helps.
I hear crackling noises during streaming/phone calls
Bluetooth® is a radio technology which means it is sensitive to objects between the headset and the device it is connected to. You should be able to have up to 10 meters of distance between the headset and the connected device if line of sight (i.e. no walls etc). Even the location of the phone on the body may be of significance.
CLEANING AND MAINTENANCE
Use a cloth wetted with soap and warm water to clean the outer shells, headband and ear cushions.
NOTE: Do NOT immerse the hearing protector in water.
If the hearing protector gets wet from rain or sweat, turn the earmuffs outwards, remove the ear cushions and foam liners and allow to dry 24h before reassembly. The ear cushions and foam liners may deteriorate with use and should be examined at regular intervals for cracking or other damage. When used regularly, 3M recommends replacing the foam liners and ear cushions at least twice a year to maintain consistent attenuation, hygiene and comfort. If an ear cushion is damaged, it should be replaced. See Spare Parts Section below.
REMOVING AND REPLACING THE EAR CUSHIONS
F:1 To remove the ear cushion, slide your fingers under the inside edge of the ear cushion and firmly pull straight out.
F:2 Remove existing liner(s) and insert new foam liner(s).
F:3 Fit one side of the ear cushion into the groove of the earmcup and then press on the opposite side until the ear cushion snaps in place.
USE AND STORAGE CONDITIONS
- Remove the batteries before storing the product.
- Do not store the hearing protector at temperatures above +55^ (for example on a dashboard, parcel shelf or window sill) or at temperatures below -20^ .
- Do not use the hearing protector at temperatures above +55^ , or below -20^ .
SPARE PARTS AND ACCESSORIES
3MTPELTORHY82,Hygiene Kit
Replaceable hygiene kit. Replace at least twice a year to help maintain constant attenuation, hygiene and comfort.
3MTM PELTORTM HY80, Gel Cushions
Replaceable gel cushions. Replace at least twice a year to help maintain constant attenuation, hygiene and comfort.
3MTPELTORTHY100A, Single-use protectors
Single-use protector that is easy to fit to the ear cushions.
3MTPELTORTHYM1000, Microphone protection
3MTPELTORTM M995/2, Wind shield for speech microphone
3MTPELTORFR08,Power supply with USB connector NOTE:Only use battery charger FR09.
3MTM PELTORTM FR09 EU, Battery charger with USB connector
3M^TM PELTORTM LR6NM,Rechargeable AA batteries
WARRANTY AND LIMITATION OF LIABILITY
WARRANTY: In the event any 3M Personal Safety Division product is found to be defective in material, workmanship or not in conformity with any express warranty for a specific purpose, 3M's only obligation and your exclusive remedy shall be at 3M's option, to repair, replace or refund the purchase price of such parts or products upon timely notification of the issue by you and substantiation that the product has been stored, maintained and used in accordance with 3M's written instructions. EXCEPT WHERE PROHIBITED BY LAW, THIS WARRANTY IS EXCLUSIVE AND IS IN LIEU OF ANY EXPRESS OR IMPLIED WARRANTY OF MERCHANTABILITY, FITNESS FOR A PARTICULAR PURPOSE OR OTHER WARRANTY OF QUALITY OR THOSE ARISING FROM A COURSE OF DEALING, CUSTOM OR USAGE OF TRADE, EXCEPT OF TITLE AND AGAINST PATENT INFRINGEMENT. 3M has no obligation under this warranty with respect to any product that has failed due to inadequate or improper storage, handling or maintenance; failure to follow product instructions or alteration or damage to the product caused by accident, neglect or misuse.
LIMITATION OF LIABILITY: EXCEPT WHERE PROHIBITED BY LAW, IN NO EVENT SHALL 3M BE LIABLE FOR ANY DIRECT, INDIRECT, SPECIAL, INCIDENTAL OR CONSEQUENTIAL LOSS OR DAMAGES (INCLUDING LOST PROFITS) ASING FROM THIS PRODUCT, REGARDLESS OF THE LEGAL THEORY ASSERTED. THE REMEDIES SET FORTH HEREIN ARE EXCLUSIVE.
NO MODIFICATION: Modifications to this device shall not be made without the written consent of 3M Company.
Unauthorized modifications may void the warranty and the user's authority to operate the device.
3MTPELTORWSTM ALERTXP Headset MRX21A2WS6,MRX21A2WS6-ACK MRX21P3E2WS6,MRX21P3E2WS6-ACK
3MTPELTORTMWSTMLAERTM XPI Headset MRX21A3WS6,MRX21A3WS6-ACK MRX21P3E3WS6,MRX21P3E3WS6-ACK
BbBEHNE
Iopabnna!Bnarapm Bn,ye n36paTe pehenraTa 3a KMyHkaun Ha 3MTPELTORT! Dope doonn B cneBaIoTO NOKoJIeHne 3aunTHa KMyHkaun.
ПРЕДHA3HAUECHNE
Te3n Cnyuajkn 3M™ PELTOR™ ca npedha3naeHn da oCnIpyraBt Ha pa6oTHnUITE 3aunTa cpeuy onaChnte HnBa Ha uM n CInHn 3Byu, KaTO CbUeBpeMeHHO N03BOJRABt Ha notpe6nteHa da KOMyHnKnpa CBpaDeHata Bluetooth texHONOrn, Da yUba 3aoBnKaJIa7aTa rO cpea Upe3 MKNpOFOHNTe 3a OKONH uymOBe N da CnyuopaNoOCTBo. OuaKBa ce BCnKn noTpe6nteN da npouetat n pa3bepat npedocTabeHte INcTpykUn 3a notpe6nte, KaTo n da ce 3an03HaRT C ynotpe6ata Ha TOBA yCTpoICTBO.
BAXHO
MOnla, npooyete, pa36peTe n cna3BaIte TcIaNata HnΦopMaua 3a 6e3oNaChOCT B Te3n IHCTpyKuIN Ppeiyn yNoTpe6a. 3ana3eTe Te3n yka3aHn 3a 6bDeua CnpaBka. 3a DonbInHtEnHa HnΦopMaua INIbnpocn Ce CBpKeTe CTEXHueckn cepBn3 Ha 3M (HnΦopMauaTa 3a KOHTaKT e NocoueHa Ha nocJeHATA cTpaHua).

ПЕДУПЕЖДЕНЕ
To3n clyxOB npOTEkTO nomara 3a HamaJIraBaHe Ha
H3IarAHeto Ha onaceH ymN dpyrN CINHN 3ByuN.
HenpaBUNHaT a ynoTepe6a nIi HenoCTABHeTo Ha
cpeDCTBaT a 3a clyxOBA 3aunTa no BCaKO BpeMe, KOraTO
cte N3IOKeHN Ha onaceH ym, MoKe da DOBeDe do
3ary6a Ha clyxa nn YbpeXdaNe. 3a npabunHa ynoTepe6a
ce nocBBeTbaIte c pKoBOdnteJIy INHCTpyKUInTe 3a
notpe6tJIe IiN Ce oBaTe Ha ekua n ToxHuecko
obCnyXBaHe Ha 3M.AKO cnybT Bn e npITbneH, YyBaTe
3bHeHe IiN 6pbMHe He BpeMe Ha IiN cIeI n3JaRaHe Ha
yWM (BKJIOUHTeHNo pni CTpeJIb6a c ORheCTpeJIHO opBXKe),
III npadn Dpyra npuHnA ndo3npate npoBlem cbc
cLyxa, HanycHeTe He3a6abH0 WymHaTa cpeDa n Ce
KOHcyTTpaIe Tc MeDnIHcKO liue
I/IIn C pKoBOdnteJIa Cn.
Deknapaun 3a 6e3onacnoCT EN 352:
- 3xOHNrT CnHrAn OT 3aBnCeUaTa OT HbTO Bepra Ha To3N CnyXOB IpOTEkTop MOKe Da HaDbuH NHBOTo Ha BbHnHr 3ByK.
IIOCTABYHeTo Ha XnHHeHH KanaaHa Bb3rAbHNuKNTe MOKe Da OKaKe BnHHe BbpXy AkcTNUHnTe XapakTepncnHa 3aflnyuHTeJIte.
XapakTePcNTKITeMOKeJaCEBLOwATBXOJaHa ynotpe6aHa6bATEpMTE.
To3n npOdyKT MOKe Da Ce NOBnIe HeRaTINBHO OT ONpeJeHn XmNHy BeSeCTBa. DOnbJIHnTeHa HΦopMaun Tp6Ba Da 6bJe NtbpceHa OT npOu3BODInTEJ.
- MoHTnpaHnTe KbM kackaTa 3aRnyuHnTeNn Ca C roJMa pa3mep. 3arnyuHnTeNtE, otroBapAun Ha EN 352-3, ca cpeHN, mALKn nnr tonemn no pa3mep. CpeHNr pa3mep 3aRnyuHnTeNn Ue e nOxOnd 3a nobeyeto notpe6nteN. MaKnTn nn ronemn rata3rnyuHnTeNn ca npoeKtnpaHn, Taka Ye da nachat Ha notpe6nteN, 3a konTo cpeHNr pa3mep cnXOBn npoteKTOpn He e nOxOnd.
- N3xOJaIaIITcHnAOTeEKeTpUeCKaTaayIOBepraHaTO3N CUYXOB IPOTeKTop MOKe Da HADBUN HNBOTO HaJIMMTa Ha EKCNO3uIN.
Hecna3BaHeTo Ha Te3n HnCTpyKmN MoKe Da DoBeDe Do cepNo3HO HapaHaBaHe Nn CmBpT:
a.CnyuhaHTo Ha My3nka HIN Dpyra ayDIOKOMyHkau na MoKe Da HamaN BaaTa CNTyaUHOHa OCBeDoMeHOCT n cnoc6bHocTtBa N da YyBaTe npEynpeIteHN CNHaHb. BDeTe Hauepe K nepylnpaTe cInata Ha 3Byka Do Hau-HNCKOTO dOncyTmO HBO.B3MOXHOCTTA 3a CyBaHe Ha npEynpeIteHN CNHaHn Ha ONpeJeHo pa6oTHo MRCTO MoKe Da ce Hapuyn PpN IN3No13BaHe Ha cyHKuYra Ta 3a pa3BneHHe.
b. 3a da ce HaMaIr CbBp3aHInTe C Bb3HnKBaHe Ha eKcPi03nPaNCKOBe, He H3NoTBAJTe TO3n PpOdyKT B NOTEHuaHNO B3PbBOONACHa ATMocpepa.
Hecna3BaHeTo Ha Te3n HNCTpyKmN MoKe Da HAmaN 3aunTata, npedocTaBeHa OT Wymo3arIywnTeJr, m MoKe da DoBeDe do 3ary6a Ha cnlyxa:
a.3M cnHIO npenopbYBa TectBaHe 3a KOHKpeTHata npiroHOCT Ha cIyXOBITE nPoTeKTopn. H3cneBAAHnraTa noka3BaT, Ye nOTpe6nteNTe MoKe Da NOnyUAT No-MaIKo HAmaJIbBAHe Ha Wyma OT NOCOeHIne Bbpxy etNKeHa OAnAKOBkATA CToHocTN Ha 3aIpyuBaAbe Nopadn pa3NnHTa PnPi NOCTABHRe, yMeHNrTa 3a NocTabHRe N MOTIBaCnRA Ta Ha nOTpe6nteJI. Hanpabete CnpabKa C npINTOxIMTE pa3nope6n 3a HAcOKn OTHOCHO peYIpapAHeto Ha CTOHOCHTe Ha eTKeTa Ha 3aIpyuBaAbe. PnI INncata Ha npINOxIMn pa3nope6n Ce npenopbYBa SNR da 6bDe hAmaneH, 3a Da MOKe TNIuHnata 3auNTa da 6bDe n3HCNEHaNo-dO6pe.
b. YBepTe ce, ye cnyxOBnT npoTeKTop e npaBnHO n36paH, noCTaBeH, perynipaH n noDlbpKaH. HenpaBnHToTO noCTaBAHe Ha TOBa ycTpoiCtBO ue HamaHn epeKTNBHOCTTa My npu 3arNyUbaHe Ha UyMa. KoHCypTuPaIte ce C npuIOKeHIne IHcTpKUn 3a npaBnHO noCTaBAHe.
c.Прглждаite cnyxobn npoteKTOp npei BcraKa ynoTpe6a.Ako e nobpeDen, n36peTe 3dpab cnyxOB npoteKTOp nIn n36yBaIte wymHa cpea.
d. Korato ca Heo6xOaIMM DoTbJIHnTeHN JIuHN npedna3Hn cpeCTBa (Haap. 3auHTH ouHla, peCnpaTopn
nДр.), n36epeTe rBkABn, HNCKOpnoHn paMKn nIJIeHTN, KOETO ige HamaJIi HamecATA B yNtBTHraBaHeTO HaBb3rnaBnUkHzata Ha Wymo3aRnuuTIEL. OTCTpaHete BCuKNdpyTN HeHyxHn Heua (HaNP. KocA, 5aKn, 6nxKyTa, CnyuJAKn, XmRHeHH Kanaaui n Dp.), KOITo 6nxMaMn DaHapyUAT yPbTHeHNETo HA Bb3rnaBnUkHzata HaWymo3aRnuuTIEL N da NOHIXkat 3aunTATA HaWymo3aRnuuTIEL.
e. He orbbaTe n He npomeHnTe oOpMaTa Ha JeHTaTa 3a rIabata n Ce yBepTe, Ye mA aKeBaTha Cnla 3a 3aDbpxaHe Ha 3arLyuNTeJIa Ha MrcTo.
f. 3aIyuHTeJIte Ioc6eHo Bb3rIabHNuKInTe MoKe da BLOwAT KaueCTBOTO cn npn ynoTpe6a n Tp8Ba Da ce npOBepRaBt YecTo, HapnpMe 3a HanyKBaHn I npOnyckaHe. Pn peoBHa yNoTpe6a CmEHa Te Bb3rIabHNuKInTe uNtBTHnTEJIte OT pHa NoHe DBA NTn rOdiuH0, 3a Da ce NODbpKat NoCToAHHa 3aUHTa, XINHeHa N KOMΦopT.
g. Ako nocoehnte no-rope npenopbKn He 6bdaT cna3eHn, 3aunTaTa, OcnpyraHa oT cnYXOBIne npoTeKTopn, ige bde cepno3Ho HamaIeHa.

BHIMAHNE
3a da ce HamaJIrT pNcKOBeTe, CBbP3aHn c NoXap, ekCnNo3nI n 3rApHnIy, KOInTo 6nxa MoIIN Da npUHNrT IeKo INI CpeDHO HapaHbAHe INI NmUeCTBeHa ZeTa, aKo He 6bDat n36BerHaTu:
a.ИЗПОЛЗВАЕ сAmO USBЗарДноустpoиCTBO 3MTMPELTORTMFR09иUSBадаNTep3a cTeHa 3MTMPELTORTMFR08cakymyIaTOpH6aTePnN 3MTMPELTORTMLR6NM.
b. BaTePnIa MoKe Ja He Ce 3apeKda, Ako OkOJIHaTa Tempepatya npEbnabA 45^

BHIMAHNE
- Onachoct ot ekcnno3n, ako 6atepnaTa 6bJe 3ameHeHa c rpeweH TnI.
BnHaHn 3nOJ3BaIte pe3epBn qactn Ha 3M, npEHa3HaueHn 3a KOHKpeTnI npOyKT. N3noJ3BaHeTo Ha HeoO6peHn pe3epBn qactn MoKe Da HamaN 3aunTa, OCnrypRaHa oT OToI npOyKT.
3A6EJIEXKA:
Korato Ce Hocn B CbOTBeTCTBne C Te3n IHNCTpykun 3a notpe6nte,TO3n CnyxOB IpoteKTOp cnomara 3a HamajraBaHe Ha N3JaRaHTo KAKTo HA He npkeKbCHAtu ShymoBe,KATO HApnpimep INDyucpnaHn ShymoBe nShymoBe OT PpeBO3HN CpeCDTBa N CAMOJETN,Taka N HA MHOrO CNHn MMynChn ShymoBe,KATO HApnpimep CTepeNBcO rHeCtpeHNO opBXKe. Tpydno e Da CE pdeBnDN HeobXODImata N/nn DeiCTBnTEHaTa 3aUHTa Ha Cnyxa, NOyueHa No BpeMe Ha N3JaRaHTo Ha MMynChn ShymoBe. IOnxOJaIyrt N3bOp, NOCTABRHeTo N IN3NoJ3BaHTo Ha CpeCDTBOTa 3a CnyXOba 3aUHTa, PpaBnHaTa rPnxka 3a Hero N dpyrN IpomEnHBu 3e NOBnRArT Ha ppon3BoJnteHnocCTta. 3a da HayuTe NOBEue OTHOCHO aUHTaHa Cnyxa ot MMynCeH Shym, nocetete www.3M.com.
To3n 3aIyuHTeN ce npedocTabe cbc 3aRyuBaAhe, 3aBuceoOTnHbTO. TOpTe6nteYrTp6Ba da npOBepeBa
npabnHTo fynKUHOHpaHe npedynynotpe6a.BcnyaHa NOBpeDa IIN HeN3npabHa paOta NpTeBnTeJrTpr6BaDa HnPaBn CnpaBA cCbCcbBeta Ha npOn3BOIDTeJAOTHOCHO NOppbXkata NCMHaTa Ha 6atePnTa.
To3n yM03aIywnTeIe ne ppeIana c o6e3onaceH ayinobxod. Notpe6nteIaT pr6Ba da npOBepn npAINHOto fynKIOHnpaHe npEi yNtpe6Ba.BcnyaHa CmyueHne Ha 3Byka IIN HEn3npABHocT nOtp6nteJIaT pr6Ba Da HApabN cnpABKa Cbc CbBeta Ha CbBeta Ha npOn3BOIDNTeIa.
To3n 7yM03aTnyuHTeJI cpePdnaC eJekTpueckn ayDIOBXoJ. IOTpe6nteJIa Tp8Ba Da npOBepraB npabINHOto cyHKUOHNpaHe npedi ynoTpe6b.BcnyaHa CMySeHHe Ha 3Byka HIn HeN3npabHa pa6ota notpe6nteJIa Tp8Ba Da HAnpaBn CnpabKa Cbc CbBeta Ha npOn3BOIDTeJI.
To3n cnyxOB npoTeKTop orpaHnUaBa pa3BJIeKaTeHNHTe ayDnOncnHaJIn do eFekTnBHO HnBO 3a yxoTo ot 82 dB(A).
-Дианаэн ha pa6oTHaTe TempepaTypa: -20°Cdo 55°C
-ДианаэнHa TemnepaTypaTa 3a cbxpaHHe: -20°Cdo55°C
OIOBPEHNA
C HactoJIoTO 3M Svenska AB DeKnapura, Ye npHemNkBT 3a padnoi3IbUbaHnna n padnoKOMyHnkaZnra Ta Bluetooth OTROBAPRT Ha DInpeKTINbATA 2014/53/EC nHa dpyrnc BcOTBeTCTBaunu DInpeKTINBn 3a N3bJIHeHne Ha N3NCKBaHnra T3a MapKnpoBkata CE. 3M Svenska AB DeKnapura cbIoo, ye cnyuAanKeTe OT Tnna JIIC OTROBAPRT Ha PerJaMeHT (EC) 2016/425 nnn DInpeKTINbATA Ha o6uHocTTa 89/686/EuO. PpINOxMOTO 3aKOHOdaTeJICTBO MOKe Da ce OnpdeN, KATO npereNdate DeKnapaZnra 3a CbOTBeTCTBne (DoC) Ha www.3M.com/pelter/doc.DoC Ue ce noKaJee CbIoo, ako HAKON dpyrN TINOBn Odo6peHnra ca npINOxMn. Korato N3BniUaTe BaWata DoC, MoJn, HamepeTe CbOy KaTANOxKeH Homep. KaTANOxHnT Homep Ha BaWnte 3aflNyUHNTeN MoKeTe Da HamePte Bbpxy DoNHaTa YAcT Ha eDHa ot YauKNe. PpIMep MoKe Da Ce BUnn Ha KapTHNKATA No-DOly.

JIIC noDnEkaT Ha eXeeroH oOHT OT SGS Fimko Ltd., Takomotie 8, FI-00380 Helsinki,ФIHnaHua, HOTnΦnIpaH opraH N0 0598, n ca TInnoBO OdoBpeH oT PZT GmbH, HOtnΦnIpaH opraH N0 1974, Bismarckstrasse 264 B, 26389, Wilhelmshaven, TepMaHn. IpoDyKbTe e TeCTBaH n OdopeH B cBoTBcTbHe c EN 352-1:2002/EN 352-3:2002, EN 352-4:2001/A1:2005, EN 352-6:2002, EN 352-8:2008 nEN 352-1:2020, EN 352-3:2020, EN 352-4:2020, EN 352-6:2020, EN 352-8:2020. IprINOxHMata BercnA MoKe Da 6bJe otKpTa B dKnapauHa Ta cBoTBcTbHe (DoC). KonHe oT DoC, KaTo n IOJbLnHtJIHa INΦopMaIya, INsCKBaHa B DnpeKTbIte, MoKeTe Da NOJyUHTe N KATO ce CBbpXeTe C 3M B dPbKaBaTa Ha NOKynka. 3a INΦopMaIyaTa 3a Bp3kA BVXTe NocJeHNTe CTpaHnHa Ta3N INHCTpyKuJa 3a Notpe6nteJ.

To3n npodukTcbIbpxKa eJeleKtpuyeckn neJeleKtpoHHN
KOMHOENTN He Tp6Ba Da ce N3XBpIg KATO 6nTOB OTnabk. MoJIa, KOHcyITnpaIte Ce c MeCTHHe pa3nope6b 3a N3XBpJIrHe Ha eJekTpUeCKo n eJekTPOHHo 06OpyDbaHe.
3AΓЛУŠΑBAHE B JΛΒΟΡΑΤΟΥ
O6aCHeHnHa Ta6nIeTe 3a 3aIyuaBaHe EN 352-1/EN 352-3/EN 352-4
3M cnHNO npenOpbUba TcTeBaHe 3a KOHKpeTHaT a npnroDnOCT Ha cnYXOBnTE npoteKTopn. N3cneDbAHnra Tnoka3BAt, ye NOTpe6nte moKe Da nOlyuAT No-MaJIko HamaJIraBaHe Ha Wyma OT nOcoeHnTE BbPxy etNkEtHa ONaKOBkata CTOnHOCTn Ha 3arNyUbaBe nopadn pa3nUHnra Tnp NOCTABnE, yMeHHaTa 3a noCTabRe H MOTNbauRrTa Ha notpe6nte.HanpaBeTe cnpabKa C npINOxIMnTe pa3nope6bHa hAcOKn OTHOCHO perynipaHTo Ha CTOnHOCTte Ha etNkEtHa 3arNyUbaBe. PpI nnCATA Ha npInNoxIMn pa3nope6bCe npenOpbUba SNr Da 6bJe HAmaleH, 3a da MoKe TnINuHaTa 3aUHTa Da 6bDe n3HCnEHa No-do6pe.
A:1 YecToTa (Hz)
A:2 CpeNo 3aŋnyuəbaNe (dB)
A:3CTaHdapTHOOTKnoHeHne(dB)
A:4 PpeiOnlaeMa cToHocT Ha 3aunTa, APV (dB) A:5
H = Ba3OBO HNBO 3a BNCOKOCHOTEN WYM
M = Ba3OBO HnBO 3a CpeDnOueCTOTeH Wym
L = Ba3OBO HNBO 3a HNCKOeCTOTEN WYM
CbBmctHn npomuJneH npednaHn Kackn EN 352-3
Te3n 3aRnyuHTeIN Tp86Ba Da ce MOHTnpaT N3N0N3BaT
cAmO C npOMuUHeHIne TpeDna3HN KACKn, N3bPoEH N
Ta6nua B. Te3n 3aRnyuHTeIN ca TecTBaHN B KOMbHaCn
CbC CneHIne PpOMuUHeHn PpeDna3HN KACKn MOrat Da
ImaT pa3NUnHn HNa Ha 3aunTa, AKO CE MOHTnpaT Ha
pa3NUnHn KACKn.
06aCHeHne Ha Ta6nIaTa 3a npNCtABKn Ha npOMuJIeHn npEJa3Hn KAcKn:
B:1Pon3BODHTeHaKaKaTa
B:2 MoTeI Na KaCKaTa
B:3Ппставka
B:4Pa3mepHa rnaBata:S=MaIbK,M= CpeDeH,L=RoJAM
JIeHTa 3a rIaBa
MRX21A2WS6, MRX21A3WS6 (BcNqKn BapnaHTn Ha npOdykTn)
D:1 JeHTa 3a rnaBa (PVC, PA)
D:2 Ka6eI Ha IeHTaTa 3a rIaBa (HepbKdaema CTOMHa)
D:4 Bb3rnaBnUka HY82 (PVC fOJIO n PUR nHa)
D:4 Bb3rnaBnHya HY80 (PUR φoJIno, PUR nHa n cnJIkoHOB reJ)
D:5 YnIbTHInTeOn tna (PUR nHa)
D:6 Yaisha (ABS)
D:7 3aBcNIM OT HbTO MmKpOΦOH 3a CnyJaHe Ha OKoJIHn 3Byu (PUR nHa)
D:8 MmKpOΦoH 3a npOBeJdaHe Ha pa3roBOpn (ABS, PA)
D:9 AHTeha (PE, ABS, TPE)
D:10 Betpo3aunTeH ekpaH (nHa)
D:11Ka3a3apAnHOyCTpoIcTB0(HepbXdaema CTomHa)
PnncTaBka 3a Kaca/npedna3Ha Kaca
MRX21P3E2WS6, MRX21P3E3WS6 (BcNcKn BapnaHTn Ha npoDyKTn)
D:12 PAmo, noIbpxkaio qauKaTa (Hepxkaema cTomaHa)
NHCTPYKUN3AIOCTABRHE
JenTa 3a rnaBa
E:1Пльзн elect HaBbHaшкпe И haKNoHete roPhaTа qact Ha KOpnyca HABbH, KaTo Ka6eJIb Tpr6Ba Da e OT BbHsHaTa CtpaHa Ha JIeHTaTa 3a rJaBa.
E:2 HAcTpoIe BnCOunHaTa Ha YauKInTe, KaTo rN nIb3HeTe Harope nn HADONY N CbUeBpeMeHNO npINbPkAte NeHTaTa 3a rnaBaTa Ha MRCTO.
E:3 JeHtata 3a rnaBa Tpr6Ba Da MInaba HaI rnaBata, KaKTo e NOKa3aHO, I da NoDbPka TerlTOHa CnyuAnKITE.
PnucKa 3a npedna kaca
E:4 NocTaBeTe npncTabKaTa 3a npedna3HaT a Kaca B CnToA Ha npedna3HaT a Kaca n 3axBaHe T Ha MrcTo (E:5).
E:6 Pexim Ha BeHTnlaqna: 3a da npemHete ot pa6oTe hpeKIM KbM peKIM Ha BeHTnlaqna, n3dbpnaIte HABbH qawknte 3a ywnte, dOKato yyeTe upaKaBaHe (E:7).
E:8 IV36yBaIte Da nocTaBTe YauKIne Bbpyx npednaHaTakka, Tb' KaTO TOBa Ue npedOTbpaTN BeHTnlaUraT.
NHCTPYKUN3A EKCINLOATALNIA
3APEXDAHE IN CMRAHA HA BATEPNTTE (pur.1)
1.C npbctnte cno tkaueTe qnkcatopa Ha JIaBaTa Yauka.
2. OTBopete yawkaTata.
3. NocTaBeTe HIN Cmehete BaTePnITE. YBepete Ce, Ye NOJIpaNTeTbT OTROBaPaHa Ma MapKnIpOBKInTe.
4. 3aTbOpete yawkaTa n 3aknOchete fNkCatopa. IpomHeTe TnHa ha 6aTePnra, aKO npemHabate ot akymyIaTopHa KbM He3apeKdaema. HATNCHEte pOdoJIxNKeTIHO (2 cek.) 6byToHa Ha MeHIOTO [M] 3a DoCTbI DO meHIO TO 3a KOHfNpypnahe, BnKte ,KoHfNpypnahe Ha cnlyaankTe".
BHIMAHNE:ИЗнолзайе само USB зарядноустю 3M™ PELTOR™ FR09 EUи USB aanTepr 3aCTeHa 3M™ PELTOR™ FR08 cakymylatopn6aTeprn3M™ PELTOR™ LR6NM.
BHUMAHNE: BaTePnra MoKe Ja He Ce 3apeKJa, ako OKoJHaTa TempepaTpa npEbnuBa 45°C.
3A6EJIEXKA:
-He ce onntBaIte Da 3apeKdaTe aJIkaJIHn 6aTePmN, TbI KaTo TOBa MoKe Da NOBpeDi CnyuAJIKITE.
-Използайтесамо Heзарждаema AA 6aTeряилнakумлаторна Ni-MH 6aTeря.
-He cmeBaIte cTapn HOBn 6aTePm. He cMeBaIte aIkaHn, cTaHdapTHn nIaKymlaTopn 6aTePm. 3a da I3XBbPnTE 6aTePnTE NO IOxOJaHauHn, Cpa3BaIte MeCTHnTe pa3npoEd6n 3a I3XbPnJHe Ha TBbpN OtnaDbuN.
BPEME HA PABOTA
Pn6H3NtEnHO Bpeme Ha yNoTpe6a C HOBIne aIkaHn 6aTeepn AA n HanbJIHo 3apeEHN akymyNaTopHn 6aTeepn LR6NM (2100 mAh):
-FMpaNo 3aBcIMOCTOTHNBOTO:np6n.58aca -BluetoothNTOUHO ppeDaBaHe n 3aBcIMOCT OT HNBOTO: np6n.78 yaca
3A6EJIEXKA:
BpeMeTo Ha pa6oTa MoKe Da BapnPa B 3aBucMocT OT cpeIaTe, TempepatypaTu BB3pactTa/CbCTOHNeTo Ha 6aTePnraTa.
BKIIIOUBAHE/M3KIIIOUBAHE (ФИ.2)
HaTnCHTe npoIbIcknteJIHO (2 cek.) 6yToHa 3a 3axpaHbaHe [13a BKNIOUBAHe NIN N3KnIOUBAHe Ha CnyuAnKNTe.
ГласовсбобшеницглacnPoweron"(ВКПИОУBAHe)ин Poweroff"(ИЗКПИОУBAHe).
PnIbPBOTo BkHIOUBaHe Ha CnyIaIKNTe Te aBTOMaTNUHO BIn3AT B pexHM Ha CdbOBAHe.
3A6ELEKKA: Ako B npoBJIkeHne Ha 4 yaca He 6bDat HATnCKaHn 6yToHn, CnyuJaIKte ABTomAtuHO uCe ce n3KnIOuT. TnaCobO cbo6eHne Ue rNaCn „Automatic power off" (ABTomAtuHO n3KJIIOUBaHe).
HACTPOIBAHE HA CNIATA HA 3BYKA HA N3TOUHNKA HA 3BYK (ФИ.3)
HactpoTe cInata Ha 3Byka,HaTncheTe 3a KpaTko (1 cek.) 6yToHa [+] nnn [-].IpnomeHeTe aKtNBnA 3ByKO u3TOuHnK ue3 KpTaKO HATnCKaHe (1 cek.) Ha 6yToHa 3a 3axpaHbHe [1]
N3ToUHnKbT Ha 3Byk MoXe da 6bJe:
FMpaio
TeIeD0H
CbpayHd (okonha cpeja)
My3nka
- Bluetooth®
HNTENIHTEH CbBET: MoKTe Da KOHpIpypuate ycINBaHeTo Ha 6acOBn 3Byk, 6aHaHcHa CbpaHyd 3Byka n EKbaIaI3epa 3a CbpaHyd 3Byka. HatncHete npOdbJIKteJIHO (2 cek.) 6byToHa Ha MeHOTo [M] 3a DoCTbN Do MeHOTo 3a KOHpIpypupe. BxKTe ,KOHpUaypupane Ha cnlywankume".
CbpayH3ByK (3aBNCM OT HNBOTO MKNPOOHO 3a cnyuha He OKOJIHN 3Byu)
Iomara 3a 3aunitaHa cnyxa Bn ot noteHuaHbveHn 3BykoBn HnBa. NocToHHOTo 6byoteHe n npytn NoteHuaHn BOeHN 3ByuCa noHxKeHn Do HNBO nD 82 dB, Ho Bbnpekn TOBa MoKeTe Da roBOpHTe HopMaHNo n da Bn CyBaT.
KOMYHNIKAUINJ,JIUEBJIUE“(HATNCKAHE3ACJYSHAHE(PUSH-TO-LISTEN,PTL))**(Φn.r.4)
Функцята „HaTnCKaHe 3a cIywaHe"Ви поЗБОЯВа нeзabHо DAчуete OKOJNHte 3Byц,ΚATOИЗКПЮЧte 3Byka нa FM paINoTo n BluTeoth®ayINoTO n aKtNbIPaTe 3aBICmMTE OT HnBOTo MnKpOfoHn.HaTnCHeTe 3a KpaTko (1 cek.)ДBA nbTи 6byToHa 3a 3axPANBaHe [ ]; 3a da akTNBIPaTe „HaTnCKaHe 3a cIywaHe".HaTnCHeTe 3a KpaTko няков OT 6byToHte,3a Дa De3akTNBIPaTe „HaTnCKaHe 3a cIywaHe".
CNYUHAHE HA FM PAIINO
Tbpche Ha cTaHnna (fur.8)
HaTnCHete 3a KpaTko (1 cek.) 6yToHa Ha MeHOTo [M] 3a BIn3aHe BpeKIM Ha TbPceHe Ha CtaHcIy. HATnCHete 3a KpTaKO (1 cek.) 6yToHa [+] nnn [-], 3a da 3anOHTe TbPceHe. Yecmomama Ha paduocmaunma ue 6bde nomebpdeHa om anacOSo cbOseHue.
HNTENREHTEH CbBET: Ako HataChete 3a KpaTko (1 cek.) ByToHa Ha MeHIOTo [M], BnHaru Ue BKNIOvBaTe FM paNoTO.
3A6EJEXKKA: PaHIOnpHemaHeTo 3aBnCn OTOIOnorpaPnraTa n CpeDaTa, B KOrTo ce HAMnPaTe. Ako npHemaHeTo e cna6o, ONiTaNte Ce Da ce PneMeCTIne B Dpyra 3OHa, aKO e Bb3MOxHO.
2. "Bass boost" (YcunBaHe Ha 6acobn3ByK)
Bass boost (YcunBaHe Ha 6acOBn 3Byk) ycInBa 6acOBnTe 3Byu B nToOnHaTa CtepeOMy3nka. HATncHeTe 3a KpaTko (1 cek.) 6byoHa [+] mIn [-], 3a da pa3peuNTe/3a6paHnTe ycunBaHe Ha 6acOBn 3Byk.
6. Battery type" (Tn 6aTepe)
HaTnchete 3a KpaTko (1 cek.) 6yToHa [-] nIn [+], 3a da npomeHnte Tnna 6aTepeHa akyMnaTopHa nIn anIkaNHa.
7. Reset to factory default" (Hynipane do pa6pnuHn hactpoKn) (Φnr. 12)
HaTnCHete 3a KpAtko (1 cek.) 6yToHa [-] mIn [+], cneI KoETo HATnCHete npOdbJxHtEnHO (2 cek.) 6yToHa Ha MeHIOTo [M].
TlaocBO CbO6eHne 乙 Bn HantCTBa.
OTCTPAHRABE HA HEN3PABHOCTN Мам побем c FM радионп悔ано
PpOBepTe daHn 6aTeepnIte ca HOBn, Hn HnTbJIHO 3apeHn.
PapnoepmaeTo 3aBnO IT OTOnpaqnaI n CpeDaTa, B KOaTo ce HAMnPate. Ako npMaHTo e cna6o, ONntaTe ce da ce npMeecntte B dpyra 30Ha.
Ima m npo6jem c Bluetooth® Bpb3kaT a
1.Поберетe ддбатерпс tc HOBn,нлн HANbJIHO 3apeHn.
2.Прмхнел Te BCчkn BluteothyctpoCTBa, cnHxpoHn3npaHn KbM BaunTeJefoH.
3. PecaptnpaaiTe TeneoHa (BkIIOUeTe/IN3KJIIOUeTe TeneoHa cn).
4.ИЗБьршеТунпандофбpruHHTe HactpoIGNHa cnlywaJIKeTe.
5.CdBoTe CnyuHaanKIne KbM TeNeepoHa.
6. Ako npo6nembT octaba, onntaTe da cDBOnte dpyr TelecoH, 3a da npOBepTe dann nomara.
UyBam npaune He No BpeMe Ha noTouHo npedabahe/TelefoHn pa3roBopn
Bluetooth®e paiaotexhonoia, Koeto 03haaba, ye e yBCTBNTeHa KbM PpeMeTN MExdy CnyuAaKNITE N ycTroPcTBOTO, KbM Koeto ca Cbbp3aHn. Tp6Ba da IMate pa3ctoHne do 10 Metpa MeKdy CnyuAaKNITE n Cbbp3aHOTO ycTroPcTBTO npi DnpeKTHa BUnIMoCT (T.e. 6e3 CTehn n T.H.). Dopn pa3noJooXeHneTo Ha TelefoHa Bbpxy TAnoto MoKe da 6bDe ot 3HaueHne.
NOCHTBAHE N NOIDPbJKA
N3noJI3BaIte Kbpna, HABnaxHeHa Cbc canyH n ToIIa B0da, 3a NOUcTbAHe Ha BbHUnTe KOpTyCu, JeHTaTa 3a rNaBa N Bb3rJaBHNuKNTe.
3A6EJIEXKKA: HE notanTne cnyxOBn npoTeKTOp BbB BOda.
Ako cnyxOBnT npoTeKTop ce HAMOKpn OT dbXd INI IN3NOTBaHe,ObpHete 3aflnyuHTeJIte HABbH,IN3BaDeTe Bb3rJabHNyKITE N yPbTHNTeJIte OT JNA HIOCTaBeTe da IN3cbXHaT 3a 24U, ppeDn Da crIIO6Ne OTHOBO.
Bb3rIaBHnHcNte n yIbTHInTeIte OT IraHa MoKe Da BLOwat KaueCTBOTo Cn npu yIopTe6a n Tp8Ba Da ce npOBepRaT peoBHO 3a HanyKbAHn Hn Dpyr NOBpei. Ppi YecTa yNoTpe6a 3M npenOpBuBa CmHa Ha Bb3rIaBHnHcNte n yIbTHInTeIte OT IraHa NoHe DBA nbTu rOdiuHo, 3a Da ce PoDdbPxKat NocToaHHOTo 3aRnyuBaHe, XnrHeHata N KOMΦopta. Ako Ima NobpeDeHa Bb3rIaBHnHcKa, Ta Tp8Ba Da ce 3aMeHN. BIXTE pa3dena 3a pe3epBn qactn no-doNy.
CBAJIAREI CMRAHA HA Bb3rABHNUKNTE
F:1 3a Da maxhete Bb3nabHnchkaTa, nIb3Hete npbctnte cn NOB BBtpeHHy KpaN Ira N3dbpnaTe 3dpaBO HABH.
F:2 IV3BaIeTe CbIeCTByBaIuIy(NTe) yINJbTHnTEI(II) INOCTaBte HOB(II) yINJbTHnTEI(II) OT IYHa.
F:3 NocTabete eHnata cTpaHa Ha Bb3rnaBnHcKaTa B KaHana Ha YauKATA n HaTnChTe dpyrata cTpaHa, DOKaTO Bb3rnaBnHcKaTa UpaKHe Ha MCTO.
YCIOBn3A CbXPAHEHNE N yNOTPE6A
- OTeTpaHete 6aTeepnnte npedc CbXpaHHeHne Ha npOdyKta.
He cbxpanhaBte CnyXOBn npoTeKTop npi Tempeatpyn Hnd 55^ (HapnpMeR Ha Ta6No, nepBa3 nn paMaHa npo3opeu) nnn noD -20^ - He n3no13BaIte cnyxOBn npTeKTop npT Tempepatyn Hau 55^ nn noD -20^
PE3EPBHN YACTN IN PUNHADJEXKHOCTN
3M™ PELTOR™ HY82 XmRHeHek KomnIeK
CmeHraem xHnneHen KOMJIeKT. CmeHraIte ro noHe IBa nTn rOIMUHO, 3a na NOIbPkaTe NocToRnHO 3arNyUbaAhe, XnHnEHa n KOMΦopt.
3MTPELTORHY80reIb3rJaBnHyKn
TnBb3rnaBnUcN C Bb3MOxHOCt 3a NOmHa.CMeHnTe ro nOHe DBA TbTN rOuIshO, 3a Da NODbPkaTe NOCToHHO 3arNyuaBaHe, XnIneHa n KOMΦopt.
3M™ PELTOR™ HY100A ПpoTeKTopn 3a eДнОКраТауnotpe6a
PpoteKTop 3a eHOKpaTha ynoTppe6a, KOTo IeCHO ce npKpeIg KbM Bb3rnaBnHyKInTe.
3MTPELTORTMHYM1000IpoTeKTop3aMNkpooh
3M™ PELTOR™ M995/2 BeTpOaIuTeH ekpaH 3a MKNkoΦoH 3a peU
3MTPELTORTMFR083aXpaHbHae c USB KOHeKTop
3A6ELEKKA:ИЗнOLЗВаITEcamOЗapЯДноусТpoIcTBO 3a6aTePnFR09.
3M™ PELTOR™ FR09 EU 3apádno yctpɔιCTBO 3a
6aTepeu n c USB koHeKTop
3M™ PELTOR™ LR6NM AkymytaTopHbatepH AA
TAPAHUNI OPGAHNUEHNE HA OTROBOPHOCTTA
TAPAHLJY: B clyuaye HЯко npoуkt Ha OTdela 3a IinuHn ppeiHa3Hn cpeCTBa Ha 3M ce Okaxe DepekTeH Kato Izpa6OTka, MaTePnAn NIn B HeCbOTBcETCBne C KaKBtO n da 6NIO n3pUHn rapaHcnn 3a onpeDeJeHa zen, EINHCTBeHOTo 3aDbJIxKeHne Ha 3M n BaWeto n3KIIIOHTeHNO IpaBHO cpeCTBO 3a 3aUnTa 3e 6bDe n36OpbT 3M da peMOHTnpa, 3AmEH NIn Bb3CTaHOBn CpeCTBaT a 3a nOKyHnata ZeHa Ha Te3N Yactn NIn npOdyKtn Ppi HabPeMeHHOTo yBeDOMRaHE OTHOCHO npObIema OT Ba7a ctPana n OboCHOBkata, Ye npOdyKTB e CbXpaHraBaN, IOIDbpJxAN n I3N0JI3BaBn B CbOTBcETCBne C IINCMeHNe IHCTpyKUnn Ha 3M. OCBEH AKO HE E 3A6PAHEHO OT 3AKOHA, TA3N TAPAHCLN E IN3KJIIOHTeJIHNA I 3AMECTBA BCNUCKN I3PNUH NIn IIN IOJPA3BIPAUUN CE TAPAHLCN 3A IPODAABAEMOCT, IPINTOJHOCT 3A ONPEDEJIHAE LEL NIN DPyTA TAPAHCLN 3A KAUCHETBO, INI NTE3N, KOINTO IPOIN3TNAT OT HauINA HA TbPRyBAHE, MITHNuA INI N3NOL3BAHE HA TbPROBn, C IN3KJIIOUChE Hn IAJI N I POTNB HAPUJABAHGE HA IATEHTHNTE IPIPABA: 3M hma 3aDbJIxHeHn NO cnilta Ha Ta3N rapaHcNn PO OTHOSeHne Ha IpoodyKT, KOITc Ce e NobpeJn Iopadn HeadeKBaTHO INI He npabInHo CbXpaHene, ObpaBoTKa INI IODIpBXKa, HeCna3BaHe Ha INHCTpyKUnTe Ha npOdyKTA INI IpnOMHa INI NoBpeDa Ha npOdyKTA, npuHHeHn OT 3IOnOlyKa, He6peXhoCT INI HepabInHO nI3IOn3BaHe.
OTPAHUYEHNE HA OTROBOPHOCTTA:OCBEH KOTATO E 3A6PAHEHO OT 3AKOHA, B HINTO EINH CJIYAH 3M HE HOCN OTTOBOPHOCT 3A KAKBHTO IN A E IPEKN, KOCBEHN, CIELNAJHN, CJYAHHN INIIN POCJIIEBAUIN 3AIGBYNIJIN UETN (BKJIIOCHITENHO IPONYCHATN IOL3N), IPOIN3TNUAAUIN OT TO3N IPOJYKT, HE3ABNCIMO OT TOBA KAKBO TBbPDI INI PPABHATA TEOPN. IPIPABHNTE CPECDTBA 3A 3AUHTA, INLOXEHN TYK, CA IN3KJIIOUHTENHI. 3A6PAHA 3AMODINPHKAUIN: IIO TOBA yctpoiCTBO He Tp8Ba Da ce npabrt MOINPHKAUIN 6e3 INCMehOTO cbIracne Ha KOMPAnHra 3M. Hepa3peuHn MOINPHKAUIN M0Xe Da ca npunHa 3a anynpaHe Ha rapaunrTa n npaboto Ha notpeBtEnla da ekcnloatnpa yctpoiCTBOTO.
3MTPELTORTMWSTMLAERTMXP Headset MRX21A2WS6,MRX21A2WS6-ACK MRX21P3E2WS6,MRX21P3E2WS6-ACK
3MTPELTORMWTM ALERTXPI Headset MRX21A3WS6,MRX21A3WS6-ACK MRX21P3E3WS6,MRX21P3E3WS6-ACK
UVOD
Dekujeme vam a blahoprjeme k volb'e komunika'nich resei 3M' PELTOR. Viteje v nové generaci ochrannych komunika'nich prostredku.
ZAMYŠLENÉPOUŽITÍ
3M™ Connected Equipment, mobilí aplikace **
bluetooth.org(tpg/listings.cfm.
KONFIGURACE NAHLAVNI SOUPRAVY (obr.11)
B:4 Kopfgroße: S = Small, M = Medium, L = Large
Kopfbügel
MRX21A2WS6, MRX21A3WS6 (alle Produktvarianten)
Station speichern (Abb. 9)
Gemme station (fig. 9)
Kort tryk (1 s) på Menu-knappen [M] tre gange, talemeddeelse "Store station" (gem station). Kort tryk (1 s) på [+] aller [-] knappen for at vælge position. Langt tryk (2 s) på Menu-knappen [M] for at gemme stationen. En talemeddeelse bekrafter "Confirmed" (bekræftet).
Forudindstillet station (fig. 10)
Kort tryk (1 s) på Menu-knappen [M] to gange for at gå til forudindstillet station-tilstanden. En talemeddeelse bekrafter "Preset station" (forudindstillet station). Kort tryk (1 s) på [+] eller [-] knappen for at bladre og vælge en forudindstillet station. Radiostationens frekvens bekraftes af en talemeddeelse.
3MTM Connected Equipment, mobilaplication
- Surround balance (balance for baggrundslyde)
Kort tryk (1 s) pa [-] knappen for at skrue op for venstre side og ned for hore side. Kort tryk (1 s) pa [+] knappen for at skrue op for hore side og ned for venstre side. En talemeddeelse vil meddele, nar balancen for baggrundslyde er centreret "Center" (Centreret).
- Surround equalizer (equalizer baggrundslyde)
Mobilirakendus 3MTM Connected Equipment\*\*
Uhendage omwSTM ALERTTM XPI Headset mobilirakendusega 3MTM Connected Equipment, milleI on Androidi and iOS-i tugi. PArast mobilirakendusega uhenduse loomist on teil jurdepaa satele, konfiguratsionidele, kasutusjuhendile jpm.
MÄRKUS. Lisateabe saamiseks laadige App Store'ist voi Google Play's alla rakendus 3M^T Connected Equipment. Mobilirakenduse 3M^T Connected Equipment lisateavet leiate selle juhistest.
Bluetooth® Multipoint technoloogia**
Lisateave on saadaval aadressil https://www.bluetooth.org/ tpg/listings.cfm.
PEAKOMPLEKTI KONFIGUREERIMINE (joonis 11)
3M™ Connected Equipment, mobilisovellus **
3MTM PELTORTM WSTM ALERTXP Headset MRX21A2WS6,MRX21A2WS6-ACK MRX21P3E2WS6,MRX21P3E2WS6-ACK
3MTPELTORTMWSTMLASTXPIHeadset MRX21A3WS6,MRX21A3WS6-ACK MRX21P3E3WS6,MRX21P3E3WS6-ACK
INTRODUCTION
3M™ Connected Equipment, application mobile **
Bluetooth® Multipoint technology **
3. Surround balance (Balance Surround)
3MTPELTORTM LR6NM Batteries AA rechargeables
GARANTIE ET LIMITE DE RESPONSABILITÉ
A:2 M€oN εεασθενησιn (dB)
A:3 TUTI Kn aTOKKION (dB)
3. Surround balance (Iooppoia surround)
PntnoTe ouvtoua (1 s) to koumi[-] ia va auognthetai n apioTepn TLeupa kai va i i n 8eia TLeupa. PntnoTe ouvtoua (1 s) to koumi [+] ia va auogne i n 8eia TLeupa kai va eiwte n apioTepn TLeupa. Eva wntiko mnupa th a oag evnpwot avt to Surround balance puthetaiote oTo Kevtro, «Center» (Kevtro).
4. Surround equalizer (IooTa@muTns surround)
3. Surround balance (Balans surround zvuka)
Kratkim (1 s) pritiskom gumba [-] pojačavate lijevu stranu i utišavate desnu stranu. Kratkim (1 s) pritiskom gumba [+] pojačavate desnu stranu i utišavate lijevu stranu. Ako je surround zvuk postavljen na sredinu, oglasava se glasovna poruka „Center" (Sredina).
4. Surround equalizer (Ekvilizator surround zvuka)
Ekvilizator surround zvuka ijnenja frekvencijski spektar surround zvuka. Kratko (1 s) pritisnite gumb [-] ili [+] kako bistepromijenili razine ekvilizatora surround zvuka, Low -Normal-High-Extra high" (Niska-Normalna-Visoka -Vrlo visoka).
5. Sidetone volume (Glasnoca sporednog zvuka)
HLJODDEYFING I RANNSOKNARSTOFU
Utskyringar á toflum yfir deyfigildi:
EN 352-1/EN 352-3/EN 352-4
3M maelir eindregio meo bvi ao hver og einn notandi felli allar heyrnahrllar vandlega ao ser. Rannsoknir benda til pess ao hj a morgum notendum se hljodeinangrun minni en hljodeyfeingargildi a umbuoum gefa til kynna vegna fravika vio ao fella hlifarnar ao hverjum notanda fyir sig, faeni viokomandi og hvatingu til pess. Kynntu per gildandi reglur um leiobeiningar um aoIogun hljodeyfeingargilda. Seu vioeigandi reglugeroir ekki til staar er maelt meo bvi ao draga ur suohlUTFallin (SNR) til ao auovelda mat a daemigeror vernd.
A:1 Tioni (Hz)
AD HLUSTA A FM UTVARP
Nanari upplysingar ma finna a https://www.bluetooth.org(tpg/listings.cfm.
AD STILLA HEYRNARTOLIN (11. mynd)
Prystu lenghti (2 sek.) á valmyndarhnappinn [M] til aö komast i stillivalmyndina. Raddskilabod staÖfesta „Menu" (Valmynd).
2. Bass boost (Bassastyrking)
6. Battery type (Gero rafliou)
Brystu stutt (1 sek.) à [-] eəa [+] hnappinn til a breyta rafhlöustillingu i annao hvort hleosurafhlöour eəa alkaline.
- Reset to factory default (Afrumstilla yny (verksmiöjustilling)) (12. mynd)
3MTM Connected Equipment, applicazione mobile **
D:1 Baimaybiu (NBX, PA)
D:2 Baɪnaybɪw cBmBɪ (TOT 6acnaɪtɪh 6oɪaT)
D:3 EkiHykTei 6ekiTkiu (POM)
-FMpaNocbIxheHeJeHReIeTeyEJI:waMaMeH58caTaT
-Bluetooth® aflhDbIK XaHE deHReIre TeyenDi: Wamameh 78 carat
ECKEPTNE:
Optara, TemnepaTypa XeHe 6aTapeMep3iMe 6aJaHaBbCTbl KMybc YaKbTIb e3reWeHEny MyMKIN.
KOCY/OLIIPY (2-cypet)
KynakkntbKOcyHemece eWipy yuH, Kyat Tymecin [1] 3a6abHb3 (2c).
Daybictk xa6ap «Power on» (Kocy) Hemece «Power off» (Thetaipy) pexmin xa6apnaIbl.
KyNaKaKbI aFaI KocKaH Ke3e OI ABTomATbI TypDe KytTactbIpy peximHe kipei.
ECKEPTNE:Erep4caraf6oibeewkaHdainTyIme6acblmaca, Kyaakkan ABOMaTbI Tpyde eWedi. DaybcTK xa6ap «Automatic power off》(Aamomammbieuipy)Typabla xabapnaDbI.
IbIbIc K03IHIN DAyBIC DEHREIH PETTEY (3-cypeT)
Db6bc DeHreHHpeTey,+]Hemece[-TMyMecin KbIcKa(1c) rHa 6acBnB3.BenceHdi Dbl6bc Ke3IH Kyat TMyMecin [KbIcKa(1c)rHa 6acy apkblbl e3reptiH3.
Дыбьс Kezi Temeнderinepdi 6ipinde 6oJybl Mymkh:
FMpaioocbl
TeledoH
AinHana
- My3bika
- Bluetooth®
PANDAJIbCbIbIP:TeMeH KNIJKTH KyweoiH, aHaHa
6aIahcbHxhe aHana 3KBaIaI3epiH peTei anacbI3.
KoHnurpaunm M3piHe KaTbHacy yuH, «M3ip» TyIMeCIn [M] y3ak 6acbHb3 (2c).
«Kynakanmbi KOnphiaypaunay» 6enimkapaHb3.
AHaJa DbI6BcI (CbIptKbI opTaJa TbIHayra apHaJIFaH deHreRe TayenDi MmKpOPOH)
KnyafbHb3dbbl biktmam 3nHDbI Wy deHreJepiHekparyfakemekteci. TokTaycbI3 wypkbpay kHe 6acka da biktmam 3nHdbI Wyblap 82 d5 Temen deHreIe a3aIbI, 6ipak ci3 ani de aetterie neenen, e3in3i di ectipte anacbI3.
BETNE-BET BAJIANHbIC (TbIHAY YUIN BACY (PUSH-TO-LISTEN, PTL)) **(4-cyper)
FM PAHOCbIH TbIHJAY
CTaHnIaHbI i3dey (8-cypeT)
CTaHnraHbI 3IeY peXmIe Kipy yuH, «M3ip» TyImeCIN [M] kIbCKa 6acbHbI3 (1 c). I3eYdi 6actay yuHIn [+ ] Hemece [-] tyImeCIN KbICKa 6acbHbI3 (1 c). PauocmaHua Jxuiiia daybcmbk xaabap apKbIbI paCmanaab.
ПАДАЛБСБИБР:Ер«МэзIP»ТиМссIN [M]КьИСа
6acahb3 (1c), epkaaah FM padnocbih icke kocatbH 6oanb3.
ECKPTNE: Paioka6blnday ci3 opHanacKaH tonorpaqma MeOpTara 6aIJIaHbICTbl 6oIaIbI. erep Ka6blnday Haap 6oIca, MymKINdiHnue aMakTbI e3repTyre TbIpbCbIHbI3.
CtahunnhaicayTay (9-cyper)
«Məsip» Tvyimecin [M] yw peT kblcka 6acbHb3 (1 c), daybICTbK xa6ap «Store station" (CmaHuaHbCa kmay). POnuHnBt TaHday ywiH [+] Hemece [-] Tvyimecin KblcKa (1 c) 6acbHb3. CtaHuaHbCaTay ywiH «Məsip» Tvyimecin [M] y3ak 6acbHb3 (2 c). DaybICTbK xa6ap «Confirmed" (PacmandbI) pexmih pactaTbI.
AnbH ana opHaTbJnFaH cTaHcHn (10-cyper)
AnbH ana opHaTbInraH cTaHcHnpeKmHne Kipy ywiH,M3ip Tymecin [M] eki pet Kbicka 6acbHb3 (1c). DaybictbK xaap «Preset station"(AnbH ana opHamblraH cMaHua) peKmH paTaNb. AnbH ana opHaTbInraH cTaHcHn bOJy XaHe TaHday ywiH,[+] Hemece[-]TymeciH Kbicka 6acbHb3 (1c). PaNocTahnue Jxniliri DaybictbK xaab apkblpaCTanaDbI.
KocbIMa aKnapaT https://www.bluetooth.org(tpg/listings.cfm caHbHa.
KYJIAKKANTbI KOHOFNYPALUNJAY(11-cyper)
KoHpIpyaImaM3ipIHeKaTbIhAcy yuHIn, «M3ip» TyImeCIn [M] 3ak 6acblHb3 (2 c). DaIbyCTbIK xaIap «Menu» (M3ip) den pactaIdb. M3ip 6oBbHwa IapIay yuHIn «M3ip» TyImeCIn [M] KbICKa 6acblHb3 (1 c). DaIbyCTbIK xaIap eP6ip M3ip KaIambIH pactaIdb. TypIi KOHpIpyaImaIapDbI 6eIceHdpy/ewipy/ e3repTy yuHIn, [+] Hemece [-] TyIMecIn KbICKa 6acblHb3 (1 c).
KoHnrgypaunM3epiHne TeMeHderiJeonuHap 6ap:
1. Bluetooth® pairing (Bluetooth® xynTactbipybl) (6-cypeT)
DayibcTbik xa6apda «Bluetooth® pairing» (Bluetooth®
Jynmacmbpyb) aTbIca, Jyntactbipydb 6actay yuiH [+]
TMymecin Kbicka 6acblb3 (1 c).Kyntactbipydbi TOkTaTy yuiH
[-]TYMecin KbIcKa 6acbHb3 (1 c). DaYbICTbK xa6ap
«Bluetooth®pairing on» (Bluetooth®Жуимаьында) КИн pactайд.«WS ALERT XP» HeMece «WS ALERT XPI»
KypbInfbicih 3eiH3diin Bluetooth KypbInfbHb3dah i3den
Tahdahb3. KytntactbyaakTaIFaHdaaybictk xa6ap《Paing complete》(Kymmacbpy aamad) kHe «Connected
(KocbIINdb) den pactaIdb. KynTactbIpydbToKtAty wH[-]
TMymecin Kbicka bacbHb3 (1c). DaaybcIbK xa6ap«Pairing off» (Kynmacmbipyobj eWipy) den pactaNbbl.
2. Bass boost (TeMeH xniikTih Kyuweoi)
TeMeH KNIIKTIN KUWeOI TOBbK TeMeH KNIIKTI DbIbCTaH aBbNbIK Ctepeo My3bikara deiH bepei. TeMeH KNIIKTI KUWeITy MymkInirin Kocy/ewipy yuH, [+] Hemece [-] TYMeciH KbICa 6acblbl3 (1 c).
3. Surround balance (Ainhaia 6aanahcbl)
[-]TYMecin Kbicka 6ackaHda (1c) con Xafbl a3aTbInbIn, OH Xafbl XofapblnAdb. [+] TYMecin Kbicka 6ackaHda (1c) OH Xafbl XofapblnA, con Xafbl a3aTbInaDb. DaybCTbK xa6ap aiHaHa 6anaHcb opTaIbIK TaHdbipblfHaHa (Center) (OpmaIbIK) den xa6apnaDbI.
4. Surround equalizer (AinHana 3KbanaI3epi)
AHaHa 3KbAna3epi aHaHaIaIaIbI bIb6IcTbIH KIniIK CnIaTTapbIH 03repte.i. AHaHa 3KbAna3epiHIN DeHReIneP1 e3repyuH,[-] HemeC[+] TYmecIH KbICKa 6acblH3 (1 c), «Low-Normal-High-Extra high"(TeMeH-KanblmbI -KofapB-I-OmeKofapB).
5. Sidetone volume (Буніріні кураздас 6eNirih Daybic DeHrei)
Bvipnik Kypamdac DeHreini - cenecy ke3iHderi kynakkan naaandaHyybicbIme echetin H kepi baanhaic. Byipnik Kypamdac 6enirih Daybc deHrein e3repy uhi, [-] hemece
[+] TViMecin KbicKa 6acbHb3 (1c), «Off-Low-Normal-High» (Θwipyni-TomeH-Kanblmbl-JKorapbl).
6. Battery type (Batapera typi)
Batape Tpyin Kaeta 3apraTanaTbIH Hemece cintini Batape Tpyine aybCTbpyuH,[-]Hemece[+] TYmecih KbIcKa6acbHb3(1c).
7. Reset to factory default (3aybTTbIK eDenki napametpre KaannbHa KeTipy)(12-cyper)
[-] Hemece [+] Tymecin Kbicka 6acbHb3 (1 c), coaH coH «Me3ip» Tymecin [M] y3ak 6acbHb3 (2 c). DaybictbK xa6ap ci3re Hcyay 6epei.
KOCAJKbl BJIWEKTEP XOHE KEPEKXAPAKTAP
3MTM PELTORHY82 rurnehaJIbIK XnHaK
AbyICTbIpbIaTbI HrurnehaIbIK KINHak. TypaKbI eWydi, rnnHeHaHbIK He KaIbIbIKbI caTay ywiH XblbHa eKi pet aybCTbIpbI TpybHb3.
3MTPELTORHY80reIbdiJxactbikwanaap
AbyICTbpyra 60nataBH kactbikuaIap. TypaKTb ewydi, rHmHeHaBb JkHe KaJIbIKbTb CaKtay ywiH XblbHa eki pet aybCTbPbIn TypbIH3.
3MTPELTORTHY100A6ip pet naJaHaHbIaTbIH npOTEkTopnap
KyJaK XactbIkwapbHa OHaH 6eKiTietiH,6ip pet naJdaHaHbIaNbIH npOTEkTOp.
3M™ PELTOR™ HYM1000 MKNPOΦOH KOPFaHbIcBi
3M™ PELTOR™ M995/2 cēnney MnkpoΦoHbHa aphaJfA HKeJIre Kapcbl KOpFaHbIC
3MTPELTORMFRO8USBkaIrafbibimEnaIbHaTbIH KyAT ECKEPTNE:TeKFR096atapeer3aprTay Kypblfbcih naandaHbHbI3.
3MTPELTORTMFR09EUUSBkalfarbiu6ap6atape 3apdTayKpbInfbicbl
3MTPELTORTM LR6NM KaTaNapraTaIaTbIH AA 6atapeenapbl
KENIINIK XOHE KAYANKEPIJIK WEKTEYI
KENIIJIK: 3M Keke Kayincizik 6eimi eHmdepinH 6ipeyihin MaTePnAbI, JxacaybI 3aKbIMdAnrH HeMece 6eJIi 6ip MaKcat Keniirine caikec 6oImarah XaFdaJa 3M KomnaHrcB Meene yakItbIbI xabapnHaHa Jxhe eHim 3M KOMNaHrcBbHIn Jxaz6aHa HcckaynapbHa caiKeC CaTaNFaHda, KbI3Met KepctinReHe Jxhe naDanaHbINFaHda OcbHdae BSeIeKterpHn Hemece eHimdepHn caTbIn any 6afacbH eTeyre Hemece aybCTbpyfMa HndetTI XaHe ci3 M KomnaHrcBbHn Taan etYe KkblbcI3.3AHMEH TbIbIM CAJIbIHFAH XAFDAIBJXOHE AT IEN IATEHT 5Y3UbIBIKTbI ECKEPMEHENDE OCBI KENIIJIK EPEKWE OPI KOMMEPLINBk CANA KEINIDITI, BELIJI BIP MAKCATKA XAPAMDbIbIFbI HEMECE ICKEPNECY HOTNXECIHDEI CANA KEINIDIR, KEHEN HEMECE CAYDA KOJDAHBICb OPbIHNA PAJDAANHbIJIADbI: 3M KomnaHrcBc OBuBnHa Dypbc Hemece YkbncB3 caTay, KOJDAHy Hemece TexHNkaBk Kbi3met KepcTe, eHIM HcckaynapbH opbIHamay caIapbHaN 3aKbIMdAnrH eHIMRE Hemece Ke3deCOK, YkbNCb13 Hemece dypbc NaiaDnHaBcaydApBHaN 60fHan 3aKbMbHa H ne aybCTbpy XaFdaBHa XayantbI b6JIMaDbI. XAYANKEPHUJIK WEKTEYI: 3AHMEH TbIbIM CAJIbIHFAH XAFDAIBI ECKEPMEHENDE, 3M KOMNaHrcBb BEKITILIEH 3AHDbI TEOPNFA KAPAMACTAH OCbl OHMHEN BOJFAH TIKELEJ, XAHAMA, APHAbl, KE3DEMCOK HEMECE XyJEJI UdbIFbIHFA HEMECE 3AKbIMdPA (OHbIH IUIHD TABICTAH AByIPbIJY) XAYANTBIOJLMAIDbl. OCbIHDA SEKITILIEH ECKEPTUYEP 03FEWE.
SLAPESANA LABORATORIJA
Troksna slapeesan tabulu skaidrojums
EN 352-1/EN 352-3/EN 352-4
Uznemums 3M stingri iesaka individuali pbaraudit dzirdes aizsargiericu piemerotibu. Petijumi liecina, ka dzirdes aizsarglidzekla nodrosinatais troksna stipruma samazinajums var but mazaks, neka noradits uz iekapojuma etiketes. To var izraisit nepiemerots izmers, neprasmiga lietosana vai lietotaja motivacijas trukums. Noradijumus par troksna stipruma samazinajuma vertibu korigesanu skatiet spek esosajos noteikumos. Ja sadu noteikumu nav, ieteicams samazinat SNR vertibu, la precizak noteiktu tipisko aizsardzibu.
A:1 Frekvence (Hz)
A:2 Videjaskanaslapesanas vertiba (dB)
A:3 Standarta novirze (dB)
A:4 Pienemtā skanas stipruma samazinajuma vertiba (Assumed Protection Value - APV) (dB)
A:5
H = Dzirdes aizsardzibas apleses augstam skanas frekvencem (f≥ 2000Hz)
M = Dzirdes aizsardztbas apleses videjam skanas frekvencem (500 Hz < f < 2000 Hz).
L = Dzirdes aizsardzibas apleses zemam skanas frekvencem (f≤ 500Hz)
A:6 Kriterijlu timeni
H = Augstas frekvences trokšna kriterija limenis
M = Videjas frekvences troksna kriterija limenis
L = Zemas frekvences troksha kriterija limenis
Saderigas rupnieciskas aizsargkiveres, EN 352-3
Sis austinas drikst savienot un izmantot tikai ar B tabula
noraditajam rupnieciskajam aizsargkiverem. Sis austinas ir
pärbauditas kopā ar talak noraditajam rupnieciskajam
aizsargkiverem un kopā ar citam kiverem var nodrosinat
atskirigu aizsardzibas limeni.
Rupniecisko aizsargkiveru fiksatoru tabulas skaidrojums
B:1 Kiveres ražotājs
B:2 Kiveres modelis
B:3 Fiksators
B:4 Galvas izmérS = mazes, M = videjs, L = liels
Galvas lente MRX21A2WS6,MRX21A3WS6 (visi produkta varianti)
D:1 Galvas lente (PVC, PA)
D:2 Galvas lentes stieple (nerusosais terauds)
D:3 Divu punktu stiprinajums (POM)
D:4 Spilventns HY82 (PVC folija un putupoliuretans)
D:4 Spilventins HY80 (PUR folija, putupoliuretans un silicija gels)
D:5 Putu ieliktnis (putupoliuretans)
D:6 Apvalks (ABS)
D:7 Apkartjas vides skanas mikrofons ar no skajuma atkarigas dzirdamibas funkciju (putupoliuretans)
D:8 Runas mikrofons (ABS, PA)
D:9 Antena (PE, ABS, TPE)
D:10 Vēja aizsargs (putas)
D:11 Uzliades ligzda (neruosoais terauds)
Kiveres fiksators/kivere MRX21P3E2WS6, MRX21P3E3WS6 (visi produkta varianti)
D:12 Apvalka kronsteins (neruosais terauds)
UZSTADISANAS NORADIJUMI
Galvas lente
E:1 Izbidiet apvalkus uz aru un pagrieziet to augsejo malu uz aru, jo kabelim ir jaatrodas galvas lentes arpuse.
E:2 Regulējiet apvalku augstumu, pieturot galvas lenti un bīdot apvalkus uz augsu vai uz leju.
E:3 Galvas lente ir janovieto pari galvas virspusei, ka tas redzams attela, un tai ir jabalsta austinu svars.
Piestiprinăsana aizsargkiverei
E:4 levietojiet kiveres fiksatoru kiveres sprauga un nofikszejiet to vietā (E:5).
E:6 Ventilacijas rezims. Lai parslegtu no darba rezima uz ventilacijas rezimu, pavelciet apvalkus uz aru, lidz atskan klikskis (E:7).
E:8 Nenovietojiet apvalkus pret kiveri, jo tadejadi tiek trauceta ventilacija.
EKSPLUATACIJAS NORADIJUMI AKUMULATORU UZLÄDE UN BATERIJUN NOMAINA
(1. att.)
- Ar pirkstiem atbrivojiet kreisa apvalka fiksatoru.
- Ateriet apvalku.
-
levietojiet vai nomainiet baterjas. Pariecinieties, vai polaritate atbilst markejumiem.
-
Aizveriet apvalku un nostipriniet fiksatoru. Ja uzladejamo akumulatoru vieta tagad lietojat neuzladejamas baterijas, mainiet bateriju tipa iestatijumu. Nospiediet un (2 sek.) turiet nospiestu izvelnes pogu [M], lai piekutu konfiguracijas izvelnei, skatiet sadalu "Austinu konfiguresana".
UZMANIBU! Izmantojiet tikai 3M^TM PELTORTM USB lidetaju FR09 EU un 3M^TM PELTORTM USBkontaktigzdas adapteri FR08, lai lidetu 3M^TM PELTORTM LR6NM uzladejamos akumulatorus.
UZMANIBU!Ja apkartepa temperatura ir augstaka par 45^ ,akumulators var netikt uzladets.
PIEZIME.
3MTM PELTORT WSTM ALERTXPI Headset MRX21A3WS6,MRX21A3WS6-ACK MRX21P3E3WS6,MRX21P3E3WS6-ACK
INLEIDING
3M™ Connected Equipment, mobiele app**
UW HEADSET CONFIGUREREN (afb.11)
3M™ Connected Equipment, mobilapp **
- Surround Balance (surround-balance)
- Battery type (batterity)
RENGJØRING OG VEDLIKEHOLD
3M™ Connected Equipment, aplicaçãoovel **
Bluetooth® Multipoint technology **
RECONECTAREA DISPOZITIVELOR BLUETOOTH
- Surround balance (Balans surround)
- Surround equalizer (Egalizator surround)
3MTM PELTORTM WSTM ALERTXP Headset MRX21A2WS6,MRX21A2WS6-ACK MRX21P3E2WS6,MRX21P3E2WS6-ACK
3MTPELTORTMWSTMLAERTM XPI Headset MRX21A3WS6,MRX21A3WS6-ACK MRX21P3E3WS6,MRX21P3E3WS6-ACK
UVOD
MoeiNc KpeIeHnEm Ha kacky
MRX21P3E2WS6, MRX21P3E3WS6 (Bce moiФнкaиn)
D:12.Держateлчашки(нержавошаясты)
C6OPKA IN PEYJIMPOBKA
ModenbcorOIOBbem
E:1. BbIbINHytB yAaKN. OTKnHOHTb BepXHIOU YacTb YaaKNn HapyK, TTO6bl Ka6eJIb paCNoIOxNlC8 C BHeuHne CTOpOHbl OToIOBBja.
E:2. OtperynnpoBaTb BbICOTy qaIeK,ДЯчero npeBHyTb INx BBExx ININ BHN3, pNIDepXNBaB orOJNoBbe.
E:3. PacnoJIOKnTb oroJIoBbe TaKIM o6pa3OM, yTo6bl OHO npoxOuIIO uepe3 TEMN nPnHmAlIO Ha Ce6Ba Bec YaWeK.
KpenenHe Ha kacky
E:4. Bctabntb kpenJenne H na3 do ueJyka (cm. pnc. E:5).
E:6. BeHTnIaHNoHoe noToXeHne. E:7. IJra nepeBoda HayuHIOKOB n3 pa6Oyero noToXeHnB BeHTnIaHNoHoe pa3BeCTn YauKN HauHNUKOB B CTOpOHbIo eJIyKa.
E:8. He cneyuET paonaratb yaun HuyuHkoB Ha KaKe, T.K. 3TO npenrTcTByeT IN BEHTINaUN.
3KcπnyATAU
3APRKA 3AMEHA 3JEMEHTOB NITAHNA (pnc.1)
1.ПалцамоТКрьтБФИССАТОРЯБОЧАшк.
2. OTkpbItb YauKy.
3. 3aMeHHTb 3aMeHHTbI NITaHnY. YIOCTOBepNTbcB C06JIHODeHn IIOJAPHOCTN CORJaCHO IMeIOUImCmO 06o3HaueHnM.
4.3akpbTb yaKu nФHKcTOp. Pn 3ameHe aKKymJrTOPOB Ha He3apjXaEMbIe 3JIeMeHTbI NITAHN Heo6xOIMo I3MeHHTb COOTBETCTBHyUHO HAcTPOy MEHIO. JIN BxOda B MEHIO CNeDyET HAKaTB KHOJky MeHIO M yUpexJBaTb ee B TeueHne DByx cekyHd. CM. pa3JeI (MeHIO KOHOFpyaun).
BHIMAHHE! 3apkaakmyjTOpOB 3MTPELTORTM LR6NMdoJxHaOcUyIeCTBJIaTBcR NCKHIOHTeJIbHO C nMOuHIO 3apdHoro yctpoiCTBa 3MTPELTORTM FR09 EU c pa3bemOM USB n CTENHO aanTepa 3MTPELTORTM FR08 c pa3bemOM USB.
BHUMAHHE! 3anpeucaetc3apkaTb aKKyMnyTopbl npTemnpaType BO3dyxa Bblse 45^
ПРМЕЧАНЕ.
-3anpeucaTc3apKaTaB 5eNoHbIe 3JeMeHTbI NITaHn.
TO MoKET npNBecTN BixOy HayHnKOB n3 CTPOJ.
-Питане усторсва должно осуцесьляпсь сгпзаржаembix зем entob питаня ТINоразмера AA Илинkeль-Metаллогдрньх akkymларTopOBТOROж.TINOPa3mepa.
-3aIpeucaetcOJHOBpeMeHHo IcNoJIb3OBaTb CTapbIe INHOBbIe 3JIeMeHTbl NITaHn.3aIpeuaetc OJHOBpeMeHHO IcNoJIb3OBaTb UeIOUHbIe 3JIeMeHTbl NITaHn,ObIyHbIe 3JIeMeHTbl NITaHn n AKKyMylrTOpbI.PpI yTIIN3aun 3JIeMeHTOB NITaHn CNeJeYET COJIIOaTb Tpe6ObaHn MeCTHBIX HOpMaTHBOB,KacaIoXcraYTIIN3aun TBepDbIX OTXoIDOB.
PPOJONIXTEJIbHOCTbPABOTbl
Pn6n3ntbna npoDnKntbHoctb pa60tb yctpoicTba OT Ondoro KOMnKeTa 1eNoCHbIX 3IeMeHTOB NtAHn IN Ondoro KOMnKeTa nONHOCTbO 3apXeHHbIX aKKyMylrTOPOB LR6NM (emKocTbO 2 100 mA·4):
-Пи trpahcIaI FM-paIIO n OkpykaIoX 3ByKOB c abTomatueckoi perynnpobKoi nx rpoMkoCTn:okono 58 yacob. -Пи trpahcIaI CNrHaN a C nomObIkyHKuIN Bluteoth@ IN trpaHcIaI NOKpykaIoX 3ByKOB c ABtOMaTueckoi peylnpobKoi nx rpoMkoCTn:okono 78 yacob.
ПРИМЕЧАНИЕ.
IpoOJIKHTbHOCTb paObI OT ODHOro KOMnJIeKtAJIEMeHOB NITaHm MOKeT 3aBNCeTb OT DIIITeHbHOCTN IX3KcPlyatauIN XpaHeHn,OT IN COCTOHN, a TaKke OTTEMNEpATpybl INdpyInx PhAKTOPOB OKpyKaIOUe CpeDbI.
BKIOUOHEH N BbIKIOUOHEH NITAHN YCTPOICTBA (pnc.2)
ДяВКIOUeHnIиВbIKIOUeHnI\PNTaHnI yCTpOiCtBaHaKaTb KhONKy\PNTaHnI 乌ydePknBaTb ee B TeueHne DByX CEkyHd.
Bpe3yIbTaTe nocblIunTcra roIocOoe coo6eHne «Power on》(「NumaHue eKIOUeHo»)nn «Power off》(OmkJIouHeue numaHua》.
Pn nepBOM BKIOUeHm NITaHn yCTpoiCTBO
abTomatUeCKn nepeJdET B pexkM cnapuBaHna.
ПРИМЕЧАН. ПИТанe yctpoiCTBa aВТOMaTиecKIn OTKIIOuYaeTcA, ecn Hn OJHa n3 erO KHOIpOK He bIJa IcNoJIb3OBAHa B TeueHne YeTbIpex YacOB.пepeД OTKIIOUeHem NocJIbIshTcR rOIOcoBOe COOБцeHne «Automatic power off» («Aemomamuueckoe omKIIuoyehue numaHura»).
PEYIIMPOBAHNE IPMKOCTN 3BYKA (pnc.3)
Дя руларовая ромкoctn 3Byka cneуet BOCNoIb3OBAtbcra KHOJIkAMN + n-ДяпpekeKIOUeHn MEXdya pa3JIuHbIMN NCTOCHKAMN 3Byka cneyuET BOCNoIb3OBAtbcra KHOJKO Bo3MOxHbIe NCTOCHNK 3Byka:
FM-paio.
TeJeOH.
- OkpykaHouaIcpeIa.
- UcTpoIcTBa DnI BOCIpON3BedeHnaydno3anCeN.
- UcTpoIcTbA, nOdkNIOUeHHbIe K HauShHnKamYepe3 Bluetooth®.
PIMMEAHNE. B KOHCTpyKuIN ycTPOINCTBa ppeyCMOTpeHa BO3MOXHOCTb HAcTPOIN TaKIN QyHKUIN, KAK NOpIeM Hn3KHX qACTOT, BaIaHC OkpyKaIOUx 3ByKOB IN 3KBaIaNep OKpyKaIOUx 3ByKOB. IIN BxOda B MeHIO KOHpIpyauIN CNe dyET HaxaTB KONKy MeHIO M yDepkNBA Tb ee B TeueHne DByx CEkyHd.
Ponck paadnoctaHcN (pnc.8)
Дя BXODA B pexm noncKa paNocTaNcI cneyet haxaTB KhoKy M.ДЯ BKHouEnra NOncKa Heo6XoIMo HaxaTB KhoKpy +nn -. Pocne bIbopa paduocmauu nocblumcza zonocoboe cooBueHe c ee yacmomoi **.
PIMMEAHNE.ДЯВКЛЮЧЕнЯ FM-paIIO CJIeIyET HaxaTb KONKY MeHIO M.
PIMMEAHNE. KaueCTBO npneMa paAnocnHaHa moKeT 3aBnCetb OT peJIbeFa MeCTHOCTN N OkpyKaHoueN o6ctaHOBVKn. B cnyae IIOXOro npneMa peKOMeHNdyETc r CMeHHTb MecToIOnIOJKeHne.
CoxpaheneHne padnoctaun (pnc.9)
TpNkblnKaTb KONKMy MeHIO M.B pe3yIbTaTe NocbluNTcra roNoCOboe COo6UeHne «Store station»(«CoXpaHeHne paNIOCTaHcIM»).ДЯ BbIbopa nIOJKeHNe, B KOtOpoe 6ydet coXpaHeHa paNIOCTaHcIM, BOCNOb3ObaTbcRA KONKAMN + n-.. DЯ CoXpaHHeHa paNIOCTaHcIM HaKaTb KONKMy MeHIO M u ydePknBaTb ee B TeueHne dByx cekyHd. B pe3yIbTaTe NocbluNTcra rONOCOboe COo6UeHne «Confirmed» («TOnmBepKdeHo»)
PpocnyuBaHne coXpaHeHHo paAnocTaHn (pc. 10)
HayuHnKu WSTM ALERTTM XPI Headset MoryT pa6oTaTb c MoBnJIbHbIM npIIOXeHnEM 3MT Connected Equipment no Android u iOS. PpIIOxEHeNe CoepKNT HacTpoKn HayuHnKOB, pyKOBoDCTBO NO IX EKCIpyaTuN INHbIE nOJe3HbIe pa3dEnbl.
PIMMEAHNE. 3arpy3ntb npnnoxehne n noIpyntb 6oone noDpo6HyIO uHOpMauio O HeM MoXHO B INHTepHeTMara3nHex App Store n Google Play. CBeDeHn o TexHnueckO noDpeKke npnnoxehn yka3aHbIB COOTBcTByIOe m pa3dene erO INHTepceca.
Функцьia Bluetooth® Multipoint**
B KOHCTpyKUHO yctpoiCTBa npdeymoTpena
MHorokHaJIbHaJyHKUaBluTeoth® Multipoint. DaHHaJyHKUaIIO3BOJIaEROT OINHOBpeMeHNO IOkJIIOUaTb K
HayuHnKam Dba yCTPOIcTBa, NOdEeXHBaOUsx FyHKUOBluTeoth® Multipoint. PExIM pa60TbI HayuHnKOB C
IOdKIIQUeHHbIMN yCTPOIcTBaMn c FyHKUeNE Bluteoth®
ONpeJeJIeTCra IIX TINOM N TEkyUIM COCTOHNEM.
KOHCTpyKUmaHayuHnKOB ppeDyCMatPbAeT BO3MOXHOCTb
ABTomATNUeCKORO ynpabJIeHnRAIOkJIIOUeHHbIMN
yCTPOIcTBaMn c FyHKUeNE Bluteoth® n ABtOMaTHueCKOrO
Ha3NaueHn IM pa3HbIX pInOpNToB.
CnapBaHHe HayuHKnOB c yCTpOcTBOM, NOdepKnBAoUm cyHKuIO Bluetooth (Pnc. 2 n 5)
ПипьвOM BKHQueHIN nITaHnY yCTpoiNCTBO
ABTOMATUWeCKN nepeIeT B pexIM cnapuBAHnI. Пр n3Tom
NocblIHTcR rOLOcoBoe COo6JeHne «Bluetooth ^圆 pairing on» («CnapueaHue Bluetooth ^圆 ekHoueHo)」.ПOMMIO 3TOrO,
IMeETcR BO3MOxHOCb T nepeIeTN B pexIM cnapuBAHnI C
NOMOJIbMo MeHIO.3To Heo6XoJIMo dJa cnapuBAHnI
HayuHKnOB CO BTOpbIM yCTpoiNCTBOM (pnc.6).
CM.pa3dE«MeHIO KOHcPuauuu」.
YdoCTOBepuTBcR,чTOФyHKZnIBuTeeth ^圆 cnapuBaemoro
yCTPOIcTBa BKHQUeHa.ПocNe 3TOrO cIeDyET B MeHIO
cnapuBAEMOrO yCTPOIcTBa B cIncKe yCTPOIcTB dJa
cnapuBAHnI HaTn N Bb6PaTb PnyKT «WS ALERT XP»ИЛN
«WS ALERT XPI」.ПocNe 3aBePeHnI cnapuBAHnI
NocblIUtcR rOLOcoBbIe COo6UeHnI «PaIring complete»
(«CnapueaHue zaepeHoo))И «Connected»(«CoeduHeHuE
ycmaHOeHo))
IPNMEAHNE.ДЯ OCTaHOBKn Ipocecca cnapuBaHnCneJyET Haxatb KhoIky Bluteoth ydepxmbTaB ee BTeueHne DByx ceKyHd (pnc.7).
PIMMEAHNE. KOHcmpyKuHaHayuHuko8 npedycMmpuBaem 603MoXHOcmb ux cnapuBaHua monbko c odHou npueMHO-nepeadooue paduocmaHue. ** CnpuBaema paNIOCTaHnO DOJXHa NOIePKNBaTb npotoKoI pyHOr BOKNOyeHn PAINOpEpaN 3MT PELTOR. PnB03HNKOBHeHH KAKNX-Ni6o BONPOCOB npoc6ba o6paatbca K MeCTHOMy DInnepy KomnaHnn.
IPIMMEAHNE. Nocne cnapuabaHn HayunkoB cmpbum ycmpoicmeom, noedepexuaiozum fynkuio Bluetooth° odno u3 doyx paHee cnapeHHbx ycmpoicme ydannemc. Ecnu npu 3mOM c odHum u3 ycmpoicme ycmaHOeNo coedunehue, ydaenemc ycmpoicmeo, c komopbim coedunehue He ycmaHOeNo. B npomueHom cnyuae ydaanemc nepeoe cnapeHHoe ycmpoicmeo**
YCTAHOBKA COEINHEHNA CO CNAPEHHbIMN YCTPOIcTBAMN,IOJIePKNBAIOUIMN FYHKUNIO BLUETOOTH
B nepbIe pIb MHyT nocIe BkJIoueHnI nITAHnI HayuHnKOB npOxCoJNT yCTaHOBka coEiHHeHnC DoCTyINbIMn cnapEHbIMn yCTpoNCTBaMn. IocIe yCTaHOBKn
coeHHeHnOcIbIuNTcraTolocBoe coo6ueHne Connected》(CoedunHue ycmaHOeNo)
ПРИМЕЧАН.В слуаеnotери coeДиЕня CO cnapeHbIM yCTpoIcTBOM B TEчЕпE 30 ceKHyI 6yDyT npOn3BODITbcr nonbITkn erO BOCCTaHOBJENH.NPn 3Tom nocJIbIWIHTcR rONoCObOE coo6UeHne «Disconnect» («Pa3beDUnHo»).
Pa6oTa C OdHm TeJeΦoHOM.
Pa6oma c d8yMa melefoHaMu ** (pnc.7).
| Ист百年ам Кондь Bluetooth® | Ист百年ам Союнские Союнские Союнские Союнские Союнские Союнские Союнские Союнские Союнские Союнские Союнские Союнские Союнские Союнские Союнские Союнские Союнские Со�рльский Союнские Союнские Союнские Союнские Союнские Союнские Союнские Союнские Союнские СоюнOMIC СоюнOMIC СоюнOMIC СоюнOMIC СоюнOMIC СоюнOMIC СоюнOMIC СоюнOMIC СоюнOMIC СоюнOMIC СоюнOMIC СоюнOMIC СоюнOMIC СоюнOMIC СоюнOMIC СоюнOMIC СоюнOMIC Со�рльский Со�рльский Со�рльский Со�рльский Со�рльский Со�рльский Со�рльский Со�рльский Со�рльский Со�рльский Со�рльский Со�рльский Со�рльский Со�рльский Со�рльский C83b | Ист百年ам СоюнOMIC СоюнOMIC СоюнOMIC СоюнOMIC СоюнOMIC СоюнOMIC СоюнOMIC СоюнOMIC СоюнOMIC СоюнOMIC СоюнOMIC СоюнOMIC СоюнOMIC СоюнOMIC СоюнOMIC СоюнOMIC Со nouнOMIC СоюнOMIC СоюнOMIC СоюнOMIC СоюнOMIC СоюнOMIC СоюнOMIC СоюнOMIC СоюнOMIC СоюнOMIC СоюнOMIC СоюнOMIC СоюнOMIC СоюнOMIC СоюнOMIC СоюнOMIC СоюнOMIC C83b Буздддддддддддддддддддддддддддддддддддддддддддддддддддддддддддддддддддддддддддддддддддддддддддддддддддд Бузддддддддддддддддддддддддддддддддддддддддддддддддддддддддддддддддддддддддддддддддддддддддддддддд Великий СоюнOMIC СоюнOMIC СоюнOMIC СоюнOMIC СоюнOMIC СоюнOMIC СоюнOMIC СоюнOMIC СоюнOMIC СоюнOMIC СоюнOMIC СоюнOMIC СоюнOMIC СоюнOMIC СоюнOMIC СоюнOMIC Со poucmea** |
| Надаь и уderжinasь | Буздддддддддддддддддддддддддддддддддддддддддддддддддддддддддддддддддддддддддддддддддддддддддддддддд Бусдддддддддддддддддддддддддддддддддддддддд Великий СоюнOMIC СоюнOMIC СоюнOMIC СоюнOMIC СоюнOMIC СоюнOMIC СоюнOMIC СоюнOMIC СоюнOMIC C83b Буздддддддддддддддддддддддддддддддд Буздддддддддддддддддддд Великий СоюнOMIC СоюнOMIC СоюнOMIC C83b Бузддддддддддд Бузддддд Бузддд Буздд Бузд Бузд Буз Буз Буз Буз Буз Буз Буз Буз Буз Буз Буз Буз Буз Буз Буз Буз Буз Буз Буз Буз Буз Буз Буз Буз Буз Бу. Бу. Бу. Бу. Бу. Бу. Бу. Бу. Бу. Бу. Бу. Бу. Бу. Бу. Бу. Бу. Бу. Бу. Бу. Бу. Бу. Бу. Бу. Бу. Бу. Бу. Бу. Бу. Бу. Бу. Бу. Бу. Бу. Бу. B Б B B B B B B B B B B B B B B B B B B B B B B B B B B B B B B B B B B B B B B B B B B B B B B B B B B C B B B B B B B B B B B B B B B B B B B B B B B B B B B B B B B B B B B B B B B B B B B B B B B B B A B B B B B B B B B B B B B B B B B B B B B B B B B B B B B B B B B B B B B B B B B B B B B B B B B E B B B B B B B B B B B B B B B B B B B B B B B B B B B B B B B B B B B B B B B B B B B B B B B B B R B B B B B B B B B B B B B B B B B B B B B B B B B B B B B B B B B B B B B B B B B B B B B B B B B N N N N N N N N N N N N N N N N N N N N N N N N N N N N N N N N N N N N N N N N N N N N N N N N N N B B B B B B B B B B B B B B B B B B B B B B B B B B B B B B B B B B B B B B B B B B B B B B B B B M M M M M M M M M M M M M M M M M M M M M M M M M M M M M M M M M M M M M M M M M M M M M M M M M M B B B B B B B B B B B B B B B B B B B B B B B B B B B B B B B B B B B B B B B B B B B B B B B B B Y Y Y Y Y Y Y Y Y Y Y Y Y Y Y Y Y Y Y Y Y Y Y Y Y Y Y Y Y Y Y Y Y Y Y Y Y Y Y Y Y Y Y Y Y Y Y Y Y Y N N N N N N N N N N N N N N N N N N N N N N N N N N N N N N N N N N N N N N N N N N N N N N N N N M M M M M M M M M M M M M M M M M M M M M M M M M M M M M M M M M M M M M M M M M M M M M M M M M N N N N N N N N N N N N N N N N N N N N N N N N N N N N N N N N N N N N N N N N N N N N N N N N N Y Y Y Y Y Y Y Y Y Y Y Y Y Y Y Y Y Y Y Y Y Y Y Y Y Y Y Y Y Y Y Y Y Y Y Y Y Y Y Y Y Y Y Y Y Y Y Y Y X X X X X X X X X X X X X X X X X X X X X X X X X X X X X X X X X X X X X X X X X X X X X X X X X X Y Y Y Y Y Y Y Y Y Y Y Y Y Y Y Y Y Y Y Y Y Y Y Y Y Y Y Y Y Y Y Y Y Y Y Y Y Y Y Y Y Y Y Y Y Y Y Y Y y y y y y y y y y y y y y y y y y y y y y y y y y y y y y y y y y y y y y y y y y y y y y y y y y y Y Y Y Y Y Y Y Y Y Y Y Y Y Y Y Y Y Y Y Y Y Y Y Y Y Y Y Y Y Y Y Y Y Y Y Y Y Y Y Y Y Y Y Y Y Y Y Y Y L10000000000000000000000000000000000000000000000000000000000000000000000000000000000000000000000000000 |
IopknloueHa npneHNO-nerpaiaoua paNIOCTAHn.
Iodknloeyhbl npuemho-nepeaoua paraocmauua umeneoH*.
Pa60a c npneMHO-apeaHooe paNocTaNuei (pnc 7).
CTaHdapt Bluetooth® 4.2
Bluetooth® — 3TO obuemipobOoi CTaHdapT 6ecnpoBHOH CB8n, npedHa3NaueHHbI dna o6MeHa daHHbIMn MeJy 6n3ko paCnoJoxeHHbIMn yCTpoiCTBaMn. B YacTHocTn, DAHHbI CTaHdapT N03BOJraET yCTaHOBHTb C83b MeJxD HayuHKAMNI TePeFOHOM, a TAKKe MeJxD cMaprTOHOM n pePOnyKTopom INI nepcoHaJIbHbIM KOMNbIOTePOM. Boone noDPo6HyIO INΦOpMaUIO MOXHO HaITN Ha caITe WwW. bluetooth.com.
CtaHapr Bluetooth® IMeet HeckoIbKO npoΦnnei: HSP 1.2, HFP 1.6, A2DP 1.3 u AVRCP 1.6.
Bollee noipobnyu nHΦopMauno MoxHo haHTn Ha cTpaHnue. https://www.bluetooth.org(tpg/listings.cfm.
MEHIO KOHΦIgPALaUN (puc. 11)
Дя BXOda B MeHIO KOHФИгураци CNeIeIyET HaxaTb KHOKky MeHIO M yUdepXINBaT b ee B TeueHne DByx cekyHd. B pe3yIbTaTe nocblIwITc rOLOCOOB coo6uHHe «Meu» («MeHIO»).ДЯп epemeSeHn I NO MeHIO cIeIyET BOCNoIb3OBAtbcr KHOKNKoi MeHIO M. KaJdoe npEpeMeIeHne 6yIet COpOBoXDaTcR rOLOCOBBIM COo6uHnEM.ДЯ BKJIIOUeHn, OTKIIOUeHn I N3MeHEnra pa3JIuYhbIX ONIiN I NaHAcTPOeB M MeHIO CNeIeIyET BOCNoIb3OBAtbcr KHOKNaMn+ n-
Hnke npBODITcOINCAHNE NyHKTOB MeHIO.
TAPAHNTHbIE OBJ3ATEJIbCTBAI 3AABJIeHHe OB OJPAHnueHIn OTBETCTBEHHOCTN
TAPAHINHbIE O6R3ATEJIbCTBA EcIn B n3deInn, npOn3BeHeHOM OtJeIom CpeCTB INnINIBnIyAIBHOI 3aunTBi KOMNaHH 3M, 6blna obHapyKeHa HeNCnpaBHocTB, BbI3BaHHa DeΦeKTo MAtepnAIA nnN cNoIhHeHH, N6o HeNCnpaBHocTB, DeJaIOUaer HeBO3MOXhbIM NcNOJb3OBaHne I3dEInn PO 3a8BnEHOMy Ha3HaueHnIO, N3dEInne IIN eTO HeNCnpaBHte YAcTN DoJXHbI 6blr OTpeMOHTnpOBAHbI IIN 3aMeHeHbI KOMNaHne 3M, N6o KOMNaHH dONXHa BO3MeCTNb KIneHTu IX CTOnMOCtB. KOMNaHH IMeET npABO IO CBOeMy yCMOTpeHHIO BbIbpaT bIO6oe I3 nepeUncLeHHbIX DeIcTBn. KIneHT He IMeET npBa Tpe6oBaTb OT KOMNaHH KaKHX-Nb6 OINbIX DeIcTBNI KpOME nepeUncLeHHbIX. TapaHTnHbIE o6raTeJIbCTBA KOMNaHH ChITaIOTcR HeDeIcTBNTeJIbHbIMN, ECNI KIneHT CBOeBPemEHo HE yBeDMnI KOMNaHH O6 ObHapyKeHHo HeNCnpaBHocTn, a TaKke ppi OTCYCTBNI NOITBepxJeHHN TORO, YTO 3KcnNyataua, TexnHuCeCKoe O6CnyKnBaHne IN xpaHeHne I3dEInn PpOn3BOinncB COOTBEcTBN C Tpe6oBaHnMa RyKOBODCTBa No 3KcnNyatauinn. ECINI INHOE HE IPEDyUCMTPEHO 3AKOHODATEJIbCTBOM,
HACTOUIIIE TAPAHINHbIE O5R3ATEJIbCTBA YBIAIOTC EINHCTBEHHbIMN 3AMEHJOT COBOI JIObIE 3AIBJIeHHbIE INI NIOPA3YMEBABUINEcRA TAPAHIN, KACAOUIECEI PNIPOJHOCTN 3DEJIIN IIN PODAXN INI INCNOJIb3OBAHN B KAKNX- JIN6 KOHKPETbIX CEJIAX, A TAKKE KACAOUIXcRA KAUCHTBA IN3DEJIIN, PABHO KAK IPOVCTEKAOUINE IN3 CLOKINBEENCR IPAKTIKN INIPIHNrTBIX HOPM DEIOBbIX OTHOWEHIN, 3A INCKLIQUEHNEM IPAB COBCTBEHHOCTN INI PATEHTHO TIPABA.
TapaHTnHbIe 6o3aTeJIbCTBa KOMnHaHm 3M He pacnPoCTpaHraIOc Ta H3dEJIa, BblSeIdUme I3 CToPOBcIcTBHe HeHaIJIeKAsuIX 3KcPlyaTaUIM, TeXHnueCKOro 06CNoKyBaHnI XpaHEnH, HecobIIOdeHnYka3AHn pyKOBoDcTBa NO 3KcPlyaTaUIM, BHeCEHnY N3MeHEHn B KOHcTpyKcIIO yCtpoIcTBa, a TaKKe BCLeIcCTBHe HeCuaCTHBIX cLyuaEB, XaIaNTHocTN INCNOJb3OBaHnY I3dEJIa He No Ha3HaueHInO.
3AABJIENHE O6 OPGAHUCHEN OTBETCTBEHHOCTN 3A NCKJIIOUCHENEM CNYAEB, PPEYCMOTPEHHbIX 3AKOHOM, KOMPAHNA 3M HN INPNI KAKNX YCJIOBNX HE HECET OTBETCTBEHHOCTN 3A INPROM, HEPROMO, ONPEDEJREMBI INOCOBIMN OBCTOATENBCTBAMN, CNYAHAHBINKOCBEHHBI USEPB, BKLIQUAYUYUEHHYIO INPBbIBb, BO3HKUNB CCB3N C HACTOUIIM N3DEJIENEM BHE 3ABNCIMOCTN OT IOPNCINKUN. INPN OBHAPYKEHN HENCPPABHOCTN IN3DEJIINKOMPAHNA HE O53AHA PDEIPPNHMATb KAKNE bTO HN bIIO DEICTBIA NOMIMO NEPEHCJENHHbIX BbIIE.
3APET HA BHECEHNE I3MEHEH N B KOHCTPYKUHO 3apeaaetc BHOCTb N3MeHnB KOHCTpyKUHO HactoIeO n3deNna 6e3 NcMbHeHOro pa3peWeHn KOMNaHn 3M Company. HecaHKUHOHpOBaHHbe I3MeHnMoryT CTaTb npuHnO aHHyJnpOBaHn rapaHTnHBIX 063aTeJIbCTB npOn3BODInTeI, a TAKKe yTpabI pONbOBeIeMpAO Ha kCPIyatauIO n3DeHn.
3MTPELTORtWSTALERTXP Headset MRX21A2WS6,MRX21A2WS6-ACK MRX21P3E2WS6,MRX21P3E2WS6-ACK
3MTPELTORTMWSTMLASTXHPHeadset MRX21A3WS6,MRX21A3WS6-ACK MRX21P3E3WS6,MRX21P3E3WS6-ACK
INLEDNING
Mobilappen 3MTM Connected Equipment\*\*
3. Surround balance (surroundbalans)
4. Surround equalizer
Med Surround equalizer andrar du frekvensinstallninger for surroundljud. Tryck snabbt (1 sekund) pa nagon av knapparna (-) eller (+) for att andra niva pa Surround equalizer Low -Normal-High-Extra high' (lagt-normalt-hogt-extra hegt).
3M™ Connected Equipment, mobil uygulama **
Ayrintili bilgi: https://www.bluetooth.org(tpg/listings.cfm
KULAKLIGINIZI YAPILANDIRMAK (Sekil 11)
KpinnHnI Do KacKn/woJoma
MRX21P3E2WS6, MRX21P3E3WS6 (yci BapiaHTn Bpu6y)
D:12 KpoHwTeH nI npTpMkn YaWKn (HePkaBIOva cTaIb)
IHCTPYKII13 BCTAHOBJIEHHRA
ToIOBHaDyKka
E:1 3cyhble Taaikn Ta BiDxnilb BepxHIO qACTMHY NOKpTTT, OckilbkN Ka6enb Ma e 6ytn i3 30BHIHboi CTOPOHI rJOBOHOI DyKKN.
E:2 BiDperyHIOHe BnCOTy yauoK nepeCyBaHHM Bropy Ta BHN3, YTPmHyOnrONoBHy dyKy HaMiCi.
E:3 TOnOBHa DyKKa MaepoOHTN Upee3 BepxHIOaCTnHy roNoB, kE POKa3aHO Ha MaJIIOHky Ta Mae NITpIMyBaTu Bary raphiTy.
KpInnHnI Do 3axnchnx kacok
E:4 BCTaBTe KOpCTKe KpInnEnHn DO KaCkN y OTBip Ha Kacu, DOKN He NoUyETe KnaCaHH, 0o O3Haue φikCaio (E:5).
E:6 Pekm BeHTnrai: 106 nepeBecT npncptpi i3 poboyor peKmMy Do pekmMy BeHTnrai, BiTgHITb Ha3OBHi aWKn HabyuHKIB Do knaaHaHr (E:7).
E:8 YnkaTe po3mieHHaawok Ha nobepxHi kackn, Ockilbkne nepeWkoKdKae BeHTnlauii.
IHCTPYK23 BKNOPUCTAHH
3APRAKA TA 3AMIHA AKYMЛTOpIB (pnc.1)
1.3a donomoroio naIbucB 3HIMITb fikcatop nboi yawkn.
2. BiДКрИТe чИЗК.
3. BctabTe a6o 3amHItb akymyIaTOpn.IpeBipTe, uO6 nonpHiCTb BiNobiDana No3HaUkAM.
4. 3akpiTe yauKy ta 3akpiiTb pfikcatop. 3amHITb Tn akymyIaTopa, kUO BV nepexoNTe 3 akymyIaTOpHIX 6bapeN do 6bapeN, UO He nepezapJxkaOTbcr. YtpmYte (2c) KHOKNK MeHIO [M], UO bYbiTN B MeHIO KOHphiRpyaqii, DnB. KOHphiRpyaqirnapHITypn.
YBAGA! BnKOpncToByTe NnSe 3apAnHn USB-npncTpi
3MTPELTORTM FR09 EU Ta HactiHn IepexiHnK
3MTPELTORTM FR08 i3 akyMnyTopHmN 6aTapeMa
3MTPELTORTM LR6NM.
YBAGA! He 3apJkaaTe 6aTapeHo, KaIO TeMnepaTpa HABKoIuHbOrO NOBITpR nepeBnUye 45°C.
ПРИМITKA.
- He 3apaykaIte nykHi 6aTaPeI, ockInbKn ce moKe npn3BecTn do noWKoJKeHHra rapHItypn.
-BnKOpNCToBvIe TIIbKn 6aTapei AA, uo He nepe3apJxKaIObCra, afo HikeNb-MetAnrIpuHn akymyIaTOp. - He BnKOpNCToBvIte pa30m cTapi ta HObi 6aTapei. He BnKOpNCToBvIte pa30m JnykHi, cTaHdApTHi a6o akMyJrTopHi
6atapei. DToPmMyTecb MicceBn npaBn yTuNla3aui TBepnX BixOxDIB nIraHaleKHOyTuNla3aui 6atapei.
YACPOBOTN
Pn6JH3Hn Yac BnKOpNCTaHH 3 HOBIM NjxHMn
6aTapeMn AA Ta NOBHiCTo 3apJxKeHMn AkyMnyTopHMn
6aTapeMn LR6NM (2100 mA-roI.):
-FM-paio i dnpepenHnepeyIIOBaHHn: np6n. 58 roHN.
- ItoKoBA nepeaCnHany uee3 Bluetooth i dInepeHcHHepeyKnBaHn: np6n. 78 roHN.
ПРИМITKA.
3aIexHO bID yMOB HABKOLINHbO rcepeOBuca, TEmnpaTpy Ta cTaHy 6aTapei Yac po6OT M0Ke 3MiHOBaTnCra.
YBIMK/BIMK. (pnc.2)
YtpmMyTe (2 c) KhoNky KINBneHn [1, uo6 yBimKHytn a60 BIMKHyTn rapHityp.
TOnoCoBe NOBIOMJIeHHa CNoBicTuTb Power on (YeIMKHeHo) a6o Power off (BumKHeHo).
PiJvac nepworo yBIMKHeHHrahpHtpyn BOHa aBTOMaTHHO nepexoHTb y pexm noeHaHH.
IPMITKA. RaKIO npOTaROM 4 roINH He HATnCKaTN KODHOI KHONKI, rapHItypa aBtOMaTHNO BmKHeTBcR. TOnOCOB NOiDomneHH cNoBICTb Automatic power off (AemomamuHHe bKnIOueHH).
PEYIIOBAHHI PIBH IYHOCTI 3BYKU JXKEPILA (pnc.3)
BiDpyHnIe pibeHb IyHocTi 3Byky KOpOTKIM HAITNCKAHHMA (1c)Ha KHOKNy ([+] a6o[-].3MInHb AKTINBHe JxKepeNo 3Byky KOpOTKIM HAITNCKAHHMA (1c)Ha KHOKNy XINBNeHHRA []. DKepeLOM 3BykMoKe 6yTN:
FM-paio
TeJeDoh
- Otoyuoye cepedobuune
- My3nka
- Bluetooth®
PO3YMHA IOPADA. Bm moxete HanaTobyBatn nocnienHna 6acib, banaHC o6'emHoro 3bky Ta eKbaan3ep 06'EMHoro 3bvyahnry. YtpmyTe (2 c) KhoNkMy MeHIO [M], 1o6 yBIn T B MeHIO KOhphiirpauii. DnB. «Kohphiaypaia zapHimypu».
06'EMHn 3Byk (mikpofoh nifepeHciHoro peryIIOBaHHdI npocnyxOByBaHHHaBKOINHbOro cepeoBuNca)
IOnomarae 3axnctnTn opraHn cnyx BiD notehuiHo Hebe3neuHnx pIBHB uMy. NocTHiN rypKIT ta iHsi IOTehiHNO shkiinBlyuMn 3HNkYIObCdoPiBHa HIXKYe 82 d5, npote Bn moKeTe npoDobKyBaTn HopMaIbHo roBOpTu Ta UyTu caMoTo ce6e.
3B'RA3OK «BIU-HA-BIU» (PUSH-TO-LISTEN, PTL — «HATUCHITb, UO5 CJIYXATN») (pnc. 4)
Функця Push-To-Listendo3BONe BiDpa3y npocnyxObyBaTn HabkoIuHc cepedobuue wJnxOM npirnyuHnryuHocTi 3Byky FM-padioi Bluetooth Ta yBimKHeHnMikpOponib CnpnHrTTra HabkoIuHbOro 3Byky. HATncHtB (1 c) DBiCi
KhONky XINBJIeHnra, [1]uOb aKTiByBaTn cyHKnIO Push-To-Listen. Hatncihtb 6yNb-ryk Ky KhoNky, uOb BmMkhTyn fynKciio Push-To-Listen.
Mobilha nporpama 3MTM Connected Equipment **
Пикюатету rapHTpy WSTM ALERTTM XPI Headsetdo Мобьhoi nporpamn 3MTM Connected Equipment. Поррам Доctунда ДЯ OC Android ta iOS.Зрбиши Ze, ВИ Зможete OTPIMATN DoCTyn Do HanaTByBaHb, KOHφiryaци, IHCtpyKuiz 3 ekCnnyatauToIo.
PIMITKA. 606 OTPMaTn 6IbB DoKnaHy iHΦopMaζio, nepeiDb Ap Store afo Google Play Ta 3aBaHTaXTe nporpamy 3M™ Connected Equipment. RaO BAM nTppiHa donomora 3 BkOpncTahHra 3M™ Connected Equipment, nepeRnHbTe BiDnOBiHy iHΦopMaζio B MoibHi nporpami.
Texhonoria Bluetooth® Multipoint**
TapHITypa nIDTPMMy eYHKuII Bluetooth® Multipoint. BnKOpNCtOByTe texHonorIO Bluetooth® Multipoint, 0o6 nIKNIOHTn rapHITpy Do DBox npICCTpoIB Bluetooth®ODHOACHNO.3aIeXHO BiD TINy nIKNIOeHX npICCTPOIB Bluetooth® TaixnotOHOro FYNKUioHyBaHNr rapHITpya KONTpONIE npICCTPOI Bluetooth® no-pi3HOMy. RapHITypa BN3HaueAe NpiOpNTeTI Ta KOOpDInHy e pOboTy 3 nIKNIOHeHx npICCTPOIB Bluetooth®.
PoeDHaHnH npCtpoB Bluetooth (pnc. 2, pnc. 5)
Пид яаспшугнгьяггггггьяггггьяггьягьягьягьягьягьягьягьягьягьягьягьягьягьягьягьягьягьягьягьягьягьягьягьягьягьягьягьягьягьягьягьягьягьяgngy. Y pexnnoeHnna HnraTOKX MoxHa nepeHTN 3 MeHIO. Lc notpiBHO nna noeHnna DpyrTO npCtPOO (pnc.6). NIB. «KoHphiypaui zapHimpu>. IpekoHaiTeCb, zuФHyKuio BLeuTooth yBIMKHeHO Ha npCtpoi Bluteoth. 3HauiTa BnBepitb WS ALERT XP a60 WS ALERT XPI Ha rapHtiPyi Bluetooth. TOnocobe nobIDomneHHI niTBePdntb 3aBepWeHHI noeHnHHia Pairing complete (NochHaHHa 3aeePeHo) Ta Connected (Piokluoyeo).
ПРМITKA. Пюразец NOБданнг мохна 3уннHTN, yтрмуон (2c) кнку Bluetooth[] (pnc.7).
IPMMITKA. Tinbku Oduh 3 dox noeohauhx npucmpoie MOKe 6ymu paueio**. TapHitypa niDtpmmye poobTy paui TInbKn 3a donomoro npotoKony 3MT PELTORTM Push-To-Talk (HAtncHtB, uO6 p03MOBnTn). JaUO y BAC BNHKn 3anHTAHN, 3BepHiTbca Do MiueBoOr DnCTpn6IOTopa.
PIMITKA. Iicna ycniHnoo noeHaHHmpemboo npucmpoio Bluetooth oduh 3 nonepehix noeDaHux npucmpoie budaneMbc3 zapHimypu. KxO nkiueHu oduh 3 npucmpoe, He ndoueHu npucmpiu budaneMcbI hakwe budaneMcbnepwui noeHaHui npucmpiu **
NOBTOPHE NIDKJIIOUeHHN PNPCTPOIB BLUETOOTH
Iicra yBIMKHeHHr rapHITpyn BOHaHAMaraETbCS NOBTOPO nIKIOHTBCBdo BCIX IOeHNHX PnCtpoIB IpOTAROM 5XBNIH. FIOOCBE NOBIDOMNEHHN IITBepDITb IINKIOUeHHN:"Connected" (PiKOuHoHO).
PIMITKA. Ka3b30k Btpaeho, rapHitypa HamaTImetbcB iDHOBHTn 3'EdHaHH npotrrom 30 cekyH. Fonocobe noiDOMJIeHH npoiHfOpMyc npo BTPaTy 3B'3ky "Disconnect" (BioknOyeHo).
PiiknoueHH Ta yHKIOHyBaHH OndHO TeneoHy.
PioknoeHH ma yHKIOHyaeHH oex meeOHe ** (DINB.pnc.7).
NobidomnHn CnoBicntb Pairing off (NoeHaHHB EumKHeHO).
4. Surround equalizer (Ekbana3ep o6'cMHOro 3ByaHHa)
EknanaJep 06'EMHOrO 3ByaHn 3MHoe yactOTHy
XapakTepeNkY 06'EMHOrO 3ByKy. HATNCHTb (1 c) KHOKNy [-]
a6o [+, u6b 3mHHTn pIBHi eKnanaJepa 06'EMHoro
3ByaHn, «Low - Normal - High - Extra high » (Hu3bKu - 3EuauHn - BuCoku - Dyke eucoku).
HaTnCHiB (1 c) KHOJky [-] a60 [+], 3mHHT Tn6aTaapei KINBJIeHHHa akMyIaTOpHy a60 JnyKHy.
7. Reset to factory default (CkndaHnHaHaawTyBaHb do 3aBODcbKnx 3HaueHb) (pnc.12)
HaTnCHiB (1 c) KhONky [-] a6o [+], a notim yTpmyTe (2 c) KhONky MeHIO [M]. DToTpMyIeCb Bka3iBok roJocoboro NOBIDOMJIeHHa.
BUNIWEHHIPOBJIEM
PpO6IeMa 3 npHOMom cHany FM-paio.
IpekoHaTeC, 6aTaapei HOi a6o NobHicTIO 3apJKeHi. Ipnom paioocnHany 3anexntb BID tonorpaip Ta cepeOBoNua, B KOMy BN nepe6yBaTe. KaIO CNHAn cna6kn, cnpo6yTe 3mHHTn Mlcne nepe6yBaHHra.
PpO6IeMa 3 niiKJIIOUeHnM BluTeoth.
- NapekoHaTeC8, 06 6aTaPei HOBi a6o nobHicTIO 3apJxKeHi.
- Buaanitb Cbi npncptoi Bluetooth, cnHxpoHizobHi 3 Baum TepeHOM.
- Ipe3aBaHTaxTe TeNeoH (yBIMKHiTb/BIMKHiTb TeNeoH).
4.СиНьTe HanaшТУВанг rapHITypn Do 3aBOДсБКИX.
5.Поевдайтетарнітузтениховом.
6.Якpo npoblema He 3Hnkae, cnpo6ynte npneDHaTN iHsIn Tepeoh.
Pnncytni 3Bykn TpickaHn nIac noTOKOoi nepedayi cnHany / TepeoHHoro d3BInka.
Bluetooth 一 贝 texhnojiorpaio3B'3kY,kaeCyTnIBOIO do 06'ekTIB,uo 3naXoJrbcraMIX rapHITpyoTO Ta npNCtpoEm,do JAKoro BOHa NiKlNoeHa.Y 3OHi npRAMOI BnIMMoCTI (To6To 6e3 CTIN TOO) BiCTaHb MIX rapHITpyoTO Ta NiKlNoeHMm PnCtPOcM MaE cKnadaTn Do 10 MeTpiB.HabIt po3aUyBaHHa Telefohy 6In3bKO Do Tila MoKe MatN cyTTBe 3NaHeHH.
OuHJEHH I TEXHlYHE OBCJyTOBYAHH
Дя Oчишеня 3OBHшьогп рг.T罗OBHOДуЖКТа ambyuypiB BOKOPICTOBYte TKAHHHy, 3moуehу TeNIOBOdoO 3doBaAHM MJIJa.
PIMITKA. HE 3aHypoTe 3acI6 3axncty opraHIB cnyxy y BDOy.
Y pa3iHamokaHn 3ac6by 3axNCTy opraHb Cnyxh BiD douy a6o Noty BvBepHITb npOTuWMHi HabyuHNKn HABNBOpit, 3HIMtB am6yUpyn Ta cInHei BKnAdnSi i 3aNiWte ix BcHexATn npotrrom 24 roDnH, a Notim 3HOBy yce 36epiTb. 3 YacOM am6yUpyn Ta cInHei BKnAdnSi 3HOuyOToBcR, TOMy ix Heo6XiHo perynpno nepeBiprTa HAraBHicTb TpiUnn a6o IHnxn OoKoDKeHb. Y pa3i perynpHoro BkOpncTahnn KOMNaHria 3M peKoMeHdye 0HaJMeHneDbci Ha pik 3AmihOBaTu cInHei BKnAdnSi ta am6yUypn dIa 3a6e3neHnHaJeXHOro nocJa6JIeHHy UyMy, rirEHN Ta KOMphiOpTy. Y pa3i NoKoDKeHHa6yUpya NOro Heo6XiHo 3AmHNT. DInB. po3dIn «3anach YactuHn» HIXKye.
3HRTTA 3AMIHA AMByUYPIB
F:1 06 BnTARHyTN am6yUpyn, npocynbTe naIbci nID BnTypiuHi kpaI am6yUypiB Ta notarHITb ix.
F:2 BntaHnItb cniHeHi BknaDiuTa Ta BCTaBte HOBi cniHeHi BknaDiu.
F:3 Pnntchitb oINH 6ik am6yupa do na3a Yawkn Ta HATNCITb Ha npotnIeKHN 6ik, nOKn am6yup He cTaHe Ha Micce.
YMOBNI BUKOPUCTAHHRA 36EPIAHH
-Перед 3бергань Виpo6у 6атapei Heo6xIDNo BnHЯТN.
He 36epiraTe 3acis 3axncty orpraHIB cnyx3a Tempeatpyn Bnue 55 ^ C (HanpiKnai, nIIObOBm/ 3aHIM CKNOM ABTomO6in a60 Ha niDbikoHHi) nn 3a Tempeatpyn HnXe-20 ^ C
- He BnKOpncToBnyTe 3acic 3axNCTy oprAhB cIyxy 3a TempepaTyPi Bnue 55^ cn HnKHe -20^
3ANACHI YACTUNH T A AKCECYAPN
TiriehiuHnHa6ip3MTPELTORTMHY82
3miHHn ririHCHn Habip. 3aMHoTe KOMHOHTN
IohaMeHwe DbiHa pik, uob 3abe3neHTn HadiHe
nocna6bNeHHra 3Byky, ririHcHicTb i 3pyHcTb KopNCyBaHHa.
Tenebi am6yupn 3MTPELTORTMHY80
3miHhi reIeBi am6byuypn. 3amHIOHTe KOMnoHeHTN
IohaImeHwe dbiHi ha pik, uOb 3a6e3neHTn HadiHHe
nocla6bNeHHra 3Byky, ririEHIHCt b i 3pyHICTb KopNCtYBaHHa.
Odnopa3oBi 3axnchi enemehTu 3MT PELTORTHY100A
Ondopazobi 3axnchi eIemEnTH, zo Ierko HadraHcBHa ByuHi amByuypn.
3axnHneJeMeHTmKpOpoHy 3MTPELTORTM HYM1000
Bitpo3axnchm uHTOK dna MIKPOOHB Tnny 3MPELTORTM995/2
БлOKЖИВLEHЯ3гИЗДOMUSB3M™PELTOR™FR08
ПРIMITKA.ВикорисовутetiЛькзарднйпсстри FR09.
3apn3i 3HIDOM USB 3MTM PELTORM FR09 EU
AkymnyTophi 6atapei AA 3M^T PELTORTM LR6NM
TAPAHTIA TAOEBMEXEHHBIBIOBIDAlbHOCTI
TAPAHTIy. y BnnaKdy, kkuo 6yd-kynn BnpiioB iDdIeHnHa 3acobib iNdbiyalbHorO 3axncty 3M 6yde Bnu3HaHn TaKIM, 0mae defeektn MaTepiany, kocti BnroTOBneHHa 6o He BIDNOBIAc 6yd-kyi npmri rapaHTII dny KOHKpeTHOI MeTN, EDNHIM oOB'3kOM 3M Ta BaWM BnKIOHMM CnoOCbOM KOMNECaui NobuHEn 6ytN, 3a Bn6bOpom 3M, pemOH, 3amHa a6o NOBepHeHHB ABPTOCTI NOKYN TAKNX YACTIN a6o BnO6IB NICRA CBOeachHO rOBIDOMLeHHN Odo npbIe MToTA ObrpyHTBaHNN TORO, 0o Bnip6 36epirABcra, 06CnyROByabcra Ta BnKOpNCTOBvBaBCr BIDNOBIDHO Do nncMbONx IHCTpykui 3M. OKPIM BnPAADKIB, KOJI 3A6OPOHEHO 3AKOHODABCTBOM, DAHA TAPAHITIG C BnKIOUHO TO 3AMIHRC Bylb-ky PPRMY ABO HENPRAmy TAPAHTIIO TOBAPHOJ RKOCTI, PNDATHOCTI DnBnKOPNUCTAHN 3A INEBHIM PNI3HAueHHM ABO IHWY TAPAHTIIO RKOCTI, YN TI, 1003YMOBJIeHI 3BNUAIHOIO PPAKTIKOO BEDEHHJ DIIIOBNX OIEPALUIM, MTHNM ABO TOPROBMN 3BNUAYMI, OKPIM PPABA BNACHOCTI TA 3 METOIO 3ANOBIRAHN IOPUYSEHHIO NATEHTHO TIPABA: BiNDOBINO do ciEi rapaHTII KOMNaHria 3M He Mae JKDnIX 3068'3aHb 0do 6yd-kyoro Bnpo6y, kyn BnWIOB i3 naNy y 3B'3ky 3 HeNAEXHM AMo HnpabnblHM 36epiraHHM, NOBDOJENHM QN OScnyROBYBaHNM; HeDOTpImaHHM iHCTpykui 3 BnKOpNCtAHN; MoNiFkaui abo NoWKoDKeHHB Bnpo6y B peyntaTi Heaachoro BnadaKy, HeDbaNocTi abo HnpabnblHO BnKOpNCtAHN.
OBMEJEHHBIDIOBIAJIbHOCTI:KPIM BINAJKIB, KOJI NCE 3ABOPOHEHO 3AKOHODABCTBOM, KOMIIAHJ3M 3A JOKDHNX OECTABINH HE HECE BIIOBIAJIbHOCTI 3A BUYJ-RKI IPRMI, HEPPIMI, OC0BJNBI, IOATKOBI YI NOBICH BTPATN ABO 3BNTKN (Y TOMU YNCJI 3BNTKN, NOB'3AHI 3 HEOOTPIMAHNM PnBvTKU), 3YMOBJIeHI DAHIM BINO5OM, HE3AJEHXBOI BID INPABOBoI TEOPII, RKA 3ACTOCOByETcR. BVKNADEHI B DAHOMY DOKUMEHTI 3AC06NI PPABOBTO 3AXNCTU E BVKNIOUHIMN.
PNCPTPI 3A6OPOHEHO MOINΦIKYBATN. LcE npnCTpi He moKHa MoiΦIKyBATn 6e3 nCbMOBoI 3roDi KOMNaHII 3M. HecAnKIOHOBAHI MOINΦIkaJI IOXyt pIn3BecTn DO BTPaTH rapaHTI Ta npaba KOpNCtBuBaVA BKNOPNCTOByBATn npnCTpi.
3M Australia
Building A, 1 Rivett Road
NORTH RYDE NSW 2113
+61 (1) 800 024 464
3M Azerbaijan
"BRIDGE Plaza" 4th floor
12 Bakikhanov street.
Baku AZ1065,Azerbaijan
Tel: +994 12 404 5050
3M Belarus Representation Office
Mogilevskaya str 18, office 4
220007 Minsk
+375 172 10 41 85
3M Belgium N.V. / S.A.
Hermeslaan 7
1831 Diegem
+32 27225310
3M Representation Office Beograd
Milutina Milankovica 23
11070 Novi Beograd
+381 11 3018459
3M Bulgaria Representation Office
1715 Sofia, Mladost 4Business Park, sgrada 4
+359 2 960 19 11
3M China
41/F, Maxdo Centre, No.8 Xing Yi Rd.,
Hong Qiao Development Zone Shanghai,
200336 China
+86 021 22103047
3M Cesko, spol. s r.o.
V Parku 2343/24
148 00 Praha 4
Czech Republic
+420 261 380 111
3M Deutschland GmbH
Carl-Schurz-Str. 1
41453 Neuss
+49 2131 14 26 04
3M Denmark a/s
Hannemanns Alle 53
DK 2300 København S
+45 43 48 01 00
3M (East) AG
19th Floor, Maadi, Cairo
Egypt
+202 525 9007
3M Espana S.L.
Building 11, Third Floor, Dubai
Internet City, Deira
+97143670777
3M Hellas MEPE
Knipioia 20,
151 25 Mapouoi
+30 210 68 85 300
3M Hungaria Kft.
1138 Budapest
Vaciut 140.
+31 1 270 7713
3M India Limited
Corporate Office, Concorde Block, UB City,
24 Vittal Mallya Road Bangalore - 560001
+918066595759
3M Ireland Limited
The Iveagh Building
The Park
Carrickmines
Dublin 18
Ireland
+353 1800 320 500
3M Israel
3M Israel.eps
+972-9-961-5000
3M Italia S.p.A.
Via Norberto Bobbio, 21
20096 Pioltello (MI)
+390270351
3M Kazakhstan LLP
17a Fonvizin str., 3rd floor,
Business Center "Koktem-2"
KZ-050051 ALMATY
+77273330000
3M Latvija SIA.
K. Ulmana gatte 5
Riga, LV-1004
+37167066120
3M Lietuva
A. Goštauto g. 40A
LT-011128, Vilnius
+37052160780
3M Nederland B.V.
Industriebweg 24
2382 NW Zoeterwoude
+31715450450
3M New Zealand
94 Apollo Drive
Rosedale, Albany
NORTH SHORE CITY AUCKLAND
Phone: +64 0800 364 357
3M Norge A/S
Avd. Verneprodukter
Postboks 100
2026 Skjetten
+4763847500
3M Pakistan (PVT) Ltd.
Islamic Chamber of Commerce Building ST-2/A,
Block 9, KDA Scheme 5,
Clifton-Karachi 75600
+9221111225536
3M (EAST) AG PODRUZNICA RH
Slavonska avenija 26/7
10000 Zagreb
+38512499750
3M Poland Sp. z o.o.
Aleja Katowicka 117, Kajetany
05-830 Nadarzyn
+48227396000
3M Portugal Lda
Bucharest Business Park,
3M Singapore Pte Ltd
1 Yishun Avenue 7
Singapore 768923
(65) 6450 8888 (Yishun)
3M Slovensko s.r.o.
Obchodné zastupiterstvo
Vajnorska 142,83104
Bratislava, Slovensko
+421 2 49 105 230
3M South Africa
146a Kelvin Drive, Woodmead Sandton
2128 Rivonia
+27 011 806 2355
Suomen 3M Oy
Keilaranta 6
PL600
02151 ESPOO
+358 9 525 21
3M Svenska AB
Bollstanäsvagen 3
191 89 Sollentuna
+468922100
3M Taiwan
3M Taiwan
6F, NO. 95, Dunhua S. Rd.,
Sec. 2 Taipei, Taiwan
886227049011
3M United Kingdom PLC
3M Centre, Cain Road
Bracknell, RG12 8HT
+44 870 60 800 60
3MÖsterreich GmbH
3M Personal Safety Division
3M Svenska AB, Box 2341
SE-331 02 Varnamo
Sweden
Email: cstechservice@mmm.com
Internet: www.3M.com/PELTOR
Phone: +46 370 65 65 00
FP3813REVF
© 3M 2020. All rights reserved.
3MTPELTORWTWSTALERTXP Headset and
3MTPELTORTMWSTALERTXPI Headset are made in
Sweden by 3M Svenska AB, SE-331 02, Varnamo, Sweden.
3M, WS and ALERT are trademarks of 3M Company, used under license in Canada. PELTOR is a trademark of 3M Svenska AB, used under license in Canada.
The Bluetooth® wordmark and logos are registered trademarks of Bluetooth® SIG Inc., and any use of such marks by 3M is under license. Please recycle. Printed in Sweden.
3M PSD products are occupational use only
