
X6200 - Router LINKSYS - Free user manual and instructions
Find the device manual for free X6200 LINKSYS in PDF.
| Product type | Dual-band ADSL/VDSL Wi-Fi modem router |
| Dimensions | 215 mm x 40 mm x 200 mm |
| Weight | 415 g |
| Power supply | 12 V, 1.5 A |
| Main features | Wireless dual-band router (2.4 GHz and 5 GHz), integrated ADSL/VDSL modem, 4 Gigabit Ethernet ports, 1 USB 2.0 port, Wi-Fi Protected Setup, guest access |
| Security | WEP, WPA, WPA2, RADIUS, encryption up to 128 bits |
| Maintenance and cleaning | Unplug the device before cleaning. Use a soft, dry cloth. Do not use chemical products. |
| Spare parts and repairability | No user-serviceable parts. Contact Linksys support for repairs. |
| General information | Brand: Linksys, Model: X6200, Radio frequency: 2.4 GHz and 5 GHz, Number of antennas: 4, ADSL standards: T1.413i2, G.992.1, G.992.2, G.992.3, G.992.5, G.993.1, G.993.2, Certifications: FCC, CE, Wi-Fi (802.11ac/a/b/g/n) |
Frequently Asked Questions - X6200 LINKSYS
User questions about X6200 LINKSYS
0 question about this device. Answer the ones you know or ask your own.
Ask a new question about this device
Download the instructions for your Router in PDF format for free! Find your manual X6200 - LINKSYS and take your electronic device back in hand. On this page are published all the documents necessary for the use of your device. X6200 by LINKSYS.
USER MANUAL X6200 LINKSYS
WiFi Protected Setup

WiFi

DSL

Internet

Power
aaii iaii pi aiai gaa iiai ie jy dii jy yiaian LEE 1
Protected Setup
LEBI 1iWi-Fi-Protected SetupTM
WtfiProtectedSetup
LEEB
SiWi-Fi Protected Setup
LEDLao
Ae 1
dsL
y
DSL
Juaa aag Jda jao ci jylll
Juaa aagaae aaii aai iiaaie aai jn gnnnnae aae aee
1PJgEeUgAaalpaaeggegejuaaiey
Wi-Fi Protected Setup" WPS
.Wi-Fi Protected SetupTM
aall Jyay jll iJuy 5
Ethernet 6
Ae 1
j 7
J 1
8
75.61 2008-03-04 19:50 pm
aal 10
10g4g 1
a aal alal alal alal alal alal alal
1.1
a 1
1
(J)ISDN)
gaii gao jiu ciey 8 aiall ciui iaii ai
jaiy jil 1
aannnnnne
DSL ADSL
2

y j 1
Etherfi#olvii
Etheript
1 Jua 12c 12y 13y
Ethereneia
2
EETHTHcERNTJg 1
iLagaiil iJy jalj
http://192:168.1.1

"JgJgJg" gJgJgJgJgJgJgJgJgJgJgJgJgJgJgJgJgJgJgJgJgJgJgJgJgJgJgJgJgJgJgJgJgJgJgJgJgJgJgJgJgJgJgJgJgJgJgJgJgJgJgJ
"8a 1000000000000000000000000000000000000000000000000000

1 7
aannn aannnnn anannn nnnnnn nn nnnnnn nnnnnn nnnnnn nnnnnn nnnnnn nnnnnn nnnnnn nnnnnn nnnnnn nnnnnn nnnnnn nnnnnn nnnnnn nnnnnn nnnnnn nnnnnn nnnnnn nnnnnn nnnnnn nnnnnn nnnnnn nnnnnn nnnnnn nnnnnn nnnnnn nnnnn
neB
EED,asisobidiAsy
a 1
24!
VDBP
yss ynnn nnnn (ISP))
PTM
DSd 1
.DSL
VLAN"JL,VLAN"JL,2
aalal aalal alalal alalal alalal alalal alalal alalal alalal alalal
1
VC
IPOE RFC 2684 Bridged .2
1gic pssu" 24 45 46 47 48 49 49 49 49 49 49 49 49 49
IP
IPOA RFC 2684 Routed .3
RFC 2516 PPPOE .4
IP PPOE (PPPoE)
1.
a a a a a a a a a a a a a a a a a a a a a a a a a a a a a a a a a a a a a a a a a a a a a
IPJPPoA (PPPoA)ATM
P 1
(PTM/VDSL) DSL
VDSL2-VDSL2
(1)
JalSly 8daiyai yaiyai yaiyai vAN piai aiaiaiaiaiaiaiaiaiaiaiaiaiaiaiaiaiaiaiaiaiaiaiaiaiaiaiaiaiaiaiaiaiaiaiaiaiaiaiaiaiaiaiaiaiaiaiaiaiaiaiaiaiaiaiaiaiaiaiaiaiaiaia
WAN
4095,110jLJyVLAN
y
Jn 1
(ISP)
1 1
"1
1P 1POE.2
"glip IP jie piai" 111111111111111111111111111
"ip jie" 1iipipipipipipipipipipipipipipipipipipipipipipipipipipipipipipipipipipipipipipipipipipipipipipipipipipipipipipipipipipipipipipipipipipipipipipipipipipipipipipipipipip
a a a a a a a a a a a a a a a a a a a a a a a a a a a a a a a a a a a a a a a a a a a a a a a a a a a a a a a a a a a aaa
.PPPoE (PPPoE)
"Jaa Jaaal" yXbaillie JaaiyIyjaii all jay - jaaa Jaaai yXbaillie JaaiyI.
y 1
aaii aii iiaai aiai ai (Jaaai) 8
PPTP
IP DHCPLPPTP
i 1
"IP
"Jus Jusal yllal ie Jusil jlll all giny - jus Jusil jllal ic Jusil
aalal aalal alalal alalal alalal alalal alalal alalal alalal alalal alalal alalal alalal alalal alalal alalal alalal alalal alalal alalal alalal
Lc 12
-
21.
"Juaa Jaaia" 12y1 12y1 12y1 12y1 12y1 12y1 12y1 12y1
y
JyIyIyIyIyIyIyIyIyIyIyIyIyIyIyIyIyIyIyIyIyIyIyIyIyIyIyIyIyIyIyIyIyIyIyIyIyIyIyIyIyIyIyIyIyIyIyIyIyIyIy
y 1
ai s ai ≤ S1 ≤ S2 ≤ S_3
aaii i 1
.Wi-Fi Protected Setup
Fi Protected Setup!
Wi-Fi Protected Setup Wi-Fi Protected Setup
5 21 120
(18 iang) "jia" E liang" < "iandai
j2.4 2
"(gial)bliia"XeabnXeclny
Wireless-B, Wireless-G, Wireless-N
"bbxaiy jayiy dya yde dae
Wireless-G & Wireless-B
Wireless-B/G
Wireless-B Wireless-B Wireless-B
Wireless-G Wireless-G Wireless-G Wireless-G
Wireless-N Wireless-N
Wireless-N, Wireless-G, Wireless-B
"
y
b^2 ≥ 0 , h( x) ≥ 0 = h( 1)
SSID) SSID)
aai jaiy jaiy jaiy jaiy jaiy jaiy jaiy jaiy jaiy jaiy jaiy jaiy jaiy jaiy jaiy jaiy jaiy jaiy jaiy jaiy jaiy jaiy jaiy jaiy jaiy jaiy jaiy jaiy jaiy jaiy jaiy jaiy jaiy jaiy
jssssssssssssssssssssssssssssssss
(18a) "j"
Wireless-G Wireless-B
20 48
bod
Wireless-N Wireless-G Wireless-B
"siisii yiyy baiiai lssy iiaai jia
a 1
y 152
"Joo" 124
j5e 5ae
a
5 Wireless-N Wireless-AC Wireless-A
"bdjiaq jaiy1 xayly baiai (kaiy) (jaiyai
Wireless-A Wireless-A
Wireless-N
Wireless-N
(j5e)Wireless-AC 1
Wireless-AC
Wireless-N Wireless-A 1
Wireless-A/N
Wireless-AC, Wireless-N
Wireless-N/AC
5 4w) Wireless-N, Wireless-AC, Wireless-A
j
a 1
b^2 + 12 = - 16
(SSID)
32 15
J 55 J Linksys
05
i 1
a
1
"jLgJg
| ### | ### |
| ### | WPA2 |
| ###:WPA2 | WPA2/WPA10000000000000000000000000000000000000000000000000000000000000000000000000000000000000000000000000000 |
| ### | WPA2/WPA100000000000000000000000000000000000000000000000000000000000000000000000000000000000000000000 |
| ### | WPA |
| ### | WPA2/WPA10000000000000000000000000000000000000000000000000000000000000000000000000000000000000000 |
Jusai jiai piu, ci jui li Jusai uai Juaie Ssuui jauy iue! paae Ssuui jauy jauy cui
a
Wi-Fi Protected Setup
Wi-Fi Protected Setup

p 100
.Fi Protected Setup
Wi-Fi Protected Setup
.Wi-Fi Protected Setup Wi-Fi

Jannll Jn Jnnnssg aagall galsgall
Wi-FiProtectedSetup#
ProtectechSettp 1
a 1
Wi-Fi Protected Setup
Wi-Fi Protected Setup
Wi-Fi Protected Setup
JiFi Protected Setup 1
Wi-Fi Protected Setup Wi-Fi Protected Setup 2
Wi-Fi Protected Setup
Wi-Fi Protected Setup"
PIN)
wiFiprotected Setup (PIN)
WiRiProtected Setup 1 (PIN) 1
Wi-Protected Setup "J" 2
wiipfcted Setup"g"g jaij jaij jaij jaij 3
J111 111
PIN
11 jaii aill bai (aaiyall oai)
Wi-Fi Protected Setup (PIN)
()
Wi-Fi Protected Setup "g" 2
aaii jie 10
a 1 a 1 1 1 1 1 1 1 1 1 1 1 1 1 1 1 1 1 1 1 1 1 1
4.4.1.2
a+all<a<≤L
1 1 1 1 1 1 1 1 1 1 1 1 1 1 1 1 1 1 1 1 1 1 1 1 1 1 1 1 1 1 1 1 1 1 1 1 1 1 1 1 1 1 1 1 1
"
"guest"--1 2
gl 1
4 1
"1 32
5 5
a aalldlll 1
SSID 15
"Joo" 1
L
"Jgss Jss" aie gale gaae yagaiy gaae gaae gaae gaae gaae gaae 1
2
Jd Jdall Jdai aie." 1aiae
"Jgdl Jg 4
LgXla! g lbsy1 cLcs
i j 1
iuiy jiu 1u
LED2s 11111111111111111111111111111
"gsaagaae" 15g aaykssg 2000
jss
ailllll lalil ailllll al j 1
Internet Explorer aasaaaagaaaee
( s - 2) t - 1 = ( x^2 - 4) t^2 + 3
"1
"lll 1000000000000000000000000000000000000
"JUaill 116 p20" 3
"g 4
JauuJIe JgIgIgIgIgIgIgIgIgIgIgIg
"IP 100000000000000000000000000000000000000000000000000000
a
SSID
e 1
jie jie jie jie jie jie jie jie jie jie jie jie jie jie jie jie jie jie jie jie jie jie jie jie jie jie jie
Jalal jajj Jai jai jai IP jajie jai (Firefox) Internet Explorer (Jai jai jai jai)
"prnlll p 1) "prrrall d" "prrrrrrrrrrrrrrrrrrrrrrrrrrrrrrrrrrrrrrrrrrrrrrrrrrrrrrrrrrrrrrrrrrrrrrrrrrrrrrrrrrrrrrrrrrrrrrrrrrrrrrrrrrrrrrrrrrrrrrrrrrrrrrrrrrrrrrrrrrrrrrrrrrrrrrrrrrrrrrrrrrrrrrrrrrr
y 1 y
LgU.DSL
1
i 1
Internet Explorer
1
"1 2
3
Juaill 4
"5
J 1
ADSL
9 1
"aaasssssssssssssssssssssssssssssssssssssssssssssssssssssssssssssssssssssssssssssssssssssssssssssssssssssssssssssssssssssss
aNpPnP 1
y
1000
"UPnP Jd jI"
"
linksys.com/support
Linksys X6200
Suggested Mounting Hardware
7-8 mm

1.5-2 mm
3-5 mm
3a6eTeXKa - Linksys He Hocu omeOBopHocm 3a uemu, npuunHeu om Heo6pe 3akpenehu KomnoHehmu 3a cmeHeh MoHmaxk.
3aMOHTnpaHekbMMoDEM-pyTepa:
- OnpeJeTe MrcTo, Ha KoTo nckate da MOHTnpaTe pyTepa. YBepeTe ce, ye cteHata, KoTo ige n3noJI3BaTe, e rJaKa, paBHa, cyXa n 3dpaba. OcBeH ToBa npOBepeTe dAnMrcTO e B 6In3OCT do eJKeTpueeCKn KOHTaKT.
2.ПобиTeДВаOTBopaВCTeHATA.YBepete ce,Ye pa3CTOHNTo MEXKdy T8e 75,6 mm. - Пoctabete BnHT BbB BCEKn OTbOp, KaTO OCTabNTe da ce noka3Ba 3 mm ot rIaBaTa My.
4.ПоЗицнонра Te pyTePa TaKa,Ye cIOTOBe 3a CTeHeH MoHTaK Da ca noДpaBHeHcnprMo DbTa BnHTa. - NocTabete cIOTOBete 3a cTeHeH MOHTax HaB BuHTOBete IN Pb3Hete pyTepa HADONY, DOKATO BuHTOBete BnA3at PbTHO B CLOTOBete 3a CTeHeH MOHTax.
Ua6noh3a cTeHeH MOHTax
Personal (WPA liuha)
BbBeTe 0pa3a 3a doctbn ot 8-63 3naka. Io noDpa3bnpahe T e password. Ako 3a nHcTaIauIra t cTe n3noI3BaIIn coOfTyepa 3a nHcTaIauPaHe, fpa3aTn o npda3bnpaHe e npomeHa Ha yHkAInha fpa3a 3a doctbn.
WPA Enterprise (WPAkopnopatubha), WPA2Enterprise (WPA2kopnopatubha) m
WPA2/WPA Enterprise Mixed (WPA2/WPAkopnpaTbHa cmeceHa)
- Изэнлэва се координиранос RADIUS сьрвьр. (Това Травьда се Изэнлэва само Когату мma RADIUS сьрвьр, сьрзан с рутepа.)
BbBeTe IP aDpeca Ha RADIUS cbpBbpa.
BbBeTe Homepa Ha npTa Ha RADIUS cbpbpa. IIO npda36pnahe Toe 1812.
BbBeTeKIOUc, cnoJeH MeKdy cbpBpa npyTepa.
WEP
WEP e ochoben MeToD 3a KpinnTupaHe, KoTo He e ToIkoBa cnrypeH, KoIkoTo WPA.
- Encryption (UHΦpOBAHe) - H36epeTe HnBO Ha WEP UΦpOBAHe, (40/64-6ntOBn 10 uecTHaDeceTnCHn UΦpn) nnn 104/128-6ntOBn (26 uecTHaDeceTnCHn UΦpn). HactpoKaTa no noDpa3bnpaHe e 40/64-6ntOBn (10 uecTHaDeceTnCHn UΦpn).
Passphrase (Фраза за дocьи) - ВьБеДeTe Фраза за дocьи за вВТМатино reHepnpaHe Na WEP Кючa. Слд Тoba КлиКнЕТ e Bbpxy Generate (ГерерпаHe).
Key 1 (Klou 1) - Ako He cTe BbBEnn fpa3a 3a doctb, BbBeDeTe WEP Kluoya pbuHO.
N3KIOUeH
Ako peuHTe da n3KJIouHTe 3aunTata Ha 6e3KUnHaTa MpeKa, npn NbpBnR Bn ONIT 3a doctbIdo INtepHET 7e 6bDeTe yBeDomeHn, ye 6e3KUnHaTa 3aunTa e n3KlOueHa. Ue Bn 6bJe npedocTabeHa onu 3a BKIOUcbAHe Ha 3aunTata Ha 6e3KUnHaTa MpeKa nn 3a notBbpxJaBaHe, Ye pa3bupate puckOBete, Ho BbnpkeToBa Jeklaete da npodblJxnte 6e3 TaKaba 3auNTa.
3A6EJIEXKKA-KoZamo 6e3kuHama 3auJma e deakmubupaHa, Bceku moKe da uma docmbn do Bawama 6e3kuHa mpeka no BcraKO BpeMe.
3aunTeHO KOHnrgnpaHa Ha 6e3KnUHa Bpb3Ka
HaunuHn ca Tpu Haunha Ha 3aunteto HcTaIpaHe ha Wi-Fi. N3noJ3BaIte MeToDa, KoTo e npINOxIMa 3a KIneHTCKOTO yCTPOICTBO, KOETo KOHfnpipate.

3A6ELEKKA - 3aumeho uHcmaIupane Ha Wi-Fi He moke da konfoepupa eHOBpeMeHHo nobue om edno KJIeuHmcko ycmpoucmbo. Nobmopeme deucmbura 3a Bcko KJIeuHmcko ycmpoucmbo, koemo noodbpxa Wi-Fi Protected Setup.
CBeTInHEn HnDnKaTop 3a DeHocTtHa Wi-Fi Protected Setup
- Iloroto Ha ropnnaeHa pytepa irpae poIa Ha cBeTInHeH INdkaTOp Ha 3aunTeHO nHCTaIInpaHe Ha Wi-Fi.
Korato npouecbt Ha 3aunTeHO KOHnpynpaHe Ha 6e3xuHa Bpb3ka e aKTINBeH, CBETNIHHNRT INDkATOp npmIRBa 6abHO. Korato npouecbt Ha 3aunTeHO KOHnpynpaHe Ha 6e3xuHa Bpb3ka npNKIOUy ycneuHO, CBETNIHHNRT INDkATOp 3anOvBa Da CBETn HnpeKbchato.
Ako mHa rpeuKa, CBeTJIHHNHT INHnKATOp npIMnRBa 6bp30 B npOdbJxKeHne Ha DBe MHyTu; n34aKaTe n ONnTaTe OTHOB. - I3yakaKeTe,doKaTo CBeTlnHaTa 3aNoUHe Da CBeTu HEnpeKbChaTo, npEi Da CTapTnpaTe CneDbaaata Cecn 3a 3aunTeHO HnCTaJInpaHe Ha Wi-Fi.
Бутун за Wi-Fi Protected Setup
I3noJIaBaiTe To3n MeToD, aKO BaUeTo KIneHTcKo yCTpoiCTBO mTaKaBb 6yToH.
3A6EJIEXKA - YBepeme ce, Ye u3BbPWBame KOHphiuypupahe cMo Ha eDHO KJIueHmcko ycmpoUcMbO B MomeHma.
- KlinkheTe Nn HataChHe 6yToHa 3a Wi-Fi Protected Setup Ha KIneHTckOtO yCTpoiCTBO.
- KlnkHeTe Bbpy 6yToHa Wi-Fi Protected Setup Ha ekpaHa Wi-Fi Protected Setup Ha pyTepa NnHaTncHeTe n3aApBxTe 6yToHa Wi-Fi Protected Setup oT 3aHaTa cTpaHa Ha pyTepa B npOdbJIkeHne Ha eHa CeKyHda.
- CneI KOHfpypnaHe Ha KJIeENTCKOTO yCTPOIcTBO KIIINKHeTe Bbpxy OK Ha ekpaHa Wi-Fi Protected Setup Ha pyTePaB pAMKInTe Ha IBe MInHyTu.
BbBeTe BpyTepa INH KoJa Ha KIneHTcKTo yCTpoCTBO
I3noJ3BaIe To3n MeToI, aKO BaIeTO KJIeHrTcKO yCTpoIcTBO mHa IINH (nepcoHaJIe HndENTnΦnKaUHOHeH Homep) 3a Wi-Fi Protected Setup.
- BbBeTe PIH kOa OT KIneHTCKOTo yCTpoiCTBO B NOJIeTO Ha eKpaHa Wi-Fi Protected Setup ha pyTepa.
- Klinke Tbe Bbpxy 6yToHa Register (PereNcTpnpaHe) Ha eKpaHa Ha pyTepa Wi-Fi Protected Setup.
- CneI KOHfNpynpaHe Ha KIneHTCKOTo yCTpoiCTBO KInkHeTe Bbpxy OK Ha ekpaHa Wi-Fi Protected Setup Ha pyTepa B paMKnte Ha DBe MInHyTN.
BbBeTeIINH KoHaHa pyTepa B KIneHTcKTo yCtpoCTBO.
N3noJIbAaIe To3n MeToD, aKo BaUeTe KJIneHTcKO yCtpoiCTBO N3nCKBa PnH ha pyTepa.
- B KIneHTCKTo yCtpoiCTBO BBBeJeTe PIN kOJa, nocOeuH ha ekpaHa Ha pyTepa Wi-Fi Protected Setup. (Toi e nocOeuH cbIo Taka Ha DbHOTo Ha pyTepa.)
- CJIeI KOHfNpynpaHe Ha KJIeENTCKOTO yCTpOJCTBO KJIINKHeTe Bbpxy OK Ha eKpaHa Wi-Fi Protected Setup Ha pyTepa B paMKInTe Ha DBe MInHyTN.
3a BCsKa 6e3KnUHa MpeKa B DoJHata YacT Ha ekpaHa ca nok3aHn Network Name (SSID) (Me Ha MpeKaTa - SSD), Security (3aunTa) n Passphrase (Φpa3a 3a DocTbn).
3a6eJekka - Ako Bauemo KJIueHmcko ycmpoUcmbo He noddbpxa Wi-Fi Protected Setup, 3anueme 6e3KuHume HacmpoUku u cIed moBa pbHNO konfueypupaime cbombemHume KJIueHmcko ycmpoUcmba.
Wireless > Guest Access (Бeзкуна мрека > Достьnot roct)
Функцятадoctьп OT roCT Bn no3BOJRA DA npedocTABTe INHTepHETdoctbHa roCTN, KOnto ca Ha nOceueHne B doma Bn,чpe3 6e3Kmua Mpeka.Мржata 3a roctne 6e3Kmua Mpeka,OTdJIHa OT BaWATA lokaiHa Mpeka.ФункцятTa Guest Access (Docb ot roct) He npedocTabrdoctbI DO lokaiHa T Ma Pexka HneHnTE pecypcn, TaKa che BaWHTe roctn Hma Da Imat doctbI Do KOMPOTpIte N IunHnTE Bn daHHn. Hanpimep, KOMPTbPT Ha roCT He MoKe Da neuTa Ha npINTEpa Ha lokaiHaTa Mpeka, HnTo da KOnIPA fainloBe KbM KOMPOTbpB lokaiHaTa Mpeka. Po TaKbB NaHnHa ce MINHMn3npa n3laRaHeTo Ha nokaHa BaWata lokaiHa Mpeka.
DocTbI 3a roCTn
Allow Guest Access (Pa3pewabane Ha DocTb n OT roct) - 3a da pa3peWnte INHTepHETdoCTb n Upe3 Mpeka 3a roctn, 3ana3e T HAcTpoNkata no noDpa36npaHe Yes (Ja). B npOTuBEN clyaayn36epTe No (He).
Guest Network Name (Име на мрека за roctи) - Имeto по подабигае с IMeto на Ваша тбзкуна мрека, полдвано OT _-guest".
OtctpaHЯBaHe Ha Hen3npaBHOCTN
Вашсятkomпютbp He можеда ссвьржe CИntepnet.
CneBbAte Te3n HcTpyKcun,doKaTO KOMNtbpbTce CbPke c NHTepHeT:
-
Поберете дали на мдем-pутера e подано зхранвае. Светоюдът на зхранваен� Трбва да e зелен И ду He мига.
AkoCBeToIIObT Ha 3axpaHbAHeto Mnra, N3KJIouTe 3axpaHbAHeto Ha BCNUkMpeXOBu yCTpoiCTBa, BKIOUHTeJHO MoDEM-pyTepa I KOMNIOTpnte. CJeI TOBaBKIOUHe 3axpaHbAHeto Ha BCaKO yCTPOIcTBo B CJeHNr peI: -
MoDEm-pyTep
-
KomnoTbp
-
Пюверете сбetoДиОнTe Ha npedHЯ панел Ha yctpoiCTBOTo. YbepeTe ce, che CBetoIIObT Ha 3axpaHbaHeto, Ha DSL, И nohe eDIN OT HomepnpaHite CBetoIIOdHa Ethernet cBeTЯ.T. Ako ToBa He e Taka, npobepeTe KaBJIHnTe Bpb3Kn. KomIoTbPbT Tpr6Ba Da e Cbbp3aH KbM eDIn OT Ethernet nopToBete c Homepa 1-4 Ha yctpoiCTBOTo, a DSL nopTbT Ha yctpoiCTBOTo Tpr6Ba Da e Cbbp3aH KbM ADSL liHnYTa.
Korato KlinkheTe DByKpaTHo Bbpxy ye6 6pay3bpa, Ze 6bdeTe 3a\PntaHn 3a nOpTe6nteLscko Ime n napola.
Ako nckate da npemaxheTe 3aNTBaHeto, cJeDbaiTe Te3n INHCTpyKcN.
CtaptnpaTe ye6 6pay3bpa n nnBnHeTe cIeHNrTe CTbNk (Te3n CTbNk ca cneuHn 3a Internet Explorer, Ho npu dpyrnte 6pay3bpr ca noo6h):
1.Изберетe Tools>Internet Options (Инстументи>Интерпетоци).
2. KlnkheTe Bbpxy pa3dena Connections (Bpb3kn).
3.Изберетe Never dial a connection (Hukora da He ce Ha6upa Bp3ka).
4. KInKHeTe Bbpxy OK.
WiFi Protected Setup

WiFi

DSL

Internet

Power
Suggested Mounting Hardware

7-8 mm

1.5-2 mm
3-5 mm
Rezim DSL (ATM/ADSL)
WPA2/WPA Mixed, WPA2 Personal a WPA Personal
WPA Enterprise, WPA2 Enterprise a WPA2/WPA Enterprise Mixed
Wi-Fi Protected Setup
WiFi Protected Setup

WiFi

DSL

Internet

Power
Installation of VDSL
WPA2/WPA Mixed, WPA2 Personal og WPA Personal
WPA Enterprise, WPA2 Enterprise og WPA2/WPA Enterprise Mixed
Wi-Fi Protected Setup
Knappen Wi-Fi Protected Setup
WiFi Protected Setup

WiFi

DSL

Internet

Power
Wi-Fi Protected Setup
Suggested Mounting Hardware

7-8mm
1.5-2 mm
Enuei H Linksys eivva utuBunny aegraa Battpavovrouk oTartdpctoand oev ia opnec.
Tia vatoTeBETeTOuVteuRouter oToiX
- Kaopio To oneio oTo oToio eTe va tooetnoeTo router. Baeawtheite nwo oToixoc Tou xpoouofoe Eiva aeoc,piE6oc,oteyvoKai Oaepoc. Eionc,beawtheta TnCn thon evai kovTc epuatoC.
- AvoiTe 8o TpuNc oToV toXo. BeBauWte iE nC oI trPune cexouv anootaon metaTuoc 75,6 mm.
- Tonoerntote μα βδα οκαθε Φηκα αφησε εκτεθεμενα 3 mm τις κεφαλής τις.
- TOnoTeHTo rOuter eTpoTo wote oUOnoDoxEc ToOnoTeHOnc oE toXo va Eivau Evuypaumuevec e TIC duO BiDEC.
- TOnoTeHnote Tc unOdoXeC toOnoTeTnOnc oToiXo enAvw ano tC BiEe kaetakivnoTe router npoc ta kAtw mExpl oBiEe va OtaepoOnouv otic unOdoXe cToOnoTeTnOnc oToiXo.
Poruro toroetnpn cto xo
Ekrwnwote auyn tn aeiaa eyeooc 100%.
KoTe Kata mKoc TcS diakekoevnc ypaumc kai tonoetote tv otov toxo ia va tpunnoete aKpiBw oTa diaaOnmuata nou xpeiaQovta.
EykaTaoTaon
Eykataoataon
E E E E E E E E E E E E E E E E E E E E E E E E E E E E E E E E E E E E E E E E E E E E E E E E E E E E E E E E E E E E E E E E E E E E E E E E E E E E E E E E E E E E E E E E E E E E E E E E E E E E E
Eav aalae t oioeoh note puthetaic e oia oovn, 0a pene v a kave t kuk otnv A nohkeuon Puthetaewv ia va eapuoote ticaiayec oac, n va kave t kuk otnv Akupwn Aalayowvi a va akupwete tic aiayec oac. Auta ta otoiexia eleyxou biokovtai oto katw mepoc kthe obovnc.
Ie 11 a vae tep oorepy aorto crrare mea kne KorykopreBicei amy agntlauprtng
WPA Enterprise, WPA2 Enterprise,
WPA2/WPA Enterprise Mixed
Xpnouo Tioovta ouvtoioo me evav diakouotn RADIUS. (Oa pEe va XpouoTOntheiMoO ovToav exei ouvdeoEvac diakouoatc RADIUS oTo router.)
Eiayete tn tov oikoiot RADIUS.
Eiayete tov aipu o hupac tou diaokoortn RADIUS. H poepiayevn puthetaon eivau 1812.
Eiayete To kiovokaietoi tou router kalou diakopiotn.
WEP
Wi-Fi Protected Setup
AiaiThevtai tpeic mEthetaoi Wi-Fi Protected Setup. Xpnoio Tounote tn mEthetao oou avntoixei otn ouokueh-π ελattnoov puθμizete.

ZuFi Con-To WFi Protected Setup
aepnepnnneun nncyca
KoeaoueAom Touncompz toWfiprotected Setup.
Apomma ornog Auyw of Wrotected Setup
To loyotu o 60tov eanaw πivaka tou npapou tou router aetoupyei onwcs akpiwc Ka n luxvi Wi-Fi Protected Setup.
Otau n diakaiia Wi-Fi Protected Setup eivai evepn, n auvi a vaoohei apva. Meta tvv e tuxn ookipwn tn c diakaiac Wi-Fi Protected Setup, n auvi a npaevei staepa avmuevn.
Eavu npexi oafma, n auvi aovao biyeipnyopa yia duo ae Tstv npwn autn, Tepievee kai npootaohote gavo.
- Pniv Eeknuoetev nEvnoeynpeiofoaetou Wi-Fi Protected Setup, 0 npentv a Tepuivte mexpniuxv aovaei oTaepa.
Kupri WfI Protected Setup
Xpouoouoteaun tne ué0do evn ouakeun-πελntc slαθeτkouμWi-Fi Protected Setup.
Top view 3
Back 4
Wall-mounting placement 5
Installation 6
Setup. 6
VDSL Setup 9
Set up your modem router as only a router. 11
Advanced Configuration 13
How to access the browser-based utility. 13
How to use the browser-based utility. 14
Troubleshooting 24
Your computer cannot connect to the Internet 24
When you double-click the web browser, you are prompted for a user name and password. 24
You are using a static IP address and cannot connect. 24
The computer cannot connect wirelessly to the network. 25
You need to modify settings on the device. 25
You cannot use the DSL service to connect manually to the Internet. 25
When you open the web browser, the login screen appears, even though you do not need to log in. 25
The router does not have a coaxial port for the cable connection. 25
In Windows XP, you do not see the router in the My Network Places screen....26
Specifications 27
Linksys X6200 27
Environmental 27
Product Overview
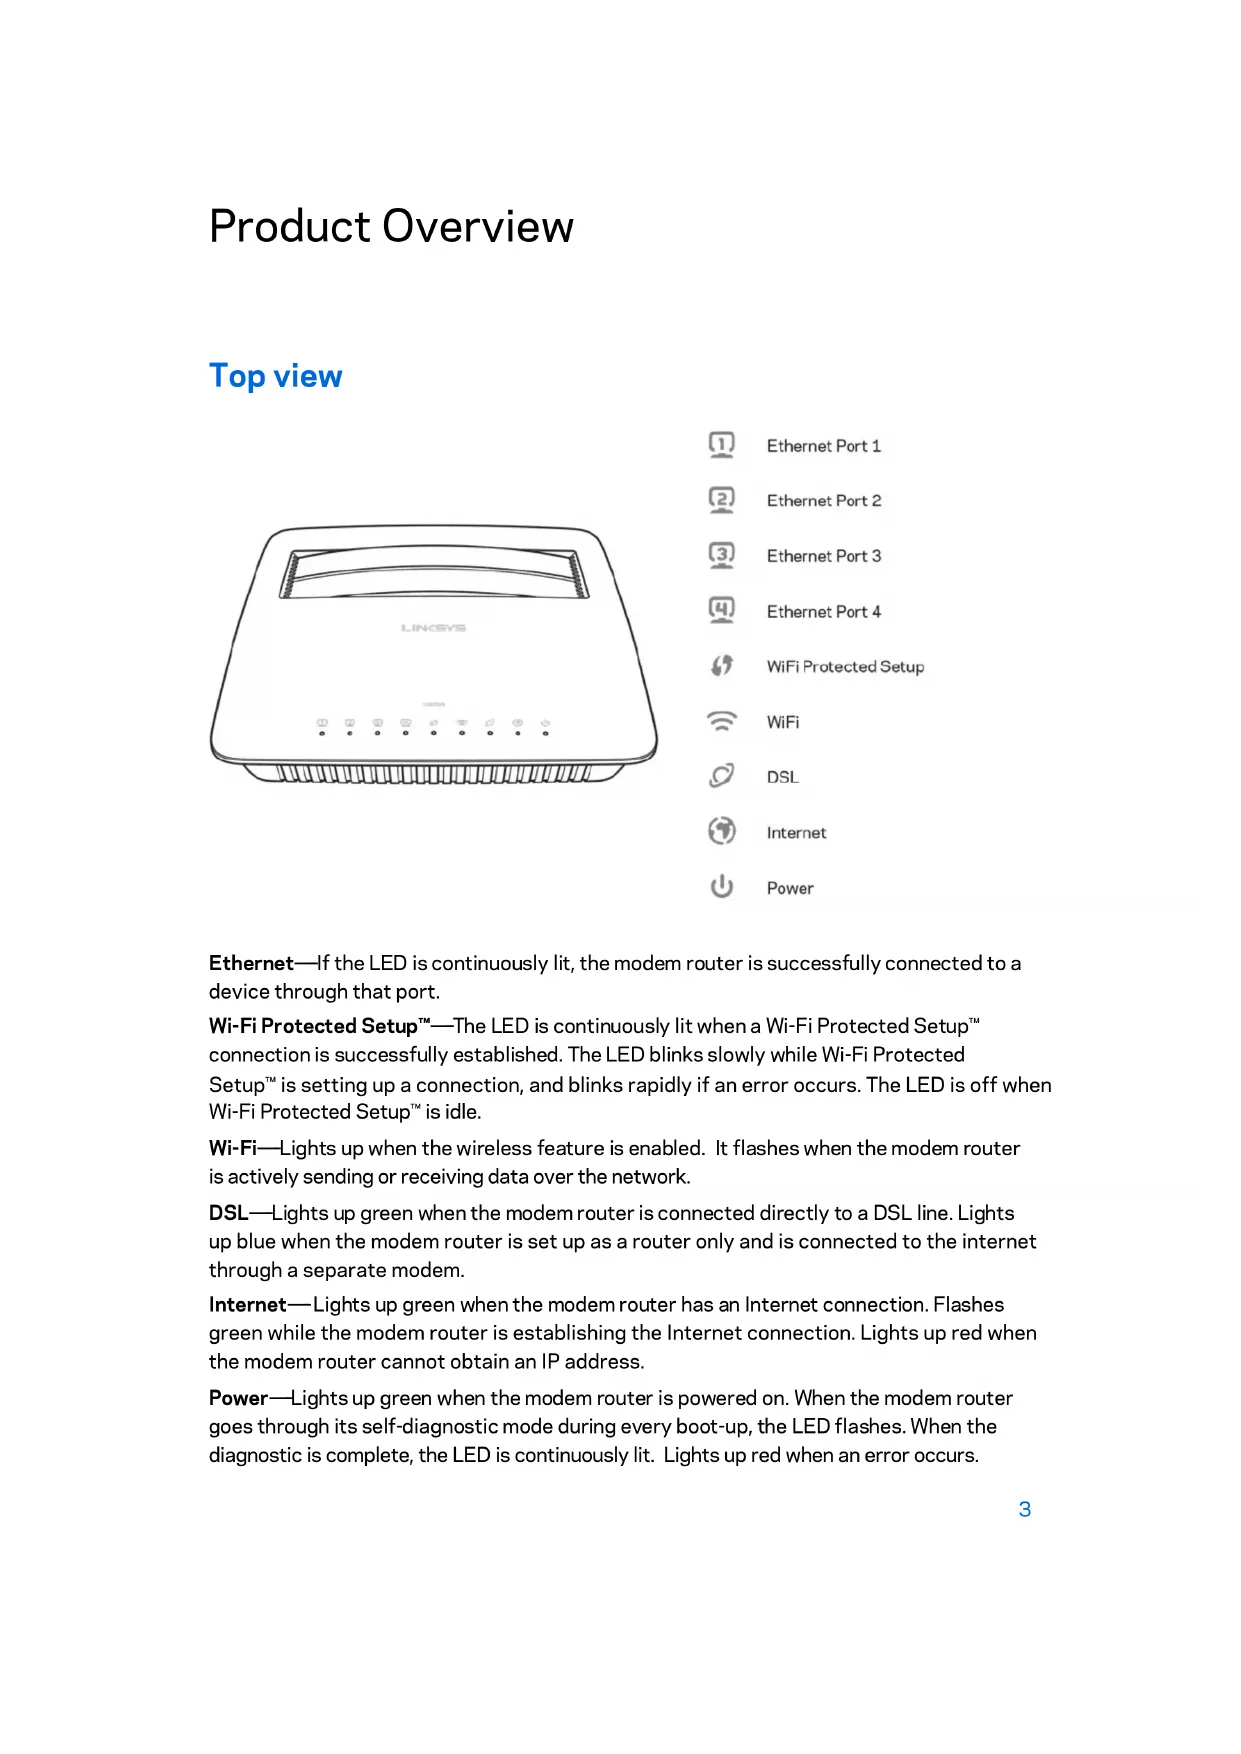
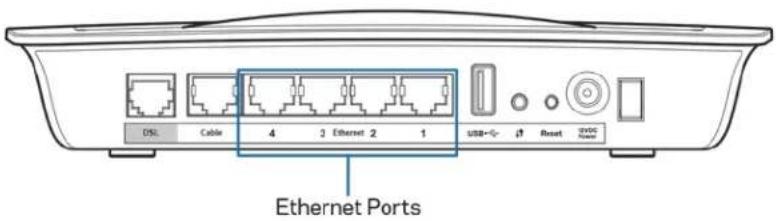
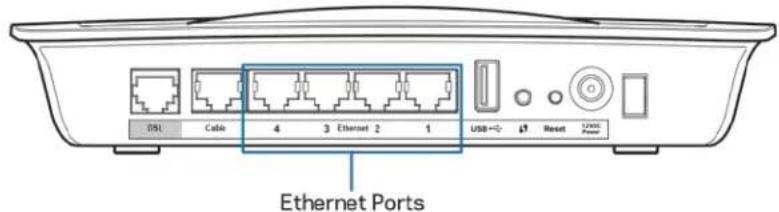
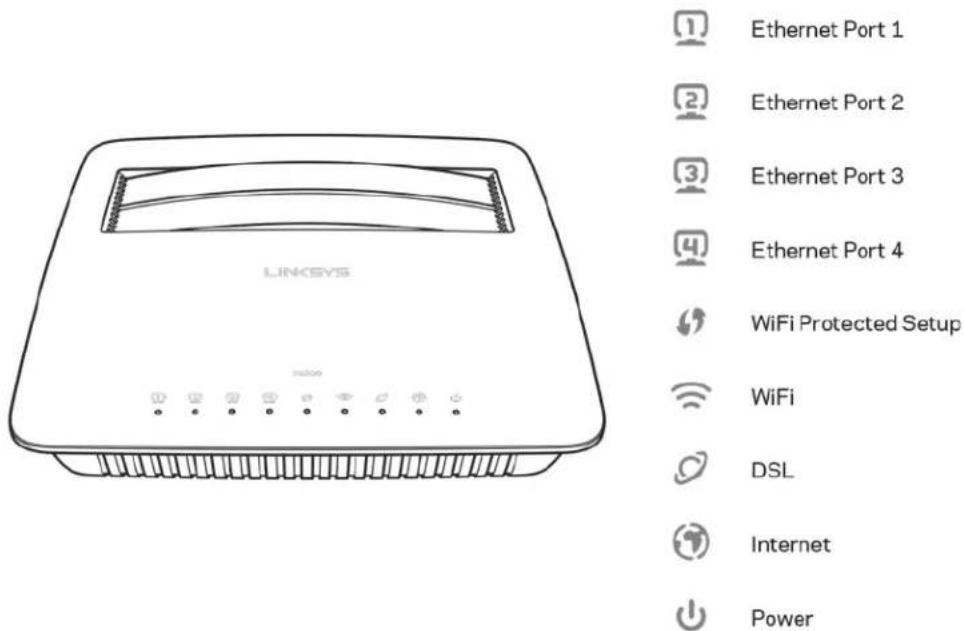
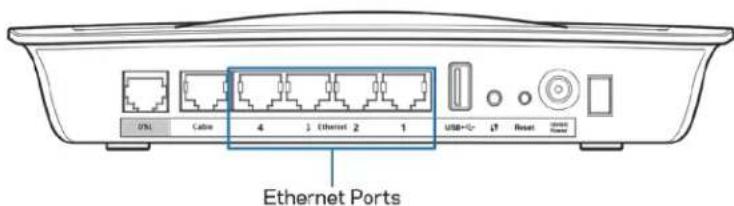
Top view
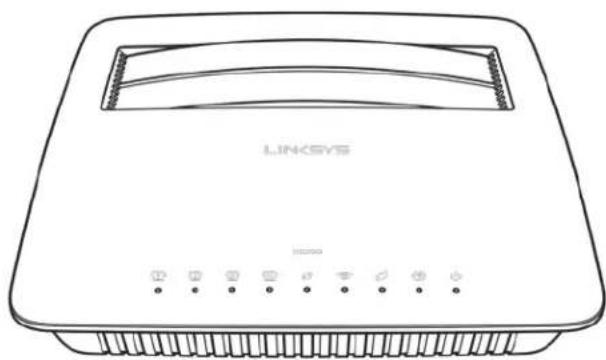

Ethernet Port 1

Ethernet Port 2

Ethernet Port 3

Ethernet Port 4

WiFi Protected Setup

WiFi

DSL

Internet

Power
Ethernet—If the LED is continuously lit, the modem router is successfully connected to a device through that port.
Wi-Fi Protected Setup™—The LED is continuously lit when a Wi-Fi Protected Setup™ connection is successfully established. The LED blinks slowly while Wi-Fi Protected Setup™ is setting up a connection, and blinks rapidly if an error occurs. The LED is off when Wi-Fi Protected Setup™ is idle.
Wi-Fi—Lights up when the wireless feature is enabled. It flashes when the modem router is actively sending or receiving data over the network.
DSL—Lights up green when the modem router is connected directly to a DSL line. Lights up blue when the modem router is set up as a router only and is connected to the internet through a separate modem.
Internet—Lights up green when the modem router has an Internet connection. Flashes green while the modem router is establishing the Internet connection. Lights up red when the modem router cannot obtain an IP address.
Power—Lights up green when the modem router is powered on. When the modem router goes through its self-diagnostic mode during every boot-up, the LED flashes. When the diagnostic is complete, the LED is continuously lit. Lights up red when an error occurs.
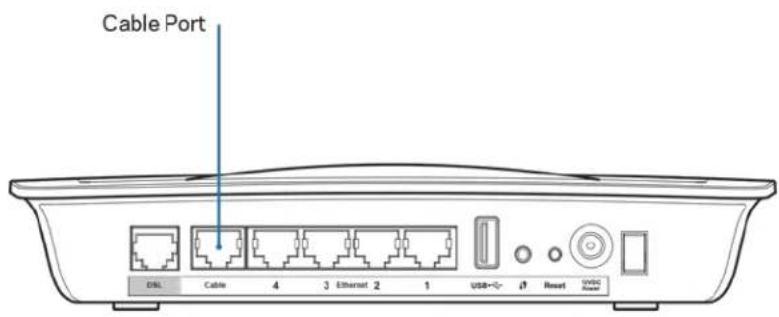
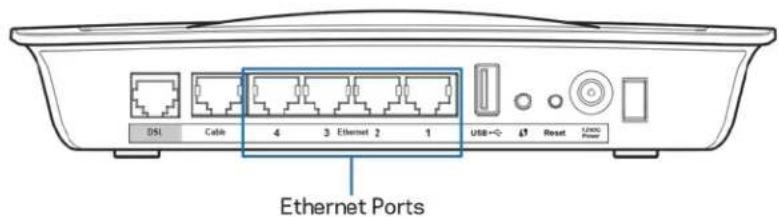
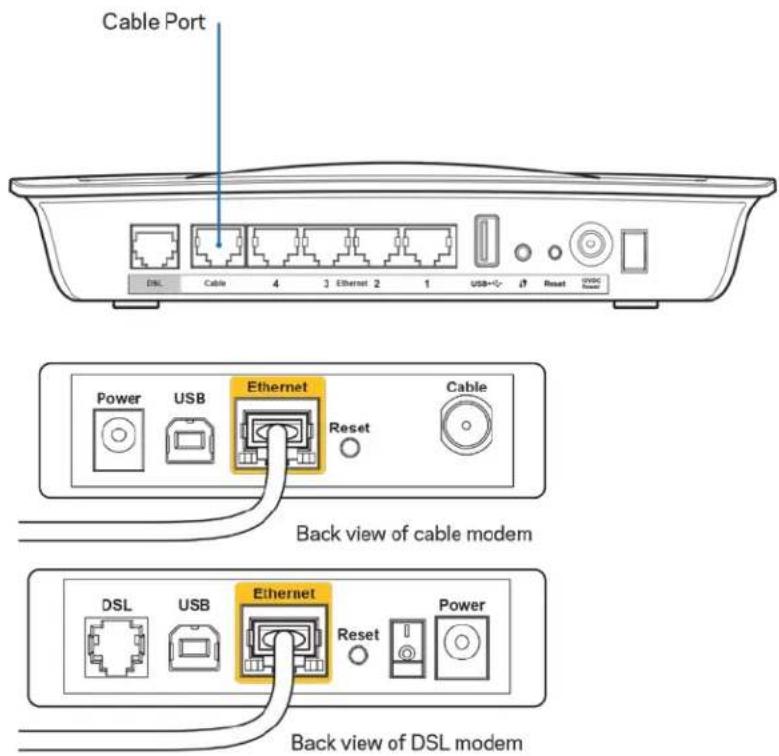
Back
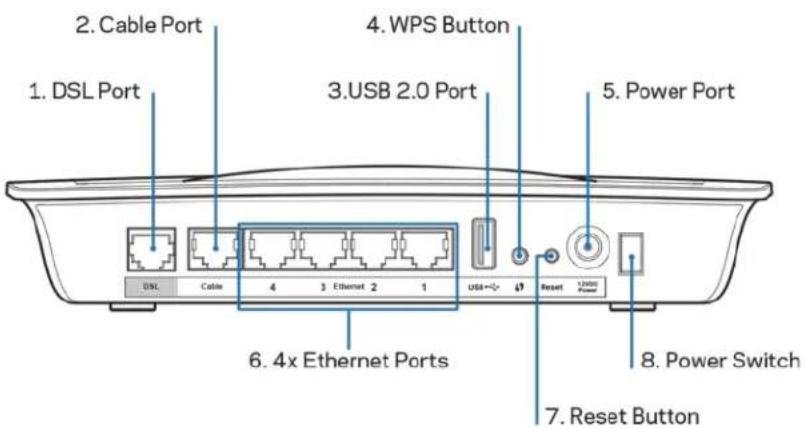
- DSL port—Connects to the DSL line.
- Cable port—To use the modem router as only a router, use a network cable to connect this port to a separate modem's LAN/Ethernet port.
- USB 2.0 port—Connect and share a USB drive on your network or on the Internet.
- WPS button—Press this button to have Wi-Fi Protected Setup™ search for your Wi-Fi Protected Setup™-supported wireless device.
- Power port—The Power port connects to the included power adapter.
- Ethernet ports—Using Ethernet cables (also called network cables), these Ethernet ports connect the modem router to computers and other Ethernet network devices on your wired network.
- Reset button—This button allows you to reset the router to its factory defaults. Press and hold the Reset button for about five seconds.
- Power button—Press I (on) to turn on the modem router.
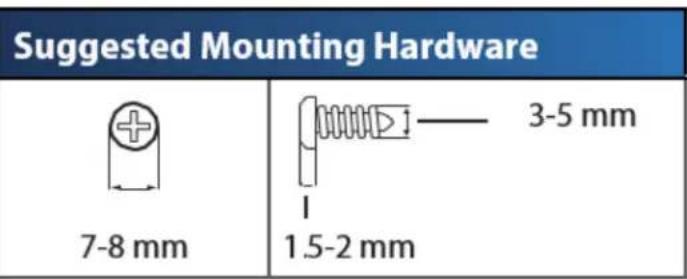
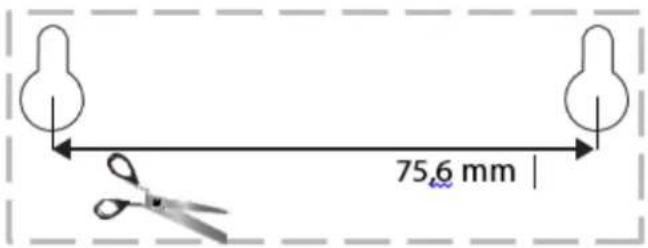
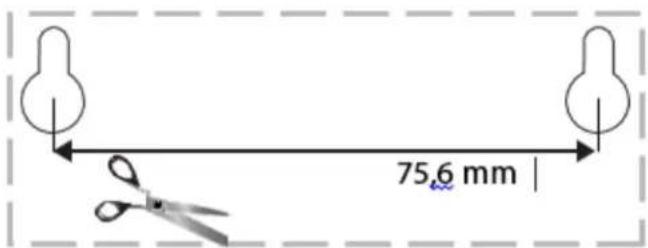
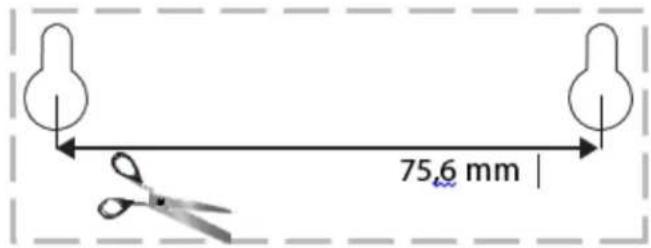
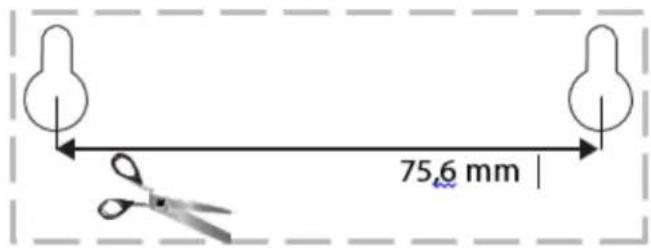
Wall-mounting placement
The router has two wall-mount slots on its bottom panel. The distance between the slots is 75.6 mm. Two screws are needed to mount the router.
Suggested Mounting Hardware

7-8 mm

1.5-2 mm
3-5 mm
Note—Linksys is not responsible for damages incurred by unsecured wall- mounting hardware.
To mount the modem router:
- Determine where you want to mount the router. Make sure that the wall you use is smooth, flat, dry, and sturdy. Also make sure the location is within reach of an electrical outlet.
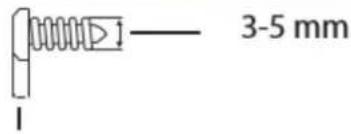
- Drill two holes into the wall. Make sure the holes are 75.6 mm apart.
- Insert a screw into each hole and leave 3mm of its head exposed.
- Position the router so the wall-mount slots line up with the two screws.
- Place the wall-mount slots over the screws and slide the router down until the screws fit snugly into the wall-mount slots.
Wall-mounting template
Print this page at 100% size.
Cut along the dotted line, and place on the wall to drill precise spacing.
Installation
Setup
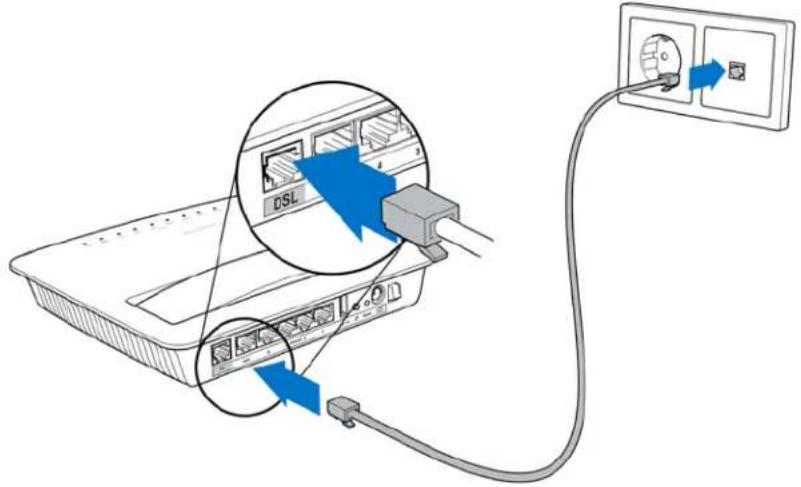
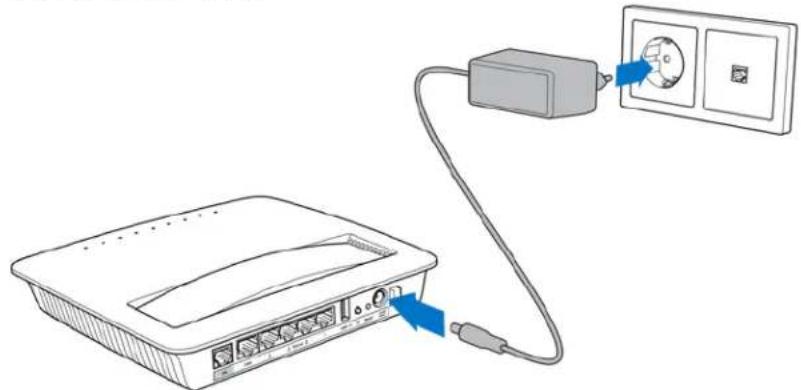
- Connect the provided phone cable to the DSL port on the modem router and a wall jack.

Note—If you experience static on your phone line, you may need a microfilter or splitter. (This is required for users in the UK; other users should contact their ISPs to verify. ISDN users do not need a microfilter.) If you require a microfilter, you must install one for each phone or fax that you use. To install a microfilter, plug it into a phone jack that has ADSL service, then connect one end of the provided phone cable to the microfilter's DSL port.
- Connect the power adapter to the modem router and plug into a power source.

-
On a computer, connect to the secure network name on the sticker (You can change these details later.) Select the option to automatically connect to this network in the future. You will not have Internet access until you complete modem router setup.
-
For wired setup, connect one end of the provided Ethernet cable to your computer's Ethernet adapter and the other end to an Ethernet port on the back of the modem router.
Repeat step 2 for each additional computer or device that you want to connect to the modem router.
Note--If your computer's Ethernet adapter is not set up, refer to the Ethernet adapter's documentation for more information.
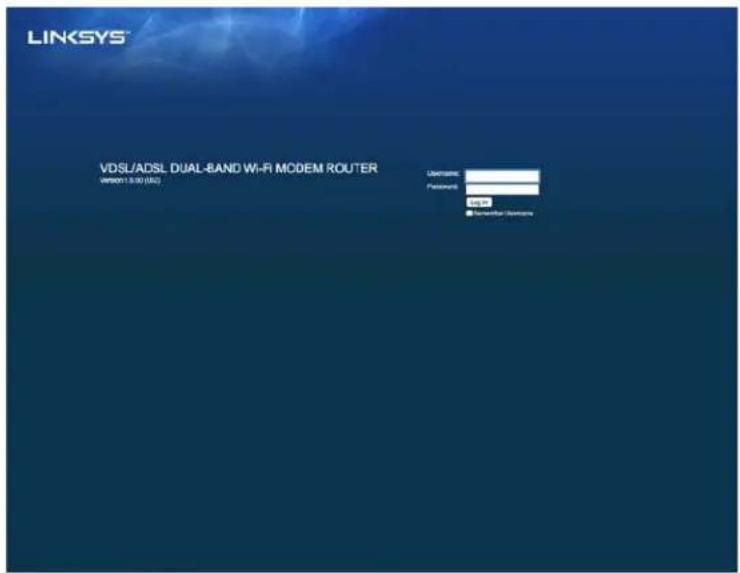
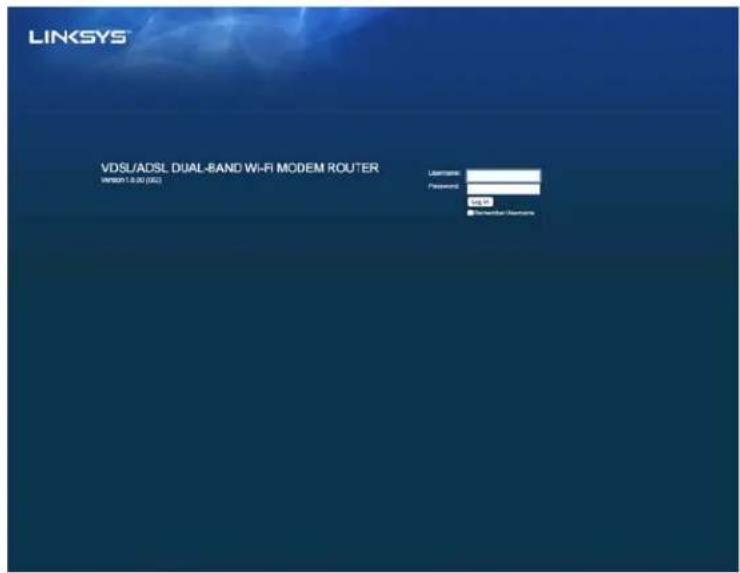
- Open a web browser and type http://192.168.1.1 in the address bar.

- Enter "admin" in both theUsername and Password fields then click Log in.

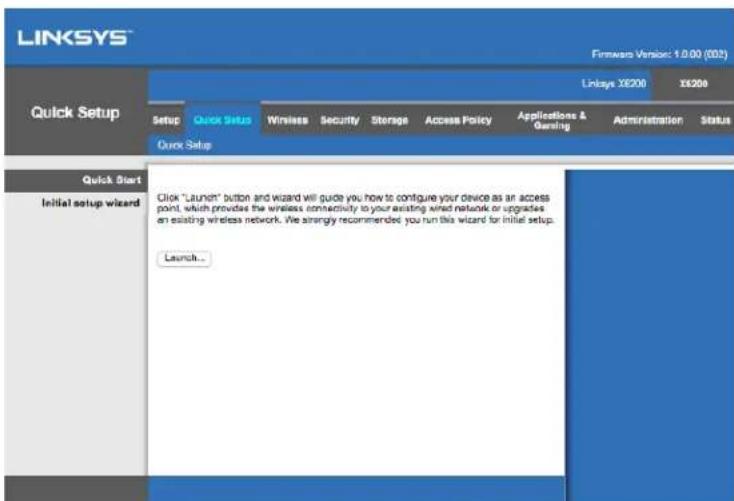
- The web-based setup page of your modem router will then appear. Click on the Quick Start tab.
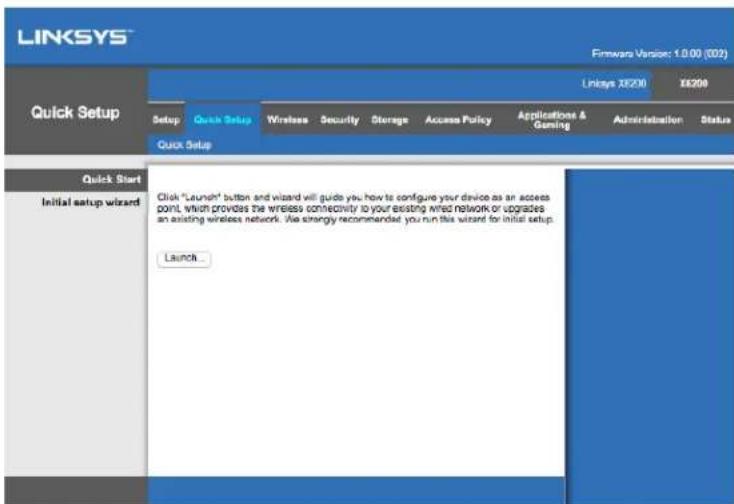
-
Click Launch to start the setup wizard. The wizard is recommended for initial setup because it will guide you through the most effective configuration of your modem router.
-
For manual setup, click on the Setup tab and use the browser-based utility.

- The LEDs for Power, Wireless, and Ethernet (one for each connected computer/device) should light up. If not, make sure the modem router is powered on and the cables are securely connected.
VDSL Setup
If your connection is VDSL (i.e., if it goes over the phone line but has a download speed greater than 24Mbps) you must set up the modem router manually. Your Internet service provider may refer to VDSL as "fibre." As long as you have the correct information from your Internet service provider (ISP) this is simple and quick.
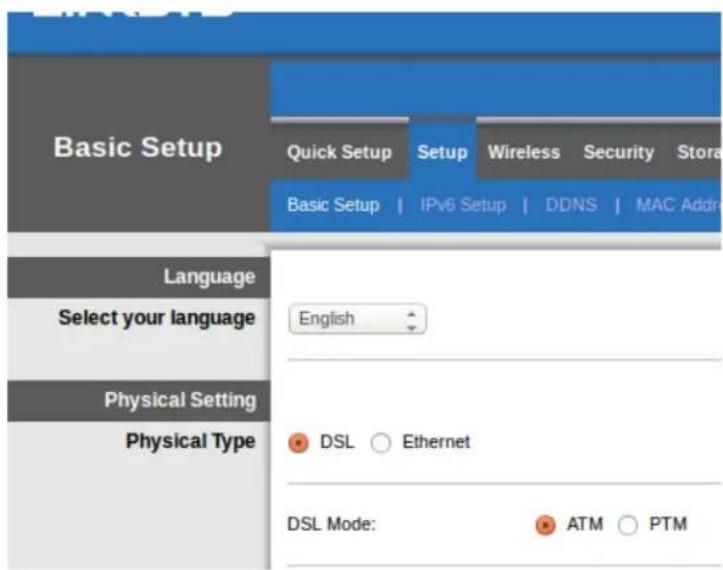
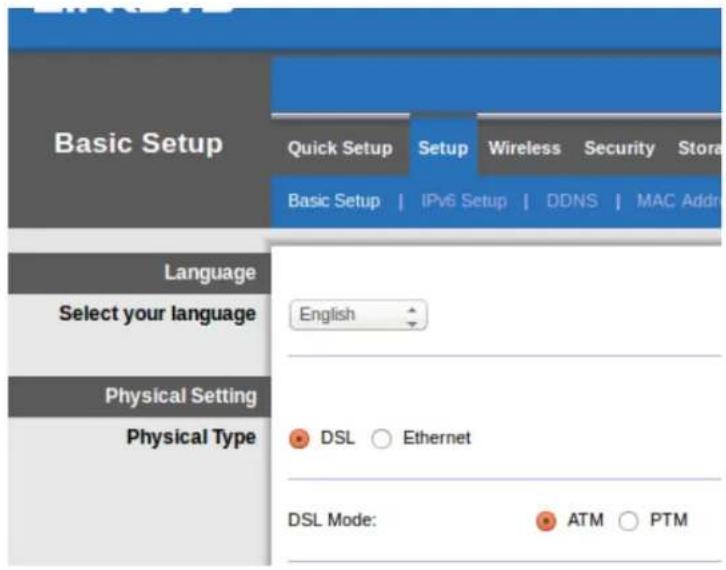
- Click on the Setup>Basic Setup tab. In the Physical Setting section, select DSL for Physical Type, and PTM for DSL Mode.
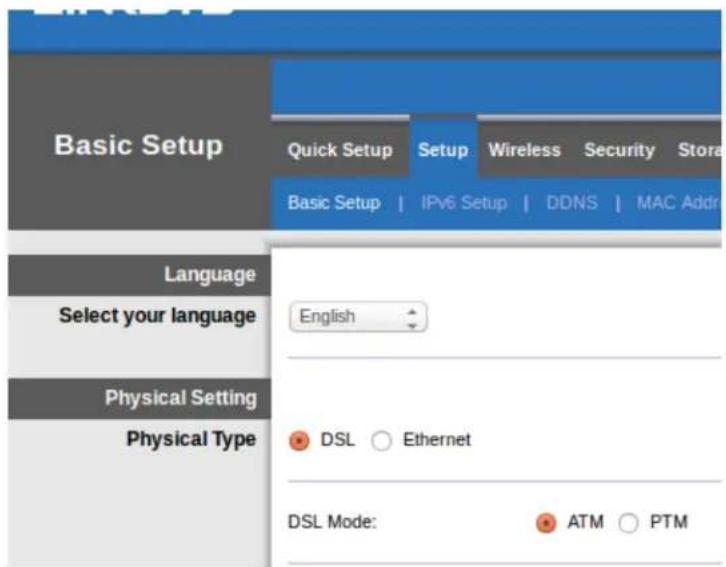
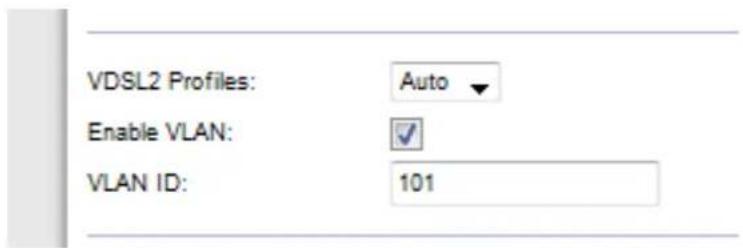
- If your ISP requires a VLAN, select Enable VLAN and enter the VLAN ID required by your ISP. Check with your provider's helpdesk if you're not sure which to use.

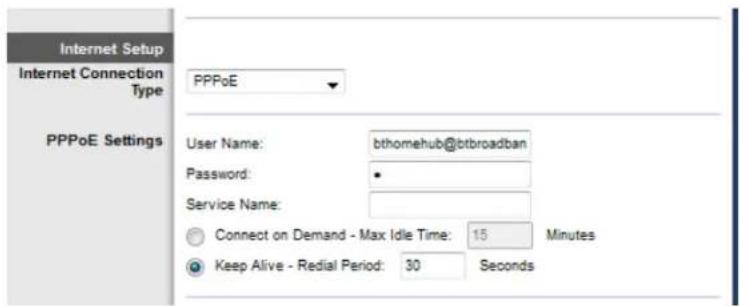
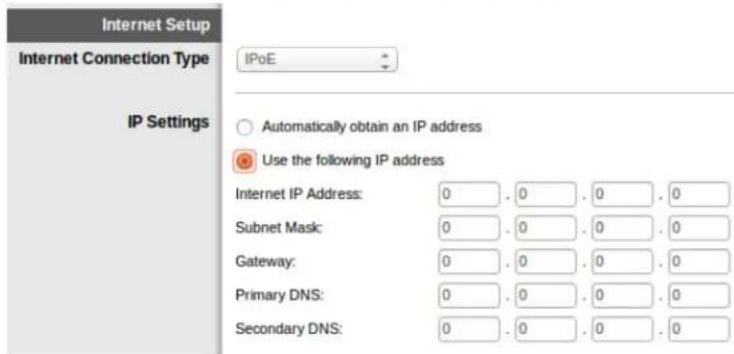
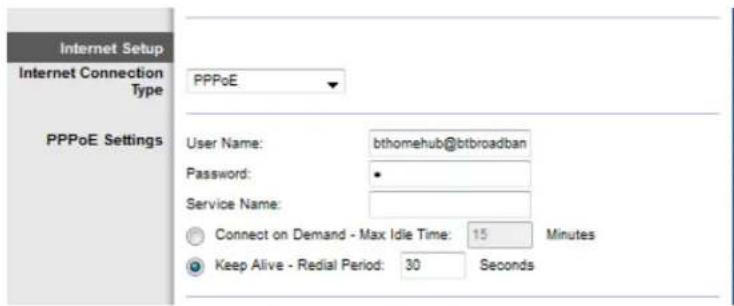
- In the Internet Setup > Internet Connection Type section select either PPPoE, or IPoE (dynamic or static IP address) as required by your ISP (check with your provider's helpdesk if you're not sure). Select Bridge Mode only to use the unit as a modem without router functionality (i.e., without Wi-Fi or any other network functions).
If using PPPoE, enter the correct username and password as specified by your ISP.
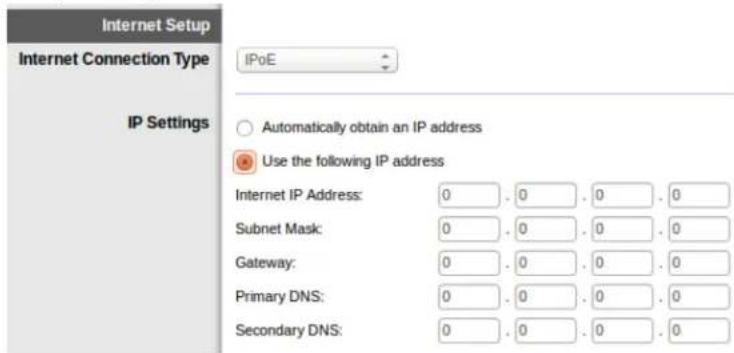
If your connection type is Dynamic, selectIPoEfor Internet Connection Type, and for IP Settings selectAutomatically obtain an IP address.
- If your ISP requires IPoE with a static IP address, select PoE for Internet Connection Type then select Use the Following IP Address and enter the IP address settings (given to you by your ISP) in the fields provided.

- Click Save Settings (at the bottom of the page) to save settings and complete setup.

Set up your modem router as only a router
- Connect one end of the provided Ethernet cable to your computer's Ethernet adapter and the other end to an Ethernet port on the back of the modem router.

- Connect one end of an Ethernet cable to the Cable port on the back of the modem router, then connect the other end to an available Ethernet port on your modem.
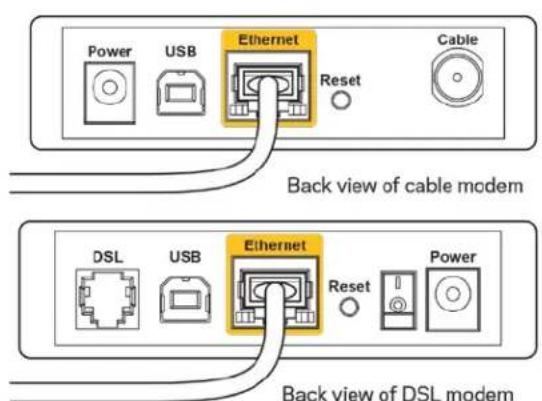
- Connect one end of the power adapter cord to the power port and the other end to the electrical outlet.
-
Power on the computer that you will use to configure the modem router.
-
The LEDs for Power, Wireless, and Ethernet (one for each connected computer/device) should light up. If not, make sure the modem router is powered on and the cables are securely connected.
Advanced Configuration
If you would like to change the router's advanced settings, use the router's browser-based utility. You can access the utility via a web browser on a computer connected to the router. For more help with the utility, click Help on the right side of the screen or go to our website.
How to access the browser-based utility
- To access the browser-based utility, launch the web browser on your computer, and enter the router's default Internet Protocol (IP) address, 192.168.1.1, in the Address field. Then press Enter.
Note—You can also access the browser-based utility on Windows computers by entering the device name in the Address field.
A login screen appears.
- In the User name field, enter admin.
- In the Password field, enter the password created during setup. If you did not change the password in setup, the default is "admin".
- Click OK to continue.
How to use the browser-based utility
Use the tabs at the top of each screen to navigate within the utility. The tabs are arranged in two levels, top-level tabs for general functions and lower-level tabs for the corresponding specific functions.
Note—Within this user guide, each screen is identified by its top- and lower-level tab names. For example, "Setup > Basic Setup" is the screen accessed via the Setup top-level tab, and its Basic Setup lower-level tab.
If you change any settings on a screen, you must click Save Settings to apply your changes, or click Cancel Changes to clear your changes. These controls are located at the bottom of each screen.
Note—To learn more about any field, click Help on the right side of the screen.
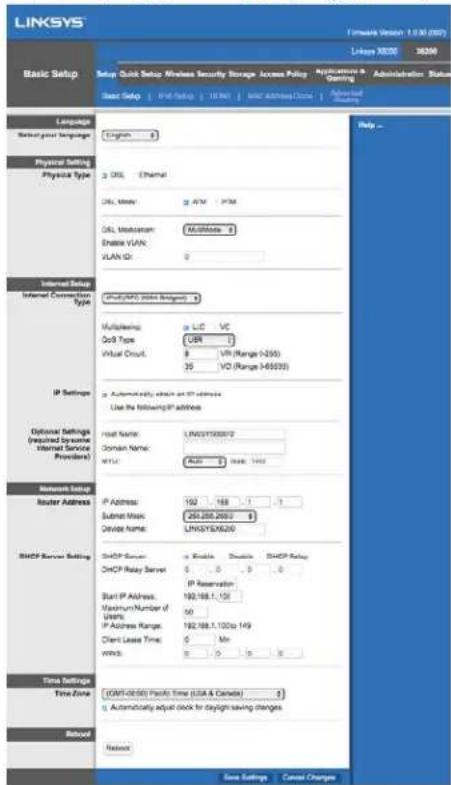
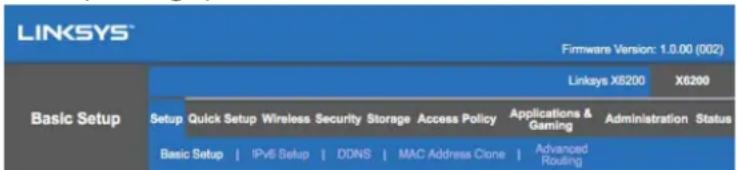
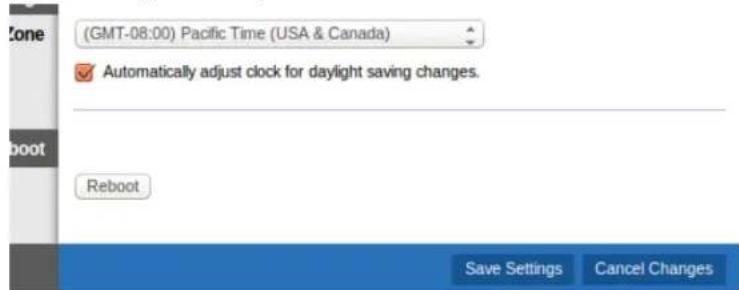
Setup > Basic Setup
The first screen that appears is the Basic Setup screen. This allows you to change the router's general settings.
DSL mode (ATM/ADSL)
Language—Select your language To use a different language, select one from the dropdown menu. The language of the browser-based utility will change five seconds after you select another language.
Internet Setup--The Internet Setup section configures the router to your Internet connection. Most of this information can be obtained through your Internet Service Provider (ISP).
- Internet Connection Type
Select the type of Internet connection your ISP provides from the drop-down menu. The available types are:
-
Bridged Mode Only—In this mode, only the DSL modem function is available, and all Gateway features are disabled. If selected, you only need to enter the VC Settings.
-
IPoE RFC 2684 Bridged—If selected, enter the correct data for the IP Settings. Select Obtain an IP address automatically if your ISP allocates an IP address upon connection. Otherwise, select Use the following IP address.
- IPoA RFC 2684 Routed—With this method, you are required to use a permanent IP address to connect to the Internet.
- RFC 2516 PPPoE—Some DSL-based ISPs use PPPoE (Point-to-Point Protocol over Ethernet) to establish Internet connections. If you are using PPPoE, your IP address is provided automatically.
- RFC 2364 PPPoA—Some DSL-based ISPs use PPPoA (Point-to-Point Protocol over ATM) to establish Internet connections. If using PPPoA, your IP address is provided automatically.
Network Setup—The Network Setup section configures the IP settings for your local network.
DSL mode (PTM/VDSL)
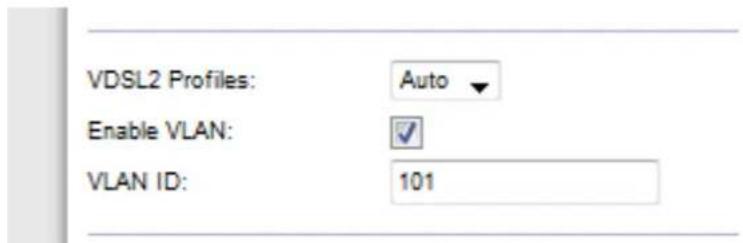
VDSL2 Profiles—Select VDSL2 profiles supported by your ISP. Default is Auto (recommended).
Enable VLAN—The modem router will tag specific VLAN numbers to all outgoing traffic through the WAN interface. Please contact your ISP to get this information.
VLAN ID—You will need to enter a VLAN ID once VLAN is enabled. The ID range is from 10 to 4095. Please contact your ISP for your specific setting.
Internet Setup--The Internet Setup section configures the router to your Internet connection. Most of this information can be obtained through your Internet Service Provider (ISP).
- Internet Connection Type
Select the type of Internet connection your ISP provides from the drop-down menu. The available types are:
- Bridged Mode Only-In this mode, only the DSL modem function is available, and all Gateway features are disabled.
- IPoE—If selected, enter the correct data for the IP Settings. Select Obtain an IP address automatically if your ISP allocates an IP address upon connection. Otherwise, select Use the following IP address.
- PPPoE—Some DSL-based ISPs use PPPoE (Point-to-Point Protocol over Ethernet) to establish Internet connections. If you are using PPPoE, your IP address is provided automatically.
Ethernet mode
Language—Select your language To use a different language, select one from the dropdown menu. The language of the browser-based utility will change five seconds after you select another language.
Internet Setup—The Internet Setup section configures the router to your Internet connection. Most of this information can be obtained through your Internet Service Provider (ISP).
- Internet Connection Type
Select the type of Internet connection your ISP provides from the drop-down menu. The available types are:
- Automatic Configuration - DHCP—The default Internet Connection Type is Automatic Configuration - DHCP (Dynamic Host Configuration Protocol). Keep the default only if your ISP supports DHCP or if you connect using a dynamic IP address. (This option usually applies to cable connections.)
- Static IP—If you are required to use a fixed IP address to connect to the Internet, select Static IP.
-
PPPoE—If you have a DSL connection, check whether your ISP uses Point-to-Point Protocol over Ethernet (PPPoe). If so, select PPPoE.
-
Connect on Demand or Keep Alive—The Connect on Demand and Keep Alive options let you choose whether the router connects to the Internet only as needed (useful if your ISP charges for connect time), or if the router should always be connected. Select the appropriate option.
-
PPTP--Point-to-Point Tunneling Protocol (PPTP) is a service that generally applies to connections in Europe. If your PPTP connection supports DHCP or a dynamic IP address, then select Obtain an IP Address Automatically. If you are required to use a fixed IP address to connect to the Internet, then select Specify an IP Address and configure the options below.
-
Connect on Demand or Keep Alive—The Connect on Demand and Keep Alive options let you choose whether the router connects to the Internet only as needed (useful if your ISP charges for connect time), or if the router should always be connected. Select the appropriate option.
-
L2TP—Layer 2 Tunneling Protocol (L2TP) is a service that generally applies to connections in Israel.
-
Connect on Demand or Keep Alive—The Connect on Demand and Keep Alive options let you choose whether the router connects to the Internet only as needed (useful if your ISP charges for connect time), or if the router should always be connected. Select the appropriate option.
-
Telstra Cable—Telstra Cable is a service that generally applies to connections in Australia.
Network Setup—The Network Setup section configures the IP settings for your local network.
Wireless > Basic Wireless Settings
Note-To learn more about any field, click Help on the right side of the screen.
There are two ways to configure the router's wireless network(s), manual and Wi-Fi Protected Setup.
Wi-Fi Protected Setup is a feature that makes it easy to set up your wireless network. If you have client devices, such as wireless adapters, that support Wi-Fi Protected Setup, then you can use Wi-Fi Protected Setup.
Manual setup
Note—After you set up the wireless network(s), set up the wireless security settings. Go to Wireless > Basic Wireless Settings > Security Modes (p. 19).
2.4 GHz Wireless Settings
Network Mode (In most network situations, you should leave it set to Mixed (default).
- Mixed—If you have Wireless-N, Wireless-G, and Wireless-B devices in your network, keep the default, Mixed.
- Wireless-B/G Only—If you have both Wireless-B and Wireless-G devices in your network, select Wireless-B/G Only.
- Wireless-B Only—If you have only Wireless-B devices, select Wireless-B Only.
- Wireless-G Only—If you have only Wireless-G devices, select Wireless-G Only.
- Wireless-N Only—If you have only Wireless-N devices, select Wireless-N Only.
- Disabled—If you have no Wireless-B, Wireless-G, and Wireless-N devices in your network, select Disabled.
Note—If you are not sure which mode to use, keep the default, Mixed.
Network Name (SSID)—The Service Set Identifier (SSID) is the network name shared by all devices in a wireless network. It is case-sensitive and must not exceed 32 keyboard characters. The default is Linksys followed by the last 5 digits of the router's serial number, which is found on the bottom of the router. If you used the setup software for installation, then the default Network Name is changed to an easy-to-remember name.
Note—If you restore the router's factory default settings (by pressing the Reset button or using the Administration > Factory Defaults screen), the Network Name will return to its default value, and all devices on your wireless network will need to be reconnected.
Security Mode—See Security Modes (p. 19).
- Channel Width—For best performance in a network using Wireless-B, Wireless-G and Wireless-N devices, select Auto (20 MHz or 40 MHz). For a channel width of 20 MHz, select 20 MHz only.
- Standard Channel—Select the channel from the drop-down list for Wireless-B, Wireless-G, and Wireless-N networking. If you are not sure which channel to select, then keep the default, Auto.
- SSID Broadcast—When wireless clients survey the local area for wireless networks to associate with, they will detect the SSID broadcast by the router. To broadcast the router's SSID, keep the default, Enabled. If you do not want to broadcast the router's SSID, then select Disabled.
5 GHz wireless settings
Network Mode—Select the wireless standards your network will support.
- Mixed If you have Wireless-A, Wireless-AC and Wireless-N (5 GHz) devices in your network, keep the default, Mixed.
- Wireless-A Only—If you have only Wireless-A devices, select Wireless-A Only.
- Wireless-N Only—If you have only Wireless-N (5 GHz) devices, select Wireless-N Only.
- Wireless-AC Only—If you have only Wireless-AC (5 GHz) devices, select Wireless-AC Only.
- Wireless-A/N Only—If you have both Wireless-A and Wireless-N devices in your network, select Wireless-A/N Only
- Wireless-N/AC Only—If you have both Wireless-N and Wireless-AC devices in your network, select Wireless-N/AC Only
- Disabled—If you do not have any Wireless-A, Wireless-AC and Wireless-N (5 GHz) devices in your network, select Disabled.
Note—If you are not sure which mode to use, keep the default, Mixed.
Network Name (SSID)—The Service Set Identifier (SSID) is the network name shared by all devices in a wireless network. It is case-sensitive and must not exceed 32 keyboard characters. The default is Linksys followed by the last 5 digits of the router's serial number, which is found on the bottom of the router. If you used the setup software for installation, then the default Network Name is changed to an easy-to-remember name.
Note—If you restore the router's factory default settings (by pressing the Reset button or using the Administration > Factory Defaults screen), the Network Name will return to its default value, and all devices on your wireless network will need to be reconnected.
Security Mode—See Security Modes below.
- Channel Width—For best performance in a network using Wireless-A, Wireless-AC and Wireless-N devices, select Auto (20 MHz or 40 MHz or 80 MHz). For a channel width of 20 MHz, select 20 MHz only. For a channel width of 20 or 40 MHz, select Auto (20 MHz or 40 MHz).
- Standard Channel—Select the channel from the drop-down list for Wireless-B, Wireless-G, and Wireless-N networking. If you are not sure which channel to select, then keep the default, Auto.
- SSID Broadcast—When wireless clients survey the local area for wireless networks to associate with, they will detect the SSID broadcast by the router. To broadcast the router's SSID, keep the default, Enabled. If you do not want to broadcast the router's SSID, then select Disabled.
Security Modes
| Security Option | Strength |
| WPA2 Personal/Enterprise | Strongest |
| WPA2/WPA Mixed Mode | WPA2: Strongest |
| WPA: Strong | |
| WPA Personal/Enterprise | Strong |
| WEP | Basic |
Notes
- Whatever mode you chose, each device in your wireless network MUST use that mode and the same passphrase, or shared key in the case of a RADIUS server.
If using WEP (not recommended), select a level of WEP encryption, (40/64-bit 10 hex digits) or 104/128-bit (26 hex digits). The default is 40/64-bit (10 hex digits).
WPA2/WPA Mixed, WPA2 Personal, and WPA Personal
- Enter a passphrase of 8-63 characters. The default is password. If you used the setup software for installation, then the default is changed to a unique passphrase.
WPA Enterprise, WPA2 Enterprise, and WPA2/WPA Enterprise Mixed
- Used in coordination with a RADIUS server. (This should only be used when a RADIUS server is connected to the router.)
- Enter the IP address of the RADIUS server.
- Enter the port number of the RADIUS server. The default is 1812.
- Enter the key shared between the router and the server.
WEP
- WEP is a basic encryption method, which is not as secure as WPA.
- Encryption—Select a level of WEP encryption, (40/64-bit 10 hex digits) or 104/128-bit (26 hex digits). The default is 40/64-bit (10 hex digits).
- Passphrase—Enter a passphrase to automatically generate the WEP key. Then click Generate.
Key 1—If you did not enter a passphrase, enter the WEP key manually.
Disabled
If you choose to disable wireless security, you will be informed that wireless security is disabled when you first attempt to access the Internet. You will be given the option to enable wireless security, or confirm that you understand the risks but still wish to proceed without wireless security.
Note—When wireless security is disabled, anyone can access your wireless network at any time.
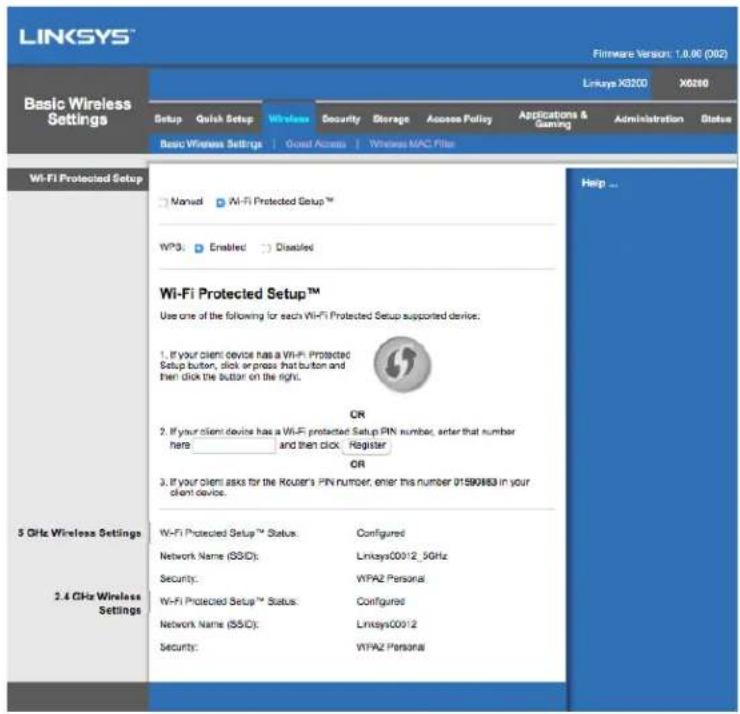
Wi-Fi Protected Setup
Three methods of Wi-Fi Protected Setup are available. Use the method that applies to the client device you are configuring.

Note--Wi-Fi Protected Setup configures one client device at a time. Repeat the instructions for each client device that supports Wi-Fi Protected Setup.
Wi-Fi Protected Setup light activity
- The logo on the top panel of the router functions as the Wi-Fi Protected Setup light.
- When the Wi-Fi Protected Setup process is active, the light flashes slowly. When the Wi-Fi Protected Setup is successful, the light is continuously lit.
If there is an error, the light flashes quickly for two minutes; please wait and try again. - Wait until the light is continuously lit, before starting the next Wi-Fi Protected Setup session.
Wi-Fi Protected Setup Button
Use this method if your client device has a Wi-Fi Protected Setup button.
Note—Make sure you configure one client device at a time.
-
Click or press the Wi-Fi Protected Setup button on the client device.
-
Click the Wi-Fi Protected Setup button on the router's Wi-Fi Protected Setup screen, OR press and hold the Wi-Fi Protected Setup button on the back panel of the router for one second.
- After the client device has been configured, click OK on the router's Wi-Fi Protected Setup screen within two minutes.
Enter Client Device PIN on Router
Use this method if your client device has a Wi-Fi Protected Setup PIN (Personal Identification Number).
- Enter the PIN from the client device in the field on the router's Wi-Fi Protected Setup screen.
- Click the Register button on the router's Wi-Fi Protected Setup screen.
- After the client device has been configured, click OK on the router's Wi-Fi Protected Setup screen within two minutes.
Enter RouterPINonClientDevice
Use this method if your client device asks for the router's PIN.
- On the client device, enter the PIN listed on the router's Wi-Fi Protected Setup screen. (It is also listed on the bottom of the router.)
- After the client device has been configured, click OK on the router's Wi-Fi Protected Setup screen within two minutes.
For each wireless network, the Network Name (SSID), Security, and Passphrase are displayed at the bottom of the screen.
Note--If you have client devices that do not support Wi-Fi Protected Setup, note the wireless settings, and then manually configure those client devices.
Wireless > Guest Access
The Guest Access feature allows you to provide guests visiting your home with Internet access via wireless. The guest network is a wireless network separate from your local network. The Guest Access feature does not provide access to the local network and its resources, so your guests will not have access to your computers or personal data. For example, the guest computer cannot print to a printer on the local network or copy files to a computer on the local network. This helps minimize exposure of your local network.
Guest Access
Allow Guest Access-To allow Internet access through a guest network, keep the default, Yes. Otherwise, select No.
Guest Network Name—The default is the name of your wireless network, followed by "-guest".
Guest Password—The default is "guest". If you used the setup software for installation, then the default is changed to a unique password.
Change—Click this option to change the Guest Password. The Change Guest Password screen appears. Enter a password of 4-32 characters. Click Change to save the new password and return to the Guest Access screen.
Total Guests Allowed—By default, 5 guests are allowed Internet access through the guest network. Select the number of guests you want to allow on your guest network.
SSID Broadcast—When wireless devices survey the local area for wireless networks to associate with, they will detect the SSID (wireless network name) broadcast by the router. To broadcast the SSID of the guest network, keep the default, Enabled. If you do not want to broadcast the SSID of the guest network, then select Disabled.
Guest Instructions
When a guest wants Internet access in your home, provide these instructions:
- On the guest computer, connect to the wireless guest network named on the Guest Access screen.
- Open a web browser.
- On the login screen, enter the password displayed on the Guest Access screen.
- Click Log in.
Troubleshooting
Your computer cannot connect to the Internet.
Follow the instructions until your computer can connect to the Internet:
- Make sure that the Modem Router is powered on. The Power LED should be green and not flashing.
-
If the Power LED is flashing, then power off all of your network devices, including the Modem Router and computers. Then power on each device in the following order:
-
Modem Router
-
Computer
-
Check the LEDs on the device's front panel. Make sure the Power, DSL, and at least one of the numbered Ethernet LEDs are lit. If they are not, then check the cable connections. The computer should be connected to one of the Ethernet ports numbered 1-4 on the device, and the device's DSL port must be connected to the ADSL line.
When you double-click the web browser, you are prompted for a user name and password.
If you want to get rid of the prompt, follow these instructions.
Launch the web browser and perform the following steps (these steps are specific to Internet Explorer but are similar for other browsers):
- Select Tools > Internet Options.
- Click the Connections tab.
- Select Never dial a connection.
- Click OK.
You are using a static IP address and cannot connect.
Refer to Windows Help and change your Internet Protocol (TCP/IP) Properties to Obtain an IP address automatically.
The computer cannot connect wirelessly to the network.
Make sure the wireless network name or SSID is the same on both the computer and the device. If you have enabled wireless security, then make sure the same security method and key are used by both the computer and the device.
You need to modify settings on the device.
Open the web browser (for example, Internet Explorer or Firefox), and enter the device's IP address in the address field (the default IP address is 192.168.1.1). When prompted, complete the User name and Password fields (the default user name and password is admin). Click the appropriate tab to change the settings.
You cannot use the DSL service to connect manually to the Internet.
After you have installed the router, it will automatically connect to your Internet Service Provider (ISP), so you no longer need to connect manually.
When you open the web browser, the login screen appears, even though you do not need to log in.
These steps are specific to Internet Explorer but are similar for other browsers.
- Open the web browser.
- Go to Tools > Internet Options.
- Click the Connections tab.
- Select Never dial a connection.
- Click OK.
The router does not have a coaxial port for the cable connection.
A coaxial cable can connect to only a cable modem. Your modem router works as a modem with your ADSL Internet, but if you have cable Internet, your modem router should be connected to a separate cable modem. See page 9.
In Windows XP, you do not see the router in the My Network Places screen.
In the Network Tasks section, click Show icons for networked UPnP devices. If the router does not appear, follow these instructions:
Go to Start > Control Panel > Firewall.
Click the Exceptions tab.
Select UPnP Framework.
Click OK.
If your questions are not addressed here, refer to the website, linksys.com/support.
Specifications
Linksys X6200
| Model Name | Linksys AC750 ADSL/VDSL Dual-Band Wi-Fi Modem Router |
| Model Number | X6200 |
| Switch Port Speed | 10/100/1000 Mbps (Gigabit Ethernet) |
| Radio Frequency | 2.4 GHz and 5 GHz |
| # of Antennas | 4 |
| Ports | Cable, DSL, Power, USB 2.0, Ethernet (1-4) |
| Buttons | Reset, Wi-Fi Protected Setup, Power |
| LEDs | Ethernet, Wi-Fi Protected SetupTM, Wi-Fi, DSL, Internet, Power |
| UPnP Supported | |
| Security Features | WEP, WPA, WPA2, RADIUS |
| Security Key Bits | Up to 128-bit encryption |
| Storage File System Support | FAT, NTFS, and HFS+ |
| Browser Support | Latest versions of Google Chrome™, Firefox®, Safari® (for Mac® and iPad®, Microsoft Edge, and Internet Explorer® version 8 and newer work with Linksys Smart Wi-Fi |
Environmental
| Dimensions | 215 x 40 x 200 mm (8.5 x 1.6 x 7.9") |
| Unit Weight | 415 g (14.6 oz) |
| Power | 12V, 1.5A |
| Certifications | FCC, CE, K .21, Telepermit, Wi-Fi (IEEE 802 .11ac/a/b/g/n), WPA2™, WMM®, Wi-Fi Protected Setup, Windows 7, 8 |
| ADSL Standards | T1 .413i2, G .992 .1 (G .DMT), G .992 .2 (G. Lite), G .992 .3 (ADSL2), G .992 .5 (ADSL2+), G.993.1 (VDSL), G.993.2 (VDSL2) Annex A, M, L |
| Operating Temperature | 0 to 40°C (32 to 104°F) |
| Storage Temperature | -20 to 60°C, (-4 to 140°F) |
| Operating Humidity | 10% to 80% relative humidity, non-condensing |
| Storage Humidity | 5% to 90% non-condensing |
NOTES
For regulatory, warranty, and safety information, see the CD that came with your modem router or go to Linksys.com/support.
Specifications are subject to change without notice. Maximum performance derived from IEEE Standard 802.11 specifications. Actual performance can vary, including lower wireless network capacity, data throughput rate, range and coverage. Performance depends on many factors, conditions and variables, including distance from the access point, volume of network traffic, building materials and construction, operating system used, mix of wireless products used, interference and other adverse conditions.
Visit linksys.com/support/ for award-winning technical support.
BELKIN, LINKSYS and many product names and logos are trademarks of the Belkin group of companies. Third-party trademarks mentioned are the property of their respective owners.
© 2016 Belkin International, Inc. and/or its affiliates. All rights reserved.
LINKSYS
Guía de usuario
Modem router Wi-Fi de doble banda ADSL/VDSL
X6200
Contidente
Suggested Mounting Hardware

7-8 mm

1.5-2 mm
3-5 mm
Wi-Fi Protected Setup
WiFi Protected Setup

WiFi

DSL

Internet

Power
Suggested Mounting Hardware

7-8 mm

1.5-2 mm
3-5 mm
Wi-Fi Protected Setup
Saadaval on kolm funktsioni Wi-Fi Protected Setup metodit. Kasutage seadistatavale klienseadmele vastavat metodit.

Markus. Wi-Fi Protected Setup seadistab ühe clientseadme korraga. Korrake neid juhiseid iga clientseadme jaoks, mis toetab funktsooni Wi-Fi Protected Setup.
Funktsioni Wi-Fi Protected Setup tuled
WiFi Protected Setup

WiFi

DSL

Internet

Power
Wi-Fi Protected Setup
Wi-Fi Protected Setup -painike
WiFi Protected Setup

WiFi

DSL

Internet

Power
Suggested Mounting Hardware

7-8 mm

1.5-2 mm
3-5 mm
Wi-Fi Protected Setup
Bouton Wi-Fi Protected Setup
WiFi Protected Setup

WiFi

DSL

Internet

Power
Suggested Mounting Hardware

7-8 mm

1.5-2 mm
3-5 mm
WiFi Protected Setup

WiFi

DSL

Internet

Power
Suggested Mounting Hardware

7-8 mm
1.5-2 mm
3-5 mm
Wi-Fi Protected Setup
Tombol Wi-Fi Protected Setup
Modem router Wi-Fi dual band ADSL/VDSL
X6200
Sommario
WiFi Protected Setup

WiFi

DSL

Internet

Power
- Internet Connection Type (Tipodi connectione Internet)
WPA2/WPA Mixed Mode (Modalità mista WPA2/WPA) / WPA2 Personal / WPA Personal
WPA Enterprise, WPA2 Enterprise e WPA2/WPA Enterprise Mista
Wi-Fi Protected Setup
Utilizzato Anything to do this is the best way to get a better idea of how to use this service.
WiFi Protected Setup

WiFi

DSL

Internet

Power
"Wi-Fi Protected Setup"
Galimi trys „Wi-Fi Protected Setup“ budai. Naudokite buda, taikomak konfiguruojamam kcliento jrenginiui.
Pastaba. "Wi-Fi Protected Setup" vienu metu gali konfigūruoti vienq).[wi-Fi] Pakartokite instrukcijas kiekvienam).[wi-Fi]
"Wi-Fi Protected Setup" lemputé
WiFi Protected Setup

WiFi

DSL

Internet

Power
Ethernet - Ja LED gaismas diode deg nepaTRAukti, modems-marsrutetajs ir sekmigi savienots ar ierici, izmantojot so pieslegvietu.
Suggested Mounting Hardware

7-8 mm

1.5-2 mm
3-5 mm
Piezime - Linksys neatbild par bojajumiem, kas radušies nenostiprinatu sienas montejumu del.
Lai piestiprinatu modemu-marstrutetaju:
Dodieties uz Start > Control Panel > Firewall.
Klikskinet cilni Exceptions (Iznemumi).
Atlaset UPnP Framework.
Noklikskiniet OK (Labi).
Ja jusu jautajums šeit nav aplukots, dodieties uz timekla vietni linksys.com/support.
Specifikácijas
Linksys X6200
ADSL/VDSL dual-band Wi-Fi-modem-router
X6200
Inhoud
Productverzicht 3
Bovenkant 3
Achterkant 4
Wandmontage 5
Installatie 6
WiFi Protected Setup

WiFi

DSL

Internet

Power
- Internet Connection Type (Type Internetverbinding)
- Internet Connection Type (Type Internetverbinding)
- Internet Connection Type (Type Internetverbinding)
Wi-Fi Protected Setup
WiFi Protected Setup

WiFi

DSL

Internet

Power
Ethernet - Hvis LED-lampen lyser kontinuereg, har modemruteren blitt koblet til en entet via den porten.
Wi-Fi Protected Setup™ - LED-lampen lyser kontinuierlig nár en Wi-Fi Protected Setup™- tilkobling er etablert. LED-lampen blinker sakte mens Wi-Fi Protected Setup™ setter oppen tilkobling, og blinker raskt hvis en feil oppstår. LED-lampen er slukket mens Wi-Fi Protected Setup™ er inaktiv.
Wi-Fi - Tennes nár den tradlõse funksjonen er aktivert. Den blinker nár modemruteren aktivt sender eller mottar data over nettverket.
DSL - Tennes med et gront lys nár modemruteren er koblet direkte til en DSL-linje. Tennes med et blätt lys nár modemruteren er satt opp som bare en ruter og er koblet til Internett gjennom et separat modem.
Internet - Tennes med et gront lys'nar modemruteren har en Internett-tilkobling. Blinker gront mens modemruteren etablerer Internett-tilkoblingen. Tennes med et rodt lys'nar modemruteren ikke kan innhente en IP-adresse.
Suggested Mounting Hardware

7-8 mm

1.5-2 mm
3-5 mm
Merk -Linksys er/DDke ansvarlig for skader som inntreffer som fofge av maskinvarare som.
ikke er sikkert montert pA veggen.
Slik monterer du modemruteren:
Mal for veggmontering
Skriv utijke sideri 100% storrelse.
- Internet Connection Type (Type Internett-tilkobling)
- Internet Connection Type (Type Internett-tilkobling)
- Internet Connection Type (Type Internett-tilkobling)
WPA2/WPA Mixed, WPA2 Personal og WPA Personal
WPA Enterprise, WPA2 Enterprise og WPA2/WPA Enterprise Mixed
- Bruk i koordinasjon med en RADIUS-server. (Dette bør bare brukes.nr det er koblet en RADIUS-server til ruteren.)
- Skriv IP-adressen til RADIUS-serveren.
Angi portnummeret for RADIUS-serveren. Standardverdien er 1812. - Skrivinnokkelen som ruteren og serveren deler.
WEP
- WEP er en enkel krypteringsmetode og sekske like sikker som WPA.
- Encryption (Kryptering) - Velg et WEP-krypteringsnivå (40/64 biter 10 heksadesimaler) eller 104/128 biter (26 heksadesimaler). Standardverdien er 40/64 bit (10 heksadesimaler).
- Passphrase (Passkode) - Skriv inn et passord for Å generere WEP-nokkelen. Deretter klikker du på Generate (Generer).
Key 1 (Nokkel 1) - Hvis du/DD skrev inn et passord, angir du WEP-nokkelen manuelt.
Deaktivert
Wi-Fi Protected Setup
Tre metoder for Wi-Fi Protected Setup er tilgengelige. Bruk den metoden som gjelder for klientheneten du konfigurerer.

Wi-Fi Protected Setup-knapp
Bruk donne metoden hvis encheten har en Wi-Fi Protected Setup-knapp.
Merk - Sorg for at du konfigurerer en clientenhet om gangen.
Suggested Mounting Hardware

7-8 mm

1.5-2 mm
3-5 mm
Wi-Fi Protected Setup
WPA Enterprise, WPA2 Enterprise e WPA2/WPA Enterprise Misto
Wi-Fi Protected Setup
Suggested Mounting Hardware

7-8 mm

1.5-2mm
3-5 mm
Adapted electric la routerul cu model

- In cazul unui computer, conecta
(Pute
automat la aceast à
Wi-Fi Protected Setup.
L attnanerforman wireless B, G
Optime intr a fosind dispositive
20 MHz, selectati 20 MHz only (excludiv 20 MHz).
L atiFrentamplerforman wireless A, AC
optimeintr
modurile de securitate de mai jo:
a folosind dispositive si N, selectaAuto (20
Iatime canal de 20 MHz, selecanti 20 MHz only (exclusiv 20 MHz). Pentru ol atime a canalului de 20 sau 40 MHz, selecta Auto (20 MHz sau 40 MHz).
WPA2/WPA Mixt, WPA2 Personal Şi WPA Personal
- Introduciţi o fraza de acces de 8-63 de caractere. Setarea implicita este parola.
WPA Intreprindere, WPA2 Intreprindere si WPA2/WPA Intreprindere mixtă
Enter Router PIN on Client Device (Introducere PIN router pe dispositiv client)
PykoBOdCTBO noIb3OBaTeJIa
UcTpaHHeHHeNCnPaBHOCTe 26
BaW KOMNbIOTep He MoXeT NOdkIIOUHTbcra K INHTepHety. 26
Korda Bbl OTkpbBaete Be6-6pay3ep nOaBnAeTc 3anpoc Ha NmI POnlb30BaTeI npoIb. 26
BbI nCnoJIb3yeTe cTaNueeCKn IP-aDpec n He MoKeTe NpDKLIouHTbcra. 26
KomnbIOpTepy He ydaetcnoKJIIOHTbcK 6ecnpoBOHOcTn. 27
Bam HxKHO n3MeHnTb HacToPoKn Ha ycToPoNCTBe. 27
BbI He MoXeTe IcNoJIb3ObaTb DSL cepBnC IaI noKJIoueHnBpyHyIO K INHTepHeTy. 27
Korda oTKpbBaIO Be6-6pay3ep NOBJIeTcR OKHO BXOa, He CMOTpR Ha To, YTO MHe He HxKHO BBOINb DaHHbIe Ira BXOda. 27
Y pouterap He KoaKcnaIbHoro nopTa Ira NpokluOeHn C nOMoUIO Ka6eJ.28 B Windows XP pouter He BvDm Ha 3KpaHe Mon POKluOeHn. 28
Texnueckne xapaKTepcntkN 29
Linksys X6200 29
Φn3nueckne xapaKTepeNCTnKn 29
0630pnpoodykTa
BnD Cbepxu
Ethernet—EcnHnDnKaTOp ropnt noCToRHHO 3TO O3NaHaet, yTo yCTpoiCTBO ycNeuHo NOdkIIOUeHO K MoDEMу-poyTepy uepe3 3OT nOpT.
Wi-Fi Protected SetupTM—Инд�示ахогурагглпсьглкьчеси Wi-Fi Protected Setup™ ycneшно установлени. Инд�示ахогурагглпсьглкьчеси Wi-Fi Protected Setup™ yctanablnbaet nodkliquehene, И мiraет 6bICtpo, korда прочходот oшбka. Инд�示ахогурагглпсьглкьчеси Wi-Fi Protected Setup™ в ржиме ожundая.
Wi-Fi—Индikatopby ropaT, KOrda onuia 6ecnpoBODHoro noKluoyehra Bkluoyeha 3ToT INdikatop Mnraet, Korda MoDem-poyTeP aKTUBHO nepeaET nI npINHMaeT daHHbIe NO cETN.
DSL—Индкатор зелень, кorda moDEM-poyter nodklioyen Hanpemyk DSL linn.
Индкатор сини, korda moDEM-poyter hactpoeH tolbko kaK poyter n nodklioyen K INHTepHeTу chepe3 OTdeIbHbMoDEM.
Internet—Индikatop зелень, korда мodem-pondetpoTep nodkluoyeK nHTepHeTy. Muraet 3eIeHbIM, noka moDEM-poyTeP noDKluoyaetcK nHTepHeTy. Иndikatop KpacHBi, korda modem-poyTeP He moKet noJyntb IP aDpec.
Suggested Mounting Hardware

7-8 mm

1.5-2 mm
3-5 mm
3ametka-Linksys He Hecet OTBETCTBEHHOCTn 3a yuep6, Bbl3BaHHbI HeHaedexHo 3akpenJIeHHbIM CTeHHbIM KpeJIeHHem.
YTo6bI 3aKpenNTb MoEm-poyTeP:
- OnpeJeIte MeCTO KpeJIeHnMapuTy3aTopa. Y6eIITecb, yTO CTeHaPoBHnA cyXa HnHaTeKHnA. TaK Je y6eIITcB, yTO TaM, rDe Bbl Co6nPaTeCb 3aKpeINb poYtep, eCTb B6JIu3n Po3eTKa.
- IpocBepIte Dba OTBepCTnB CTEHe. Y6eIITecb, YTO paCtOHaHne MeKdy HMM coCTaJIaET 75,6 MM.
- B kaJdoe OTBepCTne BCtABBe Twpyn TaKIM o6pa3OM, YTO6bI rOIOBka wypna BbICTyPnala HaI NOBepXHOCTbIO CTEHbI Ha 3 MM.
- PacnoJoxTe poyTep TaKIM o6pa3OM, yTO BbIeMKn HaxoJaTcHapOTNB uypynOB.
- CoBmecTe Na3bI C BNHTaMn MeJneHHO 3aDbNHBTe poYTepa Bn3 TaK, YTo6bI BNHTbI NIOTHO 3aUIN B Na3bl.
Ua6loh cTeHHoro KpenenHn
HaneuataaTe 3Ty cTpaHnUy B 100% pa3Mepe.
BbpeKbTe no npepbHNo JInHne, n npNKpeNtE K cTeHe, tam rde co6upaTeCb CBePnTb OTBepCTn.
YCTaHOBka
Hactpoika
- Пдклочтete TelefoHHb Ka6eIb, KOTOpb IndT B KomPJIeKTe K DSL npTp y poTyepa n K TelefoHHoPo3eTKe Ha cTeHe.

3aemka-Ecnu y BAC BO3Hukaiom nomexu B melefoHHou LUNU, BO3MOxHO BAM nohadoobumc MUKPOphiBmp uuu pa3BemBumeIb. (3mo nohadoobumc dIra noIb3oBamelue B BeLukO6pumuaHuu, noIb3oBameLu u3 dpyeux cmpan moaym 3anpocmb unphiopmauuy CBOe2o npoBaudepa. POnb3oBameIm ISDN MUKPOphiBmp He HxkeH.) Eclu Bam nompe6yemc MUKPOphiBmp, Bam cIedyem ycmanohumbe e0 Ha KaKdbi melefoH uuu foakc. Umo6bl ycmaHOumb MUKPOphiBmp, noDknIOchme e2o B melefoHHbu pa3bEm, y Komopo2o ecmb ADSL noDknIOchue, dpyeou Koneu Ka6eN naDknIOchume B nopmy DSL c MukpophiBmpom.
- Подклioчnte aадаNTep nHTaHЯ KMODemy poyTepy N BkIIOUHTe poyTeB 3JIeKTPo po3eTKy.

- Ha KOMNbIbTepe NOdKJIIOHITcB K 6e3ONaCHoC cETn, IMR KOtOpoi BblMOKeTe HaHTn Ha HAcLeNe (Bbl MOKeTe N3MeHNTb IMr cETn P03Ke.) Bbl6epnte abTOMaTIueckoe NOdkJIIOUeHHe K 3ToI cETn BdaJIbHeIWeM. Y Bac He 6yDet DoCTyNA K INTEpHety NOKa Bbl HAcTpaINBaTe MoDEM-poyTeP.
*ДянстюкскавелмпдкючteODIN KOHeu Ethernet Ka6eJI, KOTopьиndetвКOMПLEKTeK Ethernet aanTepyHa BaWeM KomNbIoTepe,a pyroKoHeu Ka6eJI K Ethernet npTy Ha 3aDHei cTeHKe MoDemaPoyTepa.
Iobtopte 2 dJa donoHnTeJbHOrO KOMnbOTepa nn yCTpoNCTBa, KOToPbB Bbl XOTHe IodKJIouHTb K MoDeMy-poyTepy.
3ametka--ecu Ethernet aanmep Ha Bawem Komnbomepe He Hacmpoeh, obpamumecb K dokymehmaquuu no Ethernet aanmepy dna nodpo6ho uhopmaueu.
- OTKpoIe Be6 6pay3ep n HabepeTe http://192.168.1.1 B aIpeChoi cTpOke.

- BBeInTe "admin" B KaueCTBe IMeHn Nolb3ObaTeIy I NaPoiJ.

- OTKpoetcra cTpaHnca HacTroKb BaWero MoeMa-poyTepa. HaxMnte Ha BknaKy Bbictpy 3anyck.
-
Haxmte Haatb, tO6b3aNcTb MaCTepa HAcTPOk. MblpeKOMeHnyem nCnoB3OBaTB MaCTepa HAcTPOk Nlra HaayalbHOY yCTaHOBKn, Notomy OTO OH nocobetyet Hanbolee ONTNMaJIbHyIO KOHfNpyaCuNIO dIy BaUero MoEma-poyTepa.
-
Дя рунов насторь Вьберпесь востановке и снолььшеше спцалыну утuntу.

- Инданатор дд Питань, БсрpoBoДон сети Ethernet (дя кадуюнчehногКOMпьOTepа)doJxHbВКLOUHTbcR.EcIn 3ToRo He npOn3oшлу, y6eNTecb,чTO moDEM-poyTep BKLOUeH B 3JIeKtpo po3eTKu n BCE Ka6eInnnoKLOUeHbnpaBnIbHo.
Hac tropona VDSL
Ecnn BnncnoJIb3ye Te VDSL (ecnn noKIOUeHne npOcXoIIT uepe3 TelefoHHyIO IINHIO, HO CKOpocTb cKaUNBaHn8 60JIbSe, Yem 24 M6/ceK) Bam npndTcra HAcTpOntB moDem poyTeP bpyHyIO. 3TO TnN noKIOUeHn8 eue Ha3bIbaETcra "ontobolokOHoe". Ecnn y Bac ectb npaBnIbHa nHΦopMaunr O hAcTpoKax OT BaWero npOBaIdep, To hAcTpoKha He 3aIMeT MHOrO BpemeHn.
- Bb6epnte Bklaadky HactpoikKa>OchOBhie HactpoikKn. B cekunn Fm3neckne HactpoikKn, Bb6epnte DSL B kaueCTBe Fm3neckoro Tuna n PTM B kaueCTbe pejKma DSL.
- EcIn BaW npOBaIep Tpe6yeT VLAN, To OTMeTbTe VLAN n BBeIte VLAN ID BaIero npOBaIepa. O6paTntecb K BaIeMy npOBaIdepy, ecIn Bbl He yBepHe b KaKyIO INΦOpMaIIO BBOIITb.
-
B pa3dene HactpoiKa INTepHET TnN INTepHET NODKIOUeHnBb6epnte IINoPPoE IIn60 IPoE (DINHAMueckn nn CTaTNueckn IP-aDpec) KaK Tpe6yeTcIyBaawero npobaidepa (ecn Bbl He yBepehbl KaKOB b6paTb, o6pATNTecBnpobaidepy 3a NOMOsb). Bb6epnte Pexm MocTa B Tom Cnyae, ecn Bbl XOTnTeNCNoB3OBaTb TOlbKO MoDem 6e3 fYHKcnn poyTepa (Knprimepy ToIbKO Wi-Fi nIindpuyfO fYHKcniO cetn).
-
EcIn Bbl nCnoB3yeTe PPPoE BBeDnTe npaBnIbHoe Nmra noIb3ObaTeIy I npoIb, KOtOpBie npedocTabn Bam BaW npoBaJdep.

- EcIIN TIN BauJero noDKJIIOUeHnA INHAMNueCKoe,TO BbIbepnte/POEB TIne INHTepHET IIOKJIIOUeHnA ABtOMaTNUeCKn NOJyuaTB IP aDpeC B HAcTpoKax IP.
- EcInBaWeMy npoBaIepy Tpe6yeTcI POE co cTaunHbIM IP-aDpeCOM, Bbl6epnte IPoE dIra Tnna IVHTepHET NpdkJIouChEnra, 3aTeM Bbl6epnte NcnoJb3ObaTb CLedyUOniIP AApec n BBeJeNTe IP aDpe (KOTOpBn IpeDoCTabIeN BaAMm npoBaIdepom) B noJIe HnKe.
- HaxmTe CoxpaHnTb HacTpoNk (BHN3y cTpaHnCbl), YTO6bl coXpaHnTb HacTpoNkn 3aKoHnTb yCTaHOBky.
HactrpoiKa moeMa-poyTepa Tolibko KaK poyTepa
- Подклочи Te Odnн KoHeu Ethernet Ka6eJ, KOTOpBи nIeT B KOMnJIeKTe K Ethernet aAnTepy Ha BaWeM KombIoTepe, a pyroN KoHeu Ka6eJ K Ethernet nopTy Ha 3aHNe CTeHKe MoEma-poyTepa.
- Поdkлioчnte OdHH KoHeu Ethernet Ka6eЯ K npTy Ka6la Ha 3aHnei CTeHKe MODema-poyTepa, a dpyroKoHeu NOdklIOUHTe B cbo6Ondb Ethernet nopT BaWero MOdema.
- PoiKJIIOUHTe OJIN KOHeu aJAnTepa NITaHn K NOpTu NITaHn, a npuro - K pO3eTKe 3JIeKTpocetN.

-
BkIIOUHTe KOMNbIOTep, KOtOpBb Bbl 6ydeTe HcNoIb3OBaTb dIy yCTaHOBKn MoDEMapoYtepa.
-
Инданахетдя Питань, Бсрповodнй сети Ethernet (Дя кадую ндклioчehногКOMmbioTepa)doJxHbBkIIOuHTbcЯ.ЕслэТоу He npoN3Oшл, убeДNTecb,чTo moDEM-poyTep BkIIOUeH B эл ekTpopo3eTKу И Все KaБел ндклioчehыnpaВиьHo.
3aMeTka—Ecnn Bbl He yBepenbl, KaKoI KaHaI cJeAyeTe NcNoIb3OBA Tb, OCTaBbTe BapnAHT, nCNoIb3yEmbl no yMoIuHaHIO, CMeaHbI.
- Pexm Cetn—BbIbepnte cTaHapTbI 6ecnpoBOdHOn CB3N dJaBaWei ceTn.
CmeeHbE Ecnn K cetn noKIOUeHb yCTpoiCTBa Wireless-N (5 GHz), Wireless-G n Wireless-B, torda ocTabte 3NaueHne no ymoJuaHIO - CmeeHHbIe.
ToIbko Wireless-A-Ecnu y Bac B cemu moIbko ycmpoucmba Wireless-A, moBbIbepeme onuToIbko Wireless-A.
ToIbko Wireless-N—Ecnu y Bac B cemu moIbko ycmpoicmba Wireless-N (5 GHz), mo BbIbepeme onuio ToIbko Wireless-N.
- Toько Wireless-AC—Ecnn y Bac B ceTn Toько yctpoiCtBa Wireless-AC (5 GHz), to bblbepete onuio Toько Wireless-AC.
ToIbko DnA Wireless-A/N—EcIyBa cEcTb ycTroPoIcTba n Wireless-Bn Wireless-G, To Bbl6epTe onuToIbko Wireless-A/N.
- Toько дя Wireless-N/AC—Ecnn y bac ectb yctpoicTba n Wireless-Bn Wireless-G, to bblbepete onuToько Wireless-N/AC.
- Otklountb—Ecnu y bac b cemu hem ycmpoucmb C Wireless-B, Wireless-G, u Wireless-N (5 GHz), mo Bbybepeom onuO Omkloquumb.
3aMeTka-EcIu BbI He yBepenbl, KaKoI KaHal cIeDyem uCnoJIb3Obamb, oCmAbBeBapuaHm, uCnoJIb3yEmbl no yMOnUaHnU, CMeuaHHbI.
Khonka Wi-Fi Protected Setup
IcnoJIb3yIe 3OT cNoC06, ecn KIneHTCKoe yCTpoiCTBO OChauSeHo KhoNko Wi-Fi Protected Setup.
3aMeTka—OndHOBpeMeHHo MoXHo HacTpauBaTb ToJIbKO Ond Ho yCtpoIcTBO.
- HauKmTe KhoNky Wi-Fi Protected Setup Ha KIneHTcKom yctpoiCTBe.
- HaxmTe KhoNky Wi-Fi Protected Setup B OKHe Wi-Fi Protected Setup ycHnTeIy IIN HaXmTe N ydepKuBaIe B TeueHne cekHyKnOKy Wi-Fi Protected Setup Na 6okOBoN paHeN poyTepa.
- После тoro, кak Клиентскoe устpoиctBO hactpoeHO,В TeueHne DByX MmHyT NaKmTe KhoNky OK ha ekpahe Wi-Fi Protected Setup poutepa.
BVeAnTe PIN-KoA KIneHtCKOro yCtpoiCTBa Ha PoyTepe.
Icnoj3ynte 3OT cnooc6,ecn dna hactpoynfHKnn Wi-Fi Protected Setup KIneHTckoro yctpoiCTBa Tpe6yeTcBBeCTn PIN-KoJd.
- BBeIte PIN-KoId KJIeHrTcKOrO yCTpoIcTbA B IOne Ha 3KpaHe Wi-Fi Protected Setup poyrepa.
- HaxMMTe KhoNkY 3aperncptnpoBaTb Ha 3KpaHe Wi-Fi Protected Setup poyTepa
- После ТOrO, КАК КИЕНТСКOE yCтpoIcTBO HAcTppoEHO, В TeчЕнe ДБуX MИHyT NaЖмITE KhoNky OK на Зкранe Wi-Fi Protected Setup poyterpa.
BBeAnTe PIN-koD poyTepa Ha KIneHTcKOM YcTpoIcTbe
3TOT cnooc nCnoIb3yETc, eCNI KIneHTCKoe yCTpoiCTBO 3a npaunBaet PIN-KoD poytepa.
- B KJIeHTcKOM yCTpOuCTBe BBeIITe PIN-KoI, yKa3aHbI Ha 3KpaHe Wi-Fi Protected Setup poyTepa. (Oh TaKke yKa3aH Na 3TnKeTKe, npNKpeIeHHoN K 3aDHeI NaHEn poyTepa.)
- После ТОТ, КАК КИЕНТСКOE yCTpoIcTBO HAcTpoEHO, B TeUeHne DByX MInHyT NaKmTe KhoNkY OK на за Кранe Wi-Fi Protected Setup poyTepa.
Baw KOMnbIOTep He MoXeT NOdKJIouYtbcra K INTepeHety.
CleyuTe HcTpyKUINIe IIOkNIOueHnKOMNbIoTepa K INHepeHy:
- Y6eHITecb, yTo MoDEM-PoyTep BkJIIOueH B po3eTKy. INHdNkaTOPbI DOJXHBi 6bITb 3eJIeHbIMn Hr Me MURaTb.
-
EcIn INDnKATOpbIMraIOT, TOrda OTKIOUHTe BCE cTeBbIe yCTpOCTBa, BkIOUaMoDem-PoyTeP IN KOMNbIOTepb. 3aTeM BKIOHTe KaXdoe yCTpOCTBO BCLeDuOcEM IopRdKe:
-
MoDEm-PoyTepe
-
KommbioTepe
-
Поберы сндкаторь на поеден панелу усточь.Убадпесь,чTo индкаторь Питаня,DSL ихоть одн Из Индкаторов Ethernet riprt.Ел ЗТОгNotpoBepte nodkluoyehne ka6ela.KomnbIoTePdoJkeH 6bIb nodkluoyen K odHomy n3 Ethernet nopTob cHomepaMn 1-4,a DSL npot усточьdoJokhen 6bIb nodkluoyen K ADSL liHHN.
Korda Bbl OTKpbIbAeTe Be6-6pay3ep nOraBnaeTc 3aIpoc Ha NmI POnb3OBaTeIaNnapoIb.
EcnBbXOTnTe n36aBnTbcra O TTOrO 3anpoca, cJeDyTe HnHCTpyKcnn HnKe.
OTKpoTe Be6-6pay3ep n cdeJaTe cIeDyUoJee (3Tu wArn npedctabJeHbI dIra Internet
Explorer, Ho noidnyT JnIIO6oro 6pay3epa):
- BbIbepnTe INHcTpymEnTb > CBoYCTBa Bpay3epa.
- HaxMMTe Ha BkJaIky PoJKnIoueHnA.
- BbIbepnte HnKorTa He nCNoIb3OBAtB KOMMyTnpyEmble NOkJIHueHna.
- Haxmnte OK.
BbI nCpOJIb3YeTe cTaTnueckn IP-aDpec n He moXeTe IODKJIIOuHTbcra.
06paTntecb K PmOuNi Windows, ymo6bl u3MeHumb Hacmpouku Nmephem Ipomokola (TCP/IP), ymo6bl noJyamb IP abmammuyecku.
KoMnIbIOTepy He ydaeTcra NODKJIIOUHTbcra K 6ecnpoBODHOcTn.
y6eHNTecb B TOM, yTO Ha KOMNbIOTepe n ycTpoJCTBe yka3aHO OdHO n To Je IIMr (nIN SSID) 6ecnpoBOJHO cETn. EcIn fynKzua o6ecneueHn 6e30NaChOCTn 6ecnpoBOJHO cETn BKIOUeHa, y6eHNTecb B TOM, yTO Ha KOMNbIOTepe n Ha TOpKe DOCTyPa NcNoJIb3yeTcR OdIH N TO T Ke KJIou H MeToD o6ecneueHn 6e30NaChOCTn.
Bam Huxkno n3MeHnTb HacTpoiKn Ha yCTpoiCTBe.
ОткpoиTe Вe6-6pay3ep (к примepy Internet Explorer ил Firefox), И ВБeДиTe IP aadpec yctpoiCtBaВадрсно CTpoke (IP adPEC no ymoJauHnIO 192.168.1.1).ВБeДиTe ИмЯ поьзOBaTeЯ и ПарльВ coOTBeTCTbUOxN NOJAX (IMЯ поьзOBaTeЯ и napOlб no ymoJauHnIO admin).ВыберпTe hyЖнYIO BklaAdky ДягИЗMEнЯ NaCTpoEK.
BbI He Moxe Te nCnoIb3oBaTb DSL cepBnC dIa IopKJIoueHnBpyuHyIO K INHTepHeTy.
Iocne Toro, KaK Bbl HaCTponn poyTeP OH aBToMaTnueeCK N oDKnIOuHTcK BaUeMy npObaNdepy, Bam He HxJHNO nOdkNIOuOaTcBpyHyU.
Korдая оTKpbIbAIO Be6-6pay3ep nOyBnJeTcR OKHO BXODa, He CMOTpRA Na TO, YTO MHe He HxKHO BBOdntb DaHHbIe DnRA BXODa.
Uarn Hnke noxodT He ToIbKO dIy Internet Explorer, Ho n dIy IIO6oro 6pay3epa.
- OTKpoIte Be6-6pay3ep.
- BbIbepuTe HcTpymEnTbI > CBoiCTBa Bpay3epa.
- HaxMMTe Ha BkJaIky PoIqKJIIOueHnIa.
- BbIbepnte HnKorTa He nCNoJIb3OBAt b KOMMyTnpyEmbl e NOJKNIOUeHna.
- Haxmnte OK.
Y pouTepa Het KoakcnaIbHoro nopTa dIy IodKJIoueHnA C NOMOu bIO Ka6eIa.
KoakcnaJIbHbI KabeMb MoXHO NOdKIOUHTb TOnbKO K Ka6eJIbHOMy MoDEM.Y.BaMuMoEmpoyTepa pa6oTaET ToIbKO KaK MoDEM c ADSL INTEpHEToM, Ho ecIn y Bac eCTb Ka6eJIbHbINHTepHeT, BaMu MoDEM-pOyTePdoJKeH 6bITb NOdKIOUeH Upe3 OTdeJIbHbI Ka6eJIbHbIMoDEM.Cm. cTpaHnCy 9.
B Windows XP pouterne He BvDnM Ha 3KpaHe Mon PoiokJIoueHna.
BceKuN CeTeBbIe 3aDAnH, BbIbePnte Poka3aTb NkOHKn POnKJIouHeHbI UPnP yctpoiCTB. EcIn poyTe Hne PONBITcB CnncKe, CJeDuYte INHCTpyKUmaH HnHexe:
Haxmnte CtapT > KoHTpoIbHaŋ PaHeIb > Ep3HdMay3p.
HaKMTe Ha BklaKy NCKUeyHn
Bb6epnte UPnP uHΦpacmpkykmypa.
HaKmTe OK.
EcnBbHe cmOrn HauTn OTBe T ha BOpoc B daHHOM pyKOBoDCTBe, nonuTe peWeHne Ha Be6caIte linksys.com/support.
TexHnueckne xapaKTepeNCTnKn
Linksys X6200
WPA2/WPA Mixed, WPA2 Personal a WPA Personal
WPA Enterprise, WPA2 Enterprise a WPA2/WPA Enterprise Mixed
- Používa sa v koordinácii so serverom RADIUS. (Malo by sa používat, len ak je k smerovaču pripojený server RADIUS.)
Vlozte adressu IP servera RADIUS.
Vlozte cislo portu servera RADIUS. Predvolená hodnota je 1812.
Vlozte kluč zdiejaný medzi smerovacom a serverom.
WEP
Suggested Mounting Hardware

7-8 mm

1.5-2 mm
3-5 mm
Način DSL (ATM/ADSL)
Načini WPA2/WPA Mixed, WPA2 Personal in WPA Personal
Načini WPA Enterprise, WPA2 Enterprise in WPA2/WPA Enterprise Mixed
Gumb Wi-Fi Protected Setup
Ta način uporabite, Če ima odjemalska naprava gumb Wi-Fi Protected Setup.
Opomba—Vselej konfigurirajte samo po eno odjemalsko napravo naenkrat.
-
Kliknite ali pritisnite gumb Wi-Fi Protected Setup na odjemalski napravi.
-
Kliknite gumb Wi-Fi Protected Setup na zaslonu Wi-Fi Protected Setup usmerjevalnika ALI pritisnite in za eno sekundo zadržite gumb Wi-Fi Protected Setup na zadnji strani usmerjevalnika.
- Ko konfigurirate odjemalsko napravo, v dveh minutah kliknite OK (V redu) nazaslonu Wi-Fi Protected Setup usmerjevalnika.
WiFi Protected Setup

WiFi

DSL

Internet

Power
Ethernet—Om lysdioden lyser konstant, har modemroutern anslutits till en enchet via den porten.
Wi-Fi Protected Setup™—Lysdioden lyser konstant när en Wi-Fi Protected Setup™—anslutting har etablerats. Lysdioden blinkar sakta när Wi-Fi Protected Setup™
Suggested Mounting Hardware

7-8 mm

1.5-2 mm
3-5 mm
Mall for vaggmontering
Skriv ut den har sidan i 100% storlek.
Wi-Fi Protected Setup
Knappen Wi-Fi Protected Setup
Suggested Mounting Hardware

7-8 mm
1.5-2 mm
3-5 mm
-
7n Launch (1)
-
ยง reviews of the following are available at www.novindu.com Setup (novindu) http://www.novindu.com

- W LED wuuuunwuw uuuuauu (auuuuwwuwwuwwuwwu)
VDSL
VDSL 24Mbps)
- Setup (nrs) > Basic Setup (ns) Physical Setting (ns) in an DSL av Physical Type (uunnu) uan PTM uiau DSL Mode (nua DSL)

- wnn ISP wavwau vlan nienan Enable VLAN (uunnu VLAN) uauuau VLAN ID nISP wavwau wvua aunuunuunuunuunuunuunuunuunuunu unuunuunuunuunu unuunuunuunu
- Internet Setup (ntnwnnnn) >Internet Connection Type (nuannnn)
PPPOE P0E (IP uanrnnnnnaaunnnnnae)
ISP uanrnnnnaa (wnnnnnnnnaa)
Bridge Mode Only (wnnnnnnnnaa) waiuauu
PPPOE 11111111111111111111111111
- wwnnnnnaaiaaaan n nn Poe an Internet Connection Type (15555555555) uavwwu IP Settings (nneipn IP) uann Automatically obtain an IP address (IP uauuauauuuu
- wnt ISP waaanuaua IPoE nI IP uauauauuuuuuunn uusan /PoE snwne Internet Connection Type (uuaannnnnaa aauauauauuunn) uanuuean Use the Following IP Address (12IP uauauauauuauu) uauauauauuuuauuip uauauauuu (wISP waaanuui) uuaowwnuua
- Bridged Mode Only (Lwz Bridge Mode)—Lwzwnu Lwzwnu DSL wunnuuwruea uuaauuurnauuunu uuuu uuuuauuauuauuauuauuauuauuauuuuuuuuuuuuuuuuuuuuuuuuuuuuuuuuuuuuuuuuuuuuuuuuuuuuuuuuuuuuuuuuuuuuuuuuuuuuuuuuuuuuuuuuuuuuuuuuuuuuuuuuuuuuuuuuuuuuuuuuuuuuuuuuuuuuuuuuuuuuuuuuuuuuuuuuuuuuuuuuuuuuuuuuuuuuuuuuuuuuuuuuuuuuuuuuuuuuuuuuuUU
- IPoE RFC 2684 Bridged—wnnnn nn nnaaaynne aynnnnnpip Settings (n)
IP) nAn Obtain an IP address automatically (u IP uanranaeauanu)
nISP wannnnnns IP uanrnnnnaeauanu naeauan Use the following IP
address (uIP uanranaeauanu) - IPoA RFC 2684 Routed-1P uauuuaaunnaa
- RFC 2516 PPPoE—ISP vDSL PPPoE (Point-to-Point Protocol over Ethernet) wTAPWADAAUauuuaaunuauu uuuuauuPPPoE uauuauuIP uauuauuauu
- RFC 2364 PPPoA—ISP vDSL vPPoA (Point-to-Point Protocol over ATM) waaanranaaannnnae nppoA npnnip IP naanrann
Network Setup (nunnnnnnnnn)
inua DSL (PTM/VDSL)
VDSL2 Profiles (vslw VDSL2)--uantuwa VDSL2 ISP uauuaaauuau Auto (aunu) (uunu)
Enable VLAN (LAN) LAN VAN
VLAN ID- 10495 1500ISP 10495
Internet Setup (nnaanana) --nunnnnne nannnnae nnnnnae nnnnnae nnnnnae nnnnnae nnnnnae nnnnnae nnnnnae nnnnnae nnnnnae nnnnnae nnnnnae nnnnnae nnnnnae nnnnnae nnnnnae nnnnnae nnnnnae nnnnnae nnnnnae nnnnnae nennnnae nnnnnae nnnnnae nnnnnae nnnnnae nnnnnae nnnnnae nnnnnae nnnnnae nnnnnae nnnnnae nnnnnae nnnnnae nnnnnae nnnnnae nnnnnae nnnnnae nnnnnae nnnnnae
- Internet Connection Type (https://www.muaa.nu.edu/).
iunnnnnaaannnnaeau nI sP uuaanuunnuannuanuauuunu
- Automatic Configuration (namnuuunnuuunnuu) - DHCP-15nuuunnuuuuuuuuuuuuuuuuuuuuuuuuuuuuuuuuuuuuuuuuuuuuuuuuuuuuuuuuuuuuuuuuuuuuuuuuuuuuuuuuuuuuuuuuuuuuuuuuuuuuuuuuuuuuuuuuuuuuuuuuuuuuuuuuuuuuuuuuuuuuuuuuuuuuuuuuuuuuuuuuuuuuuuuuuuuuuuuuuuuuuuuuuuuuuuuuuuuuuuuuuUU
- Static IP (IP uuuuuaaun)--wnnueonnnnuuunvIP uauuauuuuauuuwauia nnuunnaunuun nnuun Static IP (IP uuuaaun)
- PPPoE—wnnununununuDSL nwnnnnununISP unnnunl Point-to-Point Protocol over Ethernet (PPPoE) nnunnnnnnnnnnnnnnnnnnnnnnnnnnnnnnnnnnnnnnnnnnnnnnnnnnnnnnnnnnnnnnnnnnnnnnnnnnnnnnnnnnnnnnnnnnnnnnnnnnnnnnnnnnnnnnnnnnnnnnnnnnnnnnnnnnnnnnnnnnnnnnnnnnnnnnnnnnnnnnnnnnnnnnnnnnn
Connect on Demand (uaaiaaaa) Ws Kepe Alive (nna)
(uaa) 1nnnnnnnnnnnnnnnnnnnnnnnnnnnnnnnnnnnnnnnnnnnnnnnnnnnnnnnnnnnnnnnnnnnnnnnnnnnnnnnnnnnnnnnnnnnnnnnnnnnnnnnnnnnnnnnnnnnnnnnnnnnnnnnnnnnnnnnnnnnnnnnnnnnnnnnnnnnnnn
- PPTP--Point-to-Point Tunneling Protocol (PPTP) 1uunnuuunnuu uuuuauuuuuuuuuuuuuuuuuuuuuuuuuuuuuuuuuuuuuuuuuuuuuuuuuuuuuuuuuuuuuuuuuuuuuuuuuuuuuuuuuuuuuuuuuuuuuuuuuuuuuuuuuuuuuuuuuuuuuuuuuuuuuuuuuuuuuuuuuuuuuuuuuuuuuuuuuuuuuuuuuuuuuuuuuuuuuuuuuuuuuuuuuuuuuuuuuuuuuuuuuUU
Wi-Fi Protected Setup nanaanauuunu uuuuauuauuauuuuuuuuuuuu uuuuuuuuuuuuuu uuuuuuuuuuuuuuuuuuuuuuuuuuuuuuuuuuuuuuuuuuuuuuuuuuuuuuuuuuuuuuuuuuuuuuuuuuuuuuuuuuuuuuuuuuuuuuuuuuuuuuuuuuuuuuuuuuuuuuuuuuuuuuuuuuuuuuuuuuuuuuuuuuuuuuuuuuuuuuuuuuuuuuuuuuuuuUU
nnae
- Mixed (nau)—wnnnnnaunnnae Wireless-N, Wireless-G uau Wireless-B uauuauuauuuuuuuuuuuuuuuuuuuuuuuuuuuuuuuuuuuuuuuuuuuuuuuuuuuuuuuuuuuuuuuuuuuuuuuuuuuuuuuuuuuuuuuuuuuuuuuuuuuuuuuuuuuuuuuuuuuuuuuuuuuuuuuuuuuuuuuuuuuuuuuuuuuuuuuuuuuuuuuuuuuuuuuuuuuuuuuuuuuuuuuuuuuuuuuuuuuuuuuuuUU
- Wireless-B/G Only (Wireless-B/G wnuu)-wnnauwauWineless-B uau Wireless-G 1uunauuuu nn Wireless-B/G Only (Wireless-B/G wnuu)
- Wireless-B Only (Wireless-B wnuu)—wnnauwauuWineess-B uuaan Wireless-B Only (Wireless-B wnuu)
-
Wireless-G Only (Wireless-G wnu)—wnnauwauuWiresse-G Wuaa
Wireless-G Only (Wireless-G wnu) -
Wireless-N Only (Wireless-N wnu)—wnnunwauuunnnae Wireless-N Wnuan
Wireless-N Only (Wireless-N wnu) - Disabled (الإستعمال)- نوروره بوروره Wireless-B, Wireless-G ور Wireless-N الإستعمال بوروره ور Disabled (الإستعمال)
wnunn--wnnnuuiuuiiinaiiunua iuiuianwana Mixed (wa)
Network Name (SSID) (SAIINANSHU (SSID))-Service Set Identifier (SSID) SAIINANSHU 32 Anu Suwaaanu Linksys nwnnnnau 5 anu wnuu uuuu uuuu uuuu uuuu uuuu uuuu uuuu uuuu
nunnnn-- nannnnnnnnnnnnnnnnnnnnnnnnnnnnnnnnnnnnnnnnnnnnnnnnnnnnnnnnnnnnnnnnnnnnnnnnnnnnnnnnnnnnnnnnnnnnnnnnnnnnnnnnnnnnnnnnnnnnnnnnnnnnnnnnnnnnnnnnnnnnnnnnnnnnnnnnnnnnnnnnnnnnnnn nn
Network Name (SSID) (SAaRnAnu (SSID))—Service Set Identifier (SSID) nauanauauuauuauuuuuuuuuuuuuuuuuuuuuuuuuuuuuuuuuuuuuuuuuuuuuuuuuuuuuuuuuuuuuuuuuuuuuuuuuuuuuuuuuuuuuuuuuuuuuuuuuuuuuuuuuuuuuuuuuuuuuuuuuuuuuuuuuuuuuuuuuuuuuuuuuuuuuuuuuuuuuuuuuuuuuuuuuuuuuuuuuuuuuuuuuuuuuuuuuuuuuuuuuUU
wnnnn--wnnnnnnnnnnnnnnnnnnnnnnnnnnnnnnnnnnnnnnnnnnnnnnnnnnnnnnnnnnnnnnnnnnnnnnnnnnnnnnnnnnnnnnnnnnnnnnnnnnnnnnnnnnnnnnnnnnnnnnnnnnnnnnnnnnnnnnnnnnnnnnnnnnnnnnnnnnnnnnnnnnnnnnnnnnnnnnnnnnnnnn nn nannnnaaennnnaeennnneennnneennnneennnneennnneennnneennnneennnneennnneennnneennnneennnneennnneennnnee
Security Mode (wnnnnnaaannnaa) Security Modes (nnnnnnnaa)
- Channel Width (nununnuuunnuuun) --wauuunnuuunnuuunnuuuuuuuuuuuuuuuuuuuuuuuuuuuuuuuuuuuuuuuuuuuuuuuuuuuuuuuuuuuuuuuuuuuuuuuuuuuuuuuuuuuuuuuuuuuuuuuuuuuuuuuuuuuuuuuuuuuuuuuuuuuuuuuuuuuuuuuuuuuuuuuuuuuuuuuuuuuuuuuuuuuuuuuuuuuuuuuuuuuuuuuuuuuuuuuuuuuuuuuuuUU
Standard Channel (uaaaynauuunur)--anwaaeynuynrnnnnaeauu u WneuwnuWineess-B, Wireless-G uae Wireless-N uunnnaaunuauuauuauuauuauuauuauuuuauuauuuuuuuuuuuuuuuuuuuuuuuuuuuuuuuuuuuuuuuuuuuuuuuuuuuuuuuuuuuuuuuuuuuuuuuuuuuuuuuuuuuuuuuuuuuuuuuuuuuuuuuuuuuuuuuuuuuuuuuuuuuuuuuuuuuuuuuuuuuuuuuuuuuuuuuuuuuuuuuuuuuuuuuuuuuuuuuuuuuuuuuuuuuuuuuuuUU
SSID Broadcast (nsswwssSsID)--nnaaennnnnne nnnnnnnnnnnnnnnnnnnnnnnnnnnnnnnnnnnnnnnnnnnnnnnnnnnnnnnnnnnnnnnnnnnnnnnnnnnnnnnnnnnnnnnnnnnnnnnnnnnnnnnnnnnnnnnnnnnnnnnnnnnnnnnnnnnnnnnnnnnnnnnnnnnnnnnnnnnnnn nnennn nnennn nnennn nnennn nnennn nnennn nnennn nnennn nnennn nnennn nnennn nnennn nnennn nnennn nnennn nnennn nnennn nnennn nnennn nnennn nnennn nnennn nnennn nnennn nnennn nnennn nnannn nnannn nnannn nnannn nnannn nnannn nnannn nnannn nnannn nnannn nnannn nnannn nnannn nnannn nnannn nnannn nnannn nnannn nnannn nnannn nnannn nnannn nnannn nnannn nnannn nnannn nnannn nnannn nnannn nnannn nnannn nnannn nnannn nnann
T
| "WPA2 Personal/Enterprise | "WPA2: WPA2 |
| WPA2/WPA Mixed Mode | WPA2: WPA2 |
| WPA: WPA | WPA: WPA |
| WPA Personal/Enterprise | WPA: WPA |
| WEP | WEP: WEP |
M
"Jnnaaunnnnnae aenannnnnnae ananennnne nanaanennnnae "aa" 10000000000000000000000000000000000000000000000000000000000
WEP (10 hex digits) (40/64 bit 10 hex digits) (40/64 bit 10 hex digits) WEP (40/64-bit 10 hex digits) (40/64 bit 10 hex digits) WEP (40/64-bit 10 hex digits) WEP (40/64-bit 10 hex digits) WEP (40/64-bit 10 hex digits)
WPA2/WPA Mixed, WPA2 Personal wPA Personal
- 1aansnwnnnnna 8-63 anss nana password wannnnnnae
WPA Enterprise, WPA2 Enterprise uαw WPA2/WPA Enterprise Mixed
RADIUS (a)
JauIP uuaaeeaae aee RADIUS
- 1812
Jauuuii
WEP
WEP 10000000000000000 WPA
- Encryption (ntwurw) - wep (40/64-bit 10 hex digits) (40/64 bit (10 wunwn) wra 104/128-bit (26 hex digits) (104/128 (26 wunwn)) wra 40/64-bit (10 hex digits) (40/64 (10 wunwn))
Passphrase (nun)--WEP nnnn Generate (nu)
Key 1 (A) 1-wnnunuulauuswau WEP
的山
Disabled (fai)
wnnnnnaananaananaananaananaananaananaananaananaananaananaananaananaananaananaananaananaananaananaananaananaananaananaananaananaananaananaananaananaananaananaananaananaananaananaananaananaananaananaananaananaananaananaananaananaananaananaananaananaananaananaanaraannnnaaannnnaaannnnaaannnnaaannnnaaannnnaaannnnaaannnnaaannnnaaannnnaaannnnaaannnnaaannnnaaannnnaaannnnaaannnnaaannnnaaannnnaaannnnaaannnnaaannnnaaannnnaaannnnaaannnnaaannnnaaannnna
wnuun-1anrnsnnaaunauuuullanaunqnlalnuu uauununansnauuauuau
Wi-Fi Protected Setup
Wi-Fi Protected Setup nnnnnaaannnnaaennnnnnnnnnnnnnnnnnnnnnnnnnnnnnnnnnnnnnnnnnnnnnnnnnnnnnnnnnnnnnnnnnnnnnnnnnnnnnnnnnnnnnnnnnnnnnnnnnnnnnnnnnnnnnnnnnnn

Wi-Fi Protected Setup wwnnnnnaa nannnnaa aannnnaaennnnaa nnnnnaa nnnnnaa nnnnnaa nnnnnaa nnnnnaa nnnnnaa nnnnnaa nnnnnaa nnnnnaa nnnnnaa nnnnnaa nnnnnaa nnnnnaa nnnnnaa nnnnnaa nnnnnaa nnnnnaa nnnnnaa nnnnnaa nnnnnaa nannnnaa nnnnnaa nnnnnaa nnnnnaa nnnnnaa nnnnnaa nnnnnaa nnnnnaa nnnnnaa nnnnnaa nnnnnaa nnnnnaa nnnnnaa nnnnnaa nnnnnaa nnnnnaa nnnnnaa nnnnnaa nnnnnaa nnnnnaa nennnnaa nnnnnaa nnnnnaa nnnnnaa nnnnnaa nnnnnaa nnnnnaa nnnnnaa nnnnnaa nnnnnaa nnnnnaa nnnnnaa nnnnnaa nnnnnaa nnnnnaa nnnnnaa nnnnnaa nnnnnaa nnnnnaa nnnnnaa
W WFi Protected Setup
- Setup
Wi-Fi Protected Setup wwnwwnn Wi-Fi Protected Setup wau - WEDLED WEDLEDLED WEDLEDLED WEDLEDLED WEDLEDLED WEDLEDLED WEDLEDLED WEDLEDLED WEDLEDLED
Wi-Fi Protected Setup
Wwnnnaaannnnn nn nnnn nn Wi-Fi Protected Setup
wnuu-aaauuuiuuiuuaaueaunnauuauauauu
- 1
- Wi-Fi Protected Setup Wi-Fi Protected Setup Wi-Fi Protected Setup Wi-Fi
- wwnnnnnaaannnnaaennnnn nn OK (nnn) nn nwi Fi Protected Setup
Iau PIN yovaynnaaataaunnn
Pin (wnuunnnnna) wvi-Fi Protected Setup
- iau PIN ananunnnaa aonnnnnnna Wi-Fi Protected Setup
- Register (Wi-Fi Protected Setup
- wwnnnnnaaannnnaaauauauauauuok OK (nnaa) uunnuu Wi-Fi Protected Setup
ilau PIN yuivniunnnnnaa
nnae neaee nneae Guest
Allow Guest Access (auayanannnnaaunnnnnae Guest)unrnnnnae nnnnnae annnnae
Guest Network Name (waanwauunnaunnun Guest)
Guest Password (wauuuaunun Guest) - wauuuaunun "guest" wauuuaunun
Change (ulauu)--nanaanwauu Guest Password (naunuaaunnaunnaunnaunnaunnaunnaunnaunnaunnaunnaunnaunnaunnaunnaunnaunnaunnaunnaunnaunnaunnaunnaunnaunnaunnaunnaunnaunnaunnaunnaunnaunnaunnaunnaunnaunnaunnaunnaunnaunnaunnaunnaunnaunnaunnaunnaunnaunnaunnaunnaunnnaunnaunnaunnaunnaunnaunnaunnaunnaunnaunnaunnaunnaunnaunnaunnaunnaunnaunnaunnaunnaunnaunnaunnaunnua
Total Guests Allowed (wuuuauuunu Guest wuyu) - uuuuwa uauyua uuuuauu Guest 5 uuuuauuunu uuuuauu uuuuauu Guest Guest uuuuuuauu uuuuauu Guest
SSID Broadcast (nsswss SSID)--nsswss sswss sswss sswss sswss sswss sswss sswss sswss sswss sswss sswss sswss sswss sswss sswss sswss sswss sswss sswss sswss sswss sswss sswss sswss sswss sswss sswss sswss sswss sswss sswss sswss sswss ss
nunnnnnnn
nnaananaananaananaananaananaananaananaananaanana
nnaa aannnnnnaaennnnnnae nnnnnnnnne
uunnnnnaaannnnnnnnnnnnnnnnnnnnnnnnnnnnnnnnnnnnnnnnnnnnnnnnnnnnnnnnnnnnnnnnnnnnnnnnnnnnnnnnnnnnnnnnnnnnnnnnnnnnnnnnnnnnnnnnnnnnnnnnnnnnnnnnnnnnnnnnnnnnnnnnnnnn
P P P P P P P P P P P P P P P P P P P P P P P P P P P P P P P P P P P P P P P P P P P P P P P P P P P P P P P P P P P P P P P P P P P P P P P P P P P P P P P P
Windows uauuuaaunuInternet Protocol (TCP/IP) uouu u IP
aannnnnnae nnnnne aennnne nnnnne
aannnnnnae aennnnnne aen nnnnne aaee aennnne aennnne aennnne aennnne aennnne aennnne aennnne aennnne aennnne aennnne aennnne aennnne aennnne aennnne aennnne aennnne aennnne aennnne aennnne aennnne aennnne aennnne aennnne aennnne aennnne aennnnee
uunuunuunu (nununu Unnternet Explorer nua Firefox) uauuuu IP uunununununununu uuuu ununu (nuwuaanuauu AP uununununu 192.168.1.1) uauuuuuuuuuuuuuuuuuuuuuuuuuuuuuuuuuuuuuuuuuuuuuuuuuuuuuuuuuuuuuuuuuuuuuuuuuuuuuuuuuuuuuuuuuuuuuuuuuuuuuuuuuuuuuuuuuuuuuuuuuuuuuuuuuuuuuuuuuuuuuuuuuuuuuuuuuuuuuuuuuuuuuuuuuuuuuuuuuuuuuuuuuuuuuuuuuuuuuuuuuUU
nunnnnnn n nn nns DSL nnnnnnnnnaaennnnaeannnnae
nannnnnne nnnnne nnnnne nnnnne nnnnne nnnnne nnnnne nnnnne nnnnne nnnnne nnnnne nnnnne nnnnne nnnnne nnnnne nnnnne nnnnne nnnnne nnnnne nnnnne nnnnne nnnnne nnnnne nnnnne nnnnne nnnnne
nnae nnnnne ne nnnnne nnnnne nnnnne nnnnne nnnnne nnnnne
uunauuunu uunauuunu Internet Explorer uuiuaa aan anu
- Tools (网 网) > Internet Options (网 网)
- Nnnu Connections (nssuaa)
- 1an Never dial a connection (iiaaunwnnaaiaa)
- nOK (nna)
Coax
Coax 2017-03-04 15:00:00 16:00:00 17:00:00 18:00:00 19:00:00 20:00:00 21:00:00 22:00:00 23:00:00 24:00:00 25:00:00 26:00:00 27:00:00 28:00:00 29:00:00 30:00:00 31:00:00 32:00:00 33:00:00 34:00:00 35:00:00 36:00:00 37:00:00 38:00:00 39:00:00 40:00:00 41:00:00 42:00:00 43:00:00 44:00:00 45:00:00 46:00:00 47:00:00 48:00:00 49:00:00 50:00:00 51:00:00 52:00:00 53:00:00 54:
u Windows XP nuiinunnna My Network Places (nuuuaaauau
nuu Network Tasks (nuuununununununununun) uan Show icons (nuuulau) anu unu UPnP uununununun unnu nununununun unnu uununununun
Start (出) > Control Panel (wwwnu) > Firewall (waaa)
Nnuu Exceptions (aunu)
ian UPnP Framework
nOK(nau)
wnnnuuwwnnnaaunauyauauauauuullssnnuulnllnksys.com/support.
Linksys X6200
| 指向指针 | Linksys AC750 ADSL/VDSL Dual-Band Wi-Fi Modem Router |
| 指向指针 | X6200 |
| 指向指针指向指针 | 10/100/1000 Mbps (Gigabit Ethernet) |
| 指向指针指向指针 | 2.4 GHz unless 5 GHz |
| 指向指针指向指针 | 4 |
| 指向指针 | USB 2.0, 3.0, 4.0, 5.0 (1-4) |
| 指向指针 | Wi-Fi Protected Setup, 100/100 |
| 指向 LED | Bluetooth Specification, Wi-Fi Protected SetupTM, Wi-Fi, DSL, 400MHz/100MHz |
| UPnP | 蓝牙蓝牙 |
| 指向指针指向指针指向指针指向指针指向指针指向指针指向指针指向指针指向指针指向指针指向指针指向指针指向指针指向指针指向指针指向指针指向指针指向指针指向指针指向指针指向指针指向指针指向指针指向指针指向指针指向指针指向指针指向指针指向指针指向指针指向指针指向指针指向指针指向指针定向 | |
| 指向指针指向指针指向指针指向指针指向指针指向指针指向指针指向指针指向指针指向指针指向指针指向指针指向指针指向指针指向指针指向指针指向指针指向指针指向指针指向指针指向指针指向指针指向指针指向指针指向指针指向指针指向指针指向指针指向指针指向指针指向指针指向指针定向 |
nunuunnuan
| ยงnam | 215 x 40 x 200 mm. (8.5 x 1.6 x 7.9") |
| ยงnamcoree | 415 n. (14.6 aaaaef) |
| ย诗句 | 12V, 1.5A |
| ย诗句corea coree | FCC, CE, K .21, Telepermit, Wi-Fi (IEEE 802 .11b/g/n), WPA2TM, WMM®, Wi-Fi Protected Setup, Windows 7, 8 |
| ย诗句corea | T1 .413i2, G .992 .1 (G .DMT), G .992 .2 (G .Lite), G .992 .3 (ADSL2), G .992 .5 (ADSL2+), G .993.1 (VDSL), G .993.2 (VDSL2) Annex A, M, L |
| ย诗句corea ADSL | 0 °00' 40" C (32 °00' 104" F) |
| ย诗句corea coree | -20 °00' 60" C (-4 °00' 140" F) |
| ย诗句corea coree coree coree coree coree coree coree coree coree coree coree coree coree coree coree coree coree coree coree coree coree coree coree coree coree coree coree coree coree coree coree coree coree coree coree coree coree coree coree coree coree coree coree coree coree coree coree coree coree coree core e | |
| ย诗句corea coree coree coree coree coree coree coree coree coree coree coree coree coree coree coree coree coree coree coree coree coree coree coree coree coree coree coree coree coree coree coree coree coree coree coree coree coree coree coree coree coree coree coree coree coree coree |
W
nwnwauu uunuunu uuaaayaaanuuaaauu uuuuwwauu uuuuauu
u ananannnanaanennnnnaaannnnnnaanannnnnnaanannnnnnaanannnnnnaanannnnnnaanannnnnnaanannnnnnaanannnnnnaanannnnnnaanannnnnnaanannnnnnaanannnnnnaanannnnnnaanannnnnnaanannnnnnaanannnnnnaanannnnnnaanannnnnnaanannnnnnaanannnnnnaanannnnnna anannnnnnnnnnnnnnnnnnnnnnnnnnnnnnnnnnnnnnnnnnnnnnnnnnnnnnnnnnnnnnnnnnnnnnnnnnnnnnnnnnnnnnnnnnnnnnnnnnnnnnnn
lntn linksys.com/support/ waaanwnnnnnaaannnnnnaaennnnnnaaannnnn
BELKIN, LINKSYS 7uauuaaunuauauauauauauuuu u uauauuuuuuuuuuuuueu Belkin
© 2016 Belkin International, Inc. w
LINKSYS
Kullanici Kilavuzu
ADSL/VDSL
Gift Bantli Wi-Fi
Modem Router
X6200
icindekiler
Urune Genel Bakis 3
Suggested Mounting Hardware

7-8 mm

1.5-2 mm
3-5 mm
WPA Kurumsal, WPA2 Kurumsal ve WPA2/WPA Kurumsal Karma
BcTaHOBLeHHaMapwpyTu3aTopaMoTeMa
- Bn3haute 6aXaHe Micce KpInIeHn MapwpyTu3aTopa. IpekeohaiTecb, 0o NobepxHa CTiH, Ha kky Bn PnaHyTe BCTaHOHTn npicTpiE rAkoIO, pIBHOIO, cyxoIO iTbepdoIO. TaKox CJId 3a6e3neuHTn, 0o6 Micce BCTaHOBLeHHa 6ylo B Mexkax DoCAXHOCTI do wTeNceIbHOI po3eTKn.
- PpocBepdIb IBa OTBOpN y CTiHi. IpepeKoHaIeTecr, 06 BiIcTaHb MIX OTBopAMn CTAHOBUNa 75,6 MM.
- BCTABTe no rBnHTy B KOKHm OTbip Ta HeDokpyTtB ix roLOBKn np6Jn3Ho Ha 3 MM.
- Po3mictiB MapuptyaTOp TaK, 06 MoHTaXHi OTbOpn po3TaOByBaJIncs Ha IHHI 3 DBOMa TBHNTAMN.
- Nomicitb MOHTaKHi OTBOpn HaI rBnHTamn Ta onyctiTb MapuTytn3aTOp BnH3, 0o6 TBnHTn 1JIbHO BBiWmN B MoHTaKHi OTBOpn.
Ua6noH DnBCTaHOBHeHHHa CTiHi
Pozdnyte uO CTOpHky B p03mipi 100%.
BidpiKTe B3doBx nyHKTnpHOi liHH Ta npNKlaIb Do CTIN, 06 BnCBepdINTN OTBOpHa ToHi BiCTaHI.
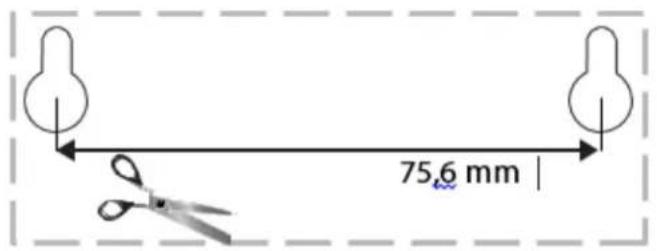
BcTaHOBJIeHHa
Hactpoobannr
1.ПдкшчытseлфоHHи Ka6eь,so BXoHnTbdo KOMnIeKTy,do npTy DSLHaMapuPyTu3aTopi MoEma Ta do HactiHHOi po3eTKn.

Ipumimka. Raio Ha Baui melefoHH iHii nepewkodu, moke 3naoobumcra Mikpoiflbmp a6o po3nodIOBau. (Le nompi6no dR kOpucmyBaivy Beuokobpuhanii, iHsUm KopucmyBaam cniD 3BepHymucdo CBOO iHmepeHnpobaudepa dny ymoueHHa. KopucmyBaam ISDN mikpoiflbmp he nompi6en.) Raio Bam nompi6en MikpophiIbmp, nompi6ho BcmaHOBumu no odHomy dR KOxHOZo meLEFOHa a6o fakca, Aku Bu buKOpUCMOByeMe. Ira BcmaHOBJeHHa Mikpoiflbmpa ndKluOmbuOo do meLEFOHooPozemku, kA mac cepBic ADSL nomim niO'edhaume oOn H Kineub hadaHOz o MeLEFOHOZo Ka6eIo do npma DSL Mikpoiflbmpa.
2.Пдклочь силовиадаNTepdo МаршуТаTopaMoDEmai yBIMKHITb NOrO BdxpepeNo JxNBJIeHHJ.
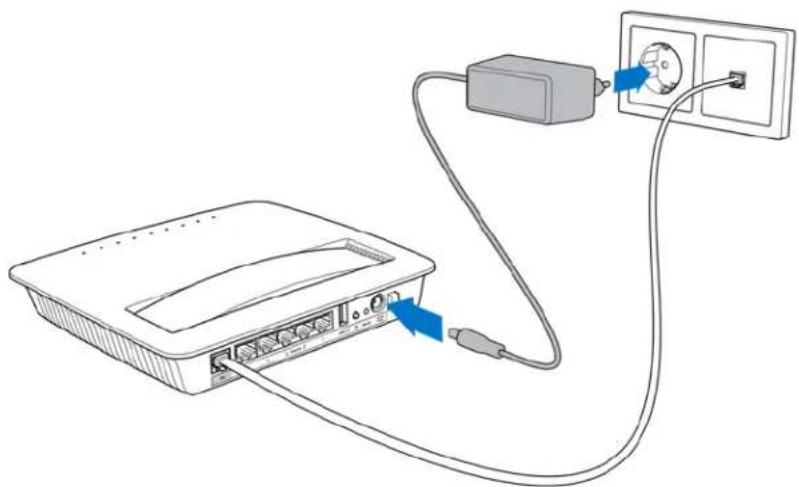
-
Ha kom'toTepi niKlouitb 6e3neue He mepexebe im' 3 hakleyn (Li noDpO6nCi moXHa Ni3HHe 3miHHTn.) Bn6epiB bapiaHT aBtOMaTHUHO npE,DHaHHdo ciEi mepeXi BnoAusbomy. Y Bac He 6yde DoCTuPy do iHTepHeTy, nOKn He BnKOHaHo HalaTuBaHHa MapuPyTu3aTopa Moema.
-
Дя пов好吗оюн Habсpoювань niДКЛЮчы OДИN KIHeь Ka6eLIO, Ун НадаETbCS,do aanTepa Ethernet komn'IoTepa,a iHши KIHeь Do npOra Ethernet Ha 3BOPOTHomу 6oCi МаршуТиЗАтopa MoDEma.
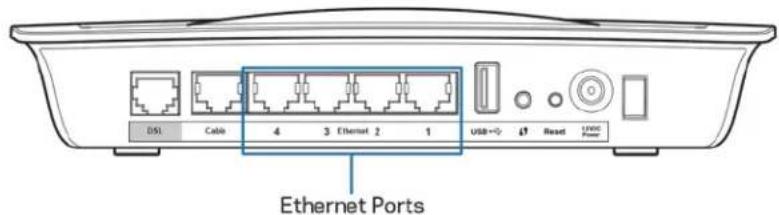
Iobtopitb kpoK 2 dJa KoxHoro DoaTkoBoro KOMn'IoTepa a6o npncTroo,
Akn noTpi6Ho NiKlnOHTn Do MapuPyTu3aTopa Moema.
Приитka.Якsoадантep Ethernet komn'tepa He halaustobanu,дИВ.doKlaadHy iHΦopMaцioBdoKymeHTaui adaTepa Ethernet.
- BiKpnIe Be6-6pay3ep i BBeDiItb http://192.168.1.1 ypaDOK aDpeCn.

- Bveiitb"admin"B o6ox nolx Im'kopncTyBaHa (Username)i NapoIb (Password), notim HATnCHITb YBiTn (Log in).

- BiKpncTbcra CToPiHka HAcTpoOBaHHBaWoRo MapWpyTu3aTopa MoEma Ha ochobi Be6. HatnCHiTb Ha BknaDky Quick Start (Kopomku noci6HuK).
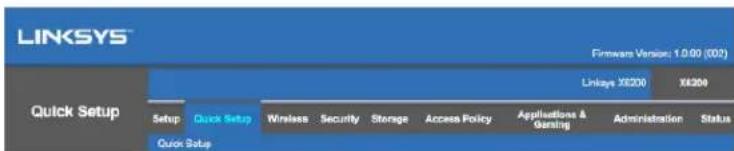
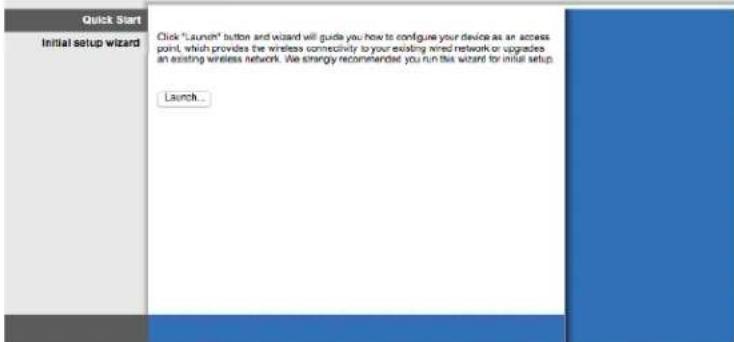
-
HaTnCHiTb Launch (3anycntn) dny3anycky MaNcTp a HanaTuBaHHa. MaNCTep peKOMeHDoBaHn dIy NOaTKOBOro HanaTuBaHH, TOM yO BIn npObede Bac do Na6ilbue eFekTNBHOI KOHfirpauii MapwpyTu3aTopa Moema.
-
Дя Налаштуваимь Врууну Натисіть На Вкладку Setup (Hалаштуваимь) i BИКорпстовітЕ службові рporраму Ha ochobi 6payзера.

- Повини загориссвитлдiodи iHdNKaTOpN ДЯжВLEнн (Power), 6e3npoBiDn (Wireless) i Ethernet (no ODHOMy DЯ КОЖНOrо пДКЛЮЧЕHORO kom'tepa/npncTpo).Якцу се HeТak,пepeKOHaTEcS,цу yВIMKHeNe JxNBLEHnMapшpyTu3aTopa moDEma i Ka6eli NaIHy nI KJIQUeHi.
Hanaштуваня VDSL
Якwo y Bac Tnpi ndkIoueHn VDSL (To6To uepe3 TelefoHny liHIO, aIe MaE wBnDkiCt b 3aBaHTaKeHn 6ilbwe 24 M6iT/c), notp6HO halaTuBaTN MapuTy3aTop moema BpyHy. BaW iTHepHeT-npObaNdep MOxe Ha3NuBAtn VDSL "BoJokHo".Якwo y Bac npabInbHa iNΦopMauiB iD iTHepHeT-npObaNdepa — ue npocTo i wBnDko.
- HataChiB BklaKy Setup (HacmpoobAH) >Basic Setup (BaOBe halaTbAH). B po3iPi Physical Setting (PhiHne halaTbAH) o6epitb DSL dPhy sical Type (Φiuchun mun) i PTM nDSL Mode (peKm).
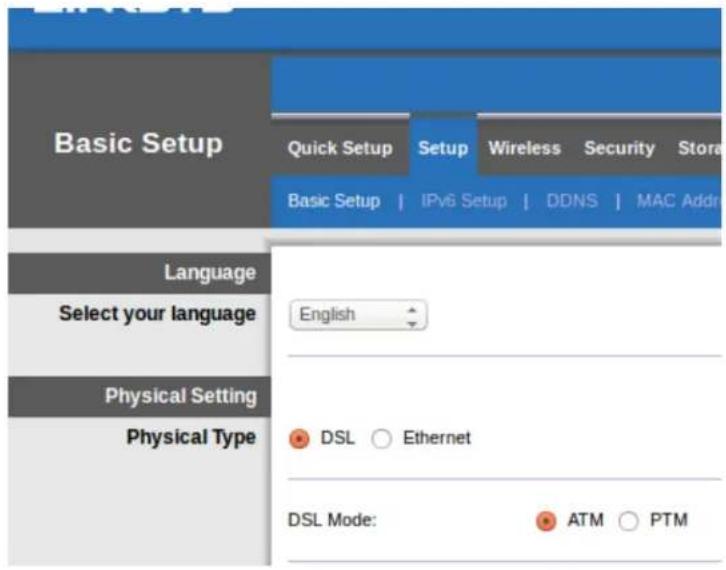
2.ЯкwoДЯ iHTepHET-npOBAIDepa notpi6Ha BiPtyaIbHa JOM VLAN, o6epiTb Enable VLAN (BKnIOuHTn VLAN) iBBeDiTVLAN ID, noTpio6Hm dJa iHTepHET-npOBAIDepa. IpeBipTe BdoBikoi cnyk6i iHTepHET-npOBAIDepa, kso BV He neBHni, zo BIKOpNCToBvBaTu.
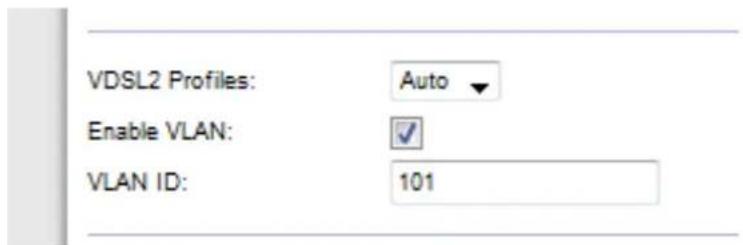
-
Y po3diInternet Setup (HanaTuBaHHa IInTepeT) > Internet Connection Type (Tin intepheT-niknueHH) o6epiPPoE a60 IPoE (DnHaMiHa a6o cTaTuHa IPaPeca) 3a BmOrOu BaWo r intepHeT-npOaBdepa (DiHaTEcB DOBiKobi Cnyk6i npOaBdepa, kso HeNeBHi). O6epiB Bridge Mode only (TilbKn peJIM MOCTa) dIy BnKOpCTAHN pncToB R KocTi MoDEMy 6e3 fynKioHaJIbHOCTI MapupTy3aTopa (To6To 6e3 Wi-Fi a60 Byb-RAx iHnx fynKci MepeXi).
-
Пи ВИКОПИСТАНHI PPPoE BBeДITb npabINbHe IM'я KОПИСТУВaayi napoiB, RAK Bn3HaueHo npOBaIdepom.
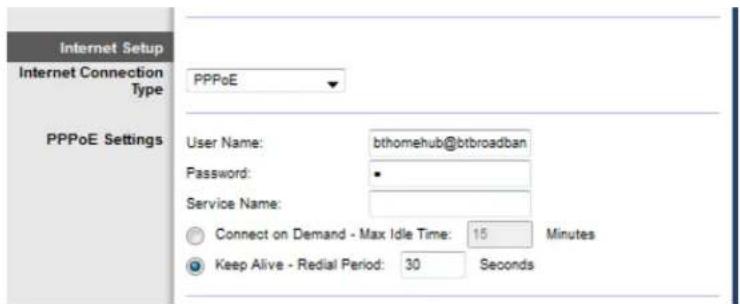
- RaKuo TnPiDKNIOUeHHaINHaMChHn, o6epiTb/PoEdIg Internet Connection Type (Tnny INTepeHET-nDkNIOUeHHa) i dIy HanaWtBuHn IP o6epiTb Automatically obtain an IP address(ABToMaTuNo OTPmByaTn IP-aDpecy).
-Якuto Дя npobaipepa notpi6ho IPoE 3i ctaTnHIO IP-aDpecoio,obepitb IPoE dIa Internet Connection Type (Tny lHTepHer-nikNoeHH),notim oBeipitb Use the Following IP Address(BnkopncTOByBaTH hAcTyHNY IP- aDpecy)i BBeiTb HanaWtBuHHr IP-aDpeCn (HaadHi BaUM iHTepHeTnpobaidepom) y BiIDnoBidiHIOJ.
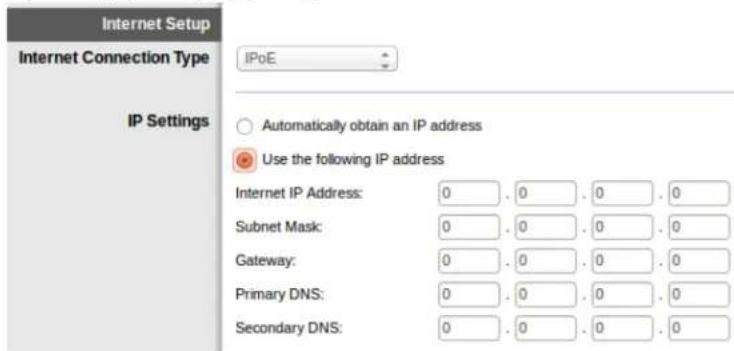
- Hatachitb Save Settings (36epertn hactpoikn) (BHN3y ctopiHK), 06 36epertn HalaatyBaHH i 3aBepuHTn Hactpoiky.
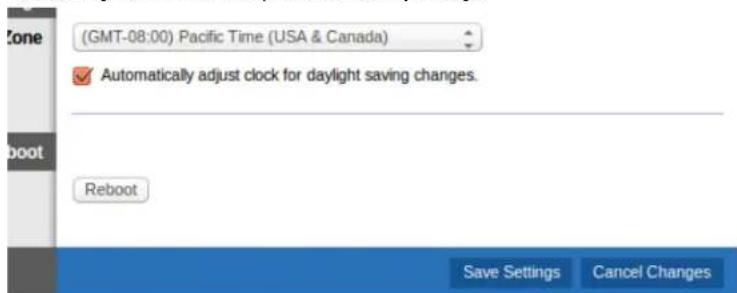
Hac troяka mapшутн3aTopa модама Лише як mapшутн3aTopa
Network Mode (Pexm Mepexi) (y 6iIbOcTi mepex cIid 3aIIuHTn Ioro BCTaHOBLeHm Ha Mixed (KOM6iHOBaHn) (3a 3amOByBaHHaM).
Kombiohahi-kuo y Bac y mepexi npucmpoi Wireless-N, Wireless-G ma Wireless-B, 36epeximb HalaumyBAHHa 3a 3amOByBAHHaM, Kombohann.
- Wireless-B/G Only (Wireless-B/G BUKKIOUHO).Якzoу bac y Мерекi npucmpoi Wireless-B ma Wireless-G, obepimb onuio «Wireless-B/G BUKKIOUHO».
- Wireless-B Only (Wireless-B BnKlouHo). JaKo y Bac luwe Wireless-Bnpucmpi, o6epimb «Wireless-B BukNoHOr.
Wireless-G Only (Wireless-G Buklouho). JaKuo y Bac luwe Wireless-Gnpucmpiu, o6epimb «Wireless-G Buklouho».
- Wireless-N Only (Wireless-N BukljuOHo). JaKuO y Bac luUwe Wireless-Nnpucmpiui, o6epimb «Wireless-N BukljuOHo».
- Disabled (Бл_OKувань).ЯкzoуВасимаэnpсмpoB Wireless-B, Wireless-G ma Wireless-Nу мерекi,оберпь «БлOKувань».
WPA2/WPA Mixed, WPA2 Personal WPA Personal
BBeiTb napoIbHy pa3y 38-63 cIMBOJIB. 3a 3amOBuBaHHm —password. RaKopo BnKOpucToByBaTu I3 dJa HaJaUHTyBaHH, ToDi 3HaueHHra 3a 3amOBuBaHHm 3MiHIOEtbcr Ha yHikalbHy napoIbHy pa3y.
WPA Enterprise, WPA2 Enterprise i WPA2/WPA Enterprise Mixed
BnKOpncToBvetybCByy3roJxHc3 cepBepom RADIUS. (Noro cIiD BnKOpncToBvBaTn IInse, KOn cepBep RADIUS nikLIOueHm do mapuTytnaTopa.)
BVeDiTb IP-apecy cepBepa RADIUS.
BBeiTb HOMep npTy cepBepa RADIUS.3a 3amOByBaHnHa—1812.
BVeDiTb cnilbHn KIOUy dIa MapuTy3aTopa i cepBepa.
WEP
WEP-6a3OBm MeToD uΦpyBaHHraKn He hAcTiIbKn HaadiHm, k WPA.
- ΜινφpybaHH.ObepiTB pIBeHb ΜινφpyBaHH WEP, (40/64-6it 10 wicTHaIaTkoBnx ΚΦp) a6o 104/128-6it (26 wicTHaIaTkoBnx ΚΦp). 40/64-6it (10 wicTHaIaTkoBnx ΚΦp) BCTAHOBJIeHO 3a 3aMOByBaHHM.
- NapoIbHa φpa3a. BVeDiTb napoIbHy φpa3y dIra aBTOMaTHHOrO CTBOpEHnKJIIOuA WEP. NToIM HATnCHiTb «3reHepyBaTu|.
Klou 1. Kuo Bn He Bbnn npoBHy fpa3y, BBeiTb Kluq WEP BpyHy.
BumKHeHo
JaKuo o6paHO BmKHeHH 6e3neKy 6e3npoBidHOi MepeXi, NiJ uac nepworo DocTyny do IntepHET Bam haDiJe nobIDomLeHH npo BmKHeHH 6e3neKn 6e3npoBidHOi MepeXi. 3'ABITbc 3aIHT Ha BBIMKHeHH 6e3neKn 6e3npoBidHOi MepeXi a60 Ha niTBePdxKeHH toro, 0u Bn ycBiDOMIOTe pN3NK, aIe 6aKaTe npoDBkUTn po6Otu, He BKJIouHbUn 6e3neKy 6e3npoBidHOi MepeXi.
IpnmiTka. JaKsO BmKHeHa 6e3peKa 6e3npoBidHoi MepeXi, 6yDb-xTo MoKe OTPmuTn DocTy n Do BaWo i 6e3npoBidHoi MepeXi B 6yDb-ynkN qac.
3axuhe HanautybaHHmepexi Wi-Fi
DocTyHNO TpN MeToDn 3axuueHoro halaWtYBaHHa Mepexi Wi-Fi. BnKOpuctoByte MeToD, knn CTocyeTbCk NJIeHTcbKO rnpCTPOU, kNN BN HAcTPOOETe.
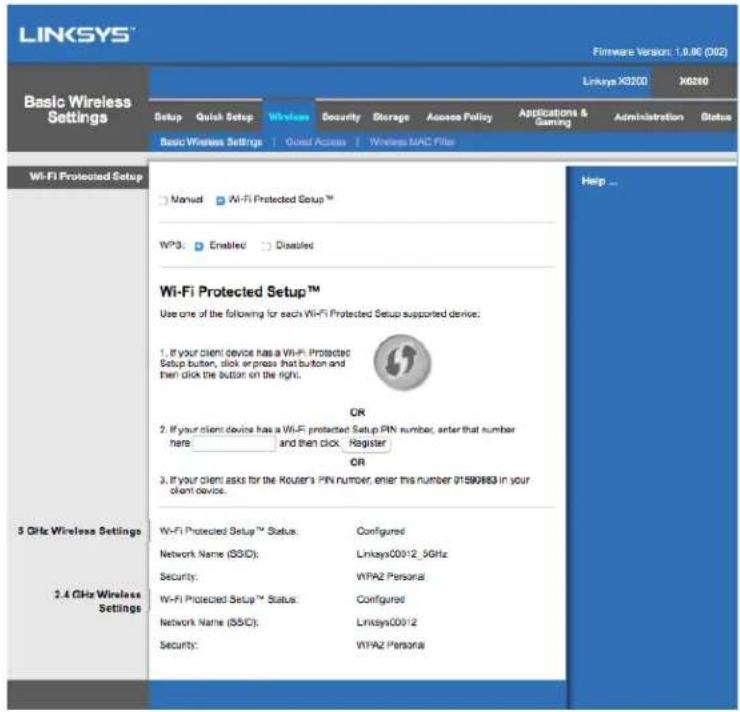
Ppimitka.3axuhe HalaTuBaHHa MepeXi Wi-Fi hactpooe OIN KJIieHTcbKni npictpi 3a oDn pa3. Nobmopimb Bkazibku dIra KoxHoO npucmpoio-KliEHa, zo niompumye fynkuio 3axuuehozo HalaumyBaHHa MepeXi Wi-Fi.
Po6oTa cBtIOBnX iHnKaTOpiB fynKuii 3axnueHoro HalaunTyBaHHaMepeksi Wi-Fi
- IlorotnHaBepxHnIpaHeI MappyTu3aTopa BnKoHye yHKciIO iNdkaTopa 3axuheHOro HalaTuBaHHmepeXi Wi-Fi.
KoI npOuec 3axnueHoro hanaTuBaHHa MepeXi Wi-Fi aKTuBn, iNDkaTOp 6JIIMae noBIOHO. KoI npOuec 3axnueHoro hanaTuBaHHa MepeXi ycniHo 3aBepSeHn, iNDkATOp cBITITbc8e3nepePBHO. - YKUO BUNIKLa NOMILKa, iHdNKaTOp 6LIMMaE WBNIDKO DBi XBNIHH; 6yIb NaCKa, 3aueKaIte i NOBTOPIb cnpo6y.
3auekaute, nokn cbiTIOIOHNI iNDkAToP He noHHe 6e3nepeBHO Cbitntncr, nepH HIX po3noHNATN HOBy cecio 6e3neuHOro HalaWtYBaHHra 6e3npobidhoi mepexi.
KhoNka 3axnueHoro HalaunTyBaHHa 6e3npoBIDHOI MepeKi
CkopncTaITeCb Lm MeToDom, kUo BaW npncpti-klieHT Mae KhoNky 3axuHoro HalaTuBaHHa Mepexi Wi-Fi.
Ppimitka. O6OB'3KOBO HanaTObyIte oINH KJIeHTcBKn pncTpI 3a oINH pa3.
- Klaunb abo haTncItb KHonky 3axnueHoro HanaWtBuHna Mepexi Wi-Fi Ha npictpoi-KnieHTi.
- Hatncihb Ka KhoNky 3axuheHoro HalaTuBaHHa Mepexi Wi-Fi Ha ekpani fynkii 3axuheHoro HalaTuBaHHa Mepexi Wi-Fi Mappytn3atopa ABO hatncihb Ta ytpmyte KhoNky 3axuheHoro HalaTuBaHHa Mepexi Wi-Fi Ha 3boporhomy 6oCi mappTytn3atopa npotrarom odHiei cekyHn.
3.Писяналаштувань Клійстського пистою натуспіг Ok ha ekpani Функцii 3axи龟норуналаштувань Мерекi Wi-Fi mapspуТиЗатopa npotrayOM DBOX XBNINH.
BbeiITb PIN-koK KnieHcBko npncpoHa MapuTy3aToPi
BukopncToByte ue MeToD, kso Baw npictpiN-KIeHT MaE PIH-KoD (nepcohaIbHni iENTnphiKauiHn Homep) fynKci 3axuenceHoro hanaTuBaHHaMepeXi Wi-Fi.
- BBeiB IIH-koD npucTropo-KlieHTa B noJe Ha ekpaHi fynKciI 3axuIeHoro HalaTuBaHHmepeXi Wi-Fi Mapwpytn3atopa.
- HataHcHtB KhoNky Register (PeeCtp) Ha eKpaHi 3axuIeHoro HanaTuBaHHa MepeXi Wi-Fi Mapupymusamopa.
3.Писяналаштуваим Клій entського пистою hatиспіть OK ha ekpani Функцii 3axи龟Horo nalaштуваим мерекi Wi-Fi mapшутuaTopa npotraym DBOX XBNINH.
BbeiTb PIN-koMapuPyTu3aTopaHa KnieHcBkOMy npucTpoi
BnKopncToBvIe TcE MeTod, kUo Baw npncTpii-KJIeHT npocntb BBecTn PIH-KoMapuPyTu3aTopa.
- BBeiTb Ha npicTrooi-KnieHti IIH-KoD, Bka3aHn Ha ekpaH i 3axNuIeHoro HalaTuBaHHa Mepexi Wi-Fi MapuTy3aTopa. (BiH TAKOx 3a3HaueHn Ha HxHi cToPOHi MapuTy3aTopa.)
2.Писяналаштувань КліeHTсьКOrO npИСТpoI HoTиСHITb OK ha ekpaHI φункii 3axицehoroналаштувань Мерекi Wi-Fi МаршутuaTopa npOTЯROM DBOX XBNINH.
Для кожни 6e3npobidhoi mepeki mepekebe im' (SSID), 6e3neka ta napolyha φpa3a BiO6paKaIbCra Bn3y ekpaHy.
PnmuTka. Ka y Bac KJIeHmcbKu npucmpiu, Ku He niDmpUmy 3axuueHe HalaumyBaHHa Mepexi Wi-Fi, zanuimb HalaumyBaHHa 6e3npoBioHOi Mepeksi i nomIM BpyHy Halaumyume ue npucmpiu.
Baw kom'tep He moKe PiKJIouHTncrdo IntepHeTy.
DotpmynteciaHCTpykci, NOKI KOMTIOTep He 3MOKe niKJIIOHTNCa Do IHTepHeTy.
- IpeekohaiTeec, 0o MapwpyTu3aTOp Moema nikluoyen m Do MepeXi XnBLeHn. IHdkaTOp KINBleHn IOBHeH 6Tu 3eJeHm i He 6lImaTu.
-
RaKuo iHdNkatop XnBHeHHa6bIImae, Todi BmKHiTb Bci CBOi MepeXeBi npncTpoi, BV. T.4. MapuTy3aTOp MoEma i Komn'IOTepn. Notim BMnKaIte KoxeH npncTpriy HactynHni nocliIOBHOCTi:
-
MapuPyTu3aTop MoJeMy
-
KOMN'KTeP
-
IpebeipTe cbiTIOiOHa nepeHnI naneI npncTroIO. IpekoHaTecra, 0cBITbcra CbitIOiOd XnBHeHHr, DSL i npinaMHi OOnH 3 npohymepoBaHnx cbitIOiOIB Ethernet. Raio ce He TaK, ToDi nepeBiTe Ka6JIbHe NiKIOUeHHa. Kom'IoTeP nobHe H 6Tu NiKIOUeHH do OOnHO r 3 nopTib Ethernet 3 homepom 1-4 Ha npicTrooi, a DSL npot npncTroIO nobHe H 6Tu NiKIOUeHHm do liHii ADSL.
- o6epiTb Tools (CepBic) > Internet Options (onuii IHTepHet).
- Hatachitb Ha BklaKy Connections (PiiknloueHHa).
- 06epitb Never dial a connection (Hikoln He Ha6npaTu nikluoyehna).
- Hatnchitb OK.
Ви ВИКОРИСТОВЕТе статуни IP-aДпecу i He можete πiДКЛЮЧNTИСА.
Wi-Fi Protected Setup
Co ba phuong thuc thiét lap Wi-Fi Protected Setup. Hay sur dung phuong thuc cap dung cho thiet bi khac ma ban dang dát cau sinh.

Luu y--Wi-Fi Protected Setup chi dāt cau hinh cho môt thiét bj khachat mōi lan. Hay lap lai theo huóng dān cho tung thiet bj khachat hô tro Wi-Fi Protected Setup.
Hoat dong cua den Wi-Fi Protected Setup
Logo o măt trân cua bó dinh tuyén la den Wi-Fi Protected Setup.
Khi qua trinh Wi-Fi Protected Setup dang hoat dong, den se nhay cham. Khi thiet lap Wi-Fi Protected Setup thanc cong, den se sang lien tuc.
- Néu có lāi, dén sé nháp nháy nanh trong hai phút; hyd doi va thu lái.
Hay doi cho den khi den sang lien tuc truc khi bat dau phien Wi-Fi Protected Setup tiep theo.
Nut Wi-Fi Protected Setup
Sudung phuong thuc nay nei thei bt ki chac cua ban co nut Wi-Fi Protected Setup.
Luu y-Ban hay nhó chi dαt cαu hinh cho môt thiet bi khach moi lan.
- Bām hóac an nút Wi-Fi Protected Setup trén thiet bi khách.
- Bam nut Wi-Fi Protected Setup tren man inh Wi-Fi Protected Setup cua bo dinh tuyen HOAC an va giu nut Wi-Fi Protected Setup o mat sau cua bo dinh tuyen trong mot giay.
- Trong vong hai phut sau khi thiét bj khach duoc cau hinh, hay bam OK tren man hinh Wi-Fi Protected Setup cua bo dinh tuyén.
Nhap ma PIN cua Thiét bi khach vao Bô dinh tuyén
Sū dung phuong thuc nay néu tiét bi khách cua bān có mā PIN (Sō nhān dang ca nhān) cho Wi-Fi Protected Setup.
- Nháp mā PIN cúa thiét bi khách vào truong tiên mân先进技术 Vi-Fi Protected Setup cúa bó dinh tuyén.
- Bam nut Dang k y trn man hinh Wi-Fi Protected Setup cua bo dinh tuyen.
- Trong vong hai phut sai khi thiet bi khach duoc cau sinh, hay bam OK tren man sinh Wi-Fi Protected Setup cua bo dinh tuyen.
Nhap ma PIN cua Bô dinh tvén vao Thiét bi khach
Su dung phuong thuc nay neu thei bet bi khach cua ban yeu cau ma PIN cua bo dinh tuyen.
- Trén thiet bi khach, nhap ma PIN hiñn thi trén man hinh Wi-Fi Protected Setup cua bó dinh tuyén. (No cung duoc ghi ò mat duoi cua bô dinh tuyén).
- Trong vong hai phut sau khi thiet bi khach duoc cau sinh, hay bam OK tren man hinh Wi-Fi Protected Setup cua bo dinh tuyen.
Voi māi mang khong day, Tén mang (SSID), Bao mát va Chuōi mát khāu duoc hièn thi ò phia duói cung cuà mān hinh.
Luu y--Neu bao cac thiet bi khach khong hto Wy-Fi Protected Setup, hay ghi lai cac cai ddt khong day, sao do dst cau sinh tu cong cho cac thiet bi khach do.
Khongday Truy nhap khach
Tinh nang Truy nhap khac giup ban cung cap truy nhap Internet khong day cho cac vi khach toi nha. Mang khach la mot mang khong day tach biét voi mang cuc bo cua ban. Tinh nang Truy nhap khac khong cung cap truy nhap toi mang cuc bo va cac tai nguyen cua no, vi vay khach cua ban se khong truy nhap duoc cac may tinh hoac du lieu ca nhan cua ban. Vi du, may tinh khach khong the dung may in tren mang cuc bo hoac sao chep tep tin toi may tinh tren mang cuc bo. Vi ec nay giup giam thieu cac nguy co bao mat cho mang cuc bo cua ban.
Truy nhap khach
Cho phép Truy nhap khach—Dé cho phép truy nhap Internet qua môt mang khach, hy giu nguyen mac dinh, Co. Nou khong, hy chon Khong.
Tén mang khách—Tén mac dinh cua mang khong day cua ban va sau do la duoi “guest”.
Māt khāu khách—Mac dinh l'“guest”. Neu bān dā sür dung phan mēm thiet lap de cai dāt thi. mat khāu mac dinh dā duoc thay doi thanh mot mat khāu riéng.
Thay doi—Bam tuy chon nay de thay doi Māt khāu khách. Man inh Thay doi māt khāu khách s é xuat hiên. Nhap mōt māt khāu dai 4-32 ký tv. Bam Thay doi de luu māt khāu moi va tro vè man hinh Truy nhap khách.
Tóng só kháché chopép—Theo mac dinh, 5 kháchuqc hép truy nhap Internet qua mang kháché. Chon so luong kháché tói da ma ban muon cho hép tren mang khách cua ban.
Phat rong SSID—Khi cac thiet bi khong day khao sat khu vu c Ian can de tim cac mang khong day dé két noi, chung sé phat hiên duoc SSID (ten mang khong day) ma bó dinh tuyén dang phat rong. De phat rong SSID cua mang khach, hyi gu nguyen mac dinh, Bát. Nou ban khong muon phat rong SSID cua mang khach, hyi chon Tát.
Huóng dān chō khách
Khi mot vi khach muon truy nhap Internet tai nha cua ban, hay hong dan ho nhu tau:
- Trén may tinh khách, hay két noci vovi mang khách khong day co ten tren man sinh Truy nhap khách.
- Mô trinh duyêt web.
- Trén man hinh dang nhap, nhap mat khau hién thi trén man hinh Truy nhap khach.
- Bam Dang nhap.
Xuy su co
May tinh cua bān khong the két noci Internet.
Hãy lam theo hróng dan cho dén khi may tinh cua ban có thekét não Internet:
- Hay chac chan rang Bô dinh tuyén Modem dà duoc bát nguôn. Den LED nguôn phai sang mau xanh lá vā khong nhap nhay.
-
Nou den LED nguôn nhap nhay, hyāt nguôn tát ca cac thiet bj mang cua ban, bao gôm ca Bô dinh tuyén Modem va cac may tinh. Sau do bat nguôn cho tung thiet bi theo thu tu nhu sau:
-
Bô dinh tuyén Modem
-
May tinh
-
Kiem tra cac den LED ò mát truncc cua thiet bi. Hay chac chan rang den Nguon, DSL va it nhát mot trong so cac den LED Ethernet duoc dänh so dang sang. Neu khong, hay kiem tra cac douk két noi cua day cap. May tinh phai duoc két noi vovi mot trong cac cong Ethernet duoc dānh so 1-4 trèn thiet bi, va cóng DSL cua thiet bi phai duoc két noi vovi duong day ADSL.