AdvancedTemp - Thermometer BOSCH - Free user manual and instructions
Find the device manual for free AdvancedTemp BOSCH in PDF.
| Feature | Details |
|---|---|
| Product type | Thermometer |
| Measurement range | 0 °C to 100 °C |
| Accuracy | ± 0.5 °C |
| Display | LCD screen |
| Power supply | AAA batteries |
| Usage | Ideal for kitchen and household applications |
| Maintenance | Clean with a damp cloth, do not immerse in water |
| Safety | Do not use on hot surfaces, keep out of reach of children |
| Warranty | 2 years |
| Included accessories | Batteries, user manual |
Frequently Asked Questions - AdvancedTemp BOSCH
User questions about AdvancedTemp BOSCH
0 question about this device. Answer the ones you know or ask your own.
Ask a new question about this device
Download the instructions for your Thermometer in PDF format for free! Find your manual AdvancedTemp - BOSCH and take your electronic device back in hand. On this page are published all the documents necessary for the use of your device. AdvancedTemp by BOSCH.
USER MANUAL AdvancedTemp BOSCH
natural_image
Exterior view of a Bosch handheld device (no visible text or symbols)1 609 92A 85E | (19.10.2022) Bosch Power Tools
other
| Stage | Temperature (°C) | |-------|------------------| | (a) | 46% | | (b) | 17.9 | | (c) | 18.1 | | (d) | 34.7 | | (e) | 35.2 | | (f) | 34.7 | | (g) | 35.2 | | (h) | 34.7 | | (i) | 35.2 | | (m) | 89.3 | | (l) | 122.5 | | (k) | -33.2 | | (h) | 19.7 | | (r) | 22.5 | | (s) | 22.5 | | (t) | 29.7 | | (u) | 29.7 |Bosch Power Tools 1 609 92A 85E | (19.10.2022)
6

natural_image
Illustration of a hand holding a flashlight inside a cabinet (no text or symbols visible)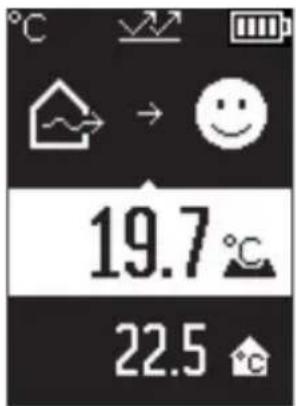
natural_image
Hand holding a flashlight with a pointer, no visible text or symbols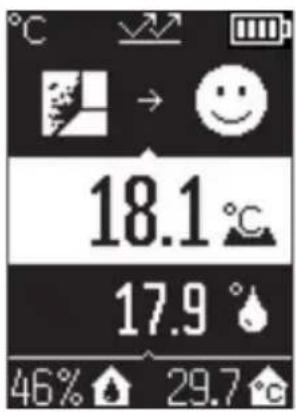
1 609 92A 85E | (19.10.2022) Bosch Power Tools
Deutsch
Sicherheitshinweise

www.bosch-pt.com/serviceaddresses
Entsorgung
All instructions must be read and observed in order for the measuring tool to function safely. The safeguards integrated into the measuring tool may be compromised if the measuring tool is not used in accordance with these instructions. Never make warning signs on the measuring tool unrecognisable. SAVE THESE IN-
STRUCTIONS FOR FUTURE REFERENCE AND INCLUDE THEM WITH THE MEASURING TOOL WHEN TRANSFERRING IT TO A THIRD PARTY.
▶ Warning! If operating or adjustment devices other than those specified here are used or other procedures are carried out, this can lead to dangerous exposure to radiation.
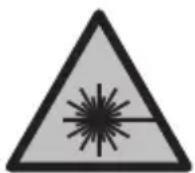
The measuring tool is delivered with a laser warning sign (marked in the illustration of the measuring tool on the graphics page).
If the text of the laser warning label is not in your national language, stick the provided warning label in your national language over it before operating for the first time.
Do not direct the laser beam at persons or animals and do not stare into the direct or reflected laser beam yourself. You could blind somebody, cause accidents or damage your eyes.
▶ If laser radiation hits your eye, you must close your eyes and immediately turn your head away from the beam.
▶ Do not make any modifications to the laser equipment.
▶ Do not use the laser goggles (accessory) as protective goggles. The laser goggles make the laser beam easier to see; they do not protect you against laser radiation.
▶ Do not use the laser goggles (accessory) as sunglasses or while driving. The laser goggles do not provide full UV protection and impair your ability to see colours.
▶ Have the measuring tool serviced only by a qualified specialist using only original replacement parts. This will ensure that the safety of the measuring tool is maintained.
▶ Do not let children use the laser measuring tool unsupervised. They could unintentionally blind themselves or other persons.
▶ Do not use the measuring tool in explosive atmospheres which contain flammable liquids, gases or dust. Sparks may be produced inside the measuring tool, which can ignite dust or fumes.
The measuring tool may not be 100% accurate for technological reasons. Environmental factors (e.g. dust or steam in the area being measured), temperature fluctuations (e.g. from fan heater) as well as the nature and condition of the surfaces being measured (e.g. highly reflective or transparent materials) can distort measurement readings.
Product Description and Specifications
Please observe the illustrations at the beginning of this operating manual.
Intended Use
The measuring tool is intended for contactless measurement of surface temperature, ambient temperature and relative humidity. It calculates the dew point temperature and indicates thermal bridges and mould risk. Mould spores cannot be detected with the measuring tool.
The measuring tool must not be used for temperature measurement on persons and animals or for other medical purposes.
The measuring tool is not suitable for surface temperature measurement of gases or liquids.
The measuring tool is not intended for commercial use.
The measuring tool is suitable for indoor use.
This product is a consumer laser product in accordance with EN 50689.
Product features
The numbering of the product features shown refers to the illustration of the measuring tool on the graphic page.
(1) Measure button
(2) Laser beam outlet aperture
(3) Infrared beam reception lens
(4) Humidity and temperature sensor
(5) Emissivity label
(6) Laser warning label
(7) Serial number
26 | English
(8) Retaining strap holder
(9) Battery compartment cover
(10) Battery compartment cover locking mechanism
(11) Back button/delete button
(12) ON/OFF button/mode button
(13) Emissivity button
(14) Display
(15) Indicator LED
(16) Protective bag
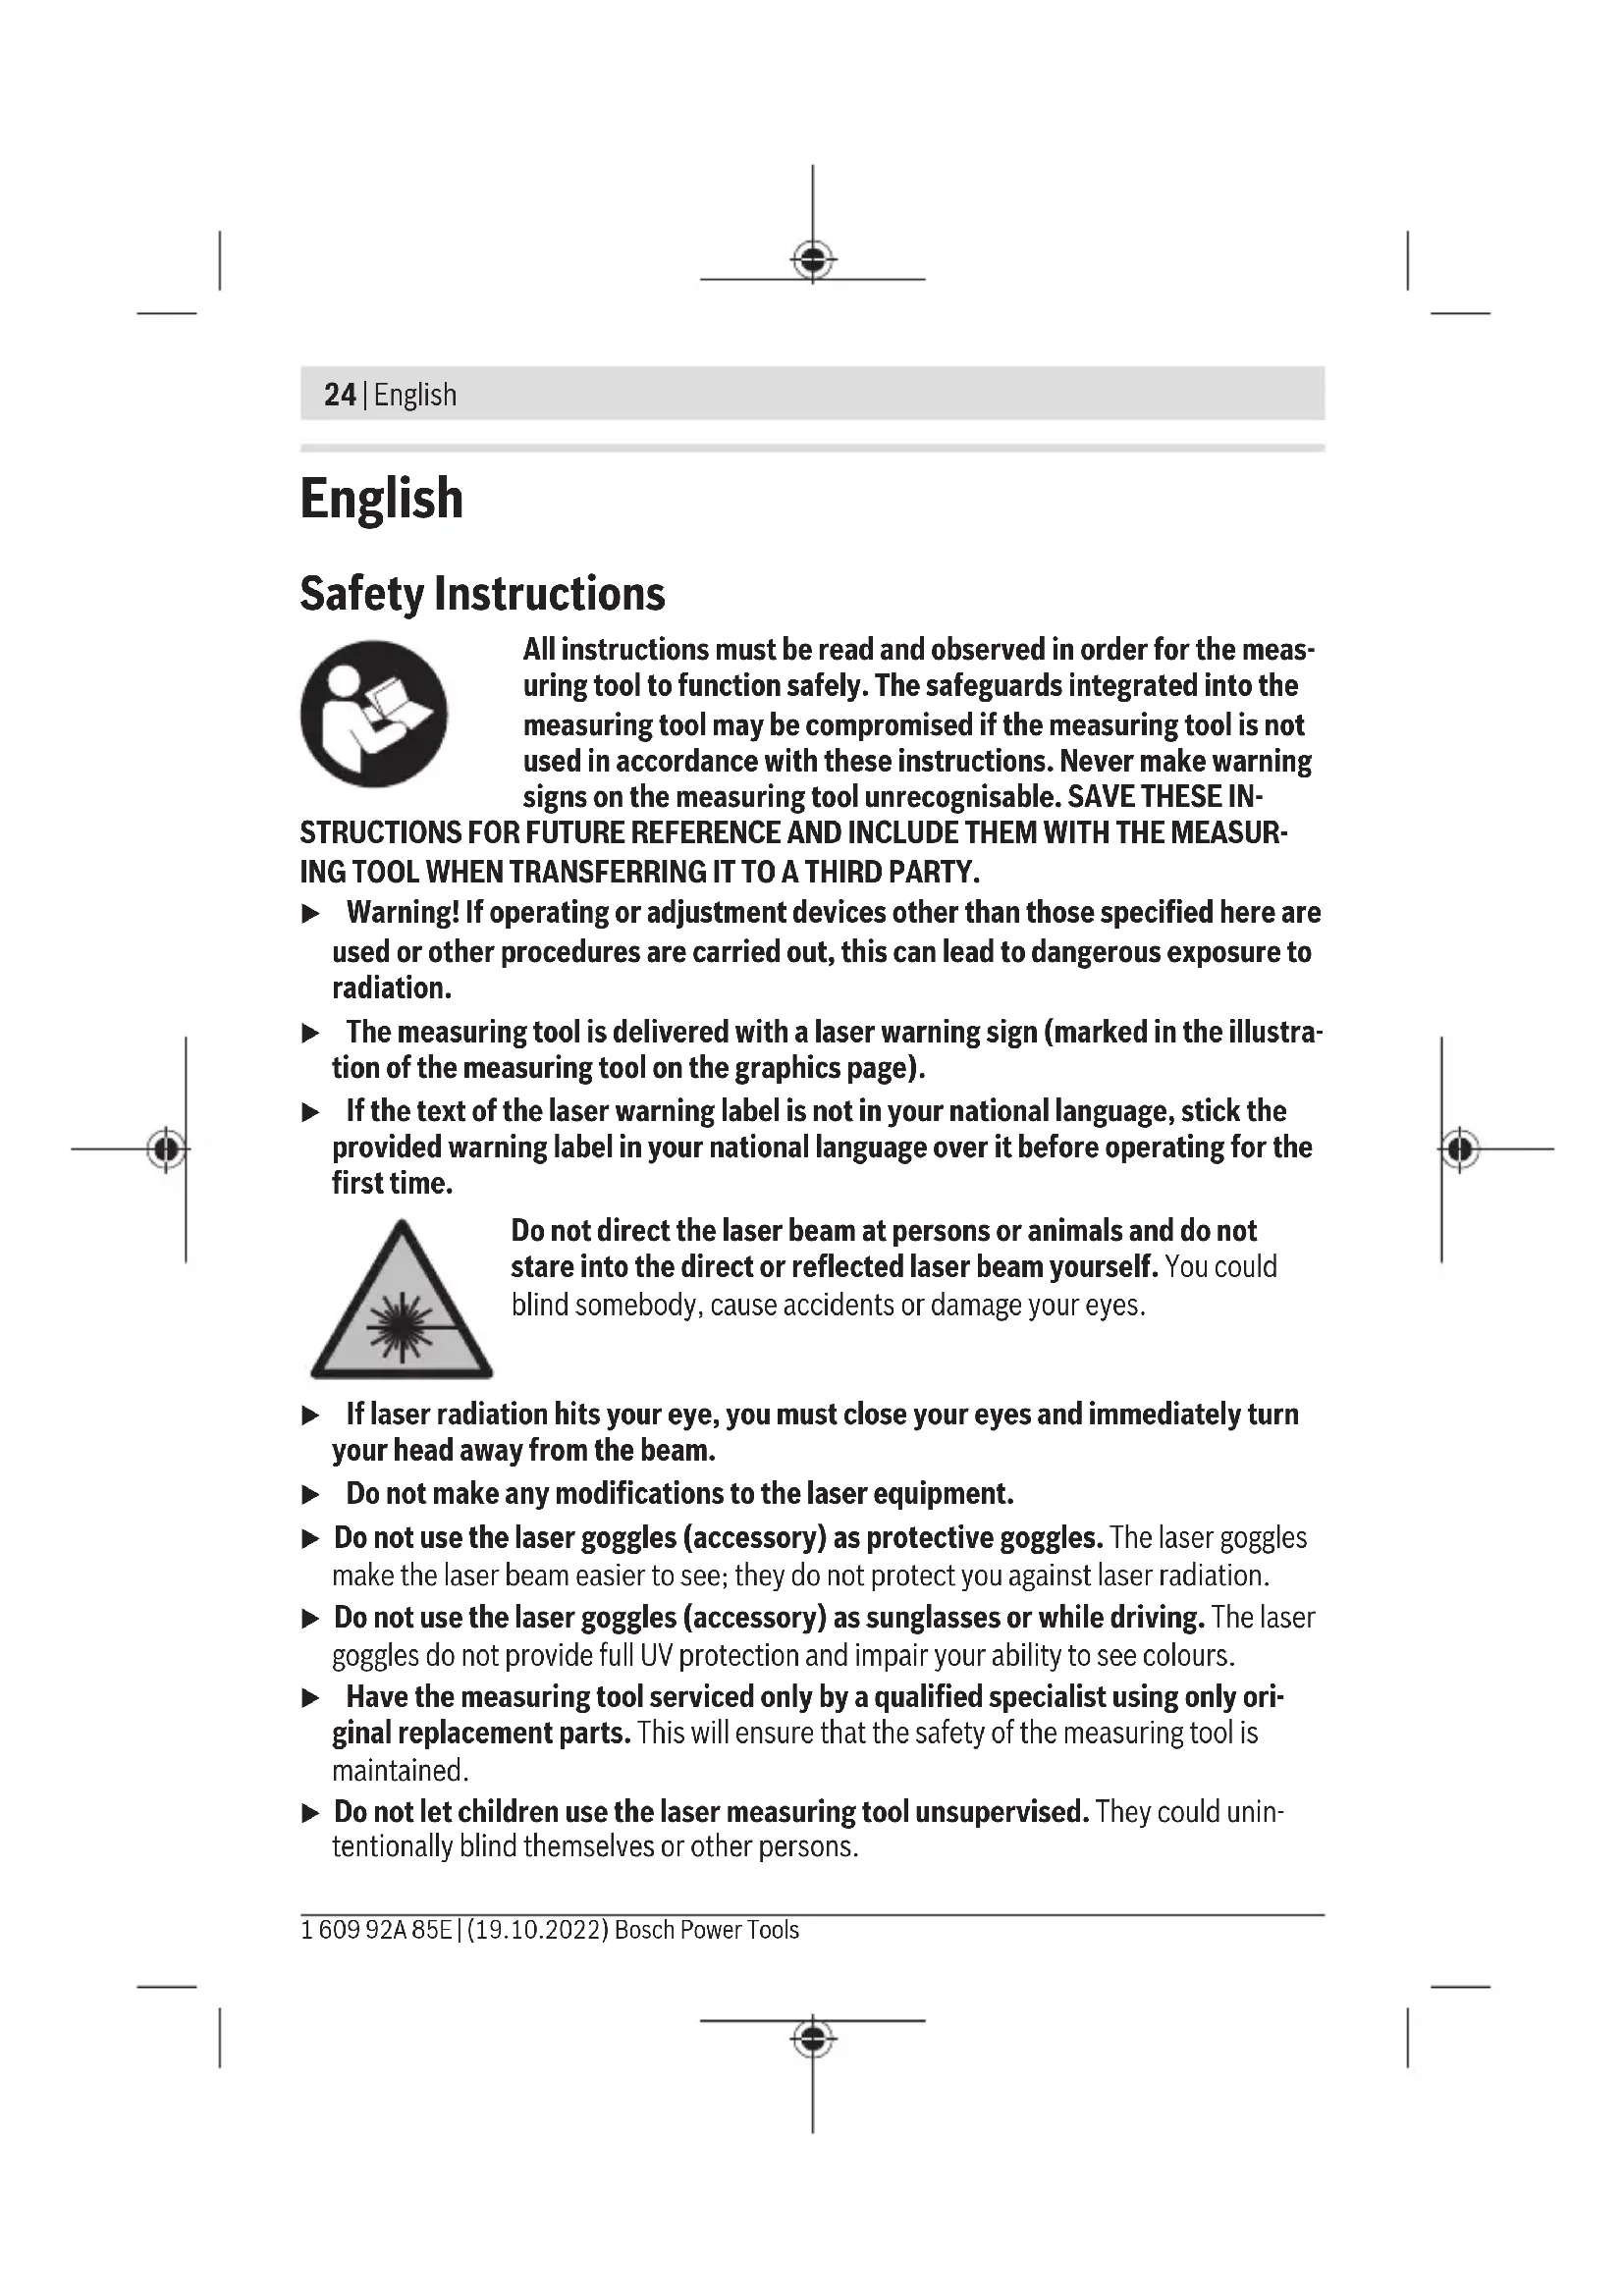
Display elements
(a) Mould warning mode indicator
(b) Thermal bridge mode indicator
(c) Reference temperature mode indicator
(d) Surface temperature mode indicator
(e) Emissivity
(f) Unit of temperature measurement
(g) Battery indicator
(h) Current measured value for surface temperature
(i) Previous measured value for surface temperature
(j) Surface temperature reference value
(k) Surface temperature difference value
(I) Difference value symbol
(m) Reference value symbol
(n) Test result indicator
(o) Surface temperature symbol
(p) Dew point temperature symbol
(q) Dew point temperature
(r) Ambient temperature symbol
(s) Ambient temperature measured value
(t) Relative humidity symbol
(u) Relative humidity measured value
English | 27
Technical data
| Thermo detector AdvancedTemp | |
| Article number | 3 603 F83 2.. |
| Measuring range | |
| - Surface temperature -30 °C to +500 °C | |
| - Ambient temperature -5 °C to +50 °C | |
| - Relative humidity 10 to 90 % | |
| Measuring accuracy | |
| Surface temperature^A)B) | |
| - -30 to -10 °C ±(1.5 + 0.1 × |t|) °C | C) |
| - -10 to 0 °C ±2.5 °C | |
| - 0 to 100 °C ±1.5 °C | |
| - 100 to 500 °C ±0.015 × t °C | |
| Ambient temperature ±1 °C | |
| Relative humidity^B) | |
| - < 20 % ±3 % | |
| - 20 to 60 % ±2 % | |
| - 60 to 90 % ±3 % | |
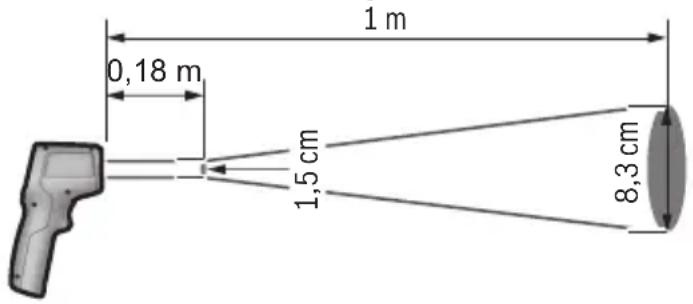
| Optics (measuring distance:measured surface ratio) ^D)E) | 12:1 |
| Operating temperature -5 °C to +50 °C | |
| Storage temperature -20 °C to +70 °C | |
| Max. altitude 2000 m | |
| Relative air humidity max. 90 % | |
| Pollution degree according to IEC 61010-1 2 | F) |
| Laser class 2 | |
| Laser type (typical) | 650 nm, < 1 mW |
| Laser point divergence | ≤ 1.5 mrad |
| Batteries | 2 × 1.5 V LR6 (AA) |
| Approx. operating time | 8 h |
28 | English
Thermo detector AdvancedTemp
Weight according to EPTA-Procedure 01:2014 0.28 kg
Dimensions (length × width × height) 124 × 53 × 180 mm
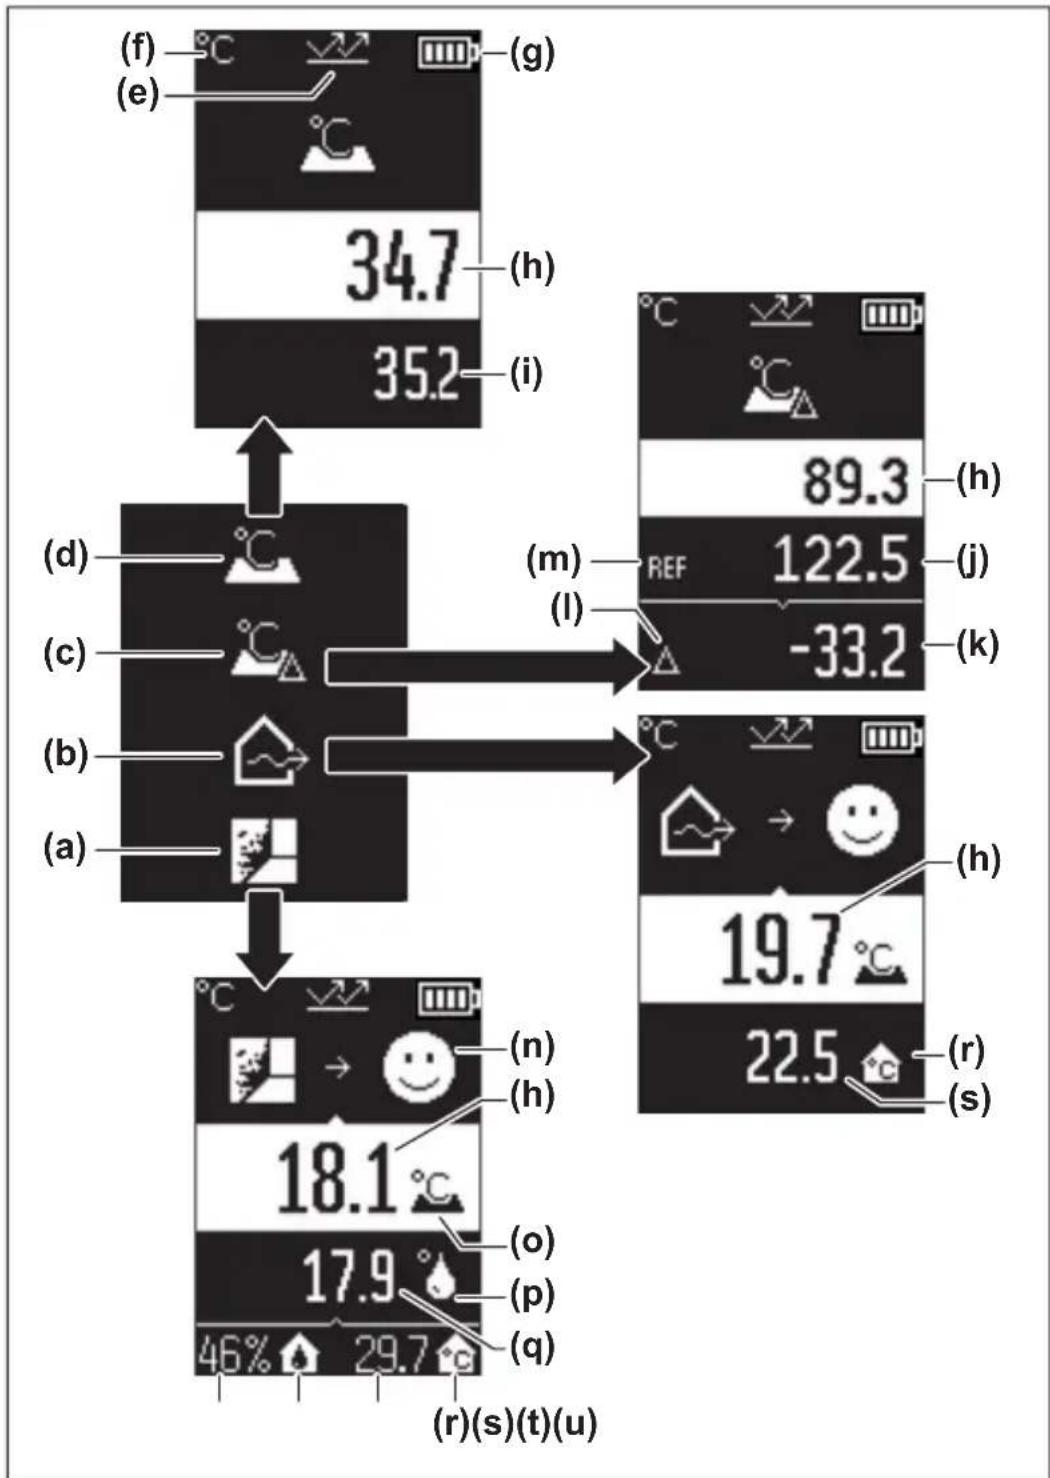
A) At a measuring distance of 0.75–1.25 m from the surface
B) At an ambient temperature of 21–25 °C
C) At a measuring distance of 0.1–0.3 m from the surface
D) Values in accordance with the Association of German Engineers' VDI/VDE 3511 part 4.3 standard (publication date July 2005); applies for 90 % of the measuring signal.
In all areas beyond the values detailed in the technical data, deviations are possible in measurement readings.
E) Refers to infrared measurement, see figure:
F) Only non-conductive deposits occur, whereby occasional temporary conductivity caused by condensation is expected.
The serial number (7) on the type plate is used to clearly identify your measuring tool.
Assembly
Inserting/changing the batteries
It is recommended that you use alkaline manganese batteries to operate the measuring tool.
To open the battery compartment cover (9), press the locking mechanism (10) and lift open the battery compartment cover. Insert the batteries. When inserting the batteries, ensure the polarity is correct according to the representation on the inside of the battery compartment cover.
The battery indicator (g) shows the state of charge of the batteries:
Display Capacity
| 76% to 100% |
Display Capacity
| 51 % to 75 % | |
| 26 % to 50 % | |
| 15 min to < 25 % | |
| maximum 15 min |
If the battery indicator (g) flashes with the empty battery symbol, the batteries must be replaced.
Always replace all the batteries at the same time. Only use batteries from the same manufacturer and which have the same capacity.
▶ Take the batteries out of the measuring tool when you are not using it for a prolonged period of time. The batteries can corrode and self-discharge during prolonged storage in the measuring tool.
Operation
Starting operation
▶ Protect the measuring tool from moisture and direct sunlight.
Do not expose the measuring tool to any extreme temperatures or variations in temperature. For example, do not leave it in a car for extended periods of time. In case of large variations in temperature, allow the measuring tool to adjust to the ambient temperature before putting it into operation. The precision of the measuring tool may be compromised if exposed to extreme temperatures or variations in temperature.
▶ Make sure that the measuring tool is correctly acclimatised. In case of large variations in temperature, acclimatisation can take up to 30 min, or up to 90 min in extreme situations. This may be the case, for example, if you store the measuring tool in a cool car and then perform a measurement in a warm building.
- Avoid hard knocks to the measuring tool or dropping it. After severe external influences and in the event of abnormalities in the functionality, you should have the measuring tool checked by an authorised Bosch after-sales service agent.
▶ Do not close or cover the humidity and temperature sensor (4), the reception lens (3) or the laser outlet aperture (2).
Switching on/off
You can switch on the measuring tool by pressing the ON/OFF button/mode button (12) or the measure button (1). After a brief start sequence, the measuring tool is
30 | English
ready to use – always in surface temperature mode and with the emissivity that was saved when the tool was last switched off. No measurement is initiated at this stage and the laser is still switched off. After pressing the measure button (1), the measuring tool begins measuring.
▶ Never leave the measuring tool unattended when switched on, and ensure the measuring tool is switched off after use. Others may be dazzled by the laser beam.
▶ Do not direct the laser beam at persons or animals and do not stare into the laser beam yourself (even from a distance).
To switch off the measuring tool, press the ON/OFF button/mode button (12) for approx. 2 s.
If no button on the measuring tool is pressed for approx. 5 min, the measuring tool will automatically switch itself off to preserve battery life.
Measurement preparations
Changing the unit of temperature measurement
To switch the unit of measurement between Celsius and Fahrenheit, press and hold the emissivity button (13) for approx. 3 s.
The current setting appears in the unit of temperature measurement (f) display.
Emissivity for surface temperature measurements
To determine the surface temperature, the tool performs a contactless measurement of the natural infrared thermal radiation emitted by the object at which the tool is aimed. To ensure correct measurement, the emissivity setting on the measuring tool must be checked before every measurement and adapted to the measuring object if necessary.
To change the emissivity, press the emissivity button (13) repeatedly until the emissivity display (e) shows the required emissivity for the next measurement. Confirm your selection by pressing the measure button (1) or with the ON/OFF button/mode button (12).
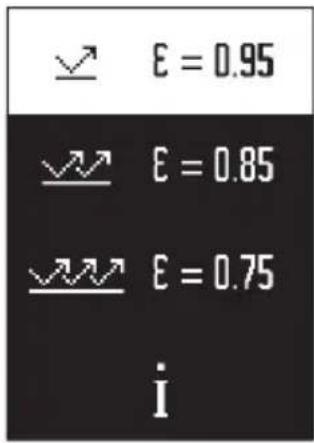
- High emissivity group (≈ 0.95): Concrete (dry), brickwork (red, rough), sandstone (rough), marble, plastic (PE, PP, PVC), rubber, anodised aluminium (mat), tiles, radiator paint, wood, mortar, roofing felt, wallpaper, adhesive tape, lacquer, plaster
- Medium emissivity group (≈ 0.85): Granite, enamel, cast iron, fireclay, paving stones, textiles, linoleum, paper, fibreboard
- Low emissivity group (≈0.75): Cork, porcelain (white), leather, natural stone
- i: More information Scan the QR code for more information.
▶ Temperature measurements will only be correct if the emissivity setting matches the emissivity of the object. Otherwise, object temperatures could be shown to be hotter or colder than they are, which may present a danger if touched.
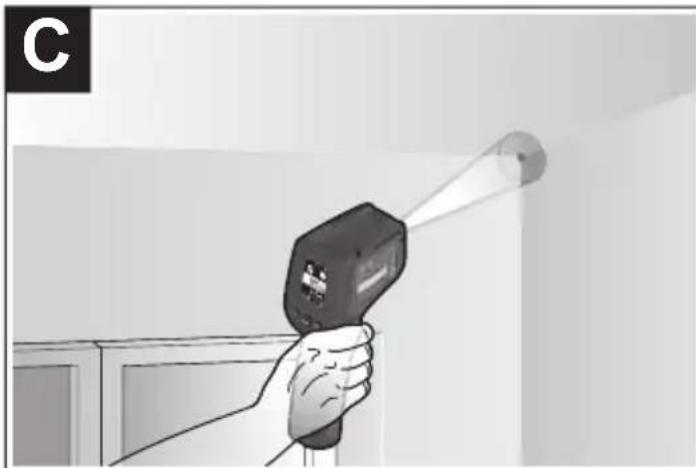
Measuring surface for surface temperature measurements
The laser circle produced by the measuring tool indicates the measuring surface. The infrared radiation of this measuring surface is then determined when performing a contactless surface temperature measurement.
The central laser point marks the centre of the measuring surface. For an optimum measurement reading, position the measuring tool so that the laser beam meets the measuring surface perpendicularly to this point.
▶ Do not direct the laser beam at persons or animals and do not stare into the laser beam yourself (even from a distance).
Increasing the distance between the measuring tool and the object being measured increases the size of the laser circle and therefore the size of the area being measured. The optimum measuring distance is 0.75 m to 1.25 m.
▶ Do not hold the measuring tool directly against hot surfaces. The heat can damage the measuring tool.
The displayed reading is the average value of all temperatures measured within the measuring surface.
Information about the measuring conditions
Highly reflective, shiny or transparent surfaces (e.g. high-gloss tiles, stainless steel cupboard fronts or saucepans) may impair the surface temperature reading. If necessary, mask the area to be measured with a dark, matt adhesive tape that conducts heat well. Allow the tape to acclimatise briefly on the surface.
It is not technically possible to perform measurements through transparent materials.
32 | English
Consequently, the more suitable and stable the measuring conditions are, the more accurate and reliable the results of the measurement will be.
The humidity and ambient temperature sensor (4) can be damaged by chemical contaminants, such as paint or varnish vapours. Infrared temperature measurement is impaired by smoke, vapour or dusty air.
It is therefore important to ventilate the room prior to measuring, especially when the air is contaminated or steamy. For example, do not perform measurements in a bathroom immediately after the shower has been used.
Once ventilated, allow the room to reacclimatise a while until it returns to the usual temperature.
The ambient temperature and relative humidity are measured directly on the measuring tool at the humidity and ambient temperature sensor (4). To achieve meaningful results, do not hold the measuring tool directly over or next to sources of interference such as radiators or open liquids. Do not cover the sensor (4) under any circumstances.
Measuring functions
Individual measurements
Briefly pressing the measure button (1) once switches the laser on and actuates a single measurement in the selected mode. The measuring process can take 1 to 2 s to complete. The measurements are displayed in the display section with the white background. Upon completion of the measurement, the laser switches off automatically.
The most recent measurement readings are shown on the display.
Continuous measurement
Press and hold the measuring button (1) to perform continuous measurements in the selected mode. The laser remains switched on. Using slow movements, aim the laser circle at each of the surfaces to be measured, one by one. Move the measuring tool slowly in the room to perform humidity and ambient temperature measurements.
The indication on the display and the indicator LED (15) are continually updated. As soon as you let go of the measuring button (1), the measurement is stopped and the laser is switched off.
The most recent measurement readings are shown on the display. The indicator LED remains unchanged for the last display.
Mode selection

To open the mode menu, press the ON/OFF button/mode button (12). Use the ON/OFF button/mode button (12) to select the required mode. Confirm your selection by pressing the measure button (1) or the emissivity button (13).
To return to the previous mode, press the back button/delete button (11).
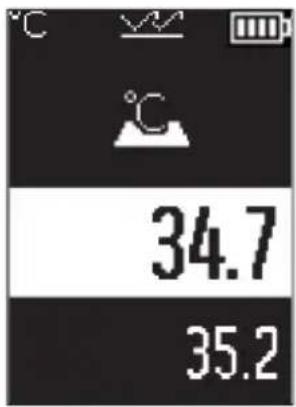
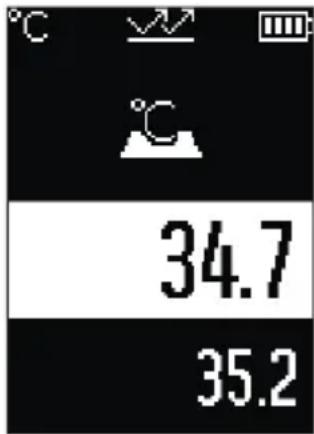
Surface temperature mode (see figure A)
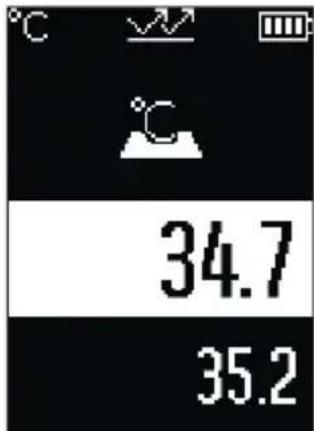
Surface temperature mode is used to measure the surface temperature of an object.
Press the measure button (1) and aim the laser circle so that it is perpendicular to the centre of the object being measured. The surface temperature measured (h) is displayed in the area of the display with the white background. When the next measurement is taken, the previously measured value appears in the display (i).
Press the back button/delete button (11) to delete the measured value (h) in the area of the display with the white background.
The indicator LED (15) does not light up in surface temperat-
ure mode.
You can use this mode to measure the temperature of radiators, underfloor heating or fridge interiors, for example.
34 | English
Reference temperature mode

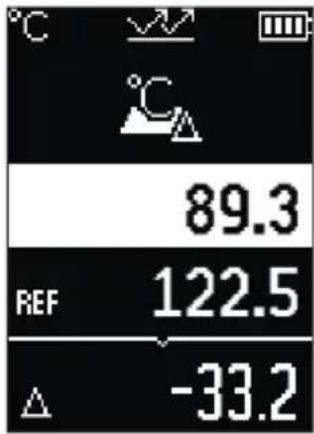
In reference temperature mode, 2 measured surface temperatures are compared and the difference is displayed. This way, significant temperature differences can be measured at 2 different positions on one or more surfaces.
Press the measure button (1) to measure the reference value (j). All subsequent measured values are then related to the reference value (j). The temperature difference (k) is displayed immediately after a new measurement. With each new measurement, the measured value (h) is updated in the area of the display with the white background and the difference from the reference value is recalculated.
If the new value (h) is more than 1 °C lower than the refer-
ence value (j), the indicator light (15) lights up blue. If the new value (h) is more than 1 °C lower than the reference value (j), the indicator light (15) lights up red. If the difference value (k) falls within the ±1 °C range, the indicator light (15) does not light up.
Thermal bridge mode (see figure B)

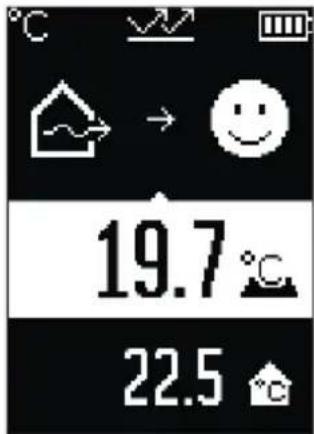
In thermal bridge mode, the surface and ambient temperatures are measured and compared with each other. If there is a significant difference between the two temperatures, a thermal bridge (see "Thermal bridge", page 37) warning is issued.
Press the measure button (1) and aim the laser circle so that it is perpendicular to the centre of the object being measured. Once the measurement is complete, the measured surface temperature (h) is displayed. The ambient temperature (s) is automatically displayed before the measurement is taken.
The measuring tool automatically compares the values and interprets the result as follows:

Green indicator LED (15): Low temperature difference, no thermal bridges present.

Yellow indicator LED (15): Temperature difference near the limit value, a thermal bridge may be present in the area being measured; if necessary, repeat the measurement at a later point in time.

Red indicator LED (15): The symbol indicates that the surface temperature of the area being measured deviates significantly from the ambient temperature. There is a thermal bridge in the area being measured, which is an indication of poor insulation. The room is too cold – if it is being heated normally, then the low temperature is an indication of poor overall insulation.
If there are thermal bridges, check the thermal insulation in this area. If necessary, consult a building expert.
Mould warning mode (see figure C)
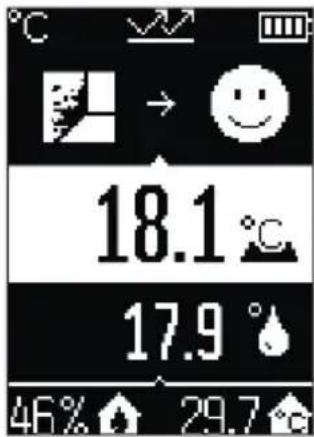
In mould warning mode, the ambient temperature and relative humidity (see "Relative humidity", page 37) are measured. The dew point temperature (see "Dew point temperature", page 37) is then calculated using these two values. The surface temperature is also measured.
The dew point temperature is compared with the surface temperature and the result is interpreted with regard to the risk of mould forming.
Relative humidity (u), ambient temperature (s) and calculated dew point temperature (q) are determined and displayed automatically.
Press the measure button (1) and aim the laser circle so that it is perpendicular to the centre of the object being measured. The surface temperature measured value (h) is displayed in the area of the display with the white background.
The measuring tool automatically compares the values and interprets the result as follows:

Green indicator LED (15): There is no risk of mould forming under the current conditions.

Yellow indicator LED (15): The values are near the limit; pay attention to room temperature, thermal bridges and humidity, and repeat the measurement if necessary at a later point in time.

Red indicator LED (15): There is an increased risk of mould forming because the humidity is too high or the surface temperature is close to the dew point temperature.
When the risk of mould is indicated, you should – depending on the cause – reduce the humidity through more frequent and thorough ventilation, increase the room temperature and eliminate thermal bridges. Contact a building expert, if necessary.
36 | English
Note: Mould spores cannot be detected with the measuring tool. It only indicates that mould may form if the conditions remain unchanged.
Errors – causes and corrective measures
Measured values outside the measuring range
If the measured values for the object being measured in the laser circle are outside the measuring range, the following indicators are shown on the display:
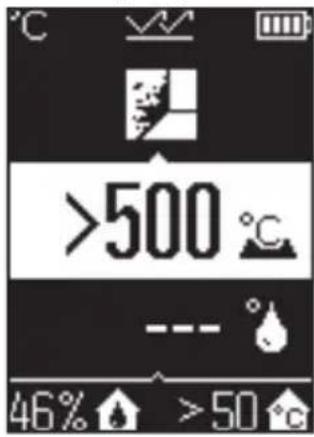
500 °C – the surface temperature is too high.

<-30°C – the surface temperature is too low.
For an ambient temperature: > 50 °C (too high) or < -5 °C (too low)
The values of this object cannot be measured. Aim the laser circle at another object and start a new measurement.
Internal error
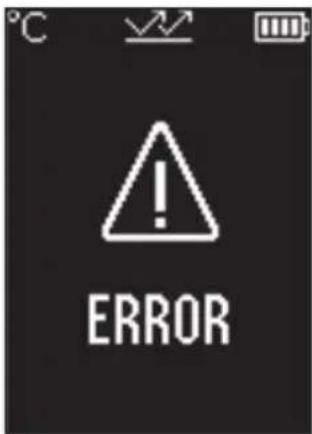
The measuring tool has experienced an internal error and switches off after five seconds. To reset the software, remove the batteries, wait a few seconds and then reinsert the batteries.
If the error persists, have the measuring tool checked by a Bosch customer service agent.
Glossary of terms
Emissivity
The emissivity of an object depends on the material and the structure of its surface. This specifies how much infrared thermal radiation the object emits compared with an ideal radiant warmer (black body, emissivity = 1 ) and accordingly has a value between 0 and 1.
Thermal bridge
A thermal bridge is defined as a position on the external wall of a building, where there is a localised increase in heat loss due to a structural defect.
Thermal bridges can lead to an increased risk of mould.
Relative humidity
The relative humidity indicates the degree to which the air is saturated with water vapour. The value is indicated as a percentage of the maximum amount of water vapour the air can absorb. The maximum amount of water vapour depends on the temperature: The higher the temperature is, the more water vapour the air can absorb.
If the relative humidity is too high, there is an increased risk of mould. If the relative humidity is too low, it may have a negative impact on your health.
Dew point temperature
The dew point temperature indicates the point at which the water vapour in the air starts to condense. The dew point temperature depends on the relative humidity and the air temperature.
38 | English
If the temperature of a surface is below the dew point temperature, water will start to condense on this surface.
Condensate on surfaces is one of the main reasons why mould forms.
Maintenance and Service
Maintenance and Cleaning
▶ Check the measuring tool before each use. If the measuring tool is visibly damaged or parts have become loose inside the measuring tool, safe function can no longer be ensured.
Always keep the measuring tool clean and dry to ensure optimum, safe operation.
Never immerse the measuring tool in water or other liquids.
Wipe off any dirt using a dry, soft cloth. Do not use any detergents or solvents.
When cleaning the measuring tool, ensure that no liquids enter the tool.
In particular, clean the humidity and temperature sensor (4), the reception lens (3) and the laser outlet aperture (2) very carefully:
Ensure that there is no lint on the reception lens or the laser outlet aperture. Do not attempt to remove dirt from the sensor or the reception lens using pointed objects. If necessary, you can carefully blow away dirt using oil-free compressed air.
Do not store the measuring tool in a plastic bag, as the evaporation could damage the humidity and temperature sensor (4). Do not affix any stickers near to the sensor on the measuring tool.
Do not store the measuring tool for extended periods where the atmospheric humidity is outside the range of 30 % to 50 %. If the measuring tool is stored in conditions that are too damp or too dry, it can result in inaccurate readings.
Only store and transport the measuring tool in the protective bag provided.
If the measuring tool needs to be repaired, send it off in the protective bag.
After-Sales Service and Application Service
Our after-sales service responds to your questions concerning maintenance and repair of your product as well as spare parts. You can find explosion drawings and information on spare parts at: www.bosch-pt.com
The Bosch product use advice team will be happy to help you with any questions about our products and their accessories.
In all correspondence and spare parts orders, please always include the 10-digit article number given on the nameplate of the product.
Great Britain
Robert Bosch Ltd. (B.S.C.)
P.O. Box 98
Broadwater Park
North Orbital Road
Denham Uxbridge
UB 9 5HJ
At www.bosch-pt.co.uk you can order spare parts or arrange the collection of a product in need of servicing or repair.
Tel. Service: (0344) 7360109
E-Mail: boschservicecentre@bosch.com
You can find further service addresses at:
www.bosch-pt.com/serviceaddresses
Disposal
Measuring tools, accessories and packaging should be recycled in an environmentally friendly manner.
Do not dispose of measuring tools or batteries with household waste.
Only for EU countries:
According to the Directive 2012/19/EU on waste electrical and electronic equipment and its transposition into national law, measuring tools that are no longer usable, and, according to the Directive 2006/66/EC, defective or drained batteries must be collected separately and disposed of in an environmentally correct manner.
If disposed incorrectly, waste electrical and electronic equipment may have harmful effects on the environment and human health, due to the potential presence of hazardous substances.
Only for United Kingdom:
According to The Waste Electrical and Electronic Equipment Regulations 2013 (SI 2013/3113) (as amended) and the Waste Batteries and Accumulators Regulations 2009 (SI 2009/890) (as amended), products that are no longer usable must be collected separately and disposed of in an environmentally friendly manner.
Français
Robert Bosch (France) S.A.S.
www.bosch-pt.com/serviceaddresses
www.bosch-pt.com/serviceaddresses
Eliminación
www.bosch-pt.com/serviceaddresses
Eliminação
www.bosch-pt.com/serviceaddresses
Smaltimento
(11) Terug-toets/wis-toets
www.bosch-pt.com/serviceaddresses
Afvalverwijdering
- Høj emissionsgrad ( ≈ 0,95): beton (tørring), tegl (rød, ru), sandsten (ru), marmor, plast (PE, PP, pvc), gummi, eloxeret aluminium (mat), fliser, radiatormaling, træ, mør-tel, dækpap, tapeter, tape, lakfarver, stuk
- Middel emissionsgrad ( ≈ 0,85): granit, emalje, støbejern, chamotte, brosten, tekstiler, linoleum, papir, fiberplade
- Lav emissionsgrad ( ≈ 0,75): kork, porcelæn (hvid), læder, natursten
- i: Yderligere oplysninger Scan QR-koden for at få vist yderligere oplysninger.
Bosch Service Center
Telegrafvej 3
Svensk | 135
2750 Ballerup
På www.bosch-pt.dk kan der online bestilles reservedele eller oprettes en reparations ordre.
Tlf. Service Center: 44898855
Fax: 44898755
E-Mail: vaerktoej@dk.bosch.com
www.bosch-pt.com/serviceaddresses
Bortskaffelse
Bosch Service Center
Telegrafvej 3
150 | Norsk
2750 Ballerup
Danmark
Tel.: (08) 7501820 (inom Sverige)
Fax: (011) 187691
www.bosch-pt.com/serviceaddresses
Avfallshantering
www.bosch-pt.com/serviceaddresses
Kassering
| 76...100% | |
| 51...75% | |
| 26...50% | |
| 15 min ... < 25% |
1 609 92A 85E | (19.10.2022) Bosch Power Tools
Näyttö Kapasiteetti

Enintään 15 min
www.bosch-pt.com/serviceaddresses
Hävitys
www.bosch-pt.com/serviceaddresses
Απόσυροη
www.bosch-pt.com/serviceaddresses
Tasfiye
Robert Bosch Sp. z o.o.
www.bosch-pt.com/serviceaddresses
Utylizacja odpadów
Bosch Service Center PT
K Vápence 1621/16
692 01 Mikulov
www.bosch-pt.com/serviceaddresses
Likvidace
www.bosch-pt.com/serviceaddresses
Likvidácia
szüksége.
www.bosch-pt.com/serviceaddresses
Hulladékkezelés
www.bosch-pt.com/serviceaddresses
Утилизация
www.bosch-pt.com/serviceaddresses
Утилізація
www.bosch-pt.com/serviceaddresses
Кәдеге жарату
Service scule electrice
Strada Horia Măcelariu Nr. 30–34, sector 1
013937 Bucureşti
www.bosch-pt.com/serviceaddresses
Eliminarea
Service scule electrice
Strada Horia Măcelariu Nr. 30–34, sector 1
013937 Bucureşti, România
www.bosch-pt.com/bg/bg/
www.bosch-pt.com/serviceaddresses
Бракуване
www.bosch-pt.com/serviceaddresses
Отстранување
- Visok stepen emisije (≈ 0,95): beton (suv), cigla (crvena, gruba), peščar (grubi), mermer, plastika (PE, PP, PVC), guma, eloksirani aluminijum (mat), pločice, boja za radijatore, drvo, malter, krovni filc, tapete, trake, boje, štukature
- Srednji stepen emisije (≈ 0,85): granit, emajl, liveno gvožđe, šamot, kamen za popločavanje, tekstil, linoleum, papir, fiber ploča
- Nizak stepen emisije (≈ 0,75): pluta, porcelan (beli), koža, prirodni kamen
- i: Dodatne informacije Skenirajte QR kod za dalje informacije.
392 | Srpski
▶ Ispravna merenja temperature su moguća samo ako se podudaraju podešeni stepen emisije i stepen emisije objekta. Objekti mogu biti prikazani višom ili nižom temperaturom, što može dovesti do moguće opasnosti pri dodirima.
Za izvođenje menija Režim, pritisnite taster za uključivanje/isključivanje režima (12). Pomoću tastera za uključivanje/isključivanje režima (12) izaberite željeni režim. Pomoću tastera Merenje (1) ili tastera za stepen emisije (13) potvrdite vaš izbor.
Pritisnite taster Nazad/Brisanje (11), za vraćanje na prethodni režim rada.
Režim za površinsku temperaturu (videti sliku A)

U režimu za površinsku temperaturu meri se površinska temperatura objekta merenja.
Pritisnite taster Merenje (1) i usmerite laserski krug vertikalno ka sredini mernog objekta. Izmerena površinska temperatura (h) se prikazuje na belom području displeja.
www.bosch-pt.com/serviceaddresses
Uklanjanje dubreta
Merni alati, pribor i ambalaža treba da se uključe u reciklažu koja odgovara zaštiti čovekove okoline.
Merne alate i baterije nemojte bacati u kućni otpad!
Samo za EU-zemlje:
Prema evropskoj direktivi 2012/19/EU o starim električnim i elektronskim uređajima i njenoj primeni u nacionalnom pravu, merni alati koji se više ne mogu koristiti, a prema evropskoj direktivi 2006/66/EC akumulatori/baterije koje su u kvaru ili istrošene moraju se odvojeno sakupljati i uključiti u reciklažu koja ispunjava ekološke uslove.
- Visoka emisivnost ( ≈ 0,95): beton (osušen), opeka (rdeča, hrapava), peščenjak (hrapav), marmor, plastika (PE, PP, PVC), guma, eloksiran aluminij (matiran), ploščice, barva za grelna telesa, les, malta, strešna lepenka, tapeta, lepilni trak, barva v laku, kos
– Srednja emisivnost (≈ 0,85): granit, emajl, lito železo, šamot, tlakovci, tekstil, linolej, papir, vlaknena plošča
– Nizka emisivnost (≈ 0,75): pluta, porcelan (bel), usnje, naravni kamen - i: dodatne informacije Skenirajte QR-kodo, da prejmete dodatne informacije.
www.bosch-pt.com/serviceaddresses
Odlaganje
Merilne naprave, pribor in embalažo oddajte v okolju prijazno recikliranje.
- Visoki stupanj emisije (≈ 0.95): beton (suhi), opeka (crvena, gruba), pješčenjak (grubi), mramor, plastika (PE, PP, PVC), guma, aluminij eloksirani (mat), pločice, boja za radijatore, drvo, mort, krovna ljepenka, tapeta, ljepljiva traka, lak, štuk
- Srednji stupanj emisije ( ≈ 0.85): granit, emajl, lijevano željezo, šamot, kaldrma, tekstil, linoleum, papir, vlaknasta ploča
– Niski stupanj emisije ( ≈ 0.75): pluto, porculan (bijeli), koža, prirodni kamen - i: Dodatne informacije Skenirajte QR kod kako biste dobili dodatne informacije.
U načinu rada s referentnom temperaturom uspoređuju se 2 izmjerene površinske temperature i prikazuje se njihova razlika. Tako se mogu izmjeriti značajne temperaturne razlike na 2 različita mjesta jedne ili više površina.
www.bosch-pt.com/serviceaddresses
Jäätmekäitlus
www.bosch-pt.com/serviceaddresses
QR koda.
www.bosch-pt.com/serviceaddresses
Šalinimas
Robert Bosch Morocco SARL
www.bosch-pt.com/serviceaddresses
www.bosch-pt.com/serviceaddresses