Sigma 80 - Flush GEBERIT - Free user manual and instructions
Find the device manual for free Sigma 80 GEBERIT in PDF.
| Features | Details |
|---|---|
| Product type | Concealed cistern frame |
| Dimensions | Width: 80 cm, Height: 112 cm, Depth: 12 cm |
| Material | Galvanized steel and plastic |
| Weight | Approximately 30 kg |
| Tank capacity | 6/3 liters |
| Water pressure | 0.5 to 10 bars |
| Installation | Concealed in the wall, compatible with different types of toilets |
| Usage | Allows quiet and efficient flushing operation |
| Maintenance | Easy access for maintenance thanks to a service panel |
| Safety | Complies with current safety standards |
| Warranty | 2-year warranty |
| Additional information | Compatible with Geberit Sigma flush plates |
Frequently Asked Questions - Sigma 80 GEBERIT
User questions about Sigma 80 GEBERIT
0 question about this device. Answer the ones you know or ask your own.
Ask a new question about this device
Download the instructions for your Flush in PDF format for free! Find your manual Sigma 80 - GEBERIT and take your electronic device back in hand. On this page are published all the documents necessary for the use of your device. Sigma 80 by GEBERIT.
USER MANUAL Sigma 80 GEBERIT
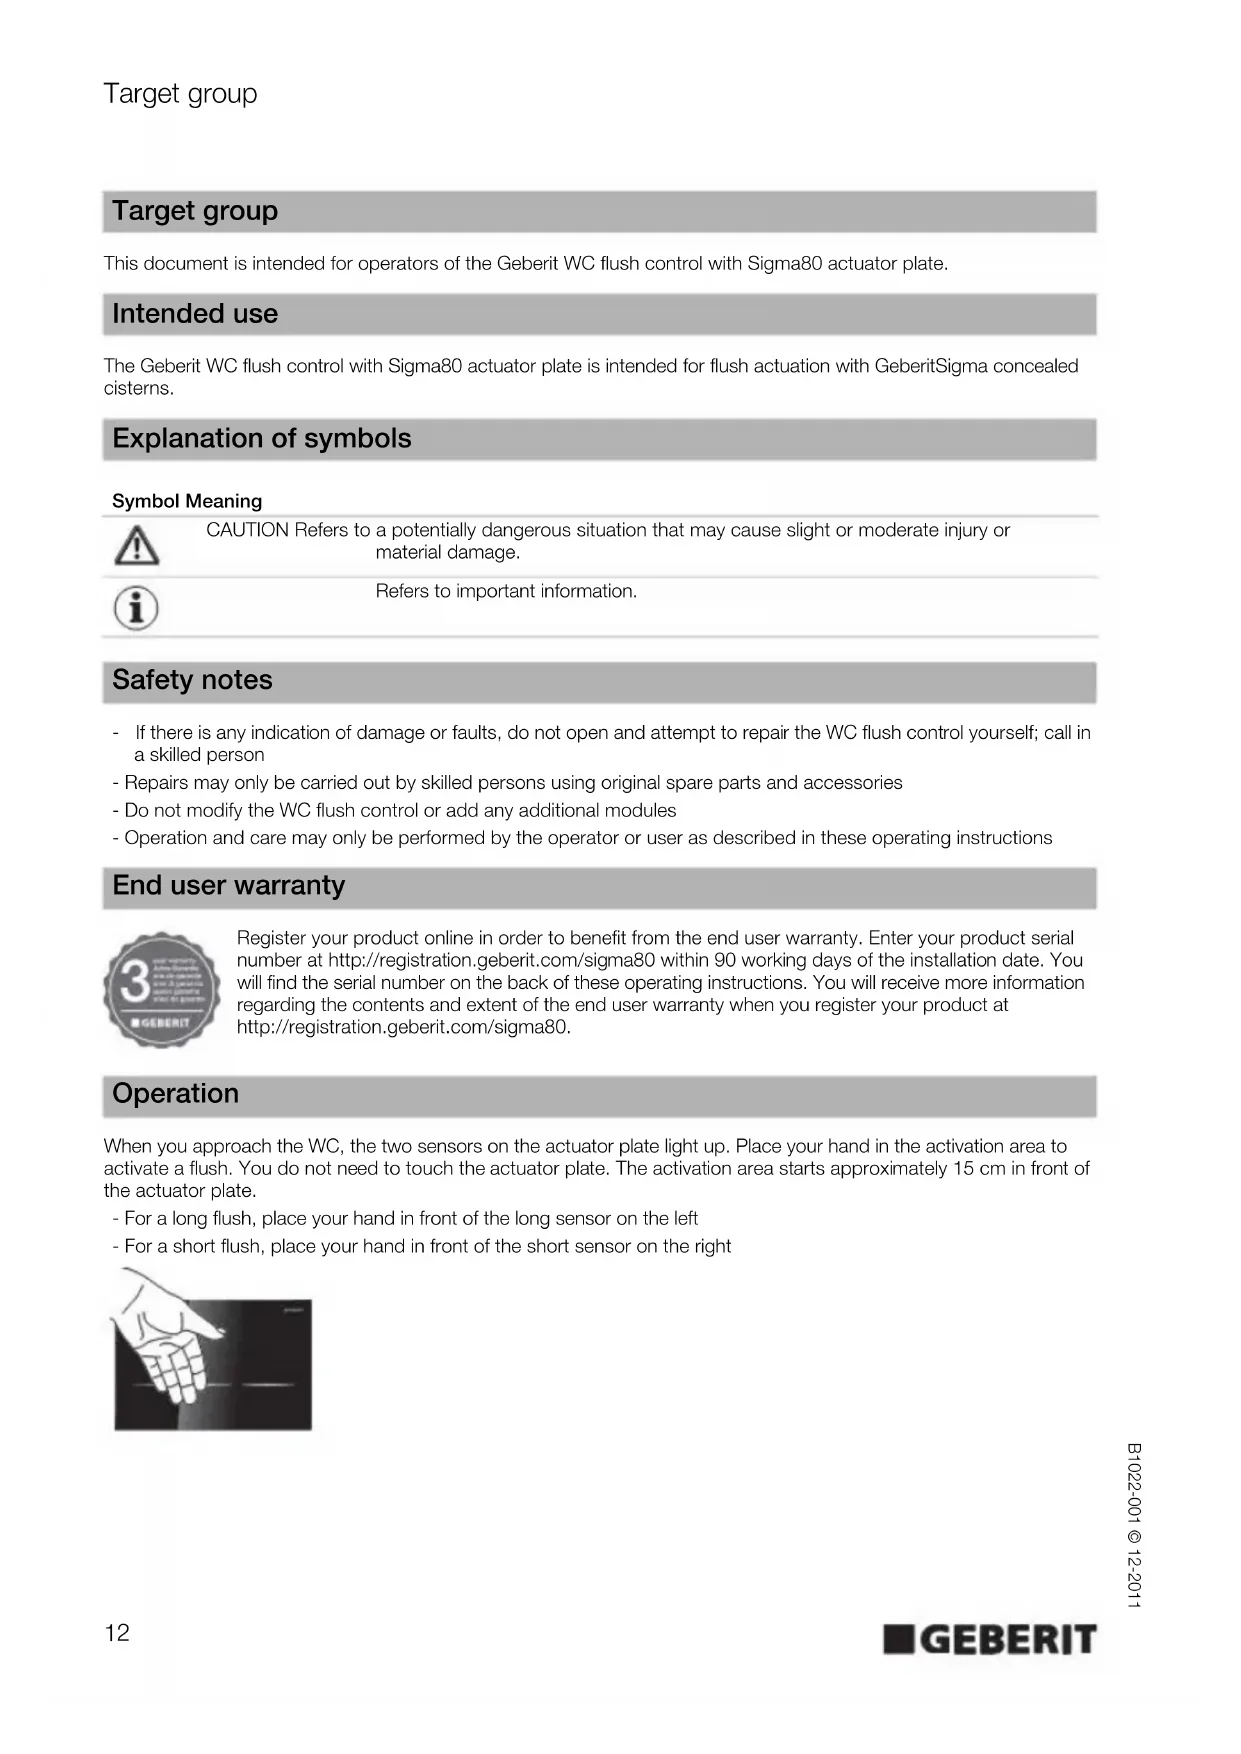
This document is intended for operators of the Geberit WC flush control with Sigma80 actuator plate.
Intended use
The Geberit WC flush control with Sigma80 actuator plate is intended for flush actuation with GeberitSigma concealed cisterns.
Explanation of symbols
Symbol Meaning

CAUTION Refers to a potentially dangerous situation that may cause slight or moderate injury or material damage.

Refers to important information.
Safety notes
If there is any indication of damage or faults, do not open and attempt to repair the WC flush control yourself; call in a skilled person
- Repairs may only be carried out by skilled persons using original spare parts and accessories
- Do not modify the WC flush control or add any additional modules
- Operation and care may only be performed by the operator or user as described in these operating instructions
End user warranty

Register your product online in order to benefit from the end user warranty. Enter your product serial number at http://registration.geberit.com/sigma80 within 90 working days of the installation date. You will find the serial number on the back of these operating instructions. You will receive more information regarding the contents and extent of the end user warranty when you register your product at http://registration.geberit.com/sigma80.
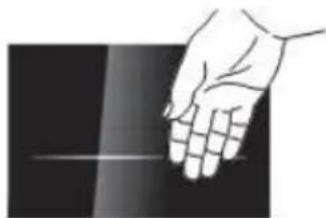
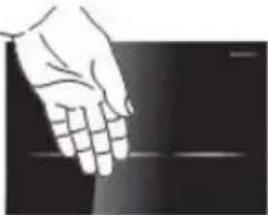
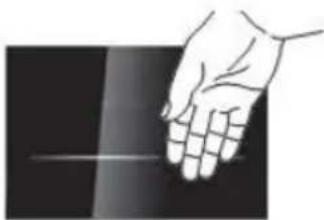
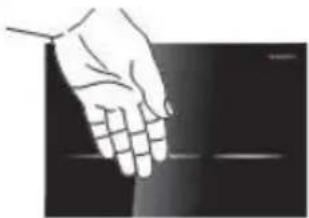
Operation
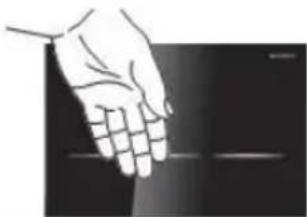
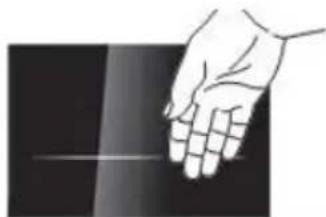
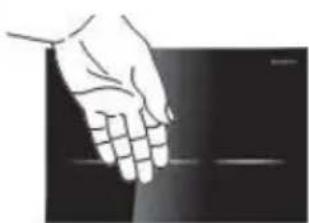
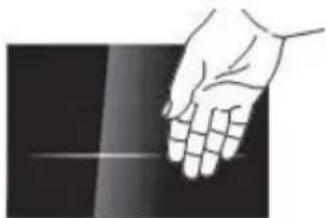
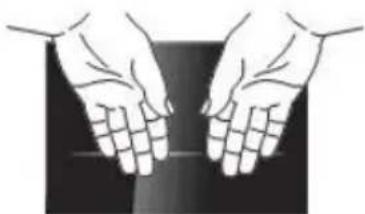
When you approach the WC, the two sensors on the actuator plate light up. Place your hand in the activation area to activate a flush. You do not need to touch the actuator plate. The activation area starts approximately 15 cm in front of the actuator plate.
- For a long flush, place your hand in front of the long sensor on the left
- For a short flush, place your hand in front of the short sensor on the right

Settings
With the Geberit WC flush control with Sigma80 actuator plate, specific settings can be made. The instructions can be found on the following pages.
Overview
Setting Description Factory setting
| A Activate or deactivate the cleaning function | The actuator plate and WC can be cleaned without triggering a flush. The cleaning function can be activated and then deactivated following completion of the cleaning process. The cleaning function is automatically deactivated after 3 min. | - |
| B Select the colour of the sensor lights | The following colours can be selected: Blue, turquoise, magenta, orange, yellow | Blue |
| C Set the sensor illumination | Three different settings are possible. 1. The sensor illumination always remains off and does not come on even when you approach the WC 2. The sensor illumination always remains on, even when you step back from the WC and leave the room 3. The sensor illumination comes on as soon as you approach the WC and goes off again when you step back | Setting 3 |
| D Activate or deactivate automatic flush actuation | When the automatic flush actuation is activated, the WC flush control always activates a long flush when you step back after use. Manual actuation is not necessary. Setting 1 = deactivated Setting 2 = activated | Setting 1 |
| E Reset to factory setting | Settings B, C and D are reset to the factory setting - |
With the Geberit WC flush control with Sigma80 actuator plate, further settings are possible. If you want to change any of the settings in the following table, please consult a skilled person.

Skilled persons will find information on the settings at www.geberit.com.
Setting Description Factory setting Remarks
| Interval flush The WC flush control activates the flush at regular time intervals. | Not active Adjustment range 1-168 h | ||
| Flush volume for short flush | The flush volume for a short flush can be set so that the optimum volume for the respective WC ceramic appliance is obtained. | Level 3 Adjustment range 5 levels | |
| Detection time | The minimum time for detecting a user within the detection range can be changed (relevant in the case of automatic flush actuation). | 7 s | Adjustment range 1-60 s |
| Cleaning time | The time span during which the WC flush control is inactive in the cleaning function can be changed. | 3 min | Adjustment range 1-30 min |
| Sensor illumination detection distance | The distance between the user and the actuator plate at which the sensor illumination is activated can be changed. | Level 3 Adjustment range 5 levels | |
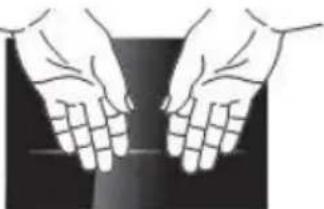
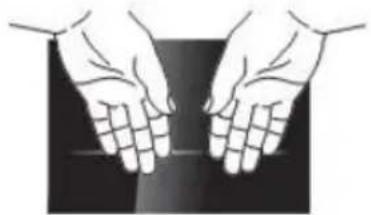
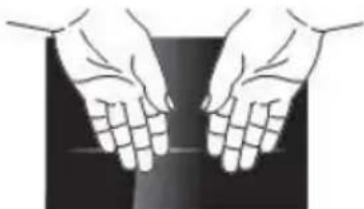
A - Activating or deactivating the cleaning function
The actuator plate and WC can be cleaned without triggering a flush.
Prerequisites
The WC flush control is ready for operation.

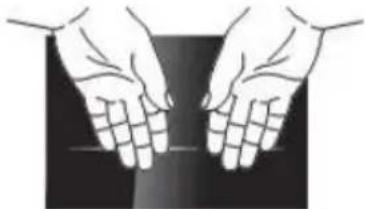
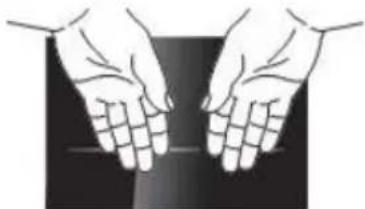
If the sensors are not covered at the same time, a flush will be activated. Remove your hands and repeat the procedure.
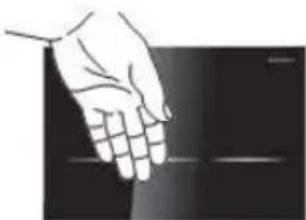
1 Cover both sensors at the same time with both hands at a distance of approx. 5 cm. After a few seconds both sensors begin to flash. Now remove both hands.

Result
The cleaning function is now active.

The cleaning function is automatically deactivated after 3 min.
2
Now carry out the cleaning process. Remember to follow the care instructions provided in these operating instructions.
3
Cover both sensors at the same time with both hands at a distance of approx. 5cm to deactivate the cleaning function. The flashing stops after a few seconds. Now remove both hands.

Result
The cleaning function is deactivated. The WC flush control is ready for operation again.
B - Selecting the colour of the sensor lights
The following colours can be selected: Blue, turquoise, magenta, orange, yellow
Prerequisites
The WC flush control is ready for operation.

If the sensors are not covered at the same time, a flush will be activated. Remove your hands and repeat the procedure.
1 Cover both sensors at the same time with both hands at a distance of approx. 5 cm. After a few seconds both sensors begin to flash. After a few more seconds, the sensors flash red 3 times and then turn blue. Now remove both hands.

Result
You are now in the mode for setting the colour of the sensor lights.

Place your hand in front of the sensor on the right. The next colour appears on both sensors.

Place your hand in front of the sensor on the right repeatedly until the desired colour is displayed.

Cover both sensors at the same time with both hands at a distance of approx. 5 cm until both sensors flash once.

Result
The desired light colour is now saved. The WC flush control is ready for operation again.
C - Adjusting the sensor illumination
Three different settings are possible.
- The sensor illumination always remains off and does not come on even when you approach the WC
- The sensor illumination always remains on, even when you step back from the WC and leave the room
- The sensor illumination comes on as soon as you approach the WC and goes off again when you step back
Prerequisites
The WC flush control is ready for operation.

If the sensors are not covered at the same time, a flush will be activated. Remove your hands and repeat the procedure.
1
Cover both sensors at the same time with both hands at a distance of approx. 5 cm. After a few seconds both sensors begin to flash. After a few more seconds, the sensors flash red 3 times and then turn blue. Now remove both hands.
2
Cover the sensor on the left with your hand until it lights up orange. The sensor on the right flashes repeatedly to show the current setting (setting 1 = flashing once, setting 2 = flashing twice, setting 3 = flashing three times).
Result
You are now in the setting mode for the sensor illumination.
3
Cover the sensor on the right repeatedly until the desired setting has been made. Each time you cover the sensors, the WC flush control jumps to the next setting (1-2-3-1-2-3- ...).
4
Cover both sensors at the same time with both hands at a distance of approx. 5 cm until both sensors flash once.

Result
The desired setting is now saved. The WC flush control is ready for operation again.
D - Activating or deactivating the automatic flush actuation
When the automatic flush actuation is activated, the WC flush control always activates a flush when you step back. Manual actuation is not necessary.
Setting 1 = deactivated
Setting 2 = activated
Prerequisites
The WC flush control is ready for operation.

If the sensors are not covered at the same time, a flush will be activated. Remove your hands and repeat the procedure.
1
Cover both sensors at the same time with both hands at a distance of approx. 5cm .After a few seconds both sensors begin to flash. After a few more seconds, the sensors flash red 3 times and then turn blue.Now remove both hands.
2
Cover the sensor on the left with your hand until it lights up orange. The sensor on the right flashes.
3
Cover the sensor on the left with your hand again until it lights up yellow. The sensor on the right flashes repeatedly to show the current setting 1. or 2. (setting 1 = flashing once, setting 2 = flashing twice).
Result
You are now in the setting mode for automatic flush actuation.
4
Cover the sensor on the right repeatedly until the desired setting has been made. Each time the sensor is covered, the WC flush control changes between the two settings (1-2-1-2- ...).
5
Cover both sensors at the same time with both hands at a distance of approx. 5 cm until both sensors flash once.

Result
The desired setting is now saved. The WC flush control is ready for operation again.
E - Resetting to factory setting
The settings B, C and D are reset to the factory setting, see Overview.
Prerequisites
The WC flush control is ready for operation.
Cover the sensor on the left for half a minute until both sensors light up red. A flush is then triggered.

Result
The factory settings are restored.
Troubleshooting
EN

Skilled persons will find the information on troubleshooting at www.geberit.com.
Malfunction Possible cause Fault clearance
| The sensors are flashing red • The WC flush control waits until all objects (tools, people, curtain, etc.) are outside of the 1 m measuring zone in front of the actuator plate. The teach-in process for the surrounding area then begins | • Keep objects outside of the 1 m measuring zone | |
| When you approach the WC, the sensor illumination comes on, but the flush does not work | • Software fault • Interrupt the power supply (mains fuse) for 10 min | |
| • Technical fault • Call in a skilled person | ||
| When you approach the WC, the sensor illumination does not come on and the flush does not work | • Mains power failure • Wait until the end of the power failure | |
| • Technical fault • Call in a skilled person | ||
| When you approach the WC, the sensor illumination does not come on, but the flush works | • Sensor illumination for user detection is deactivated | • Activate sensor illumination, see "Settings" |
| The sensor illumination does not go off when you step away (stays on for more than 15 minutes) | • Sensor illumination for user detection is activated | • Deactivate sensor illumination, see "Settings" |
| • An object is located within the 1 m measuring zone in front of the actuator plate | • Remove objects (tools, people, curtain, etc.) from the 1 m measuring zone | |
| • A new object is located within the 1,5 m detection distance around the actuator plate | • 15 Wait 15 minutes until the surrounding area has been reassessed | |
| Incorrect flushes (too soon, too late, unwanted) | • The actuator plate is dirty or damp • Clean or dry the actuator plate, see "Care" | |
| • The actuator plate is scratched • Call in a skilled person | ||
| A flush is triggered when you step back from the WC, without manual actuation | • Automatic flush actuation is activated | • Deactivate the automatic flush, see "Settings" |
| Water is running continuously into the WC ceramic appliance | • Software fault • Interrupt the power supply (mains fuse) for 10 min | |
| • Technical fault • Call in a skilled person | ||
| The WC ceramic appliance is not being flushed out properly | • The flush volume is set incorrectly • Call in a skilled person |
Care
Cleaning the actuator plate

CAUTION
Aggressive and scouring cleaning agents can damage the surface.
Never use aggressive cleaning agents that contain chlorine or are acidic, abrasive or corrosive
Clean the actuator plate with mild cleaning agents and water.
Use a soft cloth.

Geberit recommends the Geberit AquaClean cleaning set (article number 242.547.00.1) for cleaning the actuator plate.
Disposal
Contents
This product meets the requirements of the directive 2002/95/EC RoHS (Restriction of Hazardous Substances in electrical and electronic equipment).
Disposal
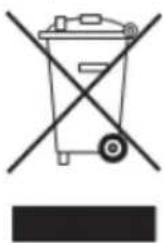
In accordance with directive 2002/96/EC WEEE on waste electrical and electronic equipment, manufacturers of electrical equipment are obliged to take back old equipment and to dispose of it correctly.
The symbol indicates that the product cannot be disposed of with non-recyclable waste. Old equipment should be returned directly to Geberit where it will be disposed of appropriately.
Please contact your responsible Geberit sales company or visit www.geberit.com for collection point addresses.
Clientèle visée
Réglage 2 = activation
Conditions requires
HactpoKa 2 =akTbnpaHa
PpeNoctabKn
YnpabJIeHHeTo Ha ToaJIeTHaTa e rOToBO Da 6bJe NOJ3BaHO OTHOB.

Ako 6yToHnTe He ce 3aKpNt eHOBpeMeHHo, ce 3aJeCTBa npOMBaHe. OTrpaHete dJaHnTe cn n NobTopeT npOceDypata.
1
3aknne eHOBpeMeHHo Dbata 6yToHa C dnaHnTe Ha pa3ctOraHne ok.5cm.CneH HAKONKO ckyHnD Bbata 6yToHa 3anoYBaT da Mrrat. CneO ue HAKONKO ckyHnD Dbata 6yToHa Mrrat 3 nTn B cepBeHO n CneT TOBA CBETT B cnHbo.Cera otCTpaHete nnAHnTe cn.
2
3akpiTe neBn6yToH cDlaH,doKaTo 3aNoUHe Da CBETN B opAHKeBO. DeCHnT 6yToH Mna.

3
3aKpHte Oue BeHNbX JEBN6yTOH C dNaH, DOKaTO 3aONUHe Da CBETn B XbJNTO. DeCHNAT 6yTOH NOKa3Ba Upe3 MfAHe OTHOBO TeKyuaTa HAcTPOKa 1. nIi 2. (HAcTPOKa 1 = MfRa eDhOKpaTHo, HAcTPOKa 2 = MfRa DByKpaTHo).
PezyntaT
Cera ce Hamipate B pexkM Ha HacTpoiKa 3a aBTOMaTHUHO 3aDeIcTBaHe Ha npOMBaHeTo.
4
3akpiTe NOBTOPO DeCHN6yToH,doKaTo 6bDe NoCTnIHATA KeJHaHATA HAcTpoKa. Ppn BCsKO 3akpmbaHe ynpabneHNeTo Ha ToaIeTHaTa npemHaBa MeKdy DBeTe HAcTpoKn (1-2-1-2-.
5
3aknTe eHOBpeMeHHo Dbata 6yToHa C dnaHnTe Ha pa3ctOraHne ok.5 cm,doKaTo Dbata 6yToHa MmHaT eINH nBt.
Pezyntat
Cera XeHaHata HAcTpoKa ce 3anaMeTaBa. YnpaBHeHneTo Ha ToaTeHata nak e RotoBO da 6bJe non3BaHO OTHOBO.
E-Ппес actpoиka KbM pha6pruHa NaCTpoiKa
HacpoKnte B, C n D ce BpBsaT KbM fapnHaTa HacpoKa, BxTe o6uI nperrJe.
PpeDnocTabKn
YnpabJIeHHeTo Ha ToaJIeTHaTa e rOtBO Da 6bDe IOJ3BaHO OTHOBO.
#
3akpnnte neBn6yToH 3a noNobnMHHyTa, DOKATO dBata 6yToHa CBeTHAT B YepBeHo. 3aJeCTBa ce npomBahe.

Pezyntat
HacpoKnTe ca BbPHaTn KbM pa6puHnTe HacptoKn.
NouctBaHe Ha KOMaHHaTa IJaTka

BHIMAHNE
ArpeBnHn a6pa3NBn nouchTbaun npenapatn MORa Da yBpeaT NOBbpxocTa. He n3noJ3BaIte nouchTbaun npenapatn, konTO ca a6pa3NBn, pa3xdaun, cbdbpxaT Xlop nn KncJIHa
IOnHCTBaIte KOMaHdHaTAtIIaTKa C MEKN IOnHCTBaUIN IIpeNaPaTHN BOJa.
YnoTpe6BaIte MeKa KbPna 3a nonnBaHe.

3a nouCTBaHe Ha KOMaHdHaTa PnAtKa GeBerit npenOpbUba KOMPJIeKta 3a nouCTBaHe GeBerit AquaClean (apTkyIeH Homep 242.547.00.1).
YnpaBneHne Ha OTpaDbu
CbCTaBKn
To3 npOdyKT e B cBoTBeCTBnE C n3NCKBaHnIa Ha DInpeKtNbA 2002/95/EG RoHS (OrpaHnueHneTo Ha yNoTpe6aTa Ha onpeJeHn OnaChn BeIeCTBa B eNEKtpuYeCKnTe n eNEKtpoHHnTe ypei).
YnpabJIeHHe Ha OTnaIbci


CbIacHo IupeKtNaBa 2002/96/EG WEEE oTHocHo eIekTpueckn i eIekTpoHH cTapuyei, npou3BOUnteJIte Ha eIekTpueckn ypei ca 3aIbIxKeHn da Cb6puat cTapu ypei n da rI ppeDaBt 3a yypabHeHne Ha otnaDbu n o npipodocbo6pa3en HauHH.
CmboTnoka3Ba,Ye npOdykTbT He Tp86Ba da ce n3XbPna 3aeHc o cctaHaNte OTnabu. YnoTpe6BaHnte ypeDu Tp86Ba da 6bDat npedaen Hn DnpeKTHo Ha Geberit Geberit 3a npocecnoHnHoto m npedabahe 3a ynpabHe Hn OtnadBu.
3a aDpeCnTe Ha npHemHnTe nyHKToBe MoKe Da ce 3aHt Ta npi KOMnTeHTHaTa fnpMa DnCTpN6yTop Ha Geberit nHa aDpec www.geberit.com.
BG
Grup tinta
MIIAE, TUPKouaZ, MaTzEvTA, TropTokaI, KITpivo, NPOYNOOEEEI
To ouotma eayxou WC eiva etoiyo ia aetoupyia.

Av ta nnktpa dev kauopouv kai ta duo tautoxpova, evpyoioiteiia pia atnoian. AIOUAKPuvETa xepia oac kai ETTavaaabeTn diadikcia.
1
KaIuIe TaUToxpoVa KAI ta DIO TIAKtpa ME ta Xepia Oe aIoOtaon TEP. 5 cm. Meta aIO uepikad EutepeoAeTTa apXizouv va avaoobhivouv MaZI ta DIO TIAKtpa. Meta aIO akoun Aiyad EutepeoAeTTa avaoobhivouv MaZI ta DIO TIAKtpa 3 opec Me KOKKivo Xpwma KAI eTAt avabovu Pe Pwma. Twpa aTOpaKpuveTa Xepia OaC.
ANOTEAEEMA
Twa piokeote otn aeitoupyia puohionyia to Xpwa qwiogou Twv TTAnktpow.
2
KpatnoTe to xepi oac mtpoota aio to dejo nnktpo.To eTIOevo xpwa qwiou Eqavicietai kai Ota duo nnktpa.

3
Kpatnote to xepi oac mtpoota aio to degio TAnkpo eoc otou epaovite to etiupnto xpua qwtioou.
4
KaUyTe TaTOxPovTa 8duo TAnKtpa Me Ta Xepia 6e aTIOOtaon Tep.5cm,expi KAI Ta Duo TAnKtpa va avaoosouv 1 opa.
ANOTEAE\SMA
To eTIOUNTo xOwpa oWIOuO exI Twpa aTOBKeute.To ouTnma eEyxou WC eivai kai pAI EToIOy IA AEIToupyia.
C-PuOioI 1nKtpwv
Eivai duvatac tpeis diaopotiképuuioeic.
- O φωτιαμός τών πλήκτρων εἶναι πάντα σβησός και δεν αὐβείούτε τότουν πλησίαζετε οτο WC
- O wtiioos twiAnktpwv eivai navta avaumevoc, akoun ki otav aTOnapkpueote aTo WC kai
- O p w v i a o e t e to WC kai oBnvei moAci atoakpuVtheta auto
NPOYNOGEZEIZ
To ouotma eayxou WC eivai etoiyoia aetoupyia.

Av ta TAnktpa dev kaUupOouv kai ta duo Tauroxpova, evpyoTIOeTai ia aTOnTluon. ATopaKpuVETe Ta Xepia oac kai ETTavaAβETe Tn diAdikacia.
1
KaUyTe taTOxpoVa ta duo TAnKtpa Me Ta Xepia o antoOtaon Tep. 5 cm. Meta ato epikdeutepolentapaxizouv va avaboosnvouuva Dua TAnktpa.Met aTao akoun AiyaduetopoleTTa avaboosnvouu ma ta duo TAnktpa 3 opec me KOKivo xpwka kai tata avabouv me pTLe xpwma.Twpa anpakpuveTa Xepia Oac.

2
KaUyTe to apioTePo TAnKtpo Me To Xepi, EwO otou avapei Me Tnptokai xpwa. To deio TAnKtpo avaBooBnvei UToOnawovTac
ETaveiAnmueva Tnv Tpexoua puOuian (puOuian 1 = avaBooBnvei miA φopa, puOuian 2 = avaBooBnvei duo φopεc, puOuian 3 = avaBooBnvei Tpeic φopεc).

ANOTEAEEMA
Twa p biokote ot n aeoupyia puoiang yia to 公 工 o TovnKtpwv.
3
BbnoHnRETCBOCCTaHOBNEHHe3aBOcKx yCTaHOBOK dna Hactpoek B, C n D, cm. 0630p.
Heo6xoDnMbIe ycIOBnA
CnCTema ynpabNeHn CmblbOM rTOBa K 3KcNnyatau.

3aKpbTb NeByu KnaBnU pyKo u ydepknBaTbe B TAKOM NonoKeHH N TeeHne 30 cekyH, noka o6e KnaBnU He 3aRoprTc KpaCHbIM CBeTom. Ppi 3tOM 3aEInCTByeTc cyHKmra CmbiBa.
Pe3ynbTaT
Bce HactpoN cHOBa c6paCbIbaOTcHa 3aBOckne yCTaHOBKn.
YcTpaHHeHHeNCnPaBHOCTeI

15.15.15.15.15.15.15.15.15.15.15.15.15.15.15.15.15.15.15.15.15.15.15.15.15.15.15.15.15.15.15.15.15.15.