AquaClean Cama - Toilet GEBERIT - Free user manual and instructions
Find the device manual for free AquaClean Cama GEBERIT in PDF.

| Product type | Lavatory toilet |
| Brand | Geberit |
| Model | AquaClean Cama |
| Dimensions (LxDxH) | 18.5 x 24.5 x 30.5 cm |
| Weight | 3.1 kg |
| Power supply | 230 V AC, 50 Hz |
| Power consumption | 1850 W |
| Standby power | ≤ 0.5 W |
| Protection rating | IPX4 |
| Protection class | I |
| Water tank capacity | 3 L |
| Connection | Mains via electrical socket |
| Radio technology | Bluetooth® Low Energy (2400–2483.5 MHz) |
| Hygiene functions | Anal douche WhirlSpray, automatic pre-rinse |
| Comfort functions | Adjustable jet intensity (3 levels), adjustable water temperature (34-40°C) via app |
| Control | Wireless remote control and Geberit Home app |
| Cleaning | Weekly cleaning of tank and technical module, annual descaling |
| Maintenance | Replacement of douche nozzle every 6 months |
| Safety | Mandatory grounding, supervision required for children |
| Warranty | 3 years subject to registration within 90 days |
Frequently Asked Questions - AquaClean Cama GEBERIT
User questions about AquaClean Cama GEBERIT
0 question about this device. Answer the ones you know or ask your own.
Ask a new question about this device
Download the instructions for your Toilet in PDF format for free! Find your manual AquaClean Cama - GEBERIT and take your electronic device back in hand. On this page are published all the documents necessary for the use of your device. AquaClean Cama by GEBERIT.
USER MANUAL AquaClean Cama GEBERIT
natural_image
Modern white toilet with open lid and adjacent storage unit, no visible text or symbols on the main bodyUSER MANUAL
BEDIENUNGSANLEITUNG
MODE D'EMPLOI
ISTRUZIONI PER L'USO

[Non-Text]
-
广力云智慧零售收银系统
[Non-Text]
[Non-Text]
[Non-Text]
[Non-Text]
[Non-Text]
[Non-Text]
[Non-Text]
[Non-Text]
[Non-Text]
[Non-Text]
[Non-Text]
[Non-Text]
[Non-Text]
[Non-Text]
[Non-Text]
[Non-Text]
[Non-Text]
[Non-Text]
[Non-Text]
[Non-Text]
[Non-Text]
|
|
[Non-Text]
[Non-Text]
[Non-Text]
[Non-Text]
[Non-Text]
[Non-Text]
[Non-Text]
[Non-Text]
[Non-Text]
[Non-Text]
[Non-Text]
[Non-Text]
[Non-Text]
[Non-Text]
[Non-Text]
[Non-Text]
[Non-Text]
[Non-Text]
[Non-Text]
[Non-Text]
[Non-Text]
[Non-Text]
-
[Non-Text]
Deutsch 4
English.... 34
Français.... 64
Italiano.... 94
Geberit AquaClean Cama 6
Grundlegende Informationen beachten.... 6
text_image
QR code image containing encoded data, no visible human-readable textAndroid: iOS:
Per Geberit Home App:

text_image
QR code image containing encoded data, no visible human-readable text
text_image
QR code image containing encoded data, no visible human-readable texttext_image
Two identical QR codes side by side, no visible text or symbols beyond the matrix patterns.DE
natural_image
3D diagram of a blue plastic container with attached plastic clips and rods (no text or symbols)natural_image
Illustration of a toilet with a water dispenser connected to a sink, showing no text or symbols
natural_image
Two blue plastic storage bins with plastic clips and three parallel tubes (no text or symbols visible)natural_image
3D illustration of a medical device with a blue catheter and arrow indicating rotation (no text or symbols)DE
natural_image
3D illustration of a blue cube with a black arrow pointing to its surface, next to a partial view of a curved object (no text or symbols)Duschdüse anbringen
natural_image
3D illustration of a toilet with blue opening and black arrow indicating direction (no text or symbols)natural_image
Blue toilet with a magnified inset showing a toothbrush and toilet (no text or symbols)natural_image
Two transparent plastic containers with a blue plastic seat and an arrow indicating rotation (no text or symbols)natural_image
Illustration of a computer mouse with a blue cord and an eye icon, no text or symbols present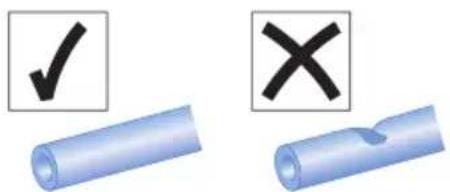
text_image
Diagram showing two blue cylindrical objects with checkmark and cross symbols, likely indicating selection or validation steps.natural_image
Illustration of a medical toilet with an eye icon and directional arrows indicating airflow or movement (no text or symbols present)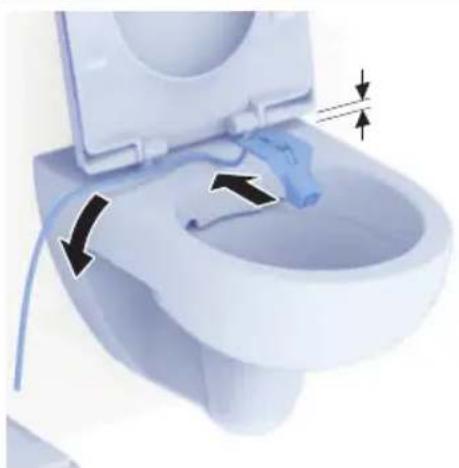
natural_image
Illustration of a toilet with water flow arrows indicating airflow direction (no text or symbols)DE
natural_image
Close-up of a white toilet with an eye insertion, showing the toilet's opening and suction pipe (no text or symbols visible)natural_image
Close-up of a blue plastic device with a circular button and arrow, no visible text or symbolsnatural_image
Close-up of a toilet with hand tools and an hourglass icon (no text or symbols)natural_image
Illustration of a toilet with an eye insertion step, showing the opening and interior (no text or symbols)natural_image
Close-up of a white mechanical component with a blue curved cable and an arrow pointing to a small component (no text or symbols visible)natural_image
3D illustration of a square water dispenser with a wall-mounted pipe and two side handles, labeled 'max' (no text or symbols on the diagram itself)natural_image
Illustration of a blue plastic container with an arrow pointing downward (no text or symbols)natural_image
3D rendering of a blue mechanical device with a black arrow pointing to its top component (no text or symbols visible)text_image
Diagram illustrating toilet wall installation with magnified views and tool icons for cleaning or repair operations2
text_image
Diagram illustrating toilet door assembly with tool icons and measurement annotationstext_image
Diagram showing a blue electrical plug inserted into a wall socket, with an hourglass icon and a device labeled 'B-GEKENT' nearby.text_image
Diagram showing a blue electrical plug inserted into a wall socket next to an orange control device labeled 'R-GENERIT'.natural_image
Illustration of a toilet with a blue base and a smartphone icon showing wireless signal (no text or symbols)text_image
GE EnergyErgebnis
natural_image
Close-up of a white mechanical component with a blue tool tip and a black arrow pointing to a circular feature (no text or symbols visible)
natural_image
Close-up of a white toilet with blue shower unit and water inlet, showing airflow direction arrows (no text or symbols)natural_image
3D illustration of a blue plastic water dispenser pouring liquid into a blue container (no text or symbols)natural_image
Blue plastic medical device with a rolled handle and two inset images showing hourglass and thermometer symbols (no text or labels)natural_image
3D rendering of a blue plastic appliance with a black upward arrow indicating a component (no text or symbols)2
natural_image
3D rendering of a transparent plastic tray with a blue interior and a small dot on the top (no text or symbols)3
natural_image
3D rendering of a small transparent plastic container with a blue handle, no text or symbols visible4
natural_image
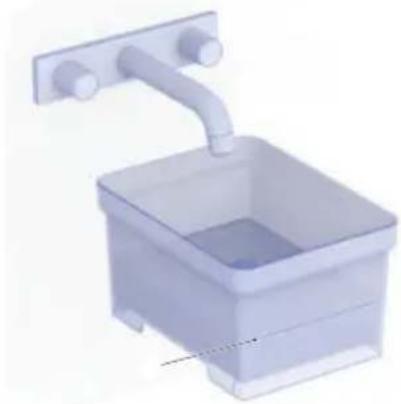
3D rendering of a square basin with a wall-mounted pipe and two side handles (no text or symbols)natural_image
Illustration of a blue open box with a downward arrow pointing to the lid (no text or symbols)natural_image
3D illustration of a blue mechanical component with a black arrow pointing to its top surface (no text or symbols)natural_image
Close-up of a generic remote control device with blue buttons and a leaf icon (no readable text or symbols)natural_image
3D rendering of stacked blue plastic containers with a black upward arrow indicating upward motion (no text or symbols)DE
natural_image
3D rendering of a square water dispenser with a wall-mounted pipe and two handles (no text or symbols)natural_image
3D illustration of a blue open box with a black arrow pointing downward (no text or symbols)natural_image
Two blue plastic blocks with a black arrow pointing to the top of the block (no text or symbols visible)natural_image
Close-up of a white remote control device with a blue circular icon and two buttons (no readable text or symbols)natural_image
3D rendering of a wall-mounted washing machine with blue liquid and a pipe (no text or symbols visible)natural_image
3D illustration of a blue plastic container with a black arrow pointing downward (no text or symbols)text_image
Diagram illustrating a recycling process on a remote device, showing step-by-step rotation and recycling symbol.natural_image
Two-step illustration of a device with blue circular components and black arrows indicating motion (no text or symbols)Explanation of warning notes 37
Register your device.... 38
Geberit App.... 39
Checking compatibility.... 39
Downloading the Geberit Home app 39
Familiarise yourself with the Geberit Home app.... 40
Getting to know your device 41
Familiarise yourself with the Geberit AquaClean Cama.... 41
Familiarise yourself with the functions.... 42
How to install the device 43
Prepare the Geberit AquaClean Cama 43
Attaching the spray nozzle 44
Connecting the technics assembly.... 47
Fix cable with cable ducts 48
Establish connection with the Geberit remote control 48
Establish connection with the Geberit app 49
Water leakage – situation and solutions.... 50
How to use the device 51
Operating concept 51
Familiarise yourself with the Geberit remote control 51
Use the anal shower.... 52
Set the spray intensity 52
Additional device settings in the Geberit Home app.... 52
Cleaning and descaling the device 53
Care Instructions 53
General cleaning and descaling recommendations 53
General care instructions 54
Cleaning the surface 54
Clean the vacuum pads and spray nozzle 55
Descale the device 56
Replace the remote control battery 59
Sustainability 60
Geberit Group and sustainability 60
Ecodesign - ecobalance 60
Tips for reducing the ecological footprint.... 60
Disposal 61
Disposal of waste electrical and electronic equipment.... 61
End user warranty 62
Technical data and conformity 63
Technical data 63
Simplified EU Declaration of Conformity 63
Simplified UK Declaration of Conformity 63
Observe basic information
In order to use the Geberit AquaClean Cama without complications, it is imperative that you observe the following basic information:
- The Geberit AquaClean Cama is only allowed to be used to execute the Geberit AquaClean shower toilet functions within the bathroom.
—The device is only allowed to be used when it is earthed.
—Geberit accepts no liability for the consequences arising from misuse.
- The Geberit AquaClean Cama is only allowed to be used by children and people with physical impairments once they have been given appropriate instructions and can be supervised.
- The Geberit AquaClean Cama is only allowed to be used together with the Geberit Home app and the Geberit remote control.
- Keep the packaging of the Geberit AquaClean Cama to use when transporting it to a different place of use.
– The device is only allowed to be transported in its original packaging.
- When unpacking the device, check that it is not damaged and that none of the hygiene seals have been broken. If damaged, the Geberit AquaClean Cama must be returned to Geberit immediately.
—If damaged, do not continue to use the device.
- Only install the device according to Geberit instructions.
—It is not permitted to make any modifications.
- You must read this user manual before installing or operating the device and ensure you follow all instructions.
- Replace the water in the water tank at regular intervals and only use water of drinking water quality (cold water).
- Follow the care instructions provided in this user manual.
—The device is only allowed to be cleaned when the power supply is disconnected.
- Descale the device at least once a year and follow the descaling instructions in this user manual.
Explanation of warning notes
Warning notes are placed at the location at which the hazard may occur.
Warning notes are structured as follows:

WARNING
Nature and source of the hazard
Possible consequences if the hazard is ignored.
▶ Measures to prevent the hazard.
The following signal words are used to indicate residual hazards in warning notes and important information.
| Symbol S | Signal word and meaning |
 | WARNINGThe signal word denotes a hazard with a medium degree of risk which, if not avoided, could result in death or serious injury. |
| ATTENTIONThe signal word denotes a hazard, which, if not avoided, may result in material damage. | |
 | Symbol only.Refers to important information. |
Warranty registration
Extend the warranty period of your Geberit AquaClean for free. Register for this within 90 working days from the installation date.

text_image
+1In the third year of the warranty period, Geberit will supply replacement parts free of charge in the event of material or production defects.
By computer: http://www.geberit-aquaclean.com/registration
By smartphone or tablet:

text_image
QR code image containing encoded data, no visible human-readable textAndroid: iOS:
Via Geberit Home app:

text_image
QR code image containing encoded data, no visible human-readable text
text_image
QR code image containing encoded data, no visible human-readable textChecking compatibility
To ensure you can use the Geberit App to its full extent, you will need a smartphone with an up-to-date Android or iOS version. You may need to check the permissions (Bluetooth®, location sharing) and confirm them.
Downloading the Geberit Home app
Download the free Geberit Home app for Android and iOS smartphones directly from the respective App Store:
1 Open the App Store on your smartphone.
2 Enter "Geberit Home app" in the search field.
√ The Geberit Home app is displayed.

GEBERIT
3 Download the app.
√ The app is downloaded and displayed on your smartphone.
Alternatively, you can scan the respective QR code to download the Geberit Home app:
Android: iOS:

text_image
Two identical QR codes side by side, no text or symbols presentEN
Familiarise yourself with the Geberit Home app
The Geberit Home app communicates via a Bluetooth® interface with the AquaClean device.

The remote control function of the Geberit AquaClean device is deactivated while the device is connected to the Geberit Home app.
You can execute the following functions and settings via the Geberit Home app:
- Remote control
– Using remote control functions
- Care and maintenance (Geberit services)
- Registering the device
- Software update
- Updating the firmware
You can access the following information via the Geberit Home app:
• Service and contact
- Chatbot
- Order accessories
– Frequently asked questions (FAQ)
– Geberit AquaClean customer service
- Information
– Name (of your device: you can edit this)
- Colour (of the background in the app: you can edit this)
- Model
- Article number
- Serial number
– Initial commissioning
- Step-by-step instructions
- Displaying descaling
- Explanatory videos
– Playing function videos
– Playing maintenance and cleaning videos
- User manual
- Displaying the user manual
Familiarise yourself with the Geberit AquaClean Cama
We are delighted to introduce you to the Geberit AquaClean Cama that you can use to experience the Geberit AquaClean shower sensation in your own home.
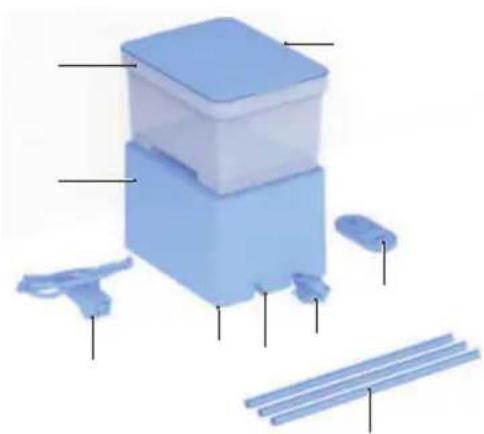
natural_image
3D diagram of a blue plastic container with attached plastic clips and rods (no text or symbols)| Item Component Information | ||
| 1 Lid – | ||
| 2 Water tank – | ||
| 3 Technics assembly – | ||
| 4 Spray nozzle with feed pipe | For regular replacement:Available for you in the Geberit Web Shop with the art. no. 245.390.11.1 | |
| 5 | Specification plate with serial number (not visible) | Below the technics assembly |
| 6 | Connection between feed pipe and technics assembly | – |
| 7 | Mains cable for the technics assembly | Wound up below the technics assembly |
| 8 Cable ducts | 3 x 33 cm, for cutting to size and fixing the hose and cable | |
| 9 Remote control To operate your device | ||
EN
Some components and the consumables listed below can be ordered directly via the Geberit Home app, the Geberit spare parts catalogue or via the Geberit Web Shop.
| Consumables Information | |
| Geberit AquaClean cleaning set | To clean your device:Art. no. 242.547.00.1 |
| Geberit AquaClean descaling agent | To descale your device:Art. no. 147.040.00.1 |
| Geberit AquaClean descaling agent set (4 pcs.) | Art. no. 147.047.00.1 |
| Geberit AquaClean descaling agent set (10 pcs.) | Art. no. 147.048.00.1 |
Familiarise yourself with the functions
Hygiene functions:
• WhirlSpray shower technology
• automatic pre-flush function (with cold water)
- descaling programme
Comfort functions:
• spray intensity can be selected
• water temperature can be selected (via the Geberit Home app)
- selected functions can be operated via remote control
- all functions can be operated via the Geberit Home app
Prepare the Geberit AquaClean Cama

WARNING
Incorrect installation
Incorrect cable routing can lead to injuries.
▶ Lay the cable in a way that does not create any trip hazards.
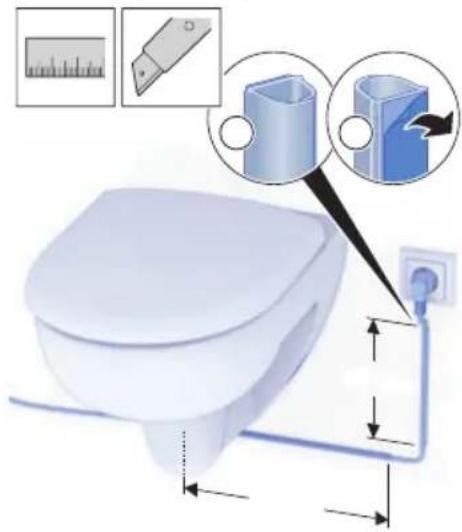
▶ Connect the device to the nearest mains connection, bearing in mind the cable length of 3 metres.
1 Check the distance to the nearest power socket.
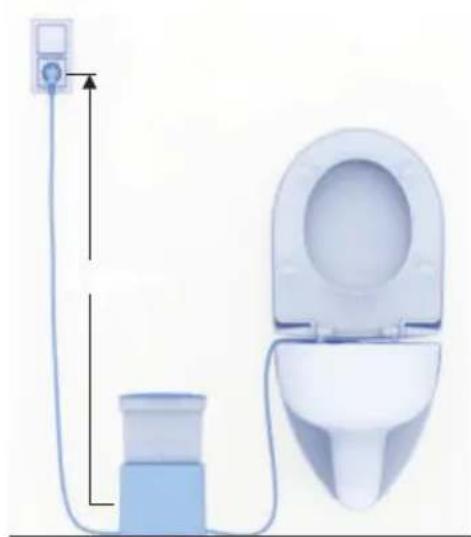
natural_image
Illustration of a toilet with a water pump connected to a sink, showing no text or symbols.
Position the technics assembly firmly on the floor.
2 Remove the device from the packaging.
√ Check for damage. √ Retain the packaging.
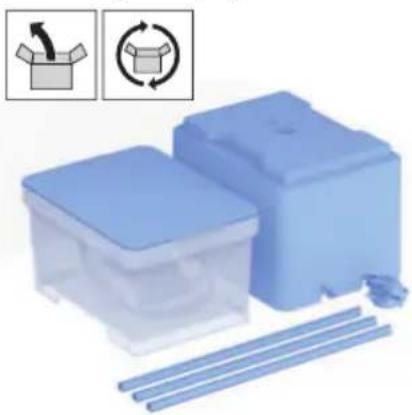
natural_image
Blue plastic storage bins with plastic strips and a recycling symbol (no text or labels)3 Unroll the mains cable enough to reach the power socket.
natural_image
Illustration of a medical device with a blue cable and arrow indicating rotation (no text or symbols)EN
4 Position the technics assembly accordingly.
√ The technics assembly can be positioned on the right or left of the WC.

natural_image
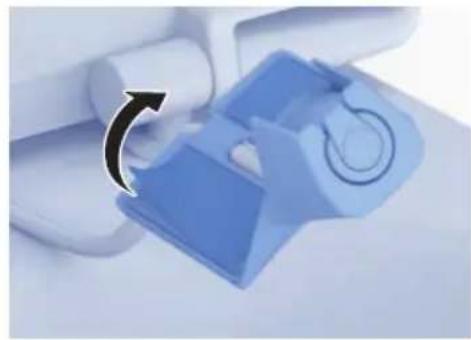
3D illustration of a blue cube with a black arrow pointing to its top surface, next to a curved object (no text or symbols)Attaching the spray nozzle
1 Lift up the WC seat.
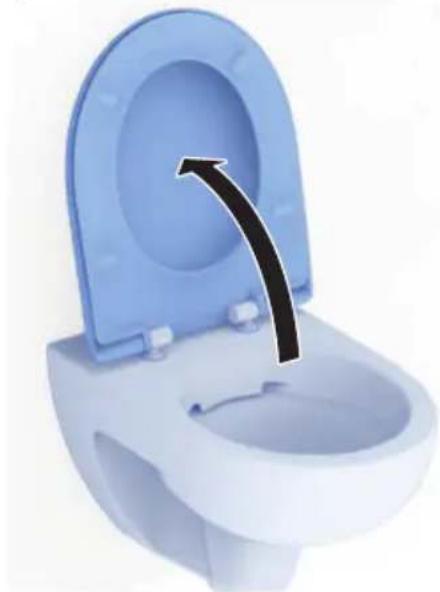
natural_image
3D illustration of a toilet with blue opening and white interior, showing airflow direction (no text or symbols)2 Clean the WC surface.
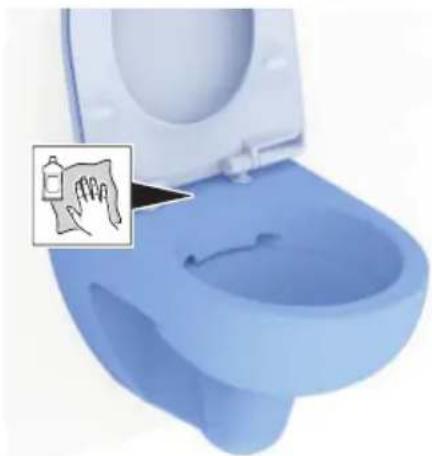
natural_image
Blue toilet with a close-up inset showing a toothbrush and toilet (no text or symbols)3 Take the spray unit out of the water tank.

natural_image
Illustration of a blue plastic container with an arrow indicating rotation or change, no text or symbols present.4 Replace the lid on the water tank to close it again and prevent any impurities from getting inside.
5 Take the spray unit out of the plastic bag.
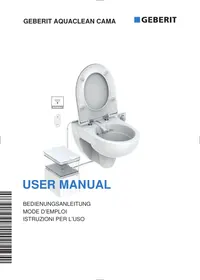
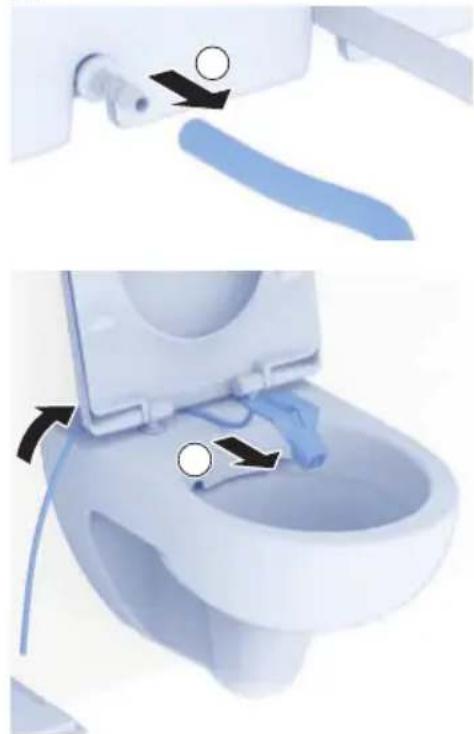
6 Roll out the feed pipe for the spray unit ensuring no kinks are formed.

text_image
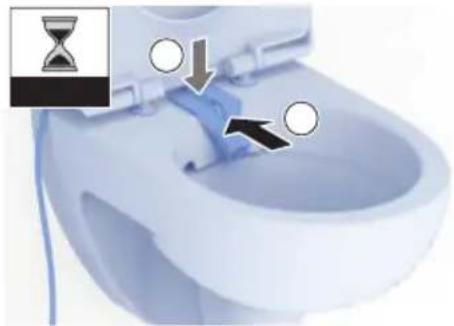
Diagram illustrating eye inspection and packaging process with labeled arrows and checkmark/cancel icons7 Guide the feed pipe for the spray unit between the WC seat and the WC surface and out towards the technics assembly side.
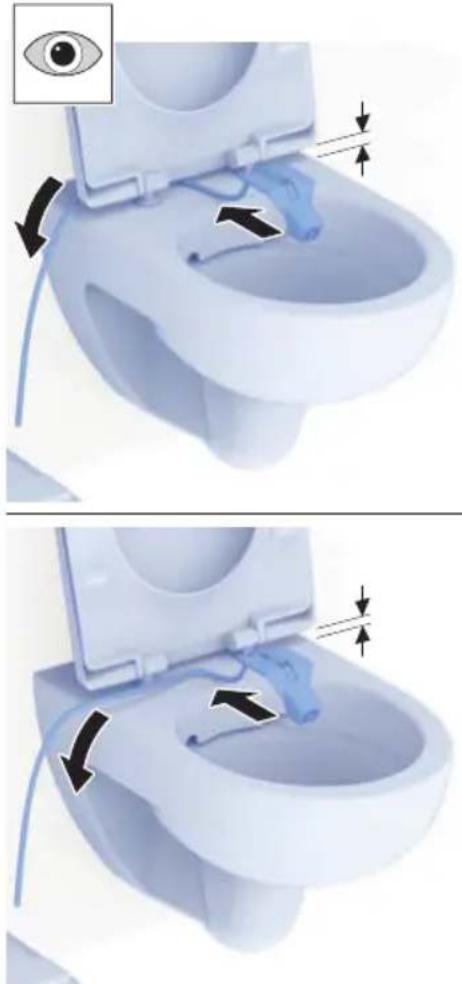
text_image
Medical illustration showing eye insertion and fluid flow on a toilet sink, with labeled arrows indicating movement.8 Position the spray unit centrally in the preferred position on the rear rim of the WC without sticking it down.

natural_image
Close-up of a white toilet with an eye icon pointing to the drain and a blue plastic component, no text or symbols present.EN
9 Remove the protective foil.
natural_image
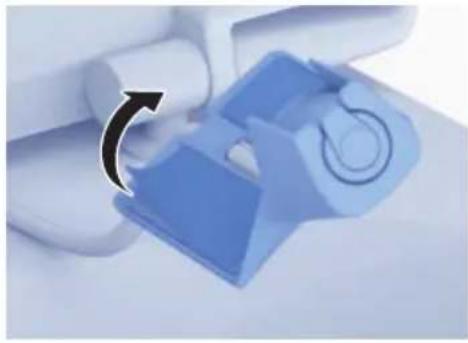
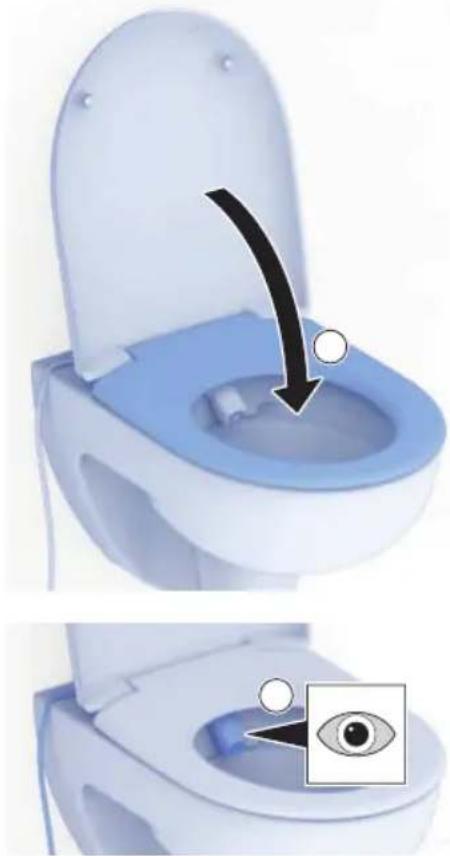
Close-up of a blue plastic component with a circular symbol and arrow indicating rotation (no text or symbols present)10 Fasten the spray unit down centrally in the preferred position on the rear rim of the WC and press it firmly against the ceramic for at least 1 minute.
natural_image
Close-up of a toilet with hand positioning arrows and an hourglass icon (no text or symbols)11 Close the WC seat ring and check whether the spray unit is properly secured.
natural_image
Illustration of a toilet with an eye insertion step, showing the opening and interior (no text or symbols)Connecting the technics assembly
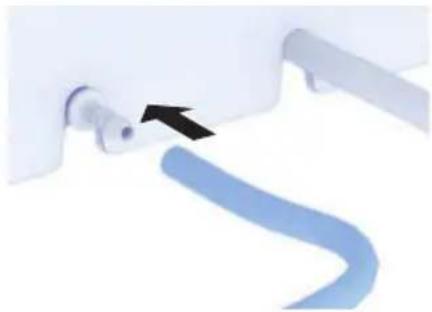
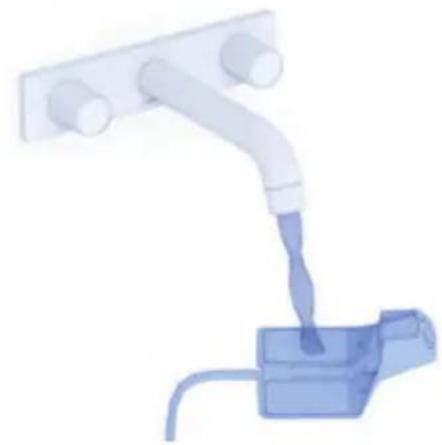
1 Connect the water hose for the spray unit to the technics assembly.
√ To ensure an optimal water supply, the water hose must not have any kinks.
natural_image
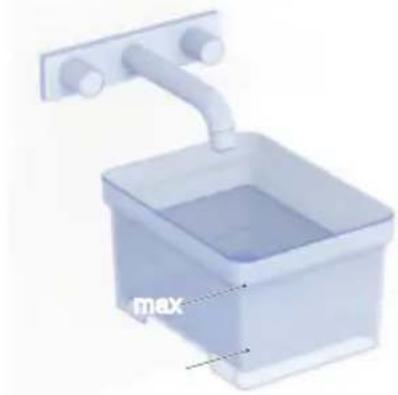
Close-up of a white mechanical component with a blue curved cable and an arrow pointing to it (no text or symbols visible)2 Fill the water tank with water.
√ Only fill it with water of drinking water quality (cold water).
√ Replace the water regularly.
natural_image
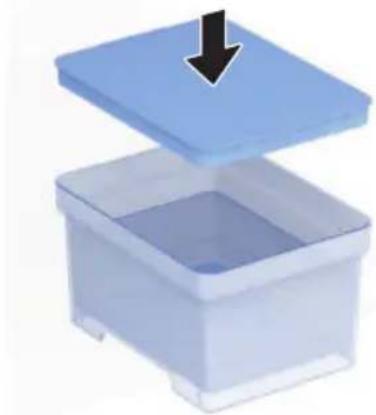
3D rendering of a square water dispenser with a piping and labeled 'max' (no other text or symbols)3 Replace the lid on the water tank to close it.
√ The lid must sit correctly on the water tank to ensure no impurities can enter.
natural_image
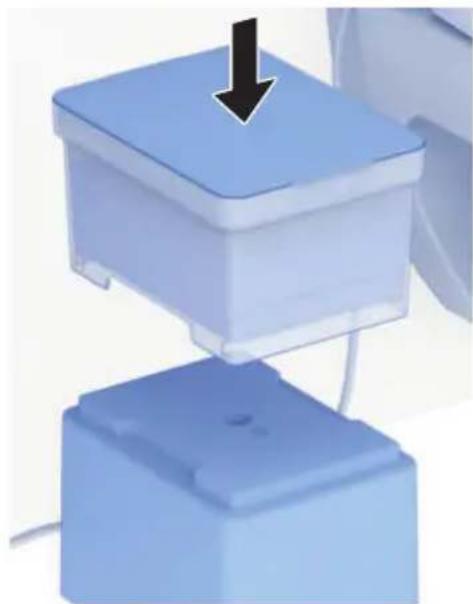
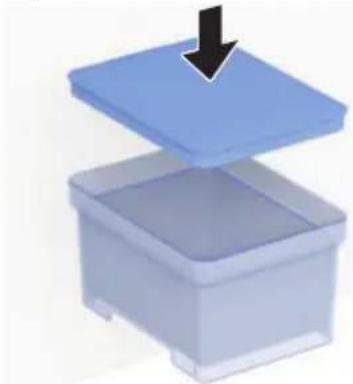
3D illustration of a blue open box with a black arrow pointing downward (no text or symbols)4 Place the water tank with the lid closed on top of the technics assembly.
natural_image
Close-up of a blue mechanical component with a black arrow pointing to its top surface (no text or symbols visible)√ The Geberit AquaClean device is installed and can be connected with the Geberit app or the remote control.
EN
Fix cable with cable ducts

All cables must be securely laid and fixed in cable ducts to prevent tripping hazards and cable damage.
Note that three cable ducts are provided, which you can cut to size and fix individually. You may need more than the cable ducts provided to lay and fix all cables securely. The laying of the cables shown here in the example may also vary depending on the prerequisites for your bathroom.
1
Lay the cable ducts so that all cables are securely laid and fixed.
text_image
Diagram illustrating a wall-mounted toilet with tool application and component alignment, including magnified views of the toilet's internal structure.2
Lay the cable ducts so that all cables are securely laid and fixed.

text_image
Diagram illustrating toilet wall cleaning process with magnified views and tool iconsEstablish connection with the Geberit remote control

The shower procedure can be actuated at any time – even if no one is sitting down on the WC seat ring. Ensure that you are sitting on the WC seat ring before starting the shower procedure.
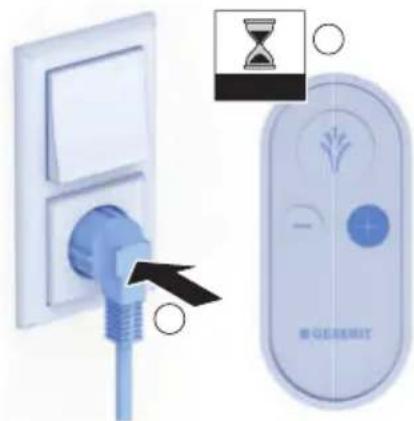
▶ Connect the Geberit AquaClean device to the power supply and press the <+> button on your remote control for about 10 seconds.
√ Ensure you are in close range of the device.
text_image
Diagram showing a blue electrical plug inserted into a wall socket next to a GE ENERGY remote control with an hourglass icon and an arrow indicating insertion.√ The connection is established. This can take several seconds.
√ The Geberit AquaClean device is ready for operation.
Establish connection with the Geberit app
1 Connect the Geberit AquaClean device to the power supply and press the <+> button on your remote control for about 10 seconds.

text_image
Diagram showing a plug inserted into a wall socket next to a GE GENERY remote control with an hourglass icon highlighting the component.2 Open the Geberit app.
√ Ensure you are in close range of the device.
3 Select your country and language and confirm with [NEXT].
4 Start the search by selecting [Add (search for products)].
√ The Geberit AquaClean device is displayed.
5 Connect your Geberit AquaClean device with [Connect now].
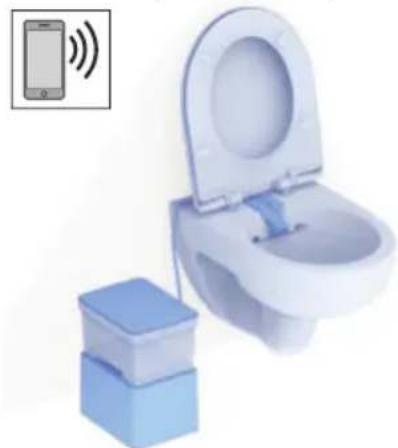
natural_image
Illustration of a white toilet with a blue sink and a blue storage box beside it, accompanied by an icon showing a smartphone emitting sound waves (no text or symbols on the toilet itself)√ The connection is established. This can take several seconds.
√ The Geberit AquaClean device is ready for operation.
ATTENTION
Device does not connect to the Geberit app
The Geberit AquaClean device does not connect to the Geberit app within the next ten minutes or needs to be connected to a second smartphone.
▶ Disconnect the mains plug and plug it back in after approximately 10 seconds. Then press the <+> button on your remote control for approximately 30 seconds to restart the pairing process.
EN
Water leakage – situation and solutions
If the device tips over and water leaks out, the technics assembly could come into contact with water. Proceed as follows if the technics assembly comes into contact with water:
1 Disconnect the device from the power supply.
2 Ensure that the technics assembly is not in the vicinity of leaking water.
3 If the technics assembly has come into contact with water, allow it to dry out fully.
4 Dry the floor fully to ensure there is no more residual water.
5 Once the device is dry and there is no more water in the vicinity, re-install it according to the instructions in the user manual.
If the Geberit AquaClean device shows signs of damage, contact Geberit or return the device immediately to Geberit.
Operating concept
You can operate the device via the Geberit remote control or the Geberit Home app.

The remote control function of the Geberit AquaClean device is deactivated while the device is connected to the Geberit Home app.
Familiarise yourself with the Geberit remote control
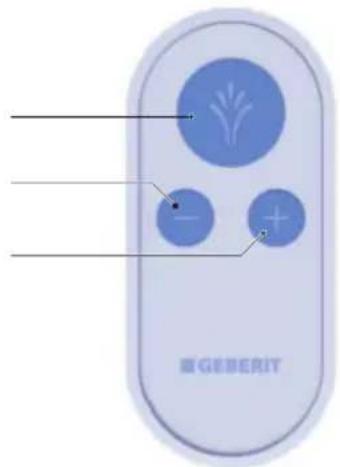
text_image
GEBERIT1
2 <-> button: Reduce spray intensity
3 <+> button: Increase spray intensity
EN
Use the anal shower

The shower procedure can be actuated at any time – even if no one is sitting down on the WC seat ring. Ensure that you are sitting on the WC seat ring before starting the shower procedure.
Prerequisite
- You are sitting on the WC seat ring.
▶ Briefly press the
natural_image
Close-up of a light blue remote control with a leaf icon and two buttons (no readable text or symbols)Result
√ The shower procedure starts.
Set the spray intensity
Prerequisite
- The shower procedure is running.
▶ Press the <+> button to increase the spray intensity. Press the <-> button to decrease the spray intensity.

text_image
福 5G后端定时灯Result
√ The shower spray becomes stronger/weaker.

You can set the spray intensity in 3 stages.
Additional device settings in the Geberit Home app
| Appointment Adjustment range Factory setting | ||
| Shower water temperature Position 1–5 Position 4 | ||
| Hot water of the spray functionality on/off on |
Care Instructions
You have selected a product with a high-grade surface. Please follow the care instructions below.
The manufacturer does not assume any liability for product damage that arises as a result of incorrect care and handling.
General cleaning and descaling recommendations
Cleaning the shower toilet at the recommended cleaning intervals will ensure that it functions properly. The shower toilet must only be cleaned using suitable cleaning agents and cleaning equipment.
ATTENTION
Aggressive descaling agents
Unsuitable descaling agents may cause damage to the device.
▶ Only use Geberit AquaClean descaling agents to descale the device.
▶ Refer to the “Descaling the device” section.
ATTENTION
Aggressive and scouring cleaning agents
Cleaning using aggressive and scouring cleaning agents can cause surface damage.
▶ Use Geberit AquaClean cleaning agents.
▶ Pay attention to the cleaning and care instructions.
| Interval Task | |
| Daily | ▸ Remove water drops with a soft, lint-free cloth to avoid limescale stains. |
| Weekly | ▸ Empty the water tank. Clean the water tank and lid with a soft, lint-free cloth and a suitable cleaning agent. Only fill the water tank with water of drinking water quality (cold water).▸ Clean the technics assembly with a soft, lint-free cloth and a suitable cleaning agent.√ Always disconnect the device from the power supply to clean it.√ The technics assembly must not be immersed in water.▸ Check spray nozzle including vacuum pads and clean or replace if necessary. → See "Clean the vacuum pads and spray nozzle", page 55. |
| Annually ▶ Descale your device. → See "Descale the device", page 56. | |
EN
General care instructions
- Never use cleaning agents that contain chlorine or that are acidic or corrosive.
- Never use cleaning agents that are abrasive or may scratch the surface.
- Never use sharp or pointed objects when cleaning.
• Make sure that an efficient source of ventilation and an appropriate room temperature are present in your bathroom. - Protect the surface from bleaching due to extreme light and sun exposure.
Cleaning the surface

WARNING
Danger of fatal electric shock Incorrect cleaning can lead to death or serious injury.
▶ Disconnect the power supply before cleaning.
▶ Allow all of the surfaces to dry completely before the power supply is permitted to be switched back on.
1 Clean the surfaces. Please follow the corresponding care instructions.
2 Dry the surfaces with a soft, lint-free cloth.
Clean the vacuum pads and spray nozzle
Prerequisite
- The vacuum pad is dirty and no longer adheres to the surface.
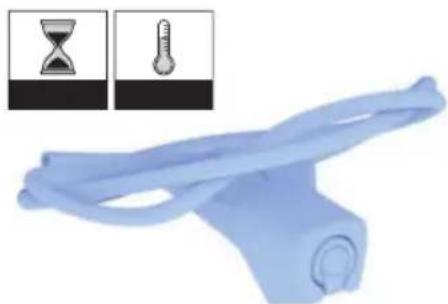
– The spray nozzle is dirty. - The spray nozzle and feed pipe must be replaced after approximately 6 months.
- The water tank is empty.
1 Demount the spray unit and the feed pipe to clean them.
natural_image
Two-step illustration of a toilet sink with blue tubing and black arrows indicating flow direction (no text or symbols)2 Clean the vacuum pad and the spray nozzle by rinsing them with warm, clear water and a mild cleaning agent.
natural_image
3D illustration of a faucet pouring liquid into a blue container (no text or symbols)3 Allow the spray nozzle to dry at room temperature for 30 minutes.
natural_image
Blue plastic mechanical component with two inset images showing hourglass and thermometer symbols (no text or labels)√ The vacuum pad and spray nozzle are clean, and the vacuum pad adheres to the surface again.
4 Reattach the spray nozzle to your WC. → See "Attaching the spray nozzle", page 44.
EN
Descale the device

Bear in mind that you can also perform descaling by following the step-by-step instructions available on the Geberit Home app.
1
Remove the water tank from the technics assembly.
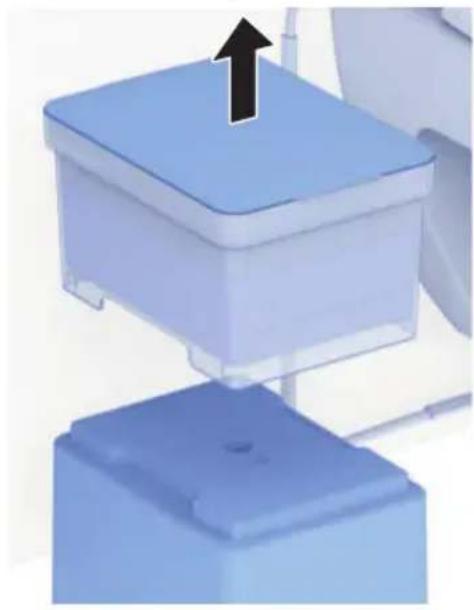
natural_image
3D rendering of a blue mechanical component with an upward arrow, no visible text or symbols2
Empty out the water.
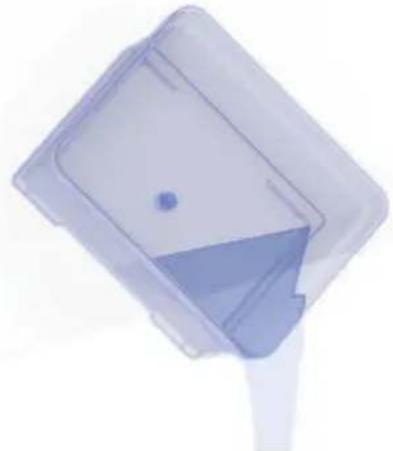
natural_image
Top-down view of a transparent plastic tray with a small blue dot on the side (no text or symbols visible)3
Pour a bottle (125 ml) of Geberit descaling agent into the water tank.
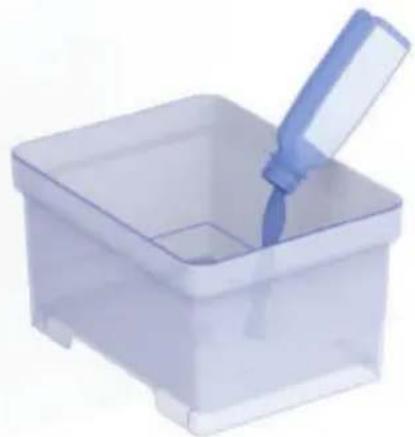
natural_image
Transparent plastic container with a blue handle, no text or symbols visible4
Fill the water tank half full with water.
√ Only fill it with water of drinking water quality (cold water).
natural_image
3D rendering of a square water dispenser with a pipe and handle (no text or symbols)5 Replace the lid on the water tank to close it.
√ The lid must sit correctly on the water tank to ensure no impurities can enter.
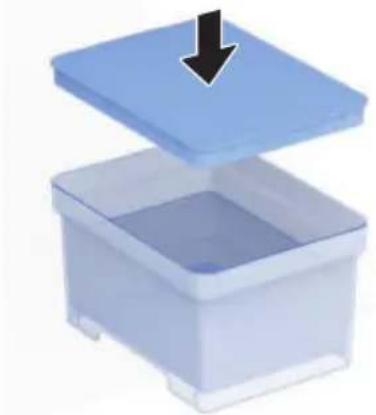
natural_image
Illustration of a blue open box with a downward arrow pointing to the lid (no text or symbols)6 Place the water tank with the lid closed on top of the technics assembly.

natural_image
Close-up of a blue plastic electronic device with a black arrow pointing to its top surface (no text or symbols visible)7 Press the <-> and
natural_image
Close-up of a generic remote control device with blue buttons and a leaf icon (no readable text or symbols)√ The descaling programme is started, which can take about 30 minutes.
√ The descaling programme is finished as soon as the water tank is completely empty.
8 Remove the water tank from the technics assembly.

natural_image
Close-up of blue plastic containers with a black upward arrow indicating a component (no text or symbols visible)EN
9 Fill the water tank half full with water.
√ Only fill it with water of drinking water quality (cold water).
natural_image
3D rendering of a square water dispenser with a vertical pipe and side-mounted handle (no text or symbols)10 Replace the lid on the water tank to close it.
√ The lid must sit correctly on the water tank to ensure no impurities can enter.
natural_image
3D illustration of an open plastic box with a blue lid and black arrow pointing downward (no text or symbols)11 Place the water tank with the lid closed on top of the technics assembly.

natural_image
Two blue plastic blocks with a black arrow pointing to the top of the block (no text or symbols visible)12 Press the button to start the flushing programme.

text_image
国QE新通讯灯√ The flushing programme is started, which can take about 10 minutes.
13 Fill the water tank completely with water.
√ Only fill it with water of drinking water quality (cold water).
natural_image
3D rendering of a wall-mounted sink with blue liquid and a pipe, no text or symbols visible14 Replace the lid on the water tank to close it.
√ The lid must sit correctly on the water tank to ensure no impurities can enter.
natural_image
3D illustration of a blue plastic container with a black arrow pointing downward (no text or symbols)√ After the flushing programme is finished, the device is ready for operation again.
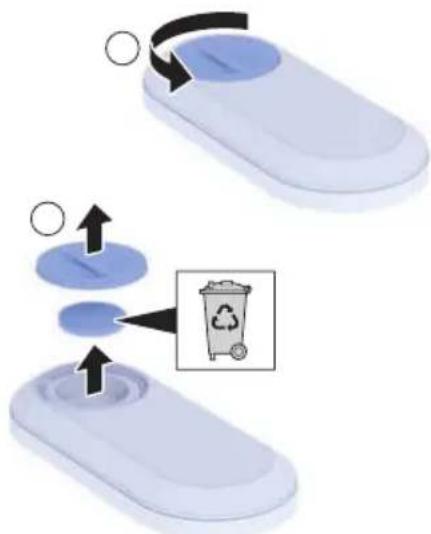
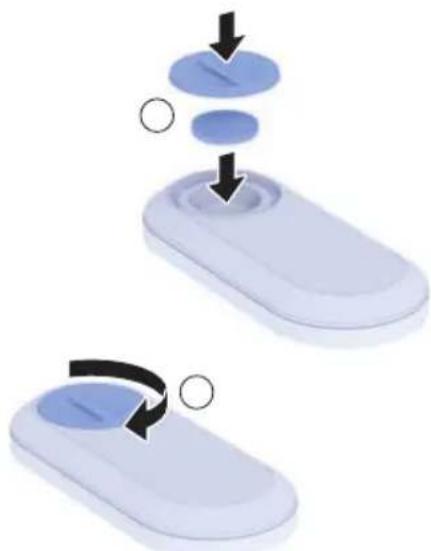
Replace the remote control battery
Prerequisite
– During the entire procedure, the remote control must be located in the physical range of the shower toilet.
1 Remove the used battery. Dispose of the used battery appropriately.
text_image
Diagram illustrating a recycling process with labeled steps and a recycling bin icon2 Insert a new CR2032 battery.
natural_image
Two-step diagram showing a device being processed, with arrows indicating the process (no text or symbols present)Geberit Group and sustainability
As the European market leader in the sanitary industry, Geberit stands for water saving, resource efficiency and sustainable building. The Group has proven for decades that long-term business success is compatible with environmentally friendly actions and social policies. A company management geared to sustainability helps to save costs while minimizing risks at the same time. Geberit aims to act as a role model and set standards for its customers, suppliers and other partners. This means creating water-saving and sustainable products, using safe, environmentally friendly and resource-efficient production practices, engaging in purchasing and logistics activities with high environmental and ethical standards, and offering excellent working conditions for more than 12 000 dedicated and highly qualified employees worldwide. One way in which the company is showing its awareness of social responsibility is by participating in water relief projects around the world.
Ecodesign – ecobalance
The basis for sustainable products is formed by a systematic innovation process in which product materials and functional principles are chosen that are as environmentally friendly as possible, risks are minimised and a high degree of resource efficiency is strived for. We can supply a detailed ecobalance for this product upon request.
Tips for reducing the ecological footprint
This product was developed with the utmost care, also with regard to the consumption of energy, water and resources (see also technical data). You can reduce the ecological footprint of the product by observing the following recommendations:
- Switch off the device when you go on holiday.
- Interrupt the spray functionality manually in order to save hot water.
- Use small amounts of paper for drying.
- Switch off the heating function of the water heater when you do not need warm shower water.
- Use environmentally friendly cleaning agents.
- Carry out regular maintenance on the device and handle it with care in order to extend the service life.
- Return defective devices to Geberit or a designated partner for appropriate disposal.
Disposal of waste electrical and electronic equipment
The symbol of the crossed-out wheeled bin means that waste electrical and electronic equipment (WEEE) must be disposed of separately and not with other non-recyclable waste. End users are legally obliged to return old equipment to public waste disposal authorities, distributors, or Geberit for proper disposal. Many distributors of electrical and electronic equipment are obliged to take back WEEE free of charge. Contact the responsible sales or service company to return the WEEE to Geberit.
Used batteries and accumulators that are not enclosed within the old equipment, as well as lamps that can be removed from the old equipment in a non-destructive manner, must be separated from the old equipment before being handed over to a disposal point.
If personal data is stored on the old equipment, end users themselves are responsible for deleting it before handing it over to a disposal point.
End user warranty
The following end user warranty is provided in addition to and does not affect your contractual partner's liability for defective products.
The Geberit company (“Geberit”) responsible for the place of installation of the Geberit AquaClean product (“product”) shall provide the end user with a warranty for the product identified by the serial number on the warranty card. The scope of this warranty is as follows:
- Geberit guarantees that the product shall be free from material defects and manufacturing faults for a period of 3 years (“warranty period”) calculated from the installation date at the end user's premises. Warranty scope:
– Within the first 2 years of the warranty period, a customer service representative authorised by Geberit shall rectify any material defects or manufacturing faults free of charge by repairing or replacing the defective parts.
– In the third year of the warranty period, Geberit shall supply replacements for defective parts free of charge to the customer service representative authorised by Geberit and contracted by the end user to repair the product.
-
The end user shall not be entitled to assert more extensive claims against Geberit on the basis of this warranty.
-
Claims can only be made under the warranty if:
-
No modifications have been made to the product; in particular, no parts have been removed, replaced or added.
-
The product defect has not been caused by improper installation or use, nor can it be attributed to inadequate care or maintenance.
– Claims made in the third year of the warranty period are only valid within 90 working days, calculated from the installation date. -
This warranty applies solely to places of installation in countries in which Geberit has its own sales company or is represented by a sales partner.
-
The warranty is exclusively subject to the substantive law of the country in which Geberit has its place of business. The United Nations Convention on Contracts for the International Sale of Goods is expressly excluded. The exclusive place of jurisdiction for all disputes arising from or in connection with this warranty is the location of Geberit's headquarters.
Technical data
| Dimensions 18.5 x 24.5 x 30.5 cm (WxDxH) | |
| Weight 3.1 kg | |
| Max. water tank capacity 3 l | |
| Nominal voltage 230 V AC | |
| Mains frequency 50 Hz | |
| Power consumption 1850 W | |
| Power consumption standby ≤ 0.5 W | |
| Protection degree IPX4 | |
| Protection class I | |
| Frequency range 2400–2483.5 MHz | |
| Maximum output power 0 dBm | |
| Wireless technology Bluetooth® Low Energy | 1) |
| Mains connection Mains connection via mains | plug |
| Spray time 30 s | |
| Number of shower pressure settings, shower spray | 3 |
| Water temperature 34–40 °C | |
| Operating temperature 5–40 °C |
1) The Bluetooth® brand and its logos are the property of Bluetooth SIG, Inc. and are used under licence by Geberit.
Simplified EU Declaration of Conformity
Geberit International AG hereby declares that the radio equipment type Geberit AquaClean Cama is in compliance with Directive 2014/53/EU.
The full text of the EU declaration of conformity is available at the following Internet address: https://doc.geberit.com/969879000.pdf.
Simplified UK Declaration of Conformity
Hereby, Geberit International AG declares that the radio equipment type Geberit AquaClean Cama is in compliance with the Radio Equipment Regulations 2017.
The full text of the UK declaration of conformity is available at the following Internet address: https://doc.geberit.com/970866000.pdf
Geberit AquaClean Cama 66
text_image
QR code image containing encoded data, no visible human-readable textAndroid : iOS :
text_image
QR code image containing encoded data, no visible human-readable text
text_image
QR code image containing encoded data, no visible human-readable texttext_image
Two identical QR codes side by side, no visible text or symbols beyond the matrix patternsFR
natural_image
3D diagram of a blue plastic container with attached plastic clips and rods (no text or labels)natural_image
Illustration of a toilet with a water dispenser connected to a sink, showing no text or symbols.natural_image
Two blue plastic storage containers with plastic strips, one open and one closed, both with an instructional icon showing rotation (no text or symbols on main objects)natural_image
3D illustration of a medical device with a blue cable and arrow indicating rotation (no text or symbols)FR
natural_image
3D illustration of a blue cube with a black arrow pointing to its surface, next to a partial view of a curved object (no text or symbols)natural_image
3D illustration of a blue toilet with a black arrow pointing to the opening area (no text or symbols)natural_image
Blue toilet with a magnified inset showing a toothbrush and toilet (no text or symbols)natural_image
Two transparent plastic crates with a blue shipping container and an arrow indicating rotation (no text or symbols)text_image
Medical diagram illustrating eye anatomy with labeled eye, cross, and checkmark indicators for compliance or validation.text_image
Medical illustration showing eye insertion and catheter placement on a toilet, with labeled arrows indicating movement.FR
natural_image
Close-up of a white toilet with an eye icon pointing to the drain (no text or symbols visible)9 Retirez le film de protection.
natural_image
Close-up of a blue plastic component with a circular symbol and arrow indicating rotation (no text or symbols present)natural_image
Close-up of a white toilet with handrails and a blue suction tube, showing no text or symbols.natural_image
Illustration of a toilet with an eye insertion step, showing the opening and interior (no text or symbols)natural_image
Close-up of a white mechanical component with a blue curved cable and an arrow pointing to it (no text or symbols visible)natural_image
3D rendering of a square water dispenser with a piping and wall-mounted handle (no text or symbols)natural_image
3D illustration of a blue open box with a black arrow pointing downward (no text or symbols)natural_image
3D rendering of a blue mechanical component with a black arrow pointing to its top surface (no text or symbols visible)text_image
Diagram illustrating toilet wall installation with magnified views and tool icons, showing measurement setup and component placement.2
text_image
Diagram illustrating toilet door assembly with measurement annotations and tool iconstext_image
Diagram showing a blue electrical plug inserted into a wall socket next to an orange hourglass icon and a device labeled 'B-GEKENT' with control buttons.text_image
Diagram showing a blue electrical plug inserted into a wall socket next to a device labeled 'M-GENERIT', with an hourglass icon and an arrow pointing to the plug.natural_image
Illustration of a toilet with a blue box and a smartphone icon showing wireless signal (no text or symbols)natural_image
Close-up of a white remote control with a blue circular icon and two buttons (no readable text or symbols)Résultat
natural_image
Close-up of a remote control device with two blue buttons and a leaf symbol (no readable text or labels)Résultat
natural_image
Two-step illustration of a toilet sink with blue tubing and black arrows indicating flow direction (no text or symbols)natural_image
3D illustration of a blue plastic water dispenser pouring liquid into a blue container (no text or symbols)natural_image
Blue plastic object with a rolled-up edge, accompanied by two small inset images showing hourglass and thermometer symbols (no text or labels)natural_image
3D rendering of a blue plastic appliance with a black upward arrow indicating a component (no text or symbols)2
Videz l'eau.

natural_image
3D rendering of a transparent plastic tray with a small blue dot on the top surface (no text or symbols)3
natural_image
3D rendering of a small transparent plastic container with a blue handle, no text or symbols visible4
natural_image
3D rendering of a square basin with a wall-mounted pipe and two side handles (no text or symbols)natural_image
Illustration of a blue open box with a black downward arrow pointing to the lid (no text or symbols)natural_image
Close-up of a blue mechanical device with a black arrow pointing to its top component (no text or symbols visible)natural_image
Close-up of a blue plastic toilet with a black upward arrow pointing to the top portion of the lid (no text or symbols visible)FR
natural_image
3D rendering of a square water dispenser with a faucet and side-mounted sink (no text or symbols)natural_image
3D illustration of a blue open box with a downward arrow pointing to the lid (no text or symbols)natural_image
3D rendering of a blue mechanical component with a black arrow pointing to its top surface (no text or symbols visible)text_image
NEQESERJITnatural_image
3D rendering of a wall-mounted shower unit with blue liquid, mounted on a wall-mounted fixture (no text or symbols visible)natural_image
3D illustration of a blue plastic box with a black arrow pointing downward (no text or symbols)text_image
Diagram illustrating a recycling process on a plastic door, showing step-by-step rotation and recycling symbol.natural_image
Illustration of a device being processed with a blue circular component, showing step-by-step motion (no text or symbols)text_image
QR code image containing encoded data, no visible human-readable textAndroid: iOS:
Tramite la Geberit Home App:

text_image
QR code image containing encoded data, no visible human-readable text
text_image
QR code image containing encoded data, no visible human-readable texttext_image
Two identical QR codes side by side, no visible text or symbols beyond the matrix patternsIT
natural_image
3D diagram of a blue plastic container with attached plastic clips and rods (no text or symbols)natural_image
Illustration of a toilet with a water dispenser connected to a sink, showing no text or symbols.
natural_image
Two blue plastic storage units with plastic caps and three parallel blue rods (no text or symbols visible)natural_image
Illustration of a medical device with a blue cable and arrow indicating rotation (no text or symbols)IT
natural_image
3D illustration of a blue cube with a black arrow pointing to its surface, next to a partial view of a curved object (no text or symbols)natural_image
3D illustration of a toilet with blue opening and white interior, showing airflow direction (no text or symbols)natural_image
Blue toilet with soap dispenser icon pointing to the toilet (no text or symbols on the toilet itself)natural_image
Two transparent plastic containers with a blue plastic seat and an arrow indicating rotation (no text or symbols)text_image
Medical diagram illustrating eye anatomy with labeled eye, cross, and checkmark indicators for medical procedures.natural_image
Illustration of a medical procedure on a toilet sink, showing eye insertion and catheter placement (no text or symbols)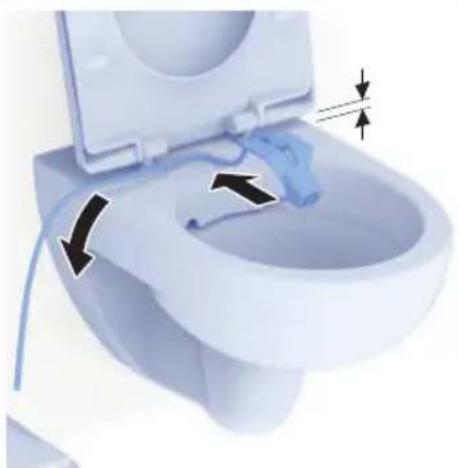
natural_image
Illustration of a toilet with water flow arrows indicating airflow direction (no text or symbols)IT
natural_image
Close-up of a white toilet with an eye icon pointing to the drain (no text or symbols present)natural_image
Close-up of a blue plastic electronic device with a circular button and arrow indicating rotation (no text or symbols)natural_image
Close-up of a toilet with hand tools and a close-up of the dial indicator (no text or symbols on the toilet itself)natural_image
Illustration of a toilet with an eye insertion step, showing the opening and interior (no text or symbols)natural_image
Close-up of a white mechanical component with a blue curved cable and an arrow pointing to it (no text or symbols visible)natural_image
3D rendering of a wall-mounted toilet with a max handle and side panel (no text or symbols)natural_image
3D illustration of a blue plastic container with an arrow pointing downward (no text or symbols)natural_image
3D illustration of a blue mechanical component with a black arrow pointing to its top surface (no text or symbols)text_image
Diagram illustrating a wall-mounted toilet with a close-up of its component being inserted, accompanied by a magnified view of the toilet's internal structure.2
text_image
Diagram illustrating toilet wall cleaning steps with magnified views of the component and measurement indicatorstext_image
Diagram showing a blue electrical plug inserted into a wall socket, with an hourglass icon and a control panel labeled 'M-GEACHY' indicating a warning or alert.text_image
Diagram showing a blue electrical plug inserted into a wall socket next to a device labeled 'WEGENERIT', with an hourglass icon and directional arrows indicating action.natural_image
Illustration of a toilet with a blue base and a smartphone icon showing wireless signal (no text or symbols)natural_image
Close-up of a white mechanical component with a blue blade and a black arrow pointing to a circular feature (no text or symbols)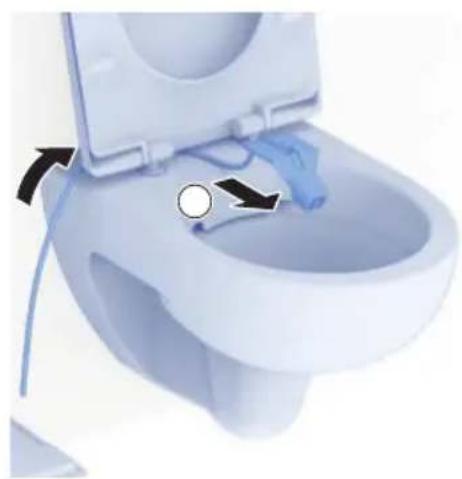
natural_image
Close-up of a white toilet with a blue gauze and a circular valve, showing airflow direction (no text or symbols)natural_image
3D illustration of a faucet pouring liquid into a blue container (no text or symbols)natural_image
Blue plastic mechanical component with side grooves and a small inset showing hourglass and thermometer symbols (no text or labels)natural_image
3D rendering of a blue toilet with a black upward arrow indicating upward motion (no text or symbols)2
Svuotare l'acqua.