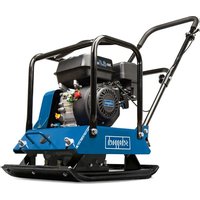
VS1000 - Vibratory plate SCHEPPACH - Free user manual and instructions
Find the device manual for free VS1000 SCHEPPACH in PDF.
Frequently Asked Questions - VS1000 SCHEPPACH
User questions about VS1000 SCHEPPACH
0 question about this device. Answer the ones you know or ask your own.
Ask a new question about this device
Download the instructions for your Vibratory plate in PDF format for free! Find your manual VS1000 - SCHEPPACH and take your electronic device back in hand. On this page are published all the documents necessary for the use of your device. VS1000 by SCHEPPACH.
USER MANUAL VS1000 SCHEPPACH
Günzburger Straße 69
D-89335 Ichenhausen
VEREHRTER KUNDE,
Explanation of the symbols on the product
Symbols are used in this manual to draw your attention to potential hazards. The safety symbols and the accompanying explanations must be fully understood. The warnings themselves will not rectify a hazard and cannot replace proper accident prevention measures.
| Before commissioning, read and observe the operating manual and safety instructions! | Lifting point is used to secure the machine during transport. |
| Wear safety goggles! | Removing or modifying protective or safety equipment is prohibited. |
| Wear hearing protection! | Do not touch rotating parts. Getting caught in the spinning belt will cause a hand injury. Always put on the belt guard. |
| Use work gloves. | Naked flames or smoking near the device is strictly prohibited! |
| Use safety shoes. | Hot surface! Touching can cause burns. Only carry out servicing, maintenance and cleaning work when the engine has cooled down. |
| Do not expose the device to rain. | Warning - Hot parts! Make sure that other persons maintain a sufficient safety distance. Keep uninvolved persons away from the device. |
| Lifting point, on which the machine can be securely fastened, e.g. to load onto a transport vehicle. | Sparks are produced when the engine is started. These can ignite nearby flammable gases. |
| Danger of poisoning! Only use the device outdoors and never in closed or poorly ventilated rooms. | - Choke closed - Open fuel valve | ||
| Important: Always switch off the engine before refuelling. Do not refill during operation. | Speed lever | ||
| Before carrying out any cleaning or maintenance work, switch off the engine and remove the spark plug connector from the spark plug. Be very careful when dealing with fuels and lubricants! | Check the oil level. | ||
| LWA 108 dB | Guaranteed sound power level of the device. | DANGER! | Signal word to indicate an imminently hazardous situation which, if not avoided, will result in death or serious injury. |
| ON / OFF On/off | switch WARNING! | Signal word to indicate a potentially hazardous situation which, if not avoided, could result in death or serious injury. | |
| CE | The product complies with the applicable European directives. | CAUTION! | Signal word to indicate a potentially hazardous situation which, if not avoided, could result in minor or moderate injury. |
| ΔΔ | The product complies with the applicable Serbian directives. | NOTE | Signal word for marking a potentially hazardous situation which, if not avoided, could result in material damage to the machine or property/possessions. |
| We have marked points in these operating instructions that impact your safety with this symbol. |
Table of contents: Page:
- Introduction 29
- Device description (Fig. 1). 29
- Scope of delivery (Fig. 2) 29
- Intendeduse 29
- General safety instructions 30
- Technical data 32
7.Unpacking 33 - Layout 33
9.Before commissioning 34 - Commissioning 35
- Cleaning and maintenance 37
- Transporting and lifting the machine 39
- Storage 40
- Disposal and recycling 40
- Troubleshooting 41
- Declaration of conformity 435
1. Introduction
MANUFACTURER:
Scheppach GmbH
Günzburger Straße 69
D-89335 Ichenhausen
DEAR CUSTOMER,
we wish you much pleasure and success in working with your new device.
NOTE:
In accordance with the applicable product liability laws, the manufacturer of this product assumes no liability for damage to the product or caused by the product arising from:
- Improper handling,
- Failure to comply with the operating manual,
- Repairs carried out by third parties, unauthorised specialists,
- Installing and replacing non-original spare parts,
Application other than specified.
Note:
The operating manual is part of this product. It includes important instructions for the safe, proper and economic operation of the product, for avoiding danger, for minimising repair costs and downtimes and for increasing the reliability and extending the service life of the product. In addition to the safety instructions in this operating manual, you must also observe the regulations applicable to the operation of the product in your country.
Familiarise yourself with all operating and safety instructions before using the product. Only operate the product as described and for the specified areas of application. Keep the operating manual in a good place and hand over all documents when passing the product on to third parties.
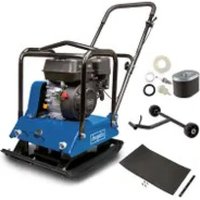
2. Device description (Fig. 1)
- Transport bar
- Protective frame
- Air filter
3a. Paper filter
3b. Foam filter
3c. Air filter housing cover - Fuel filler cap
4a. Fuel filter insert - Fuel tank
- Throttle
- Choke lever
- Ventilation hose
- Fuel valve on the engine
- Motor
11.Pull starter -
Oil drain screw
-
Oil dipstick
- Rammer foot oil drain screw
- Guide bar
- On/off switch
- Bottom rammer
- Rammer foot
- Fuel valve on the fuel tank
- Transmission
- Adapter plates (2x)
- Spark plug connector
22a. Spark plug - Silencer
- Transport roller
3. Scope of delivery (Fig. 2)
Tamper (A)
- 4 x Hexagon bolts M10x25 (B)
- 1 x Hose clamp (C)
- 2 x Hexagonal bolts (D)
- 1 x Transport device (E)
- 2 × Cable ties (F)
- 1 x Spark plug wrench (C)
- 1 x Protective frame (2)
- 1 x Fuel tank (5)
- 2 x Adapter plates (21)
- 1 x operating instructions
4. Intendeduse
The machine complies with the applicable EC machinery directive.
The machine is a motor-driven tool and is suitable for compacting loose soil, clods of earth and gravel, thereby creating a firm and stable base for foundations, sub-concrete and other subsoil consolidation.
However, the machine is not suitable for compacting soils with a high clay content.
The machine may only be used in the intended manner. Any use beyond this is improper. The machine may only be operated by persons who are trained, instructed and authorised to do so.
The user/operator, not the manufacturer, is responsible for damages or injuries of any type resulting from this.
An element of the intended use is also the observance of the safety instructions, as well as the assembly instructions and operating information in the operating manual.
Persons who operate and maintain the machine must be familiar with it and must be informed about potential dangers.
The liability of the manufacturer and resulting damages are excluded in the event of modifications of the machine.
The machine may only be operated with original parts and original accessories from the manufacturer.
Please note that our equipment was not designed with the intention of use for commercial or industrial purposes. We assume no guarantee if the device is used in commercial or industrial applications, or for equivalent work.
5. General safety instructions
We have marked points in the operating manual that impact your safety with this symbol:
Furthermore, the operating manual contains other important text sections that are marked with the word "ATTENTION!".
Attention!
When using equipment, several safety warnings must be observed to prevent injuries and damage. For this reason, please carefully read this operating manual/ these safety instructions. If you hand the device over to another person, please hand over this operating manual / safety instructions as well. We accept no liability for accidents or damage that occur due to a failure to observe this manual and the safety instructions.
DANGER
A failure to observe these instructions poses an extreme danger of death or the risk of life-threatening injuries.
WARNING
A failure to observe these instructions poses a danger of death or the risk of serious injuries.
CAUTION
A failure to observe these instructions poses a minor to moderate danger of injury.
NOTE!
A failure to observe these instructions poses a risk of damage to the engine or other property.
- Familiarise yourself with your machine.
- Read the operating manual carefully and make sure you understand its contents, as well as all labels attached to the machine.
- Familiarise yourself with the area of application, as well as limitations of the machine, and particular sources of danger.
- Make sure that you know all the controls and their function exactly.
-
Make sure you know how to stop the machine and quickly disable the controls.
-
Do not attempt to use the machine without knowing the exact method of operation and the maintenance requirements of the engine and how to avoid accidents resulting in personal injury and/or property damage.
- Keep other people, particularly children, away from your work area.
Working range
- Never start or operate the machine in an enclosed or poorly ventilated area. The exhaust gases are dangerous because they contain the odourless and deadly gas carbon monoxide. Operate the machine only in a well-ventilated outdoor area.
- Never operate the machine without good visibility or lighting conditions.
- Ensure that the trench walls are stable and will not collapse due to the vibrations. Caution: Danger of falling or toppling over!
- Ensure that the area to be tampered does not contain any electrical cables, gas or water lines which could be damaged due to the vibrations.
- Be careful when working in the vicinity of unprotected holes or excavations.
- Do not work with the device during rain, thunderstorms and especially when there is a risk of lightning.
- Make sure you have secure footing in bad weather, on uneven terrain or on slopes.
-
Only use the machine on sites where the operating conditions of the site allow appropriate use of the machine. In particular, pay attention to:
-
the stability conditions;
- the ground conditions and bearing capacity;
- the track width;
- the height-width ratio to obstacles and edges to be driven over (e.g. in connection with the band width; kerb height; trench depth);
-
the tipping angle of the machine and the operating conditions at the site which have a negative effect on the stability (e.g. kerb height, dynamic effects).
-
When operating in areas with special hazards, pay attention to the following:
-
Observe the local provisions for operation,
- keep your distance from electrical power lines,
- pay attention to vapours and dust when working in tunnels,
- pay attention to special hazards when working in contaminated areas.
Personal safety
- Do not use the machine if you have taken drugs, alcohol or medication that affects your ability to operate the machine correctly.
-
Wear suitable clothing. Wear long trousers and gloves. Wear safety shoes with steel caps, steel soles and non-slip tread.
-
Wear hearing protection and safety goggles when working. Use respiratory protection when carrying out dust-generating work.
- Do not wear loose clothing, shorts or jewellery of any kind. Tie back long hair so that it is at shoulder height at most. Keep hair, clothing and gloves away from moving parts. Loose-fitting clothing, jewellery or long hair may become caught in the moving parts.
- Leave protective screens in place and in working order.
- Make sure that all nuts, bolts, etc. are securely tightened.
- Never use the machine if it is in need of repair or in poor mechanical condition. Replace damaged, missing or defective parts before use.
- The operator must be at least 18 years of age. Trainees must be at least 16 years of age and may only work on the machine under supervision.
- All operators must be adequately trained in the use, setting and operation of the machine.
- Check the machine for fuel leaks.
- Keep it in good functional order. Do not use the machine if the engine cannot be switched on and off at the corresponding switch.
- A petrol-driven machine that cannot be controlled via the engine switch is dangerous and must be replaced.
- Before starting the machine, get into the habit of checking that screwdrivers and spanners are away from the area around the machine. A screwdriver or spanner that is still in a rotating device part may result in personal injury.
- Be attentive, watch your actions and use common sense when working with the machine. Do not over-extend yourself.
- Do not operate the machine barefoot or with sandals or similar light footwear. Wear safety shoes that protect your feet and improve your grip on slippery surfaces.
- Ensure safe footing and balance at all times. This will allow you to better control the machine in unexpected situations.
- Prevent unintentional start-up. Make sure that the engine switch is switched off before transporting the machine or carrying out maintenance work on the machine. Transport or maintenance work on the machine can lead to accidents if the switch is on.
- There is a risk of crushing at various locations on the machine from moving or rotating assemblies. Keep hands and feet away from the plate. Work with concentration and always make sure you have secure footing. Wear safety work shoes!
- Make sure that the machine and operator are both stable on level terrain when setting up and the machine does not tip, slip or fall during operation.
Safe handling of petrol
- Petrol is very flammable and its gases can explode if they ignite.
- Take safety measures when handling petrol to reduce the risk of serious injury.
- Use a suitable petrol can when filling or draining the fuel tank.
- Carry out this work in clean, well-ventilated outdoor areas.
- Do not smoke. Do not allow sparks, naked flames or other sources of fire to get near when filling up with petrol or working with the machine.
- Never fill the fuel tank indoors. Keep earthed, electrically conductive objects, such as tools, away from exposed electrical parts and wires to avoid sparking or arcing. This could ignite petrol gases.
- Always switch off the engine and let it cool down before refilling the fuel tank. Never remove the fuel filler cap or fill fuel into the fuel tank while the engine is running or while the engine is hot.
- Do not use the machine if you know there is a leak in the fuel system. Slowly loosen the fuel filler cap to release any pressure in the fuel tank. Never overfill the fuel tank (petrol should never be above the marked maximum fill level). Close the fuel tank securely again with the fuel filler cap and wipe up any spilled petrol.
- Do not use the machine if the fuel filler cap is not screwed tightly shut. Avoid ignition sources near spilled petrol. If petrol has been spilled, do not attempt to start the machine. Move the machine away from the area of the spillage and prevent the formation of ignition sources until the petrol gases have dissipated.
- Store fuel only in containers specially manufactured for this purpose.
- Store petrol in a cool, well-ventilated area away from sparks and naked flames or other sources of ignition. Never store petrol or the machine with a filled fuel tank in a building where petrol gases could reach sparks, naked flames or other ignition sources such as water heaters, ovens, clothes dryers or similar.
- Allow the engine to cool before storing the machine in an enclosed area.
Use and care of the machine
- Never pick up or carry the machine while the engine is running.
- Do not handle the machine violently.
- Use the right machine for your area of application. The right machine will do the job it was designed for better and more safely.
-
Do not change the speed governor setting of the engine or over-rev it. The speed control system controls the maximum speed of the engine with maximum safety.
-
Do not run the engine at high speeds when not compacting.
- Do not hold your hands or feet near rotating parts.
- Avoid contact with hot petrol, oil, exhaust gases and hot surfaces. Do not touch the engine or exhaust silencer. These parts become particularly hot during use. They are still hot a short time after the machine is switched off.
- Allow the engine to cool down before carrying out maintenance or adjustment work.
- If the machine starts to make unusual noises or vibrations, switch the engine off immediately, disconnect the spark plug cable and determine the cause. Unusual noises or vibrations are usually a safety sign of faults.
- Only use assembly and accessory parts approved by the manufacturer. Failure to do so may result in injury.
- Service the machine. Check for misalignment or jamming of moving parts, damaged parts and other conditions that could impair function of the machine. Have the machine repaired before any further use if you find any damage. Many accidents are the result of poorly maintained equipment.
- Keep the engine and silencer free of grass, leaves, excess grease or soot encrustation to reduce the risk of fire.
- Never pour or splash water or any other liquid onto the machine.
- Keep the handles dry, clean and free of small parts.
- Clean the machine after every use.
- Follow the applicable waste disposal guidelines for petrol, oil etc. to protect the environment.
- Keep the switched-off machine out of the reach of children and do not allow persons who are not familiar with the machine or these instructions to use the machine. The machine is dangerous in the hands of untrained operators.
- Make sure that the machine does not tip, slip, roll or fall when it is out of operation.
Service
- Before cleaning, repairing, inspecting or adjusting, switch off the engine and ensure that all moving parts have come to a standstill.
- Always ensure that the engine switch is in the "OFF" position. Disconnect the spark plug cable and keep it away from the spark plug to prevent accidental start-up.
- Have your machine serviced by qualified personnel. Use only original spare parts. This ensures that the machine remains safe.
Additional safety instructions
- Keep hands, fingers and feet away from the base plate in order to avoid injuries.
-
Hold the handle of the machine firmly with both hands.
-
Always stay behind the machine when using it; never walk or stand in front of the machine when the engine is running.
- Never place tools or other objects under the machine. If the machine hits a foreign object, stop the engine, disconnect the spark plug and check the machine for damage; repair the damage before restarting and using the machine.
- Do not overload the machine by compacting too deep or too fast.
- Do not use the machine at high speeds on hard or slippery surfaces.
- Be especially careful when using the machine to work on or cross gravel beds, gravel paths or gravel roadways.
- Watch out for hidden dangers and traffic. Do not carry people.
- Never leave the workplace and never leave the machine unattended when the engine is running.
- Always stop the machine when work is interrupted or when relocating from one place to another.
- Stay away from trench edges and avoid actions that may cause the machine to tip over. Walk up slopes carefully backwards in a direct line, to avoid tipping the machine over onto the operator.
Always place the device on a firm and level surface and switch the machine off. - Limit working hours with the machine and take regular breaks to reduce vibration stress and let your hands rest. Reduce the speed and force with which you perform repetitive movements.
Residual risks
The machine has been built according to the state-of-the-art and the recognised technical safety requirements. However, individual residual risks can arise during operation.
- Furthermore, despite all precautions having been met, some non-obvious residual risks may still remain.
- Residual risks can be minimised if the "Safety Instructions" and the "Intended Use" together with the operating instructions as a whole are observed.
- Avoid accidental start-ups of the machine.
- Use the tool that is recommended in this operating manual. This is how to ensure that your machine provides optimum performance.
- Keep your hands away from the working area when the machine is in operation.
6. Technical data
Dimensions W x D x H. 480 x 780 x 1150 mm
Tamping plate L x W. 345 x 285 mm
Lift of the tamping plate. 40 - 66 mm Impact force 450 - 650 /min
Centrifugal force. 10 kN
Engine type 1 cylinder / 4-stroke
Max. engine output. 4.1 kW
Displacement 196 ccm
Max.speed 3600/min
Fuel. super E10 petrol
Fuel tank capacity 2.81
Engine oil capacity. 0.61
Engine oil.. SAE 10 W-30 /SAE 10 W-40
Tamping system lubrication.. SAE 10 W-30
Capacity for oil in the tamping system. 0.8 I
CO2output 811.46 g/kWh
Spark plug .F7RTC
Subject to technical changes!
Noise and vibration
The noise levels have been determined in accordance with EN ISO 3744. Total vibration emission values (vector sum of three directions) determined per EN 500-4.
Noise can have serious effects on your health. If the machine noise exceeds 85 dB, please wear suitable hearing protection.
Noise data
The specified sound levels have been measured in accordance with a standardised test procedure and can be used to compare different tools with one another.
In addition, these values are suitable for estimating the stresses for the user resulting from the noise in advance.
Warning! Depending on how you use the machine, the actual values may differ from those given. Implement measures to protect against noise nuisance.
In doing so, take into account the complete working process, including the times when the tool is working without load or switched off.
Suitable measures include regular maintenance and care of the tool and the insertion tools, regular breaks as well as proper planning of the working process.
Warning!
In case of extended working periods, the operating personnel may suffer circulatory disturbances in their hands (vibration white finger) due to vibrations.
Raynaud's syndrome is a vascular disease that causes the small blood vessels on the fingers and toes to cramp in spasms. The affected areas are no longer supplied with sufficient blood and therefore appear extremely pale. The frequent use of vibrating devices can cause nerve damage in people whose circulation is impaired (e.g. smokers, diabetics).
If you notice unusual adverse effects, stop working immediately and seek medical advice.
Observe the following information to reduce hazards:
- Keep your body and especially your hands warm in cold weather.
- Take regular breaks and move your hands to promote circulation.
- Ensure as little vibration as possible at the device via regular maintenance and stable parts on the machine.
7. Unpacking
- Open the packaging and carefully remove the device.
- Remove the packaging material, as well as the packaging and transport safety devices. Remove the transport safety devices with an open-end spanner AF 10mm (not included in the scope of delivery).
- Check whether the scope of delivery is complete.
- Check the device and accessory parts for transport damage. In the event of complaints the carrier must be informed immediately. Later claims will not be recognised.
- If possible, keep the packaging until the expiry of the warranty period.
- Familiarise yourself with the device by means of the operating instructions before using for the first time.
- With accessories as well as wearing parts and replacement parts use only original parts. Spare parts can be obtained from your specialist dealer.
- When ordering please provide our article number as well as type and year of manufacture for your device.
DANGER
The device and the packaging are not children's toys! Do not let children play with plastic bags, films or small parts! There is a danger of choking or suffocating!
8. Layout
WARNING!
Danger of injury and damage!
The use of incorrect spare parts and accessories can lead to injuries and damage. These could come loose and be flung away. They can also reduce the power of the machine.
- Only use original spare parts and accessories from the manufacturer. Original spare parts or accessories can be obtained from your specialist dealer.
- Failure to do so may reduce the power of the machine and parts may come loose.
- Failure to observe this will invalidate the manufacturer's warranty.
NOTE!
Due to the heavy weight of the machine, we recommend installation by at least two people.
Some parts of the delivery come disassembled. You require the following for assembly:
- Open-end spanner AF 13 mm (mounting fuel tank)
- Needle-nosed pliers (mounting fuel tank)
- Open-end spanner AF 16 mm (assembly of protective frame and adapter plates)
- Open-end spanner AF 8 mm (mounting throttle)
- Open-end spanner AF 10 mm (mounting throttle)
The assembly tool is not included in the scope of delivery.
8.1 Mounting the protective frame (2) (Fig. 3)
- First remove the four hexagonal bolts M10x25 (B), the spring washer and washers from the adapter plates (21) on both sides.
- Fasten the protective frame (2) to the adapter plates (21) on both sides using four hexagonal bolts M10x25 (B), the spring washers and washers.
- Tighten the hexagonal bolts (B) with an open-end spanner AF 16 mm.
8.2 Fitting the fuel tank (5) (Fig. 4, 5)
- Fasten the fuel tank (5) to the mounting plate of the protective frame (2) with two hexagonal bolts (D), two washers M8 and two locking nuts M8.
- Tighten the hexagonal bolts (D) with an open-end spanner AF 13 mm.
- Push the fuel hose onto the fuel valve on the fuel tank (19). Secure the fuel hose using the hose clamp (C) to prevent slipping. Use needle-nosed pliers for this.
8.3 Fitting the throttle (6) (Fig. 2, 6)
- Fasten the throttle (6) to the protective frame (2) using the fastening clip, two hexagonal bolts M6x30 and two self-locking nuts M6.
- Tighten the hexagonal bolts and nuts with an open-end spanner AF 10mm and AF 8 mm.
- Fasten the throttle cable to the protective frame (2) using the cable ties (F) provided.
9. Before commissioning
ATTENTION!
Always make sure the machine is fully assembled before commissioning!
WARNING!
Health hazard!
Inhalation of petrol/lubricating oil vapours and exhaust gases can cause serious damage to health, unconsciousness and in extreme cases death.
- Do not breathe petrol/lubricating oil vapours and exhaust gases.
- Operate the machine outdoors only.
NOTE!
Device damage
Using the machine without or with too little engine and gearbox oil can result in engine damage.
- Fill with petrol and oil before commissioning. The machine is supplied without engine oil and gearbox oil.
NOTE!
Environmental damage!
Spilled oil can pollute the environment permanently. The liquid is highly toxic and can quickly lead to water pollution.
- Fill/empty oil only on level, paved surfaces.
- Use a filling nozzle or funnel.
- Collect drained oil in a suitable container.
- Wipe up spilled oil carefully immediately and dispose of the cloth according to local regulations.
- Dispose of oil as per local regulations.
NOTE!
Risk of damage!
If incorrectly stored or undrained fuel is used, the carburettor may become clogged or engine operation may be affected.
- Put unused fuel in an airtight vessel and store it in a dark, cool room.
9.1 Filling up with petrol (Fig. 8)
Attention!
The machine is delivered without petrol. It is therefore essential to fill with petrol before commissioning. Use Super E10 petrol for this.
DANGER!
Risk of fire and explosion!
When filling, fuel may ignite and even explode. This can lead to severe burns or death.
- Switch off the engine and let it cool down.
- Keep heat, flames and sparks away.
- Only fill up with fuel outdoors. Do not refuel the machine on the transport vehicle.
- Wear protective gloves.
- Avoid contact with skin and eyes.
- Start the machine at a distance of at least 3m from the fuel filling point.
Note: Use a fuel filter (4a). The fuel filter insert (4a) is a filter cup which is located directly under the fuel filler cap (4) and filters all the fuel filled in.
- Clean the area surrounding the filling area. Impurities in the fuel tank (5) lead to operational faults.
- Carefully open the tank cover (4) so that any possible overpressure can be relieved.
- Fill the fuel tank (5) with petrol (Super E10) using a funnel (not included in scope of delivery). Use a fuel filter insert (4a). Note the max. filling capacity of 2.8 litres. Carefully fill the petrol up to the lower edge of the filling nozzle.
- Close the tank cover (4) again. Ensure that the fuel filler cap (4) is tightly sealed.
- Clean the tank cover (4) and the surroundings.
- Check the fuel tank (5) and fuel lines for leaks.
- Move at least three meters away from the refuelling area before starting the engine (10).
- Do not use petrol that has already been used or that is contaminated. Do not allow dirt or water to enter the fuel tank (5).
9.2 Filling up with engine oil (Fig. 8, 9) Attention!
The machine is delivered without engine oil. Therefore, ensure that you add oil before starting it up. Use multigrade oil (SAE 10W-30 or 10W-40 depending on the operating temperature)) for this.
Note: Check the oil level regularly before commissioning. An oil level that is too low can damage the motor.
- Place the machine on a level, even surface.
- Unscrew the oil dipstick (13).
- Fill the tank with engine oil using a funnel (not included in scope of delivery). Note the max. filling capacity of 600ml . Carefully fill the oil up to the lower edge of the filling port.
- Wipe the oil dipstick (13) with a clean, lint-free cloth.
- Reinsert the oil dipstick (13) and check the oil level without screwing the oil dipstick (13) tight again.
- The oil level must be within the middle mark on the oil dipstick (13).
- If the oil level is too low, add the recommended amount of oil (max. 600 ml).
- Then screw the oil dipstick (13) in again.
9.3 Lubricating the tamping system (Fig. 10)
Lubricating oil is distributed into the entire tamping system by the vibrations of the machine. While the machine is operating, the oil goes into the crankcase from the bottom of the machine through the boreholes in the piston.
The oil level in the tamping system must always be kept at the correct level to ensure effective tamping operation.
Remark: If the machine is transported horizontally or has just been used, it must be stood upright for 15 minutes before the oil level can be checked.
This allows the oil to settle and provides a better measured value.
- Place the machine on a level, even surface. Tilt the machine so that a right angle is formed to the floor.
- Remove contamination in the area of the sight glass of the rammer foot oil drain screw (14).
- Check the oil level using the sight glass of the rammer foot oil drain screw (14). The tamping system lubrication is OK when the oil sight glass shows about 1/2 - 3/4 full.
- If no oil is visible, refill with oil.
- Tilt the machine forwards until it rests on the transport roller (24).
- Remove the rammer foot oil drain screw (14) using a socket spanner size 24mm and a ratchet spanner (not included in the scope of delivery).
- Fill the oil using a funnel (not included in scope of delivery). Note the max. filling capacity of 800ml Use multigrade oil (SAE 10W-30 or 10W-40 (depending on the operating temperature)) for this.
- Then screw the rammer foot oil drain screw (14) back in. Tighten the rammer foot oil drain screw 14 with a torque of 9Nm 6 ft-Ibs.).
- Place the machine upright again.
NOTE: Do not overfill the tamping system with oil. Too much oil can result in a hydraulic lock in the tamping system. This can result in faulty operation and damage to the clutch of the engine, the tamping system and the rammer foot.
9.4 Rammer foot (18) (Fig. 1)
With a new machine, before any commissioning or after installation of a new rammer foot (18), all fixing nuts must be tightened with an open-end spanner AF 19mm (not included in the scope of delivery). When using a torque wrench (not included in the scope of delivery), the tightening torque is 86 Nm.
10. Commissioning
ATTENTION!
Read through the safety instructions carefully.
10.1 Preparation
Place the machine upright on a firm, level surface to ensure proper lubrication of the engine (10).
Check before operation
- Check all sides of the engine for oil or fuel leaks.
- Check the engine oil level.
- Check the fuel level - the fuel tank should be at least half-full.
- Check the condition of the air filter.
- Check the condition of the fuel lines.
- Look for signs of damage.
-
Check that all protective covers are in place and all screws, nuts and bolts are tightened.
-
The firm seating of the external screw connections.
- Check whether the machine is positioned of solid, level and secure ground in order to prevent tipping over. Danger of injury and tipping!
- Check the location. Do not start the machine on a hard surface such as asphalt or concrete. Avoid set-up locations with depressions or holes (such as gullies for example). There is a risk of slipping on smooth, wet surfaces!
10.2 On/Off switch (16) (Fig. 11)
The ON/OFF switch (16) activates or deactivates the ignition system. The ON/OFF switch (16) must be in the ON position for the engine (10) to run.
The engine (10) stops when the ON/OFF switch (16) is moved to the OFF position.
10.3 Throttle (6) (Fig. 1, 6, 14)
The throttle (6) controls the speed of the engine (10). If the lever is moved in the directions shown, the engine (10) runs faster or slower.
Fast =

Slow/Idle=
Note:
The machine is designed for a speed of 4,000 rpm. At optimal speed, the foot beats at a rate of 680 beats per minute. An increase of the throttle speed above the speed set at the factory does not increase the number of beats and can damage the machine.
ATTENTION!
When starting the engine (10), only open the choke lever (7) when the throttle (6) is idle. Otherwise, the machine may actuate.
Slowly start up the machine from the idle position to the full throttle position.
10.4 Starting the engine (10) (Fig. 11 - 14)
10.4.1 Cold start
- Set the fuel valve on the fuel tank (19) to ON.
- Set the fuel valve on the engine (9) to the right to open.
- Close the choke lever (7) and slide it to the left.
- Open the throttle (6) slightly by pushing it a little to the left.
- Turn the on/off switch (16) to ON.
- Gently pull on the pull starter (11) until resistance is felt and let it wind back in.
- Pull strongly on the pull starter (11) and let it wind back in slowly. Do not let the pull starter (11) snap back. If necessary, pull the pull starter (11) several times until the engine (10) starts.
- Let the engine (10) warm up for a few seconds.
-
Set the throttle (6) to idle.
-
Set the choke lever (7) slowly to the right as soon as the engine (10) is running.
- Push the throttle (6) to the left to operate.
- The machine starts to work.
10.4.2 Warm start (Fig. 11-14)
- Set the fuel valve on the fuel tank (19) to ON.
- Set the fuel valve on the engine (9) to the right to open.
- Open the choke lever (7) and push it to the right.
- Push the throttle (6) to the right in idle position.
- Turn the on/off switch (16) to ON.
- Pull strongly on the pull starter (11) and let it wind back in slowly. Do not let the pull starter (11) snap back. If necessary, pull the pull starter (11) several times until the engine (10) starts.
- The engine (10) starts.
- Push the throttle (6) to the left to operate.
- The machine starts to work.
10.5 Switching off the engine (10) (Fig. 13, 14)
Attention!
If you need to stop the engine (10) in an emergency, turn the on/off switch (16) to the OFF position.
Use the following procedure under normal conditions:
- Push the throttle (6) to the right in idle position.
- Turn the on/off switch (16) to OFF.
- Set the fuel valve on the fuel tank (19) to OFF to close.
- Set the fuel valve on the engine (9) to the left to close.
CAUTION!
Do not adjust the choke lever (7) to stop the engine (10). Misfiring or engine damage may occur.
CAUTION!
Do not lift or move the machine to another location during operation. You could lose control of the machine. Observe chapter 13.
10.6 Guiding the vibration rammer (Fig. 1)
- For optimal compaction and low rammer foot wear, the rammer foot (18) must rest flat on the floor, not on the front or the rear edge.
- The rammer foot (18) must always make contact parallel to the ground to avoid extreme wear of the plate.
- Guide the machine by the guide bar (15) using both hands.
- Stand behind the machine, go slowly and steer the machine while it moves forwards in the desired direction.
-
Guide the machine so that you cannot be trapped between the machine and solid objects.
-
Always walk uphill when working on slopes or inclines. The operator must never stand in the felling direction.
- Safety shoes must be worn when the machine is on uneven terrain or when compacting loose material.
- Keep the machine clean and dry.
- Also switch the machine off during short work interruptions.
- When working, open the throttle (6) fully to achieve maximum power.
- Never let go of the guide bar (15) when compacting.
- Let the machine pull forward by itself. The machine is designed so that it moves forward by itself when tampering. To speed the feed up, gently pull the guide bar (15) back so that the rear part of the foot touches the floor first.
- Do not exert any pressure on the machine. Do not try to move the machine forward with muscle power.
- If the machine tips over, switch the engine (10) off immediately (set on/off switch (16) to OFF). Set the machine up again or place it on its side so that the engine (10) faces upwards. (see transport position. Fig. 10).
Note: To avoid engine damage, the machine must not continue to run when it is lying on its side.
ATTENTION!
Do not use the machine on concrete or hard/solid compacted surfaces. In such cases, the machine starts to bounce instead of vibrating, causing damage to the rammer foot (18) and the engine (10).
11.Cleaning and maintenance
ATTENTION!
Always shut the engine (10) down and remove the spark plug connector (22) before carrying out any cleaning work.
After each use, clean the cylinder cooling fins and remove any dirt or stones that have accumulated on the machine.
ATTENTION!
Do not use a "high-pressure cleaner" to clean the machine. Water can penetrate sealed areas of the machine and cause damage to spindles, pistons, bearings or the engine (10). High-pressure cleaners shorten the operating time and impair operability.
ATTENTION
Always shut the engine (10) down and remove the spark plug connector (22) before carrying out any maintenance work.
11.1 Maintenance plan
Observe the machine and engine maintenance table:
| Maintenance plan | |
| Check for servicing | Interval |
| Loose screws | Before commissioning |
| Check for damage | Before commissioning |
| Check fuel tank for leaks Before commissioning | |
| Clean machine | After commissioning |
| Check the cooling fins | After 25 operating hours |
| Check spark plug | After 25 operating hours |
| Change the engine oil | After 50 operating hours |
| Check the air filter | After 100 operating hours |
| Change the engine oil | After 100 operating hours |
| Replace spark plug | After 100 operating hours |
| Clean the sedimentation cup | After 100 operating hours |
| Change the oil in the tamping system | After 300 operating hours |
| Clean the fuel filter | After 300 operating hours |
11.2 Changing the engine oil (Fig. 15)
NOTE!
Environmental damage!
Spilled oil can pollute the environment permanently. The liquid is highly toxic and can quickly lead to water pollution.
- Fill/empty oil only on level, paved surfaces.
- Use a filling nozzle or funnel.
- Collect drained oil in a suitable container.
- Wipe up spilled oil carefully immediately and dispose of the cloth according to local regulations.
- Dispose of oil as per local regulations.
The engine oil change should be carried out while the engine (10) is at operating temperature and switched off.
- Place the machine on a level, even surface.
- Place a suitable collection container (not included in the scope of delivery) under the oil drain screw (12).
- Use an open-end spanner size 10mm (not included in the scope of delivery) to open the oil drain screw (12) and drain the engine oil.
- After you have drained the engine oil completely, tighten the oil drain screw (12) again.
- Now unscrew the oil dipstick (13) anti-clockwise.
- Fill up with fresh engine oil and check the oil level (see 10.2).
- Then screw the oil dipstick (13) back in clockwise.
11.3 Air filter maintenance (3) (Fig. 16)
DANGER!
Risk of fire and explosion!
If not cleaned correctly, fuel may ignite and even explode. This can lead to severe burns or death.
- Clean the air filter only by knocking out or blowing out with compressed air.
- Never clean the air filter with petrol or flammable solvents.
NOTE!
Risk of damage!
Operating the engine without the filter element in place can cause engine damage.
- Never run the engine without the air filter element in place.
A dirty air filter diminishes the engine output due to reduced air supply to the carburettor. Regular inspection is therefore essential.
The air filter should be checked every 100 operating hours and cleaned as required.
- Remove the air filter housing cover (3c).
- Remove the air filter inserts and check these for damage.
- Replace any damaged insert. Wipe off dirt on the inside of the filter housing with a clean moist cloth. Make sure that no direct enters the opening.
- Remove the foam filter (3b) from the paper filter (3a). Check it for damage and replace it if necessary. Clean the foam filter (3b) with a mild soapy solution.
- Blow out the paper filter (3a) from the inside to the outside with compressed air. Do not rub dirt off the paper filter (3a). This can result in damage.
- Place the foam filter (3b) on the paper filter (3a).
- Close the air filter housing cover (3c).
Never run the engine (10) without an air filter or with a damaged air filter insert. This would allow dirt into the engine (10), which would result in severe damage to the engine. The manufacturer is not responsible for the resulting damages; the user solely bears the risk.
11.4 Cleaning / replacing the spark plug (22a) (Fig. 17, 18)
ATTENTION: Only replace the spark plug when the engine is cold!
Check the spark plug (22a) for contamination for the first time after 25 operating hours and clean it with a copper wire brush if necessary.
Thereafter, replace the spark plug (22a) every 100 operating hours or if necessary.
-
Disconnect the spark plug connector (22) and remove any dirt in the spark plug area.
-
Unscrew the spark plug (22a) with the supplied spark plug wrench (G) and check this.
- Check the insulation. Replace the spark plug (22a) if it is damaged, e.g. cracked or fragmented.
- Clean the spark plug electrodes with a wire brush.
- Check the electrode gap and adjust it using a feeler gauge (not included in the scope of delivery). To make sure that the engine (10) remains efficient, the spark plug (22a) must have the right electrode gap (0.7 - 0.8mm)
- Screw the spark plug (22a) back in by hand and tighten it about 1/4 turn with the spark plug wrench (G).
- Place the spark plug connector (22) on the spark plug (22a).
ATTENTION!
A loose spark plug can overheat and cause damage to the engine. If you tighten the spark plug too much, the thread in the cylinder head may be damaged.
11.5 Lubricating the tamping system (Fig. 10)
- Check the oil level every time before commissioning.
- See 10.3 Lubricating the tamper system.
11.6 Changing the tamper system oil (Fig. 10)
- Place the machine on a level, even surface. Tilt the machine so that a right angle is formed to the floor.
- Tilt the machine back until it rests on the guide bar (15).
- Place a suitable collection bucket (not included in the scope of delivery) under the machine.
- Remove the rammer foot oil drain screw (14) using a socket spanner size 24mm and a ratchet spanner (not included in the scope of delivery).
- Allow the oil to drain into a collection container.
- Return the machine to an upright position and tilt it until the machine rests on the transport roller (24).
- Fill the oil using a funnel (not included in scope of delivery). Note the max. filling capacity of 800ml
- Then screw the rammer foot oil drain screw (14) back in. Tighten the rammer foot oil drain screw (14) with a torque of 9 Nm (6 ft-Ibs.).
- Place the machine upright again.
11.7 Drain petrol with a petrol extraction pump (Fig. 19)
In case of storage over a longer period of time, the petrol must be drained.
WARNING!
Health hazard!
Inhalation of petrol/lubricating oil vapours and exhaust gases can cause serious damage to health, unconsciousness and in extreme cases death.
- Do not breathe petrol/lubricating oil vapours and exhaust gases.
-
Empty out fuel only outdoors.
-
Close the fuel valve on the fuel tank (19).
- Hold a collection bucket under the hose of the petrol extraction pump (not included in the scope of delivery).
- Carefully open the tank cover (4) so that any possible overpressure can be relieved. Remove the fuel filler cap (4).
- Remove the fuel filter insert (4a).
- Push the hose of the petrol extraction pump into the fuel tank (5) and drain out the petrol completely using the petrol extraction pump.
- Reinsert the fuel filter insert (4a).
- Retighten the fuel filler cap (4).
- To ensure that no petrol remains in the carburettor, the remaining petrol must be drained out of the carburettor.
11.8 Cleaning the fuel filter insert (4a) (Fig. 19)
Note: The fuel filter insert (4a) is a filter cup which is located directly under the fuel filler cap (4) and filters all the fuel filled in.
- Unscrew the fuel filler cap (4).
- Remove the fuel filter insert (4a). Clean it in a non-flammable solvent or a solvent with a high flash point.
- Reinsert the fuel filter insert (4a).
- Retighten the fuel filler cap (4).
Please provide the following information in the event of any enquiries:
Machine data - type plate
- Motor data - type plate
Important note in the case of repairs:
When returning the machine for repair, for safety reasons, ensure that it is free of oil and fuel when it is sent to the service centre.
Spare parts / accessories
Spark plug F7RTC - Article no.: 3904601090 / SP item 16
Air filter insert - Article no.: 3908301358 / SP item 127
Transport roller article no.: 3908301101 / SP item 90
Service information
Note that the following parts on this machine are subject to natural or usage-related wear, or that the following parts are required as consumables.
Wearing parts*: Spark plug, air filter insert, transport roller
- may not be included in the scope of delivery!
Spare parts and accessories can be obtained from our Service Centre. To do this, scan the QR code on the front page.
12. Transporting and lifting the machine
WARNING!
Danger of injury!
Unintended and unexpected start-up of the machine may lead to injuries.
- Before loading, switch off the engine (10) and, after the engine (10) has cooled down, remove the spark plug connector (22) from the spark plug (22a).
- Close the fuel valve on the engine (9) and the fuel tank (19). Do not refuel the machine on the transport vehicle.
- The machine can cause severe crushing injuries due to its own weight.
WARNING!
Danger of crushing!
The guide bar must not be used to lift the machine. -Only lift the product by the transport bar.
- The transport bar must be inspected regularly for wear, damage or misuse. A damaged transport bar must be replaced immediately.
Attention! The machine can fall and cause damage or injury if it is not lifted properly.
Attention! The lifting point is used to secure the machine during transport.
Attention! The transport bar (1) is used to recover or tow a stuck machine. If towing with a tow rope is not possible, use a tow bar. Always ensure that the tow bar does not have any visible damage and can withstand the resulting forces. Unlike belts, ropes or chains, a tow bar can absorb and transmit both tensile and compressive forces.
12.1 Transport
This machine can be transported in a vehicle or by the transport device (E) depending on the conditions of the place of use and the distance to be covered.
Allow the engine (10) to cool down before transporting or loading to avoid burns and to prevent fire hazards.
Empty the fuel tank (5) completely (see section 12.7).
12.1.1 Transport device (E) (Fig. 20)
The transport device facilitates handling over short distances. Only use the transport device (E) on a level and solid surface and for short distances. Remove the transport device (E) again before first use.
- Switch the engine (10) off before transporting (see section 11.5).
-
Gently tilt the machine forward and push the transport device (E) beneath the bracket.
-
Hold the transport device (E) by the foot.
- Tilt the machine backwards on the axle.
- Roll it forwards and backwards as required using the guide bar (15).
- Proceed in reverse order when setting down.
- Carefully put the machine down and remove the transport device (E).
12.1.2 Transporting in a vehicle (Fig. 1, 10, 20)
Always transport the machine in an upright position, if possible. If there is no possibility to transport the machine upright, then only in the position shown in Fig. 11.
The air filter (3) must not point downwards. Oil may get into the cylinder, combustion chamber or air filter
(3). This can cause starting difficulties.
- Lift the machine into a vehicle. Please note that the machine is too heavy to be lifted without mechanical help (i.e. lifting device).
- Or use the transport device (E) and a loading ramp in order to load the machine into the vehicle.
- Secure the machine on the transport vehicle against rolling, slipping or tipping over and also lash down the machine. Also secure the machine with a securing strap at the lifting point.
ATTENTION!
After transport in a horizontal position, the machine must be righted again to allow the oil to run back to the engine (10). This process may take some time until the normal oil level is restored.
12.2 Lifting the machine / transport by means of a lifting device (Fig. 1)
Before lifting, make sure that the lifting device (crane or hoist) is capable of carrying the machine weight without danger. See type plate for weight of lifting device. Please note that loading ramps must be stable and able to bear the load.
- Fasten the lifting gear to the central mounting, i.e. the transport bar (1).
- Lift the machine a small distance and make sure that all connections are properly fastened.
- You can now lift the machine as desired using the lifting device.
ATTENTION!
The machine is heavy and must not be lifted by a single person. Always lift the machine with at least two persons.
13. Storage
DANGER!
Risk of fire and explosion!
Storing the machine near potential sources of ignition can result in a fire or an explosion. This can lead to severe burns or death.
- Eliminate possible sources of ignition, such as furnaces, hot water boilers with gas and gas dryers, etc.
NOTE!
Risk of damage!
If the machine is not stored properly, the engine can be damaged.
- Store the machine protected against dirt, dust and moisture.
13.1 Storage during extended breaks in operation:
If the machine will not be used for a period of more than 30 days, follow the steps below to prepare it for storage.
- Empty the fuel tank (5) completely (see section 12.7). Stored petrol containing ethanol or MTBE becomes stale within 30 days. Stale petrol has a high rubber content and can thus clog the carburettor and restrict the petrol supply.
- Drain the engine oil from the engine (10) while it is still warm. Top up with new oil. (See section 12.2.)
- Use clean cloths to clean the machine. Do not use aggressive or oil-based cleaning agents when cleaning the plastic parts. Chemicals can damage plastics.
- Store the machine in an upright position in a clean, dry building with good ventilation.
Store the machine and its accessories in a dark, dry and frost-free place that is inaccessible to children. The optimum storage temperature is between 5 and 30^ .
Store the machine in its original packaging.
Cover the machine to protect it from dust or moisture.
14. Disposal and recycling
Notes for packaging


The packaging materials are recyclable. Please dispose of packaging in an environmentally friendly manner.
You can find out how to dispose of the disused device from your local authority or city administration.
Fuels and oils
- Before disposing of the device, the fuel tank and the motor oil tank must be emptied!
- Fuel and engine oil do not belong in household waste or drains, but must be collected or disposed of separately!
- Empty oil and fuel tanks must be disposed of in an environmentally friendly manner.
15. Troubleshooting
The following table shows fault symptoms and describes remedial measures in the event of your machine failing to work properly. If you cannot localise and rectify the problem with this, please contact your service workshop.
| Fault Possible cause Remedy | ||
| Untidy compaction pattern. | Rammer foot (18) worn out. | Replace rammer foot (18). Contact authorised specialist workshop. |
| Oil loss from the engine (10). | Worn seals, radial sealing rings. Contact autho | |
| Soil surface is too hard. | Compaction of the soil surface is not possible. | |
| Soil is too wet, the rammer foot (18) gets stuck. | Allow time to dry. | |
| Thick layer of dirt on the rammer foot (18). | Clean the rammer foot (18) and bottom rammer (17). | |
| The engine (10) runs but the machine runs irregularly. | Broken parts in the tamping system. | Contact authorised specialist workshop.Broken or bad spri |
| Engine speed is set too high. | ||
| Engine (10) will not start. | No fuel in the fuel tank (5). Refuel with petrol (Super E10). | |
| Fuel valve on the engine (9) and fuel tank (19) closed. | Open the fuel valve on the engine (9) and fuel tank (19). | |
| Air filter (3) dirty. Clean the air filter (3). | ||
| On/off switch (16) set to "OFF". Set the on/off switch (16) to "ON". | ||
| Pull starter (11) defective. Repair the pull starter (11). | ||
| No engine oil. Refill the engine oil. | ||
| Spark plug (22a) contaminated. Clean the spark plug (22a). | ||
| The engine (10) runs but the machine does not move. | Centrifugal clutch defective. | Replace the clutch. Contact authorised specialist workshop. |
| Compacting pressure low. | Contact authorised specialist workshop. | |
| Exhaust opening blocked. | ||
| Engine (10) gets too hot. | The cooling air flow is obstructed. | Remove all foreign bodies from the frame, fan, air inlets and the cooling fins. |
| Spark plug (22a) defective. | Replace the spark plug (22a). | |
Günzburger Straße 69
D-89335 Ichenhausen
CHER CLIENT,
Günzburger Straße 69
D-89335 Ichenhausen, Germania
EGREGIO CLIENTE,
Günzburger Straße 69
D-89335 Ichenhausen
GEACHTE KLANT,
Apparaatbeschadiging
Traag / stationair =

Aanwijzig:
Günzburger Straße 69
Günzburger Straße 69
Günzburger Straße 69
D-89335 Ichenhausen
VAZENY ZAKAZNIKU,
Günzburger Straße 69
D-89335 Ichenhausen
VAZENY ZAKAZNIK,
Zelame Vam vela zabavy a uspechov pri praci s VaSm novym pristrojom.
UPOZORNENIE:
Günzburger Straße 69
D-89335 Ichenhausen
KEDVES UGYFELUNKI
Günzburger Straße 69
D-89335 Ichenhausen
SZANOWNY KLIENCIE,
Günzburger Straße 69
D-89335 Ichenhausen
POSTOVANI KUPCI,
želimo vam mnogo zadovoljstva i uspjeha pri radu s novim uredajem.
NAPOMENA:
Günzburger Straße 69
D-89335 Ichenhausen
SPOSTOVANI KUPEC,
želimo vam veliko veselja in uspeha pri delu z vašo novo napravo.
NAPOTEK:
Günzburger Straße 69
D-89335 Ichenhausen
AUSTATUD KLIENT!
8.3 Gaasihoova (6) monteerimine (joon. 2, 6)
- Monteerige gaasihoob (6) kinnitusvitsa, kahe ristpeakruvi M6x30 ja kahe iselukustuva mutriga M6 kaitseraami (2) kulge.
- Pingutage kuuskantpoldid ja mutrid lihtvotmega VM10 ja lihtvotmega VM8 tugevasti kinni.
- Kinnitage gaasitross kaasasolevate kaablisidemetega (F) kaitseraami (2) kulge.
Juhised pakendi koha
Günzburger Straße 69
D-89335 Ichenhausen
GERBIAMAS KLIENTE,
Günzburger Straße 69
D-89335 Ichenhausen, Vacija
GODATAIS KCLIENT!
Velam prieku un sekmes, stradajot ar so jauno ieri ci.
NORÄDE:
Sı ražojuma ražotajs saskaña ar spekā esoso likumu par ražotaja atbildibu par ražojumu kvaliti nav atbil-digs par zaudejumiem, kas rodas sim ražojumam vai si ražojuma del saistiba ar:
Reserves dalas / pigeonumi
Aizdedzes svece F7RTC - preces Nr.: 3904601090 / RD poz. 16
Gaisa filtra ieliktnis - preces Nr.: 3908301358 / RD poz. 127
Transportesanas skritulis - preces Nr.: 3908301101 / RD poz. 90
Servisa informacija
Jaievero, ka sai ieriei kalak noraditas das ia r paklautas lietosanas vai dabiskajam nodilumam, vai talak noraditadas ia nepiecesamas ka paterejamie materali.
Nodilstošas detalias*: aizdedzes svece, gaisa filtra ieliiktnis, transportešanas skritulis
- nav obligati iekjauts piegades komplektä!
Rezerves dalas un pigeonum varat sanemt musu servisa centra. Sim nolukam noskenejiet titullapao esoso kvadraktkodu.
12. Ierices transportesana un pacel-sana
BRIDINAJUMS!
Savainosanas risks!
Günzburger Straße 69
D-89335 Ichenhausen
BASTAKUNDI
Viktig information for reparation:
Günzburger Straße 69
D-89335 Ichenhausen
ARVOISA ASIAKAS,
Günzburger Straße 69
D-89335 Ichenhausen, Tyskland
KAERE KUNDE,
9.3 Smoring at stampesystemet (fig. 10)
Smorelie fordeles i hele stampesystemet vha. maskinens vibrationsbevgelse. Nar maskinen korer, ledes olien gennem borehullerne i stemplet fra maskinens bund ind i krumtaphuset.
13.1 Opbevaring under laengere driftspauser:
Günzburger Straße 69
D-89335 Ichenhausen
KJÆRE KUNDE,
Günzburger Straße 69
D-89335 Ichenhausen, Германя
YBAKAEMNIKJINEHTN,
Keenaem Bn MHO rnnm MOMENTn ycnex npna pa6oTaTc Baunr HOB ype.
YKA3AHNE:
Cbrnacho DeiCTBaun 3aKOH 3a npOdyKTobata OTROBOPHOCT, PON3BOINTeJAT Ha TO3N pOdyKT HeHOCN OTROBOPHOCT 3a UET, Bb3HNKHAN NO NnN NopaDn TO3N ypeD, npN:
- HenpaBnHo 6opabeHe,
- Hecna3BaHe Ha pbKOBOCTBOTO 3a ekCnIOaTaIyA,
- pEmOnTn OT HeynbHOMOueHn CneuaJIncTn, JRABaUcN Ce TpeTu Nua,
Brgpaxdahe IIOdmaHa Ha He opnHnHaHn pe3epBHN YactN, - ynoTpe6a He no npedHa3HaueHne.
B3emTe noBbHMaHHe:
PbKOBOCTBOTO 3a ekCnIIOatauiae CbCTaBAHcTACOT TO3n npOdyKT.To cBdbpXa BaxHN yKa3aHnOHTHO6e3oNaChATA, npABINHaTa NIKOHOMNuHATapabota C npOdyKTA,N68rBaHETo Ha ONaCHOCTN, cNectraBaHETo Ha pa3xOOn 3a peMOHT, HAmJIaBaHETo HA BPemHa Tn PnctOu N YBeJIuYBaHETo Ha NaEckDnOCTTa N EKCnIOataUHOHHN XNBOT Ha npOdyKTA.B DOnbJIHHeNe KbM yKa3aHnTa 3a 6e3oNaCHOCT B TOBA pKOBODCTBO 3a ekCnIIOatauia, 3a-DbJIXTeNHO TpRABa Da Cna3BaTe OTHacRUnTe CeDo ekCnIIOatauYraHa npOdyKTA npeDnucHnB BB BaWata CTpHa.
Ipei Da n3noJ3BaTe npOyKTA, 3aNo3HaIe Ce C BcNkU yka3aHnna 3a pa6oTa n 6e3OnacHocT. N3- noJ3BaIte npOyKTA cAmo KaKTo e OnIcaHo n 3a nocOueHIne oBnactn Ha yNoTpe6a. CbXpaHbaIte PbKOBOCTBOTO 3a EKCNIOaTuaHn HA CNrpyHO MAcTO I npEJaBAIte BCNkU DOKymENTn, KOrATo npEJaBAIte npOyKTA Ha TpeTn Nla.
2. OnncaHne Ha ypeHa (ΦmR. 1)
- Ckoba 3a TpaHcnopTnpahe
2.3auntha pamka - Bb3dywen hnnTbp
3a. XaptneH qnITbp
3b. ΦιπTpο ηεηρολίατ
3c. Kanak Ha Kopnyca Ha Bb3dyuHnna qntTbp - Kanak ha pe3epBoapa
4a.BnoKkaHa roPnBnnaΦnTbp - Pe3epBoaap 3a ropuBO
- loct 3a ra3Ta
-
JIoCT Ha cMykaHa
-
Mapkyu 3a o6e3Bb3dywaahe
- KpaH 3a roPbO npn DnBaTeTae
10.Диагал (2) - BbXeH cTapTeP
- PpO6ka 3a n3TOUbaHe Ha MaCnToT
- Maclon3MepBaTeHa ⅢeKa
- Побka 3a ИЗTOBaHe Ha MacIToTo Ha KpaKa Ha TpAm6OBkata
- HanpaBnBaFa cko6a
- PpeBkIIOUbaTeJ 3a BKnIOUBaHe/U3KlIOUBaHe
17.Донна уаст haТрамбовka t a - KpaKaHa TpaMboBkaTa
- KpaH 3a ropno npn pe3epboapa 3a ronpBO
- PeDyKTop
- AdaanTepHn nloHn (2x)
- JIyHa Ha 3anaJIteHn CBeu
22a.3anaJIteJIHa cBeu - Wymo3arnyuTneHnroIbpe
- TpaHcnpTHa poJka
3. Osem Ha doctaBkata (fnr. 2)
Bn6paunHna TpaM6OBka(A)
- 4 x BnHTOBe C ueCToCTeHa rJaBa M10x25 (B)
- 1 x ck06a 3a mApKyu (C)
2X BnHTOBe C 8ecTOcTeHHaTnaBa(D)
- 1 x npncnocoblenhe 3a TpaHcnopTupaHe (E)
- 2хкавеливрьзн(F)
- 1 x klnu 3a 3ana nntenHa cBee (G)
- 1 x 3auntha paMka (2)
- 1 x pe3epBoap 3a ropnBo (5)
- 2хадалтерни почи (21)
- 1 x pькововствоза ekрноацига
4. YnoTpe6a nonpeHa3HaueHne
MaunHaTa OTROBapHa DeHCTBaUaTa DnpeKtnBa Ha EO OTHOCHO MaunHInTe.
MaunHata npedctabnBa 3aDbNxBan C DnBraTe nHcTpymEt I e noDxOJa7a 3a yNtBTHBaHe Ha poXkaba npbCT,6yU npbCT N qakbl, pRn KoETo da ce cb3dae 3dpaBa N cTa6nHa OCHOBA 3a fyndaMeHTN, NOLOXEN 6eTOH N dpyrN yNtBTHAHHa OCHOBATA.
Maunhata oobaye He neoDxOJa 3a yIyTBnBaHe Ha noBn C BnCOKcBbPkaHne Ha rInHa.
MaunHata MoKe Da ce n3noJ3Ba cAmO cbflnacHO HeHTo npedHa3NaueHne. BcKa pa3nUaBa ca ot TOBa ynotpe6a He e no npedHa3NaueHne.MaunHaTa MoKe Da ce 06cnykBa cAmO OT JInu, KOHTo Ca 06yehn, HNCTpyKtnpaHn N yIbNHOMOeHN 3a TOBa.
3a BcKaBb BVn npOn3Tu4uO nTOBa UeTn INHapAnBaHn OTOBOPHOCT HOCNOTpe6nteJr/onepaTopbT, a He npOn3BODNTeJr.
Cbctabha yact ot ynoTpe6ata no npedna3nauhene cBIO n CnA3BaHeTo Ha yka3aHnraTa 3a 6e3onacHOCT, KaKTO n PbKOBOCTBOTO 3a MOHTAX N yka3aHNrta 3a EKcNlOaTaunr B PbKOBOCTBOTO 3a EKCnIIOaTaunr.
JIuata, KOINTO OcnykBaT N NOIbPkaT MaunHaT, Tp6Ba Da ca 3aNo3HaTN C Hero N Da Ca HΦopMpaH N OTHOCHO Bb3MOXKNHe ONaCHOCTN.
PpomeHn no MaunHaTa OCBo6oxJaBaT N3uJIo npOn3BODnteIa OT OTRObOPHOCT 3a Bb3HNKHaN Bpe3yNTat OT TOBa UeTn.
MaunHaTMOKeJaCeI3No13BaCaMoCOpnHaHn Hpe3epBnYacTnIOpUHaJIHNPiHaJLeXHoCTN HaPOn3BOIDTeJIa.
MOna,ObbPHeTe BnHMaHne,Ye HauNte UpeiH He ca KOHCTpyupaHn C npEHa3HaueHne 3a TbproBcKa, npOeCnoHaJIHa nIIN npOMuJNeHa yNoTpe6a. He noEmame rapaHnA, aKO UpeBT Ce N3NOJ3Ba BV TbpROBCKN, 3aHaarTuHCKn IIN npOMuJNeHn npEInpnaTnK, KaKTo n PnPaBHocNJn DeHOCn.
5. 06и уka3aHЯ 3a 6e3oNaCHOCT
B HactoIto pBkoBoDCTBO 3a EKcnIIOataunc T03n 3Hak CMe O6OHaUNM MecTaT, KOnTO 3acraT BaWata 6e3onachOCT:
OcbEN TOBA pBkoBOdCTBOTo 3a eKcnnoataunc bDbpxa npyRn BaxHn nacxN, KOnTO ca 0603HaueHNC dyMaTa "BHIMAHNE!.
△BHHMaHHe!
Ipiu n3non3BaHTo Ha ypei Tp86Ba da ce cna3BAt HkON ppeiHa3Hm MepKn 3a 6e3oNaCHocT, 3a Da ce npedOTbPaTATn HapaHBAHn n eTuBa npOeTeTe BnMaTeHnTOBa pKOBODCTBO 3a EKcNloatau/Te3n yka3AHn 3a 6e3oNaCHocT. Ako Tp86Ba da npedeTeyeJaHa TpeTn IInua, MoJnpedaTe CbIo N TOBa pKOBODCTBO 3a EKcNloatau/Te3n yka3AHn 3a 6e3oNaCHocT. He NoeMame OTROBOPHOCT 3a 3IOnOlyKn INn IeTn, Bb3HnKHaNNopaN HeCnA3BaHe Ha TOBa pKOBODCTBO INn Ha yka3aHnTa 3a 6e3oNaCHocT.
ONACHOCT
HecnasaBaHeTo Ha ToBa yKa3aHne ige DoBoeDe Do Hau-roJaMa OnaCHOCT 3a XNBota NnD O pNCK OT HapaHaBaHna, 3acTpaShaBaun XNBOTA.
PNEyPENKDEHNE
Hecna3BaHeto Ha ToBa yka3aHne MoKe Da DoBeDe IO CmbpT,peCn.TeKn HapaHaBaHnI.
BJIaIOPA3yMNE
Hecna3BaHeTo Ha ToBa yka3aHne MoKe Da DoBeDe OT JeKn Do CpeDn HapaHaBaHn.
YKA3AHNE!
Hecna3BaHeTo Ha ToBa yka3aHne MoKe Da IOBeDe Do NOBpeHa HdbiratEny IIN dpYn MaTePnaHn UeTn.
3aIO3HaIe Ce c BaUaTa MaUNHa.
- PpOcTeTe BHNMaTeJIHO pBkoBOJCTBTo 3a ekCnIIOatauN I ce yBepeTe, ye pa3bnpaTe cbDbpXaHHeT0 My N BCNUKn ETNKETn Ha MaunHaTa.
3a0n3HaHte ce c o6nactTa Ha npinloKeHne n OpranHueHnra Ta Ha MaunHata, KaKTo n C KOHKpeTHNTE N3TOHnU HA ONaCHOCT.
- YBepTe ce, ye no3HaBeTe do6pe opraHnte 3a ynpabJeHne n TxAHaTa fHKnIy.
- YBepTeCe, Ye 3HaTe KaK Da CnPte MaunHata N 6bp30 Da DeakTbNpaTe opraHnte 3a ynpabIeHne.
He ce onntbaTte da pa6oTnte c MaunHata, 6e3 Da cTe pa36paHn HbJHo pa6oTaHa DnBraTeNn n3nCKBaHnra 3a HerOBaTn NODpBjKaN KaKa da n36yBaTe 3noNoyKn, BoJeu Do TeNeChn NobpeDn n/nn MATEpuAJIH uETn.
-ДрькTe danelue OT pa6oTHaTa 3OHa Дугп Лица,ocobeno deua.
Pa6oTHa 3OHa
- Hinkora He CTapTnpaIte NnO 06cnyKbAte MaWuHaTa B 3aTBOpEHO Nn NOo npOBeTpRaHo NpoctpaHCTBO. Otpa6oTeHnte ra3Obe ca Onacn, 3aUOTO CbDbpXaT, BbIpeOeH OKnc, KOTo HMaMmPnc I e CmbptOHocH. N3non3BaTe MaWuHaTa cMoB Do6pe npOBeTpBN BbHUn 30HN.
- Hikora He n3no3BaIte MaunHaTa npn loa BNDIMOCT NIN NOU OCBETNEHne.
- YBepete ce, ye cTeHnTe Ha daDeHa KaHaBaKa ca CTabuJIHH n HMa Da ce CpyTt nopadn Bn6paunrTa. BHIMabaIte 3a onachocCTTa OT naDaHe nn npoe6pbUaHe!
- YBepTe Ce, Ye B 3oHaTa 3a TpAm6oBaHe HrMa eNeKtpnueckn Ka6eJIn, Ra3OpnoBOuN INN BOIO npOBOuN, KOITo 6xHa MoIIN da 6bDat NOBpeHn OT Bn6paunra.
-Бьдeteпрета3иви,КогаTo pa6OTteВ 6и3OCTdo He3auntehn Dynkn nIn CTpOnTeHHn n3-KoNn. - He paBOTeTe c ypeDa npn DbXkD, 6ypa n oco6eH npn onaCHOCT OT MbHNHn.
- PnI NOuN aTMoccepHn ycNoBn, Bbpxy HepaBn NOBbpxHOCTN INI pN OTKaUBaHe BHIMaBaTe 3a CTa6bJIeH cToeK.
-
INON3BaIte MaunHaTa cMo Ha cTPONTENH 06eKn, HA KOnTO yCIOBnra Ta Ha paOta Ha cTPONTENHIA O6eKT N03BOJRAbT NOxOJaIoo I3NOJ3BaHe Ha MaunHaTa. CbIoNDaBaIte No-cneuaNHO:
-
yCIOBnIa 3a cTaNHOC;
- CtpyKtypata N TOBAPOHOCMOCCTTHa noYBaTAta;
- WINPOUHHaTa Ha NbTg 3a DvNxHeHne;
-CbOTHOWeHHeTO MExdy BnCOUHATA N uINPOuHata Ha IpeMnHaBaHHTe IpeNrTCTBnI n p6oBe (HaNP. BBB Bp3Ka C uPOnHATA Ha 6aHaJka; BnCOUHATA Ha 6OpDIOpNTe; Dbl6OuHATA Ha n3Kona);
-bbHaHaKaHnHaMaunHaTaNycOBnTaHa yIOTpe6aHaCTponTeHNnObeKT,KOIToOKa3BAt HeraTINBHO BnHHe BbpyxCTabuHocTTa (Hanp. BnCOUnHa HbOpOpTe,INHaMnHn eEeKtN).
- Pnp pa6oTa B 30HnTe BHHMaBaIe 3a CneuΦnHu OnaCHOCTn, Hap.:
-cb6IIOdaBaTe MeCTHnTe IpeDnncAHn 3a pa-60Ta,
-cna3BaIte pa3CTOJHne OT BnCyaIeNeKTpo- npoBOiN,
- npn pa6oTa B TyHeJN BHImaBaIe 3a I3napEnHn O6pa3yBaHe Ha npax,
-BHIMaBaIte3a CneuΦnHn ONaCHOCTN B 3aMbpcEHN 3OHN.
JinuHa 6e3oNaCHOCT
He n3noI3BaIte MaunHaTa, aKo cTe npneIeJekapCTBa, anKOxOJI nn JekapCTBa, KOINTBJIINrT Ha cnoc6HocCTTa Bn da pa6OTNe npabInHo C maunHaTa.
HocTe noxOaIoo obKeIO. HocTe bJnnaTaoHOu npKabUN. HocTe npEpa3Hn 06yBcNb cC CTOMaHeHb6oBeTa, CTOMaHeHn IOmEtKn HEnbp3aJIaUc npOphiJ.
- Ppi pa6oTa HocTe 3aunTa 3a cnLyxa n npedna3-Hn ouHn. Ppi o6pa3yBaun npax pa60Tu n3non3-BaIte DnxATEHa 3auNTa.
- He Hocete Iupokn Dpexn, Kbcn NaHTaIOH nIi KaKBInTo n Da e ykpaWeHn. Hocete Dblrata KOca, Bbp3aHa Ha3aD NO DblKHNata Ha pameHeTe. DpbXte Kocata, dpexnte n pbute cN daJeUOT DBNXeUe CE Yactn. HIpOKnTe Dpexn, ykpaWeHnraTn INI Nblrata KOCA MORAT Da ce 3aKaayat B DBNXeUInTE CE Yactn.
He cBaanTe npedna3HnTe ekpaHn rnoDbPkaTe cyHKnOHaHn.
- YBepTe ce, Ye BCnKn raiKn, BoNTObe n T.H. ca 3dpabo 3aTeHaTu.
Hikora He n3no3BaIte MaunHaTa, aKO ce HyKdae OT peMOHT INE B ILOWO MExaHnHO CbCTOHNHe. PpeIN paBota cMeHete nobpeHnte, IInCbauNTe INN CyyneHnte qactn.
OnepaopbT pr6Ba da e Habbpwn nohe 18 ro-dnH. Obyaabaune ce Tp6Ba da ca nohe 16-ro-dnHn, Ho mora da paobTn MaunHaTa camo nOd h6nOdeHne.
- Bcunkn onepatopnp Tpr6ba da 6bdat noxdxoguo obyuHen 3a n3no13BaHTo, HactpoKaTa u npabBHeHnTo Ha MaunHata.
-Поберете Maшинна за Teч на 6eH3nH.
IopdbpkaTe a yHKnHOHaJHO rOHa. He n3-ON3BaTe MaunHaT, aKO dBVaTeJIr HE MoKe Da ce BKNIObA uN3KNObA cbc CbOTBeTHN KIOH.
Maunha,paobotea c 6eH3nH,KoT0 He MoKe da ce ynpabnaBa OT npEbkNIOBATEen 3a DnIraTeNa, e onacha n Tpr6Ba Da Ce CMeHn.
-Ппедидасторiate MaшинаТа, Имайтей Habикадлповерразе ддИОТВерTKITEи ГачнiteКлочьe ca OTСТра themselves OKOHAToOKOLOMaшина.OTBерTKa Ил КИЧ,Hamирац ce BbpyVbptTЯca ce yapct Ha MaшинHaTa,Можда прунHи habаняbaHe.
-БбдTe BнмATEJIH,OBpTaIe BnMaHHe Ha DeNCTBnraTc n N3NON3BaIte 3IpaBn pa3ym, KOrato pa60tTe c MaunHata. He ce npeymopraBaIte.
He n3non3BaIte MaunHata, KORATO CTe 6ocn nn Hocnte caHdAnu nn NIOobHN JeKN ObyBKn. HoCete PA5OTTH ObyBKn, KOtO npEpa3Bat KpaKaTa Bn NIOobpRaT CTaBUNHOCTTa Bn Bbpxy Xlb3raBn NOBbPxHOCTn.
- PoiDlbpkaIte Do6pa Cta6nHocT n paBHObecne no BCsKO BpeMe. Taka MoKTe Da KOHTPOIpaTe MaunHaTa No-dO6pe B HeoHaKaBaHN CnTuayuN.
- 1368raBaiTe HeBOHcSTapTnpaHe. YBepete Ce, Ye npEeKJIIOUbATEJrT 3a DnIaTeJrE n3KJIIOUeH, Npei Da TpaHCnOpTnpaTe IIN O6CnyXBaTe Ma- uHaHa. TpaHCnOpTnpaHETo IIN O6CnyXBaHeTo Ha MaunHaTMOKe Da IOBeJe DO 3JIOJNYKn, KO- rato npEeKJIIOUbATEJrE BKNIOUeH.
CbueCTByBa onaCHOCT O npMa3BaHe Ha pa3- nHn MeCTa Ha MaunHaT a nopadn DnHexu n Ce nn BbpTaUc KOHCTpykTNBn rpynn. DpBXTe pBeTe u KpaKaTa cN daJeu ot NnoaTa. Pa6oTe KOHcHTnpaHO u BNHaRc oCnrypRaBaiTe cTa6nIe H cToeK. HocTe npedna3Hn pa6oTHn 0byKn!
- YbepTe ce, Ye npi nocTaBHe Bbpxy paBeH TepeH mAsnHaT, n OepaTopbT ca CTabnHn NcNo Bpeme Ha ekCnloaTaunrTa MaAsnHaTa He ce npeo6pbu, xIb3ra nn naJa.
Be30nacnoct np6opabeHe c 6eH3mH
- BeH3nHbTe e JecHO3aIaIIM N HerOBIne ra3OBe MORaT Da ekCJNoIpaT npu Bb3JIaMeHraBaHe.
- Пибборавенeto c 6eH3nH B3eMeTe npedna3HmepK, 3a DA HamaNITE pNCKa OT cepno3HO HapaHЯBaHe.
- I3noI3BaIte IooXoJaTa Ty6a 3a 6eH3nH, KOraTO pIbIhnte IINI N3TOBATE pe3epBOapa 3a rOpIBO.
- 13BbpuTe Ta3n pa60Ta Ha YnCTO, DObpe npoBETpNBO OTKpNTO MRCTO.
He nyuhe. Korato 3apekdaTe c 6eH3nH nn pa-60ntte C MaunHaTa, na3eTe r OT NCKPN,OTKpTNn PnambUn nn DpyrN n3TOUHNu Ha OFBH. - Hinkora He 3apekdaTe pe3epBoapa 3a ropBO Ha 3akpnto. DpbjXte 3a3eMeHnTe, eNeKtponpoBODIMN npeDmEtN, KaTO INHCTpyMeHTN, daJIeUOT OKPNTu eJekTpnuCeckn qactn N ka6eIIN, 3a Da n3-6BerHeTe o6pa3yBaHe Na ICKpn nn eJekTpnuCecka TaIra. Toba MoKeJa npuynHb3IIaMeHraBe Ha 6eH3NHOBITE ra3OBe.
BnHaHcnpaTe Dnrgatena I ro octabraIte da ce oxlaDi, npdeN da 3apeXdaTe pe3epBoapa 3a ropuBO.CbaneTe Kanaka Ha pe3epBoapa n Hnkora He 3apeKdaIte pe3epBoapa 3a ropuBO,doKaTo DnrgatelaTpa6oTu nn e ropeu.
He n3noI3BaIte MaunHata, aKo 3HaTe, ye B roPnBHATA CNTeMa NIma TeUObE. OTBnBaIte 6abHO Kanaka Ha pe3epBoapa, 3a da OCbo6Onde EBeHTyAInHO HAnraHe B pe3epBoapa 3a rOpBO. Hkora He npenbIbaIte pe3epBoapa 3a rOpBO (6eH3nHbT HkORA He Tp86Ba Da e Hnd o603NaeHOTO MaKcMamHOB HO NaIbHe). 3aTBopTe IINbTHO pe3epBoapa 3a rOpBO c Kanaka Ha pe3epBoapa n 136bIpTe pa3JeTna 6eH3nH.
Hikora He n3noJIbAaTe MaunHaTa, aKo KanaKaTbTa Ha pe3epBoapa He e 3dpaBO 3aterHa. N36aRbaiTe n3TOUHNu HA 3aNaIbAHe B 6n3OCT Do pa3JrT 6eH3nH. He ce ONITBaIte Da cTapTpate MaUNHata, aKo e 6nPa3NtB 6eH3nH. N3BaTe MaUNHata OT 3OHATA Ha pa3INbA INpeDTbPaTe O6pa3yBaHTo Ha n3TOUHNu HA 3aNaIbAHe, DOKATO 6eH3INOBITE napi Ce n3napT.
CbxpaaBaiTe 6eH3nHa B CneuaJHo npou3Be-DeHN 3a Ta3n UeT Ty6n.
CbxpnaHbAte 6eH3nHa Ha xlaHIO,do6pe npoBETPNBO MRCTO,daJeO NT NCKPn,OTKpNT PnAmbkNINn Dpyr N3ToHnI HA 3anaBaHe. Hnkora He cBxpaHbAte 6eH3n Hnn MaunHaTc PnJIeH pe3epBoaap 3a rOpNBO B Crpada,B KOrTo 6eH3nHOBHTe napMoraT Da Bn3aT B KOHTAK T NCKPn,OTKpNT PnAmbIu NN dpyr N3ToHnI Ha 3aNaIbAhe,KATO BoJnep,neKa,CyUnInHra 3a DpexnNN nDpyr No06Hn.
- Octabete Dbngate Na ce OxnaN, npedn da npnbepete MaunHata B 3aTbOpeHo nomeeHne.
N3noJ3BaHe n rpnka 3a MaunHaTa
Hikora He nobDraIte NIN HocTe MaunHaTa, Korato DnurataJr pa60n.
- He ynpaxnhaTe cna Bbpx MyaHaHaTa.
- 3nnon3baTe npabunHaTa MaunHa 3a Baata oBnaCT Ha npInOxKeHne. PpaBunHaTa MaunHa ige CBbpUn pa6oTaT, 3a KOrTo e npoeKtnpaHa no-dO6pe n no-6e30NaCHO.
- He npomeHnTe HacTpoNkata Ha perynatopa Ha obopOTte Ha DBnraTeJIa, KaKTo n He ro fOpcnpaIe. PerynatopbHa ckOpocTTa KOHTpOJnpa MaKcImaJIHATA CKOpocT Ha DBnraTeJIa C MaKcImaJIHb 6e3OnaCHOCT.
He octabryte DnraTeIa pa60Tu Ha BnCOKn obopOt, Korato He yNtBTHBaTe.
-ДрькTe рьцeteи КракаТС И ДалЕУ OT ВьрТЯЦИ-Te ce.YaCTN.
- 1368BaTe KOHTaKT C ropeu 6eH3nH, MaCNo, Otpa6oTeHN rA3OBe n ropeu nOBbpxHOCTn. He DOKOCBaTe DBrAteTne IIn aCynx. IIO BpeMe Ha pa6oTa Te3n Yactn Ce HaropeuBaBAT MHOrO.
OctabaT ropeu 3a KpaTKO cnei N3KIOUbaHe Ha MaunHaTa.
- Octabete DBrataTeNaIaN, npeIaIaH3BbPbBaTe KaKbTaO I da e noOpdpbXka NIn Ha-ctpoKa.
AkoOT MaunHaTa Ce UyBat HeoBuaHn WymOBe nnT Ta3AnOueHe Da B6pnpa, He3a6abHo 3KnHO-yeTe DnRaTeN, pa3eDnHeTe KaEba Ha 3ana-nTeHnHata CBeu n OTkpniTe npuHnTa. HeoBuaHnTE WymOBe HnBpaun ObukHObeHo ca npn3HaK Ha Hn3npaBHOCTn. - I3noI3BaIte cAmO oIobpeHn OT npOn3BODnteI npNCTaBKn n npHaIaNExKHOCTn. Hecna3BaHeTo Ha TOBa MoKe Da npUHN HapaHbAhe.
- 06cnykete MaunHaTa. ПрOBepe3a otKIOHeHnI INIbOKInpaHe Ha DBXKeUInTe ce cactn, NOBpeDa Ha cactInTe n dpyrN CbCTOraHn, KOtO Morat da NOBInraT Ha pa6oTaHa MaunHaTa. Ako OTKpIeTe HRAKBA NOBpeDa, He N3No13BaIte MaunHaTa, Ipei Da 6bIe pemontpaHa. Mhoro ot abapInTe ce DbJxKat Ha loWIO NoDJIbPkaHo O6OpyDbAhe.
3a da HamaIte pIcka OT noKap, He no3BolBaI-Te BbpXy DnIraTeIa nonaDat TpeBa, IInCTa, N3NIuHe Cma3OueH MaTePnaI INN BbRlepOHNOTnaraHn. - HnKora He O6JIbBaIe N He IpbckaIte MaunHaTa C BODa INN dpyra TeuHOCT.
- Paa3eTe DpBkkMTE cyxH, uCCTn H 6e3 MaKn Uactn.
-Почистваite Маша сдел BCяka уnotpe6a. - Pn n3XbBpJHHeTo Ha 6eH3nHa, MacNoTO n T.H. CneDbaiTe npINoXmMtYe kA3aHnHa 3a n3XbBpJrHe Ha OTNaDbU, 3a Da 3aunTte OKoJHata cpeJa.
CbxpanBaTe N3KIOUeHata MaUNHa daJeY OT Docera Ha Deua H He N03BOJRAaTe Ha Iua, KOn-TO He ca 3aNO3HaTc MauINHATA INI HAcTOAOTO pbKOBoDCTBO, Da a N3NON3BAt. MaUNHata e onac-Ha Bpbute Ha Heo6yueHn Notpe6nten. - YBepTe Ce, Ye MaunHaTa He MoKe Da ce npoe6bprHe, NOxNb3He, N3TbPKaJIy IIN NaIHe, KOraTo He e B EKcnnoatauia.
CepBn3
- PpeiNoocTbaHe, pemOH, npOBepka nnHa-CTpoKa n3KnOuBaTe DnIraTeJIy Ce yBepaBai-Te, ye BCNUKn DnBKeUeCi Ce YaCTn Ca CnpEiN.
BunHcCe yBepBaIte,Ye npeKbCbauT3a DnBraTeIe B NoIOXeHne,“OFF”.Pa3eDInHeTe Ka6eHa Ha 3aapanITenHata CBeu I rO dpjxTe daJeUOT 3aapanITenHata CBeu,3a Da n36erHete HeBONHO CTapTupaHe.
Bb3noKTe 06cnykBaHTo Ha BaHaTa MaunHa Ha KbaNΦuInpaHn CnyKInTeJn. N3non3BaIte camo opunHaJIHn pe3epBHN qactn. ToBa rapaHTnpa 6e3onachOTc bCTOAHne Ha MaunHata.
DonbHnTeHNyka3aHnna 3a6e3oNaCHOCT
- IpbkTe pbcTe, npbCTnTe n KpaKaTa cn daNeu ot OCHOBHATA IIIOHa, 3a Da IVsBeHHeTe HapaHbAHIn.
-ДрькTe рькoxBaTKaTа Ha Maшинata 3драBO cДBE рьцe.
BnHaHr cToIe 3aMaunHata, Korato n3noJ3-Bate; HkORA He XoTe N He cToIe nped MaunHata, KOrato dBiratJeTpa6OtN.
- HnKora He NoctabYIe INHCTpyMeHTI INI pyTn npedmetn noD MaunHaT. Ako MaunHaTa ce ydapn B uXkD npedMet, cnpTe DnurateJe I pa3eHHeTe Ka6eJa Ha 3anaNTenHaTc Bceu n npOBepTe MaunHaTa 3a NobpeN; OTCpaHeTe NOBpeDaTa npEi Da CTapTnpate OTHOBO N3-Non3BaTe MaunHATA.
- He npetobapbaTe MaunHata, ako ynIbTHraBATE TBbpDe IbN60Ko INI TbPpe 6bp30.
He n3non3BaIte MaunHaTc BnCOKN CKOPOCTN Bbpxy TBpDn NIN XJb3raBn NOBbpxHOCTN.
-Быдete OOCSEHOBHIMMaTeJIHN,KORATOи3N0JI3BaTe MaUHHaTa BbpyxIINIpeCnuATE qakJleCTN NOBbPxHOCTn,aneuIINI nbTnua.
BHHMaBaIte 3a ckPHTn ONaCHocTn IIN TpaΦNK. He npEBo3BaIte xopa.
Hikora He HanyckaIte pa6oTHOTo MRCTo HIKORA He OCTabraTe MaunHaTa 6e3 HaD3Op, KOrato DnRatTeJrPa6oTN.
BnHa n CnpaTe MaunHata, KOrato pa6oTaTa e npEkbChata INI KOrATO XOHTe OT eHNO MRCTO Do dpyro.
CToTe daneChOT p6OBe Ha KaHabKn N 36BraI-Te DeiCTBnK, KOITMOrAT Da DOBeaT Do npeo6pBuaHe Ha MaunHaTa. DnXKeTe Ce BnMaTeNHO No HAKIOHN HArOpE B npaba JInHn Ha3aD HarOpE, 3a Da N36BerHeTe npeo6pbuHaHe Ha MaunHaTa Bbpxy OepaTopa.
BnHarncnnpaTeMaunHaTaBbpxyTBbpda npabHa nobbpxHOCTN3KNIouBaTe MaunHaTA.
OrpaHnueTe pa6oTHnTe yacObe Ha MaunHaTa n npabete peoBn nouBKn, 3a da n36erHeTe Bn- 6paOnOHnTe HatoBapBaHnA n 3a da MoKe pKaTa Bn da cn noUHne. HamaIe TCKOpOCTT a CnIaTa, c KOnTO n3NbJHnBaTe NOBtApAun Ce DInKHeHn.
OctatbHn pncKOBe
MaunHata e KOHCTpynpaHa CbINaCHO HnBOTo Ha pa3BNTne Ha TEXHnKaTa I np3HaTNe npaBnla Ha texHnKa Ha 6e3oNacOcT. BbnpK ToBa, npu pao-Ta MoraT Da Bb3HnKHat OTdJIHn OCTaTbUHN PnCKOBe.
OcBeH ToBa, Bbnpekn BCNUKn B3ETn npedna3HmepKn, MoRaT Da CbUeCTByBaT HeaBn OCTaTbHn PNCKOBe.
OctaTbUHIne pNCKOBe MORa Da 6bDat HamaIeHN, aKO 6bDaT cna3BaHn rnaBn ,Yka3aHn 3a6e0NaChocT" n ,Ynotpe6a no npedHa3hauehne" KAKTO n pbKOBoDCTBOTO 3a ynotpe6a kATO qraJIO.
- 1368baTe cnyaHNo nyckaHe B ekcnnoatauaHa MaunHaTa.
- I3noI3BaIte INCTpyMeHTa, npenOpbUah B TOBa pBkoBOdCTBO 3a ekCnloatauia. Taka noCTnraTe ONImaHa npOn3BoDnteHOCt Ha BaWata MaShHa.
-ДрьжTe рьцete cn daney ot pa6oTHata 30Ha, KOrato MaunHata pa6oTu.
6. Texhnueckn daHHN
KoHCTpykTBnHa3MePn
山 × 日 × B 480×780×1150mm
Tpamboaapanoayx..345x285mm
XoHa Tpamboaata nnoa 40-66mm
Брй удар.. 450-650/min
UeHTpO6ExHa cna 10 kN
TnHa DnirateJr. 1uinnDbp/4-TaKTOB
MaKc. MoUHOCT Ha DBnraTeIa 4,1 kW
Pa6oTeH o6eM 196 ccm
O6opotn maki 3600/min
Tognbo. 6eHs Super E10
BmectHMOCT Ha pe3epBoapa 3a ropnBO 2,81
KoJIuYeCTBO DnBraTeJHo MaCNo 0,6I
BnraTeHNO macno.....SAE 10 W-30 / SAE 10 W-40 CmaBaHe Ha TpaMboaata
CNCTema .SAE 10 W-30
Bmectmoct 3a Macno B
Tpamboaata CNTema. 0,81
Emcnn Ha CO. 811,46 g/kWh
3anaJnteHa cBeu .F7RTC
Pa3ctoHnHe mExdy eEnkTpoDnte....0,7-0,8mm
Terno 78kg
3ana3Ba ce npabTO Ha TexHneCKn npOMEHN!
UymnBn6paun
CTOHOCTHe Ha Wyma ca onpeJeHn CbrrnaCHO EN ISO 3744.Obu n CToHOCTn Ha Bn6paunTe (BeKTopHa cyMa oT Tpnte NocOKn),onpeJeHn Cb- rnaCHO EN 500-4.
UymbT Moke da Okakeceepno3Hb3deIcTBnBbpxy BaeweTo 3dpabe.Ako UymbT Ha MaunHnte npebuaba 85 dB, moJ, HocTe noDxOJa 3aunTa 3a cnya.
XapakTepcntnHa shyma
HnBO Ha 3ByKOBA MOUHOCT L WA. 108 dB
HnBOHa3ByKOBOHaJraHe L 87,45 dB
HeonpeenenoctKwa/pA 3 dB
Napametpn Ha Bn6paunnte
Bn6paun Ha JraHcHa pKoXBaTka a 30,61 m/s² Bn6paun Ha JraBa pKoXBaTka a 29,37 m/s²
IocouehnTe cToHocTn 3a Wyma ca n3mpeHn no CTaNapTN3npaH MeTOD Ha n3nITbaHe mORaT da 6bDat n3no3BaHn 3a CpabHeHne Ha pa3nUHN HCTpyMeHTN.
OcbEN TOBa, Te3N CTOnHOCTn Ca NOxDxOJaUN 3a N3BbPbBaHe Ha IpeDbapNTenHa OeHka Ha HAtOBaBpBaHnraTa 3a Notpe6bTeJn, npuHHeHn OT Wm.
PpeynpexdHne!B3aBnCmOcTOToBA,KaKn3- noJ3BaTeMaunHaTa,DeiCTBHTENHTe CToHOCTH Moar Da ce pa3nUaBAt OT NocOueHte.B3MeTe MepKn 3a PpeJna3BaHeOT WymOBn HatoBapBaHn. PnTOBa B3emaiTe NOBHNMaHne CEJIINNPOuEc Ha pa60ta,CbIO N MOMHTe, Ppe3 KOnTO INCHTpymeHTbPa60Tu6E3 HatoBapBaHe Nn E n3KNIOueH. PdoXoJaUNTE MepKn BkIouBAt,Mexdy DpyrTO, peoBHaNoDpBxKaNrpNxN3a INCHTpymeHTa IN pnpCTabKnTe,peoBHN NouVBKn,KakTo I Do6po PnAHPaHe Ha pa60THNe pnoecn.
PpeDynpexkdeHne!
B cnuyaHa npoDbJnKteHa paOta MoKe da ce CTNRHe Do HApUWeHna Ha KpbBoOpBaUeHneTo (CNHpOM Ha 6eJIraI npbCT), DblKaun Ce Ha Bn6pa- uIN B pbcTe Ha onepaTopa.
CnHdpombT Ha PeHno e cBdoBO 3a6oJBaHe, npN KOETO MaIKnte KpbBOHOCHN CbDOBE Ha npbCTnte Ha pbuTe N KpaKaTa ce CBNAcMaTHNo. 3aCeHTne yuaCTbU He ce 3axpaHbAT DOCTaTBuHO C Bb3dyx N nopAxD Ta3N npuHa N3rIeXdAT MHO6JIeD.N. YecToTO n3nOJ3BaHe Ha B6pnpaUnypeD N MOKe Da npuHHu YBpeXdaHe Ha HEPBNTe npN IInCa, WNETo OPOcBAHe Ha KpaHnUte e HapUWeHo (HaPnPmep Pnyau, Dna6BeTuu).
Ako 3a6eJeknte HraKaBO Heo6uauHO yBpeKdaHe, He3a6abHo ppeKpaTe pa6oTaTa cn n ce KOHCyTTpaaiTe c Jekap.
Cb6IIOdaBaTe cIeHNITe yKa3aHnA, 3a Da HamaJIInTe ONACHOCTITE:
BCTydeHO Bpeme DpbkTe TAnTo Cn, NocObeHo pbuete, TOnnn.
- PpaBeTe peoOBHn NOuBKn n DnuKeTe pueTe cn, 3a Da CTmMyInpate KpbBoO6pauneHneTO.
- OcnrgypeTe Bb3MOxH0 Hn-HnCKa Bn6paunHa MaunHaTa Ype3 peoBHa NDoPbXkKa n 3DpaBO 3akpenenHuacTn Ha ypea.
7. Pa30nakObaHe
- OTbopete onakOBkata n BHIMateJHo n3BaTe ypeJa.
- OTeTpaHete OnaKOBbUHnMaTePnAJI, KaKTo n ONaKOBbUHnTE n TpaHCnOpTHnTE OCnrypOKn. OTeTpaHete TpaHCnOpTHnTE OCnrypOKn c rae-ueH KInou pa3mep 10 mm (He e BkInuoye H b o6ema Ha doCTaBkata).
- PpOBepTe daJIH o6eMbT ha DoCTaBkata e nIb- neH.
-
Поверете урета и пинадпекhoeцтente 3a noBpeДОТ Транспортуарно. Пи рекламаши Доставочьт Трбва дбдe ybeDOMEN He3a-6abHo. П-КбСн рекламаши He ce пиЗнавat.
-
No Bb3MOXHOCT 3ana3eTe ONAKOBA tao n3TuHaHe Ha rapaHcNIOHHnCpOK.
- Празуnotpe6a ce 3ano3haitec ypeda no-cpeDCTBOMpbKOBOCDBOTO3aECKNIOaTuaIra.
- 3a npHnAdnHexKHOCTN, KaTTo 3a n3HocBaUc Ce n pe3epBHN qACTn, n3NOJ3BaIe cAmO oprHnHaJIHn qACTn. Pe3epBHN qACTn MoKeTe da cn Ha6aBNTe ot Baunr CneuHaJIIN3upan TbproBeu.
- Пи поьчки поочьайе нашия Homeр Ha apTNUKyI, KaKTo I Tnna I roDInHaTa Ha npOn3BOd-CTBO Ha ypeIa.
ONACHOCT
UpebT n onakOBbHnTe MaTePnAnHe ca nrpaKa 3a Dea! Dea He 6Ba Da nIrpAart C nIacTMacOBn TopbNKn, Fonno n DpeBn Yactn! CbueCTBya onaHocr OT norlbuahe n 3adywaBaHe!
8. KoHCTpyKcIa
PNEyPPEKDEHNE!
OnachocOT HapaHraBe H onachocT OT nobpe- d!
N3noJ3BaHTo Ha rpeuHn pe3epBn Yactn npnHaJnEeXHOCTM MoKe Da DOBeDe Do HapaHbAHn NIOBpeDn. B3MOxHo e Te da ce pa3xJa6T n 3XbPJIaT HAcTaHn. OcbEn ToBa Te Morat Da BLOwAT PpOn3BOUInTeJHOCCTTa Ha MaunHata.
-ИЗнOL3BaIte cAmO opRnHaHn pe3epBn YacTи npHnAJIeXHocTn OT npOn3BOIDTeJЯ.МоКeTeД 3aKynITE opRnHaHn pe3epBn YacTи npHnAJIeXHocTn OT BaIIra CneuaIIN3npaH TbproBeU.
-Прин HeспаЗBaHe ПОИЗВODиTeЛHOCТТа Ha Maшинота може да ce BLOши n eBEHT. Да ce pa3xJa6ят.YaCTN.
-При НеснаЗва He rapaHцЯТа Ha npOu3BODnte-Я OТпад.
YKA3AHNE!
Iopadn roJAMOTO terno Ha MaunHaTa npeno-pbUBAme MOHTaXbT Da ce N3BbPbBa OT Hau-Man-KO DBe JInca.
PnIOCTaBkata HAKON Yactu ca DEMOHHTnpAHN.3a MOHTaKa ce HyXJaTe OT:
- Faeyen KIIOU pa3mep 13 mm (MOHTaX Ha pe3epBOapa 3a ropBO)
- Kneu c octb p Bpbx (MOHTaJ Ha pe3epBoapa 3a ropuBO)
- Faeyen Klnou pa3mep 16 mm (MOHTaJx Ha 3aunT-Hata pamka n Ha aanTpne nnou)
- Ra3Ta)
- Rauehen Klnou pa3mep 10 mm (MOHTaK Ha loCTa 3a ra3Ta)
MOHTaXHnTe HnCTpyMeHTn He Ca BKJIIOueHN B O6eMa Ha DoCTaBkata.
8.1 MoHTnpaHe Ha 3aunTHaTa paMaKa (2) (ФИr. 3)
- Пьрв OTсразе четипгБВИТа с�ectocTeHна Гава M10x25 (B), npукHHNTe npbCTEHn NOДNOKHITe шайби OT DBeTe CTpaHn Ha aan-TePHNte ПLOУн (21).
- MoHTpaIte 3aunTHaTa paMka (2) c cheTnpn BnHTa C weCTOcTeHHa rnaBa M10x25 (B), npyKHHNTE npbCTeHn N oIoXKnTe wa6n OT DBeTe CTpaHn Ha aAnTepHnTe nIoyn (21).
- 3aTeHHeTe 3dpaBO BnHTOBeTe C WeCTOcTeHHa rnaBa (B) c raeuehen KIOU pa3Mep 16.
8.2 MoHTnpaHe Ha pe3epBoapa 3a rOpuBO (5) (ФИR.4,5)
- MoHTnpaIte pe3epBoapa 3a rOpB0 (5) c DBA BnHTa C IecToCTeHa rnaBa (D), DBe NpIoXKn Ia6M8 n DBe pHaTuOByraKm M8 KbM nIacTnHInTe 3a 3akpenBaHe Ha 3aunTHaTa paMa (2).
- 3aTeHHeTe 3dpabo BVHTOBete C wecTocteHa rnaBa (D) c raeyen knou pa3Mep 13.
- BkapaTe Mapkya 3a 6eH3nH Bbpxy KpaHa 3a ropInBO npn pe3epBoapra 3a ropInBO (19).OcnrypeTe Mapkya 3a 6eH3nH Cbc CKo6ata 3a Mapkyu (C), 3a da npedotBpataTe n3xNv3BaHe. 3a ceTaN3noJ3BaIte KneuC ocTbp BpbX.
8.3 MoHTnpaHe Ha locta 3a ra3Ta (6) (Φnir. 2, 6)
- MoHTpaIte IocTa 3a ra3Ta (6) cbc ckObaTa 3a 3akpenBaHe, DbBA BnHTa C WecTOcTeHHa rnaBa M6x30 n DBe camooCnrypRaun raKn M6 KbM 3auNTHaTpaamKa (2).
- 3aTeHHeTe 3dpaBO BnHTOBeTe C 8ecTOcTeHHa TnaBa nraKNTe C raehen KIOU pa3Mep 10 n rae- H KIOU pa3Mep 8.
-
3akpenete JnnoTo Ha ra3Ta c npnIOKeHnTe Ka-6eHNn Bp3Kn (F) KbM 3aunTHaTa paMaKa (2).
-
Праздусяканы Вексноацая
BHUMAHNE!
Ipei nyckaHTo B eKcnNoataun 3aDbJnxTeJHO crNoBeTe HanbNHO MaunHaTAt!
PNEyPExEHNIE!
OnachocT 3a 3dpaBeToI
BdunBaHTo Ha 6eH3nHOuN3napen/napoOT CMA3OuHo MaCNO N OTPa6OteHN rA3OBe MoKe Da DOBeDe Do cepNo3Hn yBpeKdaHnHa 3DpaBeTo, 6e3c3HaHne N B EKCTpEmHn Cnyan -D O cMbPT.
-HeBnBaaTe6eH3HOBnTeu3napen/napteOT CMA3OCHOTo MacIO N OTPa60TeHnTe ra3OBe.
- 3n0JI3BaIe MaIIHnHaTa cMo Ha OTKpITo.
YKA3AHNE!
IobpeHa yctpOCTBOTO
Pa60aHa MaunHaTa 6e3 nnn C TBbpde MaJko DnBiratEnHO npEpykTOpHo MacNo MoKe Da DoBeDe Do nobpeKdaHe Ha DnBiratEnr.
-Ппдп nуckaHTo B ekCnloatauaHaneIte 6eH3HH MaCNo. MaunHaTa ce Doctab8 6e3 DBuratJIHO n peDyKTopHo MaCNo.
YKA3AHNE!
EkONoruynu
N3TeKnOTo MacNo MoKe TpaHNO da 3aMbpcn OKoJIHaTa Ctpena.TeUHOCTTa e cnIHO OTpOBHa N MoKe 6b3o Da DOBeDe Do 3aMbpcBaHe Ha BOdata.
-Пьн electe/N3TOBaHTe MacITo CAmO Bbpxy paBHN, TBbpIN NOBbPxHOCTN.
-13noJI3BaITe IbPINOBnHa 3a 3apeXdahe nn Hn.
-Cb6npaIte n3TOeHOTo MaCNo B IOxOJaUc CbJ.
- He3a6abHNO n3bPwTe pa3nTToMaCNo n n3-XBpNeTe npcaJana cbrJaCHO MeCTHnTe pa3nope6n.
- IV3xBbPnIe MaCNoTO CbrrnacHO MeCTHnTe pa3-nope6n.
YKA3AHNE!
Onachocot noBpeKdane!
H3noJ3BaHeTo Ha HnpaBUNHO CbxpaHbAo Hn Hn3TOeHO ROpBO MOKe Da DOBeDe Do 3anyBa- He Ha Kap6ypatopa Na NobJIne HeraTINBHO Bbpxy paBoTaHa DnRaTeJ.
-ИЗсипете HeHyxHOTO rOpINBO B XepMeTuHо 3aTBopeH CbД И Г CBxPaHЯВaITe B TbMHO I XlaHHO NOMEuHHe.
9.1Пьлне He6eH3nH (ФИг.8)
BHIMAHNE!
MaunHaTa ce doctab 6e3 6eh3n. IIO Ta3n npuHna e Baxho npedn nyckaHeTo B ekcnloataaJa HaaneTe 6e3nH. 3a ceINa n3non3BaIte 6EH3n Super E10.
ONACHOCT!
OnachocT or noxap n ekcnno3n!
TropBoto MoKe Da ce 3aapan No BpeMe Ha nblHeH eBeHTyaHNO da ekcnnoipa.ToBa BoDn do TeKKn N3rapAHHN Nn CmbpT.
-ИЗкlioуete Дигагета n ro octabete da ce ox- naDN.
-ДрьжTe Далуч Горшин, Пламьси И NGKп.
-Пьн overheсcropибамоHaOTkpnto.He3apeKDaIteMaHInHATABbpxTypaHCnOpTHOTO npeBO3-HO cpeIcTBO.
-HocTe npeIpa3Hn pbKaBnU.
-ИЗБЯВайТЕ KOHTAKT C KOKКАТУ OЧNTE.
- CtaptnpaIte MaunHata Ha pa3ctoHne ot Hau-MaIKO 3 m OT MCTOTO Ha IIJIHeHe C rOpINBO.
Yka3aHHe: H3non3BaIte roPbEN 4a). BnOxKaTa Ha roPbHna 4a) npEcdTabnaBa 6nTnpaCbD, KOITc Ce HAMpa TOH0 NOk KaNaka Ha pe3epBoapa (4) n 6nTnpa CraIto HaJIINbAo roPBO.
- NocTeOKOJIO 30HaTa 3a nBHeHe. 3aMbpcBaHnBpe3epBoapa 3a rOpNBO (5) npuHnBaT EKcNlloatauOHn HEn3npaBHOCTn.
- O'TbaprTe Kanaka Ha pe3epBoapa (4) BHNMaTeHIO, 3a Da MOKe eBEHT. HAnuHOTo CBpbXHaJIraHe Da ce NoHxN.
- HanbHHepe3epBoaapa 3a ropnBO (5) c6eH3nH (Super/E10)c nOmoUta Ha cyHna (He e BKnIOyHa B O6ema Ha DOCTabKaTa). N3noJ3BaIte BLOKKaTa 3a rOpBEN φnITbp (4a). O6bpHeTe BHIMAHHe Ha mAcK. Obem OT 2,8 IuTpA. BHIMaTeJHO HaneTBe 6eH3nH Do DOnHnPa p6 Ha Tbp-IOBHNaTa 3a 3apeXdaHe.
- 3aTBOpTe OTHOBO KANaka Ha pe3epBoapa (4). YBepTe ce, Ye kanakbT Ha pe3epBoapa (4) 3aTBapra NtBTHO.
- ПочистетеkanakaHa pe3epBoapa (4)и Okono Hero.
- Поверяваite pe3epBoapa 3a roPBO (5) n roPBOONPOBOJNTe 3a TeOBe.
- Праздстатура themselves (10) ce ot-Daileyete Hain-Manko Ha Tpu MeTp aOT MrcTOTO Ha 3apekdahe.
- He n3noJ3BaIe Beue n3noJ3BaH n 3aMbpcEH 6eH3nH. He no3BOJraBte MPbCOTn I BOJa da nnonaHaT B pe3epBoapa 3a rOpINBO (5).
9.2ПьлнHeCдВиraTeIHoMaCNo(ФИR.8,9) △BHIMaHne!
MaunHata ce doCTaB 6e3 DBnraTeHNO MaCNo.
No Ta3n npuHa npEi NyckaHeTo B ekCnnoataa
HnpeMeHHo HanbJIhTe C MacNo. 3a cEHTa
H3NOJ3BaIe BCEcE3OHo MaCNo (SAE 10W-30
HnSAE 10W-40 (B 3aBnCmOcT ot pa6OTHaTa
TemnepaTypa).
Yka3aHHe: PIOBepraBaIte HNBOTo Ha MacNoTo pe-DoBHO npEdu BcAko NcKahe Be Eeknloatauia. HnckoTO HnBO Ha MacNtO MoKe Ja NOBpeDu DnRaTeJI.
- NocTaBeMaunHaTa Bbpy paBHa NOBbPxHOCT.
- OTBnHTeTe MacNON3MePbATEHata UeKa (13).
- HanbHHepe3epBoaapcDnBnateJHoMaCnO C NOMoTaHaФyHna(HeE BKNIOyeHaOBemaHa DOCTaBkata).ObpHHeTBHMaHneHaMaKc.KoNueCTBO HaNbHHeHOOT600ml.BHMaTeHNO HaneTe MacNo Do DOnHnPa6Ha TpPnOBnHaTa 3a 3apeXdahe.
4.И36bpeTe maclonn3MepBaTeHata ueka(13)c qnta Kbpna 6e3 BlnacnHkn. - BkapaTe OTHObMaCNoI3MepBaTeNHaTa 1eKa (13) n npoBepeTe HnBTo Ha MacNoto, 6e3 da 3aTgrate OTHObMaCNoI3MepBaTeNHaTa 1eKa (13).
- HnBTo Ha macIto TpIeBa Da e B pAMKeTe Ha cpeHaTa MapKIpOBKa Bbpxy Maclon3MepBaTeHata uEka (13).
-
Ako HnBTo Ha MacITo e TBbPde HnCKo,doJe-Te npenopbuaHOTo KOINueCTBO MacNo (MaKC. 600 ml).
-
CneI TOBa 3aTeHHeTe OTHOBo MacNON3MepBaTeNHaTa UeKa (13).
9.3 Cma3BaHe Ha Tpam6oBaaTa Ta CnCTema (ФИR.10)
Upe3 Bn6paunOHTo DvnKeHHe Ha MaunHaTa Cma3OuHOTo MacIO Ce pa3npdeJIeB UcIaTApaM-60BaAua cNCTema. IIO BpeMe Ha pa6oTata Ha MaunHaTa MaCnOTO nonaI npE3 OTbOpnte B 6ytano OTdONy Ha MaunHaTa B KapTepa.
HnBoto Ha macnoTO B TpAM60BaUaTa CnCTema Tpr6Ba BNHaN Da Ce NoDbPka Ha npABuHTo HnBO, 3aDa ce Ocnpynp eEeKTHBn TpAM60BaUa paBoTa.
3a6e9ka: Ako MaunHaTa e 6nla TpaHcnpTupaHa B XOpu3oHTaJIHO NIOXKeHne uN ToKy-TO e 6nla n3- nOJ3BaHa, Ta Tp86Ba Da npctOn 15 MmHyTu B n3npaBeHO NIOXKeHne, Ppei HnBOTo Ha MacNoTo Da MOKe da 6bIe IPOBepHo. Taka macnoTo MoKe da cTeHne n Da ce NoCTnHe NO-dO6pa N3MepeHa CToHocT.
- NocTabete MaunHaTa Bbpxy paBha NOBbpxHocT. HakJIOHeTe MaunHaTa Taka, Ye Ta da oBa pa3yBa npab bTbn CnpraMo 3emrTa.
- OTCpaHete 3aMbpcBaHnHa Ta B 30HaTa Ha Hb6HdATEJIHOTO CTbKIO Ha Ipo6KaTa 3a N3TOyBaHe Ha MacNlOTo HA Kpaka Ha TpAm6BkAta (14).
- Поберете НИВОТа Ha macnoto npe3 Ha6nOdaTeHHTO CTbKNo Ha np6KaTа 3a n3TOUbaHe Ha MacNToHa Kpaka Ha TpaM6OBkata (14). Cma3BaHTo Ha TpaM6OBAuTa CnCTema e Hapei, KOrato Ha6nOdaTeHOTo CTbKNo 3a MacNTo NOKa3Ba np6n3nteHNO 1/2 - 3/4 nbJHo.
- Ako He ce Buxka macno, Tp6Ba da ce donbHn Macno.
- HakoheTe MaunHaTa Hanpei, DokaTo TnIerHe Bbpxy TpaHcnpTha Ta poJka (24).
- OCTpaHete npo6kata 3a n3ToUbaHe Ha macNo-TO Ha Kpaka Ha TpaM6bOkaTata (14) C rnyx raeueh KIOu pa3mep 24 mm n TpecOTka (He ca BKnIO-ueHN B o6ema Ha DoCTaBkata).
- HaneIte MacNo c nomoTa Ha cyHna (He e BkIIOUeHa B OeMa Ha DOCTaBkata).OsbpHete BHIMaHne Ha MaKc. KOINueCTBO Ha NJIHe He ot 800 ml. 3a ceTnA n3no3BaIte BCEce3OHo maclo (SAE 10W-30 nn SAE 10W-40 (B 3aBnCmOcT ot pa6oTHa TEmnepaTypa).
- Hakpar 3aBnHTeTe OTHOBo npo6kata 3a n3TOUBAHe Ha MacNoTo Ha Kpaka Ha TpaM6oBkata (14).3aterHete npo6kata 3a n3TOUbaHe Ha MacNoToHa Kpaka Ha TpaM6oBkata (14) C BbpTt MmEHTOT9Nm (6 ft-lbs.).
9.ИЗправete OTHOBOMaшинна Вертукално.
YKA3AHNE: He npenbIbaiTe Tpam60baaata CnCTema C MacNO. TBbpDe BnCOKO HnBO Ha MacNToMOKe Da DoBeDe Do XnDpaBNIuH0 6nOKnPaHe B Tpam60baaata CnCTema.
ToBa MoKe Ia DoBedeIe Do HnpeBnHa pa6oTa nIOBpeDn NO CbeEHHTeTNe Ha DnRaTeN, No TpaM6oBaAaata CnCTema n IO Kpaka Ha TpaM6oBkata.
9.4 KpaKaHa Tpam6oBkaTa (18) (ΦnR. 1)
Pn HOBa MaunHa, Ppei BcKaO NyckaHb E kcnIooataaui Ha CneM MoHTaxa Ha HOB KpaK Ha TpAm6oBkata (18) BCnUKN 3aKpenBaun raKn Tpr6Ba da ce 3aTgat C raeueH KnUpa3MeP 19 (He e BKnUoyen B o6ema Ha DoCTabkata). Pn H3non3BaHe Ha DnHa-MometpuueH KIOU (He e BKnUoyen B o6ema Ha DoCTabkata) BbPTaUNrT MOMENT Ha 3aTaRahe e 86 Nm.
Onachoct OT HapaHbahe!
CnyauHTo HneOaKbAo NoTeTJIHe Ha MaUHaTa MoKe Da npuHHn HapaHbAHn.
1.ПрелиНатоварbaHETOИЗКЛЮЧЕДВИТЕЛЯ(10)и,слдкatoДВИТЕЛЯТ(10)ИЗСТИнe,ИЗВадeteЛуNTаHa3anaJInteJIHATAcBEU(22)OT3anaJInteJIHATAcBEU(22a).
2. 3aTbOpTe KpaHa 3a rOpBn Pnp DnBnraTeN (9) n KpaHa 3a rOpBn Pnp pe3epBoapa 3a rOpBn (19). He 3apeKdAte MaunHaTa Bbpxu TpaHc-nopTHOTo PpeBO3Ho CpeCTBO.
3. MaunHaTMOxE da npuHn TeKn HapaHbAHn oT npema3BaHe npaDn CO6CTBeHOTo CnTerNo.
PNEpyPExEHNIE!
OnachoctOTcMaUKBaHe!
HanpaBnaaata cko6a He Tp86Ba da ce n3noI3Ba 3a NOBnraHe Ha MaunHaTa.
-3a NOBUNIraHe Ha npOdyKta MoKe Da ce n3nOJI3Ba camo cko6aTa 3a TpaHCnpTIpaHe.
- CkO6bata 3a TpAHCnOpTnpaHe Tp8Ba Da ce npoBepraBa peoOBHO 3a N3HOCBaHe, NOBpeDa NIM3noynTope6a. NObpeDeHa CkO6a 3a TpAHCnOpTnpaHe Tp8Ba Da 6bJe CmEHe Ha3a6abHO.
BhImaHHe!MaHHaTMOKe da naHne n da npn-ynHn 1eTu HapAHBaHna, aKo He 6bDe nobDnraHa npabNJHO.
BhimaHne! Toykata 3a Bpb3BaHe Cnyxn 3a OcnIpyBaHe Ha MaunHaTn Bpeme Ha TpaHcnpTu paHeTo.
BHMaHHe! CkO6aTa 3a TpaHcnpTupaHe (1) CJyKu 3a CnacBaHe Nm N3TeJrHa Ha 3aceDHaMaUHa. Ako N3TeJrHe C BbXe 3a TerHe He e Bb3MOxHO, N3NON3BaIte UaHra 3a TerHe.
Henpemehno ce yBepete, ye 7aHrata 3a terne He Hma BnIMN DepeKtn N MoKe Da N3DbpxN Bb3HNKBaunTe CnIn. 3a pa3nka OT peMbunTe, BxKeTata n INBepnTe, 7a HraTa 3a terne Me OMe da IIOeMa n PpeDaba KaKTo CnIn Ha ONbH, Taka n CnIn Ha HATNCK.
12.1 TpaHcnpToPpAne
Ta3n MaunHa MoKe Da Ce TpaHcNopTnpa B npeBO3Ho CpeCTBO HnIype3 npncnocobneHneTo 3a TpaHCnOpTnpaHe (E),B 3abNCmOCT OT ycIOBnra Ha MRCTO To Ha yNoTpe6a N pa3ctOarHneTo, KoEt Tp6Ba Da 6bDe n3MnHaTo.
Ipei TpaHcnpTupane Hn TOBape He octaBeTe Dbratela (10) da ce oxlaan, 3a da n36BerHeTe n3- rapHnna I da n3KnIOHTe pncA ot noXap.
Изпразнete peЗервараа 3a roрибо (5) habьлно (Виктесадел 12.7).
12.1.1Писncoc6JIeHne3aTpaHcnpTupaHe(E) (ФИг.20)
Pnncnoc6neHneTo 3a TpaHcnpTupane yneChraBa 6opabHeTo npKpATKn OTceuKn. N3noN3BaIte npnc- noc6neHneTo 3a TpaHCnpTupane (E) camo Bbpxy paBHa n TBbpda OCHOBa n Ha KpATKn pa3CToRnHr. OTcpanhe ToTHOBO npncnoc6neHneTo 3a TpaHCnpTupane (E) npden CnEBAUto HnON3BaHe.
- Ппдг.TрансOptionaHTO n3KJIuOHTe DBURAte-Я (10) (BnIXTe pa3dJI 11.5).
- HaknoheMaunHataJeKo HanpeiN BkapaTe npncnocobHeHTo 3a TpaHcnpTupaHe (E) noD Ibprkaaya.
- 3aDpBxTe npncnocO6neHHeTo 3a TpaHcnpTpuHaE (E) cKpaka.
- HaknoheTe MaunHaTa Ha3aD Bbpxy OcTa.
- TbpkaJnTe c nOMoTaHa HAnpaBnaTaCKo6a (15) Hanpei nn Ha3a, B 3aBncMoCT OTHyjnda.
- Ппс cnуckaHeTo npoeHnpaIte B o6paTHa noCneIOBATEJIHOCT.
- OctaBeTe BHMaTeJIHO MaIHaTa N OTCpaHete npncnoc6bneHHeTo 3a TpaHcnpTupaHe (E).
12.1.2 TpaHcnpTnpaHe B npeBO3Ho cpeIcTBo (ФИR.1,10,20)
ПО ВБЗМоЖНСТВИАгТРанспортураiteMaшинагаВИЗпраБЕН NOLOXжHe.АКО HЯмВБЗМоЖНСТЗАТa TpAHСнОрТИрае HeMaшинагаИЗпраБЕнa,TORABAcamOB NONOJOxEHnTo,KakTO e NOKa3aHoHaФnIg.11.PPITobA Bb3ДушнRTФnITbp(3) He TpЯБа DaeHacOyen HApOny.MoKeJa nONaДнe MacNoBcINHDbpa,BrOpNtBnATA KAMepa ИnBbBb3ДушнЯФnITbp(3).TObA MoKeJa TpydHocTN pnp 3anaJIbaHeto.
- NOBdHrTe MaunHaTa B npeBo3Ho cpeIcTBo. Pn ToBa o6bPheTe BHMaHne, Ye MaunHaTa e TBbpTe Tckka, 3a Da ce NobDnra 6e3 MexaHnuHa NOMOu (T.e. NODEMHO pncnoc6JIHeNe).
2.Иииилгьаипрсncoc6bneHHeTo 3a TpaHc-nopTnpaHe (E)иTOBapHa paMna,3aДa HAtOBa-pnte MaunHaTa B npeBO3HOTcpeDCTBO.
3.OcnypeteMaunHaTaBbpyx npEBo3HOTcpeCTBO CpeUy TbpKaJnHe,IMMeCTBaHe IMn npe-06pbuane N DonbHnTeHNO yKpeNeTe MaunHaTa. Ocnypete DoNbHnTeHNO MaunHaTa CbcYkpenBaau KOnaH KbM ToKaTa 3a Bp3BaHe.
BHIMAHHE!
CneI TpaHcnpTnape H XOpN3OHTaHNO NIOJXeHHe MaunHaTa Tp8Ba OTHOB Da 6bJe N3npaBeHa, 3a Da MoKe MacNoTo Da Ce BbpHe KbM DnBraTeJI (10). Ta3n IpoueDypa MoKe Da OTHEme N3BecTHo BpeMe, DOKATO HNBOTO Ha MacNoTo OTHOBo Ce Bb3CTaHOBI.
12.2 Nobdurahe Ha MaunHaTa / TpaHcnpTnpaHe c nOmoTu Ha noDEmHo npncnoc6JeHne (fnr. 1)
Ipei noBirraheTo ce ybepeTe, ye noeMHoTo npncocobJeHne (kpan nn nle6ka) moke da noeMe ternOTo Ha maunHaTa 6ezonacHo. BxKTe TIObata Ta6jka 3a ternOTo Ha noeMHoTo npncocobJeHne.
MOna,ObbPHeTe BnHMaHHe,Ye TOBapHnTe paMn Tp6Ba Da ca TOBapOHocmN n CTabuJIHn.
- 3aKpeneTe TOBapO3aXBaTHoTo npncnoc6neHHe KbM CEHTpaNHaTa ToUka 3a OKaYBaHe, T.e.KbM cKO6aTa 3a TpaHCnopTnpaHe (1).
2.Повдигнел MaшиннаТа Малко И се уберete,Ч BCИЧКВрзкIN capaBANH0 3akpenen. - Cera moKTe Da NOBdHrHeTe MaunHaTa c noDemHTo npncnOcOBeHne, KaKTo JKeNaeTe.
BHIMAHHE!
MaunHaTa e TeKka n He 6nBa Da ce nobDnra OTeENH eINHCTBeH YOBek. BnHaru NobDnraIte MaunHaTc MInHMym DbMa dUHN.
13. CbxaheHne
ONACHOCT!
Onachoct ot noxap n ekcnnoia!
Moke da Bb3HnKHe noxap nnn ekcnno3n, ako MaunHata ce cbxpanra Ba 6n3o Do Bb3MOxHN n3- Tohui Ha 3anaIbaHe. Toba Bodn Do TeKKn n3rapaHn nn Cmbpt.
-OTcpaHete Bb3MOxHnTe N3TOUHnIHa 3aIaNBaHe, KaTo HApN. NeuKn, Ra3OBn BoJnepn, Ra3OBn CyuINHn N T.H.
YKA3AHNE!
OnachocOT nobpekdahe!
HenpaBnHTo cxbxpanHe Ha MaunHaTa MoKe da DOBeDe Do nobpeDn Ha DnraTeTna.
-CbXpaHЯBaIte MaIHaTa 3aIHTeHa OT 3aMbpCraBaHe, npax n Bnara.
13.1 CbXpaHHe npi no-DbIrr npeKbcBaHn Ha pa6oTata:
Ako MaunHata Hma da ce n3noJ3Ba noBue ot 30 dHn, cneDaBte CTbKnTe NO-dony, 3a da na noDrot-BNTe 3a cbxpaHeHne.
1.ИЗпраэзhevpeэрьоараза rolриBO(5)наньлно(Bижтетадел 12.7).Сьхсанявангтбeни,сьдьржашетанлл MTBE,иизBetpeeВразКITEHa30Ди.ИЗbetpeЛNTбeниИmaBnCOKOcБдьржаHNeHaKayUkmoKeДa3a-nyшкарбypatopaиДaогранчюndabaHetoHa rolриBO.
2.ИЗTOUteДВИТЕЛНОТMACNOOTBIVATENIA(10),DOKATOToIeOSeTOnbI.N.HaJIeTeHOBOMACNo.(BnKTe pa3den 12.2.)
3. N3noJ3BaIe YIcTn Kbpnn 3a NoOYCTBaHe Ha MaunHata. He N3noJ3BaIe arpeCnBn NOUcTBAu npenapTu nn npenapTu Ha MacJeHa OCHOBA, KORATO NOUcTBAte PNaCTMacOBtE qactN. XmKanTe MORat da NoBpejrt PnaCTmacHe.
4.CbxaHbAaTe MaunHaTa B n3npaBeHo noIooKeHHe BnCTa N cyxA crpa a c doba BeHTnla.
CbxaHbAaTe MaunHaTa HeHnTe pInHaIeK-HoCTn Ha TbMHO, cyXo 3aUHTeHO OT 3ampb3BaHe, KaTOn HEDocTbNHO 3a Deua MxCTO. ONImaJIHATA TeMnepaTypa Ha cbxaHene mExdy 5 n 30^ CbxaHbAaTe MaunHaTA BOpuHaJHATA onakOBka. POKniTe MaunHaTa, 3a da y npedna3nte ot npax IIN Bnara.
14.ИЗXBbPЯнeиpeцКлпранe
Yka3aHHa 3a onakOBkata


OnakOBbHnTe MaTePnAnMoraT da ce peuKnIpaT. MoJra, n3xBbpneTe onakOBkata no npnpoOcbO6pa3eHaHH.
Moxete da ce Hhopmnpate OTHOCHO Bb3MOXHocHTe 3a NxBbPnHe Ha N3Je3n OT ynotpe6a ypeDn ot BaunTe o6uHcKn nnn rpaCkn Bnactn.
TopBa Macna
-Ппдддддддддддддддддддддддддддддддддддддддддддддддддддддддддддддддддддддддддддддддддддддддддддддддддддд徳
-н риви резрьогьт 3а дигателно macлtn�чбьда 6ьданияпааун!
-Topnboto n DnBraTeHnHO MacNo He 6nBa da ce N3xBbpIaT 3aeDnO C 6ntOBITE OTnaDbuN ININ KaHaJIIn3aCnIraTa, a TpR6Ba Da ce CbBupat n N3-XBbpIaT pa3dEInHO!
- Ppa3HnTe pe3epBoapn 3a MacNo I ropnBO Tp8Ba Da ce nXbBpJrT NO eKoJIOruHeH HauH.
15. OtcTpaHЯBaHe Ha HEn3npaBHOCTn
CneBaata Ta6nua nok3Ba CmNtOMte 3a nobpeu n onncba kak morat da Bu nomorHa, ako MaunHaTa Bn hepaoTn npabunho. Ako He mokeTe da Hamepu Tn OTCTpaHnte npo6nema, cbbpxte ce cbc cepBn3.
| Helen RPabnoct Bb3moxHa npnunna OToCTpaHBAHe | ||
| Hecnst pe3yntat ot улльтнваhe. | Износян крак на Трамбовкata (18). | Смене Крака на Трамбовкata (18). Сбржete се с оториеран спес国安лзиран серви3. |
| Загба на масло OT двигателя (10). | Износян ульт themselves, радиални улльтн'te Лни пьстени. | Смене Крака се с oториеран спес国安лзиран серви3. |
| Земна т поьрхост e пекаленю Тьрда. | Улльтнвае на земна т nobьрхост He e Вьзможно. | |
| Зема e Тьрд e морка, кракьт на Трамбовкata (18) увисва. | Оставе врeme за ИЗсхвае. | |
| Дебел сIoй Замьрсаяня Вьрху крака на Трамбовкata (18). | Почисте Крака на Трамбовкata (18) и догнatinga ча STТРAMБOWKATA (17). | |
| Двигателя (10) работи, Но машина се двgressи неравимею. | Счунения чASTN в Трамбовашиета сисема. | Смене Крака се с oториеран спес国安лзиран серви3. |
| Счунения пош пухшии. | ||
| ОворOTITE на Двигателя са Настpoenv Тьрд e Виско. | ||
| Двигателя (10) не може да стапURA. | Ная морив в розервобара за рорив (5). 3apepepepepepepepepepepepepepepepepepepepepepepepepepepepepepepepepepepepepepepepepepepepepepepepepepepepepepepepepepepepepepepepepepepepepepepepepepepepepepepepepepepepepepepepepepepepepepepepepepepepepe pepepepepepepepepepepepepepepepepepepepepepepepepepepepepepepepepepepepepepepepepepepepepepepepepepepepepepepepepepepepepepepepepepepepepepepepepepepepepepepepepepepepepepepepepepepepepepepepepepepepe-pepepepepepepepepepepepepepepepepepepepepepepepepepepepepepepepepepepepepepepepepepepepepepepepepepepepepepepepepepepepepepepepepepepepepepepepepepepepepepepepepepepepepepepepepepepepepepepepepepepepeper | Почисте Крака на Трамбовкata (18) и догнatinga ча STТРAMБOWKATA (17). |
| ЗамьрSEN вьздушенифпьр (3). Почисте вьздушенифпьр (3). | ||
| Превклочьтелят за вьздушени/ изklочьанe (16) e на „OFF“. | ||
| Вьженистор (11) e Deфыков. Ремontу Яма DBИralteлho macneo. Долейные DBИralteлho улбогаю MacLo. | ||
| Замьрсан Залалпелна с蜱ц (22a). Почисте Залалпелна с蜱ц (22a). | ||
| Двигателя (10) работи, Но машина се с двgressи. | Дeфыков се entroбожени сbieinihel. | Смене сьедиителя. Смене се с otopиизиран смене сьедиителя смене се с ovelniитяпан с氟ви3. |
| Тьрд e Н stock налгаанe на ультнвае. | Смене се с ovelniитяпан смене се с ovelniитяпан смене се с ovelniитяпан смене се с ovelniитяпан смене се с ovelniитяпан смене се с ovelniитяпан смене се с ovelniитяпан смене се с ovelniитяпан сменe сменe сменe сменe сменe сменe сменe сменe сменe сменe сменe сменe сменe сменe сменe сменe сменe сменe сменe сменe сменe сменe сменe сменe сменe смене сменe сменe сменe сменe сменe сменe сменe сменe сменe сменe сменe сменe сменe сменe сменe сменe сменe сменe сменe сменe сменe сменe сменe сменe смен.e c c c c c c c c c c c c c c c c c c c c c c c c c c c c c c c c c c c c c c c c c c c c c c c c c c C c c c c c c c c c c c c c c c c c c c c c c c c c c c c c c c c c c c c c c c c c c c c c c c c c d d d d d d d d d d d d d d d d d d d d d d d d d d d d d d d d d d d d d d d d d d d d d d d d d d c c c c c c c c c c c c c c c c c c c c c c c c c c c c c c c c c c c c c c c c c c c c c c c c c e e e e e e e e e e e e e e e e e e e e e e e e e e e e e e e e e e e e e e e e e e e e e e e e e e c c c c c c c c c c c c c c c c c c c c c c c c c c c c c c c c c c c c c c c c c c c c c c c c c f f f f f f f f f f f f f f f f f f f f f f f f f f f f f f f f f f f f f f f f f f f f f f f f f f c c c c c c c c c c c c c c c c c c c c c c c c c c c c c c c c c c c c c c c c c c c c c c c c c g g g g g g g g g g g g g g g g g g g g g g g g g g g g g g g g g g g g g g g g g g g g g g g g g g c c c c c c c c c c c c c c c c c c c c c c c c c c c c c c c c c c c c c c c c c c c c c c c c c S S S S S S S S S S S S S S S S S S S S S S S S S S S S S S S S S S S S S S S S S S S S S S S S S S s S S S S S S S S S S S S S S S S S S S S S S S S S S S S S S S S S S S S S S S S S S S S S S S S S c c c c c c c c c c c c c c c c c c c c c c c c c c c c c c c c c c c c c c c c c c c c c c c c c G G G G G G G G G G G G G G G G G G G G G G G G G G G G G G G G G G G G G G G G G G G G G G G G G G c c c c c c c c c c c c c c c c c c c c c c c c c c c c c c c c c c c c c c c c c c c c c c c c c s s s s s s s s s s s s s s s s s s s s s s s s s s s s s s s s s s s s s s s s s s s s s s s s s s S S S S S S S S S S S S S S S S S S S S S S S S S S S S S S S S S S S S S S S S S S S S S S S S s s s s s s s s s s s s s s s s s s s s s s s s s s S S S S S S S S S S S S S S S S S S S S S S S s S S S S S S S S S S S S S S S S S S S S S S S S S s S S S S S S S S S S S S S S S S S S S S S S S s S S S S S S S S S S S S S S S S S S S S S S S S s S S S S S S S S S S S S S S S S S S S S S S S S s s s s s s s s s s s s s s s s s s s s s s s s s S S S S S S S S S S S S S S S S S S S S S S S S s S S S S S S S S S S S S S S S S S S S S S S S s s s s s s s s s s s s s s s s s s s s s s s s s s s s s s s s s s s s s s s s s s s s s s s s s c c c c c c c c c c c c c c c c c c c c c c c c c c c c c c c c c c c c c c c c c c c c c c c c c r r r r r r r r r r r r r r r r r r r r r r r r r r r r r r r r r r r r r r r r r r r r r r r r r r s s s s s s s s s s s s s s s s s s s s s s s s s s s s s s s s s s s s s s s s s s s s s s s s s t s s s s s s s s s s s s s s s s s s s s s s s s s s s s s s s s s s s s s s s s s s s s s s s s s g g g g g g g g g g g g g g g g g g g g g g g g g g g g g g g g g g g g g g g g g g g g g g g g g S S S S S S S S S S S S S S S S S S S S S S S S S S S S S S S S S S S S S S S S S S S S S S S S S S S S S S S S S S S S S S S S S S S S S S S S S S S S S S S S S S S S S S S S S S S S S S S S S S S S S s s s s s s s s s s s s s s s s s s s s s s s s s s s s s s s s s s s s s s s s s s s s s s s s s s s s s s s s s s s s s s s s s s s s s s s s s s s s s s s s s s s s s s s s s s s s s s s s s s s s S S S S S S S S S S S S S S S S S S S S S S S S S S S S S S S S S S S S S S S S S S S S S S S S S S S S S S S S S S S S S S S S S S S S S S S S S S S S S S S S S S S S S S S S S S S S S S S S S S S S S S S S S S S S S S S S S S S S S S S S S S S S S S S S S S S S S S S S S S S S S S S S S S S S S S S S S S S S S S S S S S S S S S S S S S S S S S S S S S S S S S S S S S S S S S S S S S S S S S C H N T E P E R M A L I T I E P E R M A L I T I E P E R M A L I T I E P E R M A L I T I E P E R M A L I T I E P E R M A L I T I E P E R M A L I T I E P E R M A L I T I E P E R M A L I T I E P E R M A L I T I E P E R M A L I TI E P E R M A L I T I E P E R M A L I T I E P E R M A L I T I E P E R M A L I T I E P E R M A L I T I E P E R M A L I T I E P E R M A L I T I E P E R M A L I T I E P E R M A L I T I E P E R M A L I TII F P P P P P P P P P P P P P P P P P P P P P P P P P P P P P P P P P P P P P P P P P P P P P P P P P P P P P P P P P P P P P P P P P P P P P P P P P P P P P P P P P P P P P P P P P P P P P P P P P P P P F P P P P P P P P P P P P P P P P P P P P P P P P P P P P P P P P P P P P P P P P P P P P P P P P P P P P P P P P P P P P P P P P P P P P P P P P P P P P P P P P P P P P P P P P P P P P P P P P P P F F F F F F F F F F F F F F F F F F F F F F F F F F F F F F F F F F F F F F F F F F F F F F F F F F F F F F F F F F F F F F F F F F F F F F F F F F F F F F F F F F F F F F F F F F F F F F F F F F F F f F F F F F F F F F F F F F F F F F F F F F F F F F F F F F F F F F F F F F F F F F F F F F F F F F F F F F F F F F F F F F F F F F F F F F F F F F F F F F F F F F F F F F F F F F F F F F F F F F F F E F F F F F F F F F F F F F F F F F F F F F F F F F F F F F F F F F F F F F F F F F F F F F F F F F F F F F F F F F F F F F F F F F F F F F F F F F F F F F F F F F F F F F F F F F F F F F F F F F F F W W W W W W W W W W W W W W W W W W W W W W W W W W W W W W W W W W W W W W W W W W W W W W W W W W W W W W W W W W W W W W W W W W W W W W W W W W W W W W W W W W W W W W W W W W W W W W W W W W W W w w w w w w w w w w w w w w w w w w w w w w w w w w w w w w w w w w w w w w w w w w w w w w w w w w w w w w w w w w w w w w w w w w w w w w w w w w w w w w w w w w w w w w w w w w w w w w w w w w w w W W W W W W W W W W W W W W W W W W W W W W W W W W W W W W W W W W W W W W W W W W W W W W W W W W W W W W W W W W W W W W W W W W W W W W W W W W W W W W W W W W W W W W W W W W W W W W W W W W WW W W W W W W W W W W W W W W W W W W W W W W W W W W W W W W W W W W W W W W W W W W W W W W W W W W W W W W W W W W W W W W W W W W W W W W W W W W W W W W W W W W W W W W W W W W W W W W W W W W W K D V D V D V D V D V D V D V D V D V D V D V D V D V D V D V D V D V D V D V D V D V D V D V D V D V D V D V D V D V D V D V D V D V D V D V D V D V D V D V D V D V D V D V D V D V D V D V D V D V D V DV D V D V D V D V D V D V D V D V D V D V D V D V D V D V D V D V D V D V D V D V D V D V D V D V D V D V D V D V D V D V D V D V D V D V D V D V D V D V D V D V D V D V D V D V D V D V D V D V D V D v d d d d d d d d d d d d d d d d d d d d d d d d d d d d d d d d d d d d d d d d d d d d d d d d d d d d d d d d d d d d d d d d d d d d d d d d d d d d d d d d d d d d d d d d d d d d d d d d d d d d c c c c c c c c c c c c c c c c c c c c c c c c c c c c c c c c c c c c c c c c c c c c c c c c c c c c c c c c c c c c c c c c c c c c c c c c c c c c c c c c c c c c c c c c c c c c c c c c c c c c C C C C C C C C C C C C C C C C C C C C C C C C C C C C C C C C C C C C C C C C C C C C C C C C C C C C C C C C C C C C C C C C C C C C C C C C C C C C C C C C C C C C C C C C C C C C C C C C C C C C G C C C C C C C C C C C C C C C C C C C C C C C C C C C C C C C C C C C C C C C C C C C C C C C C C C C C C C C C C C C C C C C C C C C C C C C C C C C C C C C C C C C C C C C C C C C C C C C C C C C c c c c c c c c c c c c c c c c c c c c c c c c c c c c c c c c c c c c c c c c c c c c c c c c c c c c c c c c c c c c c c c c c c c c c c c c c c c c c c c c c c c c c c c c c c c c c c c c c c c s s s s s s s s s s s s s s s s s s s s s s s s s s s s s s s s s s s s s s s s s s s s s s s s s s s s s s s s s s s s s s s s s s s s s s s s s s s s s s s s s s s s s s s s s s s s s s s s s s s ss s s s s s s s s s s s s s s s s s s s s s s s s s s s s s s s s s s s s s s s s s s s s s s s s s s s s s s s s s s s s s s s s s s s s s s s s s s s s s s s s s s s s s s s s s s s s s s s s s s sss s s s s s s s s s s s s s s s s s s s s s s s s s s s s s s s s s s s s s s s s s s s s s s s s s s s s s s s s s s s s s s s s s s s s s s s s s s s s s s s s s s s s s s s s s s s s s s s s s s s. C H N T E P E R M A L I T I E P E R M A L I T I E P E R M A L I T I E P E R M A L I T I E P E R M A L I T I E P E R M A L I T I E P E R M A L I T I E P E R M A L I T I E P E R M A L I T I E P E R M M A L I T I E P E R M A L I T I E P E R M A L I T I E P E R M A L I T I E P E R M A L I T I E P E R M A L I T I E P E R M A L I T I E P E R M A L I T I E P E R M A L I T I E P E R M A L I T I E P ER M A L I T I E P E R M A L I T I E P E R M A L I T I E P E R M A L I T I E P E R M A L I T I E P E R M A L I T I E P E R M A L I T I E P E R M A L I T I E P E R M A L I T I E P E R M A L I T I E P E P M M M M M M M M M M M M M M M M M M M M M M M M M M M M M M M M M M M M M M M M M M M M M M M M M M M M M M M M M M M M M M M M M M M M M M M M M M M M M M M M M M M M M M M M M M M M M M M M M M M M m m m m m m m m m m m m m m m m m m m m m m m m m m m m m m m m m m m m m m m m m m m m m m m m m m m m m m m m m m m m m m m m m m m m m m m m m m m m m m m m m m m m m m m m m m m m m m m m m m m m mm m m m m m m m m m m m m m m m m m m m m m m m m m m m m m m m m m m m m m m m m m m m m m m m m m m m m m m m m m m m m m m m m m m m m m m m m m m m m m m m m m m m m m m m m m m m m m m m m m m mmm m m m m m m m m m m m m m m m m m m m m m m m m m m m m m m m m m m m m m m m m m m m m m m m m m m m m m m m m m m m m m m m m m m m m m m m m m m m m m m m m m m m m m m m m m m m m m m m m m m mm m m m m m m m m m m m m m m m m m m m m m m m m m m m m m m m m m m m m m m m m m m m m m m m m m m m m m m m m m m m m m m m m m m m m m m m m m m m m m m m m m m m m m m m m m m m m m m m m m m m n m m m m m m m m m m m m m m m m m m m m m m m m m m m m m m m m m m m m m m m m m m m m m m m m m m m m m m m m m m m m m m m m m m m m m m m m m m m m m m m m m m m m m m m m m m m m m m m m m m m mn m mn mn mn mn mn mn mn mn mn mn mn mn mn mn mn mn mn mn mn mn mn mn mn mn mn mn mn mn mn mn mn mn mn mn mn mn mn mn mn mn mn mn mn mn mn mn mn mn mn mn mn mn mn mn mn mn mn mn mn mn mn mn mn mn mn mn mn mn mn mn mn mn mn mn mn mn mn mn mn mn mn mn mn mn mn mn mn mn mn mn mn mn mn mn mn mn mn mn mn mnmnmnmnmnmnmnmnmnmnmnmnmnmnmnmnmnmnmnmnmnmnmnmnmnmnmnmnmnmnmnmnmnmnmnmnmnmnmnmnmnmnmnmnmnmnmnmnmnmnmnmnmnmnmnmnmnmnmnmnmnmnmnmnmnmnmnmnmnmnmnmnmnmnmnmnmnmnmnmnmnmnmnmnmnmnmnmnmnmnmnmnmnmnmnmnmnmnmnmnmn mnmnmnmnmnmnmnmnmnmnmnmnmnmnmnmnmnmnmnmnmnmnmnmnmnmnmnmnmnmnmnmnmnmnmnmnmnmnmnmnmnmnmnmnmnmnmnmnmnmnmnmnmnmnmnmnmnmnmnmnmnmnmnmnmnmnmnmnmnmnmnmnmnmnmnmnmnmnmnmnmnmnmnmnmnmnmnmnmnmnmnmnmnmnmnmnmnmnmn mn mn mn mn mn mn mn mn mn mn mn mn mn mn mn mn mn mn mn mn mn mn mn mn mn mn mn mn mn mn mn mn mn mn mn mn mn mn mn mn mn mn mn mn mn mn mn mn mn mn mn mn mn mn mn mn mn mn mn mn mn mn mn mn mn mn mn mn mn mn mn mn mn mn mn mn mn mn mn mn mn mn mn mn mn mn mn mn mn mn mn mn mn mn mn mn mn mn mn mm mn mn mn mn mn mn mn mn mn mn mn mn mn mn mn mn mn mn mn mn mn mn mn mn mn mn mn mn mn mn mn mn mn mn mn mn mn mn mn mn mn mn mn mn mn mn mn mn mn mn mn mn mn mn mn mn mn mn mn mn mn mn mn mn mn mn mn mn mn mn mn mn mn mn mn mn mn mn mn mn mn mn mn mn mn mn mn mn mn mn mn mn mn mn mn mn mn mn mn gn gn gn gn gn gn gn gn gn gn gn gn gn gn gn gn gn gn gn gn gn gn gn gn gn gn gn gn gn gn gn gn gn gn gn gn gn gn gn gn gn gn gn gn gn gn gn gn gn gn gn gn gn gn gn gn gn gn gn gn gn gn gn gn gn gn gn gn gn gn gn gn gn gn gn gn gn gn gn gn gn gn gn gn gn gn gn gn gn gn gn gn gn gn gn gn gn gn gn gngn gn gn gn gn gn gn gn gn gn gn gn gn gn gn gn gn gn gn gn gn gn gn gn gn gn gn gn gn gn gn gn gn gn gn gn gn gn gn gn gn gn gn gn gn gn gn gn gn gn gn gn gn gn gn gn gn gn gn gn gn gn gn gn gn gn gn gn gn gn gn gn gn gn gn gn gn gn gn gn gn gn gn gn gn gn gn gn gn gn gn gn gn gn gn gn gn gn gn gn g n n n n n n n n n n n n n n n n n n n n n n n n n n n n n n n n n n n n n n n n n n n n n n n n n n n n n n n n n n n n n n n n n n n n n n n n n n n n n n n n n n n n n n n n n n n n n n n n n n n n no n n n n n n n n n n n n n n n n n n n n n n n n n n n n n n n n n n n n n n n n n n n n n n n n n n n n n n n n n n n n n n n n n n n n n n n n n n n n n n n n n n n n n n n n n n n n n n n n n n n nn n n n n n n n n n n n n n n n n n n n n n n n n n n n n n n n n n n n n n n n n n n n n n n n n n n n n n n n n n n n n n n n n n n n n n n n n n n n n n n n n n n n n n n n n n n n n n n n n n n n a n n n n n n n n n n n n n n n n n n n n n n n n n n n n n n n n n n n n n n n n n n n n n n n n n n n n n n n n n n n n n n n n n n n n n n n n n n n n n n n n n n n n n n n n n n n n n n n n n n n. n n n n n n n n n n n n n n n n n n n n n n n n n n n n n n n n n n n n n n n n n n n n n n n n n n n n n n n n n n n n n n n n n n n n n n n n n n n n n n n n n n n n n n n n n n n n n n n n n n n. C H N T E P E R M A L I T I E P E R M A L I T I E P E R M A L I T I E P E R M A L I T I E P E R M A L I T I E P E R M A L I T I E P E R M A L I T I E P E R M A L I T I E P E R M A L I T I E P E RM A L I T I E P E R M A L I T I E P E R M A L I T I E P E R M A L I T I E P E R M A L I T I E P E R M A L I T I E P E R M A L I T I E P E R M A L I T I E P E R M A L I T I E P E R M A L I T I E P E RM A L I TI E P E R M A L I T I E P E R M A L I T I E P E R M A L I T I E P E R M A L I T I E P E R M A L I T I E P E R M A L I T I E P E R M A L I T I E P E R M A L I T I E P E R M A L I T I E P E RM A L I T II N N N N N N N N N N N N N N N N N N N N N N N N N N N N N N N N N N N N N N N N N N N N N N N N N N N N N N N N N N N N N N N N N N N N N N N N N N N N N N N N N N N N N N N N N N N N N N N N N N N N NO N N N N N N N N N N N N N N N N N N N N N N N N N N N N N N N N N N N N N N N N N N N N N N N N N N N N N N N N N N N N N N N N N N N N N N N N N N N N N N N N N N N N N N N N N N N N N N N N N N N NA N N N N N N N N N N N N N N N N N N N N N N N N N N N N N N N N N N N N N N N N N N N N N N N N N N N N N N N N N N N N N N N N N N N N N N N N N N N N N N N N N N N N N N N N N N N N N N N N N N N.N N N N N N N N N N N N N N N N N N N N N N N N N N N N N N N N N N N N N N N N N N N N N N N N N N N N N N N N N N N N N N N N N N N N N N N N N N N N N N N N N N N N N N N N N N N N N N N N N N N N NN N N N N N N N N N N N N N N N N N N N N N N N N N N N N N N N N N N N N N N N N N N N N N N N N N N N N N N N N N N N N N N N N N N N N N N N N N N N N N N N N N N N N N N N N N N N N N N N N N N N No. 10000000000000000000000000000000000000000000000000000000000000000000000000000000000000000000000000000 000000000000000000000000000000000000000000000000000000000000000000000000000000000000000000000000000 | |
Eynon twv ouoAov oTo npoiov
H xpnn ouuBolw oTo Tnpov EvxepioeXeOToVa EtonoTnv Tpoooxnoa eEvdeoxevouc Kivduvouc. Ta ouuBoLa aopaaieia cai oi Eynnoeic Tpu ta uuvodouuv npTei va katavooovtai nlpwo. OI poeidtoinoeis autcKa8' eautc d ev ataoobouv Touc Kivduvouc kai d vttokaiotouv t any n wotwetpww Poiynns atuxmuatw.
| Причароть ти �ельдога ог leitουрія, діац�тікai тпсіеігі огліецхүлүлүлүлүлүлүлүлүлүлүлүлүлүлүлүлүлүлүлүлүлүлүлүлүлүлүлүлүлүлүлүлүлүлүлүлүлүлүлүлүлүлүлүлүлүлүлүлүлүлүlэлэлэлэлэлэлэлэлэлэлэлэлэлэлэлэлэлэлэлэлэлэлэлэлэлэлэлэлэлэлэлэлэлэлэлэлэлэлэлэлэлэлэлэлэлэлэлэлэлэлэнг. | То ошMuуооооооооооооооооооооооооооооооооооооооооооооооооооооооооооооооооооооооооооооооооооооооооооооооооооооу Ту ошMuуоооооооооооооооооооооооооооооооооооооооооооооооооооооооооооооооооооооооооооооооооооооооооооооооу | |||
| Φоратe птоотаеutiká уuaia! | Атуарорейтai ошMuуооооооооооооооооооооооооооооооооооооооооооооооооооооооооооооооооооооооооооооооооооооооооооооооо Ту ошMuуоооооооооооооооооооооооооооооооооооооооооооооооооооооооооооооооооооооооооооооооооооооооооооо Ту ошMuу�а ошMuуооооооооооооооооооооооооооооооооооооооооооооооооооооооооооооооооооо Форатe птоотаеutiká уuaia! | Mнv ршMuуоутai ошMuуоутai oшMuуоутai oшMuуоутai oшMuуоутai oшMuуоутai oшMuуоутai oшMuуоутai oшMuуоутai oшMuуоутai oшMuуоутai oшMuуоутai oшMuуоутai oшMuуоутai oшMuу�утai oшMuучутai oшMuучутai oшMuучутai oшMuучутai oшMuучутai oшMuучутai oшMuучутai oшMuучутai oшMuучутai oшMuучутai oшMuучутai oшMuучутai oшMuучутai OTO OTO OTO OTO OTO OTO OTO OTO OTO OTO OTO OTO OTO OTO OTO OTO OTO OTO OTO OTO OTO OTO OTO OTO OTO OTO OTO OTO OTO OTO OTO OTO OTO OTO OTO OTO OTO OTO OTO OTO OTO OTO OTO OTO OTO OTO OTO OTO OTO OTO OTo OTO OTo OTo OTo OTo OTo OTo OTo OTo OTo OTo OTo OTo OTo OTo OTo OTo OTo OTo OTo OTo OTo OTo OTo OTo OTo OTo OTo OTo OTo OTo OTo OTo OTo OTo OTo OTo OTo OTo OTo OTo OTo OTo OTo OTo OTo OTo OTo OTo OTo OTo OTO OTo OTo OTo OTo OTo OTo OTo OTo OTo OTo OTo OTo OTo OTo OTo OTo OTo OTo OTo OTo OTo OTo OTo OTo OTo OTo OTo OTo OTo OTo OTo OTo OTo OTo OTo OTo OTo OTo OTo OTo OTo OTo OTo OTo OTo OTo OTo OTO OTo OTO OTo OTo OTo OTo OTo OTo OTo OTo OTo OTo OTo OTo OTo OTo OTo OTo OTo OTo OTo OTo OTo OTo OTo OTo OTo OTo OTo OTo OTo OTo OTo OTo OTo OTo OTo OTo OTo OTo OTo OTo OTo OTo OTo OTo OTo OTo OTO OTo OTo OTO OTo OTo OTo OTo OTo OTo OTo OTo OTo OTo OTo OTo OTo OTo OTo OTo OTo OTo OTo OTo OTo OTo OTo OTo OTo OTo OTo OTo OTo OTo OTo OTo OTo OTo OTo OTo OTo OTo OTo OTo OTo OTo OTo OTo OTo OTo OTO OTO OTo OTo OTo OTo OTo OTo OTo OTo OTo OTo OTo OTo OTo OTo OTo OTo OTo OTo OTo OTo OTo OTo OTo OTo OTo OTo OTo OTo OTo OTo OTo OTo OTo OTo OTo OTo OTo OTo OTo OTo OTo OTo OTo OTo OTo OTo OTo OTo OTO OTO OTo OTO OTo OTo OTo OTo OTo OTo OTo OTo OTo OTo OTo OTo OTo OTo OTo OTo OTo OTo OTo OTo OTo OTo OTo OTo OTo OTo OTo OTo OTo OTo OTo OTo OTo OTo OTo OTo OTo OTo OTo OTo OTo OTo OTo OTo OTo OTO OTo OTo OTo OTO OTo OTo OTo OTo OTo OTo OTo OTo OTo OTo OTo OTo OTo OTo OTo OTo OTo OTo OTo OTo OTo OTo OTo OTo OTo OTo OTo OTo OTo OTo OTo OTo OTo OTo OTo OTo OTo OTo OTo OTo OTo OTo OTo OTo OTo OTO OTo OTO OTo OTO OTo OTo OTo OTo OTo OTo OTo OTo OTo OTo OTo OTo OTo OTo OTo OTo OTo OTo OTo OTo OTo OTo OTo OTo OTo OTo OTo OTo OTo OTo OTo OTo OTo OTo OTo OTo OTo OTo OTo OTo OTo OTo OTo OTo OTo OTO OTO OTo OTo OTO OTo OTo OTo OTo OTo OTo OTo OTo OTo OTo OTo OTo OTo OTo OTo OTo OTo OTo OTo OTo OTo OTo OTo OTo OTo OTo OTo OTo OTo OTo OTo OTo OTo OTo OTo OTo OTo OTo OTo OTo OTo OTo OTo OTo OTo OTO OTO OTO OTo OTo OTo OTo OTo OTo OTo OTo OTo OTo OTo OTo OTo OTo OTo OTo OTo OTo OTo OTo OTo OTo OTo OTo OTo OTo OTo OTo OTo OTo OTo OTo OTo OTo OTo OTo OTo OTo OTo OTo OTo OTo OTo OTo OTo OTo OTo OTO OTO OTO OTo OTO OTo OTo OTo OTo OTo OTo OTo OTo OTo OTo OTo OTo OTo OTo OTo OTo OTo OTo OTo OTo OTo OTo OTo OTo OTo OTo OTo OTo OTo OTo OTo OTo OTo OTo OTo OTo OTo OTo OTo OTo OTo OTo OTo OTo OTO OTO OTO OTo OTo OTO OTo OTo OTo OTo OTo OTo OTo OTo OTo OTo OTo OTo OTo OTo OTo OTo OTo OTo OTo OTo OTo OTo OTo OTo OTo OTo OTo OTo OTo OTo OTo OTo OTo OTo OTo OTo OTo OTo OTo OTo OTo OTo OTo OTo OTO OTO OTO OTO OTO OTO OTO OTO OTO OTO OTO OTO OTO OTO OTO OTO OTO OTO OTO OTO OTO OTO OTO OTO OTO OTO OTO OTO OTO OTO OTO OTO OTO OTO OTO OTO OTO OTO OTO OTO OTO OTO OTO OTO OTO OTO OTO OTO OTO O TO OTO OTO OTO OTO OTO OTO OTO OTO OTO OTO OTO OTO OTO OTO OTO OTO OTO OTO OTO OTO OTO OTO OTO OTO OTO OTO OTO OTO OTO OTO OTO OTO OTO OTO OTO OTO OTO OTO OTO OTO OTO OTO OTO OTO OTO OTO OTO OTO OTO O'TO AYU WOAN C A TIO TO OTI IO TO MNUxavu wu wu vua vua vua vua vua vua vua vua vua vua vua vua vua vua vua vua vua vua vua vua vua vua vua vua vua vua vua vua vua vua vua vua vua vua vua vua vua vua vua vua vua vua vua vua vua vua vua vua vua vua vuka wu wu wu wu wu wu wu wu wu wu wu wu wu wu wu wu wu wu wu wu wu wu wu wu wu wu wu wu wu wu wu wu wu wu wu wu wu wu wu wu wu wu wu wu wu wu wu wu wu wu wuu wu wu wu wu wu wu wu wu wu wu wu wu wu wu wu wu wu wu wu wu wu wu wu wu wu wu wu wu wu wu wu wu wu wu wu wu wu wu wu wu wu wu wu wu wu wu wu wu wu ww u wu wu wu wu wu wu wu wu wu wu wu wu wu wu wu wu wu wu wu wu wu wu wu wu wu wu wu wu wu wu wu wu wu wu wu wu wu wu wu wu wu wu wu wu wu wu wu wu wu wulw u wu wu wu wu wu wu wu wu wu wu wu wu wu wu wu wu wu wu wu wu wu wu wu wu wu wu wu wu wu wu wu wu wu wu wu wu wu wu wu wu wu wu wu wu wu wu wu wu wuu wuu wuu wuu wuu wuu wuu wuu wuu wuu wuu wuu wuu wuu wuu wuu wuu wuu wuu wuu wuu wuu wuu wuu wuu wuu wuu wuu wuu wuu wuu wuu wuu wuu wuu wuu wuu wuu wuu wuu wuu wuu wuu wuu wuu wuu wuu wuu wuu wuu wUU Wuu Wuu Wuu Wuu Wuu Wuu Wuu Wuu Wuu Wuu Wuu Wuu Wuu Wuu Wuu Wuu Wuu Wuu Wuu Wuu Wuu Wuu Wuu Wuu Wuu Wuu Wuu Wuu Wuu Wuu Wuu Wuu Wuu Wuu Wuu Wuu Wuu Wuu Wuu Wuu Wuu Wuu Wuu Wuu Wuu Wuu Wuu Wuu Wuu Wuu WUU Wuu Wuu Wuu Wuu Wuu Wuu Wuu Wuu Wuu Wuu Wuu Wuu Wuu Wuu Wuu Wuu Wuu Wuu Wuu Wuu Wuu Wuu Wuu Wuu Wuu Wuu Wuu Wuu Wuu Wuu Wuu Wuu Wuu Wuu Wuu Wuu Wuu Wuu Wuu Wuu Wuu Wuu Wuu Wuu Wuu Wuu Wuu Wuu WuuWuu Wuu Wuu Wuu Wuu Wuu Wuu Wuu Wuu Wuu Wuu Wuu Wuu Wuu Wuu Wuu Wuu Wuu Wuu Wuu Wuu Wuu Wuu Wuu Wuu Wuu Wuu Wuu Wuu Wuu Wuu Wuu Wuu Wuu Wuu Wuu Wuu Wuu Wuu Wuu Wuu Wuu Wuu Wuu Wuu Wuu Wuu Wuu Wuu WuuW uu Wuu Wuu Wuu Wuu Wuu Wuu Wuu Wuu Wuu Wuu Wuu Wuu Wuu Wuu Wuu Wuu Wuu Wuu Wuu Wuu Wuu Wuu Wuu Wuu Wuu Wuu Wuu Wuu Wuu Wuu Wuu Wuu Wuu Wuu Wuu Wuu Wuu Wuu Wuu Wuu Wuu Wuu Wuu Wuu Wuu Wuu Wuu Wuu Wuu Wsu Wuu Wuu Wuu Wuu Wuu Wuu Wuu Wuu Wuu Wuu Wuu Wuu Wuu Wuu Wuu Wuu Wuu Wuu Wuu Wuu Wuu Wuu Wuu Wuu Wuu Wuu Wuu Wuu Wuu Wuu Wuu Wuu Wuu Wuu Wuu Wuu Wuu Wuu Wuu Wuu Wuu Wuu Wuu Wuu Wuu Wuu Wuu Wuu Wuu Wku Wku Wku Wku Wku Wku Wku Wku Wku Wku Wku Wku Wku Wku Wku Wku Wku Wku Wku Wku Wku Wku Wku Wku Wku Wku Wku Wku Wku Wku Wku Wku Wku Wku Wku Wku Wku Wku Wku Wku Wku Wku Wku Wku Wku Wku Wku Wku Wku Wku Wko Wko Wko Wko Wko Wko Wko Wko Wko Wko Wko Wko Wko Wko Wko Wko Wko Wko Wko Wko Wko Wko Wko Wko Wko Wko Wko Wko Wko Wko Wko Wko Wko Wko Wko Wko Wko Wko Wko Wko Wko Wko Wko Wko Wko Wko Wko Wko Wko Wko Wiko Wko Wko Wko Wko Wko Wko Wko Wko Wko Wko Wko Wko Wko Wko Wko Wko Wko Wko Wko Wko Wko Wko Wko Wko Wko Wko Wko Wko Wko Wko Wko Wko Wko Wko Wko Wko Wko Wko Wko Wko Wko Wko Wko Wko Wko Wko Wko Wko Wko Wloo Wko Wko Wko Wko Wko Wko Wko Wko Wko Wko Wko Wko Wko Wko Wko Wko Wko Wko Wko Wko Wko Wko Wko Wko Wko Wko Wko Wko Wko Wko Wko Wko Wko Wko Wko Wko Wko Wko Wko Wko Wko Wko Wko Wko Wko Wko Wko Wko Wko Who |
Günzburger Straße 69
D-89335 Ichenhausen
AETIME NEAATH,
oac euxoate va aTolauoetn vaeaooukeun kai va exete kaata anoteleouata kata n xphan tnc.
YNOAEOH:
O kataoekuaatns auto tou pioovtoc dev euotvei aoupwva u TO IOXuvota vopo Tepi eUovnvi TPOIOVTA, yia znmues TOn Tpokalouvtai e n aTO auto to Tpoiov otic Ehns TEPITTTwEIG:
- akataaannn μεtoxεipion,
- μη τήρονητων συθηγίων χρόσς,
- ETIIOKEUc aTO TpIouc, mN EOGOIOoOTnEvouc TEYVIKOUs,
TOTTOEETONKaiavikataoTaonunwnawavaktikwv, - μη ενδεδειγμένη χρήση.
PnooE5e:
Oi odnyies xpnoans aToteauov avantooatao toepos autoou Tou Tpoiovtoc. Nepieoxou nmaavtkec utodieic yia va epyaceote me to Tpoiov me aoopaia, owa ta kai oikovouka kai yia va atopoeuyete KIVduvouc, va Egoikovopeite eo0a ETIOKEUNs, va eivwveTe Touxovous EKTOS diaBaeoiotntac kai va auaveTe nV agiotntia kai tn diapkeia cwns Tou Tpoiovtoc.ETI TPOo0eTa OTouc kavoce aqaaiaac otic napouoec odnyies xpnoans, TpETei va lauabaveTe OTWODNTOTE UTFOU OAC TGATAEIGTCou IOXOUV OTN Xwpa OAc yia tn aeitoupyia Tou Tpoiovtoc.
Piv xpon Tou pioovtoc Eoikeiweite oAeTic UTOBIDEEIC Xepioukai aopaaiaac. XpnoiOTIOITE TO TPOIOV MOV OOTTWC TEPiypapetai KAI YIA Tou c avapepeovous Touei xpon. DualeTe MEaopaia Tc obnyie Cxponkai OE TEPiTTWOn METabiaon Tou TTPOIOVTOIpaadwote paci kai oTa Eyypapa.
Günzburger Straße 69
D-89335 Ichenhausen
STIMATE CLIENT,
Vä dorim sá avej multe satisfactji si mult succes in lucrul cu noul dumneavoastraparat.
INDICATIE:
Günzburger Straße 69
D-89335 Ichenhausen
POSTOVANI KUPCE,
Günzburger Straße 69
D-89335 Ichenhausen
ithalatc:
Ankara Civata Hirdavat Baglanti Elemanlan lthalat
Ihracat Sanayi ve Ticaret A.§.
Macun Mahallesi 250. Cadde No:26
Yenimahalle/Ankara/Turkiye
SAYIN MÜSTERIMIZ,
EU Declaration of Conformity
Standard references:
EN 500-1:2006+A1; EN 500-4:2011; EN 55012:2007+A1; EN IEC 61000-6-1:2019
This declaration of conformity is issued under the sole responsibility of the manufacturer.
The object of the declaration described above fulfils the regulations of the directive 2011/65/EU of the European Parliament and Council from 8th June 2011, on the restriction of the use of certain hazardous substances in electrical and electronic equipment.
Subject to change without notice

Documents registrar: Niko Vraschek
Günzburger Str. 69, D-89335 Ichenhausen
EU Declaration of Conformity
Standard references:
EN 500-1:2006+A1; EN 500-4:2011; EN 55012:2007+A1; EN IEC 61000-6-1:2019
This declaration of conformity is issued under the sole responsibility of the manufacturer.
The object of the declaration described above fulfils the regulations of the directive 2011/65/EU of the European Parliament and Council from 8th June 2011, on the restriction of the use of certain hazardous substances in electrical and electronic equipment.
Subject to change without notice
Signature / Andreas Pecher / Head of Project Management
Documents registrar: Niko Vraschek Gunzburger Str. 69, D-89335 Ichenhausen
EU Declaration of Conformity
Standard references:
EN 500-1:2006+A1; EN 500-4:2011; EN 55012:2007+A1; EN IEC 61000-6-1:2019
This declaration of conformity is issued under the sole responsibility of the manufacturer.
The object of the declaration described above fulfils the regulations of the directive 2011/65/EU of the European Parliament and Council from 8th June 2011, on the restriction of the use of certain hazardous substances in electrical and electronic equipment.
Subject to change without notice

Signature / Andreas Pecher / Head of Project Management
Documents registrar: Niko Vraschek
Günzburgger Str. 69, D-89335 Ichenhausen
EU Declaration of Conformity
AB uygunluk beyani
CE
Scheppach GmbH, Günzburger Str. 69, D-89335 Ichenhausen
| DE | erklart folgende Konformität gemäß EU-Richtlinien und Normen für den Antikel |
| GB | hereby declares the following conformity under the EU Directive and standards for the following article |
| BG | ДекларINA CBOTBETHOTO CBOTBETCTBNE CBГЛСАСОДЕ ПИЕК-ТИВА на EC и НорМи за.apТИКУП |
| GR | δηλώνει έν ἀκόλουθη συμόρφωσι Μύμφωνα μέ ην Εδηγία EE και τοΡότιΤΑ γία ΠΙροίν |
| X 2006/42/EG | |
| Annex IV Notified Body: Notified Body No.: Certificate No.: | |
| X 2000/14/EG_2005/88/EG | |
| Annex V | |
| X | Annex VI Noise: measured LWA = 104 dB; guaranteed LWA = 108 dB Notified Body: TÜV Rheinland LGA Products GmbH, Tillystraße 2, 90431 Nürnberg Notified Body No.: 0197 |
| X 2016/1628/EU | |
| Emission. No: e13*2016/1628*2016/1628SRA1/P*0076*02 | |
Standard references:
EN 500-1:2006+A1; EN 500-4:2011; EN 55012:2007+A1; EN IEC 61000-6-1:2019
This declaration of conformity is issued under the sole responsibility of the manufacturer.
The object of the declaration described above fulfils the regulations of the directive 2011/65/EU of the European Parliament and Council from 8th June 2011, on the restriction of the use of certain hazardous substances in electrical and electronic equipment.
Subject to change without notice
Documents registrar: Niko Vraschek
Günzburgr Str. 69, D-89335 Ichenhausen
Garantie DE
Apparent defects must be notified within 8 days from the receipt of the goods. Otherwise, the buyer's rights of claim due to such defects are invalidated. We guarantee for our machines in case of proper treatment for the time of the statutory warranty period from delivery in such a way that we replace any machine part free of charge which provably becomes unusable due to faulty material
or defects of fabrication within such period of time. With respect to parts not manufactured by us we only warrant insofar as we are entitled to warranty claims against the upstream suppliers. The costs for the installation of the new parts shall be borne by the buyer. The cancellation of sale or the reduction of purchase price as well as any other claims for damages shall be excluded.