HP1900S - Vibratory plate SCHEPPACH - Free user manual and instructions
Find the device manual for free HP1900S SCHEPPACH in PDF.

User questions about HP1900S SCHEPPACH
0 question about this device. Answer the ones you know or ask your own.
Ask a new question about this device
Download the instructions for your Vibratory plate in PDF format for free! Find your manual HP1900S - SCHEPPACH and take your electronic device back in hand. On this page are published all the documents necessary for the use of your device. HP1900S by SCHEPPACH.
USER MANUAL HP1900S SCHEPPACH
Homepage: https://www.scheppach.com/de/service
Table of contents: Page:
- Explanation of the symbols on the product 29
- Introduction 31
- Product description (Fig. 1) 31
- Scope of delivery 31
- Proper use 32
- General safety instructions 32
- Technical data 35
- Unpacking 35
- Layout 36
10.Before commissioning 36 - Start-up 37
- Transport (Fig. 20) 39
- Cleaning and maintenance 39
- Storage 42
- Repair & ordering spare parts 43
- Disposal and recycling 43
- Troubleshooting 44
- Declaration of conformity 457
1. Explanation of the symbols on the product
Symbols are used in this manual to draw your attention to potential hazards. The safety symbols and the accompanying explanations must be fully understood. The warnings themselves will not rectify a hazard and cannot replace proper accident prevention measures.
| Before commissioning, read and observe the operating manual and safety instructions! | |
| Wear hearing protection! | |
| Wear safety goggles! | |
| Use work gloves. | |
| Use safety shoes. | |
| Removing or modifying protective or safety equipment is prohibited. | |
| Do not touch rotating parts. Getting caught in the spinning belt will cause a hand injury. Always put on the belt guard. | |
| Naked flames or smoking near the device is strictly prohibited! | |
| Hot surface! Touching can cause burns. Only carry out servicing, maintenance and cleaning work when the engine has cooled down. | |
| Keep third parties away from the work area. | |
| Poisoning! Only use the device outdoors and never in closed or poorly ventilated rooms. | |
| Important: Always switch off the engine before refuelling. Do not refill during operation. | |
| Before carrying out any cleaning or maintenance work, switch off the engine and remove the spark plug connector from the spark plug. | |
| Guaranteed sound power level of the device | |
| - Choke closed - Open fuel valve | |
| Speed lever | |
| Checking the oil level | |
| We have marked points in these operating instructions that impact your safety with this symbol. | |
| Already filled with oil! Do not top up. Oil level not visible. | |
| The product complies with the applicable European directives. | |
| The product complies with the applicable Serbian directives. |
2. Introduction
Manufacturer:
Scheppach GmbH
Günzburger Straße 69
D-89335 Ichenhausen
Dear Customer,
We hope your new product brings you much enjoyment and success.
Note:
In accordance with the applicable product liability laws, the manufacturer of this product assumes no liability for damage to the product or caused by the product arising from:
- Improper handling
- Failure to comply with the operating manual
- Repairs carried out by third parties, unauthorised specialists
- Installing and replacing non-original spare parts
- Improper use
- Failure of the electrical system in the event of the electrical regulations and VDE provisions 0100, DIN 57113 / VDE 0113 not being observed
Note:
The operating manual is part of this product. It includes important instructions for the safe, proper and economic operation of the product, for avoiding danger, for minimising repair costs and downtimes and for increasing the reliability and extending the service life of the product. In addition to the safety instructions in this operating manual, you must also observe the regulations applicable to the operation of the product in your country. Familiarise yourself with all operating and safety instructions before using the product. Only operate the product as described and for the specified areas of application. Keep the operating manual in a good place and hand over all documents when passing the product on to third parties.
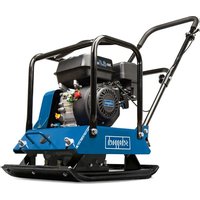
3. Product description (Fig. 1)
- Foldable guide bar with handle
1a. Guide bar screw - Throttle
2a. Throttle screw - Exhaust pipe
- Air filter cover
4a. Wing nut
4b. Wing nut (inner)
4c. Air filter insert
5. Petrol tank cap
5a. Fuel filter insert
6. Fuel tank
7. Motor
8. Starter cable
9. Eccentric vibration unit
10. Base plate
11. Transport wheels
12. Chassis
12a. Transport frame screws
13. Base plate screws
14. Oil dipstick for engine oil
15. Fuel valve
15a. Carburettor screw
16. Choke lever
17. Bracket for transport frame
18. Flex hose
19. Belt cover
19a. Belt cover screws
19b. V-belt
19c. Set screws
19d. Lock nuts
19e. Engine mounting screws
20. Rubber pad
21. Fastening strip
21a. Fastening strip screws
22. Oil drain screw for eccentric vibration unit oil
23. On/off switch
24. Spark plug
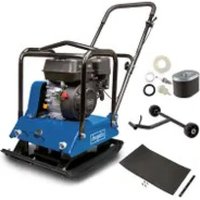
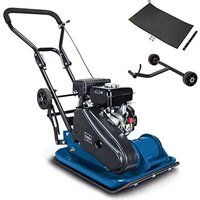
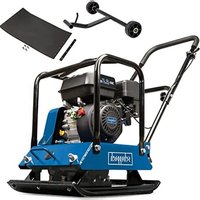
4. Scope of delivery
| Item | Quantity | Designation |
| 1x | Plate compactor with engine | |
| 1 | 1x | Handle |
| 12 | 1x | Chassis |
| 20/21 | 1x | Rubber pad with fastening bar |
| 1x | Spark plug wrench | |
| 1x | Enclosed accessories bag | |
| 1x | Operating manual |
5. Proper use
The plate compactor transfers forces to loose soil or other materials. It can be used for general road works, landscaping and building construction. The plate vibrator increases the load-bearing capacity, reduces water permeability, prevents soil settling, reduces swelling or contraction of the soil. It is particularly suitable for compacting interlocking pavers and trenches, as well as for landscaping and conservation work.
Attention!
The plate compactor is not designed for use on adherent substrates such as clay or hard surfaces such as concrete.
The machine may only be used in the intended manner. Any use beyond this is improper. The user/operator, not the manufacturer, is responsible for damages or injuries of any type resulting from this.
An element of the intended use is also the observance of the safety instructions, as well as the assembly instructions and operating information in the operating manual.
Persons who operate and maintain the machine must be familiar with it and must be informed about potential dangers.
In addition, the applicable accident prevention regulations must be strictly observed.
Other general occupational health and safety-related rules and regulations must be observed. The liability of the manufacturer and resulting damages are excluded in the event of modifications of the machine.
The machine may only be operated with original parts and original accessories from the manufacturer. The safety, operating and maintenance specifications of the manufacturer, as well as the dimensions specified in the technical data, must be observed.
Please note that our equipment was not designed with the intention of use for commercial or industrial purposes. We assume no guarantee if the device is used in commercial or industrial applications, or for equivalent work.
Explanation of the signal words in the operating manual
DANGER
Signal word to indicate an imminently hazardous situation which, if not avoided, will result in death or serious injury.
CAUTION
Signal word to indicate a potentially hazardous situation which, if not avoided, could result in minor or moderate injury.
ATTENTION
Signal word to indicate a potentially hazardous situation which, if not avoided, could result in product or property damage.
6. General safety instructions
- Familiarise yourself with your machine.
- Read the operating manual carefully and make sure you understand its contents, as well as all labels attached to the machine.
- Familiarise yourself with the area of application, as well as limitations of the machine, and particular sources of danger.
- Make sure that you know all the controls and their function exactly.
- Make sure you know how to stop the machine and quickly disable the controls.
- Do not attempt to use the machine without knowing the exact method of operation and the maintenance requirements of the engine and how to avoid accidents resulting in personal injury and/or property damage.
- Keep other people, particularly children, away from your work area.
Working range
-
Never start or operate the machine in an enclosed area. The exhaust gases are dangerous because they contain the odourless and deadly gas carbon monoxide. Operate the machine only in a well-ventilated outdoor area.
-
Never operate the machine without good visibility or lighting conditions.
Personal safety
-
Do not use the machine if you have taken drugs, alcohol or medication that affects your ability to operate the machine correctly.
-
Wear suitable clothing. Wear long trousers, boots and gloves.
-
Do not wear loose clothing, shorts or jewellery of any kind. Tie back long hair so that it is at shoulder height at most. Keep hair, clothing and gloves away from moving parts. Loose-fitting clothing, jewellery or long hair may become caught in the moving parts. Check your machine before starting.
-
Leave protective screens in place and in working order.
-
Make sure that all nuts, bolts, etc. are securely tightened.
-
Never use the machine if it is in need of repair or in poor mechanical condition. Replace damaged, missing or defective parts before use.
-
Check the machine for fuel leaks.
-
Keep it in good functional order. Do not use the machine if the engine cannot be switched on and off at the corresponding switch.
-
A petrol-driven machine that cannot be controlled via the engine switch is dangerous and must be replaced.
-
Before starting the machine, get into the habit of checking that screwdrivers and spanners are away from the area around the machine. A screwdriver or spanner that is still in a rotating device part may result in personal injury.
-
Be attentive, watch your actions and use common sense when working with the machine. Do not overextend yourself.
-
Do not operate the machine barefoot or with sandals or similar light footwear. Wear safety shoes that protect your feet and improve your grip on slippery surfaces.
-
Ensure safe footing and balance at all times. This will allow you to better control the machine in unexpected situations.
-
Prevent unintentional start-up. Make sure that the engine switch is switched off before transporting the machine or carrying out maintenance work on the machine. Transport or maintenance work on the machine can lead to accidents if the switch is on.
Safe handling of petrol
- Petrol is very flammable and its gases can explode if they ignite.
- Take safety measures when handling petrol to reduce the risk of serious injury.
- Use a suitable petrol can when filling or draining the tank.
- Carry out this work in clean, well-ventilated outdoor areas.
- Do not smoke. Do not allow sparks, naked flames or other sources of fire to get near when filling up with petrol or working with the machine.
- Never fill the tank indoors. Keep earthed, electrically conductive objects, such as tools, away from exposed electrical parts and wires to avoid sparking or arcing. This could ignite petrol gases.
- Always switch off the engine and let it cool down before refilling the fuel tank. Never remove the fuel filler cap or fill fuel into the tank while the engine is running or while the engine is hot.
- Do not use the machine if you know there is a leak in the fuel system. Slowly loosen the fuel filler cap to release any pressure in the tank. Never overfill the tank (petrol should never be above the marked maximum fill level). Close the fuel tank securely again with the fuel filler cap and wipe up any spilled petrol.
- Do not use the machine if the fuel filler cap is not screwed tightly shut. Avoid ignition sources near spilled petrol. If petrol has been spilled, do not attempt to start the machine. Move the machine away from the area of the spillage and prevent the formation of ignition sources until the petrol gases have dissipated.
- Store fuel only in containers specially manufactured for this purpose.
- Store petrol in a cool, well-ventilated area away from sparks and naked flames or other sources of ignition. Never store petrol or the machine with a filled tank in a building where petrol gases could reach sparks, naked flames or other ignition sources such as water heaters, ovens, clothes dryers or similar.
- Allow the engine to cool before storing the machine in an enclosed area.
Use and care of the machine
- Never pick up or carry the machine while the engine is running.
- Do not handle the machine violently.
-
Use the right machine for your area of application. The right machine will do the job it was designed for better and more safely.
-
Do not change the speed governor setting of the engine or over-rev it. The speed control system controls the maximum speed of the engine with maximum safety.
- Do not run the engine at high speeds when not compacting.
- Do not hold your hands or feet near rotating parts.
- Avoid contact with hot petrol, oil, exhaust gases and hot surfaces. Do not touch the engine or exhaust silencer. These parts become particularly hot during use. They are still hot a short time after the machine is switched off.
- Allow the engine to cool down before carrying out maintenance or adjustment work.
- If the machine starts to make unusual noises or vibrations, switch the engine off immediately, disconnect the spark plug cable and determine the cause. Unusual noises or vibrations are usually a safety sign of faults.
- Only use assembly and accessory parts approved by the manufacturer. Failure to do so may result in injury.
- Service the machine. Check for misalignment or jamming of moving parts, damaged parts and other conditions that could impair function of the machine. Have the machine repaired before any further use if you find any damage. Many accidents are the result of poorly maintained equipment.
- Keep the engine and silencer free of grass, leaves, excess grease or soot encrustation to reduce the risk of fire.
- Never pour or splash water or any other liquid onto the machine.
- Keep the handles dry, clean and free of small parts.
- Clean the machine after every use.
- Follow the applicable waste disposal guidelines for petrol, oil etc. to protect the environment.
- Keep the switched-off machine out of the reach of children and do not allow persons who are not familiar with the machine or these instructions to use the machine. The machine is dangerous in the hands of untrained operators.
Service
-
Before cleaning, repairing, inspecting or adjusting, switch off the engine and ensure that all moving parts have come to a standstill.
Always ensure that the engine switch is in the "OFF" position. Disconnect the spark plug cable and keep it away from the spark plug to prevent accidental start-up. -
Have your machine serviced by qualified personnel. Only use original spare parts. This ensures that the machine remains safe.
Additional safety instructions
- Keep hands, fingers and feet away from the base plate in order to avoid injuries.
- Hold the handle of the plate vibrator firmly with both hands. If both hands hold the handle and your feet are away from the compacting plate, your hands, fingers and feet cannot be injured by the compacting plate.
Always stay behind the machine when using it; never walk or stand in front of the machine when the engine is running. - Never place tools or other objects under the plate vibrator. If the machine hits a foreign object, stop the engine, disconnect the spark plug and check the machine for damage; repair the damage before restarting and using the machine.
- Do not overload the machine by compacting too deep or too fast.
- Do not use the machine at high speeds on hard or slippery surfaces.
- Be especially careful when using the machine to work on or cross gravel beds, gravel paths or gravel roadways.
- Watch out for hidden dangers and traffic. Do not carry people.
- Never leave the workplace and never leave the plate vibrator unattended when the engine is running.
- Always stop the machine when work is interrupted or when relocating from one place to another.
- Stay away from trench edges and avoid actions that may cause the plate vibrator to tip over. Walk up slopes carefully backwards in a direct line, to avoid tipping the plate vibrator over onto the operator.
Always place the device on a firm and level surface and switch the machine off. - Limit working hours with the machine and take regular breaks to reduce vibration stress and let your hands rest. Reduce the speed and force with which you perform repetitive movements.
Residual risks
The machine has been built according to the state-of-the-art and the recognised technical safety requirements. However, individual residual risks can arise during operation.
-
Furthermore, despite all precautions having been met, some non-obvious residual risks may still remain.
-
Residual risks can be minimised if the "Safety Instructions" and the "Intended Use" together with the operating instructions as a whole are observed.
- Avoid accidental start-ups of the machine.
- Use the tools that are recommended in this operating manual. This is how to ensure that your machine provides optimum performance.
- Keep your hands away from the working area when the machine is in operation.
7. Technical data
| Engine / drive | 1-cylinder, 4-stroke for unleaded petrol |
| Displacement 196 cm3 | |
| Engine output 4.1 kW | |
| Fuel content 3.6 l | |
| Engine oil capacity max. 0.6 l | |
| Eccentric vibration unit oil capacity | 0.08 l |
| Plate size (L x W) ca. 530 x 370 mm | |
| Centrifugal force 11000 N | |
| Feed | 25 m/min |
| Vibration frequency | 5500 rpm |
| Compaction depth | 25 cm |
| Max. permissible inclination for the engine | 20° |
| CO2 emissions | 925,8 g/kWh |
| Weight | approx. 57 kg |
Subject to technical changes!
Noise and vibration
The noise levels have been determined in accordance with EN ISO 3744. Total vibration emission values (vector sum of three directions) determined per EN 500-1.
Noise can have serious effects on your health. If the machine noise exceeds 85 dB, please wear suitable hearing protection.
Noise data:
| Sound pressure level \( {\mathrm{L}}_{\mathrm{{pA}}} \) | 84.2 dB |
| Uncertainty \( {\mathrm{K}}_{\mathrm{{pA}}} \) | 2.34 dB |
| Sound power level \( {\mathrm{L}}_{\mathrm{{WA}}} \) | 106 dB |
| Uncertainty \( {\mathrm{K}}_{\mathrm{{WA}}} \) | 2.34 dB |
Vibration parameters:
| Vibration \( {\mathrm{a}}_{\mathrm{h}} \) | 10.8 m/s2 |
| Uncertainty K 1.5 m/s2 |
The specified sound levels have been measured in accordance with a standardised test procedure and can be used to compare different tools with one another.
In addition, these values are suitable for estimating the stresses for the user resulting from the noise in advance.
Warning! Depending on how you use the tool, the actual values may differ from the those given. Implement measures to protect against noise nuisance.
In doing so, take into account the complete working process, including the times when the tool is working without load or switched off.
Suitable measures include regular maintenance and care of the tool and the insertion tools, regular breaks as well as proper planning of the working process.
8. Unpacking
- Open the packaging and carefully remove the product.
- Remove the packaging material, as well as the packaging and transport safety devices (if present).
- Check whether the scope of delivery is complete.
- Check the product and accessory parts for transport damage. In the event of complaints the carrier must be informed immediately. Later claims will not be recognised.
If possible, keep the packaging until the expiry of the warranty period. - Familiarise yourself with the product by means of the operating manual before using for the first time.
- With accessories as well as wearing parts and replacement parts use only original parts. Spare parts can be obtained from your specialist dealer.
- When ordering please provide our article number as well as type and year of manufacture for the product.
WARNING!
The product and the packaging material are not children's toys! Do not let children play with plastic bags, films or small parts! There is a danger of choking or suffocating!
9. Layout
You will need the following to assemble the plate compa
- Open-ended spanner SW16 (not included in the scope of delivery)
- Slotted screwdriver (not included in the scope of delivery)
- Enclosed accessories bag
9.1 Fitting the handle (Fig. 3 + 4)
- Unfold the guide bar with handle (1).
- Slide the guide bar with handle (1) between the fixing lugs and secure it with 2 hexagonal bolts M10 x 70 (1a), 2 10 mm washers and 2 stop nuts.
- Attach the throttle (2) to the upper handle (1) with a slotted screw M5 x 25 (2a) and a washer. You can tension the cable using the Bowden cable screw on the throttle (2).
9.2 Fitting the transport frame (Fig. 5)
- Secure the pre-assembled transport frame (12) to the mounting lugs with 2 M10 x 30 hexagonal bolts, 2 10 mm washers and 2 stop nuts (12a). Tighten all the screws hand-tight.
- Now fold up the complete transport frame (12) in working position and attach it to the transport frame hooks (17).
Attention: Always fold up and hook in the transport frame (12) before compacting! Make sure that the joint of the transport frame is free to move so that it can be folded up.
9.3 Fitting the rubber pad (Fig. 6)
When using the plate vibrator on paving stones, fit the rubber pad (20) to prevent chipping and scratching of the stone surface.
Attention! Use the rubber pad only for bedding in concrete blocks, concrete slabs and similar.
Remove the rubber pad when compacting gravel, grit and the like.
- To mount the rubber pad (20), place the machine with the vibratory plate on the rubber pad. Align the rubber pad so that the holes match the screw points on the device.
- Fasten the rubber pad (20) with the fastening strip (21) on the front side with 3 hexagonal bolts M10 x 20 mm each and 3 A10 mm spring washers (21a).
- Tighten all the screws well.
10. Before commissioning
Attention!
Always make sure the product is fully assembled before commissioning!
WARNING!
Health hazard!
Inhalation of petrol/lubricating oil vapours and exhaust gases can cause serious damage to health, unconsciousness and in extreme cases death.
- Do not breathe petrol/lubricating oil vapours and exhaust gases.
- Operate the product outdoors only.
NOTE!
Product damage
Using the product without or with too little engine and gearbox oil can result in engine damage.
- Fill with petrol and oil before commissioning. The product is supplied without engine and gearbox oil.
NOTE!
Environmental damage!
Spilled oil can pollute the environment permanently. The liquid is highly toxic and can quickly lead to water pollution.
- Fill/empty oil only on level, paved surfaces.
- Use a filling nozzle or funnel.
-
Collect drained oil in a suitable container.
-
Wipe up spilled oil carefully immediately and dispose of the cloth according to local regulations.
- Dispose of oil as per local regulations.
NOTE!
Risk of damage!
If incorrectly stored or undrained fuel is used, the carburettor may become clogged or engine operation may be affected.
- Put unused fuel in an airtight vessel and store it in a dark, cool room.
Check before operation
- Check all sides of the engine for oil or fuel leaks.
- Check the engine oil level.
- Check the fuel level - the tank should be at least half-full.
- Check the condition of the air filter.
- Check the condition of the fuel lines.
-
Look for signs of damage.
-
Check that all protective covers are in place and all screws, nuts and bolts are tightened.
10.1 Filling up with engine oil (Fig. 13) Attention!
The plate compactor is delivered without engine oil. Therefore, ensure that you add oil before starting it up. Use multigrade oil (SAE 10W-30 or 10W-40 (depending on the operating temperature)) for this.
Check the oil level regularly before commissioning. An oil level that is too low can damage the engine.
- Place the plate compactor on a level, even surface.
- Unscrew the oil dipstick (14).
- Fill the tank with engine oil using a funnel (not included in scope of delivery). Note the max. filling capacity of 600ml Carefully fill the oil up to the lower edge of the filling port.
- Wipe the oil dipstick (14) with a clean, lint-free cloth.
- Re-insert the oil dipstick (14) and check the oil level without screwing the dipstick tight again.
- The oil level must be within the middle mark on the oil dipstick.
- If the oil level is too low, add the recommended amount of oil (max. 600 ml).
- Then screw the oil dipstick (14) in again.
10.2 Filling up with petrol (fig. 15) Attention!
The plate compactor is delivered without petrol. It is therefore essential to fill with petrol before commissioning. Use Super E5 / E10 petrol for this.
- Clean the area surrounding the filling area. Impurities in the tank lead to operational faults.
- Carefully open the tank cover (5) so that any possible overpressure can be relieved.
- Fill the tank with petrol (Super E5 / E10) using a funnel (not included in scope of delivery). Note the max. filling capacity of 3.6 litres. Carefully fill the petrol up to the lower edge of the filling nozzle.
- Close the tank cover (5) again. Ensure that the fuel cap is tightly sealed.
- Clean the fuel cap and the surroundings.
- Check the tank and fuel lines for leaks.
-
Move at least three meters away from the refuelling area before starting the engine.
-
Do not use petrol that has already been used or that is contaminated. Do not allow dirt or water to enter the fuel tank.
11. Start-up
11.1 Starting the engine (Fig. 10 + 11) ON/OFF switch (23)
The ON/OFF switch (23) activates and deactivates the ignition system. The ON/OFF switch (23) must be in the ON position for the engine to run.
The engine stops when the ON/OFF switch (23) is moved to the OFF position.
Throttle (2)
The throttle (2) controls the speed of the machine. If the lever is moved in the directions shown, the engine runs faster or slower.
Fast / working position = 4
Slow / Idle = 3
Choke lever (16) (Fig. 10)
- Warm engine / choke open:
- Cold engine / choke closed:
Note: The closed position of the choke lever enriches the fuel mixture for starting a cold engine.
The open position provides the correct fuel mixture for normal operation after starting and for restarting a warm engine.
Fuel valve (15) (Fig. 10)
- Open fuel valve:
-
Fuel valve closed:
-
Check the engine oil and petrol levels. See section 10.1.
- Always fold up the transport frame (12) before compacting and attach it to the transport frame hooks (17)! Make sure that the joint of the transport frame is free to move so that it can be folded up.
-
Set the choke lever (16) to closed (open when the engine is warm). Note: As soon as the choke lever (16) is opened, the plate vibrator starts to vibrate at half throttle.
-
Open the fuel valve (15).
- Set the throttle (2) to "half throttle" (= middle position between "fast" and "slow").
- Set the ON/ON switch (23) to OFF.
- Pull strongly on the starter rope (8) and let it wind back in slowly.
- Once the engine is running, slowly close the choke lever (16). And thus put it in the operating position.
- Set the throttle (2) to the working position.
- Plate vibrator starts to work.
11.2 Operation
When using the machine, use the guide bar with handle (1) to steer it.
Run the engine at full throttle, using the throttle (2). In doing so, the plate moves forward by itself at normal speed. When working on inclines, push the plate vibrator forward slightly.
When working on sloping surfaces, reduce the speed by holding the plate vibrator back.
ATTENTION!
Do not use the plate compactor on concrete or extremely hard, dry, compacted surfaces. The plate vibrator then tends to jump and does not vibrate. This can damage both the plate vibrator and the engine.
The number of repetitions necessary for a desired compaction result depends on the type and moisture of the substrate. Maximum compaction has been reached when you notice a very strong recoil.
A certain amount of moisture in the ground is necessary. However, excessive moisture can cause small parts to stick together and prevent good compaction. Let the ground dry a little if it is extremely wet.
A very dry floor raises a lot of dust when working with the plate vibrator. Adding moisture can improve compaction and reduce air filter maintenance.
Compaction with rubber pad
When using the plate vibrator on paving stones, fit the rubber pad (20) to prevent chipping and abrasion of the stone surface (see 9.3).
You can prevent damage to slabs and natural stones when vibrating by fitting a rubber pad under the plate vibrator. Remove the rubber pad when compacting loose, granular soils and for blacktop repair work.
When bedding in with the black rubber pad, discolouration of the material surface may occur.
Compaction without rubber pad
If the plate vibrator is operated without a rubber pad, screw the screws (21a) into the fastening strip (21) and the base plate (20) to prevent damage to the holes.
Notes when compacting
The following notes must be followed when ground is compacted on slopes (mounds, embankments):
- Approach inclines only from the very bottom (an incline that can be easily overcome upwards can also be compacted downwards without risk).
- The operator must never stand facing the downward direction.
- ATTENTION! A maximum incline of 20^ shall not be exceeded. If this increase is exceeded, the engine lubrication system may fail (spray lubrication and therefore failure of important engine components).
11.3 Stopping the engine
Emergency stop
To stop the engine in an emergency situation, move the engine switch (23) to the OFF position.
Switching off under normal conditions:
- Return the throttle (2) to the idle position to stop the plate compactor from moving.
- Let the engine cool down for a minute or two before stopping it.
- Move the ON/OFF switch (23) to the "OFF" position.
ATTENTION!
Do not move the choke lever (16) to the "closed" position to stop the engine. This can lead to a misfire or engine damage.
11.4 Idle speed
Reducing the engine speed when idling extends the engine's operating time, saves petrol and reduces the noise level of the plate vibrator.
- Move the throttle (2) to the "idle", position to reduce the load on the engine when not compacting.
12. Transport (Fig. 20)
WARNING!
Danger of injury!
Unintended and unexpected start-up of the product may lead to injuries.
- After loading, switch off the engine and, after the engine has cooled down, remove the spark plug connector from the spark plug.
- The product can cause severe crushing injuries due to its own weight.
Allow the engine to cool down before transporting or loading to avoid burns and to prevent fire hazards.
The machine can fall and cause damage or injury if it is not lifted properly.
When transporting over longer distances, drain the fuel tank completely.
Secure the machine on the transport vehicle against rolling, slipping or tipping over and also lash down the plate vibrator.
The transport frame facilitates handling. To do this, pull the transport frame out of the hooks (17).
Push the guide bar forward with both hands. This raises the machine slightly.
Now fold the transport frame under the plate vibrator.Proceed in reverse order when setting the machine down.
ATTENTION! Only use the transport frame on a level and solid surface and for short distances.
13. Cleaning and maintenance
WARNING!
Danger of injury and burning!
The product can start unexpectedly and cause injuries. In addition, temperatures of 80^ and more can be reached.
- Switch off the motor before carrying out any cleaning or maintenance work.
- Allow the motor to cool down.
- Remove the spark plug cable from the spark plug.
WARNING!
Health hazard!
Inhaling petrol/lubricant vapours may lead to severe health damage, loss of consciousness and, in extreme cases, to death.
- Do not inhale petrol/lubricant vapours.
- Operate the product outdoors only.
NOTE!
Risk of damage!
Water entering the housing can cause engine damages. In addition, the jet of a high-pressure cleaner can damage parts of the product.
- Clean the product with a cloth, hand brush, etc.
- Do not immerse the product in water or other liquids and do not spray it with a high-pressure cleaner.
| Maintenance plan | |||||
| after 10 operating hours | after 25 oper-ating hours | Every 50 operat-ing hours | Every 100 operating hours | Every 300 operat-ing hours | |
| Air filter Clean Clear | Clean Clean Replace | ||||
| Spark plug Check C | clean Clean Clean Replace | ||||
| V-belt | Check | Replace | |||
| Exciter oil | Replace | ||||
| Engine oil level | Check | Replace | Replace | ||
13.1 Cleaning work:
WARNING!
Danger of injury!
Unintended and unexpected start-up of the product may lead to injuries.
- Switch off the engine before carrying out any cleaning or maintenance work and after the engine has cooled down, disconnect the spark plug connector from the spark plug.
Maintaining your plate compactor ensures a long service life for the machine and its components.
- Check the general condition of the plate vibrator and check for loose screws, misalignment and jamming of moving parts, broken or worn parts and other issues that could impair function of the machine.
- Use a high quality light machine oil to lubricate the moving parts.
- Clean the underside of the plate vibrator as soon as particles of compacted soil get stuck. The machine will not work well if the underside is not smooth and clean.
- Re-attach the spark plug cable after cleaning and maintenance work.
13.2 Checking and replacing the V-belts
Remove the belt cover (19) to gain access to the V-belt (19b). Never use the plate vibrator without the belt cover (19). If the belt cover (19) is not in place, it is possible that your hand will be caught between the V-belt and the clutch, causing you serious injury.
13.2.1 Tensioning the V-belts (Fig. 7, 8, 9)
The V-belt (19b) must be in good condition to ensure optimum power transmission from the engine to the eccentric shaft. Check the condition of the V-belts (19b).
- Switch the engine off and let it cool down.
- Remove the belt cover (19) to gain access to the V-belt (19b). To do this, loosen the 2 screws on the belt cover (19a) with an open-ended 13mm spanner.
- Now check the belt tension (thumb pressure). If the V-belt (19b) gives more than 10-15 mm (thumb pressure), you must retighten it.
- To do this, slightly loosen the four engine mounting screws (19e) on the engine and push the engine forward towards the housing of the eccentric vibration unit (9).
- Now loosen the two counternuts (19d).
- Tighten the V-belt (19b) using the two belt tensioning screws (19c) if the V-belt (19b) gives more than 10-15 mm (thumb pressure). To do this, turn the belt tensioning screws (19c) clockwise. Make sure that the engine/pulley remains at a right angle.
- After tensioning, retighten the four engine mounting screws (19e) and the counternuts (19d).
- Replace the belt cover (19) and tighten the 2 screws on the belt cover (19a) with an open-ended 13mm spanner.
13.2.2 Replacing the V-belts (Fig. 7, 8, 9)
If the V-belt (19b) is torn, worn out or smooth, it must be replaced.
-
Switch the engine off and let it cool down.
-
Remove the belt cover (19) to gain access to the V-belt (19b). To do this, loosen the 2 screws on the belt cover (19a) with an open-ended 13mm spanner.
- Then slightly loosen the four engine mounting screws (19e) on the engine.
- To release the pre-tension of the belt, loosen the counternuts (19d) and turn the two belt tensioning screws (19c) anti-clockwise.
- Push the engine towards the housing of the eccentric vibration unit (9).
- Pull the worn V-belts (19b) off the pulleys and pull two new V-belts into place correctly.
- Tighten the V-belt (19b) using the two belt tensioning screws (19c) if the V-belt (19b) gives more than 10-15 mm (thumb pressure). To do this, turn the belt tensioning screws (19c) clockwise. Make sure that the engine/pulley remains at a right angle.
- After tensioning, retighten the four engine mounting screws (19e) and the counternuts (19d).
- Replace the belt cover (19) and tighten the 2 screws on the belt cover (19a) with an open-ended 13mm spanner.
ATTENTION!
When you remove or attach the V-belt (19b), make sure that your fingers do not get caught between the belt and the pulley.
NOTE!
Product damage
Using the product without or with too little engine and gearbox oil can result in engine damage.
- Fill with petrol and oil before commissioning. The product is supplied without engine and gearbox oil.
NOTE!
Environmental damage!
Spilled oil can pollute the environment permanently. The liquid is highly toxic and can quickly lead to water pollution.
- Fill/empty oil only on level, paved surfaces.
- Use a filling nozzle or funnel.
-
Collect drained oil in a suitable container.
-
Wipe up spilled oil carefully immediately and dispose of the cloth according to local regulations.
- Dispose of oil as per local regulations.
13.3 Changing the engine oil (Fig. 12, 13)
After 25 working hours, the 1st oil change must be carried out. Thereafter, after 100 operating hours.
Recommended engine oil SAE 10W-30 or 10W-40 (depending on the operating temperature).
To drain the engine oil, please proceed as follows:
-
Remove the flexible hose (18) with an open-ended 17mm spanner (not included in the scope of delivery) and drain the engine oil into a suitable tray. Make sure that the sealing ring installed in the flexible hose (18) does not get lost.
-
When the engine oil is completely drained, secure the flexible hose (18) to the device again.
-
Unscrew the engine oil dipstick (14). Fill the oil using a funnel (not included in scope of delivery).
-
Check the oil level with the engine oil dipstick (14). Re-insert the oil dipstick (14) and check the oil level without screwing the dipstick tight again.
-
Screw the engine oil dipstick (14) in again.
-
Pull the starter cable (8) 5x slowly to distribute the oil (without ignition).
13.4 Drain petrol with a petrol extraction pump (Fig. 14, 15)
The petrol must be drained in the event of storage over a longer period of time or if the oil in the eccentric vibration unit is being replaced.
-
Close the fuel valve (15).
-
Hold a collection bucket under the hose of the petrol extraction pump (not included in the scope of delivery).
-
Unscrew and remove the fuel filler cap (5).
-
Remove the fuel filter insert (5a).
-
Push the hose of the petrol extraction pump into the fuel tank and drain the petrol completely using the petrol extraction pump.
-
Reinsert the fuel filter insert (5a).
-
Retighten the fuel filler cap (5).
-
To ensure that no petrol remains in the carburettor, the remaining petrol must be drained out of the carburettor. To do this, place a suitable container (not included in the scope of delivery) under the carburettor and open the carburettor screw (15a).
13.5 Changing the oil in the eccentric vibration unit (Fig. 16, 17)
Due to the weight, we advise you to carry out this work with two people! We recommend changing the eccentric vibration unit's oil after 300 operating hours. Change the eccentric vibration unit's oil only when the eccentric vibration unit has cooled down.
Recommended low-viscosity gear oil SAE 10W-40.
-
Drain the petrol as described in 13.4.
-
Drain the engine oil as described in 13.3.
- Remove the oil drain screw (22) at the top of the eccentric vibration unit housing and tilt the plate vibrator forward.
- Allow the oil to drain into a tray.
- Return the plate vibrator to its original position.
- Fill the eccentric vibration unit housing (9) with low-viscosity gear oil (10W40) using a funnel (not included in the scope of delivery). Note the max. filling capacity of 80-100 ml.
- Screw the oil drain screw (22) back in.
ATTENTION!
Do not overfill the tank! Too much oil in the eccentric vibration unit can reduce performance and overheat the eccentric vibration unit.
Eccentric vibration unit
An eccentric weight on the eccentric shaft inside the eccentric vibration unit housing is driven, at high speeds, by a clutch and belt drive system.
These high rotational speeds of the shaft cause the rapid up and down movements of the machine as well as the forward movement.
13.6 Maintenance of the air filter (Fig. 18)
DANGER!
Risk of fire and explosion!
If not cleaned correctly, fuel may ignite and even explode. This can lead to severe burns or death.
- Clean the air filter only by knocking it out.
- Never clean the air filter with petrol or flammable solvents.
NOTE!
Risk of damage!
Operating the engine without the filter element in place can cause engine damage.
- Never run the engine without the air filter element in place.
A fouled air filter insert (4c) diminishes the engine output due to reduced air supply to the carburettor. Regular inspection is therefore essential.
The air filter should be checked every 50 operating hours and cleaned as required.
- Unscrew the wing nut (4a) and remove the air filter cover (4).
-
Check the air filter cover (4) for holes or cracks. Replace any damaged insert.
-
Unscrew the inner wing nut (4b) and remove the filter insert (4c).
- Wipe off dirt on the inside of the filter housing with a clean moist cloth. Make sure that no direct enters the opening. Set the air filter cover (4) on the filter housing for the duration of the filter cleaning process.
- Remove the filter insert (4c). Check it for damage and replace it if necessary.
- Knock the filter insert (4c) against a hard surface to remove the dirt. Never try to brush the dirt out as this will press it into the fibres.
- If necessary, clean the filter insert (4c) additionally in warm water and mild soap solution. Rinse it thoroughly with clean water and let it dry well.
- Replace the clean filter insert (4c) and tighten the inner wing nut (4b).
- Put on the air filter cover (4) and secure it with the wing nut (4a).
ATTENTION: Never run the engine without an air filter insert (4c) or with a damaged air filter insert (4c). This would allow dirt to enter the engine, which would damage the engine. The manufacturer warranty is then invalidated.
13.7 Cleaning/replacing the spark plug (Fig. 19)
ATTENTION: Only replace the spark plug when the engine is cold!
Check the spark plug for dirt for the first time after 10 operating hours and clean it with a copper wire brush if necessary. Thereafter, replace the spark plug every 50 operating hours if necessary.
- Disconnect the spark plug cable and remove any dirt in the spark plug area.
- Unscrew the spark plug (24) with the supplied spark plug wrench.
- Check the insulation. Replace the spark plug if it is damaged, e.g. cracked or fragmented.
- Clean the spark plug electrodes with a wire brush.
- Check the electrode gap and adjust it using a feeler gauge. To make sure that the engine remains efficient, the spark plug must have the right electrode gap (0.7-0.8 mm).
- Screw the spark plug (24) back in by hand and tighten it about 1/4 turn with the spark plug wrench supplied.
- Fit the spark plug cable onto the spark plug (24).
ATTENTION!
A loose spark plug can overheat and cause damage to the engine. Tightening the spark plug too much can damage the thread in the cylinder head.
14. Storage
DANGER!
Risk of fire and explosion!
Storing the product near potential sources of ignition can result in a fire or an explosion. This can lead to severe burns or death.
- Eliminate possible sources of ignition, such as furnaces, hot water boilers with gas, gas dryers, etc.
NOTE!
Risk of damage!
If the product is not stored properly, the engine can be damaged.
- Store the product protected against dirt, dust and moisture.
14.1 Storage during extended breaks in operation:
If the plate vibrator will not be used for a period of more than 30 days, follow the steps below to prepare it for storage.
- Empty the fuel tank completely (see section 13.4). Stored petrol containing ethanol or MTBE becomes stale within 30 days. Stale petrol has a high rubber content and can thus clog the carburettor and restrict the petrol supply.
- Drain the engine oil from the engine while it is still warm. Top up with new oil. (See section 13.3.)
- Use clean cloths to clean the plate vibrator. Do not use aggressive or oil-based cleaning agents when cleaning the plastic parts. Chemicals can damage plastics.
- Store the plate compactor in an upright position in a clean, dry building with good ventilation.
Store the device and its accessories in a dark, dry and frost-free place that is inaccessible to children. The optimum storage temperature is between 5 and 30^ . Store the device in its original packaging.
Cover the device to protect it from dust or moisture.
Store the operating instructions with the device.
15. Repair & ordering spare parts
After repairs or maintenance, make sure that all safety-related parts are installed and are in perfect condition. All parts which may cause injury must be kept where they are inaccessible to children or others.
Attention: According to the German Product Liability Act, no liability is accepted for damage caused by improper repairs or by not using original spare parts.
Such work should be performed by a customer service centre or an authorised specialist. The same applies to accessory parts.
Spare parts and accessories can be obtained from our Service Centre. To do this, scan the QR code on the front page.
Connections and repairs
Connections and repair work on the electrical equipment may only be carried out by electricians.
Please provide the following information in the event of any queries:
Type of current for the motor
Machine data - type plate
- Motor data - type plate
Important note in the case of repairs:
For return delivery of the product for repair, please ensure for safety reasons that it is free of oil and fuel when it is sent to the service centre.
15.1 Ordering spare parts
Please provide the following information when ordering spare parts:
- Model designation
- Item number
- Type plate data
Spare parts / accessories
Rubber pad - Article no.: 3904601413
Petrol extraction pump - Article no.: ....7907600001
15.2 Service information
With this product, it is necessary to note that the following parts are subject to natural or usage-related wear, or that the following parts are required as consumables.
Wearing parts*: Spark plug, oil, belt, rubber pad, air filter
- may not be included in the scope of delivery!
16. Disposal and recycling
Notes for packaging

The packaging materials are recyclable. Please dispose of packaging in an environmentally friendly manner.
You can find out how to dispose of the disused device from your local authority or city administration.
Fuels and oils
- Before disposing of the device, the fuel tank and the motor oil tank must be emptied!
- Fuel and engine oil do not belong in household waste or drains, but must be collected or disposed of separately!
- Empty oil and fuel tanks must be disposed of in an environmentally friendly manner.
17. Troubleshooting
The following table shows fault symptoms and describes remedial measures in the event of your machine failing to work properly. If you cannot localise and rectify the problem with this, please contact your service workshop.
| Fault Possible cause Remedy | ||
| Motor does not start | Spark plug cable not connected | Connect the spark plug cable securely to the spark plug. |
| No petrol or stale petrol Fill with clean, new petrol. | ||
| Throttle not in correct start position | Set the throttle to the Start position. | |
| Blocked fuel line Clean the fuel lines. | ||
| Oiled spark plug | Clean the spark plug, set the gap or replace. | |
| Not enough oil | Check the engine oil level and top it up if necessary. | |
| Overfilling the engine Wait a few minutes before re-starting. | ||
| Motor runs erratically | Spark plug cable loose | Connect the spark plug cable and secure it. |
| Device runs in CHOKE position Set the choke lever to the OFF position. | ||
| Blocked fuel line or stale petrol Clean | the fuel lines. Fill the tank with clean, new petrol. | |
| Water or contamination in the fuel system | Drain the petrol from the tank. Top up with new petrol. | |
| Contaminated air filter | Clean or replace the air filter. | |
| Motor overheating | Contaminated air filter Clean the air filter. | |
| Restricted airflow Clean the engine of the plate vibrator. | ||
| Engine does not stop when throttle is in stop position or engine speed does not increase properly when throttle is moved. | Deposits in throttle connections. Remove dirt and debris. | |
| Pull cord damaged Contact specialist dealer. | ||
| The plate compactor is difficult to control during operation (machine bounces or moves forward abruptly). | Engine speed too high on hard ground. | Set a lower speed with the throttle. |
| Shock absorber too loose or damaged | Contact specialist dealer. | |
| No compacting function or the plate compactor does not reach the maximum speed | Damage on eccentric vibration unit or the plate vibrator | Contact specialist dealer. |
| Drive belt too loose and slipping | Adjust or replace the drive belt. | |
| Oil loss from engine or eccentric vibration unit | Worn seals | Contact specialist dealer. |
| Leaks on housing | ||
Table des matieres: Page:
Günzburger Straße 69
D-89335 Ichenhausen, Germania
Egregio cliente,
Günzburger Straße 69
D-89335 Ichenhausen
Geachte klant,
9.3 Rubbermat monteren (afb. 6)
Günzburger Straße 69
Günzburger Straße 69
Günzburger Straße 69
D-89335 Ichenhausen
Vázéný zákazníku,
Günzburger Straße 69
D-89335 Ichenhausen
Kedves Ügyfelünk!
Sok oromet es sikert kivanunk uj termeke hasznalatahoz.
Megjegyzés:
Günzburger Straße 69
D-89335 Ichenhausen
Poštovani kupci,
zelimo vam mnogo zadovoljstva i uspjeha pri radu s novim proizvodom.
Napomena:
Prema vazecem njemaackom Zakun o odgovornosti za proizvode, proizvodač ovog proizvoda ne odgovara za stete koje nastanu na ovom proizvodu ili koje ovaj proizvod uzrokuje u slučaju:
neispravnog rukovanja
- Nepridržavanje priručnika za uporabu
- popravaka koje obave drugi, neovlašeni stručnjaci
- montaže i zamjene neoriginalnih rezervnih dijelova
- nenamjenske uporabe
- kvarova elektricnog sustava zbog nepostivanja elektrichnih propisa i VDE propisa 0100, DIN 57113 /VDE 0113
Vodite računa o sljedecem:
Priručnik za uporabu sastavni je dio ovog proizvoda. On sadržava važne napomene za siguran, propisan i ekonomičan rad s proizvodom te za izbjugavanje opasnosti, smanjivanje troškova popravaka i prekida rada te povećavanje pouzdanosti i vijeka trajanja proizvoda. Osim sigurnosnih propisa iz ovog priručnika za uporabu svakako se pridržavajte i nacionalnih propisa koji se odnose na rad ovog proizvoda.
Priere uporabe proizvoda upoznajte se sa svim napomenama za rukovanje i sigurnosnim napomenama. Rabi-te proizvodismo prema opisu za navedena podruca primjene. Saucujte priučnik za uporabu, a u slučaju predaje proizvoda drugoj osobi, svakako predajte i svedokumente.
3. Opis proizvoda (sl. 1)
- Preklopivi stremen za vodenje s ručkom
1a. Vijak stremena za vodenje - Poluga gasa
2a. Vijak poluge gasa - Ispuh
- Poklopac filtra zraka
4a. Krilata matica
4b. Krilata matica (unutarnja)
4c. Uložak filtra zraka
5. Poklopac rezervaora goriva
5a. Umetak filtra goriva
6. Spremnik benzina
7. Motor
8. Potezno uže
9. Ekscentar
10. Temeljna ploča
11. Transportni kotači
12. Vozno postolje
12a. Vijci voznog postolja
13. Vijci temeljne place
14. Mjerna šipka za motorno ulje
15. Pipac za benzin
15a. Vijak rasplinjača
16. Poluga prigušnice
17. Držač voznog postolja
18. Savitljivo crijevo
19. Pokrov remena
19a. VijciPokrova remena
19b. Klinasti remen
19c. Vijci za namješanje
19d. Protumatice
19e. Vijci za učvršćivanje motora
20. Gumeni prostirac
21. Pričvrsna letvica
21a. Vijci pričvrsne letvice
22. Vijak za ispustanje ulja za ekscentar
23. Sklopka za uključivanje/isključivanje
24. Svječica
4. Opseg isporuke
Poz. Kolicina Naziv
| 1x Vibracijska ploča s motorom | |
| 1 1x Ručka | |
| 12 | 1x Vozno postolje |
| 20/21 | 1x Gumeni prostirac s pričvrsnom let VICOM |
| 1x Kliguc za svjećice | |
| 1x Vrećica s priborom | |
| 1x Priučnik za uporabu | |
Günzburger Straße 69
D-89335 Ichenhausen
Spostovani kupec,
želimo vam veliko veselja in uspeha pri delu z vašim novim izdelkom.
Napotek:
Proizvajalec tega izdelka skladno z veljavnim zakonom o odgovornosti za izdelke ne jamci za poškodbe na tem izdelku ali poškodbe s tem izdelkom, do katerih pride pri:
9.3 Kummimati monteerimine (joon. 6)
Günzburger Straße 69
D-89335 Ichenhausen
Gerbiamas clientele,
Günzburger Straße 69
D-89335 Ichenhausen, Vacija
Godatais client!
Günzburger Straße 69
D-89335 Ichenhausen
Bästa kund!
Viktig information for reparation:
Günzburger Straße 69
D-89335 Ichenhausen
Arvoisa asiakas,
Günzburger Straße 69
D-89335 Ichenhausen, Tyskland
Karekunde,
14.1 Opbevaring under laengere driftspauser:
Günzburger Straße 69
D-89335 Ichenhausen
Kjaere kunde,
vi onsker deg mye glede og lykke til ved arbeider med ditt nye produit.
Merknad:
Reservedeler /tilbehor
Gummimatte - artikkelnr.: 3904601413
Bensinsugepumpe-artikelnr.: 7907600001
15.2 Serviceinformationjon
Du ma passe pa, at falgende deler til dette produit underligger en bruksavhengig aller naturlig slitasje hcv. falgende deler er ndvendige som forbruksmaterialer.
Slitedeler*: Tennplugg, olje, reim, gummimatte, luftfilter
- nikke absolutt inkludert i leveringsomfangent!
Günzburger Straße 69
D-89335 Ichenhausen, TepMaHn
Ybaxaemn KIneHTn,
KeIaem BmMHOro npnAHTN MOMeHTN uCyIeXn npn pa6oTata C Baunr HOB npOdyKT.
Yka3aHHe:
CbIaCHO DeIcTBaUria 3aKOH 3a npOdyKTOBaT a OTROBOPHOCT, npOn3BOIDNTeJIaT Ha To3n npOdyKT He HOCN OTROBOPHOCT 3a UeTI, Bb3HnKHaJIu No nJIn nopadIT OTo3n ypeD, npi:
- HenpaBnHo 6opabeHe
- Hecna3BaHe Ha pBkoBOdCTBOTO 3a eKcnIIOaTaun
PemontnOT HeynbHOMOeHN CneuaNNCTN,BAaN Ce TpeT Nua - MoNTaIX IIOdMHa Ha He OpiRnHaJIHn pe3epBHN qACTN
- YnoTope6a He no npedHa3NaueHne
- OTKa3 Ha eJekTpueckata nHcTaJaunn npn HeCnA3BaHe Ha npedncaHnra 3a pa60ta c eJekTpueCTBO n pa3npoe6nte Ha VDE 0100, DIN 57113VDE 0113
B3emete noBHHMaHHe:
PbKOBOCTBOTO 3a ekCnNoatauiae cbCTabHa qact OT To3n npOdyKT.To cBdbpka BaxHn yka3aHna OTHOCHO 6e3oNaChATA, npABunHATA u NKOHOMNuHaTa pa6ota C npOyKa, n36rBaHeto Ha onaChOCTN, cneTBAHeTO Ha pa3XoDi 3a peMOHT, HAMAnBaHeto Ha BpeMeHa- Ta Ha npctoI uYbeJInuHaBaHeto Ha NaDeKdHocTt a EKCnPoatauONHHra KVBOT Ha npOdyKa. B Donbl- HeHne KbM yka3aHnaTA 3a 6e3oNaCHOC T TOBa pbKoBOCTBO 3a ekCnNoataua, 3aBnJxntEnHo Tp8Ba Da cna3BaTe OTHacAHTte Ce do ekCnNoatauIra Ta Ha npOdyKa npedncaHn BB BaWata cTpaHa.
Ipei Da n3noJ3BaTe npOyKta, 3aNo3HaIte cec BcUckn yka3aHnra 3a pa6oTa n 6e3onacHocT. N3-ON3BaIte npOyKta camo KaKTo e OnncAo n 3a nocoehnte oblaCTn Ha ynotpe6a. CbXpaHraBaIte pBkoBOdCTBOTO 3a ekCnloaTaun Ha cnrgpHo MrcTo n IpeDaBaIte BCuCKN DOkUMeHTn, KOrATo npEpaBaTe npOyKta Ha TpeTI Niua.
3. OnncaHne Ha npoDyKta (Onr. 1)
- Crbbaema HanpabnBaua cko6a c pbkoxBatka
1a. BnHT Ha HanpaBnaBaAata Cko6a
- JIoCT 3a ra3Ta
2a. BnHT Ha loCTa 3a Ra3Ta
-
Aycnyx
-
Kanak Ha Bb3DyHnHnΦnTTbp
4a. KpNJUcTa raIka
4b. Kpnjnuata raika (Bbtpewha)
4c. Bnokka Ha Bb3dyHnna fNtbp
- Kanak Ha 6eH3nHOBna pe3epBoap
5a. Bloxxka Ha ropuBnna fnnTbp
- BeH3nHOB pe3epBoap
7.Двигатen
-
BbXe Ha cTape
-
EKcUeHTpNK
10.OCHOBHAnIIOya
-
TpaHcnpTHn KoJena
-
XoOba qacT
12a. BnHTOBe Ha XoIOBaTa YAcT
- BnHTOBe Ha OCHOBHATA NIOya
14.Измервateлha ueka 3a DBnraTeJIHOTo MacNo
- BeH3nHOB KpaH
15a. BnHT Ha Kap6ypaTopa
- JIoCT Ha cMykaHa
17.Дьржаузховатучс
-
_BKBaB MapKyu
-
Kanak 3a pembka
19a. BnHToBe Ha kaNaka 3a peMbka
19b. KJIINHOBUNeH pEmbK
19c. Perynnpaun BNHTOBe
19d. KoHTparaKn
19e. BuHTObe 3a 3akpenBaHe Ha DBuRatEnr
3a MoNTaKa Ha Bn6paCNoHHata nNoHa mMaTe HxKdaOT CJIeHOTO:
- FaeueH KIOH SW16 (He e BkIOHcH B oEema Ha DocTabkata)
- OTBepTka 3a BnHTObe c WJNIOBa rJaBa (He e BKJIQUeHa B Obema Ha DoCTaBkata)
Top6nUka c npHaJdxJxHocTn
9.1 MoTak Ha pBkoXBaTkata (Φn.r. 3 + 4)
- Pa3rBHeTe HAnpabNraBaUaTa cKo6a C pbkoxBaTkata (1).
- BkapaTe HnpaBnaBaata cKo6a c pbkoxBatKaTa (1) MeKdy nlaHKeTe 3a 3akpenBaHe n rnoocnypeTe c 2 BNtca sIeCTOcTeHHa rnaBa M10 x70 (1a), 2 wai6u 10 mm u 2 camooCnrypRaun ce raikn.
- 3akpenete nocta 3a rata (2) c bHt c uuioBa rnaBa M5 x 25 (2a) n uai6a ha rohpata pboKoBbAtka (1). MoKeTe da o6TerHeTe BxKeTo C nomOuTa Ha BnHTa Ha XJIoTO Ha NoCTa 3a ra3Ta (2).
9.2 MoHTaK Ha XoOBoTa YacT (ФИr. 5)
- 3akpenete npedBapnteHNO MOHTnpaHaTa XoOBa Yact (12) c 2 BnHTa c wecTOcTeHHa rIaBa M10 x 30, 2 wainb 10 mm n 2 camoochnpyrau ci raikn (12a) kbl m nlaHKnte 3a 3akpenBaHe. 3a-TeRHeTe BCNUKn BnHTObe.
- B pa6oTHO nONOKeHne BnHHeTe XODOBaTa qact Dokpa(12) n oKaUeTe c npope3nte B dBpkaHa XODOBaTa qact (17).
BnMaHHe: Ppei yIpbTHBaHe BnHaRn BnraTe xoIObata qact (12) n a OKaYBaIe! YBepeTe ce, ye cTbAta Ha XoIObata qact Ce DnKn CBO6OJHo, 3a da MoKe Da ce CbBa Harope.
9.3 Mohtak Ha rymeHaTa noJIOxka (Φnr. 6)
Korato n3non3Bate Bn6paunOHnHa TnOoA Bbpxy naBeta,MOHTnpaTe rymehata noDnOxka (20),3a da npedOTbpatnte OTkbptBaHe N3dpaackBaHe Ha NOBbpxHOCTTa Ha Kambka.
BHMaHHe! N3noJ3BaIte rymeHaTa NOJNOXka cAmO 3a Bn6paUHOHO yNtBTHRAHe Ha 6eTOHH 6JOKOBe, 6eTOHH IIOuH IN DpyrN IOo6HN.
CbaIyTe rymeHaTa nOIoXkKa npn n3BbPwBaHe Ha Bn6paunOHn pa6OTn C qAkn, nAcbk N npyn noo6Hn.
- 3a MOHTaK Ha rymeHaTa NOJIOxKa (20) NOCTaBete MaunHaTc Bn6paunOHHaTaNIOy Bbpxy rymeHaTa NOJIOxKa. IOpRaBHete rymeHaTa NOJIOxKa Taka, ye OT-BOPTe Da CbBnaDat C TOOKITE Ha 3aBnHTBaHe Ha ypeDa.
- 3akpenTe rymeHATA noIIOKka (20) c nlaHKata 3a 3akpenBaHe (21) ot YenHata c TpaHa c 3 BnHTa c wectocTeHHa rnaBa M10 x 20 mm, 3 npyKinHHn npbCTeHa A10 mm (21a).
- 3aTeHHeTe Do6pe BCnUKN BnHTOBe.
Onachoct ot HapaHyaBe!
CnyaHOTOn HeoayakBaHO nOterIHe Ha npOdykTa MoKe Da npuHHn HapaHbAHn.
- Cnéd haTobapBaHe n3KJIouhe Te DBnraTeIeN, cnéd KaTo Toi n3CTnHe, n3BaTeTe Nynata Ha 3aNaIIn-TeHhTa CBeu OT 3aNaIInTeHhTa CBeu.
- PpOdyKtBt MoKe Da npuynH TeKKn HapaHbAHn npc CmaQkBaHe nopadn Co6CTBeHOTo cn TerNo.
Ipei TpaHcnpTnpaHe nn TOBapeHe OCTaBeTe DnraTeJa da ce oxnaDn, 3a Da n36erHete n3rapHn I da n3KnOHTe pNcKa ot noXap.
MaunHaTMOKe Da NaHe N Da PnHm MaTePnAnHa UeTa HapHaBaHe, aKo He 6bJe NOBnHaTa npabnHo.
Ptp TaHcnpTupaHe Ha no-DbIg pa3CTOHHn H3- npa3HeTe HanbJHo pe3epBoapa 3a ropBO.
OcnrypeTe MaunHaTa Bbpxy npeBO3HOTo CpeDCTBO cpeuy TbpKaJnHe, n3MeCTBaHe nn npeo6pbuahe n DonbHHTenHO ykpenTe Bu6paUOnHata nnoa.
XoOBaTa yact yneChra 6opabHeTo.3a ceI Ta n3- DbpnaTe xoOBaTa yact OT dbpKaay (17).
HaTnCHete HanpAbnBaAata cKo6a C DBe pBue Ha- nped. TOBa nobDura MaunHata neko.
CrbHeTe XoObTa Yact NOD Bn6paunOHHa TnOua. Pn CnyckaHe Ha MaunHata DeIcTBaIe B O6paTHa nocpeIOBaTeJHOCT.
BHIMAHNE: 3no3BaTe XoOBaTa qact cMo Bbpy paBHa n TBbpda NOBbpxHOCT n Ha KpaTK pa3-CTOHH.
Onachoct ot HapaHbahe!
CnyaHOTo HneOuyakBaHO NOTeTJIHe Ha npOdyKta MOKe Da npuHHn HapaHbAHn.
- PpeiB BCnUKN pa60Tn no NOuHCTBaHETO n NOdPbXkata n3KJIIOvBaIte DBrIaTeJn N3BaXkaIteNynata Ha 3anaNTeHNHaTa CBeUOT 3anaNTeHNHaTa CBeU.
IopdpbXkata Ha Baata Bn6paHHa nloa rapaHTnpa Dblr ekpnoataHOEH KINBOT Ha MaHnHata HneHNTe KOMNOHEHTN.
- PpOBepeTe 6oToCbCTOHNHe Ha Bn6paOnOHHaTa nNoa 3a paXla6eHn BNHTObE,OTKIOHeHnIi 6NOKIPAHe Ha NODBHXHnTe Yactn, CuyneHnIi HanyKaHn Yactn, KOITo MOraT da NOBnIyraT Ha pa6oTaTa Ha MaunHata.
- INOJI3BaIe BnCOKOKaYeCTBeHO JIeKO MaUNHOMACNO 3a Cm3BaHe Ha NODBUNKHITe YactN.
- Nocntete DoHata cTpaHa Ha Bn6paunOHata nloa BeHara 10m no Hero noJenHAT qactnnte ot ynnbTheHATA noBa. MaunHata Hma da pa60tn do6pe, aKO doHNata cTpaHa He e rnaKa n YnCTa.
Cnepa60nte no nouchBaHe n noDpBxxKa CBbpxKeTe OTHOBo Ka6ena 3a 3anaIHTenHaTa CBeu.
13.2 ПоберkaисmaHa Na KlnHOBuHnЯ peMbK
CbaJIeTe KanaKa Ha peMbKa (19), 3a da nonyUHe DoCTbIdo KNIHOBnHnepMbK (19b).Hnkora He n3non3BaIte Bn6paOnHHata IINoHa 6e3 KaNaka Ha peMbKa (19).Ako KaNAkBT Ha peMbKa (19) He e MoHTnpaH, Bb3MOxHo e pbkata Bn da ce 3axBaHe MeJdy KNIHOBnHnepMbK i CbeDInHtEJIa, KoETO Da npuHnCepeNo3Ho HapaHBAHe.
13.2.1 OStTgAHe Ha KInHOBuDHHa peMbK (Mn7,8,9)
KlnHOBNHnT peMbK (19b) Tp6Ba da e B do6po cBcTOHnE, 3a da OcnIpyn ONTMAMnO npedabAne Ha MOUHOCCTTa OT DBnraTeN KBM EKCHeHTpnuHnBA n. IpOBepeTe CbCToHNeto Ha KInHOBNHnpeMbK (19b).
1.ИЗкючeteDburateJIЯIrooctaBeTe da ce ox- naDi.
2. CBaIeTe KanaKa Ha peMbKa (19), 3a Da noJy- yIte DoCTbI DO KInHOBnHnpeMbK (19b). 3a ceI-Ta pa3Xna6Te 2-Ta BNHTa Ha KaNaka Ha peMbKa (19a) c raeueH Knou SW13.
3. Поберете объганeto на ремьka (натиckeане с палец).Трава за оветене киновднирахь (19b) ce orba c nobeve ot 10-15 mm (натиckeанe с палец).
4. 3a ΚειΤΑ ΜΤΒΗΝΤΕ ΜέΚΟ Χετηρινε Κκρεπι-TeJIΗΝΤΑ (19e) Μάνυσα Ανρεμεότε Μαπρεδ Σβυσατηλν Βοκοκα ΚβΜ Κρόγα Κα ἀκεύθητρικα (9).
5. OTBnHTe Te DBeTe KOHTparaiKu (19d).
6. 1006TerHete KINHOuHnpeMbK (19b) c noMoUta Ha Dbata 3ateraTeHN H BuHTa (19c), aKe ce orbBa c nobuee ot 10-15 mm (HaTnCKaHe cnaLeua). 3a da HAnpaBnte ToBa, 3abptete 3aTeratEnHte BnHTOBe (19c) no nocoka Ha yacOB-HNKOBaTa Ctpelka. YBepTe ce, ye DnuratEnT/peMbHuHa Taaw6a octabat noD npab bI.
7. CneD o6TraHaTe 3aTeHHeTe YeTpInTe 3aTeRaTeHNu BnHTa (19e) n KOHTparaiKnte (19d).
8. NocTabete OTHOBO Kana Ka Ha pembka (19) 3aterheTe 2-Ta BnHTa Ha Kana Ka Ha DnBraTeTn (19a) c raeuen Knou SW13.
13.2.2 CmHa Ha KInHOBnHnpeMbK (fNr.7,8,9)
KlnHOBNHnTpeMbK(19b) Tpr6Ba da ce cMeHN, aKe eCKbCaH, n3HOceH nnn rJaDbK.
1.ИЗкючeteDburatЯи ro octaBeTe da ce ox- naDi.
2. CbaneKe Kanaka Ha pembka (19), 3a Da noIy- nIte doctbn Do KlnHOBNHnpeMbK (19b). 3a ceIta pa3Xna6ete 2-Ta BnHTa Ha kanaka Ha peMbka (19a) craeeh KnIOu SW13.
3. Cnei TOBa OTBnHTeTe JekO Yetupnte 3aTeRaTeHN BuHTa (19e) Ha Dnuratena.
4. 3a Да освобдente прдарпгното onьваны ремьka, OTВИNTe KOHTparayкnte (19d) ИЗавртete ДБATA 3ATERATEHIN BINTA (19c)ob-paTHO Ha yacOBHKNOBaTA CTpeNka.
5. Ппемecтete ДВИгател no NOcOKa Ha KOpnyca ha ekCueHTpika (9).
6.ИЗдьрnaiteКлновидняpeMbK(19b)otpeMbYHNTe Wai6n I NOCTaBeTe Dbata HOBn KInHOBUNHINPEMbKaIpaBUNHO.
7. 1006TeHHeTc KJIINHOBnHnpeMbK (19b)c noMoUta Ha Dbata 3aTeaTeJn H BnHTa (19c), aKOce orbBa c nobEe ot 10-15 mm (HaTnCKaHe cnaIeua). 3a Da HnpaBnTe TOBa, 3aBbPteTe 3aTeaTeHNTE BnHTOBe (19c) nO nocKa Ha YacOBHHKOBaTa CTpeJka. YBepTe ce, ye DnRatEnT/peMbHATAaAbaOCTaBA TIO npabBtJ.
8. CneI O6TgAHeTo 3aTeHHeTe YeTpInTe 3aTeRaTeJIHN BnHTa (19e) N KOHTparaiKnTe (19d).
9. Пoctabete OTHOBO kanaka Ha peMbka (19)и 3aterheTe 2-Ta BnHTa Ha kanaka Ha DBurataTeJ (19a)crauehen KIOUc SW13.
BHUMAHNE!
Korato cBaJIaTe nIu NoCTaBTe KINHOBNHnpeMbK (19b), BHMaBaIte Da He npTuNCHe TpbcTnte Cm MeJy peMbKa n pOkaTa.
YKA3AHHEI
NoBpeKdaHe Ha npOdykTa
Pa6ota Ha npOdykTa 6e3 nnn c TBbpDe MaNko DnBnraTeHNO nnn peDyKTopHO MacNo MoKe Da DoBeDe Do NOBpeXdaHe Ha DnBnateJIa.
- PpeHn NyckaHTo B EKcNNoatauHaJeTte 6eH3HH Hm MacNo. IpoDyKTbT Ce DoCTaB 6e3 DnraTeJHO npEpykTopHo MacNo.
YKA3AHNE!
EkOnrHn 1
I3TeKIOTo MaCNo MoKe TpaHNo Da 3aMbpcn OkoHaTa CTpeJa.
TeuHocTTa e cnHIO OTPOBHa N MoKe 6bP3o Da IdoBe-De Do 3AmbpcBaHe Ha BOdTa.
-ПьлHTe/N3TOUBAIte MacJIoTO cMo Bbpxy paBHN, TBbpN IOBbPxHOCTN.
-ⅢnON3BaIte TbpIOBnHa 3a 3apeKdahe nnn cyHna.
-Cb6bpauTe H3TOueHOTo MACJIO B IOxOJaCbD.
- He3a6abHo n36bpeTe pa3JrTOTo MacNo n n3-xBbPne Te napcaNa cbrnaCHO MeCTHnTe pa3nopeDn.
- N3XBbPJIaTe Macnoto CbIaCHO MecTHHrPe pa3-nope6n.
13.3 CmHa Ha DnRaTeHTo MaCJIo (ΦnIg. 12, 13)
Cne 25 yaca pa60ta Tp8bda ce n3Bbpnn npbBata cmaHa Ha macno. Cne ToBa cne 100 pa60THn yaca.
IpenopbnteJHO dBnraTeJHo MacNo SAE 10W-30 nnSAE 10W-40 (B 3abncmoct ot pa6oTHata tempepatya).
3a n3TOBaHe Ha DnBraTeHToMaCNo IpoeIpaI-Te NO CJIeHNHaUH:
- CbaIeTe rymenMapky (18) craeuen KIOUc SW17 (He e BkIIOueH B o6ema Ha doCTaBkaTa) n3TOte DBNrAteHToMaCnO B NOxOJaC sbd. YBepeTe ce, ye MOHTnpaHnT B rBbKaBn Mapky (18) yNtBTHNTeH npbCTeH Hma da ce n3ry6n.
- Ako DnuratEnHTo MaCNo e n3ToyeHO dOKpaN, CBbpKxTe TbBkABn Mapkyu (18) OTHOBO KbM ypeDa.
- OTBnHTeTe BnHTOBete Ha MacNON3MepBaTeJIHa- Ta 3a DnRatEnHTo MaCNo (14). HaneIte MacNo C NOMOuTa HaΦHHra (He e BKnIOueHa B O6ema Ha DoCTaBkata).
- Поберете НИВОТо Ha MacIToC MacIOn3MepBaTeHATA ueKa 3a DBnIaTeHOTo MacNo (14).BkapaIte OTHOBO macIOn3MepBaTeHATA ueKa(14)ипоберетe OTHOBO HIBOTO Ha macITo,6e3 Da 3aTЯrTe OTHOBO ueKaTa.
- 3aBnHTeTe OTHOBuHToBete Ha MacNON3MepBaTeHaTa UeKa 3a DnraTeJHoto MacNo (14).
- Дрьнete 6abHOBbXeToHa cTapTepa (8)5 nTn, TakaYe MacnoTo Da ce pa3nPepen (6e3 3anaIbaHe).
13.4 N3ToUbaHe Ha 6eH3nHa c 6eH3nHOBa cmykaTeJHa NOMa (Φnr. 14, 15)
Beh3nHbT Tp8Ba Da ce n3TOU npn no-npOdbJxN-TeJIHO CbXpaHeHne nn npn cmHa Ha MacNoTo 3a ekCueHTpuKa.
- 3aTbOpTe 6eH3nHOBnKpaH (15).
2.Пoctabete npHeMeH cIД NOI Марkyua Ha 6eH3INHObATA CMyKATEJIHa NOMna (He e BKNIOUeHa BO6ema Ha IOCTaBkata).
3. OTBnIe Kanaka Ha pe3epBoapa (5) n ro cBaaneTe.
4. 13BaTe BNOkKaTa Ha roPbHnФnTbp (5a).
5. BkapaIte MapkyuHa 6eH3nHObata CMykateJIHa NOMBa 6eH3nHOBna pe3epBoap n N3TOyeTe 6eH3nHa c NOMUa Ta Ha 6eH3nHObata CMykateJIHa NOMNa.
6. NocTabete OTHOBO BNOXkata Ha rOpNBnI-Tbp (5a).
7. 3aterthe OTHOBO BnHTOBeTe Ha Kanaka Ha pe-3epBoapa (5).
8. 3a da ce rapaHTnpa, ye B kap6ypatopa He oc-taba 6eH3nH, octaHaJIyT 6eH3nH Tp8bA da ce n3TOUH OT Hero. 3a ueIa NoCTabete NODXODIc bD (He e BKNIOyeH B O6ema Ha DOCTABKaTa) NOD KAP6ypatopa I OTBnHTeTe BNHTa Ha Kap6ypatopa (15a).
13.5 CmHa Ha MaCnOTo 3a ekCuEHTpNka (ΦnR. 16, 17)
IopadnteroTTO Bn CbBETBaMe da n3BbPwBaTe Ta3npabota cDbama duyu! PpenOpbYBaMe Bn da cmHenTe MacnoTo 3a ekcEHTpKa cne3 300 pa6oTH nuaca.CmeHnTe macNoTo 3a ekcEHTpKa camo kOratoekCteHTpKnBt ce e oxJaNl.
PpenopbHTeHNO peDyKTopHO macNo c HncbK KoepuueHt Ha TpneHe SAE 10W-40.
1.ИЗTOUeTe 6eH3nHa, KaKTo e OINcAHO B 13.4.
2.ИЗTOUYE MOTOPHOTOMACNO,KAKTO e OINCAHO B13.3.
3. Chemete npo6kata 3a n3TOUbaHe Ha MacnTo (22) Bbpxy Kopnyca Ha ekcueHTpika HnakNoheTe Bn6paunOHHa TnOua Hanpei.
4. IV3TOUeTeMacJIoTOBcBД.
5. NocTabete Bn6paunOHHaTa nIOUa OTHOB B n3-XoJHO NOIOXeHHe.
6. HanbIhHeTe Kopnyca Ha ekCzehTpNka (9) c peDyKTopHO MacNo C HnCbK KoEeHneHT Ha TpNeHe (10W40) c nOmoTuHa cyHnra (He e BKnIOueHa B o6ema Ha doCTaBkata). O6bPHeTe BHMaHne Ha MaKc. 66em ot 80-100 ml.
7. 3aBnHTeTe OTHOBo npo6kata 3a N3TOUbaHe Ha MacJIoTO (22).
△BHUMAHNE!
He npenbIbaIte pe3epBoapa! TbbpDe Mhoroto MacNo B eKcUeHTpKa MoKe Da HamaJIIM MOUHOCTTa My I da DOBeJe Do HerOBOTn PerpBaHe.
EckcyeHTpNK
EkceHTpnuHa TeKecT Bbpxy BaNa Ha ekcEHTpika B Kopnyca Ha ekcEHTpika ce 3aDbNkBa npn BucOKn CKopocTH OT CbeHnTeI N CnCTema 3a 3aDbNkBaHe Ha pembka.
Te3n BnCOKn CKOpOCTn Ha BbPteHe Ha BaJa KapaT MaunHaTa Da ce DnKn 6bp3o Harope, HAnOny n Ha- nped.
13.6 NopdpbkkaHa Bb3dywnna fnnTbp (fnr. 18) ONACHOCT!
OnachocT oT noXap n ekcnno3n!
TOpnbOTMOxKe da ce 3anaJIu n eBeHTyaJIHO da ekCnloInpa npu HnnpabUNHO noNUCTBaHe. TOba BoOndoTeKKn I3rapHnN nn CMbPT.
-Поунстваite Вьздушни Фиntыр само катоюн3ТУNBATE.
-Hnkora He nouchTaBte Bb3dyHnnaΦnTbp C 6eHnHnn 3anaannmu pa3TBopnteni.
YKA3AHNE!
Onachocot noBpexdahe!
Pa6oTaHa DnuratEn 6e3 nocTaben HnntbpeH enemHT MoKe Da DoBeDe Do NobPeDa Ha DnuratEn.
-Hnkora He octabnTe Dnrgatena da pa6oTu 6e3 noctabEn eIemENT Ha Bb3dyuHnA qntTp.
3ambpcena BLOXKa Ha Bb3dUshnna QnilTbp (4c)HaMaJIra MoUHOCCTTa Ha DBrIaTeJNa NopadN HeOCTaTbUHO NoDaBaHe Ha Bb3dUx KbM Kap6bpaTopa. CNeDoBaTeHNO peoOBHnTe npOBepKn ca ot cbuectBeHo 3HaueHne.
Bb3dyuHnT fHnTbp Tp86Ba Da ce npoBepraHa BCEKN 50 pa60THn Yaca n npn Heo6xOumocT da ce noHCTBa.
- OTBnHTeTe KpNJUHaTata raKa (4a) n cBaJeTe Ka-naka Ha Bb3DyUnHnaΦnNTbp (4).
- IpoBepete Kanaka Ha Bb3dyuHnA nTbp (4) 3a DynKn nn NykHaTuHn. CmeHete eBeHT. noBpeDeHn eneMeHT.
- OTBnHTe Te BbTpewHaTa KpIuHaTa raiKa (4b) n 3BaTe ΦnTbPHaTa BnOxka (4c).
- 136bpuTe MpbcotnTa OT BbTppeuHaTcTpaHa Ha TAnOTo Ha qnIbPa C uHCTa, BnaXHa KbpNa. YBepTe Ce, Ye B OTbopa He nonada Mpbcotn. NocTabete KaNaka Ha Bb3dUHHa qnITbp (4) OTHOBo Bbpxy TaIOTO Ha qnITbpa 3a Bpemeto Ha NouchTbaHe Ha qnITbpa.
- CbaIeTe fHITbPHaTa BIOJka (4c). IpoBepete ro 3a IOBpeDu N rO CMeHeTe, aKo e Heo6xOuMo.
6.ИЗтунаге ФиNTьрнATERБLOЖKA(4c)Вьрху TBьрдЯ NOBьрхHOC,3aДа OTCTpaHITe 3ambpCЯBaHETO.HNKORA He ИЗчЕТКВайтЕ МьсOT纳Ta,TбкATO TOBA USE BNE3E BBВlaKHATA.
7. Ako e Heo6xOdmo, nouHCTe fHNTbPHaTa Bnokka (4c) c TOnna BOda n MEK canyHe n pa3TbOp. N3nnakHete r OCHOBHO C uNCTa BOda n octabete da n3cbXHe do6pe.
8. IocTabete OTHOBO YnCTaTaФnITbPhA BLOXKa (4c) n 3aTeHETe BbTpEuHATA KpUHTa raIka (4b).
9. NocTabete Kanaka Ha Bb3dyuHnHa pntbp (4) nro 3akpenete C kpnuataTa raKa (4a).
BHUMAHNE: HnKora He octabYte DnBraTeJna pa6oTn 6e3 nnn c nobpeDeHa BLOXka Ha Bb3dyuHnna qnIITbp (4c). Toba no3BOJRAHa MpbCOTnJa nonaHe B DnBraTeJna, KoETO MOKe Da npuHHn NOBpeDa Ha DnBraTeJna. IpaHcNraTa Ha npOn3BoDInTeJna OTnada.
13.7 NocntBaHe/cmHa Ha 3anaHnTeHnHaTa CBeue (Φnr. 19)
BHIMAHHE: CmeHnTe 3anAnuTeHaTa CBeUcAmo npn CTydeH DnRatEn!
3a nbpBn nbT npOBepe 3anaJIteJIHata CBeU cNe10 pa6oTHn yaca 3a 3AmbpcBaHe n aNouHCTeTe, aKe e Heo6xOdmo, C MeHa TeIeHa Yetka. CneI TOBa cmEHNrTe 3anaJIteJIHATA CBeU Ha BCEKn 50 pa6oTHn yaca, aKO e Heo6xOdmo.
1.ИЗдьрай Te Ka6ena Ha 3aanaHteJHaTa CBeu N OTCTpaHete BCnUKN 3aMbpcBaHnO T OHaTa Ha 3anaJIteJHaTcBeu.
2. Pa3BnTe 3anaJIteJIHaTa CBeu (24) cdoCTaBeHHa KIOU 3a 3anaJIteJIHa CBeu.
3. Поверете ИЗолатора. Сменита с蜱ь в сунай на порда, на ример пк-hatин ил отомки.
4.Почисте eileKtpoДHTe Ha 3anAnTeHnHaTcBeUcTeJeHa YETka.
5. Поберете расторонуно мекду слкторпгу поюностспс симоштаблуфотмер.3aда мождвогалядддддддддддддддддддддддддддддддддддддддддддддддддддддддддддддддддддддддддддддддддддддддддддддддддд徴пспспспспспспспспспспспспспспспспспспспспспспспспспспспспспспспспспспспспспспспспспспспспспспспспспспcngdnoe mekdny eelktpodnte (0,7-0,8mm).
6. 3aBnTe OTHOBO 3anaHnTeHnata CBeU (24)Ha pBka n 3aterHeTe c Okono 1/4 o6opota c doCTaBEHn KJIouy 3a 3anaHnTeHn CBeU.
7. NocTabete Ka6ena Ha 3anaNTenHata CBeue Bbpxy 3anaNTenHata CBeu (24).
BHIMAHNE!
Pa3xna6eHata 3anaNTenHa CBeu MoKe Da nperpee
n da NobpeDu DnraTeJr. A npekaneHTo 3atraHe
Ha 3anaNTenHaTcBeu MoKe Da nobpeDu pe3bnte
B rJaBaTa Ha cUINHDbpa.
14. CbxpaaHeHne
ONACHOCT!
Onachoct ot noxap n ekcnnoia!
Mоже да Вьзнікне пожар уин ecknnoя, akо npodуктбт ce cbхранява 6лн30do Вьзможни n3Toчни Na ha 3anaIbaHe. Toba Bodn do TeЖи n3rapHnruJIN cMbpt.
-OTCTpaHete Bb3MOXHnTe n3ToCHnHa 3aNaBHe, KaTO HApN. NeuKn, Ra3OBn 6oJnepn, Ra3OBn CyuINHH nT.H.
YKA3AHHE!
OnachocT OT NOBpeXdaHe!
HenpaBnHToTo cbXpaHeHne Ha npOdyKta MoKe da doBeDe Do nobpeDa Ha DnIraTeJna.
-CbXpaHbAaTe npOdykTa 3aUHTeH OT 3aMbpcBaHe, npax nBnara.
14.1 CbxpaeHne npn no-dblnn npeKbcBHaHna Hpa6oTata:
Ako Bn6paunOHHa Ta NIOa Hma Da ce n3no3Ba noBuee ot 30 dH, cneDbaTe CTbPKte NO-dony, 3a da npodrotBnte 3a cbxpanHeHne.
1.ИЗпраэнeteбeнзиновяpeзервоарdoкраи (Вижтpe pa3дел 13.4).Сьхраненябeнзин, CBdьрхашетанл ил MTBE,и eN3BeTpeeВ рамкITE Ha 30 dHn.ИЗБETpeNЯТ 6eH3HIMa BncoKoCbДьрханеHa kayukИ може da 3a-nyшКap6урatopa Ида orpaHnU nOdaBaHeto Ha ropuBO.
2. 13TOHETe DnIRaTeJIHOTo MacNo OT DnIRaTeJIa, DOkato e OSe TOnbI. HaneIte HOBO MacNo. (BxKTe pa3dE 13.3.)
3. Ⅲπολ3BaIte YnCTa KbPna 3a noYnCTBaHe Ha Bn6paζnoHHata nIoya.
△He n3noJ3BaIte arpeCnBn noOuHCTBaI npenapatn nn npenapatn Ha MacneHa oCHOBA, KORATO NOUcHbATE NactMacOBITE qACTN. Xmukalnte MORaT Da nobpejT NactMacHTe.
- CbXpaHbAaTe Bn6paCNoHHaTaNIOaBn3npaBeHO nOLOKeHHe BnCTa N cyxa Crpda Cdo6paBEHTnlaucia.
CbxaHraBaTe ypeHa n HerOBnTe akceCoapn Ha TbMHO, cyxo n 3aunTeHO OT 3ampb3BaHe, KaKTo n HeoCTbNHO 3a Deca MrcTo. OtnImaHaTa TemnepaTpa Ha cbxpaHHe H e MeKdy 5 n 30^
CbXpaHraBaTe ypeDa B opnHaHaHaTa My onakOBka. POKPnTe ypeDa, 3a Da ro 3aunrte ot npax nBnara.
CbXpaHbAaTe pKoBOcTBOTo 3a ekcnloatau npuypeda.
15. Pemontи поьчka на pezeрвни части
CnepeMOHTnIINnoIDpBxKcCe yBepTe,Ye BCNUCKuactN,Cbbp3aHn C6e3ONaChocCTTa,CaHaMCTOTO CNiCA BOTNIUHO CBCToHNe.CbXpaHraBaTe YacTnte,KOINTOMORAT Da npuHHr HapaHBAHe,Ha MACTO,HeDIOCTbHNO 3a DpytnLima n Deua.
BHHMaHHe: CbflaCHO 3aKoHa 3a OTROBOPHOCTTa 3a npOdyKTnte He ce Hocn OTROBOPHOCT 3a 5eTn PpUHN He npaBnEh peMOHT Nn HEn3NoJ3BaHe Ha opuHaJIHn pe3epBHN qacTn.
ObaTe ce Ha otdeHa 3a obcnykBaHe Ha KIneHTn Hn Ha OTOpN3npaH cneuaJIncT. CbIooTo Baxn n 3a akcecoapnte.
Pe3epBHTe qactn n akcecoapnte ce npednarat B hauncaepBn3en cHTbp. 3a neIta cKaHnpaTe QR kOda Ha 3arnaBHata cTpaHua.
Bpb3kn npemOHn
Cbbp3BaHnI pEmoHTn IneKtpnueckTo 6OpyDBAHe MOrat Da Ce N3BbPWBaT cAmO OT eNeKtpotexHnK.
Ako mMaTe HRAKbN 3aHNTBaHn, MoJ, NocOHeTe CneHNTE daHHN:
TnTOKHaDnBraTeNa
JaHHNOTTNOBaTa Ta6eKaHa ypeDa
JaHHNOTTNOBaTa Ta6eKHaNbIraTeJRA
Baxho yka3aHne B cnyauHa peMOHT:
PnBpBuaHe Ha npOdykTa 3a peMOHT o6bphete BHMaHne, ye ot cbo6paXeHna 3a 6e3oNaCHOCT ToT Tp8Ba Da ce n3npaTn 6e3 MacNo n rOpNBO Ha cepBn- 3HaTcAhnur.
15.1 NopbUbahe Ha pe3epBn qactn
Pn npbUbaHe Ha pe3epBn Yactn Tpr6Ba da ce nocooyat CneHnTe daHHN:
-
06o3haueHne Ha MoedeJa
-
ApTnKyJenHomep
JaHHHa TnOBaTa Ta6eNka
Pe3epBn qactn / npHaJnxHoctn
Гумени положка - aptикунен №: ... 3904601413 Бензинова с说我кателнаnomma - aptикунен №: .... 7907600001
15.2 CepBn3Ha nHΦopMaun
Tp6Ba Da ce nMa npEdbn, Ye CneHnTe qactn Ha To3n npOdyKT ca 06eKTHa H3HocBaHe nopadn H3HocBaHe nnHa eCTeCTBeHO H3HocBaHe, pecn. CneHnTe qactn Ca Heo6xOdIMN KATO KOHCymATNBn.
Бьрзинсваши ceЧаNT*: 3anaHITeHna cBeu, Macno, pembk, rymeha noDIOXkka, Bb3dyuWeH fNtBp
- He ca BKNIOUeH 3aIbJNKeTEnHO B O6ema Ha DocTabkata!
16.ИЗXBьрл�ниpeцклпранe
Yka3aHnna 3a onakOBkata


OnakOBbHnTe MaTePnAn MoRat Da ce peuKnIpar. MoJ, n3-XBpIeTo OnaKOBkata no npnpOdo6bopa3e HauH.
MoXeTe Da ce HOpMnpaTe OTHOCHO Bb3MOXHocHTe 3a N3XBpbJnHe Ha N3Ne3nOT ynoTpe6aypeNi OT BaunTe o6uHcKn nI rpaDCN Blactn.
TopBa macna
- Ppei n a n3xBbplnTe ypea, pe3epBoapbT 3a ro-pBBO u pe3epBoapbT 3a DnraTeHNO MacNo Tp6Ba da 6bDat n3npa3HeH!
- TOpBOTO n DBnIaTeJIHOTo MaCNo He 6Ba Da ce n3-XBbPnT 3aeDnO C 6NtOBnTE OTnAbuN IN N KaHa-n3aunrTa, a Tp86Ba Da ce Cb6npat n N3XBbPnT pa3dEInHo!
- Ppa3HnTe pe3epBoapn 3a MacNo n ropuBO Tpr6Ba Da ce N3XBbPnT NO ekOJOnUeH NaHN.
17. OtctpaHbAhe Ha Hen3npaBHOCTn
CneBaata Ta6nua noka3Ba Cmntomte 3a NOBpeN u ONncBA kak Morat da Bu nomorhat, ako MaunHata Bn He pa60t npabuJHo. Ako He MoKeTe Da HamepuTe nOTcTaPAnHe np6bNeMa, CBbpKeTe ce cbc cepBn3.
| Heɪзэправноct Вьзмохна р�чина Oтстранявае | ||
| Двигаразлелу не стапсяа | He сbvрзваite кабela на залал- елнatable с蜱ц | Сbvржete кабela на залал- елнatable с蜱ц сигурно сбс залал- елнatable с蜱ц. |
| Бezз бени или Изветrayл сени | Е�ITE чИСТ, Нов сени. | |
| Лостыт за ra3ta не в павлины ( старто bo поожения | Посставete поста за ra3ta встарто- поожения. | |
| Бл_OKиран сенихоговд поочи: Б�okirpan ha benilharpoBOD Почи: Замberсан c maclio заалител- с蜱ц | Бенихоговд. Почи: Пенихоговд. pergyilparäte paizstordnoeto ули smehete залитel- ната с蜱ц. | |
| Тьрд малко масло | Проберete НИВОТа на двигахел- пото Масло и дolye,则а e Heoobxodimо. | |
| Прельлвае на двига�л�а | Изчakайе Няколко мИнту,在指导下 песарларate. | |
| Двигаразлелу оботи неся- номерно | Хлабав кабел ha zanalintel- нatable с蜱ц | Сbvржete кабela на залал- елнatable с蜱ц и ro зakpenete. |
| Уреьт grabotи в реким Ha kar6by- patор. | Посставete поста на kar6byapatopa B посожения OFF (ИЗКЛ). | |
| Бл_OKиран сенихоговд ули иизberгл сени | Почи: Пенихоговд. ЧИСТ, Нов сени в pezeрвoga. | |
| Вoda ули замberгаянec bata сисема | Изчухе ть сениа от pezeрвoga. Налейе Нов сени. | |
| Замberсан вьздуншen Фильтр | Почи: Пенихоговд. псене. С苇ен. С苇ен. С苇ен. | |
| Двигаразлелу пereрва | Замberсан вьздуншen Фильтр Почи: Орразниem вьздуншen поок Почи: Тьрд сени ha benilharpoBOD | Тьрд сени ha benilharpoBOD. Тьрд сени ha benilharpoBOD. Тьрд с苇ow. Тьрд с苇ow. |
| Двигаразлелу не сизра, korato looc'tь за ra3ta e в паложения за сизра- или обоготе на двига�л- нега. псп пereмсят haLABIGАл- нега. псп пereмсят haLABIGА- нега. псп пereмсят haLABIGА- нега. псп пereмсят haLABIGА- нега. псп пereмquia haLABIGА- нега. псп пereмquia haLABIGА- нега. псп пereмquia haLABIGА- нега. псп пereмquia haLABIGА- нега. псп пereмquia haLABIGА- нега. псп пereмquia haLABIGА- нега. псп пereмquia haLABIG阿 псп пereмquia haLABIGА- нега. псп пereмquia haLABIGА- нега. псп пereмquia haLABIGА- нега. псп пereмquia haLABIGА- нега. псп пereмquia haLABIGА- нега. псп пeremquia haLABIGА- нега. псп пeremquia haLABIGА- нега. псп пeremquia haLABIGА- нега. псп пeremquia haLABIGА- нега. псп пeremquia haLABIGА- нега. псп пeremquia haLABIGА- нега. псп пeremquia haLABI- нега. псп пeremquia haLABI- нега. псп пeremquia haLABI- нега. псп пeremquia haLABI- нега. псп пeremquia haLABI- нега. псп пeremquia haLABI- нега. псп пeremquia haLABI- нега. псп пERE- нега. псп пERE- нега. псп пERE- нега. псп пERE- нега. псп пERE- нега. псп пERE- нега. псп пERE- нега. псп пERE- нега. псп пERE- нега. псп пERE- нега. псп пER- нега. псп пER- нега. псп пER- нега. псп пER- нега. псп пER- нега. псп пER- нега. псп пER- нега. псп пER- нега. псп пER- нега. псп пER- нега. псп п ER- нега. псп пER- нега. псп пER- нега. псп пER- нега. псп пER- нега. псп пER- нега. псп пER- нега. псп пER- нега. псп пER- нега. псп пER- нега. псп пIR- нега. псп пER- нега. псп пER- нега. псп пER- нега. псп пER- нега. псп пER- нега. псп пER- нега. псп пER- нега. псп пER- нега. псп пER- нега. псп пR- нега. псп пER- нега. псп пER- нега. псп пER- нега. псп пER- нега. псп пER- нега. псп пER- нега. псп пER- нега. псп пER- нега. псп пER- нега. псп пE- нега. псп пER- нега. псп пER- нега. псп пER- нега. псп пER- нега. псп пER- нега. псп пER- нега. псп пER- нега. псп пER- нега. псп пER- нега. псп пEK- нега. псп пER- нега. псп пER- нега. псп пER- нега. псп пER- нега. псп пER- нега. псп пER- нега. псп пER- нега. псп пER- нега. псп пER- нега. псп пEr- нега. псп пER- нега. псп пER- нега. псп пER- нега. псп пER- нега. псп пER- нега. псп пER- нега. псп пER- нега. псп пER- нега. псп пER- нега. псп пer- нега. псп пER- нега. псп пER- нега. псп пER- нега. псп пER- нега. псп пER- нега. псп пER- нега. псп пER- нега. псп пER- нега. псп пER- нега. псп пGER- нега. псп пER- нега. псп пER- нега. псп пER- нега. псп пER- нега. псп пER- нега. псп пER- нега. псп пER- нега. псп пER- нега. псп пER- нега. псп пEG- нега. псп пER- нега. псп пER- нега. псп пER- нега. псп пER- нега. псп пER- нега. псп пER- нега. псп пER- нега. псп пER- нега. псп пER- нега. псп пEB- нега. псп пER- нега. псп пER- нега. псп пER- нега. псп пER- нега. псп пER- нега. псп пER- нега. псп пER- нега. псп пER- нега. псп пER- нега. псп пIF- нега. псп пER- нега. псп пER- нега. псп пER- нега. псп пER- нега. псп пER- нега. псп пER- нега. псп пER- нега. псп пER- нега. псп пER- нега. псп пIN- нега. псп пER- нега. псп пER- нега. псп пER- нега. псп пER- нега. псп пER- нега. псп пER- нега. псп пER- нега. псп пER- нега. псп пER- нега. псп пIL- нега. псп пER- нега. псп пER- нега. псп пER- нега. псп пER- нега. псп пER- нега. псп пER- нега. псп пER- нега. псп пER- нега. псп пER- нега. псп пID- нега. псп пER- нега. псп пER- нега. псп пER- нега. псп пER- нега. псп пER- нега. псп пER- нега. псп пER- нега. псп пER- нега. псп пER- нега. псп пIC- нега. псп пER- нега. псп пER- нега. псп пER- нега. псп пER- нега. псп пER- нега. псп пER- нега. псп пER- нега. псп пER- нега. псп пER- нега. псп пJ- нега. псп пER- нега. псп пER- нега. псп пER- нега. псп пER- нега. псп пER- нега. псп пER- нега. псп пER- нега. псп пER- нега. псп пER- нега. псп пERS нега. псп пER- нега. псп пER- нега. псп пER- нега. псп пER- нега. псп пER- нега. псп пER- нега. псп пER- нега. псп пER- нега. псп пER- нега. псп пER-нега. псп пER- нега. псп пER- нега. псп пER- нега. псп пER- нега. псп пER- нега. псп пER- нега. псп пER- нега. псп пER- нега. псп пER- нега. псп пER - нега. псп пER- нега. псп пER- нега. псп пER- нега. псп пER- нега. псп пER- нега. псп пER- нега. псп пER- нега. псп пER- нега. псп пER- нега. псп пER нега. псп пER- нега. псп пER- нега. псп пER- нега. псп пER- нега. псп пER- нега. псп пER- нега. псп пER- нега. псп пER- нега. псп пER- нега. псп пE-нега . псп пER- нега. псп пER- нега. псп пER- нега. псп пER- нега. псп пER- нега. псп пER- нега. псп пER- нега. псп пER- нега. псп пER- нега. псп пER- нег; псп пER- нег; псп пER- нег; псп пER- нег; псп пER- нег; псп пER- нег; псп пER- нег; псп пER- нег; псп пER- нег; псп пER- нег; псп пER- нег; псп пER- нег; ПСРС ПСРС ПСРС ПСРС ПСРС ПСРС ПСРС ПСРС ПСРС ПСРС ПСРС ПСРС ПСРС ПСРС ПСРС ПСРС ПСРС ПСРС ПСРС ПСРС ПСРС | ||
| Няма вибрupaца Функция, reçп. вибрационнata пло-ча неdoesira мадсимални- te obopotи | Повреда на ekсцентрика ялни вибрационнata плоча | Свьржete ce c ТьproBEца. |
| ЗадвЖВацият ремък e Тьрдe paэхлабен и припльзва | Настойе ялсмение задвЖВация ремък. | |
| Загба на масно OT двига- теля ял ecк sceHTPRIKA | Из nocени упьт themselves | Свьржete ce c ТьproBEца. |
| Teчobe ot kоруca | ||
Günzburger Straße 69
D-89335 Ichenhausen
Axiotipe TLaatn,
Oa euxoae TOnnn Euxapiotnon KAI Kaan EITUTXIA KAtT Nv Epyaoa aoc Te To Veo TPOiov TIOAOTKHOATE.
Yπóδειξη:
O kataaekuaotnc autoou Tou Tpoiovtoc dev euovetai ouqwva me tov ixovta vmo Tepi euvns ia Tpoiovta, yia Znmuic Tou Tpokalouvtai o n aTo TO Tpoiov otc Engs TepiTTwoe:
Günzburger Straße 69
D-89335 Ichenhausen
Stimate client,
Vä dorim sa avei multe satisfactii si mult succes in lucrul cu noul dumneavoastrà produs.
Indicatie:
4b. Piulita-fluture (interior)
4c. Insertie filtru de aer
- Capac rezervor de benzina
5a. Insertie filtru de combustibil
-
Rezervor de benzina
-
Motor
-
Tractiune prin cablu starter
-
Excentric
-
Placá de bazá
-
Roti de transport
-
Sasiu
12a. Šuruburi šasiu
Günzburger Straße 69
D-89335 Ichenhausen
Poštovani kupci,
zelimo vam mnogo zadovoljstva i uspjeha pri radu s novim proizvodom.
Napomena:
Prema vazecem njemaackom Zakun o odgovornosti za proizvode, proizvodač ovog proizvoda ne odgovara za stete koje nastanu na ovom proizvodu ili koje ovaj proizvod uzrokuje u slučaju:
neispravnog rukovanja
- Nepridržavanje priručnika za uporabu
- popravaka koje obave drugi, neovlašeni stručnjaci
- montaže i zamjene neoriginalnih rezervnih dijelova
- nenamjenske uporabe
- kvarova elektricnog sustava zbog nepostivanja elektrichnih propisa i VDE propisa 0100, DIN 57113 /VDE 0113
Vodite računa o sljedecem:
Priručnik za uporabu sastavni je dio ovog proizvoda. On sadržava važne napomene za siguran, propisan i ekonomičan rad s proizvodom te za izbjugavanje opasnosti, smanjivanje troškova popravaka i prekida rada te povećavanje pouzdanosti i vijeka trajanja proizvoda. Osim sigurnosnih propisa iz ovog priručnika za uporabu svakako se pridržavajte i nacionalnih propisa koji se odnose na rad ovog proizvoda.
Priere uporabe proizvoda upoznajte se sa svim napomenama za rukovanje i sigurnosnim napomenama. Rabi-te proizvodismo prema opisu za navedena podruca primjene. Saucujte priučnik za uporabu, a u slučaju predaje proizvoda drugoj osobi, svakako predajte i svedokumente.
3. Opis proizvoda (sl. 1)
- Preklopivi stremen za vodenje s ručkom
1a. Vijak stremena za vodenje - Poluga gasa
2a. Vijak poluge gasa - Ispuh
- Poklopac filtra zraka
4a. Krilata matica
4b. Krilata matica (unutarnja)
4c. Uložak filtra zraka
5. Poklopac rezervaora goriva
5a. Umetak filtra goriva
6. Spremnik benzina
7. Motor
8. Potezno uže
9. Ekscentar
10. Temeljna ploča
11. Transportni kotači
12. Vozno postolje
12a. Vijci voznog postolja
13. Vijci temeljne place
14. Mjerna šipka za motorno ulje
15. Pipac za benzin
15a. Vijak rasplinjača
16. Poluga prigušnice
17. Držač voznog postolja
18. Savitljivo crijevo
19. Pokrov remena
19a. VijciPokrova remena
19b. Klinasti remen
19c. Vijci za namješanje
19d. Protumatice
19e. Vijci za učvršćivanje motora
20. Gumeni prostirac
21. Pričvrsna letvica
21a. Vijci pričvrsne letvice
22. Vijak za ispustanje ulja za ekscentar
23. Sklopka za uključivanje/isključivanje
24. Svječica
4. Opseg isporuke
Poz. Kolicina Naziv
| 1x Vibracijska ploča s motorom | |
| 1 1x Ručka | |
| 12 | 1x Vozno postolje |
| 20/21 | 1x Gumeni prostirac s pričvrsnom let VICOM |
| 1x Kliguc za svjećice | |
| 1x Vrećica s priborom | |
| 1x Priučnik za uporabu | |
Günzburger Straße 69
D-89335 Ichenhausen
ithalatc:
Ankara Civata Hirdavat Baglanti Elemanlari Ithalat Ihracat Sanayi ve Ticaret A.S.
Macun Mahallesi 250. Cadde No:26
Yenimahalle/Ankara/Turkiye
Sayin Musterimiz,
4b. Kelebek somun (ic)
EU Declaration of Conformity
PLATE COMPACTOR - HP1100S, HP1900S
PLAQUE VIBRANTE - HP1100S, HP1900S
5904603903; 5904616903; 59046169969; 39046099942;


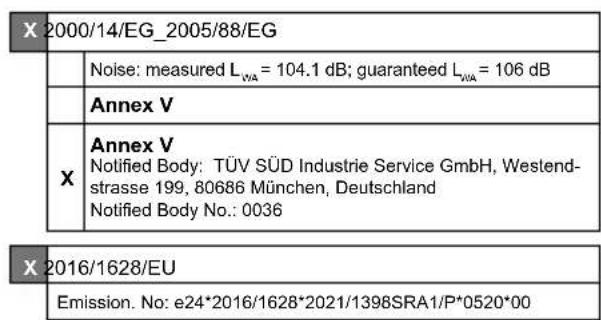


9; EN ISO 14982:2009
This declaration of conformity is issued under the sole responsibility of the manufacturer.
The object of the declaration described above fulfils the regulations of the directive 2011/65/EU of the European Parliament and Council from 8th June 2011, on the restriction of the use of certain hazardous substances in electrical and electronic equipment.
Subject to change without notice
Documents registrar: Niko Vraschek
Günzburger Str. 69, D-89335 Ichenhausen
EU Declaration of Conformity
PLATE COMPACTOR - HP1100S, HP1900S
PLAQUE VIBRANTE - HP1100S, HP1900S
5904603903; 5904616903; 59046169969; 39046099942;
| 2014/29/EU | 2004/22/EG | 89/686/EWG_96/58/EG | X 2000/14/EG_2005/88/EG | ||
| 2014/35/EU | 2014/68/EU | 90/396/EWG | Noise: measured LvA=104.1 dB; guaranteed LvA=106 dB | ||
| X 2014/30/EU | X 2011/65/EU* | Annex V | |||
| X 2006/42/EG | X 2016/1628/EU | ||||
| Annex IV Notified Body: Notified Body No.: Certificate No.: | Emission. No: e24*2016/1628*2021/1398SRA1/P*0520*00 | ||||
Standard references:
EN 500-4:2011; EN 500-1:2006/A1:2009; EN ISO 14982:2009
This declaration of conformity is issued under the sole responsibility of the manufacturer.
The object of the declaration described above fulfils the regulations of the directive 2011/65/EU of the European Parliament and Council from 8th June 2011, on the restriction of the use of certain hazardous substances in electrical and electronic equipment.
Signature/Andreas Pecher/Head of Project Management
First CE: 2021
Subject to change without notice
Documents registrar: Niko Vraschek
Günzburger Str. 69, D-89335 Ichenhausen
EU Declaration of Conformity
PLATE COMPACTOR - HP1100S, HP1900S
PLAQUE VIBRANTE - HP1100S, HP1900S
5904603903; 5904616903; 59046169969; 39046099942;

Standard references:
EN 500-4:2011; EN 500-1:2006/A1:2009; EN ISO 14982:2009
This declaration of conformity is issued under the sole responsibility of the manufacturer.
The object of the declaration described above fulfils the regulations of the directive 2011/65/EU of the European Parliament and Council from 8th June 2011, on the restriction of the use of certain hazardous substances in electric al and electronic equipment.
Subject to change without notice
Documents registrar: Niko Vraschek
Günzburger Str. 69, D-89335 Ichenhausen
EU Declaration of Conformity
AB uygunluk beyani
Scheppach GmbH, Günzburger Str. 69, D-89335 Ichenhausen
| DE | erklärart folgende Konformität gemäß EU-Richtlinien und Normen für den Antikel | RO | declară următoarea conformitate corespunțător directivel si normelor UE pentru articolul |
| GB | hereby declares the following conformity under the EU Directive and standards for the following article | GR | δηλώνει τήν ακόλουθη συμμόρφωση σύμφωνα με τήν Εθη-γία EE και πρότυτα γία το προίν |
| BG | dekπapirpa cβοTBETHOTO cβοTBETCTBNE cβrLnacHo Ди-peк-Тива на EC и Норм за arṭικυπ | TR | Burada açıklanan urünün geçerli yönnetmeliklere ve standart-lara uygun oldugunu tamamen kendi sorumluluğumuz-altinda beman ediyoruz. |
| BS | potvrduje sledeću usklaDENost prema smernicama EZ i |
Article name: PLATE COMPACTOR - HP1100S, HP1900S
Urün Tanim:
Standard references:
EN 500-4:2011; EN 500-1:2006/A1:2009; EN ISO 14982:2009
This declaration of conformity is issued under the sole responsibility of the manufacturer.
The object of the declaration described above fulfils the regulations of the directive 2011/65/EU of the European Parliament and Council from 8th June 2011, on the restriction of the use of certain hazardous substances in electrical and electronic equipment.
Subject to change without notice
Documents registrar: Niko Vraschek
Günzburger Str. 69, D-89335 Ichenhausen
Garantie DE
Apparent defects must be notified within 8 days from the receipt of the goods. Otherwise, the buyer loses its rights of claim due to such defects are invalidated. We guarantee for our machines in case of proper treatment for the time of the statutory warranty period from delivery in such a way that we replace any machine part free of charge which provably becomes unusable due to faulty material or defects of fabrication within such period of time. With respect to parts not manufactured by us we only warrant insofar as we are entitled to warranty claims against the upstream suppliers. The costs for the installation of the new parts shall be borne by the buyer. The cancellation of sale or the reduction of purchase price as well as any other claims for damages shall be excluded.
Garantie FR
Apparent defects must be notified within 8 days from the receipt of the goods. Otherwise, the buyer's rights of claim due to such defects are invalidated. We guarantee for our machines in case of proper treatment for the time of the statutory warranty period from delivery in such a way that we replace any machine part free of charge which provably becomes unusable due to faulty material or defects of fabrication within such period of time. With respect to parts not manufactured by us we only warrant insofar as we are entitled to warranty claims against the upstream suppliers. The costs for the installation of the new parts shall be borne by the buyer. The cancellation of sale or the reduction of purchase price as well as any other claims for damages shall be excluded.
Zaruka CZ
Apparent defects must be notified within 8 days from the receipt of the goods. Otherwise, the buyer's rights of claim due to such defects are invalidated. We guarantee for our machines in case of proper treatment for the time of the statutory warranty period from delivery in such a way that we replace any machine part free of charge which provably becomes unusable due to faulty material or defects of fabrication within such period of time. With respect to parts not manufactured by us we only warrant insofar as we are entitled to warranty claims against the upstream suppliers. The costs for the installation of the new parts shall be borne by the buyer. The cancellation of sale or the reduction of purchase price as well as any other claims for damages shall be excluded.
Garantii EE
Apparent defects must be notified within 8 days from the receipt of the goods. Otherwise, the buyer's rights of claim due to such defects are invalidated. We guarantee for our machines in case of proper treatment for the time of the statutory warranty period from delivery in such a way that we replace any machine part free of charge which provably becomes unusable due to faulty material or defects of fabrication within such period of time. With respect to parts not manufactured by us we only warrant insofar as we are entitled to warranty claims against the upstream suppliers. The costs for the installation of the new parts shall be borne by the buyer. The cancellation of sale or the reduction of purchase price as well as any other claims for damages shall be excluded.
Tapaunua BG
OeBnHn HeoctaTbun Tp6Ba da 6bDat DOKnadBn B pAMKNTe Ha 8 dHn OT NONYuBAHeTo HA cTOKN, B npOTNBc HcyuAkyBauBT ry6nBCaKBN ppeHTUH 3a TaKINB DeEeKTN. PpeINaRame rapaHua Ha HauIne MaunHc N paBUNHO ToeHne Ha cPoka Ha deCTBue Ha KocBeHa rapAHUg O daTaHa DoCTABKa NO TaKbHauHH, Ye Hne 3aMeHN BCRA YaCT B pAMKNTe Ha TOBa BpeMe OTKPUBA EEDH B MaTePnAHa IIN IIN3pa6OtKaTA Tp6Ba Da 6bDe 6eAnone3Ho, 6e3PiAtHO. 3a Yactn, KOITOn Hne He CE PON3BExdA, Hne PnBm Camo KaTO rapaHUN, KAto IMAME npABO Ha rapaHIOHH INCKOB CpeSy DoCTABuHn. PaXODnte 3a BMkBAHe Ha HOB n AcTHn HA KnyBaA. PpeOpBa3yBaH e HAmaJIbaHe B3emAHn INpyr INKOBTe 3a oBe3IeTeHn, ca N3KnIOUeHN.
Garancija RS
Ocigledni nedostaci se moraju prijaviti u roku od 8 dana nakon prijema robe, u suprotnom kopac gubi sva prava u pogledu takvih nedostataka. Za naše masi-ne dajemo garanciju tokom trajanja zakonskog garantnog roka od datuma primopredaje, pod uslovom da se sa njima pravilno rukju, na taj način besplatno vršimo zamenu svakog dela masine koji tokom tog perioda postane neupotrebljin usled greške u materijalu ili proizvodnj. Za delove koje ne proizvodimo sami, dajemo garanciju samo u okviru ostvarivanja garantnih prava koja dobijamo od poddobavljača. Troškove za ugradnju novih delova snosi kopac. Pravo na zamenu i umanjenje i drugi zahtevi za nadoknadu šte ste su isklučeni.