USER MANUAL HP1400S SCHEPPACH
Günzburger Straße 69
D-89335 Ichenhausen
Verehrter Kunde,
Homepage: https://www.scheppach.com/de/service
Table of contents: Page:
- Introduction 31
- Product description (Fig. 1-20) 31
- Scope of delivery 31
- Proper use 32
- General safety instructions 32
- Technical data 35
- Unpacking 35
- Layout 36
9.Before commissioning 36
- Start-up 37
- Transport (Fig. 20) 39
- Cleaning and maintenance 39
- Storage 42
- Repair & ordering spare parts 43
- Disposal and recycling 43
- Troubleshooting 44
- Declaration of conformity 461
Explanation of the symbols on the device
Symbols are used in this manual to draw your attention to potential hazards. The safety symbols and the accompanying explanations must be fully understood. The warnings themselves will not rectify a hazard and cannot replace proper accident prevention measures.
| Before commissioning, read and observe the operating manual and safety instructions! |
| Wear hearing protection! |
| Wear safety goggles! |
| Use work gloves. |
| Use safety shoes. |
| Removing or modifying protective or safety equipment is prohibited. |
| Do not touch rotating parts. Getting caught in the spinning belt will cause a hand injury.
Always put on the belt guard. |
| Naked flames or smoking near the device is strictly prohibited! |
| Hot surface! Touching can cause burns.
Only carry out servicing, maintenance and cleaning work when the engine has cooled down. |
| Keep third parties away from the work area. |
| Danger of poisoning! Only use the device outdoors and never in closed or poorly ventilated rooms. |
| Important: Always switch off the engine before refuelling.
Do not refill during operation. |
| Before carrying out any cleaning or maintenance work, switch off the engine and remove the spark plug connector from the spark plug. |
| Guaranteed sound power level of the device |
| - Choke closed
- Open fuel valve |
| Speed lever |
| Checking the oil level |
| We have marked points in these operating instructions that impact your safety with this symbol. |
| The eccentric vibration unit is already filled with oil! Do not top up. Oil level not visible. |
| The product complies with the applicable European directives. |
| The product complies with the applicable Serbian directives. |
1. Introduction
Manufacturer:
Scheppach GmbH
Günzburger Straße 69
D-89335 Ichenhausen
Dear Customer,
We hope your new product brings you much enjoyment and success.
Note:
In accordance with the applicable product liability laws, the manufacturer of this product assumes no liability for damage to the product or caused by the product arising from:
- Improper handling
- Failure to comply with the operating manual
- Repairs carried out by third parties, unauthorised specialists
- Installing and replacing non-original spare parts
- Improper use
- Failure of the electrical system in the event of the electrical regulations and VDE provisions 0100, DIN 57113 /VDE 0113 not being observed
Note:
The operating manual is part of this product. It includes important instructions for the safe, proper and economic operation of the product, for avoiding danger, for minimising repair costs and downtimes and for increasing the reliability and extending the service life of the product. In addition to the safety instructions in this operating manual, you must also observe the regulations applicable to the operation of the product in your country. Familiarise yourself with all operating and safety instructions before using the product. Only operate the product as described and for the specified areas of application. Keep the operating manual in a good place and hand over all documents when passing the product on to third parties.
2. Product description (Fig. 1-20)
- Foldable guide bar with handle
1a. Philips screw guide bar
- Throttle
2a. Throttle screw
2b. Washer
- Exhaust pipe
- Air filter cover
4a. Fixing screw
4b. Paper filter
4c. Foam filter
5. Petrol tank cap
5a. Fuel filter insert
6. Fuel tank
7. Engine
8. Start pull cord
9. Eccentric vibration unit
10. Base plate
11. Transport wheels
12. Chassis
12a. Hexagonal bolts chassis
12b. Washers
12c. Stop nuts
13. Base plate screws
14. Oil dipstick for engine oil
15. Fuel valve
15a. Carburettor screw
16. Choke lever
17. Bracket for transport frame
18. Flex hose
19. Belt cover
19a. Belt cover screws
19b. V-belt
19c. Adjusting nut
19d. Engine mounting screws
20. Rubber pad
21. Fastening strip
21a. Fastening strip screws
21b. Spring washers
21c. Hexagonal nuts
22. Oil drain screw for eccentric vibration unit oil
23. On/off switch
24. Spark plug
3. Scope of delivery
Item Quantity Designation
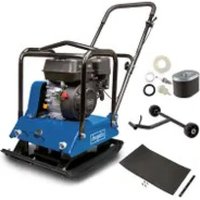
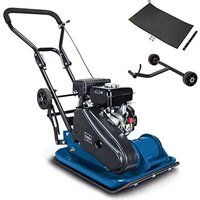
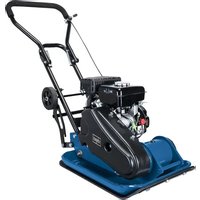
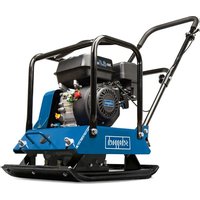
| 1x Plate compactor with engine |
| 1 | 1x Handle |
| 12 | 1x Chassis |
| 20/21 | 1x Rubber pad with fastening bar |
| 1x Spark plug wrench |
| 1x Enclosed accessories bag |
| 1x Operating manual |
4. Proper use
The plate compactor transfers forces to loose soil or other materials. It can be used for general road works, landscaping and building construction. The plate compactor increases the load-bearing capacity, reduces water permeability, prevents soil settling, reduces swelling or contraction of the soil. It is particularly suitable for compacting interlocking pavers and trenches, as well as for landscaping and conservation work.
Attention!
The plate compactor is not designed for use on adherent substrates such as clay or hard surfaces such as concrete.
The machine may only be used in the intended manner. Any use beyond this is improper. The user/operator, not the manufacturer, is responsible for damages or injuries of any type resulting from this.
An element of the intended use is also the observance of the safety instructions, as well as the assembly instructions and operating information in the operating manual.
Persons who operate and maintain the machine must be familiar with it and must be informed about potential dangers.
In addition, the applicable accident prevention regulations must be strictly observed.
Other general occupational health and safety-related rules and regulations must be observed. The liability of the manufacturer and resulting damages are excluded in the event of modifications of the machine.
The machine may only be operated with original parts and original accessories from the manufacturer. The safety, operating and maintenance specifications of the manufacturer, as well as the dimensions specified in the technical data, must be observed.
Please note that our equipment was not designed with the intention of use for commercial or industrial purposes. We assume no guarantee if the device is used in commercial or industrial applications, or for equivalent work.
Explanation of the signal words in the operating manual
DANGER
Signal word to indicate an imminently hazardous situation which, if not avoided, will result in death or serious injury.
WARNING
Signal word to indicate a potentially hazardous situation which, if not avoided, could result in death or serious injury.
CAUTION
Signal word to indicate a potentially hazardous situation which, if not avoided, could result in minor or moderate injury.
ATTENTION
Signal word to indicate a potentially hazardous situation which, if not avoided, could result in product or property damage.
5. General safety instructions
- Familiarise yourself with your machine.
- Read the operating manual carefully and make sure you understand its contents, as well as all labels attached to the machine.
- Familiarise yourself with the area of application, as well as limitations of the machine, and particular sources of danger.
Make sure that you know all the controls and their function exactly.
Make sure you know how to stop the machine and quickly disable the controls.
- Do not attempt to use the machine without knowing the exact method of operation and the maintenance requirements of the engine and how to avoid accidents resulting in personal injury and/or property damage.
- Keep other people, particularly children, away from your work area.
Working range
- Never start or operate the machine in an enclosed area. The exhaust gases are dangerous because they contain the odourless and deadly gas carbon monoxide. Operate the machine only in a well-ventilated outdoor area.
- Never operate the machine without good visibility or lighting conditions.
Personal safety
- Do not use the machine if you have taken drugs, alcohol or medication that affects your ability to operate the machine correctly.
- Wear suitable clothing. Wear long trousers, boots and gloves.
- Do not wear loose clothing, shorts or jewellery of any kind. Tie back long hair so that it is at shoulder height at most. Keep hair, clothing and gloves away from moving parts. Loose-fitting clothing, jewellery or long hair may become caught in the moving parts. Check your machine before starting.
- Leave protective screens in place and in working order.
- Make sure that all nuts, bolts, etc. are securely tightened.
- Never use the machine if it is in need of repair or in poor mechanical condition. Replace damaged, missing or defective parts before use.
- Check the machine for fuel leaks.
- Keep it in good functional order. Do not use the machine if the engine cannot be switched on and off at the corresponding switch.
- A petrol-driven machine that cannot be controlled via the engine switch is dangerous and must be replaced.
- Before starting the machine, get into the habit of checking that screwdrivers and spanners are away from the area around the machine. A screwdriver or spanner that is still in a rotating device part may result in personal injury.
- Be attentive, watch your actions and use common sense when working with the machine. Do not over-extend yourself.
- Do not operate the machine barefoot or with sandals or similar light footwear. Wear safety shoes that protect your feet and improve your grip on slippery surfaces.
- Ensure safe footing and balance at all times. This will allow you to better control the machine in unexpected situations.
- Prevent unintentional start-up. Make sure that the engine switch is switched off before transporting the machine or carrying out maintenance work on the machine. Transport or maintenance work on the machine can lead to accidents if the switch is on.
Safe handling of petrol
Use and care of the machine
- Never pick up or carry the machine while the engine is running.
- Do not handle the machine violently.
- Use the right machine for your area of application. The right machine will do the job it was designed for better and more safely.
-
Do not change the speed governor setting of the engine or over-rev it. The speed control system controls the maximum speed of the engine with maximum safety.
-
Do not run the engine at high speeds when not compacting.
- Do not hold your hands or feet near rotating parts.
- Avoid contact with hot petrol, oil, exhaust gases and hot surfaces. Do not touch the engine or exhaust silencer. These parts become particularly hot during use. They are still hot a short time after the machine is switched off.
- Allow the engine to cool down before carrying out maintenance or adjustment work.
- If the machine starts to make unusual noises or vibrations, switch the engine off immediately, disconnect the spark plug cable and determine the cause. Unusual noises or vibrations are usually a safety sign of faults.
- Only use assembly and accessory parts approved by the manufacturer. Failure to do so may result in injury.
- Service the machine. Check for misalignment or jamming of moving parts, damaged parts and other conditions that could impair function of the machine. Have the machine repaired before any further use if you find any damage. Many accidents are the result of poorly maintained equipment.
- Keep the engine and silencer free of grass, leaves, excess grease or soot encrustation to reduce the risk of fire.
- Never pour or splash water or any other liquid onto the machine.
- Keep the handles dry, clean and free of small parts.
- Clean the machine after every use.
- Follow the applicable waste disposal guidelines for petrol, oil etc. to protect the environment.
- Keep the switched-off machine out of the reach of children and do not allow persons who are not familiar with the machine or these instructions to use the machine. The machine is dangerous in the hands of untrained operators.
Service
- Before cleaning, repairing, inspecting or adjusting, switch off the engine and ensure that all moving parts have come to a standstill.
Always ensure that the engine switch is in the "OFF" position. Disconnect the spark plug cable and keep it away from the spark plug to prevent accidental start-up.
- Have your machine serviced by qualified personnel. Only use original spare parts. This ensures that the machine remains safe.
Additional safety instructions
- Keep hands, fingers and feet away from the base plate in order to avoid injuries.
- Hold the handle of the plate compactor firmly with both hands. If both hands hold the handle and your feet are away from the compacting plate, your hands, fingers and feet cannot be injured by the compacting plate.
- Always stay behind the machine when using it; never walk or stand in front of the machine when the engine is running.
- Never place tools or other objects under the plate compactor. If the machine hits a foreign object, stop the engine, disconnect the spark plug and check the machine for damage; repair the damage before restarting and using the machine.
- Do not overload the machine by compacting too deep or too fast.
- Do not use the machine at high speeds on hard or slippery surfaces.
- Be especially careful when using the machine to work on or cross gravel beds, gravel paths or gravel roadways.
- Watch out for hidden dangers and traffic. Do not carry people.
- Never leave the workplace and never leave the plate compactor unattended when the engine is running
- Always stop the machine when work is interrupted or when relocating from one place to another.
- Stay away from trench edges and avoid actions that may cause the plate compactor to tip over. Walk up slopes carefully backwards in a direct line, to avoid tipping the plate compactor over onto the operator.
Always place the device on a firm and level surface and switch the machine off.
- Limit working hours with the machine and take regular breaks to reduce vibration stress and let your hands rest. Reduce the speed and force with which you perform repetitive movements.
Residual risks
The machine has been built according to the state-of-the-art and the recognised technical safety requirements. However, individual residual risks can arise during operation.
6. Technical data
| Engine / drive | 1-cylinder
4-stroke for unleaded
petrol |
| Displacement 79 cm³ | |
| Engine output 1.5 kW | |
| Fuel content 1.6 l | |
| Engine oil capacity
max. | 0.4 l |
| Eccentric vibration
unit oil capacity | 0.06 l |
| Plate size (L x W) ca. 495 x 320 mm |
| Centrifugal force 8200 N | |
| Feed 25 m/min | |
| Vibration frequency | 5900 rpm |
| Compaction depth | 20 cm |
| Max. permissible
inclination for the
engine | 20° |
| CO2output | 1016.4 g/kWh |
| Weight | approx. 48 kg |
Subject to technical changes!
Noise and vibration
The noise levels have been determined in accordance with EN ISO 3744. Total vibration emission values (vector sum of three directions) determined per EN 500-1. Noise can have serious effects on your health. If the machine noise exceeds 85dB , please wear suitable hearing protection.
Noise data:
| Sound pressure level \( {\mathrm{L}}_{\mathrm{{pA}}} \) | 85.4 dB |
| Uncertainty \( {\mathrm{K}}_{\mathrm{{pA}}} \) | 2.2 dB |
| Sound power level \( {\mathrm{L}}_{\mathrm{{WA}}} \) | 105.4 dB |
| Uncertainty \( {\mathrm{K}}_{\mathrm{{WA}}} \) | 2.2 dB |
Vibration parameters:
| Vibration \( {\mathrm{a}}_{\mathrm{h}} \) | 17.5 m/s2 |
| Uncertainty K 2.5 m/s2 | |
The specified sound levels have been measured in accordance with a standardised test procedure and can be used to compare different tools with one another. In addition, these values are suitable for estimating the stresses for the user resulting from the noise in advance.
Warning! Depending on how you use the tool, the actual values may differ from the those given. Implement measures to protect against noise nuisance.
In doing so, take into account the complete working process, including the times when the tool is working without load or switched off.
Suitable measures include regular maintenance and care of the tool and the insertion tools, regular breaks as well as proper planning of the working process.
7. Unpacking
- Open the packaging and carefully remove the product.
- Remove the packaging material, as well as the packaging and transport safety devices (if present).
- Check whether the scope of delivery is complete.
- Check the product and accessory parts for transport damage. In the event of complaints the carrier must be informed immediately. Later claims will not be recognised.
- If possible, keep the packaging until the expiry of the warranty period.
- Familiarise yourself with the product by means of the operating instructions before using for the first time.
- With accessories as well as wearing parts and replacement parts use only original parts. Spare parts can be obtained from your specialist dealer.
- When ordering please provide our article number as well as type and year of manufacture for the product.
WARNING!
The product and the packaging material are not children's toys! Do not let children play with plastic bags, films or small parts! There is a danger of choking or suffocating!
8. Layout
You will need the following to assemble the plate compa
- 16 mm open-ended spanner (not included in the scope of delivery)
- Phillips screwdriver (not included in the scope of delivery)
- Enclosed accessories bag
8.1 Fitting the handle (Fig. 3 + 4)
- Unfold the guide bar with handle (1).
- Slide the guide bar with handle (1) between the fixing lugs and secure it with two hexagonal bolts M10 x 70 (1a), two screws 10 mm (1b) and two stop nuts (1c).
- Attach the throttle (2) to the upper handle (1) with a Philips screw M5 x 35 (2a) and a washer (2b). You can tension the cable using the Bowden cable screw on the throttle (2).
8.2 Fitting the transport frame (Fig. 5)
- Secure the pre-assembled transport frame (12) to the mounting lugs with two hexagonal bolts M10 x 30 (12a), two washers 10mm (12b) and two stop nuts (12c). Tighten the screws only enough to allow the joint on the chassis to still move.
- Now fold up the complete transport frame (12) in working position and attach it to the transport frame hooks (17).
Attention: Always fold up and hook in the transport frame (12) before compacting! Make sure that the joint of the transport frame is free to move so that it can be folded up.
8.3 Fitting the rubber pad (Fig. 6)
When using the plate compactor on paving stones, fit the rubber pad (20) to prevent chipping and scratching of the stone surface.
Attention! Use the rubber pad only for bedding in concrete blocks, concrete slabs and similar.
Remove the rubber pad when compacting gravel, grit and the like.
- To mount the rubber pad (20), place the machine with the plate compactor on the rubber pad.
Align the rubber pad so that the holes match the screw points on the device.
- Fasten the rubber pad (20) with the fastening strip (21) on the front side with two hexagonal bolts M10 × 30mm (21a) each, two spring washers A10 mm (21b) and two hexagonal nuts (21c).
- Tighten all the screws well.
9. Before commissioning
Attention!
Always make sure the product is fully assembled before commissioning!
WARNING!
Health hazard!
Inhalation of petrol/lubricating oil vapours and exhaust gases can cause serious damage to health, unconsciousness and in extreme cases death.
- Do not breathe petrol/lubricating oil vapours and exhaust gases.
- Operate the product outdoors only.
NOTE!
Product damage
Using the product without or with too little engine and gearbox oil can result in engine damage.
- Fill with petrol and oil before commissioning. The product is supplied without engine and gearbox oil.
NOTE!
Environmental damage!
Spilled oil can pollute the environment permanently. The liquid is highly toxic and can quickly lead to water pollution.
NOTE!
Risk of damage!
If incorrectly stored or undrained fuel is used, the carburettor may become clogged or engine operation may be affected.
- Put unused fuel in an airtight vessel and store it in a dark, cool room.
Check before operation
- Check all sides of the engine for oil or fuel leaks.
- Check the engine oil level.
- Check the fuel level - the tank should be at least half-full.
- Check the condition of the air filter.
- Check the condition of the fuel lines.
- Look for signs of damage.
- Check that all protective covers are in place and all screws, nuts and bolts are tightened.
9.1 Filling up with engine oil (Fig. 13)
Attention!
The plate compactor is delivered without engine oil. Therefore, ensure that you add oil before starting it up. Use multigrade oil (SAE 10W-30 or 10W-40 (depending on the operating temperature)) for this.
Check the oil level regularly before commissioning. An oil level that is too low can damage the engine.
- Place the plate compactor on a level, even surface.
- Unscrew the oil dipstick (14).
- Fill the tank with engine oil using a funnel (not included in scope of delivery). Note the max. filling capacity of 600ml Carefully fill the oil up to the lower edge of the filling port.
- Wipe the oil dipstick (14) with a clean, lint-free cloth.
- Re-insert the oil dipstick (14) and check the oil level without screwing the dipstick tight again.
- The oil level must be within the middle mark on the oil dipstick.
- If the oil level is too low, add the recommended amount of oil (max. 600 ml).
- Then screw the oil dipstick (14) in again.
9.2 Filling up with petrol (Fig. 15)
Attention!
The plate compactor is delivered without petrol. It is therefore essential to fill with petrol before commissioning. Use Super E5 / E10 petrol for this.
- Clean the area surrounding the filling area. Impurities in the tank lead to operational faults.
- Carefully open the tank cover (5) so that any possible overpressure can be relieved.
- Fill the tank with petrol (Super E5 / E10) using a funnel (not included in scope of delivery). Note the max. filling capacity of 3.6 litres. Carefully fill the petrol up to the lower edge of the filling nozzle.
- Close the tank cover (5) again. Ensure that the fuel cap is tightly sealed.
- Clean the fuel cap and the surroundings.
-
Check the tank and fuel lines for leaks.
-
Move at least three meters away from the refuelling area before starting the engine.
-
Do not use petrol that has already been used or that is contaminated. Do not allow dirt or water to enter the fuel tank.
10. Start-up
10.1 Starting the engine (Fig. 10 + 11) ON/OFF switch (23)
The ON/OFF switch (23) activates and deactivates the ignition system. The ON/OFF switch (23) must be in the ON position for the engine to run.
The engine stops when the ON/OFF switch (23) is moved to the OFF position.
Throttle (2)
The throttle (2) controls the speed of the machine. If the lever is moved in the directions shown, the engine runs faster or slower.
Fast / working position =

Slow/Idle =
Note: The throttle (2) must independently remain in the set position. If the throttle (2) no longer latches and moves out of the set position independently, the clamping screw must be tightened onto the throttle (2) by turning it clockwise.
Choke lever (16) (Fig. 10)
Cold engine / choke open:

Cold engine / choke open:

Note: The closed position of the choke lever enriches the fuel mixture for starting a cold engine.
The open position provides the correct fuel mixture for normal operation after starting and for restarting a warm engine.
Fuel valve (15) (Fig. 10)

10.2 Operation
When using the machine, use the guide bar with handle (1) to steer it.
Run the engine at full throttle, using the throttle (2). In doing so, the plate moves forward by itself at normal speed. When working on inclines, push the plate compactor forward slightly.
When working on sloping surfaces, reduce the speed by holding the plate compactor back.
ATTENTION!
Do not use the plate compactor on concrete or extremely hard, dry, compacted surfaces. The plate compactor then tends to jump and does not vibrate. This can damage both the plate compactor and the engine. The number of repetitions necessary for a desired compaction result depends on the type and moisture of the substrate. Maximum compaction has been reached when you notice a very strong recoil.
A certain amount of moisture in the ground is necessary. However, excessive moisture can cause small parts to stick together and prevent good compaction. Let the ground dry a little if it is extremely wet.
A very dry floor raises a lot of dust when working with the plate compactor. Adding moisture can improve compaction and reduce air filter maintenance.
Compaction with rubber pad
When using the plate compactor on paving stones, fit the rubber pad (20) to prevent chipping and abrasion of the stone surface (see 9.3). You can prevent damage to slabs and natural stones when vibrating by fitting a rubber pad under the plate compactor. Remove the rubber pad when compacting loose, granular soils and for blacktop repair work.
When bedding in with the black rubber pad, discolouration of the material surface may occur.
Compaction without rubber pad
If the plate compactor is operated without a rubber pad, screw the screws (21a) into the fastening strip (21) and the base plate (20) to prevent damage to the holes.
Notes when compacting
The following notes must be followed when ground is compacted on slopes (mounds, embankments):
- Approach inclines only from the very bottom (an incline that can be easily overcome upwards can also be compacted downwards without risk).
- The operator must never stand facing the downward direction.
- ATTENTION: A maximum incline of 20^ shall not be exceeded. If this increase is exceeded, the engine lubrication system may fail (spray lubrication and therefore failure of important engine components).
10.3 Stopping the engine
Emergency stop
To stop the engine in an emergency situation, move the engine switch (23) to the OFF position.
Switching off under normal conditions:
- Return the throttle (2) to the idle position to stop the plate compactor from moving.
- Let the engine cool down for a minute or two before stopping it.
- Move the ON/OFF switch (23) to the "OFF" position.
ATTENTION!
Do not move the choke lever (16) to the "closed" position to stop the engine. This can lead to a misfire or engine damage.
10.4 Idle speed
Reducing the engine speed when idling extends the engine's operating time, saves petrol and reduces the noise level of the plate compactor.
- Move the throttle (2) to the "idle" position to reduce the load on the engine when not compacting.
11. Transport (Fig. 20)
WARNING!
Danger of injury!
Unintended and unexpected start-up of the product may lead to injuries.
- After loading, switch off the engine and, after the engine has cooled down, remove the spark plug connector from the spark plug.
- The product can cause severe crushing injuries due to its own weight.
Allow the engine to cool down before transporting or loading to avoid burns and to prevent fire hazards.
The machine can fall and cause damage or injury if it is not lifted properly.
When transporting over longer distances, drain the fuel tank completely.
Secure the machine on the transport vehicle against rolling, slipping or tipping over and also lash down the plate compactor.
The transport frame facilitates handling. To do this, pull the transport frame out of the hooks (17).
Push the guide bar forward with both hands. This raises the machine slightly.
Now fold the transport frame under the plate compactor.
Proceed in reverse order when setting the machine down.
ATTENTION: Only use the transport frame on a level and solid surface and for short distances.
12. Cleaning and maintenance
WARNING!
Danger of injury and burning!
The product can start unexpectedly and cause injuries. In addition, temperatures of 80^ and more can be reached.
- Switch off the motor before carrying out any cleaning or maintenance work.
- Allow the motor to cool down.
- Remove the spark plug cable from the spark plug.
WARNING!
Health hazard!
Inhaling petrol/lubricant vapours may lead to severe health damage, loss of consciousness and, in extreme cases, to death.
- Do not inhale petrol/lubricant vapours.
- Operate the product outdoors only.
| Maintenance plan |
| after 10 operating hours | after 25 operating hours | Every 50 operating hours | Every 100 operating hours | every 300 operating hours |
| Air filter Clean Clean Clean Replace | | | |
| Spark plug Check | Clean Clean Clean Replace | | | |
| V-belt Check Replace | | | | |
| Exciter oil Replace | | | | |
| Engine oil level | Check | Replace | | Replace | |
NOTE!
Risk of damage!
Water entering the housing can cause engine damages. In addition, the jet of a high-pressure cleaner can damage parts of the product.
- Clean the product with a cloth, hand brush, etc.
- Do not immerse the product in water or other liquids and do not spray it with a high-pressure cleaner.
12.1 Cleaning work:
WARNING!
Danger of injury!
Unintended and unexpected start-up of the product may lead to injuries.
- Switch off the engine before carrying out any cleaning or maintenance work and after the engine has cooled down, disconnect the spark plug connector from the spark plug.
Maintaining your plate compactor ensures a long service life for the machine and its components.
- Check the general condition of the plate compactor and check for loose screws, misalignment and jamming of moving parts, broken or worn parts and other issues that could impair function of the machine.
- Use a high quality light machine oil to lubricate the moving parts.
- Clean the underside of the plate compactor as soon as particles of compacted soil get stuck. The machine will not work well if the underside is not smooth and clean.
- Re-attach the spark plug cable after cleaning and maintenance work.
12.2 Checking and replacing the V-belts
Remove the belt cover (19) to gain access to the V-belt (19b). Never use the plate compactor without the belt cover (19). If the belt cover (19) is not in place, it is possible that your hand will be caught between the V-belt and the clutch, causing you serious injury.
12.2.1 Tensioning the V-belts (Fig. 7, 8, 9)
The V-belt (19b) must be in good condition to ensure optimum power transmission from the engine to the eccentric shaft. Check the condition of the V-belts (19b).
- Switch the engine off and let it cool down.
- Remove the belt cover (19) to gain access to the V-belt (19b). To do this, loosen the 2 screws on the belt cover (19a) with an open-ended 13mm spanner.
- Now check the belt tension (thumb pressure). If the V-belt (19b) gives more than 10-15 mm (thumb pressure), you must retighten it.
- To do this, slightly loosen the four engine mounting screws (19d) on the engine and push the engine forward towards the housing of the eccentric vibration unit (9).
- Tighten the V-belt (19b) using the adjusting nut (19c) if the V-belt (19b) gives more than 10-15 mm (thumb pressure). To do this, turn the adjusting nut (19c) clockwise. Make sure that the engine and pulley remain at a right angle.
- After tensioning, retighten the four engine mounting screws (19d).
- Replace the belt cover (19) and tighten the 2 screws on the belt cover (19a) with an open-ended 13mm spanner.
12.2.2 Replacing the V-belts (Fig. 7, 8, 9)
If the V-belt (19b) is torn, worn out or smooth, it must be replaced.
- Switch the engine off and let it cool down.
- Remove the belt cover (19) to gain access to the V-belt (19b). To do this, loosen the 2 screws on the belt cover (19a) with an open-ended 13mm spanner.
- Then slightly loosen the four engine mounting screws (19d) on the engine.
- To release the pre-tension of the belt, undo the adjusting nut (19c) by turning it anti-clockwise.
- Push the engine towards the housing of the eccentric vibration unit (9).
- Pull the worn V-belts (19b) off the pulleys and pull two new V-belts into place correctly.
- Tighten the V-belt (19b) using the adjusting nut (19c) if the V-belt (19b) gives more than 10-15 mm (thumb pressure). To do this, turn the adjusting nut (19c) clockwise. Make sure that the engine and pulley remain at a right angle.
- After tensioning, retighten the four engine mounting screws (19d).
- Replace the belt cover (19) and tighten the 2 screws on the belt cover (19a) with an open-ended 13mm spanner.
ATTENTION!
When you remove or attach the V-belt (19b), make sure that your fingers do not get caught between the belt and the pulley.
NOTE!
Product damage
Using the product without or with too little engine and gearbox oil can result in engine damage.
- Fill with petrol and oil before commissioning. The product is supplied without engine and gearbox oil.
NOTE!
Environmental damage!
Spilled oil can pollute the environment permanently. The liquid is highly toxic and can quickly lead to water pollution.
- Fill/empty oil only on level, paved surfaces.
- Use a filling nozzle or funnel.
-
Collect drained oil in a suitable container.
-
Wipe up spilled oil carefully immediately and dispose of the cloth according to local regulations.
-
Dispose of oil as per local regulations.
12.3 Changing the engine oil (Fig. 12, 13)
After 25 working hours, the 1st oil change must be carried out. Thereafter, after 100 operating hours.
Recommended engine oil SAE 10W-30 or 10W-40 (depending on the operating temperature).
To drain the engine oil, please proceed as follows:
- Remove the flexible hose (18) with an open-ended 17mm spanner (not included in the scope of delivery) and drain the engine oil into a suitable tray. Make sure that the sealing ring installed in the flexible hose (18) does not get lost.
- When the engine oil is completely drained, secure the flexible hose (18) to the device again.
- Unscrew the engine oil dipstick (14). Fill the oil using a funnel (not included in scope of delivery).
- Check the oil level with the engine oil dipstick (14). Re-insert the oil dipstick (14) and check the oil level without screwing the dipstick tight again.
- Screw the engine oil dipstick (14) in again.
- Pull the starter cable (8) 5x slowly to distribute the oil (without ignition).
The petrol must be drained in the event of storage over a longer period of time or if the oil in the eccentric vibration unit is being replaced.
- Close the fuel valve (15).
- Hold a collection bucket under the hose of the petrol extraction pump (not included in the scope of delivery).
- Unscrew and remove the fuel filler cap (5).
- Remove the fuel filter insert (5a).
- Push the hose of the petrol extraction pump into the fuel tank and drain the petrol completely using the petrol extraction pump.
- Reinsert the fuel filter insert (5a).
- Retighten the fuel filler cap (5).
- To ensure that no petrol remains in the carburettor, the remaining petrol must be drained out of the carburettor. To do this, place a suitable container (not included in the scope of delivery) under the carburettor and open the carburettor screw (15a).
12.5 Changing the oil in the eccentric vibration unit (Fig. 16, 17)
Due to the weight, we advise you to carry out this work with two people! We recommend changing the eccentric vibration unit's oil after 300 operating hours.
Change the eccentric vibration unit's oil only when the eccentric vibration unit has cooled down.
Recommended low-viscosity gear oil SAE 80W-90 / 75W-90.
- Drain the petrol as described in 13.4.
- Drain the engine oil as described in 13.3.
- Remove the oil drain screw (22) at the top of the eccentric vibration unit housing and tilt the plate compactor forward.
- Allow the oil to drain into a tray.
- Return the plate compactor to its original position.
- Fill the eccentric vibration unit housing (9) with low-viscosity gear oil (80W-90 / 75W-90) using a funnel (not included in the scope of delivery). Note the max. filling capacity of 80 - 100ml
- Screw the oil drain screw (22) back in.
ATTENTION!
Do not overfill the tank! Too much oil in the eccentric vibration unit can reduce performance and overheat the eccentric vibration unit.
Eccentric vibration unit
An eccentric weight on the eccentric shaft inside the eccentric vibration unit housing is driven, at high speeds, by a clutch and belt drive system.
These high rotational speeds of the shaft cause the rapid up and down movements of the machine as well as the forward movement.
12.6 Air filter maintenance (Fig. 18) DANGER!
Risk of fire and explosion!
If not cleaned correctly, fuel may ignite and even explode. This can lead to severe burns or death.
- Clean the air filter only by knocking it out.
- Never clean the air filter with petrol or flammable solvents.
NOTE!
Risk of damage!
Operating the engine without the filter element in place can cause engine damage.
- Never run the engine without the air filter element in place.
A fouled filter insert (4b, 4c) diminishes the engine output due to reduced air supply to the carburettor. Regular inspection is therefore essential.
The air filter should be checked every 50 operating hours and cleaned as required.
- Undo the fixing screw (4a) by turning it anti-clock
wise.
- Take off the air filter cover (4).
- Check the air filter cover (4) for holes or cracks. Replace any damaged insert.
- Remove the paper filter (4b) and the foam filter (4c) and replace any faulty elements.
- Wipe off dirt on the inside of the filter housing and the filter housing cover (4) with a clean moist cloth. Make sure that no direct enters the opening. Set the air filter cover (4) on the filter housing for the duration of the filter cleaning process.
- Tap the paper filter (4b) on a hard surface or blow it out with compressed air to remove the dirt. Never try to brush the dirt out as this will press it into the fibres.
- Wash out the foam filter with water and leave it to dry well.
- Reinsert the paper filter (4b) and the foam filter (4c).
- Check that everything is seated properly and then reattach the filter housing cover (4).
- Secure the filter housing cover (4) with the fixing screw (4a) by turning it clockwise.
ATTENTION: Never run the engine without an air filter insert or with a damaged air filter insert (4b, 4c). This would allow dirt to enter the engine, which would damage the engine. The manufacturer warranty is then invalidated.
12.7 Cleaning / replacing the spark plug (Fig. 19)
ATTENTION: Only replace the spark plug when the engine is cold!
Check the spark plug for dirt for the first time after 10 operating hours and clean it with a copper wire brush if necessary. Thereafter, replace the spark plug every 50 operating hours if necessary.
- Disconnect the spark plug cable and remove any dirt in the spark plug area.
- Unscrew the spark plug (24) with the supplied spark plug wrench.
- Check the insulation. Replace the spark plug if it is damaged, e.g. cracked or fragmented.
- Clean the spark plug electrodes with a wire brush.
- Check the electrode gap and adjust it using a feeler gauge. To make sure that the engine remains efficient, the spark plug must have the right electrode gap (0.7 - 0.8mm)
-
Screw the spark plug (24) back in by hand and tighten it about 1/4 turn with the spark plug wrench supplied.
-
Fit the spark plug cable onto the spark plug (24).
ATTENTION!
A loose spark plug can overheat and cause damage to the engine. Tightening the spark plug too much can damage the thread in the cylinder head.
13. Storage
DANGER!
Risk of fire and explosion!
Storing the product near potential sources of ignition can result in a fire or an explosion. This can lead to severe burns or death.
- Eliminate possible sources of ignition, such as furnaces, hot water boilers with gas and gas dryers, etc.
NOTE!
Risk of damage! If the product is not stored properly, the engine can be damaged.
- Store the product protected against dirt, dust and moisture.
13.1 Storage during extended breaks in operation: If the plate compactor will not be used for a period of more than 30 days, follow the steps below to prepare it for storage.
- Empty the fuel tank completely (see section 13.4). Stored petrol containing ethanol or MTBE becomes stale within 30 days. Stale petrol has a high rubber content and can thus clog the carburettor and restrict the petrol supply.
- Drain the engine oil from the engine while it is still warm. Top up with new oil. (See section 13.3.)
- Use clean cloths to clean the plate compactor. Do not use aggressive or oil-based cleaning agents when cleaning the plastic parts. Chemicals can damage plastics.
- Store the plate compactor in an upright position in a clean, dry building with good ventilation.
Store the device and its accessories in a dark, dry and frost-free place that is inaccessible to children. The optimum storage temperature is between 5 and 30^ . Store the device in its original packaging.
Cover the device to protect it from dust or moisture.
Store the operating instructions with the device.
14. Repair & ordering spare parts
After repairs or maintenance, make sure that all safety-related parts are installed and are in perfect condition. All parts which may cause injury must be kept where they are inaccessible to children or others.
Attention: According to the German Product Liability Act, no liability is accepted for damage caused by improper repairs or by not using original spare parts.
Such work should be performed by a customer service centre or an authorised specialist. The same applies to accessory parts.
Spare parts and accessories can be obtained from our Service Centre. To do this, scan the QR code on the front page.
Connections and repairs
Connections and repair work on the electrical equipment may only be carried out by electricians.
Please provide the following information in the event of any queries:
Type of current for the motor
Machine data - type plate
- Motor data - type plate
Important note in the case of repairs:
For return delivery of the product for repair, please ensure for safety reasons that it is free of oil and fuel when it is sent to the service centre.
14.1 Ordering spare parts
Please provide the following information when ordering spare parts:
- Model designation
- Item number
- Type plate data
With this product, it is necessary to note that the following parts are subject to natural or usage-related wear, or that the following parts are required as consumables.
Wearing parts*: Spark plug, oil, belt, air filter
- may not be included in the scope of delivery!
15. Disposal and recycling
Notes for packaging


The packaging materials are recyclable. Please dispose of packaging in an environmentally friendly manner.
You can find out how to dispose of the disused device from your local authority or city administration.
Fuels and oils
- Before disposing of the device, the fuel tank and the engine oil tank must be emptied!
- Fuel and engine oil do not belong in household waste or drains, but must be collected or disposed of separately!
- Empty oil and fuel tanks must be disposed of in an environmentally friendly manner.
16. Troubleshooting
The following table shows fault symptoms and describes remedial measures in the event of your machine failing to work properly. If you cannot localise and rectify the problem with this, please contact your service workshop.
| Fault Possible cause Remedy |
| Engine does not start | Spark plug cable not connected | Connect the spark plug cable securely to the spark plug |
| No petrol or stale petrol Fill with clean, new | petrol |
| Throttle not in correct start position | Set the throttle to the Start position |
| Blocked fuel line Clean the fuel lines | |
| Oiled spark plug | Clean the spark plug, set the gap or replace |
| Not enough oil | Check the engine oil level and top it up if necessary |
| Overfilling the engine | Wait a few minutes before re-starting |
| Motor runs erratically | Spark plug cable loose | Connect the spark plug cable and secure it |
| Device runs in CHoke position Set the choke lever to the OFF position |
| Blocked fuel line or stale petrol Clean the fuel lines. Fill the tank with clean, new petrol |
| Water or contamination in the fuel system | Drain the petrol from the tank. Top up with new petrol |
| Contaminated air filter | Clean or replace the air filter |
| Motor overheating | Contaminated air filter Clean the air filter | |
| Restricted airflow Clean the engine of the plate compactor |
| Engine does not stop when throttle is in stop position or engine speed does not increase properly when throttle is moved | Deposits in throttle connections Remove dirt and debris |
| Pull cord damaged Contact specialist dealer |
| The plate compactor is difficult to control during operation (machine bounces or moves forward abruptly) | Engine speed too high on hard ground Set a lower speed with the throttle |
| Shock absorber too loose or damaged | Contact specialist dealer |
| No compacting function or the plate compactor does not reach the maximum speed | Damage on eccentric vibration unit or the plate compactor | Contact specialist dealer |
| Drive belt too loose and slipping | Adjust or replace the drive belt |
| Oil loss from engine or eccentric vibration unit | Worn seals | Contact specialist dealer |
| Leaks on housing |
Table des matieres: Page:
Günzburger Straße 69
D-89335 Ichenhausen
Cher client,
Manipulation sure de I'essence
Günzburger Straße 69
D-89335 Ichenhausen, Germania
Egregio cliente,
Günzburger Straße 69
D-89335 Ichenhausen
Geachte klant,
Günzburger Straße 69
Günzburger Straße 69
Günzburger Straße 69
D-89335 Ichenhausen
Vázéný zákazníku,
12.2.2 Vymena klinovych remenov (obr. 7, 8, 9)
Ak je klinovy remen (19b) natrhnuty, opotrebovany alebo hladký, musi sa pri njblizsej prilezitosti vymenit.
- Vypnite motor a nechajte ho vychladnuit.
- Odstrante kryt remena (19),aby ste sa dostali ku klinovemu remenu (19b).Na tento ucel uvo'nite 2 skrutky na kryte remena (19a) pomocou vidlicoveho klucas yel.13.
-
Nasledne mierne uolnite styri upevnovacie skrutky motora (19d) na motore.
-
Ak chcete uvolnit predpatie remena, otvorte na-stavovaciu maticu (19c) proti smeru hodinovych ruciiciek.
- Zatlačte motor smerom k excentrickému telesu (9).
- Vytyihnite opotrebovaný klinový reměn (19b) z remenić a správné natiahnite dva nové klinové remene.
- Pomocou nastavovacej matice (19c) dopnite klinovy remen (19b), ak sa klinovy remen (19b) zatlaci o viac ako 10 - 15 mm (tlak vytrany prstom). Na to otocte nastavovaci maticu (19c) v smere hodinovych ruciciek. Dbajte na to, aby motor a remenica dostali y spraynom uhle.
- Po utiahnuti znovu utiahnite styri upevnovacie skrutky motora (19d).
- Nasadte kryt remeña (19) naspa t' a naskrutkujte 2 skrutky na kryt remeña (19a) pomocou vidlicového kluča yel, 13.
POZORI!
Pri odoberani alebo nasadzovani klinoveho remena (19b) dbajte na to, aby ste si presty nezachytili medzi remen a valcek.
UPOZORNENIE!
Poškodenie vyrobku
Ak sa produkt prevadzkuje bez motorového a prevalového oleja, ale je ho prilis málo, moze to viest'k poskodeniam motora.
Pred uvedenim do prevadzky doplne benzin a olej. Vyrobok sa dodava bez motoroveho a prevodoveho oleja.
UPOZORNENIE!
Škody naživotnom prostredi!
Vypusteny olej moze trvalo znečistitživotné prostredie. Kvapalina je yvsoko toxická a moze viestk znečisteniu vody.
Günzburger Straße 69
D-89335 Ichenhausen
Kedves Ügyfelünk!
Sok oromet es sikert kivanunk uj termeke hasznalatahoz.
Megjegyzés:
Günzburger Straße 69
D-89335 Ichenhausen
Szanowny Kliencie,
Günzburger Straße 69
D-89335 Ichenhausen
Poštovani kupci,
želimo vam mnogo zadovoljstva i uspjeha pri radu s novim proizvodom.
Napomena:
Prema vazecem njemaackom Zakun o odgovornosti za proizvode, proizvodač ovog proizvoda ne odgovara za stete koje nastanu na ovom proizvodu ili koje ovaj proizvod uzrokuje u slučaju:
neispravnog rukovanja
- Nepridržavanje priručnika za uporabu
- popravaka koje obave drugi, neovlašeni stručnjaci
- montaže i zamjene neoriginalnih rezervnih dijelova
- nenamjenske uporabe
- kvarova elektricnog sustava zbog nepostivanja elektrichnih propisa i VDE propisa 0100, DIN 57113 /VDE 0113
Vodite računa o sljedecem:
Priručnik za uporabu sastavni je dio ovog proizvoda. On sadržava važne napomene za siguran, propisan i ekonomičan rad s proizvodom te za izbjugavanje opasnosti, smanjivanje troškova popravaka i prekida rada te povećavanje pouzdanosti i vijeka trajanja proizvoda. Osim sigurnosnih propisa iz ovog priručnika za uporabu svakako se pridržavajte i nacionalnih propisa koji se odnose na rad ovog proizvoda.
Günzburger Straße 69
D-89335 Ichenhausen
Spostovani kupec,
želimo vam veliko veselja in uspeha pri delu z vašim novim izdelkom.
Napotek:
Günzburger Straße 69
D-89335 Ichenhausen
Austatud klien!
8.3 Kummimati monteerimine (joon. 6)
Günzburger Straße 69
D-89335 Ichenhausen
Gerbiamas clientele,
Günzburger Straße 69
D-89335 Ichenhausen, Vacija
Godatais client!
Günzburger Straße 69
D-89335 Ichenhausen
Bästa kund!
Varm motor/choke oppen:
- Kall motor/choke stangd:
Günzburger Straße 69
D-89335 Ichenhausen, Tyskland
Kare kunde
13.1 Opbevaring under laengere driftspauser:
Günzburger Straße 69
D-89335 Ichenhausen
Kjaere kunde,
vi onsker deg mye glede og lykke til ved arbeider med ditt nye produit.
Merknad:
06acheHHe Ha cMbOJIte Bbpxy ypeJa
I3noJI3BaHeTo Ha CmBOni B HAcTOrIoTO pKoBOcTBo CneDbA Da HacOu BHIMaHHeTo Bn KbM eBeHTyaHn IpCKObe.CmBOniTe 3a 6e30NaChOCT N O6rCheHnra, KOnTo n PrnPpyKaBaT, Tpr6Ba Da 6bDaT pa36paHn ToUHO. CamTe npEduPexKeHn He npEmaxBat pckOBete n He Morat Da 3aMeHr TpaBnHnTe MepKn 3a npedOTbPaTaBAHe Ha 3IonoJyKn.
Günzburger Straße 69
D-89335 Ichenhausen, TepMaHn
Ybaxaemn KIneHTn,
KeIaem Bn MHO r npraTHm MOMHTN ycHexn npnpa6oTata C Baunr HOB npOdyKT.
Yka3aHHe:
CbIaCHO DeIcTBaUH 3aKOH 3a npOdyKTOBaTa OTROBOPHOCT, npON3BOIDNTeJIrT Ha TO3N npOdyKT He HOCN OTROBOPHOCT 3a UETN, Bb3HNKHAN N O Nn NOPaDN TO3N ypeD, npN:
- HenpaBnHo 6opabeHe
- Hecna3BaHe Ha pbkoBODCTBOTO 3a ekcnIioatauia
PemontnOT HeynbHOMOeHN CneuaNNCTN,BAaN Ce TpeT Jnca
- MoHTIpaHe I IOdMaHa Ha He opuHnHaJIHN pe3epBHH Yactn
- YnoTope6a He no npedHa3NaueHne
- OTKa3 Ha eJleKtpnueckaTaNHcTaNaun npn Hecna3BaHe Ha npedncaHnra 3a pa6oTa c eJektpnueCTBO n pa3npoe6bTe Ha VDE 0100, DIN 57113/VDE 0113
ImaTe npeBnCneHTo:
PbKOBOCTBOTO 3a ekCnIooatauiae cBCTaHa qact OT To3n npOdyKT. To cbDbpxka BaxHn yKa3aHnra OTHOCHO 6e3oNaChATA, npabunHATA u NKOHOMUHaTa pa60Ta C npOdyKTA, n36rBaHeTo Ha onaCHOctn, cneTBAHeTo Ha pa3XoDn 3a peMOHT, HamaJIbaHeTo Ha BpeMeHa- Ta Ha npctOnuYBeJInuAbaHeTo Ha NaEckDHOCTTa n EKCnIooatauONHHNxaHBOT Ha npOdyKTA. B donbl- HeHne KbM yKa3aHnraTa 3a 6e3oNaCHOCT B TOBa pbKOBODTBo 3a ekCnIooatauia, 3adbJnxTeHNO Tp8Ba Da cna3BaTe OTHacRHTte Ce Do ekCnIooatauuaTa Ha npOdyKta npedncaHn BB BaWata cTpaHa.
Ipeyn da n3noJ3BaTe npOdykta, 3ano3HaIte ce C BcNqKn yka3aHnra 3a pa6oTa n 6e3onacHOCT. N3- noJ3BaIte npOdykta cAmo KaKTo e OnUcaHo n 3a nocouehnte oBnaCTn Ha yNoTpe6a. CbXpaHraBaIte pBkoBOdCTBOTO 3a ekCnloatauHa CNpyH0 MRCTO n IpeDaBaIte BCNUKn DOKyMeHTn, KOrATo npEpaBaTe npOdykTa Ha TpeTu Niua.
2. OnncaHne Ha npOyKta (Φnr. 1-20)
- Crbbaema HapabnBaIa cKo6a c pbkoXBaTKa
1a. BnHT C Kpbctoo6pa3eH uuHa HnPaBnaBa- uata cko6a
- JIoCT 3a ra3Ta
2a. BnHT Ha loCTa 3a ra3Ta
2b. PoiNoJxHa Wai6a
- Aycnyx
- Kanak Ha Bb3duuHnqHnTbp
4a. CkpeneTeJen BnHT
4b. XapTneH dHnIITbp
4c.ДуhanpeHOBФИЛТьр
- Kanak Ha 6eH3nHOBna pe3epBoap
5a. Bnokka Ha ropuBnna nTbp
- BeH3nHOB pe3epBoap
7.Двигател
- Bbke Ha cTape
- EKcUeHTpNK
10.OchOBHa nNoa
- TpaHcnpTHn KOJena
- XoOba qaCT
12a. BnHTObe c IecToCTeHHa rnaBa Ha XoObata yact
12b. PoiJIOxHn wai6n
12c. Cton-raikn
- BnHTObe Ha OCHOBHaTa nNoya
14.ИЗмерВаTeЛна Zeka 3a DBuRatJIHOTo MacNo
- BeH3nHOB KpaH
15a. BnHT Ha Kap6ypaTopa
- JIoCT Ha CmyKaHa
17.ДьржаузхoДовагачсT
- _BKBaB Mapkyu
- Kanak 3a pembka
19a. BnHTOBe Ha KaNaka 3a peMbka
19b. KInHOBnDeH peMbK
19c.Гаиka 3a Nactpoиka
19d. BnHTObe 3a 3akpenBaHe Ha DnBiratEnr
- Гуменя положka
- Панka 3a 3akpenBaHe
21a. BnHTOBe Ha nlaHkata 3a 3akpenBaHe
21b. PpyxHHn npbCTeHn
21c. WecctocEnn raKn
22.ИЗпунькATEЛна npo6ka 3a macnoTo 3a ekcenuHtpnka
- PpeBknIOyBaTeI 3a BKnIOyBaHe/13KJIIOyBaHe
- 3anaJIntHa cBeu
3. 06em Ha doctabkaTa
8.3 MoHTax Ha rYmEHaTa noDnOxKa (ΦnR.6)
Korato n3non3Bate Bn6paunOHnHa TnOoA Bbpx naBeta, MoHTnpaTe rymeHata noDnOxka (20),3a da npedOTbpatnte OTkbpTbaHe n 3dpackBaHe Ha nobbpxHOCTTa Ha Kambka.
BHHMaHHe! 13noJ3BaIte rymeHaTa noJIOXka CaMo 3a Bn6paUHO yNtBTHraBe Ha 6EtOHn 6JOKOBe, 6EtOHn IIIOuN I Dpyr N IOO6Hn.
CbaIyTe rymeHaTa nOIoXka npn N3BbPwBaHe Ha Bn6paunOHn pa6OtncAkbN, PAcbN npyn npo6Hn.
- 3a MoHTax Ha rymeHaTa noIIOxKa (20) noCTaBete MaunHata C Bn6paunOHATA nIOua Bbpxy rymeHaTa noIOxKa. IoppaBHeTe rymeHaTa noIIOxKa Taka, Ye OTBOpHTe Da cBbnaDat C ToUKITE Ha 3aBnHTBaHe Ha ypeDa.
- 3akpenete rymeHaTa noJIOKka (20) cnilaHkata 3a 3akpenBaHe (21) ot YenHata CtpaHa C Dba BnHTa C weCTocTeHHa rnaM10 x 30 mm (21a), Dba noDBNHN npbCTeHa A10mm (21b) n dBe wectob- TJIHN raIKn (21c).
- 3aTeHHeTe Do6pe BCnKu BNHTObE.
9. Праздусякаме Веклноатуян.
△BHHMaHHe!
Ipeu nyckaHeTo B eKcnnoataaun 3aDbJnxTeHnHO crNo6e TaHbNHO npOdykTa!
△PDEyPEXKDEHNE!
Onachoc3a 3dpaBeTo!
BdmbaHTo Ha 6eH3nHOBu N3napEHn/napo ot Cma3OuHO MacNo n OTPa60TeHN ra3OBe MoKe da DOBeDe Do cepno3Hn yBpeXdaHn Ha 3dpaBeTo, 6e3Cb3HaHne IN B EKCTpeMHN CnyuaN -DcMbpT.
-HeBdNWBaIte6eH3nHOBNTe n3napEnra/napTeOT CMA3OHTO MACNO N OTPa6oTeHNTe ra3OBe.
-ИЗнДБаNTe npOуКТа сAmO Ha OTKpNTo.
YKA3AHHE!
NoBpeKdHa HnpoDyKta
Pa6oTaHa npOdyKta 6e3 nnn c TBbpDe MaNko DnBnraTeHNO nnn peDyKTopHO MacNo MoKe Da DoBeDe Do NOBpeXdaHe Ha DnBnateTn.
-Ппдп рсkaнTo B eкплоатугЯ HаелTe 6eH3nH nIIM MacNo. ПрдуКтбТ ce DoctabRb 6e3 DBIratelHo n peDyKTopHo MacNo.
YKA3AHNE!
EkOnoruHn 1
I3TeKnoto Macno MoKe TpaHNo Da 3aMbpcn OkJHa- Ta cTpeNa. TeuHocTTa e cnJIHo OTpOBHa n MoKe 6bP30 Da DoBede Do 3aMbpcBaHe Ha BOData.
-Пьнгет/ИЗTOВаITE MacIOTOCAMOBbpxpypaBn, TBbpIN NOBbpxHOCTN.
-ИзпοлзВаитгьрLOВИнaзаЗаэразжданe ИИнФунЯ.
-Cb6paIte n3TOyeHTo MaCNo B NOxOJaU CbD.
- He3a6abHo n36bpwe Pa3JrTO macIO n3XbpeIe npcaIa cblnacHO mectHnte pa3npoe6n.
- IV3XBbPnIe MacNoTo cbrnaCHO MeCTHnte pa3-nopeEbn.
YKA3AHNEI
Onachoct ot noBpeXdahe!
I3no3BaHTo Ha HnpaBnHcBxpaHbAo Hn Hn3TOeHO rOpBO MOKe Da IOBeDe Do 3anyuBaHe Ha Kap6ypaTopa N da NOBnRe HeRaTnBHO Bbpxy pa6o-tata Ha Dnuratena.
- I3cHnTe HeHyXHTo rOpuBO B XepMeTuH0 3aTBopeH CbI n ITO cbxpaHraBaIe TBmHO n XJaHOnPomeUeHne.
KoHTpO npeDn ynpaBJeHne
- PpOBepeTe BCnUckn CTpaHn Ha DnBraTeJr 3a TeOBe Hb MacNo n 6eH3nH.
- Поберете НВОТо на ДВИГаTeЛHOTO MACJO.
- Поберете НИВОТа Ha ropиВОТо - pe3epBoapbT
ТрЯБВа дa e nbJeH NOHe HANO nobHa.
- PpOBepTe CbCToHHeTo Ha Bb3dyuHnna QnTbp.
- PpOBepete CbCToHHeTo Ha rOpINBOIpOBoDInTe.
CnepeTe 3a npnHaun Ha noBpeJa.
-Поберетадади BCnuk npedna3нkanau ca MOHTnpaHn n daJIN BCnuk BnHTObe,raKn n 6oITOBe ca 3aTeHaTn.
9.1 IbIHeHe c DnRatEnHo MacNo (Hr. 13)
BHHMaHne!
Bn6paunohhata nnoya ce doctab8 6e3 DnuratoHn Ho macNo. Nt Ta3n npuHa npedn nyckaHTo B Eeknnoataa HnpeMeHHo HanbHHeTe C macNo. 3a ceta n3non3BaIte BCEce3OHHO macNo (SAE 10W-30 nn SAE 10W-40 (B 3aBncmocT ot pa6otHaTa Temnepatypa).
PpOBepBaIte HnBOTo Ha MacIoTO peoBHO npeIN BcRAKO NyckaHe B EKcnIooataa. TbbpDe HnCKO HnBO Ha MacIoTO MoKe Da NOBpeDN DBuRaTeN.
- NocTaBete Bn6paCnoHHaTa nNoCha Bbpxy paBHa NOBbpxHOCT.
- OTBnHTeMaCNON3MepBaTeHHaTa 14
- HanbHHepe3epBoapa c DnuratEnHo MacNo C nOmoUta Ha yHna (He e BKnIOueHa B O6ema Ha doCTaBkata).ObbPheTe BHMaHne Ha MaKc. 06em ot 600 ml.BHMaTeJHO HaneIte Macno Do DOJHnra Pb6 Ha rplOBuHaTa 3a 3apeXdaHe.
4.И36bpseTe Macnon3MepBaTeHnHaTa UeKa (14)c YnCTa Kbpna 6e3 BJaCnHKn.
- BkapaTe OTHOBO MACNON3MepBaTeJIHaTa UeKa (14) n npOBepTe OTHOBO HnBOTO Ha MacJATO, 6e3 da 3aTgate OTHOBO UeKaTa.
-
HnBTo Ha MacNoTo Tp8Ba Da e B paMKTe Ha CpeHata MapKnupOBka Bbpxy Maclon3MepBaTeHHata UeKa.
-
Ako HNBOTO Ha MacNoto e TBbpe HnCKO,doJeTe npenopbuaHOTo KOINueCTBO MacNO (MaKc. 600 ml).
- CnEe TOBa 3aTeHHeTe OTHOBo MaCJNoN3MepBaTeHNHaTaeka (14).
9.2 IbJIHeHe c 6eH3nH (Φur.15)
△BHHMaHHe!
Bn6paunonHaTa nnoa ce doCTaB8 6e3 6eH3nH.
No Ta3n npuHna e BaxHo npedn nyckaHTo B ekC-
nloatauaJa haneete 6eH3nH. 3a ceIta H3non3BaIte 6eH3nH Super E5/E10.
- Nocntete OKOIO 3oHaTa 3a NbJIHeHe. 3aMbpCBAHnBpe3epBOapApnpuHHBaTekCNloaTaUHOHH HEN3npabHOCTN.
- OTBaprTe Kanaka Ha pe3epBoapa (5) BnMaTeHNo, 3a Da MoKe eBEHT. HAnuHTo CBpbxHaJaRaHe da Ce noHxN.
- HanbJIHeTe pe3epBoapa c 6eH3nH (Super E5/ E10) c nOMoUta Ha cyHna (He e BkIIOueHa B o6ema Ha IOCTaBkata). O6bPHeTe BHMaHHe Ha MaKc. 6eM OT 3,6 IITpa. BHMaTeJHO HaneiTe 6eH3nH Do DOJIHHra Pb6 Ha rbpIOBnHaTa 3a 3apeXdaHe.
- 3aTBopete OTHOBO KanaKa Ha pe3epBoapa (5). YBepete ce, Ye KaNaYkata Ha pe3epBoapa 3aTba-pa IIbTHO.
- Nocntete KanaykaTa Ha peepBoapa n Okono Hea.
- Поберете peЗерварази горибовозду Teчовe.
- ПпенистарпаHeTo Ha ДВИгаTeЯ ce OTДалЕчerte Han-MaJIko Ha TpN MeTp aOT MЯСТОTo HaЗapexKaDAne.
He n3noJ3BaIe n3noJ3BaH n 3aMbpceH 6eH3nH. He no3BoJraBae MPbCOTn I BOa da nOpaHaT B 6eH3nHOBnpe3epBoap.
10. Nyskahe B ekcnnoataza
10.1 Ctaptnpahe Ha dBuraTeJ (Φn.r. 10 + 11)
PpeBknIOBaTeI 3a BKnIOBaHe/13KNIIOBaHe (23)
C npEKBKIOUBATeNa 3a BKNIOUBAHe/N3KIOUBAHe (23) ce aKTINBnPa n DeaKTHINBaPa CnCTeMaTa 3a 3anaJIbaHe. InpEKBKIOUBATeNaT 3a BKNIOUBAHe/N3KIOUBAHe (23) Tp6Ba Da e B noJoxKeHne ON (BKJI.), 3a da pa6oTn DBrATeNt.
Дигателтспра,КORATo npeBknHoyBaTeJrT 3a BKNIOUBAHe/U3KNIIOVAHe (23) ce npemeCTn B noIoxeHne OFF (N3KJI.).
JIoCT 3a ra3Ta (2)
C nocta 3a rata (2) moke da ce KOHTponipa ckopocTt ha MaunHata. IpemecTBaHTo Ha noCTa B noka3aH- Te nocokn kappa Dniratena da pa6oTu no-6bP3O nn no-6abHO.
Bb30/pa6oTHo noIoxHeHne =

BaHbNo/npa3eH xoD =

Yka3aHHe: IocbT 3a ra3Ta (2) Tpr6Ba ABTOMaTHUHO da 3aIbpxk 3aIaIeHOTo NIOXKeHne. Ako NoCTb 3a ra3Ta (2) Beue He e cKcpan H He ce npMeCTba OT camo Ce6e cn, 3ateraTeHNrT BnHT Ha loCTa 3a Ra3Ta (2) Tpr6Ba Da CE 3aterHe NO NOCOKa Ha YacOBHKoBata CTpeJIka.
Iocr Ha Kap6ypaTopa (16) (Our. 10)
- TOnbI DnBiratEn/OTBopeH cMyka:

- CtydeH DnBraTeJ/3aTBopeH cmyka:

Yka3aHne: 3aTbOpehata no3nue Ha loCTa Ha Kap6ypatopa o6oratraBa ropNBhata Cmec 3a CTaptnpaHe HaCTyDeH DBrIrTeI.
OTBOpEHaTnO3uNJaIOCTaBnIpaBnHataRopNBcMec 3a HopMaHa pa6oTa CneI CTapTnpaHe, KaKTo n3a pectapTnpaHe Ha TOnbI DniratEn.
BENHOB KpaH (15) (ΦnR. 10)

3aTbOpEn 6eH3nHOB KpaH:

-
Поверете НИВОТо Ha MacNOTO И на 6eH3nHa. BuxTe pa3dEn 10.1.
-
Ппени урлът haBHe BuHaR BduraTe xOdoBaTa yact (12) nЯ okaybaite B dIbpxaHa Ha xOdoBaTa yact (17)! YBepete ce, ye cTabaHa xOdoBaTa yact ce IbIXn CBO6oJHo, 3a Da MoKe da ce crbBa Harope.
-
IocTaBeTe IocTa Ha Kap6ypaTopa (16) B 3aTBopeHo IIOXKeHne (npn TOnbI DBrIrAteI - B OTBopeHo IIOXKeHne). Yka3AHne: Bn6paUHOHaTaIIOua 3aNoCbA da Bn6pnp npn POnyra3, BeHa- rA 5OM IocTbT Ha Kap6ypaTopa (16) ce OTBOpN.
-
OTbOpTe 6eH3nHOBnKpaH (15).
-
NocTabete nocta 3a ra3Ta (2) Ha "nonyra3" (= MekdHHNOIOKeHne MeKdy,6bp30" n,6abHO").
-
NocTabete npeBkIIOuBaTeTn 3a BkNIOUbaHe/n3-KIOUbaHe (23) Ha ON (BKJ.).
7.Дрьн electe cunho Bbxketo Ha cTapTepa (8) nTo octabete 6aBHO da ce npu6epe.
- CneI KaTo DnurataTeJrT ce CTapTnpa, 3aTBopTe 6abHO NoCTa Ha Kap6ypatopa (16). I cneIOBa-TeHNO rO NoCTaBtE B pa6TO HO NOJoxHe.
- NocTaBete noCTa 3a ra3Ta (2) B pa6oTHo noIoo-KeHne.
- Bn6paunOHnTa nIOy a 3anoYBa da pa6oTn.
10.2 Eknpoataa
Pn ynoTpe6a Ha MaunHata N3NoJ3BaIte HnpaBnaBaaata c06a CpbkoXBatka (1), 3a da ynpabnaBate.
OcTabete IocTa Da pa6oTH Ha IIbIHa ra3, n3noJI3-BAaIK NocTa 3a Ra3Ta (2).EdHOBpeMeHNo C ToBa IIOyata Ce DnKn HApPeC HopMaIIHa ckOpoc. Korato pa6oTHe no HAKIOH, HATNCHE Te Bn6paUOnHHata nnOua JeKO HApPe.
Korato pa6oTne no HakoH, HamaJeTe ckopocTta, 3aIbprkaikn Bn6paunOHnata nloya.
△BHIMAHNE!
He n3noJ3BaIte Bn6paQIOHHata pIoQA Bbpxy 6eToHnn n3KJIIOUHTeJIHO TBbpDn, cyXn, yNtBTHEn nOBbpxhOcTn. Bn6paQIOHHata pIoQA no-ckopo cKaaHne Bn6pnpa. Toba MoKe da nobpeDi KaKTo Bn6paQIOHHata pIoQA, Taka n DBrIraTeJIa.
Бpoar Na nobTopeHnra Ta, KOITc Hne6xOdIm 3a KjElaHnpe3yIaT OT yNtBTHBaHeTO, 3aBNCOT BnDa N BlaXHoCTTa Ha OCHOBaTa. MakCmAlHoto yNtBTHaBe e DoCTnHaTo, KOrato 3a6eJeKte MHOrO CunJeH OTKaT.
Heo6xOIMO e onpeJeIeHO KOJIueCTBO Bnara B noyBaT. N3nnHata Bnara obaue MOKe Da npuHH 3aJenBaHe Ha mankU qactn n da npedotBpTaN do6poTo yNtTHBaHe. Ako noCbata e MHoro BnaXHa, octabeTe Ja n3DbXHe.
M Horo cyxnrT noB Bnra M HorO npax npn pa6ota c Bn6paunOHnata nnoya. NobabJeTo Ha Bnara MoKe Da nOobpn yNtBTHRaHeTo n da HamaII NOdprkKaTa Ha B3DyUHnA FInIbP.
YnIbTHaBe c rymeHa nOdNoKka
Korato n3noJ3BaTe Bn6paunOHHaTnNoa Bbpxy naBeta, MOHTnpaIte rymeHata noJIOxka (20), 3a da npedOTbPaTHe OTkbpTBAHe n3TpNBHe Ha NOBbPxHOCTTa Ha KAMbKa (BnKTe 9.3).
C rymeHa nOIOKKa nOd Bn6paUOnHAta nOoA moKeTe da npedOTbPaTlTe NOBpeHa Ha nOuHata n eCTeBHeNHa KAMbK pRn BV6pIpaHe. rymeHa TNOIOKKa Tpr6BaDa ce cHema pRn yNtBTHaBe Ha poHnVBn, 3bPheCTINPOIDoe H pEmOHtnpaHe Ha 6HTymHn POKPTnY.
Pn Bn6paunOHNo ynnbTHraBe c cepHa rymeHa noIIOXka NOBbpxHocTt Ha MaTepnana MoKe da npomeHi Cbeta Ca.
YnBTHaBe 6e3 rymeHa noDnOxKa
Ako Bn6paunOHnHa TnOoA ce n3noT3Ba 6e3 rymeHa noIIOKka, 3aBnHTe Te BnHTOBeTe (21a) B nlaHkata 3a 3aKePbHe (21) nNoobTa nOoA (20), 3a da npedotBpATte NobpeDa Ha OTBOpnte.
Yka3aHn npn ynIbTHBaHe
PnynblthraBeHaNoBbTaNoHaknoHn (XbImoBe, Hacnn) Tpr6Ba Da ce Cna3Bat CneHnTe yka3AHn:
-Пиблжаваite ce KBM HAKLOHITE Ha-OTdoNY (HaKIOH, KOIto MOKe JIeCHO da ce n3kauN, MOKe da 6bde ynIbTHen HauOJy 6e3 pnc).
-Опетаюрьт НИКORA He TРЯБа Да e C Лице Кым
надолништо.
BHIMAHNE: MaKcImaJIHnT HaKJIOH OT 20° He TpIbBa Da ce HaIbNtBa. AKO To3n HaKJIOH 6bJe HaIbNtE HcTeMaTa 3a CMa3BaHe Ha DBrAteJIa MOKe Da ce Nobpei (Cma3BaHe Upe3 PInCKaHe, KOeTo Da IIOBeDe Do NOBpeXJaHe Ha BaXHi KOM- IHOHTu Ha DBrAteJIa).
10.3 Cnnpahe Ha dBuratela
N3BbHpeDnO cnnpaHe
3a da cnpeTe DnurateTn B CnyaH Ha aBapna, noctabete npeKbcBaay Ha DnuratEn (23) B noIooKeHne OFF (N3KJI.).
N3KJIIOUbaHe npn HopMaHn yCNOBna:
- BbpeTe loCTa 3a ra3Ta (2) B noIOxKeHne Ha npa-3eH XOi, 3a Da cnpTe DnIXKeHHeTo HAnpeD Ha Bn6paUHOHHata nIOva.
- Octabete Dnuratena Da ce oxna3a MNHyTa nn DBe, npdi da ro cnpeTe.
3.ПремecTeTe npeBKNIOUbaTeЯ 3a BKNIOUbaHe/N3-KNIOUBAHe (23)В NOJoxHne OFF (N3KJI.).
△BHUMAHHE!
He noctabrayte locta Ha kapbypatopa (16) B nojokheHne 3aTbopeHo", 3a da cnpete DbrarateI. TobaMOxKe Da IOBede Do HeycneuHO 3anaJIbaHe IIN NOBpeDa Ha DBrarateIe.
10.4 06opotn ha npa3eH xoJ
TOnHxKaBaHTo Ha 6oBOpOTHe Ha npa3eH XoD Ha DBrIraTeYyBeNnUaBpemeto 3a pa6Ota Ha DBrIraTeNa, NecTI RopINBO HAmalra HNBOTO Ha Wym Ha Bn6paLIOHHata PLOHa.
- NocTabete loCTa 3a ra3Ta (2) B noNoXeHne ,npa-3eH XoD, 3a Da haMaIte HaToBapBaHeTo HaDbNraTeJI, KOrato He ynnbTHraBe.
11. TpaHcnpTnpaHe (ФИг. 20)
△PDEyPEXKDEHNE!
OnachocT OTHapaHbAhe!
CnyaHOTOn HneOyakBaHO NOTeTJHe Ha npOdyKta MOKe Da npuHHn HapaHbAHn.
- CneH HatoBapBaHe n3KnIouhe Te DnIaTeTEn I, CneKATO ToI n3CTnHE, n3BaTe Te JyNata Ha 3anaJIInTeJHATA CBeU OT 3anaJIInTeJHATA CBeU.
- PpOdyKbT MoKe Da npuynH TeKn HapaHbaHna npu CMAuKBaHe nopadu Co6CTBeHOTo cn Terno.
Ipei TpaHcnpTnpaHe nn TObapeHe octabeTe DniratEnJa ce OxlaDn, 3a da n36BerHete n3rapHnN Da n3KKnOHTe pNcKa OT noXap.
MaunHaTMOKe Da naHe n da npuHn MaTePnAHa etsa HapahBaHe, aKo He 6bJe NOBnHaTa npabnHO.
Pn TpaHcnpOpTnpaHe Ha no-DbJPi pa3ctOraHna 13- npa3HeTe HantbJHo pe3epBoapa 3a ropBO.
Ocnypete MaunHata Bbpxy npeBO3HOTo cpeCTBO Cpeu TybkajHe, NImecTBaHe nn ppeo6puaHe I dOnbJIHNTeJHo yKpeTe Bn6paUHOHHata PIOva.
XoObaTa yact yneChraBa 6opabeHeto. 3a ceTaN3-DbpnaTe XoObaTa yact OT DbpkaHa (17).
HaTnchete HapnbnaBaUaTa CkoBa C DBe PbUe Ha- nped. Toba noBdura MaunHaTa neko.
CrbheTe XoOBaTa YacT NOB Bu6paHOnHaTa INoOa.
Pn CnyckaHe Ha MaunHaTa DeNCTBaIe B ObaTaHa
nocJeIOBaTeHIOCT.
BHIMAHNE: N3noJ3BaIe XoIOBAta Yact CaMO Bbpy paBHa n TBbpda NOBbpXHOCT n Ha KpaTKn pa3-CTOHH.
IoppbkataHaBaataBn6paHnHa IIOa rapaHTnpaDbIeKcPiOaTuNOHeJXMBOT HaMaunHATA HneHNTe KOMNoHEHTN.
-ПоберетеобсOTOсбTORнeHAВИбрационнatura nnoya3a pa3xna6ehn BnHTObe,OTKNoHEnHЯ nIb6nOKIPAHeHaNODBnXHNTeЧТи,CчупeHи nIb HanykaHnЧАNTi,KoNTO MoRatДа NOBnIЯT Ha pa60tataHaMaunHATA.
- 3no3BaTe BnCOKKaueCTBeHo JeKO MaunHOMacNo 3a Cma3BaHe Ha NOdBUNKHNte YactN.
-Поунстete Доннатастара на Вибрацноната
поча ведна сом по Hero поенnatч actu-
te ot улътэната пова. Машината на Нма дa
разотиdoespe, akO Доннатастара на He e Гадka
и чьта.
Cnepa6oNTe no nouCTBaHe n noDpBkKa CbbpKxTe OTHOBO Ka6ena 3a 3anaNTenHaTc Bceu.
12.2 PpOBepKa n cMaHa Ha KJIINHOvIaHnpeMbK
CbaIe KaNaka Ha peMbka (19), 3a da nOlyuHte DocTbIdo KInHOBnIHnpeMbK (19b). Hnkora He n3noJ3BaIte Bn6paOnHHata nnOca 6e3 kaNaka Ha peMbka (19). Ako KaNakBT Ha peMbka (19) He e MOHTnpaH, Bb3MOxHo e pPkata Bn da ce 3axBaHe mExdY KInHOBnIHnpeMbK i CbeDHNHTeJIa, KoETo Da npUHHnCEpNo3HO HapaHBAHe.
12.2.1 O6TgAHe Ha KJIINHOBnHnpeMbK (ФИr.7,8,9)
KlnHOBNHnT peMbK (19b) Tp8Ba da e B do6po ccbToHHe, 3a da Ocnpyn ONTMannHO npedabane Ha MoUHocTTa OT dBnraTeN KbM EKCueHTpruHnBan. IpoBepeTe CbCToHnEto Ha KInHOBNHnPeMbK (19b).
1.ИЗкlioуeteДиВагаTeЯIroOCTaBeTe da ce ox- naDi.
2. CbaJIeTe KanaKa Ha peMbka (19), 3a Da noJyHte DOCTbI Do KInHOBnIHn Ra peMbK (19b). 3a cIeTpa3Xna6eTe 2-Ta BnHTa Ha KaNaka Ha peMbka (19a) craehen Knou SW13.
3. Пюверете объганeto на ремьka (натиckeас с палец). Трябва до obтг themselves Клиовindни ремьк (19b) ce ольba c nobeche ot 10-15 mm (натиckeас с палец).
4. 3a ceI Ta OTBnIe JIeKO YeTnpITe CkpeNITeHn BnHTa (19d) Ha DBnIaTeJIy I npEmecTe He HAppeI DnIraTeJI B NocOka KbM Kopnyca Ha ekCueHTpnKa (9).
5. 1006TeHHeK KINHOBNHnpeMbK (19b) c nomOuTa Ha raiKaT a 3a HacTpOka (19c), ako ce orBa cNoBuee ot 10-15 mm (HaTnCKaHe c naneua). 3a da HanpaBHTe ToBa, 3aBbPtTe raikata 3a HacTpOka (19c) no nocoka Ha yacOBnKOBaTa CTpeIka. YBepeTe ce, ye DniratEnr n peMbYHata Waibaca pa3noJoxEHn NO npab Bbl.
6. Cnej obTraHaTe 3aTeHHeTe YetnpuTe cKpeniTeJHn BnHTa Ha DnRaTeJr (19d).
7. NocTaBeTe OTHOBo KaNaka Ha peMbka (19) n 3a- TerHeTe 2-Ta BnHTa Ha Kanaka Ha Dnuratela (19a) c raeueH KIOUc SW13.
12.2.2 CmHa Ha KInHOBnHnpeMbK (Φnr.7,8,9) KInHOBnHnT peMbK (19b) Tp6Ba da ce cMeHn, aKeCKbCaH, n3HOceH nIi rnaDbK.
1.ИЗкlioуeteДиВагATEЯи ro octabete da ce ox- naDi.
2. CbaneKe Kanaka Ha peMbka (19), 3a Da noJyHte doCTbI DO KInHOBnHnpeMbK (19b). 3a cIeTpa3xna6ete 2-Ta BnHTa Ha kanaka Ha peMbka (19a) craehen knou SW13.
3. CneI TOBa OTBnIte NekO YeTnpTe cKpeNITeHIN BnHTa (19d) Ha DnIraTeJ.
4. 3a da ocbo6oJte npedBapnteHTo OnIbBaHe Ha peMbka,OTBnIte raKaTa 3a HacTpoKa (19c) o6paTHO Ha yacOBHKOBaTa cTePkA.
5. Пемecтete Двигаеля по nocoka Ha kopnyca Ha ekcuentpika (9).
6.И3dIbPnaIte KINHOBnHnpeMbK (19b) ot peMbYHnTE Wain6n nNoCTaBeTe DbaT AHOB N KInHOBnHn PembKa npabuHNO.
7. 1006TeHHeTKeKINHOBnHnpeMbK(19b)c nOmo- taHa raKaTa 3a HacToPka (19c), aKO ce OBa c NoBeYe ot 10-15 mm (HaTnCKaHe C naneua). 3a Da HAnpaBnTe ToBa, 3aBbPtTe RaKaTa 3a HacToPka (19c) no Nocoka Ha YacOBnKoBaTa CTpeIka. YBepTe ce, ye DniratEJIr T peMbUHa-ta Wai6a ca pa3nONoXeHN NO npab bIbI.
8. Cnei o6TraHaTe 3aTeHHeTe yeTnpTe ckpenu-TeHHn BuHTa Ha DnRaTeJr (19d).
9. Пocтавete OTHOBOKanakaHa peMbka(19)иЗа-TeHete 2-Ta BnHTa Ha KanakaHaDbuRaTeJra (19a)crauehenKnoy SW13.
BHIMAHNE!
Korato cBaJIaTe nIIN NOCTaBTe KInHOBnHnpeMbK (19b), BnImaBaIte da He npITNCHe npbCTnTe CN MExdy peMbKa n polkata.
YKA3AHHE!
NoBpeKdaHe Ha npOdykTa
Pa6oTa Ha npOdyKta 6e3 nIc TBbpde MaNko DnIraTeHNO nIpeDyKTopHO MacNo MoKe Da DoBeDe Do NOBpeXdaHe Ha DnIRatEJI.
- Ppei nycKaHTo B eKcPiOaTaunHaJeIte 6eH3nH nIIM MacNo. IpoDyKTbT ce DoCTaB 6e3 DBrIaTeJIHO n peDyKTopHO MacNo.
YKA3AHHEI
EkJorHnHn 1
I3TeKnOTo MacNo MoKe TpaHNo Da 3AmbpcN OkJHa- Ta cTpeNa. TeuHocTtA e CnJIHo OTpOBHa N MoKe 6bp30 Da DOBeNe Do 3AmbpcBaHe Ha BOData.
-ПьЛHETe/N3TOBаHTe MacNTo CAmO BbPxy paBn, TBbpN NOBbPxHOCTn.
-Ⅲποπ3BaIte TbρIoBnHa 3a 3apejKaHe IIN ΦyHna.
-Cb6npaunTe n3ToeHOTo MaCIO B IOxOJa, CbI.
- He3a6abHo n36bpeTe pa3JrTOTo MacNo n 3-xBbPte npcaJa cbrnaCHO MeCTHnte pa3nope6n.
- N3xBbPnTe MacNoTo CbrNaCHO MecTHnTe pa3-nope6n.
12.3 CmHa Ha DnRaTeHNoMaCNo (Φur. 12, 13)
Cne 25 yaca pa60Ta Tp6Ba Da ce n3BbPn PbPaTa CmHa Ha MacNo. Cne ToBa Cne 100 pa60THu caca. PpenOpbUteJIHo DnBraTeJIHo MacNo SAE 10W-30 nn SAE 10W-40 (B 3aBncMocT OT pa60HaTa TemnepaTypa).
3a n3TOBaHe Ha DnBraTeHNO MaCNo npOeHpaI-Te NO CJIeHNHaUH:
1.CBaane Te rEmnna Mapkyu (18)craeueh knouc SW17 (He e BknoyeH bOeMa Ha doctabKaTa) n 3TOUeTe DnIaTeJIHOTo MaCNo B NOxOJaCbD. YBepTe Ce, Ye MOHTnpaHnT B FBKBaNn MaPkyu (18) ynnbTHnTeNe HpbcTeH hma da ce n3ry6n.
2. Ako DBnraTeHToMaCNo e n3ToeHo DOKpaN, CBpbXeTe rBbKaBn MapKyu (18) OTHOBO KbM ypeHa.
3. OTBUNHTETE BUNTOBEte Ha MACNON3MepBaTeJIHa- Ta 3a DnurataeHOTo Macno (14). HaneTc MaCNO C NOMOuta Ha FHHN (He e BKIOueHa B O6ema Ha DOCTABkata).
4. Поберете НИВОТа Ha MacIonoTc MacIono3MepBaTeJIHATA ΜЕKa 3aДиRatEnHOTo MacNo (14).BkapaTe OTHOB MacIono3MepBaTeJIHATA ΜeKa(14)и пobеретe OTHOBO HINBOTo Ha MacIono,6e3 Da 3aTЯrATE OTHOBO ΜeKaTa.
5. 3aBnHTeTe OTHOBuHToBete Ha MacNON3MepBaTeJHaTa Zeka 3a DnRaTeJHOTo MacNo (14).
6. Дрпнeteбавно Вьжeto Ha CTapTepa (8) 5 nbTn, Taka Ye Macnoto Da ce pa3npedeJN (6e3 3anaJIBaHe).
12.4 N3TOUbaHe Ha 6eH3nHa c 6eH3nHOBa cMykaTeJHa NOMna (ФИr. 14, 15)
BeH3nHbT Tp86Ba Da ce H3TOU npu no-npoDbJxN-TeJIHO CbXpaHeHne Nn npu CMHa Ha MacNoTo 3a ekCueHTpika.
- 3aTbOpTe 6eH3nHOBnKpaH (15).
- NocTabeTe npHeMeH cBd noD MapkyHa Ha 6eH-3INHObATo CMyKATEJIHa NOMa (He e BKNIOyeHa B O6ema Ha DoCTabKaTa).
- OTbniTe kanaKaHa pe3epBoapa (5) n ro cBaJeTe.
4.ИЗbaДeTe BLOЖКаТа Ha rOриВнЯ ФиNTbP (5a).
- BkapaTe Mapkya Ha 6eH3nHObTa CMyKaTeJIHa NOMBa 6eH3nHOBnpe3epBoap n N3TooyeTe 6eH3nHa c NOMOuTa Ha 6eH3nHObTa CMyKaTeJIHa NOMa.
- NocTabete OTHOBO BNOKKaTa Ha rOpNBnA qunTbp (5a).
- 3aterheTe OTHOBO BnHTOBete Ha Kanaka Ha pe-3epBoapa (5).
- 3a da ce rapaHTnpa, ye B kap6bpaTopa He ocTaba 6eH3nH, OCTaHaJIyR TbeH3nH TpIbBa Da ce H3TOU n OT Hero. 3a ueTaNocTaBte NoxOJaCbD (He e BKNIOueH B OBeMa Ha DoCTaBkata) NOD KAP6bpaTopa n OTBnHTeTe BNHTa Ha Kap6bypatoppa (15a).
12.5 CmHa Ha MacIIOTo 3a eKcUeHTpNka (Фиr.16,17)
IopadnteroTnO Bn CbBETBaMe Da n3BbPbWbTe Ta3npa6oTa cDbama dUw! PpenOpbYBaMe Bn da CmeHnTe MacnoTo 3a ekCteHTpKa cNe 300 pa6oTHn Yaca.CmehnTe MacnTo 3a ekCteHTpKa camo kOratoekCteHTpKbT ce e oxlaqn.
PpeOpbTuTeHOp peyKToPHo MaCNo C HnCbK Koe-phiuHeT Ha TpneHe SAE 80W-90 / 75W-90.
1.ИЗTOUte 6eH3nHa, KaKTo e OINcAHO B 13.4.
2. 13.3.
3. Chemete npo6kata 3a n3ToUbaHe Ha MacIIOTo (22) Bbpxy Kopnyca Ha ekcueHTpika n HAKNOHe-Te Bn6paunOHHa Tnoya Hanpei.
4. IV3TOUeTe MACJIoTO B CbIa.
5. NocTabete Bn6paunOHnHaTa nloa OTHOBo B n3-XoJHO NOIOKeHne.
6. HanbIhHeTe Kopnyca Ha ekCzEHTPnka (9) c peDy-KTopHO MacNo C HnCbK KoEΦNcHENT Ha TpneHe (80W-90 / 75W-90) c NOMOuTa Ha ΦyHna (He e BKNIOyeHa BOeMa Ha DOCTaBkata). Obphete BHIMAHHe Ha MaKc. OeM OT 80-100 ml.
7. 3aBnHTeTe OTHOBO npo6KaTa 3a N3ToUbaHe Ha MACJIoTO (22).
BHUMAHNE!
He npenbIbaIe pe3epBoapa! TbbpDe MHorOTo MacNo B EekcEHTpika MoKe Da HamaII MOUHOCTTa My I Da DOBeJe Do HerOBOTnperpBaHe.
EckcneHTpnK
EKCsHTpHa TeXeCT Bbpxy BaNa Ha EKCsHTpKa B Kopnyca Ha EKCsHTpKa ce 3aDbNkBa npn BucOKn CKOpOCTu OT CbeHInTeI N CnCTema 3a 3aDbNkBaHe Ha peMbKa.
Te3n BucOKn ckopocTn Ha BbptHe Ha Bana KapaT MaunHaTa Da ce DnKn 6bp3o Harope, HandoNy n Ha- nped.
12.6 NopdpbkaHa Bb3dyuHnA pntbp (Pur. 18) ONACHOCT!
Onachoct ot noxap n ekcnno3n!
TOpnbTo MoKe Da Ce 3aapanu N eBentyaHNO da ekCnIOnpa npn Hnnpabunno nouchTahe. TOba BOnI Do TeKKn I3rapnna nn CmbpT.
-Поунстваite Вьздушни Фиntыр само като рогиNTYNBATE.
-Hnkora He nouchTaBte Bb3dyuHnnaΦnTbp c 6eH3nH nIIN 3anaJnmu pa3TBopnten.
YKA3AHHE!
OnachocT or nobpexdahe!
Pa6oTaHa DnBraTeNa 6e3 NoCTaBeH fInTbpeH enMeHT MoKe Da DoBeNe Do NOBpeDa Ha DnBraTeNa.
-Hnkora He octabryte Dnrgate Ta pa60tn 6e3 noctabeh element Ha Bb3dyuHnA qntbp.
3ambpcHa fHnTbPha BnOxxka (4b, 4c) HamaIba MoUHOCTTa Ha DnIraTeI NopadN HeIOCTaBHyNo IOnaBaHe HA Bb3dyx KbM Kap6pyatopa. CneIOBaTeJIHO peoOBHNTe npOBepKn ca ot cbIeCTBeHO 3NaueHne.Bb3dyuHnIyFhHnTpR6Ba Da ce npOBepRa Ha BCEK 50 pa6oTHNuaca n Pn HnoEooMOCT Da ce NoNUCTBa.
- OTBnHTeTe JIeKO CkpeNITeJIHNTe BnHTObE (4a), KATO 3aBbPTte O6paTHo Ha YacOBHnKOBaTa CTpeNka.
- CbaIeTe Kanaka Ha Bb3dyuHnHa qInTbp (4).
- ПоберетеkanakaHaВьзdyшнЯФиNTbp(4)3a DyPkNIIpyKHatHn.CmeHete eBENT.NOBpeHnIeMeHT.
- ⅠЗвадeteхартненяфпгьр(4b)иduhanpeHOBNФнгьр(4c)исмehTe BCnKn DeΦeKTHNe eJIemHTN.
- 136bpuete Mpbcotnraota OT BbtpeuHaTa CtpaHa Ha TAnoto Ha Qnntbpa, KaKTo N Kanaka Ha TaIOno Ha Qnntbpa (4) C uNCTa, BnaXHa Kbpna. YBepete Ce, Ye B OTbopa He nonada Mpbcotn. IocTabete Kanaka Ha Bb3dUshnHn QnntbP (4) OTHOBO Bbpxy TaIOno Ha Qnntbpa 3a BpeMeTo Ha NouchTbaHe Ha Qnntbpa.
- Ⅰ3tynaiTe xaptnenHnФnTbp (4b) Bbpxy TBbp- Da NOBbpxHOCT nI rO n3dYxaHTe Cbc CrbCTeH Bb3dyx, 3a Da OTcTaHnTE 3AmbpcBaHNrTa. Hkora He N3yETKBAITe MpbCOTnra, TbN KaTO TOBa Iue BJIe3e BB BJaKaHaTa.
7.ИЗМИТЕДУHAПЕНOBИФИNTБРСВОДАИ ГОOC-TaBeTe DAИЗСХЕДОБпe.
- NocTabete OTHOBO xapTneHnna 4b) n dyHanpeHOBn 4c).
- Поберета дали BCИЧКО e NOCTaBEHо npabUN-HO И сд.TOBa NOCTaBete KANAKa Ha TЯЛOTO HaФИNTbpa (4).
10.ФИКСИРаTe KAnaKaHa KOpnyca HaФиNTbpa(4) CbC cKpeNITeJIHnB BuHT (4a), KaTo rO 3aBbPntTe NO Nocoka Ha YacOBHnKOBaTa CTpeJka.
BHIMAHNE: Hikora He octabraye DbrarTeIa pa6otn 6e3 nnc noBpeHa BLOXka Ha Bb3dUHHa fHHTbp (4b,4c). Toba no3BOJRA Ba MPbcOTna da noTnADHe B DBIRatJIa, KOETO MOKe dApnUHN NOBpeHa DA BRATeIg. IapAHzraTa Ha npOn3BOIDnteIg OTnada.
12.7 NocntBaHe/cmHa Ha 3anaHnTeHnHaTa CBeu (Φnr. 19)
△BHIMAHHE: CmHnTe 3anaNTenHaTa CBeu cAmo npCtUden DBuratEn!
3a nbpBn nT npOBepTe 3anaJIteJIHaTa CBeU cNeI
10 pa60THu caca 3a 3aMbpcBaHe nЯ nouchTe, ako e Heo6xOdmo, C MeHa TeIeHa Yetka. CneTobacMeHnTe 3anaIIteHnTa CBeU Ha BCEKn 50 pa60THu caca, aKO e Heo6xOdmo.
1.ИЗдьрnaiteKa6eNaHa3anaNTenHataCBeuNOTCTpaHTeBCnK3aMbpcBaHnO73oHaTaHa3anaNTenHataCBeu.
2. Pa3BnTe 3anaJIteJIHATA CBeu (24) cdoctabeHHa KIOU 3a 3anaJIteJIHNA CBeu.
3. Поберете ИЗОЛТopa.CmeHete 3anaNTeHa- Ta CBeB B ClyuH Na nobpeDa, HAnpIMep NyKHa- TINH INIOTJOMKn.
4. NoyncTeTe eJekTpoDnTe Ha 3anaNTenHaTa CBeU C TeJeHa YeTKa.
5. Поберете расторнeto мжду eлктори
И Г Носточпс с помоцт ha Лфтомер. 3aда
Може DBигателТд a Заэз MошюctTа си,З-
палитенота CBeц Трбь Дд Им павино
раб�нные мжду eлктори (0,7 - 0,8 mm).
6. 3aBnIte OTHOBo 3aIaJInteHHaTa CBeu (24) Ha pbKa I y 3aTeHete C OKOIO 1/4 o6Opota C DocTa-BEHnKJIouy 3a 3aJInteJHa CBeu.
7. Nocabete Ka6ena Ha 3anaJntenHata Cbeu Bbpxy 3anaJntenHata Cbeu (24).
BHIMAHNE!
Pa3xla6eHaTa 3anaJIteHa CBeue MoKe Da nperpeu I da nobpeDu DnRaTeJa. A npekaneHTo 3atraHe Ha 3anaJIteHaTc Bceu MoKe Da nobpeDu pe3bnte B rIaBaTa Ha cUINHDbpa.
13. CbXpaHeHne
ONACHOCT!
Onachoct ot noxap n ekcnno3n!
Mожеда Вьзнкне пожар пиEkсплоэя,аКpo-удуктбт ce cьхразявблntodo ВьзмоЖи n3Toчици Ha 3anaJIbaHe. Toba Bodn do TeЖи n3rapaHnru NN Cmblpt.
-OTCTpaHete Bb3MOxHnTe n3TOUHNu Ha 3aapanBaHe, KaTo HAp. NeuKN, ra3OBn 6oJnepn, ra3OBn cyuINHn nT.H.
YKA3AHHE!
Onachoct ot nobpekdahe! HenpaBnHTo cxbpAHeHne Ha npOyKta MoKe Da NobeDe Do nobpeDa HaDburatela.
- CbxaHraBaIte npOdyKta 3aUHTeH OT 3aMbpcBaHe, npax n Bnara.
13.1 CbxaHHe Hn np No-DbIg npeKbcBHaH na pa6oTata:
Ako Bn6paunOHnTa nIOyHa HMa Da ce n3noJ3Ba noBuee ot 30 dH, cIeDbaTe CTbKnTe NO-dOny, 3a da aNoDrotBNTe 3a cbxpanHeHne.
1.ИЗпраэне 6eH3INHOBnpe3epBoapdoKpaB(BnxTe pa3dE13.4).CbXpaHEna 6eH3nH,cb-Dbpxkaetahon nMTBE,ue n3BeTpeB pamKITE Ha 30 dH.N.I3BeTpENrT 6eH3nH mMa BnCOKOcBdIpxKaHHe Ha KAYyK MoKe Da 3anyuN Kap-6ypatopa Na da orpaHnU NOdaBaHETo Ha rOpBO.
2.И3TOUeTe DBURAteJHOTo MACno OT DBURAteJIa, DOKATO e OSe TOnbI. HaneTe HOBO MacNo. (BnKTe pa3deJ 13.3.)
3. ⅠЗПОЛЗВАЕ YИСТа KБРЯ 3a NOΥСТВАЕ Ha Bn-6paционната ппоча. He nIЗПОЛЗВАЕ arpeсиВи NОΥСТВАДИ npenapatN ИП npenapatN Ha MacJIeHa OCHOBA, KORATO NOΥСТВАЕ ПЛСТMACOBITE YACTN. XIMKANITE MOrAT DA NOВРЕДТ ПЛСТMACACHE.
4. CbXpaHraBaIe Bn6paCnoHHata nNoya B n3npaBHeO nOJKeHne B YnCTa n Cyxa crpa da c do6paBeHTnJaun.
CbxaHbAte ypea n HerOBtE akcecoapn Ha TbMHO, cyxo 3aunTeHO OT 3aMp3BaHe, KaKTo n HeDocTbHNO 3a Deca Macto. ONTMaHata TemnepaTypa hacbxaHene e mexdy 5 n 30°C.
CbxpaHbAte ypea B opunHaHaTa My onakOBka. IoknTe ypea, 3a da ro 3auNTte ot npax nna Bnara. CbxpaHbAte pkoBOcTBOTO 3a eKcnnoatau npu ypea.
14. Pemontи поьчka Ha pe3epBnчactn
CnepeMOHTnIINnoDpBxKc Ce yBepTe,Ye BCNUKu
actn,Cbbp3aHn C 6e3ONaChocCTTa,Ca Ha MCTOTO CN
n Ca B OTNIuHO CbCToRHe. CbXpaHraBaTe qactnte,
KoITOMORAT Da npuHrT HapaHraBaHe,Ha MRCTo, He-
doCTbNHO 3a Dpyr Nlua n Deca.
BHHMaHHe: CbINaCHO 3aKoHa 3a OTROBOPHOCTTa 3a npOyKTnTe He ce Hocn OTROBOPHOCT 3a UeTn PnHn
HeH NOT He npabnneH peMOHT nnn Heu3noJ3BaHe Ha opunnaJnHpe3epBn qactn.
O6aTe ce Ha OTdena 3a o6cnyKBaHe Ha KIneHTn Hn Ha OToPn3npaH cneuaJIncT. CbIoTO BaXn n 3a npHaadNexKHOCTNe.
Pe3epBnTe qactn npHaadJeKHOCTte ce npedna- rat B hAunr cepBn3eH cHTbp. 3a cIeTt cKaHpaTe QR kOda Ha 3aIJIaBHaTa CTpaHua.
Bpb3kn npemOHn
Cbpb3BaHnI pemOHn I OEKeTpueeCKoTo 6OpdyBaHe Moar Da Ce N3BbPWBat CamO OT eNEKTPoTeXHnK.
Ako mMaTe HRAKBN 3aNITBaHnra, MOJIa, NOCOyTe CneHNte daHHN:
Tn TOK Ha DnurataTeJr
-ДаHHN OТ TINOBaT aBeJka Ha ypeJa
- DAHNN OT TINOBATA TaBeJIka Ha DBNIGATEJIa
Baxho yka3aHne B cnyau Ha peMOHT:
PnBpBshaHe Ha npOdykTa 3a peMOHT o6bpHete BHHMaHHe, Ye OT cbo6paXeHn 3a 6e3oNaCHOCT ToI Tp8Ba Da ce n3npaTH 6e3 MaCNO n rOpNBO Ha cepBn-3HaTcAHTU.
14.1 NopbUbahe Ha pe3epBn qactn
Pn npbuahe Ha pe3epBnu qactn Tp6Ba da ce nocoaat CneHnTe DaHHN:
- 06o3haueHne Ha moDeHa
- ApTnKUyEn HOMep
-ДаHHи Ha TINOBaTa Ta6eNka
14.2 CepBn3Ha nHΦopMaun
Tp6Ba da ce nMa npEdBnI, che cneHnTe yactn Ha To3n npOdyKT ca 06eKTH ha n3HocBaHe nopadn n3HocBaHe nnHa eCTeCTBeHO n3HocBaHe, pecn. cneHnTe yactn Ca Heo6xOuIMN KATO KOHCymaTbN.
Bb30n3HocBaun ce yactN*: 3anaJIteHa cBeu, MacNo, pEmbK, Bb3NyweH qntTp
- He ca BKNIOUeHn 3aIbNIXTeHNO B O6ema Ha IocTabkata!
15. N3XbPJIHe n peunKnIpaHe
Yka3aHnHa onaKOBkata

OnakobbHnTe MaTePnAn MoRat Da ce peuKnnpaT. MoJ, n3-XBpIeTe OnakOBkata no npapoDocbo6pa3eH NaH.
Moxete da ce nHΦopMnpaTe OTHOCHO Bb3MOX-HoCTnte 3a N3XBbPnHe Ha N3Ne3n OT ynoTpe6a ypeNiOT BaHTe o6uHcKn Hn rpaDCN Bnactn. TOpNBa Macna
-
Ppei n da n3xBbPnTe ypea, pe3epBoapbT 3a ro-puBO n pe3epBoapbT 3a MOTOPHO MacNo Tp8Ba da 6bDat n3npa3HeH!
-
TOpuBToI MToPtoMaCNo He 6nBa Da ce n3-xBbPnT 3aedHc 6ntOBITE OTnAdbuN IN B KaHa-n3aunrTa, a Tp8Ba Da ce cb6npat N n3XBbPnT pa3dEInHo!
-
Ppa3HnTe pe3epBoapn 3a MacNo n ropnBO Tp8Ba Da ce n3XBbPnT NO EKONrOuYen HauHH.
16. OtctpaHbAhe Ha Heu3npabHoctn
CneBbauata Ta6nua noka3Ba Cmntomte 3a nobpeu n onncba kak morat da Bn nomorhat, ako MaunHaTa Bn He pa60tn npabnH. Ako He moKeTe da HamePte n OTcTpaHnTe np6nema, CBpbXeTe ce cbc cepBn3.
Günzburger Straße 69
D-89335 Ichenhausen
Axiotipe TELaTn,
aac euxoatae TOnnn euxapiotnon kai kaan EITituxia kata nTv epyaia aac me to veo TPOiov TnOAtOKtnaate.
Yπóδειξη:
O kataokeuaotncautoou Tou TPOIOVTOc EUOUVtai OuMPwva Tov IOXuovTa vOo TEPi EUOuvnc VIA TPOIOVTA, Yia ZnMIeTou TPOkALouvTAt OE n aTo auto To TPOIOV OTIC ENGTIPITIWoeIs:
A P O E X H: A A A C E T E μT N O U Z I M O V O α φ o u Ḍ E X E I K p u W O S E I O K I N T N P a C!
EeYTe To uouzi yia pUavon npwn oopa ta 10 wpec aeitoupyiac kai av xpeiazetai kaopaiote to e piua opmuatoabouptoa me xakiva oupata. Katotiv avtikaiotate To uouci kae 50 wpec aeitoupyiac av xpeiazetai.
- ApaipoeTe To kaWio TouKai aTouakpuveTe Tuxov aKaapoeC tNv Tepioxn tou TPOUzi.
- 三εβδωτε to μιους (24) υρησιμοπιώντας to παρεχόμενο μιουζόκλείδο.
- ELeyTe ToV movTh. AvTKataoTnote To mouZi av Exei UTOOtei ZnmuEs, T.x. UTTAPXOUv PwYmuEs n AetIOUV OpaOmaTa.
- Kaθαρίοτε τα έλεκτρόδια στο μπιουζι με πια συματόβουρτασ.
- ELeyTe To diakevo nAektpodiwv kai puOmuTe Tn Tn BOntheia evoc fiep. Ia va Aeitoupyei Tavta aTIOBOTiKa O KIVtnpac, Ta nAektpodia oTo mTouci TTpeTTe V a exouv To oWOTo diakevo nAektpodiwv (0,7-0,8 mm).
- Biodwote Tnai To mTouzi (24) To xepi kai opiTe To kat a Tepitou 1/4 Tns OTPOPnC To TAPEXOe-vo mTouzokAeio
- TOnoTeIeTo KaAwoIO uouzi TAvw OTo uouz (24).
NPOEOXH!
Eva aakapiaevo mouci mtopei va utepepaavtei kai va poevnoei zmuia orov kivntnpa. Eionc av oipxtei utepboikato mouci mtopei va tpoknthetai zmuia oto otiepwa otnv kuivdpokepaan.
13. AToθnkeuon
KINADYNOsI
Günzburger Straße 69
D-89335 Ichenhausen
Stimate client,
Vä dorim sa avei multe satisfactii si mult succes in lucrul cu noul dumneavoastrà produs.
Indicatie:
Günzburger Straße 69
D-89335 Ichenhausen
Postovani kupce,
Günzburger Straße 69
D-89335 Ichenhausen
ithalatc:
Ankara Civata Hirdavat Baglanti Elemanlari Ithalat Ihracat Sanayi ve Ticaret A.S.
Macun Mahallesi 250. Cadde No:26
Yenimahalle/Ankara/Turkiye
Sayin Musterimiz,
9. Isletime almadan once
Dikkat!
Isletime almadan once urunu mutlaka komple monte edin!
UYARI!
Saglik tehlikesi!
Apparent defects must be notified within 8 days from the receipt of the goods. Otherwise, the buyer loses its rights of claim due to such defects are invalidated. We guarantee for our machines in case of proper treatment for the time of the statutory warranty period from delivery in such a way that we replace any machine part free of charge which provably becomes unusable due to faulty material or defects of fabrication within such period of time. With respect to parts not manufactured by us we only warrant insofar as we are entitled to warranty claims against the upstream suppliers. The costs for the installation of the new parts shall be borne by the buyer. The cancellation of sale or the reduction of purchase price as well as any other claims for damages shall be excluded.
Garantie FR
Apparent defects must be notified within 8 days from the receipt of the goods. Otherwise, the buyer's rights of claim due to such defects are invalidated. We guarantee for our machines in case of proper treatment for the time of the statutory warranty period from delivery in such a way that we replace any machine part free of charge which provably becomes unusable due to faulty material or defects of fabrication within such period of time. With respect to parts not manufactured by us we only warrant insofar as we are entitled to warranty claims against the upstream suppliers. The costs for the installation of the new parts shall be borne by the buyer. The cancellation of sale or the reduction of purchase price as well as any other claims for damages shall be excluded.
Záruka CZ
Apparent defects must be notified within 8 days from the receipt of the goods. Otherwise, the buyer is rights of claim due to such defects are invalidated. We guarantee for our machines in case of proper treatment for the time of the statutory warranty period from delivery in such a way that we replace any machine part free of charge which provably becomes unusable due to faulty material or defects of fabrication within such period of time. With respect to parts not manufactured by us we only warrant insofar as we are entitled to warranty claims against the upstream suppliers. The costs for the installation of the new parts shall be borne by the buyer. The cancellation of sale or the reduction of purchase price as well as any other claims for damages shall be excluded.
Garantii EE
Apparent defects must be notified within 8 days from the receipt of the goods. Otherwise, the buyer's rights of claim due to such defects are invalidated. We guarantee for our machines in case of proper treatment for the time of the statutory warranty period from delivery in such a way that we replace any machine part free of charge which provably becomes unusable due to faulty material or defects of fabrication within such period of time. With respect to parts not manufactured by us we only warrant insofar as we are entitled to warranty claims against the upstream suppliers. The costs for the installation of the new parts shall be borne by the buyer. The cancellation of sale or the reduction of purchase price as well as any other claims for damages shall be excluded.
rapanBG
OeBnH HeoctaTbun Tp86Ba Da 6bDaT DOKnAbaHN B pAMKITE Ha 8 dH N OT NOlyuBaHeTo HA CTOKN, B npoTNBE CNyaua KnyBaHT rBy6nBCAKBn PpeTHcnn 3a TaKINBA DepeKtn. PpeIraIame RapaHcNHa HauIne MaunH C npabUNHO ToeHne Ha cPoka Ha deCTBne Ha KocBeHa rapAHcNn O T DaTata Ha DocTabKa No TaKB HauH, Ye Hne 3aMeHN BCRA KaCT B pAMKITE Ha TOB A BpeMe OTKPbNA B eDIN B MaTePnAna IIN IN3pa6OTkTa Tp6Ba Da 6bDe 6e3NoE3Ho, 6e3nLaTHo. 3a ChTn, KOtTO Hne He Ce npOn3BExdA, Hne npABIM CAMO KAto rapaHcNn, KATO IMMame npabo Ha rapAHcNOHH NCKOBe CpeUy DoCTaBvHcN. PaXoJnte 3a BMkBbAHe Ha HOB Yactn Ha KnyBaay. Ppeo6pa3yBaHe n HamaJIraBaHe B3emAHn n Dpyr NckOBe 3a ObeseTeHn, ca NkIOueHn.
Garancija RS
Ocigledni nedostaci se moraju prijaviti u roku od 8 dana nakon prijema robe, u suprotnom kopac gubi sva prava u pogledu takvih nedostataka. Za naše masi ne dajemo garanciju tokom trajanja zakonskog garantnog roka od datuma primopredaje, pod uslovom da se sa njima pravilno rukije, na taj nacin besplatno vrśimo zamenu svakog dela masine koji tokom tog perioda postane neupotrebljiv usled greške u materijalu ili proizvodnj. Za delove koje ne proizvodimo sami, dajemo garanciju samo u okviru ostvarivanja garantnih prava koja dobijamo od poddobavljača. Troškove za ugradnju novih delova snosi kopac. Pravo na zamenu i umanjenje i drugi zahtevi za nadoknadu šte ste su isljučeni.
Garantie RO
Defecte evidente trebuie sa fe raporate in termen de 8 zile de la primirea de bunuri, altfel cmparatorul pierde toate cerirel penru astfel de defece. Oferim o garantie de pe masinile noastre cu un tratament adevat pe durata unei garantii implicite de la data delrare in a sa fel incat vom linocui ficare parte in acel moment detectabilit intr-un rand in material Sau manoperar ar fi inutil, gratit. Pentru partile care nu ne produc, vom face doar o astfel de garantie, aca cum avem dreptul la pretentii de garantie impotrivafurnizorilor. Costurile preeu introducerea de pise noi la cmparator. Conversie si reducerea creante si alte cererile de despagubire sunt excluse.
eyunon GR
Epaawv Eaattwpatw Tnou TpETe V a KIOIOUVT ATOC 8 nepw ato Tnv TnpaalabT W EITPOeuWv. Diapopetik, ta dikawata buyeris Tc agIomega loyw teioiiv wakupwei. EyyuopaTe yia ts mnxavec mac e TEPTTwn katalan an hepatieia yia to xpovo tnc ek tou voupeio dou evynon catio tvnapdoon me TEIO TO ptoo wote va avtkaataoanei OTIOBDNTOTE epoc dupeav unxav nou antodoeiyueva th axpnoatei loyew Eaattwpatikou uikou n elattwata nC kataokeunjc moa e Teioia xovki n peiodo. Oov apopa Ta tmnpataou dev exouv kataoekuaoteat o ecxoume npov Eyyuatai expooov exoue To dikaiwa v ta sdiowec Eyyunong evavti twv tpountheutw. Ta eoda yia tnV eykataotaon twv veuv tmuatow Th a TpETe va Bapuvov Tov ayopatan. PteTne va atokaeietai n akupwn Tn tiwnn n meiwn Tn Cmpac, kaowkai otioeONTOTE aaee agwoei yia atoqniuwan. H letida npoviu eivai avawuoipoic kai egaipouvtai pnta atio kajia eyyunon.
Garanti TR