TE DRS6A - Electric drill HILTI - Free user manual and instructions
Find the device manual for free TE DRS6A HILTI in PDF.
Frequently Asked Questions - TE DRS6A HILTI
User questions about TE DRS6A HILTI
0 question about this device. Answer the ones you know or ask your own.
Ask a new question about this device
Download the instructions for your Electric drill in PDF format for free! Find your manual TE DRS6A - HILTI and take your electronic device back in hand. On this page are published all the documents necessary for the use of your device. TE DRS6A by HILTI.
USER MANUAL TE DRS6A HILTI
text_image
Technical diagram of a drill bit with labeled parts including drill, drill button, and drill head.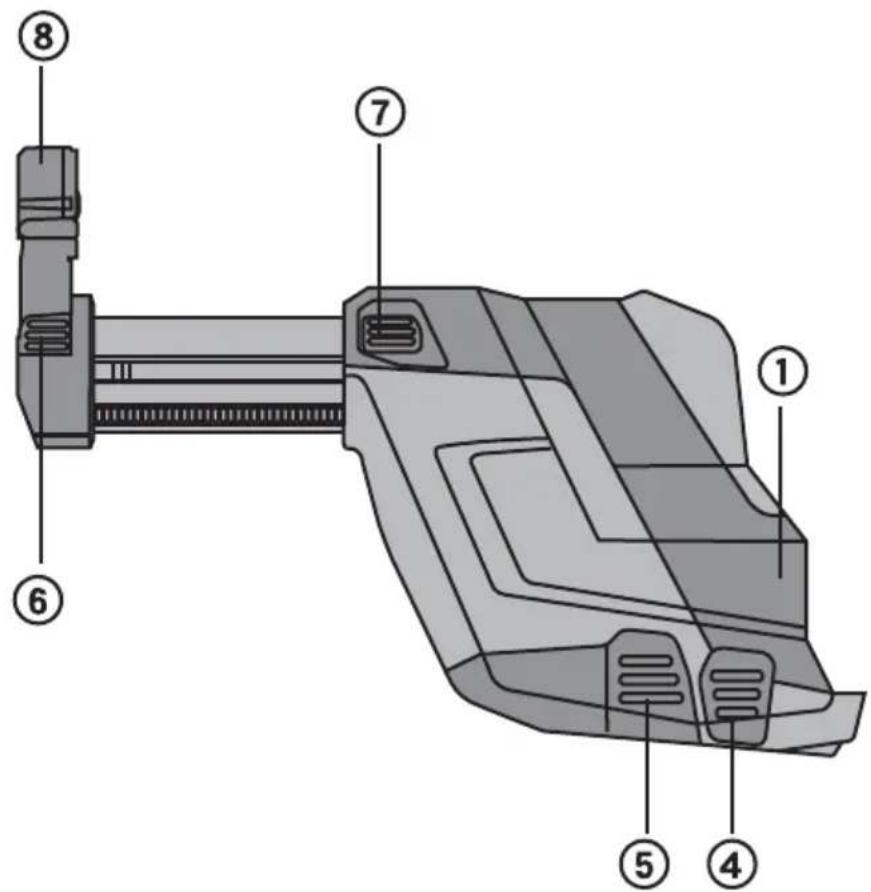
text_image
Technical diagram of a mechanical device with numbered components for identification2

text_image
Technical diagram of a drill bit with labeled parts and directional arrows indicating assembly steps.3
text_image
3 2/44
natural_image
Technical line drawing of a drill bit with a 2mm scale indicator (no text or symbols present)5
text_image
2 3/56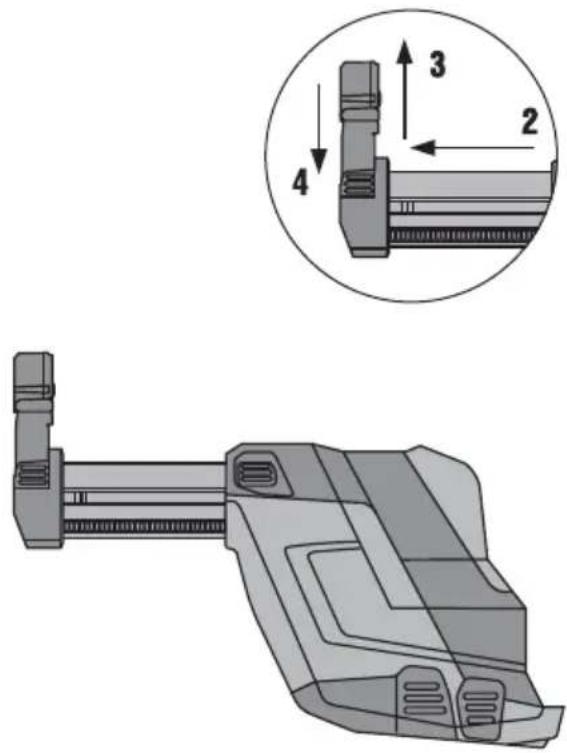 |
| Head of BA Quality and Process Management | Executive Vice President | ||||
| Business | Area | Electric | Tools & Accessories | Business | Unit Power |
| 01/2012 | Tools & Accessories | 01/2012 | |||
It is essential that the operating instruct are read before the appliance is operat the first time.
Always keep these operating instructions gather with the appliance.
Ensure that the operating instructions are with the appliance when it is given to persons.
Contents Page
| 1 | General information 7 | |
| 2 | Description 8 | |
| 3 | Accessories 8 | |
| 4 | Technical data 8 | |
| 5 | Safety instructions 9 | |
| 6 | Before use 9 | |
| 7 | Operation | 10 |
| 8 | Care and maintenance | |
| 9 | Troubleshooting | 11 |
| 10 | Disposal | 11 |
| 11 | Manufacturer's warranty - tools | |
| 12 | EC declaration of conformity (original) |
1 These numbers refer to the corresponding illustrations. The illustrations can be found on the fold-out cover pages: Keep these pages open while studying ating instructions.
In these operating instructions the designation "the model" always refers to the TE DRS-6-A dust removal rule.
^e Operating controls 1 other
① DRS electrical interface
② Electrical interface on the tool, with sliding cover
③ Guide (tool)
④ DRS release
⑤ Dust container release
⑥ Depth gauge
⑦ Stroke limiter
⑧ Suction head
10
11
12
1 General information
1.1 Safety notices and their meaning
DANGER
Draws attention to imminent danger that will lead to serious bodily injury or fatality.
WARNING
Draws attention to a potentially dangerous situation could lead to serious personal injury or fatality.
CAUTION
Draws attention to a potentially dangerous situation could lead to slight personal injury or damage to the equipment or other property.
NOTE
Draws attention to an instruction or other useful tion.
1.2 Explanation of the pictograms and other information
Warning signs

General warning
n ^thet Symbols

Read the operating instructions before use.

Return waste material for recycling.
Location of identification data on the module The type designation is shown on the appliance refer to this information when contacting our relative or service center.
Type:
Always
present-
Generation: 01
Serial no.:
en
2 Description
2.1 Use of the product as directed
The TE DRS-6-A is an accessory for use with TE 6-A36 rotary hammer.
The dust removal module can be quickly and attached to the power tool, i.e. the rotary ham. The dust removal module is not suitable for drilling in metal or wood.
Please observe national regulations applicable to work with materials hazardous to health (e.g. asbestos)
The module is intended for professional use. The may be operated, serviced and repaired only by
ized, trained personnel. This personnel must be inform of any special hazards that may be encountered.
The module and the power tool may present hazards when used incorrectly by untrained personnel or where easily used not as directed.
The working environment may be as follows: construct se when site, workshop, renovation, conversion or new construction.
Tampering with or modification of the module is not permissible.
To avoid risk of injury, use the module only in cor with the Hilti TE 6-A36 rotary hammer.
3 Accessories
Designation
| Dust container with filter |
| Filter |
| Dust container cover |
| Suction head |
4 Technical data
Right of technical changes reserved.
| Module | TE DRS-6-A |
| Rated power input 60 W | |
| Suction performance 250 l/min | |
| Weight 1.0 kg |
Tools and technical information
| Operating stroke Max. 96 mm | |||||||||
| Suitable TE-C hammer drill bits (∅) | 5...16 mm | ||||||||
| Dust container capacity 200 for HPS-1 5 mm: | Hole ø 5 mm x 30 mm | ||||||||
| 37 for HSA M10: Hole ø 10 mm x 70 mm | |||||||||
| 56 for HKD-S M10 x 40: Hole ø 12 mm x | |||||||||
| Dust container regeneration cycles | Standard filter: Up to 100 cycles | ||||||||
43 m
5 Safety instructions
WARNING! Read all instructions! Observe all a ablesafetyrulesandtheoperating instructionsfortheHilti rotary hammer used. Failure to observe the ins could lead to serious injury. SAVE THESE INST TIONS.
Use the side handle with the Hilti rotary hamn times, including when the TE DRS-6-A is fitted.
5.1 Dusts
This appliance collects a significant percentage dust produced, but not all of it.
WARNING: Some dust created by grinding, sa ing, cutting and drilling contains chemicals kr cause cancer, birth defects, infertility or othe ductive harm; or serious and permanent resp
appic- other injury. Some examples of these chemicals lead from lead-based paints, crystalline silica from brickstruodronate and other masonry products and natural stonesTRaGenic and chromium from chemically-treated lumber. Your risk from these exposures varies, depending on somehow called you do this type of work. To reduce exposure to these chemicals, the operator and bysh should work in a well-ventilated area, work with proved safety equipment, such as respiratory protection appropriate for the type of dust generated, and of the designed to filter out microscopic particles and dir dust away from the face and body. Avoid prolong contact with dust. Wear protective clothing and water exposed areas with soap and water. Allowing dust known to get into your mouth, nose, eyes, or to remain on your repro-skin may promote absorption of harmful chemicals.
6 Beforeuse

6.1 Fitting the dust removal module 2
NOTE
Dust may be released when the filter container. Accordingly, the container should be emptied reg Wear respiratory protection when doing this.
NOTE
The suction fan incorporated in the dust remov is driven by its own motor. This motor is po power tool's battery.
NOTE
Before fitting the dust removal module, check that the attachment points and the power tool especially the electrical interface on the power free from dust and other foreign matter. After dust removal module, check to ensure that it attached.
NOTE
If the power tool is cordless, set the forward / rev switch to the middle position.
- Remove the drill bit from the power tool.
- Remove the depth gauge from the side handle.
- Open the sliding cover over the electrical interface is full on the underside of the power tool.
- Hold the power tool in a way that avoids press the on / off switch.
- Position the dust module on the guides and pus onto the power tool until it engages.
I module
re22 Removing the dust module
NOTE
If the power tool is cordless, set the forward / rev switch to the middle position. ensure
itself, Remove the drill bit from the power tool.
2. Hold the power tool with the dust removal mod fitting in the way that avoids pressing the on / off swi
3. Press the DRS release buttons and hold them in position.
4. Pull the dust removal module downwards away from the power tool.
5. Close the sliding cover over the electrical interface on the underside of the power tool.
7 Operation

7.1 Preparing for use
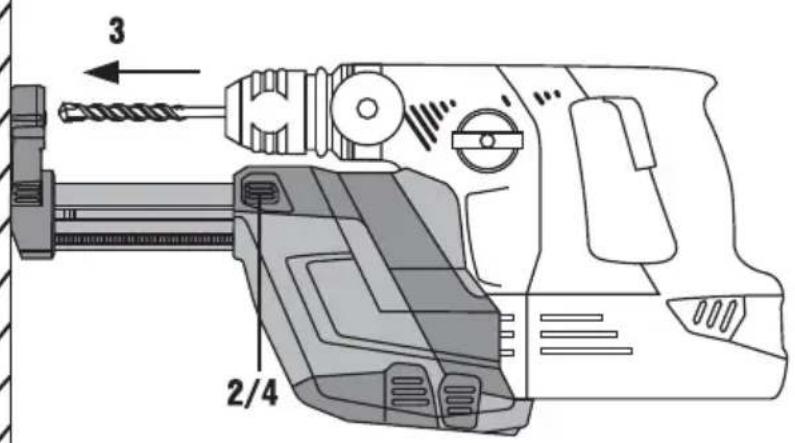
7.1.1 Length adjustment (stroke) 3
NOTE
The stroke is normally set for use with drill bit total length of 170 mm. The stroke must be shorter drill bits are used.
NOTE
If the power tool is cordless, set the forward switch to the middle position.
- Hold the power tool with the dust removal in a way that avoids pressing the on /
- CAUTION When the stroke limit button is the telescopic section is released and it may jump out up to 100 mm under spring pressure eye protection.
Press the stroke limit button and hold it position. - Press the power tool (with drill bit fitted) wall until the tip of the drill bit touches
- Release the stroke limit button.
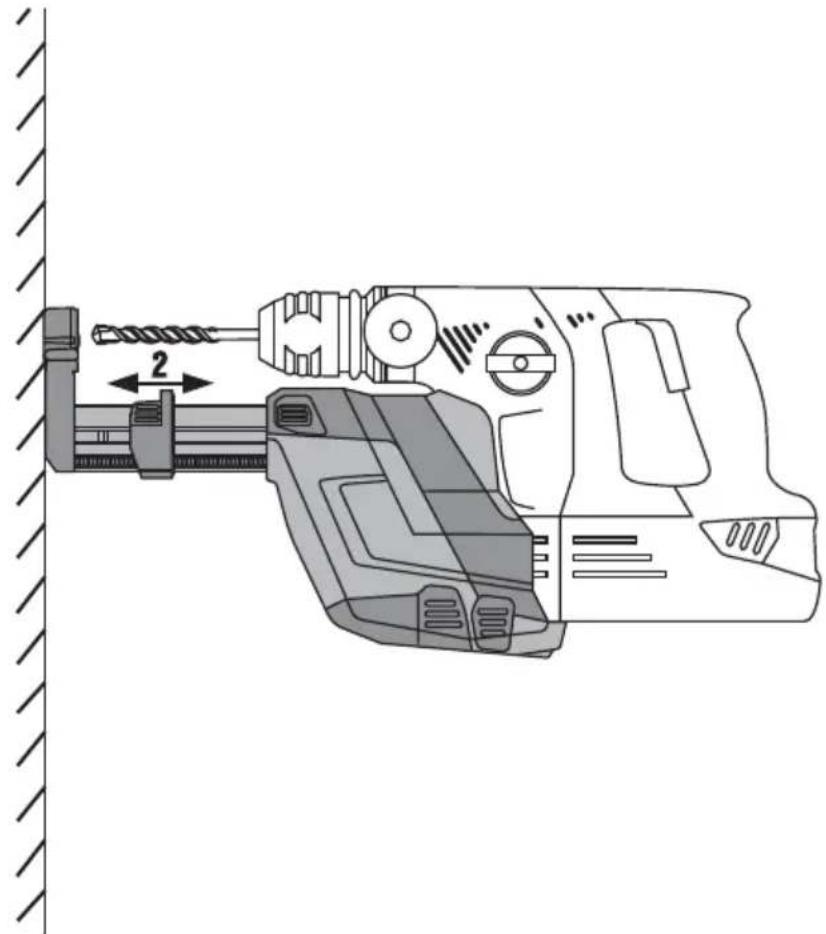
7.1.2 Setting drilling depth (depth gauge) 4
NOTE
If holes require to be drilled to an exact depth holes), the correct depth must be determined by test holes.
NOTE
If the power tool is cordless, set the forward switch to the middle position.
- Hold the power tool with the dust removal in a way that avoids pressing the on /
-
Press the depth gauge button and, while the button pressed, slide the ring to the drilling depth setting.
-
Release the depth gauge button.
7.2 Operation

bits CAUTION with a
Observe the operating instructions for the Hilti rotary just be adjusted in hammer used. Use the appliance only in conjunction the power tools listed in section 2. Failure to observ point may present a risk of personal injury.
/ reverse
WARNING
It is essential that national regulations applicable to using with materials hazardous to health (e.g. asbestos) off observed.
pressed,
May7.21en Emptying the dust container 5
NOTE Wear
Dust may be released when the filter container is fin. nAdbordingly, the container should be emptied regularly.
Wear respiratory protection when doing this.
against a
thNOVEII.
Do not touch the filter material when cleaning it and not use compressed air to clean it. The filter material become damaged.
- Hold the power tool horizontally and allow it to anchor for a short time. This ensures that any dust remain in parts of the dust removal module are drawn the dust container.
- Press the dust container release button and hold in this position. / reverse
- Pull the dust container downwards away from the module.
mod Empty the dust container by tapping it lightly. Avff switching an excessive amount of dust into the
keeping Push the empty dust container back into the dust desired removal module from below until it engages. When fitting a new dust container, first remove the protective cover.
8 Care and maintenance
CAUTION
Detach the dust removal module from the pow
8.1 Care of the module
CAUTION
Do not use water, oil, grease or cleaning agen
Use only a dry brush and a cloth to clean Wear respiratory protection when doing so.
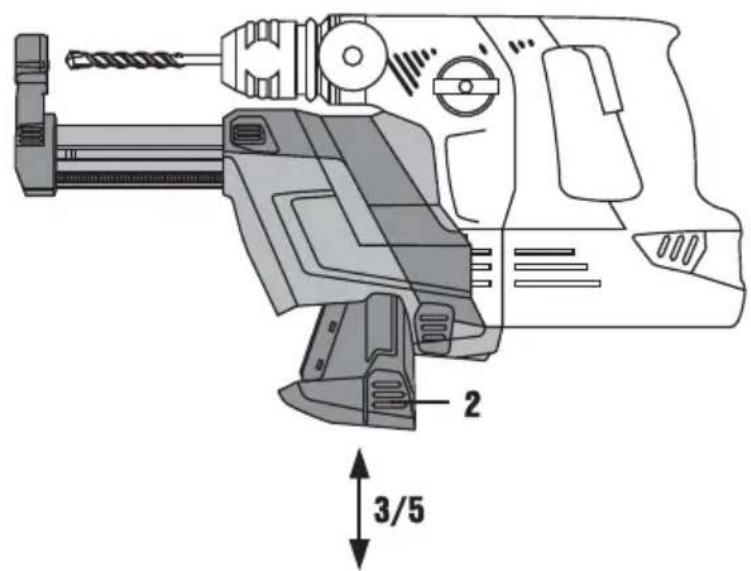
8.2 Replacing the suction head 6
- Detach the dust removal module from the power tool.
- Press the suction head release knob and hold it this position.
nts3. Pull the old suction head upwards out of its gui - Press the new suction head into the guide until the apoligages.
8.3 Maintenance
Check all external parts of the module for data regular intervals and check that all controls open
lessly. Do not operate the appliance if parts are da or when the controls do not function faultlessly. If r age at sary the appliance should be repaired at a Hilti rep ate fault-center.
9 Troubleshooting
Fault Possible cause Remedy
| Excessive dust emission. The dust container is full. Emptying the dust container | |
| The suction head is defective. Replace the suction head. | |
| The suction head brush is worn. Replace the suction head. | |
| The drill bit is not centered. Time dust removal module is not for-the dust removal module to the suction head. rectly fitted to the power tool. power tool correctly. | |
en
the
10 Disposal

Most of the materials from which Hilti tools or appliances are manufactured can be recycled. The materials must be correctly separated before they can be recycled. In many countries, Hilti has already made arrangements for taking back old tools and appliances for recycling. Ask Hilti customer service or your Hilti representative for further information.
11 Manufacturer's warranty - tools
Hilti warrants that the tool supplied is free of material and workmanship. This warranty as the tool is operated and handled correctly, and serviced properly and in accordance with t Operating Instructions, and the technical system tained. This means that only original Hilti consu components and spare parts may be used in
This warranty provides the free-of-charge repair placement of defective parts only over the entire of the tool. Parts requiring repair or replacement result of normal wear and tear are not covered warranty.
Additional claims are excluded, unless stringent national regulations prohibit such exclusion. In particular, Hilti is not obligated for direct, indirect, incidenor consequential damages, losses or expenses in connection with, or by reason of, the use of, or may to use the tool for any purpose. Implied warranty of merchantability or fitness for a particular purpose are specifically excluded.
or re- e Forespan or replacement, send the tool or related p t immediately upon discovery of the defect to the addr d by this local Hilti marketing organization provided.
This constitutes Hilti's entire obligation with regard to warranty and supersedes all prior or contemporaneous comments and oral or written agreements concerning warranties.
12 EC declaration of conformity (original)
| Designation: Dust removal module |
| Type: TE DRS-6-A |
| Generation: 01 |
| Year of design: 2009 |
en
We declare, on our sole responsibility, that this complies with the following directives and standa 2004/108/EC, 2006/42/EC, 2011/65/EU, EN ISO 1
Hilti Corporation, Feldkircherstrasse 100, FL-9494 Schaan

text_image
falu leaini
Paolo Luccini Jan Doongaji
Head of BA Quality and Process Management Business Area Electric Tools & Accessories 01/2012 01/2012 Executive Vice President Business Unit Power Tools & Accessories
Technical documentation filed at:
Business Area Electric Tools & Accessories 01/2012 Business Unit Power Tools & Accessories 01/2012
AspiratoreperlapolvereTEDRS-6-A
rettive e norme: 2004/108/CE, 2006/42/CE, 2011/
EN ISO 12100.
Hilti Corporation, Feldkircherstrasse 100, FL-9494 Schaan

text_image
falu lcai
Head of BA Quality and Process Mana-
3/EU.gement
Business Area Electric Tools & Acces-
sories
01/2012 01/2012
Executive Vice President
Business Unit Power
Tools & Accessories
Elementos de mando 1 as
es
text_image
Jia ChenyiPaolo Luccini Jan Doongaji
Head of BA Quality and Process Management Business Area Electric Tools & Accessories 01/2012 Executive Vice President Business Unit Power Tools & Accessories 01/2012
Head of BA Quality and Process Mana-
Executive Vice President
Agment
Business Area Electric Tools & Acces-
sories
01/2012 01/2012
Business Unit Power
Tools & Accessories
pt
Head of BA Quality and Process Mana-
3/EU gemeht
Business Area Electric Tools & Acces-
sories
01/2012 01/2012
Executive Vice President
Business Unit Power
Tools & Accessories
Head of BA Quality and Process Management Business Area Electric Tools & Accessories 01/2012 01/2012 Executive Vice President Business Unit Power Tools & Accessories
Head of BA Quality and Process Management Executive Vice President Business Area Electric Tools & Accessories Business Unit Powersories Tools & Accessories 01/2012 01/2012
Teknisk dokumentation vid:
Head of BA Quality and Process Executive Vice President Management Business Area Electric Tools & Accessories Business Unit Power Tools & Accessories 01/2012 01/2012
Head of BA Quality and Process Mana- Executive Vice President
gement
Business Area Electric Tools & Acces-
sories
01/2012
Jan Doongaji
Business Unit Power
Tools & Accessories
01/2012
Head of BA Quality and Process
Management
Business Area Electric Tools &
Accessories
01/2012
Executive Vice President
Business Unit Power
Tools & Accessories
01/2012
Head of BA Quality and Process Management Business Area Electric Tools & Accessories 01/2012 01/2012
Executive Vice President
Business Unit Power Tools & Accessories
Head of BA Quality and Process Management Business Area Electric Tools & Accessories 01/2012
Jan Doongaji
Executive Vice President
Business Unit Power
Tools & Accessories 01/2012
Head of BA Quality and Process
65 Management
Business Area Electric Tools &
Accessories
01/2012 01/2012
Executive Vice President
Business Unit Power
Tools & Accessories
text_image
fals lucini
Paolo Luccini
Head of BA Quality and Process Management Business Area Electric Tools & Accessories 01/2012
Jan Doongaji
Executive Vice President
Business Unit Power
Tools & Accessories
01/2012
Head of BA Quality and Process Management Executive Vice President Business Area Electric Tools & Accessories Business Unit Power 01/2012 01/2012 Tools & Accessories
Head of BA Quality and Process Management Executive Vice President
Business Area Electric Tools & Acces- Business Unit Power
sories Tools & Accessories
01/2012 01/2012
Head of BA Quality and Process Mana- Executive Vice President
gement
Business Area Electric Tools & Acces-
sories
01/2012
Business Unit Power
Tools & Accessories
01/2012
Head of BA Quality and Process
Management
Business Area Electric Tools &
Accessories
01/2012 01/2012
Executive Vice President
Business Unit Power
Tools & Accessories
Head of BA Quality and Process Mana- Executive Vice President
gement
Business Area Electric Tools & Acces- Business Unit Power
sories
01/2012 01/2012
text_image
fals lucini
Paolo Luccini
Head of BA Quality and Process
Management
Business Area Electric Tools &
Accessories
01/2012
Jan Doongaji
Executive Vice President
Business Unit Power
Tools & Accessories
01/2012
Executive Vice President
Business Unit Power
Tools & Accessories
01/2012

text_image
falu luciniPaolo Luccini
Head of BA Quality and Process
Management
Business Area Electric Tools &
Accessories
01/2012
TE DRS-6-A Puteklu mezgls
Head of BA Quality and Process Management Business Area Electric Tools & Accessories 01/2012 01/2012 Executive Vice President Business Unit Power Tools & Accessories
Head of BA Quality and Process Mana-
gement
Business Area Electric Tools & Acces-
sories
01/2012
Jan Doongaji
Executive Vice President
Business Unit Power
Tools & Accessories
01/2012
It
Tolmueemaldusmoodul TE DRS-6-A
text_image
fals lucini
Paolo Luccini
Head of BA Quality and Process Mana- Executive Vice President
gement
Business Area Electric Tools & Acces-
sories
01/2012
Tehnilised dokumendid saadaval:
Head of BA Quality and Process
Management
Business Area Electric Tools &
Accessories
01/2012
Jan Doongaji
Executive Vice President
Business Unit Power
Tools & Accessories
01/2012
Head of BA Quality and Process
Management
Business Area Electric Tools &
Accessories
01/2012 01/2012
Executive Vice President
Business Unit Power
Tools & Accessories
技術資料:
Head of BA Quality and Process
Management
Business Area Electric Tools &
Accessories
01/2012 01/2012
Executive Vice President
Business Unit Power
Tools & Accessories
기술 문서 작성자:
Head of BA Quality and Process
Management
Business Area Electric Tools &
Accessories
01/2012 01/2012
Executive Vice President
Business Unit Power
Tools & Accessories
技術文件歸檔於:
Head of BA Quality and Process
Management
Business Area Electric Tools &
Accessories
01/2012 01/2012
Executive Vice President
Business Unit Power
Tools & Accessories
技术文档提交于:
Hilti = registered trademark of Hilti Corp., Schaan
W 3710 | 0613 | 00-Pos. 1 | 1
Printed in China © 2013
Right of technical and programme changes reserved S. E. & O.
409098 / A3