0715 AA - Lawn mower SKIL - Free user manual and instructions
Find the device manual for free 0715 AA SKIL in PDF.
| Product Type | Electric Lawn Mower |
| Brand | Skil |
| Model | 0715 AA |
| Use | Domestic (lawn mowing) |
| Power supply | Mains (power cable) |
| Cutting height | 28 mm, 48 mm, 68 mm (3 adjustable positions) |
| Collector bag | Yes, with fill indicator |
| Safety switch | Yes (trigger + safety switch) |
| Double insulation | Yes (class II) |
| Sound pressure level (LpA) | 73 dB(A) |
| Sound power level (LwA) | 93 dB(A) |
| Total vibration value | 2.5 m/s² (uncertainty K = 1.5 m/s²) |
| Rear guard | Yes |
| Cord immobilization device | Yes |
| Foldable handle | Yes (for storage) |
| Maintenance | Clean with brush and soft cloth after each use; do not use water |
| Blade replacement | Possible (ref. Skil 2610Z04069 / YAT 474 552) |
| After-sales service | Skil authorized service centers |
| Compliance | CE, directives 2006/95/EC, 2004/108/EC, 2006/42/EC, 2000/14/EC, 2011/65/EU |
Frequently Asked Questions - 0715 AA SKIL
User questions about 0715 AA SKIL
0 question about this device. Answer the ones you know or ask your own.
Ask a new question about this device
Download the instructions for your Lawn mower in PDF format for free! Find your manual 0715 AA - SKIL and take your electronic device back in hand. On this page are published all the documents necessary for the use of your device. 0715 AA by SKIL.
USER MANUAL 0715 AA SKIL
This tool is intended for domestic lawn mowing only
This tool is not intended for professional use
- Check whether the packaging contains all parts as illustrated in drawing ②
- When parts are missing or damaged, please contact your dealer
Assembly instructions ② -the sequence of the numbers appearing in the drawing corresponds with the sequence of the steps to be followed for assembling the lawn mower!firmly tighten all screws and nuts
- Read this instruction manual carefully before use and save it for future reference ④
TECHNICAL DATA ①
TOOLELEMENTS ③
A Cord restraint
B Cord clip
C Safety switch
D Trigger switch
E Grass box
F "Grass box full" indicator
G Securing wing nut
H Transport handle
J Ventilation slots
K Rear guard
SAFETY
GENERAL SAFETY INSTRUCTIONS
WARNING! Read all safety warnings and all
instructions. Failure to follow the warnings and instructions may result in electric shock, fire and/or serious injury. Save all warnings and instructions for future reference. The term "power tool" in the warnings refers to your mains-operated (corded) power tool or battery-operated (cordless) power tool.
1) WORK AREA SAFETY
a) Keep work area clean and well lit. Cluttered or dark areas invite accidents.
b) Do not operate power tools in explosive atmospheres, such as in the presence of flammable liquids, gases or dust. Power tools create sparks which may ignite the dust or fumes.
c) Keep children and bystanders away while operating a power tool. Distractions can cause you to lose control.
2) ELECTRICAL SAFETY
a) Power tool plugs must match the outlet. Never modify the plug in any way. Do not use any adapter plugs with earthed (grounded) power tools. Unmodified plugs and matching outlets will reduce risk of electric shock.
b) Avoid body contact with earthed or grounded surfaces such as pipes, radiators, ranges and refrigerators. There is an increased risk of electric shock if your body is earthed or grounded.
c) Do not expose power tools to rain or wet conditions. Water entering a power tool will increase the risk of electric shock.
d) Do not abuse the cord. Never use the cord for carrying, pulling or unplugging the power tool. Keep cord away from heat, oil, sharp edges or moving parts. Damaged or entangled cords increase the risk of electric shock.
e) When operating a power tool outdoors, use an extension cord suitable for outdoor use. Use of a cord suitable for outdoor use reduces the risk of electric shock.
f) If operating a power tool in a damp location is unavoidable, use an earth leakage circuit breaker. Use of an earth leakage circuit breaker reduces the risk of electric shock.
3) PERSONAL SAFETY
a) Stay alert, watch what you are doing and use common sense when operating a power tool. Do not use a power tool while you are tired or under the influence of drugs, alcohol or medication. A moment of inattention while operating power tools may result in serious personal injury.
b) Use personal protective equipment. Always wear eye protection. Protective equipment such as dust mask, non-skid safety shoes, hard hat, or hearing protection used for appropriate conditions will reduce personal injuries.
c) Prevent unintentional starting. Ensure the switch is in the off-position before connecting to power source and/or battery pack, picking up or carrying the tool. Carrying power tools with your finger on the switch or energising power tools that have the switch on invites accidents.
d) Remove any adjusting key or wrench before turning the power tool on. A wrench or a key left attached to a rotating part of the power tool may result in personal injury.
e) Do not overreach. Keep proper footing and balance at all times. This enables better control of the power tool in unexpected situations.
f) Dress properly. Do not wear loose clothing or jewelry. Keep your hair, clothing and gloves away from moving parts. Loose clothes, jewelry or long hair can be caught in moving parts.
g) If devices are provided for the connection of dust extraction and collection facilities, ensure these are connected and properly used. Use of dust collection can reduce dust-related hazards.
4) POWER TOOL USE AND CARE
a) Do not force the power tool. Use the correct power tool for your application. The correct power tool will do the job better and safer at the rate for which it was designed.
b) Do not use the power tool if the switch does not turn it on and off. Any power tool that cannot be controlled with the switch is dangerous and must be repaired.
c) Disconnect the plug from the power source and/or the battery pack from the power tool before making any adjustments, changing accessories, or storing power tools. Such preventive safety measures reduce the risk of starting the power tool accidentally.
d) Store idle power tools out of the reach of children and do not allow persons unfamiliar with the power tool or these instructions to operate the power tool. Power tools are dangerous in the hands of untrained users.
e) Maintain power tools. Check for misalignment or binding of moving parts, breakage of parts and any other condition that may affect the power tool's operation. If damaged, have the power tool repaired before use. Many accidents are caused by poorly maintained power tools.
f) Keep cutting tools sharp and clean. Properly maintained cutting tools with sharp cutting edges are less likely to bind and are easier to control.
g) Use the power tool, accessories and tool bits etc., in accordance with these instructions, taking into account the working conditions and the work to be performed. Use of the power tool for operations different from those intended could result in a hazardous situation.
5) SERVICE
a) Have your power tool serviced by a qualified repair person using only identical replacement parts.
This will ensure that the safety of the power tool is maintained.
SPECIFIC SAFETY INSTRUCTIONS FOR LAWN MOWERS
EXPLANATION OF SYMBOLS ON TOOL
④ Read the instruction manual before use
⑤ Double insulation (no earth wire required)
⑥ Pay attention to the risk of injury caused by flying debris (keep bystanders a safe distance away from work area)
⑦ Beware of sharp blades
⑧ Keep the (extension) cord away from the rotating cutting blade
The cutting blade continues to rotate for a short time after tool is switched off (do not touch rotating blade)
Switch off and disconnect plug before cleaning/ maintenance or if (extension) cord is damaged or entangled
11 Do not dispose of the tool together with household waste material
GENERAL
- Avoid operating the mower on wet lawns
- The user is responsible for accidents or hazards occurring to other people or their property
- Never operate the tool with a defective rear guard or defective grass box
- When operating the tool without grass box, ensure that the rear guard is in closed position (risk of injury caused by rotating cutting blade)
Always disconnect plug from power source -whenever leaving the tool unattended -before clearing jammed material
-before checking, cleaning or working on the tool
-after striking a foreign object
whenever the tool starts vibrating abnormally
ELECTRICAL SAFETY
- Inspect the cord periodically and have it replaced by a qualified person, if damaged
- When operating the tool use a residual current device (RCD) with a triggering current of 30mA maximum
Use completely unrolled and safe extension cords with a capacity of 16 Amps (U.K. 13 Amps)
Only use an extension cord of types H05VV-F or H05RN-F which is intended for outdoor use and equipped with a watertight plug and coupling-socket - Do not run over, crush or pull the (extension) cord
- Protect the (extension) cord from heat, oil and sharp edges
- Inspect the extension cord periodically and replace it, if damaged (inadequate extension cords can be dangerous)
PERSONAL SAFETY
- Do not operate the tool when barefoot or wearing open sandals; always wear sturdy shoes and long trousers
- Be familiar with the controls and the proper use of the tool
- Never mow in the direct vicinity of persons (especially children) and animals
Always keep hands and feet away from rotating parts - Keep away from the discharge opening at all times
- Switch on the motor according to instructions and with feet well away from the cutting blade
- This tool is not intended for use by persons (including children) with reduced physical, sensory or mental capabilities, or lack of experience and knowledge, unless they have been given supervision or instruction concerning use of the tool by a person responsible for their safety (local regulations can restrict the age of the operator)
- Ensure that children do not play with the tool
- Operate the mower at a walking pace only (do not run)
- Keep proper footing on slopes and do not mow extremely steep slopes
- Be extremely careful when moving backwards or pulling the mower towards you
BEFORE USE
- Check the functioning of the tool before each use and, in case of a defect, have it repaired immediately by a qualified person; never open the tool yourself
- Thoroughly inspect the area where the mower is to be used and remove all hard objects which could be caught up and thrown by the cutting mechanism
Always ensure that the cutting mechanism is in good working order (have worn or damaged parts replaced) - Keep all nuts, bolts and screws tight to be sure that the mower is in safe working condition
DURING USE
- Only mow with sufficient daylight or with appropriate artificial lighting
-
Do not tilt the tool when starting or switching on the motor, except if the tool has to be tilted for starting in long grass (in this case, do not tilt it more than absolutely necessary and tilt only the part which is away from the operator); always ensure that both hands are in the operating position before returning the tool to the ground
-
Ensure that the cutting blade is at a complete standstill when tilting the tool for crossing surfaces other than grass and when transporting it to and from the area to be mowed
Mow across the face of slopes (never up and down) - Be extremely careful when changing direction on slopes
- Never pick up or carry the lawn mower while the motor is running
- Always switch off tool and disconnect plug from power source if the power supply cord or the extension cord is cut, damaged or entangled (do not touch the cord before disconnecting the plug)
- Never use the tool when cord is damaged; have it replaced by a qualified person
USE
Cord restraint ⑫
-hook the loop in the extension cord over restraint A as illustrated
-pull tight to secure the extension cord
Adjusting cutting height (28-48-68 mm) ⑬
!disconnect plug from power source and ensure that the cutting blade has stopped rotating
-turn the mower upside down
-locate the front wheel axle as well as the rear wheel axle into the desired cutting height position (28, 48 or 68 mm)
!ensure that the four wheels are fixed in the same cutting height position
On/off safety switch 14
Prevents the tool from being switched on accidentally -switch on tool by first pressing safety switch C and then pulling trigger switch D
-switch off tool by releasing trigger switch D
!after switching off the tool the blade continues to rotate for a few seconds
- Operating instructions
-hold the mower with both hands
-place the mower on the edge of the lawn and mow in a forward direction
-reverse at the end of each turn, slightly overlapping the previous cut strip
-only use the mower on dry grass
-keep the mower away from solid objects and plants
-for mowing long grass, first set the cutting mechanism to the maximum cutting height, then to a lower cutting height
!adjust your walking pace when mowing long grass
"Grass box full" indicator 15
-empty grass box E as soon as flap F lowers by itself, indicating that the grass box is full
-for optimal grass collecting performance regularly clean the holes underneath flap F with a hand brush
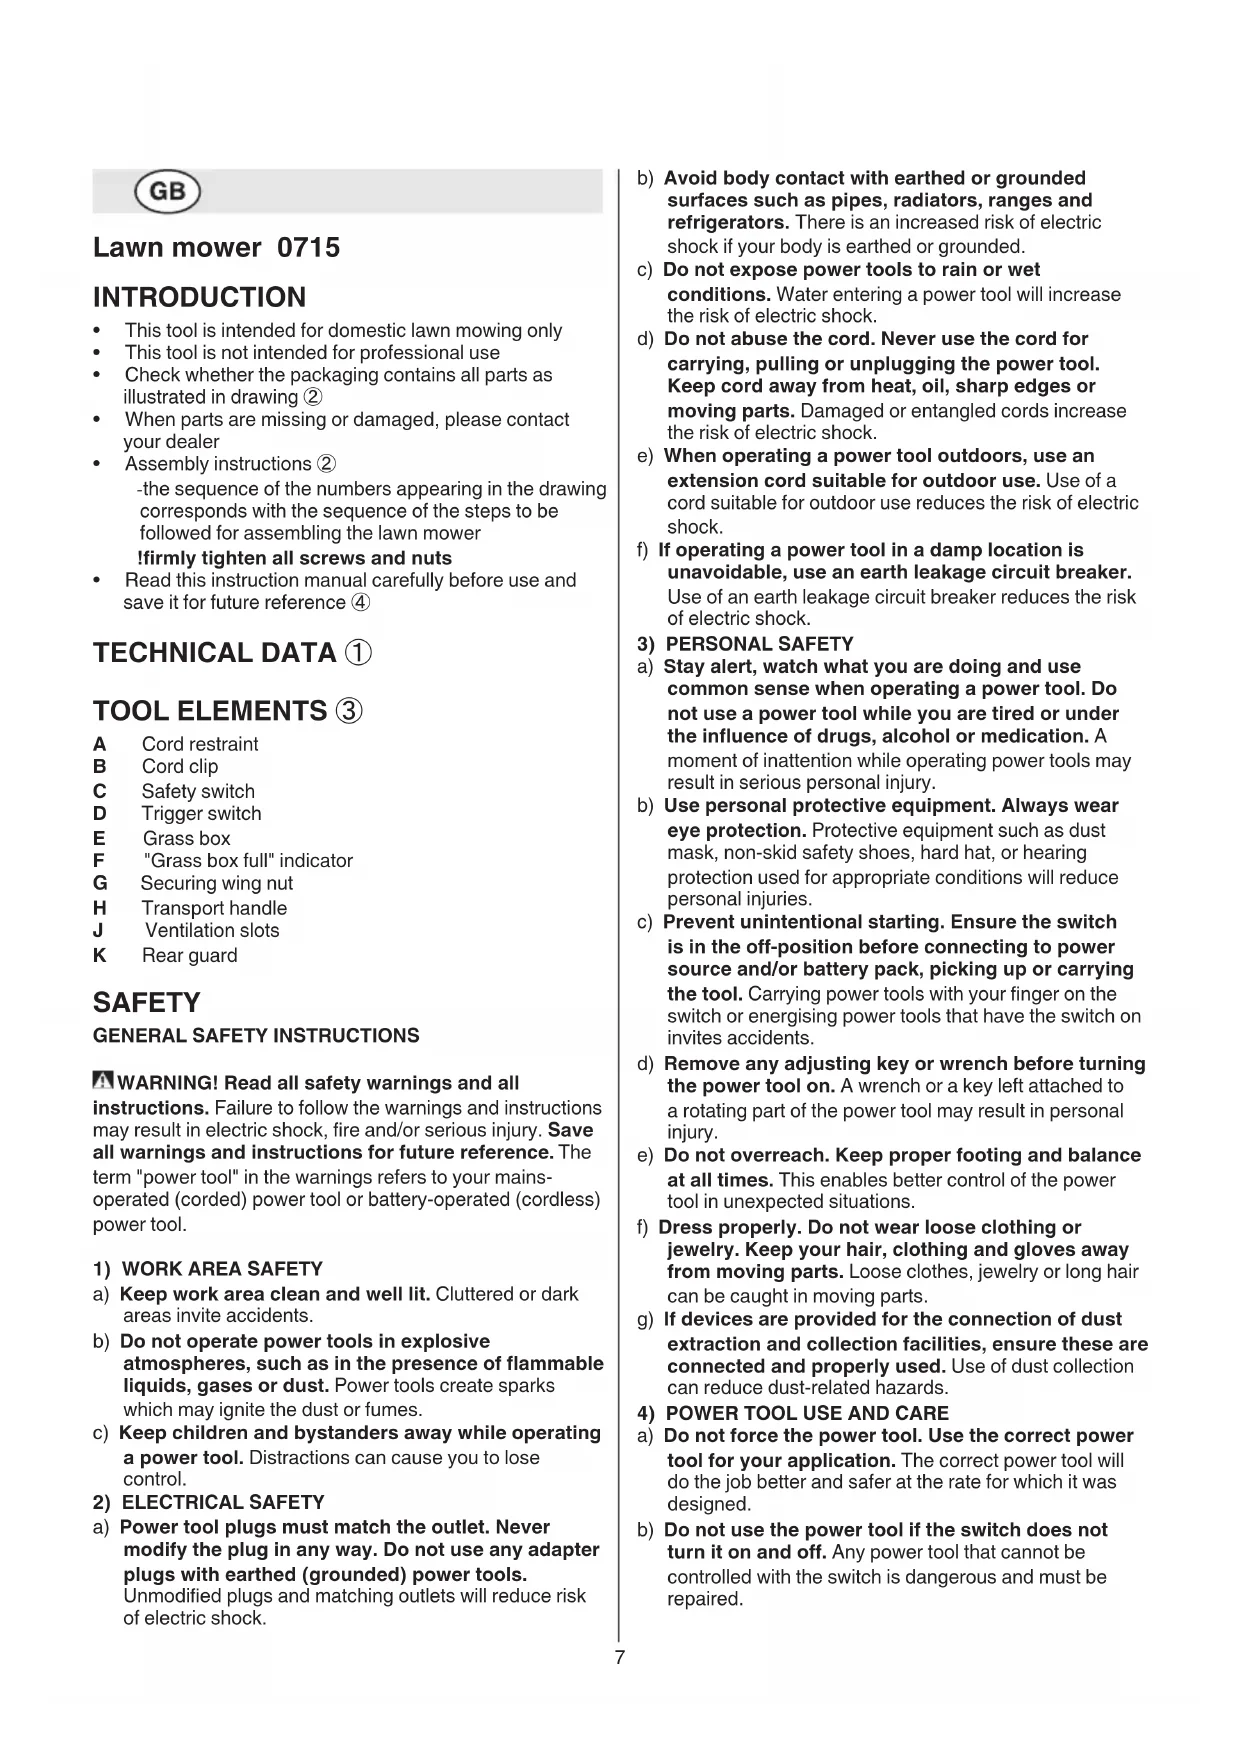
Storage 16
-for saving substantial storage space fold the tool handle (using wing nut G) and store the tool as illustrated; empty grass box first
!ensure that the (extension) cord is not trapped when folding/unfolding the tool handle (do not drop the handle)
-do not place other objects on top of the mower when stored
-store the mower indoors in a dry place
MAINTENANCE / SERVICE
This tool is not intended for professional use
Always keep tool and cord clean (especially ventilation slots J ③)
- Clean the mower after each use with a hand brush and a soft cloth
!do not use water (especially no high-pressure sprays)
-remove compacted grass cuttings from the blade area with a wooden or plastic implement
Regularly check the grass box for wear or damage
- Regularly check for worn or damaged blades and bolts and have them replaced in sets to preserve balance
- Replacing the cutting blade ①
!disconnect plug from power source and remove grass box E ③
!wear protective gloves
-turn the mower upside down
-remove/mount the cutting blade with a spanner 13 as illustrated
Ionly use replacement cutting blades of the correct type (SKIL spare part number 2610Z04069, marked YAT 474 552)
-thoroughly clean the shaft area and the underside of the tool before mounting the cutting blade
!while mounting the cutting blade ensure that two holes X perfectly match two nodges Y
If the tool should fail despite the care taken in
manufacturing and testing procedures, repair should be carried out by an after-sales service centre for SKIL power tools
- send the tool undismantled together with proof of purchase to your dealer or the nearest SKIL service station (addresses as well as the service diagram of the tool are listed on www.skil.com)
TROUBLESHOOTING
- The following listing shows problem symptoms, possible causes and corrective actions (if these do not identify and correct the problem, contact your dealer or service station)
!switch off the tool and disconnect the plug before investigating the problem
Tool does not operate
-no power supply -> check power supply (power cable, circuit breakers, fuses)
-power supply socket faulty -> use another socket
-extension cord damaged replace extension cord
- grass too high -> increase cutting height and tilt tool
Tool operates intermittently
-extension cord damaged replace extension cord
-internal wiring defective -> contact dealer/service station
Tool leaves ragged finish or motor labours
-cutting height cut too low -> increase cutting height
-cutting blade blunt -> replace cutting blade
-underside of tool badly clogged -> clean tool
-cutting height not uniform -> set 4 wheels at same cutting height
Cutting blade not rotating
-cuttingbladeobstructed clear obstruction
-blade nut/bolt loose ->tighten blade nut/bolt
Tool vibrates abnormally
-cuttingblade damaged replacecuttingblade
-blade nut/bolt loose ->tighten blade nut/bolt
ENVIRONMENT
- Do not dispose of electric tools, accessories and packaging together with household waste material (only for EU countries)
-in observance of European Directive 2012/19/EC on waste of electric and electronic equipment and its implementation in accordance with national law, electric tools that have reached the end of their life must be collected separately and returned to an environmentally compatible recycling facility
- symbol ⑪ will remind you of this when the need for disposing occurs
C∈DECLARATION OF CONFORMITY
We declare under our sole responsibility that the product described under "Technical data" is in conformity with the following standards or standardization documents: EN 60335, EN 61000, EN 55014 in accordance with the provisions of the directives 2006/95/EC, 2004/108/EC, 2006/42/EC, 2000/14/EC, 2011/65/EU
Technical file at: SKIL Europe BV (PT-SEU/ENG1), 4825 BD Breda, NL
Measured in accordance with EN 60335 the sound pressure level of this tool is 73dB(A) and the sound power level 93 dB(A) (standard deviation: 1.5 dB), and the vibration 2.5m / s^2 (hand-arm method; uncertainty K = 1.5m / s^2)
Measured in accordance with 2000/14/EC (EN/ISO 3744) the guaranteed sound power level LWA is lower than 94 dB(A) (conformity assessment procedure according to Annex VI)
Notified body: KEMA, Arnhem, NL
Notified body identification number: 0344
- The vibration emission level has been measured in accordance with a standardised test given in EN 60335; it may be used to compare one tool with another and as a preliminary assessment of exposure to vibration when using the tool for the applications mentioned
-using the tool for different applications, or with different or poorly maintained accessories, may significantly increase the exposure level
-the times when the tool is switched off or when it is running but not actually doing the job, may significantly reduce the exposure level
!protect yourself against the effects of vibration by maintaining the tool and its accessories, keeping your hands warm, and organizing your work patterns

DÉCLARATION DE CONFORMITE (C)
Operations & Engineering
Olaf Dijkgraaf
Approvals Manager
SKIL Europe BV, 4825 BD Breda, NL
13.01.2014
(12
GERÄUSCH/VIBRATION
Operations & Engineering
Approvals Manager
SKIL Europe BV, 4825 BD Breda, NL
C12
13.01.2014
GELUID/VIBRATIE
Operations & Engineering
Approvals Manager

SKIL Europe BV, 4825 BD Breda, NL
13.01.2014
(12
LJUD/VIBRATION
Operations & Engineering
Olaf Dijkgraaf
Approvals Manager

SKIL Europe BV, 4825 BD Breda, NL
13.01.2014
C€12
STJ/VIBRATION
Males after EN 60335 er lydtrykniveau af dette værktj 73 dB(A) og lydeffektniveau 93 dB(A) (standard deviation: 1,5 dB), og vibrationsniveauet 2,5 m/s² (hand-arm metoden; usikkerhed K = 1,5 m/s²)
Måles after 2000/14/EF (EN/ISO 3744) er det garanterede ydefeffektniveau LWAindre end 94 dB(A) (proceducerer for overensstemmelsesvurdering iht. bilag VI)
Underrettet myndighed: KEMA, Arnhem, NL
Identifikationsnummer for underrettet myndighed: 0344
1) SIKKERHET PÅ ARBEIDSPLASSEN
a) Hold arbeidsomraret rent og ryddig. Rotete arbeidsomraderller arbeidsomrader uten lys kan fore til ulykker.
b) Ikke arbeid med maskinen i eksplosjonsutatte omgivelser - der det befinner seg brennbare vasker, gass erler stov. Elektroverktoylager gnister som kan antennene stov ellr damper.
VEDLIKEHOLD / SERVICE
Operations & Engineering
Approvals Manager

SKIL Europe BV, 4825 BD Breda, NL
13.01.2014
(€12
STOY/VIBRASJON
Operations & Engineering
Approvals Manager

SKIL Europe BV, 4825 BD Breda, NL
13.01.2014
(12
RUIDOS/VIBRACIONES
Operations & Engineering
Olaf Dijkgraaf
Approvals Manager

SKIL Europe BV, 4825 BD Breda, NL
13.01.2014
C12
GÜRULTÜ/TITRESIM
TEXHnueCHe DAHHbIE ①
DETAJIHCHTPYMEHTA ③
A OrpaHnHTeIb Hypa
B Xomyt kaebela
C 3aunTHbIN BblIOUaTeIb
D HypkoBbI nepeKIOHouaTeIb
E C6opHcpeaHHoTpaBbl
F INHINKaTOp "C60pHnK cKoWeHHo TpaBbI 3aNoJIHeN"
G PpeoXpaHnTeBna 6apaKOBa raKa
H PykoTka dIra TpaHcnpToPbOKn
J BeHTnlaIOHHbIe OTBepCTNIA
K 3aHnKoHuyx
BE30NACHOCTb
OCHOBHBIE INHCTPYKcNIN NO TEXHNHE BE3ONACHOCTN
A BHIMAHNE! Ipooynte Bce yka3aHnI n HNCTpyHcHnIO TeXnHKe 6e3OanacHocTn. UnyuEHN, DOnyueeHHbIe npC o6JIoDeHnYk3aHnI INHCTpyKcHnI NO TexNHke 6e3OanacHocTn, MOryT cTaIb pInHuHOJ 3JIeKTPueckoro nopAkeHnI, NOnkapa I TAgKeIbIX TpaBM. CoxpanHYeTe 3TN INHCTpyHcHnI yHa3aHnI DnB 6Byduero nCnoJIb3OBaHnI. NcNoJIb3OBaHHoe B HAcTOraX INHCTpyKcHnx Yka3aHnx NoHrTHe "3JIeKTPoINHCTpymeHT"pacnpoctpaHReTcna Ha 3JIeKTPoINHCTpymeHT C NITaHHeM OT CeTn (C Ka6eMeM NITaHnI OT 3JIeKTPocETn) I Ha aKKUMyJITopHbI 3JIeKTPoINHCTpymeHT (6e3 Ka6eJIaNTaHnI OT 3JIeKTPocETn).
1) B3ONACHOCTb PA6OYERO MECTA
a) Co6IIOJaIe YnCTOy H NOIepHnBaIte HaJIeHaUO OCBueEHHoCTb Ha pa6oyem MeTe. EecnpaOK Ha pa6oyem MeTe nIe erO IIOxoe OCBeueHHe MOrT pINBecTn K HeCuaCThBIM ClyuAam.
b) He И спльзунес селктуонстументом BO B3рьЮОнacHос рede, T.e. B HENOCpeДCTBEHHO6bl30ctn OT leKOBocPnAmeHAnxCЯ HndKoCTe, ra3OB nIIN nblln. B npoccepe pa60tbl əLEKTPOHcTpyMeHT nCKpIT n NCKpbI MOrTy BOCПЯМeHNTb Ra3bl nII NBIL.
c) Пи pa6ote c 3JIeHTPOHHCTpyMeHToM He donychaite DeTei Hn NoCTOpOHnX Ha BaWe pa6ooye MeTO. OTBJeHne BaWero BHMaHn MoKeT npNBecTI K nOtepe KOHTpOJI NaD pa6oToI NHCTpyMeHToA.
2) ΘJEHTPNUECKA B3OJNACHOCTb
a) 3JIeHTPOHCTpyMeHTA DOJHKHa COOTBeTCTBOBAtb PO3eThe 3JIeHTPoCetn. He BHocHTe HnHaHX N3MeHeHH B KOHCTpyKuIO BVJKN. He HcNoIb3yIte aJaANTOpbl Ia J3JIeHTPOHCTpyMeHTa C 3aUHTbIM 3a3EmHeHem. 3aBoDcKe ITeCEJIbHbIe BVJHKn I COOTBeTCTByIOUne IM CTeEBbie PO3eTKC CyueCTBeHHO CHNkaIOT BepoTHOCTb 3JIeKTPOWoka.
b) ɪəsərəiTe MæxənHuecknX HOHTaHToB C TaHmN 3a3eMlEHHbIMN NOBepxHOCTaMn, Hah Tpy6oPBOBobl, CnCTeMbI OTOIJIeHnR,
NNTbI XOJIoHNJIbHHH. PnCOnpNIKOCHOBeHN HeIOBeKa C 3a3eMJIeHHbIMN IpeMeTAMN BO BpeMa paobToI INHCTpyMeHTOM BepoTHOcTB 3JIeHTPOWoka CyueCTBeHHO Bo3paCTaet.
c) 06epeaTe 3JeHTponHCTpymeHT OT BO3DeIcTBnA DOxNn BnArn. IOnaDaHne BObI B 3JeKTPOHNCTpymeHT NOBbIaET BepoTHOCTb 3JeKTPnuECKoro ydapa.
d) HcnoJb3yIte Ka6eIb cTpOro No Ha3HaueHIO. He donycKaetc TaHyTb n NpeEdburatb 3JeHTponHCTpyMeHT 3a Ka6eIb nn HCNoIb30BaTb Ka6eIb DJIa BbITARHbAHNn BnHNn H3 PO3ETN. OBeperaTe Ka6eIb HcTpyMeHTa OT BO3DeIcTBn BBICOHX TempePAtyp, MacJa, OCTpbIX KpOMOH nn DBHHyUxxCraacte 3JeHTponHCTpyMeHTa. IOBpeKJdeHHb nn CnyTaHHb Ka6eIb NOBbIwaET BO3MOHKHOCTb 3JeKTPnuCeCKoYO yDapa.
e) Pn pa6oTe Ha yIInCe IcNoJIb3yIte Ye yJINHInTeJIb, npEHa3NaueHHbI dJa pa6OtBi BHe NOMEeHNr. IcNoJIb3OBAHHe TaKOrO yJINHInTeJIa CHNJaet BepoATHoCTb 3JIeKTPnueCKOrO yJapa.
f) EcIn HeBO3MOHHO H36EHaTb npImeHeHHa 3JIeKTPoHNCTpyMeHTa B cbIpOM NOMeUeHHN,TO yCTaHaBnBaIte yCTpOJCTBO 3aUNtBI OT yTeHH N 1CnoJIb3OBaHne yCTpOJCTBA 3aUNtBI OT yTeHH N 3EMIO CHINKaET pINCH 3JIeKTPuYeCKOrO nopaKeHH.
3) JIYHAR BE30NACHOCTb
a) Bydte BHNMaTeIbHbI, CneIte 3a TeM, YTO BbI deNaete N BblOnHnIe pa6Oty 06dymaHNo. He noJb3yIteCb 3JeHTponHcTpymeHTOM, ecNbYcTaIIHn HaxoINTecb NOd BO3deNCTBHeM TpaHHBnIH3aTOPOB, aHOrOJIa HIN MeDnHCHNX npenapaTOB. CeKHyndHa nOTepa KOHcHTpaCNI B pa6Ote C 3JeHTponHcTpymeHTOM MOHET npNBecTn K cepBe3HbIM TpaBMam.
b) HcnoIb3yIte cpeCTBa nHdNbUdaJbHO 3aunTbI. 3aunTHbIe OCHN O6ra3aTeJIbHbI. CpeCTBa INHdNbUdaJbHO 3aunTbI, TaKHe KaK npOTNbOblJeBOI peCnnpaTOp, HeckoJIb3aJua 3aunTHaR O6yBb, IJIem-KacKa, CpeCTBa 3aunTbI opraHOB Cnyxa npIMHeYIOCTB COOTBeTCTByIOuIX yCLOBnM pa60TbI 06CTOReTBJCTBax IMHHmN3InpyOT BO3MOHHOCTb IOJIyuHENr TpaBM.
c) PpeodotBpaaaIte HnpeDHaMepeHHoe BkHIOueHne 3JIeKTPoHnCTpyMeHTa. Ipeep NODKIIIOUeHNEM 3JIeKTPoHnCTpyMeHTa K 3JIeKTPoNtAHNO H/INn H aKKyMylrTOpy y6eINTecb B BBKIIIOUeHHOM COCTOHHN 3JIeKTPoHnCTpyMeHTa. EcIn Bbl Ipn TpaHCnOpTnpOBKe 3JIeKTPoHnCTpyMeHTa DEPKITe NaIEc Ha BbIKIOuATEle INN BKIIIOUeHHbI 3JIeKTPoHnCTpyMeHT NODKIIIOUaTe K CETNIITAHN, TO 3TO MOKeT PpNBecTn K HecCuaCTHO My Clyuio.
d)Bo n36eHahne TpaBM nepeB BkIIOueHem HNCTpyMeHTa ydaJInte peryJINpOBOuHbI INn raeuHbIKIOUH 3 Bpaauouecraactn HNCTpyMeHTa.
e) He nepeoceHbAte CBOn BO3MOxHocTH. TBePcStOte Ha Horax u ydepHbAite paBHOBeCne.B TaKOM NOLOXHeHN Bbl CMOxTe lyuWe KOHTpOInpoBaTb INHCTpyMeHT B HeOxNdaHHbIX CNTyauqIaX.
f) NcnoIb3yIte noDxOJaIyU pa6OuyU OeHdy. He naDeBaIte cBo6oHyU OeHdy U yHpaWeHHa. BoIocbl, OeJHa n nepuATn DOJIHHbI HaxODHTbcra NOaJIbwe OT DBNHyUxxCra Yacte 3JeKtponHCTpyMeHTa. CBo6oHa r OeJHa, yKpaWeHn IIN dINHHbIe BOIOcbl JeRHO MOrYT nonactb B DBNKUxNecr qactn 3JeKtponHCTpyMeHTa.
g)Пин haInuHn nbIeOTcabIBaOuix n nbIe6OpHbIX npncnocO6JIeHm y6eINTeCb B TOM,чTO OHI NOcOeHNHeHb I NcNoJIb3yOTc HadJeHaUm 6pa3OM.ПрIMeHHe NpIbeOTcoCa MOJET CHN3NTb ONaCHOCTN,CO3JaBaEMbIe NbIbIO.
4) 3HcπIyATAUINYXOД3A 3JIeKTPoHCTPYMEHTOM
a) He neperpykaHte HHCTpymeHT. HcnoIb3yHTe TOT INHCTpymeHT, KOtOpB1 IpeHa3HaueH dIra DaHHoI pa6OtbI. C NOxOJaIM HNCTpymeHTOM Bbl BbIOJIHNTE pa6Ory LyuWe n HaJeKHei, HcNoJIb3yR BeCb DnAna3OH erO BO3MOXHOCTeI.
b) He nCnoJIb3yIte HnCTpyMeHT C HeNCnpaBHBIM BbIKJIouaTeIeM. INCTpyMeHT C HeNCnpaBHBIM BbIKJIouaTeIeM ONaceH I NOJIeKHT peMOHTy.
c) Do haayala hanaadn 3JeHTponHCTpyMeHTa, 3aMeHbI npHaJaleHHocTe nHn ppeHpaueHna pa60tbl OTKIOUaYte WTeNCelbHyIO BNIky OT po3eTHN CETn N/NNBbINbTE aKKyMylTOp. DaHna Mepa npedocTopoKHOCTn npedeTbpaaaet clyaHoe BKNIOUeHne INCTpyMeHTa.
d) XpaHnTe HeHCNoB3yEmbI 3JeHTPOINHCTpyMeNT B HeIOCTyNHom DJIa DeTeM MeCTe N He NO3BOJnTE HcNoB3OBaTb ERO JIncaM, He yMeIOUmC Hm O6paTaBc HnHe O3HaKOMLeHHbIM C HHCTpyKUnE No 3HCnLyaTaun. 3JeHTPOINHCTpyMeNTbI PpeDCTabJIaOT CO6oI ONaCHOCTB BYkAx HEONbITbIX NOLb3OBaTeJIeI.
e) 3JIeKTPoHnHCTpymEt Tpe6yeT HaIeHaJcero yXOda. IpoBepaIte 6e3ynpueHoNcTbФyHKnI INoDBHHbIX YAcTei, IerHOcTb Hx XOda, ceIOcTHocTb BCex YacTei N OTCytCTBHe IOBpeHKeHn, KOTOpbIE MOrTy HeraTHBHO cKa3aTbCra Ha pa6Ote IHCTpymEtA. PnI 6bHApUHeHn NOBpeHKeHn CdaIte IHCTpymEt B peMOHT. BoJIbShoe YIcNo HeCuaCTbIX ClyuaeB CBra3aHO C HeyIOBJIeTBOpNTeJIbHbIM yXoDM 3a 3JIeKTPoHnHCTpymEHTOM.
f) PeHcyuue qactn HhctpymeHa Heo6xOaHMO NOdAepHNBaTb B 3aTooyehHom uNCTOM COCToAHnn. Pn HaJIeKaUe m yxoJe 3a peHuynm npINHaJIeHHOCCTaM C OCTpbIMN KpOMKaMn OHn peKe 3aHJINHBAIOTcN INHCTpymeHT Lyuwe noDnaETcR KOHTPOJIO.
g)NcnoJb3yIte 3JIeHTponHCTpyMeHT, npHaJdJIeHHOCTH, 6HTbI N T.D. B COOTBeTCTBHN C DaHHbIMN HHCTpyKUaRMN, IxCOJa N3 Oco6eHHocTe yCNoBn H xapaKTepa BblOnHReMo pa60TbI. NcNoJIb3ObaHHe 3JIeKTPOINHCTpyMeHTa He No Ha3HaueHIno MoKeT PpNBecTI K ONaChbIM NocJIeDCTBnM.
5) CEPBnCHOE OBCJYHINBAHNE
a) NpepaBaiTe HNCTpyMeHT Ha cepBnchoe 06cnyHbAHHe TOIbHO KBAInHnHnpOBaHHOMy nepcoHaLy, HCNoIb3yUoEMy ToIbHO NOdInHHbIe
3anachbIe yactn. 3To o6ecneHT coxpaHHeH 6e3oNaChOCTn 3JIeKTPoHHCTpyMeHTa.
HCTPYKUNI NO TEXHNHE B3ONACHOCTN IPN PA6OTE C T3OHOKOCHAMN
IORCHEHNE K YCJIOBHBIM OBO3HAUENM HA IHCTPYMEHTE
④ IpepeIncnoJIb3OBAHHeM O3HaKOMbTEcB INHCTpyKUIO NO npIMeHeHIO
⑤ДВонагиЗОЛЯЦА (3a3eMЯHOCINn npoBOd He Tpe6yETcR)
⑥ OcteperaTecb OTetaOuNX OCHOHOB (OKpykaUne DoJIHHbI HaxoNTcHa 6e30NaCHOM paCCTOaHNOT MeTa y6OpHn)
⑦ OcteperaTecb octpbix HOKei
⑧ He donyckaTe nonaHaHna (yDInHnTeIbHorO) Ka6eJnoB BpaauouiCra HOK
Hoch octaHOBITc TOnbKO CncyTHeKOTOpoe BpeMnocLe BbIKIOUeHn HNCTpyMeHTa (He npHacaiTecb K BpaauoIeMycn HOHy)
10 Bcnyae,ecnnoBpeDnncn 3anyTanC (yHInHnteIbHbI) uHyp,nepeTeM,kaK paCyTaTb HIN OTpeMOHTnpOBaTB eRO,OTKIOUHTe yCTPOJCTBO N BblbTe BNIKy n3 po3eTKN
He BbIKnIDbIaBte HNCTpyMeHT BmecTe C 6bITOBbIM MycOpOM
OBUEE
He pa6oTaTc KocnKoHa BlaHbIXra3OHaX
3a Hechacthble cIyau n IIObMn HIN NOBpeJeHne Hx IMyueCTBa, a TaKHe yrpo3y dIra HNX OTBeyaet NJIb3OBATeJIb
Hnkorga He pa6oTaIe c ra3oHokocnIOK, ecIn ee 3aHn KOnyX nIN C6OpHNk Cpe3aHHO TpaBbl HncpabHbI
- Pn pa6oTe c HcTpyMeHToM 6e3 c6OpHNka cpeaHHoTpaBbI CJIeNTe 3a TEM, YTO6bI 3aHnKoKHyXOCTaBaJcR B 3aKpbItOM NIOJOKeHn (pnc TpaBmbl OTBpaauozerocraHOHa)
Bcerda BbITaRnBaIte BnIky n3 ceTeBOI po3eTKN, -ecn octabIae Te HNCTpyMeH 6e3 npncmOTpa -peed Tem, KaK y6npaTb 3acTpRAWne IpeDMetbl -peed Tem, KaK OcMaTpNBaTb, OUYaTaB INCTpyMeH TIN IpOBODtB C Hm DpyrHe ONEpaun -B clyuae IOnaDaHna Ha NoCTOpOHnI ppeMet -ecn INHCTpyMeH NaHHaET OueHb CnIbHO BN6pnpoBaTb
3JIeHTPNueCHAR Be3ONaCHOCTb
- PernoDnueckn OcmatpmbaIte shyp n Heo6xOIMO, TTo6bl KBaIIHPhiuropOBaHHbI CneuaJIInCT 3aMeHNl CeTeBOI shyB Cnyae NOBpeJDeHnI
- Ppi pa6oTe BO BlaHHbIX ycIOBnHex nCNoIb3yIte yCTpOInCTBO 3aunTHoro OTKluOeHnra (Y3O) c MaKcImaJIbHbIM NyCKOBbIM TOKOM 30 mA
IcnoJb3yIte NOJIHOCTbIO pa3MOtaHHbIe I 6e3OanChbIe ydINHITeIN, paccHTaHHbIe Ha TOK He MeHee 16 A
IcnoB3yTeToJIbKO ydINHtEnbHbIe Ka6eIIMapKn H05VV-FnHn H05RN-F, npedHa3HaueHHbIeIpaBOT HaOTKpbITOM Bo3dyXe N OChaUeHHbIEBOHOHePOnHnCaEMbIMN WTeNCeJIbHbIMn pa3bEmamnIpO3eTKamn
He hactynaIte Ha (yDInHITeIbHbI) shyp, He HadaBnBaIte Ha Hero n He TAHITEero
3aunuatae (ydnHnTeIbHbI) HypOT hctOHNKOB TeIla, Macna N OCTpbIX KpaEB
- PepnoDnueckn OcmatpmbaTe ydHInHtBbHbI shypr 3ameHHTe ero B clyuae NOBpeJdeHn (ncnoJb3ObaHne HecooTBeCTByIOux ydHHteIbHbIX shypoB He6e30NaCHO)
JIYHAR B30NACHOCTb
He pa6oTaIe C INHCTpyMeHTOM 6OcHKOM IIN B caHaJIaNX C OTKpbITbIM BepXOM; BCEgDa HOCHTe npOHyIO 0byBb N DInHHbIe 6pIKH
O3HaKOMbTeCbCo CpeDCTBAMn ynpaBJIeHnI nopraKOM pa60tbc HNCTpyMeHTOM
HaTeerOpnueckn 3anpeucho CTpnuB TpaBy B HEnocpeIcTBeHHo6JIH3OCTN OT JIOJe (OCo6eHHo DeTei) N KINBOTbIX
Bcerda depknte pyn H horn Ha 6e3oanHom pacctOAHN OT BpaaOuXcra Detale KocHn
BcerdaepnntecbHa ydaIeHIN OT BbIXoHoro OTBepCTN
BKnIOuayIe DnIraTeIb,co6JIIOaI HNCTpyKcIIN, IN depHHTe HOrn KaH MOHHO daJIbWe OT HOKa
K pa6oTe c HnHCTpyMeHTOM He dOnyckAOTcIa (B T. Y. DeTn) C ORpaHnueHHbIMN Φn3nueCHMn, CEHCOPHBIMN IIN yMCtBeHHbIMN cNoCo6HOCTAMn, a TaHKe IInca, He O6JIaIooJne DOCTaTOOHbIM ONbITOM N 3HaHnYMaN, 3a NCHLIQUeHNEM ClyuaeB, KOrda OHN pa6OtaIOT nOg HAd3Opom IIN npOnHCTpyHTnpOBaHbI NO 3KcnIyatauyn UcTPOiCtBa IInCuM, OTBeTCTBEHHbIM 3a INX 6e3OnacHocTb (Ha Bo3pact OepaTopa MOrTy HaKlaIbIBaTbcr MeCTHbIE 3aHOHOaTeJIbHbIe orpaHnueHn)
- Y6eHNTecb, YTO DeTn He HmEOT BO3MOXHOCTn INpTaTbcnHCTpyMeHTOM
Pa60Ta rca3oHOKocnIKoN, DnRraTecb pa3MepeHHbIM HeuPOKM WaROM (He 6ernte)
БудTe ocToPoJHbI Ha cHIoHax, YTo6bI He nOcKoJIb3HyTbcr; He noDcTpIraIe TpaBy Ha cNIIHKOM KpyTbIX cHIOHax
БудTe NCKIQUHTeJIbHO OCTOpOHHbI BO BpeMnBnKHeHn Ha3aN ININ PpNTrIBaHn KOCNIKN NOHaNPaBLeHIO Kce6e
NEPEDHcNOJIb3OBAHHEM
- PpOBePnTe pa6oTocnOC6HocTb 3JIeKTPoHHCTpyMeHTa nepeKaJdbIM NcIIOJIb3OBaHNHeM n, B CJIyUae O6HApYKeHnI HEnCIIpaBHOCTn, DOBepRrTe erO peMOHT TOJIbKO KBAJIINΦuNtPOBaHHbIM CNEuJaNtAm; HN B KOem CJIyUae He OTKpbIBaIte HHCTpyMeHT cAMOCTOrTeJIbHO
- Ipeed ctpnHKoTtuaTeIbHO OCMOTpnte raoH y6epnte BCE TBepBle IppeMeTb, KOTOpBle MOyT 6blb IOxBaueHbI OT6poWeHbI peHyuM MexaHn3MOM
Cleinte 3a ncpabHocTbOp peKyuIero MexaHn3Ma (cBOeBpeMeHHo 3aMeHnTe N3HOWeHHbIe INI NOBpeKdEHHbIe Yactn)
-Дяобсесеньябзогахocntи npi pa6ote c ra30HOKOcNIOI npOBepaTe 3aTJKHy BCex raeK, 60JTOB IN BINTOB
BO BPEM NcNoJIb3OBAHN
CTpnKnyra3OHa cIeDyET npoBOuNTb TOnbKO npn DOCTaTOUHOM eCTeCTBENHOM NIN COOTBEcTBByIOUeM NCHycCTBeHHOM OCBeUeHN
He haknohyTe HNCTpyMeH Tprn BkHoueHN nBbIKNoyeHN DBNrAteJIa, KpOME Tex CnyaEB, KOrdaHaKIOH HyKeH dJa Haaya pa6oTbIBBbICOKOJ
Tpabe(B TAKOM Cnyuae He CJeDyeT HaHIOHrTB
HHCTpyMeHT 60JIbWe, Yem 3TO HEO6XoDMO; PnI 3TOM
HaHIOHrTB CJeDyET TOJbKO TY eRO YaCTb, KOTOPa
HaxODNTc DaJIbWe OT OpeTaOpa); NpePe yCTaHOBKnO
HHCTpyMeHTa Ha 3eMIIIO BceRda HyKHO CJeDNITb 3a TeM,
YTo6bl ObE pyKN HaxOOniINCb B pa6OeM NOLOKeHN
- PnHaKIOHe IHCTpyMeHTa IJIpeHocKn Yepe3 yactkn 6e3 TpaBbI IIN6o ERO TpaHCnOpTIpOBKe K yactky NOKOCA INN O6paTHo Heo6xOIMO yDOCTOBepntbC B IONHO HEnoDBNKHOCTn HOJc
- Pn noKoCe Ha nKaToN NOBepXHOCTn HeIb3n nepemeaTbcra CBepxu BHN3 HIN CHN3y BBepx CNOHa (DBNrTaBcra CneJyET B TROP3OHTaJIbHON NIOCKOCTn)
- Ppi N3MeHHeHn HAnpaBLeHn IOKoCA Ha CkIOHax CJIeDyET 6bITb OcOBeHHO BHMaTeJIbHbIM
HnkOrda He cIeNyET NOHMaTb HnN nepeHocntb ra3OHOKOcNkny npn pa6oTaUcem dBVaTeNe
B clyae pa3pe3aHn, noBpeKeHn Hnn 3anyTbIBAHn CINIOBOrO nn yDInHNTeNBHO O hHpy, BbIKIOHTe NHCtpyMeHT n BbITAHNTE BnKy C po3ETH (He KacaItecb shHpya, nOKA BnKbA BCTaBHeBa B po3eTHy)
HnkOrda He nCnoIb3yIte HnCTpyMeHT,ecnI cTeBOJ WHyp NOBpeKdE;Heo6xOIMO,YTO6bl KBaJIINΦUIpOBaHHbI CneuaJIInCT 3aMeHNl CeTeBOJ shHyp
NcNoJIb3OBAHNE
OrpaHnHTeIb Hypa 17
-NepeKnHbTe KOLbIcO yDInHITeIbHoro shHpya che3 orpaHnHTeIb, KaK noka3aHO Ha pncyHke A -TTo6bl 3aΦHKnPObaTb Whyp, cnlbHO NotAHnTe
PerylnpoBbA BbcOTbI NOKcA (28-48-68 MM) 13!OTHIOUHTe BNHy n3 CeTeBOI PO3eTHN INoOJHdTe, N0Ha OCTaHOBtbcra peKyuueeJe3BHe
-NepeBepHnTe ra3oHokocnIky BBepx HOM
-ycTaHOBInTe OCN IpeHero N 3aHero KOleca Ha Tpe6yeMyIO BBICOTy NOKoca (28,48 INN 68 MM) !yOcTOBepbTEcB TOM, YTO YeTbipe HOleca 3aΦHKcnpoBaHbI Ha ODNH BBICOTE NOHoca
PepdoxpaHnteIbHbB BblIOuOaTeIb Bn/BbIKn 14
IpedoxpaHReT INHCTpyMeHT O TcLyauaHOrO BkLIOueHnA
-BKIOUHTe HNCTpyMeH, CHaJaHaKaB Ha 3aUNTHbI BbIKIOUaTeJIb C, a 3aTeM HaJaABNB raWetky D
-BbIKIOUHTe HNCTpyMeH TOTnyCTNB KypKOBBI BbIKIOUaTeJIb D
HOH octaHOBNTCA TOnbHO CnYCTHa HeCHOJIbHO CEkyH NocLe OTKIOUeHn yCTpoIcTba
- Ka3aHnIO nKcnnyatauN
-ynpaBJIaIte Ra3oHOKocJIKoN o6eIMn pyKaMn
-NotabTe Ra3OHOKOcNkHa KaPra3oHa NaHauHHaTe CtpnKky,DbIraCb Bnepe
-Доидддддддддддддддддддддддддддддддддддддддддддддддддддддддддддддддддддддддддддддддддддддддддддддддддддд徳нгнгнгнгнгнгнгнгнгнгнгнгнгнгнгнгнгнгнгнгнгнгнгнгнгнгнгнгнгнгнгнгнгнg
-7a30HOHOCINKHy CJIeIyET NcNOb3OBaTbNCKIIHOUHTJIbHO Ha cyXOITpaBe
-He NOBODHTe Ra3OHOKOCHky K TBepdbIM npedMeTaM, KcyTAm N DepeBbam
-ДТСТРИКНВБICOKОТРаБыYCTaHOBITe peJxuIM MEXAHN3M CHaHaJa Ha MaKcIMaJIbHyIO BbICOTy
NOKOCA, a NOTOM — Ha MeHbUyO BbICOTy!npn NHOce BBICOKoT TaBbI BbIEpHTe COOTBetCTByUOuN TEMXoDb6bl
- INHINKATOP "C60pHNK CKOWeHHo TpaBb 3aNoJIHe" ⑤ -OnopOHNTE c60pHNK CKOWeHHo TpaBb E KaT OJIbKO KlaPah F CamOCToRteJIbHO onyCTnTcY, YKa3bIBaH NaTo, YTO DaHHbI c60pHNK 3aNoJIHe -ДЯ o6ecneHnA ONTHMaJIbHO r C60pa CKOWeHHo TpaBb peYJrPHo npoUaJTe OTBepCTnN oD KlaPahOM F c NOMOu bIO pyHoi UeTHN
XpaheHne 16 cyecTBeHHO yMeHbHTb 3aHnMaemoe yCTpoNCTBOM npocTpaHCTBO MOxHO, cIooHNb pyHy (c NOMoUb 6apaKOBoR raiKn G) n omeCTNB erO ha xpaHeHne, KaN pOKa3aHO Ha PNCyHke; BHaayane Heo6xOdHM OonopOHHTb C6OpHNk CkOweHHo TpaBbl!npn cKnaDbIBAHnn IIn60 paChnaDbIBAHnn pyHn HnCTpyMeHtA Heo6xOdHMo He dOnyCTNTb 3aueMJIeHHaYdINHHTeJIbHOro Ka6eJn (He poHnTe pyHy)
-He CTaBbTe Ha r3oHOKocnIky dpyIne npedMeTbI BO BpemxpaHEnH
-ra3oHokocnky Heo6xOdImo XpaHITb B cyXOM nomeuehen
TEXO6CJIYKINBAHNE/CEPBNC
- DaaHbI INCTpyMeHT He IIOxOHT dIa IpnombiUeHHOrIO HcNoIb3OBAHn
Bcerda coepknte Hnctpyment n ero shyp B nctote (oco6ehHO BEHTNIAUHnhie OTBepCTnJ ③)
Iocne KaJIOrO NcNoJIb3OBaHnY uNCTITe Ra3OHOKoCNIky C NOMOuBpyHOu IeTKn MmRKOJ TkaHn
!He MoTe HocnIHy BDoI (a Oco6eHHO n3 Homnpeccopa)
-yaJIaIYeYTpAm6oBaHHbIeObe3KnTpaBbI H3 30Hb HOKeC NOMOuBIO DepeBraHHOrO HJIN PIACTMACCOBOr INHCTpyMeHTa
PeryIaHPO npOBepnTe c6OpHNK CkOSeHHo TpaBbI Ha HAnuHe N3HOca nn NOBpeKeHdHn
PeryIpaHno npOBepnTe cTepeHb n3HoCa n HcnpaBHOCTb HOKeH N 6oTIOB. JIra COxpaHeHHa ONTMaJIbHbIX XapaKTEpNCTNK 3aMeHnTe 3TN YactNI KOMJIeKTOM
3aMeHa HoKei !!BbIHbTe WTeNceJIbHyIO BnIky N3 po3eTHN3JIeHTpOHTaHHI IN CHIMITE c6OpHNCHoWeHHO TpaBbl E ③!HaDeBaTe 3auntHbIe nepaTHN-HepeBepHInTe ra30HOKOCINKy BBepx HOM-dYCTaHOBH NIO CHOHTNHOJka NOJIb3yIteCbraeHbIM KIOUcHOM 13, KaK NOKa3aHO Ha pncuHKe!B KaueCTBe 3aMeHbI NCNoJIb3yIte peKyuIneJe3BnTolbHo HADJIeKaIeero Tnna (Homep3anacHOuACTn SKIL:2610Z04069,MapKnipOBHa:YAT 474552)
-NepeJyCTaHOBKOHOHaTtAteJIbHOOCHTe3OHY BaJaHNNKHIIOUcACTbHCTpyMeHTa!Inpn yCTaHOBKe HOHa COBmctHTe DBA OTBepCTnX CdbymBaICTynamnY
EcnnnHCTpymEn,HeCMOTpHa TuaTeIbHbIe MeToDbI N3ROTOBLeHnN I NCbITaHnB, BblJeTn3 cTPO,TOpeMOHT CJIeDyeT POnu3BOuNTb CINaMn ABTOPu3OBaHHO CEpbCHOH MaCTepcKoI JIa
3JIeKToHcTpymeHTOB HpMbI SKIL
-OTnpaBbTe Hepa3o6paHHb INHCTpyMeHT CO CBnIeTbCTBOM NOKyNkBaWSeMy DInnepy HIN B 6nKaaMuyO CTAHuIO OBCnyKuBaHnYΦnPMbl SKIL (aDpeca n Cxema o6cLyKuBaHnY INHCTpyMeHa T npNBedeHb I Be6caIte WwW.skil.com)
YCTPAHEHNE HENCINPABHOCTE
Hnke npBedeH nepeHeH HeNCpabHocTe, Hx BO3MOHHbIX pNCH IN KOppeKTHpyUOux DeIcTBIN (ecn npn IN NOMOHN He ydaetc NcnpaBNTb npo6lemy, o6paTInTeCb K dIJIepy IIN B cepBnchblI ceHTp) !peed noncHOM HeNCpapBHOCTn BbIKIOuHTe HHCTpyMeHT N OTcoEINHHTe BNkHy
★Интур金融机构 He pa6oTaet
-OTCYTCTBYET NHTaHHe ->npOBepbTe HCTOCHN KNTaHn(CNIOBOn Ka6eJIb,ABTOMaTHueCKHe NpepbBaTeJI,IIaBKnpepeOxpaHtTeJI)
-NoBpeJxHHe npo3eTKn nHTaHnra-> HcnoJIb3yIteDpyrIPO3eTKy
-NOBpeKdEn ydInHtTeNbHbI WHyp->3aMeHHTe ydInHtTeNbHbI WHyp
-CINHOM BbICOKaTpaBa->yBeJIuHbTe BbICOTy NOKOcNHaKIOHHTe INHCTpymeHT
★ HctpymeHOT OTHIOHoeTcpeHOnUeCKn
-NotpeKdEn ydInHtBbHbI uHyp->3aMeHHTe ydInHtBbHbI uHyp
-NotpeKdHa BHTpeHHn npoBODka->obpaTntecb K DInIepy HIN B cepBnchbI ueHtp
HepoBna noBepxHocb cOoWeHHoro yactha, nio60 dBiratelb pa60aet C haipbIBOM
-CLINSHKOM MaJIaB BbICota NOKOca->YBEJIuHbTe BbICOTy NOKOca
-HOH3aTyHINJCA->3aMeHHTEHOH
-HNHJH YAcTB HNCTpyMeHTa 3a6NTa->OuHCTnTe INHCTpyMeHT
-BbICOTa NOKOCA He paBHomepHa- yCTaHOBnTe 4 KOIEca Ha Ondy BbICOTy NOKOCA
HOKHeBpaaetcra
-BpauenHHe Hoxa 3aTpduHHeHO -> yctpaHnTe npenrTCTBne
-60NT(raHka)HOKa He 3aTAYtbi->3aTAHnTe 60NT (raKy) HOKa
★ HcTpymeHT CnIbHO B6pnpyET
-HOHIOBpeKHeH->3aMeHHTe HOH
-60NT(raHka)HOHa He 3aTAYtbi->3aTAHnTe 60NT (raKy) HOKa
OXPAHA OKPYKAIOJIEN CPEbl
He BbIKnIbIbAaTe 3JIeKTpOHcTpymeHT, npHnHaJIeXHOCTH uYnaHOBHy BmecTe C 6bITOBbIM Mycopom (ToIbKO dIra cTpaH EC)
-BO INCNOJHHeHne EBPONeIckOДIpeKTHBbI 2012/19/ EC o6 yTIN3aunn OTCnyHNBWeero CBOI cpoK 3JIeKTPnueCHoro N 3JIeKTPoHHoro 06OpyIDOBaHnN I B COOTBeTCTBnN C DeIcTBYIOUm 3aKOHOJaTeJIbCTBOM, yTIN3aunn 3JIeKTPoHHCTpyMeHTOB pOnI3BOIDITcR OTDeJIbHo OT dpynx OTXODOB Ha npeIprnTHX, COOTBeTCTBYIOUx YCLOBnM 3HOLOrHuECHO 6e3OanachocTN
-3NaOH ⑪ HANOMHT Bam o6 3TOM, KOrda NORBNTcHHeo6XoIMOCtB cTaTB 3JeKTPoINHCTpyMeHT HaYTNIN3aUNO
DEKHJIAPAUH O COOTBETCTBHN CTAHAPTAMC
C NOJHON OTBETCTBEHHOCtBMO Mbl 3aABJIeM, YTO ONHCANHBi B pa3deJe "TexHnueckne daHHbIe" npOyKT COOTBETCTByeT HnHexcJIeDyUoIM CTaHdApTAM HIN HopMaTHBbIM DOkymeHTam: EN 60335, EN 61000, EN 55014 corJaacHO nIoJKeHNm DInpeKtNB 2006/95/EC, 2004/108/EC, 2006/42/EC, 2000/14/EC, 2011/65/EC
- TexHnuecka doKymeHTaun y: SKIL Europe BV (PTSEU/ENG1), 4825 BD Breda, NL
Operations & Engineering
Approvals Manager

SKIL Europe BV, 4825 BD Breda, NL
13.01.2014
∈12
- INΦopMaζη O cepTnΦHkAte COOTBETCTBnIpaCNoJIoKHeHa NocLeDHei cTpaHnce HactoIeN HcTpyKuIN
CepTnΦnKaTbI COOTBETCTBnXpaHATcNo aDpeCy: OOO "Po6epT BoW" yI. Akad. KoponeBa, 13, cTp. 5 Poccn, 129515, MockBa
CAnbap2014r.
BaWyTHNCHKoe WOCCE, BlaA.36
Pocn,141446r.o.XmKu
- Data npoun3BODCTBa yHa3aHa Ha nocJeHNe CTpaHnue HactoJeu HNCTpyKuHN
- HΦopMaHIO 6 NMOpTepe N3dJIIM MOHHO HaTnHa yNaKOBKe
UYMHOCTN/BIBPAULN
- Пи Измерени B COOTBETCTBи CO CTaHДapTOM EN 60335 ypoBeHb 3ByKOBOr DAblEnHn DЯ 3TOrO INHCTpyMeHtA coCTaBJIeT 73 dB (A) n ypoBeHb 3ByKOBoI MoUHocTn -93 dB (A) (cTaHApTHoe OTHIOHHe:1,5dB),ИВибpaun -2,5M/c²(no MeToyd IЯpyK; HeNOCToBepHoCt b K =1,5 M/c²)
- TapaHTnpoBaHHbI ypoBeHb 3BykoBo MoUHocTH LWA, n3MepeHHbI corlaCHO cTaHdApTy 2000/14/EC (EN/ISO 3744) Hnke 94 d(A) (cNoC6 oueHKn COOTBETCTBnA corlaCHO PpInIoKeHHIO VI) YnoHOMOeHHbI opraH: KEMA, Arnhem, NL NdeHTnΦnKaUHOHHbI HOMep ynoHOMOeHHoro oprana: 0344
- YpOBeHb Bn6paCnN 6bl H3MpeH B COOTBETCTBn CO CTaHapTn3HPOBaHHbIM NcblTaHHeM, CoepKaUHMcB EN 60335; daHna XapaKTePncTnKa MoKeT NcNoJIb3OBAbTcRdIg CpaBHeHrO OJHO rHCTpyMeHTa C dpyrM, a TaHKe IJa IpeDbapnteHbHO J OceHKn BO3dEYCTBnR Bn6paCnN pRi NcNoJIb3OBAHm DaHHoro INHCTpyMeHTa DnI yKa3aHHbIX ceJeN
-ПИ NСПОЛБЗОВАИN ИНСТРУМЕNTA B DpyгИX CEДЯХ ИИС C ДPyгИМN/HENCРаBHBIM BCNOMORATEЛБHыIMN прспосблелямууровь BO3DEYCTBNY BИБраци MOJET 3HAчITeJIbHO NOBblaTaTbCRA
-B nepnoDbI, KOrda HnCTpyMeHT OTKIOueHnn ΦyHKUHOHpyeT 6e3 paKTuuecKOro BbINoHHeHna pa60tbl, ypOBeH bO3dEiCTBnA Bn6paun MoKeT 3HaHTeJIbHO CHNHaTbcra
!3aunauTece6oTBO3eNCTBnBn6paun,noDepHnBaHnCTpyMeHTeroBCnOMoraTeNbHbIe npncnocO6JeHHnHCnpaBHOM COCToAHn,noDepHnBaRpyHN BTeJIe,a TaHKe npaBnJbHO orpaHn3OBycBoi pa6ouh npoeccc

TaohoKocapka 0715
BCTYN
- LcHCTpyMeHT npn3NaYeHO dIy BnKOpncTaHHa Hra3oHax 6JI y Domy
Ley iHCTpymeHT He npuaTHn IJI npomncIOBOrO BHKOPNCtAHH - IpepeipTe HaBnHicb By ynaKOBci BCix YactNH, nokaahnx Ha MaJIIOHNky ②
- Y pa3i BiDcyTHOCTI qnNoWKoJKeHHaTeTale NPOcHMO 3BepTaTNC B MaarAnH, De6yNo npNDbao IHCTpymENT
-1hctpykui 3i 36npaHHn ② -36paaiTe ra3oHOKocapky B nocIIOBHOCTi, 0o BiINOBiJaE Hymepaui Ha BiINOBiHi CXemI !HaIiHo 3aTARHITb BcI rBNHTu Ta raIKu - IpeepBnKOpNCtAHm npnlaIy yBaHNO npOHTaTe DaHy IHCTpyKUIO 3 EKnIyatauII N 36epeKeITb II dI naJbWoBO BnKOpNCtAHH ④
TEXHIYI DAHI ①
EJEMHTN IHCTPymehta ③
A O6mExyBaHypa
B 3aTnckau nn lwnhypa
C AbapiHIN BMMKau
D KypkoBni nepemnkau
E TpaBO36ipHHK
F IHNKaTOp "TpaBo36ipHnK 3anOBHeHn"
G 3aTnckHa6apAHueBaraKa
H Puyka dIra TpaHCnOpTyBaHHa
J BenthnlauiHi OTBOPN
K 3aHnIuNTOK
BE3NEKA
3AΓΑJIbHI BKA3IBKN 3 TEXHIKN BE3NEHN
YBAIg!PpOHTaTe BcI nonepeHHeHH I
BHA3IBKn. HeoepKaHHn nonepeHHeh i BkA3IBOK
MOKe Ipn3BOAnTH Do ydApy eJeKTPuHm CTpyMOM,
noHexi Ta/a6o cepNo3HNx TpaBM. DObpe 36epiraTe Ha
Ma6ByThe ci nonepeHHeHH I BkA3IBKn. Pid noHATTM "eJeKTPponpHaD B cHX nonepeHHeHHX MaTbcra
Ha yBa3i eJeKTPponpHaD, lo npauoe BiD MepeXi (3
eJeKTPokaBelem) a6o BiD aKymJrTopHOi 6aTaapei (6e3
eJeKTPokaBeIIO).
1) B3NEHA HA POBOOYMICLI
a) PpMaTe CBOe po6Oye Mice B YnCTOTI Ta np6paTe Noro. Be3naI a6o noraHe oCBiTJeHHa Ho6OyOMy Micci MoHcyTb Pn3BODHTn Do HeuacHnx BnJaKIB.
2) ENEKTPNHA B3NEKA
3) B63NEKA JIODEI
b) He npaioHe 3 npnaIam y cepedobu, ie icHye He6e3neHa Bn6yH BnacIIO npncTyHocTi ropouxpiHHra3IB a6o nnny.EleKtponpuaMoHyTb nopOAnBAtn ickpn,Bid RkNx MoKe 3aMmTaCn nn a6o napn.
c)Пдчac npaцOBaHH3 npHJaOM He niDnycKaHTe Do po6oHorO MicuI dite Ta iHux IIOeB. BmOKeTe BTPaTHn KOHTpOJIb NaI npHJaOM,ЯHIoBa Waa ybara 6yde BiDBepyTa.
a) 7Tencel npnilady NOBHeH nacyBaTN do po3eTHN. He Do3BOJAEbCra 10-He6ydb MInrTN B wTeNCJI. Dn pO6OTn 3 npHApamn, 10 MaOTb 3axHCHE 3a3EmLeHH, He BnHOpNCTOByte aanTepn. BnKOpNCtAHnOpirHaJIbHOro 7Tencel Ta HaJIeHHoIpo3eTHN 3MeHwYc Pn3HK ydApy eJIeKTPnHIM CTpyMOM.
b) YHnHaTe KOHTaHTy Cacte Tia i3 3a3emJIeHMn NOBepXHAMn, RaH HAnp., Tpy6amn, 6aTapeMn ONaJIeHHra, NeaMn Ta XoIOnJbHnKaMn. KoJI Na Bae tIo 3a3emJIeHe, icHy e3iNbSeHa He6e3neHa ydApy eJeKTPuHm CTpyMOM.
c) 3axuatae npulad BID douy Ta BOJOrn. IonaadaHHBODNBEleHTpoiHCTpymeHT 36ilbUye pnsHK ynapy eelHTpnHNM CTPYMOM.
d) He BnKOpNCToBvIte Ka6eIb IJIa nepeHecHn npuIady, nIbIiSyBaHHa 6o BNTaRyBaHHa WTeNcEJI 3 po3EtHN. 3axNuAite Ka6eJIb BiJ hapn, oIIi, roctpIX KpaIB Ta deTalei npuIady, zo pyXaIOtbc. PioKoJHeHn a6o 3akpyeHn Ka6eJIb 36IbUye pnsIK yIapy eJeKTPNHM cTpyMOM.
e)ДЯ3OBHiwHixpo6ITO6OB'3HOBOBnHOpNCOTByIeNHe TaHHNoDObHyBaU,IO DonyueHnДЯ3OBHiwHixpo6IT.BNKOpNCaHHaNoDBKhyBaA,io po3paXoBAHnHa 3OBHiwHipo6OTn, 3MeHwE pN3NK yIapy eJIeKTPnHIM CTpyMOM.
f) Anho He MoHnHa 3anO6irTu BnHopncTaHHo eIeHTponpnuIady y BoIoromy cepedOBnIi, BnHopncTOByIte npncptpi 3axNcTy BiD BnTOHy B 3emIIIO. BnKOpncTahHra 3pncptpo 3axNcTy BiD BnTOHy B 3emIIIO 3MeHsUe pnsIK yIapy eIeHTpnHIM CtpymOM.
a) Bydte yBaHHMn, cIiHynte 3a Tm, IIO Bn po6nte, Ta po3cyIINBO NOOBtecn iIac po6OTn 3 eIeHTponpHaJOM. He KopNCTyNTecn npHApOM, RaIO Bu CTOMJIeHi a60 3haxOHTecn iI dieH HApKOTnKIB, CNPTNX HANOIB a60 IIK. MItb HeyBaXHocTI pN KOpNCTyBaHHI pNlaDM MoKe npN3BOuNTn Do cepNo3HNx TpaBM.
b) Bdraite oc6ncte 3axnche cnopndhen H Ta o6oB'3HOBO Bdraite 3axnchi OHJyRn. BdaHnOc6nCToro 3axnCHOro cnopdHeHH, Rk Hanp., -B 3aJeHHocTi BiD BVdy po6it - 3axnCHOI MaKn, CneuB3yTT, 10 He KOB3aETbcr, KaKn a6o HabuyuHNKIB,3MeHwye pN3nck TpaBM.
c) YHnKaIe HeHaBMnCHOrO BMnKaHH. Nepw HIX BMnKaTH eJeKTPoPnpHJaB eJeKTPompeHcy a6o BCTpOMJrAnyMylTOpHy 6aTapeU, 6paTu Horo B pyu n a6o nepeHoCHTN, BneBHITbcR B TOMy, 0eJeKTPoPnpHJaB BMKnHYtN. TpMaHH naJIbca Ha BMnKaHi niD qac nepeHeceHH eJeKTPoPnpHJaY a6o BCTpOMJrHHB PO3eTKy YBIMKHyTO rPiJaMy MoKe np3BOIDTN DO TpaBM.
4) INPABINbHE NOBOJXEHHRA TAKOPNCTYBAHH EJEKTPONPNIAADAMN
d) Ipeed TMM, RA BMMHATN npHnla, npH6epiHa HalaorOHyBaJIbHI iHCTpyMeHTn Ta raHOBn KIOU. 3haxoJKeHHa HalaorOHyBaJIbHO rHCTpyMeHTa a60 KIOUca B DeTaJI, IO o6eptaETbcR, MOKe pHn3BOuNTn DO TpaBM.
e) He nepeoiciHoiTe ce6e. 36epiraTe ctiHe nolohnHa Ta 3aBHN 36epiraTe pIBHObary. Ue do3BOiHTb Bam kpaue 36epiratN KOHTpoJIb HaI npilaom y HecnoiBaHx CHTyauiX.
f) BdraTe npdaTHn OJr. He BdraTe npocToPnOarTa npHpaCn. He ndaTbnaTe BOLOcc, OJr Ta pyHaBnCi 6bn3bNo do Detanei npnaLy, 0p yxaOTbcr. PocToPn OJra, npKpacn Ta DOBRe BOLOCC MoKyTB nonadTu B detaji, 0p pyxaOTbcr.
g) RaHIO icHye MoKJINBicTh MOHTyBaTHn HIOBIDCMOHTyBaJIbHI a6o NIOLOYIOBIOBAJIbHI npHCTpoI, nepeKHOaTEcra, 0o6 BOHN 6yIn Do6pe nID'EDHaHI Ta npABNJIbHO BHKOpHCTOByBaJIncRA. BHKOpHCTaHHra NIOBIDCMOHTyBaJIbHO rnpCTpO MoKe 3MeHUnTI He6e3neKn, 3ymOBJIeHi nIOM.
a) He nepeBaHTaKHyIe npHaI. BnHOpNCTOByIte TaHn npHaI, 0o CneiaIbHo np3NaueHn dIe NEBHOi p6Otn. 3 npHaTHM npHaIaOM Bn 3 MeHsIM np3HOM OTPMaTe KpaJI pe3yIbTaTH p6OTo, kIIO 6yIDEte npauOBaTH B 3a3NaueHOMy diJana3OH iNoTyXHocTI.
b) He HopncTyIeca npnlaqom 3 NowkOHeHMMBmHaueM. PpnaJ, RaHr He MoXHa yBIMKHyTu a6o BmKHyTu, e He6e3neuHm i Noro Tpe6a BiDpemOHyBaTu.
c) Ipepe THM, RAH peryIIOBATN 0o-He6ydb Ha npnlaDi, MInrTn npnaIadra 6oXOBaTH npnlaad, BHTARHITb wTeNCelb i3 po3eTK Ta/a6o BHTARHITb anMyJlTOpHy 6aTaapeo. Li nonepeDkyBaJIbHi 3axOOn 3 TexHIk 6e3neK 3MeHsuToB pN3NK HeHaBMnCHOrO 3aNyCKy npnlaady.
d) 36epiraTe eIeHTpnpnlaHn, RHMn Bn came He KopncTyEcB, daJIeHO BiD iITEH. He do3BoJnTe HOpncTyBaTHcE IeHTpnpnlaHOM Oco6am, 0o He 3HaNomi 3 NOro po6ToIO a6O He YHTaHI ci Bha3IBHN. y pa3i 3actOCyBaHHr HeDCBIduEHNMn Oco6amn npnaHn Hecytb C6bi He6e3neKy.
e) CtapaHNO dOrlJaIte 3a npHlaOM. IpebipTe, 06pyxomi Detani npHady 6e3dOraHNO npaOBAJI Na He 3aIdaJI, He 6yIn nolamAHmna 6o hactiIbHN NOxKoDHeHMn, 06 ce Morlo BnHHHTn Ha yHNIOHyBaHHr npHady. NowKOHeI Detani Tpe6a BiPemOHTyBaTHn B abTOPN3OBaHI MaICTepHI, nepu HIX HMM MoHHa 3HOBy KOpNCtBuTncs. BeINka KInbKiCTb HeUacHnx BnIadKn CnpuHHReTbcra NOrAHM DoIJIaOM 3a eJeKTPonpNJadaMn.
f) Tpmaite pi3aIbHI iHCTpyMeHTn do6pe HaroctpeHIMn Ta B uHcToTi. CtapaHNO dOgJIHyTI pi3aIbHI iHCTpyMeHTn 3 rOCTpMn p3aIbHM KpaEM MeHwe 3acTpaIOb Ta ix IerWe BecTH.
g) BnHOpncToByTe eIeHTponpnaIaI, npHaIaIdo Hnx,po6oqi IHcTpymEnTn T.i. BiNobiHO do cIHX BkA3iBOh. Bepitb Do yBaH npu bOMy yMOBn po60Tu cneunphiKy BnHOyBaHOi po60Tu.
BnKOpncTaHHeJeKtpponpnaIaIB Dnpo6iT,JaRkNX BOHHe nepeD6aueHi,MOKe npn3BOuNTn Do He6e3neuHnx Cntyaui.
5) CEPBIC
a) BiДаВаиTe cBi nprHJaHa peMoHT IиWe KBaIiФIKOBaHnФaxiBcYMa Ta IиWe 3 BnHOpNCTaHHaOprHInaHbHNx 3anYacTHN. Lc 3a6e3neuTb 6e3neuHicTb npHJaHa NoBriYac.
IHCTPYKII 3 TEXHIK INE3NEHN JIA RA3OHOOCAPOK
IORCHEHHA DO YMOBHNX I03HAQOH HA IHCTPYMEHTI
④ IpepeBnKOpNCTaHHM npOHTaIte IHCTpyKciio i3 3actocyBaHH
⑤ PódbiHa i3oJauCi (3a3eMJIIOUOHy npoBID He nOtpi6eH)
⑥ OctepiraTecb ochonib, khi BiDnitaOtB (IOUDIOBkoJa MaOtB nepe6yBaTu Ha 6e3neuHi BiDCTaHi BID Micua npn6npaHH)
⑦ BydTe o6eepKHi 3 roctpum Nn ne3aMn
⑧ He donyckaITe, 0o6 (noobHyBaIbHm) shyp notpanIaB nip i3aIbHe Ie3o, 0o o6epTaetbcra
⑨ Pizalhe Ie3o npOOBHy e o6epTaTnCra DeHkN yac nicI BmHKaHH iHCTpyMeHTa (He TopKaTeCb Ie3a, 0o o6epTaTbc)
10 Y pa3i, RHKIO NOKIOBcA 6O 3aNNyTABCnOIOBHyBaA 6o CINIOBNI SHyp, NpeD TmR, KPO3NlTyBaTHu PEMOHTyBaTH NoRO, BIMKHITb npHCTpi Ta BNTARHITb BNky 3 pO3eTKN
⑪ He BHKnJaIe iHCTpyMeHT pa3OM 3i 3BnHaHMM CMITTAM
3AΓΑJIbHE
He BnKOpNCToBMyTe r3oHokocapHy Ha MOkpxr Ra3oHax
3a Heuachi BnnaHn 3 IIObMn a6o NooKoJKeHH ix MaHa, a TaKoX 3arpo3y dI Hx BIDNOBIdae KopncTyBaY
3a60pOHeHO BnKOpNCtOByBaTN IHCTpyMeHT, RkUo N0uKOdKeHO 3aDHiN UTOK a6o TpaBO36ipHnK
PiД yapc po60r3 iHCTpyMeHTOM 6e3 BCTaHOBHeHOro TpaBO36ipHHKa 3aHIN ΜιTOK MaE 6yTN 3aKpNTM (pi3aIbHe Ie3a, ΜO o6ePTaETbcR, MOnJE HaHeCTn TpaBMy)
3aBKn BnTgryTe BNky 3 MepeKeBoi po3eTKI -KoJI 3aJIHsaTe IHcTpymENT 6e3 HargJyD -IpeJ TIm, JIK BnIMaTI 3acTpIgI I ppeMEnI -pePd TIm, JIK ORJaTn, ONUyBaTIn IHcTpymENT a60 npOBOnTH 3 Hm iHsi Oepaui -y pa3i NotpapanHHHa cToPOHHI ppeMeT -RkIo IHcTpymENT NOUHaE 3acNlHo Bi6pyBaTn
EJEKTPN4HA B3NEKA
- PepioDnHOrO orlaJaTe shHyp Ta 3noro NOBHeH 3aMInHTN KBaJIiΦIKOBaHN φaxIBEy BUNaKv N0sKoDxKeHHa
PiJ yOBoTn y BoIOnx yMOaX BnHOpNCTOByTe npctpi3axncHO BmHKaHHa (P3B) 3 MaKcMaJIbHM nCkoBm Ctpymom 30 mA
BnKOpncToByTe NOBHCtIO PO3rOpeHn HHyp NODOBKyBaHa, KIN MOKe BHTPmMyBaTu HaBaHTaKeHHB 16 Amnp
BnKOpncTobyTe TlIbKn noOobKyBauchiny H05VV-F
a6o H05RN-F,Якni npn3naheNo dny 3OBhiHix po6it Ta o6laHaHO BOO3axnCHOU wTeNcIbHOIO p03eTKHO
He hactynaIte Ha noIOBkyBaH, He haTnCKaIte Ha HbOTo Ta He TgHiTb NOrO
3axnauTe npoobkyBaB BiD dHepeI TeNla, OINB Ta roctpIX kpaIB
- PepioDnHNO orIaIte noIOBHyBaY ta 3amHITb Ioro y pa3i noIKoJKeHHra (BNHOpNCTOByBatn HeBIDNOiHN NOIOBHyBaY He6e3neHNO)
BE3NEKAJIIODEI
He npaioIte 3 iNCTpyMeHToM 60oHix a6o y BIDKpHTnx caHaJx; 3aBKn OJaTae Miue He B3yTT Ta doBri Wtahn
O3haHOMTecb i3 3ac06aMn KepyBaHHra Ta npraKOM p06OTN 3 IHCTpyMeHTOM
HaTeerOpuHNo 3a6opOHeNO KopnctyBaTnCra KocapKoIO 6e3nocepEnbO no6n3y iHux IIOJe (OCo6nBO dTei) i TBapHH
TpmaTe pyK Ta HOrn Ha 6e3neuHb BicTaH BiD etaJe, Aki o6epTaIObC
3aBHHn TpHMaTecb noaJI BiD BnNyCnHOOTBOPY
BmkaTe DnHyh BiDnOBiDHO do iHCTpyKuT Ta TpmaIOHN HOrn NoadJI BiD piaJbHorOJe3a
- 1eHCTpymENT He MoKe BnKOpNCTOBByBaTncb oc6amn (BkIIOUaOOnu dite) 3 O6MeKeHNm H i3NCHMn, ceHCOPHMn a6o PO3yMOBHMn 3dI6HOCTaMn, a6o OC6amn, kHe MaOTb DOCTaTHbO DocBiDy Ta 3HaHb 3a BnKIIoueHHAM BnnaAdKiB, KOJI NBOH npaiooTb NiD HarlaDM o6o npoiWIn IHCTpyKTAn qOo BnKOpNCtAHH IHCPTpymEnTy 3 60ky Oco6n, rHa BiNobiAe 3a ix 6e3neKy (MICcEbi 3aKOH MOnHyTB O6MeKByBaTN BIK onepaTopa)
- IpepeKoHaITeCra, 10 DiITn He MaIOTh 3MOrn rpaTnca 3 IHCTpyMeHTOM
-Пид ус кocinну рухаiteя HeWBnIOpo3mipeHOxOIO(He6HITb)
- Bynde obepeHHi Ha cxnlaux, 06 He nockOB3HyTncra; He Kocitb HauTo CTpIMKi CXNJIN
- DToPmMyTeC8Oc6bNBoI ObepeKHoCTi iD yac pyxy Ha3aT aPiTaryBaHH KocapKn Do ce6e
NEPEBNIKOPNCTAHH
- IpepeipnIe npaue3daTHicThb IHCTpymEnTy nepei KOHHM NOro BnKOpNCtAHHrMaTa, y BnPaNkY BnRBeHHeCnpabHocTi, BiHeciTb NOro Do KBaJIphiIOBaHO rneuaJIcTa; Hi, B RKOy pa3i He BiDkPnBaTe IHCTpymEnT CaMOTyHKN
IpepeKociHHm peTeJbHO orJHbTe ra3OH Ta npnbepiTb yci TBepdi npedmTu, kipinym MexaHi3M MOHe NiXOnHTu BAIDKNHyTN
3aBKnNiTpmyTe piKyuM MexaHImy y cnpabHomy cTaHi (3HOseHi a6o NooKOJKeHi qactnHi cIiD 3amHrTu)
Дябeэнкpo6OTn3KocapkoIO cIippeTeIbHO 3aTAYBAtN BCIraIKN,6OJIITaTBHTN
ПИД YAC BHKOPNCTAHN
KopnCTyBaTnCn KocapHO MoHnHa IInHe 3a DOCTaTHbOro DeHHoro YN BiINOBiHORo WITyHORO OCBIJIeHHA
He haxnlaIte IHcTpMeH TID Yac 3anycky a60 BMnKaHHN DnBnryHa, xi6a 1o IHcTpMeH MaE 6ytN HaxnleHn IJRA NOATky PObOTy BnCOkI TpaBI (y CbOMy BnnaKHy He haxnlaIte IHcTpMeH 6JIbSe HiX Heo6xIDHO, Ta HaxnlaIte Ty cactHy, RaKa 3hAxOdnTbcR
Ha BicTaHi BiD onepaTopa); nepu Hix Onyckatn IHCTpymeHT Ha 3emLIO 3abKdN nepeBipraTe, o6o6nbI pyKn 3haxOdnncb y po6oyomy nIoJxehHI
- Nepu Hix HaxnIaTH nIHCTpyMeHT IJI nepeTnHaHH naOBepxhi 6e3 TpaBn, a60 niD uac TpaHCnOpTyBaHH iHCTpyMeHTy Do Micu pObToN, 3aBKnI nepeBipraTe, 1o6 pi3aJIbHe Je3o 6yIo NOBHiCTU 3ynHeHe
Hocitb nonepeckxiny (hikolndoropn a6o BHN3) - DToPmMyTeC8OcO6JIbBOI OBepeHHOCTi NiD Yac 3MiHN HaprMky Ha CXnJax
- Yxohomypa3i He nHimaiTe Ta He nepeHoCbTe ra3OHOKocapky 3 yBIMKHyTm DBNyHOM
- Y pa3i po3pi3aHH, NOsKoJKeHH a60 3aannTyBaHH cnIOBOrO shHpya nn npOoBHyBaay, BmKHiTb IHCTpymeHT i BnTgHtB BNkHy 3 po3ETN (He TopKaIteCb shHpya, DOHN BnHa BCTabJeHa y po3eTHy)
HikoJHe BnKOpNCToBMyTe iNCTpyMeHT 3 NOWKoDKeHm WHyPOM; NOrO NOBHeH 3aMiHNT KBaJIiFikOBaHm faxiBeU
BNHOPNCTAHH
O6MeHyyBaU Hypa1
-NepeKHHbTe KINbue NOIOBHyBaHa Chepe3 06MeKhyBaH, RIK NOKa3aHO Ha MaIIOHkyA
-063aifikcyBaTN WHyp, CNJbHO NotarHITb
- PerynIOBaHHBNCOTN KocIHH (28-48-68 MM) 13
IbIKIOUHTb BNHy 3 MepeKeBOi po3eTHn i 3aueKaHTe,doHN 3yNNHtbcra piaJIbHe Je30
-ηepeBepHiKocapHy dOropn dHOM
-BCTaHOBIb nepeDnIO Ta 3aDnIO KOJIichi BICI Ha Heo6XiHy BVcoTy pi3aHHr (28,48 a60 68 MM)
Inepebipte, 06 Bci OHTnp Hoileca 6yln BCTaHOBJIeHI Ha ODiH BNCOTi p3aHH
AbapiHn BmHKaH HbEHH 14
3axnuae iHcTpymeNT BiD BnnaKOBOro BMnKaHHA
-BMNAHTe IHCTpyMeHT CNoaTHy HaTnCKaHHMa H BmNkau-3anO6iJHKnC,a nOTim Ha Kypok-BmNkauD
-BIMMKHITb IHCTpyMeHT BiDnyCTNBUN KypKa- nepeMnKaaya D
!nicra BmHKaHHIHCtpyMeHTaJe3o npoobkye pyxatnc npotarom KJIbHOxCeHyHd
IHCtpyku3eknnyatau
Inepe TnM RAyHaTHeCnpaBHiCb, BmKHiTb IHCTpyMeHT I BuTARHtB BNHy
★ IHCTpyMeHT He npauoE
-BiCyTHKINBLeHHN->NepeBipTeJKepeNo HINBLeHHN (CINOBNI Ka6eJIb, aBTOMaTNHi nepeepNBHNK, TOnKI 3Ano6iHNKN)
-NOHODHeHHPO3eTHKHNBLeHHN BnHOpNCToByIteInHypo3eThy
-ПОШКоДжЕно рpoДовЖуВач ->ЗamИнТь рpoДовЖуВач
-Дунг ВиcoKa TpaBa -> 36iNbWntb BnCOTy p3aHnTa HaxuIITb IHCTpymeHT
★ IHCTpyMeHT nepioIduHOBBIMNKaetbcra
-NotkoJHeNo npoOBKyBaY->3amHITb npoOBKyBaY -NotkoJHeNo BHyTpIshIO npoBOkY -> 3BepHiTbcrdo nnlepa a60 y cepBicnHn ceHTp
★ IHCTpymEnT 3aIiuae pBaHi cTe6la a6o DnBryH npauoe Ha MeKi
-3aHaITo Hn3bKa BnCOTa pi3aHH->36ilbunTb BnCOTy pi3aHH
-pi3aIbHe Ie3o 3aTyPiNIOCb->3aMiHiTb pi3aIbHe Ie3o
-ДНО ИСТРМЕNTа сиьно 3aБИLOСb -> NOИСТIb IHCTPMENT
-BnCOTA pi3aHH He pibHomipHa-> BCTaHObitb 4 KOleca Ha OndaKOBy BnCOTy pi3aHH
★ Pizalhe Ie30 He 6eTbcra
-pi3aIbHe Ie3o 3a6IOKOBaHO->3BJIbHiTb Ie3o BiD 6IOKyBaHH
-raKa/6oNTIe3a noraHo 3aTgHeHi->3aTgHITb raKy/6oNTIe3a
★ IHCTpyMeHT CnIbHo Bi6pyE
-pi3aIbHe Ie3o noUKoJxHe -> 3amHITb pi3aIbHe Ie30
-raKa/6oTne3a noraHo 3aTaRHeHi->3aTaRHiTb raKy/6oTne3a
OXOPOHA HABKOLINHbOICPEEN
He BHKnJaTe eNeKtpoiHcTpymeHT, npHaJaleXHoCTi Ta yNaHOBky pa3OM 3i 3BnuaHm CmTTAM (TilbKn Ira KpaIH EC)
-BiINOBIOHDo EBPoneNcBKOI DnpeKTHBN 2012/19/ECUoOyTNlI3auiCTapNX eEKeTpHuHX Ta eEKeTPOHHNX npHaIb, B 3aJeHHocTi 3 MICeBIM 3aHOHOaBCTBM, eEKeTpoIHCTpyMeHT, AKNI nepe6ybAB B ekCnlyaTaui NOBHNen 6yTN yTNl3OBAHN OKpeMO, 6e3neuHm IJRA HABKOLINHBTO CepEOBNIua WJXOM
-MaJIIOHOK 1HaRaJaE Bam npo ce
DEHJIAPAUI INPO BIINOBIDHICTb CTAHdAPTAMC
Mn 3aBnE mo nHaWbNIOHHy BiINOBiaIbHicTb,
IO ONcaHn B "TexHiYi daHI npOdyKT BiIOBiaAc
TaKIM HopMa m a6o HopMaTHBHM DOkyMeHTam: EN
60335,EN 61000,EN 55014 y BiIOBiaHocTi do
NoIOKeH bIpeKTHB 2006/95/EG,2004/108/EG,
2006/42/EG,2000/14/EG,2011/65/EC
- Texhihi dohymeHTB: SKIL Europe BV (PT-SEU/ENG1), 4825 BD Breda, NL
anoppmuatowv (movo yia tic xwpe ts EC)
-ouphiwva eTnv evupnaiok odnyia 2012/19/EK nepi nAektpikwv kai nAektpovikwv ouokewv kai Tnv evomegaatwn tnc oTo eVikódeltaio, ta nAektpika epyaia npéni va oulambdaevovtai Exwipota kai va eniotpefovtai yia avakukawon eTponto fliko npoc to pepiaaov
Operations & Engineering
Olaf Dijkgraat
Approvals Manager

SKIL Europe BV, 4825 BD Breda, NL
13.01.2014
C€12
ZGOMOT/VIBRATII
1) B3ONACHOCT HA PAEOTHOTO MRACTO
a) Nopdbpkaite pa60HTOc n MRCTO u nppeeno. Be3npaBbT HIN HeIOCTaTBHOTOCBeTJIeHne MORaI a CNOMoHaT 3a Bb3HNKBaHeTo Ha TpydoBa 3IonoLyka.
b) He pa6oTe c eJeHtponHcTpymeHTa B cpeda C NOBnWeHa ONaCHOCT OT Bb3HNKBaHe Ha EHCnIO3N, B 6IIN3OCT Do IecHO3aNAIMM TeuHOCTn, Ra3OBe Hn Ipaxoo6pa3Hn MaTepnaJI. IIO BpeMe Ha pa6oTa B eJeHtponHcTpymeHTte ce OTdEJIrT NCKPn, KOnTO MoRat Da Bb3PiAmEHrT npaxoo6pa3Hn MaTepnaJI nII napn.
c)Дрьнтудеци CTpaHnHлИца Ha 6e3OnaCHO pa3CTOarHne,doKaTo pa6OTnte c eIeKTPoHHCTpyMeHTa.AHO BVHMaHNeTO Bn 6bDe OTKIOHeHO,MOKe Da 3aRy6Nte KOHTpOJa Had eJIeKTPoHHCTpyMeHTa.
2) BE30NACHOCT INPNA BAPOTA C EJEHTPNUECKN TOK
a) ⅢeNcSeIbT Ha eIeNtPOnHcTpymEHTa Tp6Ba Da e NODXODAa 3a NOJ3BaHnKoHTaT. B HnHaKbB Clyuay He Ce DOnyCHa N3MeHnHe Ha KOHCTpyHcUraTa Ha uenceLa. Horato pa6OTte Cbc 3aHyJeHn EJeHtPoypedn, He n3NoJ3BaIte aadAnTeprn 3a uenceLa. POn3BaHeTo Ha oprHnHaHn UeIeJIi N KOHTaHTn HaMaJIaBA pNcKa OT Bb3HNKBaHe Ha ToKOB yIap.
b) N36aRbaIte dOnnpa Ha TJIto Bn Do 3a3eMeHn TeJa, HAnp. Tpb6n, OTOnnTeHNu ypeN, Neu n XlaunHnCu. Korato TaIoto Bn e 3a3eMeHo, pncbT OT Bb3HNKBaHe Ha TOKOyap e No-ToJAM.
c) IpeDn3BaIe eJektpOHnHCTpymEnTa cN OT bHd N Blara. IpOHNKBAHeTO Ha BOda B eJektpOHnHCTpymEnTa NOBnAba ONaCHOCTTa OT TOKOB yAp.
d) He n3noJ3BaIte 3axpaHbAun Ha6eJ 3a ceJn, 3a KOHTo ToH He e npEdbuJeH, HAp. 3a Da HocHTe eJenKpOHnCtpymeHTa 3a Ka6eNa IIN Da n3BaJnte 7eenceHa OT KONTaTt. IpeJna3BaIte Ka6eNa OT HarpBaHe, OmacJIbAHe, DOnnp DO OCTpn Pb6OBe HnDo NOBHNn 3BeHa Ha MaUnHH. NObpeJHn IIN yCyKaHn Ka6eN yBcJIuHaBAT PnCKa OT Bb3HnKBaHe Ha TOHOv yap.
e) HoraTo pa6oTHe c eIeKtpOnHcTpyment HaBbH, H3No13BaIte caMo yDbJInTeJIHN Ka6eIIN, npedHa3HaueHn 3a pa6oTa Ha OTHpHTo. H3No13BaHeTo Ha yDbJInTeJI, npedHa3HaueH 3a
pa60Ta Ha OTKpHTo, HAmajBa pUcKa OT Bb3HNKBaHe Ha TOKOB yap.
f) Aho ce HaIara n3noJI3BaHeTo Ha eJeHTPOHcTpymeHTa BbB BJaHHa CpeDa, n3NoJ3BaIte npedna3eH npekbcBaay 3a yTeHN TOKOB. N3noJ3BaHTo Ha npedna3eH npekbcBaay 3a yTeHN TOKOB HamaJIyBa OaCHOCTTa OT Bb3HnKBaHe Ha TOKOB yIap.
3) B630NACEH HAHIN HA PABOTA
a)БbTe KOHcEHTpnpaHn, cIeTe BHNMaTeJHo DeiCTBnTa CN NocTbNBAite NpeJa3JIbO np pa3ymHO. He n3NoJ3BaIte eJeKTPoHHCTpyMeHTa, KOrato CTe yMopeHn IIN NOB BInraHHeTo Ha HApKOTnHn BeUeCTBa, aHoxoJ INn yNoBaaUN lekapCTBa. EINMH p3ceHooT npn pa6ota c eJeKTPoHHCTpyMeHT MoKe Da Ima 3a NocJeCTBne I3KNIOHTeJIHO TeKKn HapaHARBaHn.
b) Pa6oTeTe c npedna3BaIo pa6oTHO oBleKNo BnHaRc npedna3Hn Ounla. HocHeTo Ha NODXODaI 3a ION3BaHnEJeKTPOINHCTpyMeHT IN 3BbPwBaHaTa DeHOC TnnHn PpeDna3Hn CpeCDTBa, KaTO dNxAteJHa MaCKa, 3dPaBn NtBtHO3aTBOpEH NObyBKn CbC CTa6nJIeH rpaJep, 3aUHTHa KACKa IIIn Shymo3aTnyuWnteNi (aHTnfoH), HamaJIra Ba pscKa OT Bb3NHKBaHe Ha TpyOba 3lonOlyka.
c)ИЗБЯВайе OnaCHOCTTA OT BKHIOUObaHe Ha eJIeKTPoHnCtpyMeHTA NO HeBHNMaHne.ПпEDи DA BKHIOUHTe цeCEla B 3axpaHbAaTa MpeKa Ил Да NOCTaBNTe aHymyIaTOphAta 6aTePnIa, ce YBepRABaTe, Ye NsCHOBnT npeKbCBaue B NOLOJHHe N3HIOUeHo.AKO, KOraTo HOCITE eJIeKTPoHnCtpyMeHTA,ДьрЖnte npbCTa Cn BbPxy NysCBOBn IpeKbCBaH, Ил aKO NOdaBaTe 3axpaHbAso HAnpeJHHe Na eJIeKTPoHnCtpyMeHTA, KOraTo e BKHIOUCh, CBSeCTByBa OnaCHOCT OT Bb3HNKBaHe Ha TpyDoBa 3ЛОПОЛУka.
d) Ппдд вклоче eнentponHctpymeHTa, ce ybepaBte, ye cTe OTcTpaHnO T Hero BCnHn NOMOuHN HcTpymeHTu raeHHN KIOUObE. Tomoeh nHcTpymeHT, 3a6paBeH Ha BbptraO ce 3BeHO, MoKe da npuHHn TpaBMn.
e) He HauceHbAte Bb3MOHHocHTe cn. Pa6oTeB Cta6nHIO NOLOHeHne Ha TAnOTo N BbB BCEHMOMeHT NoDtpHaIte paBHOBecne. TaKa UeMOKeTe Da KOHTPOJnPate ENEKTPONHCTpyMeHTa NOdope nNo-6e30nacHO, aKO Bb3HNKHe HeOaKBaHaCtTuaun.
f) Pa6oTeTe c noxOdoIoo o6JIeHIO. He pa6oTeTe c wnpOnn dpexn nIyKpaSeHnA DpbHTe Hocata cn, dpexnte n pHaBnCu Ha 6e30NaCHO pa3cTOrHne OT BbPTaunCe 3BeHa Ha eJeKTHPOHNCTpymENTHe. UnpOntE dpexn, yKpaSeHHraTa, dblrnte Kocn MoarTa da 6bDaT 3axBaHaTu n YBLeYeHn OT BbPTaun Ce 3BeHa.
g) Ako e Bb3MOHHo N3noJI3BaHTo Ha BbHnHa acnnpaunOHha cnCTema, ce yBepraBaIte, ye Ta e BkIOUHeHa nФyHKUOnHpa N3npaBHO. N3noJI3BaHTo Ha acnpaUNOHHa cnCTema HaMaJIba pncKOBTe, D'JIkauCe Ha OTdJIaTa Ce npu pa60Ta npax.
4) BHIMATEJIHO OTHOWEHNE KbM EJEKTPOHCTPYMEHTN
a) He npetobapbaite eIeHTpOHcTpymeHtA. H3noJ3BaIte eIeHTpOHcTpymeHTnte camo cbo6pa3HO TAXHOTnpedHa3HaueHne. Ue pa6oTnte no-dO6pe nNo-6e30nacHo, KOrato n3noJ3BaTe NOxOJaUe IeHTpOHcTpymeHT B 3aJaDeHnO T pOn3BOIDITeJI DaNAp3OH Ha HATOBAPBaHe.
b) He n3noJI3BaIte eJeHTponHCTpyMeHT, HnHTo NUCOB pEKBcBAu e NobpeDeH. EJeKTPoHHCTpyMeHT, KOITHe MoKe Da 6bJe N3KJIIOUvBaH IN BKNIOUvBaH IO pPeBUNeHr O T npOn3BOJNTeJIHaunH, e OnaceH n TpRA6Ba Da 6bJe peMOHTnpaH.
c)Ппддпгнгпсгнгпснгпснгпснгпснгпснгпснгпснгпснгпснгпснгпснгпснгпснгпснгпснгпснгпснгпснгпснгпснгпснгпснгпснгпснгпснгпcngnngnngnngnngnngnngnngnngnngnngnngnngnngnngnngnngnngnngnngnngnngnngnngnngnngnngnngnngnngnngnngnngnngnngnngnngnngnngnngnngnngnngnngnngnngnngnngnngnngnng nnnnnnnnnnnnnnnnnnnnnnnnnnnnnnnnnnnnnnnnnnnnnnnnnnnnnnnnnnnnnnnnnnnnnnnnnnnnnnnnnnnnnnnnnnnnnnnnnnnnnnnnnnnnnnnnnnnnnnnnnnnnnnnnnnnnnnnnnnnnnnnnnnnnnnnnnnnnnnnnnnnnnnnnnnnnn nn nann nann nann nann nann nann nann nann nann nann nann nann nann nann nann nann nann nann nann nann nann nann nann nann nann nann nann nann nann nann nann nann nann nann nann nann nann nann nann nann nann nann nann nann nann nann nann nann nann nann nenn nann nann nann nann nann nann nann nann nann nann nann nann nann nann nann nann nann nann nann nann nann nann nann nann nann nann nann nann nann nann nann nann nann nann nann nann nann nann nann nann nann nann nann nann nann nann nann nann nann namm ngm ngm ngm ngm ngm ngm ngm ngm ngm ngm ngm ngm ngm ngm ngm ngm ngm ngm ngm ngm ngm ngm ngm ngm ngm ngm ngm ngm ngm ngm ngm ngm ngm ngm ngm ngm ngm ngm ngm ngm ngm ngm ngm ngm ngm ngm ngm ngm ngm ngm ng
d) CbxpahnBaHte eJektpOnHcTpymeHTNe Ha MeCTa, KbTeTo He Morat Da 6bDat DocTHHaTH O T deua. He donychaiTe Ta 6bDat H3noI3BaHN OT Iuca, KOHTo He ca 3ano3HaTH c HauHa Ha pa6ota C TEx N He ca npOeyN Te3n HNCTpyKcH. Korato ca B pTuCeTe Ha HeONHTH nOTpe6nteH, eJektpOnHcTpymeHTNe MoT a Da 6bDat N3KJIIOHTeH ONaCH.
e)Подьркайе eLEHTPONHCTpyMeHTIte cn rpnKlnBO.IpOBepaBte daJIH NOdBHHNTE 3BeHaФyHKUOHNpaT6e3yHOPHO,daJIH He 3aKNHBAT,daJIH NMa cHyNeHиNIOBpeHn DeTaJIn,KOnTO HApuBaT nINn3MeHrT ΦyHKcNITHe ha eLEHTPOHNCTpyMeHTa.ПpeDn da n3NoJ3BaTe eLEHTPOHNCTpyMeHTa,ce NOrpHHeTe NOBpeHNTe DeTaJIn Da6bDat pemOHtnpaHn. MHoroOT TpyIDOBtE 3IonoJyKn Ce dJIxKaT Ha HeDo6pe NODbPkaHn eLEHTPOHNCTpyMeHTn UpeDn.
f) PpKaTe peHcHTpyMeHTBnHaNdo6pe 3atoeHN uHCTn. O6pe noDbpKaHNTpeKeu HcTpyMeHTC octpn p6OBe OKa3BaT NOMaJIHO CbIPOTNBJIeHne I CE BOJr TIO-JeKO.
g)ИЗнOL3BaIte eJIeKTPoHnHCTpyMeHTHe,ДОЛьHNITeJIHITe npICNOCO6JIeHЯ,pa6OTHInTe HnHCTpyMeHTn n.T.H.,cBo6pa3HO INHCTpyHcIHTe Ha npOn3BOJNTeJI. C DeHocTn n npOceDpyn, eBeHTyaJIHo ppeIINcaHI OT pa3JIuHn HOpMaTHBn DOkUMeHTn.ИЗнOL3BaHETo Ha eJIeKTPoHnHCTpyMeHTn 3a pa3JIuHn OT npEdbIeHHTe OT npOn3BOJNTeJI npIIIOJeHn IOBNUaBA onaCHocTTa OT Bb3NHKBaHe Na TpyOBI 3JIOnOJIyKn.
5) IOaBpHAAE
a) Oonychai Te peMOHTbT Ha eJeKTPoHnCtpymeHTte Bn da ce n3Bbpwba camo OT hBaJIHΦnUpaHn CneuaHnCTn I camo C n3NoJ3BaHeTo Ha opuHaHnpe3epBn Yactn. NTo3n HaunCe rapaHTnpa CbxpaHnBaHe Ha 6e3onacHocTTa Ha eJeKTPoHnCtpymeHTa.
CNEUΦNHNHCHTPYKUN3ABE3OJACHOCT IPN PABOTA C HOCAHKN3ATPEBA
OBRCHEHNE HA CHMBOJNTE IO NHCTPYMEHTA
④ Ппени уnotpe6а почеTeTe рьководъTOсуka3aHHI
⑤ДВОИнИЗОЛАЦИ(He CE ИЗИСКВа Ka6eJI 3a 3a3eMЯBaHe)
⑥ BnHmabaTe 3a onachocTtAOT HapaHbAhe OTIeTaun OTnabu(DpbKTe OKOHHTe Ha 6e3OnacHOpa3cToHHe O paoTHata nlo)
⑦ Na3ete ce ot octpnte HOKOBe
⑧ДрьнTe(ydblnHteJIHHa3axpaHbauKabel) 3axpaHbauNJa6eI daJeU OT BbptTuaNcepeKeu HOH
⑨ PeXeUHT HOK pOaBJIkaBa Da Ce BbPtN 3BecTHOBpeMe CLEd N3KJIIOuBaHe Ha MaunHaTa (He NnnaTeBbPTaUNCe HOH)
10 N3KIOHcTe O6yToHa n OT KOHTaKtTa npeDn NOHCCTBaHe/NoDpBHKa HnA kO Ka6eTbT (yDbJNKeTJeT) e NOBpeDeH nn 3aJIteTeH
1 He n3xBpIaIe HnCTpyMeHTa 3aeHc C bHTOBN OTnAdbu
OBUUN
- 1368BaTe Da Kocnte MoKpa TpeBa
- Notpe6ntelT Hocn OTROBOPHocT 3a 3IIOJnyuN BpeNi, npuHHeHn Ha dpyrN Xopa Nn Ha TxHa co6CTBeHOCT
Hikora He pa6oTeTe c KocaykaTa, aKo e NOBpeDeH 3aHnT npEtna3eH Kanak NIn KOWbT 3a TpeBa
Korato pa6oTHe c kocauKaTa 6e3 KoU 3a TpeBa, yBepTe ce, ye 3aHnIr npEpa3eH Kanak e B 3aTBopeHo nOLOKeHne (OnaCHOCT OT HapaHraBaHe, npuHHeHO OT BbPTaunCe peHexu HOx)
BnHaHn n3KnIOuBaIte ⅢeNceJa ot KOHTaKTa -KOraTo OCTabAte HNCTpyMeHaTb6e3 Ha3Op -Ipei Da nouchTBate 3aceHaJI MaTePnaJI -Ipei Da npOBepRaBe, NOChCTBaTe IIN pa6OTHe IOn HHCTpyMeHaTb -CleD yIap C yJxdo TJIo -aKO INHCTpyMeHTb3aNoUHe Da Bn6pnpa HeHopMaJIHO
BE30NACHOCT INP NABOTA C EJEHTPNUECHN TOK
- PernouHn npOBepaBte Bpb3KeTe Ha Ka6eNa n B clyua, ye ca NOBpeHn, ce o6bphTe KbM KBaHnHnupah CneuaHnCT 3a NpMaHa
HoraToNo3BaTe HnCTpyMeHTa Ha BnaKHO MAcTO, No13BaIte yCTpoIcTBO 3a OCTaTBueh TOK (YOT) C TOK Ha 3aDeIcTBAHe 30 mA MaHCmym - I3noJ3BaIte HantbIHO pa3BHTn n 06e3oNaCeHpa3KIOHNTeIc KanaUTeT 16 A
H3noJ3BaIte cAmO yIbJIHKITeJIOn OT Tn H05VV-F IIN H05RN-F, npedHa3NaueHn 3a yNtpe6a Ha OTKpnto n Cha6deHn C BDOyCTOnYNBn UeNCeJIIn KOHTaKTn
He hactbnaIte, He npema3BaIte n He dbpnaIte Ka6eHa (yDbJIHnTeJ) - Na3eTe Ka6eNa (yDbIKNITeJI) OT ropeu npEmdTe, MacJIO nOCTpnp60Be
- PepnoDnHNO npOBeBaIte ydbLnHNTeIa ITO pOdMeHTe, aKO e IOBpeIeN (HeNoDxOJaIuNTe ydbLnHNTeI MoKe Da ca OnaChi)
BE3ONACEH HAHIN HA PABOTA
He pa6oTeTe c Kocaykata 6ocn nIc otBopeHn caHaJI; BnHaRn HocTe 3dpaBn oSyBkn NbJIr NaHTaJOnHn
3aNo3HaIte ce cynpaBHeHneTo npabnHOTo nol3BaHe Ha HNCTpyMeHTa
HnKora He KocTe B HenocpeDCTBeHa 6JIu3OcT Do xopa (OCo6eHO deua) IIN JNHBOTTHN
BnHaH npbKHe pbcTe n KpaHaTa HactpaHn OT BbpTAAHTe ce qactn
BnHar n cToIte daJeU OT OTbopa 3a H3XBpJHHe Ha TpeBaTa
BkIIOUBAIte MaunHaTa B CbOTBeTCTBHe C HnCTpyKuHInTe, KaTo BHIMaBaTe KpaKaTa Bn Da ca Ha 6e3oNaCHO pa3cTOnHHe OT peKeuHn HOK
To3n HNCTpyMeHT He e npedHa3NaueH 3a ynotpe6a OT ctpaHa Ha INuca (BKNIOHTeHNO deua) C hAmaleHN FIn3NueChN, CeTINBHN IIN yMCTBeHn CnOCO6HOCTn, IIN TaHNBa, KOHTO HrMaT HJHHNTe N03HaHn INOT, OCEH ANO Te HE ca IOD KOMTeHTHO pBHOBOcTBO, IIN aHO He Ca 6IIN CbOTBeTHo HNCTpyHTnpAHn NO OTHOWHey ynotpe6ata Na HNCTpyMeHTA OT ctpaHa Ha INuTeO, OTROBapraio 3a T8XHATA 6e3OnacHOCT (MeCTHTe pa3nope6n MOHe Da HaJIarAT OrpaHNeHne Bbpxy Bb3pactTa Ha onepaTopa)
He no3BolraIte Deca da nIrpAaT CnHCTpyMeHa
Pa6oTeTe c KocaykaTa cAmO KaTo XoJnte (He TuaIte)
- PoiDJIbPkaIte NIOxOJaHa ONopa Ha KpaKaTa No CkHOHOBE HHe KOcTe pN MHOrO CTpbMHN HaKJIOH
-БыдenteИЗнЮчNTeJIHOBHIMaTeJIHn,KOraTO KOCHTeHa3aI NIIДьрnte KocayKaTa KbM Bac
PPEH YNOTPEBA
- Ppei Da 3anoyhe Ta, BnHa n npOBepaBte KaH pa6oTu HcTpymeHTa N B CnyaH Ha DeΦeKTHe3a6abHo r DaIte 3a peMOHT Ha KBaJIHnHnUpaHO IInue; HNKORA He OTbapraTe camn EneKTpOHHCTpyMeHTa
- PpOBepeO OCHOBHO TpeBHaTa NLOU, KbJeTO Ue ce H3NoJ3Ba KOcaHkata, I OTCTpaHETe BCNUKN TBbpNn ppeMTeN, KOHTo 6xHa MoRn Da 6bDaT 3axBaHaTu n H3XBpJIeHN OT peKeuN MexaHn3bM
BnHaH6bTeCnrypHn,yepeKeIeIaMxaHn3bMe Bdo6po pa6oTHO CbCToHHe (noMeHeTe N3HOceHHTe nnIOBpeDeHHuactn)
IodbpaKeTe 3aTeHaTH BCnHKn rAkn,6oHTOBe n BnHTOBe,3a Da CTE CNpyPHN,Ye KocayKaTa e B 6e3oNaCHO pa60THo CbCToRHe
IPN YNOTPE6A
Hocete camo npnIOCTaTbUHa IHeBHa CBETInHa IINI NOxOJaIO N3KycTBHeO OCBETJeHne
He haklanhaTe KocaukaTa npn nyckahe nIn cnpaHe Ha eIeKToPDnRaTeJI,OCBeH aKO He ce HalaKa Kocaykata Da Ce HAKIOH, 3a Da CE NcHE BbB BnCOHa TpeBa (B To3N CnyaH He YHKlaHnTe NOBEe OT a6COJIoTHo HE06XODMOTO HAKLAHnTe CamO YaCTTa, KOrTO e daLevOT OepaTopa); BNHaRn DpbXte 3paBO Kocaykata C DBete CN pbue npedn Da J BbpHeTe Ha 3emra
YBepBaTe ce,Ye peKeeunr HOK e HAnbHcnpraJaCe BbPTn, KOraTo HaKaJHaTe KOcaKaTa 3a npemHaBaHe npe3 HeNoKpTn C TpeBa yAcTbU N KOraTo TaPacnOpTpAte Do NIN OT PLoUta, KoTO ue ce Kocn
- По нахлочен терен кocete Binharн habpehyн нахлоча (ннORA haropeи надoly)
БдTe OcObeHO BHIMATEJIHn Iprn CMHa Ha IOcOKaTa Ha DBNKeHne NO CKJIOHOBe
HnKora He BnuIaIe HnI npHacraTe KocauHaTa npu paBoTeU eJeKtpoDburat
- N3KIOUeTe INHCTpyMeHTa H3BaIeTe UeNceLa OT KOHTaKTa, aKO 3axpaHbAunr Ka6eI Nn YdbJINHTeJIr 6bJe cpr3ah, NOBpeH eNn 3aIneTeH (He nNaIte Ka6eNa npEn Da H3BaUNTE uenCeLa OT KOHTaTAt)
He n3noJI3BaIte HNCTpyMeHTa, KOrato e NOBpeDeH UHyptb; 3amHaTa My CLeIbBa Da ce N3BbPUn OT KBaIIHΦnIpuHo IInCe
YNOTPEBA
OrpaHnHTeJHaKa6eJa ⑫
-3aKaYeTe N3BvBkAta Ha yDbJlnKHeIHa orpaHnUHTeI A KaKTo e nok3aHo Ha fHyypata
-ДрьнHeTe 3dpaBO,3a Da 3aKpeNITe YdbJIHNTeJIa
- Peryilipahe Ha BucouHata Ha p3aHe (28-48-68 MM) 13
I n3BaTe ΜeNcEla OT 3axpaHbAunn H3ToUHH n ce yBepTe, Ye peHHeuHT HOH e cnpaI da ce BbpTN
-06bpheteKocauHaonakn
-IOCTaBeTe OCTa Ha InpdHnTe KOJIeHa N OCTa Ha 3aDnHTe KOJIeBa B JKeHaHaTa OT Bac No3uHa H BInCOUHaTa Ha p3aHe (28,48 nnn 68 MM)
! yBepTe ce, ye YeTnpTe KOJIeNa ca fHKcnpaHn B eHa N CbUa N03uNHa BA BnCOUnHaTa Ha p3aHe
Oe3oNaCBAu npeKbcBauch 3a BkHIOUbaHe/H3HIOUbaHe 14
He no3BOLJIbA CnyuHOTOBKIOUVAHe Ha HNCTpymeHTa
-BHIOUOte HNCTpyMeHTa, KaTO NpBPO HaTNCHeTe npEpa3eH n3KIOUyBaTeJ C u CneT OBA cnycbKOB BKNIOUbaTeJ D
-инчte HCTpymEnTa KaTO OCBO6OHTe CnycbHOB BKIOHBaTeJ D
!cIeHn3KIOUBaHeHaHHCTpyMeHTapeHexuHr HOH npOdbJIbHaBa Da Ce BbPTN HHOJNO CeyHdN
- INHCTpyKcnn 3a pa6oTa
-ДрьжTe KocaKaTa CДБeТe рьuce
-IOCTaBeTe KocauKaTa B KpaHa TpeBHaTa IIOU N KOcTe B NOcOka HAppeI
-06bpeTe NocKaTa Ha DnKHeHne B KpaHa BceKn 3aBoi, KaTo IeKO npenokpneTe npeduHaTa OTPra3Ha Hbua
★ HhctpymehTbT He pa60TN
-няма 3axpaHbaHe ->npobepeTe 3axpaHbaHeTo (3axp. Ka6eI, npekbcbaun, npedna3nTeJI)
-NotpeHn KOHTaKT->NoI3BaIeDpyr KOHTaKT
-BNCOUHHaTa Ha p3aHe He e eHaKaBa-> NOCTaBeTe
4-Te KOJelena Ha eDHa N CbIa BnCOUHHa Ha pr3aHe
★ PeKHeIaHT HOH He Ce BbPtn
-peKeuHT HOe 6IoknpaH->OTcTaHete npenrTCTBHeTO
-raKaTa/6oTbTHaHOJa e pa3Xla6eHa/pa3Xla6eH
->3aTeHHeTe raKaTa/6oTtHa HoXa
★ INHCTpyMeHTbT Bn6pnpa Heo6nuaHo
-peXeunr HOH e NOBpeDeH->noDmeHeTe peXeunr HOH
-raHkata/6oJIbTbHT Ha HOJa e pa3Xla6eHa/pa3Xla6eH
->3aTeHHeTe rKaTa/6oJtHaHOHa
ОПАЗВАЕ HA OKОЛHATA CРEDA
He n3xBpbIaIe eIeHTpoypeIte, npncnoc6JIeHNrTa H onaKOBHnTe 3aeHc C 6ntOBn OTnaDbun (cAmO 3a cTpaHnOT EC)
-cb6pa3Ho DnpeKTHBaTa Ha EC 2012/19/EG oTHoHn3HOCEHN eEeKTPnueckn n eEeKTPoHHn ypeDNnOTpa3raBaHeTo B HauNoHaJIHOTo 3aKHOdaTeIcTBOn3HOceHnte eEeKTPoYpeDNn CneBa Da ce cb6npaTOTdEJHo N da CE npedAaT 3a peuKlnpHaNe cnopeN3NCKBaHnTA 3a ONa3BaHe Ha OKONHaTa CpeDa
-3aTOBa yHa3Ba CnMBOJbT ⑪TORaba KOraTo Tp6Ba Da 6bDaT yHnOxHeH
ENJIAPAUH3ACBOTBETCTBNE CC
C nblHa OTROBOPHOCT Hne deKJIaHpAme, Ye onncAHnRT B "TexHnueckn daHHn" npOdyKT
cBoTBeCTBa Ha cIeIeHnTe CTaHdapTu IIN HOpMaTHBHN DoKymEnTu: EN 60335, EN 61000, EN 55014 cbrIacHo N3NCKBaHnraTa Ha dIpeKtBu 2006/95/EG, 2004/108/ EG, 2006/42/EG, 2000/14/EG, 2011/65/EC
- Поббн Тхиесн OnncanH npn: SKIL Europe BV (PT-SEU/ENG1), 4825 BD Breda, NL
Operations & Engineering
Olaf Dijkgraat
Approvals Manager

SKIL Europe BV, 4825 BD Breda, NL
13.01.2014
C€12
WYM/BNBPALUN
-
ⅠЗмepeHOBcBoTBcTBnE c EN60335 HNBOToHa 3ByKOBO HaJIraHe Ha TO3n INHcTpymEnTe 73 dB(A) a HNBOTo Ha 3ByKOBa MOuHOCT e 93 dB(A) (CTaHApTHO OTHIOHeHHe:1,5dB),a Bn6paunTe ca2,5M/c² (MeTOd pKa-pamO; HeonpeJeIeHoCt K=1,5M/c²)
-
Измерега в сботBetCTBne c 2000/14/EC (EN/ISO 3744) rapaHTnpaHata сиla Haшуma LWA e no-Hncka ot 94 dB(A) (MeToIbT 3a OeHka Ha cSbOTBetCTBneTe o cIgIacHO ПиLOXeHne VI)
HOTUΦIupaH opraH: KEMA, Arnhem, NL
IeHTnKauHHeH Homep Ha HOtNcnpaHn OprAH:0344
HnBTo Ha npdaeHnte Bn6paun e n3MepeHo B CbOTBeTCTBne CbC CTaNapTN3npaHn TecT, onpeJeIeH B EN 60335; To MOKe Da ce H3NoJ3Ba 3a cpaBHeHne Ha eINH INCTpyMeHT C dpyr N KaTO npedBaPHTeJIHa OceHka Ha NOJaRaHeTO Ha Bn6paun Pn H3NoJ3BaHTo Ha INCTpyMeHTa 3a IocOueHnTe npNJIOKHeHn
-3nOJI3BaHeTo Ha HnCtpyMeHTa 3a pa3JnHn OT Te3n npIIOKeHHn IIN C DpyrN, INN IIOo IOIDbPHaHn aKceCoapn MoKe 3HaunTeHNO A NOBUN HNBOTo Ha KOeTO CTne NIOIOKeHH
-NePnoDHTeOTBpeMe,KOraTOHCTpyMeHTa e N3KIOUeHIMCBoTBeTHO BKHIOUeH,HOCHEPe pa60TuB MOMeHTa MoRaT 3HauHTeJIHO Da HamaJrT HNBOTO Ha KOETO CTI NOLOKeHN
!npedna3BaIte ce ot efeHTnte OT Bn6paunnte, KaTO NOdIbPHaTe HNCTpyMeNTa n AnCeCoapnte My, Na3nte PbueTe cn TOnnn N OprAnH3nPaTe BaunTe Moen Ha pa6ota
(SK)
Kosačka 0715
UVOD
Operations & Engineering
Approvals Manager

SKIL Europe BV, 4825 BD Breda, NL
13.01.2014
C€12
HLUKU/VIBRÁCIÁCH
- Merané podla EN 60335 je uroven akustického tlaku tohto nastroja 73 dB(A) a uroven akustického vykonu je 93 dB(A) (standardna odchylka: 1,5 dB), a vibracie su 2,5 m/s² (metóda ruka - paža; nepresnost K = 1,5 m/s²)
- Garantovaná hladina akustického vykonu LWA, nameraná v sulade s normou 2000/14/EC (EN/ISO 3744) je nizsia ako 94 dB(A) (sposob hodnotenia konformity podla prilohy VI)
Operations & Engineering
Approvals Manager

SKIL Europe BV, 4825 BD Breda, NL
13.01.2014
(12
BUCI/VIBRACIJAMA
Mjereno prema EN 60335 preg zvučnog tlaka ovog elektricnog alata iznosi 73 dB(A) a jakost zvuka 93 dB(A) (standardna devijacija: 1,5 dB), a vibracija 2,5 m/s² (postupkom na šaci-ruci; nesigurnost K = 1,5 m/s²)
- Pri mjerenju izvedenom u skladu s 2000/14/EC (EN/ISO 3744) zajamčena razina buke LWA manja je od 94 dB(A) (postupak vrednovanja usklaedenosti prema Dodatku VI)
OPSTAUPUTSTVAOSIGURNOSTI
PAZNJA! Citajte sva upozorenja i uputstva. Propusti kod pridržavanja upozorenja i uputstava mogu imati za posledicu elektrichi udar, požar i/ili teske povrede. Cuvajte sva upozorenja i uputstva za buducnost. Pojam upotrebljen u upozorenjima "elektrichi alat" odnosi se na elektriche alate sa radom na mrezi (sa mreznim kablom) i na elektriche alate sa radom na akumulator (bez mreznog kabla).
1) SIGURNOST NA RADNOM MESTU
a) Držite Vase područje rada Čisto i pospremljeno.
Operations & Engineering
Olaf Dijkgraat
Approvals Manager

SKIL Europe BV, 4825 BD Breda, NL
13.01.2014
(C12
BUKA/VIBRACJE
- Mereno u skladu sa EN 60335 nivo pritiska zvuka ovoq alata iznosi 73 dB(A) a jacina zvuka 93 dB(A) (normalno odstupanje: 1,5 dB), a vibracija 2,5 m/s² (mereno metodom na šaci-ruci; nesigurnost K = 1,5 m/s²)
Garantovani nivo jacine zvuka LWA, izmeren u skladu sa 2000/14/EC (EN/ISO 3744) niži je od 94 dB(A) (postupak ocene usaglasenosti prema Dodatku VI) Obavešteno telo : KEMA, Arnhem, NL Identifikazioni broj obaveštenog tela : 0344 - Nivo emisije vibracija izmeren je u skladu sa standardizovanim testom datim u EN 60335; on se moze koristiti za uporedenje jedem atakte sa drugom, kao i za preliminarnu procenu izlozenosti vibracijama pri korišcenju ove atakte za pomenute namene
-koriscenje alatke u drugacije svrhe ili sa drugacijim ili slabo odrzavanim nastavcima moze značajn ovecati nivo izloženosti
-vreme kada je alatka iskljucena ili kada je ukljucena, ali se njome ne radi, mange značajno smanjiti nivo izloženosti
!zašitite se od posledica vibracija održavanjem alatke i njenih nastavaka, održavajuci Vaš ruke toplim i organizovanjem Vaših radnih obrazaca

Kosilnica 0715
UVOD
ÜLDISED OHUTUSJUHISED
APKALPOŠANA / APKOPE
- Sis darbariks nav paredzets profesionalai lietošanai
Uzturiet tiru instrumentu un elektrokabeli (ipasi
Operations & Engineering
Olaf Dijkgraaf
Approvals Manager

SKIL Europe BV, 4825 BD Breda, NL
13.01.2014
C€12
TROKSNIS/VIBRACija
TECHNINIAI DUOMENYS ①
PRIETAISO ELEMENTAI ③
A Laido laikiklis
B Laido apkaba
C Apsauginis jungiklis
D Gaiduko jungiklis
E Zolès surinkimo dézuté
F Pilnos zoles dezes indicatorius
G Apsauginé sparnuotoji verzle
H Rankena, skirta jrankuii nesti
J Ventiliacinés angos
K Uzpakalinis gaubtas
SAUGA
BENDROSIOS DARBO SAUGOS INSTRUKCIJOS
Operations & Engineering
Olaf Dijkgraat
Approvals Manager

SKIL Europe BV, 4825 BD Breda, NL
13.01.2014
(C12
TRIUKSMINGUMAS/VIBRACija
ONHTN YNATCTBA 3A BE3BENDHOCT
N PEPYNPDEYBAHbE! Cnte ynatcTba Mopa da ce npoHTaat. HenoNTyBaBe Ha doLy HabeDeHnTe yNaTCTBa MoHe Da npedIN3BnHa cTpyeH yap, noHap n/Inn TeuKNIOBpei. YbajTe rN CNTe npEDynpeyBaHa HanaTCTBnja 3a BO nDHHa. NOnMOT "eJeKtpnueH aIaT", KOJ CE KOpNCrN BO NOHaTaMOuHNOT TEKT, ce OdHecyBa HA BaHnot eJeKTPnueH aIaT (co npHKnyeH Ka6e) n Ha eJeKTPnHn aIaTN CO nOROH Ha 6aTePn (6e3 npHKnyeH Ka6e).
1) B63B6EDHOCT HA PABOTHOTO MECTO
a) OdpHyBajTe ro BaWeTo pa6oTHo MeCTO uHcTo HypeNo. HeypeDen HIn TemeH pa6oTeH npocTOp MoKe Da npEdu3BnKaat He3rOuN.
b) HemojTe da pa6oTHe co ypeDoT BO cpeHnHa BO Hoja hMa onaChoc T od eKcnlo3nJa, BO Hoja hMa 3anaJIINB TeuHocTH, racOBn n npauHnA. EJeKtpnHHe aIaNt npOn3BeDyBaAT nChpN KO MoHaT da 3anaIaT npauHn Hn napea.
c) 3a Bpeme Ha ynoTppe6aTa Ha eIeHTpnHnO t anaT, Deuata H octaHaTHe Iua dPKeTe rN NOaIeKy Od MeCTOTo Kaede pa6oTHe. ODbpaKaHe, 6N MoKeJe da N3rHy6nte KOHTpOJa Bp3 ypeDoT.
2) EJEKTPNUHACNIGYPHOCT
a) YtkaMopa da OJRObapa Ha npHJyOHO. HnHaHO He cMee da ce npaBaT n3MeHN Ha 7TeKepo. He KopncTeTe aanTpEpcn 7TeKepe 3aeHOb co ypeoT Hoj e 3aWTHHO 3a3emJeH. He npomeHETn 7TeKeepn COODBeTHn pNkJyOuOn r Ho HamaJIyBaat pn3IKOT oEleKTpUHeh yap.
b) N36erHybajTe DoOpn Ha TeIToCo 3a3emjeHn IOBpWHn, KaO WTO Ce ueBn, paJnaTOpn, pepHn HΦpHHuepn. IocTo3roJeMeHa onaCHOt Od CTpyeH yap,doKoJHy BaWteTo TeIo e 3a3emJeHo.
c) YybajTe ro ypeDoT noDaleky oddoHnBnara. IpoInpaHeTo Ha BOA Bo eJeKTPnuHnOT ypeJ a 3roIeMyBa onaCHOCTa OD cTpyeH yap.
d) He 3Iooyntpe6yBajTe ro npHHnyHnOT ha6eI 3a Hoche, 6ceHe Ha ypeoT nn 3a n3BneKyBaBe Ha uTeKePOT od mpeHHNOT npHHyOc. YbajTe ro Ka6eIot noaIeKoY oTOnnHa, MacNo, octpn pa6OBu nn DeIOBHTe Ha anapaTOT kon ce DnHnat. OwteteHn nn 3aJIeTKaHN Ka6n ja 3roJeMyBaat onacnoCTa od cTpyeH yap.
e) Kora ro ynotpe6yBaTe noJHaOT HaBOp, KopncTe Te npoDolHeH Ka6eI HoJ e COODBeTeH
3a ynoTpe6a Ha OTbOpEn npocToP. IpImeHaTa Ha npoDoJIxKeH Ka6eN COOBeTeH 3a pa60Ta Ha OTbOpEn npocToP ja HAMalyBa ONaCHOCTa Od cTpyen yap.
f)doKohHy He MoHe da ce N36erHe pa6oTa co eJeHTpuHHNOT aHaT BO BlaHnHa cpeHnHa, HOpNCTeTe npEHNHyBauch 3a CtpyjHa 3awTHTa pIn TexHNuKN np6Lemn. YnoTppe6aTa Ha npEKNHyBaOH 3a CtpyJHa 3auTHTa npTu TexHNuKN np6Lemn r Ho HamayBa pu3NKOT oEJIeKTPnuH yap.
3) B6B6HOCHT HA JIYTE
a)Бидete BHHMaTeJIHn,BHHMaBJte WTo npabite nNoCTanyBaJte BHHMaTeJIHo DoJeHa pa6OTHe co eIeHTpHnHnot aIaT. He pa6OTete co ypeDTo DOHOly CTe yMOpHN IIN NOD JeCTBO Ha Dpora, anHOxOI IIN JekOBN. EdeH MOMeHT ha HEBHHaHne npu yNotpe6ata MoKe da DoBeE do cENo3Hn NOBpeDN.
b) Hocete ja IInuHaTa 3aWHTnTH onpema n cenoraw Hocete 3aWHTnO uHJa. HocebeTo Ha IInuHaTa 3aWHTnHa Onpema, KaHO uTo e MacKaTa 3a npaUnHa, 6e36eHocHaTa 0BeKeHa KoJa He Ce JIN3ra, 3aWHTnTeH IJIem NIII WHTnHK 3a CIny, 3aBnCHO OD BnDT N npImeHaTa Ha eJeKtpnHnOT aIaN, Ja HamaJyBa onaCHOCTa OD NOBpeDa.
c) N36erHyBaJTe HeBnMaTeJHo BkLyUyBaHe 3a BpeMe Ha pa6oTata. OcnrgpajTe ce npeknHyBaOT Da 6nIe Bo "OFF" no3njuJa nped da ro cTaBnte WTeHepot Bo npnKnyOKeT. DOKOLky Ro Hocnte eJeKtpuHHoT aJat Co npCtOT Ha npeknHyBaOT IInr To pNkLnuYBaTe anapaTOr Koj e npNKlyueH CO HanojyBaBe Ha cTpju, MoKe da npedeN3BnKaTe He3roDn.
d) PpeBnkyBaBe Ha ypeToT, TprHete rHa aIaHTe 3a noDecyBaBe Hn KnyoT 3a HABpTyBaBe. AAnot nnn KnyOT KoJ ce Haora BO BPTINBnOT DeI Ha ypeoT, MoKe Da npEdu3BnKa He3roda.
e) He rH npeceHybajTe cBOHTe cnoocHOCTH. 3aB3emete cnhypen H cTaNJIeH CTAB N BO CEHOJ MOMENT ODPKHyBaJte pAMHOTeHa.Ha Toj HauHH MOKeTe IIOO6po Da ro KOHTpOInPaTe ypeoT Bo HeOuekyBaHN CNTyaUHN.
f) Hocete cooBteHa 6hkeHa. He hocete shpoHa 6hkeHa nn HaHT. Kocata, 6hkekata n paHabuNTe DpKHe Tn noJaIeHy Od DeJIOBHTe KOH Ce DBNHaT. KOMOTHaT o6hKeHa, HAKITOT Nn DOJIrata HOca MoHe Da 6HdA t FoTeHN BO DeJIOBHTe KOH CE DBNHaT.
g)ДOKOLKMyMOHeJaCEMOHTnpaaTHaPpBn3a BwmykyBaHBeNΦaKaHBe npaunHa, npoBepete DaJIncBbJIyueHnIaJIH MoHAt NcnpaBHO da Ce HOpNCtA.ПрIMeHATAHaOBHeHaPpBnJaHaMaJyBa onaCHOCTaO npaunHaTa.
4) BHIMATEJIHA YNOTPEBAI PAHYBAHbE CO EJEKTPNUHNTA JATN
a) He ro npeonTepeTyBajTe ypeDoT. Pn BawaTa pa6ota kOpncTeTe ro npedBnIeHNoT eJeKtpuCh aIat 3a Taa ynoTp6a. Co cooDBetHnOteJeKtpuCh aIat Ke pa6OTne noDo6po n NoCnHypHo BO HabeHeHaTa fYHKUHOHaHa o6laCT.
b) He HopncTeTe eIeHTpUeH anat qJ npEHHyBa e HEnCnpaBeH. EJIeHTpUHnO t aJat Koj nobEke He moKe Da ce BkIyUba n IckIyUba e onaceH mopa da ce nonpaBn.
c) N3BleyeTe ro wTeHepoT od npnKnyOhoT nped n3BpUyBaHe Ha 6HNo KaKbN NOdecyBaHa Ha anapaT0, 3aMeHa Na np6Opot HIn cHnaHpaBe. Co OBHe MEPKn Ha BHIMATEJIHOCT Ke ce H36eHHe HEBHMATEJIHOTO BkLYyBaHe Ha ypeDToT.
d) Tprhete ro eIeHTpnHnot aJat KoJ He ro KopnCTnte od dOnnpot Ha deqata. He donyutajte pa6ota co ypeDOT ha Iuca kon He ce 3ano3Haehn CO HERO HN KON Ro HEMAAT npOHTaHO OBA ynatCTBO. EJeKTPnuHnTe aJatn Ce onaChn DoKOJIky Co HNB pa6oTaT HeNCHyCN Iuca.
e) OdpHyBaJTe ro ypeoT co BHMaHne. ImajTe KOHTpOla OKOly Toa daIIN DBNHeCHNTE DeIOBn Ha ypeoT pa6oTat 6ecnpEhopHO n daIIN He ce 3aIaBeHN, daIIN DeIOBnTe Ce cKpWeHN nn OWTeTeHN Do Taa MEPHa wTO He MoKe Da CE 06e36eHN FyHKuONHpaHbe Ha ypeoT. Ppei npMeHATA, OBne OWTeTeHN DeIOBn Tpe6a Da ce nonpaBat. PpUHNa 3a MHOry He3roDi e loWo ODpKyBaHNo T eJeKtpuHc aIaT.
f) AataTe 3a ceuehe OdpHyBaJte rnooctpn uHCTn. BnmaTeNo odpKyuBaHnte aata 3a ceuehe co ocTpnoOHTpuu NOMaIHy Ke ce 3aIabyBaat n CO HNB pa6oTaTa Ke 6nnde nolecha.
g) EJeHTpHnHnOT aHaT, np6Op, pa60THn aHaTHn., Tpe6a Da rH KOpHCTHnTe cNopeD OBHe yNaTcTBa, n Ha Naun HKe e OnnuAn 3a COoBbETHnOT TnN Ha ypeI. Pn Toa, ZemTe rN ppeBnD pa60THnTe ycIOBn Hpa60TaTa Hoja ce N3BpUyBa. YnoTp6aTaHa eJeKTPnHnTe aHaTn 3a DpyrN CEJI KOn He ce PpeBnDEHN, MoKe Da npEnzBnKa ONaCHN CNTyaUIN.
5) CEPBNCHPAHe
a) NonpaBkata Ha BaAhoT ypeI npnyuTeTe Hm ja camo Ha o6yeh, cTpyeH hAp Ha OBlaCTeH cepBncep, n camo coOprrHaJIHnTe pe3epBHN deIOBN. Ha ToJ NaHH Ke ce 06e36eHn ypeDoT da ocTaHe co 3aUyBaHa 6e36eHnOCT.
CNEUΦHNFBE3BEOCHNYATCTBA 3A HOCINKNTE
OBJACHYBAHc 3A CHMBOJNTE HA AJATOT
④ Ipei ynoTpe6a npoHTajTe ro npupaHnKOT 3a ynoTpe6a
⑤ Bojha n30launja (He e nTope6Ha 3a3emHa Xnua)
⑥ O6pHETe BHHMaHHe Ha pN3HHot OD NOBpeDa wTO MoHe Da rnpEn3BnHa OTΦpIeHNOT OCTaTOK OD KocHeTo (PnncyTHnte IInca da cTojaT ha 6e36eHno paCtoJaHHe oM MeCTO To Ha pa6oTa)
⑦ BHIMAbajTe Ha ocTpnte ceHnBa
⑧Дрнete ro Ka6eIOT (и npoDoJIHHNOT) nOdaJIeKy od potnpaHKOTo CEHNBO
⑨ CeuBOTO npoOJHyBa da potpa ywTe n3Becho BpeMe OTkako KocNkata Ke ce ncknyn (He DonnpajTe ro CeuBOTO doeKa ce BPTn)
10 Ncknyte ja kocnilkata n H3BaTe ro npknkyokot od wTeHep nped YnCTe/OpjxByaHe nAko Ka6eNoT (npoDOnKHHOT) e oTTeHn 3anIeTKaH
He pPajTe ro aIaTOT 3aeDHO co dpyrnoT OTnad OJ DOMaHCTBOTO
ONHTN
He pa6oTeTe co KocnIkaTa Ha BlaaKHN TpeBHIuN
Kopuchnikot o odrobopeh 3a HecpeKHTe cnyan nn WTeTtE To Ke ce npedn3BnKaat Kaj dpyrN Jnca nn HA HNBHOT NMOT
- HnKoraw He BkIyBajte ja KocuHaTa co pacnna3aDen 3aWtHTnIK nIN OwTeTeHa KyTna 3a TpeBa
CTabeTe ro 3aHnOT 3awTHTNk BO 3aTBopeHa nO3njuJa Kora pa6oTnte co KocuHata 6e3 KyTuJaTa 3a TpeBa (noCTOn pnsHK od nobpeDa od potnpauKOTO ceuHBO)
- Cekoraш ИСКИУБAJte ro npINJIyOHOt OJ wTeHep -KORA KOCINKATA ja OCTaBaTe 6e3 Na3Op -пед чстЕе 3aIЯВeH MaTePиJAI -пед поверka,чстЕе ИИ pa6ToHa KOCINKATA -ANO ydpNTe BO CTpanпpeDMET -ceKORAш KORA KOCINKATA Ke Bn6pIPA HeBOO6NuaEHO
ELEKTPNCHBA E3BEOHOCT
- Поверувajte ro KaбелOT od Врeme Ha Врeme И NOВИКAJTe KBaIINФИКУВaHО Лице Да ГСмEHn aKO e OwTeTeH
KopncTeTe ypei 3a npceocTaHaT HanoH (RCD) co MaKcImaIeH HANO 3a aKTbBpaHe oD 30 mA kora ja KopnCTHTe KocuIkata - PpOdoJHKeHnOT Ka6eI Koj ro KopHCTnTe, Mopa da 6nde cOcema oDMoTaH n 6e36eDeH, co KanaunTe oD 16 A
KopncTe cAmo npOdoJIHKeH Ka6eI Od TInOBnTe H05VV-F H05RN-F KoJTo e HameHeT 3a yNoTpe6a Ha OTBOpEHO e OnpemcH CO pNkNyOc Co 3aUHTa od BODa N WTeKeP Bo FOpMa Ha 3anaJaKa
He npemHnHyBajTe npeky ka6eNoT (npoDoJHHNO) He npebNTkyBajTe Nn H BneYeTe r
3aunTeTe ro (npoOJIHHNO) Ka6eI OJ TOJIINHa, Maclo n ocTpna paobu - PpOBepyBaJTe ro npOdoJIHHnoT Ka6e Od BpeMe Ha BpeMe n CmeHeTe ro aKO e oWTeTeH (HecooDBeTHnTe npOdoJIHH Na6Ie ce onaChn)
JIYUHA 3AWTNTA
He pa6oTe co KocnIkaT a Kora cTe 6ocn nH aHO HocHTe OTbOpEn CaHaJi; ceKOraW HocTe UbpCTN YeBIn N DOJIg NaHToJIoHN
3ana03hajte ce co KOHTpOJIte n co npaBnHaTa ynoTpe6a Ha KocnKaTa
HnkoraH He KocTe BO HnOcpeHa 6n3nHa Ha Lyte (oco6eHO deua) n HNBOTHN
Cehorawybajte rnpaueTe H03eTe noaIeHy oD potnpaHKeTe deIOBn
- Ctojre cekoraaw hactpaHa oNcncyctOT
BnnybajTe rMOtOpOT BO cOrlaChOCT CO yNaTCTBOTO n Co cTaIaIata wTO nOdaJIeKy oD ceHbOTO
Anatot He e Hamehet 3a ynoTpe6a od cTpaHa Ha IInu (BnIyUHTeHNO n Deua) co HamaJIeHN 3N KN , YyBCTBNTENH Nn MeHTaINH cnocO6HOCTn, 6e3 NcKcyTBO n No3HaBaHa, OCBeh aHO He ce NOd HAd3Op Nn aHO He ce o6yueHN 3a yNoTpe6ata Ha anATOT od cTpHa Ha IInce HoE To e ODROBOPHO 3a HNBHATA 6e36EdHocT (JOKaJIHHTe 3aKOHn ja OndepyBaatt BO3pacta Ha onepaTopoT)
- 06e36eTe deuata da He cn ngpaat co aIaTOT
Pa6oTeCoKocnHaTcAmoCoOeHe(HeTpajTe)
OdpkybajTe cooDbetHO paTojaHne Ha 3aKocehn TepeHn HHe KOCeTe Ha NCHJyHtEnHO CtpMHN TepeHn
BnTeHCHnyHTeJIHO BHIMATEJIHN KOra Kocnte HaHa3aI INI KOra ja BLeYeTe KocNIkAta KOH Ce6e
PNEA yNOTPEBA
- PpOBepyBajTe jaФункионаHnocTaHaMaunHaTAppeKeJoa ynoTppeBa n BO cnuyaj Ha deΦeKT, nobnKajTe KBaInnKByBaHO JIue da ja nonpaBn. HnkoraW He OTBopajTe ja MaunHaTacamn
TeMeHnO npOBepeTe ja o6JIaCTa KaIe Ke ce KOpNCTH KOCHJKAtA NOTcPaHeTe Tn CHTe ZbPCTN PpeDMETU TO MOKe Da Ce 3aΦaTAt N HcΦpIaT Co MExaHN3MOT 3a KOceHe
CekoraawnpoBepyBajTe daJIIMexaHn3MOT 3a KOceHe e BO do6pa paoTHa coCToj6a (3aMeHeTe rN HCTpoWeHHTe NIN OWTeTEHNTe DeIOBn)
OdpKyBaJTe rncnHe HABPTKN,3aBPKNu npapobu CBpCTo 3aTeHaTHa 3a da o6e36eHTE DeKa Kocnilkata e BO do6pa pa60tha coctoj6a
BO TEKOT HA YNOTPEBATA
Hocete camo Ha nHeBHO CBETIO IIN CO COOdBETHO BeTuKo OCBETnyBaHe
He 3akocybaje ja MaunHaTa Kora ro BnnyBaTe MOTOPOT OCBEN aKO Taa Mopa da ce 3akoc npn pa6ota BO BnCoka TpeBa (BO ToJ cnuyaj He 3akocybaJe ja NOBeKe od HeonxOHNTO n CeKoraw co DeIOT wTo e NodaIeKy od onepaTopoT). Cekoraw dpKHe rN DBeTe paue Bo pa6oTHata noIOX6a nped da ja BaPatnte MaunHaTa Ha TeNoTo
- ПовереTe Дали ceHyBToE kOMnIeTHO 3aCTaHaTO KOra ja 3aKocyBaTe MaunHaTa 3a Ja npemHete OpeDeHa NOBpUHa HTo He e TpeBa N KOra ja HocHTe Do n od oblacta 3a KoCeHe
Kocete nonpeky Ha 3aKocehnte Tepen (HnKora Harope n HdoJy)
BndTe NCHLnyHTeHOB HnMaTeHN Kora rO MeHyBaTe npabeoT Ha 3aKoCeHHTe TepeHH
HnkoraaHe KpeBajTe Hn He HocTe ja KocnKaTa doKeKa pa60TN MOTOPOT
Cekorauncknyte ja maunnHaTa nncnyte ro npnknyokOT od uTekepO aKO Ka6eIOT 3a HanojyBaHe co eI. eHepriJa nn npoDOnKHNOT Ka6eI CE npceueHH, oWTeTeHN nn 3anNeTKaHN (He DonnpajTe ro Ka6eIOT nped da Ro ncknyute npnkyokOT)
HnkoraaHKeKopnCTeTe aIaT aKO Ka6eIoTe oWTeTeH; 3aMeHaTa Ha Ka6eIoT Mopa Da ja N3BpSh cTpuyHo IInue
YNOTPEBA
BoDnIka 3a Ka6eIoT⑫
-3aKaYeTe ja KyKaTa Ha npoDoJnKHNOT Ka6eI HaD BOiNkata A KaHO wTo e npiKaHaHO -NoBLeYeTe uBpCTo 3a Da ro o6e36eInte npoDoJnKHNOT Ka6eI
- PpnilaroyBaHbHe Ha BnCnHaTa 3a KocHe (28-48-68 MM) ⑬
Incnyte ro npnkyohOT od utekep npobepete daHceHBOTO BeKe He potnpa
-CBPTeTe ja KocnIkaTa
-NotabeTe Tn npedHaTa N 3aHaTa OcKa Ha TpKaJaTa Ha cKaHaTa No3uJia 3a BncHa Ha KocHe (28,48 nn68 MM)
Inpobepete daJIy cheTpHte TPhaIe ce HnKcnpaHn Ha nCTa no3njuja 3a KocHe
-Be36eHocen npeKHHyBaay 3a BknyyBahe/ nckIyBuBe 14
CnpeYBaMaunHaTa Da ce Bknyu CnyaJHo -Bklyute ja MaunHata npBO co npntnckaHe Ha 6e36eHocnnot pkeHyBaC n noToa nobLeheTe ro
PneKHyBaHOT 3a aKTbBpaHe D
-NCKnyteJaMaunHaTaCoNyTaHeHa npeKNHyBaHOT3aAKTNBnPaheD
Ino ncknyBahe Ha MaunHaTa,ceHBOTOnpOdoJyBa da potnpa yUte HeKoJky ceHyHn
- YnataCTBO 3a pa6oTa
-Држete ja KocnilkaTa co Дьerte paue
-IOCTaBeTe ja KocuHaTa Ha paBOT Ha TpeBnKOT N KOceTe HAnPepd
-CBpTeCe Ha Kpaot Ha CeKoJ NOTer, DeJyMHO npeKnonyBajkn r npTeXoHTo KOceHe
-Корисе te ja kocnilka tca camo Ha cyBa TpeBa
-увajte ja kocnilkaTa noJaIeKy od uBpcTn npeMTeN paCTehnja
-Пи КОсеНe BИСОКa TpeBa, ИрБО NOCTaBete Г MEXaHn3MOT 3a KОсeHe Ha MaKcImaJIHaTa BИСиHa 3a KОсeHe И NOToA Ha NoHnCkA BИСиHa
!npnlaorodeje ja 6p3HHata Ha Oedehe npn Koehe BncoHa TpeBa
HnKaTOp 3a ,noHa kyTuJa 3a TpeBa"15
-ncpaa3HeTe ja kyTjnta 3a tpeBa E wTOM kpnIeTo FKe ce cnuytncamTO co wTO ce nocoyba deka kyTjnta 3a TpeBa e noHa
-3a Hajdo6pa co6npaHbe TpeBa, peoBHO uHcTeTe rN OTbOpHTe noKpuiueTo F co YeTknuHa
UyBaHe 16
-πpeBntkajTe ja paKaTa Ha MaunHaTa 3a WTeDeHBe Ha npocToPOT 3a cKlaDnpaHc (co KpNlTeTO G) nOdloKeTe ja MaunHaTa KaKo WTo e pNkaKaHo.
IpbO hcnpa3HeTe ja KyTuJaTa 3a TpeBa InpOBepe TaJIH (npoDoJHHNOT) Ka6eI e 3arlaBeH npn npeBHTyBaHe/ hcnpaBaHe Ha paKaTHa MaunHaTt (He hCnyuTajTe ja paKaTAt)
-He CtabajTe DpyrN PpeDMETN Bp3 OJIOKeHaTa Kocnilka
-увajte ja kocnilkaTa Ha 3aTBopeHo n cyBO MeCTO
OДРЖУBAнБЕ/CEPBИСИРАБE
Oboj aIaT He e HameHET 3a npoepnoHaHa ynotpe6a
- AnatotиKabelotceKoraaDa ceOpkyBaat YnCTN (ocobeho OTbopnte 3a Janahe J ③)
IcHcTeTe ja KocnKaTa no cekoja ynoTpe6a co YeTkau cyBa Kpna
!He HOpncTeTe BOda (ocObeHo He cnpeOBn noBnBOcH npHTnCOH)
-OTCTpaHeTe ja Haco6paHaTa nokoceHa TpeBa Od CEHBOTOCDpBeHnIINPactuH eAaT
3aMeHa Ha ceuBTo 3a KocHe ①!nchnyte ro npHkyoKOT od wTeHep n3BaTe ja kyTuJa 3a TpeBa E ③
PeIOBHO npOBepyBajTe ja KyTnjata 3a TpeBa 3a 3Haun Ha n3a6eHoc nnn OwTeTyBaHe
Peobno npOBepyBajTe daJIIN CEuNBOTOn HABpTKHTe ce n3a6EHn IIN OwTeTeHN I 3aMeHyBajTe Tn BO napOBN 3a da ja 3aDPKHTpe pAMHOTekata
!HocTe 3aWHTTN paKaBnC
-CBPTeTe ja KocnHaTa
-3BaTe/CTaBeTe CeHBO 3a KOceHe co Klyu 13 KaKo ITO e PnKaKaHO
!HopncTeTe cAmO ceuBa 3a KoceHe oCooDbTeH Tn (6poj Ha pe3epBEN DeJ Ha SKIL2610Z04069, o6eJeHcH co YAT 474 552)
-TeMeJIHO ICHNCTeJa 06IaTcKaJ OChTa N BHaTpeWnOCTa Ha MaunHaTa nped Da Ro NOCTaBNTe CEYNBOTO 3a KOCHe
!npn noctabyBaHe Ha ceuHbTo 3a HocHe, npOBepTe dAnI Dbata OTbopa X coBpuHcO ce noklonybaat co dbata KInHa Y
ДOKOLky aIaTOTи NOKpaj BHNMaTeHTo pa6OteHe n KOHTpOla HeKOraW OTKaHKe, NonpaBkata Mopa da ja ja 3BpUn HeKoj OblaCTeH SKIL cepBnC 3a eNeKtpuHn aJIaTN
-BO Cnyaj Ha npimEd6a, nCnpaTeTe ro aIaTOT HepacKnOeH[/], 3aeDnO CO cmETKOnOTBpDaTao,do BaHnot npoDaBaay Hau Haj6ncknOT SKIL cepBnC (adpecnTe ce habeEn Ha www.skil.com)
PEUABAHIEIPOBJIEMN
CneHnOT cncOK rnpKaHyBa CmNTOMITE 3a npo6IeMITE, MOHHTE npuHHN I JeCTBA 3a nonpaBkA (KoHTaKTnpajte CO npOdaBaOT NIN cepBncepOT aHO nCTnTe He ro NdeHTnHkyBaAT HnTy peWaaBaat npo6IeMOT)
Incnyte ja MaunHaTn H3BaTe ro npHHyOHOT nped da ro nctpaKyBaTe npo6lemot
★ MaunHaTa He paBoTn
-Hema HanojyBaHBe -> npoBepeTe ro HanojyBaHbTo (ka6eI 3a HanojyBaHBe, npeKnHyBaHn, ocNrypyBaHn)
-pacnnaH wTekep 3a HanojyBaHe co eI. eHeprnja -> KopncTeTe npyr wTekep
MaunHaTa Bn6pnpa HeBoo6nuaeHo
-CEYNBOTO 3a KOCEHb e OWTTeHO -> 3aMeHETe RO CEYNBOTO 3a KOCEHb
-HaBPTKHTe/3aBPTKHTe Ha ceYINBOTo Ce pa3Ja6aBeHN
->3aTeHHeTe Hn HABPTKHTe/3aBPTKHTe Ha CEYIBOTO
3AWTNTA HA JHBOTHATA CPEINHA
He ce ocno6oBajTe oEJIeKTHHn aIaTH, ypei nn am6baJha npeky HNBHO φpnahe BO domaHHTO rY6pe (camo 3a 3emjnte Ha EY)
-cnopeE BpOncKaTa DnpeKTHBa 2012/19/EC 3a OcNo6OyBaHe oEeKTPnHa n EeKTPoHcKa ONPema HneJ3nHa NmIeMeHTaunJa BO COrlaCHOCT CO HaOnHOJIHNTe 3aKOH, eJeKTPnHnTe aJatn KOn FOOCTHnHaJIe KpaJOT Ha CBOJOT JINBOTeH BEH Mopa Da 6nDat Co6paHn Ioc6Ho N da 6nDat BpaTeH N BO COODBeTeH Objekt 3a peuHKInpaHe
CIM60JOT ⑪ Ke Be NOTcETyBa Ha Oba KOra Ke DojDe BpeMe aIaTOT da ro φpIInTe
DEKJIAPAUJ3A YCOIACEHOCT
Co ceIocHa oIROBOpHoc T3jaByBaMe deKa npOn3BOoT OINsAn Kaj "TexHnUKN IOnaTou" e ycoIaceH co CJIeHNTe CTaHdApN ININ DOKymeHTN 3a cTaHapDn3auJia: EN 60335, EN 61000, EN 55014 Bo corIacHocT co OJpeD6nTe BO dInpeKTbNTe 2006/95/ EG, 2004/108/EG, 2006/42/EG, 2000/14/EG, 2011/65/ EY
- Texnue docije BO: SKIL Europe BV (PT-SEU/ENG1), 4825 BD Breda, NL
OblaTeHo Iue: KEMA, Arnhem, NL
Operations & Engineering
Olaf Dijkgraaf
Approvals Manager

SKIL Europe BV, 4825 BD Breda, NL
13.01.2014
C12
ZHURMA/VIBRIMI
E matur ne perputhje me EN 60335, niveli i trysnise se tingullit i kesaj pajisje aeshte 73 dB(A) dhe niveli i fuqises tingullit 93 dB(A) (shmangia standarde: 1,5 dB) dhe vibrimi 2,5m / s^2 (metoda e krahut-dores; pasiguria K = 1,5 m/s²)
Matur ne perputhje me 2000/14/EC (EN/ISO 3744) nivei i garantuar i fuqise sie zerit LWA ehtme i ulet se 94 dB(A) (procedura e vleresimit te konformitetit ne perputhje me Shtojcen VI)
Organizmi njoftuar : KEMA, Arnhem, NL
Numri i identifikimit te organizmit t njoftuar : 0344
J 45 Jn Jn Jn Jn Jn Jn Jn Jn Jn Jn Jn Jn Jn Jn Jn Jn Jn Jn Jn Jn Jn Jn Jn Jn Jn Jn Jn Jn Jn Jn Jn Jn Jn Jn Jn Jn Jn Jn Jn Jn Jn Jn Jn Jn Jn Jn Jn Jn Jn Jn J n J n J n J n J n J n J n J n J n J n J n J n J n J n J n J n J n J n J n J n J n J n J n J n J n J n J n J n J n J n J n J n
KEMA, Arnhem, NL
122.00 1 L JLoLwJ Lw
1-10 EN 45 gdo ydaillw wuL WbI Lluln lal n 1234567890123456789012345678901234567890123456789012345678901234567890123456789012345678901234567890123456789
LaoIolgjgluoglao glojgljyolal 10aolal 10
m = 311
j 100000000000000000000000000000000000000000000000
()
1 14
-(Lg).
- 21 + 5( 21)
- 21 × s 若 g C
-15 1
15 15 15 15
-215 1
-
150
1
≤j<,y
- 2 ,3 5 L
100
wJ 1 a0/0- wJ 00
j 1
w 1
中
j1 j1j1j1j1j1j1j1j1j1j1j1j1j1j1j1j1j1j1j1j1j1j1j1j1j1j1j1j1j1j1j1j1j1j1j1j
()j1g25 1j1j0a0a0g a
0000g 000000000000000000000000000000000000000000
1111111111111111111111111111
1j as golao by aiaa jaaas gohw j j w slyj j jy as golao
Lai, 155 5 5 5 5 5 5 5 5 5 5 5 5 5 5 5 5
Jolss aai jai li s
100000000000000000000000000000000000000000000000000000000000000000000000000000
1 1
1
1
1
1
1
1
1
1
1
1
1
1
1
1
1
1
1
1
1
1
1
1
1
1
1
1
1
1
j jy gai jai jai jai jai jai jai jai jai jai jai jai jai jai jai jai jai jai jai jai jai jai jai jai jai jai jai jai jai jai jai jai jai jai jai jai jai jai jai jai jai jai jai
LgJgJgJgJgJgJgJgJgJgJgJgJgJgJgJgJgJgJgJgJgJgJgJgJgJgJgJgJgJgJgJgJgJgJgJgJgJgJgJgJgJgJgJgJgJgJgJgJgJgJg
G jda Hjla Jagsl SL Kui Jbl
giogocgic slqoi
1 10 golg 400 1
1000 1000 1000 1000 1000 1000 1000 1000 1000 1000 1000 1000 1000 1000 1000 1000 1000 1000 1000 1000 1000
(1)
()
y 1000 aLggo Jaoa aLggo y 1000 aLggo Jaoa aLggo
()
Cefgjglc
20 gafg jy" 11111111111111111111 1
fagl 00-12 EN9 11... EN9 1rrn EN: aJIJIaIaIaIaIaIaIaIaIaIaIaIaIaIaIaIaIaIaIaIaIaIaIaIaIaIaIaIaIaIaIaIaIaIaIaIaIaIaIaIaIaIaIaIaIaIaIaIaIaIaIa I
EC/12/1... EC/2/1... 9 EC/1A/1... 2g EC/9/0... 2g EU/10/1.. 1g
NL,Breda BD 5AF0,SKIL Europe BV (PT-SEU/ENG):
S 1
S 1
S 1
S 1
S 1
S 1
S 1

V10
中
40
1 1
f 1g w glaegjw
1 10000000000000000000000000000000000000

1

S1 = 2S2 = ·s = 2^n - 1
四、学习指导 A
B
15 C
15 D
S OBC = S COD + S_ BOC
F
a031/a1
J 4ggl lalngs) dllgol gdlb jie
1
aagai jia jia jia jia jia jia jia jia jia jia jia jia jia jia jia jia jia jia jia jia jia jia jia jia jia jia jia jia jia jia jia jia jia jia jia jia jia jia jia jia jia jia
a. a. a. g. 211
e 1
L1L 2.5,211jg 1c 1c 1c 1c
45 111111111111111111
a 15g aIgogol j 55j 15g 55j
J 1
.
iijie jll plai i wlg aloles 12
y
jglslc1sllc1Lacgaa JsuJyagolly
15gj 25j 2 jaiw 1g jig 1w Jaei 2
a e 1e j 1e Lg a j g a 1g a 1g a 1g
jglj jzai 1 J aaii jclj0ao
50.15 1g11 a111111111
gall gll gll scc uol gll lgl 1
J 15
a 1
plaiiui oiai i jia jaojig Jie jilbog dci ci jy Lai
1 1
m = 311
动量守恒 ① 动能
1
gS Loric a yy gSll cLolal sls sly
S OBC = S COD + S_ BOC
aIySsll cIowall Jbs sJz aIgBjgl jIb81 Jc aIySsll sssell 0
aJyjglll jI 111
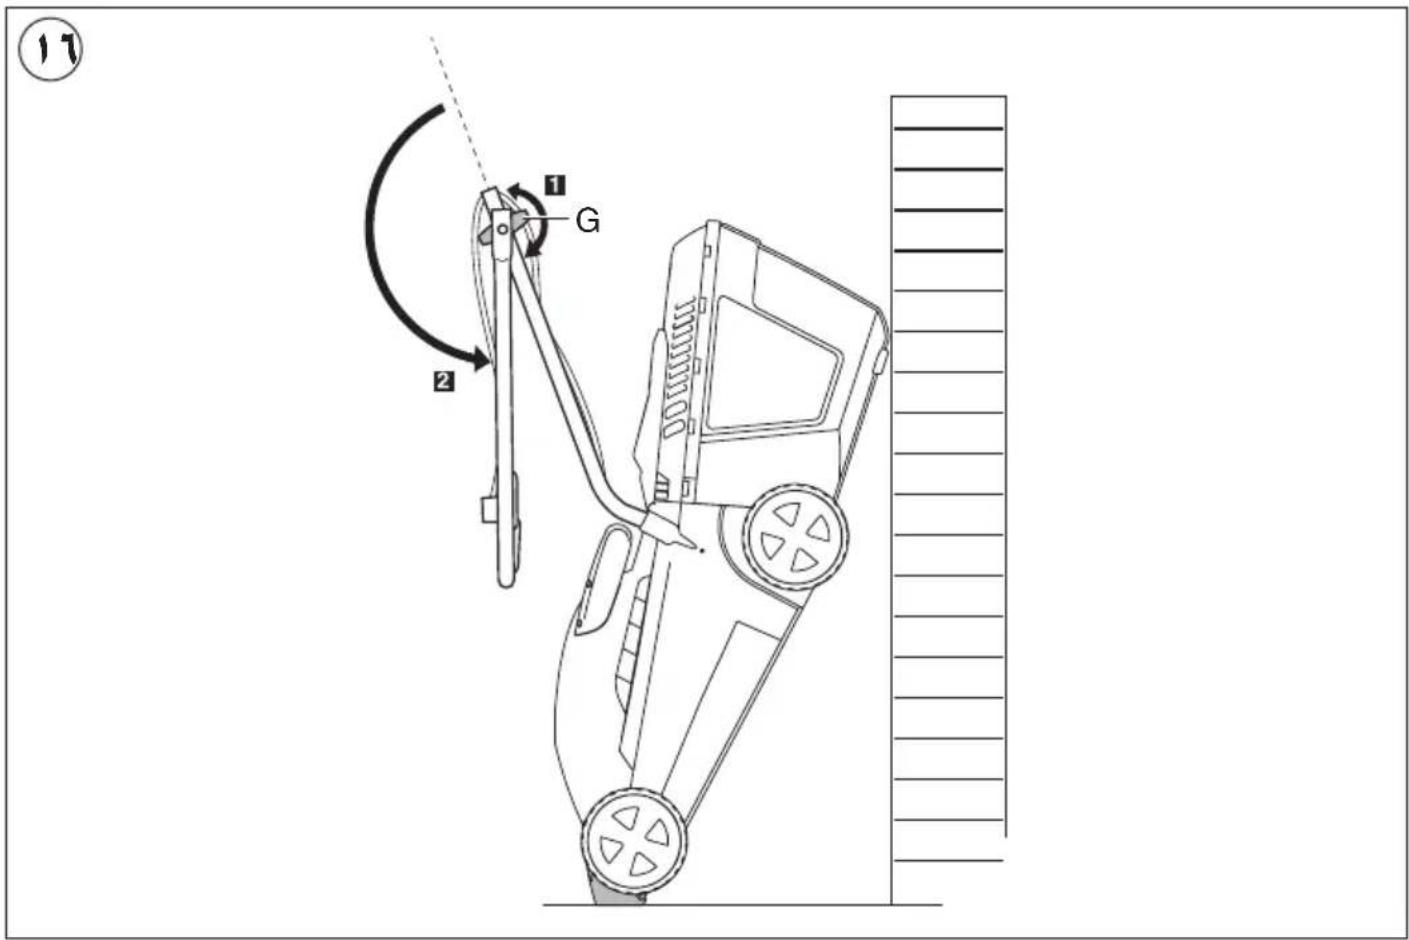
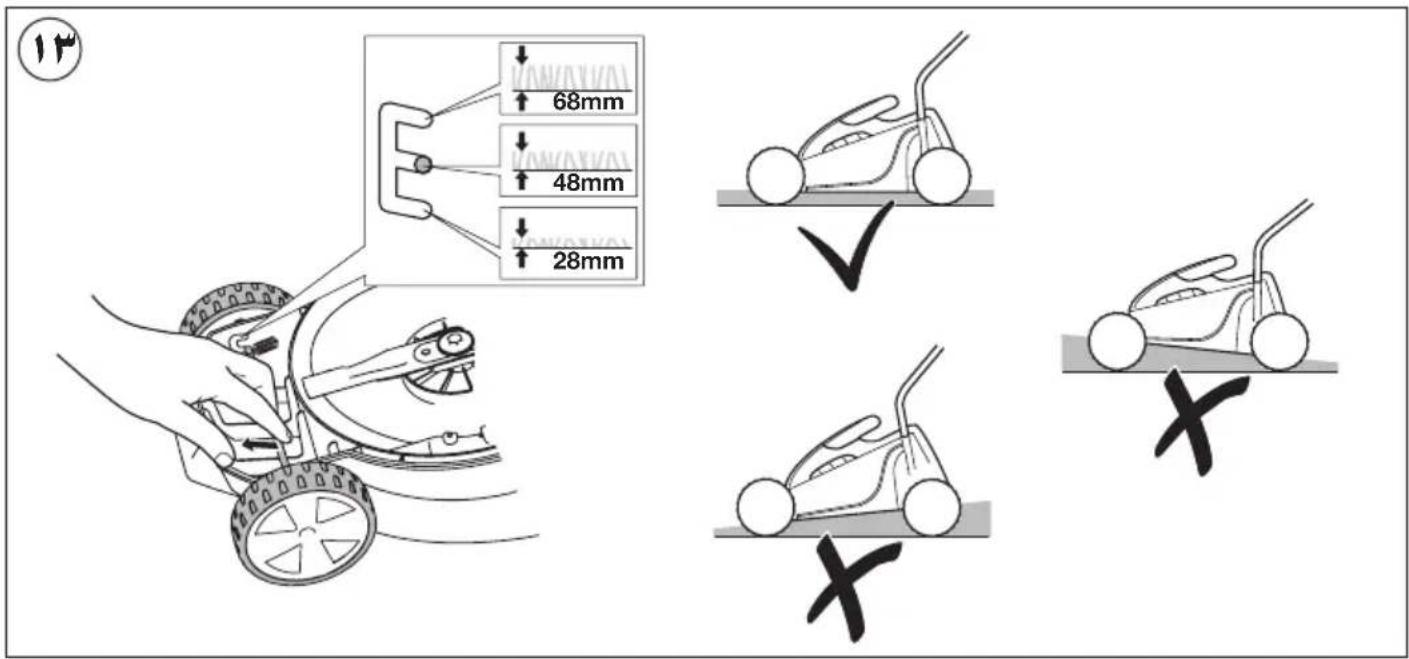
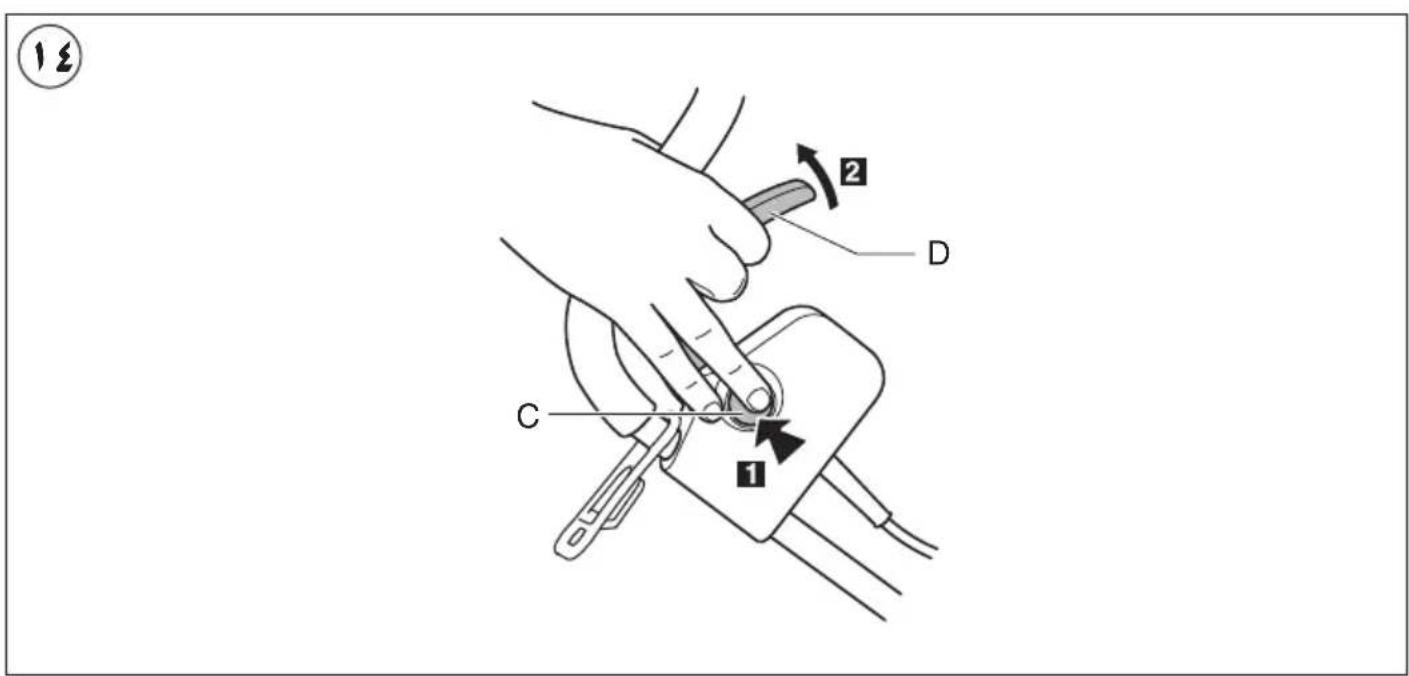
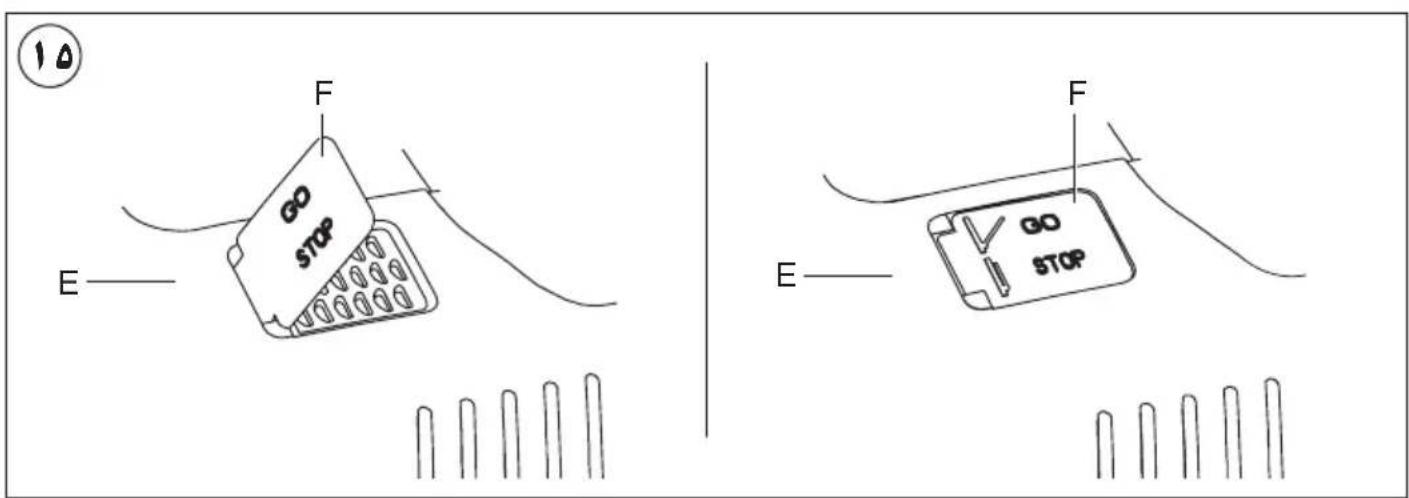
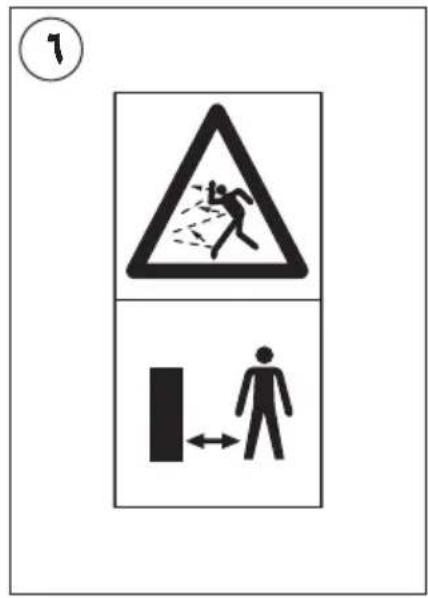
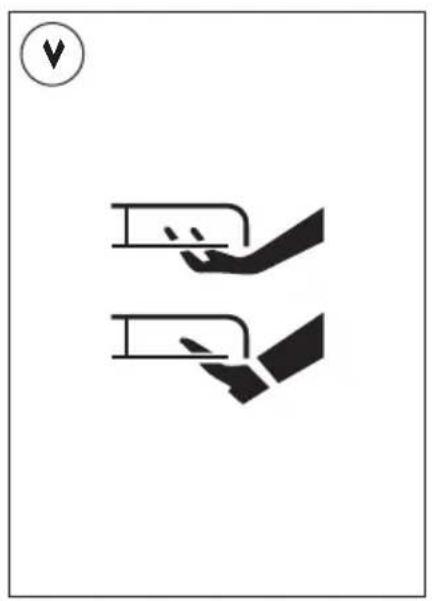
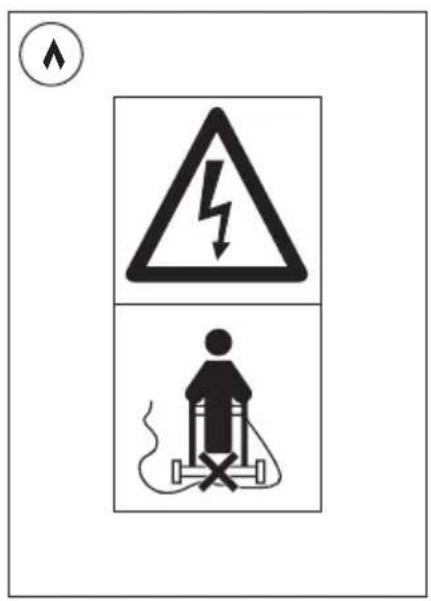

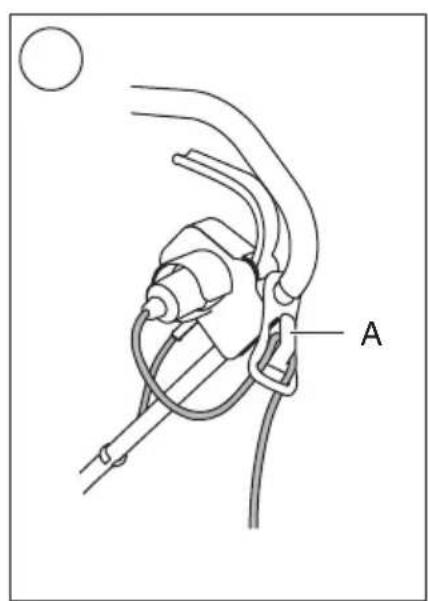

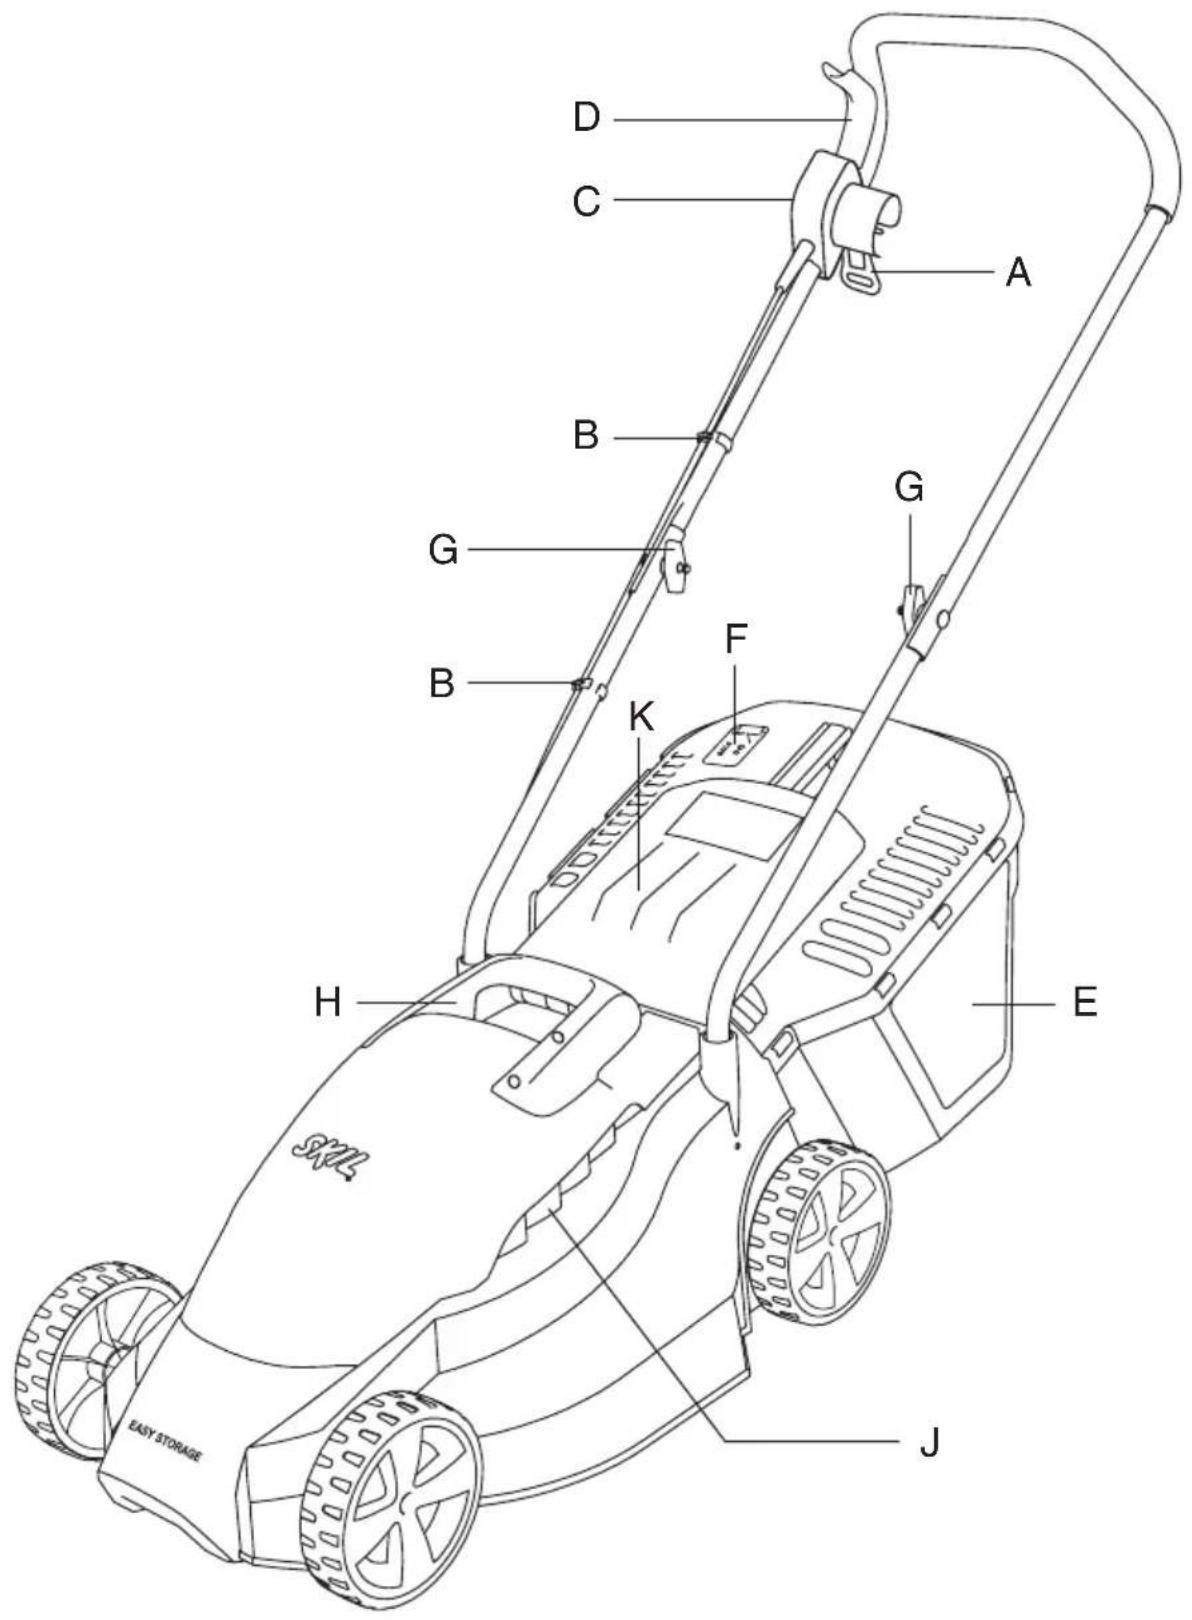
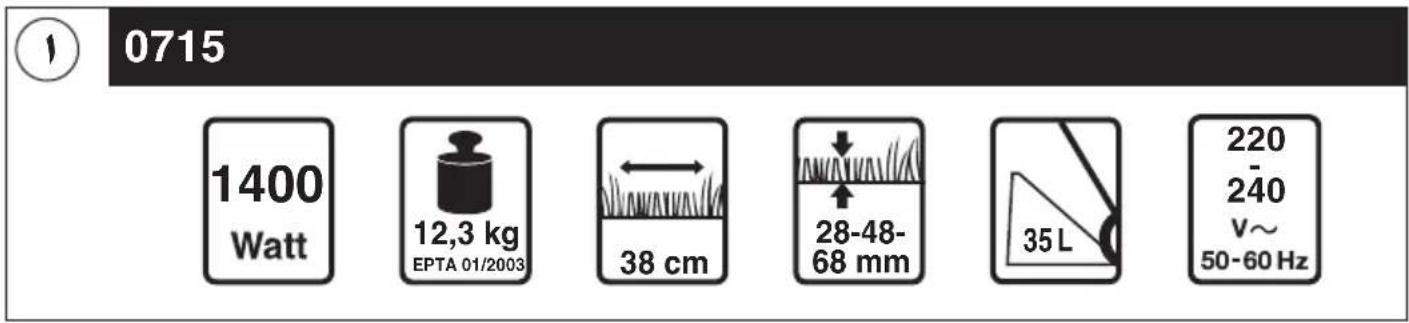
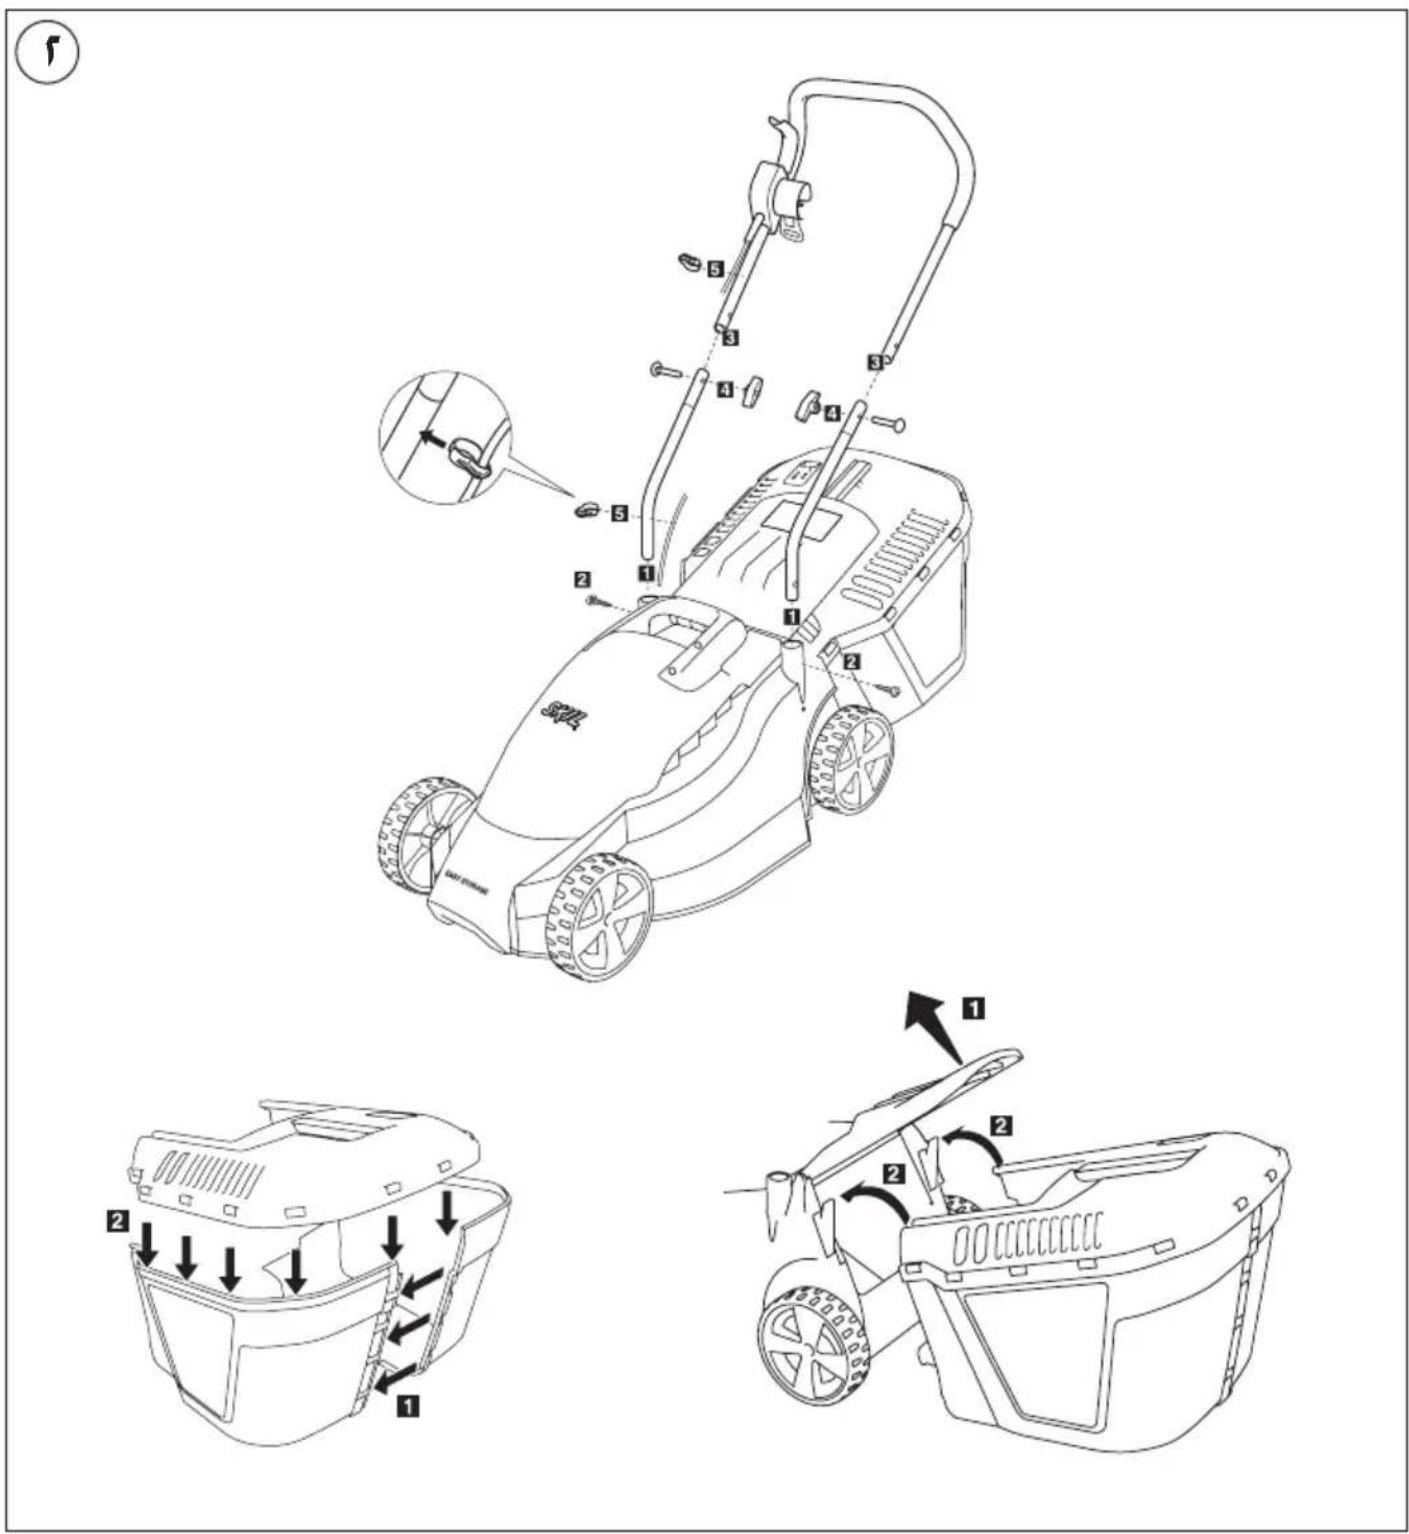

JAR
FA


01/142610Z05342
60cLgS-3LgJ L
14825

CepTHΦHKAT O COOTBETCTBUN
KZ.7500052.22.01.00048
CpOK DeIeCTBnI cepTnHnHaTa O COOTBeTCTBnI
no 09.07.2018
TOO «LeHTp CepTnΦnKauμn npoDyKuμn uClyr»
r.AImatbl,ynHa6aH6aB6aTbipa,
yr. KaIaJaKoBa 51/78