USER MANUAL SIGMA 2 CAMPINGAZ
| REVISION HISTORY |
| REV. | DATE | MODIFICATIONS | NAME | ECN NO. |
| A | 18 NOV 2024 | NEW - Spins-off from NWL0001638960. | Bonny B. | 0086868 |
| | | | |
| | | | |
| | | | |
| | | | |
| | | | |
| | | | |
| | | | |
| DO NOT PRINT THIS PAGE
Printing Notes:
Material: 64 GSM bond paper, white
Ink: Black
Resolution: 150 DPI or above
Printing method: Offset Printing
Binding: Perfect Binding
Folded size: A5 - 148 x 210 mm (W x H) |
| SAP N° : 2210694 | Program: InDesign 2024 |
| Black |
| RELEASED FOR PRODUCTION | |
| CONFIDENTIAL
THIS DOCUMENT AND ITS CONTENTS ARE CONFIDENTIAL AND CONSTITUTE TRADE SECRETS PROPRIETARY TO NEWELL BRANDS, WHO RESERVE ALL RIGHTS THEREIN. BY ACCEPTING THIS DOCUMENT, THE RECIPIENT AGREES NOT TO COPY USE, MANUFACTURE, OR COMMUNICATE TO OTHERS, WHOLLY OR IN PART, THE CONTENTS OF THIS DOCUMENT EXCEPT AS EXPRESSLY AUTHORIZED IN WRITING BY NEWELL BRANDS. | newwell
BRANDS | 3 Glenlake Parkway
Atlanta, GA 30328 USA | |
| MATERIAL: SEE NOTES | |
| DRAWING PREPARED IN ACCORDANCE WITH ASME Y14.5 | FINISH: SEE NOTES | |
| TITLE:
IFU PLANCHA RL 2024 29MB | |
| 1ST ANGLE
PROJECTION | DRAWN BY: Bonny B. | SCALE: 1:1 | DRW NO.
NWL0001683444 | REV
A |
| DATE: 18 NOV 2024 | SHEET 1 OF 1 |


FR MODE D'EMPLOI 05
GB INSTRUCTIONS FOR USE 9
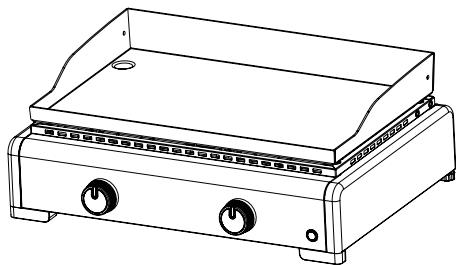
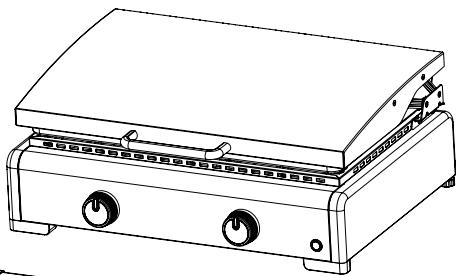
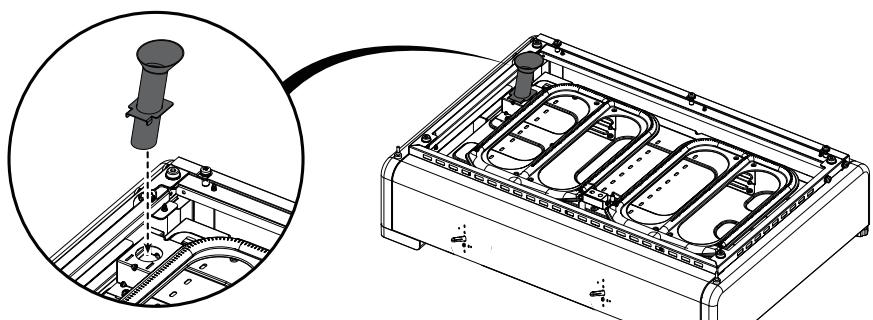
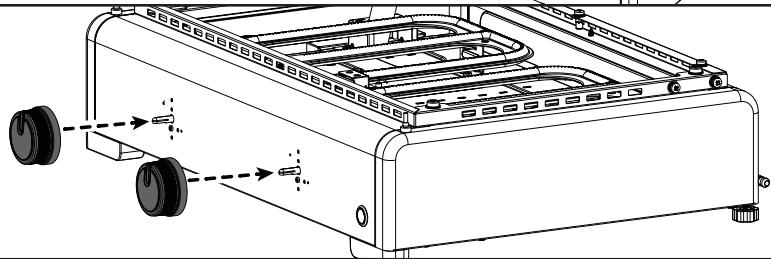
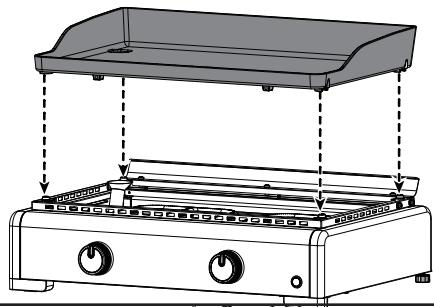
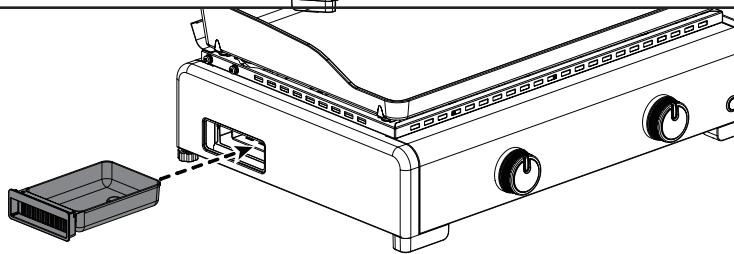
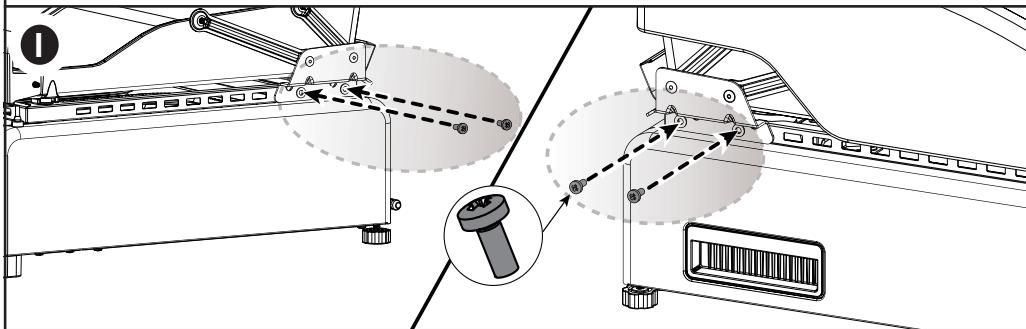
Assembling instructions
A
B

C
D
E

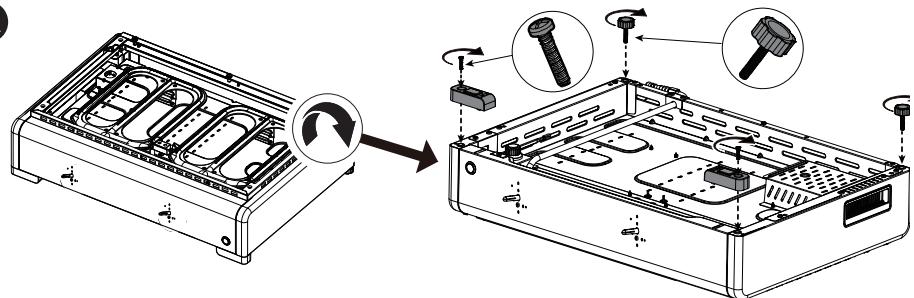
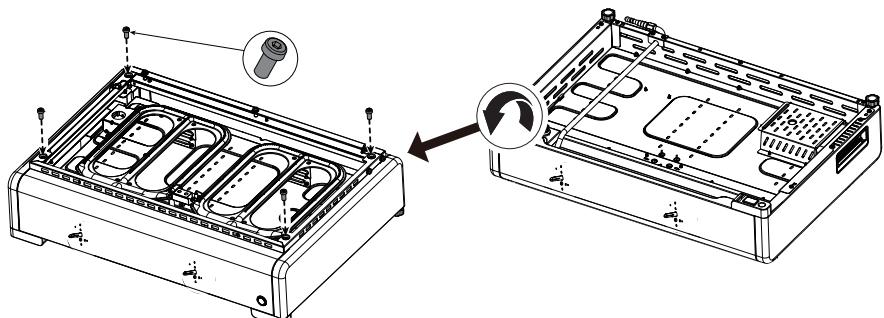
Assembling instructions
F
G
H
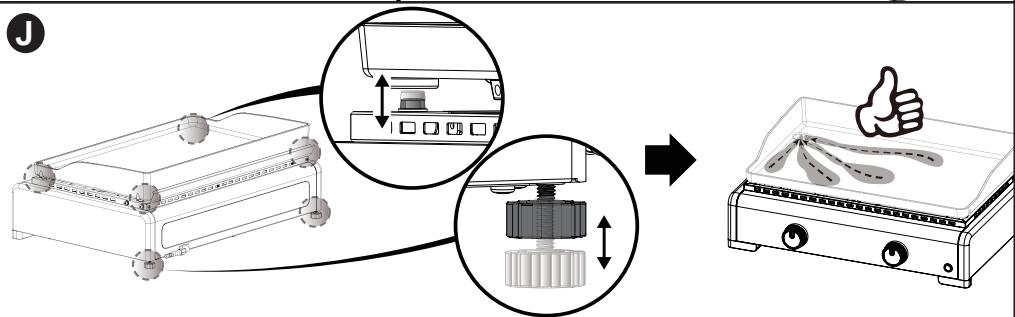
J
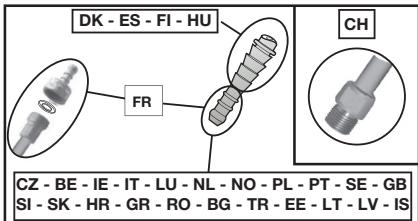
Fig. 01
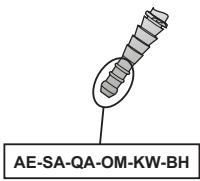
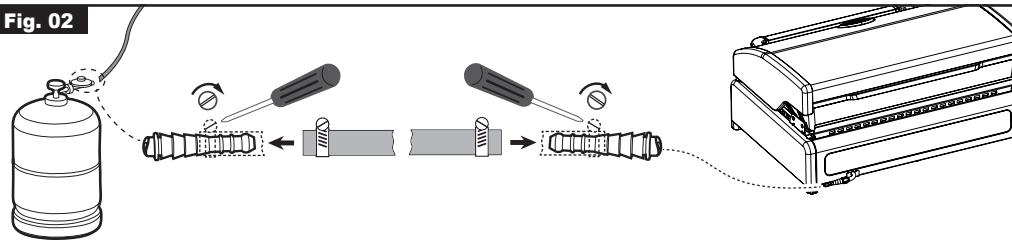
Fig. 02
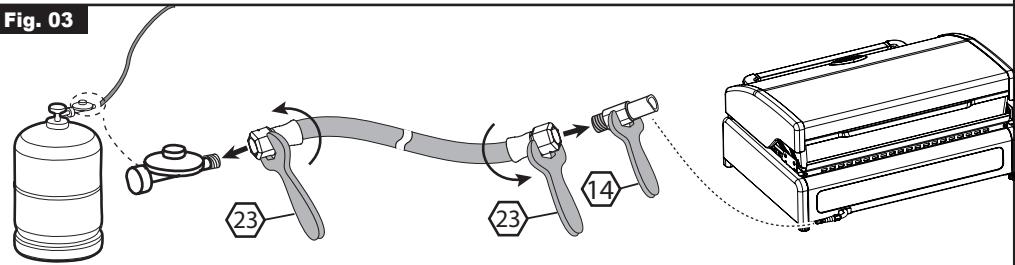
Fig. 03
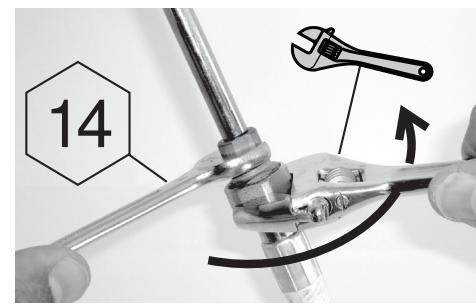
Fig. 04
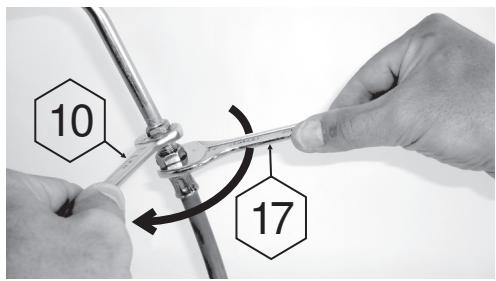
Fig. 05
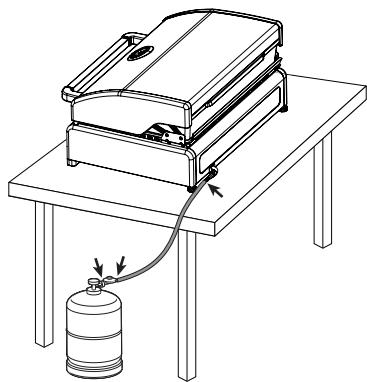
Fig. 06
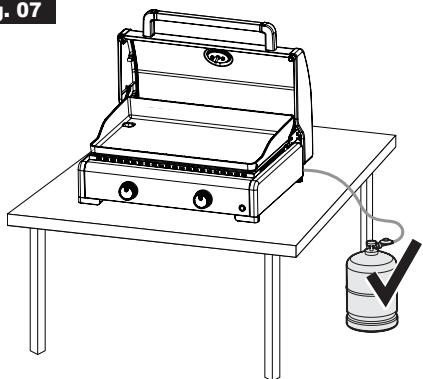
Fig. 07
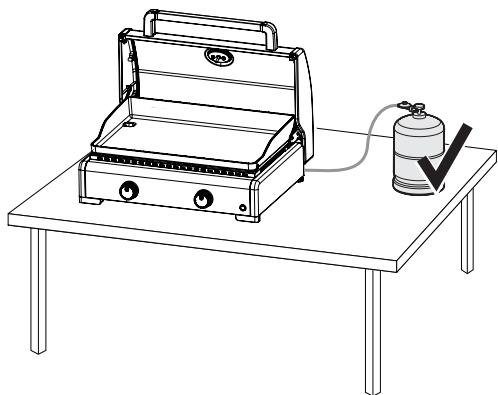
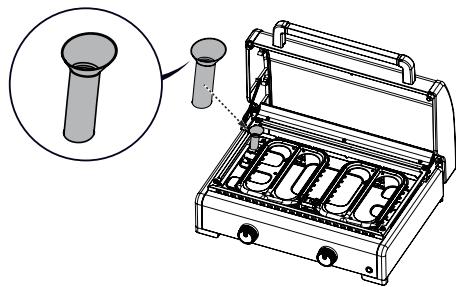
Fig. 08
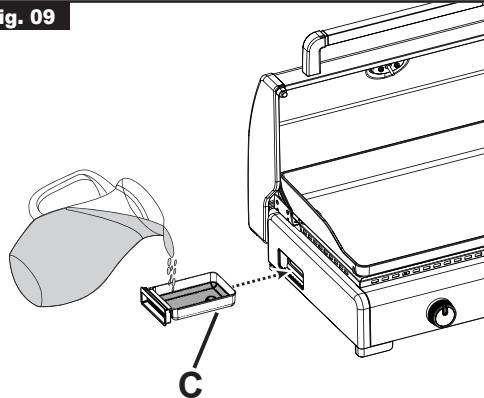
Fig. 09
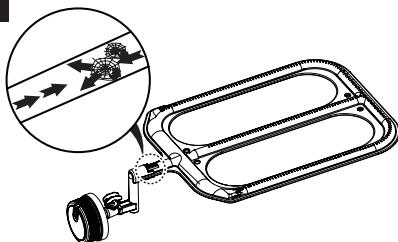
Fig. 10
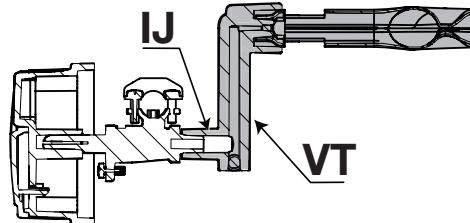
Fig. 11
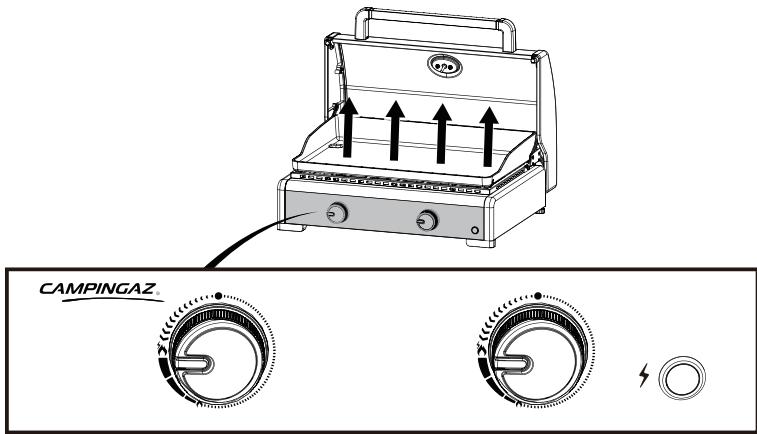
Fig. 12
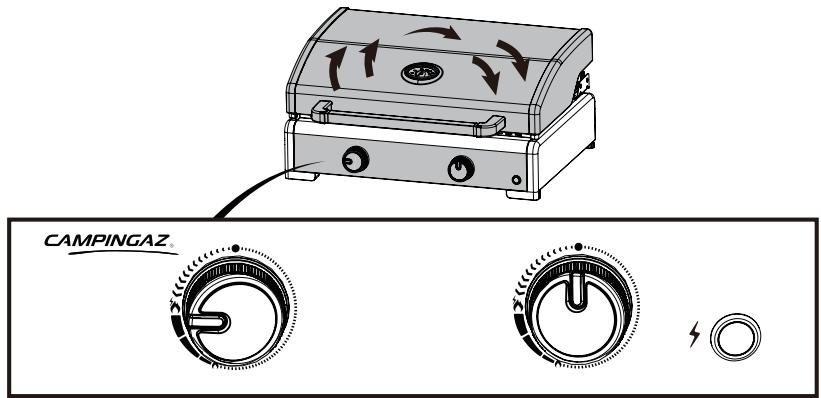
Fig. 13
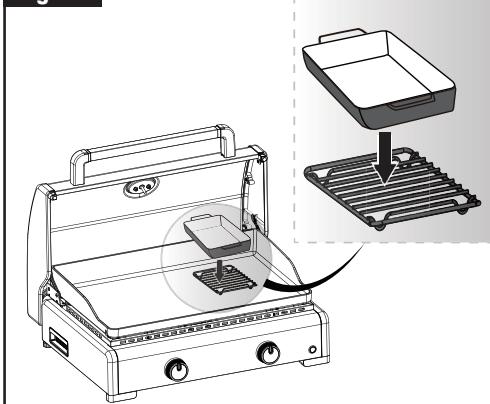
Fig. 14
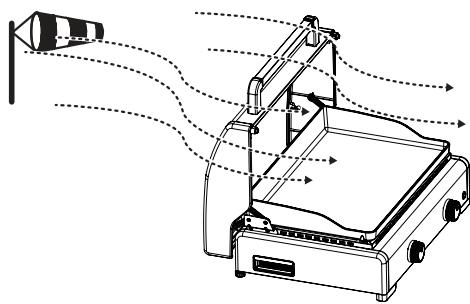
Fig. 15
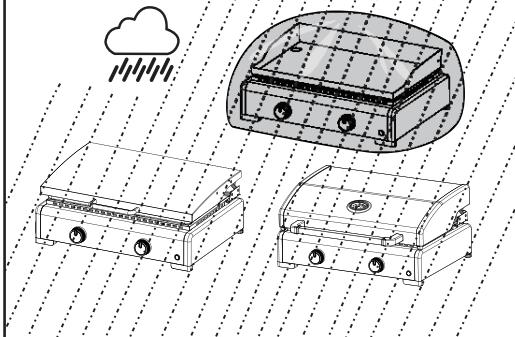
Fig. 16
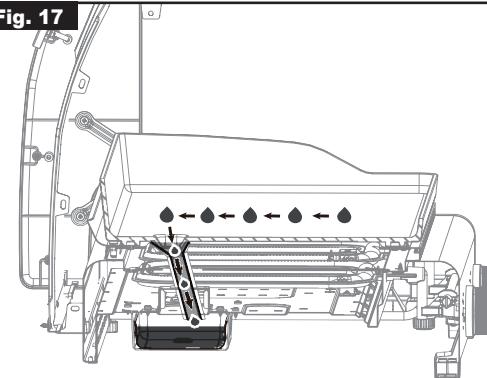
Fig. 17
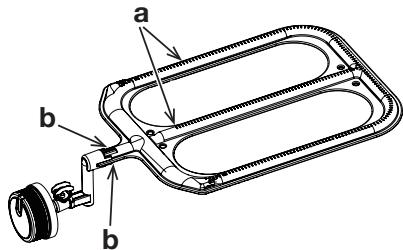
Fig. 18
MODE D'EMPLOI
NOTE : Unless otherwise specified, following generic terms “appliance / product / equipment / device" appeared in this instruction manual all refer to the product "Campingaz® Gas barbecue griddle".

This product is designed for normal private use and is not intended for commercial purposes. Please read the instructions carefully before using the product.
- Use the product outdoors only.
It is best to wear gloves to assemble the product.
- Do not use charcoal on or with the product.
- Do not use an adjustable low pressure regulator. Use fixed regulators that comply with the European standard concerning them.
- Do not cover the bottom of the firebox with aluminium foil.
- Do not lean over the hot cooking surface.
- Use caution when opening and closing the lid when the griddle is in use.
- Campingaz® always recommends wearing protective gloves when handling components which may be hot.
- Clean out grease and food fragments from the bottom of the firebox regulatory to avoid any risk of inflation during usage.
Follow these instructions carefully to avoid harming yourself or damaging your gas barbecue griddle.
A. For your safety
- Do not store or use petrol and other flammable liquids or vapours in the vicinity of this gas barbecue griddle. This device must be kept away from flammable materials when it is in use.
If you smell gas:
- Close the valve of the gas bottle
- Close the burner knobs
- Extinguish all naked flames
- Open the lid
-
If the smell continues, see "E. Checking for gas leaks" or immediately seek advice from your local retailer.
-
Parts which are protected by the manufacturer or the manufacturer's representative must not be manipulated.
-
Close the gas bottle after use.
Make sure that vulnerable users (including children, elderly people and people with disabilities) are supervised by a person with full physical, mental and sensory capabilities, that has been instructed on how to safely use the appliance and understands the hazards involved. Children must not play with the appliance. Assembly, cleaning, and maintenance must not be carried out by children.
Recommended age:
Gas appliances and accessories: 15 years +
Gas bottles: 15 years +
Use only the parts or accessories supplied with the product or purchased from an authorized service center. Do not use them with other devices or for other purposes. Use the product exclusively for its intended purpose, as stated in the operating instructions.
B. Location
- This appliance must only be used outdoors.
- CAUTION: accessible parts may get very hot. Keep young children away.
- There should be no combustible materials within a radius of approximately 60~cm around the appliance.
- Do not move the appliance when alight or in use.
- The appliance should be operated on a level surface.
Minimum ventilation airflow requirement of 2m^3 /kW / h
- When the appliance is in operation, the support on which the gas barbecue griddle is standing can get very hot. The gas barbecue griddle must not be placed on a combustible surface (plastic, tablecloth, etc.). It is recommended that the device be placed on a heat-resistant surface (concrete, stone, brick, directly on the ground (earth)). Otherwise, an incombustible, heat insulating material should be placed between the gas barbecue griddle and its stand or trolley.
C. Gas bottle
This appliance has been adjusted to operate from a 4.5 to 15kg butane/propane bottle with an appropriate low pressure regulator.
France, Belgium, Luxembourg, United Kingdom, Ireland, Portugal, Spain, Italy, Greece, Switzerland: butane 28 -30 mbar / propane 37 mbar.
Netherlands, Czech Republic, Slovakia, Hungary, Slovenia, Norway, Sweden, Denmark, Finland, Bulgaria, Turkey, Romania, Croatia, Estonia, Lithuania, Latvia, Iceland: butane 30 mbar / propane 30 mbar.
Poland:propane 37 mbar.
Always connect or replace the gas bottle outdoors in a well-ventilated area, never in the presence of a flame, spark or heat source.
France: (Fig. 01)
The equipment may be used with two types of flexible hose: (Fig. 02)
a) flexible hose designed to be joined onto ringed hose connectors on both the gas barbecue griddle and regulator sides, held firm with collars (in accordance with standard XP D 36-110).Recommended length 1.25m
b) flexible hose (according to standard XP D 36-112 or NF D 36-112) fitted with a G 1/2 threaded nut for connection to the gas barbecue griddle and a M 20x1.5 threaded nut for connecting to the regulator, recommended length 1.25m .
The appliance has a G1/2 threaded gas inlet connector. Depending on model it can be supplied with a pre-fitted NF ringed hose connector and seal. (Fig. 03)
1) To use the equipment with the flexible hose XP D 36-110: (refer to Section D - a)
- slide the flexible hose onto the ringed hose connector on both the gas barbecue griddle and regulator as far as it will go.
- slide the collars behind the two first large rings on the tailpieces and tighten them until the tightening head breaks.
- check for leaks following the instructions in paragraph E).
2) To use the equipment with the flexible hose XP D 36-112 or NF D 36-112, G 1/2 and M 20x1.5 nuts: (refer to Section D - b))
- If need be, loosen and remove the NF ringed hose connector to release the G1/2 inlet connector and remove the seal.
- tighten the G1/2 threaded nut on the hose onto the gas barbecue griddle inlet connector and the M20x1.5 threaded nut onto the regulator output connector following the instructions supplied with the flexible hose.
- use a spanner to hold the gas barbecue griddle inlet connector firm and tighten or loosen the threaded nut with another spanner.
- use a spanner (14) to hold the regulator outlet connector firm. (Fig. 04)
- check for leaks following the instructions in paragraph E).
Check that the flexible hose can stretch out without twisting or pulling and does not come into contact with the hot sides of the device. It should be replaced when the expiry date on the hose is passed or whenever it is damaged or develops surface cracks.
Belgium, Luxembourg, United Kingdom, Ireland, Portugal, Spain, Italy, Croatia, Greece, Netherlands, Czech Republic, Slovakia, Hungary, Slovenia, Norway, Sweden, Denmark, Finland, Bulgaria, Turkey, Romania, Poland, Estonia, Lithuania, Latvia, Iceland: (Fig. 01)
The gas barbecue griddle is equipped with a circular connector. It should be used with flexible hose that is suitable for use with butane and propane gas. Hose length should not exceed 1.20 meters. It should be replaced if it is damaged or cracked, when required by national regulations or at the end of its lifecycle. Do not pull or pierce the hose. Keep the hose away from any parts of the gas barbecue griddle that get hot. Check that the flexible hose can stretch out, without twisting or pulling.
Switzerland: (Fig. 01)
The gas barbecue griddle should be used with flexible tubing that is suitable for use with butane and propane gas. Tubing length should not exceed 1.50 meters. Do not pull or pierce the tubing. It should be replaced if it is damaged or cracked, when required by national regulations or at the end of the part lifecycle. Do not pull or pierce the tubing. Keep away from any parts of the gas barbecue griddle that get hot. Check that the flexible hose stretches out normally, without twisting or pulling.
Flexible tubing connection: To connect the tubing to the connector on the gas barbecue griddle, tighten the nut on the tubing firmly but without excess force using the two wrenches provided:
E. Checking for gas leaks
1) Work outside, away from all sources of ignition. Do not smoke near the gas barbecue griddle or gas bottle.
2) Make sure the control knobs are in the "off" () position.
3) When required, push the end of the hose completely onto the regulator nozzle and secure with a suitable clip.
4) Fit the regulator onto the gas cylinder in accordance with its instructions.
5) Use a soapy solution to test for leaks. Important: never use a naked flame to check for gas leaks.
6) Apply the solution to the connections cylinder/regulator/hose/ apparatus (Fig. 06) (the control knobs should remain closed: off position ). Open the gas cylinder valve.
7) Bubbles in the gas leak solution indicate that there are gas leaks.
8) The leak can be stopped by tightening any hose connection or replacing any faulty component. The gas barbecue griddle must not be used until the leak is stopped.
9) Close the valve on the gas bottle. Check for leaks at least once per year and each time the gas bottle is replaced. Important: Never use a flame to detect a gas leak.
The gas bottle must be changed and checked for leaks at least once a year.
F. Batteries for electronic ignition
1) Battery requirement
Your gas barbecue griddle is equipped with an electronic ignition that requires one AA/LR6 battery.
For your convenience the applicable battery has been included in the package.
If the grill is not used over an extended period of time, it is highly recommended to remove the battery from the grill and store it separately in a dry and cool place.
2) Exchanging the battery
- Identify the electronic ignitor.
- Unscrew the plastic cap.
- Replace the battery, respecting the polarities as indicated.
- Screw the cap back in place.
Refer to the paragraph F(3) for the battery recycling.
- Non rechargeable batteries are not to be recharged.
3) Battery disposal

This symbol found on the batteries means that at the end of their lives, the batteries must be removed from the unit, and then recycled or properly disposed of.
The batteries should not be thrown into the trash but should be brought to a collection point (recycling centre etc.). Check with your local council. Never dispose of batteries in nature. Do not try to incinerate: the presence of certain substances (Hg,Pb Cd, Zn, Ni) in used batteries may be hazardous to the environment and human health.
G. Use of the gas barbecue griddle
1) Prior to use
Reminder: Never use the gas barbecue griddle until the instructions have been read carefully and fully understood. Additionally, ensure that:
- There are no gas leaks.
The hose does not touch any components which may get hot. (Fig. 07)
- The grease evacuation funnel has been correctly inserted in its dedicated housing. (Fig. 08)
- The grease container C (Fig. 09) has been correctly inserted into its compartment on its rail.
-
The burners are not blocked or obstructed (e.g. by spider webs). (Fig. 10)
-
Also make sure that the grease container C (Fig. 09) is filled with water according to the minimum and maximum levels indicated and that it is inserted on its rail. This is not required but will make cleaning much easier. Insertion is from the front on models with doors.
- It is recommended to use protective gloves when handling particularly hot components.

Check that the venturi tubes (VT) cover the injectors (IJ). (Fig. 11)
2) Using the gas barbecue griddle for the first time
When used for the first time, heat up the gas barbecue griddle with all its burners on FULL FLOW position ( , ) (with the lid closed), for approximately 30 minutes in order to eliminate any odours resulting from any residual coatings on the new parts.
H. Lighting the gas barbecue griddle burners
Once the burner is lit, there are two ways of lighting another burner:
Firstly, repeat the lighting operation described above; OR
Secondly, light the burner to the right or left of the first burner lit, then the other burners in turn by turning the adjustment button to the full flow position (4).
If the piezoelectric ignition doesn't work, use the manual ignition (following paragraph).
In case of burn back (flame inside the burner) switch the product off, allow it to cool down (approximately five minutes), then reignite the appliance. If the problem of burn back persists, then please contact your local Campingaz® representative.
I. Gas barbecue griddle burner-manual lighting
If the automatic ignition should fail to operate, turn the control knob to the "off" position (●) and wait 5 minutes.
Remove the griddle to access the burner.
Place a long lit match close to the burner flame outlets, then turn the control knob on the control panel to the full flow position (4) on the same side where you have the match.
Next, position the control knob to low flow, all the while keeping your hands at a safe distance from the flames.
J. Turning off the gas barbecue griddle burner
Return the control knobs to the "off" position () , then close the cylinder valve.
K. Cooking Lid with Thermometer
Gas barbecue griddle cooking as we know it has changed, the gas barbecue griddle with cooking lid opens the door to endless varieties of cooking possibilities.
For the best cooking results preheat the gas barbecue griddle for 5 - 10 minutes with the cooking lid closed which will not only help reduce the heat up time but also help the cooking surface reach its maximum temperature.
Having a hot cooking surface will not only stop your food from sticking to the cooking surface but also give you the best caramelization on steak and meat resulting in amazing flavours.
Grilling Use (Iid in open position - Fig. 12): Allows the griddle to be used for searing food without flare-ups.
Use the gas barbecue griddle in the traditional way with the lid open which is ideal for grilled foods, such as fish, seafood, vegetables, fruits, diced foods, eggs and pancakes etc
If the food is crisping too quickly reduce the heat on all the burners that are on.
Convection cooking (lid in closed position - Fig. 13): Allows the
cooking area to be used as an oven, ideal for roasting chicken, meat, fish, pizza, casserole and even baking a cake.
Pre heat the gas barbecue griddle with lid closed to the desired temperature using 1 of the 2 burners on maximum while keeping the other off, to create the convection effect. (Fig. 13) Using the lid thermometer regulate this burner as required to maintain the ideal heat needed with the lid closed.
Place the food on a gas barbecue griddle griddle cooking surface above the burner that is turned off. This will prevent the food from burning and ensure even cooking using the convection cooking method.
Moreover, we recommend using the included (depending on gas barbecue griddle model) raised oven accessory (see Fig. 14) or a similar baking accessory when baking. The accessory raises the ingredients off the griddle, allowing the hot air to flow between the griddle and the ingredients, thereby enabling perfect baking results. Such an oven accessory makes it possible to make a variety of recipes from casseroles, cookies or even your favourite cake on your gas barbecue griddle.
Tip: Keep the lid closed as much as possible during cooking to maintain the temperature within the cooking area. If the food is crisping too quickly reduce the heat using the two burners that are on.
For optimal results when cooking large pieces of meat or roasts the use of a meat thermometer to measure the internal meat temperature is encouraged.
Cooking times may vary from one grilling session to another depending on the weather conditions, size of the food portion and how often you open and close the lid.
Additional functions of the cooking lid:
Increases Preheating Efficiency: Keeps hot air around the griddle, reducing preheat time by half and saves gas. (Fig. 13)
Wind Protection: (in open position - Fig. 15): Shields the griddle and the burners from wind during usage.
Splash Back: (in open position - Fig. 15): Prevents grease splatters during cooking.
Griddle Protection: (in closed position - Fig. 16): Safeguards the griddle during storage.
L. Protective Lid (depending on Gas barbecue griddle model)
The protective lid of the gas barbecue griddle serves multiple purposes:
Increases Preheating Efficiency: Keeps hot air around the griddle, reducing preheat time by half and saves gas. (Fig. 13)
Wind Protection: (in open position - Fig. 15): Shields the griddle and the burners from wind during usage.
Splash Back: (in open position - Fig. 15): Prevents grease splatters during cooking.
Griddle Protection: (in closed position - Fig. 16): Safeguards the griddle during storage.
Note: The protective lid is not intended for cooking and should not be closed during cooking.
M. Replacing the gas bottle
- Always work outside in a well ventilated area and never in the presence of a flame, spark or heat source.
- Return the control knobs in the "off" position (●) then close the gas bottle valve.
- Remove the regulator, check that the sealing joint is in good condition.
- Put the full gas bottle in place, refit the regulator, taking care not to apply stress to the hose. Check for gas leaks (see Section E.)
N. Cleaning and maintenance
We love to grill, but cleaning is always a pain. Yet it is a very important stage of every grilling session. Regular cleaning facilitates the durability and reliability of your Campingaz® gas barbecue griddle.
Cooking surface:
Let the cooking surface cool down before cleaning. Use Campingaz Cleaner Spray BBQ cleaner and spatula. Alternatively use dishwashing liquid to degrease the cooking surface.
When cleaning always rinse thoroughly with water and avoid the use of scratch-sponges where possible and opt for a soft microfiber towel as it is as efficient and will prevent damages.
Before replacing the cooking surface, rub them lightly with grease to protect them from corrosion and to prevent them rusting and
sticking to the food.
Campingaz recommends applying a thin coat of vegetable oil to the cooking surface with kitchen towel.
Grease drawer:
Please remember to empty the grease drawer C (Fig. 09) regularly, to prevent it from overflowing. The grease drawer can fill up quickly, especially when cleaning the cooking surface with water. For the sake of convenience, the grease drawer is dishwasher-safe.
Grease funnel:
The grease funnel (Fig 08) guides excess grease into the grease container (Fig 17).
The funnel is removable and dishwasher-safe., as it is made from stainless steel.
Base walls, lid, control panel:
Clean these elements from time to time using a sponge with washing up liquid. Do not use abrasive products.
Burners
- In order to maintain your gas barbecue griddle in perfect operating condition, it is recommended to clean it periodically (after 4 or 5 uses).
- Wait until the gas barbecue griddle has cooled down before cleaning.
- Close the gas bottle.
- The gas barbecue griddle burner must be cleaned and checked every 3 months. Remove the entire burner and check that no dirt or spider webs block the venturi tube openings, which may cause the burner to be less efficient or cause a dangerous gas fire outside the burner.
- Clean the top of the burner, as well as the sides and base, using a moist sponge (water with washing up liquid). If necessary, use a damp steel brush.
- Check that all burner outlets are clear and let dry before using again. If necessary, use a wire brush to unclog the burner outlets.
- Clean the orifices on the Venturi jet (see Fig. 18: a - Outlet holes, b - Venturi tube openings) or the burner if necessary.
- Never modify the gas barbecue griddle: any modification may prove dangerous.
N.b.: Frequent cleaning of the burner maintains it in good condition for many uses and prevents premature oxidation, notably due to acid residue from cooking. Oxidation of the grill burner is, however, normal.
O. Stainless Steel Griddle (depending on gas barbecue griddle model)
During usage, it is normal for the griddle to undergo a change in colour. This change can sometimes be observed even after thorough cleaning.
Rest assured, this discolouration is a natural phenomenon of the raw material of the griddle, when it becomes very hot. This does not affect the performance of the product or its compliance with food safety standards.
The griddle remains safe and efficient for all your cooking needs.
P. Storage
- After use, close the valve of your gas bottle by turning the handwheel.
- Store your appliance in a dry, enclosed storage area (eg: garage) to protect your appliance from the weather elements.
- Disconnect the gas bottle and store it outdoors.
- If your appliance is not used during a long period of time, it is recommended to protect it from dirt with an appropriate cover during storage.
Q. Accessories
To ensure you get the most out of your grilling experience, Campingaz has designed many accessories to aid preparing your favourite dishes your gas barbecue griddle, make cleaning as simple as possible and to ensure your can make your gas barbecue griddle last longer.
| Grilling Essentials | Clean & Protect |
| Premium Utensils: Spatulas, Tongs etc | Tailored covers |
| Grilling Glove | Brushes |
| Grilling Cloche | Cleaning Spray |
| Pizza stone | Stainless Steel Cleaners |
To view our full range and more information, please visit www.Campingaz.com
ADG (Campingaz) advises that its Gas barbecue griddles should systematically be used with accessories and replacement parts from Campingaz. ADG (Campingaz) accepts no responsibility for any damage or malfunction due to the use of accessories and/or replacement parts from other brands.
R. Protecting the environment
Think about protecting the environment! Your equipment contains materials which can be recovered or recycled. Hand them in to the waste collection service in your municipality and sort the packing materials.
S. Troubleshooting:
| Problems | Probable causes / remedies |
| The burner will not light | • Lack of gas supply.
• Regulator does not work.
• Hose, valve, Venturi tube or burner openings are blocked.
• Venturi tube not seated over jet. |
| Burner 'pops' or blows itself out | • Check gas supply.
• Check hose connections.
• Contact the After Sales Service. |
| Sputtering unsteady flames | • New bottle may contain air. Continue use and the problem will disappear.
• Contact the After Sales Service. |
| Large flames on surface of burner | • Jet nozzle badly connected to Venturi tube. Adjust the Venturi tube.
• The Venturi tube is clogged (e.g.: cobwebs). Clean Venturi tube.
• Contact the After Sales Service. |
| Flame low on jet | • The bottle is almost empty. Change bottle and the problem will disappear.
• Contact the After Sales Service. |
| Excessive grease flare-up | • Clean the protective plate above the burner.
• Grill temperature too high: Lower flame.
• Clean the grease drip tray. |
| Burners light with a match, but not with the "PIEZO" igniter | • Faulty igniter button, wire or electrode. Check igniter cable connections.
• Check condition of electrode and connection wire.
• Contact the After Sales Service. |
| Fire at any connection | • Leaking connection.
• Turn off gas supply immediately.
• Contact the After Sales Service. |
| Lack of heat | • Clogged jet or Venturi tube.
• Contact the After Sales Service. |
| Fire behind control knob | • Defective tap unit.
• Turn off appliance.
• Contact the After Sales Service. |
| Fire under control panel | • Turn off appliance.
• Close gas cylinder.
• Contact the After Sales Service. |
Your Plancha is equipped with an electronic ignition that requires one AA/LR6 battery.
Please remember to empty the grease drawer C (Fig. 09) regularly, to prevent it from overflowing. The grease drawer can fill up quickly, especially when cleaning the cooking surface with water. For the sake of convenience, the grease drawer is dishwasher-safe.
Fetttrichter:
Please remember to empty the grease drawer C (Fig. 09) regularly, to prevent it from overflowing. The grease drawer can fill up quickly, especially when cleaning the cooking surface with water. For the sake of convenience, the grease drawer is dishwasher-safe.
Embudo de grasa:
Your Plancha is equipped with an electronic ignition that requires one AA/LR6 battery.
Please remember to empty the grease drawer C (Fig. 09) regularly, to prevent it from overflowing. The grease drawer can fill up quickly, especially when cleaning the cooking surface with water. For the sake of convenience, the grease drawer is dishwasher-safe.
Funil de gordura:
O funil de gordura (Fig. 08) conduc o excesso de gordura para o recipiente de gordura (Fig. 17).
Your Plancha is equipped with an electronic ignition that requires one AA/LR6 battery.
Please remember to empty the grease drawer C (Fig. 09) regularly, to prevent it from overflowing. The grease drawer can fill up quickly, especially when cleaning the cooking surface with water. For the sake of convenience, the grease drawer is dishwasher-safe.
Imbuto del grasso:
Your Plancha is equipped with an electronic ignition that requires one AA/LR6 battery.
Please remember to empty the grease drawer C (Fig. 09) regularly, to prevent it from overflowing. The grease drawer can fill up quickly, especially when cleaning the cooking surface with water. For the sake of convenience, the grease drawer is dishwasher-safe.
Vettrechter:
De vetrechter (Fig. 08) leidt overtollig vet maar de vetcontainer (Fig. 17).
Your Plancha is equipped with an electronic ignition that requires one AA/LR6 battery.
Please remember to empty the grease drawer C (Fig. 09) regularly, to prevent it from overflowing. The grease drawer can fill up quickly, especially when cleaning the cooking surface with water. For the sake of convenience, the grease drawer is dishwasher-safe..
Drypptrakt for fett:
BPPraktien for fett (Fig. 08) foper overflodig fett inn i fettoppsmaleren (Fig. 17).
Your Plancha is equipped with an electronic ignition that requires one AA/LR6 battery.
Please remember to empty the grease drawer C (Fig. 09) regularly, to prevent it from overflowing. The grease drawer can fill up quickly, especially when cleaning the cooking surface with water. For the sake of convenience, the grease drawer is dishwasher-safe.
Tillagningsya:
Your Plancha is equipped with an electronic ignition that requires one AA/LR6 battery.
Please remember to empty the grease drawer C (Fig. 09) regularly, to prevent it from overflowing. The grease drawer can fill up quickly, especially when cleaning the cooking surface with water. For the sake of convenience, the grease drawer is dishwasher-safe.
Rasvasuppilo:
Your Plancha is equipped with an electronic ignition that requires one AA/LR6 battery.
Please remember to empty the grease drawer C (Fig. 09) regularly, to prevent it from overflowing. The grease drawer can fill up quickly, especially when cleaning the cooking surface with water. For the sake of convenience, the grease drawer is dishwasher-safe.
Fedtragt:
Fedtragtien (Fig 08) leder overskydende fert ned i fertbeholderen (Fig. 17).
Your Plancha is equipped with an electronic ignition that requires one AA/LR6 battery.
Vioeigandi rafihóʊr fylgia meo greillin pu, pé til hægərauka.
Ef grilloi er ekki nota l lengi tima er eindregi maelt meo a taka
rafihóūrnnur ur grillin ü goyma pær sa r purum andsvolum
sta.
Please remember to empty the grease drawer C (Fig. 09) regularly, to prevent it from overflowing. The grease drawer can fill up quickly, especially when cleaning the cooking surface with water. For the sake of convenience, the grease drawer is dishwasher-safe.
Fitutrecht:
Fitutrektin (Mynd 08) beinir umframfitu i fitupponnuna (Mynd 17). Par sem trektin er ur ryofriu stali er haegt er a fjarlaegja hana og bvo i uppbvattavel.
Undirstödupil, lok, stjörnborð:
Hreinsö pessa hulta ðóru hvoru meo svampi vættum meo uppvottaleg. Ekki notingris vor.
Brennarar
- Melt er meδ bvi aδ prifa Plancha gasgrillò regulega (efirt 4 eəla 5 skipti) til aδ halle henni i fulfilkomnu notkunaréstandi.
Biodi par til Plancha gasgrillio kolnar aour en hun er hreinsua.
- Skrufið fyir gaskúttinn.
- Nauosynlegt er adbrifa og skoda Plancha gasrillio a brigga mana fresti. Fjarlaegi allan brennarann og gangio ur skugga um ad engin ochireni eda konguloarevfir stifip on brednaslsonnun, sem gaeti leitt til pess ad brennarrin starfki ekki sem skyldi eda ad haettulegur gaseldur Myndist fyir utan brennann.
- Prifidbrennanarr aofan, auk hlianna og undinstobunnar, mekromsvampi (vættum ivatni og upppvottalegi). Noti rakanstalbursta forb krefur.
Gangióur skugga um að ölluttok brennarans sé Óstiflóg o purr ádur en hann er notáur aftur. Ef pess barf skal notable virbursta til að losa stiflur ur öttukum brennarans.
Hreinsö opin a prenglastumtunn (sjá Ñmýrd 18: a- uttaksop, b- op prenglaslóngu) eða brennananef eþör krefur.
Aldreia mä breyta Plancha gasgrilliö: breytingar gætu verö haettlegar.
Athugio: Pegar brennarinn er prifinn oft helst hann i goodu astandi til margvislegra notkun og kemur i veg firn smemmbera ryMyndun, einkum vegna surra leifa eftir edun. RyMyndun a grillbrrenanuran er bo edileg.
O. Grind ur ryofriu stali (meo sumum geroum Plancha gasgrilla)
Paō er eolilieg tā litur grindarinnar breyist vio notkun. Litabreytingin er stundum synileg pott grindin hafi veri o prin vandlega.
Your Plancha is equipped with an electronic ignition that requires one AA/LR6 battery.
Please remember to empty the grease drawer C (Fig. 09) regularly, to prevent it from overflowing. The grease drawer can fill up quickly, especially when cleaning the cooking surface with water. For the sake of convenience, the grease drawer is dishwasher-safe.
Lejek do tuszczcu:
Your Plancha is equipped with an electronic ignition that requires one AA/LR6 battery.
Please remember to empty the grease drawer C (Fig. 09) regularly, to prevent it from overflowing. The grease drawer can fill up quickly, especially when cleaning the cooking surface with water. For the sake of convenience, the grease drawer is dishwasher-safe.
Your Plancha is equipped with an electronic ignition that requires one AA/LR6 battery.
Pre văčsie pohodlie je sučast'ou balenia aj prislužná bateria.
Ak sa gril dhsls ch nepouziva, odporucame bateriu z gril yvbrat a uskladn'ju oddelene na suchom a cladnom miseste.
2)Vymena batiere
Vyhradajte elektronicky zapaovač
- Odrskrutkujte plastový kryt.
Vymente batériu, pričom dodržte vyznačenu polaritu.
Naskrutkujte uzáver spáť na miesto.
Postup recyklacia baterie je popisany v odseku F(3).
- Nenabijate'né baterie sa nesmú nabijat'.
3) Likvidácia baterii

Please remember to empty the grease drawer C (Fig. 09) regularly, to prevent it from overflowing. The grease drawer can fill up quickly, especially when cleaning the cooking surface with water. For the sake of convenience, the grease drawer is dishwasher-safe.
Lievik na mastnotu:
lievik na mastnotu (Obr. 08) védie prebyćnú mast' do nádoby na mastnotu (Obr. 17).
Your Plancha is equipped with an electronic ignition that requires one AA/LR6 battery.
Please remember to empty the grease drawer C (Fig. 09) regularly, to prevent it from overflowing. The grease drawer can fill up quickly, especially when cleaning the cooking surface with water. For the sake of convenience, the grease drawer is dishwasher-safe.
Zsirtolcser:
Your Plancha is equipped with an electronic ignition that requires one AA/LR6 battery.
Please remember to empty the grease drawer C (Fig. 09) regularly, to prevent it from overflowing. The grease drawer can fill up quickly, especially when cleaning the cooking surface with water. For the sake of convenience, the grease drawer is dishwasher-safe.
Lijak za maschobo:
Your Plancha is equipped with an electronic ignition that requires one AA/LR6 battery.
Please remember to empty the grease drawer C (Fig. 09) regularly, to prevent it from overflowing. The grease drawer can fill up quickly, especially when cleaning the cooking surface with water. For the sake of convenience, the grease drawer is dishwasher-safe.
Lijevak za masnoch:
Lijevak za masnoću (slika 08) vodi višak masnoće u spremin za masnoću (slika 17).
Lijevak sie moze skunuti prati u perilisi posuda jer je izraden od nehrdajuceg celika.
Nosece stranice,Poklopac,kontrolna ploca:
Ocistite ove elemente s vremna na vrijeme spužom i tekučinom za pranje posuda. Nemojtke koristiti abrazivne proizvodze.
Plamenici
- Kako bistie svoju ravnu plochu odzali u savrsenrad namdon stanju, prepučrůc se povremno cisěcně (nakon 4 ili 5 uporaba).
- Pricekajte da se ravna ploča ohladi prije cisćenja.
Zatvorite plinskubocu.
- Plamenik ravne ploceme sera estiiti i kontralirati svaka 3mjesca. Uklonite cijeli plamenik i provjerde da nikavka prljavstina ili paukova mreza ne blokiraj venturi otvore cijevi jer toozhe uzrokovati manju učinkovitost plamenika ili izazvati opasan plinski požar izvan plamenika.
Ocistite vrh plamenika, kao i stranice i osnovu, koristeci vlaznu spuzvu (voda sa tekucinom za pranje posuda). Ako je potrebno, upotrijbeite vlaznu celicnu cteku.
- Provjerite Jesu li svi izlazi plamenika Čisti i ostavite da se osuše prije ponovne uporabe. Ako je potrebno, upotrijebite Žicanu Četku da odčepte izlaje plamenika.
- Čcistite ovotre na venturi mlaznici (vidi sliku 18: a- izlazni olvtori, b- venturoti ovtri na cijevi) ili plameniku ako je potrebno.
- Nikada nemojte modificatori ravnu plocu: svaka se modifikacja要去Pokazati opasnom.
Napomena: Cesto ciscenje plamenika odrzava ga u dobrom stanju za mnoge upotrebe i sprjecava preuranjenu oksidaciju, posebice zborg kiselih ostataka od pripreme hrane. Medutim, oksidacija plamenika rostilja je normalna.
O. Rešetka od nehrdajuceg Čelika (ovisno o modelu ravne ploče)
Your Plancha is equipped with an electronic ignition that requires one AA/LR6 battery.
Please remember to empty the grease drawer C (Fig. 09) regularly, to prevent it from overflowing. The grease drawer can fill up quickly, especially when cleaning the cooking surface with water. For the sake of convenience, the grease drawer is dishwasher-safe...
Ako yceTte Mnpnc Ha ra3:
- 3aTbOpTe KnaHaHa Ha ra3oBaTa 6yTuIka
- 3aTBopeTe KOnyEtata Ha ropejIkata
- 3aracete OTKPNTIe INaMbU.
-
OTbopete kanaka.
5.AkO MHPN3MATA OCTBA, BnKTe S E) « N3NTBaHE 3a HENPOYCKNIBOCT » INIe Ce o6bPHeTe He3aBabHO KbM TbProBCKaTcΦnMa, OT KOrTo CTe KYNiyn UpeDa.
-
CactHTE, KOHTO ca 3aUHTENI OT pNO3BODHTENI INI ON InpdCTABNTENI Ha pNO3BODHTENI, He TpRbBa da ce noDnppaB.
- 3aTbOpTe ra3oBaTa 6yTuJka cIeI yNoTpe6a.
Ybpebe c, ye yBa3nMMN NOTpe6BtENr (BKIOHHTENHO Dae, Bb3paCTHN Xopa rXopa C yBpeKdAHHa? ca NOD hApNDHeMe O TINue c TINH MfH3NeCKn, YMCETBEHN cTeNTBH NcOo6HoCTN, KOeTo e HNCPTyRTHAPO K aE023nACo h NaIeONTBA yPeNa d PAsbHcBa cBp3aHIne T cTOBa nCkOBe. DeCaeta h TeP8Ba da I npArat c YpeDa. MoNTaKbT, noNCTBaHeto NpOdpBckKaHa te TPB8Ba da c Eh3BpUbaT oDeA.
PpenopbunTeJHa Bb3pact:
Гаоби уреди и akcecoapn: 15 rodnn +
Ta3OBn 6yTuJIKN: 15 roUHn +
H3n033BaiTe cAmoYactMe ININ AKCECoaPHTe,OCCTABENi C pOyDyTA INI 3AKZyHENOT OTOPINAP HcEBpIH3ENHTbP. He rH3n03BaTte C dpyrY cyptOJCTBA 3a dpyrYN cIeTI. H3n03BaTte pOyDyTA INKHOHITNeIO npdHa3AHueHne, KAKTO E NOCOHENO B IHCHTPYkUIMTE 3 aECKNLOAATauN.
Your Plancha is equipped with an electronic ignition that requires one AA/LR6 battery.
3a Baume yuo6cbTO npINOxMATA 6abeTpe e BkIOHeHa B onAKOBkTa.
Ako rpnblt He ce nIIO3Ba 3a npOIOJIHTENeH nepHOOD T BpeMe, CINIO HnpenOpBHTENHO e BatePrrata Da ce I3BADn O rpIna N da Ce bXpaHRbT Oa TENHO cyxO xNIAdo MRCTO.
2) CmHa Ha 6aTepeyra
- IndeHTnФицpaIte eNEKtpOHnBb3JIaMeHHTeJ.
Pa3BnTe nlaCTMacobata KaNaUka.
6aHeTe 6aTeepnTa, cna3BauKIN noJpyNTeT,aKKT o nOKa3Ae
3aBnTe KaNaUKaTa ObaPaTHO Ha MRCTO.
BnxTe a63aF(3) 3apeunKJnpaHe Ha 6aTepeyraTa.
BatepniTe, KOtO He ca pneapexdaaun ce, He tpr6Ba da ce npesapekDat.
3) N3XbpbJHe Ha 6aTepeJrTa

TOni CnHMBOI, HAMmuaC ce Ha BatePmIe, O3HaUaba, He Bc KpAa HA XbOBA CN BatePmIE TPrBa Da 6BDat IN3AdebenOT yCTPOCTBOTo H CnE ToBA peKMcnpaH ININENH pabNINO.
BateprHne TE rPb6A da CE3XbPnTBA KUcHTo, a TpRbA da CE 3aehcat B yNHTk 3a CbSbPahe (LeHTbP 3a peuKlnPiape H T.H.) O6bPrHe Ce KbM MeCTHa obuHa. HKOHa He N3XbPnIe BateprHne cpe npOda. He c OnnTbaite da nIparape: pncsCTBmIo HA onpEneHn BeueceCTBa (Hg,Pb,Cd,Zn,Ni) BnON3BANHe BateprMoKe da e oNaCHO 3a OKnHATA cpe Da YOBEuIKOTO 3ZpAbe.
G. Ynotpe6a Ha rpnI-nNooyata (nJaHua)
1)Предиултpe6a
HAmOhMaHHe: HmKora He n3n0n3BaIte rpnI-nNoVaTata (nnaHua), DOKATO INCHpykUIne He ce pOHTa BHIMATEJHO He CE paBepat HantbIHO.OcEBn TOBA cYepe
HЯMaTeHObEHaRa3.
- Kapkybt He dokocba KOMNOHEHTN, KOINTO MORAT da ce Harpejt. (Ф.И. 07)
ФУИНТА 3а BTБЕДАпЕ на МЗИнIHATA e pIabIиHNO NOCTABeHA B cIeIuaIIHnI COn KOpNc.(ФИr.18)
KoHTeHepb3 3a Ma3nHaHATA C (Φr.09) NOCTaBHeO npabHNO B rheDOTO.
- Fopenkata He e bokupaana nii 3aynueta (Hanp. ot naqxHH). (Фиг.10)
IpnopbHTeHNO e da e n3nONBtpePnDnAaNp kKaBmnp np aBoTaO c o60eBO ropeu KOMNoHEHTn

M. CmraHa Ha ra3OBaTa 6yTuNka
-BnHaHn pa6oTe He OTKPHTO, HA MToC Do6pa BeHTHnaUma HN KOra pnp HAnuHneTo Ha PJIaMbK, NCKpn INI IN3TOHNK Ha TOnJIHnA.
BbPHTeKoNcTetAa ynpaIaJIeBHnNoJoxHeHne,off(●), cneI KOETaBtOpBe BENTINHa na RaO3BaTb6yTNkA.
OTBHHETe peDyIup-BENTHILA, npOBepete HAIHNHTO n CbCTOHNHTHO YAINTHTNEIA.
- Nocobete NTJHATA RAOBA 6YTNINA HA MCTO, NOCTeBE OTHOBO perynatopa, KOte BHNMABaTe Da He OKA3BATE HATNCK Bpxy Mapkyua. IpopeBepete 3aHTMUnHe Ra3 (BxKte Pa4zen E.)
N.Почистваени подрьжka
Ohmame da NcHema H kaapa, NO nOCTBaHTe BnAHri e 6oNka. N BCE NaK ToBa E MHOrBO BAeHXe ETan pRi BCaKO neHema Ha cKape. PEOBHOTo NocHTBaHE CNOMA 3a I3pJbXNIbOCCTTa H naEkdHcOCTHa BAawaTprI-nNoHa (PnaHau) Campingaz
NobbpxHOCT3a rotBeHe:
Octabete noBpXHOCTTa 3a roTBEHe da n3cTHHe, npedn da na noHCTHe. m3noI3BaIe noHCTBaIa cnpe 3a bap6eko Campingaz Cleaner Spray BBQ BQ uInatyna. Kato antpetHnatBa mno13BaIe TEHOC T3 meHe Na cbIOBe, 3 da o6e3MaCInTe noBpXHOCTTa 3a roTBEHe.
KORATO NOCTBATE, BHNAI NINIKABAITE 06NIHIO C BODA I NO B3MOKHOCT 138BAIHTE 13N0N3BAHETO HA 6p3a3BHMI 7b61, A 136PETe MEKA KUPNA OT MKNPOD5bp, K KATO T4 E cSUO TONKOBA ePHKACA H pNepDAHTA OTOPBEP
PpeDn Da CMEHNTe NOBbPxHOCTTa 3a roTBeHE, n HamaXete NekO cMaTHNHa, 3a Na PpeDnA3NEt O T KOPO3N a Dn PpeDTBPATVTE pBXKDAHBOHTo N 3aJIENBAHToN KMb XpAHATA.
Campingaz npenopbya da hanece t btkcn pactneHNO macNo bpxy NoBpXHOCTTA 3a rotBeC k KyxHENCKA Kpbna.
Grease drawer:
Please remember to empty the grease drawer C (Fig. 09) regularly, to prevent it from overflowing. The grease drawer can fill up quickly, especially when cleaning the cooking surface with water. For the sake of convenience, the grease drawer is dishwasher-safe.
Фунязma3HnHa:
Your Plancha is equipped with an electronic ignition that requires one AA/LR6 battery.
Please remember to empty the grease drawer C (Fig. 09) regularly, to prevent it from overflowing. The grease drawer can fill up quickly, especially when cleaning the cooking surface with water. For the sake of convenience, the grease drawer is dishwasher-safe.
Rasvalehter:
Your Plancha is equipped with an electronic ignition that requires one AA/LR6 battery.
Please remember to empty the grease drawer C (Fig. 09) regularly, to prevent it from overflowing. The grease drawer can fill up quickly, especially when cleaning the cooking surface with water. For the sake of convenience, the grease drawer is dishwasher-safe.
Tauku piltuve:
tauku piltuve (08. att.) izvada liekos taukus tvertne (17. att.). Piltuvi var nonem un mazgat trauku mazgajama masina, jo ta ir igatova no nerusejoša terauda.
Pamatnes sienas, vaks, vadibas panelis:
laiku pa laikim notifiri s oes elementus, izmantojot suki ar tauku maszaganas lidzeki. Neizmantojet abrazvus produktus.
Degli
Lai utuzreplu Tana gazis grilu perfekta darba kartibla, ieteicams to periodisknotir (pec 4 vai 5 lietoisanas reizem).
- Pirms tirisanas pagaidiet, lidz Plancha gazes grils ir atdzisis.
-Aizveriet gazes balonu.
- Plancha gazes grila deglis ir jatira un japbauda Ik pec 3 meneisen. Nemomet degli paurbaudit, vai Venturi caurules atveres nenospropto netirumi var zinekru tiki, kas ver samazinat degra efektiviti va izraitsibstamu gazes degsan arpus degra.
- Notiriet degli augspusi, kā ari sānus un pamatni, izmantojot mitru sūkli (ūdeni ar trauku maggāsanas lidzekli). Ja nepieciésams, izmantojiet mitru terauda suku.
- Pärbaudiat, vai visas deglu atveres ir tiras un pirms lietoşanas lauijet tam nozüt. Ja nepieçacmi, izmantojiet stieplu suku, lia itziritu nospistrojus deglu atveres.
Ja nepiecièsams, izitriet Venturi sprauslas (skatjet 18. att.: a- izplüdes atveres, b-Venturi caurules atveres) vai degli atveres.
- Nekada gadijuma neparveidoject Plancha gazes grlu: modifikacjas var but bistamas.
Uzmanibu! Biieza degra tirišana palidz to uztrét laba stavokli litgostai lietošanai un novér priešklaicgu oksidaciju, ko izrada gatavošanas laikā radusās skabju palekacs. Tomér grila degla oksidacija ir normală.
Your Plancha is equipped with an electronic ignition that requires one AA/LR6 battery.
Jusu patogumui atitinkama baterija jtrauktaj komplekta.
Jei kepsinne nenuaodaja ilgesni lajka,rekomendujoama isimi t i kepsinnes baterija i r laiktyi atskrai saosje u visejo vietoe.
2) Bateriju keitimas
Raskite elektronij użdegiklj.
- Atsukite plastikinj dangtelj
- Pakeiskite baterija, laikydamiesi nurodyto poliskumo.
Uzsukite dangtelj atgal j vieta.
- Apie bateriju perdirbima skaity kite F(3) skirsnyje.
- Nejkraunamu bateriju negalima jkrauti.
3) Bateriju Šalinimas

Please remember to empty the grease drawer C (Fig. 09) regularly, to prevent it from overflowing. The grease drawer can fill up quickly, especially when cleaning the cooking surface with water. For the sake of convenience, the grease drawer is dishwasher-safe.
Riebalu piltuvelis
Riebalpltuvelis (08 pav.) nukreipia rebaluy pertekliy riebaluy dezute (17 pav.).
Piltuvël glalu niuni r plauti indaplovejë, nesjis pagamintas iñ erudijánçio pleno.
Pagrindo sienelès, dangtis, valdymo putas
Siaoudakis laikas nuo laiko valkykite kempine su indy ploviklu. Nenaodiskabrayzviniu medziagi.
Degikliai
- Norint išaiktyi puikia Plancha dujinio grillo bukle, rekomenduojama jj reguliariai valtyi (panaudojis 4 ar 5 kartus).
- Pries valydami palaukite, kol Plancha dujinis grilis atves.
-Uzsukite duju baliona.
- Plancha djuñinio grillo degiklis turi buti valomas i tirkrinamas kas 3 mènesius. Ismkite visa degiklj i patikrinkite, ar purvas arba voratinkliai neuzkemsa Venturio varmdzó angu, nés del to degiklis gali buti maiziu efektyvus arba gali kilti duju uzsidegimo uz degiklio ribu pavojus.
Nuvalykite degiklio virsu, sonus ir pagrinda dregnka kempine (vandeniu su indu plovikliu). Jei reikia, naudokite dregnka plieninji sepeti.
- Patikrinkite, ar visos degiklo angos yra tušcios, ir prieš naudodami dar karta leiskite išdziūti. Jei reikia, išvalkykite degiklo angs vieliniu sepeciu.
- Jei reikia, i'salykite Venturio difusiorius angas (zr. 18 pav.: a - isleidimo angos, b - Venturio vampzdizion angos) arba degikl.
- Niekada neatlkite kokju Plancha dujinjo grillo konstrukcjos pakeitmu, nes bet kokie pakeitmai gali buti pavojingoi.
E. Checking for gas leaks
1) Paayatotoinote tov Eleyo oe eEutepiko xwpo, atouakpuovvtac 0la ta euplekta uliaK. Mny KaniVcTe Kovt oTn ynpotaiepe etipdviae npoiotaoc n Tn qian apoiu.
2) Bεβαιωθείτε οήοι λαβες μρθμιούς εἰναι στην θέση “OFF” (●).
3) Ota vatai tatai, otpwte To akpo Tou eukajttou ouaIyia Tnpuoc Tavw oto akofouio Tou puthetaiTn kai aospaliote ME eva kataalno KAIT.
4) Biδωτε TOV εKTOVWT Οη φιλη αερίου.
5) Xnqoioutoine Eva diAuaa aattouviou ia va eEyEeTe iia diapooec. Snaivtko: mote uny xnpoioutoie yuvyn fioya ia va eEvEeTe ia diapooec aeiou.
EgApOaTe To dAuaJua OTC uOvDeae TNC φiAnic/Tou puBtiTou EoKuMTU OAIyai/TnO quKeunc (Eik. 06) (OI diakottnc EAEVyou TpeTne IvaopavEvov KIAeiToI: Εθη "Off" . AVOJeTn Tn BAlBDI TaN φiAne aepIo.
7 Eav oanatovtai ouaalde, auto oanaive ot utapxouv diappoc
8) Iria va staatpatae tn diapnoi, ophiie ta Teepikoxla. Eav katoio eapntma evia elaatmuatiko, avitkaataotnto T. Hoakeun deo tpeetra va tibetar ce aeitoupiya tropoiuva attokataatagei ni apdoip.
9) Kaieite Tn BaIbDi Tns qiaNs aeipoiu. EaeyXeY via diaapoec Toulambdaotov jia oopaTov xpovo kai kOe opaTou avtkAthetaiatai n qian epiou.
SigmaVtiko: Iont mnu xnpoiotoei e oya via va evtioe diappoaiepoi.
Your Plancha is equipped with an electronic ignition that requires one AA/LR6 battery.
Tn TdiEkoAvoan oas, n katAalnn mptatapia tapexetai otn ouakeuaia.
Av npataia 8ev AxpuiatoiHei yia evaOxoviko diadtna, ouviatarai idieptnc an paealar ntrn ptatapac ato tvn npata kai aortohkeuon nTc Exwipota eNpko Ka dpoepo mepc.
2) AvtikataoTaon ts mtaipias
- EvtoTIOte TnV nAeKtpovikn avapAeEi.
- 三εβδωTE TO TIAOTIKO KATTAKI.
AVTKAATAOTNTUATAPIA,AKOAUBWVTAACTNKATEUBVON TWWTAWOWTTOIDEOKEVIANT
Biodwote To kattaki Tali Otn Theon Tou.
AvatpeTe Otvnpaepo Z(3) yiayn avakkuwn nts mntapiaic.
Oi un tetravapoprticoevee mtatapiec 6ev pteetva tetravapoprtizovta.
3) Atoppiyn natapia

Toouboo Tou avaypaeetai otu mtatapiec anaivei ot ToTtoc nuchc tou, oI mtatapiec tptetie va aqaepoeov atto T movoda kaon touveexia va Aooov na v atopoppkiv oukataanla.
Oi atartapetev atopotitovatouc kaooc atoppipatuv, aala vaetapeovtata anuiae uauohyic (keTPO vavakukwanc KATL).ETIKOVUVNATE me TOUC totKOC apIOIOUC. Mny atoppiptetai mot ic ntiataptes atpuean. Mny tpootnabeite vi ta tatoepwaeote n tapouia opiaoeuvu ouuoi (Hg, Pd, Cb, Zn, Ni) oe xphaiontoievee mtaotapei v eivai etikivduyn yia to tepiaalokv na tvnvdpovtniv ueya.
H. XpnoT nC ΨnoTapiac με επiφaveia ψησιμatoc
1)Piv aTIO nXpHOn
Yteuoi: Tne yv npnaiotnoiote nyn npotapia me. Etnapeia yniujatos ptoou diaepet e pooekntka kai katavonoe t naipws tic odyiec. Etnaiaev,Bebaiowtei on:
- unapxouv diappoeaepiou.
O eukutnoc oaiyvac dev ayicie 1eapnta tou ev6exetai va Ceataouv. (Eik. 11)
To xuvi atoatpavianLitouc exi totoetneoiomega ta eioikotou TeipBnua. (Eik.18)
To doxio liouc C (Eik. 09) exi totoeetneoiota ot n tio
Oaoutjaoevi 10 Aoi taiokapiaevoc n 6eV eumodieetai (T. x, aotio iotou apoxyns). (Eik. 10)
Etianc, BaeaiiEeite ot to doxieio Aitouc C (Eik. 09) eivai yeuato ue vepo uupuvaue tnv aixotn kai yeiin toun tuo odeekvuetai kai oti exei totoeineoi tpaoyau. Autoe deiv eaatapalntio, aaAa Kev Toov kabapioo TAOI TIO EkoAo. H iiaayuyiyiveetai ato mtpoata sto vovela tseptoc
VUviatata n xpanoTPOATEUTIKWAVYtov otav XeipCEATE iidaetepa CcctpImuata.

EaEeK aKa oI oOaIyves Venturi (VT) kaUttouv touc EYXUTpejC (IJ) (Eik. 11)
2XpnnTns npoapias E emipaveia npoiatoc yia TpOwn opa
Otav xnpoiotieia via tpiunwpopa, thepaevateyn npoyatiape me emepiaea unipatoe me oaoiouk taowauitneq st thn PAHOYPO
POHS (A) (Me to kaujuma kaiotiro), yia teriou 30 letra eoi wote
va ecapaintovtuoyuovoj aoe tto emtioewae sta kouvaiyia pieh.
Θ. Avμμa twv kauoTHnpw Tns ΨnoTapiac με επιφανeia Ψnoiμatoς
-AvoiTe TO Kattaki paeyipepaatoC
- Bεβαιωθείτε οτιολαβες μύθμιση εἰναι στην θέοη “OFF” (●).
I-IEKATEKaYUPIOTTOIAKOTTTAEYXOAPIOEoPOTPOPAKAI TOIOETOTATETOEaEOTHAIPOUCPO()
- PntnoTe aéosw to koupti avapxEg (4) expi va kavcik.
EAV o kauotnpac dev avafoe ieta 4 n 5 pooataeiec, yupiote tvdakottin eeyxou ton eon "off" (●) ka tpiuveTE 5 letti Ka otuvexia etavaalabeTn diaokaia.
Apou avaou e kaoutpau, utapxouv 2 duatotntc via to auajma kantoioa aauoatanpa:
H 1n duvotnta vuotata tntn evanauyn nTsi diaikaiaac avauoou Tne tripyipapadit aapatavu.
H
H 2n duvaotnta uoviatata oto avauiaou tau kauatnpa tou biapeketai ot aedja n ta apitepa tou 1uavauivoukauotnpa, kai onu vexeiau tvupakeieuvw kauotnpawu tou utoleimovtai, yupocvatoo koumtu pueianc otn then TlAnpouc tapoxns (4).
EaV n TIEONeKTPiKn avapaeEn n n aeKtpovikn avapaeEn dev IaIoupeYi, XpOIOIOHTNE TO xeiPOKIVTIO DIAKOITTN (TAPAKATU TpaDyapaoC).
Enipaveia paayepaTOs:
ApojtoNT IVTEIAEVAJEPEIaO KUPOeI TIV NT KABIPOIE. XPOJIOJIOTe KABIAPITKO OTPeI CBKGKueer Sner Kayo IOTaOuaA.EvaAakTtKa, XPOJIOJIOTe UyPoI TiWv GYIA TNY APOJEPONLTIOATN ETV IETPAVAIEJAPEIaTO.
Otav aqapicete, Tviata eietalevete Ka lae vepo kai atoateuveytn Xpnan oayauipuyuTou paoaovouOtou eivai duvatovoi EiMaTeia jua maakn Toetota mikplovuv KaBcE iavai eoatoteaatikai KAt Oa tatopeye tic nCjue.
Pniv etavatotrobetane Tnv Etniapeia yaeipetaoct, Tphtpe Tny eapa me Iton icva va tv npoTateuote aTo tn idaBpwon kai yia va nn oskoupiékai kaolaido toyann.
H Campingaz1 ouviata tyn epaoyuyn iac aentnn ctpoucn cputikou elaiou atn eimpeiaea meayepiatoe me xapch koulcva.
Grease drawer:
Please remember to empty the grease drawer C (Fig. 09) regularly, to prevent it from overflowing. The grease drawer can fill up quickly, especially when cleaning the cooking surface with water. For the sake of convenience, the grease drawer is dishwasher-safe.
Xwvi Aitouc:
To xuvi Iiotouc (Eik. 08) obnyei to tepiioeouoevo Iotoc sto doxieio Iiotouc (Eik. 17).
To yuvi elavapaojuevo kai moptei va tauvi sto tauvnpio tatauw, kaouc vataokaouejuvo aotovaeoiotdoa
ToiXwmuTa bao, kaumu, tinakas EeYxou:
KabaciEte auta ta otoyie atra kaipoe kaipoi xynjmoiOivtca eva oouyapuy e yu mpo tuvm. Mny xynjmoiOEIEAevitkaoTpovta.
Kauotnpes
Tia va diatnpiee Tnu npotapia e emipovdea ypoaiatoc o apiouta leitpykni kataoana, ouviotata va Tnu kaapiTE nepoioka (mu ta 4 n 5 pnoekic).
- PIIeIaEVEte MEXPI VA KpuWoei NsOHTAPA ME EIMApAeVA sOIOAtoc pIV TNY KABAPIEOE.
KLeioTe Tn qiaa aeipou.
O kaotniapac nqn pataiace mepiaeia yoiaiutoc npnei va Kaabapicetai kai va Eeyxeta kabe 3 iuev.Apaapeote ookanpo ToV kaotniapa kai EYEte ot ta avoayipta Tou Owaiya Veturi Dev e emoibodovtai an okiovn n itouc apayvnc, yevoyoc nou umopei va npokaleoe i meiown n taooaoctou kaotniapa na npokalaeen Enikivduvnpukayia apeiou ektoCkaotniapa.
KaBapIote To nauu Jepoc Tou kauTjpa KaHuc KAC TIA NAEUPc KATn Taan, xnpoiNtowvTac ev npOyApvyv (vepo me yupo mawv). EaXpeiaotei, xnpoiNtowe iua uyn ouputviBouptsigma.
EaekTe OI aekoi Eokoi tauotipa eivai Kaabepc kai anpote Tc vAteywoovouipinx npoiauonioiote EaVdxpeiaote, xnpoiunoiote muaupativn Booptoa yia vEeouawoetie Tc Eocoudou tau kaotipra.
- Kaopaiotie Tc n otic stc e6oou Venturi (Bia Eik: 1a- oE6oou, b-Avojuyta aowlvAventuri) t'ov kauotnpa, evivivatapaintno.
Noté miy troponoieite tvn otnapiae ie opiadepiae yoiopiatoc. otoaodjnothpontooninomoeip aanao6eiEbi enkiivbuvni.
SHMEIOZH: O aovxoc kaapiaucoc tau kauitnpa vot diatpei oe kaai kataotaia vio taolec xpoaeia kai atotepei tvn pouopoe oEoiwn, kuipw ovivu oiviuuvtuoiaiuutauoatttoyapeiipeja.H oEoiWOn tau kauitnpa nci npotarapic elvai, wotoo, quaoyoiaki.
E. Checking for gas leaks
Your Plancha is equipped with an electronic ignition that requires one AA/LR6 battery.
Please remember to empty the grease drawer C (Fig. 09) regularly, to prevent it from overflowing. The grease drawer can fill up quickly, especially when cleaning the cooking surface with water. For the sake of convenience, the grease drawer is dishwasher-safe.
Yag hunisi: