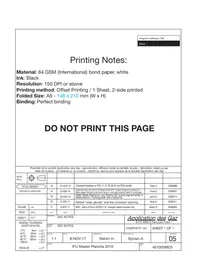
USER MANUAL BLUE FLAME EXLD CAMPINGAZ
| REVISION HISTORY |
| REV. | DATE | MODIFICATIONS | NAME | ECN NO. |
| A | 20 JUN 2018 | NEW - Spins-off from 4010056718. | Jenny D. | 20065527 |
| B | 23-MAY-2019 | Removed the commercial names on cover page. | Fiona S. | 20069097 |
| | | | |
| | | | |
| | | | |
| | | | |
| | | | |
DO NOT PRINT THIS PAGE
Printing Notes:
Material: 64 GSM (International) bond paper, white
Ink: Black
Resolution: 150 DPI or above
Printing method: Offset Printing / 1 Sheet, 2-side printed
Folded size: A5 - 148 x 210 mm (W x H)
Binding: Perfect binding
| RELEASED FOR PRODUCTION |
| CONFIDENTIAL
THIS DOCUMENT AND ITS CONTENTS ARE CONFIDENTIAL AND CONSTITUTE TRADE
SECRETS PROPRIETARY TO NEWELL BRANDS, WHO RESERVE ALL RIGHTS
THEREIN, BY ACCEPTING THIS DOCUMENT, THE RECIPIENT AGREES NOT TO COPY
USE, MANUFACTURE, OR COMMUNICATE TO OTHERS, WHOLLY OR IN PART, THE
CONTENTS OF THIS DOCUMENT EXCEPT AS EXPRESSLY AUTHORIZED IN WRITING
BY NEWELL BRANDS. | NEWELL
BRANDS | 3 Glenlake Parkway
Atlanta, GA 30328, USA |
| MATERIAL: SEE NOTES |
| DRAWING PREPARED IN ACCORDANCE WITH ASME Y14.5 | FINISH: SEE NOTES |
| TITLE:
IFU Plancha BF EX/EXB/EXL+ Range |
| 3RD ANGLE
PROJECTION | DRAWN BY: Jenny D. | SCALE: 1:1 | DRW NO.
4010060582 | REV
B |
| DATE: 20 JUN 2018 | SHEET 1 OF 1 |
Program: InDesign CS6
BLACK
CAMPINGA Z
FR MODE D'EMPLOI 5
GB INSTRUCTIONS FOR USE 9
IT ISTRUZIONI PER L'USO 13
PT MODO DE EMPREGO 17
Q. RECOMMANDATIONS PILES

NOTE: Unless otherwise specified, following generic terms "appliance / unit / product / equipment / device" appeared in this instruction manual all refer to the product "Plancha".

- Please read the instructions carefully before use.
- Use outdoors only.
It is best to wear gloves to assemble the product.
- Do not use charcoal.
- Do not use an adjustable low pressure regulator. Only use fixed regulators that comply with relevant European Standards.
- Regularly clean the parts at the frame bottom to avoid risk of inflammation from fat drippings.
Follow these instructions carefully to avoid serious damage to your barbecue.
A. FOR YOUR SAFETY
- Do not store or use petrol and other flammable liquids or vapours in the vicinity of this appliance. This device must be kept away from inflammable materials when it is in use.
If you smell gas:
- Close the valve of the cylinder.
- Extinguish all naked flames.
-
If the smell continues, see "F. Checking for gas leaks" or immediately seek advice from your local retailer.
-
Do not leave your appliance unattended while it is working.
- Parts which are protected by the manufacturer or the manufacturer's representative must not be manipulated by the user.
- Close the gas container after use.
B. LOCATION
- This appliance must be used outdoors.
- CAUTION: accessible parts may get very hot. Keep young children away.
- There should be no combustible materials within a radius of approximately 1 meter around the appliance.
- Do not move the appliance when alight.
- Install your appliance and the gas bottle on a flat, level and non-inflammable surface.
Estimated air offtake is 2m^3 /kW / h
C. ASSEMBLY
Installation of the battery in the electronic ignition (according to model)
ELECTRONIC IGNITION OF GAS BURNERS :
- The gas burner electronic ignition system is powered by 1 AA battery (LR06). The battery holder is located under the console (Fig. 9).
See fig. 10 for battery installation:
1) Unscrew the top of the lighting battery holder.
2) Insert the AA battery making sure the positive and negative ends are facing the correct direction as shown (Fig. 10), then screw the top back in place.
D. GAS CYLINDER
This appliance has been adjusted to operate from 4.5 to 15kg butane/propane cylinders with an appropriate low pressure regulator :
Switzerland: see separate spreadsheet.
France, Belgium, Luxembourg, United Kingdom, Ireland, Portugal, Spain, Italy, Greece: butane 28-30 mbar / propane 37 mbar.
Netherlands, Norway, Sweden, Denmark, Finland, Czech Republic, Slovenia, Slovakia, Hungary, Romania, Estonia, Turkey, Bulgaria, Croatia: butane 30 mbar / propane 30 mbar.
Germany, Austria: butane 50 mbar / propane 50 mbar.
Poland:propane 37 mbar.
Always connect or replace the cylinder in a well-ventilated area, never in the presence of a flame, spark or heat source.
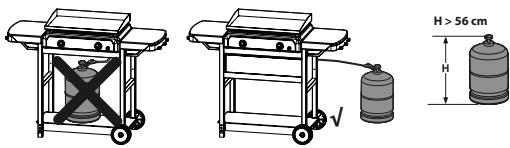
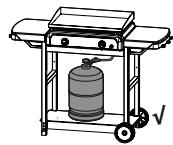
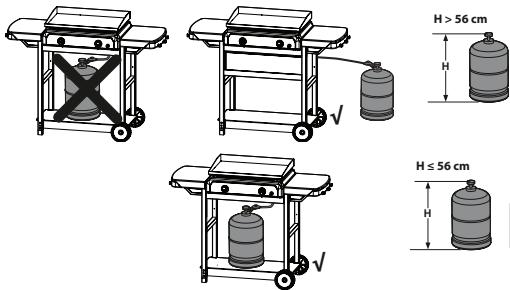
The height H of the cylinder must be less than 22 in. (56 cm), regardless of the cylinder's width or diameter D.

GB
E. HOSE
France: The equipment may be used with two types of flexible hose: (Depending on the model)
a. Flexible hose designed to be joined onto ringed tailpieces on both the barbecue and regulator sides, held firm with collars (in accordance with standard XP D 36-110). Recommended length 1.25 metre. (Fig. 2-A)
b. Flexible hose (according to standard XP D 36-112 or NF D 36-112) fitted with a G 1/2 threaded nut for fixing to the barbecue and a M 20x1.5 threaded nut for fixing to the regulator, recommended length 1.25 metre. (Fig. 2-B)
The barbecue has a G 1/2 threaded gas inlet connector supplied with pre-fitted NF ringed tailpiece and seal.
-
To use the appliance with the flexible hose XP D 36-110 (Fig. 2-A):
-
Slide the flexible hose onto the ringed tailpiece on both the barbecue and regulator as far as it will go.
- Slide the collars behind the two first bosses on the tailpieces and tighten them until the tightening head breaks.
-
Check for leaks following the instructions in paragraph F).
-
To use the equipment with the flexible hose XP D 36-112 or NF D 36-112, G 1/2 and M 20x1.5 nuts (Fig. 2-B):
-
Loosen and remove the NF ringed tailpiece to release the G 1/2 inlet connector.
- Remove the seal.
- Tighten the G 1/2 threaded nut on the hose onto the barbecue inlet connector and the M20x1.5 threaded
nut onto the regulator output connector following the instructions supplied with the flexible hose.
- Use two wrenches to tighten the flexible hose on the gas end piece:
- Use no. 10 wrench to secure the inlet connection of the appliance.
- Use no. 24 wrench to close the nut on the flexible tube of the appliance, or when removing it.
- Use a wrench to fix the outlet connection of the regulator when attaching the flexible tube, or when removing it.
Air tightness is to be verified following the instructions in paragraph F).
Check that the flexible hose stretches out normally without twisting or pulling and does not come into contact with the hot sides of the barbecue. It should be replaced when the expiry date on the hose is passed or whenever it is damaged or develops surface cracks.
Belgium, Luxembourg, United Kingdom, Ireland, Portugal, Spain, Italy, Croatia, Greece, Netherlands, Czech Republic, Slovakia, Hungary, Slovenia, Norway, Sweden, Denmark, Finland, Bulgaria, Turkey, Romania, Poland, Estonia, Switzerland (depending on model):
The barbecue is equipped with a circular connector. It should be used with flexible hose that is suitable for use with butane and propane gas. Hose length should not exceed 1.20 meter. It should be replaced if it is damaged or cracked, when required by national regulations or at the end of the part lifecycle. Do not pull or pierce the hose.
Keep hose away from any parts of the barbecue that get hot. Check that the flexible hose stretches out normally, without twisting or pulling.
Germany, Austria, Switzerland (depending on model):
The barbecue should be used with flexible tubing that is suitable for use with butane and propane gas. Hose length should not exceed 1.50 meter. It should be replaced if it is damaged or cracked, when required by national regulations or at the end of the part life-cycle. Do not pull or pierce the tubing. Keep away from any parts of the barbecue that get hot. Check that the flexible hose stretches out normally, without twisting or pulling.
Attaching the flexible tube (see Fig. 3): use two wrenches to close the flexible tube on the gas connection of the appliance:
Use no. 10 wrench to tighten the connector.
Use no. 17 wrench to tighten the nut on the tubing.
F. CHECKING FOR GAS LEAKS
- Work outside, away from all sources of ignition. Do not smoke.
- Make sure the control knobs are in the "off" (O) position.
- Connect the flexible tubing to the connector and barbecue as described in part e).
- Fit the regulator onto the gas cylinder in accordance with its instructions.
- Use a gas leak solution to test for leaks. Important: never use a naked flame to check for gas leaks.
- (Fig. 4) Apply the solution to the connections cylinder/ regulator/ hose/appliance (the control knobs should remain closed: off position (O)). Open the gas cylinder valve.
- Bubbles in the gas leak solution indicate that there are gas leaks.
- The leak can be stopped by tightening any hose connection or replacing any faulty component. The barbecue must not be used until the leak is stopped.
- Close the valve on the gas cylinder.
Important:
Check for leaks at least once per year and each time the gas cylinder is replaced.
Never use a flame to detect a leak.
G. PRIOR TO USE
Never use the appliance until the instructions have been read carefully and understood. Additionally, ensure that:
- There are no leaks.
- (Fig. 5) The venture tubes are not blocked (example : spider webs).
- (Fig. 1) The hose does not touch any components which may get hot.
- (Fig. 11) The lid is not in closed position (depending on models).
- This appliance is equipped with wide holes for air circulation. Ensure that these holes are not obstructed.
H. IGNITION OF THE BURNERS
Never light the appliance with the lid closed, only with the lid opened.
- Attach the protective lid to the back of the device. (Fig. 6)
- Make sure that the control knobs are in the "OFF" position (O).
- Press and turn the adjustment lever counter-clockwise and put it in a full flow position (4). (Fig. 7)
- If your appliance is equipped with a piezoelectric igniter: Press immediately on the igniter button ( ) until it clicks. (Fig. 8)
If the burner does not ignite after 4 or 5 attempts, wait 5 minutes and then repeat the operation.
- If your device is equipped with an electronic igniter using sparks:
Press immediately on the switch (4). A burst of sparks occurs. Continue pressing for a few seconds until the burner is lit. (Fig. 8)
- If the burner does not ignite after 4 or 5 attempts, wait 5 minutes and then repeat the operation.
- Once a burner is ignited, there are two options for lighting another burner:
Firstly, repeat the lighting operation described above;
Secondly, light the burner to the right or left of the first burner lit by turning the adjustment button to the full flow position (4).
- If the piezoelectric ignition or the electronic ignition doesn't work, use the manual ignition (following paragraph).
I. MANUAL IGNITION
In case of non-working automatic ignition, set the control knobs on « OFF » (O).
Remove grease cup. Light a match and then bring it toward the burner through the grease cup hole of the plancha.
Push the control knob and turn it counterclockwise until it is in the full flow position ( ).
Put the grease cup back in place with protective gloves, being sure to correctly position the drippings evacuation hole.
J. SHUTTING OFF OF THE APPLIANCE
Return the control knobs to the "OFF" position (O), then close the cylinder valve.
K. REPLACING THE GAS CYLINDER
- Always work in a well ventilated area and never in the presence of a flame, spark or heat source.
-
Return the control knobs to the "off" position (O) then close the cylinder valve.
-
Remove the regulator, check that the sealing joint is in good condition.
- Put the full cylinder in place, refit the regulator, taking care not to apply stress to the hose. Check for gas leaks.
L. OPERATION
On your first use, warm up the appliance with its burners in full flow position ( ), for approximately 15 minutes in order to eliminate any odors resulting from the paint on the new parts.
- It is recommended that protective gloves be worn to handle components which may be very hot. Use long handled utensils to move food which is on the grate.
- Before cooking, pre-heat appliance for a few minutes at the Full Flow ( ) setting.
- The cooking speed can be regulated via the control knobs: between the full flow position ( ) and medium flow position ( ).
Important : if one or several burners go out whilst you are using the appliance, turn the control knobs to OFF immediately (O). Wait five minutes to allow unburned gas to escape. Only carry out the lighting steps after this time.
Important: wait for the complete cooling of the appliance before moving the lid (depending on models)
M. CLEANING AND MAINTENANCE
Never modify the appliance : any modifications may prove dangerous.
- In order to maintain your appliance in perfect operating condition, it is recommended to clean it periodically (after 4 or 5 uses).
- Wait until the appliance has cooled down before cleaning.
- Close the gas cylinder and remove the regulator.
- Clean the top of the burner, as well as the sides and base, using a moist sponge (water with dish washing liquid). If necessary use a damp steel brush.
- Check that the burners outlets are clear and dry before using again. If necessary use a wire brush to unclog the burners outlets.
- If the appliance has not been used for over three months, make sure that cobwebs are not obstructing the openings of the burner tubing, which might lead to poor grill performance or dangerous flaming outside the burner. Clean the tube openings of the burner tube or the burner itself when necessary.
NOTE: Regular cleaning extends the lifetime of the burner and prevents premature oxidation that may result from cooking acid residue. Oxidation of the grill burner is, however, normal.
Firebox walls, control panel, grease cup
Regularly clean these elements using a sponge damped with dish washing liquid. Do not use abrasive products.
Cooking griddle
The cooking griddle is porcelain enamelled. In order to clean it it is recommended to firstly scrap them with a sponge or a metallic brush. Then, remove grease thanks to a dish-washing liquid.
Pay attention not to hit the cooking griddle on a hard surface as it could damage the enameling.
N. STORAGE
- Close the gas cylinder valve after use.
- It is recommended to store your appliance indoors after removal of the gas cylinder.
-
When not used for a long period of time, it is recommended that the plancha be stored in a dry, sheltered place (eg: garage).
-
Environment conducive to corrosion: particular care must be taken with the product if used by the sea; it must not be stored outside without protection, and must be kept sheltered in a dry environment.
O. ACCESSORIES
ADG (Application des Gaz) recommends the systematic use of its gas appliances with Campingaz® accessories and replacement parts. ADG accepts no responsibility for any damage or malfunction due to the use of accessories and/or replacement parts from other brands.
P. PROTECTING THE ENVIRONMENT
Think about protecting the environment! Your equipment contains materials which can be recovered or recycled. Hand them in to the waste collection service in your municipality and sort the packing materials.
Q. BATTERY RECOMMENDATIONS

This symbol found on the batteries means that at the end of their lives, the batteries must be removed from the unit, and then recycled or properly disposed of.
The batteries should not be thrown into the trash, but should be brought to a collection point (dump...). Check with your local authorities. Never dispose of in nature, do not incinerate: the presence of certain substances (Hg, Pb, Cd, Zn, Ni) in used batteries may be hazardous to the environment and human health.
R. ELECTRICAL AND ELECTRONIC WASTE

This symbol means that the appliance's electrical system must be disposed of selectively. At the end of its life, the appliance's electrical system must be scrapped correctly. The electrical system must not be disposed of with unsorted municipal waste. Selective
collection of waste promotes reuse, recycling or other forms of recovery of recyclable materials contained in this waste. Take the appliance's electrical system to a waste recovery centre designed for the purpose (waste collection point). Check with your local authorities. Never dispose of in nature, do not incinerate: the presence of certain hazardous substances in electrical and electronic equipment can be harmful to the environment, and have a potential effect on human health.
S. TROUBLESHOOTING
| Problems | Probable causes / remedies |
| The burner will not light | • Lack of gas supply.
• Regulator does not work.
• Hose, valve, Venturi tube or burner openings are blocked.
• Venturi tube not seated over jet. |
| Burner 'pops' or blows itself out | • Check gas supply.
• Check hose connections.
• Contact the After Sales Service. |
| Sputtering unsteady flames | • New bottle may contain air. Continue use and the problem will disappear.
• Contact the After Sales Service. |
| Large flames on surface of burner | • Jet nozzle badly connected to Venturi tube. Adjust the Venturi tube. (Fig. 5)
• The Venturi tube is clogged (e.g.: cobwebs). Clean Venturi tube.(Fig. 5)
• Contact the After Sales Service. |
| Flame low on jet | • The bottle is almost empty. Change bottle and the problem will disappear.
• Contact the After Sales Service. |
| Burners light with a match, but not with the "PIEZO" igniter | • Faulty igniter button, wire or electrode. Check igniter cable connections.
• Check condition of electrode and connection wire.
• Contact the After Sales Service. |
| Fire at any connection | • Leaking connection.
• Turn off gas supply immediately.
• Contact the After Sales Service. |
| Lack of heat | • Clogged jet or Venturi tube. (Fig. 5)
• Contact the After Sales Service. |
| Fire behind control knob | • Defective valve.
• Turn off appliance.
• Contact the After Sales Service. |
| Fire under control panel | • Turn off appliance.
• Close gas cylinder.
• Contact the After Sales Service. |
ISTRUZIONI PER L'USO
H. ACCENSIONE DEI BRUCIATORI A GRIGLIA
J. SLUKKING AV APPARATET
Sett grillen i fra-modus (O). Lukk deretter kranen til gassbeholderen.
K. SKIFTE AV GASSEBHOLDER
J. SLUKKING AV APPARATET
F. LUCHTDICHTHEIDSTEST
J. HET APPARAAT DOVEN
ILDSTEDETS SIDE, BEHOLDERENS BUND, FEDTBAKKE
P. OCHRANA ZIVOTNEHO PROSTREDAI!
S. RIESENIE PROBLEMOV
| Anomálie | Pravdepodobné príčiny/ riešenia |
| Horák sa nezapáťuje | • Mál o plynu.
• Nefunguje regulovanie.
• Zablokovaná hadica, ventil, Venturiho trabica alebo otvory na horák.
• Venturiho trabica eoste nie je nad tryskou. |
| Horák praská | • Skontrolujte prívod plynu.
• Skontrolujte pripojenie hadice.
• Obráťte sa na popredajné serviced. |
| Prskajúce nepravidelné plamene | • V novej făši moze byt' vzduch. Pokračujte v používaní a problém zmizne.
• Obráťte sa na popredajné serviced. |
| Veľké plamene na povrchu horáka | • Tryska je zle pripojená k Venturiho trabici. Upravte Venturiho trabuc. (Obr. 5)
• Venturiho trabica je zapchatá (napr. pavučiny). Vyčistite Venturiho trabuc. (Obr. 5)
• Obráťte sa na popredajné serviced. |
| Slabý plameř trysky | • Făša je takmer prázdna. Vymeěnte făšu a problém zmizne.
• Obráťte sa na popredajné serviced. |
| Nadterné horenie masti | • Vyčistite ochrannú platné nad horákom.
• Teplota grilu je privysoká: Stíťste plameñ.
• Vyčistite mastné odkvapkávaciu platné. |
| Horák sa dajú zapálit' zámalkami, aleNie zapalováčom "piezo" | • Pokazený spínač, drôt alebo elektróda zapařovača. Skontrolujte káblové prepojenie zapalováča.
• Skontrolujte stav elektródy a spojovacieho drôtu.
• Obráťte sa na popredajné serviced. |
| Plameŋ v akomkolvek spoji | • Únik v spoji.
• Ihnéť vypnite prívod plynu.
• Obráťte sa na popredajné serviced. |
| Slabý ohrev | • Zapchatá tryska alebo Venturiho trabica. (Obr. 5)
• Obráťte sa na popredajné serviced. |
| Plameŋ za ovládacím gombíkom | • Pokazené veko.
• Vypnite spotrebič.
• Obráťte sa na popredajné serviced. |
| Plameŋ pod ovládacím panelom | • Vypnite spotrebič.
• Zavrite făšu s plynom
• Obráťte sa na popredajné serviced. |
UPORABA I ODRŽAVANJE
NAPOMENA: Akoijke navedeno drugacije, svi sljedeci generici pojmovi ,aparat / jedinica / proizvod / oprema / ureda j" navedeni u ovom priucniku s uputama se odnose na proizvod "Plancha".

- Pažljivo proēitati upute o korištenju prije uporabe.
- Koristite samo na otvorenom prostoru.
- Prilikom sastavljanja proizvoda najbolje je nositi rukavice.
- Ne koristite drveni uglien.
- Ne koristite redukcijski ventil koji se moze regulirati. Upotrebljavaje fiksne redukcijske ventil koji odgovaraju europskoj normi koja se odnosi na zašitu.
- Redovito eistite dno plitice kako bi izbjugli rizik zapaljenja masnoaee.
Nepostivanje ovih uputa za uporabu moze izavati teško osteaivanje Vaseg uredaja.
A. ZA VASU SIGURNOST
- Ne koristite i ne stavljaje u blizinu Va'seg uredaja benzin ili druge zapaljive tekuciine ni plinove. Prilikom kori stenja olav aparat mora biti udalen od zapaljivh materijala.
U slucaju da osjetite miris plina:
- Zatvorite izlazni ventil na plinskoj boci.
- Ugasite bilo kakav otvoreni plamen.
- Ako i dalje osjecate miris plina, pogledajte upute F i odmah potrazite informacije kod Vasega prodavaça.
Germany, Austria, Switzerland (in functie de model):
NHCTPYKÇİN 3A YÜNOTPEBA
3A6EJIEXK4: Ocben ako He nocoueno dpyro, BCEKN eHN OT o6uHTe TepMNH "ypei / npnbop / npooykt / cbopbxeHne / yctpoictbo", kOTo ce cpeaAT B TOBA pBkoBOCTBO 3a yNtpe6a, ce otHacra 3a npooykTa "Plancha".

- PpoheTeTe yntbTaHeto npdeynynotpe6a.
- ɪnənɪ3baɪte camaɪ Na Oɪtkpɪnto.
- Ппөрөрьча ce no Врeme Ha мотхада НOCиTe рькавиц.
- He n3non3BaIe TdpbBEnbBrlnla.
He3nON3BaTepepeyunp-BeHTIn.13nON3BaTepeyunp-BeHTIn cΦkCpaHO nHaIaHae,OTOBAPaH Na CbOETBnH EBPOEJIcknCTaHdAp.
-Почистайся рedingовно有很大 соруca,зд поизberгете рпска от залива на машина.
Hecna3BaHeTo Ha roPHTe yka3aHn MoKe da npuHH cepno3H noBpeH na ypeHa.
A. 3A BALIATA BE3ONACHOCT
He noctabraye n He 3nnon3baite B 6n3oCT do ypeda 6bennnn 3anaanTeHn TneHoctn nn npn. Pto Bpeme Ha pabota ypebt TprOba da ce HAMnpa danepOT 3anaannM MATEpnaI.
Ako yceTnte mnp3Ma Ha ra3:
- 3aTbOpTe KpaHa Ha ra3oBaTa 6yTuNka.
- 3aracete OTKPNTNE PnAmbU.
-
Otbopete kanaka.
4.AKIMMHINMATA OCTABA, BIXTE § F. «ИЗПНТBAЕ 3a HenponycklnBOCT » ИМ с obБPHTe He3a6abHBO KbM TpbROBCKATA ΦINMa, OT KOЯTO CTe KYNIIY YpeDA.
-
He octabray Te ypea 63 Na6bIIOJeHne IIO BpeMe Ha pa6oTa.
HeI3BbIpuBaIePnoMENHO nEmeHHTe,3aUHTeHNc IrapanuO rTOPOB3BOIDTEnA UINOTHEROBtNHOUMOHUZHK.
- 3aTbOpTe ra3oBaTa 6yTuNka cneI yNoTpe6a.
B. MЯCTO HA NOJ3BAHE HA YPEDA
To3n ypeI Tp6Ba Da ce non3Ba cAmo Ha OTKpuITO.
BHIMAHHE: HaKoN IeChOIOCTbHn Yactn MoRat Da 6bDat MHOro ropeu. Na3eTe MaIKNe Te da.
BpaunycOT60cmOKOLOypeaHeTpr6BaDaHMa3anaIHTeHHMaTePnAIn.
He mectete ypeda no Bpeme Ha non3Bahe.
- YpeBt TpRb6a Da e NocTabeH Ha paBa HoxP30HTaHa NoBbpxHOCT. MoTHnPauTe I3dEnMeTo r Ra3OBaTa 8yTuNka ha paBA, TbBpDa He3eananIma NOBbXHOCT.
- Ocinyperte YnCT Bb3duyxC De6nT 2 M³/kBT/4.
C. MOHTAX
1.Индануразе На Батерета за[eIeKTPOHHTo 3anaIbAbe (B 3aBIMCNOCT OTOMaJha).
EJEKTPOHHO 3ANJBAHE HA TOPEJIKITE:
- EneKtpoHnata Cntema 3a 3anaBHe Ha ropeKNite ce 3axpaHBAOT 1 batepna TIN AA (LR06), KOto CE npOABAOTdENo. OTdeneHneTo 3a 6atepnaTce HAMIPA noKD KOH3ONATA (Phr.9).
BukTe 103a HnctaIupaHe Ha 6atepyra:
1) pa3BnIte KanaeHTo Ha OTeHeHneTo 3a 6aTepeHraTa.
2) noctabete batepnaTt AA, kaTo ce yBepnte, ye NpOxKHTeHnHrNt INOTPUaTeHNHrN TPOJHC aOpNEHTnpAHn PnABINHO KaTO e nocOeHNO (Φm. 10) n cneT ToBa 3aBNIte o6paTHo KanaHcTo.
D. ΓA3OBA BSYTNJIKA
YpeBt e npDHa3aHcH e 3a pObTa c 6yTbnKn pOnanHb/ytBt 04 5 do t Kc, Ch6dene Hc bC cneIaHnepEhyuPb-BeHTn
■ WBeuapn: BIXTE OTdENHnI NCT.
Фанць, Белгь, Локсевр, Великовпатань, Иралдь, Рортуль, Истань, Италь, Гъць: 6удан 28-30 mbar / npponan 37 mbar.
XoNaIaHn, HopBerHa, WbEcai, DaHn, FInHaNdHa, WbEuIaHn, YHrApHa, CNoBHeHa, CNoBaKHa, EChxHa,
Былгая,Турця,Рьн,在,XbPВATSCa:6yTah 30 mbar / nponaH 30 mbar.
- 蕩маня, Астрия: 6ytan 50 mbar / nponaan 50 mbar.
■Nonwa: nponaH 37 mbar.
Cbpy3BaHETO NMI CmHaTATA Ha ra3OBATA 6yTHNka Tpr6Ba Da CTaBA HA NPOBETPNBO MCTO, daJIeOH OTKPTI NaMbK, INCKPNI INI INTOTNHIK HA TOPTNIHA.
BucuHnata H ha 6ytNkKat Tp86Ba da 6bJe no-Maika ot 22 in. (56 cm), He3aBcHMo OT HeHnata WIpOuHnHa IIIN dAmetbpa D.
E. TpBBA
Фанци:ур ebT Moxe da ce n3no13Ba C 2 Bnda rBbKaBN Tpb6n: (B 3AusbHMOCT OT MOneda)
a.ΓbVkaba Tp6a, KOrTo ce Noctabry Bbpxy Ope6bpeHn HkpaHnHsO t CtpaHATA Ha yPeJa nHa peDuIup-BeHTnla, KaTO ce YpIIbTHRa Cbc CTeRaIu rPnBn (CbIpaHo cTaHApdXP D 36-110). PnpOpBtuIeHnHa DblKnHa 1,25 M.(ΦIr:2-A)
b.ΓbKaba Tpb6a (cBnIacHO cTaNapr XP D 36-112 nIu NF D 36-112), cHaDeha c pe36ObaHa raiKa G S, KOrTO ce 3aBnBa KbM ypeia, n pe36ObaHa raiKa M 20x1,5, KOrTO ce 3aBnBa KbM peDuHp-BeHTnla, npenOpbHuTeNa dIbJnxHa 1,25 M. (Φnr.2-B)
YpeBt e cHa6BeH cpe36oBaHa cBeiHNHTeHa MyFa HbXoJa 3a r3 G 1/2, npEdbapTeHNO MOHTnpAHa Ha ope6peHn Hakpaink OT BcOka Mapka NF 3aeHc OyIbTHeHMeTo.
-
Пи ползване на урEDA с гьвкава Трьба XP D 36-110 (Fig. 2-A):
-
Пьхнete дokрай тьвава Трба врху орбени
нakраимк на урета и на peуцир-veltima.
-ПлзHTe TcraaHTe rPbHN 3aJ TbPBHTe 2pe6pa Ha HakpAHNTe I nI 3aTeHETe DOkato Tcraaata rnaBa ce cynn.
- Повереете Ненисту Споста Като Спебату Казаная за на парраф $F.
2.Пи плзвае на урEDA съвкава тьба XP D 36-112
ии NF D 36-112, ragин G 1/2 и M 20x1,5 (Fig. 2-B):
- OTBnIe n OCTpAHeTe ope6peHnHaKpaHnIK Mapka NF, 3a da ocB6oOdnte BXoHnata MyFa G1/2.
Maxhete ynltbTheHHneTo
- 3abnne pe36b0aHaTata raiKa G 1/2 Ha Tpb6aTa Bbpyx BxOHaTata MyFa hyapea, ape36b0aHaTata raiKa M20x1,5 -Bpxy N3XoHnata MyFa hpa deyUnp-BeHTnla, KaTO cIeBaTe YK3aHaNtA, DaJIeHN KbM TbKAbata Ttp6a.
C NMOUHTa Ha raeuHc KIOU dPbJKe BxOHDATA MyFa yepa, a C Dpyr KIOU 3aTgAraTe IIN OTNyckaTe pe36OBAHATA raika.
EiHraeueh KIOU 103a fKcnpaHe Ha BxOHaTa Bpb3ka Ha ypeia.
EaHn Raen H KIOU 24 3a 3aTgAHa RaIKAHa TbBkABATA TbPbSA Ha yPeDa IIN 3a DEMOnHTpaHETo.
EeHNraeHEn KIOH 3aФNCKIpaHE Ha N3XODHaTbB3ka Ha neyuOpB-BeNTnI npn PnCbeENHBAHe HaTbKBABATA TpbBa Hn npn DEMOHTnpaHO.
HenponypcKbNtBocTaTgBa6Ba cpe npobep B cbOTBeTCTBnC HcHTpyKuMnte B naparpF).
Ybepete Ce, Ye TbKabata Tp6ba Ce pa3TbBa HopMaHIO, 6e3 ycYBaHe Nm ONbBAHe, N He CE ONIPA B ropeuHTe CTehn Ha ypeHa. TpbBata Tpr6Ba Da 6bDe CmEHea CneI n3TuHae Ha cPoKa Ha rOHOCT, NocOHeH BbPxH HeNn Ako Ce NOpeDn, nn E Hanyka.
■Befirn,IIOKcEM6pyr,ObeHINHETO KpaJIcTBo,IpNaJdHn,NpOtyraHn,IcNanHn,ItnaHn,XbPbATn,Tbpu,XoHaHnD,UexHn,CNoBaKn,YHrpA H,CnoBeHn,HopBerHn,UWeuHn,DaHn,ΦHnAnHn,BbIrpA,Typu,PymbHn,PiOna,EctOnHn,UWeuapar(B3abChmocTOTModena):
YpeBt e cHa6dH c Ope6bH hakpaHnK. ToI trp6Ba da ce nON3Ba cBc cneMaHna TbKBaBA Tp6Ba, noNDoJAa 3a ra3 npOan Hra 3b 8yTaN. DJIxNInHata Ha Tp6BaTa He Tp6Ba da HauBnUba 120M. ToI trp6Ba da 6b De noMDHen, Ako e nobPeHen, HanyKaH nn CByrAcho DeJeCTBaWnte HopMATBHN m3CKBaHnA. He IbPnAte I ne H yCykBaIte Tp6Ba. PAn3e TaJaTeOT HApRbAsi Ce qactn.YBepete Ce, Ye TbKBaBATA Tp6Ba ce pa3rBa HopMaHNo, Be3 yCkyBaBA INI ONtBaHe.
NobbpxHOCT 3a roTBeHe
Повьхноctta 3a rotbehe e emaiinipana. Koratoя
ночьate ce npenopbyba првд отстарпгte BCNUK
ocatbci ot rotbehto c b6a nIN CHOHR ep 3a MNEHe. Bcka
octaTuHa ma3HnHa може дбдe OTCTpaHena KaTO ce
n3PON3Ba TeHOCt 3a MNEHe Ha cbdoBe.
BHHMabaiTe Da He ydpTe NObIpxHOCTTa 3a roTbeHe B TBbPaIOBbpxHOCT, TbI KATO TOBA MOKe Da OTyPiOT emaiJa.
N. CbXPAHEHME
CneI BcKo NpI3BaHe 3aTbApRyKe KpaHa Ha ra3OBATA6ytNtka.
- Ako pnpbipate 6ap6ekIO TO B 3aTbOpeHO NOMEueHne, npeKbCHete 3axpaHbAHeto C r3.
Ako He non3bate 6ap6ekoto Dbliro Bpeme,do6pe e da ro npmbepete B cyxo 3atBOpEno nomeuene (HanPmEp: rapax).
- Okonha cpea, 6bnaropnraTCTBa7a Kopo3na: Tpr6ba da ce nnonarat cneuaanHn prnKm 3a npDyKta, ako ce n3no3Ba 6bn3o do mope nIn okeah; ToI He Tpr6ba da ce octabra Ha OKpNtO 6e3 3auNTa n Tpr6ba da ce cbxpaHraBa H cyXo N 3akPnTO MRCTO.
O. AKGECOAPN
Kompanheta ADG (Application des Gaz) npenopbya
Heinthe ra3obn ypei Da ce n3no3BAT c akcecoapn H
pe3epBNH actn Campingaz. ADG He hocn OTROBOPoct
npn NOBpda nn lowa pa6oTa, pniuHneH otynotpe6bata
Ha akcecoapn H/nn pe3epBNH actn ot dpya mapka.
P. ONA3BAHE HA OKOJIHATA GPEDA
Гржerte са онаBaHe Ha OKolnata срда!УрдьСьдьржа Матерлии,Кontо могат Да Бдат Вьз��овени илpenецларни。Пр dedITE ro By NtHIOBEЗа 3быране на OTандьси ВьВ ваша对接обина,OTДЕНО OT onakOBKaTa.
Q. INPENOPbKN 3A BATEPNTNE

To3n CmB0n, p3aIPOJKeH Bbpxy 6atePInTe O3HaHab, cE b Kpaar Ha EeKpIOnOaTauIOHN Hc MepNIO TpRbBa 3a 6bDat N3BaDeHn O3NeIMeTO, a CneD TOBA npEaIeHn 3a peuKKnIpaHe IIN Hn H oNDxOJIATO MCTo. BatePInTe He 6bMa da XbBpLnH B DOMaKInHckNb 6okIyuk, a TpRbBa 3a 6bDat n B cbBpATeHEn NYHK (nonEbn CKlaI...). PnpoepeT hInte Bnactn. HmKOra He n m3XbBpIeTBe T npipOdaT a copTe: HanuMeTO HA Nkou BoeueCTBa (Hg, Pb, Cd, B INTOSeHIne 6atePmOke Da 6bJe OnaCHO 3a a cpea n 3a 3dpABETo Hx xpTa.
R. ENEKTPNUECKN ENEKTPOHHN OTNAJbU

To3n CnMBOI NOKa3Ba,Ye eNeKtpNueCKaTa CnCTeMa Ha ypeDaNoJIeNxHa pa3dJeHNO Cb6pNaHe.B KpaHa EKCnIPOATAUIOHNHa XJBOT Ha ypeDa HerOBA Ta eNEKtpNueCKaTa CnCTeMa Tp8Ba Da ce N3XbPnB CbOTBETCTBNE C HOPMATINBHNT N3UKBAAHH.
EeKtpnueckata cnCTema He tprba da ce i3XbPnla 3aeHc O dpyrnte Domaknckn OTnabIu. PaazdHnTo CbIpaHa ne OTnabIuIte N pOIOOMrhe NOBtOPHa yOtnpE6a, peUknpaHeto I npTyN FOPMn Ha NOBtPOHO OTNO3OTBOPBaHane HpeUknpuHpyMeNTe MATEpAIIu, CbIbPxAauCe B oTnAdbIyTe. PnpaHte eEeKTPneckata cnCTema Ha yPeDa BnyHKt 3a peUknpaHae NaOTNbIu, npeBxDnE 3a Ta3u CE (CmEtuJe). PnpoBepTe npn MeCTHNe BNacti. HKnora He n13xBbPnIe Tbe PnpOdaT a Ne rnpote: HAnuHnTo Ha HKnOi OnaChn BeIeCTBa B eNEKTPnuECKOTO n eEKeTPOHHOTO ObOpyDaHane MOKe Da b6Ibe BpeHO 3a OKOnHaTa cPeda n da Ima NOTHeuHaJIHO BbnHHe Bbpxy 3dpabeto Ha xopata.
S. OTCTPAHBAHE HA IPOBJIEMN
| Поведи | Вер�огна рлишина остраваянe |
| Торелкata не се залалba | • Лочо поадаане на ra3
• Рedlyцрвентлгпс He pa6otn
• Трьбота, краньт, вениху Trьбата илnotовине на ropeлкata ca zanuшени.
• Вених Trьбата не obхваши добре дюзатa. |
| Торелкata пекьсва ил
игасва | • Поверete поадаанeto на ra3.
• Поверete сььрзванeto на trьбатa.
•Обрпete ce KM cepBN3. |
| Несавини сбостяши
пламьци | • Нoba 6bytлka, кого може за сььрха виздух. Octabete da p6otn и пбileмьт
ше ичесné.
•Обрпete ce KM cepBN3. |
| Виски пламьци на
пobьрхността на
trорелкata | • Нakраинкьт на дюзата e лочо сььрзан c виздух. Зakpenete вениху
trьбата правимно. (Фиг. 5)
• Вених Trьбата e зanuшени (нарр. пяжини). Почистete я.
•Обрпete ce KM cepBN3. |
| Ниськ пламьк в дюзатa | • Бутлкata e почи празана. Сmedete я и пбileмьт (
ше ичесné.
•Обрпete ce KM cepBN3. |
| Торелкata се залалba с
КИбрптона КLEЧка, по се
ПИЕЗО залалkata | • Д Equ龟ten 6bytOn, КИЗА Илие онлайн на залалкata. Поверete сьенин�да на
Кабеля на залалкata.
• Поверete сьстаянeto на онлайн на сьенин�да.
•Обрпete ce KM cepBN3. |
| Пова на пламьци в
сbieиненье | • Heynilьт themselves on
He3ababho 3atbopete питока на ra3.
•Обрпete ce KM cepBN3. |
| Нedoстыно наhrявае | • 3anuшени дюза ил вени Trьба. (Фиг. 5)
•Обрпete ce KM cepBN3. |
| Пова на пламьци за
peruginaшся loost | • Dequ龟ten кран.
•Изкingly�е урEDA.
•Obprпete ce KM cepBN3. |
| Пова на пламьци за
konzolалata | • Изкingly�е урEDA
•Затовete sbутлкатa
•Obprпete ce KM cepBN3. |
INSTRUKCJA OBSŁUGI
K. A GÁZPALACK CSERÉJE
J. CIHAZIN KAPATILMASI