USER MANUAL SORIO 3 LXD TWIN CAMPINGAZ
| REVISION HISTORY |
| REV. | DATE | MODIFICATIONS | NAME | ECN NO. |
| A | 21 OCT 2021 | NEW - Spins-off from 4010067561. | Jenny D. | 0035331 |
| | | | |
| | | | |
| | | | |
| | | | |
| | | | |
| | | | |
| | | | |
| | | | |
| DO NOT PRINT THIS PAGE
Printing Notes:
Material: 64 GSM (International) bond paper, white
Ink: Black
Resolution: 150 DPI or above
Printing method: Offset Printing / 1 Sheet, 2-side
printed
Folded Size: A5 - 148 x 210 mm (W x H)
Binding: Perfect binding |
|
|
|
|
|
|
|
|
|
|
|
|
|
|
|
CAMPINGA Z
FR MODE D'EMPLOI
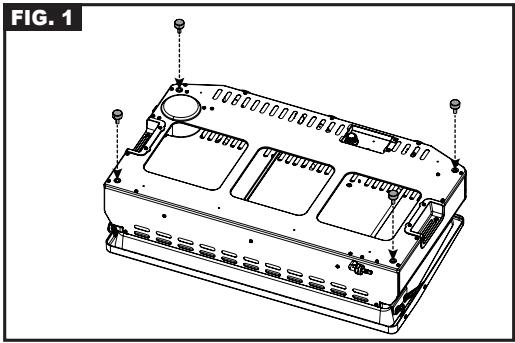
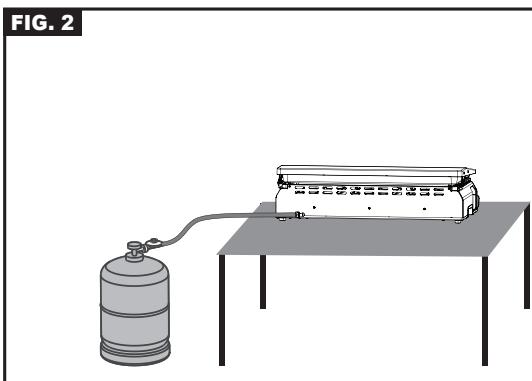
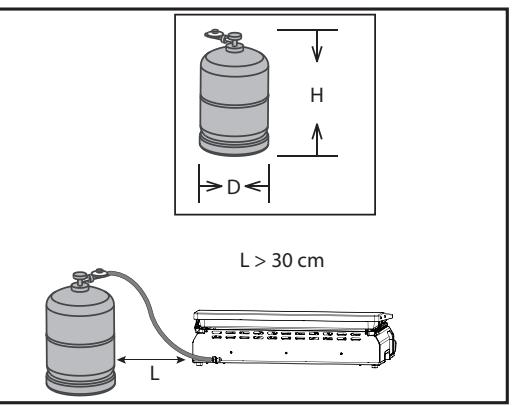


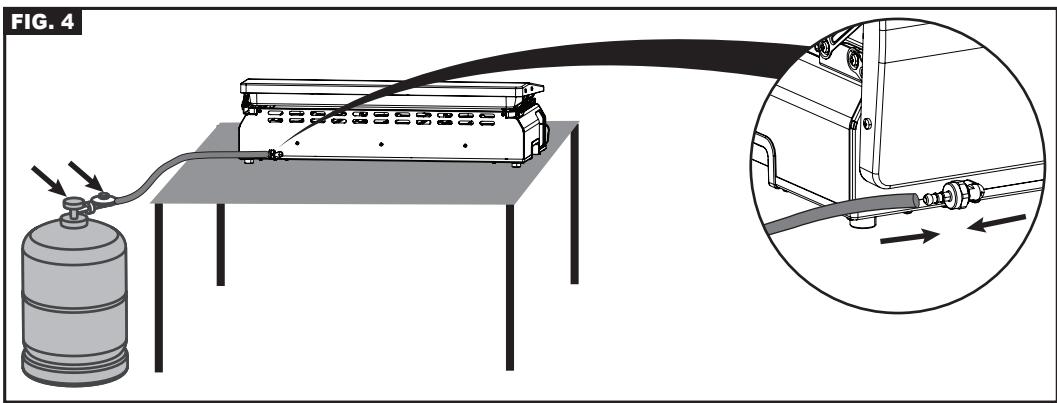
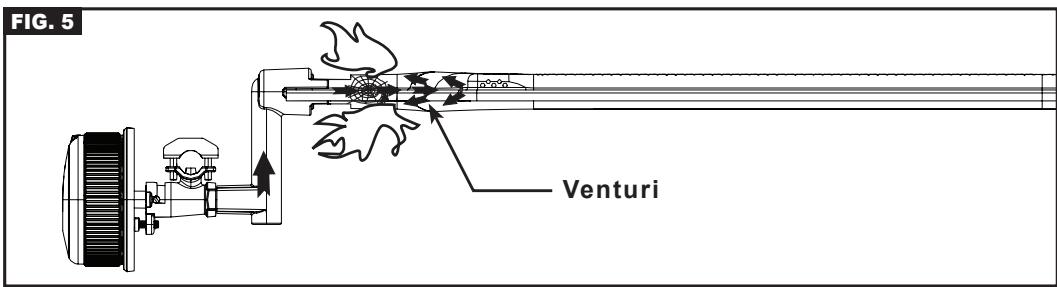
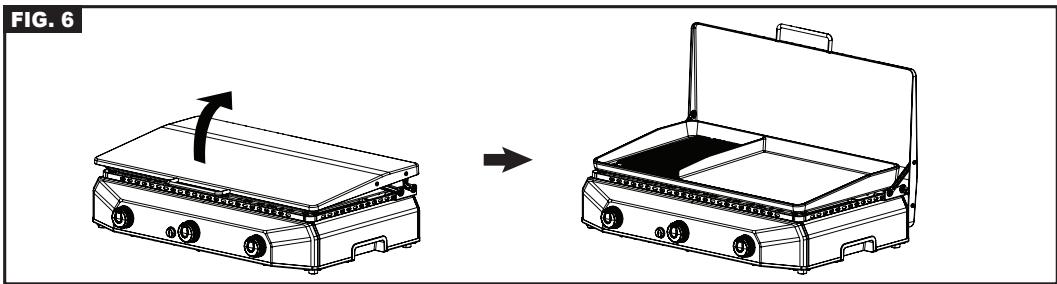
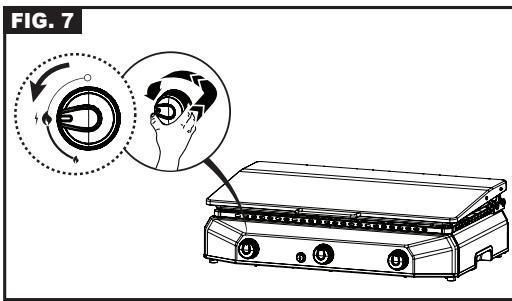
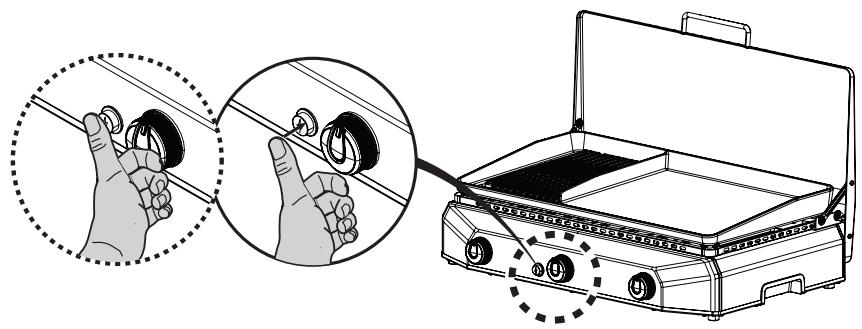
FIG.8
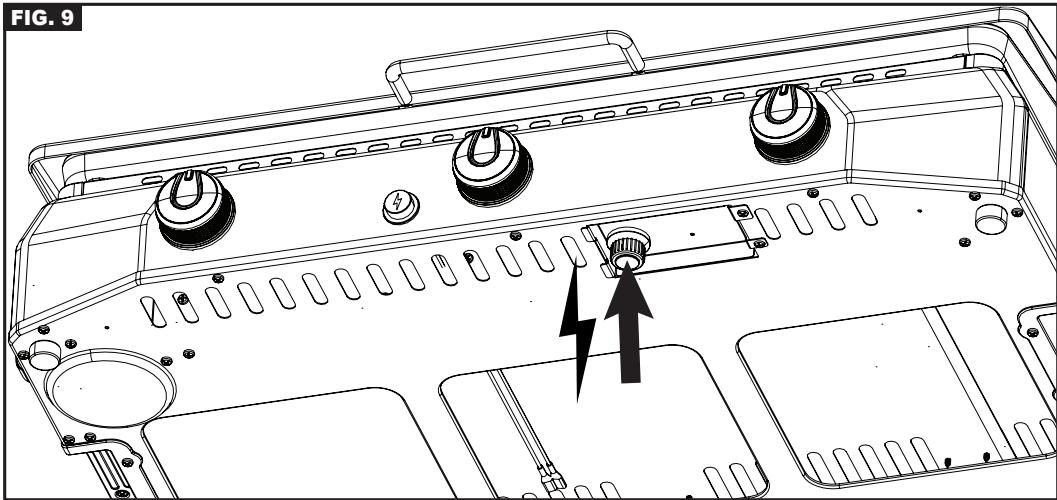
FIG.9
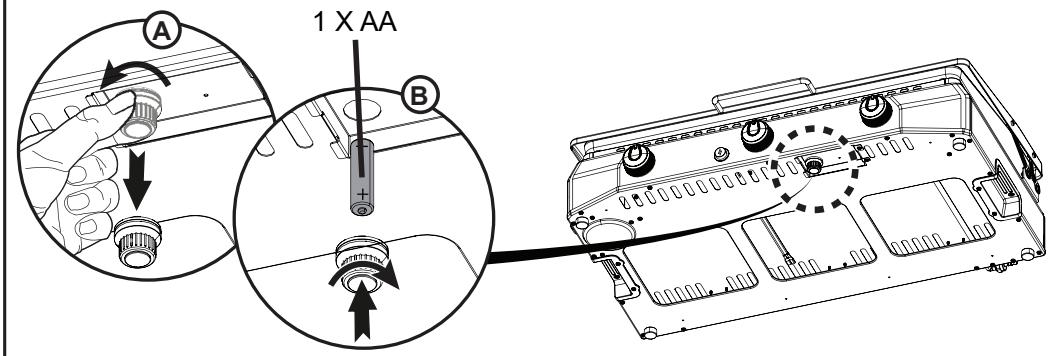
FIG. 10

FIG. 11
FIG. 12


MODE D'EMPLOI
R. RECOMMANDATIONS PILES

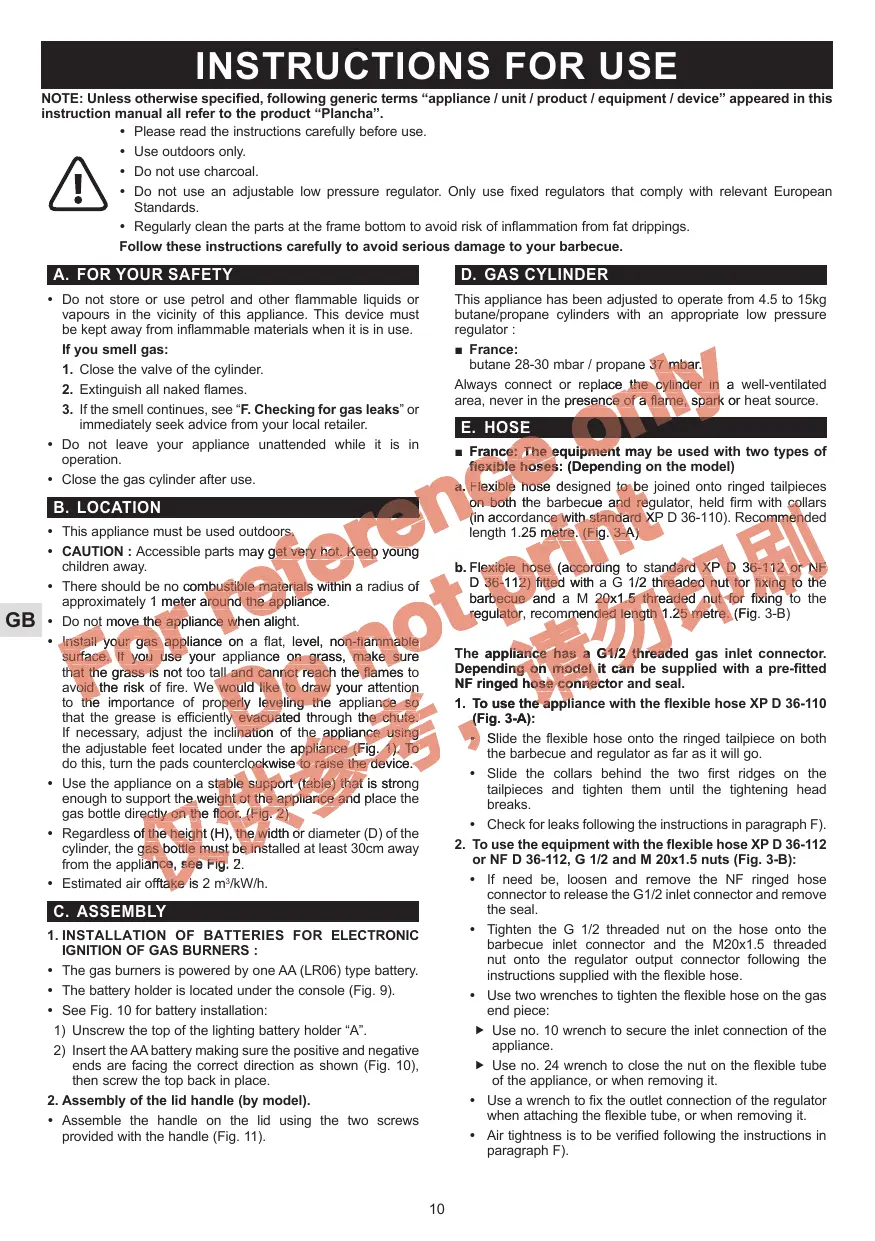
NOTE: Unless otherwise specified, following generic terms "appliance / unit / product / equipment / device" appeared in this instruction manual all refer to the product "Plancha".

- Please read the instructions carefully before use.
- Use outdoors only.
- Do not use charcoal.
- Do not use an adjustable low pressure regulator. Only use fixed regulators that comply with relevant European Standards.
- Regularly clean the parts at the frame bottom to avoid risk of inflammation from fat drippings.
Follow these instructions carefully to avoid serious damage to your barbecue.
A. FOR YOUR SAFETY
- Do not store or use petrol and other flammable liquids or vapours in the vicinity of this appliance. This device must be kept away from inflammable materials when it is in use.
If you smell gas:
- Close the valve of the cylinder.
- Extinguish all naked flames.
-
If the smell continues, see "F. Checking for gas leaks" or immediately seek advice from your local retailer.
-
Do not leave your appliance unattended while it is in operation.
- Close the gas cylinder after use.
B. LOCATION
- This appliance must be used outdoors.
- CAUTION: Accessible parts may get very hot. Keep young children away.
- There should be no combustible materials within a radius of approximately 1 meter around the appliance.
-
Do not move the appliance when alight.
-
Install your gas appliance on a flat, level, non-flammable surface. If you use your appliance on grass, make sure that the grass is not too tall and cannot reach the flames to avoid the risk of fire. We would like to draw your attention to the importance of properly leveling the appliance so that the grease is efficiently evacuated through the chute. If necessary, adjust the inclination of the appliance using the adjustable feet located under the appliance (Fig. 1). To do this, turn the pads counterclockwise to raise the device.
- Use the appliance on a stable support (table) that is strong enough to support the weight of the appliance and place the gas bottle directly on the floor. (Fig. 2)
- Regardless of the height (H), the width or diameter (D) of the cylinder, the gas bottle must be installed at least 30cm away from the appliance, see Fig. 2.
Estimated air offtake is 2m^3 /kW / h
C. ASSEMBLY
1. INSTALLATION OF BATTERIES FOR ELECTRONIC IGNITION OF GAS BURNERS :
- The gas burners is powered by one AA (LR06) type battery.
- The battery holder is located under the console (Fig. 9).
See Fig. 10 for battery installation:
1) Unscrew the top of the lighting battery holder "A".
2) Insert the AA battery making sure the positive and negative ends are facing the correct direction as shown (Fig. 10), then screw the top back in place.
2. Assembly of the lid handle (by model).
- Assemble the handle on the lid using the two screws provided with the handle (Fig. 11).
D. GAS CYLINDER
This appliance has been adjusted to operate from 4.5 to 15kg butane/propane cylinders with an appropriate low pressure regulator :
France:
butane 28-30 mbar / propane 37 mbar.
Always connect or replace the cylinder in a well-ventilated area, never in the presence of a flame, spark or heat source.
E. HOSE
■ France: The equipment may be used with two types of flexible hoses: (Depending on the model)
a. Flexible nose designed to be joined onto ringed tailpieces on both the barbecue and regulator, held firm with collars (in accordance with standard XP D 36-110). Recommended length 1.25 metre. (Fig. 3-A)
b. Flexible hose (according to standard XP D 36-112 or NF D 36-112) fitted with a G 1/2 threaded nut for fixing to the barbecue and a M 20x1.5 threaded nut for fixing to the regulator, recommended length 1.25 metre. (Fig. 3-B)
The appliance has a G1/2 threaded gas inlet connector. Depending on model it can be supplied with a pre-fitted NF ringed hose connector and seal.
- To use the appliance with the flexible hose XP D 36-110 (Fig. 3-A):
Slide the flexible hose onto the ringed tailpiece on both the barbecue and regulator as far as it will go.
- Slide the collars behind the two first ridges on the tailpieces and tighten them until the tightening head breaks.
- Check for leaks following the instructions in paragraph F).
2. To use the equipment with the flexible hose XP D 36-112 or NF D 36-112, G 1/2 and M 20x1.5 nuts (Fig. 3-B):
Check that the flexible hose stretches out normally without twisting or pulling and does not come into contact with the hot sides of the barbecue. It should be replaced when the expiry date on the hose is passed or whenever it is damaged or develops surface cracks.
F. CHECKING FOR GAS LEAKS
- Work outside, away from all sources of ignition. Do not smoke.
- Make sure the control knobs are in the "OFF" (O) position.
- Connect the flexible tubing to the connector and barbecue as described in part E).
- Fit the regulator onto the gas cylinder in accordance with its instructions.
- Use a gas leak solution to test for leaks. Important: never use a naked flame to check for gas leaks.
- (Fig. 4) Apply the solution to the connections cylinder/ regulator/ hose/appliance (the control knobs should remain closed: "OFF" position (O)). Open the gas cylinder valve.
- Bubbles in the gas leak solution indicate that there are gas leaks.
-
The leak can be stopped by tightening any hose connection or replacing any faulty component. The barbecue must not be used until the leak is stopped.
-
Close the valve on the gas cylinder.
Important:
Check for leaks at least once per year and each time the gas cylinder is replaced.
Never use a flame to detect a leak.
G. PRIOR TO USE
Never use the appliance until the instructions have been read carefully and understood. Additionally, ensure that:
- There are no leaks.
- (Fig. 5) The venture tubes are not blocked (example: spider webs).
- (Fig. 2) The hose does not touch any components which may get hot.
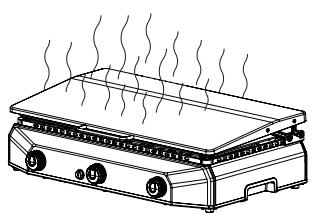
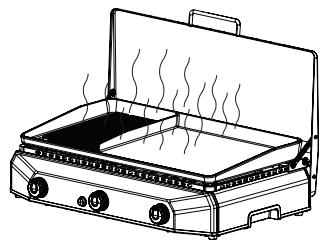
- (Fig. 12) The lid is not in closed position.
- This appliance is equipped with wide holes for air circulation. Ensure that these holes are not obstructed.
H. IGNITION OF THE BURNERS
In case of burn back (ignition under the burner cap) switch the product off, allow it to cool down (approximately five minutes), then reignite the appliance. If the problem of burn back persists, then please contact your local Campingaz® representative.
Never light the appliance with the lid closed, only with the lid open.
- Open the protective lid by rotating it to the back of the device. (Fig. 6)
- Make sure that the control knobs are in the "OFF" position (O).
- Press and turn the adjustment lever counter-clockwise and put it in a full flow position (Fig. 7)
- Your device is equipped with an electronic ignitor :
Press the ignition button (4)
- If the electronic ignition does not work (see chapt T), please use the manual ignition procedure described at the following paragraph.
I. MANUAL IGNITION
In case of non-working automatic ignition, set the control knobs to "OFF" (O).
Remove grease cup. Light a match and then bring it toward the burner through the grease cup hole of the plancha.
Push the control knob and turn it counterclockwise until it is in the full flow position ( ).
Put the grease cup back in place with protective gloves, being sure to correctly position the grease evacuation hole.
J. SHUTTING OFF THE APPLIANCE
Return the control knobs to the "OFF" position (O), then close the cylinder valve.
K. REPLACING THE GAS CYLINDER
- Always work in a well ventilated area and never in the presence of a flame, spark or heat source.
- Return the control knobs to the "OFF" position (O) then close the cylinder valve.
- Remove the regulator, check that the sealing joint is in good condition.
- Put the full cylinder in place, refit the regulator, taking care not to apply stress to the hose. Check for gas leaks.
L. OPERATION
On your first use, warm up the appliance with its burners in full flow position (4), for approximately 15 minutes in order to eliminate any odors resulting from the paint on the new parts.
- It is recommended that protective gloves be worn to handle components which may be very hot. Use long handled utensils to move food which is on the grate.
Before cooking, pre-heat appliance for a few minutes at the Full Flow ( ) setting.
- The cooking speed can be regulated via the control knobs: between the full flow position ( ) and medium flow position ( ).
Important: If one or several burners go out whilst you are using the appliance, turn the control knobs to "OFF" immediately (O). Wait five minutes to allow unburned gas to escape. Only carry out the lighting steps after this time.
Important: Wait for the complete cooling of the appliance before closing the lid (depending on models).
M. USAGE ADVICE
The Campingaz Plancha TWIN has been specially designed to prevent the transfer of flavors between different foods. A customized separation wall divides the ribbed "grill" side from the classic flat surface side of your griddle. The ribbed side is ideal for cooking meats (sausages, duck breast...) and offers the possibility of classically branding it, while excess grease channels away and ensuring it doesn't grill in too much oil for healthier cooking.
N. CLEANING AND MAINTENANCE
Never modify the appliance: any modifications may prove dangerous.
In order to maintain your appliance in perfect operating condition, it is recommended to clean it after each use.
Important: Please do not use paper towel or scratch-sponges. As it is extremely aggressive towards paint and stainless steel material, it could scratch paint/stainless steel/markings. A soft microfiber towel is as efficient and will prevent damages.
- Wait until the appliance has cooled down before cleaning.
- Close the gas cylinder and remove the regulator.
-
Clean the top of the burner, as well as the sides and base, using a moist sponge (water with dish washing liquid). If necessary use a damp steel brush.
-
Check that the burners outlets are clear and dry before using again. If necessary use a wire brush to unclog the burners outlets.
- If the appliance has not been used for over three months, make sure that cobwebs are not obstructing the openings of the burner tubing, which might lead to poor grill performance or dangerous flaming outside the burner. Clean the tube openings of the burner tube or the burner itself when necessary.
NOTE: Regular cleaning extends the lifetime of the burner and prevents premature oxidation that may result from cooking acid residue. Oxidation of the grill burner is, however, normal.
Firebox walls, control panel, grease cup
Regularly clean these elements using a sponge damped with dish washing liquid. Do not use abrasive products.
Cooking griddle
The cooking griddle is porcelain enamelled.
Pay attention not to hit the cooking griddle on a hard surface as it could damage the enameling.
Cleaning precautions:
The most efficient and easiest way to clean your Plancha TWIN griddle is when it is still lukewarm after it has been in use. If the griddle has already cooled down after usage, it is also possible to slightly re-heat it for a few minutes at a low flow rate. Always clean the griddle with the burner OFF, the taps closed and WITHOUT any flames.
Ribbed grilling surface:
To clean the ribbed part of your Plancha TWIN griddle, Campingaz recommends using the brush included. When the griddle is still lukewarm, sweep between the ribs from the back of Plancha to the front and push the grease toward the trough. Then channel the grease towards the drain hole on the front left of the griddle.
Flat surface:
To clean the flat surface of your Plancha TWiN griddle, Campingaz recommends pouring water or white vinegar on the still lukewarm griddle. Gently scrape over the surface with a spatula to remove as much of the residue as possible and push the residue as well as the liquid towards the trough at the front of the griddle. Using the spatula channel the remnants towards the drain hole on the front left of the griddle.
Overall griddle:
White vinegar makes cleaning the Plancha Twin griddle easier. Be mindful that the addition of any assisting cleaning liquids (water, vinegar etc.), can cause the grease cup to fill up considerably. Monitor the fill level of the cup to avoid overfilling. Empty the cup and secure it back in place when necessary. Campingaz recommends emptying the grease cup after each grilling session.
Complete the cleaning and degreasing by removing the griddle from the Plancha TWIN, wash it with a sponge and dishwashing liquid, rinse with clean water and finally dry the griddle.
Empty the grease cup and wash it in the dishwasher.
O. STORAGE
- Close the gas cylinder valve after use.
- It is recommended to store your appliance indoors after removal of the gas cylinder.
- When not used for a long period of time, it is recommended that the plancha be stored in a dry, sheltered place (eg : garage).
P. ACCESSORIES
ADG (Campingaz) advises that its gas barbecues should systematically be used with accessories and replacement parts from Campingaz. ADG (Campingaz) accepts no responsibility for any damage or malfunction due to the use of accessories and/or replacement parts from other brands.
Q. PROTECTING THE ENVIRONMENT
Think about protecting the environment! Your equipment contains materials which can be recovered or recycled. Hand them in to the waste collection service in your municipality and sort the packing materials.
R. BATTERY RECOMMENDATIONS

This symbol found on the batteries means that at the end of their lives, the batteries must be removed from the unit, and then recycled or properly disposed of.
The batteries should not be thrown into the trash, but should be brought to a collection point (dump...). Check with your local authorities. Never dispose of in nature, do not incinerate: the presence of certain substances (Hg, Pb, Cd, Zn, Ni) in used batteries may be hazardous to the environment and human health.
S. ELECTRICAL AND ELECTRONIC WASTE

This symbol means that the appliance's electrical system must be disposed of selectively. At the end of its life, the appliance's electrical system must be scrapped correctly. The electrical system must not be disposed of with unsorted municipal waste. Selective
collection of waste promotes reuse, recycling or other forms of recovery of recyclable materials contained in this waste. Take the appliance's electrical system to a waste recovery centre designed for the purpose (waste collection point). Check with your local authorities. Never dispose of in nature, do not incinerate: the presence of certain hazardous substances in electrical and electronic equipment can be harmful to the environment, and have a potential effect on human health.
| Problems | Probable causes / remedies |
| The burner will not light | • Lack of gas supply.
• Regulator does not work.
• Hose, valve, Venturi tube or burner openings are blocked.
• Venturi tube not seated over jet. |
| Burner 'pops' or blows itself out | • Check gas supply.
• Check hose connections.
• Contact the After Sales Service. |
| Sputtering unsteady flames | • New bottle may contain air. Continue use and the problem will disappear.
• Contact the After Sales Service. |
| Large flames on surface of burner | • Jet nozzle badly connected to Venturi tube. Adjust the Venturi tube. (Fig. 5)
• The Venturi tube is clogged (e.g.: cobwebs). Clean Venturi tube. (Fig. 5)
• Contact the After Sales Service. |
| Flame low on jet | • The bottle is almost empty. Change bottle and the problem will disappear.
• Contact the After Sales Service. |
| The burner can ignite with a match but not with the electronic ignition button | • Battery missing or drained. Please start by its replacement by a brand new one before checking next steps below.
• Faulty igniter button, wire or electrode. Check igniter cable connections.
• Check condition of electrode and connection wire.
• Contact the After Sales Service. |
| Fire at any connection | • Leaking connection.
• Turn off gas supply immediately.
• Contact the After Sales Service. |
| Lack of heat | • Clogged jet or Venturi tube. (Fig. 5)
• Contact the After Sales Service. |
| Fire behind control knob | • Defective valve.
• Turn off appliance.
• Contact the After Sales Service. |
| Fire under control panel | • Turn off appliance.
• Close gas cylinder.
• Contact the After Sales Service. |
GB