USER MANUAL SELECT 3 LX PLUS CAMPINGAZ
| REVISION HISTORY |
| REV. | DATE | MODIFICATIONS | NAME | ECN NO. |
| A | 17 AUG 2022 | NEW - Spins-off from 4010067969. | Suky W. | 0058946 |
| | | | |
| | | | |
| | | | |
| | | | |
| | | | |
| | | | |
DO NOT PRINT THIS PAGE
Printing Notes:
Material: 64 GSM bond paper, white
Ink: Black
Resolution: 150 DPI or above
Printing method: Offset Printing
Binding: Perfect Binding
Folded size: A5- 148 x 210 mm (W x H)
SAP REF = 2181557
Program: InDesign CS6
Black
RELEASED FOR PRODUCTION
| CONFIDENTIALTHIS DOCUMENT AND ITS CONTENTS ARE CONFIDENTIAL AND CONSTITUTE TRADESECRET'S PROPRIETARY TO NEWELL BRANDS, WHO RESERVE ALL RIGHTSTHEREIN. BY ACCEPTING THIS DOCUMENT, THE RECIPIENT AGREES NOT TO COPYUSE, MANUFACTURE, OR COMMUNICATE TO OTHERS, WHOLLY OR IN PART, THECONTENTS OF THIS DOCUMENT EXCEPT AS EXPRESSLY AUTHORIZED IN WRITINGBY NEWELL BRANDS. |  BRANDS 3 Glenlake ParkwayAtlanta, GA 30328 USA BRANDS 3 Glenlake ParkwayAtlanta, GA 30328 USA |
| MATERIAL: SEE NOTES |
| DRAWING PREPARED IN ACCORDANCE WITH ASME Y14.5 | FINISH: SEE NOTES |
| TITLE:IFU SELECT 3 AND 4 |
| 1ST ANGLEPROJECTION | | DRAWN BY: Suky W. | SCALE: 1 : 1 DRW NO.NWL0001404763 REV A |
| DATE: 17 AUG 2022 | SHEET 1 OF 1 |
IFU SELECT 3 AND 4
1ST ANGLE PROJECTION  | DRAWN BY: Suky W. | SCALE: 1 : 1 | DRW NO.NWL0001404763 | REV A |
| DATE: 17 AUG 2022 | SHEET 1 OF 1 |
CAMPINGAZ®
FR MODE D'EMPLOI 05
GB INSTRUCTIONS FOR USE 10
DE BEDIENUNGSANLEITUNG 15
ES INSTRUCCIONES DE EMPLEO 20
PT MODO DE EMPREGO 25
IT ISTRUZIONI PER L'USO 30
NL GEBRUIKSAANWIJZING 35
NO BRUKSANVISNING 40
SE BRUKSANVISNING 45
EI KÄYTTÖOHJE 50
DK BETJENINGSVEJLEDNING 55
IS Notkunarleiðbeiningar 60
DI INSTRUKCJA OBSIUGI 65
CZ NÁVOD NA POUŽITÍ 70
SK NÁVOD NA POUŽITÍ 75
HU HASZNÁLATI ÚTMUTATÓ 80
SI UPORABA IN VZDRŽEVANJE 85
HR UPORABA I ODRŽAVANJE 90
RO FOLOSIRE SI ÎNTRETINERE 95
BG ИНСТРУКЦИИ ЗА УПОТРЕБА 100
EE Kasutusju hend 105
LV LIETOŠANAS PAMACIBA 110
NAUDOJIMO instrukcija 115
GR ODHΓIEΣ XPHΣΗΣ 120
TR KULLANIM KILAVUZU 125
AR مادختسالا قييرط 130
flowchart
graph LR
    A["Gas Cylinder"] --> B["Tool Position"]
    B --> C["Tool Placement"]
    C --> D["Tool Mount"]
    D --> E["Roller Belt"]
    style A fill:#f9f,stroke:#333
    style E fill:#bbf,stroke:#333
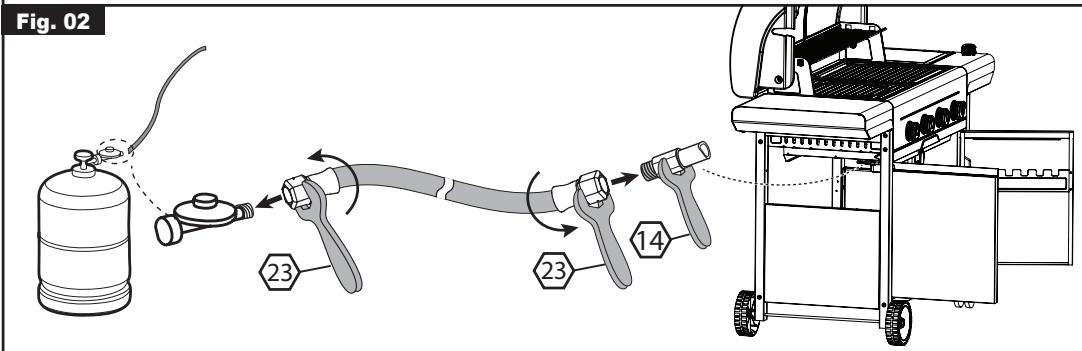
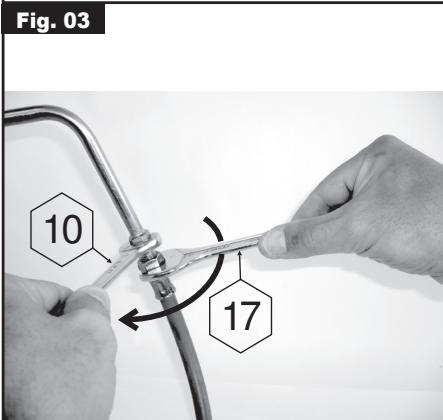
Fig. 05
Fig. 04
natural_image
Technical line drawings of two industrial gas processing machines with hoses and a gas cylinder (no text or symbols)
Fig. 06
natural_image
Abstract diagram with concentric rings and curved lines, no text or symbols present
natural_image
Technical line drawing of a cylindrical mechanical component with a crescent and plus symbol on top (no text or labels)
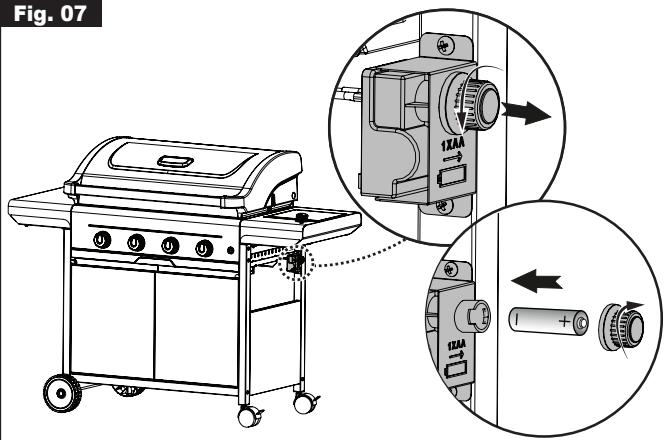
Fig. 08
natural_image
Line drawing of a portable electric grill with wheels and a labeled panel (no text or symbols)
Fig. 09
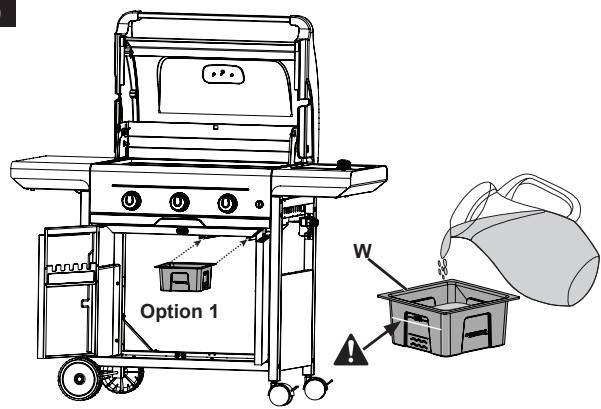
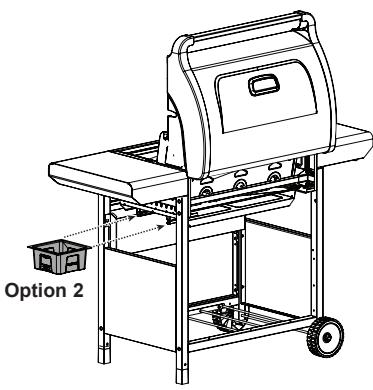
Fig. 10
natural_image
Line drawing of a portable electric stove or gas stove unit with wheels and internal components (no text or symbols)
natural_image
Line drawing of a hand holding a tool near a dome-shaped structure (no text or symbols)
Fig. 11
natural_image
Line drawing of a portable gas stove with a cylindrical tank inside, no text or symbols present
natural_image
Line drawing of a portable gas stove with a gas cylinder and a checkmark on the side (no text or symbols)
Fig. 12

natural_image
Technical diagram of a mechanical assembly with directional arrows and a close-up inset showing internal components (no text or symbols)
Fig. 13
natural_image
Line drawing of a portable electric grill with open doors and wheels (no text or symbols)
Fig. 14
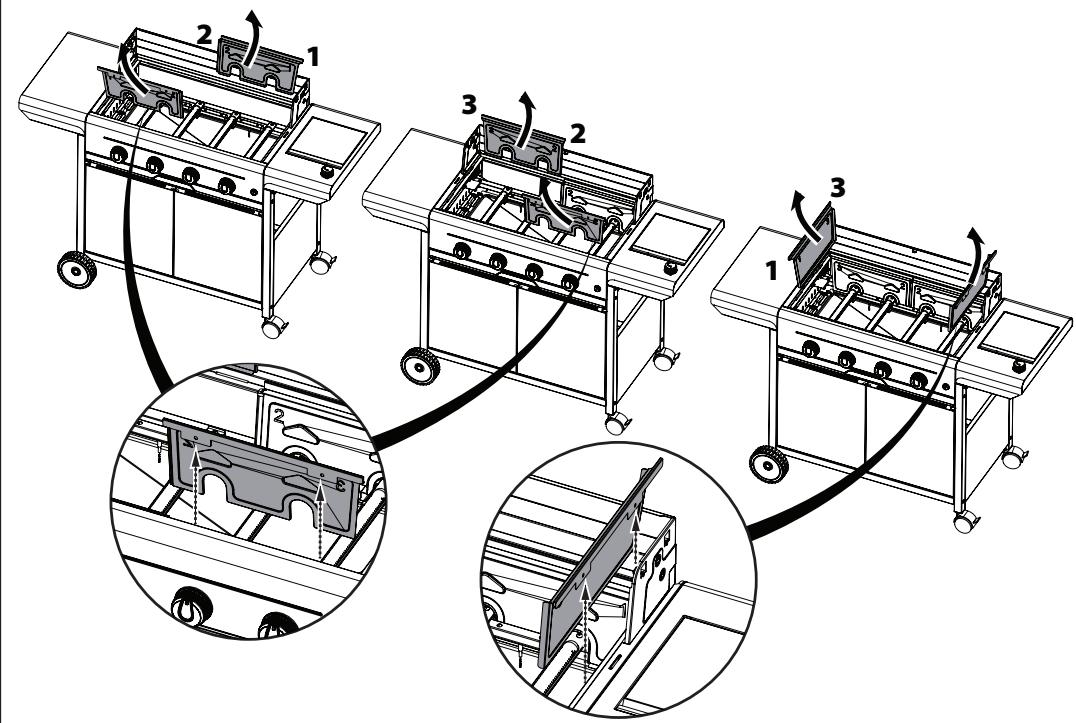
Fig. 15
NOTE: Unless otherwise specified, following generic terms “appliance / unit / product / equipment / device” appeared in this instruction manual all refer to the product “SELECT 3 & 4”.
This product is designed for a normal private use, not intended for commercial purposes.
Thank you for choosing a Campingaz ^® gas barbecue!
This product has been designed to ensure you delight in the best grilling experience.
For the best cooking experience, please keep this manual in a safe place. Prior to use, we recommend that you carefully read the instructions and information provided.
1 - IMPORTANT NOTICE
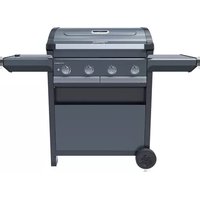
The grill shown in this manual may look different from yours. It is for illustration purpose only.
Follow these instructions carefully to ensure safe usage and avoid damaging your barbecue:
- Do not modify the grill. Any modification of the grill may be dangerous.
- Please read the instructions carefully before use.
- Use outdoors only.
- It is recommended to wear gloves to assemble the grill.
- Do not use any other fuel source than LPG on this barbecue.
- Do not use an adjustable low-pressure regulator. Only use fixed regulators that comply with the relevant European standards.
- To ensure safe operation of your barbecue, never use griddle plates that cover 100% of your cooking surface.
- Regularly clean the parts at the base of the firebox to avoid risk of inflammation from excess grease residue and food waste.
- Do not store or use petrol and other flammable liquids or vapors in the vicinity of this grill.
- There should be no combustible materials within a radius of at least 60cm around the grill.
- This grill must be kept away from inflammable materials when it is in use.
- Do not leave your grill unattended while it is in operation.
- Do not move the grill when alight.
- To ensure proper and safe operation, the grill should be operated on a level surface. Avoid soft surface such as grass or muddy terrain as swivel castors could sink into the ground and get blocked due to weight of the grill.
- CAUTION: Accessible parts may get very hot. Keep young children away.
- Handle the lid of your grill carefully, especially while in use. Do not lean over the fire box or grilling surface as it can get very hot.
- Parts which are protected by the manufacturer or the manufacturer's representative must not be manipulated by the user.
- Close the gas bottle after each use.
- If equipped with castors: use the 2 brake levers on the wheels to prevent the grill from moving.
- If you smell gas:
-
Close the valve of the gas bottle.
-
Extinguish all naked flames.
-
Open the lid.
-
If the smell continues, see chapter "3.3 - Checking for gas leaks" or immediately seek advice from your local retailer.
2 - ASSEMBLY
2.1 Unpacking
When opening/unpacking the barbecue, please pay attention when using a cutter or knife blade to avoid damaging parts. Take each component out of the box with care.
2.2 Work space
Ensure you have a big enough work space for assembly. In order to prevent scratches and damages when unpacking the grill, we suggest laying down some soft material or work on a soft surface. Place all parts on the work space, taking care that there is enough space between them, preventing parts from coming in contact and causing unnecessary scratches during the assembly.
We do not recommend the use of an electric screw driver for assembly. The torque applied could strip the metal. A hand-held screwdriver should be used. Carefully check that the model used fits the screw head properly to avoid damaging the screw head.
2.4 Assembly
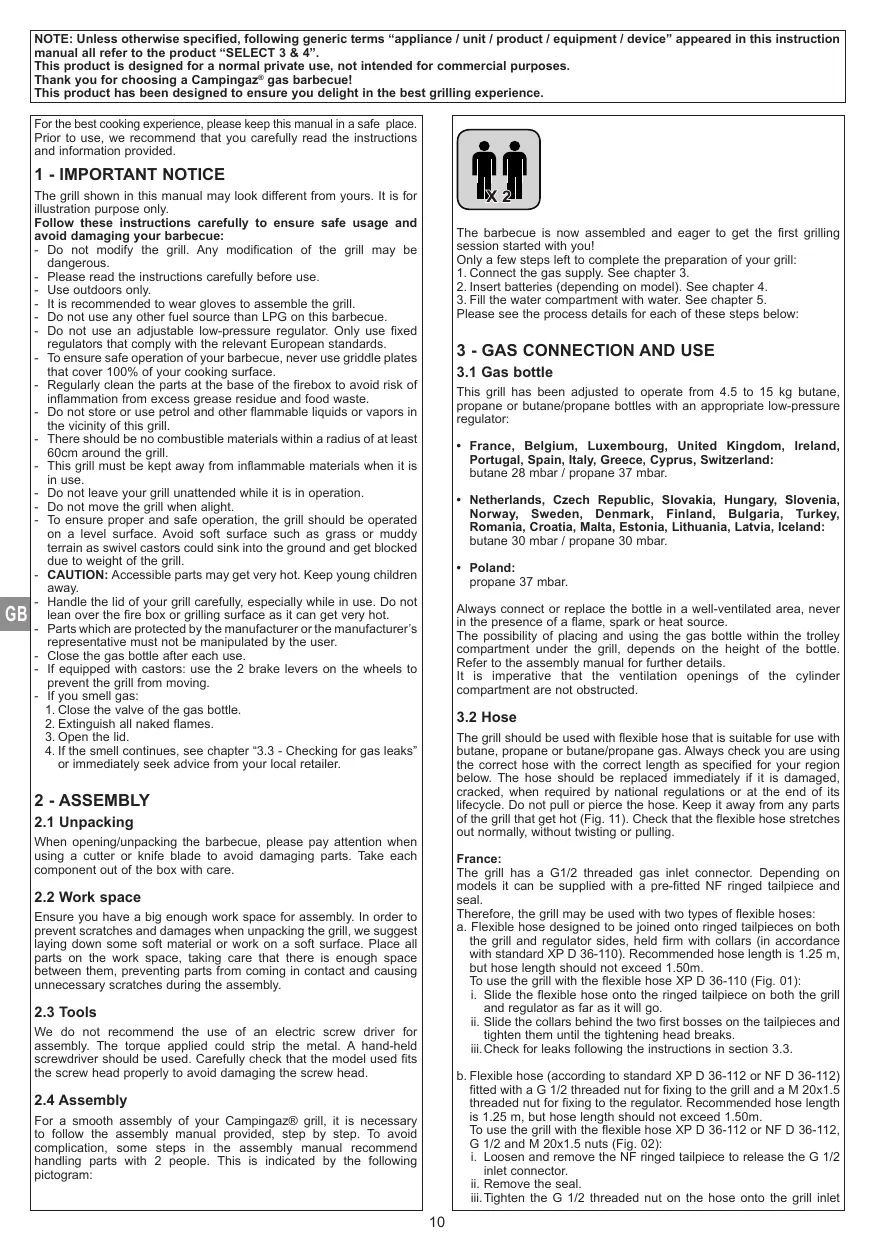
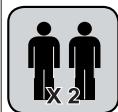
For a smooth assembly of your Campingaz® grill, it is necessary to follow the assembly manual provided, step by step. To avoid complication, some steps in the assembly manual recommend handling parts with 2 people. This is indicated by the following pictogram:
The barbecue is now assembled and eager to get the first grilling session started with you!
Only a few steps left to complete the preparation of your grill:
-
Connect the gas supply. See chapter 3.
-
Insert batteries (depending on model). See chapter 4.
-
Fill the water compartment with water. See chapter 5.
Please see the process details for each of these steps below:
3 - GAS CONNECTION AND USE
3.1 Gas bottle
This grill has been adjusted to operate from 4.5 to 15 kg butane, propane or butane/propane bottles with an appropriate low-pressure regulator:
- France, Belgium, Luxembourg, United Kingdom, Ireland, Portugal, Spain, Italy, Greece, Cyprus, Switzerland: butane 28 mbar / propane 37 mbar.
- Netherlands, Czech Republic, Slovakia, Hungary, Slovenia, Norway, Sweden, Denmark, Finland, Bulgaria, Turkey, Romania, Croatia, Malta, Estonia, Lithuania, Latvia, Iceland: butane 30 mbar / propane 30 mbar.
• Poland: propane 37 mbar.
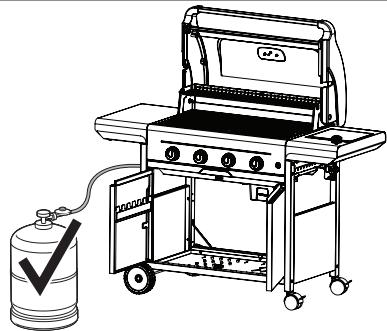
Always connect or replace the bottle in a well-ventilated area, never in the presence of a flame, spark or heat source.
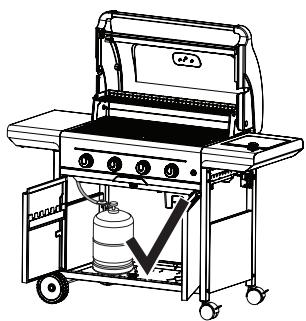
The possibility of placing and using the gas bottle within the trolley compartment under the grill, depends on the height of the bottle. Refer to the assembly manual for further details.
It is imperative that the ventilation openings of the cylinder compartment are not obstructed.
3.2 Hose
The grill should be used with flexible hose that is suitable for use with butane, propane or butane/propane gas. Always check you are using the correct hose with the correct length as specified for your region below. The hose should be replaced immediately if it is damaged, cracked, when required by national regulations or at the end of its lifecycle. Do not pull or pierce the hose. Keep it away from any parts of the grill that get hot (Fig. 11). Check that the flexible hose stretches out normally, without twisting or pulling.
France:
The grill has a G1/2 threaded gas inlet connector. Depending on models it can be supplied with a pre-fitted NF ringed tailpiece and seal.
Therefore, the grill may be used with two types of flexible hoses:
a. Flexible hose designed to be joined onto ringed tailpieces on both the grill and regulator sides, held firm with collars (in accordance with standard XP D 36-110). Recommended hose length is 1.25 m, but hose length should not exceed 1.50m.
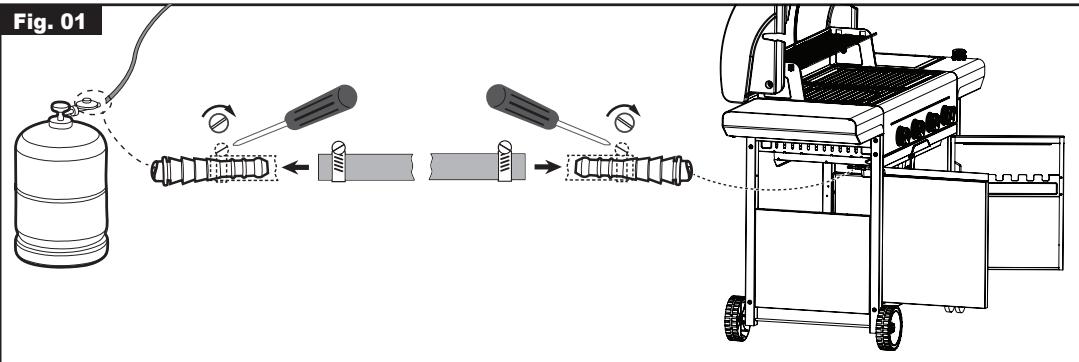
To use the grill with the flexible hose XP D 36-110 (Fig. 01):
i. Slide the flexible hose onto the ringed tailpiece on both the grill and regulator as far as it will go.
ii. Slide the collars behind the two first bosses on the tailpieces and tighten them until the tightening head breaks.
iii. Check for leaks following the instructions in section 3.3.
b. Flexible hose (according to standard XP D 36-112 or NF D 36-112) fitted with a G 1/2 threaded nut for fixing to the grill and a M 20x1.5 threaded nut for fixing to the regulator. Recommended hose length is 1.25 m, but hose length should not exceed 1.50m.
To use the grill with the flexible hose XP D 36-112 or NF D 36-112, G 1/2 and M 20x1.5 nuts (Fig. 02):
i. Loosen and remove the NF ringed tailpiece to release the G 1/2 inlet connector.
ii. Remove the seal.
iii. Tighten the G 1/2 threaded nut on the hose onto the grill inlet
connector and the M20x1.5 threaded nut onto the regulator output connector following the instructions supplied with the flexible hose.
iv. Use a spanner to hold the grill inlet connector firm and tighten or loosen the threaded nut with another spanner.
v. Use a spanner to hold the regulator outlet connector firm.
vi.Check for leaks following the instructions in section 3.3.
Belgium, Luxembourg, United Kingdom, Ireland, Portugal, Spain, Italy, Croatia, Greece, Netherlands, Czech Republic, Slovakia, Hungary, Slovenia, Norway, Sweden, Denmark, Finland, Bulgaria, Turkey, Romania, Poland, Cyprus, Malta, Estonia, Lithuania, Latvia, Iceland:
The barbecue is equipped with a circular connector. It should be used with flexible hose that is suitable for use with butane and propane gas. Hose length should not exceed 1.20m.
Switzerland:
The barbecue should be used with flexible tubing that is suitable for use with butane and propane gas. Tubing length should not exceed 1.50 meters.
Do not pull or pierce the tubing. It should be replaced if it is damaged or cracked, when required by national regulations or at the end of the part lifecycle. Do not pull or pierce the tubing. Keep away from any parts of the barbecue that get hot. Check that the flexible hose stretches out normally, without twisting or pulling.
Flexible tubing connection: To connect the tubing to the connector on the barbecue, tighten the nut on the tubing firmly but without excess force using the two wrenches provided:
no. 10 wrench to tighten the connector (Fig. 03)
- no. 17 wrench to tighten the nut on the tubing (Fig. 03)
- Check for leaks following the instructions in section 3.3.
3.3 Checking for gas leaks
Important: never use a naked flame to check for gas leaks.
- Work outside, away from all sources of ignition. Do not smoke.
- Make sure the control knobs are in the "OFF" position (O)
- Fit the regulator onto the gas bottle in accordance with its instructions.
- Connect the hose to the regulator and grill as described in section 3.2.
- Use a gas leak solution to test for leaks. Alternatively, you can mix your own gas leak solution by combining 1 cup of water with 1 cup of liquid dish soap in a spray bottle and swirling gently to mix.
- (Fig. 04) Apply or spray the solution to the connections between bottle/regulator/hose/grill.
- Open the gas bottle valve (the control knobs should remain closed: "OFF" position (O)). Bubbles in the gas leak solution indicate that there is a gas leak.
- The leak can be stopped by tightening any hose connection or replacing any faulty component. The grill must not be used until the leak is stopped.
- Close the valve on the gas bottle.
Important: Check for leaks at least once per year and each time the gas bottle is replaced.
3.4 Replacing the gas bottle
- Always work in a well-ventilated area and never in the presence of a flame, spark or heat source.
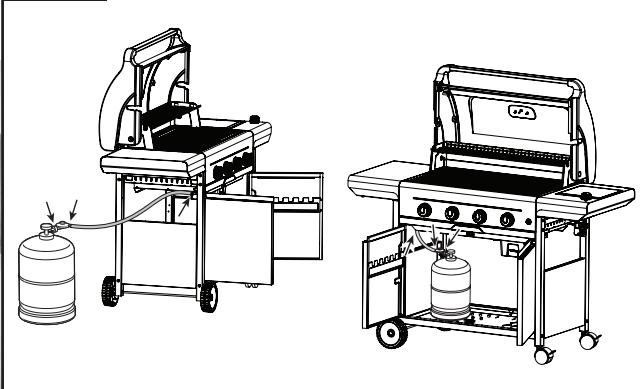
- (Fig. 05) Return the control knobs to the "OFF" position (O), then close the valve of the gas bottle by turning the handwheel.
- Remove the regulator and check that the sealing joint is in good condition.
- Replace the empty gas bottle with a full one and put it in place. Refit the regulator, taking care not to apply stress to the hose.
- Check for gas leaks.
4 - BATTERIES FOR ELECTRONIC IGNITION (depending on model)
4.1 Battery requirement
If your grill is equipped with an electronic ignition, it will require 1xAA/LR6 alkaline battery.
For your convenience the applicable battery has been included in the package.
If the grill is not used over an extended period of time, it is highly recommended to remove the battery from the grill and store it separately in a dry and cool place.
4.2 Exchanging the battery
4.3 Battery disposal

This symbol found on the batteries means that at the end of their lives, the batteries must be removed from the unit, and then recycled or properly disposed of.
The batteries should not be thrown into the trash but should be brought to a collection point (recycling centre etc.). Check with your local council. Never dispose of batteries in nature. Do not try to incinerate: the presence of certain substances (Hg, Pb, Cd, Zn, Ni) in used batteries may be hazardous to the environment and human health.
5 - USE OF THE GRILL
5.1 Prior to use
Reminder: Never use the grill until the instructions have been read carefully and understood. Additionally, ensure that:
• There are no gas leaks.
• (Fig. 11) The hose does not touch any components which may get hot.
- Ventilation openings within the trolley are not obstructed, especially in grill chassis in which the gas bottle is stored.
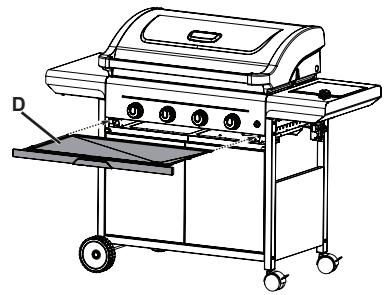
- (Fig. 08) The grease drawer D has been correctly inserted into its compartment and pushed as far in as it will go.
- The removable InstaClean® parts of the firebox enclosure have been assembled correctly (see section 7 - Cleaning and maintenance).
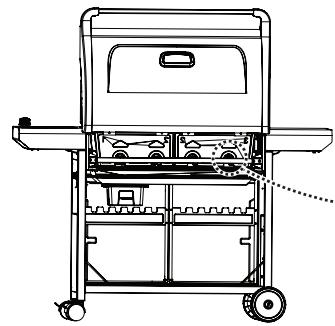
- (Fig. 12) The burner are not blocked or obstructed (e.g. by spider webs).
- Also make sure that the water compartment W (Fig. 09) is filled with water according to the minimum and maximum levels indicated and that it is inserted in its housing. This is not required but will make cleaning much easier. Insertion is from the front on models with doors and from the right side on models with front panel.
- It is recommended to use protective gloves when handling particularly hot components.
5.2 Using the grill for the first time
When used for the first time, heat up the barbecue with all its burners on FULL FLOW position (✗) (with the lid closed), for approximately 30 minutes in order to eliminate any odours resulting from any residual coatings on the new parts.
5.3 Lighting the barbecue main burners and the side burner (depending on model)
In case of burn back (ignition under the burner cap) switch the product off, allow it to cool down (approximately five minutes), then reignite the appliance. If the problem of burn back persists, then please contact your local Campingaz® representative.
- Open the valve of the gas bottle.
- Open the cooking lid.
- Make sure that the control knobs are in the "OFF" position (O).
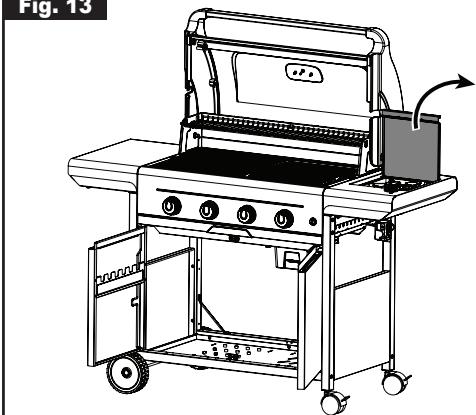
- For models with a side burner included, the side burner may operate independently or in conjunction with the barbecue burners. Before igniting the side burner, be sure that the side burner protective cover is open (Fig. 13). Do not use a pan or pot smaller than 12 cm or larger than 24 cm.
Note: Do not lean over the firebox while igniting the barbecue!
Note: the appliances equipped with a side-burner are supplied with electronic ignition.
If your barbecue is equipped with piezo ignition:
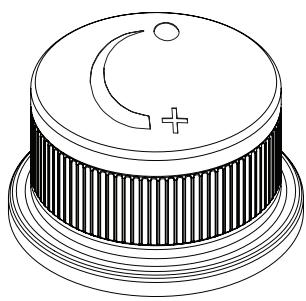
- Press and turn the control knob counter-clockwise and turn it to the FULL FLOW position ( ) (Fig. 05).
- Push immediately the ignition button ( Ⓤ ) until it clicks.
- If the burner does not ignite after 4 or 5 attempts, wait 5 minutes and then repeat the operation.
If your barbecue is equipped with electronic ignition:
- Press and turn the control knob counter-clockwise and turn it to the FULL FLOW position ( ) (Fig. 05).
- Push immediately the ignition button ( 🔒 ). You should hear a ticking sound that causes a burst of sparks to occur at the burner. Continue pushing the ignition button for a few seconds until the burner is lit.
- If the burner does not ignite after 4 or 5 attempts, wait 5 minutes and then repeat the operation.
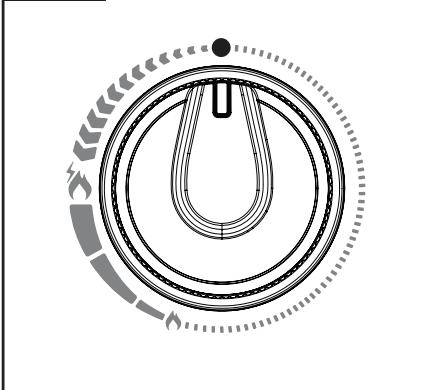
- Follow the same steps to ignite the side-burner, turning the control knob next to the side-burner in the “+” direction (Fig. 06) and
pushing the same electronic ignition button located on the control panel.
NOTE: If the burner or side burner does not ignite after about 10 seconds during the ignition process, wait 5 minutes before repeating the operation.
Once the first of the main burners is lit, there are two ways of lighting another burner:
- Repeat the lighting operation described above
- Light the burner to the left or right of the already ignited burner by adjusting its control knob to the FULL FLOW position ( ), thereby enabling cross-lighting.
5.4 Manual ignition
If the piezo ignition or the electronic ignition doesn't work, you can manually ignite your grill.
- Open the cooking lid.
- Make sure that the control knobs are in the "OFF" position (O).
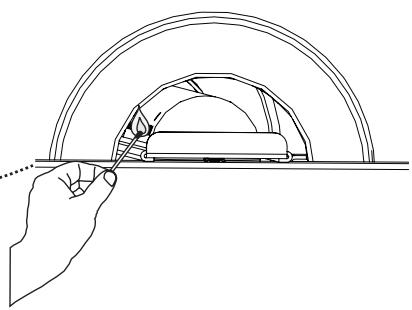
- (Fig. 10) Light a match and then bring it from the back of the barbecue grill toward the burner.
- Push the control knob in and turn it anticlockwise until it is in the full flow position ( 🔥 ).
5.5 Extinguishing the barbecue
a. Main burners
(Fig. 05) Return the control knobs to the "OFF" position (O) then close the valve of the gas bottle by turning the handwheel.
b. Side burner (depending on model)
(Fig. 06) Turn the side-burner knob in the “O” direction until the OFF position. Then close the valve of the gas bottle if the grills main burners are no longer in use.
6 - COOKING EXPERIENCE
Once you have ignited your barbecue, it's time to start grilling! It is good practice to pre-heat your grill for a few minutes before you start placing food on it. Similarly, to when you cook in a pan or in an oven, it helps you to reach an appropriate grilling temperature and prevents food from sticking, ensuring a crisp, brown crust.
Campingaz ^® always recommends wearing protective gloves when handling components which may become very hot.
6.1 Endless cooking possibilities
Did you know that some foods are better suited for various barbecue grilling surfaces?
Grids are better suited for grilling fatty meats such as sausages and steak, as well as skin on poultry. As the heat transfers directly from the flame to the food, grid cooking generally uses higher temperatures on the surface. The cast iron absorbs and intensifies the heat, browning or burning at the point of contact. These are the grill marks we love on our steaks and sausages. Further the food does not fry in its own grease.
Griddles/Planchas on the other hand are better for more delicate grilled foods, such as fish, seafood, vegetables, fruits or diced foods. Griddles/Plancha transfer heat consistently from the entire cast iron surface to the food, cooking and browning evenly. The flames never touch the food, which also means food is not subject to flare ups or charring which is much healthier. You can also use your Griddle/Plancha to cook runny or battery foods, such as eggs or pancakes.
Since different foods take different lengths of time to cook, the barbecue is also equipped with a warming rack. It is a smaller second grid that is positioned above the main grill and is primarily used to keep food that has already been cooked hot, without exposing it with as much heat as on the grid. This allows slower-cooking food to catch up. The warming rack can also be used as an additional grilling surface when using the barbecue like an oven for indirect cooking, for dishes such as stuffed tomatoes, baked potatoes or breads.
Thanks to all the different cooking surfaces available on the barbecue, it is possible to make an infinite number of recipes.
6.2 Unleash your grilling creativity with prolonged cooking versatility
Note: This paragraph only applies to models with a cast iron grill having a removable central disc.
For even more versatility that goes beyond cooking surfaces, explore world of the Campingaz® Culinary Modular interchangeable cooking solutions!
Simply take out the inner ring of the cast iron modular grid and insert one of the various Campingaz® Culinary Modular Barbecue Accessories. From Pizza, Paella and even a Wok, the Campingaz® Culinary Modulars offer every option your gourmet barbecue heart desires.
6.3 Lid open or closed? Direct and Indirect cooking
For searing the perfect steak, using the Campingaz ^® Wok, or cooking a plancha, it is best to leave the lid of the barbecue open. By doing so, heat is transferred by “direct” contact between food and a hot grid, griddle or plancha. However, the barbecue can also be used like an oven when the lid is closed. In this case, heat is transferred by “indirect” contact between food and the hot air that is circulated inside the lid. Campingaz’s ^® Chicken Roaster, warming racks or rotisserie are perfect for indirect cooking but the favorite usage is probably to cook a pizza on the barbecue. Use the Campingaz ^® Pizza Stone to get a crispy and perfectly BBQ-baked pizza.
6.4 Healthier and safer cooking with less flare ups.
Flare-ups can occur when cooking meat or fatty fish.
To reduce flare-ups, the cooking grates have solid portions that prevent most of the grease from falling onto very hot areas, which would cause flare-ups.
In addition, to reduce the spontaneous ignition of fat as much as possible, when cooking fatty foods it is advisable:
- remove excess fat from food
- leave the lid open
- use the reduced flow position, or even to switch off one or more burners for a few minutes.
It is also advisable, for cooking with the lid closed, to monitor the cooking regularly to adjust the flow rate if necessary.
7 - CLEANING AND MAINTENANCE
We love to grill, but cleaning is always a pain. Yet it is a very important stage of every grilling session. Regular cleaning facilitates the durability and reliability of your Campingaz ^® grill.
In order to maintain your grill in perfect working condition, it is recommended to clean it regularly (latest after 4 or 5 uses). If you use the grill with water, it is recommended you exchange the water after each use.
How to proceed:
- Wait for your barbecue to cool down completely after your grilling session.
- Remove the grease drawer D (Fig. 08) and the water compartment W (Fig. 09). Clean them with a sponge and some soap or put them in the dishwasher.
- Use a stainless-steel BBQ brush to brush off excess grime from cooking grids and griddles and place them either in the dishwasher or let them soak in a tub of soapy water or a homogenous mix of white vinegar and water.
- Remove the InstaClean® elements (Fig. 14). Thanks to the InstaClean® Aqua technology, a non-abrasive sponge and soapy water should be enough to effortlessly clean the parts.
- Rinse and dry.
Note that abrasive sponges could damage your grill.
7.1 Burner
Regularly check that no dirt or cobwebs block the burner openings. Clean the burner using a damp sponge (soaked in water and dishwashing soap). If necessary, use a damp steel brush.
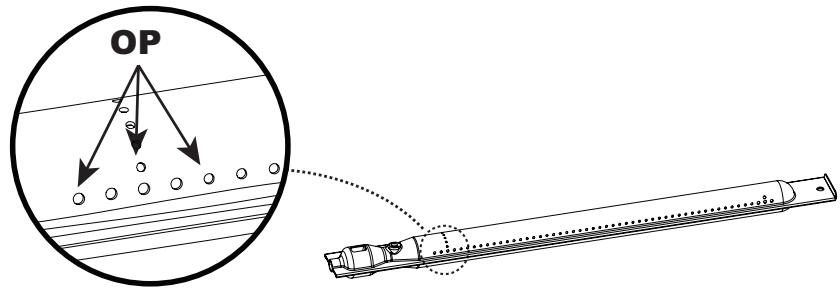
Make sure all burner openings are unclogged and dry before using the burner again. If necessary, unclog the burner using a wire brush. If necessary, clean the burner air entries (Fig. 12) and burner openings OP (Fig. 15).
NOTE: Regular cleaning extends the lifetime of the burner and prevents premature oxidation that may result from cooking acid residue. However, oxidation of the grill burner is normal.
8 - STORAGE
- Close the valve of your gas bottle after use by turning the handwheel.
- If you store your barbecue in an enclosed storage area, disconnect the gas bottle and store the bottle outdoors.
- If you store your barbecue outdoors, Campingaz® highly recommends the usage of an appropriate cover to protect your grill from the weather elements and dirt during storage.
- When the grill is not used for a long period of time, it is recommended that the barbecue is stored in a dry, sheltered place (eg: garage).
- Environment conducive to corrosion: particular care must be taken with the barbecue if used by the sea. The barbecue should preferably be stored under shelter, protected from the wind. It can be stored outside for a few weeks if protected by a cover. It must be cleaned and dusted regularly because the dust contains salt particles that lead to corrosion.
9 - ACCESSORIES
To help you get the most out of your barbecue experience, Campingaz ^® has designed many accessories to; aid preparing your favourite dishes on your grill, make cleaning as simple as possible and to ensure you can make your grill last longer:
| Grilling Essentials | Clean & Protect |
| Premium Utensils:Spatulas, Tongs etc | Tailored covers |
| Rotisserie | Brushes |
| Pizza Stone | BBQ Cleaners |
| Wok (see note below) | Stainless Steel Cleaners |
| Paella skillet | |
| Plancha griddle | |
IMPORTANT: For safety reasons, do not use the Culinary Modular Wok (ref. 2000014584) on your barbecue.
Instead, use the Culinary Modular Cast Iron Wok (ref. 2000036961) or the Culinary Modular Mandarin Wok (ref. 2000038449) which has a production date no older than October 2020. You can find this information marked on the handle.
ADG (Campingaz ^® ) advises that its gas barbecues should systematically be used with accessories and replacement parts from Campingaz ^® . ADG (Campingaz ^® ) accepts no responsibility for any damage or malfunction due to the use of accessories and/or replacement parts from other brands.
10 - PROTECTING THE ENVIRONMENT
Don't forget the environment! Your grill contains materials which can be recovered or recycled. If you want to dispose of your barbecue, hand these materials in to the waste collection service in your community and sort the packing materials.
Electrical and electronic waste:

This symbol means that the grill's electrical system must be disposed of selectively. At the end of its life, the grill's electrical system must be scrapped correctly. The electrical system must not be disposed of with unsorted municipal
waste.
Selective collection of waste promotes reuse, recycling or other forms of recovery of recyclable materials contained in this waste. Take the grill's electrical system to a waste recovery centre or waste collection point. Check with your local council or authorities if unsure. Never dispose of these materials in nature. Do not try to incinerate; the presence of certain hazardous substances in electrical and electronic equipment can be harmful to the environment and have a potential effect on human health.
11 - TROUBLESHOOTING
| Problems | Probable causes / remedies |
| The burner will not light | Lack of gas supply.Regulator does not work.Hose, valve, burner or burner openings are blocked. |
| Burner ‘pops’ or blows itself out | Check gas supply.Check hose connections.Contact the After Sales Service. |
| Sputtering unsteady flames | New bottle may contain air. Continue use and the problem will disappear.Contact the After Sales Service. |
| Large flames on surface of burner | Jet nozzle badly connected to burner. Adjust the burner.The burner is clogged (e.g.: cobwebs). Clean burner.Contact the After Sales Service. |
| Flame low on jet | The bottle is almost empty. Change bottle and the problem will disappear.Contact the After Sales Service. |
| Excessive grease flare-up | Grill temperature too high: Lower flame.Clean the grease drip tray. |
| Burners light with a match, but not with the “PIEZO” igniter | Faulty igniter button, wire or electrode. Check igniter cable connections.Check condition of electrode and connection wire.Contact the After Sales Service. |
| Fire at any connection | Leaking connection.Turn off gas supply immediately.Contact the After Sales Service. |
| Lack of heat | Clogged jet or burner.Contact the After Sales Service. |
| Fire behind control knob | Defective tap unit.Turn off appliance.Contact the After Sales Service. |
| Fire under control panel | Turn off appliance.Close gas bottle.Contact the After Sales Service. |
4.2 Trocar as pilhas
11 - PROBLEEMOPLOSSING
11 – TRAUCĚJUMU NOVĚRŠANA