
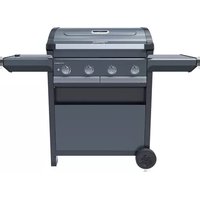
2 SERIES Classic LX Plus Vario - Gas barbecue CAMPINGAZ - Free user manual and instructions
Find the device manual for free 2 SERIES Classic LX Plus Vario CAMPINGAZ in PDF.
| Product type | Gas barbecue |
| Brand | CAMPINGAZ |
| Model | 2 SERIES Classic LX Plus Vario |
| Power source | Butane or propane gas (4.5 to 15 kg cylinders) |
| Gas pressure | 28-30 mbar (butane) / 37 mbar (propane) depending on country |
| Number of burners | 2 (grill) |
| Ignition | Automatic piezo |
| Maximum temperature | Approximately 340 °C (lid closed, full power) |
| Minimum temperature | Approximately 175 °C (lid closed, reduced power) |
| Recommended preheating | 10 minutes (15 minutes for first use) |
| Usage | Outdoor use only |
| Safety distance | 60 cm from combustible materials |
| Gas type | Butane / Propane (depending on regulator) |
| Connection | Flexible hose (standards according to country) |
| Maintenance | Clean after 4 to 5 uses |
| Burner cleaning | Wire brush and damp sponge |
| Grid cleaning | Sponge and dish soap (non-abrasive) |
| Spare parts | Campingaz® accessories |
| Storage | Close the valve, use a cover, store dry |
| Safety | Do not use charcoal, do not cover the bottom of the aluminum tank |
| Additional functions | Side burner (depending on model), lava stones (depending on model) |
Frequently Asked Questions - 2 SERIES Classic LX Plus Vario CAMPINGAZ
User questions about 2 SERIES Classic LX Plus Vario CAMPINGAZ
0 question about this device. Answer the ones you know or ask your own.
Ask a new question about this device
Download the instructions for your Gas barbecue in PDF format for free! Find your manual 2 SERIES Classic LX Plus Vario - CAMPINGAZ and take your electronic device back in hand. On this page are published all the documents necessary for the use of your device. 2 SERIES Classic LX Plus Vario by CAMPINGAZ.
USER MANUAL 2 SERIES Classic LX Plus Vario CAMPINGAZ
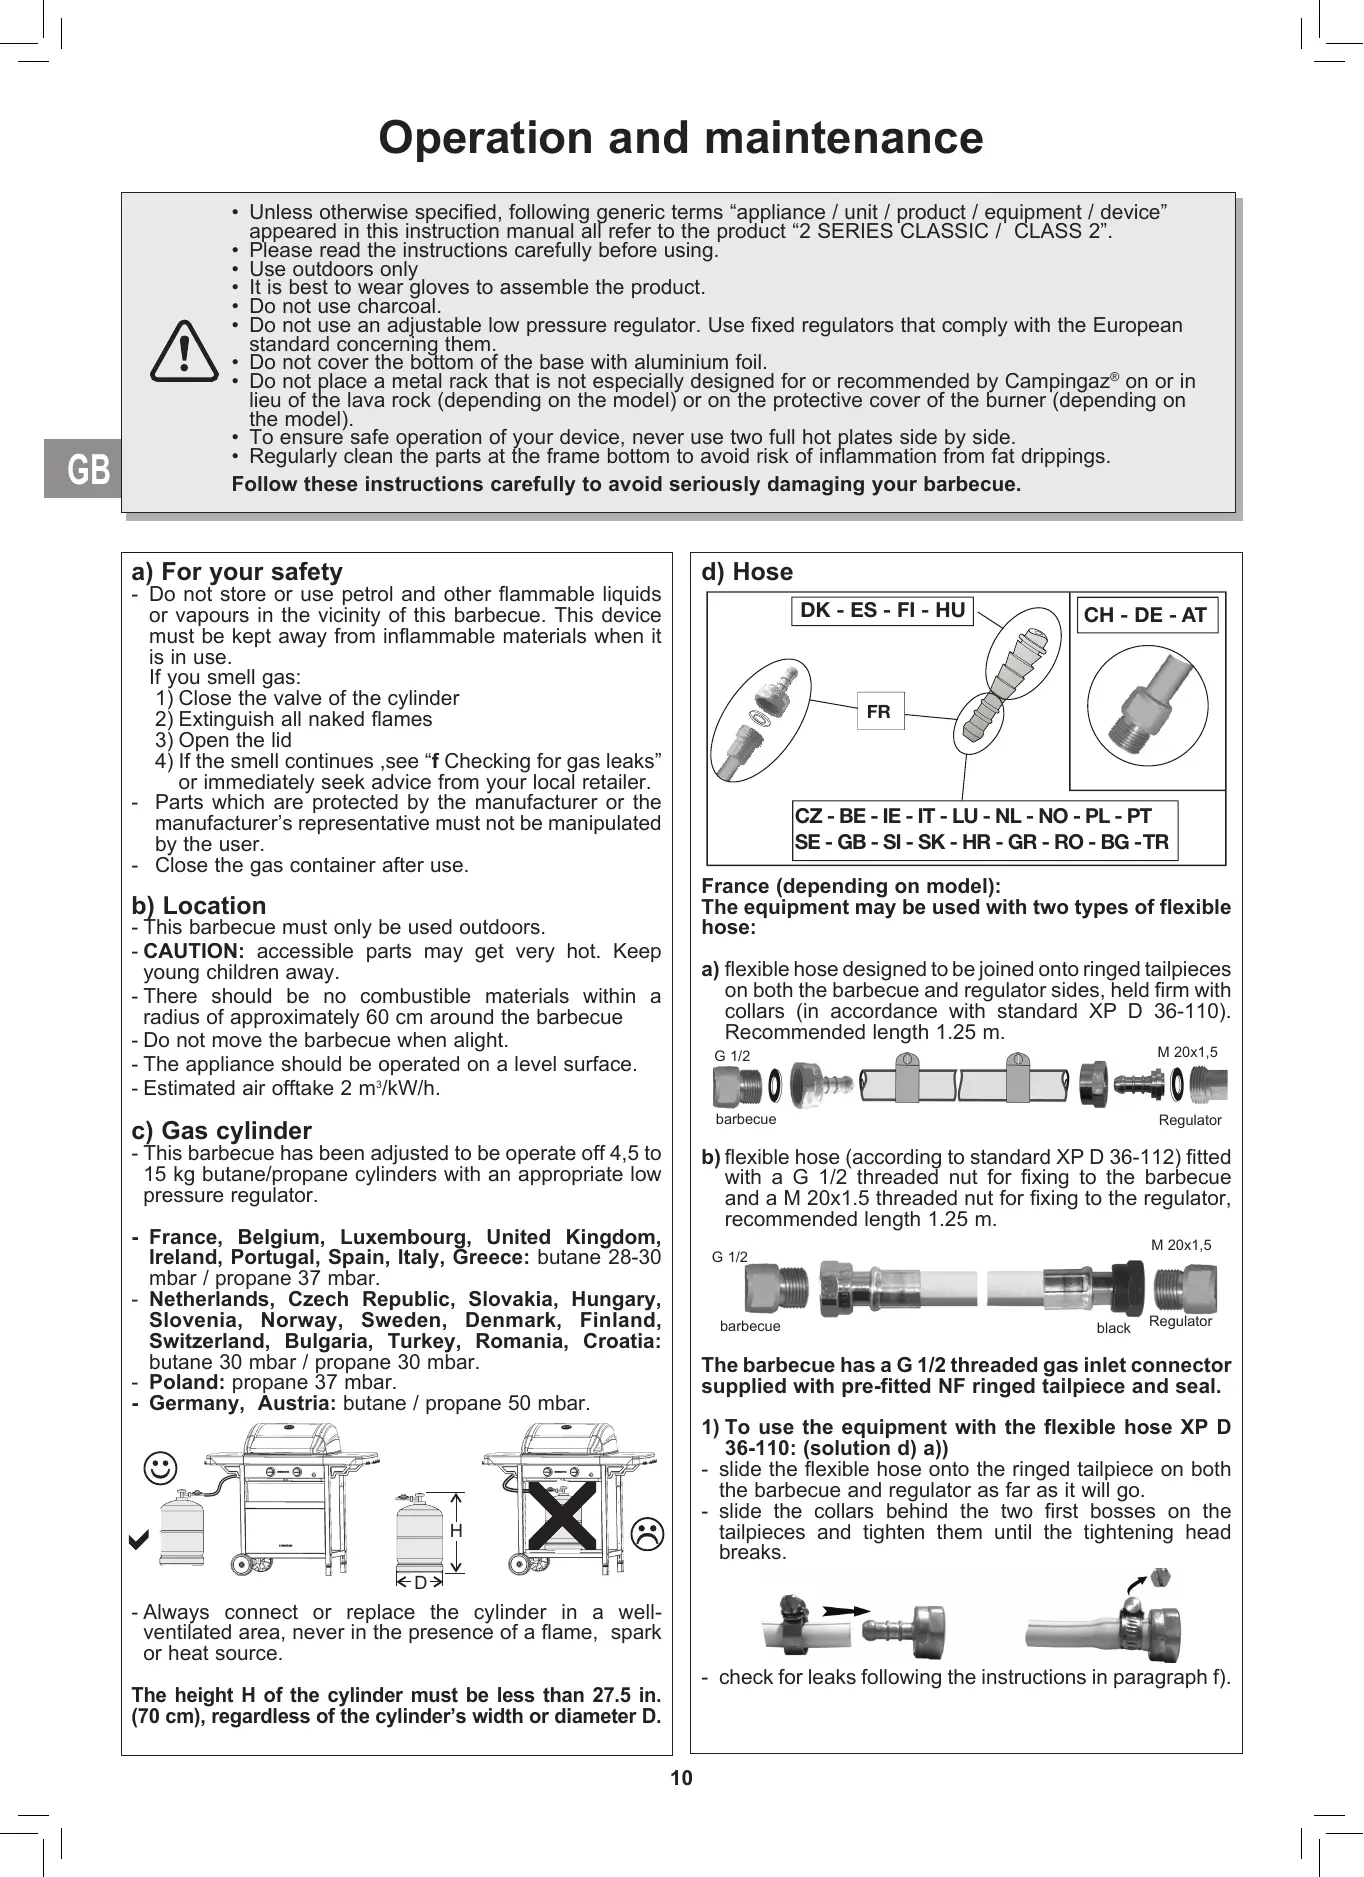
Operation and maintenance

- Unless otherwise specified, following generic terms "appliance / unit / product / equipment / device" appeared in this instruction manual all refer to the product "2 SERIES CLASSIC / CLASS 2".
Please read the instructions carefully before using. - Use outdoors only
- It is best to wear gloves to assemble the product.
- Do not use charcoal.
- Do not use an adjustable low pressure regulator. Use fixed regulators that comply with the European standard concerning them.
- Do not cover the bottom of the base with aluminium foil.
- Do not place a metal rack that is not especially designed for or recommended by Campingaz® on or in lieu of the lava rock (depending on the model) or on the protective cover of the burner (depending on the model).
- To ensure safe operation of your device, never use two full hot plates side by side.
- Regularly clean the parts at the frame bottom to avoid risk of inflammation from fat drippings.
Follow these instructions carefully to avoid seriously damaging your barbecue.
a) For your safety
- Do not store or use petrol and other flammable liquids or vapours in the vicinity of this barbecue. This device must be kept away from inflammable materials when it is in use.
If you smell gas:
1) Close the valve of the cylinder
2) Extinguish all naked flames
3) Open the lid
4) If the smell continues, see "f Checking for gas leaks" or immediately seek advice from your local retailer. - Parts which are protected by the manufacturer or the manufacturer's representative must not be manipulated by the user.
- Close the gas container after use.
b) Location
- This barbecue must only be used outdoors.
- CAUTION: accessible parts may get very hot. Keep young children away.
- There should be no combustible materials within a radius of approximately 60 cm around the barbecue
- Do not move the barbecue when alight.
- The appliance should be operated on a level surface.
- Estimated air offtake 2m^3 /kW / h
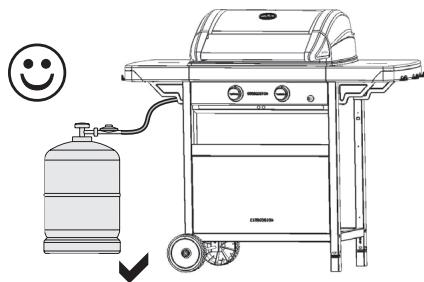
c) Gas cylinder
- This barbecue has been adjusted to be operate off 4,5 to 15kg butane/propane cylinders with an appropriate low pressure regulator.
- France, Belgium, Luxembourg, United Kingdom, Ireland, Portugal, Spain, Italy, Greece: butane 28-30 mbar / propane 37 mbar.
- Netherlands, Czech Republic, Slovakia, Hungary, Slovenia, Norway, Sweden, Denmark, Finland, Switzerland, Bulgaria, Turkey, Romania, Croatia: butane 30 mbar / propane 30 mbar.
- Poland: propane 37 mbar.
- Germany, Austria: butane / propane 50 mbar.
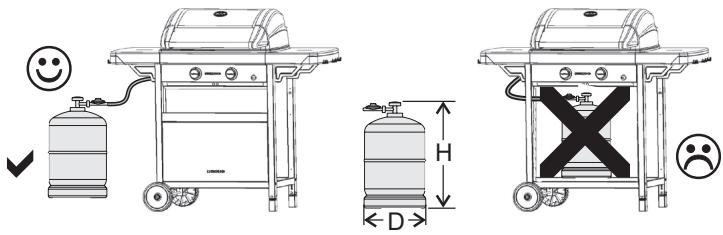
- Always connect or replace the cylinder in a well-ventilated area, never in the presence of a flame, spark or heat source.
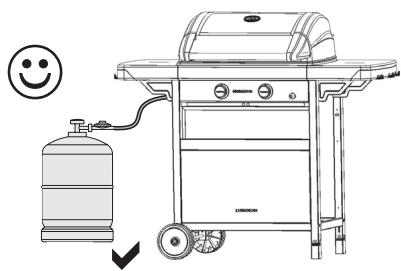
The height H of the cylinder must be less than 27.5 in. (70 cm), regardless of the cylinder's width or diameter D.
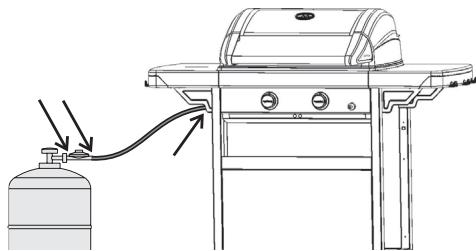
d) Hose
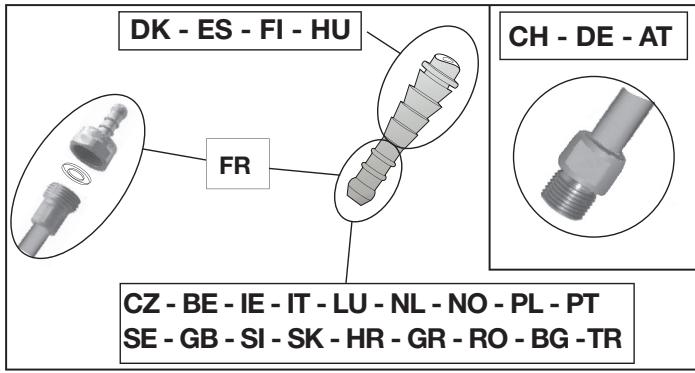
France (depending on model):
The equipment may be used with two types of flexible hose:
a) flexible hose designed to be joined onto ringed tailpieces on both the barbecue and regulator sides, held firm with collars (in accordance with standard XP D 36-110). Recommended length 1.25m .

b) flexible hose (according to standard XP D 36-112) fitted with a G 1/2 threaded nut for fixing to the barbecue and a M 20x1.5 threaded nut for fixing to the regulator, recommended length 1.25m .
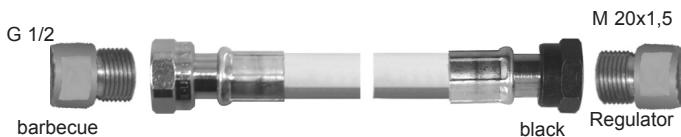
The barbecue has a G 1/2 threaded gas inlet connector supplied with pre-fitted NF ringed tailpiece and seal.
1) To use the equipment with the flexible hose XP D 36-110: (solution d) a))
- slide the flexible hose onto the ringed tailpiece on both the barbecue and regulator as far as it will go.
- slide the collars behind the two first bosses on the tailpieces and tighten them until the tightening head breaks.
- check for leaks following the instructions in paragraph f).
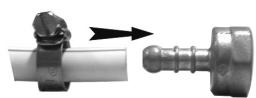
2) To use the equipment with the flexible hose XP D 36-112, G 1/2 and M 20x1.5 nuts: (solution d) b))
- loosen and remove the NF ringed tailpiece to release the G 1/2 inlet connector.
- remove the seal
- tighten the G1/2 threaded nut on the hose onto the barbecue inlet connector and the M20x1.5 threaded nut onto the regulator output connector following the instructions supplied with the flexible hose.
- use a spanner to hold the barbecue inlet connector firm and tighten or loosen the threaded nut with another spanner.
- use a spanner (14) to hold the regulator outlet connector firm.
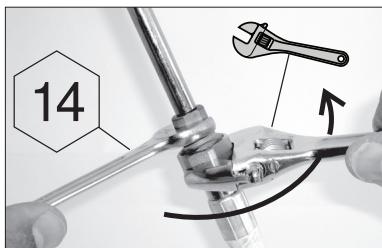
- check for leaks following the instructions in paragraph f).
Check that the flexible hose stretches out normally without twisting or pulling and does not come into contact with the hot sides of the barbecue. It should be replaced when the expiry date on the hose is passed or whenever it is damaged or develops surface cracks.
Belgium, Luxembourg, United Kingdom, Ireland, Portugal, Spain, Italy, Croatia, Greece, Netherlands, Czech Republic, Slovakia, Hungary, Slovenia, Norway, Sweden, Denmark, Finland, Bulgaria, Turkey, Romania, Poland:
The barbecue is equipped with a circular connector. It should be used with flexible hose that is suitable for use with butane and propane gas. Hose length should not exceed 1.20 meters. It should be replaced if it is damaged or cracked, when required by national regulations or at the end of the part lifecycle. Do not pull or pierce the hose.
Keep the hose away from any parts of the barbecue that get hot. Check that the flexible hose stretches out normally, without twisting or pulling.
Switzerland, Germany, Austria:
The barbecue should be used with flexible tubing that is suitable for use with butane and propane gas. Tubing length should not exceed 1.50 meters. Do not pull or pierce the tubing. It should be replaced if it is damaged or cracked, when required by national regulations or at the end of the part lifecycle. Do not pull or pierce the tubing. Keep away from any parts of the barbecue that get hot. Check that the flexible hose stretches out normally, without twisting or pulling.
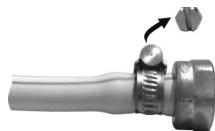
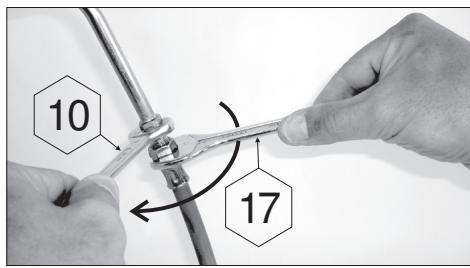
Flexible tubing connection: To connect the tubing to the connector on the barbecue, tighten the nut on the tubing firmly
but without excess force using the two wrenches provided:
- no. 10 wrench to tighten the connector
- no. 17 wrench to tighten the nut on the tubing
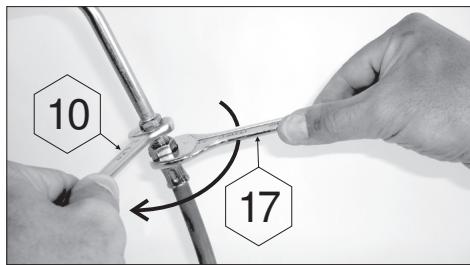
- check for leaks following the instructions in paragraph f).
e) Lid
Handle the lid carefully, especially during operation. Do not lean over the base
f) Checking for gas leaks
1) Work outside, away from all sources of ignition. Do not smoke.
2) Make sure the control knobs are in the "off" (O) position.
3) Push the end of the hose completely onto the regulator nozzle and secure with a suitable clip.
4) Fit the regulator onto the gas cylinder in accordance with its instructions.
5) Use a gas leak solution to test for leaks. Important: never use a naked flame to check for gas leaks.
6) Apply the solution to the connections cylinder/regulator/ hose/apparatus (the control knobs should remain closed: off position O). Open the gas cylinder valve.

7) Bubbles in the gas leak solution indicate that there are gas leaks.
8) The leak can be stopped by tightening any hose connection or replacing any faulty component. The barbecue must not be used until the leak is stopped.
9) Close the valve on the gas cylinder. Check for leaks at least once per year and each time the gas cylinder is replaced.
g) Prior to use
Never use the barbecue until the instructions have been read carefully and understood. Also, make certain that:
- there are no leaks
- the venturi tubes are not blocked

- the hose does not touch any components which may get hot.
- that the ventilation openings in the gas receptacle housing are not obstructed, if appropriate.

Check that the venturi tubes (VT) cover the injectors (IJ).
h) Lighting the grill burner
Read steps 1 to 6 before beginning with step 1.
1) Never light the barbecue with the lid closed, only with the lid open.
2) Make sure the 2 control knobs are in the "off" (O) position.
3) Open the gas cylinder valve.
4) Press one of the 2 control knobs and turn it to the full flame ( ) position, then immediately press the igniter button () until you hear the click. Repeat 3 or 4 times if necessary until the burner is lit.
5) If the burner fails to light, turn the control knob to the "off" position (O). Wait 5 minutes before repeating the operation.
6) As soon as the burner is lit, the other burner automatically lights when the second control knob is placed in the full flame ( ) position without pushing the automatic igniter button again.
Important:
If the burner fails to light after the 2^nd attempt, turn the control knob to the "off" position (O) and check that the burner oulets and venturi tubes are not blocked.
i) Grill burner-manual lighting
If the automatic ignition should fail to operate, turn the control knob to the "off" position (O) and wait 5 minutes.
Remove the tent or the grill supporting the lava rocks to access the burner.
Place a lit match close to the burner flame outlets, then turn the lever on the control panel to the full flow position (4) on the same side where you have the match.
Next, position the knob to slow flow and put the tent or the lava rocks back in place, all the while keeping your hands at a safe distance from the flames.
j) Turning off the grill burner
Return the control knobs to the "off" position (O), then close the cylinder valve.
k) Lighting the side stove (if applicable to your model)
The stove may operate independently or in conjunction with the grill burner.
Lighting:
- open the gas cylinder valve.
- check that there is no gas leak between the gas cylinder and the stove.
- check the condition of the hose connecting the grill burner to the stove. Should it present cracks, call our After Sales Service to have it replaced.
- open the valve of the stove (towards the +) and press the igniter button ( ) until you hear the click. Repeat three or four times if necessary. Should the stove fail to light, present a match to the edge of the burner.
- adjust the size of the flame to the dimensions of the container you are using by opening the valve to various extents. Do not use a container smaller than 10cm or larger than 26cm .
I) Turning off the side stove
(if applicable to your model)
Close the stove valve (towards the -) and the valve of the gas cylinder if the grill burner is not in use.
m) Replacing the gas cylinder
- Always work in a well ventilated area and never in the presence of a flame, spark or heat source.
-
Return the control knobs in the "off" position (O) then close the cylinder valve.
-
Remove the regulator, check that the sealing joint is in good condition.
- Put the full cylinder in place, refit the regulator, taking care not to apply stress to the hose. Check for gas leaks.
n) Operation
- It's recommended that protective gloves be worn to handle components which may be very hot.
- Before cooking, preheat the barbecue for about 10 minutes in the full flame ( ) position with the lid closed.
When using the barbecue for the first time, preheat for about 20 minutes in the full flame (4) position, in order to eliminate the smell of paint from new components.
Cooking rate can be adjusted, depending upon the position of the control knobs.
Temperature with lid closed: in the full flame (1) position, approx. 340^ , in the reduced flame position (2) approx. 175^ , with the possibility of adjusting the rate between these 2 positions.
- Depending on how much food is to be cooked, it is possible to use only half of the grid, by lighting only one side of the burner.
- After cooking, close the lid and put the barbecue in the full flame ( ) position for about 10 minutes, in order to burn the food residue or grease on the grid or on the lava rock (self cleaning effect).
-A yellow flame when cooking is normal.
Important :
If a burner flame goes out when the unit is in use, immediately turn the control knobs to the "off" (O) position, open the lid and wait 5 minutes to allow the unburnt gas to dissipate. Only attempt to light again after this time period has elapsed.
A yellow flame when cooking is normal.
Important :
If a burner flame goes out when the unit is in use, immediately turn the control knobs to the "off" (O) position. Only attempt to light again after this time period has elapsed.
Model with burner cap
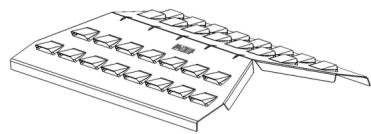
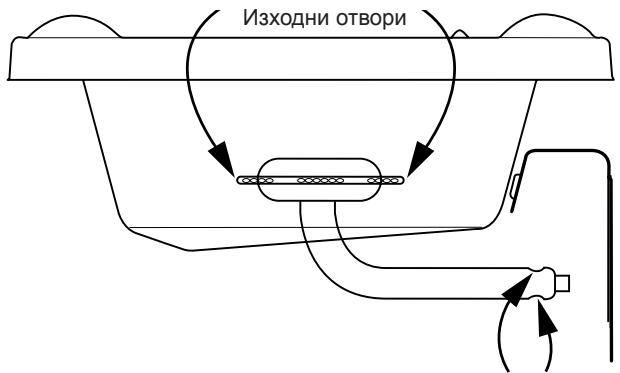
If your barbecue is equipped with a burner cap (illustrated above), when cooking meat with high content of fat (chicken, duck, sausages, etc.), the
burners should be set to the minimum flow position (A) to reduce flaring up of cooking fats. It may also be necessary to reduce the number of items being cooked on the cooking grid and spread them out over several cooking batches in succession.
o) Cleaning and maintenance
- Never modify the barbecue: any modification may prove dangerous.
- In order to maintain your barbecue in perfect operating condition, it is recommended to clean it periodically (after 4 or 5 uses).
- Wait until the barbecue has cooled down before cleaning.
- Close the gas cylinder.
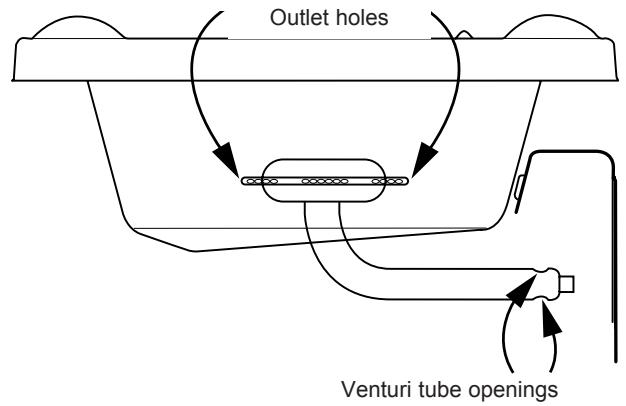
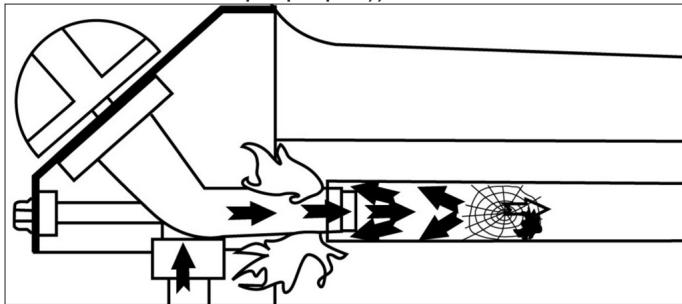
- The grill burner must be cleaned and checked every 3 months. Remove the entire burner and check that no dirt or spider webs block the venturi tube openings, which may cause the burner to be less efficient or cause a dangerous gas fire outside the burner.
- Clean the top of the burner, as well as the sides and
base, using a moist sponge (water with washing up liquid). If necessary, use a damp steel brush.
- Check that all burner outlets are clear and let dry before using again. If necessary, use a wire brush to unclog the burner outlets.
- Clean the orifices on the Venturi jet (see diagram below) or the burner if necessary.
N.B.: Frequent cleaning of the burner maintains it in good condition for many uses and prevents premature oxidation, notably due to acid residue from cooking. Oxidation of the grill burner is, however, normal.
- Base walls, lid, cooking grids, control panel:
Clean these elements from time to time using a sponge with washing up liquid. Do not use abrasive products. Do not clean the grids in a self-cleaning oven; the extreme heat may damage the chrome plated parts.
- Cooking plates:
Let them cool down before cleaning. Use Campingaz® Cleaner Spray BBQ cleaner and barbecue brushes.
Before cleaning and drying the cooking grills, rub them lightly with grease to protect them from corrosion and to prevent them rusting and sticking to the food.
Campingaz® recommends applying a thin coat of vegetable oil to the cooking grills with kitchen towel.
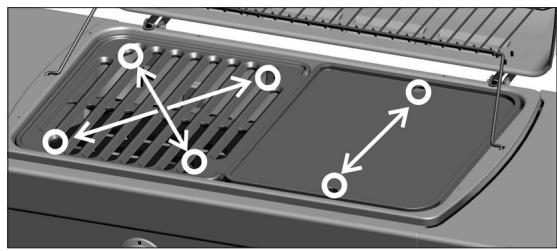
To remove a plate or cooking grate unit, place a finger of each hand in two opposite openings (see figure below). Lift and remove the grid or plate of your unit.
p) Storage
- Close the gas cylinder valve after use.
- If you store your barbecue indoors, disconnect the gas cylinder and store the cylinder outdoors.
- If you store your barbecue outdoors, it is recommended that a protective cover be used.
- When not used for a long period of time, it is recommended that the barbecue be stored in a dry, sheltered place (eg: garage). Store the lava rocks in a dry place
- Environment conducive to corrosion: particular care must be taken with the product if used by the sea; it must not be stored outside without protection, and must be kept sheltered in a dry environment.
q) Lava rock (depending on model)
- The lava rock should be replaced when it becomes heavily coated in grease or when eroded so that it falls through the lower grid. This will only happen after it has been used many times.
Spread the lava rock evenly in a single layer. Do not pile the rock up and leave a few millimetres between each rock to allow air to pass through.
Do not use charcoal in place or in addition to the lava rock provided.
- Use replacement lava rock from Campingaz®. We cannot accept responsibility should other lava rock be used, which could be dangerous to the user.
- Keep the lava rock dry. Do not use wet or damp lava rock, first allow it to dry in a sheltered area.
r) Accessories
ADG ('Application Des Gaz') advises that its gas barbecues should systematically be used with accessories and replacement parts from Campingaz®. ADG accepts no responsibility for any damage or malfunction due to the use of accessories and/or replacement parts from other brands.
s) Protecting the environment
Think about protecting the environment! Your equipment contains materials which can be recovered or recycled. Hand them in to the waste collection service in your municipality and sort the packing materials.
TROUBLESHOOTING: you can expect years of useful service from your barbecue once it is properly assembled, adjusted and you have learned to operate it. Should you experience any difficulty, you might find solutions below.
| Problems | Probable causes / remedies |
| The burner will not light | • Lack of gas supply. • Regulator does not work. • Hose, valve, Venturi tube or burner openings are blocked. • Venturi tube not seated over jet. |
| Burner 'pops' or blows itself out | • Check gas supply. • Check hose connections. • Contact the After Sales Service. |
| Sputtering unsteady flames | • New bottle may contain air. Continue use and the problem will disappear. • Contact the After Sales Service. |
| Large flames on surface of burner | • Jet nozzle badly connected to Venturi tube. Adjust the Venturi tube. • The Venturi tube is clogged (e.g.: cobwebs). Clean Venturi tube. • Contact the After Sales Service. |
| Flame low on jet | • The bottle is almost empty. Change bottle and the problem will disappear. • Contact the After Sales Service. |
| Excessive grease flare-up | • Clean the protective plate above the burner. • Grill temperature too high: Lower flame. • Clean the grease drip tray. |
| Burners light with a match, but not with the "PIEZO" igniter | • Faulty igniter button, wire or electrode. Check igniter cable connections. • Check condition of electrode and connection wire. • Contact the After Sales Service. |
| Fire at any connection | • Leaking connection. • Turn off gas supply immediately. • Contact the After Sales Service. |
| Lack of heat | • Clogged jet or Venturi tube. • Contact the After Sales Service. |
| Fire behind control knob | • Defective tap unit. • Turn off appliance. • Contact the After Sales Service. |
| Fire under control panel | • Turn off appliance. • Close gas cylinder. • Contact the After Sales Service. |
Cbbp3BaHe Ha rBkBaBata Tpb6a: 3a Da CbbpKjTe TbbkBaBata Tpb6a c HakpaHnKa Ha ypeDa, 3aTeHete raKaTa Ha Tpb6aTa 3dpabo, Ho He npekomepHo, C NOMOHTa Ha 2 NOxOJrIraeHn KIOUca:
- KJIIOU 10 3a 3acToOpRABaHe Ha NaKpaHnKa
- KПЮч 17 за заразе на гайкata на Трьбату.
e) Kanak
XbaaTe kanaKa BnMaTeHNo, oObeHo KOrato ypeBt pa60tn. He ce HabeKdAte NaI roPraun nnambK
f)ИЗптвае 3a He nponycknIBOcT
1) Pa6oTeTe Ha oTKpIto, daJIeU oT 3aIaJIIMu MaTePnJI. He nyuTe.
2)Уверете се, чe рergyларцит e Лостуca в положене "OFF" (O).
3) CbpxkeTe rBkabata Tpb6a cbrnacho naparpa.
4) 3aBnIte peDyUnp-BeHTnla KbM ra3OBata 6ytNlka
5) 3a npOBepkata n3nOJI3BaITe TeUHOCT 3a OTKpNBaHe n3TNUHaHETo Ha ra3.
6) NocTaBete TeuHcT Bbpxy CbeDInHeHnra Ta 6yTuNka /peNyucp-BeHTnJ / Tpb6a / ypeI. PeryNuPauuTe NoCTyeta Tpr6Ba Da ca B noLoXKeHne "OFF" (O). OTBopete KpaHa Ha ra3OBata 6yTuNka.
7) Ako ce obpa3yBaT MexypueTa, TOBa O3HaayBa, Ye nMa n3TuHaHe Ha ra3.
8) 3a da cnpete n3TnuaHeTo Ha ra3, 3aTeHHeTe raiknte. Ako hKoJ yact e depekTHa, Tp6Ba Da ce CMeHn. YpeBt He Tp6Ba Da ce Nol3Ba, Ppei Da 6bde OTCTpaHENo n3TnuaHeTo Ha ra3.
9) 3aTbOpTe KpaHa Ha ra3oBaTa 6yTuJIka.
Baxho:
HnKora He n3noJ3BaIe pIaMbK, 3a da npOBepuTe daJIIMMa n3TnUaHe Ha ra3.
Поберka И OTКрИВаHe Na ИЗТичaHTo Ha ra3 TprЯБа Да
Се прави NOHe BeДньЖ ГДишо, КАКТо И пri ВсяKa
СмЯна На ra3OВаТа 6уТиЛКа.
g) Преши рунcke на hy урда.
He nyskaTe ypeDa npdei Da CTe npoeyn BHNMaTeJHOn i pa3bpaNn BCnUKN yKa3aHnY. YBepTe ce CbIoo TaKa, ye.
- HЯMa N3TnUaHe Ha rα3
- BeHTypn TpbOte He ca 3anyuSeHn (Ha npimep: ot NaJxHHN - BnK naparpaΦ M)).
- TpbbaTa He e B KOHTaKT C HapraBaUc Ce Yaactu

Пювере Мнoro Добpe Дали В entypnТрьбnte (VT) obxbaaatДIO3nte (IJ)
h) 3anaIbaHe Ha ropeJIknte Ha 6ap6ekIoTo
(B 3A B N C H M O C T O T M O D E J A)
Ckapata 3a 3aToPJIHe MoKe Da paBoTn camOCTeJIHo IIN eNHOBpeMeHNO C rPINA.
3anaJbahe : OTbopete KpaHa Ha ra3OBaTa 6yTnJIka.
Проверетe He nponycklnBocTTa Ha Bpb3KaTa OT
6yTnIKAta Do ckapata 3a 3atONJIne (BnK § f).
OTbOpn Ha BeHTypn Tpb6aTa Ha ropeJIkata
N.B.: YecToTO NOUcTBAHe Ha ropeJkata No3BOJRA Ta Da ce NODbPka B Do6po CbCTOAHne I Da ce NOL3Ba MHorokpaTHO, KaTO Ce N36aRb NaPexKDeBpeMeHHOTo N pbXdCBAHe, DJIkaIoo Ce Ha KNCeJIINHHTe OCTaTBcI npn peueHeTo. CBpeMeTo NOBaTa Ha pbXJa no ropeJkata e HopMaJIHO n He e Heo6xOdImo T a Da 6bJe NOpMeHa, Ako paBOTn Do6pe. FroepKata Tp86Ba Da ce CMeHN, AKO He paBOTn Do6pe: npoBnta ropeJkA...
CTeHn Ha orHnIeTo, KaIaK, cKaPn 3a neYeHe, KOMaHdHo Ta6JIo:
NepnoDnHNO NoCCTBaIte N Te3n Yactn C NOMOHTa Ha Tb6a, NOTOneHa B pa3TbOp Ha NpOdyKT 3a MneHe Ha CbDoBe. He n3PON3BaIte abpa3nBHN npOdyKTn. He NocCTBaIte cKapInTe B camOnOuNCtBaUca Ce fypHa, Tb KATO ppeKaJIeHO BVnCOkATA TempePaTypa MoKe da NOBpeDi XpOMnPaHIne Yactn.
HarpraBaunn
I3yakaIte nIooYaTa da I3CTnHe npEi Da 3aNoOHTe NoHCTBaHTo. I3noJ3BaIte CneuIaEN npOdyKT 3a NoHCTBaHc e Campingaz® BBQ Cleaner Spray u Yetkn 3a 6ap6ekIO.
CneI KaTo Cte NouchTnIn N NOdCyuHIn CKapNTe, HAmaxKeTe rN JeKO C Ma3HnHa, 3a Da rN ppeDnA3nTe OT KOpO3nI IN 3a Da He pbKJcCBAT N 3aJeENBaT 3a npOdyKTInTe. Campingaz® npenopbUBy ynoTpe6ata Ha pactInTeHNO MacNo, KOEtO ce pa3CTnJa HA TbHbK CNoI Bbpxy ckapNTe C nOMoUta Ha nonNbaUca XapTna.
3a da npemaxhe Te nloa nnr roTbepeuetka yctpoiCTBO, NOCTabe TpBcT Ha BcKa pKa B DBe npOTNBONIOJXHn OTBOpN (BxK cnpypaTn-DOJy). NOBunHete n cBaIe TpeuETkata nn nnoyn ot BaUeTo yctpoiCTBO.

p) CbxpaheneHne
- CnéД BCЯКО ПОЛЗВАне 3aТВаряйTe КраHA Na Ra3OBaTA 6bTyNJka.
-Ako npnbipate 6ap6ekhTo B 3aTbopeHo NomeueHne, PpeKbchTe 3axpaHbaHeTO C ra3.
-Ako ro octaBAre Ha OTKpNTo, npenopbUHTeHIO e Da n3NoJ3BaTe KaJIbΦ. - Ako He noJI3BaTe 6ap6eKIOTo DbIIO BpeMe, Do6pe e daTo npI6epeTe B cyXo 3aTBoPeHNo NOMEueHne
- Okonha cpeda, bnaorponprrTCTBa7a Kopo3n: Tpr6Ba Da ce nolaraT cneuaJIHr rpnK 3a npOyKTA, aKO ce n3noJ3Ba 6nI3o Do MOpe nn OKeaH; ToI He Tpr6Ba Da ce octab Ha OTkpnto 6e3 3aunTa n Tpr6Ba Da ce CbXpaHraBa Ha cyxo 3akpnto MxCTO
q) BylkaHnUHn KaMbHn (B 3aBncmOcT OT MoJeJa)
- BylknKaHnHnTe KaMbHn Tp86Ba Da Ce CmehrT, KOraTO ce HAnoRr TBbRpDe MHOr C Ma3HnHa IINKorato epO3nraTa NcTaHe npuHa Da npemHaBAt Ppe3 ckapata, Koeto Ce cnUyBa CneId MHOROKpaTHa yNtpe6a.
Pa3cteIeTe Do6pe BylkaHnUHnTe KaMbHn B eHN CNoi. He rN CTpyNBaIte N OCTaBeTe CBO6OdHO npoctpaHCTBO MExJy KaMbHnTe OT HraKOJIko MnImMeTpA. He n3noJ3BaIte DbPBeHn BbrJnua KaTO 3aMecTInTe Jnn KaTO dOnbJIHeHne Ha npedOctaBeHnTe BylkaHnUHn KaMbHn.
-Присмяна, РОЛЗвайтЕ ВУКанчи Камьни, Рредлагани ot Campingaz®. Фирмата He Ноч OTROBOPHOCT рпи уnotpeba Ha Други ВУКанчи Камьни, У提到 ползвае може за Бде onacho 3a NOTpe6nteЯ. - He mokpeTe ByIkaHnUHnTe KaMbHn. He n3noJ3BaHTe MOKpn IJIbBnaJHn ByIkaHnUHn KaMbHn, npEiYynotpe6a, nOCTaBeTe Da n3cbxHaT Ha cyxo MRCTO.
r) Akcecoapn
KoMaHnA DG npenopbUba n3noJ3BaHeTo Ha HeHHTe ra3OBu 6ap6eKHTa da CTAba cAmO c Akcecoapn u pe3epBHN qactn Campingaz. ADG He Hocn OTROBOPHOt pni NOBpeDa nn lo7a pa60Ta, PnpunHeHn ot ynotpe6bata Ha akcecoapn n/nn pe3epBHN qactn ot dpyra Mapka.
s) Ona3BaHe Ha OKoJHaTa cpeDa
IpykTe ce 3a ONa3BaHe Ha OKJHaTa CpeDa! UpeBbT CbDpKja MaTePnaJI, KOINTO MORaT Da 6bDaT Bb3CTaHOBeHn NII peZIKNpaHn. IpeaIte ro BV NyHKTOBete 3a Cb6HpAHe Ha OTNaDbu BbB BaWata ObUHa,OTdJIHO OT ONaKOBkata.
T. oTcTaHЯBaHe Ha npo6JIeMn
| Повrei | Вераяну поочино остравене |
| Горелкata не се залалba | • Лошо поадаане на ra3 • Редуцревентilloгп не павOTи • Трьбата, краньт, венихлары или OTворипес на поvelката са залшени. • Венихлары не obхваши добре дюзата. |
| Горелкata поекьсва или ИЗразва | • Поверete поадаанeto на ra3. • Поверete сььрзванeto на Трьбатa. •Обрhoe се Кьм серВи3. |
| Небашини свістяші пlamьци | • На вутникka, каято може за сьдьржа Вьзdux. Octabete за павOTи и поobLEMьт所需要 ИЗчeзne. •Обрhoe се Кьм серВи3. |
| Виски пlamьци на поьрхността на поvelката | • На краийнокьт на пою сььрзан c венихлары. 3akpenete венихлары. • Венихлары равилно. •Обрhoe се Кьм серВи3. |
| Иоськ пlamьци на поьрхнostота на поvelката | • Бутникота e почten пазана. Сmenete я и поobLEMьт所需要 ИЗчeзne. •Обрhoe се Кьm серВи3. |
| Ниськ пlamьк в поцота | • Бутникота e почten пазана. Сmenete я и поobLEMьт所需要 ИЗчeзne. •Обрhoe се Кьm серВи3. |
| Мазнинatable се залалba чесо | • Поверete поедаэнatable пазапану над поvelката. • Тьрдve васка темпетура на скага: Намалete пlamьka. • Поверete tabata за сьбиране на мазнинna. |
| Горелкata се залалba сьбрпente ha кileчka, по се пIE3O залалkata | • Дeфekten bутон, жида или поедков на залалкata. Поверete сь dedиненяты на кабela на залалкata. • Поверete сьстаянeto на поедков и сь dedиненяты на кабел. •Обрhoe се Кьm серВи3. |
| Пова на пlamьци в с被告инения | • Heynilьтеньо с被告инения. • Иозавно за воре пожитoka на ra3. •Обрhoe се Кьm серВи3. |
| Небостатуно наgreраданe | • Залшena дюза или венихлары. •Обрhoe се Кьm серВи3. |
| Пова на пlamьци за релларши лoust | • Дeфekten ксан. • Иозkilоче урEDA. •Обрhoe се Кьm серВи3. |
| Пова на пlamьци илpond конztолatinga | • Иозkilоче урEDA • Затовete bутникота •Обрhoe се Кьm серВи3. |
Kullanım ve Bakım


- Operation and maintenance
- a) For your safety
- b) Location
- c) Gas cylinder
- d) Hose
- France (depending on model):
- 1) To use the equipment with the flexible hose XP D 36-110: (solution d) a))
- 2) To use the equipment with the flexible hose XP D 36-112, G 1/2 and M 20x1.5 nuts: (solution d) b))
- Switzerland, Germany, Austria:
- e) Lid
- f) Checking for gas leaks
- g) Prior to use
- h) Lighting the grill burner
- Important:
- i) Grill burner-manual lighting
- j) Turning off the grill burner
- Lighting:
- I) Turning off the side stove
- m) Replacing the gas cylinder
- n) Operation
- Important :
- A yellow flame when cooking is normal.
- Model with burner cap
- o) Cleaning and maintenance
- - Base walls, lid, cooking grids, control panel:
- - Cooking plates:
- p) Storage
- q) Lava rock (depending on model)
- r) Accessories
- s) Protecting the environment
- e) Kanak
- f)ИЗптвае 3a He nponycknIBOcT
- Baxho:
- g) Преши рунcke на hy урда.
- h) 3anaIbaHe Ha ropeJIknte Ha 6ap6ekIoTo
- (B 3A B N C H M O C T O T M O D E J A)
- CTeHn Ha orHnIeTo, KaIaK, cKaPn 3a neYeHe, KOMaHdHo Ta6JIo:
- HarpraBaunn
- p) CbxpaheneHne
- q) BylkaHnUHn KaMbHn (B 3aBncmOcT OT MoJeJa)
- r) Akcecoapn
- s) Ona3BaHe Ha OKoJHaTa cpeDa
- Kullanım ve Bakım
Brand : CAMPINGAZ
Model : 2 SERIES Classic LX Plus Vario
Category : Gas barbecue